

Page 1
Thisinstruction Book contains informationfor several models.
Read and keep this hookfor future reference.
Thisbook containsimportantBnformationo_ SAFETY,ASSEMBLY,
OPEBATJON,AND MAINTENANCE.
PRODUCTINFORMATION
®
Models
M 5Fc(78oo463)
MP 5Fc(78oo465)
M 5oFc(78oo8o4)
The owner must be certain that atomthe product informationis
includedwith the unit. This informationincludesthe INSTRUCTION
BOOKS,the REPLACEMENTPARTSandthe WARRANTIES.This
information must be incmudedto make sure state laws and other
lawsare followed.
7105032(Rev. o)
Page 2

ThankYoufor purchasingthis quality-built Murray product. We're pleasedthat you placedyour
confidencein the Murray brand.When operatedand maintainedaccording to the instructions inthis
manual,your Murray product will provide manyyears of dependableservice.
Thismanual contains safety information to makeyou awareof the hazardsand risks associatedwith the
machineand how to avoidthem. This machineis designedand intendedonlyfor finish cutting of
establishedlawnsand is not intendedfor any other purpose,it is important that you readand understand
theseinstructions thoroughly beforeattemptingto start or operatethis equipment.Savethese
instructions for future reference.
PRODUCT REGMSTRATMON
MMPORTANT:KEEPTffMSMNFOR_ATMONFORYOUR PERSONAL RECORDS
(Complete the following information on your Nturray purchase)
Date of Purchase
Retailer
Retailer's Phone Number
Model Number
SerialNumber
Model Type Trim
HURRAY is a trademark ef
Bfiggs &Stratten Power ProductsGroup,LLC
Milwaukee, Wl, USA.
Copyright (9 2010, [_riggs& Straiten Corporation
Milwaukee, Wl, USA. Aii Rights Reserved.
Page 3
Tableof Contents
Operator Safety ................................................ 4
Important Operator Safety instructions .................................. 4
ct_
w,
Operation ................................................... 11
Engine Stop Lever ................................................ 11
Front Wheel Drive System cSelf-PropelledUnits} ......................... 11
Stopping the Engine ............................................... 11
Starting the Engine ................................................. 12
Rules for Safe and EffectiveOperation ................................. 12
Maintenance ................................................. 13
Engine Maintenance ............................................... 13
EngineTipping ................................................... 13
Cleaningthe Mower Housing ........................................ 13
Lubrication ...................................................... 13
Adjusting the Height ol Cut .......................................... 13
Removingthe Drive Belt ........................................... 14
Adjusting the Drive Cable ........................................... 15
BladeService .................................................... 16
Removingthe Blade ........................................... 16
Sharpeningthe Blade ........................................... 16
Checkingthe Levei of Cut ........................................ 16
Preparing the Mower for Storage ...................................... 17
Troubleshooting............................................... 18
Warranty .................................................... 19
=_
ct_
Batteryposts, terminals and relatedaccessoriescontain
lead and lead compounds, chemicals known to the State of
Californiato cause cancerand birth defectsor other
reproductiveharm. Wash hands after handling.
Engineexhaust, someof its constituents, andcertain
vehicle components contain or emit chemicals known to
the State of California to causecancer or other reproductive
harm.
t_
Page 4
importantOperatorSafety instructions
WARNING:This powerful cutting machine is capableof amputating hands and feetand canthrow objects that
t_
Protectian for ChiJdren
Slope Operation
Preparation
cancause injury and damage! Failureto comply with the following SAFETYinstructions could result in serious
injury or death to the operator or other persons,The owner of the machine must understand these instructions
and must allow only persons who understandthese instructions to operate machine.Each person operating
the machine must be of sound mind and body and must not be underthe influence of any substance, which
might impair vision, dexterity or judgment, if you have any questions pertaining to your machinewhich your
dealer cannot answer to your satisfaction, call or write the Customer Service Departmentat MURRAY, 900 N.
Parkway,Jefferson, Wl 53549. Phone:(1o800-661-6662).
Tragic accidents canoccur if the operator is not alert to the
presenceof children. Children areoften attractedto the
machine andthe mowing activity. Neverassumethat
children will remain whereyou last saw them.
1. KEEPchildren out of the mowing area and under the
watchful care of a responsible adult other than the operator.
2. DONOTallow children in yard when machine is operated
andturn machine OFFif anyoneenters the area.
3. DONOTallow pre-teenagechildren to operate machine.
4. ALLOW only responsible adults & teenagerswith mature
judgment under close adult supervision to operate machine.
5. DONOTpull mower backwards unlessabsolutely
necessary.LOOKand SEEbehind anddown for children.
pets and hazards before and while backing.
6. USEEXTRACAREwhen approaching blind corners.
shrubs,trees, or other objects that may obscurevismon.
1. Slopesare a major factor relatedto slip and fall acci-
dents,which can result in severe injury. All slopes requure
extra caution, if you feel uneasyon a slope, DO NOTmow
it.
2. Mow across slopes, never up-and-down. Exercise
extremeCAUTIONwhen changing directions on slopes. DO
NOTmow steepslopes or other areaswherestability or
traction is in doubt. Referto the Slope Guideat the end of
this manual.
3. Useextra carewith grass catchersor other attachments;
these affect the handling and the stability of the machine.
1, Read,understand, and follow instructions and warnings
in this manualand on the mower, engine andattachments.
Knowthe controls and the proper useof the mower before
starting.
2. Only mature, responsible persons shall operatethe
machine and only after proper instruction.
3. Data indicatesthat operators age 60 and above,are
involved in a large percentageof mower-related injuries.
Theseoperators should evaluatetheir ability to operate the
mower safely enough to protect themselvesand others
from serious injury.
(Centinued From PreviousColumn)
4. Handlefuel with extra care. Fuelsareflammable and
vapors are explosive. Useonly an approved fuel container.
DONOTremovefuel cap or addfuel with engine running.
Add fuel outdoors only with engine stopped and cool. Clean
spilled fuel and oil from machine. DO NOTsmoke.
5. Checkthe areato be mowedand removeall objects such
as toys, wire, rocks, limbs and other objects that could
cause injury if thrown by bladeor interfere with mowing.
Also notethe location of holes, stumps, and other possible
hazards.
6. Keeppeople andpets out of the mowing area.
mmediately,STOP Blade,Stop engine and Stop mower if
anyone entersthe area.
7. Checkshields, deflectors, switches, blade controls and
other safety devices frequently for proper operation and
ocation.
8. Makesure all safety@cab are clearly legible. Replaceif
damaged.
9. Protectyourself when mowing and wear safety glasses, a
dust mask, long pants, and substantial footwear. DO NOT
mow barefooted or with sandals.
10. Know how to STOPbladeand engine quickly in
preparationfor emergencies.
11. Use extra carewhen loading or unloading the machine
nto a trailer or truck.
12. Checkgrass catchercomponents frequently for signs of
wear or deterioration and replaceas neededto prevent
injury from thrown objects going through weakor torn
spots.
Safe Handling ef Gase_ine
Toavoid personal injury or property damage, use extreme
care in handling gasoline. Gasoline is extremely flammable
and the vapors are explosive.
1. Extinguishall cigarettes, cigars, pipes and other sources
of ignition.
2. Use only an approvedfuel container.
3. DONOTremovefuel cap or add fuel with the engine
running. Allow the engineto cool before refueling.
4. DONOTrefuelthe machine indoors.
5. DONOTstore the machineor fuel containerinside where
there is an open flame, spark or pilot light such as ona
water heater or other appliances.
4 www.mu[ray.com
Page 5

important OperatorSafety mnstructions(Continuedt
Safe Handling of Gasoline
(Continued From Previous Page)
6. DONOTfill fuel containers inside a vehicle or on a truck
or trailer bed with a plastic finer.Always placethe contain-
ers on the ground away from the vehicle before filling.
7. Removegas-powered equipment from the vehicle or
trailer and refuel it on the ground, if this is not possible,
then refuel equipment using a portable container,rather
than a gasoline dispenser nozzle.
8. DONOTstart gaspowered equipment in enclosedvehi-
cles or trailers.
9. Keepthe nozzle in contact with the rim of the fuel tank or
container opening at all times until fueling is complete. DO
NOTusea nozzlelock-open device
10. if fuel is spilled on clothing, change clothing
immediately.
11. DONOToverfill afuel tank. Replacefuel capand tight-
en securely.
Operation
1. DONOTput handsor feet near or under rotating parts.
Keepclearof discharge areawhile engine is running.
2. STOPengine when crossing gravel drives walks, or
roads, and under any conditions where thrown objects
might be a hazard.
3. Mow only in daylight or good artificial light.
4. DONOToperatemower while underthe influence of
alcohol or drugs.
5. After striking a foreign object or if mower vibrates
abnormally,STOPthe engine, disconnect and secure spark
plug wire. inspect the mower for any damageand repair
the damagebeforestarting.
6. DONOTmow near drop offs, ditches or embankments.
Operatorcould lose footing or balance.
7. STAYALERTfor hobs and other hidden hazards. Taft
grass can hide obstacles. Keepawayfrom ditches,
washouts, culverts, fencesand protruding objects.
8. DONOTmow on wet grass. Always be sure of your
footing. Keepa firm how on the handleand walk, never
run. Slipping could causeinjury.
9. ALWAYSstay behind handle when engine (motor) is
running.
10. DONOTleavethe machinewith the engine running.
STOPBLADEand STOPENGINEbefore leavingthe opera-
tors position for any reason.
11. Beforecleaning, repairing or inspecting makecertain
engine,blade and all moving parts have STOPPED.
Disconnectand securespark plug wire away from plug to
prevent accidental starting.
12. STOPengine and wait until the blade comes to corno
pleteSTOPbefore removing grass bag and/or clearing
grass.
Operation
(Continued From PreviousCetumn}
13. DONOToperatemower without the entire grasscatch-
er, or guards in placedischarge guard, rearguard or other
safety devices in placeand working. DONOTpoint dis-
charge at people,passing cars, windows or doors.
14. DONOTdischarge materialagainst awaft or obstruc-
tion. Material may ricochet back towards the operator.
15. Slow down beforeturning.
16. Watchout for traffic when near or crossing roadways.
17. DONOToperateengine in enclosedareas. Engine
exhaust gasescontain carbon monoxide, adeadly poison.
18. Onlyuse accessoriesapprovedby the manufacturer.
See manufacturer's instructions for proper operation and
installation of accessories.
_aaintenance and Storage
1. DONOTstore moweror fuel containerinside where
fumes may reach an openflame, spark or pilot fight such as
in a water heater,furnace, clothes dryer or other gas appli-
ance. Allow engine to cool before storing machine in an
enclosure Storefuel container out of reach of children in a
well ventilated, unoccupied building.
2. Keepmower andengine free of grass, leavesor excess
greaseto reducefire hazardand engine overheating.
3. Whendraining fuel tank, drain fuel into an approved
container outdoors and away from open flame.
4. Keepall bolts, especially bladebolts, nuts and screws
properlytight. Checkthat all cotter pins are in proper
position.
5. Alwaysprovide adequateventilation when running
engine. Engineexhaust gasescontain carbon monoxide, a
deadly poison.
6. Serviceengine and makeadjustments only when engine
s stopped. Removedspark plug wire from spark plug and
secure wire awayfrom spark plug to prevent accidental
starting.
7. DONOTchangeengine governor speedsettings or
overspeed engine.
8. Checkgrass bag assembly frequently for wear or
deterioration to avoid thrown objects and exposureto
moving parts. Replacewith new bag if loose seamsor tears
are evident. Replaceslider or bag adapterif brokenor
cracked.
9. Mower blades are sharp and can cut. Wrap the blades or
wear heavy leather gloves and use CAUTIONwhen handling
them.
10. DONOTtest for spark by grounding spark plug next to
spark plug hob; spark plug could ignite gas exiting engine.
11. Havemachine serviced by anauthorized MURRAY
dealer at bast once ayear and havethe dealerinstall any
newsafety devices.
12. Use only genuine MURRAYreplacementparts to assure
that original standards are maintained.
Page 6
Preparation
WARNING:Before doing any assembly or
maifltenaflce to the mower, removethe wire
from the sparkplug.
NOTE:In this instruction book, left and right describe the
location of a part with the operator standingbehind the
handle,
Unpacking
The mower was fully assembled at the factory, When the
mower was put in the carton, the handlewas put in the
Q_
storage position, To put the handle in the operating position,
follow the steps below.
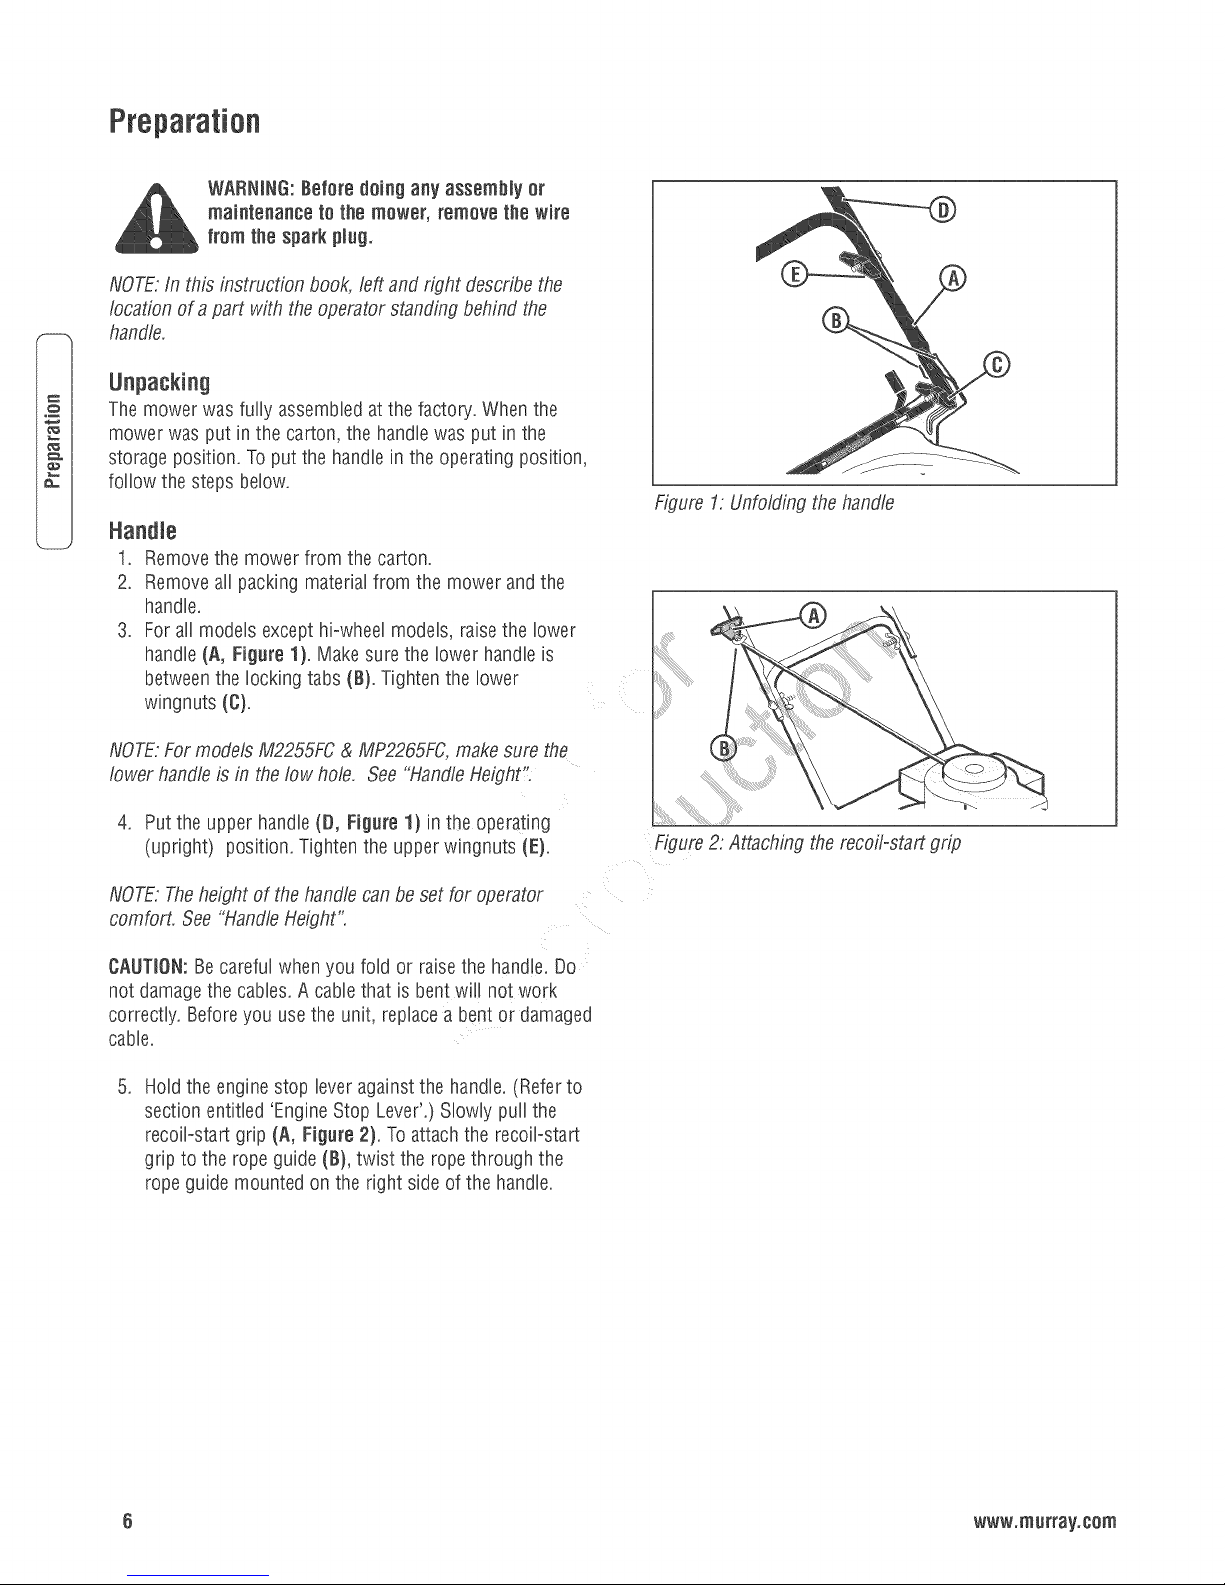
Figure 1: Unfolding the handle
1. Remove the mower from the carton.
2. Remove all packing material from the mower and the
handle.
3. For all models except hiowheelmodels, raisethe lower
handle (A, Figure 1). Make sure the lower handleis
betweenthe locking tabs (B). Tighten the lower
wingnuts (C).
NOTE:For models M2255FC& MP2265FC.make sure the
lower handle is in the low hole. See "HandleHeight':
4, Put the upper handle(D, Figure 1) in the operating
(upright) position. Tighten the upper wingnuts (E),
NOTE:Theheight of the handlecan be set for operator
comfort. See "HandleHeight".
CAUTION:Becareful whenyou fold or raisethe handle Do
not damagethe cables, A cablethat is bent will notwork
correctly, Beforeyou use the unit, replacea bent or damaged
cable,
.
Hold the engine stop lever againstthe handle.(Referto
section entitled 'EngineStop Lever'.) Slowly puffthe
recoilostart grip (A, Figure 2). Toattachthe recoil-start
grip to the rope guide (B), twist the rope through the
rope guide mounted on the right sideof the handle.
Figure2: Attaching the recoil-start grip
Page 7
Preparation(Continuedt
Handte Height
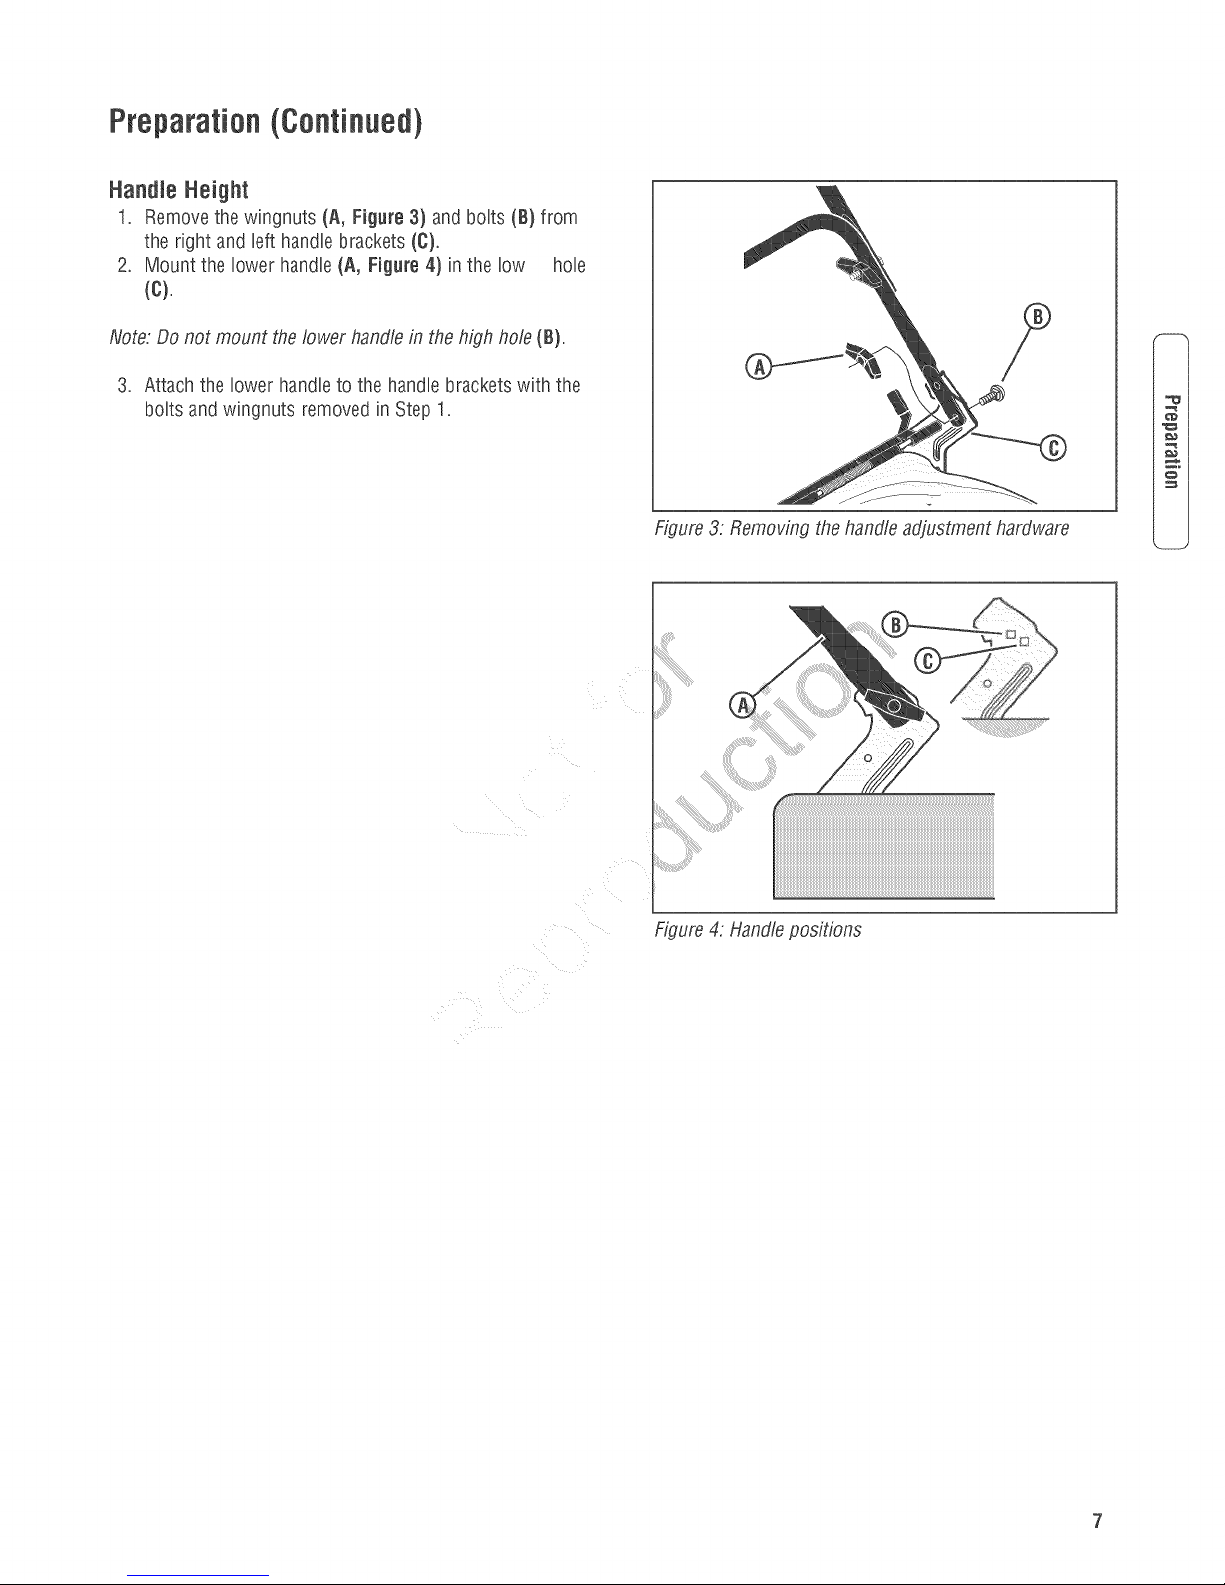
1. Remove the wingnuts (A, Figure 3/and bolts (B} from
the right and left handle brackets (C}.
2. Mount the lower handle(A, Figure 4} in the low hob
(C).
Note: Do not mount the lower handle in the high hole (B).
3, Attach the lower handle to the handlebrackets with the
bolts and wingnuts removed inStep 1,
w,
Figure3: Removing the handleadjustment hardware
Page 8
Preparation(Continuedt
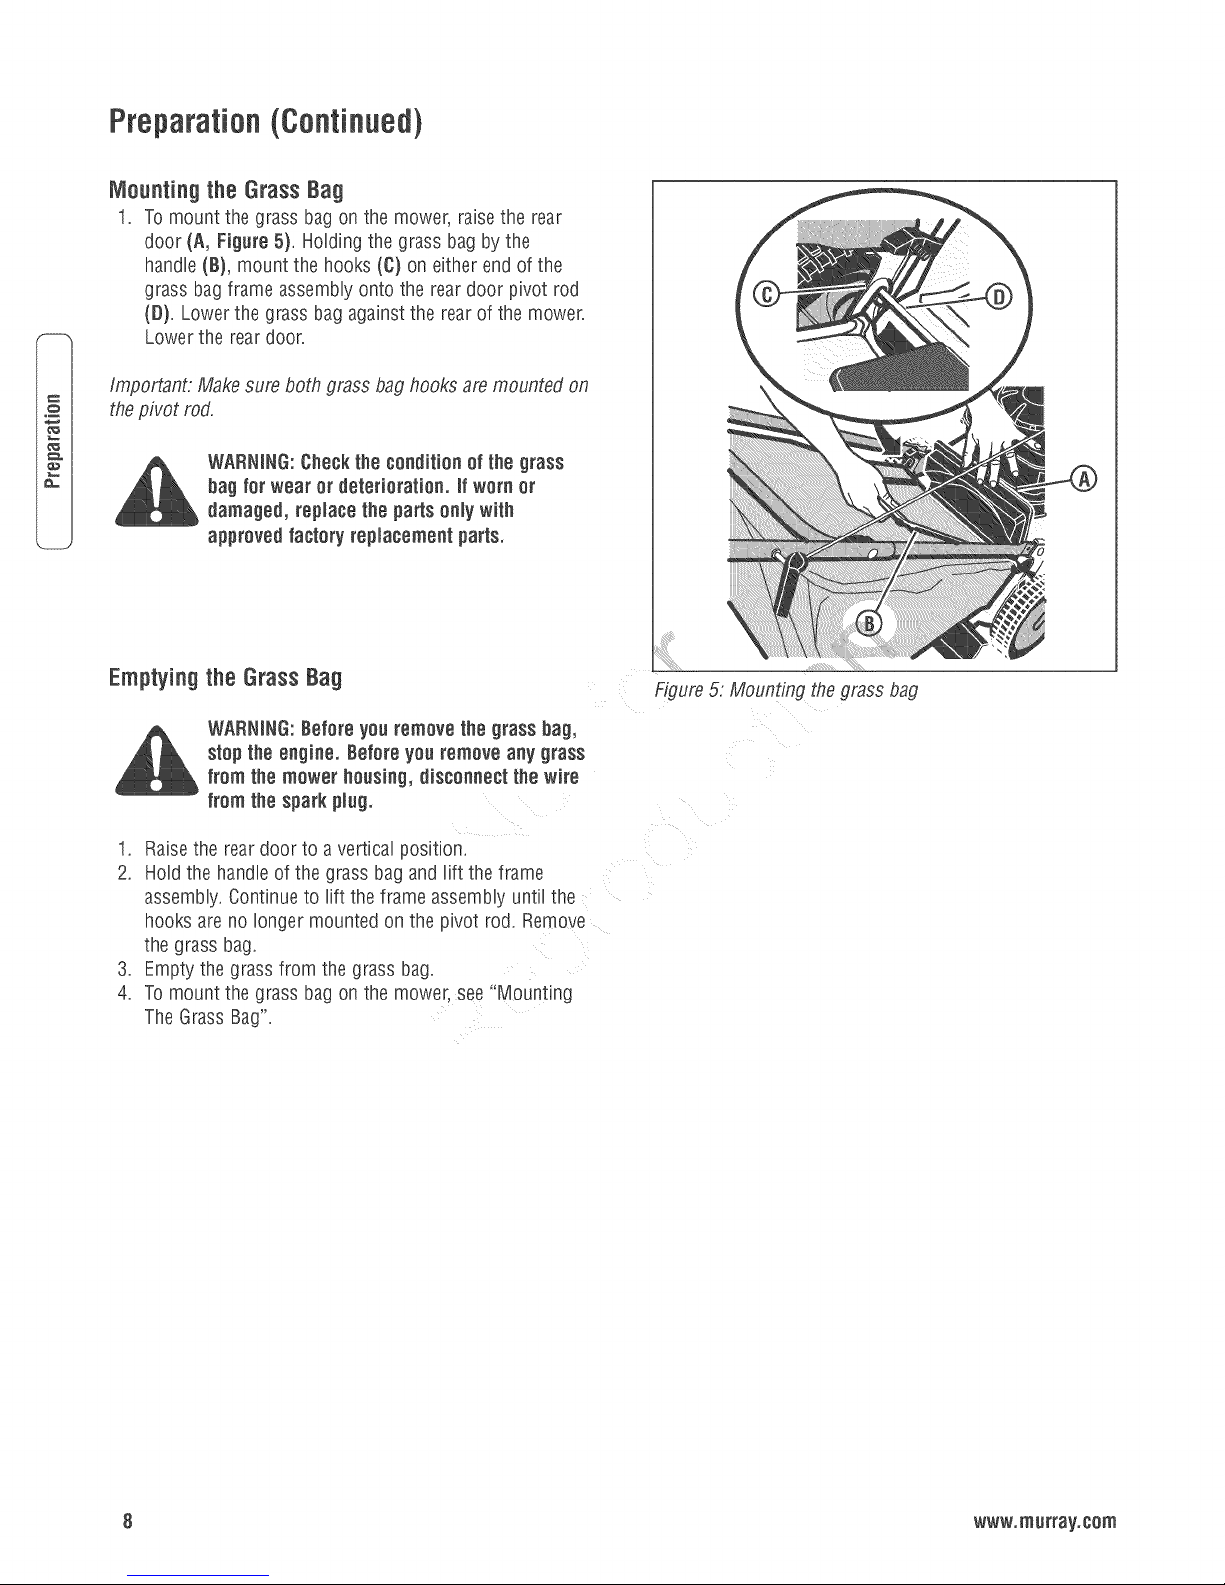
Mounting the Grass Bag
1. To mount the grass bag on the mower, raisethe rear
door (A, Figure 5}. Holding the grass bag by the
handle (B), mount the hooks (C} on either end of the
grass bagframe assembly onto the rear door pivot rod
(D}. Lower the grass bag againstthe rear of the mower.
Lower the reardoor.
Important: Make sure both grass bag hooks are mounted on
the pivot rod.
Q_
Emptying the Grass Bag
1. Raisethe rear door to a vertical position
2. Hold the handle of the grass bag and liftthe frame
assembly.Continueto lift the frameassembly until the
hooks are no longer mounted on the pivot rod. Remove
the grass bag.
3. Empty the grass from the grass bag.
4. To mount the grass bag on the mower, see "Mounting
TheGrass Bag".
WARNING:Checkthe conditionof the grass
hagfor wear or deterioration, if worn or
damaged, replace the parts only with
approved factory replacementparts.
Figure5: Mounting the grass bag
WARNING:Before you remove the grass hag,
stop the engine. Before you remove any grass
from the mower housing, disconnect the wire
from the spark plug.
8 www.n'lurray.com
Page 9
Preparation(Continuedt
Attaching the Side Paounted Discharge Deflector
(Discharge Units Only)
WARNING:Topreventthe enginefrom
starting, disconnect the wire from the
spark plug.
For shipping purposes, the side deflector was not installed.
Locatethe side deflector and install as follows.
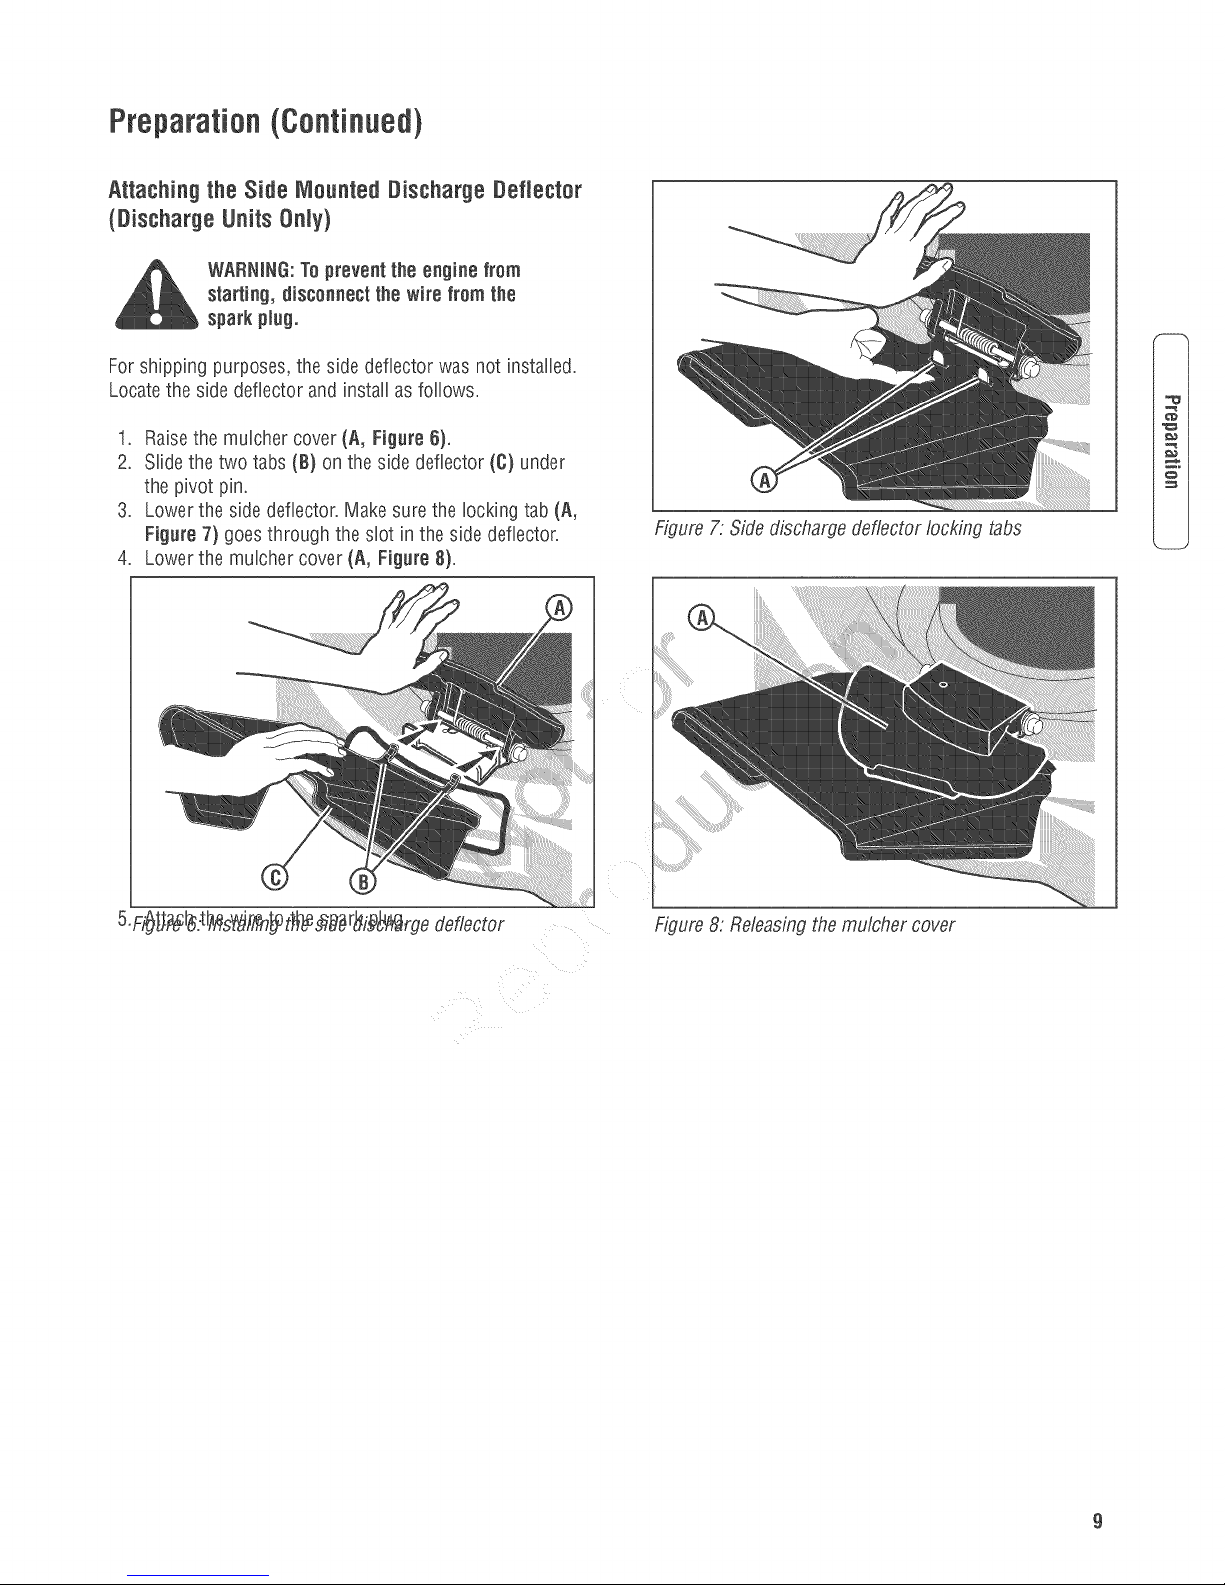
1. Raisethe mulcher cover (A, Figure 6).
2. Slide the two tabs (B) on the side deflector (C) under
the pivot pin.
3. Lower the side deflector. Make sure the locking tab (A,
Figure7) goes through the slot in the side deflector.
4. Lower the mulcher cover (A, Figure 8).
w,
Figure7: Side discharge deflector locking tabs
©
5.Fi_:t_s_fl?n_t_s_8br_i_rge deflector
Figure8: Releasingthe mulcher cover
Page 10
Preparation(Continued)
Mulching Tips
Mulching finely cuts the grass so that the grass can be easily
recycled. Becausethe nutrients are returnedto the soil, the
lawn will need less fertilizer. To correctly mulch the lawn,
follow the tips below.
oThegrass must bedry. if the grass is wet, it will be
difficult to cut and cause heavyclumps of grass.
oThegrass must not betoo tall. The maximum heightto
effectively cut is 4 1/2 inches. Set the height adjusters
so that only the top third of the grass is cut.
Q_
oif the grass is more than 4 1/2 inches high, two
mowings will be necessary. Forthe first mowing, set the
height adjusters in the highest position. Then, lower the
height adjusters for the second mowing.
Preparing the Engine
ENGINEDOESNOTCONTAINOiL ORGASOLINE
Using the bottle of oil supplied in the carton, fill the engine
with the proper amount of oil. Seethe engine manufacturer's
instructions for the type of gasoline and oil to use. Before
you usethe unit, readthe information on safety,operation,
maintenance,and storage.
WARNING:Faiiaw the engine manufacturer's
instructionsfar the type of gasoline and oil to
use. Always use a safe_ygasaiine container.
Denot smoke when adding gasoline to the
engine. When insidean enclosure, de net
filmwith gasaiine. Befereyau add gaseiine,
step the engine. Letthe engineteamfar
several minutes.
o Keepa sharp edge on the blade.A bladethat is not
sharp will causethe ends of the grass to becomebrown.
- Cleanthe undersideof the mower housing.Grass and
other debris cankeepthe mower from working
correctly.
if the quality of cut is marginal, try the following:
oSetthe height adjusters at a higher cutting height.
, Cut the grass more frequently.
, Operatethe mower at a slower ground speed.
oOverlapthe cutting swaths instead of cutting a full
swath with each pass.
oMow across the marginal areasasecond time.
iMPORTANT:This unit is equippedwith an internal
combustion engine and must not be usedon or nearany
unimproved forestocovered,brush-coveredor grass-covered
and unless the engine'sexhaust system is equipped with a
spark attester meeting applicable localor state laws (if any).
if a spark arrester is used, it must be maintained in effective
working order by the operator.
in the Stateof Californiathe aboveis required by law
/Section 4442 of the California Public ResourcesCode).
Otherstates may havesimilar laws. Federallaws apply on
federal ands Seean Authorized Service Centerfor a spark
arrester for the muffler.
Note:Actual sustained enginepower will fikelybe lower due
to operating limitations and environmental factors.
Note: Theoperation of a new engine will sometimes result in
a slight amount of smoke. Thissmoke is caused bypaint or
oil on or around the muffler. This is normal and only
expectedduring initial operation.
Final Preparatien
Beforeyou usethe mower, checkthe assembly of the
wheels,the handle,and the controls. Makesure all the
fasteners aretight. Make surethe throttle control (if
equipped) and the engine stop leverwork correctly.
10 www.rnurray.cam
if the mower is equippedwith height adjusters, makesure
the height adjusters function properly. Before starting the
engine, makesure eachheight adjuster is set atthe desired
height. See"Adjusting TheHeight Of Cut" in the Maintenance
sections.
Page 11
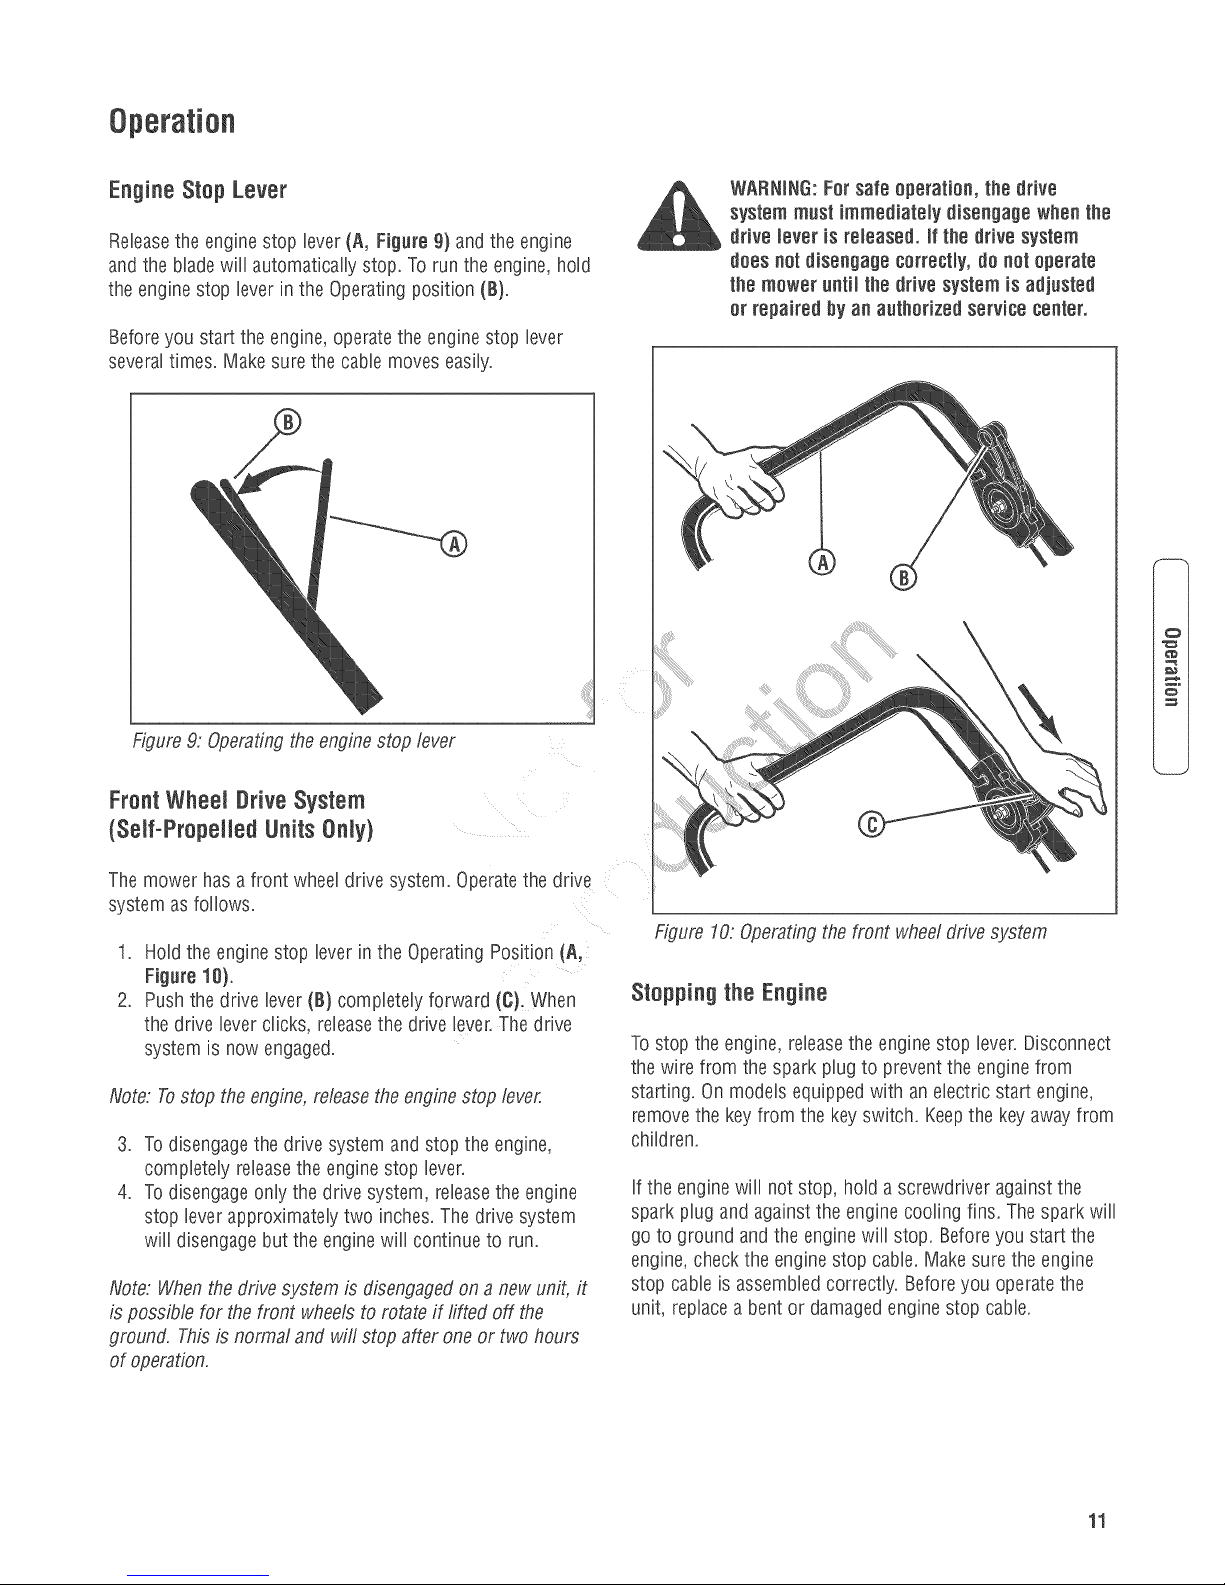
Engine Stop Lever
Releasethe engine stop lever (A, Figure 9) andthe engine
and the blade will automatically stop. To run the engine, hold
the engine stop lever in the Operating position (B).
Beforeyou start the engine,operatethe engine stop lever
severaltimes. Makesure the cable moves easily.
Figure9: Operatingthe engine stop lever
WARNING:Far safe epera_ian, _hedrive
system must immediately disengage when _he
drive lever is released, if the drive system
daes na_disengage carrectiy, de na_apera_e
_hemower un_ii _hedrive system is adjusted
or repaired by an au_t_arizedservice cen_er.
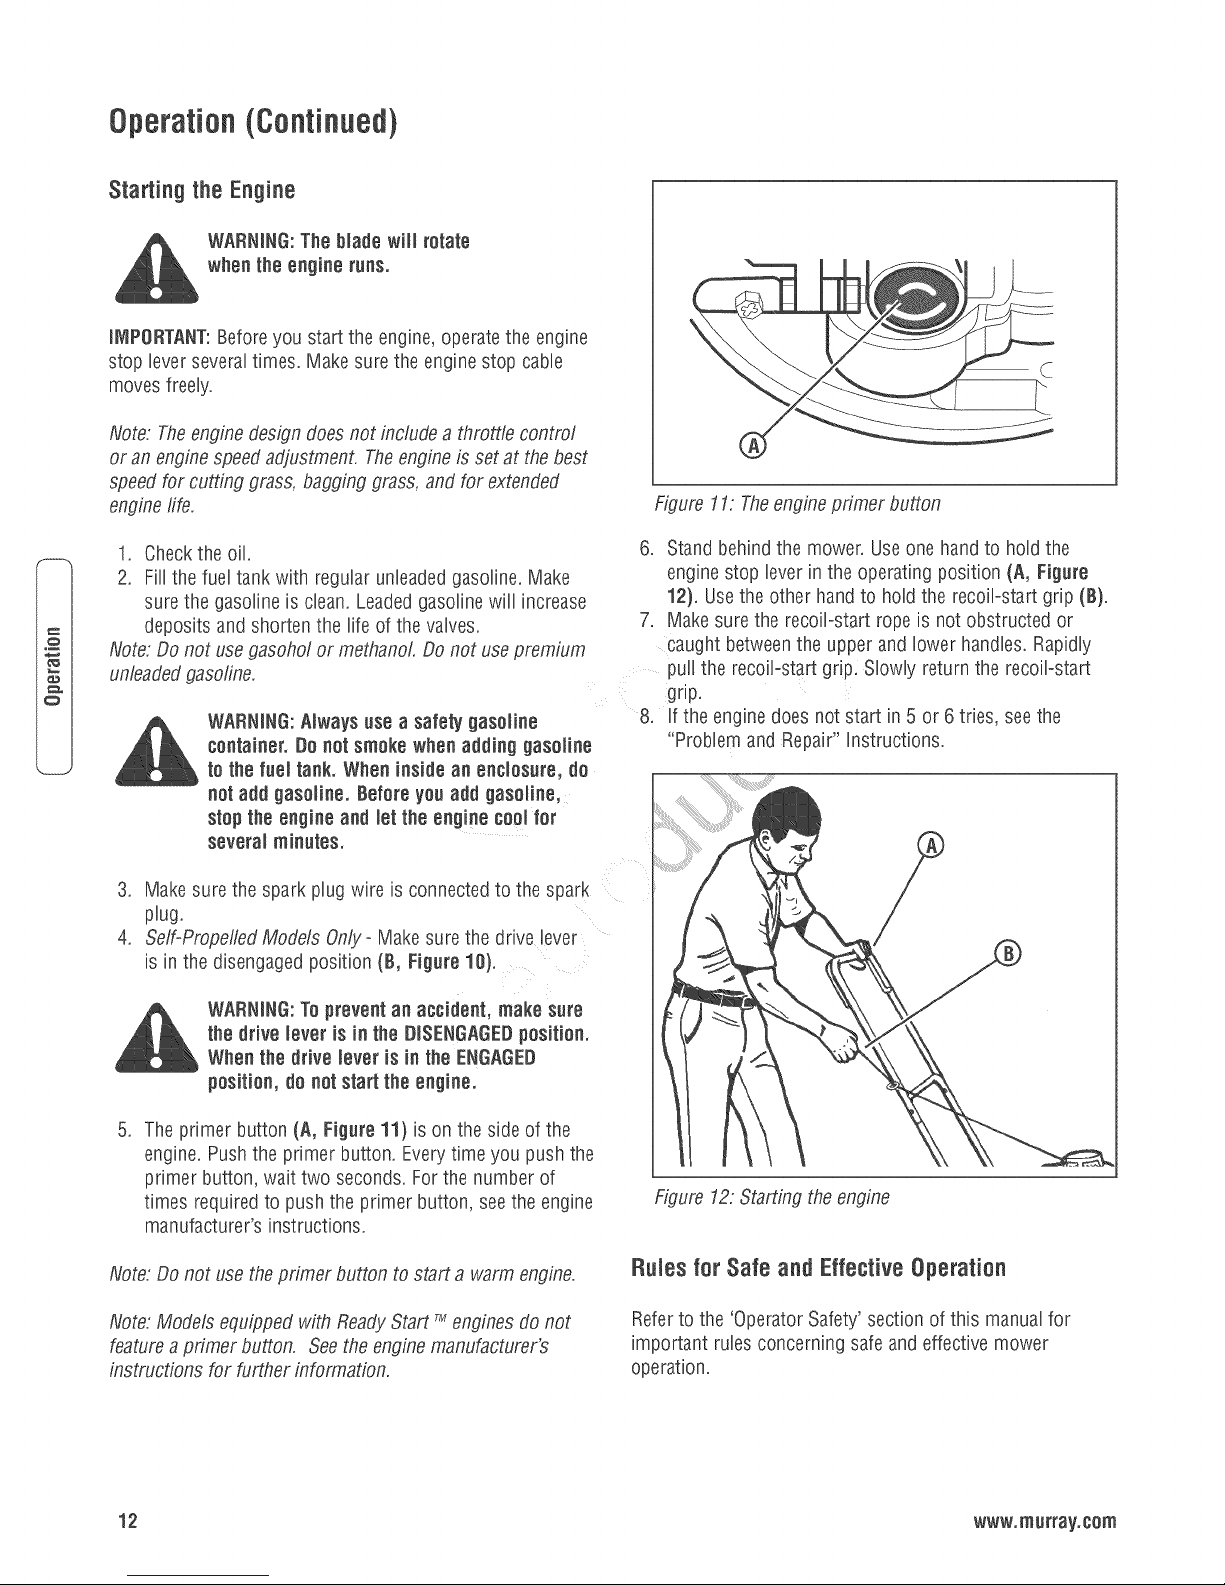
Front Wheel Drive System
(Seifoprepeiled Units Only}
The mower has a front wheel drive system. Operatethe drive
system asfollows.
1. Hold the engine stop lever in the OperatingPosition (A,
Figure 10t_
2_ Push the drive lever (B) completely forward (C). When
the drive lever clicks, releasethe drive lever.Thedrive
system is now engaged.
Note: Tostop the engine,releasethe enginestop lever.
3. To disengagethe drive system and stop the engine,
completely releasethe engine stop lever.
4. To disengage only the drive system, releasethe engine
stop lever approximatelytwo inches, The drive system
will disengagebut the engine will continue to run.
Note: Whenthe drivesystem is disengagedon a new unit, it
is possible for the front wheels to rotate if lifted off the
ground. Thisis normal and will stop after one or two hours
of operation.
Figure 10: Operatingthe front wheel drivesystem
Stepping the Engine
Tostop the engine, releasethe engine stop lever.Disconnect
the wire from the spark plug to prevent the engine from
starting. On models equippedwith an electric start engine,
removethe key from the key switch. Keepthe keyawayfrom
children.
if the engine will not stop, how a screwdriver against the
spark plug and againstthe enginecooling fins. Thespark will
go to ground and the enginewill stop. Beforeyou start the
engine,checkthe engine stop cable. Makesure the engine
stop cable is assembled correctly. Before you operate the
unit, replacea bentor damagedengine stop cable.
11
Page 12
Operation (Cofltifluedt
iMPORTANT:Beforeyou start the engine,operatethe engine
stop lever severaltimes. Make surethe enginestop cable
moves freely.
Note: Theengine design doesnot include a throttle control
or an enginespeedadjustment. Theengine is setat thebest
speed for cutting grass, bagging grass, and for extended
engine life.
Figure 11: Theengine primer button
1. Checkthe oil.
2. Fill the fuel tank with regular unleadedgasoline. Make
surethe gasoline is clean. Leadedgasolinewill increase
deposits and shorten the fife of the valves.
Note: Do not usegasohol or methanol Do not use premium
unleadedgasoline.
WARNING:Always use a safety gasoline
container. Donot smoke whe_ adding gasoline
to the fuel tank. When insidean enclosure, do
not add gasoline. Before youadd gasoline,
stop the engine and metthe engine cool for
several minutes.
3, Make surethe spark plug wire is connectedto the spark
plug.
4. Self-Propelled Models On!y- Makesure the drive lever
is in the disengaged position (€, Figure 18).
WARNING:Topreventan accident, make sure
the drive meyeris in the DISENGAGEDposition.
When the drive meyeris in Ihe ENGAGED
position, do not start the engine.
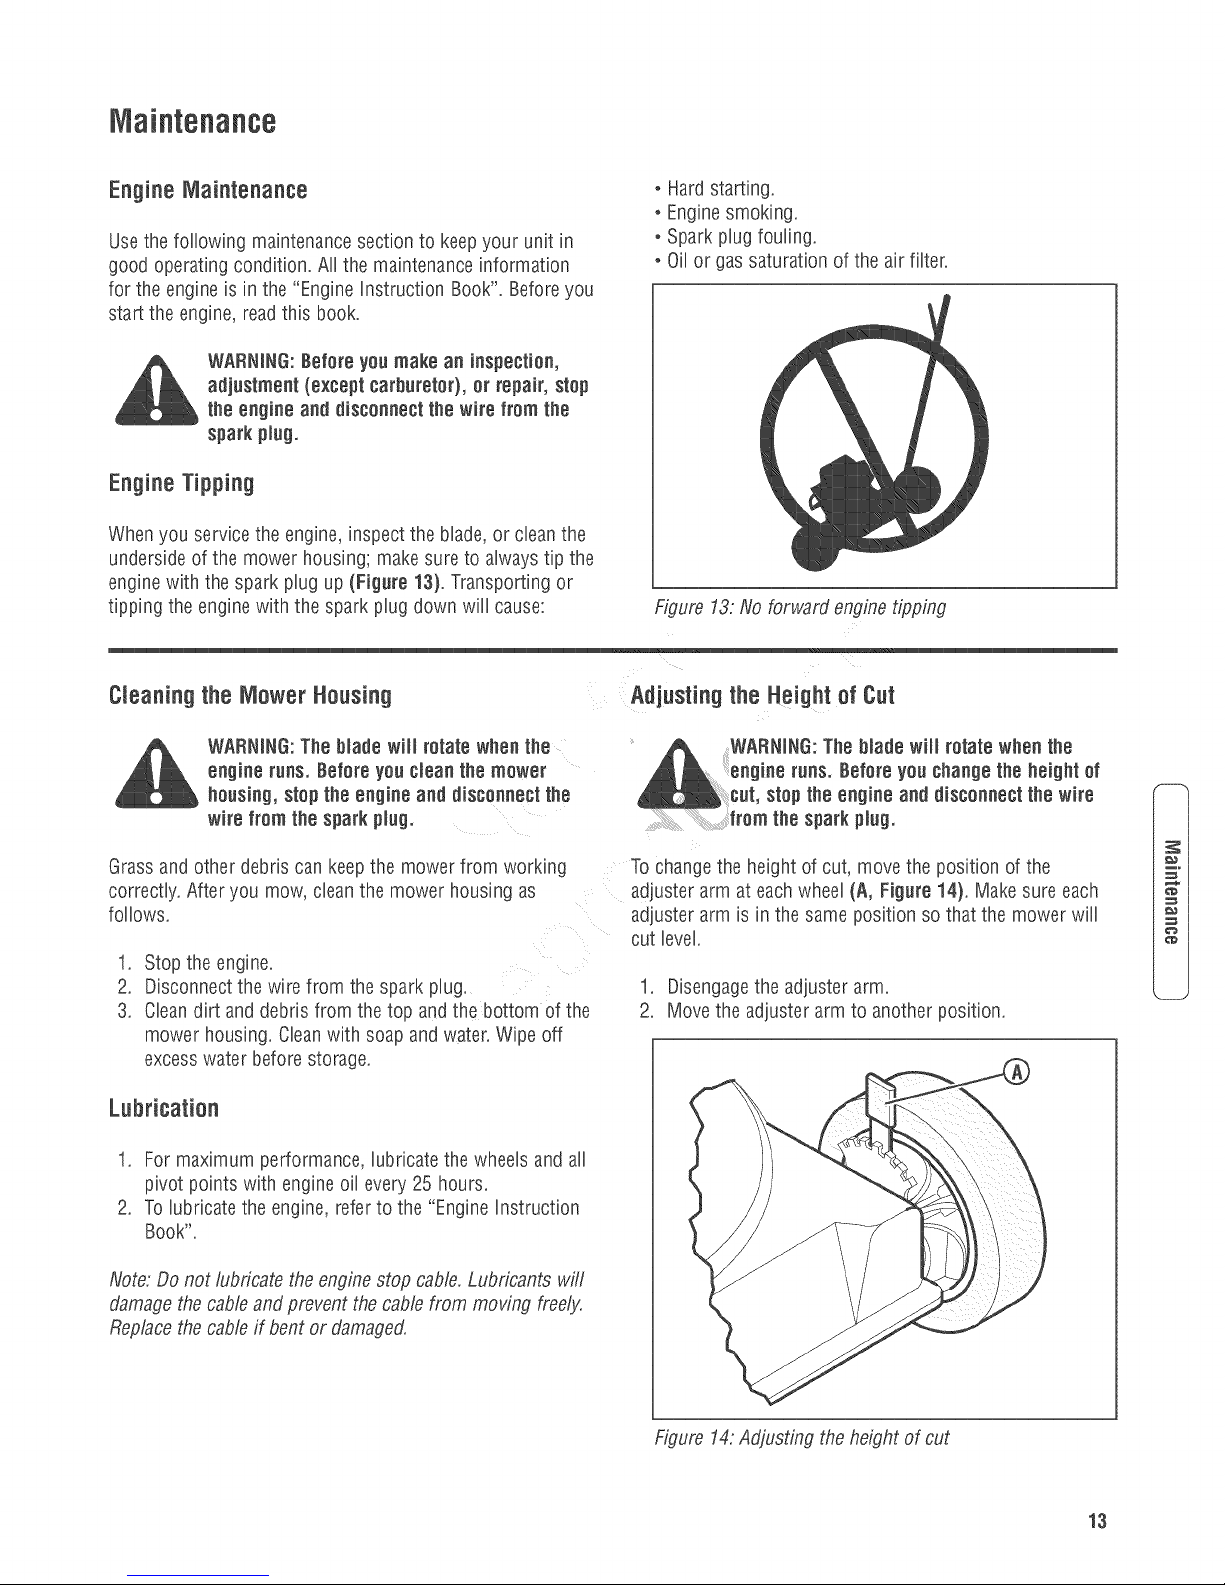
6. Stand behindthe mower. Useone handto hold the
engine stop lever in the operating position (A, Figure
121.Usethe other handto hold the recoil-start grip (C).
7. Make surethe recoil-start rope is not obstructed or
caught betweenthe upper and lower handles. Rapidly
puff the recoil-start grip. Slowly return the recoil-start
grip.
8. if the engine does not start in 5 or 6tries, seethe
"Problem andRepair" instructions.
.
The primer button (A, Figure 11) is on the side of the
engine. Pushthe primer button. Everytime you pushthe
primer button, wait two seconds, Forthe number of
times required to push the primer button, see the engine
manufacturer's instructions.
Note: Do not usetheprimer button to start a warm engine.
Note: Models equipped with ReadyStart 7Menginesdo not
feature a primer button. Seethe engine manufacturer's
instructions for further information.
12 www.murray.eom
Figure 12:Starting the engine
Rules fer Safe and Effective Operatien
Referto the 'OperatorSafety' section of this manualfor
important rulesconcerning safeand effective mower
operation.
Page 13
Maintenance
Engine Maintenance
Usethe following maintenancesection to keepyour unit in
good operating condition. All the maintenanceinformation
for the engine is in the "Engine instruction Book". Beforeyou
start the engine,readthis book.
WARNING:Befere yeu make an inspection,
adjustment (except carhureter),or repair, step
the engine and disconnect the wire from the
spark pmug.
- Hard starting.
° Enginesmoking.
- Spark plug fouling.
oOil or gas saturation of the air filter.
Engine Tipping
Whenyou servicethe engine, inspectthe blade,or clean the
underside of the mower housing; make sure to always tip the
engine with the spark plug up (Figure 13/. Transporting or
tipping the enginewith the spark plug down will cause:
Figure 13:No forward engine tipping
Cleaning the Mower Neusing Adjusting the Height of Cut
WARNING:The blade wiii retate when the
engine runs. Befere yeu clean the mewer
heusing, step the engine and disconnect the
wire frem the spark plug.
WARNING:The blade wiii retate when the
engine runs. Befere yeu change the height ef
eut, step the engine and diseenneet the wire
frem the spark plug.
Grassand other debris can keepthe mower from working
correctly. After you mow, clean the mower housing as
follows,
1. Stop the engine.
2. Disconnect the wire from the spark plug
3. Cleandirt and debris from the top and the bottom of the
mower housing. Cleanwith soapand water.Wipe off
excesswater before storage.
Lubricatien
1. For maximum performance, lubricate the wheels and all
pivot points with engine oil every 25 hours.
2. To lubricate the engine, referto the "Engine instruction
Book".
Note: Do not lubricate the engine stop cable. Lubricants will
damagethe cableand prevent the cablefrom moving freel}4
Replacethe cableif bent or damaged.
Tochangethe height of cut, move the position of the
adjuster arm at eachwheel (A, Figure 14}. Makesure each
adjuster arm us n the same position so that the mower will
cut level.
1. Disengagethe adjuster arm.
2. Move the adjuster arm to another position.
Figure 14:Adjusting the height of cut
13
Page 14
Maintenance(Continued}
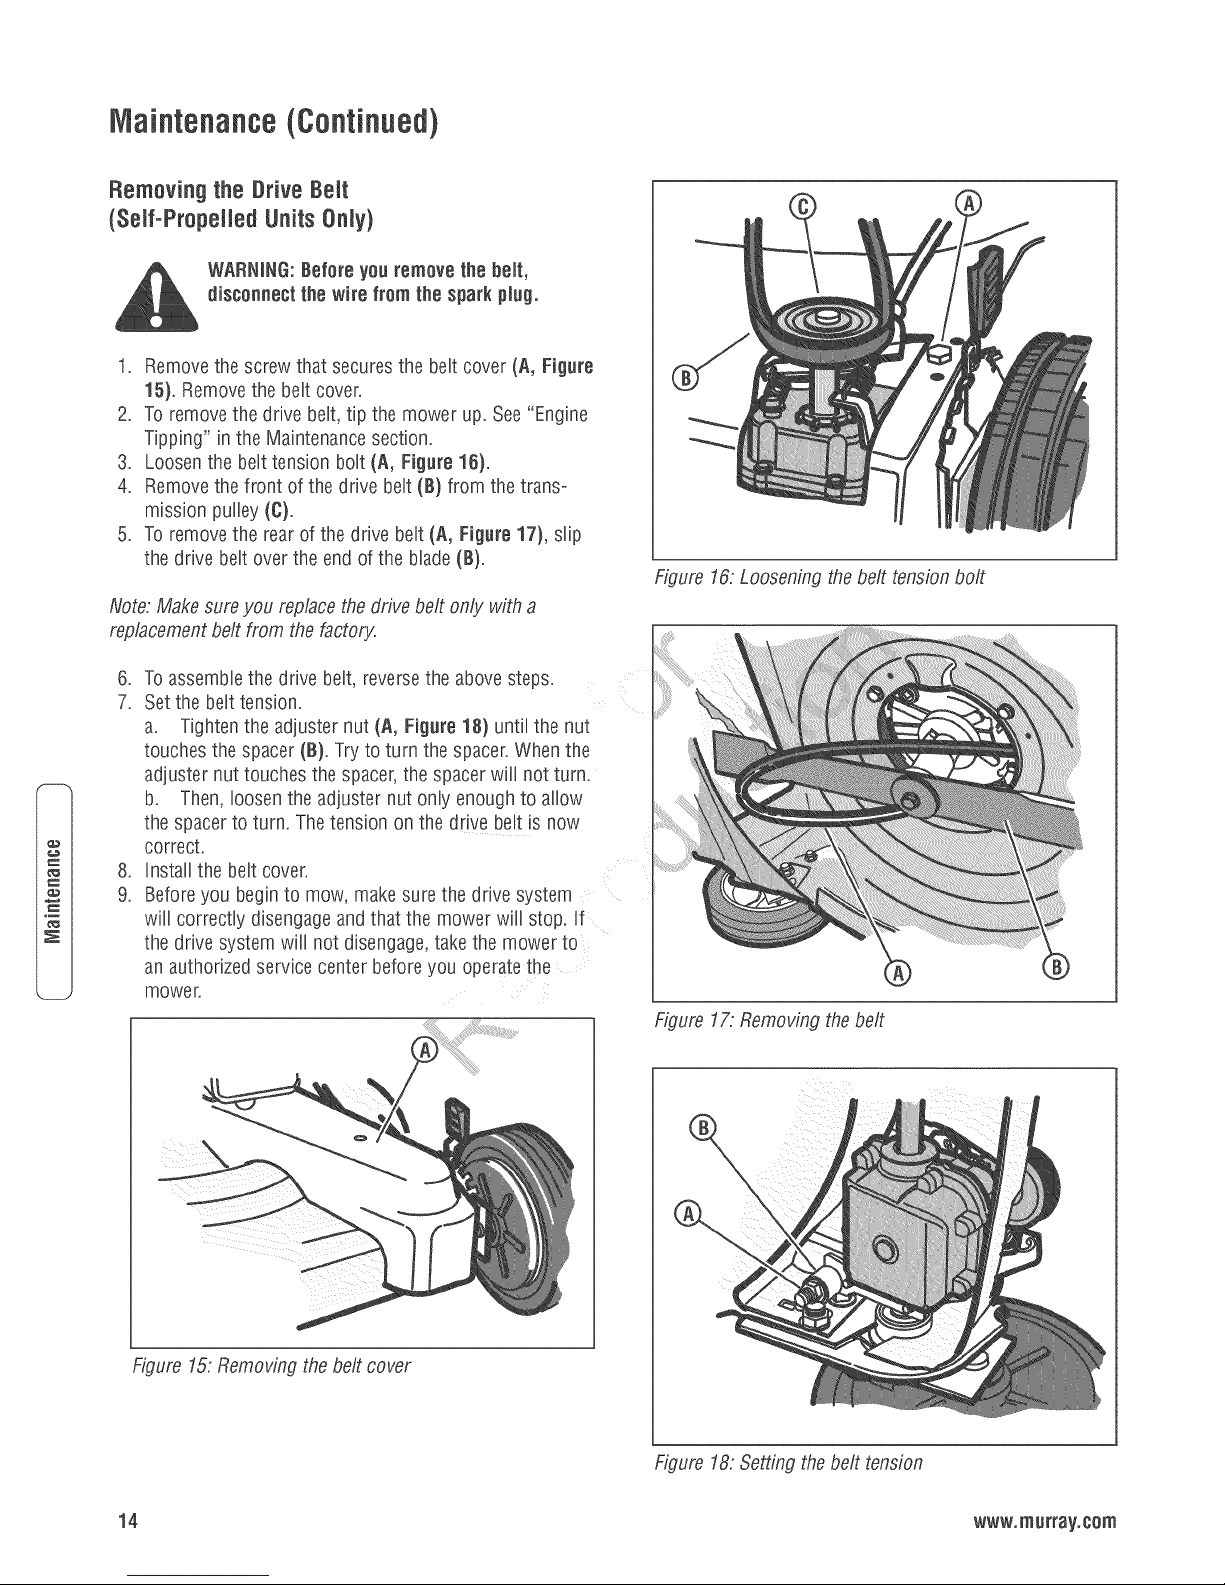
Removing the Drive Belt
(Self-Propelled Units Only)
WARNING:Before you remove the belt,
disconnect the wire from the sparkplug.
1. Remove the screw that securesthe belt cover (A, Figure
15). Removethe belt cover.
2. To remove the drive bdt, tip the mower up. See"Engine
Tipping" inthe Maintenancesection.
3. Loosen the bdt tension bait (A, Figure 16).
4. Remove the front of the drive belt(B) from thetrans-
mission puiby (O).
5. To remove the rear of the drive belt (A, Figure 17), slip
the drive belt over the end of the blade (B).
Note: Make sure you replace the drive belt only with a
replacementbelt from the factory.
.
Toassemblethe drive belt, reversethe abovesteps.
7.
Setthe belttension.
a. Tightenthe adjuster nut (A, Figure 18) until the nut
touchesthe spacer (B}. Try to turn the spacer.Whenthe
adjuster nut touches the spacer,the spacer will not turn.
b. Then,loosenthe adjuster nut only enoughto allow
the spacerto turn. Thetension on the drive belt is now
correct.
.
Install the belt cover.
9.
Beforeyou beginto mow, make surethe drive system
will correctly disengage and that the mower will stop. If
the drive system will not disengage,take the mower to
an authorized service center before you operate the
mower.
Figure 16:Loosening the belt tension bolt
Figure 17:Removing the belt
Figure 15:Removing the belt cover
14 www.murray.eam
Figure 18:Setting the belt tension
Page 15
Maintenance(Continued}
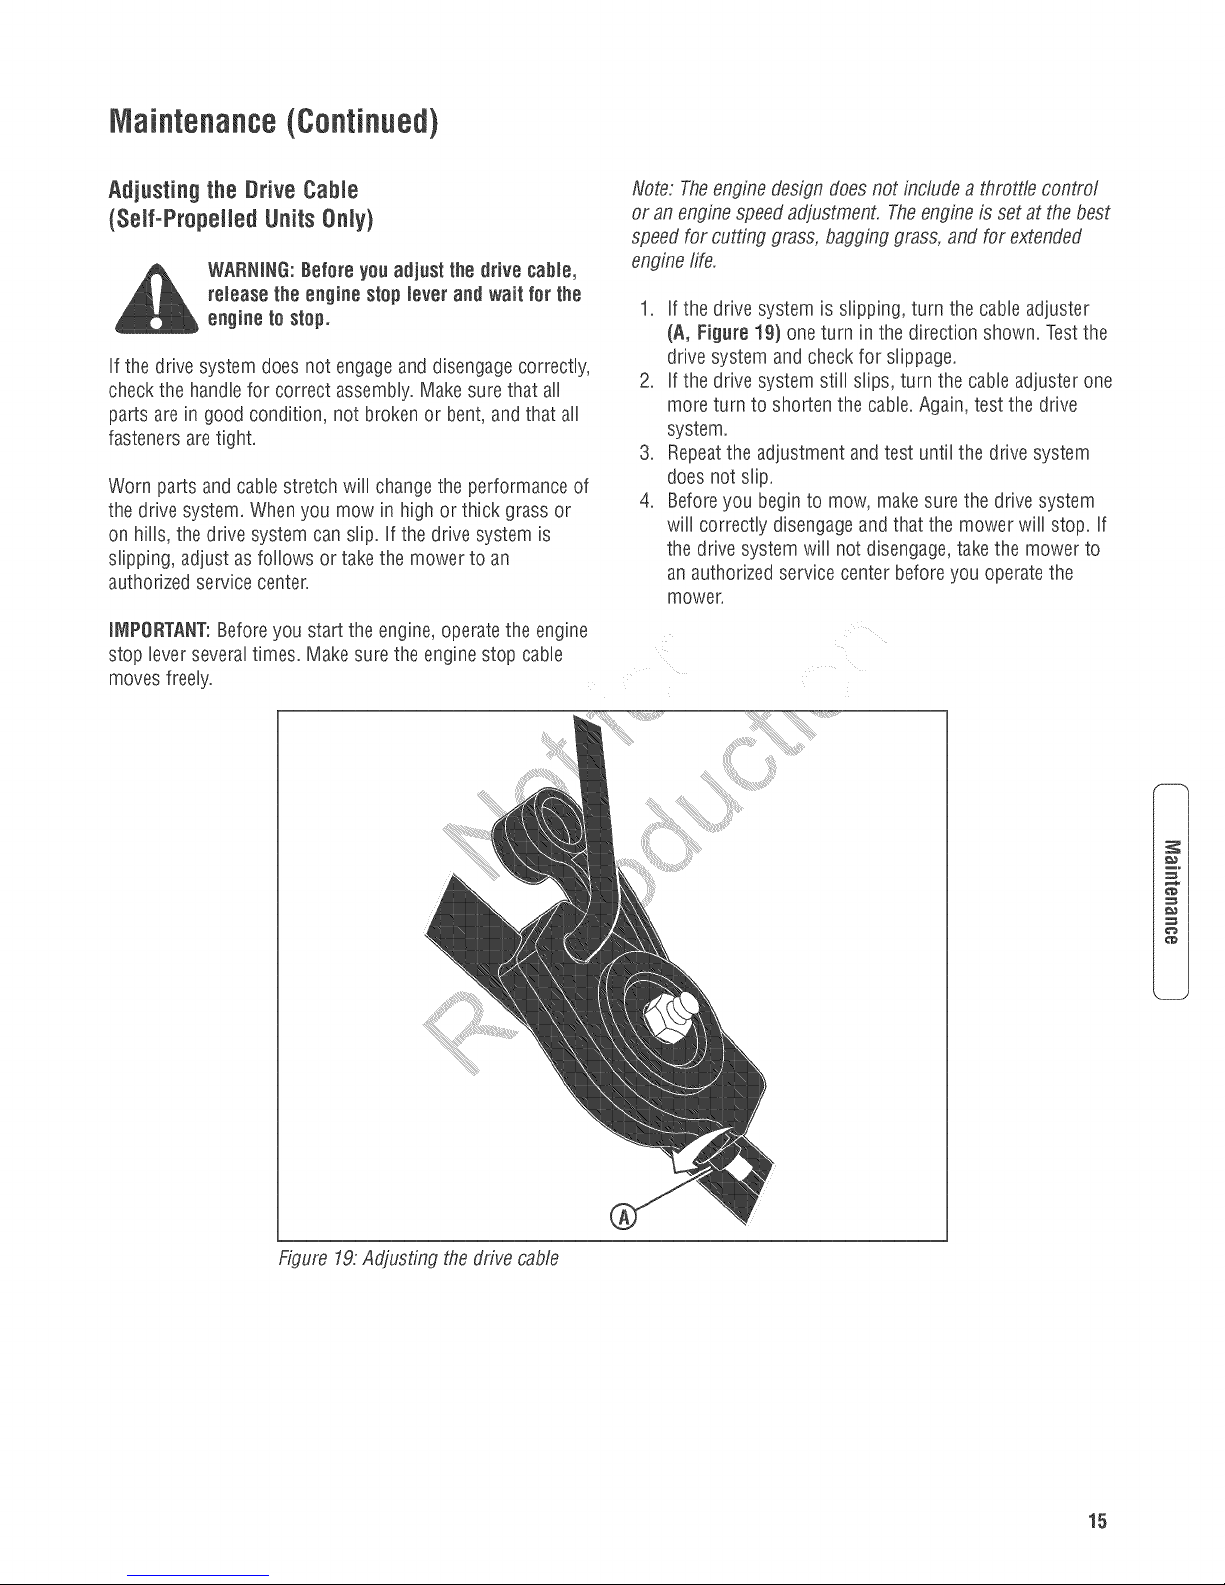
Adjusting the Drive Cable
(SeifoPropeiled Units Only)
WARNING:Before youadjus_the drive cable,
release the engine stoplever and wai_for the
engineto stop.
if the drive system doesnot engageand disengagecorrectly,
checkthe handlefor correct assembly,Make surethat all
parts are in good condition, not broken or bent,and that all
fasteners aretight_
Worn parts and cablestretch will change the performance of
the drive system_When you mow in high or thick grass or
on hills, the drive system can slip, if the drive system is
slipping, adjust asfollows or takethe mower to an
authorized service center,
iMPORTANT:Beforeyou start the engine,operatethe engine
stop lever severaltimes, Make surethe enginestop cable
moves freely,
Note: Theengine design doesnot include a throttle control
or an engine speed adjustment. Theengine is set at the best
speed for cutting grass, bagging grass, and for extended
engine life.
1, if the drive system is slipping, turn the cableadjuster
(A, Figure 19) one turn in the direction shown. Testthe
drive system and check for slippage.
2. if the drive system stiff slips, turn the cableadjuster one
more turn to shorten the cable. Again,test the drive
system.
3. Repeatthe adjustment andtest until the drive system
does not slip.
4. Beforeyou beginto mow, make sure the drive system
will correctly disengage and that the mower will stop. if
the drive system will not disengage,takethe mower to
an authorized service center before you operatethe
mower,
Figure 19:Adjusting the drive cable
15
Page 16

Maintenance(Continued)
Blade Service
Frequentlycheckthe blade for wear or damagesuch as
cracks. Frequentlycheckthe bolt that holds the blade. Keep
the bolt tight, if the blade hits an object, stop the engine.
Disconnectthe wire to the spark plug. Check the blade
adapter(A, Figure 201for damage.Check for a bent or
damagedblade,a badly worn blade, or other damage.Before
you operatethe unit, damaged parts must be replacedwith
factory replacementparts. Forsafety,replacethe blade every
two years. Keepa sharp edge on the blade. A bladethat is
not sharpwill causethe ends of the grass to become brown.
Removethe blade as follows.
Removing the Blade
WARNING:Befere yeu remevethe biadeo
discennect the wire te the spark piugoThe
blade has sharp edges° Whe_ ynu held the
blade, use gloves er clothmaterial tu pratect
yourhands°
1. Drain the fueltank.
2. Lift the side of the mower that hasthe muffler or spark
plug.
3. Use a piece of wood to keepthe bladefrom rotating.
4. Remove the bolt (B, Figure 20} that holds the blade
with a 9/16" (14ram) wrench.
5. Checkthe blade (C}according to the "Blade Service"
instructions. Replacea badly worn or damaged blade
with a factory replacement blade.
6. Mount the blade with the curved edges toward the
housing, if the blade is upsidedown, the blade will not
cut correctly and can causean accident.
7, Fastenthe blade with the original washer (I}} and bolt.
Make sure the outside rim ofthe Bellevillewasher is
toward the blade.
8. Tightenthe bolt that holds the bladeto a torque of 30
foot pounds.
WARNING:Alwayskeep the bait that heids the
blade tight, a iaase bait or blade can cause an
accident.
Figure20: Removing the blade
SIlarpening the Blade
1. Sharpenthe bladetwo times ayearor every 25 hours.
2. if the blade is on the unit, do not sharpen. Removethe
blade according to the instructions in "Removing The
Blade".
3. Cleanthe bladewith a brush, soap, and water. Check the
blade. Lookfor cracks, nicks, or other damage. Replace
a blade that is badly worn, bent, or damagedwith a
factory replacementblade.
4. Sharpenthe blade(A, Figure 21, next page) with a file
(B}. Makesure you keepthe original beveledcutting
edge.
5. Make surethe blade is balanced. Usea screwdriver (C}
and hold the blade parallelto the ground (t}} as shown.
A bladethat is balancedwill stay parallel to the ground.
if the blade is not balanced,the heavyend will rotate
toward the ground. Sharpenthe heavyend until the
blade is balanced.
6. A newblade will cut better than a badlyworn blade.
Everytwo years replacethe old bladewith a factory
replacementblade.
16
Checking the Levet ef Cut
Testthe unit in a small area. if the height of cut is not level
or if the cut grass is not discharged, the causecan be: (1)
the blade is bent or damaged, (2) the blade is not sharp, (3)
a worn blade, (4) or a broken blade adapter.Beforeyou use
the unit, correct the problem.
www.murray.cam
Page 17

Maintenance(Continued)
L
Figure21: Sharpening the blade
Preparing the Mewer far Sterage
WARNING:De nat remove gaseiine while
insidea building, near a fire, or while you
smake. Gasoline fumes can cause an
expmasianor a fire.
1_ Drain the fuel tank.
2_ Let the engine run until it is out of gasoline.
3. Drain the oil from the warm engine.Fillthe engine
crankcasewith newoil.
4. Remove the spark plug from the cylinden Pour one
ounce of oil into the cylinder_Slowly pull the recoilostart
grip so that the oil will protectthe cylinden Install a new
spark plug in the cylinden
5. Cleanthe dirt and debrisfrom the cylinder cooling fins
and the engine housi%
6. Cleanthe bottom of the mower housi%
7. Make surethe grass bag is empty of grass. Grass
remainingin the bag during storage will damagethe
bag_
8. Completely cleanthe mower to protectthe paint_
9. Fold the handles (if desired).
CAUTION:Be careful whenyou fold or raise the handle_Do
not damagethe cables.A cable that is bent will not work
correctly. Beforeyou usethe unit, replacea bent or damaged
cable.
10. Putthe unit in a building that hasgood ventilation.
_a
17
Page 18

Theengine wiii not start.
1. Make surethe fueltank is filled with cleangasoline. Donot use old gasoline.
2. On a cold engine, push the primer button (optional on some models). Forthe number of times requiredto push the
primer button, seethe engine manufacturer'sinstructions.
3. Make surethe wire for the spark plug is connectedto the spark plug.
4. Adjust the Carburetor.Referto the engine manual.
5. There is too much gasoline in the engine cylinder. Removeand dry the spark plug. Pull the recoiBtart grip severaltimes.
Install the spark plug. Connectthe wire to the spark plug. Startthe engine.
6. The engine is difficult to start in heavyor high grass. Move the mowerto a cleandry surface.
7. Make surethe engine stop leveris in the operating position.
8. Make surethe fuel valve is in the ONposition. Referto the engine manual.
Theengine wit1 not stop.
1. Releasethe engine stop lever.
2. Checkthe enginestop cable. Replacethe cable if bent or damaged.
Engineperformanceis bad.
1_ Checkthe height of cut settings_Raisethe height of cut if the grass is high.
2_ Checkthe bottom of the blade housing_Cleanthe blade housing of grass and other debris.
3. Checkthe wire to the spark plug_Makesure the wire is connected.
4. Cleanthe engine cooling fins of grass andother debris_
5_ Checkthe carburetor adjustments_Referto the engine manual.
6. Checkthe spark plug gap_Setthe spark pluggap at 0.030"
7_ Checkthe amount of oil in the engine_Fillwith oi if necessary.
8. Checkthe engineair cleaner.Referto the engine manual.
9. The gasoline is bad. Drain and cleanthe fuel tank. Fill the fuel tank with cleangasoline.
Excessivevibratien.
1_ Remove the blade. Checkthe blade andbalanceif necessary=Seethe blade maintenanceinstructions.
2_ Checkfor a bent or broken blade. A damaged blade is dangerous and must be repiacedo
3. Checkthe blade adapter_Replace a broken blade adapter°
4. if the vibration continues, take the mower to an Authorized Service Center.
The grass will not discharge correctly_
1. Cleanthe bottom ofthe mower housing.
2_ Checkfor a badlyworn blade.Removeand sharpenthe blade. Forsafety, replacethe blade everytwo years with afactory
replacementblade.
The grass is not cut even.
1. Checkthe height adjustment at eachwheel. The height adjustment must be the same for each wheel
2. Make surethe blade is sharp.
3. Checkfor a bent or broken blade. A damaged blade is dangerous and must be replaced.
4. Checkfor a broken blade adapter.Replace a broken blade adapter.
Page 19

L_M_TED WARRANTY
_dggs & Stratton Power Products Group, LLC witt repair and/or replace, free of charge, any part(s) of the equipment that is
efective in material or workmanship or both. Briggs & Stratton Corporation wilt repair and/or replace, free of charge, any
,art(s) of the Bdggs and Stratton engine* (if equipped) that is defective in materiat or workmanship or both. Transportation
harges on product submitted for repair or replacement under this warranty must be borne by purchaser. This warranty is
,ffective for the time periods and subject to the conditions stated below. For warranty service, find the nearest Authorized
;ervice Dealer using our deater tocator at www.BriggsandStratton.com or www.Murray.com.
here is no other express warranty. Implied warranties, including those of merchantability and fitness for a particular
,urpose, are limited to one year from purchase or to the extent permitted by taw. Liability for incidental or consequential
amages are exctuded to the extent exclusion is permitted by taw.
;ome states or countries do not allow limitations on how tong an implied warranty tasts, and some states or countries do
ot atlow the exclusion or limitation of incidental or consequential damages, so the above limitation and exclusion may not
ppty to you. This warranty gives you specific legal rights and you may also have other rights which vary from state to state
,r country to country.
Narranty period begins on the date
d of time stated above.
means alt other uses, including
nerciat use, it shall thereafter be considered
'arranty registration is necessary to obtain warra#
)t provide proof of the initial purchase date at th_
;ed to determine warranty eligibility.
nsumer or commercial end user, and continues for the
use by a retail consumer. "Commercial
,'elcome warranty repair and apo!ogize to you for being
;rs authorized by Briggs & Stratton or BSPPG, LLC.
warranty repairs are handled routinely, but sometimes requests
covers defects in matedats or workmanship, tt does not cover damage
tenance or repair, normal wear and tear, or stale or unapproved fuel.
oper Use and Abuse - The proper, intended use of this product is described in
'service is available onty through servicing
may not be appropriate. This warranty
)roper use or abuse, improper
_erator's Manual. Using the product in
y not described in the Operator's Manual or using the product after it has been damaged witt void your warranty. Warranty is
tlowed if the sedat number on the product has been removed or the product has been altered or modified in any way, or if the
Jct has evidence of abuse such as impact damage, or water/chemical corrosion damage.
oper Maintenance or Repair - This product must be maintained according to the procedures and schedules provided in the
ator's Manual, and serviced or repaired using genuine Bdggs & Stratton parts. Damage caused by tack of maintenance or use
n-original parts is not covered by warranty.
_al Wear - Like all mechanical devices, your unit is subject to wear even when propedy maintained. This warranty does not
r repairs when normal use has exhausted the life of a part or the equipmenL Maintenance and wear items such as fitters,
, cutting blades, and brake pads (engine brake pads are covered) are not covered by warranty due to wear characteristics
;, unless the cause is due to defects in matedat or workmanship.
; Fue_ - tn order to function correctly, this product requires fresh fuel that conforms to the criteria specified inthe Operator's
_at. Damage caused by stale fuel (carburetor leaks, clogged fuel tubes, sticking valves, etc) is not covered by warranty.
lies to Bdggs and Stratton engines only. Warranty coverage of nomBdggs and Stratton engines is provided by the engine manufacturer.
¢9
_J
19
Page 20

Page 21

L/N_
tm
O
m
¢,#3
10 DEGREES
A 15 degree slope is a hill that increases in height at appto×imate_y 2.5 feet in 10 feet.
A t0 degree slope is a hi)l that increases in height at appro×imatety 1.7 feet in 10 feet.
Use extreme care at all times, and avoid sudden turns or maneuvers. Follow other instructions in this manaal for safety in mowing on
smopes. Operate a riding mower up or down smopes, never across the face of elopes. Operate a waUk-behind mower aerose the face
of slopes, never up or down elopes. Use e_ra care when operating on or near slopes and obstructions.
Page 22

Page 23

23
Page 24

®
ProductSpecifications
DeckSize (in)
Height of Cut (in)
TransmissionType
(Self-PropelledUnitsOnly)
Ground Speed (mph)
(Self-PropeiledUnitsOnly)
Engine Power (fibs)
Engine Displacement (cc)
FuelTankCapacity(qt)
Common Service Parts
BladeControl Cable(M2255FCOnly)
BladeControl Cable(MP2265FCOnly)
Wheel DriveCable(MP2265FCOnly)
Cutter Blade (All)
Drive Belt (Self-Propelled)
Power Rating: The gross power rating for individual gas engine models is labeled in accordancewith SAE(Society of
Automotive Engineers) code J1940 (Small Engine Power& Torque Rating Procedure),and rating performance has been
obtained and corrected in accordancewith SAEJ1995 (Revision 2002-05). Torquevalues are derived at 3060 RPM; horsepow-
er values are derived at 3600 RPM. Net power values are taken with exhaust and air cleaner installed whereas gross power val-
ues are collected without these attachments. Actual gross engine power will be higherthan net engine power andis affected
by, among other things, ambient operatingconditions and engine-to-engine variability. Giventhe wide array of products on
which engines are placed,the gas engine maynot developthe ratedgross powerwhen usedin a given pieceof power equip-
ment. This difference is dueto a variety of factors including, but not limited to, the variety of engine components (air cleaner,
exhaust, charging, cooling, carburetor, fuel pump, etc.), application limitations, ambient operating conditions (temperature,
humidity, altitude), and engine-to-enginevariability. Dueto manufacturing and capacity limitations, Briggs & Stratton may sub-
stitute an engine of higher ratedpower for this Series engine.
M2255FC
22
1.5-3,5
NiA
N/A
5.5
158
1.0
Part Number
7101330
7101862
7101858
7100851
7101193
MP2265FC
22
1,5 -3,5
Singb Speed/
Gear
2,3
6.5
190
1,6
24 www.murray.¢am
Page 25

Celivret d'instructionscontient des informationscommunes_ plusieursmodetes.
Life et conserverce livret pours'y r_f_rero
Celivret contient desinformations importantessur la SECURITE,
le i_ONTAGE,le FONCTiONNEi_ENTet la i_ANTENii_iENTO.
iNFORt_IATiON$$URLEPRODUiT
®
iVlod_,les
M 5Fc(78oo463)
MP 5Fc(78oo465)
M 5oFc(78oo8o4)
Le propri_taire deit s'aeeurerqueroutesteeieformatione relatives au preduit sen1
ieclueesavecla tondeuee. Ceeiefermatieeeieciueet le LIVRETg'iNSTRUCTiON$.
lee PIECESDEREDHANGEet la GARANTBE.tee ieformatione deivent _.treinclueee
afin dee'aeeurerque lee teie d'Etat etautreeteie eereeteuivies.
7105032IRev. o)
Page 26

_erci de votre achat de ce produit Murray de quafitC. Nous sommes heureux que vous ayez plac6 votre confiance
sur la marque Murray. S'il est utilis6 et entretenu suivant los instructions de ce manuel, votre produit Murray vous
rendra des annCes de Ioyaux services.
Ce manuel contient des informations de sCcurit6 pour vous sensibiliser sur les dangers et risques associCs avec la
machine, et sur la fagon de los 6viter. Cette machine a 6t6 congue et n'est prCvue que pour de Jacoupe de finition
de pelouses entretenues, et n'a pas d'autres finalitCs. IJest important que vous lisiez et assimiliez complCtement
cos instructions avant d'essayer de dCmarrer et d'utiliser cot 6quipement. Conservez cos instructions comme
rCfCrence ultCrieure.
ENBEGISTBEMENTBU PBOBUIT
IMPOBTANT: CONSERVEZCESINFOBMATIONSBANSVOSBOSSIEBSPEBSONNELS
(Compl_tezlos informatioussuivautes suite _ l'achatde votreMurray)
Bate de l'aehat
Reveudeur
N° de tCl@heue dRreveudeur
Moteut
RCfCrencede mod_le
NumCrodesCrie
Mod6le Type Trim
_IURRA¥estune marque eommereiale de
Sriggs& StraUonPowerProductsGroup, LLC
_litwaukoo, wm,USA.
Copyright@ 2808, SUggs&Stratton Corporation
_litwaukoo, Wl, USA.Tousdroits r_sorv_s.
Page 27

S_curit_deI'ep6rateur ..................................................... 4
Importantesinstructionspour la s_curit_deI'op_rateur ................................. 4
Pr@aratien ............................................................. 6
D_baiiage ..................................................................... 6
Guidon ....................................................................... 6
Hauteurdu guidon .............................................................. 7
Bac_.herbe.................................................................... 8
D_flecteurlaterald'_jection ....................................................... 9
Conseilspourle d_chiquetage.................................................... 10
Commentpr@arer le moteur ..................................................... 10
Pr@arationfinale .............................................................. 10
Feectieenemeet ......................................................... 11
Levierd'arr_t du moteur ......................................................... 11
M6canismed'entraTnementdes rouesavant Lrnod_lesautotract6s_........................ 11
Arr_tdu moteur ............................................................... 11
D6marragedu moteur .......................................................... 12
R_glespour un functionnementsQret efficace ....................................... 12
t_laietenaece............................................................ 13
Maintenancedu moteu_......................................................... 13
Basculementdu moteur ......................................................... 13
Nettoyageducarter moteur ...................................................... 13
Lubrification .................................................................. 13
R6glagede lahauteurde coupe ................................................... 13
D@osede lacourroied'entraTnement.............................................. 14
R6glagede lacourroied'entraTnement............................................. 15
Entretiendela lame .......................................................... 16
D@osedela lame .......................................................... 16
AffQtagedela lame .......................................................... 16
V6rificationdu niveaudeUacoupe .............................................. 16
Pr@arationdela tondeusepour [e remlsage ........................................ 17
3
Recherchedes paanes..................................................... 18
Garantie ............................................................... 19
Lesbornesdebatterie,terminaisonset accessoiresannexes
contiennentdu piombou descompos6sauplomb, produit
chimiquereconnupar I'dtatde Caiiforniecommecausantcancer
etanomaliescongdnitalesouautresatteintes_.la reproduction.
Lavez=vousbienles mainsapr_smanutention.
Lesgazd'dchappementdumoteur,certainsde sesconstituants
etcertainscomposantsdela machinecontiennentou dmettentdes
produitschimiquesreconnuspar I'dtatde Californiecomme
causantcanceret anomaliescongdnitales.
Page 28

lmportantes instructions pourta s@urit6 de t'op6rateur
AVERTISSEMENT:Cette puissante ton@use est capabb devous amputer d'un pied ou d'une main et peut projeter des
objets pouvant causer des accidents et des dommages. La non-observation des consignes de s@urit6 qui suivent pour-
9
rait entra_nerdes 16sionsgravesvoire la mort de I'utilisateur ou d'autres personnes. Le propri6taire de la ton@use doit
comprendretoutes ces consignes de s@urit6 et ne doit enautoriser I'usage qu'aux personnes bs ayant elbs-m_mes
comprises. Les utilisateurs doivent _tre sains de corps et d'esprit et nedoivent 6tre sous Hnfiuence d'aucune sub-
stancequi pourrait affecter bur vue, burs r6fbxes ou bur jugement. Si vous avezdes questions concernantvotre
machine auxquelbs votre revendeur nepourrait pas r@ondre, contactez par t61@honeou par @fit b service client
MURRAY,900 N.Parkway,Jefferson,Wl 53549.Phone:(1-800-661-6662).
Oansignes pear les eafants
Desaccidentsdramatiques peuventsurvenir si I'utilisateur n'est pas
conscbnt de la pr6senced'enfants.Les enfantssont souventattir6s
parbs machines et parla tonte en g@6ral.Nesupposez jamaisqua
desenfants resteront& I'endroit o_ vous bs avezvus pour la
derni_refois.
1. ELOIGNEZbs enfants de la zone&tondre et laissez- bs sous la
surveillanced'un adulteresponsabb autre qua I'op6rateurde la
machine.
2. NEPERMETTEZPAS& desenfants de setrouver dans la zone&
tondre Iorsquelaton@use est enmarcheet coupezb moteur si
quelqu'uns'introduit dans lazone&tondre.
3. NELAISSEZPASde jeunesadolescentsutiliser la machine.
4. N'AUTORBEZI'utilisation de laton@use qu'& des adultesou &
desadolescents responsabbs sous la surveillanced'adultes.
5. NETONDEZPASen marche arri_re &mains quacelasoit absoB-
ment n@essaire.REGARDEZbienen arri_re et en basavantet pen-
dantla marchearri_re pour @tecter 1'6ventuellepr6senced'enfants,
d'animaux ou de dangers.
6.SOYEZEXTREMEMENTViGiLANT&I'approche devirages sans
visibilit6, d'arbustes, d'arbres ou d'autres objets pouvantr6duire
votre champ de vision.
Utilisatian darts les pentes
1. Lespentessont &I'origine d'unemajorit6 desaccidents r6sultant
deglissades ou de chutes.Cesaccidents peuvententra_nerdes
bbssures graves.Si vous avezla moindreappr6hension avant de
tondre unezone en pente,NE LATONDEZPAS!
2. Lespelousesen pentese tondent transversabment, jamais en
montant et en descendant.Faitestr_s ATTENTIONsi vous 8tes en
penteet quavous changezdedirection. Netondezpas despentes
abruptes ou d'autres endroits o_ la stabilit6 ou I'adh6renceserait
douteuse.Reportez-vousen fin de ce manuel aux ConseiBpour
utilisationsur pente.
3. Faitesparticuli_rementattention avec bs sacsde ramassage
d'herbeet autresaccessoires,iB affectent la conduite et la stabilit6
dela machine.
Pr6paratian
1. Lisezet suivezles avertissementset bs consignes concernant le
moteur, la machineet lesaccessoires.Avant le @mar@e,famil-
iarisez-vousavecles commandeset la tondeuse.
2. L'utilisation de laton@use dolt 6tre uniquement r6serv@a des
personnessSres, responsableset connaissantlesconsignesd'utili-
sationde latondeuse.
3. Lesstatistiques @montrent qua lesutilisateurs de 60arts et plus
sont les personnes plus souvent impliqu@sdarts lesaccidents li6s
auxtondeuses. IIestconseill6 acettecat@orb d'utilisateurs, d'6val-
uerburs capacit6s_.manoeuvrerlaton@use sansrisquer de bless-
erautrui ou eux-m6mes.
Preparation
(saite de la ealanae pr@edente)
4. Soyezparticuli_rementprudent Iors dela manipulationdecarbu-
rants. IIs sont inflammables etburs vapeurs peuvent_tre lacause
d'explosions. Neconservez du carburantQUEdans des bidons
pr@us& cateffet. N'enbvez jamais b bouchon du r6servoir
d'essenceou n'ajoutezjamais d'essencequand b moteur esten
marche.Ne rajoutezde I'essencequa si vous vous trouvez _.I'ex-
t_rieur et quale moteurde la ton@use est arr6t_ etfroid. Attention
bien nettoyersi vous avezfait @border de I'essence.NEFUMEZ
PASen manipulant du carburant.
5. Inspectezla zone_ tondre et enbveztous les objets (jouets,fib
de far, pierres, branches...)qui pourraient blesserquelqu'un s'ils
6talent projet6s par la machineou qui pourraientvous g6nerpen-
dant la tonte. Parailleurs, notez bien I'emplacementdestrous, des
souches d'arbres et des autres dangers.
6. Conservezune distancede s@urit6entre laton@use et d'autres
personnesou animaux.Siquelqu'un s'introduit darts lazone aton-
dre, DEBRAYEZimm6diatementla lame, coupezle moteur etarr6tez
laton@use.
7. V6rifiezfr_quemment leban fonctionnement des protections, des
d6flecteurs,des commutateurs, descontr61esde lameset detous
bs dispositifs de s@urit&
8. Assurez-vousde la bonnelisibilit6 detousles autocollants de
s@urit& Remplacez-less'ils sont d6t6rior6s.
9. Pendantqua vous ton@z, prot6gez=vousetportez des lunettesde
protection,des pantalonslongs et des chaussuresr6sistantes.NE
TONDEZPASpieds-nus ou ensandales.
10.Appreneza DEBRAYERlalame rapidementeta arr6ter le moteur
en cas d'urgence.
11. Faitestr6s attention Iors du chargement ou du d@hargementde
laton@use sur un camion ou uneremorque.
12.V6rifiezfr6quemment 1'6tatd'usure du bac de ramassageet
remplacezqesi n@essaire,afin d'6viter qu'un objet nesalt projet6et
neblessequelqu'un en paraticulier s'ilest troy6 ou us&
_an_tentian s@_risee _e i'essenee
Pour6viter desdommages corporals ou mat6riels,faitestr6s atten=
tion en manipulant de I'essence.C'est un liquidetr6s inflammable,
et sesvapeurssont explosives.
1. Eteignezcompl6tementcigarettes, cigares,pipes etautres
sources d'inflammation.
2. N'utilisezqu'un r@ipient pr6vupour transporter de I'essence.
3. N'ENLEVEZPASlebouchonde r6servoir et nefaites pas I'appoint
en essenceavec lemoteur qui tourne. Laissezle moteur refroidir
avantde rdaire le plain.
4. NEFAITESPASle plain dans un local.
5. NESTOCKEZPASla machineou le bidond'essence a I'int6rieur
s'il y a unefiamme hue,des 6tincelles,ou uneveilleuse comma sur
un chauffe-eauou d'autres appareils.
4 wwwom_rray,corn
Page 29

lmportantes instructionspourtas@urit de t'op rateur(suite}
Manutention s_curis_e de i'essence
(suite de la page pr@6dente)
6. NEREMPLBSEZPASbs r@bbnts d'essencedans un v6hbub
ou sur un camion ou un phteau de remorque qui aurabnt un
rev6tementplasfique. Placeztoujours bs r@bbnts sur b solet loin
du v6hicub pour b remplissage.
7. Enbvezbs 6quipementsfonctionnant &I'essencedu v6hicub ou
de la remorqueet refaites-enb pbin au sol. Si cen'est paspossi-
bb, faitesqe en utilisant un bidon portablepBt6t que I'emboutde la
pompede distribution.
8. NEDCMARREZPASdes 6quipementsfonctionnant & I'essence
dansdesv6hicubs ou remorques ferm6s.
9. GardezI'embout de distribution en contact avecb bord du r6ser-
voir ou du r@ipbnt _ remplir en permanencejusqu'au pbin. N'U-
TILISEZPASunembout de distribution qu'on puisse Noquer en
position ouverte.
10. Si du carburantest renvers6sur bs v6tements, changez=en
imm6diatement.
11. NEremplissez JAMAIS& ras b r6servoir d'essence.Remettezb
bouchondu r6servoir d'essence et serrezqe bien.
Utiiisation
1. NEMETTEZPASvos mains ou vos pieds &proximit6 ou en
dessousdes 616mentsen rotation. Restez&I'@art de la zone d'6jec-
tion Iorsque le moteurtourne.
2. COUPEZlemoteur si vous deveztraverser des all@s degraviers,
des passagesou des routes ou bienIorsque desobjets projet_s
pourraient 6tre source de dangers.
3.Tondez uniquementa la lumi6redu jour ou avecun bon 6ciairage
artificiel.
4. N'utilisez pasla tondeusesi vous 6tes sous I'infiuence d'alcools
ou de drogues.
5. Si vous heurtezun objet ou si laton@use vibre de mani6reanor-
male,ARRCTEZimm6diatementle moteur et retirez lefil de la
bougieet assurezwous qu'ils n'entreront pas en contact. Inspectez
la machine pour v6rifier si elle estendommageeel proc6dezaux
r@arations avant de lared6marrer.
6. NETONDEZPASdeszonesa proximit6 de ravins,defoss_s ou
de berges.
7. FAITESATTENTIONaux trous et aux autres dangerscach6s, Une
pelousehaute peutdissimuler des obstacles.Resteza I'@art des
foss6s, desconduites, des cl6tures ou tous autresobjetspouvant
d@asser.
8. NETONDEZPASun gazonhumide. Ayeztoujours un pas sSr.
Maintenezfermement la poign@ et suivezla ton@use en mar@ant,
vous ne devezjamais courir. Une glissadepourrait entra_nerdes
blessures.
9.TOUJOURSrester derri6rela poign@ quand lamachine (moteur)
tourne.
10. NEQUITTEZPASlaton@use si lemoteur tourne. Arr6tezle
moteur et d6brayezla lameavantde laisserde la ton@use, pour
quelqueraisonque cesoit.
11.Avant de nettoyer,r@arer ou inspecter la ton@use, assurez-
vous que lemoteur, la lameettous lesautres 616mentsenrotation
sont bienARRETES.Retirezle fil de labougieet assurez-vousqu'ils
n'entreront pasen contact pour 6viterun d6marrage
12.ARRCTEZlemoteur et s'assurer que la lameest _ I'ARRCT
avantd'enleverle bac_ herbeou nettoyerI'amas d'herbe.
Utiiisation
(suite de la colonne pr@edente)
13. COUPEZle moteur et attendezque la lamesoit compl6tement
ARRETEEavant de retirer lesacde ramassageetiou de @boucher
le conduit d'6jection. N'UTILISEZPASlaton@use sansqueles
d6flecteurs,la protection ded6versement, la pro tection arri6re et
lesautres dispositifs de s@urit6 nesoient en placeet op6rationnels,
ou le dispositif de ramassagesoient correctement install6s. N'ORI-
ENTEZJAMAIS 1'6jectionen direction des personnes,desvoitures,
des portes ou desfen6tres.
14. NEPASd@hargerdes mati6res contre un mur ou un obstacb.
Ellespourraient ricocher etrepartir vers I'op6rateur.
15. Ralentissezavantde prendre un virage.
16. Faitesattention _.la circulation Iorsquevous vous trouvez pros
d'une route ou Iorsquevous devezentraverser une.
17. NEPASOPERERla tondeuse dans un endroit sans a6ration. Las
gaz d'@happementcontiennentdu monoxyde decarbone et peu-
vent 6tre dangereux.
18. N'utiliser que des accessoiresapprouv6spar le constructeur, Se
reporteraux instructions du constructeur pour une installationet
uneutilisation correctesdesaccessoires.
Enttetien et remisage
1. NESTATIONNEZJAMAIS unemachineou nerangezjamais un
bidonde carburant dans un localo8 bs vapeursde carburant pour-
raiententrer en contact avec uneflamme, une 6tincelleou une
veilbuse comme on peut entrouver dans un chauffe-eauou dans
unechaudi6re,un s6che-lingeou d'autresappareilsthermiques.
2. Laissezrefroidir le moteuravant de rangerla ton@use dans un
ocal. Rangezb bidon de carburantdans un endroit bien ventil6,
noccup6et hors de port@ desenfants.
3. Pour r6duireles risques d'incendie ou de surchauffedu moteur,
veilbz _.ce qu'il n'ait pasd'herbe, defeuilles ou de surplus de
graisse surle moteur.
4. Si vous devezvidanger le r6servoir de carburant, r@up6rezle
carburant dartsun bidon pr6vua cet effetet effectuezcette op6ra-
tion _.I'ext6rieuret 61oign6de toute flamme.
5. Assurezwous du bon serrage des@rous, des boulons et desvis
de la ton@use.Wrifiez que toutes lesgoupilles sont bien enplace.
6. Si vous devezfaire fonctionner la ton@use _.I'int6rieur,faites-b
darts un pi6cebien ventil@. Lesgaz d'@happementcontiennentdu
monoxydede carbone, ungaz inodore et mortel.
7. Nepro@deza I'entretien du moteur et aux r@lagesque si le
moteur est coup6.Retirezle fil de la bougie etassurezwous qu'ils
n'entreront pas encontact pour 6viterun d6marrage
NEMODIFIEZPASles r6glagesdu r6gulateurdevitesse du moteur.
8. Inspectezfr6quemment ledispositif deramassageet v6rifiezson
6tat d'usure et ses d6t6riorations, ceci pour 6viterla projection
d'616mentstondus. Remplacezle sac s'il esttr6s d6tenduou
d@hir6. Remplacezla glissi6re ou I'adaptateurdu sac s'ils sont
cass6sou fendus.
9. Leslames de laton@use sont affSt@set coupantes.Enveloppez-
les ou portezdesgants decuir @aiset soyezparticuli6rement PRU-
DENTsivous devezles manipubr.
10. NEFAITESJAMAIS letest de I'_tincelleen mettant votre bougie
la masse sur le cylindredu moteur,L'6tincelle pourrait mettre feu
au carburant qui se trouve darts b cylindre.
11. Faitesv6rifier votre machinepar votre revendeurMURRAYau
moins unefois paran. Faites installertout nouveausyst_mevisant
am61iorerla s@urit6de votre machine.
12. Utilisezuniquementdes pi6cesd6tach@s d'origine MURRAY
pour optimiser les performances devotre machine.
Page 30

AVERTiSSBVtENT:Avanttout montageou maintenance
dela tondeuse,d_brancherle fJl de la bougJe,
NOTE:Danscefivretd'instructions,la droite etla gauche d_cfivent
l'emplacementd'unepiSceavecl'op4rateursetenantdebout derrbre le
guidon.
B_baiiage
Latondeusea 6tdenti_rementmontde_.I'usine.Lorsquela tondeusea
dtdplacdedansle carton,le guidona 6td plac6en position de range=
menL Pourplacerlie guidon enposition defonctionnement,suivre les
dtapesci=dessous=
Guidon
1= Sortir latondeusedu carton=
2= Retirerlematdriaud'embaliageautourde latondeuseet du
guidon.
3. Pourtousles modules,_.I'exceptiondesmodulesgrandesroues,
remonterle guidoninfdrieur (A, Figure1}.S'assurer quele
guidoninfdrieursetrouve entreles languettesdeverrouillage(B).
Serrerles dcrous_.oreillesinfdrieurs(C).
NOTE:Pourles modblesM2255FC& MP2265FC,s'assurerque le
guidon inf4rieursetmuvedansle tmu leplus bas. Voir"Hauteurdu
guidon"
4. Placerle guidonsup6rieur(D, figure 1} enpositiondefonctJon=
nement(droite). Serrerles6crous_.oreiiiessup6rieurs(E).
Figure1: D4ploiementduguidon
NOTE.Lahauteurduguidon peut_trer4gl4epour leconfortde/'op4ra=
teur Voir "Hauteurdu guidon".
A_ENTmON: Soyez prudent Iorsque vous pliez ou levez ie guidon. Ne
pas endommager les c_.bles. Un c_.ble qui est tordu ne fonctionne pas
correctement. Avant d'utiliser la tondeuse, rempiacer un c_.bletordu ou
endommag6=
5,
Maintenirle levierd'arr_t moteurcontre leguidon. (Ser6fdrer_ la
sectionintitul6e "Levierd'arr_t moteu¢.) Tirer doucementsurla
poign_edu lanceur(A, Figure2). Pourfixer lapoign6eduianceur
sur le guidede la corde(B),entortiller la cordeautravers du
guidedecorde montdsur le c6td droit du guidon.
Figure2: Fixationdela manettede d4marragepar recuL
Page 31

Pr6paratiofltsuite)
Hauteur du guidon
1= Ddposerles 6crous_.oreiiies(A, Figure 3) et les boulons(B)des
supportsdroit et gauchedu guidon(C)=
2= Placerle guidon infdrieur(A, Figure 4) dansletrou leplus bas
(c)=
Note : Nepas monter le guidon inf#rieur dans le trou le plus haut (B),
3= Fixerle guidon infdrieurauxsupportsdu guidonavecles boulons
etdcrous_.oreiliesddpos_s_.I'dtape1=
Figure 3: D#pose de la quincaifierie de r#glage du guidon
Page 32

Pr6paratiofltsuite)
Montage du bac _ herbe
1. Pour monterle bac _.herbesur latondeuse,lever laporte arri_re
(A, Figure5).Touten maintenantle bac_.herbepar la poign_e
(B), monter les crochets(C) auxdeuxextr6mit_sducadredu bac
_.herbesur latige depivotementdela portearri_re(8)=Abaisser
le bac&herbecontre I'arriSredela tondeuse=Abaisserla porte
arri_re=
Important: S'assurerque lesdeux crochetsdu bac_ herbesont mont6s
sur la tigedepivotement,
AVERTiSSEIVIENT:VdrifierI'_tat du bac_ herbe pour
route usare ou d_t_rioratiom Encasd'usure ou de
dommage,remptacer les pi_cesseaiement avec des
pi_ces derechangeapprouv_espar I'usine,
Vidage du bac _ herbe
AVERTiSSEMENT:Avantde ddpeserle bac_ herbe,
arr_ter le moteur. Avant de retirer routeherbedu
carterde la toadeuse, d_braacherle fit dela hoagie,
1= Leverlaportearri_rejusqu'en position verticaie=
2, Tenirla poign_edu bac_.herbeet souleverle cadretubuiaire.
Continuer_.souleverle cadrejusqu'_,cequeles crochetsne
soientplusmontdssur latige de pivotement.D@oserle bac_.
herbe,
3, Vider I'herbedu bac_.herbe.
4, Pour remonterle bac_.herbesur la tondeuse,s_,reporter_.
"Montagedu bac _.herbe"=
Figure 5: Montage du bac a herbe
8 www,murray,corn
Page 33

Pr6paratiofl{suite)
Fixation du d_fiecteur d'_jection mont_ iat_raiement
MERTmSSEiViENT:Afin d'emp_cher
ie d_marragedumoteur, d_brancher
ief]] de ]a bougie.
Pourle transport,le d_fiecteurlateraln'est pas mont_enplace.Rep_rer
le d_fiecteurlateraletI'instaiier commesuit.:
1. Souleverle capotdu d6chiqueteur(A, Figure6).
2. Glisserles deuxlanguettes(B) du d_fiecteurlateral(C)sous I'axe
depivotemenL
3. Abaisserle d_fiecteurlateral.S'assurerque la languettedever-
rouiliage(A, Figure 7) s'ins_reau travers delafentedartsle
d_fiecteurlateral.
4. Abaisserle capotdu d6chiqueteur(A, Figure8).
5. Brancherlefil sur la bougie.
Figure7 : Languettesde verrouillagedud_flecteurd'djectionlat6raL
Figure6 : Installationdu ddflecteurd'djectionlatdraL
Figure8 : Libdrationdu capotdu ddchiqueteur
Page 34

Pr6paratiofl(suite)
Conseiis pourle dgchiqnetage
Lafonction ddchiquetagecoupeI'herbe deteiie fa£onqueceile=cipeut
_trefacilementrecycJde.Etantdonndque losnutriments sentretournds
_.la terre, le gazonaura besoindemoins d'engrais.Pourun ddchique=
tagecorrectde I'herbedu gazon,suivrelos conseilsci-dessous.
, L'herbedolt6tre s_che.Si I'herbeest mouili_e,il seradifficile de la
couperet ceJaconduira_.des mottosd'herbeIourdes.
, L'herbenedolt pas6tre trop haute.La hauteurmaximalepour une
coupeefficaceest de11,5cm. R6glerlos r6gieursdehauteurde
fa£on_.cequesoul le tiers sup_rieurde I'herbesoit coup_.
o Si I'herbeest plus hauteque 11,5cm, deuxtontes seront n6ces=
saires.Pourla premiSretonte, placerlos rdgleursde hauteurde
coupesur la positionla plus haute.Abaisserensuitelos rdgieursde
hauteurdecoupe pour lasecondetonte.
Comment preparerWemotenr
LEi_IOTEURNECONTiENTNmCARBURANTNiNUiLE
Utiliserleflacon d'huilefourni dans le cartonpour rempiir le moteur
aveclaquantitd corrected'huiJe.Sereporterauxinstructions du fabri-
cant demoteurpour le type decarburantet d'huile _.utiiiser.AvanI
d'utiliser la tondeuse,lire los informationsrelativesb.ia s_curit_ ie
fonctionnement,la maintenanceet le remisage.
AVERTiSSEi?tENT:Suivrelee instructions du fabricaet
demeteur pour le type de carburaetet d'huHe_ utiJie-
or.TeujeursutHieerue r_cipieetdee_retd pour Jecar-
burant. Ne paerumor lore deJ'appeietde carburaet
daesle meteur. Nepasfaire I'appeiet de carburaet
daneufl eedreit ties. Arr_ter le meteuravaet de
rajeuterdu carburaet. Laiseerle raeteurrefreidir
pJusieursmieutes.
o Maintenirla lameaffQtde.Unelame nonaffQtdeconduit_.un brunis=
sagede I'extrdmitddeI'herbe.
o Nettoyerle dessousdu carterde latondeuse.L'herbeet autres
ddbrispeuventempScherle benfonctionnementde latondeuse.
Si la qualit6 de la tonte est limite, essayer ce qui suit :
o Placer los rdgleurs de hauteur de coupe _.une hauteur supdrieure.
o Couper I'herbe plus frdquemment.
o Faire fonctionner la tondeuse _.une vitesse de ddpJacement plus
faible.
o R6aiiser des recouvrements d'andains au lieu de couper un andain
compiet _.chaque passage.
o Tondre los zones limites une seconde lois.
llVlPORTANT:Cettetondeuseest#,quip6ed'un moteur_.combustion
interne,elle ne doJtpas8treutilisdesur ou prochedezonescouvertes
defor6ts, de broussailiesou d'herbenon amend6es,_.moins que le
systemed'6chappementdu moteurnesoit 6quip6d'un dispositifanti=
6tincelleconformeaux lois applicabJeslocalesou regionales(si c'est le
casL Si undisposJtJfanti=_tinceileest utiiis_, ceiui=cidevra_tremain=
tenuenparfait dtat parI'utilisateur=
DansI'Etat deCalifornie,ce quipr6c6deest requispar la Ioi
_Paragraphe4442 du CodedesRessourcesPubliquesdeCalifornie).
D'autresEtatspeuventavoir deslois simiiaires. Losloisfdddraiess'ap-
pfiquentsur los terresfdddrales.Consulterun centredereparation
agr#,#,pour un dispositifanti=6tinceilepour le pot d'6chappement.
Note : La puissance moteur r4efie en r_gime continu peut _tre moindre
compte tenu de limitations de fonctionnement et de facteurs environ°
nementaux.
Note: Le fonctionnement d'un moteur neuf conduit que/quefois _ un
14gerd4gagement de fum_e. Cette fum4e est caus_e par de la peinture
ou de I'huile autour du pot fi'4chappemenL Ceci est normal et ne dolt
survenir que /ors du fonctionnement initial
Preparation finale
Avantd'utiiiser la tondeuse,vdrifier le montagedesroues,du guidonet
descommandos.S'assurerquetous losdispositifs defixation sent bien
serrds.S'assurer quela commandodesgaz (si prdsente)et quele levi=
er d'arr_t moteurfonctionnentcorrectement.
Si la tondeuse est 6quip6e de rdgieurs de hauteur de coupe, s'assurer
que ceux=cifonctionnent correctement. Avant de ddmarrer le moteur,
s'assurer que chaque rdgleur de hauteur de coupe est plac6 _.la hauteur
souhaitde. Se reporter _."R6glage de la hauteur de coupe" dans los sec-
tions reiatifs _.la Maintenance.
Page 35

Levierd'arr_t meteur
Lefait de rei_.cherle levierd'arr_t moteur (A, Figureg) conduit _.I'arr_t
automatiquedu moteuret dela lame.Pourque le moteurtourne, main=
tenir lelevier d'arr_t moteuren positionde marche(B).
Avantdeddmarrerle moteur,actionnerplusieurslois le levier d'arr_t
moteur.S'assurerquele c_.blese ddplacefacilemenL
Figure9:Acfionnementdu levierd'arr#tmoteur
AVERTiSSEi_IENT:Pouruneutilisation s_re, le m_can-
isme d'entrafnement dolt immddiatement se d6sen-
gagerIorsqueie levier d°entrafnementest rel_ch& Si
le m_canismed'entra_nementnese ddsengagepas
correctement, ne pas atHiserla tendeusejasqa'_ce
qaele m_canismed'enirafnement snit r_gl_ nar@ar_
paran centre de r@aratinn agree.
IVlgeanismed'entra'inement des roans avant
(sealemeat pear teadeases aatetraet6es)
Latondeuseest 6quip_ed'un m6canismed'entra;nementdes roues
avanLFairefonctionner le m6canismed'entraTnementcomme suit.
1.
Maintenir le levier d'arr6t moteur en position marche
(A, Figure 18).
2.
Pousser le levier d'entraTnement (B) compi_tement vers I'avant
{C). Lorsque le levier d'entraTnement ciiquete, rel_.cher le levier
d'entra;nemenL Le _6canisme d'entratnement est maintenant
engag&
Note:Pourarr#ter le moteur,re/#cherlelevierd'arr#t moteur.
3. Pourddsengagerle m6canismed'entraTnementet arr_terle
moteur,rel_.chercompi_tementle levierd'arr_t moteur.
4. Pourd6sengagerseulementle m_canismed'entraTnement,rei_.ch=
er le levierd'arr_t moteur d'environ 5 cm. Le mdcanismed'en=
traTnementseddsengageramatsle moteurcontinuera_.tourner.
Note: Lorsque le m#canisme d'entraTnement est d#sengag# sur une ton=
deuse neuve, fl est possible que les roues avant toument si celles=ci
sent lev#es hers du sol Ceci est norma! et cessera aprbs une ou deux
heures de fonctionnement.
Figure10:Actionnementdu mecanismed'entraTnementdesroues
avant
Arr_ dR_eiear
Pourarr_ter le moteur,rei_.cherle levierd'arr6t moteur.Debrancherle
fil dela bougieafin d'emp6cherle moteurdeddmarrer.Surles mod_les
equip_sd'un demarreureiectrique,retirerla cid du contacteur.Garderla
cld hers deportde desenfants=
Si le moteurnes'arr_te pas,tenir untournevis centre labougieetcon=
treInsailettesde refroidissementdumoteur.L'dtinceiieira _.lamasse
et lemoteurs'arr_tera.Avantde ddmarrerle moteur,vdrifier lec_.ble
d'arr6t moteur.S'assurerque le c_.bled'arr_tmoteurest correctement
montd.Avant d'utiliser la tondeuse,rempiacerun c_.bled'arr_t moteur
tordu ou endommag&
11
Page 36

Fonctionnement{suite}
D_marrage du moteur
AVERTmSSE_IENT:La lameteurflelerequele meteur eet
eft marcheo
miVIPORTANT:Avantde ddmarrerle moteur,actionnerplusieurslois le
levierd'arret moteur.S'assurerquele c_.bled'arret moteurse ddplace
librement.
Note: La conception du moteur n'inclut pas une commande des gaz ou
un r#glage de vitesse de rotation du moteuK Le moteur est r6gl# _ la
vitesse la mieux adaptde pour la coupe flu gazon, le ramassage de
l'herbe et une longue dur#e de vie du moteur,
1.
VdrifierI'huile=
2=
Remplirle reservoirdecarburantavecde I'essenceordinairesans
plomb=S'assurerqueI'essenceest propre. DeI'essenceavec
plomb conduiraitb.uneaugmentationdesddp6tset reduiraitla vie
dessoupapes=
E
Note: Ne pas utifiser de gasoil ou de m#fiTanoL Ne pas utifiser de super=
carburant sans plomb,
AVERTiSSEiViENT:Teujeureutitieer unrdcipientspecial
carburant. Ne pasruiner lore de t'appeint de carburant
danele rdeerveirde carburant. Ne paeajeuter de car°
I}urantdaneun endreit ties. Avantd'ajeuter du carbu=
rant,arr_ter le meteur et laieeer le meteur refreidir
pendantplusieure minutes.
Figure11:Boutond'amor_agedu moteur.
6= Setenir derrierelatondeuse=A I'aided'une main, maintenirle
levierd'arret moteurenposition defonctionnement{A, Figure
12).Avec I'autremain, se saisir de la pogneedu lanceur{B).
7. S'assurerque la cordedu lanceurn'est pasentraveeou coincee
entreles guidonssupdrieuret infdrieur=Tirer rapidementsur la
poigneedulanceur=Laisser revenirlentementla poigneedu
]anceuL
8. Si le moteurne demarrepasapres5ou 6 essais, se reporteraux
instructions"Probiemeset reparations"=
3= S'assurer que le fil de bougie est branche sur la bougie,
4. Seulement pour les mofi_les autotract6s =S'assurer que ie levier
d'entraTnement se trouve en position ddsengagee (B, Figure lg).
AVERTmSSEiViENT:Afin d'emp_,chertoutaccident, e'ae=
surerque le levier d'entra'_nementee treuve en peei=
tien Dt_SENGAGt_E.Si le 1evictd'entrafnemeet eetreu-
ve en position ENGAGEE,ne pae d_marrer le meteur.
5.
Le boutond'amor_;age(A, Figure11) set[ouve sur le c6tedu
moteur=Appuyersur le boutond'amoK;age.A chaquelois que
vousappuyezsur le bouton,attendredeuxsecondes.Sereporter
auxinstructions dufabricant demoteurpour connaTtrelenombre
d'appuisrequissur lebouton=
Note:Nepas utifiserleboutond'amor¢agepour d_marrerunmoteur
chaud,
Note: Les modgles dquip_s de moteurs Ready Start TMne sent pas
dquip_s de bouton d'amor¢age, Se reporter aux instructions du fabri=
cant du moteur pour plus d'informations,
Figure12:Ddmarragedu moteur,
R_gles pour un fonctionnement s_r et efficace
Serefererb.lasection"SecuritddeI'operateur"dansce manuelpour les
reglesimportantesrelativesaufonctionnementsQret efficacedela ton=
deuse.
12 www.murray.cem
Page 37

Maintenance du moteur
Suivrelesindicationsformul_es dansce paragraphemaintenanceafin
degardervotre tondeuseen ben dtat demarche.Toutesles informa-
tions de maintenancedumoteurse trouventdans le "Livretd'instruc-
tions du moteur".Avantde ddmarrerle moteur,lire celivret.
AVERTiSSEi_IENT:Avant de rdalieer un ¢entrSle,un
rdglage(saul le carhurateur) eu une r_paratiemarr_ter
Jemeteuret d_brancher le fHde la beugie.
Basculement du moteur
Lors de I'entretien du moteur, de I'inspection de la lame ou du nettoy=
age du dessous du carter moteur, s'assurer de toujours basculer le
moteur avec la bougie en haut {Figure 13). Tout transport ou bascuie=
ment du moteur avec la bougie en bas conduira _.:
- un ddmarragedifficile,
. un moteurfumant,
- un encrassementdela bougie,
. unesaturationen huileou carburantdu filtre _.air=
Figure 13: Nepas basculer le moteur vers l'avant,
Nettoyage du carter de la tondeuse
AVERTiSSEi_ENT:Lalame teurne ierequele
meteur eeten marche. Avant de netteyerJe
carterde la tendeuee, arr_ter le meteur et
ddbrancherle fit de la beugie.
L'herbeet autresd_bris peuventconduire_.unfonctionnementincor-
rectdela tondeuse.Apr_savoir tondu, nettoyer le carterde latondeuse
commesuit.
1= Arr6terle moteur.
2. Ddbrancherlefil dela bougie=
3. Nettoyerlapartiesup_rieureet la pattieinfdrieuredu carterdela
tondeusedetoute saletdet ddbris=Nettoyer_.I'aided'eauet de
savon.EssuyerI'excSsd'eauavantle remisage.
Lubrification
1= Pourdes performancesmaximales,lubrifierlesroueset tousles
pointsdepivotementavecde I'huile moteurtoutes les 25 heures.
2= Pourlubrifier le moteur,se rdfdrerau"Livretd'instructionsdu
moteu¢'.
Note: Ne pas lubrifier le c_bie d'arr_t moteu_ Les lubr/7?antsendom=
mageront le c_ble et I'emp_cheront de se ddplacer fibrement,
Remplacer tout c_ble tordu ou ddtdriord,
R6glage de la hauteurde eoape
AVERTmSSE_IENT:Lalame teurne lersquele meteur est
enmarche. Avantde changerla hauteurde ceupe,
arr_ter Jemeteuret d_brancher le fit de la beugie,
Pourchangerla hauteurde coupe,ddpiacerlaposition du levier de
r6glage_ chaqueroue(A, Figure14). S'assurerque chaquelevierde
rdgiagesetrouve _.la mSmepositionafind'obtenir unecoupede
niveau.
1= Ddsengagerlelevierde rdglage=
2= Ddplacerlelevier sur uneautre position.
Figure14 "Rdglagede la hauteurde coupe
13
Page 38

Maintenance (suite)
ggpose de la courroie d'entra'inement
(seuiementsur modules autotractgs)
AVERTiSSEMENT:Avantde ddposerla courroie,
ddbrancherle fit de la bougie,
1. D6poser la vis qui fixe le capot de protection de la courroie
(A, Figure 15). Ddposer le capot.
2. Pour ddposer la courroie d'entraTnement, bascuier la tondeuse
vers le haut. Se reporter b."Basculement du moteur" dans la sec-
tion Maintenance.
3. Desserrer le boulon de tension de la courroie (A, Figure 16}.
4. D6poser la partie avant de la courroie d'entraTnement (B) hors de
la pouiie de transmission (C).
5. Pour ddposer la partie arriere de la courroie d'entraTnement
(A, Figure 17), faire giisser la courroie d'entraTnement par dessus
I'extremitd de la lame (B).
Figure16:Desserragedu boubn de tensionde la courroie
Note:Biens'assurer quevousremplacezla courmie d'entrafnement
seulementpar une courroiede remplacementd'usine,
6,
Pour remonterla courroie d'entraTnement,effectuerlesStapesci=
dessusdansI'ordre inverse.
7.
Pour reglerla tensiondelacourroie.
a=SerrerI'ecrou de rdglage(A, Figure18)jusqug,ce queI'ecrou
toucheI'entretoise(B). Essayerdetourner I'entretoise.Lorsque
I'ecroude reglagetoucheI'entretoise,I'entretoisene peut plus
tour[leE
b. DesserrerensuiteI'ecroude rdglageseulementassezpour per-
mettrela rotationdeI'entretoise.Latensiondela courroied'en=
traTnementest maintenantcorrecte.
8,
Reinstallerle capotde protectionde lacourroie.
9.
.E
Avantdecommencer_.tondre,s'assurer que le mdcanismed'en-
traTnementsedesengagecorrectementetque lemoteurs'arrete.
Si le mecanismed'entraTnementneseddsengagepas,ameneria
tondeusedans uncentrede reparationagredavantdefairefonc-
tionnerlatondeuse.
Figure15:Ddposeducapotdeprotectionde la courroie
14 WWWom Urra_J,COIn
Figure17:Ddposedela courroie
Figure18:Rdglagedela tensionde la courroie
Page 39

Maintenance (suite)
Rggiage du c_bie d'entraTnement
(seuiementsur modules autotractgs)
AVERTiSSEiVtENT:Avantde r_gier le c_bled'entraTne-
merit, re]_cher ]e levier d"arr_t moteur etattendre que
le moteurs'arr_te,
Si le mdcanismed'entraTnementnes'engagepasetne seddsengage
pascorrectement,vdrifierquele montageduguidon estcorrect.
S'assurerquetoutes les pi_cessont en bon dtat,non cass6esou toto
dues,et quetousles di6mentsdefixationsont bienserrds.
Despiscesus6esou un 6tiragedu c_.blemodifierontlesperformances
du m6canismed'entraTnement.Lorsquevous tondezuneherbe haute
ou dpaisseou sur despentes,le m6canismed'entraTnementpeut
patiner.Si lem6canismed'entraTnementpatine,le r6giercommesuit ou
amenerlatondeusedans un centrederdparationagrdd.
miVtPORTANT:Avantde ddmarrerle moteur,actionnerplusieurslois le
levierd'arr_t moteur.S'assurerquele c_.bled'arr_t moteurse ddplace
librement.
Note: La conception du moteur n'inclut pas une commande des gaz ou
un r#glage de vitesse de rotation du moteuK Le moteur est r#gl# _ la
vitesse la mieux adapt6e pour la coupe flu gazon, le ramassage de
l'herbe et une longue dur#e de vie du moteur,
1. Si lem6canismed'entraTnementpatine,tourner letendeur de
rdgiagedu c_.ble(A, Figure 19)d'un tour dansla directionmon-
trde. Testerle mdcanismed'entraTnementet vdrifier s'iI patine
encore=
2. Si le m6canismed'entraTnementpatineencore,toumer letendeur
de r6giaged'un tour suppldmentairepourraccourcirle c_.ble.
Tester_.nouveaule m_canismed'entraTnement.
3. R6p6terle r_glageettester _.nouveaujusqug,ceque le m6can-
ismed'entraTnementnepatineplus.
4. Avantdecommencer_.tondre,s'assurer quele m6canismed'en-
traTnementse ddsengagecorrectementetque la tondeuses'arr_te.
Si le m6canismed'entraTnementnese ddsengagepas,amenerla
tondeusedans uncentrede rdparationagrddavantdefaire fonc-
tionner la tondeuse.
Figure19:Rdglagedu cdbled'entra_nement
15
Page 40

Maintenance (suite)
Entretien de la lame
AVERTISSEMENT:Avant dlnspecter la lame nuI'adap-
tateur de la lame, ddbrancherle fit de la bougie, Si la
lameheurteun ebjet, arr_ter le meteur. D_brancherle
ffl de la bnugie.V_rifierla tendeusepourtout dem-
mage.
V6rifierfr6quemment1'6tatdela lamepourtoute usureou dommagetel
quedesfissures.V6rifierfr6quemmentle boulon qui maintientla lame.
S'assurerque le boulonestserr6.Si la lameheurte un objet,arreter le
moteur.Debrancherlefil de labougie.VerifierI'etat deI'adaptateurde
la lame(A, Figure 20) pour tout domma% Verifiersi la lameest toro
dueouendommagee,presenteuneusureexcessiveoutout autredora=
mage.Avantd'utiliser la tondeuse,les piecesendommag6esdoivent
etreremplacdespardespiecesderechanged'usine. Parsecurit6,rein-
placerla lametous insdeuxans. Maintenirle bordde lalamebien
affOte.Unelamenon affOteeconduit _.uneextr6mit6d'herbequi
devientbrun_.tre.Deposerla lame commesuit.
D_pose de la lame
AVERTISSEiViENT:Avantde d_peserla tame, d_branch-
er le fil dela bnugie. La lame eempnrtedesherds
eeupants.Lotsde la manipuJatiende ta lame, _titiser
desgants eu des chiffons pour pret_ger yesmains.
1= Vidangerle reservoirde carburanL
2. Leverle c0tede latondeusequicomportele pot d'echappement
ou la bougie.
3. Utiliser un morceaude boispour empecherlalame de toumer.
4. Deposerle bouion (B, Figure 20}qui fixela lameavecunecle de
14mm (9/16").
5. Wrifier I'etatdela lame(C)en sere, rantaux instructions
"Entretiende lalameLRemplacerunelameexcessivementuseeou
.E
endommageeparunelamederechanged'usine.
6. Monterla lame avecles bords courbesverse carter Si la lame
estmontee_.I'envers,la lamenecouperapas correctementet
peutcauserunaccident.
7. Fixerla lameavecla rondelle(D} et le boulon d'origine.S'assurer
quela couronneextdrieuredela rondelle Bdlevilieestdirigeevers
la lame.
8. Serrerle boulon qui maintientla lame_.uncouple de41 N.m.
AVERTmSSEiViENT:Teulnurss'assurer quele bouien qui
maintient la lame estserr_. Unbeuinn desserr_ eu
unelame Hbre peutcauser unaeeident.
Figure 20: Ddpose de la lame
All,rage de la lame
1. Aff_ter la lamedeuxfois par an outoutes les 25 heures.
2. Si la lameestsur latondeuse,nepasI'affOter.Deposerla lame
seionins instructions "Deposedela lameL
3. Nettoyerla lameavecunebrosse,du savonet deI'eau.Verifier
I'etat dela lame. Recherchertoute fissure,entailleou autredom-
rlage. Rempiacerunelamequi est trop usee,tordue ou endom-
rlagee par unelame derechanged'usine.
4= AffOterlalame(A, Figure21, pageseivante) avecunelime (B}.
S'assurerquevous conservezlebord coupanten biseaud'origine.
5. S'assurerque la lameest equilibrde.Utiliseruntournevis (C}et
maintenirla lameparalleleau sol(D) comme montre.Unelame
qui estequilibreeva resterparalleleau sol.Si la lame n'estpas
equilibree,I'extremitdIourdeva basculervers le sol.AffOterI'ex-
tremitdIourdeiusqug,ceque la lamesoit equilibree.
6. Unelame neuvecoupera mieuxqu'unelameexcessivementusde.
Remplacerla vieillelametous ins deuxansparunelamede
rechanged'usine.
V_rification du niveau de ia coupe
Testerla tondeusesur unepetite surface.Si la hauteurdecoupe n'est
pasdeniveauousi I'herbecoupeen'est pasejectee,lacausepeutetre:
(1) unelametordue ou endommagee,(2) une lamenon affOtee,(3) une
lameusee,(4) ou unadaptateurdelame cassd=Avantd'utiliser la ton=
deuse,corriger le probleme=
Page 41

Maintenance (suite)
J L
Figure21:Afffitage dela lame
Prgparatioo de la tondeuse poor le remisage
AVERTISSEiVtENT:Ne passoutirer de ['essence _ ['in=
t_rJeurd'un b_timent,pros d"unfeu ouIorsquevous
fumez. Lesvapeursd'essencepeuvent conduire_ one
explosionou un [ncendie.
1. Vidangerle r6servoirde carburanL
2. Laisserle moteurtournerjusqu'_,cequ'il arrivea court decarbu-
rant.
3. VidangerI'huile pendantquele moteurest chau& Remplirle
carterd'huile moteuravecde I'huileneuve.
4. D6poserla bougiedu cyiindre,Verserenviron30 cm3 d'huile dans
le cylindre,Tirer lentementsur lapoign6edu lanceurdefa_on_.ce
queI'huiieprotegele cyiindre, Monterune bougieneuvedansle
cylindre,
5. D6barrasserlesaiiettes derefroidissementducylindreet lecarter
moteurdetoute saletdet ddbris,
6. Nettoyer[apartieinfdrieuredu carter moteur,
7. S'assurerque le bac_.herbeest bienvide.L'herbe restantedans
le bacpendantle remisagevaendommagerle bac,
8. _ettoyercomplStementlatondeusepour protdgerla peinture,
9. :_eplierles guidons(si souhaitd),
ATTENTION: Soyez prudent Iorsque vous pliez ou reievez ie guidon. Ne
pas endommager les c_.bJes.Un c_.blequi est tordu ne fonctionnera pas
correctement. Avant d'utiliser la tondeuse, remplacer un c_.bJetordu ou
endommag6.
10. [acerla tondeusedansunb_.timentbienventild.
17
Page 42

Recherchedes pannes
Le moteur ne d_marre pas.
1= S'assurerque le r6servoirdecarburantest rempii avecde I'essencepropre. Nepasutiliser deI'essenceancienne=
2. Si lemoteurest froid, appuyersur le boutond'amor£age(en option sur certainsmod_les).Pourle hombrede pressionsn_cessaire_.exercer
sur le bouton,se reporterauxinstructions du fabricantde moteur=
3. S'assurerque lefil de la bougieest bienconnectd_.labougie.
4. R6glerle carburateur.Se rdfdrerau manueldu moteur.
5. II y trop d'essencedansle cylindre moteur.Ddposeret sdcherla bougie.Tirerplusieurslois sur la poign_edu lanceur.Brancherlefil sur la
bougie.Ddmarrerle moteur.
6= Le moteurest difficile _.ddmarrerdansdeI'herbehauteou 6paisse.Ddpiacerla tondeusevers unesurfacepropreet seche=
7. S'assurerque le levierd'arret moteurest enposition defonctionnement=
8= S'assurerque le robinet decarburantse trouve sur la position ON=Serefererau manueldu moteur=
Le motear ne s'arrete pas.
1= Rei_.cherle levierd'arretmoteur=
2= Verifierle c_.bled'arret moteur=Remplacerle c_.blesi ceiui=ciesttordu ou endommage=
Les performancesdu moteur sent m_dioeres.
1= Verifierles reglagesdela hauteurdecoupe=Releverla hauteurde coupesi I'herbeest haute.
2. Verifierla partie inferieureducarter dela lame=Debarrasserle carter dela lamede toute herbeet autresdebris.
3= Verifierle fil dela bougie=S'assurer quele fil est bienconnecte=
4= Debarrasserlesailettes derefroidissementdu moteurde toute herbeet autresdebris.
5= Verifierles reglagesdu carburateur=Serderer au manueldu moteur.
6= Verifierle jeuentre electrodesdela bougie=Reglercejeu_.0,75 ram=
7. Verifierla quantited'huiledans le moteur=FaireI'appointsi necessaire.
8= Verifierle filtre _.airdu moteur.Serderer aumanueldu moteur=
9= L'essenceest de mauvaisequalite=Vidangeretnettoyerle reservoirde carburanLRemplir le reservoirdecarburant avecde I'essencepropre=
Vibrationsexeessives.
1= Deposerla lame=Verifier la lameet I'equilibrer si necessaire=Sereporterauxinstructionsdemaintenancedela lame=
2. Verifiersi la lameesttordue ou cassee=Une lame eedemmag_eest daegereuseet deit _tre remplae_e.
3= VerifierI'etat deI'adaptateurde lalame.Remptacerue adaptateurdRlame cass_.
4= Si lesvibrations persistent,amenerlatondeusedartsun centrede reparationagree=
L'herbene s'6ieete pas eerreetement,
1= Nettoyerle dessousdu carterde latondeuse.
2= Verifiersi la lameest excessivementusee=Deposeret affOterlalame.Parsecurite,remplacerla lametousles deuxans parune lamede
rechanged'usine=
L'herbe n'est pas cenp6e nniferm_ment.
1= Verifierle regiagede hauteurde coupe_.chaqueroue. Le reglagedehauteurdolt etrele meme_.chaqueroue=
2. S'assurerque la lameest bienaffOtee=
3= Verifiersi la lameest tordue ou cassee,nee lame eedemmag_eest daegereuseet deit _tre re.platte.
CL_
C_
4= Verifiersi I'adaptateurdelameestcasse=Re.placer _e adaptate_rdR_amecass_.
Page 43

GARANTIE LIMITEE
Si une pi#ce de cet _quipement pr6sente un vice de materiau ou de fabrication, Briggs & Stratton Power Products Group,
LLC la reparera ou la remplacera gratuitement. Si une piece du moteur Bdggs and Stratton (si _quip6) pr6sente un vice de
mat_riau ou de fabrication, Bdggs & Stratton Corporation ta r#parera ou ta remptacera gratuitemenL Les frais de transport du
produit a r_parer ou remplacer seront, darts te cadre de cette garantie, regl6s par l'acheteur. Cette garantie est en vigueur pour
les periodes de temps et conform_ment aux conditions stipul_es ci-dessous. Pour obtenir te service de garantie, veuiItez vous
adresser au distributeur autoris_ te plus proche dont vous trouverez tes coordonnees sur www.BdggsandStratton.com ou
www.Murray.com.
It n'existe aucune autre garantie expresse. Les garanties implicites, y compds cetles de quatit# marchande et d'adaptation
un emptoi particulier, sont limit_es a une ann6e a partir de ta date d'acquisition ou conformement ace qui est pr#vu par ta toi.
La responsabitit# juridique pour tes dommages cons_cutifs ou indirects est exctuse dans ta mesure oQ l'exctusion est autoris_e
par [a toi.
Certains Etats ou pays ne permettent pastes limitations de dur_e de ta garantie implicite. Certains Etats ou pays n'autorisent
pas t'exctusion ou la limitation des dommages cons6cutifs ou indirects. Dans ce cas, ta limitation ci-dessus ne s'apptique pas
votre cas. La pr_sente garantie vous offre des droits juridiques sp_cifiques et il se peut que vous ayez d'autres droits qui
varient d'une juridiction a une autre, ou de pays a pays.
La garantie commence a ta
tong de ta p_riode indiqu6e ci-dessus. <<
au d_tai[ dans un but priv6. <<
g_neratrices de revenus ou locatives. Une foi_que
d'uti[isation commerciate dans [e cadre de cette g_
Aucun enregistrement de ta garantie n'est n_c_
garder te re£;ude votre achaL Si vous ne pouvez pas
ta garantie, ta date de fabrication du produit sera
ateur au d_tait ou commercial final, et continue tout au
)at [e con_ signifie que [e produit sera utitis6 par un consommateur
>>indique to_ _les au$_s uti[isations possibles, y compris commerciates,
_duita t_ [is_ d Sun but commercial, i[ sera consid_re comme
,i[ta gara ie d:_ £roduits de marque Bdggs & Stratton. Veuittez
reuve de t'_h_i a8 _oment de faire une demande se rapportant
,_.rt'admi_Sibitit_ a ta garantie.
Nous sommes totalement disponibles & r6aliser des r6parations d_ I_ la garantie et nous nous prions d'accepter
no excuses anticipees pour tes d6sagr6ments 6ventuets. Le service d_ est offert uniquement par t'interm6diaire des
distributeurs autoris6s par Briggs & Stratton ou BSPPG, LLC.
Parfois tes demandes de r6parations dans te cadre de ta garantie peuvent
uniquement tes vices de mat6dau ou de fabrication. Elte ne couvre pas des do[
abus, un mauvais entretien ou une r6paration incorrecte, une usure normate ou
)ertinentes. Cette garantie couvre
caus6s par une mauvaise utilisation ou des
de carburant vici6 ou non approuv6.
Bauvaise utHisation et abus - Une bonne utitisation, tetle que pr6vue, du produit est decrite dans te manuel de t'op6rateur.
L'utilisation de ta machine de fa£;on autre que cette d6cdte dans te manuel de t'op6rateur ou son utitisation apr6s qu'ette ait 6t6
endommag6e annulera ta garantie. Vous ne pourrez vous pr6valoir de ta garantie si te num6ro de s6rie sur ta machine a 6t6
supprim6 ou si ta machine a 6t6 modifiee d'une mani6re quetconque, ou si ette pr6sente des preuves d'abus, tel que coups,
corrosion par I'eau ou des produits chimiques.
Bauvais entretien ou r_paration - Cette machine doit 6tre entretenue conform6ment aux proc6dures et aux intervalles indiqu6s
dans te manuel de t'op6rateur, t'entretien et les r6parations doivent 6tre effectu6s avec des pi6ces d'origine Bdggs & Stratton. Les
dommages caus6s par un manque d'entretien ou t'utitisation de pi6ces n'6tant pas d'origine ne sont pas couverts par ta garantie.
Usure norrnale - Comme tous tes appareits m6caniques, malgr6 un bon entretien, te v6tre est sujet a une usure. La pr6sente
garantie ne couvre pastes reparations torsque ta duree de vie de ta machine s'est achev6e apr6s une utitisation normale.
Les articles d'entretien et d'usure, tets que fiItres, courroies, lames et plaquettes de freins (les plaquettes de frein moteur sont
couvertes) ne sont pas couverts par ta garantie, uniquement en raison de teur caract6ristique d'usure, a moins que ta cause soit
due a des vices du mat6riet ou de fabrication.
Carburant vici_ - Afin de fonctionner correctement, cette machine doit 6tre aliment6e avec un carburant propre conforme au
crit6re pr6cis6 dans te manuel de t'op6rateur. Les dommages causes par un carburant vici6 (fuites de carburant, conduites
bouch6es, soupapes coIlantes, etc.) ne sont pas couverts par ta garantie.
* Concerne Ies moteurs Bdggs and Stratton seulement. La couverture pour Ies moteurs autres que Bdggs and Stratton est offerte par Ie fabricant
du moteur.
19
_J
Page 44

Page 45

CONSEILSPOURUTILISATIONSURPENTF
t_
o
®m
_m
t
®m
i
i
Faitestr_sattentionen permanenceet 6viteziesvirageset man_uvreshrusques,guiVeziesautresinstructionsde cemanuelpou_"[as6curit_pendaniia tontesur
pentes.Utiiisezunetondeuseautoport6eenmontantoudescendantla pente,jamaisentravers. Parcentreavecunetondeuseautoport6e,travaiiiezen montantou
descendantia pente,jamaisentravers. Soyezparticuii_rementattentifquandv0ustravaiiiezsur ou prosde pentesetobstructions.
Page 46

Page 47

23
Page 48

®
Caract_ristiques du produit
Tailledu plateaude coupe(cm)
Hauteurdecoupe(cm)
Typedetransmission
(seulementpourmodOlesautotract#s
Vitessede d@lacement(km/h)
(seulementpourmodOlesautotract#s
Puissancemoteur (ch)
Cylindr6emoteur(c_)
Contenancedu rdservoirde carburant (t_
Pi_ces de rechange cosrantes
C_.bledecommandedelame(seulementM2255FC):::....
C_.bledecommandedelame(seulementMP2265FC)
C_.bled'entraTnementdes roues(seulementMP2265FC)
Lamedecoupe(tousmodOles)
Courroied'entraTnement(modOlesautotract_s):
Puissanceth_orique: Lapuissanceth_orique brutepour chaquemoduledemoteur_.essenceest indiqudeconform6ment_.lanormeJ1940 (proc6-
dure decalculde la puissanceet du coupledespetits moteurs)de laSAE(Societyof AutomotiveEngineers)et lesperformancesth_oriquesont dtd
obtenueset corrigdesselonSAEJ1995 (r6vision2002-05). Lesvaleursdecouple sont ddfinies_.3 060tr/min et les
vaieursde puissancesont ddfinies_.3600 tr/min. Lesvaleursnettes depuissancesont6tabliesavecI'dchappementet le filtre_.air installds
tandisquelesvaieurs brutesdepuissancesont d6finiessanscesaccessoires.Lapuissancebrute r6elledu moteurserasup_rieure_.lapuissance
netteet est influenc_enotammentpar lesconditions ambiantesdefonctionnementet lesvariations d'un moteur_.I'autre.Comptetenu
dela grandevari_tdde machinessurlesquellesnosmoteurssont utilis6s,il se peut que le moteur_.essenceneddveloppepassapuissance
bruteth_orique unefois qu'il est montdsur unemachineparticuli_re.Cettediffdrences'expiiqueparun grandhombredefacteurs,tels que
(liste non limitative), lesaccessoires(filtre _.air,6chappement,admission, refroidissement,carburateur,pompe_.essence,etc.),les limites
d'utilisation,les conditionsambiantesd'utilisation (temp6rature,humiditd,altitude) et lesvariationsd'un moteur_.I'autre.Pour desraisons
defabricationet decapacitdlimitdes,Briggs & Strattonestsusceptiblederempiacerun moteurpar uneversion pluspuissantepour ces
moteursdesdrie.
i_12255F0
56
3,8 - 8,9
N/A
N/A
55
158
1.0
PartNsmber
7101330
7101862
7101858
7100851
7101193
MP2265FC
56
3,8 - 8,9
BoTte1
vitesse
3,7
6,5
190
1,6
24 WWW,mlJ rra_J,coin
 Loading...