

Page 1

Information Server Kit
IS-100
User’s Guide
for
MFX-2500
MFX-2530
Page 2

Muratec America, Inc.
6400 International Parkway, Suite 1500
Plano, Texas 75093-8218
http://www.muratec.com
Muratec (UK), Ltd.
Tempus Court Onslow Street
Guildford, Surrey GU1 4SS
http://www.muratec.co.uk
MAI ItemMasterNo:OMIS100KIT
© 2001 Murata Machinery, Ltd.
Printed in Japan
D90-90120-60
Page 3

i
Introduction
Thank you for purchasing Muratec’s Information Server Kit IS-100.
This manual describes the operation procedures of the fax main unit, as well as the
procedures for registration and adjusting the settings on your PC. Please read this
manual carefully before starting the operation. For details of the fax main unit
operations, please refer to the operation manual that comes with the fax main unit.
This manual presupposes that its reader understands the basic operation and
concepts of PC’s, operating systems, networks and application software. Please refer
to each manual respectively for details of operation.
Warning
Only your authorized Muratec dealer should install the IS-100 main
unit.
Do not perform this installation yourself. Otherwise electric shock
or machine failure may result.
Registered trademarks and trademarks
Windows
®
95, Windows®98, Windows NT®, Windows®Millennium Edition and Windows
®
2000 are the registered trademarks of Microsoft Corporation, USA, in the U.S. and other
countries.
Screen copies in this manual are shown under permission of Microsoft Corporation, USA.
IBM, OS/2, NuOffice are the registered trademarks of IBM Corp., USA, in the U.S. and
other countries.
Salutation is the registered trademark of Salutation Consortium, Inc.
All other brand names and product names used in this manual are trade names,
trademarks or registered trademarks of their respective owners.
Page 4
ii
Major features of IS-100
Internet fax transmission
Paper documents, such as hand-written letters, can be transmitted by e-mail using
the existing e-mail environment just like sending a fax. All you have to do is load the
original and designate the recipient’s e-mail address using a one-touch key or speed
dialing.
Scanned data from the original is sent by e-mail as an image data attachment.
Internet fax reception
E-mail messages are received from a POP server or SMTP server after checking the
mailbox, with preset time intervals for automatic printout.
PC-FAX transmission
When the recipient’s e-mail environment is unavailable, a document prepared by
Windows applications (quotation or chart) can be sent to the recipient’s fax machine
directly from a PC.
PC-FAX reception
The received fax document can be transferred to a PC and stored as electronic data to
save labors in filing or stocking. Hardcopy output can be made only for necessary
documents to save paper. It is also possible to order individual transfer to a PC
designated by a key with F-code or the sender’s number.
Data
Fax
PC
Data
Fax
PC
Incoming e-mail
P
r
i
n
t
o
u
t
Outgoing e-mail
Original
document
Page 5
iii
Network scanner function
Up to A3 size original and book original can be scanned at high-speed by simple
operation.
Scanned document data is saved in the designated folder on a PC, efficiently
converting paper-based information into electronic data. A data file can be shared in
any work place for effective utilization, promoting the fusion of conventional paperbased information with electronic documents.
Network printer function
With its network capability, the printer can be used as a shared printer for PCs on the
LAN without the need for a printer server. Any document prepared by application
software can be printed out with high quality 600 dpi resolution.
Network management tools
With the use of a Web browser, a PC can perform such operations as Information
Server settings,display of transmission/reception history of e-mails and faxes,as well
as registration of one-touch dial.
PC
E-mail transmission/
reception history
Fax transmission/
reception history
One-touch dial setting
Speed dial setting
P
r
i
n
t
o
u
t
Data
PC
Data
PC
Original
document
Page 6
iv
Fax main unit operation panel
FAX key
Numeric keys
One-touch keys
Cursor keys
MENU key
STOP key
NEXT key
START key
Page 7

v
Contents
Introduction.......................................................................................................................i
Major features of IS-100 .................................................................................................ii
Fax main unit operation panel ......................................................................................iv
Contents ...........................................................................................................................v
Chapter 1 Before use
Safety precautions ................................................................................................2
Functional expansion ...........................................................................................3
Time zone ..................................................................................................3
Functional expansion ...............................................................................3
Fax main unit setup .............................................................................................4
Time zone setting ......................................................................................4
IP address setting .....................................................................................5
IP address check .......................................................................................8
‘Web Manager’ setup ..........................................................................................10
What is ‘Web Manager’? .........................................................................10
Startup of ‘Web Manager’ .......................................................................10
Descriptions of ‘Web Manager’ ...............................................................12
Chapter 2 System configuration
Registration procedures .....................................................................................18
Administrator registration ................................................................................19
What is administrator registration? ......................................................19
Registration of administrator information ............................................20
Installation information registration ................................................................23
What is installation information registration? .....................................23
Installation information registration ....................................................23
Network setting ..................................................................................................25
What is network setting? .......................................................................25
Network setting ......................................................................................25
E-mail environment setting ...............................................................................28
What is E-mail environment setting? ...................................................28
E-mail environment setting ...................................................................28
User registration ................................................................................................33
What is User registration? .....................................................................33
User registration .....................................................................................33
Page 8

vi
Chapter 3 Useful functions
One-touch dial setting ........................................................................................40
What is One-touch dial setting? ............................................................40
One-touch dial registration ....................................................................40
Speed dial registration .......................................................................................44
What is Speed dial registration? ............................................................44
Speed dial registration ...........................................................................44
Received fax forwarding ....................................................................................47
What is Received fax forwarding? .........................................................47
Setting of Received fax forwarding ........................................................48
Exceptions Handling ..............................................................................51
Individual fax forwarding ..................................................................................54
What is Individual fax forwarding? .......................................................54
Setting of Individual fax forwarding .....................................................55
Chapter 4 Device management
Device information check ...................................................................................60
Device information check .......................................................................60
Fax communication log check ............................................................................63
Fax transmission (reception) history check ..........................................63
Mail communication history check ...................................................................65
Mail transmission history check ............................................................65
Mail reception history check ..................................................................67
Scheduled communication check .......................................................................69
Scheduled communication check ...........................................................69
Print job check ....................................................................................................71
Print job check ........................................................................................71
Chapter 5 Troubleshooting guide
Troubleshooting guide .......................................................................................74
Printed message .......................................................................................74
Error message display.............................................................................76
Others.......................................................................................................76
Page 9

vii
Chapter 6 Linkage with other systems
SNMP Agent .......................................................................................................80
Outline of SNMP .....................................................................................80
SNMP agent setting ...............................................................................81
Salutation commands list ..................................................................................84
‘Fax Data’-related commands ..................................................................84
‘Print’-related commands.........................................................................86
Main specifications ........................................................................................................87
Index ...............................................................................................................................89
If problems arise ............................................................................................................91
Page 10

viii
Page 11

Chapter 1
Before use
Safety precautions...................................................................2
Functional expansion..............................................................3
Fax main unit setup ................................................................4
‘Web Manager’ setup.............................................................10
Page 12
Do not place anything on the
equipment that contains water or
chemical drugs.
Do not place articles on the equipment
such as flower vases, potted plants,
beverage cups, cosmetics, containers of
chemical drugs or water, or small
metallic articles. These substances,
once overturned and dropped inside of
the equipment, may cause fire or
electric shock.
Chapter 1 Before use
2
Safety precautions
● Please read “Safety precautions” in the operation manual of the fax main unit.
● The following notations are used to alert the user to harm or damage that could result from
mishandling due to negligence of precautions.
Warning
This notation alerts the user to the potential for serious injury or
death.
Caution
This notation alerts the user to the potential for bodily harm or
damage to hardware.
● The following symbols are used to distinguish the types of alerts. (Shown below are the
examples.)
This symbol indicates warning or caution. The illustration will give a
concrete description.
This symbol indicates the prohibition in handling. The illustration will give
a concrete description.
This symbol indicates the mandatory handling. The illustration will give a
concrete description.
Never attempt to disassemble,
repair or modify the equipment.
It may cause electric shock or machine
failure. Request repairs from the
Customer Information Center.
When any of the following occurs,
stop operation immediately,
unplug the power cable of the fax
main unit from the power outlet,
and call our Information Center.
◆ Smoke generation or unusually
heated machine housing
◆ Abnormal noise
Never attempt anything other
than what is specified in this
manual.
It may cause unexpected accidents or
machine failure.
Warning
Caution
Page 13

Chapter 1 Before use
3
1
Functional expansion
Functions added to the fax main unit by IS-100.
Time zone
‘Time Zone’ setting is added to the ‘Initial setting’ by pressing MENU, I.
The time zone is required as part of the E-mail header information when sending
Internet faxes.
Functional expansion
‘Net Func’ is additionally shown.
Settings for the network environment and scanning are enabled.
‘Net Func’ setting includes the following three items.
‘A. Server Settings’
‘B. User Settings’
‘C. Mail priority setup’
Page 14
Chapter 1 Before use
4
Fax main unit setup
Time zone and IP address settings are needed to operate this equipment over the
network.
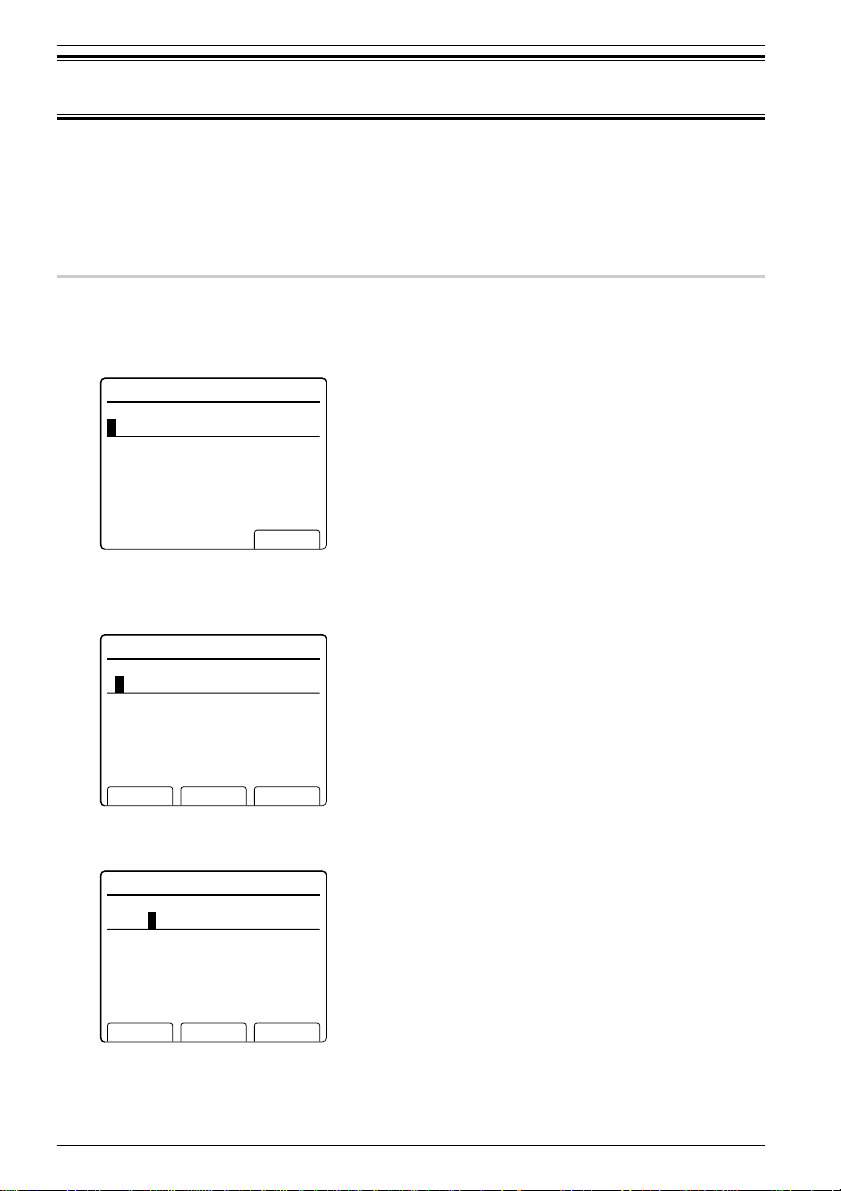
Time zone setting
1 Press the FAX key to call the fax screen.
2 Press the MENU key, One-touch key I, and then the [Enter] key, in that order.
3 Press [Enter] key twice.
The machine asks you to enter your time zone.
4 Enter your Time Zone using the numeric keys.
Example of Time Zones in United States and Canada
:
GMT +10:00 Guam
GMT --11:00 Midway Island
GMT --10:00 Hawaii
GMT --09:00 Alaska
GMT --08:00 Pacific Time (US & Canada)
GMT --07:00 Mountain Time (US & Canada)
GMT --06:00 Central Time (US & Canada)
GMT --05:00 Eastern Time (US & Canada)
GMT --04:00 Atlantic Time (Canada)
GMT --03:30 Newfoundland
I.UserInstall
Entertimezone
‑06:00
Enter
+--
I.UserInstall
Entertimezone
‑06:00
Enter
+--
I.UserInstall
Entercurrenttime.
200108/1017:30
Enter
Page 15
Chapter 1 Before use
5
1
5 Press [Enter] key to save the setting.
6 Press the RESET key to exit the User Install mode.
IP address setting
1 On the copier standby screen or fax standby screen, press the NEXT key
continually until the following screens appear.
Copier standby screen Fax standby screen
2 Press [Net Func] key, and then the MENU key.
AdvancedScan
Usecursortoselect
item.
B.UserSettings
C.Mailprioritysetup
Enter
A.ServerSettings
FaxReady
Aug30200117:00
NetFuncMailAdr#OfPages
FaxReadyMemory100%
CopyReady
NetFuncChg.Ppr.
1
Set
100%Ppr.Auto
I.UserInstall
Enteryourfaxnumber.
123‑456‑7890
ClearEnter
--
Page 16
Chapter 1 Before use
6
3 Select “A. Server Settings” using cursor key. Then press [Enter] key.
4 Select “01. IP Address Setting” using cursor key. Then press [Enter] key.
5 Select “IP Address” using cursor key. Then press [Enter] key.
6 Enter the IP Address using the numeric keypad. Then press [Enter] key.
* Entry is allowed to be up to 12 digits.
* To enter numbers less than 2 digits between the dots, use the cursor key to
move the entry point.
* To correct a wrong number entry ,move the cursor with the cursor key and press
[Clear] key to correct, or overwrite it.
IPAddressSetting
Usecursortoselect
item.
SubnetMask:255.255.255.0
ExitEnter
IPAddress:192.168.1.13
IPAddressSetting
EnterIPaddress.
192.168.1.13
SubnetMask:255.255.255.0
ClearEnter
IPAddressSetting
Usecursortoselect
item.
SubnetMask:255.255.255.0
ExitEnter
IPAddress:192.168.1.13
ServerSettings
Usecursortoselect
item.
02.MACaddressdisplay
Enter
01.IPAddressSetting
Page 17

Chapter 1 Before use
7
1
7 Set the “ SubnetMask” in the same procedure as the “IP Address Setting”.
8 Press the [Exit] key,the RESET key.Then power OFF/ON to reflect the settings.
IPAddressSetting
Usecursortoselect
item.
SubnetMask:255.255.255.0
ExitEnter
IPAddress:192.168.1.13
Page 18
Chapter 1 Before use
8
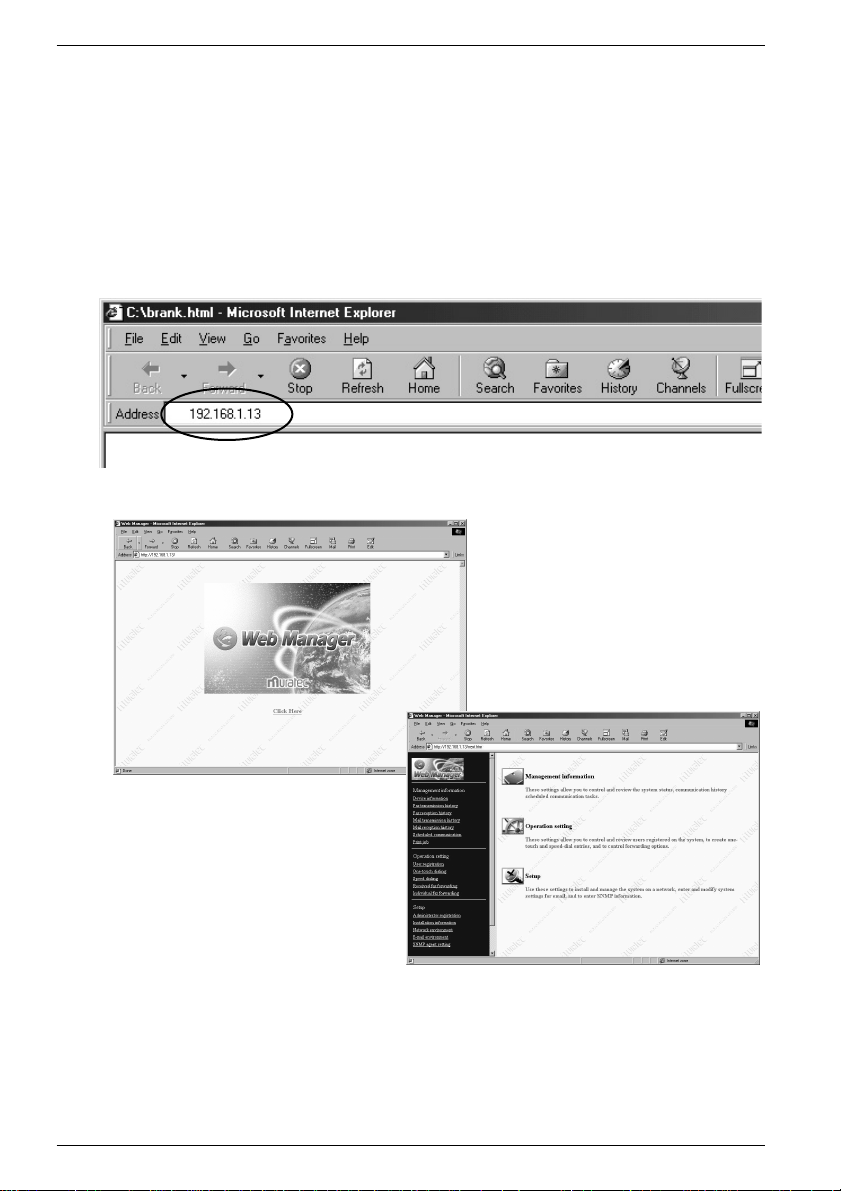
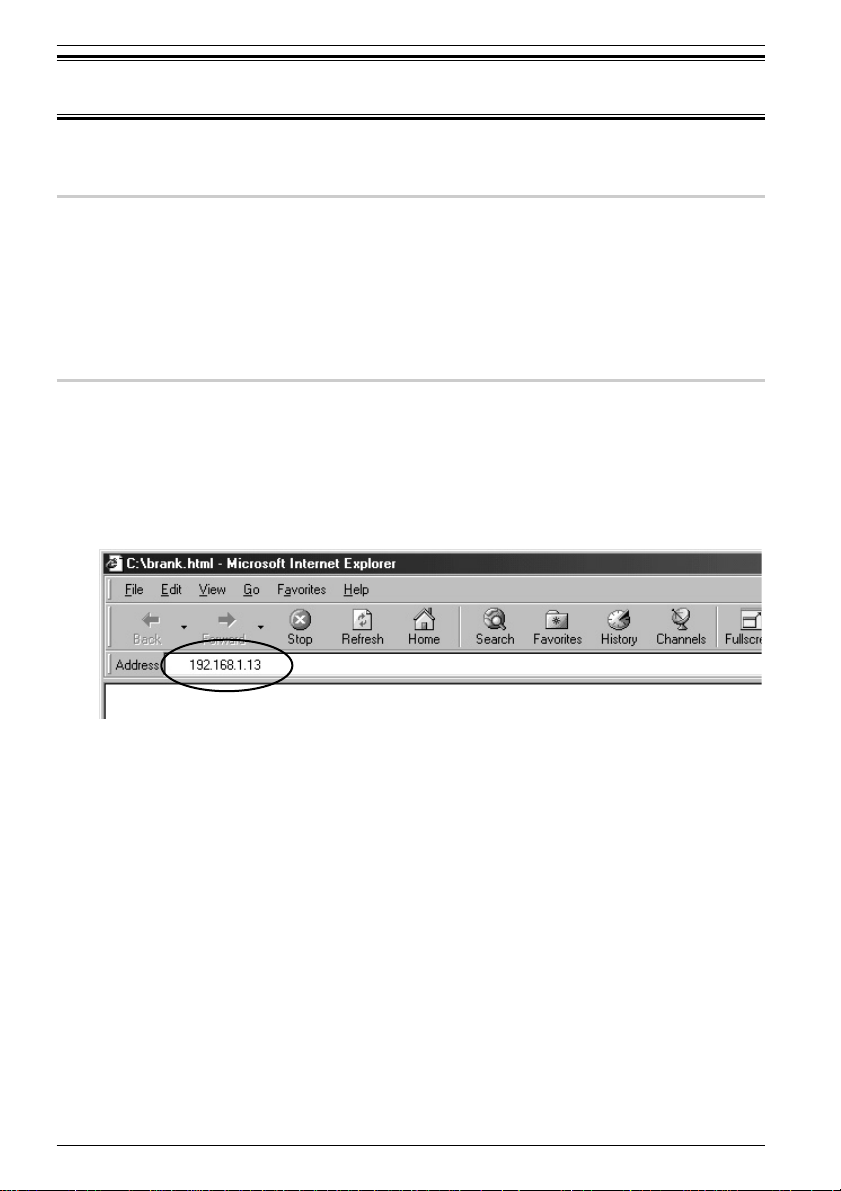
IP address check
It is possible to check the settings made in ‘IP Address Setting’ (p.5).
1 Start ‘Internet Explorer’ (4.0 or later) or ‘Netscape Communicator’ (4.5 or
later).
* Use the latest browser version possible.
Some old versions may not produce the correct display.
2 Enter the IP address in the address box, and press the <Enter> key.
* The ‘Web Manager’ startup screen appears followed by the ‘Web Manager’
initial screen.
If the ‘Web Manager’ screen does not appear
Double-check the IP address in ‘IP Address Setting’ (p.5), and carry out power
OFF/ON of the fax main unit to restart.
A while later …
Page 19
Chapter 1 Before use
9
1
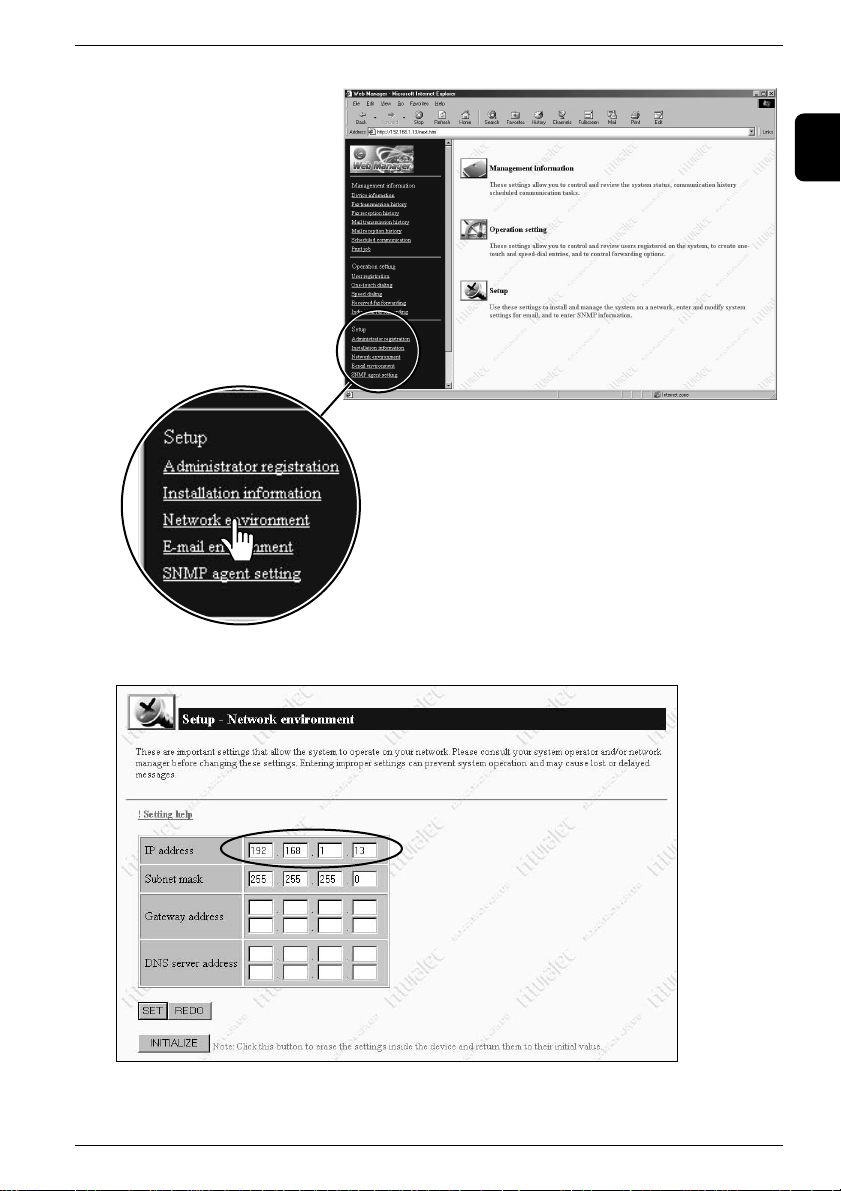
3 Click [Network environment] under [Setup].
4 Check if the IP address shown is correct.
* If the IP address shown is not correct, double-check the IP address in ‘IP
Address Setting’ (p.5), and carry out power OFF/ON of the fax main unit to
restart.
Page 20
Chapter 1 Before use
10
‘Web Manager’ setup
What is ‘Web Manager’?
‘Web Manager’ is the program that enables adjustment of settings and registration
of this device with a Web browser.
In addition to adjusting settings and registration, ‘Web Manager’ enables the
management and browsing of the device information.
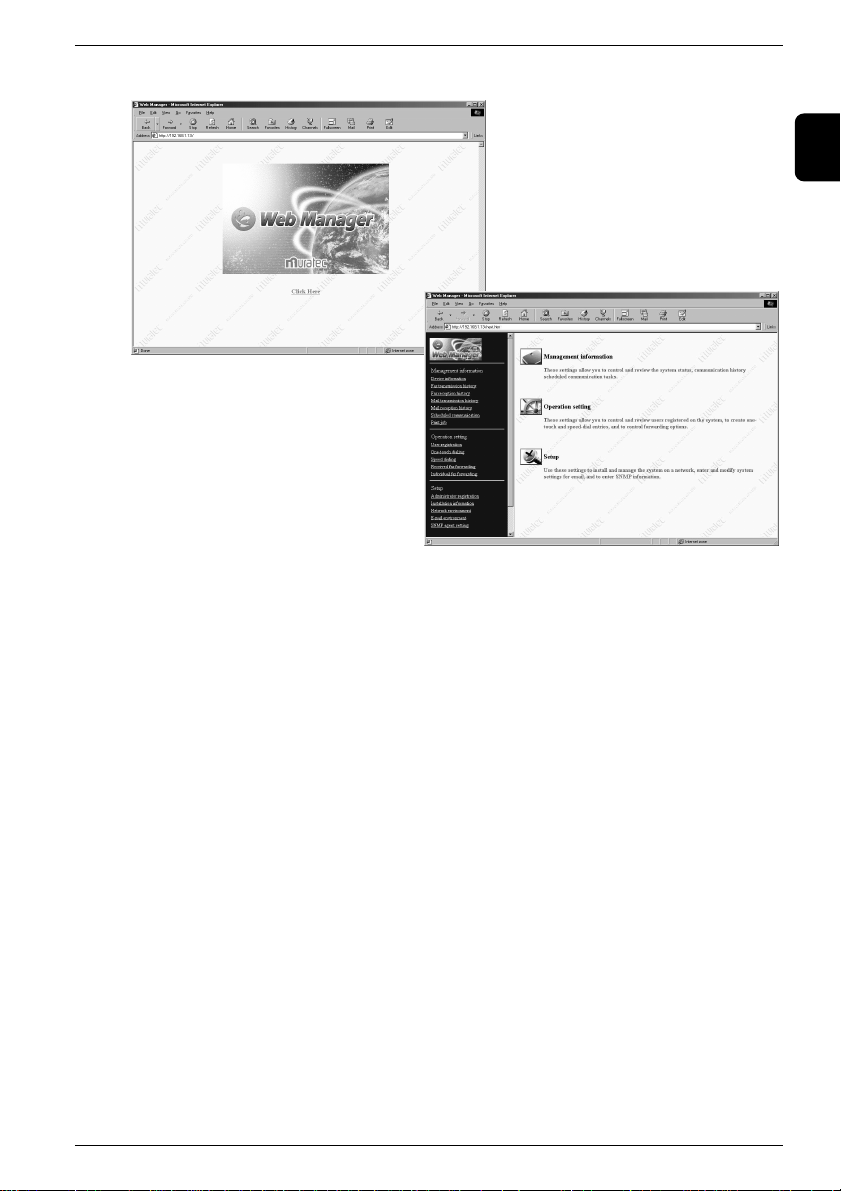
Startup of ‘Web Manager’
1 Start ‘Internet Explorer’ (4.0 or later) or ‘Netscape Communicator’ (4.5 or
later).
* Use the latest browser version possible.
Some old versions may not produce the correct display.
2 Enter the IP address in the address box, and press the <Enter> key.
Page 21
Chapter 1 Before use
11
1
* The ‘Web Manager’ startup screen appears followed by the ‘Web Manager’
initial screen follows.
If the ‘Web Manager’ screen does not appear
Double-check the IP address in ‘IP Address Setting’ (p.5), and press power
OFF/ON of the fax main unit to restart.
A while later …
Page 22
Chapter 1 Before use
12
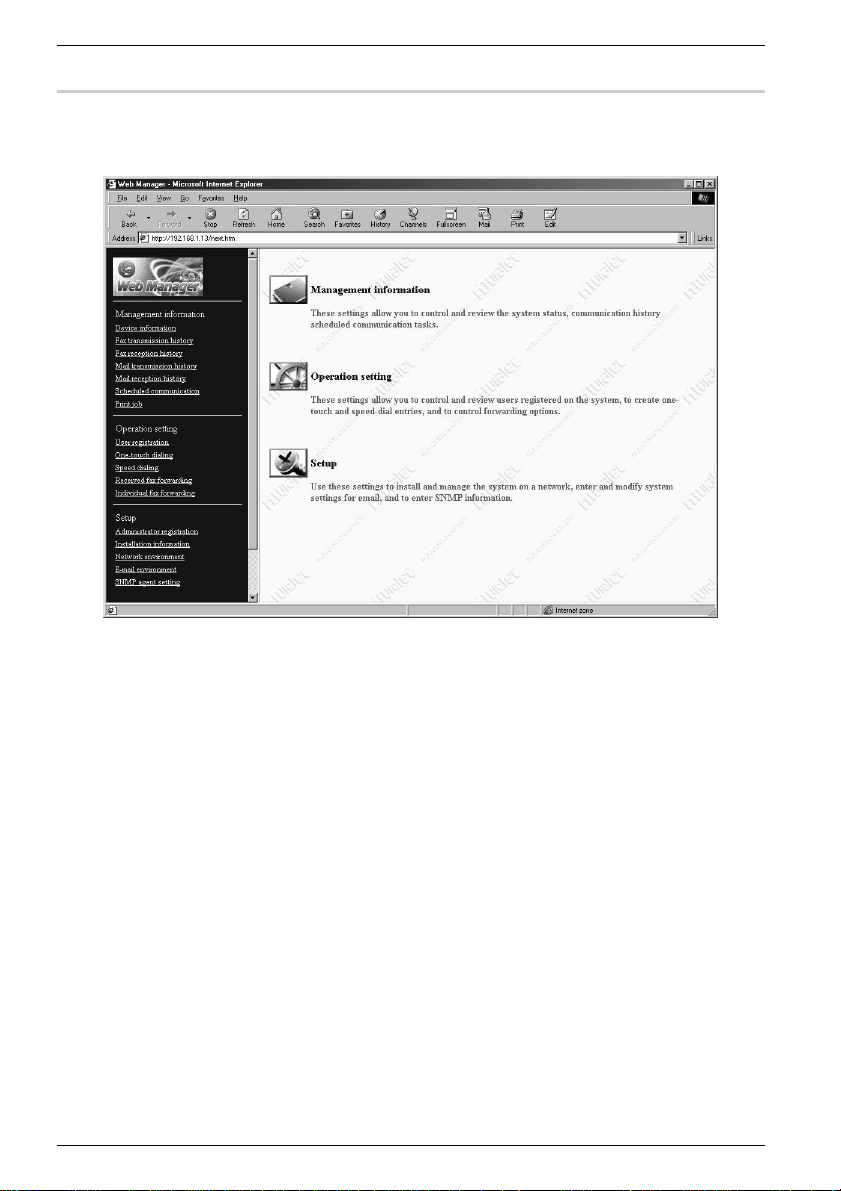
Descriptions of ‘Web Manager’
The following sections are item-by-item descriptions of ‘Web Manager’.
Page 23
Chapter 1 Before use
13
1
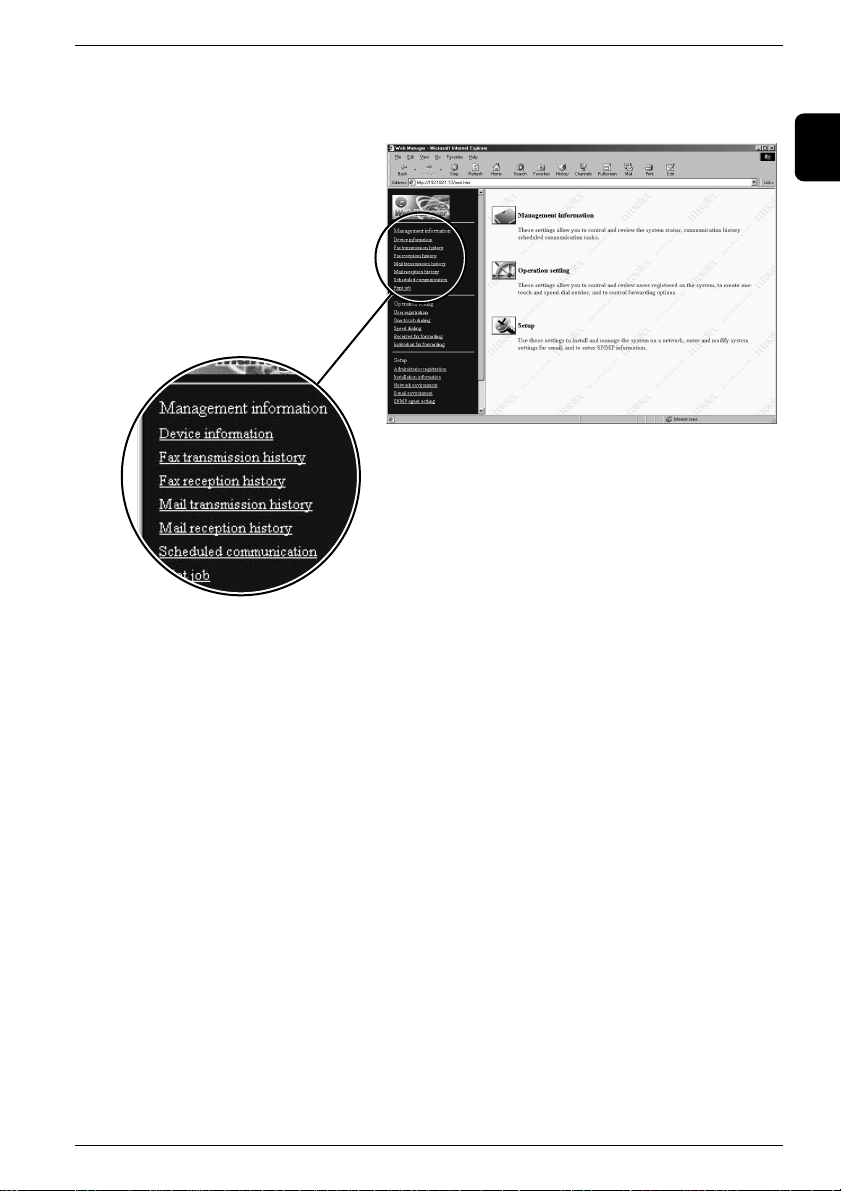
Management information
Information can be displayed to enable management of the device’s status,
management of the communication log, confirmation or deletion of jobs, and
other procedures.
Device information
Device information (Device name, Installation location, System options)
Device status (Speed and transmission system of network connection, telephone line
status, scanner status, printer status, Unit name, Setting, paper remaining, Media
in manual feed tray and cassette 1)
(Device information displays the data entered in [Installation information] under [Setup].)
Fax transmission history
Displays history of fax transmission
Fax reception history
Displays history of fax reception
Mail transmission history
Displays history of sent e-mail items
Mail reception history
Displays history of received e-mail items
Scheduled communication
Displays fax transmission jobs requested from client PC’s
It is also possible to cancel any job if desired.
Print job
Displays ongoing print jobs, as well as the jobs that are spooling or waiting.
It is also possible to cancel any job if desired.
Page 24
Chapter 1 Before use
14
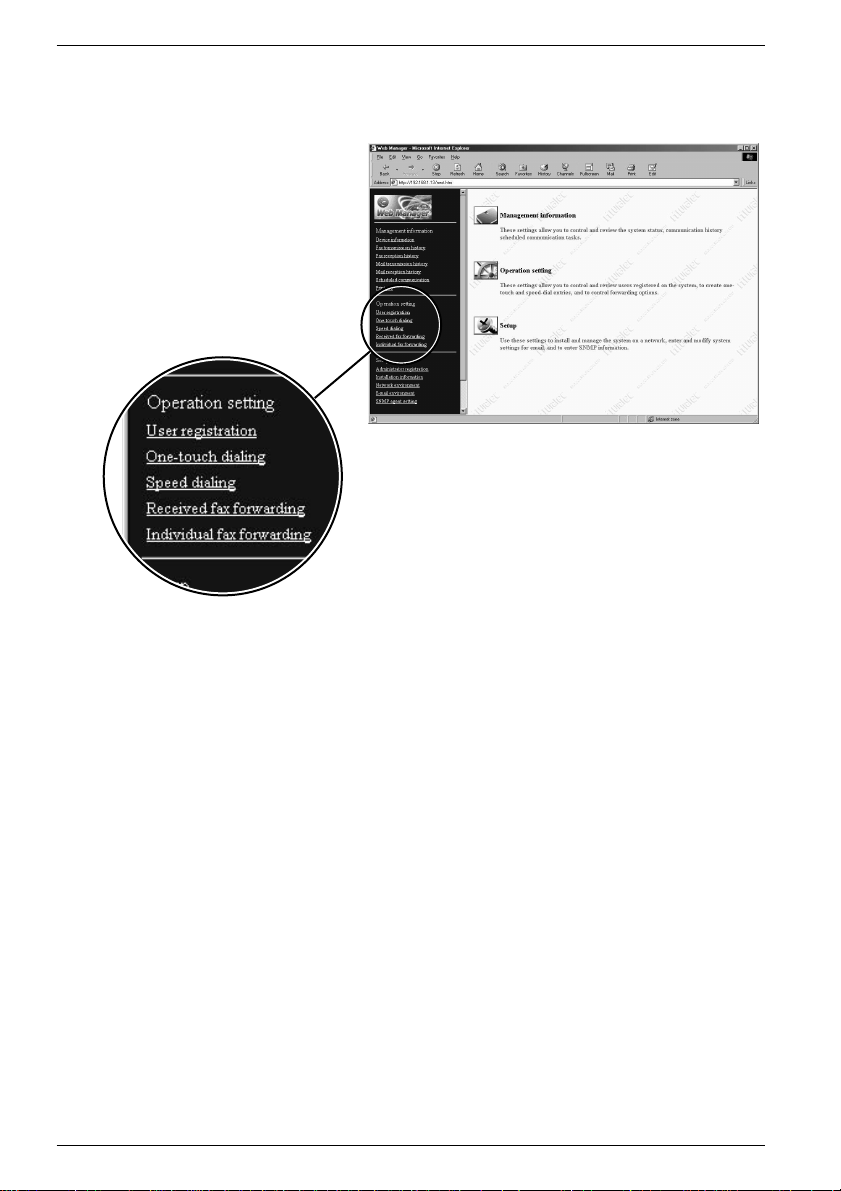
Operation setting
Settings of routine functions can be done,such as User registration, Received fax
forwarding, and One-touch dial and Speed dial settings.
User registration
Enables new user registration, deletion and editing of user data
One-touch dialing
Enables registration, deletion and editing of one-touch dial
Speed dialing
Enables registration, deletion and editing of speed dial
Received fax forwarding
Enables forwarding of a received fax to each user
Individual fax forwarding
Enables further forwarding of the fax that was delivered by received fax forwarding
Page 25

Chapter 1 Before use
15
1
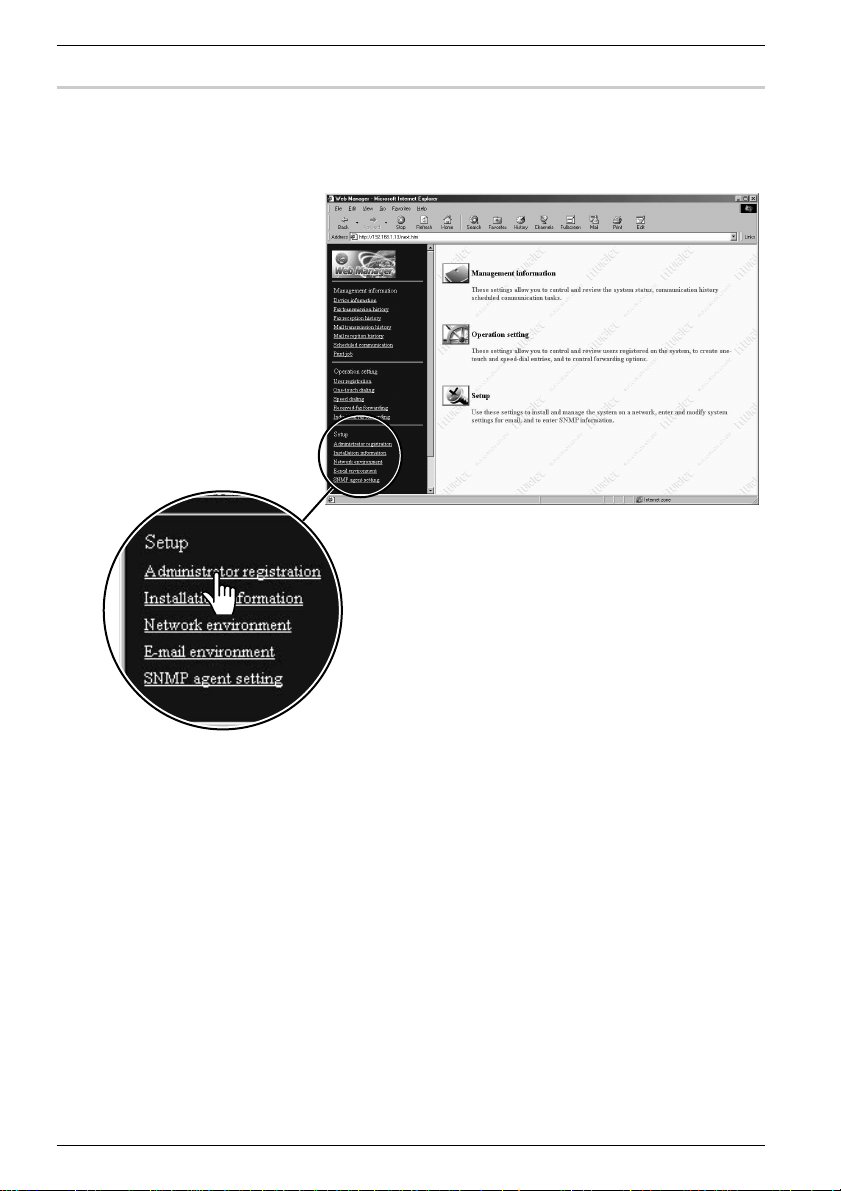
Setup
Setup settings such as Administrator registration and Network environment
settings can be changed.
Administrator registration
Enables registration of an administrator
Installation information
Enables registration of device information
Network environment
Enables establishment of a network connection
E-mail environment
Enables establishment of e-mail transmission and reception
SNMP agent setting
Enables management of this device using SNMP software
Page 26

Chapter 1 Before use
16
Page 27

Chapter 2
System configuration
Registration procedures ........................................................18
Administrator registration...................................................19
Installation information registration...................................23
Network setting.....................................................................25
E-mail environment setting .................................................28
User registration...................................................................33
Page 28
Chapter 2 System configuration
18
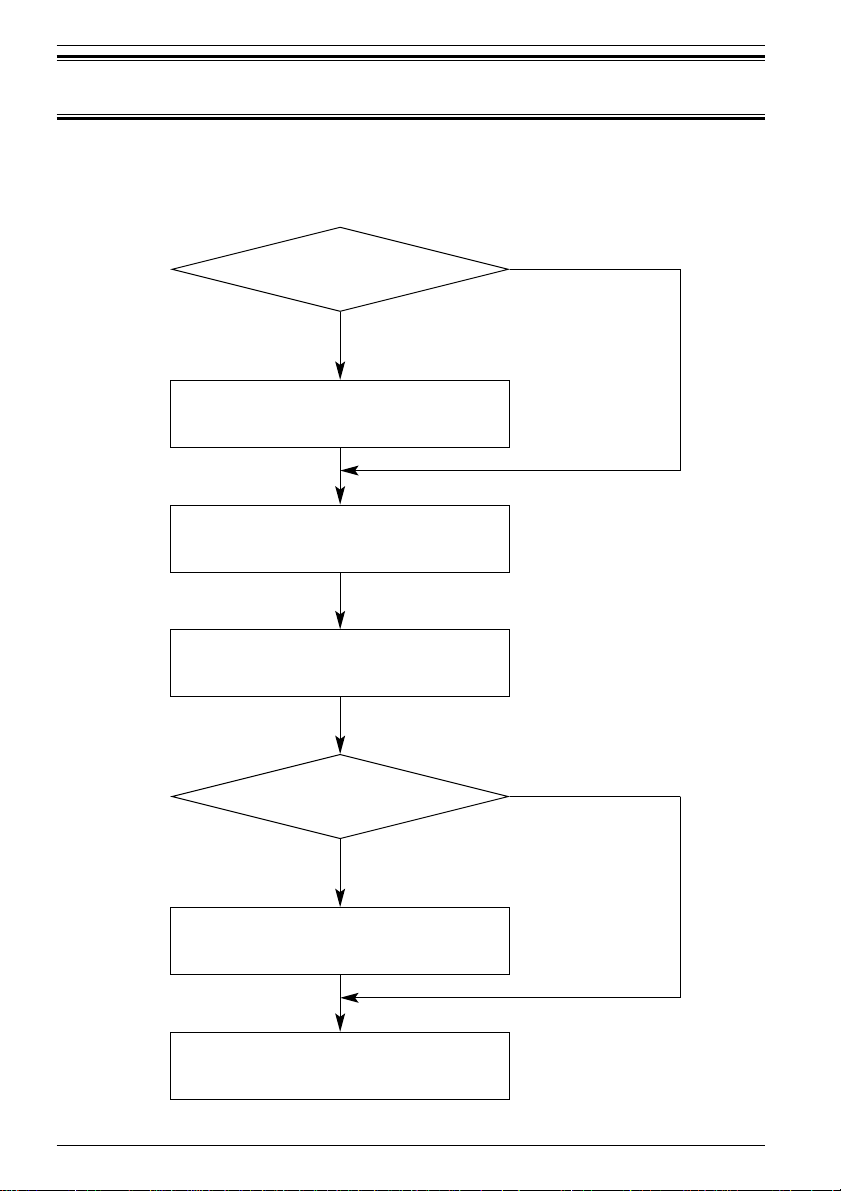
Registration procedures
Carry out registrations in accordance with the following procedures.
Do you register the
administrator?
Administrator registration
Installation information registration
Network setting
Do you use
the Internet fax?
E-mail environment setting
User registration
No
Yes
(See p.19)
(See p.23)
(See p.25)
(See p.28)
(See p.33)
No
Yes
Page 29

Chapter 2 System configuration
19
2
Administrator registration
What is administrator registration?
Administrator registration will enable the following:
◆ Authentication is requested whenever making or altering any device settings.
◆ Authentication is requested whenever making or altering a user registration.
◆ Authentication is requested whenever making or altering fax distribution
settings.
◆ Authentication is requested whenever canceling fax transmission jobs or print
jobs in queue.
Once the administrator is registered, authentication is also required when changing
the administrator . In such case,authentication is done with the user ID and password
currently in effect.
Page 30
Chapter 2 System configuration
20
Registration of administrator information
1 Start up ‘Web Manager’. Cross-reference / Page 10
2 Click [Administrator registration] under [Setup].
Page 31

Chapter 2 System configuration
21
2
3 Fill in each of the following fields, and then click the [SET] button.
Descriptions
A. Administrator name
The Administrator name can be entered with up to 40 characters.
Make sure to fill in this field when setting the administrator.
B. User ID
The User ID can be entered with up to 20 characters.
(Colons and spaces cannot be entered.)
Authentication is done using this ID.
The User ID must be entered without fail when setting the administrator.
C. Password
The Password can be entered with up to 20 characters.
(Colon and spaces cannot be entered.)
Authentication is done using this password.
The Password does not appear on the display even during its entry.
The Password must be entered without fail when setting the administrator.
D. Password re-entry
Re-enter the password for the purpose of double-checking.
Make sure to fill in this field.
E. Authorization
Authentication is requested whenever attempting to change the items checkmarked.
A
B
C
D
E
Page 32

Chapter 2 System configuration
22
[SET] button
Click this button to register the entry.
[REDO] button
Click this button to retrieve the current settings.
[INITIALIZE] button
Click this button to restore the initial shipment settings.
Page 33

Chapter 2 System configuration
23
2
Installation information registration
What is installation information registration?
Registration of device information makes it easier to identify the device.
Installation data, once registered, is fed into the device information for display.
Installation information registration
1 Start up ‘Web Manager’. Cross-reference / Page 10
2 Click [Installation information] under [Setup].
Page 34

Chapter 2 System configuration
24
3 Fill in each of the following fields, and then click the [SET] button.
Descriptions
A. Device name
Set the Device name to identify this device.
Up to 40 characters can be entered.
B. Installation location
Enter place of installation or name of department using (controlling) this device.
Up to 100 characters can be entered.
C. Options configuration
Enter options added to this device, or any other accessible functions as desired.
Up to 200 characters can be entered.
[SET] button
Click this button to register the entry.
[REDO] button
Click this button to retrieve the current settings.
[INITIALIZE] button
Click this button to restore the initial shipment settings.
A
B
C
Page 35

Chapter 2 System configuration
25
2
Network setting
What is network setting?
This setting is to establish the network connection of this device.
Network setting
1 Start up ‘Web Manager’. Cross-reference / Page 10
2 Click [Network environment] under [Setup].
Page 36

Chapter 2 System configuration
26
3 Fill in each of the following fields, and then click the [SET] button.
The following items must be entered without fail.
◆ IP address of this device
◆ Subnet mask
When the IP address or subnet mask entry is changed, new entry becomes
effective only after restart of the fax main unit with the power OFF/ON
operation.
Please note the altered value is not in effect until the unit is restarted.
Make sure to restart the fax main unit after restoring the initial shipment
setting with [INITIALIZE] button.
A
B
C
D
Page 37

Chapter 2 System configuration
27
2
Descriptions
A. IP address
Enter the IP address for this device.
When installing this device, set the IP address to match the existing LAN.
B. Subnet mask
Enter the Subnet mask for this device.
Set the Subnet mask to match the existing LAN.
C. Gateway address
Enter the gateway address, if necessary.
Up to two gateway addresses can be set.
D. DNS server address
Enter the DNS server address, if necessary.
Up to two DNS server addresses can be set.
[SET] button
Click this button to register the entry.
[REDO] button
Click this button to retrieve the current setting.
[INITIALIZE] button
Click this button to restore the initial shipment setting.
Gateway
‘Gateway’ collectively refers to hardware and software that interlink systems and
networks using different protocols.
‘Gateway user’ appearing in this manual means a networked PC equipped with
gateway function.
Page 38

Chapter 2 System configuration
28
E-mail environment setting
What is the E-mail environment setting?
This setting enables the device to perform e-mail transmission and reception.
E-mail environment setting
1 Start up ‘Web Manager’. Cross-reference / Page 10
2 Click [E-mail environment] under [Setup].
Page 39

Chapter 2 System configuration
29
2
3 Fill in each of the following fields, and then click the [SET] button.
A
B
C
D
E
F
G
H
I
J
K
L
M
N
O
Page 40

Chapter 2 System configuration
30
Descriptions
A. Name
The name entered here is shown in sender’s field (From) when sending e-mail.
Up to 40 characters can be entered.
B. E-mail address
Enter the e-mail address for this device.
E-mail address can be entered with up to 80 characters.
C. Send mail (SMTP) server
The SMTP server is used to send e-mail.
Enter the domain name or IP address of the SMTP server.
Enter the IP address with dot notation system (xxx.xxx.xxx.xxx).
The domain name can be entered with up to 80 characters.
D. SMTP receiving domain name
Set the domain name for SMTP reception from the mail server. SMTP reception is
not possible unless this setting is chosen.
The domain name can be entered with to 80 characters.
Enter “*” to accept reception from all domains.
E. Receive mail (POP3) server
The POP3 server is used to receive e-mail.
Enter the domain name or IP address of the POP3 server.
Enter the IP address with dot notation system (xxx.xxx.xxx.xxx).
The domain name can be entered with up to 80 characters.
Enter an IP address in both the SMTP and POP3 fields, even if the IP address is
exactly the same for both.
F. E-mail account
The E-mail account is used to log on to the POP3 server.
Enter the e-mail account.
Up to 80 characters can be entered.
G. E-mail password
The E-mail password is used to log on to the POP3 server.
Enter the password.
Up to 80 characters can be entered.
H. Check for new mail
Set the time interval to check for new messages at the mail server.
Set the time from 5 seconds up to 99 hours 59 minutes 59 seconds.
The initial setting is 10 minutes.
Page 41

Chapter 2 System configuration
31
2
I. Send document format conversion
Set the file format for outgoing messages.
Messages are converted into any of the file formats set here when the recipient’s
e-mail address is entered directly or when forwarding a received fax with e-mail.
[TIFF-S (T.37 simple mode)]
Messages are converted into TIFF files in compliance with T.37 simple mode.
T.37 is a standard that is related to the Internet fax. If a message is sent in
this simple mode format,it can be received normally by the recipient’s Internet
fax machine.
However, every message is sent out after converting its size to A4 and its
resolution to 200 dpi.
[TIFF (Expansion)]
Messages are converted into TIFF files, but are sent out in the original size
and resolution selected while scanning.
An encoding method can be preset from among MH, MR, MMR and JBIG.
[PDF]
Messages are converted into PDF files.
When registering an e-mail address on one-touch dial or speed dial, the file format
can be set individually.
Even when entering the recipient’s e-mail address directly or when setting
recipients for deliveries, TIFF-S, TIFF and PDF can be designated individually by
adding /S, /F or /P, respectively, to the end of the e-mail address.
J. TIFF image encoding method
Set the image encoding method of an outgoing message when it is sent in TIFF
(expansion) format.
K. Insert text when sending mail
When sending e-mail from this device, the message is sent as an attached file.
Select whether to insert text in the e-mail message area.
When text is to be inserted, select the language as well.
Japanese text may not be reproduced correctly, depending on the recipient’s
conditions.
When a subject and comments are entered in the transmission dialog box when
sending from client PC software, the entries will appear as the e-mail’s subject and
text regardless of this setting.
Page 42

Chapter 2 System configuration
32
L. Request receipt verification when sending mail
This setting determines whether to request delivery status notification (DSN) or
message disposition notification (MDN) when sending an e-mail.
However, the request for DSN or MDN may not be granted, depending on the mail
server and the recipient’s e-mail software.
M. When mail requesting MDN is received
This setting determines whether to comply with a MDN request by a received
e-mail.
If set to comply, it is also possible to allow a reply only to an e-mail with a specific
e-mail address or domain name (after the @ mark in the e-mail address). In this
case, enter the e-mail address or domain name to which a reply is allowed.
When making multiple entries, separate them with a semicolon (;).
A single e-mail address or domain name can be entered in up to 80 characters.
For multiple entries, up to 1000 characters are allowed (including semicolons).
N. When mail that cannot be analyzed is received
In some cases, received e-mail may not be printed out correctly when it has an
attached file or due to restrictions on the data format.
This setting determines whether to return such an e-mail to its sender or forward it
to another e-mail address.
When forwarding is selected, it is also necessary to set the e-mail address to which
e-mail is forwarded.
A forwarding e-mail address can be entered with up to 80 characters.
O. When mail that requests forwarding to fax machine is received
When a received e-mail has an instruction to forward it to a fax machine, it is
converted into fax transmission data and forwarded to the fax machine.
This setting determines whether to comply with the forwarding request or not.
If complying with the request, it is also possible to accept the request only from an
e-mail with a specific e-mail address or domain name (after the @ mark in the e-mail
address).
In this case, enter the e-mail address or domain name from which a request is
accepted.
When making multiple entries, separate them with a semicolon (;).
A single e-mail address or domain name can be entered in up to 80 characters.
For multiple entries, up to 1000 characters are allowed (including semicolons).
[SET] button
Click this button to register the entry.
[REDO] button
Click this button to retrieve the current settings.
[INITIALIZE] button
Click this button to restore the initial shipment settings.
Page 43

Chapter 2 System configuration
33
2
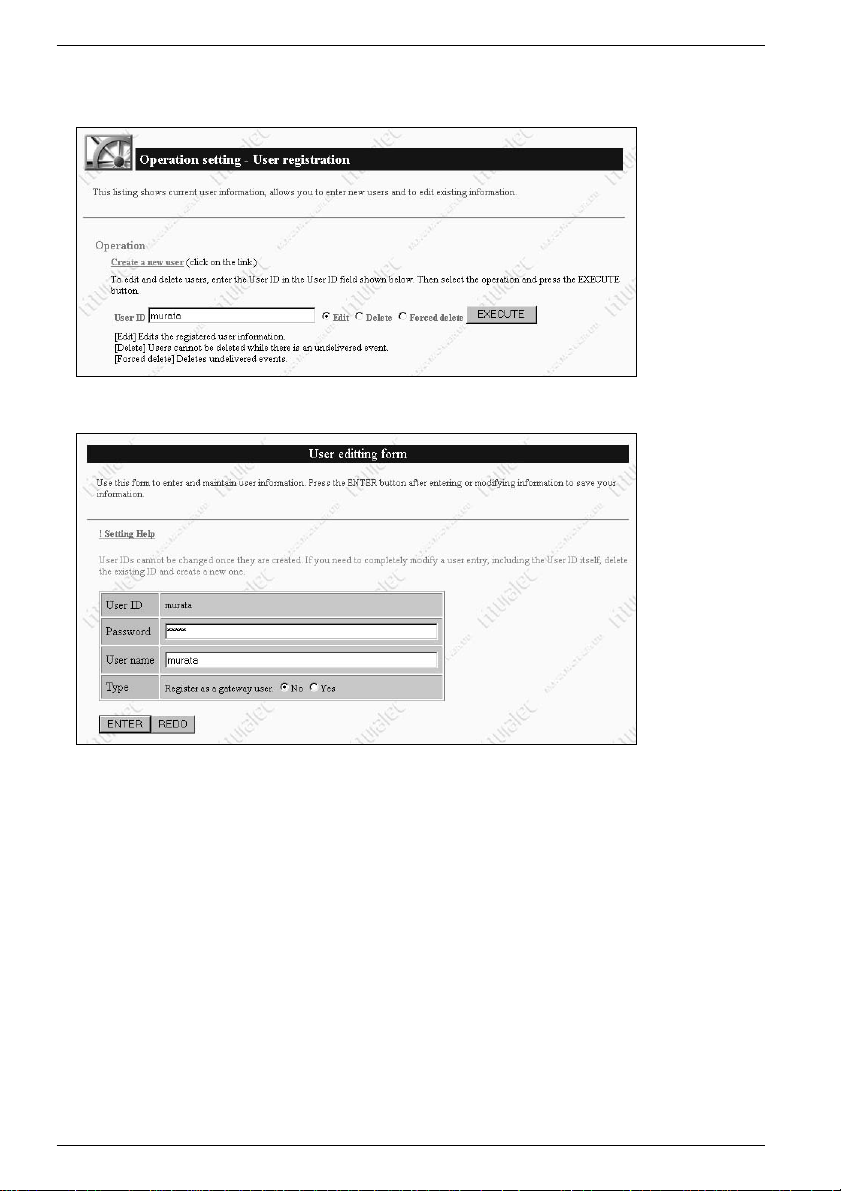
User registration
What is User registration?
Each client PC in the network is made accessible to this device once it is registered as
a user.
User registration
1 Start up ‘Web Manager’. Cross-reference / Page 10
2 Click [User registration] under [Operation setting].
Page 44

Chapter 2 System configuration
34
3 Registration, editing and deletion.
New user registration
Click [Create a new user].
Fill in each field, and click the [ENTER] button.
A
B
C
D
Page 45

Chapter 2 System configuration
35
2
Descriptions
A. User ID
This is the ID to log on to this device from client PC software.
The User ID can be entered with up to 20 characters.
In network scanning, this user ID is designated as the destination of the scanned
data.
B. Password
This is the password to log on to this device from client PC software.
The Password can be entered with up to 20 characters.
The Password setting is not mandatory.
C. User name
Enter the user name with up to 30 characters.
D. Type
Select whether to register this user as a general user or as a gateway user.
Once registered as a gateway user, all received fax messages are delivered to the
user unconditionally regardless of their destinations or delivery settings.
(See p.27 ‘Gateway’.)
[ENTER] button
Click this button to register the entry.
[REDO] button
Click this button to retrieve the current registration.
Page 46
Chapter 2 System configuration
36
Editing user data
Enter the user’s ID,mark on Edit, and then click the [EXECUTE] button.
Renew the entry, and click the [ENTER] button.
[ENTER] button
Click this button to register the entry.
[REDO] button
Click this button to retrieve the current registration.
Page 47

Chapter 2 System configuration
37
2
User Delete and Forced delete
Enter the user’s ID,mark on Delete, and then click the [EXECUTE] button.
A user cannot be deleted when it has undelivered events (such as scanned data or
received fax data).
Delete the user after all deliveries are finished.
If a user to be deleted has undelivered events, mark on Forced delete,and click the
[EXECUTE] button again.
Page 48

Chapter 2 System configuration
38
Page 49

Chapter 3
Useful functions
One-touch dial setting ..........................................................40
Speed dial registration .........................................................44
Received fax forwarding .......................................................47
Individual fax forwarding.....................................................54
Page 50

Chapter 3 Useful functions
40
One-touch dial setting
What is One-touch dial setting?
Once a recipient’s data is registered in One-touch dialing, it can be displayed with a
single touch of a button.
When communications are frequent with a recipient, this setting can save
cumbersome entry jobs.
One-touch dial registration
Information : This describes the procedure for registration on a client PC.
Make sure to register ‘e-mail address’ or ‘user ID’ only on a client
PC.
For the registration procedure on the fax unit,please refer to the
fax main unit operation manual.
Page 51

Chapter 3 Useful functions
41
3
New registration
1 Start up ‘Web Manager’. Cross-reference / Page 10
2 Click [One-touch dialing] under [Operation setting].
3 Click the number in the list to be registered.
* Click [Address Book - Import/Export] to perform import/export of one-
touch dial and speed dial registration data.
Page 52

Chapter 3 Useful functions
42
4 Fill in each field, and click the [SET] button.
Descriptions
A. [<<Prev] [List] [Next>>]
[<<Prev]
The previous registration number screen appears.
[List]
The list screen appears.
[Next>>]
The next registration number screen appears.
B. Contact number
Enter the fax number, e-mail address or user ID. Check on Type.
The e-mail address and user ID can be entered with up to 80 characters.
The fax number can be entered with up to 40 digits, and is limited to numeric
characters and symbols (0-9, *, #, -, / and !).
C. Contact name
Enter the recipient’s name.
D. Group No. (0-32)
Specify the group number from 0-32.
For multiple entries, separate them with a comma (,).
Group 0 means it belongs to all groups from 1 to 32.
E. Attached file format
When an e-mail address is registered in “Contact number”, select the image data
format for attachment out of TIFF-S, TIFF (Expansion) and PDF.
A
B
C
D
E
Page 53

Chapter 3 Useful functions
43
3
[SET] button
Click this button to register the entry.
After registration, the next number registration screen appears.
[REDO] button
Click this button to retrieve the current setting.
Editing
1 Click the number in the list to be edited, and enter the new data.
2 Click the [SET] button.
Deletion
Click the [Erase] button on the list for the number to be deleted.
Page 54

Chapter 3 Useful functions
44
Speed dial registration
What is Speed dial registration?
Once a recipient’s data is registered in Speed dialing, it can be displayed by entering
a 3-digit number.
When communications are frequent with a recipient, this setting can save
cumbersome entry jobs.
Speed dial registration
Information : This describes the procedure for registration on a client PC.
Make sure to register ‘e-mail address’ or ‘user ID’ only on a client
PC.
For the registration procedure on the fax unit,please refer to the
fax main unit operation manual.
Page 55

Chapter 3 Useful functions
45
3
New registration
1 Start up ‘Web Manager’. Cross-reference / Page 10
2 Click [Speed dialing] under [Operation setting].
3 Click the number in the list to be registered.
Page 56

Chapter 3 Useful functions
46
4 Fill in each field, and click the [SET] button.
* Entry items are the same as described in ‘One-touch dialing’.
Cross-reference / Page 42
Editing
1 Click the number in the list to be edited, and enter the new data.
2 Click the [SET] button.
Deletion
Click the [Erase] button in the list for the number to be deleted.
A
B
C
D
E
Page 57

Chapter 3 Useful functions
47
3
Received fax forwarding
What is Received fax forwarding?
Received fax messages can be circulated to each user or forwarded to an e-mail
address.
For example,the following settings are possible.
◆ Forward a fax from a customer to multiple persons concerned.
◆ Print out a fax from a customer received at the head office, and at the same time
forward it to braches by e-mail.
Fax
PC
Page 58

Chapter 3 Useful functions
48
Setting of Received fax forwarding
1 Start up ‘Web Manager’. Cross-reference / Page 10
2 Click [Received fax forwarding] under [Operation setting].
Page 59

Chapter 3 Useful functions
49
3
3 Click the number in the list to be registered.
4 Fill in each field, and click the [SET] button.
A
B
C
D
Page 60

Chapter 3 Useful functions
50
Descriptions
A. [<<Prev] [List] [Next>>]
[<<Prev]
The previous registration number screen appears.
[List]
The list screen appears.
[Next>>]
The next registration number screen appears.
B. Search condition
Sender’s origination number (fax number) or a sub-address designated by the sender
can be set as the condition for delivery. Enter the sender’s origination number or
sub-address to be set as the condition.
Also enter the password if the password accompanying a sub-address is to be
included in the condition.
It is not possible to set a password without designating a sub-address.
The sender’s origination number can be entered with up to 20 digits of numbers and
symbols (0-9, *, #, - and +).
The sub-address can be entered with up to 20 digits of numbers 0-9.
The password can be entered with up to 20 digits of numbers and symbols (0-9, * and
#).
Check the following two search conditions.
[Include any of the conditions below]
Delivery is carried out when a received fax matches either the sender’s number
or sub-address (plus password).
[Include all of the conditions below]
Delivery is carried out when a received fax matches all settings including the
sender’s number and sub-address (plus password).
C. Delivery destination
This setting is used to decide where to deliver a received fax that meets the search
conditions.
The following types of delivery are available :
[Deliver to user]
When a user is selected as the destination, the received fax is delivered to the
user if they meet search conditions.
Multiple users are selectable. Click users while keeping the <Ctrl> key
pressed.
[Forward to remote fax machine]
When a fax number is designated as the destination, the received fax is
forwarded to that remote fax.
When making multiple fax number entries,separate them with a semicolon (;).
A single fax number can be entered in up to 40 digits of numbers and symbols
(0-9, *, #, -, / and !).
For multiple entries, a total of 1000 characters can be entered (including
semicolons).
[Forward by e-mail]
When an e-mail address is designated as the destination, the received fax will
Page 61

Chapter 3 Useful functions
51
3
be delivered by e-mail as an attachment.
When making multiple e-mail address entries, separate them with a
semicolon (;).
A single e-mail address can be entered with up to 80 characters.
For multiple entries, a total of 1000 characters can be entered (including
semicolons).
D. Print
Click ON if the received fax is to be printed out with this device’s printer along with
delivery.
Click OFF if the need is for delivery only and not for printout.
(When a gateway user is designated, the print setting becomes invalid.)
(See ‘Gateway’ on p.27.)
[SET] button
Click this button to register the entry.
After registration, the next number registration screen appears.
[REDO] button
Click this button to retrieve the current settings.
Exceptions Handling
This setting is used to decide in advance how to handle a received fax that does not
match any of the registered delivery settings.
1 Click [Change] under Exceptions Handling in the Received fax forwarding
screen.
Page 62

Chapter 3 Useful functions
52
2 Fill in each field, and click the [SET] button.
Descriptions
A. Print
Click ON if the received fax is to be printed out with this device’s printer.
B. Deliver
Click ON if the received fax is to be delivered to any user, remote fax or e-mail
address.
[Deliver to user]
When a user is selected as the destination, the received fax is delivered to the
user if they meet the search conditions.
Multiple users are selectable. Click users while keeping the <Ctrl> key
pressed.
[Forward to remote fax machine]
When a fax number is designated as the destination, the received fax is
forwarded to that remote fax.
When making multiple fax number entries,separate them with a semicolon (;).
A single fax number can be entered with up to 40 digits of numbers and
symbols (0-9, *, #, -, / and !).
For multiple entries, a total of 1000 characters can be entered (including
semicolons).
B
A
Page 63

Chapter 3 Useful functions
53
3
[Forward by e-mail]
When an e-mail address is designated as the destination, the received fax will
be delivered by e-mail as an attachment.
When making multiple e-mail address entries, separate them with a
semicolon (;).
A single e-mail address can be entered with up to 80 characters.
For multiple entries, a total of 1000 characters can be entered (including
semicolons).
[SET] button
Click this button to register the entry.
[REDO] button
Click this button to retrieve the current settings.
Page 64

Chapter 3 Useful functions
54
Individual fax forwarding
What is Individual fax forwarding?
The fax delivered to each user by Received fax forwarding can be forwarded further.
For example,the following settings are possible.
◆ Forward a fax to another person in charge when it is delivered to a recipient who
is absent on a business trip.
◆ Forw ard a fax to a person’s home e-mail address when it is delivered on Saturday.
Fax
PC
Page 65

Chapter 3 Useful functions
55
3
Setting of Individual fax forwarding
1 Start up ‘Web Manager’. Cross-reference / Page 10
2 Click [Individual fax forwarding] under [Operation setting].
Page 66

Chapter 3 Useful functions
56
3 Enter the User ID and Password, and click the [ENTER] button
4 Fill in each field, and click the [SET] button.
A B C D E F
Page 67

Chapter 3 Useful functions
57
3
Descriptions
A. Setting
Check here to activate forwarding with specified conditions.
To suspend the forwarding operation temporarily, remove the check. Then no
forwarding is carried out.
B. Destination type
Select the type of destination from [User], [E-mail] or [Remote fax].
C. Forwarding destination
Set the destination to which the delivered fax should be forwarded.
Enter the user ID, fax number or e-mail address.
There should be one destination. No multiple entries are allowed.
D. Interval Type
Select the type of period that activates the forwarding operation.
Select [Month/day], [Day-of-week] or [Time].
E. Interval
Set starting and ending times of the period that activates the forwarding operation.
In [Month/day] designation, set the month, day and time for both starting and
ending the operation. There is no need to set the day of the week.
In [Day-of-week] designation, set the day of the week and time for both starting and
ending the operation. There is no need to set the month and day.
In [Hour] designation,set the time for both starting and ending the operation. There
is no need to set the month, date and day of the week.
F. Repeat
Check here to activate the set period repeatedly.
In[Month/day], the check is invalid.
In [Day-of-week], the set period becomes effective every week.
In [Time], the set period becomes effective every day.
[SET] button
Click this button to register the entry.
[REDO] button
Click this button to retrieve the current settings.
Deletion of setting
Select the setting number, and click the [ERASE] button.
Page 68

Chapter 3 Useful functions
58
Page 69

Chapter 4
Device management
Device information check .....................................................60
Fax communication log check...............................................63
Mail communication history check......................................65
Scheduled communication check..........................................69
Print job check.......................................................................71
Page 70

Chapter 4 Device management
60
Device information check
Device information can be checked using ‘Web Manager’.
Device information check
1 Start up ‘Web Manager’. Cross-reference / Page 10
2 Click [Device information] under [Management information].
Page 71

Chapter 4 Device management
61
4
3 A description of each item is offered below.
Descriptions
A. Device name
A name to identify the device
B. Installation location
Displays the place of installation
C. System options
Displays system options
Information : ‘Device information’ shows the information entered in
‘Installation information’ (p.23).
A
B
C
D
E
F
G
H
Page 72

Chapter 4 Device management
62
D. Network connection
Displays the network connection speed
E. Telephone line
Displays the status of the telephone line
F. Scanner
Displays the scanner’s status
G. Printer
Displays the printer’s status
H. Cassette
Displays the following information
◆ Unit name
◆ Setting
◆ Direction
◆ Paper remaining
◆ Media
Page 73

Chapter 4 Device management
63
4
Fax communication log check
Fax transmission (reception) history can be checked.
Fax transmission (reception) history check
1 Start up ‘Web Manager’. Cross-reference / Page 10
2 Click [Fax transmission (reception) history] under [Management
information].
Page 74

Chapter 4 Device management
64
3 A list of transmission (reception) history is displayed.
* Please refer to the fax main unit operation manual for more details on each
item.
Page 75

Chapter 4 Device management
65
4
Mail communication history check
Mail transmission (reception) history can be checked.
Mail transmission history check
1 Start up ‘Web Manager’. Cross-reference / Page 10
2 Click [Mail transmission history] under [Management information].
Page 76

Chapter 4 Device management
66
3 A list of the latest 50 e-mail items sent is displayed.
Descriptions
A. No.
Displays numbers 01-50 serially
B. Address
Displays only one address at the top
C. Date
Displays the date of transmission
D. Subject
Displays the subject of the sent e-mail
E. Dept.
Displays the department code
F. Result
Displays [Completed] or [Failed]
A B C D E F
Page 77

Chapter 4 Device management
67
4
Mail reception history check
1 Start up ‘Web Manager’. Cross-reference / Page 10
2 Click [Mail reception history] under [Management information].
Page 78

Chapter 4 Device management
68
3 A list of the latest 50 e-mail items received is displayed.
Descriptions
A. No.
Displays numbers 01-50 serially
B. Sender
Displays the sender’s e-mail address
C. Date
Displays the date of reception
D. Subject
Displays the subject of the received e-mail
E. Result
[Completed] :Completed reception
[Forwarding denied] :Rejected forwarding to fax
[Connection failed] : Failed in connecting to the mail server
[Reception Failed] : Received e-mail that is unrecognizable
[Cannot locate server] : Server not found and failed in connection
[Authentication failed]: Failed in authentication when connecting to the mail server
F. Remarks
[Print] : Printed out received e-mail
[Fax forwarding] : Forwarded received e-mail to fax
[Mail forwarding] : Forwarded to preset e-mail address because received e-mail
is unrecognizable
[Reply] : Sent e-mail back to sender because it is unrecognizable
[Error notice reply] : Sent error notice to sender because received e-mail is
unrecognizable
[Erase] :Erased received e-mail because it was not normal
A B C D E F
Page 79

Chapter 4 Device management
69
4
Scheduled communication check
Fax transmission requests from client PCs as well as ongoing jobs can be checked in
a list.
Scheduled communication check
1 Start up ‘Web Manager’. Cross-reference / Page 10
2 Click [Scheduled communication] under [Management information].
Page 80

Chapter 4 Device management
70
3 A list of transmission jobs from client PCs is displayed.
Descriptions
A. Contact number
Displays recipient’s telephone number
B. Status
Displays transmission status
C. Owner
Displays the name of the client requesting the job
D. Specified date
Displays the date and time requested for transmission
Displays the current time in case of immediate transmission
E. Delete
To cancel the job,put a checkmark in this field and click the [DELETE] button.
A B C D E
Page 81

Chapter 4 Device management
71
4
Print job check
Ongoing print jobs as well as the jobs spooling can be checked.
Print job check
1 Start up ‘Web Manager’. Cross-reference / Page 10
2 Click [Print job] under [Management information].
Page 82

Chapter 4 Device management
72
3 A list of ongoing print jobs and the jobs spooling is displayed.
Descriptions
A. Document name
Displays the document name of the job
B. Status
Displays the current status of the job
C. Owner
Displays the name of the client requesting the job
D. Progress status
Displays the progress of the job
E. Time received
Displays the date and time when the job was accepted
F. Delete
To cancel the job,put a checkmark in this field and click the [DELETE] button.
A B C D E F
Page 83

Chapter 5
Troubleshooting guide
Troubleshooting guide ..........................................................74
Page 84

Chapter 5 Troubleshooting guide
74
Troubleshooting guide
Printed message
Checkpoint
Is the LAN cable firmly plugged in?
No disconnection in the LAN cable?
Is the DNS server working?
Is the DNS server registration correct?
Are the gateway settings correct?
Is the gateway working?
Is the LAN cable firmly plugged in?
No disconnection in the LAN cable?
Is the SMTP server working?
Is the SMTP server registration correct?
Are the gateway settings correct?
Is the recipient’s e-mail address correct?
Is the setting of the e-mail environment
correct?
__
__
__
Message
Mail could not be sent.
Cannot locate mail server.
Mail could not be sent.
No response from mail server.
Mail could not be sent.
Check mail address.
Mail could not be sent.
Check setting.
Mail could not be sent.
Send again.
Received Doc. Erased.
Reserved emails were erased.
Page 85

Reference page
__
__
26
26
__
__
__
29
26
__
29
__
__
__
Chapter 5 Troubleshooting guide
75
5
Action
Check the LAN cable.
Check the DNS server operation.
Check the DNS server registration.
Check the gateway settings.
Check the gateway operation.
Check the LAN cable.
Check the SMTP server operation.
Check the SMTP server registration.
Check the gateway settings.
Check the recipient’s e-mail address.
Check the e-mail environment setting.
Retry transmission.
Received data has been erased. Ask the sender to resend it.
Retry transmission.
Page 86

Message
Not Connect Network
Server: System error 01
Server: System error 02
Server: System error 03
Server: System error 04
Chapter 5 Troubleshooting guide
76
Checkpoint
Is the LAN cable firmly plugged in?
No disconnection in LAN cable?
__
Error message display
Description
Web Manager screen does not
appear.
Checkpoint
Is the IP address of this device correct?
Is the IP address registration effective?
Is the address entered in the Web
browser correct?
Are the computer settings correct?
Are the Web browser settings correct?
Others
Page 87

Chapter 5 Troubleshooting guide
77
5
Reference page
__
__
Action
Check the LAN cable.
Check the system error number, and contact our Information
Center.
Reference page
5
__
8
__
__
__
Action
Set the correct IP address.
Carry out power OFF/ON operation of the fax main unit to
restart.
Check the registered IP address, and type the correct entry in
the Web browser.
Check for correct installation and configuration of TCP/IP
protocol.
Using “ping” command, check for response from this device.
Check for the correct connection settings and proxy server
settings.
Page 88

Chapter 5 Troubleshooting guide
78
Page 89

Chapter 6
Linkage with other
systems
SNMP Agent..........................................................................80
Salutation commands list.....................................................84
Page 90

Chapter 6 Linkage with other systems
80
SNMP Agent
This device has the SNMP Agent function.
If the SNMP Manager is available on the network, it will enable monitoring of this
device.
Outline of SNMP
The agent retrieves the management object data and saves them in its database (MIB).
The agent notifies the Manager of the data in accordance with the Manager’s request.
If an exceptional incident such as restart occurs, the agent will notify the Manager
(TRAP transmission).
Network management station
Manager
RequestDataTRAP
Network Element
Agent MIB
Page 91

Chapter 6 Linkage with other systems
81
6
SNMP agent setting
1 Start up ‘Web Manager’. Cross-reference / Page 10
2 Click [SNMP agent setting] under [Setup].
Page 92

Chapter 6 Linkage with other systems
82
3 Fill in each field or make each choice.
A
B
C
D
Page 93

Chapter 6 Linkage with other systems
83
6
Descriptions
A. Service start setting
This setting determines whether to activate the SNMP Agent function or not.
Activation of this function enables remote management of device information via the
management software.
When the function is not activated,all settings described below are made ineffective.
B. Agent identification
The settings are reflected in the MIB system group.
Each field can be entered with up to 255 characters.
[Contact destination]
: Enter the name of the manager to be contacted and the contact method
regarding the relevant managed node.
[Name] : The name is for management purposes.
Enter the full domain name of this node.
[Location]: Enter the location of the relevant managed node.
C. Security
This is the setting of the host computer that accepts the SNMP packet.
When requests from all the hosts are to be accepted, set their community name.
If a request from a specific host is to be accepted, set the IP address and the
community name of the host. Up to 3 hosts can be registered.
D. Trap transmission destination 1-3
This is the setting of whether to send a TRAP or not. Up to 3 destinations can be
registered.
If a TRAP is to be sent, at least one destination must be registered.
Enter the destination IP address, and choose the event level for TRAP issuance and
whether a consumables ordering event is to be posted or not.
The community name can be entered in up to 20 characters.
[SET] button
Click this button to register the entry.
[REDO] button
Click this button to retrieve the current settings.
[INITIALIZE] button
Click this button to restore the initial shipment settings.
Page 94

Chapter 6 Linkage with other systems
84
Salutation commands list
Listed below are the commands that this server kit supports in each function unit.
Command/Message
RegisterUserID
UnregisterUserID
ListAllUserID
ChangePassword
SubscribeFaxEvent
FaxEvent SentNotification
FaxEvent ReceiptNotification
FaxEvent ReadConfirmation
FaxEvent ReadConfirmationForQuery
FaxEvent ReadInformed
UnsubscribeFaxEvent
SendExtFax
QuerySentFax
RetrieveFaxData
PrintFaxData
InformRead
QueryFaxHistory
QueryReadInformation
GetGlobalAttribute
GetPrivateAttribute
SetPrivateAttribute
QueryDynamicStatus
ResumeJob
Support status
Y
Y
Y
Y
Y
Y
Y
Y
Y
Y
Y
Y
Y
Y
Y
Y
N
Y
Y
N
N
Y
Y
‘Fax Data’-related commands
Page 95

Chapter 6 Linkage with other systems
85
6
Command/Message
SuspendJob
CancelJob
FreeJobHandle
ChangeJobAttribute
QueryJobStatus
RetriveFaxDocID
StartMonitorJobStatus
CancelMonitorJobSatus
NotifyJobStatus
CancelJobEntry
SubscribeEvent
UnsubscribeEvent
NotifyEvent
ListFaxDataJob
VenderEscape
Support status
Y
Y
Y
Y
Y
N
Y
Y
Y
Y
N
N
N
Y
N
Y : Support N : Not support
Page 96

Chapter 6 Linkage with other systems
86
Command/Message
Print
VenderEscape
GetPrivateAttribute
GetGlobalAttribute
SetPrivateAttribute
QueryDynamicStatus
SubscribeEvent
UnsubscribeEvent
NotifyEvent
CancelJob
FreeJobHandle
ChangeJobAttribute
QueryJobStatus
NotifyJobStatus
SuspendJob
ResumeJob
StartMonitorJobStatus
CancelMonitorJobStatus
ListPrintJob
Support status
Y
N
N
Y
N
Y
Y
Y
Y
Y
Y
Y
Y
Y
Y
Y
Y
Y
Y
‘Print’-related commands
Y : Support N : Not support
Page 97

87
Main specifications
Network interface
Network protocol
Ethernet 10Base-T/100Base-TX
TCP/IP
Basic specifications
E-mail communication protocol
Original document size
Resolution
Encoding method
Standard
Halftones
Broadcast faxing
Total number of jobs in queue
in Scheduled communication
SMTP/POP3
A3/B4/A4
Max. 400 ✕ 400 dpi equivalent
MH/MR/MMR/JBIG
T.37
64 gradation
(128 gradation for transmission from client PC software)
Available
Up to 100
Internet fax
Scanning size
Scanning resolution
Halftones
Data format
Scanning speed*
Density
A3 / B4 / A4 / A4 / B5 / B5 / A5 / A5
400dpi/600dpi
256 gradation
Proprietary
1.7 seconds (400 dpi) / 2.5 seconds (600 dpi)
5 grades
Network scanner
* In A4 size
Page 98

88
Paper size
Resolution
Halftones
Printer language
Print speed
Warm-up time
Print volume
Sorting
A3 / B4 / A4 / A4 / B5 /B5 / A5 / A5 / A6 /
Postcard / Letter / Letter / Legal
200dpi / 400dpi / 600dpi
128 gradation
GDI system
15 PPM (A4)
Less than 60 seconds
99
Available
Network printer
Device information display
Transmission and reception
history
Job cancellation
Dialer setting capability
Received fax forwarding
Individual fax forwarding
Environment setting capability
SNMP Agent
Device information / Device status
Fax / E-mail
Fax / Printer
One-touch dial / Speed dial
User ID / Fax number / E-mail address
User ID / Fax number / E-mail address
Network environment / E-mail environment
Security setting / TRAP transmission destination
Device management
Page 99

89
Index
A
Administrator registration.................15,19
B
Before use...................................................1
C
Contents .....................................................v
D
Descriptions of ‘Web Manager’ ...............12
Device information ..................................13
Device information check .......................60
Device management ................................59
E
E-mail environment.................................15
E-mail environment setting ...................28
Error message display .............................76
Exceptions Handling ..............................51
F
Fax communication log check ................63
‘Fax Data’-related commands..................84
Fax main unit operation panel ...............iv
Fax main unit setup .................................4
Fax reception history...............................13
Fax transmission (reception) history
check ........................................................63
Fax transmission history.........................13
Functional expansion ...............................3
I
If problems arise .....................................91
Index ........................................................89
Individual fax forwarding ..................14,54
Installation information..........................15
Installation information registration ....23
Introduction ................................................i
IP address check .......................................8
IP address setting .....................................5
L
Linkage with other systems....................79
M
Mail communication history check ........65
Mail reception history .............................13
Mail reception history check ..................67
Mail transmission history.......................13
Mail transmission history check ............65
Main specifications .................................87
Major features of IS-100 ..........................ii
Management information........................13
N
Network environment .............................15
Network setting ......................................25
O
One-touch dial registration ....................40
New registration..............................41
Editing .............................................43
Deletion............................................43
One-touch dial setting ............................40
One-touch dialing ....................................14
Operation setting.....................................14
Others.......................................................76
Outline of SNMP ....................................80
P
Print job....................................................13
Page 100

90
Print job check ........................................71
‘Print’-related commands ........................86
Printed message.......................................74
R
Received fax forwarding.....................14,47
Registration of administrator
information ..............................................20
Registration procedures .........................18
S
Safety precautions ....................................2
Salutation commands list ......................84
Scheduled communication.......................13
Scheduled communication check ...........69
Setting of Individual fax forwarding .....55
Setting of Received fax forwarding ........48
Setup.........................................................15
SNMP Agent ...........................................80
SNMP agent setting...........................15,81
Speed dial registration ...........................44
New registration..............................45
Editing .............................................46
Deletion............................................46
Speed dialing............................................14
Startup of ‘Web Manager’ .......................10
System configuration...............................17
T
Time zone ..................................................3
Time zone setting .....................................4
Troubleshooting guide........................73,74
U
Useful functions.......................................39
User registration.................................14,33
W
‘Web Manager’ setup ..............................10
What is ‘Web Manager’? .........................10
What is administrator registration? ......19
What is E-mail environment setting? ...28
What is Individual fax forwarding? .......54
What is installation information
registration? ............................................23
What is network setting? .......................25
What is One-touch dial setting? ............40
What is Received fax forwarding? .........47
What is Speed dial registration? ...........44
What is User registration? .....................33
 Loading...