

Page 1
Quick Reference
Fax
For
F-360
Sending a fax.....................page
Broadcast........................page
Cancel sending a fax...............page
Copy
Making a copy ....................page
Using the bypass tray ..............page
Just in case
Clearing original document jams .....page
Clearing printout jams.............page
Function table
...........page
2
3
4
5
6
8
10
12
Page 2
Fax
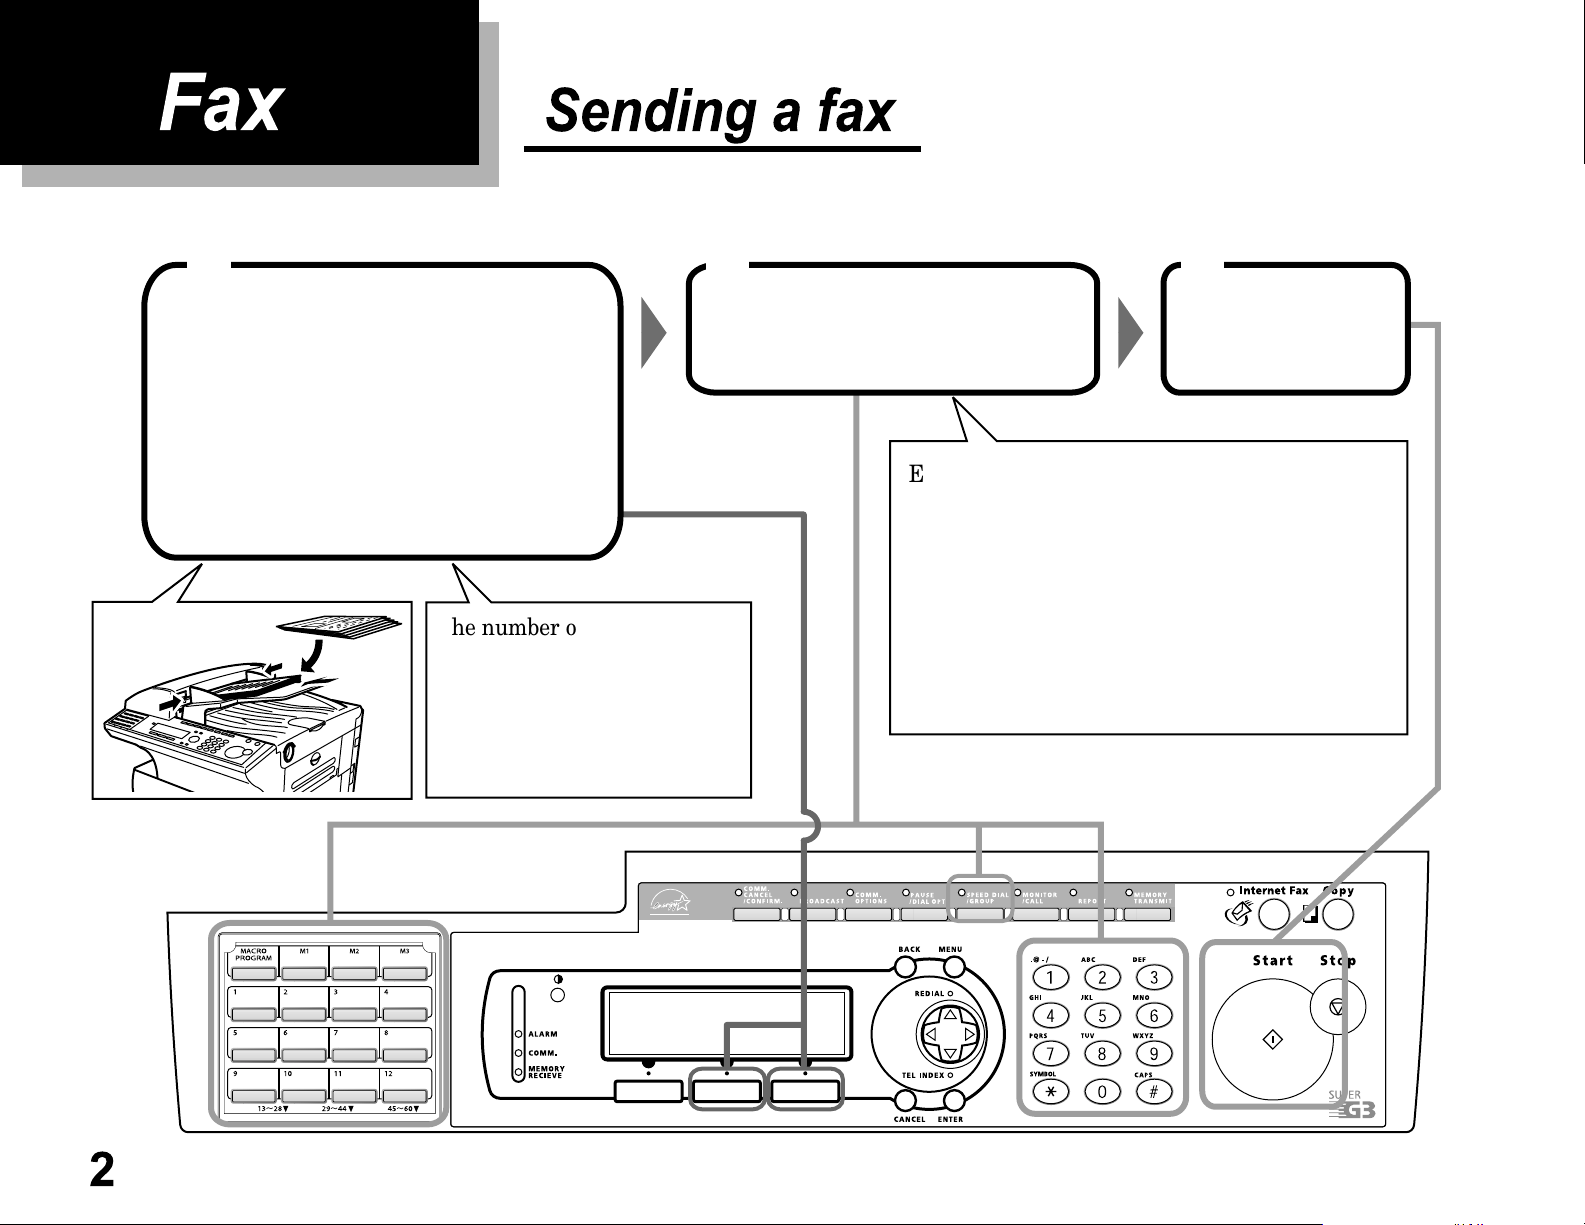
Sending a fax
Set the document in the
ADF face up and adjust
the document guides.
Adjust the followings, if necessary:
• Select the resolution by pressing
• Select the contrast by pressing
The number of the pages you
can set in the ADF at one time
is as follows:
Letter-sized: 80 sheets
Half letter-sized: 80 sheets
Legal-sized: 50 sheets
[Mode]
[Contrast]
21
Enter the fax number.
Enter the fax number using the numeric keypad
.
.
or
Press the one-touch key*
or
Press
the speed-dial number using the numeric keypad
or
Press
the group number using the numeric keypad
SPEED DIAL/GROUP
SPEED DIAL/GROUP
1
*
: When you press a one-touch key, you do not need
START
to press
.
3
Press
1
once and enter
twice and enter
START
.
2
Page 3
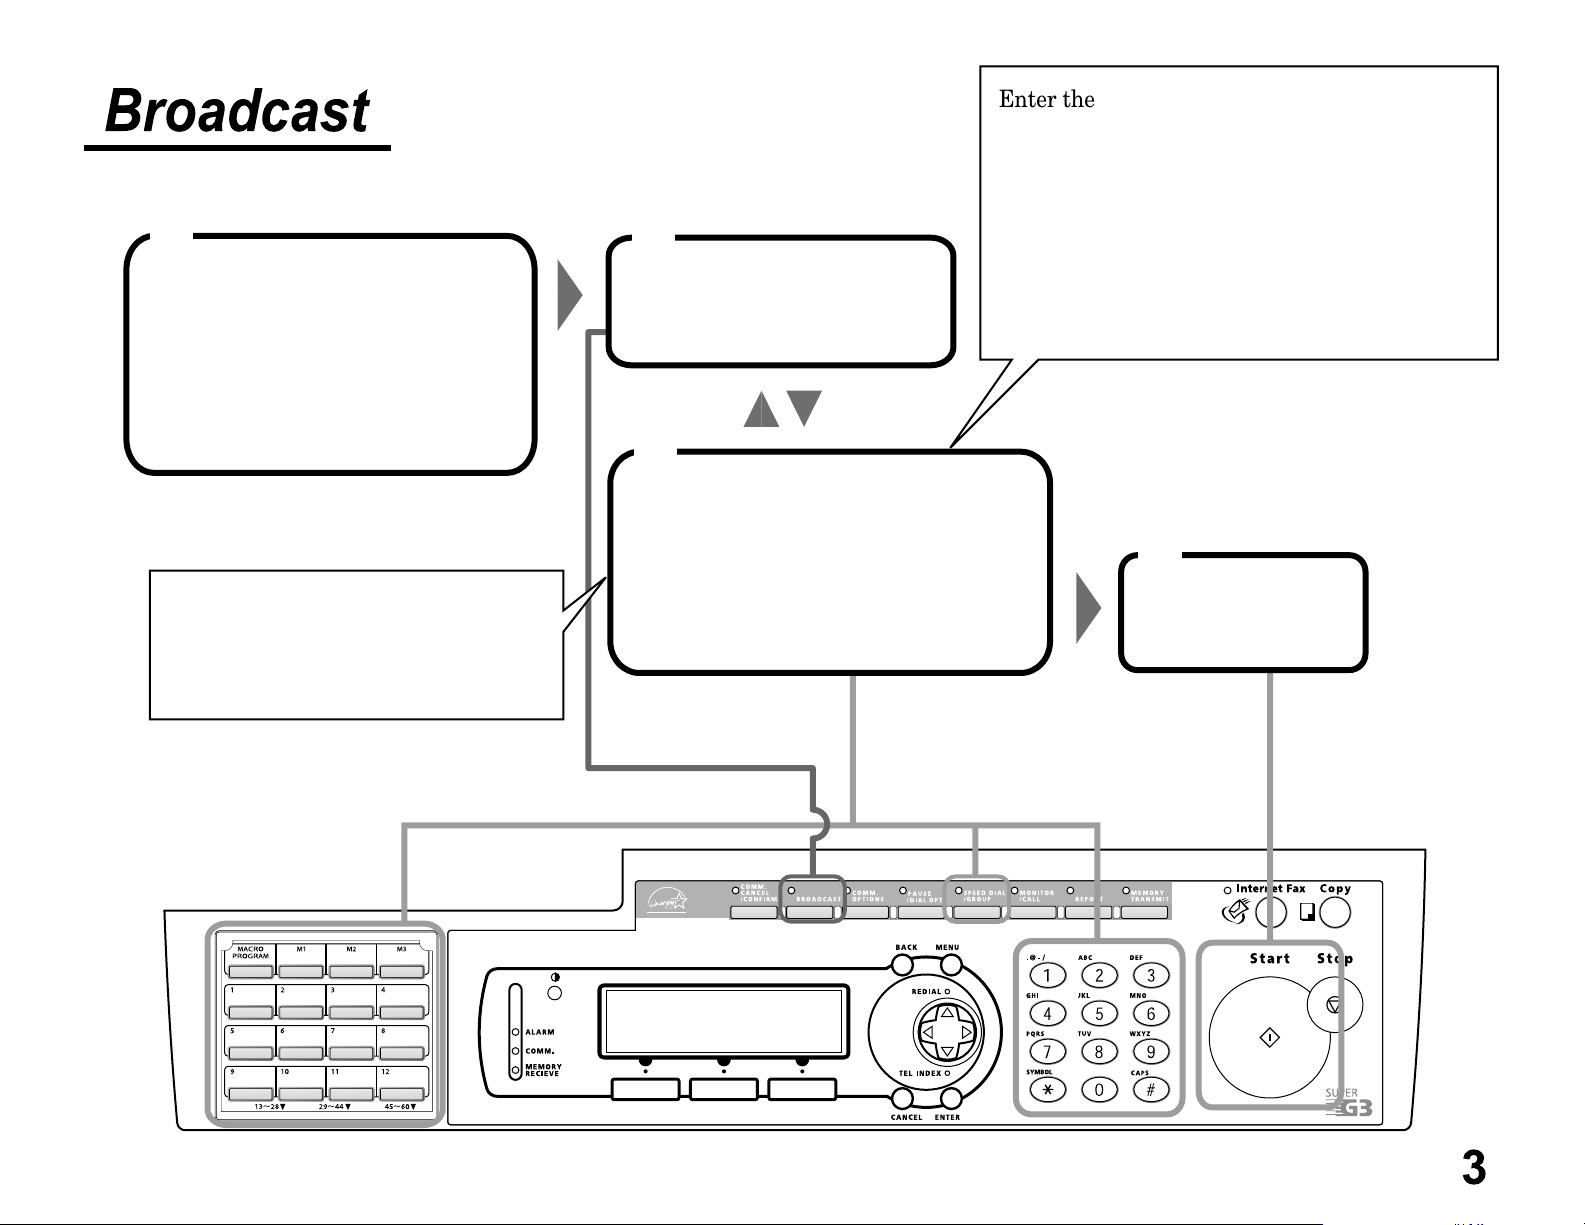
Broadcast
1
Set the document in the
ADF face up.
Adjust the resolution and the
contrast, if necessary.
2
Press
BROADCAST
.
3
Enter the fax number.
Enter the fax number using the numeric keypad
or
Press the one-touch key*
or
Press
the speed-dial number using the numeric keypad
or
Press
the group number using the numeric keypad
SPEED DIAL/GROUP
SPEED DIAL/GROUP
1
*
: When you press a one-touch key, you do not need
to press
START
1
once and enter
twice and enter
.
If you want to review the numbers
you entered, press
When you are finished, press
to return to the previous display.
[Review]
.
[Return]
To add more fax numbers,
4
repeat steps 2 and 3.
Press
START
.
3
Page 4
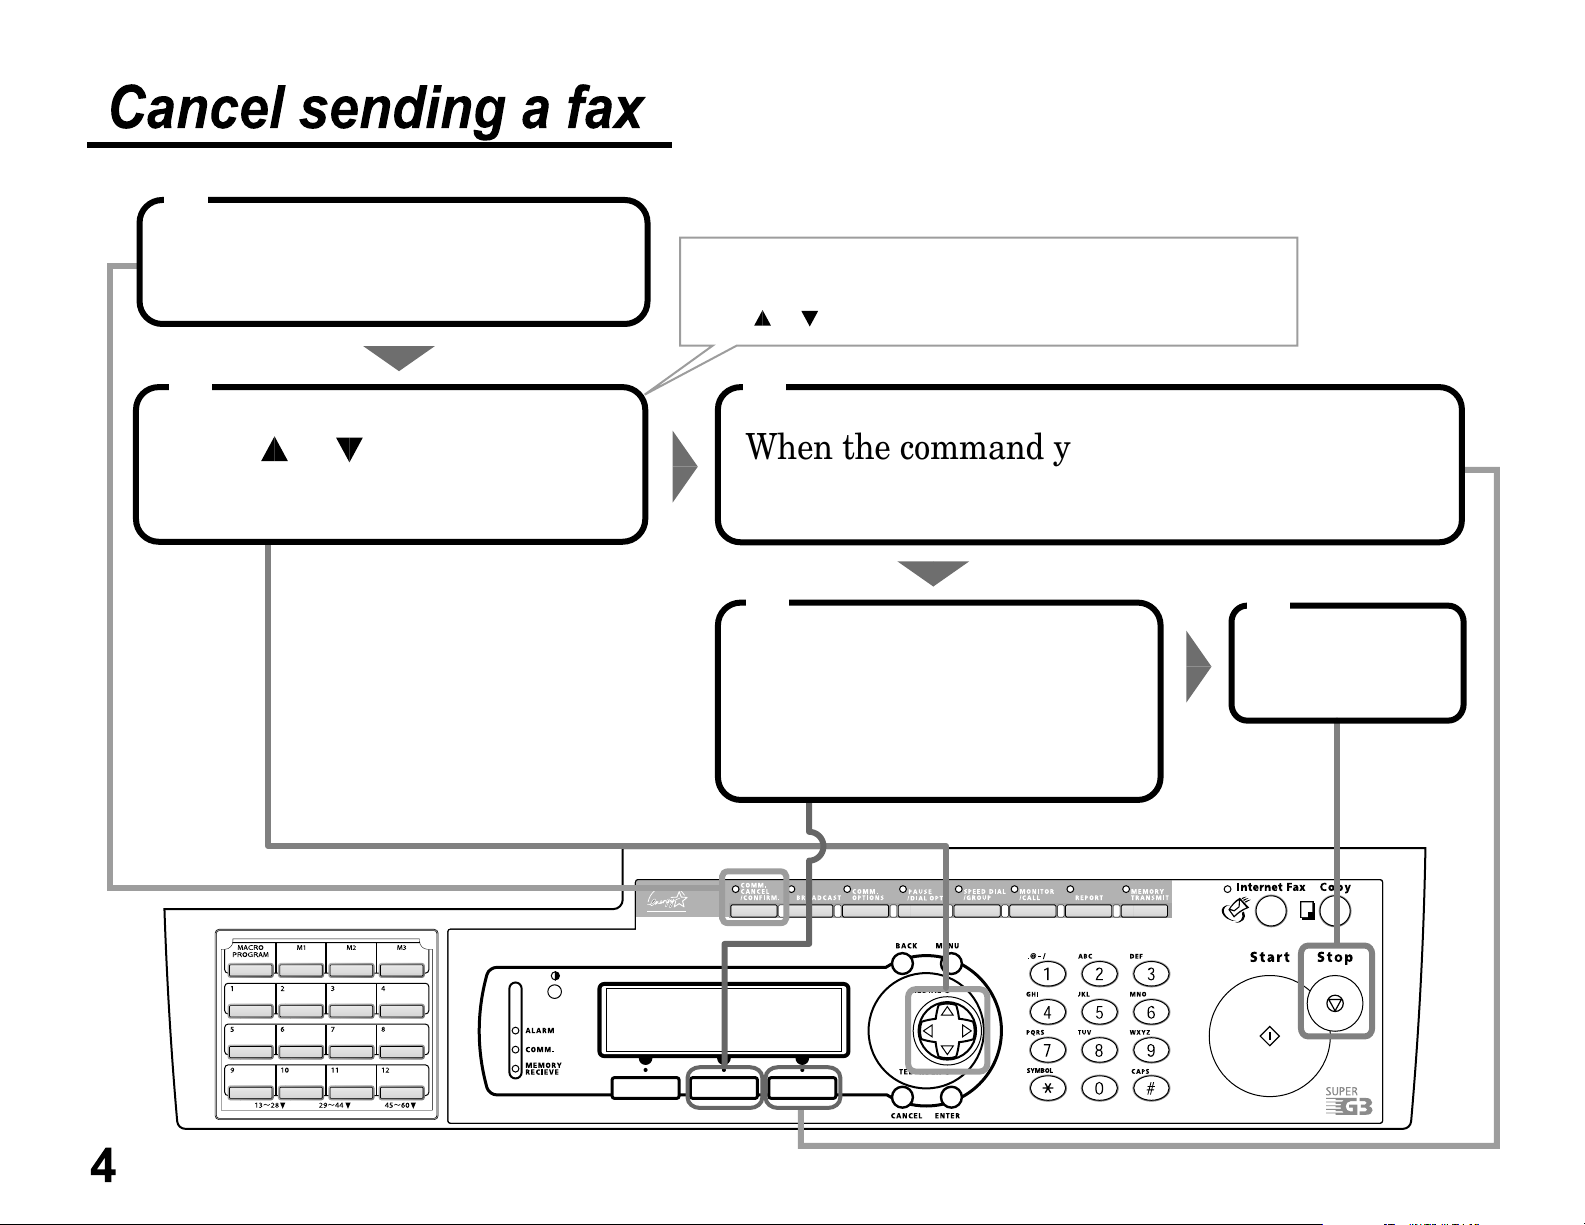
Cancel sending a fax
1
Press
COMM.CANCEL/CONFIRM.
2
Press or to scroll through
currently stored commands.
Press
the broadcast.
Press or until you find the number you want to cancel.
[Location]
to see the individual numbers within
3
When the command you want to cancel shown,
press
4
Press
If you want to cancel another command,
repeat steps 2–4.
[Erase]
[Yes]
.
.
5
Press
STOP
.
4
Page 5
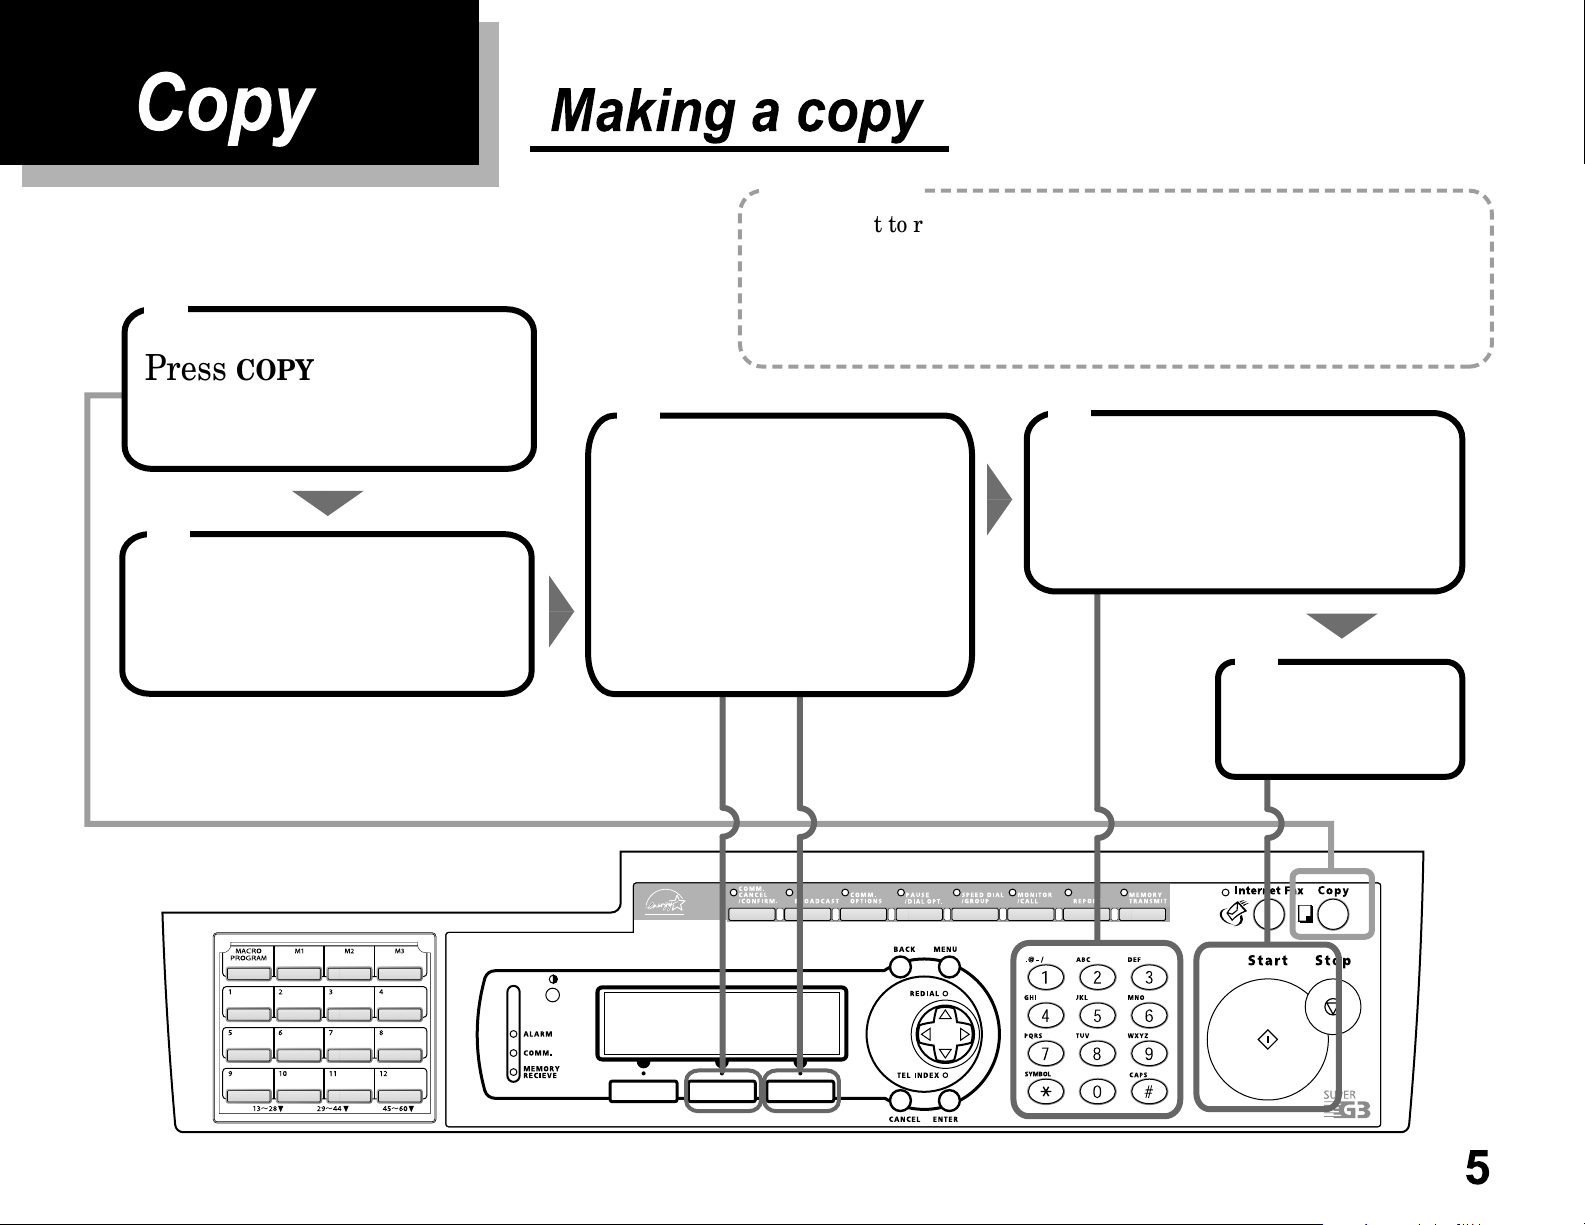
Copy
1
Press
COPY
to change
Making a copy
Helpful Tip
If you want to reduce the document, set the reduction rate in advance:
1. Press
2. Select "Copy Reduction Rate", then press
3. Select Auto, 100% or 78%
4. Select "Exit", then press
MENU
, 2, 3, 0, 1,
ENTER
.
ENTER
(Legal -> Letter), then press
ENTER.
.
ENTER
.
to Copy mode.
2
Set the document in the
ADF face up.
3
Adjust the followings,
if necessary.
• Select the resolution by
pressing
• Select the contrast by pressing
[Contrast]
[Mode]
.
.
4
Enter the number of copies
using the numeric keypad.
5
Press
START
.
5
Page 6

Using the bypass tray
1
Press
to Copy mode.
COPY
to change
3
Open the bypass tray on the right
side of your machine.
2
Set the document in the ADF face up.
4
Place the paper on the bypass tray
Hopper
face down. Insert up to 50 sheets.
6
Adjust the paper guide to fit the
Flapper release lever
paper. Then lower the flapper
release lever.
Pull out the hopper of the bypass tray
and raise the flapper release lever.
Page 7

5
8 9
The LCD will show:
Bypass Tray
Letter OHP
Legal
H.LTR
Using the cursor key, select
the paper size you’ve set on
the bypass tray.
When you use transparency film,
select "OHP".
6
Press
ENTER
Enter the number of
Press
START
.
copies.
7
Adjust the following, if necessary.
• Select the resolution by pressing
• Select the contrast by pressing
.
[Mode]
[Contrast]
.
.
7
Page 8

Just in case
1
Document Jam
Open & Check
the Blinking Cover
Open the scanner cover and remove
the jammed paper (see next page).
If the document jammed in the following cases,
perform the job again from the beginning
after removed the jammed paper.
• The first page of the document jammed.
Clearing original document jams
In this step, if more than 60 seconds passes without
pressing any keys, the machine will erase from memory
all pages stored during this operation and the machine
will return to the standby mode.
2
Document Jam
Continue Storing?
[ Yes ][ No ]
If you see this message on the LCD
and wish to resume scanning from
the jammed page, press
To abort the operation, press
[No]
[Yes]
.
.
• During the quick memory transmission.
The check message "Repeat transmission."
will be printed out if the document jammed
during transmission.
In this step, if more than 60 seconds passes without
pressing any keys, the machine will begin to send or
copy the document(s) stored during this operation.
8
3
Reset the document from
the jammed page and
press
START
.
Page 9

To remove the document...
1
Open the scanner cover.
Remove the original document.
If you cannot remove it, go to step 2.
Otherwise, skip to step 3.
2
Open the inner cover.
Remove the original document.
3
Gently close the scanner cover.
Make sure both sides are
snapped down securely.
If the document has become wrinkled
or torn, do not re-send it.
9
Page 10

Clearing printout jams
Important !
Be careful not to put your hand between
the top cover and the machine.
1
Open the top cover.
Important !
Shield the drum cartridge from light,
especially strong light.
3
Remove the toner and
drum cartridge.
10
2
Pull up the printer cover release
and open the printer cover.
Page 11

Important !
The fuser unit becomes very hot. Do not touch the fuser unit
when you are removing jammed paper.
4
Remove the jammed paper.
7
5
Reset the toner and
drum cartridge.
Open the side cover.
Raise the jam release lever to
remove the jammed paper.
6
Gently close the top cover.
Press firmly on the both sides of
the cover until you hear it click.
Gently close the printer cover.
11
Page 12
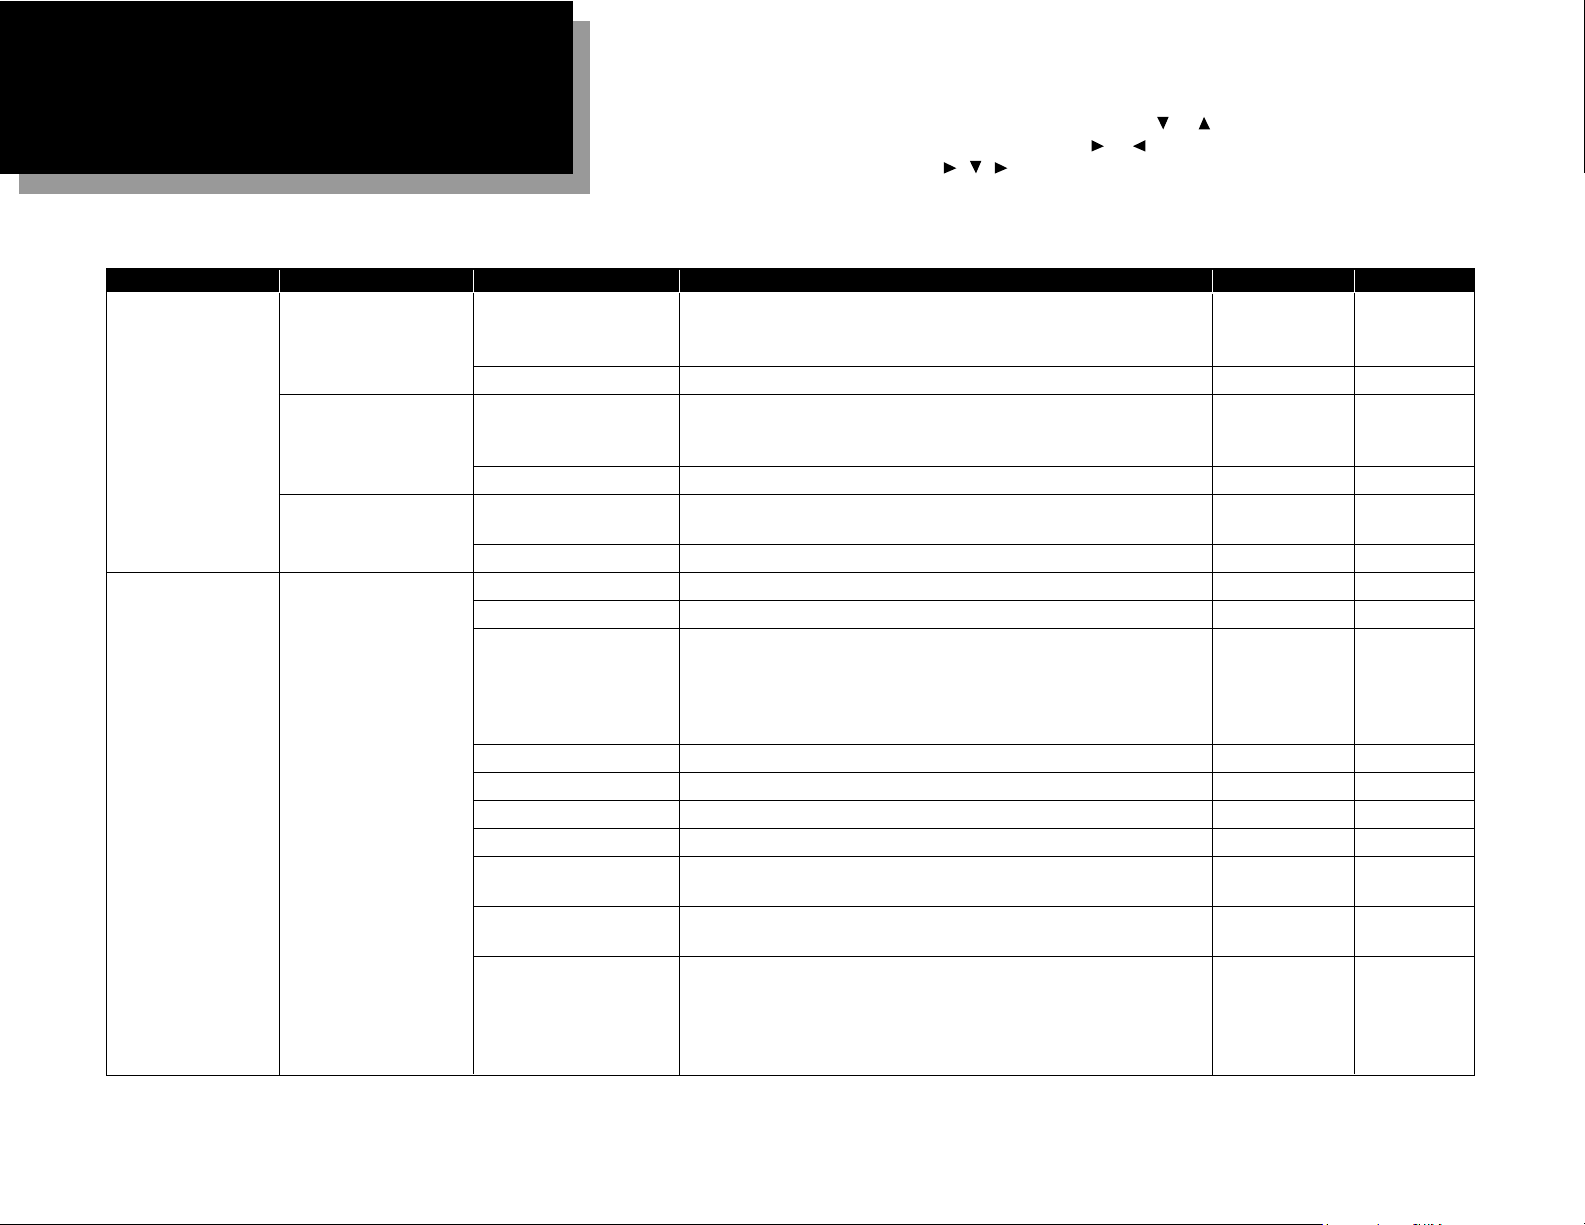
Level one function Level two function Level three function Summary of setting Default setting Page
1. Autodial Entries 1.One-touch Dial 01.Enter One-Touch Select one-touch key and register the fax dial numbers and names
(Max. 56 locations.) on one-touch dial keys. — 3.2
If you register the name, you can use the telephone index feature.
02.Erase One-Touch Erase the registration in a one-touch key. — 3.2
2.Speed Dial 01.Enter Speed Dial Select speed-dial number and register the fax dial numbers and
(Max. 244 locations.) names as Speed-Dial numbers. — 3.4
If you register the name, you can use the telephone index feature.
02.Erase Speed Dial Erase the registration in a speed-dial number. — 3.4
3.Group Dial 01.Enter Group Dial Select group number and register the one-touch dial or speed-dial
— 3.6
(Max. 32 group.) numbers you want to group.
02.Erase Group Dial Erase the registration in a group number. — 3.7
2. User Settings 1.Machine Settings 01.Cassette Size Set the size of paper in the paper cassette. Letter 1.9
02.Protect Passcode Enter the protection passcode for using the security features. — 3.46
03.Soft Key Program to turn on or off the function by pressing this key.
Soft key 1:
COMM.CANCEL/ CONFIRM
. Soft key 5:
SPEED DIAL/ GROUP
Soft key 2:
BROADCAST
Soft key 6:
MONITOR/ CALL
See left. 3.17
Soft key 3:
COMM.OPTIONS
Soft key 7:
REPORT
Soft key 4:
PAUSE/ DIAL OPT
. Soft key 8:
MEMORY TRANSMIT
04.Silent Mode Mute your machine. Off 4.8
05.Sleep Mode Conserve power. On 4.9
06.Fax & Copy Make a copy of your document each time it transmit. Off 3.21
07.Date & Time Enter the current date and time. — 4.9
08.Paper Source Select paper source (paper cassette and bypass tray) for
For Fax / Copy 4.9
fax reception or copying.
09.Service Mode For technical support. Do not turn this setting to on unless an
Off —
authorized technician asks you to do so.
10.2-Bin Tray*
1
Select the paper tray for delivery.
• Copy exit Lower tray
• Received fax document exit Upper tray 4.9
• List exit Upper tray
• PC-Fax print exit*
2
Upper tray
12
Using this function table, you can find the short-cut operation you want at a glance. For example, if you want
to enter a one-touch dial, press
MENU
,1,1,0,1,
ENTER
.
Also you can search functions using
MENU
and the cursor key. Press or of the cursor key to go down or
up in this table. To go to the right or left in this table, press or of the cursor key. For example, if you
want to enter a Speed-Dial, press
MENU
,,,,
ENTER
.
Note: “Page” in the rightest column in this table means the pages in the F-360 Operating Instructions.
Note: Your machine can print a function list. It lists the functions available on your fax machine and the
keystrokes needed to complete them. To print a function list, press
MENU
,5,1,0,1.
Function table
*1: This option appears only if the optional 2-Bin tray has been installed. *2: This option appears only if the optional RS-232C interface has been installed.
Page 13

Level one function Level two function Level three function Summary of setting Default setting Page
2. User Settings 2.Fax Settings 01.Scan Parameters You can set the following settings for send fax message.
• Primary resolution mode Normal
• Primary contrast mode Normal 4.1
• Scanning width limit B4
02.Print Parameters You can set the following settings for receive fax message.
• Reduction rate Auto
• Reduction margin 40 mm 4.3
• Half-page reception Off
03.Number of Rings Number of rings before your machine answers. 2 times 4.4
04.Redial Number of times and interval for automatic fax redialing. 2 times 4.5
1 minute
05.Dialing Pause Dialing pause length. 2 seconds 4.5
06.Memory Tx On/Off setting for Memory transmission. On 4.2
07.Quick Memory Tx On/Off setting for Quick Memory transmission. On 4.2
08.TTI Transmission On/Off setting for sending your TTI. On 4.2
09.ECM Mode On/Off setting for ECM mode. On 4.2
10.Block Junk Fax Reject the fax reception from unauthorized incoming faxes. Off 3.50
11.Security Rx Keep all received fax messages in memory and after print them. Off 3.46
12.Separator Page Partition each received documents by inserting the separator page. Off 2.24
13.Rotate Rx On/Off setting for Rotate Rx. Off 4.4
14.PIN Mode Prevent unauthorized long-distance calls. Off 3.48
15.DRD Set the ring pattern to use with phone company’s Distinctive Ring
Off 3.26
service.
3.Copy Settings 01.Scan Parameters You can set the following settings for copying.
• Primary resolution mode Fine
• Primary contrast mode Normal 4.6
• Scanning width limit B4
02.Print Parameters You can set the following settings for copying.
• Reduction rate 100%
• Reduction margin 24 mm 4.7
• Bypass Tray priority No
4.Printer Settings*301.TCP/IP Enter the IP Address, Subnet mask and Gate way address. — —
5.Scanner Settings*401.Scan Parameters Enter the scanning parameters. — —
02.Auto Reset Set the time (minutes) for resetting the scan parameters and
10 minutes
—
returning to the Fax mode.
13
*3: This option appears only if the optional NIC (network interface card) has been installed.
*4: This option appears only if the optional printer controller has been installed. For details see the operating instructions included with the printer controller kit.
Page 14

Level one function Level two function Level three function Summary of setting Default setting Page
3. Other Settings 1.Journal & Reports 01.Journal Auto Print Print the Activity journal automatically after 100 transactions. Off 3.22
02.Journal Line Up Change the printing order of the activity journal. Off 3.23
03.Report Auto Print Print the TCR automatically at every transmission. Off 3.23
2.Cover Page 01.Set Cover Page On/Off setting for sending the Cover page. Off 3.25
02.Cover Page Message Enter your message for the cover page. — 3.25
3.Department Code 01.
Department Code Protect
Protection for department code settings. Off 3.53
02.
Enter Department Code
Register the Department code. — 3.52
03.
Department
Setting On/Off setting for Department code activation. Off 3.52
04.
Erase Department TimeList
Clear the total counts of each department code. — 3.53
4.Program One-Touch 01.Set P One-touch Program several operations for a function you frequently use. — 3.38
This key can reduce several steps to a simple press of a key.
02.Erase P One-touch Erase the programming in a programmable one-touch key. — 3.45
5.F-Code Box 01.Set F-Code Box Create the F-Code box. — 3.28
02.Erase F-Code Box Erase an empty F-Code box. — 3.35
6.Batch Tx 01.Set Batch Box Create the Batch box. — 3.12
02.Erase Batch Box Erase an empty batch box. — 3.14
7.Scan Box*
4
01.Set Scan Box Create the Scan box. — —
02.Erase Scan Box Erase an empty scan box. — —
8.Internet Fax*
5
01.TCP/IP Set the TCP/IP address. — —
02.MAC Address Enter the Media Access Control Address for network card. — —
03.Default Relay Setting of relay box. — —
4. Doc. Management 1.Store Document 01.Polling Document Store the document to be retrieved by other fax machine. — 3.15
02.F-Code Document Store the document to be retrieved by other F-Code compatible — 3.32
fax machine.
2.Erase Document 01.Polling Document Erase stored document for polling transmission. — 3.16
02.F-Code Document Erase stored document in the F-Code box. — 3.33
03.Batch Tx Document Erase stored document in the Batch box. — 3.14
04.Scan Box Document*4Erase stored document in the Scan box. — —
3.Print Document 01.Polling Document Print the stored document for polling transmission. — 3.16
02.F-Code Document Print the stored document in the F-Code box. — 3.33, 3.34
03.Batch Tx Document Print the stored document in the Batch box. — 3.13
04.Security Rx Document Print the fax received document during Security reception (and
return to your machine to normal reception mode until the next — 3.47
time).
05.
Com. Stored Document
Print the stored document for delayed transmission. — 2.7
14
*4: This option appears only if the optional printer controller has been installed. For details see the operating instructions included with the printer controller kit.
*5: This option appears only if the optional Internet fax kit has been installed. For details see the operating instructions included with the Internet fax kit.
Page 15

15
Level one function Level two function Level three function Summary of setting Default setting Page
5.Print 1.List Print 01.Function List Print a list of your machine’s functions. — 1.13
02.User Settings Print a list of your machine settings. — 4.10
03.Journal Print the activity journal manually. — 3.22
04.Commands List Print a list of the delayed commands. — 2.7
05.One-Touch List Print a list of the one-touch dial keys. — 3.3
06.Speed Dial List Print a list of the speed-dial numbers. — 3.5
07.Group List Print a list of the group numbers. — 3.7
08.Block Junk Fax List Print a list of the blocked numbers. — 3.51
09.Cover Page Print a cover page. — 3.25
10.Dept. Time List Print a total communication time and printed pages of each
— 3.53
department code.
11.P One-Touch List Print a list of the programmable one-touch keys. — 3.45
12.F-Code Box List Print a list of F-Code boxes. — 3.32
13.F-Code Doc. List Print a list of the document stored in the F-Code boxes. — 3.32
14.Batch Box List Print a list of Batch boxes. — 3.13
15.Batch Doc. List Print a list of the document stored in the batch boxes. — 3.13
16.Macros List Print a list of Macro keys. — 3.21
17.Scan Box List*
4
Print a list of Scan boxs. — —
2.Printer Function*401.Status Page Print all the status and configuration of the printer. — —
02.Font List Print the list of all PCL fonts currently installed in the printer. — —
03.NIC Status*
3
Print the NIC (network interface card) settings. — —
6. PC-FAX Commands*21.PC-FAX 01.PC-FAX Scan Scanning a document into the PC. — —
02.PC-FAX Initial Initializing your machine. — —
03.Set RS-232C Setting of the RS-232C parameters. — —
9. User Install Set-up the following settings:
• Language on the LCD and Lists English
• Current Day and Time —
• Automatically Daylight saving time Off
• Fax reception mode Fax Ready 1.18
• Phone dialing type Tone
• Subscriber ID (your fax phone number) —
• Your TTI (your name) —
• TTI select —
• Time for the machine to enter the sleep mode 5 minutes
15
*2: This option appears only if the optional RS-232C interface has been installed.
*3: This option appears only if the optional NIC (network interface card) has been installed.
*4: This option appears only if the optional printer controller has been installed. For details see the operating instructions included with the printer controller kit.
Page 16

Muratec America, Inc.
6400 International Parkway
Suite 1500
Plano, Texas 75093
http://www.muratec.com
© Muratec America, Inc. 2001 Printed in China.
MAI order number: OMF360QRG
MML item number: D94-90020-60
 Loading...