

Page 1
USER GUIDE for
RPR 530 SERIES
RADIO PAGERS
9261-0366 issue 4
Page 2

FCC & IC STATEMENT
OF COMPLIANCE
This device complies with FCC Part 15 & IC RSS
210 regulations. Operation is subject to the
following two conditions: (1) this device may not
cause harmful interference and (2) this device must
accept any interference received, including
interference that may cause undesired operation.
Unauthorised modification to this equipment, will
void the user’s authority to continue to operate the
device under the terms of the above regulations.
Page 3

IMPORTANT USER INFORMATION
MAIN VARIANTS OF 530 SERIES RADIO PAGERS
T - Tone and Speech version - no display
D - Tone and Display version - no speech
RADIO RECEPTION
Your pager has been designed to give optimum
performance within the coverage area of the
transmitter system. In common with any radio system
there may be areas of poor coverage where the signal
reception is not always possible.
SAFETY
As a normal safety precaution your pager should not
be carried into areas where explosive gases or dusts,
etc. may be present. Intrinsically Safe pagers are
available from Multitone for use in hazardous areas
and details of these are available from your distributor.
CARE OF YOUR PAGER
Protect your pager from liquids, strong magnetic fields
and extreme temperatures. Please do not leave your
pager exposed to strong sunlight inside cars or on
window ledges.
Page 4
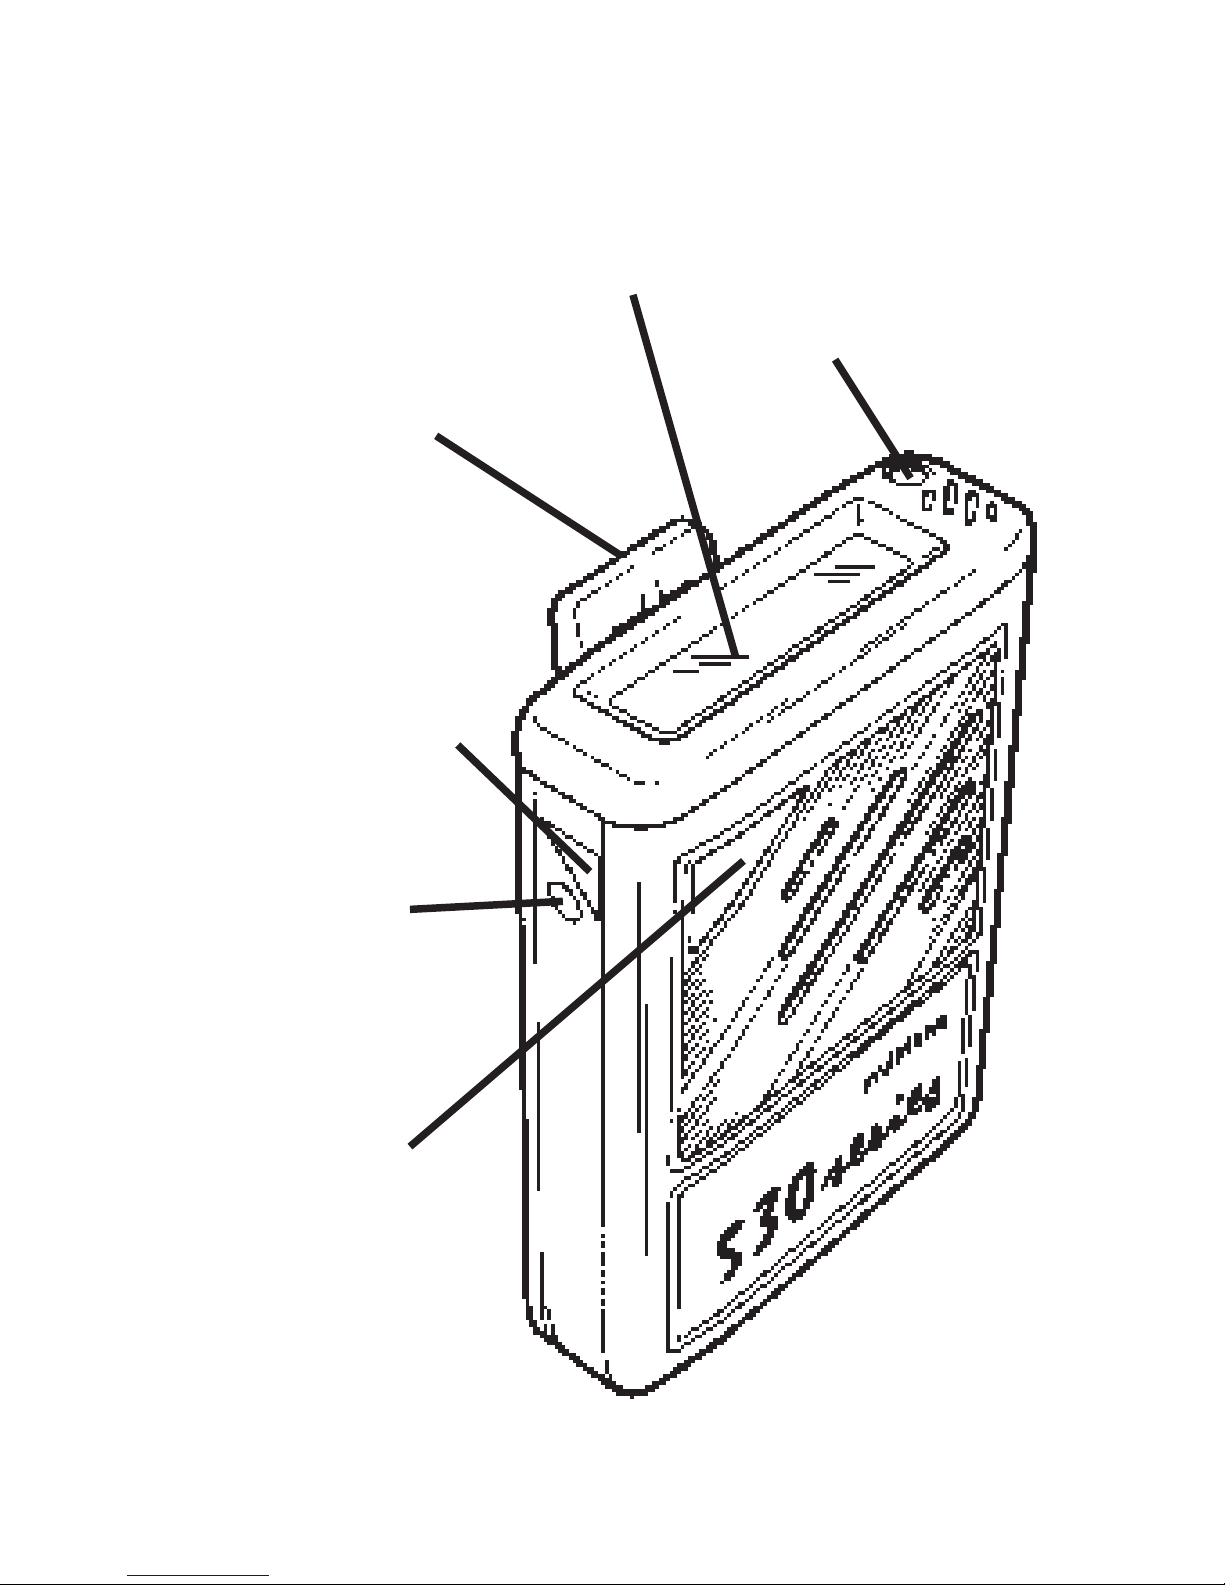
CONTROLS AND DISPLAY
DISPLAY
ALERT LAMP
GRIPTITE CLIP
MUTE BUTTON
OFF BUTTON
ON/CANCEL
MEMORY
RECALL (OCR)
BUTTON
Page 5

HOW TO GET THE BEST FROM
YOUR NEW MULTITONE RADIO
PAGER
SWITCHING ON
To switch on your pager press the On/Cancel/Recall
(OCR) BUTTON. A beep and lamp self-test routine
follows. Next, the pager displays its full address
followed by an optional switch-on message. When the
display shows “ON” or “--:--”, and then goes blank - in
this state it is ready to receive calls.
SWITCHING OFF
To switch off your pager, press the recessed Off button.
RECEIVING A TONE ALERT CALL
The red alert lamp flashes, an alert tone sounds (not in
mute mode) and the pager will vibrate, if this option is
fitted. The display shows the call and the beep code
number. Cancel the alert by pressing the OCR button.
RECEIVING A CALL WITH A DISPLAY MESSAGE
For calls with a short message of up to 14 characters
the display shows the message for the full alert
duration. For longer messages the display shows the
whole message in sections.
(Not applicable to the 530T variants)
Page 6

RECEIVING A CALL WITH A SPEECH
MESSAGE
Your display acts as for a call with a display message
except that a few seconds after the alerting starts, the
speech channel automatically opens and you hear a
spoken message. The speech channel is closed, after
a predetermined time or can be manually closed by
pressing the OCR button.
(Not applicable to the 530D variants)
Page 7

STATUS MESSAGES
Your pager is equipped to display its current status to
you on demand from a blank display. Press the OCR
button once. The display will then show status
information, e.g:
X New Messages - X new messages are stored in
memory
Out-of-Range - The pager is not within range of
receiving calls
Low Battery - Battery is low and needs replacing
or recharging if rechargeable
batteries are being used
HH:MM - Hours and minutes shown on the
pager. An optional facility
Mute - Indicates the pager is in mute
mode
On - The pager is switched on and
there is no other status
information
(Not applicable to 530T variants)
Page 8

MEMORY
Your pager automatically stores up to four messages.
To recall messages from memory press the OCR button
twice from a blank display. The most recent message is
displayed prefixed by ‘M1’ or the time at which it was
received. When the memory is full a new message
erases the oldest one. Each call is designated new
status when first received. This is removed by
cancelling alert sequence (press the OCR button during
the alert period) or by accessing the call from memory.
“X New Messages” on display shows the number of
messages with ‘new’ status. This prompts your attention
to unacknowledged calls.
Successive presses of the OCR button recall other
messages from memory on a last-in first-out basis.
(Not applicable to 530T variants)
Page 9

MUTE ALERT MODE
Your pager can receive calls and alert you discreetly
(without audible beep) when in mute alert mode. To
change to mute alert mode press and hold the mute
button until two pips are heard. If your pager is fitted
with a display it will show “Mute” to confirm this change.
Release the mute button. To return to normal alert
mode press and hold the mute button until you hear
two pips followed by a single pip and the display has
changed from “Mute” to “On”.
DISPLAY REVERSAL
The direction of messages displayed can be reversed
for correct viewing from the wearing position
(top pocket or belt). To achieve this, press the mute
button during the display of a message during memory
recall.
(Not applicable to 530T variants)
Page 10

REVIEW DIRECTORY OF ALPHA
MESSAGES
Any Alpha message your pager is programmed to
receive can be reviewed with ease. You may wish to do
this if you want to send an Alpha message to another
pager user on your site.
Holding the OCR button, press the mute button once,
then release both buttons. The display shows the
directory of Alpha messages, together with the assigned
beep code and two digit message number. After the first
message is shown press cancel to step to the next Alpha
message and follow this through until your selection of
Alpha message is complete. Your pager is able to
receive calls while reviewing Alpha messages.
(Not applicable to 530T variants)
Page 11

OPTIONAL FEATURES
Your pager may be fitted with the following options:
Group Alert
Your pager may be operated as part of a team if so,
any call to your group alerts you audibly even if you
have elected to have the pager in mute mode.
Extended Alert
This is an additional alert sequence which acts as a
reminder if the original alert is not cancelled. The red
lamp flashes to indicate a call not cancelled and two
short pips are sounded every two minutes. The pager
vibrates if the option is fitted. Press the OCR button to
stop extended alert and display the most recently
received message.
Escalating Alert
The escalating alert mode allows the tone alert to start
at a low level and increase in volume so the user can
stop the alert before it gets louder by pressing the OCR
button once.
Vibrate Alert
This option provides an additional discreet alert in the
form of a vibration which alternates on and off for two
seconds throughout the alert period. The vibrating part
is a module which sits in the battery compartment in
place of the standard ‘AA’ cell along with an ‘N’ size
battery.
Page 12

Out-of-Range
If you enter areas of poor radio coverage on your site
the pager display will advise you by indicating
“Out-of-Range” and optionally by a warning buzz.
Pressing OCR when the pager is out-of-range causes a
warning buzz to be heard.
Time-of-Day
The display shows current Time-of-Day as one of the
standard messages
(Not applicable to 530T variants)
Continuous Display-On
Your pager may be fitted with this option. Here the
pager display shows current status continuously.
(Not applicable to 530T variants)
Page 13

GRIPTITE CLIP
The pager is fitted with a detachable Griptite clip
which secures firmly to thick or thin material. To
tighten the clip move the slider on the clip towards
the top of the pager.
Page 14

BATTERY
Use high capacity alkaline or Nickel Cadmium cells in
your pager (or ‘N’ type if a vibrate option is fitted). To
obtain the maximum life from your battery, cancel
alerts quickly and switch off your pager when it is not
in use. If your pager is not to be used for a month or
more, you should remove your battery.
BATTERY REPLACEMENT
A low battery indication is triggered when the battery
voltage drops below a predetermined level. You will
clearly hear modulated beep tones when your pager is
called when the battery is low.
(This applies to all 530 variants.)
The display will show ‘Low Battery’ when you press
the OCR button to query status of pager.
(Not applicable to 530T variants.)
Page 15
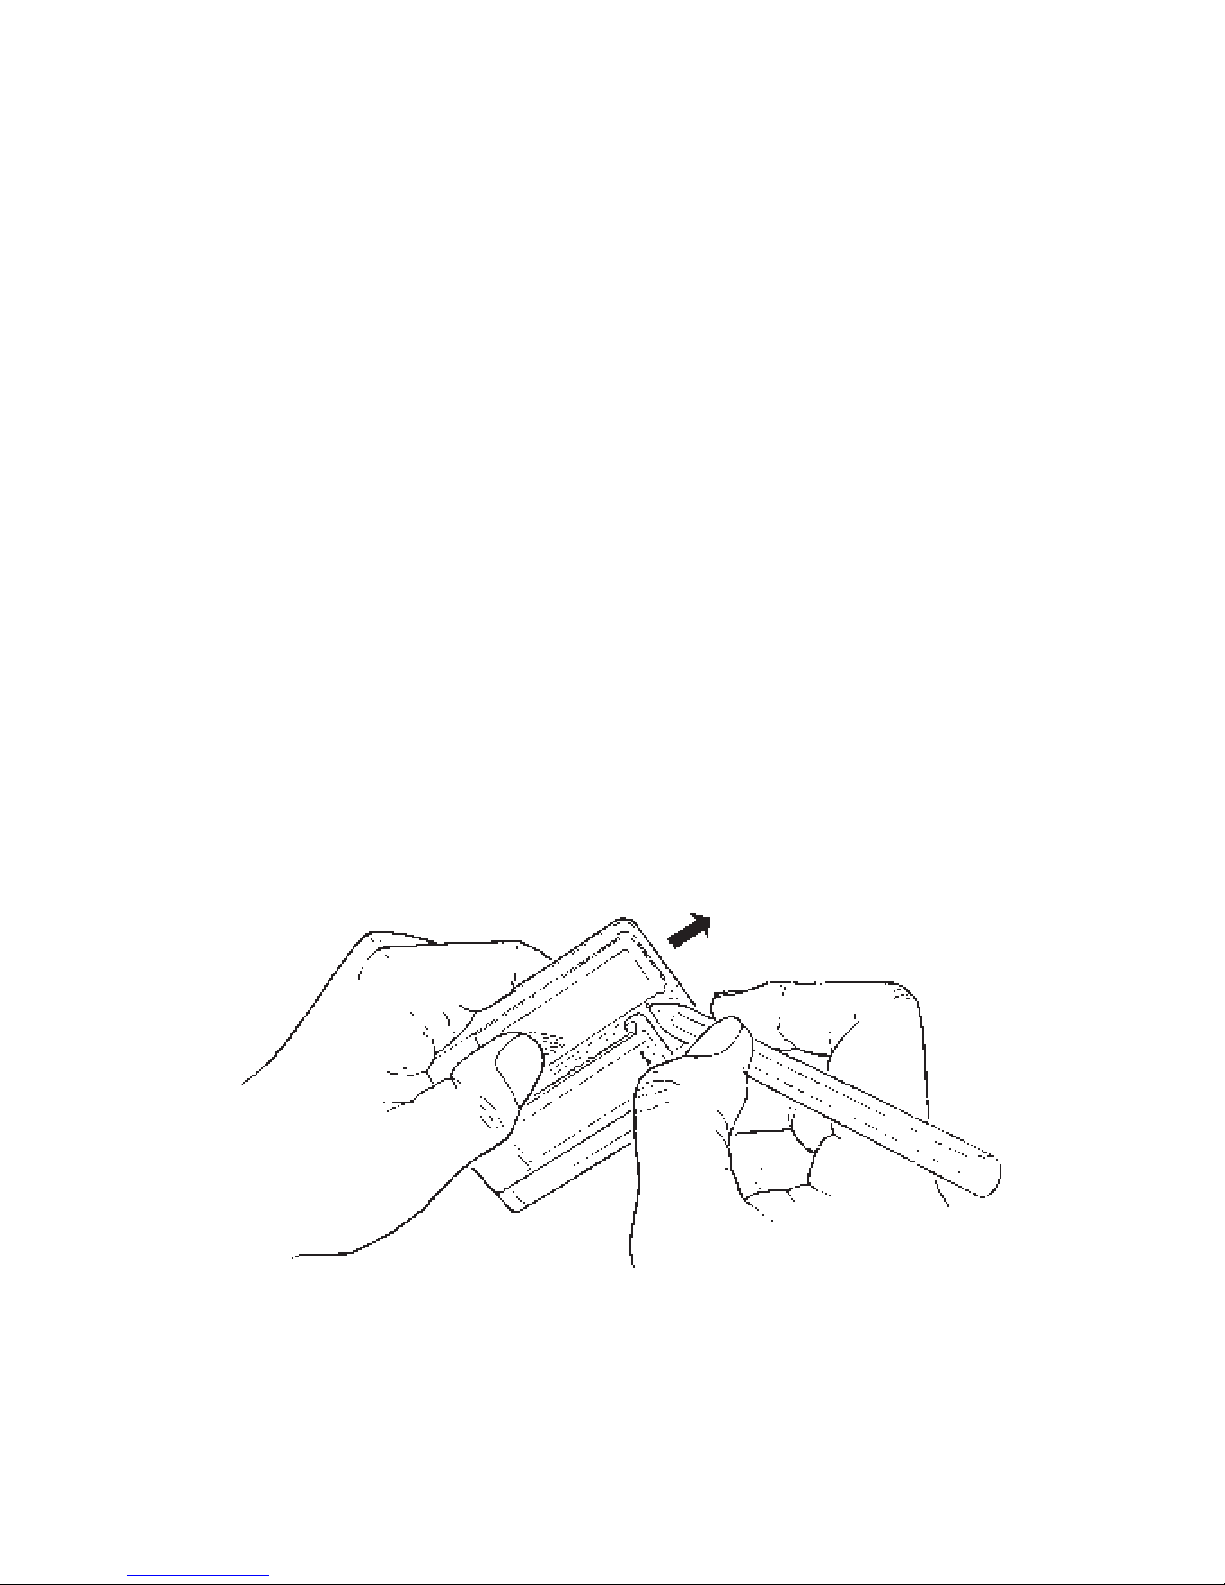
The battery replacement procedure is as follows:
1. Switch the pager off by pressing the recessed Off
button.
2. Hold the pager as shown and insert a small
pointer in the hole.
3. While pressing this pointer down, slide the battery
door cut out with your thumb.
4. Remove the old battery, fit a new one with ‘+’
terminal facing towards the bottom of the case.
5. Slide the battery door back in position along the
moulded slots in the case.
Page 16

 Loading...