

Page 1
™
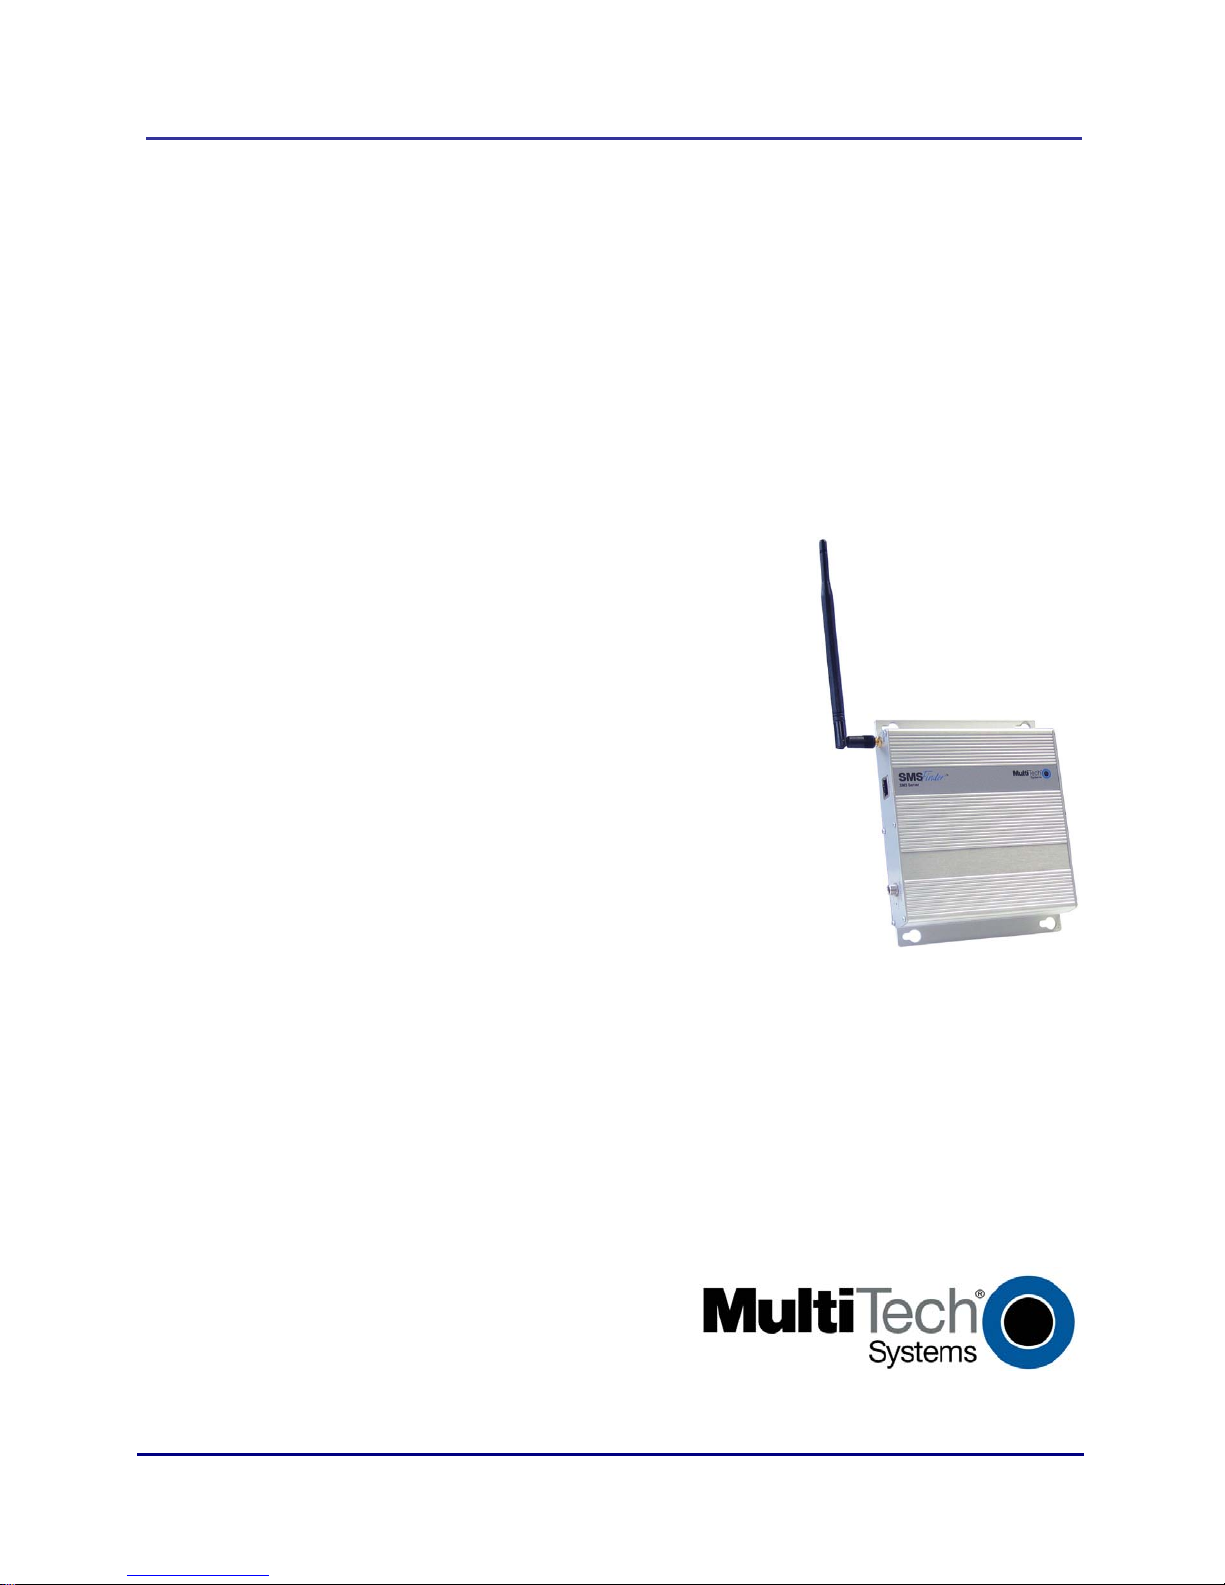
SMSFinder
Turnkey SMS Server
Model SF100-G
User Guide for System Administrators
Page 2

Copyright and Technical Support
SMSFinder
User Guide for Administrators
Model: SF100-G
Document S000451B, Revision B
Copyright © 2008
This publication may not be reproduced, in whole or in part, without prior expressed written permissio n from MultiTech Systems, Inc. All rights reserved.
Multi-Tech Systems, Inc. makes no representations or warranty with respect to the contents hereof and specifically
disclaims any implied warranties of merchantability or fitness for any particular purpose. F urthermore, Multi-Tech
Systems, Inc. reserves the right to revise this publication and to make changes from time to time in the content hereof
without obligation of Multi-Tech Systems, Inc. to notify any person or organization of such revisions or changes.
Revision Date Description
A 02/08/08 Initial release.
B 07/07/08 Updated for software 1.20 release.
08/07/08 Add the End User License Agreement.
Trademarks
SMSFinder is a trademark of Multi-Tech Systems, Inc. The Multi-Tech logo is a registered trademark of Multi-Tech
Systems, Inc.
World Headquarters
Multi-Tech Systems, Inc.
2205 Woodale Drive
Mounds View, Minnesota 55112
Phone: 763-785-3500 or 800-328-9717
Fax: 763-785-9874
Internet Address: http://www.multitech.com
Technical Support
Country By E-Mail By Phone
Europe, Middle East, Africa: support@multitech.co.uk +(44) 118 959 7774
U.S., Canada, all others: support@multitech.com (800) 972-2439 or +763-717-5863
Multi-Tech Systems, Inc. SMSFinder User Guide for System Administrators (Document S000451B) 2
Page 3

Table of Contents
Contents
Chapter 1 – Introduction and Product Description ................................................................................. 6
Safety Warnings ..................................................................................................................................... 6
Ethernet Port Caution ....................................................................................................................... 6
Handling Precautions ....................................................................................................................... 6
Ship Kit Contents .................................................................................................................................... 6
SMSFinder Documentation .................................................................................................................... 7
Front and Back Panels ........................................................................................................................... 8
Front Panel ....................................................................................................................................... 8
Front Panel LEDs and Other Features ............................................................................................ 8
Install the SIM Card .......................................................................................................................... 8
Signal Strength LEDs ....................................................................................................................... 9
Back Panel ..................................................................................................................................... 10
Back Panel Connectors.................................................................................................................. 10
Panel Mounting .............................................................................................................................. 10
Technical Specifications ....................................................................................................................... 11
Chapter 2 – Getting Started ...................................................................................................................... 12
Cabling Your SMSFinder ...................................................................................................................... 12
SMSFinder Cabling ........................................................................................................................ 12
Establishing TCP/IP Communication.................................................................................................... 13
Obtaining and Activating a Wireless Account ....................................................................................... 16
Important Note About Service Provider Fees ................................................................................ 16
Direct Communication to the Cellular Modem ............................................................................... 16
Using AT Commands to Check Network Registration and Roaming Status ................................. 16
Chapter 3 – SMSFinder Basics and the Setup Wizard .......................................................................... 17
Starting the SMSFinder ........................................................................................................................ 17
Open a Web Browser ..................................................................................................................... 17
Login............................................................................................................................................... 17
Web Interface Opens ..................................................................................................................... 17
Navigating the Screens ........................................................................................................................ 18
Save & Restart Button Under Menu Bar ........................................................................................ 18
Sub-Menus ..................................................................................................................................... 19
Table of Menus and Sub-Menus .................................................................................................... 19
Table of Menus and Sub-Menus (continued) ................................................................................. 20
Using the SMSFinder Wizard Setup .............................................................................................. ....... 21
Use the Wizard Setup for Quick Configuration .............................................................................. 21
Benefits of Using the Wizard Setup ............................................................................................... 21
Open the Wizard Setup Screen ..................................................................................................... 21
Save & Restart ............................................................................................................................... 22
Chapter 4 – Using the SMSFinder's Web Interface ................................................................................ 23
Administration ....................................................................................................................................... 23
Administration > System Setup ...................................................................................................... 23
Administration > SNTP Client ........................................................................................................ 25
Administration > Administrative Access ......................................................................................... 27
Administration > Admin Access > Allowed Networks .................................................................... 28
Administration > Remote Syslog .................................................................................................... 28
Administration > Tools ................................................................................................................... 28
Administration > Factory Defaults .................................................................................................. 29
Save & Restart ............................................................................................................................... 29
Network Setup ...................................................................................................................................... 30
Network Setup > IP Settings .......................................................................................................... 30
Multi-Tech Systems, Inc. SMSFinder User Guide for System Administrators (Document S000451B) 3
Page 4

Table of Contents
Network Setup > Cellular Modem .................................................................................................. 31
Save & Restart ............................................................................................................................... 31
SMS Services ....................................................................................................................................... 32
SMS Services > Address Book ...................................................................................................... 32
SMS Services > Groups ................................................................................................................. 34
SMS Services > International Number ........................................................................................... 35
SMS Services > Send SMS Users ................................................................................................. 35
SMS Services > SMS Settings ....................................................................................................... 36
SMS Services > Send SMS ........................................................................................................... 36
SMS Services > API ....................................................................................................................... 37
SMS Services > Inbox .................................................................................................................... 39
SMS Services > Outbox ................................................................................................................. 39
Save & Restart ............................................................................................................................... 39
Triggers ................................................................................................................................................. 40
Triggers > Authentic List ................................................................................................................ 40
Triggers > Broadcast Triggers ....................................................................................................... 40
Triggers > Action Triggers .............................................................................................................. 42
Triggers > Pre-Configured SMS ..................................................................................................... 44
Save & Restart ............................................................................................................................... 44
Utilities .................................................................................................................................................. 45
Utilities > Backup ........................................................................................................................... 45
Utilities > Firmware Upgrade .......................................................................................................... 45
Save & Restart ............................................................................................................................... 45
Import & Export Address Book ............................................................................................................. 46
Import & Export Address Book > Import ........................................................................................ 46
Import & Export Address Book > Export ........................................................................................ 48
Save & Restart ............................................................................................................................... 48
Statistics & Logs ................................................................................................................................... 49
Statistics & Logs > System Information ......................................................................................... 49
Statistics & Logs > SMS Statistics ................................................................................................. 50
Statistics & Logs > Log Traces ...................................................................................................... 51
Chapter 5 – The Non-Administrative User Interface .............................................................................. 52
Introduction ........................................................................................................................................... 52
Web Interface Available to Non-Administrative Users .......................................................................... 52
How Non-Administrative Users Login ............................................................................................ 52
Chapter 6 – SMS Examples ...................................................................................................................... 54
Check to See if the SIM Card Is Installed Correctly and Activated ...................................................... 54
Creating a Broadcast Message for Future Use .................................................................................... 56
Chapter 7 – Troubleshooting ................................................................................................................... 57
SMSFinder Troubleshooting ................................................................................................................. 57
Appendix A – Application Programming Interface (API) ...................................................................... 59
1. Introduction ................................................................................................................................... 59
1.1 Purpose ................................................................................................................................... 59
1.2 Scope ...................................................................................................................................... 59
2. Acronyms and Definitions ............................................................................................................. 59
3. Overview of Send SMS API .......................................................................................................... 59
3.1 HTTP Send API ...................................................................................................................... 60
3.2 TCP Send API ........................................................................................................................ 66
4. Receive SMS API...................................................................................................................... 67
4.1 HTTP Receive API ....................................................................................................................... 68
4.2 TCP Receive API ...................................................................................................................... 70
Multi-Tech Systems, Inc. SMSFinder User Guide for System Administrators (Document S000451B) 4
Page 5

Table of Contents
Appendix B – Table of Commonly Supported Subnet Addresses ....................................................... 71
Appendix C – Antenna for the SMSFinder .............................................................................................. 73
RF Specifications .................................................................................................................................. 73
Antenna Specifications ......................................................................................................................... 73
GSM/EGSM Antenna Requirements/Specifications ...................................................................... 73
Antennas Available from Multi-Tech Systems, Inc. ....................................................................... 73
PTCRB Requirements Note ........................................................................................................... 73
FCC Requirements Note ................................................................................................................ 73
Appendix D – Warranty and Repairs ............................................................................................. .......... 74
Appendix E – Waste Electrical and Electronic Equipment Directive (WEEE) ..................................... 76
Appendix F – End User License Agreement (EULA) ............................................................................. 77
Index ........................................................................................................................................................... 79
Multi-Tech Systems, Inc. SMSFinder User Guide for System Administrators (Document S000451B) 5
Page 6

Chapter 1 – Introduction and Product Description
Chapter 1 – Introduction and
Product Description
The Multi-Tech SMSFinder™ is a turnkey SMS (Short Message Services) server that empowers businesses with
the ability to broadcast and receive SMS text messages with a click of a button. The ready-to-use solution simply
plugs into the Ethernet network and connects to the wireless network via an integrated quad-band GSM modem.
Now anyone on the network can broadcast messages allowing organizations to reach clients, subscribers,
members and prospects in real-time via SMS.
Safety Warnings
Ethernet Port Caution
The Ethernet port is not designed to be connected to a Public Telecommunication Network.
Handling Precautions
All devices must be handled with certain precautions to avoid damage due to the accumulation of static
charge. Although input protection circuitry has been incorporated into the devices to minimize the effect of this
static build up, proper precautions should be taken to avoid exposure to electrostatic discharge during
handling and mounting.
Caution: Maintain a separation distance of at least 20 cm (8 inches) between the transmitter’s
antenna and the body of the user or nearby persons. The modem is not designed for, nor
intended to be, used in applications within 20 cm (8 inches) of the body of the user.
Ship Kit Contents
The SMSFinder ship kit contains the following items:
• One SMSFinder
• Power Supply
• RJ-45 Ethernet Cable
• Cellular Antenna (not included with all models)
• The Quick Start Guide
• One SMSFinder CD which contains SMSFinder documentation in Acrobat PDF format and a link to the Adobe
Web site from which you can download Acrobat Reader
If any of the items is missing or damaged, please contact Multi-Tech Systems, Inc.
Multi-Tech Systems, Inc. SMSFinder User Guide for System Administrators (Document S000451B) 6
Page 7

Chapter 1 – Introduction and Product Description
SMSFinder Documentation
Quick Start Guide
The Quick Start Guide is a shorter version of this User Guide. The Quick Start is included in printed form with your
SMSFinder. The guide provides the necessary information for a qualified person to unpack, cable, and configure
the device for proper operation.
User Guide
The User Guide contains more detail than the Quick Start Guide. If you want easy access to the User Guide, you
can install it from the SMSFinder CD onto your hard drive by clicking Install Manuals on the Installation screen or
downloading the file from our Web site at: http://www.multitech.com
AT Commands
AT commands used to configure this product are published in a separate reference guide and included on the
SMSFinder CD as well as being posted on the Multi-Tech web site. See the GPRS AT Commands Reference
Guide.
Multi-Tech Systems, Inc. SMSFinder User Guide for System Administrators (Document S000451B) 7
Page 8
Chapter 1 – Introduction and Product Description
Front and Back Panels
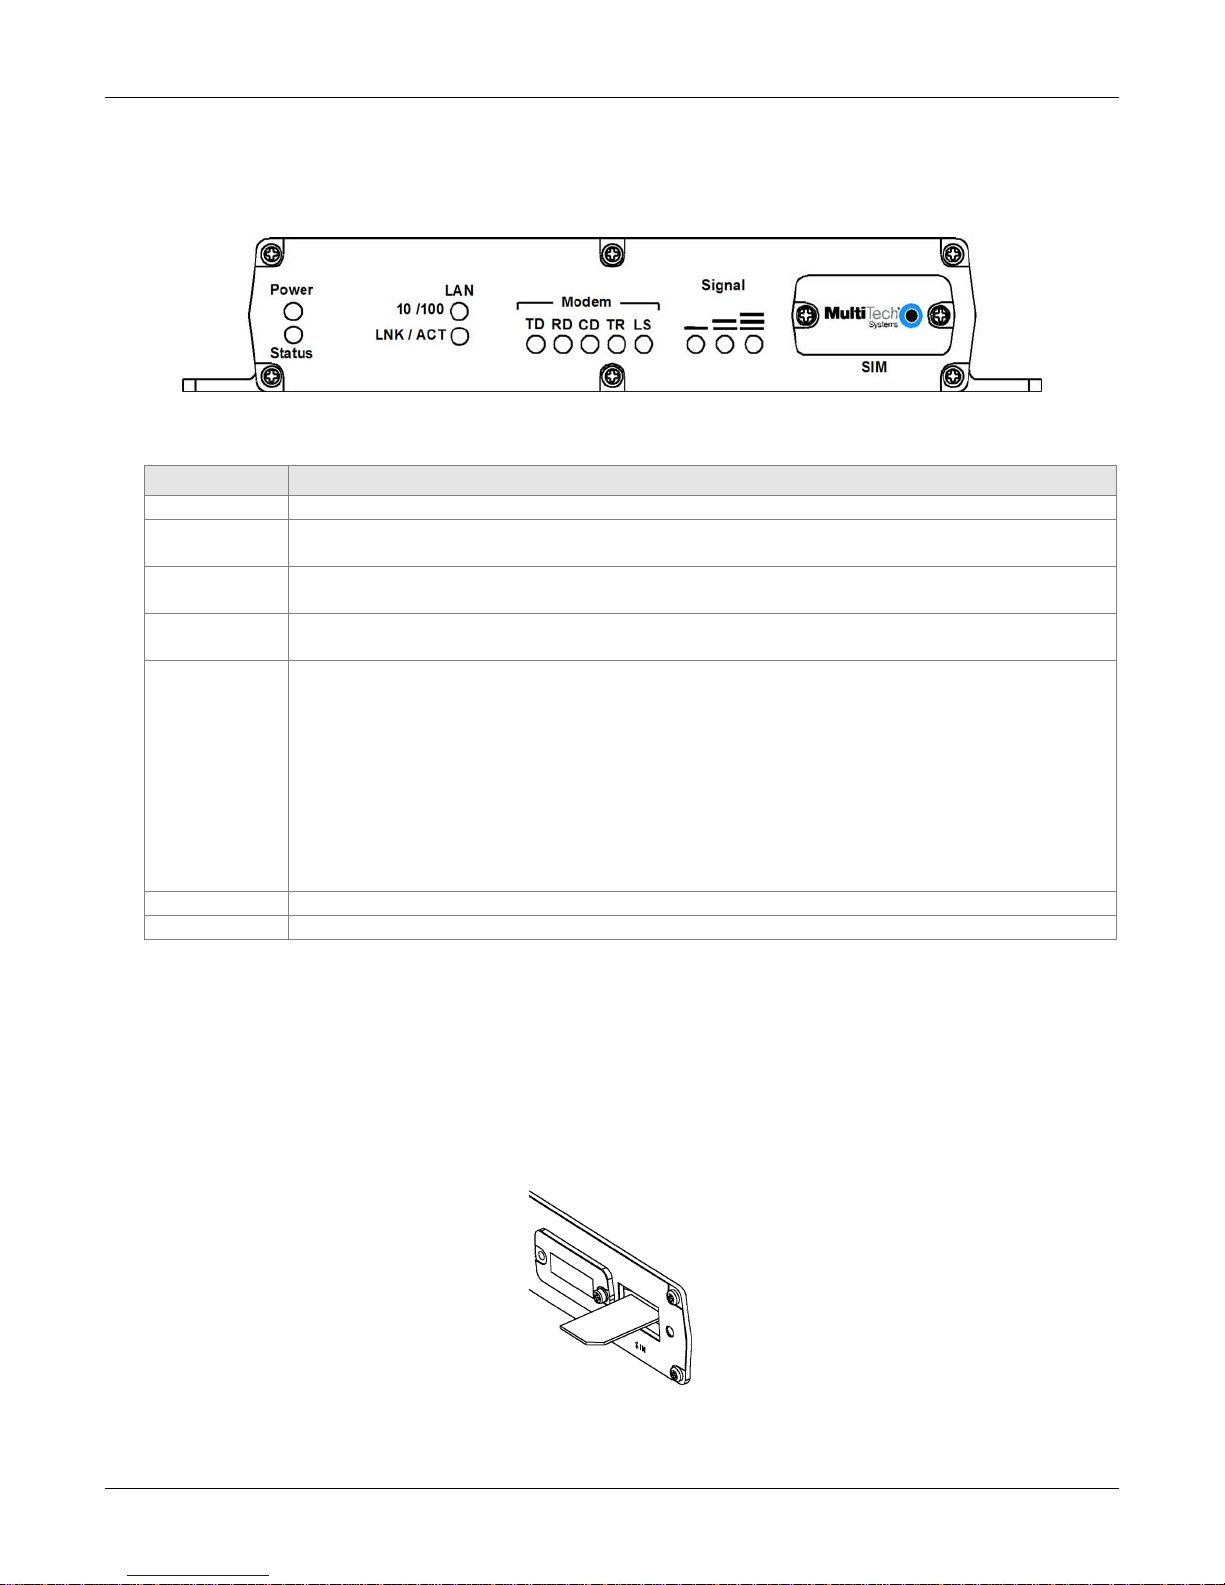
Front Panel
Front Panel LEDs and Other Features
LEDs Description
Power
Status
LAN
10/100
LAN
LNK / ACT
Modem
Signal
SIM
Lights when power is being supplied to the SMSFinder.
When functioning normally, the LED blinks. The LED is a solid light when the SMSFinder is
booting up, saving the configuration, restarting, or updating the firmware.
Lights when a successful connection to the 100BaseT LAN is established. Off when
connected at 10BaseT.
Lights when the LAN port has a valid Ethernet connection.
Blinks when it is receiving or transmitting data.
TD TRANSMIT DATA. This LED blinks when the modem is transmitting data to your
wireless carrier.
RD RECEIVE DATA. This LED blinks when the modem is receiving data from your
wireless carrier.
CD CARRIER DETECT. This LED lights when the modem detects a valid carri er signal
from a wireless carrier.
TR (DATA) TERMINAL READY. This LED lights when the modem is trying to establish
a wireless connection.
LS LINK STATUS. This LED flashes when the network registration is OK.
If the network registration is invalid, the LED will be On/Off.
Indicates the wireless signal strength. See the Signal Strength Chart on the next page.
Location of the SIM card.
Install the SIM Card
A SIM (Subscriber Identity Module) card is required in order for the SMSFinder to operate on a GPRS
network. To install the SIM card:
1. Use a small screwdriver to remove the screw closest to the outside edge of the SMSFinder. Then
swing the SIM slot cover up and over to the left.
2. Insert the SIM card into the SIM card slot. The following graphic shows a partial front panel illustrating
the correct SIM card orientation.
Multi-Tech Systems, Inc. SMSFinder User Guide for System Administrators (Document S000451B) 8
Page 9
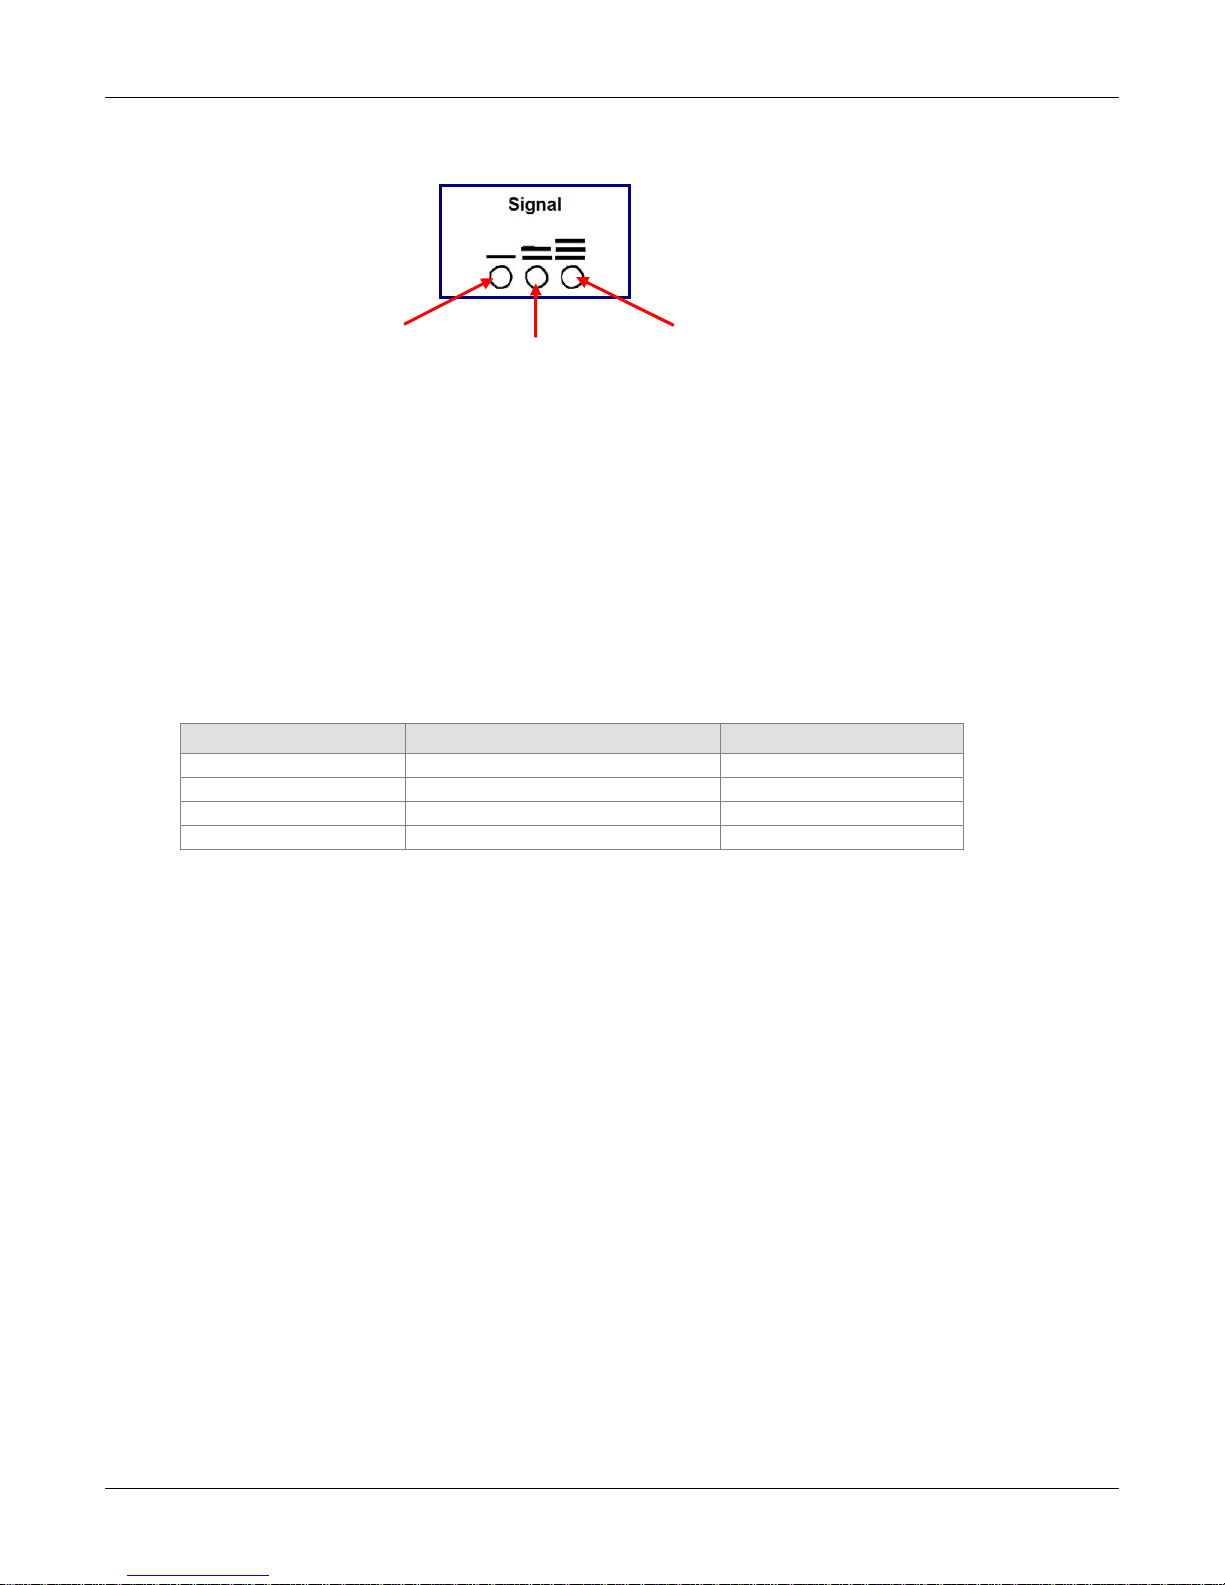
Signal Strength LEDs
1 Bar LED 2 Bar LED 3 Bar LED
Signal Strength LEDs on the Front Panel
Signal Strength
To View Strength
Signal strength can be viewed by using the following AT command: AT+CSQ. This command is the
default setting on the Network Setup > Cellular Modem screen.
AT Command Response Example
+CSQ: xx, 99 (For xx, see the values chart below)
Signal Strength LEDs Reference Table
The following table lists the meaning of the xx values in the signal strength response and explains how
they correspond to the number of LEDs lit for signal strength.
AT+CSQ xx Values Signal Strength LED Bars Signal Strength
0 to 6 No light Very weak signal
7 to 14 1 Bar LED is lit Weak signal
15 to 23 1 Bar and 2 Bar LEDs are lit Stronger signal
24 to 31 1 Bar, 2 Bar, 3 Bar LEDs are lit Strongest signal
Chapter 1 – Introduction and Product Description
Multi-Tech Systems, Inc. SMSFinder User Guide for System Administrators (Document S000451B) 9
Page 10
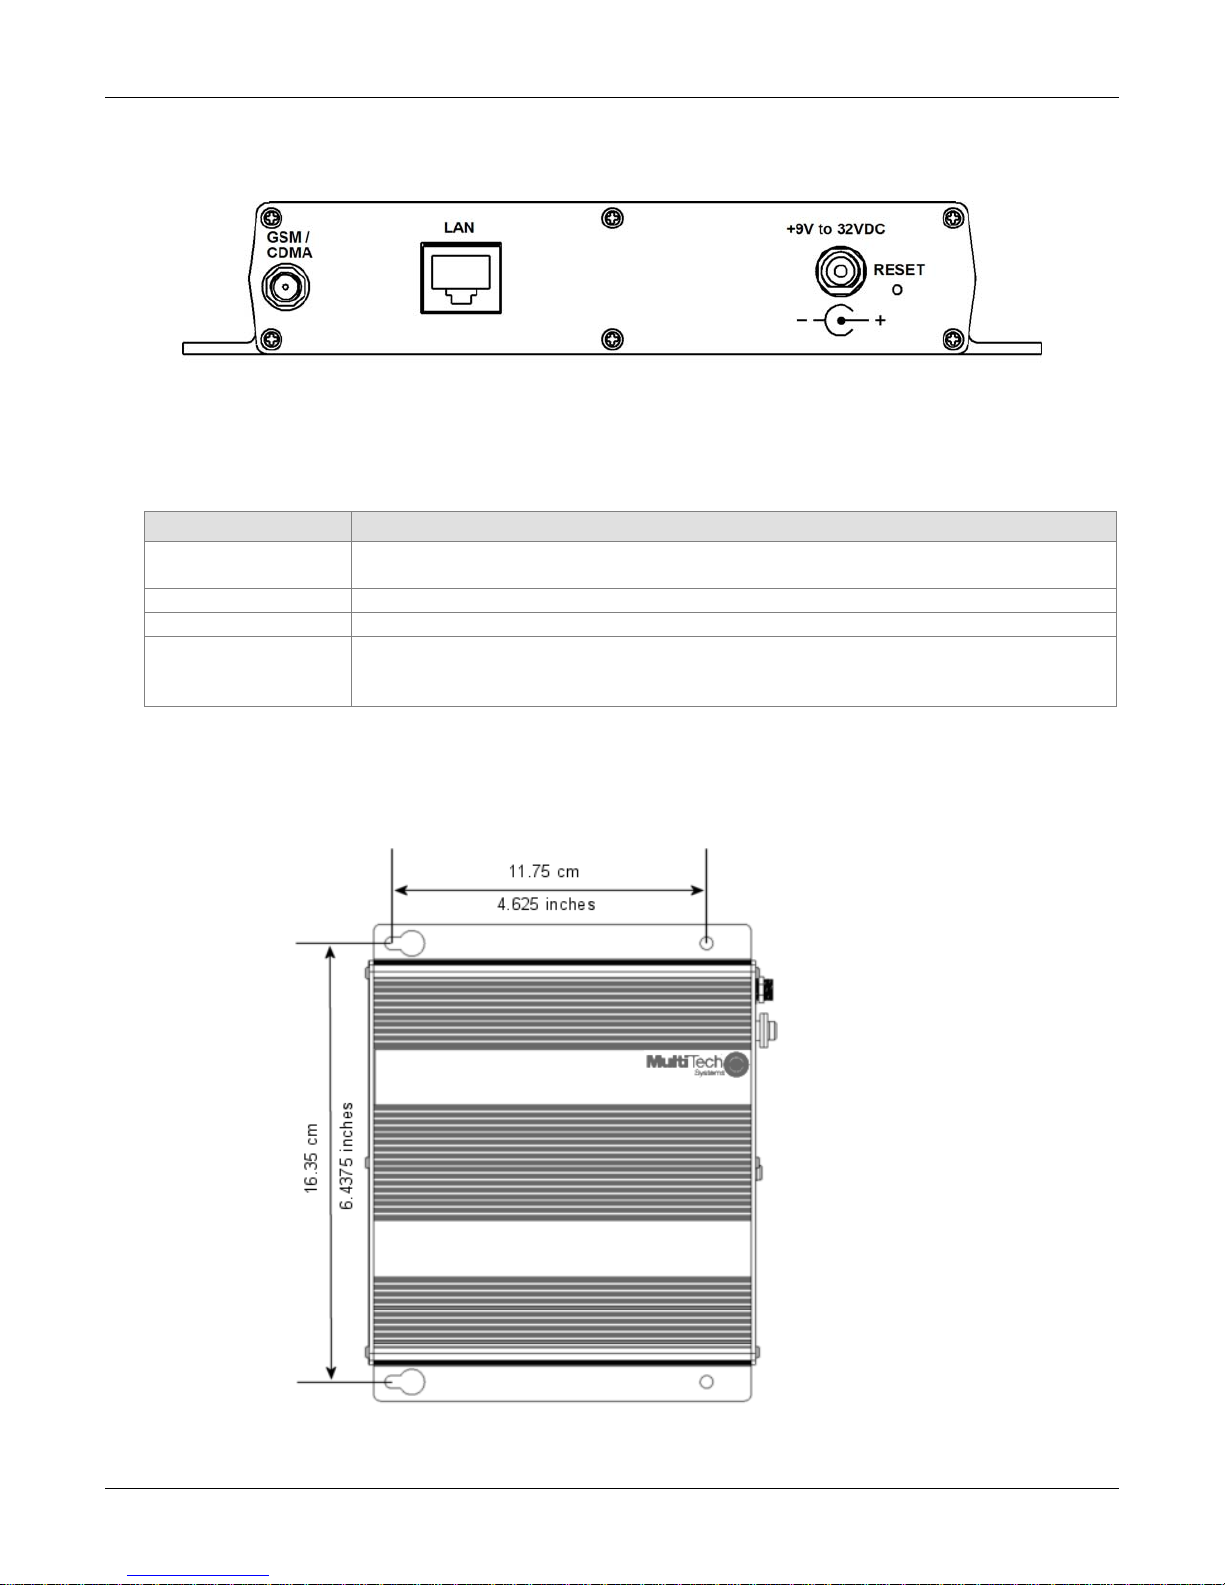
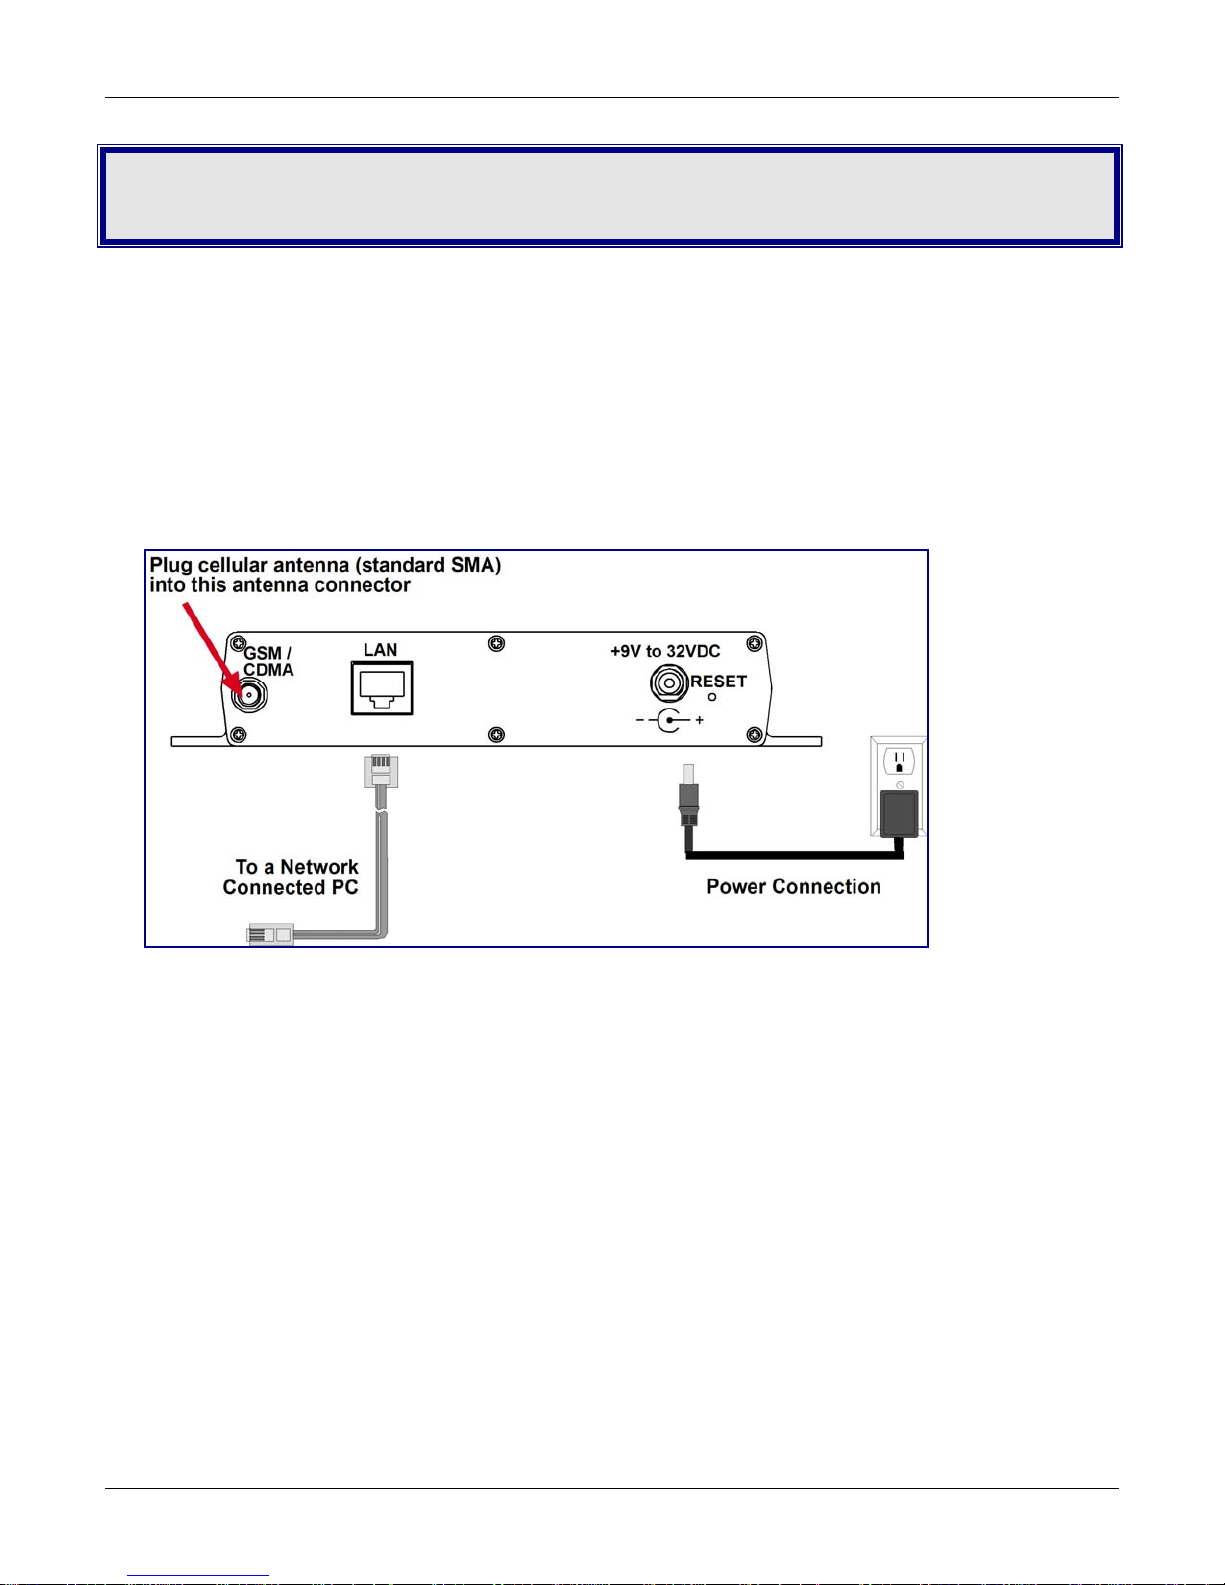
Back Panel
Back Panel Connectors
Connector Description
GSM Antenna
Connector
LAN
+9V to 32VDC
Reset
SMA (female) antenna connector for a quad-band cellular antenna.
Note: The antenna must be attached in order for the SMSFinder to be operational.
The LAN port connects the SMSFinder to your Ethernet network-connected PC.
SMSFinder power source can range from 9 volts to 32VDC.
The Reset button resets the SMSFinder to its factory defaults. Press and hold the
Reset button until the Status LED turns off, and then release it. Do not press this
button unless you want to restore all settings to the factory defaults.
Chapter 1 – Introduction and Product Description
Panel Mounting
The SMSFinder can be panel mounted with screws spaced according to the measurement shown.
Note: Use either #6 or #8 pan head screws for all four mount locations.
Multi-Tech Systems, Inc. SMSFinder User Guide for System Administrators (Document S000451B) 10
Page 11

Chapter 1 – Introduction and Product Description
Technical Specifications
Specifications Description
Hardware Interface
Ports
Wireless Modem Frequencies
Dimensions
Weight
Operating Temperature
Humidity
Hardware Connectors
Power External Power Supply
Certifications and Approvals CE Mark & R&TTE
Warranty
Features
Network: 10/100BaseT
Connector: RJ-45 Ethernet connection
LAN: 1 Port
Quad-band GSM 850/900/1800/1900 MHz
6.4" w x 1.2" h x 6" d
(16.3 cm x 3.0 cm x 15.2 cm)
1.25 lbs.
(.56 kg)
o
+32
to +120o F (0o to +50o C)
Note: UL listed @ +40
25–85% non-condensing
SIM connector: Standard 3V
Antenna: RF antenna 50 ohm SMA (female)
See Appendix B for antenna specifications
Input: 100 ~240V, 0.5A 50-60- Hz
Output: 9VDC, 1.7A
Power Consumption
Maximum power consumption is 0.95A at 9V
EMC:
FCC 2, 15, 22, 24
EN 55022
EN 55024
Safety:
cUL
UL 60950
EN 60950
Network:
PTCRB
2 years
Sends SMS messages to one or multiple individuals, a group, or
multiple groups
Supports up to 20,000 entries in the address book
Supports sorting and searching the address book
Allows importing address books (standard CSV file format)
Allows setup of up to 50 pre-configured SMS messages
Broadcast pre-defined SMS based on receipt of matching SMS and/or
phone number
Setup user accounts with different rights
Integrated quad-band GSM modem
Web-based configuration and management
Flash memory to update firmware with the latest enhancements
Desktop or panel mounting
o
C (limited by the power supply)
Multi-Tech Systems, Inc. SMSFinder User Guide for System Administrators (Document S000451B) 11
Page 12
Chapter 2 – Getting Started
Chapter 2 – Getting Started
Cabling Your SMSFinder
To use your SMSFinder make the appropriate connections to PCs, a cable or xDSL modem, AC power, and the
antenna.
After your device is properly cabled, it must be configured. Basic cabling directions are included below. See
Chapter 3 for basic configurations. See Chapter 4 for advanced configurations.
SMSFinder Cabling
1. Turn the power off on the PCs and the SMSFinder.
2. Plug one end of a RJ-45 cable into the LAN port on the SMSFinder and the other end into the Ethernet
port on a network connected PC.
3. Connect the provided power supply cable to the 9 volt power port on the back of the SMSFinder, and plug
the other end into an AC power outlet.
4. Attach the cellular antenna.
Antenna Notes:
• Be sure to locate this appliance wh ere there is wireless coverage.
• The antenna must be attached in order for the SMSFinder to be operational.
Multi-Tech Systems, Inc. SMSFinder User Guide for System Administrators (Document S000451B) 12
Page 13
Chapter 2 – Getting Started
Establishing TCP/IP Communication
The following directions establish a TCP/IP connection at the workstation so the PC can communicate with the
SMSFinder. The following directions were written using a Windows 2000+ / XP operating system.
Setting a Fixed IP Address
1. Make the SMSFinder connections as described on the previous two pages.
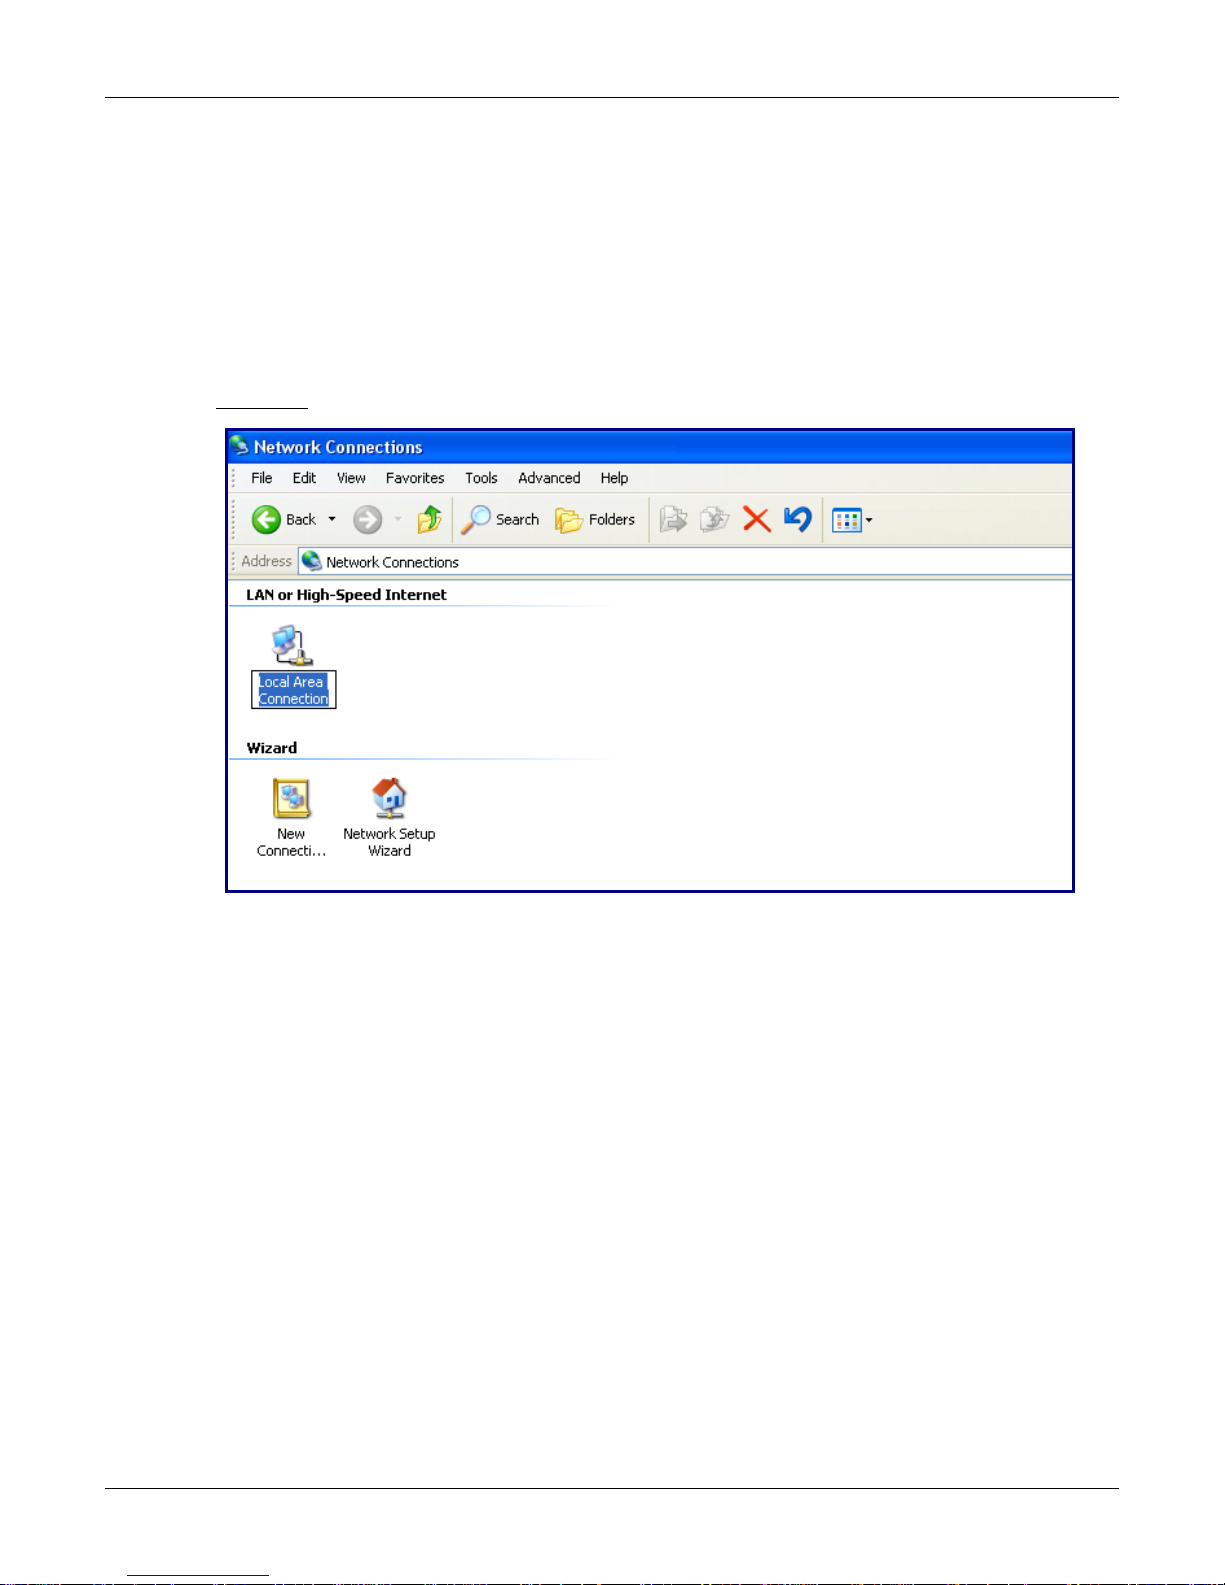
2. Click Start | Settings | Control Panel. Double-click the Network Connections icon.
3. The Network Connections screen displays.
Right-click
the Local Area Connection icon and choose Properties from the drop down li st.
Multi-Tech Systems, Inc. SMSFinder User Guide for System Administrators (Document S000451B) 13
Page 14
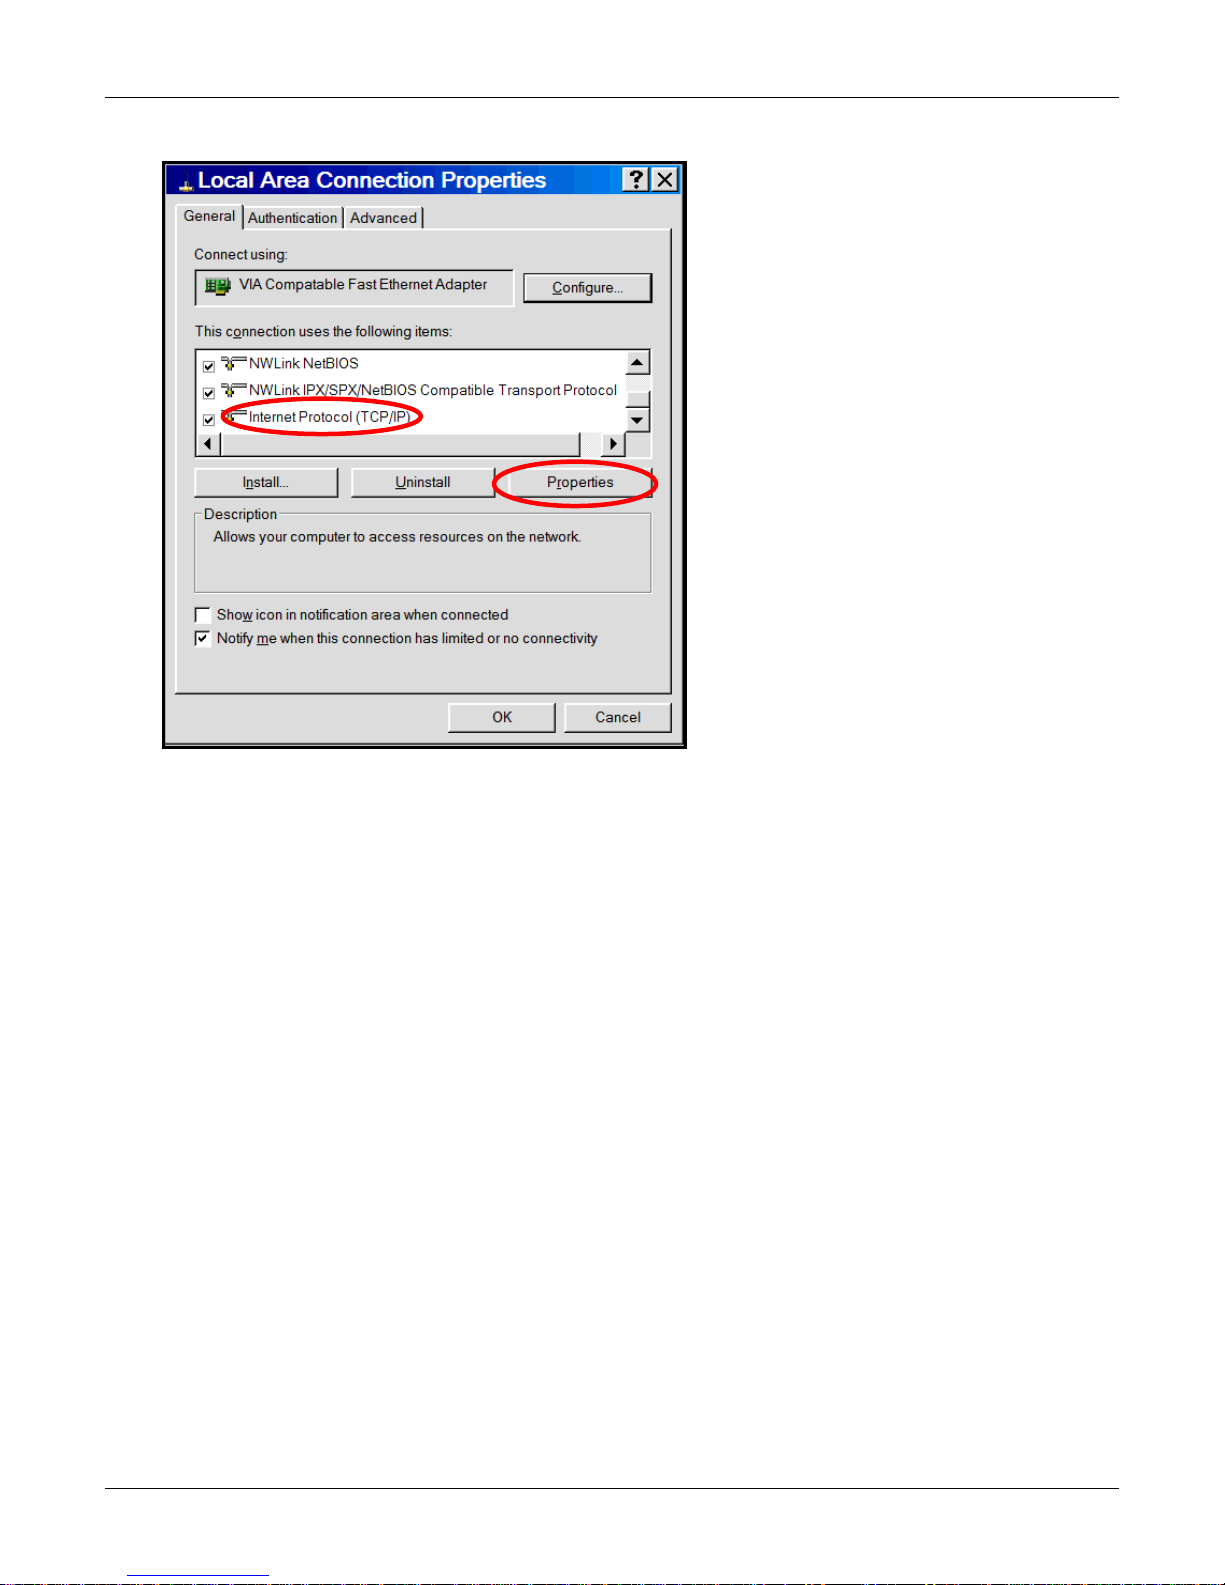
4. The Local Area Connection Properties dialog box displays.
Chapter 2 – Getting Started
• Select Internet Protocol [TCP/IP].
• Click the Properties button. The Internet Protocol (TCP/IP) Properties screen displays.
Multi-Tech Systems, Inc. SMSFinder User Guide for System Administrators (Document S000451B) 14
Page 15
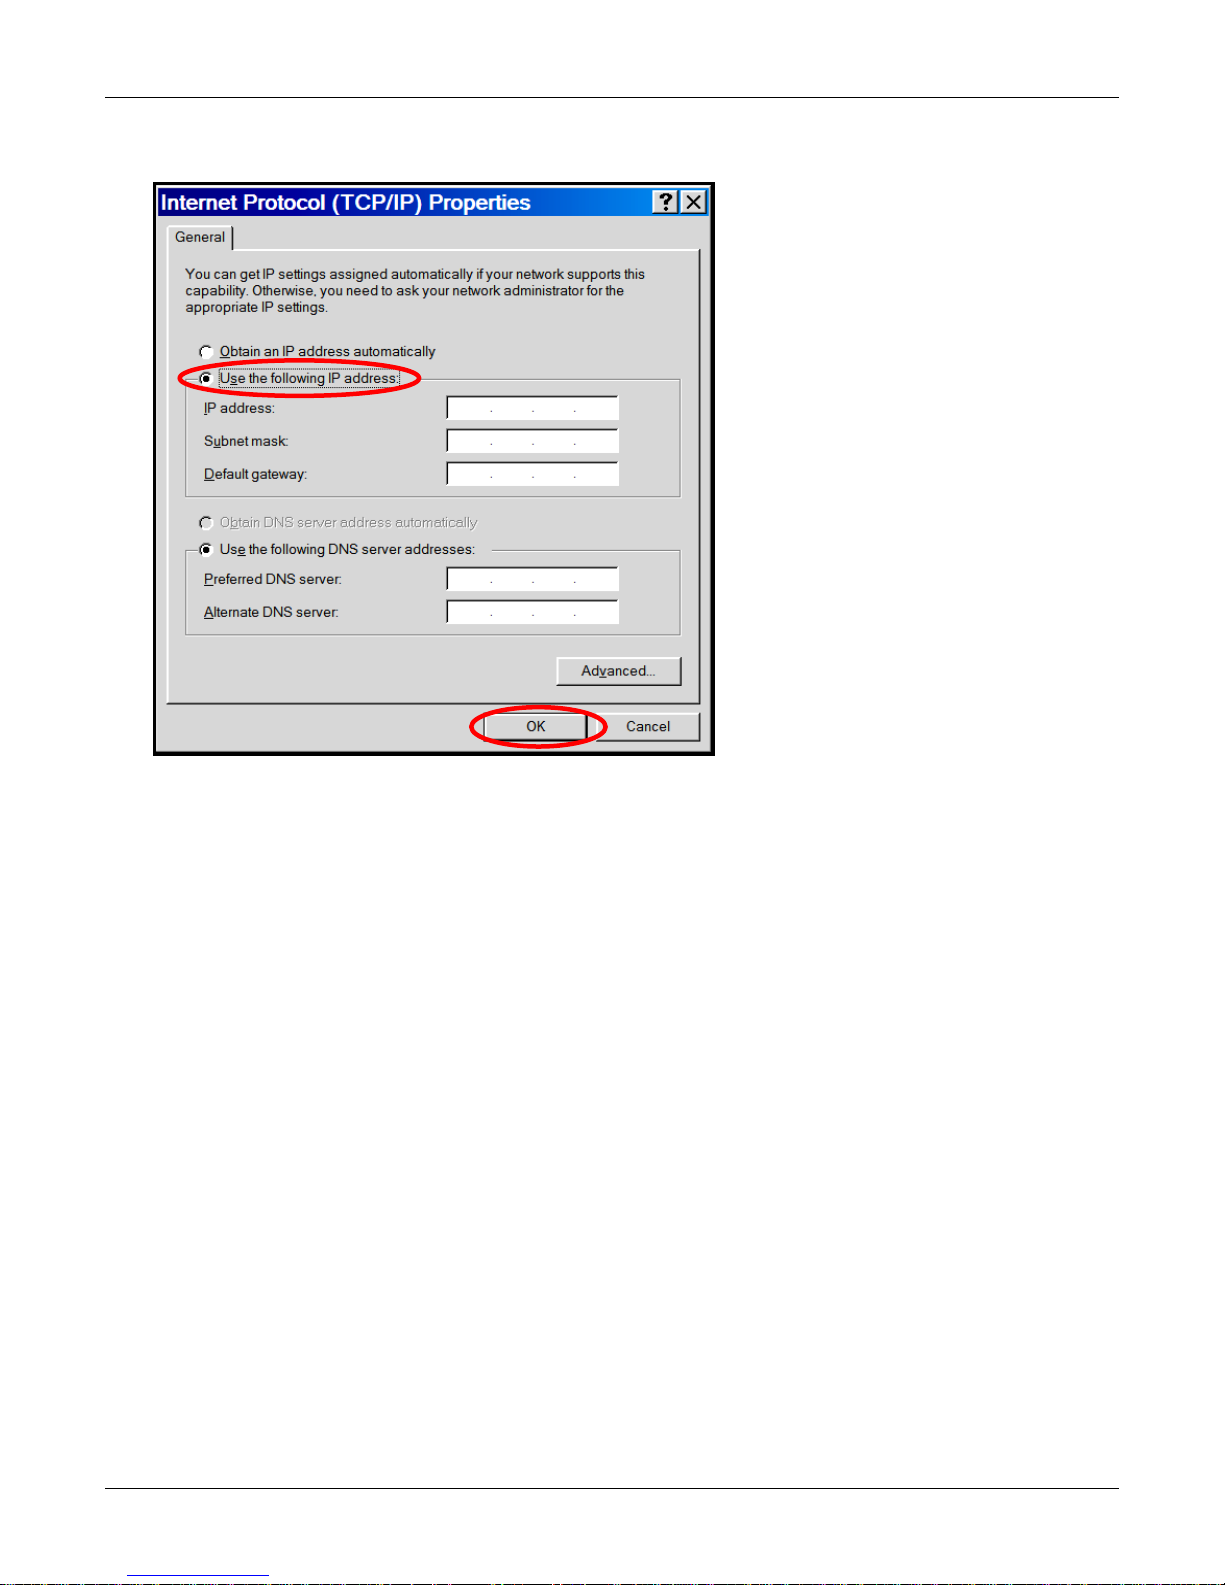
5. The Internet Protocol (TCP/IP) Properties screen.
Chapter 2 – Getting Started
Important Note:
If this screen opens and displays your current IP configuration, we suggest you record this information for
future reference (i.e., after the SMSFinder is configured, you may wish to return this PC to its original
settings).
• To set a Fixed IP Address for the workstation, select Use the following IP address.
∗ Enter the workstation IP Address. Example: 192.168.2.x.
Note: The x in the address stands for numbers 101 and up.
∗ Enter the workstation Subnet Mask. Example: 255.255.255.0
∗ Enter the workstation Default Gate way. Example: 192.168.2.2
Note: The workstation settings must be in the same subnet range as the SMSFinder.
The factory default settings for the SMSFinder are:
IP Address: 192.168.2.1
Subnet Mask: 255.255.255.0
Default Gateway: 192.168.2.2
• Select Use the following DNS server addresses.
∗ Enter the IP Address for the Preferred DNS Server. Example: 205.171.3.65
∗ Click OK.
• Close the Local Area Properties screen by clicking OK.
• Close the Control Panel.
• Repeat these steps for each PC on your network.
Multi-Tech Systems, Inc. SMSFinder User Guide for System Administrators (Document S000451B) 15
Page 16
Chapter 2 – Getting Started
Obtaining and Activating a Wireless
Account
Before you can use the cellular feature, you must obtain a GSM wireless account with an activated SIM card
capable of sending SMS text messages through your service provider. Then activate the account by installing the
SIM into the SMSFinder. Please see the wireless account Activation Notice located on the SMSFinder CD;
follow the directions to complete the activation of your account.
Important Note About Service Provider Fees
Your service provider will charge you for your data usage. Please check with your provider to make sure you
are aware of the charges.
Your SMSFinder can be used to send a large number of SMS messages very quickly, and, as such, you
should have a contract/plan that accounts for the numbers of messages you are likely to send. Multi-Tech is
not responsible for any charges relating to your cellular bill.
Direct Communication to the Cellular Modem
You may want to communicate directly to the cellular modem to activate the modem, verify network
registration, and/or troubleshooting your connection. To do this:
1. Open a PC's command window by clicking the Start button and selecting Run.
2. Type CMD to open the command window. Click OK.
3. When the command window opens, type IPCONFIG.
4. Type Telnet 192.168.2.1 5000 (Note: 5000 is the port number).
See the GPRS AT Commands Reference Guide.
Using AT Commands to Check Network Registration
and Roaming Status
Use this command to verify that the cellular modem has been registered on a wireless network.
1. In the command window, type AT+CREG?
2. The modem will respond in one of the following ways:
Network Registration Verification
Value Network Registration Status
+CREG: 0,0 The modem is not registered on any network
+CREG: 0,1 The modem is registered o n the home network
+CREG: 0,5 The modem is registe red o n a network and it is roaming
Note: If the modem indicates that it is not registered, verify the signal strength to determine if the
problem is the strength of the received signal.
Multi-Tech Systems, Inc. SMSFinder User Guide for System Administrators (Document S000451B) 16
Page 17
Chapter 3 – SMSFinder Basics and Setup Wizard
Chapter 3 – SMSFinder Basics and
the Setup Wizard
Starting the SMSFinder
Open a Web Browser
1. Be sure that the SMSFinder is cabled and that the power is connected as shown in Chapter 2.
2. Then open a Web browser.
3. Type the default gateway address line:
http://192.168.2.1
4. Press Enter.
Login
The Login screen for the SMSFinder Web Interface displays.
• Type admin (admin is the default user name) in the user name box.
• Type admin in the password box.
• Click Login.
Note: The User name and Password entries are case-sensitive (both must be typed in lower-
case). The password can be up to 12 characters. Later, you will want to change the password
from the default (admin) to something else (see the User Guide). If Windows displays the
AutoComplete screen, you may want to click No to tell Windows OS to not remember the
password for security reasons.
Password Caution: Use a safe password! Your first name spelled backwards is not a sufficiently
safe password; a password such as xfT35$4 is better. It is recommended that you change the
default password. Create your own password.
Web Interface Opens
This is the Home screen from which you can access all setup functions.
Note: Only the top portion of the Home screen is shown here.
Multi-Tech Systems, Inc. SMSFinder User Guide for System Administrators (Document S000451B) 17
Page 18
Chapter 3 – SMSFinder Basics and Setup Wizard
Navigating the Screens
Before using the Web Interface, you may find the following information about navigating through the screens and
the structuring of the menus helpful.
Menu
Bar
Sub
Menu
Save & Restart Button Under Menu Bar
Select the Save and Restart button located just under the menu bar. The Save and Restart screen displays.
Other
ptions
creen
Name
Input
Area
Save to Flash Memory
If a connection is established, the settings have been entered correctly, and your basic configuratio n is
complete; now, you must save your settings to the Flash Memory. Saving to the Flash Memory saves the
current settings in the flash prom and prevents the settings from getting lost at the next power up.
Note: The system will save the SMS settings every 8 hours automatically; however, it will not save the
system settings during this automatic save. The automatic saving of the SMS settings is helpful for those
times when the administrator does not have direct access to the Ethernet port.
Save
Click the Save button to save your system settings to the flash memory.
Restart
This is optional. You do not have to restart the SMSFinder after saving to the flash memory.
Multi-Tech Systems, Inc. SMSFinder User Guide for System Administrators (Document S000451B) 18
Page 19
Chapter 3 – SMSFinder Basics and Setup Wizard
Sub-Menus
Each Menu selection has its own sub-menu, which displays on the left side of the screen.
When you click one of the Main Menu choices, the first screen listed in the sub-menu displays. Choose other
sub-menu options/screens by clicking on its name. The following is an example o f the Administration submenu.
Table of Menus and Sub-Menus
Administration
System Setup – Set up the SMTP server for e-mail notifications, the names of individuals who will receive
notifications, and the email ID for the notifications FROM line.
SNTP Client – Set up the synchronization of the SMSFinder clock to real time.
Admin Access – Set up the administrator's password and set an automatic inactivity disconnection interval.
Allowed Networks – Set the networks to be allowed access to the SMSFinder's WEB GUI, Telnet
Dialout, and Telnet. The administrator can then add, edit and delete any network. By default, the LAN
network is always allowed access to the SMSFinder. The administrator can configure the IP Address
and Subnet Mask as 0.0.0.0 to allow access to any network.
Remote Syslog – Configure the Remote Syslog status and server's IP. The default is Disabled.
Tools – Reset the cellular modem.
Factory Defaults – Reset all parameters to the original factory defaults.
Network Setup
IP Settings – Specify your LAN settings and your TCP connection.
Cellular Modem – Configure the cellular modem.
SMS Services
Address Book – Manually input names and phone numbers into the phone book.
Groups – Create groups of names with their phone numbers.
International Number – Enable or disable international numbers.
Send SMS Users – Set up users and their passwords.
SMS Settings – Enable or disable extended ASCII character support.
Send SMS – Send SMS messages by manually entering the message or using a message from the
Preconfigured SMS list.
SMS API – This page is divided into two sections: Send API and Receive API.
Send API – Configure the ports for Send APIs as well as enable/disable the service. API commands can
be sent via HTTP or TCP.
Receive API – Configure the SMS to Receive APIs.
Inbox – View messages received.
Outbox – View messages sent.
Triggers
Authentic List – From the address book set up a list of authentic users who are allowed to trigger broadcast
messages and action triggers.
Broadcast Triggers – Configure trigger codes or words and broadcast messages. Set the destination
group. Set authentication option if desired.
Action Triggers – Create the triggers (codes or words) that will cause certain actions.
Pre-Configured SMS – Write and save pre-configured messages.
Multi-Tech Systems, Inc. SMSFinder User Guide for System Administrators (Document S000451B) 19
Page 20
Chapter 3 – SMSFinder Basics and Setup Wizard
Table of Menus and Sub-Menus (continued)
Utilities
Backup – Save SMSFinder settings to a backup file.
Firmware Upgrade – Get firmware upgrade from Multi-Tech Systems, Inc.
Import & Export Address Book
Import Address Book – Import an address book that you want to use to set up your SMSFinder.
Export Address Book – Export an address book.
Statistics & Logs
System Information – View product model number, firmware version, MAC Address, signal strength and
live system details.
SMS Statistics – View SMS Statistics: Number of messages in the inbox, number of message in the
outbox, and number of messages sent.
View Triggers Statistics: Number of broadcast triggers received, number of action
triggers received, and number of broadcast triggers configured.
View Address Book Statistics: Number of entries in the Address Book.
Log Traces – View SMS Logs: SMS Sent Log, SMS Received Log, SMS Failure Log, SMS Live Log.
View Sent API Logs: Send API Status Log, Send API Failure Log, Send HTTP API Live
Log, Send TCP API Live Log.
View Receive API Logs: Receive API Live Log and Receive API Failure Log.
View System Logs: System Log
Multi-Tech Systems, Inc. SMSFinder User Guide for System Administrators (Document S000451B) 20
Page 21
Chapter 3 – SMSFinder Basics and Setup Wizard
Configuring the SMSFinder Using the Wizard Setup
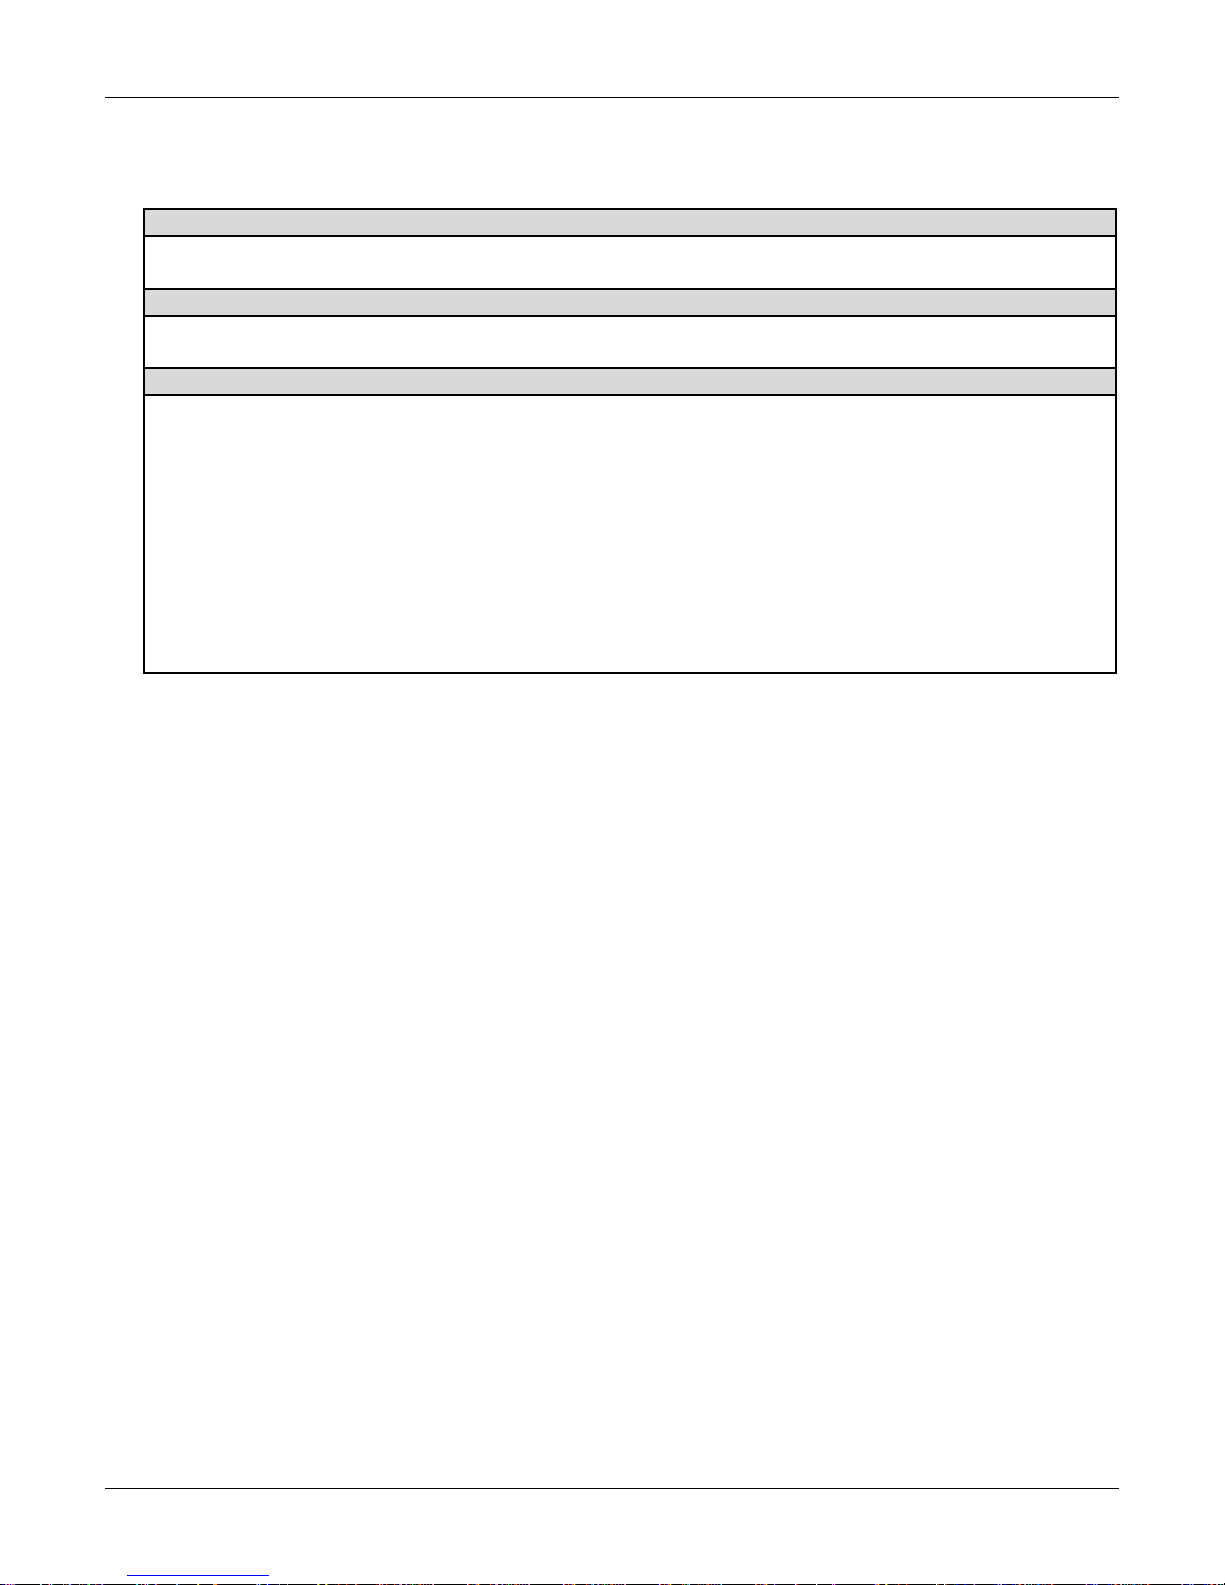
Using the SMSFinder Wizard Setup
Use the Wizard Setup for Quick Configuration
A quick way to configure the SMSFinder is to use the Wizard Setup. The Wizard Setup can be opened by
clicking the words Wizard Setup located under the menu bar. The information entered here will default to
other screens that require this information.
Benefits of Using the Wizard Setup
• Saves time so that you are not entering the same information several times.
• Allows you to start using your device with a minimum configuration.
• Provides a short way to enter and save information needed to create a connection to the Internet.
Note: Additional features and functions can be set up using the complete Web Interface.
Open the Wizard Setup Screen
After you have logged in, open the Wizard Setup screen by clicking on the words "Wizard Setup" located
under the Menu Bar.
Settings – Enter the following information for your Ethernet network.
LAN IP Address – 192.168.2.1 defaults into this field.
Subnet Mask – 255.255.255.0 defaults into this field.
Default Gateway – Enter a default IP Address: example: 192.168.2.2.
Primary DNS – Enter a primary DNS (Domain Server Name) IP Address.
Secondary DNS – Enter a secondary DNS IP Address.
Save – Click the Save button.
Multi-Tech Systems, Inc. SMSFinder User Guide for System Administrators (Document S000451B) 21
Page 22
Chapter 3 – SMSFinder Basics and Setup Wizard
Configuring the SMSFinder Using the Wizard Setup
Admin Password – You should change the password immediately after initial installation and also
change it regularly thereafter for security purposes.
Old Password – Enter the existing password.
New Passwo rd – Enter new password of your choice.
Confirmation – Confirm your new password by re-entering it into this field.
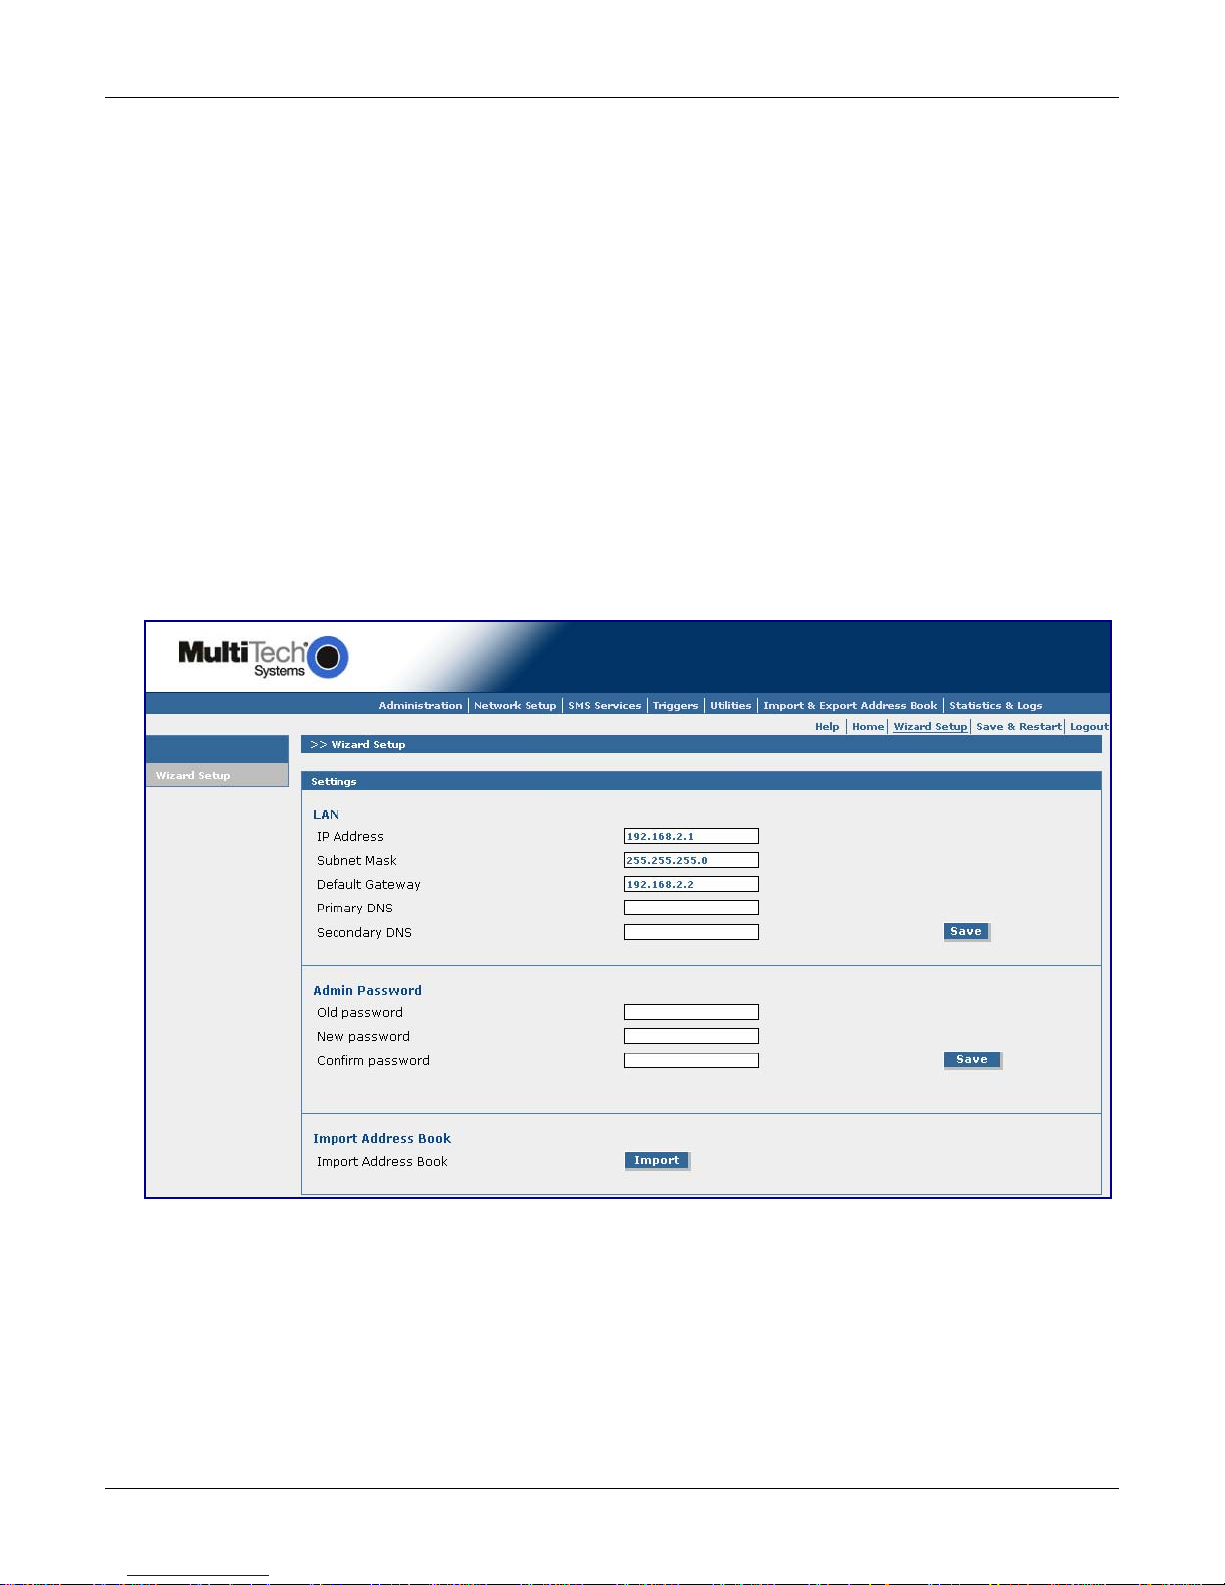
Import Address Book – Click the Import button. The Import Address Book screen displays.
Use this screen to set up senders and receivers of messages, as well as authentic users. Note: CSV
stands for comma separated values, a term that applies to the format of an address book.
Import Address Book
Select the CSV Format
Browse for the address file you want to use, and then click the Upload button once it is found.
Save & Restart
IMPORTANT Note About Save & Restart
When you have completed your SMSFinder settings and you are not going to enter any more data,
you must click the Save & Restart button located under the menu bar. The system will save the new
settings to the Flash Memory and give you the option to restart your SMSFinder. Saving to the Flash
Memory saves the new settings in the flash prom and prevents the settings from getting lost at the
next power up.
Note: The system will save the SMS settings every 8 hours automatically; however, it will not save the
system setting during this automatic save. The automatic saving of the SMS settings is helpful for
those times when the administrator does not have direct access to the Ethernet port.
Save
Click the Save button to save your system settings to the flash memory.
Restart is Optional
This is optional. You do not have to restart the SMSFinder after saving to the flash memory.
Multi-Tech Systems, Inc. SMSFinder User Guide for System Administrators (Document S000451B) 22
Page 23
Chapter 4 – Using the SMSFinder's Web Interface
Chapter 4 – Using the SMSFinder's
Web Interface
Now that you have completed the Wizard Setup, you can use the Web-based configuration and managem ent
interface to set up other SMS features and parameters. This chapter takes you screen-by-screen through the
Web Interface.
Note: The antenna must be attached in order for the SMSFinder to be operational.
IMPORTANT Note About Save & Restart
When you have completed your SMSFinder settings, you must click the Save & Restart button
located at the top of the window under the menu bar. The system will save all the settings and give
you the option to restart your SMSFinder. Restarting is not required.
Administration
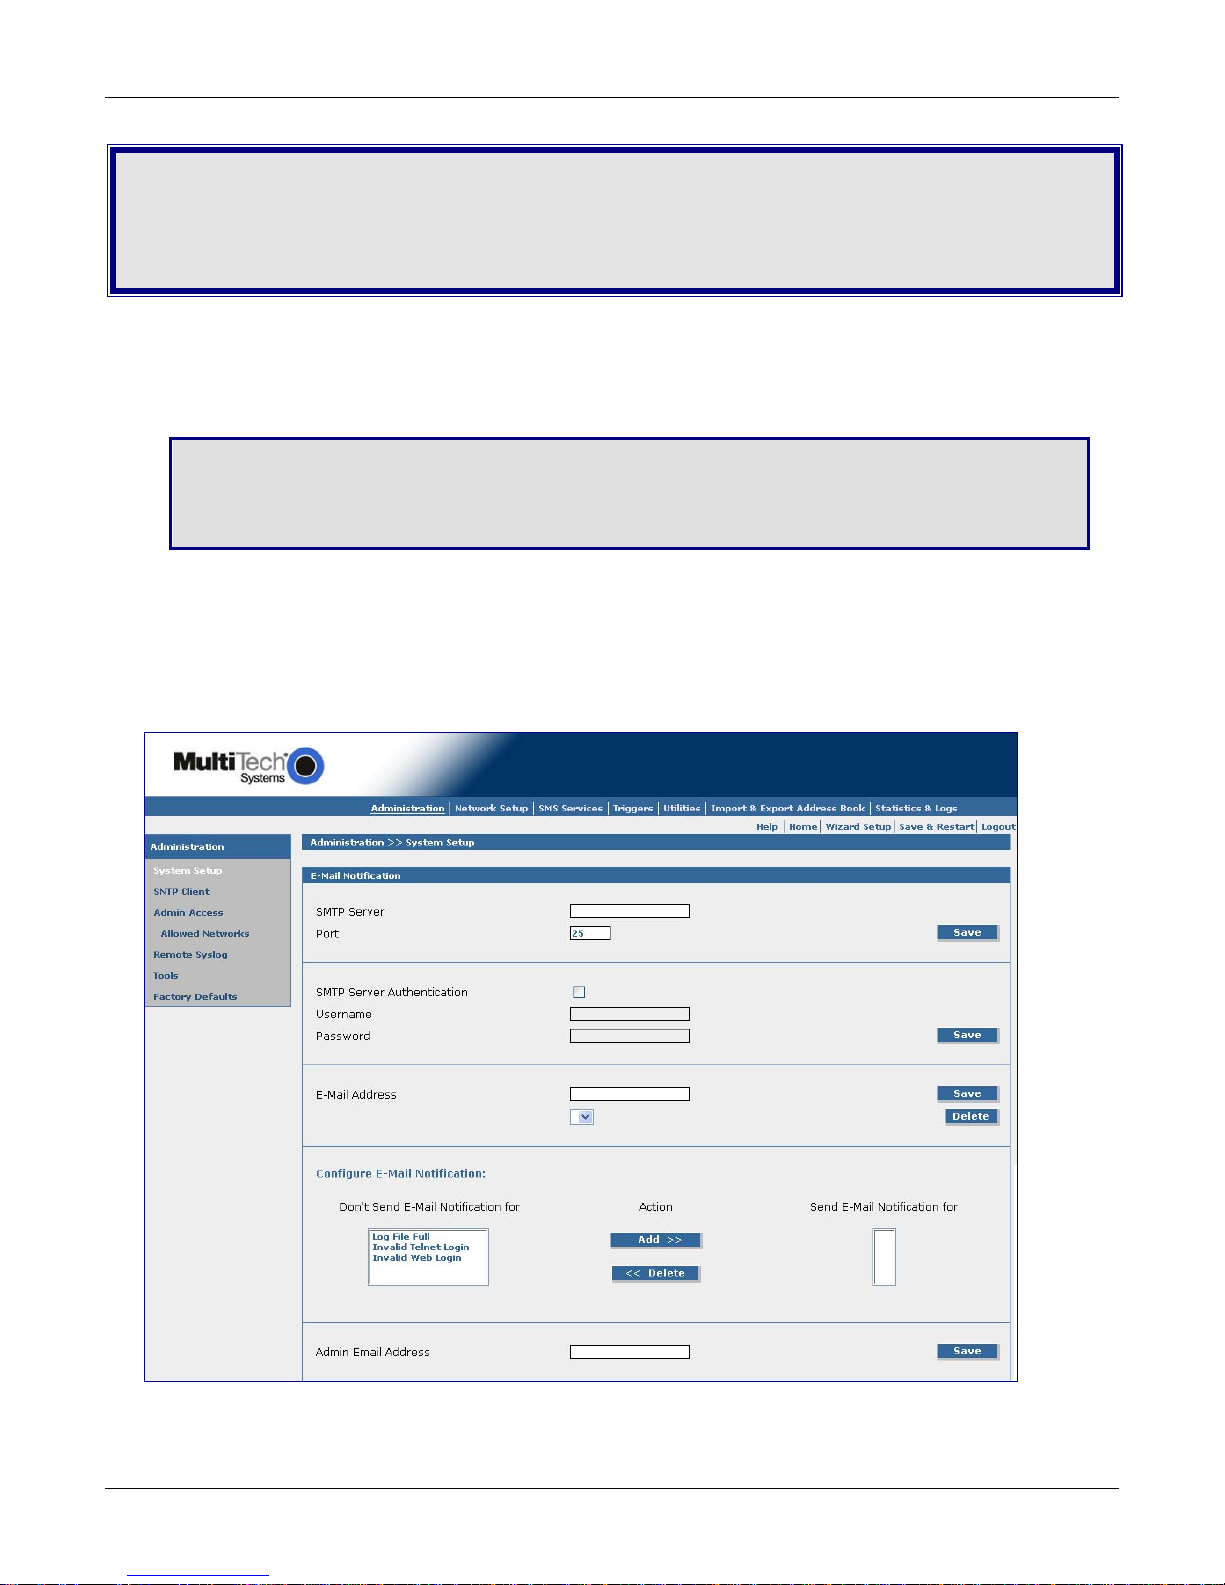
Administration > System Setup
On the System Setup screen, you can set up the e-mail address of the administrator to whom e-mails are
sent for event notification. The e-mail address must be entered in proper "user@domain" format.
A Note About E-Mail Notification
E-Mail notification is delivered through the Ethernet network with an Internet connection, not through the
wireless cellular connection.
Multi-Tech Systems, Inc. SMSFinder User Guide for System Administrators (Document S000451B) 23
Page 24
Chapter 4 – Using the SMSFinder's Web Interface
Administration > System Setup
E-Mail Notification
SMTP Server
Enter the IP address or the domain name of the mail server.
Port
Enter the port number on which the mail server listens. Example: 25. Click the Save button.
SMTP Server Authentication
Some mail servers accept connection only after a user name and password are authenticated. If your
server requires this, check the SMTP Server Authentication box. Then enter the User Name and
Password in the next fields.
User Name
If your mail server accepts connection only after a user name and password are authenticated, enter
the user name.
Password
If your mail server accepts connection only after a user name and password are authenticated, enter
the password. Click the Save button.
E-Mail Address
Enter the e-mail addresses of the individuals to whom notifications regarding the log file being full, an
invalid Telnet login, or an invalid Web login should be sent. In addition, the administrator may want
his office e-mail address, his home e-mail address, etc. Enter the addresses in proper user@domain
format. Click the Save button. An address can be deleted or changed at any time.
Note that at least one e-mail address must be entered in this field.
Configure E-Mail Notification
Select the types of notifications that you want sent to individuals listed above. Click the Add button.
Each entry will then move to the Send E-Mail Notification For box. A notification can be removed by
clicking the Delete button. The entry will then move back to the Don't Send E-Mail Notification For
box.
The following are defaulted for Don't Send E-Mail Notification:
1. Log File Full
2. Invalid Telnet Login
3. Invalid Web Login
Administrator E-Mail ID
Enter the administrator's e-mail identification. This is the name/address that will display in the FROM
line of the notification emails. This will allow the recipients of the notifications to direct questions or
comments to the administrator. Enter the email ID in proper user@domain format. Click the Save
button. The address can be deleted or changed at any time.
A Note About E-Mail Notification
E-Mail notification is delivered through the Ethernet network with an Internet connection, not through
the wireless cellular connection.
Multi-Tech Systems, Inc. SMSFinder User Guide for System Administrators (Document S000451B) 24
Page 25

Chapter 4 – Using the SMSFinder's Web Interface
Administration > SNTP Client
Administration > SNTP Client
Clicking the SNTP Client check box enables the firewall to act as a SNTP client. Also, SNTP (Simple Network
Time Protocol) is an internet protocol used to set up the synchronization of the SMSFinder clock to real time.
SNTP Configuration
General Configuration
SNTP Client
Enable or disable the SNTP Client to contact the configured server on the UDP port 123 and set the
local time. Default is Enabled.
A Note About the Outbox
In order for messages in the outbox to have a valid date/time stamp, do one of the following
options:
• SNTP Client must be enabled and the Ethernet connection must be live to the Internet.
OR
• Enter the SMSFinder cellular phone number on the Network Setup > Cellular Modem
screen.
Server
Enter the SNTP server name or IP address to which the SNTP Client must contact in order to update
the time. The default is time.nist.gov.
Polling Time
Enter the polling time at which the SNTP client requests the server to update the time. Default is 30
minutes. Time must be entered in minutes.
Multi-Tech Systems, Inc. SMSFinder User Guide for System Administrators (Document S000451B) 25
Page 26

Chapter 4 – Using the SMSFinder's Web Interface
Administration > SNTP Client
Time Zone Configuration
Time Zone
Enter your time zone. Default = UTC (Universal Coordination).
See the following Web site for Time Zone information:
http://wwp.greenwichmeantime.com/info/timezone.htm
Time Zone Offset
Enter +/- hh:mm. Default = +06:00. Offset is the amount of time varying from the standard time of a
Time Zone.
Daylight Configuration
Daylight Saving
Enables/disables Daylight Saving mode. Default is Enable.
Daylight Saving Offset
Set the offset to use during Daylight Saving mode. Default is +60 minutes. Enter the time in + / minutes. Offset is the amount of time varying from the standard time of a Time Zone.
Daylight Saving Start Time
Start Ordinal (Month, Day, Time)
Set the start ordinal to use during Daylight Saving mode. Options are first/second/third/fourth/last.
Default is second.
Daylight Saving time usually starts at the same time on the same day of the week in the same month
every year. Each day of the week occurs four or five times a month. Therefore, you will be selecting
the week in which daylight saving time starts: the first, second, third, fourth or the last of the month.
Start Month
Set the start month to use during Daylight Saving mode. The default is March.
Start Day
Set the start weekday to use during Daylight Saving mode. The default is Sunday.
Start Time
Set the start time to use during Daylight Saving mode. The default is 02:00 (hh:mm).
Daylight Saving End Time
End Ordinal (Month, Day, Time)
Set the end ordinal to use during Daylight Saving mode. Select the week in which daylight saving
time ends. Options are first/second/third/fourth/last. The default is first.
End Month
Set the end month to use during Daylight Saving mode. The default is November.
End Day
Set the end weekday to use during Daylight Saving mode. The default is Sunday.
End Time
Set the end time to use during Daylight Saving mode. The default is 02:00 (hh:mm).
Save Button
Click the Save button to save these settings.
Multi-Tech Systems, Inc. SMSFinder User Guide for System Administrators (Document S000451B) 26
Page 27

Chapter 4 – Using the SMSFinder's Web Interface
Administration > Administrative Access
Administration > Administrative Access
Use this screen to set up the password that will be used by the administrator and to set an automatic inactivity
disconnection interval.
Change Password
Old Password, New Password, Confirm Password
To change the password, enter the existing password in the Old Password field, enter the new password
into the New Password field, and confirm your new password by re-entering it into the Confirm Password
entry field. Click the Save button.
Note: You should change the password immediately after initial installation and configuration, and also
change it regularly thereafter.
Web Interface Inactivity Time Out
Time Before Automatic Disconnect
An automatic inactivity disconnection interval is part of this firmware for security purposes.
In the Time Before Automatic Disconnect entry field, enter the desired time span (in seconds) after which
you will be automatically disconnected from the Web Interface if no operations take place.
• The default setting is 120 seconds.
• The smallest possible setting is 60 seconds.
• The maximum setting is 3600 seconds.
Click the Save button.
Administrative Access HTTP Port
Specify the HTTP port for administrative access. Port 80 is the default used for HTTP sessions. If you
choose to change the port number, it should be between 1 and 65535. Well known port numbers and port
numbers used by the firewall are not allowed.
Click the Save button.
Multi-Tech Systems, Inc. SMSFinder User Guide for System Administrators (Document S000451B) 27
Page 28

Chapter 4 – Using the SMSFinder's Web Interface
Administration > Admin Access > Allowed Networks
Administration > Remote Syslog
Administration > Tools
Administration > Admin Access > Allowed Networks
Use this screen to set the networks that will be allowed access to the SMSFinder's WEB GUI, Telnet Dialout,
and Telnet. The administrator can then add, edit and delete any network. By default, the LAN network is
always allowed access to the SMSFinder. In addition, the administrator can configure the IP Address and
Subnet Mask as 0.0.0.0 to allow access to any network.
Allowed Networks
IP Address – Enter the IP address of any network you want the SMSFinder to be able to access.
Subnet Mask – Enter the Subnet Mask of any network you want the SMSFinder to be able to access.
Add – Then click the Add button.
The allowed network displays at the bottom of the screen.
Note: The first entry is the LAN Network, which defaults onto this screen.
Administration > Remote Syslog
Use this screen to enable/disable Remote Syslog and to set the server's IP Address. The default is Disabled.
Remote Syslog Configuration
Remote Syslog Status – Check the Remote Syslog Status box to enable this remote syslog.
Remote Syslog Host IP Address – Enter the remote syslog host IP Address.
Save – Then click the Save button.
Administration > Tools
This screen is used to reset the cellular modem.
You may want to use Reset if you have lost your connection or the modem is not functioning properly but you
don't want to recycle power through the SMSFinder.
Reset Modem
Click the Reset button. The modem will reset.
Multi-Tech Systems, Inc. SMSFinder User Guide for System Administrators (Document S000451B) 28
Page 29

Chapter 4 – Using the SMSFinder's Web Interface
Administration > Factory Defaults
Administration > Factory Defaults
Reset to Factory Defaults
Click the Factory Defaults button to load all configuration parameters to the original factory default
settings.
All Administration and Network Settings will return to the factory defaults. Use this option only if it is
necessary to wipe out your current Administration and Network Settings.
Note: SMS Settings (Address Book, Groups, Users, International Numbers, Triggers, Inbox, Outbox) will
not be reset using this option.
Reset SMSFinder Defaults
Clicking the SMSFinder Defaults button will delete the following:
SMS configurations and
• All
Administrative and Network Settings.
• All
This option is to be used only if really necessary to wipe out all current settings and completely start over.
Save & Restart
IMPORTANT Note About Save & Restart
When you have completed your SMSFinder settings and you are not going to enter any more data,
you must click the Save & Restart option located under the menu bar. The system will save the new
settings to the Flash Memory and give you the option to restart your SMSFinder. Saving to the Flash
Memory saves the new settings in the flash prom and prevents the settings from getting lost at the
next power up.
Note: The system will save the SMS settings every 8 hours automatically; however, it will not save
the system setting during this automatic save. The automatic saving of the SMS settings is helpful for
those times when the administrator does not have direct access to the Ethernet port.
Save
Click the Save button to save your system settings to the flash memory.
Restart is Optional
This is optional. You do not have to restart the SMSFinder after saving to the flash memory.
Multi-Tech Systems, Inc. SMSFinder User Guide for System Administrators (Document S000451B) 29
Page 30

Network Setup
Network Setup > IP Settings
Use this screen to set up your network.
IP Settings – LAN
IP Address
Enter the IP Address of the LAN Interface. The factory default is 192.168.2.1.
Subnet Mask
Enter the Subnet Mask for the IP address configured. The factory default is 255.255.255.0.
Default Gateway
Enter the Default Gateway. The factory default is 192.168.2.2.
Primary DNS and Secondary DNS
Enter the address of the primary and secondary DNS (domain name system) IP Address. The order in
which domain names are entered is the order in which they are consulted.
IMPORTANT Note About Valid Gateway and DNS Addresses
For e-mail notifications and SNTP Time/Date accuracy, you must have a live Ethernet connection,
and this requires a valid gateway address and at least one DNS address.
Save
Click the Save button.
Chapter 4 – Using the SMSFinder's Web Interface
Network Setup > IP Settings
TCP Connection
TCP Connection
Enable or Disable the TCP Connection by clicking the appropriate radio button. Default: Enable
TCP Connection Port
Enter the Port number on which the TCP port will connect.
Save
Click the Save button.
Multi-Tech Systems, Inc. SMSFinder User Guide for System Administrators (Document S000451B) 30
Page 31

Chapter 4 – Using the SMSFinder's Web Interface
Network Setup > Cellular Modem
Use this screen to configure the cellular modem.
Initialization Strings
Initialization Strings 1 – 3
Initialization strings are composed of AT commands sent to the modem to initialize and prepare it for
connection. These strings typically set options such as speed, error corre ction, compression, various
timeout values, and various display parameters. See the GPRS AT Commands Reference Guide.
Save
Click the Save button.
Network Setup > Cellular Modem
Signal Strength (for GSM Cellular only)
Command
The string entered here is sent to the cellular modem so that the signal strength LEDs can display the
current signal strength. Use the following command: AT+CSQ
See the Signal Strength LEDs Reference Table on page 8.
Save
Click the Save button.
SIM Number
SIM Number
Specify the cellular phone number that the wireless provider assigned to your account. Do not enter
dashes. Example: 6126361654.
SIM Notes
• The SIM card reads real time from the network and this provides the time stamp for SMS
messages.
• If your SIM card is locked, you cannot sent SMS messages.
Save
Click the Save button.
Save & Restart
IMPORTANT Note About Save & Restart
When you have completed your SMSFinder settings and you are not going to enter any more data, you
must click the Save & Restart button located under the menu bar. The system will save the new settings
to the Flash Memory and give you the option to restart your SMSFinder. Saving to the Flash Memory
saves the new settings in the flash prom and prevents the settings from getting lost at the next power up.
Note: The system will save the SMS settings every 8 hours automatically; however, it will not save the
system setting during this automatic save. The automatic saving of the SMS settings is helpful for
those times when the administrator does not have direct access to the Ethernet port.
Save
Click the Save button to save your system settings to the flash memory.
Restart is Optional
This is optional. You do not have to restart the SMSFinder after saving to the flash memory.
Multi-Tech Systems, Inc. SMSFinder User Guide for System Administrators (Document S000451B) 31
Page 32

Chapter 4 – Using the SMSFinder's Web Interface
SMS Services
What is SMS? Short Messages through SMS (Short Message Service) can be sent to
• Mobile numbers
• Any person(s) from the address book
• Any group(s) of persons created from the address book or individual entries.
SMS Services > Address Book
SMS Services > Address Book
Ways to Create Address Book Entries:
1. Enter names and phone numbers manually. Use the following screen to enter addresses in this way.
2. Import an Address Book. See the following screen information: Import & Export Address Book >
Import.
3. Remotely enter a name and phone number. See the following screen information: Triggers > Action
Triggers.
Use This Screen to Manually Add Names and Phone Numbers to the Address Book:
Use this screen to manually add the names and phone numbers of any person(s) you want to include in your
address book. If you imported an address book, you can use this screen to add names not included in the
imported Address Book. All address book names display on this screen, and each entry can be edited,
deleted, and/or added to a group list.
Address Book
Click the Add button to display the Add a Phone Number screen.
Add a Phone Number
Note that fields marked with an asterisk are required.
Name
Enter the name of the person you want to add to the SMS Phonebook. The maximum number of
characters is 50 including spaces and punctuation.
Multi-Tech Systems, Inc. SMSFinder User Guide for System Administrators (Document S000451B) 32
Page 33

Chapter 4 – Using the SMSFinder's Web Interface
SMS Services > Address Book Continued
Phone Number
Enter the mobile phone number of person you are adding. The maximum number of characters is 50
including spaces and punctuation.
Note: If you plan to use authentication on any entry in the address book, the phone numbers of
these individuals should be preceded with the country code. For the U.S., enter "1".
Example: 16124935555.
Description
Enter any additional information about this phonebook entry that will aid in your contacting or
identifying this person. The maximum number of characters is 120 including spaces and punctuation.
Groups
If you want this person to be a member of a phonebook group, select the group name from this box.
Note: Group names must be entered on the SMS Services > Groups screen before they will display
here.
Save or Cancel
Click the Save button to save the entries, or click Cancel if you want to start over on this screen or want
to end the entries from the last Save.
Multi-Tech Systems, Inc. SMSFinder User Guide for System Administrators (Document S000451B) 33
Page 34

Chapter 4 – Using the SMSFinder's Web Interface
SMS Services > Groups
SMS Services > Groups
Use this screen to create groups of customer/client names with their phone numbers.
The SMSFinder can hold up to 50 groups.
Groups allow you to send SMS messages to many individuals using only a group name.
For example, groups can be established based on a common functionality, a location, or an activity such as
an Administrators group, an Engineers group, a Building 201 group, a Basketball Team group, etc. Once
created, group names display on this screen where they can be edited and deleted.
Groups
Click the Create button to display the Create a Group screen.
Create a Group
Note that fields marked with an asterisk are required.
Group Name
Enter a name for the group you would like to create. Maximum number of characters is 10. Group
names can be edited.
Group Members
Click Address Book to bring in the names of all individuals in your Address Book. All names will
display in this box.
Click Delete to remove the names of those you do not want in this group. If you want the entire
Address Book of names included in this group, simply check the Create button.
Create or Cancel
Once you have the group completed, click the Create button. If you want to start over, click the
Cancel button.
Multi-Tech Systems, Inc. SMSFinder User Guide for System Administrators (Document S000451B) 34
Page 35

Chapter 4 – Using the SMSFinder's Web Interface
SMS Services > International Number
SMS Services > Send SMS Users
SMS Services > International Number
Use this screen to allow or disallow SMS messaging to international numbers. International numbers are
identified according to the number of digits.
Disable International Number
If Disable International Number is checked (this is the default), SMS messages can be sent to phone
numbers limited by the maximum allowed digits (entered in the Maximum Digits field).
If Disable International Number is NOT checked, SMS messages can be sent to any phone number.
Maximum Digits
Enter the number of digits you want to be allowed when Disable International Number is checked. The
default is 11 digits.
Save
Click the Save button.
SMS Services > Send SMS Users
Use this screen to create a list of users who can have limited access to the SMSFinder to send SMS
messages and monitor the inbox and outbox. The screen shown here includes an example of a entry entitled
"user". Once a user is enter, the Delete checkbox is available.
User Name
Click the Add button to display the Add a New User screen. After a user name is added using the Add a New
User screen, it will display on this screen. You can delete any user from this screen, if desired.
Add a New User
Note that fields marked with an asterisk are required.
User Name
Enter the user's name.
Password
Enter a password for this user. Each user should have his own password.
Create or Cancel
Once you have entered the users, click the Create button. If you want to start over, click the Cancel
button.
Multi-Tech Systems, Inc. SMSFinder User Guide for System Administrators (Document S000451B) 35
Page 36

Chapter 4 – Using the SMSFinder's Web Interface
SMS Services > SMS Settings
SMS Services > Send SMS
SMS Services > SMS Settings
Use this screen to enable or disable extended ASCII character support.
Extended ASCII Configuration
Extended ASCII (ISO-8859-1)
Check the box to enable Extended ASCII characters in the SMS. When enabled, the Extended ASCII
characters option will be linked to the following screens in order for you to select the characters: Send
SMS, Triggers, Preconfigured SMS.
Save
Click the Save button.
SMS Services > Send SMS
Messages can be sent to a contact phone number, any person(s) from the address book, or any group(s).
Notes About User Limitations
• This screen along with the Inbox and Outbox screens are the only screens available to non-administrative
users when they login with their names and passwords.
• The Save & Restart option under the Menu Bar is not available to non-administrative users. However,
the SMSFinder automatically saves the SMS settings and configuration every 8 hours.
To
Enter Phone Numbers
Enter the mobile phone numbers to which a new message will be sent. Click the Add button after each
entry. The phone number will display in the box. If you change your mind about a phone number, highlight
the number and press the Delete button.
OR
Select Names from the Address Book
Click Address Book to display all names. Select the names of the individuals to whom a new message
will be sent. Click the Add button after each name. If you change your mind about a name, highlight the
name and press the Delete button or check Select the entire Address Book, press the Delete button
and all the names will be deleted.
Multi-Tech Systems, Inc. SMSFinder User Guide for System Administrators (Document S000451B) 36
Page 37

Chapter 4 – Using the SMSFinder's Web Interface
SMS Services > Send SMS continued
SMS Services > SMS API
SMS Services > SMS API > Send API
OR
Select Group
Click Groups to display all group names. Select the Groups to which a new message will be sent. Click
the Add button after each selection. The group name will display in the box. If you change your mind
about a group, highlight the group name and press the Delete button or check the Select all the Groups,
and press the Delete button and all groups will be deleted.
SMS Text
Enter the text of the message you want to send. The maximum number of characters is 160 including
spaces and punctuation.
OR
You can choose a Pre-Configured Message that you set up on the Triggers > Pre-Configured SMS
screen. Click the Pre-Configured Message text to access a list of pre-configured messages. See
Triggers > Pre-Configured Messages for entering pre-configured messages.
SMS Services > API
SMS Services > API consists of two screens: Send API and Receive API.
Note: See the Appendix A for more information about the Application Programming Interface (API).
SMS Services > SMS API > Send API
On the Send API screen you can enable/disable Send API and configure the ports for sending API.
HTTP Send API Configuration
HTTP Send API Status
Check the box to enable the HTTP Send API service.
HTTP Port
Enter the port number on which Send API service is available. This port can be the same as the Web
port. The default is 80.
Save
Click the Save button.
TCP Send API Configuration
TCP Send API Status
Check the box to enable TCP Send API service.
TCP Port
Enter the port number on which TCP API service is available. The default is 2040.
Save
Click the Save button.
Multi-Tech Systems, Inc. SMSFinder User Guide for System Administrators (Document S000451B) 37
Page 38

Chapter 4 – Using the SMSFinder's Web Interface
SMS Services > SMS API > Receive API
SMS Services > SMS API > Receive API
On the Receive API screen you can enable/disable the Receive API service, configure the ports for
receiving API, set server authentication, and set the interval for posting messages to the configured
server.
Receive API Configuration
Receive API Status
Check the box to enable the SMS Receive API service.
Protocol
Select either the HTTP or TCP protocol.
Save
Click the Save button.
Server
Enter the IP Address or Domain Name of the HTTP or TCP server.
Port
Enter the Port Number on which the HTTP or TCP server listens.
Save
Click the Save button.
Server Default Page
Specify the page path to which the HTTP server is configured. This depends on how the HTTP server
is setup.
Save
Click the Save button.
Server Authentication
If the HTTP or TCP server mandates authentication, then enter the user name and password.
Save
Click the Save button.
Post Interval
Enter the number of seconds that you want to elapse before SMS messages received by the
SMSFinder are posted to the HTTP or TCP server. The default is 0, which causes received
messages to post immediately. The minimum allowed post interval is 30 seconds.
Save
Click the Save button.
Multi-Tech Systems, Inc. SMSFinder User Guide for System Administrators (Document S000451B) 38
Page 39

Chapter 4 – Using the SMSFinder's Web Interface
SMS Services > Inbox
SMS Services > Outbox
SMS Services > Inbox
This screen displays a list of all messages received and includes the sender's number, the message
received, and a timestamp.
Note: The inbox gets a time stamp from the cellular service provider.
Clear Inbox
Click the Clear button to delete all the inbox entries.
SMS Services > Outbox
This screen lists the messages sent and includes Message ID, the receiver's number, the message sent,
and the timestamp.
Clear Outbox
Click the Clear button to delete all the outbox entries.
Msg ID
The message ID (Msg ID) is non-zero if the message has been sent using SEND API.
A Note About the Outbox
In order for messages in the outbox to have a valid date/time stamp, be sure to set up one of
the following options:
• SNTP Client must be enabled and the Ethernet connection must be live to the Internet.
OR
• Enter the SMSFinder cellular phone number on the Network Setup > Cellular Modem
screen.
Save & Restart
IMPORTANT Note About Save & Restart
When you have completed your SMSFinder settings and you are not going to enter any more data,
you must click the Save & Restart button located under the menu bar. The system will save the new
settings to the Flash Memory and give you the option to restart your SMSFinder. Saving to the Flash
Memory saves the new settings in the flash prom and prevents the settings from getting lost at the
next power up.
Note: The system will save the SMS settings every 8 hours automatically; however, it will not save the
system setting during this automatic save. The automatic saving of the SMS settings is helpful for
those times when the administrator does not have direct access to the Ethernet port.
Save
Click the Save button to save your system settings to the flash memory.
Restart is Optional
This is optional. You do not have to restart the SMSFinder after saving to the flash memory.
Multi-Tech Systems, Inc. SMSFinder User Guide for System Administrators (Document S000451B) 39
Page 40

Chapter 4 – Using the SMSFinder's Web Interface
Triggers > Authentic List
Triggers > Broadcast Triggers
Triggers
On the four Triggers screens, you can accomplish the following tasks:
• Establish a list of authentic users – those users who will be allowed to set the triggers (codes or words)
that initiate broadcast messages from a user's remote cell phone.
• Set up broadcast triggers (codes or words) that will send broadcast messages.
• Set up action triggers that will cause phone book edits.
• Compose and save pre-configured messages.
Triggers > Authentic List
Use this screen to set up a list of authentic users. Authentic users will be allowed to set the trigger (codes or
words) that initiates the broadcasting of selected messages.
Authentic List
Click the Add button to display the Address Book from which you can select those users who will be
"authentic users" – users who can send triggers (codes or words) from their cell phones that will allow them to
send a broadcast message.
Triggers > Broadcast Triggers
Use this screen to set up trigger messages, broadcast messages, and authentication parameters.
Broadcast Triggers
Click the Add button to display the Add a Broadcast Trigger screen.
Multi-Tech Systems, Inc. SMSFinder User Guide for System Administrators (Document S000451B) 40
Page 41

Chapter 4 – Using the SMSFinder's Web Interface
Triggers > Broadcast Triggers Continued
Add a Broadcast Trigger
Note that the fields marked with an asterisk are required. This is a setup screen; no messages are
sent from this screen.
Trigger Message
Type in a code or word that you want to trigger a broadcast message.
• Some trigger words can be given to all users.
• Some trigger words can be created for authenticated users only.
• Some trigger words can be created for use by the administrator only.
Broadcast Message
Type in a message that will be broadcast when the trigger code or word is received, or click PreConfigured Message if you want to use one of these messages as your broadcast message.
To
Select the Groups who will receive this broadcast message. Click Groups to display your list of group
choices. If you change your mind, you can highlight the name of a group and click Delete to remove a
group from the list.
Authenticate
Check the Authenticate box if you want this trigger code or word and the broadcast message to be
managed by the authentication function.
Authentic Users
Select the Authentic Users who are allowed to trigger and initiate a broadcast message on this
screen.
Save or Cancel
Click the Save button, or if you change your mind and do not want the information saved, click
Cancel.
Multi-Tech Systems, Inc. SMSFinder User Guide for System Administrators (Document S000451B) 41
Page 42

Chapter 4 – Using the SMSFinder's Web Interface
Triggers > Action Triggers
Triggers > Action Triggers
Use this screen to set up trigger codes or words. Action Triggers are the codes or words sent from a remote
cell phone and received by the SMSFinder – the trigger will execute the action associated with it. This is a
setup screen; no messages are sent from this screen.
The trigger codes or words along with the authentication function may be configured for each trigger actio n. If
authentication is enabled, only the trigger code or word received from an authenticated user can trigger the
action.
Trigger Action – The following actions are executed when an initiating trigger code or word is detected from
an incoming SMS text message.
Trigger Message (Codes or Words) – The trigger codes or words shown on this screen are built in to the
Web Interface. These built-in codes can be changed. See the table on the next page for an explanation of
how the trigger codes and their associated trigger actions are created.
Authenticate – If the authenticate option is enabled, only the message received from the configured
authenticated user can trigger the action. The authenticated users are set up on the Triggers > Authentic
List screen.
Enable Authentication
To enable authentication click Edit. The Authenticate column then displays a check box, and the
View/Edit column displays the words Save and Cancel.
Click the check box to enable Authentication for this action and then click Save. If you want to disable
Authentication for this action, simply click Cancel.
Multi-Tech Systems, Inc. SMSFinder User Guide for System Administrators (Document S000451B) 42
Page 43

Table of Trigger Codes and Trigger Actions
Trigger
Code/Word
ADD
ADDG
ADDSMS
DEL
DELG
Objective Configuring the Trigger Code and Its
Associated Trigger Action
To add an entry in
the address book
Configuration format:
<act_tri_configured>;name;number
Example:
ADD;first last;7633604174
Configuration format:
<act_tri_configured>;name
Example:
ADD;first last
Configuration format:
<act_tri_configured>
Example:
ADD
To add a group
name and an entry.
Note: The same
action trigger
message is used for
creating a group
Configuration format:
<act_tri_configured>;grp_name
Example:
ADDG;Building_201
name and adding
an entry to a group.
So, in the interface
there will be one
configuration for
both
Configuration format:
<act_tri_configured>;grp_name;name;
number
Example:
ADDG;Building_201;first last;
7633604174
Configuration format:
<act_tri_configured>;grp_name;name;
Example:
ADDG;Building_201;first last
To add a preconfigured SMS
Configuration format:
<act_tri_configured>;SMS
Example:
ADDSMS;Building 201 is closed until
further notice.
To delete an entry
from the address
book
Configuration format:
<act_tri_configured>;name;number
Example:
DEL;first last;7633604174
Configuration format:
<act_tri_configured>;name
Example:
DEL;first last
To delete a group
Configuration format:
<act_tri_configured>;grp_name
Example:
DELG;Building_201;first last
Chapter 4 – Using the SMSFinder's Web Interface
Action
Adds name with number to
address book.
Adds name with sender's
number to address book.
Adds name and number of
sender to address book.
Creates a group with a group
name.
Adds name with number to a
group. Group must already
exist.
Adds name to a group. Group
must already exist.
Adds SMS to preconfigured list.
Deletes name with number from
the address book.
Deletes all entries with this
name from the address book.
Deletes the group with the
group name.
Multi-Tech Systems, Inc. SMSFinder User Guide for System Administrators (Document S000451B) 43
Page 44

Chapter 4 – Using the SMSFinder's Web Interface
Triggers > Pre-Configured SMS
Use this screen to compose and save pre-configured messages.
Pre-Configured SMS
Click the Add button to open the Add a Pre-Configured SMS screen.
Add a Pre-Configured SMS
Note that fields marked with an asterisk are required.
Triggers > Pre-Configured SMS
Pre-Configured SMS
Enter the text for your Pre-Configured SMS Message.
Pre-Configured Group
Select the groups to receive this pre-configured message. Click Groups and select the desired groups. If
you change your mind about a group, highlight the group and click Delete to remove it from the list. Note
that a message can contain only 160 characters including spaces and punctuation.
Save
Click the Save button
Cancel
If you want to start over on this screen or do not want to continue creating this pre-configured message,
click Cancel.
Save & Restart
IMPORTANT Note About Save & Restart
When you have completed your SMSFinder settings and you are not going to enter any more data,
you must click the Save & Restart button located under the menu bar. The system will save the new
settings to the Flash Memory and give you the option to restart your SMSFinder. Saving to the Flash
Memory saves the new settings in the flash prom and prevents the settings from getting lost at the
next power up.
Note: The system will save the SMS settings every 8 hours automatically; however, it will not save the
system setting during this automatic save. The automatic saving of the SMS settings is helpful for
those times when the administrator does not have direct access to the Ethernet port.
Save
Click the Save button to save your system settings to the flash memory.
Restart is Optional
This is optional. You do not have to restart the SMSFinder after saving to the flash memory.
Multi-Tech Systems, Inc. SMSFinder User Guide for System Administrators (Document S000451B) 44
Page 45

Chapter 4 – Using the SMSFinder's Web Interface
Utilities > Backup
Utilities > Firmware Upgrade
Utilities
Utilities > Backup
The Backup function lets you save the SMSFinder settings to a local hard disk or to be exported to a remote
client. With a backup file, you can set a recently installed SMSFinder to the identical configuration level as an
existing SMSFinder. This is useful in case there is a problem with your new settings. Important Note: A
backup file should only be restored to SMSFinders that have the same firmware as the backup.
Backup
Import Backup from Remote Client
Use this section of the screen to import a saved configured. Click the Browse button to locate the file.
Then click the Import button to restore the SMSFinder configuration from this backup file. The
configuration file is uploaded to the SMSFinder and the saved configuration is restored.
Export Backup
Use this section of the screen to store the SMSFinder configuration. Click the Export button to save the
configuration file.
Utilities > Firmware Upgrade
The firmware on the SMSFinder can be upgraded to the latest version using this feature. All Multi-Tech
firmware upgrades are posted on the Multi-Tech Web site from which they can be downloaded.
Firmware Upgrade
Select a File to Upgrade
Click the browse button to locate the latest firmware version.
Click the Upgrade button to start the download.
Note: The SMSFinder will reboot automatically after the firmware upgrade.
Save & Restart
IMPORTANT Note About Save & Restart
When you have completed your SMSFinder settings and you are not going to enter any more data,
you must click the Save & Restart button located under the menu bar. The system will save the new
settings to the Flash Memory and give you the option to restart your SMSFinder. Saving to the Flash
Memory saves the new settings in the flash prom and prevents the settings from getting lost at the
next power up.
Note: The system will save the SMS settings every 8 hours automatically; however, it will not save the
system setting during this automatic save. The automatic saving of the SMS settings is helpful for
those times when the administrator does not have direct access to the Ethernet port.
Save
Click the Save button to save your system settings to the flash memory.
Restart is Optional
This is optional. You do not have to restart the SMSFinder after saving to the flash memory.
Multi-Tech Systems, Inc. SMSFinder User Guide for System Administrators (Document S000451B) 45
Page 46

Chapter 4 – Using the SMSFinder's Web Interface
Import & Export Address Book > Import
Import & Export Address Book
Import & Export Address Book > Import
Use this screen to import an address book that you want to use to set up senders and receivers of messages,
as well as authentic users. Note: CSV stands for comma separated values, a term that applies to the format
of an address book.
Import Address Book
Select the CSV Format
Browse for the address file you want to use, and then click the Upload button once it is found. A screen
to select the columns that you want shown in your address book displays.
Choose Your Address Book Column Headings
Address Book Field and Field in the CSV
The options that default into Field in the CSV come from the address book file that you import;
therefore, the number of drop boxes is determined by your address book file. You can have up to 10
columns in the .CSV file. From the drop down boxes, select the order in which the columns will be
displayed in your address book. Then click the Import button.
In the example used here, the columns selected headings are First Name, Last Name, Phone, and
Description in this order.
Example: Excerpt from a .CSV File
First Name,Last Name,phone,description
first1,last1,17633604174,Parent
first2,last2,17633604174,Parent
first3,last3,17633604174,Student
first4,last4,17633604174,Teacher
first5,last5,17633604174,Supplier
first6,last6,17633604174,Newspaper
first7,last7,17633604174,Photographer
Important Note:
If you plan to use authentication on any entry in the address book, the phone numbers of these
individuals should be preceded with the country code. For the U.S., enter "1". This allows
authentication to work properly by allowing the SMSFinder box to successfully match the cell phone
number of a received trigger message with the phone number in the authentication list.
Multi-Tech Systems, Inc. SMSFinder User Guide for System Administrators (Document S000451B) 46
Page 47

Chapter 4 – Using the SMSFinder's Web Interface
Import & Export Address Book > Import Continued
Example of an Imported Address Book
Exception: The first entry was entered remotely with a trigger message. Note that remotely sent numbers
have a "+" in front of the number. This is how the SMSFinder compares phone numbers of incoming
messages to the authentication list.
Address Book
After the Address Book has been imported, you can Add a new entry, Edit an entry, Delete an entry, and
Search for an entry.
Add
To add a new entry, click the Add button. The SMS Services > Add a Phone Number screen displays on
which you can enter the new number.
Edit
To edit an entry, click the corresponding Edit button in line with the entry you want to edit. The screen turns to
edit mode.
Delete
To delete an entry, place a check in the Delete box in line with the entry or entries you want to delete. Then
click the Delete button. Note that you can select all entries to be deleted at one time instead of checking each
entry; simply check Select All and then click Delete.
Search
To search for an entry, type in the beginning letters of a name. Then click the Search button.
You can enter a new starting point at anytime, if your search does not yield the results you wanted.
Multi-Tech Systems, Inc. SMSFinder User Guide for System Administrators (Document S000451B) 47
Page 48

Chapter 4 – Using the SMSFinder's Web Interface
Import & Export Address Book > Export
Import & Export Address Book > Export
Use this screen to export an address book. You would use the export function to share the address list of this
SMSFinder by sending the list to a laptop, to a remote location, to another company, to your current e-mail
program such as Outlook.
Export Address Book
Export Address Book
Click the Export button to save the address book of this SMSFinder to the workstation that is accessing
the SMSFinder. The address list is saved in the following format (a zipped-up file):
.tar.gz Win RAR
The CSV file is saved with four columns labeled First Name, Last Name, Description, and Phone.
Save & Restart
IMPORTANT Note About Save & Restart
When you have completed your SMSFinder settings and you are not going to enter any more data,
you must click the Save & Restart button located under the menu bar. The system will save the new
settings to the Flash Memory and give you the option to restart your SMSFinder. Saving to the Flash
Memory saves the new settings in the flash prom and prevents the settings from getting lost at the
next power up.
Note: The system will save the SMS settings every 8 hours automatically; however, it will not save the
system setting during this automatic save. The automatic saving of the SMS settings is helpful for
those times when the administrator does not have direct access to the Ethernet port.
Save
Click the Save button to save your system settings to the flash memory.
Restart is Optional
This is optional. You do not have to restart the SMSFinder after saving to the flash memory.
Multi-Tech Systems, Inc. SMSFinder User Guide for System Administrators (Document S000451B) 48
Page 49

Chapter 4 – Using the SMSFinder's Web Interface
Statistics & Logs > System Information
Statistics & Logs
Statistics & Logs > System Information
The System Information screen provides the following information:
System Information
• Product Model Number
• Firmware Version
• MAC Address
• Signal Strength
Live Details
• Date and Time
• System Uptime
• Memory Utilization
• Free Memory Blocks
Multi-Tech Systems, Inc. SMSFinder User Guide for System Administrators (Document S000451B) 49
Page 50

Chapter 4 – Using the SMSFinder's Web Interface
Statistics & Logs > SMS Statistics
The SMS Statistics screen provides the following information:
SMS Statistics:
Number of Messages in the Inbox
Number of Message in the Outbox
Number of Messages Sent
Trigger Statistics
Number of Broadcast Triggers Received
Number of Action Triggers Received
Number of Broadcast Triggers Configured
Address Book Statistics
Number of Entries in the Address Book
Rate of Messages
Rate of Messages: This is the number of messages sent or received per minute. The average
number of messages sent from the SMSFinder is about 10 a minute. The average number of
messages received by the SMSFinder is about 5 a minute. These rates are affected by the size of
each message and the amount of network congestion.
Statistics & Logs > SMS Statistics
Multi-Tech Systems, Inc. SMSFinder User Guide for System Administrators (Document S000451B) 50
Page 51

Chapter 4 – Using the SMSFinder's Web Interface
Statistics & Logs > Log Traces
Statistics & Logs > Log Traces
The Log Traces screen provides detailed information about SMS messages, API functions, and the SMS
system:
SMS Logs (Sent, Received, Failure, Live)
Send API Logs (Status, Failure, HTTP API Live, TCP API Live)
Receive API Logs (Live, Failure)
System Log
The number of logged messages is dependent upon the amount of memory. Typically, the log can store
information for about 500+ messages.
To View Logs
Click the Show button to view the desired Log.
Multi-Tech Systems, Inc. SMSFinder User Guide for System Administrators (Document S000451B) 51
Page 52

Chapter 5 – The User Interface
Chapter 5 – The Non-
Administrative User Interface
Introduction
This chapter may be photocopied or printed separately and given to non-administrative users who have limited
access to the SMSFinder for sending SMS text messages and for monitoring SMS messages in the Inbox and
Outbox.
Users send SMS text messages from a networked PC. They login using the name and password created by the
administrator for each user and can send messages from the SMS Services > Send SMS screen.
This chapter covers the Web Interface available to non-administrative users
Note: Users are identified and setup by the Administrator on the SMS > Send SMS Users screen.
Web Interface Available to NonAdministrative Users
The only screens available to users are the following SMS Services screens:
• Send SMS
• Inbox
• Outbox
How Non-Administrative Users Login
Note: Be sure that the SMSFinder is cabled and that the power is connected as shown in Chapter 2.
1. Open a Web browser on the PC.
2. Type the default gateway address line:
http://192.168.2.1
3. The Login screen for the SMSFinder displays.
• Users must type their names the way the administrator entered them on the SMS Services >
Send SMS Users screen.
• Users must type the passwords created for them by the administrator on the SMS Services >
Send SMS Users.
• Click Login.
• The SMS Services > Send SMS screen displays.
Multi-Tech Systems, Inc. SMSFinder User Guide for System Administrators (Document S000451B) 52
Page 53

SMS Services > Send SMS
This is the screen from which general users will send SMS text messages (original text or pre-configured
messages). The screen options here are the same options available to the administrator.
SMS Services > Inbox
This screen is also available to Users; it displays a list of all SMS text messages received. The list
includes the sender's number, the message received, and a timestamp.
SMS Services > Outbox
This screen is also available to Users; it lists the SMS text messages sent. The list includes the receiver's
number, the message sent, and a timestamp.
Note
Save & Restart are not available to users. However, the SMSFinder automatically saves the SMS
settings and configuration every 8 hours.
Chapter 5 – The User Interface
Multi-Tech Systems, Inc. SMSFinder User Guide for System Administrators (Document S000451B) 53
Page 54

Chapter 6 – SMS Examples
Chapter 6 – SMS Examples
Check to See if the SIM Card Is Installed
Correctly and Activated
This example will verify that the SIM is installed correctly and that it is activated.
1. Power up the SMSFinder. Wait until the Status LED and the LS LED are blinking before continuing.
Make sure all setup procedures and connections have been made. See Chapter 2.
2. Open the Web browser, enter the IP address, and login to the SMSFinder. See Chapter 3.
3. Go to the Network Setup > Cellular Modem screen.
• Enter the phone number of your SIM card. Example: 6126361654.
• Click the Save button.
• Click Save & Restart under the Menu Bar. Select Save.
Note: You do not have to restart the SMSFinder.
4. Send a text message to yourself. Do this on the SMS Services > Send SMS screen.
• To – Enter Phone Numbers – Enter the SIM phone and click Add. The phone number displays
in the box to the right.
• SMS Text – Enter an SMS Text message. The format add;SF100 is a trigger message word that
tells the SMSFinder to add
the semicolon in this message.
• Click Send. The following message displays: Your request is being processed.
• Click OK.
the phone number and name to the address book. Notice the use of
Multi-Tech Systems, Inc. SMSFinder User Guide for System Administrators (Document S000451B) 54
Page 55

Chapter 6 – SMS Examples
5. Check the Outbox and you will see that the message was sent.
6. Check the Inbox and you will see that the message was received. This verifie s that the cellular
modem is functioning.
Note: Sometimes you may have to refresh this screen and wait several minutes for the cellular
provider to deliver the message.
7. Go to the SMS Services > Address Book. You will see the trigger SMS text message was
processed and the name and phone number were added to the address book.
Note: The phone number is entered with a "+1" in front of it. This indicates the address phone
number was entered into the address book using a trigger message.
Multi-Tech Systems, Inc. SMSFinder User Guide for System Administrators (Document S000451B) 55
Page 56

Chapter 6 – SMS Examples
Creating a Broadcast Message for Future
Use
In this example a school wants to be prepared to send a message that school is closed for the day. The
Administrator creates a Trigger Message word Snow and the following Broadcast Message:
School is closed today.
This example assumes that a Group called Parents has been created and that SF100 stands for the
Administrator's cell phone number.
1. Go to the Triggers > Add a Broadcast Trigger screen.
• Enter Snow in the Trigger Message word box. Trigger message words or codes are not case-
sensitive.
• Enter the Broadcast Message. In this case the message is School is closed today.
• Select the Group that will receive this message. In this case the group is Parents.
• Check the Authenticate box to indicate that this message can be sent by an authenticated user
only.
• The Authentic User selected to trigger this message is SF100, the Administrator's cell phone.
Note: All phone numbers for Authenticated Users must be preceded by the country code ("1" for
U.S.) in the address book so the SMSFinder can match the phone number of the received S MS
trigger message with the phone number in the Authenticated User list.
• Click Save. The following screen displays the Broadcast Message saved for future use.
2. To trigger the broadcasting of this message to the Parent group, the administrator sends the SMS
text message word Snow from his cell phone to the SMSFinder. When the SMSFinder receives this
message, it compares the Administrator's cell phone number with the Authentication List and if they
match, it broadcasts the message to everyone in the Parent group.
Multi-Tech Systems, Inc. SMSFinder User Guide for System Administrators (Document S000451B) 56
Page 57

Chapter 7 – Troubleshooting
Chapter 7 – Troubleshooting
This chapter provides a list of common problems encountered while installing, configuring, or a dministering the
SMSFinder.
SMSFinder Troubleshooting
Other computers can connect to the network device, but my computer can’ t.
• Whenever I click on Internet Explorer or Netscape, I see the Windows Dial-up utility popping up on my
screen asking my phone number and password to dial-up my ISP. To correct this, remove the TCP/IP dialup adapter from all computers that will be using your SMSFinder. TCP/IP dial-up adapter is not needed to
access the SMSFinder.
1. To remove the Dial-up Adapter, click Start | Settings | Control Panel.
2. Double-click the Network icon.
3. Click the Dial-up Adapter and click Remove. Restart the computer and try agai n.
• Ensure your PC has a correct IP address. From a DOS window in Windows 95/98, type WINIPCFG or
from other Windows operating systems, type IPCONFIG. If the address field is listed as 0.0.0.0, the
computer does not have an IP address. Enter a statically assigned IP address.
• Ensure that the Web browser is properly configured to connect to the SMSFinder via the LAN.
The SMSFinder is connected, but my workstation has problems accessing the SMSFinder.
• Ensure the workstation has TCP/IP properly configured.
• Attempt to ping the IP address of the SMSFinder.
• Use WINIPCFG (Windows 95/98) or IPCONFIG (Windows NT/ 2000) to check to see if the computer’s IP
settings are correct.
• Ensure the DNS settings are correct.
• Ensure the Gateway IP addre ss is the device’s LAN Ethernet IP address (Server IP address).
• Ensure the IP addres s netmask is correct.
It appears that the SMSFinder cannot communicate with the cellular modem.
• Check your initialization string.
• The Status LED and LS LED should be blinking.
• Review the wireless modem account activation instructions to make sure they were properly executed.
Authenticated triggers are not being executed.
• Is the SMS trigger text message sent to the SMSFinder worded as configured?
• The phone number of the device sending the SMS trigger message (word or code) must be included in
the list of authenticated users and the phone number must be preceded with the country code. For the
U.S., enter "1". This allows authentication to work properly by allowing the SMSFinder box to successfully
match the cell phone number of a received trigger message with the phone number in the authentication
list.
Multi-Tech Systems, Inc. SMSFinder User Guide for System Administrators (Document S000451B) 57
Page 58

Chapter 7 – Troubleshooting
The Please set the Device IP screen displays while configuring the SMSFinder.
• Windows detects that the SMSFinder’s LAN Ethernet IP address is not in the same subnet as the PC’s.
Ensure your PC has a correct IP address. From a DOS window in Windows 95/98, type WINIPCFG or
from other Windows operating systems, type IPCONFIG. If the address field is listed as 0.0.0.0, the
computer does not have an IP address. Enter a statically assigned IP address.
A message appears indicating the input IP address is either not valid on your network or is in conflict
with another IP address.
• The system has detected the IP address of the SMSFinder you are configuring is in conflict with another
device. Power off the conflicting device and configure the SMSFinder with a different Ethernet LAN IP
address.
A line appears in the Inbox that says TIMESETTINGS_LOOP_BACK_MSG. What does this mean?
• This is simply a time setting verification. You can ignore this line.
E-mail alerts sent to the Administrator are not being received.
• Is the SMTP Server configured properly for e-mail notification? See the Administration > System Setup
screen.
• The SMSFinder's Ethernet port must be connected to a live network. SMTP e-mail alerts are sent through
the Ethernet connection.
The SNTP Time/Date stamp are not correct in the outbox.
• Is the SNTP Client configured p rop erly? See the Administration > SNTP screen.
• The SNTP Ti me/Date function works through the SMSFinder's Ethernet connection. The Ethernet port
needs to be connected to a live network.
Multi-Tech Systems, Inc. SMSFinder User Guide for System Administrators (Document S000451B) 58
Page 59

Appendix A – Application Programming Interface (API)
Appendix A – Application
Programming Interface (API)
1. Introduction
1.1 Purpose
Requirement: Customers require an Application Programming Interface (API) to integrate the SMSFinder's
Send and Receive SMS capability into their custom application.
This document defines the API interface provided for sending SMS via the SMSFinder and for receiving
SMS via the SMSFinder
1.2 Scope
APIs are defined to send and receive SMS using HTTP or TCP protocols. The packet form ats and
handshakes are provided in Section 3.
2. Acronyms and Definitions
Acronyms Definitions
API Application Programming Interface
HTTP Hypertext Transfer Protocol
SMS Short Message Service
TCP Transport Control Protocol
3. Overview of Send SMS API
HTTP / TCP
Applicant
Send API Request
ID: Msg ID
.
.
.
Query API Request
ID: Msg ID Status: Status Code
Multi-Tech Systems, Inc. SMSFinder User Guide for System Administrators (Document S000451B) 59
SMSFinder
SMS is
sent
Mobile
network
Page 60

3.1 HTTP Send API
Configuration of the "HTTP Send API" Using the SMSFinder Web Admin Interface
Appendix A – Application Programming Interface (API)
HTTP Send API Status:
Enable “HTTP Send API Status” to send SMS / query status using HTTP API.
By default, HTTP Send API is disabled.
HTTP Port:
Configure the port to service the HTTP Send API.
Default is 80
Multi-Tech Systems, Inc. SMSFinder User Guide for System Administrators (Document S000451B) 60
Page 61

Appendix A – Application Programming Interface (API)
3.1.1 HTTP Send API Format
Each "HTTP Send API Request" consists of four parts:
• The first part is the destination; i.e., the SMSFinder’s IP and HTTP port number.
• The second part is the API call which is the query; therefore, it has a '?' post-fixed to the
call.
• The third part is for authentication, which is in the form of a username and password.
• The fourth part is the message parameters.
Where: portnumber is optional.
user1, puser1, 7634567765 and message are variables / configured parameters.
Note: The SMSFinder can be accessed ONLY from the preconfigured allowed networks.
Example: To access the SMSFinder 204.26.122.125 from 125.63.78.44, you MUST add the
network 125.63.78.0 to the following SMSFinder screen:
Admin Access >> Allowed Networks
When HTTP Send API is enabled, it is also possible to send SMS from a non-browser with a
TCP connection to the configured HTTP Port by following the steps below:
• Initiate a raw TCP connection to the SMSFinder’s IP address over the "HTTP Send API"
port
Example : telnet 192.168.2.1 80
• Issue GET command to send SMS.
• Issue GET command to query the status of send SMS.
Send API Format
GET /sendmsg?user=admin&passwd=admin&cat=1&to=5645676543&ton=Graham&
group=Engineering&text=This%20is%20a%20test%20message.^M^J
Or
GET
/sendmsg?user=admin&passwd=admin&cat=1&to=%225678976543%22&ton=%22Bob%2
2&group=%22Engineering%22&text=This%20is%20a%20test%20message.^M^J
Query API Format
GET /querymsg?user=admin&passwd=admin&apimsgid=message id.^M^J
Note: All special characters must be given in URL encoded format with hex value; e.g., space
should be given as %20; double quotes should be given as %22.
Example: If a name is Graham Bell, it should be given as Graham%20Bell
Multi-Tech Systems, Inc. SMSFinder User Guide for System Administrators (Document S000451B) 61
Page 62

Appendix A – Application Programming Interface (API)
3.1.2 Authentication
The system needs to authenticate any API request. We achieve this by having the
authentication credentials as part of the "Send SMS URL" or “Send SMS TCP" command.
user - The username of the account, which has a maximum of 50 bytes.
passwd - The password of the account, which has a maximum of 50 bytes.
This user should be Admin or the configured Send Users.
Every "Send SMS URL" should have the username and password, and every request is
authenticated by the SMSFinder.
3.1.3 Sending to a Number
HTTP API format is:
http://192.168.2.1[:portnumber]/sendmsg?user=user1&passwd=puser1&ca
t=1&to=”7657867765”&text=message
The parameters are:
• cat Category
1 - Send SMS
2 - Broadcast Trigger
3 - Action Trigger
• to The mobile number where the SMS is to be delivered.
This number has to be given within double quotes. The maximum size of each
recipient’s number is 50 bytes.
• text The message text to be sent.
Enable Extended ASCII in the SMSFinder to send both ASCII and extended
ASCII characters. By default, Extended ASCII is disabled and the message
could have only ASCII characters.
Important Note: The message field should NOT contain %0D.
Note: If Extended ASCII is disabled, a maximum of 160 characters can be sent.
If Extended ASCII is enabled, a maximum of 140 characters can be sent.
In the format example above:
user1, puser1, 7657867765 and message are variables / configured parameters.
3.1.4 Sending to an Address Book Name
The API can be used to send the message to a name in the SMSFinder's address book. If
the name does not exist in the address book, the message is dropped.
HTTP API format is:
http://192.168.2.1[:portnumber]/sendmsg?user=user1&passwd=
user1&cat=1&ton=”bob”&text=message
The parameters are:
• cat 1
• ton The name in the address book where the SMS is to be delivered must be
given within double quotes.
The maximum size of each recipient's name is 50 bytes.
• text The message text to be sent.
Enable Extended ASCII in the SMSFinder to send both ASCII and extended
ASCII characters. By default, Extended ASCII is disabled and the message
can have only ASCII characters.
If Extended ASCII is disabled, a maximum of 160 characters can be sent.
If Extended ASCII is enabled, a maximum of 140 characters can be sent.
Important Note: The message field should NOT contain %0D.
Multi-Tech Systems, Inc. SMSFinder User Guide for System Administrators (Document S000451B) 62
Page 63

Appendix A – Application Programming Interface (API)
3.1.5 Sending to a Group
The API can be used to send SMS to a pre-defined group. The group should exist in the
SMSFinder. If the group does not exist, the message is dropped.
HTTP API format is:
http://192.168.2.1[:portnumber]/sendmsg?user=user1&passwd=user1&cat
=1&group=”admin”&text=message
The parameters are:
• cat 1
• group The pre-defined group name(s) must be given within double quotes.
The maximum size of group name is 50 bytes.
• text The message text to be sent.
Important Note: The message field should NOT contain %0D.
Enable Extended ASCII in the SMSFinder to send both ASCII and
extended ASCII characters.
By default, Extended ASCII is disabled, and the message can have only
ASCII characters.
If Extended ASCII is disabled, a maximum of 160 characters can be sent.
If Extended ASCII is enabled, a maximum of 140 characters can be sent.
3.1.6 Sending a Broadcast Trigger Message
We can use the API to send a broadcast trigger message to the SMSFinder.
HTTP API format is:
http://192.168.2.1[:portnumber]/sendmsg?user=user2&passwd=user2&ca
t=2&text=message
The parameters are:
• cat 2
• text The trigger message text to be sent.
Enable Extended ASCII in the SMSFinder to send both ASCII and
extended ASCII characters.
By default, Extended ASCII is disabled, and the message can have only
ASCII characters.
If Extended ASCII is disabled, a maximum of 160 characters can be sent.
If Extended ASCII is enabled, a maximum of 140 characters can be sent.
The API can be used to send a trigger message to the SMSFinder. If the
SMSFinder has a configured broadcast trigger, it will send the broadcast
trigger message to the configured recipients.
Multi-Tech Systems, Inc. SMSFinder User Guide for System Administrators (Document S000451B) 63
Page 64

Appendix A – Application Programming Interface (API)
3.1.7 Sending an Action Trigger Message
We could use this API to perform a predefined action.
HTTP API format is:
http://192.168.2.1[:portnumber]/sendmsg?user=user1&passwd=user1&cat
=3&text=message
The parameters are:
• cat 3
• text The trigger message text to be sent.
The API can be used to send an action trigger to the SMSFinder. If the SMSFinder has a
configured action trigger, it will perform the configured action.
3.1.8 Sending to Multiple Numbers, Address Book
Recipients or Groups
An SMS can be sent to multiple numbers, address book names and groups using a single
API.
HTTP API format is:
http://192.168.2.1[:portnumber]/sendmsg?user=xxx&passwd=xxx&
cat=1&to=”xxx1”,”xxx2”,”xxx3”&ton=”name1”,”name2”&group=”adm
in”,”rd”,”market”&text=message
xxx1, xxx2 and xxx3 are mobile numbers.
name1 and name2 are names in the Address Book.
admin, rd and market are groups present in the SMSFinder.
Note: The to, ton and group parameters should be enclosed in quotes.
3.1.9 Response from the SMSFinder After
Submitting the Send SMS API
The SMSFinder returns a unique identifier; i.e., an API message ID for each "Send API
request".
This ID can be used to track and monitor any given message.
ID: apimsgid
OR
Err: error code
e.g.,
ID: 1
Err: 601
Multi-Tech Systems, Inc. SMSFinder User Guide for System Administrators (Document S000451B) 64
Page 65

Appendix A – Application Programming Interface (API)
3.1.10 HTTP Query API Format
Processing the "Send API" and sending the message takes some time. So, only an
apimsgid is returned as a response to the "Send SMS API". Query API can be used to
query the status of a Send. It returns the status of a message submitted earlier.
HTTP API format is:
http://192.168.2.1[:portnumber]/querymsg?user=xxx&passwd=xxx&apim
sgid=id
Response values:
ID: apimsgid Status: status code
OR
ID: apimsgid Err: error code
OR
Err: error code
e.g.,
ID: 1 Status: Done
ID: 1 Err: 604
Err: 602
3.1.11 Status Codes
Status Code Status Description Description
0 Done The SMSFinder has completed servicing the "Send"
job, and a message is sent to all the recipients.
1 Done with error The SMSFinder has completed servicing the "Send"
job, but the message is not sent to all the recipients
2 In progress The SMSFinder is processing the "Send" API.
3 Request Received The SMSFinder has received the "Send" request.
4 Error Error occurred while sending the SMS from the
SMSFinder.
5 Message ID Not Found An API Message ID does not exist.
3.1.12 Error Codes
Error Code Error Description Response to
601 Authentication Failed Send API, Query API
602 Parse Error Send API, Query API
603 Invalid Category Send API
604 SMS message size is greater than 160 chars Send API
605 Recipient Overflow Send API
606 Invalid Recipient Query API
607 No Recipient Send API
608 SMSFinder is busy, can’t accept this request Send API, Query API
609 Timeout waiting for a TCP API request Send API
610 Unknown Action Trigger Send API
611 Error in broadcast Trigger Send API
612 System Error. Memory Allo cation Failure Send API, Query API
Note: The maximum supported size of the URL is 2048 bytes.
Multi-Tech Systems, Inc. SMSFinder User Guide for System Administrators (Document S000451B) 65
Page 66

3.2 TCP Send API
Configuration of the "TCP Send API" Using the SMSFinder Web Admin Interface
Appendix A – Application Programming Interface (API)
TCP Send API Status:
Enable “TCP Send API Status” to send SMS / query status using TCP API. By default, TCP Send API
is disabled.
TCP Port:
Configure the port to service the TCP Send API. Default is 2040
Note: SMSFinder can be accessed ONLY from the preconfigured allowed networks.
Example: To access the SMSFinder 204.26.122.125 from 125.63.78.44, you MUST add the network
125.63.78.0 to the following SMSFinder screen:
Admin Access >> Allowed Networks
• Initiate a raw TCP connection to the SMSFinder’s IP address over the "TCP Send API" port
• Issue send command to send SMS.
• Issue query command to query the status of send SMS.
Multi-Tech Systems, Inc. SMSFinder User Guide for System Administrators (Document S000451B) 66
Page 67

3.2.1 TCP Send API Format
/sendmsg?user=admin&passwd=admin&cat=1&to="+919844895691"&ton=”Bob”&
group=”eng”&text=Here is the test message
3.2.2 TCP Query API Format
/querymsg?user=admin&passwd=admin&apimsgid=id
Notes:
• The TCP buffer should contain only this data in the given format to be parsed properly by
the TCP Server in the SMSFinder to send SMS / query status.
• SMS could be sent to different multiple recipients like name, number, group using the
same format. Enumeration and examples given in HTTP Send API section hold good.
• Response to TCP Send API, response to TCP Query API, Status Codes and Error Codes
are the same as given for HTTP Send API.
4. Receive SMS API
Appendix A – Application Programming Interface (API)
HTTP / TCP
Applicant
Mobile
network
SMSFinder
SMS is
received
Receive API Request
OK
• Upon receipt of an SMS message and based on the configuration, the SMSFinder uploads the
SMS to the HTTP or TCP server configured.
• If the post interval is more than zero seconds, the SMSFinder uploads the message
immediately upon receipt of it. If the post interval is non-zero, it waits for the configured post
interval, queues up the messages, and then uploads the messages accumulated for the
configured post interval.
• The SMSFinder will wait for an OK response from the server after sending the SMS to the
application via HTTP or TCP. The response timeout at the SMSFinder is 30 secs.
Multi-Tech Systems, Inc. SMSFinder User Guide for System Administrators (Document S000451B) 67
Page 68

4.1 HTTP Receive API
Configuration of the "Receive API" Using the SMSFinder Web Admin Interface
Appendix A – Application Programming Interface (API)
When the protocol is HTTP, the "Receive API request" is an HTTP POST packet.
4.1.1 POST Packet Format With Authentication
POST /cgi-bin/postquery.cgi HTTP/1.1
HOST: 192.168.2.2:80
User-Agent: SMSFinder/1.20
Accept: text/xml, application/xml,
application/xhtml+xml,text/html;q=0.9,text/plain;q=0.8,
application/msword, application/vnd.ms-powerpoint, image/png, */*
Accept-Language: en-us; en;q=0.50
Accept-Encoding: gzip, deflate
Accept-Charset: ISO-8859-1, utf-8;q=0.7, *;q=0.7
Keep-Alive: 300
Connection: keep-alive
Content-Type: application/x-www-form-urlencoded
Content-Length: 395
username=SMSFINDER&password=SMSFINDER&XMLDATA=%3C%3Fxml%20version%3
D%221.0%22%20encoding%3D%22ISO-88591%22%3F%3E%0D%0A%3CMessage%20Notification%3E%0D%0A%3CSenderNumber%3
E%2B919844895692%3C%2FSenderNumber%3E%0D%0A%3CDate%3E08%2F03%2F14
%3C%2FDate%3E%0D%0A%3CTime%3E12%3A53%3A09%3C%2FTime%3E%0D%0A%3
CMessage%3ETest%0D%0A%0D%3C%2FMessage%3E%0D%0A%3C%2FMessage%20N
otification%3E%0D%0A
Multi-Tech Systems, Inc. SMSFinder User Guide for System Administrators (Document S000451B) 68
Page 69

Appendix A – Application Programming Interface (API)
4.1.2 POST Packet Format Without Authentication
POST /cgi-bin/postquery.cgi HTTP/1.1
HOST: 192.168.2.2:80
User-Agent: SMSFinder/1.20
Accept: text/xml, application/xml,
application/xhtml+xml,text/html;q=0.9,text/plain;q=0.8,
application/msword, application/vnd.ms-powerpoint, image/png, */*
Accept-Language: en-us; en;q=0.50
Accept-Encoding: gzip, deflate
Accept-Charset: ISO-8859-1, utf-8;q=0.7, *;q=0.7
Keep-Alive: 300
Connection: keep-alive
Content-Type: application/x-www-form-urlencoded
Content-Length: 346
XMLDATA=%3C%3Fxml%20version%3D%221.0%22%20encoding%3D%22ISO-8859 1%22%3F%3E%0D%0A%3CMessage%20Notification%3E%0D%0A%3CSenderNumber%
3E%2B919844895692%3C%2FSenderNumber%3E%0D%0A%3CDate%3E08%2F03%2F
14%3C%2FDate%3E%0D%0A%3CTime%3E12%3A55%3A54%3C%2FTime%3E%0D%0
A%3CMessage%3ETest%0D%0A%0D%3C%2FMessage%3E%0D%0A%3C%2FMessage
%20Notification%3E%0D%0A
Note:
If authentication is disabled, POST DATA contains XMLDATA=[urlencoded(XML)]
If authentication is enabled, POST DATA contains username=user&passwd=user&
XMLDATA=[urlencoded(XML)]
The server authenticates the message from SMSFinder using the username/password
XML data
<?xml version="1.0" encoding="ISO-8859-1"?>\r\n
<Message Notification>\r\n
<SenderNumber>6754535645</SenderNumber>\r\n
<Date>08/03/10</Date>\r\n
<Time>09:05:30</Time>\r\n
<Message>Here is a test message</Message>\r\n
</Message Notification>\r\n
OR
<?xml version="1.0" encoding="ISO-8859-1"?>\r\n
<Message Notification>\r\n
<SenderNumber>8767654534</SenderNumber>\r\n
<Date>08/03/07</Date>\r\n
<Time>08:07:20</Time>\r\n
<Message>Test message 1</Message>\r\n
</Message Notification>\r\n
<Message Notification>\r\n
<SenderNumber>9876754534</SenderNumber>\r\n
<Date>08/03/13</Date>\r\n
<Time>10:10:36</Time>\r\n
<Message>Test message 2</Message>\r\n
</Message Notification>\r\n
The SMSFinder accommodates two messages at the maximum in one POST message.
The SMSFinder waits for an OK response from the HTTP server; it will timeout in 30
seconds.
Multi-Tech Systems, Inc. SMSFinder User Guide for System Administrators (Document S000451B) 69
Page 70

4.2 TCP Receive API
Configuration at the SMSFinder
Appendix A – Application Programming Interface (API)
4.2.1 TCP Receive API Request Without
Authentication
From: SMSFinder/1.20
Authentication: OFF
Data-Length: 72
+7632671249
08/03/27
21:45:49
We are testing the demo version!
4.2.2 TCP Receive API Request With Authentication
From: SMSFinder/1.20
Authentication: ON
Data-Length: 72
smsuser1
smsuser1
+7632671249
08/03/27
21:45:49
We are testing the demo version!
The SMSFinder waits for an OK response from the TCP application; it will timeout in 30 seconds.
Multi-Tech Systems, Inc. SMSFinder User Guide for System Administrators (Document S000451B) 70
Page 71

Appendix B – Table of Commonly Supported Subnet Addresses
Appendix B – Table of Commonly
Supported Subnet Addresses
This table lists commonly supported Subnets organized by Address.
255.255.255.128 N.N.N.0 N.N.N.1-126 N.N.N.127
/25 N.N.N.128 N.N.N.129-254 N.N.N.255
255.255.255.192 N.N.N.0 N.N.N.1-62 N.N.N.63
/26 N.N.N.64 N.N.N.65-126 N.N.N.127
N.N.N.128 N.N.N.129-190 N.N.N.191
N.N.N.192 N.N.N.193-254 N.N.N.255
255.255.255.224 N.N.N.0 N.N.N.1-30 N.N.N.31
/27 N.N.N.32 N.N.N.33-62 N.N.N.63
N.N.N.64 N.N.N.65-94 N.N.N.95
N.N.N.96 N.N.N.97-126 N.N.N.127
N.N.N.128 N.N.N.129-158 N.N.N.159
N.N.N.160 N.N.N.161-190 N.N.N.191
N.N.N.192 N.N.N.193-222 N.N.N.223
N.N.N.224 N.N.N.225-254 N.N.N.255
255.255.255.240 N.N.N.0 N.N.N.1-14 N.N.N.15
/28 N.N.N.16 N.N.N.17-30 N.N.N.31
N.N.N.32 N.N.N.33-46 N.N.N.47
N.N.N.48 N.N.N.49-62 N.N.N.63
N.N.N.64 N.N.N.65-78 N.N.N.79
N.N.N.80 N.N.N.81-94 N.N.N.95
N.N.N.96 N.N.N.97-110 N.N.N.111
N.N.N.112 N.N.N.113-126 N.N.N.127
N.N.N.128 N.N.N.129-142 N.N.N.143
N.N.N.144 N.N.N.145-158 N.N.N.159
N.N.N.160 N.N.N.161-174 N.N.N.175
N.N.N.176 N.N.N.177-190 N.N.N.191
N.N.N.192 N.N.N.193-206 N.N.N.207
N.N.N.208 N.N.N.209-222 N.N.N.223
N.N.N.224 N.N.N.225-238 N.N.N.239
N.N.N.240 N.N.N.241-254 N.N.N.255
255.255.255.248 N.N.N.0 N.N.N.1-6 N.N.N.7
/29 N.N.N.8 N.N.N.9-14 N.N.N.15
N.N.N.16 N.N.N.17-22 N.N.N.23
N.N.N.24 N.N.N.25-30 N.N.N.31
N.N.N.32 N.N.N.33-38 N.N.N.39
N.N.N.40 N.N.N.41-46 N.N.N.47
N.N.N.48 N.N.N.49-54 N.N.N.55
N.N.N.56 N.N.N.57-62 N.N.N.63
N.N.N.64 N.N.N.65-70 N.N.N.71
N.N.N.72 N.N.N.73-78 N.N.N.79
N.N.N.80 N.N.N.81-86 N.N.N.87
N.N.N.88 N.N.N.89-94 N.N.N.95
N.N.N.96 N.N.N.97-102 N.N.N.103
N.N.N.104 N.N.N.105-110 N.N.N.111
N.N.N.112 N.N.N.113-118 N.N.N.119
N.N.N.120 N.N.N.121-126 N.N.N.127
N.N.N.128 N.N.N.129-134 N.N.N.135
N.N.N.136 N.N.N.137-142 N.N.N.143
N.N.N.144 N.N.N.145-150 N.N.N.151
N.N.N.152 N.N.N.153-158 N.N.N.159
N.N.N.160 N.N.N.161-166 N.N.N.167
N.N.N.168 N.N.N.169-174 N.N.N.175
Network Number Hosts Available Broadcast Address
Network Number Hosts Available Broadcast Address
Network Number Hosts Available Broadcast Address
Network Number Hosts Available Broadcast Address
Network Number Hosts Available Broadcast Address
Multi-Tech Systems, Inc. SMSFinder User Guide for System Administrators (Document S000451B) 71
Page 72

Appendix B – Table of Commonly Supported Subnet Addresses
N.N.N.176 N.N.N.177-182 N.N.N.183
N.N.N.184 N.N.N.185-190 N.N.N.191
N.N.N.192 N.N.N.193-198 N.N.N.199
N.N.N.200 N.N.N.201-206 N.N.N.207
N.N.N.208 N.N.N.209-214 N.N.N.215
N.N.N.216 N.N.N.217-222 N.N.N.223
N.N.N.224 N.N.N.225-230 N.N.N.231
N.N.N.232 N.N.N.233-238 N.N.N.239
N.N.N.240 N.N.N.241-246 N.N.N.247
N.N.N.248 N.N.N.249-254 N.N.N.255
255.255.255.252 N.N.N.0 N.N.N.1-2 N.N.N.3
/30 N.N.N.4 N.N.N.5-6 N.N.N.7
N.N.N.8 N.N.N.9-10 N.N.N.11
N.N.N.12 N.N.N.13-14 N.N.N.15
N.N.N.16 N.N.N.17-18 N.N.N.19
N.N.N.20 N.N.N.21-22 N.N.N.23
N.N.N.24 N.N.N.25-26 N.N.N.27
N.N.N.28 N.N.N.29-30 N.N.N.31
N.N.N.32 N.N.N.33-34 N.N.N.35
N.N.N.36 N.N.N.37-38 N.N.N.39
N.N.N.40 N.N.N.41-42 N.N.N.43
N.N.N.44 N.N.N.45-46 N.N.N.47
N.N.N.48 N.N.N.49-50 N.N.N.51
N.N.N.52 N.N.N.53-54 N.N.N.55
N.N.N.56 N.N.N.57-58 N.N.N.59
N.N.N.60 N.N.N.61-62 N.N.N.63
N.N.N.64 N.N.N.65-66 N.N.N.67
N.N.N.68 N.N.N.69-70 N.N.N.71
N.N.N.72 N.N.N.73-74 N.N.N.75
N.N.N.76 N.N.N.77-78 N.N.N.79
N.N.N.80 N.N.N.81-82 N.N.N.83
N.N.N.84 N.N.N.85-86 N.N.N.87
N.N.N.88 N.N.N.89-90 N.N.N.91
N.N.N.92 N.N.N.93-94 N.N.N.95
N.N.N.96 N.N.N.97-98 N.N.N.99
N.N.N.100 N.N.N.101-102 N.N.N.103
N.N.N.104 N.N.N.105-106 N.N.N.107
N.N.N.108 N.N.N.109-110 N.N.N.111
N.N.N.112 N.N.N.113-114 N.N.N.115
N.N.N.116 N.N.N.117-118 N.N.N.119
N.N.N.120 N.N.N.121-122 N.N.N.123
N.N.N.124 N.N.N.125-126 N.N.N.127
N.N.N.128 N.N.N.129-130 N.N.N.131
N.N.N.132 N.N.N.133-134 N.N.N.135
N.N.N.136 N.N.N.137-138 N.N.N.139
N.N.N.140 N.N.N.141-142 N.N.N.143
N.N.N.144 N.N.N.145-146 N.N.N.147
N.N.N.148 N.N.N.149-150 N.N.N.151
N.N.N.152 N.N.N.153-154 N.N.N.155
N.N.N.156 N.N.N.157-158 N.N.N.159
N.N.N.160 N.N.N.161-162 N.N.N.163
N.N.N.164 N.N.N.165-166 N.N.N.167
N.N.N.168 N.N.N.169-170 N.N.N.171
N.N.N.172 N.N.N.173-174 N.N.N.175
N.N.N.176 N.N.N.177-178 N.N.N.179
N.N.N.180 N.N.N.181-182 N.N.N.183
N.N.N.184 N.N.N.185-186 N.N.N.187
N.N.N.188 N.N.N.189-190 N.N.N.191
N.N.N.192 N.N.N.193-194 N.N.N.195
N.N.N.196 N.N.N.197-198 N.N.N.199
N.N.N.200 N.N.N.201-202 N.N.N.203
N.N.N.204 N.N.N.205-206 N.N.N.207
N.N.N.208 N.N.N.209-210 N.N.N.211
N.N.N.212 N.N.N.213-214 N.N.N.215
N.N.N.216 N.N.N.217-218 N.N.N.219
N.N.N.220 N.N.N.221-222 N.N.N.223
N.N.N.224 N.N.N.225-226 N.N.N.227
N.N.N.228 N.N.N.229-230 N.N.N.231
N.N.N.232 N.N.N.233-234 N.N.N.235
N.N.N.236 N.N.N.237-238 N.N.N.239
N.N.N.240 N.N.N.241-242 N.N.N.243
N.N.N.244 N.N.N.245-246 N.N.N.247
N.N.N.248 N.N.N.249-250 N.N.N.251
N.N.N.252 N.N.N.253-254 N.N.N.255
Multi-Tech Systems, Inc. SMSFinder User Guide for System Administrators (Document S000451B) 72
Network Number Hosts Available Broadcast Address
Page 73

Appendix C – Antenna for the Wireless SMSFinder
Appendix C – Antenna for the
SMSFinder
RF Specifications
Frequency RX
Frequency TX
RF Power Stand
Antenna Specifications
GSM/EGSM Antenna Requirements/Specifications
Frequency Range: 824 – 960 MHz / 1710 – 1990 MHz
Impedance: 50 Ohms
VSWR: <2.0:1
Typical Radiated Gain: 3 dBi on azimuth plane
Radiation: Omni
Polarization: Vertical
Wave: Half Wave Dipole
GSM 850 EGSM 900 GSM 1800 GSM 1900
869 to 894 MHz 925 to 960 MHz 1805 to 1800 MHz 1930 to 1990 MHz
824 to 849 MHz 880 to 915 MHz 1710 to 1785 MHz 1850 to 1910 MHz
2W at 12.5% duty
cycle
2W at 12.5% duty
cycle
1W at 12.5% duty
cycle
1W at 12.5% duty
cycle
Antennas Available from Multi-Tech Systems, Inc.
Description Part Number
Hinged Right Angle 900/1800 MHz Cellular Modem Antenna ANF1-1HRA
Hinged Right Angle 800/1900 MHz Cellular Modem Antenna ANF21HRA
Hinged Right Angle 850/900/1800/1900 MHz Cellular Modem Antenna ANQB-1HRA
PTCRB Requirements Note
There cannot be any alteration to the authorized antenna system. The antenna system must be the same
type with similar in-band and out-of-ban radiation patterns and maintain the same specifications.
FCC Requirements Note
The antenna gain, including cable loss, must not exceed 3.0 dBi at 1900 MHz / 1.6 dBi at 850 MHz for mobile
operating configurations and 7.0 dBi at 1900 MHz / 2.3 dBi at 850 MHz for fixed mounted operations, as
defined in 2.1091 and 1.1307 of the rules for satisfying RF exposure compliance.
Multi-Tech Systems, Inc. SMSFinder User Guide for System Administrators (Document S000451B) 73
Page 74

Appendix D - Multi-Tech Systems, Inc. Warranty, Repairs, and Replacement Policies
Appendix D – Warranty and Repairs
This chapter covers with the terms of your SMSFinder’s warranty and repair policies.
Multi-Tech Warranty Statement
Multi-Tech Systems, Inc., (hereafter “MTS”) warrants that its products will be free from defects in material or workmanship for a period of two,
five, or ten years (depending on model) from date of purchase, or if proof of purchase is not provided, two, five, or ten years (depending on
model) from date of shipment.
MTS MAKES NO OTHER WARRANTY, EXPRESS OR IMPLIED, AND ALL IMPLIED WARRANTIES OF MERCHANTABILITY AND FITNESS
FOR A PARTICULAR PURPOSE ARE HEREBY DISCLAIMED.
This warranty does not apply to any products which have been damaged by lightning storms, water, or power surges or which have been
neglected, altered, abused, used for a purpose other than the one for which they were manufactured, repaired by Customer or any party
without MTS’s written authorization, or used in any manner inconsistent with MTS’s instructions.
MTS’s entire obligation under this warranty shall be limited (at MTS’s option) to repair or replacement of any products which prove to be
defective within the warranty period or, at MTS’s option, issuance of a refund of the purchase price. Defective products must be returned by
Customer to MTS’s factory — transportation prepaid.
MTS WILL NOT BE LIABLE FOR CONSEQUENTIAL DAMAGES, AND UNDER NO CIRCUMSTANCES WILL ITS LIABILITY EXCEED THE
PRICE FOR DEFECTIVE PRODUCTS.
Repair Procedures for U.S. and Canadian Customers
In the event that service is required, products may be shipped, freight prepaid, to our Mounds View, Minnesota factory:
Multi-Tech Systems, Inc.
2205 Woodale Drive
Mounds View, MN 55112 U.S.A.
Attn: Repairs, Serial # ____________
A Returned Materials Authorization (RMA) is not required. Return shipping charges (surface) will be paid by MTS to destinations in U.S. and
Canada.
Please include, inside the shipping box, a description of the problem, a return shipping address (must have street address, not P.O. Box), and
your telephone number. If the product is out of warranty, a payment in advance is required. Acceptable means of payment include credit card,
wire transfer or a check in U.S. dollars drawn on a U.S. Bank.
For out of warranty repair charges, go to COMPANY/Policies/warranty/
Extended two-year overnight replacement service agreements are available for selected products. Please call MTS customer service at (888)
288-5470 or visit our web site at /PARTNERS/Programs/overnight_replacement/
Please direct your questions regarding technical matters, product configuration, verification that the product is defective, etc., to our Technical
Support department at (800) 972-2439 or e-mail support@multitech.com
shipping, billing, etc., to our Repair Accounting department at (800) 328-9717 or (763) 717-5631, or e-mail mtsrepair@multitech.com.
Repairs for damages caused by lightning storms, water, power surges, incorrect installation, physical abuse, or user-caused damages are
billed on a time-plus-materials basis.
for details on rates and coverages.
. Please direct your questions regarding repair expediting, receiving,
Repair Procedures for International Customers
(Outside U.S.A. and Canada)
Your original point-of-purchase Reseller may offer the quickest and most economical repair option for your Multi-Tech product. You may also
contact any Multi-Tech sales office for information about the nearest distributor or other repair service for your Multi-Tech product. The MultiTech sales office directory is available at www.multitech.com/PARTNERS/Channels/offices/
In the event that factory service is required, products may be shipped, freight prepaid to our Mounds View, Minnesota factory. Recommended
international shipment methods are via Federal Express, UPS or DHL courier services, or by airmail parcel post; shipments made by any other
method will be refused. Please include, inside the shipping box, a description of the problem, a return shipping address (must have street
address, not P.O. Box), and your telephone number. If the product is out of warranty, a payment in advance is required. Acceptable means of
payment include credit card, wire transfer or a check in U.S. dollars drawn on a U.S. Bank. Repaired units shall be shipped freight collect,
unless other arrangements are made in advance.
Please direct your questions regarding technical matters, product configuration, verification that the product is defective, etc., to our Technical
Support department nearest you or e-mail support@multitech.com
expediting, receiving, shipping, billing, etc., to our Repair Accounting department at +(763) 717-5631 in the U.S.A., or e-mail
mtsrepair@multitech.com
Multi-Tech Systems, Inc. SMSFinder User Guide for System Administrators (Document S000451B) 74
.
. When calling the U.S., please direct your questions regarding repair
Page 75

Appendix D - Multi-Tech Systems, Inc. Warranty, Repairs, and Replacement Policies
Repairs for damages caused by lightning storms, water, power surges, incorrect installation, physical abuse, or user-caused damages are
billed on a time-plus-materials basis.
Repair Procedures for International Distributors
International distributors should contact their MTS International sales representative for information about the repair of Multi-Tech product(s).
Please direct your questions regarding technical matters, product configuration, verification that the product is defective, etc., to our
International Technical Support department at +(763)717-5863. When calling the U.S., please direct your questions regarding repair
expediting, receiving, shipping, billing, etc., to our Repair Accounting department at +(763) 717-5631 in the U.S.A. or e-mail
mtsrepair@multitech.com.
Repairs for damages caused by lightning storms, water, power surges, incorrect installation, physical abuse, or user-caused damages are
billed on a time-plus-materials basis.
Multi-Tech Systems, Inc. SMSFinder User Guide for System Administrators (Document S000451B) 75
Page 76

Appendix E – Waste Electrical and Electronic Equipment Directive (WEEE)
Appendix E – Waste Electrical and
Electronic Equipment Directive
(WEEE)
Waste Electrical and Electronic Equipment (WEEE) Directive
The WEEE directive places an obligation on manufacturers, distributors and retailers to take-back electronic
products at the end of their useful life. A sister Directive, ROHS (Restriction of Hazardous Substances),
complements the WEEE Directive by banning the presence of specific hazardous substances in the products at
the design phase. The WEEE Directive covers all Multi-Tech products being sold into the EU as of August 13,
2005. Manufacturers, distributors and retailers are obliged to finance the costs of recovery from municipal
collection points, reuse, and recycling of specified percentages per the WEEE requirements.
Instructions for Disposal of WEEE by Users in the European Union
The symbol shown below is on the product or on its packaging which indicates that this product must not be
disposed of with other waste. Instead, it is the user’s responsibility to dispose of the user’s waste equipment by
handing it over to a designated collection point for the recycling of electrical and electronic wa ste equipment. The
separate collection and recycling of waste equipment at the time of disposal will help to conserve natural
resources and ensure that it is recycled in a manner that protects human health and the environment. For more
information about where you can drop off your waste equipment for recycling, please contact your local city office,
your household waste disposal service or the seller from whom you purchased the product.
06/27/2005
Multi-Tech Systems, Inc. SMSFinder User Guide for System Administrators (Document S000451B) 76
Page 77

Appendix F – End User License Agreement (EULA)
Appendix F – End User License
Agreement (EULA)
Multi-Tech Systems, Inc.
Multi-User Software License Agreement
IMPORTANT - READ BEFORE OPENING OR ACCESSING SOFTWARE
This is a basic software license granted by Multi-Tech Systems, Inc., a Minnesota corporation, with its mailing address at 2205 Woodale Drive,
Mounds View, MN 55112.
This is a legal agreement between you (either an individual or a single entity) and Multi-Tech Systems, Inc. for the Multi-Tech software product
enclosed, which includes computer software and may include associated media, printed materials, and "online" or electronic documentation
("SOFTWARE PRODUCT"). The SOFTWARE PRODUCT also includes any updates and supplements to the original SOFTWARE PRODUCT
provided to you by Multi-Tech.
Any software provided along with the SOFTWARE PRODUCT that is associated with a separate end-user license agreement is licensed to
you under the terms of that license agreement. By installing, copying, downloading, accessing, or otherwise using the SOFTWARE
PRODUCT, you agree to be bound by the terms of that separate end-user license agreement.
This copy of Multi-Tech Systems software is provided only on the condition that you, Customer, agree to the following license agreement.
READ THIS LICENSE CAREFULLY. If you do not agree to the terms contained in this license, return the packaged program UNOPENED to
the place you obtained it. If you agree to the terms contained in this license, fill out the enclosed Software Registration Card, and return the
card by mail. Registration may also be done on Multi-Tech Systems web site at www.multitech.com/register. Opening the packaged program
constitutes agreement to be bound by the terms and conditions of this Software License Agreement. Your right to use the software terminates
automatically if you violate any part of this software license agreement.
Multi-Tech Software License Agreement Multi-Tech Systems, Inc. (MTS) agrees to grant and Customer agrees to accept on the following
terms and conditions, a non-transferable and non-exclusive license to use the software program(s) delivered with this Agreement.
GRANT OF LICENSE. MTS grants Customer the right to use one copy of the software on a single product (the Licensed System). You may
not network the software or otherwise use it on more than one product at the same time.
COPYRIGHT. The software is owned by MTS and is protected by United States copyright laws and international treaty provisions. Therefore,
Customer must treat the software like any copyrighted material. Customer may install the software to a single hard disk and keep the original
for backup or archival purposes. Customer shall NOT copy, or translate into any language, in whole or in part, any documentation which is
provided by MTS in printed form under this Agreement.
OTHER RESTRICTIONS. The software may not be assigned, sublicensed, translated or otherwise transferred by Customer without prior
written consent from MTS. Customer may not reverse engineer, decompile, or disassemble the software. Any updates shall be used only on
the Licensed System, and shall remain subject to all other terms of this Agreement. Customer agrees not to provide or otherwise make
available the software including, but not limited to documentation, programs listings, object code, or source code, in any form, to any person
other than Customer and his employees and /or agents, without prior written consent from MTS. Customer acknowledges that the techniques,
algorithms, and processes contained in the software are proprietary to MTS and Customer agrees not to use or disclose such information
except as necessary to use the software.
Customer shall take reasonable steps consistent with steps taken to protect its own proprietary information to prevent the unauthorized
copying or use by third parties of the software or any of the other materials provided under this Agreement. Any previous version of the
software must be destroyed or returned to Multi-Tech Systems, Inc. within 90 days of receipt of the software upgrade or update.
LIMITED WARRANTY. MTS warrants that the software will perform substantially in accordance to the product specifications in effect at the
time of receipt by Customer. If the MTS software fails to perform accordingly, MTS will optionally repair any defect, or replac
is void if the failure has resulted from accident, abuse, or misapplication. A Software Registration Card must be on file at MTS for this warranty
to be in effect. In all other respects, the MTS software is provided AS IS. Likewise, any other software provided with MTS software is
provided AS IS.
THE FOREGOING WARRANTY IS IN LIEU ALL OTHER WARRANTIES, EXPRESSED OR IMPLIED, INCLUDING, BUT NOT LIMITED TO,
THE IMPLIED WARRANTIES OF MERCHANTABILITY AND FITNESS FOR A PARTICULAR PURPOSE. IN NO EVENT WILL MTS BE
LIABLE FOR CONSEQUENTIAL DAMAGES RESULTING FROM USE OF THE LICENSED PROGRAM, WHETHER AS A RESULT OF MTS
NEGLIGENCE OR NOT, EVEN IF MTS HAS BEEN ADVISED OF THE POSSIBILITY OF SUCH DAMAGES. MTS ALSO DISCLAIMS ANY
LIABILITY IN CONTRACT OR OTHERWISE FOR THE DEFECT OR NON-PERFORMANCE OF ANY SEPARATE END-USER LICENSED
SOFTWARE PRODUCT INCLUDED WITH MTS' SOFTWARE.
INDEMNIFICATION. MTS will indemnify and defend Customer from any claim that the software infringes on any copyright, trademark, or
patent. Customer will indemnify and defend MTS against all other proceedings arising out of Customers use of the software.
GENERAL. If any of the provisions, or portions thereof, of this Agreement are invalid under any applicable statute or rule of law, they are to
that extent deemed to be omitted. This is the complete and exclusive statement of the Agreement between the parties, which supersedes all
proposals, oral, written and all other communications between the parties relating to the subject matter of this Agreement. This Agreement
may only be amended or modified in writing, signed by authorized representatives of both parties.
This Agreement shall be governed by the laws of the State of Minnesota. The waiver of one breach or default hereunder shall not constitute
the waiver of any subsequent breach or default. Licensee also agrees to the following:
I am not a citizen, national, or resident of, and am not under the control of the government of: Afghanistan, Cuba, Iran, Iraq, Libya,
Montenegro, North Korea, Pakistan, Serbia, Sudan, Syria, nor any other country to which the United States has prohibited export.
e it. This warranty
Multi-Tech Systems, Inc. SMSFinder User Guide for System Administrators (Document S000451B) 77
Page 78

Appendix F – End User License Agreement (EULA)
I will not download or by any other means export or re-export the Programs, either directly or indirectly, to the above countries, nor to
citizens, nationals or residents of the above countries.
I am not listed on the United States Department of Treasury lists of Specially Designated Nationals, Specially Designated Terrorists,
and/or Specially Designated Narcotics Traffickers, nor am I listed on the United States Department of Commerce Table of Denial Orders.
I will not download or otherwise export or re-export the Programs, directly or indirectly, to persons on the above mentioned lists.
I will not use the Programs for, and will not allow the Programs to be used for, any purposes prohibited by United States law, including,
without limitation, for the development, design, manufacture or production of nuclear, chemical, or biological weapons of mass
destruction.
Licensee agrees that by purchase and/or use of the Software, s/he hereby accepts and agrees to the terms of this License Agreement.
Multi-User Limited Warranty and License Agreement
The software contained in this package is licensed by Multi-Tech Systems, Inc., to the original end-user purchaser, hereafter referred to as
Licensee, of this product for site use. A site is defined as a single business, government, or academic location, such as a building, a floor of a
building, a campus, etc., and covers no more than 250 users at that location. A licensee may be a Local Area Network administrator, MIS
director, purchasing agent, or other representative who acts on behalf of the users at that single site. This license provides for use of the
distribution diskette, other accompanying programs, where applicable, and one copy of the documentation.
The software programs and installation utilities, hereafter referred to as Software, consist of the computer program files included on the
original distribution diskette(s) or CD-ROM(s).
Licensee agrees that by purchase and/or use of the Software, s/he hereby accepts and agrees to the terms of this License Agreement. In
consideration of mutual covenants contained herein, and other good and valuable considerations, the receipt and sufficiency of which is
acknowledged, Multi-Tech Systems, Inc., does hereby grant to the Licensee a non-transferrable and non-exclusive license to use the Software
and accompanying documentation under the following terms and conditions:
The software is furnished to the Licensee as the single site representative for execution and use on as many workstations as that single
site contains, for up to 250 users inclusively. Software and manuals may be copied, with the inclusion of the Multi-Tech Systems, Inc.,
copyright notice, for use within that single site. Additional manuals may be ordered from Multi-Tech Systems, Inc., for a nominal charge.
This license covers only the stipulated single site. The Licensee hereby agrees not to provide, or otherwise make available, any portion of this
software in any form to any third party without the prior express written approval of Multi-Tech Systems, Inc.
Licensee is hereby informed that this Software contains confidential, proprietary, and valuable trade secrets developed by or licensed to MultiTech Systems, Inc., and agrees that sole ownership shall remain with Multi-Tech Systems, Inc.
The Software and documentation are copyrighted. Except as provided herein, the Software and documentation supplied under this agreement
may not be copied, reproduced, published, licensed, sub-licensed, distributed, transferred, or made available in any form, in whole or in part,
to others without expressed written permission of Multi-Tech Systems, Inc. Copies of the Software may be made to replace worn or
deteriorated copies, for archival, or back-up purposes. Licensee agrees to implement sufficient security measures to protect Multi-Tech
Systems, Inc.'s proprietary interests, and not to allow the use, copying, or transfer by any means, other than in accordance with this
agreement.
Licensee agrees that any breach of this agreement will be damaging to Multi-Tech Systems, Inc. Licensee agrees that all warranties, implied
or otherwise, with regard to this Software, including all warranties of merchantability and fitness for any particular purpose are expressly
waived, and no liability shall extend to any damages, including consequential damages, whether known to Multi-Tech Systems, Inc. It is
hereby expressly agreed that Licensee's remedy is limited to replacement or refund of the license fee, at the option of Multi-Tech Systems,
Inc., for defective distribution media. There is no warranty for misused materials.
If this package contains multiple media formats (e.g., both 3.5" disk(s) and CD-ROM), they are provided only to facilitate use at a single site.
Neither this Software, nor its accompanying documentation may be modified or translated without the written permission of Multi-Tech
Systems, Inc.
This agreement shall be governed by the laws of the State of Minnesota. The terms and conditions of this agreement shall prevail regardless
of the terms of any other submitted by the Licensee. This agreement supersedes any proposal or prior agreement. Licensee further a grees
that this License Agreement is the complete and exclusive Statement of Agreement, and supersedes oral, written, or any other
communications between Multi-Tech Systems, Inc., and Licensee relating to the subject matter of this agreement. This agreement is not
assignable without written permission of an authorized agent of Multi-Tech Systems, Inc.
Copyright 2001 Multi-Tech Systems, Inc.
P/N 87000915 10/01
Multi-Tech Systems, Inc. SMSFinder User Guide for System Administrators (Document S000451B) 78
Page 79

Index
A
Action Triggers ........................................... 41, 42
Address Book in SMS Services ....................... 31
Address List Format ......................................... 47
Admin Access .................................................. 26
Administration > Admin Access ....................... 26
Administration > Admin Access Allowed
Networks ....................................................... 27
Administration > Factory Defaults .................... 28
Administration > Remote Syslog ...................... 27
Administration > SNTP Client .......................... 24
Administration > System Setup ........................ 22
Administration > Tools ..................................... 27
Antenna Connector ............................................ 9
API .................................................................... 36
Approvals ......................................................... 10
AT Commands ................................................... 6
Authentic List .................................................... 39
Authentic Users ................................................ 40
Authenticate ..................................................... 40
Automatic Save of SMS settings .......... 17, 21, 28
Index
Fixed IP Address .............................................. 14
Flash Memory ...................................... 17, 21, 28
Front Panel ........................................................ 7
G
Groups in SMS Services .................................. 33
H
Handling Precautions ......................................... 5
Humidity ........................................................... 10
I
Import ............................................................... 21
Import & Export Address Book > Import .......... 21
Import an address book ................................... 45
Inactivity Time Out ........................................... 26
Inbox .......................................................... 38, 52
Initialization strings........................................... 30
International Number in SMS Services ............ 34
IP Settings ........................................................ 29
B
Back Panel ......................................................... 9
Backup ............................................................. 44
Broadcast Triggers ........................................... 39
C
Cabling ............................................................. 11
Cellular Modem ................................................ 30
Creating Address Book Entries ........................ 31
CSV Format ..................................................... 45
D
Daylight Saving Time configuration ................. 25
Dimensions ...................................................... 10
Documentation ................................................... 6
E
Email notification .............................................. 22
Email Notification ............................................. 23
Ethernet ports caution ........................................ 5
Export an address book ................................... 47
F
Factory Defaults ............................................... 28
Firmware Upgrade ........................................... 44
L
LAN 10/100 ........................................................ 7
LAN LNK/ACT .................................................... 7
LEDs .................................................................. 7
Locked SIM ...................................................... 30
Log Traces ....................................................... 50
Login .......................................................... 16, 51
M
Management Features ..................................... 10
Menu Table ...................................................... 18
Modem LEDs ..................................................... 7
N
Navigating the screens .................................... 17
Network Registration ....................................... 15
Network Setup > Cellular Modem .................... 30
Network Setup > IP Settings ............................ 29
Non-administrative users ................................. 51
O
Obtain a Wireless Account .............................. 15
Open a Web browser ....................................... 51
Outbox ............................................................. 38
Multi-Tech Systems, Inc. SMSFinder User Guide for System Administrators (Document S000451B) 79
Page 80

P
Panel Mounting .................................................. 9
Password Changing ......................................... 21
Polling time ....................................................... 24
Ports ................................................................. 10
Power Requirements ........................................ 10
Pre-Configured SMS ........................................ 43
R
Receive API ..................................................... 37
Remote Syslog ................................................. 27
Repair Policy .................................................... 73
Reset .................................................................. 9
Roaming Status ................................................ 15
S
Safe password ................................................. 16
Save & Restart ................................................. 22
Send API .......................................................... 36
Send SMS ........................................................ 35
Service Provider Fees ...................................... 15
Ship Kit ............................................................... 5
Signal strength ................................................... 8
Signal Strength Command ............................... 30
Signal strength LEDs ......................................... 8
SIM card ............................................................. 7
SMS Service > Inbox........................................ 52
SMS Services > Address Book ........................ 31
SMS Services > Groups ................................... 33
SMS Services > Inbox ...................................... 38
SMS Services > International Number ............. 34
SMS Services > Outbox ................................... 38
SMS Services > Send SMS ............................. 35
SMS Services > Send SMS Users ................... 34
SMS Services > SMS API > Receive API ........ 37
SMS Services > SMS API > Send API ............ 36
SMS Services > SMS Settings ......................... 35
SMS Settings ................................................... 35
Index
SMS Statistics .................................................. 49
SNTP Client ..................................................... 24
Standards ......................................................... 10
Statistics & Logs > Log Traces ........................ 50
Statistics & Logs > SMS Statistics ................... 49
Statistics & Logs > System Information ........... 48
Sub-Menus ....................................................... 18
Subnet Addresses............................................ 70
Supported Subnet Addresses .......................... 70
System Information Log ................................... 48
System Setup ................................................... 22
T
TCP Connection ............................................... 29
TCP/IP Communication ................................... 12
Telnet ............................................................... 15
Temperature .................................................... 10
Time Before Automatic Disconnect ................. 26
Time Stamp .......................................... 24, 30, 38
Time zone configuration .................................. 25
Tools ................................................................ 27
Triggers > Action Triggers ......................... 41, 42
Triggers > Authentic List .................................. 39
Triggers > Broadcast Triggers ......................... 39
Triggers > Pre-Configured SMS ...................... 43
U
Users in SMS Services .................................... 34
Utilities > Backup ............................................. 44
Utilities > Firmware Upgrade ........................... 44
W
Warranty .................................................... 10, 73
Waste Electrical and Electronic Equipment
(WEEE) Directive ......................................... 75
Weight .............................................................. 10
Wizard Setup ................................................... 20
Multi-Tech Systems, Inc. SMSFinder User Guide for System Administrators (Document S000451B) 80
 Loading...