

Page 1

OPERATION AND PARTS MANUAL
SideWinder
MODEL SHS81A
CUT-OFF SAW
Revision #0 (01/30/08)
To find the latest revision of this
publication, visit our website at:
www.multiquip.com
THIS MANUAL MUST ACCOMPANY THE EQUIPMENT AT ALL TIMES.
Page 2

Engine exhaust and some of
its constituents, and some dust created
by power sanding, sawing, grinding,
drillingandotherconstructionactivities
contains chemicals known to the State
of California to cause cancer, birth
defects and other reproductive harm.
Some examples of these chemicals are:
Leadfromlead-basedpaints.
Crystallinesilicafrombricks.
Cementandothermasonryproducts.
Arsenicandchromiumfromchemically
treatedlumber.
Your risk from these exposures varies,
dependingonhowoftenyoudothistype
of work. To reduce your exposure to
these chemicals: work in aALWAYS
well ventilated area, and work with
approved safety equipment, such as
dust masks that are specially designed
to filter out microscopic particles.
Page 3

NOTE PAGE
Page 4

SHS81A CUT-OFF SAW — TABLE OF CONTENTS
STOW — SHS81A CUT-OFF
SAW
Proposition 65 Warning ............................................. 2
Table Of Contents ..................................................... 4
Parts Ordering Procedures ....................................... 5
Safety Message Alert Symbols .............................. 6-7
Rules For Safe Operation .................................... 8-11
Specifications (Saw/Engine) ................................... 12
Decal Placement ..................................................... 13
Controls & Components ..................................... 14-15
Blade Installation Instructions ................................. 16
Water Kit Installation Instructions ............................ 17
Blades ..................................................................... 18
Initial Start-Up/Operation ................................... 19-20
Maintenance ...................................................... 21-25
Troubleshooting (Blade) .......................................... 26
Troubleshooting (Engine) ................................... 27-28
Filter Kits ................................................................. 29
Explanation of Codes in Remarks Column ............. 30
Suggested Spare Parts ........................................... 31
Carburetor Mounting Assembly ......................... 56-57
Carburetor Assembly ......................................... 58-59
Crankshaft and Piston Assembly .......................60-61
Water Kit Assembly ............................................ 62-63
Tools ................................................................... 64-65
Recommended Diamond Blades ............................ 66
Terms and Conditions of Sale — Parts ................... 67
COMPONENT DRAWINGS
Muffler Assembly ............................................... 32-33
Recoil Start Assembly ........................................ 34-35
Crankcase Assembly ......................................... 36-37
V-belt Cover (Clutch Side) Assembly ................. 38-39
V-Belt Cover (Pulley) Blade Guard Assembly .... 40-41
Fuel Tank Assembly ........................................... 42-43
Lifting Handle and Roller Assembly ................... 44-45
Throttle Linkage Assembly ................................ 46-47
Flywheel Cover Assembly .................................. 48-49
Flywheel Assembly ............................................ 50-51
Ignition Assembly ............................................... 52-53
Air Filter Assembly ............................................. 54-55
NOTE
Specifications and part
numbers are subject to
change without notice.
PAGE 4 — SHS81A CUT-OFF SAW — OPERATION AND PARTS MANUAL — REV. #0 (01/30/08)
Page 5
Effective: June 1st, 2005
PARTS ORDERING PROCEDURES
When ordering parts,
please supply the following information:
❒❒
❒ Dealer account number
❒❒
❒❒
❒ Dealer name and address
❒❒
❒❒
❒ Shipping address (if different than billing address)
❒❒
❒❒
❒ Return fax number
❒❒
❒❒
❒ Applicable model number
❒❒
❒❒
❒ Quantity, part number and description of each part
❒❒
❒❒
❒ Specify preferred method of shipment:
❒❒
✓ FedEx or UPS Ground
✓ FedEx or UPS Second Day or Third Day
✓ FedEx or UPS Next Day
✓ Federal Express Priority One
✓ DHL
✓ Tr u c k
Note: Unless otherwise indicated by customer, all
orders are treated as “Standard Orders”, and will
ship within 24 hours. We will make every effort to
ship “Air Shipments” the same day that the order is
received, if prior to 2PM west coast time. “Stock
Orders” must be so noted on fax or web forms.
Place Your Parts Order Via Web or Fax
Here’s how to get help...
Please have the model and serial number on
hand when calling.
For Even More Savings!
Parts Department
800-427-1244 Fax: 800-672-7877
310-537-3700 Fax: 310-637-3284
Service Department
800-478-1244 Fax: 310-537-4259
310-537-3700
Technical Assistance
800-478-1244 Fax: 310-631-5032
Warranty Department
800-421-1244, Ext. 279 Fax: 310-537-1173
310-537-3700, Ext. 279
Sales Department
310-661-4242 Fax: 310-604-9237
877-289-7869 (877-BUY-STOW)
STOW CONSTRUCTION EQUIPMENTSTOW CONSTRUCTION EQUIPMENT
STOW CONSTRUCTION EQUIPMENT
STOW CONSTRUCTION EQUIPMENTSTOW CONSTRUCTION EQUIPMENT
A DIVISION OF MULTIQUIP INC.
POST OFFICE BOX 6254
CARSON, CA 90749
310-537-3700 • 888-252-STOW [888-252-7869]
FAX: 310-537-1986 • FAX: 800-556-1986
E-MAIL: stow@multiquip.com • WWW: stowmfg.com
Extra Discounts!
All parts orders which include complete part numbers
and are received by our automated web parts order
system, or by fax qualify for the following extra
discounts:
Ordered Standard Stock orders
via orders ($750 list and above)
Fax 3% 10%
Web 5% 10%
Special freight allowances
when you order 10 or more
line items via Web or Fax!**
FedEx Ground Service
No other allowances on freight shipped by any other
carrier.
NOTE: DISCOUNTS ARE SUBJECT TO CHANGE
at no charge for freight
Direct TOLL-FREE access
to our Parts Department:
Toll-free nationwide — 800-427-1244
SHS81A CUT-OFF SAW — OPERATION AND PARTS MANUAL — REV. #0 (01/30/08) — PAGE 5
Page 6
SHS81A CUT-OFF SAW — SAFETY MESSAGE ALERT SYMBOLS
FOR YOUR SAFETY AND THE SAFETY OF OTHERS! HAZARD SYMBOLS
Safety precautions should be followed at all times when operating
this equipment. Failure to read and understand the Safety
Messages and Operating Instructions could result in injury to
yourself and others.
This Owner's Manual has been
NOTE
to the maintenance section of this manual for data relative to its safe
operation.
Before using this SAW, ensure that the operating individual
has read and understands all instructions in this manual.
developed to provide complete
instructions for the safe and efficient
operation of the STOW MODEL
SHS81A
maintenance information, please refer
CUT-OFF SAW
. For engine
SAFETY MESSAGE ALERT SYMBOLS
The three (3) Safety Messages shown below will inform you
about potential hazards that could injure you or others. The
Safety Messages specifically address the level of exposure
to the operator, and are preceded by one of three words:
DANGER, WARNING, or CAUTION.
Lethal Exhaust Gases
Engine exhaust gases contain poisonous
carbon monoxide. This gas is colorless and
odorless, and can cause death if inhaled.
NEVER operate this equipment in a confined
area or enclosed structure that does not
provide ample free flow air.
Explosive Fuel
Gasoline is extremely flammable, and its
vapors can cause an explosion if ignited. DO
NOT start the engine near spilled fuel or
combustible fluids. DO NOT fill the fuel tank
while the engine is running or hot. DO NOT
overfill tank, since spilled fuel could ignite if it
comes into contact with hot engine parts or
sparks from the ignition system. Store fuel in
approved containers, in well-ventilated areas
and away from sparks and flames. NEVER
use fuel as a cleaning agent.
DANGER
You WILL be
KILLED
NOT follow directions.
WARNING
You CAN be
KILLED
NOT follow directions.
CAUTION
You CAN be
INJURED
or
SERIOUSLY
or
SERIOUSLY
injured if you DO
injured if you DO
if you DO NOT follow directions.
Burn Hazards
Engine components can generate extreme heat.
To prevent burns, DO NOT touch these areas
while the engine is running or immediately after
operations. NEVER operate the engine with
heat shields or heat guards removed.
Rotating Parts
NEVER operate equipment with covers, or
guards removed. Keep
and
clothing
prevent injury.
fingers, hands, hair
away from all moving parts to
PAGE 6 — SHS81A CUT-OFF SAW — OPERATION AND PARTS MANUAL — REV. #0 (01/30/08)
Page 7
SHS81A CUT-OFF SAW — SAFETY MESSAGE ALERT SYMBOLS
Accidental Starting
ALWAYS place the engine ON/OFF
switch in the OFF position, when the saw
is not in use.
Over Speed Conditions
NEVER tamper with the factory settings of the
engine governor or settings. Personal injury
and damage to the engine or equipment can
result if operating in speed ranges above
maximum allowable.
Guards and Covers In Place
NEVER operate the saw without blade guards
and covers in place. Adhere to safety
guidelines ANSI, OSHA, or other applicable
local regulations.
Respiratory Hazard
ALWAYS wear approved respiratory protection.
Sight and Hearing hazard
ALWAYS wear approved eye and hearing
protection.
Equipment Damage Messages
Other important messages are provided throughout this manual
to help prevent damage to your concrete saw, other property, or
the surrounding environment.
Rotating Blade
NOTE
Rotating blade can cut and crush. Keep
hands and feet clear.
This
concrete/asphalt saw
, other
property, or the surrounding
environment could be damaged if
you do not follow instructions.
SHS81A CUT-OFF SAW — OPERATION AND PARTS MANUAL — REV. #0 (01/30/08) — PAGE 7
Page 8
SHS81A CUT-OFF SAW — RULES FOR SAFE OPERATION
■
WARNING - Read This Manual
Failure to follow instructions in this manual may lead to
Serious Injury
or even
Death
. This equipment is to be
operated by trained and qualified personnel only! This
equipment is for industrial use only.
The following safety guidelines should always be used
when operating the STOW SHS81A Cut-off Saw.
SAFETY
■
DO NOT operate or service this equipment
before reading this entire manual.
■
This equipment should not be operated by persons under 18
years of age.
■
NEVER operate the saw without proper protective clothing,
shatterproof glasses, steel-toed boots and other protective
devices required by the job.
NEVER touch the hot exhaust manifold,
muffler or cylinder. Allow these parts to cool
before servicing the saw.
■
High Temperatures – Allow the engine to cool before adding
fuel or performing service and maintenance functions. Contact
with
■
The engine of this saw requires an adequate free flow of
cooling air. NEVER operate the saw in any enclosed or narrow
area where free flow of the air is restricted. If the air flow is
hot!
components can cause serious burns.
restricted it will cause serious
damage to the saw's engine
and may cause injury to
people. Remember the
saw's engine gives off
DEADLY
gas.
carbon monoxide
■
NEVER operate this equipment when not feeling
well due to fatigue, illness or taking medicine.
■
NEVER operate the saw under the influence or drugs or alcohol.
■
NEVER use accessories or attachments, which are not
recommended by STOW for this equipment. Damage to the
equipment and/or injury to user may result.
■
Manufacturer does not assume responsibility for any accident
due to equipment modifications. Unauthorized equipment
modification will void all warranties.
■
Whenever necessary, replace nameplate, operation and
safety decals when they become difficult read.
■
ALWAYS check the saw for loosened hardware such as nuts
and bolts before starting.
■
■
■
■
■
ALWAYS refuel in a well-ventilated area, away from sparks
and open flames.
ALWAYS use extreme caution when
working with flammable liquids.
When refueling, STOP the engine and
allow it to cool.
NEVER
Fire or explosion could result from
vapors
engine.
NEVER operate the saw in an explosive atmosphere where
fumes are present or near combustible materials. An
explosion or fire could result causing severe
smoke
around or near the saw.
fuel
, or if fuel is spilled on a
hot!
bodily harm
or even death.
ALWAYS move the saw at least 10 feet away from the fueling
point before starting the engine and make sure the gas cap
on the saw and the fuel can are properly tightened.
■
Topping-off to filler port is dangerous, as it tends to spill fuel.
■
NEVER use fuel as a cleaning agent.
PAGE 8 — SHS81A CUT-OFF SAW — OPERATION AND PARTS MANUAL — REV. #0 (01/30/08)
Page 9
SHS81A CUT-OFF SAW — RULES FOR SAFE OPERATION
General Safety
■
ALWAYS read, understand, and
follow procedures in Operator's
Manual before attempting to operate
this equipment.
■
ALWAYS wear proper respiratory (mask), hearing and eye
protection equipment when operating the saw.
■
ALWAYS be sure the operator is familiar with proper safety
precautions and operating techniques before using the saw.
■
ALWAYS inspect the blade, flanges and shafts for damage
before installing the blade.
■
ALWAYS use high-speed, reinforced, abrasive blades - 1/8"
(3.17 mm) thick (minimum) or high-speed, diamond blades
specifically rated with a maximum operating speed of at least
5,400 RPM on 14" (350 mm) or 6,200 RPM on 12" (300 mm).
■
ALWAYS use high-speed reinforced, abrasive blades or
high-speed, diamond blades marked with a 1" (25.4 mm)
hole for a 1" (25.4 mm) flange, or a 20 mm hole for a 20 mm
flange.
■
ALWAYS use abrasive blades or high-speed diamond blades
marked for use with gasoline-powered, hand-held, portable,
abrasive cutting-off saws.
■
ALWAYS read all safety materials and instructions that
accompany any blade used with this saw.
■
ALWAYS inspect each blade carefully before using it. If there
are any signs of damage or unusual wear, DO NOT USE
THE BLADE.
■
ALWAYS verify the blade arbor hole matches the saw's
spindle before mounting the blade.
■
■
■
■
■
■
■
■
■
■
■
■
■
■
■
■
■
■
ALWAYS hold the saw with both hands when the engine is
running. Use a firm grip with thumbs and fingers encircling
the handles.
ALWAYS keep all parts of the body away from the cutting-off
blades when the engine is running.
ALWAYS keep the handles dry, clean and free of oil or fuel.
ALWAYS carry the saw with the engine stopped and the
muffler away from the body.
ALWAYS instruct bystanders on where to stand while the
saw is in operation.
ALWAYS clear the work area of unnecessary people.
NEVER allow anyone to stand in front of or behind the blade
while the engine is running.
ALWAYS make sure the blade is not contacting any objects
before starting the engine.
ALWAYS check for buried electrical cables before sawing. If
unsure, contact the local utilities.
ALWAYS have all service and maintenance performed by
competent trained service personnel.
ALWAYS clean the saw after each day’s use.
ALWAYS have a copy of this manual at the job site.
ALWAYS
oil.
ALWAYS service air cleaner frequently to prevent carburetor
malfunction.
ALWAYS keep clear of
saw is in operation.
ALWAYS maintain this saw in a
all times
ALWAYS keep any inexperienced and unauthorized people
away from the saw at all times.
ALWAYS store saw properly when it is not being used.
Equipment should be stored in a clean, dry location out of
the reach of children.
stop
the engine before servicing, adding fuel and
rotating
.
or
moving parts
safe
operating condition at
while the
■
ALWAYS mount the blade
the arbor nut.
■
ALWAYS make sure the blade and flanges are clean and
free of dirt and debris before mounting the blade on the saw.
■
ALWAYS use the correct blade for the type of work being
done. Check with blade manufacturer if you do not know if
blade is correct for desired application.
SHS81A CUT-OFF SAW — OPERATION AND PARTS MANUAL — REV. #0 (01/30/08) — PAGE 9
solidly
and
firmly
. Wrench tighten
NOTE
This saw is designed for certain
applications only. DO NOT use or
modify this saw for any application
other than for which it was designed.
Page 10

SHS81A CUT-OFF SAW — RULES FOR SAFE OPERATION
■
NEVER leave the machine
■
NEVER run the engine without the air filter. Severe engine
damage could occur.
■
NEVER wear jewelry or loose fitting clothing that may snag
on the controls or moving parts, this can cause a serious
injury.
■
NEVER operate this saw without the blade guard, or other
protective guards in place.
■
NEVER stand behind or in front of the blade path while the
engine is running.
■
NEVER use abrasive blades that are less the 1/8" (3.17 mm)
thick.
■
NEVER exceed maximum blade speed shown for each blade
size. Excessive speed could result in blade breakage.
■
NEVER use a damaged saw or blades.
■
NEVER try to stop a moving blade with your hand.
■
NEVER use an abrasive blade that has been dropped.
■
NEVER use carbide-tipped or toothed type blades of any
kind.
■
NEVER use segmented diamond blades unless they are
specifically designed for high-speed, hand-held saws.
■
NEVER place 1 inch (25.4 mm) arbor hole blades on 20 mm
flanges.
■
NEVER use the side of a cutting-off blade as a grinder.
■
NEVER cock, jam or wedge the blade in the cut.
■
NEVER operate the saw if the blade does not stop rotating
when the throttle trigger is released.
■
NEVER start cutting until you have a clear work area and
secure footing.
■
NEVER allow other persons to be near the saw when starting,
refueling, or when the saw is operating.
■
NEVER allow bystanders or animals in the work area while
using a cutting-off machine.
■
NEVER touch a dry cutting diamond blade immediately after
use. These blades require several minutes to cool after each
cut.
■
NEVER use damaged or worn blade flanges. Discard any
damage or worn saw parts.
unattended
while running.
Diamond Blade Safety
■
■
■
■
■
■
■
■
■
Saw Transportation Safety
■
■
■
■
Use appropriate steel centered diamond blades
manufactured for use on concrete saws.
WARNING
ALWAYS inspect diamond blades before each use. The
blade should exhibit no cracks,
dings, or flaws in the steel
centered core and/or rim. Center
(arbor) hole must be undamaged
and true.
Examine blade flanges for
damage, excessive wear and
cleanliness before mounting
blade. Blade should fit snugly on the shaft and against the
inside/outside blade flanges.
Ensure the blade is marked with an operating speed greater
than the blade shaft speed of the saw.
Only cut the material that is specified by the diamond blade.
Read the specifications of the diamond blade to ensure the
proper tool has been matched to the material being cut.
ALWAYS keep blade guards in place. Exposure of the
diamond blade must not exceed 180 degrees.
Ensure that the diamond blade does not come into contact
with the ground or surface during transportation. DO NOT
drop the diamond blade on ground or surface.
The engine governor is designed to permit maximum
engine speed in a no-load condition. Speeds that exceed
this limit may cause the diamond blade to exceed the
maximum safe allowable speed.
Ensure that the blade is mounted correctly for proper
operation.
NEVER transport the saw with the blade mounted.
ALWAYS use caution when
saw.
ALWAYS tie-down the saw when transporting.
ALWAYS use caution and follow the instructions when
loading and unloading the saw.
lifting
and
transporting
this
■
NEVER allow blade exposure from the guard to be more
than 180 degrees.
■
NEVER operate this saw without both hands on the handles.
PAGE 10 — SHS81A CUT-OFF SAW — OPERATION AND PARTS MANUAL — REV. #0 (01/30/08)
Page 11
SHS81A CUT-OFF SAW — RULES FOR SAFE OPERATION
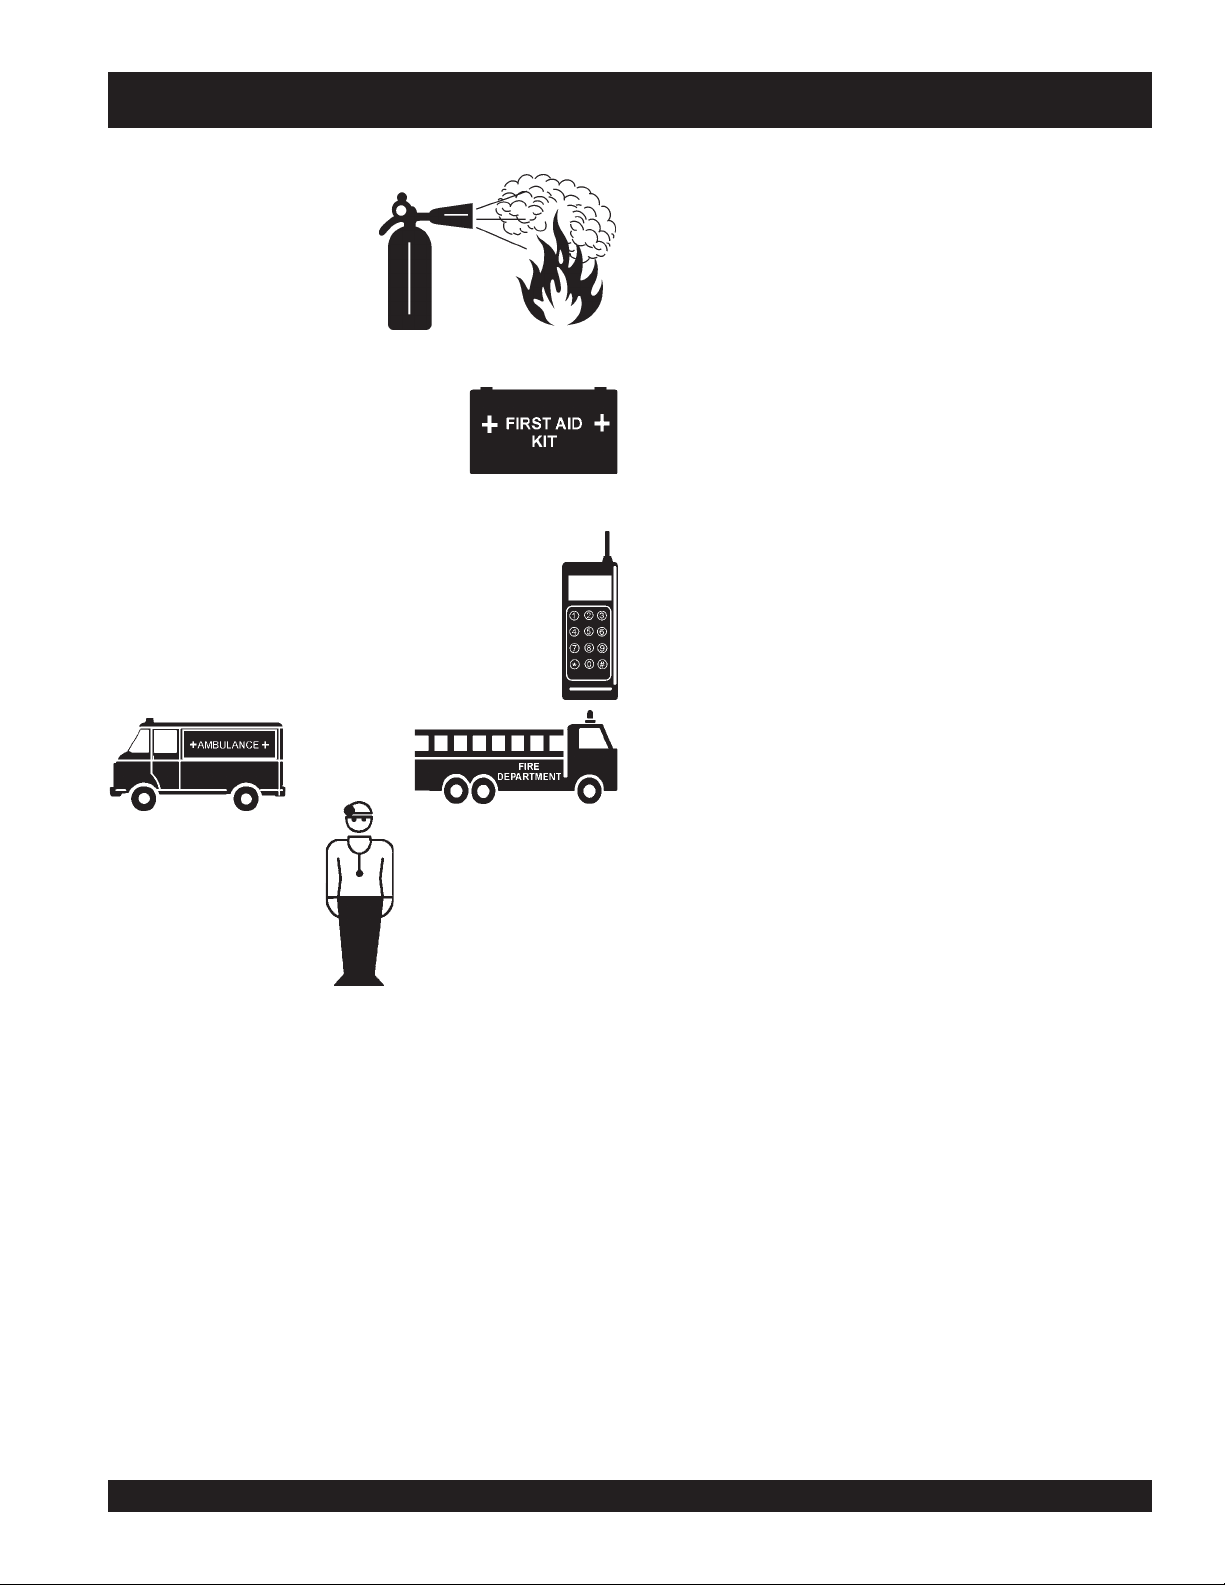
EMERGENCIES
■
ALWAYS know the location of
the nearest
■
ALWAYS know the location of the
nearest
■
In emergencies
nearest phone or
Also know the phone numbers of the nearest
ambulance, doctor,
information will be invaluable in the case of an
emergency.
fire extinguisher
first aid kit
.
always
keep a phone on the job site
and
.
know the location of the
.
fire department
. This
SHS81A CUT-OFF SAW — OPERATION AND PARTS MANUAL — REV. #0 (01/30/08) — PAGE 11
Page 12

SHS81A CUT-OFF SAW — SPECIFICATIONS
snoitacificepSwaSffo-tuCA18SHS.1elbaT
HxWxL)gnippihS(snoisnemiD
)edalbtuohtiw(thgieW )gk4.11(.sbl1.52
eziSedalB
htpeDtuCmumixaM
eziSrobrA )mm4.52(.ni1
mrAgnittuCelbisreveR
epyTenignE deloocriA,rednilyCelgniS,ekortS-owT
tnemecalpsiD).cc7.08(.ni.uc29.4
deepSeldnipSmumixaM001,5MPR
eepSenignE000,01MPR
d
ni33x81x05
)mm838x754x0721(
3(.ni21
)mm50
)mm653(.ni41
)mm001(.ni4
)mm721(.ni5
snoitacificepSecruoSrewoPA18SHS.2elbaT
deepSeldI005,2MPR
)HxWxL(snoisnemiD
yticapaCknaTleuF)sret
oitaRxiMliO/leuF22erugiFeeS
dohteMgnitratStratSlioceR
epyT
noitingI
paG)mm53.(.ni410.
rerutcafunaMKGN/noipmahC
sgulPkrapS
roterubraC
epyTA6RPB/Y7JCR
paG)mm5.(ni20.
rerutcafunaMorb
ledoM58JW
epyT
.ni57.51x7.8x5.13
)mm004x022x008(
iL9.(snollaG32.
cinortcelE
S
laW
dellortnoCdeep
/mgarhpaiD
teJdexiF-imeS
devorppAAPE
PAGE 12 — SHS81A CUT-OFF SAW — OPERATION AND PARTS MANUAL — REV. #0 (01/30/08)
Page 13

SHS81A CUT-OFF SAW — DECAL PLACEMENT
P/N DCL 230
Machine Operation And Safety Decals
The SHS81A CUT-OFF SAW is equipped with a number of
operation and safety decals (Figure 1). Should any of these
decals become unreadable, replacements can be obtained from
your dealer.
P/N DCL 231
P/N TBD
A
81A
P/N DCL 232
P/N DCL 161
Figure 1. Safety Decals
SHS81A CUT-OFF SAW — OPERATION AND PARTS MANUAL — REV. #0 (01/30/08) — PAGE 13
Page 14
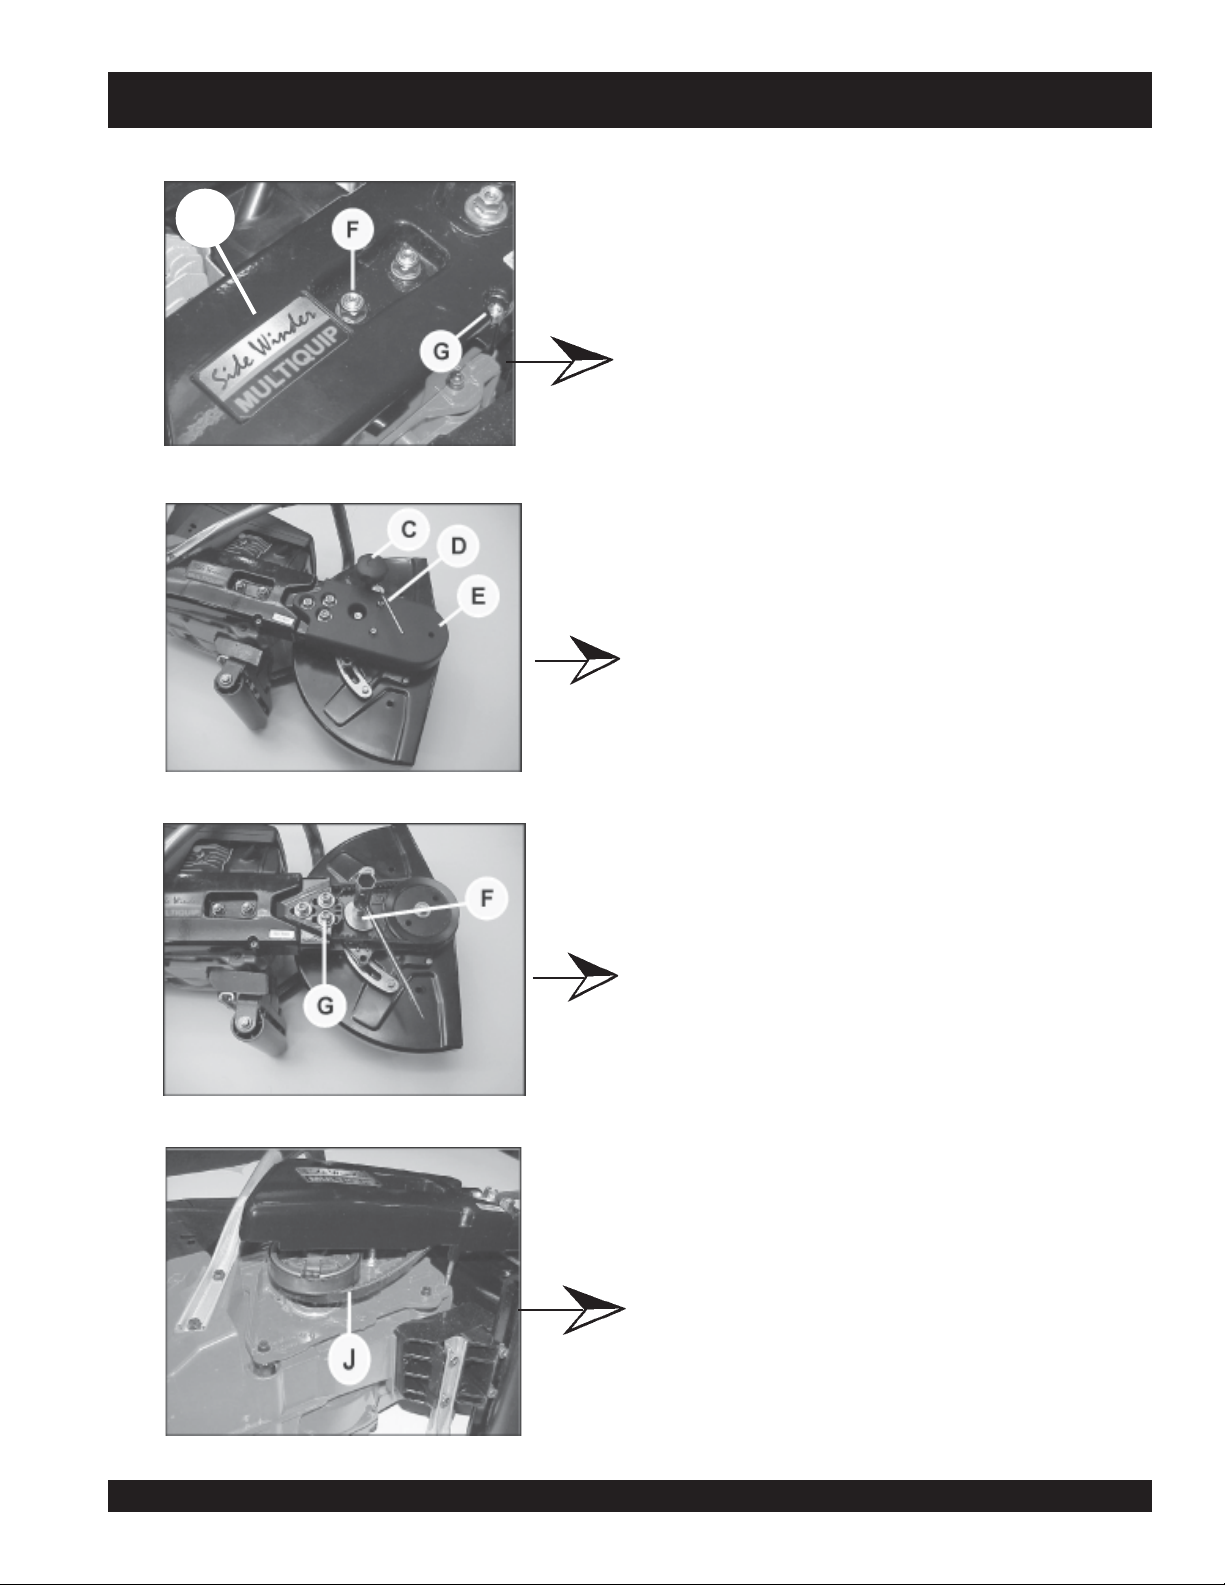
SHS81A CUT-OFF SAW — CONTROLS & COMPONENTS
3
1
2
4
12
11
9
10
Figure 2. SHS81A Cut-off Saw Components 1
Figures 2 and 3 shows the location of the basic controls or
components for the Multiquip Model SHS81A Cut-off Saw. Listed
below is a brief explanation of each control or component.
1. Air Filter – Prevents dirt and debris from entering the engine
air intake. Check filter periodically and keep cleaned or
replace when necessary. NEVER run engine with a dirty
air filter.
2. Muffler – Used to reduce noise and emissions. NEVER!
touch muffler when engine is running. Allow engine to cool
down. This component gets extremely hot!
3. Guard Adjustmet Knob – Allows for the adjustment of
the blade guard. Turn this knob clockwise to tighten,
counter-clockwise to loosen.
4. Pulley Lock Pin Hole – Insert a phillips head screw driver
or similar tool into this hole to prevent the pulley from rotating.
5. V-belt Tensioning Cam – Allows for the adjustment of the
V-belt. To tighten V-belt turn clockwise, to slacken turn
counterclockwise.
8
7. Roller Wheel – Allows for easy free movement of the saw
when cutting on a flat surface.
8. V-belt Cover (Clutch) – Unscrew these 2 nuts to remove
the clutch V-belt cover. NEVER operate the saw with this
cover removed. It may be necessary to remove the pulley
cover first before this cover can be removed.
9. Decompression Valve – Push inward when starting
engine.
10. Choke Lever – Used in the starting of a cold engine, or in
cold weather conditions. The choke enriches the fuel
mixture.
11. Rear Handle – When starting engine, place right foot onto
rear handle base. For normal operation always place one
hand on the rear handle and the other hand on the upper
handle. Always use two hands when operating the saw.
7
6
5
6. V-belt Cover (Pulley) – Unscrew these 3 nuts to remove
the pulley V-belt cover. NEVER operate the saw with this
cover removed.
PAGE 14 — SHS81A CUT-OFF SAW — OPERATION AND PARTS MANUAL — REV. #0 (01/30/08)
12. Engine ON/OFF Switch – ON position permits engine
starting, OFF position stops engine operation.
Page 15
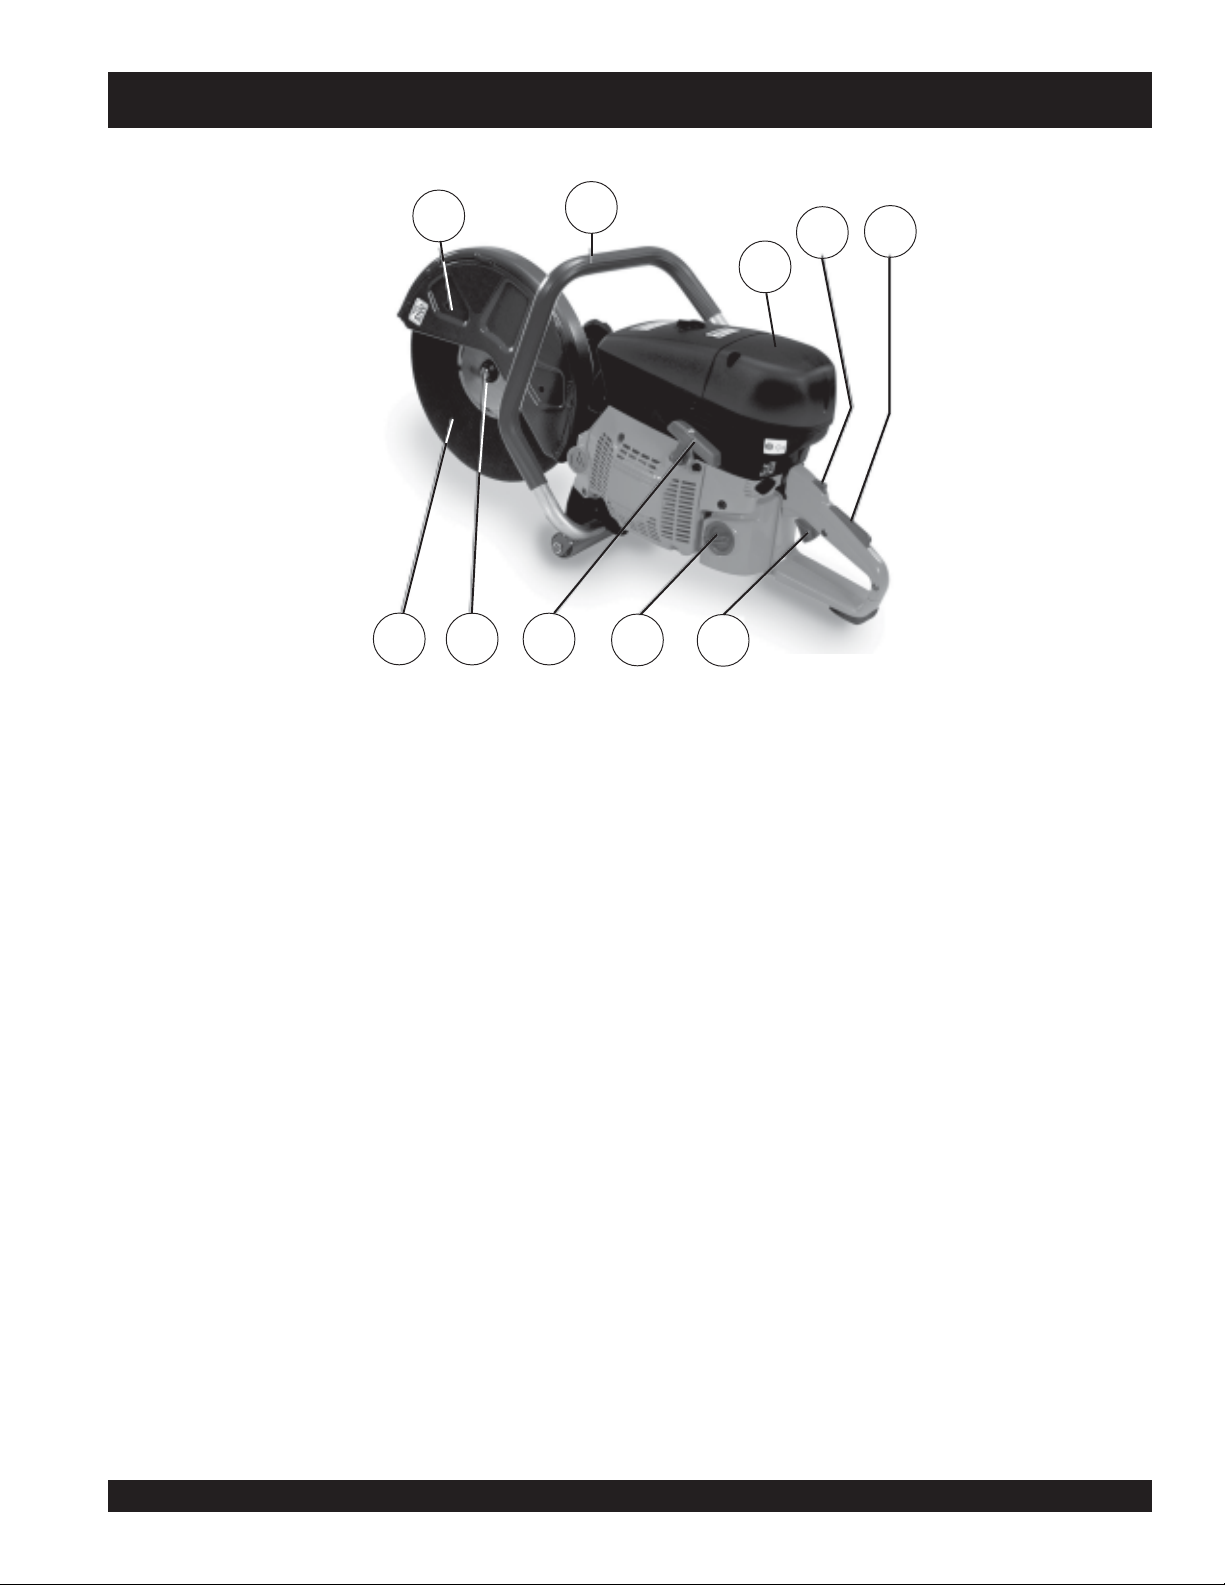
SHS81A CUT-OFF SAW — CONTROLS & COMPONENTS
13
21 20 19
Figure 3. SHS81A Cut-off Saw Components 2
13. Blade Guard – Covers saw blade.
14. Front Handle – When lifting or carrying of the saw is
required, use this handle.
15. Throttle Lock Lever – Using your thumb, press this lever
downward and squeeze the trigger lever to lock the throttle
in place. This will allow the saw blade to rotate at maximum
speed without having to hold the trigger lever. Squeeze the
trigger lever again to unlock the throttle.
16. Variable Throttle Lever – To obtain a variable blade
speed, press this lever downward then squeeze the throttle
trigger.
14
18
18. Fuel Filler Cap – Remove this cap to add mixed fuel
19. Recoil Starter (pull rope) – Manual-starting method. Pull
20. Blade Shaft Nut – Loosen to remove the cutting blade
21. Cutting Blade – Use appropriate type blades for desired
15
16
22
17
(requires a 50:1 mixture) to the fuel tank. This saw uses a
2-stroke engine. Make sure fuel cap is tightened securely.
DO NOT over fill. See Figure 25 for correct fuel to oil mixture.
the starter grip until resistance is felt, then pull briskly and
smoothly.
from the outer and inner flanges.
cutting application.
17. Throttle Trigger Lever – Squeeze this lever to start the
saw blade rotation. Release the trigger lever to stop the
saw blade rotation. This lever is to be used in conjunction
with either the throttle lock or variable throttle levers.
SHS81A CUT-OFF SAW — OPERATION AND PARTS MANUAL — REV. #0 (01/30/08) — PAGE 15
22. Spark Plug – Provides spark to the ignition system. Set
spark plug gap to 0.02 inch (0.5 mm). Clean spark plug
once a month.
Page 16
SHS81A CUT-OFF SAW — BLADE INSTALLATION INSTRUCTIONS
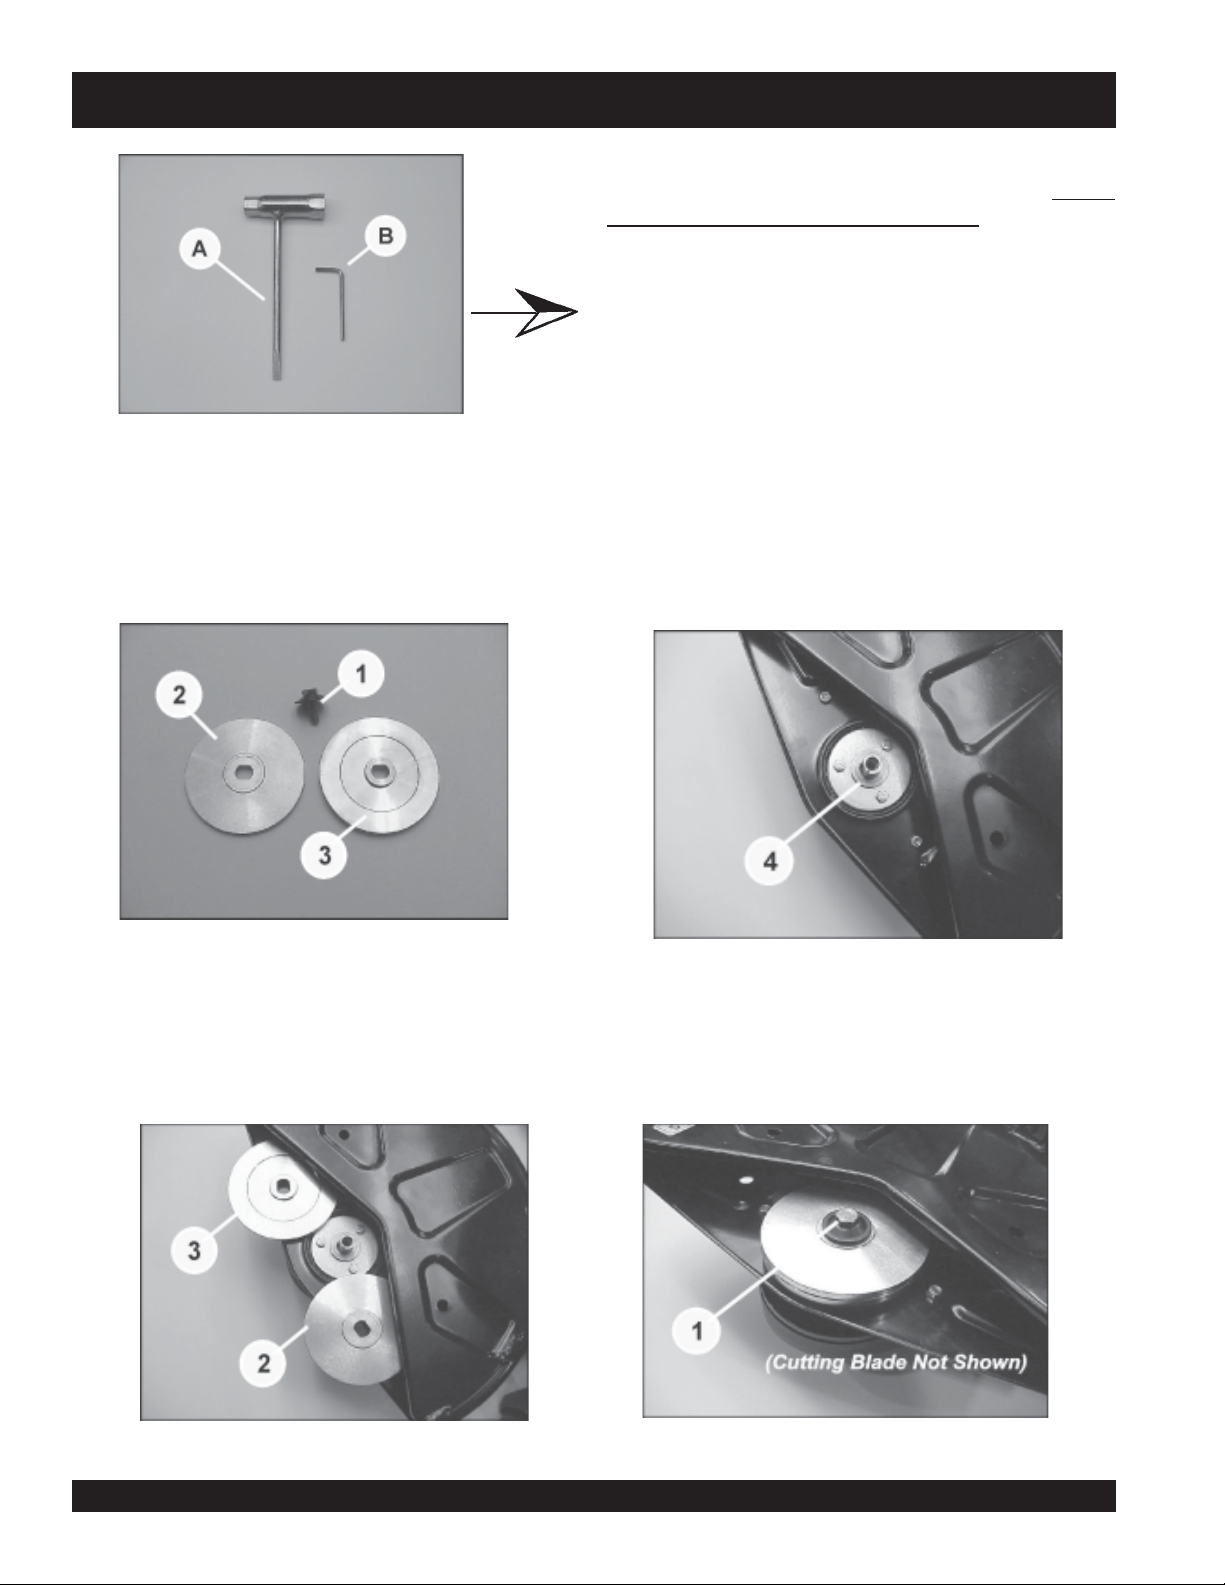
Figure 4. Tool Kit
Blade Installation Procedure
STEP 1
For proper installation, first remove the
outer
flange Y, and
inner
“dual-arbor” flange Z.
blade shaft nut
X,
The Multiquip
(Figure 4) that assists you with day to day operations.
need these tools for the assembly of your saw.
Item
G
common bolt/screw and nut head sizes of your saw.
Item
H
allen screws.
STEP 3
Chose the proper
your cutting blade arbor) and place this selected side to the
blade shaft
Side Winder
is a versatile screwdriver/wrench that accommodates
is the wrench necessary to accommodate various
blade arbor
.
[
Cut-Off Saw comes with a Tool Kit
You will
side of the
inner flange
(to match
Figure 5. Inner and Outer Flanges (Removal)
STEP 2
A dual sided, “dual-arbor”
a 20 mm or 1-inch arbor hole for operator safety and convenience.
The
outer flange
Figure 6. Inner and Outer Flanges (Placement)
PAGE 16 — SHS81A CUT-OFF SAW — OPERATION AND PARTS MANUAL — REV. #0 (01/30/08)
inner flange
fits on top of the cutting blade.
Y
Zaccommodates either
Figure 7. Selecting the Proper Blade Arbor
STEP 4
Match the arbor side to the dimension of your blade arbor and
“sandwich” between the inner and outer flanges. Tighten the
blade shaft nut
securely to hold the blade in place.
X
Figure 8. Securing the Cutting Blade
Page 17
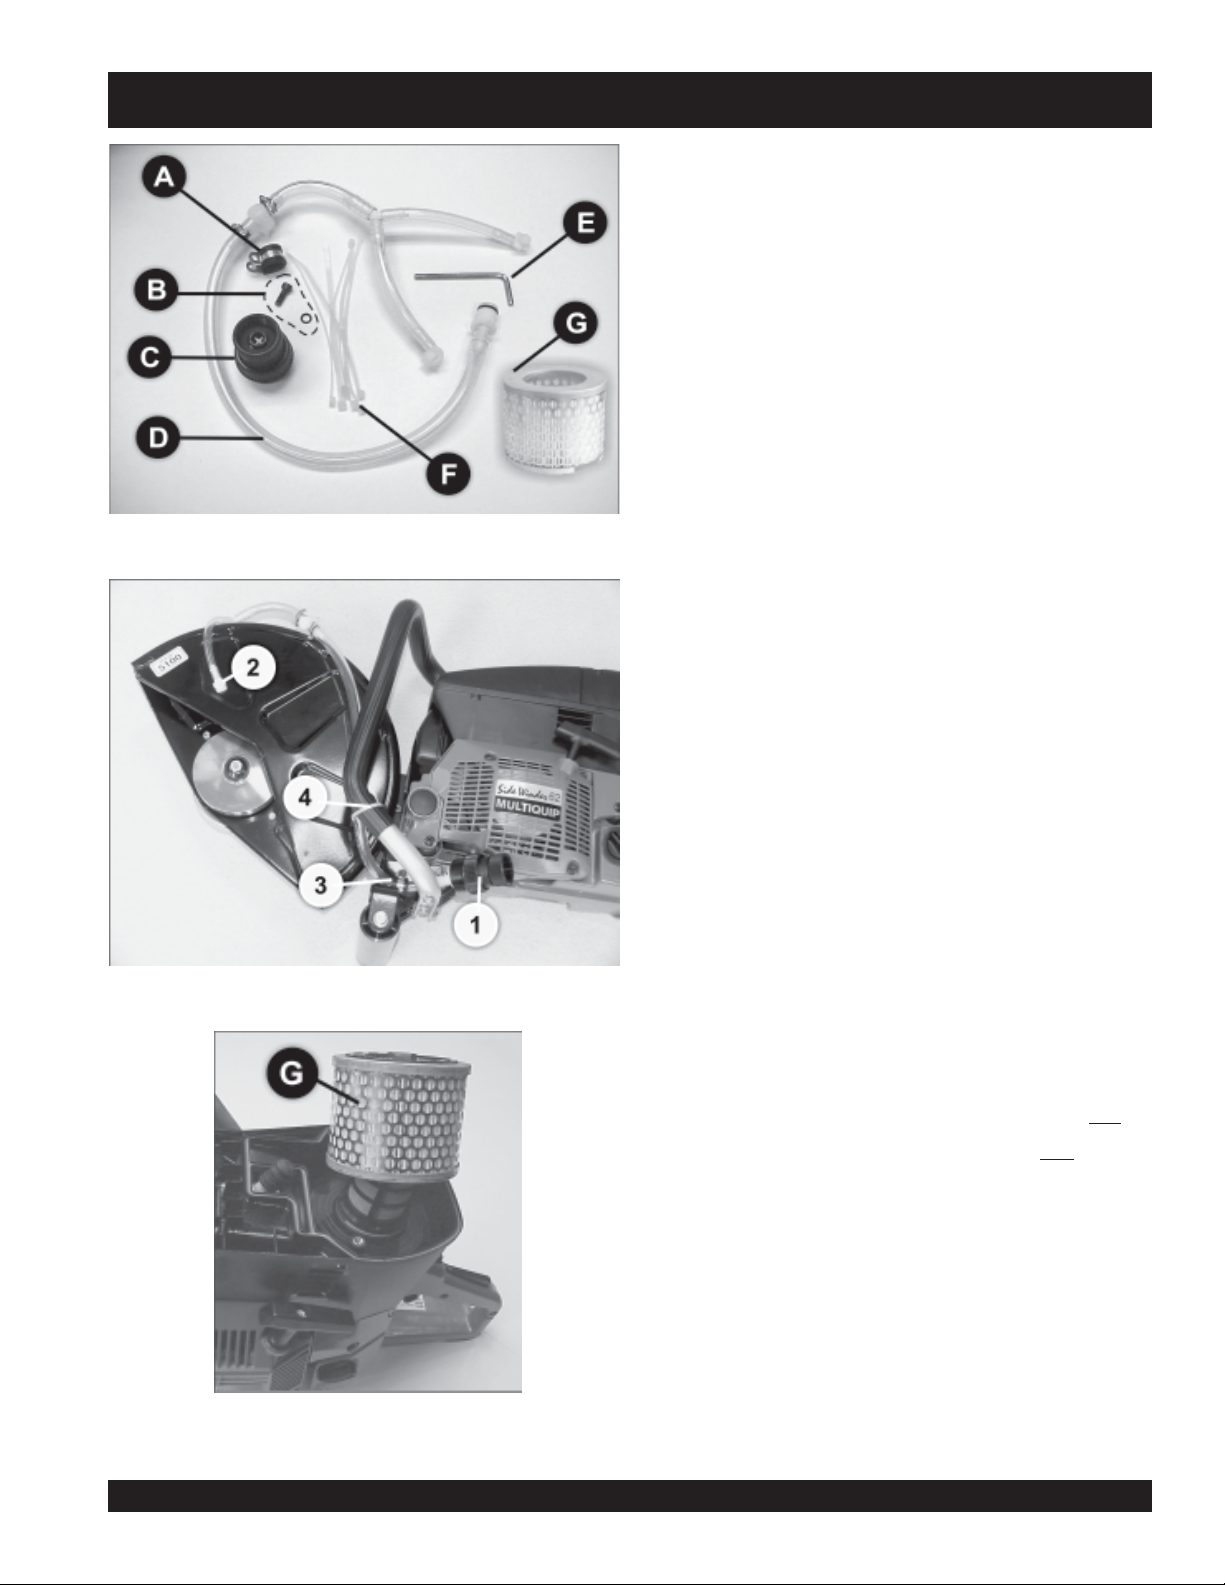
SHS81A CUT-OFF SAW — WATER KIT INSTALLATION INSTRUCTIONS
Contents of Water Kit
The contents of the Water Kit cannot be purchased seperately.
See Water Kit Assembly in Parts Section of this manual for
Water Kit part number.
Figure 9. Water Kit Parts
Hose Clamp
Socket Head Cap Screw w/ Washer
Quick Disconnect Fitting
Water Hose
Hex Key Tool K (Included with Tool Kit)
Plastic Ties
Wet
Air Filter Canister
Water Kit Installation Procedure
Connect the
single end of the
Snap fit the
Blade Guard
Front Handle.
Loop the
!
and fasten the clamp to the
G
H
I
J
L
M (Sold Seperately)
Quick Disconnect Fitting
Water Hose
Water Hose
. Orient the
Hose Clamp
Outlets J to the
G
.
J
Water Hose
around the
Roller Bar Support Arm
I to the
Holes
in the
through the
J
Water Hose
J
using the Socket Head Cap Screw w/ Washer H, and
Figure 10. Water Kit Assembly Points
Figure 11. Wet Air Filter Canister
SHS81A CUT-OFF SAW — OPERATION AND PARTS MANUAL — REV. #0 (01/30/08) — PAGE 17
Hex Key Tool
Use the
"
the hose fittings and water hose to the saw.
When using the Water Kit option for your saw, the Dry
#
Filter Canister
Canister
Section of this manual).
Plastic Ties
M (See Air Filter Kit Assembly in Parts
.
K
as preferred to further secure
L
MUST be replaced with the Wet
Air
Air Filter
Page 18
SHS81A CUT-OFF SAW — BLADES
PREPARATION / PRE-INSPECTION
1. Read and fully understand this manual,
the safety instructions in particular, and
the engine manufacturer's manual
supplied with the saw.
2. Select the correct blade for each application. If abrasive
blades are used, MAKE CERTAIN they are designed for
use on a concrete floor saw. They must be reinforced and
have a hole for the driving pin. When wet cutting with an
abrasive blade, MAKE CERTAIN the blade is intended for
wet cutting. Water will destroy a dry cut abrasive blade.
Some diamond blades require water cooling and failure to
do so will destroy them almost immediately. Other diamond
blades can be used with or without water.
3. Handle all blades with care and NEVER use a damaged
blade. NEVER use an abrasive blade that has been
dropped.
BLADES
Saw blades, or cutting disks, are available in either an abrasive
design or as diamond blades. Either blade will work on the
SHS81A CUT-OFF SAW , however, diamond blades are recommended.
Ask your dealer about your specific cutting application.
SAW BLADE INSPECTION
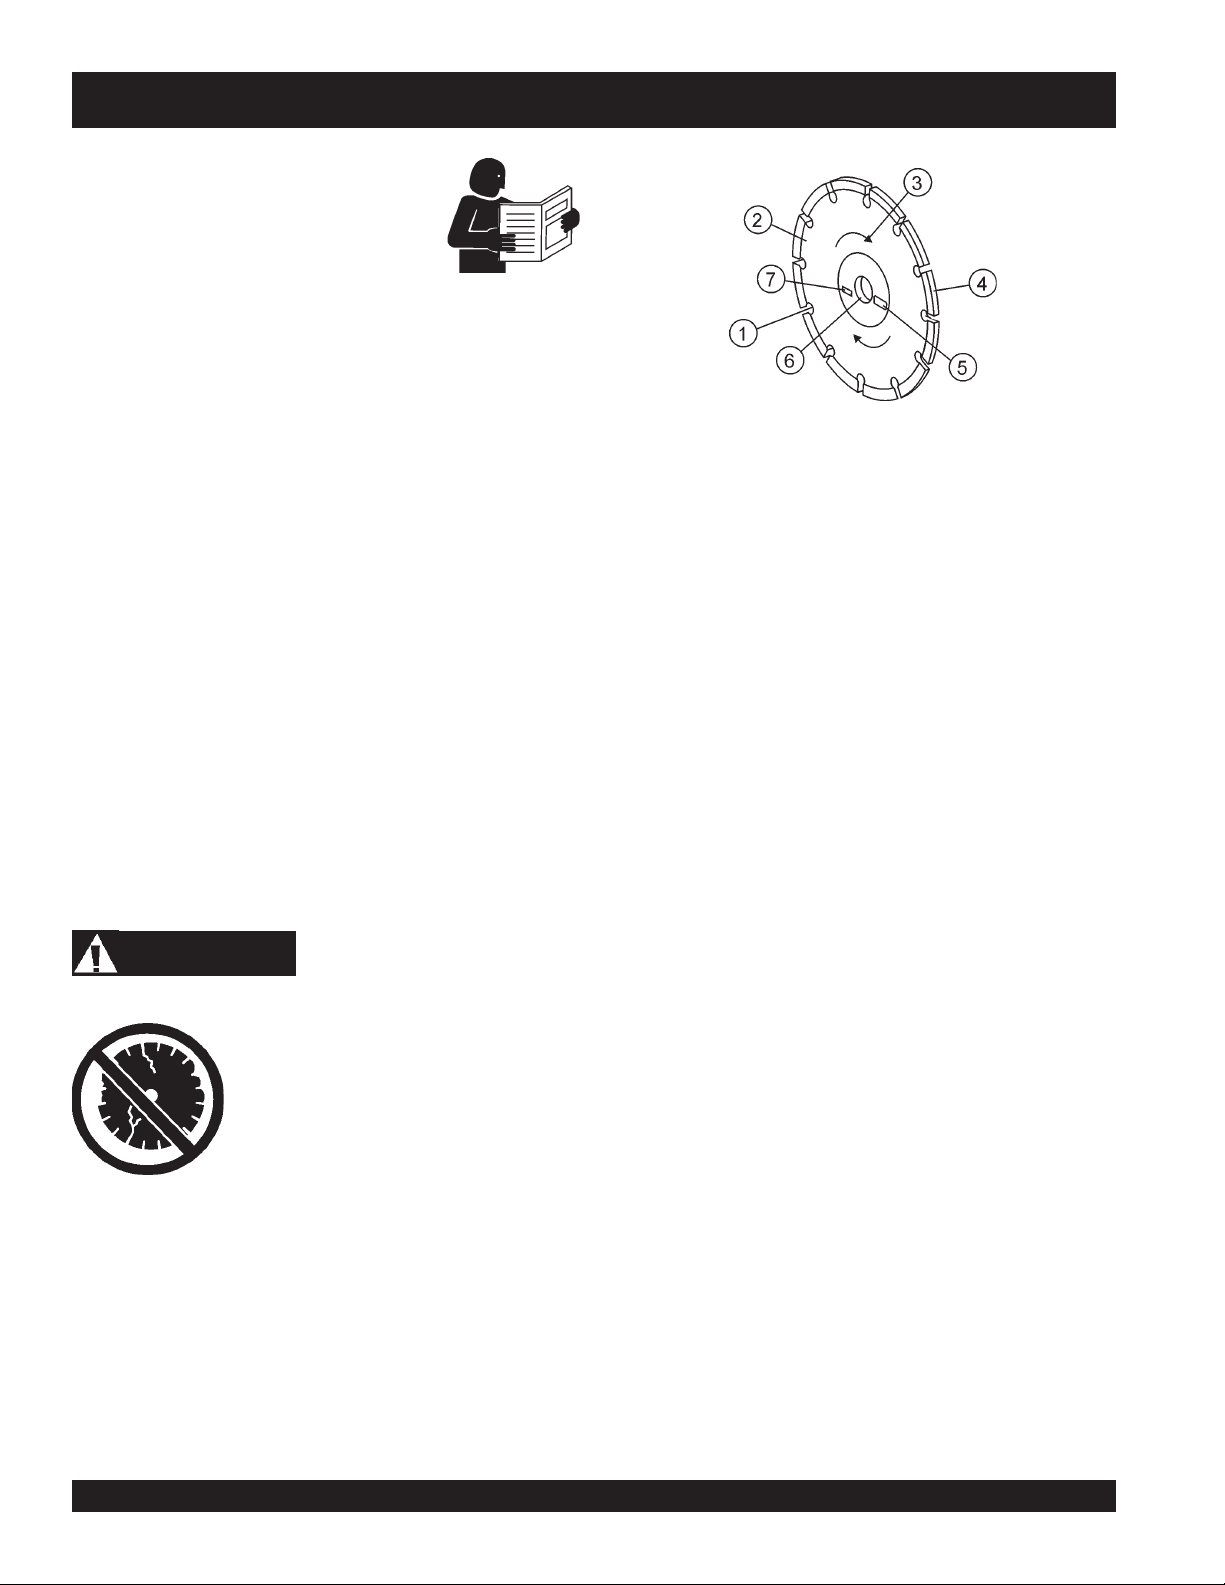
WARNING
Failure to thoroughly inspect the diamond
blade (Figure 12) for operational safety
could result in damage to the blades or
the saw and may cause injury to the user
or others in the operating area.
1. Stress Relief Holes (Gullets) - Check the steel core for
cracks that may have propagated from the slots and/or
gullets. Cracks indicate extreme fatigue failure and if sawing
continues, catastrophic failure will occur.
2. Edge of the Steel Core - Check the diameter edge for
discoloration (blue oxidation) indicating an overheating
condition caused by insufficient cooling water/air.
Overheating of blades may lead to loss of core tension and/
or increase the possibility for blade failure. Make sure the
steel core's width is uniform about the rim of the blade, and
not succumbing to an "under-cutting" condition brought
about by highly abrasive material or improper under-cutting
core protection
3. Directional Arrow - Ensure that the blade is oriented
properly on the blade shaft for sawing. Reference the
directional arrow on the blade and place it so the direction
of rotation "downcuts" with the turn of the shaft.
4. Diamond Segment or Rim - Ensure there are no cracks,
dings, or missing portions of the diamond segment/rim. DO
NOT
of the rim.
cause damage to your saw or injury to the user or others in
the operating area.
5. Specifications - Ensure that the blade specifications, size,
and diameter properly match up to sawing operations.
Utilizing a blade not matched properly to the task may result
in poor performance and/or blade damage.
6. Arbor Hole - It is essential that the arbor hole diameter
properly matches the blade, and that it is free from distortion.
Correct blade flanges (collars) must be used. The inside
face of the flanges must be clean and free of debris. An outof-round arbor condition will cause damage to the blade
and the saw.
7. MAX RPM - This RPM reference is the maximum safe
operating speed for the blade selected. NEVER exceed the
max RPM on the diamond blade. Exceeding the maximum
RPM is dangerous and may cause poor performance and
may damage the blade.
Figure 12. Diamond Blade
use a blade that is missing a segment or a portion
Damaged and /or missing segments/rims may
PAGE 18 — SHS81A CUT-OFF SAW — OPERATION AND PARTS MANUAL — REV. #0 (01/30/08)
Page 19
INITIAL START-UP
SHS81A CUT-OFF SAW — INITIAL START-UP/OPERATION
CAUTIONCAUTION
CAUTION
CAUTIONCAUTION
CAUTIONCAUTION
CAUTION
CAUTIONCAUTION
ALWAYS wear approved eye and hearing
protection before operating the saw.
NEVER place hands or feet inside the belt
guard or blade guard while the engine is
running. ALWAYS shut the engine down
before performing any kind of maintenance
service on the saw.
DO NOT attempt to operate the saw until
the Safety, General Information and
Inspection sections of this manual have
been read and thoroughly understood.
Depending on engine manufacturer,
operating steps may vary. See engine
manufactures operating manual.
NEVER operate the saw in a
confined area or enclosed
area structure that does not
provide ample
free flow of air
.
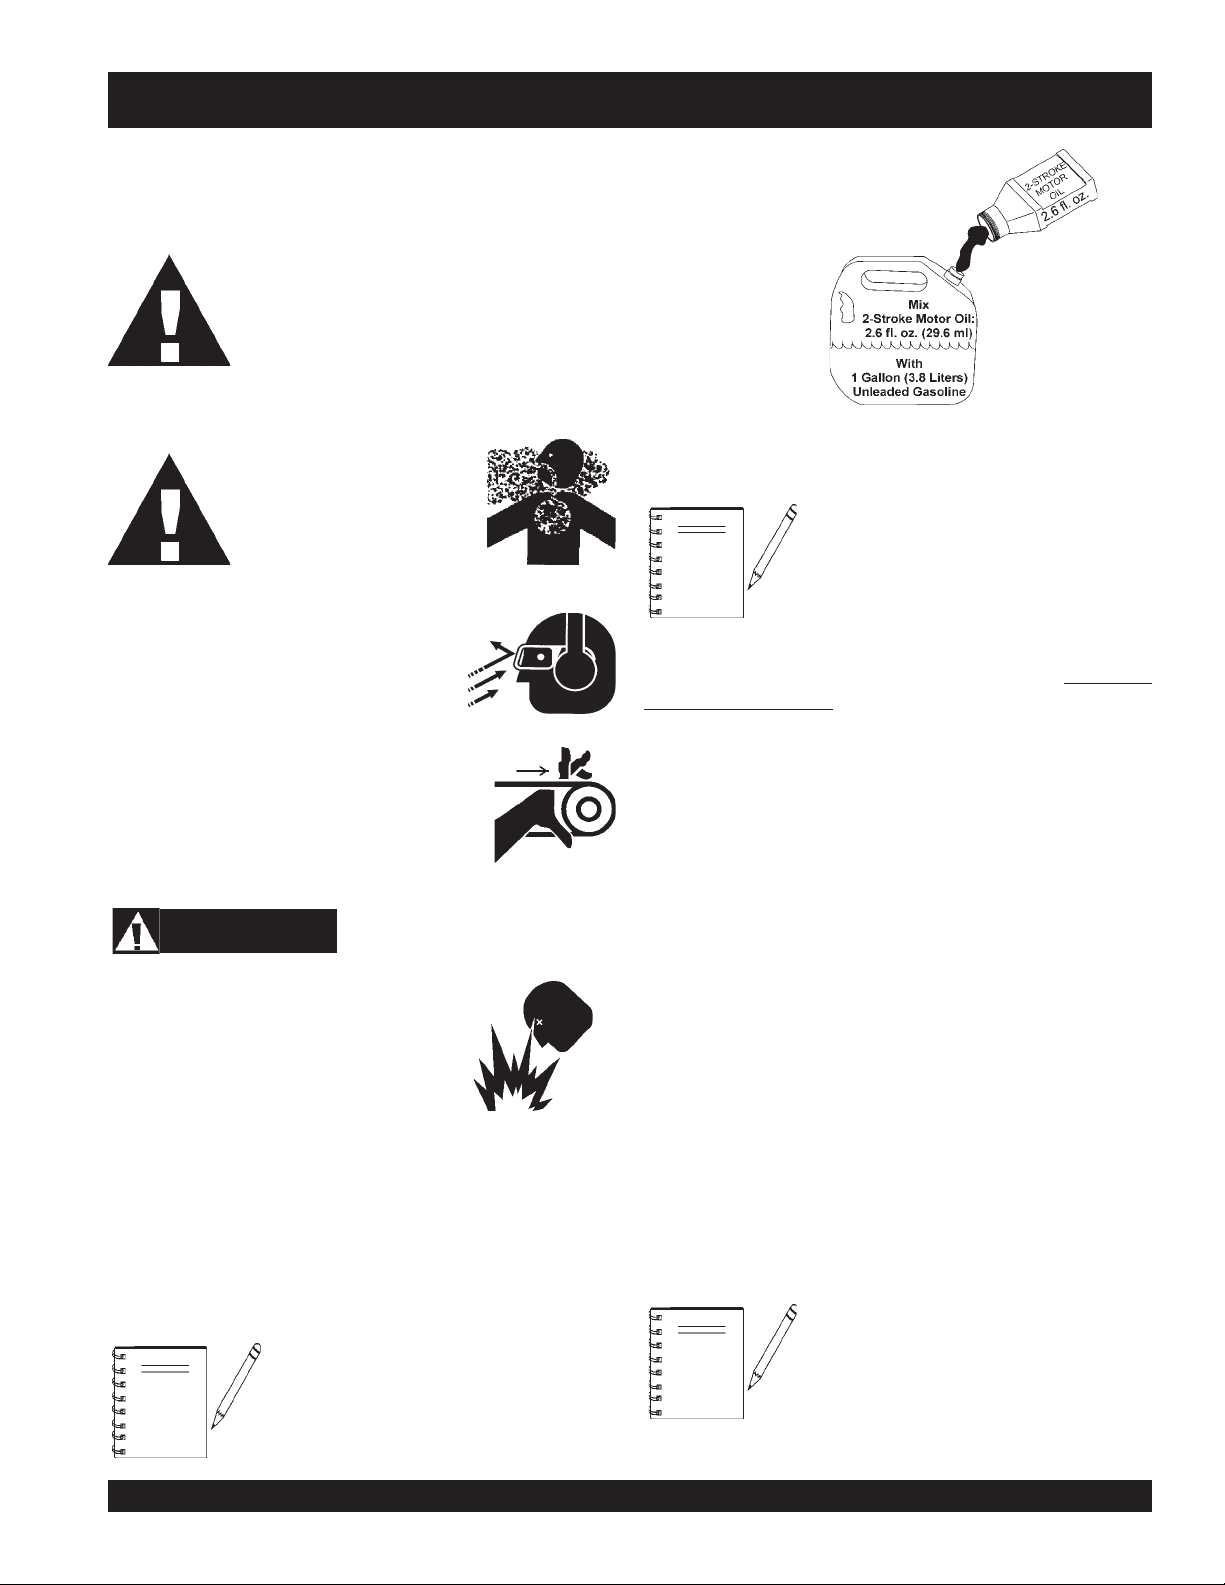
Figure 13. Fuel to Oil Mixture
For correct fuel to oil mixture, add 2.6 fl. oz
(29.6 ml) of 2-stroke motor oil to 1 gallon (3.8
NOTE
A bottle ( 2.6 fl. oz) of smokeless 2-stroke motor oil
purchased separately
be purchased. When ordering use Multiquip P/N 00325.
Starting
1. Place the engine ON/OFF switch in the ON position
liters) of
gasoline
unleaded gasoline add 13 fl. oz (384 ml) of
2-stroke motor oil.
premium 92 octane unleaded
. For a
. Only a case of 36 individual bottles can
5 gallon
can of
premium
cannot be
Explosive Fuel
Fuel Check
Motor fuels are highly flammable and can be
dangerous if mishandled. DO NOT smoke
while refueling. DO NOT attempt to refuel the
saw if the engine is
1. Remove the fuel cap located on the side of the saw.
2. Visually inspect to see if fuel level is low. If fuel is low,
replenish with fuel oil mixture as shown in Figure 13.
3. When refueling, be sure to use a strainer for filtration. DO
NOT top-off fuel. Wipe up any spilled fuel.
NOTE
hot! or running
This saw uses a 2-stroke engine which
requires a mixture of
unleaded gasoline and smoke free 2-stroke
motor oil. See Figure 13.
.
premium
92 octane
2. Using your thumb, press down on the throttle lock lever,
while squeezing the throttle trigger. This will lock the throttle
half-throttle
in the
3. Pull the choke lever all the way out to the CLOSED position.
4. Pull the
5. Place the saw on level ground. Make sure the saw blade is
free to rotate and will not come into contact with any foreign
objects.
6. Hold the front handle firmly with the left hand and put your
right foot onto the base of the rear handle.
NOTE
decompression button
position.
outward.
The CLOSED position of the choke lever
enriches the fuel mixture for starting a COLD
engine. The OPEN position provides the
correct fuel mixture for normal operation after
starting, and for restarting a warm engine.
SHS81A CUT-OFF SAW — OPERATION AND PARTS MANUAL — REV. #0 (01/30/08) — PAGE 19
Page 20
SHS81A CUT-OFF SAW — INITIAL START-UP/OPERATION
7. Grasp the
becomes the hardest at a certain position, corresponding to
the compression point. Pull the starter grip briskly and smoothly
for starting.
8. If the engine has started, slowly return the choke lever to the
"OPEN"
1 through 9.
9. Squeeze the throttle lever trigger to release it from the
throttle position.
10. Before the saw is placed into operation, run the engine for
several minutes. Check for fuel leaks, and noises that would
associate with a loose guards and/or covers.
OPERATION
ALWAYS cut with the saw at FULL THROTTLE. Attempting to
cut with the saw at less than full throttle could cause the blade to
bind or stop abruptly in the slab resulting in serious injury to the
operator or others in the area.
starter grip
position. If the engine has not started repeat steps
and slowly pull it out. The resistance
half-
WARNING
NOTE
4. When the end of the cut has been reached, raise the blade
out of the cut .
5. If cutting is complete, turn the engine off and wait for the blade
to stop rotating.
Shut-down
1. Let the engine idle for 3-5 minutes.
2. Place the engine ON/OFF switch to the OFF position
3. Wait for the blade to stop spinning before handling the saw.
4. DO NOT touch the cutting blade it is very
cool, severe burn condition exists.
Mark the cutting line clearly and always
saw in a STRAIGHT LINE ONLY.
hot!
, allow it to
WARNING
ALWAYS keep clear of
this equipment.
2. To begin sawing, lower the rotating blade allowing it to cut to
the preset depth.
3. When blade has reached full cutting depth, slowly walk
behind the saw at a rate that will allow the engine to operate
without losing optimum RPM.
CAUTIONCAUTION
CAUTION
CAUTIONCAUTION
rotating
DO NOT try to cut faster than the blade will allow.
Cutting too fast will cause the blade to rise up
out of the cut. Improper cutting rate can decrease
the life of the engine and blades.
or
moving
parts while operating
PAGE 20 — SHS81A CUT-OFF SAW — OPERATION AND PARTS MANUAL — REV. #0 (01/30/08)
Page 21
V-Belt Changing Procedure
N
SHS81A CUT-OFF SAW — MAINTENANCE
Figure 14. Belt Guard Cover Removal
Figure 15. Re-Installing Cover Guard
Remove the 2 hex nuts
gain access to the V-belt on the clutch side. Remove V-belt
cover
Remove the 2 hex nuts
knob
the Cover Guard
.
to gain access to the V-belt on the spindle side. Remove
I
K
and hex screw and washer M to
L
and hex screw and guard adjustment
J
.
Using the provided wrench, loosen the three nuts
the tension on the V-belt, then turn the V-belt Tensioning Cam
until the V-belt is completely slacked.
L
Figure 16. V-Belt Tensioning
Remove the V-belt
Install the new V-belt around both pulleys. It is essential that the
drive V-belt is properly positioned around both the clutch and
spindle pulleys.
Figure 17. Drive V-Belt
SHS81A CUT-OFF SAW — OPERATION AND PARTS MANUAL — REV. #0 (01/30/08) — PAGE 21
from the
clutch and spindle pulleys
to reduce
M
.
Page 22

V-Belt Changing Procedure (continued)
SHS81A CUT-OFF SAW — MAINTENANCE
Figure 118. Reversing the Cutting Arm
N
Re-tension the V-belt by turning the
The V-belt should remain in tension.
Fully tighten the three nuts
tensioning position.
Re-install the
the two cap screws
guard
N
and
K
and reinstall the adjustment knob
J
belt tensioning cam
that lock the V-belt into the proper
V-belt covers
.
. Fully tighten
.
I
Figure 19. Re-Installing Cover Guard
PAGE 22 — SHS81A CUT-OFF SAW — OPERATION AND PARTS MANUAL — REV. #0 (01/30/08)
Page 23

Reversing the Cutting Arm Procedure
SHS81A CUT-OFF SAW — MAINTENANCE
NOTE
This assembly procedure permits the operator to reorient the
and/or object.
Figure 20. Tool Kit
cutting blade
The Multiquip
(Figure 16) that assist you with day to day operations. You will
need these tools for the maintenance of your saw.
Item
G
common bolt/screw and nut head sizes of your saw.
Item
is the wrench necessary to accommodate various allen
H
screws.
This position displays the
cutting position. To reverse the blade position continue with the
following steps:
Remove the following items from the
to expose the V-belt:
Side Winder
is a versatile screwdriver/wrench that accommodates
Cut-Off Saw comes with a Tool Kit
cutting blade on the inside
closer to a wall, column
(center)
Cutting Arm Assembly
Figure 21. Inside Center Cutting Position
Figure 22 Belt Tensioning Cam
■
Guard Adjustment Knob
■
Two Cap Screws
■
Cover Guard
Loosen the
nuts
reverse the
belt tensioning cam
. This will take tension off the V-belt, and permit you to
M
cutting arm
.
K
J
I
and remove the three
L
SHS81A CUT-OFF SAW — OPERATION AND PARTS MANUAL — REV. #0 (01/30/08) — PAGE 23
Page 24

SHS81A CUT-OFF SAW — MAINTENANCE
Reversing the Cutting Arm Procedure (continued)
Figure 23. Reversing the Cutting Arm
Reverse the
23, and re-tension the V-belt by turning the
cam
Fully tighten the three nuts
tensioning position.
Re-attach the
and reconnect the
cutting arm
. The V-belt should remain in tension.
cover guard
180 degrees as shown in the Figure
that lock the V-belt into the proper
N
Kwith the 2 cap screws J,
guard adjustment knob
belt tensioning
I.
Figure 24. Re-attaching Cover Guard
PAGE 24 — SHS81A CUT-OFF SAW — OPERATION AND PARTS MANUAL — REV. #0 (01/30/08)
Page 25

SHS81A CUT-OFF SAW — MAINTENANCE (AIR/FUEL FILTER)
Air/Fuel Filter Maintenance Procedures
Figure 25. Fuel Filter
Figure 26. Pre-Filter
Check the
for dirt/debris build up. It is recommended to change the fuel filter
every
This engine is a 2-stroke gasoline engine
fuel to oil mixture of 50:1(2%). It is recommended to use an
unleaded gasoline rated at 92 octane (
use on 2-stroke engines only. See Figure 13.
It is highly recommended to keep a supply of spare
on hand. Maintaining the
will prolong the life of the
Every 8 hours of operation
and wash the foam
I
water. Let dry thoroughly. When dry, completely coat the filter
with only an approved
fuel filter
50 tanks of fuel
located inside the fuel tank periodically
G
.
foam pre -filter
pre-cleaner
foam filter oil
requiring a specific
premium)
, and regular exchanges
main filter element
, remove the
H in warm fresh soapy
.
.
pre-air cleaner cover
with an oil for
pre-filters
Every 8 hours of operation
and inspect the
element
soft brush. DO NOT air blast clean this element with compressed
gas.
The main filter element should be replaced after
Figure 27. Main Filter Element
Figure 28. Supplementary Filter
SHS81A CUT-OFF SAW — OPERATION AND PARTS MANUAL — REV. #0 (01/30/08) — PAGE 25
changes
Every 8 hours of operation, inspect the
element
vigorously shaking out and dusting off with a soft brush. DO
NOT air blast clean this element with compressed gas.
The
three pre filter changes
Kby vigorously shaking out and dusting off with a
L. Clean the
supplementary filter element
main filter element
supplementary filter element
, remove the
.
covers
. Clean the
supplementary filter
should be replaced after
Iand
main filter
three pre filter
J
L by
Page 26

SHS81A CUT-OFF SAW — TROUBLESHOOTING (BLADE)
GNITOOHSELBUORTEDALB.3ELBAT
MOTPMYS MELBORPELBISSOP NOITULOS
gnieblairetamehtrofdrahootedalB
?tuc
foesuacebdehsinimideuqrotenignE
?tleb-Vesool
.gnittucspotsroswolsedalB
thgiartstuctonseodedalB
.eurtro/dna
?gnittuc
?rewopenignetneiciffusnI .rewopesrohenignEkcehC.gnitteselttorhtkcehC
?tucgnieblairetam
?segnalfdnasredluohs
?noitatorfonoitceridreporpmI
?tfahsedalbehtnognippilssiedalB
?wasdengilasimnodesugniebedalB .ytirgetnitnemngiladnasgniraebtfahsedalbkcehC
ehtrofdrahylevissecxesiedalB
?MPRreporpmitadesugniebedalB
robranodetnuomylreporpmiedalB
elihwedalbotdeilppaecrofevissecxE
TONOD dnawolsaylppA.tucehtniedalbehtecrof
.edalbeht"sserdeR"
.stleB-Vecalperro/dnanethgiT
.noitcerid"gnittuC-nwoD"anistniopworra
.tfahsedalbeht
.noitamrofnirofpiuqitluMrorelaeDtlusnoC.tuc
.000,6yletamixorppa
.gniwasnehwecapydaets
gnittucyrT.edalbtcerrocrofpiuqitluMrorelaeDtlusnoC
ot)kcolbrednic,kcirbacilis,enotsdnas(lairetamtfosyrev
lanoitatordnadetneiroylreporpsiedalbehttahtkcehC
nodellatsniylreporperanipegnalf&edalbehttahtkcehC
gnieblairetamehthtiwedalbehtfonoitacificepskcehC
si)MPFS(deepsetunimrepteefecafrusedalberusnE
.tfahsedalbehtnodexiffaylreporpsiedalberusnE
gnieblairetamehtrofdrahootsedalB
?tuc
robranodetnuomylreporpmiedalB
?segnalfdnasredluohs
gniloochguonegniviecertonedalB
gnilkcarc,gnirolocsidedalB
.ylevissecxegniraewro/dna
?riaroretaw
?dnuorfotuoelohrobrA .tfahsedalbehtnodexiffaylreporpsiedalberusnE
lairetamrofnesohcedalbtcerrocnI
?tucgnieb
elihwedalbotdeilppaecrofevissecxE
?gnittuc
TONOD dnawolsaylppA.tucehtniedalbehtecrof
.edalbeht"sserdeR"
.edalbgnittucyrdatuoba
.gniwasnehwecapydaets
PAGE 26 — SHS81A CUT-OFF SAW — OPERATION AND PARTS MANUAL — REV. #0 (01/30/08)
gnittucyrT.edalbtcerrocrofpiuqitluMrorelaeDtlusnoC
ot)kcolbrednic,kcirbacilis,enotsdnas(lairetamtfosyrev
.tfahsedalbehtnodexiffaylreporpsiedalberusnE
tewrofdedivorpsiretawfoemulov&wolfreporperusnE
detalucricsiriagnilooctneiciffuserusnE.sedalbgnittuc
gnieblairetamehthtiwedalbehtfonoitacificepskcehC
.noitamrofnirofpiuqitluMrorelaeDtlusnoC.tuc
Page 27

SHS81A CUT-OFF SAW — TROUBLESHOOTING (ENGINE)
)ENIGNE(GNITOOHSELBUORT.4ELBAT
MOTPMYSESUACELBISSOPNOITULOS
?gnigdirbgulpkrapS
?gulpkrapsnotisopednobraC .gulpkrapsecalperronaelC
ontub,elbaliavasileuf",tratsottluciffiD
."gulpkrapstaKRAPS
dna,elbaliavasileuf",tratsottluciffiD
eserpsiKRAPS
."gulpkrapsehttatn
kraps,elbaliavasileuf",tratsottluciffiD
inoisserpmocdnatneserpsi
."lamrons
?noitalusni
?gnitiucric
udroretaW.metsysleufhsulF
ifedoteudtiucrictrohS
?paggulpkrapsreporpmI.pagreporp
?evitcefedliocnoitingI.liocnoitingiecalpeR
?detrohssihctiwsFFO/NO
ronekorberiwgulpkrapS
?epytleufgnorW
?metsysleufnits
?ytridrenaelcriA .renaelcriaecalperronaelC
gulpkrapstneic
?ytridstniop,pagkrapsreporpmI
trohsronrownoitalusniresnednoC
?gnitiucrictrohs
.nrowfiecalper
otteS
.hctiws
.stniopnaelc
.gniriw
ronoitalusni,pagkcehC
.gulpkrapsecalper
,noitalusnigulpkrapskcehC
ecalper,gniriwhctiwskcehC
krapstcerrocteS
dnapag
.resnednocecalpeR
gulpkrapsevitcefedecalpeR
ecalperdna,metsysleufhsulF
.leuffoepyttcerrochtiw
?nepOekohC.ekohCesolC
eR
?dedurtorprokcutsevlavtsuahxe/noitcuS.sevlavtaes-
?nrowrednilycro/dnagnirnotsiP
ileuf",tratsottluciffiD
kraps,elbaliavas
."wolsinoisserpmocdnatneserpsi
denethgit
?degamad
.roterubracehttatneserpleufoN
?ylreporp
?deggolcretlifleuF.retlifleufecalpeR
enilleufniriA.enilleufdeelB
?
tongulpkrapsro/dnadaehrednilyC
teksaggulpkrapsro/dnateksagdaeH
?)ypmeknat(knatleufnielbaliavatonleuF .leuffoepyttcerroc
?deggolcelohrehtaerbpacknatleuF .packnatleufecalperronaelC
.notsip
.gulpkraps
ehecalpeR
.steksag
htiwlliF
ro/dnasgnirnotsipecalpeR
dnastlobdaehrednilyceuqroT
gulpkrapsro/dnada
SHS81A CUT-OFF SAW — OPERATION AND PARTS MANUAL — REV. #0 (01/30/08) — PAGE 27
Page 28

SHS81A CUT-OFF SAW — TROUBLESHOOTING (ENGINE)
)DEUNITNOC,ENIGNE(GNITOOHSELBUORT.4ELBAT
MOTPMYSESUACELBISSOPNOITULOS
?naelctonrenaelcriA .renae
reporpsinoisserpmoc"rewopnikaeW"
.erifsimtonseoddna
tcefeD .gulpkrapsecalperronaelC
reporpsinoisserpmoc"rewopnikaeW"
ifsimtub
.ser
.staehrevoenignE
looC.snifgniloocnaelC
?gulpkrapsevi
?metsysleufniretaW
?evitcefedliocnoitingI.liocnoit
?gulpkrapsytriD .gulpkrapsecalperronaelC
?epytleufgnorW
?ytridsnifgni
?roterubracnilevelleufreporpmI
?paggulpkrapsreporpmI.pagreporpotteS
?reporpmieulavtaehgulpkrapS
?yltcerrocdetsujdaronrevoG.ronrevogtsujdA
ingiecalpeR
hsulF
.gulpkraps
lcriaecalperronaelC
.tnemtsujdataolfkcehC
.roterubracdliubeR
ecalperdnametsysleufhsulF
.leufepyttcerrochtiw
ecalperdna,metsysleuf
.leuffoepyttcerrochtiw
foepyttcerrochtiwecalpeR
.setautculfdeepslanoitatoR
.noitc
nuflamretratslioceR
?trid
irpslaripS.gnirpslaripsecalpeR
efedgnirpsronrevoG.gnirpsronrevogecalpeR
?detcirtserwolfleuF
?esoolgn
?gnissimroevitc
.sgolcroskael
dnatsudhtiwdeggolcmsinahcemlioceR
.retawdna
PAGE 28 — SHS81A CUT-OFF SAW — OPERATION AND PARTS MANUAL — REV. #0 (01/30/08)
rofmetsysleuferitnekcehC
paoshtiwylbmessaliocernaelC
Page 29

SHS81A CUT-OFF SAW — FILTER KITS
For
HS81FK1A
[ Includes 1 ea.]
HS52010451R- Foam Filter
HS018600125R- Paper Filter
HS018600056AR - Inner Filter
Side WinderSide Winder
Side Winder
Side WinderSide Winder
SHS81A
HS Series Cut-Off Saws
DR Y FIL TER KITS
HS81FK5A
[ Includes 5 ea.]
HS52010451R - Foam Filter
HS018600125R - Paper Filter
HS018600056AR - Inner Filter
HS81FK10A
[ Includes 10 ea.]
HS52010451R - Foam Filter
HS018600125R - Paper Filter
HS018600056AR - Inner Filter
WET FILTER
* Replaces
Standard Water Kit (provided)
SHS81A CUT-OFF SAW — OPERATION AND PARTS MANUAL — REV. #0 (01/30/08) — PAGE 29
DRY
Air Filter Canister When Using Water &
HS099900778A
[ Includes 1 ea.]
Page 30

SHS81A CUT-OFF SAW — EXPLANATION OF PARTS SECTION REMARKS
The following section explains the different symbols and remarks
used in the Parts section of this manual. Use the help numbers
found on the back page of the manual if there are any questions.
The contents and part numbers listed in the parts section are
subject to change
guarantee the availibility of the parts listed.
Sample Parts List:
NO. PART NO. PART NAME QTY. REMARKS
1 12345 BOLT .......................1 .... INCLUDES ITEMS W/
2
*
2*12347 WASHER, 3/8 IN. .... 1....
3 12348 HOSE .................... A/R .. MAKE LOCALLY
4 12349 BEARING ................ 1 .... S/N 2345B AND ABOVE
NO. Column
Unique Symbols - All items with same unique symbol
, #, +, %, or >) in the number column belong to the same
(
*
assembly or kit, which is indicated by a note in the “Remarks”
column.
Duplicate Item Numbers - Duplicate numbers indicate
multiple part numbers are in effect for the same general item,
such as different size saw blade guards in use or a part that
has been updated on newer versions of the same machine.
NOTE
without notice
WASHER, 1/4 IN. ...........
When ordering a part that has more
than one item number listed, check
the remarks column for help in
determining the proper part to order.
. Multiquip does not
NOT SOLD SEPARATELY
MQ-45T ONLY
QTY. Column
Numbers Used - Item quantity can be indicated by a number,
a blank entry, or A/R.
A/R (As Required) is generally used for hoses or other parts
that are sold in bulk and cut to length.
A blank entry generally indicates that the item is not sold
separately. Other entries will be clarified in the “Remarks”
Column.
REMARKS Column
Some of the most common notes found in the “Remarks”
*
Column are listed below. Other additional notes needed to
describe the item can also be shown.
Assembly/Kit
symbol will be included when this item is purchased.
Indicated by:
“INCLUDES ITEMS W/(unique symbol)”
Serial Number Break
range where a particular part is used.
Indicated by:
“S/N XXXXX AND BELOW”
“S/N XXXX AND ABOVE”
“S/N XXXX TO S/N XXX”
Specific Model Number Use
only with the specific model number or model number variant
listed. It can also be used to show a part is NOT used on a
specific model or model number variant.
Indicated by:
“XXXXX ONLY”
“NOT USED ON XXXX”
- All items on the parts list with the same unique
- Used to list an effective serial number
- Indicates that the part is used
PART NO. Column
Numbers Used - Part numbers can be indicated by a number,
a blank entry, or TBD.
TBD (To Be Determined) is generally used to show a part that
has not been assigned a formal part number at time of
publication.
A blank entry generally indicates that the item is not sold
separately or is not sold by Multiquip. Other entries will be
clarified in the “Remarks” Column.
PAGE 30 — SHS81A CUT-OFF SAW — OPERATION AND PARTS MANUAL — REV. #0 (01/30/08)
“Make/Obtain Locally”
purchased at any hardware shop or made out of available
items. Examples include battery cables, shims, and certain
washers and nuts.
“Not Sold Separately”
purchased as a separate item and is either part of an
assembly/kit that can be purchased, or is not available for
sale through Multiquip.
- Indicates that the part can be
- Indicates that an item cannot be
Page 31

SHS81A CUT-OFF SAW — SUGGESTED SPARE PARTS
SUGGESTED SPARE PARTS
SHS81A SIDEWINDER CUT-OFF SAW
1 to 3 Units
Qty. P/N Description
1 ............ HS52012047A ....... STARTER ASSEMBLY
3 ............ HS098000079R .... ROPE, STARTER
1 ............ HS50140060 ......... HANDLE, ROPE
1 ............ HS098000060A ..... SPRING & CASE, STARTER
6 ............ HS3055118 ........... SPARK PLUG
1 ............ HS097000132 ....... CLUTCH ASSEMBLY
1 ............ HS52022005 ......... FUEL CAP, W/O-RING
3 ............ HS50010218 ......... FILTER, FUEL
1 ............ HS52010092 ......... THROTTLE TRIGGER LEVER
1 ............ HS52010077 ......... THROTTLE LOCK LEVER
1 ............ HS52010078 ......... CHOKE LEVER
1 ............ HS52010022A ....... COVER, BELT GUARD
3 ............ HS3914010 ........... NUT, BELT COVER
3 ............ HS018100180 ....... V-BELT
2 ............ HS018600235 ....... FLANGE, ARBOR
2 ............ HS018600236A ..... FLANGE, ARBOR
2 ............ HS52010177 ......... SCREW AND WASHER, ARBOR
2 ............ HS52010062A ....... KNOB, ADJ. GUIDE
2 ............ HS3833080 ........... WASHER, ADJ. GUIDE
2 ............ HS52010045 ......... SPACER, ADJ. GUIDE
2 ............ HS52010013 ......... LOCK, GUIDE BLADE GUARD
1 ............ HS52012024B ....... FLANGE, PRE-FILTER CAP
1 ............ HS52010014B ....... SUPPORT FILTER
2 ............ HS3802002A ......... SCREW, FILTER SUPPORT
1 ............ HS330000010 ....... O-RING, FLANGE PRE-FILTER
1 ............ HS018600090A ..... GASKET, AIR FILTER LOWER
18 .......... HS018600125R .... AIR FILTER
6 ............ HS018600056AR .. FILTER, AIR INNER
18 .......... HS52010451R ...... PRE-FILTER, FOAM
3 ............ HS4191240 ........... TOOL KIT
3 ............ HS099900778A ..... WET, AIR FILTER
3 ............ HS52010082 ......... BREATHER ASSEMBLY
1 ............ 00325 .................... CASE, OIL 2-STROKE NON-SMOKE - 36 BOTTLES
NOTE
The contents of this parts
catalog are subject to change
without notice.
SHS81A CUT-OFF SAW — OPERATION AND PARTS MANUAL — REV. #0 (01/30/08) — PAGE 31
Page 32

MUFFLER ASSY.
SHS81A CUT-OFF SAW — MUFFLER ASSY.
PAGE 32 — SHS81A CUT-OFF SAW — OPERATION AND PARTS MANUAL — REV. #0 (01/30/08)
Page 33

SHS81A CUT-OFF SAW — MUFFLER ASSY.
MUFFLER ASSY.
NO. PART NO. PART NAME QTY. REMARKS
1
2
3
4
5
6
7
8
9 HS52010441 MUFFLER ASSEMBLY ............................. 1 ......... INCLUDES ITEMS W/
10
11 HS097000094A GASKET, MUFFLER 1
HS3801052 SCREW 3
*
HS3033074 WASHER 5
*
HS097000342A COVER, MUFFLER 1
*
HS3801045 SCREW 2
*
HS005100913B SCREW 2
*
HS3833073 WASHER 2
*
HS098000133 DEFLECTOR, MUFFLER 1
*
HS098000132 SCREEN 1
*
HS097000092A SCREW 2
*
*
SHS81A CUT-OFF SAW — OPERATION AND PARTS MANUAL — REV. #0 (01/30/08) — PAGE 33
Page 34

RECOIL START ASSY.
SHS81A CUT-OFF SAW — RECOIL START ASSY.
PAGE 34 — SHS81A CUT-OFF SAW — OPERATION AND PARTS MANUAL — REV. #0 (01/30/08)
Page 35

SHS81A CUT-OFF SAW — RECOIL START ASSY.
RECOIL START ASSY.
NO. PART NO. PART NAME QTY. REMARKS
14
15
16
17
18
19
20
21
22
23 HS097000092A SCREW 4
24 HS52012047A STARTER ASSEMBLY .............................. 1 ......... INCLUDES ITEMS W/
25
26
27
HS50140060 HANDLE, STARTER ROPE 1
*
HS098000079R ROPE, STARTER 1
*
HS098000060A SPRING AND CASE, STARTER 1
*
HS3960017 SCREW 4
*
HS3960116 SCREW 1
*
HS50140055 COVER 1
*
HS3918006 WASHER 1
*
HS52010439B PULLEY, STARTER 1
*
HS3908036 SCREW 1
*
HS52010410 CAP 1
*
HS50140056 CAP 1
*
HS52010404 SPACER 1
*
*
SHS81A CUT-OFF SAW — OPERATION AND PARTS MANUAL — REV. #0 (01/30/08) — PAGE 35
Page 36

CRANKCASE ASSY.
SHS81A CUT-OFF SAW — CRANKCASE ASSY.
PAGE 36 — SHS81A CUT-OFF SAW — OPERATION AND PARTS MANUAL — REV. #0 (01/30/08)
Page 37

SHS81A CUT-OFF SAW — CRANKCASE ASSY.
CRANKCASE ASSY.
NO. PART NO. PART NAME QTY. REMARKS
3 HS52010312 PLATE 1
11 HS09990268 RUBBER CLAMP 1
12 HS52020040 CAP 1
16 HS097000009A GASKET, CRANKCASE 1
18 HS52012018 CRANKCASE W/ BEARING ASSY ........................ 1 ......... INCLUDES ITEMS W/
19
20 HS099900110 GROMMET 1
21 HS52010117 GROMMET 1
22 HS3833073 WASHER 7
23 HS006100303 SCREW 2
24 HS097000080BR BAR STUD, CRANKCASE 2
26 HS3801015 SCREW 4
28 HS005100987 SCREW 1
30 HS097000057 GROMMET 1
31 HS006000102 SPLIT PIN 1
37
40 HS52010078 CHOKE LEVER 1
41 HS3049030 O-RING 1
HS3034012 BEARING, CRANKCASE 2
*
HS3023008 PIN 2
*
*
SHS81A CUT-OFF SAW — OPERATION AND PARTS MANUAL — REV. #0 (01/30/08) — PAGE 37
Page 38

SHS81A CUT-OFF SAW — V-BELT COVER (CLUTCH SIDE) ASSY.
V-BELT COVER (CLUTCH SIDE) ASSY
PAGE 38 — SHS81A CUT-OFF SAW — OPERATION AND PARTS MANUAL — REV. #0 (01/30/08)
Page 39

SHS81A CUT-OFF SAW — V-BELT COVER (CLUTCH SIDE) ASSY.
V-BELT COVER (CLUTCH SIDE) ASSY.
NO. PART NO. PART NAME QTY. REMARKS
25 HS52010430 V-BELT COVER, (CLUTCH SIDE) 1
31 HS50010148R NUT 2
34 HS3833073 WASHER 3
40 HS3806021A SCREW 2
41 HS3801037 SCREW 1
42 HS52010023 GUARD, BELT INNER 1
43 HS3916008R WASHER 2
44 HS006000300 BUSHING 1
SHS81A CUT-OFF SAW — OPERATION AND PARTS MANUAL — REV. #0 (01/30/08) — PAGE 39
Page 40

SHS81A CUT-OFF SAW — V-BELT COVER (PULLEY) /BLADE GUARD
V-BELT COVER (PULLEY-SIDE)/BLADE GUARD ASSY.
BLADE FLANGE
INNER (LIP)
10
2
8
34
5
BLADE FLANGE
OUTER (FLAT)
6
22
14
14
12
46
34
7
4
12
36
ASSY.
1
14
13
20
23
24
28
27
11
45
38
35
15
26
CLUTCH
PULLEY
37
9
47
32
39
21
6
16
17
18
33
34
19
29
30
PAGE 40 — SHS81A CUT-OFF SAW — OPERATION AND PARTS MANUAL — REV. #0 (01/30/08)
Page 41

SHS81A CUT-OFF SAW — V-BELT COVER (PULLEY) /BLADE GUARD
V-BELT COVER (PULLEY-SIDE)/BLADE GUARD ASSY.
NO. PART NO. PART NAME QTY. REMARKS
1 HS52010026 BLADE COVER 14-INCH 1
2 HS52010177 SCREW AND WASHER 1
4 HS52010045 SPACER 1
5 HS018600235 FLANGE, ARBOR (OUTER) 1
6 HS52010044 SPACER 2
7 HS018600019 SHAFT 1
8 HS3806022 SCREW 3
9 HS005000343 WASHER 1
10 HS018600236A FLANGE, ARBOR (INNER) 1
11 HS018100029 O-RING, BLADE GUARD SUPPORT 1
12 HS3035019 BEARING 2
13 HS093000020 SPACER 1
14 HS094000251 NUT 5
15 HS52010039 SPACER 1
16 HS01860004A PULLEY, BELT 1
17 HS3918013 WASHER 1
18 HS3806065 SCREW 1
19 HS52010305 PLATE 17
20 HS3806021A SCREW 5
21 HS52012114 ARM 1
22 HS52010043 FLANGE 1
23 HS52010013 LOCK, GUIDE BLADE GUARD 1
24 HS52010396 GUIDE, BLADE GUARD 1
26 HS52010062A KNOB, ADJUSTMENT GUIDE 1
27 HS3802005A SCREW 2
28 HS52010025A SUPPORT BLADE GUARD 1
29 HS3801016 SCREW 2
30 HS3914010 NUT 3
32 HS018100180 V-BELT 1
33 HS52010022A COVER, V-BELT (PULLEY SIDE) 1
34 HS3833073 WASHER 6
35 HS3806037A SCREW 1
36 HS52010211 GUARD 1
37 HS52010046 BUSHING 1
38 HS52010401 SCREW 1
39 HS52010036 BELT ADJUSTER 1
45 HS3833080 WASHER 1
46 HS3906019 SCREW 1
47 HS52010428 PLASTIC PIN 2
ASSY.
SHS81A CUT-OFF SAW — OPERATION AND PARTS MANUAL — REV. #0 (01/30/08) — PAGE 41
Page 42

FUEL TANK ASSY.
SHS81A CUT-OFF SAW — FUEL TANK ASSY.
PAGE 42 — SHS81A CUT-OFF SAW — OPERATION AND PARTS MANUAL — REV. #0 (01/30/08)
Page 43

SHS81A CUT-OFF SAW — FUEL TANK ASSY.
FUEL TANK ASSY.
NO. PART NO. PART NAME QTY. REMARKS
4 HS52010082 BREATHER 1
5 HS093000448 TUBE 1
6 HS018500066 FITTING 1
8 HS018500096 VALVE BODY 1
9 HS50010093 TUBE 1
15
16 HS52022005 CAP, FUEL ............................................................. 1 ......... INCLUDES ITEM W/
19 HS4098377 CLIP 1
28 HS50010218 FILTER, FUEL 1
HS099900090 0-RING 1
*
*
SHS81A CUT-OFF SAW — OPERATION AND PARTS MANUAL — REV. #0 (01/30/08) — PAGE 43
Page 44

SHS81A CUT-OFF SAW — LIFTING HANDLE AND ROLLER ASSY.
LIFTING HANDLE AND ROLLER ASSY.
PAGE 44 — SHS81A CUT-OFF SAW — OPERATION AND PARTS MANUAL — REV. #0 (01/30/08)
Page 45

SHS81A CUT-OFF SAW — LIFTING HANDLE AND ROLLER ASSY.
LIFTING HANDLE AND ROLLER ASSY.
NO. PART NO. PART NAME QTY. REMARKS
1 HS52010047 HANDLE 1
2 HS097000061A SCREW 4
3 HS3072015 WASHER 2
7 HS3801020 SCREW 2
17 HS52020026 GUARD, FUEL TANK 1
18 HS3960087 SCREW 1
20 HS52010214 MAIN ROLLER SUPPORT UPPER 1
21 HS3960045 SPACER, ROLLER SUPPORT LOWER 2
22 HS018100171A ROLLER 1
23 HS52010098 SUPPORT, ROLLER LOWER 1
24 HS3072015 WASHER 2
25 HS3801024 SCREW 2
26 HS52010066R SHOCK ABSORBER 4
27 HS097000485 FUEL TANK ASSY. 1
29 HS3833076 WASHER 4
30 HS3806035 SCREW 2
SHS81A CUT-OFF SAW — OPERATION AND PARTS MANUAL — REV. #0 (01/30/08) — PAGE 45
Page 46

THROTTLE ASSY.
SHS81A CUT-OFF SAW — THROTTLE LINKAGE ASSY.
PAGE 46 — SHS81A CUT-OFF SAW — OPERATION AND PARTS MANUAL — REV. #0 (01/30/08)
Page 47

SHS81A CUT-OFF SAW — THROTTLE LINKAGE ASSY.
THROTTLE ASSY
NO. PART NO. PART NAME QTY. REMARKS
10 HS52010092 THROTTLE TRIGGER LEVER ............................... 1 ......... INCLUDES ITEM W/ #
11 HS52010077 THROTTLE LOCK LEVER 1
12 HS097000028 SPRING 1
13 HS097000024 COVER, HANDLE/TANK 1
14 HS3960040 SCREW 3
38% CAP, THROTTLE LINKAGE ................................... 1 ......... NOT SOLD SEPARATELY
39 HS52012044 THROTTLE LINKAGE ............................................ 1 ......... INCLUDES ITEM W/ %
40# PLATE .................................................................... 1 ......... NOT SOLD SEPARATELY
SHS81A CUT-OFF SAW — OPERATION AND PARTS MANUAL — REV. #0 (01/30/08) — PAGE 47
Page 48

FLYWHEEL COVER ASSY.
SHS81A CUT-OFF SAW — FLYWHEEL COVER ASSY.
PAGE 48 — SHS81A CUT-OFF SAW — OPERATION AND PARTS MANUAL — REV. #0 (01/30/08)
Page 49

SHS81A CUT-OFF SAW — FLYWHEEL COVER ASSY.
FLYWHEEL COVER ASSY.
NO. PART NO. PART NAME QTY. REMARKS
3 HS005000361 WASHER, FLAT 1
4 HS3833080 WASHER, LOCK 1
5 HS004000142 NUT 1
6 HS097000019C FLANGE, STARTER 1
SHS81A CUT-OFF SAW — OPERATION AND PARTS MANUAL — REV. #0 (01/30/08) — PAGE 49
Page 50

FLYWHEEL ASSY.
SHS81A CUT-OFF SAW — FLYWHEEL ASSY.
PAGE 50 — SHS81A CUT-OFF SAW — OPERATION AND PARTS MANUAL — REV. #0 (01/30/08)
Page 51

SHS81A CUT-OFF SAW — FLYWHEEL ASSY.
FLYWHEEL ASSY.
NO. PART NO. PART NAME QTY. REMARKS
1 HS52010136R FLYWHEEL ................................................ 1 ......... INCLUDES ITEM W/
2
HS52012027 PAWL SET 1
*
*
SHS81A CUT-OFF SAW — OPERATION AND PARTS MANUAL — REV. #0 (01/30/08) — PAGE 51
Page 52

IGNITION COIL ASSY.
SHS81A CUT-OFF SAW — IGNITION COIL ASSY.
PAGE 52 — SHS81A CUT-OFF SAW — OPERATION AND PARTS MANUAL — REV. #0 (01/30/08)
Page 53

SHS81A CUT-OFF SAW — IGNITION COIL ASSY.
IGNITION COIL ASSY.
NO. PART NO. PART NAME QTY. REMARKS
7
8
9 HS052010362 CABLE WIRE 1
10 HS3916004 WASHER 2
11 HS006000315 WASHER 2
12 HS094000227 SCREW 2
13 HS52010320R COIL, IGNITION ASSY. ............................. 1 ......... INCLUDES ITEMS W/
15 HS52010132 CONNECTING LINK 1
16 HS094500497 SWITCH, ON-OFF 1
17 HS097000121A CABLE WIRE, ON-OFF SWITCH 1
18 HS099900397 NUT 1
19 HS004000438 PLATE, ON-OFF SWITCH 1
HS094600169 SPRING SPARK PLUG 1
*
HS094600097A CAP, SPARK PLUG 1
*
*
SHS81A CUT-OFF SAW — OPERATION AND PARTS MANUAL — REV. #0 (01/30/08) — PAGE 53
Page 54

AIR FILTER ASSY.
SHS81A CUT-OFF SAW — AIR FILTER ASSY.
PAGE 54 — SHS81A CUT-OFF SAW — OPERATION AND PARTS MANUAL — REV. #0 (01/30/08)
Page 55

SHS81A CUT-OFF SAW — AIR FILTER ASSY.
AIR FILTER ASSY.
NO. PART NO. PART NAME QTY. REMARKS
1 HS52012024B FLANGE, PRE- FILTER, CAP 1
2 HS330000010 O- RING, FLANGE PRE- FILTER 2
3 HS018600125 FILTER, AIR (STANDARD) 1
3A HS099900778A FILTER, AIR (WET CUTTING) .................. 1 ......... OPTIONAL
4 HS018600056AR FILTER, AIR INNER 1
5 HS3802002A SCREW, FILTER SUPPORT 3
6 HS3049007 O-RING 1
7 HS52010014B SUPPORT, FILTER 1
8 HS52010451R PRE- FILTER, FOAM 1
9 HS015000100 TUBE 1
10 HS018600090A GASKET, AIR FILTER LOWER 1
11 HS52010059 GASKET, AIR FILTER BASE 1
12 HS52010016 COVER, AIR FILTER LOWER 1
13 HS072700182 SCREW, AIR CLEANER MTG. 3
14 HS3833073 WASHER, AIR CLEANER MTG. 3
20 HS52012004A COVER, AIR FILTER, UPPER 1
21 HS52010060 GASKET, AIR FILTER COVER 1
22 HS52010041 KNOB, AIR FILTER COVER 1
23 HS52010018A COVER, AIR FILTER, LONG 1
24 HS093000468A SCREW, AIR FILTER COVER 2
SHS81A CUT-OFF SAW — OPERATION AND PARTS MANUAL — REV. #0 (01/30/08) — PAGE 55
Page 56

SHS81A CUT-OFF SAW — CARBURETOR MOUNTING ASSY.
CARBURETOR MOUNTINGASSY.
PAGE 56 — SHS81A CUT-OFF SAW — OPERATION AND PARTS MANUAL — REV. #0 (01/30/08)
Page 57

SHS81A CUT-OFF SAW — CARBURETOR MOUNTING ASSY.
CARBURETOR MOUNTING ASSY.
NO. PART NO. PART NAME QTY. REMARKS
6 HS3833073 WASHER 2
11 52010120 SPRING 1
12 094600126 TUBE 1
13 HS61052009B SCREW 1
14 HS097000059A SPRING, MANIFOLD 1
15 HS52010008A MANIFOLD, OUTER 1
16 HS097000333 FLANGE 1
17 HS3960057 SCREW 1
18 HS2318920B CARBURETOR ASSEMBLY 1
19 HS015000100 FUEL LINE, CARBURETOR 1
20 HS52010189 SCREW 1
21 HS097000092A SCREW 1
22 HS098000057 SUPPORT, CARBURETOR 1
23 HS098000010 MANIFOLD, INNER 1
SHS81A CUT-OFF SAW — OPERATION AND PARTS MANUAL — REV. #0 (01/30/08) — PAGE 57
Page 58

CARBURETOR ASSY.
SHS81A CUT-OFF SAW — CARBURETOR ASSY.
PAGE 58 — SHS81A CUT-OFF SAW — OPERATION AND PARTS MANUAL — REV. #0 (01/30/08)
Page 59

SHS81A CUT-OFF SAW — CARBURETOR ASSY.
CARBURETOR ASSY.
NO. PART NO. PART NAME QTY. REMARKS
1
2
3 HS2318920B CARBURETOR ASSY. .............................. 1 ......... INCLUDES ITEMS W/
4
5
6
7
8
9
10
11
12
13
14
15
16
17
18
19
20
21
22
23
24
25
26
27 HS380000272 SEAL RING 2
28 HS015400153 WASHER 1
HS52010019 THROTTLE VALVE 1
*
HS380000338 SCREW 1
*
HS097000161 SPRING 1
*
HS097000154 THROTTLE SHAFT 1
*
HS097000155 STARTER SHAFT 1
*
HS097000162 SCREW, ADJUST 1
*
HS2318761 SCREW "L" CARBURETOR 1
*
HS2318762 SCREW "H" CARBURETOR 1
*
HS097000223 SPRING 2
*
HS097000224 BUSHING 2
*
HS035000162 SCREW 5
*
HS52010007 COVER 1
*
HS003300202 SCREW 1
*
HS035000169 PIN 1
*
HS035000164 SPRING 1
*
HS006000325 BALL, CARBURETOR 1
*
HS003300209 SCREW 1
*
HS035000151 STARTER VALVE 1
*
HS035000149 PLATE 1
*
HS097000160 LEVER 1
*
HS003300036 ELBOW CONNECT 1
*
HS097000157 COVER 1
*
HS035000161 SCREW 1
*
HS097000220 KIT, REPAIR CARBURETOR 1
*
HS097000221 KIT, GASKET CARBURETOR 1
*
*
SHS81A CUT-OFF SAW — OPERATION AND PARTS MANUAL — REV. #0 (01/30/08) — PAGE 59
Page 60

SHS81A CUT-OFF SAW — CRANKSHAFT / PISTON ASSY.
CRANKSHAFT AND PISTON ASSY.
PAGE 60 — SHS81A CUT-OFF SAW — OPERATION AND PARTS MANUAL — REV. #0 (01/30/08)
Page 61

SHS81A CUT-OFF SAW — CRANKSHAFT AND PISTON ASSY.
CRANKSHAFT AND PISTON ASSY.
NO. PART NO. PART NAME QTY. REMARKS
1 HS3055118 SPARK PLUG 1
2 HS005100906A SCREW 4
3 HS3833076 WASHER 4
4 HS52010067 DECOMPRESSOR 1
# HS098000004 PISTON RINGS 1
5
*
6
# HS094500007 PISTON PIN 1
*
7
# HS007201198 RING, PISTON PIN 2
*
8
9 HS50102012B CYLINDER ASSEMBLY W /PISTON .............. 1 .......... INCLUDES ITEMS W /
10 HS097000010B GASKET, CYLINDER 1
13 HS006000010 BEARING, UPPER CRANKSHAFT 1
14 HS098000001 CRANKSHAFT 1
15 HS094500028R KEY, CRANKSHAFT 1
17 HS094500004 SEAL RING 1
25 HS099900014 SEAL RING, CRANKSHAFT 1
27 HS097000132 CLUTCH ASSEMBLY ..................................... 1 .......... INCLUDES ITEMS W /
29+ HS004900137B SPRING, CLUTCH 1
32 HS097000097 WASHER 1
33$ HS52010030 BEARING 1
34 HS52010035 SPACER, CLUTCH DRUM 1
35 HS52010034 BUSHING, CLUTCH DRUM 1
36 HS52010029R CLUTCH DRUM ............................................ 1 .......... INCLUDES ITEMS W /$
HS098000033B PISTON ASSEMBLY W /RINGS ..................... 1 .......... INCLUDES ITEMS W /#
*
*
+
SHS81A CUT-OFF SAW — OPERATION AND PARTS MANUAL — REV. #0 (01/30/08) — PAGE 61
Page 62

WATER KIT ASSY.
SHS81A CUT-OFF SAW — WATER KIT ASSY.
PAGE 62 — SHS81A CUT-OFF SAW — OPERATION AND PARTS MANUAL — REV. #0 (01/30/08)
Page 63

SHS81A CUT-OFF SAW — WATER KIT ASSY.
WATER KIT ASSY.
NO. PART NO. PART NAME QTY. REMARKS
1
2
3
4
5
6
7
HS52012062 WATER KIT ASSY. ....................................................... 1 .......... INCLUDES ITEMS W /
HS52010121 FITTING, QUICK DISCONNECT 1
*
*
*
*
*
HS52010207 VALVE, SHUT-OFF 1
*
NOTE
PLASTIC TIE WRAPS .................................................. 8 .......... NOT SOLD SEPARATELY
HOSE CLAMP ............................................................. 1.......... NOT SOLD SEPARATELY
SCREW, SOCKET HEAD CAP W/ WASHER ...............1 .......... NOT SOLD SEPARATELY
HOSE, WATER ............................................................ 1 .......... NOT SOLD SEPARATELY
Items 3-6 are included with the
Water Kit Assembly and cannot be
purchased separately.
*
SHS81A CUT-OFF SAW — OPERATION AND PARTS MANUAL — REV. #0 (01/30/08) — PAGE 63
Page 64

TOOLS
SHS81A CUT-OFF SAW — TOOLS
PAGE 64 — SHS81A CUT-OFF SAW — OPERATION AND PARTS MANUAL — REV. #0 (01/30/08)
Page 65

SHS81A CUT-OFF SAW — TOOLS
TOOLS
NO. PART NO. PART NAME QTY. REMARKS
1
2 00325 SMOKELESS 2-STROKE OIL....... 1 ............. CAN ONLY BE PURCHASED AS A CASE (QTY 36)
HS4191240 TOOL KIT 1
SHS81A CUT-OFF SAW — OPERATION AND PARTS MANUAL — REV. #0 (01/30/08) — PAGE 65
Page 66

SHS81A CUT-OFF SAW — RECOMMENDED DIAMOND BLADES
Recommended Diamond Blades
Material to Cut
For your
Side WinderSide Winder
Side Winder
Side WinderSide Winder
Saw
12" x .125" x 1" - 20mm Arbor
ymonocEdradnatSmuimerPemerpuS
SPG21LBS211SHDP212SHDP21
SPG21ALBS21A1SHDP21A2SHDP21
SPG21LBS21H1SHDP21H2SHDP21
Material to Cut
SPG21LBS
SPG21ALBS21A1SHDP21A2SHDP21
211SHDP212SHDP21
14" x .125" x 1" - 20mm Arbor
ymonocEdradnatSmuimerPemerpuS
SPG41LBS411SHDP412SHDP41
SPG41ALBS41A1SHDP41A2SHDP41
SPG41LBS41H1SHDP41H2SHDP41
SPG41LBS
SPG41ALBS41A1SHDP41A2SHDP41
411SHDP412SHDP41
PAGE 66 — SHS81A CUT-OFF SAW — OPERATION AND PARTS MANUAL — REV. #0 (01/30/08)
Page 67

SHS81A CUT-OFF SAW — OPERATION AND PARTS MANUAL — REV. #0 (01/30/08) — PAGE 67
Page 68

OPERATION & PARTS MANUAL
HERE’S HOW TO GET HELP
PLEASE HAVE THE MODEL AND SERIAL
NUMBER
ON-HAND
WHEN CALLING
PARTS DEPARTMENT
800-427-1244 FAX: 800-672-7877
310-537-3700 FAX: 310-637-3284
SERVICE DEPARTMENT
800-478-1244 FAX: 310-537-4259
310-537-3700
TECHNICAL ASSISTANCE
800-478-1244 FAX: 310-631-5032
WARRANTY DEPARTMENT
800-421-1244, EXT. 279 FAX: 310-537-1173
310-537-3700, EXT. 279
SALES DEPARTMENT
310-661-4242 FAX: 310-604-9237
877-289-7869 (877-BUY-STOW)
© COPYRIGHT 2008, MULTIQUIP INC.
Multiquip Inc, and the STOW logo are registered trademarks of Multiquip Inc. and may not be used, reproduced, or altered without written permission. All other trademarks
are the property of their respective owners and used with permission.
This manual MUST accompany the equipment at all times. This manual is considered a permanent part of the equipment and should remain with the unit if resold.
The information and specifications included in this publication were in effect at the time of approval for printing. Illustrations, descriptions, references and technical data
contained in this manual are for guidance only and may not be considered as binding. Multiquip Inc. reserves the right to discontinue or change specifications, design or
the information published in this publication at any time without notice and without incurring any obligations.
Your Local Dealer is:
Atlanta • Boise • Newark • Quebec, Canada
Manchester, UK • Rio de Janeiro, BR • Puebla, MX
MQ STOW CONSTRUCTION EQUIPMENT
A DIVISION OF MULTIQUIP INC.
POST OFFICE BOX 6254
CARSON, CA 90749
310-537-3700 • 888-252-MQ STOW [888252-7869]
FAX: 310-537-1986 • FAX: 800-556-1986
E-MAIL: MQ STOW@multiquip.com • WWW:
stowmfg.com
 Loading...