

Page 1

OPERATION MANUAL
DRY PRIME PUMP
MP150SDLTE (6-inch, High Flow, Deutz F3L914, Electric Brakes)
MP150SDLTS (6-inch, High Flow, Deutz F3L914, Surge Brakes)
MP150SDLSM (6-inch, High Flow, Deutz F3L914, Skid Mount)
MP200DLTE (8-inch, High Flow, Deutz F3L914, Electric Brakes)
MP200DLTS (8-inch, High Flow, Deutz F3L914, Surge Brakes)
MP200DLSM (8-inch, High Flow, Deutz F3L914, Skid Mount)
MP200SDLTE (8-inch, High Flow, Deutz F4L914, Electric Brakes)
MP200DLST (8-inch, High Flow, Deutz F4L914, Surge Brakes)
MP200SDLSM (8-inch, High Flow, Deutz F4L914, Skid Mount)
Revision #3 (10/06/08)
To find the latest revision of this
publication, visit our website at:
www.multiquip.com
THIS MANUAL MUST ACCOMPANY THE EQUIPMENT AT ALL TIMES.
P/N 17567
Page 2

PROPOSITION 65 WARNING
Diesel engine exhaust and some of
PAGE 2 —DRY PRIME PUMP — OPERATION MANUAL — REV. #3 (10/06/08)
Page 3

REPORTING SAFETY DEFECTS
REPORTING SAFETY DEFECTS
If you believe that your vehicle has a defect that could cause a crash or could cause injury or
death, you should immediately inform the National Highway Traffic Safety Administration
(NHTSA) in addition to notifying Multiquip at 1-800-421-1244.
If NHTSA receives similar complaints, it may open an investigation, and if it finds that a safety
defect exists in a group of vehicles, it may order a recall and remedy campaign. However,
NHTSA cannot become involved in individual problems between you, your dealer, or
Multiquip.
To contact NHTSA, you may either call the Vehicle Safety Hotline toll-free at 1-888-327-4236
(TTY: 1-800-424-9153), go to http://www.nhtsa.dot.gov; or write to:
Administrator
NHTSA
1200 New Jersey Avenue S.E.
Washington, DC 20590
You can also obtain information about motor vehicle safety from http://www.safecar.gov.
DRY PRIME PUMP — OPERATION AND PARTS MANUAL — REV. #3 (10/06/08) — PAGE 3
Page 4

TRAINING CHECKLIST
TRAINING CHECKLIST
This checklist will lists some of the minimum requirements for machine maintenance and operation. Please feel free to detach it and
make copies. Use this checklist whenever a new operator is to be trained or it can be used as a review for more experienced
operator’s.
TSILKCEHCGNINIART
.ON NOITPIRCSED ?KO ETAD
1 .yletelpmoclaunaMs’rotarepOdaeR
2
3 .erudecorpgnileufer,metsysleuF
4 .erudecorpgnimirppmuP
5 .serudecorppotsycnegremE
6 .erudecorppu-tratsenignE
7 )liabgnitfil(enihcamfognitfiL
8 ).ctesesu,tfil(snoitacilppapmuP
9 .tnemecalpreniartsnoitcuS
01 .snoitcennocesoH
11 .tnemecalppmuP
21 .senilediugytefasreliarT
liodnaenignefognikcehc,stnenopmocfonoitacol,tuoyalenihcaM
.slevel
31 .senilediuggnihtolcevitcetorP
41 .erudecorptsetmuucaV
51 .egarotsdnatropsnartenihcaM
61 .erudecorpytivacpmuptuonaelC
Operator _________________________________________ Trainee __________________________________________
COMMENTS:
PAGE 4 —DRY PRIME PUMP — OPERATION MANUAL — REV. #3 (10/06/08)
Page 5

DAILY PRE-OPERATION CHECKLIST
1 .levellioenignekcehC
2 .)leufnaelcrofdna(levelleufkcehC
3 .wolfriagniloocdnasnifgniloockcehC
4 .renaelcriaenignekcehC
5 .snoitcennocelbacdnayrettabenignekcehC
6 .)etulovdnarellepmi(roiretnipmupkcehC
7 .liolaespmupmuucavkcehC
8 .liognisuohgniraebkcehC
9 .laespmupkcehC
DAILY PRE-OPERATION CHECKLIST
SILKCEHCNOITAREPO-ERPYLIAD T
COMMENTS:
01 .skcarcrofgnisacpmupkcehC
11 .ssenthgitrofstungulleehwreliartkcehC
21 .sgniraebleehwreliartkcehC
31 .llabdnahctihreliartkcehC
41 .)dnatskcaj(erawdrahdnasgnirpsreliartkcehC
51 .erusserperitreliartkcehC
61 .sthgilreliartkcehC
DRY PRIME PUMP — OPERATION AND PARTS MANUAL — REV. #3 (10/06/08) — PAGE 5
Page 6

Multiquip Dry Prime
Diesel Powered Trash Pump
California Proposition 65 Warning ............................. 2
Reporting Safety Defects .......................................... 3
Training Checklist ...................................................... 4
Daily Pre-Operation Checklist ................................... 5
Table Of Contents ..................................................... 6
Safety Message Alert Symbols .............................. 8-9
Rules For Safe Operation .................................. 10-12
Pump Dimensions ................................................... 13
Trailer Dimensions .................................................. 14
Pump Specifications ................................................ 15
Engine Specifications .............................................. 16
General Information ................................................ 17
Pump Components ............................................ 18-19
Engine Components ............................................... 20
Engine Control Box Components............................ 21
Pumping Application ............................................... 22
Towing Application .................................................. 23
Setup ....................................................................... 24
Setup ....................................................................... 25
Operation ........................................................... 26-27
Maintenance (Pump) .............................................. 28
Maintenance (Engine)........................................ 29-30
Maintenance (Trailer) ......................................... 31-34
Trailer Safety Guidelines .................................... 35-44
Tire Safety .......................................................... 45-50
Trailer Lights Wiring Diagram .................................. 51
Nameplate and Decals............................................ 52
Troubleshooting (Pump) .......................................... 53
Troubleshooting (Engine) ................................... 54-55
Trailer Brakes (Hydraulic) ....................................... 56
Trailer Brakes (Electric) ........................................... 56
TABLE OF CONTENTS
Terms and Conditions Of Sale — Parts .................. 57
NOTE
Specification and part number
are subject to change without
notice.
PAGE 6 —DRY PRIME PUMP — OPERATION MANUAL — REV. #3 (10/06/08)
Page 7

NOTES
DRY PRIME PUMP — OPERATION AND PARTS MANUAL — REV. #3 (10/06/08) — PAGE 7
Page 8

SAFETY MESSAGE ALERT SYMBOLS
FOR YOUR SAFETY AND THE SAFETY OF OTHERS!
Safety precautions should be followed at all times when
operating this equipment. Failure to read and understand the
Safety Messages and Operating Instructions could result in
injury to yourself and others.
NOTE
This Owner's Manual has been developed to provide
complete instructions for the safe and efficient operation
of the Multiquip Model
engine manufacturer's instructions for data relative to its
safe operation.
Before using this trash pump, ensure that the
operating individual has read and understood all
instructions in this manual.
SAFETY MESSAGE ALERT SYMBOLS
The three (3) Safety Messages shown below will inform you
about potential hazards that could injure you or others. The
Safety Messages specifically address the level of exposure to
the operator, and are preceded by one of three words: DANGER,
WARNING, or CAUTION.
Dry Prime Pump
. Refer to the
HAZARD SYMBOLS
Lethal Exhaust Gases
Engine exhaust gases contain poisonous
carbon monoxide. This gas is colorless and
odorless, and can cause death if inhaled.
NEVER operate this equipment in a confined
area or enclosed structure that does not
provide ample free flow air.
Explosive Fuel
DIESEL fuel is extremely flammable, and its
vapors can cause an explosion if ignited. DO
NOT start the engine near spilled fuel or
combustible fluids. DO NOT fill the fuel tank
while the engine is running or hot. DO NOT
overfill tank, since spilled fuel could ignite if it
comes into contact with hot engine parts or
sparks from the ignition system. Store fuel in
approved containers, in well-ventilated areas
and away from sparks and flames. NEVER
use fuel as a cleaning agent.
DANGERDANGER
DANGER
DANGERDANGER
You WILL be
NOT follow directions.
WARNINGWARNING
WARNING
WARNINGWARNING
You CAN be
NOT follow directions.
CAUTION
CAUTIONCAUTION
CAUTION
CAUTIONCAUTION
You CAN be
Potential hazards associated with the
operation will be referenced with Hazard Symbols which appear
throughout this manual, and will be referenced in conjunction
with Safety Message Alert Symbols.
KILLED
KILLED
INJURED
or
or
if you DO NOT follow directions.
SERIOUSLY
SERIOUSLY
Dry Prime Trash Pump
injured if you DO
injured if you DO
Burn Hazards
Engine components can generate extreme heat.
To prevent burns, DO NOT touch these areas
while the engine is running or immediately after
operations. Never operate the engine with heat
shields or heat guards removed.
Rotating Parts
NEVER operate equipment with covers, or
guards removed. Keep fingers, hands, hair and
clothing away from all moving parts to prevent
injury.
PAGE 8 —DRY PRIME PUMP — OPERATION MANUAL — REV. #3 (10/06/08)
Page 9

SAFETY MESSAGE ALERT SYMBOLS
Accidental Starting
ALWAYS place the engine ON/OFF switch in
the OFF position. Close the vandal cover door
on the engine control box. Lock the door by
placing a pad lock on the door hasp when the
machine is not in use.
Sight and Hearing Hazard
ALWAYS wear approved eye and hearing
protection.
Respiratory Hazard
ALWAYS wear approved respiratory
protection.
Equipment Damage Messages
Other important messages are provided throughout this manual
to help prevent damage to your pump, other property, or the
surrounding environment.
This pump, other property, or the
NOTE
surrounding environment could be
damaged if you do not follow
instructions.
DRY PRIME PUMP — OPERATION AND PARTS MANUAL — REV. #3 (10/06/08) — PAGE 9
Page 10

RULES FOR SAFE OPERATION
■
DANGERDANGER
DANGER
DANGERDANGER
Failure to follow instructions in this manual may lead to
serious injury or even death! This equipment is to be
operated by trained and qualified personnel only! This
equipment is for industrial use only.
The following safety guidelines should always be used when
operating the
GENERAL SAFETY
■
DO NOT operate or service this
equipment before reading this entire
manual.
■
This equipment should not be operated by persons under
18 years of age.
■
NEVER operate this equipment without proper protective
clothing, shatterproof glasses, steel-toed boots and other
protective devices required by the job.
Dry Prime Pump
Read this manual!
:
NEVER touch the hot exhaust
manifold, muffler or cylinder. Allow
these parts to cool before servicing
engine or pump.
■
High Temperatures – Allow the
engine to cool before adding fuel or
performing service and maintenance
functions. Contact with
burns.
■
The air-cooled diesel engine
of this pump requires an
adequate free flow of cooling
air.
NEVER
pump in any enclosed or
narrow area where free flow
of the air is restricted. If the
air flow is restricted it will
cause serious damage to the pump or engine and may
cause injury to people. Remember the engine gives off
DEADLY
hot!
components can cause serious
operate the
carbon monoxide gas.
■
ALWAYS refuel in a well-ventilated area, away from
sparks and open flames.
■
NEVER operate this equipment when not
feeling well due to fatigue, illness or taking
medicine.
■
NEVER operate this equipment under the influence of
drugs
or
alcohol
■
ALWAYS wear proper respiratory (mask),
hearing and eye protection equipment when
operating the pump.
■
Whenever necessary, replace nameplate, operation and
safety decals when they become difficult read.
■
Manufacture does not assume responsibility for any
accident due to equipment modifications.
.
■
ALWAYS use extreme caution when
working with flammable liquids. When
refueling, stop the engine and allow it to
cool. DO NOT
machine. Fire or explosion could result
from fuel vapors, or if fuel is spilled on a
hot engine.
■
NEVER operate the pump in an
explosive atmosphere or near
combustible materials. An explosion or
fire could result causing severe
harm or even death.
■
Topping-off to filler port is dangerous, as it tends to spill
fuel.
■
Stop the engine when leaving the pump unattended.
■
Block the unit when leaving or when using on a slope.
smoke
around or near the
bodily
■
NEVER use accessories or attachments, which are not
recommended by Multiquip for this equipment. Damage
to the equipment and/or injury to user may result.
PAGE 10 —DRY PRIME PUMP — OPERATION MANUAL — REV. #3 (10/06/08)
Page 11

RULES FOR SAFE OPERATION
■
NEVER pump volatile, flammable or low flash point fluids.
These fluids could ignite or explode.
■
NEVER pump corrosive chemicals or water containing toxic
substances. These fluids could create serious health and
environmental hazards. Contact local authorities for
assistance.
■
NEVER open the volute cover during operation or start the
pump with the cover off. The rotating impeller inside the pump
can cut or sever objects caught in it.
■
NEVER block or restrict flow from discharge hose. Remove
kinks from discharge line before starting pump. Operation
with a blocked discharge line can cause water inside pump to
overheat.
■
NEVER run engine without air cleaner. Severe engine damage
may occur.
■
ALWAYS read, understand, and follow procedures in
Operator’s Manual before attempting to operate equipment.
■
ALWAYS be sure the operator is familiar with proper safety
precautions and operations techniques before using pump.
■
ALWAYS store equipment properly when it is not being used.
Equipment should be stored in a clean, dry location out of the
reach of children.
■
Refer to the
questions or information.
■
In winter, drain water from pump housing to prevent freezing.
Engine Owner's Manual
for engine technical
Maintenance Safety
■
■
■
■
■
■
■
Lifting
■
NEVER lubricate components or attempt service on a running
machine.
ALWAYS allow the machine a proper amount of time to cool
before servicing.
Keep the machinery in proper running condition.
Fix damage to the machine immediately and always replace
broken parts.
Dispose of hazardous waste properly. Examples of potentially
hazardous waste are used motor oil, fuel and fuel filters.
DO NOT use food or plastic containers to dispose of
hazardous waste.
DO NOT pour waste, oil or fuel directly onto the ground,
down a drain or into any water source.
The pump has an operating weight of 3180 lbs. (1,442 kg) or
more . Use lifting equipment with a rated capacity of at least
14,000 lbs. (6,350 kg). Remove suction & discharge hoses/
pipes before lifting.
Add 1000 lbs. (454 kg.) to the
NOTE
operating weight for a full tank of
fuel, 140 gallons (530 liters).
■
ALWAYS make sure pump is correctly secured to the trailer.
Check all supports attaching the pump to the trailer and make
sure they are tight.
■
ALWAYS make sure that the pump's trailer is placed on solid
level ground so that it cannot slide or shift around, endangering
workers. Deploy jack stands for stabilization. Place blocks
under the trailer's bumper to make it level (prevents tipping),
and use a chocked block underneath the wheels to prevent
rolling. Also keep the immediate area free of bystanders.
■
High Temperatures – Allow the engine to cool before adding
fuel or performing service and maintenance functions. Contact
hot
with
components can cause serious burns.
EMERGENCIES
■
■
ALWAYS know the location of the nearest
extinguisher
In emergencies
nearest phone or
and first aid kit.
always
know the location of the
keep a phone on the job site
fire
.
Also know the phone numbers of the nearest
ambulance, doctor
and
fire department
. This
information will be invaluable in the case of an
emergency.
DRY PRIME PUMP — OPERATION AND PARTS MANUAL — REV. #3 (10/06/08) — PAGE 11
Page 12

RULES FOR SAFE OPERATION
Battery
The battery contains acids that can cause injury to the eyes and
skin. To avoid eye irritation,
shielding. Use well-insulated gloves when picking up the battery.
Use the following guidelines when handling the battery.
■
DO NOT drop the battery. Any impact to the battery may
cause it to explode.
■
DO NOT expose the battery to open flames,
sparks, lit cigarettes etc. The battery
contains combustible gases and liquids. If
these gases and liquids come in contact
with a flame or spark an explosion can occur.
■
ALWAYS keep the battery charged. If the
battery is not charged, a buildup of
combustible gas will occur.
■
ALWAYS keep battery cables in good working condition.
Repair or replace all worn cables.
■
ALWAYS disconnect the
performing service on the equipment.
always
wear safety glasses or face
negative battery terminal
before
■
Inadequate battery connections may cause poor starting
of the trowel, and create other malfunctions.
■
ALWAYS recharge the battery in a vented air environment
to avoid risk of a dangerous concentration of combustible
gases.
■
DO NOT charge battery if frozen. Battery can explode. When
frozen, warm battery to at least 61°F (16°C).
■
If the battery liquid (dilute sulfuric acid) comes in contact with
clothing or skin
plenty of water.
■
If the battery liquid (dilute sulfuric acid) comes in contact with
eyes
your
contact the nearest doctor or hospital and seek medical
attention.
, rinse eyes immediately with plenty of water, then
, rinse skin or clothing immediately with
PAGE 12 —DRY PRIME PUMP — OPERATION MANUAL — REV. #3 (10/06/08)
Page 13

B
PUMP DIMENSIONS
A
C
Figure 1. Pump Dimensions
ECNEREFER
RETTEL
ATHGIEH
BHTDIW
CHTPED
SNOISNEMIDPMUP.3ELBAT
NOITPIRCSED
I5.84
SNOISNEMID
)MM(SEHCNI
SEHCNI74
)MM8.3911(
SEHCN
)MM79.1321(
SEHCNI6.54
)MM41.8511(
DRY PRIME PUMP — OPERATION AND PARTS MANUAL — REV. #3 (10/06/08) — PAGE 13
Page 14

TRAILER DIMENSIONS
Figure 2. Trailer Dimensions
SNOISNEMIDRELIART.2ELBAT
ECNEREFER
RETTEL
ATHGIEH
BHTD
C
DHTGNELGNIPPIHS
ETHGIEHNOITCUSDBT
FTHGIEHEGRAHCSIDDBT
GEGNARDNATHGIEHHCTIHDBT
IW
NOITPIRCSED
HTGNEL
)dednetxEeugnoT(
(
SNOISNEMID
)MM(SEHCNI
SEHCNI35.58
)MM43.2712(
SEHCNI37.27
)MM43.7481(
SEHCNI65.141
)MM66.5953(
SEHCNI49
)MM6.7832
PAGE 14 —DRY PRIME PUMP — OPERATION MANUAL — REV. #3 (10/06/08)
Page 15

SPECIFICATIONS
SNOITACIFICEPSPMUP.1ELBAT
ledoMMSLDS051PMETLDS051PMSTLDS051PMMSLD002PMETLD002PMSTLD002PMMSLDS002PMETLDS002PMSTLDS002PM
ytic
apaC
PH
MPRmpr0081mpr0081mpr0081mpr0081mpr0081mpr0081mpr0081mpr
C-riA
gnipmuPmumixaM
tfiLnoitcuSmumixaM
daeHlatoTmumixaM
sdiloSmumixaM
erusserPdnuoSABd47ABd47ABd47ABd47ABd47ABd47ABd67ABd67ABd67
emiTnuRsruoh65sruoh65sruoh65sruoh65sruoh65sruoh6
)detnuoMdikS(thgieW
enignEdeloo
yticapaCleuF
MPG0052
3
m4.9(
).nim/
.tf03
)sretem1.9(
.tf221
)sretem73(
.ni2.3
)mm2.18(
PH34
)Wk23(
.sbl0573
).gk0071(
ztueD
419L3F
lag521
)sretil574(
MPG0052
3
m4.9(
).nim/
.tf03
)sretem1.9(
.t
f221
)sretem73(
.ni2.3
)mm2.18(
PH34
)Wk23(
.sbl0093
).gk9671(
ztueD
419L3F
lag521
)sretil574(
MPG0052
3
m4.9(
).nim/
.tf03
)sretem1.9(
.tf221
)sretem73(
.ni2.3
)mm2.18(
PH34
)Wk23(
.sbl0093
).gk9671(
ztueD
419L3F
lag521
)sretil574(
MPG0072
3
m2.01(
).nim/
.tf52
)sretem8.7(
.tf221
)sretem73(
.ni2.3
)mm2.18(
PH34
)W
k23(
.sbl0083
).gk
3271(
ztueD
419L3F
lag521
)sretil574(
MPG0072
3
m2.01(
).nim/
.tf52
)sretem8
.7(
.tf221
)sretem73(
.ni2.3
)
mm2.18(
PH34
)Wk23(
.sbl0593
).gk1971(
ztueD
419L3F
lag521
)sretil574(
MPG0072
3
m2.01(
).nim/
.tf52
)sretem8.7(
.tf221
)sretem73(
.ni2.3
)mm2.18(
PH34
)Wk23(
5sruoh14sruoh14sruoh14
.sbl0593
).gk1971(
ztueD
419L3F
l
ag521
)sretil574(
MPG0053
3
m2.31(
).nim/
.tf52
)sretem8.7(
.tf531
)sretem14(
.ni6.3
)mm4.19(
PH06
)Wk84(
.sbl0693
).gk6971(
ztueD
419L4F
lag521
)sretil574(
3
m2.31(
0081mpr0081
MPG0053
).nim/
.tf52
)sretem8.7(
.tf531
)
sretem14(
.ni6.3
)mm4.19(
PH06
)Wk84(
.sbl0114
).gk3681(
ztueD
419L4F
lag521
)sretil574(
MPG0053
3
m2.31(
).nim/
.tf52
)sretem8.7(
.tf531
)sretem14(
.ni6.3
)mm4.19(
PH06
)Wk84(
.sbl0114
).gk3681(
ztueD
419
L4F
lag521
)sretil574(
SOUND MEASUREMENTS
The required sound specifications, per Appendix 1, paragraph 1.7.4.f of the EC-Machine
Regulations, are defined as follows:
The sound pressure level at the operator's location (L) = 87 dB (A)
The sound power level (L) = 97 dB (A)
These sound values are determined according to ISO 3744 for the sound power level (L)
and ISO 6081 for the sound pressure level (L) at the operator's location.
The sound measurements were obtained with the unit operation on pavement at nominal
speed.
DRY PRIME PUMP — OPERATION AND PARTS MANUAL — REV. #3 (10/06/08) — PAGE 15
Page 16

SPECIFICATIONS (ENGINE)
SNOITACIFICEPSENIGNE.4ELBAT
ekaMenignEztueDztueD
ledoMenignE419L3F419L4F
epyTenignEdelooCriAdelooCriA
fOrebmuN34
/eroBekortS
tnemecalpsiD
Heni)Wk8.92(PH04)Wk8.83(PH25
gnEP
srednilyC
ni2.5/4
mm231/201
ni-uc5.791
)cc6323(
yticapaCliO)sretil6.9(lag35.2)sretil0.31(lag34.3
epyTleuFleseiDleseiD
TleuF
1
yticapaCkna
)detnuoMdikS(thgieW
dohteMgnitratStr
)gk692(
atScirtcelEtratScirtcelE
)sretil235(lag041)sretil235(lag041
.sbl75.256
.reliartfotrapsiknatleuF)1
ni2.5/4
mm231/201
ni-uc3.362
)cc4134(
.sbl82.008
)gk363(
PAGE 16 —DRY PRIME PUMP — OPERATION MANUAL — REV. #3 (10/06/08)
Page 17

GENERAL INFORMATION
The Multiquip Dry Prime pump is a prime dry and primeassist pump that can handle dewatering, sewer bypass, and
wellpoint applications.
The Dry Prime pump uses a vacuum pump to remove the
air. This becomes important in certain applications such as
long suction hose runs or multiple suction points (such as
wellpoints). In these cases, high volumes of air enters into
the pump. Dry Prime uses direct-drive vacuum pump to
efficiently remove very large volumes of air quickly to obtain
the priming necessary for these special applications. Dry
Prime is very useful when you have to move a lot of water
fast.
Impeller
The Dry Prime impeller has a patented design to eliminate
cavitation. It is a 2-blade spiral, smooth flow, open, non-clog
impeller, designed to handle up to 3.2-inch solids. The impeller
pulls water directly into the pump from the priming tank,
reducing friction losses, and then pushes it out the volute
discharge. This design does not cause turbulence normally
found in centrifugal pumps.
Wear Plate
In conjunction with the impeller, the wear plate gives a perfect
match for great pump performance and durability. The wear
plate can be fully adjusted up to .6 inch (15mm) for wear.
Priming System
The vacuum system is innovative, simple, yet rugged and
dependable. I uses direct drive which means no belt failure
and with only one moving part, means no maintenance. It
uses liquid-ring design with a closed water system. Separate
oil bath lubrication for the seal and bearings with oil reservoir,
can run dry without damage. It operates quietly with no
pollution or unwanted discharge noise.
Float and Backflush (Priming Tank)
The priming tank float is a one-piece welded construction,
rubber valve seat, self-aligning rubber hinge. This design
increases reliability. The backflush valve allows for cleaning
of the suction strainer or wellpoint headswhile the engine is
running.
Fuel Tank
Run time is up to 72 hours with the Dry Prime’s fuel tank,
good for continuous running for those long-term jobs. There
are two corner fuel drains to check condition of fuel. The
TrackBar system allows for the easy addition of jack stands,
fenders, axle, lifting bail, and other options. This allows for
fast and easy positioning of the jack stands on the job site
to fit the application, or to add subtract jack stands as
required. The removable, retractable towing tongue minimizes
storage requirements.
Volute
The pump volute has an external inspection cover to inspect
or clear the impeller. The pump shaft bearings and
mechanical seal are run in independent oil baths for low
maintenance.
LOFA Engine Control Panel
Vandal protected panel that provides engine status and shutdowns in the event of low oil pressure, high engine heat,
and alternator belt breakage. Optional auto-start module with
floats can be added for automatic start-stop of pump engine
and pumping operation.
Frame and Trackbar System
DRY PRIME PUMP — OPERATION AND PARTS MANUAL — REV. #3 (10/06/08) — PAGE 17
Page 18

PUMP COMPONENTS
13
6
4
10
12
15
5
1
2
3
1
4
Figure 3-A shows the location of the components of the Dry
Prime pump. The function of each component or control is
described below:
1. Rear Fuel Tank Drain Plugs – Remove either plug to
drain fuel.
2. Primary Tank Drain Valve – Open valve to drain water
from priming tank. In freezing weather conditions water
inside priming pump should always be drained.
3. License Plate Light – ALWAYS make sure light is
working correctly before towing at night.
4. Rear Tail Lights – Before towing make sure both tail-
lights are working correctly and are properly connected
to the towing vehicle brake light system.
5. Inlet Port – Attach suction hose to this port. ALWAYS
make sure suction hose is securely attached.
6. Priming System Tank Fill Reservoir – Used to fill
inner priming tank and vacuum system.
7. Priming System Drain Valve – Open valve to drain in
water priming tank.
9
8
7
14
9. Bearing/Seal Sight Glasses – Use these sight glasses
to determine if oil is present. Oil must be
at the slight glasses.
10. Pump Driveshaft Access Panel – Remove this panel
to gain access to the pump driveshaft (gear) or second
vacuum pump.
11. Tires – This pump uses XX-inch X-ply tires. Replace with
only recommended type tires. Replace defective or worn
tires immediately.
12. Fuel Cap – Remove to visually inspect fuell level and
to refill fuel tank. Refuel using only recommended types
of diesel fuel (see Deutz Manual). DO NOT top off fuel
and wipe up any spilled fuel immediately.
13. Jackstand – Use jack stands to level and stabilize
pump. ALWAYS make sure jack stands are deployed
before operating pump.
14. Tie Downs –When transporting of the pump is required,
use these tie-downs (4) to secure the pump.
15. Front Fuel Tank Drain Plug –Remove either plugs to
drain fuel.
8. Impeller/Volute – The impeller is a two-blade sprial
open impeller connected to a drive shaft, when rotated
creates a partial vacuum, drawing fluid through the pump
creating suction. The volute houses the impeller.
11
13
14
Figure 3-A. Pump
Components
visible
midway
PAGE 18 —DRY PRIME PUMP — OPERATION MANUAL — REV. #3 (10/06/08)
Page 19

PUMP COMPONENTS
23
24
26
27
28
29
30
31
25
Figure 3-B shows the location of the more components of
the Dry Prime pump, The function of each component or
control is described below:
16. Safety Chain – ALWAYS attach safety chain to the
towing vehicle. NEVER tow the pump with the safety
chain unattached! See towing section of this manual.
17. Towing Coupler/Ring – Attach this coupler to the towing
vehicle. Use only the specified ball diameter as indicated
on your coupler (2-5/16). Use of any other ball diameter
will create an extremely dangerous condition which can
result in separation of the coupler and ball or ball failure. A
3-inch tow ring is also available as an option.
18. Ajustable Tow Tongue – Tow tongue is adjustable by
removing locking pin to adjust tongue length then
reinserting pin to lock tongue in place.
19. Battery – Unit uses a +12VDC wet battery Group 31.
20. Engine – These pumps are equipped with either a
Deutz F3L914 or F4L914 three or four cylinder aircooled diesel engine.
21. Skid Lifting Bail –When lifting of the pump skid is required,
attach a strap or chain of adequate lifting capacity to lift the
skid.
22. Engine Control Box – Vandal proof (lockable) engine
control box displaying engine guages, tachometer,
tempertature, battery voltage, hour meter, oil pressure
and ignition switch.
23. Document Box – Contains all documentation relating
to the pump or engine.
21
22
33
32
24. Vacuum Pump Mechanical Seal Oil Reservoir – Oil
level should always be maintained to the FULL level
marked on the bottle.
25. Backflush Valve – Open valve to backflush wellpoints
or to clean suction strainer.
26. Priming Tank Lifting Bail – When removing of the
priming tank is required, attach a strap or chain of adequate
lifting capacity to lift vacuum pump.
27. Pump Discharge – Attach discharge hose to this port.
ALWAYS make sure discharge hose is securely
attached.
28. Float Valve – Regulates and controls vacuum level
during pump operation. Consist of self-aligning
reinforced rubber hinge that doubles as a seal and a
one piece welded float assembly.
29. Priming Tank – Vacuum system that creates a vacuum
in the outer priming tank, drawing water in. Water drawn
into the outer priming tank then flows into the volute,
priming the pump.
30. Vacuum Gauge – Vacuum gauge for priming system.
Monitors air discharge. Required when troubleshooting.
31. Fuel Tank – Holds 140 gallons (530 liters) of diesel
fuel
32. Volute Inspection Cover – Remove this cover to
inspect or clear the impeller.
33. Vacuum Pump – This unit uses a direct-drive 60 CFM
vacuum pump to remove large volumes of air to obtain
priming for the pump.
20
17
19
18
16
Figure 3-B. Pump
Components
DRY PRIME PUMP — OPERATION AND PARTS MANUAL — REV. #3 (10/06/08) — PAGE 19
Page 20

3
ENGINE COMPONENTS
4
7
6
5
9
13
2
1
Figure 4. Basic Engine Components
Figure 4 illustrates the location of the basic components for the
Deutz Model F3L914 and F4L914 Engines. The function of each
component is described below:
1. Starter Motor/Solenoid – NEVER
foreign debris to come in contact with the starter motor/
solenoid.
2. Alternator – (not shown) Provides power to the electrical
system. Replace with only manufactures recommended
type alternator.
3. Muffler/Guard – DO NOT
is running. The muffler can become extremely hot, causing
severe burns. NEVER run the pump with the muffler guard
removed.
4. Engine – Air-cooled, 4-stroke, 3 or 4 cylinder diesel
engine. See Table 2 for detailed specifications.
5. Engine Throttle Lever – Controls the speed of the
engine. For load conditions (pumping water) ALWAYS
run the engine at
6. Fuel Filter – Replace or clean the fuel pump or fuel filter as
specified in the maintenance section of this manual.
full speed
touch the muffler when engine
allow concrete or any
.
7. Air Cleaner – Prevents dirt and other debris from entering
the fuel system. Remove wing-nut on top of air filter
cannister to gain access to filter element. Replace with only
manufactures recommended type air cleaner.
8. V-Belts – ALWAYS make sure that V-belts are properly
tensioned. Loose or defective V-belts can adversely affect
the performance of the pump.
9. Cooling Fan Blades – Make sure that the blades of the
cooling fan are not
can cause the engine to run hot and overheat.
10. Oil Filler Port Cap – Remove this cap to add engine oil to
the crankcase. Fill with recommended type oil as specified
in the maintenance section of this manual.
11. Crankcase Drain Plug – Remove this plug to drain engine
oil from the crankcase. Replace with recommended engine
oil as specified in the maintenance section of this manual.
12. Dipstick – Remove this dipstick to determine if engine oil
is low. Maintain oil level at the "H "marking on the dipstick.
NEVER
12. Oil Filter – Replace oil filter as recommended in the
maintenance section of this manual.
12
11
10
bent or broken
run engine with low oil.
8
. A damaged fan blade
PAGE 20 —DRY PRIME PUMP — OPERATION MANUAL — REV. #3 (10/06/08)
Page 21

ENGINE CONTROL BOX COMPONENTS
1
0
1
2
8
1
4
1
6
VDO
P
S
I
2
0
4
0
6
0
0
2
3
QUARTZ
1
4
0
8
0
bar
0
5
0
025
H
O
V
D
O
AUX
AUX
U
1
2
R
S
8
5
AUTOSTART
(WHENEQUIPPE
2
0
10
RPM
3
0
0
x100
4
0
VDO
F
2
0
0
2
6
0
1
2
0
3
1
2
0
0
9
0
0
5
0
C
1
5
0
VDO
O
F
F
D)
0
R
U
N
P
I
II
I
I
I
START
10
12
8
14
16
V
D
1
7
O
PSI
20
40
60
0
2
3
1
4
0
b
ar
V
D
O
QUARTZ
80
00
5
HOURS
025
5
20
10
R
P
M
30
0
x
1
0
0
40
V
D
O
F
2
0
0
2
6
0
1
2
0
3
1
2
0
0
9
0
0
5
0
C
1
5
0
VDO
2
3
4
5
AUX
AUX
Figure 5. Control Box
Figure 5 shows the location of the components for the engine
control box. The function of each component is described
below:
1. Voltmeter Gauge – Indicates the battery charge.
2. Engine Tachometer – Monitors engine RPM's.
3. Temperature Meter - Indicates engine coolant
temperature.
4. Engine Hour Meter – Displays the number of hours
6. Engine ON/OFF Switch – Turn the knob here to start
the engine. Turn the knob clockwise to the RUN position,
then continue turning clockwise to the START position
and release. To stop the engine turn the knob fully
counterclockwise to the OFF position.
7. Oil Pressure Meter - Monitors engine oil pressure.
8. Vandal Cover - Close cover and lock to prevent
unauthorized personnel from starting engine.
the engine has been in use.
5. LED Panel– contains LED fault indicators that light up
to indicate battery discharge, low oil pressure, high
temperature, alternator failure and V-belt failure. LED
will remain lit indicating fault until reset.
O
F
A
U
T
O
S
(
W
H
E
N
E
Q
1
2
F
T
A
R
T
U
I
P
P
E
D
)
0
RUN
P
I
III
START
6
DRY PRIME PUMP — OPERATION AND PARTS MANUAL — REV. #3 (10/06/08) — PAGE 21
Page 22
DISCHARGE HOSE
JACK
STAND
PUMPING APPLICATION
DISCHARGE HEAD
JACK
STAND
JACK
STAND
(PREVENT ROLLING)
SUCTION HOSE
STRAINER
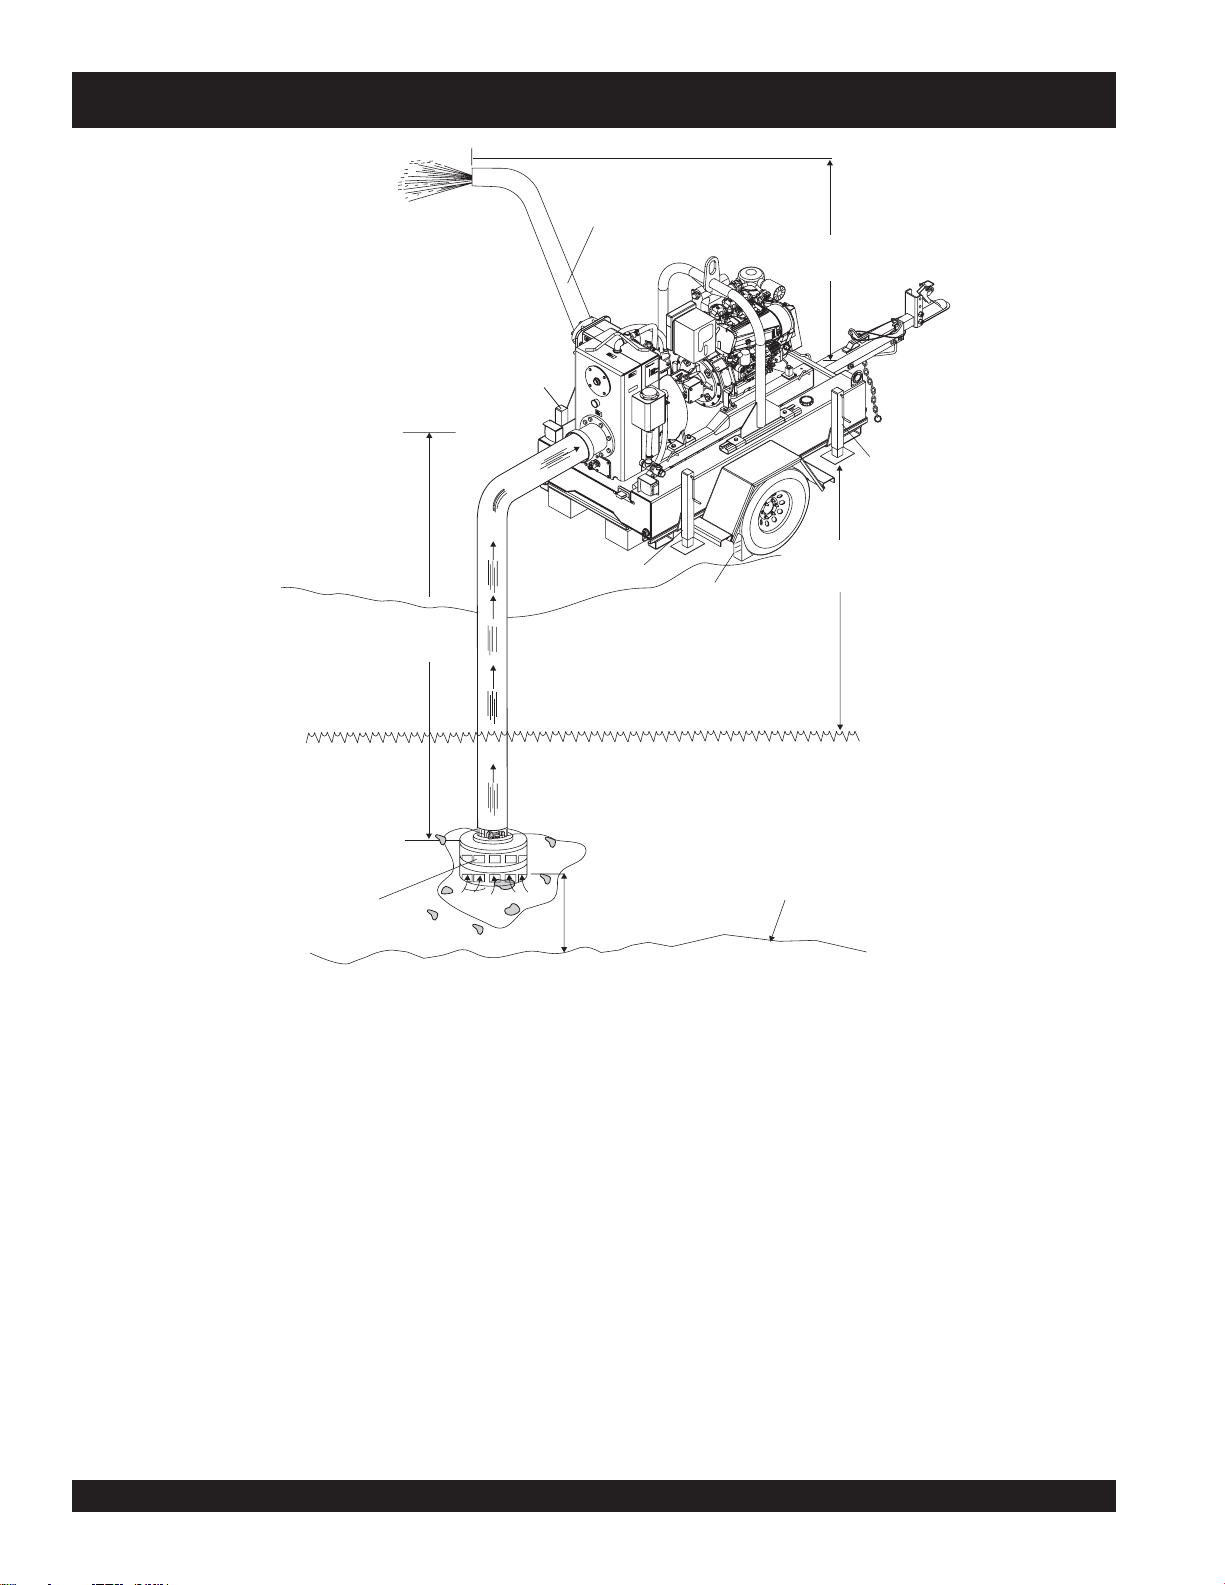
Figure 6 shows a typical application using the Dry Prime
diesel-powered prime-assist pump. Please note that this
pump is intended for the removal of clean water and water
containing some debris and solids. Maximum size of solids
should not exceed 3.2 inches (81.2 mm) in diameter. DO
NOT set strainer on bottom of water bed.
Placing the strainer above the water bed will prevent the
pump from drawing in excessive amounts of sand and foreign
debris.
The following terms are usually used when referring to
head
:
DO NOT LAY
STRAINER ON
BOTTOM SURFACE
lift
or
3. Dynamic Suction Head – The static
suction lift plus the friction in the suction
line. Also referred to as
head
4. Dynamic Discharge Head – The static
discharge head plus the friction in the
discharge line. Also referred to as
discharge head
5. Total Dynamic Head – The Dynamic Head
Suction Head plus the Dynamic Discharge
Head. Also referred to as
CHOCKED
BLOCKS
.
BOTTOM
SURFACE
.
STATIC
SUCTION
LIFT
Figure 6. Pump Application
total suction
total
total head
.
1. Static Suction Lift – The vertical distance from the
water line to the center of the impeller.
2. Static Discharge Head – The vertical distance from
the discharge outlet to the point of discharge or liquid
level when discharging into the bottom of a water tank.
PAGE 22 —DRY PRIME PUMP — OPERATION MANUAL — REV. #3 (10/06/08)
Page 23

NOTE
TOWING APPLICATION
See "Trailer Safety Guidelines"
section in this manual for a complete understanding on towing
techniques.
Figure 7. Typical Coupler and
Safety Chain Connection
TRAILER
TONGUE
BREAK-AWAY
SAFTEY CABLE
SAFETY CHAIN
MASTER LINK
COUPLER
LOCK
LATCH
2-5/16 INCH
TRAILER
COUPLER
2-5/16”
BALL HITCH
SAFETY CHAIN
HOOK
IMPORTANT!
CROSS BOTH
SAFETY CHAINS
DRY PRIME PUMP — OPERATION AND PARTS MANUAL — REV. #3 (10/06/08) — PAGE 23
Page 24
SETUP
Before Starting
1. Read safety instructions at the beginning of manual.
2. Place pump as near to water as possible. Level the pump with
jack stands. Rear jack stand on suction end of the pump must
be used as the weight of the suction hose filled with liquid
could cause the pump to tip. The jack stands can be moved
from side to side and optional extra jack stands can be added.
3. Fill the vacuum system with water. Water level should be up
to the middle of the hose below the priming system tank fill
reservoir. Fill with clean water, free of solids or foreign
material. Do not use salt water, water with abrasives, or acidic
water as this will cause damage to the system. Non-polluting,
environmentally-safe antifreeze should be used in freezing
conditions.
Pump will not be able to begin
NOTE
4. Check for
between the pump and bearing housing, the seal inside the
pump may be worn or damaged. Continued operation of the
pump is not recommended. Further usage of the pump under
these conditions may cause severe water damage to bearing
housing assembly.
Suction and Discharge Hoses
1. Check that the suction hose is
pump. Make certain suction hose (Figure 3) does not have
any air leakage. Tighten hose clamps and couplings as
required.
2. Shorter suction lift and suction hose length will produce
better performance.
3. Make sure the
securely attached to the water end of the suction hose. The
strainer is designed to protect the pump by preventing large
objects from being pulled into the pump. Failure to use a
strainer could cause damage to the pump, impeller, pump
shaft, pump bearings, or wear plate.
4. If a strainer becomes clogged with debris, the strainer can be
cleared while the pump is running by opening the backflush
valve.
leaks
between pump and engine. If water is leaking
suction strainer
pumping unless the water level is up
to the middle of the hose below the
fill port tank
.
securely
(Figure 6) is clean and
attached to the
DANGER - High Pressure
PVC discharge hoses and thin-walled
rubber hoses can easily fail at the end of
the hose fittings. Leaks from the hoses
can cause high-pressure liquid to be
discharged, causing dangerous
conditions. Make sure pressure rating of
hoses exceeds the pump maximum pressure to prevent hose
failure.
CAUTION - Strainer Placement
The strainer should be positioned so it will remain completely
under water
water for long periods can damage the pump.
5. Multiple suction lines may be used but valves need to be
installed in all lines to adjust for different flows and suction lift.
Suction lines of lengths of 1000 feet or more will lower
performance of the pump.
Check that the
6.
tached and not restricted. Place hose so that it lays as straight
as it is possible on the ground. Remove any twists or sharp
bends from hose which may block the flow of water.
7. Light discharge hose should be anchored to avoid movement with high flow or high pressure.
NOTE
DANGER - Flammable Fluids
DO NOT pump flammable fluids, corrosive chemicals or fluids
containing toxic substances. These fluids can create potentially
dangerous health and environmental hazards. Contact local
authorities for assistance.
8. Always use a suction hose or pipe that matches the size of
the pump inlet to insure optimum performance and reduce
the risk of damage to the pump.
9. It is recommended that the discharge hose or pipe match
the size of the pump outlet to reduce friction as much as
possible. Using a discharge line that is larger than the pump
outlet will reduce friction and improve water flow. Similarly, a
smaller line will reduce water flow by increasing friction.
. Running the pump with the strainer above
discharge
hose (Figure 6) is securely at-
Suction and discharge hoses are
available from Multiquip. Contact your
nearest dealer for more information.
PAGE 24 —DRY PRIME PUMP — OPERATION MANUAL — REV. #3 (10/06/08)
Page 25
INSPECTION
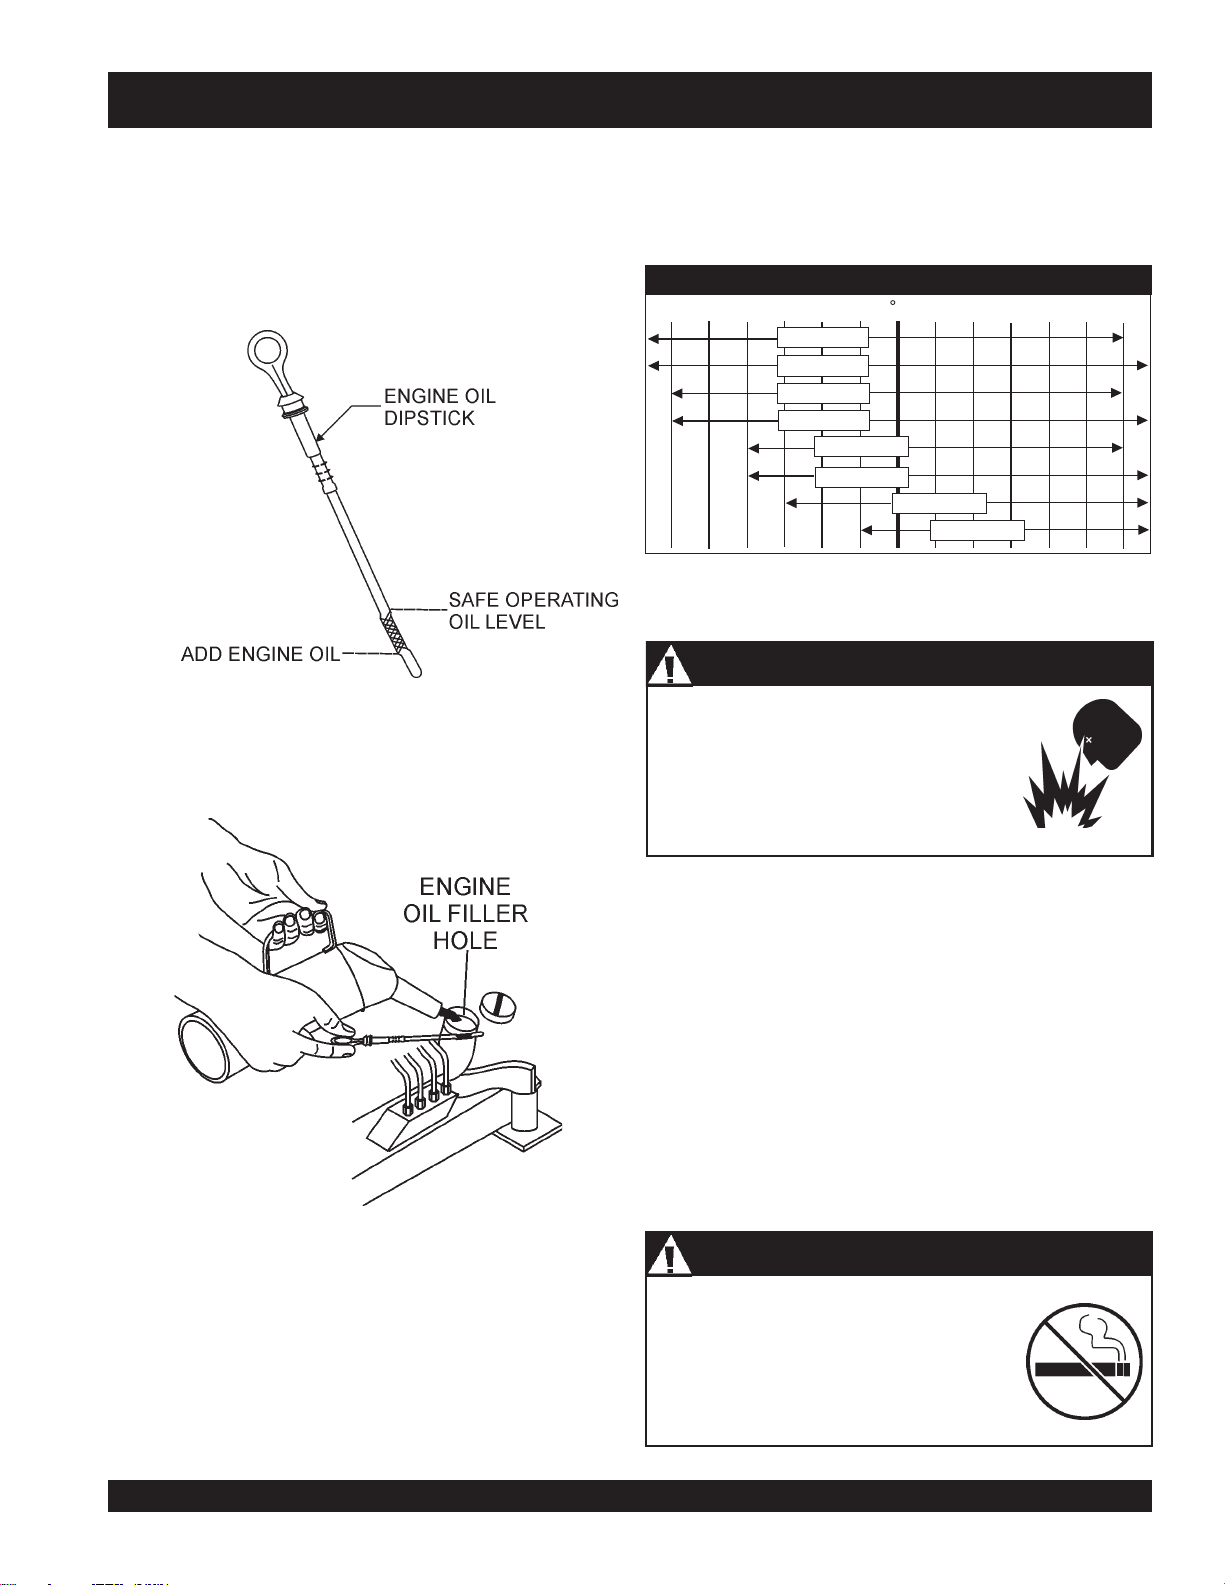
Engine Oil
1. Make sure pump/engine is on level ground.
2. Pull the engine oil dipstick from its holder.
3. Verify that oil level (Figure 8) is maintained between the
two notches on the dipstick.
Figure 8. Engine Oil Dipstick
4. If engine oil is low, fill engine crankcase with lubricating
oil through filler hole (Figure 9), but DO NOT overfill.
5. The oil listed in Table 5 is recommended to ensure better
engine performance. Use class CD or higher grade motor
oil.
TABLE 5. OIL CHART
-30 -25
-20 -15
-10 -5
SAE 0W - 30
SAE 0W - 40
SAE 5W - 30
SAE 5W - 40
SAE 10W - 30
SAE 10W - 40
0C
51015
SAE 15W - 40
SAE 20W - 50
20
25 30
Fuel
DANGER - Fire/Explosion
NEVER fill the fuel tank while the engine
is running or in the dark. Fuel spillage on a
hot engine can cause a fire or explosion.
If fuel spillage occurs, wipe up the spilled
fuel completely to prevent fire hazards.
Figure 9. Engine Oil Filler Hole
1. Remove the fuel cap from the trailer frame and visually
inspect if the engine fuel level is low. If low, fill with
recommended type diesel fuel. DO NOT fill the tank
beyond capacity.
2. Handle fuel in a safety container. If the container does
not have a spout use a funnel.
3. Pay attention to the fuel tank capacity when replenishing
fuel. Refer to the fuel tank capacity listed in Engine
Specification Table 1.
4. Tighten fuel tank cap securely after filling.
DANGER - No Smoking
DO NOT smoke while refueling, motor
fuels are highly flammable and can be
dangerous if mishandled.
DRY PRIME PUMP — OPERATION AND PARTS MANUAL — REV. #3 (10/06/08) — PAGE 25
Page 26

OPERATION
Engine Startup
Speed Control Lever
1. Set the
Speed Control Lever
half way between start and stop.
Figure 10. Speed Control Lever
Engine Control Box
1
0
1
2
8
1
4
1
6
V
D
O
PSI
20
40
60
0
2
3
Q
1
0
U
4
A
R
T
Z
80
b
a
r
00
5
025
5
HOURS
V
D
O
AUTOSTART
(
W
H
E
N
E
Q
U
I
P
P
E
D
A
U
X
1
A
U
X
2
Figure 11. Ignition Switch
4. Release engine start stop switch as soon as engine
star ts, and verify that ignition switch automatically
(Figure 10) to a position
returns back to the RUN position.
5. Verify that the battery charge and status LED indicator
lamps are OFF.
6. If battery charge indicator lamp remains lit, increase
engine speed until light goes off. When the charge
indicator light goes off, it can then be assumed that the
charging system is working correctly.
7. If the charge light remains on while the engine is running,
refer to Engine Troubleshooting or the Deutz Engine
Repair Manual.
8. If the AUX 1 status LED lamp is ON, stop engine and
check for broken or defective V-belt.
9. Move
speed control lever
to full speed position for
maximum engine speed.
If engine does not start, place
engine start/stop switch in OFF
NOTE
20
10
R
P
M
30
0
x
1
0
0
40
V
D
O
F
2
0
0
2
6
0
1
2
0
3
1
2
0
0
9
0
0
5
0
C
1
5
0
V
D
O
position to reset. Wait 10 seconds
before restarting. Use hand fuel
pump to remove air from fuel return
line.
Operation
O
F
F
)
0
RUN
P
I
S
I
T
A
I
R
T
III
ENGINE
1. The Dry Prime pump should begin pumping water within
a minute depending on the length of suction hose and
height the pump is above water.
ON/OFF
SWITCH
Longer suction hoses will require
NOTE
more time for the pump to begin
pumping water.
1. Turn engine start switch (see Figure 11) to the RUN
position, and verify that voltmeter gauge indicates 12
2. If pump does not begin to pump water after a few
VDC.
2. Verify that the battery and status LED indicator lamps
are ON.
3. Continue turning the ignition key from the RUN position
to the START position.
PAGE 26 —DRY PRIME PUMP — OPERATION MANUAL — REV. #3 (10/06/08)
minutes, check for loose connections or air leaks in
suction hose. Make sure there is water in the vacuum
system and strainer is not clogged with debris, reference
Pump Troubleshooting Flowchart.
Page 27

OPERATION
Engine Shut-Down
1. Place
speed control lever
in the idle position and place
the engine start/stop switch in the OFF position.
2. Close vandal cover on engine control box, and lock.
Store pad lock key in a safe place, out of the reach of
unauthorized persons.
CAUTION - Locking Engine Control Box
Pump Storage
For storage of the pump for over 30 days, the following is
required:
z
Drain the fuel tank completely.
z
Run the engine until the fuel in the injection system is
completely consumed.
z
Completely drain used oil from the engine crankcase
and fill with fresh clean oil, then follow the procedures
described in the engine manual for engine storage.
When the pump is not in use,
on the engine control box and
cover
the engine control box will prevent unauthorized
personnel from starting the pump. Store key in a
safe place.
close the vandal
lock
. Locking
z
Remove the drain plug from the pump and drain out any
water from left in the housing.
z
Remove the pump cover and clean inside of pump
housing. Coat inside of pump housing with a light film of
oil to reduce corrosion. A spray can of oil works well for
CAUTION - Disconnecting Discharge Hose
If pumping in a positive head (pumping up hill), be sure to
open discharge check valve drain and release pressure
before uncoupling hose.
this application.
z
Cover suction and discharge ports with duct tape to
prevent any foreign matter from falling into pump.
z
Cover pump and engine with plastic covering or
equivalent and store in a clean, dry place.
Pump Inspection After Use
It is recommended that the pump be inspected after use for
damage or wear.
1. Drain and flush pump volute and priming system. Usually
from suction end.
2. Inspect impeller for wear or damage and measure
impeller clearance if it appears worn. Inspect interval
should be about every 1000 hours. This inspection should
be done when the pump is scheduled for maintenance
inspection.
3. Inspect discharge check valve for wear or damage.
Replace if necessary.
4. Inspect fuel tank and check for water by removing
0.5-inch drain plugs. Do not overtighten when replacing.
5. Check oil reservoirs for contamination or water.
6. Do dry vacuum test to check seal and check valve seal.
This check should be done when the pump is scheduled
for maintenance inspection.
DRY PRIME PUMP — OPERATION AND PARTS MANUAL — REV. #3 (10/06/08) — PAGE 27
Page 28
MAINTENANCE (PUMP)
Engine Maintenance
To ensure longer pump life and service, please follow the
pump maintenance guidelines as listed in Table 6 and on
preceeding pages.
ecnanetniaMpmuP.6elbaT
.gnisuohgniraebkcehC
riovreserliolaespmupkcehC
yliaD
.metsysmuucavnisnoitidnoc
sruoH052yrevE
.yrassecenfiecalper
sruoH005yrevE
.dedeensaecnaraelc
.riovreserliolaespmupmuucavkcehC
ezeerf-itnadnametsysmuucavnilevelretawkcehC
.snoitidnocrehtaewrofnoitartnecnoc
.esohegrahcsidnisknikdnaskaelrofkcehC
rofthgirsiezeerf-itnadnanaelcsiretawfikcehC
dnalaespmup,sgniraebrofsriovreserliokcehC
dnaniard,noitanimatnocroflaespmupmuucav
.ssenthgitroftlobrellepmikcehC
naelchtiwllifdnaknatretawmetsysmuucavhsulF
.yrassecenfiezeerfitnaddA.retaw
tsujdA.ecnaraelcdnanoitidnocrellepmikcehC
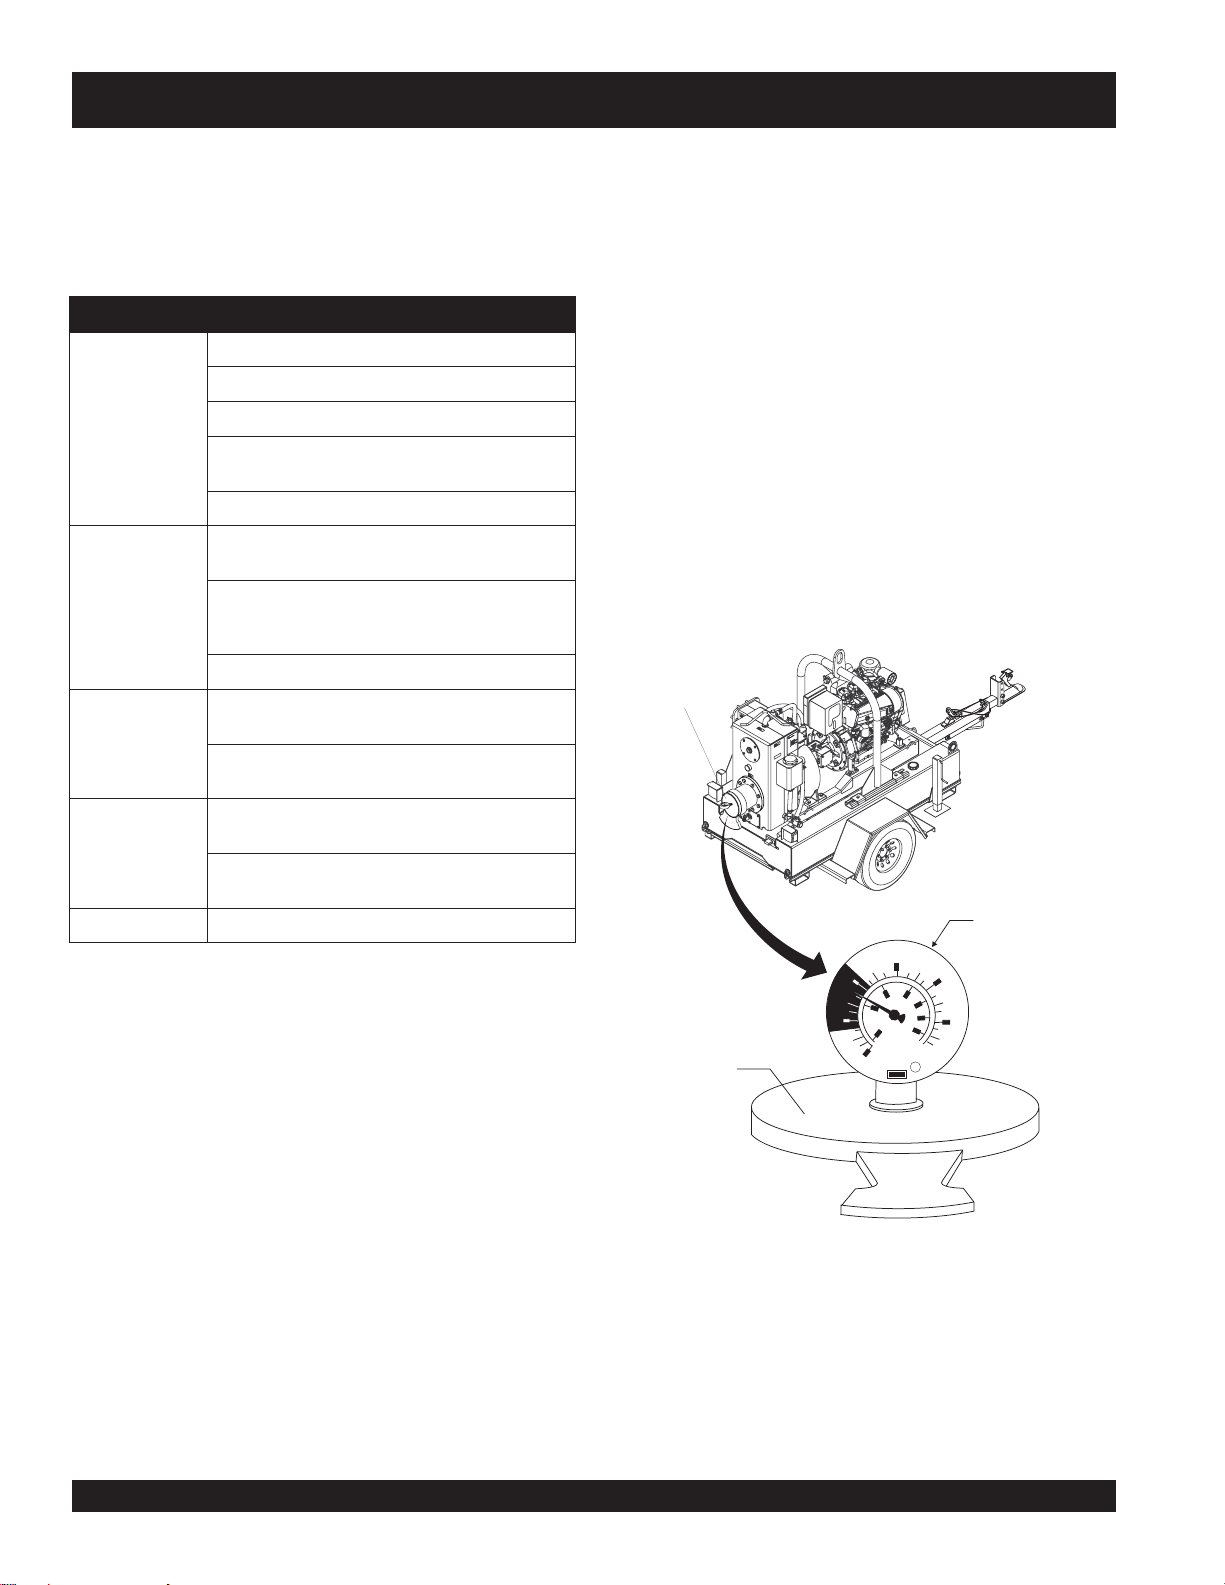
Dry Pump Vacuum Test
To perform the pump vacuum test do the following:
1. Perform all start-up steps without installing the hoses.
2. Block the suction with a plug or heavy rubber flap as
shown in Figure 12. An accurate vacuum gauge should
be installed in the plug or flap to check vacuum system
performance and pump vacuum gauge.
2. Start the engine and run at 1,800 RPM. Note the
maximum vacuum reading.
3. Shut off the engine and check the vacuum reading. The
vacuum reading should be .75 to .9 Bar or 25 to 27
inches. Vacuum reading should hold for about 3 to 10
minutes before dropping to zero. If vacuum reading drops
fast, check for leaks and repair if necessary. Listen for
leaks. If area is quiet, small air leaks should be easy to
hear.
PUMP VACUUM
TESTER
sruoH0001yrevE
sruoH0002yrevE .sgniraebpmupmuucavesaerG
.sriovreserlaespmupmuucavdna
.yrassecen
,gnisuohgniraebpmup,laespmupnilioegnahC
fiecalpeR.raewrofevlavkcehcegrahcsidtcepsnI
ACCEPTABLE READING
SHOULD BE BETWEEN
-27 AND -25 IN. HG.
-10
25 IN. HG TRANSLATES
-5
INTO 25 FEET OF LIFT
AT SEA LEVEL.
(In. Hg = INCHES
OF MERCURY)
PLACE VACUUM TESTER
OVER PUMP INLET.
-15
-20
-40
-60
-80
-20
-100
-25
kPa
in. Hg
-30
R
WIKA
PUMP VACUUM TESTER
Figure 12. Dry Pump Vacuum Test
PAGE 28 —DRY PRIME PUMP — OPERATION MANUAL — REV. #3 (10/06/08)
Page 29

Engine Maintenance
The following engine maintenance guidelines are intended
to assist the operator in preventative maintenance. For a
more detailed maintenance schedule refer to the
Engine Instruction Manual
Changing Engine Oil
Change engine oil after first 20 hours of operation. Drain and
refill engine crankcase with the correct type and amount oil
(reference Table 5) after 250 hours of operation hours or once
a week thereafter.
When draining engine crankcase oil, place oil into a suitable
container while engine is still warm. Replace the drain plug
tightly. Add oil through the filler hole.
supplied with the pump.
Deutz
NOTE
MAINTENANCE (ENGINE)
Figure 14. In-Line Fuel Filter
When reinstalling fuel filters,
please note the arrows indicating
direction of fuel flow
the
.
Changing Oil Filter
Change the Deutz engine oil filter (Figure 13) after 250 hours
of operation.
Figure 13. Oil Filter Element
Fuel Filter System
The Deutz engine fuel system incorporates four different
types of fuel filters, in-line, easy change, IMSA, and a fuel
water separator.
In-line Fuel Filter
Replace the in-line fuel filter (Figure 14) every 500 hours. If
the purity of the fuel being used is of lesser quality replace
the in-line fuel filter more often as needed.
Easy-Change Fuel Filter
Replace the easy change fuel filter (Figure 15) every 500
hours.
Cleaning the IMSA Fuel Filter
1. Close the fuel shut-off valve and loosen the retaining on
the IMSA fuel filter (Figure 16).
2. Remove the cover and the fuel strainer.
3. Clean the fuel strainer with diesel fuel. Replace fuel
strainer if necessary.
4. Reassemble IMSA fuel filter.
5. Bleed fuel system and check for fuel leaks.
Figure 15. Easy-Change Fuel Filter
DRY PRIME PUMP — OPERATION AND PARTS MANUAL — REV. #3 (10/06/08) — PAGE 29
Page 30
MAINTENANCE (ENGINE)
IMSA Fuel Filter
Inspect and clean (replace if necessary) the IMSA fuel filter
(Figure 16) every 500 hours. This filter is part of the fuel
pump.
Figure 16. IMSA Fuel Filter
Fuel Tank
Unscrew the fuel drain plug on the fuel tank (Figure 18) to
remove water and sediment every 500 hours. If the purity of
the fuel being used is of lesser quality drain the fuel tank
more frequently.
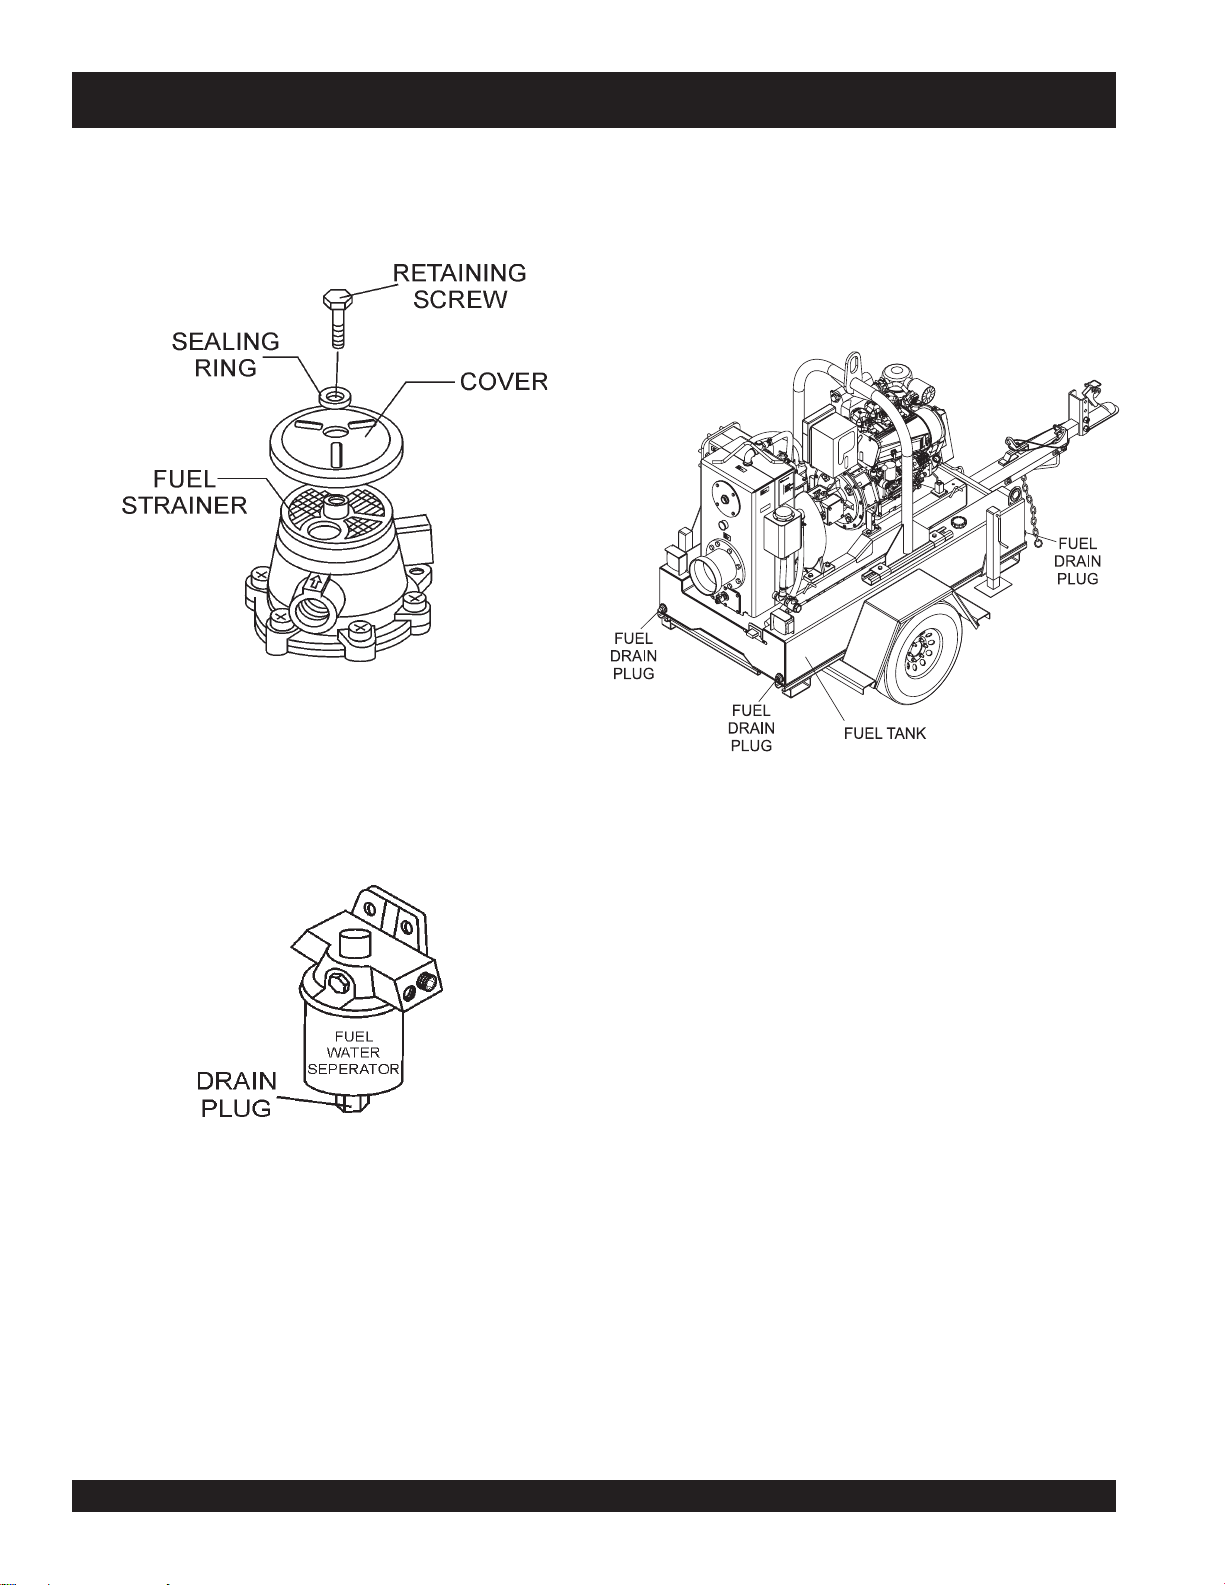
Fuel Water Separator Filter
1. Inspect the fuel water separator (Figure 17) every 40
hours. If the fuel water separator requires maintenance
follow steps 2 and 3 below:
Figure 17. Fuel Water separator Filter
2. Open the drain plug on the fuel water separator (Figure
18) to remove any sediment or water that may have
accumulated in the fuel water separator reservoir.
3. After water and sediment and foreign debris has been
drained from the fuel water separator, reinstall the drain
plug on fuel water separator.
Figure 18. Fuel Tank/Drain Plug
PAGE 30 —DRY PRIME PUMP — OPERATION MANUAL — REV. #3 (10/06/08)
Page 31

MAINTENANCE (TRAILER)
The following trailer maintenance guidelines are intended to
assist the operator in preventative maintenance.
Trailer Brakes
Properly functioning brake shoes and drums are essential to
ensure safety. The brakes should be inspected the first 200
miles of operation. This will allow the brake shoes and drums
to seat properly. After the first 200 mile interval, inspect the
brakes every 3,000 miles. If driving over rough terrain, inspect the brakes more frequently.
Surge Brakes
If your trailer has surge-operated brakes, they
function the same way the surge brakes do on your tow
vehicle. The surge braking system must be inspected at
least as often as the brakes on the tow vehicle, but no less
than once per year. This inspection includes an
assessment of the condition and proper operation of the wheel
cylinders, brake shoes, brake drums and hubs.
Manually Adjusting the Brakes
Most axles are fitted with a brake mechanism that will
adjust the brakes during a hard stop. However, some
braking systems are not automatically adjusted by hard
stopping. These brakes require manual adjustment. The
following steps apply to adjust most manually adjustable
brakes.
1. Jack up the trailer and secure it on adequate capacity
jack stands.
2. Be sure the wheel and brake drum rotate freely.
3. Remove the adjusting-hole cover from the adjusting slot
on the bottom of the brake backing plate.
4. With a screwdriver or standard adjusting tool, rotate the
starwheel of the adjuster assembly to expand the brake
shoes. Adjust the brake shoes out until the pressure of
the linings against the drum makes the wheel very
difficult to turn. Note: Your trailer maybe equipped with
drop spindle axles. See axle manual for your axle type.
You will need a modified adjusting tool for adjusting the
brakes in these axles. With drop spindle axles, a
modified adjusting tool with about an 80 degree angle
should be used.
5. Rotate the starwheel in the opposite direction until the
wheel turns freely with a slight drag.
6. Replace the adjusting-hole cover.
7. Repeat the above procedure on all brakes.
8. Lower the trailer to the ground.
You must check the fluid level in the master cylinder
reservoir at least every three months. If you tow your trailer
an average of 1,000 miles per month in a hot and dry
environment, you must check the brake fluid level once a
month. The brake fluid reservoir is located on the tongue of
the trailer. Always fill with clean, uncontaminated DOT 4
brake fluid.
Figure 19 below displays the major air/surge brake components that will require inspection and maintenance. Please
inspect these components as required using steps 1 through
6 as referenced in the “Manually Adjusting The Brakes” section on this page. See Table 11 Surge Brake Troubleshooting.
Electric Brakes
Electrically actuated brakes (Figure 20) are similar to
surge brakes. The basic difference is that surge brakes are
actuated by an electromagnet. Listed below are some of
the advantages that electric brakes have over
surge brakes:
Brake system can be manually adjusted to provide the
corrected braking capability for varying road and load
conditions.
Brake system can be modulated to provide more or
less braking force, thus easing the brake load on the
towing vehicle.
Brake system has very little lag time between the time
the vehicle’s brakes are actuated and the trailer’s brakes
are actuated.
Brake system can provide an independent emergency
brake system.
Figure 19. Surge Brake Components
DRY PRIME PUMP — OPERATION AND PARTS MANUAL — REV. #3 (10/06/08) — PAGE 31
Page 32

MAINTENANCE (TRAILER)
Remember in order to properly synchronize the tow vehicle’s
WARNING - Breakaway Brake System
braking to the trailer’s braking, can only be accomplished by
road testing. Brake lockup, grabbiness or harshness is due
to lack of synchronization between the tow vehicle and the
trailer being towed or under-adjusted brakes.
If electric breakaway brakes do not operate when trailer is uncoupled
from the tow vehicle, death or serious injury can occur.
Check emergency breakaway brake system BEFORE each tow.
Before any brake synchronizations adjustments can be
made, the trailer brakes should be burnished-in by applying
the brakes 20-30 times with approximately a 20 m.p.h. decrease in speed, e.g. 40 m.p.h. to 20 m.p.h. Allow ample
time for brakes to cool between application. This allows the
brake shoes to slightly be seated into the brake drum sur-
NOTE
face.
Figure 20 displays the major electric brake components that
will require inspection and maintenance. Please inspect
these components as required. See Table 12 Electric Brake
Troubleshooting.
and follow the axle/brake and the brake controller
manufacturers’ instructions. To make certain an electricallyoperatedbraking system will function properly, you must have
your dealer inspect the magnets at least once a year, or
each 12,000 miles. See the brake manual for wear and current inspection instructions.
The electric brakes that operate in
conjunction with the tow vehicle
brakes must be
“synchronized”
so that braking is properly distributed to the tow vehicle brakes and
the trailer brakes. For proper operation and synchronization, read
Hydraulic Brack Actuator
The the surge brake actuator (Figure 21) is the mechanism
that activates the trailer’s brake system. This actuator
changes fluid power into mechanical power. Therefore, the
fluid level must be checked frequently to assure that the
brakes function properly.
Figure 20. Electrical Brake Components
Breakaway Battery
This battery supplies the power to operate the trailer brakes
if the trailer uncouples from the tow vehicle. Be sure to
check, maintain and replace the battery according to the
battery manufacturer’ instructions.
Breakaway Switch
This switch causes the breakaway battery to operate the
electric brakes if the trailer uncouples from the tow vehicle.
The pull cable for the pull pin is connected to the tow
vehicle, and the switch is connected to the trailer. To check
for proper functioning of the switch, battery and brakes, you
WARNING - Actuator Fluid Level
must pull the pin from the switch and confirm that the brakes
apply to each wheel. You can do this by trying to pull the
trailer with the tow vehicle, after pulling the pin. The trailer
Failure to maintain proper fluid level in the actuator may
result in loss of braking action which could cause severe
property damage, injury or death.
brakes may not lock, but you will notice that a greater force
is needed to pull the trailer.
HYDRAULIC
BRAKE FLUID
RESERVOIR
Figure 21. Trailer Actuator
PAGE 32 —DRY PRIME PUMP — OPERATION MANUAL — REV. #3 (10/06/08)
Page 33
MAINTENANCE (TRAILER)
Periodically check the actuator mounting fasteners for
damage or loosening. Inspect the actuator for worn or damaged parts. As you are towing your trailer, be aware of any
changes in braking quality. This could be an early warning of
brake or actuator malfunction and requires immediate
attention. Consult a certified brake specialist to make
DANGER - Wheel Bearings
If trailer wheels are under water for a long period of time,
wheel bearings may fail. If this is the case, service wheel
bearings immediately.
The possibility exists of the wheels falling off, causing
equipment damage and severe bodily harm even death!
necessary adjustment or repairs.
Replace bearings that have flat spots on rollers, broken
Adjustable Channel
Your trailer may be equipped with an adjustable channel (Figure 22) that allows the coupler to be raise or lowered to a
desired height. Periodically check the channel bolts for dam-
roller cages, rust or pitting. Always replace bearings
and cups in sets. The inner and outer bearings are to be
replaced at the same time.
Replace seals that have nicks, tears or wear.
age or loosening.
Lubricate the bearings with a high quality EP-2
ADJUSTABLE
CHANNEL
5/8”X11”X5”
BOLT
automotive wheel bearing grease.
BEARING
OIL
SEAL
CONE
BEARING
CUP
WHEEL
HUB
COTTER
PIN
5/8”
5/8” FLAT
2-5/16” BALL
COUPLER
WASHER
Figure 22. Adjustable Channel
With Pintle Eye Coupler
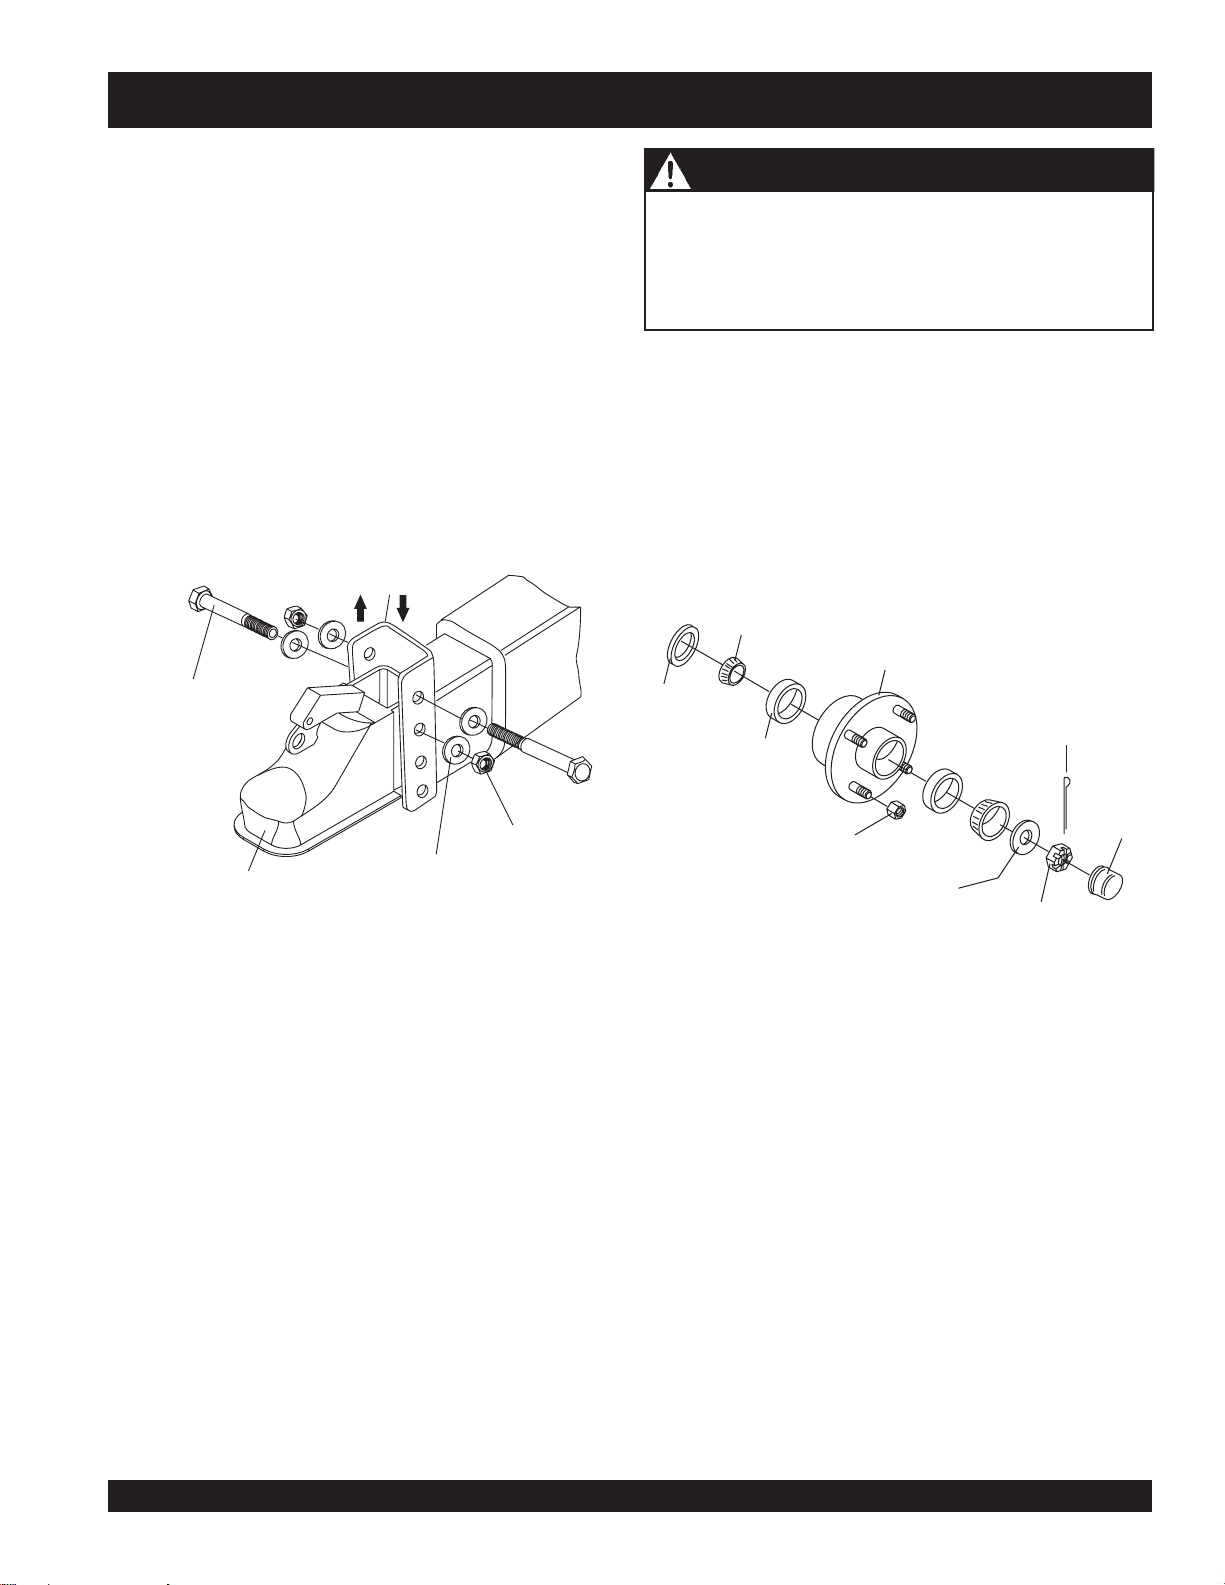
Wheel Bearings (Hubs)
Wheeel bearings (Figure 23) must beinspected and lubricated once a year or 12,000 miles toinsure safe operation of
your trailer.
If a trailer wheel bearing is immersed in water, it must be
NYLOC
NUT
Figure 23. Wheel Hub Components
Wheel Hub Adjustment
Every time the wheel hub is removed and the bearings are
reassembled, follow the steps below to check the wheel
bearings for free running and adjust.
Turn the hub slowly, by hand, while tightening the spindle
nut, until you can no longer turn the hub by hand.
replaced.
If the pump/trailer has not been used for an extended amount
of time, have the bearings inspected and packed more
Loosen the spindle nut just until you are able to turn it
(the spindle nut) by hand. Do not turn the hub while the
spindle nut is loose.
frequently, at least every six months and prior to use.
Follow the steps below to disassemble and service the
wheel bearings.
After removing the dust cap, cotter pin, spindle nut
and spindle washer, remove the hub and drum to
Install a new cotter pin through the spindle nut and axle.
Check the adjustments. Both the hub and the spindle
nut should be able to move freely (the spindle nut
motion will be limited by the cotter pin).
inspect the bearings for wear and damage.
LUG
NUT
SPINDLE
WASHER
DUST
CAP
CASTLE
NUT
DRY PRIME PUMP — OPERATION AND PARTS MANUAL — REV. #3 (10/06/08) — PAGE 33
Page 34

TRAILER MAINTENANCE
Danger - Raising the Trailer
NEVER! crawl under the trailer unless it is on firm and
level ground and resting on properly placed and secured
jack stands.
The possibility exists of the trailer falling thus causing
equipment damage and severe bodily harm even death!
DANGER - Trailer Inspection
When performing trailer inspection and maintenance activities, you must jack up the trailer using jacks and jack
stands.
When jacking and using jack stands, place them so as
to clear wiring, brake lines, and suspension parts
(i.e.,springs,torsion bars). Place jacks and jack stands
inside of the perimeter strip on the supporting structure
to which the axles are attached.
Torsion Suspension
The mounting bracket (Figure 24) of the torsion suspension
assembly is bolted directly to the trailer frame. Except for
periodic inspection of the bracket’s fasteners to the trailer
frame, no other suspension maintenance is required on the
axles.
5/8”-18 X 2”
MOUNTING
BOLT
MOUNTING
BRACKET
SPINDLE
TORSION
ARM
TORSION
BAR
5/8”-18
NYLOC NUT
GRADE C
Figure 24. Torsion Suspension
AXLE
TUBE
WARNING - Trailer Impact
If the trailer is involved in an accident have it inspected
immediately by qualified personnel. In addition, the trailer
should be inspected annually for signs of wear or
deformations.
WARNING - Cracked or Broken Welds
Improper weld repair will lead to early failure of the trailer
structure and can cause serious injury or death.
DO NOT repair cracked or broken welds unless you have
a
certified welder
welds repaired by your dealer.
perform the repair. If not, have the
Danger - Trailer Welds
Broken or damaged welds can cause injury or severe
damage to your trailer and contents. Inspect all of the
welds for cracks or failure at least twice a year.
Danger - Worn or Defective Suspension
Worn or broken suspension parts can cause loss of
control, damage to equipment and severe bodily injury
even
death!
Check suspension regularly.
PAGE 34 —DRY PRIME PUMP — OPERATION MANUAL — REV. #3 (10/06/08)
Page 35

TRAILER SAFETY GUIDELINES
■
TRAILER SAFETY INFORMATION
Safety precautions should be followed at all times when
operating this equipment. Failure to read, understand and
follow the Operating Instructions could result in injury to
yourself and others. Loss of control of the trailer or tow vehicle can result in death or serious injury.
Common Causes for Loss of Trailer
■
Driving too fast for the conditions (maximum speed
when towing a trailer is 60 m.p.h.).
■
Overloading the trailer or loading the trailer unevenly
■
Trailer improperly coupled to the hitch
■
No braking on trailer
■
Not maintaining proper tire pressure
■
Not keeping lug nuts tight
■
Not properly maintaining the trailer structure.
Trailer Towing Guidelines
■
Recheck the load tiedowns to make sure the load will
not shift during towing.
■
Before towing, check coupling, safety chain, safety
brake, tires, wheels and lights.
■
Check the lug nuts or bolts for tightness.
■
Check coupler tightness after towing 50 miles.
■
Adjust the brake controller to engage the trailer brakes
before the tow vehicle brakes. Your dealer can assist
you by making this adjustment.
■
Use your mirrors to verify that you have room to change
lanes or pull into traffic.
■
Use your turn signals well in advance. Allow plenty of
stopping space for your trailer and tow vehicle.
■
Allow plenty of stopping space for your trailer and tow
vehicle.
ALWAYS use lower gears for climbing and descending
grades.
■
DO NOT ride the brakes while descending grades, they
may get so hot that they stop working. Then you will
potentially have a runaway tow vehicle and trailer.
■
To conserve fuel, don’t use full throttle to climb a hill.
instead, build speed on the approach.
■
Slow down for bumps in the road. Take your foot off the
brake when crossing the bump.
■
DO NOT brake while in a curve unless absolutely necessary.
Instead, slow down before you enter the curve
and power through the curve. This way, the towing vehicle
remains in charge.
■
DO NOT apply the brakes to correct extreme trailer swaying.
Continued pulling of the trailer, and even slight
acceleration, will provide a stabilizing force.
■
Anticipate the trailer “swaying.” Swaying is the trailer
reaction to the air pressure wave caused by passing
trucks and busses. Continued pulling of the trailer
provides a stabilizing force to correct swaying. DO NOT
apply the brakes to correct trailer swaying.
■
Use lower gear when driving down steep or long grades.
Use the engine and transmission as a brake. Do not
ride the brakes, as they can overheat and become
ineffective.
■
Be aware of your trailer height, especially when
approaching roofed areas and around trees.
■
Make regular stops, about once each hour. Confirm that:
A. Coupler is secure to the hitch and is locked.
B. Electrical connectors are made.
C. There is appropriate slack in the safety chains.
D. There is appropriate slack in the breakaway
E. Tires are not visibly low on pressure
switch pullpin cable.
■
DO NOT drive so fast that the trailer begins to sway due
to speed.
■
Allow plenty of room for passing. A rule of thumb is that
the passing distance with a trailer is 4 times the passing
distance without the trailer.
■
Shift your automatic transmission into a lower gear for
city driving.
DRY PRIME PUMP — OPERATION AND PARTS MANUAL — REV. #3 (10/06/08) — PAGE 35
WARNING - Drive Safely
Driving too fast for severe road conditions can
result in loss of control and cause death or serious
injury.
Decrease your speed as road, weather and lighting
conditions deteriorate.
ALWAYS check for local trailer-tow speed limits in
your area.
Page 36

TRAILER SAFETY GUIDELINES
CAUTION - Lcal Towing Regulations
Check with your county or state safety towing
pump
regulations department before towing your
.
Driving Conditions
When towing a trailer, you will have decreased acceleration,
increased stopping distance, and increased turning radius
(which means you must make wider turns to keep from hitting curbs, vehicles, and anything else that is on the inside
corner). In addition, you will need a longer distance to pass,
due to slower acceleration and increased length.
■
Be alert for slippery conditions. You are more likely to be
affected by slippery road surfaces when driving a tow
WARNING - Coupler Selection/Condition
Proper selection and condition of the coupler and hitch
are essential to safely towing your trailer. A loss of
coupling may result in death or serious injury.
• Be sure the hitch load rating is equal to or greater
than the load rating of the coupler
• Be sure the hitch size matches the coupler size
• Observe the hitch for wear, corrosion and cracks
before coupling. Replace worn, corroded or cracked
hitch components before coupling the trailer to the
tow vehicle
Be sure the hitch components are tight before coupling
the trailer to the tow vehicle.
WARNING - Coupler Connection
vehicle with a trailer, than driving a tow vehicle without a
trailer.
■
Check rearview mirrors frequently to observe the trailer
and traffic.
■
NEVER drive faster than what is safe.
WARNING - Transporting Personnel
DO NOT transport people on the trailer. The transport of
people puts their lives at risk and may be illegal.
Coupling to the Tow Vehicle
Follow all of the safety precautions and instructions in this
An improperly coupled trailer can result in death or serious
injury.
DO NOT move the trailer until:
• The coupler is secured and locked to hitch
• The safety chains are secured to the tow vehicle
• The trailer jack(s) are fully retracted
DO NOT tow the trailer on the road until:
• Tires and wheels are checked
• The trailer brakes are checked
• The breakaway switch is connected to the tow vehicle
• The load is secured to the trailer
• The trailer lights are connected and checked
manual to ensure safety of persons, equipment, and satisfactory life of the trailer.Always use an adequate tow vehicle and hitch. If the vehicle or hitch is not properly se-
DANGER - Hitch/Tow Vehicle Load Rating
lected and matched to the Gross Vehicle Weight Rating
(GVWR) of your trailer, you can cause an accident that could
lead to death or serious injury.
If you already have a tow vehicle, know your vehicle tow
rating and make certain the trailer’s rated
capacity is less than or equal to the tow vehicle’s rated towing capacity. If you already have (or plan to buy) a trailer,
make certain that the tow rating of the tow vehicle is equal
Use of a hitch with a load rating less than the load rating
of the trailer can result in loss of control and may lead to
death or serious injury.
Use of a tow vehicle with a towing capacity less than the
load rating of the trailer can result in loss of control, and
may lead to death or serious injury.
Be sure your hitch and tow vehicle are rated for the Gross
Vehicle Weight Rating of your trailer.
to or greater than that of the trailer.
The trailer VIN tag contains the critical safety
information for the use of your trailer. Again, be sure your
hitch and tow vehicle are rated for the Gross Vehicle Weight
Rating of your trailer.
PAGE 36 —DRY PRIME PUMP — OPERATION MANUAL — REV. #3 (10/06/08)
Page 37

TRAILER SAFETY GUIDELINES
Reporting Safety Defects
If you believe that your vehicle has a defect that could cause
a crash or could cause injury or death, you should
immediately inform the National Highway Traffic Safety
Administration (NHTSA) in addition to notifying us.
If NHTSA receives similar complaints, it may open an
investigation, and if it finds that a safety defect exists in a
group of vehicles, it may order a recall and remedy
campaign. However, NHTSA cannot become involved in
individual problems between you, your dealer, or us.
Trailer Towing Tips
Driving a vehicle with a trailer in tow is vastly different from
driving the same vehicle without a trailer in tow. Acceleration, maneuverability and braking are all diminished with a
trailer in tow.
It takes longer to get up to speed, you need more room to
turn and pass, and more distance to stop when towing a
trailer. You will need to spend time adjusting to the different
feel and maneuverability of the tow vehicle with a loaded
trailer.
To contact NHTSA, you may either call the Vehicle Safety
Hotline toll-free at 1-888-327-4236 (TTY: 1-800-424-9153),
go to http://www.safecar.gov; or write to:
Because of the significant differences in all aspects of maneuverability when towing a trailer, the hazards and risks of
injury are also much greater than when driving without a
Administrator
NHTSA
1200 New Jersey Avenue S.E.
Washington, DC 20590
trailer. You are responsible for keeping your vehicle and
trailer in control, and for all the damage that is caused if you
lose control of your vehicle and trailer.
As you did when learning to drive an automobile, find an
open area with little or no traffic for your first practice trailering.
You can also obtain other information about motor vehicle
safety from http://www.safecar.gov.
Inoperable Brakes, Lights or Mirrors
Be sure that the brakes and all of the lights on your trailer
are functioning properly before towing your trailer. Check
the trailer taillights by turning on your tow vehicle headlights.
Check the trailer brake lights by having someone step on
the tow vehicle brake pedal while you look at trailer lights.
Do the same thing to check the turn signal lights. (See
Trailer Wiring Diagram section in this manual.)
Of course, before you start towing the trailer, you must
follow all of the instructions for inspection, testing, loading
and coupling. Also, before you start towing, adjust the
mirrors so you can see the trailer as well as the area to the
rear of it.
Drive slowly at first, 5 m.p.h. or so, and turn the wheel to get
the feel of how the tow vehicle and trailer combination
responds. Next, make some right and left hand turns. Watch
in your side mirrors to see how the trailer follows the tow
vehicle. Turning with a trailer attached requires more room.
Standard mirrors usually do not provide adequate visibility
for viewing traffic to the sides and rear a towed trailer. You
must provide mirrors that allow you to safely observe
approaching traffic.
Stop the rig a few times from speeds no greater than 10
m.p.h. If your trailer is equipped with brakes, try using
different combinations of trailer/electric brake and tow
vehicle brake. Note the effect that the trailer brakes have
when they are the only brakes used. When properly
WARNING - Checking Taillights/Brakelights
Improper electrical connection between the tow vehicle
and the trailer will result in inoperable lights and electric
brakes, and can lead to collision.
Before each tow:
• Check that the taillights, brake lights and turn
signals work
• Check that the electric brakes work by operating the
brake controller inside the tow vehicle
DRY PRIME PUMP — OPERATION AND PARTS MANUAL — REV. #3 (10/06/08) — PAGE 37
adjusted, the trailer brakes will come on just before the tow
vehicle brakes.
It will take practice to learn how to back up a tow vehicle
with a trailer attached. Take it slow. Before backing up, get
out of the tow vehicle and look behind the trailer to make
sure that there are no obstacles.
Page 38

TRAILER SAFETY GUIDELINES
Some drivers place their hands at the bottom of the steering
wheel, and while the tow vehicle is in reverse, “think” of the
PSIC: The tire pressure (Pounds per Square Inch)
measured when Cold.
hands as being on the top of the wheel. When the hands
move to the right (counter-clockwise, as you would do to
turn the tow vehicle to the left when moving forward), the
rear of the trailer moves to the right. Conversely, rotating
the steering wheel clockwise with your hands at the bottom
of the wheel will move the rear of the trailer to the left while
backing up.
If you are towing a bumper hitch rig, be careful not to allow
the trailer to turn too much, because it will hit the rear of the
tow vehicle. To straighten the rig, either pull forward or turn
the steering wheel in the opposite direction.
Trailer VIN Tag
Figure 25 below is a sample of the Vehicle
Identification Number (VIN) Tag which is located on the left
VIN: The Vehicle Identification Number.
EMPTY WEIGHT: Some information that comes with the
trailer (such as the Manufacturer’s Statement of Origin) is
not a reliable source for “empty” or “net” weight. The shipping documents list average or standard weights and your
trailer may be equipped with options.
To determine the “empty” or “net” weight of your trailer, weigh
it on an axle scale. To find the weight of the trailer using an
axle scale, you must know the axle weights of your tow
vehicle without the trailer coupled. Some of the trailer
weight will be transferred from the trailer to the tow vehicle
axles, and an axle scale weighs all axles, including the tow
vehicle axles.
front of the trailer. See Figure 26.
SAFETY WARNING LABELS ON YOUR TRAILER
Figure 25. Vehicle VIN Tag
The trailer VIN Tag contains the following critical safety
information for the use of your trailer.
GAWR: The maximum gross weight that an axle can
support. It is the lowest of axle, wheel, or tire rating.
Usually, the tire or wheel rating is lower than the axle rating,
and determines GAWR.
GVWR: The maximum allowable gross weight of the trailer
and its contents. The gross weight of the trailer includes the
weight of the trailer and all of the items within it (such as the
pump with water, engine, and other ITEMS). GVWR is sometimes referred to as GTWR (Gross Trailer Weight Rating), or
MGTW (Maximum Gross Trailer Weight). GVWR, GTWR
and MGTW are all the same rating.
The sum total of the GAWR for all trailer axles may be less
than the GVWR for the trailer, because some of the trailer
load is to be carried by the tow vehicle, rather than by the
trailer axle(s). The total weight of the cargo and trailer must
not exceed the GVWR, and the load on an axle must not
exceed its GAWR.
G
TA
IN
V
VIN TAG
Figure 26. VIN Tag Location
PAGE 38 —DRY PRIME PUMP — OPERATION MANUAL — REV. #3 (10/06/08)
Page 39

TRAILER SAFETY GUIDELINES
Tow Vehicle
The towing hitch attached to your tow vehicle must have a
capacity equal to or greater than the load rating of the trailer
you intend to tow. The hitch capacity must also be matched
to the tow vehicle capacity. Your vehicle dealer can provide
and install the proper hitch on your tow vehicle.
Suspension System
Sway bars, shock absorbers, heavy duty springs, heavy
duty tires and other suspension components may be required
to sufficiently tow the Dry Prime trailer and pump.
Brake Controller
For trailers equipped with electric brakes, the electric brake
controller is part of the tow vehicle and is essential in the
operation of the electric brakes on the trailer. The brake
controller is not the same as the safety breakaway brake
system that may be equipped on the trailer.
Safety Chains
If the coupler connection comes loose, the safety chains
can keep the trailer attached to the tow vehicle. With
properly rigged safety chains, it is possible to keep the tongue
of the trailer from digging into the road pavement, even if
the coupler-to-hitch connection comes apart.
Trailer Lighting (and Braking) Connector.
A device that connects electrical power from the tow vehicle to the trailer. Electricity is used to turn on brake lights,
running lights, and turn signals as required. In addition, if
your trailer has a separate braking system, the electrical
connector will also supply power to the brakes from the tow
vehicle.
Breakaway System
If the trailer coupler connection comes loose, the breakaway
system can actuate emergency electric or surge brakes depending on the type of actuator on the trailer. The breakaway
Side View Mirrors
The size of the trailer that is being towed and your state law
regulations determine the size of the mirrors. However, some
cable must be rigged to the tow vehicle with
appropriate slack that will activate the system if the coupler
connection comes loose.
states prohibit extended mirrors on a tow vehicle, except
while a trailer is actually being towed. In this situation, detachable extended mirrors are necessary. Check with your
dealer or the appropriate state agency for mirror requirements.
Jackstand
A device on the trailer that is used to raise and lower the
coupler. The jack is sometimes called the “landing gear” or
the “tongue jack”.
Heavy Duty Flasher
A Heavy Duty Flasher is an electrical component that may
be required when your trailer turn signal lights are attached
to the tow vehicle flasher circuit.
Electrical Connector
An Electrical Connector connects the light and brake
systems on the trailer to the light and brake controls on the
towing vehicle.
Emergency Flares and Emergency Triangle Reflectors
It is wise to carry these warning devices even if you are not
towing a trailer. It is particularly important to have these
when towing a trailer because the hazard flashers of your
towing vehicle will not operate for as long a period of time
when the battery is running both the trailer lights and tow
vehicle lights.
WARNING
An improperly coupled trailer can result in death or serious
injury.
DO NOT move the trailer until:
• The coupler is secured and locked to hitch;
• The safety chains are secured to the tow vehicle
• The trailer jack(s) are fully retracted.
DO NOT tow the trailer on the road until:
• Tires and wheels are checked;
• The trailer brakes are checked;
• The breakaway switch is connected to the tow vehicle;
• The load is secured to the trailer
• The trailer lights are connected and checked.
DRY PRIME PUMP — OPERATION AND PARTS MANUAL — REV. #3 (10/06/08) — PAGE 39
Page 40

TRAILER SAFETY GUIDELINES
Coupler Types
The Dry Prime pump is shipped from the factory with a 2-5/
16-inch ball coupler. A pintle eye coupler can be purchased
as an alternative method (option) for towing. Both types of
couplers will be discussed in this manual.
Ball Hitch Coupler
Pintle Eye Coupler
The load rating of the coupler and the necessary ball size
are listed on the trailer tongue. You must provide a hitch
and ball for your tow vehicle where the load rating of the
hitch and ball is equal to or greater than that of your trailer.
Also, the ball size must be the same as the coupler size. If
the hitch ball is too small, too large, is underrated, is loose
or is worn, the trailer can come loose from the tow vehicle
and may cause death or serious injury.
Ball Hitch Coupler
A ball hitch coupler (Figure 27) connects to a ball that is
located on or under the rear bumper of tow vehicle. This
system of coupling a trailer to a tow vehicle is sometimes
referred to as “bumper pull.”
A ball hitch trailer may be fitted with a tongue jack that can
raise and lower the coupler. The tongue jack is mounted to
the A-frame (front, or tongue) part of the trailer. By rotating
THE TOW VEHICLE, HITCH AND BALL MUST HAVE A
RATED TOWING CAPACITY EQUAL TO OR GREATER
THAN THE TRAILER Gross Vehicle Weight Rating
(GVWR). IT IS ESSENTIAL THAT THE HITCH BALL BE
OF THE SAME SIZE AS THE COUPLER.
The ball size and load rating (capacity) are marked on the
ball; hitch capacity is marked on the hitch.
the jack handle clockwise, the jack will extend and raise the
tongue of the trailer.
NOTE
When replacing a ball, the load
rating must match or exceed the
GVWR of the trailer.
Figure 27. Ball Hitch Coupler
Adjustable Tongue
NOTE
Before each tow, coat the ball with a thin layer of automotive
bearing grease to reduce wear and ensure proper operation;
and check the locking device that secures the coupler to the
ball for proper operation.
If you see or feel evidence of wear, such as flat spots,
deformations, pitting or corrosion, on the ball or coupler,
immediately have your dealer inspect them to determine the
proper action to prevent possible failure of the ball and
coupler system. All bent or broken coupler parts must be
replaced before towing the trailer.
WARNING - Hitch Ball Load Rating
Coupler-to-hitch mismatch can result in uncoupling,
leading to death or serious injury.
Be sure the LOAD RATING of the hitch ball is equal or
greater than the load rating of the coupler.
Be sure the SIZE of the hitch ball matches the size of
the ball coupler.
The coupler handle lever must be able to rotate freely and
automatically snap into the latched position. Oil the pivot
points, sliding surfaces, and spring ends with SAE 30W motor
oil. Keep the ball socket and latch mechanism clean. Dirt or
contamination can prevent proper operation of the latching
mechanism.
Before coupling the tow vehicle to
the trailer, be sure the size and rat-
ing of hitch ball match the size
and rating of the coupler. Hitch
balls and couplers are marked with
their size and rating.
PAGE 40 —DRY PRIME PUMP — OPERATION MANUAL — REV. #3 (10/06/08)
Page 41

WARNING - Defective Hitch Ball
2-5/16 INCH
TRAILER
COUPLER
2-5/16 INCH
BALL
TOW
VEHICLE
A worn, cracked or corroded hitch ball can fail while towing,
and may result in death or serious injury.
Before coupling trailer, inspect the hitch ball for wear,
corrosion and cracks.
Replace worn or damaged hitch ball.
WARNING - Uncoupled Hitch Ball
A loose hitchball nut can result in uncoupling, leading to
death or serious injury.
Be sure the hitch ball is tight to the hitch before coupling
the trailer.
Rock the ball to make sure it is tighten to the hitch, and
visually check that the hitch ball nut is solid against the
lock washer and hitch frame.
Wipe the inside and outside of the coupler, clean and
inspect it visually for cracks and deformations; feel the
inside of the coupler for worn spots and pits.
Be sure the coupler is secured tightly to the tongue of
the trailer. All coupler fasteners must be visibly solid
against the trailer frame.
The bottom surface of the coupler to be above the top
of the hitch ball. Use the tongue jackstand to support
the trailer tongue. Wood or concrete blocks may also be
used.
TRAILER SAFETY GUIDELINES
Figure 28. Ball Hitch Coupling Mechanism
Lower the trailer (Figure 28) until the coupler fully engages the hitch ball.
Engage the coupler locking mechanism. In the engaged
position, the locking mechanism securely holds the
coupler to the hitch ball.
Insert a pin or lock through the hole in the locking
mechanism.
Be sure the coupler is all the way on the hitch ball and
the locking mechanism is engaged. A properly engaged
locking mechanism will allow the coupler to raise the
rear of the tow vehicle. Using the trailer jackstand, verify
that you can raise the rear of the tow vehicle by
1-inch after the coupler is locked to the hitch.
Lower the trailer so that its entire tongue weight is held
by the hitch.
Coupling the Trailer to the Tow Vehicle (Ball Coupler)
Lubricate the hitch ball and the inside of the coupler
with a thin layer of automotive bearing grease.
Slowly back up the tow vehicle so that the hitch ball is
near or aligned under the coupler.
Using the jackstand at the front of trailer (tongue), turn
the jackstand crank handle to raise the trailer. If the ball
coupler does not line up with the hitch ball, adjust the
position of the tow vehicle.
Open the coupler locking mechanism. Ball couplers have
a locking mechanism with an internal moving piece and
an outside handle. In the open position, the coupler is
able to drop fully onto the hitch ball.
DRY PRIME PUMP — OPERATION AND PARTS MANUAL — REV. #3 (10/06/08) — PAGE 41
Raise the jackstand to a height where it will not interfere
with the road.
Overloading can damage the
NOTE
tongue jack. DO NOT use the
tongue jack to raise the tow vehicle
more than 1 inch.
If the coupler cannot be secured to the hitch ball, do not
tow the trailer. Call your dealer for assistance. Lower the
trailer so that its entire tongue weight is held by the hitch,
and continue retracting the jack to its fully retracted position.
Page 42
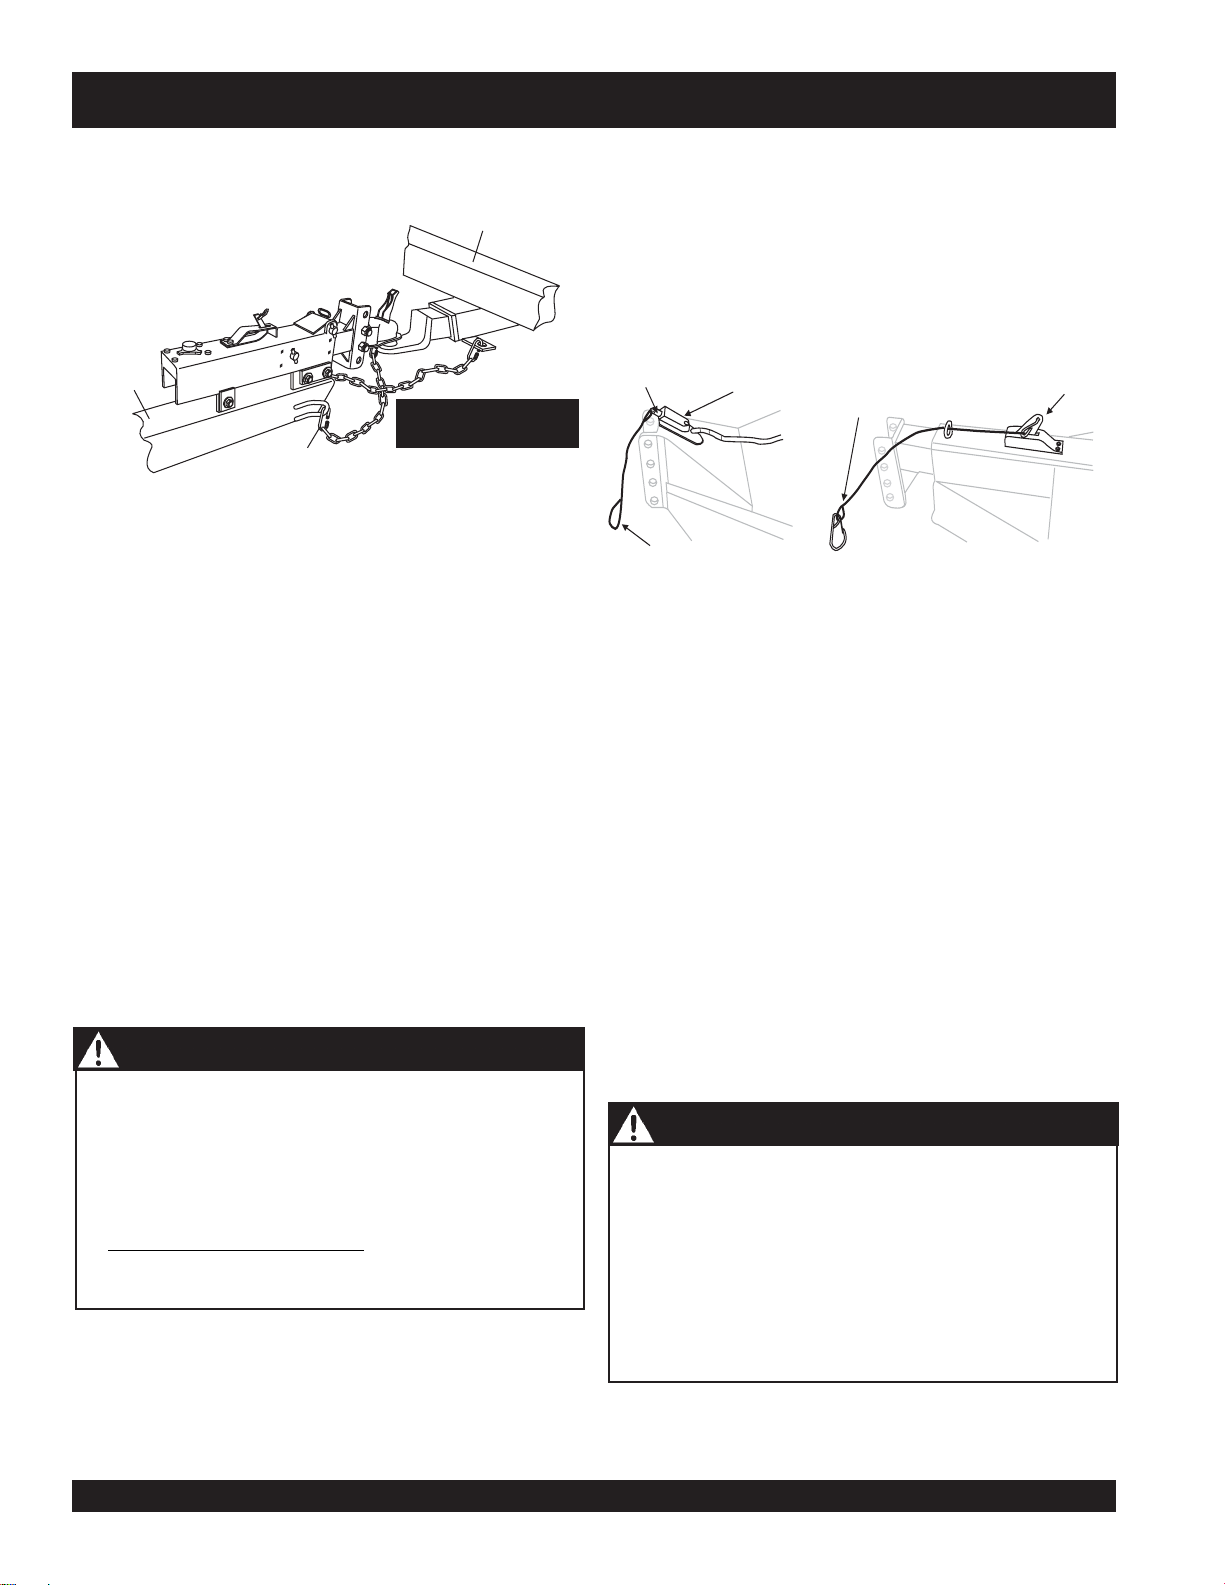
TRAILER SAFETY GUIDELINES
Attaching Safety Chain
TOW
VEHICLE
TRAILER
TONGUE
IMPORTANT!
SAFETY CHAIN
MASTER LINK
Figure 29. Safety Chain Arrangement
for a Bumper Pull Trailer (Ball Hitch)
Visually inspect the safety chains and hooks for wear
or damage. Replace worn or damaged safety chains
and hooks before towing.
Attach the safety chains so that they:
A. Cross underneath the coupler. See Figure 29.
B. Loop around a frame member of the tow vehicle
or holes provided in the hitch system (but, DO
NOT attach them to an interchangeable part of
the hitch assembly).
CROSS BOTH
SAFETY CHAINS
Breakaway Brake System
If the coupler or hitch fails, a properly connected and working breakaway brake system (Figure 30) will apply the hydraulic and/or electric brakes on the trailer. The safety chains
will keep the tow vehicle attached and as the brakes are
applied at the trailer’s axles, the trailer/tow vehicle combination will come to a controlled stop.
Pull-Pin
Electric Brake Adapter
Breakaway Switch
Connect Cable to
Tow Vehicle
Connect Cable to
Tow Vehicle
Hydraulic Actuator
Breakaway Lever
Figure 30. Breakaway Brake Systems
Breakaway Cable Surge Brake System
For Dry Prime pump trailers equipped with hydraulic surge
brakes, the breakaway brake system includes a brake cable
connected to the tow vehicle on one end and to the emergency brake lever located on the hydraulic actuator on the
other end.
C. Have enough slack to permit tight turns, but not
be close to the road surface, so if the trailer un
couples, the safety chains can hold the tongue
up above the road.
WARNING - Safety Chains Rigging
Improper rigging of the safety chains can result in loss of
control of the trailer and tow vehicle, leading to death or
serious injury, if the trailer uncouples from the tow vehicle.
• Fasten chains to frame of tow vehicle. DO NOT fasten
chains to any part of the hitch unless the hitch has
holes or loops specifically for that purpose.
•
Cross chains underneath
enough slack to permit turning and to hold tongue up,
if the trailer comes loose.
hitch and coupler with
Breakaway Electric Braking System
For Dry Prime pump trailers equipped with an electric braking system, the electric breakaway brake system includes a
DC power source, a switch with a pull pin, and a breakaway
brake controller. You must periodically charge the battery to
keep the breakaway brake system in working order.
WARNING - Brakeaway Cable
An ineffective breakaway brake system can result in a
runaway trailer, leading to death or serious injury, if the
coupler or ball hitch fails.
Connect the breakaway cable to the tow vehicle; and NOT
to the hitch, ball or support.
Before towing the trailer, test the function of the breakaway
brake system. If the breakaway brake system is not
working, DO NOT tow the trailer. Have it serviced or
repaired.
PAGE 42 —DRY PRIME PUMP — OPERATION MANUAL — REV. #3 (10/06/08)
Page 43

TRAILER SAFETY GUIDELINES
Electric Brake Testing
Perform the following when testing the electric braking system:
Connect the pull pin cable to the tow vehicle so that the
pull pin will be pulled out before all of the slack in the
safety chains is taken up (see Figure 30). DO NOT
connect the pullpin cable to a safety chain or to the
hitch ball or hitch ball assembly. This would keep the
breakaway brake system from operating when it is
needed.
When electric brakes are used, the tow vehicle will have
an electric brake controller that sends power to the trailer
brakes. Before towing the trailer on the road, you must
operate the brake controller while trying to pull the trailer
in order to confirm that the electric brakes operate. Remove the pullpin from the switch. While towing the trailer
at less than 5 m.p.h., manually operate the electric brake
controller in the tow vehicle cab.
You should feel the trailer resisting being towed, but the
wheels will not necessarily be locked. If the brakes do
not function, DO NOT tow the trailer until brakes are
repaired.
Immediately replace the pullpin. The breakaway brake
system battery discharges rapidly when the pullpin is
removed.
WARNING - Pullpin Replacement
Failure to replace the pullpin will prevent brakes from
working, leading to loss of control, serious injury or death.
Connecting Trailer Lights
Connect the trailer lights to the tow vehicle’s electrical
system using the electric connectors at the front of the trailer
(tongue). Reference the wiring diagram shown in the trailer
wiring diagram section of this manual. Before towing the
trailer check for the following:
Running lights (turn on tow vehicle headlights).
Brake Lights (step on tow vehicle brake pedal).
Backup Lights (place tow vehicle gear shift in reverse).
Turn Signals (activate tow vehicle directional signal lever).
WARNING - Improper Electrical Connections
Improper electrical connection between the tow vehicle
and the trailer will result in inoperable lights and electric
brakes, and can lead to collision.
Before each tow:
y Check that the taillights, brake lights and turn signals
work
y Check that the electric brakes work by operating the
brake controller inside the tow vehicle.
Uncoupling the Ball Hitch
Follow these steps to uncouple ball hitch from tow vehicle:
Block trailer tires to prevent the trailer from rolling,before
jacking the trailer up.
Disconnect the electrical connector.
Disconnect the breakaway brake switch cable. Promptly
replace the pullpin in the switchbox.
NOTE
NOTE
DO NOT tow the trailer with the
breakaway brake system ON be-
cause the brakes will overheat
which can result in permanent
brake failure.
Before extending jackstand, make certain the ground
surface below the jackstand foot will support the tongue
load.
Rotate the jackstand handle (or crank) clockwise. This
will slowly extend the jack and transfer the weightof the
trailer tongue to the jack.
Replace the breakaway brake battery (if equipped) according to the
battery at intervals specified by
manufacturer.
DRY PRIME PUMP — OPERATION AND PARTS MANUAL — REV. #3 (10/06/08) — PAGE 43
Page 44
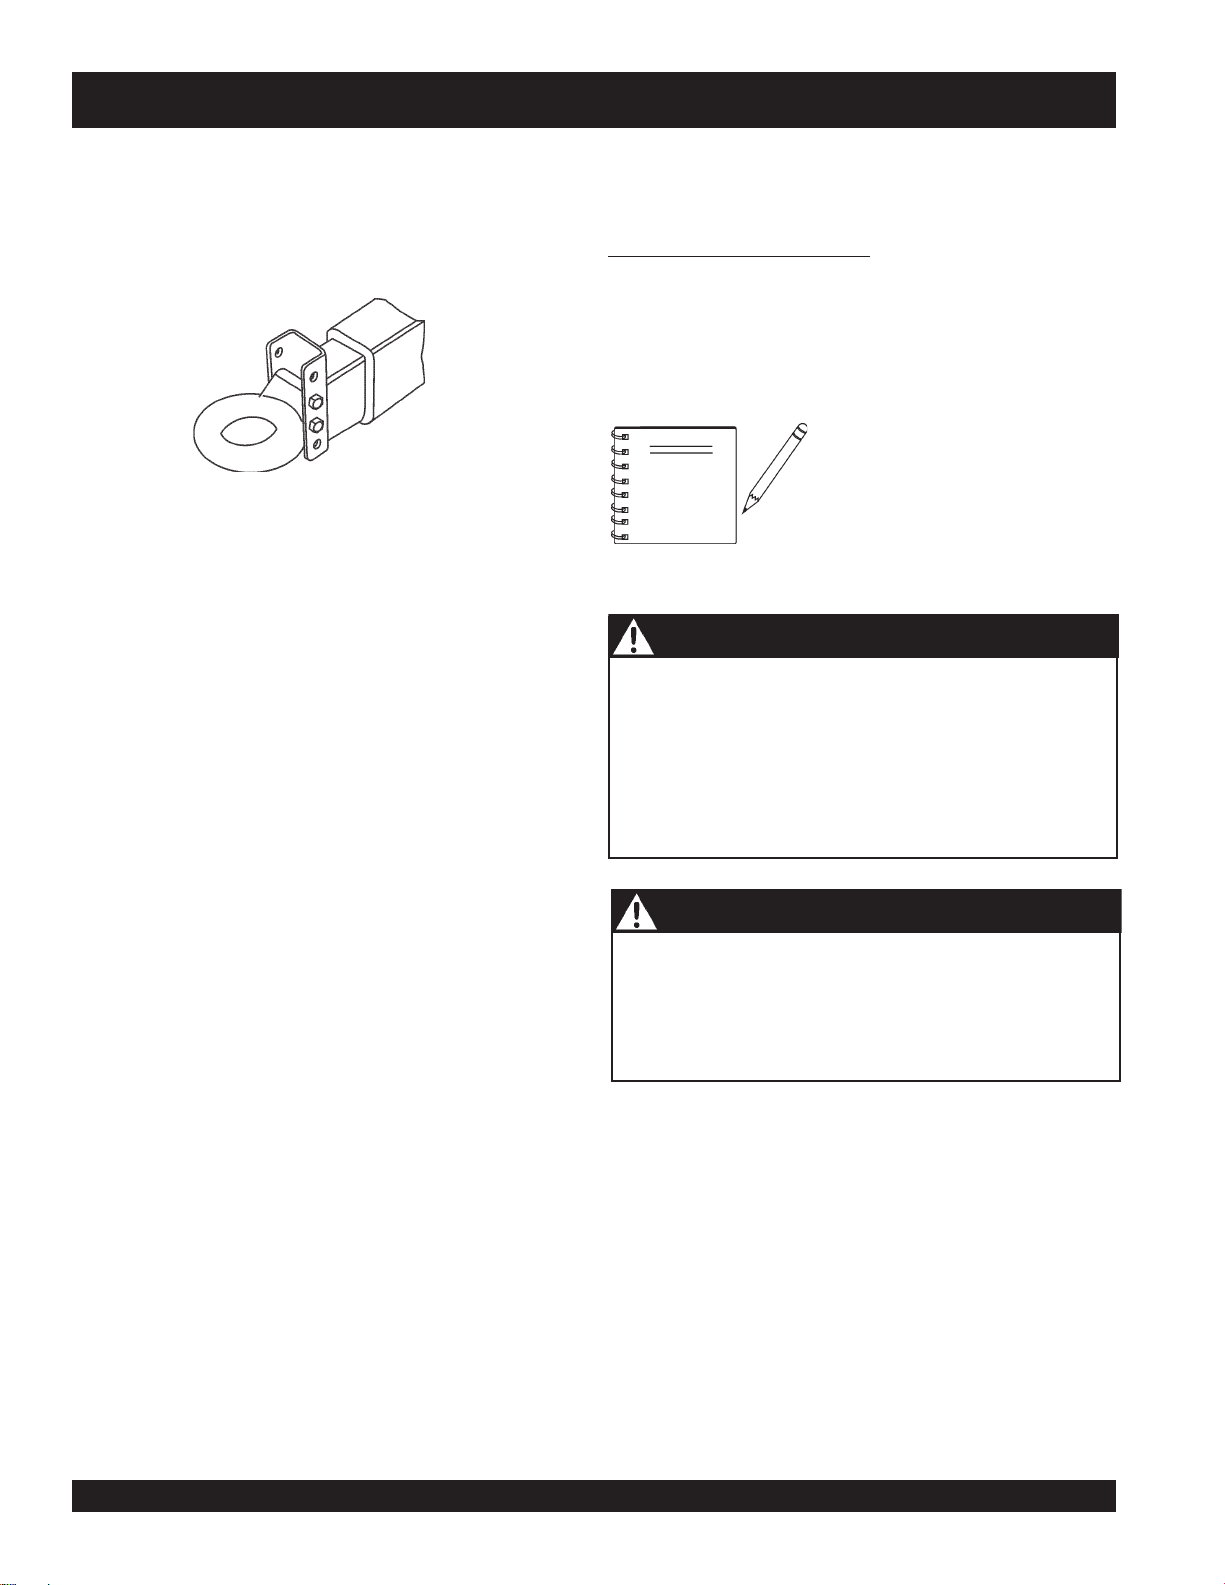
TRAILER SAFETY GUIDELINES
Pintle Hitch Coupler
A pintle eye coupler (Figure 31) connects to a pintle-hook
hitch that is located on or under the rear bumper of the tow
vehicle. This system of coupling a trailer to a tow vehicle is
sometimes referred to as a “lunette eye, tow ring or G.I.
hitch.”
THE TOW VEHICLE, PINTLE HITCH AND PINTLE
COUPLER MUST HAVE A RATED TOWING CAPACITY
EQUAL TO OR GREATER THAN THE TRAILER
Gross Vehicle Weight Rating (GVWR).
IT IS ESSENTIAL THAT THE PINTLE HITCH BE OF THE
SAME SIZE AS THE PINTLE COUPLER.
The coupler size and load rating (capacity) are marked on
the coupler; hitch capacity is marked on the hitch.
NOTE
Figure 31. Pintle Hitch Coupler
Adjustable Tongue
A pintle hitch trailer may be fitted with a tongue jackstand
that can raise and lower the coupler. The tongue jack is
mounted to the A-frame (front, or tongue) part of the trailer.
By rotating the jack handle clockwise, the jack will extend
and raise the tongue of the trailer.
The load rating of the coupler and the necessary pintle hitch
size are listed on the trailer tongue. You must provide a
pintle hitch and pintle coupler for your tow vehicle, where
the load rating of the pintle hitch and pintle coupler is equal
to or greater than that of your trailer.
WARNING - Hitch Ball Load Rating
Coupler-to-hitch mismatch can result in uncoupling,
leading to death or serious injury.
Be sure the LOAD RATING of the pintle hitch hook is
equal or greater than the load rating of the pintle eye
coupler.
Be sure the SIZE of the pintle hitch hook matches the
size of the pintle eye coupler.
Before coupling the tow vehicle to
the trailer, be sure the size and rat-
ing of the pintle-hook hitch match
the size and rating of the pintle
eye coupler. Pintle-hook hitches
and couplers are marked with their
size and rating.
Also, the pintle hitch size must be the same as the pintle
coupler size. If the hitch is too small, too large, is underrated, is loose or is worn, the trailer can come loose from
the tow vehicle, and may cause death or serious injury.
Pintle Coupler and Pintle Hook
Before each tow, check the locking device that secures the
coupler to the pintle hook assembly.
The pintle hook lever must be able to operate freely and
automatically snap into place into the latched position. Lightly
oil the pivot points and sliding surfaces with SAE30W motor
oil to prevent rust and help ensure proper operation of the
latching mechanism.
If you see or feel evidence of wear, such as flat spots, de-
formations, pitting or corrosion, on the pintle hook or coupler, immediately have your dealer inspect them to determine the proper action to prevent possible failure of the ball
andcoupler system. All bent or broken coupler parts must
be replaced before towing the trailer.
WARNING - Defective Pintle Hitch Hook
A worn, cracked or corroded pintle hitch hook can fail
while towing, and may result in death or serious injury.
Before coupling trailer, inspect the pintle hitch hook for
wear, corrosion and cracks.
Replace worn or damaged pintle hitch hook.
Rock the pintle eye coupler to make sure it is secured
tightly to the hitch.
Wipe the inside and outside of the pintle coupler, clean
and inspect it visually for cracks and deformations; feel
the inside of the coupler for worn spots and pits.
Be sure the coupler is secured tightly to the tongue of
the trailer. All coupler fasteners must be visibly solid
against the trailer frame.
Raise the bottom surface of the coupler to be above the
top of the pintle hitch hook. Use the tongue jackstand
to support the trailer tongue. Wood or concrete blocks
may also be used.
PAGE 44 —DRY PRIME PUMP — OPERATION MANUAL — REV. #3 (10/06/08)
Page 45
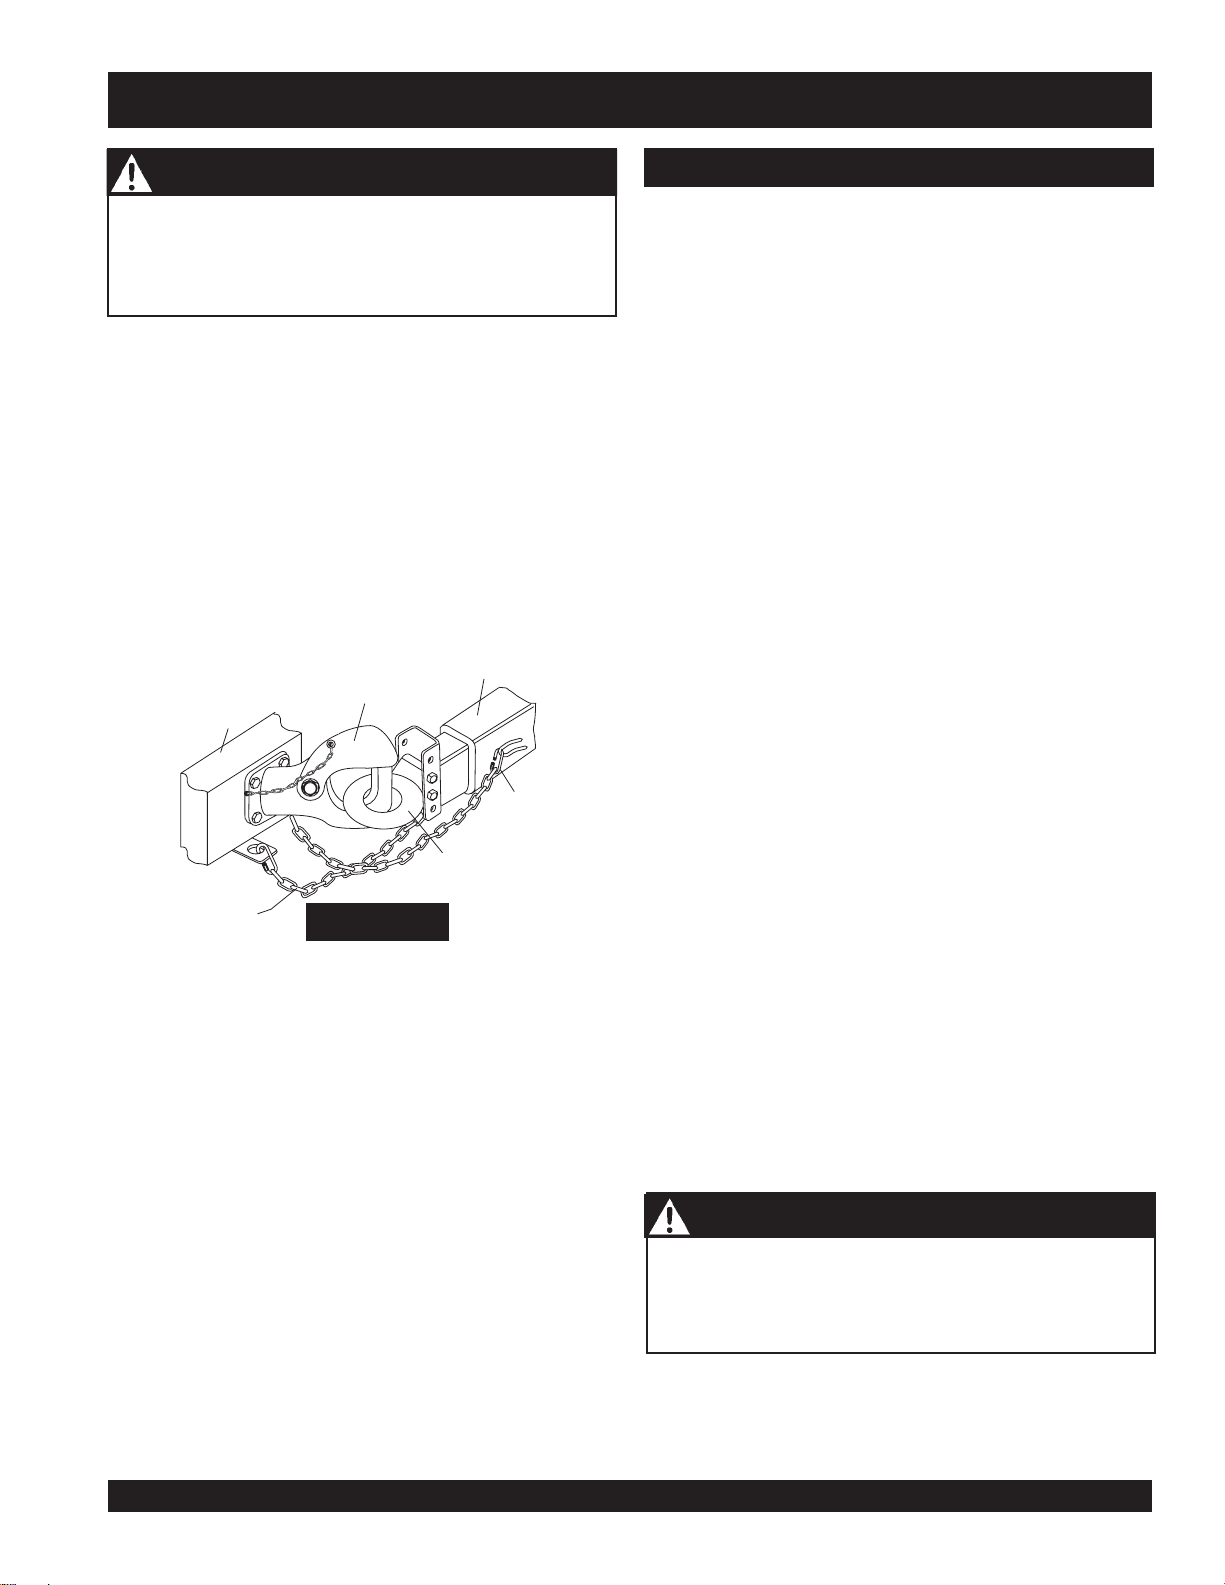
TIRE SAFETY
WARNING - Uncoupled Pintle Hitch Hook
A defective pintle hitch not properly fastened can result
in uncoupling, leading to death or serious injury.
Be sure the pintle hook is securly tighten to the tow vehicle
before coupling the trailer.
Coupling the Trailer to the Tow Vehicle (Pintle Coupler)
Slowly back up the tow vehicle so that the pintle hitch
hook is near or aligned under the pintle eye ring coupler.
Using the jackstand at the front of trailer (tongue), turn
the jackstand crank handle to raise the trailer. If the
pintle eye coupler does not line up with the pintle hitch
hook, adjust the position of the tow vehicle.
OPEN the pintle hook locking mechanism (Figure 32).
Place the hook inside the eye coupler. CLOSE the pintle
hook mechanism.
TOW
VEHICLE
PINTLE
HOOK
TRAILER
TONGUE
TIRE SAFETY
Unsafe Tires, Lug Nuts or Wheels
Trailer tires and wheels are more likely to fail than car tires
and wheels because they carry a heavier load. Therefore, it
is essential to inspect the trailer tires before each tow.
If a tire has a bald spot, bulge, cuts, is showing any cords,
or is cracked, replace the tire before towing. If a tire has
uneven tread wear, take the trailer to a dealer service center
for diagnosis.
Uneven tread wear can be caused by tire imbalance, axle
misalignment or incorrect inflation.
Tires with too little tread will not provide adequate tracking
on wet roadways and can result in loss of control, leading to
death or serious injury.
Improper tire pressure causes an unstable trailer and can
result in a tire blowout and loss of control. Therefore, before
each tow you must also check the tire pressure. Tire
pressure must be checked when tires are cold.
SAFETY CHAIN
MASTER LINK
PINTLE
RING “EYE”
SAFETY
CHAIN
IMPORTANT!
CROSS BOTH
SAFETY CHAINS
Figure 32. Safety Chain Arrangement
for a Bumper Pull Trailer (Pintle Hitch)
Insert a pin or lock through the hole in the locking
mechanism.
Be sure the pintle hook is inserted completely through
the eye ring and the locking mechanism is engaged. A
properly engaged locking mechanism will allow the coupler to raise the rear of the tow vehicle. Using the trailer
jack, test to see that you can raise the rear of the tow
vehicle by1-inch after the coupler is locked to the hitch.
Lower the trailer so that its entire tongue weight is held
by the hitch.
Allow 3 hours cool-down after driving as much as 1 mile at
40 m.p.h. before checking tire pressure. NOTE: Trailer tires
willbe inflated to higher pressures than passenger vehicle
tires.
Since trailer wheels and lug nuts (or bolts) are subjected to
greater side loads than automobile wheels, they are more
prone to loosen. Before each tow, check to make sure they
are tight.
The proper tightness (torque) for lug nuts is listed in the lug
nut tightening section of this manual. Use a torque wrench
to tighten the lug nuts. If you do not have a torque wrench,
use a lug wrench (from your tow vehicle) and tighten the
nuts as much as you can. Then have a service garage or
trailer dealer tighten the lug nuts to the proper torque.
WARNING - Lug Nut Tightening
Metal creep between the wheel rim and lug nuts will cause
rim to loosen and could result in a wheel coming off,
leading to death or serious injury.
Tighten lug nuts before each tow.
Raise the jackstand to a height where it will not interfere
with the road.
DRY PRIME PUMP — OPERATION AND PARTS MANUAL — REV. #3 (10/06/08) — PAGE 45
Page 46
TIRE SAFETY
Lug nuts are also prone to loosen after first being assembled.
When driving a new trailer (or after wheels have been
remounted), check to make sure they are tight after the first
10, 25 and 50 miles of driving and before each tow
thereafter.
Failure to perform this check can result in a wheel parting
from the trailer and a crash, leading to death or serious
injury.
Determining Load Limit of Trailer
Determining the load limits of a trailer includes more than
understanding the load limits of the tires alone. On all trailers there is a Federal certification/VIN label that is located
on the forward half of the left (road) side of the unit. This
certification/VIN label will indicate the trailer’s Gross Vehicle
Weight Rating (GVWR). This is the most weight the fully
loaded trailer can weigh. It will also provide the Gross Axle
Weight Rating (GAWR). This is the most a the axle can weigh.
WARNING - Lug Nut Loosening
Lug nuts are prone to loosen after initial installation, which
can lead to death or serious injury.
Check lug nuts for tightness on a new trailer or when
wheel(s) have been remounted after the first 10, 25 and
50 miles of driving.
WARNING - Improper Lug Nut Torque
Improper lug nut torque can cause a wheel parting from
the trailer, leading to death or serious injury.
Be sure lug nuts are tight before each tow.
There is a vehicle placard (Figure 33) located in the same
location as the certification label described above. This placard provides tire and loading information. In addition, this
placard will show a statement regarding maximum cargo
capacity.
The weight of cargo should never exceed XXX kg. Or XXX lbs
TIRE
FRONT
REAR
SPARE
TIRE AND LOADING INFORMATION
SIZE
COLD TIRE PRESSURE
SEE OWNER’S
MANUAL FOR
ADDITIONAL
INFORMATION
.
WARNING - Tire Pressure
Improper tire pressure can result in a blowout and loss of
control, which can lead to death or serious injury.
Be sure tires are inflated to pressure indicated on side
wall before towing trailer.
Figure 33. Tire and Loading Information Placard
If additional work items (hoses, tools, clamps etc.) are going to be added to the trailer, be sure they are distributed
evenly to prevent overloading front to back and side to side.
Heavy items should be placed low and as close to the axle
positions as reasonable. Too many items on one side may
overload a tire.
Excessive loads and/or underinflation cause tire
overloading and, as a result, abnormal tire flexing occurs.
This situation can generate an excessive amount of heat
within the tire. Excessive heat may lead to tire failure. It is
the air pressure that enables a tire to support the load, so
proper inflation is critical. The proper air pressure may be
found on the certification/VIN label and/or on the Tire
and Loading Information placard. This value should never
exceed the maximum cold inflation pressure stamped on
the tire.
PAGE 46 —DRY PRIME PUMP — OPERATION MANUAL — REV. #3 (10/06/08)
Page 47
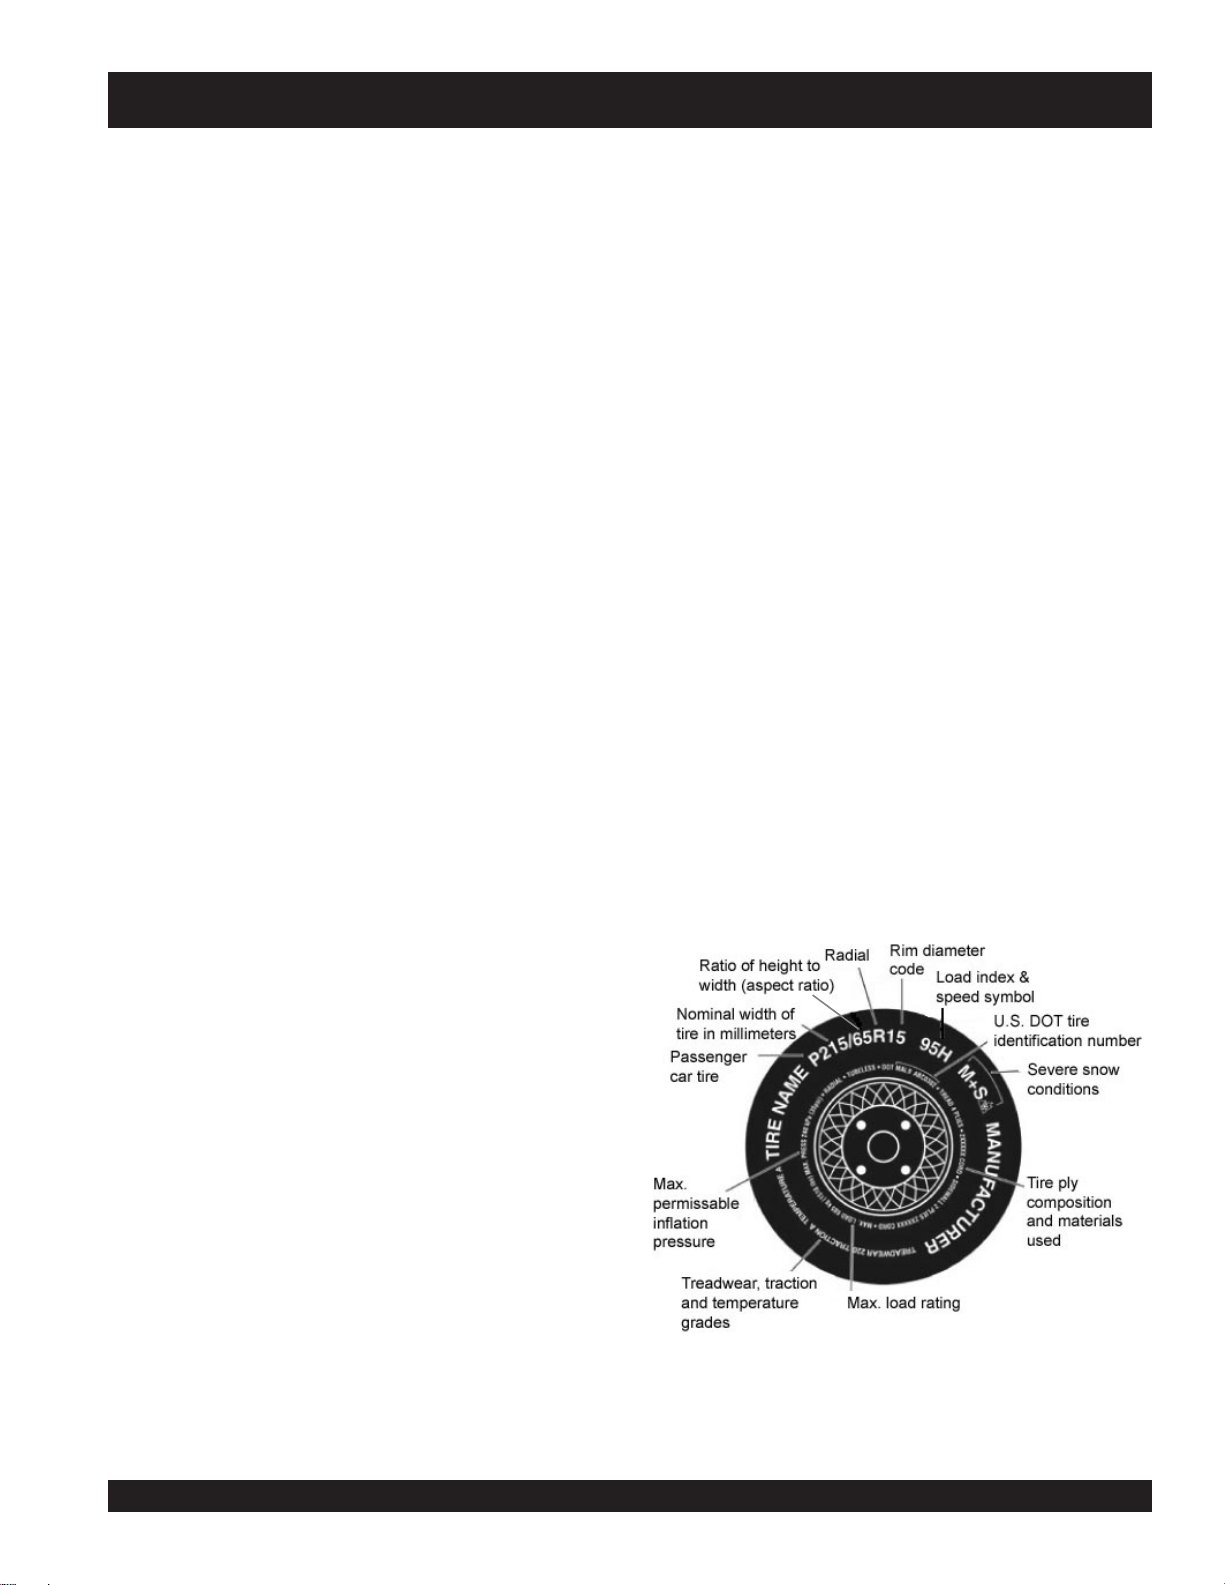
TIRE SAFETY
Step 1.
Locate the statement, “The weight of cargo should never
exceed XXX kg or XXX lbs.,” on your vehicle’s
Tire and Loading Information placard(Figure XX). This figure
equals the available amount of equipment load capacity.
Step 2.
Determine the weight of the equipment being loaded on the
tow vehicle. That weight may not safely exceed the available equipment load capacity. The trailer’s Tire Information
Placard is attached adjacent to or near the trailer’s VIN (Certification) label at the left front of the trailer (See Figure 33).
Determining Load Limit of Tow Vehicle
Step 1.
Locate the statement, “The combined weight of
occupants and cargo should never exceed XXX lbs.,” on
your vehicle’s placard.
Step 2.
Determine the combined weight of the driver and passengers who will be riding in your vehicle.
Step 3.
Subtract the combined weight of the driver and
passengers from XXX kilograms or XXX pounds.
Step 4.
The resulting figure equals the available amount of cargo and
luggage capacity. For example, if the “XXX” amount equals
1400 lbs. and there will be five 150 lb.
passengers in your vehicle, the amount of available cargo and
luggage capacity is 650 lbs. (1400-750 (5 x 150) = 650 lbs.).
Studies of tire safety show that maintaining proper tire
pressure, observing tire and vehicle load limits (not carrying
more weight in your vehicle than your tires or vehicle can
safely handle), avoiding road hazards and inspecting tires
for cuts, slashes and other irregularities are the most
important things you can do to avoid tire failure, such as
tread separation or blowout and flat tires. These actions,
along with other care and maintenance activities, can also:
Improve vehicle handling
Help protect you and others from avoidable breakdowns
and accidents.
Improve fuel economy
Increase the tire life
Use the information contained in this section to make tire
safety a regular part of your vehicle maintenance routine.
Recognize that the time you spend is minimal compared
with the inconvenience and safety consequences of a flat
tire or other tire failure.
Tire Fundamentals
Federal law requires tire manufacturers to place standardized information on the sidewall of all tires (Figure 34). This
information identifies and describes the fundamental characteristics of the tire and also provides a tire identification
number for safety standard certification and in case of a
recall.
Step 5.
Determine the combined weight of luggage and cargo being
loaded on the vehicle. That weight may not safely
exceed the available cargo and luggage capacity
calculated in Step 4.
If your vehicle will be towing a trailer, load from your trailer
will be transferred to your vehicle. Consult the tow vehicle’s
manual to determine how this weight transfer reduces the
available cargo and luggage capacity of your vehicle.
Figure 34. Standard Tire Sidewall Information
DRY PRIME PUMP — OPERATION AND PARTS MANUAL — REV. #3 (10/06/08) — PAGE 47
Page 48

TIRE SAFETY
P: The “P” indicates the tire is for passenger vehicles.
Next number: This three-digit number gives the width in
millimeters of the tire from sidewall edge to sidewall edge. In
general, the larger the number, the wider the tire.
U.S. DOT Tire Identification Number: This begins with
the letters “DOT” and indicates that the tire meets all federal
standards. The next two numbers or letters are the plant
code where it was manufactured, and the last four numbers
represent the week and year the tire was built. For example,
Next number: This two-digit number, known as the aspect
ratio, gives the tire’s ratio of height to width. Numbers of 70
or lower indicate a short sidewall for improved steering
response and better overall handling on dry pavement.
P: The “R” stands for radial. Radial ply construction of tires
has been the industry standard for the past 20 years.
Next number: This two-digit number is the wheel or rim
diameter in inches. If you change your wheel size, you will
have to purchase new tires to match the new wheel
diameter.
Next number: This two- or three-digit number is the tire’s
load index. It is a measurement of how much weight each
tire can support. You may find this information in your owner’s
manual. If not, contact a local tire dealer. Note: You may not
find this information on all tires because it is not required by
law.
M+S: The “M+S” or “M/S” indicates that the tire
the numbers 3197 means the 31st week of 1997. The other
numbers are marketing codes used at the manufacturer’s
discretion. This information is used to contact consumers
if a tire defect requires a recall.
Tire Ply Composition and Materials Used: The number
of plies indicates the number of layers of rubber-coated fabric in
the tire. In general, the greater the number of plies, the more
weight a tire can support. Tire manufacturers also must indicate the materials in the tire, which include steel, nylon, polyester, and others.
Maximum Load Rating: This number indicates the maximum load in kilograms and pounds that can be carried by
the tire.
Maximum Permissible Inflation Pressure: This number
is the greatest amount of air pressure that should ever be
put in the tire under normal driving conditions.
Uniform Tire Quality Grading Standards (UTQGS)
has some mud and snow capability. Most radial tires have
these markings; hence, they have some mud and snow capability.
Treadwear Number: This number indicates the tire’s wear
rate. The higher the treadwear number is, the longer it should
take for the tread to wear down. For example, a tire graded
Speed Rating: The speed rating denotes the speed at which
400 should last twice as long as a tire graded 200.
a tire is designed to be driven for extended periods of time.
The ratings range from 99 miles per hour (mph) to 186 mph.
These ratings are listed in Table 7. Note: You may not find
this information on all tires because it is not required by law.
Traction Letter: This letter indicates a tire’s ability to stop
on wet pavement. A higher graded tire should allow you to
stop your car on wet roads in a shorter distance than a tire
with a lower grade. Traction is graded from highest to lowest
as “AA”,”A”, “B”, and “C”.
Table 7. Speed Rating
Le tter R ating Speed Rating
Q99 mph
R106 mph
S112 mph
T118 mph
U 124 mph
H130 mph
V 149 mph
W 168* mph
Y 186* mph
Temperature Letter: This letter indicates a tire’s resistance
to heat. The temperature grade is for a tire that is inflated
properly and not overloaded. Excessive speed, underinflation
or excessive loading, either separately or in combination,
can cause heat build-up and possible tire failure. From highest to lowest, a tire’s resistance to heat is graded as “A”,
“B”, or “C”.
PAGE 48 —DRY PRIME PUMP — OPERATION MANUAL — REV. #3 (10/06/08)
Page 49

Reference Figure 35 for additional tire information for light
trucks.
Make sure your tire valves have valve caps.
ALWAYS check tire pressure on tow vehicle and trailer
before towing. Check tire pressure at least once a month.
DO NOT overload tow vehicle. Check the tire
information and loading placard for safe allowable tire
loading conditions.
Tire Repair
The proper repair of a punctured tire requires a plug for the
hole and a patch for the area inside the tire that surrounds
the puncture hole. Punctures through the tread can be
repaired if they are not too large, but punctures to the sidewall
should not be repaired
rim to be properly inspected before being plugged and patched.
TIRE SAFETY
. Tires must be removed from the
Figure 35. UTQGS Tire Information
Tires for light trucks have other markings besides those
found on the sidewalls of passenger tires.
LT: The “LT” indicates the tire is for light trucks
ST: An “ST” is an indication the tire is for trailer use only.
Max. Load Dual kg (lbs) at kPa (psi) Cold: This informa-
tion indicates the maximum load and tire pressure when the
tire is used as a dual, that is, when four tires are put on each
rear axle (a total of six or more tires on the vehicle).
Max. Load Single kg (lbs) at kPa (psi) Cold
This information indicates the maximum load and tire
pressure when the tire is used as a single.
Load Range
This information identifies the tire’s load-carrying capabilities and its inflation limits.
Tire Safety Tips
Slow down if you have to go over a pothole or other
object in the road.
or trailers.
Replacing Worn or Damaged Tires
Replace the tire before towing the trailer if the tire treads
have less than 1/16 inch depth or the telltale bands are
visible. Check inflation pressure weekly during use to insure
the maximum tire life and tread wear. A bubble, cut or bulge
in a side wall can result in a tire blowout. Inspect both side
walls of each tire for any bubble, cut or bulge; and replace a
damaged tire before towing the trailer.
Table 8 below will help pinpoint the causes and solutions of
tire wear problems.
DO NOT run over curbs or other foreign objects in the
roadway, and try not to strike the curb when parking.
Check tire inflation pressure weekly during use to insure the maximum tire life and tread wear.
DO NOT bleed air from tires when they are hot.
Inspect tires for uneven wear patterns on the tread,
cracks, foreign objects, or other signs of wear or trauma.
Remove bits of glass and foreign objects wedged in the
tread.
DRY PRIME PUMP — OPERATION AND PARTS MANUAL — REV. #3 (10/06/08) — PAGE 49
Page 50

TIRE SAFETY
WARNING - Flying Objects
Lug Nut Torque Requirements
It is extremely important to apply and maintain proper wheel
ALWAYS
removing or installing force fitted parts
DO NOT attemp to repair or modify a
wear safety glasses when
mounting torque on the trailer. Be sure to use only the fasteners matched to the cone angle of the wheel. Proper procedure for attachment of the wheels is as follows:
wheel. DO NOT install an inner-tube to
correct a leak through through the rim. If
the rim is cracked, the air pressure in the inner tube may
cause pieces of the rim to explode (break off) with great
force and cause serious eye or bodily injury.
1. Start all wheel lug nuts by hand.
2. Torque all lug nuts in sequence. See Figure 36. DO NOT
torque the wheel lug nuts all the way down. Tighten each
lug nut in 3 separate passes as defined by Table 9.
3. Check to see if the lug nuts are tight after the first 10, 25
Wheel Rims
and 50 miles of driving and before each tow thereafter.
If the trailer has been struck, or impacted, on or near the
wheels, or if the trailer has struck a curb, inspect the rims for
damage (i.e. being out of round); and replace any damaged
wheel. Inspect the wheels for damage every year, even if no
obvious impact has occurred.
Wheels, Bearings and Lug Nuts
A loose, worn or damaged wheel bearing is the most
common cause of brakes that grab.
To check wheel bearings, jack trailer and check wheels for
side-to-side looseness. If the wheels are loose, or spin with
a wobble, the bearings must be serviced or replaced. Check
inflation pressure weekly during use to insure the maximum
tire life and tread wear.Most trailer axles are built with sealed
bearings that are not serviceable. Sealed bearings must be
replacedas complete units.
eziSleehW
"2152-0204-5356-05
"3152-0204-5356-05
"4152-0206-05021-09
"5152-0206-05021-09
"6152-0206-05021-09
ssaPtsriF
SBL-TF
ssaPdnoceS
SBL-TF
STNEMERIUQEREUQROTERIT.9ELBAT
ssaPdrihT
SBL-TF
NEVER! use an pneumatic
NOTE
air gun to tighten wheel lug
nuts.
WARNING - Lug Nut Tightening
Over-tightening lug nuts will result in breaking the studs
or permanently deforming the mounting stud holes in the
wheels.
WARNING - Lug Nut Inspection
Lug nuts are prone to loosen after initial installation, which
can lead to death or serious injury. Check all wheel lug
nuts periodically.
Figure 36. Wheel Lug Nuts Tightening Sequence
PAGE 50 —DRY PRIME PUMP — OPERATION MANUAL — REV. #3 (10/06/08)
Page 51

TRAILER LIGHTS WIRING DIAGRAM
Figure 37 Trailer to Tow Vehicle Wiring Diagrams
Lights and Signals
Before each tow, check the trailer taillights, stoplights, turn
signals and any clearance lights for proper operation.
Replace any broken or burned-out lamps as necessary.
Check the wire harness for cuts, fraying or other damage. If
it needs replacing, contact your dealer.
DRY PRIME PUMP — OPERATION AND PARTS MANUAL — REV. #3 (10/06/08) — PAGE 51
WARNING - Trailer Lights
Improper operating taillights, stoplights and turn signals
can cause collisions.
Check all lights before each tow.
Page 52

NAMEPLATE AND DECALS
Figure 38 Nameplate and Decals
Engine exhaust and some of
its constituents,and somedust created
by power sanding, sawing, grinding,
drillingand otherconstructionactivities
contains chemicals known to the State
of California to cause cancer, birth
defects and other reproductive harm.
Someexamples of thesechemicals are:
Leadfrom lead-basedpaints.
Crystallinesilica frombricks.
Cementand othermasonryproducts.
Arsenicand chromiumfromchemically
treatedlumber.
Yourrisk from these exposures varies,
dependingon howoftenyou dothistype
of work.To reduce your exposure to
these chemicals: work in aALWAYS
well ventilated area, and work with
approved safety equipment, such as
dust masksthat are specially designed
to filterout microscopic particles.
Lightscan prevent trailer from being
hitby other vehicles. You must:
1. CONNECT trailer and tow vehicle
electricalconnectors.
2.CHECK all lights, taill lights, turn
signal,and brake lights.
3. DO NOT TOW if lights are not
working.
WARNING
WARNING
ALWAYSuse safety chains.
Chainshold trailer if connection fails.
Youmust:
1. CROSS chains underneath coupler.
2. ALLOW slack for trailer to turn.
3. ATTACH chain hooks securely to tow
vehicleframe.
DISCONNECTED CONNECTED
ATTACHHOOKS TO TOW VEHICLE FRAME
ENOUGHSLACK
CROSSCHAINS
FORTURNS
BRAKES ON
DO NOT TOW
BRAKES OFF
TOWABLE
Theweight of cargo should never exceed XXX kg. Or XXX lbs
TIRE
FRONT
REAR
SPARE
WARNING
ile
a
tr
e
s
u
a
c
ill
w
g
lin
p
u
o
c
n
U
u
.
Yo
le
ic
h
e
v
w
o
t
m
o
fr
e
s
o
lo
D
A
O
L
ll
a
b
t
a
th
K
C
E
H
C
.
1
u
o
c
n
a
th
r
te
a
e
r
g
r
o
s
a
E
IZ
S
ll
a
b
t
a
th
K
C
E
H
C
.
2
L
C
R
E
L
P
U
O
C
E
S
O
L
C
.
3
s
d
r
a
w
p
u
r
le
p
u
o
c
T
IF
L
.
4
m
o
r
f
te
a
r
p
a
e
s
t
o
n
ill
w
w
p
m
la
c
r
le
p
u
o
c
K
C
O
L
5
.
TIRE AND LOADING INFORMATION
SIZE
COLDTIRE PRESSURE
n
e
p
O
p
m
la
C
e
m
o
c
to
r
t:
s
u
m
e
m
a
s
is
G
A
IN
R
T
.
G
A
R
IN
T
D
A
O
L
r
le
p
r
le
p
u
.
o
c
s
a
e
m
a
s
is
ll.
a
b
P
n
o
M
A
in
P
it
t
a
th
t
s
te
to
ll.
a
b
.
k
c
p
lo
r
d
o
a
in
p
ith
C
t
if
L
SEE OWNER’S
MANUAL FOR
ADDITIONAL
INFORMATION
d
a
p
r
o
p
in
le
p
u
o
WARNING
DIESEL FUELcan cause
fire or explosion.
Stop engine before fueling
Keep cigarettes, sparks
and flame away.
DCL184
.
p
m
la
c
d
e
s
lo
C
ck
lo
ce
la
k
c
e
ch
to
r
WARNING
Tire,wheel or lug nut failure can cause loss of
control.Before towing, you must CHECK:
1.Tire pressure and tread.
2.Tires and wheels for damage.
3.Lug nuts for tightness.
Fornew and remounted wheels,
re-tightenlug nuts at the first
10,25 and 50 miles of driving.
Tires and wheels ok?
Lug Nuts
TIGHT?
PAGE 52 —DRY PRIME PUMP — OPERATION MANUAL — REV. #3 (10/06/08)
Page 53

TROUBLESHOOTING (PUMP)
Priming or Pump
Flow Problems
Check for air discharge from the elbow on
the water fill tank. The cover must be on.
Check vacuum gauge reading.
If low vacuum reading, vacuum
pump might not be producing
rated vacuum level.
Check the water level in the
hose below the fill cap. If level
is above half full on the hose,
check the vacuum pump
temperature and check for water
flow out of the vacuum pump
discharge hose. Check vacuum
pump hose for damage.
If the temperature and water flow
out of the vacuum pump is
normal, shut off the pump,
disconnect suction hose, do dry
vacuum test, and check vacuum
gauge. Check for air leaks
including at the pump seal. If the
oil level is low, add oil and redo
dry vacuum test. No oil could
indicate seal failure. Listen at the
seal oil fill cap for an air leak.
Check vacuum at vacuum pump
by disconnecting inlet hose. If
low, disassemble vacuum pump
and inspect.
If the vacuum pump water
temperature is high, or if there is
no water flow visible, clean the
filter in the water feed line. If a
filter is not installed, clean the
inlet orifice behind the vacuum
pump turbine with a wire. If the
problem persists, clean the
water reservoir by flushing with
clean water. A filter should be
added.
No
Check vacuum gauge reading.
If the vacuum reading is 20” or
more, the vacuum pump is
If the suction lift is too high,
reduce suction lift to a
maximum lift of 28 to 30 feet.
If the suction line is plugged, the
suction hose inner liner is
collapsed, the strainer is plugged
or the suction is buried or stuck
to the floor. Backflush to clean
If the strainer is clear, check the
inside of the hose for
obstructions. A collapsed hose
will return to normal without
vacuum. Replace the hose.
If the material pumped is too
thick or viscous, use a larger
diameter suction hose. If the
specific gravity is too high, move
the pump closer to the liquid.
Air
Discharge?
Low
working properly.
the strainer.
High
Check to see that the drain,
surge control and backflush
valves are closed.
Check the suction hose for loose
fittings and check that the
strainer is under the liquid.
Shut off the pump, disconnect
discharge hose and inspect the
discharge check valve for wear
or not closing completely. If the
discharge check valve is
leaking, a good piece of PVC
discharge hose will collapse
and the pump should prime.
If there is a continued failure to
prime and build vacuum,
disconnect the suction hose and
do the dry vacuum test. If the
vacuum reading is normal and
there are no leaks, the problem
is a suction hose leak. If vacuum
reading is low, block off the
pump discharge and redo dry
vacuum test. If the vacuum is
still low, look for a large air
leak. If the seal oil level is low,
add oil and redo dry vacuum
test. No oil could indicate seal
failure. Listen at seal oil fill cap
for an air leak.
Primes but the flow is low.
Reduced flow at higher heads
could indicate that the impellerwearplate clearance needs
adjusting or that there is an
obstruction in the impeller.
DRY PRIME PUMP — OPERATION AND PARTS MANUAL — REV. #3 (10/06/08) — PAGE 53
Page 54

TROUBLESHOOTING (ENGINE)
GNITOOHSELBUORTENIGNE.01ELBAT
MOTPMYSMELBORPELBISSOPNOITULOS
?noitisop"POTS"nisirevellortnocdeepS .noitisop"TRATS"otrevellortnocdeepsteS
sop"POTS"ehtnisidionelosPOTS .noitisop"TRATS"ehtotdionelospotsteS
?noiti
.yrassecenfietacirbuldnatsujdA
itcejnignihcaerleufoN .metsysleuferitnekcehC.leufddA
?pmupleufevitcefeD.pmupleufecalpeR
F .knatnaelcdnaretlifleufecalpeR
sitratsrotratstonlliwenignE
,deyaled
.revodenruteb
.tratston
nacenignehguohtla
pmetwol
lliwenigneserutarepmetwoltA
?deggolcretlifleu
?enilylppusleufytluaF .enilleufriaperroecalpeR
?wolootnoisserpmoC
?wolooterusserpliO .erusserplioenignekcehC
?yrettabevitcefeD .yret
?serutare
?pmupno
A.sevlavdnarednilyc,notsipkcehC
.launamriaperenignerepriaper
?yltcerrocgnikrowtonrotcejnileuF
lerutarepmetgnitratswoL
dedeecxetimi
otecnatsiseretauqedanisahsetarepesleuF
.leuf
.launamriaperenigne
.ytisocsivlioreporp
tabecalperroegrahC
occanirotcejniecalperroriapeR
rotsujd
htiwecnadr
dnasnoitcurtsnignitratsdlochtiwylpmoC
segremeleuf)dibrutton(raelcrehtehwkcehC
noitcejnimorfhcated(enilleufehtmorf
,rehtiedetarepesrodibrutsileufehtfI.)pmup
leufetelpmocehtniardroenigneehtpumraw
leseidedargretniwhtiwleufeR.metsysylppus
?kcihtootlioenignE
?yrettabevitcefeD.yr
?noitisopPOTSnirevelelttorhT .noitisopNURotr
sanoosspotstubserifenignE
.ffodehctiwssiretrats
uF.leufddA
gnirudflestiybspotsenignE
.noitarepolamron
?dekcolbretlifleuF.retlifleufecalpeR
?dekcolbylppusleuF .metsysleuferitneehtkcehC
dionelosleuftamelborplacirtcelE.eriw7#gnisuriapeR
?
?ytpmeknatle
?dekcolbretlifleuF.retlifleufecalpeR
?pmupleufevitcefeD.pmupleufecalpeR
olacinahceM
?liowoloteudenigneehtspots
rosnesnwodtuhserusserpli
ettabecalpeR
.yrassecen
PAGE 54 —DRY PRIME PUMP — OPERATION MANUAL — REV. #3 (10/06/08)
liofoepyttcerrochtiwesacknarcenignellifeR
.tnemnorivneretniwrof
evelelttorhtnoitisopeR
firosnesnwodtuhsliowolecalpeR.lioddA
Page 55

TROUBLESHOOTING (ENGINE)
)DEUNITNOC(GNITOOHSELBUORTENIGNE.01ELBAT
MOTPMYSMELBORPELBISSOPNOITULOS
pmeknatleuF.retlifleufecalpeR
?yt
?deggolcretlifleuF.retlifleufecalpeR
?etauqedanisignitnevknatleuF .detnevyle
dnatuptuo,rewopenignewoL
.deeps
?noitisop
dnatuptuorewopenignewoL
tsuahxekcalb,deepswol
.ekoms
snurenigneleseiddelooc-riA
daehrednilyC."TOH"yrev
)noitpo(no
E
semocpmalelatllet,taehrevo
uspac
?snoinuepiptaskaeL nethgitdnaepatsnoinuepipdedaerhtkcehC
sniniamertonseodrevellortnocdeepS
detcele
?llufootlevellioenignE ?l
?dekcolbretlifriA .retlifriaecal
?secnaraelcevlavtcerrocnI .noitacificepsenignerepsevlavtsujdA
?rotcejnitanoitcnuflaM.launameni
nigneniliohcumooT
?stnemeleel
?esacknarce
?dekcolbdetanimatnocmetsysriagnilooceritn
rosetalpediugriatagnilaesetauqedanI
gneeeS
.kcitspid
.laes
.deriuqerasnoinu
perronaelC
.saeranifgnilooc
tauqedasiknattahterusnE
.noitcaevitcerrocroflaunamenigneeeS
evellioenignetcerroC
nokramreppuotnwodlioenigneffoniarD
dnasduorhsevomer,metsysriagniloocnaelC
erusolcnednasetalpediugriatahtkcehC
thgitaekamdnatneserpllaerastnemele
DRY PRIME PUMP — OPERATION AND PARTS MANUAL — REV. #3 (10/06/08) — PAGE 55
Page 56

TROUBLESHOOTING (TRAILER BRAKES)
gnitoohselbuorTekarBegruS.11elbaT
motpmyS esuaCelbissoP noituloS
sekarBoN?deknikronekorbenilekarB.ecalperroriapeR
rB.ecalperrohsinrubeR
ediSenOotlluPsekarBrosekarBkaeW
erusserperiT.yllauqeseritllaetalfnI
sekarBgnikcoL
sekarBysioN
ekarB .sgninildnaseohswenllatsnI
sekarBgniggarD
oolstnenopmocekarB .stnenopmocecalpeR
?dezalggninileka
?dedaolrevoreliarT.thgiewtcerroC
?devoorgroderocssmurdekarB.ecalperroenihcaM
?tcerroc
?elxaemasehtnodehctamnuseriT.serithctaM
?nekorbrotneb,es
?dnuor-fo-tuosmurdekarB.ecalpeR
?detacirbulmetsyS.etacirb
?tcerrocstnenopmocekarB.tcerrocdnaecalpeR
?noitisopgnorwthgirnirotcerrocssenkcihtgninil
?diulftcerrocrodiulfekarbhguonE
uL
straprebburecalpeR
.diulf4toDhtiwllif
gnitoohselbuorTekarBcirtcelE.21elbaT
motpmyS esuaCelbissoP noituloS
?seriwnekorbrostiucricnepoynA.tcerrocdnadniF
?stiucrictrohsynA.tcerr
sekarBtnettimretnIrosekarBoN
ediSenOotlluPsekarBrosekarBkaeW
BgnikcoL
sekar
sekarBysioN
sekarBgniggarD?detsujdaleehwehtfosgn
iraeB.tsujdA
?rellortnocytluaF.tcerrocdnatseT
?snoitcennocesoolynA.riaperdnadniF
?eruceseriwdnuorG.erucesdnadn
?sgninilrostengamnolioroesaerG.ecalperronaelC
?dedorrocsnoitcennoC .noi
?devoorgroderocssmurdekarB.ecalperroenihcaM
?dezinorhcnyssekarB.tcerroC
?nekorbrotneb,esoolstnenopmocekarB .stnenopmocecalpeR
?dnuor-fo-tuosmurdekarB.ecalpeR
?detacirbulmetsyS.etacirbuL
?tcerrocstnenopmocekarB.tcerrocdnaecalpeR
ocdnadniF
iF
sorrocfoesuactcerrocdnanaelC
PAGE 56 —DRY PRIME PUMP — OPERATION MANUAL — REV. #3 (10/06/08)
Page 57

NOTES
DRY PRIME PUMP — OPERATION AND PARTS MANUAL — REV. #3 (10/06/08) — PAGE 57
Page 58

OPERATION MANUAL
HERE’S HOW TO GET HELP
PLEASE HAVE THE MODEL AND SERIAL
NUMBER
UNITED STATES
Multiquip Corporate Office MQ Parts Department
18910 Wilmington Ave. Tel. (800) 421-1244 800-427-1244 Fax: 800-672-7877
Carson, CA 90746 Fax (800) 537-3927 310-537-3700 Fax: 310-637-3284
Contact: mq@multiquip.com
Mayco Parts Warranty Department
800-306-2926 Fax: 800-672-7877 800-421-1244, Ext. 279 Fax: 310-537-1173
310-537-3700 Fax: 310-637-3284 310-537-3700, Ext. 279
Service Department Technical Assistance
800-421-1244 Fax: 310-537-4259 800-478-1244 Fax: 310-631-5032
310-537-3700
MEXICO UNITED KINGDOM
MQ Cipsa Multiquip (UK) Limited Head Office
Carr. Fed. Mexico-Puebla KM 126.5 Tel: (52) 222-225-9900 Hanover Mill, Fitzroy Street, Tel: 0161 339 2223
Momoxpan, Cholula, Puebla 72760 Mexico Fax: (52) 222-285-0420 Ashton-under-Lyne, Fax: 0161 339 3226
Contact: pmastretta@cipsa.com.mx Lancashire OL7 0TL
CANADA BRAZIL
Multiquip Multiquip
4110 Industriel Boul. Tel: (450) 625-2244 Av. Evandro Lins e Silva, 840 - grupo 505 Tel: 011-55-21-3433-9055
Laval, Quebec, Canada H7L 6V3 Fax: (450) 625-8664 Barra de Tijuca - Rio de Janeiro Fax: 011-55-21-3433-9055
Contact: jmartin@multiquip.com Contact: cnavarro@multiquip.com.br, srentes@multiquip.com.br
ON-HAND
WHEN CALLING
Contact: sales@multiquip.co.uk
© COPYRIGHT 2008, MULTIQUIP INC.
Multiquip Inc. and the MQ logo are registered trademarks of Multiquip Inc. and may not be used, reproduced, or altered without written permission. All other trademarks are
the property of their respective owners and used with permission.
This manual MUST accompany the equipment at all times. This manual is considered a permanent part of the equipment and should remain with the unit if resold.
The information and specifications included in this publication were in effect at the time of approval for printing. Illustrations, descriptions, references and technical data
contained in this manual are for guidance only and may not be considered as binding. Multiquip Inc. reserves the right to discontinue or change specifications, design or
the information published in this publication at any time without notice and without incurring any obligations.
Your Local Dealer is:
 Loading...