

Page 1

OPERATION AND PARTS MANUAL
SERIES
MODEL C-30HDNI
CONCRETE PUMP
(ZENITH FUEL INJECTION)
Revision #11 (04/03/12)
To find the latest revision of this
publication, visit our website at:
www.multiquip.com
THIS MANUAL MUST ACCOMPANY THE EQUIPMENT AT ALL TIMES.
Page 2

PROPOSITION 65 WARNING
Diesel engine exhaust and some of
PAGE 2 — MAYCO C-30HDNI (ZENITH) PUMP — OPERATION AND PARTS MANUAL — REV. #11 (04/03/12)
Page 3
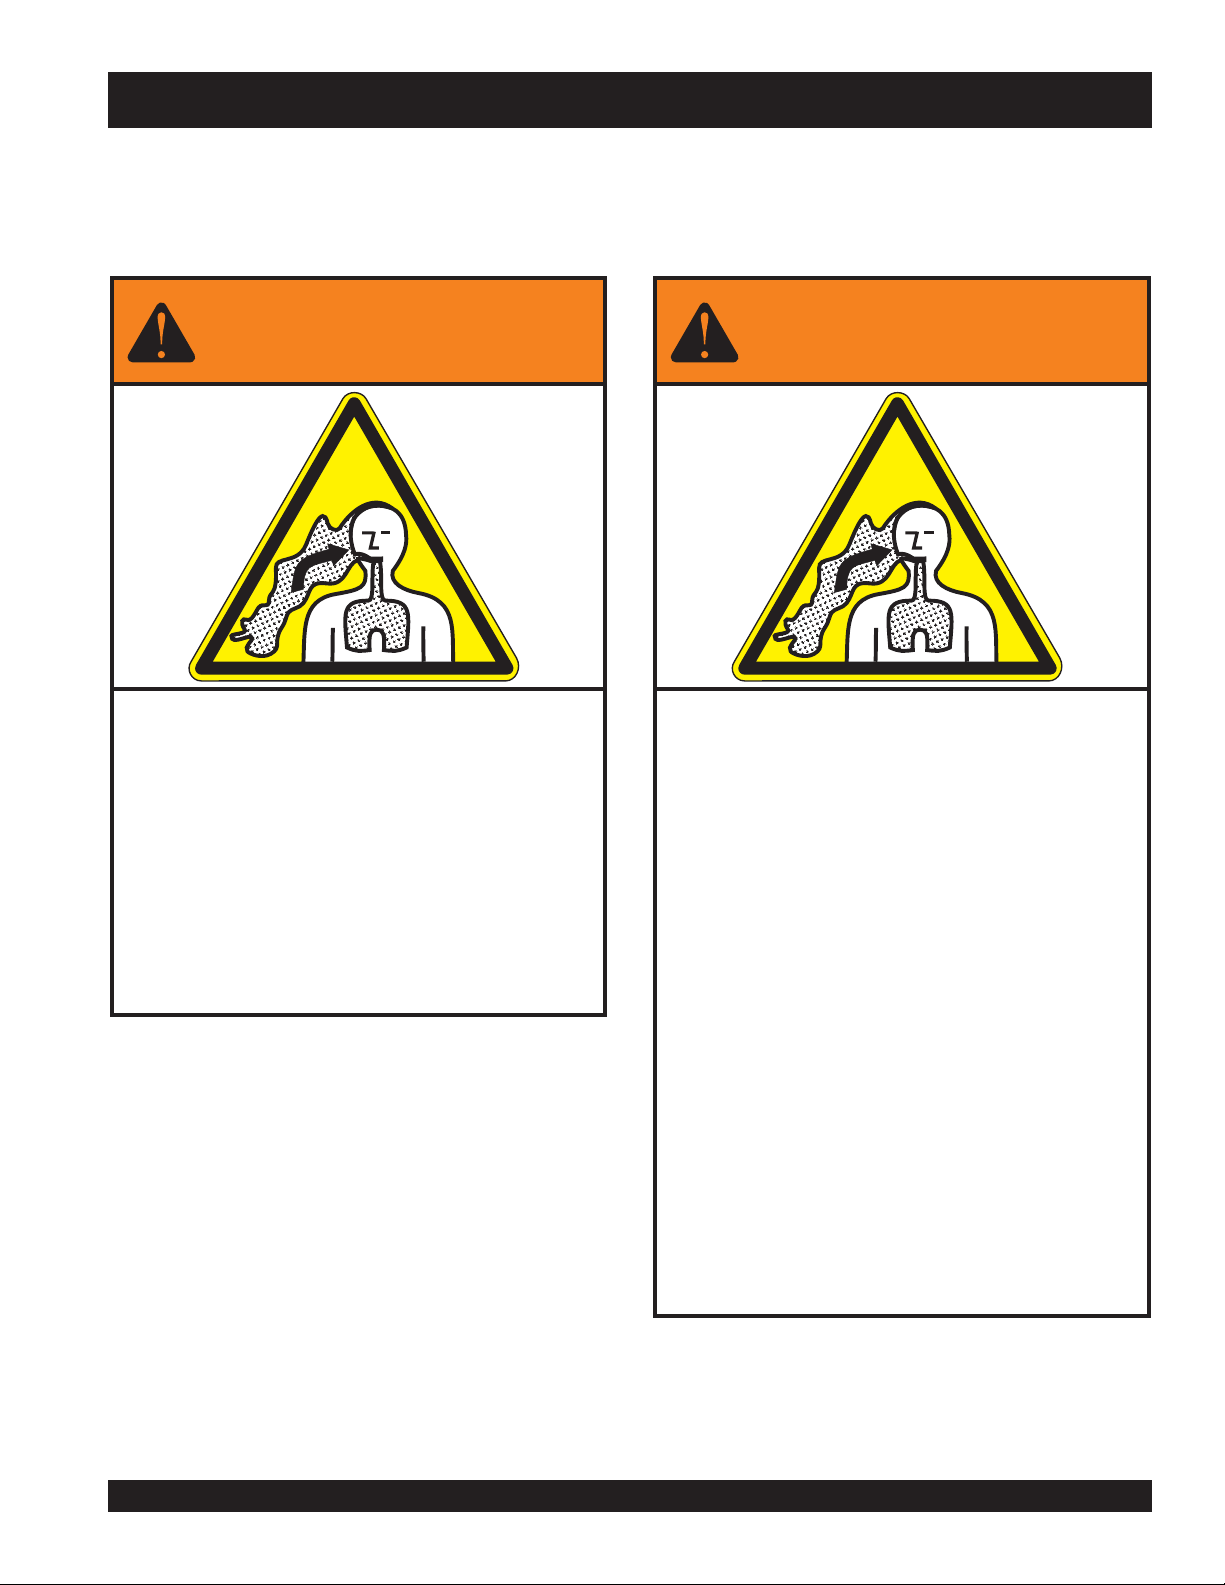
SILICOSIS/ RESPIRATORY WARNINGS
WARNING
SILICOSIS WARNING RESPIRATORY HAZARDS
Grinding/cutting/drilling of masonry, concrete, metal and
other materials with silica in their composition may give
off dust or mists containing crystalline silica. Silica is a
basic component of sand, quartz, brick clay, granite and
numerous other minerals and rocks. Repeated and/or
substantial inhalation of airborne crystalline silica can
cause serious or fatal respiratory diseases, including
silicosis. In addition, California and some other
authorities have listed respirable crystalline silica as a
substance known to cause cancer. When cutting such
materials, always follow the respiratory precautions
mentioned above.
WARNING
Grinding/cutting/drilling of masonry, concrete, metal and
other materials can generate dust, mists and fumes
containing chemicals known to cause serious or fatal
injury or illness, such as respiratory disease, cancer,
birth defects or other reproductive harm. If you are
unfamiliar with the risks associated with the particular
process and/or material being cut or the composition of
the tool being used, review the material safety data
sheet and/or consult your employer, the material
manufacturer/supplier, governmental agencies such as
OSHA and NIOSH and other sources on hazardous
materials. California and some other authorities, for
instance, have published lists of substances known to
cause cancer, reproductive toxicity, or other harmful
effects.
Control dust, mist and fumes at the source where
possible. In this regard use good work practices and
follow the recommendations of the manufacturers or
suppliers, OSHA/NIOSH, and occupational and trade
associations. Water should be used for dust
suppression when wet cutting is feasible. When the
hazards from inhalation of dust, mists and fumes cannot
be eliminated, the operator and any bystanders should
always wear a respirator approved by NIOSH/MSHA for
the materials being used.
MAYCO C-30HDNI (ZENITH) PUMP — OPERATION AND PARTS MANUAL — REV. #11 (04/03/12) — PAGE 3
Page 4

TABLE OF CONTENTS
MAYCO C-30HDNI (ZENITH)
CONCRETE PUMP
Proposition 65 Warning .............................................. 2
Silicosis/Respiratory Warnings ................................... 3
Table of contents ........................................................ 4
Parts ordering procedures .........................................5
Pump Specifications ...................................................6
Engine Specifications ................................................. 6
Pump Dimensions ......................................................7
Safety Message Alert Symbols .............................. 8-9
Rules For Safe Operation .................................. 10-12
Towing Guidelines .............................................. 14-15
Trailer Safety Guidelines .................................... 16-18
Operation And Safety Decals ................................... 20
Important Hand Signals ...........................................21
Pump Components ............................................ 22-23
Control Box Components .........................................24
Engine Components ................................................ 25
General Information .................................................26
How It Works ...................................................... 27-28
Operating Information ........................................ 29-32
Inspection ........................................................... 34-36
Startup/Shutdown Procedures ................................. 37
Maintenance (Pump) ......................................... 38-47
Engine Troubleshooting...................................... 48-49
Malfunction Indicator Diagnostic Error Codes ............. 50
Wiring Diagram (Zenith Wiring Harness) ........... 52-53
Wiring Diagram ........................................................54
Wiring Diagram (Trailer Lights) ................................ 55
Appendix —
Slump Test Procedure ........................................ 56
Concrete Mix Information ............................. 57-59
Recommended Shotcrete System ............... 60-61
Recommended Shotcrete Accessories........ 62-63
Explanation of Codes in Remarks Column ..............64
Suggested Spare Parts ............................................ 65
COMPONENT DRAWINGS
Nameplate and Decals....................................... 66-67
Compensator Piston Rod Assembly .................. 68-69
Connecting Rod - Drive Side Assembly ............. 70-71
Rocker Assembly ............................................... 72-73
Countershaft Assembly ...................................... 74-75
Crankshaft Assembly ......................................... 76-77
Manifold Assembly ............................................. 78-79
Frame Assembly ................................................ 80-81
Axle Assembly .................................................... 82-83
Muffler, Air filter And Stop Switch Assembly ...... 84-85
Clutch Assy ........................................................ 86-87
Radiator & Engine Mounting Bracket Assy......... 88-89
Radiator, Mounting And Hoses Assembly .......... 90-91
Control Box Assembly ........................................ 92-93
Battery Assembly ............................................... 94-95
Fuel Tank Assembly ........................................... 96-97
Hopper Assy....................................................... 98-99
Hood Assembly .............................................. 100 101
Lubrication Panel Assembly ........................... 102-103
Remote Control Cable Assembly ................... 104-105
Zenith Fuel Injection System ......................... 106-107
COMPONENT DRAWINGS
(NISSAN ENGINE)
Cylinder Block And Oil Pan Assembly ............ 108-109
Cylinder Head And Valve Cover Assembly .... 110-111
Crankcase Ventilation Assembly .................... 112-113
Piston, Crankshaft And Flywheel Assembly... 114-115
Camshaft And Valve Mechanism Assembly ... 116-117
Manifold Assembly ......................................... 118-119
Oil Pump Assembly ........................................ 120-121
Exhaust Tube and Muffler Assembly .............. 122-123
Water Pump Assembly ................................... 124-125
Ignition System Assembly .............................. 126-127
Distributor Assembly ...................................... 128-129
Alternator Assembly ....................................... 130-131
Terms and Conditions Of Sale — Parts .................132
Mayco Pump Warranty ........................................... 133
NOTE
PAGE 4 — MAYCO C-30HDNI (ZENITH) PUMP — OPERATION AND PARTS MANUAL — REV. #11 (04/03/12)
Specification and part
number are subject to change
without notice.
Page 5

PARTS ORDERING PROCEDURES
Ordering parts has never been easier!
Choose from three easy options:
January 1
Effective:
st
, 2006
Best Deal!
Order via Internet (Dealers Only):
Order parts on-line using Multiquip’s SmartEquip website!
N View Parts Diagrams
N Order Parts
N Print Specification Information
Goto www.multiquip.com and click on
Order Parts
Order via Fax (Dealers Only):
All customers are welcome to order parts via Fax.
Domestic (US) Customers dial:
1-800-6-PARTS-7 (800-672-7877)
Non-Dealer Customers:
Contact your local Multiquip Dealer for
parts or call 800-427-1244 for help in
locating a dealer near you.
to log in and save!
Order via Phone:
If you have an MQ Account, to obtain a Username
and Password, E-mail us at: parts@multiquip.
com.
To obtain an MQ Account, contact your
District Sales Manager for more information.
Use the internet and qualify for a 5% Discount
on Standard orders for all orders which include
complete part numbers.*
Note: Discounts Are Subject To Change
Fax your order in and qualify for a 2% Discount
on Standard orders for all orders which include
complete part numbers.*
Note: Discounts Are Subject To Change
Domestic (US) Dealers Call:
1-800-427-1244
International Customers should contact
their local Multiquip Representatives for
Parts Ordering information.
When ordering parts, please supply:
R Dealer Account Number
R Dealer Name and Address
R Shipping Address (if different than billing address)
R Return Fax Number
R Applicable Model Number
R Quantity, Part Number and Description of Each Part
NOTICE
All orders are treated as Standard Orders and will
ship the same day if received prior to 3PM PST.
R Specify Preferred Method of Shipment:
UPS/Fed Ex DHL
N Priority One Tr uck
N Ground
N Next Day
N Second/Third Day
www.multiquip.com
WE ACCEPT ALL MAJOR CREDIT CARDS!
MAYCO C-30HDNI (ZENITH) PUMP — OPERATION AND PARTS MANUAL — REV. #11 (04/03/12) — PAGE 5
Page 6
C-30HDNI (ZENITH) PUMP — PUMP SPECIFICATIONS
SNOITACIFICEPSPMUPNDH03-C.1ELBAT
epyTpmuPnotsiPgnitacorpiceR
etaRgnipmuP*ruohrep.sdy.uc52otpU
thgieHgnipmuPlacitreV)m37.54(.tf051otpU
iDgnipmuPlatnoziroH*)m251-221(.tf005-004
ecnats
eziSetagerggAmumixaM)mm7.21(sunim.ni2/1
yticapaCreppoH.cte.tf.uc6
esoHlairetaM
thgieW)gK833,1(.sbl059,2
xoBlioebuL)sretiL5.62(snollaG7
lortnoCetomeRd
eziSeriT
*
.snoitidnocetisbojdnadesu
"2/1-2ro"2
)mm5.36ro8.05(
radnatSelbac.tf521
"41x"53.7
)mm653x781(
ezisenil,pmuls,ngisedximnognidnepedyravlliwtuptuoemuloV
SNOITACIFICEPSENIGNE.2ELBAT
ledoMENIGNELAIRTSUDNI51ANASSIN
epyT
ekortSXeroB
oitaRnoisserpmoC1:0.9
tnemecalpsiD)cc784,1(.uc487.09
tuptuOsuounitnoC.M.
yticapaCknaTleuF)sretil35(snollaG.S.U41.xorppA
epyTleuFenilosaGdedaelnU
enignE
thgieWteNyrD).gK301(sbl722
yticapaCliOebuL)tq8/
deepSenignE
daoLlluF
deepSenignE
eldIlluF
renaelCriAepyTnroHriA
noitacirbuLenignE
dohteMgnitratStr
gulPkrapSSE4B
paGgulPkrapS
)HxWxL(noisnemiD
oh
.ni32.3x99.2
)mm28x67(
P.R0063/.P.H93
3-3(sretil2.3
001±mpr578
atScirtcelE
.ni9.0-8.0
)mm530.0-130.0(
675x8.035x8.725(
ednilycelgnis,evlavdaehrevo,ekorts4
enigneenilosagtfahslatnozir
)05-/+mpr0572daoLoN(001±mpr0562
)001-/+mpr0572daoL(
)edarGliO(03-W01EAS
)ssalCecivreS(FSroGS
.ni96.22x09.02x87.02
)mm3.
PAGE 6 — MAYCO C-30HDNI (ZENITH) PUMP — OPERATION AND PARTS MANUAL — REV. #11 (04/03/12)
Page 7
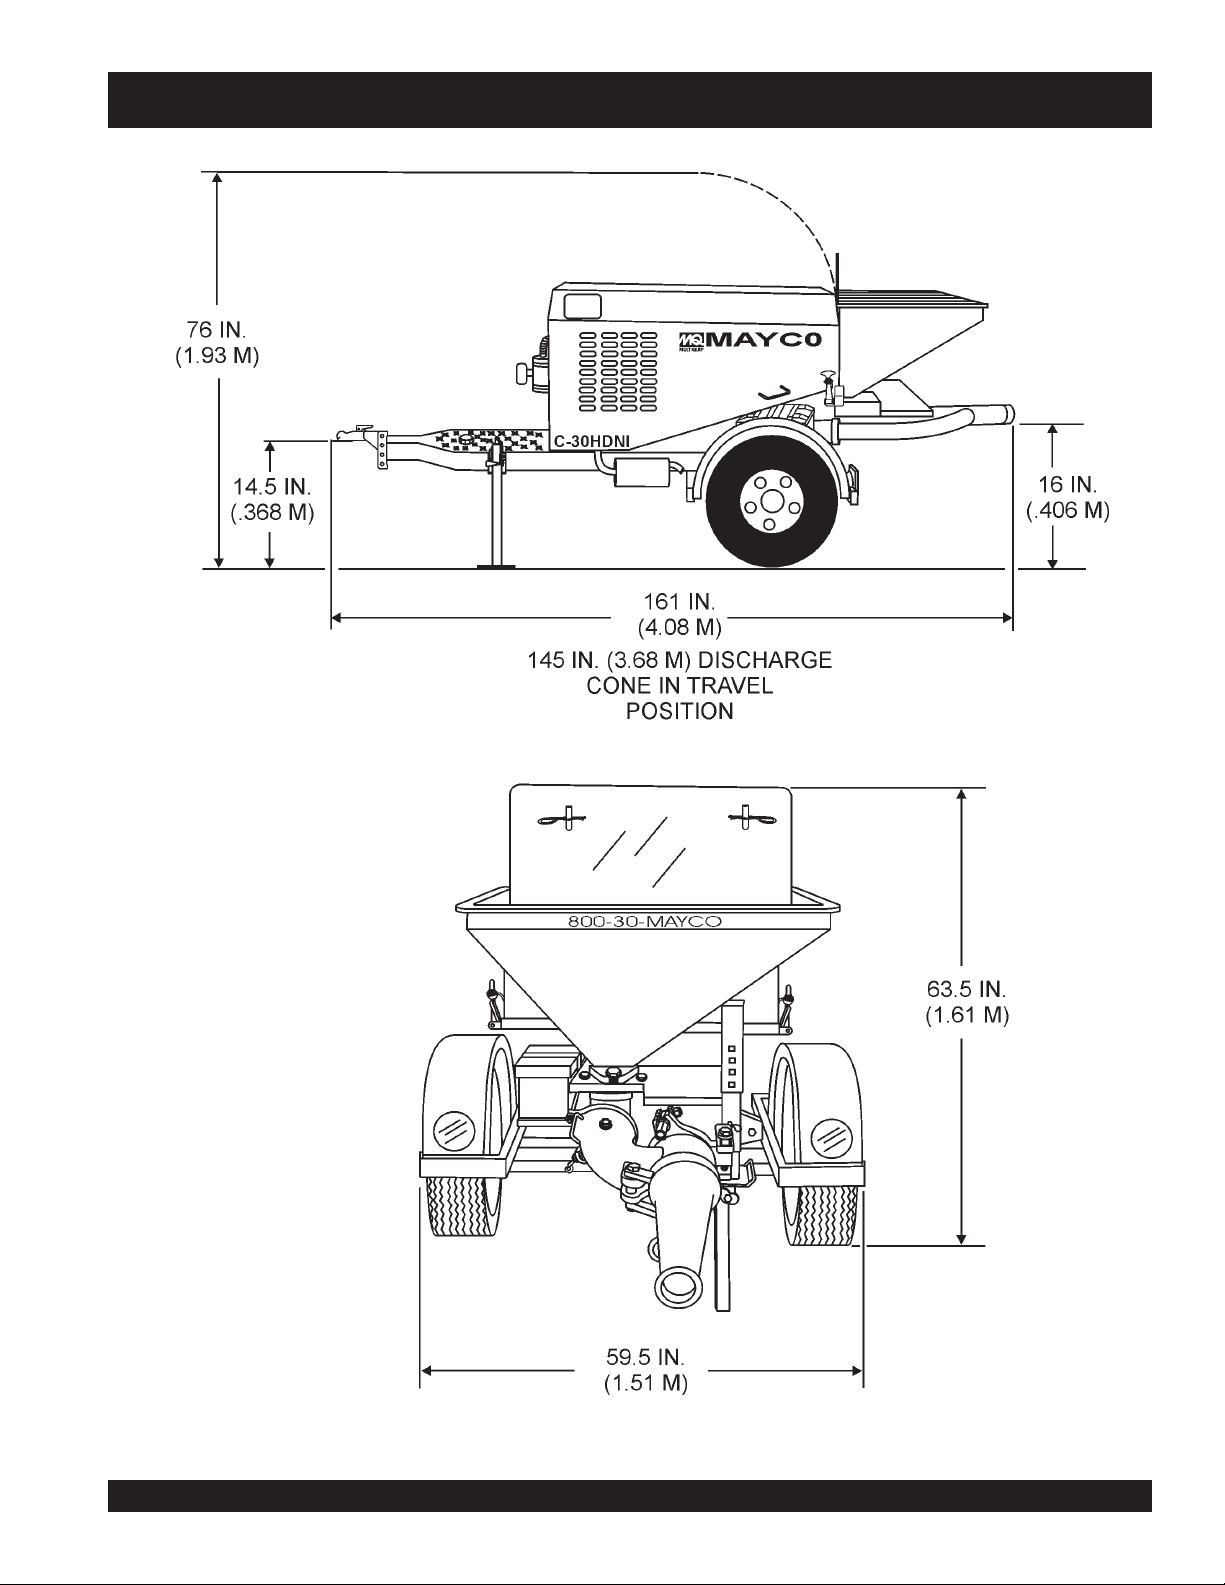
C-30HDNI (ZENITH) PUMP — PUMP DIMENSIONS
Figure 1. C-30HDNI Concrete Pump Dimensions
MAYCO C-30HDNI (ZENITH) PUMP — OPERATION AND PARTS MANUAL — REV. #11 (04/03/12) — PAGE 7
Page 8
C-30HDNI (ZENITH) PUMP — SAFETY MESSAGE ALERT SYMBOLS
FOR YOUR SAFETY AND THE SAFETY OF OTHERS!
Safety precautions should be followed at all times when operating
this equipment. Failure to read and understand the Safety
Messages and Operating Instructions could result in injury to
yourself and others.
This Owner's Manual has been
NOTE
Refer to the engine manufacturers instructions for data relative
to its safe operation.
Before using this pump, ensure that the operating individual
has read and understands all instructions in this manual.
developed to provide complete
instructions for the safe and efficient
operation of the Mayco Model
C-30HDNI Concrete Pump.
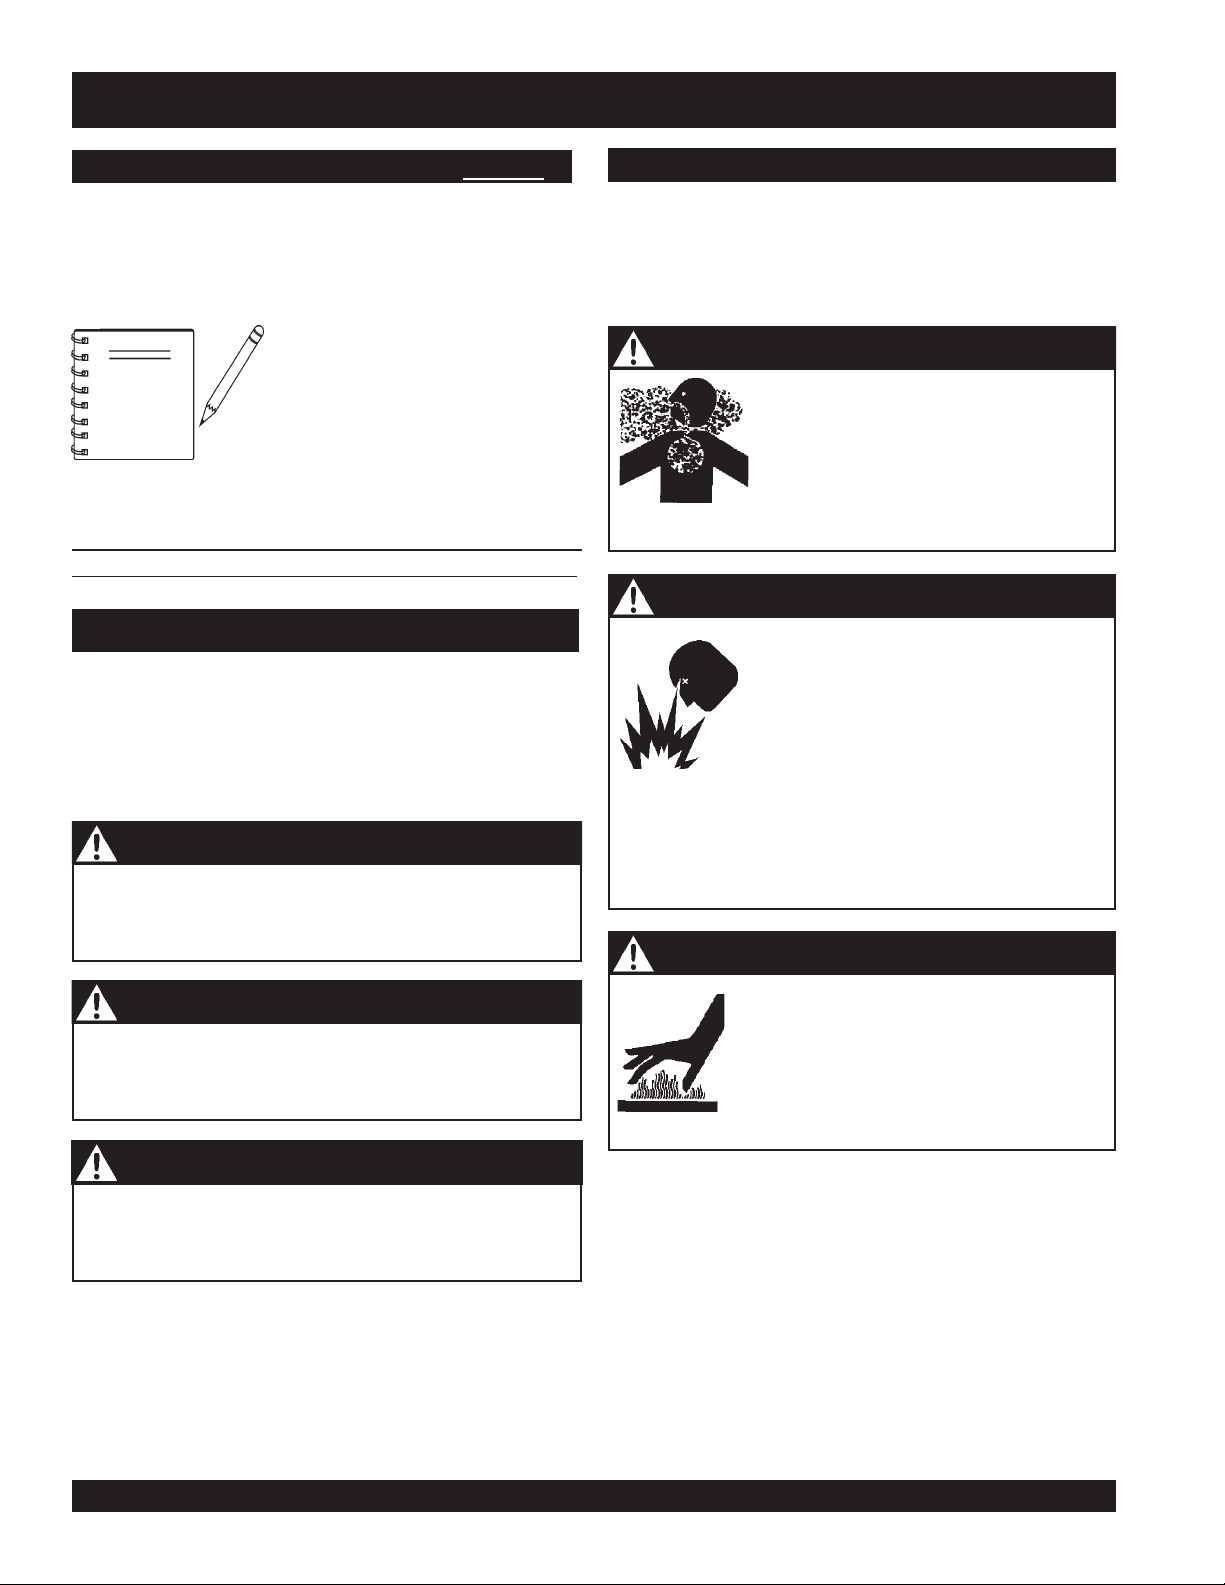
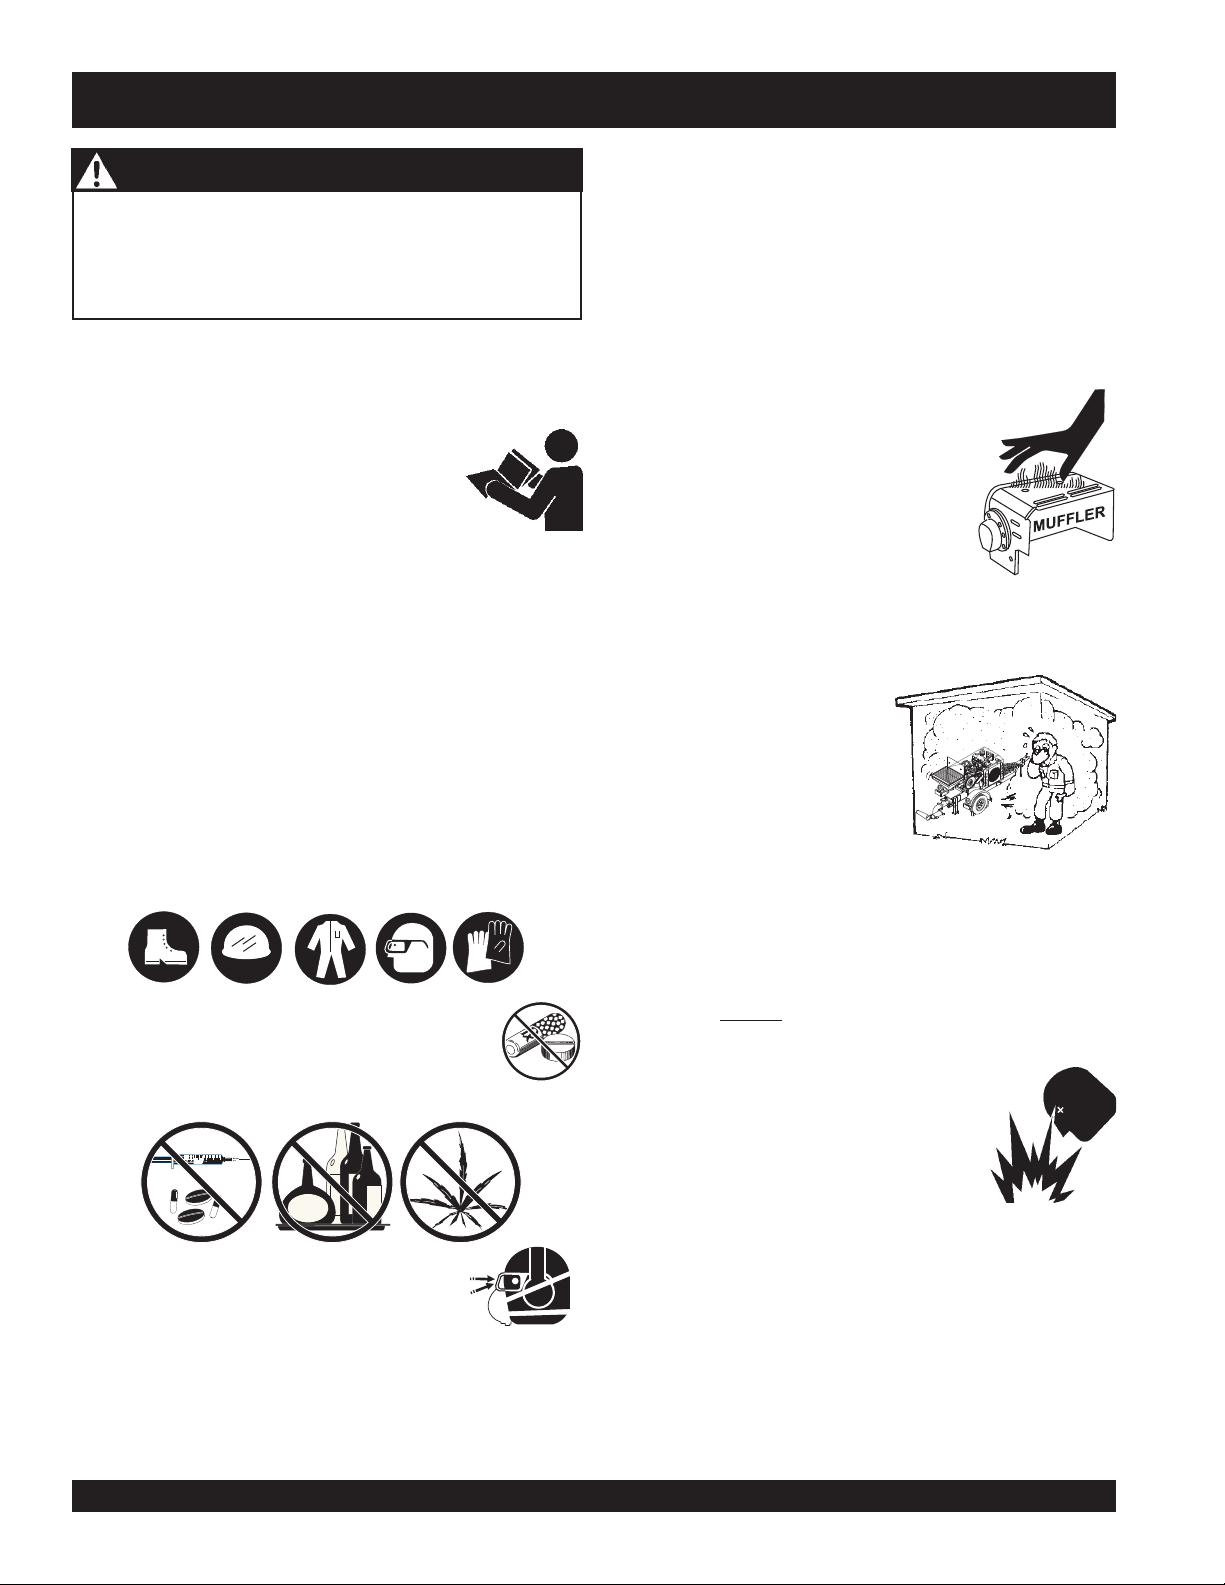
HAZARD SYMBOLS
Potential hazards associated with operation of the pump will be
referenced with Hazard Symbols which appear throughout this
manual, and will be referenced in conjunction with Safety
Message Alert Symbols. Some examples are listed below:
WARNING - LETHAL EXHAUST GASES
structure that does not provide ample free flow air.
WARNING - EXPLOSIVE FUEL
SAFETY MESSAGE ALERT SYMBOLS
The three (3) Safety Messages shown below will inform you
about potential hazards that could injure you or others. The Safety
Messages specifically address the level of exposure to the
operator, and are preceded by one of three words: DANGER,
WARNING, or CAUTION.
could ignite if it comes into contact with hot engine parts or
DANGER
You WILL be KILLED or SERIOUSLY injured if you do
not follow directions.
sparks from the ignition system. Store fuel in approved
containers, in well-ventilated areas and away from sparks and
flames. NEVER use fuel as a cleaning agent.
Gasoline engine exhaust gases contain
poisonous carbon monoxide. This gas is
colorless and odorless, and can cause
death if inhaled. NEVER operate this
equipment in a confined area or enclosed
Gasoline
vapors can cause an explosion if ignited.
DO NOT start the engine near spilled fuel
or combustible fluids. DO NOT fill the fuel
tank while the engine is running or hot.
DO NOT overfill tank, since spilled fuel
is extremely flammable, and its
WARNING - BURN HAZARDS
WARNING
You COULD be KILLED or SERIOUSLY injured if you
do not follow directions.
Engine components can generate extreme
heat. To prevent burns, DO NOT touch these
areas while the engine is running or
immediately after operations. NEVER operate
the engine with heat shields or heat guards
removed.
CAUTION
You CAN be injured if you do not follow directions
PAGE 8 — MAYCO C-30HDNI (ZENITH) PUMP — OPERATION AND PARTS MANUAL — REV. #11 (04/03/12)
Page 9

C-30HDNI (ZENITH) PUMP — SAFETY MESSAGE ALERT SYMBOLS
WARNING - ROTATING PARTS
NEVER operate equipment with covers,
or guards removed. Keep
hair
and clothing away from all moving
parts to prevent injury.
fingers, hands
CAUTION - ACCIDENTAL STARTING
ALWAYS place the Engine ON/OFF switch
in the OFF position and remove the ignition
key when the pump is not in use.
CAUTION - OVER-SPEED CONDITIONS
NEVER tamper with the factory settings of
the engine governor or settings. Personal
injury and damage to the engine or
equipment can result if operating in speed
ranges above maximum allowable.
CAUTION - RESPIRATORY HAZARDS
,
ALWAYS wear approved
protection.
respiratory
CAUTION - SIGHT AND HEARING HAZARDS
ALWAYS wear approved
hearing
protection.
eye
and
CAUTION - EQUIPMENT DAMAGE MESSAGES
Other important messages are provided throughout this manual
to help prevent damage to your concrete pump, other property,
or the surrounding environment.
NOTE
This
pump
, other property, or the
surrounding environment could
be damaged if you do not follow
instructions.
MAYCO C-30HDNI (ZENITH) PUMP — OPERATION AND PARTS MANUAL — REV. #11 (04/03/12) — PAGE 9
Page 10
C-30HDNI (ZENITH) PUMP — RULES FOR SAFE OPERATION
■
DANGER - Read This Manual!
Failure to follow instructions in this manual may lead to serious
injury or even death! This equipment is to be operated by
trained and qualified personnel only! This equipment is for
industrial use only.
The following safety guidelines should always be used when
operating the Mayco C-30HDNI Concrete Pump:
General Safety
■
DO NOT operate or service this equipment
before reading this entire manual.
■
ALWAYS read, understand, and follow
procedures in Operator’s Manual before
attempting to operate equipment.
■
ALWAYS be sure the operator is familiar with proper safety
precautions and operations techniques before using pump
■
This equipment should not be operated by persons under 18
years of age.
■
ALWAYS read, understand and follow procedures in
Operator’s Manual before attempting to operate equipment.
■
ALWAYS be sure the operator is familiar with proper safety
precautions and operations techniques before using pump
■
NEVER operate this equipment without proper protective
clothing, shatterproof glasses, steel-toed boots and other
protective devices required by the job.
Whenever necessary, replace nameplate, operation and safety
decals when they become difficult read.
■
Manufacture does not assume responsibility for any accident
due to equipment modifications.
■
NEVER use accessories or attachments, which are not
recommended by Multiquip for this equipment. Damage to the
equipment and/or injury to user may result.
■
NEVER touch the hot exhaust manifold, muffler or cylinder.
Allow these parts to cool before servicing engine or
concrete pump.
■
High Temperatures – Allow the engine
to cool before adding fuel or performing
service and maintenance functions.
Contact with
serious burns.
■
The engine section of this concrete pump requires an
adequate free flow of cooling air.
pump in any enclosed or narrow area where free flow of the
air is restricted. If the air flow is
restricted it will cause serious
damage to the concrete pump
or engine and may cause injury
to people. Remember the
concrete pump's engine gives
off
DEADLY
gas.
■
ALWAYS refuel in a well-ventilated area, away from sparks
and open flames.
hot!
components can cause
NEVER
carbon monoxide
operate the concrete
■
ALWAYS use extreme caution when working with flammable
liquids. When refueling, stop the engine and allow it to cool.
■
NEVER operate this equipment when not feeling
well due to fatigue, llness or taking medicine.
■
NEVER operate this equipment under the
influence of
drugs
or
alcohol
.
DO NOT
explosion could result from fuel vapors, or if fuel is spilled on
a hot engine.
■
NEVER operate the concrete pump in an
explosive atmosphere or near
combustible materials. An explosion or fire
could result causing severe
smoke
around or near the machine. Fire or
bodily harm
or even death.
■
Topping-off to filler port is dangerous, as it tends to spill fuel.
■
ALWAYS wear proper respiratory (mask),
hearing and eye protection equipment when
operating the concrete pump.
PAGE 10 — MAYCO C-30HDNI (ZENITH) PUMP — OPERATION AND PARTS MANUAL — REV. #11 (04/03/12)
■
Stop the engine when leaving the concrete pump unattended.
■
DO NOT leave the pump unattended. Use chock blocks if
parking pump on a grade.
■
Maintain this equipment in a safe operating condition at all
times.
Page 11

C-30HDNI (ZENITH) PUMP — RULES FOR SAFE OPERATION
■
CAUTION must always be observed while servicing this
pump. Rotating parts can cause injury if contacted.
■
ALWAYS stored the pump in a clean, dry location out of the
reach of children.
■
ALWAYS use extreme care when operating near obstructions,
on slippery surfaces, grades and side slopes.
■
Unauthorized equipment modifications will void all
warranties.
■
Refer to the
questions or information.
■
Before start-up, check the hopper and remove all obstructions.
■
Keep all hands out of the hopper when the engine is running.
■
DO NOT operate the pump with the hood open.
■
Replace any worn or damaged pump components
immediately.
■
ALWAYS turn the engine
before performing maintenance.
■
ALWAYS make sure pump is correctly secured to the trailer.
Check all supports attaching the pump to the trailer and make
sure they are tight.
■
ALWAYS make sure that the pump's trailer is placed on solid
level ground so that it cannot slide or shift around, endangering
workers. Place blocks under the trailer's bumper to make it
level (prevents tipping), and use a chocked block underneath
the wheels to prevent rolling. Also keep the immediate area
free of bystanders.
Engine Owner's Manual
OFF
for engine technical
before performing must be
■
A copy of this manual shall accompany the pump at all times.
■
DO NOT use worn out hoses or couplings; inspect daily.
■
DO NOT disconnect the hose couplings or nozzle while they
are under pressure. Relieve the pressure by manually
swinging the clamp arm latch handle to the first open position
at the exhaust cone outlet.
■
The pump should NEVER be towed in excess of 45 MPH (or
less depending on road conditions).
■
If hose lines are
kinked
pressure could straighten out the kink or force out the blockage.
This rapid surge of material could cause the lines to
whip
■
Inspect the hose lines at all times
■
DO NOT tow the pump with the hopper full of material.
■
DO NOT tow the pump with the hoses attached.
■
NEVER disconnect any
These devices are intended for operator safety. Disconnection
of these devices can cause severe injury, bodily harm or even
death! Disconnection of any of these devices will void all
warranties.
blocked
when starting up or during pumping cycle, the pump
for any reason, or if the lines are
move or
in a manner that could cause injury to personnel.
emergency or safety devices
.
■
Before towing, check the hitch and secure the safety chain to
the towing vehicle. Also check for proper tire pressure.
■
Tow only with a vehicle and hitch rated to tow a 2,950 lbs.
(1,338 Kg) load.
■
If pump is equipped with ball hitch coupler, use only a 2” all
steel ball rated for a minimum of 5000 lbs. Use a 1” hardened
steel pull pin, if the pump is equipped with a pin hitch.
■
ALWAYS check the machine for loosened threads or bolts
before starting.
MAYCO C-30HDNI (ZENITH) PUMP — OPERATION AND PARTS MANUAL — REV. #11 (04/03/12) — PAGE 11
Page 12
C-30HDNI (ZENITH) PUMP — RULES FOR SAFE OPERATION
Maintenance Safety
■
NEVER lubricate components or attempt service on a running
machine.
■
ALWAYS allow the machine a proper amount of time to cool
before servicing.
■
Keep the machinery in proper running condition.
■
Fix damage to the machine immediately and always replace
broken parts.
■
Dispose of hazardous waste properly. Examples of potentially
hazardous waste are used motor oil, fuel and fuel filters.
■
DO NOT use food or plastic containers to dispose of
hazardous waste.
■
DO NOT pour waste, oil or fuel directly onto the ground,
down a drain or into any water source.
Lifting
■
The pump has an operating weight of approximately 2,950
lbs. (1,338 Kg). Use lifting equipment capable of lifting this
weight.
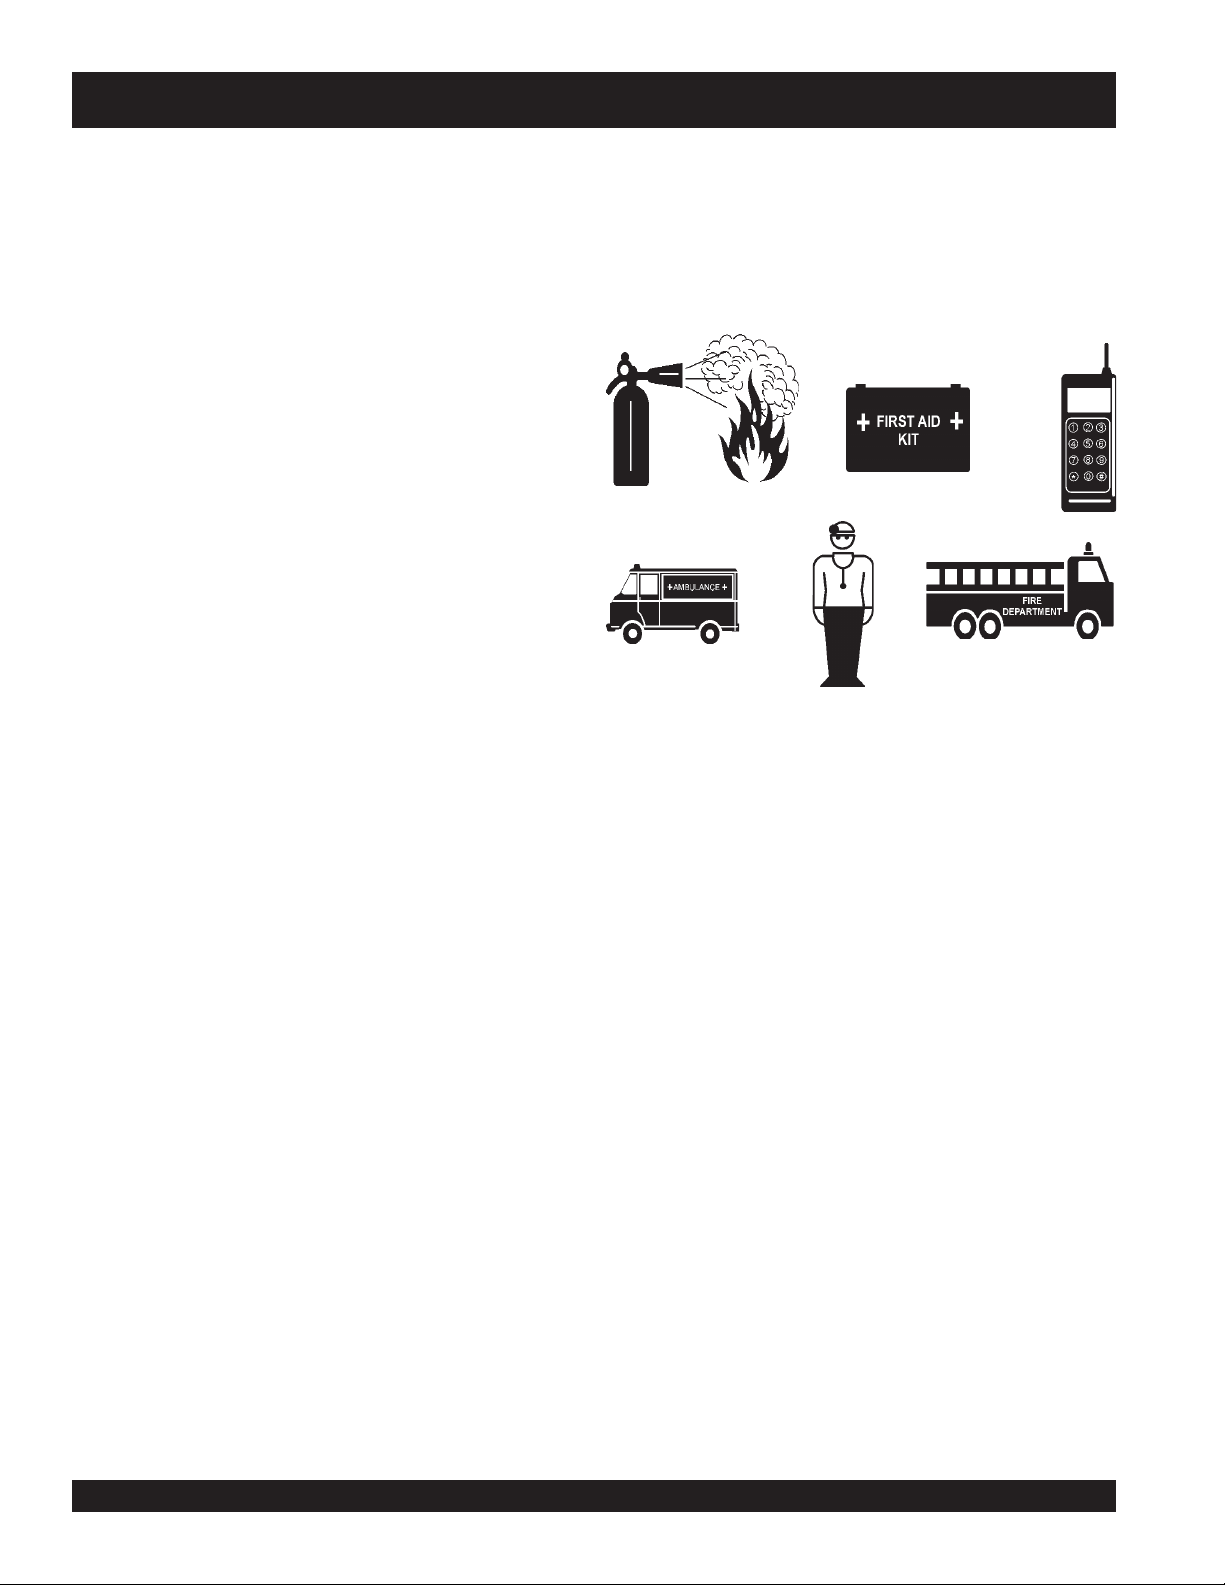
Emergencies
■
ALWAYS know the location of the nearest
and
first aid kit
Also know the phone numbers of the nearest
doctor
invaluable in the case of an emergency.
and
. Know the location of the nearest telephone.
fire department
. This information will be
fire extinguisher
ambulance
,
PAGE 12 — MAYCO C-30HDNI (ZENITH) PUMP — OPERATION AND PARTS MANUAL — REV. #11 (04/03/12)
Page 13

NOTES
MAYCO C-30HDNI (ZENITH) PUMP — OPERATION AND PARTS MANUAL — REV. #11 (04/03/12) — PAGE 13
Page 14

C-30HDNI (ZENITH) PUMP — TOWING GUIDELINES
Towing Safety Precautions
CAUTION - Local Towing Regulations
Check with your county or state safety towing regulations
department before towing your concrete pump.
To reduce the possibility of an accident while transporting the
pump on public roads, always make sure that the trailer and the
towing vehicle are in good operating condition and both units
are mechanically sound.
The following list of suggestions should be used when towing
the pump:
■
Make sure that the hitch and coupling of the towing vehicle
are rated equal to, or greater than the trailer "gross vehicle
weight rating" (GVWR).
■
ALWAYS inspect the hitch and coupling for wear. NEVER
tow the light tower's trailer with defective hitches, couplings,
chains etc.
■
CHECK the tire air pressure on both the towing vehicle and
the trailer. Also check the tire tread wear on both vehicles.
■
ALWAYS make sure the trailer section of the pump is
equipped with a "Safety Chain".
■
ALWAYS attach trailer's safety chain to frame of towing
vehicle.
■
ALWAYS make sure that the vehicle and trailer directional,
backup, brake, and trailer lights are connected properly and
are working properly.
■
Remember in most cases the maximum speed unless
otherwise posted for highway towing is 45 MPH, however
before towing your pump, check your local state, and county
vehicle towing requirements. Recommended off-road towing
is not to exceed 10 MPH or less depending on type of terrain.
■
Place
chocked blocks
while parked.
■
Depending on soil conditions and location it may be
necessary to place
bumper to prevent
■
Inflate tires to correct pressure, inspect tires for cuts, and
excessive wear. See Table 3 (Tire Wear Troubleshooting).
underneath wheel to prevent
support blocks
tipping
, while parked.
underneath the trailer's
rolling,
■
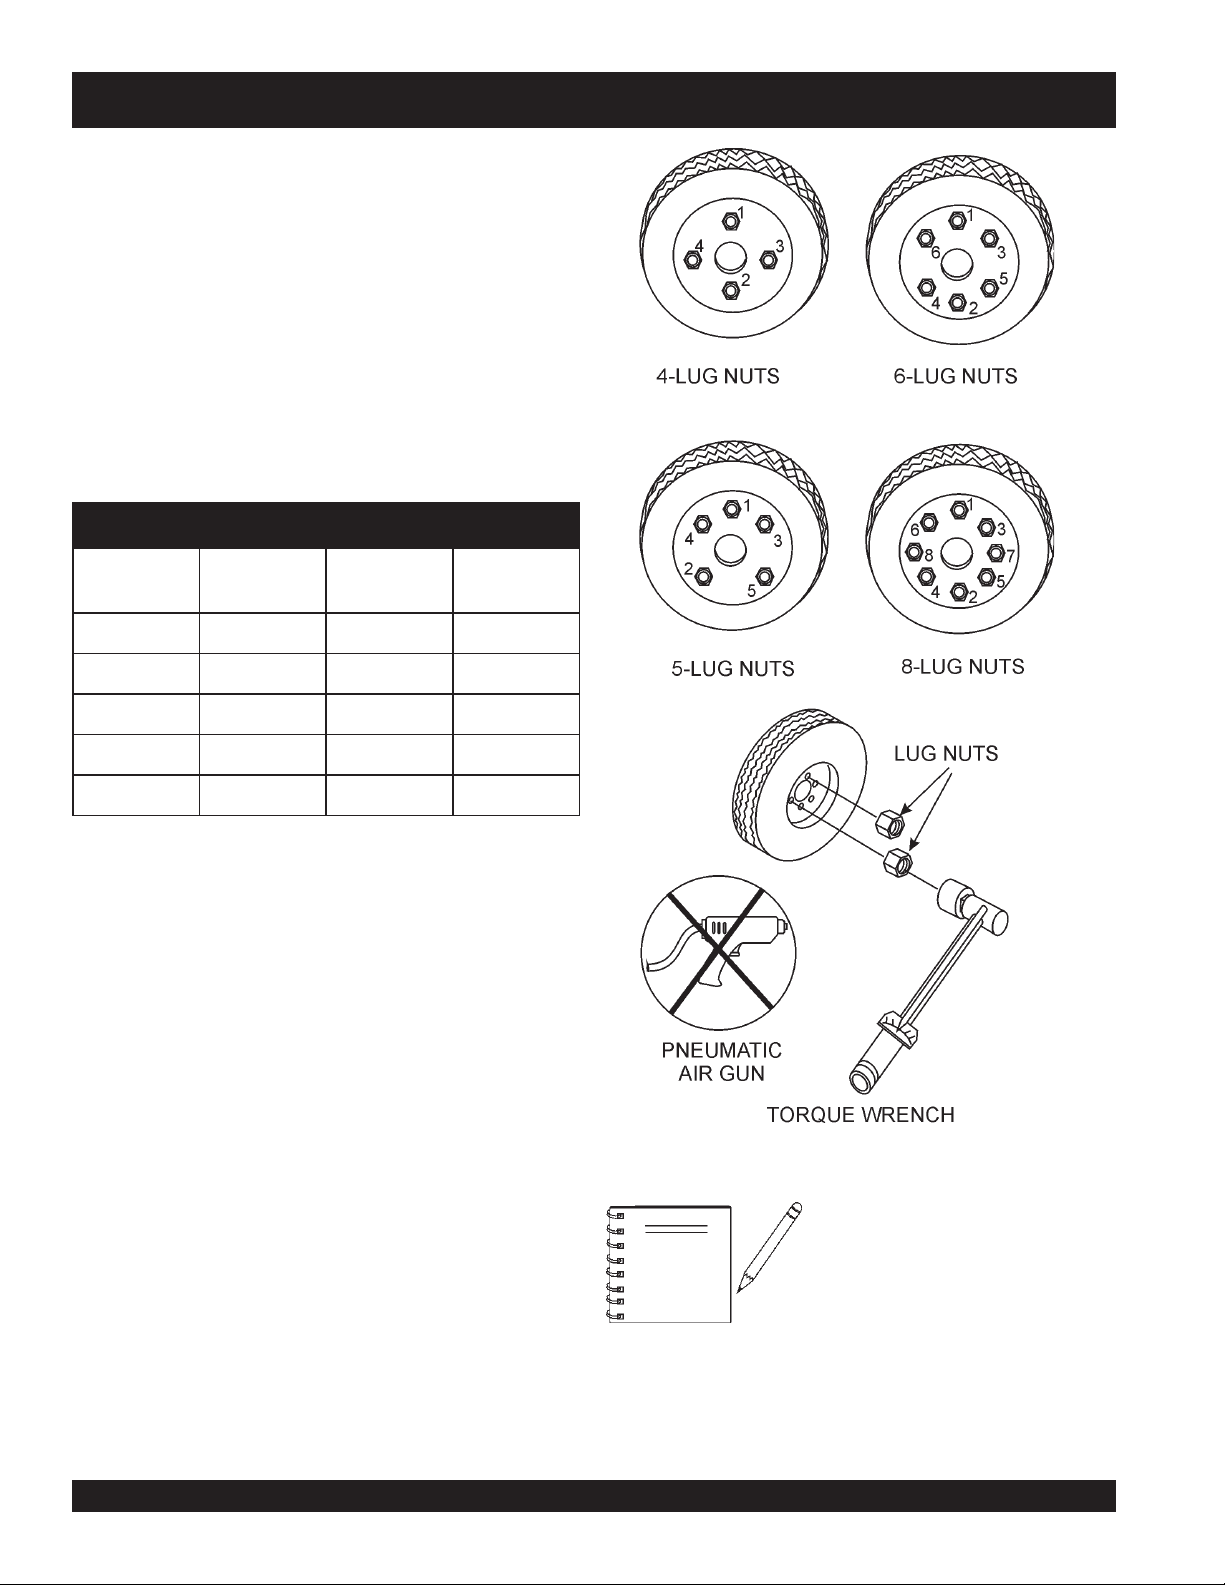
Check wheel mounting lug nuts with a torque wrench.
Torque wheel lug nuts as described in the "
Requirements
■
Make sure brakes are synchronized and functioning properly.
■
Check tightness of suspension hardware (nuts and bolts).
■
Avoid sudden stops and starts. This can cause skidding, or
jackknifing. Smooth, gradual starts and stops will improve
gas milage.
■
Avoid sharp turns to prevent rolling.
■
Retract wheel stand when transporting.
■
DO NOT transport pump with fuel in the fuel tank.
CAUTION -
If the trailer coupler is deformed replace entire coupler. NEVER
tow the pump with a defective trailer coupler. There exist the
possibility of the trailer separating from the towing vehicle.
Pump Trailer Vehicle Connection
1. Check the vehicle hitch ball, and trailer coupler for signs of
wear or damage. Replace any parts that are worn or
damaged before towing.
2. Use only the 2-inch ball diameter with a towing capability of
5,000 lbs. (2,268 kg) as indicated on the trailer's coupler.
Use of any other ball diameter will create an extremely
dangerous condition which can result in separation of the
coupler and ball or ball failure.
3. Be sure the coupler is secured to the hitch ball and the lock
lever is down (locked).
4. Attach safety chains as shown in Figure 2. Remember to
cross
5. After towing for about 50 miles recheck the entire towing
system for tightness.
Recommended Maintenance
1. Smear ball socket and clamp face with chassis grease.
Periodically oil pivot points and were surfaces of coupler
with SAE 30 W motor oil.
2. When parking or storing the concrete pump, keep the coupler
off the ground so dirt and other debris will not build up in the
ball socket.
Lug Nut Torque
", Table 5.
Never Use Defective Couplers
the safety chains.
PAGE 14 — MAYCO C-30HDNI (ZENITH) PUMP — OPERATION AND PARTS MANUAL — REV. #11 (04/03/12)
Page 15
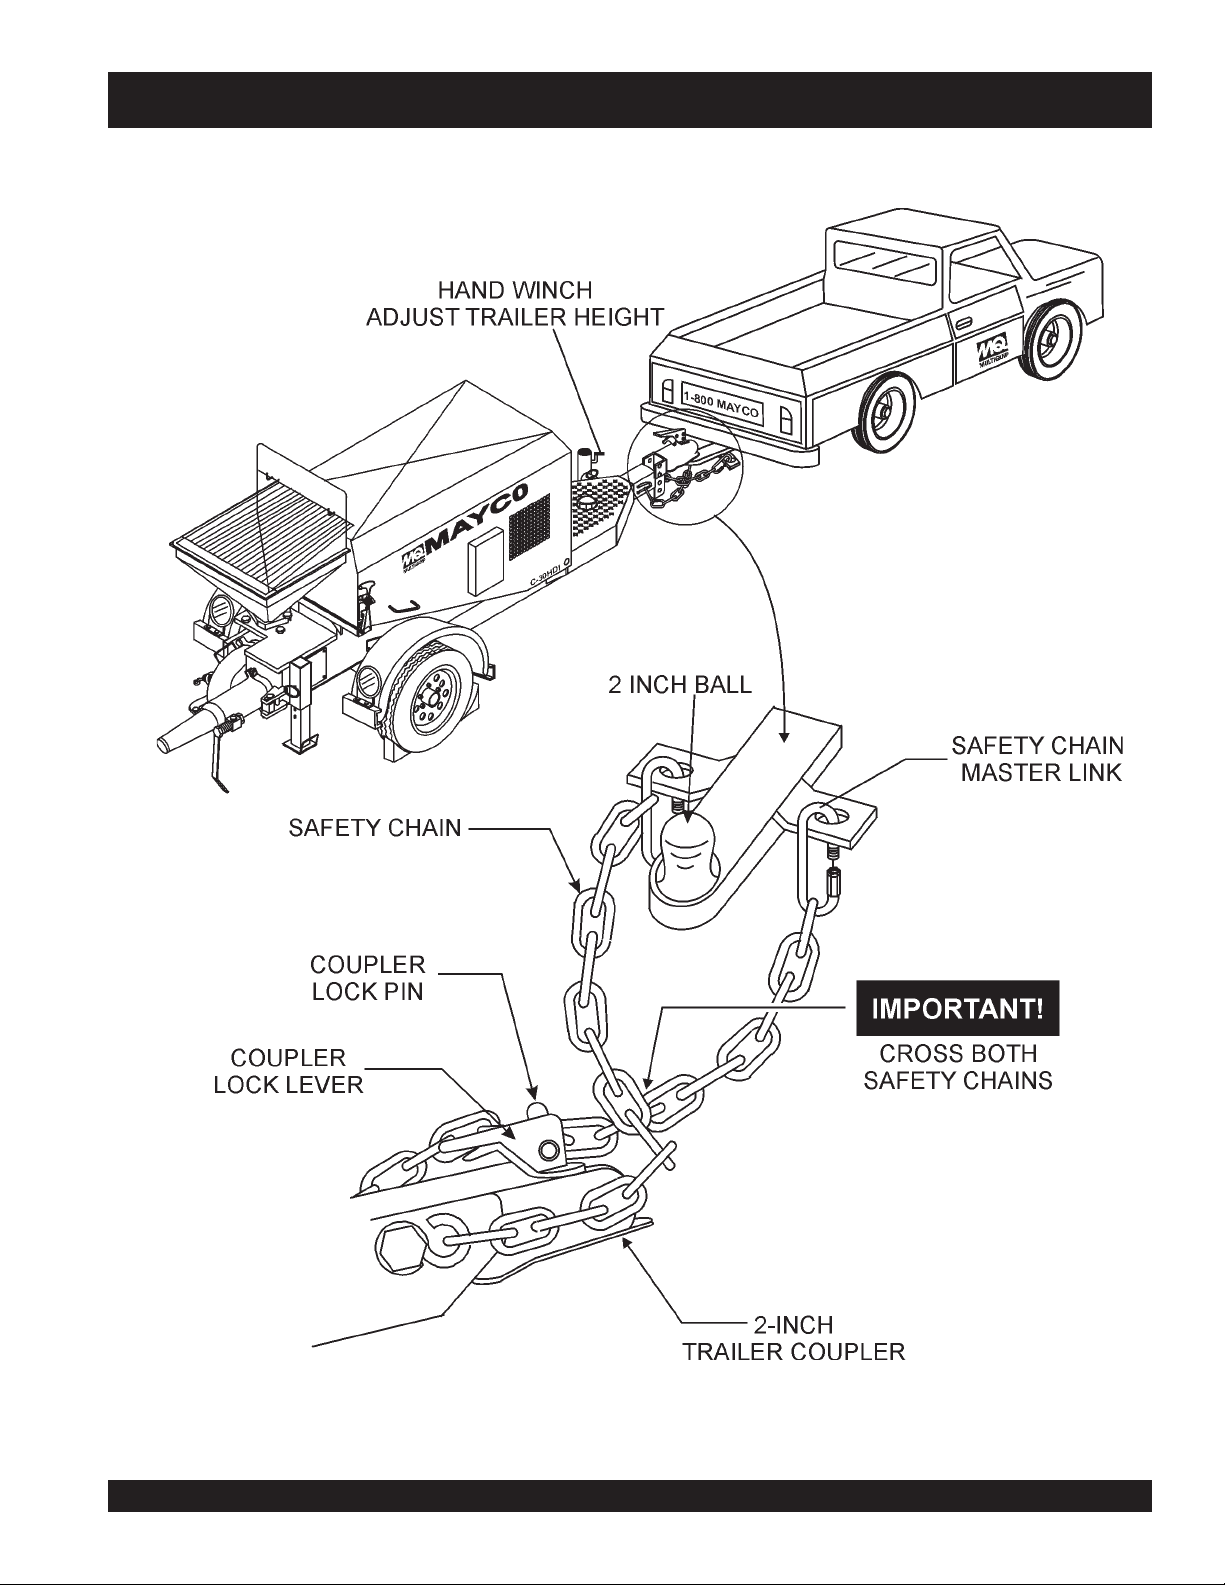
C-30HDNI (ZENITH) PUMP — TOWING GUIDELINES
Figure 2 shown below illustrates the typical towing application
that should be used when towing the pump.
Figure 2. Towing Applications
MAYCO C-30HDNI (ZENITH) PUMP — OPERATION AND PARTS MANUAL — REV. #11 (04/03/12) — PAGE 15
Page 16

C-30HDNI (ZENITH) PUMP — TRAILER SAFETY GUIDELINES
Trailer Safety Precautions
CAUTION -
ALWAYS make sure that the trailer is in good operating condi-
tion. Check the tires for proper inflation and wear. Also check the
wheel lug nuts for proper tightness.
This section is intended to provide the user with trailer service
and maintenance information. Remember periodic inspection of
the trailer will ensure safe towing of the equipment and will
prevent damage to the equipment and personal injury.
It is the purpose of this section to cover the major maintenance
components of the trailer. The following trailer components will
be discussed in this section:
■
Tires
■
Lug Nut Torquing
■
Suspension
■
Electrical
General Trailer Safety
The following list defines the major trailer components:
1. Fuel Cell – Provides an adequate amount of fuel for the
equipment in use. Fuel cells must be empty when transporting equipment.
2. Frame Length – This measurement is from the ball hitch to
the rear bumper (reflector).
3. Frame Width – This measurement is from fender to fender.
4. Jack Stand – Trailer support device with maximum pound
requirement from the tongue of the trailer.
5. Coupler – Type of hitch used on the trailer for towing. This unit
employes a 2 in. ball.
6. Tires Size – Indicates the diameter of the tire in inches (10,
12, 13, 14, etc. ), and the width in millimeters (175, 185, 205
etc.). The tire diameter must match the diameter of the tire rim.
This unit employes 7.35 x 14 in. tires.
7. Tires Ply – The tire ply (layers) number is rated in letters:
2-ply, 4-ply, 6-ply, 8-ply, 10-ply etc. This unit employes
4-ply tires.
8. Wheel Hub – The wheel hub is connected to the trailer's axle.
9. Tire Rim – Tires are mounted on a tire rim. The tire rim must
match the size of the tire.
10. Lug Nuts – Used to secure the wheel to the wheel hub.
Always use a torque wrench to tighten down the lug nuts. See
Table 5 and Figure 4 for lug nut tightening and sequence. This
unit employes 5 lug nuts to secure the wheel to the hub.
11. Axle – This trailer employes a torsion bar type suspension,
which can support 3,500 lbs.
12. Electrical – Electrical connectors (looms) are provided with
the trailer so that brake lights and turn signal lights can be
connected to the towing vehicle. See
for proper wiring connections.
Trailer Wiring Diagram
PAGE 16 — MAYCO C-30HDNI (ZENITH) PUMP — OPERATION AND PARTS MANUAL — REV. #11 (04/03/12)
Page 17
C-30HDNI (ZENITH) PUMP — TRAILER SAFETY GUIDELINES
Tires/Wheels/Lug Nuts
Tires and wheels are a very important and critical components
of the trailer. When specifying or replacing the trailer wheels it is
important the wheels, tires, and axle are properly matched.
CAUTION -
DO NOT attempt to repair or modify a wheel. DO NOT install
an inter-tube to correct a leak through the rim. If the rim is
cracked, the air pressure in the inter-tube
may cause pieces of the rim to explode
(break-off) with great force and can cause
serious eye or bodily injury.
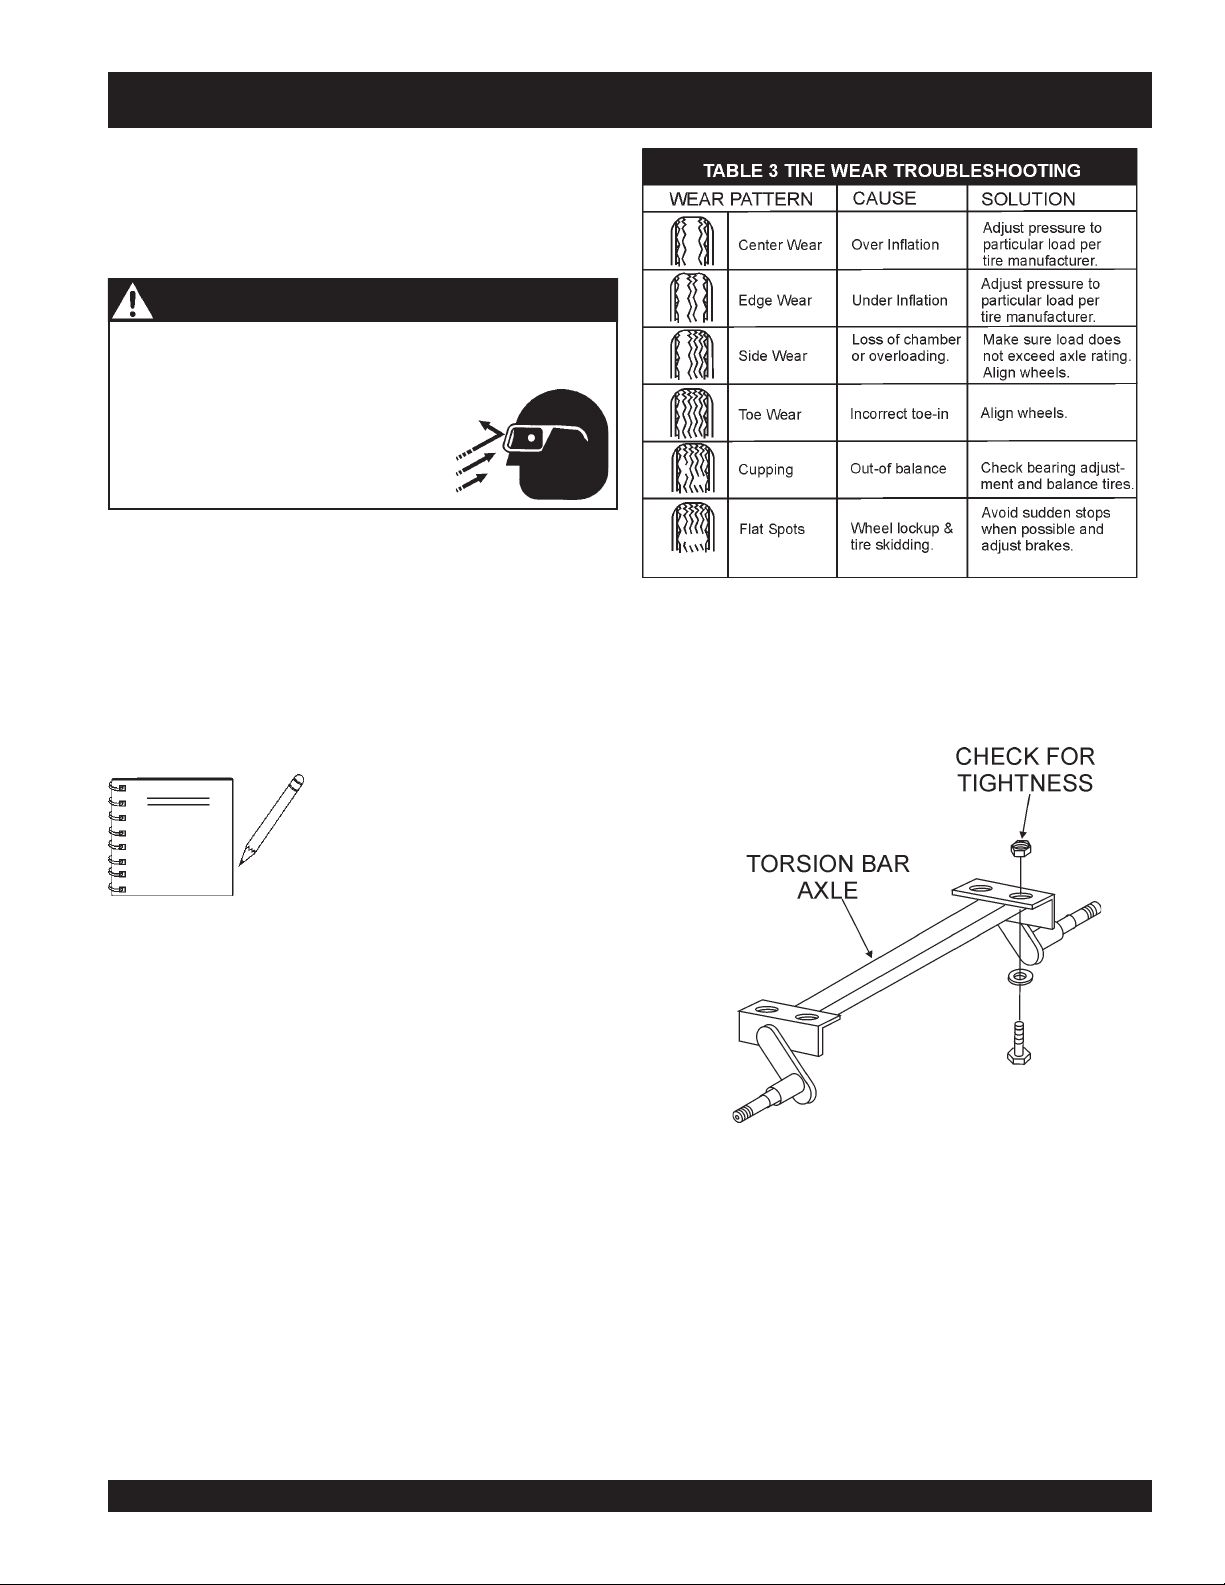
Tires Wear/Inflation
Tire inflation pressure is the most important factor in tire life.
Pressure should be checked cold before operation. DO NOT
bleed air from tires when they are hot. Check inflation pressure
weekly during use to insure the maximum tire life and tread wear.
Table 3 (Tire Wear Troubleshooting) will help pinpoint the causes
and solutions of tire wear problems.
NOTE
General Trailer Safety
ALWAYS
removing or installing force fitted
parts. Failure to comply may result in
serious injury.
wear safety glasses when
Torsion Bar Suspension
The torsion bar suspension and associated hardware
(Figure 3) should be visually inspected every 6,000 miles for
signs of excessive wear, elongation of bolt holes, and loosening
of fasteners. Replace all damaged parts (suspension) immediately.
Figure 3. Major Suspension Components
MAYCO C-30HDNI (ZENITH) PUMP — OPERATION AND PARTS MANUAL — REV. #11 (04/03/12) — PAGE 17
Page 18
C-30HDNI (ZENITH) PUMP — TRAILER SAFETY GUIDELINES
Lug Nut Torque Requirements
It is extremely important to apply and maintain proper wheel
mounting torque on the trailer. Be sure to use only the fasteners
matched to the cone angle of the wheel. Proper procedure for
attachment of the wheels is as follows:
1. Start all wheel lug nuts by hand.
2. Torque all lug nuts in sequence (Figure 4). DO NOT torque
the wheel lug nuts all the way down. Tighten each lug nut in
3 separate passes as defined by Table 4.
3. After first road use, retorque all lug nuts in sequence. Check
all wheel lug nuts periodically.
stnemeriuqeReuqroTeriT.4elbaT
eziSleehW
"2152-0204-5356-05
"3152-0204-5356-05
"4152-0206-05021-09
"5152-0206-05021-09
"6152-0206-05021-09
ssaPtsriF
SBL-TF
ssaPdnoceS
SBL-TF
ssaPdrihT
SBL-TF
Figure 4. Wheel Lug Nuts Tightening Sequence
NOTE
NEVER!
use an pneumatic air gun
to tighten wheel lug nuts.
PAGE 18 — MAYCO C-30HDNI (ZENITH) PUMP — OPERATION AND PARTS MANUAL — REV. #11 (04/03/12)
Page 19

NOTES
MAYCO C-30HDNI (ZENITH) PUMP — OPERATION AND PARTS MANUAL — REV. #11 (04/03/12) — PAGE 19
Page 20
C-30HDNI (ZENITH) PUMP — OPERATION AND SAFETY DECALS
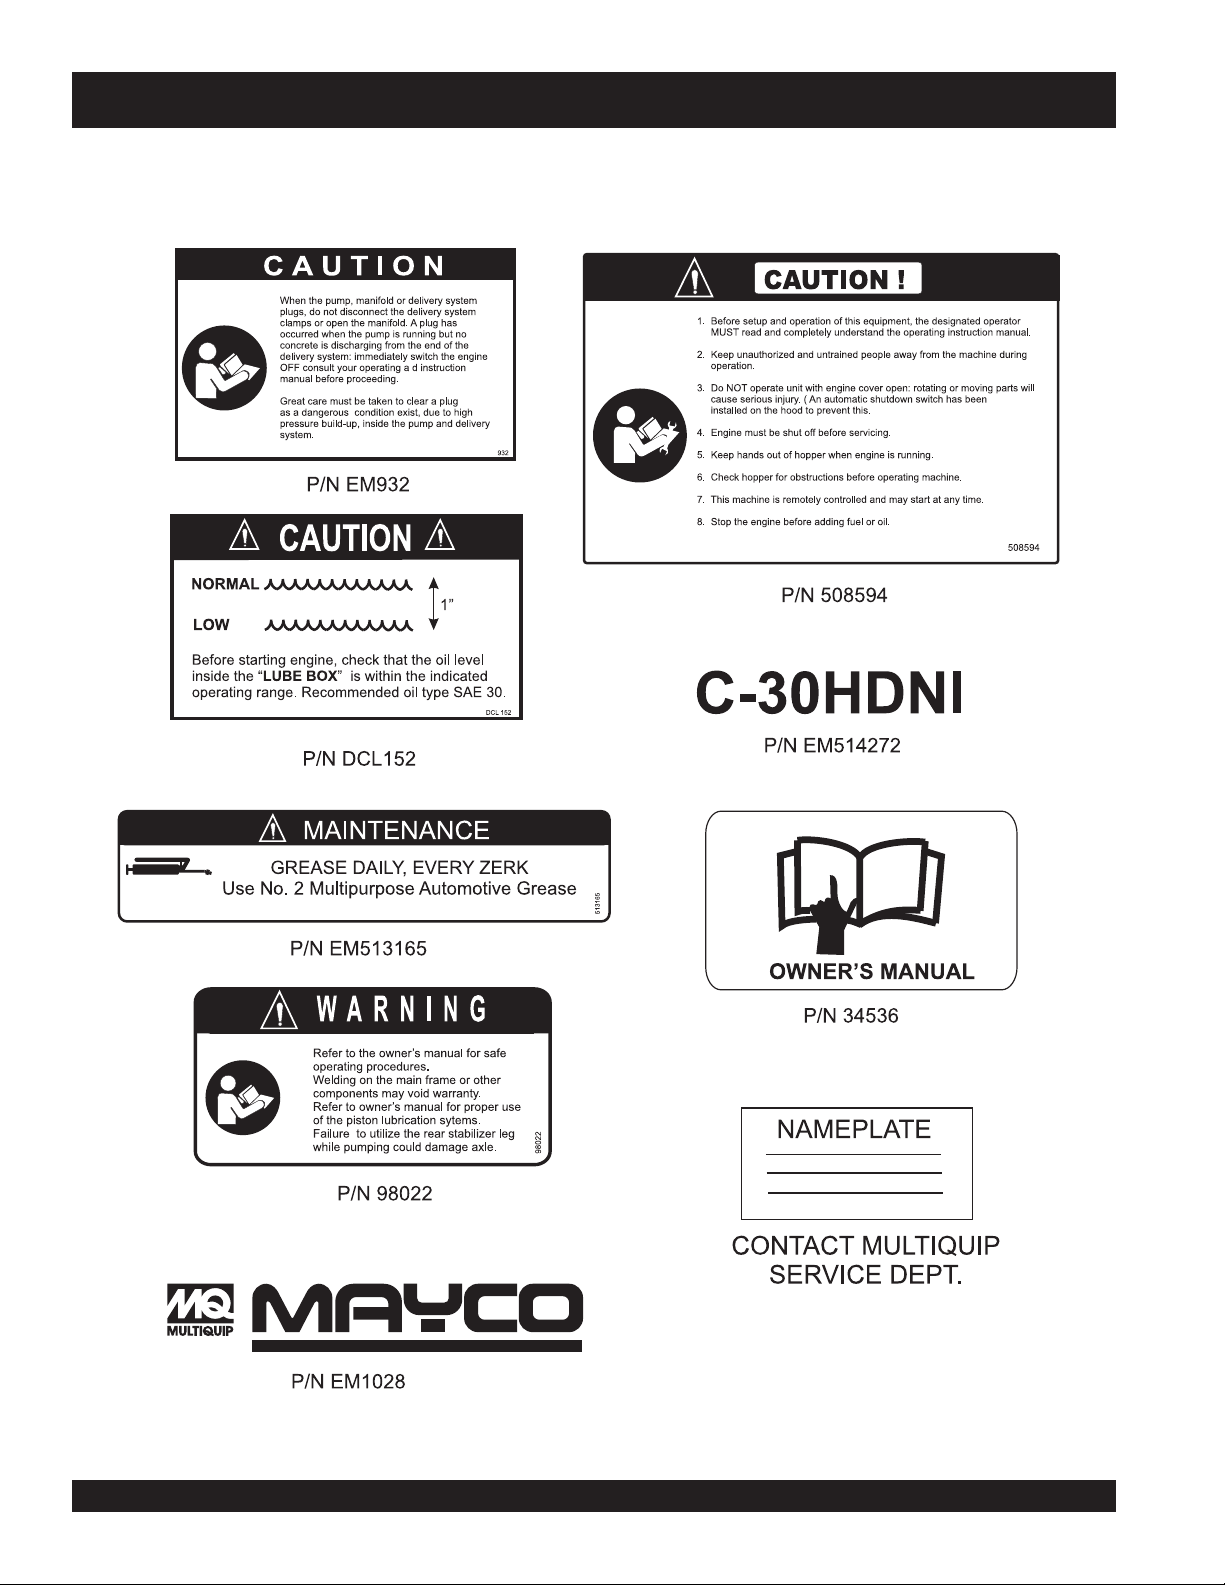
Figure 5 display's the operation and safety decals as they appear on the concrete pump, should any of these decals become
damaged or unreadable, contact the Multiquip Parts Department for a replacement set.
Figure 5. Operation and Safety Decals
PAGE 20 — MAYCO C-30HDNI (ZENITH) PUMP — OPERATION AND PARTS MANUAL — REV. #11 (04/03/12)
Page 21
C-30HDNI (ZENITH) PUMP — IMPORTANT HAND SIGNALS
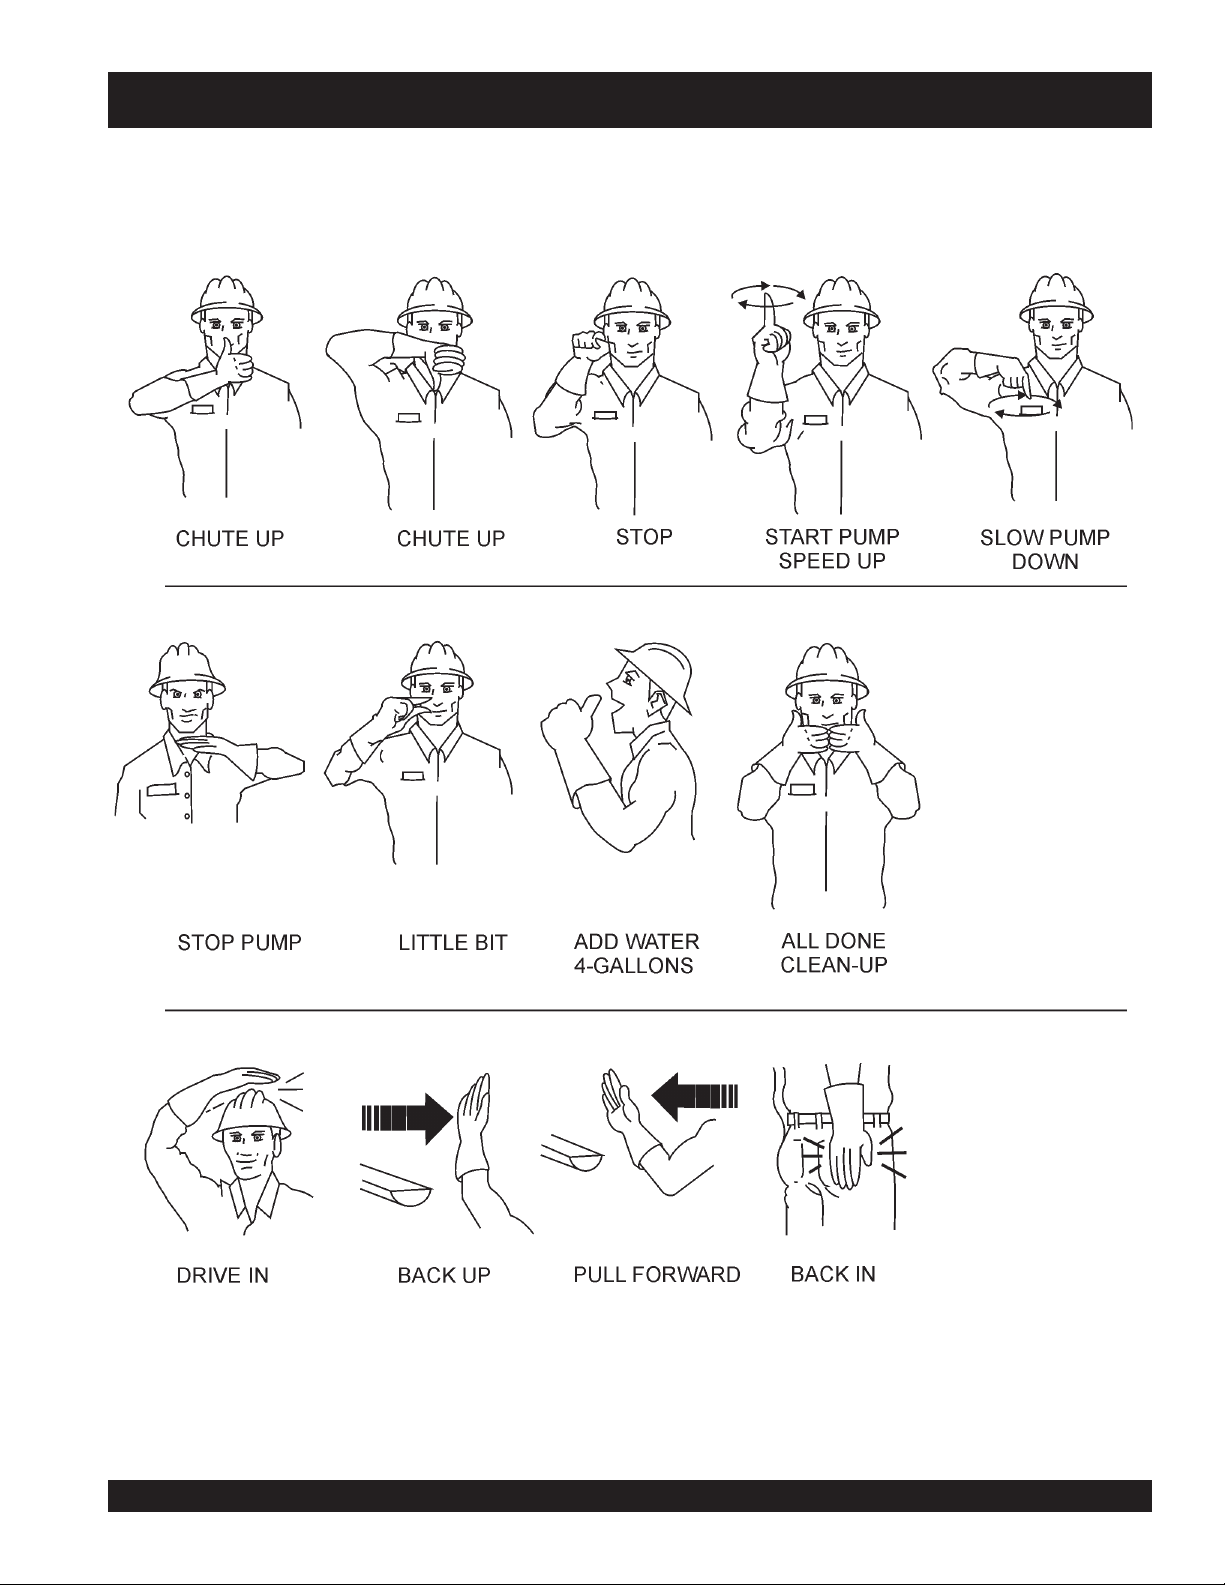
Figure 6 display's the basic hand signals commonly used in concrete pumping operations.
Figure 6. Operation Hand Signals
MAYCO C-30HDNI (ZENITH) PUMP — OPERATION AND PARTS MANUAL — REV. #11 (04/03/12) — PAGE 21
Page 22
C-30HDNI (ZENITH) PUMP — PUMP COMPONENTS
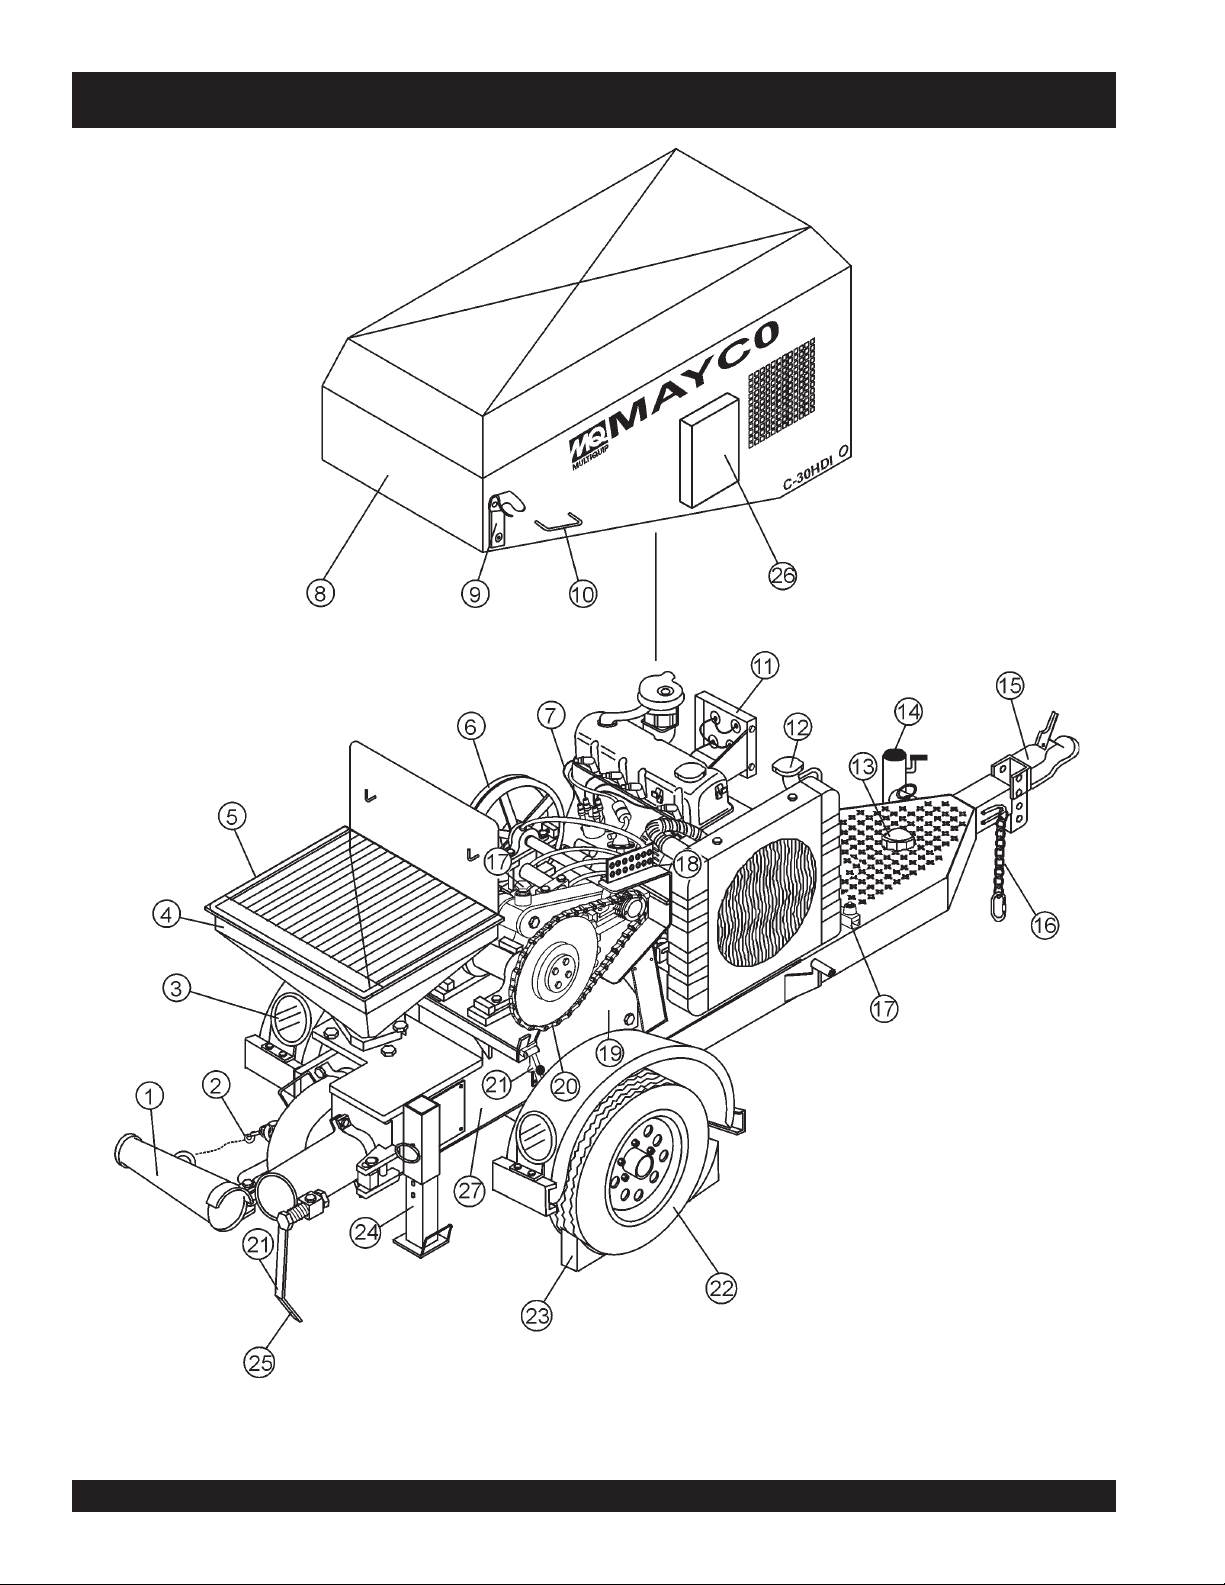
Figure 7. Major Pump Components
PAGE 22 — MAYCO C-30HDNI (ZENITH) PUMP — OPERATION AND PARTS MANUAL — REV. #11 (04/03/12)
Page 23

C-30HDNI (ZENITH) PUMP — PUMP COMPONENTS
Figure 7 illustrates the location of the major components for the
C-30HDNI Concrete Pump. The function of each component is
described below:
1. Discharge Cone – Connect 3" elbow to this discharge
port, then connect 3" x 2" reducer to elbow.
2. Discharge Cone Safety Latch – When towing of the pump
is required, ALWAYS secure the discharge cone to latch
located on the manifold.
3. Rear Running Lights – ALWAYS check and make sure
both the right and left running lights are functioning correctly
before towing the pump.
4. Hopper – Concrete from a Redi-Mix truck is poured into
this hopper. The hopper can hold 6.0 cu. ft of concrete.
NEVER put hands or any other parts of you body into the
hopper.
5. Safety Grill – The safety grill should be locked at all times
when the pump is being towed. Under normal working
conditions, raise and place the safety grill on the support
hooks which are located on splash guard.
6. Shaft Pulley V-Belt – ALWAYS inspect the drive shaft V-
belt for wear and alignment. A defective or misaligned Vbelt can wear prematurely and adversely affect the
performance of the pump. Replace with only manufactures
recommended type V-belt.
7. Distributor – NEVER allow concrete, water or any foreign
debris to come in contact with the distributor.
8. Compartment Hood – NEVER operate the pump with the
hood removed. Installed on the pump frame is a safety interlock device which prevents the engine from starting if the
hood is removed or in the up position (open).
9. Hood Fastener – When the hood is in the down position,
secure the rubber latch to this fastener.
10. Hood Lift Handle – Grip this handle, pull upward then
back to raise the compartment hood.
11. Control Box – Contains the mechanical and electrical
components required to run the pump. Below is a list of
those components:
■
Throttle Control
■
Low Oil Pressure Indicator
■
Battery Charge Indicator
■
Water Temperature Indicator
■
Ignition Switch
■
Remote Connector
12. Radiator/Cap – Fill with a water/anti-freeze type solution
as recommended in the maintenance section of this manual.
ALWAYS
operating level before starting the engine.
13. Fuel Tank/Cap – Fill with unleaded fuel. Fuel tank (cell)
holds approximately 11 gallons (42 liters). DO NOT top off
fuel. Wipe up any spilled fuel immediately
14. Tow End Jack Stand – Use this jack stand to level and
support the pump.
15. Tow Hitch Coupler – Requires a 2-inch ball hitch or a 3inch pintle. Capable of towing 5,000 lbs.
16. Safety Chain – ALWAYS attach safety chain to the towing
vehicle. NEVER! tow the pump with the safety chain
unattached.
17. Engine Stop Device – This device will prevent the starting
of the engine when the compartment hood is in the UP
position. The compartment hood must be in the DOWN
position in order for the engine to start.
18. Grease Port Console – This console allows for the remote
lubrication of components on the pump.
19. Access Door – There are four access doors on the pump.
Remove these door to gain access to drive and piston
assemblies when maintenance is required.
20. Drive Chain – Keep this chain properly lubricated and
aligned at all times. Lubricate this chain as specified in the
maintenance section of this maintenance.
21. Rubber Latch – Secure this rubber latch to the hood
fastener whenever the pump is in use or being towed.
22. Tires Ply– The tire ply (layers) number is rated in letters;
This trailer uses 4-ply tires.
23. Chock Blocks – Place these blocks (not included as part
of your concrete pump package) under each trailer wheel
to prevent rolling.
24. Pump End Jack Stand – Use this jack stand to level and
support the pump.
25. Discharge Cone Release Lever – secures the discharge
cone to the "Y" manifold; also relieves manifold pressure.
26. Documentation Box – Contains engine and pump
operation, parts and maintenance information.
27. Lubrication Box – This box is empty when shipped from
the factory. Please fill with 7 gallons ( 26.5 liters) of SAE
motor oil for first time use. Also check the dual clean-out
point on bottom of lubrication box for a secure tight fit.
make sure that the radiator is filled to the proper
MAYCO C-30HDNI (ZENITH) PUMP — OPERATION AND PARTS MANUAL — REV. #11 (04/03/12) — PAGE 23
Page 24
C-30HDNI (ZENITH) PUMP — CONTROL BOX COMPONENTS
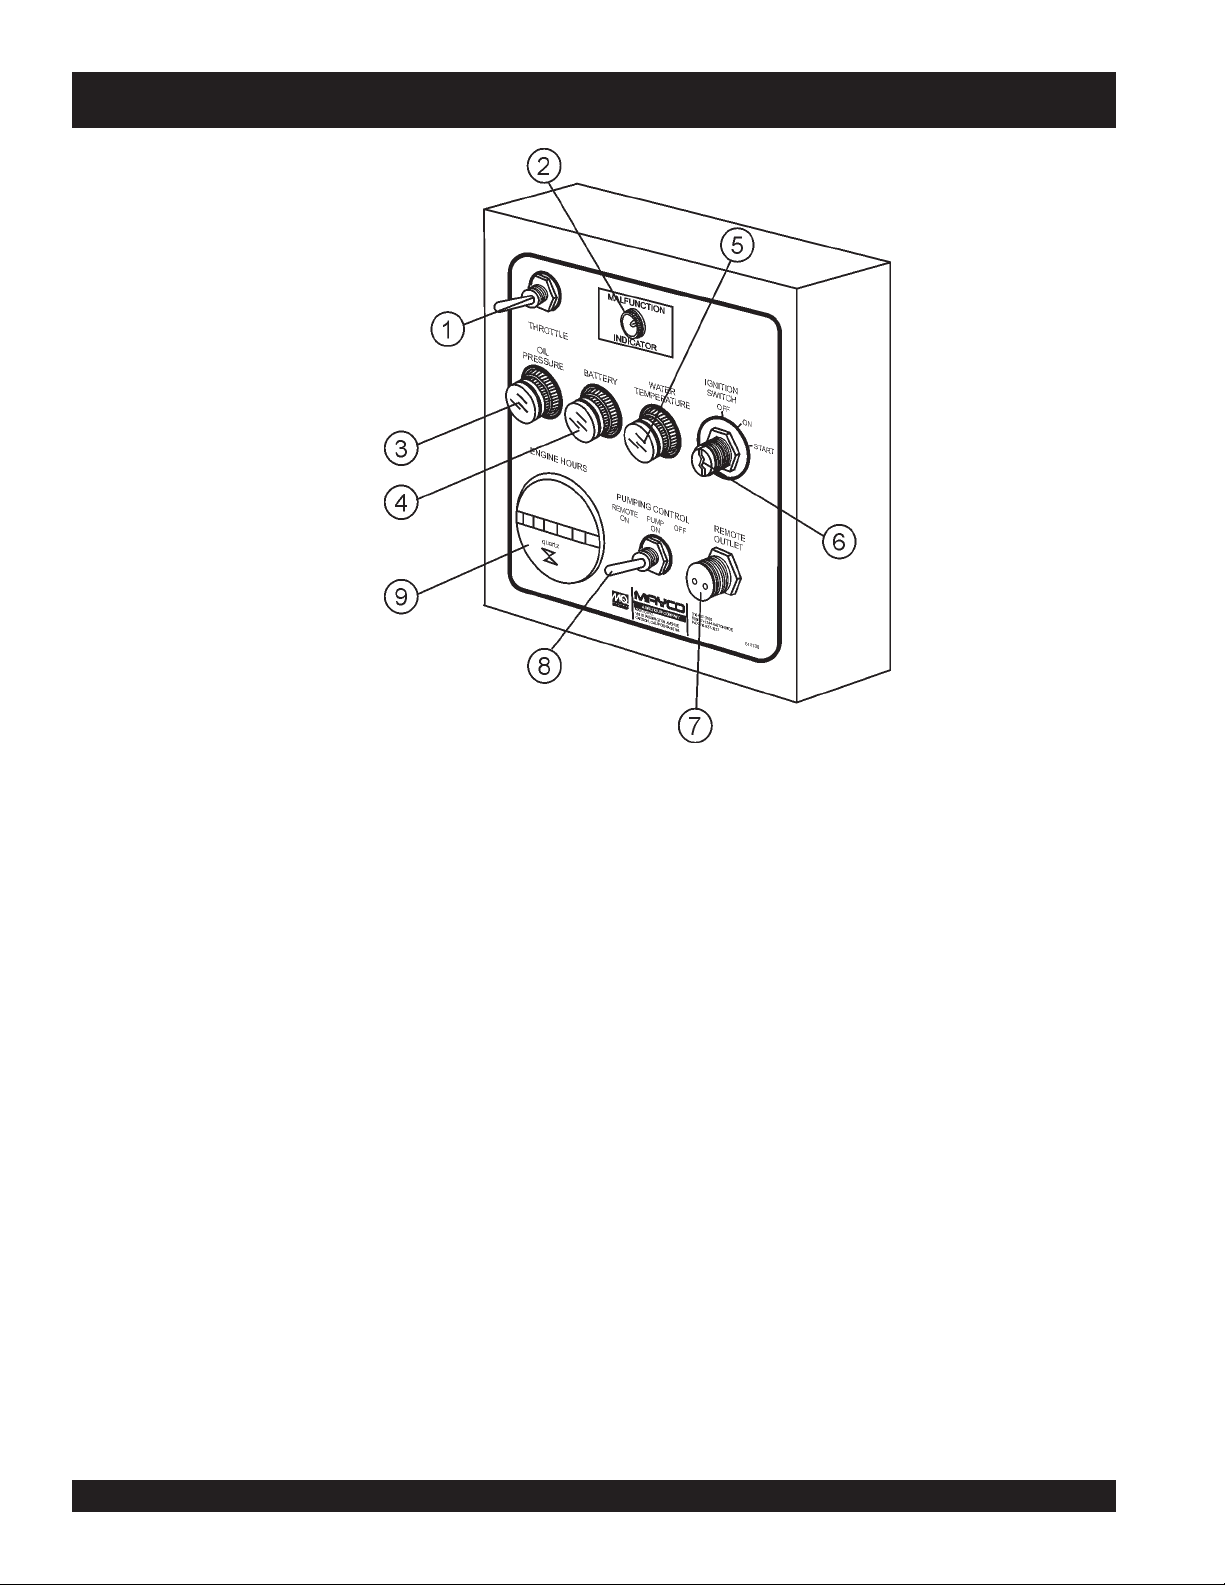
Figure 8. Pump Control Box Components
Figure 8 illustrates the location of the major components for the
C-30HDNI Control Box. The function of each component is
described below:
1. Throttle Control Switch – This is a variable speed type
control. Holding the control switch to the
engine speed. To place the engine at IDLE speed, hold the
control switch to the
minutes.
2. Trouble Indicator LED– This is a diagnostic feature on the
C-30HDNI to assist the operator with identifying problems
that occur with the fuel injection system (See Table 7).
3. Oil Pressure Indicator Lamp – In the event of low oil in the
engine crankcase or low oil pressure, the oil "
Lamp
" indicator will be lit. STOP the engine immediately if
this lamp is lit.
4. Battery Charge Indicator Lamp – Indicates if the electrical
system is charging properly. If the "
Lamp
" is lit, this is an indication that the charging system is
malfunctioning. STOP the engine and remedy the electrical
charging problem.
right
NEVER
run the engine when this lamp is on.
and let the engine run for 3-5
Battery Charge Indicator
left
increases the
Oil Pressure
5. Water Temperature Lamp – In the event of high engine
water temperature (220 degrees Fahrenheit), this lamp will
be lit. STOP the engine immediately if this lamp comes on.
NEVER
6. Ignition Switch – Insert the ignition key here to start the
engine. Turn the key clockwise to the ON position, then
continue turning clockwise to the START position and
release. To stop the engine turn the key fully counterclockwise to the
7. Remote Control Input Connector – Insert the remote
control input cable into this connector.
8. Pumping Control Switch – This 3-position switch controls
the pumping of the pump. The
with the remote control unit, the
(prevents pumping), and the
normal pump operation.
9. Hourmeter– Display's the number of hours the pump has
been in use.
run the engine when this lamp is on.
STOP position.
left most
right most
position is for use
center
position is for off
position is for
PAGE 24 — MAYCO C-30HDNI (ZENITH) PUMP — OPERATION AND PARTS MANUAL — REV. #11 (04/03/12)
Page 25
C-30HDNI (ZENITH) PUMP — ENGINE COMPONENTS
TOP VIEWFRONT VIEW
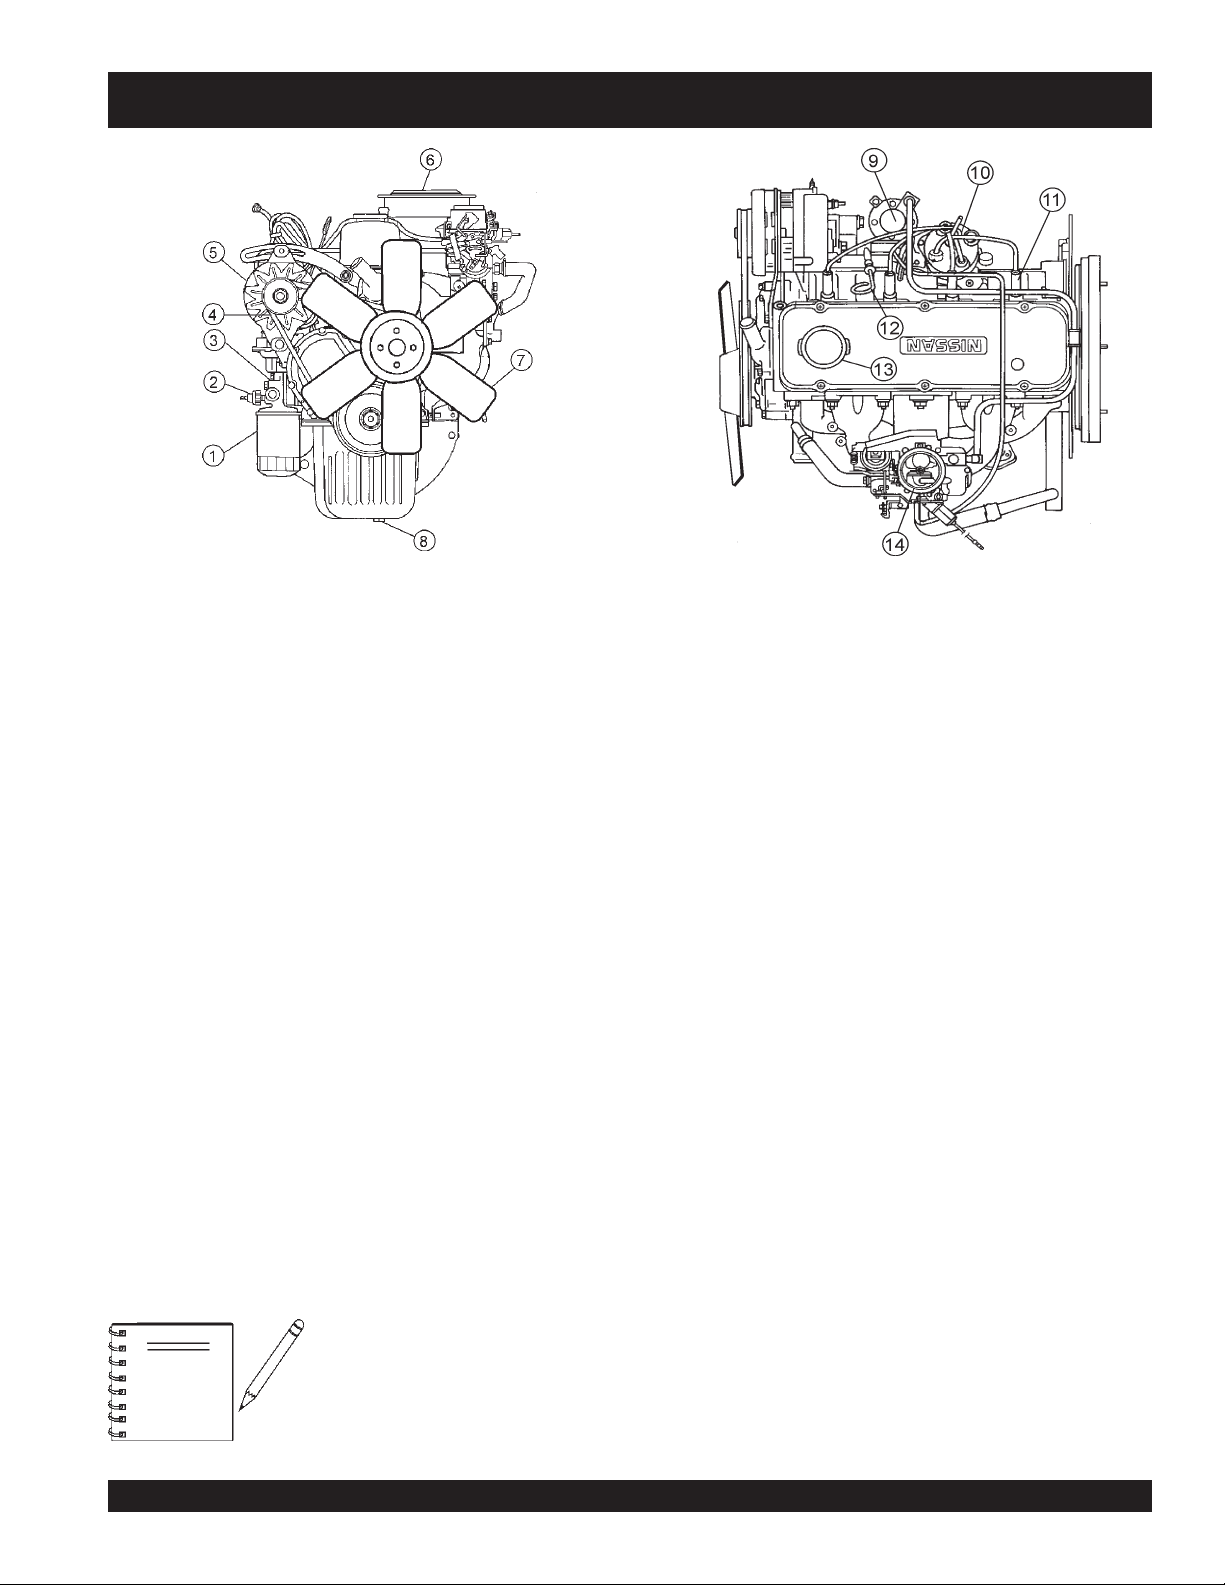
Figure 9. Nissan Model A15 Basic Engine Components
Figure 9 illustrates the location of the basic components for the
NISSAN A-15 Engine.The function of each component is
described below:
1. Oil Filter – Replace this filter as recommended in the
maintenance section of this manual
2. Oil Pressure Switch – In the event of low oil level, this
switch will shutdown the engine.
3. Starter Motor/Solenoid – NEVER
foreign debris to come in contact with the starter motor/
solenoid.
4. Fan V-Belt – ALWAYS make sure that V-belt is properly
tensioned. A loose or defective V-belt can adversely affect
the performance of the pump.
5. Alternator – Provides power to the electrical system.
Replace with only manufactures recommended type
alternator.
6. Air Cleaner – Prevents dirt and other debris from entering
the fuel system. Remove wing-nut on top of air filter
cannister to gain access to filter element. Replace with only
manufactures recommended type air cleaner.
7. Cooling Fan Blades – Make sure that the blades of the
cooling fan are not
can cause the engine to run hot and overheat.
bent or broken
allow concrete or any
. A damaged fan blade
8. Crankcase Drain Plug – Remove this plug to drain engine
9. Fuel Pump/Fuel Filter – Replace or clean the fuel pump
10. Distributor – NEVER
11. Spark Plug – Provides spark to the ignition system. Set
12. Dipstick – Remove this dipstick to determine if engine oil
13. Oil Filler Port Cap – Remove this cap to add engine oil to
14. Fuel Injection System – ALWAYS keep dirt, dust, and any
oil from the crankcase. Replace with recommended engine
oil as specified in the maintenance section of this manual.
or fuel filter as specified in the maintenance section of this
manual.
allow concrete or any foreign debris
to come in contact with the distributor.
spark plug gap to 0.6 - 0.7 mm (0.028 - 0.031 inch). Clean
spark plug once a week.
is low. Maintain oil level at the "H" marking on the dipstick.
NEVER run engine with low oil.
the crankcase. Fill with recommended type oil as specified
in the maintenance section of this manual
foreign debris from entering the fuel injection system. Clean
the fuel injection system as recommended in the
maintenance section of this manual.
Operating the engine without an air
NOTE
MAYCO C-30HDNI (ZENITH) PUMP — OPERATION AND PARTS MANUAL — REV. #11 (04/03/12) — PAGE 25
filter, with a damaged air filter, or a
filter in need of replacement will allow
dirt to enter the engine, causing rapid
engine wear.
Page 26
C-30HDNI (ZENITH) PUMP — GENERAL INFORMATION
The following operating principles and operating suggestions
should prove helpful in the successful operation of your concrete
pump. Your new “small line” concrete pump has been designed
to give you many years of service when operated properly. A
study of the following paragraphs is important to the successful
operation of your new Direct-flow Concrete Placer.
All concrete pumps require a high level of operator skill and
more frequent service than most of the other construction
equipment. The highly abrasive nature of concrete under pressure
makes it extremely important that expendable wear components
be inspected at regular intervals between jobs to prevent having
to replace these items during a pour.
Experience has proved that inconsistency of batched concrete
mixes and frequent moving of the line requires the operator to be
readily available at all times during pumping to stop the pump
and prevent abuse to the unit which may occur if unexpected
blockages develop.
Pump Mix Guidelines
When ordering concrete, be certain to advise the concrete supplier
that you require a “
pump a wide variety of materials, but certain basic principles
must be followed to assure successful pumping, as follows:
Generally speaking, the washed concrete sand and #4 aggregate
(pea gravel) should conform to A.S.T.M. standards in regard to
sieve analysis. Sands in some areas are washed clean of the
#100 and #200 mesh fines, which results in separation and
jamming in the manifold while pumping under pressure.
If this condition develops, check with your concrete suppliers
engineers and get their recommendations for supplementing
the lack of the fines. The use of locally accepted ad-mixes may
be required. (For example, Pozzolith, Bentonite Clay, Plastiments,
etc.) When properly prescribed, additives form the plastic paste
sometimes necessary to hold the cement and aggregate together.
NOTE
Determine the cause of jamming, correct it and resume pumping.
Trying to force material through under jammed conditions may
result in damage to the drive system, thus voiding any warranty
services.
pump mix
”. The Direct-flow manifold will
If jamming conditions in the pump or
hose occur for any reason at all, do
not attempt to use more power to
correct the condition.
As a general rule, the use of approximately six sacks of cement,
70% washed concrete sand and 30% #4 pea gravel per yard of
concrete will result in a pumpable mix. The ideal nature of sand
and rock in certain areas may permit you to increase the
percentage of rock or adjust the mix considerably to meet the job
requirements. When possible, you may experiment with various
mixes in your area to determine the degree of versatility of the
Direct-flow Pump.
Uniform gradation of the washed concrete sand and the 1/2”
minus aggregate along with sufficient cement content and water
are important to a successful pump operation.
A recommended pumpable mix design would be 70% sand and
30% aggregate-cement content to be a minimum of 6 sacks.
(564 lbs.)
NOTE
Sample Design Mix - 3000 Psi 3/8 in. Slump 4- 5 in.
Type II Cement 6.49 sack/cu. yd 611 lbs.
Sand Sat. Surf. Dry 2000 lbs.
#4 Gravel Sat. Surf. Dry 864 lbs.
#3 Gravel Sat. Surf. Dry 0 lbs.
Water 48 Gallons 400 lbs.
Admixture WRDA-79 26 oz.
Water 7.40 gal/sack
Test laboratory data has proven in many areas that the above
mix guidelines have produced concrete rated at 3000 psi (28
day test) and upwards of 5000 psi with an increase in cement.
In some areas where the gradation of sand and rock is ideal and
sufficient cement is used along with admixtures, the Mayco small
line concrete pump will handle up to a 50-50 ratio of sand and
rock.
When the mix is designed for wet gunning applications, it is
normal to increase the cement (up to 7.5 or 8 sacks) and change
the sand to rock ratio to 85% sand and 15% rock.
The Mayco concrete pump will valve efficiently when using
cellular-foam concrete mixes upwards of 70 lbs. per cubic foot
wet density. (Below 70 lbs. materials (roof decks) the valving
becomes inefficient.)
Your local sand and rock engineers
will give you the S.S.D. weights of
sand and rock required in your local
area which will yield one cubic yard
per the above recommendation.
Total Weight 3,906 lbs
PAGE 26 — MAYCO C-30HDNI (ZENITH) PUMP — OPERATION AND PARTS MANUAL — REV. #11 (04/03/12)
Page 27
C-30HDNI (ZENITH) PUMP — HOW IT WORKS
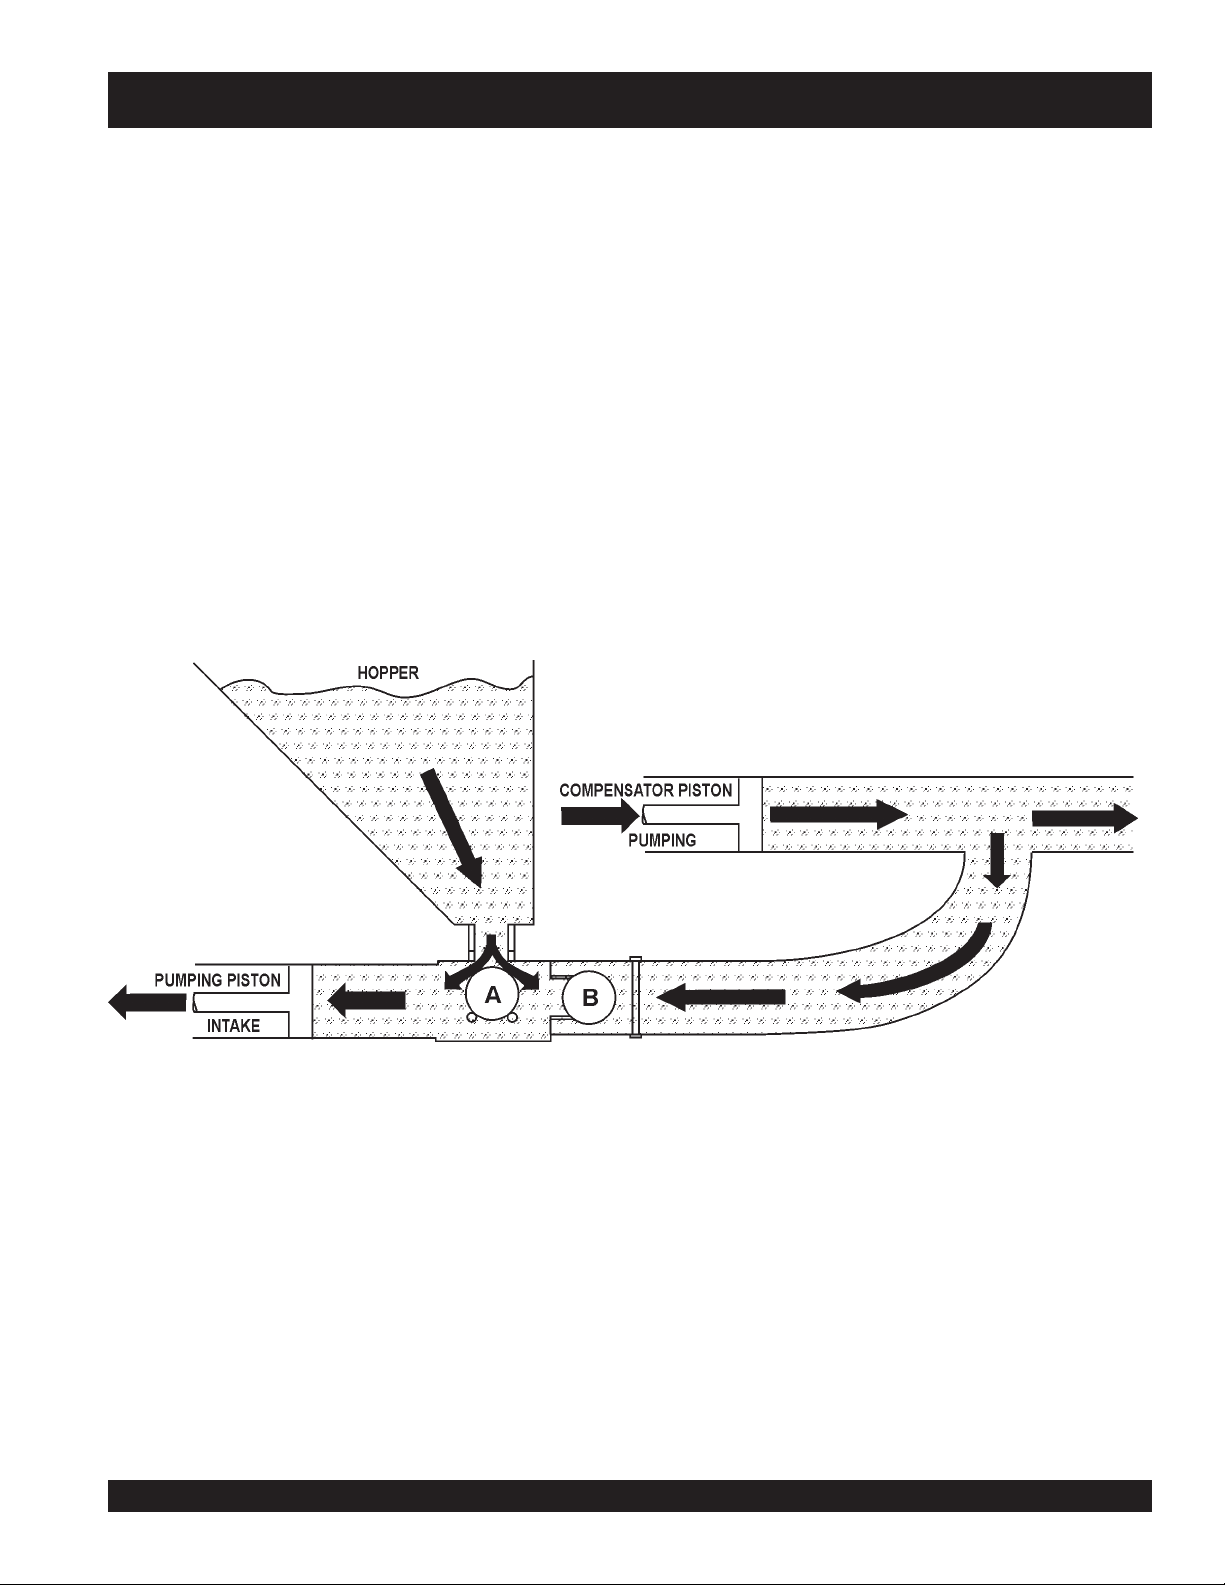
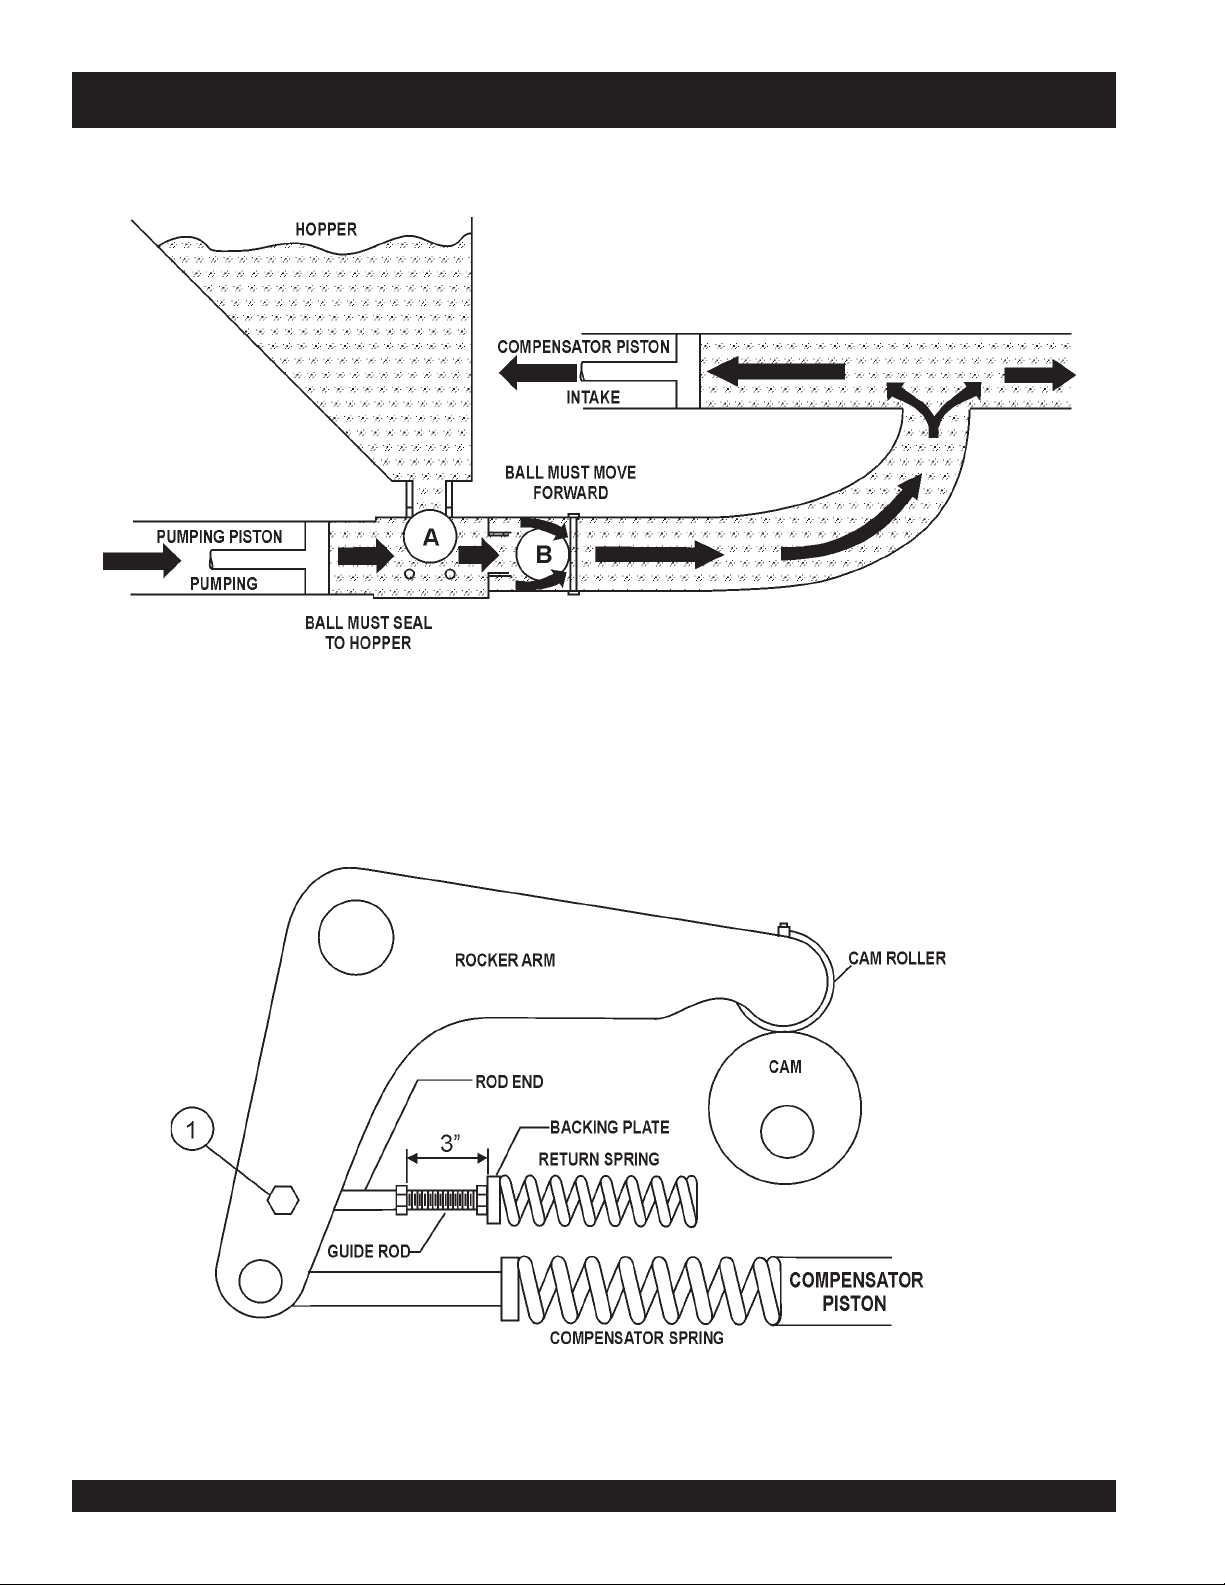
The C-30HDNI concrete pump has one main pumping piston
which is valved by means of two ball checks. (A inlet, and B
outlet.)
The secondary piston is used as a compensator piston to smooth
out the pulsations of a single piston action. Note: The compensator
will not start operating until material is pumped into the line and
back pressure develops.
The
compensator spring
piston rod, deflects with each piston stroke. This “
in conjunction with the cam profile, produces and uninterrupted
smooth flow of material under average pumping conditions.
The pumping cylinder (Figure 10) retracts drawing the material
past the ball (A) and filling the cylinder. The compensator piston
is pumping the material out to the nozzle and causing ball (B) to
seat preventing the material from returning to the pumping cylinder
intake.
, which is installed on the compensator
spring cushion
An automatic, centrifugal clutch is installed to engage and
disengage the pumping action without stopping or starting the
engine. The
idle speed is approximately 875 R.P.M.; therefore, the clutch is
completely disengaged at idle. The throttle settings while pumping
should always maintain an engine R.P.M. high enough to prevent
the clutch from slipping and burning the clutch lining.
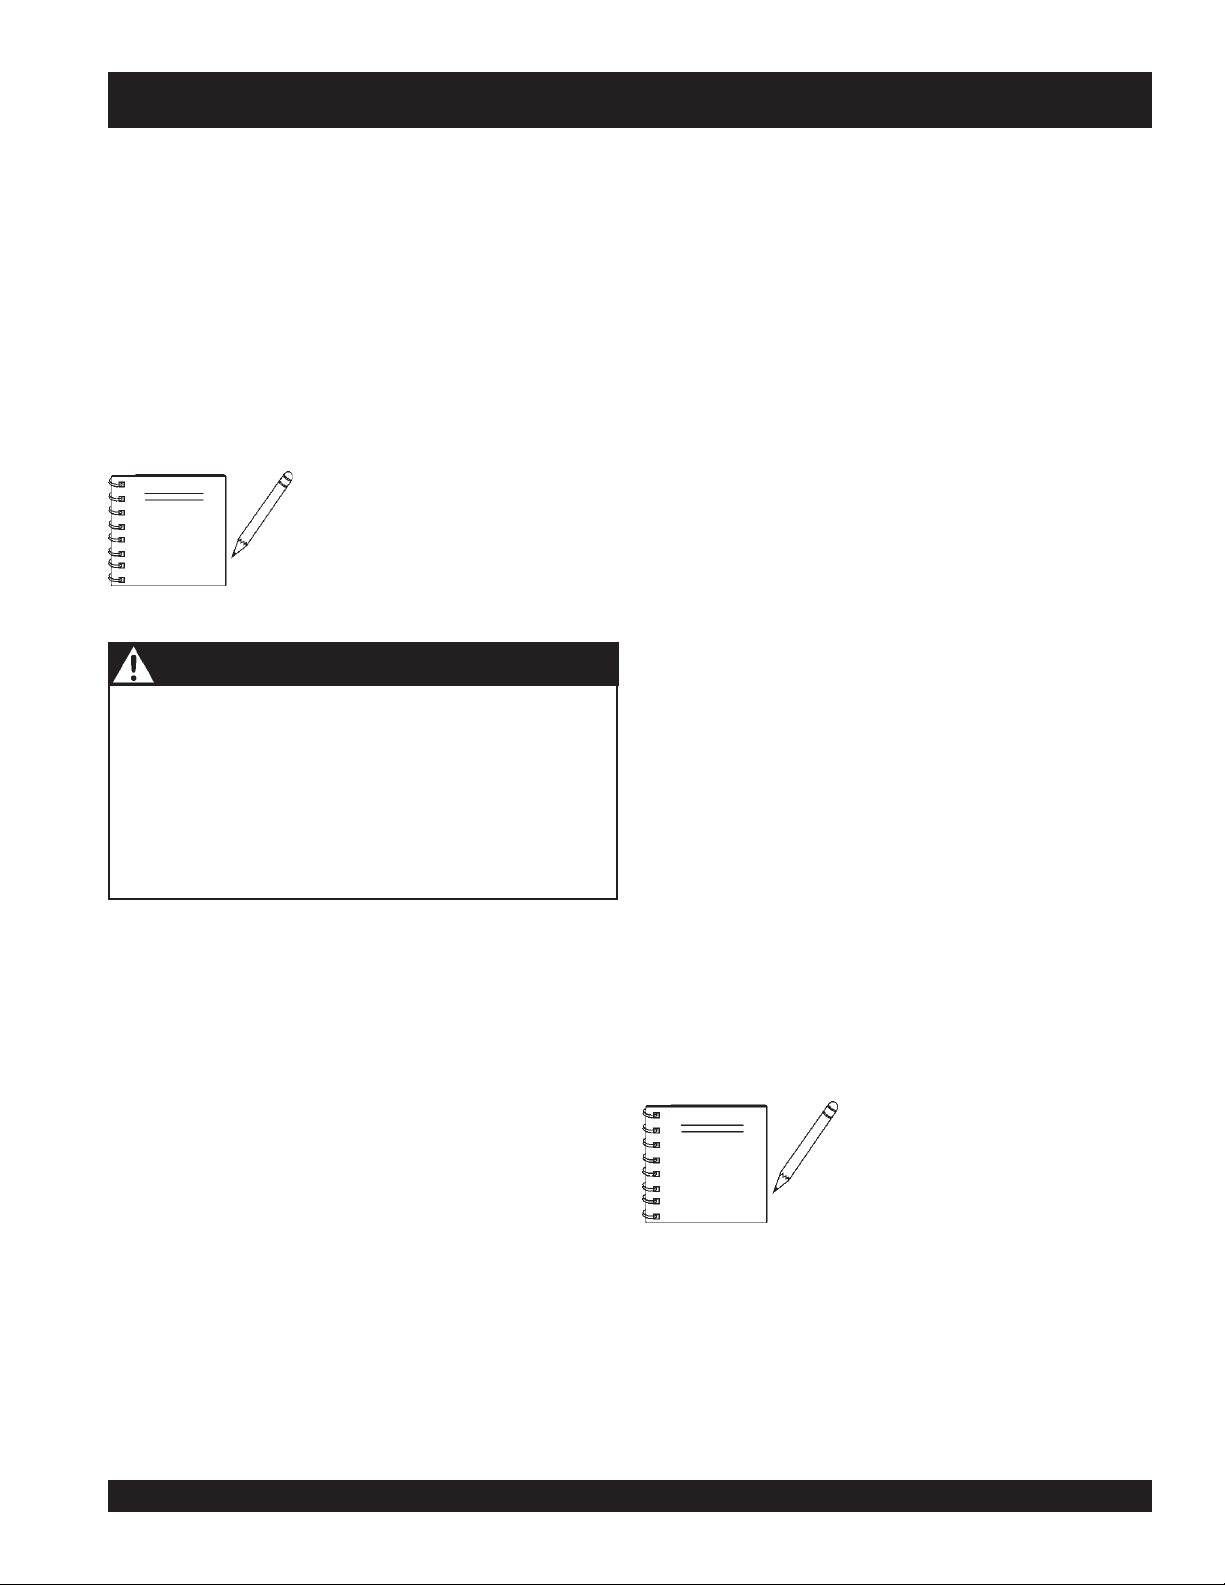
The return spring which is installed on the rocker arm, is installed
to eliminate shock and stress between the cam roller and the
”,
cam weldment when the pump is in operation. If the return spring
is removed or replaced for any reason, maintain the backing
plate dimension of 3” as shown on Figure 3, to produce the
proper pre-loading of the spring for a smooth performance.
centrifugal clutch
is set at 1100 R.P.M. The engine
Figure 10. Pumping Cylinder
MAYCO C-30HDNI (ZENITH) PUMP — OPERATION AND PARTS MANUAL — REV. #11 (04/03/12) — PAGE 27
Page 28
C-30HDNI (ZENITH) PUMP — HOW IT WORKS
The pumping piston (Figure 11) is forcing the material past ball (B) and out to the nozzle, also seating ball A so that the material will
not flow back to the hopper. This action also fills the compensating piston for the next stroke.
Figure 11. Pumping Pistons
Figure 12 shows the relationship between the return spring, the compensator spring and the rocker arm to maintain a smooth
performance. DO NOT tighten the bolt (Item 1) completely, the rod end must be able to move.
The return spring is installed to eliminate shock and stress between the cam roller and the cam weldment when the pump is in
operation. If the
produce proper pre-loading of the spring for a smooth performance.
return spring
is removed or replaced for any reason, maintain the backing plate dimension (3-inches) as shown to
Figure 12. Return Spring, Compensator Spring and
Rocker Arm Interaction
PAGE 28 — MAYCO C-30HDNI (ZENITH) PUMP — OPERATION AND PARTS MANUAL — REV. #11 (04/03/12)
Page 29
C-30HDNI (ZENITH) PUMP — OPERATING INFORMATION
OPERATING SUGGESTIONS
1. A well-planned location of the pump and routing of the hose
before starting a pour may save subsequent moves throughout the job.
2. Before concrete is discharged into the hopper, it is suggested
that 3 to 4 gallons of water be sprayed into the hopper,
followed by approximately 5 gallons of a creamy cement and
water slurry (1/2 bag of cement to 5 gallons of water). This
procedure lubricates the hose and prevents separation and
blockages in the hose.
Getting the concrete to flow through the
NOTE
hose at the start of the pumping cycle
can be one of the most critical operations of the pour. (
throttle when starting, NOT
Manually
operate the
remotely
)
C. If it is necessary to wait 10 minutes or more for another
D. When pumping stiff mixes and there is waiting time
E. When the pumping job requires a stiffer mix, the follow-
WARNING - Hose Blockage Hazard
If hoses or lines are
kinked
when starting up or during the pumping cycle, the
pump pressure could straighten out the kink or force out the
blockage. This rapid surge of material could cause the lines to
whip
or
move
Inspect the lines at all times to prevent the above
conditions
3. It is important that once the slurry procedure is completed,
and you have started concrete flowing through the hose, do
not stop the pour until all the slurry is pumped out and the
concrete has reached the end of the hose. The only time to
stop the pump at the start is if a blockage occurs.
4. When the pump is stopped for any reason during a pour; e.g.,
moving hose, waiting for redi-mix truck, the following suggestions are offered:
A. Leave the hopper full of concrete at the time of shutdown.
It is important not to let the
water into the hopper, as this could cause separation of
the concrete in the hopper.
blocked
in a manner that could cause injury to personnel.
for any reason, or if the lines are
5. Following the pump operation, proper wash out of all mate-
6. A thorough inspection of the drive components and greasing
redi-mix
driver wash too much
F. Hose sizing is very important: We strongly recommend
rials or “build-up” within the pump manifold and hoses will
prevent problems when starting the next job.
of all bearings after each job will ensure adequate lubrication
and service to the pump which is normally operating in wet,
gritty conditions.
NOTE
load of concrete, it is wise to start the pump and pump 6
or 8 strokes every 5 minutes to prevent setting of the mix
in the system. If waiting time is excessive, it would be wise
to wash out the pump and hoses and start over when the
new truck arrives.
between redi-mix trucks, it is advisable to add some
water to the last hopper of material and “hand mix” to
ensure an easier start with the following load.
ing method is suggested for starting: Take a water hose
with a nozzle on it and apply water with a fine spray to the
concrete as it comes down the redi-mix chute into the
pump hopper after the slurry procedure is completed and
you are ready to start pumping.
Using this procedure will make it easier to pump through
the clean hose. Note: Once the concrete has reached the
end of the hose, do not apply any more water in this
manner as this procedure is used on the start only.
on harsh mixes, vertical pushes, stiff concrete, shotcrete,
long pushes, that a 2 -1/2” line be used as far as possible.
The advantages of using the 2 -1/2” line are improved
pumpability, less pumping pressure and less wear on the
pump.
Over-greasing any
Mayco pump will not damage the
bearing.
bearing
on your
B. If the
MAYCO C-30HDNI (ZENITH) PUMP — OPERATION AND PARTS MANUAL — REV. #11 (04/03/12) — PAGE 29
shutdown
the engine so the vibration does not separate the mix in
the hopper which can cause a blockage in the manifold
when the pump is started.
period exceeds 2 to 3 minutes, turn off
Page 30
C-30HDNI (ZENITH) PUMP — OPERATING INFORMATION
WARNING - Hose Blockage Hazard
If you repeatedly pull the throttle all the way out and try to force
your pump to push through
material in the hose or manifold, you will soon have
breakdowns and costly repairs which are not covered under
warranty.
If a blockage occurs, find where it is and clear it before further
pumping. DO NOT increase the engine speed to clear the
blockage. Increasing the engine speed will only compound
the problem.
WARNING -
It will be necessary at times to move your pump from one job
site location to another. Before moving the pump, make sure to
pump the remaining concrete out of the hopper. Moving the
pump with a
or breakage of the axle and axle springs, excess strain and
pressure on the hub and bearing assembly.
New Pumps
All new pumps are “
shipment. This procedure permits a thorough inspection of the
entire drive system and valving under simulated full load conditions.
The pump owner can do the same by attaching an adaptor couple
to the end of the discharge cone; e.g., the use of a standard 2 in.
pipe cap with a 3/8 in. hole drilled in the center, screwed on to the
end of the hinged cone or reducer at the pump.
Fill the hopper with water after making sure that all sand and rock
have been removed from the manifold. Operate the pump at full
throttle and the 3/8 in. diameter hole restriction will create sufficient
back-pressure to make a thorough inspection of all moving parts.
Pumping Tips
1. The effects of heat and excessive time on concrete: Hot
concrete, commonly referred to as a hot load, is concrete that
has been in the redi-mix truck in excess of 2 to 3 hours. On a
hot day, this amount of time is even less. A brief explanation
of why heat and time affect concrete:
Concrete starts setting by drying up through a chemical
reaction. The catalyst to this reaction is heat. When pumping
a hot load, it is important to remember that when you have to
stop pumping for any reason, add water to the concrete in the
hopper and hand mix and move concrete in the hose every
5 minutes. If the shut down time becomes too long, wash out
immediately.
full hopper
Moving The Pump On The Job Site
water pressure tested
blockages
of concrete can cause severe damage
due to separation of
” at the factory before
2. ADMIXTURES
Remixtures that are designed into the concrete mix by the
redi-mix company or an architectural engineering company.
This section lists common admixtures and a brief explanation
of their functions:
A. Pozzolith 300 – or the equivalent acts as a water
B. MBVR – air entraining, acts as a lubricant.
C. Calcium Chloride – commonly referred to as C.C., is
D. Super Plasticizers – acts as an accelerator. The
E. Red Label – acts as a water retarder and an accelerator.
F. Fly Ash – is used to help increase the strength of the
NOTE
3. When pumping long distance or pumping stiff mixes, you can
expect a drop in volume compared to shorter lines and wetter
mixes due to the change in valve efficiency or cavitation.
4. Leaking manifold seals or hose coupling gaskets which leak
water can cause separation and subsequent jamming at that
point.
5. Damaged hoses with internal restrictions can cause blockages.
retarder and a lubricant. On a lean mix, long pushes, stiff
mixes, and vertical pushes, Pozzolith 300R helps
pumpability.
used as an accelerator. When pumping a load with
calcium chloride, it is recommended that you wash out
if the waiting time between delivery trucks becomes too
long.
concrete will look very wet after the super plasticizer is
added, but will begin to set up very fast. Wash out
immediately if you do not have a truck waiting. Super
plasticizers are used mainly on commercial jobs.
Red label will be used mainly on commercial jobs.
concrete and decrease the cement content per yard. This
is one of the most common admixtures used.
All admixtures will be shown on the
redi-mix concrete ticket. Before starting the pumping job, ask the driver of
the redi-mix truck to see the concrete
ticket and note the admixtures that
exist and take the proper action.
PAGE 30 — MAYCO C-30HDNI (ZENITH) PUMP — OPERATION AND PARTS MANUAL — REV. #11 (04/03/12)
Page 31

C-30HDNI (ZENITH) PUMP — OPERATING INFORMATION
6. If a blockage occurs in a hose, “walk the hose” until you find
the point of trouble. The hose will be soft immediately past the
blockage. If this happens at the start, disconnect the hose at
the first coupling past the blockage.
Elevate the hose at that point with the blockage area hanging
down.
CAUTION -
When disconnecting hoses, use
is under pressure!
Using a hammer, you can pound the down-stream edge of the
packed area until it is free to flow. Shake all of the sand and
gravel out to the end of the hose. Before reconnecting the
hose, start the pump and run a small amount of concrete out
to the end of the hose. This will assure that all of the separation
is out of the hose.
7. Clearing a Plugged Manifold
The manifold is plugged if the volume at the discharge end
of the hose stops, and the hose is soft. The drive belts will start
to slip and the engine will lugdown.
Follow steps 7A through 7J to un-plug a clogged manifold.
DANGER -
Hose Pressure Hazard
extreme
CAUTION! The hose
Clearing A Plugged Manifold
H. After the blockage has been cleared and the pump
I. Before reconnecting hose to the reducer, start the engine
J. Shake out around 2 feet of concrete before reconnecting
8. Avoiding Setting of the Mix in the System
To avoid setting of the concrete mix in the system when
waiting more than 30 minutes between concrete loads, flush
the system depending on job factors (such as presence of
accelerators and job site temperature) and your particular
mix design.
Clearing a Mix from the System
If, for any reason, the mix should set up in the system, the following
procedure is suggested:
CAUTION -
When disconnecting hoses, use
hose is under pressure!
manifold has been thoroughly flushed with water, close
the hinged discharged cone and lock into place.
and pump two or three shovels of concrete through the
reducer. This will insure that all the blockage has been
cleared.
hose to pump. After this is done, connect hose to pump
and resume the pumping operation.
Hose Pressure Hazard
EXTREME CAUTION!
The
Due to pressure build-up inside the manifold, great care must
be taken when clearing a plugged manifold.
A. STOP the pump. Switch OFF the engine.
B. DO NOT open any of the delivery system joint clamps.
senior
C. The
least 20 feet away from the pump and turn their heads
away from the manifold.
D. The operator must position himself/herself away from
the hinged side of the manifold.
E. Wearing safety glasses, grasp the clamp arm weldment
and carefully pull it open to the primary (safety) position.
STOP count to 20. This will allow the pressure to release.
F. After the pressure has been released, open the clamp
arm weldment and swing the hinged discharge cone
open.
G. Remove blockage with a round 2-foot length of reinforc-
ing steel rod. Flush the manifolds with water. Make sure
the (3” x 2”) reducer is clear of any blockage before
closing the discharge cone.
operator must warn all others to stand at
1. Disconnect the hoses from the pump and wash the pump out
immediately. For example: If you had 200 ft. of system out, you
would disconnect each hose.
2. Reconnect the first hose and fill the hopper with water. DO
NOT try to push all the concrete out of all of the hose lines at
one time.
3. Clean it out by pushing water through the first hose off the
pump, then continue progressing through all the hoses, until
all the system is clean.
4. If waiting time is excessive, it would be wise to wash out the
pump and hoses and start over when the new truck arrives.
This can be avoided by being observant to the pump and
system, also taking into consideration the above factors
affecting the mix.
MAYCO C-30HDNI (ZENITH) PUMP — OPERATION AND PARTS MANUAL — REV. #11 (04/03/12) — PAGE 31
Page 32

C-30HDNI (ZENITH) PUMP — OPERATING INFORMATION
Down-Hill Pumping
Downhill pumping can be difficult on some jobs. It is suggested that
a sponge 2”x 4”x 6” be placed in the hose before the start of
pumping. Wet the sponge before placing it in the hose. Reference
the Operating Suggestions at the start of this section for slurry
procedures.
The reason for using the wet sponge is to keep the slurry from
running too far ahead of the concrete and so reducing the
possibility of separation. When the pump is stopped, the material
can flow slowly down, due to gravity, and cause the hose to
collapse.
When pumping is resumed, you can expect a blockage at the point
of hose collapse. To prevent this from happening, the hose can be
“kinked off” at the discharge end when the pump is stopped to
prevent the gravity flow of the material in the hose.
The use of stiffer mixes when pumping down-hill will decrease
gravity flow of the material in the hose and will assure a smoother
operation between the cam roller bearing and cam plate. As with
any job, make sure that the hose and the couplings are in good
workable shape.
Valve Seats
If the volume at the end of hose starts to decrease gradually and
eventually almost stops, it is quite likely that the
had excessive wear and need replacement. Once they have
reached a certain wear point, they may “channel out” rapidly and
material will reciprocate past the ball on each stroke.
The hollow
dents or appears to be badly worn. Sand and aggregate materials
in some areas are extremely sharp and hard and therefore highly
abrasive. Under these conditions when pumping stiff mixes, or to
high elevations which cause line pressures, it will be noted that
valve components may have short wear life.
If this condition exists, it is advisable to remove the manifold only,
and inspect the lower seat at the end of each day. If it appears that
the seat is beginning to “channel out", replace before starting the
next day’s pour.
The upper valve seat can be inspected after each washout by
running your finger around lower edge of seat where the ball
makes contact. You can reach this from the inside of the hopper. Be
sure that the engine is turned off.
steel ball
should be replaced when it starts to show
valve seats
have
Vertical Pumping
When pumping vertically up the side of a building, above 40 feet,
we would recommend the installation of
fastened at intervals as necessary to support the pipe. Ninety
degree, long radius pipe sweeps should be installed at the top and
bottom of the steel line.
Use a 25 ft. hose, or short section, off the pump; and for the balance
of the horizontal distance to the vertical line, use steel pipe. This
type of installation has been satisfactory on many jobs being
pumped in excess of 100 feet high. Line pressures are always less
using steel pipe as compared to hose.
When pumping vertically using
to go higher than 50 feet with hose. The hose should be tied off at
intervals of 10 feet, if possible. Special attention should be given
when tieing the hose off at the top as the hose will have a tendency
to stretch when filled with concrete. This will increase the possibility of a blockage at the point where the hose is tied off. To avoid
this, a long radius of 90 degree elbow is recommended. The
suggested place to tie off is on the hose, under the clamp.
NOTE
all hose
It is strongly recommended that steel
pipe be used on ALL vertical pump-
ing for safety and convenience.
steel pipe
, it is recommended not
securely
Pulsation
A slight pulsation of the hose will always be noticeable near the
pump. Excessive pulsation of the hose near the pump is normally
due to higher than average line pressures caused by stiff, harsh
mixes, or extremely long pumping distances.
The use of 2 -1/2” I.D. hose in these extreme cases reduces line
pressures or the addition of slight amounts of water to the mix, if
permissible, will permit easier pumping. The use of certain pumping admixtures may help.
If excessive pulsation exists in the hose, it is advisable to use
burlap or some means of wear protection under the hose at points
where the hose may wear through the outer cover; e.g. over forms,
steel or sharp curbs.
PAGE 32 — MAYCO C-30HDNI (ZENITH) PUMP — OPERATION AND PARTS MANUAL — REV. #11 (04/03/12)
Page 33

C-30HDNI (ZENITH) PUMP — OPERATING INFORMATION
Cam Roller
If the cam roller does not ride on the cam profile smoothly, it may
be caused by insufficient line back-pressure; e.g., a wet mix with
only 50 feet of hose. Add more hose as necessary. It can also be
caused by cavitation or the passing of over-sized aggregates
through the valving, causing it to skip.
Snap-Joint
When using Snap-Joint couplings with gaskets to join hose, see
that they are washed clean after each job. Keeping the hose ends
clean (heavy duty) is very important for the best job setup. A thin
coat of grease on the rubber gasket or dipping both coupling and
gasket in water before coupling the hose will make for easier
installation.
MAYCO C-30HDNI (ZENITH) PUMP — OPERATION AND PARTS MANUAL — REV. #11 (04/03/12) — PAGE 33
Page 34

C-30HDNI (ZENITH) PUMP — INSPECTION
CAUTION - General Saftey Guidelines
NEVER operate the pump in a confined
area or enclosed area structure that does
not provide ample
NEVER operate the pumps's engine with the
engine hood removed. The possibility exists
of
hands, long hair
becoming entangled with the V-belt, causing
injury and bodily harm.
NEVER place hands or feet inside the
while the engine is running. ALWAYS shut-down the engine
before performing any kind of maintenance service on the
pump.
Before Starting
free flow of air
ALWAYS wear approved
protection before operating the pump .
, and
.
clothing
hopper
eye
and
hearing
. ALWAYS make
Engine Oil Check
1. To check the engine oil level, place the pump on secure
level ground with the engine stopped.
2. Remove the dipstick from its holder (Figure 13) and wipe it
clean.
3. Check the engine oil level as shown on the dipstick
(Figure 14).
Figure 13. Engine Oil Dipstick (Removal)
1. Read safety instructions at the beginning of
this manual.
2. Removing any dirt and dust that might have accumulated
around the engine cooling air inlet, fuel injection system.
3. Check the air filter for dirt and dust. If air filter is dirty, replace
air filter with a new one as required.
4. Check fuel injection system for external dirt and dust. Clean
with dry compressed air.
5. Check fastening nuts and bolts for tightness.
6. Connect Battery
7. Make sure hopper is free of dirt and foreign debris (large
objects over 2-inches)
8. Make sure radiator is filled with proper amount of anti-freeze
water solution (50/50).
9. Make sure all hose lines are in good condition and are
working properly.
Reference manufacturer engine
NOTE
manual for specific servicing
instructions.
4. If the engine oil level is low, add oil through the engine oil filler
hole (Figure 15) with the recommended oil type (Table 3).
Maximum oil capacity is 3-3/8 quarts (3.2 liters).
Figure 14. Engine Oil Dipstick
Figure 15. Engine Oil Filler Hole
PAGE 34 — MAYCO C-30HDNI (ZENITH) PUMP — OPERATION AND PARTS MANUAL — REV. #11 (04/03/12)
Page 35

C-30HDNI (ZENITH) PUMP — INSPECTION
EPYTLIO.5ELBAT
Lubrication Box
The model C-30HDNI model features a fully enclosed
which utilizes the
nosaeSerutarepmeTepyTliO
remmuS52
llaF/gnirpS01
retniW0
o
o
o
retaergdnaC03-W01EAS
o
52otC
C02/03-W01EAS
rewoLroC01-W01EAS
box,
Before using your new pump, 7 gallons of SAE 30 motor oil must
be added directly into the lubrication box. Visually inspect the oil
in the lubrication box by making sure the oil is at the correct
operating level as indicated by the dip stick (Figure 16).
Also reference the oil level decal (Figure 17) adjacent to the
Gasoline Check
lubrication box.
1. Remove the gasoline cap located on top of fuel tank.
2. Handle Fuel in a safety container. If the container does not
NOTE
have a spout use a funnel.
3. Visually inspect to see if fuel level is low. If fuel is low,
replenish with unleaded fuel. When refueling, be sure to use
a strainer for filtration. DO NOT top-off fuel. Wipe up any
spilled fuel.
4. Pay attention to the fuel tank capacity when replenishing fuel.
Refer to the fuel tank capacity listed in Table 5.
CAUTION -
The oil level must be
level and oil cleaniness.
WARNING - EXPLOSIVE FUEL
lubrication
"SPLASH"
method of lubrication.
Make sure the pump is on a secure
level surface when checking the oil
level inside the lubrication box.
Checking Lubrication Oil Levels
checked daily
to ensure adequate oil
Gasoline
is extremely flammable, and its
vapors can cause an explosion if ignited.
DO NOT start the engine near spilled fuel
or combustible fluids. DO NOT fill the fuel
tank while the engine is running or hot.
DO NOT overfill tank, since spilled fuel
could ignite if it comes into contact with hot engine parts or
sparks from the ignition system. Store fuel in approved
containers, in well-ventilated areas and away from sparks and
flames. NEVER use fuel as a cleaning agent.
DO NOT smoke while refueling, motor fuels are highly
flammable and can be dangerous if mishandled.
Figure 16. Lubrication Box Dipstick
Figure 17. Lubrication Box Oil Caution Decal
MAYCO C-30HDNI (ZENITH) PUMP — OPERATION AND PARTS MANUAL — REV. #11 (04/03/12) — PAGE 35
Page 36

C-30HDNI (ZENITH) PUMP — INSPECTION
Checking Engine Coolant Level
1. Remove the radiator cap, and check the cooling water level
inside the radiator (Figure 18).
2. Maintain water/coolant level at top of radiator coils.
Figure 18. Radiator Coolant
WARNING - Burn Hazards
NEVER remove the radiator cap when the
engine is HOT! Allow the engine to cool
before remove the cap.
V-Belt Deflection
1. Visually inspect the V-belt for cracks, fraying, wear or oiliness.
2. Make sure V-belt does not the bottom the pulley groove.
3. Check the V-belt tension (Figure 19) by pushing midway through
the two pulleys. The V-belt deflection should be between .300 to
.472 inches (8 to 12 mm).
Figure 19. V-Belt Deflection
3. Check the radiator and hoses for any signs of leakage.
4. If cooling water is dirty, flush the cooling system.
5. When using antifreeze, mix the antifreeze coolant with water.
Observe the instructions on the antifreeze container. Usually
a 50/50 mixture is a good choice.
6. When replacing the radiator cap, be sure to fit it securely back
onto the radiator. If replaced loosely or incorrectly, the cooling
water will quickly evaporate, causing the engine to overheat.)
PAGE 36 — MAYCO C-30HDNI (ZENITH) PUMP — OPERATION AND PARTS MANUAL — REV. #11 (04/03/12)
Page 37

C-30HDNI (ZENITH) PUMP — STARTUP/SHUTDOWN PROCEDURES
Starting
CAUTION - General Saftey
DO NOT attempt to operate this concrete pump
until the Safety, General Information and
Inspection sections have been read and
understood.
1. Hold the throttle control switch fully to the RIGHT to set the
engine speed to IDLE (Figure 20).
Figure 20. Throttle Control Switch
NOTE
During
engine speed cannot be reduced
below 1300 RPM's.
pumping operations
, the
6. Verify that the
status lamps (Figure 23) are all OFF. If any of these lamps are
ON, stop the engine and correct the problem.
7. Let the engine run for 3-5 minutes before putting pump into
operational use. Push the choke knob in all the way.
8. Listen for any abnormal sounds. If any mechanical or electrical problems exists, STOP the engine and correct the problem.
9. To begin pumping concrete. Place the pumping control switch
(Figure 24) in the ON position
oil pressure, battery
Figure 23. Control Box Status Lamps
and
water temperature
This built in feature protects the clutch from disengaging
(slipping) during operation.
2. Place the pumping control switch (Figure 21) in the OFF
position.
System Shut-Down
1. Place the pumping control switch in the OFF position
(Figure 21).
2. Turn the throttle control knob fully counter-clockwise.
Let the engine run at idle speed for 3-5 minutes.
Figure 21. Pumping Control Switch (OFF)
3. Insert the ignition key into the ignition switch (Figure 22), turn
the key to the ON position, then to the START position,
release the key when the engine starts.
3. Turn the ignition key (Figure 22) to the OFF position.
4. Clean pump as referenced in the maintenance section of this
manual.
Figure 24. Pumping Control Switch (ON)
Figure 22. Ignition Switch
MAYCO C-30HDNI (ZENITH) PUMP — OPERATION AND PARTS MANUAL — REV. #11 (04/03/12) — PAGE 37
Page 38

C-30HDNI (ZENITH) PUMP — MAINTENANCE (PUMP)
Preventive Maintenance
It is extremely important to maintain this pump due to the
highly abrasive nature of concrete material.
1. Inspect all drive components for loose or worn bolts.
2. Drive belt/chain should be checked to remove all slack. Refer
to adjustment procedure.
ALWAYS
3.
4. Keep entire pump clean of concrete to prevent build-up.
5.
ALWAYS
grease.
NOTE
carry extra “O” rings.
grease every fitting daily. Use only premium grade
Over greasing will not damage
pump.
General Clean-up Procedure
1. Ensure that there is no blockage in the hose and line
(Pumping Tips, step 8) or in the manifold (Pumping Tips,
step 7). If a blockage exists, clear it to ensure proper
operation the next time it is used. At the end of every pour,
or during long delays during a pour, the pump and delivery
system must be thoroughly cleaned by removing all concrete material.
2. Proper wash out of all materials or build up within the
pump manifold and hoses following the pumping operation will prevent problems when starting the next job. After
completion of the pour, pump the remaining concrete in
the hopper through the discharge line.
NOTE
3. Turn the pump engine off before filling the hopper with water.
Engine vibration at idle may “separate” material in the hopper,
causing jamming in manifold when pumping is resumed.
To avoid the possibility of separation
during clean-up, do not pump the
concrete below the inlet ball in the
hopper. It is best to leave approximately 3 to 4 inches of concrete above
the inlet ball.
4. Fill hopper with water and resume pumping. The water will
push the concrete through the line. When the water runs clear
at the end of the hose, disconnect lines and shake out all the
sand and sediment so the lines will be clean for the next pour.
5. It is important that the hinged discharge cone on the pump
manifold be opened and all remaining concrete (rock and
sand) be thoroughly washed out. This must be done after
each job to prevent concrete build up in the discharge
manifolds and 3” discharge elbow.
PAGE 38 — MAYCO C-30HDNI (ZENITH) PUMP — OPERATION AND PARTS MANUAL — REV. #11 (04/03/12)
Page 39

C-30HDNI (ZENITH) PUMP — MAINTENANCE (PUMP)
Sponge Clean-out Procedure
This section will explain the recommended procedure for using
sponge
a
to clean out the
hose lines.
CAUTION - Clearing The Pump
NEVER use
the chrome finish on the pumping cylinder.
NEVER use compressed air to clean out the lines.
When using a clean-out hook to clean out the rear of the redimix truck, use a
some solid part of the redi-mix truck to prevent the hook from
jumping off the redi-mix truck’s hopper. Run the pump at half
throttle.
1. After completion of the pour, pump the remaining concrete in
the hopper through the discharge line. Using a shovel, clean
the sides of the hopper.
NOTE
2. Star t the pump engine and pump the hopper all the way down.
3. Disconnect the hose from the pump. Fill the hopper with water
and pump the remaining concrete out of the pump.
4. Open the hinged discharge cone and thoroughly wash out all
remaining concrete (sand-sediment) from the cone and
pump manifolds. Close the discharge cone and lock in place.
5. Take a sponge (2”x 4”x 6”) and soak it with water. Take the hose
that is disconnected from the pump and shake out the
concrete so that about 2 feet of it is clear. Insert the sponge into
the hose.
6. Reconnect the hose to the pump. Fill the hopper with water
and resume pumping. Run the pump approximately half
throttle. The sponge will be discharged at the end of the line
followed by clear water. At this point, the pump and lines will
be completely clean and ready for the next job.
muriatic acid
to clear the pump. Acid will dissolve
safety chain
The pump engine should be turned
OFF, as explained in General Clean
Up Procedure.
After the sides of the hopper have
been cleaned, add a small amount
of water to the remaining concrete in
the hopper and hand mix.
to secure the clean-out hook to
Lubrication Box
The C-30HDNI model features a fully enclosed
which utilizes the
Visually inspect the oil in the lubrication box (Figure 16) by making
sure the oil is at the correct operating level as indicated by the
dip stick. Also reference the oil level decal (Figure 17) adjacent
to the lubrication box.
NOTE
CAUTION -
The oil level must be
level and oil cleaniness.
Piston Cup Wear
rubber piston cups
The
will require
depends on many factors, proper oil level, oil cleanliness,
abrasiveness of aggregrate being pumped and material slump
etc.
NOTE
As the rubber piston cups wear, fine cement particles will
accumulate in the bottom of the lubrication box. Once this cement
paste reaches 1-inch in height, it is recommended that the
lubrication box be drained (flushed) and cleaned and the oil
replaced with new SAE 30 motor oil.
NOTE
lubrication box,
"SPLASH"
method of lubrication.
Make sure the pump is on a secure
level surface when checking the oil
level inside the lubrication box.
Checking Lubrication Oil Levels
checked daily
are a natural wear component and
periodic replacement. The life of the rubber cups
IMPORTANT! To ensure maximum
cup life, the oil level in the lubrication
box
proper level. In addition the
lubrication box must be cleaned
periodically.
There are two clean-out ports
located at the bottom of the
lubrication box.
to ensure adequate oil
must be
maintained at the
Repeat steps 1 through 6 a few times
NOTE
MAYCO C-30HDNI (ZENITH) PUMP — OPERATION AND PARTS MANUAL — REV. #11 (04/03/12) — PAGE 39
to ensure that the hose lines are
thoroughly cleaned.
Any questions regarding the lubrication box clean-out procedure,
contact the MAYCO Service Department.
Page 40

C-30HDNI (ZENITH) PUMP — MAINTENANCE (PUMP)
Crankshaft and Cam Assembly Procedure
1. Set bearing block (P/N EM14303) into hydraulic press. Place
bearing cup into bearing block and press in evenly. Bearing
cup should be aligned equally on both sides of bearing block.
2. Set
3. Insert bearing cone spacer (P/N EM14323) onto crankshaft
4. Place O-ring and spacer (P/N EM14302) on crankshaft. Set
5. Slide cam bushing down crankshaft and align the bushing,
6. Release pressure on the bushing, reapply pressure to bush-
7. After bushing has been fitted tightly into cam, remove from
8. Place cam bearing onto crankshaft keeping bearing loose.
9. Set crankshaft assembly into the pump box and align both
10. After crankshaft assembly is securely fastened to the pump
11. Install chain P/N EM14308. To adjust, loosen locknuts on
crankshaft
wards the top. Install spacer (P/N EM14322), O-ring (P/N
EM14326) and bearing cone (P/N EM14325) onto crankshaft. Place bearing block on crankshaft until the bearing
cone is riding in the bearing cup.
and inside bearing block. Install second bearing cone until it
is seated inside bearing cup.
cam weldment on top of spacer. Install crankshaft key and cam
key on cam bushing (P/N EM14301).
cam and crankshaft. Install sleeve over crankshaft and align
with hydraulic press. Install cam bushing bolts loosely. Press
bushing down onto bearing assembly. Leaving pressure on
the bushing, tighten cam bolts evenly to 40-50 foot pounds.
ing and tighten bolts evenly to 40-50 foot pounds. Repeat
procedure 3 to 4 times.
hydraulic press. Remove one bolt at a time, using Loctite,
install bolts and torque to 65-70 foot pounds. Counter sink set
screw hole and install dog point set screw and second set
screw both with Loctite
NOTE
bearing assemblies with the pump box mountings.
box, place sprocket (P/N EM14307) onto the cam side of the
crankshaft assembly. Install bushing (P/N EM14309) into
sprocket. Align sprocket with sprocket on countershafts and
tighten bolts.
pusher bolts and tighten chain to approximately 1/2 in. slack
in the chain. Once chain is adjusted properly, tighten down
locknuts.
into hydraulic press with the long end to-
TM
.
Make sure the eccentric lock is
facing toward the outside of the
pumping unit.
Ball and Seat Replacement Procedure
1. Remove 3”x 2” reducer and 3” elbow from the pump outlet.
Remove exhaust gate and Y-manifold (secondary manifold).
Check ball seat and ball stop pin for wear. If any wear is
detected, the part should be replaced. Remove T-manifold
(primary manifold). Check all parts for wear. Remove hopper
and hopper seat and inspect.
2. Loosen the piston nuts and remove the piston cup assembly
and cylinders. Inspect all parts for wear and replace parts with
excessive wear. Check oiler pump for proper operation.
3. Clean all parts thoroughly, removing all foreign material and
concrete slurry. Once parts are clean, install concrete cylinders. Place oiler plate O-ring in place and coat with oil. Install
small O-ring on piston rod. Run oiler line through the cylinders
and connect in the oiler fitting on the oiler plate.
4. Push oiler plate into cylinder. Install ring and felt holder, soak
felt ring in oil, then install around felt holder in cylinder. Make
sure the bronze ring is flat, then push it up flush with the ring
and felt holder.
5. Coat piston cup with oil and push it into the cylinder. Install
bushing into center of piston cup. Put small O-ring on rod,
place face plate on rod and tighten down securely. Repeat
these procedure on the opposite cylinder.
6. Thoroughly check T-manifold, ball stoppings and both steel
balls for wear. Insert an O-ring in the top flange and in the
leading edge of the manifold. Put the manifold onto the
primary side of the pump and install bolts leaving them loose.
7. Check Y-manifold for wear, install all O-rings, ball stop pin, ball
and seat. Align and install Y-manifold to T-manifold and
cylinder assembly. Tighten Y-manifold bolts first before tightening T-manifold bolts. After manifolds are tight, check O-rings
for slippage.
8. Insert seat into frame hole directly above the T-manifold. The
seat orifice should fit inside the frame itself, then the seat sits
on top of the orifice. On the dura-seat, set the big end of the
seat in the frame. The seat, or the small part of the dura-seat,
fits into the bottom of the hopper.
9. After tightening the manifold bolts and inserting the seats in
place, set the hopper over the seat and align the bolt holes.
Tighten bolts, check O-ring and seat for alignment.
10. Check exhaust gate for wear, install and align gate onto
Y-manifold. Insert O-ring into exhaust gate flange and close
gate. Lock down lever and adjust clamp arm.
11. Install 3 in. elbow and 3x 2 in. reducer. Fill hopper half full and
check for leaks.
PAGE 40 — MAYCO C-30HDNI (ZENITH) PUMP — OPERATION AND PARTS MANUAL — REV. #11 (04/03/12)
Page 41

C-30HDNI (ZENITH) PUMP — MAINTENANCE (PUMP)
Clutch Lining Replacement
(For P/N EM14320 Clutch Assembly Only)
The normal lining thickness measures 3/16 of an inch. If the
clutch starts to slip or make an usual noise, it may be necessary
to replace the lining. Please note that the lining retaining rivets
should not be exposed
The following procedure will assist you in replacing the lining.
1. Remove worn out lining and rivets. Check clutch springs and
flyweights for wear.
2. Cut 1/8 in. off of each end of clutch lining. Slide lining into
place. Insert one rivet into clutch lining hole. (Make sure rivet
goes from inside out.) Wedge a flathead screwdriver between
clutch flyweight and rivet head.
3. Adjust screwdriver so that the rivet sticks out from the clutch
housing approximately 1/8 of an inch. With a flat punch, pen
the ends on the rivet so that it locks in place with the clutch
housing. Repeat this procedure for all remaining clutch rivets.
to the rotating weight.
NOTE
The clutch lining is a normal
maintenance item and will require
periodic replacement.
MAYCO C-30HDNI (ZENITH) PUMP — OPERATION AND PARTS MANUAL — REV. #11 (04/03/12) — PAGE 41
Page 42
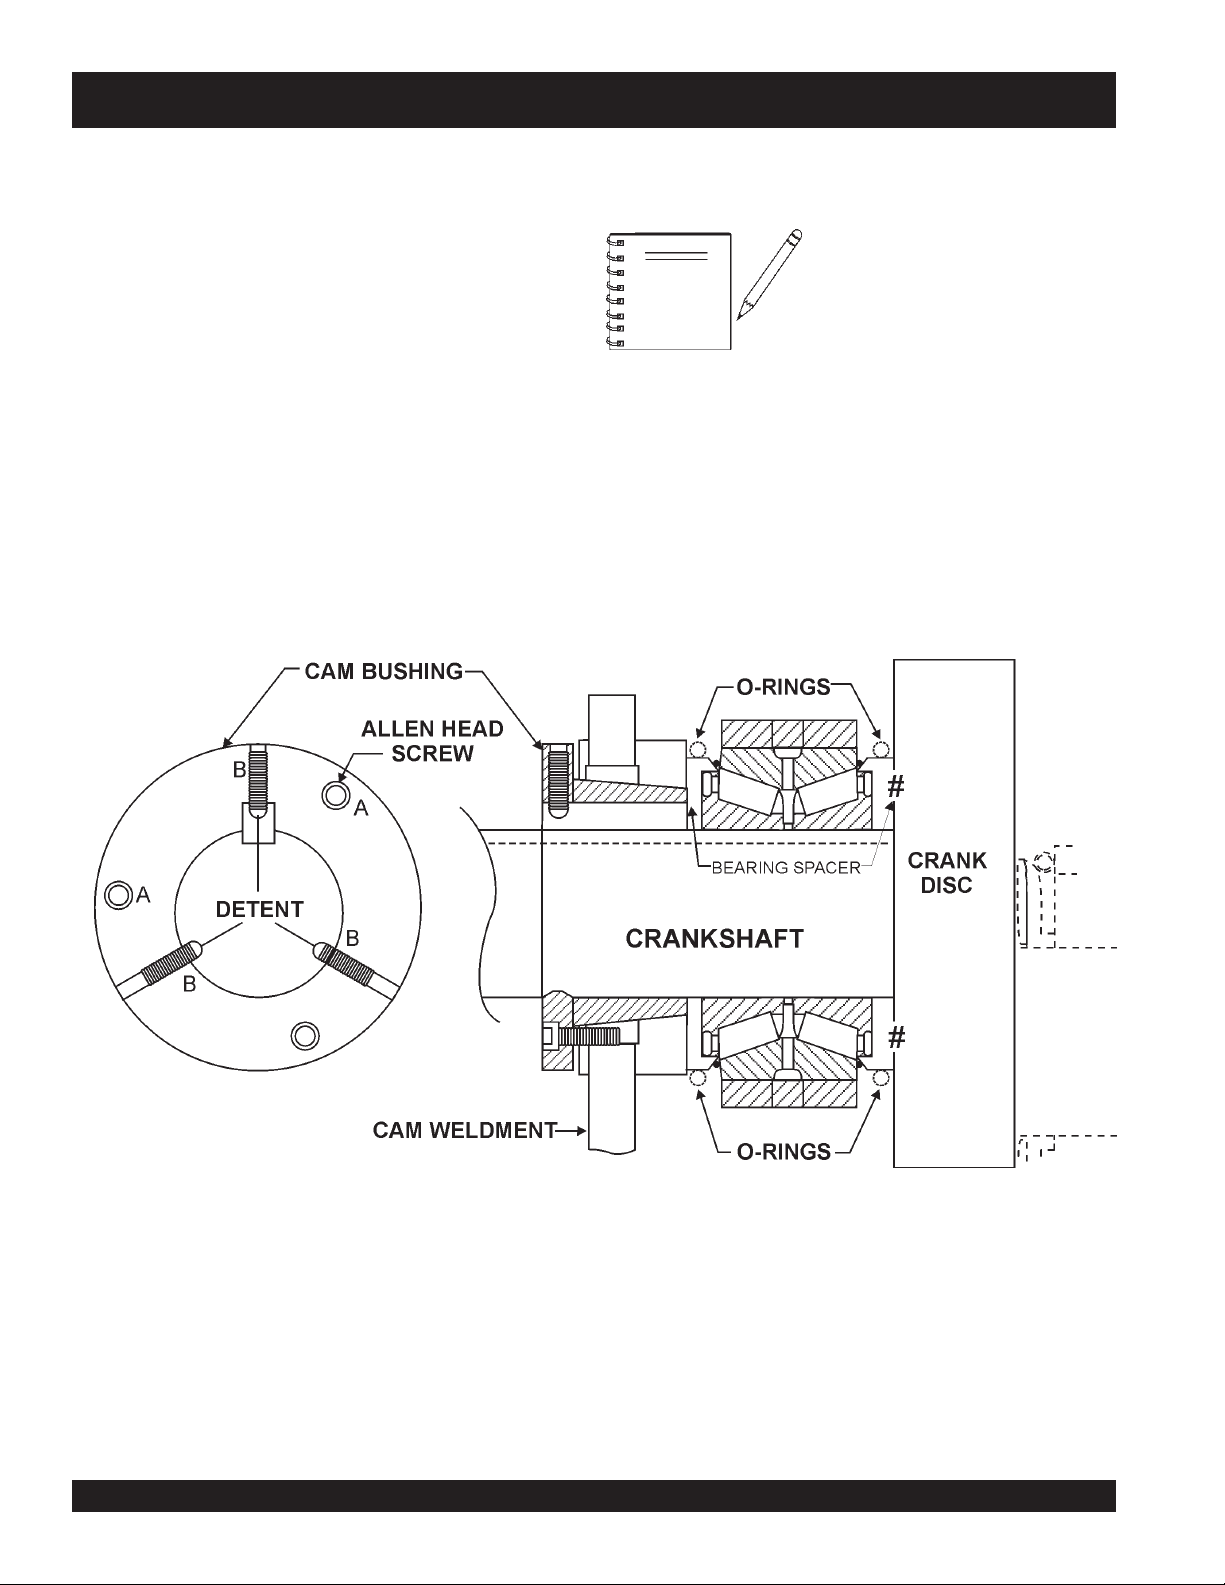
C-30HDNI (ZENITH) PUMP — MAINTENANCE (PUMP)
Bearing Installation
1. Install the bearing components on the crankshaft making full
contact with the back side of the crank disc as indicated the
symbol #. See Figure 25 below.
2. Install the bushing in the cam weldment and slide it onto the
crankshaft until contact is made with the bearing spacer.
NOTE
It is important that the
Assembly
is installed properly.
Bearing
3. Tighten the 3
on the bushing towards the bearing spacer.
allen head bolts
“A” while exerting pressure
Figure 25. Bearing/Cam Bushing Installation
PAGE 42 — MAYCO C-30HDNI (ZENITH) PUMP — OPERATION AND PARTS MANUAL — REV. #11 (04/03/12)
Page 43

C-30HDNI (ZENITH) PUMP — MAINTENANCE (PUMP)
Detent Hole (3) Installation
1. After the bearing assembly has been is installed , remove the
three “dog type” allen head set screws (B) to allow detents to
be drilled. See Figure 26 below.
The detent holes will prevent the
NOTE
2. Use a 9/32” drill to “detent” half (minimum 1/8” deep). Then
“chase” the threads with a 3/8-16 bottom tap and blow out the
chips after drilling, to be certain that the “dog type” allen set
screws bottom in the detents to prevent the taper bushing from
sliding laterally.
bushing from sliding away from the
bearing spacer when the pump is
under load.
3. If this procedure is not followed closely the heavy loading
of the bearing during pumping operation causes the
Timken
move the taper bushing and allow the Timken
bearings to separate from the race and subsequently fail.
NOTE
4. Drill (detent) the shaft under the allen set screws “B” to prevent
the bushing from the sliding away from the bearing spacer
when the pump is under a load.
™ cone bearings to create lateral forces which will
™ cone
Position the ‘O’ ring on the O.D. of the
bearing spacer during assembly to
assure proper bearing adjustment.
Figure 26. Detent Holes
MAYCO C-30HDNI (ZENITH) PUMP — OPERATION AND PARTS MANUAL — REV. #11 (04/03/12) — PAGE 43
Page 44

C-30HDNI (ZENITH) PUMP — MAINTENANCE (PUMP)
Figure 27. V-Belt and Drive Chain Adjustment
V-Belt And Drive Chain Adjustment
1. Loosen the pillow bearing bolts (Figure 27) only to the point
where the bolts will remain snug.
2 Unlock the two pusher bolt lock nuts.
3. Turn each pusher bolt clockwise an equal amount until the
chain is to proper adjustment of approximately 3/8 to 1/2 in.
slack in the chain. It is very important that the pulley side and
the chain side (pillow block bearings) are within 1/16” of an
equal distance.
4. This distance can be checked by using a tape measure or a
straight edge ruler, measuring from the inside of the pusher
bolt bracket to the face of the pillow block bearing.
5. The drive chain should be adjusted regularly to remove all
slack. Once all slack is removed, DO NOT over-adjust, as this
will overload the shaft bearings. A slack chain on the crank
drive creates backlash and shock loads on the shafts and
bearings which results in shorter wear/life of the drive components.
7. Drive belts should be regularly adjusted to prevent slippage.
To adjust the belts, loosen the engine mounting bolts and
move the engine until there is a maximum 3/4 in. deflection
in the belts, retighten the engine mounting bolts.
8. Frequent inspections should be made on all drive components to make certain that all bolts and nuts remain tight.
NOTE
Prior to adjusting the chain, place the
lobe of the cam in the down position.
The chain should have 83 rivets,
Including one each, half-link and full
link.
6. Lubricate the chain regularly. Note-it is advisable to carry a
spare chain and master links for replacement in the field if
necessary.
PAGE 44 — MAYCO C-30HDNI (ZENITH) PUMP — OPERATION AND PARTS MANUAL — REV. #11 (04/03/12)
Page 45

C-30HDNI (ZENITH) PUMP — MAINTENANCE (PUMP)
Roller Chain Application
A properly selected, installed and maintained
(Figure 28) is an extremely versatile means of power transmission.
It is possible, however, to greatly reduce a chain’s life and even
induce failure if the chain is abused through improper installation,
operating or maintenance procedures. In certain applications,
failure can lead to personal injury or property damage.
Figure 28. Drive Chain
Recommendations and comments on how to get the most from
your roller chain drive are given in this section. The drive chain
used in the MAYCO C-30HDNI pump is manufactured by the
"DIAMOND CHAIN COMPANY
Working Loads
UTS-Ultimate Tensile Strength-is the one time pull required to
break the chain. For single strand chain, the load (pull) applied
to the chain in service should never exceed 1/6th of the UTS for
the chain being used except as noted below.
TM
"
drive chain
Installation and Drive Alignment
Chain and sprockets (Figure 29) must be installed correctly.
Sprockets must be properly aligned and sprocket shafts must be
parallel so the drive will run in a plane perpendicular to them.
Axial alignment should be checked with a straight edge which
will extend across the finished sides of the sprockets. They should
be true-running with minimum wobble and eccentricity. The higher
the drive speed, the more important these details become.
Figure 29. Shaft and Drive Sprocket Alignment
The chain should be installed so the slack span is properly
tensioned. To check chain tension (Figure 30), turn one sprocket
to tighten the upper span of the chain while holding the other
sprocket fixed. The lack span should have 4-6% of span length in
the mid-span movement for horizontal drives and 2-3% for
vertical drives.
It is possible to exceed the allowable working loads for a limited
number of cycles, but you should contact Diamond Chain
Company before this is considered. A roller chain should never
be loaded above 50% of UTS for even one cycle. To do so
will damage the chain structure and reduce its capacity.
The UTS or one time breaking load of multiple strand chain is
the UTS of a single strand chain times the number of strands; i.e.,
two strand chain is twice as strong as single.
When allowable working loads are considered, however, the
capacity of each strand in a multiple strand chain is only 65% of
the single strand rating; thus, three-strand chain would rate not
three times single but only 1.95 times. This is because the chain
load cannot be exactly distributed across all three strands of the
three-strand chain.
A roller chain’s capacity can be significantly reduced if it is twisted
or bent sideways in the direction of the pin axis. Exercise particular
care in alignment of hoist or other applications where loads are
suspended near personnel.
Figure 30. Drive Chain Tension
MAYCO C-30HDNI (ZENITH) PUMP — OPERATION AND PARTS MANUAL — REV. #11 (04/03/12) — PAGE 45
Page 46
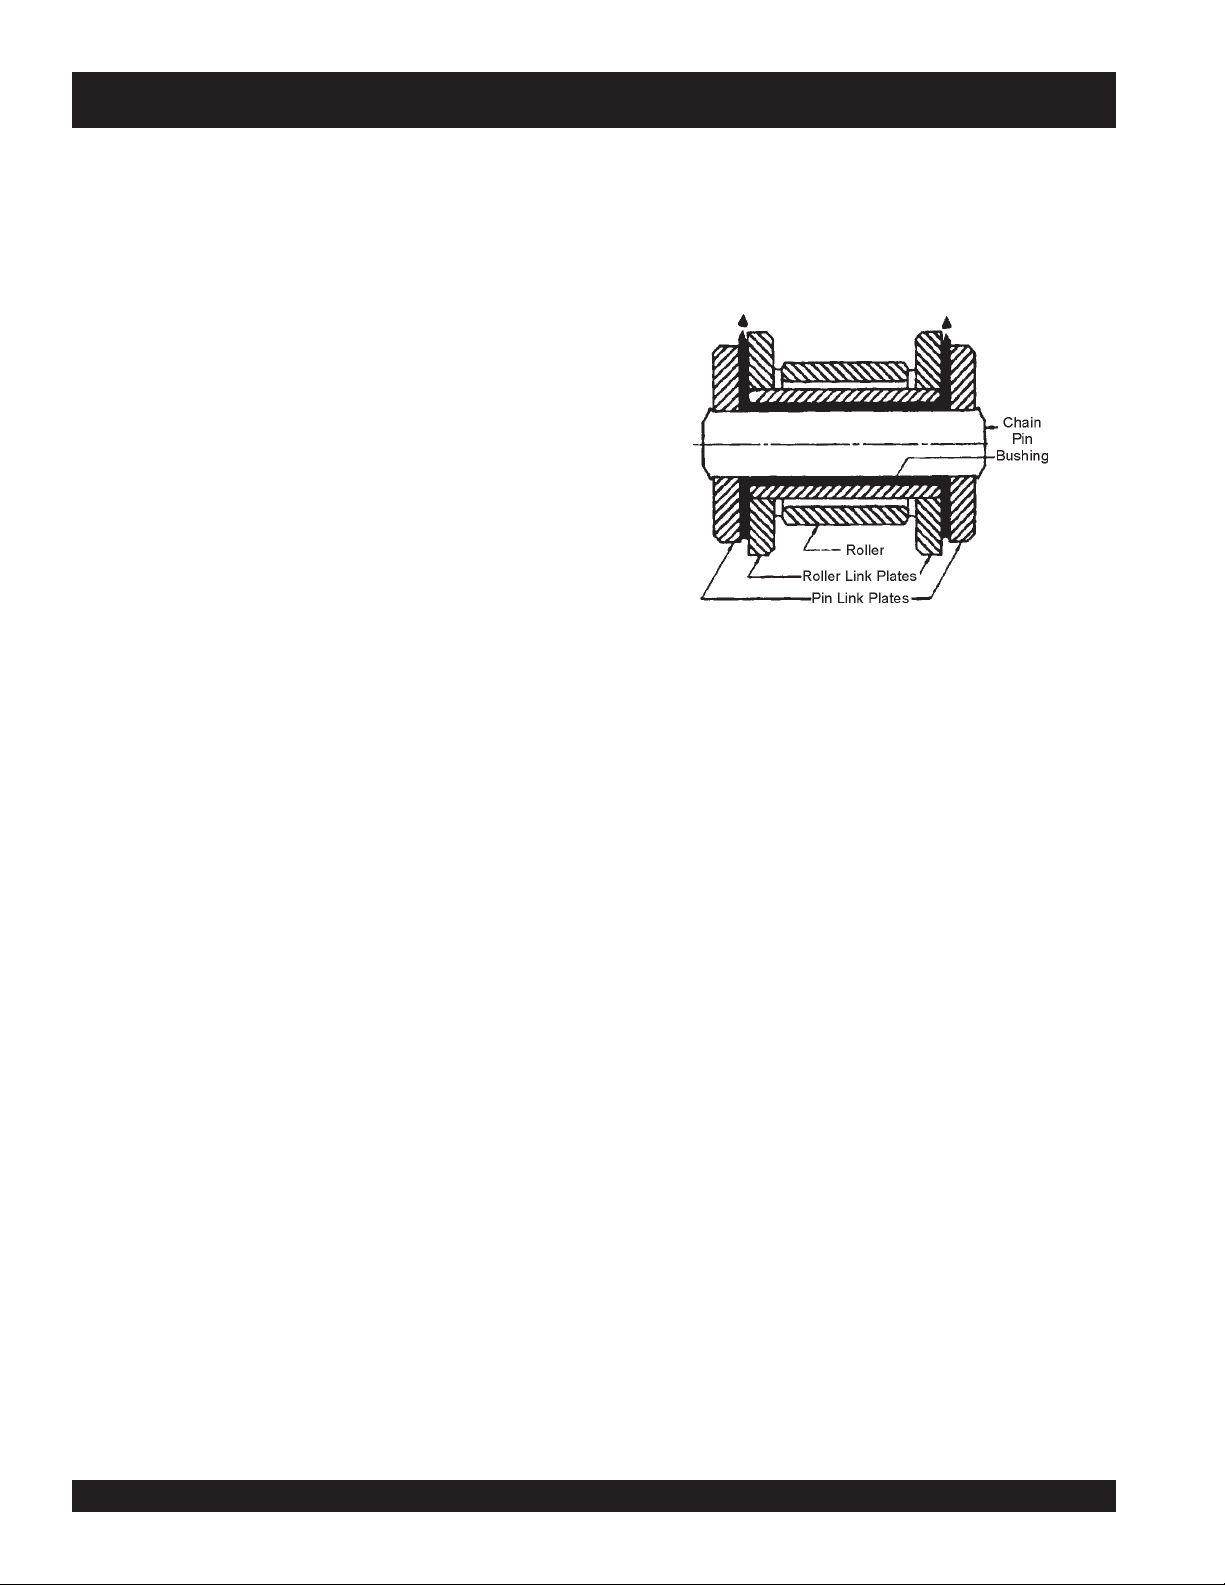
C-30HDNI (ZENITH) PUMP — MAINTENANCE (PUMP)
Drive Chain Lubrication
As a chain articulates in entering and leaving a sprocket, there is
relative movement between pin and bushing surfaces. These
surfaces wear causing chain elongation. If a lubricant film can be
maintained between the pin and bushing, the wear rate is very
slow and the chain wear life very long. Maintaining the oil film is
relatively simple at low speeds but becomes increasingly difficult
as the speed increases.
It is recognized that good lubrication is not possible in many
applications, so shorter wear life must be accepted in these
situations.
In general, chain wear leads to rough or unsatisfactory service
prior to actual chain breakage. Good lubrication can help to
prevent chain failure by providing protection against rust or
corrosion. Rusting can allow pits to form in the surfaces of the
chain parts causing stress concentration points. This can lead to
chain failure at relatively low loads.
The clearance between pin and bushings is very small
(Figure 31), on the order of .003 to .005 inches. A lubricant must
be thin enough to flow into the chain. SAE 30 weight oil is about
right for room temperature. Lighter oil should be used for lower
ambients and heavier for higher operating temperatures. Grease
should not be used as it cannot penetrate chain clearances.
Figure 31. Chain-Link Cross Section
PAGE 46 — MAYCO C-30HDNI (ZENITH) PUMP — OPERATION AND PARTS MANUAL — REV. #11 (04/03/12)
Page 47
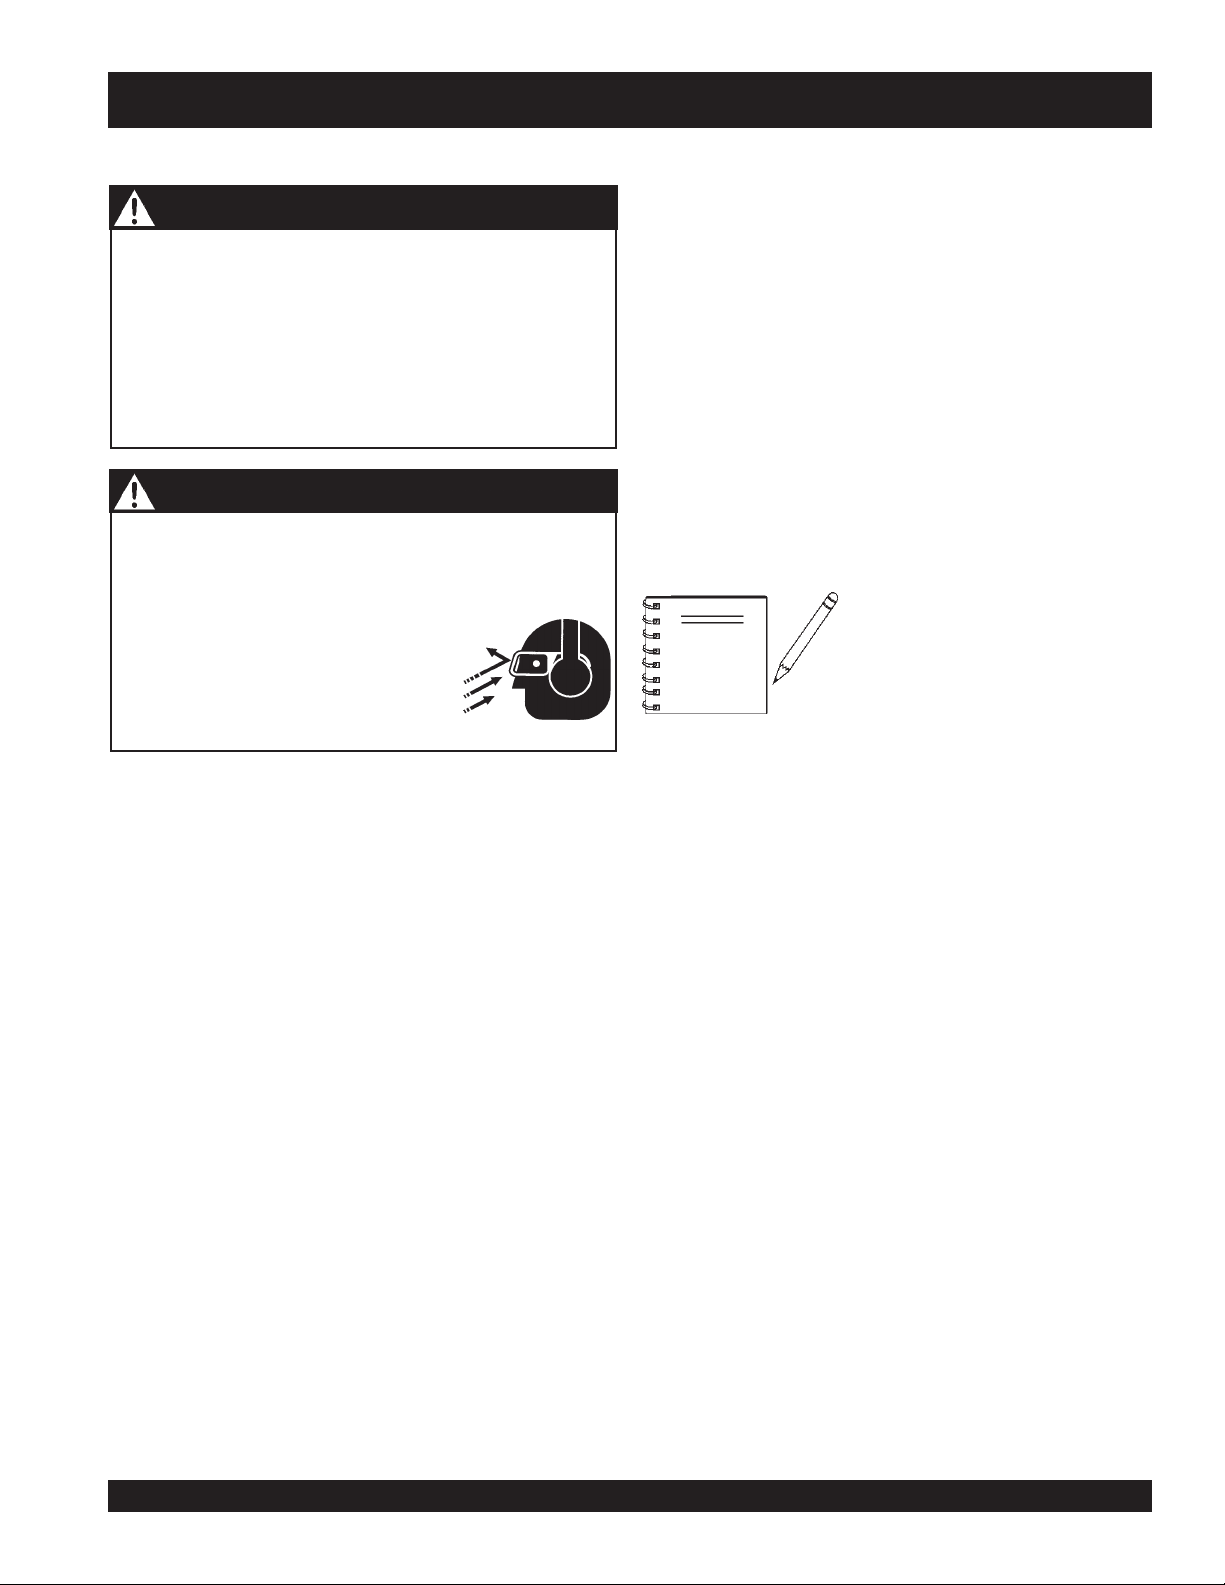
C-30HDNI (ZENITH) PUMP — MAINTENANCE (PUMP)
Assembling and Disassembling Drive Chain
CAUTION -
You may be
chain while the pump is running. Turn OFF the engine and
lock out gears and sprockets before attempting installation.
Once installed, the drive chain must be guarded to prevent
personal injury or properly damage in the event the chain
separates during operation. NEVER run pump with drive chain
guard removed.
CAUTION -
The components of the drive chain are hardened parts. Striking
these parts may cause metal chips to break off from the chain
or the tools used resulting in personal injury.
During all stages of chain disassembly
and assembly, wear
prevent metal parts or chips from entering
your eyes and have personnel in the
immediate area do likewise.
DRIVE CHAIN SAFETY
seriously injured
if you attempt to install the drive
Eyesight Hazard
safety glasses
to
Chain-Link Pin Removal
1. If chain is of cotter pin- type construction, remove cotters.
2. If chain is riveted type construction, grind pin heads off so pin
ends are flush with the linkplate.
3. Drive pins out of linkplate using a Diamond pin extractor
Model P/N 113 or 135. Some multiple strand chains or large
pitch models will require a hammer and punch or a press to
remove the pins.
Installation Of Coversides
Diamond Chain coversides are manufactured three different ways:
■
Slip Fit
■
Modified Press Fit
■
Full Press Fit
Installation of Spring Locks and Cotter-Pins
NOTE
Modified
some patience and tools to assemble
and/or disassemble. Use vice grips,
plumbers pliers or a small hammer to
drive coversides onto pins.
and
Full Press Fits
require
After coversides have been installed, install spring locks or cotters
(depending on chain design). Avoid using bent or worn cotters or
spring locks. After spring locks (or cotters) are installed, lightly
tap pin ends to position these parts snug against the coverside
for additional support.
Tips To Remember
■
Chian will break if mused or abused
■
Serious injury or property damage can result if chain is
installed incorrectly.
■
Select, install, guard and maintain chain in accordance with
equipment manufacturer and "Diamond Chain Company's
recommendations.
■
Read chain assembly instructions before attempting to install
chain on pump sprocket wheel.
■
Knowing more about how the chain is constructed may help
in assembly and disassembly. Further information may be
obtained by calling or writing Diamond Chain Company
TM
.
MAYCO C-30HDNI (ZENITH) PUMP — OPERATION AND PARTS MANUAL — REV. #11 (04/03/12) — PAGE 47
Page 48

C-30HDNI (ZENITH) PUMP — ENGINE TROUBLESHOOTING
Practically all breakdowns can be prevented by proper handling and maintenance inspections, but in the event of a breakdown,
please take a remedial action following the diagnosis based on the Engine Troubleshooting (Table 6) information shown below and
on the proceeding page. If the problem cannot be remedied, please leave the unit just as it is and consult our company's business
office or service plant.
GNITOOHSELBUORTENIGNE.6ELBAT
NOTPMYSMELBORPELBISSOPNOITULOS
?noitisop"POTS"nisirevellortnocdeepS .noitisop"TRATS"otrevellortnocdeepsteS
ufevitcefeD.pmupleufecalpeR
sitratsrotratstonlliwenignE
deyaled
.revodenruteb
ratston
.t
nacenignehguohtla,
lliwenigneserutarepmetwoltA
feD.yrettabecalpeR
sanoosspotstubserifenignE
.ffodehctiwssiretrats
?pmuple
?deggolcretlifleuF .knatnaelcdnaretlifleufecalpeR
?enilylppusleufytluaF .enill
?wolootnoisserpmoC
?wolooterusserpliO .erusserplioenignekcehC
dedeecxetimilerutarepmetgnitratswoL
?yrettabevitcefeD .yrettabecalperroegrahC
?kcihtootlioenignE
?yrettabevitce
?noitisopPOTSnirevelelttorhT .noitisopN
?dekcolbretlifleuF.retlifleufecalpeR
?dekcolbylppusleuF .metsysleuferitneehtk
?dionelosleuftamelborplacirtcelE.eriw7#gnisuriapeR
r
cehC
eufriaperroecalpeR
rotsujdA.sevlavdnarednilyc,notsipkcehC
.launamriaperenignerepriape
lochtiwylpmoC
.ytisocsivlioreporp
.tnemnorivneretniwrof
URotrevelelttorhtnoitisopeR
dnasnoitcurtsnignitratsd
liofoepyttcerrochtiwesacknarcenignellifeR
natleuF.leufddA
gnirudflestiybspotsenignE
.noitarepolamron
?ytpmek
?dekcolbretlifleuF.retlifleufecalpeR
?pmupleufevitcefeD.pmupleufecalpeR
erpliolacinahceM
?liowoloteudenigneehtspots
rosnesnwodtuhseruss
.yrassecen
For more detail troubleshooting methods, refer
NOTE
to NISSAN Operation and Maintenance manual
supplied with your pump.
PAGE 48 — MAYCO C-30HDNI (ZENITH) PUMP — OPERATION AND PARTS MANUAL — REV. #11 (04/03/12)
firosnesnwodtuhsliowolecalpeR.lioddA
Page 49

C-30HDNI (ZENITH) PUMP — ENGINE TROUBLESHOOTING
)DEUNITNOC(GNITOOHSELBUORTENIGNE.6ELBAT
NOTPMYSMELBORPELBISSOPNOITULOS
?ytp
meknatleuF.retlifleufecalpeR
?deggolcretlifleuF.retlifleufecalpeR
dnatuptuo,rewopenignewoL
.deeps
dnatuptuorewopenignewoL
iA .retlifriaecalperronaelC
tsuahxekcalb,deepswol
.ekoms
gnitaehrevO
ignetcerrocnI.gnimittsujdA
?snoinuepiptaskaeL nethgitdnaepatsnoinuepipdedaerhtkcehC
levellioenignE ?levellioenignetcerroC
looctneiciffusnI.hsinelpeR
?tlebnafesooL.tlebnaftsujdA
?llufoot
?dekcolbretlifr
?tna
?tlebdelioronroW.tlebecalpeR
?tatsomrehtevitareponI.t
?pmupretawnroW.pmupretawecalpeR
?p
acrellifrotaidarytluaF.pacrotaidarecalpeR
?metsysgniloocniriA .metsysgniloocfotraphcaenethgiteR
?gnimiten
?etauqedanisignitnevknatleuF .detnevylet
.deriuqerasnoinu
?secnaraelcevlavtcerrocnI .noitacificepsenignerepsevlavtsujdA
atsomrehtecalpeR
?rotaidarykaelrodeggolC .rotaidarecalperroriaper,hsulF
auqedasiknattahterusnE
?tnemtsujdaronrevogreporpmI .snoitidnocdeificepsehtotronrevogtsujdA
For more detail troubleshooting methods, refer
NOTE
to NISSAN Operation and Maintenance manual
supplied with your pump.
MAYCO C-30HDNI (ZENITH) PUMP — OPERATION AND PARTS MANUAL — REV. #11 (04/03/12) — PAGE 49
Page 50

C-30HDNI PUMP — MALFUNCTION INDICATOR DIAGNOSTIC ERROR CODES
Malfunction Indicator Diagnostic System
The Mayco C-30HDNI concrete pump features an engine malfunction indicator LED, found on the control panel
(Figure 8). When a malfunction in the operation of the engine is detected, the light will blink in sequence to indicate an error code.
Use the Diagnostic Error Code Table (Table 7) to troubleshoot the malfunction.
Determining an Error Code
The malfunction indicator light blinks in two patterns; long and short. Count the long blinks to determine the first digit of the error
code. Count the short blinks to determine the second digit of the error code.
For example, four long blinks and five short blinks represent error code 45, indicating a faulty oxygen sensor.
SEDOCRORRECITSONGAIDROTACIDNINOITCNUFLAM.7ELBAT
ELBUORT
)GALF(EDOC
)2(
)3(
)4(
)5(
21enituorcitsongaidehtgninnigebsitinuehT
41
xe
51tiucricneposetacidnirosneStnalooCenignE
12
NOITCNUFLAMFONOITPIRCSED NEKATNOITCA
setacidnihctiwSerusserPliOenignE
c1roferusserpliowol
.gnitaehrevOenignE
enifeDremotsuC
.dnocesetelpmo
setacidnierutarepmettnalooC
thgiLenignEkcehC.nwodstuhsenignE
sehsalf
.deruccosahnwodtuhsetacidniotylsuounitnoc
yralixuAd
.tluafsetacidniecived
ehtnohsalflliw21edoCnignE
kcehCthgiLe
.lanoitarepositiucricehttahtyfingisot
seodsihT
ton
rotiucrictrohssetacidnirosneStnalooCenignE
)F°662=>pmeT(enignefognitaehrevoemert
niylsuounitnoc
.noitcnuflametacidni
thgiLenignEkcehC.nwodstuhsenignE
sehsalf
.deruccosahnwodtuhsetacidniotylsuounitnoc
nosniamerthgiLenignEkcehC,tratserretfA
.derotssawedocgnitacid
egatlovrevorosneSnoitisoPladeP
)V5.4revo(
22egatlovrednurosneSnoitisoPladeP
32tiu
cricneposetacidnirosneSerutarepmeTriA
derotssawedocgnitacidni
42tiucrictrohssetacidnirosneSerutarepmeTriA
33dnuorgottrohssetacidn
43OnaelstcetedrosneSnegyxO
54OhcirstcetedrosneSnegyxO
PAGE 50 — MAYCO C-30HDNI (ZENITH) PUMP — OPERATION AND PARTS MANUAL — REV. #11 (04/03/12)
itiucriCrosneSpaM
2
2
noitidnoc
noitidnoc
,ylsuounitnocnosniamerthgilenignekcehC
.yromemni
Page 51

NOTES PAGE
MAYCO C-30HDNI (ZENITH) PUMP — OPERATION AND PARTS MANUAL — REV. #11 (04/03/12) — PAGE 51
Page 52
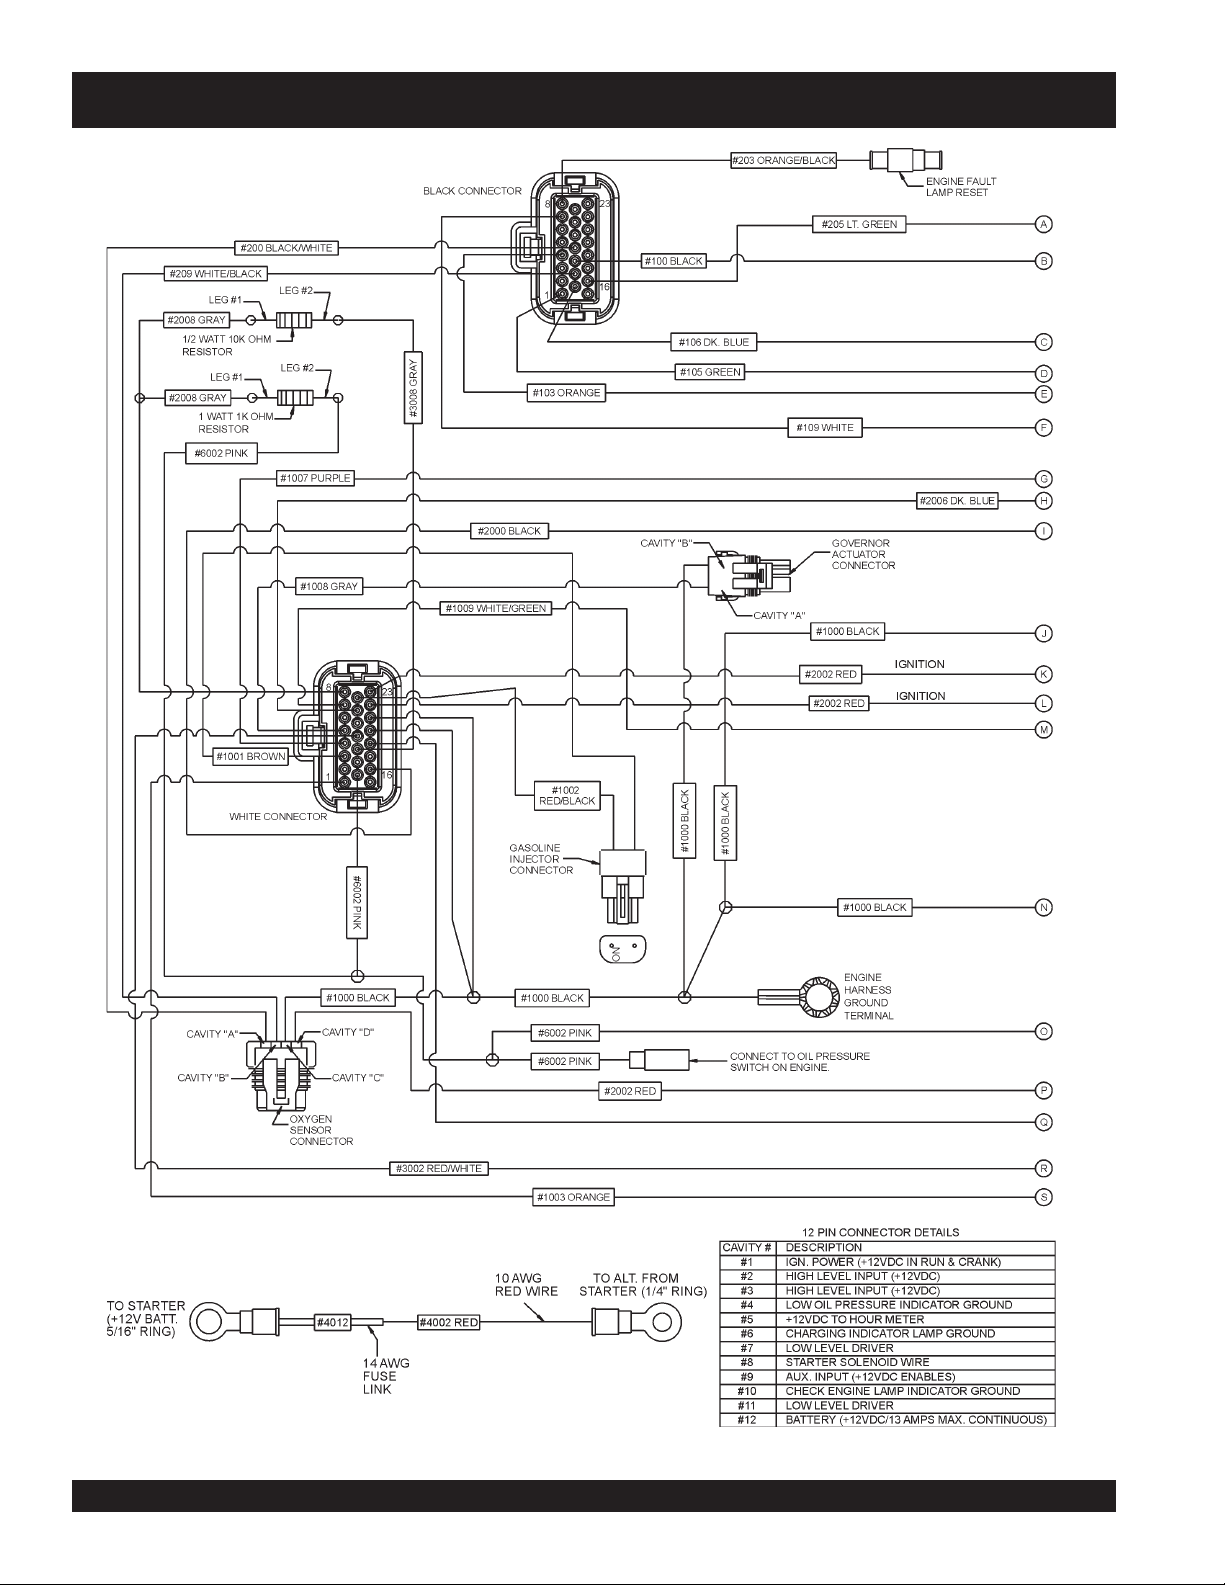
C-30HDNI PUMP — WIRING DIAGRAM (ZENITH WIRING HARNESS)
Figure 34. Zenith Fuel Injection System Wiring Diagram
PAGE 52 — MAYCO C-30HDNI (ZENITH) PUMP — OPERATION AND PARTS MANUAL — REV. #11 (04/03/12)
Page 53

C-30HDNI PUMP — WIRING DIAGRAM (ZENITH WIRING HARNESS)
Figure 34. Zenith Fuel Injection System Wiring Diagram (Cont.)
MAYCO C-30HDNI (ZENITH) PUMP — OPERATION AND PARTS MANUAL — REV. #11 (04/03/12) — PAGE 53
Page 54

C-30HDNI (ZENITH) PUMP — WIRING DIAGRAM
SW2 - ENGINE
SPEED SWITCH
(REAR VIEW)
SW3 - IGNITION
SWITCH
(REAR VIEW)
CONTROL BOX
REMOTE OUTLET
WHT
PNK
DECREASE
2
RED
SPEED
BLK
3
DK RED/ WHT
TB1
(P/N EM515421)
6
4
3
1
12
10
9
7
INCREASE
LAMP
SPEED
1
MALFUNCTION
INDICATOR LAMP
RED
WATER
TEMPERATURE
LAMP
L
B
S
DK RED
DK RED
GRN/BLK
DK RED
DK RED/WHT DK RED/WHT
BATTERY
LAMP
DK BLU
DK RED/WHT
OIL PRESSURE
GRN
RED
12 VOLT
BUS
SW 1 - PUMPING
CONTROL SWITCH
(REAR VIEW)
ON
PUMP
OFF
1
2
REMOTE
PUMP
ON
3
DK BLU
DK RED
DK RED/WHT
GRN/BLK
WHT
GRN
PNK
DK RED
BLK
RED
HOUR
METER
BLK
WHT
ORG
Fu Fu
SPLICE
ORG
12 PIN ENGINE
CONNECTOR PLUG
DK BLU
11
12
2
1
Fu
Fu
Fu Fu
DK RED
DK RED/WHT
10
3
GRN/BLK
9
8
4
5
WHT
7
6
Fu
Fu
Fu
Fu
PNK
DK RED
BLK
GRN
12 BLK
CONNECT TO
CHASSIS
GROUND
Figure 35. Wiring Diagram
PAGE 54 — MAYCO C-30HDNI (ZENITH) PUMP — OPERATION AND PARTS MANUAL — REV. #11 (04/03/12)
Page 55

C-30HDNI (ZENITH) PUMP — WIRING DIAGRAM (TAIL LIGHTS)
Figure 37. Trailer Tail Lights Wiring Diagram
MAYCO C-30HDNI (ZENITH) PUMP — OPERATION AND PARTS MANUAL — REV. #11 (04/03/12) — PAGE 55
Page 56
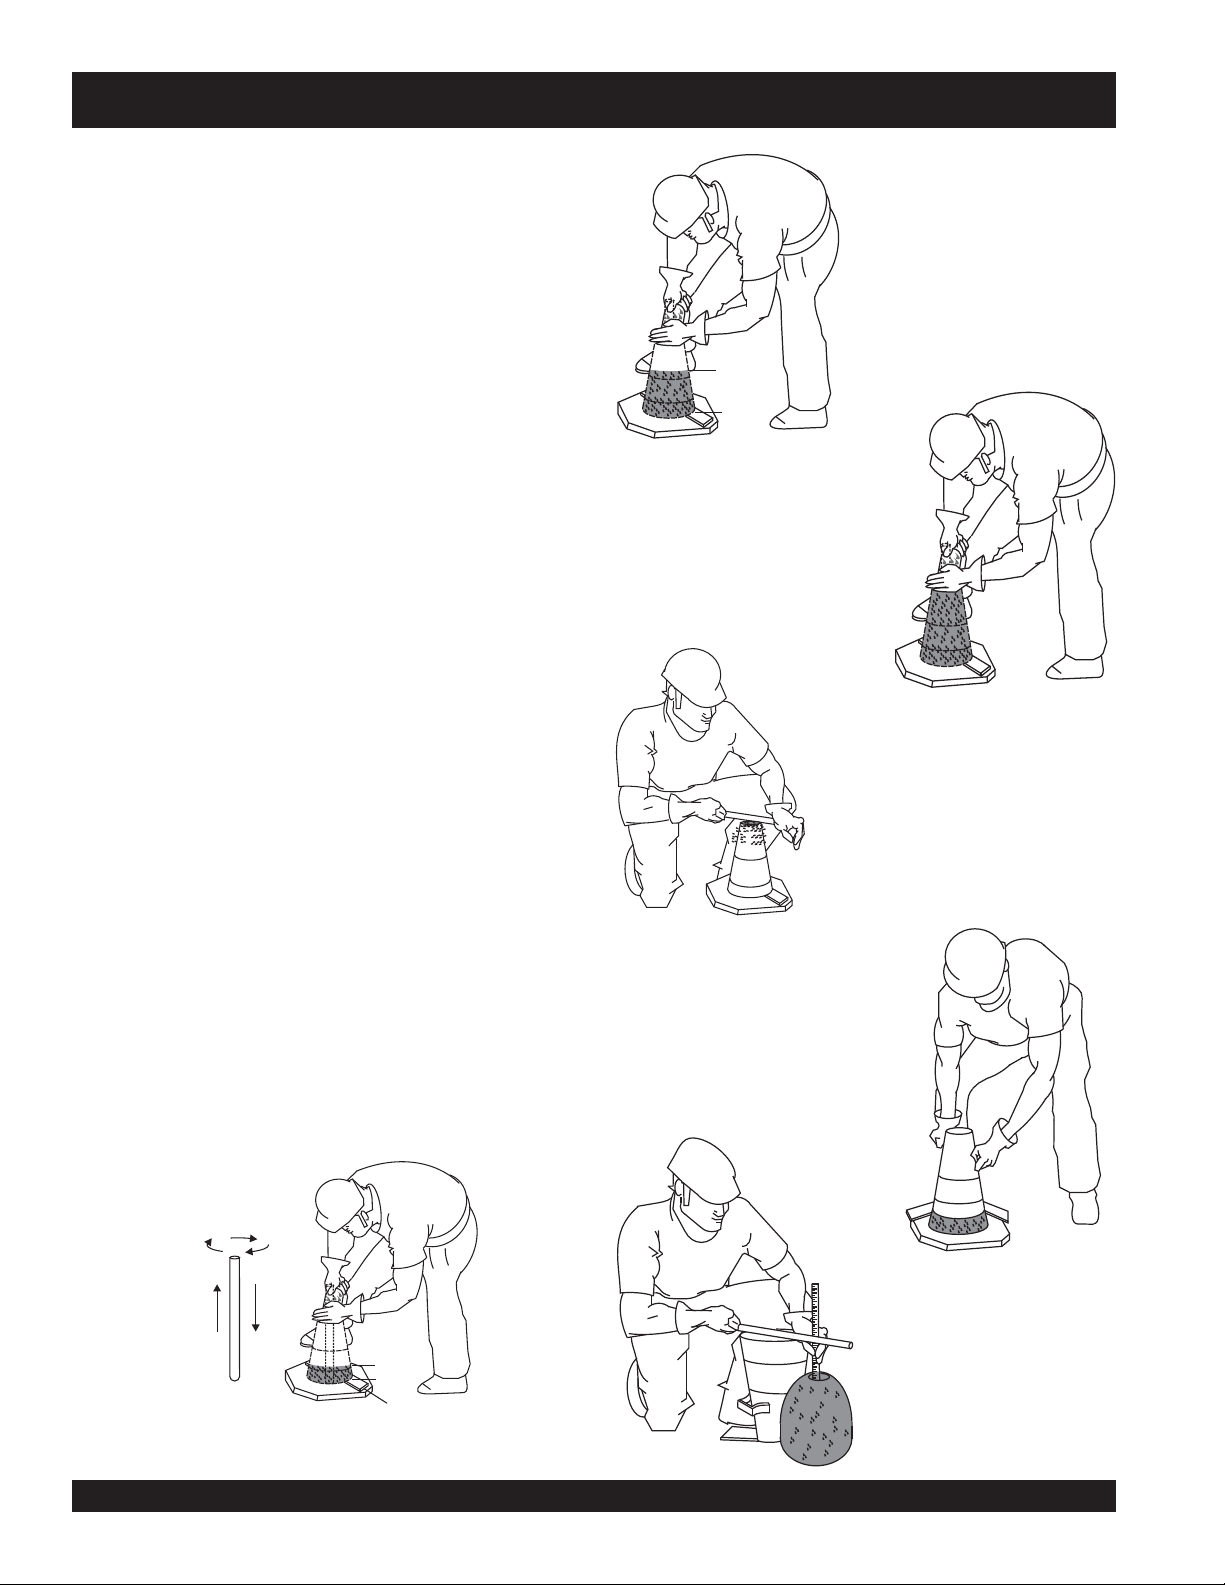
APPENDIX — C-30HDNI C-30HDNI SLUMP TEST PROCEDURE
1. To obtain a representative sample (concrete), take several
samples at three or more regular intervals throughout the
discharge of the mixer or truck. DO NOT take samples at the
beginning or end of the discharge.
2. Dampen the inside of the cone and place it on a smooth, moist,
nonabsorbent, level surface large enough to accommodate
both the slumped concrete and the slump cone. Stand on the
“foot pieces” throughout the test procedure to hold the cone
firmly in place.
3. Fill the cone 1/3 full by volume (Figure 38-A) and rod 25 times
with a 1/2” dia x 24” lg. bullet-pointed steel rod. (This is a
specific requirement which will produce non-standard results unless followed exactly.) Distr ibute rodding evenly over
the entire cross section of the sample.
4. Fill cone another 1/3 (Figure 38-B) which will make the cone
2/3 full by volume. Rod this second layer 25 times with the rod
penetrating into, but not through, the first layer. Distribute
rodding evenly over the entire cross section of the layer.
5. Fill cone to overflowing (Figure 38-C). Rod this layer 25 times
with rod penetrating into but not through, the second layer.
Distribute rodding evenly over the entire cross section of this
layer.
Figure 38-C. Slump Test
Figure 38-B. Slump
Test (2/3 Full)
2/3 FULL
(Full-Overflow)
FULL
(OVERFLOW)
6. Remove the excess concrete (Figure 38-D) from the top of the
cone, using the tamping rod as a screed.
7. Lift the cone vertically (Figure 38-E) with a slow even motion.
DO NOT jar the concrete or tilt the cone during this process.
( Invert the withdrawn cone, and place it next to, but not
touching the slumped concrete.
8. Lay a straight edge (Figure 38-F) across the top of the
slumped cone. Measure the amount of slump in inches from
the bottom of the straight edge to the top of the slumped
concrete at a point over the original center of the base . The
slump operation must be complete in a maximum elapsed
Figure 38-E. Slump Test
time of 1-1/2 minutes. Discard the concrete. DO NOT use it in
any other tests.
BULLET POINTED
STEEL ROD
Figure 38-D. Slump Test
(Removing Excess Concrete)
(Cone Invert)
Figure 38-F. Slump Test
(Measurement)
1/2 DIAMETER
24 INCHES LONG
1/3 FULL
FOOT
PIECE
Figure 38-A. Slump Test (1/3 Full)
PAGE 56 — MAYCO C-30HDNI (ZENITH) PUMP — OPERATION AND PARTS MANUAL — REV. #11 (04/03/12)
Page 57

APPENDIX — C-30HDNI CONCRETE MIX INFORMATION
The following information has been extracted from actual testing laboratory reports. The purpose of this printing is only to help
create a better understanding of the importance of uniform gradation and proportioning of materials which affect pumpability of
concrete mixes. These weights and proportions illustrate that when the sieve analysis is ideal, the sand/rock ratio can be adjusted
(65% sand 35% rock) and pumpability should be excellent.
EXAMPLE #1 (A California Test Lab. Report)
JOB: Building Foundations (Water Project)
Sacks per cu./yd. 6.5 designed for 2,500 lbs. in 28 days
Gallons per sack 7.1
Washed Sand-#200 wash 1.3
Organic matter-OK
Specific gravity (SSD) Sand-2.58; Pea Gravel-2.60
Sieve analysis-percent passing
Material 1.5” 1” 3/4” 3/8” #4 #8 #16 #30 #50 #100 #200
W.C. Sand 100 99.7 79.1 60.4 36.5 14.3 4.0 1.1
Pea Gravel 100 3.0
% Comb. 100 66 51 39 23 9 3 1.0
DESIGN FOR ONE YARD OF CONCRETE (SATURATED & SURFACE DRY):
Absolute volume of aggregate in one cu. yard: 17.78 cu. ft.
Specific gravity of aggregates in one cu. yard: 2.58
Weight of aggregates in one cu. yard batch: 2850 lbs.
% BATCH SPEC. GRAVITY ABS. VOL.
W.C. Sand 65 1800 2.58 11.56
PEA GRAVEL 35 1000 2.60 6.22
WATER 46 gal. 1
CEMENT 6.5 sk. 611
TOTAL 27.00
ADMIXTURE: None
SLUMP 4”
REMARKS This mix designed for pumping
NOTE: Due to the availability of well-graded sand as shown in the above sieve analysis,
this mix pumped very successfully.
MAYCO C-30HDNI (ZENITH) PUMP — OPERATION AND PARTS MANUAL — REV. #11 (04/03/12) — PAGE 57
Page 58

APPENDIX — C-30HDNI CONCRETE MIX INFORMATION
A.S.T.M. STANDARD SPECIFICATION FOR GRADING AGGREGATE
PAGE 58 — MAYCO C-30HDNI (ZENITH) PUMP — OPERATION AND PARTS MANUAL — REV. #11 (04/03/12)
Page 59

APPENDIX — C-30HDNI CONCRETE MIX INFORMATION
Consolidated Rock Products Co., Division of Tests
3/8” Pea Gravel STANDARD PUMP MIXES (one-half inch minus)
NOTE: All weights shown are one cubic yard with S.S.D. aggregates.
CRP Mix Number 6004 .......................... 6005 .............................6006 .......................... 6007
Design Slump (in.) 6” (15 cm) ............. 6” (15 cm) .................6” (15 cm) ............. 6” (15 cm)
Cement, SACK. 7.0 ................................ 7.0 ......................................7.0 ................................ 7.0
Cement, Lbs. 658 (298 kg) ............ 658 (298 kg) ................ 658 (298 kg) ............ 658 (298 kg)
w/Con Sand (1 lb.) 2031 (920 kg) ............ 2982 (943 kg) ................ 1879 (851 kg) ............ 1943 (880 kg)
Gravel #4(9.51 mm) 677 (307 kg) ............ 693 (314 kg) ................806 (365 kg) ............ 832 (377 kg)
TOTAL AGGREGATE 2708 (1227 kg) .......... 2775 (1257 kg) .............2685 (1216 kg) .......... 2775 (1257 kg)
ADMIXTURE
Pozzolight 311-1 lb. 1.4 (.63 kg) ............. 1.4 (.63 kg) .................1.4 (.63 kg) ............. —
Water, Design (gals.) 50.0 (189 liters) ......... 53.0 (200 liters) ............50.0 (189 liters) ......... 53.9 (200 liters)
Mater, Max. (gals.) 50.0 (189 liters) ......... 53.0 (200 liters) ............53.0 (200 liters) ......... 53.0 (200 liters)
NOTE: Multiply above kilograms and liters by 1.308 to obtain the proportions for one cubic meter of concrete.
Consolidated Rock Products Co., Division of Tests
3/8” Pea Gravel STANDARD PUMP MIXES (one-half inch minus)
NOTE: All weights shown are one cubic yard with S.S.D. aggregates.
CRP Mix Number 6000 .......................... 6001 .............................6002 .......................... 6003
Design Slump (in.) 6” (15 cm) ............. 6” (15 cm) ................. 6” (15 cm) ............. 6” (15 cm)
Cement, SACK. 6.5 ................................ 6.5 ......................................6.5 ................................ 6.5
Cement. Lbs. 611 (276 kg) ........... 611 (276 kg) ................ 611 (276 kg) ............ 611 (276 kg)
w/Con Sand (1.1 lb.) 2062 (934 kg) ........... 2112 (957 kg) ................ 1924 (872 kg) ............ 1971 (893 kg)
Gravel #4 (9.51mm) 687 (311 kg) ........... 704 (319 kg) ................ 825 (374 kg) ............ 845 (383 kg)
TOTAL AGGREGATE 2749 (1245 kg) .......... 2816 (1276 kg) .............2749 (1245 kg) .......... 2816 (1276 kg)
ADMIXTURE
Pozzolight 311-1.3lb. 1.3 (.59 kg) ............. 1.3 (.59) ......................—
Water, Design (gals.) 50.0 (189 liters) ......... 53.0 (200 liters) ............50.0 (189 liters) ......... 53.9 (200 liters)
Mater, Max. (gals.) 50.0 (189 liters) ......... 53.0 (200 liters) ............53.0 (200 liters) ......... 53.0 (200 liters)
NOTE: Multiply above kilograms and liters by 1.308 to obtain the proportions for one cubic meter of concrete.
MAYCO C-30HDNI (ZENITH) PUMP — OPERATION AND PARTS MANUAL — REV. #11 (04/03/12) — PAGE 59
Page 60

APPENDIX — RECOMMENDED SHOTCRETE SYSTEM
MAYC0
RECOMMENDED SHOTCRETE SYSTEM
10
1-800-30-MAYCO
N
D
H
0
-3
C
1
2
1/2 STANDARD
AIR HOSE
3
AIR COMPRESSOR
(125 TO 250 CFM)
3
7
8
9
11
13
14 15
10
3/4 STANDARD
AIR HOSE
Figure 39. Shotcrete System
PAGE 60 — MAYCO C-30HDNI (ZENITH) PUMP — OPERATION AND PARTS MANUAL — REV. #11 (04/03/12)
Page 61

APPENDIX — RECOMMENDED SHOTCRETE SYSTEM
RECOMMENDED SHOTCRETE SYSTEM
NO. PART NO. PART NAME QTY. REMARKS
1 EM28904 ........... 3" “B” COUPLING
2 EM23946 ........... 3"-90° ELBOW
3 EM28903 ........... 2 1/2" S/J COUPLING
4 EM28005DD ...... 3"X 2 1/2 REDUCER
5 EM28061 ........... 2 1/2"X 10FT. PIPE
6 EM24849 ........... 2 1/2"X 50FT. HOSE
7 EM28001DD ...... 2 1/2"X 2" REDUCER
8 EM23815D ........ 2 1/2"X 2" REDUCER
W/AIR VIBRATOR
9 EM28902 ........... 2" S/J COUPLING
10 EM23101 ........... AIR VIBRATOR
11 EM28131 ........... 2"X 2 ELBOW
12 EM24841 ........... 2"X 25 FT. HOSE
13 EM23808D ........ NOZZLE ASSEMBLY
14 EM23806 ........... 1 3/8" NOZZLE TIP
15 EM23807 ........... 1 1/4" NOZZLE TIP
General recommendations
■
If the site will permit, use steel pipe from the pump
to the pool perimeter. It will reduce line pressures
which is highly recommended.
■
The vibrator on the reducer by the pool improves
pumpability.
■
Turn both air vibrators off whenever the pump is
stopped to prevent separation of mix.
■
The air vibrators are low consumption (4.2 scfm).
■
Leave the air on at the nozzle when the pump is
stopped to prevent clogging of air the hoses in the
air insert.
■
Use item #11 (steel elbow) at the edge of the pool
to prevent collapse of the rubber hose, which can
cause blockage.
MAYCO C-30HDNI (ZENITH) PUMP — OPERATION AND PARTS MANUAL — REV. #11 (04/03/12) — PAGE 61
Page 62

APPENDIX — RECOMMENDED SHOTCRETE ACCESSORIES
RECOMMENDED SHOTCRETE ACCESSORIES
Figure 40. Shotcrete System Accessories
Use a 1-3/8" rubber nozzle tip for a wide spray pattern. Use a 1-1/4" rubber nozzle tip for a narrow spray
NOTE
PAGE 62 — MAYCO C-30HDNI (ZENITH) PUMP — OPERATION AND PARTS MANUAL — REV. #11 (04/03/12)
pattern. DO NOT INSTALL THE NOZZLE AT THE END OF THE HOSE UNTIL THE FIRST MATERIAL
HAS PASSED THROUGH THE ENTIRE HOSE LENGTH.
Disassemble and clean the nozzle assembly thoroughly after each job. Grease all threads before reassembly. DO NOT close the air valve when pumping is stopped as a continued air flow keeps the air
passages clean.
Page 63

APPENDIX — RECOMMENDED SHOTCRETE ACCESSORIES
RECOMMENDED SHOTCRETE ACCESSORIES
NO. PART NO. PART NAME QTY. REMARKS
1 EM26107 HOPPER SCREEN 1
2 EM231011 AIR VIBRATOR 1
3 EM132 BOLT, 1/2-13X2 2
4 EM23407 AIR HOSE 1
5 EM23408 BUSHING 1
6 EM23411 VALVE 1
7 EM912073 NIPPLE 2
8 EM23409 COUPLING 1
9 EM923346 WASHER, 1/2 LOCK 2
10 EM406 NUT, HEX 1/2-13 2
11 EM23818 2"X25' GROOVED HOSE
EM24841 2"X25' RAISED HOSE
EM23845 2"X50' GROOVED HOSE
12
13
14
15
16
17
18
19
20 AIR HOSE ..................................................... NOT SUPPLIED BY MAYCO
21 EM23808 NOZZLE ASSEMBLY ...................... 1 .......... INCLUDES. ITEMS W/
EM23802 ADAPTER 1
*
EM23803 GUN BODY 1
*
EM20816 “O” RING 1
*
EM23804 AIR INSERT 1
*
EM23805 NOZZLE CLAMP 1
*
EM23806 NOZZLE TIP, 1-3/8" 1
*
EM23807 NOZZLE TIP, 1-1/4" 1
*
EM911076 STREET ELBOW 1
*
*
MAYCO C-30HDNI (ZENITH) PUMP — OPERATION AND PARTS MANUAL — REV. #11 (04/03/12) — PAGE 63
Page 64

C-30HDNI (ZENITH) PUMP — EXPLANATION OF CODE IN REMARKS COLUMN
The following section explains the different symbols and
remarks used in the Parts section of this manual. Use the
help numbers found on the back page of the manual if there
are any questions.
NOTICE
The contents and part numbers listed in the parts
section are subject to change without notice. Multiquip
does not guarantee the availability of the parts listed.
SAMPLE PARTS LIST
NO. PART NO. PART NAME QTY. REMARKS
1 12345 BOLT ......................1 .....INCLUDES ITEMS W/%
2% WASHER, 1/4 IN. ...........NOT SOLD SEPARATELY
2% 12347 WASHER, 3/8 IN. ...1 .....MQ-45T ONLY
3 12348 HOSE ..................A/R ...MAKE LOCALLY
4 12349 BEARING ..............1 .....S/N 2345B AND ABOVE
NO. Column
Unique Symbols — All items with same unique
symbol
QTY. Column
Numbers Used — Item quantity can be indicated by a
number, a blank entry, or A/R.
A/R (As Required) is generally used for hoses or other
parts that are sold in bulk and cut to length.
A blank entry generally indicates that the item is not sold
separately. Other entries will be clarified in the “Remarks”
Column.
REMARKS Column
Some of the most common notes found in the “Remarks”
Column are listed below. Other additional notes needed
to describe the item can also be shown.
Assembly/Kit — All items on the parts list with the
same unique symbol will be included when this item is
purchased.
Indicated by:
“INCLUDES ITEMS W/(unique symbol)”
(@, #, +, %, or >) in the number column belong to the
same assembly or kit, which is indicated by a note in the
“Remarks” column.
Duplicate Item Numbers — Duplicate numbers indicate
multiple part numbers, which are in effect for the same
general item, such as different size saw blade guards in
use or a part that has been updated on newer versions
of the same machine.
NOTICE
When ordering a part that has more than one item
number listed, check the remarks column for help in
determining the proper part to order.
PART NO. Column
Numbers Used — Part numbers can be indicated by a
number, a blank entry, or TBD.
TBD (To Be Determined) is generally used to show a
part that has not been assigned a formal part number
at the time of publication.
A blank entry generally indicates that the item is not sold
separately or is not sold by Multiquip. Other entries will
be clarified in the “Remarks” Column.
Serial Number Break — Used to list an effective serial
number range where a particular part is used.
Indicated by:
“S/N XXXXX AND BELOW”
“S/N XXXX AND ABOVE”
“S/N XXXX TO S/N XXX”
Specific Model Number Use — Indicates that the part
is used only with the specific model number or model
number variant listed. It can also be used to show a
part is NOT used on a specific model or model number
variant.
Indicated by:
“XXXXX ONLY”
“NOT USED ON XXXX”
“Make/Obtain Locally” — Indicates that the part can
be purchased at any hardware shop or made out of
available items. Examples include battery cables, shims,
and certain washers and nuts.
“Not Sold Separately” — Indicates that an item cannot
be purchased as a separate item and is either part of an
assembly/kit that can be purchased, or is not available
for sale through Multiquip.
PAGE 64 — MAYCO C-30HDNI (ZENITH) PUMP — OPERATION AND PARTS MANUAL — REV. #11 (04/03/12)
Page 65

C-30HDNI (ZENITH) PUMP — SUGGESTED SPARE PARTS
C-30HDNI CONCRETE PUMP
W/ ZENITH FUEL INJECTION SYSTEM
1 Units
QTY. P/N DESCRIPTION
6 ....... EM14904 ...................... PISTON CUP KITS
4 ....... EM18804 ...................... 4 1/2" STEEL BALL
4 ....... EM14818 ...................... 4" STEEL BALL
6 ....... EM14903 ...................... BALL STOP PIN KIT
10 ...... EM18801 ...................... 0-RING MANIFOLD
1 ....... EM14308 ...................... CHAIN
2 ....... EM26313 ...................... HALF LINK
2 ....... EM26314 ...................... MASTER LINK
1 ....... EM14334 ...................... COMPENSATOR SPRING
2 ....... EM14408 ...................... BRONZE RING
2 ....... EM903092 .................... CAM ROLLER BEARING
2 ....... EM14315 ...................... V-BELT
2 ....... EM14842 ...................... LOWER SEAT
2 ....... EM14843 ...................... UPPER SEAT
2 ....... EM26310 ...................... CLUTCH LINING
10 ...... EM18409 ...................... O-RING
2 ....... EM20763 ...................... FUEL FILTER
2 ....... EM20328TKIT ............... BEARING KIT
1 ....... EM28004DD ................. REDUCER 3" X 2"
1 ....... EM23946 ...................... 3" ELBOW
2 ....... EM28904 ...................... 3" CLAMP
4 ....... EM289041 .................... 3" GASKETS
1 ....... EM14159 ...................... HOPPER SCREEN
8 ....... 22401M7714 ................. SPARK PLUG
4 ....... 1520855400 .................. ELEMENT, OIL
1 ....... 11920H9915 ................. V-BELT, GOVERNOR
1 ....... 2215723G15 ................. ROTOR ASSY, ENGINE
1 ....... 2211577A11 .................. SIGNAL ROTOR SET
1 ....... 22020G5111 ................. TRANSISTOR-IGN UNIT
1 ....... 22023G5110 ................. SEAT-SYNK
1 ....... 2216278A10 .................. CAP ASSY, DIST. W/POINT ASSY
1 ....... 1172077702 .................. V-BELT, FAN
Part number on this Suggested
NOTE
Spare Parts List may super cede/
replace the P/N shown in the text
pages of this book.
C-30HDNI CONCRETE PUMP
W/ ZENITH FUEL INJECTION SYSTEM
3 Units
QTY. P/N DESCRIPTION
10 ...... EM14904 ...................... PISTON CUP KITS
10 ...... EM18804 ...................... 4 1/2" STEEL
10 ...... EM14818 ...................... 4" STEEL BALL
12 ...... EM14903 ...................... BALL STOP PIN KITS
25 ...... EM18801 ...................... MANIFOLD O-RINGS
3 ....... EM14308 ...................... CHAINS
10 ...... EM26313 ...................... HALF LINK
10 ...... EM26314 ...................... MASTER LINK
2 ....... EM14334 ...................... COMPENSATOR SPRING
4 ....... EM14408 ...................... BRONZE RING
2 ....... EM903092 .................... CAM ROLLER BEARING
6 ....... EM14315 ...................... V-BELT
6 ....... EM14842 ...................... LOWER SEAT
6 ....... EM14843 ...................... UPPER SEAT
3 ....... EM26310 ...................... CLUTCH LINING
20 ...... EM18409 ...................... O-RING
6 ....... EM20763 ...................... FUEL FILTER
2 ....... EM20328TKIT ............... BEARING KIT
2 ....... EM28004DD ................. REDUCER 3" x 2"
2 ....... EM23946 ...................... 3" ELBOW
4 ....... EM28904 ...................... 3" CLAMP
10 ...... EM289041 .................... 3" GASKET
2 ....... EM14159 ...................... HOPPER SCREEN
1 ....... EM14300 ...................... CAM
1 ....... EM14801 ...................... T-MANIFOLD
1 ....... EM14819 ...................... Y-
2 ....... EM14335 ...................... PISTON ROD
1 ....... EM26788 ...................... REMOTE SWITCH
1 ....... EM903176 .................... CONN. ROD BEARING
1 ....... EM14305 ...................... CRANKSHAFT
2 ....... EM14807 ...................... PUMP CYLINDER
2 ....... EM18800 ...................... COMPENSATOR CYLINDER
1 ....... EM14320 ...................... CLUTCH
24 ...... 22401M7714 ................. SPARK PLUG
12 ...... 1520855400 .................. ELEMENT, OIL
3 ....... 11920H9915 ................. V-BELT, GOVERNOR
3 ....... 2215723G15 ................. ROTOR ASSY, ENGINE
3 ....... 2211577A11 .................. SIGNAL ROTOR SET
3 ....... 22020G5111 ................. TRANSISTOR-IGN UNIT
3 ....... 22023G5110 ................. SEAT-SYNK
3 ....... 2216278A10 .................. CAP ASSY, DIST. W/POINT ASSY
3 ....... 1172077702 .................. V-BELT, FAN
MANIFOLD
MAYCO C-30HDNI (ZENITH) PUMP — OPERATION AND PARTS MANUAL — REV. #11 (04/03/12) — PAGE 65
Page 66

C-30HDNI (ZENITH) PUMP — NAMEPLATE AND DECALS
PAGE 66 — MAYCO C-30HDNI (ZENITH) PUMP — OPERATION AND PARTS MANUAL — REV. #11 (04/03/12)
Page 67

C-30HDNI (ZENITH) PUMP — NAMEPLATE AND DECALS
NAME PLATE AND DECALS
NO PART NO PART NAME QTY. REMARKS
1
*
2
3
4
5
6
7 DECAL, NAME PLATE ............................. 1 ........... CONTACT MQ PARTS DEPT. W/
8
*
9
*
10 DCLC30HDNIKIT KIT, DECAL .............................................. 1 ........... INCLUDES ITEMS W/
DCL152 DECAL, CAUTION OIL LEVEL 1
EM932 DECAL, CAUTION, MANIFOLD 1
*
EM1028 DECAL, MULTIQUIP MAYCO 2
*
508594 DECAL, CAUTION READ MANUAL 2
*
EM514272 DECAL, C-30HDNI 2
*
EM513165 DECAL, MAINTENANCE 1
*
............................................................................... MODEL AND SERIAL NUMBER.
98022 DECAL, WARNING 1
34536 DECAL, OWNER'S MANUAL 1
*
MAYCO C-30HDNI (ZENITH) PUMP — OPERATION AND PARTS MANUAL — REV. #11 (04/03/12) — PAGE 67
Page 68

C-30HDNI PUMP — COMPENSATOR PISTON ROD ASSY.
COMPENSATOR PISTON ROD ASSY.
PAGE 68 — MAYCO C-30HDNI (ZENITH) PUMP — OPERATION AND PARTS MANUAL — REV. #11 (04/03/12)
Page 69

C-30HDNI PUMP — COMPENSATOR PISTON ROD ASSY.
COMPENSATOR PISTON ROD ASSY.
NO. PART NO. PART NAME QTY. REMARKS
1 EM14805 ROD END ................................... 1 ........... INCLUDES ITEMS W/+
1A+ EM148053 BUSHING 1
2 EM968446 NUT HEX, 3/4”-10 GR5 2
3 EM14332 ROD SPRING GUIDE 3/4” 1
4 EM14331 SPRING BACKING PLATE 1
5 EM14333 SPRING RETURN 1
6 EM14806 PISTON GUIDE ASSY. 1
7 EM505490 FITTING 1
8
*
9
*
10
11
12
13 EM916001 FITTING 2
14 EM510266 SCREW, HHC 1/2-13X3 1
15 EM621 WASHER 2
16 492584 NUT LOCK 1/2” DIA. 1
17 EM14335 PISTON ROD 1
18 EM14336 PISTON GUIDE 1
19 EM505489 FITTING 1
20 EM14334 COMPENSATOR SPRING 1
21 EM18409 O-RING 1
22 EM98032 PLATE, OILER 1
23 EM14407 O-RING, OILER PLATE 1
24 EM14410 RING & FELT HOLDER 1
25 EM14408 BRONZE RING 1
26 EM14411 PISTON CUP-BLACK 1
26 EM98051 PISTON CUP-ORANGE 1
27 EM14412 BUSHING 1 1/4 CRS 1
28 EM18409 O-RING 1” 2
29 EM14413 FACE PLATE 1
30 EM18800HD PUMPING CYLINDER ................ 1 ............ 2-1/2" LIP SLEEVE
31 EM26525 O-RING, CYLINDER BOX 1
32 EM968446 NUT HEX, 3/4-10 3
33 EM16493 FELT RING 1
34 EM148053 BUSHING 1
35 EM20328TKIT BEARING KIT ............................ 1 ............ INCLUDES ITEMS W/
EM903163 BEARING CUP 1
EM20814 BEARING BUSHING 1
EM20813 SPACER 1
*
EM903162 BEARING CONE 2
*
EM20816 O-RING 2
*
*
MAYCO C-30HDNI (ZENITH) PUMP — OPERATION AND PARTS MANUAL — REV. #11 (04/03/12) — PAGE 69
Page 70

C-30HDN PUMP — CONNECTING ROD - DRIVE SIDE ASSY.
CONNECTING ROD - DRIVE SIDE ASSY.
PAGE 70 — MAYCO C-30HDNI (ZENITH) PUMP — OPERATION AND PARTS MANUAL — REV. #11 (04/03/12)
Page 71

C-30HDN PUMP — CONNECTING ROD - DRIVE SIDE ASSY.
CONNECTING ROD - DRIVE SIDE ASSY.
NO. PART NO. PART NAME QTY. REMARKS
7 EM505490 FITTING 1
8
*
9
*
10
11
12
21 EM18409 O-RING 1
22 EM98032 PLATE, OILER 1
23 EM14407 O-RING, OILER PLATE 1
24 EM14408 BRONZE RING 1
25 EM14410 RING AND FELT HOLDER 1
26 EM14411 PISTON CUP-BLACK 1
26 EM98051 PISTON CUP-ORANGE 1
27 EM14412 BUSHING 1 1/4 CRS 1
28 EM18409 O-RING 1” 2
29 EM14413 FACE PLATE 1
30 EM14807HD CONCRETE CYLINDER ............. 1 ............ 3-3/4 IN. LIP SLEEVE
32 EM968446 NUT HEX, 3/4-10 3
33 EM14808 PISTON ROD ASSY. 1
34 EM16493 FELT RING 1
35 EM20328TKIT BEARING KIT ............................ 1 ............ INCLUDES ITEMS W/
EM903163 BEARING CUP 1
EM20814 BEARING BUSHING 1
EM20813 SPACER 1
*
EM903162 BEARING CONE 2
*
EM20816 O-RING 2
*
*
MAYCO C-30HDNI (ZENITH) PUMP — OPERATION AND PARTS MANUAL — REV. #11 (04/03/12) — PAGE 71
Page 72
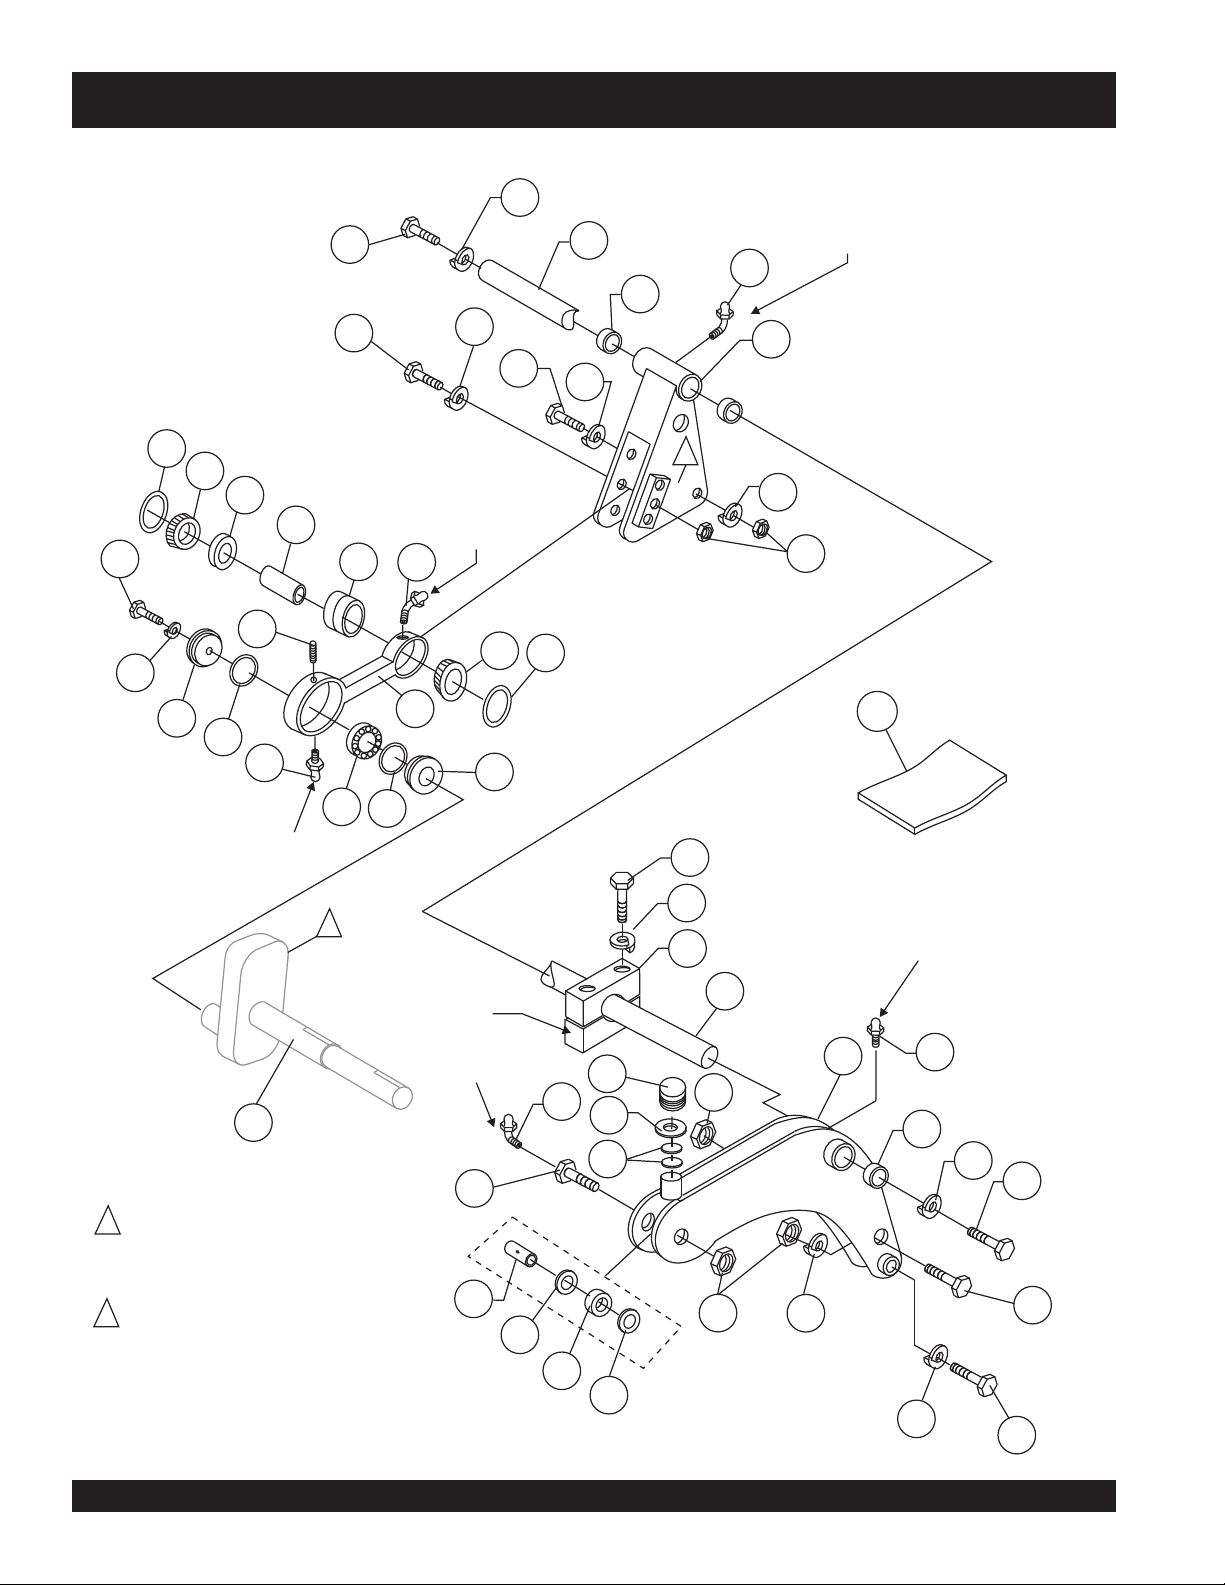
ROCKER ASSY.
6
25
C-30HDNI (ZENITH) PUMP — ROCKER ASSY.
7
1
27
7
45
7
LUBRICATION
POINT
31
35
24
23
22
21
8
20
LUBRICATION
POINT
31
1
A
B
C
7
14
30
23
24
41
36
28
46
37
8
LUBRICATION
POINT
38
37
40
KIT
3
4
2
2
PAR T O F
FRAME
1
LUBRICATION
POINT
8
27
7
43
NOTES:
A. LONG STROKE SETTING.
1
HIGHER VOLUME, LOWER PSI.
B. STANDARD SETTING, NORMAL.
C. SHORT STROKE SETTING.
REDUCED VOLUME, HIGHER PSI.
SEE CRANKSHAFT ASSEMBLY
2
LUBRICATION
POINT
12
11
13
17
16
15
19
44
5
7
10
9
10
7
PAGE 72 — MAYCO C-30HDNI (ZENITH) PUMP — OPERATION AND PARTS MANUAL — REV. #11 (04/03/12)
6
3
25
Page 73

C-30HDNI (ZENITH) PUMP — ROCKER ASSY.
ROCKER ASSY.
NO. PART NO. PART NAME QTY. REMARKS
1 EM14329 SHAFT ROCKER ARM 1
2 EM14116 JOURNAL BLOCK 1
3 EM963180 SCREW, HHC 3/4”-10X5 2
4 EM923350 WASHER LOCK 3/4” SPRING STEEL 2
5 EM14846 CAM ROCKER ARM ..................................... 1......... INCLUDES ITEMS W/
6 EM133 BOLT 1”-14X2” HEX HEAD 1
7 EM603 WASHER 1” LOCK 1
8 EM916001 ZERK FITTING 1
9 EM903092 BEARING ASSY. 1
10 EM20347 BEARING SPACER 2
11 EM402434 BEARING BUSHING 1
12 EM20344 SPECIAL BOLT 1
13 EM916001 ZERK FITTING 1
14 EM417 NUT FLEX LOCK 1
15 EM402456 OILER FELT 2
16 EM607 WASHER, FLAT 5/8” 1
17 EM20349 OILER PLUG, PLASTIC 1
19 EM969038 NUT STOP REG. 3/4”-10 1
20% EM903163 BEARING CUP 1
21% EM20814 BEARING BUSHING 1
22% EM20813 SPACER 1
23% EM903162 BEARING CONE 2
24% EM20816 O-RING 2
25 EM105 BOLT 1”-14X6” HEX HEAD 1
27#+ EM203262 BRONZE BUSHING 4
28 EM20364 CONNECTING ROD 1
30 EM702 SCREW ALLEN HEAD 3/8”-16X3/4” 1
31 EM505490 ZERK FITTING 1
35 EM14328 ROCKER ARM ASSY. ................................... 1 ......... INCLUDES ITEM W/#
36 EM402996 SEAL PLATE 1
37 EM20336 O-RING 1
38 EM903176 BEARING 1
40 EM20338 SPACER 1
41 EM923348 WASHER LOCK 5/8 1
42 EM503982 BOLT 1/2-13X5 1
43 EM98043 FORGED CRANKSHAFT .............................. 1 ......... INCLUDES ITEM W/
44 EM417 NUT, LOCK 3/4"-10 2
45 EM202 BOLT, HEX 1-8 X 6 LG. 1
46 EM20328TKIT BEARING KIT ............................................... 1......... INCLUDES ITEMS W/%
+
*
MAYCO C-30HDNI (ZENITH) PUMP — OPERATION AND PARTS MANUAL — REV. #11 (04/03/12) — PAGE 73
Page 74

COUNTERSHAFT ASSY.
C-30HDNI (ZENITH) PUMP — COUNTER-SHAFT ASSY.
9
11
1
12
NOTES:
SEE CLUTCH ASSEMBLY
1
SEE CRANKCASE ASSEMBLY
2
7
8
2
3
4
5
LUBRICATION
POINT
6
6
PAR T O F
FRAME
1
12
2
3
LUBRICATION
4
POINT
7
PAR T O F
FRAME
12
21
12
6
2
6
6
5
22
55
MASTER
LINK
HALF
LINK
60
59
61
PAGE 74 — MAYCO C-30HDNI (ZENITH) PUMP — OPERATION AND PARTS MANUAL — REV. #11 (04/03/12)
Page 75

C-30HDNI (ZENITH) PUMP — COUNTER-SHAFT ASSY.
COUNTER-SHAFT ASSY.
NO. PART NO. PART NAME QTY. REMARKS
1 EM513073 COUNTER SHAFT 1
2 EM14311 CAM BEARING 2
3 EM124 BOLT HEX 1/2 X 1-3/4 2
4 EM1621 WASHER 5” 2
5 EM923346 WASHER, LOCK1/2” 2
6 EM968011 NUT HEX, 1/2-13 2
7 EM916001 FITTING 1
8 EM14316 KEY WAY 3/8”X2.5” 1
9 EM14314 BUSHING, PULLEY 1
10 EM14313 PULLEY 1
11 EM98089 BELT, DOUBLE 83 INCHES 1
12 EM143111 SET COLLAR 1
21 EM14318 SPROCKET, 13 TOOTH 1
22 EM14319 BUSHING 1
55 EM14307 SPROCKET 60 TEETH 1
57 EM1702 SCREW ALLEN HEAD 3/8”-16X3/4” 1
58 EM703 SET SCREW 3/8”-16X3/8” 1
59 EM14308 CHAIN W/MASTER LINK 1
60 EM26314 LINK MASTER 1
61 EM26313 HALF LINK 1
MAYCO C-30HDNI (ZENITH) PUMP — OPERATION AND PARTS MANUAL — REV. #11 (04/03/12) — PAGE 75
Page 76

CRANKSHAFT ASSY.
C-30HDNI (ZENITH) PUMP — CRANKSHAFT ASSY.
57
KIT
1
54
41
52
48
51
45
34
46
24
35
50
2
35
LUBRICATION
POINT
49
33
46
30
55
24
32
29
23
25
31
24
LUBRICATION
POINT
28
27
31
26
43
44
56
NOTES:
SEE ROCKER ARM ASSEMBLY
1
ITEM 43 FOR ASSOCIATED
CRANKSHAFT COMPONENTS.
SEE COUNTER-SHAFT ASSEMBLY,
2
ITEM 55
32
PAGE 76 — MAYCO C-30HDNI (ZENITH) PUMP — OPERATION AND PARTS MANUAL — REV. #11 (04/03/12)
Page 77

C-30HDNI (ZENITH) PUMP — CRANKSHAFT ASSY.
CRANKSHAFT ASSY.
NO. PART NO. PART NAME QTY. REMARKS
23
24
25 EM505490 ZERK FITTING 1
26 EM129 SCREW, HHC 3/4-10X8-1/2 2
27 EM492628 LOCK WASHER 3/4 2
28 EM968446 NUT HEX, 3/4-10 GR5 4
29
30
31
32
33
34
35
38 EM903176 BEARING 1
40 EM402996 SEAL PLATE 1
41 EM923348 WASHER, LOCK 5/8" 2
43
44
45
46
48
49
50
51 EM128 BOLT 5/8-11X4” HEX HEAD 2
52 EM620 WASHER, SPECIAL 5/8” 2
54 EM968013 NUT HEX 5/8-11 4
55
56
57 EM98043K CRANKSHAFT FORGE ASSEMBLY ............ 1......... INCLUDES ITEM W/
EM14303 BEARING BLOCK 1
*
EM702 SCREW, ALLEN HEAD 3/8-16X3/4 6
*
EM14324 CUP BEARING 1
*
EM14323 SPACER BEARING CONE 1
*
EM14325 CONE BEARING 2
*
EM14326 O-RING 2
*
EM14322 SPACER 1
*
EM98043 CRANKSHAFT, FORGED 1
*
EM14306 KEY CRANKSHAFT 2
*
EM14302 SPACER, CAM BUSHING 1
*
EM14300 CAM ASSY. 1
*
EM14301 BUSHING, CAM 1
*
EM703 SCREW ALLEN HEAD 3/8-16X3/8 6
*
EM175 BOLT 3/8-16X1-1/4 6
*
EM14304 BEARING-CAM COMPLETE 1
*
EM916001 ZERK FITTING 1
*
EM14307 SPROCKET 60 TEETH 1
*
EM14309 BUSHING 1
*
*
MAYCO C-30HDNI (ZENITH) PUMP — OPERATION AND PARTS MANUAL — REV. #11 (04/03/12) — PAGE 77
Page 78
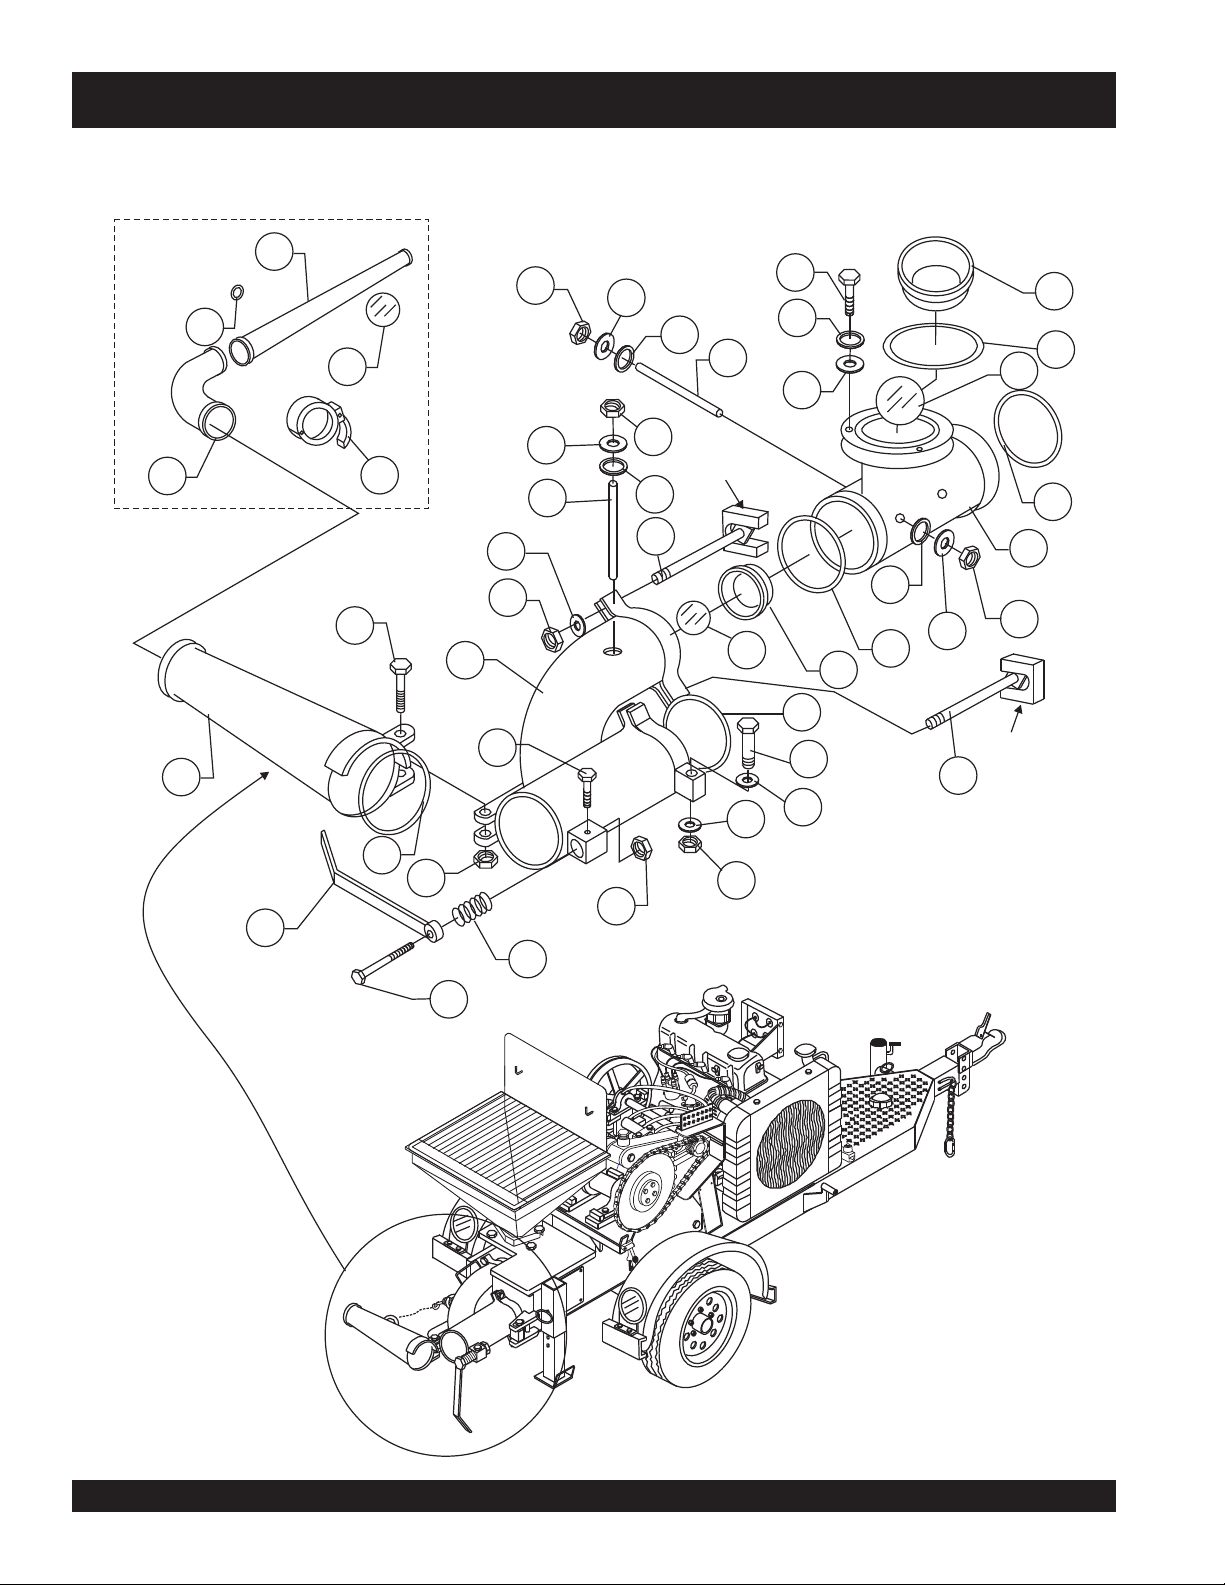
MANIFOLD ASSY.
ACCESSORIES
5
C-30HDNI (ZENITH) PUMP — MANIFOLD ASSY.
2
14
13
12
3
11
15
6
16
7
8
17
1
30
33
31
24
4
11
27
28
21
14
23
26
PAR T O F
FRAME
19
18
12
7
13
7
9
14
7
37
38
PAR T O F
FRAME
26
27
27
7
32
32
36
35
34
PAGE 78 — MAYCO C-30HDNI (ZENITH) PUMP — OPERATION AND PARTS MANUAL — REV. #11 (04/03/12)
Page 79

C-30HDNI (ZENITH) PUMP — MANIFOLD ASSY.
MANIFOLD ASSY.
NO. PART NO. PART NAME QTY. REMARKS
1 EM23946 ELBOW 3”X90 DEG.HD 1
2 EM28004DD REDUCER 3X2X36 HD 1
3 EM2C0B BALL 2” SPONGE 2
4 EM28904 COUPLING 3” HD *CF* 2
5 EM18409 O-RING 1” 4
6 EM14843 UPPER DURASEAT 1
7 EM18801 O-RING 6
8 EM18804 BALL 4-1/2” 1
9 EM14801 MANIFOLD T ASSY. 1
11 EM136 PIN BALL STOP 3/4-16 x 8 3
12 EM18409 O-RING 4
13 EM618 WASHER SPECIAL 4
14 EM968266 NUT JAM HEX 3/4-16 4
15 EM104 BOLT 5/8-11X2” HEX HEAD 3
16 EM923348 WASHER LOCK 5/8 SPRING 3
17 EM505882 WASHER, 5/8 3
18 EM14842 SEAT DURA LOWER 1
19 EM14818 BALL 4” 1
21 EM14819A MANIFOLD ASSY. EASY OPEN 1
23 EM18409 O-RING 2
24 EM618 WASHER SPECIAL 2
26 EM137 TEE-BOLT 3/4-10X14” 2
27 EM619 WASHER 3/4” 2
28 EM968446 NUT HEX 3/4”-10 GR5 2
30 EM14850 EXHAUST GATE “H/D” 1
31 EM963180 CAPSCREW 3/4-10X5 HEX HD G8 1
32 EM969038 NUT STOP REG.3/4-10 2
33 EM14845 ARM CLAMP 1
34 EM135 BOLT 1-1/4” -12X7” HEX HD. 1
35 EM14810 SPRING 1
36 EM451 NUT 1-1/4” -12 LOCK 1
37 EM160 BOLT 3/8-16X3/4” 1
38 EM509329 SCREW HHC 3/4-10X6 1
MAYCO C-30HDNI (ZENITH) PUMP — OPERATION AND PARTS MANUAL — REV. #11 (04/03/12) — PAGE 79
Page 80

FRAME ASSY.
C-30HDNI (ZENITH) PUMP — FRAME ASSY.
PAGE 80 — MAYCO C-30HDNI (ZENITH) PUMP — OPERATION AND PARTS MANUAL — REV. #11 (04/03/12)
Page 81

C-30HDNI (ZENITH) PUMP — FRAME ASSY.
FRAME ASSY.
NO. PART NO. PART NAME QTY. REMARKS
1 EM513085 FRAME ASSEMBLY 1
2 EM70186 JACK STAND, REAR 1
3 EM744 CLEVIS PIN 1/2” X 4” 1
4 EM745 HAIR PIN C 5/8- 3/4” 1
5 EM14600A AXLE, ASSEMBLY 1
7 501299 WASHER THICK 1” 2
8 491689 KEY COTTER 1/8 X 2 2
10 EM492396 SCREW HHC 1/2- 13 X 2 4
11 EM621 WASHER .5” 4
12 EM406 NUT LOCK 1/2” DIA. 4
13 EM511418 FENDER RIGHT-SIDE 1
14 981635 BOLT, HHC 1/2- 13 X 3/4 6
15 6109180 WASHER LOCK 1/2” 6
16 EM512251 COVER 1
17 EM512252 COVER 1
18 EM512253 COVER 1
19 EM512250 COVER 1
20 EM492309 SCREW, HHC 16
21 0166 A WASHER, LOCK 3/8” 24
22 EM512263 ROD 1
23 EM507895 PLUG, 2 1/2 NPT 2
26 29228 HITCH, TONGUE 2" 1
27 EM969023 NUT, HEX 5/8" NC 2
28 EM507658 SCREW, HHC 5/8" NC 4-1/2 G5 2
29 EM509947 LINK, QUICK 2
30 EM14165 BOLT EYE 2
31 EM619 WASHER 3/4” WILLIAM 2
32 EM968002 NUT COUPLING 3/4- 10 2
33 EM505121 SCREW 3/4”- 10 X 3 GR.5 2
34 EM969038 NUT STOP REG. 3/4- 10 2
35 EM513078 COVER, CHASSIS BOTTOM 1
36 10136 WASHER, FLAT 3/8 8
37 EM492264 HHCS. 3/8" NC X 1" 8
38 EM929028 HOOD REST, STEEL 2
39 492363 SCREW HHC 5/16- 18 X 3/4” 4
40 EM923343 WASHER LOCK 5/16” 4
41 EM265361 BRACKET LIGHT 2
42 EM26536 TAIL LIGHT 2
43 491010 HOOD FASTENER, RUBBER 2
44 EM513087 FENDER LEFT-SIDE 1
45 25610 JACK STAND, FRONT 1
MAYCO C-30HDNI (ZENITH) PUMP — OPERATION AND PARTS MANUAL — REV. #11 (04/03/12) — PAGE 81
Page 82

AXLE ASSY.
C-30HDNI (ZENITH) PUMP — AXLE ASSY.
PAGE 82 — MAYCO C-30HDNI (ZENITH) PUMP — OPERATION AND PARTS MANUAL — REV. #11 (04/03/12)
Page 83

C-30HDNI (ZENITH) PUMP — AXLE ASSY.
AXLE ASSY.
NO. PART NO. PART NAME QTY. REMARKS
1 EM26518 CAP 14” CHROME 2
2 EM26615A TIRE ASSY. ................................ 2 ........... INCLUDES ITEMS W/
3
*
4
*
5# EM26306 DUST COVER 2
6# EM968481 CASTLE NUT 2
7 EM705 PIN, COTTER 3/16X1 1/2 2
8# EM26329 WASHER 2
9# EM903113 OUTER BEARING 2
10# EM903012 OUTER CUP 2
11# EM26519 NUT 12
12# EM20612 STUD 12
13# EM26300 HUB 2
14# EM903169 INNER CUP 2
15# EM903168 INNER BEARING 2
16# EM26305 GREASE SEAL 2
17% EM20601 HUB ASSEMBLY ........................ 2 ........... INCLUDES ITEMS W/#
18% EM14600 AXLE 1
19 EM14600A AXLE WITH HUBS INSTALLED ..... 1 .......... I NCLUDES ITEMS W/%
WHEEL ....................................... 2 ........... CANNOT BE PURCHASED SEPARATELY
TIRE 14" ..................................... 2 ........... CANNOT BE PURCHASED SEPARATELY
*
MAYCO C-30HDNI (ZENITH) PUMP — OPERATION AND PARTS MANUAL — REV. #11 (04/03/12) — PAGE 83
Page 84

C-30HDNI PUMP — MUFFLER, AIR FILTER, AND STOP SWITCH ASSY.
MUFFLER, AIR FILTER AND STOP SWITCH ASSY.
PAGE 84 — MAYCO C-30HDNI (ZENITH) PUMP — OPERATION AND PARTS MANUAL — REV. #11 (04/03/12)
Page 85

C-30HDNI PUMP — MUFFLER, AIR FILTER, AND STOP SWITCH ASSY.
MUFFLER, AIR FILTER AND STOP SWITCH ASSY.
NO. PART NO. PART NAME QTY. REMARKS
1 EM98076 FILTER, AIR 1
1A EM98162 PRECLEANER, AIR FILTER 1
2 492364 SCREW, HHC 5/16- 18 X 1 2
3 EM513126 CLAMP, AIR INTAKE 2
4 514690 FLEX HOSE, AIR CLEANER ................................... 1.......... 17.5" LENGTH 1-3/4 DIA.
5 EM513106 PANEL, FILTER SUPPORT 1
6 EM492897 WASHER, FLAT 5/16 2
7 492582 NUT, NYLOC 5/16- 18 2
8 EM963610 HHCS 3/8 X1 G5 2
9 0166A WASHER, LOCK 2
10 3019092 WASHER, FLAT 2
11 506257 U-BOLT 2
12 515459 REAR SUPPORT, CATALITIC CONVERTER 1
13 EM513110 BUSHING, 1/4- 20 RUBBER MUFFLER 8
14 492596 WASHER, FLAT 1/4 IN. 8
15 492622 WASHER, LOCK 1/4 IN. 8
16 400 NUT, HEX 1/4 IN. 4
17 EM98078 CLAMP, 6” MUFFLER 2
18 515434 MUFFLER 1
19 563P-IT-2B92-41 CATALYTIC CONVERTER 1
20 515450 FRONT SUPPORT, CATAYTIC CONVERTER 1
21 515435 EXHAUST PIPE 1
22 492378 BOLT, C/H 3/8 IN. NC x 1 IN. G5 2
23 492554 NUT, HEX 3/8 IN. 2
24 492624 WASHER, LOCK 3/8 IN. 2
25 504679 WASHER, FLAT 3/8 IN. 4
26 EM14217 STOP SWITCH, ENGINE COVER 1
27 EM491873 GLAND CONNECTOR 1
28 ZE1 ELEMENT, AIR FILTER 1
29 X190056302 GASKET 1
30 2069172W00 GASKET 1
MAYCO C-30HDNI (ZENITH) PUMP — OPERATION AND PARTS MANUAL — REV. #11 (04/03/12) — PAGE 85
Page 86
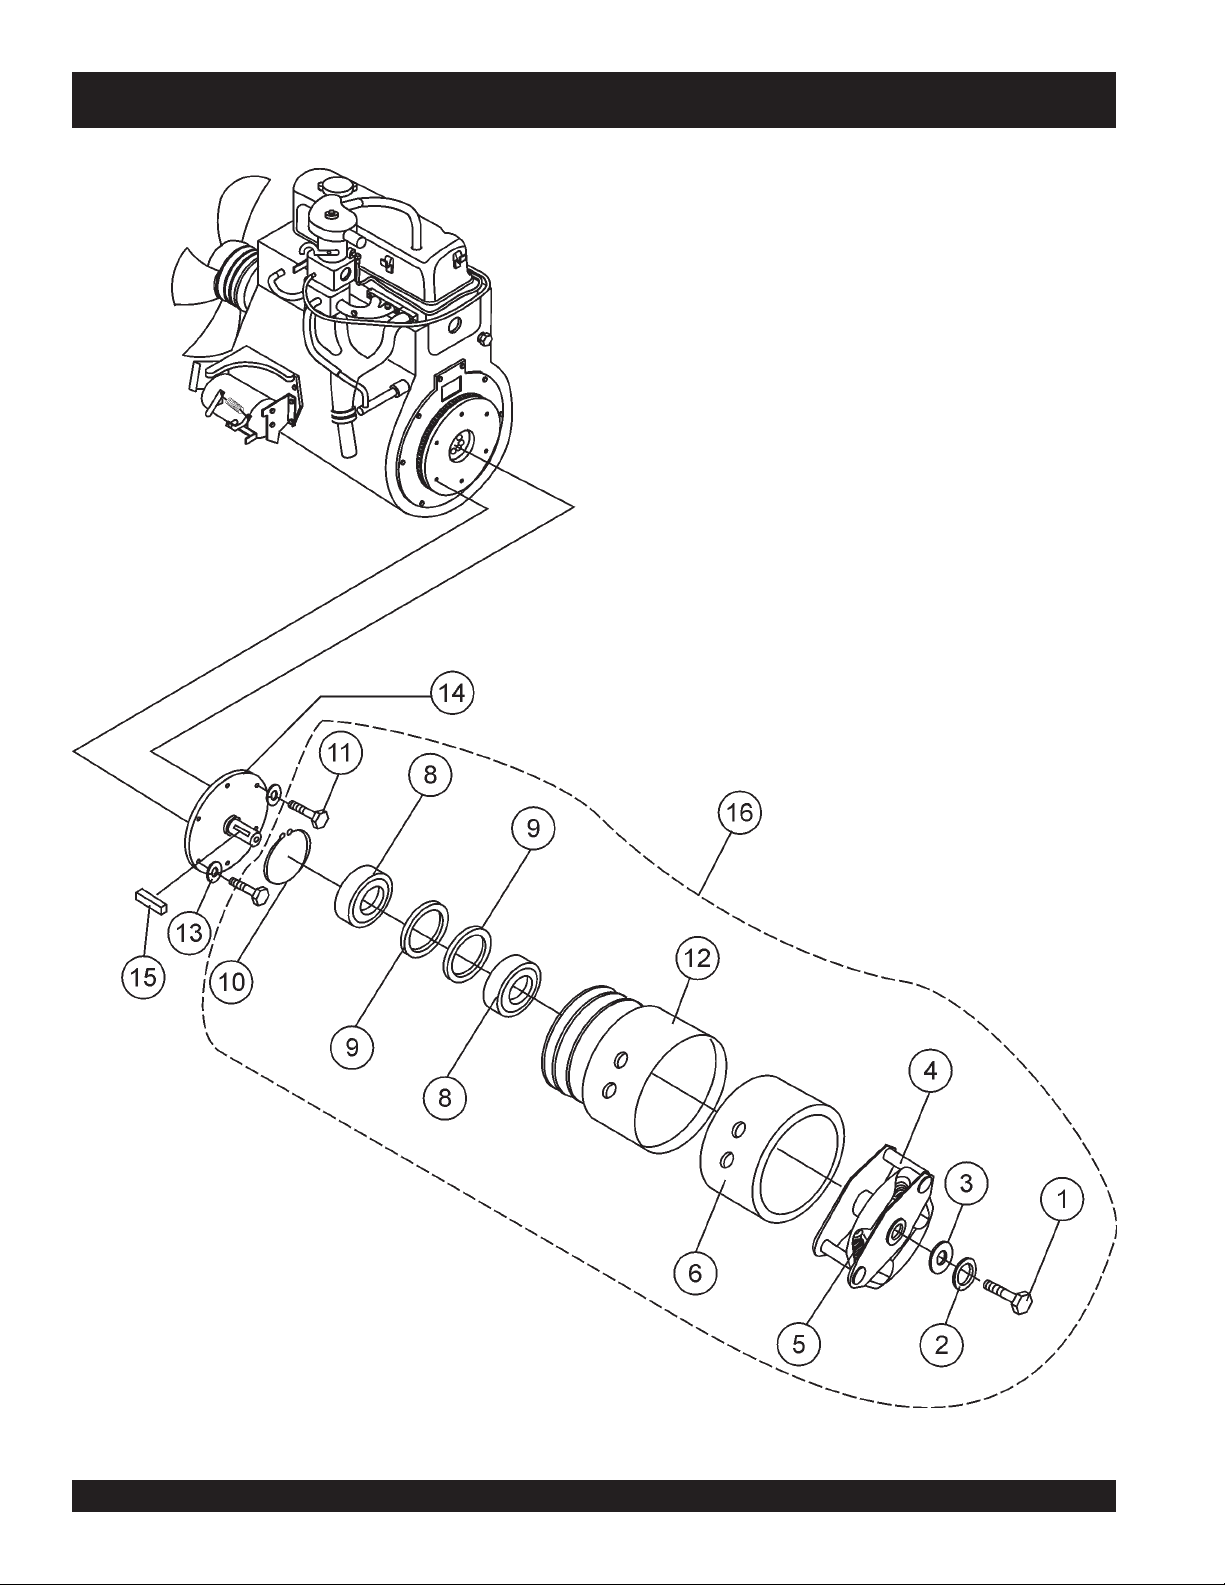
CLUTCH ASSY.
C-30HDNI (ZENITH) PUMP — CLUTCH ASSY.
PAGE 86 — MAYCO C-30HDNI (ZENITH) PUMP — OPERATION AND PARTS MANUAL — REV. #11 (04/03/12)
Page 87

C-30HDNI (ZENITH) PUMP — CLUTCH ASSY.
CLUTCH ASSY.
NO. PART NO. PART NAME QTY. REMARKS
1
*
2
*
3
*
4
*
5
*
6
*
8
*
9
*
10
11
12
13 0166A WASHER, LOCK 3/8” 6
14 EM98071 SHAFT STUB (FLANGE), ENGINE 1
15 EM26348 KEY 1
16 EM14320 CLUTCH COMPLETE ASSEMBLY ............. 1 ............. INCLUDES ITEMS W/
492395 SCREW, HHC 1/2- 13X1-3/4” 1
EM923346 WASHER, LOCK 1/2” 1
EM621 WASHER, FLAT 1/2” SPECIAL 1
EM26321 ROTOR ASSEMBLY 1
EM918050 CLUTCH SPRING 2
EM26310 CLUTCH LINING 1
EM902204 CLUTCH BEARING 2
EM926066 RETAINING RING 2
EM926053 RETAINING RING 1
*
EM508342 SCREW, HHC M8X25 PI.25 6
*
EM26322 CLUTCH HOUSING W/LINING 1
*
*
MAYCO C-30HDNI (ZENITH) PUMP — OPERATION AND PARTS MANUAL — REV. #11 (04/03/12) — PAGE 87
Page 88

C-30HDNI PUMP — RADIATOR AND ENGINE MOUNTING BRACKET ASSY.
RADIATOR AND ENGINE MOUNTING BRACKET ASSY.
C-30HDNI (ZENITH) PUMP — RADIATOR AND ENGINE MOUNTING
2
MOTOR MOUNTING
STUDS
1
5
4
22
19
17
18
20
25
5
21
4
24
15
11
3
2
3
1
10
12
14
11
17
12
18
6
23
15
16
7
7
8
15
16
15
19
14
13
16
8
15
6
14
13
NOTES:
INCLUDED WITH ENGINE.
1
SEE RADIATOR ASSEMBLY
2
PAGE 88 — MAYCO C-30HDNI (ZENITH) PUMP — OPERATION AND PARTS MANUAL — REV. #11 (04/03/12)
Page 89

C-30HDNI PUMP — RADIATOR AND ENGINE MOUNTING BRACKET ASSY.
RADIATOR AND ENGINE MOUNTING BRACKET ASSY.
NO. PART NO. PART NAME QTY. REMARKS
1 EM64900014 SCREW, HHCS 3/8 - 16 x 7/8" 2
2 EM64700071 WASHER, LOCK 3/8 2
3 EM64700070 WASHER, FLAT .375 x .0734 x .065 6
4 EM64900156 BOLT, HEX 5/16 - 16 x 1 4
5 EM65500003 ISOLATOR 38 x 25, 3/8-16 2
6 EM513094 SCREW, SQUARE 1/2- 13 x 1-3/4” 2
7 6109160 NUT, HEX 1/2- 13 4
8 EM513040 TENSIONER, ADJUSTMENT 2
10 EM64800145 NUT, HEX 5/16 - 18` 4
11 6109160 NUT, HEX 1/2- 13 2
12 6109180 WASHER, LOCK 1/2” 2
13 513095 SCREW, SQUARE 1/2- 13X2 2
14 492584 NUT, NYLOC 1/2- 13 4
15 492600 WASHER, FLAT 1/2” 12
16 6109160 NUT, HEX 1/2- 13 8
17 6109160 NUT, HEX 1/2- 13 2
18 6109180 WASHER, LOCK 1/2” 2
19 EM64800124 NUT, HEX M8-1.25 2
20 EM94700080 WASHER, LOCK 8 MM 2
21 EM94700079 WASHER, FLAT 8MM NARROW 2
22 EM20200043 LEFT FRONT SUPPORT 1
23 EM20100042 LEFT REAR SUPPORT 1
24 EM20200042 LEFT RIGHT SUPPORT 1
25 EM20500034 BRACKET, CROSS 1
MAYCO C-30HDNI (ZENITH) PUMP — OPERATION AND PARTS MANUAL — REV. #11 (04/03/12) — PAGE 89
Page 90

C-30HDNI PUMP — RADIATOR, MOUNTING BRACKET AND HOSES ASSY.
RADIATOR, BRACKET AND HOSES ASSY.
PAGE 90 — MAYCO C-30HDNI (ZENITH) PUMP — OPERATION AND PARTS MANUAL — REV. #11 (04/03/12)
Page 91

C-30HDNI PUMP — RADIATOR, MOUNTING BRACKET AND HOSES ASSY.
RADIATOR, BRACKET AND HOSES ASSY.
NO. PART NO. PART NAME QTY. REMARKS
1 EM513116 CLAMP, 1/2” HOSE 1
2 2101402 WASHER, FLAT 1/4" 1
3 492268 HHCS 1/4" x 3/4" 1
4 EM20427 HOSE, OVERFLOW 1
5 EM64900014 HHCS, 3/8 -16 x 7/8" 1
6 EM94700071 WASHER, LOCK 3/8" 1
7 EM64700070 WASHER, FLAT .375 x .0734 x .065" 1
8 506208 CLAMP, HOSE 1
9 EM21000092 BRACKET, UPPER RADIATOR 1
10 EM68800003 CLAMP, HOSE WORM DRIVE 4
11 EM65508003 ISOLATOR 1
12 EM64800155 NUT, HEX 3/8-16 1
13 EM98079 RADIATOR HOSE, UPPER 1
14 EM98080 RADIATOR HOSE, LOWER 1
15 EM98072 RADIATOR 1
16 EM69300001 CAP, RADIATOR 13 PS1 1
17 EM21000091 BRACKET, UPPER RADIATOR .................... 1 .............ISOLATOR MOUNT
18 EM64900101 HHCS, M8-1.25 X 20 1
MAYCO C-30HDNI (ZENITH) PUMP — OPERATION AND PARTS MANUAL — REV. #11 (04/03/12) — PAGE 91
Page 92

CONTROL BOX ASSY.
C-30HDNI (ZENITH) PUMP — CONTROL BOX ASSY.
PAGE 92 — MAYCO C-30HDNI (ZENITH) PUMP — OPERATION AND PARTS MANUAL — REV. #11 (04/03/12)
Page 93

C-30HDNI (ZENITH) PUMP — CONTROL BOX ASSY.
CONTROL BOX ASSY.
NO. PART NO. PART NAME QTY. REMARKS
1 EM515461 FRONT PANEL OVERLAY 1
3 EM98036 SWITCH, THROTTLE CONTROL 1
4 P2300 LED, MALFUNCTION INDICATOR LED 1
5 P7655 LABEL, MALFUNCTION INDICATOR 1
6 12305 RED PILOT LENS DIA 5/8" 3
7 51908 12 VDC BULB 3
8 10958 IGNITION SWITCH 1
8 508239 CONNECTOR, PLASTIC 1
9 11078 IGNITION SWITCH KEY 1
10 EM40711 SWITCH, PUMPING CONTROL 1
11 EM513076 CONTROL BOX 1
12 EM26789 RECEPTACLE (REMOTE) 1
13 506222 HOURMETER 1
14 492356 BOLT, HEX 1/4 IN. x 3/4 IN. 5
15 515466 SUPPORT, ZENITH CONTROL PANEL 1
16 492596 WASHER, FLAT 1/4 IN. 5
17 492581 NUT, HEX 1/4 IN. 5
18 508451 NUT, LOCK 1/4 IN. 6
19 515455 SIDE SUPPORT, ZENITH CONTROL PANEL 1
20 EM513110 BUSHING, 1/4- 20 RUBBER MUFFLER 3
MAYCO C-30HDNI (ZENITH) PUMP — OPERATION AND PARTS MANUAL — REV. #11 (04/03/12) — PAGE 93
Page 94

BATTERY ASSY.
C-30HDNI (ZENITH) PUMP — BATTERY ASSY.
PAGE 94 — MAYCO C-30HDNI (ZENITH) PUMP — OPERATION AND PARTS MANUAL — REV. #11 (04/03/12)
Page 95

C-30HDNI (ZENITH) PUMP — BATTERY ASSY.
BATTERY ASSY.
NO. PART NO. PART NAME QTY. REMARKS
1 EM14705 CABLE, POSITIVE BATTERY 1
2 EM506266 COVER, POSITIVE TERMINAL 1
3 10318 BOX, BATTERY 1
4 EM492541 NUT, HEX 5/16- 18 1
5 EM923023 WASHER, FLAT 5/16 1
6 EM923343 WASHER, LOCK 5/16 1
7 EM20720 CABLE, NEGATIVE BATTERY 1
8 EM505624 COVER, NEGATIVE TERMINAL 1
9 EM491344 BATTERY, 12 VOLT 1
MAYCO C-30HDNI (ZENITH) PUMP — OPERATION AND PARTS MANUAL — REV. #11 (04/03/12) — PAGE 95
Page 96

FUEL TANK ASSY.
C-30HDNI (ZENITH) PUMP — FUEL TANK ASSY.
PAGE 96 — MAYCO C-30HDNI (ZENITH) PUMP — OPERATION AND PARTS MANUAL — REV. #11 (04/03/12)
Page 97

C-30HDNI (ZENITH) PUMP — FUEL TANK ASSY.
FUEL TANK ASSY.
NO. PART NO. PART NAME QTY. REMARKS
1 TBD HOSE, FUEL 3/8 IN. 1
2 EM506208 CLAMP, HOSE 1
3 C282224 FILTER, FUEL 1
4 TBD ADAPTER..................................................... 1 ............. BEFORE JULY 2005
5 EM491210 PLUG, 1/4 IN. 1
6 EM505594 PIPE, 5/16 COPPER .................................... 1 .............BEFORE JULY 2005
7 EM514722 FUEL TANK .................................................. 1 ............. BEFORE JULY 2005
7 EM514550 FUEL TANK ASSY ....................................... 1 .............INCLUDES ITEM 13
...................................................................................... AFTER JULY 2005
8 2108 FUEL CAP 1
9 C282-238 PUMP, FUEL 1
10# 19633 BUSHING ..................................................... 1 ............. AFTER JULY 2005
11# 60058 HOSE, 4-1/2" ................................................ 1 ............. AFTER JULY 2005
12# 12009 SCREEN ...................................................... 1 .............AFTER JULY 2005
13 EM516533 PICK UP TUBE ASSY ................................. 1 ............. INCLUDES ITEMS W/#
...................................................................................... AFTER JULY 2005
14# 12008 FITTING ....................................................... 1 ............. AFTER JULY 2005
15 C282314 CLAMP, FUEL FILTER, #34 2-1/2" ID 1
16 C282315 CLAMP, FUEL PUMP, #26 1-5/8" ID 2
MAYCO C-30HDNI (ZENITH) PUMP — OPERATION AND PARTS MANUAL — REV. #11 (04/03/12) — PAGE 97
Page 98
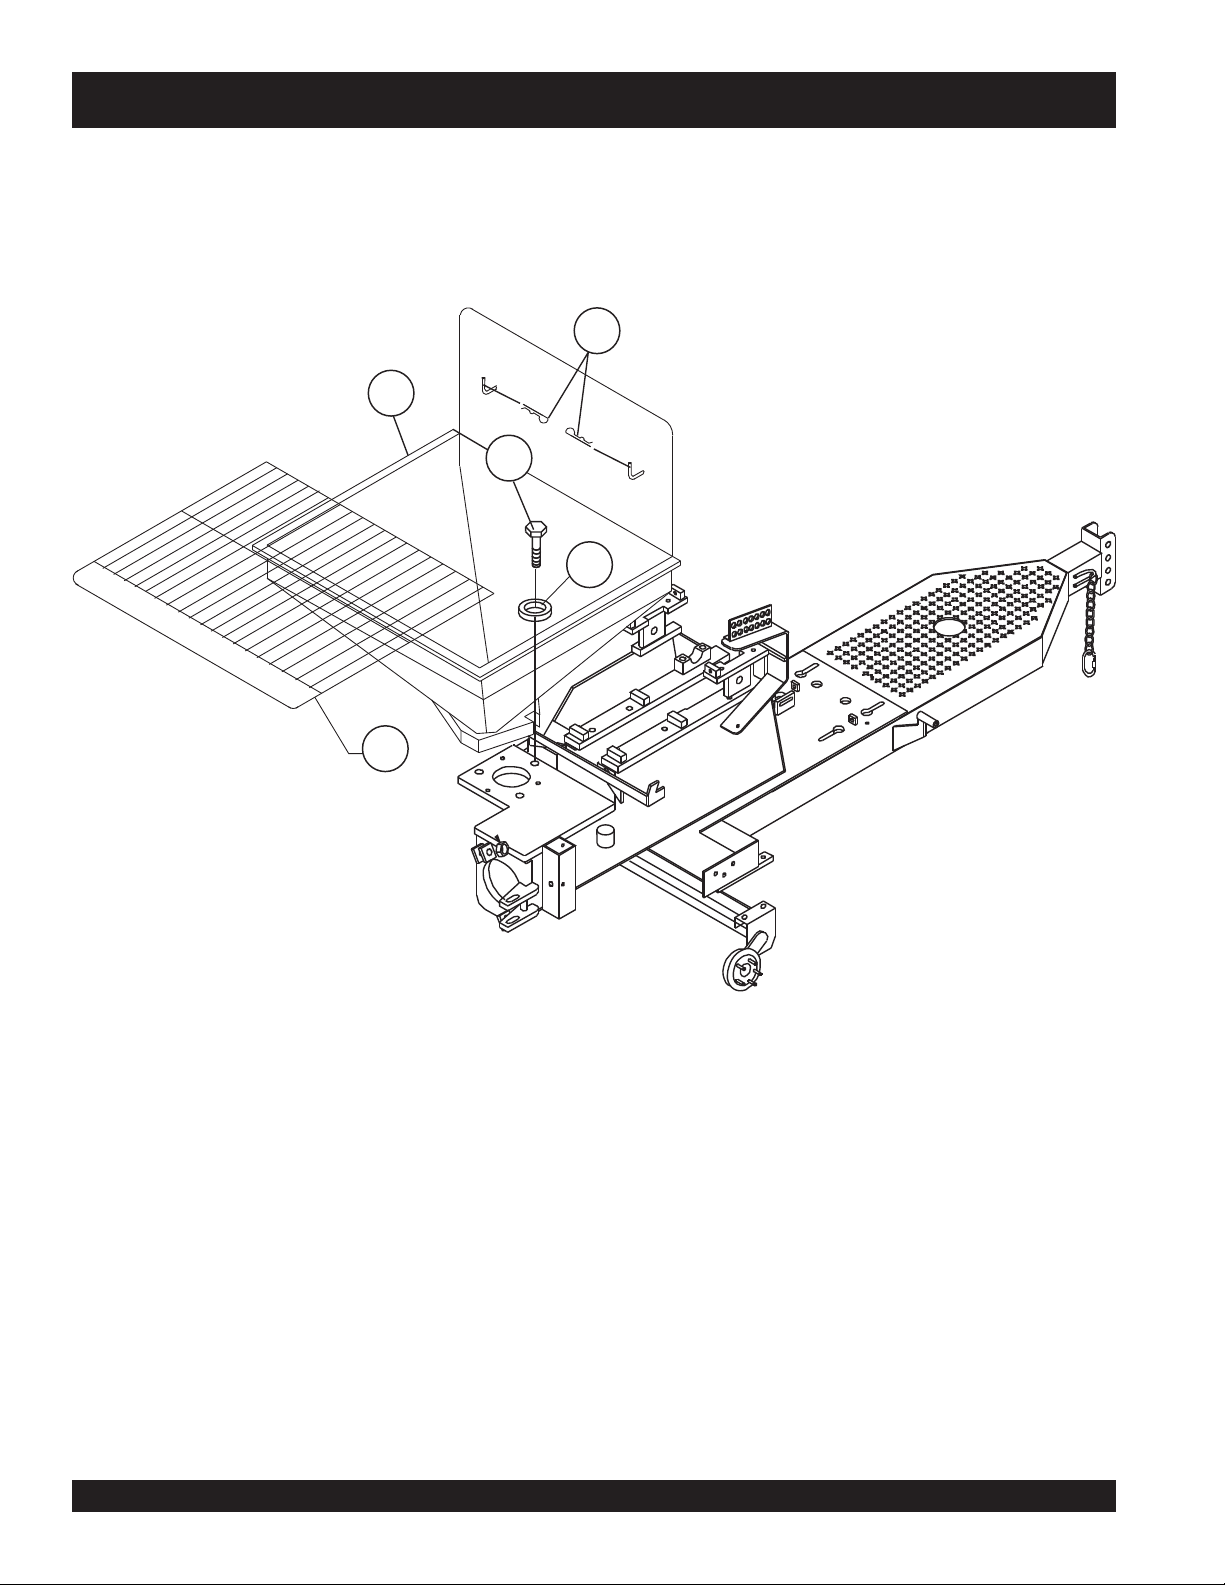
HOPPER ASSY.
C-30HDNI (ZENITH) PUMP — HOPPER ASSY.
3
2
4
5
1
PAGE 98 — MAYCO C-30HDNI (ZENITH) PUMP — OPERATION AND PARTS MANUAL — REV. #11 (04/03/12)
Page 99

C-30HDNI (ZENITH) PUMP — HOPPER ASSY.
HOPPER ASSY.
NO. PART NO. PART NAME QTY. REMARKS
1 EM14159 HOPPER SCREEN 1
2 EM14141 HOPPER 1
3 EM925191 PIN, HAIR 2
4 EM104 BOLT, 5/8”-11X2” HEX HEAD 3
5 EM507599 WASHER 5/8” FLAT 3
MAYCO C-30HDNI (ZENITH) PUMP — OPERATION AND PARTS MANUAL — REV. #11 (04/03/12) — PAGE 99
Page 100

HOOD ASSY.
C-30HDNI (ZENITH) PUMP — HOOD ASSY.
PAGE 100 — MAYCO C-30HDNI (ZENITH) PUMP — OPERATION AND PARTS MANUAL — REV. #11 (04/03/12)
 Loading...