

Page 1

OPERATION AND PARTS MANUAL
MODELS
AR13HA
AR13HAR
RIDE-ON TANDEM DRUM ROLLER
SERIES DRIVE SYSTEM
(HONDA GX630RQZB2 GASOLINE ENGINE)
Serial No. 110301 and ABOVE
Revision #0 (06/22/11)
To find the latest revision of this
publication, visit our website at:
www.multiquip.com
THIS MANUAL MUST ACCOMPANY THE EQUIPMENT AT ALL TIMES.
Page 2
PROPOSITION 65 WARNING
PAGE 2 — AR13HA/AR13HAR ROLLER (S/N 110301 & UP) • OPERATION AND PARTS MANUAL — REV. #0 (06/22/11)
Page 3

TABLE OF CONTENTS
AR13HA/HAR Ride-On
Tandem Roller
Proposition 65 Warning ........................................... 2
Table Of Contents .................................................... 3
Safety Information ................................................4-8
Specifications .....................................................9-10
Dimensions ............................................................ 11
General Information ..........................................12-13
Components ..................................................... 14-16
Basic Engine .......................................................... 17
Inspection ......................................................... 18-20
Operation .......................................................... 21-22
Maintenance ..................................................... 23-32
Preparation For Long-Term Storage ...................... 33
Manifold Test Ports ................................................ 34
Hydraulic System Diagram .................................... 35
Hydraulic Hose Connections ............................ 36-37
Troubleshooting ................................................38-39
Wiring Diagram ...................................................... 40
Drawings
Explanation Of Code In Remarks Column............. 42
Suggested Spare Parts ......................................... 43
Nameplate And Decals ..................................... 44-47
Front Drum Assy. .............................................. 48-49
Exciter Assy. ..................................................... 50-51
Rear Drum And Chassis Assy. .........................52-53
Covers And Frame Articulation Lock Assy. ....... 54-55
Hood And Rear Panel Assy. ............................. 56-57
Steering Column And
Articulation Arm Assy. ....................................... 60-61
Hydraulic Drive Pump Assy. .............................. 62-63
Manifold And Hydraulic Oil Filter Assy. ............. 64-65
Fuel Tank Assy. ................................................. 66-67
Water Tank Assy. ..............................................68-69
Engine And Muffler Assy. .................................. 70-71
Throttle Assy. .................................................... 72-73
Brake Control Assy. .......................................... 74-75
Battery Assy. ..................................................... 76-77
Scrapper Assy. .................................................. 78-79
Terms And Conditions Of Sale — Parts ................ 80
Hydraulic Articulation
Assy ..58-59
NOTICE
Specifications are subject to change without notice.
AR13HA/AR13HAR ROLLER (S/N 110301 & UP) • OPERATION AND PARTS MANUAL — REV. #0 (06/22/11) — PAGE 3
Page 4
SAFETY INFORMATION
Do not operate or service the equipment before reading
The following table shows the potential hazards associated
the entire manual. Safety precautions should be followed
at all times when operating this equipment.
Failure to read and understand the safety
messages and operating instructions could
result in injury to yourself and others.
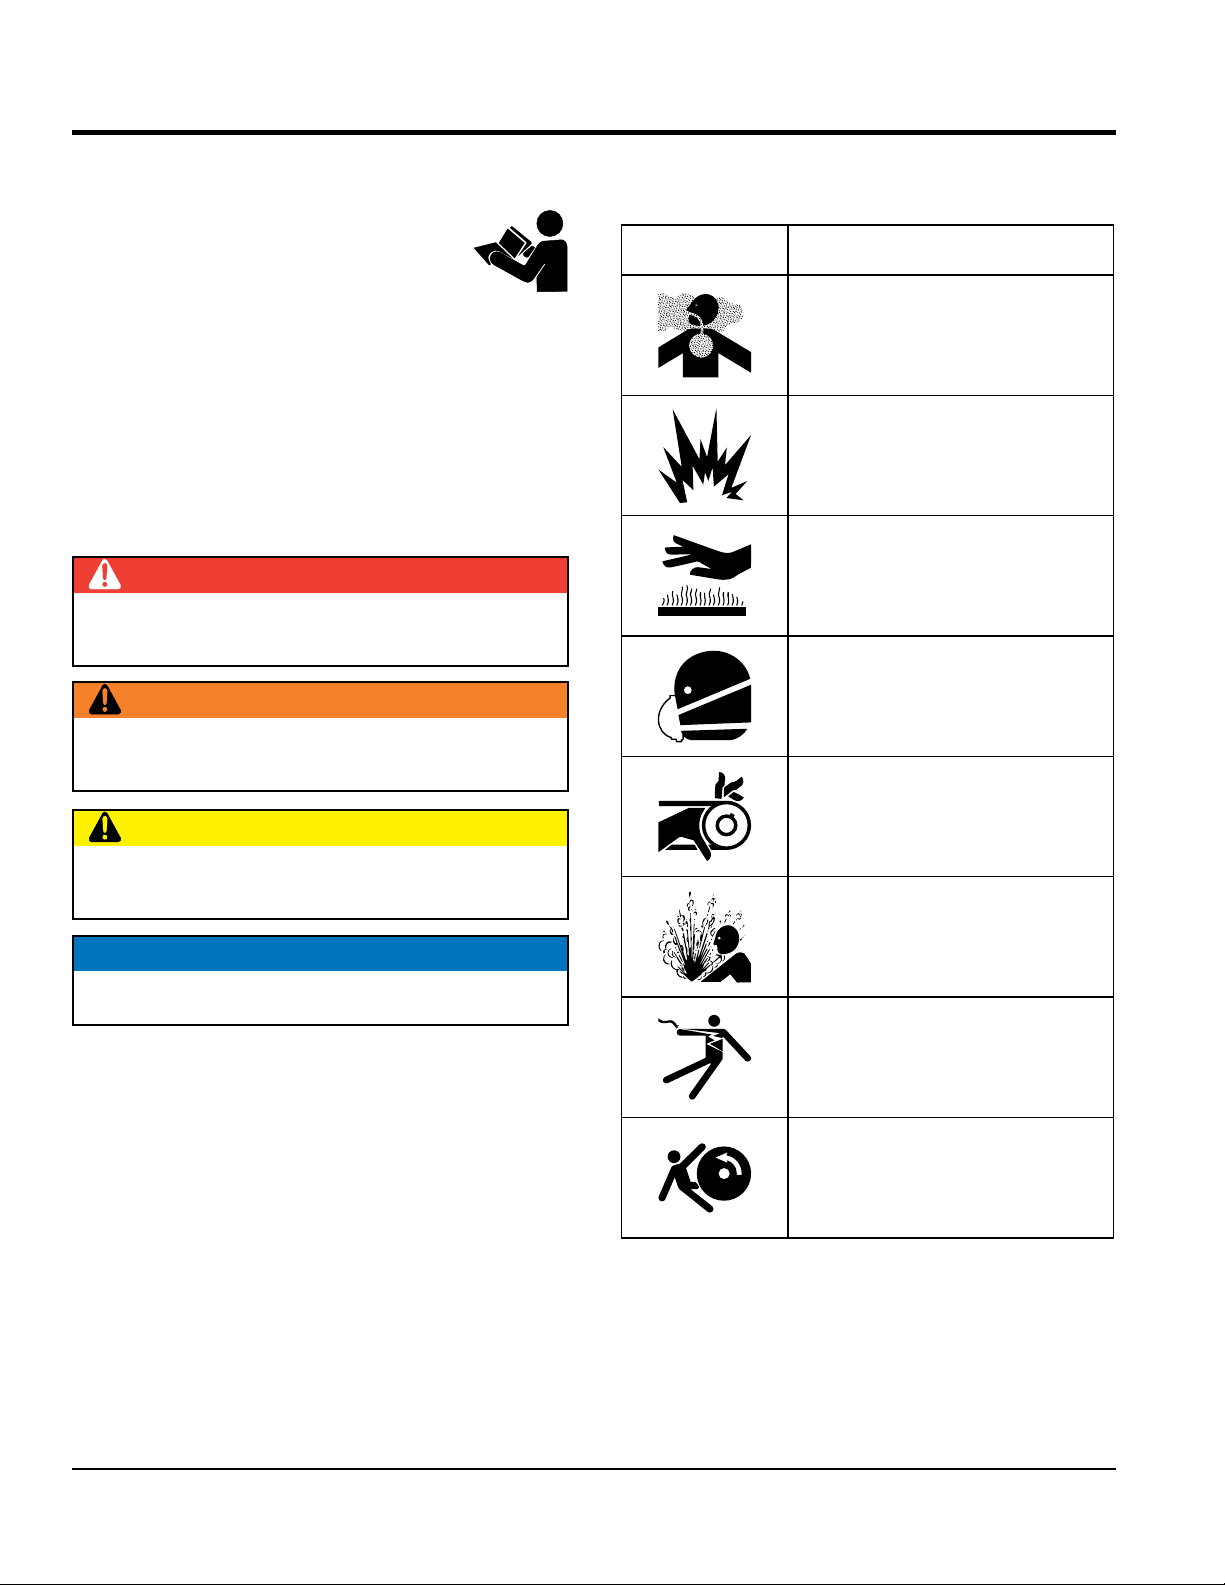
SAFETY MESSAGES
The four safety messages shown below will inform you
about potential hazards that could injure you or others. The
safety messages specifi cally address the level of exposure
to the operator and are preceded by one of four words:
DANGER, WARNING, CAUTION or NOTICE.
SAFETY SYMBOLS
DANGER
Indicates a hazardous situation which, if not avoided,
WILL result in DEATH or SERIOUS INJURY.
WARNING
Indicates a hazardous situation which, if not avoided,
COULD result in DEATH or SERIOUS INJURY.
with the operation of this equipment.
Symbol Safety Hazard
Lethal exhaust gas hazards
Explosive fuel hazards
Burn hazards
Respiratory hazards
CAUTION
Indicates a hazardous situation which, if not avoided,
COULD result in MINOR or MODERATE INJURY.
NOTICE
Addresses practices not related to personal injury.
Rotating parts hazards
Pressurized fluid hazards
Electric shock hazards
Runover hazards
PAGE 4 — AR13HA/AR13HAR ROLLER (S/N 110301 & UP) • OPERATION AND PARTS MANUAL — REV. #0 (06/22/11)
Page 5
GENERAL SAFETY
NOTICE
This equipment should only be operated by trained and
Whenever necessary, replace nameplate, operation and
accident due to equipment modifi cations. Unauthorized
recommended by Multiquip for this equipment. Damage
keep
Also, know the phone numbers
fi re department.
SAFETY INFORMATION
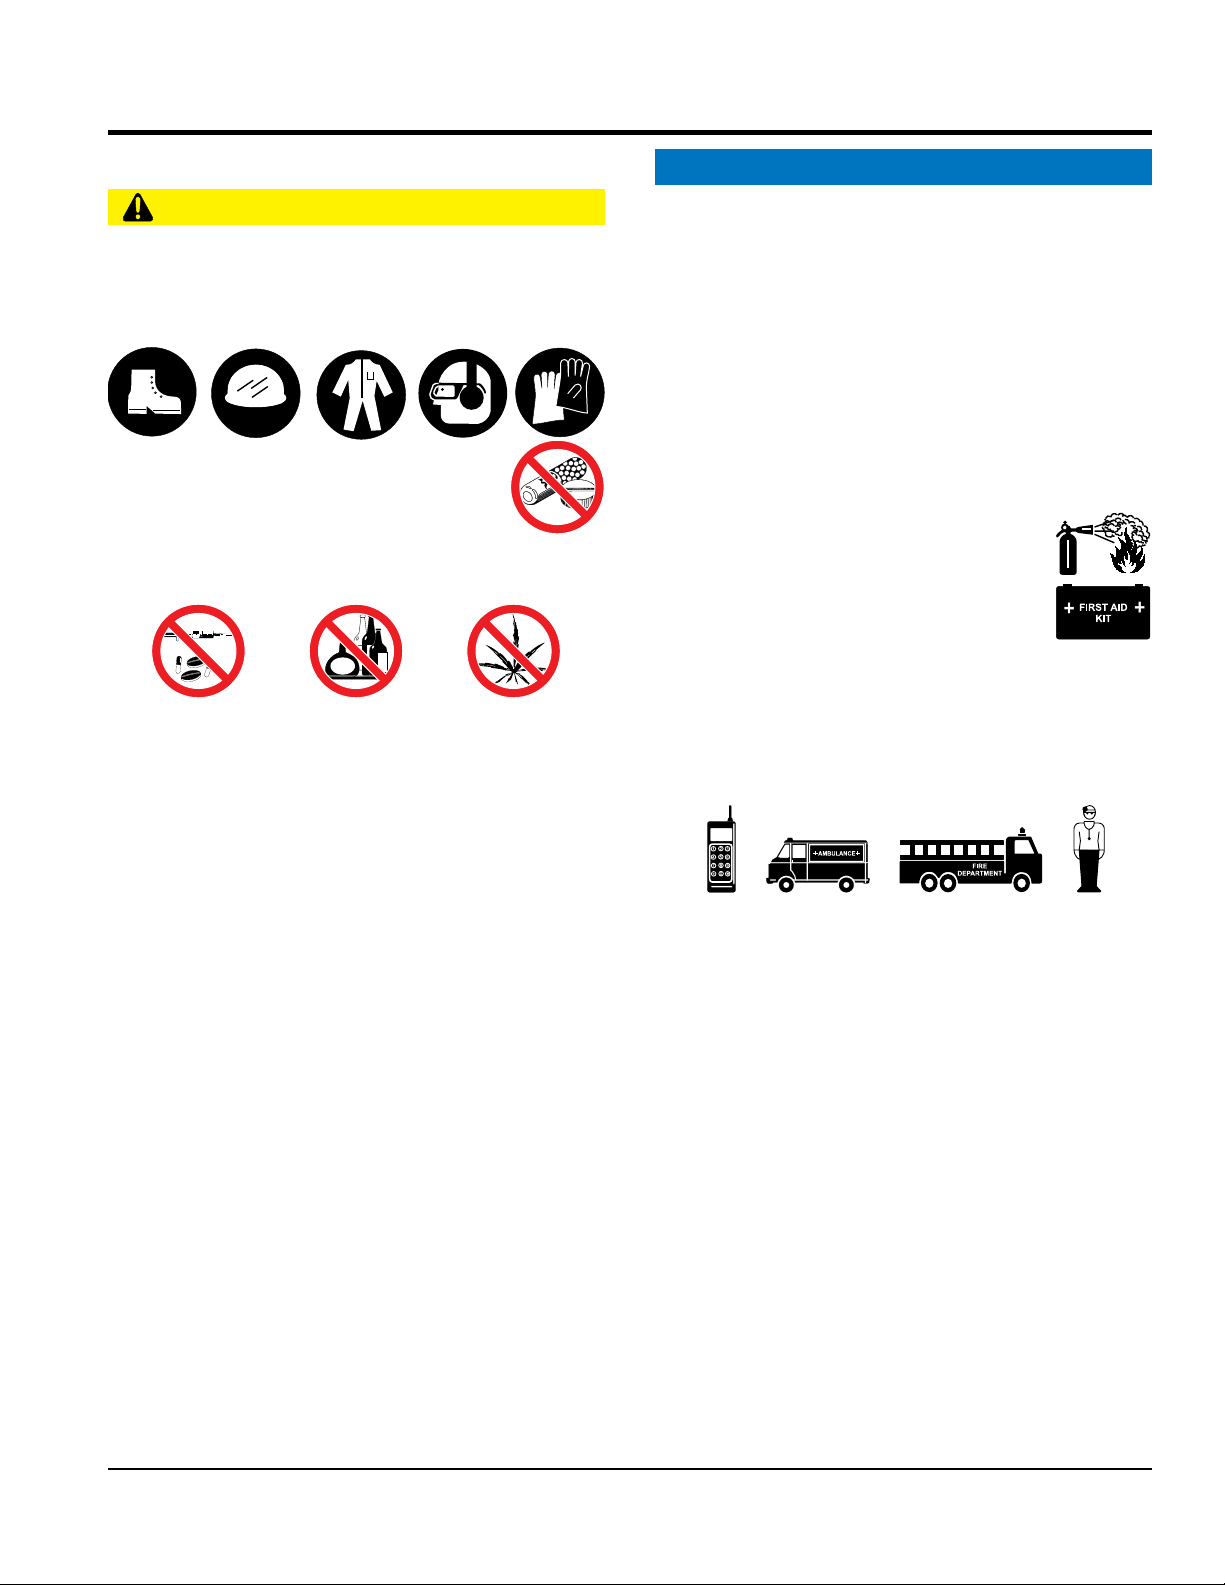
CAUTION
NEVER operate this equipment without proper protective
clothing, shatterproof glasses, respiratory protection,
hearing protection, steel-toed boots and other protective
devices required by the job or city and state regulations.
NEVER operate this equipment when not
feeling well due to fatigue, illness or when
under medication.
NEVER operate this equipment under the infl uence of
drugs or alcohol.
ALWAYS check the equipment for loosened threads or
bolts before starting.
DO NOT use the equipment for any purpose other than
its intended purposes or applications.
ALWAYS clear the work area of any debris, tools, etc.
that would constitute a hazard while the equipment is
in operation.
qualifi ed personnel 18 years of age and older.
safety decals when they become diffi cult read.
Manufacturer does not assume responsibility for any
equipment modifi cation will void all warranties.
NEVER use accessories or attachments that are not
to the equipment and/or injury to user may result.
ALWAYS know the location of the nearest
fi re extinguisher.
ALWAYS know the location of the nearest
fi rst aid kit.
ALWAYS know the location of the nearest phone or
a phone on the job site.
of the nearest ambulance, doctor and
This information will be invaluable in the case of an
emergency.
AR13HA/AR13HAR ROLLER (S/N 110301 & UP) • OPERATION AND PARTS MANUAL — REV. #0 (06/22/11) — PAGE 5
Page 6
SAFETY INFORMATION
ROLLER SAFETY
DO NOT use worn-out hoses or couplings. Inspect daily.
store equipment properly when it is not being
used. Equipment should be stored in a clean, dry location
out of the reach of children and unauthorized personnel.
The engine fuel exhaust gases contain poisonous carbon
monoxide. This gas is colorless and odorless, and can
operate this equipment
tank and severely scald any persons in the general area
Always turn the engine off before performing maintenance.
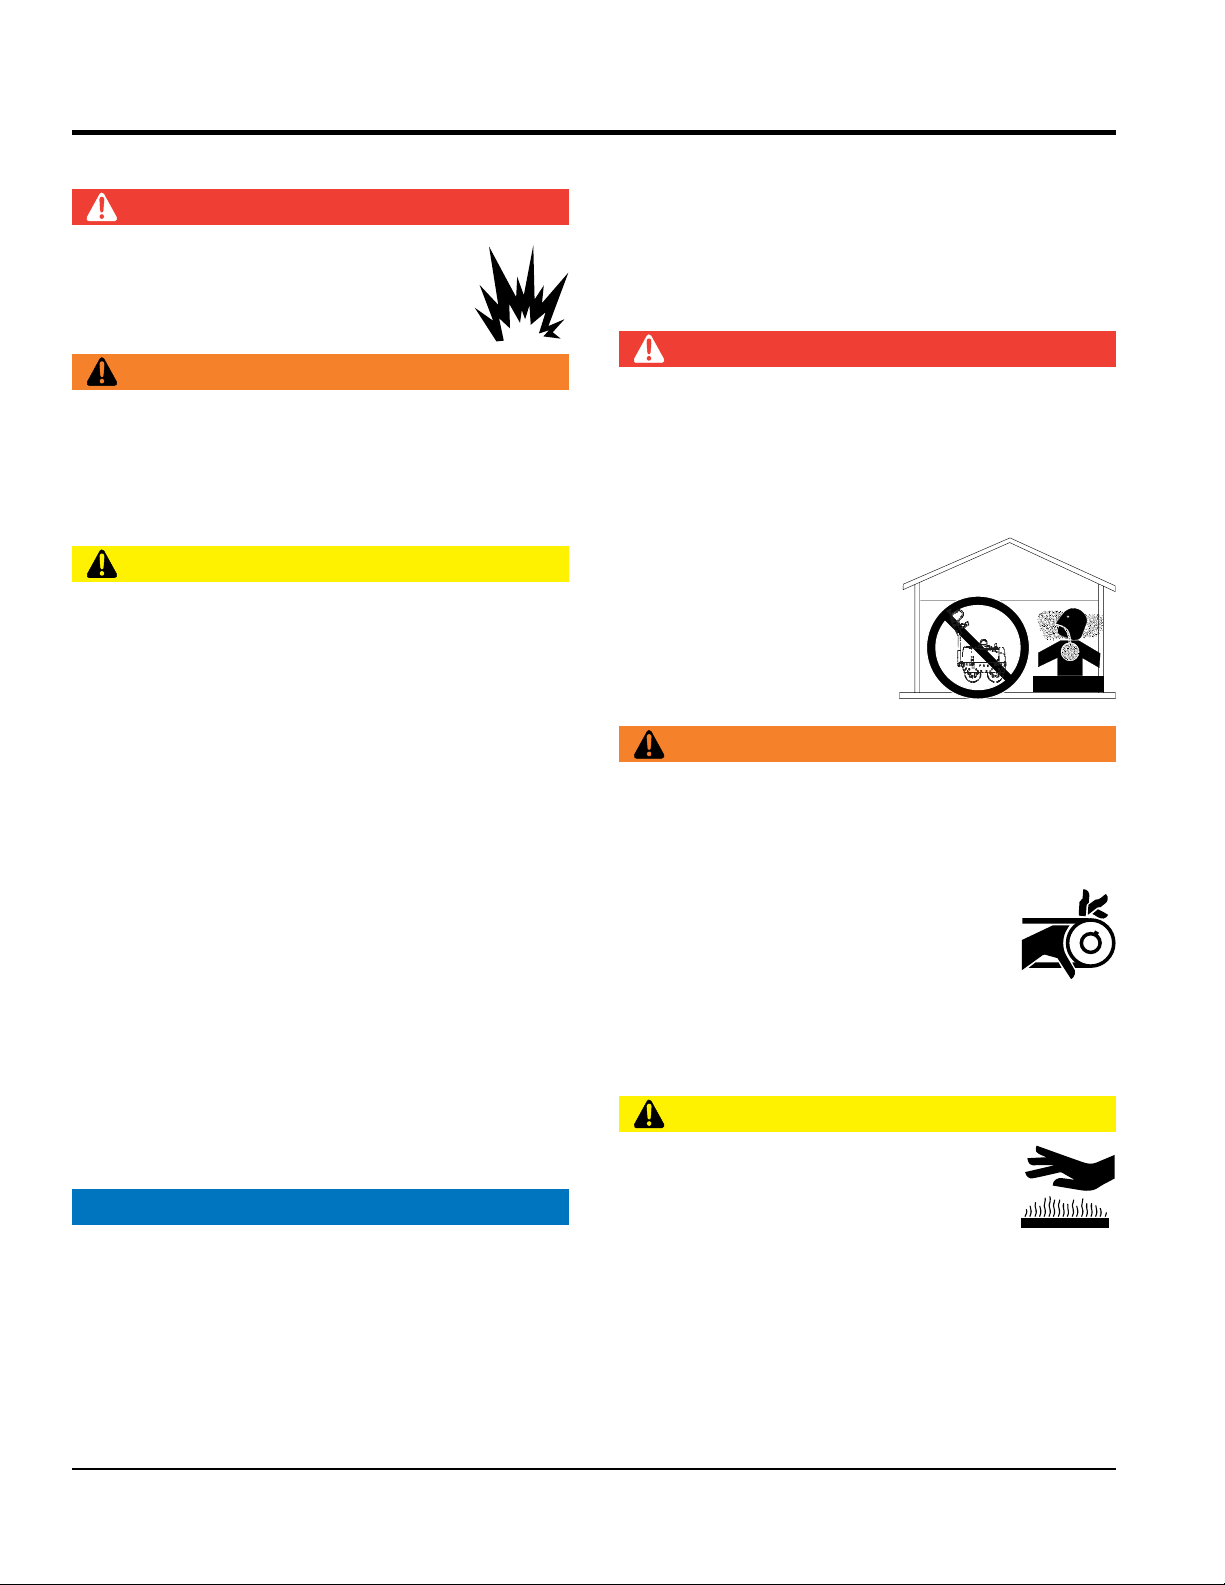
DANGER
NEVER operate the equipment in an explosive
atmosphere or near combustible materials. An
explosion or fi re could result causing severe
bodily harm or even death.
WARNING
NEVER disconnect any emergency or safety devices.
These devices are intended for operator safety.
Disconnection of these devices can cause severe injury,
bodily harm or even death. Disconnection of any of these
devices will void all warranties.
CAUTION
NEVER lubricate components or attempt service on a
running machine.
Never leave the roller unattended with the engine
running. Turn off engine.
Use chock blocks when parking roller on a grade.
Use extreme care when operating near obstructions, on
slippery surfaces, grades, and slide slopes.
ALWAYS
ENGINE SAFETY
DANGER
cause death if inhaled.
The engine of this equipment requires an adequate
free fl ow of cooling air. NEVER
in any enclosed or narrow
area where free fl ow of the
air is restricted. If the air
fl ow is restricted it will cause
injury to people and property
and serious damage to the
equipment or engine.
WARNING
DO NOT pl ace h ands or fingers inside engine
compartment when engine is running.
DANGEROUS
GAS FUMES
When reversing, particularly on the edges and banks
of ditches, as well as in front of obstaces, the operator
must stay in a standing position at a safe distance from
the machine.
When operating near any house/building or pipelines,
always check the effect of machine vibration. Stop work
if necessary.
DO NOT operate the roller with the covers open.
ALWAYS keep the machine away from other personnel
and obstacles. Always keep immediate are free of
bystanders.
NOTICE
ALWAYS keep the machine in proper running condition.
Fix damage to machine and replace any broken parts
immediately.
NEVER operate the engine with heat shields or
guards removed.
Keep fi ngers, hands hair and clothing away
from all moving parts to prevent injury.
DO NOT remove the engine oil drain plug
while the engine is hot. Hot oil will gush out of the oil
of the roller.
CAUTION
NEVER touch the hot exhaust manifold,
muffl er or cylinder. Allow these parts to cool
before servicing equipment.
PAGE 6 — AR13HA/AR13HAR ROLLER (S/N 110301 & UP) • OPERATION AND PARTS MANUAL — REV. #0 (06/22/11)
Page 7

NOTICE
or hot.
overfi ll tank, since spilled fuel could ignite if it
comes into contact with hot engine parts or sparks from
drop the battery. There is a possibility that the
keep the battery charged. If the battery is not
charge battery if frozen. Battery can explode.
environment to avoid the risk of a dangerous concentration
SAFETY INFORMATION
NEVER run engine without an air fi lter or with a dirty air
fi lter. Severe engine damage may occur. Service air fi lter
frequently to prevent engine malfunction.
NEVER tamper with the factory settings
of the engine or engine governor. Damage
to the engine or equipment can result
if operating in speed ranges above the
maximum allowable.
NEVER tip the engine to extreme angles during lifting as
it may cause oil to gravitate into the cylinder head, making
the engine start diffi cult.
FUEL SAFETY
DANGER
DO NOT add fuel to equipment if it is placed inside truck
bed with plastic liner. Possibility exists of explosion or
fi re due to static electricity.
FUEL
DO NOT
the ignition system.
Store fuel in appropriate containers, in well-ventilated
areas and away from sparks and fl ames.
NEVER use fuel as a cleaning agent.
DO NOT smoke ar ound or near the
equipment. Fire or explosion could result
from fuel vapors or if fuel is spilled on a
hot engine.
BATTERY SAFETY (ELECTRIC START ONLY)
DANGER
DO NOT
battery will explode.
DO NOT expose the battery to open fl ames,
sparks, cigarettes, etc. The battery contains
combustible gases and liquids. If these
gases and liquids come into contact with a
fl ame or spark, an explosion could occur.
FUEL
DO NOT start the engine near spilled fuel or combustible
fl uids. Diesel fuel is extremely fl ammable and its vapors
can cause an explosion if ignited.
ALWAYS refuel in a well-ventilated area, away from
sparks and open fl ames.
ALWAYS use extreme caution when working with
fl ammable liquids.
DO NOT fi ll the fuel tank while the engine is running
WARNING
ALWAYS wear safety glasses when
handling the battery to avoid eye irritation.
The battery contains acids that can cause
injury to the eyes and skin.
Use well-insulated gloves when picking up
the battery.
ALWAYS
charged, combustible gas will build up.
DO NOT
When frozen, warm the battery to at least 61°F (16°C).
ALWAYS recharge the battery in a well-ventilated
of combustible gases.
If the battery liquid (dilute sulfuric acid)
comes into contact with clothing or skin,
AR13HA/AR13HAR ROLLER (S/N 110301 & UP) • OPERATION AND PARTS MANUAL — REV. #0 (06/22/11) — PAGE 7
Page 8
SAFETY INFORMATION
rinse skin or clothing immediately with plenty of water.
transporting on a trailer. Make sure all supports attaching
pour waste, oil or fuel directly onto the ground,
If the battery liquid (dilute sulfuric acid) comes into
contact with eyes, rinse eyes immediately with plenty
of water and contact the nearest doctor or hospital to
seek medical attention.
CAUTION
ALWAYS disconnect the NEGATIVE battery terminal
before performing service on the equipment.
ALWAYS keep battery cables in good working condition.
Repair or replace all worn cables.
TRANSPORTING SAFETY
CAUTION
NEVER allow any person or animal to stand underneath
the equipment while lifting.
NOTICE
Before lifting, make sure that the equipment parts are not
damaged and screws are not loose or missing.
the roller to the trailer are tight.
ENVIRONMENTAL SAFETY
NOTICE
Dispose of hazardous waste properly.
Examples of potentially hazardous waste
are used motor oil, fuel and fuel fi lters.
DO NOT use food or plastic containers to dispose of
hazardous waste.
DO NOT
down a drain or into any water source.
Use lifting equipment capable of lifting the weight of
the roller.
Always make sure crane or lifi tng device has been
properly secured to the lifting bail (hook) of the
equipment.
ALWAYS shutdown engine before transporting.
NEVER lift the equipment while the engine is running.
Tighten fuel tank cap securely and close fuel cock to
prevent fuel from spilling.
Use adequate lifting cable (wire or rope) of suffi cient
strength.
Use one point suspension hook and lift straight upwards
with suffi cient bearing capacity to prevent machine from
tilting or slipping.
DO NOT lift machine to unnecessary heights.
ALWAYS make sure that roller is secured correctly when
PAGE 8 — AR13HA/AR13HAR ROLLER (S/N 110301 & UP) • OPERATION AND PARTS MANUAL — REV. #0 (06/22/11)
Page 9

SPECIFICATIONS
Table 1. Specifications (Roller)
Shipping Weight 2,572 lbs. (1,167 Kg.)
Dry Weight 2,428 lbs. (1101 Kg.)
Operating Weight 3,088 lbs. (1,400 Kg.)
Operating Weight w/ Drum Ballast 3173 lbs. (1,439 Kg.)
Overall Length 85 in. (2,159 mm.)
Overall Width 38.25 in. (972 mm.)
Overall Height-ROPS (up) 88 in.(2235 mm.)
Maximum Rolling Width 35.7 in. (907 cm.)
Turning Radius-Inside 109 in. (2,768 mm.)
Ground Clearance 11.5 in. (292 mm.)
Curb Clearance 7.75L, 19.0R (197 mm., 483 mm.)
Wall Clearance 1.75L, 1.25R (45 mm., 32 mm.)
Wheelbase 45 in. (1,143 mm.)
Drum Width 35.7 in. (907 mm.)
Drum Diameter 22.6 in. (574 mm.)
Drum Thickness 0.38 in. (10.0 mm.)
Centrifugal Force 2,400 - 2,700 rpm 3,100 Lbs. (1,406 Kg.)
Vibrations per minute 2,400 - 2,700 rpm 4,000 VPM
Dynamic Linear Force
per Drum 2,400 - 2,700 rpm
Oscillating Angle 11 degrees
Hydraulic Oil Tank Capacity 5.7 U.S. Gallons (21.6 Liters)
Cooling System Air
Fuel Gasoline
Fuel Tank Capacity 9.5 U.S. Gallons (36 Liters)
Water Tank Capacity 40 Gallons (181 Liters)
Battery 12 Volt Group Type U1
Travel Speed -variable- 0-4.8 MPH (0-7.7 KPH)
Grade Ability w-w/o Vibration 15 degrees (27%)
87.5 Lbs./in. (39.6 Kg./cm.)
(front only)
AR13HA/AR13HAR ROLLER (S/N 110301 & UP) • OPERATION AND PARTS MANUAL — REV. #0 (06/22/11) — PAGE 9
Page 10

SPECIFICATIONS
Table 2. Specifications (Engine)
Model Honda GX630RQZB2 Engine
Type
Piston Displacement 37.5 cu. in. (614 cc)
[Bore x Stroke] [3.03 in. x 2.60 in. (77 mm x 66 mm)]
Max. Output 20 hp (13.4 KW, 18.3 PS) at 3,600 rpm
Max. Governed Speed, No Load 3,500 rpm
Max. Torque 31.8 lbf-ft. at 2,500 rpm
Cooling System Forced Air
Engine Oil SAE-10W-30 for general use
Engine Oil Capacity (with oil filter replacement) 1.90 qts. (1.80 liters)
Engine Oil Capacity (without oil filter replacement) 1.59 qts. (1.50 liters)
Fuel Unleaded gasoline
Fuel Consumption 0.51 lb/hph (313 g/kWh, 230 g/PSh)
Spark Plug Type NGK: ZGR5A
DENSO: J16CR-U 22.6 in. (574 mm.)
Idle Speed 1,400 +/- 150 rpm
PTO Shaft Rotation Counterclockwise
Air-Cooled 4 Stroke, Overhead Valve, 2 cylinders
(90 degree V-Twin), Gasoline Engine.
PAGE 10 — AR13HA/AR13HAR ROLLER (S/N 110301 & UP) • OPERATION AND PARTS MANUAL — REV. #0 (06/22/11)
Page 11
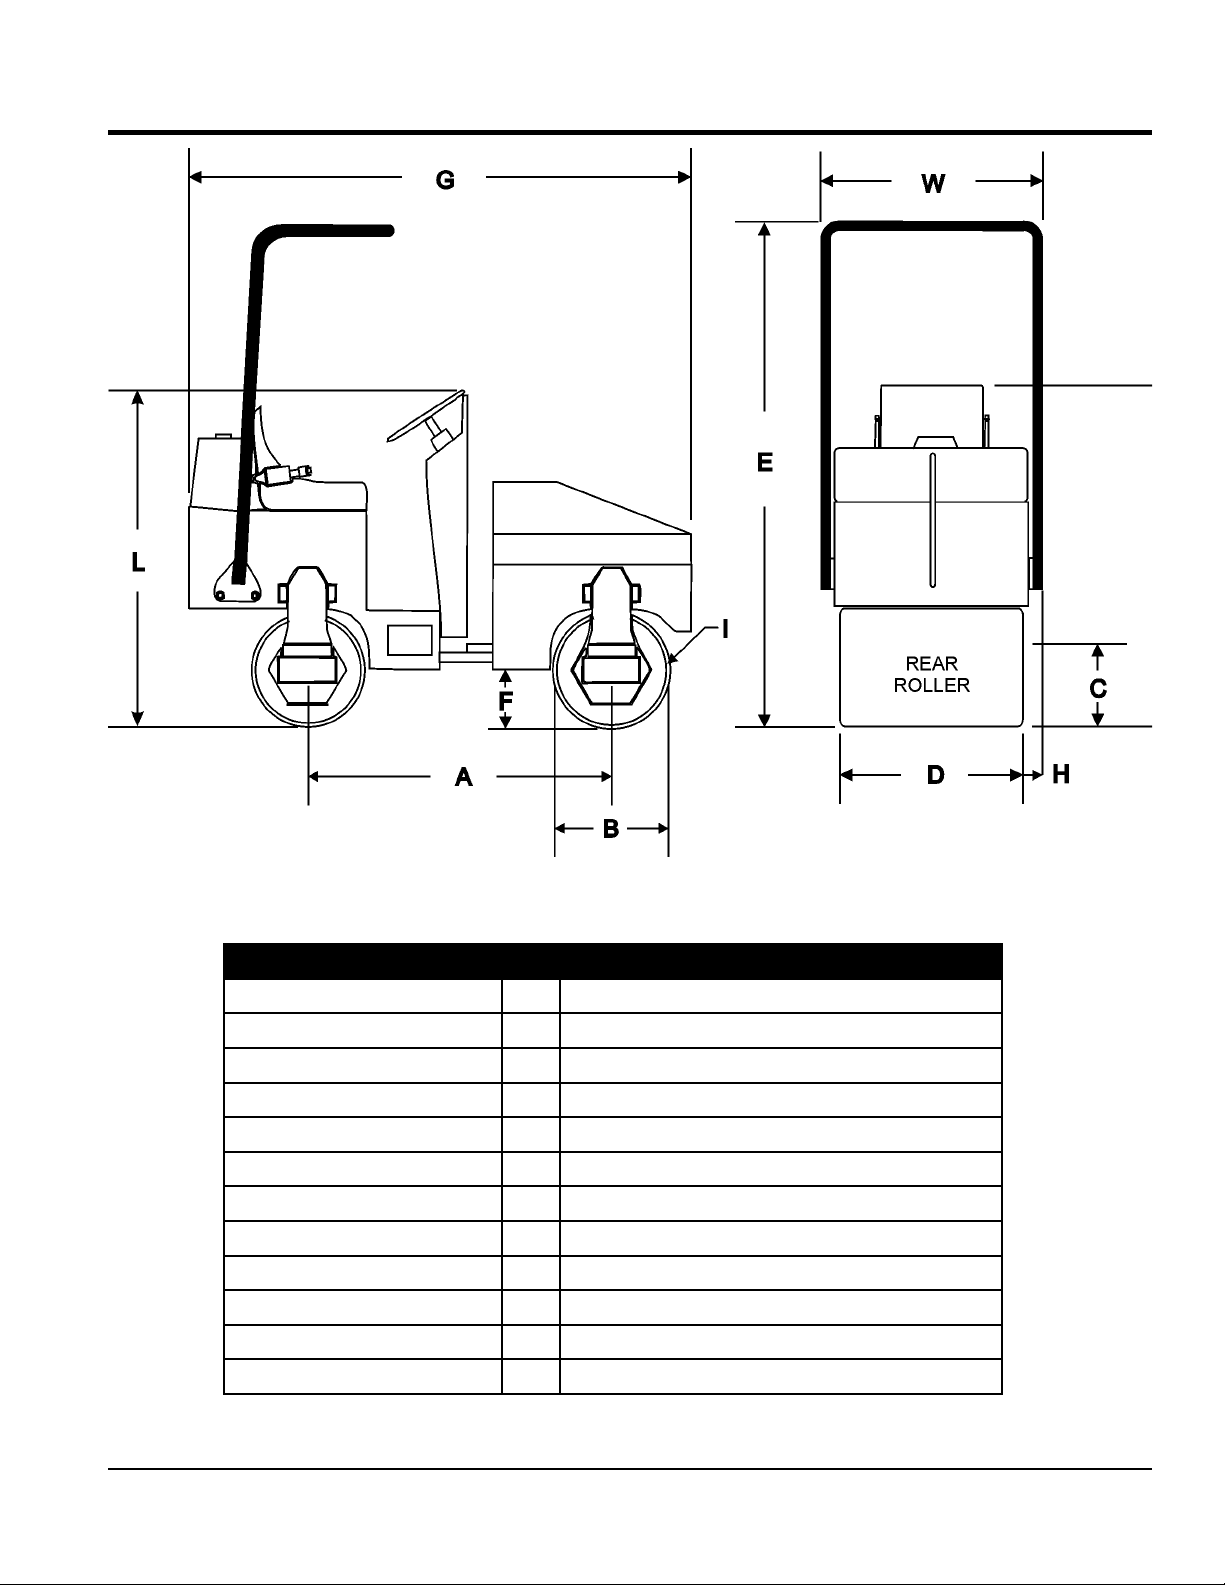
DIMENSIONS
Figure 1. Roller Dimensions
Table 3. Dimensions (Roller)
Wheelbase A 45.0 in. (1,143 mm.)
Drum Diameter B 22.6 in. (574 mm.)
Curb Clearance C 7.75 in. Left, 19.0 in. Right ( 197 mm., 483 mm.)
Drum Width D 35.7 in. (907 mm.)
Overall Height (with ROPS) E 88 in. (2,235 mm.)
Ground Clearance F 11.5 in. (292 mm.)
Overall Length G 85 in. (2,159 mm.)
Wall Clearance H 1.75 in. Left, 1.25 in. Right ( 45 mm., 32 mm.)
Drum Thickness I .38 in. (10 mm.)
Overall Width J 38.25 in. (972 mm.)
Seat Height K 63 in. (1,600 mm.)
Steering Wheel L 60 in. (1,524 mm.)
AR13HA/AR13HAR ROLLER (S/N 110301 & UP) • OPERATION AND PARTS MANUAL — REV. #0 (06/22/11) — PAGE 11
Page 12

GENERAL INFORMATION
The AR13HA/HAR roller has been designed for asphalt
application and compaction of granular soils used in
site preparation. Use the machine only for the purpose
intended and by experienced personnel who understand
this operation manual and all safety decals. Typical
applications for this roller are driveways, patch work and
road repairs. Standard features included with this roller
are articulated steering, double drum hydrostatic drive,
front drum vibration, high curb clearance and on-board
water capability.
POWER PLANT
The AR13HA/HAR roller is powered by a Honda GX630,
air-cooled, gasoline engine rated at 20 hp @3,500 rpm.
The engine features a side-mounted muffler designed to
direct engine exhaust away from the operator. In the event
of low oil, this engine has a built in "oil alert system" that
will shut down if the engine oil level reaches an unsafe
operating level.
HYDRAULIC SYSTEM
The Honda GX630 engine drives an axial hydraulics,
variable displacement pump which is manually controlled
via a cable control system. Pump flow is directed through
an aluminum block manifold which provides the control for
the 3 hydraulic motors.
action generates 3,100 lbs. (1,406 Kg.) of centrifugal force
at a frequency of 4,000 vpm (vibrations per minute). If the
vibration appears to be weak or slow, allow the machine to
warm-up thoroughly, and check the hydraulic oil level. Add
hydraulic oil if necessary.
The vibrator housing and drum are shock mounted to
isolate the engine compartment and operator from vibration.
The roller nominally has an operating weight of 3,088 lbs
(1,400 Kg.), but can be increased to 3,309 lbs (1,500 Kg.)
by adding a water ballast to the rear drum.
HYDRAULIC OIL FILTER SYSTEM
The hydraulic system oil is filtered by a screen type filter
located in the reservoir filler neck, then doubled filtered
within the system first by a 40 micron mesh-type suction
filter located in the tank and the by a Zinga 10-micron,
cartridge style, spin-on return line filter.
ARTICULATED STEERING SYSTEM
Power for the articulated steering system, which uses a
single hydraulic cylinder, is provided by the gear pump.
This steering system can produce an inside turning radius
of 109 inches (2.77 meters).
SPRINKLER SYSTEM
The hydraulic drum drive system incorporates a parallel
closed loop configuration operating at a maximum pressure
of 2,900 psi. In addition this hydraulic system offers a "free
wheel valve" which allows the roller to be towed in the event
of an emergency.
COMPACTION SYSTEM
The compaction force is delivered by a 36-inch wide steel
drum with beveled edges to help prevent asphalt marring.
A fully enclosed hydrostatic drive system offers a variable
speed control as well as smooth acceleration and braking.
Connected to the axial hydraulic pump is a gear pump
that provides power for the drum vibratory system and
the articulating steering system. Oil from this pump flows
to the manifold control valve block and then to a hydraulic
motor which rotates the eccentric weights inside a sealed
housing containing oil to lubricate the bearings.
A pushbutton switch located on top of the gearshift lever,
when pressed, activates a hydraforce valve that engages
or disengages the vibratory action. The drum's vibratory
A 40-gallon (181 liters) water tank with a gravity feed spray
bar is provided for wetting the roll for asphaltic pavement
rolling.
The water system is fully adjustable from the operator’s
position by adjusting the two water valves. The front valve
controls the water supply to the front drum, and the rear
valve controls water to the rear drum.
Before starting an asphalt rolling job, be sure all spray bar
holes are clear of dirt or foreign matter and are working.
Always use clean fresh water in the water tank. To prevent
rust and foreign debris from clogging the spray bar holes,
drain and flush water tank and spray bars every 30 days.
LIFTING THE ROLLER
When lifting of the roller is required, attach a
suitable hook or shackle to the lifting eye of the
roller. These four lifting points are marked by a
lifting hook decal. Make sure the lifting device
is capable of lifting 4,000 lbs. (1,814 Kg).
PAGE 12 — AR13HA/AR13HAR ROLLER (S/N 110301 & UP) • OPERATION AND PARTS MANUAL — REV. #0 (06/22/11)
Page 13
GENERAL INFORMATION
DANGER
DO NOT allow personnel to stand under or near any
suspended machine. Before operating the roller, make
sure that personnel and obstacles are free from the
roller’s path. Serious injury or death may result.
The forward-reverse control lever operates the hydrostatic
pump which governs the roller speed and direction of
travel. The speed in which movement of this lever is made
is directly related to the amount of pressure that is applied
to the travel lever in each direction. Travel speed is infinitely
variable from 0 to 4.8 mph. The neutral position of this lever
will cause the roller to stop.
CAUTION
ONLY use approved certified lifting devices capable of
lifting at least 4,000 lbs. (1,814 Kg.).
CAUTION
When lifting of the roller is required, only use the
provided lifting eyes to lift the roller. Using other sections
of the roller for lifting purposes may cause severe
damage to the roller.
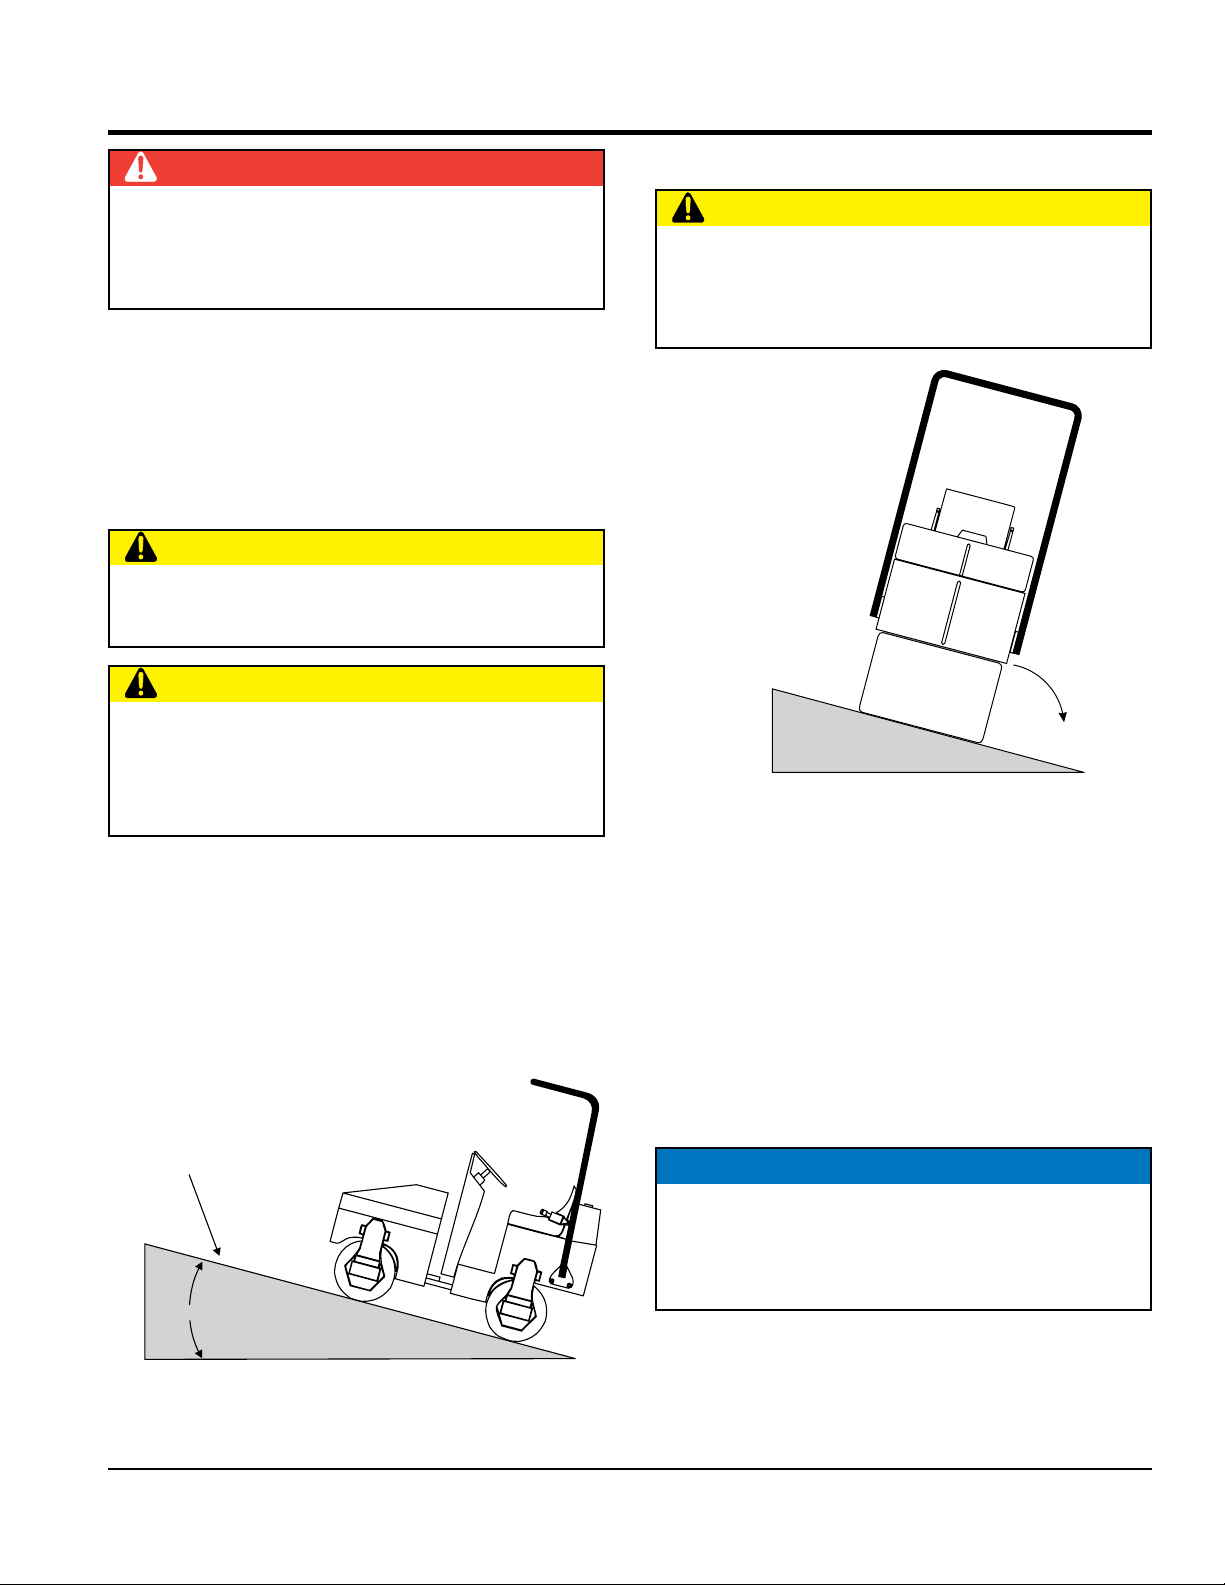
TIPPING (ROLLOVERS)
CAUTION
NEVER operate the roller on side slopes (Figure 3). The
possibility exists that the roller could tip over (roll over), thus
causing bodily harm, even death, and serious damage to
the equipment.
SIDE TO SIDE
OPERATION
NOT RECOMMENDED
REAR
ROLLER
ROLL OVER
Figure 3. Tipping (Rollover)
OPERATING ON SLOPES
Special care must be taken when operating the roller on hills
or slopes. There exist the possibility of serious injury to the
operator and severe damage to the roller in the event of a
roll over. ALWAYS operate the roller up and down hills rater
than from side to side. For safe operation hillside slopes
should not exceed 12 degree (27 % grade). See Figure 2.
MAXIMUM SLOPE
27%
Figure 2. Recommended Slope
In the event the roller does tip over, if at all possible, try to
shut down the engine by turning the ignition key to the OFF
position. Extreme care must be taken to prevent damage
to the engine. When the roller has been tipped over, oil
from the engine crankcase can flow into the combustion
chamber, which can severely damage the engine the next
time it is started.
IMMEDIATELY after a unit has tipped over, upright the unit
as soon as possible to prevent oil from leaking into the
combustion chamber.
NOTICE
To prevent damage to the engine after a rollover, the
roller must NOT be started. NEVER start a roller after
a rollover. CONTACT your nearest authorized Multiquip
dealer for instructions or servicing.
AR13HA/AR13HAR ROLLER (S/N 110301 & UP) • OPERATION AND PARTS MANUAL — REV. #0 (06/22/11) — PAGE 13
Page 14
18
COMPONENTS
10
17
12
13
11
8
7
14
16
15
9
4
5
3
19
20
21
22
23
24
25
6
PAGE 14 — AR13HA/AR13HAR ROLLER (S/N 110301 & UP) • OPERATION AND PARTS MANUAL — REV. #0 (06/22/11)
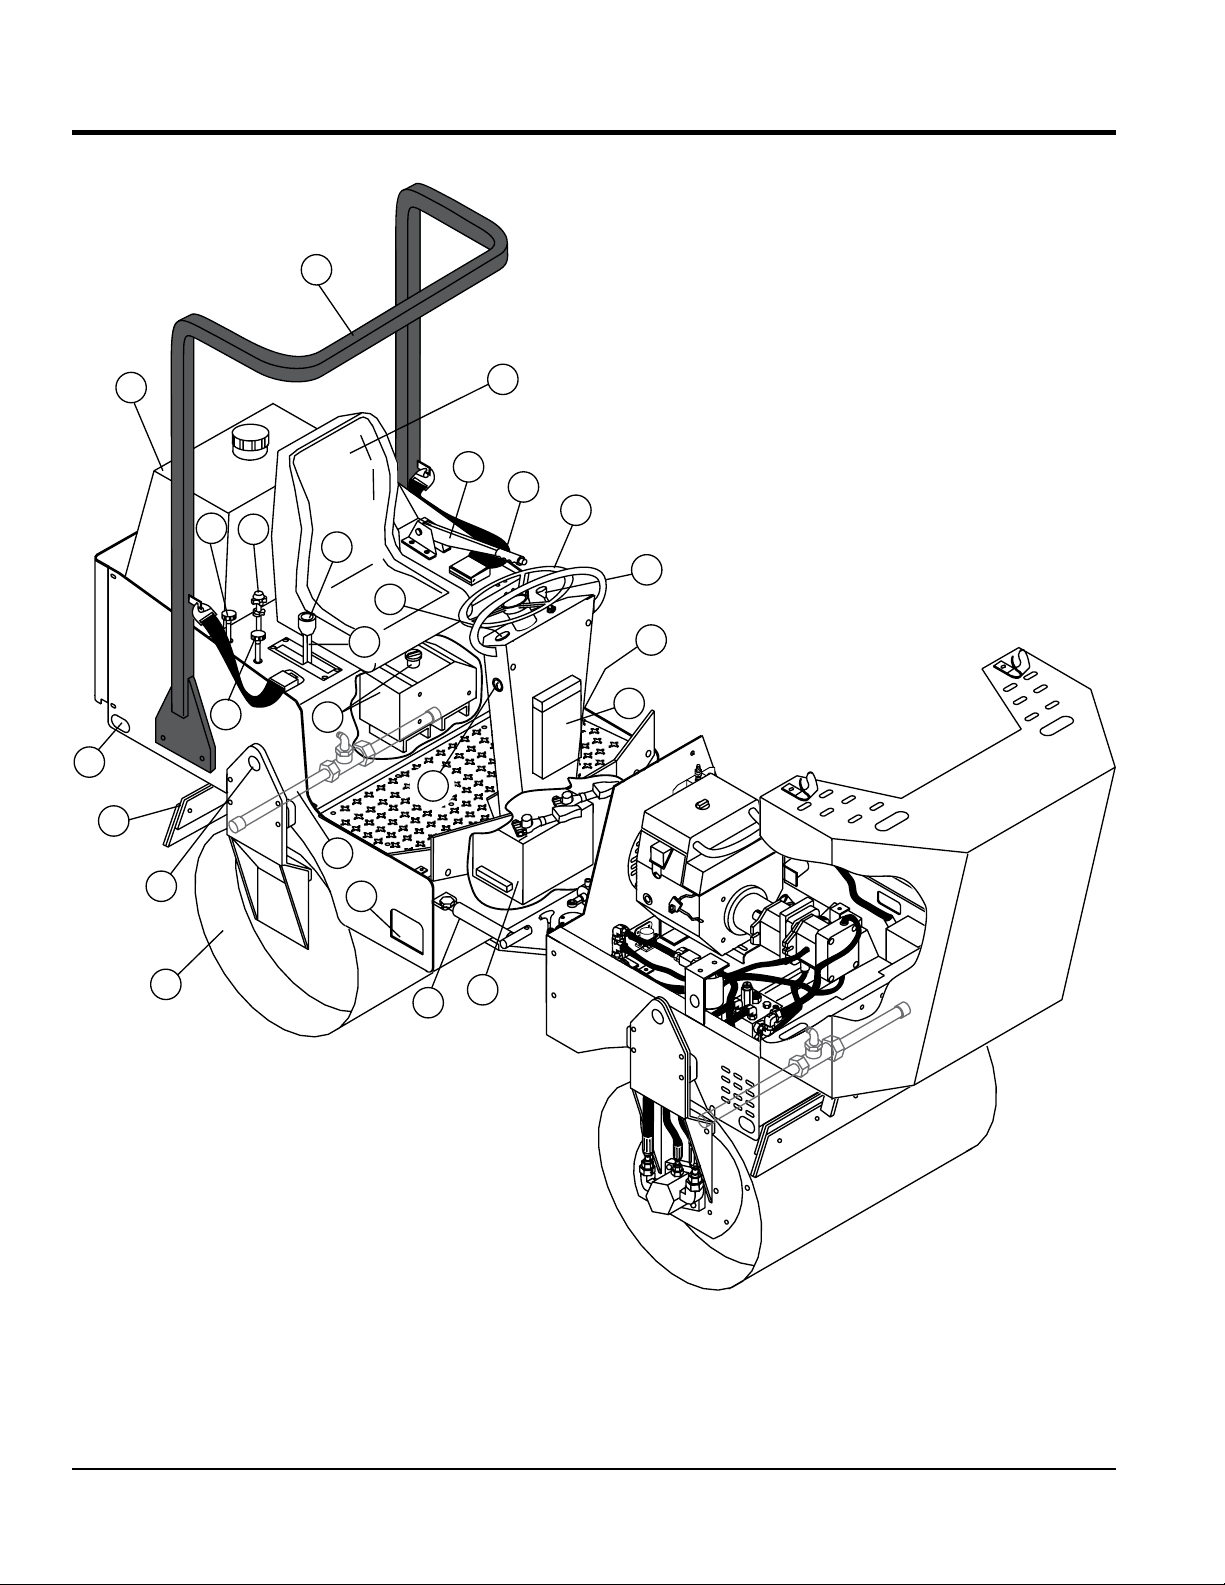
1
2
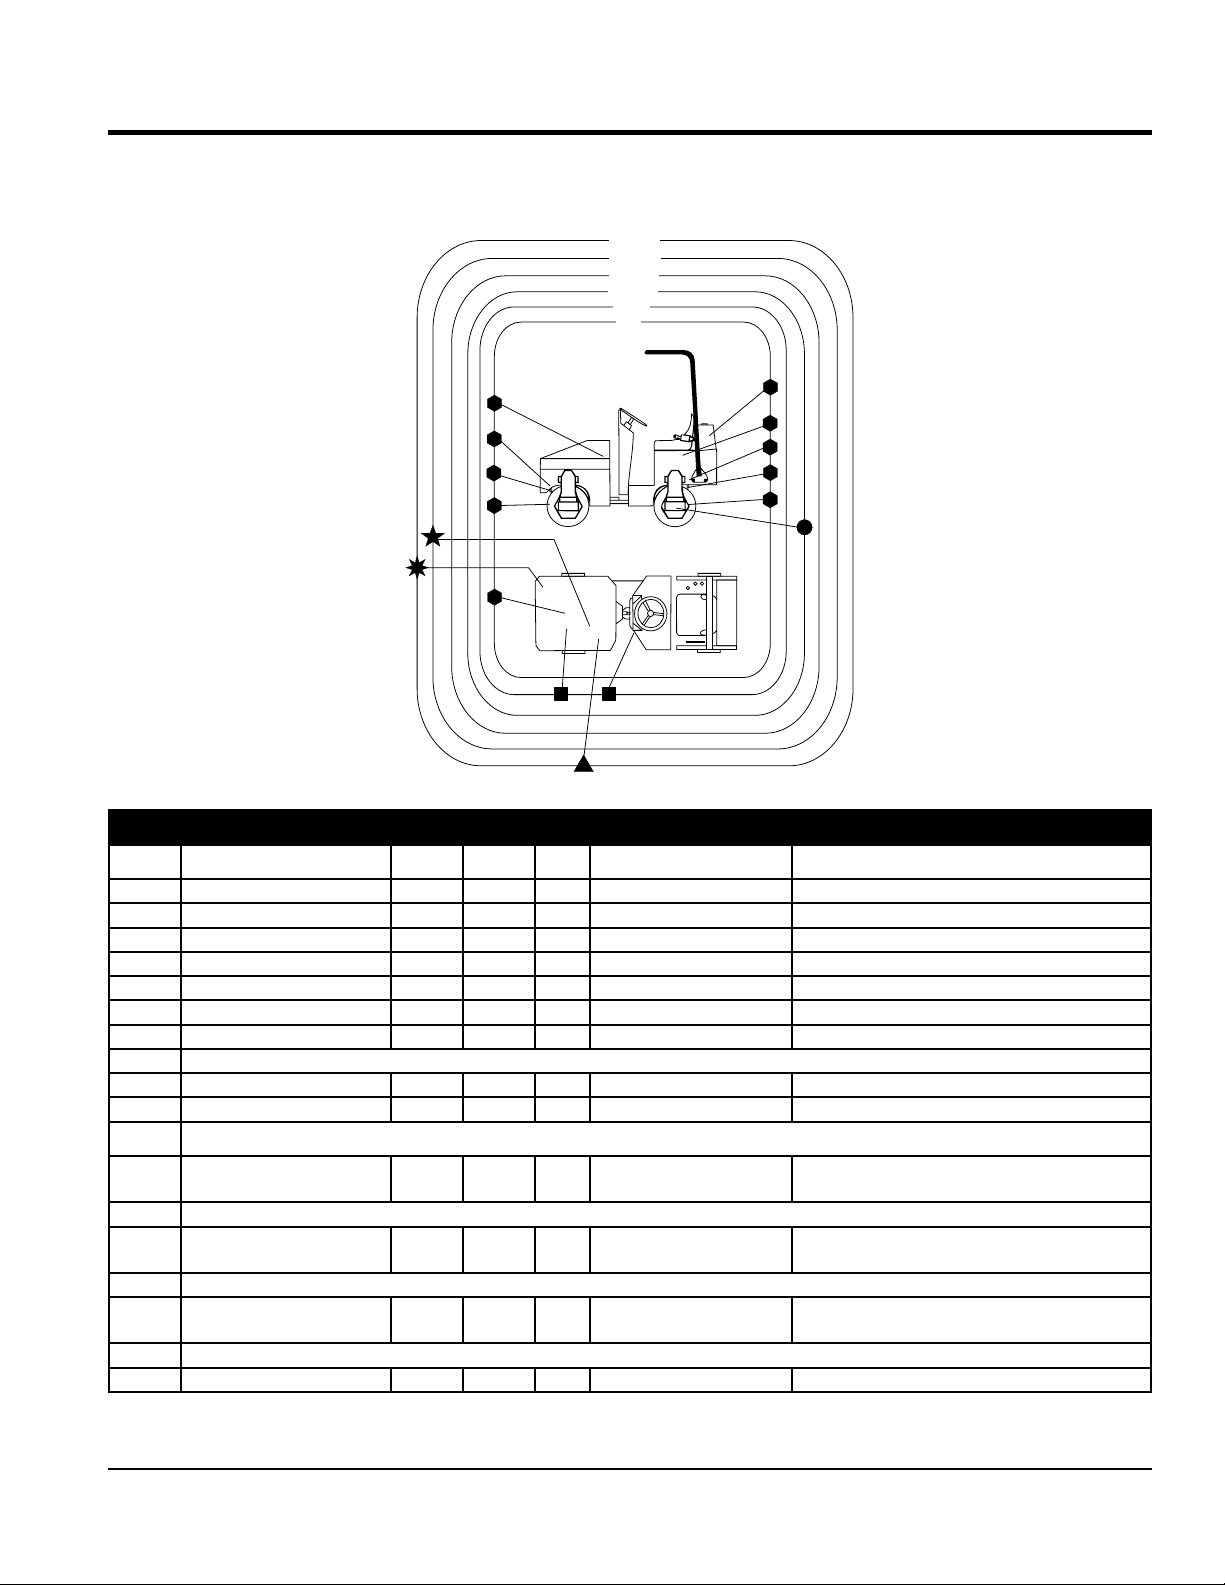
Figure 4. Roller Components
Page 15
COMPONENTS
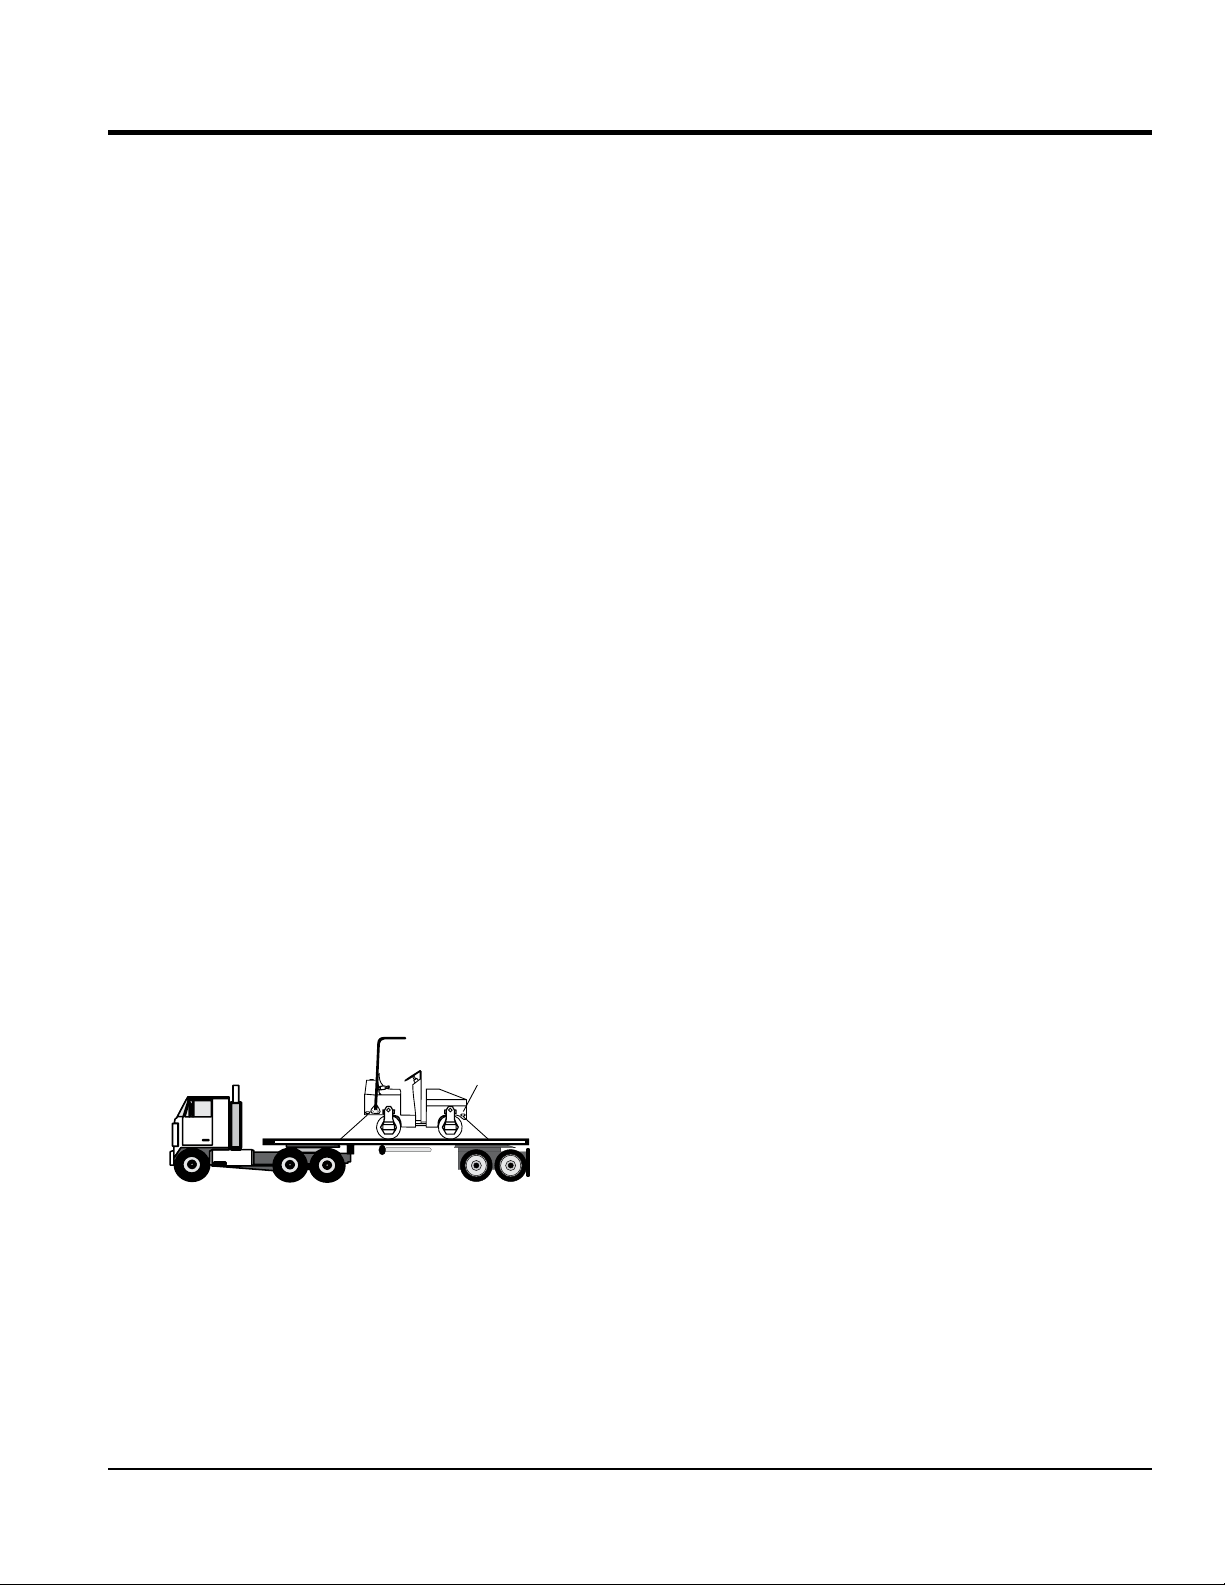
TRANSPORT
TIE-DOWN POINT
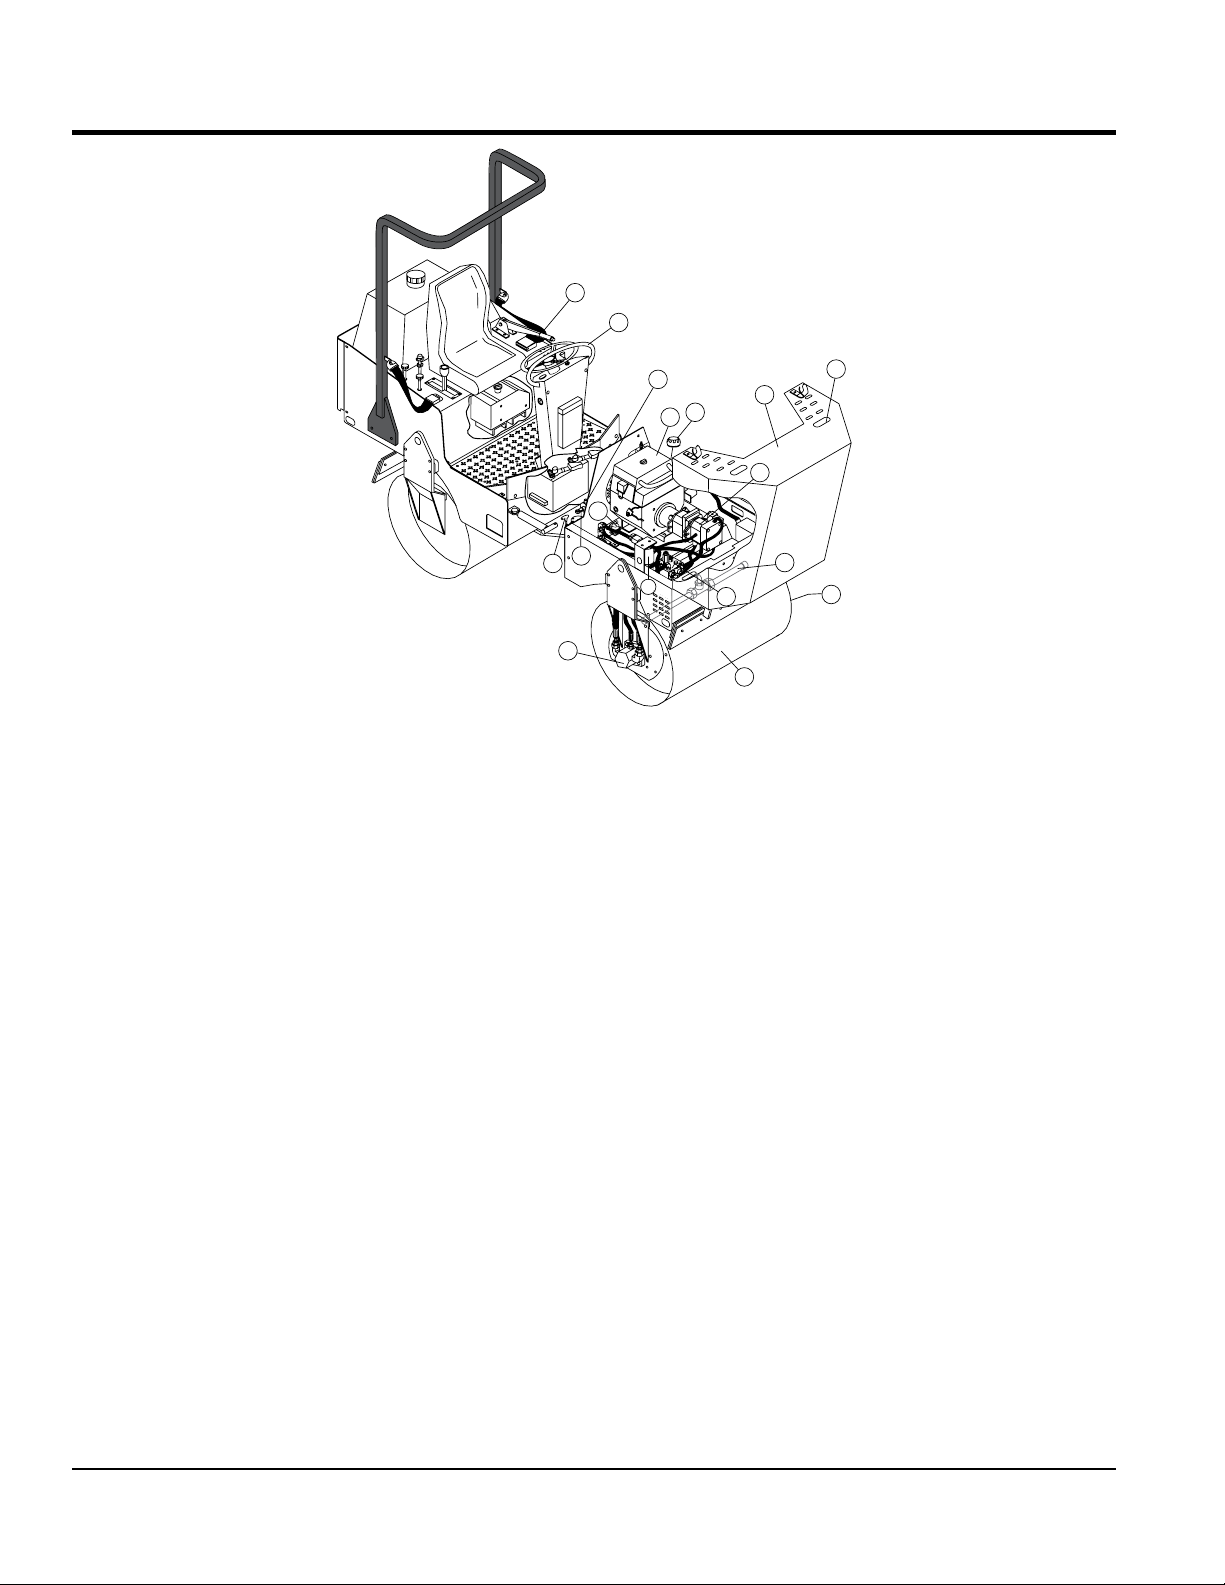
Figure 4 shows the location of the components and basic
components for the AR13HA compaction roller. The function
of each component or control is described below:
1. Battery — Provides +12VDC to the electrical system,
and is located underneath foot plate. Replace only with
recommended type battery, see specification Table 1.
2. Articulating Locking Bar — Always make sure that
the articulating locking bar is engaged during lifting,
transport and maintenance.
3. Foot Step — To lift yourself onto the roller's platform,
place foot into foot step, then grab hold of hand rail.
4. Ignition Switch — With key inserted, turn clockwise
to start the engine.
5. Rear Sprinkler System — A gravity feed spray bar is
provided for the wetting the roll for asphalt pavement.
6. Rear Roller — This roller is a 30 inch wide steel drum
with beveled edges (no vibration). The beveled edges
help prevent asphalt marring.
7. Lifting Point — Attach a crane or suitable lifting device
to this point when lifting of the roller is required.
8. Rear Scrapper — This adjustable rear scrapper blade
helps prevent the buildup of material between the drum
and frame.
9. Fuel Tank/Fuel Gauge — The fuel capacity of the
fuel tank is 9.5 gallons (36 liters). Read the gauge on
top of the fuel cap to determine if fuel level is low. Fill
with unleaded type gasoline. To gain access to the fuel
tank, tilt the front seat forward. Fuel tank has a spill
containment feature.
10. Tie-Down Transport Point — Attach a chain or
suitable tie-down device to this point when transporting
of the is required.
return this valve to the closed position (clockwise) when
water is not required.
13. Throttle Control — Pull all the way out to achieved
maximum engine RPM's. To idle the engine, push the
RED stop button inwards all the way.
14. Vibration Control Button — Press this button to
activate the eccentric that will produce a vibration
frequency of 4,400 vpm (vibrations per minute).
Pressing the button again will stop the vibrations.
15. Shift Lever — Push the lever forward to make the roller
travel in a forward direction, pull the lever backward to
make the roller travel in a reverse direction. Maximum
travel speed is 4.8 MPH ( 7.7 KPH). Center position is
neutral, no travel.
16. Hourmeter — Indicates the number hours the unit
has been in use.
17. Water Tank — Remove filler cap and fill with water.
Water tank capacity is 40 gallons (181 liters). To
determine if water level is low, visually inspect water
level gauge (tube) at rear of roller. Add water as
necessary.
18. Roll-Over Bar — This unit may be equipped with a
Roll Over Protection System (ROPS option) to protect
the operator when the roller is used on slopes, open
trenches, sharp turns, slippery surfaces or objects in
the rollers's path of travel.
19. Operator's Seat — A contoured seat that provides
visibility of both front rear drum edges during operation.
NEVER start the roller unless seated in the operator's
seat.
20. Parking Break Lever — Pull the lever upward to set
the parking break. To release the parking break, press
and hold the button on top of the lever and push lever
downward.
21. Seat Belt — When using the roller in working
conditions always have the operator wear the seat
belt. NEVER use the roller without a seat belt. If the
seat belt becomes worn or damaged, have it replaced
11. Front Spray Control Valve — This valve controls the
flow of water to the front spray bar. Turn the water valve
to the open position (counterclockwise) to let water flow,
return this valve to the closed position (clockwise) when
water is not required.
12. Rear Spray Control Valve — This valve controls the
flow of water to the rear spray bar. Turn the water valve
to the open position (counterclockwise) to let water flow,
AR13HA/AR13HAR ROLLER (S/N 110301 & UP) • OPERATION AND PARTS MANUAL — REV. #0 (06/22/11) — PAGE 15
immediately.
22. Steering Wheel — Use this wheel to steer the roller.
23. Choke Knob — Used in the starting of a cold engine,
or in cold weather conditions. The choke enriches the
fuel mixture.
24. Hydraulic Motor — This hydraulic motor provides
control for the rear of the roller
25. Documentation Box — Store and maintain Operation,
Parts, and Engine manuals in this box at all times.
Page 16
COMPONENTS
40
42
33
Figure 5. Additional Roller Components
Figure 5 shows the location of additional components
for the AR13HA compaction roller. The function of each
component or control is described below:
26. Front Sprinkler System — A gravity feed spray bar is
provided for the wetting the roll for asphalt pavement.
27. Hydraulic Manifold — Aluminum block that controls
the flow of hydraulic pressure to the various hydraulic
motors and other components required to control the
roller.
28. Hydraulic Oil Filter — Filters return oil from the front
and rear hydrostatic motors.
29. Accessory Relay — Provides the +12VDC necessary
to run the roller's electrical accessories.
30. Hydraulic Pump — This unit incorporates an axial
variable displacement hydraulic piston pump.
31. Front Ride-on Tandem Drum Roller — This roller is
a 30 -inch wide steel drum with beveled edges. The
beveled edges help prevent asphalt marring.
32. Hydraulic Motor — This hydraulic motor controls the
rotation of the vibratory system.
33. Latch — Pull this latch upward and back to gain access
to the engine/pump compartment. There is one latch
located on each side of the unit.
41
36
35
29
34
28
32
37
30
27
31
38
26
39
34. Steering Cylinder — Controls direction of roller.
35. Engine — This unit incorporates a HONDA GX630, air
cooled engine rated at 20 hp at 3,500 rpm.
36. Hydraulic Fluid Filler Port — Remove this cap to
add hydraulic fluid. Fill with type ISO 46 anti-wear
hydraulic fluid.
37. Compartment Hood — Houses the engine, hydraulic
manifold, accessory relay, hydraulic oil filter, hoses,
and hydraulic pump. To lift the compartment hood,
release the rubber bungee latches located on each
side of the hood.
38. Compartment Hood Lift Point — Place hand here
then lift upwards to lift compartment hood.
39. Hydraulic Motor — This hydraulic motor drives the
roller during operation.
40. Rear Drum Zerk Grease Fitting — Grease this fitting
bi-weekly. See maintenance section of this manual.
41. Articulation Zerk Grease Fitting — Grease this fitting
once a year. See maintenance section of this manual.
42. Hand Rail — Grab hold of this hand rail when lifting
yourself onto the operator's platform.
PAGE 16 — AR13HA/AR13HAR ROLLER (S/N 110301 & UP) • OPERATION AND PARTS MANUAL — REV. #0 (06/22/11)
Page 17
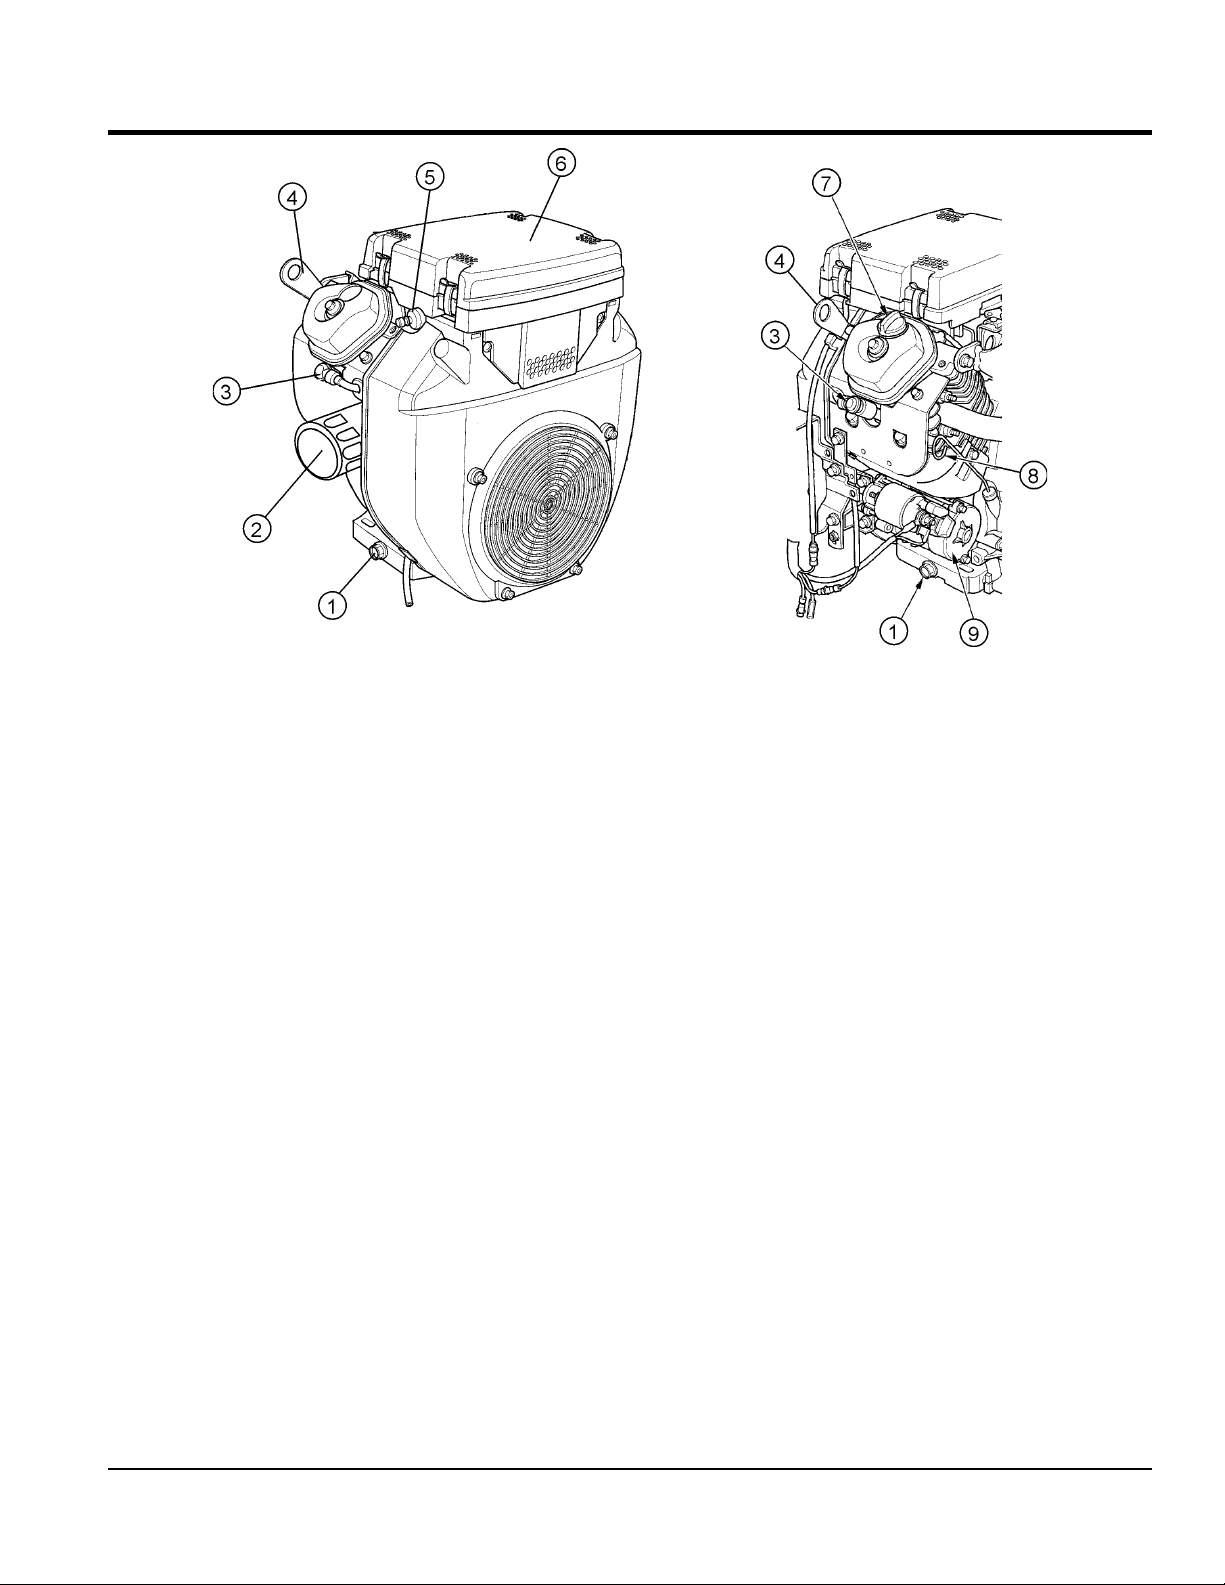
Figure 6. Engine Components
BASIC ENGINE
The engine (Figure 6) must be checked for proper
lubrication and filled with fuel prior to operation. Refer to the
manufacturer's engine manual for operation and servicing
information.
1. Oil Drain Plug — Remove to drain crankcase oil. Fill
with recommended type oil as listed in Table 4.
2. Oil Filter — Spin-on type, filters oil for contaminants.
3. Spark Plug — Provides spark to the ignition system.
Set spark plug gap to 0.6 - 0.7 mm (0.028 - 0.031 inch)
Clean spark plug once a week.
4. Lifting Hook Eye — Attach a lifting device of adequate
lifting capacity at this lifting point whenever lifting of the
engine is required.
5. Fuel Filter — Prevents dirt and other debris from
entering the fuel system.
6. Air Filter — Prevents dirt and other debris from
entering the fuel system. Unsnap air filter cover to gain
access to filter element.
7. Oil Filler Cap — Remove to add engine oil.
8. Oil Dip Stick — Remove to check amount and
condition of oil in crankcase. Refill or replace with
recommended type oil as listed in Table 4.
9. Starter — Starts engine when ignition key is rotated
to the "ON" position.
AR13HA/AR13HAR ROLLER (S/N 110301 & UP) • OPERATION AND PARTS MANUAL — REV. #0 (06/22/11) — PAGE 17
Page 18
INSPECTION
BEFORE STARTING
1. Read safety instructions at beginning of manual.
2. Clean the roller, removing dirt and dust, particularly
the engine cooling air inlet, carburetor and air cleaner.
3. Check the air filter for dirt and dust. If air filter is dirty,
replace air filter with a new one.
4. Check carburetor for external dirt and dust. Clean with
dry compressed air.
5. Check fastening nuts and bolts for tightness.
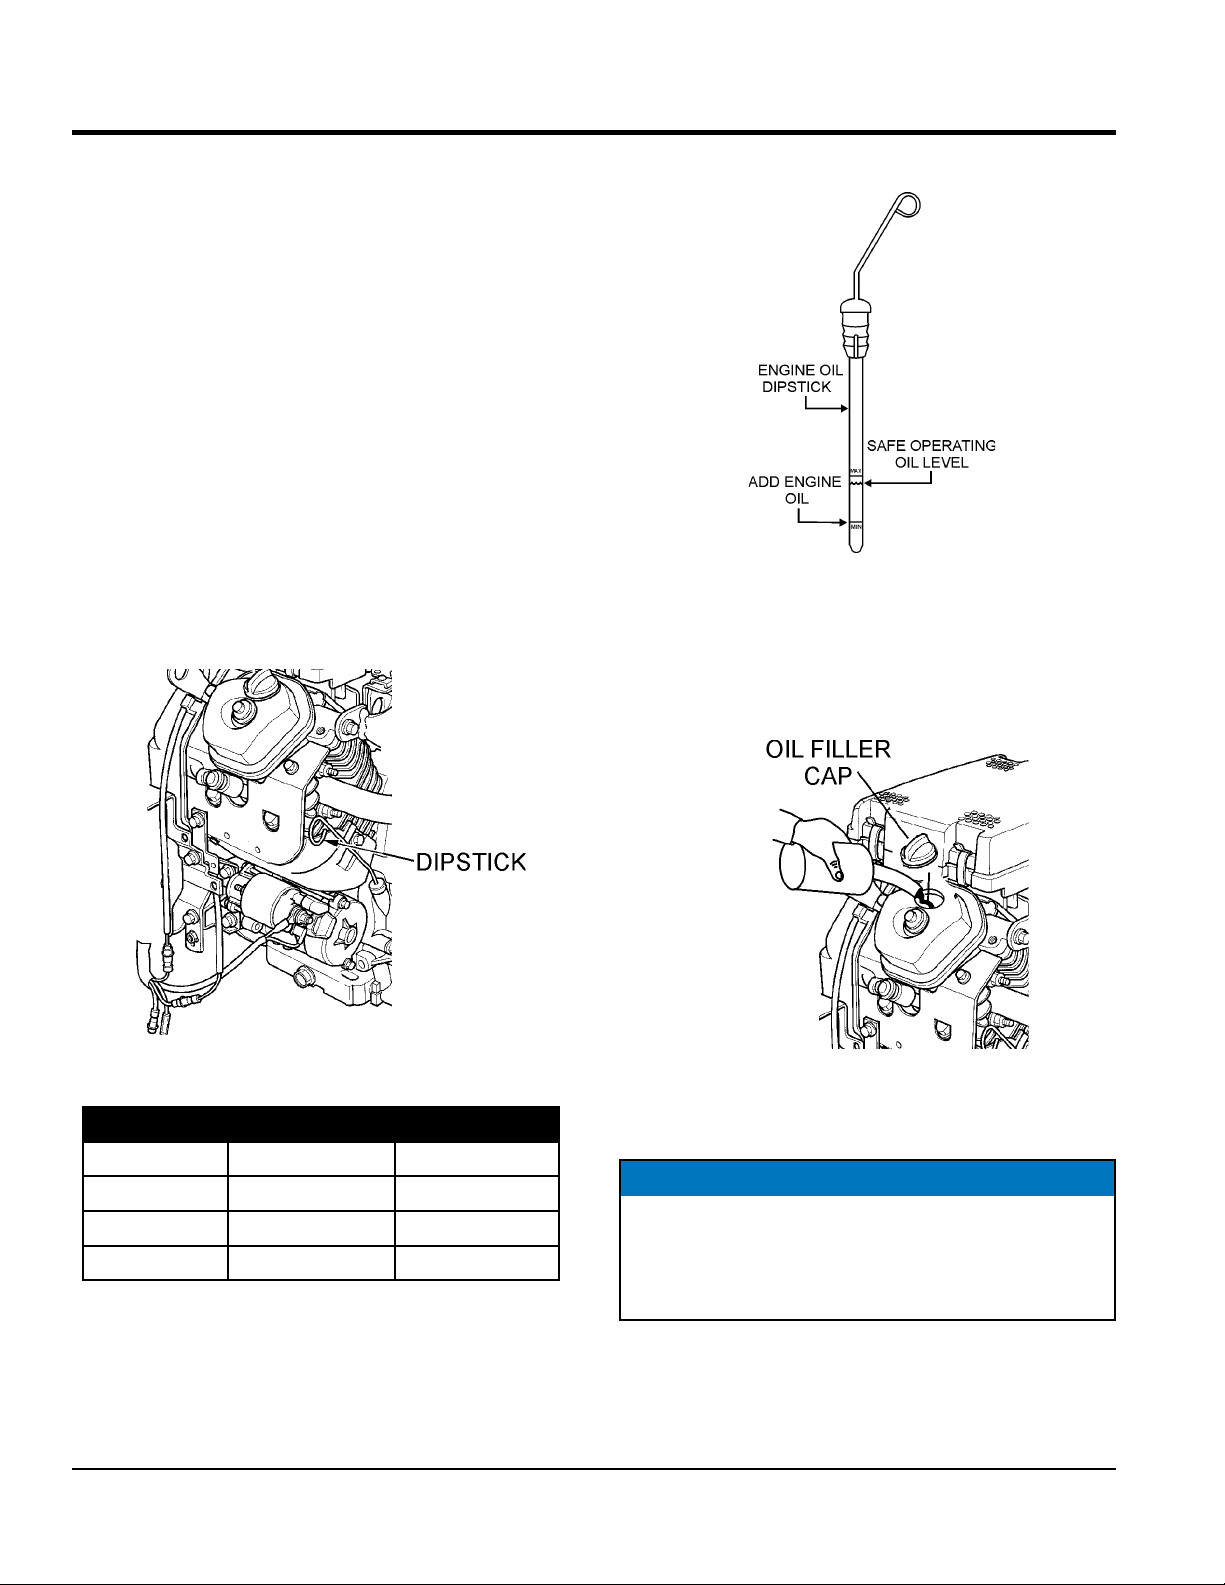
ENGINE OIL CHECK
1. To check the engine oil level, place the roller on secure
level ground with the engine stopped.
2. Remove the dipstick from its holder (Figure 7) and
wipe it clean.
3. Check the oil level shown on the dipstick (Figure 8).
Figure 8. Engine Oil Dipstick Level
4. If the oil level is low, remove the oil filler cap (Figure 9)
and fill to the safe operating level (max) as indicated by
the dipstick. Fill with recommended type oil as listed in
Table 4. Maximum oil capacity is 1.90 quarts (1.8 liters).
Figure 7. Engine Oil Dipstick (Removal)
Table 4. Oil Type
Season Temperature Oil Type
Summer 25°C or Higher SAE 10W-30
Spring/Fall 25°C~10°C SAE 10W-30/20
Winter 0°C or Lower SAE 10W-10
PAGE 18 — AR13HA/AR13HAR ROLLER (S/N 110301 & UP) • OPERATION AND PARTS MANUAL — REV. #0 (06/22/11)
NOTICE
The HONDA GX630 engine used on this roller has an
"Oil Alert System". This system will automatically stop
the engine in the event of low oil level. ALWAYS be sure
to check the engine oil level prior to starting the engine.
Figure 9. Engine Oil Filler Port
Page 19
INSPECTION
FUEL CHECK
DANGER
Motor fuels are highly flammable and can
be dangerous if mishandled. DO NOT
smoke while refueling. DO NOT attempt
to refuel the pump if the engine is hot or
running.
1. To check the engine fuel level, place the roller on
secure level ground with the engine stopped.
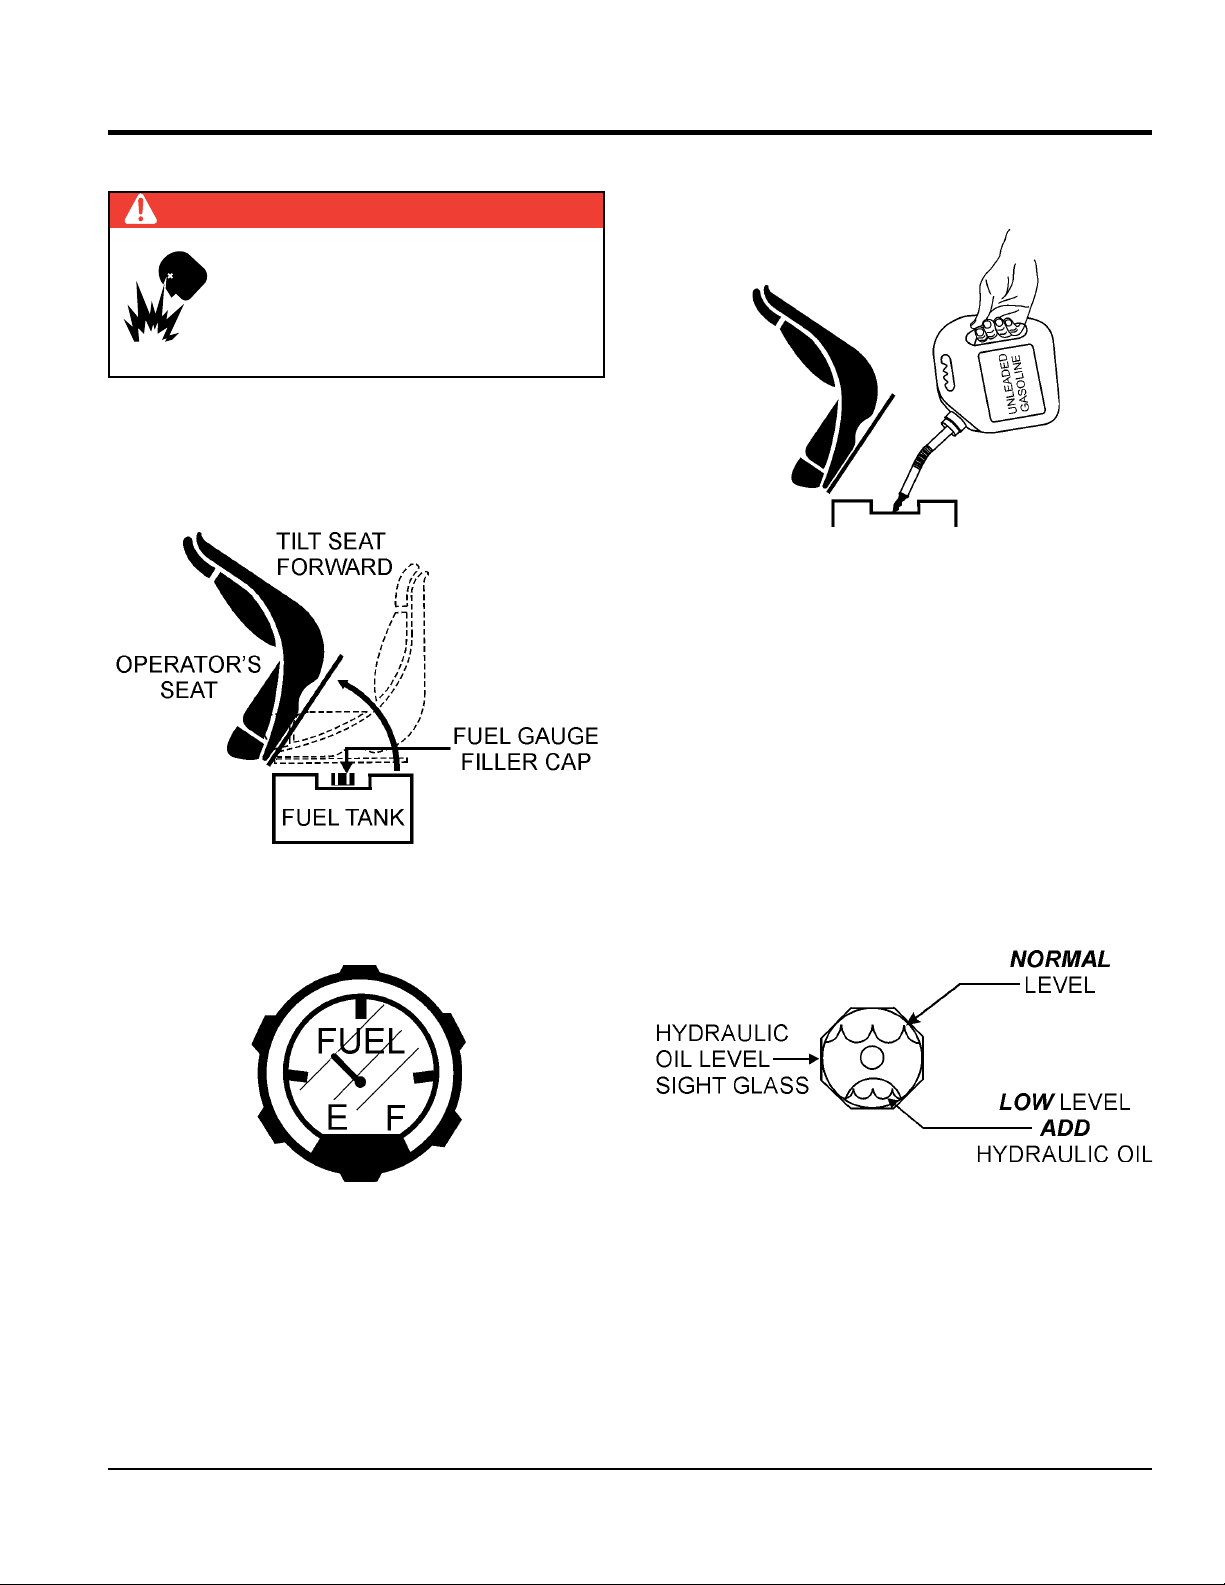
2. Tilt the operator's seat (Figure 10) forward to gain
access to the fuel tank.
5. Pay attention to the fuel tank capacity when replenishing
fuel (Figure 12). Refer to the fuel tank capacity listed
on the specifications table.
Figure 12. Adding Fuel
6. After replenishing fuel, make sure fuel cap is securely
tighten to fuel tank. Return operator's seat to normal
operating position.
HYDRAULIC OIL CHECK
1. To check the hydraulic oil level, place the roller on
secure level ground with the engine stopped.
Figure 10. Fuel Tank Access
3. Read the fuel gauge (Figure 11) located on top of the
fuel tank to determine if fuel level is low.
Figure 11. Fuel Gauge
4. If the fuel level is low, remove the fuel filler cap/gauge
and fill with unleaded gasoline. Wipe up any spilled
fuel immediately.
2. Visually inspect the hydraulic oil sight glass (Figure
13) located on the right rear of the front drum. For
normal operation the hydraulic oil level must be below
the top and above the bottom of the sight glass. DO
NOT OVERFILL!
Figure 13. Hydraulic Oil Sightglass
AR13HA/AR13HAR ROLLER (S/N 110301 & UP) • OPERATION AND PARTS MANUAL — REV. #0 (06/22/11) — PAGE 19
Page 20
INSPECTION
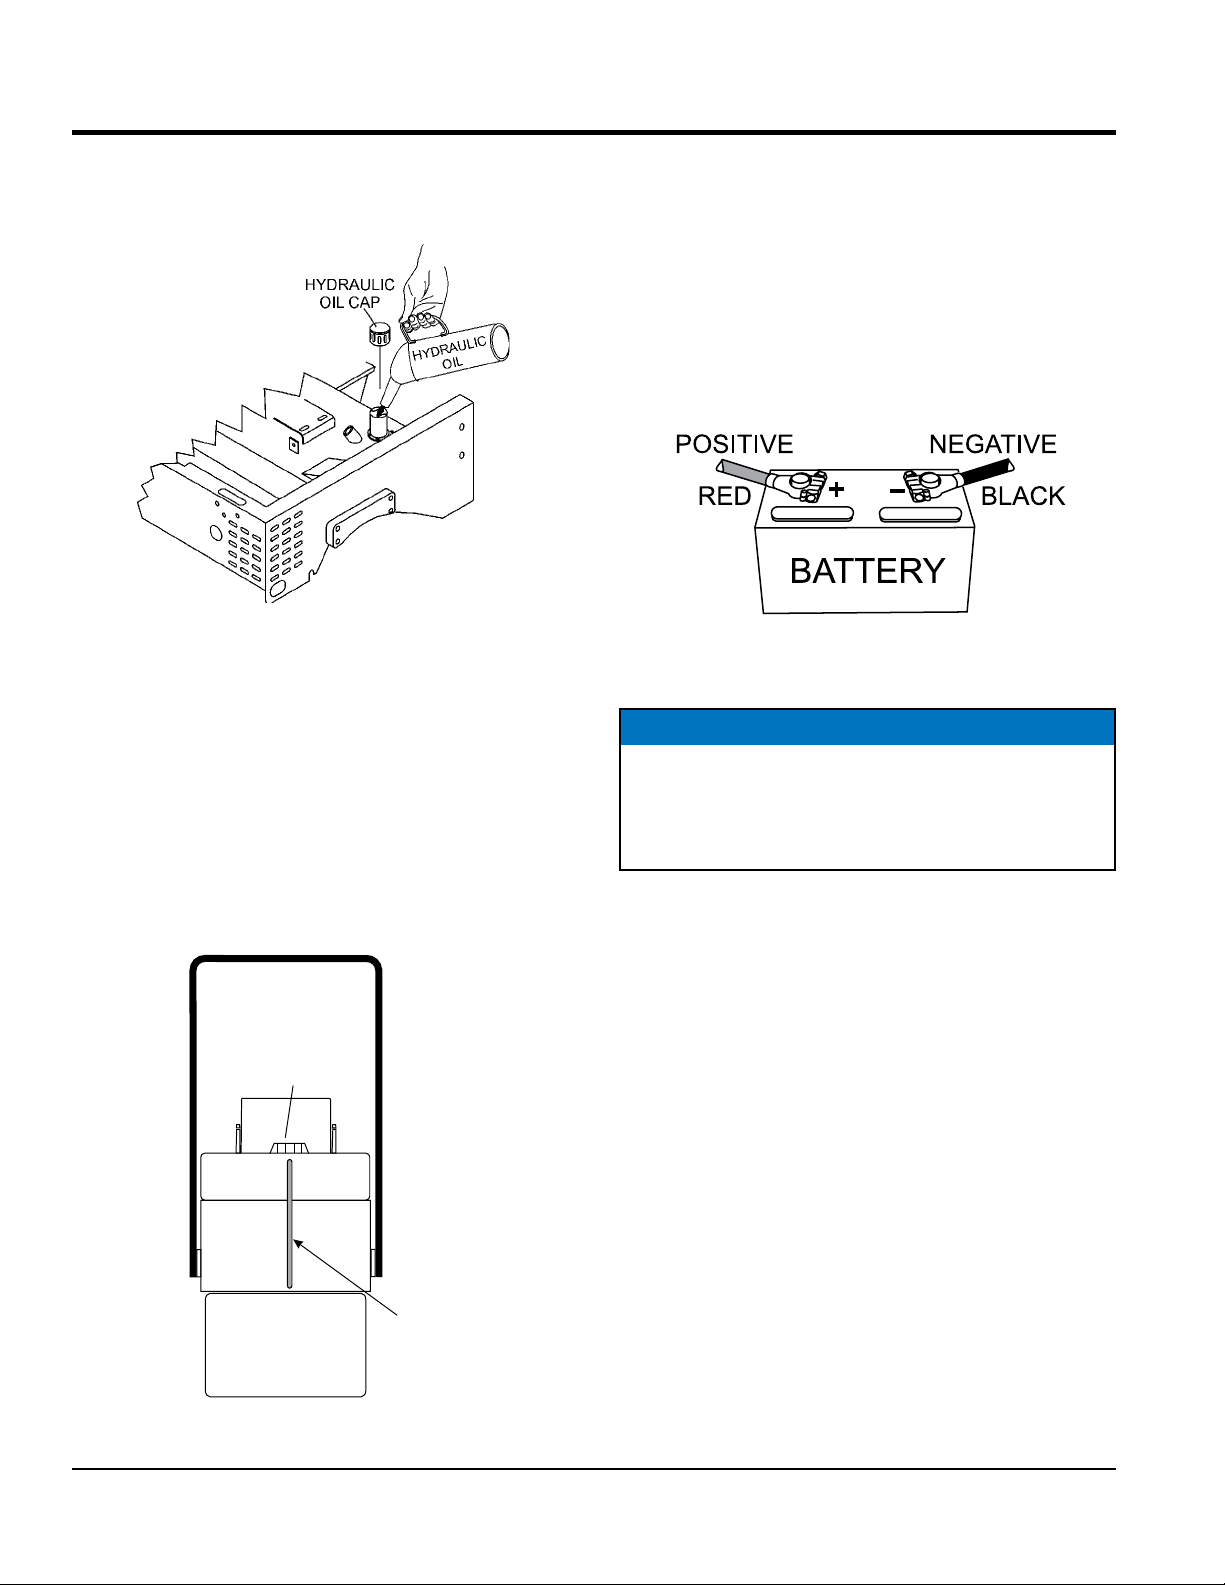
3. If the hydraulic oil level is low, remove the hydraulic
oil cap (Figure 14) and fill with type ISO 46 anti-wear
type hydraulic oil to the recommended operating level.
Figure 14. Hydraulic Oil Reservoir Filler Port
WATER TANK CHECK
1. To check the water tank water level, place the roller
on secure level ground.
2. The amount of water inside the water tank can be
visually inspected by reading the water tube (Figure
15) that runs vertically along the water tank at the rear
of the roller. This tube indicates the amount of water
inside the water tank. Total tank capacity is 40 gallons
(181 liters.)
BATTERY CHECK
A 12-volt DC battery (Figure 16) is shipped dry, and will
require a proper electrolyte level for operation.
ALWAYS be sure that the battery cables are properly
connected to the battery terminals as shown below.
Generally the RED cable will be connected to the positive
terminal of the battery, and the BLACK cable will be
connected to the negative terminal of the battery.
Figure 16. Battery
NOTICE
If the battery cables are connected incorrectly, electrical
damage will occur causing damage to the roller's
electrical circuits. Pay close attention to the polarity of
the battery when connecting the battery.
WATER
TANK
CAP
WATER
TANK
WATER
LEVEL
REAR
ROLLER
Figure 15. Water Tank
PAGE 20 — AR13HA/AR13HAR ROLLER (S/N 110301 & UP) • OPERATION AND PARTS MANUAL — REV. #0 (06/22/11)
TUBE
Page 21
OPERATION
TO LOCK THROTTLE CABLE.
STARTUP
NOTICE
DO NOT attempt to operate the roller until the Safety,
General Information and Inspection sections have been
read and understood.
1. Place your foot into the roller's foot step, grab hold of
the hand rail located on the steering console, and lift
yourself onto the platform.
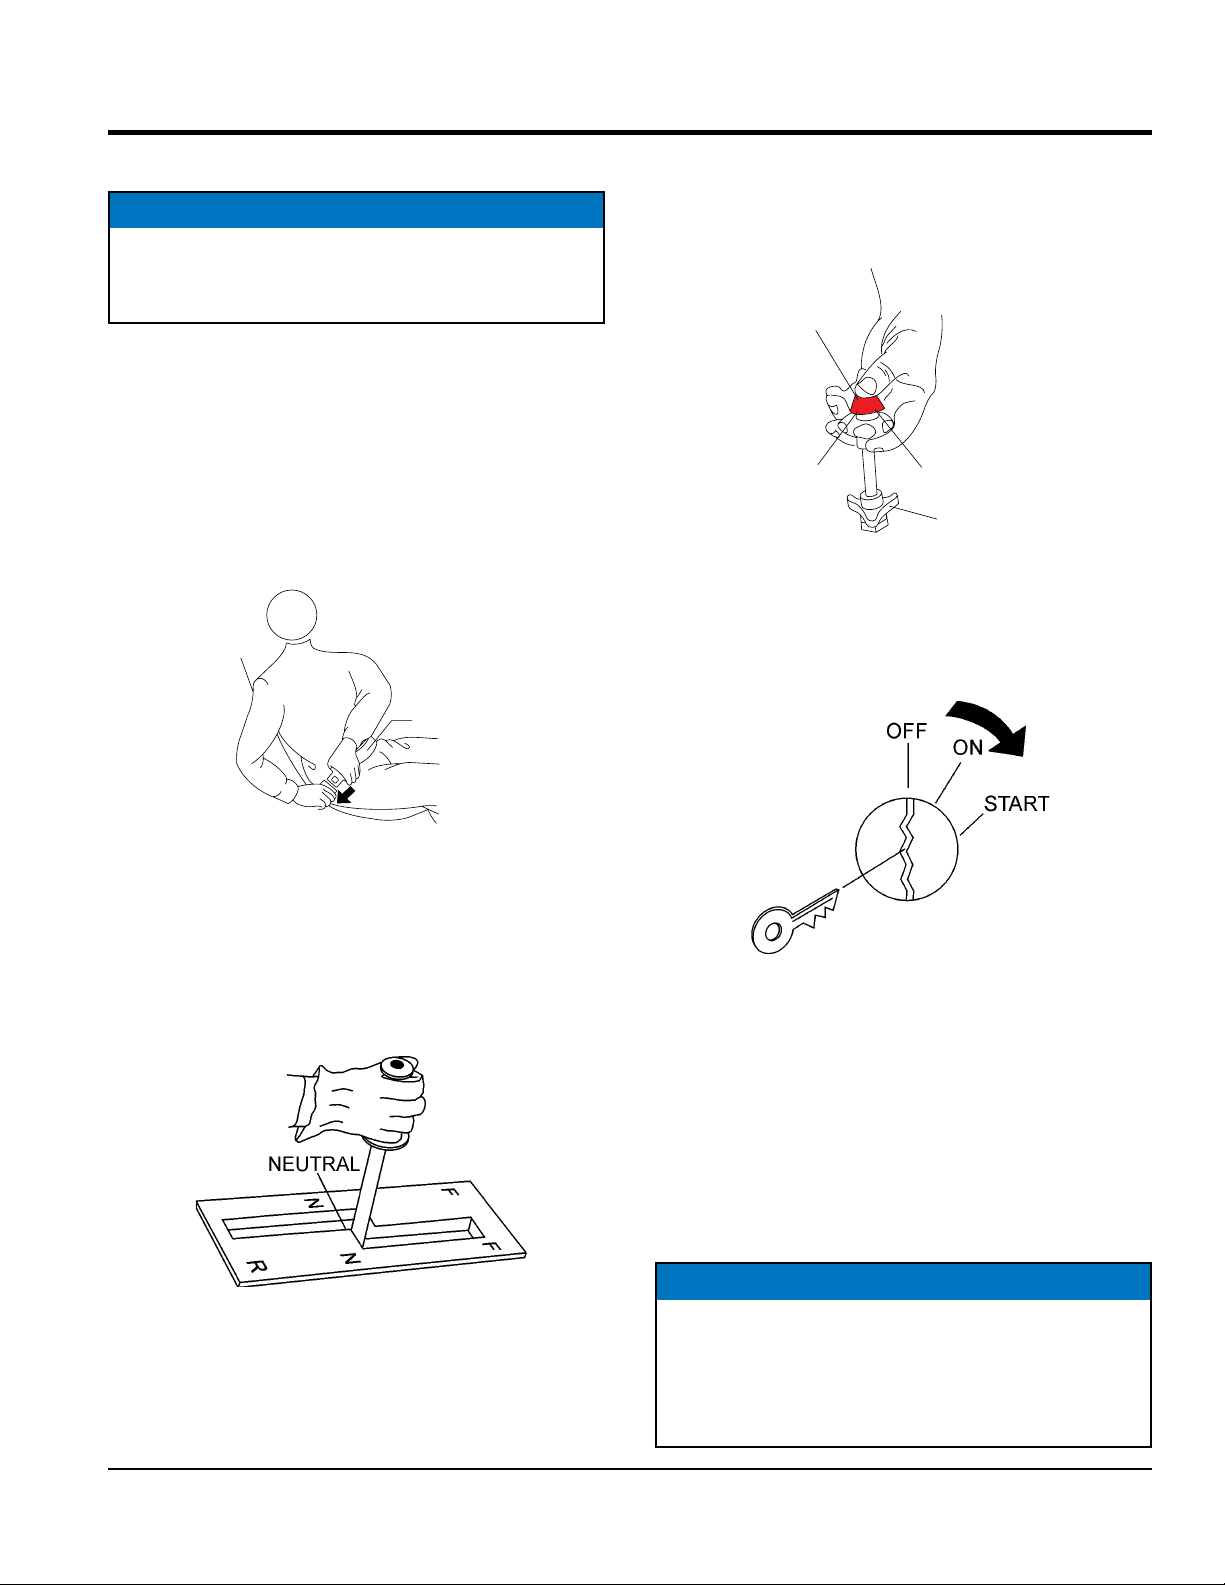
2. Sit down in the operator's seat and adjust the seat
for a comfortable position, then fasten the seat belt
(Figure 17) around your waist. NEVER operate the
roller without the seat belt being fastened. Serious
injury could occur if the seat belt is not used.
FASTEN
SEAT BELT
6. PUSH the "RED" button (Figure 19) on the throttle
control and pull the round black knob about halfway
out. Make sure that the throttle lock knob has been
disengaged.
PUSH-IN, THEN PULL
TO SET THROTTLE
(RPM’s)
THROTTLE RELEASE
AND IDLE BUTTON
PUSH ALL THE WAYDOWN
TO IDLE ENGINE
THROTTLE LOCK
KNOB, TURN CLOCKWISE
Figure 19. Throttle Control
7. Insert the ignition key into the ignition (Figure 20), then
turn and hold the key in the clockwise position until the
engine starts, release key.
Figure 17. Securing Seat Belt
3. Before starting engine, make sure the immediate area
is free of obstructions and debris that may lay in the
roller's path.
4. Make sure that the roller's shift lever (Figure 18) is
placed in the neutral position.
Figure 18. Shift Lever
5. In cold weather, start the roller with the choke fully
closed. In warm weather or when the engine is
warm, the roller can be started with choke halfway or
completely open.
Figure 20. Ignition Switch
8. If the engine does not start, repeat steps 1 through
7 or consult the troubleshooting guide contained in
this manual.
9. Let the engine warm for 3 to 5 minutes before using
roller. Check for fuel and oil leaks, and noises that would
associate with a loose guard and/or covers.
10. If necessary, return the choke knob to the full OPEN
position.
NOTICE
The CLOSED position of the choke knob enriches the
fuel mixture for starting a COLD engine. The OPEN
position provides the correct fuel mixture for normal
operation after starting, and for restarting a warm
engine.
AR13HA/AR13HAR ROLLER (S/N 110301 & UP) • OPERATION AND PARTS MANUAL — REV. #0 (06/22/11) — PAGE 21
Page 22
OPERATION
PARKING BRAKE
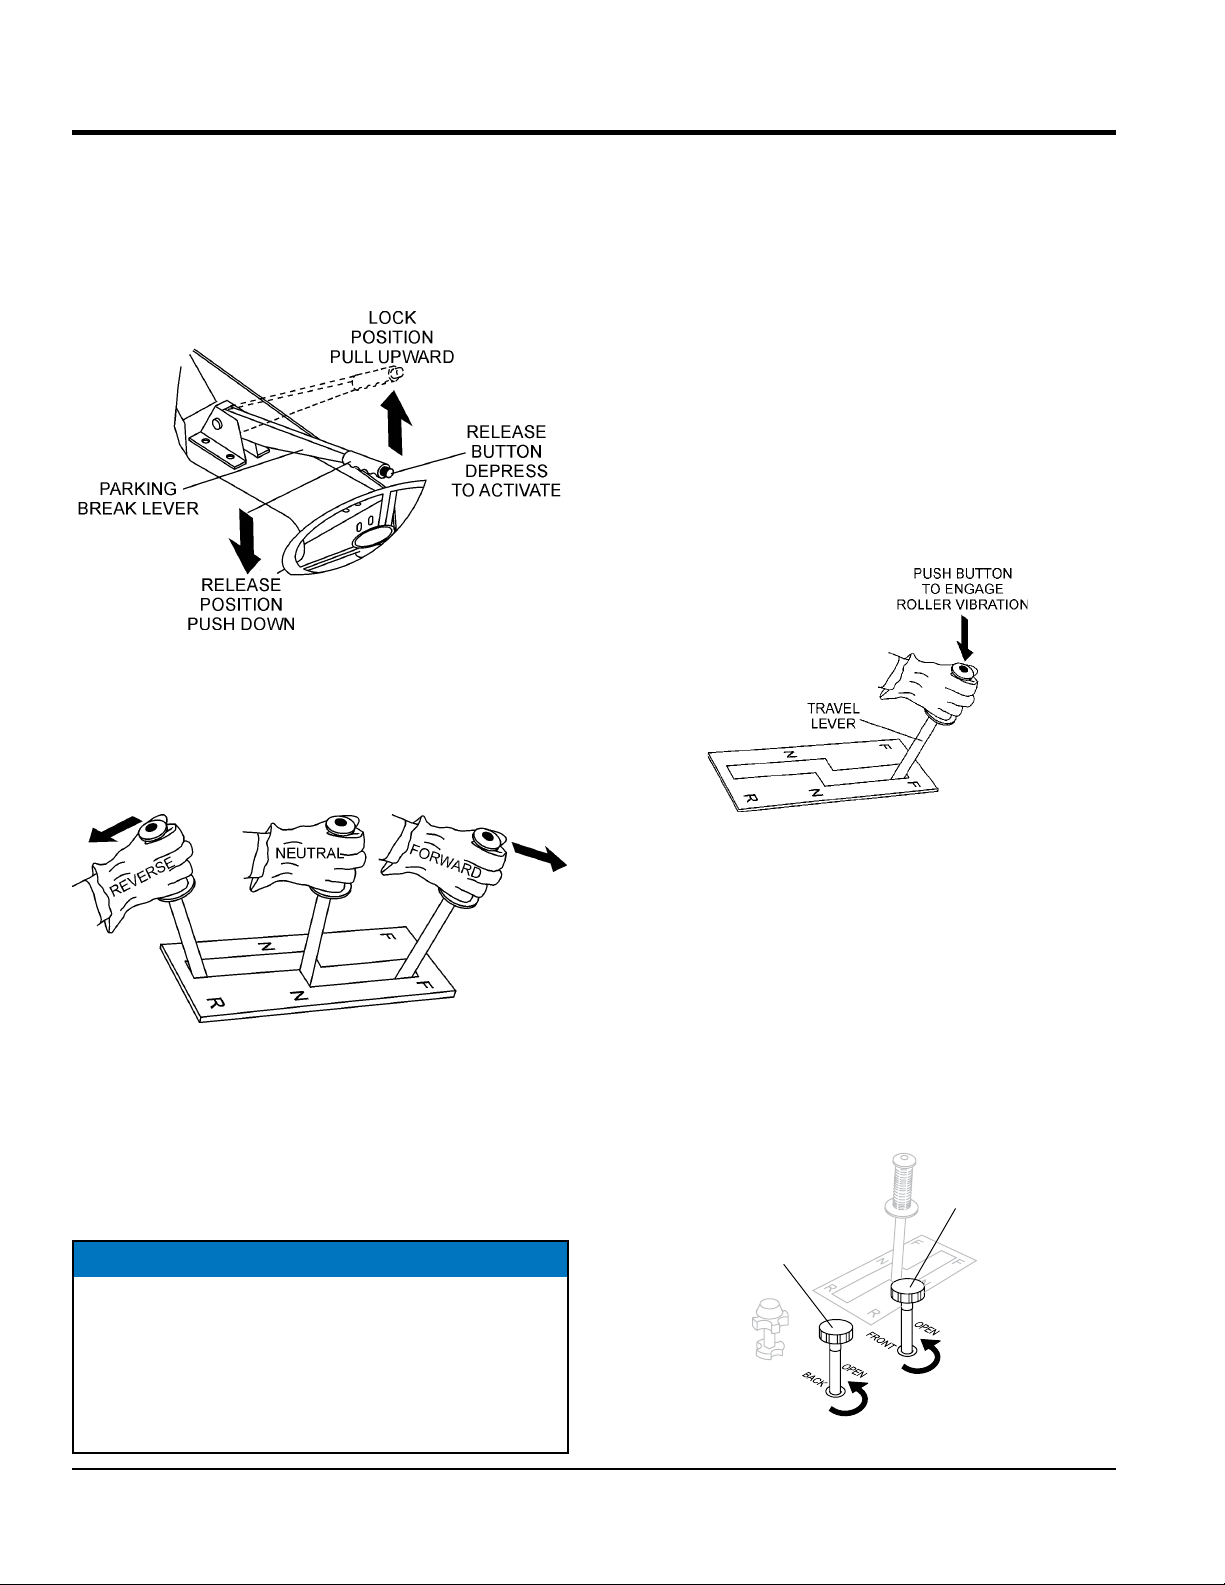
1. To release the parking brake, press and hold the
release button (Figure 21) pull up slightly on the
parking lever, then push the parking brake lever all
the way down.
Figure 21. Brake Release Lever
SHIFT LEVER
3. Try maneuvering the roller a few times to get familiar
with the handling. Also place the travel lever in the
opposite direction to get acquainted with driving in
reverse.
4. Make sure that the roller comes to a complete stop
(neutral) before placing the travel lever in either a
forward or reverse position.
VIBRATION BUTTON
1. To begin the vibratory action, press the vibratory
pushbutton switch located on top of the travel lever
as shown in Figure 23. The pressing of this switch will
generate 3,100 lbs. (1,406 Kg.) of centrifugal force at
a frequency of 4000 vpm (vibrations per minute) to
the front drum.
1. To make the roller move in a forward direction, move
the shift lever forward as shown in Figure 22.
Figure 22. Shift Lever
2. Remember the speed of the roller is directly proportional
to the amount of pressure being applied to the lever
in each direction. Travel speed is between 0 and 4.8
mph (7.2 kph).
NOTICE
ALWAYS allow the roller to come to a complete stop
before changing the direction of travel. Changing
directions before the roller comes to a complete stop
will result in excessive force being applied to the
transmission and drive system, which will reduce the
over service life of the system.
Figure 23. Vibration Pushbutton Switch
2. To stop the vibratory action, press the vibratory
pushbutton switch again.
SPRINKLER CONTROLS
If the application requires the wetting of a surface, front
and rear drum sprinkler controls have been provided. These
controls (Figure 24) are located to the bottom right of the
operators seat. The front valve controls the water supply to
the front drum spray bar and the back valve controls water
flow to the back drum spray bar.
FRONT
BACK
Figure 24. Sprinkler Controls
PAGE 22 — AR13HA/AR13HAR ROLLER (S/N 110301 & UP) • OPERATION AND PARTS MANUAL — REV. #0 (06/22/11)
Page 23
MAINTENANCE
Perform roller maintenance as indicated by Figure 25 and Table 5.
Yearly
6 Months
3 Months
Bi-Weekly
Weekly
Daily
MAINTENANCE
4
5
6
7
13
12
1
9
8
14
2
3
5
6
7
10
Figure 25. Roller Maintenance Schedule
Table 5. Roller Maintenance Schedule
Daily 1 2 3 Interval Notes
1 Engine Oil Level X X See Table 4
2 Water Tank Level X X
3 Fuel Level X X
4 Hydraulic Oil Level X X Use ISO 46 Type Hydraulic Oil
5 Sprinkler System X
6 Scraper X X Replace when badly worn
7 Drums (Front/Rear) X X
Weekly
8 Air Filter X X Replace paper element once a year.
9 Battery Liquid Level X X
Bi Weekly
10
Zerk Grease Fitting (Rear
Drum)
X 80 hrs. or Bi-Weekly
3 Months
12
H y draulic O i l F i l t e r
(Return)
X 500 hrs. Replace with same type filter.
6 Months
13 Engine Oil Filter X 20 hrs. or 1 month
Yearly
14 Hydraulic Oil X 1,100 hrs. or once a year Use ISO 46 Type Hydraulic Oil
Use Ty pe Alva nia # 2 o r e qui vale n t
3 shots max. DO NOT overgrease
After first 20 hrs, change oil filter every 6
months or 100 hrs.
AR13HA/AR13HAR ROLLER (S/N 110301 & UP) • OPERATION AND PARTS MANUAL — REV. #0 (06/22/11) — PAGE 23
Page 24
MAINTENANCE
HYDRAULIC OIL SYSTEM
The hydraulic system consists of a two-pump stack directly
coupled to the engine. A hydraulic valve block (manifold)
is provided for quick and easy testing and troubleshooting.
Hydraulic oil is filtered by a screen filter located in the tank
filler neck, a 40 micron suction filter located in the tank, and
a 10 micron return filter, with cold oil bypass valve located
in the return circuit.
It is recommended that ISO 46 type hydraulic oil or
equivalent be used when adding or replacing the hydraulic
oil is required.
DO NOT USE MULTI-VISCOSITY OIL. Cleanliness is a
very important part of proper hydraulic system operation.
Hydraulic oil is not only used to transfer power; it also
lubricates and cools the system components. Keeping
the hydraulic system clean can help reduce costly repairs.
The hydraulic oil level sight glass is located on the right
rear of the front drum, below the engine compartment. This
level should be checked daily. Oil must be below the top and
above the bottom of the sight glass. DO NOT OVERFILL!
Care should be taken to clean the filler cap before adding oil
to the system. If hydraulic oil has to be added, the machine
should be inspected for leaks.
The suction filter (Figure 26) is located inside the hydraulic
tank. This filter is attached to the fitting connected to the
hydraulic pump suction hose.
environmentally friendly manner. Replace the drain
plug and tighten.
HYDRAULIC
OIL DRAIN
PLUG
HYDRAULIC OIL
CAP/FILLER PORT
HYDRAULIC OIL
RETURN FILTER
Figure 26. Hydraulic Filter Locations
HYDRAULIC OIL
SUCTION FILTER
3. Remove the return filter and install a new filter. Dispose
of the used filter in an environmentally friendly manner.
4. Disconnect the suction hose and remove the fitting from
the tank. Replace the suction filter. Dispose of the used
filter in an environmentally friendly manner. Replace
the fitting and reconnect the suction hose.
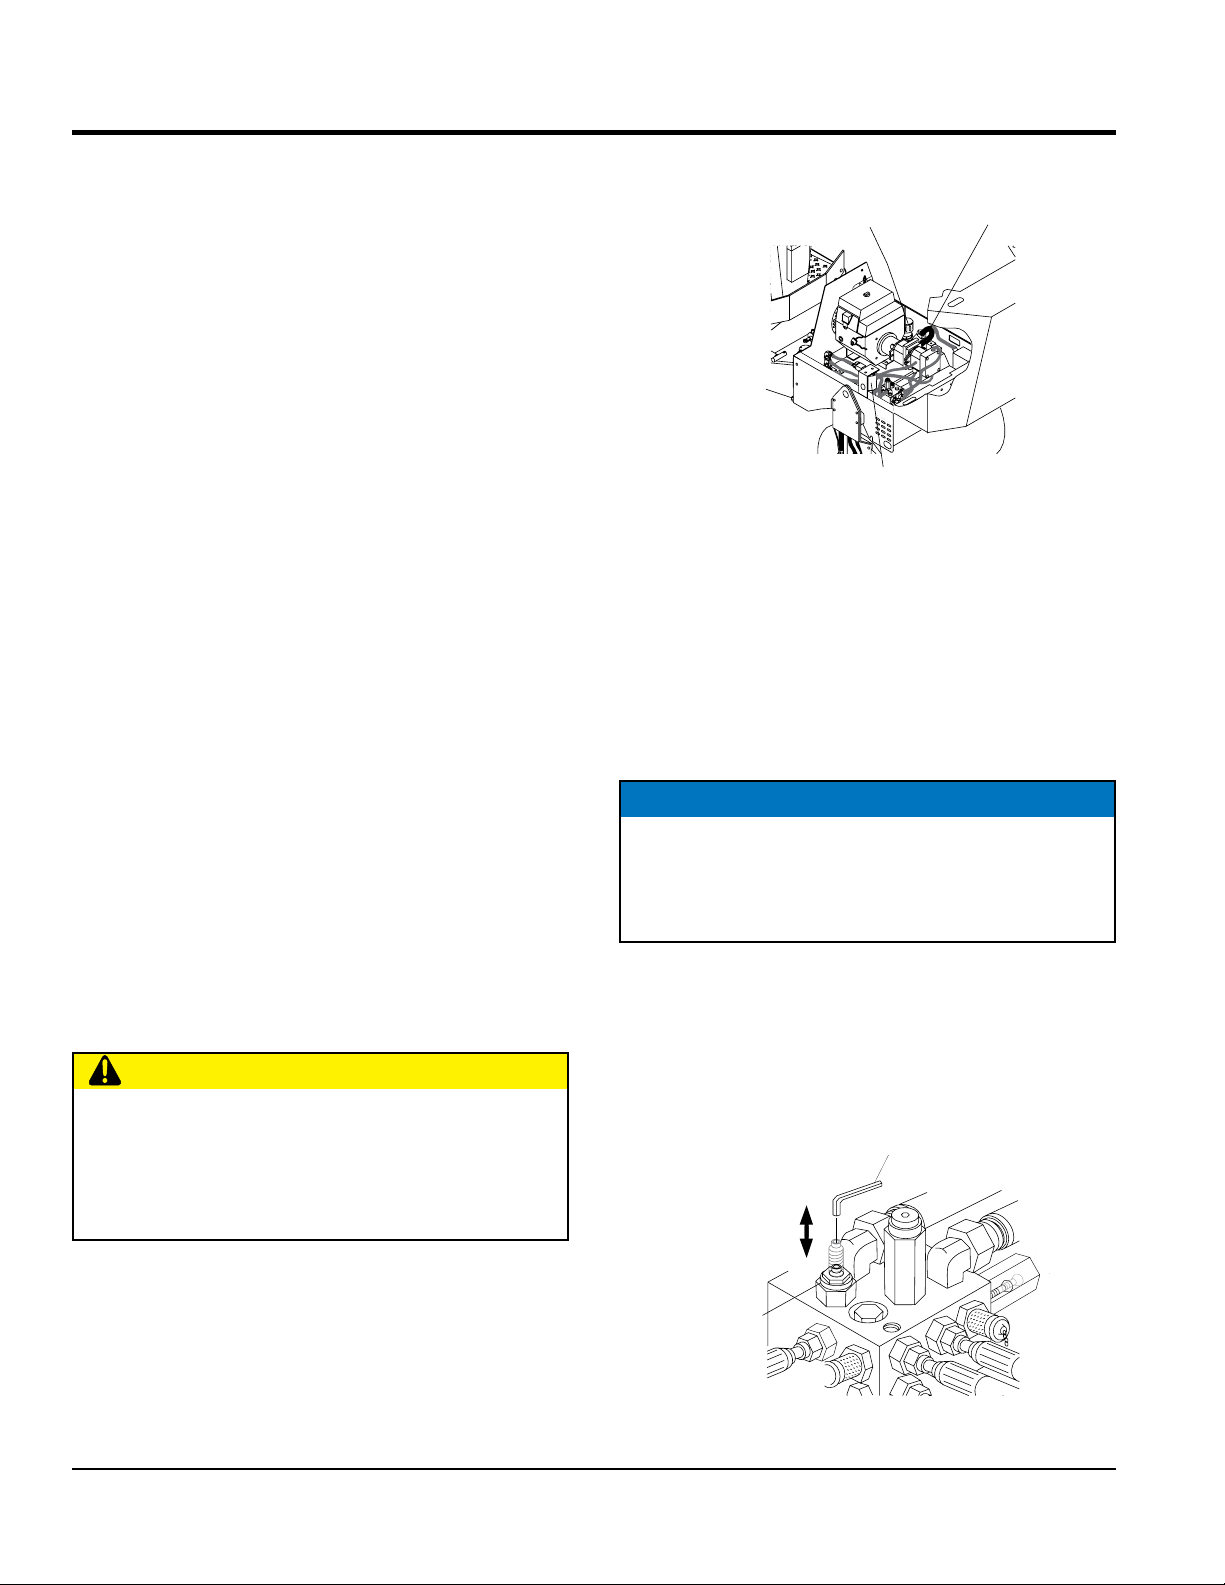
FREEWHEEL ENGAGEMENT VALVE
NOTICE
The freewheel engagement valve (towing) is only for
emergency use. DO NOT move roller over 2 MPH or
long distances as hydraulic system component failure
could result..
The return filter (Figure 26) is located at the front of the
engine compartment. Replace both filters according to the
Table 5.
CAUTION
DO NOT open hydraulic lines or loosen hydraulic fittings
while engine is running! Hydraulic fluid under pressure
This hydraulic system has a freewheel engagement valve
allowing hydraulic oil to be bypassed. Open (turn allen
wrench counter-clockwise) this valve (Figure 27) to engage
the freewheel capability of the roller. When the valve is fully
opened, ports A and B are allowed to connect, bypassing
the oil to and from the drum drive motors.
ALLEN
WRENCH
can penetrate the skin, blind, cause burns or create
other potentially dangerous hazards follow all safety
OPEN
instructions as described throughout this manual.
CLOSED
CHANGING HYDRAULIC OIL AND FILTERS
1. Park the roller on a clean flat work area and set the
TOW
FREEWHEEL
ENGAGEMENT
VALVE
parking brake.
2. Remove the hydraulic oil drain plug (Figure 26) and
drain the hydraulic oil. Dispose of the used oil in an
PAGE 24 — AR13HA/AR13HAR ROLLER (S/N 110301 & UP) • OPERATION AND PARTS MANUAL — REV. #0 (06/22/11)
Figure 27. Freewheel Engagement Valve
Page 25
MAINTENANCE
Remember the freewheel engagement valve should only
be used in emergencies when the roller cannot be driven
due to engine or hydraulic system problems.
When towing of the roller has been completed, this
valve must be closed (turn allen wrench fully clockwise)
completely and the lock nut set. Failure to close this valve
completely will result in low power, improper speed, and
excessive hydraulic oil temperature.
DRUM DRIVE
The drum drive circuit is a parallel, closed loop system
consisting of a hydrostatic pump, two relief valves, a
freewheel engagement valve, and front and rear drum
drive motors.
The hydrostatic pump is manually controlled by a cable
connected to the forward/reverse shift lever located on the
right side of the operator seat. When the shift lever is placed
in forward, high-pressure oil is supplied by the hydrostatic
pump to the valve block (port A). The valve block (manifold)
directs this high-pressure oil to the front and rear drum
drive motors. Return oil from the motors is returned to the
valve block (port B) and is returned to the suction side of
the hydrostatic pump.
When the switch is in the “ON” position, the electric control
valve closes and oil is directed out of port 1 to the vibration
motor. Return oil from the motor returns to the valve block
via port 2 and is directed to the steering valve.
Steering is controlled by a steering valve and cylinder.
The steering wheel is direct coupled to the steering valve
controlling the oil flow to the cylinder. Oil supplied from the
vibration circuit is directed to port 3 which connects to port
P of the steering valve. When steering is not being used,
oil passes out of port T of the valve block and returns to
the hydraulic tank. When the steering wheel is operated,
the steering valve closes and oil is directed to ports L or R
to extend or retract the steering cylinder.
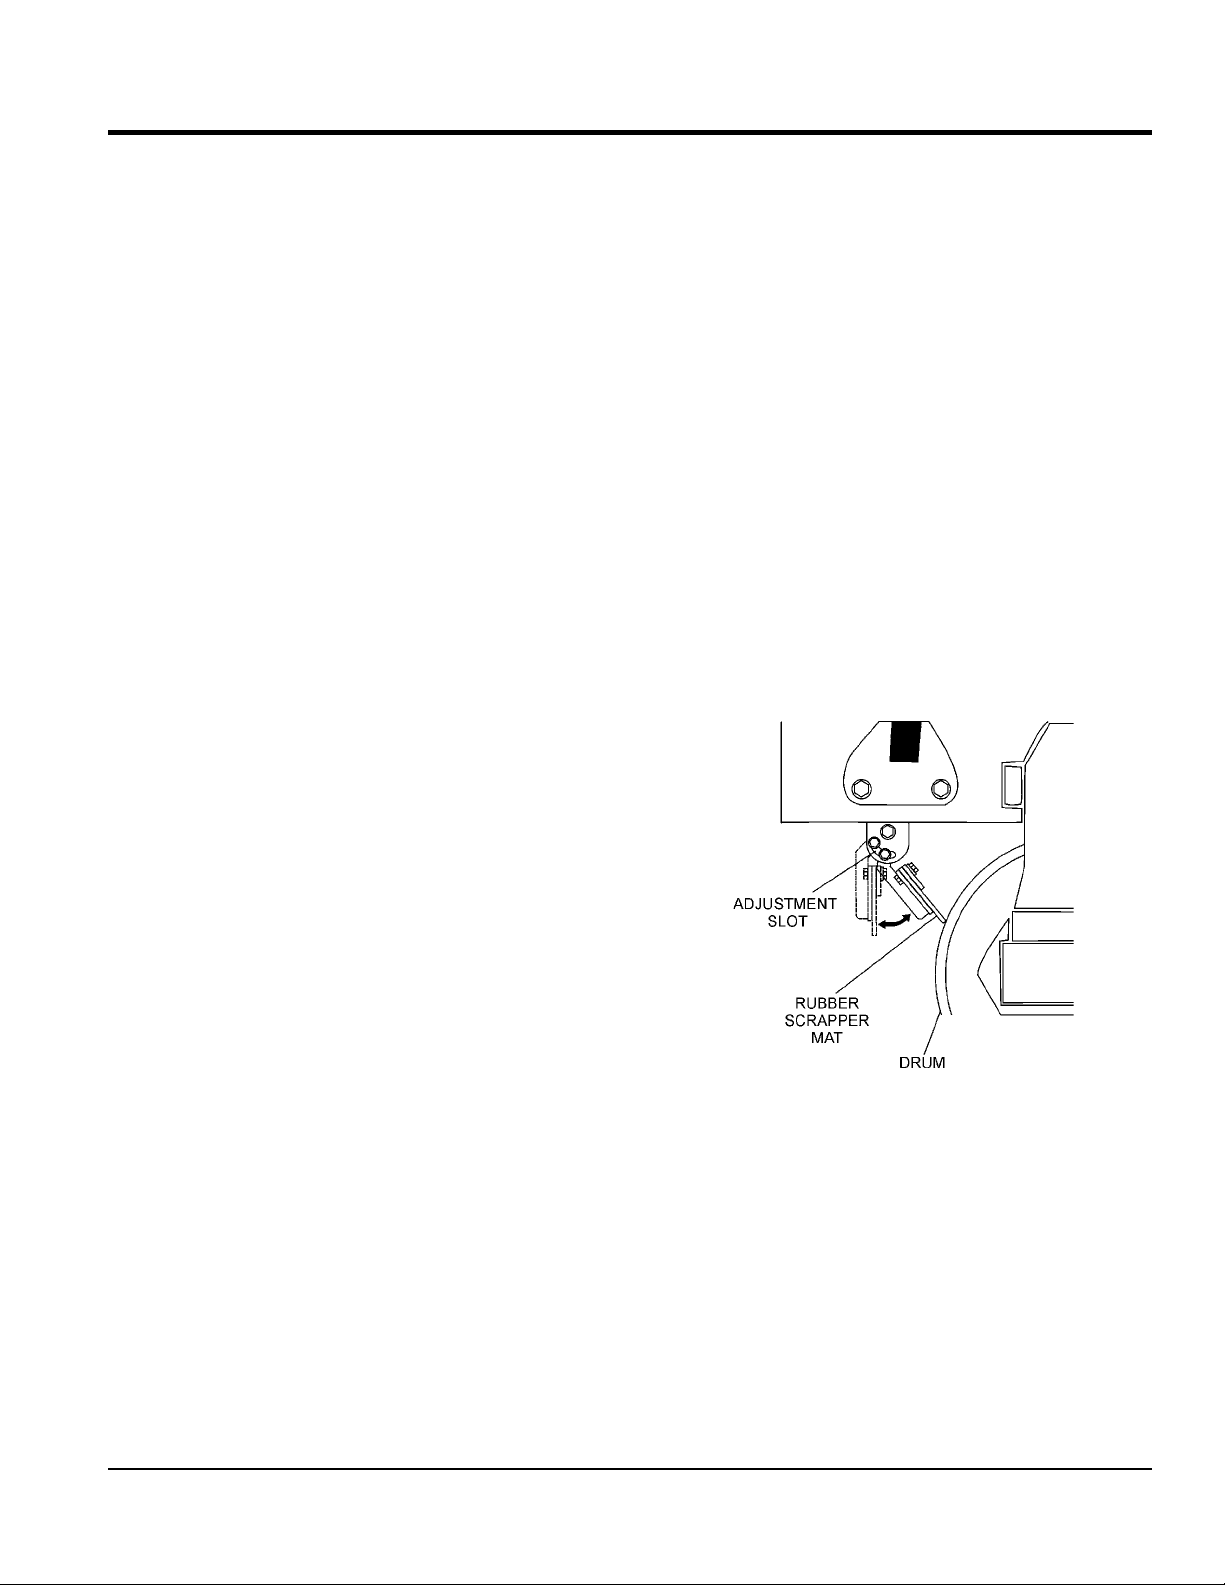
RUBBER SCRAPPER MAT
Rubber scraper mats have been provided for the cleaning
of the front and rear drums. Adjust the scrapers mats as
close as possible to the drums, using the slotted holes
(Figure 28) provided. Replace these rubber mats when
they become badly worn.
When shifted into reverse, the high-pressure and suction
ports on the hydrostatic pump are reversed. Oil flow is
then in the opposite direction of forward (port B becomes
high-pressure and port A becomes suction).
VIBRATION AND STEERING
The vibration and steering system is an open loop circuit
operated by a gear type pump. Separate relief valves control
each circuit. This system consist of the gear pump, relief
valves, electric vibration control valve, vibration drive motor,
steering valve, and steering cylinder.
The vibration circuit is controlled by an electric control
valve located on the valve block (manifold). This valve is
controlled by the “ON/OFF” pushbutton switch mounted on
top of the travel lever.
High-pressure oil is supplied by the pump to the valve block
(port P) and is directed to the electric control valve. When
the pushbutton switch is in the “OFF” position, this valve is
open allowing oil to go to the steering valve, without driving
the vibration motor.
Figure 28. Scraper Bar Adjustment
AR13HA/AR13HAR ROLLER (S/N 110301 & UP) • OPERATION AND PARTS MANUAL — REV. #0 (06/22/11) — PAGE 25
Page 26

MAINTENANCE
FORWARD/REVERSE HYDRAULIC PRESSURE
TEST
1. Park the machine on a solid flat surface and stop the
engine. Set the parking brake and block the front drum
securely.
2. Check hydraulic oil level by viewing the hydraulic oil
sight glass. The hydraulic oil level must be below the
top and above the bottom of the sight glass. DO NOT
OVERFILL!
3. Adjust engine RPM (3,500 +/- 50 RPM).
4. Let engine run for 5 minutes, this will bring the hydraulic
oil operating temperature to a minimum of 135° F.
5. Check and repair all hydraulic leaks.
6. On the manifold block, install a 5,000 psi pressure
gauge (Figure 29) to the forward pressure quick
disconnect test port 2.
7. Run engine at full throttle.
8. Move the travel lever to the forward position. MAKE
SURE FRONT AND REAR DRUMS DO NOT SPIN.
4. To start the vibration, press the pushbutton switch
(vibration control) located on top of the travel lever.
Under normal operating conditions this pressure will
range between 900-1,500 psi.
NOTICE
Vibration relief pressure is hard to read accurately using
this test. It may be necessary to disconnect the pressure
line to the vibration drive motor. Plug this line and retest,
pressure will be exact relief pressure. DO NOT perform
this test for a long period of time — damage could occur.
STEERING PRESSURE TEST
1. On the manifold block, install a 5,000 psi pressure
gauge into quick disconnect test port 1 (Figure 29).
2. Start the engine and run at full throttle.
3. Turn the steering wheel to the left or right (maximum)
and hold. Read the steering relief pressure. The relief
pressure reading for the steering test port 1 will be 700
psi. Again, under normal operating conditions, pressure
for the steering port will be between 200-400 psi.
9. Read the pressure gauge. The relief pressure (roller
drums blocked) will read 2,900 ± 145 psi. Under normal
operating conditions this pressure will read 400-600 psi.
10. Return the travel lever to the neutral position and stop
the engine.
11. Install the pressure gauge into the reverse quick
disconnect port 3 and repeat the above procedures.
The relief pressure reading for the reverse test port 3
will be the same (2,900 psi). Again normal operation
pressure for the reverse port will be 400-600 psi.
12. Normal operating pressures are based on the machine
traveling on level, firm surface. The operating pressures
will increase significantly when traveling uphill.
VIBRATION CIRCUIT PRESSURE TEST
1. Place the front drum on soil, gravel, or a heavy rubber
mat. DO NOT ACTIVATE VIBRATION FEATURE ON
CONCRETE OR HARD SURFACE!
2. On the manifold block install a 5,000 psi pressure
gauge to quick disconnect test port 1.
4. If maximum pressure cannot be reached, plug the
steering cylinder pressure hoses and retest. If pressure
is correct, the steering cylinder is leaking. DO NOT
ACTIVATE THE VIBRATION FUNCTION WHILE
PERFORMING THIS TEST!
Figure 29. Manifold Test Ports
3. Start the engine and run at full throttle.
PAGE 26 — AR13HA/AR13HAR ROLLER (S/N 110301 & UP) • OPERATION AND PARTS MANUAL — REV. #0 (06/22/11)
Page 27

MAINTENANCE
FORWARD/REVERSE RELIEF VALVES DRIVE
ADJUSTMENT
The forward and reverse relief valves (Figure 30) are
located in the hydrostatic pump (not on the manifold block)
under plugs 1 and 2 . Plug 2 is located in the same location
as plug 1, except it is on the bottom side of the pump. Relief
valve 1 is reverse and 2 is forward.
NOTICE
Pumps supplied after 01/01/2003 do not have adjustable
relief cartridges. The pressure is fixed at 2,900 ± 145
psi. If the relief pressure is not within normal range, the
complete cartridge must be replaced.
REVERSE
RELIEF VALVE
(PLUG 1)
HYDROSTATIC
PUMP
S T E E R I N G R E L I E F VA LVE P R E S S U R E
ADJUSTMENT
To adjust the relief valve steering pressure perform the
following:
1. Insert an 8 mm allen wrench into steering relief port 4
(Figure 36) on the manifold block.
Figure 31. Steering and Vibration Relief Valves
2. On the manifold, connect at 5,000 psi pressure gauge
into quick disconnect test port 1.
FORWARD
RELIEF VALVE
(PLUG 2)
Figure 30. Adjusting Relief Valves
1. Clean the area around the cap.
2. Remove the cap.
3. Carefully remove the valve cartridge.
4. Using an allen wrench, remove the top nut (extreme
care must be taken not to loosen existing shims, spring,
or valve) Add or remove shims as required. Adding
shims increases pressure; removing shims lowers
pressure. One shim is equal to approximately 50 psi.
Shim P/N is 34538.
5. Install the top nut and install valve in the pump cavity
using extreme care not to bind.
6. Install the valve cap.
3. Start the engine and run at full throttle.
4. Turn the steering wheel to the left or right (maximum)
and hold. Read the steering relief pressure. The relief
pressure reading for the steering test port 1 will should
be 700 psi.
5. If the steering relief pressure is not 700 psi, using the
allen wrench adjust the pressure at port 4 until the
pressure gauge reads 500 psi.
V I B R ATIO N RE L I E F VALV E PRE S S U R E
ADJUSTMENT
1. Insert an 8 mm allen wrench into steering relief port 5
(Figure 31) on the manifold block.
2. On the manifold block, insert a 5,000 psi pressure
gauge into quick disconnect test port 1.
3. Start the engine and run at full throttle.
4. To start the vibration, press the pushbutton switch
(vibration control) located on top of the travel lever. The
relief pressure should read 900 ~ 1,500 psi.
7. Retest pressure, further adjustment may be needed if
pressure is not correct.
5. If the vibration relief pressure is not 900 ~ 1,500 psi,
using the allen wrench, adjust the pressure at port 5
until the pressure gauge reads correctly.
AR13HA/AR13HAR ROLLER (S/N 110301 & UP) • OPERATION AND PARTS MANUAL — REV. #0 (06/22/11) — PAGE 27
Page 28

MAINTENANCE
REMOVING AND REPLACING HYDROSTATIC
PUMP
1. Set the parking brake.
2. Disconnect the battery.
3. Clean the pump and all connections.
4. Mark and disconnect all hoses and lines from the pump.
5. Disconnect the forward / reverse control cable.
6. Disconnect the pump support bracket.
7. Remove the engine mounting bolts.
8. Elevate the pump and engine assembly using a proper
lifting device.
9. Disconnect and remove the hydrostatic pump assembly.
10. Repair or replace the hydrostatic pump as required.
11. Install the hydrostatic pump in the reverse order of
removal, using Locktite 271 on all mounting bolts and
nuts.
12. Test operation. Test and adjust the forward and reverse
relief pressures as required. Adjust the forward/reverse
control cable.
DRUMS AND MAIN FRAME
1. The front drum is designed to apply vibration and
co mp action force to the operating surface for
compaction. This vibration and compaction force is
produced when the vibrator shaft is rotated. Maximum
efficiency is achieved only when the engine is operated
at full throttle.
2. A single drive motor is mounted on the left side of the
drum and is shock mounted. This type of drive motor
is designed for maximum torque and power.
3. The vibrator is driven by a gear motor coupled to the
vibrator shaft. The vibrator assembly rotates inside of a
sealed housing containing oil to lubricate the bearings.
This side of the drum is also shock mounted.
FRO NT AND R EAR DRU M RE MOVA L AN D
DISASSEMBLY.
Refer to Figure 32, Figure 33, and Figure 34 for the
removal and disassembly of the front and rear drums.
When reassembling the front drum, use Locktite 271 on
all mounting hardware.
REMOVI NG AN D REP L AC I NG VIBRAT ION/
STEERING PUMP
1. Remove the hydrostatic pump as per preceding
instructions.
2. Remove all hoses and lines.
3. Disconnect the vibration / steering pump and remove.
4. Repair or replace pump as required.
5. Install the pump in the reverse order of removal, using
Locktite 271 on all mounting bolts and nuts.
6. Test operate. Test and adjust the forward and reverse
pressure relief valves as required. Adjust the forward/
reverse control cable. Test and adjust the vibration and
steering pressure relief valves as required.
PAGE 28 — AR13HA/AR13HAR ROLLER (S/N 110301 & UP) • OPERATION AND PARTS MANUAL — REV. #0 (06/22/11)
Page 29

STEP 1
AND NUTS.
STEP 2
Q
STEP 4
O
MAINTENANCE
P
Q
STEP 3
P
1. JACK FRAME UP SLIGHTLY AT
ARTICULATION JOINT.
2. REMOVE THE FOUR ALLEN HEAD
SCREWS HOLDING THE SIDE
COVER OF THE DRUM SUPPORT
PLATE.
5. REMOVE NUTS SECURING FLANGE
ASSEMBLY TO DRUM SUPPORT PLATE
AND PULL OFF OF FLANGE ASSEMBLY.
6. REMOVE THE SIX 9/16 BOLTS SECURING
EXCITER PLATE TO DRUM WALL
3. MARK AND DISCONNECT
HOSES FROM MOTOR AND
MANIFOLD.
4. REMOVE FOUR ALLEN HEAD
SCREWS FROM DRUM SUPPORT
PLATES.(SCREWS MAY NEED TO BE
HEATED TO REMOVE)
STEP 7
FRONT DRUM
7. PULL EXCITER ASSEMBLY TO
REMOVE FROM DRUM INTERIOR.
STEP 6
8. REVERSE PROCEDURES TO
REASSEMBLE DRUM. USE
STEP 5
LOCKTITE 271 ON ALL BOLTS
Figure 32. Front Right Drum Removal
AR13HA/AR13HAR ROLLER (S/N 110301 & UP) • OPERATION AND PARTS MANUAL — REV. #0 (06/22/11) — PAGE 29
Page 30

BOLTS.
STEP 2
MAINTENANCE
STEP 1
STEP 4
M
N
STEP 3
1. JACK FRAME UP SLIGHTLY AT
ARTICULATION JOINT.
2. REMOVE THE EIGHT ALLEN HEAD
SCREWS HOLDING THE SIDE
COVER OF THE DRUM SUPPORT
PLATE.
PULL DRUM SUPPORT PLATE
5.
OFF DRIVE PLATE ASSEMBLY.
6.
REMOVE FOUR ALLEN HEAD
SCREWS SECURING MOTOR TO
DRUM SUPPORT PLATE AND
SET ASIDE.
7. REMOVE SIX NUTS SECURING
DRIVE PLATE TO SHOCK MOUNTS.
PULL OFF DRIVE PLATE AND SET
ASIDE.
STEP 9
3. MARK AND DISCONNECT
HOSES FROM MOTOR.
4. REMOVE FOUR ALLEN HEAD
SCREWS FROM DRUM SUPPORT
PLATE. (SCREWS MAY NEED TO BE
HEATED TO REMOVE)
STEP 6
STEP 5
STEP 7
STEP 8
STEP 8
FRONT DRUM
8. UN-THREAD SIX SHOCK MOUNTS
FROM DRUM WALL TO REPLACE.
9. PULL EXCITER ASSEMBLY TO
REMOVE FROM DRUM INTERIOR.
REVERSE PROCEDURES TO
10.
REASSEMBLE DRUM. USE
LOCKTITE ON ALL NUTS AND
Figure 33. Front Left Drum Removal
PAGE 30 — AR13HA/AR13HAR ROLLER (S/N 110301 & UP) • OPERATION AND PARTS MANUAL — REV. #0 (06/22/11)
Page 31

STEP 2
STEP 3
1. JACK FRAME UP SLIGHTLY AT
ARTICULATION JOINT.
2. REMOVE THE FOUR ALLEN HEAD
SCREWS SECURING THE DRUM
SUPPORT PLATE TO THE FRAME.
STEP 1
MAINTENANCE
STEP 6
STEP 4
I
STEP 5
4.
REMOVE ALLEN HEAD SCREWS
HOLDING THE SIDE COVER OF THE
DRUM SUPPORT PLATE.
5. MARK AND DISCONNECT
HOSES FROM MOTOR.
J
STEP 4
3. REMOVE NUTS SECURING BEARING
FLANGE TO BASE OF DRUM SUPPORT
PLATE.
7.
REMOVE TWO NUTS SECURING
DRUM SUPPORT PLATE TO FLANGE.
PULL OFF LEFT DRUM SUPPORT
PLATE AND SET ASIDE.
. PULL FLANGE OFF DRUM ROD
8
FOR SERVICE.
PULL RIGHT DRUM SUPPORT PLATE
9.
OFF DRIVE PLATE ASSEMBLY.
REAR DRUM
STEP 8
STEP 7
6. REMOVE FOUR ALLEN HEAD
SCREWS FROM DRUM SUPPORT
PLATES.
STEP 9
STEP 11
10.
REMOVE FOUR ALLEN HEAD
SCREWS SECURING MOTOR TO
DRUM SUPPORT PLATE AND
SET ASIDE.
REMOVE SIX BOLTS SECURING
11.
DRIVE PLATE TO DRUM WALL.
PULL OFF DRIVE PLATE AND SET
ASIDE.
STEP 10
12. REVERSE PROCEDURES TO
REASSEMBLE DRUM.
Figure 34. Rear Drum Removal/Installation
AR13HA/AR13HAR ROLLER (S/N 110301 & UP) • OPERATION AND PARTS MANUAL — REV. #0 (06/22/11) — PAGE 31
Page 32

ALTERNATOR/REGULATOR
This roller is equipped with a 20-amp charging system. This
system uses three charge coils connected in parallel. The
windings of each coil are wound with heavy-duty insulated
wire and are further protected by insulating material for long
life. A voltage regulator is provided to control the amount
of charge voltage being delivered to the 12 volt electrical
system. For servicing this charging system, contact your
Honda dealer.
NEUTRAL SAFETY SWITCH
MAINTENANCE
The travel lever is provided with a neutral safety switch
(Figure 35) that prevents the engine from starting when
the lever is in the forward or reverse drive position. Lever
must be placed in the neutral position in order for the starter
to function.
Figure 35. Safety Switch
To check this switch, remove the panel located below and
to the rear of the floor. This switch is mounted to the lower
forward/ reverse lever mechanism. Disconnect the white
and green wires. Place the lever in neutral and test for
continuity. Place the lever in forward or reverse; no continuity
should be present. Repair or replace as required.
Figure 36. Vibration Solenoid
BATTERY
Mishandling of the battery shortens the service life of the
battery and adds to maintenance cost. When handling the
battery do the following:
Be careful not to let the battery electrolyte come in
contact with your body or clothing.
Always wear eye protection and rubber gloves, since
the battery contains sulfuric acid which burns skin and
eats through clothing.
Check the battery regularly and make sure that each
electrolyte level is to the bottom of the vent well (Figure
42). If necessary, add only distilled water in a wellventilated area.
VIBRATOR SOLENOID
The vibrator solenoid (Figure 36) is located in the manifold
valve block and is controlled by the vibration switch located
on top of the travel lever. This solenoid controls the vibration
control valve which supplies hydraulic oil to the vibration
drive motor.
To test the vibration solenoid, turn the ignition switch on.
Check for proper supply voltage and ground. If proper
voltage and ground are present, check the solenoid for
continuity. If no continuity, replace the solenoid coil. If
continuity is present, place your hand on the solenoid and
turn the switch to the ON position; movement should be felt.
DO NOT START THE ENGINE FOR THIS TEST.
PAGE 32 — AR13HA/AR13HAR ROLLER (S/N 110301 & UP) • OPERATION AND PARTS MANUAL — REV. #0 (06/22/11)
Figure 37. Battery Fluid Levels
Page 33

PREPARATION FOR LONG-TERM STORAGE
ROLLER STORAGE
For storage of the roller for over 30 days, the following is
recommended:
1. Drain the fuel tank completely, or add STA-BIL to the
fuel.
2. Run the engine until the fuel in the injection system is
completely consumed.
3. Completely drain used oil from the engine crankcase
and fill with fresh clean oil, then follow the procedures
described in the engine manual for engine storage.
4. Drain water tank.
5. Clean the entire roller and engine compartment.
6. Remove battery and store it in cool dry place.
7. Cover the roller and place it a clean dry area, that is
protected from harsh elements.
8. Remove ignition key, and store in a safe place.
AR13HA/AR13HAR ROLLER (S/N 110301 & UP) • OPERATION AND PARTS MANUAL — REV. #0 (06/22/11) — PAGE 33
Page 34

MANIFOLD TEST PORTS
PAGE 34 — AR13HA/AR13HAR ROLLER (S/N 110301 & UP) • OPERATION AND PARTS MANUAL — REV. #0 (06/22/11)
Page 35

RELIEF VALVE
2000 PSI
STEERING
RELIEF VALVE
700 PSI
EXCITER
P
TEST
G1
HYDRAULIC SYSTEM DIAGRAM
MANIFOLD
M
EXCITER
VALVE
W
1
VIBRATION
EXCITER
MOTOR
EXCITER
PUMP
CHARGE PRESSURE
RELIEF VALVE
150-210 PSI
DRIVE
PUMP
W
CHARGE
PUMP
INTERNAL DRIVE PUMP
RELIEF VALVES
2900 ± 145 PSI
M
W
PUMP ASSEMBLY
TEST
G2
TEST
G3
2
W
P
3
L
STEERING
CYLINDER
M
4
T
W
R
STEERING VALVE
SERIES
DRIVE
TOW
VALVE
A
FRONT
DRIVE
MOTOR
REAR
DRIVE
MOTOR
B
T
10 MICRON
SUCTION
FILTER
14.5 PSI
M
RETURN LINE FILTER
W
ASSEMBLY
FILTER BY-PASS
25 PSI
AR13HA/AR13HAR ROLLER (S/N 110301 & UP) • OPERATION AND PARTS MANUAL — REV. #0 (06/22/11) — PAGE 35
Page 36

HYDRAULIC HOSE CONNECTIONS
G
MANIFOLD
C
E
FROM OPERATOR’S
POSITION
A
FRONT RIGHT SIDE
H
F
G
B
D
B
A
F
FROM OPERATOR’S
E
D
POSITION
C
FRONT LEFT SIDE
HYDRAULIC
DRIVE PUMP
NOTES
HOSES SHADED FOR
VISUAL CLARITY.
PAGE 36 — AR13HA/AR13HAR ROLLER (S/N 110301 & UP) • OPERATION AND PARTS MANUAL — REV. #0 (06/22/11)
Page 37

FRONT RIGHT MOTOR
Q
O
Q
P
HYDRAULIC HOSE CONNECTIONS
STEERING COLUMN
O
K
MANIFOLD
N
M
I
J
FROM OPERATOR’S
POSITION
K
P
L
L
REAR LEFT MOTOR
J
I
M
FRONT LEFT MOTOR
AR13HA/AR13HAR ROLLER (S/N 110301 & UP) • OPERATION AND PARTS MANUAL — REV. #0 (06/22/11) — PAGE 37
N
NOTES
HOSES SHADED FOR
VISUAL CLARITY.
Page 38

TROUBLESHOOTING
Troubleshooting (Roller)
SYMPTOM POSSIBLE PROBLEM SOLUTION
Low Vibration
No Vibration
Slow Steering
Steers Slow in One Direction Defective steering cylinder?
Slow Forward/Reverse
Speed
Low engine RPM? Check and adjust engine speed.
Low hydraulic pressure? Check and adjust hydraulic pressure.
No voltage to 12 volt solenoid?
No oil pressure?
Broken motor coupler? Replace coupler.
Low hydraulic pressure? Check pressure.
Steering column connector? Inspect bearings and grease if necessary.
Defective steering cylinder? Check seals, replace if necessary.
Low hydraulic pressure? Check pressure.
Rubber scrapper adjustment incorrect?
Rubber shock mount loose?
Free wheel valve "open"? Close valve.
Check vibration switch, check coil for
continuity.
Check for proper oil pressure or defective
relief valve.
Inspect cylinder for contamination,
replace if necessary.
Check for proper adjustment against
drum.
Inspect for broken mount, replace if
necessary.
Main Hydraulic Pressure
Low
Speed control cable out of adjustment? Inspect cable and adjust if necessary.
Incorrect engine speed? Adjust engine speed to correct speed.
Broken rubber shock mounts or drive plate? Inspect for cracks, replace if necessary.
PAGE 38 — AR13HA/AR13HAR ROLLER (S/N 110301 & UP) • OPERATION AND PARTS MANUAL — REV. #0 (06/22/11)
Page 39

Symptom Possible Problem Solution
Diffi cult to start, fuel is available, but no spark
at spark plug.
Diffi cult to start, fuel is available, and spark is
present at the spark plug.
Diffi cult to start, fuel is available, spark is
present and compression is normal.
Diffi cult to start, fuel is available, spark is
present and compression is low.
No fuel present at carburetor.
TROUBLESHOOTING
Troubleshooting (Engine)
Spark plug bridging? Check gap, insulation or replace spark plug.
Carbon deposit on spark plug? Clean or replace spark plug.
Short circuit due to defi cient spark plug
insulation?
Improper spark plug gap? Set to proper gap.
Fuel reaching carburetor? Check fuel line.
Water in fuel tank? Flush or replace fuel tank.
Fuel fi lter clogged? Replace fuel fi lter.
Stuck carburetor? Check fl oat mechanism.
Spark plug is red? Check transistor ignition unit.
Spark plug is bluish white?
No spark present at tip of spark plug?
No oil? Add oil as required.
Oil pressure alarm lamp blinks upon starting?
(if applicable)
ON/OFF switch is shorted? Check switch wiring, replace switch.
Ignition coil defective? Replace ignition coil.
Improper spark gap, points dirty? Set correct spark gap and clean points.
Condenser insulation worn or short circuiting? Replace condenser.
Spark plug wire broken or short circuiting? Replace defective spark plug wiring.
Wrong fuel type?
Water or dust in fuel system? Flush fuel system.
Air cleaner dirty? Clean or replace air cleaner.
Choke open? Close choke.
Suction/exhaust valve stuck or protruded? Reseat valves.
Piston ring and/or cylinder worn? Replace piston rings and/or piston.
Cylinder head and/or spark plug not tightened
properly?
Head gasket and/or spark plug gasket damaged? Replace head and spark plug gaskets.
No fuel in fuel tank? Fill with correct type of fuel.
Fuel cock does not open properly?
Fuel fi lter/lines clogged? Replace fuel fi lter.
Fuel tank cap breather hole clogged? Clean or replace fuel tank cap.
Air in fuel line? Bleed fuel line.
Check spark plug insulation, replace if worn.
If insuffi cient compression, repair or replace
engine. If injected air leaking, correct leak. If
carburetor jets clogged, clean carburetor.
Check transistor ignition unit is broken, and
replace defective unit. Check if voltage cord
cracked or broken and replace. Check if
spark plug if fouled and replace.
Check automatic shutdown circuit, "oil
sensor". (if applicable)
Flush fuel system, and replace with correct
type of fuel.
Torque cylinder head bolts and spark plug.
Apply lubricant to loosen fuel cock lever,
replace if necessary.
AR13HA/AR13HAR ROLLER (S/N 110301 & UP) • OPERATION AND PARTS MANUAL — REV. #0 (06/22/11) — PAGE 39
Page 40

POSITIVE
REVERSE SHIFTER
NEUTRAL
POSITION
SWITCH
VIBRATION
SWITCH
REVERSE
ALARM
SWITCH
RED
+12VDC
BACK-UP
ALARM
3
(OPTION)
STARTER
MOTOR
FORWARD
WHT
BLK
BLK
RED
BLK
GRN
WHT
BLK
BLK
BLK
GRN
CHASSIS
GND.
(B)
BLU
YEL
WHT
BLK
RED
30 AMP
FUSE
WHT WHT
WHT
(S)
+12VDC
+12VDC
YEL
L
M
CHASSIS
S
G
GND.
ORANGE
2
B (BATT.)
RED
RED
IGNITION SWITCH
COMBINATION
POSITION
1. OFF
2. RUN
3. START
7
GRN
HOUR
METER
FUEL
PUMP
CIRCUIT “MAKE”
G + M (GND).
B + L
B + L + S
CHASSIS
GND.
4
TB1
BLK
BLK
5
CHASSIS
GND.
CHASSIS
GND.
WIRING DIAGRAM
BLUE
NC
YEL
BLK
YEL
YEL
BLK
UNIT
IGNITION
COIL (RIGHT)
OIL LEVEL
SWITCH
UNIT
CHASSIS
1
GND.
BLK/YEL
VOLTAGE
REGULATOR
RECTIFIER
FUEL CUT-OFF
SOLENOID
WHT
NOTES:
1
2
3
4
5
6
7
CHASSIS
IGNITION
COIL (LEFT)
HYDRAULIC
VALVE BLOCK
CHASSIS
YEL
GND.
WHT
EXCITER
SOLENOID
GROUND TO STOP ENGINE, (OIL SWITCH).
PINS M AND G GROUNDED TO IGNITION CASE.
AUDIBLE ALARM ORDER AS OPTION.
LOCATED INSIDE STEERING COLUMN.
LOCATED UNDERNEATH FOOT PLATFORM.
LOCATED IN ENGINE COMPARTMENT.
GROUND TO START ENGINE, (IGNITION SWITCH).
BATTERY
NEGATIVE
CHASSIS
GND.
GR
20 AMP
CHARGE COIL
M
CHASSIS
GND.
GR
WHT
CHASSIS
GND.
WHT
GR
BLK/YEL/
RED
GR
BLK
BLK/YEL
CHASSIS
BLK/YEL
6
GND.
PAGE 40 — AR13HA/AR13HAR ROLLER (S/N 110301 & UP) • OPERATION AND PARTS MANUAL — REV. #0 (06/22/11)
GND.
Page 41

NOTES
AR13HA/AR13HAR ROLLER (S/N 110301 & UP) • OPERATION AND PARTS MANUAL — REV. #0 (06/22/11) — PAGE 41
Page 42

EXPLANATION OF CODE IN REMARKS COLUMN
The following section explains the different symbols and
PART NO. Column
QTY. Column
— Item quantity can be indicated by a
A/R (As Required) is generally used for hoses or other
A blank entry generally indicates that the item is not sold
separately. Other entries will be clarifi ed in the “Remarks”
Some of the most common notes found in the “Remarks”
Column are listed below. Other additional notes needed
same unique symbol will be included when this item is
— Used to list an effective serial
— Indicates that the part
part is NOT used on a specifi c model or model number
available items. Examples include battery cables, shims,
— Indicates that an item cannot
be purchased as a separate item and is either part of an
assembly/kit that can be purchased, or is not available
remarks used in the Parts section of this manual. Use the
help numbers found on the back page of the manual if there
are any questions.
Numbers Used
number, a blank entry, or A/R.
NOTICE
The contents and part numbers listed in the parts
section are subject to change without notice. Multiquip
does not guarantee the availability of the parts listed.
SAMPLE PARTS LIST
NO. PART NO. PART NAME QTY. REMARKS
1 12345 BOLT .....................1 .....INCLUDES ITEMS W/%
2% WASHER, 1/4 IN. ..........NOT SOLD SEPARATELY
2% 12347 WASHER, 3/8 IN. ..1 .....MQ-45T ONLY
3 12348 HOSE ..................A/R ...MAKE LOCALLY
4 12349 BEARING ..............1 .....S/N 2345B AND ABOVE
NO. Column
Unique Symbols — All items with same unique
symbol
(@, #, +, %, or >) in the number column belong to the
same assembly or kit, which is indicated by a note in the
“Remarks” column.
Duplicate Item Numbers — Duplicate numbers indicate
multiple part numbers, which are in effect for the same
general item, such as different size saw blade guards in
use or a part that has been updated on newer versions
of the same machine.
NOTICE
When ordering a part that has more than one item
number listed, check the remarks column for help in
determining the proper part to order.
parts that are sold in bulk and cut to length.
Column.
REMARKS Column
to describe the item can also be shown.
Assembly/Kit — All items on the parts list with the
purchased.
Indicated by:
“INCLUDES ITEMS W/(unique symbol)”
Serial Number Break
number range where a particular part is used.
Indicated by:
“S/N XXXXX AND BELOW”
“S/N XXXX AND ABOVE”
“S/N XXXX TO S/N XXX”
Specifi c Model Number Use
is used only with the specifi c model number or model
number variant listed. It can also be used to show a
variant.
Indicated by:
Numbers Used — Part numbers can be indicated by a
number, a blank entry, or TBD.
TBD (To Be Determined) is generally used to show a
part that has not been assigned a formal part number
at the time of publication.
A blank entry generally indicates that the item is not sold
separately or is not sold by Multiquip. Other entries will
be clarifi ed in the “Remarks” Column.
PAGE 42 — AR13HA/AR13HAR ROLLER (S/N 110301 & UP) • OPERATION AND PARTS MANUAL — REV. #0 (06/22/11)
“XXXXX ONLY”
“NOT USED ON XXXX”
“Make/Obtain Locally” — Indicates that the part can
be purchased at any hardware shop or made out of
and certain washers and nuts.
“Not Sold Separately”
for sale through Multiquip.
Page 43

SUGGESTED SPARE PARTS
AR13HA RIDE-ON TANDEM DRUM ROLLER (with Honda GX630RQZB2 Engine)
1 TO 3 UNITS
Qty. P/N Description
1............510229 .................. CABLE, THROTTLE
1............506239 .................. CABLE, CHOKE
1............513324 .................. CABLE, FORWARD/REVERSE
1............10958 .................... SWITCH, STARTER
3............506267K ...............KEY, STARTER SWITCH
6............508667 .................. OIL FILTER, HYDRAULIC
1............507278 .................. CAP, HYDRAULIC TANK
1............506221 .................. FILTER, GAS TANK
6............EM20763 ..............FILTER, FUEL
1............23514 .................... GAUGE, FUEL/CAP
1............509249 .................. CAP, WATER TANK
4............508433 .................. SCRAPER, RUBBER
3............17010ZJ1000 ........ ELEMENT SET, AIR
1............17218ZJ1000 ........ FILTER OUTER, AIR
6............15410ZJ4999AH ... FILTER, OIL
6............9807956846 .......... SPARK PLUG
3............16910ZE8015 ....... FILTER, FUEL ENGINE
AR13HA/AR13HAR ROLLER (S/N 110301 & UP) • OPERATION AND PARTS MANUAL — REV. #0 (06/22/11) — PAGE 43
Page 44

NAMEPLATE AND DECALS
1
CAUTION
8
9
6
3
1
5
USE WATER
ONLY
CHOKE
ENGINE HOURS
513457
7
High RPM: RPM
Low RPM: RPM
2
15
WARNING!
8
4
13
14
3
6
9
345336
12
PUSH
TO
STOP
VIBRATION
CONTROL
PUSH
TO
START
THROTTLE
MULTIQUIP COMPANY, 18910 WILMINGTON AVENUE
310-537-3700. 800/421-1244 NATIONWIDE. FAX:310-537-3927
CARSON, CALIFORNIA 90746
FRONT
BACK
OPEN
WATER VALVES
OPEN
FORWARD
NEUTRAL
REVERSE
515436
SERVICE INSTRUCTION CHART
10
PAGE 44 — AR13HA/AR13HAR ROLLER (S/N 110301 & UP) • OPERATION AND PARTS MANUAL — REV. #0 (06/22/11)
CAUTION!
5
REAR
ROLLER
Page 45

NAMEPLATE AND DECALS
NO. PART NO. PART NAME QTY. REMARKS
1 513457 DECAL: STEERING CONSOLE 1
2 13118 DECAL: POWDER COATED 1
3 511726 DECAL: HYDRAULIC OIL LEVEL INDICATOR 1
4 511736 DECAL: WARNING 1
5 511740 DECAL: MULTIQUIP 1
6 34536 DECAL: OWNERS MANUAL 1
7 513580 DECAL: ENGINE RPM SETTING 1
8 513698 DECAL: WATER TANK CAP 1
9 515436 DECAL: CONTROL PANEL 1
10 511737 DECAL: SERVICE INSTRUCTION CHART 1
12 511735 DECAL: CAUTION 2
13 513707 DECAL: ATTENTION 2
14 513467 DECAL: PARKING BRAKE INSTRUCTIONS 1
15 511733 DECAL: HYDRAULIC OIL INDICATOR 1
AR13HA/AR13HAR ROLLER (S/N 110301 & UP) • OPERATION AND PARTS MANUAL — REV. #0 (06/22/11) — PAGE 45
Page 46

16
AR-13HA
NAMEPLATE AND DECALS
17
18
26
24
CAUTION
1.
Read instruction manual before operation.
2.
Never leave machine unattended with the
engine running.
3.
Keep unauthorized and untrained people away
from the machine during operation.
4.
Do not tow or push machine.
5.
When parked on a slope, block drum to prevent machine
movement.
6.
Exhaust gasses are dangerous, do not operate or run machine
in a enclosed area.
7.
Wear safety clothing and devices as required.
8.
Always place forward and reverse lever in neutral position
before starting machine.
9.
Before starting or resuming work, operator must check that
no one is in the operating area.
10.
Keep away from machine articulating area. This is a pinch
point and will cause serious injury.
11.
Keep away from edges and steep slopes, do not operate
machine close to embankments or open trenches.
12.
Check mechanical parking brake prior to traveling up or down
slopes, limit travel to straight up and down at low speed only.
13.
Start and operate machine from operatorís seat only.
14.
Be sure to stop engine whenever maintenance or refueling is
being performed.
26
18
20
21
19
511724
AR-13HA
25
511739
23
26
21
20
22
PAGE 46 — AR13HA/AR13HAR ROLLER (S/N 110301 & UP) • OPERATION AND PARTS MANUAL — REV. #0 (06/22/11)
18
Page 47

NAMEPLATE AND DECALS
CONTINUED
NO. PART NO. PART NAME QTY. REMARKS
16 513529 DECAL: AR-13H MQ LOGO 1
17 511738 DECAL: DANGER 1
18 513393 DECAL: SECURING POINT INDICATOR ..........4................POINT ARROW UP
19 513469 DECAL: CAUTION STRIPE PATTERN ..............1................HORIZONTAL PLACEMENT
20 511718 DECAL: CAUTION STRIPE PATTERN ..............2................VERTICAL PLACEMENT
21 513688 DECAL: MQ LOGO 2
22 513740 DECAL: CAUTION STRIPE PATTERN ..............1................HORIZONTAL PLACEMENT
23 513531 DECAL: AR-13H MQ LOGO 1
24 511739 DECAL: CAUTION: INSTRUCTIONS 1
25 511724 DECAL: GREASE REMINDER 1
26 513393 DECAL: SECURING POINT INDICATOR ..........3................POINT ARROW DOWN
AR13HA/AR13HAR ROLLER (S/N 110301 & UP) • OPERATION AND PARTS MANUAL — REV. #0 (06/22/11) — PAGE 47
Page 48

FRONT DRUM ASSY.
PAGE 48 — AR13HA/AR13HAR ROLLER (S/N 110301 & UP) • OPERATION AND PARTS MANUAL — REV. #0 (06/22/11)
Page 49

FRONT DRUM ASSY.
NO. PART NO. PART NAME QTY. REMARKS
2 513280 FRONT ROLLER 1
4 506145 HOUSING BEARING 1
6 506147 BEARING 1
8 506136 RING, RETAINING 1
10 508665 COUPLER 1
12 506142 MOUNT, VIBRATION MOTOR 1
14 011208025 BOLT, 8X25T ......................................................6................REPLACES 508342
16 EM923023 WASHER, FLAT 5/16" ........................................6................REPLACES 492597
18 492264 BOLT, 3/8"X1" 6
20 506141 SHOCK, MOUNT 3
22 508340 STUD, M8X40 6
24 EM923343 WASHER, LOCK 5/16........................................6................REPLACES 492623
26 020108060 NUT, M8 .............................................................6................REPLACES 508341
28 514522 ROLLER, SUPPORT .........................................1................RIGHT SIDE - FRONT
30 492276 BOLT 1/2" X 1-1/2" 8
32 513283 HOSE, PROTECTION COVER 1
34 513314 NUT 1/4" X 3/4" 12
36 506220 MOTOR, HYDRAULIC 1
40 492362 NUT 5/16" X 5/8" 4
41 EM923343 WASHER, LOCK 5/16" ......................................4................REPLACES 492623
43 513337 HOSE 1
45 513343 HOSE 1
47 513342 HOSE 1
78 EM963610 CAPSCREW 3/8" NC X 1-1/4" G8 .....................6................REPLACES 492375
80 3019092 WASHER, FLAT 3/8" ..........................................6................REPLACES 508346
82 517389 SHOCK MOUNT, 3" DIAMETER 6
84 021110120 NUT, NYLON LOCK M10 ZINC 1.SP 6
86 505977 PLATE, DRIVER 1
88 505984 HUB 1
90 EM503803 PINS, DOWEL....................................................2................REPLACES 503803
92 515637 SUPPORT, ROLLER ..........................................1................LEFT SIDE - FRONT/REAR
94 EM924006 KEY, COTTER 1/8" X 2" .....................................1................REPLACES 491690
96 515396 MOTOR, HYDRAULIC 1
98 505990 BOLT 1/2" X 2-1/2" 4
100 515639 COVER 1
124 505951 FITTING 2
126 513332 FITTING 2
128 515641 HOSE 1
130 513344 HOSE 1
AR13HA/AR13HAR ROLLER (S/N 110301 & UP) • OPERATION AND PARTS MANUAL — REV. #0 (06/22/11) — PAGE 49
Page 50

66
EXCITER ASSY.
58
46
64
74
54
44
60
46
70
48
64
74
52
1
62
FRONT DRUM
NOTES:
INNER BEARINGS ARE INCLUDED
1
WITH ITEM 64.
76
70
PAGE 50 — AR13HA/AR13HAR ROLLER (S/N 110301 & UP) • OPERATION AND PARTS MANUAL — REV. #0 (06/22/11)
Page 51

EXCITER ASSY.
NO. PART NO. PART NAME QTY. REMARKS
44 EM963610 CAPSCREW, 3/8" NC X 1-1/4" G8 ....................6................REPLACES 492375
46 3019092 WASHER, FLAT 3/8" .........................................12...............REPLACES 508346
48 513285 HOUSING, BEARING RIGHT 1
52 EM927040 KEY, WOODRUFF 606 ......................................1................REPLACES 506250
54 492467 SCREW, ALLEN 5/16" 2
58 EM963610 CAPSCREW, 3/8" NC X 1-1/4" G8 ....................6................REPLACES 492375
60 506144 SEAL 1
62 490964 RING, RETAINING 1
64 506131 BEARING 2
66 513418 EXCITER SHAFT 1
70 506135 RING, RETAINING 2
74 513286 OIL SEAL 65x100x9 2
76 513287 HOUSING, BEARING LEFT 1
AR13HA/AR13HAR ROLLER (S/N 110301 & UP) • OPERATION AND PARTS MANUAL — REV. #0 (06/22/11) — PAGE 51
Page 52

REAR DRUM AND CHASSIS ASSY.
PAGE 52 — AR13HA/AR13HAR ROLLER (S/N 110301 & UP) • OPERATION AND PARTS MANUAL — REV. #0 (06/22/11)
Page 53

REAR DRUM AND CHASSIS ASSY.
NO. PART NO. PART NAME QTY. REMARKS
2 513291 REAR DRUM 1
4 505988 ALLEN PLUG 1
6 492584 NUT, LOCK 1/2 IN. 1
8 503735 BEARING, FLANGE ..........................................1................INCLUDES ITEMS W/
10 514523 SUPPORT, ROLLER ..........................................1................RIGHT SIDE - REAR
12 509165 BOLT, 1/2 NC x 2-1/4 IN. G5 1
14 492276 BOLT, 1/2 NC x 1-1/2 IN. G5 8
16 EM963610 CAPSCREW, 3/8 IN. NC x 1-1/4 IN. G5 6
18 508346 LOCK WASHER 3/8 IN. 6
20 505977 PLATE DRIVE 1
24 EM963610 CAPSCREW, 3/8 NC x 1-1/4 IN. G8 ..................6................REPLACES 492375
26 505984 HUB 1
28 EM503803 PINS, DOWEL 3/8 x 1 IN. 2
30 515637 REAR ROLLER SUPPORT, LEFT .....................1................LEFT SIDE - FRONT/REAR
32 515639 SUPPORT COVER 1
34 513314 BOLT, 1/4 NC x 1/2 IN. G 12
36 491689 KEY, COTTER 1/8 x 2 IN. 1
38 515396 MOTOR, HYDRAULIC 1
40 505990 BOLT, 1/2 NC x 2-1/2 IN. G 4
66 505951 FITTING 8-10-F5OLO-S 2
70 513349 HOSE 2
72* ZERK GREASE FITTING ..................................1................NOT SOLD SEPARATELY
74* ZERK CAP .........................................................1................NOT SOLD SEPARATELY
100 513266 REAR CHASSIS 1
*
AR13HA/AR13HAR ROLLER (S/N 110301 & UP) • OPERATION AND PARTS MANUAL — REV. #0 (06/22/11) — PAGE 53
Page 54

170
COVERS AND FRAME ARTICULATION LOCK ASSY.
164
167
166
240
162
238
30
168
161
4
136
138
138
6
140
142
A
STEERING
CONSOLE
20
22
32
33
34
247
246
248
PAGE 54 — AR13HA/AR13HAR ROLLER (S/N 110301 & UP) • OPERATION AND PARTS MANUAL — REV. #0 (06/22/11)
Page 55

COVERS AND FRAME ARTICULATION LOCK ASSY.
NO. PART NO. PART NAME QTY. REMARKS
4 513315 REAR WATER TANK COVER 1
6 509177 BOLT 5/16 IN. 4
20 515416 FLOOR PLATE/W ALUMINUM COVER 1
22 509177 BOLT 5/16 X 5/8 IN. 10
30 514243 COVER, STEERING COLUMN 1
32 492363 BOLT 5/16 X 3/4 IN. NCG5 4
33 505679 WASHER, FLAT 5/16 IN 4
34 EM923343 WASHER, LOCK 5/16 IN . .................................4................REPLACES 492623
136 507888 SEAT 1
138 505679 NUT, 5/16" 8
140 2105164 NUT, NYLON 5/16 IN. - 18 .................................4................REPLACES 492582
161 513471 LOCK CLIP 4
162 513328 LOCKING ARM 1
164 492410 BOLT 5/8 NC x 2-1/2 IN. G5 1
166 506167 WASHER, PLASTIC 5/8 IN. 2
167 EM923023 WASHER, PLAIN 5/16 IN. .................................1................REPLACES 506109
168 EM969023 NUT, LOCK 5/8 IN. ............................................1................REPLACES 492586
170 745 LOCK PIN 1
238 23297 CONTAINER, MANUAL 1
240 492259 SCREW, HHC 1/4 IN.- 20X12 2
246 515415 ARM, FLOOR COVER 1
247 511474 BRACKET, ARM 1
248 503723 RIVET AM-54 1
AR13HA/AR13HAR ROLLER (S/N 110301 & UP) • OPERATION AND PARTS MANUAL — REV. #0 (06/22/11) — PAGE 55
Page 56

HOOD AND REAR PANEL ASSY.
PAGE 56 — AR13HA/AR13HAR ROLLER (S/N 110301 & UP) • OPERATION AND PARTS MANUAL — REV. #0 (06/22/11)
Page 57

HOOD AND REAR PANEL ASSY.
NO. PART NO. PART NAME QTY. REMARKS
2 515096 HOOD 1
6 492364 SCREW, HHC 5/16 X 18 X 1 IN. 2
8 505679 FLAT WASHER 5/16 IN. 2
10 2105164 NUT, NYLON 5/16- 18 .......................................2................REPLACES 492582
12 EM514610 LATCH KIT, STEEL 2
13 503723 RIVET BRAKE LINING 13
15 515199 SEAL RUBBER 1
16 513305 HINGE, SLOTTED 1
18 514438 LATCH KIT (HOOD) 1
22 492356 BOLT 1/4 X 3/4 IN. 12
24 492581 NUT 1/4 IN. 12
30 513396 FRONT CHASSIS 1
32 513308 REAR ENGINE COVER 1
33 13212 GROMMET, 1-1/4 IN. ID 1
34 513309 BOLT 5/16 X 3/4 IN. 4
86 513312 BOLT 1/4 X 1 IN. 2
88 492581 NUT 1/4 IN. 2
90 490181 SIGHT GLASS 1
92 513313 SUPPORT REAR ENGINE COVER 1
94 492356 BOLT 1/4 X 3/4 IN. 1
96 2101402 WASHER, LOCK 1/4 IN. ....................................1................REPLACES 492622
98 492596 FLAT WASHER 1/4 IN. 3
100 011208025 BOLT 8 X 25T DCA-85,125,150SSM .................1................REPLACES 508342
102 EM923343 WASHER, LOCK 5/16 IN. ..................................1................REPLACES 492623
104 506205 PLUG 1
146 506273 SOLENOID, STARTER 1
148 510925 NUT 3/16 IN. 2
150 513314 BOLT 1/4 X 1/2 IN. 2
152 492596 FLAT WASHER 1/4 IN. 2
154 492581 NUT 1/4 IN. 2
155 506085 GROMMET 1
156 31750Z2E8020 RECTIFIER ASSY, REGULATOR , 20A 1
157 32105Z6LA002 SUB-WIRE HARNESS ASSY. 1
AR13HA/AR13HAR ROLLER (S/N 110301 & UP) • OPERATION AND PARTS MANUAL — REV. #0 (06/22/11) — PAGE 57
Page 58

STEERING COLUMN AND
CLUTCH CABLE
CONNECTS TO ENGINE
1
NOTES:
SEE HYDRAULIC
HOSE CONNECTIONS
PAGES 34-35
K
L
L
K
HOSES
CONNECT TO
MANIFOLD
STEERING
VALVE
K
L
174
180
182
176
184
58
26
30
34
36
28
52
32
172
42
38
44
40
46
48
50
18
14
16
18
22
54
16
24
56
188
1
202
198
194
196
190
200
22
178
186
192
3
HOSE CONNECTS TO
HYDRAULIC CYLINDER
PORT 2, ITEM 24
2
3
HOSE CONNECTS TO
HYDRAULIC CYLINDER
PORT 1, ITEM 24
2
181
2
1
195
HYDRAULIC ARTICULATION
ASSY
PAGE 58 — AR13HA/AR13HAR ROLLER (S/N 110301 & UP) • OPERATION AND PARTS MANUAL — REV. #0 (06/22/11)
Page 59

STEERING COLUMN AND
NO. PART NO. PART NAME QTY. REMARKS
14 EM923348 WASHER, LOCK 5/8 IN. 2
16 EM969023 NUT, LOCK 5/8 IN. .............................................2................REPLACES 492586
18 492412 BOLT 5/8” UNC X 3 2
22 506196 ELBOW FITTING 2
24 513297 CYLINDER, STEERING 1
26 513298 BOLT 1/2 IN. NC x 1 IN. G 4
28 513299 COVER, ARTICULATING JOINT 1
30 EM963055 HEX HEAD CAPSCREW 3/8 IN. x 3/4 IN. .........3................REPLACES 492373
32 6109180 WASHER, LOCK 1/2” DIAMETER .....................4................REPLACES 492626
34 0166A WASHER, LOCK 3/8” DIAMETER .....................3................REPLACES 492624
36 513300 RETAINER PLATE 1
38 513301 SPACER 1
40 506164 BEARING 1
42 492276 BOLT 1/2 IN. NC x 1-1/2 IN. G 4
44 6109180 WASHER, LOCK 1/2 IN. ...................................4................REPLACES 492626
46 513302 BASE, ARTICULATING JOINT 1
48 513303 ARTICULATING JOINT 1
50 492276 BOLT 1/2 IN. NC x 1-1/2 IN. G 4
52 491701 ZERK FITTING 1
54 513350 HOSE, 9 1
56 513348 HOSE, 16 1
58 491008 GREASE COVER 1
172 598156 NUT 1
174 518728 WHEEL, STEERING 1
176 507862 STEERING COLUMN 1
178 506265 NUT 5/16 IN. 4
180 509143 NUT 5/16 IN. 4
181 513346 HOSES K AND L 2
182 508344 WASHER 5/16 IN. 4
184 508335 BUSHING 4
186 509190 WASHER 3/4 IN. 1
188 506186 HYDRAULIC VALVE 1
190 506222 HOUR METER 1
192 503119 NUT, LOCK 3/16” 1
194 10958 SWITCH, STARTER 1
195 11078 KEY, IGNITION 1
196 506239 CABLE CHOKE 1
198 503958 BOLT 1/4 IN. x 5/8 IN. G5 1
200 EM969079 NUT 1/4 IN. ........................................................1................REPLACES 492581
202 515423 HARNESS, WIRING 1
HYDRAULIC ARTICULATION
ASSY
AR13HA/AR13HAR ROLLER (S/N 110301 & UP) • OPERATION AND PARTS MANUAL — REV. #0 (06/22/11) — PAGE 59
Page 60

10
ARTICULATION ARM ASSY.
4
2
6
4
2
8
6
8
PAGE 60 — AR13HA/AR13HAR ROLLER (S/N 110301 & UP) • OPERATION AND PARTS MANUAL — REV. #0 (06/22/11)
Page 61

ARTICULATION ARM ASSY.
NO. PART NO. PART NAME QTY. REMARKS
2 513294 ROD END 2
4 514347 BOLT 3/4 IN. x 2-1/2 IN. 2
6 EM505069 NUT 3/4 IN. 2
8 513295 NUT 3/4 IN. 2
10 513296 ROD, DIRECTION STABILIZER 1
AR13HA/AR13HAR ROLLER (S/N 110301 & UP) • OPERATION AND PARTS MANUAL — REV. #0 (06/22/11) — PAGE 61
Page 62

HYDRAULIC DRIVE PUMP ASSY.
201
A
202
200
206
204
62
38
209
B
199
196
192
54
190
48
52
46
50
C
38
45
200
202
F
66
87
E
68
203
64
74
72
70
D
60
56
58
191
192
40
42
89
90
88
44
NOTES
A C
B D
PAGE 62 — AR13HA/AR13HAR ROLLER (S/N 110301 & UP) • OPERATION AND PARTS MANUAL — REV. #0 (06/22/11)
A
SEE HYDRAULIC
HOSE CONNECTIONS
B
Page 63

HYDRAULIC DRIVE PUMP ASSY.
NO. PART NO. PART NAME QTY. REMARKS
38 500214 KEY SQUARE 1
40 EM969013 NUT LOCK 3/8 IN. .............................................4................REPLACES 492583
42 3019092 WASHER, FLAT 3/8 IN. ......................................8................REPLACES 492598
44 EM963059 BOLT 3/8 X 2 IN. ................................................4................REPLACES 492379
45 513352 RUBBER RING 1/2 X 1/2 IN. .............................1................S/N 101201 AND BELOW
46 506234 SPACER 1
48 506235 COUPLER 1
50 506236 ALUMINUM ADAPTER 1
52 EM963610 CAPSCREW 3/8 NCX 1-1/4 IN. GS ...................4................REPLACES 492376
54 507845 PUMP, STEERING 1
56 EM508346 WASHER 3/8 IN. ................................................2................REPLACES 508346
58 EM175 BOLT 3/8-16 X 1-1/4 SC HD 2
60 507860 ADAPTER, STEERING PUMP 1
62 506187 HYDRAULIC PUMP 1
64 513310 SHIFT LEVER 1
66 509144 BOLT 3/16 X 1-3/4 IN. 1
68 492367 BOLT 5/16 X 1-3/4 IN. 1
70 2105164 NUT, NYLON 5/16 IN. - 18 .................................1................REPLACES 492582
72 503119 NUT, LOCK 3/16 IN. 1
74 492465 SCREW ALLEN HEAD 1/4 - 20 X 3/8 IN. 1
87 513335 HOSE 2
88 513618 ADAPTOR 1
89 513620 HOSE, DRAIN 1
90 513619 PLUG 1
190 506217 FITTING 3/4 IN. 1
191 513340 HOSE 1
192 506207 HOSE CLAMP, HS-16 2
196 506203 FITTING 1
199 513338 HOSE 1
200 508427C COPPER WASHER 21/32 IN. 3
201 513333 HOSE 1
202 508343 FITTING 3
203 513339 HOSE 1
204 508428C COPPER WASHER 5/8 IN. 1
206 506219 FITTING 1/2 IN. 1
208 506200 FITTING 3703-08-08 1
209 513336 HOSE 1
AR13HA/AR13HAR ROLLER (S/N 110301 & UP) • OPERATION AND PARTS MANUAL — REV. #0 (06/22/11) — PAGE 63
Page 64

MANIFOLD AND HYDRAULIC OIL FILTER ASSY.
119
114
112
120
122
124
183
187
83
116
118
144
140
142
B
138
A
136
108
110
106
H
157
B
87
A
134
132
128
G
170
B
130
132
128
168
181
182
183
166
119
158
30
164
160
172
162
176
178
174
172
156
126
PAGE 64 — AR13HA/AR13HAR ROLLER (S/N 110301 & UP) • OPERATION AND PARTS MANUAL — REV. #0 (06/22/11)
126
184
119
NOTE:
G
SEE HYDRAULIC
H
HOSE CONNECTIONS
Page 65

MANIFOLD AND HYDRAULIC OIL FILTER ASSY.
NO. PART NO. PART NAME QTY. REMARKS
83 513334 HOSE 1
87 513335 HOSE 2
106 507278 HYDRAULIC TANK CAP 1
108 506218 STRAIGHT FITTING 3/4" 1
110 506221 FILTER, GAS 1
112 508667 OIL FILTER 1
114 508664 FILTER, HEAD 1
116 492357 SCREW HHC 1/4- 20X12 2
118 2101402 WASHER, LOCK 1/4” .......................................2................REPLACES 492622
119 EM25507 FITTING 3
120 506204 FITTING 1
122 506244 BLOCK FILTER M10 1
124 508670 VALVE CHECK 1
126 505976 CLAMP 3/4 5
128 506185 PLATE CORNER 4
130 492367 SCREW, HHC5/16”-18X1-3/4” 3
132 EM923343 WASHER, LOCK 5/16” .....................................4................REPLACES 492623
134 492371 BOLT 5/16” LOCK 1
136 506201 FITTING, TEE 1
138 506202 FITTING 2
140 506206 FITTING 1
142 508472 FITTING 1
144 506195 FITTING 1
156 515502 MANIFOLD 1
157 508814 BOLT 5/16”X3-1/4” 2
158 506192 FITTING 2
160 507774 VALVE RELIEF, 500 PSI 1
162 507772 PLUG 1
164 506247 VALVE, NEEDLE 1
166 506246 VALVE, RELIEF, 2000 PSI 1
168 506245 VALVE, SOLENOID 1
170 507885 12 VOLT COIL SOLENOID 1
172 506182 COUPLING PSI TEST 3
174 506190 FITTING 2
176 511808 ADAPTER, STRAIGHT 2
178 506190 FITTING 2
181 506195 FITTING 1
182 506205 PLUG 1
183 506193 FITTING 4
184 506195 FITTING 2
AR13HA/AR13HAR ROLLER (S/N 110301 & UP) • OPERATION AND PARTS MANUAL — REV. #0 (06/22/11) — PAGE 65
Page 66

FUEL TANK ASSY.
124
204
212
FUEL TANK
214
205
252
207
213
256
A
216
320
206
330
300
310
210
220
208
740
330
720
750
650
730
700
670
To Engine
Air Filter
690
680
660
To Engine
Carburetor
A
221
REAR
ENGINE COVER
222
224
224
258
228
218
248
226
268
FUEL TANK
223
248
284
LEFT SIDE
CHASSIS
250
227
266
PAGE 66 — AR13HA/AR13HAR ROLLER (S/N 110301 & UP) • OPERATION AND PARTS MANUAL — REV. #0 (06/22/11)
Page 67

FUEL TANK ASSY.
NO. PART NO. PART NAME QTY. REMARKS
94 513314 BOLT, 1/4" NC X 3/4" G 1
124 508302 PAD, RUBBER TANK 2
204 520831 FUEL TANK, STEEL EPA REQ. 1
205 514467 BRACKET, FUEL TANK SUPPORT 1
206 23514 CAP, FUEL EPA 1
207 514840 PAD, RUBBER BRACKET 4 x 36 x 10 mm 1.7
208 505594 FLEX TUBE 5/16 IN. 1
210 514560 ADAPTER, 129HB-5-4 1
212 492364 BOLT 5/16 NC x 1 IN. G5 2
213 492623 WASHER, LOCK 5/16 IN. 2
214 492597 WASHER, FLAT 5/16 IN. 2
216 492553 NUT, HEX 5/16 IN. 2
218 506208 CLAMP HS-4 8
220 520612 HOSE 4FLH 5/16 IN. AR*
221 520612 HOSE 1/4 IN. AR*
222 352431090 FILTER, FUEL ....................................................1................REPLACES EM20763
223 516450 PUMP, FUEL 1
224 520611 HOSE 1/4 IN. AR*
226 492622 WASHER, LOCK 1/4 IN. 2
227 492561 NUT, HEX 1/4 IN. 2
228 492357 BOLT 1/4 NC x 1 IN. G5 2
230 505976 CLAMP 3/4 1
248 EM20426 ADAPTOR, ELBOW 2
250 514559 ADAPTOR, ELBOW 1
252 512731 ADAPTOR 2
256 512722 FUEL SHUT-OFF VALVE 1
258 520612 HOSE 1/4 IN. AR*
266 491028 WRAP CABLE TIE 1
268 511778 ADAPTER 1
284 491210 PLUG, TANK 1/4 IN. 1
300 23507 GROMMET, FUEL VALVE 1
310 23509 FUEL VALVE 1
320 520833 HOSE, 3/16" EPA AR*
330 517621 STAPLE, DOUBLE METAL #178 1
650 23506 CANNISTER, CHARCOAL 800 CC 1
660 801006 SUPPORT, CANNISTER 1
670 492581 NUT, 1/4" NC 2
680 492596 WASHER, FLAT 1/4" 2
690 513312 BOLT, 1/4" NC X 1" G 2
700 493108 CLAMP, HS-60 3
720 520612 HOSE, 5/16" EPA AR*
730 515468 CLAMP, HS-6 1
740 800416 ADAPTER 5/16" TO 3/16" 1
750 520833 HOSE, 3/16" EPA AR*
* — AS REQUIRED
AR13HA/AR13HAR ROLLER (S/N 110301 & UP) • OPERATION AND PARTS MANUAL — REV. #0 (06/22/11) — PAGE 67
Page 68

WATER TANK ASSY.
PART OF FRAME
1
NOTES
1
132
128
18
270
130
266
1
268
132
128
18
270
130
266
268
116
116
116
10
12
13
18
18
93
116
8
14
18
100
102
92
98
90
84
104
88
86
116
96
119
16
PAGE 68 — AR13HA/AR13HAR ROLLER (S/N 110301 & UP) • OPERATION AND PARTS MANUAL — REV. #0 (06/22/11)
Page 69

WATER TANK ASSY.
NO. PART NO. PART NAME QTY. REMARKS
8 513316 WATER TANK 1
10 EM963055 BOLT 3/8”X3/4” ..................................................1................REPLACES 492373
12 3019092 WASHER, FLAT 3/8” SPECIAL ..........................1................REPLACES 492598
13 0166A WASHER, LOCK 3/8” ........................................1................REPLACES 492624
14 509249 WATER TANK CAP 1
16 506094 PLUG 1/2” NPT GALVANIZED 1
18 506071 ELBOW PVC 7
84 513321 WATER VALVE EXTENSION 1
88 492358 BOLT 1/4" NC x 1-1/4" G5 4
90 492581 NUT1/4" 4
92 513322 VALVE, BALL 2
93 813351 ELBOW 90G 1/2” NYLON 1
94 513379 “T” ADAPTER 1
98 506086 U- BOLT 3/8" 4
100 3019092 WASHER, FLAT. 3/8”.........................................16...............REPLACES 492598
102 508435 LOCK NUT 8
104 503015 KNOB, HANDLE ADJ. 2
116 504163 HOSE 1/2" 1
118 504163 HOSE 1/2" 1
119 504163 HOSE 1/2" 1
120 504163 HOSE 1/2" 1
122 504163 HOSE 1/2" 1
128 506084 CLAMP 4
130 505679 NUT 5/16" 4
132 505401 SCREW, HHC 5/16”- 18X1/2” 4
266 506072 PVC TUBE 4
268 506074 MALE ADAPTER 4
270 508610 CAP 4
AR13HA/AR13HAR ROLLER (S/N 110301 & UP) • OPERATION AND PARTS MANUAL — REV. #0 (06/22/11) — PAGE 69
Page 70

ENGINE AND MUFFLER ASSY.
266
210
278
212
222
216
214
212
215
265
36
265
280
510
430
480
640
470
460
440
450
420
500
PAGE 70 — AR13HA/AR13HAR ROLLER (S/N 110301 & UP) • OPERATION AND PARTS MANUAL — REV. #0 (06/22/11)
280
282
218
400
256
257
258
220
221
212
Page 71

ENGINE AND MUFFLER ASSY.
NO. PART NO. PART NAME QTY. REMARKS
36 GX630RQZB2 ENGINE, HONDA 20 HP 1
210 513449 MUFFLER PIPE (MODIFIED) 1
212 506257 U- BOLT ASSY. 1-1/2" 3
214 514711 TUBE 1.25” FLEX 1
215 506207 HOSE CLAMP HS-16 2
216 510718 HEAT WRAP 2”x1/16” 1
218 513447 EXTENSION MUFFLER PIPE 1
220 520308 ELBOW, EXHAUST FLANGED 1
221 514540 RIVET, POP STEEL 4
222 520288 DEFLECTOR, EXHAUST 1
256 492553 NUT, HEX 5/16” NC 1
257 492623 WASHER, LOCK 5/16” 1
258 505679 WASHER, FLAT 5/16” 1
265 18333ZJ1000 GASKET, MUFFLER 2
266 9405008000 NUT 4
278 492357 BOLT, 1/4"NC X 1" G5 1
280 492596 WASHER, FLAT 1/4" 2
282 492581 NUT, 1/4" NC 1
400 520271 MUFFLER VHSM6 1
420 520437 MUFFLER BASE EXTENSION 1
430 520429 SUPPORT GUIDE 1
440 505679 WASHER, FLAT 5/16" 1
450 492364 BOLT 5/16" NC X 1" G5 1
460 492596 WASHER, FLAT 1/4" 2
470 DULT100256 BOLT M6 X 25 P=1 GALVANIZED 2
480 492364 BOLT 5/16" NC X 1"G5 2
500 492371 BOLT 5/16" NC X 3"G5 1
510 492623 WASHER, LOCK 5/16" 2
640 492622 WASHER, LOCK 1/4" 2
AR13HA/AR13HAR ROLLER (S/N 110301 & UP) • OPERATION AND PARTS MANUAL — REV. #0 (06/22/11) — PAGE 71
Page 72

135
THROTTLE ASSY.
110
112
136
134
106
108
3
114
1
2
NOTES:
ITEM 114 BOLTS
1
TO ENGINE
THROTTLE CABLE
2
CONNECTS TO ENGINE
ITEM 110 CONNECTS
3
TO ITEM 64, SEE PAGE 66
PAGE 72 — AR13HA/AR13HAR ROLLER (S/N 110301 & UP) • OPERATION AND PARTS MANUAL — REV. #0 (06/22/11)
Page 73

THROTTLE ASSY.
NO. PART NO. PART NAME QTY. REMARKS
106 513323 TRAVEL LEVER (FWD/REV) 1
108 513324 CABLE, FORWARD/REVERSE 1
110 514742 JOINT BALL 1
112 508451 LOCK NUT 1/4" - 28 NF 1
114 513325 ADVANCE CABLE SUPPORT 1
134 510229 CABLE THROTTLE ASSEMBLY 1
135 G201 KNOB HANDLE 1
136 DA1252 LEVER HANDLE 1
AR13HA/AR13HAR ROLLER (S/N 110301 & UP) • OPERATION AND PARTS MANUAL — REV. #0 (06/22/11) — PAGE 73
Page 74

36
BRAKE CONTROL ASSY.
38
44
56
60
54
78
82
48
58
66
76
64
42
46
40
62
68
70
72
265
74
266
PAGE 74 — AR13HA/AR13HAR ROLLER (S/N 110301 & UP) • OPERATION AND PARTS MANUAL — REV. #0 (06/22/11)
268
269
267
Page 75

BRAKE CONTROL ASSY.
NO. PART NO. PART NAME QTY. REMARKS
36 506046 LEVER, BRAKE 1
38 506158 BOLT 5/16" NC x 3/4" G5 4
40 492365 BOLT 5/16" NC x 1/1/4" G5 1
42 EM923023 WASHER, FLAT 5/16” ........................................2................REPLACES 492597
44 2105164 NUT, NYLON 5/16”- 18 ......................................1................REPLACES 492582
46 506057 BRAKE LINK 1
48 505999 BELL CRANK 1
50 EM963097 BOLT 3/8” NC x 1/1/2" G5 .................................1................REPLACES 492313
52 EM969013 NUT, LOCK 3/8” .................................................1................REPLACES 492583
56 508674 BOLT 5/16" NC x 1" G5 4
58 506042 PIN, CLEVIS 1
66 2219 KEY, COTTER 1
68 492570 NUT, HEX 5/8" 1
70 EM923348 WASHER, LOCK 5/8” .......................................1................REPLACES 492627
72 508449 BRAKE ROD 1
74 508619 BOLT, HEX HEAD 3/8” NCX4” 1
76 3019092 WASHER, FLAT 3/8” ..........................................2................REPLACES 492598
78 EM969013 NUT, LOCK 3/8” .................................................1................REPLACES 492583
82 506001 BUSHING, PLASTIC 1
265@ 513320 SUPPORT, BRAKE SHOE 1
266@ 505997 BRAKE PAD 1
267@ 508566 RIVET 6
268@ 508386 WASHER 3/16" 6
269 513193 BRAKE PAD ASSY. ............................................1................INCLUDES ITEMS W/@
AR13HA/AR13HAR ROLLER (S/N 110301 & UP) • OPERATION AND PARTS MANUAL — REV. #0 (06/22/11) — PAGE 75
Page 76

BATTERY ASSY.
154
146
150
148
144
158
160
152
156
PAGE 76 — AR13HA/AR13HAR ROLLER (S/N 110301 & UP) • OPERATION AND PARTS MANUAL — REV. #0 (06/22/11)
Page 77

BATTERY ASSY.
NO. PART NO. PART NAME QTY. REMARKS
144 514391 BATTERY 12V 1
146 513446 CABLE (-) BATTERY 1
148 513445 CABLE (+) BATTERY 1
150 505624 BATTERY TERMINAL COVER ..........................1................BLACK
152 506266 BATTERY TERMINAL COVER ..........................1................RED
154 506152 WRAP 1
156 506151 CLAMP, BATTERY 1
158 492354 HEX HEAD SCREW 1/4"X1 1/2" NC G5 1
160 3019092 WASHER, FLAT 3/8” ..........................................1................REPLACES 492598
AR13HA/AR13HAR ROLLER (S/N 110301 & UP) • OPERATION AND PARTS MANUAL — REV. #0 (06/22/11) — PAGE 77
Page 78

122
SCRAPPER ASSY.
120
1
118
A
A
112
114
110
108
106
NOTE:
116
PAGE 78 — AR13HA/AR13HAR ROLLER (S/N 110301 & UP) • OPERATION AND PARTS MANUAL — REV. #0 (06/22/11)
PART OF FRAME
1
Page 79

SCRAPPER ASSY.
NO. PART NO. PART NAME QTY. REMARKS
106 513290 SCRAPER, SUPPORT 4
108 508433 SCRAPER, RUBBER 4
110 508434 PLATE BACKING 4
112 EM963057 BOLT 3/8” ..........................................................12...............REPLACES 492313
114 3019092 WASHER, FLAT3/8” ..........................................12...............REPLACES 492598
116 EM969013 NUT, LOCK 3/8” ................................................12...............REPLACES 492583
118 EM963692 BOLT, 1/2” UNC X 1-1/2” ....................................8................REPLACES 492384
120 492584 NUT, LOCK 1/2” NC 8
122 621 WASHER 1/2” SPECIAL 8
AR13HA/AR13HAR ROLLER (S/N 110301 & UP) • OPERATION AND PARTS MANUAL — REV. #0 (06/22/11) — PAGE 79
Page 80

PAYMENT TERMS
5. Parts must be in new and resalable
Multiquip reser ves the right to quote and
who use our products as integral parts of their
LIMITATIONS OF SELLER’S LIABILITY
connection with the sale of its products. Apart
statutory, which extend beyond the description
TERMS AND CONDITIONS OF SALE — PARTS
Terms of payment for parts are net 30 days.
FREIGHT POLICY
All parts orders will be shipped collect or
prepaid with the charges added to the invoice.
All shipments are F.O.B. point of origin.
Multiquip’s responsibility ceases when a
signed manifest has been obtained from the
carrier, and any claim for shortage or damage
must be settled between the consignee and
the carrier.
MINIMUM ORDER
The minimum charge for orders from Multiquip
is $15.00 net. Customers will be asked for
instructions regarding handling of orders not
meeting this requirement.
RETURNED GOODS POLICY
Return shipments wil l be accepted and
credit will be allowed, subject to the following
provisions:
1. A Returned Ma terial Authoriza ti on
must be approved by Multiquip prior to
shipment.
2. To obtain a Return Material Authorization,
a list must be provided to Multiquip
Parts Sales that defi nes item numbers,
quantities, and descriptions of the items
to be returned.
a. The parts numbers and descriptions
b. The list must be typed or computer
c. The list must state the reason(s)
d. The list must reference the sales
e. The list must include the name
3. A copy of the Return Material Authorization
must accompany the return shipment.
4. Freight is at the sender’s expense. All
parts must be returned freight prepaid to
Multiquip’s designated receiving point.
must match the current parts price
list.
generated.
for the return.
ord er( s ) o r in vo i ce(s ) un der
which the items were originally
purchased.
and phone number of the person
requesting the RMA.
co ndition , in th e ori ginal Multiqui p
package (if any), and with Multiquip part
numbers clearly marked.
6. The following items are not returnable:
a. Obsolete parts. (If an item is in the
price book and shows as being
repla ced by an other ite m, it is
obsolete.)
b. Any parts with a limited shelf life
(such as gaskets, seals, “O” rings,
and other rubber parts) that were
purchased more than six months
prior to the return date.
c. Any line item with an extended
dealer ne t price of les s than
$5.00.
d. Special order items.
e. Electrical components.
f. Paint, chemicals, and lubricants.
g. Decals and paper products.
h. Items purchased in kits.
7. The sender will be notifi ed of any material
received that is not acceptable.
8. Su ch ma teria l will be he ld for five
working days from notifi cation, pending
instructions. If a reply is not received
within five days, the material will be
returned to the sender at his expense.
9. Credit on returned parts will be issued
at dealer net price at time of the original
purch as e, le ss a 15 % res to cking
charge.
10. In cases where an item is accepted, for
which the original purchase document
can not be determined, the price will be
based on the list price that was effective
twelve months prior to the RMA date.
11. Credit issued will be applied to future
purchases only.
PRICING AND REBATES
Prices are subject to change without prior
notice. Price changes are effective on a
specifi c date and all orders received on or
after that date will be billed at the revised price.
Rebates for price declines and added charges
for price increases will not be made for stock
on hand at the time of any price change.
sell direct to Government agencies, and to
Original Equipment Manufacturer accounts
own products.
SPECIAL EXPEDITING SERVICE
A $ 35.00 surcharge will be added to the
invoice for special handling including bus
shipments, insured parcel post or in cases
where Multiquip must personally deliver the
parts to the carrier.
Multiquip shall not be liable hereunder for
damages in excess of the purchase price of
the item with respect to which damages are
claimed, and in no event shall Multiquip be
liable for loss of profi t or good will or for any
other special, consequential or incidental
damages.
LIMITATION OF WARRANTIES
No warrant ies, express or implied , are
made in connection with the sale of parts or
trade accessories nor as to any engine not
manufactured by Multiquip. Such warranties
made in connection with the sale of new,
complete units are made exclusively by a
statement of warranty packaged with such
units, and Multiquip neither assumes nor
authorizes any person to assume for it
any other obligation or liability whatever in
from such written statement of warranty,
there are no warranties, express, implied or
of the products on the face hereof.
Effective: February 22, 2006
PAGE 80 — AR13HA/AR13HAR ROLLER (S/N 110301 & UP) • OPERATION AND PARTS MANUAL — REV. #0 (06/22/11)
Page 81

NOTES
AR13HA/AR13HAR ROLLER (S/N 110301 & UP) • OPERATION AND PARTS MANUAL — REV. #0 (06/22/11) — PAGE 81
Page 82

OPERATION AND PARTS MANUAL
HERE’S HOW TO GET HELP
© COPYRIGHT 2011, MULTIQUIP INC.
Multiquip Inc
the MQ logo are registered trademarks of Multiquip Inc. and may not be used, reproduced, or altered without written permission. All other trademarks are the property
The information and specifications included in this publication were in effect at the time of approval for printing. Illustrations, descriptions, references and technical data contained in
this manual are for guidance only and may not be considered as binding. Multiquip Inc. reserves the right to discontinue or change specifications, design or the information published
in this publication at any time without notice and without incurring any obligations.
PLEASE HAVE THE MODEL AND SERIAL
NUMBER ON-HAND WHEN CALLING
United StateS
Multiquip Corporate Office MQ Parts Department
18910 Wilmington Ave.
Carson, CA 90746
Contact: mq@multiquip.com
Service Department Warranty Department
800-421-1244
310-537-3700
Technical Assistance
800-478-1244 Fax: 310-943-2238
Tel. (800) 421-1244
Fax (800) 537-3927
Fax: 310-537-4259 800-421-1244
800-427-1244
310-537-3700
310-537-3700
Fax: 800-672-7877
Fax: 310-637-3284
Fax: 310-943-2249
mexico United Kingdom
MQ Cipsa Multiquip (UK) Limited Head Office
Carr. Fed. Mexico-Puebla KM 126.5
Momoxpan, Cholula, Puebla 72760 Mexico
Contact: pmastretta@cipsa.com.mx
Tel: (52) 222-225-9900
Fax: (52) 222-285-0420
Unit 2, Northpoint Industrial Estate,
Globe Lane,
Dukinfield, Cheshire SK16 4UJ
Contact: sales@multiquip.co.uk
Canada
Multiquip
4110 Industriel Boul.
Laval, Quebec, Canada H7L 6V3
Contact: jmartin@multiquip.com
Tel: (450) 625-2244
Tel: (877) 963-4411
Fax: (450) 625-8664
Tel: 0161 339 2223
Fax: 0161 339 3226
of their respective owners and used with permission.
This manual MUST accompany the equipment at all times. This manual is considered a permanent part of the equipment and should remain with the unit if resold.
and
Your Local Dealer is:
 Loading...