

Page 1
Advanced Contact Technology
MA251 (es_en)
Instrucciones de empleo
Tenaza de engarce PV-CZM...
para MC3, MC4 y MC4-EVO 2
Índice
Instrucciones de seguridad ........................................................2
Realización para MC3 ����������������������������������������������������������������3
Realización para MC4 ����������������������������������������������������������������4
Realización para MC4-EVO 2�����������������������������������������������������5
Cambio de la matríz de engarce ������������������������������������������������7
—
Desmontaje de la matríz de engarce ��������������������������������������7
—
Montaje de la matríz de engarce ��������������������������������������������7
Engarce �������������������������������������������������������������������������������������8
Calidad de engarce ��������������������������������������������������������������������9
Nota ������������������������������������������������������������������������������������10-12
MA251 (es_en)
Operating instructions
Crimping pliers PV-CZM...
for MC3, MC4 and MC4-EVO 2
Content
Safety Instructions ......................................................................2
Explanation for MC3 ������������������������������������������������������������������3
Explanation for MC4 ������������������������������������������������������������������4
Explanation for MC4-EVO 2 ������������������������������������������������������5
Exchanging the crimping insert �������������������������������������������������7
—
Removing the crimping insert ������������������������������������������������7
—
Fitting the crimping insert ������������������������������������������������������7
Crimping ������������������������������������������������������������������������������������8
Crimping quality ������������������������������������������������������������������������9
Notes ����������������������������������������������������������������������������������10-12
PV-CZM...
* UL le E343181
www.multi-contact.com 1 / 12
Page 2

Advanced Contact Technology
Instrucciones des montaje Safety Instructions
Sólo personal adecuadamente cualicado y especialistas formados podran realizar el montaje y la instalación de los productos teniendo en cuenta todas las regulaciones de seguridad aplicables.
Multi-Contact (MC) no se responsabiliza ante el incumplimiento de estas advertencias.
Utilice sólo los componentes y herrmientas indicadas por MC.
No se desvíe de los procedimientos de preparación y montaje
aquí descritos, en caso de una manipulación inadecuada no
se podrá garantizar la seguridad ni la conformidad con los datos técnicos. No modique el prodcuto en ningún caso.
Los trabajos aquí descritos no pueden ejecutarse
en piezas conectadas a la red y con tensión.
El producto nal debe proporcionar protección al
usuario frente a una descarga eléctrica.
MC recomienda no utilizar cables de PVC ni cables
no galvanizados del tipo H07RN-F.
The products may be assembled and installed exclusively by
suitably qualied and trained specialists duly observing all applicable safety regulations.
Multi-Contact (MC) does not accept any liability in the event of
failure to observe these warnings.
Use only the components and tools specied by MC. In case
of self-assembly, do not deviate from the preparation and
assembly instructions as stated herein, otherwise MC cannot
give any guarantee as to safety or conformity with the technical data. Do not modify the product in any way.
The work described here must not be carried out
on live or load-carrying parts.
Protection from electric shock must be assured by
the end product (i.e. by the correctly assembled
plug connector) and by its user.
For safety reasons, MC does strongly recommend
not to use PVC cables or untinned cables of type
H07RN-F.
Encontrará más detalles técnicos en el catálogo del
producto.
For further technical data please see the product
catalogue.
Explicación de los símbolos Explanation of the symbols
Advertencia de voltajes peligrosos
Advertencia de área de peligro Warning of a hazard area
Sugerencia o consejo útil Useful hint or tip
2 / 12 www.multi-contact.com
Warning of dangerous voltages
Page 3
Advanced Contact Technology
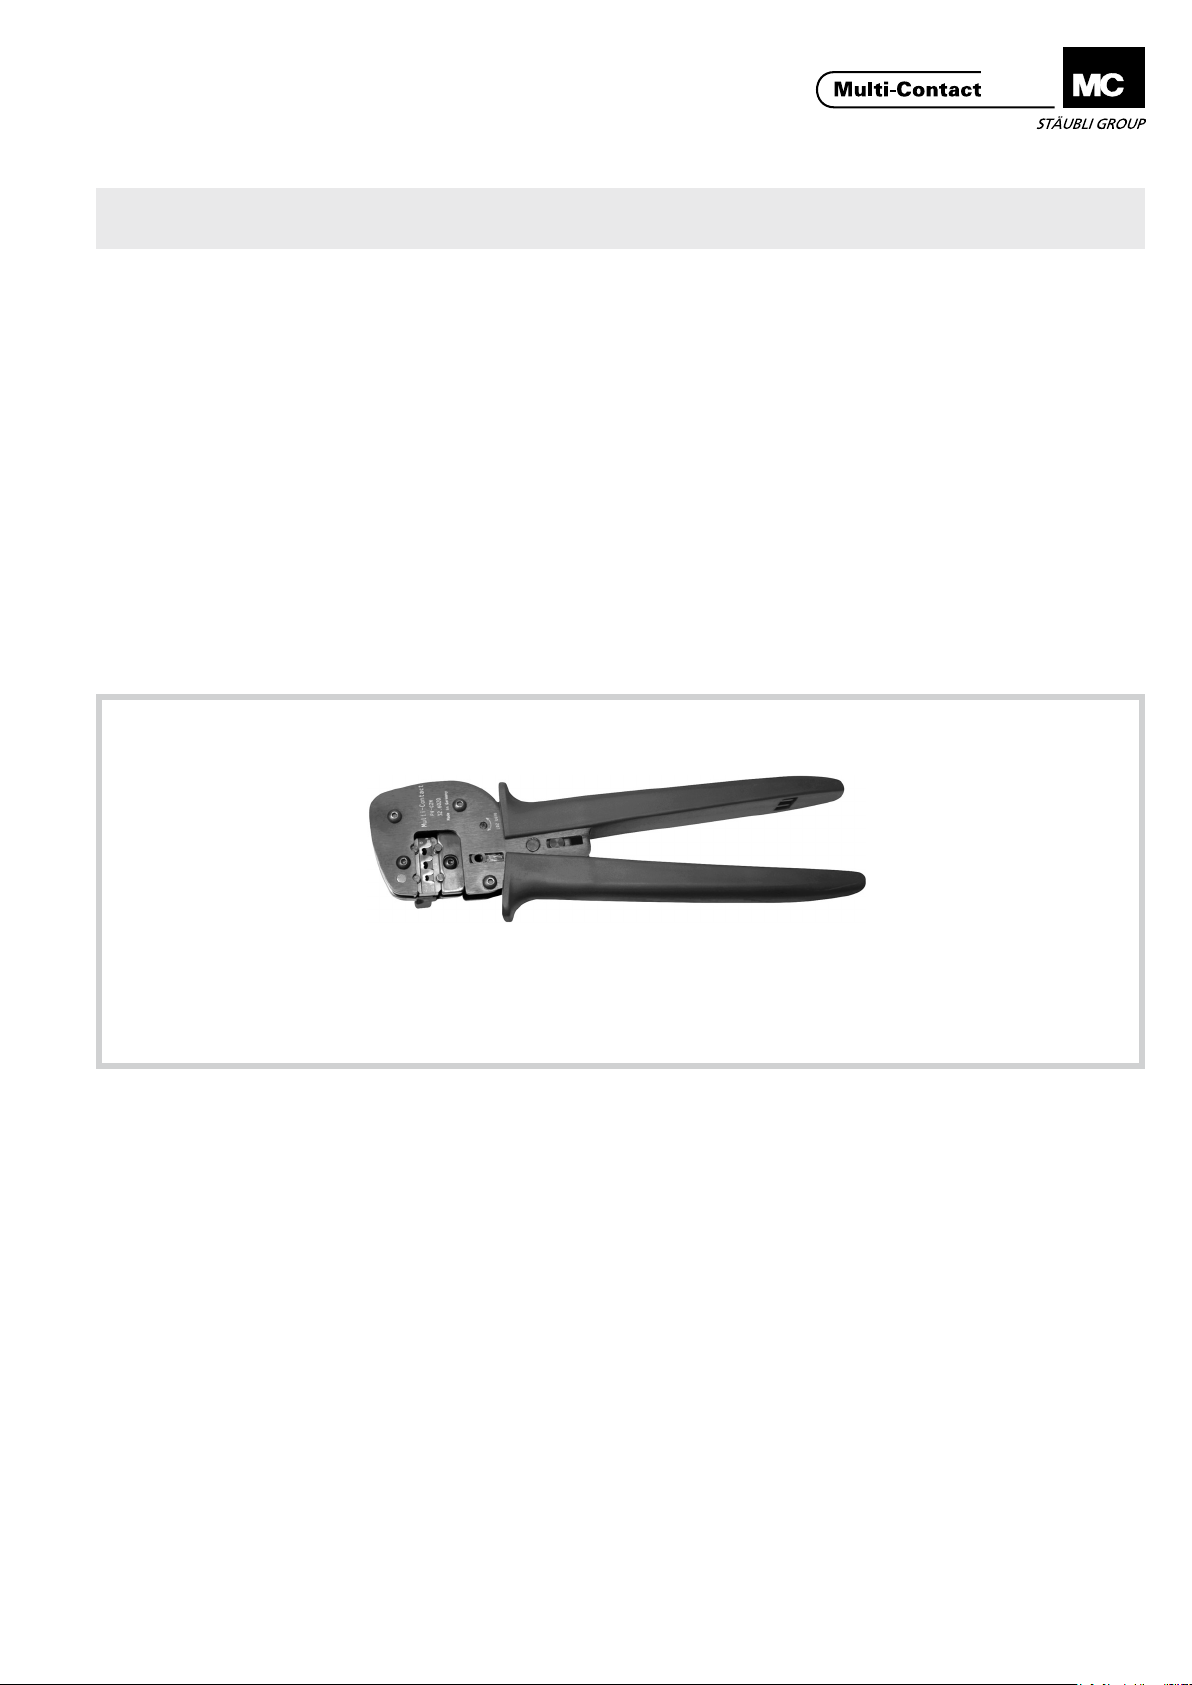
Realización para MC3 Explanation for MC3
(ill. 1)
Tenaza de engarce PV-CZM-16100A
incluye dos posicionadores intercambiables y dos matrices de engarce
intercambiables
(ill. 1)
Crimping pliers PV-CZM-16100A
incl. two interchangeable Locators
and two interchangeable crimping
inserts
Pos.
Seccion del cable
Cable cross section
2
mm
AWG
1 2,5 14
2 4 12
3 6
4
adecuado para
suitable for
PV-SP3/4
PV-BP3/4
PV-SP3/4
PV-BP3/4
PV-SP3/6
PV-BP3/6
5
1
Seccion del cable: 2,5 / 4 / 6mm
(14 / 12 / 10AWG)
N° de código: 32.6020-16100A
2
Crimping range: 2,5 / 4 / 6mm
(14 / 12 / 10AWG)
Order No.: 32.6020-16100A
Componentes Individual parts
(ill. 2 + 3)
Matrices de engarce intercambiables
Rangos de engarce
Crimping range
2
2
mm
2,5 / 4 / 6 14 / 12 / 10 PV-ES-CZM-16100 32.6021-16100
4 / 10 PV-ES-CZM-17100 32.6021-17100
AWG
Tipo
Type
(ill. 2 + 3)
Interchangeable crimping inserts
2
N° de código
Order No.
Pos.
Seccion del cable
Cable cross section
2
mm
AWG
4 4 10
5 10
adecuado para
suitable for
PV-SP3/4
PV-BP3/4
PV-SP4/10
PV-BP4/10
3
(ill. 4)
Posicionadores intercambiables
Rangos de engarce
Crimping range
2
4
mm
2,5 / 4 / 6 12 / 10 PV-LOC-A 32.6039
AWG
4 / 10 PV-LOC-A10 32.6049
Estos tipos de posicionador son sólo
para Ø 3mm
Tipo
Type
(ill. 4)
Interchangeable locators
N° de código
Order No.
This locator types are for Ø 3mm only
www.multi-contact.com 3 / 12
Page 4
Advanced Contact Technology
Realización para MC4 Explanation for MC4
(ill. 5)
Tenaza de engarce incl. posicionador
PV-LOC y matriz de engarce integrada
(ill. 5)
Crimping pliers incl. locator PV-LOC
and built-in crimping insert
Pos.
1
Seccion del cable
Cable cross section
mm
1,5 14
2 2,5
3
1
2
AWG
4 12
2
3
adecuado para
suitable for
PV-SP4/2.5
PV-BP4/2.5
PV-SP4/2.5
PV-BP4/2.5
PV-SP4/6
PV-BP4/6
Rangos de engarce: 1,5 / 2,5 / 4mm
2
(14 / 12AWG)
5
Tipo: PV-CZM-18100
N° de código: 32.6020-18100
Rangos de engarce: 2,5 / 4 / 6mm
2
(12 / 10AWG)
Tipo: PV-CZM-19100
N° de código: 32.6020-19100
Rangos de engarce: 4 / 10mm
2
Tipo: PV-CZM-20100
N° de código: 32.6020-20100
2
Rangos de engarce: 6 / 10mm
Tipo: PV-CZM-21100
6
N° de código: 32.6020-21100
Rangos de engarce: 8 / 12 / 10AWG
Tipo: PV-CZM-22100
N° de código: 32.6020-22100
Componentes Individual parts
(ill. 6 + 7 + 8 + 9 + 10)
Matrices de engarce intercambiables
(ill. 6 + 7 + 8 + 9 + 10)
Interchangeable crimping inserts
Crimping range: 1,5 / 2,5 / 4mm
2
(14 / 12AWG)
Type: PV-CZM-18100
Order No.: 32.6020-18100
Crimping range: 2,5 / 4 / 6mm
2
(12 / 10AWG)
Type: PV-CZM-19100
Order No.: 32.6020-19100
Crimping range: 4 / 10mm2
Type: PV-CZM-20100
Order No.: 32.6020-20100
Crimping range: 6 / 10mm2
Type: PV-CZM-21100
Order No.: 32.6020-20100
Crimping range: 8 / 12 / 10AWG
Type: PV-CZM-22100
Order No.: 32.6020-22100
Pos.
4
Seccion del cable
Cable cross section
2
mm
AWG
2,5
5 4 12
6
6 10
8
7
Pos.
7
8
Seccion del cable
Cable cross section
2
mm
4
10
4
6
adecuado para
suitable for
PV-SP4/2.5
PV-BP4/2.5
PV-SP4/6
PV-BP4/6
PV-SP4/6
PV-BP4/6
adecuado para
suitable for
PV-SP4/6
PV-BP4/6
PV-SP4/10
PV-BP4/10
Rangos de engarce:
5
7
8
1,5 / 2,5 / 4
Crimping range
2
mm
Rangos de engarce:
Crimping range
2
mm
2,5 / 4 / 6
Rangos de engarce:
Crimping range
2
mm
AWG
14 / 12
AWG
12 / 10
AWG
Tipo
Type
N° de código
Order No.
PV-ES-CZM-18100 32.6021-18100
Tipo
Type
N° de código
Order No.
PV-ES-CZM-19100 32.6021-19100
Tipo
Type
N° de código
Order No.
4 / 10 PV-ES-CZM-20100 32.6021-20100
4 / 12 www.multi-contact.com
Page 5

Advanced Contact Technology
Pos.
9
10
Seccion del cable
Cable cross section
mm
12
Pos.
11 8
12 10
13 12
Seccion del cable
Cable cross section
AWG
10
10
9
adecuado para
suitable for
2
6
PV-SP4/6
PV-BP4/6
PV-SP4/10
PV-BP4/10
9
11
13
adecuado para
suitable for
PV-SP4/8
PV-BP4/8
PV-SP4/6
PV-BP4/6
PV-SP4/6
PV-BP4/6
10
Rangos de engarce
Crimping range
2
mm
6 / 10 PV-ES-CZM-21100 32.6021-21100
Rangos de engarce
Crimping range
AWG
8 / 12 / 10 PV-CZM-22100 32.6020-22100
Tipo
Type
Tipo
Type
N° de código
Order No.
N° de código
Order No.
12
11
(ill. 11)
Posizionator PV-LOC
N° de código: 32.6040
Posizionator PV-LOC-B
N° de código: 32.6055
Nota:
Cuando utilice la herramienta de
crimpado PV-CZM-22100, use el
posicionador PV-LOC-B.
(ill. 12)
Tenaza de engarce incl. posicionador y
matriz de engarce integrada
Rangos de engarce: 1,5 / 2,5 / 4mm
2
(14 / 12AWG)
Tipo: PV-CZM-40100
N° de código: 32.6020-40100
Rangos de engarce:: 2,5 / 4 / 6mm
(14 / 12 / 10AWG)
Tipo: PV-CZM-41100
N° de código: 32.6020-41100
Rangos de engarce:: 4 / 10mm
(12 / 8AWG)
Tipo: PV-CZM-42100
N° de código: 32.6020-42100
(ill. 11)
Locator PV-LOC
Order No.: 32.6040
Locator PV-LOC-B
Order No.: 32.6055
Note:
When using the crimping tool
PV-CZM-22100, please use the
locator PV-LOC-B.
(ill. 12)
Crimping pliers incl. Locator and built
in crimping insert
Crimping range: 1,5 / 2,5 / 4mm
(14 / 12AWG)
Type: PV-CZM-40100
Order No.: 32.6020-40100
2
Crimping range: 2,5 / 4 / 6mm
(14 / 12 / 10AWG)
Type: PV-CZM-41100
Order No.: 32.6020-41100
2
Crimping range: 4 / 10mm
(12 / 8AWG)
Type: PV-CZM-42100
Order No.: 32.6020-42100
2
2
2
www.multi-contact.com 5 / 12
Page 6

Advanced Contact Technology
1
1
Componentes Individual parts
2
2
Pos.
1
Seccion del cable
Cable cross section
2
mm
AWG
1,5
2 2,5 14
3
Pos.
4
5
5
4 12
Seccion del cable
Cable cross section
2
mm
AWG
2,5 14
5 4 12
6
6 10
adecuado para
suitable for
PV-SP4-EVO 2/2,5
PV-BP4-EVO 2/2,5
PV-SP4-EVO 2/2,5
PV-BP4-EVO 2/2,5
PV-SP4-EVO 2/6
PV-BP4-EVO 2/6
4
4
6
6
adecuado para
suitable for
PV-SP4-EVO 2/2,5
PV-BP4-EVO 2/2,5
PV-SP4-EVO 2/6
PV-BP4-EVO 2/6
PV-SP4-EVO 2/6
PV-BP4-EVO 2/6
(ill. 13 + 14 + 15)
Matrices de engarce intercam-
(ill. 13 + 14 + 15)
Interchangeable crimping inserts
biables
Rangos de engarce
Crimping range
2
13
3
3
mm
1,5 / 2,5 / 4
14
Rangos de engarce
Crimping range
2
mm
2,5 / 4 / 6
AWG
14 / 12
AWG
14 / 12 / 10
Tipo
Type
PV-ES-CZM-40100 32.6021-40100
Tipo
Type
PV-ES-CZM-41100 32.6021-41100
N° de código
Order No.
N° de código
Order No.
8
8
7
7
15
Pos.
7
Seccion del cable
Cable cross section
2
mm
AWG
4 12
8 10 8
adecuado para
suitable for
PV-SP4-EVO 2/6
PV-BP4-EVO 2/6
PV-SP4-EVO 2/10
PV-BP4-EVO 2/10
Rangos de engarce
Crimping range
mm
4 / 10
2
AWG
12 / 8
Tipo
Type
PV-ES-CZM-42100 32.6021-42100
(ill. 16)
Posicionador PV-LOC-C
N° de código: 32.6056
16
6 / 12 www.multi-contact.com
N° de código
Order No.
(ill. 16)
Locator PV-LOC-C
Order no.: 32.6056
Page 7

Advanced Contact Technology
17
Cambio de la matríz de engarce Exchanging the crimping
inserts
Desmontaje de la matríz de engarce
(ill. 17)
Cierre la tenaza de engarce.
Removing the crimping insert
(ill. 17)
Close the crimping tool
18
19
20
(ill. 18)
Desatornille los tornillos el largo (S) y
el corto (S1) y abra la tenaza de engarce (apriete a fondo y suelte).
(ill. 18)
Unscrew both the long S and the
short S1 screw. Open the crimping
tool (press completely together and
release).
(ill. 19)
Extraiga la matríz de engarce superior.
(ill. 20)
Extraiga la matríz de engarce inferior.
(ill. 19)
Remove the upper crimping insert.
(ill. 20)
Remove the lower crimping insert.
Montaje de la matríz de engarce Fitting the crimping insert
(ill. 21)
Abra la tenaza de engarce (apriete a
fondo y suelte).
Introduzca ambas matrices de engarce. Las señales marcadas deben
quedar a la vista en la misma cara que
las marcas de la tenaza.
Cierre la tenaza de engarce.
(ill. 21)
Open the crimping tool (press completely together and release). Insert
both crimping inserts. The markings
must be on the same side as the
marking on the crimping tool.
Close crimping tool and screw both
crimping inserts tight.
Atornille a fondo ambas matrices de
engarce.
(ill. 22)
Insertar el posicionador dentro de la
(ill. 22)
Insert locator into the guide pin.
guía.
21
22
www.multi-contact.com 7 / 12
Page 8

Advanced Contact Technology
23
(ill. 23)
Girar el posicionador (retención magnética).
(ill. 24)
Cerrar el posicionador.
(ill. 23)
Rotate the locator (held magnetically)
(ill. 24)
Lock the locator.
24
25
Engarce Crimping
Ejemplo para ADBP3/... y
ADSP3/...
(ill. 25)
Rimuovere il locatore. Inserire il
cavo spellato nel lato sinistro nchè
l’isolamento viene a contatto con
l’inserto di crimpatura.
Serrare la pinza completamente. Controllare la crimpatura.
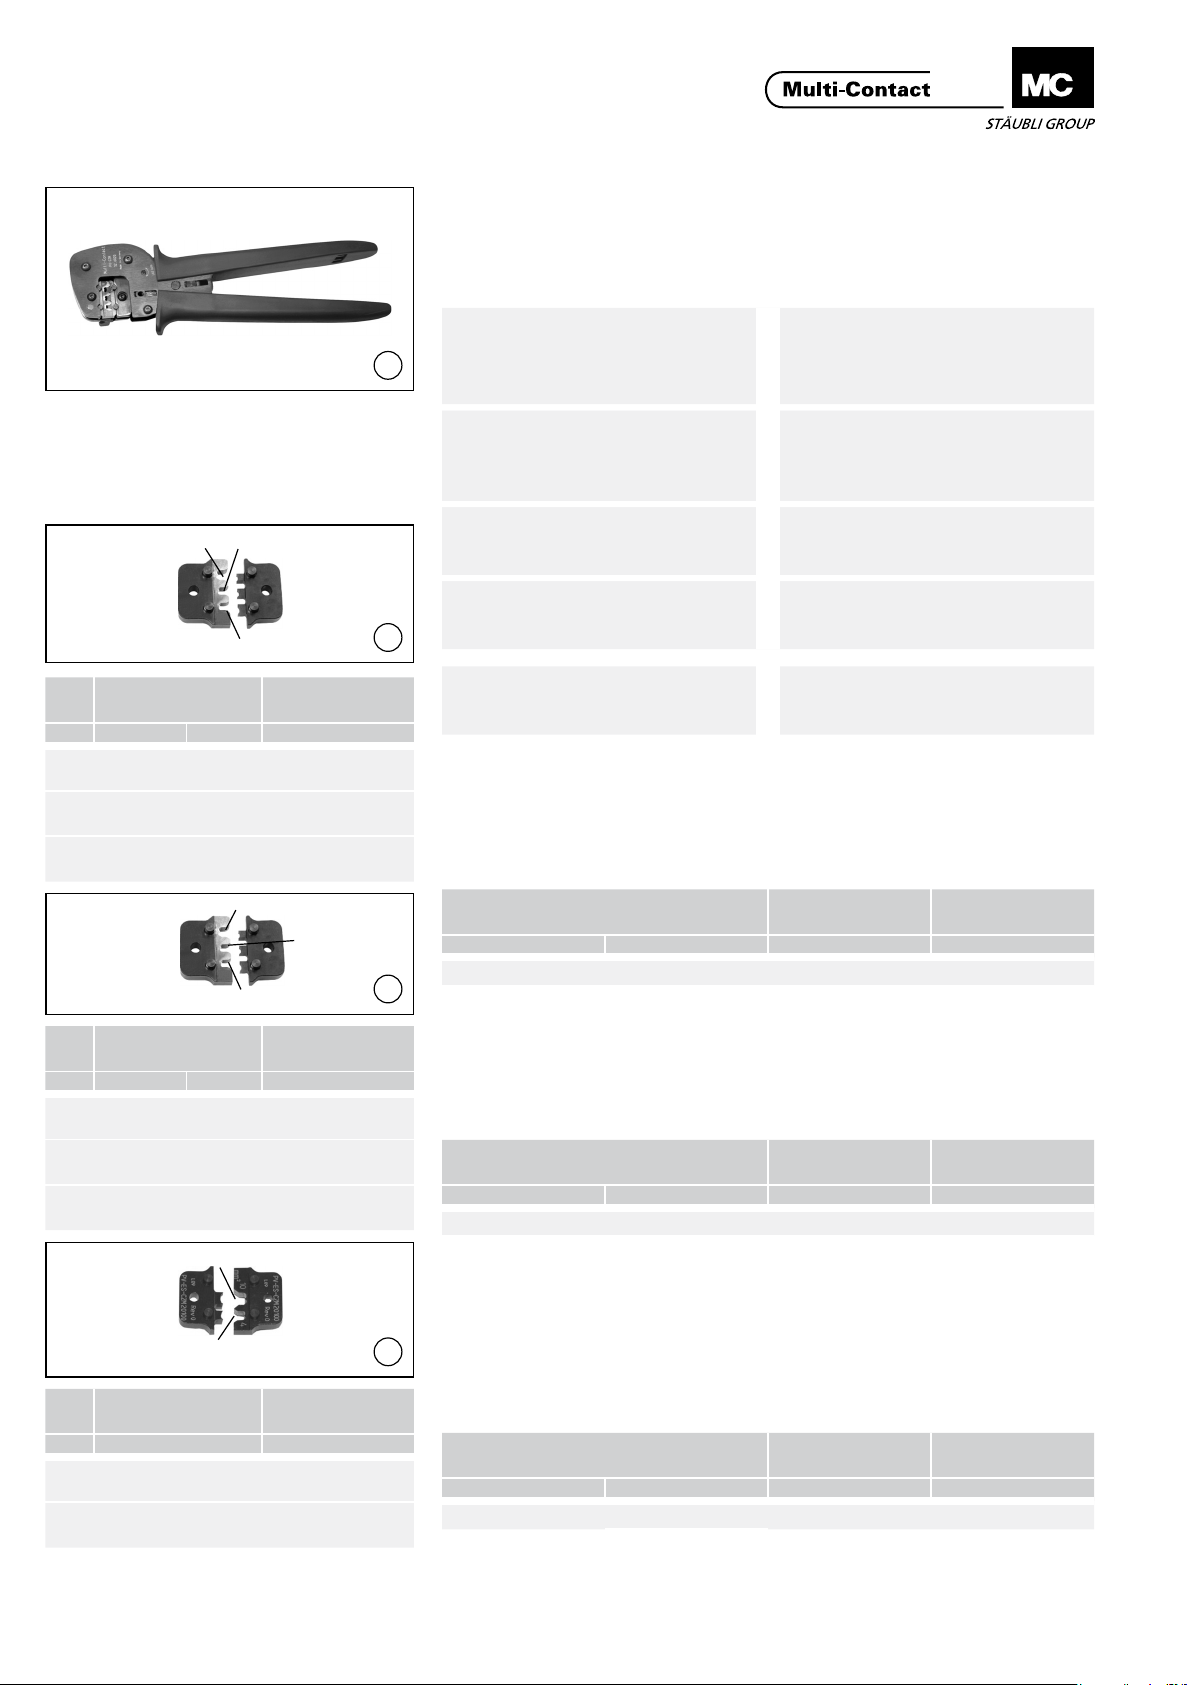
Ejemplo para KBT4.../KST4... Example for KBT4.../KST4...
(ill. 26)
Abra y aguante el clip de sujeción (K).
Introduzca el contacto en la galga de
la sección deseada en la tenaza de
engarce.
Gire el contacto hasta que la lengueta
de crimpado mire hacia arriba. Suelte
el clip de sujeción (K). El contacto esta
jado.
Example for ADBP3/... and
ADSP3/...
(ill. 25)
Remove the locator. Insert the
stripped cable on the left side until the
insulation comes into contact with the
crimping insert. Close crimping tool
completely.
Check crimp.
(ill. 26)
Open and hold clamping clip K. Insert
contact in the appropriate cross-section range of the crimping tool. Turn
contact till crimping tabs face the top.
Release clamping clip K. The contact
is secured.
26
8 / 12 www.multi-contact.com
Page 9

Advanced Contact Technology
27
(ill. 27)
Apriete ligeramente la tenaza hasta
que las aletas de engarce encajen bien
en la matríz.
(ill. 28)
Inserte el cable pelado hasta que su
aislante toque la matriz de engarce.
Cierre completamente la engarcera.
Compruebe la buena ejecución del
(ill. 27)
Lightly press the pliers together so
that the crimping tabs lie securely
within the crimping die.
(ill. 28)
Insert the stripped cable until the
insulation comes into contact with the
crimping insert. Close crimping tool
completely.
engarce.
Calidad de engarce Crimping quality
La calidad de engarce se valora en
función de la altura de engarce. En la
siguiente tabla se muestran los valores habituales de los cables
FLEX-SOL-XL y Studer BETAfIam®.
The quality of the crimp can be as-
sessed on the basis of the crimp
height. Typical values for the cables
FLEX-SOL-XL and Studer BETAam®
are shown in the following table.
28
29
(ill. 29)
Compruebe el crimpado.
(ill. 29)
Visually check the crimp.
MC4 / MC4-EVO 2 MC3
Cavo
A
Cable
2
mm
FLEX-SOL-XL
1,5
BETAam
FLEX-SOL-XL
2,5
BETAam
FLEX-SOL-XL
4
BETAam
FLEX-SOL-XL
6
BETAam
10 FLEX-SOL-XL 3,02
®
®
®
®
Altura engarce
Crimp height
mm
1,65
1,65
1,80
1,80
2,15
2,15
2,40
2,40
mm
1,5
2,5
Cavo
A
Cable
2
FLEX-SOL-XL
BETAam
FLEX-SOL-XL
BETAam
FLEX-SOL-XL
4
BETAam
FLEX-SOL-XL
6
BETAam
10 FLEX-SOL-XL 4,80
®
®
®
®
Altura engarce
Crimp height
mm
2,20
2,20
2,20
2,20
2,50
2,50
3,12
3,12
www.multi-contact.com 9 / 12
Page 10

Advanced Contact Technology
Notas / Notes:
10 / 12 www.multi-contact.com
Page 11

Advanced Contact Technology
Notas / Notes:
www.multi-contact.com 11 / 12
Page 12

Advanced Contact Technology
Notas / Notes:
Fabricante/Producer:
Multi-Contact AG
Stockbrunnenrain 8
CH – 4123 Allschwil
Tel. +41/61/306 55 55
Fax +41/61/306 55 56
mail basel@multi-contact.com
www.multi-contact.com
© by Multi-Contact AG, Switzerland – MA251 – 10.2014, Index j, Global Communications – Sujeto a modicaciones / Subject to alterations
 Loading...