

Page 1
1 Mitek Plaza • Winslow, IL • 61089 • mtx.com
©2010 MTX Audio. All rights reserved. MTX and Thunder are trademarks of Mitek Corporation.
21A9526
TP1100 / TP1200 / TP2400
OWNER'S MANUAL
Page 2
TP SERIES SPEAKERS
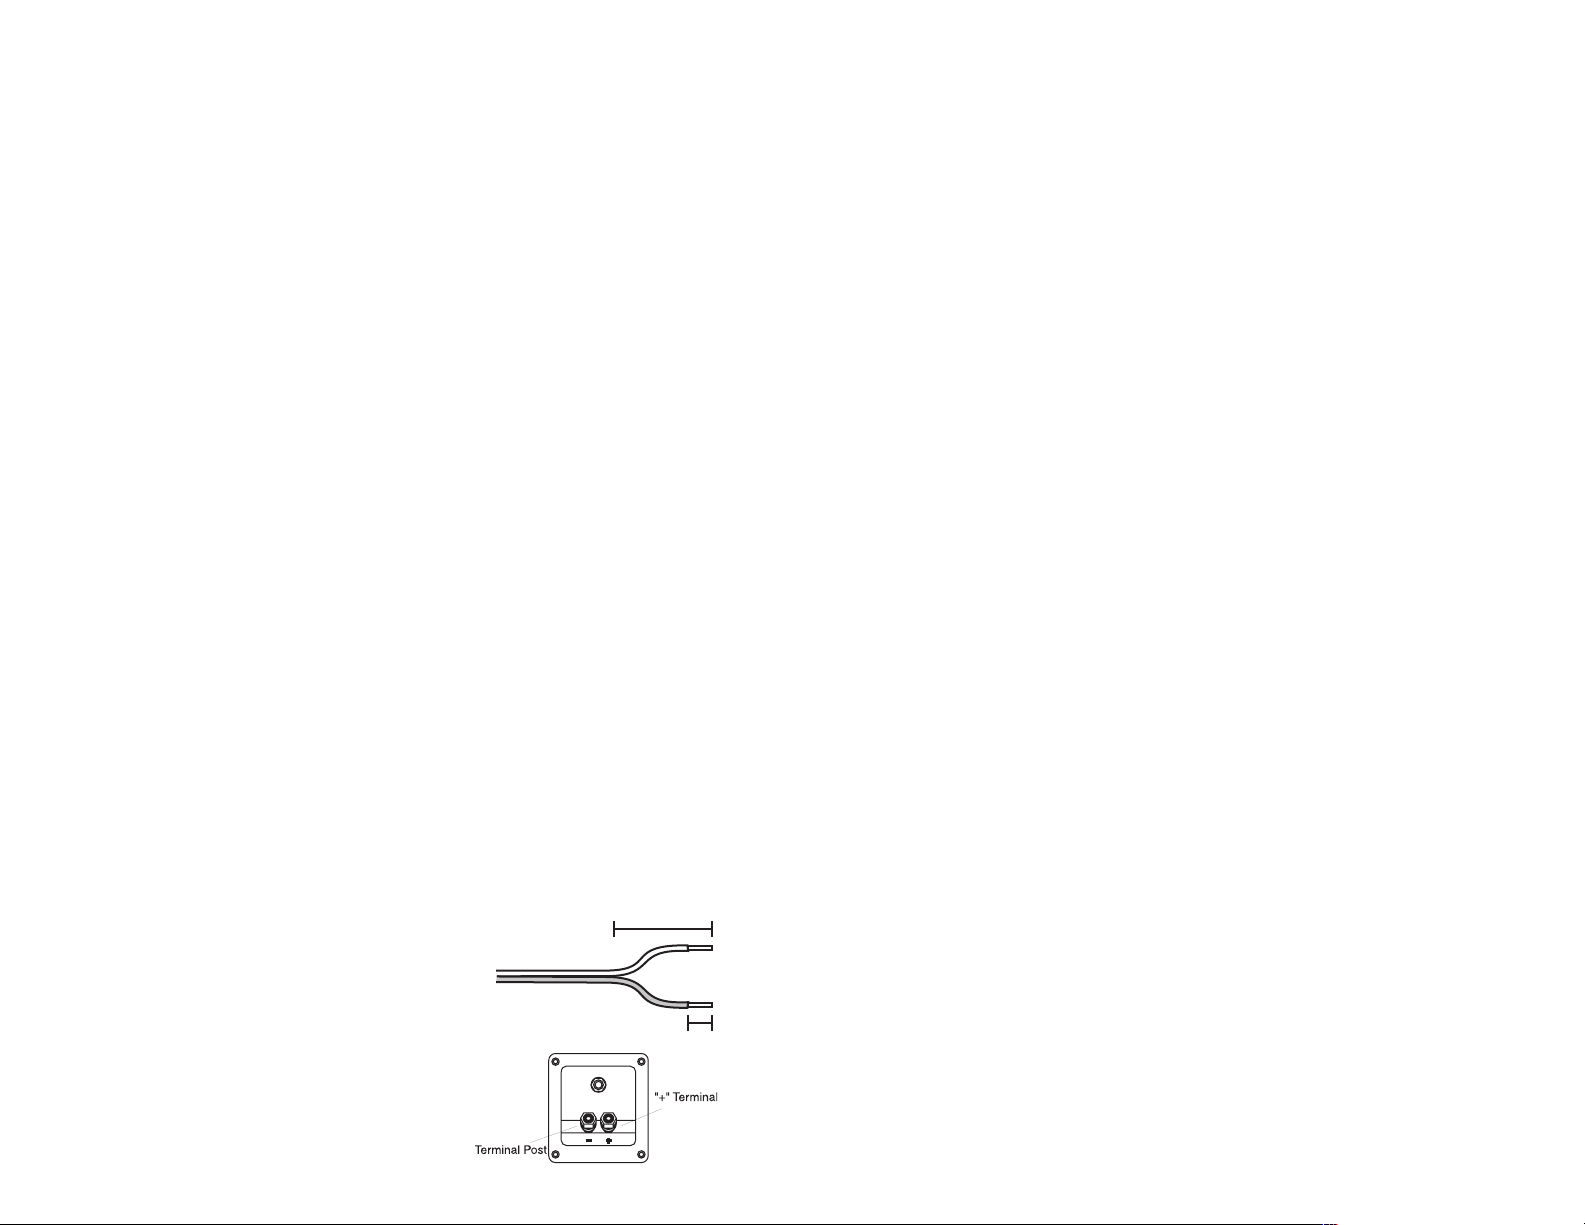
2 inches
1/2 inch
Congratulations on your purchase of an excellent, high performance loudspeaker system
from MTX! We are confident that your purchase will bring you years of listening pleasure.
MTX’s TP speakers consists of single 10" and single or dual 12” woofers matched with our
Generation 2 X-radial designed horn loaded high frequency tweeter designed to provide uniform
sound dispersion, and coverage area, with excellent sound quality. Your speaker is designed to
perform equally well in many different applications, including low to mid level live sound reproduc
tion, public address, karaoke applications, or mobile entertainment. The long excursion woofer
and horn-loaded tweeter with high frequency protection circuitry make your TP speaker suitable
for voice or music.
Your speakers carrying handles, mounted to a strong, lightweight cabinet make it easily
portable to use anywhere you need it. The rugged corner braces allow for upright positioning
and interlock for secure stacking of multiple cabinets. The versatile 5-way binding posts and 1/4"
phone jack inputs make it easy to connect to any amplifier. You can use a single speaker for mono
or connect a pair to a stereo amplifier for a stereo pair. Some models are equipped with pole
mount cups to allow for stand mounting
WARNING: To avoid injury, DO NOT SUSPEND the enclosure.
AMPLIFIER CONSIDERATIONS
Your speaker system specifications list RMS power and Peak power ratings. Power
amplifiers are also typically rated using RMS power, which is an indication of the power level
an amplifier is able to continuously deliver to a loudspeaker without damage or distortion to
the amplifier. Consult your amplifier owners manual to confirm power output at the rated
impedance at which your amplifier will be operating with the speakers connected. These
ratings should be considered when selecting the best amplifier to power your system. For
general use, amplifier output should match or exceed the RMS rated power of the speaker
system.
WARNING: Overpowering could cause serious damage to the loudspeaker.
Warranty Statement
MTX products purchased in the USA from an authorized MTX dealer are guaranteed
against defects in material and workmanship for a period of FIVE YEARS, the warranty
period begins the day the product is purchased by the end user. This warranty is limited to
the original retail purchaser of the product. Product found to be defective during that period
-
will be repaired or replaced by MTX at no charge. This warranty is void if it is
unauthorized parties have attempted repairs or alterations of any nature. Warranty does not
extend to cosmetics or finish. Before presuming a defect is present in the product, be certain
that all related equipment and wiring is functioning properly. MTX disclaims any liability for
other incurred damages resulting from product defects. Any expenses in the removal and
reinstallation of products are not covered by this warranty. MTX's total liability will not exce
the purchase price of the product. If a defect is present, your authorized MTX dealer may be
able to effect repairs.
Proof of purchase is required when requesting service, so please retain your sales
receipt and take a moment to register your product on line at mtx.com. Also, a Return
Authorization number (RA) is required before shipping product back to MTX, call 800-556
2888 or 608-325-5560 for speaker RA's.
determined that
ed
-
HOOK UP
Your TP speaker comes equipped with 5-way binding posts and 1/4” phone jack for
easy connection depending on your needs.
CAUTION: Be sure your amplifier is turned off before you make any wire
connections.
5-Way Binding Posts
Use color coded, two conductor or stranded, twisted pair wire to connect your speaker
to an amplifier using the 5-way binding posts. Each has two individual conductors covered
with insulation, and are often marked to help you make the proper connections. Insulation on
one side of the wire might have a ridge or colored stripe. Or, the two conductors may have
different color insulation (red and black, for example). Be sure to connect (+) on the speaker
to (+) on the amp, and (-) on the speaker to (-) on the amp.
1) Separate the conductors at each end for about two
inches.
2) Strip away 1/2” of insulation from the end of each
conductor.
3) Unscrew the positive (+) terminal and insert the (+)
stripped end of a conductor wire into the hole on the
side of the terminal post.
4) Hand tighten the terminal to secure the wire in
place.
5) Connect the conductor wires other stripped end to
the amplifiers (+) terminal.
6) Repeat steps 3-5 to connect the speaker to the
amplifier’s negative (-) terminals.
Page 3

225 Watts RMS/450 Watts Peak Power
Frequency Response: 30Hz-22kHz
4 Ohm
TP212
225 Watts RMS/450 Watts Peak Power
Frequency Response: 30Hz-22kHz
4 Ohm
TP212
SPEAKER OUTPUTS
-RIGHT+ -LEFT+
Prises de casque 1/4”
225 Watts RMS/450 Watts Peak Power
Frequency Response: 30Hz-22kHz
4 Ohm
TP212
225 Watts RMS/450 Watts Peak Power
Frequency Response: 30Hz-22kHz
4 Ohm
TP212
SPEAKER OUTPUTS
-RIGHT+ -LEFT+
À la place des bornes serre-fils de l’enceinte, le raccordement peut être effectué à l’aide de la
prise de casque 1/4”. Si l’amplificateur dispose d’une prise de casque 8 ohms, vous pouvez raccorder
l’enceinte à l’amplificateur à l’aide d’un câble muni d’une fiche de casque 1/4” à chaque extrémité.
Si l’amplificateur ne dispose pas d’une prise de casque 8 ohms, vous pouvez raccorder l’enceinte à
l’amplificateur à l’aide d’un câble de haut-parleur muni d’une fiche de casque 1/4” du côté de l’enceinte
et dénudé à l’autre extrémité.
Prises de casque 1/4”
Raccordement de deux enceintes à un amplificateur STÉRÉO
Vous pouvez raccorder deux enceintes TP Haut-parleurs à un amplificateur stéréophonique afin
d’obtenir un son stéréo. Raccordez les bornes positive (+) et négative (-) d’une enceinte aux bornes posi
tive et négative correspondantes de la voie gauche de l’amplificateur. Raccordez les bornes de l’autre
enceinte aux bornes correspondantes de la voie droite de l’amplificateur.
la réponse des graves, il est extrêmement important de raccorder le (+) de l’enceinte au (+) de
l’amplificateur et le (-) de l’enceinte au (-) de l’amplificateur.
REMARQUE: Pour optimiser
1/4” Phone Jack
ENGLISH
Instead of using the speaker’s terminal posts, you can use the 1/4” phone jack to make
the connection. If your amplifier has an 8 ohm phone jack, you can use speaker cable that
has a phone plug on each end to connect the speaker’s 1/4" jack to the amps phone jack.
Or, if your amplifier does not have an 8 ohm phone jack, you can use speaker wire that has
a phone plug on one end to connect your speakers 1/4" jack, and stripped ends to connect
to your amplifiers output terminals.
-
Connecting two speakers to a STEREO amplifier
You can connect two TP speakers to a stereo amplifier for stereo sound. Connect one
speaker’s positive (+) and negative (-) terminals to the amplifier’s corresponding positive and
negative left speaker terminals. Connect the other speaker’s terminals to the corresponding
right speaker terminals.
nect (+) on the speaker to (+) on the amp, and (-) on the speaker to (-) on the amp
NOTE: For best bass response, it is extremely important to con-
.
Amplificateur ou récepteur stéréo
Circuit de protection contre les hautes fréquences
L’enceinte TP Haut-parleurs est équipée d’un circuit de protection contre les hautes fréquences,
conçu pour protéger le haut-parleur d’aigus contre une puissance excessive accidentelle. Ce circuit de
protection est conçu pour s’activer lorsque le signal (musical) envoyé à l’enceinte atteint des niveaux
pouvant entraîner des dégâts importants. Le niveau de sortie haute fréquence de l’enceinte est alors
notablement réduit : cela indique que le circuit de protection fonctionne. Une fois le niveau musical réduit
à un niveau acceptable, l’enceinte reprend automatiquement son fonctionnement normal.
High Frequency Protection Circuit
Your TP speaker is equipped with high frequency protection circuitry, which is designed
to protect your speaker’s tweeter from accidental overpowering. The protection circuit is
designed to “turn on” when the signal (music) being sent to the speaker is reaching levels
that could cause serious damage. There will be a noticeable reduction in your speaker’s
high frequency output, which lets you know that the protection circuitry is working. When
the music level is reduced to a safe level, the speaker will automatically return to normal
operation.
Page 4

SPECIFICATIONS-
5 centimètres
1.2cm
borne poteau
“+” bornes
TP1100
Diameter of Subwoofer (1) 10"
Type FULL RANGE
Frequency Response 66Hz - 20kHz
Nominal Impedance 4 OHM
Sensitivity (1w-1m) 92.1 dB
Power Handling (Watts) 100W RMS/ 200W PEAK
Crossover Frequency 3.0 kHz
Weight 21 LBS
Dimensions 21" X 13 3/4" X 10 1/4"
TP1200
Diameter of Subwoofer (1) 12"
Type FULL RANGE
Frequency Response 39Hz - 20kHz
Nominal Impedance 4 OHM
Sensitivity (1w-1m) 91.4 dB
Power Handling (Watts) 150W RMS/ 300W PEAK
Crossover Frequency 2.5 kHz
Weight 39.5 LBS
Dimensions 24 3/4" x 15 1/4" x 12 3/4"
TP2400
Diameter of Subwoofer (2) 12"
Type FULL RANGE
Frequency Response 40Hz - 20kHz
Nominal Impedance 4 OHM
Sensitivity (1w-1m) 91 dB
Power Handling (Watts) 200W RMS/400W PEAK
Crossover Frequency 2.0 kHz
Weight 67 LBS
Dimensions 39 1/2" X 15 1/4" X 15 3/4"
*Due to continual product development, all specifications are subject to change without notice.
TP FEUILLETON
Toutes nos félicitations pour l’achat de ces excellentes enceintes MTX très performantes! Ces
enceintes vous donneront entière satisfaction pendant de longues années.
TP Haut-parleurs de MTX sont chacune constitués seul 10" et seul ou double 12" de graves de
30 centimètres adaptés à notre haut-parleur d’aigus haute fréquence à pavillon de conception la gen
eration 2 X-radial, offrant une dispersion acoustique et une zone de couverture uniformes avec un son
d’excellente qualité. L’enceinte haut-parleurs a été conçue pour donner satisfaction dans diverses appli
cations, notamment la reproduction sonore en direct à niveau moyen, les installations de sonorisation,
les applications de karaoké et les systèmes mobiles de divertissements. Grâce à son haut-parleur de
graves à longue course et son haut-parleur d’aigus à pavillon avec circuit de protection haute fréquence,
l’enceinte TP Haut-parleurs convient aussi bien pour la voix que pour la musique.
Montées sur un coffret léger et solide, les poignées de transport de l’enceinte facilitent l’utilisation
partout où vous en avez besoin. Des renforts d’angles robustes permettent le placement en position
verticale et l’empilage sans risque de plusieurs enceintes. Les entrées à bornes serre-fils polyvalentes
et prise de casque 1/4” facilitent le raccordement à tout amplificateur. Vous pouvez utiliser soit une seule
enceinte pour un fonctionnement monophonique, soit une paire raccordée à un amplificateur stéréopho
nique. Quelques modeles sont equipes avec les tasses de mont de pole a allo pur monter de position.
AVERTISSEMENT: Pour éviter toute blessure, NE PAS SUSPENDRE
l’enceinte.
REMARQUES RELATIVES À L’AMPLIFICATEUR
Les caractéristiques techniques des enceintes indiquent les valeurs efficace (RMS) et de crête de
la puissance. Généralement, les amplificateurs de puissance sont également caractérisés par leur puis
sance efficace, valeur indiquant le niveau de puissance que peut délivrer de façon continue un amplifi
cateur à une enceinte sans endommagement de l’amplificateur ni distorsion de son signal. Consultez le
manuel d’utilisation de l’amplificateur pour vérifier sa puissance de sortie selon son impédance nominale
de fonctionnement lorsqu’il est raccordé aux enceintes. Ces valeurs doivent être prises en compte pour
la sélection de l’amplificateur convenant le mieux à l’alimentation du système. En règle générale, la
puissance de sortie de l’amplificateur doit être supérieure ou égale à la puissance efficace nominale des
enceintes.
AVERTISSEMENT: Une puissance excessive risque d’endommager gravement l’enceinte.
RACCORDEMENT
L’enceinte TP Haut-parleurs est livrée équipée de bornes serre-fils polyvalentes et de prises jack
de casque 1/4” facilitant le raccordement selon le besoin.
ATTENTION: Avant d’effectuer les raccordements, s’assurer que
l’amplificateur est hors tension.
Bornes serre-fils polyvalentes
Pour raccorder l’enceinte à un amplificateur à l’aide des bornes serre-fils polyvalentes, utilisez un
câble deux conducteurs à code couleur ou une paire torsadée souple. Les deux types de câble sont con
stitués de deux conducteurs isolés et sont souvent repérés pour faciliter le bon raccordement. L’isolant
peut présenter, sur un côté du fil, une crête ou une bande colorée. Les isolants des deux conducteurs
peuvent aussi être de différentes couleurs (rouge et noire par exemple). Veillez à raccorder le (+) de
l’enceinte au (+) de l’amplificateur et le (-) de l’enceinte au (-) de l’amplificateur.
1) Séparez les conducteurs à chaque extrémité sur 5 cen
timètres environ.
2) Dénudez l’extrémité de chaque conducteur sur 8 mm
environ.
3) Dévissez la borne positive (+) et insérez l’extrémité
dénudée (+) d’un conducteur dans le trou sur le côté de
la borne.
4) Serrez la borne à la main pour immobiliser le fil.
5) Raccordez l’autre extrémité dénudée du conducteur à la
borne (+) de l’amplificateur.
6) Répétez les étapes 3 à 5 pour raccorder l’enceinte à la
bornes négative (-) de l’amplificateur.
-
-
-
-
-
-
-
FRANCAIS
Page 5

2” pulgadas
1/2” pulgada
terminal poste
“+” terminal
¼-Zoll-Kopfhöreranschluss
225 Watts RMS/450 Watts Peak Power
Frequency Response: 30Hz-22kHz
4 Ohm
TP212
225 Watts RMS/450 Watts Peak Power
Frequency Response: 30Hz-22kHz
4 Ohm
TP212
SPEAKER OUTPUTS
-RIGHT+ -LEFT+
Sie können zum Anschluss auch statt der Anschlussterminals des Lautsprechers auch den ¼-ZollKopfhöreranschluss verwenden. Wenn Ihr Verstärker über einen 8-Ohm-Kopfhöreranschluss verfügt,
können Sie ein Lautsprecherkabel verwenden, das an beiden Enden Kopfhörerstecker hat, um den ¼Zoll-Anschluss des Lautsprechers mit dem Kopfhörerausgang des Verstärkers zu verbinden. Wenn Ihr
Verstärker keinen 8-Ohm-Kopfhöreranschluss hat, können Sie ein Lautsprecherkabel verwenden, das an
einem Ende einen Kopfhörerstecker hat, in den ¼-Zoll-Anschluss des Lautsprechers stecken und an den
Anschlussterminals des Verstärkers blanke Drahtenden befestigen.
¼-Zoll-Kopfhöreranschluss
Anschluss von zwei Lautsprechern an einen STEREO-Verstärker
Sie erhalten Stereosound, wenn Sie zwei TP sprechers an einen Stereoverstärker anschließen.
Verbinden Sie die positiven (+) und negativen (-) Anschlüsse eines Lautsprechers mit den entsprechenden positiven und negativen linken Lautsprecherausgängen des Verstärkers. Verbinden Sie die Terminals
des anderen Lautsprechers mit den entsprechenden rechten Lautsprecherausgängen.
beste Basswiedergabe zu erreichen, müssen Sie
unbedingt (+) am Lautsprecher mit (+) am Verstärker
und (-) am Lautsprecher mit (-) am Verstärker verbinden.
HINWEIS: Um die
SERIE DE TP
Felicitaciones por la compra de este excelente sistema de altavoces MTX de alto rendimiento.
Confiamos en que su compra le dará muchos años de placer auditivo.
Oradores de TP de MTX tienen solo 10" y signle o doble 12". asociados a nuestro tweeter de alta
frecuencia cargado por trompeta con diseño La generacion radial en X y han sido diseñados para disper
sar el sonido y cubrir el área de audición uniformemente y con excelente calidad de sonido. Oradores de
TP han sido diseñados para funcionar igualmente bien en muchas aplicaciones diferentes, tales como
reproducción de sonido en vivo de bajo a mediano nivel, megafonía, karaoke o entretenimiento móvil. El
woofer de alto desplazamiento lineal y el tweeter cargado por trompeta con circuito de protección de alta
frecuencia hacen que el oradores de TP sea adecuado para voz o música.
Las asas de los altavoces, montadas en una caja resistente y liviana, hacen que sea fácil trans
portarlos y usarlos en cualquier lugar en que los necesite. Las sólidas escuadras de esquina permiten
colocarlos verticalmente y enclavarlos para apilar con seguridad varias cajas. Los versátiles tornillos de
presión de 5 modos de conexión y las entradas para enchufe de teléfono de ¼ de plg. facilitan la conexión
a cualquier amplificador. Usted puede usar un solo altavoz para sonido monofónico o conectar un par
de altavoces a un amplificador estereofónico a fin de tener un par estereofónico. Algunos modelos son
equipados con copas de monte de asta al allo para montar de soporte.
ADVERTENCIA. Para evitar lesiones, NO CUELGUE la caja.
CONSIDERACIONES DEL AMPLIFICADOR
Las especificaciones de su sistema de altavoces indican potencias nominales RMS y máxima. Por
lo general, los amplificadores de potencia también se clasifican de acuerdo a la potencia RMS, que es
una indicación de la potencia que un amplificador puede suministrar de forma continua a los altavoces sin
daño ni distorsión para el amplificador. Consulte el manual del propietario del amplificador para confirmar
la salida de potencia a la impedancia nominal en la cual el amplificador funcionará con los altavoces
conectados. Estos valores nominales se deben tener en cuenta cuando se seleccione el mejor amplifi
cador para su sistema. Para uso general, la salida del amplificador debe coincidir o exceder la potencia
nominal RMS del sistema de altavoces.
ADVERTENCIA. El exceso de potencia puede dañar gravemente los altavoces.
CONEXIÓN
El oradores de TP viene equipado con tornillos de presión de 5 modos de conexión y enchufes de
teléfono de ¼ de plg. para conectarlos fácilmente según sus necesidades.
-
-
ESPANOL
-
Verstärkers oder Stereo
-Receiver
Hochfrequenz-Schutzschaltung
Der TP sprecher verfügt über eine Hochfrequenz-Schutzschaltung , die den Hochtöner des
Lautsprechers vor einer versehentlichen Überlastung schützt. Die Schutzschaltung wird aktiviert, wenn
das an die Lautsprecher geleitete Signal (Musik) einen Pegel erreicht, der ernste Schäden verursachen
könnte. Es kommt zu einer deutlichen Verringerungen der Hochfrequenzleistung des Lautsprechers,
wodurch Sie wissen, dass die Schutzschaltung aktiv ist. Wenn die Musik auf einen sicheren Pegel herun
tergefahren wird, geht der Lautsprecher automatisch wieder in den Normalbetrieb über.
PRECAUCIÓN. Asegúrese de que el amplificador está apagado antes de
hacer cualquier conexión de cables.
Tornillos de presión de 5 modos de conexión
Use cable de dos conductores codificado por colores o cable de par trenzado para conectar el
altavoz a un amplificador usando los tornillos de presión de 5 modos de conexión. Cada cable tiene dos
conductores individuales cubiertos con aislamiento y a menudo marcados para ayudarle a hacer las
conexiones correctas. El aislamiento de uno de los conductores del cable puede tener un resalto o una
banda de color. O bien, los conductores pueden tener aislamiento de distinto color (por ejemplo rojo y
negro). Asegúrese de conectar la (+) del altavoz a la (+) del amplificador, y la (-) del altavoz a la (-) del
amplificador.
1) Separe los conductores en cada uno de los extremos del
cable aproximadamente dos pulgadas.
2) Pele ½ plg. de aislamiento del extremo de cada conduc
tor.
3) Desatornille la terminal positiva (+) e inserte el extremo
pelado del conductor (+) en el agujero lateral del tornillo
-
de la terminal.
4) Apriete a mano la terminal para asegurar el cable en
su sitio.
5) Conecte el otro extremo pelado del conductor a la termi
nal (+) del amplificador.
6) Repita los pasos 3 a 5 para conectar el altavoz a la ter
minal negativa (-) del amplificador.
-
-
-
Page 6

Enchufe de teléfono de ¼ de plg.
225 Watts RMS/450 Watts Peak Power
Frequency Response: 30Hz-22kHz
4 Ohm
TP212
225 Watts RMS/450 Watts Peak Power
Frequency Response: 30Hz-22kHz
4 Ohm
TP212
SPEAKER OUTPUTS
-RIGHT+ -LEFT+
5 cm
1,2 cm
terminal pfosten
“+” terminal
En lugar de usar las terminales de tornillo de presión del altavoz, usted puede usar el enchufe
de teléfono de ¼ de plg. para hacer la conexión. Si su amplificador tiene un enchufe de teléfono de 8
ohmios, puede conectar el cable de altavoz con enchufes de teléfono entre el enchufe de ¼ de plg. del
altavoz y el enchufe de teléfono del amplificador. O bien, si su amplificador no tiene enchufe de teléfono
de 8 ohmios, puede conectar el cable de altavoz con un solo enchufe de teléfono al enchufe de ¼ de plg.
del altavoz y los extremos pelados a las terminales de salida del amplificador.
enchufe de teléfono de ¼ de plg.
Conexión de dos altavoces a un amplificador estereofónico
Usted puede conectar dos oradores de TP a un amplificador estereofónico para obtener sonido
estereofónico. Conecte las terminales positiva (+) y negativa (-) de un altavoz a las terminales corre
spondientes positiva y negativa para el altavoz izquierdo del amplificador. Conecte las terminales del
otro altavoz a las terminales correspondientes positiva (+) y negativa (-) para el altavoz derecho del
amplificador.
NOTA: Para obtener la mejor respuesta de bajos es muy importante conectar la (+)
del altavoz a la (+) del amplificador y la (-) del altavoz a la (-) del amplificador.
amplificador o receptor estereofónico
Circuito de protección de alta frecuencia
El oradores de TP viene equipado con un circuito de protección de alta frecuencia diseñado para
proteger el tweeter del altavoz del exceso de potencia accidental. El circuito de protección está diseñado
para “activarse” cuando la señal (música) que se envía al altavoz alcanza niveles que pueden causar un
daño grave. Habrá una reducción evidente en la salida de alta frecuencia del altavoz, lo cual indica que
el circuito de protección se ha activado. Cuando el nivel de la música se reduce hasta un nivel seguro,
el altavoz regresa automáticamente a su funcionamiento normal.
TP SERIE
Herzlichen Glückwunsch! Sie haben ein ausgezeichnetes Hochleistungs-Lautsprechersystem von MTX
erworben! Wir sind uns sicher, dass dieses Produkt Ihnen jahrelanges Hörvergnügen bieten wird.
Der MTX TP sprecher besteht aus zwei heben sie 10" und einzeln oder doppelt 12" heraus, die
zusammen mit unserem Generation 2X-strahlenformig. Horn-Load-Hochfrequenz-Hochtöner bei hervor
ragender Klangqualität eine gleichmäßige Abstrahlung und Beschallung bieten. Ihr sprecher-Lautsprecher
bietet unter verschiedenen Einsatzbedingungen gleich gute Leistungen, darunter die Wiedergabe
von Live-Sound auf niedrigem bis mittlerem Pegel, Beschallung, Karaoke-Anwendungen und mobiles
Entertainment. Der Langhub-Tieftöner und der Horn-Load-Hochtöner mit Hochfrequenz-Schutzschaltung
machen Ihren TP sprecher sowohl für Stimm- als auch Musikwiedergabe geeignet.
Die Tragegriffe Ihres Lautsprechers, die an einem starken, leichten Gehäuse angebracht sind,
machen ihn leicht tragbar und überall einsetzbar. Die stabilen Eckversteifungen ermöglichen eine verti
kale Aufstellung, und sie greifen ineinander, so dass mehrere Gehäuse sicher übereinander aufgestellt
werden können. Die vielseitigen Fünffach-Terminals und ¼-Zoll-Kopfhöreranschlüsse erleichtern den
Anschluss an jeden Verstärker. Sie können einen einzelnen Lautsprecher für den Monoeinsatz ver
wenden, oder zwei zum Stereoeinsatz an einen Stereoverstärker anschließen. Einige modelle sind mit
stangenuntersatzentassen ausgerustet, zum Gestell von Aufstellen zu erlauben.
WARNUNG: Um Verletzung zu vermeiden dürfen Sie das Gehäuse NICHT
AUFHÄNGEN.
HINWEISE ZUM VERSTÄRKER
Die technischen Angaben Ihres Lautsprechersystems enthalten Werte für die RMS-Leistung und
die Spitzenleistung. Endverstärkerwerden meist nach RMS-Leistung gemessen, die anzeigt, welches
Leistungsniveau ein Verstärker kontinuierlich und verzerrungsfrei an einen Lautstärker abgeben kann.
-
Sehen Sie im Handbuch des Verstärkers nach, welche Leistung er bei der Impedanz hat, mit der der
Verstärker die angeschlossenen Lautsprecher betreiben wird. Diese Werte sollten bei der Auswahl
des besten Verstärkers für Ihr System berücksichtigt werden. Im allgemeinen Einsatz sollte die
Verstärkerleistung größer oder gleich dem RMS-Wert für das Lautsprechersystem sein.
WARNUNG: Ein Überlastung könnte den Lautsprecher schwer beschädigen.
ANSCHLUSS
Ihr TP sprecher besitzt Fünffach-Terminals und ¼-Zoll-Kopfhöreranschlüsse, die einen einfachen
Anschluss ganz nach Ihren Bedürfnissen ermöglichen.
GERMAN
VORSICHT: Vergewissern Sie sich, dass der Verstärker ausgeschaltet ist,
bevor Sie Kabel anschließen.
Fünffach-Terminals
Verwenden Sie farblich markierte zweiadrige Kabel, oder geflochtenen Twisted-Pair-Kabel, um den
Lautsprecher über die Fünffach-Terminals an den Verstärker anzuschließen. Jedes verfügt über zwei mit
einer Isolierschicht überzogene Adern, die oft markiert sind, damit Sie das Kabel korrekt anschließen. Die
Isolierschicht auf einer Seite des Kabels könnte über eine Erhöhung oder einen Farbstreifen verfügen.
Die zwei Adern könnten auch über unterschiedlich gefärbte Isolierungen verfügen (z. B. rot und schwarz).
Vergewissern Sie sich, dass (+) am Lautsprecher mit (+) am Verstärker und (-) am Lautsprecher mit (-)
am Verstärker verbunden wird
1) Trennen Sie die letzten 5 cm der Adern voneinander.
2) Entfernen Sie am Ende der Adern jeweils ca. 1,2 cm der
Isolierung.
3) Lösen Sie die Schraube am positiven (+) Terminal und füh
ren Sie das abgeschabte (+) Ende der Ader in das Loch
an der Seite des Anschlussterminals ein.
4) Drehen Sie das Terminal handfest an, um das Kabel zu
befestigen.
5) Verbinden Sie das andere abgeschabte Ende des Kabels
mit dem (+) Terminal des Verstärkers.
6) Wiederholen Sie Schritte 3-5 zum Anschluss des
Lautsprechers an das negative (-) Terminal des
Verstärkers.
.
-
 Loading...