

Page 1
MTP
INSTRUCTION MANUAL
Infrared Video Thermometer
Model MTP 1320
MTP Instruments
Tel.: +506 2280-1686 • Fax: +506 2524-2397
ventas@eproteca.com • www.eproteca.com
Page 2
Table of Content
1.
Introduction
Page 1
2.
Features
Page 1
3.
Specifications
Page 2
4.
Front panel and button description
Page 3
5.
Menu overview
Page 4
5.1
Measurement modes
Page 4
5.2
CAM mode
Page 5
5.2.1
Capturing picture function
Page 5
5.2.2
Capturing video function
Page 6
5.3
IR mode (only)
Page 6
5.4
Dew point temperature mode
Page 6
5.5
Datalogging mode
Page 7
5.6
Gallery (view stored pictures, videos and logs)
Page 8
5.7
Settings
Page 8
5.7.1
Setting the date and time
Page 9
5.7.2
Setting the temperature units
Page 10
5.7.3
Setting the language
Page 10
5.7.4
Setting the font color
Page 10
5.7.5
Setting the cursor style
Page 11
5.7.6
Setting the backlight brightness
Page 11
5.7.7
Setting the auto power off time
Page 11
5.7.8
Setting the screen timeout
Page 12
5.7.9
Enable/disable key press alert
Page 12
5.7.10
Memory status
Page 12
5.7.11
Factory default setting
Page 13
6.
Measurement settings
Page 13
6.1
Emissivity setting
Page 14
6.2
Enable/disable high alarm and set value
Page 14
6.3
Enable/disable low alarm and set value
Page 14
6.4
Laser
Page 15
6.5
Auto mode (measure lock)
Page 15
6.6
Max/Min IR temperature
Page 15
6.7
Average/differential IR temperature
Page 15
6.8
Ambient temperature / %RH
Page 16
6.9
Dew point and wet bulb
Page 16
6.10
Type K thermocouple input
Page 16
7.
Notes
Page 16
8.
Emissivity values
Page 17
9.
Maintenance
Page 18
Tel.: +506 2280-1686 • Fax: +506 2524-2397
ventas@eproteca.com • www.eproteca.com
Page 3
1) Introduction
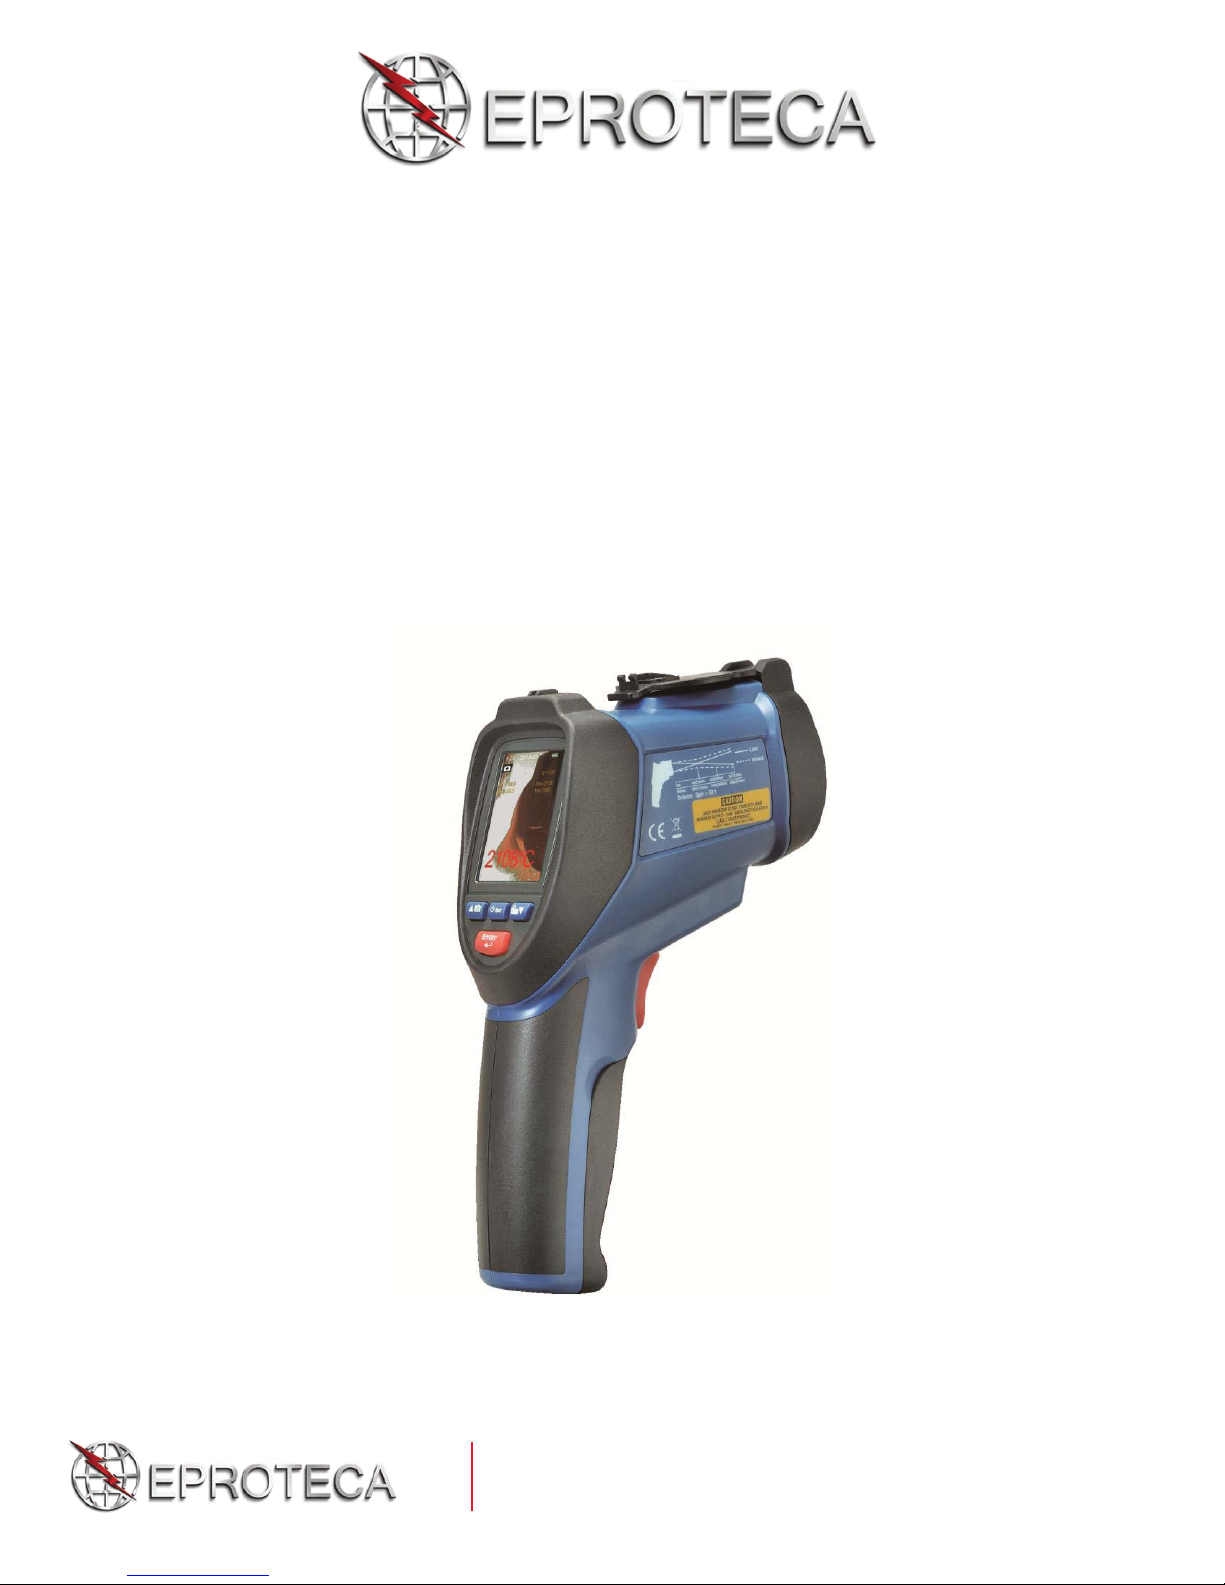
Thank you for purchasing the IR Video Thermometer, model MTP 1320 which is
capable of non-contact (infrared) temperature measurements with visual camera at the
touch of a button. The built-in laser pointer increases target accuracy while the
backlight LCD and handy push-buttons combine for convenient, ergonomic
operation.
The IR video thermometer can be used to measure the surface temperature of objects
that are impractical to be measured by a traditional (contact) thermometer (such as
moving objects, a surface with a live electrical current or objects that are out of
reach).
Proper use and care of this meter will provide years of reliable service.
Please read this instruction manual carefully before using the instrument.
2) Features
2.2 TFT LCD display
640 x 480 pixels (30 millions pixels)
Micro SD memory card
Image (JPEG) and video (AVI)
Humidity and Air temperature
Dual laser targeting
Type K thermocouple probe
Ajustable emissivity
High accuracy
Fast response time
Dew Point temperature and Wet Bulb temperature
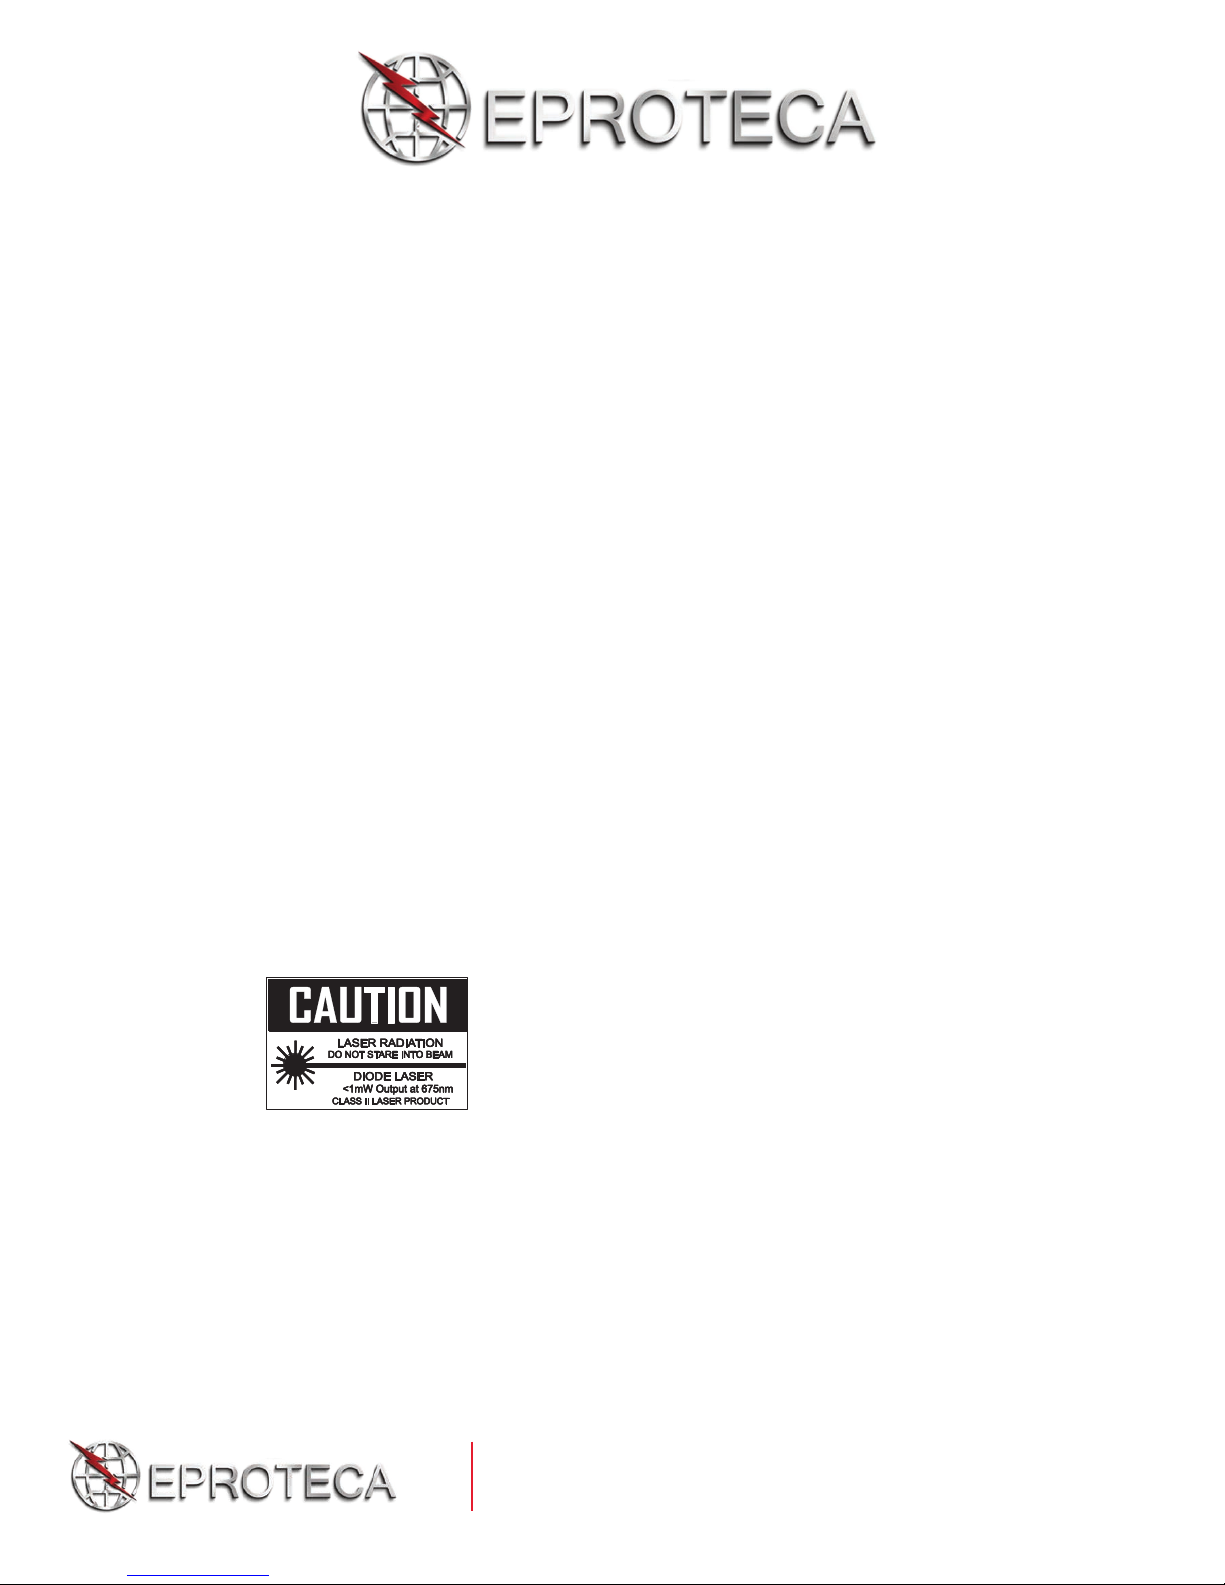
ATTENTION
Laser Radiation
Do not stare into beam
1mW output at 675nm
Class II Laser Product
1
Tel.: +506 2280-1686 • Fax: +506 2524-2397
ventas@eproteca.com • www.eproteca.com
Page 4
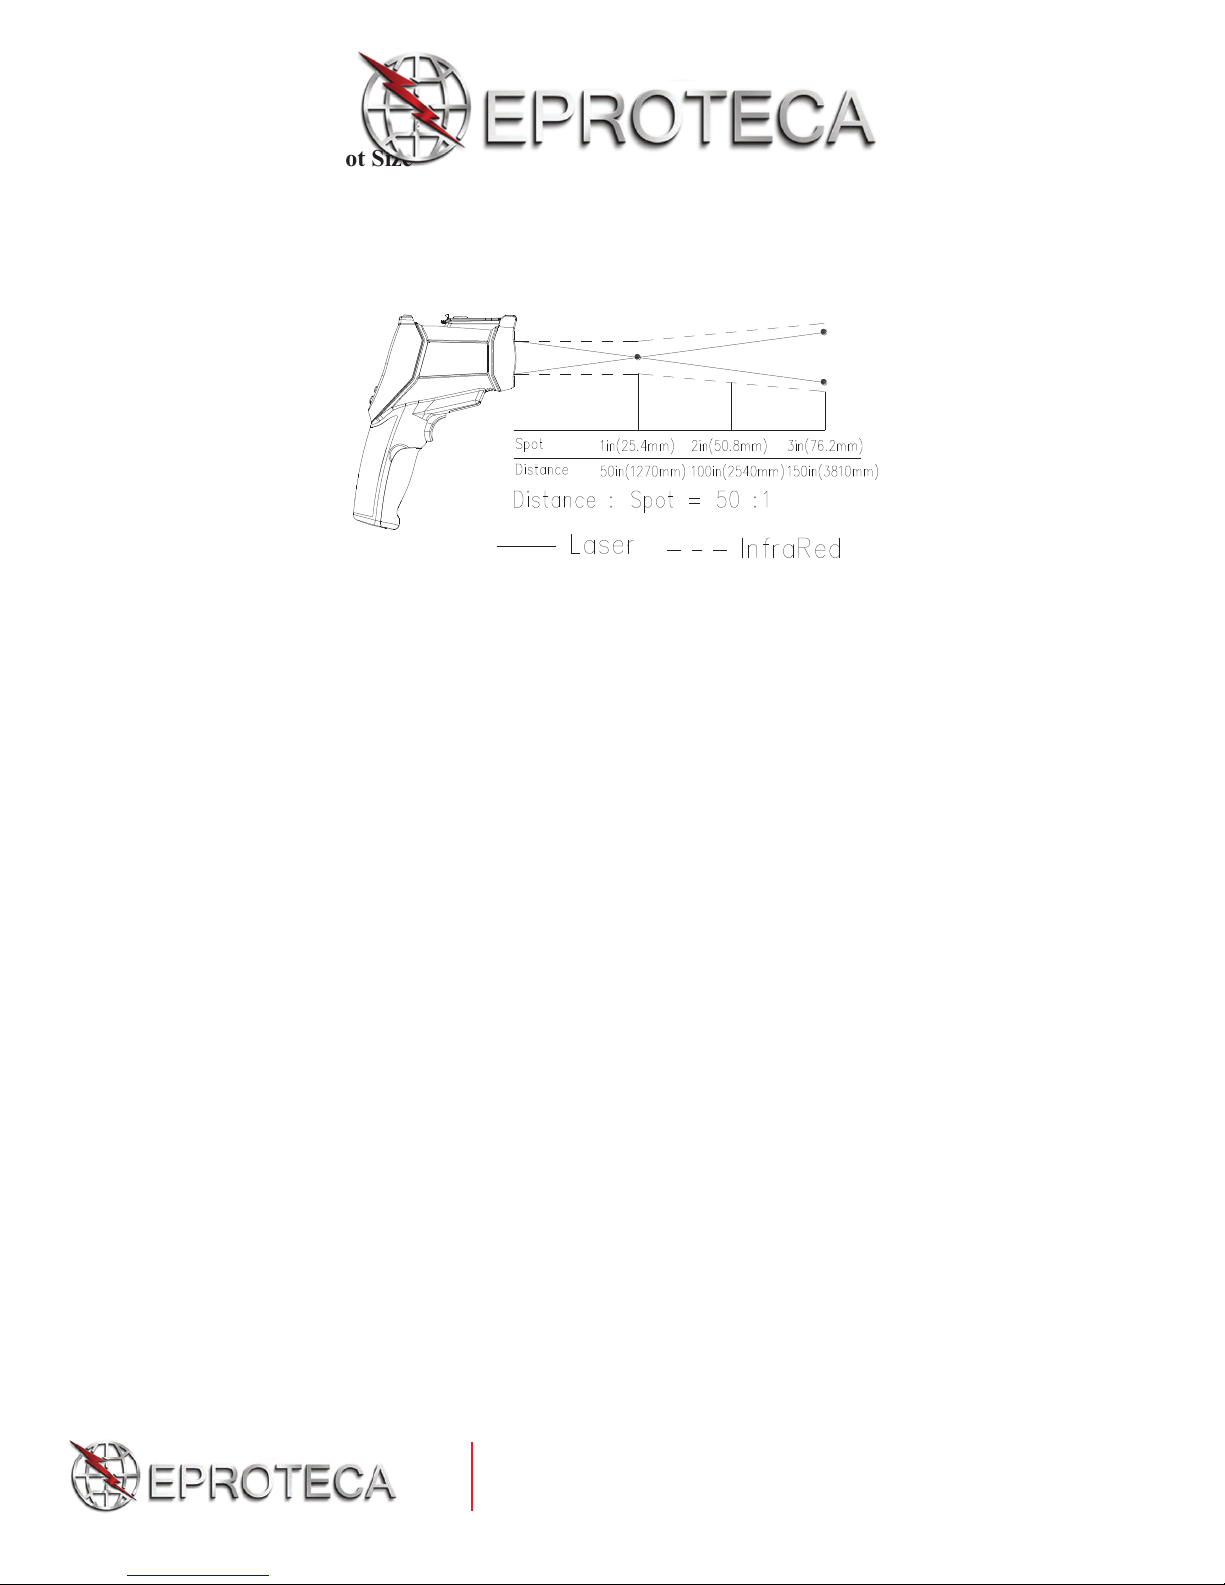
Distance and Spot Size
As the distance (D) from the object increases, the spot size (S) of the area measured by
the unit becomes larger. The relationship between distance and spot size for each unit is
listed below. The focal point for each unit is 914 mm (36). The spot sizes indicate 90%
of encircled energy.
3) Specifications
IR temperature measurement
Measurement range : -50 to 1000°C (-58 to 1832°F)
D:S 50 :1
Accuracy: ±1%±1ºC (1.8ºF) 20 to 500ºC (68 to 932ºF)
1.5% 500 to 1000ºC (932 to 1832ºF)
3.5C (6.3F) -50 to 20ºC (-58 to 68ºF)
Resolution : 0.1°C (0.1°F) 1000
1°C (1°F) 1000
Repeatability: 1.5ºC (2.7ºF) -50 to 20ºC (-58 to 68ºF)
0.5% or 0.5ºC (0.09ºF) 20 to 1000ºC (68 to 1832ºF)
Response time : 150ms
Spectral range : 8 ~ 14μm
Emissivity : réglable 0.10 à 1.00
Type-K temperature measurement
Measurement range : -50 to 1370°C (-58 to 1832°F)
Resolution : 0.1°C (0.1°F) 1000°C
1°C (1°F) 1000°C
Air temperature and Relative Humidity measure
Air temperature range : 0 à 50°C (32 to 122°F)
Dew point temp. range : 0 à 50°C (32 to 122°F)
Relative humidity range : 0 à 100% HR
Operating temperature : 0 à 50°C (32 to 122°F)
Storage temperature : -10 à 60°C (14 to 140°F)
Relative humidity : 10 à 90% HR sans condensation
Display : 2,2 320 x 240 colour LCD
ment
2
Tel.: +506 2280-1686 • Fax: +506 2524-2397
ventas@eproteca.com • www.eproteca.com
Page 5
Power
Battery
Battery life : Approx. 4 hours continuous use
Battery charge time : Approx. 2 hours with AC adapter or USB connection
Size : 205mm x 62mm x 155mm
Weight : 410 g
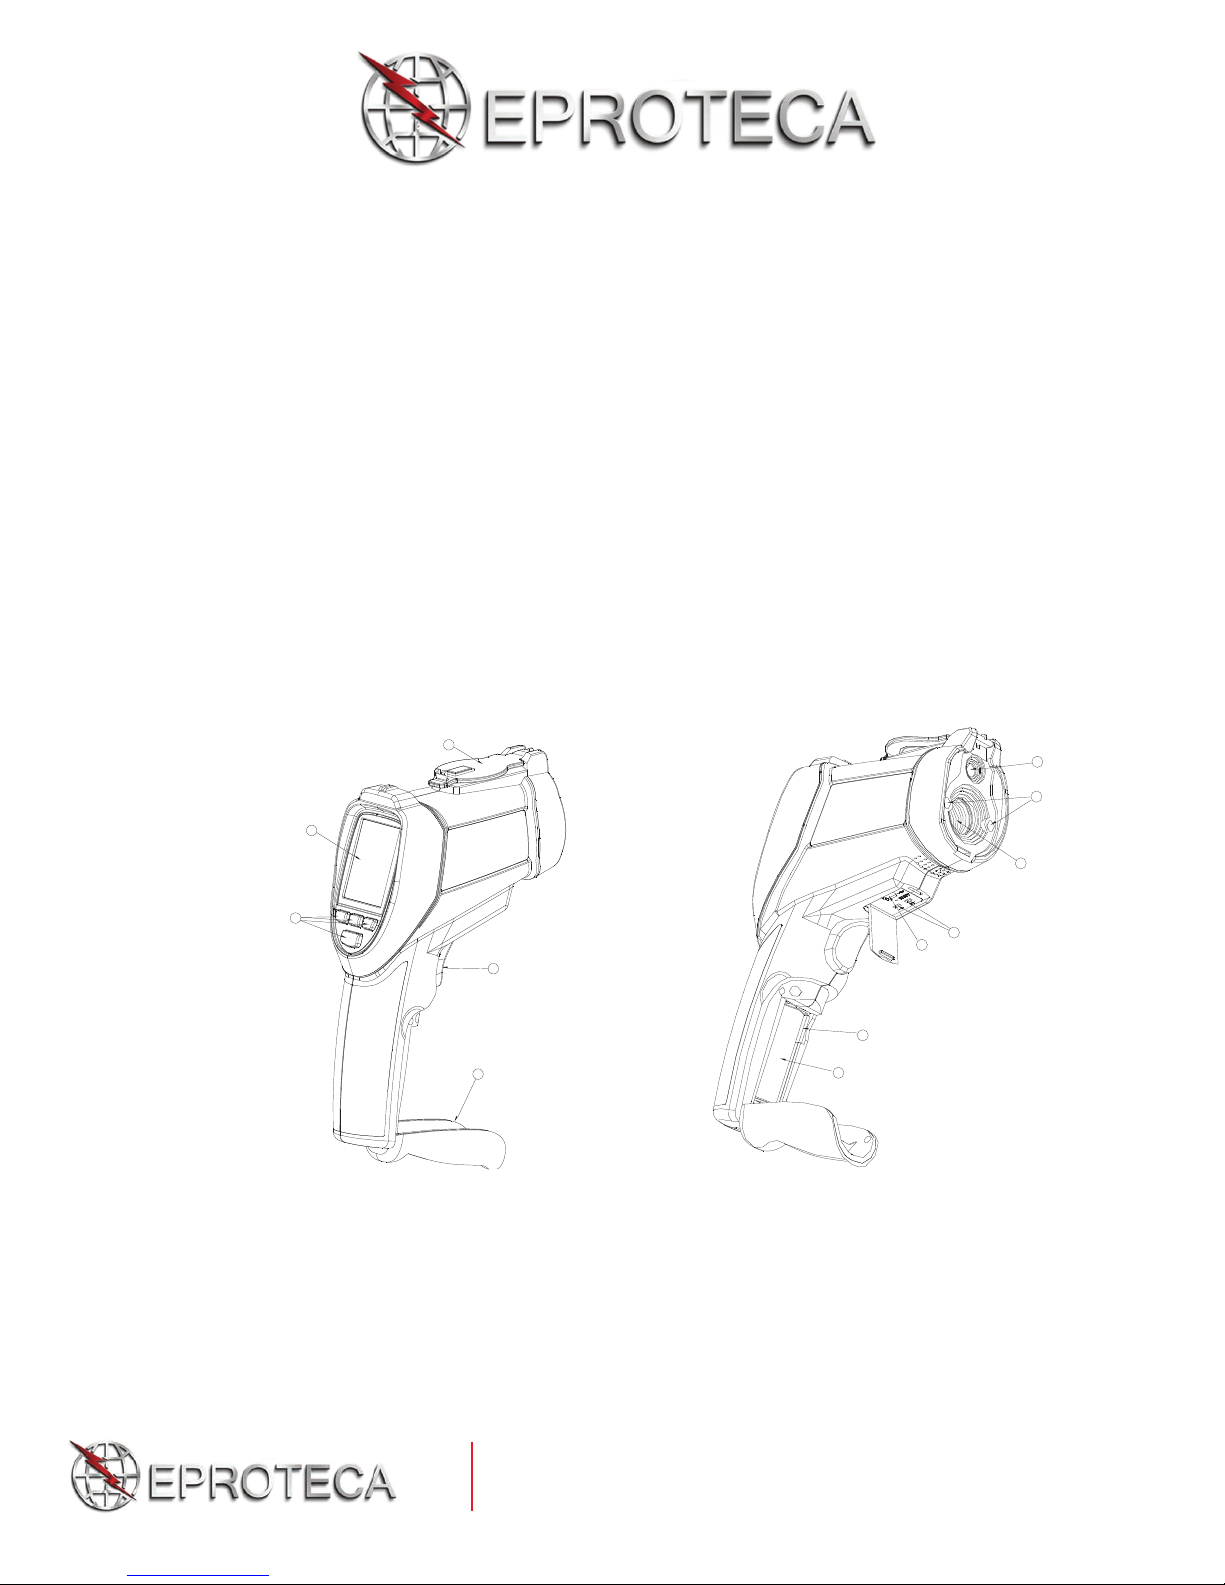
4) Front Panel and Button Description
1) LCD display
2) Buttons
3) Battery cover
4) Measurement trigger
5) Retractable lens cover
6) Visual camera
7) Laser
8) IR sensor
9) Type-K thermocouple socket
10) USB computer interface socket
11) Micro SD card port
12) Battery
5
6
7
1
8
2
4
11
3
12
9
10
3
Tel.: +506 2280-1686 • Fax: +506 2524-2397
ventas@eproteca.com • www.eproteca.com
Page 6

Description of buttons
Mode
Description
CAM mode
Meter measures the IR temperature, air
temperature and air humidy with camera
IR mode
Meter measures the IR temperature, very fast
response time
Dew Point mode
Meter measures the IR temperature and dew
point temperature
Datalog mode
Datalogging
Galery mode
Display picture/datalog and video
Settings
Setting parameters
1) Up () or Picture button
2) ESC button
3) Down () or Video button
4) ENTER
(MODE) button
1
2
5. Menu overview
Power ON or power OFF
Press and hold ESC button to switch the instrument ON.
Press and hold ESC button to switch the unit OFF.
5.1 Measurement Modes
The IR video thermometer has six measurement modes. When the meter is switched
ON, the rst screen that appears is the mode selection screen. Use the and
buttons to select the desired mode and then press the ENTER button to access the
mode.
3
4
4
Tel.: +506 2280-1686 • Fax: +506 2524-2397
ventas@eproteca.com • www.eproteca.com
Page 7

Symbols
Symbol
Description
Symbol
Description
CAM mode
High alarm
IR mode
High alarm triggering
Dew point mode
Low alarm
Laser
Low alarm triggering
Scanner
Hold
5.2 CAM Mode
In CAM mode , the meter can measure the IR temperature, air temperature, air humidity,
dew point temperature and wet bulb temperature with camera. The IR maximum (MAX)
temperature, IR minimum (MIN) temperature, IR differential (DIF) temperature and the
IR average (AVG) temperature can also be displayed. Press and hold trigger to measure
the temperature. This mode can take picture and video.
5.2.1 Capturing picture function
In CAM mode, press the button to enter the picture taking mode and then press
SAVE with the button to save picture or press CANCEL to cancel picture.
Tel.: +506 2280-1686 • Fax: +506 2524-2397
ventas@eproteca.com • www.eproteca.com
5
Page 8

5.2.2 Capturing video function
In CAM mode, press the button to enter video taking mode, then press START
with the button to take video, or press ESC button to escape.
Use the button to stop video.
5.3 IR Mode
In the IR mode, the meter can measure IR temperature, air temperature, air
humidity, dew point temperature and wet bulb temperature but without the video
camera capabilities. The IR maximum (MAX) temperature, IR minimum (MIN)
temperature, IR differential (DIF) temperature and the IR average (AVG)
temperature can also be displayed. Press and hold trigger to measure the
temperature.
5.4 Dew point temperature Mode
In the dew point temperature mode, the meter displays the dew point temperature
measurement along with the IR temperature value. Press and hold the trigger to take
a measurement.
Tel.: +506 2280-1686 • Fax: +506 2524-2397
ventas@eproteca.com • www.eproteca.com
6
Page 9

In the dew point mode, the percentage bargraph indicates how close the IR
temperature is to the dew point temperature. At 100% the two values are identical.
5.5 Datalogging Mode
In the datalogging mode, first set parameters for high alarm value, low alarm value,
interval time and the line color. Once configured, press the trigger to start logging.
The unit will automatically record data. Press the ESC button to exit the
DATALOG mode, the meter will automatically save the data to a file.
Set the datalogger parameters
Set the high alarm value
From the datalogger screen, use the arrow
parameter and then press the ENTER button. Use the and buttons to adjust
the alarm value, then press the ENTER button to confirm.
Set the low alarm value
From the datalogger screen, use the arrow keys to select LOW alarm value
parameter and then press the ENTER
alarm value, then press the ENTER button to confirm.
Set the interval time for the datalogger
From the datalogger screen, use the arrow keys to select the interval TIME
parameter and then press the ENTER button. Use the and b uttons to adjust
the time value and then press the ENTER button to confirm.
Set the line color
From the datalogger screen, use the arrow keys to select the COLOR parameter and
then press the ENTER button. Use the and buttons to select a line color and
then press the ENTER button to confirm.
button. Use the and buttons to adjust the
keys to select the HIGH alarm value
7
Tel.: +506 2280-1686 • Fax: +506 2524-2397
ventas@eproteca.com • www.eproteca.com
Page 10

5.6 View stored pictures, videos and logs (GALLERY)
Item
Description
Pictures
Display the saved pictures
Videos
Play the saved videos
Logs
Display the data logs and view
Press the and buttons to select one of the sub-menus
(picture, video, log) and
then press ENTER button.
In the picture, video or log mode, press the ENTER button to view picture, play
video or view log. Then press the ENTER and the button to delete or press the
button to cancel.
5.7 Settings
8
Tel.: +506 2280-1686 • Fax: +506 2524-2397
ventas@eproteca.com • www.eproteca.com
Page 11

Item
Description
Date/Time
Set the current date and time
Units (°C/°F)
Select the temperature unit of measure
Language
Select language
Font color
Select font color
Cursor
Switch the cursor ON or OFF
Backlight
Backlight brightness adjustment
Auto power off
Set the auto power off time period
Screen timeout
Set the screen auto off time period
Key press alert
Enable or disable the key press alert
Memory status
Display the memory and SD card capacity
Factory setting
Restore factory settings
Press the and buttons to select an item and then press the ENTER button to access
it.
5.7.1 Setting the Date and Time
Use the ENTER button to scroll to the desired digit and then use the and
buttons to change the digit. Use the ESC button to exit this mode and save the
date and time.
9
Tel.: +506 2280-1686 • Fax: +506 2524-2397
ventas@eproteca.com • www.eproteca.com
Page 12

5.7.2 Setting the Temperature Units (°C / °F)
Use the and buttons to select the desired unit of measure, press the ESC
button to exit and save.
5.7.3 Setting the Language
Press the and to select the language, press ESC button to exit and save.
5.7.4 Setting the Font Color
Press the and buttons to select the color, press the ESC button to exit and
save.
10
Tel.: +506 2280-1686 • Fax: +506 2524-2397
ventas@eproteca.com • www.eproteca.com
Page 13

5.7.5 Setting the Cursor Style
Use the and buttons to select the cursor style ( off, cross or circle), press the
ESC button to exit and save.
5.7.6 Setting the Backlight Brightness
Use the and buttons to select the backlight brightness level in %, press the
ESC button to exit and save.
5.7.7 Setting the Auto Power Off Time
Use the and buttons to disable or select an auto power off time, press ESC
button to exit and save.
11
Tel.: +506 2280-1686 • Fax: +506 2524-2397
ventas@eproteca.com • www.eproteca.com
Page 14

5.7.8 Setting the Screen Timeout
Use the and buttons to disable or select a screen auto o time, press the
ESC button to exit and save.
5.7.9 Enable/Disable Key Press Alert
Use the and buttons to enable or disable the key press alert feature, press the
ESC button to exit and save.
5.7.10 Memory Status
Use the and buttons to select the memory (internal ash or SD card). Press the
ESC button to exit and save. If an SD card is inserted in the meter, the SD card will be
selected by default. Press the ENTER button to format the internal flash or SD card.
Press the button to cancel the formatting, and press the button to conrm the
format.
12
Tel.: +506 2280-1686 • Fax: +506 2524-2397
ventas@eproteca.com • www.eproteca.com
Page 15

5.7.11 Factory Default Setting
Item
Description
Emissivity set
Set the emissivity
High alarm
Set the high alarm ON/OFF and set the alarm limit
Low alarm
Set the low alarm ON/OFF and set the alarm limit
Laser
Enable or disable the laser pointer
Auto mode
Lock to continue measurement
MAX/MIN
Display the highest (MAX) or lowest (MIN) IR temperature
AVG/DIF
Display average temperature or differential IR temperature
Ambient TEMP/% RH
Display the air temperature and relative humidity
Dew point/Wet bulb
Display the dew point and wet bulb temperature
Type K
Enable or disable the type K contact thermocouple input
Use the and buttons to select either YES (return to the factory default
settings) or NO (cancel). Press the ESC button to exit and save.
6. Measurement Settings
On any mode, press the ENTER button to access into the menu measurement
settings
13
Tel.: +506 2280-1686 • Fax: +506 2524-2397
ventas@eproteca.com • www.eproteca.com
Page 16

6.1 Emissivity Setting
Use the arrow buttons to highlight an emissivity setting and then press ENTER to
choose it. Select emissivity by description (concrete, glass, etc.) or select = 0.94
to set the emissivity manually using the arrow buttons. Press the ESC button to
exit and save.
6.2 High Alarm
Use the and buttons to enable or disable the alarm. If the high alarm is
enabled, press the ENTER button and then use the and buttons to adjust the
value. Press the ENTER button to confirm and then press the ESC button to exit
and save.
6.3 Low Alarm
Use the and buttons to enable or disable the alarm. If the low alarm is
enabled, press the ENTER button and then use the and buttons to adjust the
value. Press the ENTER button to confirm and then press ESC button to exit and
save.
14
Tel.: +506 2280-1686 • Fax: +506 2524-2397
ventas@eproteca.com • www.eproteca.com
Page 17

6.4 Laser
Use the and buttons to enable or disable the laser pointer, press the ESC
button to exit and save.
6.5 Auto Mode (Measure Lock)
Use the and buttons to enable or disable auto mode, press the ESC buttons
to exit and save.
If auto mode is enabled and the ESC button is then pressed, the meter will enter
the Measure Lock mode, where measurements will be made automatically.
To cancel the Measure Lock mode, press the ENTER button and then press the
UP button. Use the DOWN button to switch the laser ON or OFF.
6.6 Max/Min
Use the and buttons to set the MAX/MIN mode ON or OFF. The
MAX/MIN mode displays the
Press the ESC button to exit and save.
highest (MAX) and lowest (MIN) IR temperature.
6.7 Average/Dif
Use the and buttons to switch ON or OFF the average or differential IR
temperature. Press the ESC button to exit and save.
15
Tel.: +506 2280-1686 • Fax: +506 2524-2397
ventas@eproteca.com • www.eproteca.com
Page 18

6.8 Ambient TEMP/% RH
Use the and buttons to switch the air temperature and relative humidity
display ON or OFF. Press the ESC button to exit and save.
6.9 Dew Point/ Wet Bulb Temperature
Use the and buttons to switch the dew point and wet bulb temperature ON
or OFF. Press the ESC button to exit and save.
6.10 Type K
Use the and buttons to enable or disable the Type K contact thermocouple
input. Press the ESC button to exit and save.
Note : If a Type-K probe is inserted into the meter’s thermocouple jack,
Enable will be selected by default. Select the Disable
LCD from displaying Type-K temperature.
setting to prohibit the
7. Notes
How it works
Infrared thermometers measure the surface temperature of an object. The unit’s
optics sense emitted, reflected and transmitted energy which is collected and focused
onto a detector. The unit’s electronics translate the information into a temperature
reading, which is displayed on the unit. In units with a laser, the laser is used for
aiming purposes only.
Field of view
Make sure that the target is larger than the unit’s spot size. The smaller the target is,
the closer you should be to it. When accuracy is c
least twice as large as the spot size.
ritical, make sure the target is at
16
Tel.: +506 2280-1686 • Fax: +506 2524-2397
ventas@eproteca.com • www.eproteca.com
Page 19

Distance and spot size
Substance
Thermal Emissivity
Substance
Thermal Emissivity
Asphalt
0.90 à 0.98
Cloth (black)
0.98
Concrete
0.94
Human skin
0.98
Cement
0.96
Leather
0.75 à 0.80
Sand
0.90
Charcoal (powder)
0.96
Earth
0.92 à 0.96
Lacquer
0.80 à 0.95
Water
0.92 à 0.96
Lacquer (matt)
0.97
Ice
0.96 à 0.98
Rubber (black)
0.94
Snow
0.83
Plastic
0.85 è 0.95
Glass
0.90 à 0.95
Wood
0.90
Ceramic
0.90 à0.94
Paper
0.70 à 0.94
Marble
0.94
Chromium oxides
0.81
Plaster
0.80 à 0.90
Copper oxides
0.78
Mortar
0.89 à 0.91
Iron oxides
0.78 à 0.82
Brick
0.93 à 0.96
Textiles
0.90
As the distance (D) from the object increases, the spot size (S) of the area measured
by the unit, becomes larger. (See Fig. 1 on page 2).
Locating a hot spot
To find a hot spot, aim the thermometer outside the area of interest, then scan across
with an up and down motion until you locate the hot spot.
Reminders
a. Do not use the unit to measure shiny or polished metal surfaces (stainless steel,
aluminum, etc.). (See Emissivity).
b. The unit cannot measure through transparent surfaces such as glass. It will measure
the surface temperature of the glass instead.
c. Steam, dust smoke, etc, can obscure measurements.
Emissivity
Emissivity is a term used to describe the energy emitting characteristics of materials.
Most (90% of typical applications) organic materials and painted or oxidized surfaces
have an emissivity of 0.95 (pre-set in the unit). Inaccurate readings will result from
measuring shiny or polished metal surfaces. To compensate, cover the surface to be
measured with masking tape or flat paint. Allow time for the tape to reach the same
temperature as the material underneath it. Measure the temperature of the tape or
painted surface.
8. Emissivity Values
17
Tel.: +506 2280-1686 • Fax: +506 2524-2397
ventas@eproteca.com • www.eproteca.com
Page 20

9. Maintenance
MTP Instruments warrants this instrument to be free of defects in parts and
liability is limited to repair or replacement of the product.
Repairs or service are not covered in this manual and should only be carried out by a
qualified trained technician.
Periodically wipe the body with a dry cloth. Do not use abrasives or solvents on this
instrument.
MTP WARRANTY
workmanship for one (1) year from date of shipment. This warranty does not apply to
defects resulting from action of the user such as misuse, improper wiring, operation
outside of specification, improper maintenance or repair, or unauthorized
modification. MTP Instruments specifically disclaims any implied warranties or
merchantability or fitness for a specific purpose and will not be held liable for any
direct, indirect, incidental or consequential damages. MTP Instruments total
18
Tel.: +506 2280-1686 • Fax: +506 2524-2397
ventas@eproteca.com • www.eproteca.com
 Loading...