

Page 1
C 17
FORM NO. 769-12192
jqa=mкзЗмЕнл=^внбЙеЦЙлЙддлЕЬ~Сн=√=p~~êÄêΩÅâÉå=√=dÉêã~åó
Page 2

Page 3
A
U
T
S
R
Q
P
O
N
M
L
K
J
I
A
B
C
D
E
F
G
H
B
C D
aba
C
CBCCCCCCACCCCCBC
A
b
A
C
B
C
C
A
A
A
B
B
B
1
2
3
4
5
6
7
Page 4
E
F
G
bb
a
G H
I J
a
2
3
K
ab
1
2
3
1
L
M
N
Page 5

100%
50%
0%
O
P
Q
U
R
S
V
W
T
X
Y
Page 6

Page 7

EN
FR
DE
NL
IT
ES
SV
English ............................. 8
(Original operating instructions)
Français ............................. 27
(Notice d’instructions d’origine)
Deutsch ............................. 47
(Originalbetriebsanleitung)
Nederlands ........................... 67
(Originele gebruiksaanwijzing)
Italiano ............................. 87
(Istruzioni per l’uso originali)
Español ............................. 107
(Instrucciones de funcionamiento originales)
Svenska ............................. 127
(Originalbruksanvisning)
DA
NO
FI
PT
EL
HU
PL
Dansk ............................. 146
(Originale driftsvejledning)
Norsk ............................. 165
(Originale driftsanvisningen)
Suomi ............................. 184
(Alkuperäinen käyttöohjekirja)
Português ............................ 203
(Instruções de serviço originais)
Ελληνικά............................. 223
(Αυθεντικές οδηγίες χειρισμού)
Magyar ............................. 243
(Eredeti üzemeltetési útmutató)
Polski ............................. 263
(Oryginalna instrukcja obsługi)
Page 8
Content
EN
Content
Meaning of the symbols......................................... 8
For your safety....................................................... 9
Safety instructions
Intended use
Identication plate.................................................. 13
Safety equipment................................................... 13
Assembly
............................................................... 14
Operating elements
Putting into use
Operation
............................................................... 16
Indicator panel (model-dependent, optional)
Servicing
................................................................ 22
Disassembly / assembly and conguring the
cutting mechanism................................................. 24
Storage
Transport
.................................................................. 24
............................................................... 24
Troubleshooting
Motor information................................................... 26
Warranty
................................................................ 26
CE Declaration of Conformity
Environmentally-friendly disposal
................................................. 10
.......................................................... 13
............................................... 16
...................................................... 16
......... 20
..................................................... 25
................................ 26
.......................... 26
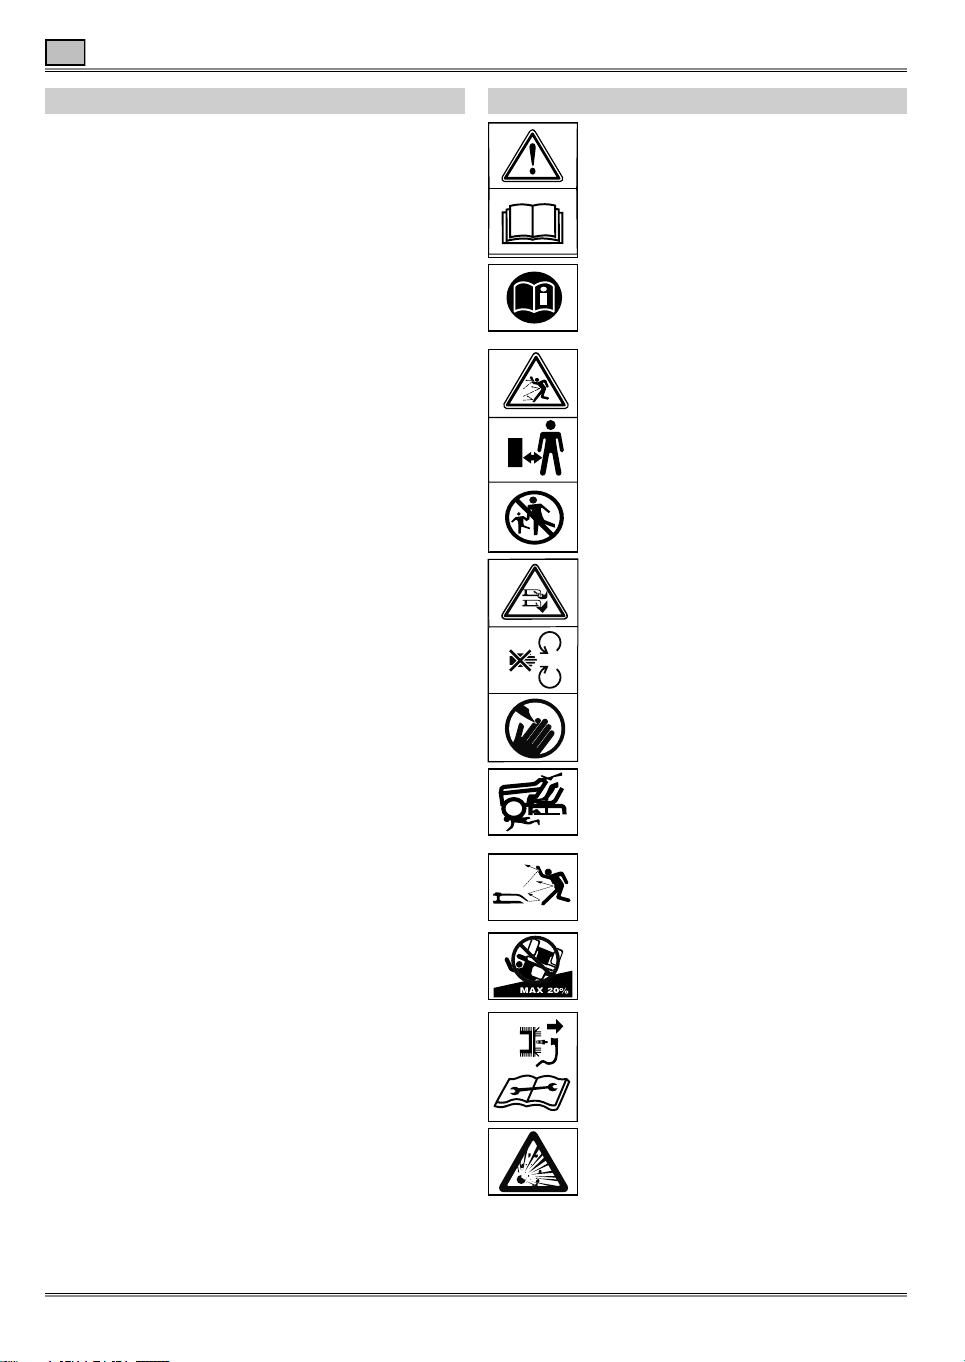
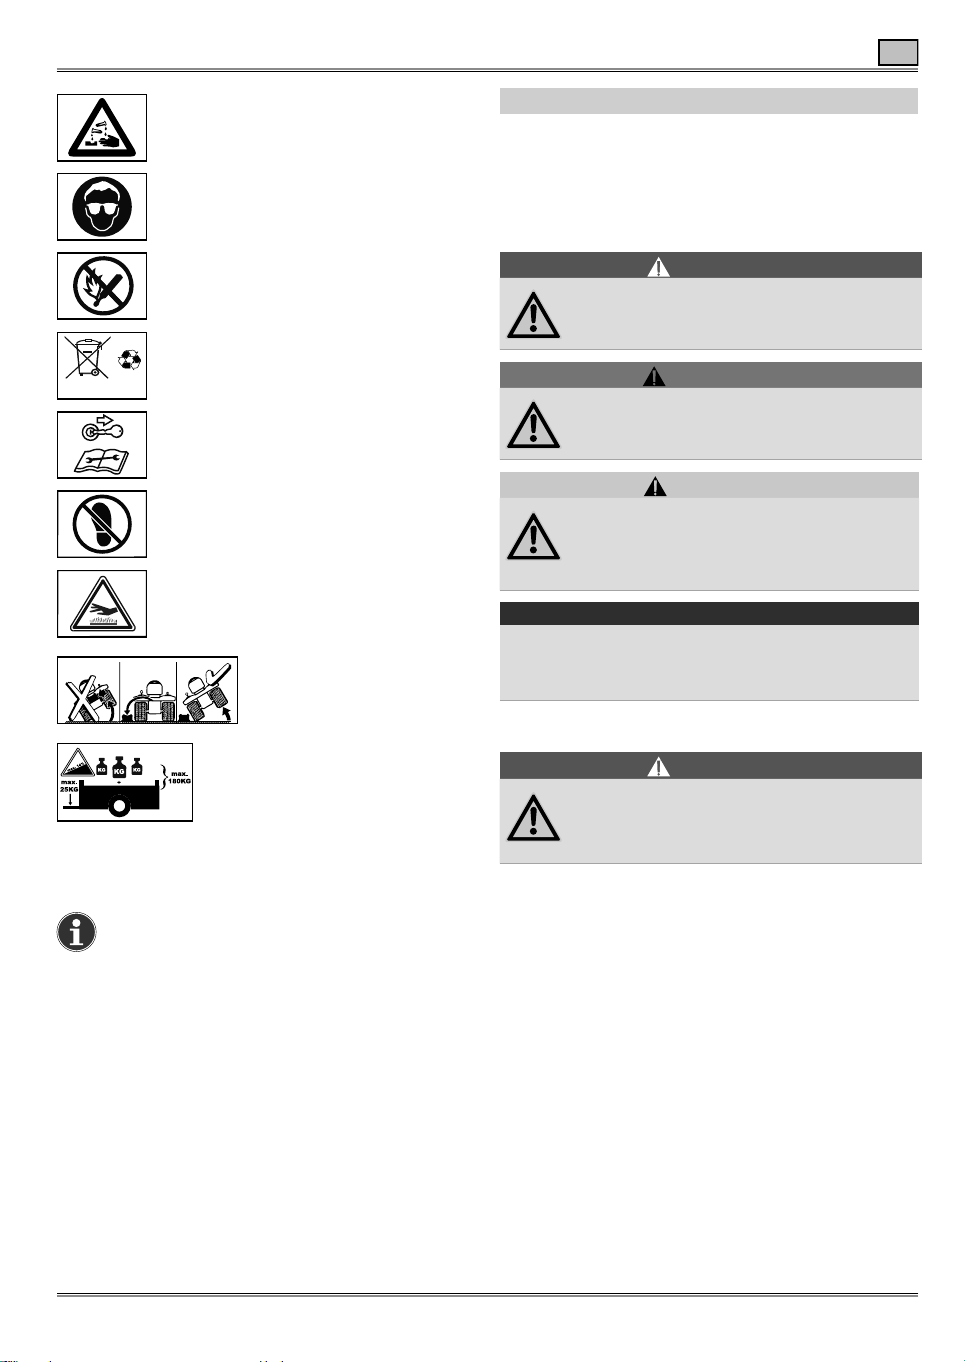
Meaning of the symbols
Warning!
Read the instruction manual before
assembly and using for the rst time!
Caution! Bystanders
Do not allow any other persons to enter
the danger area.
Warning! Rotating blades
Risk of injury posed by rotating blades
or parts
Warning! Rotating blades
Keep hands and feet away from rotating
parts. Keep hands and feet away from
underneath the mower.
Caution! Projectile debris
Debris picked up by the mower may be
ejected at high speed.
Warning! Risk of tipping over
Do not operate the device on slopes with
an incline above 20%.
Danger ! Unintended activation
Before working on the device, pull the
spark plug connector. Keep hands and
feet away from rotating parts.
Danger ! Risk of explosion
8
Page 9
For your safety
EN
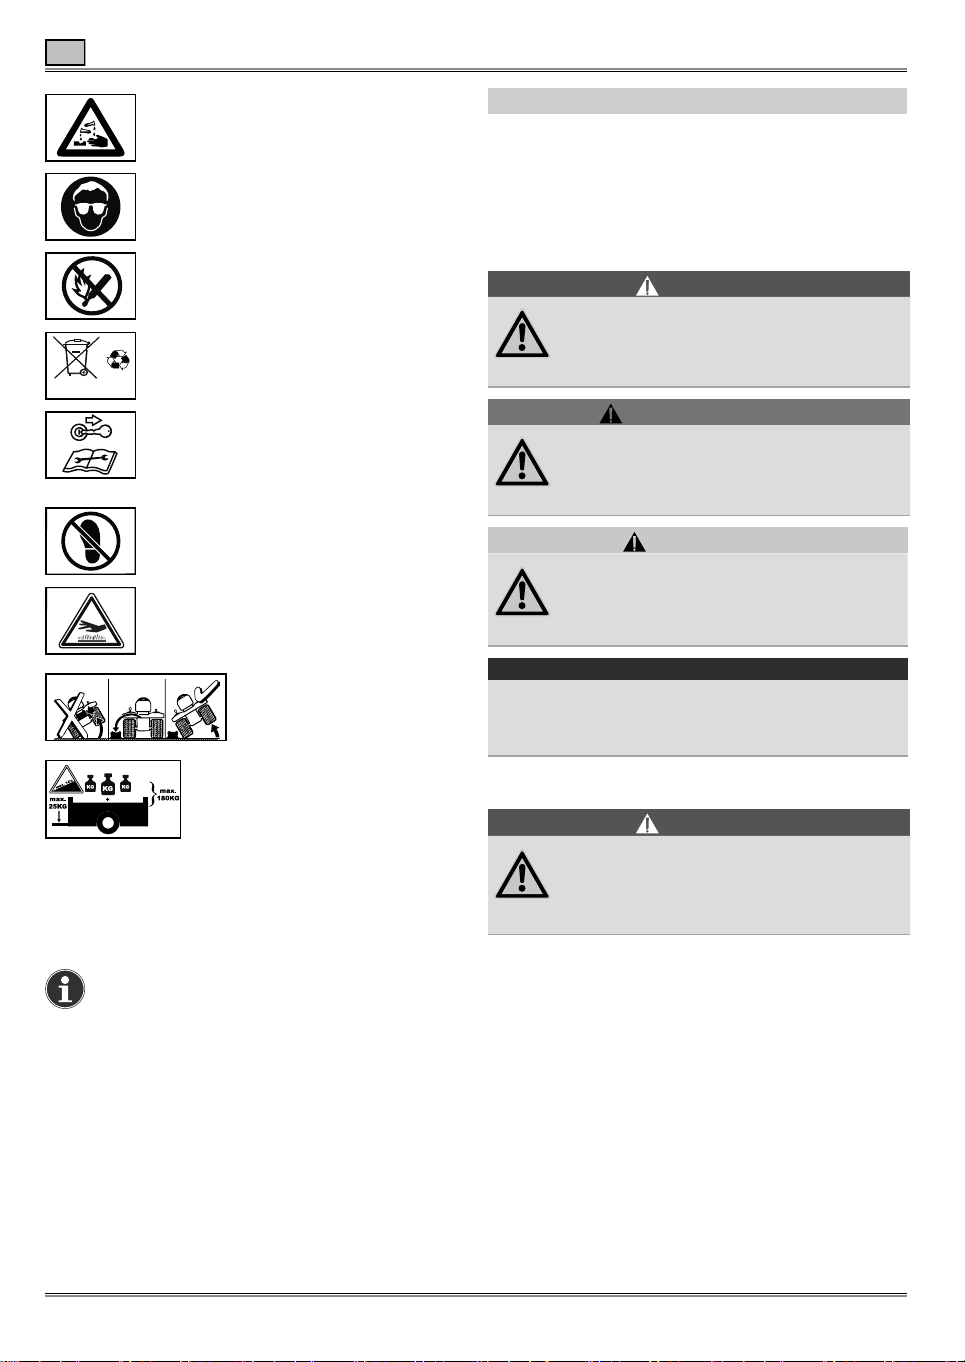
3E
Warning! Risk of injury posed by battery acid
Caution!
Wear protective goggles.
Danger ! Fire, sparks, naked ames
and smoking forbidden!
Attention!
Do not dispose of used batteries with
domestic waste.
Danger ! Unintended activation
Before working on the device, remove
the ignition key. Pay attention to the
notes in these operating instructions.
Attention!
Do not step on the cutting mechanism.
Warning! Hot surface
Caution!
Remove the battery before
tipping the device over.
Warning!
Do not exceed the following
maximum values when using a trailer:
Max. slope: 14 %
Max. bearing load on the trailer coupling: 25 kg
Max. trailer load (trailer and cargo): 180 kg
For your safety
Danger levels of warning information
The following danger levels are used in this
instruction manual to indicate potentially dangerous
situations:
DANGER !
A dangerous situation is highly likely and, if
the measures are not followed, will result in
severe injury and even death.
WARNING !
A dangerous situation may occur and, if
the measures are not followed, will result in
severe injury and even death.
CAUTION !
A dangerous situation may occur and, if
the measures are not followed, will result in
slight or minor injuries.
Attention!
A possibly harmful situation may occur which if not
avoided will result in property damage.
Safety information content
DANGER !
Type and source of the danger!
ÂConsequences of non-observation
¾ Measure for preventing the danger
Note
Always keep these symbols in a legible
condition. Replace damaged or illegible
symbols.
9
Page 10
EN
Safety instructions
Safety instructions
Before using your device for the rst
time, read this instruction manual
carefully and observe the instructions.
Keep this instruction manual for later use or
subsequent owners.
Î Before using for the rst time, you must read the
safety information!
Failure to observe the instruction manual and
the safety instructions can result in damage to
the device and danger for the operator and other
persons.
Î Familiarise yourself with all the controls and their
proper application.
Î All persons involved with set-up, operation and
servicing of the device must have appropriate
qualications.
The making of unauthorised changes or
conversions is not permitted
Do not make any changes to the device nor convert
it to produce other devices. Such changes may
result in personal injury and malfunctions.
Î Repairs to the device must only be performed
by trained persons who have been instructed to
do so. When doing so always use original spare
parts. This ensures that the safety of the device is
maintained.
Information symbols in this manual
The signs and symbols in this manual should help
you to use the manual and device quickly and
safely.
Note
Information to ensure the most effective
and practical use of the mower.
Î Step
Requires you to perform an action.
3 Action result
This is the result of a sequence of steps.
[1]Item number
Item numbers are indicated in the text by square
brackets [ ].
Protection of yourself and others
¾ For safety reasons, children or persons who
are not familiar with the instruction manual
and operation of the device, must not use it.
¾ Persons under the age of 16 must not operate
the device or perform other work on it, such
as maintenance, cleaning or conguration.
The minimum age of the user may be dened by
local or national legislation.
¾ Persons operating the device must not
be under the inuence of intoxicants (e.g.
alcohol, drugs or medication).
¾ Do not use the device without appropriate
training or if you are suffering from tiredness
or illness.
¾ Be careful and do not reach into the cutting
blade area.
¾ Remember that the mower operator is
responsible for any accidents with other
persons or their property.
¾ The device can be used by persons with
limited physical, sensory or mental abilities
or lack of experience and / or knowledge,
insofar that they are supervised or have
received instructions about the safe handling
of the device and understand the associated
dangers.
¾ Do not operate the device when there are
people (especially children) or animals in the
immediate vicinity.
¾ Ensure children do not play with the device.
¾ Stop moving if you notice that persons
(especially children) or animals are nearby.
¾ Always wear sturdy shoes and long trousers
as well as other appropriate personal
protective equipment (safety glasses, ear
defenders, safety gloves etc.) when working
with the device. The wearing of personal
protective equipment minimises the risk of injury.
Do not wear loose clothing or clothing with
hanging cords or belts. Working without hearing
protection can lead to hearing loss.
Illustration label
A
Illustrations are numbered with letters and
identied in the text.
Step number
1
The dened sequence of steps is numbered and
identied in the text.
10
Page 11

Safety instructions
EN
Safety instructions
Before use
¾ Before starting work, make sure you are
familiar with the device, its controls and how
it is operated.
¾ Check that all fastening components (nuts,
bolts, screws, etc.) are tight to ensure safe
operation of the device.
¾ Only operate the device in a technically
perfect condition. Never modify the motor
settings which have been preset at the factory.
Any damage must be repaired by a qualied
expert or workshop.
¾ Remove any adjustment tools or spanners
before switching the device on. Injuries could
be caused by a tool left in the activity area of the
rotating cutting tools.
¾ Never use a device with damaged or missing
guards.They must be repaired or replaced by a
qualied expert or workshop.
¾ Never use the machine without protective
devices, and do not remove them! The
protective equipment forms part of the device.
¾ Never use the device with defective or
damaged safety equipment. Safety equipment
is designed for your protection and must always
be in functioning order. You must never make any
modications to safety equipment or bypass their
functions.
¾ Check the grass collector for damage and
correct mounting.
¾ Before mowing, make sure that the lawn is
free from branches, stones, wire etc. and look
out for such objects the whole time when
mowing. Objects can be seized and hurled away.
¾ Visually inspect the cutting blade and its
fasteners to check that they are not blunt,
damage or deformed.
¾ Attach trailers or add-on devices as per
instructions. Add-on devices, trailers, ballast
weights and lled grass collector inuence driving
performance, especially steering capability,
braking capability and the propensity for tipping
over.
When in use
¾ Do not mow lawns with grass longer than 25
cm in height.
¾ Drive carefully. Reduce speed before making a
turn.
¾ Do not use the device in an explosive
environment, where there are inammable
liquids, gases or dusts. The device may create
sparks, which could ignite the dust or vapours.
Avoid naked ames, sparks and do not smoke.
¾ Take extra care if you are mowing or driving
backwards. To prevent accidents, drive slowly
and take glances at the ground behind you while
doing so.
¾ Only adjust the cutting height with the
motor switched off and the cutting tool at a
standstill.
¾ Never remove the grass collector or the
optional deector while the motor is running.
¾ Never drive over gravel or pavements with the
cutting mechanism running. You may be hit by
stones!
¾ Do not mow overgrown, dry grass (e.g.
pasture grass) or dry piles of leaves. Do not
park the device on dry grass or leaves. Risk of
re from contact with the hot exhaust and when
dried grass or leaves accumulate on the hot
mower.
¾ Pay attention to trafc when working on roads
or when crossing them. The device is not
intended for use on public roads.
¾ Never empty the grass collector when the
cutting mechanism is running. Either yourself
or others could become injured by cut material or
objects which are ung out when emptying the
grass collector.
¾ Take particular care when opening and
closing the grass collector as there is a risk
of crushing.
¾ Keep sufcient distance when mowing
by boundary areas, such as next to steep
inclines or pits, beneath trees, or by bushes
and hedges.
¾ If a foreign object (like a stone) comes into
contact with the cutting mechanism, or if
the device starts to vibrate unusually, switch
the motor off immediately. Inspect the device
for damage before continuing operation. If
necessary, take it to a workshop.
11
Page 12

EN
Safety instructions
Safety instructions
¾ Never stand in front of the grass ejector
openings.
¾ Switch off the motor and remove the ignition
key before freeing blockages or removing
obstructions in the discharge duct.
Mowing on steep slopes
¾ Do not mow or drive on slopes with an incline
greater than 20%.
¾ Always mow up and down slopes and not
across them. Do not turn on slopes. Working
on slopes is dangerous. The device could tip over
or slip.
¾ Always approach slopes as gently as possible
and brake carefully. When driving backwards,
keep the motor engaged and drive slowly. Take
extra care when changing direction.
¾ Do not use any heavy add-on devices on
slopes of more than 9%, such as transport
trailers or lawn rollers.
After use
Î If you leave the seat of the device, always
switch the motor off. Always remove the ignition
key and engage the parking brake.
¾ Ensure that ventilation slots are free from dirt.
¾ Let the motor cool down before storing the
device.
Prior to working on the device
¾ Prior to all work on the device, protect
yourself from injury by
- Switching the motor off.
- Removing the ignition key.
- Engaging the parking brake.
- Waiting until all moving parts have come to a
complete standstill.
- Wait until the motor has cooled down.
- Remove the spark plug connector from the motor
so that unintentional motor starts are prevented.
General safety instructions
¾ Never let the motor run in buildings or poorly
ventilated areas. Risk of fatality from carbon
monoxide poisoning!
¾ Spare parts and accessories must meet the
requirements specied by the manufacturer.
Therefore use only original spare parts/
accessories or spare parts/accessories approved
by the manufacturer. During replacement, always
observe the supplied tting instructions. Using
spare parts or accessories not approved by the
manufacturer may pose an elevated safety risk.
¾ Repairs must only be performed by a qualied
expert or workshop.
¾ Never allow any passengers on the device.
The device is not approved for passenger
transport.
¾ This device is intended for the care of grass
and lawn areas in private households. The
device must not be used for purposes other than
those intended because of the risk of bodily injury
to the user or other persons.
¾ Only use the device in daylight or under
bright articial light. Keep your work area clean
and well lit.
¾ Always have all maintenance work performed
punctually to keep the device in a safe
operating condition.
¾ The exhaust and motor get hot and can cause
burns. Do not touch!
¾ Only use the device in dry weather
conditions. Keep the device away from rain or
damp. The device can slip on wet grass due to
reduced ground traction.
¾ Do not use the device when raining or there is
a risk of lightning.
¾ Never drive with the motor hood open.
¾ Handle fuel carefully. Fuel and petrol fumes
are explosive and fuel is readily ammable.
Never refuel the device with the motor running or
hot. Only refuel the device out in the open. Only
store fuel in containers approved for that purpose
and never within the proximity of sources of heat
(e.g. furnaces or boilers). Damaged exhausts,
fuel tanks or tank caps must be replaced.
¾ Do not start the motor of fuel has overown.
Push the device away from the area
contaminated with fuel and wait until the fuel
vapours have evaporated.
¾ In order to prevent a risk of re, keep the
motor, the battery and the fuel tank free of
grass and discharging oil.
¾ Also pay attention to the notes in the motor
manual.
12
Page 13
Intended use
EN
Intended use
This device is intended for use
- As a lawn tractor for mowing grass areas of a
house or gardens.
- With accessories explicitly approved for this lawn
tractor.
- In accordance with the descriptions and safety
notes provided in these operating instructions.
Any other use is classed as an unintended use.
Improper use invalidates the warranty and results in
a rejection of all responsibility by the manufacturer.
The user is liable for damage to third parties and
their property.
Unauthorised modications to the device absolves
the manufacturer of liability for any damages that
result.
This device is not approved for operation on public
roads, nor for transporting people.
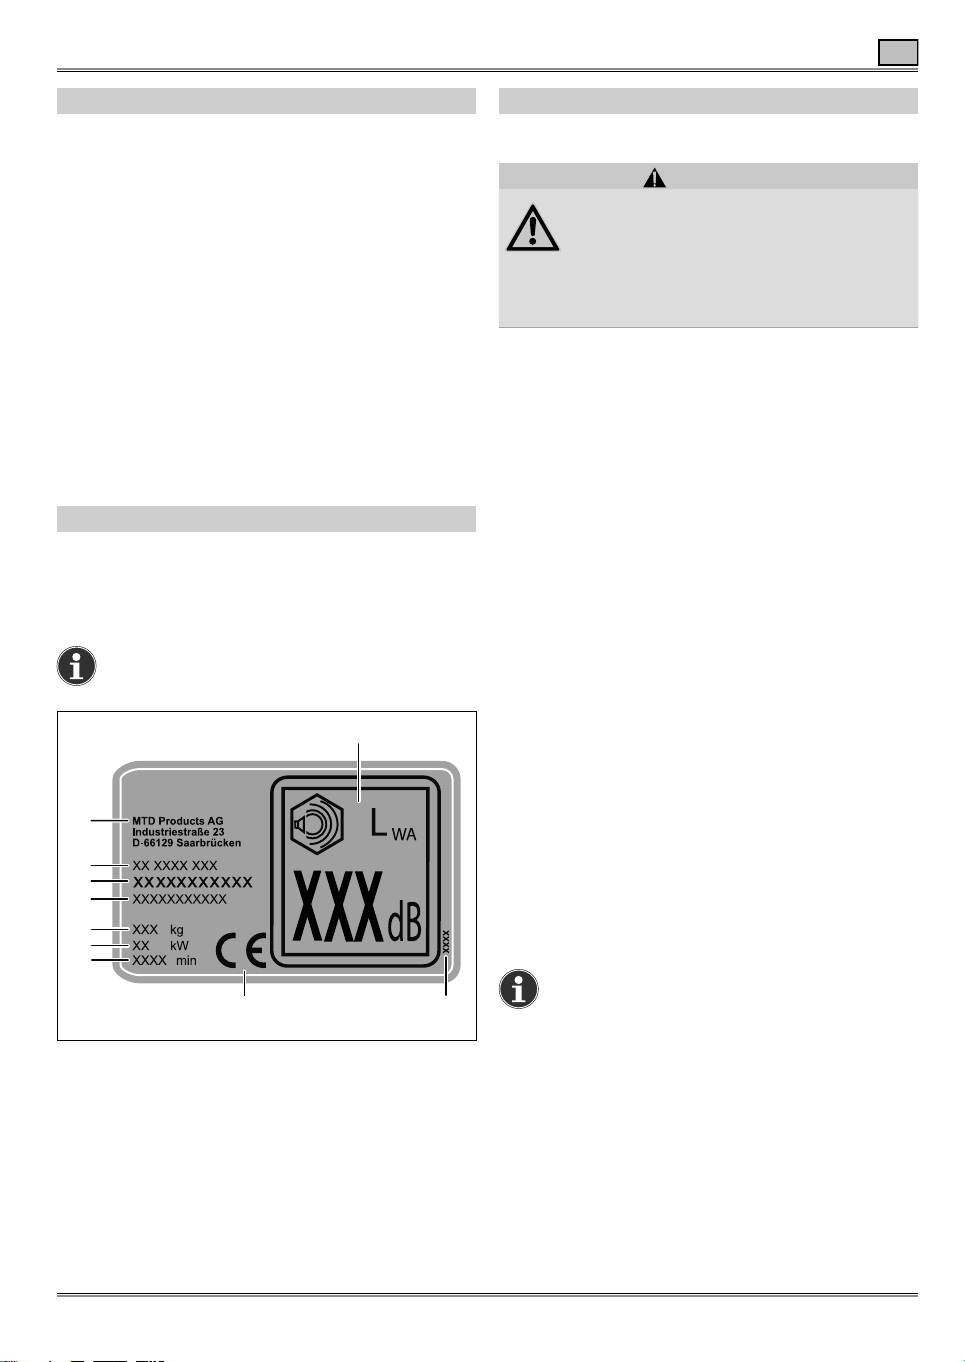
Identication plate
Position
The identication plate is located under / in front of
the driver's seat.
Note
The identication is considered as a document. It must never be altered or obliterated.
1
2
3
4
5
6
7
8
Structure
1 Guaranteed sound level
2 Manufacturer
3 Model name
4 Model number
5 Serial number
6 Weight
7 Power
8 Motor rotation speed in rpm
9 CE label
10 Year of manufacture
/
9
10
Safety equipment
Grass collector
Contact with the cutting blade and objects
hurled out
ÂRisk of injury
¾ Only operate the device with the
grass collector attached or an optional
deector.
S
CAUTION !
Safety locking system
The safety locking system enables the starting of the
motor only when
- The driver has taken his/her seat on the device.
- The brake pedal is pushed down / the parking
brake is in the parking position.
- The accelerator pedal is at "N".
- The cutting mechanism is switched off; i.e.: PTO
switch to position "O/Aus/Off" (PTO = Power TakeOff)
The safety locking system prevents mowing without
the grass collector attached or without the optional
deector attached (automatic motor or cutting
mechanism deactivation).
In devices with a PTO switch (electromechanical
PTO), the safety locking system automatically
switches off the cutting mechanism once the
operator leaves the seat with the cutting mechanism
activated; irrespective of whether the parking brake
was activated beforehand.
In devices without an OCR function or with a
deactivated OCR function, the safety locking
system prevents reversing with the cutting
mechanism activated (automatic shutdown of motor
or cutting mechanism).
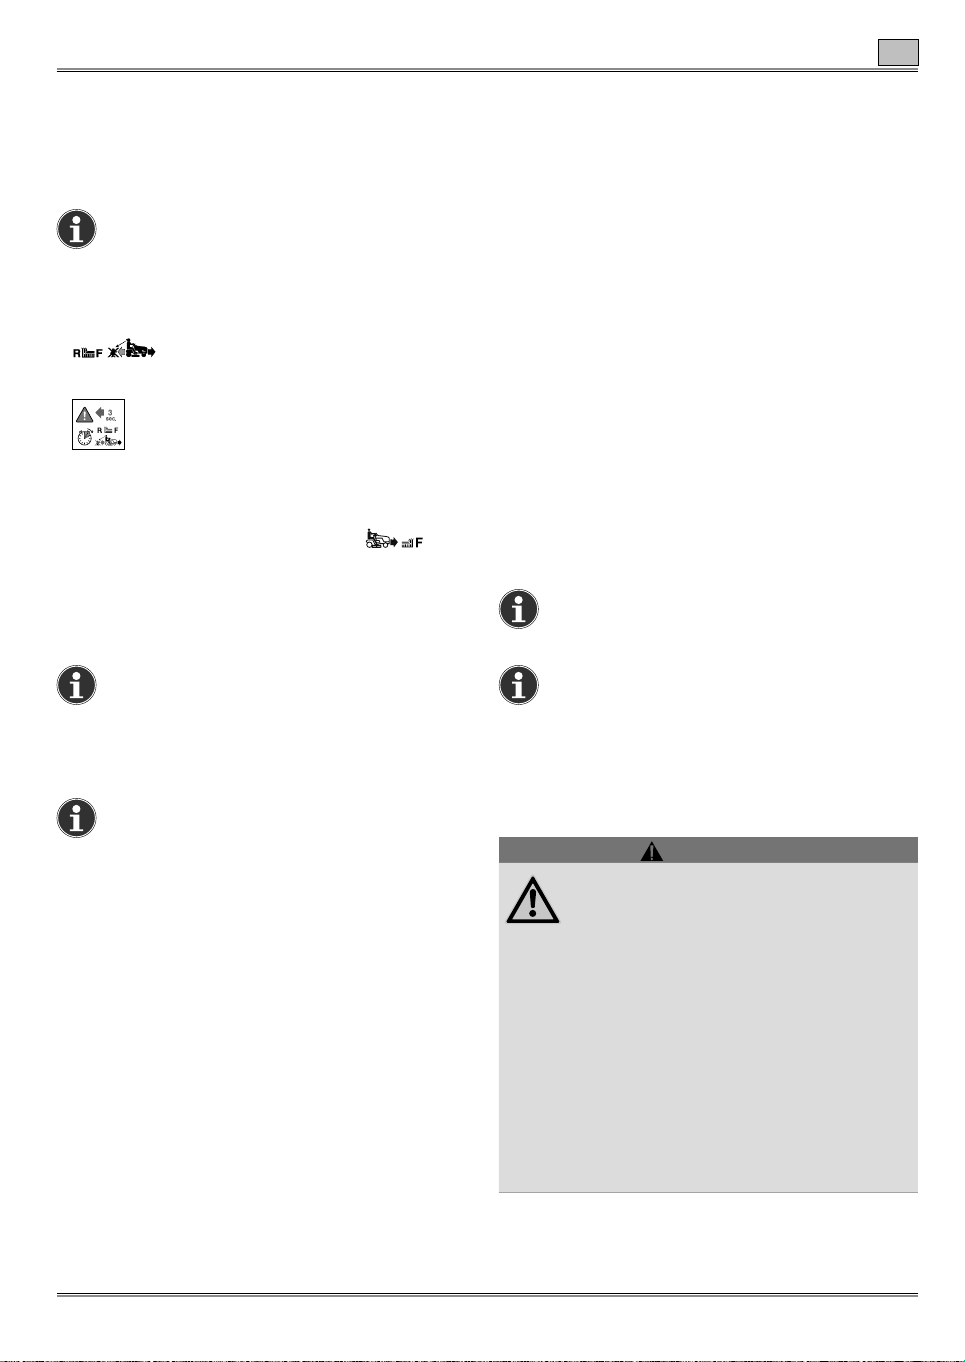
Î Prior to reversing on devices with PTO, switch off
the cutting mechanism using the PTO switch.
Note on devices with a PTO switch
In the case of automatic shutdown through
the safety locking system (e.g. reversing or
leaving the seat with the cutting mechanism
activated), rst switch the switch off, and
then back on again, to release the clutch
lock (PTO).
13
Page 14
EN
Assembly
Direction specications
The direction specications on the device (e.g. left,
right) are always based on facing forwards.
Assembly
Note
In order to be able to move the tractor, the
gear release lever must be in the appropriate position. See the section "Operation –
Pushing the device".
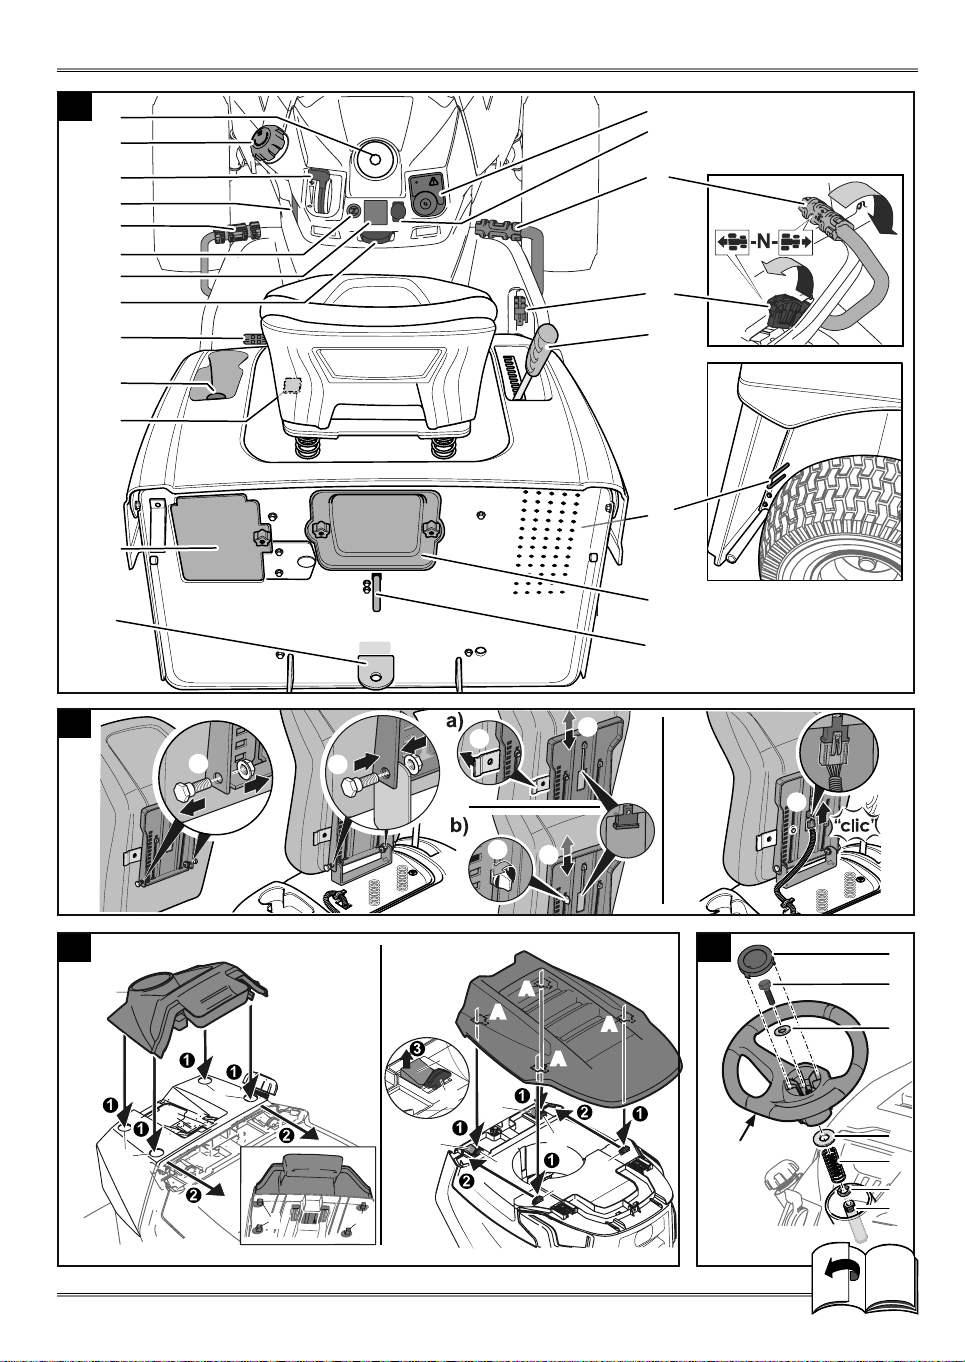
Attaching the seat
Î Remove the screws and nuts on the seat sup-
.
port
1
Î Fix the seat support to the mounting bracket
B
2
using the previously removed screws and nuts.
Î Press the adjustment lever or open the adjustment
screw (depending on the model)
Î Push the seat into a position in which you have
good access to the seat connector
Î Attach the connection cable to the seat con-
nector
Î Retighten the seat adjustment screw (depending
5
.
3
.
4
.
on the model).
Note
The seat is equipped with a seat-occupation
sensor, which belongs to the safety locking
system. The device can thus only be operated correctly when the connection cable is
correctly inserted into the seat connector.
Attaching the upper dashboard covering
(model-dependent)
Î Insert the tabs (A) of the dashboard covering [B]
into the openings of the dashboard support [C]
Î Press them forwards until the stop
Î Check the covering ts rmly.
Ca
2
.
Attaching the motor hood covering
(model-dependent) C b
Attaching the steering wheel
Î Remove the cover cap [1] (design-dependent) on
the steering wheel.
Î Place the spacer [6], the spring [5] and the
washer [4] onto the steering shaft [7].
Î Place the steering wheel on the steering shaft.
Î Fasten the steering wheel using the washer [3]
and the screw [2] (tightening torque: 25-28 Nm).
Note
Put on the washer [3] with the bulge facing
upwards.
Î Put on the cover cap [1].
Note
After disassembling the steering wheel
screw, this must be replaced with a new
original screw and screw retention.
Attaching the front bumper
(model-dependent)
Î Remove the four screws from the front bumper.
Î Fasten the front bumper to the tractor frame (inner
side) using the previously removed four screws.
E
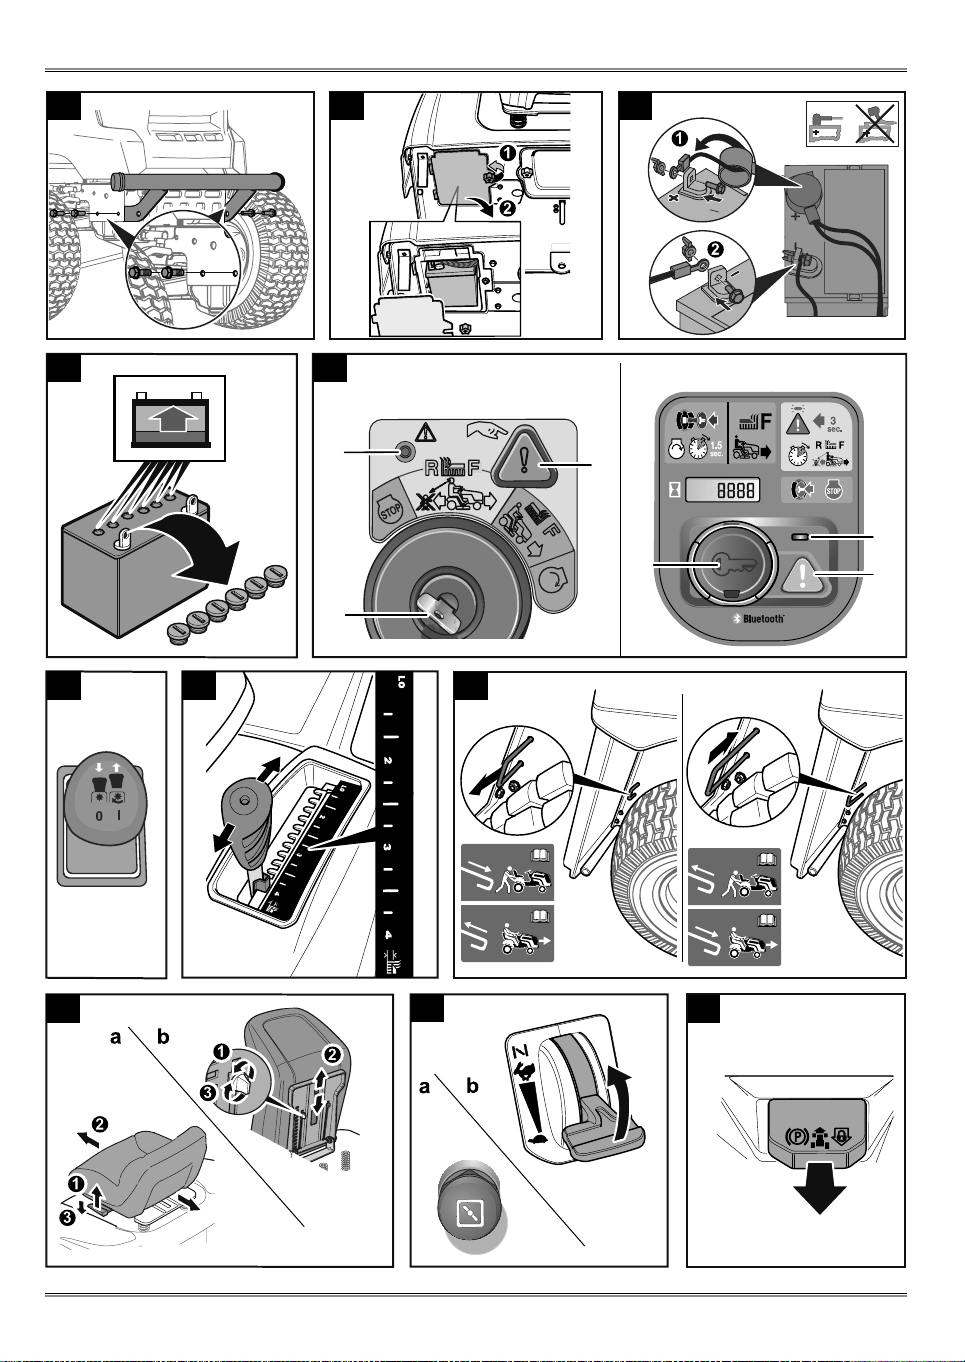
Putting the battery into operation
DANGER !
Risk of re, explosion and corrosion posed
by battery acid and gases from battery acid
¾ Battery acid is corrosive. Clean all device
parts immediately which are sprayed with
battery acid.
¾ Do not smoke, keep burning and hot
1
.
objects at a distance.
¾ Charge batteries only in well-ventilated
and dry areas.
¾ Possible short circuits when working on
the battery. Do not place any tools or
metallic objects on the battery.
D
Î Place the motor hood covering with the re-
cesses [A] on the retaining brackets [B] on the
motor hood
Î Press the covering backwards until the stop
Î Press both clips [C] slightly upwards to lock the
cover
3
Î Check the covering ts rmly.
.
1
.
14
2
.
Page 15
Assembly
EN
DANGER !
Risk of poisoning and injury posed by
battery acid
¾ Wear protective goggles and protective
gloves.
¾ Avoid skin contact with battery acid.
¾ If battery acid is sprayed in your face
or eyes, wash the area exposed
immediately with cold water and seek
medical attention.
¾ If you have swallowed battery acid, drink
lots of water and seek medical attention.
¾ Store batteries out of the reach of
children.
¾ Never tip batteries over, as battery acid
may run out.
¾ Return any leftover battery acid to your
dealer or a disposal company.
Attention!
¾ Pay attention to the assembly sequence for
connecting and disconnecting the battery.
¾ Put the battery into operation only with the
battery pole cover (in the form of a cover ap on
the positive terminal, or as a complete battery
protection cover, depending on the design)
attached.
Note
The battery is located in the battery compartment on the rear of the device F. To open
the battery compartment, remove the two
tommy nuts and take off the cover.
Installation
Î First connect the red cable (+ / positive pole)
Î Then connect the black cable
(- / negative pole)
Î Attach the battery pole cover.
Ga
2
.
Removal
Î Detach the battery pole cover.
Î First disconnect the black cable (- / negative pole).
Î Then connect the red cable (+ / positive pole).
1
In the event of a maintenance-free / sealed
battery (type 1) being supplied
(Battery without sealing plugs)
WARNING !
Electrolyte uid may even discharge from
sealed batteries
ÂRisk of injury and re
¾ Avoid tipping the battery over
Î Prior to initial commissioning, charge up the bat-
tery using a 12-Volt battery charger (maximum
charge current 6 Amperes) for one to two hours.
Î Once charging is over, rst detach the mains con-
nector of the charger.
Î Then disconnect the battery (also refer to the
charger's operating instructions).
Attention!
¾ Pay attention to the notes in the operating
instructions for the charger.
In the event of an unlled battery being delivered
(type 2)
(Battery with sealing plugs)
Î Remove the sealing plugs from the battery
cells
Î Fill each cell slowly with battery acid up to 1 cm
Gb
.
below the ll opening.
Î Leave the battery standing for 30 mins.
Î Check the acid level, and top up with battery acid
if necessary.
Î Prior to initial commissioning, charge up the bat-
tery using a 12-Volt battery charger (maximum
.
charge current 6 Amperes) for one to two hours.
Î Once charging is over, rst detach the mains con-
nector of the charger.
Î Then disconnect the battery.
Î Attach the sealing plugs to the battery.
Î Install the battery in the device.
Î First connect the red cable (+), then the black
cable (-).
Attention!
¾ Pay attention to the notes in the operating
instructions for the charger.
Note
Later only ll the battery with distilled water
(inspect every two months).
Attaching the grass collector
Î Read and observe the separate operating instruc-
tions 'Grass collector'.
15
Page 16
Operating elements
EN
Operating elements
Overview
A Ignition lock (model-dependent)
1 Ignition lock with key for turning
2 Ignition lock with key for pressing (also with a Bluetooth
B PTO switch (model-dependent)
C Forward-drive pedal
D Reversing pedal
E Cutting height adjustment lever
F Gear release lever
G Discharge chute
H Fill level sensor for grass collector (model-dependent)
I Trailer coupling
J Battery compartment
K Seat adjustment lever
L Storage compartment with cup holder, dependent on model
with optional 12 volt socket
M Pedal for differential lock (model-dependent)
N Switch for parking brake / cruise control
O Indicator panel (model-dependent)
P Choke (model-dependent)
Q Braking pedal
R Tank level indicator
S Throttle / choke (model-dependent)
T Fuel tank
U Steering wheel (not visible)
A
service function on certain models)
Putting into use
Checking tyre pressure
Note
For reasons of manufacture, tyre pressure
may be higher than required.
Î Check tyre pressure and correct it when required.
Front 0.9 bar
Rear 0.7 bar
Adjusting the driver's seat
Î Pull the lever and adjust the seat
or
Release the adjusting screw, set the seat and
tighten the adjusting screw once again
Adjusting the cutting mechanism wheels
The cutting mechanism wheels must be at the
lowest cutting mechanism setting, always at least
6–12 mm above the ground. The cutting mechanism
wheels are not designed to bear the weight of the
cutting mechanism. They are merely designed to
compensate for bumps in the ground.
Î Always space the cutting mechanism wheels
evenly.
L
La
.
Lb
.
U
Operation
Prior to each operation
Check:
• All protective equipment
• Motor oil level (see motor manual)
• Tank ll level
• Tyre pressure
• Side coverings, add-on devices, air lter area
for damage and mowing residue
Checking the tank and oil level
Note
The motor is already lled with oil at the factory. Please check and top up if necessary.
• Refuel with unleaded petrol
• Fill the fuel tank to a maximum of 2 cm below
the bottom edge of the ller neck.
• Seal the fuel tank shut tightly.
• Check the oil level
between the "Full/Max" and "Add/Min" markings
(also refer to the motor manual).
. The oil level must be
T
P
.
Attention!
¾ Also pay attention to the notes in the operating
instructions for the motor.
Note
Pay attention to national / municipal regulations governing hours of use; enquire at your
local authority if necessary.
Engaging / disengaging the parking
brake A
Î To engage the parking brake, step down fully on
the brake pedal A Q and press the switch
Î To disengage the parking brake, step on the brake
pedal A Q until the switch
¾ Always engage the parking brake before leaving
the device.
N
N
Attention!
is released.
N
.
16
Page 17
Operation
EN
Setting the motor speed
Q
You can set the motor speed with innite variability
using the throttle.
Fast motor speed =
Slow motor speed =
Starting the motor
Note
The choke M is used for starting the device
when the motor is cold. Some models do
not have a choke. The motor prepares itself
automatically for the relevant start process.
Î Open the fuel tap (if present, see motor manual).
Î Sit yourself down on the driver's seat.
Î Switch off the cutting mechanism.
Î Engage the parking brake.
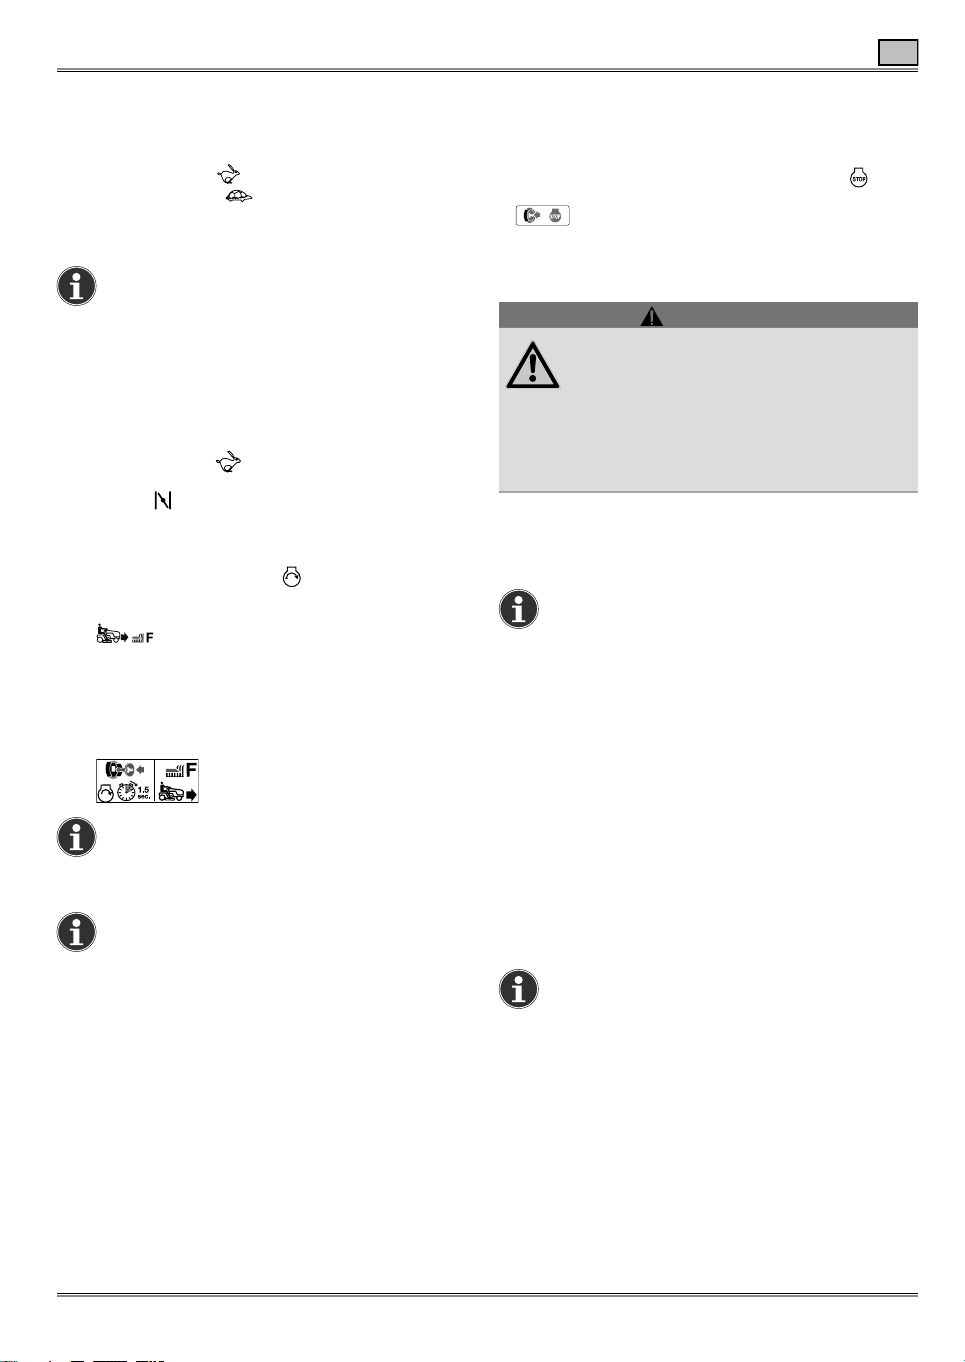
Î Set the throttle to .
Î If the motor is cold, pull the choke / set the
throttle to .
Î Actuate the ignition key
tion lock):
Î Insert the ignition key into the ignition lock [3].
Î Turn the ignition key to until the motor starts
running. Release the ignition key.
Î The ignition key stays in the normal position.
(Mowing in a forward direction)
or
Î Insert the ignition key [3] in the ignition lock
and press it downwards for at least 1.5 seconds
until the motor starts running.
Î Release the ignition key.
3 The ignition key stays in the normal position.
(Mowing in a forward direction)b.
Note
A start attempt should last a max. of 5
seconds. Wait 10 seconds until the next
attempt.
Note
The OCR function must not be activated
during the start process (see section "OCR
function).
Î Reset the choke or the throttle until the motor runs
smoothly.
(depending on the igni-
H
a
.
Stopping the motor
Î Set the throttle to the mid-throttle point.
Î Let the motor run for approx. 20 seconds.
Î Set the ignition key (model-dependent) to
or press the ignition key downwards and release it
.
Î Remove the ignition key.
Hb
Driving
WARNING !
Risk of sudden start-up, sudden stopping
and driving with excessive speed
ÂRisk of accident
¾ Start up slowly and brake slowly.
¾ Do not drive at excessive speed.
¾ Never change the driving direction
without rst bringing the device to a stop.
Î Release the parking brake by stepping down fully
on the brake pedal and then releasing it again.
Î To drive away, step on the accelerator pedal.
Note
The further down on the accelerator pedal
you step, the faster the device will move.
Driving with cruise control
Î Press the switch while driving.
3 The forward speed selected at that point in time
(but not the maximum speed) is maintained.
3 You can take your foot off the accelerator pedal.
Î To deactivate cruise control, step on the brake
pedal / accelerator pedal until the switch is released again.
Stopping the device
Î Take your foot off the accelerator pedal C or D.
Î Step on the brake pedal Q until the device comes
to a standstill.
Note
When you step on the brake pedal, you
simultaneously switch the cruise control off.
A
N
Ha
17
Page 18
EN
Operation
Switching the cutting mechanism on/off
With the PTO switch, the cutting mechanism is
switched on and off through an electromechanical
coupling.
Î To switch the cutting mechanism on, pull the PTO
switch .
Î To switch the cutting mechanism off, press the
PTO switch .
Note on the PTO switch
In the case of automatic shutdown through
the safety locking system (e.g. reversing
with the cutting mechanism activated), the
switch must rst be switched off and then
back on again, to release the clutch lock.
Adjusting the cutting height
Î To set the cutting height, actuate the cutting height
J
adjustment lever.
Note
"4" is the largest possible cutting height
(approx. 10 cm); the cutting mechanism is
located right at the top.
"Lo/1" is the smallest cutting height (approx. 2.5 cm); the cutting mechanism is
located right at the bottom.
Mowing
CAUTION !
Objects hurled out (cut grass, stones, etc.)
ÂRisk of injury
¾ Only empty the grass collector when the
cutting mechanism is switched off.
¾ Only operate the device with the
grass collector attached or an optional
deector.
Attention!
¾ If a foreign object (like a stone) comes into
contact with the cutting mechanism, or if the
device starts to vibrate unusually, switch the
motor off immediately.
¾ Inspect the device for damage before continuing
operation. If there is damage, do not continue
to use the device, and have it repaired by a
workshop prior to next use.
¾ Do not activate the cutting mechanism when
grass is long.
I
Î Start the motor as specied.
Î Set the throttle to .
Î Switch on the cutting mechanism and lower it.
Î Release the parking brake by stepping down fully
on the brake pedal and then releasing it again.
Î To drive away, step on the forward-drive pedal.
Notes on mowing
Do not mow wet grass. Drive slowly at maximum motor speed.
Mowing on tall or wet grass may lead to
uneven grass accumulation / blockages in
the discharge chute.
Notes on mowing
Depending on the model, the device may
have a ll level indicator for the grass collector. The ll level sensor
extent to which the grass collector is lled
during mowing. When the grass collector is
full, an acoustic signal sounds and, depending on the model, the cutting mechanism
automatically, simultaneously switches itself.
The grass collector must then be emptied
prior to further mowing. The sound signal is
only deactivated after emptying the grass
collector.
Setting the fill level sensor
Y
WARNING !
Risk of injury
¾ Only make adjustments to the ll level
sensor when the motor is switched
off, the parking brake is engaged, the
ignition key is removed and the grass
collector has been detached.
The length of the ll level sensor can be modied
(multiple locking positions) and thus set to the
consistency of the grass cuttings. In this process,
the degree of lling of the grass collector is
inuenced at the same time.
Î To shorten the length, push the ll level sensor in
further.
3 The sound signal is triggered later; the cutting
mechanism is deactivated later, depending on the
model.
Note
Ideal for short, very dry grass cuttings.
Î To extend the length, pull the ll level sensor out
further.
3 The sound signal is triggered earlier; the cutting
mechanism is deactivated earlier, depending on
the model.
measures the
Y
18
Note
Ideal for lush, damp grass.
Page 19
Operation
EN
OCR function (model-dependent)
H
The ignition lock is tted with an OCR function,
which offers you user-controlled mowing, even when
reversing.
Notes on mowing
Only use the OCR function if absolutely
necessary.
Î Start the motor.
Î Turn the ignition key [3] anti-clockwise from
normal position to reverse-mowing position
and press the switch [1]a.
or
Press the switch [1]b for 3 seconds.
3 The indicator lamp [2] lights up. You can now mow
both when moving forwards and when reversing.
Î To terminate the OCR function, turn the ignition
key clockwise to the normal position .
or
Press the switch [1]
downwards and then
b
release it.
3 The indicator lamp goes out.
Notes on the ignition lock
Ha
The OCR function is switched off automatically once the key is turned to the normal
position or the motor is shut down (stop
position or shutdown of the motor through
the safety lock system).
Information about the ignition lock
Hb
The OCR function is switched off automatically once the OCR switch is pressed, the
motor is shut down or the safety lock system
automatically switches the motor or the cutting mechanism off.
Mulching
Mulching is when the grass is cut into small pieces
(approx. 1 cm) during mowing and left lying there.
This means the lawn retains many nutrients.
Î Ask your dealer for appropriate accessories for
mulching.
Lawn care tips
A lawn comprises various grass types. If you mow
more frequently, the growth of strongly-rooting
grasses is favoured resulting in rm turf.
If you mow only rarely, the growth of tall grasses and
other weeds (e.g. clover, daisies) is encouraged.
To ensure you lawn grows healthily and uniformly,
without any lines, the cutting stripes must always
overlap by a couple of inches/several centimetres.
- The normal height of the grass is 40–50 mm.
Cut approximately one third of the overall height
as soon as the lawn has reached a height of
60–70 mm.
- Do not cut the lawn shorter than 45 mm as otherwise the turf can be damaged during dry periods.
- Cut long grass in stages until normal height is
reached.
Switching on the headlights (model-
dependent)
Î To switch on the headlights, set the switch to
"ON".
3 The headlights light up while the motor is running.
R
Note
The headlamps switch on and off automatically on models without a light switch.
Note
Depending on the model, the headlights stay
lit up for approx. 10 seconds after the motor
has shut down and then switch themselves
off automatically.
Switching the differential lock on and off
(model-dependent)
An activated differential lock has a strong
inuence on the steering performance of
the device.
ÂRisk of injury and damage to the device
¾ Only use the differential lock when
absolutely necessary; e.g. on difcult
terrain.
¾ Only activate the differential lock when
the device is at a standstill.
¾ Do not use the differential lock on paved
pathways or downhill.
¾ Only drive straight when the differential
lock is activated.
¾ Only drive slowly with the differential lock
activated.
A
WARNING !
19
Page 20
EN
Indicator panel (model-dependent, optional)
With the differential lock activated, power is
transmitted to both rear wheels. The differential lock
intervenes if different wheel speeds are detected.
Î Stop the device.
Î To activate the differential lock, step on the
pedal M.
Î To deactivate the differential lock, take your foot
back off the pedal M.
Note
If the differential lock does not release immediately, reduce the speed of the device or
bring the device to a standstill.
Parking the device
Î Stop the device.
Î Switch off the cutting mechanism.
Î Set the throttle to the centre position.
Î Bring the cutting mechanism into the highest posi-
tion.
Î Switch the motor off after 20 seconds.
Î Engage the parking brake.
Î Remove the ignition key.
Pushing the device
Note
The gear release lever is located between
the rear panel and the device's right rear
wheel.
Devices with differential lock
Î Switch the motor off.
Î Disengage the parking brake.
Î Pull the gear release lever out fully.
3 You can now push the device.
Note
Before you start the motor, press the gear
release lever back in fully.
Ka
12-volt socket (model-dependent)
X
The socket is used for connection of a 12 volt
battery charger or connection of miscellaneous 12
volt devices.
Note
Observe the corresponding information of
the battery charger or the 12 volt devices
that are to be connected.
Indicator panel (model-dependent,
optional)
Note
The indicators only come on when the motor
is running.
Note
If an oil change and air lter maintenance
arise simultaneously, the oil change indicator
lights up rst, then the air lter indicator.
Depending on the design, the indicator panel may
consist of the following elements:
Type 1 Oa in conjunction with the ignition
lock
Ha
Operating hours counter
When the ignition is activated, the battery voltage is
briey displayed. This then changes to the operating
hours indicator.
The operating hours are always counted, except
when the ignition key is at "Stop" or is withdrawn.
Maintenance indicator
Note
means: The total operating hours are
displayed.
– – –
Î Change the motor oil immediately (see the oper-
ating instructions for the motor).
Oil change
Devices without differential lock
Î Switch the motor off.
Î Disengage the parking brake.
Î Press the gear release lever in fully.
3 You can now push the device.
Note
Before starting the motor, pull the gear
release lever out again fully.
20
Kb
This indicator appears every 50 operating hours for
a period of 2 hours.
Page 21
Indicator panel (model-dependent, optional)
EN
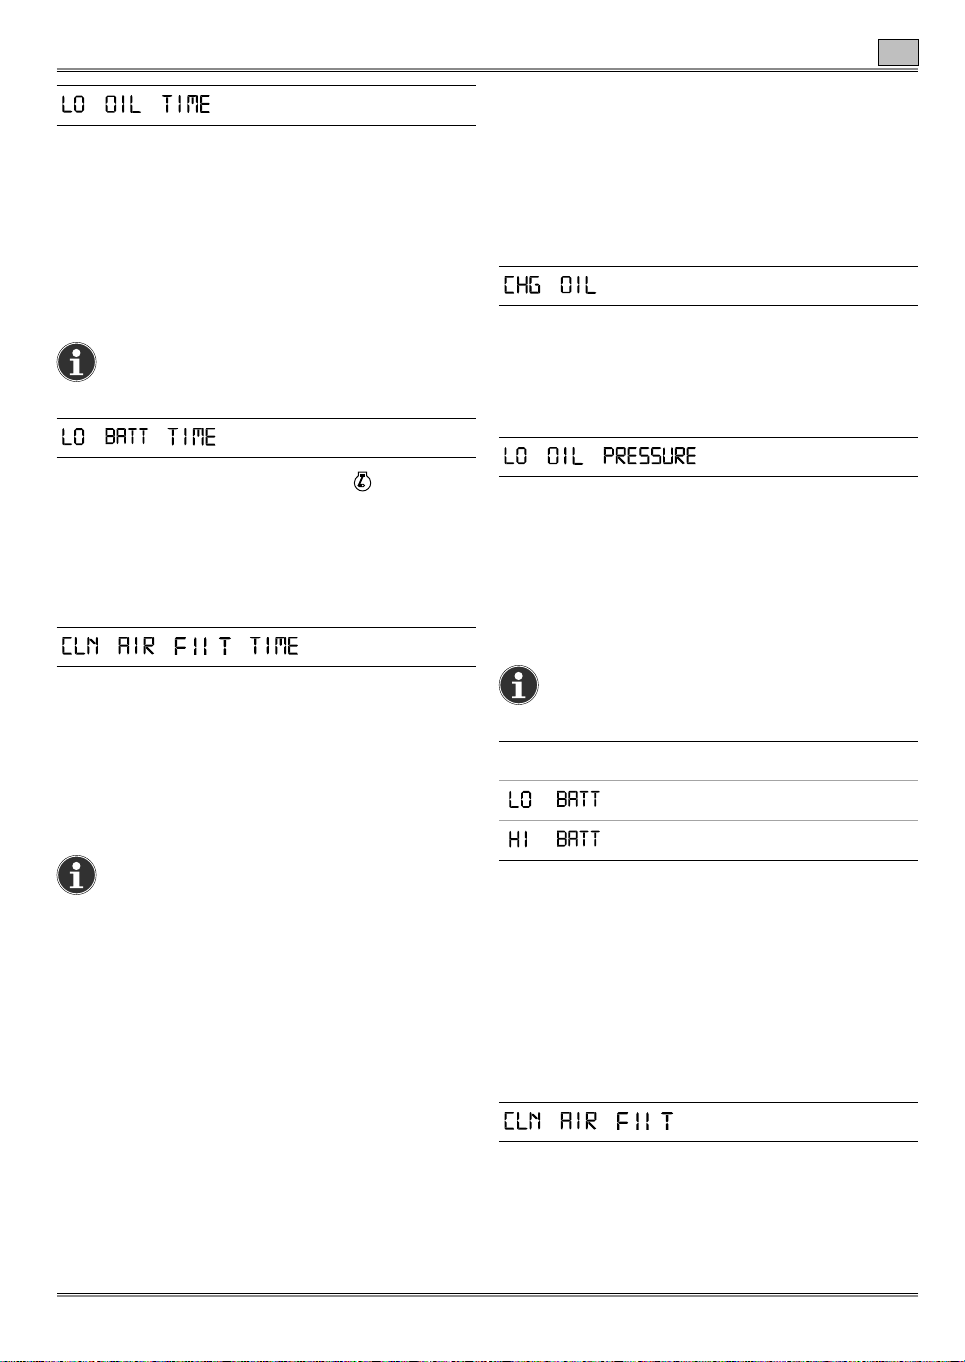
– –
Oil level
The motor oil level is too low.
Î If the indicator does not go out, switch the motor
off immediately and check the motor oil level (see
operating instructions for the motor). Top up with
oil if necessary.
This indicator may appear briey after the motor has
started and then go out again.
Note
This function is only active for motors with
an oil pressure switch.
– –
Battery voltage
If you turn the ignition key to position , the battery
voltage is displayed briey and then the total
operating hours.
Î Charge the battery as soon as possible.
Î If necessary, have the charging system checked
by a workshop for possible damage.
– – –
Î Perform air lter maintenance immediately (see
Air lter mainte-
nance
the operating instructions for the motor).
Operating hours counter
When the inserted ignition key is pressed for less
than 1.5 seconds, the battery voltage is briey
displayed and then changes to the operating hours
indicator. Operating hours are only counted if the
motor is running.
Maintenance indicator
–
Î Change the motor oil immediately (see the oper-
Oil change
ating instructions for the motor).
This indicator appears every 50 operating hours for
a period of 2 hours.
– –
The motor oil level is too low.
Î If the indicator does not go out, switch the motor
Oil level
off immediately and check the motor oil level (see
operating instructions for the motor). Top up with
oil if necessary.
This indicator may appear briey after the motor has
started and then go out again.
Note
This function is only active for motors with
an oil pressure switch.
This indicator appears every 25 operating hours for
a period of 7 minutes.
Type 2 Ob in conjunction with the ignition
lock
Hb
Note
Depending on the model, the indicator panel
may come with a Bluetooth symbol. You
can therefore have all of the functions listed
below, as well as other ones, displayed on
your smartphone. You only require our ConnectTM app (available for the Android and
iOS operating systems). The ConnectTM
app provides you with all the important information and notices concerning your device.
For example, you are notied when the time
comes to check the oil, air lter, battery, cut-
ting blade, etc. or have them serviced.
You can nd the ConnectTM app at our web-
site www.mtdproducts.eu for download.
Install the app onto your smartphone and
follow the step-by-step instructions to synch
your device to your phone.
Battery voltage
–
–
Low (< 11 Volt)
High (> 16 Volt)
During a motor start, the battery voltage is displayed
briey and then the total operating hours.
If battery voltage too low:
Î Charge the battery as soon as possible.
Î If necessary, have the charging system checked
by a workshop for possible damage.
If battery voltage too high:
Î Switch the device off and have the charging
system checked by a workshop.
– –
Î Perform air lter maintenance immediately (see
Air lter maintenance
the operating instructions for the motor).
This indicator appears every 25 operating hours for
a period of 7 minutes.
21
Page 22
EN
Servicing
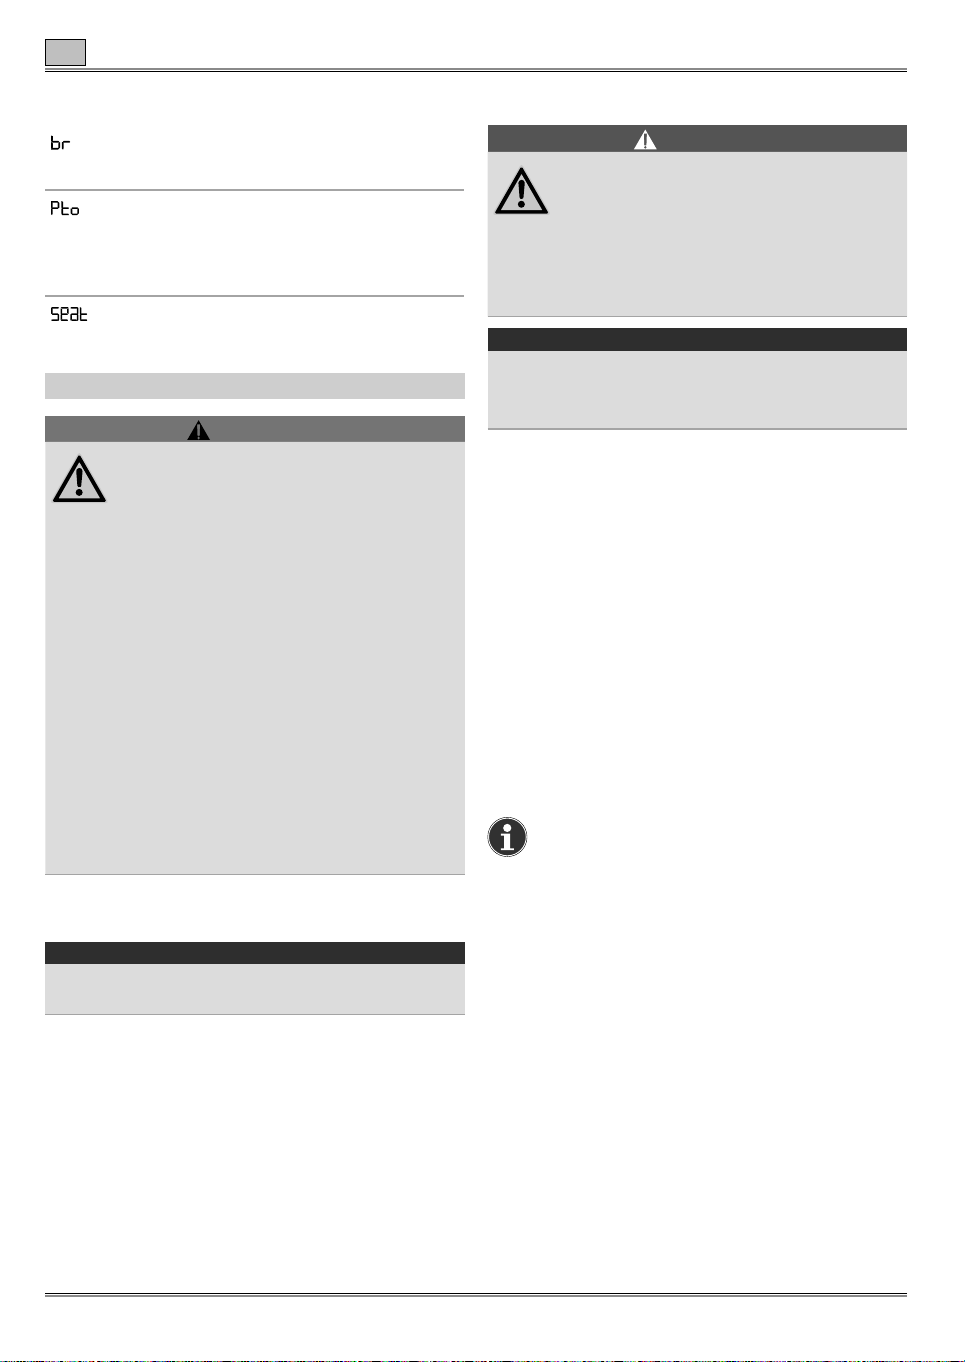
Other indicators in the display
Brake / parking brake not actuated during
motor start attempt.
a) Mower not switched off during motor
start attempt.
b) OCR function was not activated prior to
mowing in reverse.
Operator not sitting on the driver's seat during motor start attempt.
Servicing
WARNING !
Risk of injuries or material damage
¾ Only clean or service the device if the
motor is stationary.
¾ Remove the ignition key and the spark
plug connector.
¾ Wait until all moving parts have come
to a standstill and the motor has cooled
down.
¾ Never reach into the rotating cutting
blades.
¾ Only have repair and service work,
as well as the replacement of safety
elements, performed by a qualied
expert or workshop.
¾ Only have the replacement or
resharpening of the cutting blades
performed by a workshop.
¾ Clean the device and all add-on and
accessory parts after every instance of
use.
Cleaning the cutting mechanism
DANGER !
Sharp, moving cutting tools
ÂRisk of injury
¾ War safety gloves.
¾ Clean the cutting tools carefully.
¾ Ensure that the movement of one cutting
tools can lead to the rotation of another
cutting tool.
Attention!
Fuel may run into the combustion chamber.
ÂMotor damage
¾ Do not tilt the device more than 30°.
Î Bring the cutting mechanism into the highest posi-
tion.
Î Clean the cutting area with a brush, a hand brush
or a cloth.
Cutting mechanism with cleaning nozzle
(optional)
Cleaning
Î Place the device on a clean, solid foundation.
Î Engage the parking brake.
Î Attach a water hose with a standard quick cou-
pling to the cleaning nozzle.
Î Start the motor.
Î Lower the cutting mechanism and switch it on.
Î Let the motor and cutting mechanism run for a few
minutes.
Î Switch the motor and cutting mechanism off.
W
Note
If available, repeat the steps for the second
cleaning nozzle.
Cleaning the device
Attention!
¾ Do not use high-pressure cleaners for cleaning
the device.
Î Place the device on a solid and even foundation.
Î Engage the parking brake.
Î Clean the device with a brush, a hand brush or a
cloth.
22
Drying
Î Bring the cutting mechanism into the highest posi-
tion.
Î Start the motor and switch on the cutting mecha-
nism.
Î To dry the cutting mechanism, let the motor and
cutting mechanism run for a few minutes.
Î Switch the motor and cutting mechanism off.
Page 23
Servicing
EN
Cleaning the grass collector
Attention!
¾ Note the separate operating instructions for the
grass collector.
Î Detach the grass collector and empty it.
Î Clean the grass collector with a powerful water jet
(e.g. with a garden hose).
Î Allow the grass collector to dry thoroughly before
next use.
Maintaining the device
Î Note the maintenance instructions in the motor
manual.
Î At the end of each mowing season have the de-
vice inspected and maintained by a workshop.
Note
In the event of an oil change, drop any accumulated waste oil off at a waste oil collection
point or a disposal company.
Note
Return used batteries to your dealer or a disposal company. Uninstall the battery in the
device before the device is scrapped.
Using a jump lead
DANGER !
Risk of explosion / short circuit
¾ Never bypass a defective or frozen
battery with a jump lead.
¾ Also ensure that the devices and the
cable terminals do not come into contact
and the ignitions are deactivated.
Î Connect the red jump lead to the positive terminal
(+) of the discharged battery and to the positive
terminal (+) of the donor battery.
Î First connect the black jump lead to the negative
terminal (-) of the donor battery.
Î Attach the other terminal on the frame near to the
motor block of the lawn tractor as far away from
the battery as possible.
Note
If the donor battery is installed in a vehicle,
the vehicle must not be started during the
jump starting process.
Tyre pressure
WARNING !
Increased tyre pressure
ÂRisk of injury and damage to the device
¾ Never exceed the permitted tyre
pressure (see tyre walls).
Î Check tyre pressure and correct it when required.
Front 0.9 bar
Rear 0.7 bar
Note
Excess tyre pressure reduces the service
life of the tyres. Check tyre pressure prior to
each journey.
After 5 operating hours
Î Perform the rst motor oil change (see motor
manual for intervals).
Î Use the quick oil drain (optional) to drain the
.
oil
V
Note
When draining the oil, use an appropriate
collection container.
Every 25 operating hours
Î Lubricate all pivot points and bearing points of the
driving and braking pedals, of the cutting height
adjustment lever and of the PTO lever with a few
drops of light oil.
Î Clean the battery pole.
Î Lubricate all blade shafts, clamping rollers and
clamping roller brackets at the lubricating nozzles
with 251H EP-type grease.
Note
Have this work performed by a workshop.
Î Lubricate the wheel bearings and front wheel
axles at the lubricating nozzles using a multipurpose grease.
Î Lubricate the wheels of the cutting mechanism
at the lubricating nozzles with a multi-purpose
grease.
Î Dirt and grass residue under the V-belt cover must
be removed by a specialist workshop.
Î Start the lawn tractor.
Î Engage the parking brake.
Î Disconnect the jump lead in reverse order.
23
Page 24
EN
Disassembly / assembly and configuring the cutting mechanism
Every 50 operating hours
Î Have dirt and grass residue removed from the
drive gear by a workshop.
Î Have drive belts, blade shafts and clamping rollers
checked by a workshop for wear and damage.
Every 2 months
Î Only for battery type 2: Fill the battery cells with
distilled water up to 1 cm below the ll opening.
As required
Charging the battery:
Î If you are not going to use the device for lengthy
periods, remove the battery from the device.
Î Charge the battery every 6–8 weeks, as well
as prior to putting back into operation following
storage.
Note
Pay attention to the notes in the operating
instructions of your battery charger.
Replacing fuses:
Î Replace defective fuses with those of the same
power.
Note
The fuse is located on the main cable harness between the battery and the motor.
Only have a defective fuse replaced by a
workshop.
Once per season
Î Clean the spark plugs and adjust the electrode
gap / replace the spark plug (see motor manual).
Î Have the rear wheel axles lubricated by a work-
shop with special water-repellent grease.
Î Arrange for a specialist workshop to sharpen or
replace the cutting tool.
Disassembly / assembly and conguring
the cutting mechanism
Storage
Attention!
Material damage to the device
¾ Store the device in a clean and dry room.
¾ Protect the device against rust in the event of
lengthy storage.
¾ Protect the device against frost.
Î Clean the device and the grass collector.
Î Wipe all metallic parts down with an oiled cloth or
use spray oil to protect against rust.
Î Charge the battery.
Î Remove the battery in the event of lengthy
storage (e.g. in winter).
Î Charge the battery every 6–8 weeks, as well as
prior to re-installation, in the event of lengthy
storage.
Î Drain the fuel and shut the motor down – see
motor manual.
Transport
Note
The device is not permitted for use on roads
(as required by German road trafc regulations).
Short distances
Î To change the location of use, only drive short
distances with the lawn tractor.
Long distances
WARNING !
Danger posed by unstable and insecure
ramps
ÂDanger posed by heavy persons and
material damage
¾ If you are driving the device onto a trailer
or lorry, rst ensure that the ramp is
stable and secure.
24
CAUTION !
The hanger/lifting mechanism is springloaded and may spring upwards as soon
as the cutterdeck is disconnected from the
lifting mechanism.
When releasing the cutting height
adjustment lever with the cutting
mechanism removed, it can spring violently
upwards.
Note
Only have this work performed by a workshop.
WARNING !
Danger posed by inadequate fastening
ÂTurbulence during transport
¾ If you are transporting the device in
a trailer or lorry, fasten and secure it
properly.
Î Use a transport vehicle for larger distances.
Î Push the device by hand in idle into/onto the
transport vehicle.
Î Engage the parking brake and secure the device
against slipping.
Page 25

Troubleshooting
Troubleshooting
WARNING !
Risk of injuries or material damage
¾ In case of doubt always consult a specialist workshop.
¾ Park the device prior to each inspection or prior to working on the cutting blades.
¾ Prior to all work on the device, protect yourself from injury by
- Switching the motor off.
- Removing the ignition key.
- Engaging the parking brake.
- Waiting until all moving parts have come to a complete standstill.
- Wait until the motor has cooled down.
- Remove the spark plug connector from the motor so that unintentional motor starts are prevented.
Problem Possible cause Remedy
Sit down on the driver's seat, step down
fully on the brake pedal and engage the
parking brake.
Switch the PTO off.
Attach the grass collector or the optional
deector to the device.
Connect the red cable to the (+) pole of
the battery, and the black cable to the (-)
pole of the battery.
Check and charge the battery.
If necessary, replace the battery.
Replace the fuse.
If the fuse trips again, look for the cause
(usually a short circuit).
Connect the ground cable.
Actuate the choke. Set the throttle
to .
Top up with fuel.
Check the spark plugs (see motor
manual).
Have the ignition checked in a workshop.
Switch the device off immediately.
Check the motor oil level.
Switch the device off immediately.
Have the motor inspected in a workshop.
Switch the device off immediately.
Have defective parts replaced in a
workshop.
Have the cutting blade sharpened or
replaced in a workshop.
Starter is not turning.
Starter is not turning.
Start is turning but motor is
not starting.
Motor producing smoke.
Strong vibrations.
Cutting mechanism does
not eject any grass or cut
is not clean.
Motor is running but cutting
mechanism is not mowing.
Safety locking system has been triggered.
Battery not properly connected.
Empty or weak battery.
Fuse has tripped.
Loose ground cable between motor and
frame.
Incorrect position of choke and throttle.
Carburettor not receiving any fuel; fuel
tank empty.
Defective or soiled spark plugs.
No ignition sparks.
Too much motor oil in the motor.
Motor defective.
Damaged motor shaft or defective cutting
blade.
Low motor speed. Rev up!
Excessive driving speed. Set a lower driving speed.
Cutting blade blunt.
V-belt torn. Have the V-belt replaced in a workshop.
EN
25
Page 26

Motor information
EN
Motor information
The motor manufacturer is liable for all motor-related
problems in terms of performance, performance
measurement, technical data, warranty and service.
You can nd information in the holder/user manual
of the motor manufacturer supplied separately.
Warranty
The warranty conditions of our local company or
importer apply in all countries. Under the terms of
the warranty we will repair faults on your lawnmower
free of charge, insofar as material or manufacturing
defects are the cause. To make a claim under
warranty please contact your reseller or your
nearest branch.
CE Declaration of Conformity
Further details about the lawnmower are
contained on the separately enclosed CE
Declaration of Conformity, which forms part
of this instruction manual.
Environmentally-friendly disposal
Dispose of any packaging residue, old
devices, etc. which accrue in accordance
with local regulations.
26
Page 27
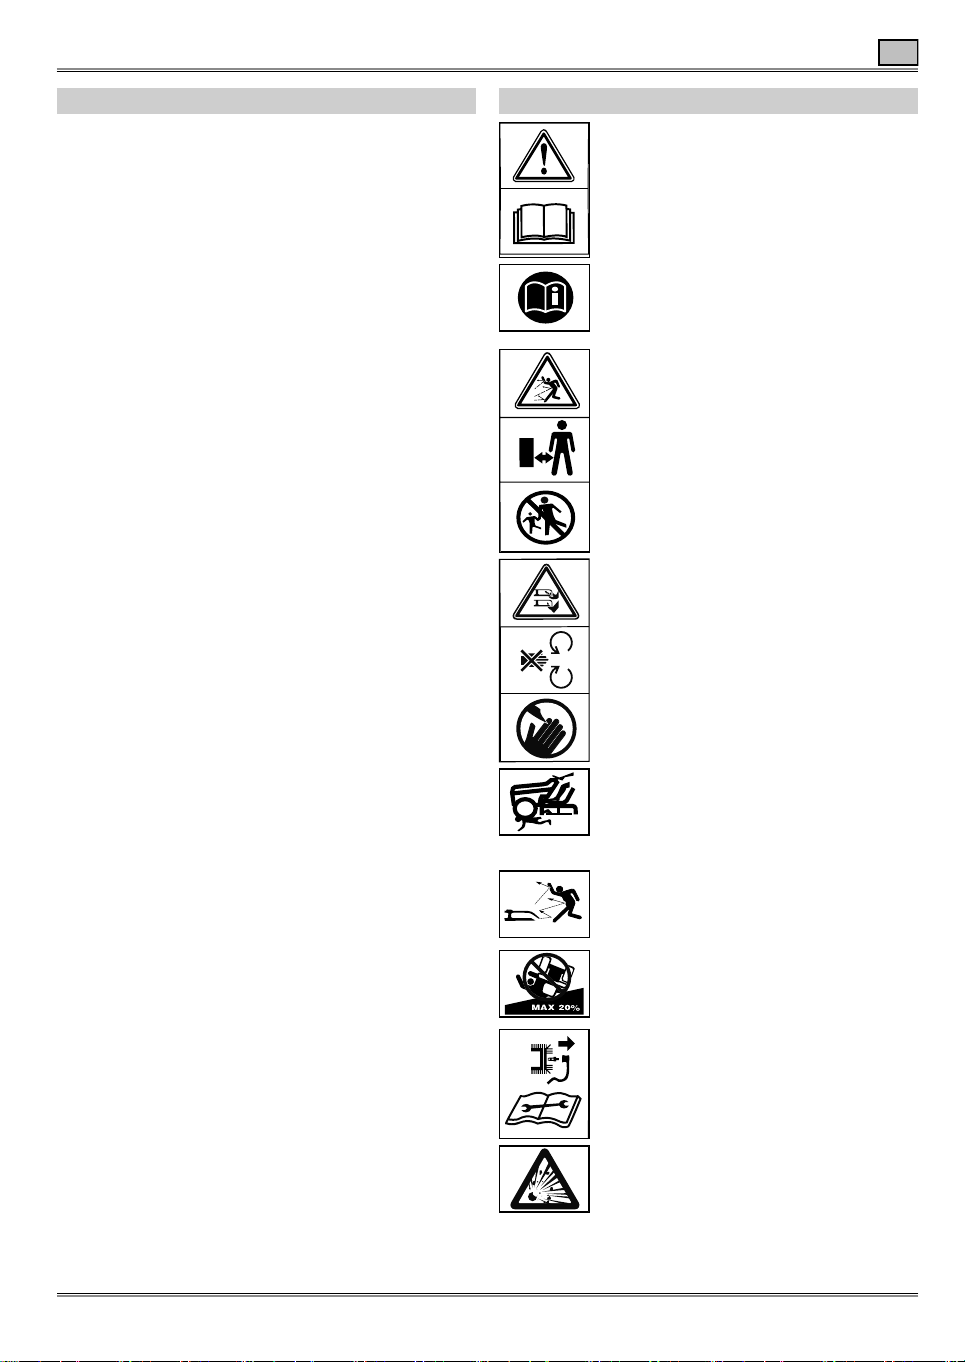
Table des matières
FR
Table des matières
Signication des symboles .................................... 27
Pour votre sécurité
Consignes de sécurité
Utilisation conforme
Plaque signalétique
Dispositifs de sécurité............................................ 33
Montage................................................................. 33
Éléments de commande
Mise en service...................................................... 35
Fonctionnement
Afchage combiné (suivant le modèle, en
option).................................................................... 40
Maintenance
Démontage/montage et réglage du mécanisme
de coupe
................................................................ 44
Rangement
Transport
............................................................... 44
Dépannage
Information relative au moteur
Garantie
................................................................. 46
Déclaration de conformité CE................................ 46
Élimination conforme aux impératifs
écologiques
................................................ 28
........................................... 29
............................................... 32
............................................... 32
........................................ 35
..................................................... 36
.......................................................... 42
............................................................ 44
............................................................ 45
............................... 46
........................................................... 46
Signication des symboles
Avertissement !
Lisez la notice d'utilisation avant de
procéder au montage et à la mise en
service !
Prudence ! Personnes se trouvant à
proximité
Maintenez les personnes étrangères au
service à l’écart de la zone dangereuse.
Avertissement ! Lames rotatives
Risque de blessures pouvant être
occasionnées par des lames ou pièces
rotatives
Avertissement ! Lames rotatives
Tenez vos mains et vos pieds à l'écart
des pièces rotatives. Ne pas placez vos
mains et vos pieds sous le mécanisme
de tonte.
Prudence ! Projection d'objets
Des objets peuvent être saisis par l'appareil et projetés.
Avertissement ! Risque de renversement
N'utilisez pas l'appareil sur les pentes
d'une déclivité supérieure à 20 %.
Danger ! Mise en marche involontaire
Avant de procéder à des travaux sur
l’appareil, débranchez le connecteur de
la bougie d'allumage. Tenez vos mains
et vos pieds à l'écart des pièces rotatives.
Danger ! Risque d'explosion
27
Page 28
Pour votre sécurité
FR
3E
Avertissement ! Risque de brûlures
Prudence !
Portez des lunettes de protection.
Danger ! Feu, étincelles, lumière
directe et fumée interdits !
Attention !
Ne jetez pas les batteries usagées aux
ordures ménagères.
Danger ! Mise en marche involontaire
Avant de procéder à des travaux sur
l’appareil, retirez la clé de contact. Veuil-
lez respecter les consignes gurant dans
la présente notice d'utilisation.
Attention !
Évitez de marcher sur le système de
coupe.
Avertissement ! Surface chaude
Prudence !
Démontez la batterie avant
de basculer l'appareil.
Avertissement !
En cas de remorque tractée,
ne dépassez pas les valeurs
maximales suivantes :
Déclivité max. : 14 %
Charge d'appui max. au niveau de l'accouplement de
remorquage : 25 kg
Charge max. tractée (remorque et chargement) :
180 kg
Pour votre sécurité
Niveaux de danger des mentions d’avertissement
Les niveaux de danger suivants sont employés dans
la présente notice d’utilisation pour attirer l’attention
sur les situations potentiellement dangereuses :
DANGER !
La situation dangereuse décrite est
imminente et provoque, lorsque les
mesures ne sont pas observées, de graves
blessures, voire la mort.
AVERTISSEMENT !
La situation dangereuse décrite peut
survenir et provoque, lorsque les mesures
ne sont pas observées, de graves
blessures, voire la mort.
PRUDENCE !
La situation dangereuse décrite peut
survenir et provoque, lorsque les mesures
ne sont pas observées, des blessures
légères ou mineures.
Attention !
Une situation potentiellement dangereuse peut
survenir et provoque, à moins de l’éviter, des
dommages matériels.
Structure des consignes de sécurité
DANGER !
Nature et source du danger !
ÂConséquences en cas de non-observa-
tion
¾ Mesure à prendre an d’éviter le danger
Remarque
Veillez toujours à ce que ces symboles
soient parfaitement lisibles. Remplacez les
symboles endommagés ou non lisibles.
28
Page 29

Consignes de sécurité
FR
Consignes de sécurité
Avant la première utilisation de l’appa-
reil, lisez attentivement la présente
notice d’utilisation et observez les
instructions qu’elle contient. Conservez
la présente notice d’utilisation en vue d’une
utilisation ultérieure ou de sa remise à un
nouveau propriétaire.
Î Avant la première mise en service, lisez impérati-
vement les consignes de sécurité !
En cas de non-respect de la notice d’utilisation
et des consignes de sécurité, l’appareil risque
d’être endommagé et l’utilisateur et les autres
personnes s’exposent à des dangers.
Î Familiarisez-vous avec l'ensemble des éléments
de commande et leur utilisation correcte.
Î Toutes les personnes chargées de la mise en ser-
vice, de l’utilisation et de la maintenance de l’appa-
reil doivent disposer des qualications requises.
Interdiction de procéder à des modifications et transformations arbitraires
Il est interdit de modier l’appareil ou de fabriquer
des appareils supplémentaires à partir de ce dernier.
De telles modications peuvent provoquer des
dommages corporels et des dysfonctionnements.
Î Les réparations de l’appareil sont strictement
réservées aux personnes dûment mandatées
et formées. À cette n, employez toujours des
pièces de rechange d'origine. Cela permet de
préserver la sécurité de l’appareil.
Symboles d’information figurant dans la
présente notice
Les repères et symboles gurant dans la présente
notice vous aident à garantir une prise en main rapide
et une utilisation en toute sécurité de l’appareil.
Remarque
Informations à propos de la méthode d’utilisation
la plus efcace ou la plus pratique de l’appareil.
Î Étape de la procédure
Vous invite à réaliser une action.
3 Résultat de la procédure
Vous trouverez ici le résultat d’une séquence
d’étapes de la procédure.
[1]N° de repère
Les numéros de repère apparaissent dans le
texte entre [crochets].
Repère des illustrations
A
Les illustrations sont identiées par les lettres
qui apparaissent dans le texte.
N° de l’étape de la procédure
1
La séquence dénie des étapes de la procédure
est identiée par des numéros qui apparaissent
dans le texte.
Protection de l’utilisateur et des personnes
¾ Pour des raisons de sécurité, il est interdit
aux enfants et aux autres personnes qui
ne connaissent pas le contenu de la notice
d’utilisation d’utiliser l'appareil.
¾ Les personnes âgées de moins de 16 ans ne
sont pas autorisées à utiliser l'appareil ou à
exécuter des travaux sur ce dernier tels que
des travaux de maintenance, de nettoyage ou
de réglage.Observer les réglementations locales
relatives à l’âge minimum des utilisateurs.
¾ Les utilisateurs de l'appareil ne doivent pas
être sous l’emprise de stupéants (par ex.
alcool, drogues ou médicaments).
¾ N'utilisez l'appareil sans avoir bénécié d'une
formation adéquate préalable ou en cas de
fatigue ou de maladie.
¾ Faites preuve de prudence et n’introduisez
pas les mains dans le système de coupe.
¾ N’oubliez pas que l'opérateur assume
l’entière responsabilité en cas d’accidents
impliquant des personnes ou la propriété de
ces dernières.
¾ Cet appareil peut être utilisé par des
personnes aux capacités physiques, motrices
et intellectuelles limitées ou ne disposant
pas d’une expérience et de connaissances
sufsantes dans la mesure où elles sont
surveillées ou ont été instruites quant à
l’utilisation en toute sécurité de l’appareil et
des dangers liés à son utilisation.
¾ Ne mettez pas l'appareil en marche tant que
des personnes (en particulier des enfants)
ou des animaux se trouvent à proximité
immédiate.
¾ Veillez à ce que les enfants ne jouent pas
avec l'appareil.
¾ Stoppez l'appareil dès que des personnes (en
particulier des enfants) ou des animaux se
trouvent à proximité de l'appareil.
¾ Pendant les travaux avec ou sur l'appareil,
portez toujours des chaussures robustes et
un pantalon ainsi que tous les équipements
de protection individuelle appropriés
(lunettes de protection, casque antibruit,
gants de travail, etc.). Le port des équipements
de protection individuelle réduit le risque de
blessures. Évitez de porter des vêtements
amples ou des vêtements avec des lacets ou
ceintures qui pendent. Les travaux réalisés
sans casque de protection acoustique peuvent
entraîner une perte d'acuité auditive.
29
Page 30

FR
Consignes de sécurité
Consignes de sécurité
Avant l’utilisation
¾ Familiarisez-vous avec l'appareil, ses
éléments de commande et son utilisation
avant d'entamer les travaux.
¾ Assurez-vous que tous les éléments
de xation (écrous, boulons et vis etc.)
soient parfaitement serrés an de garantir
un fonctionnement en toute sécurité de
l'appareil.
¾ N'utilisez l'appareil qu'en parfait état
technique. Ne modiez jamais des réglages par
défaut du moteur. Demandez à un technicien
qualié ou à un atelier spécialisé de réparer les
dommages.
¾ Avant d’allumer l'appareil, rangez tous les
outils et clés employés pendant les travaux
de réglage. Tout outil se trouvant dans la zone
des outils de coupe rotatifs peut provoquer des
blessures.
¾ N’employez jamais un appareil avec des
dispositifs de protection endommagés ou
manquants. Demandez à un technicien qualié
ou à un atelier spécialisé de les réparer ou de les
remplacer le cas échéant.
¾ N'utilisez jamais l'appareil sans dispositifs de
protection et ne retirez jamais ces derniers.
Ces dispositifs de protection font partie intégrante
de l'appareil.
¾ N'utilisez jamais l'appareil avec des
dispositifs de sécurité endommagés ou
défectueux. Les dispositifs de sécurité
servent à vous protéger et doivent toujours
être opérationnels. Il est interdit d'apporter des
modications aux dispositifs de sécurité ou de
détourner leur fonction.
¾ Vériez que le dispositif de récupération
d'herbe soit intact et correctement monté.
¾ Avant de tondre la pelouse, ramassez toutes
les branches, pierres, ls de fer, etc. qui
traînent sur la pelouse et assurez-vous
pendant toute la tonte que vous n’avez rien
oublié. Des objets peuvent être saisis et éjectés.
¾ Assurez-vous (en effectuant un contrôle
visuel) que les lames de coupe et leur
matériel de xation ne sont pas émoussés,
endommagés ou déformés.
¾ Couplez les remorques et autres outils portés
dans les respect des prescriptions. Les outils
portés, remorques, poids de lestage et dispositifs
de récupération d'herbe pleins ont un impact
sur la conduite de l'appareil, en particulier sa
maniabilité, sa puissance de freinage et sa
propension au renversement.
Durant l’utilisation
¾ Ne tondez pas les pelouses constituées de
brins d'herbe d'une hauteur supérieure à
25 cm.
¾ Roulez avec précaution. Réduisez la vitesse
avant de vous engager dans un virage.
¾ Ne travaillez pas avec l’appareil dans les
atmosphères explosives qui contiennent des
liquides, gaz ou poussières inammables.
L'appareil peut produire des étincelles qui
risqueraient d’enammer la poussière ou les
vapeurs. Évitez les feux à ciel ouvert, la formation
d'étincelles et ne fumez pas.
¾ Faites preuve d’une grande prudence lorsque
vous tondez ou roulez en marche arrière.
An d'éviter des accidents, roulez lentement et
regardez vers l'arrière en direction du sol.
¾ Ne modiez la hauteur de coupe que lorsque
le moteur est à l'arrêt et l'outil de coupe est
immobilisé.
¾ Ne retirez jamais le dispositif de récupération
d'herbe ou le déecteur optionnel lorsque le
moteur tourne.
¾ Ne roulez jamais sur le gravier ou les trottoirs
lorsque le mécanisme de coupe est en
marche. Un risque de projection des gravillons
n'est en effet pas exclu !
¾ Ne passez pas la tondeuse sur les herbes
hautes et sèches (herbes de pâturage par ex.)
ou les tas de feuilles mortes. Ne stationnez
jamais l'appareil sur des herbes ou feuilles
sèches. Risque d'incendie en cas de contact
avec l'échappement chaud ou lorsque l'herbe
ou les feuilles sèches s'accumulent sur le
mécanisme de coupe.
¾ Attention à la circulation lors de travaux
effectués sur la chaussée ou lorsque vous
traversez la voie. L'appareil n'est pas prévu pour
être utilisé sur la voie publique.
¾ Ne videz jamais le dispositif de récupération
d'herbe lorsque le mécanisme de coupe est
en marche. Attention au risque de blessures
pouvant être occasionnées par des débris de
tonte et des objets éjectés lorsque vous videz le
dispositif de récupération d'herbe.
¾ Faites particulièrement attention lorsque vous
ouvrez et fermez le dispositif de récupération
d'herbe – le risque de coincement n'est pas
exclu.
¾ Veillez à respecter une distance sufsante
lorsque vous tondez à proximité de pentes
escarpées, de fossés, le long de buissons et
baies et sous des arbres.
30
Page 31

Consignes de sécurité
FR
Consignes de sécurité
¾ Si un corps étranger (par ex. pierre) entre
en contact avec le mécanisme de coupe ou
l'appareil se met anormalement à vibrer,
coupez immédiatement le moteur. Vériez que
l'appareil ne présente aucun dommage avant de
continuer à l'utiliser. Conez-le éventuellement à
un atelier spécialisé.
¾ Ne vous tenez jamais en face des orices
d’éjection d’herbe.
¾ Coupez le moteur et retirez la clé de contact
avant de procéder à des déblocages ou
d'éliminer les engorgements dans le canal
d'éjection.
Tonte sur les pentes escarpées
¾ Ne tondez ou ne roulez pas sur les pentes
d'une déclivité supérieure à 20%.
¾ Tondez toujours vers l'avant et vers l'arrière
et non en travers de la pente. Ne faites pas
demi-tour sur la pente. Les travaux effectués
sur les pentes sont dangereux. L'appareil peut se
renverser ou glisser.
¾ Démarrez toujours en douceur et freinez
toujours avec précaution sur les pentes.
Lorsque vous roulez en marche arrière, laissez
le moteur embrayé et roulez lentement. Faites
preuve de grande prudence lorsque vous
changez de direction.
¾ Sur les pentes d'une déclivité de plus de 9 %,
n'utilisez aucun outil porté lourd tel que des
remorques ou des rouleaux à gazon.
Après l’utilisation
Î Lorsque vous quittez le siège, coupez
toujours le moteur. Retirez toujours la clé de
contact et activez le frein de stationnement.
¾ Veillez à ce que les fentes d’aération ne soient
pas obstruées par des impuretés.
¾ Laissez refroidir le moteur avant de ranger
l’appareil.
Avant tous les travaux sur l’appareil
¾ Avant de procéder à des travaux sur
l'appareil, protégez-vous du risque de
blessures en
- coupant le moteur,
- retirant la clé de contact,
- activant le frein de stationnement,
- attendant que les pièces mobiles se soient toutes
complètement immobilisées,
- attendant que le moteur ait refroidi,
- débranchant le connecteur de la bougie d'allu-
mage du moteur an d'empêcher tout démarrage
intempestif du moteur.
Consignes de sécurité générales
¾ Ne faites jamais tourner le moteur en intérieur
ou dans des zones mal aérées. Danger de mort
par intoxication au monoxyde de carbone !
¾ Les pièces de rechange et les accessoires
doivent satisfaire aux exigences dénies
par le fabricant. Par conséquent, utilisez
exclusivement des pièces de rechange /
accessoires d'origine ou agréés par le fabricant.
En cas de remplacement, observez toujours les
instructions de montage jointes. L'utilisation de
pièces de rechange ou accessoires non agréés
par le fabricant représente un risque considérable
en matière de sécurité.
¾ Conez exclusivement les réparations à un
technicien qualié ou à un atelier spécialisé.
¾ Ne prenez aucun passager sur l'appareil.
L'appareil n'est pas conçu pour le transport de
personnes.
¾ Cet appareil a uniquement été conçue en vue
de l’entretien des gazons et pelouses par les
particuliers. En raison des dangers corporels
auxquels l’utilisateur et les autres personnes sont
exposés, il est interdit d’utiliser l’appareil à des
ns atypiques.
¾ Employez uniquement l'appareil tant qu’il fait
jour ou veillez à un bon éclairage articiel.
Veillez à la propreté et au bon éclairage du
périmètre de travail.
¾ Faites toujours exécuter les travaux de
maintenance dans les temps an de
maintenir l'appareil dans un parfait état de
fonctionnement.
¾ L'échappement et le moteur chauffent et
peuvent occasionner des brûlures. Ne pas les
toucher !
¾ Employez uniquement l'appareil par temps
sec. Conservez l'appareil à l’abri de la pluie ou
de l’humidité. Sur l'herbe mouillée, l'appareil peut
glisser en raison d'une adhérence au sol réduite.
¾ N'utilisez pas l'appareil par temps pluvieux ou
orageux.
¾ Ne roulez jamais lorsque le capot du moteur
est ouvert.
31
Page 32

FR
Consignes de sécurité
Consignes de sécurité
¾ Faites preuve de précaution avec le carburant.
Les vapeurs de carburant et d'essence sont
explosives et le carburant est facilement
inammable. Ne faites jamais le plein lorsque le
moteur tourne ou lorsqu'il est chaud. Ne faites le
plein qu'en extérieur. Ne stockez le carburant que
dans des récipients prévus à cet effet et jamais à
proximité de sources de chaleur (par ex. fours ou
accumulateurs d'eau chaude). Faites remplacer
l'échappement, le réservoir de carburant et
le bouchon du réservoir lorsque ceux-ci sont
endommagés.
Utilisation conforme
Cet appareil est conçu pour être utilisé
- comme tracteur-tondeuse pour la tonte des pelouses et gazons privés.
- avec des accessoires expressément autorisés.
- conformément aux descriptions et consignes de
sécurité gurant dans la présente notice d'utilisation.
Toute autre utilisation est considérée comme non
conforme.
Toute utilisation non conforme entraîne une perte
de la garantie et un rejet de responsabilité de la
part du fabricant. L'utilisateur est responsable des
dommages occasionnés aux tiers et leurs biens.
Le fabricant décline toute responsabilité en cas
de modications arbitraires et des dommages en
résultant.
Cet appareil n'est pas prévu pour être utilisé sur la
voie publique ou pour transporter des personnes.
¾ Ne démarrez pas le moteur lorsque le
carburant a débordé. Éloignez l'appareil de
la surface souillée de carburant et attendez
jusqu'à ce que les vapeurs de carburant se soient
volatilisées.
¾ An d'éviter tout risque d'incendie, maintenez
le moteur, l'échappement, la batterie et le
réservoir de carburant exempts d'herbe et de
fuite d'huile.
¾ Veuillez également respecter les consignes
gurant dans le manuel d'utilisation du
moteur.
Plaque signalétique
Emplacement
La plaque signalétique se trouve sous/à l'avant du
siège conducteur.
Remarque
Le marquage a valeur de document ofciel
et il est interdit de le modier ou de le rendre
illisible.
1
2
3
4
5
6
7
8
/
32
9
Structure
1 Puissance acoustique garantie
2 Fabricant
3 Nom du modèle
4 Numéro du modèle
5 Numéro de série
6 Poids
7 Puissance
8 Vitesse du moteur en min
-1
9 Marquage CE
10 Année de fabrication
10
Page 33

Dispositifs de sécurité
FR
Dispositifs de sécurité
Dispositif de récupération d'herbe
PRUDENCE !
Contact avec la lame de coupe et éjection
d'objets
ÂRisque de blessures
¾ N'utilisez l'appareil qu'avec un dispositif
de récupération d'herbe monté ou un
déecteur optionnel.
S
Système de verrouillage de sécurité
Le système de verrouillage de sécurité permet de
démarrer le moteur uniquement lorsque
- le conducteur a pris place sur le siège,
- la pédale de frein est actionnée ou le frein de stationnement est en position de stationnement,
- la pédale d'accélérateur est sur « N »,
- le mécanisme de coupe est éteint, c.-à-d. : com-
mutateur de prise de force (PTO) en position « O/
ARRÊT/Off ») (PTO = Power-Take-Off).
Le système de verrouillage de sécurité empêche la
tonte sans dispositif de récupération monté ou sans
déecteur optionnel monté (arrêt automatique du
moteur ou du mécanisme de coupe).
Indications de direction
Les indications de direction gurant sur l'appareil
(par ex. à gauche, à droite) se basent toujours sur
un sens de marche vers l'avant.
Montage
Remarque
Pour pouvoir déplacer le tracteur manuellement, le levier de déverrouillage du
réducteur doit se trouver dans la position
correspondante. Voir à ce sujet la section
« Fonctionnement – Pousser l'appareil ».
Montage du siège
Î Retirez les vis et écrous du support de siège
Î Fixez le support du siège au dispositif porteur
à l'aide des vis et écrous préalablement supprimés
Î Appuyez sur le levier de réglage ou ouvrez la vis
de réglage (suivant le modèle)
Î Poussez le siège dans une position dans laquelle
il est facile d'accéder à la che de raccordement
du siège 4.
Î Enchez le câble de raccordement sur la che de
raccordement du siège
Î Revissez fermement la vis de réglage du siège
(suivant le modèle).
2
.
B
5
1
.
3
.
.
Sur les appareils avec commutateur de prise
de force (prise de force électromécanique),
le système de verrouillage de sécurité arrête
automatiquement le mécanisme de coupe, dès
que l'utilisateur quitte le siège mécanisme de
coupe activé, que le frein de stationnement ait
préalablement été activé ou non.
Sur les appareils sans fonction OCR ou
avec fonction OCR désactivée, le système de
verrouillage de sécurité empêche toute marche
arrière avec mécanisme de coupe activé (arrêt
automatique du moteur ou du mécanisme de
coupe).
Î Avant de procéder à une marche arrière avec un
appareil avec prise de force, désactivez le mécanisme de coupe avec le commutateur de prise de
force.
Remarque relative aux appareils avec
commutateur de prise de force
En cas d'arrêt automatique par le système
de verrouillage de sécurité (par ex. marche
arrière ou siège quitté mécanisme de coupe
activé), désactivez d'abord le commutateur
puis réactivez-le an d'annuler le blocage de
l'accouplement (prise de force).
Remarque
Le siège est équipé d'un facteur de présence appartenant au système de verrouillage de sécurité. Ainsi, la commande de
l'appareil n'est correcte que lorsque le câble
de raccordement est correctement branché
à la prise de raccordement du siège.
Montage du cache supérieur du tableau de
bord
(selon le modèle)
Î Insérez les languettes (A) du cache du tableau de
bord [B] dans les trous du support du tableau de
bord [C]
Î Enfoncez-le vers l'avant jusqu'à la butée
Î Vériez que le cache soit correctement xé.
1
.
Ca
2
.
Montage du cache du capot moteur
(selon le modèle) C b
Î Posez le cache du capot du moteur en position-
nant les évidements [A] sur les languettes de
maintien [B] du capot moteur
Î Poussez le cache vers l'arrière jusqu'à la butée
Î Poussez les deux languettes [C] légèrement vers
le haut pour bloquer le cache
Î Vériez que le cache soit correctement xé.
1
3
.
.
2
.
33
Page 34

FR
Montage
Montage du volant
Î Retirez le capuchon de protection [1] (selon le
D
modèle) situé sur le volant.
Î Enlez la rondelle d'écartement [6], le ressort [5]
et la rondelle [4] sur l'arbre de direction [7].
Î Enlez le volant sur l'arbre de direction.
Î Fixez le volant à l'aide de la rondelle [3] et de la
vis [2] (couple de serrage : 25-28 Nm).
Remarque
Posez la rondelle [3] tout en veillant à ce
que la face bombée soit orientée vers le
haut.
Î Remettez le capuchon de protection [1] en place.
Remarque
La vis du volant une fois démontée, celleci doit être remplacée par une vis d'origine
avec frein de vis.
Montage du pare-chocs avant
(selon le modèle)
Î Retirez les quatre vis du pare-chocs avant.
Î Fixez le pare-chocs avant à l'aide des quatre vis
préalablement retirées au châssis du tracteur
(face intérieure).
E
Mise en service de la batterie
DANGER !
Risque d'incendie, d'explosion et de
corrosion dû à l'acide de la batterie et aux
gaz qui en émanent
¾ L'acide de batterie a un effet corrosif.
Nettoyez immédiatement toutes les
pièces de l'appareil aspergées d'acide
de batterie.
¾ Ne fumez pas et tenez les objets
brûlants et chauds à l'écart.
¾ Chargez les batteries dans des locaux
bien aérés et secs uniquement.
¾ Court-circuit possible lors de travaux
réalisés sur la batterie. Ne posez pas
d'outils ou d'objets métalliques sur la
batterie.
DANGER !
Risque d'intoxication et de blessures dû à
l'acide de batterie
¾ Portez des lunettes et gants de
protection.
¾ Évitez tout contact cutané avec l'acide
de batterie.
¾ Si de l'acide de batterie venait à être
pulvérisé sur votre visage ou vos yeux,
lavez-les immédiatement à l'eau froide et
consultez un médecin.
¾ En cas d'ingurgitation d'acide de batterie,
buvez beaucoup d'eau et consultez un
médecin.
¾ Stockez les batteries hors de portée des
enfants.
¾ N'inclinez jamais la batterie, l'acide
pourrait s'écouler.
¾ Remettez l'acide de batterie résiduel
à votre revendeur ou une entreprise
d'élimination.
Attention !
¾ Veillez à respecter l'ordre de montage lors de la
déconnexion et de la connexion de la batterie.
¾ Ne mettez la batterie en service que lorsque le
couvercle est monté (celui-ci peut se présenter
sous forme de clapet de protection au niveau
du pôle positif ou de couvercle de protection
complet selon le modèle).
Remarque
La batterie se trouve dans le compartiment
batterie à l'arrière de l'appareil
vrir le compartiment batterie, retirez les deux
. Pour ou-
F
écrous de serrage puis retirez le cache.
Montage
Î Connectez d'abord le câble rouge (+/ pôle po-
sitif)
Î Connectez ensuite le câble noir
(-/ pôle négatif)
Î Montez le couvercle de protection des pôles de la
1
Ga
.
2
.
batterie.
Démontage
Î Démontez le couvercle de protection des pôles de
la batterie.
Î Déconnectez d'abord le câble noir (-/ pôle négatif).
Î Déconnectez ensuite le câble rouge (+/ pôle
positif).
34
Page 35

Éléments de commande
FR
À la livraison d'une batterie exempte de
maintenance/étanche (type 1)
(Batterie sans bouchons d'obturation)
AVERTISSEMENT !
Risque de fuite de liquide d'électrolyte,
même lorsque la batterie est étanche
ÂRisque de blessures et d'incendie
¾ Évitez de renverser la batterie.
Î Chargez la batterie avant la première mise en
service avec un chargeur 12 V (courant de charge
maximal 6 ampères) pendant une durée d'une
heure ou deux.
Î Le chargement une fois terminé, débranchez
d'abord le chargeur.
Î Déconnectez ensuite la batterie (voir également la
notice d'utilisation du moteur).
Attention !
¾ Veuillez respecter les consignes gurant dans la
notice d'utilisation du chargeur.
À la livraison d'une batterie vide (type 2)
(Batterie avec bouchons d'obturation)
Î Retirez les bouchons d'obturation des cellules de
la batterie
Î Remplissez lentement chaque cellule d'acide de
Gb
.
batterie jusqu'à 1 cm en dessous de l'orice de
remplissage.
Î Laissez la batterie reposer pendant 30 minutes.
Î Vériez le niveau d'acide puis faites l'appoint si
nécessaire.
Î Chargez la batterie avant la première mise en
service avec un chargeur 12 V (courant de charge
maximal 6 ampères) pendant une durée d'une
heure ou deux.
Î Le chargement une fois terminé, débranchez
d'abord le chargeur.
Î Déconnectez ensuite la batterie.
Î Montez les bouchons d'obturation de la batterie.
Î Incorporez la batterie dans l'appareil.
Î Connectez d'abord le câble rouge (+) puis le câble
noir (-).
Attention !
¾ Veuillez respecter les consignes gurant dans la
notice d'utilisation du chargeur.
Montage du dispositif de récupération
d'herbe
Î Veuillez lire et respecter la notice d'utilisation dis-
tincte « Dispositif de récupération d'herbe ».
Éléments de commande
Aperçu
A Serrure de contact (selon le modèle)
B Commutateur de prise de force (selon le modèle)
C Pédale de marche avant
D Pédale de marche arrière
E Levier de réglage de la hauteur de coupe
F Levier de déverrouillage du réducteur
G Colonne d'éjection
H Capteur de niveau de remplissage du dispositif de récupé-
I Dispositif d'attelage
J Compartiment batterie
K Levier de réglage du siège
L Compartiment de rangement avec porte-boissons, avec
M Pédale pour blocage du différentiel (selon le modèle)
N Commutateur pour frein de stationnement/régulateur de
O Afchage combiné (selon le modèle)
P Étrangleur (selon le modèle)
Q Pédale de frein
R Indicateur de niveau du réservoir
S Levier d'accélération/étrangleur (selon le modèle)
T Réservoir de carburant
U Volant (invisible)
A
1 Serrure de contact avec clé à tourner
2 Serrure de contact avec clé à enfoncer (selon le modèle,
avec fonction de service Bluetooth supplémentaire)
ration d'herbe (suivant le modèle)
prise 12 V optionnelle selon le modèle
vitesse
Mise en service
Avant chaque utilisation
Contrôlez :
• tous les dispositifs de protection
• le niveau d'huile moteur (voir manuel du moteur)
• le niveau de remplissage du réservoir
• la pression de pneus
• l'absence de saletés et de restes de tonte sur
les revêtements latéraux, les outils portés, la
zone du ltre à air
Plein et vérification du niveau d'huile
Remarque
Par la suite, ne remplissez la batterie
qu'avec de l'eau distillée (contrôle tous les
deux mois).
Remarque
Le moteur est rempli d'huile en usine –
veuillez vérier le niveau, faites l'appoint si
nécessaire.
• Utilisez de l'essence sans plomb P.
• Le niveau maximal de remplissage du réservoir
de carburant doit se situer 2 cm en dessous de
l'arête inférieure de la tubulure de remplissage.
35
Page 36

Fonctionnement
FR
• Fermez fermement le réservoir de carburant.
• Vériez le niveau d'huile
. Le niveau d'huile
T
doit être situé entre le repère « Full/Max » et le
repère « Add/Min » (voir également le manuel
du moteur).
Vérification de la pression des pneus
Remarque
Pour des raisons de production, la pression
des pneus peut être supérieure au niveau
requis.
Î Vériez la pression des pneus et corrigez-la au
besoin.
avant 0,9 bar
arrière 0,7 bar
Réglage du siège conducteur
Î Tirez sur le levier et réglez le siège
L
La
.
ou
dévissez la vis de réglage, réglez le siège et
revissez la vis de réglage
Lb
.
Réglage des roulettes du mécanisme de
coupe
Les roues du mécanisme de coupe doivent,
lorsqu'elles se trouvent dans la position la plus
basse, toujours être situées à 6-12 mm au-dessus
du sol. Les roulettes du mécanisme de coupe sont
conçues pour supporter la charge du mécanisme de
coupe. Elles servent tout simplement à compenser
les irrégularités du sol.
U
Î Décalez toujours les roulettes du mécanisme de
coupe de manière équitable.
Fonctionnement
Attention !
¾ Veuillez également respecter les consignes
gurant dans la notice d'utilisation du moteur.
Attention !
¾ Activez toujours le frein de stationnement avant
de quitter l'appareil.
Réglage du régime du moteur
Q
Le levier d'accélération permet de régler
progressivement le régime du moteur.
Régime du moteur rapide =
Régime du moteur lent =
Démarrage du moteur
Remarque
L'étrangleur M sert à démarrer l'appareil
lorsque le moteur est froid. Certains modèles n'ont pas d'étrangleur, le moteur se
règle automatiquement sur le processus de
démarrage correspondant.
Î Ouvrez le robinet d'essence (si existant – voir
manuel du moteur).
Î Prenez place sur le siège conducteur.
Î Désactivez le mécanisme de coupe.
Î Activez le frein de stationnement.
Î Réglez le levier d'accélération sur .
Î Tirez sur l'étrangleur lorsque le moteur est froid
ou réglez le levier d'accélération sur .
Î Actionnez la clé de contact
contact) :
Î Insérez la clé de contact dans la serrure de
contact [3].
Î Tournez la clé de contact sur jusqu'à ce que
le moteur tourne. Relâchez la clé de contact.
Î La clé de contact est en position normale.
(Tonte en marche avant)
ou
Î Insérez la clé de contact [3] dans la serrure de
contact et poussez-la vers le bas pendant au
moins 1,5 secondes jusqu'à ce que le moteur
tourne.
Î Relâchez la clé de contact.
3 La serrure de contact est en position normale.
(Tonte en marche avant)
(selon la serrure de
H
.
a
b
.
Remarque
Respectez les directives nationales/communales en matière de périodes d'utilisation
(demander au besoin aux autorités compétentes).
Activation ou désactivation du frein de stationnement A
Î Pour activer le frein de stationnement, actionnez
entièrement la pédale de frein A Q puis appuyez
sur le commutateur
Î Pour désactiver le frein de stationnement, ac-
tionnez la pédale de frein A Qjusqu'à ce que le
commutateur
36
N
.
N
se désenclenche.
N
Remarque
La tentative de démarrage ne doit pas excéder les 5 secondes. Attendez 10 secondes
avant de réessayer.
Remarque
La fonction OCR ne doit pas être activée
pendant le processus de démarrage (voir
section « Fonction OCR »).
Î Ramenez lentement l'étrangleur ou le levier d'ac-
célération vers l'arrière jusqu'à ce que le moteur
tourne calmement.
Page 37

Fonctionnement
FR
Arrêt du moteur
Î Mettez le levier d'accélération en position intermé-
diaire.
Î Laissez tourner le moteur pendant env. 20 se-
condes.
Î Mettez la clé de contact (selon le modèle) sur
ou poussez la clé de contact vers le bas
Ha
puis relâchez-la
Î Retirez la clé de contact.
Hb
.
Rouler
AVERTISSEMENT !
Risque de démarrage abrupt, d'arrêt
soudain et de marche à vitesse élevée
ÂRisque d'accident
¾ Démarrez lentement et freinez en
douceur.
¾ Ne roulez pas à vitesse excessive.
¾ Ne changez jamais le sens de la marche
sans avoir immobilisé l'appareil au
préalable.
Î Desserrez le frein de stationnement tout en enfon-
çant la pédale de frein et la relâchant.
Î Pour avancer, appuyez sur la pédale d'accéléra-
teur.
Remarque
Plus vous enfoncez la pédale d'accélérateur,
plus l'appareil roule rapidement.
Rouler avec le régulateur de vitesse
Î Appuyez sur le commutateur durant la conduite.
3 La vitesse d'avance sélectionnée à ce moment
(pas la vitesse maximale) est maintenue.
3 Vous pouvez relever le pied de la pédale d'accé-
lérateur.
Î Pour désactiver le régulateur de vitesse, appuyez
sur la pédale de frein/pédale d'accélérateur
jusqu'à ce que le commutateur se désenclenche.
Arrêter l'appareil
Î Relevez le pied de la pédale d'accélérateur C
. D.
ou
Î Actionnez la pédale de frein Q jusqu'à ce que
l'appareil s'immobilise.
Remarque
Lorsque vous actionnez la pédale de frein,
vous désactivez également le régulateur de
vitesse.
A
N
Mise en marche / à l'arrêt du mécanisme de
coupe
Le commutateur de prise de force permet
d'activer / de désactiver le mécanisme de coupe via
un accouplement électromécanique.
Réglage de la hauteur de coupe
I
Î Pour activer le mécanisme de coupe, tirez sur le
commutateur de prise de force .
Î Pour désactiver le mécanisme de coupe, appuyez
sur le commutateur de prise de force .
Remarque relative au commutateur de
prise de force
En cas d'arrêt automatique par le système
de verrouillage de sécurité (par ex. marche
arrière mécanisme de coupe activé), le
commutateur doit d'abord être désactivé
puis réactivé an d'annuler le blocage de
l'accouplement.
J
Î Pour régler la hauteur de coupe, actionnez le
levier de réglage de la hauteur de coupe.
Remarque
« 4 » correspond à la hauteur de coupe
maximale (env. 10 cm), le mécanisme de
coupe se trouve en position supérieure.
« Lo/1 » correspond à la hauteur de coupe
la plus petite (env. 2,5 cm), le mécanisme de
coupe se trouve en position inférieure.
Tonte
PRUDENCE !
Éjection d'objets (débris de tonte, pierres
etc.)
ÂRisque de blessures
¾ Ne videz le dispositif de récupération
d'herbe que lorsque le mécanisme de
coupe est à l'arrêt.
¾ N'utilisez l'appareil qu'avec un dispositif
de récupération d'herbe monté ou un
déecteur optionnel.
Attention !
¾ Si un corps étranger (par ex. pierre) entre
en contact avec le mécanisme de coupe ou
l'appareil se met anormalement à vibrer, coupez
immédiatement le moteur.
¾ Vériez que l'appareil ne présente aucun
dommage avant de continuer à l'utiliser. En cas
de dommages, n'utilisez plus l'appareil et faitesle réparer par un atelier spécialisé avant de le
réutiliser.
¾ Ne mettez pas le mécanisme de coupe en
marche là où l'herbe est haute.
37
Page 38

FR
Fonctionnement
Î Démarrez le moteur tel qu'indiqué.
Î Réglez le levier d'accélération sur .
Î Activez le mécanisme de coupe et abaissez-le.
Î Desserrez le frein de stationnement tout en enfon-
çant la pédale de frein et la relâchant.
Î Pour avancer, appuyez sur la pédale de marche
avant.
Remarques relative à la tonte
Ne tondez pas l'herbe mouillée. Roulez
doucement à régime maximal.
Tondre de l'herbe trop haute ou trop mouillée peut entraîner une accumulation excessive d'herbe / un engorgement de la colonne
d'éjection.
Remarques relative à la tonte
Suivant le modèle, l'appareil est doté d'un indicateur de niveau de remplissage du dispositif de récupération d'herbe. Le capteur de
niveau de remplissage
de remplissage du dispositif de récupération
mesure le degré
Y
d'herbe durant la tonte. Lorsque le dispositif
de récupération d'herbe est plein, un signal
sonore retentit et le mécanisme de coupe
s'éteint automatiquement dans le même
temps, suivant le modèle. Le dispositif de
récupération d'herbe doit ensuite être vidé
avant la prochaine tonte. Le signal sonore
n'est désactivé qu'après avoir vidé le dispositif de récupération d'herbe.
Réglage du capteur de niveau de remplissage
Y
AVERTISSEMENT !
Risque de blessures
¾ Ne procédez au réglage du capteur
de niveau de remplissage que lorsque
le moteur est à l'arrêt, le frein de
stationnement est activé, la clé de
contact est retirée et le dispositif de
récupération d'herbe est retiré.
Le capteur de niveau de remplissage peut être
modié en longueur (plusieurs crans d'arrêt) et donc
réglé en fonction de la consistance des végétaux à
couper. Cela a également un impact sur le degré de
remplissage du dispositif de récupération d'herbe.
Î Pour rallonger la longueur, tirez davantage sur le
capteur de niveau de remplissage.
3 Le signal sonore retentit plus tôt, le mécanisme de
coupe est désactivé plus tôt, suivant le modèle.
Remarque
Idéal pour les herbes denses et humides.
Fonction OCR (selon le modèle)
H
La serrure de contact est équipée d'une fonction
OCR qui permet de tondre de manière contrôlée,
même en marche arrière.
Remarques relative à la tonte
N'utilisez la fonction OCR que lorsque c'est
vraiment nécessaire.
Î Démarrez le moteur.
Î Tournez la clé de contact [3] vers la gauche de
la position normale vers la position de tonte en
marche arrière et appuyez sur le commutateur [1]a.
ou
appuyez sur le commutateur [1]b pendant 3
secondes.
3 Le témoin lumineux [2] s'allume. Vous pouvez
désormais tondre en marche avant et en marche
arrière.
Î Pour mettre terme à la fonction OCR, tournez la
clé de contact vers la droite en position normale
.
ou
poussez le commutateur [1]
vers le bas puis
b
relâchez-le.
3 Le témoin lumineux s'éteint.
Remarques relatives à la serrure de
contact
Ha
La fonction OCR est automatiquement
désactivée dès que la clé est tournée en
position normale ou le moteur est arrêté
(position d'arrêt ou arrêt du moteur par le
système de verrouillage de sécurité).
Î Pour raccourcir la longueur, poussez le capteur de
niveau de remplissage davantage vers l'intérieur.
3 Le signal sonore retentit plus tard, le mécanisme
de coupe est désactivé plus tard, suivant le modèle.
Remarque
Idéal pour les végétaux à couper courts et
très secs.
38
Remarques relatives à la serrure de
contact
Hb
La fonction OCR est automatiquement désactivée dès que le commutateur OCR est
actionné, le moteur est arrêté ou le système
de verrouillage de sécurité arrête le moteur
ou le mécanisme de coupe automatiquement.
Page 39

Fonctionnement
FR
Mulching
Lors du mulching, l'herbe est découpée en petits
morceaux (env. 1 cm) et reste au sol. La pelouse
dispose ainsi de nombreux nutriments.
Î Demandez à votre revendeur les accessoires
nécessaires au mulching.
Conseils pour l’entretien de la pelouse
La pelouse se compose de différents types
d’herbes. Si vous tondez fréquemment, les herbes
tendant à prendre fortement racine et à former une
couche végétale ferme pousseront davantage.
Si vous tondez moins fréquemment, les herbes qui
poussent en hauteur et les autres herbes sauvages
pousseront davantage (par ex. trèes, pâquerettes).
An que votre pelouse pousse sans mauvaises
herbes et de manière homogène et an d’éviter
l’apparition de bandes de gazon, les voies de
coupe doivent toujours se chevaucher de plusieurs
centimètres.
- La hauteur normale de la pelouse est comprise
entre 40 et 50 mm env. Dès que l’herbe atteint
une hauteur de 60-70 mm, tondez environ un tiers
de la hauteur totale.
- Ne coupez jamais l’herbe à une hauteur inférieure
à 45 mm, la couche herbeuse risquerait sinon
d’être endommagée en cas de sécheresse.
- Coupez l’herbe haute en plusieurs étapes jusqu’à
atteindre une hauteur normale.
Activation et désactivation du blocage du
différentiel (suivant le modèle)
AVERTISSEMENT !
Un blocage du différentiel activé inuence
très fortement la maniabilité de l'appareil.
ÂRisque d'accident et d'endommagement
de l'appareil
¾ N'utilisez le blocage de différentiel que
lorsque c'est nécessaire, par ex. sur
terrain difcile.
¾ N'activez le blocage du différentiel que
lorsque l'appareil est à l'arrêt.
¾ N'utilisez pas le blocage du différentiel
sur les chemins consolidés ou en
descente.
¾ Roulez uniquement tout droit lorsque le
blocage du différentiel est activé.
¾ Roulez lentement lorsque le blocage du
différentiel est activé.
Lorsque le blocage de différentiel est activé, aucune
force n'est transmise aux deux roues arrière. Le
blocage de différentiel intervient lorsque différentes
vitesses de roue sont détectées.
A
Activation des phares
(selon le modèle)
Î Pour allumer les phares, mettez le commutateur
sur « ON ».
3 Les phares s'allument tant que le moteur tourne.
Remarque
Sur les modèles sans interrupteur d'éclairage, les phares s'allument et s'éteignent
automatiquement avec le moteur.
Remarque
Selon le modèle, les phares restent allumés
pendant env. 10 secondes après arrêt du
moteur et s'éteignent ensuite automatiquement.
R
Î Arrêtez l'appareil.
Î Pour activer le blocage du différentiel, actionnez la
pédale M.
Î Pour désactiver le blocage du différentiel, relevez
le pied de la pédale M.
Remarque
Si le blocage du différentiel ne se déclenche
pas immédiatement, réduisez la vitesse de
l'appareil ou immobilisez l'appareil.
Rangement de l’appareil
Î Arrêtez l'appareil.
Î Désactivez le mécanisme de coupe.
Î Mettez le levier d'accélération en position intermé-
diaire.
Î Amenez le mécanisme de coupe en position
supérieure.
Î Éteignez le moteur après 20 secondes.
Î Activez le frein de stationnement.
Î Retirez la clé de contact.
39
Page 40

FR
Affichage combiné (suivant le modèle, en option)
Pousser l'appareil
Remarque
Le levier de déverrouillage du réducteur se
trouve entre la paroi arrière et la roue arrière
droite de l'appareil.
Appareils avec blocage du différentiel
Î Éteignez le moteur.
Î Désactivez le frein de stationnement.
Î Tirez entièrement sur le levier de déverrouillage
Ka
du réducteur.
3 Vous pouvez désormais pousser l'appareil.
Remarque
Avant de démarrer le moteur, réenclenchez
entièrement le levier de déverrouillage du
réducteur.
Appareils sans blocage du différentiel
Î Éteignez le moteur.
Î Désactivez le frein de stationnement.
Î Enfoncez entièrement le levier de déverrouillage
Kb
du réducteur.
3 Vous pouvez désormais pousser l'appareil.
Remarque
Avant de démarrer le moteur, tirez à nouveau entièrement sur le levier de déverrouillage du réducteur.
Prise 12 V (selon le modèle)
X
La prise sert au raccordement d'un chargeur de
batterie 12V ou au raccordement d'appareils 12V
divers.
Remarque
Veuillez respecter à cet effet les indications
du chargeur de batterie ou des appareils de
raccordement 12V.
Afchage combiné (suivant le modèle,
en option)
Remarque
Les indicateurs ne s'allument que lorsque le
moteur tourne.
Remarque
Si la vidange d'huile et la maintenance du
ltre à air tombent au même moment, s'allume dans un premier temps l'indicateur de
vidange d'huile, puis celui du ltre à air.
Type 1 Oa avec serrure de contact
Ha
Compteur d'heures de service
Le contact une fois établi, la tension de la batterie
s'afche brièvement et disparaît pour laisser la place
aux heures de service.
Les heures de service sont toujours comptées, à
moins que la clé de contact se trouve sur « Stop »
ou soit retirée.
Indicateur de maintenance
Remarque
signie que les heures de service
totales sont afchées.
– – –
Î Changez immédiatement l'huile moteur (voir no-
Vidange d'huile
tice d'utilisation du moteur).
Cet afchage survient toutes les 50 heures de
service pendant une durée de 2 heures.
– –
Niveau d'huile
Le niveau d'huile moteur est faible.
Î Si l'afchage ne s'éteint pas, éteignez immédia-
tement le moteur et contrôlez le niveau d'huile
moteur (voir notice d'utilisation du moteur). Faites
éventuellement l'appoint d'huile.
Cet afchage peut apparaître brièvement après démarrage du moteur puis disparaître.
Remarque
Cette fonction est uniquement active sur les
moteurs avec pressostat d'huile.
– –
Tension de la batterie
Lorsque vous tournez la clé de contact en position
, la tension de la batterie s'afche brièvement puis
disparaît pour laisser la place au décompte total
d'heures de service.
Î Rechargez la batterie le plus rapidement possible.
Î Faites éventuellement contrôler l'état du système
de chargement par un atelier spécialisé.
– – –
Maintenance du
ltre à air
L'afchage combiné se compose des éléments
suivants en fonction du modèle :
40
Î Procédez immédiatement à une maintenance du
ltre à air (voir notice d'utilisation du moteur).
Cet afchage survient toutes les 25 heures de
service pendant une durée de 7 minutes.
Page 41

Affichage combiné (suivant le modèle, en option)
FR
Type 2 Ob avec serrure de contact
Hb
Remarque
L'afchage combiné est équipé selon le modèle d'un symbole Bluetooth optionnel. Ainsi,
vous avez la possibilité d'afcher toutes les
fonctions mentionnées ci-dessous ainsi que
d'autres fonctions sur votre smartphone.
Vous avez pour cela tout simplement besoin
de notre appli ConnectTM (disponible pour
systèmes d'exploitation Android et iOS).
L'appli ConnectTM vous fournit toutes les
informations et remarques importantes au
sujet de votre appareil. Elle vous informe par
exemple quand vérier l'huile, le ltre à air,
la batterie, la lame de coupe etc. ou quand
procéder à leur maintenance.
Vous pouvez télécharger l'appli ConnectTM
à partir de notre site Internet www.mtdproducts.eu.
Installez l'appli sur votre smartphone puis
suivez les instructions pas-à-pas pour synchroniser votre smartphone avec l'appareil.
Compteur d'heures de service
Lorsque vous appuyez sur la clé de contact insérée
pendant moins de 1,5 secondes, la tension de la
batterie s'afche brièvement et disparaît pour laisser
la place au décompte des heures de service. Les
heures de service ne sont comptées que lorsque le
moteur tourne.
Indicateur de maintenance
–
Î Changez immédiatement l'huile moteur (voir no-
Vidange d'huile
tice d'utilisation du moteur).
Cet afchage survient toutes les 50 heures de
service pendant une durée de 2 heures.
Tension de la batterie
–
–
Faible (< 11 Volt)
Élevée (> 16 Volt)
Au démarrage du moteur, la tension de la batterie
s'afche brièvement puis disparaît pour laisser la
place au décompte total d'heures de service.
En cas de tension faible de la batterie :
Î Rechargez la batterie le plus rapidement possible.
Î Faites éventuellement contrôler l'état du système
de chargement par un atelier spécialisé.
En cas de tension élevée de la batterie :
Î Éteignez l'appareil et faites contrôler le système
de chargement par un atelier spécialisé.
– –
Î Procédez immédiatement à une maintenance du
Maintenance du
ltre à air
ltre à air (voir notice d'utilisation du moteur).
Cet afchage survient toutes les 25 heures de
service pendant une durée de 7 minutes.
Autres afchages de l'écran
Frein ou frein de stationnement non actionné lors de la tentative de démarrage du
moteur.
a) Mécanisme de tonte non arrêté lors de
la tentative de démarrage du moteur.
b) La fonction OCR n'a pas été activée
avant la tonte en marche arrière.
L'opérateur n'est pas assis sur le siège
conducteur lors de la tentative de démarrage du moteur.
– –
Le niveau d'huile moteur est faible.
Î Si l'afchage ne s'éteint pas, éteignez immédia-
Niveau d'huile
tement le moteur et contrôlez le niveau d'huile
moteur (voir notice d'utilisation du moteur). Faites
éventuellement l'appoint d'huile.
Cet afchage peut apparaître brièvement après démarrage du moteur puis disparaître.
Remarque
Cette fonction est uniquement active sur les
moteurs avec pressostat d'huile.
41
Page 42

FR
Maintenance
Maintenance
AVERTISSEMENT !
Risque de blessures ou de dommages
matériels
¾ Le moteur doit toujours être coupé
durant les travaux de maintenance et de
nettoyage sur l’appareil.
¾ Retirez la clé de contact et débranchez
le connecteur de la bougie d'allumage.
¾ Attendez que les pièces mobiles se
soient toutes immobilisées et que le
moteur ait refroidi.
¾ N'introduisez jamais les mains dans les
lames de coupe en rotation.
¾ Conez les travaux de réparation et de
maintenance ainsi que le remplacement
des éléments de sécurité exclusivement
à un technicien qualié ou à un atelier
spécialisé.
¾ Conez le remplacement ou le réaffûtage
des lames de coupe exclusivement à un
atelier spécialisé.
¾ Après chaque utilisation, nettoyez
l’appareil ainsi que l'ensemble des
pièces rapportées et des accessoires.
Attention !
Du carburant peut pénétrer dans la chambre de
combustion.
ÂRisque d'endommagement du moteur
¾ N'inclinez pas l'appareil de plus de 30°.
Î Amenez le mécanisme de coupe en position
supérieure.
Î Nettoyez le compartiment de coupe avec une
brosse, une balayette ou un chiffon.
Mécanisme de coupe avec buse de
nettoyage (en option)
Nettoyer
Î Positionnez l'appareil sur une surface propre et
solide.
Î Activez le frein de stationnement.
Î Fixez un tuyau d'eau doté d'un système d'accou-
plement rapide usuel à la buse de nettoyage.
Î Démarrez le moteur.
Î Abaissez le mécanisme de coupe et activez-le.
Î Laissez tourner le moteur et le mécanisme de
coupe pendant quelques minutes.
Î Éteignez le moteur et le mécanisme de coupe.
Remarque
En cas de présence d'une seconde buse de
nettoyage, répétez les étapes.
W
Nettoyer l’appareil
Attention !
¾ N'utilisez aucun nettoyant haute-pression pour
nettoyer l'appareil.
Î Positionnez l'appareil sur une surface solide et
plane.
Î Activez le frein de stationnement.
Î Nettoyez l'appareil avec une brosse, une balayette
ou un chiffon.
Nettoyer le mécanisme de coupe
DANGER !
Outils de coupe tranchants mobiles
ÂRisque de blessures
¾ Portez des gants de protection.
¾ Nettoyez les outils de coupe avec
précaution.
¾ Veuillez noter que le mouvement d'un
outil de coupe entraîne la rotation
d'autres outils de coupe.
Sécher
Î Amenez le mécanisme de coupe en position
supérieure.
Î Démarrez le moteur et éteignez le mécanisme de
coupe.
Î Pour sécher le mécanisme de coupe, laissez
tourner le moteur et le mécanisme de coupe pendant quelques minutes.
Î Éteignez le moteur et le mécanisme de coupe.
Nettoyage du dispositif de récupération
d'herbe
Attention !
¾ Veuillez respecter la notice d'utilisation distincte
du dispositif de récupération d'herbe.
Î Retirez le dispositif de récupération d'herbe et
videz-le.
Î Nettoyez le dispositif de récupération d'herbe
à l'aide d'un jet d'eau puissant (par ex. avec un
tuyau d'arrosage).
Î Laissez bien sécher le dispositif de récupération
d'herbe avant de réutiliser l'appareil.
42
Page 43

Maintenance
FR
Maintenance de l'appareil
Î Observez les prescriptions de maintenance gu-
rant dans le manuel du moteur.
Î La saison une fois terminée, faites contrôler l'ap-
pareil par un atelier spécialisé.
Remarque
Lors de la vidange d'huile, remettez l'huile
usagée à un point de collecte spécialisé ou
à une entreprise d'élimination.
Remarque
Remettez les batteries usagées à votre
revendeur ou à une entreprise d'élimination.
Démontez la batterie avant de mettre l'appareil au rebut.
Utilisation d'un câble d'aide au démarrage
DANGER !
Risque d'explosion / de court-circuit
¾ Ne court-circuitez jamais une batterie
défectueuse ou gelée avec un câble
d'aide au démarrage.
¾ Veillez à ce que les appareils et les
pinces du câble n'entrent pas en contact
et à ce que les allumages soient éteints.
Î Connectez le câble d'aide au démarrage rouge au
pôle positif (+) de la batterie déchargée et au pôle
positif (+) de la batterie de secours.
Î Connectez le câble d'aide au démarrage noir au
pôle négatif (-) de la batterie de secours dans un
premier temps.
Î Fixez l'autre pince au châssis à proximité du
bloc-moteur du tracteur-tondeuse, le plus loin
possible de la batterie.
Remarque
Si la batterie de secours est incorporée dans
un véhicule, ne pas démarrer le véhicule
durant le processus d'aide au démarrage.
Î Démarrez le tracteur-tondeuse.
Î Activez le frein de stationnement.
Î Déconnectez le câble d'aide au démarrage dans
l'ordre inverse des étapes.
Pression des pneus
AVERTISSEMENT !
Pression des pneus excessive
ÂRisque d'accident et d'endommagement
de l'appareil
¾ Ne dépassez jamais la pression des
pneus maximale admise (voir anc des
pneus).
Î Vériez la pression des pneus et corrigez-la au
besoin.
avant 0,9 bar
arrière 0,7 bar
Remarque
Une pression excessive des pneus réduit la
durée de vie des pneus. Contrôlez la pression des pneus avant chaque utilisation.
Après 5 heures de service
Î Procédez à la première vidange d'huile moteur
(voir le manuel du moteur pour connaître les
intervalles).
Î Utilisez le bouchon de vidange rapide (en option)
pour la vidange
V
.
Remarque
Lors de la vidange d'huile, utilisez un récipient de récupération approprié.
Toutes les 25 heures de service
Î Lubriez l'ensemble des paliers et des articula-
tions des pédales d'accélérateur et de frein, du
levier de réglage de la hauteur de coupe et du
levier de prise de force avec quelques gouttes
d'huile légère.
Î Nettoyez les pôles de la batterie.
Î Lubriez tous les arbres porte-lames, les pou-
lies de tension et supports de ces dernières au
niveau des graisseurs avec de la graisse de type
251H EP.
Remarque
Conez ces travaux à un atelier spécialisé.
Î Lubriez les paliers de roue et essieux des roues
avant au niveau des graisseurs avec une graisse
multi-usages.
Î Lubriez les roulettes du mécanisme de coupe au
niveau des graisseurs avec une graisse multi-usages.
Î Faites éliminer la saleté et les restes d'herbe si-
tués sous le cache de la courroie trapézoïdale du
mécanisme de coupe par un atelier spécialisé.
Toutes les 50 heures de service
Î Faites éliminer la saleté et les restes d'herbe du
mécanisme d'entraînement par un atelier spécialisé.
Î Faites vérier l'usure et l'état des courroies trapé-
zoïdales d'entraînement, des arbres porte-lames
et des poulies de tension.
Tous les 2 mois
Î Uniquement pour les batteries de type 2 : Rem-
plissez les cellules de batterie d'eau distillée jusqu'à
1 cm en dessous de l'orice de remplissage.
43
Page 44

FR
Démontage/montage et réglage du mécanisme de coupe
Au besoin
Charger la batterie :
Î Si vous n'utilisez pas l'appareil pendant une pé-
riode prolongée, démontez la batterie de l'appareil.
Î Chargez la batterie toutes les 6-8 semaines ainsi
qu'avant la remise en service après stockage.
Remarque
Veillez respecter les consignes gurant dans
la notice d'utilisation de votre chargeur.
Remplacement des fusibles :
Î Ne remplacez les fusibles défectueux que par des
fusibles de même intensité.
Remarque
Le fusible se trouve sur le faisceau de
câbles principal entre la batterie et le
moteur. Ne conez le remplacement d'un
fusible défectueux qu'à un atelier spécialisé.
Une fois par saison
Î Nettoyez la bougie d'allumage et réglez l'écar-
tement des électrodes ou remplacez la bougie
d'allumage (voir manuel du moteur).
Î Faites lubrier les essieux par un atelier spécialisé
avec de la graisse spéciale repoussant l'eau.
Î Faites affûter ou remplacer l'outil de coupe par un
atelier spécialisé.
Démontage/montage et réglage du
mécanisme de coupe
PRUDENCE !
La suspension / le mécanisme de levage est
assisté(e) par ressort et risque de remonter
brutalement dès que le mécanisme de coupe
est détaché du mécanisme de levage.
Au moment de libérer le levier de réglage
de la hauteur de coupe après avoir démonté
le mécanisme de coupe, ce dernier risque
de remonter brutalement en raison de
l’assistance par ressort.
Remarque
Ne conez ces travaux qu'à un atelier spécialisé.
Rangement
Attention !
Risque de dommages matériels
¾ Rangez l'appareil dans un local propre et sec.
¾ Protégez l'appareil de la rouille lorsqu'il n'est pas
utilisé pendant une durée prolongée.
¾ Protégez l'appareil du gel.
Î Nettoyez l'appareil et le dispositif de récupération
d'herbe.
Î Essuyez toutes les pièces métalliques en vue de
les protéger de la rouille avec un chiffon imbibé
d'huile ou pulvérisez-les d'huile.
Î Rechargez la batterie.
Î Démontez la batterie en cas de période de stoc-
kage prolongée (par ex. en hiver).
Î Chargez la batterie toutes les 6-8 semaines en
cas de période de stockage prolongée ainsi
qu'avant la remise en service.
Î Évacuez le carburant et mettez le moteur à l'arrêt
– voir manuel du moteur.
Transport
Remarque
L'appareil n'est pas homologué selon StVO
(code de la route allemand) pour circuler sur
la voie publique.
Trajets courts
Î Parcourez uniquement des distances courtes pour
changer de lieu d'utilisation.
Trajets longs
AVERTISSEMENT !
Risque dû à des rampes instables et mal
xées
ÂRisque de blessures et de dommages
matériels graves
¾ Lorsque vous chargez l'appareil sur une
remorque ou un poids lourd, assurez-vous au préalable de la stabilité et de
la xation des rampes.
AVERTISSEMENT !
Risque dû à une xation insufsante
ÂTurbulences durant le transport
¾ Lorsque vous transportez l'appareil dans
une remorque ou un poids lourd, xez-le
et sécurisez-le sufsamment.
Î Utilisez un véhicule de transport pour les grandes
distances.
Î Poussez manuellement le tracteur-tondeuse en
marche à vide sur le véhicule de transport.
Î Activez le frein de stationnement et sécurisez
l'appareil pour éviter qu'il ne glisse.
44
Page 45

Dépannage
FR
Dépannage
AVERTISSEMENT !
Risque de blessures ou de dommages matériels
¾ En cas de doute, consultez toujours un atelier spécialisé.
¾ Avant de procéder à un contrôle ou à des travaux sur les lames de coupe, arrêtez l'appareil.
¾ Avant de procéder à des travaux sur l'appareil, protégez-vous du risque de blessures en
- coupant le moteur,
- retirant la clé de contact,
- activant le frein de stationnement,
- attendant que les pièces mobiles se soient toutes complètement immobilisées,
- attendant que le moteur ait refroidi,
- débranchant le connecteur de la bougie d'allumage du moteur an d'empêcher tout démarrage
intempestif du moteur.
Problème Cause possible Solution
Prenez place sur le siège conducteur,
actionnez la pédale de frein ou activez
le frein de stationnement.
Arrêtez la prise de force.
Montez le dispositif de récupération d'herbe
ou le déecteur optionnel sur l'appareil.
Raccordez le câble rouge au pôle (+) de
la batterie et le câble noir au pôle (-) de
la batterie.
Vériez et chargez la batterie.
Remplacez éventuellement la batterie.
Remplacez le fusible.
Si le fusible saute de nouveau, identiez
la cause (souvent court-circuit).
Raccordez le câble de mise à la masse.
Actionnez l'étrangleur. Réglez le levier
d'accélération sur
Faites l'appoint de carburant.
Contrôlez la bougie d'allumage (voir
manuel du moteur).
Faites contrôler l'allumage à un atelier
spécialisé.
Éteignez immédiatement l'appareil.
Contrôlez le niveau d'huile moteur.
Éteignez immédiatement l'appareil.
Faites contrôler le moteur par un atelier
spécialisé.
Éteignez immédiatement l'appareil.
Faites remplacer les pièces défectueuses par un atelier spécialisé.
Réglez une vitesse de marche plus
réduite.
Faites aiguiser ou remplacer les lames
de coupe par un atelier spécialisé.
Faites contrôler la courroie trapézoïdale
par un atelier spécialisé.
Le démarreur ne tourne
pas.
Le démarreur ne tourne
pas.
Le démarreur tourne, mais
le moteur ne démarre pas.
Le moteur dégage des
fumées épaisses.
Fortes vibrations.
Le mécanisme de coupe
n'éjecte pas d'herbe ou la
coupe est grossière.
Le moteur tourne, le
mécanisme de coupe ne
tond pas.
Le système de verrouillage de sécurité
s'est déclenché.
La batterie n'est pas correctement reliée.
Batterie vide ou faible.
Le fusible a sauté.
Câble de mise à la masse entre le moteur
et le châssis lâche.
Mauvaise position de l'étrangleur et du
levier d'accélération.
Le carburateur n'est pas alimenté en carburant, le réservoir de carburant est vide.
Bougie d'allumage défectueuse ou encrassée.
Pas d'étincelle d'allumage.
Trop d'huile dans le moteur.
Moteur défectueux.
Arbre porte-lames endommagé ou lame
de coupe défectueuse.
Régime du moteur faible. Accélérez davantage.
Vitesse de marche trop élevée.
Lames de coupe émoussées.
Courroie trapézoïdale ssurée.
.
45
Page 46

Information relative au moteur
FR
Information relative au moteur
Le fabricant du moteur est responsable de tous les
problèmes liés au moteur en matière de puissance,
de mesure de la puissance, de caractéristiques
techniques, de garantie et de service.
Vous trouverez des informations dans le manuel
d'utilisation du fabricant du moteur joint à part.
Garantie
Les dispositions de la garantie publiées par notre
société ou notre importateur dans le pays respectif
doivent être observées. À condition que la panne
résulte d’un vice de matière ou de fabrication,
votre appareil sera réparé à titre gracieux durant
la période de couverture par la garantie légale. En
cas de recours à la garantie, veuillez vous adresser
à votre revendeur ou à notre succursale la plus
proche.
Déclaration de conformité CE
La déclaration de conformité CE jointe
séparément contient des informations
complémentaires à propos de l’appareil. Elle
fait partie intégrante de la notice d’utilisation.
Élimination conforme aux impératifs
écologiques
Éliminer les restes d'emballage, les
appareils usagés etc. conformément aux
prescriptions locales.
46
Page 47

Inhalt
DE
Inhalt
Bedeutung der Symbole ........................................ 47
Zu Ihrer Sicherheit
Sicherheitshinweise
Bestimmungsgemäße Verwendung.......................52
Typenschild............................................................52
Sicherheitseinrichtungen
Montage................................................................. 53
Bedienelemente..................................................... 55
Inbetriebnahme...................................................... 55
Betrieb
................................................................... 56
Kombianzeige (je nach Modell, optional)............... 60
Wartung
................................................................. 61
Demontage/Montage sowie Einstellung des
Schneidwerks
Lagerung
Transport
............................................................... 64
............................................................... 64
Beseitigung von Störungen
Information zum Motor........................................... 66
Garantie
................................................................. 66
CE-Konformitätserklärung
Umweltgerechte Entsorgung
................................................. 48
............................................... 49
....................................... 53
........................................................ 64
................................... 65
..................................... 66
................................. 66
Bedeutung der Symbole
Warnung!
Lesen Sie die Betriebsanleitung vor
Montage und Inbetriebnahme!
Vorsicht! Umstehende Personen
Halten Sie Dritte aus dem Gefahrenbereich fern.
Warnung! Rotierende Messer
Verletzungsgefahr durch rotierende
Messer oder Teile
Warnung! Rotierende Messer
Halten Sie Hände und Füße fern von rotierenden Teilen. Halten Sie Hände und
Füße nicht unter das Mähwerk.
Vorsicht! Herumgeschleuderte Gegenstände
Gegenstände können vom Gerät erfasst
und herumgeschleudert werden.
Warnung! Umsturzgefahr
Betreiben Sie das Gerät nicht auf Gefälle
mit einer Steigung über 20 %.
Gefahr! Unbeabsichtigtes Einschalten
Ziehen Sie vor Arbeiten am Gerät den
Zündkerzenstecker. Halten Sie Hände
und Füße fern von rotierenden Teilen.
Gefahr! Explosionsgefahr
47
Page 48

Zu Ihrer Sicherheit
DE
3E
Warnung! Verätzungsgefahr durch
Batteriesäure
Vorsicht!
Tragen Sie eine Schutzbrille.
Gefahr! Feuer, Funken, offenes Licht
und Rauchen verboten!
Achtung!
Entsorgen Sie Altbatterien nicht im
Hausmüll.
Gefahr! Unbeabsichtigtes Einschalten
Ziehen Sie vor Arbeiten am Gerät den
Zündschlüssel ab. Beachten Sie die
Hinweise in dieser Anleitung.
Achtung!
Treten Sie nicht auf das Schneidwerk.
Warnung! Heiße Oberäche
Vorsicht!
Bauen Sie vor dem Kippen
des Gerätes die Batterie
aus.
Warnung!
Überschreiten Sie bei Anhängerbetrieb die folgenden
Maximalwerte nicht:
max. Hangneigung: 14 %
max. Stützlast an der Anhängerkupplung: 25 kg
max. Anhängelast (Anhänger und Ladung): 180 kg
Zu Ihrer Sicherheit
Gefahrenstufen von Warnhinweisen
In dieser Betriebsanleitung werden die folgenden
Gefahrenstufen verwendet, um auf potenzielle
Gefahrensituationen hinzuweisen:
GEFAHR !
Die gefährliche Situation steht unmittelbar
bevor und führt, wenn die Maßnahmen
nicht befolgt werden, zu schweren
Verletzungen bis hin zum Tod.
WARNUNG !
Die gefährliche Situation kann eintreten
und führt, wenn die Maßnahmen nicht
befolgt werden, zu schweren Verletzungen
bis hin zum Tod.
VORSICHT !
Die gefährliche Situation kann eintreten
und führt, wenn die Maßnahmen
nicht befolgt werden, zu leichten oder
geringfügigen Verletzungen.
Achtung !
Eine möglicherweise schädliche Situation kann
eintreten und führt, wenn sie nicht gemieden wird,
zu Sachschäden.
Aufbau von Sicherheitshinweisen
GEFAHR !
Art und Quelle der Gefahr!
ÂFolgen bei Nichtbeachtung
¾ Maßnahme zur Gefahrenabwehr
Hinweis
Halten Sie diese Symbole immer in einem
lesbaren Zustand. Ersetzen Sie beschädigte
oder nicht lesbare Symbole.
48
Page 49

Sicherheitshinweise
DE
Sicherheitshinweise
Lesen Sie vor der ersten Benutzung
Ihres Gerätes diese Betriebsanleitung
sorgfältig und handeln Sie danach.
Bewahren Sie diese Betriebsanleitung für
späteren Gebrauch oder Nachbesitzer auf.
Î Lesen Sie vor der ersten Inbetriebnahme unbe-
dingt die Sicherheitshinweise!
Bei Nichtbeachtung der Betriebsanleitung und
der Sicherheitshinweise können Schäden am
Gerät und Gefahren für den Bediener und andere
Personen entstehen.
Î Machen Sie sich mit allen Bedienelementen und
ihrer richtigen Anwendung vertraut.
Î Alle Personen, die mit der Inbetriebnahme, Be-
dienung und Wartung des Gerätes zu tun haben,
müssen entsprechend qualiziert sein.
Verbot eigenmächtiger Veränderungen und
Umbauten
Es ist verboten, Veränderungen am Gerät
durchzuführen oder Zusatzgeräte daraus
herzustellen. Solche Änderungen können zu
Personenschäden und Fehlfunktionen führen.
Î Reparaturen am Gerät dürfen nur von hierzu be-
auftragten und geschulten Personen durchgeführt
werden. Verwenden Sie hierbei stets die Originalersatzteile. Damit wird sichergestellt, dass die
Sicherheit des Gerätes erhalten bleibt.
Informationssymbole dieser Anleitung
Die Zeichen und Symbole in dieser Anleitung sollen
Ihnen helfen, die Anleitung und das Gerät schnell
und sicher zu benutzen.
Hinweis
Informationen über die effektivste bzw.
praktikabelste Nutzung des Gerätes.
Î Handlungsschritt
Fordert Sie zum Handeln auf.
3 Handlungsergebnis
Hier nden Sie das Ergebnis einer Abfolge von
Handlungsschritten.
[1]Positionsnummer
Positionsnummern sind im Text mit eckigen
Klammern [ ] gekennzeichnet.
Illustrationskennzeichnung
A
Illustrationen sind mit Buchstaben nummeriert
und im Text gekennzeichnet.
Selbst- und Personenschutz
¾ Aus Sicherheitsgründen dürfen Kinder oder
Personen, die die Gebrauchsanweisung nicht
kennen, das Gerät nicht benutzen.
¾ Personen unter 16 Jahren dürfen das Gerät
nicht bedienen oder sonstige Arbeiten, wie
z. B. Warten, Reinigen, Einstellen an dem
Gerät ausführen. Örtliche Bestimmungen
können das Mindestalter der Benutzer festlegen.
¾ Personen, die das Gerät bedienen, dürfen
nicht unter dem Einuss von Rauschmitteln
(z. B. Alkohol, Drogen oder Medikamenten)
stehen.
¾ Verwenden Sie das Gerät nicht ohne
angemessene Schulung oder bei Müdigkeit
oder Krankheit.
¾ Seien Sie vorsichtig und greifen Sie nicht in
die Schnittmesser.
¾ Denken Sie daran, dass der Bediener für
Unfälle mit anderen Personen oder deren
Eigentum verantwortlich ist.
¾ Dieses Gerät kann von Personen mit
verringerten physischen, sensorischen
oder mentalen Fähigkeiten oder Mangel an
Erfahrung und Wissen benutzt werden, wenn
sie beaufsichtigt oder bezüglich des sicheren
Gebrauchs des Gerätes unterwiesen wurden
und die daraus resultierenden Gefahren
verstehen.
¾ Nehmen Sie das Gerät nicht in Betrieb, wenn
sich Personen (insbesondere Kinder) oder
Tiere in unmittelbarer Nähe benden.
¾ Achten Sie darauf, dass Kinder nicht mit dem
Gerät spielen.
¾ Unterbrechen Sie die Fahrt, wenn Sie
bemerken, dass Personen (insbesondere
Kinder) oder Haustiere in der Nähe sind.
¾ Tragen Sie bei Arbeiten mit oder am Gerät
immer feste Schuhe und lange Hosen sowie
weitere entsprechende geeignete persönliche
Schutzausrüstung (Schutzbrille, Gehörschutz,
Arbeitshandschuhe etc.). Das Tragen von
persönlicher Schutzausrüstung verringert
das Risiko von Verletzungen. Vermeiden Sie
das Tragen loser Kleidung oder Kleidung mit
hängenden Schnüren oder Gürteln. Arbeiten
ohne Gehörschutz kann zu Gehörverlust führen.
Handlungsschrittnummer
1
Die denierte Abfolge von Handlungsschritten ist
nummeriert und im Text gekennzeichnet.
49
Page 50

DE
Sicherheitshinweise
Sicherheitshinweise
Vor dem Einsatz
¾ Machen Sie sich vor Arbeitsbeginn mit dem
Gerät und seinen Bedienelementen sowie mit
seiner Bedienung vertraut.
¾ Überprüfen Sie, ob alle Befestigungselemente
(Muttern, Bolzen und Schrauben etc.)
festsitzen, um sicherzustellen, dass das Gerät
sicher betrieben wird.
¾ Betreiben Sie das Gerät nur in technisch
einwandfreiem Zustand. Verändern Sie
niemals die werksseitig voreingestellten
Motoreinstellungen. Lassen Sie Schäden von
einer qualizierten Fachkraft oder in einer
Fachwerkstatt reparieren.
¾ Entfernen Sie Einstellwerkzeuge oder
Schraubenschlüssel, bevor Sie das Gerät
einschalten. Ein Werkzeug, das sich in dem
Bereich der rotierenden Schneidwerkzeuge
bendet, kann zu Verletzungen führen.
¾ Verwenden Sie niemals ein Gerät
mit beschädigten oder fehlenden
Schutzeinrichtungen. Lassen Sie diese von
einer qualizierten Fachkraft oder Fachwerkstatt
reparieren oder ggf. austauschen.
¾ Benutzen Sie das Gerät niemals ohne
Schutzvorrichtungen und entfernen Sie diese
nicht. Die Schutzeinrichtungen sind Bestandteil
des Gerätes.
¾ Benutzen Sie das Gerät niemals mit defekten
oder beschädigten Sicherheitseinrichtungen.
Sicherheitseinrichtungen dienen Ihrem
Schutz und müssen immer funktionsfähig
sein. Sie dürfen keine Veränderungen an
Sicherheitseinrichtungen vornehmen oder deren
Funktion umgehen.
¾ Überprüfen Sie die Grasfangeinrichtung auf
Beschädigung und korrekte Montage.
¾ Vergewissern Sie sich vor dem Mähvorgang,
dass der Rasen von Ästen, Steinen,
Drähten etc. befreit ist und berücksichtigen
Sie dieses während des gesamten
Mähvorgangs. Gegenstände können erfasst und
weggeschleudert werden.
¾ Prüfen Sie (Sichtprüfung), ob die
Schnittmesser und deren Befestigungsmittel
stumpf, beschädigt oder deformiert sind.
¾ Kuppeln Sie Anhänger oder Anbaugeräte
vorschriftsmäßig an. Anbaugeräte,
Anhänger, Ballastgewichte sowie gefüllte
Grasfangeinrichtungen beeinussen das
Fahrverhalten, insbesondere Lenkbarkeit,
Bremsfähigkeit und Kippverhalten.
Beim Einsatz
¾ Mähen Sie keine Rasenächen mit einer
Halmhöhe von mehr als 25 cm.
¾ Fahren Sie vorsichtig. Reduzieren Sie die
Geschwindkeit, bevor Sie eine Kurve fahren.
¾ Arbeiten Sie mit dem Gerät nicht in
explosionsgefährdeter Umgebung, in der sich
brennbare Flüssigkeiten, Gase oder Stäube
benden. Das Gerät kann Funken erzeugen, die
den Staub oder die Dämpfe entzünden können.
Vermeiden Sie offenes Feuer, Funkenbildung und
rauchen Sie nicht.
¾ Seien Sie besonders vorsichtig, wenn Sie
rückwärts mähen oder fahren. Um Unfälle zu
vermeiden, fahren Sie langsam und blicken Sie
dabei nach hinten auf den Bodenbereich.
¾ Verstellen Sie die Schnitthöhe nur bei
abgeschaltetem Motor und stillstehendem
Schneidwerkzeug.
¾ Entfernen Sie nie die Grasfangeinrichtung
oder den optionalen Deektor, während der
Motor läuft.
¾ Fahren Sie nie mit laufendem Schneidwerk
über Kies oder Gehwege. Es besteht die Gefahr
des Steinschlags!
¾ Mähen Sie nicht über hochgewachsenes,
trockenes Gras (z. B. Weidegras) oder über
trockene Laubhaufen. Stellen Sie das Gerät
nicht auf trockenem Gras oder Laub ab.
Feuergefahr durch Kontakt mit heißem Auspuff
und wenn sich getrocknetes Gras oder Laub auf
dem heißen Mähwerk ansammelt.
¾ Achten Sie beim Arbeiten an Straßen oder
bei der Überquerung einer Straße auf den
Verkehr. Das Gerät ist nicht zum Einsatz an
öffentlichen Straßen vorgesehen.
¾ Entleeren Sie die Grasfangeinrichtung nie bei
laufendem Schneidwerk. Beim Entleeren der
Grasfangeinrichtung können Sie oder andere
durch herausgeschleudertes Mähgut oder
Gegenstände verletzt werden.
¾ Seien Sie besonders vorsichtig beim Öffnen
und Schließen der Grasfangeinrichtung – es
besteht Quetschgefahr.
¾ Halten Sie beim Mähen in Grenzbereichen,
wie z. B. in der Nähe von steilen Abhängen,
Gräben oder unter Bäumen, an Büschen und
Hecken, genügend Abstand.
¾ Wenn ein Fremdkörper (z. B. Stein) vom
Schneidwerk getroffen wird oder falls das
Gerät anfängt ungewöhnlich zu vibrieren,
stellen Sie den Motor sofort ab.Untersuchen
Sie das Gerät vor weiterem Betrieb auf Schäden.
Bringen Sie es ggf. in eine Fachwerkstatt.
50
Page 51

Sicherheitshinweise
DE
Sicherheitshinweise
¾ Stellen Sie sich nie vor die
Grasauswurföffnungen.
¾ Stellen Sie den Motor ab und ziehen Sie den
Zündschlüssel, bevor Sie Blockierungen
lösen oder Verstopfungen im Auswurfkanal
beseitigen.
Mähen an steilen Hängen
¾ Mähen oder fahren Sie nicht an Gefällen, die
eine Neigung über 20 % haben.
¾ Fahren Sie immer auf- und abwärts zum
Gefälle und nicht quer zum Gefälle. Wenden
Sie nicht am Hang. Das Arbeiten an Hängen ist
gefährlich. Das Gerät kann kippen oder rutschen.
¾ Fahren Sie an Hängen immer möglichst
sanft an und bremsen Sie vorsichtig. Wenn
Sie abwärts fahren, lassen Sie den Motor
eingekuppelt und fahren Sie langsam. Üben Sie
besondere Vorsicht beim Richtungswechsel.
¾ Verwenden Sie an Hängen mit einer
Neigung von mehr als 9 % keine schweren
Anbaugeräte wie z. B. Transportanhänger
oder Rasenwalzen.
Nach dem Einsatz
Î Wenn Sie den Sitz des Gerätes verlassen,
schalten Sie den Motor immer ab. Ziehen Sie
immer den Zündschlüssel ab und schalten Sie
die Feststellbremse ein.
¾ Achten Sie darauf, dass Lüftungsschlitze frei
von Verschmutzungen sind.
¾ Lassen Sie den Motor abkühlen, bevor Sie
das Gerät lagern.
Vor allen Arbeiten am Gerät
¾ Schützen Sie sich vor Verletzungen, indem
Sie vor allen Arbeiten am Gerät
- den Motor abstellen,
- den Zündschlüssel ziehen,
- die Feststellbremse einschalten,
- Abwarten, bis alle beweglichen Teile vollständig
zum Stillstand gekommen sind,
- Warten, bis der Motor abgekühlt ist,
- den Zündkerzenstecker am Motor ziehen, so
dass ein unbeabsichtigtes Starten des Motors
verhindert wird.
Allgemeine Sicherheitshinweise
¾ Lassen Sie den Motor nie in
Gebäuden oder in schlecht belüfteten
Bereichen laufen. Lebensgefahr durch
Kohlenstoffmonoxidvergiftung!
¾ Ersatzteile und Zubehör müssen den vom
Hersteller festgelegten Anforderungen
entsprechen. Verwenden Sie daher nur
Original-Ersatzteile/-Zubehörteile oder die vom
Hersteller zugelassenen Ersatzteile/Zubehörteile.
Bitte beachten Sie beim Austausch immer die
mitgelieferten Einbauhinweise. Die Verwendung
von nicht vom Hersteller freigegebenen
Ersatzteilen oder Zubehör kann ein erhebliches
Sicherheitsrisiko darstellen.
¾ Lassen Sie Reparaturen ausschließlich von
einer qualizierten Fachkraft oder in einer
Fachwerkstatt durchführen.
¾ Nehmen Sie keine Beifahrer auf dem Gerät
mit. Das Gerät ist für den Personentransport
nicht zugelassen.
¾ Dieses Gerät ist für die Pege von Gras-
und Rasenächen im privaten Bereich
vorgesehen. Wegen körperlicher Gefährdung
des Benutzers oder anderer Personen darf das
Gerät nicht für artfremde Zwecke eingesetzt
werden.
¾ Verwenden Sie das Gerät nur bei Tageslicht
oder unter guter künstlicher Beleuchtung.
Halten Sie Ihren Arbeitsbereich sauber und gut
beleuchtet.
¾ Lassen Sie immer alle Wartungsarbeiten
termingerecht ausführen, um das Gerät in
einem sicheren Betriebszustand zu halten.
¾ Auspuff und Motor werden heiß und können
Verbrennungen verursachen. Nicht berühren!
¾ Verwenden Sie das Gerät nur bei trockenen
Wetterbedingungen. Halten Sie das Gerät von
Regen oder Nässe fern. In feuchtem Gras kann
das Gerät durch verminderte Bodenhaftung
rutschen.
¾ Benutzen Sie das Gerät nicht bei Regen oder
Gewittergefahr.
¾ Fahren Sie niemals mit geöffneter
Motorhaube.
51
Page 52

DE
Sicherheitshinweise
Sicherheitshinweise
¾ Gehen Sie vorsichtig mit Kraftstoff um.
Kraftstoff- und Benzindämpfe sind explosiv
und Kraftstoff ist leicht entammbar.
Betanken Sie das Gerät nie bei laufendem
oder heißem Motor. Betanken Sie das Gerät
nur im Freien. Lagern Sie den Kraftstoff nur
in dafür zugelassenen Behältern und nie in
der Nähe von Heizquellen (z. B. Öfen oder
Warmwasserspeichern). Lassen Sie einen
beschädigten Auspuff, Kraftstofftank oder
Tankdeckel austauschen.
Bestimmungsgemäße Verwendung
Dieses Gerät ist bestimmt zur Verwendung
- als Rasentraktor zum Mähen von Grasächen des
Haus- und Freizeitgartens.
- mit Zubehör, das ausdrücklich für diesen Rasentraktor zugelassen ist.
- entsprechend den in dieser Betriebsanleitung
gegebenen Beschreibungen und Sicherheitshinweisen.
Jeder darüber hinausgehende Gebrauch gilt als
nicht bestimmungsgemäß.
Der nicht bestimmungsgemäße Gebrauch hat den
Verfall der Garantie und die Ablehnung jeglicher
Verantwortung seitens des Herstellers zur Folge.
Der Benutzer haftet für Schäden an Dritten und
deren Eigentum.
¾ Starten Sie den Motor nicht, wenn Kraftstoff
übergelaufen ist. Schieben Sie das Gerät
von der kraftstoffverschmutzten Fläche weg
und warten Sie, bis sich die Kraftstoffdämpfe
verlüchtigt haben.
¾ Um Brandgefahr zu vermeiden, halten Sie
den Motor, den Auspuff, die Batterie und den
Kraftstofftank frei von Gras und austretendem
Öl.
¾ Beachten Sie auch die Hinweise im
Motorenhandbuch.
Typenschild
Lage
Das Typenschild bendet sich unter/vor dem
Fahrersitz.
Hinweis
Die Kennzeichnung besitzt Urkundenwert
und darf nicht verändert oder unkenntlich
gemacht werden.
1
2
Eigenmächtige Veränderungen an dem Gerät
schließen eine Haftung des Herstellers für daraus
resultierende Schäden aus.
Dieses Gerät ist nicht für den Betrieb auf
öffentlichen Straßen und nicht für den Transport von
Personen zugelassen.
52
3
4
5
6
7
8
/
Aufbau
1 Schallleistung garantiert
2 Hersteller
3 Modellname
4 Modellnummer
5 Seriennummer
6 Gewicht
7 Leistung
8 Motordrehzahl in min
-1
9 CE-Kennzeichnung
10 Baujahr
9
10
Page 53

Sicherheitseinrichtungen
DE
Sicherheitseinrichtungen
Grasfangeinrichtung
Kontakt mit dem Schneidmesser und
herausgeschleuderte Gegenstände
ÂVerletzungsgefahr
¾ Betreiben Sie das Gerät nur mit
angebauter Grasfangeinrichtung oder
einem optionalen Deektor.
S
VORSICHT !
Sicherheitssperrsystem
Das Sicherheitssperrsystem ermöglicht das Starten
des Motors nur, wenn
- der Fahrer seinen Platz auf dem Sitz eingenommen hat,
- das Bremspedal durchgetreten bzw. die Feststellbremse in Parkstellung ist,
- das Fahrpedal auf "N" steht,
- das Schneidwerk ausgeschaltet ist, d. h.: PTOSchalter auf Stellung "O/Aus/Off") (PTO = PowerTake-Off).
Das Sicherheitssperrsystem verhindert das Mähen
ohne montierte Grasfangeinrichtung oder ohne
montierten optionalen Deektor (automatische
Abschaltung von Motor oder Schneidwerk).
Bei Geräten mit PTO-Schalter
(elektromechanischer PTO) schaltet das
Sicherheitssperrsystem automatisch das
Schneidwerk ab, sobald der Bediener bei
eingeschaltetem Schneidwerk den Sitz verlässt,
unabhängig davon, ob vorher die Feststellbremse
eingeschaltet wurde.
Bei Geräten ohne OCR-Funktion bzw. bei
deaktivierter OCR-Funktion verhindert das
Sicherheitssperrsystem das Rückwärtsfahren
mit eingeschaltetem Schneidwerk (automatische
Abschaltung von Motor oder Schneidwerk).
Î Schalten Sie vor dem Rückwärtsfahren bei Ge-
räten mit PTO das Schneidwerk mit dem PTOSchalter aus.
Hinweis für Geräte mit PTO-Schalter
Bei automatischer Abschaltung durch das
Sicherheitssperrsystem (z. B. Rückwärtsfahren oder den Sitz verlassen mit eingeschaltetem Schneidwerk) schalten Sie den Schalter zuerst aus- und dann wieder ein, um die
Sperrung der Kupplung (PTO) aufzuheben.
Richtungsangaben
Die Richtungsangaben am Gerät (z. B. links, rechts)
beziehen sich immer auf Vorwärtsfahrrichtung.
Montage
Hinweis
Um den Traktor von Hand bewegen zu können, muss der Getriebeentriegelungshebel
in der entsprechenden Stellung sein. Siehe
dazu Abschnitt "Betrieb – Gerät schieben".
Sitz montieren
Î Entfernen Sie die Schrauben und Muttern am
Sitzträger
Î Befestigen Sie den Sitzträger mit den zuvor
1
B
.
entfernten Schrauben und Muttern am Träger-
2
.
.
3
halter
Î Drücken Sie den Verstellhebel oder öffnen Sie die
Verstellschraube (je nach Ausführung)
Î Schieben Sie den Sitz in eine Position, in welcher
Sie guten Zugang zum Sitzanschlussstecker
4
.
.
5
haben
Î Stecken Sie das Anschlusskabel auf den Sitzan-
schlussstecker
Î Ziehen Sie die Sitzverstellschraube (je nach Aus-
führung) wieder fest.
Hinweis
Der Sitz ist mit einem Sitzbelegungssensor
ausgestattet, welcher zum Sicherheitssperrsystem gehört. Das Gerät lässt sich somit
nur korrekt bedienen, wenn das Anschlusskabel richtig am Sitzanschlussstecker
eingesteckt ist.
Obere Armaturenabdeckung montieren
(je nach Modell)
Î Setzen Sie die Laschen (A) der Armaturenab-
deckung [B] in die Öffnungen des Armaturenträgers [C] ein
Î Drücken Sie sie bis zum Anschlag nach vorne
Î Prüfen Sie die Abdeckung auf festen Sitz.
1
Ca
.
2
Motorhaubenabdeckung montieren
(je nach Modell) C b
Î Setzen Sie Motorhaubenabdeckung mit den
Aussparungen [A] auf die Haltelaschen [B] an der
Motorhaube auf
Î Drücken Sie die Abdeckung bis zum Anschlag
nach hinten
Î Drücken Sie die beiden Laschen [C] etwas nach
oben, um die Abdeckung zu arretieren
Î Prüfen Sie die Abdeckung auf festen Sitz.
2
.
1
.
.
3
.
53
Page 54

DE
Montage
Lenkrad montieren
Î Entfernen Sie die Abdeckkappe [1] (je nach Aus-
D
führung) am Lenkrad.
Î Stecken Sie die Distanzscheibe [6], die Feder [5]
und die Unterlegscheibe [4] auf die Lenkwelle [7].
Î Stecken Sie das Lenkrad auf die Lenkwelle.
Î Befestigen Sie das Lenkrad mit der Unterleg-
scheibe [3] und der Schraube [2] (Anzugsdrehmoment: 25-28 Nm).
Hinweis
Legen Sie die Unterlegscheibe [3] mit der
Wölbung nach oben auf.
Î Setzen Sie die Abdeckkappe [1] ein.
Hinweis
Nach einer Demontage der Lenkradschraube muss diese durch eine neue Originalschraube mit Schraubensicherung ersetzt
werden.
Frontstoßstange montieren
(je nach Modell)
Î Entfernen Sie die vier Schrauben aus der Front-
stoßstange.
Î Befestigen Sie die Fronstoßstange mit den zuvor
entfernten vier Schrauben am Traktorrahmen
(Innenseite).
E
Die Batterie in Betrieb nehmen
GEFAHR !
Vergiftungs- und Verletzungsgefahr durch
Batteriesäure
¾ Tragen Sie eine Schutzbrille und
Schutzhandschuhe.
¾ Vermeiden Sie Hautkontakt mit der
Batteriesäure.
¾ Wenn Ihnen die Batteriesäure in das
Gesicht oder in die Augen spritzt,
waschen Sie sie sofort mit kaltem Wasser
ab und suchen Sie einen Arzt auf.
¾ Wenn Sie Batteriesäure geschluckt
haben, trinken Sie viel Wasser und
suchen Sie einen Arzt auf.
¾ Lagern Sie Batterien außerhalb der
Reichweite von Kindern.
¾ Kippen Sie nie die Batterie, da
Batteriesäure auslaufen kann.
¾ Geben Sie übriggebliebene
Batteriesäure bei Ihrem Händler oder
einem Entsorgungsunternehmen ab.
Achtung !
¾ Beachten Sie die Montagereihenfolge beim Ab-
und Anklemmen der Batterie.
¾ Nehmen Sie die Batterie nur mit montierter
Batteriepolabdeckung (je nach Ausführung als
Abdeckklappe am Pluspol oder als komplette
Batterieschutzabdeckung) in Betrieb.
54
GEFAHR !
Brandgefahr, Explosion und Korrosion durch
Batteriesäure und Gase der Batteriesäure
¾ Batteriesäure wirkt korrodierend.
Reinigen Sie sofort alle Geräteteile, auf
die Batteriesäure gespritzt ist.
¾ Rauchen Sie nicht, halten Sie brennende
und heiße Gegenstände fern.
¾ Laden Sie Batterien nur in gut belüfteten
und trockenen Räumen.
¾ Möglicher Kurzschluss bei Arbeiten an
der Batterie. Legen Sie keine Werkzeuge
oder Metallgegenstände auf die Batterie.
Hinweis
Die Batterie bendet sich in dem Batteriefach an der Rückseite des Gerätes
das Batteriefach zu öffnen, entfernen Sie die
F
beiden Knebelmuttern und nehmen Sie die
Abdeckung ab.
Einbau
Ga
Î Klemmen Sie erst das rote Kabel (+/Pluspol)
.
an
1
Î Klemmen Sie danach das schwarze Kabel
(-/Minuspol) an
Î Montieren Sie die Batteriepolabdeckung.
2
.
Ausbau
Î Demontieren Sie die Batteriepolabdeckung.
Î Klemmen Sie erst das schwarze Kabel (-/Mi-
nuspol) ab.
Î Klemmen Sie danach das rote Kabel (+/Pluspol)
ab.
. Um
Page 55

Bedienelemente
DE
Bei Lieferung einer wartungsfreien/versiegelten
Batterie (Typ 1)
(Batterie ohne Verschlussstopfen)
WARNUNG !
Auslaufende Elektrolytüssgkeit auch aus
einer versiegelten Batterie
ÂVerletzungs- und Brandgefahr
¾ Vermeiden Sie ein Kippen der Batterie.
Î Laden Sie die Batterie vor der ersten Inbetrieb-
nahme mit einem 12-Volt-Batterieladegerät (maximaler Ladestrom 6 Ampere) ein bis zwei Stunden
auf.
Î Ziehen Sie nach dem Laden zuerst den Netzste-
cker des Ladegerätes.
Î Klemmen Sie anschließend die Batterie ab (siehe
auch Betriebsanleitung des Ladegerätes).
Achtung !
¾ Beachten Sie die Hinweise in der
Betriebsanleitung des Ladegerätes.
Bei Lieferung einer ungefüllten Batterie (Typ 2)
(Batterie mit Verschlussstopfen)
Î Nehmen Sie die Verschlussstopfen der Batterie-
zellen ab
Î Füllen Sie jede Zelle langsam mit Batteriesäure
Gb
.
bis 1 cm unterhalb der Einfüllöffnung.
Î Lassen Sie die Batterie 30 min stehen.
Î Überprüfen Sie den Säurestand und füllen Sie ggf.
Batteriesäure nach.
Î Laden Sie die Batterie vor der ersten Inbetrieb-
nahme mit einem 12-Volt-Batterieladegerät (maximaler Ladestrom 6 Ampere) ein bis zwei Stunden
auf.
Î Ziehen Sie nach dem Laden zuerst den Netzste-
cker des Ladegerätes.
Î Klemmen Sie anschließend die Batterie ab.
Î Montieren Sie die Verschlussstopfen der Batterie.
Î Bauen Sie die Batterie in das Gerät ein.
Î Klemmen Sie erst das rote Kabel (+) an, dann das
schwarze Kabel (-).
Achtung !
¾ Beachten Sie die Hinweise in der
Betriebsanleitung des Ladegerätes.
Hinweis
Füllen Sie die Batterie später nur noch mit
destillierten Wasser auf (Kontrolle alle zwei
Monate).
Bedienelemente
Übersicht
A Zündschloss (je nach Modell)
1 Zündschloss mit Schlüssel zum Drehen
2 Zündschloss mit Schlüssel zum Drücken (je nach Modell
B PTO-Schalter (je nach Modell)
C Vorwärtsfahrpedal
D Rückwärtsfahrpedal
E Schnitthöheneinstellhebel
F Getriebeentriegelungshebel
G Auswurfschacht
H Füllstandssensor für Grasfangeinrichtung (je nach Modell)
I Anhängevorrichtung
J Batteriefach
K Sitzverstellhebel
L Ablagefach mit Dosenhalter, je nach Modell mit optionaler
12-Volt-Steckdose
M Pedal für Differentialsperre (je nach Modell)
N Schalter für Feststellbremse/Tempomat
O Kombianzeige (je nach Modell)
P Choke (je nach Modell)
Q Bremspedal
R Tankinhaltsanzeige
S Gashebel/Choke (je nach Modell)
T Kraftstofftank
U Lenkrad (nicht sichtbar)
A
mit einer zusätzlichen Bluetooth-Service-Funktion)
Inbetriebnahme
Vor jedem Betreiben
Kontrollieren Sie:
• alle Schutzeinrichtungen
• den Motorölstand (siehe Motorhandbuch)
• die Tankfüllung
• den Reifendruck
• Seitenverkleidungen, Anbaugeräte, Luftlterbe-
reich auf Schmutz und Mähreste
Tanken und Ölstand prüfen
Hinweis
Der Motor ist werksseitig bereits mit Öl befüllt – bitte überprüfen, ggf. nachfüllen.
• Tanken Sie bleifreies Benzin
• Füllen Sie den Kraftstofftank höchstens bis 2 cm
unter die Unterkante des Einfüllstutzens.
• Verschließen Sie den Kraftstofftank fest.
• Prüfen Sie den Ölstand
zwischen der "Full/Max"- und "Add/Min"-Markierung liegen (siehe auch Motorenhandbuch).
.
P
. Der Ölstand muss
T
Grasfangeinrichtung montieren
Î Lesen und beachten Sie die separate Bedie-
nungsanleitung „Grasfangeinrichtung“.
55
Page 56

Betrieb
DE
Reifendruck überprüfen
Hinweis
Aus Produktionsgründen kann der Reifendruck höher als erforderlich sein.
Î Überprüfen Sie den Reifendruck und korrigieren
Sie ihn bei Bedarf.
vorn 0,9 bar
hinten 0,7 bar
Fahrersitz einstellen
Î Ziehen Sie den Hebel und stellen Sie den Sitz
ein
La
.
L
oder
Lösen Sie die Verstellschraube, stellen Sie den
Sitz ein und ziehen Sie die Verstellschraube
wieder an
Einstellung der Schneidwerkräder
Lb
.
U
Die Schneidwerkräder sollten in der niedrigsten
Schneidwerkstellung immer mindestens 6-12 mm
über dem Boden sein. Die Schneidwerkräder
sind nicht konstruiert, um die Last des
Schneidwerks zu tragen. Sie dienen lediglich dazu,
Bodenunebenheiten auszugleichen.
Î Versetzen Sie die Schneidwerkräder immer
gleichmäßig.
Betrieb
Achtung !
¾ Beachten Sie auch die Hinweise in der
Betriebsanleitung des Motors.
Motordrehzahl einstellen
Q
Mit dem Gashebel können Sie die Motordrehzahl
stufenlos einstellen.
Schnelle Motordrehzahl =
Langsame Motordrehzahl =
Motor starten
Hinweis
Der Choke M dient zum Starten des Gerätes bei kaltem Motor. Einige Modelle haben
keinen Choke, der Motor stellt sich automatisch auf den jeweiligen Startvorgang ein.
Î Öffnen Sie den Benzinhahn (falls vorhanden –
siehe Motorhandbuch).
Î Setzen Sie sich auf dem Fahrersitz.
Î Schalten Sie das Schneidwerk aus.
Î Schalten Sie die Feststellbremse ein.
Î Stellen Sie den Gashebel auf .
Î Ziehen Sie bei kaltem Motor den Choke bzw.
stellen Sie den Gashebel auf .
Î Betätigen Sie den Zündschlüssel
Zündschloss):
Î Stecken Sie den Zündschlüssel in das Zünd-
schloss [3].
Î Drehen Sie den Zündschlüssel auf bis der
Motor läuft. Lassen Sie den Zündschlüssel los.
Î Der Zündschlüssel steht auf Normalstellung.
(Mähen im Vorwärtsgang)
oder
Î Stecken Sie den Zündschlüssel [3] in das
Zündschloss und drücken Sie ihn für mindestens 1,5 Sekunden nach unten bis der Motor
läuft.
Î Lassen Sie den Zündschlüssel los.
3 Das Zündschloss steht auf Normalstellung.
(Mähen im Vorwärtsgang)
(je nach
H
a
.
.
b
Hinweis
Beachten Sie die nationalen/kommunalen
Vorschriften bezüglich der Benutzungszeiten
(ggf. bei Ihrer zuständigen Behörde erfragen).
Feststellbremse ein- bzw. ausschalten A
Î Um die Feststellbremse einzuschalten, drücken
Sie das Bremspedal ganz durch A Q und drücken
Sie den Schalter
Î Um die Feststellbremse auszuschalten, drü-
cken Sie das Bremspedal A Q durch, bis der
Schalter
sich löst.
N
¾ Schalten Sie immer die Feststellbremse ein,
bevor Sie das Gerät verlassen.
56
.
N
Achtung !
N
Hinweis
Ein Startversuch sollte max. 5 Sekunden
dauern. Warten Sie vor dem nächsten Versuch 10 Sekunden.
Hinweis
Die OCR-Funktion darf während des Startvorgangs nicht aktiviert sein (siehe Abschnitt
„OCR-Funktion“).
Î Stellen Sie den Choke bzw. den Gashebel
langsam zurück, bis der Motor ruhig läuft.
Page 57

Betrieb
DE
Motor stoppen
Î Stellen Sie den Gashebel auf mittlere Gasstellung.
Î Lassen Sie den Motor ca. 20 Sekunden laufen.
Î Stellen Sie den Zündschlüssel (je nach Modell)
auf
nach unten und lassen Sie ihn los
Î Ziehen Sie den Zündschlüssel ab.
bzw. drücken Sie den Zündschlüssel
Ha
Hb
Fahren
WARNUNG !
Gefahr durch abruptes Anfahren,
plötzliches Anhalten und Fahren mit zu
hoher Geschwindigkeit
ÂUnfallgefahr
¾ Fahren Sie langsam an und bremsen Sie
langsam ab.
¾ Fahren Sie nicht mit überhöhter
Geschwindigkeit.
¾ Wechseln Sie nie die Fahrtrichtung
ohne das Gerät vorher zum Stehen zu
bringen.
Î Lösen Sie die Feststellbremse, indem Sie das
Bremspedal ganz durchdrücken und wieder
loslassen.
Î Um loszufahren, treten Sie auf das Fahrpedal.
Schneidwerk ein- bzw. ausschalten
I
Mit dem PTO-Schalter wird das Schneidwerk
über eine elektromechanische Kupplung ein- und
ausgeschaltet.
.
Î Um das Schneidwerk einzuschalten, ziehen Sie
den PTO-Schalter .
Î Um das Schneidwerk auszuschalten, drücken Sie
den PTO-Schalter .
Hinweis zum PTO-Schalter
Bei automatischer Abschaltung durch das
Sicherheitssperrsystem (z. B. Rückwärtsfahren mit eingeschaltetem Schneidwerk) muss
der Schalter zuerst aus- und dann wieder
eingeschaltet werden, um die Sperrung der
Kupplung aufzuheben.
Schnitthöhe einstellen
Î Um die Schnitthöhe einzustellen, betätigen Sie
J
den Schnitthöheneinstellhebel.
Hinweis
"4" ist die größte mögliche Schnitthöhe
(ca. 10 cm), das Schneidwerk bendet sich
ganz oben.
"Lo/1" ist die kleinste Schnitthöhe
(ca. 2,5 cm), das Schneidwerk bendet sich
ganz unten.
Hinweis
Je weiter Sie auf das Fahrpedal treten, desto schneller fährt das Gerät.
Fahren mit Tempomat
Î Drücken Sie beim Fahren den Schalter.
N
3 Die zu diesem Zeitpunkt gewählte Vorwärtsge-
schwindigkeit (jedoch nicht die Maximalgeschwindigkeit) wird beibehalten.
3 Sie können den Fuß vom Fahrpedal nehmen.
Î Um den Tempomat auszuschalten, drücken Sie
das Bremspedal/Fahrpedal, bis der Schalter sich
wieder löst.
Gerät anhalten
Î Nehmen Sie den Fuß vom Fahrpedal C bzw. D.
Î Treten Sie auf das Bremspedal Q, bis das Gerät
A
zum Stehen kommt.
Hinweis
Wenn Sie auf das Bremspedal treten,
schalten Sie damit gleichtzeitig auch den
Tempomat aus.
Mähen
VORSICHT !
Herausgeschleuderte Gegenstände
(Mähgut, Steine etc.)
ÂVerletzungsgefahr
¾ Entleeren Sie die Grasfangeinrichtung
nur bei ausgeschaltetem Schneidwerk.
¾ Betreiben Sie das Gerät nur mit
angebauter Grasfangeinrichtung oder
einem optionalen Deektor.
Achtung !
¾ Wenn ein Fremdkörper (z. B. Stein) vom
Schneidwerk getroffen wird oder falls das Gerät
anfängt ungewöhnlich zu vibrieren, stellen Sie
den Motor sofort ab.
¾ Untersuchen Sie das Gerät vor weiterem Betrieb
auf Schäden. Benutzen Sie das Gerät bei
Schäden nicht weiter und lassen Sie es vor dem
nächsten Gebrauch von einer Fachwerkstatt
instandsetzen.
¾ Schalten Sie das Schneidwerk nicht im hohen
Gras ein.
57
Page 58

DE
Betrieb
Î Motor wie angegeben starten.
Î Stellen Sie den Gashebel auf .
Î Schalten Sie das Schneidwerk ein und lassen Sie
es ab.
Î Lösen Sie die Feststellbremse, indem Sie das
Bremspedal ganz durchdrücken und wieder
loslassen.
Î Um loszufahren, treten Sie auf das Vorwärtsfahr-
pedal.
Hinweise zum Mähen
Mähen Sie kein nasses Gras. Fahren Sie
langsam bei maximaler Motordrehzahl.
Mähen von zu hohem bzw. nassem Gras
kann zu einer übermäßigen Grasansammlung/Verstopfung im Auswurfschacht führen.
Hinweise zum Mähen
Je nach Modell verfügt das Gerät über eine
Füllstandsanzeige für die Grasfangeinrichtung. Der Füllstandssensor
rend des Mähens den Befüllungsgrad der
misst wäh-
Y
Grasfangeinrichtung. Bei voller Grasfangeinrichtung ertönt ein Signalton und je nach
Ausührung schaltet sich gleichzeitig automatisch das Schneidwerk ab. Die Grasfangeinrichtung muss dann, vor dem weiteren
Mähen, zuvor entleert werden. Der Signalton
wird erst nach Entleerung der Grasfangeinrichtung deakiviert.
Füllstandssensor einstellen
Y
WARNUNG !
Verletzungsgefahr
¾ Nehmen Sie Einstellung am
Füllstandssensor nur bei abgeschaltetem
Motor, eingeschalteter Parkbremse,
abgezogenem Zündschlüssel und
abgenommener Grasfangeinrichtung vor.
Der Füllstandssensor kann in seiner Länge
(mehrere Rastpositionen) verändert und somit auf
die Konsistenz des Schnittgutes eingestellt werden.
Hierbei wird gleichzeitig auch der Befüllungsgrad
der Grasfangeinrichtung beeinusst.
Î Um die Länge zu verkürzen, schieben Sie den
Füllstandssensor weiter hinein.
3 Der Signalton löst später aus, das Schneidwerk
wird je nach Ausführung später abgeschaltet.
OCR-Funktion (je nach Modell)
H
Das Zündschloss ist mit einer OCR-Funktion
ausgestattet, die Ihnen ein benutzerkontrolliertes
Mähen auch im Rückwärtsgang ermöglicht.
Hinweise zum Mähen
Benutzen Sie die OCR-Funktion nur, wenn
unbedingt erforderlich.
Î Starten Sie den Motor.
Î Drehen Sie den Zündschlüssel [3] nach links von
Normalstellung auf Rückwärtsmähstellung
und drücken Sie den Schalter [1]a.
oder
Drücken Sie den Schalter [1]
3 Sekunden lang.
b
3 Die Kontrolllampe [2] leuchtet. Sie können jetzt
sowohl im Vorwärts- als auch im Rückwärtsgang
mähen.
Î Um die OCR-Funktion zu beenden, drehen Sie
den Zündschlüssel nach rechts auf die Normalstellung .
oder
Drücken Sie den Schalter [1]
nach unten und
b
lassen Sie ihn dann los.
3 Die Kontrolllampe erlischt.
Hinweise zum Zündschloss
Ha
Die OCR-Funktion wird automatisch ausgeschaltet, sobald der Schlüssel auf Normalstellung gedreht oder der Motor abgeschaltet wird (Stoppstellung oder Abschaltung des
Motors durch das Sicherheitssperrsystem).
Hinweise zum Zündschloss
Hb
Die OCR-Funktion wird automatisch ausgeschaltet, sobald der OCR-Schalter gedrückt
wird, der Motor abgeschaltet wird oder das
Sicherheitssperrsystem den Motor oder das
Schneidwerk automatisch abschaltet.
Mulchen
Beim Mulchen wird das Gras beim Mähen in kleine
Stücke (ca. 1 cm) geschnitten und bleibt liegen.
Dem Rasen bleiben so viele Nährstoffe enthalten.
Hinweis
Ideal bei kurzem, sehr trockenem Schnittgut.
Î Um die Länge zu verlängern, ziehen Sie den Füll-
standssensor weiter heraus.
3 Der Signalton löst früher aus, das Schneidwerk
wird je nach Ausführung früher abgeschaltet.
Hinweis
Ideal bei sattem, feuchten Gras.
58
Î Fragen Sie bei Ihrem Fachhändler nach entspre-
chendem Zubehör zum Mulchen.
Page 59

Betrieb
Tipps zur Rasenpflege
Der Rasen besteht aus verschiedenen Grasarten.
Wenn Sie häug mähen, wachsen verstärkt Gräser,
die stark wurzeln und eine feste Grasnarbe bilden.
Wenn Sie selten mähen, entwickeln sich verstärkt
hochwasende Gräser und andere Wildkräuter (z. B.
Klee, Gänseblümchen).
Damit Ihr Rasen gesund und gleichmäßig wachsen
kann und keine Rasenstreifen entstehen, müssen
sich die Schneidbahnen immer um einige Zentimeter
überdecken.
- Die Normalhöhe des Rasens liegt bei etwa 40–
50 mm. Mähen Sie etwa ein Drittel der Gesamthöhe, sobald der Rasen eine Höhe von 60–70 mm
erreicht hat.
- Schneiden Sie den Rasen nicht kürzer als 45 mm,
da sonst die Grasnarbe bei Trockenheit geschädigt werden kann
- Schneiden Sie hochgewachsenes Gras etappenweise auf Normalhöhe.
Scheinwerfer einschalten
(je nach Modell)
Î Um die Scheinwerfer einzuschalten, stellen Sie
den Schalter auf „ON“.
3 Die Scheinwerfer leuchten solange der Motor läuft.
Hinweis
Bei Modellen ohne Lichtschalter schalten
sich die Scheinwerfer automatisch mit dem
Motor ein und aus.
R
DE
Bei eingeschalteter Differentialsperre erfolgt
die Kraftübertragung auf beide Hinterräder. Die
Differentialsperre greift ein, wenn unterschiedliche
Raddrehzahlen erkannt werden.
Î Halten Sie das Gerät an.
Î Um die Differentialsperre einzuschalten, treten Sie
auf das Pedal M.
Î Um die Differentialsperre auszuschalten, nehmen
Sie den Fuß wieder vom Pedal M.
Hinweis
Wenn sich die Differentialsperre nicht gleich
löst, verringern Sie die Geschwindigkeit des
Gerätes oder bringen Sie das Gerät zum
Stehen.
Gerät abstellen
Î Halten Sie das Gerät an.
Î Schalten Sie das Schneidwerk aus.
Î Stellen Sie den Gashebel auf mittlere Position.
Î Bringen Sie das Schneidwerk in die oberste
Position.
Î Schalten Sie nach 20 Sekunden den Motor aus.
Î Schalten Sie die Feststellbremse ein.
Î Ziehen Sie den Zündschlüssel ab.
Gerät schieben
Hinweis
Je nach Modell leuchten die Scheinwerfer
nach Abschalten des Motors noch für ca.
10 Sekunden weiter und schalten sich danach automatisch aus.
Differentialsperre ein- und ausschalten
(je nach Modell)
Eine aktivierte Differentialsperre beeinusst
sehr stark das Lenkverhalten des Gerätes.
ÂUnfallgefahr und Schäden am Gerät
¾ Verwenden Sie die Differentialsperre
nur wenn unbedingt nötig, z. B. bei
schwierigem Gelände.
¾ Schalten Sie die Differentialsperre nur
bei Stillstand des Gerätes ein.
¾ Verwenden Sie die Differentialsperre
nicht auf befestigten Wegen oder bei
Bergabfahrt.
¾ Fahren Sie nur geradeaus, wenn die
Differentialsperre eingeschaltet ist.
¾ Fahren Sie mit eingeschalteter
Differentialsperre nur langsam.
A
WARNUNG !
Hinweis
Der Getriebeentriegelungshebel bendet
sich zwischen der Rückwand und dem rechten Hinterrad des Gerätes.
Geräte mit Differentialsperre
Î Schalten Sie den Motor aus.
Î Schalten Sie die Feststellbremse aus.
Î Ziehen Sie den Getriebeentriegelungshebel ganz
Ka
heraus.
3 Sie können das Gerät jetzt schieben.
Hinweis
Bevor Sie den Motor starten, drücken Sie
den Getriebeentriegelungshebel wieder
ganz hinein.
Geräte ohne Differentialsperre
Î Schalten Sie den Motor aus.
Î Schalten Sie die Feststellbremse aus.
Î Drücken Sie den Getriebeentriegelungshebel
Kb
ganz hinein.
3 Sie können das Gerät jetzt schieben.
59
Page 60

DE
Kombianzeige (je nach Modell, optional)
Hinweis
Bevor Sie den Motor starten, ziehen Sie den
Getriebeentriegelungshebel wieder ganz
heraus.
12-Volt-Steckdose (je nach Modell)
X
Die Steckdose dient zum Anschluss eines 12-VoltBatterieladegerätes oder zum Anschluss von
diversen 12-Volt-Geräten.
Hinweis
Beachten Sie hierzu die Angaben des Batterieladegerätes bzw. der 12-Volt-Anschlussgeräte.
Kombianzeige (je nach Modell, optional)
Hinweis
Die Anzeigen erfolgen nur, wenn der Motor
läuft.
Hinweis
Fallen Ölwechsel und Luftlterwartung auf
den gleichen Zeitpunkt, leuchtet erst die Öl-
wechselanzeige, dann die Luftlteranzeige.
Die Kombianzeige kann je nach Ausführung aus
folgenden Elementen bestehen:
Typ 1 Oa in Verbindung mit dem
Zündschloss
Betriebsstundenzähler
Beim Einschalten der Zündung wird kurzzeitig die
Batteriespannung angezeigt und wechselt dann auf
die Anzeige der Betriebsstunden.
Betriebsstunden werden immer gezählt, außer der
Zündschlüssel steht auf „Stop“ oder ist abgezogen.
Wartungsanzeige
Hinweis
triebsstunden angezeigt.
– – –
Î Wechseln Sie umgehend das Motoröl (siehe Be-
triebsanleitung des Motors).
Diese Anzeige erscheint alle 50 Betriebsstunden für
eine Zeit von 2 Stunden.
Ha
bedeutet: Es werden die Gesamtbe-
Ölwechsel
– –
Ölstand
Der Motorölstand ist zu niedrig.
Î Wenn die Anzeige nicht erlischt, schalten Sie
den Motor umgehend aus und kontrollieren Sie
den Motorölstand (siehe Betriebsanleitung des
Motors). Füllen Sie bei Bedarf Öl nach.
Diese Anzeige kann kurzzeitig nach dem Motorstart
erscheinen und dann wieder erlischen.
Hinweis
Diese Funktion ist nur bei Motoren mit Öldruckschalter aktiv.
– –
Batteriespannung
Wenn Sie den Zündschlüssel in Stellung drehen,
wird kurz die Batteriespannung angezeigt und dann
die Gesamtbetriebsstunden.
Î Laden Sie die Batterie schnellstmöglich auf.
Î Lassen Sie ggf. das Ladesystem durch eine Fach-
werkstatt auf mögliche Schäden kontrollieren.
– – –
Î Führen Sie umgehend eine Luftlterwartung durch
Luftlterwartung
(siehe Betriebsanleitung des Motors).
Diese Anzeige erscheint alle 25 Betriebsstunden für
eine Zeit von 7 Minuten.
Typ 2 Ob in Verbindung mit dem
Zündschloss
Hinweis
Je nach Modell besitzt die Kombianzeige
eine optionale „Bluetooth Symbol“-Ausstattung. Alle die unten aufgeführten sowie weitere zusätzliche Funktionen können Sie sich
somit auch auf Ihrem Smartphone anzeigen
lassen. Sie benötigen lediglich unsere ConnectTM App (erhältlich für Betriebssysteme
Android und iOS). Die ConnectTM App
zeigt Ihnen alle wichtigen Informationen und
Hinweise bezüglich Ihres Gerätes an. Sie
werden z. B. informiert, wann es Zeit ist, Öl,
Luftlter, Batterie, Schneidmesser usw. zu
überprüfen oder warten zu lassen.
Die ConnectTM App nden Sie auf unserer
Webseite www.mtdproducts.eu zum
Download.
Installieren Sie die App auf Ihrem Smartphone und folgen Sie den Schritt-für-Schritt-Anweisungen, um das Smartphone mit Ihrem
Gerät zu synchronisieren.
Hb
60
Page 61

Wartung
DE
Betriebsstundenzähler
Beim Drücken des eingesteckten Zündschlüssels
für weniger als 1,5 Sekunden wird kurzzeitig die
Batteriespannung angezeigt und wechselt dann auf
die Anzeige der Betriebsstunden. Betriebsstunden
werden nur dann gezählt, wenn der Motor läuft.
Wartungsanzeige
–
Î Wechseln Sie umgehend das Motoröl (siehe Be-
Ölwechsel
triebsanleitung des Motors).
Diese Anzeige erscheint alle 50 Betriebsstunden für
eine Zeit von 2 Stunden.
– –
Der Motorölstand ist zu niedrig.
Î Wenn die Anzeige nicht erlischt, schalten Sie
Ölstand
den Motor umgehend aus und kontrollieren Sie
den Motorölstand (siehe Betriebsanleitung des
Motors). Füllen Sie bei Bedarf Öl nach.
Diese Anzeige kann kurzzeitig nach dem Motorstart
erscheinen und dann wieder erlischen.
Hinweis
Diese Funktion ist nur bei Motoren mit Öldruckschalter aktiv.
Batteriespannung
–
–
Niedrig (< 11 Volt)
Hoch (> 16 Volt)
Beim Motorstart wird kurz die Batteriespannung
angezeigt und dann die Gesamtbetriebsstunden.
Sonstige Anzeigen im Display
Bremse bzw. Feststellbremse beim Motorstartversuch nicht betätigt.
a) Mähwerk beim Motorstartversuch nicht
ausgeschaltet.
b) OCR Funktion wurde vor dem Mähen
im Rückwärtsgang nicht aktiviert.
Bediener sitzt beim Motorstartversuch nicht
auf dem Fahrersitz.
Wartung
WARNUNG !
Gefahr von Verletzungen oder
Sachschäden
¾ Führen Sie Wartungs- und
Reinigungsarbeiten am Gerät nur bei
stillgesetztem Motor durch.
¾ Ziehen Sie den Zündschlüssel und die
Zündkerzenstecker ab.
¾ Warten Sie, bis alle beweglichen Teile
zum Stillstand gekommen sind und der
Motor abgekühlt ist.
¾ Greifen Sie niemals in die rotierenden
Schnittmesser.
¾ Lassen Sie Reparatur- und
Wartungsarbeiten sowie den Austausch
von Sicherheitselementen nur von
einer qualizierten Fachkraft oder einer
Fachwerkstatt durchführen.
¾ Lassen Sie das Auswechseln oder
Nachschleifen von Schneidmessern nur
von einer Fachwerkstatt ausführen.
¾ Reinigen Sie das Gerät und alle Anbau-
und Zubehörteile nach jedem Gebrauch.
Bei zu niedriger Batteriespannung:
Î Laden Sie die Batterie schnellstmöglich auf.
Î Lassen Sie ggf. das Ladesystem durch eine Fach-
werkstatt auf mögliche Schäden kontrollieren.
Bei zu hoher Batteriespannung:
Î Schalten Sie das Gerät aus und lassen Sie das
Ladesystem durch eine Fachwerkstatt kontrollieren.
– –
Î Führen Sie umgehend eine Luftlterwartung durch
Luftlterwartung
(siehe Betriebsanleitung des Motors).
Diese Anzeige erscheint alle 25 Betriebsstunden für
eine Zeit von 7 Minuten.
Gerät reinigen
Achtung !
¾ Verwenden Sie keinen Hochdruckreiniger zum
Reinigen des Gerätes.
Î Stellen Sie das Gerät auf einem festen und
ebenen Untergrund ab.
Î Schalten Sie die Feststellbremse ein.
Î Reinigen Sie das Gerät mit einer Bürste, einem
Handbesen oder einem Lappen.
61
Page 62

DE
Wartung
Schneidwerk reinigen
GEFAHR !
Scharfe, bewegliche Schneidwerkzeuge
ÂVerletzungsgefahr
¾ Tragen Sie Schutzhandschuhe.
¾ Reinigen Sie die Schneidwerkzeuge
vorsichttig.
¾ Achten Sie darauf, dass die Bewegung
eines Schneidwerkzeuges zur Drehung
anderer Schneidwerkzeuge führen kann.
Achtung !
Kraftstoff kann in den Verbrennungsraum laufen.
ÂMotorschaden
¾ Kippen Sie das Gerät nicht mehr als 30°.
Î Bringen Sie das Schneidwerk in die oberste
Position.
Î Reinigen Sie den Schneidraum mit einer Bürste,
einem Handbesen oder einem Lappen.
Schneidwerk mit Reinigungsdüse
(optional)
Reinigen
Î Stellen Sie das Gerät auf einem sauberen, festen
Untergrund ab.
Î Schalten Sie die Feststellbremse ein.
Î Befestigen Sie einen Wasserschlauch mit han-
delsüblicher Schnellkupplung auf der Reinigungsdüse.
Î Starten Sie den Motor.
Î Lassen Sie das Schneidwerk ab und schalten Sie
es ein.
Î Lassen Sie Motor und Schneidwerk einige Mi-
nuten laufen.
Î Schalten Sie Motor und Schneidwerk aus.
Trocknen
Î Bringen Sie das Schneidwerk in die oberste
Position.
Î Starten Sie den Motor und schalten Sie das
Schneidwerk ein.
Î Um das Schneidwerk zu trocknen, lassen Sie
Motor und Schneidwerk einige Minuten laufen.
Î Schalten Sie Motor und Schneidwerk aus.
W
Hinweis
Falls vorhanden, wiederholen Sie die Schritte für die zweite Reinigungsdüse.
Grasfangeinrichtung reinigen
Î Nehmen Sie die Grasfangeinrichtung ab und
leeren Sie sie aus.
Î Reinigen Sie die Grasfangeinrichtung mit einem
kräftigen Wasserstrahl (z. B. mit einem Gartenschlauch).
Î Lassen Sie die Grasfangeinrichtung vor dem
nächsten Gebrauch gründlich trocknen.
Gerät warten
Î Beachten Sie die Wartungsvorschriften im Moto-
renhandbuch.
Î Lassen Sie das Gerät am Ende der Saison von
einer Fachwerkstatt überprüfen und warten.
Hinweis
Geben Sie bei einem Ölwechsel anfallendes
Altöl bei einer Altölsammelstelle oder einem
Entsorgungsunternehmen ab.
Hinweis
Geben Sie verbrauchte Batterien bei Ihrem
Händler oder einem Entsorgungsunternehmen ab. Bauen Sie die Batterie aus, bevor
das Gerät verschrottet wird.
Verwendung eines Starthilfekabels
GEFAHR !
Explosionsgefahr / Kurzschlussgefahr
¾ Überbrücken Sie niemals eine defekte
oder gefrorene Batterie mit einem
Starthilfekabel.
¾ Achten Sie darauf, dass sich die Geräte
und die Kabelklemmen nicht berühren
und die Zündungen ausgeschaltet sind.
Î Klemmen Sie das rote Starthilfekabel an den
Pluspol (+) der entladenen Batterie und an den
Pluspol (+) die Spenderbatterie.
Î Klemmen Sie das schwarze Starthilfekabel zuerst
an den Minuspol (-) der Spenderbatterie.
Î Befestigen Sie die andere Klemme am Rahmen
nahe dem Motorblock des Rasentraktors möglichst weit entfernt von der Batterie.
Hinweis
Wenn die Spenderbatterie in ein Fahrzeug
eingebaut ist, darf das Fahrzeug während
des Starthilfevorgangs nicht gestartet sein.
Î Starten Sie den Rasentraktor.
Î Schalten Sie die Feststellbremse ein.
Î Klemmen Sie das Starthilfekabel in umgekehrter
Reihenfolge ab.
Achtung !
¾ Beachten Sie die separate Bedienungsanleitung
der Grasfangeinrichtung.
62
Page 63

Wartung
DE
Reifendruck
WARNUNG !
Erhöhter Reifendruck
ÂUnfallgefahr und Beschädigungen am
Gerät
¾ Überschreiten Sie niemals den
zulässigen Reifendruck (siehe
Reifenwandung).
Î Überprüfen Sie den Reifendruck und korrigieren
Sie ihn bei Bedarf.
vorn 0,9 bar
hinten 0,7 bar
Hinweis
Überhöhter Reifendruck reduziert die Lebensdauer der Reifen. Kontrollieren Sie den
Reifendruck vor jeder Fahrt.
Nach 5 Betriebsstunden
Î Führen Sie den ersten Motor-Ölwechsel durch
(Intervalle siehe Motorhandbuch).
Î Verwenden Sie den Quick-Ölablass (optional) zum
Ölablassen
V
.
Hinweis
Benutzen Sie beim Ölablassen einen geeigneten Auffangbehälter.
Alle 25 Betriebsstunden
Alle 50 Betriebsstunden
Î Lassen Sie Schmutz und Grasrückstände vom An-
triebsgetriebe durch eine Fachwerkstatt entfernen.
Î Lassen Sie Antriebskeilriemen, Messerwellen und
Spannrollen von einer Fachwerkstatt auf Verschleiß und Beschädigungen überprüfen.
Alle 2 Monate
Î Nur bei Batterie Typ 2: Füllen Sie die Batterie-
zellen bis 1 cm unterhalb der Einfüllöffnung mit
destilliertem Wasser auf.
Nach Bedarf
Batterie auaden:
Î Wenn Sie das Gerät längere Zeit nicht benutzen,
bauen Sie die Batterie aus dem Gerät aus.
Î Laden Sie die Batterie alle 6-8 Wochen auf sowie
vor Wiederinbetriebnahme nach Lagerung.
Hinweis
Beachten Sie die Hinweise in der Bedienungsanleitung Ihres Batterieladegerätes.
Sicherungen ersetzen:
Î Ersetzen Sie defekte Sicherungen nur mit Siche-
rungen gleicher Stärke.
Hinweis
Die Sicherung bendet sich am Hauptkabelstrang zwischen Batterie und Motor. Lassen
Sie eine defekte Sicherung nur von einer
Fachwerkstatt austauschen.
Î Schmieren Sie alle Dreh- und Lagerstellen der
Fahr- und Bremspedale, des Schnitthöheneinstellhebels und des PTO-Hebels mit einigen Tropfen
Leichtöl.
Î Reinigen Sie die Batteriepole.
Î Schmieren Sie alle Messerwellen, Spannrollen
und Spannrollenhalter an den Schmiernippeln mit
Fett Typ 251H EP.
Hinweis
Lassen Sie diese Arbeiten von einer Fachwerkstatt ausführen.
Î Schmieren Sie die Radlager und Achsen der
Vorderräder an den Schmiernippeln mit einem
Mehrzweckfett.
Î Schmieren Sie die Räder des Schneidwerks an
den Schmiernippeln mit einem Mehrzweckfett.
Î Lassen Sie Schmutz und Grasrückstände unter-
halb der Keilriemenabdeckung des Schneidwerks
von einer Fachwerkstatt entfernen.
Einmal pro Saison
Î Reinigen Sie die Zündkerze und stellen Sie den
Elektrodenabstand ein bzw. wechseln Sie die
Zündkerze aus (siehe Motorenhandbuch).
Î Lassen Sie die hinteren Radachsen von einer
Fachwerkstatt mit wasserabweisendem Spezialfett schmieren.
Î Lassen Sie das Schneidwerkzeug von einer Fach-
werkstatt schärfen bzw. ersetzen.
63
Page 64

DE
Demontage/Montage sowie Einstellung des Schneidwerks
Demontage/Montage sowie Einstellung
des Schneidwerks
VORSICHT !
Die Aufhängung/ Aushebung ist
federunterstützt und kann nach oben
zurückschnellen, sobald das Schneidwerk
von der Aushebung getrennt wird.
Beim Lösen des
Schnitthöheneinstellhebels bei
demontiertem Schneidwerk kann dieser,
bedingt durch die Federunterstützung,
unkontrolliert nach oben schnellen.
Hinweis
Lassen Sie diese Arbeiten nur von einer
Fachwerkstatt ausführen.
Lagerung
Achtung !
Materialschäden am Gerät
¾ Lagern Sie das Gerät in einem sauberen und
trockenen Raum.
¾ Schützen Sie das Gerät bei längerer Lagerung
vor Rost.
¾ Schützen Sie das Gerät vor Frost.
Î Reinigen Sie das Gerät und die Grasfangeinrich-
tung.
Î Wischen Sie alle Metallteile zum Schutz vor Rost
mit einem geölten Lappen ab oder verwenden Sie
Sprühöl.
Î Laden Sie die Batterie auf.
Î Bauen Sie die Batterie bei längerer Lagerung aus
(z. B. im Winter).
Î Laden Sie die Batterie bei längerer Lagerung alle
6-8 Wochen auf sowie vor Wiedereinbau.
Î Lassen Sie den Kraftstoff ab und legen Sie den
Motor still – siehe Motorenhandbuch.
Transport
Hinweis
Das Gerät besitzt keine Straßenzulassung
gemäß StVO.
Kurzstrecken
Î Fahren Sie zum Wechsel des Einsatzortes nur
kurze Strecken mit dem Rasentraktor.
Langstrecken
WARNUNG !
Gefahr durch unstabile und ungesicherte
Rampen
ÂGefahr von schweren Personen- und
Sachschäden
¾ Wenn Sie das Gerät auf einen Anhänger
oder Lastwagen fahren, stellen Sie
vorher sicher, dass die Rampe stabil und
gesichert ist.
WARNUNG !
Gefahr durch unzureichende Befestigung
ÂTurbulenzen während dem Transport
¾ Wenn Sie das Gerät in einem Anhänger
oder Lastwagen transportieren,
befestigen und sichern Sie es
ausreichend.
Î Verwenden Sie für größere Entfernungen ein
Transportfahrzeug.
Î Schieben Sie das Gerät von Hand im Leerlauf in/
auf das Transportfahrzeug
Î Schalten Sie die Feststellbremse ein und sichern
Sie das Gerät gegen Verrutschen.
64
Page 65

Beseitigung von Störungen
DE
Beseitigung von Störungen
WARNUNG !
Gefahr von Verletzungen oder Sachschäden
¾ Suchen Sie im Zweifelsfall immer eine Fachwerkstatt auf.
¾ Stellen Sie vor jeder Prüfung oder vor Arbeiten an den Schnittmessern das Gerät ab.
¾ Schützen Sie sich vor Verletzungen, indem Sie vor allen Arbeiten am Gerät
- den Motor abstellen,
- den Zündschlüssel ziehen,
- die Feststellbremse einschalten,
- Abwarten, bis alle beweglichen Teile vollständig zum Stillstand gekommen sind,
- Warten, bis der Motor abgekühlt ist,
- den Zündkerzenstecker am Motor ziehen, so dass ein unbeabsichtigtes Starten des Motors
verhindert wird.
Problem Mögliche Ursache Abhilfe
Nehmen Sie auf dem Fahrersitz Platz,
drücken Sie das Bremspedal ganz durch
bzw. schalten Sie die Feststellbremse ein.
Schalten Sie den PTO aus.
Montieren Sie die Grasfangeinrichtung
oder den optionalen Deektor an das
Gerät.
Schließen Sie das rote Kabel an den
(+).Pol der Batterie und das schwarze
Kabel an den (-)-Pol der Batterie an.
Überprüfen und laden Sie die Batterie.
Tauschen Sie die Batterie ggf. aus.
Tauschen Sie die Sicherung aus.
Wenn die Sicherung wiederholt auslöst,
suchen Sie nach der Ursache (meist
Kurzschluss).
Schließen Sie das Massekabel an.
Betätigen Sie den Choke. Stellen Sie
den Gashebel auf
Füllen Sie Kraftstoff auf.
Prüfen Sie die Zündkerze (siehe Motorhandbuch).
Lassen Sie die Zündung in Fachwerkstatt prüfen.
Schalten Sie das Gerät sofort aus. Prüfen Sie den Motorölstand.
Schalten Sie das Gerät sofort aus.
Lassen Sie den Motor in einer Fachwerkstatt prüfen.
Schalten Sie das Gerät sofort aus.
Lassen Sie defekte Teile in einer Fachwerkstatt austauschen.
Stellen Sie eine geringere Fahrgeschwindigkeit ein.
Lassen Sie die Schneidmesser in einer
Fachwerkstatt schärfen oder ersetzen.
Lassen Sie den Keilriemen in einer
Fachwerkstatt ersetzen.
Anlasser dreht nicht.
Anlasser dreht nicht.
Anlasser dreht, aber Motor
startet nicht.
Motor qualmt.
Starke Vibrationen.
Schneidwerk wirft kein
Gras aus oder Schnitt ist
unsauber.
Motor läuft, Schneidwerk
mäht nicht.
Sicherheitssperrsystem hat ausgelöst.
Batterie nicht korrekt angeschlossen.
Leere oder schwache Batterie.
Sicherung hat ausgelöst.
Lockeres Massekabel zwischen Motor und
Rahmen.
Falsche Stellung von Choke und Gashebel.
Vergaser bekommt keinen Kraftstoff, Kraftstofftank leer.
Defekte oder verschmutzte Zündkerze.
Kein Zündfunke.
Zu viel Motoröl im Motor.
Motor defekt.
Beschädigte Messerwelle oder defektes
Schneidmesser.
Geringe Motordrehzahl. Geben Sie mehr Gas.
Zu hohe Fahrgeschwindigkeit.
Schneidmesser stumpf.
Keilriemen gerissen.
.
65
Page 66

Information zum Motor
DE
Information zum Motor
Der Motorenhersteller haftet für alle
motorbezogenen Probleme im Hinblick auf
Leistung, Leistungsmessung, technische Daten,
Gewährleistung und Service.
Informationen nden Sie in dem separat
mitgelieferten Halter-/Bedienerhandbuch des
Motorherstellers.
Garantie
In jedem Land gelten die von unserer Gesellschaft
oder dem Importeur herausgegegeben
Garantiebestimmungen. Störungen beseitigen wir
an ihrem Gerät im Rahmen der Gewährleistung
kostenlos, sofern ein Material- oder
Herstellungsfehler die Ursache sein sollte. Im
Garantiefall wenden Sie sich bitte an Ihren Verkäufer
oder die nächstgelegene Niederlassung.
CE-Konformitätserklärung
Weitere Angaben zum Gerät nden Sie auf
der separat beigelegten CE-Konformitätserklärung, die ein Bestandteil dieser Betriebsanleitung ist.
Umweltgerechte Entsorgung
Anfallende Verpackungsreste, Altgeräte
usw. entsprechend den örtlichen
Vorschriften entsorgen.
66
Page 67

Inhoud
NL
Inhoud
Betekenis van de symbolen................................... 67
Voor uw veiligheid..................................................68
Veiligheidsaanwijzingen.........................................69
Bedoeld gebruik..................................................... 72
Typeplaatje
Veiligheidsvoorzieningen
Montage................................................................. 73
Bedieningselementen
In gebruik nemen
Gebruik
Combi-display (afhankelijk van het model,
optioneel)
Onderhoud............................................................. 82
Demontage/montage en instellen van het
maaiwerk
Opslag
Transport
Verhelpen van storingen
Informatie over de motor
Garantie
CE-conformiteitsverklaring
Milieuvriendelijke recycling
............................................................ 72
....................................... 73
............................................ 75
................................................... 75
.................................................................. 76
............................................................... 80
............................................................... 84
................................................................... 84
............................................................... 84
........................................ 85
....................................... 86
................................................................. 86
.................................... 86
.................................... 86
Betekenis van de symbolen
Waarschuwing!
Lees de gebruikshandleiding vóór
montage en in gebruik nemen!
Voorzichtig! Omstanders
Houd derden weg uit de buurt van de
gevarenzone.
Waarschuwing! Roterende messen
Letselgevaar door roterende messen of
onderdelen
Waarschuwing! Roterende messen
Houd uw handen en voeten uit de buurt
van roterende onderdelen. Houd uw
handen en voeten niet onder het maaiwerk.
Voorzichtig! Weggeslingerde voorwerpen
Voorwerpen kunnen door de machine
worden gegrepen en weggeslingerd.
Waarschuwing! Valgevaar
Gebruik de machine niet op hellingen
met een stijging van meer dan 20 %.
Gevaar! Onbedoeld inschakelen
Vóór werkzaamheden aan de machine
de bougiestekker lostrekken. Houd uw
handen en voeten uit de buurt van roterende onderdelen.
Gevaar! Explosiegevaar
67
Page 68

Voor uw veiligheid
NL
3E
Waarschuwing! Gevaar voor brandwonden door accuzuur
Voorzichtig!
Draag een veiligheidsbril.
Gevaar! Vuur, vonken, open licht en
roken verboden!
Let op!
Oude accu's niet afvoeren met het huishoudelijk afval.
Gevaar! Onbedoeld inschakelen
Vóór werkzaamheden aan de machine
de contactsleutel verwijderen. De aanwijzingen in deze handleiding opvolgen.
Let op!
Ga niet op het maaiwerk staan.
Waarschuwing! Heet oppervlak
Voorzichtig!
Vóór het kantelen van de
machine de accu uitbouwen.
Voor uw veiligheid
Gevarenniveaus van waarschuwingen
In deze gebruikshandleiding worden de volgende
gevarenniveaus gebruikt om op potentieel
gevaarlijke situaties te wijzen:
GEVAAR!
De gevaarlijke situatie doet zich
onmiddellijk voor en leidt, indien de
maatregelen niet worden opgevolgd, tot
ernstig letsel of de dood.
WAARSCHUWING!
De gevaarlijke situatie kan ontstaan en
leidt, indien de maatregelen niet worden
opgevolgd, tot ernstig letsel of de dood.
VOORZICHTIG!
De gevaarlijke situatie kan ontstaan en
leidt, indien de maatregelen niet worden
opgevolgd, tot licht of matig letsel.
Let op!
Een mogelijk schadelijke situatie kan ontstaan
en leidt, indien deze niet wordt vermeden, tot
materiële schade.
Waarschuwing!
Bij gebruik van een aanhanger de volgende maximale
waarden niet overschrijden:
max. hellingshoek: 14 %
max. verticale kracht op de aanhangerkoppeling: 25 kg
max. aanhangergewicht (aanhanger met lading):
180 kg
Aanwijzing
Houd deze symbolen altijd in een leesbare
toestand. Vervang beschadigde of niet leesbare symbolen.
68
Opbouw van de veiligheidsaanwijzingen
GEVAAR!
Soort en bron van het gevaar!
ÂGevolgen bij niet opvolgen
¾ Maatregel voor het voorkomen van het
gevaar
Page 69

Veiligheidsaanwijzingen
NL
Veiligheidsaanwijzingen
Vóór het eerste gebruik van uw machine
deze gebruikshandleiding zorgvuldig
lezen en opvolgen.Bewaar deze gebruiks-
handleiding voor later gebruik of de
volgende eigenaar.
Î Lees vóór het eerste gebruik altijd de veiligheids-
aanwijzingen!
Bij het niet opvolgen van de gebruikshandleiding
en de veiligheidsaanwijzingen, kunnen beschadigingen aan de machine en gevaren voor de
bediener en andere personen ontstaan.
Î Maak u vertrouwd met alle bedieningselementen
en het correcte gebruik hiervan.
Î Alle personen die met het in gebruik nemen, be-
dienen en onderhouden van de machine te maken
hebben, moeten hiervoor zijn gekwaliceerd.
Verbod op eigenmachtige wijzigingen en
ombouw
Het is verboden wijzigingen aan de machine aan
te brengen of hier hulpapparatuur van te maken.
Dergelijke wijzigingen kunnen leiden tot persoonlijk
letsel en storingen.
Î Reparaties aan de machine mogen alleen
worden uitgevoerd door personen die hiervoor
opdracht hebben gekregen en hiervoor zijn opgeleid. Gebruik hierbij altijd de originele reserveonderdelen. Zo wordt gezorgd dat de veiligheid van
de machine gewaarborgd blijft.
Informatiesymbolen in deze handleiding
De tekens en symbolen in deze handleiding moeten
u helpen de handleiding en de machine snel en
veilig te gebruiken.
Aanwijzing
Informatie over het meest effectieve of
meest handige gebruik van de machine.
Î Actiestap
Vraagt u om een actie.
3 Actieresultaat
Hier vindt u het resultaat van een reeks actiestappen.
[1]Positienummer
Positienummers zijn in de tekst aangegeven met
vierkante haakjes [ ].
Illustratieaanduiding
A
Illustraties zijn met letters aangeduid en in de
tekst gemarkeerd.
Bescherming van uzelf en andere personen
¾ Om veiligheidsredenen mogen kinderen of
andere personen, die de gebruikshandleiding
niet kennen, de machine niet gebruiken.
¾ Personen onder 16 jaar mogen de machine
niet bedienen of andere werkzaamheden,
bijv. onderhoud, reinigen of instellen, aan de
machine uitvoeren. Plaatselijke voorschriften
kunnen de minimumleeftijd van de gebruiker
bepalen.
¾ Personen die de machine bedienen, mogen
niet onder invloed zijn van verdovende
middelen (bijv. alcohol, drugs of medicijnen).
¾ Gebruik de machine niet zonder de juiste
opleiding of bij vermoeidheid of ziekte.
¾ Wees voorzichtig en grijp niet in de
maaimessen.
¾ Houd er rekening mee dat de bediener
verantwoordelijk is voor ongevallen met
andere personen of hun eigendommen.
¾ Deze machine kan door personen met
lichamelijke, sensorische of mentale
beperkingen of een gebrek aan kennis en
ervaring worden gebruikt, als ze onder
toezicht staan of instructies hebben gekregen
over de veilige omgang met de machine
en bekend zijn met de mogelijke gevaren
hiervan.
¾ Neem de machine niet in gebruik, wanneer
personen (vooral kinderen) of dieren dicht in
de buurt zijn.
¾ Zorg dat kinderen niet met de machine
spelen.
¾ Onderbreek de het rijden, als u merkt, dat er
personen (vooral kinderen) of huisdieren in
de buurt zijn.
¾ Draag bij het werken met of aan de
machine altijd stevige, dichte schoenen
en een lange broek en andere geschikte
persoonlijke beschermingsmiddelen
(veiligheidsbril, gehoorbescherming,
werkhandschoenen, etc.). Het dragen van
persoonlijke beschermingsmiddelen vermindert
het letselgevaar. Vermijd het dragen van losse
kleding of kleding met hangende koorden of
loshangende riemen of banden. Werken zonder
gehoorbeschermers kan tot gehoorverlies leiden.
Actiestapnummer
1
De gedenieerde volgorde van actiestappen is
genummerd in de tekst aangegeven.
69
Page 70

NL
Veiligheidsaanwijzingen
Veiligheidsaanwijzingen
Vóór het gebruik
¾ Maak u voor aanvang van de werkzaamheden
vertrouwd met de machine, de
bedieningselementen en de bediening
hiervan.
¾ Controleer of alle bevestigingselementen
(moeren, pennen en bouten, etc.) vastzitten,
om te zorgen dat de machine veilig kan
worden gebruikt.
¾ Gebruik de machine alleen in technisch
probleemloze toestand. Wijzig nooit de in de
fabriek vooringestelde motorinstellingen. Laat
beschadigingen door een gekwaliceerd vakman
of een gespecialiseerde werkplaats repareren.
¾ Verwijder instelgereedschap of
schroefsleutels voordat u de machine
inschakelt. Een stuk gereedschap, dat zich
binnen het bereik van het roterende maaiwerk
bevindt, kan tot letsel leiden.
¾ De machine mag nooit worden gebruikt
met beschadigde of ontbrekende
veiligheidsvoorzieningen. Laat deze door
een hiervoor gekwaliceerd vakman of
gespecialiseerde werkplaats repareren of indien
nodig vervangen.
¾ Gebruik de machine nooit zonder de
beschermende veiligheidsvoorzieningen
en verwijder deze niet. De beschermende
veiligheidsvoorzieningen zijn bestanddeel van de
machine.
¾ Gebruik de machine nooit met defecte of
beschadigde veiligheidsvoorzieningen.
Veiligheidsvoorzieningen dienen voor uw
veiligheid en moeten altijd in goed werkende
toestand zijn. U mag geen wijzigingen aan
veiligheidsvoorzieningen uitvoeren of de werking
hiervan omzeilen.
¾ Controleer de grasvanginrichting op
beschadiging en correcte montage.
¾ Controleer voor het maaien of geen takken,
stenen, draden, etc., op het gras liggen en
houd tijdens het maaien altijd rekening met
dergelijke obstakels. Voorwerpen kunnen
worden gegrepen en weggeslingerd.
¾ Controleer (visuele controle) of de
maaimessen en de bevestigingsmiddelen
hiervan stomp, beschadigd of vervormd zijn.
¾ Aanhangers of aanbouwapparatuur volgens
de voorschriften koppelen. Aanbouwapparaten,
aanhangers, ballastgewichten en gevulde
grasvanginrichtingen beïnvloeden het rijgedrag,
vooral de wendbaarheid, het remvermogen en
kantelneiging.
Tijdens gebruik
¾ Maai geen grasvelden met een halmhoogte
van meer dan 25 cm.
¾ Rijd voorzichtig. Verminder de snelheid, voordat
u een bocht neemt.
¾ Werk niet met de machine niet in een
explosiegevaarlijke omgeving, waarin zich
brandbare vloeistoffen, gassen of stof
bevinden. De machine kan vonken afgeven, die
het stof of de dampen kunnen ontsteken. Vermijd
open vuur, vonkvorming en niet roken.
¾ Wees zeer voorzichtig, als u achteruit maait of
rijdt. Rijd hierbij langzaam en kijk naar achter op
de grond, zodat ongevallen worden voorkomen.
¾ Verstel de maaihoogte alleen bij
uitgeschakelde motor en stilstaand maaiwerk.
¾ Verwijder de grasvanginrichting of de
optionele leiplaat niet bij draaiende motor.
¾ Rijd nooit met draaiend maaiwerk over grind
of voetpaden. Er bestaat dan gevaar voor
steenslag!
¾ Maai niet over hoog gegroeid, droog gras
(bijv. weidegras) of over droge loofhopen.
Parkeer de machine niet op droog gras of
loof. Brandgevaar door contact met de hete
uitlaat en als gedroogd gras of loof zich verzamelt
op het hete maaiwerk.
¾ Let bij het werken langs straten of bij het
oversteken van een straat op het verkeer.
De machine is niet bestemd voor gebruik langs
openbare wegen.
¾ Leeg de grasvanginrichting nooit bij
draaiend maaiwerk. Bij het legen van de
grasvanginrichting kunt uzelf of kunnen anderen
door weggeslingerd maaigoed of voorwerpen
gewond raken.
¾ Wees zeer voorzichtig bij het openen en
sluiten van de grasvanginrichting – er bestaat
knelgevaar.
¾ Houd bij het maaien bij begrenzingen, bijv. in
de buurt van steile hellingen, sloten of onder
bomen, bij struiken en heggen, voldoende
afstand.
¾ Wordt een vreemd voorwerp (bijv. een
steen) door het maaiwerk geraakt of begint
de machine abnormaal te trillen, moet u de
motor direct uitzetten. Controleer de machine
op beschadiging voordat u hier verder mee
werkt. Breng de machine indien nodig naar een
gespecialiseerde werkplaats.
70
Page 71

Veiligheidsaanwijzingen
NL
Veiligheidsaanwijzingen
¾ Ga nooit staan voor de openingen waar het
gras wordt uitgeworpen.
¾ De motor uitzetten en de contactsleutel
verwijderen, voordat u blokkades losmaakt of
verstoppingen in het uitwerpkanaal verhelpt.
Maaien op steile hellingen
¾ Maai of rijd niet op hellingen, die een
hellingshoek van meer dan 20 % hebben.
¾ Rijd hellingen altijd op en neer en rijd niet
dwars over de helling. Keer niet op een
helling. Het werken op hellingen is gevaarlijk. De
machine kan kantelen of wegglijden.
¾ Rijd op hellingen altijd zo langzaam mogelijk
en rem voorzichtig. Bij het omlaag rijden de
motor gekoppeld laten en langzaam rijden. Wees
zeer voorzichtig bij het veranderen van richting.
¾ Gebruik op hellingen met een hellingshoek
van meer dan 9 % geen zware
aanbouwapparaten, zoals aanhangers of
graswalsen.
Na het gebruik
Î Verlaat u de stoel van de machine, wordt de
motor altijd uitgeschakeld. Altijd de contactsleutel verwijderen en de parkeerrem inschakelen.
¾ Zorg dat de ventilatiesleuven vrij zijn van vuil.
¾ Laat de motor afkoelen, voordat u de machine
wegzet.
Vóór alle werkzaamheden aan de machine
¾ Bescherm uzelf tegen letsel, door vóór alle
werkzaamheden aan de machine
- de motor uit te zetten,
- de contactsleutel te verwijderen,
- de parkeerrem in te schakelen,
- te wachten, tot alle bewegende onderdelen volledig tot stilstand zijn gekomen,
- te wachten, tot de motor is afgekoeld,
- de bougiestekker van de motor los te trekken,
zodat onbedoeld starten van de motor wordt
voorkomen.
-
Algemene veiligheidsaanwijzingen
¾ Laat de motor nooit in gebouwen of in slecht
geventileerde zones draaien. Levensgevaar
door koolmonoxidevergiftiging!
¾ Reserveonderdelen en toebehoren moeten
voldoen aan de door de fabrikant vastgelegde
eisen. Gebruik daarom alleen originele
reserveonderdelen / toebehoren of door de
fabrikant goedgekeurde reserveonderdelen
/ toebehoren. Bij het vervangen altijd de
meegeleverde inbouwinstructies opvolgen. Het
gebruik van niet door de fabrikant vrijgegeven
reserveonderdelen of toebehoren kan een
aanzienlijk veiligheidsrisico vormen.
¾ Laat reparaties uitsluitend door
een gekwaliceerd vakman of een
gespecialiseerde werkplaats uitvoeren.
¾ Neem geen passagier mee op de machine.
De machine is niet goedgekeurd voor
personenvervoer.
¾ Deze machine is bestemd voor de verzorging
van gazons en grasvelden in de privésector.
Vanwege gevaar voor lichamelijk letsel van de
gebruiker of andere personen, mag de machine
niet voor andere doeleinden worden gebruikt.
¾ Gebruik de machine alleen bij daglicht of
bij goede kunstmatige verlichting. Houd uw
werkgebied schoon en goed verlicht.
¾ Laat alle onderhoudswerkzaamheden altijd op
tijd uitvoeren, om de machine in een veilige
gebruikstoestand te houden.
¾ Uitlaat en motor worden heet en kunnen
brandwonden veroorzaken. Niet aanraken!
¾ Gebruik de machine alleen bij droog weer. De
machine niet blootstellen aan regen of nattigheid.
In vochtig gras kan de machine door minder grip
op de grond slippen.
¾ Gebruik de machine niet bij regen of gevaar
voor onweer.
¾ Rijd nooit met een open motorkap.
71
Page 72

NL
Veiligheidsaanwijzingen
Veiligheidsaanwijzingen
¾ Ga voorzichtig om met brandstof. Brandstof-
en benzinedampen zijn explosief en brandstof
is licht ontvlambaar. Tank de machine nooit bij
draaiende of hete motor. Tank de machine alleen
in de open lucht. De brandstof alleen opslaan in
hiervoor goedgekeurde reservoirs en nooit in de
buurt van warmtebronnen (bijv. ovens of boilers).
Laat een beschadigde uitlaat, brandstoftank of
tankdop vervangen.
Bedoeld gebruik
Deze machine is bestemd voor gebruik
- als zitmaaier voor het maaien van grasvelden van
privé- en recreatietuinen.
- met toebehoren, dat uitdrukkelijk voor deze zitmaaier is goedgekeurd.
- volgens de in deze gebruikshandleiding gegeven
beschrijvingen en veiligheidsaanwijzingen.
Elk ander of verdergaand gebruik geldt als niet
bedoeld gebruik.
Niet bedoeld gebruik zorgt voor het vervallen
van de garantie en het afwijzen van elke
verantwoordelijkheid door de fabrikant. De gebruiker
is aansprakelijk voor schade aan derden en aan
eigendommen hiervan.
Eigenmachtige wijzigingen aan de machine sluiten
aansprakelijkheid van de fabrikant voor hierdoor
ontstane schade uit.
Deze machine is niet voor goedgekeurd voor het
gebruik op de openbare weg en voor transport van
personen.
¾ Start de motor niet, als brandstof is
overgelopen. Duw de machine van het met
brandstof vervuilde oppervlak en wacht tot de
brandstofdampen zijn vervlogen.
¾ Om brandgevaar te voorkomen, de motor,
de uitlaat, de accu en de brandstoftank
vrijhouden van gras en lekkende olie.
¾ Ook de aanwijzingen in het motorhandboek
opvolgen.
Typeplaatje
Positie
Het typeplaatje bevindt zich onder/voor de
bestuurdersstoel.
Aanwijzing
De markering heeft ofciële waarde en mag
niet worden gewijzigd of onleesbaar worden
gemaakt.
1
2
3
4
5
6
7
8
/
72
9
Opbouw
1 Geluidsvermogen gegarandeerd
2 Fabrikant
3 Modelnaam
4 Modelnummer
5 Serienummer
6 Gewicht
7 Vermogen
8 Motortoerental in min
-1
9 CE-aanduiding
10 Bouwjaar
10
Page 73

Veiligheidsvoorzieningen
NL
Veiligheidsvoorzieningen
Grasvanginrichting
Contact met de maaimessen en
weggeslingerde voorwerpen
ÂLetselgevaar
¾ Gebruik de machine alleen met
aangebouwde grasvanginrichting of de
optionele leiplaat.
S
VOORZICHTIG!
Veiligheidsblokkeringssysteem
Het veiligheidsblokkeringssysteem maakt het starten
van de motor alleen mogelijk, als
- de bestuurder heeft plaatgenomen op de bestuurdersstoel,
- het rempedaal is ingetrapt, resp. de parkeerrem in
de parkeerstand staat,
- het rijpedaal op "N" staat,
- het maaiwerk is uitgeschakeld, d.w.z.: PTO-schakelaar in stand "O/Uit/Off") (PTO = Power-Take-Off).
Het veiligheidsblokkeringssysteem verhindert het
maaien zonder gemonteerde grasvanginrichting
of zonder gemonteerde optionele leiplaat
(automatische uitschakeling van motor of maaiwerk).
Bij apparaten met PTO-schakelaar
(elektromechanische PTO) schakelt het
veiligheidsblokkeringssysteem automatisch het
maaiwerk uit, zodra de bediener bij ingeschakeld
maaiwerk de bestuurdersstoel verlaat, ongeacht of
hiervoor de parkeerrem is ingeschakeld.
Bij apparaten zonder OCR-functie of bij
gedeactiveerde OCR-functie voorkomt het
veiligheidsblokkeringssysteem het achteruitrijden
met ingeschakeld maaiwerk (automatische
uitschakeling van motor of maaiwerk).
Î Schakel bij machines met PTO vóór het achteruit-
rijden het maaiwerk uit met de PTO-schakelaar.
Richtingsgegevens
De richtingsgegevens op de machine (bijv. links,
rechts) hebben altijd betrekking op de rijrichting
vooruit.
Montage
Aanwijzing
Om de tractor met de hand te kunnen verplaatsen, moet de ontgrendelingshendel van
de koppeling in de betreffende stand staan.
Zie hiervoor paragraaf "Gebruik – machine
duwen".
Bestuurdersstoel monteren
Î Verwijder de bouten en moeren van het stoelf-
rame
Î Bevestig het stoelframe met de eerder verwijderde
bouten en moeren aan de stoelbevestiging
Î Druk op de verstelhefboom of draai de verstelbout
los (afhankelijk van de uitvoering)
Î Schuif de stoel naar een positie, waarbij u goed
toegang heeft tot de stoelaansluitstekker
Î De aansluitkabel aansluiten op de stoelaansluit-
stekker
Î De stoelverstelbout weer vastdraaien (afhankelijk
1
.
5
.
B
3
.
2
.
.
4
van de uitvoering).
Aanwijzing
De stoel is voorzien van een zitting-bezetschakelaar, die onderdeel is van het
veiligheidsblokkeringssysteem. De machine
kan dus alleen correct worden bediend, als
de aansluitkabel correct is aangesloten op
de stoelaansluitstekker.
Bovenste armaturenafdekking monteren
(afhankelijk van het model)
Î Plaats de strips (A) van de armaturenafdek-
king [B] in de openingen van het armaturenframe [D]
Î Druk ze tot de aanslag naar voren
Î Controleer of de afdekking goed vastzit.
1
.
Ca
2
.
Aanwijzing voor machines met PTO-scha-
kelaar
Bij automatische uitschakeling door het
veiligheidsblokkeringssysteem (bijv. achteruitrijden of verlaten van de bestuurdersstoel
met ingeschakeld maaiwerk), de schakelaar
eerst uit- en vervolgens weer inschakelen,
om de blokkering van de koppeling (PTO) op
te heffen.
Motorkapafdekking monteren
(afhankelijk van het model) C b
Î Plaats de motorkapafdekking met de uitspa-
ringen [A] op de bevestigingsstrips [B] aan de
motorkap
Î Druk de afdekking tot de aanslag naar achter
Î Druk de beide strips [C] iets naar boven, om de
afdekking te vergrendelen
Î Controleer of de afdekking goed vastzit.
1
.
.
3
2
.
73
Page 74

NL
Montage
Stuurwiel monteren
Î Verwijder de afdekkap [1] (afhankelijk van de
D
uitvoering) van het stuurwiel.
Î Steek de afstandsring [6], de veer [5] en de on-
derlegring [4] op de stuuras [7].
Î Steek het stuurwiel op de stuuras.
Î Bevestig het stuurwiel met de onderlegring [3] en
de bout [2] (aanhaalmoment: 25-28 Nm).
Aanwijzing
De onderlegring [3] met de welving naar
boven plaatsen.
Î De afdekkap [1] erin plaatsen.
Aanwijzing
Na een demontage van de stuurwielbout
moet deze door een nieuwe originele bout
met schroefborging worden vervangen.
Voorbumper monteren
(afhankelijk van het model)
Î Verwijder de vier bouten uit de voorbumper.
Î Bevestig de voorbumper met de eerder verwij-
derde vier bouten aan het tractorframe (binnenkant).
E
De accu in gebruik nemen
GEVAAR!
Vergiftigings- en letselgevaar door
accuzuur
¾ Draag een veiligheidsbril en
veiligheidshandschoenen.
¾ Vermijd huidcontact met het accuzuur.
¾ Komt accuzuur in uw gezicht of in uw
ogen, het onmiddellijk met koud water
wegspoelen en een arts bezoeken.
¾ Heeft u accuzuur ingeslikt, veel water
drinken en naar een arts bezoeken.
¾ Bewaar accu's buiten de het bereik van
kinderen.
¾ Kantel de accu nooit, omdat dan
accuzuur kan weglekken.
¾ Lever overgebleven accuzuur in bij uw
dealer of bij een recyclingbedrijf.
Let op!
¾ De montagevolgorde bij het loskoppelen en
vastklemmen van de accu aanhouden.
¾ De accu alleen in gebruik nemen met
gemonteerde accupoolafdekking (afhankelijk
van de uitvoering als afdekkap op de pluspool of
als complete beschermende afdekking van de
accu).
GEVAAR!
Brandgevaar, explosie en corrosie door
accuzuur en gassen van het accuzuur
¾ Accuzuur is bijtend. Alle onderdelen
van de machine waar accuzuur op is
gekomen direct reinigen.
¾ Rook niet en houd brandende en hete
voorwerpen uit de buurt.
¾ Accu's alleen opladen in goed
geventileerde en droge ruimten.
¾ Mogelijke kortsluiting bij werkzaamheden
aan de accu. Leg geen gereedschappen
of metalen voorwerpen op de accu.
Aanwijzing
De accu bevindt zich in de accubak op de
achterkant van de machine
nen van de accubak, de beide greepmoeren
. Voor het ope-
F
verwijderen en de afdekking verwijderen.
Inbouwen
Î Eerst de rode kabel (+/pluspool) vastklemmen
Î Daarna de zwarte kabel
(-/minpool) vastklemmen
Î Monteer de accupoolafdekking.
Ga
2
.
Uitbouwen
Î Demonteer de accupoolafdekking.
Î Eerst de zwarte kabel (-/minpool) loskoppelen.
Î Daarna de rode kabel (+/pluspool) loskoppelen.
1
.
74
Page 75

Bedieningselementen
NL
Bij levering van een onderhoudsvrije/verzegelde
accu (type 1)
(accu zonder sluitdoppen)
WAARSCHUWING!
Weglekkend elektrolyt ook uit een
verzegelde accu
ÂLetsel- en brandgevaar
¾ Vermijd het kantelen van de accu.
Î De accu vóór het eerste gebruik met een 12 Volt
acculader (maximale laadstroom 6 Ampère) één
tot twee uur opladen.
Î Na het laden eerst de netstekker van het laadap-
paraat uit het stopcontact trekken.
Î Daarna de accu afkoppelen (zie ook de gebruiks-
handleiding van het laadapparaat).
Let op!
¾ De aanwijzingen in de gebruikshandleiding van
het laadapparaat opvolgen.
Bij levering van een ongevulde accu (type 2)
(accu met sluitdoppen)
Î De sluitdoppen van de accucellen verwij-
deren
Î Elke cel langzaam vullen met accuzuur tot 1 cm
Gb
.
onder de vulopening.
Î De accu 30 min laten staan.
Î Controleer het zuurpeil en indien nodig accuzuur
bijvullen.
Î De accu vóór het eerste gebruik met een 12 Volt
acculader (maximale laadstroom 6 Ampère) één
tot twee uur opladen.
Î Na het laden eerst de netstekker van het laadap-
paraat uit het stopcontact trekken.
Î Daarna de accu afkoppelen.
Î De sluitdoppen op de accu monteren.
Î De accu inbouwen in de machine.
Î Eerst de rode kabel (+) vastklemmen, daarna de
zwarte kabel (-).
Let op!
¾ De aanwijzingen in de gebruikshandleiding van
het laadapparaat opvolgen.
Bedieningselementen
Overzicht
A Contactslot (afhankelijk van het model)
1 Contactslot met sleutel voor draaien
2 Contactslot met sleutel voor drukken (afhankelijk van het
B PTO-schakelaar (afhankelijk van het model)
C Rijpedaal vooruitrijden
D Rijpedaal achteruitrijden
E Instelhendel voor de maaihoogte
F Ontgrendelingshendel voor de koppeling
G Uitwerpschacht
H Vulpeilsensor voor grasvanginrichting (afhankelijk van
model)
I Aanhanginrichting
J Accubak
K Stoelverstellingshendel
K Opbergvak met blikjeshouder, afhankelijk van het model
met optioneel 12 Volt stopcontact
M Pedaal voor differentieelblokkering (afhankelijk van het
model)
N Schakelaar voor parkeerrem/cruise control
O Combi-display (afhankelijk van het model)
P Choke (afhankelijk van het model)
Q Rempedaal
R Tankmeter
S Gashendel/choke (afhankelijk van het model)
T Brandstoftank
U Stuurwiel (niet zichtbaar)
A
model met een extra bluetooth-servicefunctie)
In gebruik nemen
Vóór elk gebruik
Controleren:
• alle veiligheidsvoorzieningen
• het motoroliepeil (zie motorhandboek)
• de tankvulling
• de bandenspanning
• zijbekledingen, aanbouwapparaten, gebied rond
luchtlter op vuil en maairesten
Tanken en oliepeil controleren
Aanwijzing
De motor is al in de fabriek gevuld met olie –
graag controleren, indien nodig bijvullen.
Aanwijzing
De accu later alleen nog met bijvullen met
gedestilleerd water (controle elke twee
maanden).
Grasvanginrichting monteren
Î De separate bedieningshandleiding van de gras-
vanginrichting lezen en opvolgen.
• Tank loodvrije benzine
P
.
• Vul de brandstoftank tot hoogstens 2 cm onder
de onderrand van de vulopening.
• De brandstoftank goed afsluiten.
• Controleer het oliepeil
. Het oliepeil moet
T
tussen de "Full/Max"- en "Add/Min"-markering
liggen (zie ook motorhandboek).
75
Page 76

Gebruik
NL
Bandenspanning controleren
Aanwijzing
Om productieredenen kan de bandenspanning hoger zijn dan noodzakelijk is.
Î Controleer de bandenspanning en corrigeer deze
indien nodig.
voor 0,9 bar
achter 0,7 bar
Bestuurdersstoel instellen
Î Trek aan de hendel en de stoel instellen
L
La
.
of
de stelbout losdraaien, de stoel instellen en de
stelbout weer vastdraaien
Instellen van de maaiwerkwielen
Lb
.
U
De maaiwerkwielen moeten zich in de laagste
maaiwerkstand altijd minimaal 6-12 mm boven
de grond bevinden. De maaiwerkwielen zijn niet
ontworpen voor het dragen van de last van het
maaiwerk. Ze dienen alleen voor het compenseren
van bodemoneffenheden.
Î De maaiwerkwielen altijd gelijkmatig verstellen.
Gebruik
Let op!
¾ Ook de aanwijzingen in de gebruikshandleiding
van de motor opvolgen.
Aanwijzing
De nationale/gemeentelijke voorschriften
m.b.t. de gebruikstijden opvolgen (evt. bij de
verantwoordelijke instanties opvragen).
Parkeerrem in-, resp. uitschakelen A
Î Voor het inschakelen van de parkeerrem, het
rempedaal volledig indrukken A P en drukken op
de schakelaar
Î Voor het uitschakelen van de parkeerrem, het
rempedaal indrukken A P, tot de schakelaar
loskomt.
¾ De parkeerrem altijd inschakelen, voordat u de
machine verlaat.
N
.
Let op!
N
N
Motortoerental instellen
Q
Met de gashendel kunt u het motortoerental traploos
instellen.
Hoog motortoerental =
Laag motortoerental =
Motor starten
Aanwijzing
De choke M dient voor het starten van de
machine bij koude motor. Sommige modellen hebben geen choke, de motor stelt zich
automatisch in op de betreffende startprocedure.
Î Open de benzinekraan (indien aanwezig – zie
motorhandboek).
Î Neem plaats op de bestuurdersstoel.
Î Het maaiwerk uitschakelen.
Î De parkeerrem inschakelen.
Î De gashendel omhoog zetten .
Î Bij koude motor de choke uittrekken of de ga-
shendel omhoog zetten .
Î Bedien de contactsleutel
contactslot):
Î Steek de contactsleutel in het contactslot [3].
Î Draai de contactsleutel tot de motor loopt.
De contactsleutel loslaten.
Î De contactsleutel staat in de normale stand.
(Maaien bij vooruitrijden)
of
Î Steek de contactsleutel [3] in het contactslot
en druk deze minimaal 1,5 seconden naar
beneden tot de motor loopt.
Î De contactsleutel loslaten.
3 De contactsleutel staat in de normale stand.
(Maaien bij vooruitrijden)
Aanwijzing
Een startpoging mag max. 5 seconden
duren. Wacht 10 seconden tot de volgende
poging.
Aanwijzing
De OCR-functie mag tijdens het starten niet
geactiveerd zijn (zie paragraaf "OCR-functie").
Î De choke of de gashendel langzaam terug zetten,
tot de motor rustig loopt.
(afhankelijk van het
H
.
a
.
a
76
Page 77

Gebruik
NL
Motor stoppen
Î De gashendel in de middelste stand zetten.
Î Laat de motor ca. 20 seconden lopen.
Î Zet de contactsleutel (afhankelijk van het model)
op
en laat deze los
Î De contactsleutel verwijderen.
of druk de contactsleutel naar beneden
Ha
Hb
.
Rijden
WAARSCHUWING!
Gevaar door abrupt wegrijden, plotseling
stoppen en rijden met een te hoge snelheid
ÂOngevalgevaar
¾ Rijd langzaam weg en rem langzaam af.
¾ Rijd niet met een te hoge snelheid.
¾ Verander nooit van rijrichting zonder de
machine eerst tot stilstand te brengen.
Î De parkeerrem uitschakelen door het rempedaal
helemaal in te trappen en weer los te laten.
Î Voor het wegrijden, trappen op het rijpedaal.
Aanwijzing
Hoe verder u het rijpedaal intrapt, hoe sneller de machine rijdt.
Rijden met cruise control
N
Maaiwerk in- resp. uitschakelen
I
Met de PTO-schakelaar wordt het maaiwerk via een
elektromechanische koppeling in- en uitgeschakeld.
Î Voor het inschakelen van het maaiwerk, trekken
aan de PTO-schakelaar .
Î Voor het uitschakelen van het maaiwerk, de
PTO-schakelaar indrukken.
Aanwijzing m.b.t. de PTO-schakelaar
Bij automatische uitschakeling door het
veiligheidsblokkeringssysteem (bijv. achteruitrijden met ingeschakeld maaiwerk)
moet de schakelaar eerst uit- en dan weer
ingeschakeld worden, om de blokkering van
de koppeling op te heffen.
Maaihoogte instellen
Î Bedien de hendel voor het instellen van de maai-
J
hoogte, voor het instellen van de maaihoogte.
Aanwijzing
"4" is de hoogst mogelijke maaihoogte
(ca. 10 cm), het maaiwerk bevindt zich
volledig boven.
"Lo/1" is de laagste maaihoogte (ca. 2,5 cm),
het maaiwerk bevindt zich volledig beneden.
Maaien
Î Tijdens het rijden de schakelaar indrukken.
3 De op dit tijdstip gekozen snelheid vooruit (echter
niet de maximumsnelheid) wordt gehandhaafd.
3 U kunt de voet van het rijpedaal halen.
Î Voor het uitschakelen van de cruise control, het
rempedaal/rijspedaal intrappen, tot de schakelaar
weer loskomt.
Machine stoppen
Î Haal de voet van het rijpedaal C resp. D.
Î Trap op het rempedaal Q, tot de machine tot
A
stilstand komt.
Aanwijzing
Trapt u op het rempedaal, schakelt u tegelijkertijd de cruise control uit.
VOORZICHTIG!
Weggeslingerde voorwerpen (maaigoed,
stenen, etc.)
ÂLetselgevaar
¾ Leeg de grasvanginrichting alleen bij
uitgeschakeld maaiwerk.
¾ Gebruik de machine alleen met
aangebouwde grasvanginrichting of de
optionele leiplaat.
Let op!
¾ Wordt een vreemd voorwerp (bijv. een steen)
door het maaiwerk geraakt of begint de machine
abnormaal te trillen, moet u de motor direct
uitzetten.
¾ Onderzoek de machine op beschadigingen
voordat u hiermee verder werkt. Gebruik
de machine bij beschadiging niet meer en
laat hem vóór het volgend gebruik door een
gespecialiseerde werkplaats repareren.
¾ Het maaiwerk niet inschakelen in hoog gras.
77
Page 78

NL
Gebruik
Î Motor starten zoals aangegeven.
Î De gashendel omhoog zetten .
Î Het maaiwerk inschakelen en laten zakken.
Î De parkeerrem uitschakelen door het rempedaal
helemaal in te trappen en weer los te laten.
Î Voor het wegrijden, het rijpedaal voor vooruitrijden
intrappen.
Aanwijzingen m.b.t. het maaien
Maai geen nat gras. Rijd langzaam bij maximaal motortoerental.
Maaien van te hoog, resp. nat gras kan tot
overmatige grasophoping in / verstopping
van de uitwerpschacht leiden.
Aanwijzingen m.b.t. het maaien
Afhankelijk van het model, beschikt de
machine over een vulpeilindicatie voor de
grasvanginrichting. De vulpeilsensor
de vullingsgraad van de grasvanginrichting
Y
tijdens het maaien. Bij een volle grasvanginrichting klinkt een signaaltoon en afhankelijk
van de uitvoering schakelt het maaiwerk
direct uit. De grasvanginrichting moet dan,
voor het verder maaien, eerst worden
geleegd. De signaaltoon wordt pas na het
legen van de grasvanginrichting gedeactiveerd.
Vulpeilsensor instellen
Y
WAARSCHUWING!
Letselgevaar
¾ Het instellen van de vulpeilsensor alleen
uitvoeren bij uitgeschakelde motor,
ingeschakelde parkeerrem, verwijderde
contactsleutel en verwijderde
grasvanginrichting.
meet
OCR-functie (afhankelijk van het model)
Het contactslot is uitgerust met een OCR-functie,
die een door de gebruiker gecontroleerd maaien
mogelijk maakt, ook bij achteruitrijden.
Aanwijzingen m.b.t. het maaien
Gebruik de OCR-functie alleen als dit absoluut noodzakelijk is.
Î Start de motor.
Î Draai de contactsleutel [3] vanuit de normale
stand linksom naar de stand voor achteruitrijdend
maaien en druk op de schakelaar [1]a.
of
druk 3 seconden op de schakelaar [1]b.
3 De controlelamp [2] brandt. U kunt nu zowel bij
vooruit- als achteruitrijdend maaien.
Î Voor het beëindigen van de OCR-functie, de
contactsleutel rechtsom draaien naar de normale
stand .
of
de schakelaar [1]
daarna loslaten.
3 De controlelamp gaat uit.
Aanwijzingen m.b.t. het contactslot
De OCR-functie wordt automatisch uitgeschakeld, zodra de sleutel naar de normale
stand wordt gedraaid of de motor wordt
uitgeschakeld (stopstand of uitschakeling
van de motor door het veiligheidsblokkeringssysteem).
naar beneden drukken en
b
Ha
H
De vulpeilsensor kan in lengterichting (meerdere
vergrendelbare posities) worden ingesteld en zo
worden ingesteld op basis van de dichtheid van het
maaigoed. Hierbij wordt tevens de vullingsgraad van
de grasvanginrichting beïnvloed.
Î Voor een kortere lengte, de vulpeilsensor verder
inschuiven.
3 De signaaltoon activeert later, het maaiwerk wordt
afhankelijk van de uitvoering later uitgeschakeld.
Aanwijzing
Ideaal bij kort, zeer droog maaigoed.
Î Voor een langere lengte, de vulpeilsensor verder
uitschuiven.
3 De signaaltoon activeert eerder, het maaiwerk
wordt afhankelijk van de uitvoering eerder uitgeschakeld.
Aanwijzing
Ideaal bij dik, vochtig gras.
78
Aanwijzing m.b.t. het contactslot
Hb
De OCR-functie wordt automatisch uitgeschakeld, zodra de OCR-schakelaar wordt
ingedrukt, de motor wordt uitgeschakeld of
het veiligheidsblokkeringssysteem de motor
of het maaiwerk automatisch uitschakelt.
Mulchen
Bij het mulchen wordt het gras bij het maaien
in kleine stukjes (ca. 1 cm) gesneden en blijft
het liggen. Voor de grasmat blijven zo veel
voedingsstoffen behouden.
Î Informeer bij uw dealer naar het toebehoren voor
mulchen.
Page 79

Gebruik
NL
Tips voor de verzorging van het gazon
Het gazon bestaat uit verschillende grassoorten.
Wanneer u vaak maait, wordt de groei van sterk
wortelend gras bevorderd en wordt een stevige
grasmat gevormd.
Wanneer u zelden maait, ontwikkelen zich meer
hoog groeiende grassoorten en onkruid (bijv. klaver,
madeliefjes).
Om uw gras gezond en gelijkmatig te laten groeien
en geen banen te laten ontstaan, moet u de
gemaaide banen altijd enkele centimeters laten
overlappen.
- De normale hoogte van het gras is ongeveer
40 – 50 mm. Ca. een derde van de totale hoogte
afmaaien, zodra het gras een hoogte van 60 –
70 mm heeft bereikt.
- Maai het gras niet korten dan 45 mm, omdat anders de grasmat bij droogte beschadigd kan raken
- Maai hoog gegroeid gras in etappes tot de normale hoogte.
Koplampen inschakelen
(afhankelijk van het model)
Î De schakelaar naar "ON" schakelen om de kop-
lampen in te schakelen.
3 De koplampen branden zolang de motor loopt.
Aanwijzing
Bij modellen zonder lichtschakelaar, worden
de koplampen automatisch tegelijk met de
motor in- en uitgeschakeld.
Aanwijzing
Afhankelijk van het model, branden de koplampen na het uitschakelen van de motor
nog ca. 10 seconden en worden daarna
automatisch uitgeschakeld.
R
Differentieelblokkering in- en uitschakelen
(afhankelijk van het model)
WAARSCHUWING!
Een geactiveerde differentieelblokkering
beïnvloedt het stuurgedrag van de
machine in hoge mate.
ÂGevaar voor ongevallen en beschadigin-
gen aan de machine
¾ Gebruik de differentieelblokkering alleen
als dit absoluut noodzakelijk is, bijv. in
zwaar terrein.
¾ De differentieelblokkering alleen
inschakelen bij stilstaande machine.
¾ Gebruik de differentieelblokkering niet op
verharde wegen of bij afdalingen.
¾ Rijd alleen rechtuit bij ingeschakelde
differentieelblokkering.
¾ Rijd met ingeschakelde
differentieelblokkering alleen langzaam.
Bij ingeschakelde differentieelblokkering vindt de
krachtoverbrenging plaats bij beide achterwielen.
De differentieelblokkering grijpt in, wanneer
verschillende wielsnelheden worden gedetecteerd.
Î Stop de machine.
Î Voor het inschakelen van de differentieelblokke-
ring trappen op het pedaal L.
Î Voor het inschakelen van de differentieelblokke-
ring de voet van het pedaal M halen.
Aanwijzing
Wordt de differentieelblokkering niet direct
uitgeschakeld, verlaag dan de snelheid
van de machine of brengt de machine tot
stilstand.
A
Machine parkeren
Î Stop de machine.
Î Het maaiwerk uitschakelen.
Î De gashendel in de middelste stand zetten.
Î Breng het maaiwerk in de bovenste positie.
Î De motor na 20 seconden uitschakelen.
Î De parkeerrem inschakelen.
Î De contactsleutel verwijderen.
Machine duwen
Aanwijzing
De ontgrendelingshendel voor de koppeling
bevindt zich tussen de achterwand en het
rechter achterwiel van de machine.
79
Page 80

NL
Combi-display (afhankelijk van het model, optioneel)
Machines met differentieelblokkering
Î De motor uitschakelen.
Î De parkeerrem uitschakelen.
Î De ontgrendelingshendel van de koppeling vol-
Ka
ledig uittrekken.
3 Nu kunt u de machine duwen.
Aanwijzing
Voordat u de motor start, de ontgrendelingshendel van de koppeling weer volledig
indrukken.
Machines zonder differentieelblokkering
Kb
Î De motor uitschakelen.
Î De parkeerrem uitschakelen.
Î De ontgrendelingshendel van de koppeling vol-
ledig indrukken.
3 Nu kunt u de machine duwen.
Aanwijzing
Voordat u de motor start, de ontgrendelingshendel van de koppeling weer helemaal
uittrekken.
12 Volt stopcontact (afhankelijk van het
model)
Het stopcontact dient voor het aansluiten van een
12 V acculaadapparaat of voor het aansluiten van
diverse 12 Volt apparaten.
X
Aanwijzing
Hierbij de gegevens van het acculaadapparaat, resp. de op 12 Volt aangesloten
apparaten opvolgen.
Combi-display (afhankelijk van het model,
optioneel)
Type 1 Oa in combinatie met het contactslot
Ha
Bedrijfsurenteller
Bij het inschakelen van de ontsteking wordt kortstondig de accuspanning weergegeven, daarna wordt
omgeschakeld naar de weergave van de bedrijfsuren.
De bedrijfsuren worden altijd geteld, behalve als de
contactsleutel op "Stop" staat of is verwijderd.
Onderhoudsindicatie
Aanwijzing
betekent: Het totaal aantal bedrijfsu-
ren wordt weergegeven.
– – –
Î Ververs de motorolie onmiddellijk (zie gebruiks-
handleiding van de motor).
Deze indicatie verschijnt elke 50 bedrijfsuren
gedurende 2 uur.
– –
Het motoroliepeil is te laag.
Î Gaat de indicatie niet uit, moet u de motor onmid-
dellijk uitschakelen en het motoroliepeil controleren (zie gebruikshandleiding van de motor).
Indien nodig olie bijvullen.
Deze indicatie kan na het starten van de motor kortstondig verschijnen en daarna weer uit gaan.
Aanwijzing
Deze functie is alleen bij motoren met oliedrukschakelaar actief.
Olieverversen
Oliepeil
Aanwijzing
De indicaties verschijnen alleen, als de
motor loopt.
Aanwijzing
Vallen olieverversen en luchtlteronderhoud
op hetzelfde tijdstip, brandt eerst de olieverversingsindicatie en daarna de luchtlteronderhoudsindicatie.
Het combi-display kan, afhankelijk van de uitvoering,
uit de volgende elementen bestaan:
80
– –
Accuspanning
Draait u de contactsleutel naar de stand , wordt
kort de accuspanning weergegeven en daarna het
totaal aantal bedrijfsuren.
Î De accu zo spoedig mogelijk opladen.
Î Laat het oplaadsysteem indien nodig door een
gespecialiseerde werkplaats op mogelijke beschadigingen controleren.
– – –
Î Het luchtlteronderhoud onmiddellijk uitvoeren
Luchtlteronder-
houd
(zie gebruikshandleiding van de motor).
Deze indicatie verschijnt elke 25 bedrijfsuren
gedurende 7 minuten.
Page 81

Combi-display (afhankelijk van het model, optioneel)
NL
Type 2 Ob in combinatie met het contactslot
Hb
Aanwijzing
Afhankelijk van het model heeft het combi-display een optionele "Bluetooth-symbool"-uitrusting. Alle hieronder vermelde
en andere extra functies kunt u hiermee
ook op uw smartphone laten weergeven. U
heeft hiervoor alleen onze ConnectTM app
nodig (verkrijgbaar voor besturingssystemen
Android en IOs). De ConnectTM app toont u
alle belangrijke informatie en aanwijzingen
met betrekking tot uw machine. U wordt bijv.
geïnformeerd, wanneer het tijd is om olie,
luchtlter, accu, maaimessen etc. te controleren of te laten onderhouden.
De ConnectTM app vindt u op onze website
www.mtdproducts.eu voor het
downloaden.
Installeer de app op uw smartphone en volg
de stap-voor-stap-instructies, om de smartphone met uw machine te synchroniseren.
Bedrijfsurenteller
Bij het minder dan 1,5 seconden indrukken van
de ingestoken contactsleutel, wordt kortstondig de
accuspanning weergegeven en daarna worden de
bedrijfsuren weergegeven. Bedrijfsuren worden
alleen geteld, als de motor loopt.
Onderhoudsindicatie
–
Olieverversen
Accuspanning
–
–
Laag (< 11 Volt)
Hoog (> 16 Volt)
Bij het starten van de motor wordt kort de
accuspanning weergegeven en daarna het totaal
aantal bedrijfsuren.
Bij te lage accuspanning:
Î De accu zo spoedig mogelijk opladen.
Î Laat het oplaadsysteem indien nodig door een
gespecialiseerde werkplaats op mogelijke beschadigingen controleren.
Bij te hoge accuspanning:
Î De machine uitschakelen en laat het oplaadsys-
teem door een gespecialiseerde werkplaats
controleren.
– –
Î Het luchtlteronderhoud onmiddellijk uitvoeren
Luchtlteronder-
houd
(zie gebruikshandleiding van de motor).
Deze indicatie verschijnt elke 25 bedrijfsuren
gedurende 7 minuten.
Overige indicaties op het display
Rem resp. parkeerrem niet ingeschakeld bij
een motorstartpoging.
Î Ververs de motorolie onmiddellijk (zie gebruiks-
handleiding van de motor).
Deze indicatie verschijnt elke 50 bedrijfsuren
gedurende 2 uur.
– –
Het motoroliepeil is te laag.
Î Gaat de indicatie niet uit, moet u de motor onmid-
Oliepeil
dellijk uitschakelen en het motoroliepeil controleren (zie gebruikshandleiding van de motor).
Indien nodig olie bijvullen.
Deze indicatie kan na het starten van de motor kortstondig verschijnen en daarna weer uit gaan.
Aanwijzing
Deze functie is alleen bij motoren met oliedrukschakelaar actief.
a) Maaiwerk niet uitgeschakeld bij een
motorstartpoging.
b) OCR-functie is vóór het achteruitrijdend
maaien niet geactiveerd.
Bediener zit bij motorstartpoging niet op de
bestuurdersstoel.
81
Page 82

NL
Onderhoud
Onderhoud
WAARSCHUWING!
Gevaar voor letsel of materiële schade
¾ Onderhouds- en
reinigingswerkzaamheden aan de
machine mogen alleen bij uitgeschakelde
motor worden uitgevoerd.
¾ De contactsleutel verwijderen en de
bougiestekker lostrekken.
¾ Wacht tot alle bewegende onderdelen
tot stilstand zijn gekomen en de motor is
afgekoeld.
¾ Grijp nooit in de roterende maaimessen.
¾ Laat reparatie- en
onderhoudswerkzaamheden en het
vervangen van veiligheidselementen
alleen door een gekwaliceerd vakman
of door een gespecialiseerde werkplaats
uitvoeren.
¾ Laat het vervangen of slijpen van
de maaimessen alleen door een
gespecialiseerde werkplaats uitvoeren.
¾ Reinig de machine en alle aanbouwdelen
en toebehoren na elk gebruik.
Machine reinigen
Let op!
¾ Gebruik geen hogedrukreiniger voor het reinigen
van de machine.
Î Zet de machine op een stevige en vlakke onder-
grond.
Î De parkeerrem inschakelen.
Î Reinig de machine met een borstel, een hand-
veger of een poetslap.
Let op!
Er kan brandstof in de verbrandingsruimte lopen.
ÂMotorschade
¾ Kantel de machine niet meer dan 30°.
Î Breng het maaiwerk in de bovenste positie.
Î Reinig de maaiwerkruimte met een borstel, een
handveger of een poetslap.
Maaiwerk met reinigingsmondstuk
(optioneel)
Reinigen
Î Zet de machine op een stevige en vlakke onder-
grond.
Î De parkeerrem inschakelen.
Î Bevestig een waterslang met een gangbare snel-
koppeling op het reinigingsmondstuk.
Î Start de motor.
Î Het maaiwerk laten zakken en inschakelen.
Î Motor en maaiwerk enkele minuten laten draaien.
Î Motor en maaiwerk uitschakelen.
Drogen
Î Breng het maaiwerk in de bovenste positie.
Î De motor starten en het maaiwerk inschakelen.
Î Om het maaiwerk te drogen, motor en maaiwerk
enkele minuten laten draaien.
Î Motor en maaiwerk uitschakelen.
W
Aanwijzing
Indien aanwezig, deze stappen voor het
tweede reinigingsmondstuk herhalen.
Grasvanginrichting reinigen
Let op!
¾ De separate bedieningshandleiding van de
grasvanginrichting opvolgen.
Maaiwerk reinigen
Scherpe, bewegende
maaigereedschappen
ÂLetselgevaar
¾ Draag veiligheidshandschoenen.
¾ Reinig de maaigereedschappen
voorzichtig.
¾ Houd er rekening mee dat een beweging
van een maaigereedschap het draaien
van andere maaigereedschappen kan
veroorzaken.
82
GEVAAR!
Î De grasvanginrichting verwijderen en legen.
Î Reinig de grasvanginrichting met een krachtige
waterstraal (bijv. met een tuinslang).
Î Laat de grasvanginrichting grondig drogen voor
het volgende gebruik.
Machineonderhoud
Î De onderhoudsvoorschriften in het motorhand-
boek opvolgen.
Î De machine aan het einde van het seizoen door
een gespecialiseerde werkplaats laten controleren
en onderhouden.
Aanwijzing
Bij het verversen van olie de afgewerkte olie
inleveren bij een inzamelpunt voor afgewerkte olie of bij een recyclingbedrijf.
Page 83

Onderhoud
NL
Aanwijzing
Oude accu's inleveren bij uw dealer of bij
een recyclingbedrijf. De accu uitbouwen
voor het verschroten van de machine.
Gebruik van een hulpstartkabel
GEVAAR!
Explosiegevaar / kortsluitgevaar
¾ Een defecte of bevroren accu nooit
overbruggen met een hulpstartkabel.
¾ Zorg dat de machines en de
kabelklemmen elkaar niet raken en de
ontstekingen uitgeschakeld zijn.
Î Klem de rode hulpstartkabel aan de pluspool (+)
van de ontladen accu en aan de pluspool (+) van
de hulpaccu.
Î Klem de zwarte hulpstartkabel eerst aan de min-
pool (-) van de hulpaccu.
Î Bevestig de andere klem aan het frame in de
buurt van het motorblok van de zitmaaier, zo ver
mogelijk verwijderd van de accu.
Aanwijzing
Is de hulpaccu ingebouwd in een voertuig,
mag het voertuig tijdens de hulpstartprocedure niet zijn gestart.
Î Start de zitmaaier.
Î De parkeerrem inschakelen.
Î De hulpstartkabels in omgekeerde volgorde los-
koppelen.
Na 5 bedrijfsuren
Î De eerste verversing van de motorolie uitvoeren
(interval, zie motorhandboek).
Î Gebruik de Quick-olieafvoer (optioneel) voor het
aftappen van de olie
V
.
Aanwijzing
Gebruik bij het aftappen van olie een geschikte opvangbak.
Elke 25 bedrijfsuren
Î Smeer alle draai- en lagerpunten van rij- en rem-
pedalen, van de instelhendel voor de maaihoogte
en van de PTO-hendel met enkele druppels
dunne olie.
Î Reinig de accupolen.
Î Smeer alle mesassen, spanrollen en spanrolhou-
ders via de smeernippels met vet type 251H EP.
Aanwijzing
Laat deze werkzaamheden door een gespecialiseerde werkplaats uitvoeren.
Î Smeer de wiellagers en assen van de voorwielen
via de smeernippels met een multipurpose-vet.
Î Smeer de wielen van het maaiwerk via de smeer-
nippels met een multipurpose-vet.
Î Laat vuil en grasresten onder de V-riemafdekking
van het maaiwerk door een gespecialiseerde
werkplaats verwijderen.
Elke 50 bedrijfsuren
Bandenspanning
WAARSCHUWING!
Verhoogde bandenspanning
ÂOngevalgevaar en beschadigingen aan
de machine
¾ De toegestane bandenspanning nooit
overschrijden (zie zijkant van de band).
Î Controleer de bandenspanning en corrigeer deze
indien nodig.
voor 0,9 bar
achter 0,7 bar
Aanwijzing
Een te hoge bandenspanning verkort de
levensduur van de banden. Controleer de
bandenspanning vóór elke rit.
Î Laat vuil en grasresten door een gespecialiseerde
werkplaats van het aandrijfmechanisme verwijderen.
Î Laat de aandrijf-V-riem, mesassen en spanrollen
door een gespecialiseerde werkplaats controleren
op slijtage en beschadigingen.
Elke 2 maanden
Î Alleen bij accu type 2: De accucellen tot 1 cm
onder de vulopening bijvullen met gedestilleerd
water.
Indien nodig
Accu opladen:
Î Gebruikt u de machine langere tijd niet, verwijder
dan de accu uit de machine.
Î De accu elke 6-8 weken opladen, evenals voor
het weer in gebruik nemen na opslag.
Aanwijzing
De aanwijzingen in de bedieningshandleiding van uw acculader opvolgen.
83
Page 84

NL
Demontage/montage en instellen van het maaiwerk
Zekeringen vervangen:
Î Vervang defecte zekeringen alleen door zeke-
ringen van gelijke sterkte.
Aanwijzing
De zekering bevindt zich in de hoofkabelboom tussen motor en accu. Een defecte
zekering alleen door een gespecialiseerde
werkplaats laten vervangen.
Eens per seizoen
Î De bougie reinigen en de elektrodeafstand
instellen, resp. vervang de bougie (zie motorhandboek).
Î Laat de achterste wielassen door een gespecia-
liseerde werkplaats met waterafstotend speciaal
vet smeren.
Î Laat het maaigereedschap door een gespeciali-
seerde werkplaats slijpen, resp. vervangen.
Demontage/montage en instellen van het
maaiwerk
VOORZICHTIG!
De ophanging / verstelling is
veerondersteund en kan snel naar boven
springen, zodra het maaiwerk wordt
ontkoppeld wordt van de verstelling.
Bij het losmaken van de instelhendel voor
de maaihoogte bij een gedemonteerd
maaiwerk kan deze, vanwege de
veerondersteuning, ongecontroleerd snel
naar boven springen.
Aanwijzing
Laat deze werkzaamheden alleen door een
gespecialiseerde werkplaats uitvoeren.
Opslag
Let op!
Materiële schade aan de machine
¾ De machine opslaan in een schone en droge
ruimte.
¾ Bescherm de machine bij langere opslag tegen
roest.
¾ Bescherm de machine tegen vorst.
Î De accu bij langere opslag elke 6-8 weken
opladen, evenals voor het weer inbouwen in de
machine.
Î De brandstof aftappen en de motor stilleggen –
zie motorhandboek.
Transport
Aanwijzing
De machine heeft geen goedkeuring voor
gebruik op de openbare weg volgens de
wegenverkeerswet.
Korte trajecten
Î Rijd voor het wisselen van gebruikslocatie slechts
korte trajecten met de zitmaaier.
Lange trajecten
WAARSCHUWING!
Gevaar door instabiele en niet vastgezette
oprijplaten
ÂGevaar voor zwaar persoonlijk letsel en
materiële schade
¾ Rijdt u de machine op een aanhanger of
vrachtwagen, controleer dan vooraf of de
oprijplaten stabiel en vastgezet zijn.
WAARSCHUWING!
Gevaar door onvoldoende bevestiging
ÂTurbulentie tijdens het transport
¾ Vervoert u de machine in een aanhanger
of vrachtwagen, deze voldoende
bevestigen en beveiligen.
Î Gebruik voor grotere afstanden een transportvoer-
tuig.
Î Duw de machine stationair draaiend met de hand
in/op het transportvoertuig
Î De parkeerrem inschakelen en de machine bevei-
ligen tegen wegglijden.
Î Reinig de machine en de grasvanginrichting.
Î Alle metalen onderdelen ter bescherming tegen
roest met een poetslap met olie afvegen of gebruik een oliespray.
Î De accu opladen.
Î Bij langere opslag de accu uitbouwen uit de ma-
chine (bijv. in de winter).
84
Page 85

Verhelpen van storingen
NL
Verhelpen van storingen
WAARSCHUWING!
Gevaar voor letsel of materiële schade
¾ Bezoek bij twijfel altijd een gespecialiseerde werkplaats.
¾ Vóór elke controle of vóór werkzaamheden aan de maaimessen de machine uitschakelen.
¾ Bescherm uzelf tegen letsel, door vóór alle werkzaamheden aan de machine
- de motor uit te zetten,
- de contactsleutel te verwijderen,
- de parkeerrem in te schakelen,
- te wachten, tot alle bewegende onderdelen volledig tot stilstand zijn gekomen,
- te wachten, tot de motor is afgekoeld,
- de bougiestekker van de motor los te trekken, zodat onbedoeld starten van de motor wordt
voorkomen.
Probleem Mogelijke oorzaak Oplossing
Op de bestuurdersstoel gaan zitten, het
rempedaal volledig intrappen, resp. de
parkeerrem inschakelen.
De PTO uitschakelen.
Monteer de grasvanginrichting of de
optionele leiplaat op de machine.
De rode kabel op de (+) pluspool van
de accu en de zwarte kabel op de (-)
minpool van de accu aansluiten.
De accu controleren en opladen.
De accu indien nodig vervangen.
Vervang de zekering.
Wordt de zekering herhaaldelijk aangesproken, zoek dan de oorzaak (meestal
kortsluiting).
De massakabel aansluiten.
Activeer de choke. De gashendel om-
hoog zetten
Brandstof bijvullen.
Controleer de bougie (zie motorhandboek).
Laat de ontsteking in een gespecialiseerde werkplaats controleren.
De machine onmiddellijk uitschakelen.
Controleer het motoroliepeil.
De machine onmiddellijk uitschakelen.
Laat de motor in een gespecialiseerde
werkplaats controleren.
De machine onmiddellijk uitschakelen.
Laat defecte onderdelen in een gespecialiseerde werkplaats vervangen.
Laat de maaimessen in een gespecialiseerde werkplaats slijpen of vervangen.
Laat de V-riem in een gespecialiseerde
werkplaats vervangen.
Startmotor draait niet.
Startmotor draait niet.
De startmotor draait, maar
de motor start niet.
Motor walmt.
Sterke trillingen.
Maaiwerk werpt geen gras
uit of slechte maaisnede.
Motor loopt, maaiwerk
maait niet.
Veiligheidsblokkeringssysteem is geactiveerd.
Accu niet correct aangesloten.
Lege of zwakke accu.
De zekering is aangesproken.
Loszittende massakabel tussen motor en
frame.
Verkeerde stand van choke en gashendel.
De carburateur krijgt geen brandstof,
brandstoftank leeg.
Defecte of vervuilde bougie.
Geen ontstekingsvonk.
Teveel motorolie in de motor.
Motor defect.
Beschadigde mesas of defecte maaimessen.
Laag motortoerental. Geef meer gas.
Te hoge rijsnelheid. Een lagere rijsnelheid instellen.
Maaimessen stomp.
V-riem gebroken.
.
85
Page 86

Informatie over de motor
NL
Informatie over de motor
De motorfabrikant is aansprakelijk voor alle
motorgerelateerde problemen m.b.t. prestaties,
vermogensmeting, technische gegevens, garantie
en service.
Informatie vindt u in het apart meegeleverde
gebruikers-/bedieningshandboek van de
motorfabrikant.
Garantie
In elk land gelden de door ons bedrijf of door de
importeur uitgegeven garantiebepalingen. Storingen
aan uw machine verhelpen wij binnen het kader van
de garantie kosteloos, voor zover een materiaalof productiefout hiervan de oorzaak is. Neem
voor garantie contact op met uw verkoper of de
dichtstbijzijnde vestiging.
CE-conformiteitsverklaring
Meer informatie over de machine vindt u in
de apart bijgevoegde CE-conformiteitsverklaring, die een bestanddeel is van deze
gebruikshandleiding.
Milieuvriendelijke recycling
Oude verpakkingsresten, oude machines,
etc., volgens de plaatselijke voorschriften
recyclen.
86
Page 87

Indice
IT
Indice
Signicato dei simboli ..........................................87
Per la vostra sicurezza
Avvertenze sulla sicurezza
Utilizzo a norma
Targhetta..............................................................92
Dispositivi di sicurezza
Montaggio
............................................................93
Elementi di comando
Messa in funzione................................................95
Funzionamento
....................................................96
Indicatore combinato (a seconda del modello,
opzionale)
Manutenzione
............................................................100
......................................................102
Smontaggio/montaggio e regolazione del
dispositivo di taglio
Rimessaggio
Trasporto
........................................................104
.............................................................104
Risoluzione delle anomalie
Informazioni sul motore
Garanzia
..............................................................106
Dichiarazione di conformità CE
Smaltimento ecocompatibile................................106
........................................88
..................................89
...................................................92
........................................93
...........................................95
..............................................104
..................................105
.......................................106
...........................106
Signicato dei simboli
Avvertenza!
Leggere le istruzioni per l'uso prima del montaggio e della messa in
funzione!
Attenzione! Persone circostanti
Non fare mai avvicinare nessuno alla
zona di pericolo.
Avvertenza! Lame in rotazione
Pericolo di lesioni a causa delle lame o
degli organi in rotazione
Avvertenza! Lame in rotazione
Tenere le mani e i piedi lontano dagli
organi in rotazione. Non tenere mai le
mani e piedi sotto il dispositivo falciante.
Attenzione! Proiezione di oggetti
Gli oggetti possono essere raccolti e
scagliati dall'apparecchio.
Avvertenza! Pericolo di rovesciamento
Non utilizzare l'apparecchio su pendii
con una pendenza superiore al 20 %.
Pericolo! Accensione accidentale
Staccare il cappuccio della candela di
accensione prima di eseguire lavori
sull'apparecchio. Tenere le mani e i piedi
lontano dagli organi in rotazione.
Pericolo! Pericolo di esplosione
87
Page 88

Per la vostra sicurezza
IT
3E
Avvertenza! Pericolo di ustioni a causa dell'acido della batteria
Attenzione!
Indossare degli occhiali di protezione.
Pericolo! Vietato accendere fuochi,
scintille, amme libere e fumare!
Avviso!
Non smaltire le batterie usate nei riuti
domestici.
Pericolo! Accensione accidentale
Togliere la chiave di accensione prima
di eseguire lavori sull'apparecchio.
Rispettare le note riportate nelle presenti
istruzioni.
Avviso!
Non camminare sul dispositivo di taglio.
Avvertenza! Supercie calda
Attenzione!
Smontare la batteria prima
di ribaltare l'apparecchio.
Per la vostra sicurezza
Livelli di pericolo delle avvertenze
Nelle presenti istruzioni per l'uso, per segnalare le
potenziali situazioni pericolose vengono utilizzati i
seguenti livelli di pericolo:
PERICOLO!
Situazione di pericolo imminente che,
se non evitata, provoca gravi lesioni,
potenzialmente mortali.
AVVERTENZA !
Situazione potenzialmente pericolosa che,
se non evitata, può provocare gravi lesioni,
potenzialmente mortali.
ATTENZIONE!
Situazione potenzialmente pericolosa che,
se non evitata, può provocare lesioni di
minore o modesta entità.
Avviso!
Situazione potenzialmente negativa che, se non
evitata, può causare danni materiali.
Struttura delle avvertenze sulla sicurezza
Avvertenza!
Non superare i seguenti
valori massimi durante l'uso
con rimorchio:
Pendenza massima del pendio: 14%
Carico massimo sul gancio di traino: 25 kg
Carico rimorchiabile massimo (rimorchio e carico):
180 kg
Nota
Tenere sempre questi simboli in condizioni
leggibili. Sostituire i simboli danneggiati o
non leggibili.
88
PERICOLO!
Tipo e origine del pericolo!
ÂConseguenze della mancata osservanza
¾ Cosa fare per prevenire il pericolo
Page 89

Avvertenze sulla sicurezza
IT
Avvertenze sulla sicurezza
Prima del primo utilizzo dell'apparecchio
leggere attentamente le presenti istruzioni per l'uso e attenersi a quanto qui
riportato. Conservare queste istruzioni per
l'uso in modo da poterle consultare di
nuovo in futuro o cederle al nuovo proprietario in caso di vendita dell'apparecchio.
Î Prima della prima messa in funzione leggere
assolutamente le avvertenze sulla sicurezza!
La mancata osservanza delle istruzioni per l'uso
e delle avvertenze sulla sicurezza può provocare danni all'apparecchio e mettere in pericolo
l'utente e altre persone.
Î Cercare di familiarizzare con tutti gli elementi di
comando e il loro utilizzo corretto.
Î Tutte le persone che si occupano della messa
in funzione, dell'utilizzo e della manutenzione
dell'apparecchio devono essere opportunamente
qualicate.
Divieto di apportare modifiche e trasformazioni arbitrarie
È vietato apportare modiche all'apparecchio
o ricavare da esso apparecchi accessori. Tali
modiche possono provocare lesioni personali e
determinare malfunzionamenti.
Î Eventuali riparazioni all'apparecchio possono
essere effettuate solo da persone appositamente
incaricate e addestrate. A tale scopo utilizzare
sempre ricambi originali. In questo modo si è certi
di preservare la sicurezza dell'apparecchio.
Simboli associati alle informazioni di queste istruzioni per l'uso
I segnali e i simboli presenti in queste istruzioni
per l'uso servono a consentire un utilizzo rapido e
sicuro delle istruzioni per l'uso e dell'apparecchio.
Nota
Informazioni per rendere l’utilizzo dell’appa-
recchio il più possibile efcace e pratico.
Î Operazione
Indica un'operazione da svolgere.
3 Risultato dell'operazione
Indica il risultato di una sequenza di operazioni.
[1] Numero di posizione
All'interno del testo i numeri di posizione sono
inseriti tra parentesi quadre [ ].
Identicativo gura
A
All'interno del testo le gure sono identicate e
numerate con delle lettere.
Numero operazione
1
All'interno del testo la sequenza denita delle
operazioni è opportunamente numerata.
Protezione personale e di terzi
¾ Per motivi di sicurezza non devono utilizzare
l'apparecchio i bambini e coloro che non
hanno letto le istruzioni per l'uso.
¾ Le persone sotto i 16 anni non devono
utilizzare l'apparecchio o eseguire altri lavori
sull'apparecchio, ad esempio manutenzione,
pulizia e regolazione. Eventuali disposizioni
locali potrebbero prescrivere una diversa età
minima per gli utenti.
¾ Coloro che utilizzano l'apparecchio non
devono essere sotto l'effetto di sostanze
stupefacenti (ad es. alcol, droghe o farmaci).
¾ Non utilizzare l'apparecchio senza adeguata
formazione o in caso di stanchezza o malattia.
¾ Prestare attenzione e non inlare gli arti in
corrispondenza delle lame di taglio.
¾ Tenere presente che l'utente sarà
responsabile di eventuali incidenti con altre
persone o con oggetti di proprietà di queste
ultime.
¾ Questo apparecchio può essere utilizzato
da persone affette da difcoltà siche,
sensoriali o mentali o che non dispongano
della necessaria esperienza e/o conoscenze,
a condizione che vengano sorvegliate o
abbiano ricevuto istruzioni sul corretto
utilizzo dell'apparecchio e conoscano i
pericoli che ne risultano.
¾ Non mettere in funzione l'apparecchio se nelle
sue vicinanze sono presenti altre persone (in
particolare bambini) o animali.
¾ Assicurarsi che i bambini non giochino con
l'apparecchio.
¾ Interrompere la marcia se nei paraggi si nota
la presenza di altre persone (in particolare
bambini) o animali domestici.
¾ Quando si lavora con l'apparecchio e si
eseguono interventi su di esso, indossare
sempre scarpe robuste e pantaloni lunghi,
nonché gli altri necessari dispositivi di
protezione individuale (occhiali di protezione,
cufe insonorizzanti, guanti da lavoro, ecc.).
Indossando i dispositivi di protezione individuale
si riduce il rischio di lesioni. Evitare di indossare
abiti non attillati o capi di vestiario con cinghie
o lacci penzolanti. Lavorare senza cufe
insonorizzanti può portare alla perdita dell'udito.
89
Page 90

IT
Avvertenze sulla sicurezza
Avvertenze sulla sicurezza
Prima dell'uso
¾ Prima di iniziare a lavorare, cercare di
familiarizzare con l'apparecchio, i suoi
elementi di comando e il suo utilizzo.
¾ Controllare che tutti gli elementi di ssaggio
(dadi, bulloni e viti ecc.) siano bene in sede, in
modo da essere certi che l'apparecchio venga
utilizzato in condizioni di sicurezza.
¾ Utilizzare l'apparecchio solo in perfette
condizioni tecniche. Non modicare mai le
regolazioni del motore preimpostate in fabbrica.
Far riparare gli eventuali danni da un tecnico
qualicato o un'ofcina specializzata.
¾ Prima di accendere l'apparecchio, rimuovere
gli eventuali utensili di regolazione o le chiavi
presenti. Un utensile presente nella zona degli
utensili di taglio rotanti può provocare lesioni.
¾ Non utilizzare mai l'apparecchio se i
dispositivi di protezione sono danneggiati
o assenti. Farli riparare o se necessario
sostituire da un tecnico qualicato o un'ofcina
specializzata.
¾ Non utilizzare mai l'apparecchio senza
dispositivi di protezione e non rimuoverli. I
dispositivi di protezione sono parte integrante
dell'apparecchio.
¾ Non utilizzare mai l'apparecchio con
dispositivi di sicurezza difettosi o
danneggiati. I dispositivi di sicurezza servono
alla vostra protezione e devono essere sempre
funzionanti. Non apportare mai modiche ai
dispositivi di sicurezza né aggirarne la funzione.
¾ Controllare che il raccoglierba non presenti
danneggiamenti e vericare che sia montato
correttamente.
¾ Prima di iniziare a tagliare l’erba, assicurarsi
che dal prato siano stati rimossi rami, pietre,
li di ferro, ecc. e per tutto il tempo in cui si
taglia l’erba prestare attenzione a questo tipo
di oggetti. Gli oggetti possono venire raccolti e
scagliati via.
¾ Controllare (visivamente) che le lame di
taglio, e i relativi mezzi di ssaggio, non siano
smussate, danneggiate o deformate.
¾ Agganciare rimorchi o macchine portate in
ottemperanza alle vigenti normative. Macchine
portate, rimorchi, contrappesi e raccoglierba
riempiti inuiscono sul comportamento di guida,
in particolare sulla manovrabilità, sulla capacità
frenante e sul comportamento in caso di
ribaltamento.
Durante l'uso
¾ Non tagliare superci erbose con altezza
dell'erba superiore ai 25 cm.
¾ Guidare con cautela. Ridurre la velocità prima di
percorrere una curva.
¾ Non utilizzare il tagliaerba in ambienti
a rischio di esplosione, in cui sono
presenti liquidi, gas o polveri inammabili.
L'apparecchio può produrre scintille che, a loro
volta, possono far inammare la polvere o i
vapori. Evitare amme libere, la formazione di
scintille e non fumare.
¾ Prestare particolare attenzione quando si
taglia o guida in retromarcia. Per evitare
incidenti guidare lentamente guardando indietro
sull'area di terreno.
¾ Regolare l'altezza di taglio solo a motore
spento e utensile di taglio fermo.
¾ Non rimuovere mai il raccoglierba o il
deettore opzionale a motore in moto.
¾ Quando il dispositivo di taglio è acceso,
non passare mai su terreni con ghiaia o
marciapiedi. Vi è il rischio di urti prodotti dalle
pietre!
¾ Non tagliare su erba alta e secca (ad esempio
erba da pascolo) o su mucchi di foglie. Non
parcheggiare l'apparecchio su erba secca o
foglie secche. Pericolo di incendio in seguito
al contatto con la marmitta in caso di accumulo
di erba secca o foglie secche sul dispositivo
falciante caldo.
¾ Fare attenzione al trafco durante i lavori
su strade o durante l'attraversamento di
una strada. L'apparecchio non è pensato per
l'impiego su strade pubbliche.
¾ Non svuotare mai il raccoglierba con il
dispositivo di taglio in moto. Durante lo
svuotamento del raccoglierba l'utente o altre
persone possono subire lesioni a causa
dell'espulsione dell'erba tagliata o di oggetti.
¾ Prestare particolare cautela durante l'apertura
e la chiusura del raccoglierba – Pericolo di
schiacciamento.
¾ Mantenere una distanza sufciente durante il
taglio in punti limite, ad esempio in prossimità
di discese ripide, fossi o sotto gli alberi,
vicino a cespugli e siepi.
¾ Quando un corpo estraneo (ad es. una pietra)
viene colpito dal dispositivo di taglio o se
l'apparecchio inizia a vibrare in maniera
anomala, spegnere immediatamente il motore.
Controllare se l'apparecchio presenta dei danni
prima di continuare l'uso. Se necessario, portarlo
in un'ofcina specializzata.
90
Page 91

Avvertenze sulla sicurezza
IT
Avvertenze sulla sicurezza
¾ Non posizionarsi mai davanti alle aperture di
scarico dell'erba.
¾ Spegnere il motore e togliere la chiave di
accensione prima di allentare i bloccaggi
o rimuovere gli intasamenti nel canale di
espulsione.
Taglio dell’erba su terreni con forte pendenza
¾ Non tagliare e non guidare su pendii di
pendenza superiore al 20%.
¾ Guidare sempre in salita e in discesa rispetto
al pendio e mai trasversalmente ad esso.
Non svoltare sul pendio. Lavorare su pendii è
pericoloso. L'apparecchio può ribaltarsi oppure
scivolare.
¾ Sui pendii guidare sempre nel modo più
delicato possibile e frenare con cautela.
Quando si guida in discesa, lasciare il motore in
presa e guidare lentamente. Prestare particolare
attenzione quando si effettuano i cambi di
direzione.
¾ Sui pendii con una pendenza superiore al 9%
non utilizzare macchine portate pesanti, come
ad esempio rimorchi di trasporto o rulli per
prati.
Al termine dell'uso
Î Spegnere sempre il motore quando si lascia
il sedile dell'apparecchio. Togliere sempre la
chiave di accensione e inserire il freno di stazionamento.
¾ Vericare che le fessure di aerazione non
siano sporche.
¾ Prima di parcheggiare l'apparecchio far
raffreddare il motore.
Prima di eseguire qualsiasi lavoro sull'apparecchio
¾ Per proteggere se stessi dalle lesioni, prima
di eseguire qualsiasi lavoro sull'apparecchio
- spegnere il motore,
- togliere la chiave di accensione,
- inserire il freno di stazionamento,
- attendere che tutte le parti mobili si siano fermate
completamente,
- attendere che il motore si sia raffreddato,
- togliere il cappuccio della candela del motore per
evitare un avviamento involontario del motore.
Avvertenze generali sulla sicurezza
¾ Il motore non deve mai restare acceso
all'interno di edici o in ambienti scarsamente
ventilati. Pericolo di morte per intossicazione da
monossido di carbonio!
¾ Le parti di ricambio e gli accessori devono
essere conformi ai requisiti prescritti dal
costruttore. Pertanto utilizzare solo parti di
ricambio/accessori originali o parti di ricambio/
accessori omologati dal costruttore. Quando si
effettuano interventi di sostituzione, attenersi
sempre alle indicazioni di montaggio fornite
in dotazione. L'utilizzo di parti di ricambio o
accessori non omologati dal costruttore può
costituire un notevole rischio per la sicurezza.
¾ Far eseguire le riparazioni esclusivamente
da un tecnico qualicato o un'ofcina
specializzata.
¾ Non trasportare passeggeri sull'apparecchio.
L'apparecchio non è omologato per il trasporto di
persone.
¾ Questo apparecchio è stato concepito per
consentire di tagliare l'erba su prati e terreni
erbosi in ambito privato. Dato il rischio di
lesioni a cui sono esposti l'utente o altre persone,
l'apparecchio non deve essere utilizzato per altri
scopi.
¾ Utilizzare l'apparecchio solo alla luce
del giorno o in presenza di una buona
illuminazione articiale. Tenere l'area di lavoro
pulita e ben illuminata.
¾ Far eseguire sempre tutti gli interventi di
manutenzione entro i termini stabiliti per
mantenere l'apparecchio in uno stato di
esercizio sicuro.
¾ La marmitta e il motore raggiungono
temperature elevate e possono causare
ustioni. Non toccare queste parti!
¾ Utilizzare l'apparecchio solo in condizioni
atmosferiche asciutte. Non esporre
l'apparecchio a pioggia o umidità. Sull'erba umida
l'apparecchio può scivolare a causa della ridotta
aderenza al terreno.
¾ Non utilizzare l'apparecchio in caso di pioggia
o pericolo di temporale.
¾ Non guidare mai con il cofano del motore
aperto.
91
Page 92

IT
Avvertenze sulla sicurezza
Avvertenze sulla sicurezza
¾ Maneggiare il carburante con cautela. I vapori
di carburante e di benzina sono esplosivi e
il carburante è facilmente inammabile. Non
rifornire mai l'apparecchio a motore in moto o
caldo. Rifornire l'apparecchio solo all'aperto.
Conservare il carburante solo in contenitori
approvati allo scopo e mai in prossimità di fonti
di calore (ad es. stufe o accumuli di acqua
calda). Far sostituire la marmitta, il serbatoio
del carburante o il tappo del serbatoio, se
danneggiati.
Utilizzo a norma
Questo apparecchio è concepito per l'utilizzo
- come trattore tagliaerba per tagliare superci
erbose di giardini domestici e per il tempo libero.
- con accessori espressamente omologati per que-
sto trattore tagliaerba.
- secondo le descrizioni e le istruzioni per la sicurezza riportate nelle presenti istruzioni per l'uso.
Ogni altro uso diverso da questo è considerato non
a norma.
L'uso non a norma comporta la perdita di validità
della garanzia e il riuto di qualsiasi responsabilità
da parte del costruttore. L'utente è responsabile per
i danni cagionati a terzi e alle relative proprietà.
Modiche arbitrarie apportate all'apparecchio
sollevano il costruttore dalla responsabilità per i
danni che ne risultino.
Questo apparecchio non è omologato per l'utilizzo
su strade pubbliche e per il trasporto di persone.
¾ Non avviare il motore se il carburante è
traboccato. Spingere e allontanare l'apparecchio
dalla supercie sporca di carburante e attendere
che i vapori di carburante si siano volatilizzati.
¾ Per evitare il pericolo di incendio tenere il
motore, la marmitta, la batteria e il serbatoio
del carburante liberi da erba e fuoriuscite
d'olio.
¾ Rispettare inoltre le indicazioni riportate nel
manuale del motore.
Targhetta
Posizione
La targhetta si trova sotto/davanti al sedile del
conducente.
Nota
La marcatura ha valore di documento legale
e non deve essere modicata o resa irriconoscibile.
1
2
3
4
5
6
7
8
/
92
9
Struttura
1 Livello di potenza sonora garantito
2 Costruttore
3 Nome modello
4 Numero di modello
5 Numero di serie
6 Peso
7 Potenza
8 Numero di giri del motore in giri/min
9 Marcatura CE
10 Anno di costruzione
10
Page 93

Dispositivi di sicurezza
IT
Dispositivi di sicurezza
Raccoglierba
Contatto con la lama e proiezione di oggetti
S
ATTENZIONE!
ÂPericolo di lesioni
¾ Utilizzare l'apparecchio solo con il
raccoglierba montato o con un deettore
opzionale.
Sistema di blocco di sicurezza
Il sistema di blocco di sicurezza permette di avviare
il motore solo se
- il conducente ha preso posto sul sedile,
- il pedale del freno è premuto a fondo e/o il freno di
stazionamento è in posizione di parcheggio,
- il pedale dell'acceleratore è su "N",
- il dispositivo di taglio è disattivato, ossia: In-
terruttore PTO in posizione "O/Spento/Off")
(PTO = Power-Take-Off, presa di forza).
Il sistema di blocco di sicurezza impedisce il taglio
senza raccoglierba montato o senza deettore
opzionale montato (spegnimento automatico del
motore o del dispositivo di taglio).
Su apparecchi con interruttore PTO (presa di
forza elettromeccanica) il sistema di blocco di
sicurezza spegne automaticamente il dispositivo
di taglio non appena l'operatore lascia il sedile con
il dispositivo di taglio acceso, indipendentemente
dal fatto che il freno di stazionamento sia stato
precedentemente inserito.
Su apparecchi senza funzione OCR oppure a
funzione OCR disattivata il sistema di blocco
di sicurezza impedisce la guida in retromarcia
con il dispositivo di taglio attivato (spegnimento
automatico del motore o del dispositivo di taglio).
Î Prima di guidare in retromarcia con apparecchi
dotati di presa di forza, spegnere il dispositivo di
taglio con l'interruttore PTO.
Nota per apparecchi con interruttore PTO
In caso di spegnimento automatico da parte
del sistema di blocco di sicurezza (ad es. in
retromarcia oppure lasciando il sedile con
il dispositivo di taglio attivato) disinserire e
quindi inserire nuovamente l'interruttore prima per rimuovere il blocco del giunto (PTO,
presa di forza).
Indicazioni di direzione
Le indicazioni di direzione sull'apparecchio (ad es.
lato sinistro, lato destro) si riferiscono sempre alla
direzione di marcia in avanti.
Montaggio
Nota
Per poter spostare il trattore a mano la leva
di sblocco del cambio deve essere nella
posizione apposita. Vedere in merito il
paragrafo "Funzionamento – Spinta dell'apparecchio".
Montaggio del sedile
Î Rimuovere le viti e i dadi dal supporto del sedile
.
1
Î Fissare il supporto del sedile al sostegno del sup-
B
porto utilizzando le viti e i dadi rimossi precedentemente 2.
Î Premere la leva di regolazione o svitare la vite di
registro (a seconda della versione)
Î Spingere il sedile in una posizione da cui si possa
3
.
accedere facilmente al connettore di collegamento
sedile 4.
Î Inserire il cavo di collegamento nel connettore di
collegamento sedile
Î Serrare nuovamente la vite di registro del sedile (a
5
.
seconda della versione).
Nota
Il sedile è dotato di un sensore di occupazione sedile che fa parte del sistema di blocco
di sicurezza. In questo modo, è possibile
utilizzare l'apparecchio solo se il cavo di
collegamento è correttamente inserito nel
connettore di collegamento sedile.
Montaggio della copertura superiore dei
comandi
(a seconda del modello)
Î Inserire le linguette (A) della copertura dei co-
mandi [B] nelle aperture del supporto dei comandi
[C] 1.
Î Spingerla in avanti no a battuta
Î Controllare il corretto ssaggio della copertura.
Ca
2
.
Montaggio della copertura del cofano motore
(a seconda del modello) C b
Î Mettere la copertura del cofano motore con le
aperture [A] sulle linguette di ritegno [B] del cofano motore 1.
Î Spingere indietro la copertura no a battuta
Î Premere entrambe le linguette [C] leggermente
verso l'alto per bloccare la copertura 3.
Î Controllare il corretto ssaggio della copertura.
2
.
93
Page 94

IT
Montaggio
Montaggio del volante
Î Rimuovere il cappuccio di copertura [1] (a se-
D
conda della versione) sul volante.
Î Inserire la rondella distanziale [6], la molla [5] e la
rosetta [4]
Î Inlare il volante sull'albero dello sterzo.
Î Fissare il volante con la rosetta [3] e la vite [2]
sull'albero dello sterzo [7].
(coppia di serraggio: 25-28 Nm
Nota
Mettere la rosetta [3] con la bombatura
verso l'alto.
Î Montare il cappuccio di copertura [1].
Nota
Dopo aver smontato la vite del volante è
necessario sostituirla con una nuova vite
originale munita di frenaletti.
Montaggio della barra paraurti anteriore
(a seconda del modello)
Î Rimuovere le quattro viti dalla barra paraurti
anteriore.
Î Fissare la barra paraurti anteriore al telaio del trat-
tore con le quattro viti rimosse precedentemente
(lato interno).
E
Messa in funzione della batteria
PERICOLO!
Pericolo di incendio, esplosione e
corrosione a causa dell'acido della batteria
e dei gas dell'acido della batteria
¾ L'acido della batteria ha un effetto
corrosivo. Pulire subito tutte le parti
dell'apparecchio colpite da spruzzi di
acido della batteria.
¾ Non fumare e tenere lontano gli oggetti
in amme e caldi.
¾ Caricare le batterie solo in ambienti ben
aerati e asciutti.
¾ Possibilità di cortocircuito durante i lavori
sulla batteria. Non mettere nessun tipo di
utensile o oggetti metallici sulla batteria.
PERICOLO!
Pericolo di intossicazione e lesioni a causa
dell'acido della batteria
¾ Indossare degli occhiali di protezione e
dei guanti di protezione.
¾ Evitare il contatto della pelle con l'acido
della batteria.
¾ In caso di spruzzi di acido della
batteria sul volto o negli occhi, lavarsi
immediatamente con acqua fredda e
consultare un medico.
¾ In caso di ingestione di acido della
batteria, bere molta acqua e consultare
un medico.
¾ Conservare le batterie al di fuori della
portata dei bambini.
¾ Non inclinare mai la batteria, poiché
l'acido della batteria può uscire.
¾ Consegnare l'acido residuo della batteria
al proprio rivenditore o a un'azienda
specializzata nello smaltimento.
Avviso!
¾ Rispettare la sequenza di montaggio per il
collegamento e lo scollegamento della batteria.
¾ Mettere in funzione la batteria solo con la
copertura dei poli della batteria montata (a
seconda della versione sotto forma di coperchio
o come copertura completa di protezione della
batteria).
Nota
La batteria si trova nel vano batterie sul
retro dell'apparecchio
batterie, rimuovere i due dadi a galletto e
. Per aprire il vano
F
rimuovere il coperchio.
Montaggio
Î Collegare prima il cavo rosso (+/polo positivo)
Î Quindi collegare il cavo nero
Ga
(-/polo negativo) 2.
Î Montare la copertura dei poli della batteria.
Smontaggio
Î Smontare la copertura dei poli della batteria.
Î Scollegare prima il cavo nero (-/polo negativo).
Î Quindi scollegare il cavo rosso (+/polo positivo).
1
.
94
Page 95

Elementi di comando
IT
In caso di fornitura di una batteria esente da
manutenzione/sigillata (tipo 1)
(batteria senza tappi)
AVVERTENZA !
Fuoriuscita di liquido elettrolita anche da
una batteria sigillata
ÂPericolo di lesioni e di incendio
¾ Evitare di ribaltare la batteria.
Î Prima della prima messa in funzione caricare la
batteria con un caricabatterie a 12 volt (corrente di
carica massima 6 ampere) da una a due ore.
Î Dopo il caricamento staccare prima la spina del
caricabatterie.
Î Quindi scollegare la batteria (vedere anche le
istruzioni per l'uso del caricabatterie).
Avviso!
¾ Rispettare le note riportate nelle istruzioni per
l'uso del caricabatterie.
In caso di fornitura di una batteria non riempita
(tipo 2)
(batteria con tappi)
Î Togliere i tappi delle celle della batteria
Î Riempire ogni cella lentamente con acido per
Gb
.
batterie no a 1 cm al di sotto del foro di riempimento.
Î Lasciar riposare la batteria per 30 min.
Î Controllare il livello dell'acido e rabboccare l'acido
della batteria se necessario.
Î Prima della prima messa in funzione caricare la
batteria con un caricabatterie a 12 volt (corrente di
carica massima 6 ampere) da una a due ore.
Î Dopo il caricamento staccare prima la spina del
caricabatterie.
Î Quindi scollegare la batteria.
Î Montare i tappi della batteria.
Î Montare la batteria nell'apparecchio.
Î Collegare prima il cavo rosso (+/polo positivo),
quindi il cavo nero (-).
Avviso!
¾ Rispettare le note riportate nelle istruzioni per
l'uso del caricabatterie.
Nota
In seguito, rabboccare la batteria solo con
acqua distillata (controllare ogni due mesi).
Montaggio del raccoglierba
Î Leggere e rispettare il manuale di istruzioni sepa-
rato "Raccoglierba".
Elementi di comando
Vista d'insieme
A Blocchetto di accensione (a seconda del modello)
1 Blocchetto di accensione con chiave da girare
2 Blocchetto di accensione con chiave da premere (a
seconda del modello con funzione di assistenza Bluetooth
supplementare)
B Interruttore PTO (a seconda del modello)
C Pedale di marcia in avanti
D Pedale di retromarcia
E Leva di regolazione dell'altezza di taglio
F Leva di sblocco del cambio
G Pozzetto di espulsione
H Sensore del livello di riempimento per raccoglierba (a
seconda del modello)
I Dispositivo di traino
J Vano batterie
K Leva di regolazione del sedile
L Vano portaoggetti con portalattine, a seconda del modello
con presa elettrica a 12 volt opzionale
M Pedale per bloccaggio del differenziale (a seconda del
modello)
N Interruttore per freno di stazionamento/Tempomat
O Indicatore combinato (a seconda del modello)
P Starter (a seconda del modello)
Q Pedale del freno
R Indicatore di livello del serbatoio
S Leva dell'acceleratore/starter (a seconda del modello)
T Serbatoio del carburante
U Volante (non visibile)
A
Messa in funzione
Prima di ogni utilizzo
Controllare:
• tutti i dispositivi di protezione
• il livello dell'olio del motore (vedere il manuale
del motore)
• il livello di carburante nel serbatoio
• la pressione dei pneumatici
• eventuale presenza di sporco e residui di fal-
ciatura sui rivestimenti laterali, sulle macchine
portate e nella zona del ltro dell'aria
Rifornimento di carburante e controllo del
livello dell'olio
Nota
Il motore è già stato riempito d'olio in fabbrica; controllare il livello e rabboccare se
necessario.
• Rifornire con benzina senza piombo P.
• Riempire il serbatoio del carburante non oltre 2
cm al di sotto del bordo inferiore del bocchetto-
ne di rifornimento.
95
Page 96

Funzionamento
IT
• Chiudere saldamente il serbatoio del carburante.
• Controllare il livello dell'olio
. Il livello dell'o-
T
lio deve essere compreso fra le tacche "Full/
Max" e "Add/Min" (vedere anche il manuale del
motore).
Controllo della pressione dei pneumatici
Nota
Per motivi di produzione la pressione dei
pneumatici può essere superiore a quella
necessaria.
Î Controllare la pressione dei pneumatici e correg-
gerla se necessario.
anteriore 0,9 bar
posteriore 0,7 bar
Regolazione del sedile del conducente
Î Tirare la leva e regolare il sedile
La
.
L
oppure
Allentare la vite di registro, regolare il sedile e
serrare nuovamente la vite di registro Lb.
Regolazione delle ruote del dispositivo di
taglio
Le ruote del dispositivo di taglio, con il dispositivo
di taglio nella posizione più bassa, devono essere
almeno 6-12 mm sopra il pavimento. Le ruote del
dispositivo di taglio non sono costruite per sostenere
il peso del dispositivo di taglio. Esse servono
semplicemente a compensare le irregolarità del
terreno.
U
Î Spostare sempre le ruote del dispositivo di taglio
in modo uniforme.
Funzionamento
Avviso!
¾ Rispettare inoltre le note riportate nelle istruzioni
per l'uso del motore.
Nota
Rispettare le disposizioni nazionali/locali in
materia di orari di utilizzo (eventualmente
richiedere informazioni presso le autorità
responsabili).
Î Per disinserire il freno di stazionamento premere
il pedale del freno
.
tore
N
Q no a rilasciare l'interrut-
A
Avviso!
¾ Inserire sempre il freno di stazionamento prima
di lasciare l'apparecchio.
Regolazione del numero di giri del
motore
Con la leva dell'acceleratore è possibile regolare in
modo continuo il numero di giri del motore.
Aumento del numero di giri del motore =
Riduzione del numero di giri del motore =
Q
Avviamento del motore
Nota
Lo starter M serve ad avviare l'apparecchio a motore freddo. Alcuni modelli non
sono dotati di starter, il motore si imposta
automaticamente alla relativa procedura di
avviamento.
Î Aprire il rubinetto della benzina (se presente –
vedere il manuale del motore).
Î Mettersi sul sedile del conducente.
Î Disinserire il dispositivo di taglio.
Î Inserire il freno di stazionamento.
Î Portare la leva dell'acceleratore su .
Î Tirare lo starter a motore freddo oppure portare
la leva dell'acceleratore su .
Î Azionare la chiave di accensione
del blocchetto di accensione):
Î Inserire correttamente la chiave di accensione
nel blocchetto di accensione [3].
Î Girare la chiave di accensione su nché il
motore non va in moto. Rilasciare la chiave di
accensione.
Î La chiave di accensione è in posizione nor-
male.
(taglio con marcia in avanti)
oppure
Î Inserire la chiave di accensione [3] nel bloc-
chetto di accensione e spingerla verso il basso
per almeno 1,5 secondi nché il motore non va
in moto.
Î Rilasciare la chiave di accensione.
3 La chiave di accensione è in posizione norma-
le.
(taglio con marcia in avanti)
(a seconda
H
.
a
.
b
Inserimento e/o disinserimento del freno di
stazionamento A
Î Per inserire il freno di stazionamento premere a
fondo il pedale del freno
tore N.
96
N
Q e premere l'interrut-
A
Nota
Ciascun tentativo di avviamento deve durare
al massimo 5 secondi. Attendere 10 secondi
prima del tentativo successivo.
Page 97

Funzionamento
IT
Nota
La funzione OCR non deve essere attivata
durante la procedura di avviamento (vedere
il paragrafo "Funzione OCR").
Î Riportare lentamente indietro lo starter e/o la leva
dell'acceleratore nché il motore non gira in modo
regolare.
Arresto del motore
Î Portare la leva dell'acceleratore in posizione
intermedia.
Î Far girare il motore per circa 20 secondi.
Î Portare la chiave di accensione (a seconda del
modello) su
oppure premere la chiave di
Ha
accensione verso il basso e rilasciarla
Î Estrarre la chiave di accensione.
Guida
AVVERTENZA !
Pericolo in caso di avviamento improvviso,
arresto brusco e guida a velocità eccessiva
ÂPericolo di incidente
¾ Guidare lentamente e frenare
dolcemente.
¾ Non guidare a velocità eccessiva.
¾ Non cambiare mai la direzione di marcia
senza aver prima fermato l'apparecchio.
Î Rilasciare il freno di stazionamento premendo a
fondo il pedale del freno e rilasciandolo nuovamente.
Î Per partire premere il pedale dell'acceleratore.
Nota
Più si preme a fondo il pedale dell'acceleratore, maggiore è la velocità dell'apparecchio.
Guida con Tempomat
Î Premere l'interruttore durante la guida.
3 La velocità di avanzamento scelta a questo punto
(ma non la velocità massima) viene mantenuta.
3 È possibile togliere il piede dal pedale dell'accele-
ratore.
Î Per disattivare il Tempomat, premere il pedale del
freno/pedale dell'acceleratore no a rilasciare nuovamente l'interruttore.
N
Hb
Nota
Premendo il pedale del freno si disattiva
contemporaneamente anche il Tempomat.
Inserimento e disinserimento del dispositivo di taglio
Con l'interruttore PTO il dispositivo di taglio
viene inserito e disinserito per mezzo di un giunto
elettromeccanico.
Î Per attivare il dispositivo di taglio tirare l'interrut-
tore PTO .
Î Per disattivare il dispositivo di taglio premere l'in-
terruttore PTO .
.
Regolazione dell'altezza di taglio
Î Per regolare l'altezza di taglio utilizzare la leva di
regolazione dell'altezza di taglio.
I
Nota sull'interruttore PTO
In caso di spegnimento automatico da parte
del sistema di blocco di sicurezza (ad es. in
retromarcia con il dispositivo di taglio attivato) l'interruttore deve essere prima disinserito e poi inserito nuovamente per rimuovere il
blocco del giunto.
J
Nota
"4" è l'altezza di taglio massima possibile
(circa 10 cm), il dispositivo di taglio è nella
posizione più alta.
"Lo/1" è l'altezza di taglio minima (circa 2,5
cm), il dispositivo di taglio è nella posizione
più bassa.
Taglio
ATTENZIONE!
Proiezione di oggetti (erba tagliata, pietre
ecc.)
ÂPericolo di lesioni
¾ Svuotare il raccoglierba solo con il
dispositivo di taglio spento.
¾ Utilizzare l'apparecchio solo con il
raccoglierba montato o con un deettore
opzionale.
Arresto dell'apparecchio
Î Togliere il piede dal pedale dell'acceleratore C
D.
o
Î Premere il pedale del freno Q nché l'apparecchio
A
non si ferma.
97
Page 98

IT
Funzionamento
Avviso!
¾ Quando un corpo estraneo (ad es. una
pietra) viene colpito dal dispositivo di taglio
o se l'apparecchio inizia a vibrare in maniera
anomala, spegnere immediatamente il motore.
¾ Controllare se l'apparecchio presenta dei danni
prima di continuare l'uso. Non continuare a
utilizzare l'apparecchio in presenza di danni e
farlo riparare da un'ofcina specializzata prima
dell'uso successivo.
¾ Non azionare il dispositivo di taglio nell'erba alta.
Î Avviare il motore come indicato.
Î Portare la leva dell'acceleratore su .
Î Inserire il dispositivo di taglio e lasciarlo scendere.
Î Rilasciare il freno di stazionamento premendo a
fondo il pedale del freno e rilasciandolo nuovamente.
Î Per partire premere il pedale di marcia in avanti.
Note per il taglio
Non tagliare l'erba bagnata. Guidare lentamente al numero di giri massimo del motore.
Il taglio di erba troppo alta o bagnata può
causare un accumulo eccessivo di erba/un
intasamento nel pozzetto di espulsione.
Note per il taglio
A seconda del modello, l'apparecchio è
dotato di un indicatore di livello per il raccoglierba. Il sensore del livello di riempimen-
misura il riempimento del raccoglierba
to
Y
durante il taglio. Se il raccoglierba è pieno,
viene emesso un segnale acustico e contemporaneamente, a seconda della versione, il dispositivo di taglio si spegne automaticamente. Prima di proseguire con il taglio, il
raccoglierba deve essere quindi svuotato. Il
segnale acustico viene disattivato solo dopo
aver svuotato il raccoglierba.
Regolazione del sensore del livello di riempimento
Il sensore del livello di riempimento può essere
regolato in lunghezza (più posizioni di incastro) e,
quindi, adattato alla consistenza dell'erba tagliata. In
questo modo, si incide contemporaneamente anche
sul livello di riempimento del raccoglierba.
Y
AVVERTENZA !
Pericolo di lesioni
¾ Regolare il sensore del livello di
riempimento solo dopo aver spento il
motore, inserito il freno di stazionamento,
tolto la chiave di accensione e rimosso il
raccoglierba.
Î Per ridurre la lunghezza, spingere il sensore del
livello di riempimento più all'interno.
3 Il segnale acustico viene emesso più tardi, il
dispositivo di taglio viene disattivato più tardi a
seconda della versione.
Nota
Ideale per erba tagliata corta e molto secca.
Î Per aumentare la lunghezza, spingere il sensore
del livello di riempimento più all'esterno.
3 Il segnale acustico viene emesso prima, il dispo-
sitivo di taglio viene disattivato prima a seconda
della versione.
Nota
Ideale per erba spessa e umida.
Funzione OCR (a seconda del modello)
H
Il blocchetto di accensione è dotato di una funzione
OCR che consente il taglio controllato dall'utente
anche in retromarcia.
Note per il taglio
Utilizzare la funzione OCR solo se indispensabile.
Î Avviare il motore.
Î Girare la chiave di accensione [3] verso sinistra
dalla posizione normale alla posizione di taglio in
retromarcia
e premere l'interruttore [1]a.
oppure
Premere l'interruttore [1]
per 3 secondi.
b
3 La spia di controllo [2] è accesa. Ora è possibile
tagliare sia in avanti sia in retromarcia.
Î Per chiudere la funzione OCR girare la chiave
di accensione verso destra in posizione normale
.
oppure
Premere l'interruttore [1]
verso il basso e quindi
b
rilasciarlo.
3 La spia di controllo si spegne.
Nota per il blocchetto di accensione
Ha
La funzione OCR si disattiva automaticamente non appena la chiave viene girata in
posizione normale oppure non appena si
spegne il motore (posizione di arresto o spegnimento del motore da parte del sistema di
blocco di sicurezza).
98
Page 99

Funzionamento
IT
Note per il blocchetto di accensione
Hb
La funzione OCR si disattiva automaticamente non appena l'interruttore OCR viene
premuto, non appena il motore viene spento
oppure se il sistema di blocco di sicurezza spegne automaticamente il motore o il
dispositivo di taglio.
Pacciamatura
Con la pacciamatura l'erba viene tagliata in piccoli
pezzi (circa 1 cm) durante il taglio e rimane sul
terreno. Nell'erba rimangono numerose sostanze
nutritive.
Î Richiedere gli accessori necessari per la paccia-
matura al proprio rivenditore specializzato.
Consigli per la cura del prato
Il prato è costituito da diversi tipi di erbe. Se si usa
il tosaerba frequentemente, si favorisce la crescita
dell’erba, con radici più forti e un manto erboso più
compatto.
Se invece l’erba viene tagliata solo raramente, si
sviluppano soprattutto erbe alte ed erbe selvatiche
(ad es. trifoglio, margheritine)
Afnché il prato possa crescere in modo sano e
uniforme senza strisce erbose, le corsie di taglio
vanno sempre sovrapposte di qualche centimetro.
- Di norma l’altezza del prato è di ca. 40–50 mm.
Se il prato ha raggiunto un’altezza di 60–70 mm,
falciare circa un terzo dell’altezza totale.
- Non tagliare il prato a un’altezza inferiore ai
45 mm, altrimenti il manto erboso può danneggiarsi in caso di siccità.
- Se l’erba è cresciuta troppo alta, tagliarla a tappe
no a portarla all’altezza normale.
Accensione dei fari (a seconda del
modello)
Î Per accendere i fari portare l'interruttore su "ON".
3 I fari rimangono accesi nché il motore è in moto.
R
Nota
Sui modelli senza interruttore per le luci i fari
si accendono e spengono automaticamente
con il motore.
Nota
A seconda del modello i fari rimangono
accesi per circa 10 secondi dopo lo spegnimento del motore e si spengono poi automaticamente.
Inserimento e disinserimento del
bloccaggio del differenziale (a seconda del
modello)
Con il bloccaggio del differenziale inserito la forza
viene trasmessa a entrambe le ruote posteriori. Il
bloccaggio del differenziale interviene quando viene
rilevato un numero di giri diverso tra le due ruote.
Î Fermare l'apparecchio.
Î Per inserire il bloccaggio del differenziale premere
il pedale M.
Î Per disinserire il bloccaggio del differenziale
togliere di nuovo il piede dal pedale M.
A
AVVERTENZA !
L'attivazione del bloccaggio del
differenziale incide notevolmente sulla
risposta allo sterzo dell'apparecchio.
ÂPericolo di incidente e danni all'apparec-
chio
¾ Utilizzare il bloccaggio del differenziale
solo se indispensabile, ad es. bei su
terreni difcili.
¾ Inserire il bloccaggio del differenziale
solo ad apparecchio fermo.
¾ Non utilizzare il bloccaggio del
differenziale su percorsi pavimentati o in
discesa.
¾ Guidare solo in rettilineo se il bloccaggio
del differenziale è inserito.
¾ Guidare solo lentamente con il
bloccaggio del differenziale inserito.
Nota
Se il bloccaggio del differenziale non viene
rilasciato subito, ridurre la velocità dell'apparecchio o fermare l'apparecchio.
Spegnimento dell'apparecchio
Î Fermare l'apparecchio.
Î Disinserire il dispositivo di taglio.
Î Portare la leva dell'acceleratore in posizione
intermedia.
Î Portare il dispositivo di taglio nella posizione più
alta.
Î Spegnere il motore dopo 20 secondi.
Î Inserire il freno di stazionamento.
Î Estrarre la chiave di accensione.
99
Page 100

IT
Indicatore combinato (a seconda del modello, opzionale)
Spinta dell'apparecchio
Nota
La leva di sblocco del cambio si trova fra la
parete posteriore e la ruota posteriore destra
dell'apparecchio.
Apparecchi con bloccaggio del differenziale
Ka
Î Spegnere il motore.
Î Disinserire il freno di stazionamento.
Î Estrarre completamente la leva di sblocco del
cambio.
3 Ora è possibile spingere l'apparecchio.
Nota
Prima di avviare il motore, premere di nuovo
la leva di sblocco del cambio completamente
verso l'interno.
Apparecchi senza bloccaggio del differenziale
Kb
Î Spegnere il motore.
Î Disinserire il freno di stazionamento.
Î Spingere completamente la leva di sblocco del
cambio all'interno.
3 Ora è possibile spingere l'apparecchio.
Nota
Prima di avviare il motore, estrarre di nuovo
la leva di sblocco del cambio completamente
verso l'esterno.
Presa elettrica a 12 volt (a seconda del
modello)
La presa elettrica serve a collegare un caricabatterie
a 12 volt o diversi apparecchi a 12 volt.
X
Nota
A tal ne rispettare le indicazioni del caricabatterie o degli apparecchi da collegare a 12
volt.
Indicatore combinato (a seconda del mo-
dello, opzionale)
Nota
Le indicazioni vengono visualizzate solo a
motore acceso.
Nota
Se il cambio dell'olio e la manutenzione del
ltro dell'aria ricadono nello stesso momento, si accende prima l'indicazione per il
cambio dell'olio e, quindi, l'indicazione per il
ltro dell'aria.
L'indicatore combinato può essere composto dai
seguenti elementi a seconda della versione:
Tipo 1 Oa in combinazione con il blocchetto di accensione
Contatore delle ore di esercizio
Inserendo l'accensione, viene visualizzata
brevemente la tensione della batteria, quindi
l'indicazione passa a quella delle ore di esercizio.
Le ore di esercizio vengono sempre conteggiate, a
meno che la chiave di accensione sia su "Stop" o
sia stata tolta.
Indicatore di manutenzione
Nota
di esercizio totali.
– – –
Î Cambiare immediatamente l'olio del motore (ve-
dere istruzioni per l'uso del motore).
Questa indicazione viene visualizzata ogni 50 ore di
esercizio per una durata di 2 ore.
– –
Il livello dell'olio del motore è troppo basso.
Î Se l'indicazione non scompare, spegnere imme-
diatamente il motore e controllare il livello dell'olio
del motore (vedere le istruzioni per l'uso del motore). Se necessario, rabboccare l'olio.
Questa indicazione può apparire per un breve lasso di
tempo dopo l'avviamento del motore, per poi scompari-
re nuovamente.
Nota
Questa funzione è attiva solo su motori con
pressostato dell'olio.
– –
Girando la chiave di accensione in posizione
, viene visualizzata brevemente la tensione della
batteria e, quindi, vengono visualizzate le ore di
esercizio totali.
Î Ricaricare la batteria il più rapidamente possibile.
Î Se necessario, far controllare gli eventuali danni
del sistema di ricarica da un'ofcina specializzata.
Ha
signica: Vengono visualizzate le ore
Cambio dell'olio
Livello dell'olio
Tensione della batteria
100
 Loading...