


Operator’s Manual
Cordless Grass Trimmer
Model
MTD599
IMPORTANT: READ SAFETY RULES AND INSTRUCTIONS CAREFULLY
P/N 6096-959908 © 2005
PRINTED IN CHINA
English

TABLE OF CONTENTS
Warranty Statement |
Page 1 |
Maintenance Instructions |
Pages 10-12 |
Rules for Safe Operation |
Pages 2-6 |
Specification |
Page 13 |
Assembly Instructions |
Page 7 |
Parts List |
Page 14 |
Adjustment Instructions |
Pages 7-8 |
Note |
Page 15 |
Operating Instructions |
Page 9-10 |
Manufacturer’s Limited Warranty |
Page 16 |
WARRANTY STATEMENT
TWO YEAR LIMITED WARRANTY ON YARD MACHINES GRASS TRIMMER
For two years from the date of purchase, when this grass trimmer is used and maintained according to the operator’s manual, Yard Machines will repair any defect in material for workmanship free of charge.
If this grass trimmer is used for commercial or rental purposes, this warranty applies for only 90 days from the date of purchase.
WARRANTY SERVICE IS AVAILABLE BY RETURNING THIS GRASS TRIMMER TO THE NEAREST MTD REPAIR DEALER.
This warraanty gives you specific legal rights, and you may also have other rights which vary from state to state.
1

RULES FOR SAFE OPERATION
The purpose of safety symbols is to attract your attention to possible dangers. The safety symbols, and their explanations, deserve your careful attention and understanding. The safety warnings do not by themselves eliminate any danger. The instructions or warnings they give are not substitutes for proper accident prevention measures.
SYMBOL MEANING
Indicates danger, warning or
caution. Attention is required in order to avoid serious personal injury. May be used in conjunction with other symbols or pictographs.
NOTE: Advises you of information or instructions vital to the operation or maintenance of the equipment.
Read the Operator’s Manual(s) and follow all warnings and safety instructions.
Failure to do so can result in serious injury to the operator and/or bystanders.
SYMBOL MEANING
Failure to obey a DANGER: safety warning will
result in serious injury to yourself or to others. Always follow the safety precautions to reduce the risk of fire, electric shock and personal injury.
Failure to obey a WARNING: safety warning can
result in injury to yourself and others. Always follow the safety precautions to reduce the risk of fire, electric shock and personal injury.
Failure to obey a CAUTION: safety warning may
result in property damage or personal injury to yourself or to others. Always follow the safety precautions to reduce the risk of fire, electric shock and personal injury.
FOR QUESTIONS, CALL 1-800-668-1238
• IMPORTANT SAFETY INSTRUCTIONS •
READ ALL INSTRUCTIONS
BEFORE OPERATING
•Read the instructions carefully. Be familiar with the controls and proper use of the unit.
When using the WARNING: unit, safety rules.
Please read these instructions before operating the unit in order to ensure the safety of the operator and any bystanders. Please keep these instructions for later use.
•Do not operate this unit when tired, ill or under the influence of alcohol, drugs or medication.
•Children must not operate the unit. Teens must be accompanied and guided by an adult.
•All guards and safety attachments must be installed properly before operating the unit.
•Inspect the unit before use. Replace damaged parts. Make sure all fasteners are in place and secure. Replace parts that are cracked, chipped or damaged in any way. Do not operate the unit with loose or damaged parts.
•Carefully inspect the area before starting the unit. Remove all debris and hard or sharp objects such as glass, wire, etc.
•Clear the area of children, bystanders, and pets. At a minimum, keep all children, bystanders, and pets outside a 50 feet (15m.) radius; there still may be a risk to bystanders from thrown objects. Bystanders should be encouraged to wear eye protection. If you are approached, stop the unit immediately.
2

RULES FOR SAFE OPERATION
 PLEASE READ - SAVE THESE INSTRUCTIONS
When using an electrical appliance, basic precautions should always be followed to assure maximum safety and optimum performance. Read this manual before assembling and operating this appliance. Failure to comply with instructions may result in electrical shock, burns, fire, or personal injury.
WARNING
TO REDUCE THE RISK OF ELECTRIC SHOCK, BURNS, FIRE OR PERSONAL INJURY:
1.FOLLOW ALL SAFETY INSTRUCTIONS listed in this manual before/during operation of this trimmer.
2.To Reduce Risk of Injury to Persons, Remove Battery Pack When Not in Use.
3.Risk of eye injury. Use Safety glassed or similar eye protection.
4.To reduce the risk of injury to persons, do not operate without guards in place.
5.INSPECT UNIT FOR DAMAGE to the housing, cord or plug. Keep all fasteners tight. Do not use if the switch does not turn the unit off properly. Never use unit if cord or plug has been damaged, the motor or unit itself is not working as it should or has been dropped, damaged, left outdoors or dropped in water. Never operate with any air opening blocked. Keep air openings free of debris that may reduce air flow. Replace damaged parts that are chipped, cracked or damaged in any way.
6.DO NOT ABUSE CORD - Never carry appliance by cord or pull cord to disconnect from outlet. Keep cord clear of operator and obstacles at all times. Do not expose cord to heated surfaces, oil or water. Do not pull cord around sharp edges, corners or close door on cord.
7.NO SERVICEABLE PARTS INSIDE - Your dou-
ble insulated appliance has no serviceable parts inside. Do not attempt to repair it yourself. For service information, contact the Yard Machines Product Service Department listed on the back cover of this User Manual.
8.RISK OF EYE INJURY - Always wear goggles or other suitable eye protection when operating your trimmer. Edging increases the risk of injury caused by flying debris. Always keep bystanders at a safe distance.
9.KEEP HANDS AND FEET AWAY from rotating line. Do not operate without guard attached.
10.DRESS PROPERLY - Always wear long pants, shoes and gloves. Do not wear loose clothing, jewelry, short pants, sandals or go barefoot.
11.KEEP AREA CLEAR - Keep everyone, especially children and pets away from the area of operation. Turn off unit immediately if you are approached. Never allow children to operate the appliance to be used as a toy or to run unattended at any time.
12.AVOID A DANGEROUS ENVIRONMENT - Do not use in the presence of flammable liquids or gases, smoking or burning materials to avoid creating a fire or explosion. Never operate the trimmer in wet or damp conditions or around swimming pools, hot tub, etc. Do not use in rain. Do not handle plug, cord or appliance with wet hands.
13.USE APPLIANCE CORRECTLY - Use this appliance only for its intended use as described in this manual. DO NOT SWEEP WITH TRIMMER - Sweeping refers to tilting stringhead to sweep away debris from walkways, etc. Your trimmer is a powerful tool and small stones or other such debris may be hurled 50 feet or more, causing injury or damage to nearby property such as automobiles, homes and windows. Inspect area before starting the appliance to remove debris and other objects that can cause damage during operation.
14.DO NOT USE ACCESSORIES or attachments except as recommended and provided by Yard Machines. Do not use any type of wire or metal cutting line.
15.DO NOT OVERREACH - Keep firm footing and balance at all times.
16.AVOID UNINTENTIONAL STARTING - Do not carry trimmer with your finger on the switch.
17.DISCONNECT trimmer from battery pack when not in use and before servicing stringhead.
18.STORE idle trimmer indoors. Appliance should be stored in a dry, high or locked up place - out of the reach of children.
IMPORTANT SAFETY INSTRUCTIONS FOR CHARGER
1.This manual contains important safety and operating instruction for battery charger.
2.Before using battery charger, read all instructions and cautionary markings on (1) battery charger, (2) battery, and (3) products using battery.
To reduce the risk of WARNING: injury, charge only
Nickel-Cadmium type rechargeable batteries. Other types of batteries may burst, causing injury.
3.Do not expose charger to rain or snow.
4.Use of an attachment not recommended or sold by the battery charger manufacturer may result in a risk of fire, electric shock, or injury to persons.
3

RULES FOR SAFE OPERATION
5.To reduce risk of damage to electric plug and cord, pull by the plug rather than the cord when disconnecting charger.
6.An extension cord should not be used unless absolutely necessary. Use of an improper extension cord could result in a risk of fire and electric shock. If an extension cord must be used, make sure:
a.that the pins on the plug of the extension cord are the same number, size, and shape as those of the plug on the charger;
b.that the extension cord is properly wired and in good electrical conditions; and
c.that the wire size is large enough for AC ampere rating of charger as specified in the table below.
Ampere rating |
0-2.0 |
2.1 - 3.4 |
(on face plate) |
|
|
|
|
|
Cord Length |
Wire Size (A.W.G.) |
|
|
|
|
25’ |
18 |
18 |
50’ |
16 |
16 |
100’ |
16 |
16 |
|
|
|
7.Do not operate charger with damaged cord or plug. Replace immediately.
8.Do not operate charger if it has received a sharp blow, been dropped, or otherwise damaged in any way; take it to an Authorized Service Center
9.Do not disassemble charger; take it to an Authorized Service Center when service or repair is required. Incorrect reassembly may result in a risk of electric shock or fire.
10.To reduce risk of electric shock, unplug charger from outlet before attempting any maintenance or cleaning. Turning off controls will not reduce this risk.
SAFETY PRECAUTIONS WHEN USING CHARGER AND BATTERY
1.Do not charge battery when temperature is below 50˚ F (10˚ C) or above 104˚ F (40˚ C).
2.Never attempt to connect two chargers together.
3.The charger is designed to operate on standard household electrical power. Do not attempt to use it on any other voltage.
4.Do not insert foreign matter into the hole reserved for the battery in charger stand.
5.Do not charge by means of an engine generator or DC power source.
6.Do not disassemble the battery.
7.Do not store the tool and battery in locations where the temperature may reach or exceed 104˚ F (40˚ C), such as outside sheds or metal buildings in summer.
8.Do not incinerate the battery, even if it is severely damaged or completely worn out. The battery may explode in fire.
9.Battery leakage may occur under conditions of
extreme usage or temperature. If liquid comes in contact with skin, wash quickly with soap and water, then lemon juice or vinegar. If liquid gets in your eyes, wash with a strong solution of boric acid and seek medical attention immediately.
10.Do not short-circuit the battery.
11.Charge battery pack only with the charger provided.
12.The battery pack for this tool has been shipped in a low charge condition, therefore, you should charge it prior to use.
If any parts are miss- WARNING: ing, do not operate
tool until the missing parts are replaced. Failure to do so could result in possible serious personal injury.
DISPOSAL OF THE EXHAUSTED BATTERY
Do not attempt to dis- WARNING: assemble the battery
pack. Fire or injury may result.
For safety and to preserve natural resources, please recycle or dispose of properly. This Product Contains NickelCadmium Battery. Must Be Disposed Of Properly. Local, state, or federal laws may prohibit disposal of NickelCadmium batteries in ordinary trash. Consult your local waste authority for information regarding available recycling and/or disposal options.
BATTERY PACK PREPARATION FOR RECYCLING
Upon removal, cover WARNING: the battery pack’s ter-
minals with heavy duty adhesive tape. Do not attempt to destroy or disassemble the battery pack or remove any of its components. Do not touch both terminals with metal objects and body parts, as short-circuit may result. Keep away from children. Failure to comply with these warnings could result in fire and/or serious injury.
EXPLANATION OF NOTE, WARNING, and
WARRANTY SYMBOL
1.A NOTE is used to convey additional information, or highlight a particular explanation, or to expand a step instruction.
2.A WARNING identifies a procedure which, if not undertaken or if improperly done, can result in a serious personal injury or damage to the unit and/or both.
4

RULES FOR SAFE OPERATION
3.  (WARRANTY SYMBOL) serves notice that unless instructions or procedures are followed, any damage will void the warranty and repairs will be at owner’s expense. Service other than user maintenance should be performed by a Yard Machines Authorized Service Center. Damage or conditions caused by improper maintenance practices which
render this product inoperable will void the manufacturer’s warranty.
4.FOR WARRANTY OR SERVICE contact the nearest Yard Machines Authorized Service Center by calling 800# on back cover.
SAVE THESE INSTRUCTIONS
SAFETY AND INTERNATIONAL SYMBOLS
This operator's manual describes safety and international symbols and pictographs that may appear on this product. Read the operator's manual for complete safety, assembly, operating and maintenance and repair information.
SYMBOL |
MEANING |
SYMBOL |
MEANING |
|
• SAFETY ALERT SYMBOL |
|
DANGER: Objects thrown up by |
|
Indicates danger, warning, or caution. |
|
machine. |
|
|
|
|
|
May be used in conjunction with |
|
|
|
other symbols or pictographs. |
|
|
•WARNING - READ OPERATOR'S MANUAL
Read the Operator’s Manual(s) and follow all warnings and safety instructions. Failure to do so can result in serious injury to the operator and/or bystanders.
•WEAR HEAD, EYE AND HEARING PROTECTION
WARNING: Thrown objects and loud noise can cause severe eye injury and hearing loss. Wear eye protection meeting ANSI Z87.1-1989 standards and ear protection when operating this unit. Falling objects can cause severe head injury. Wear head protection when operating this unit. Use a full face shield when needed.
•MINIMUM OPERATING DISTANCE
WARNING: Keep children, bystanders, and animals 50 feet (15meters) away. If approached stop unit immediately.
•DO NOT USE BLADES
WARNING: To prevent serious personal injury, do not attach or operate the unit with any type of blade.
Must Be Disposed Of Properly. Local, state, or federal laws may prohibit disposal of Nickel-Cadmium batteries in ordinary trash.
Do not charge cracked or damaged battery.
Do not incinerate the battery, even if it is severely damaged or completely worn out. The battery may explode in fire.
5
RULES FOR SAFE OPERATION
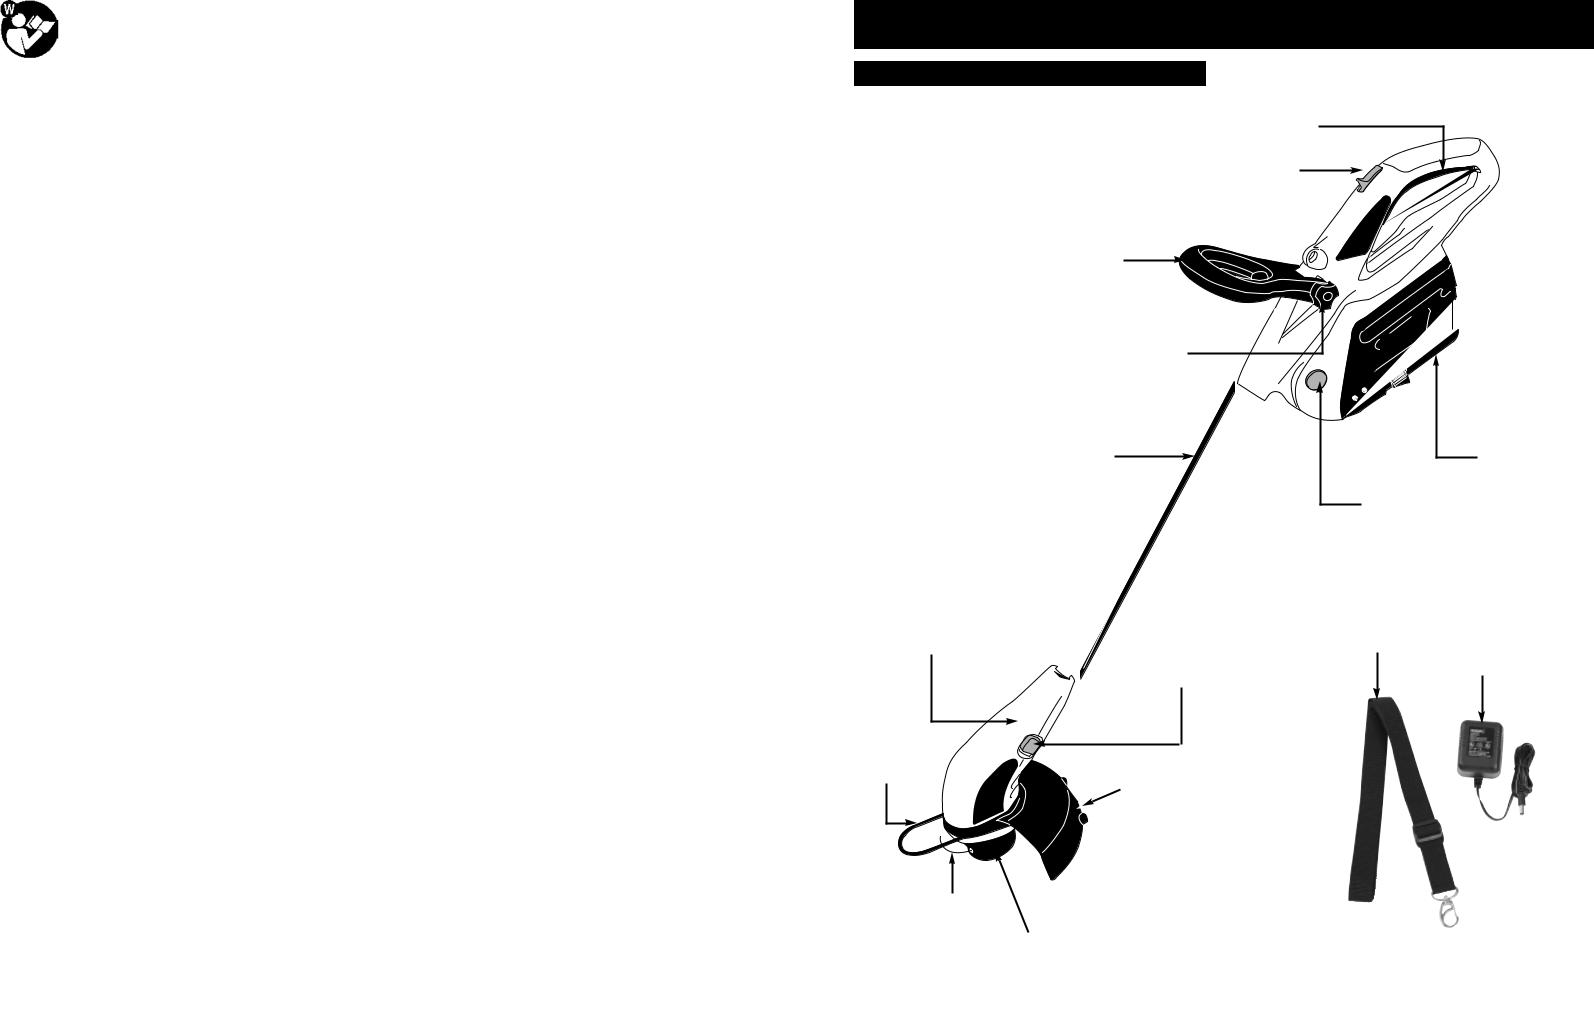
KNOW YOUR UNIT
ON/OFF SWITCH
LOCK-OFF SWITCH
ASSIST HANDLE
|
ADJUSTMENT KNOB |
SHAFT |
BATTERY PACK |
|
RELEASE BUTTON |
MOTOR HOUSING |
|
HARNESS |
EDGER CONVERSION |
BATTERY |
|
|
CHARGER |
|
|
BUTTON |
|
|
|
EDGE GUIDE
DEBRIS SHIELD
NYLON
LINES
STRING HEAD
6

ASSEMBLY INSTRUCTIONS
NOTE: The only assembly required for your trimmer is to install the debris shield and the assist handle.
DEBRIS SHIELD INSTALLATION
1. Position the motor housing with string head carrier facing up. (Fig. 1)
2. Slide debris shield over motor housing.
3. Fit the Edge guide (A) on the front part of the guard. Secure it at the rear with two screws (B). (Fig. 2)
A
B
Fig. 2
Fig. 1
ADJUSTMENT INSTRUCTIONS
ADJUST THE ASSIST HANDLE
1.Assemble the assist handle (A) to the unit, insert the bolt (B) to the handle adjustment knob (C) and tighten. (Fig. 3)
2.Loosen the adjustment knob (C) to adjust the assist handle to the most suitable position. (Fig. 4)
NOTE: The assist handle is ratcheted for variable operating positions. Adjust to a comfortable position.
A
B C
Fig. 3
C
EDGING CONVERSION
1.Grip shaft firmly.
2.Push shaft locking button (A) forward, and rotate cutting assembly until an audible click is heard. (Fig. 5)
A
Fig. 5
BATTERY CHARGING
To charge the battery pack it must first be removed from the trimmer. To remove the battery pack. Put the trimmer horizontally on the ground at first. Then grasp both sides of the battery pack and depress the battery clip (A) as shown Fig 6. Now gently pull the battery pack from the housing.
Fig. 4
7

ADJUSTMENT INSTRUCTIONS
A 

Fig. 6
CHARGING BATTERY
To recharge battery first plug the battery charger jack into the connector. Then plug the battery charger into the electrical outlet. The indicator light will remain lit (red color). (Fig. 7)
The battery will be fully charged after 16 hours. The green light wil be on when the battery is fully charged. Do not over charge the battery or it may be damaged and void factory warranty.
grip. Let the grass trimmer run for a few seconds and “bump” the stringhead against the lawn. Nylon line will automatically release. The cut-off blade in the debris shield will trim off excess line.
5.To switch off the string trimmer let go of the switch.
A short or worn line CAUTION: cuts less efficiently
so, to improve its operation on subsequent occasions, bump the stringhead lightly on the ground while the trimmer is running.(Fig. 9)
These operations should be repeated a few times before starting work to make sure that everything is functioning properly and to familiarize yourself with the grass trimmer. Start off slowly, when you have gained experience, you will be able to use the grass trimmer to its full potential.
The stringhead will CAUTION: continue to rotate for
a few seconds even after switching off.
Fig. 7
STARTING
1.Before starting the grass-trimmer for the first time, check that the nylon line touch or pass over the linecutting blade. If they are not long enough, press the bump knob and, at the same time, pull the nylon line. (Fig. 8).
2.Connect the correct extension cord to the string trimmer power cord per the instructions in Section 5-1 Connect the cord.
3.Make sure the length of grass trimmer and position of assist handle is most applicable before use, adjust the length of grass trimmer by pressing the shaft adjustment button, adjust the height of assist handle by loosening the adjustment knob.
4.Take a secure hold of the grass trimmer and, without letting it touch the grass to be cut, push up the safety switch, then press the trigger on the upper hand-
Fig. 8
B
Fig. 9
8
OPERATING INSTRUCTIONS
TRIMMER OPERATION
SWITCH
1.Push forward the lock-off switch (A) and depress the trigger switch (B) to start. (Fig. 10)
2.To stop the unit, simply release the trigger switch.
A 
B
Fig. 10
3.TRIMMING / MOWING (Fig. 11). Swing trimmer with a sickle-like motion from side to side. Do not tilt the stringhead during the procedure. Test area to be trimmed for proper cutting height. Keep stringhead at same level for even depth of cut.
4.CLOSER TRIMMING (Fig. 12). Position trimmer straight ahead with a slight tilt so bottom of stringhead is above ground level and string contact occurs at proper cutting point. Always cut away from operator. Do not pull trimmer in toward operator.
5.FENCE/FOUNDATION TRIMMING. Approach trimming around chain link fences, picket fences, rock walls and foundations slowly to cut close without whipping string against the barrier. If the string comes in contact with rock, brick walls, or foundations, it will break or fray. If string snags fencing, it will snap off.
6.TRIMMING AROUND TREES. Trim around tree trunks with a slow approach so string does not contact bark. Walk around the tree trimming from left to right. Approach grass or weeds with the tip of the string and tilt stringhead slightly forward.
7.SCALPING (Fig. 12). Scalping refers to removal of all vegetation down to the ground. To do this, tilt the stringhead to about a 30 degree angle to the left. By adjusting the handle you will have better control during this operation. Always keep a distance of 50 feet (15 meters) from other people and animals when scalping. Do not attempt this procedure if there is any chance flying debris could injure operator, other people or cause damage to property.
8.OPERATING AS AN EDGER (Fig. 14). With the unit configured as an edger, hold it so the motor is to your left side so that debris is thrown to the rear. Always use eye protection.
Fig. 11
Fig. 12
Fig. 13
Fig. 14
9
OPERATING INSTRUCTIONS
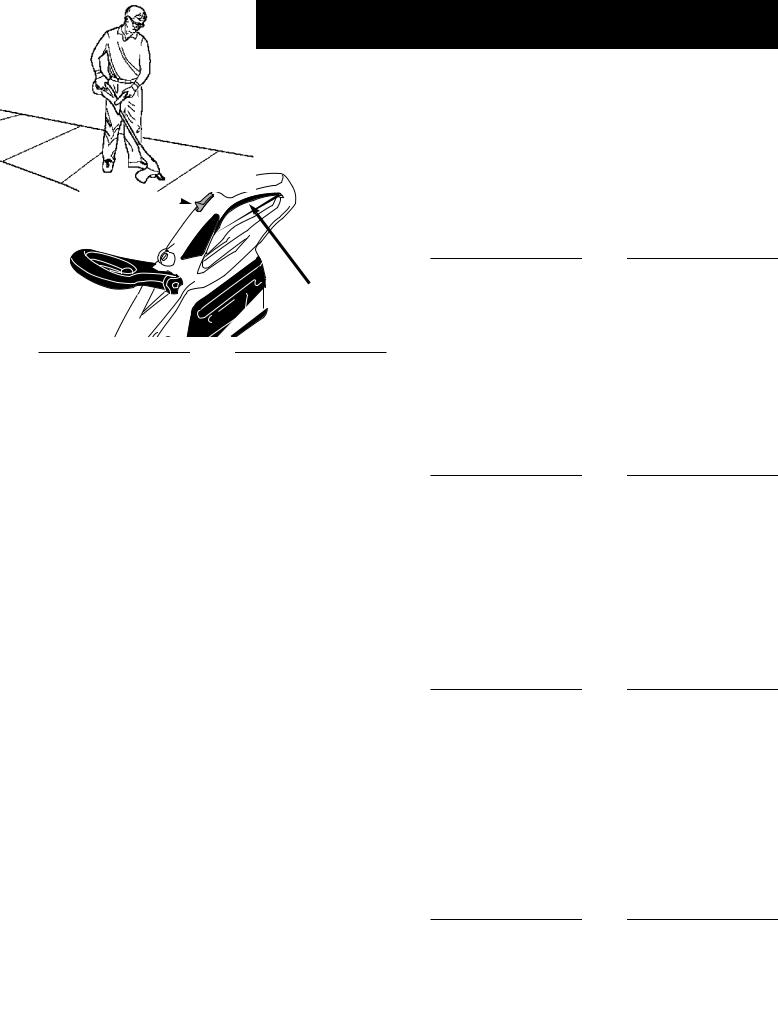
9.SWEEPING - DO NOT SWEEP WITH TRIMMER
(Fig. 15)
10.DO NOT BUMP TRIMMER ON CONCRETE. This can damage the stringhead (Fig. 16).
Fig. 16
Fig. 15
MAINTENANCE INSTRUCTIONS
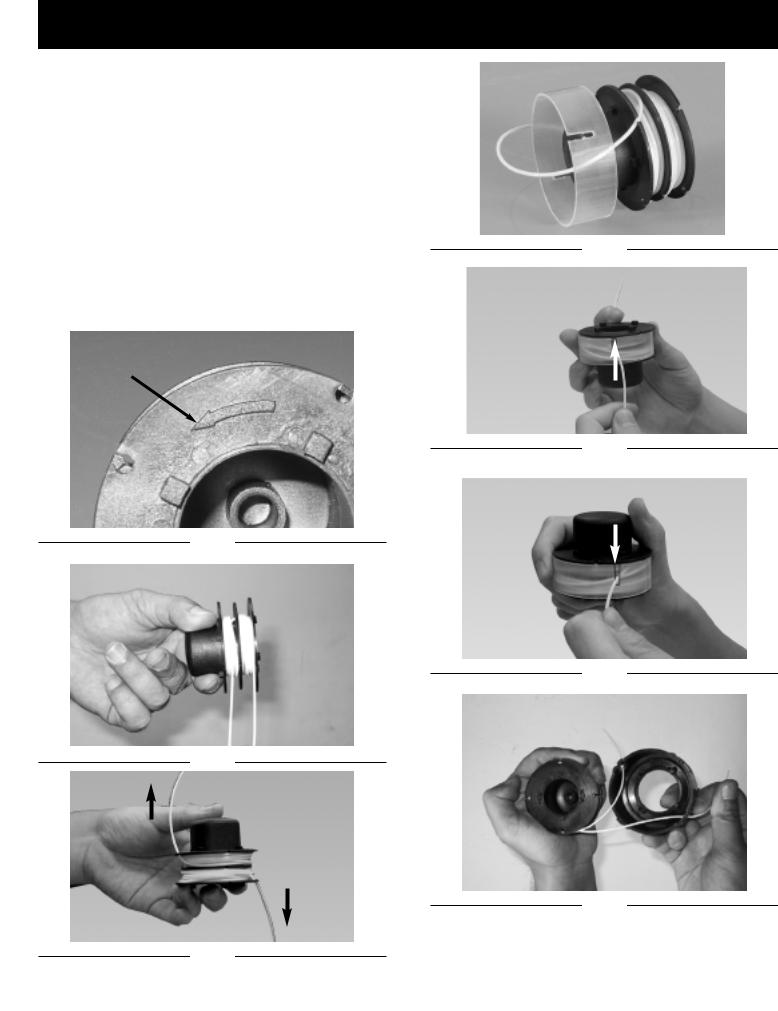
REPLACE THE SPOOL OF NYLON LINE
1.Unplug the trimmer.
2.Remove the spool assembly from the trimmer. To do so, hold the outer ribbed part of the assembly with one hand, while pushing down and turning the spool head with the other to unlock it. (Fig. 17 & Fig. 18) The spool carrier and spool will now disassemble easily. NOTE: There is a spring inside the spool head that could easily be lost. Ensure that it is put in a safe place.
Fig. 18
3. Remove the clear plastic line retaining ring. Remove any existing line from the spool.
4. Using 0.065" replacement line measure off approximately 14' of line. Double over the cutter line into two equal lengths and place loop in slot of the spool divider (Fig. 19).
Fig. 17
Fig. 19
10
MAINTENANCE INSTRUCTIONS
5.Wind the line onto the spool by turning the spool. The line should go on in the direction of the arrow (A) on the spool (Fig. 20). Line should be wrapped tightly around the spool. The line is wound with each half separated by the divider. Tightly wind it until there is about 6" of line left (Fig. 21).
6.Lock the ends of the line in opposite slots on the spool (Fig. 22). Place the clear plastic line retainer back over the line and spool (Fig. 23). Pull the lower line up into the lower slot in the clear plastic line retainer (Fig. 24). Pull the upper line down into the upper slot (Fig. 25).
7.Insert the line through each eyelet in the spool carrier and slide the spool into the carrier. (Fig. 26)
NOTE: Ensure that the line is within the clear plastic line retainer. If it's outside of the clear plastic line retainer, the line will not feed.
A
Fig. 20
Fig. 21
Fig. 22
Fig. 23
Fig. 24
Fig. 25
Fig. 26
11

MAINTENANCE INSTRUCTIONS
8.Make sure to insert the spring, assemble the spool and spool carrier back onto the trimmer. To do so, push the head on and turn it clockwise until it locks. (Fig. 27 and Fig. 28)
9.To test if the line is advancing properly, push the button with your thumb while pulling the line with your fingers. The line should advance freely. (Fig. 29).
10.In the event of the line breaking inside the spool, repeat the replacement operation.
11.Start the grass trimmer following the instructions in the “STARTING” section.
Fig. 27
MAINTENANACE
Before carrying out CAUTION: any maintenance
operations, cut off the electric power supply by disconnecting the battery pack from the housing.
1.Regular cleaning and maintenance of your string trimmer will ensure efficiency and prolong the life of your machine.
2.After each cutting operation, take apart and clean out the grass and soil from: the spool and its slot, the whole trimmer and in particular the guard.
3.During operation, keep the air slots clean and free of grass.
4.Only use a cloth soaked with hot water and a soft brush to clean the string trimmer.
5.Do not spray or wet the appliance with water.
6.Do not use detergents or solvents as these could ruin the trimmer. The parts in plastic can easily be damaged by chemical agents.
7.If the line cutting blade no longer cuts or breaks, have this replaced by contacting an professional service center.
The line cutting CAUTION: blade can give deep
cuts. For repairs which have not been explained in these instructions, contact a professional service center.
8.This appliance has no internal serviceable parts. Do not attempt any repairs. Doing so could create a hazard and void the manufacturer’s warranty.
Fig. 28
Fig. 29
12

SPECIFICATION
Motor . . . . . . . . . . . . . . . . . . . . . . . . . . . . . . . . . . . . . . . . . . . . . . . . . . . . . . . . . . . . . . . . . . . . . . . . . . . . . . . . . . . . . . . . . . .12V No Load Speed . . . . . . . . . . . . . . . . . . . . . . . . . . . . . . . . . . . . . . . . . . . . . . . . . . . . . . . . . . . . . . . . . . . . . . . . . . . . .11,000 min. Cutting Line . . . . . . . . . . . . . . . . . . . . . . . . . . . . . . . . . . . . . . . . . . . . . . . . . . . . . . . . . . . . . . . . . . . . . . . . . . .ø0.065” (1.65mm) Cutting Path . . . . . . . . . . . . . . . . . . . . . . . . . . . . . . . . . . . . . . . . . . . . . . . . . . . . . . . . . . . . . . . . . . . . . . . . . . . . . . . .9” (230mm) Charge Time . . . . . . . . . . . . . . . . . . . . . . . . . . . . . . . . . . . . . . . . . . . . . . . . . . . . . . . . . . . . . . . . . . . . . . . . . . . . . . . . . . .16 Hrs Weight . . . . . . . . . . . . . . . . . . . . . . . . . . . . . . . . . . . . . . . . . . . . . . . . . . . . . . . . . . . . . . . . . . . . . . . . . . . . . . . . . . . . . . . . .4.9 kg
13
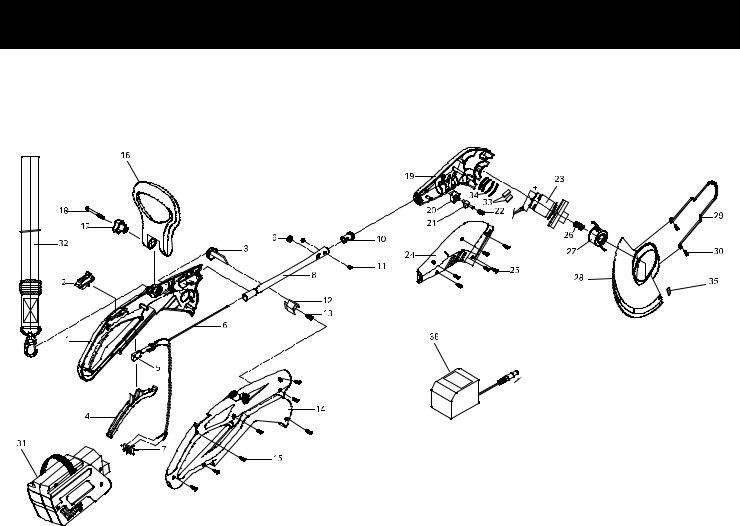
PARTS LIST
No. |
Parts No. |
Description |
No. |
Parts No. |
Description |
1 |
6038-959908 |
HOUSING (L) |
19 |
6086-959910 |
MOTOR HOUSING (L) |
2 |
6209-959903 |
PUSH BUTTON |
20 |
6134-202009 |
LOCK RELEASE |
3 |
6056-959909 |
BUTTON RELEASE |
21 |
6114-202001 |
CLUB |
4 |
6056-959907 |
TIRGGER |
22 |
6024-959902 |
SPRING |
5 |
6022-959901 |
SWITCH |
23 |
6228-959901 |
MOTOR ASS'Y |
6 |
6011-959901 |
POWER CORD |
24 |
6086-959909 |
MOTOR HOUSING (R) |
7 |
6041-751001 |
TERMINAL |
25 |
6SDABB04-18 |
SCREW |
8 |
6114-959901 |
TUBE |
26 |
6024-959903 |
SPRING |
9 |
6036-959901 |
BUCKLE |
27 |
6228-202004 |
SPOOL ASS'Y |
10 |
6131-959902 |
COLLAR |
28 |
6228-959902 |
GUARD ASS'Y |
11 |
6SDABB04-06 |
SCREW |
29 |
6131-959901 |
GUIDE |
12 |
6056-959908 |
BATTERY LOCK |
30 |
6SLABB3.5-10 |
SCREW |
13 |
6024-959901 |
SPRING |
31 |
6228-BL1201 |
BATTERY ASS'Y |
14 |
6038-959907 |
HOUSING (R) |
32 |
6149-959901 |
STRAP |
15 |
6SDABB04-18 |
SCREW |
33 |
6014-638101 |
SPONGE |
16 |
6228-959903 |
HANDLE ASS'Y |
34 |
6014-959901 |
SPACER |
17 |
6219-959901 |
KNOB |
35 |
6017-959902 |
COVER |
18 |
6SXDB-06-57 |
SCREW |
36 |
6205-607031 |
ADAPTOR |
14

NOTES
15

MANUFACTURER’S LIMITED WARRANTY FOR:
The limited warranty set forth below is given by MTD LLC (“MTD”) with respect to new merchandise purchased and used in the United States and Canada, its possessions and territories.
MTD warrants this product against defects in material and workmanship for a period of two (2) years commencing on the date of original purchase and will, at its option, repair or replace, free of charge, any part found to be defective in material or workmanship. This limited warranty shall only apply if this product has been operated and maintained in accordance with the Operator’s Manual furnished with the product, and has not been subject to misuse, abuse, commercial use, neglect, accident, improper maintenance, alteration, vandalism, theft, fire, water or damage because of other peril or natural disaster. Damage resulting from the installation or use of any accessory or attachment not approved by MTD for use with the product(s) covered by this manual will void your warranty as to any resulting damage. This warranty is limited to ninety (90) days from the date of original retail purchase for any MTD product that is used for rental or commercial purposes, or any other income-producing purpose.
HOW TO OBTAIN SERVICE: Warranty service is available, WITH PROOF OF PURCHASE THROUGH YOUR LOCAL AUTHORIZED SERVICE DEALER. To locate the dealer in your area, please check for a listing in the Yellow Pages or contact the Customer Service Department of MTD LLC by calling 1-866-747-9816 or writing to P.O. Box 361131, Cleveland OH 44136-0019 or if in Canada call 1-800-668-1238. No product returned directly to the factory will be accepted unless prior written permission has been extended by the Customer Service Department of MTD LLC.
This limited warranty does not provide coverage in the following cases:
A.Trimmer line.
B.MTD does not extend any warranty for products sold or exported outside of the United States of America and Canada, its possessions and territories, except those sold through MTD’s authorized channels of export distribution.
MTD reserves the right to change or improve the design of any MTD Product without assuming any obligation to modify any product previously manufactured.
No implied warranty, including any implied warranty of merchantability or fitness for a particular purpose, applies after the applicable period of express written warranty above as to the parts as identified. No other express warranty or guaranty, whether written or oral, except as mentioned above, given by any person or entity, including a dealer or retailer, with respect to any product shall bind MTD. During the period of the Warranty, the exclusive remedy is repair or replacement of the product as set forth above. (Some states do not allow limitations on how long an implied warranty lasts, so the above limitation may not apply to you.)
The provisions as set forth in this Warranty provide the sole and exclusive remedy arising from the sales. MTD shall not be liable for incidental or consequential loss or damages including, without limitation, expenses incurred for substitute or replacement lawn care services, for transportation or for related expenses, or for rental expenses to temporarily replace a warranted product.
(Some states do not allow limitations on how long an implied warranty lasts, so the above limitation may not apply to you.)
In no event shall recovery of any kind be greater than the amount of the purchase price of the product sold. Alteration of the safety features of the product shall void this Warranty. You assume the risk and liability for loss, damage, or injury to you and your property and/or to others and their property arising out of the use or misuse or inability to use the product.
This limited warranty shall not extend to anyone other than the original purchaser, original lessee or the person for whom it was purchased as a gift.
How State Law Relates to this Warranty: This warranty gives you specific legal rights, and you may also have other rights which vary from state to state.
To locate your nearest service dealer dial 1-866-747-9816 in the United States or 1-800-668-1238 in Canada.
MTD LLC
P.O. Box 361131
Cleveland, OH 44136-0019
16
 Loading...