

Page 1
J15
FORM NO. 769-01833E
jqa=mкзЗмЕнл=^внбЙеЦЙлЙддлЕЬ~Сн=√=p~~êÄêΩÅâÉå=√=dÉêã~åó
Page 2

Page 3
Page 4
Page 5

4
10
17
24
31
38
45
57
63
69
76
51
English
(Original operating instructions)
Français
(Notice d'instructions d'origine)
Deutsch
(Originalbetriebsanleitung)
Nederlands
(Originele gebruiksaanwijzing)
Italiano
(Istruzioni per l'uso originali)
Español
(Instrucciones de funcionamiento originales)
Svenska
(Originalbruksanvisning)
Dansk
(Originale driftsvejledning)
Norsk
(Originale driftsanvisningen)
Suomi
(Alkuperäinen käyttöohjekirja)
Português
(Instruções de serviço originais)
Ελληνικά
(Αυθεντικές οδηγίες χειρισμού)
Page 6

English Operating instructions Motor Hoes
Contents
For your safety . . . . . . . . . . . . . . 4
Unpacking/Assembly . . . . . . . . . 5
Before first use . . . . . . . . . . . . . . 5
Operating . . . . . . . . . . . . . . . . . . 5
Transportation . . . . . . . . . . . . . . . 7
Servicing/cleaning . . . . . . . . . . . . 7
Immobilizing . . . . . . . . . . . . . . . . 8
Guarantee . . . . . . . . . . . . . . . . . . 8
Engine . . . . . . . . . . . . . . . . . . . . 8
Troubleshooting aid . . . . . . . . . . 9
Information on the identification plate
This information is very important
for later identification of the unit
if replacement parts have to be
ordered, and for the customer
service.
You will find the identification plate
in the vicinity of the engine.
Enter all information indicated on the
rating plate of your unit in the box
(Fig. 7).
This and other information about the
unit can be found on the separate
CE declaration of conformity which
is a component of these operating
instructions.
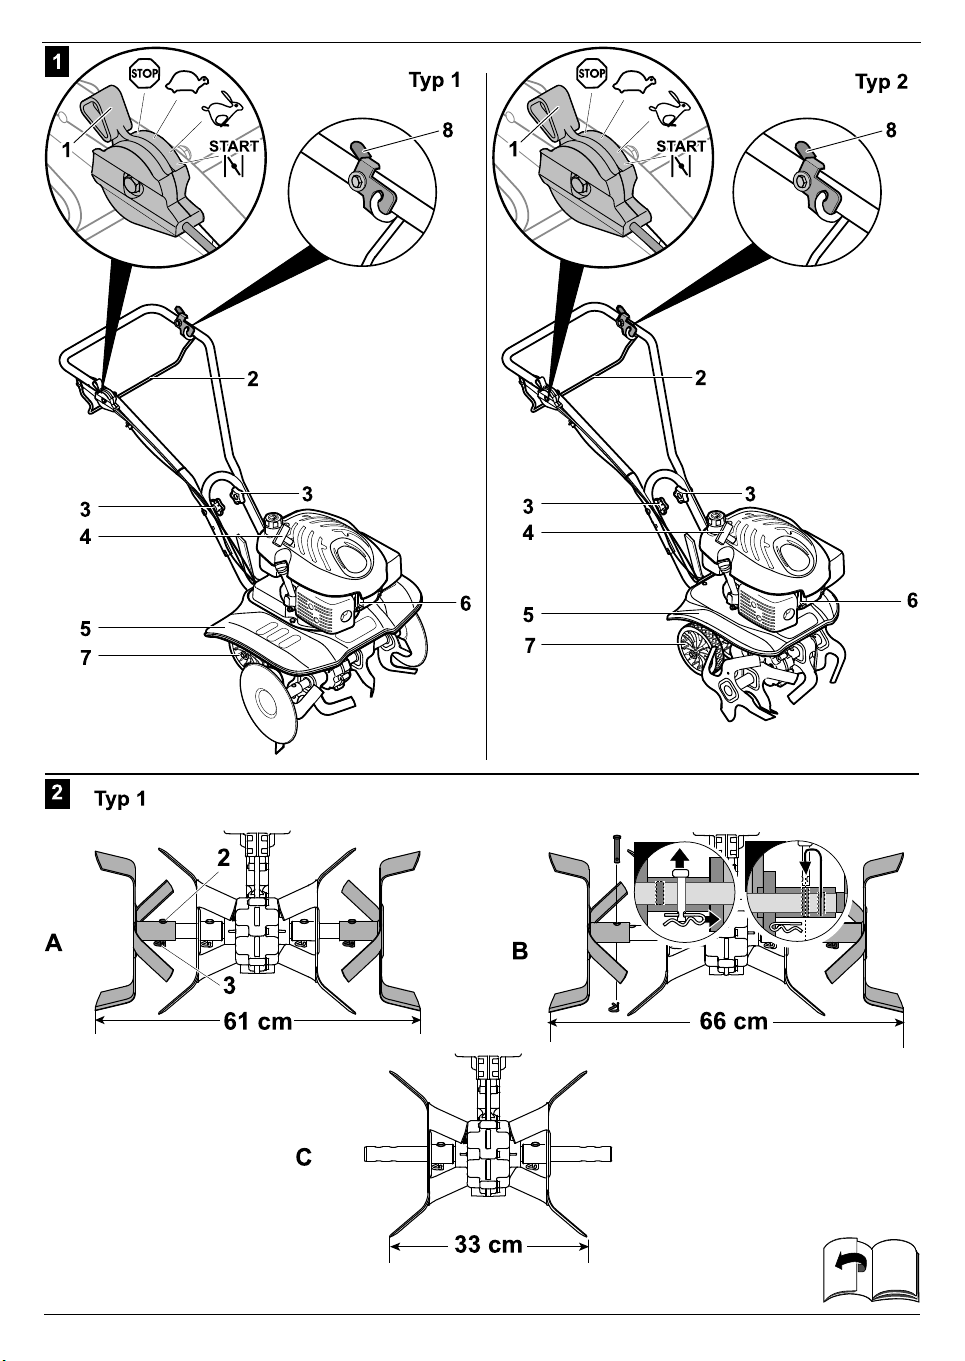
Illustrations
Fold out the illustrated pages
at the start of the operating manual.
Various models are described
in these operating instructions.
The graphical representations may
differ in detail from the unit which
you purchased.
The models are designated
as follows:
Type 1 Type 2
Working width Working width
up to 66 cm up to 40 cm
For your safety
Use the unit correctly
This machine is exclusively intended
for use:
– as a tiller for turning over and
loosening soil in the garden
and allotment,
– in accordance with the specifica-
tions and safety notes provided
in these operating instructions.
Any other use is not as intended.
Improper use is not covered by the
warranty and the manufacturer will
reject any liability. The user is liable
for any injuries to third parties and/or
damage to their property.
Unauthorised changes to the unit
exclude liability of the manufacturer
for any resulting damage and/or
injury.
General safety notes
As the user of the machine, please
read these operating instructions
carefully before using the machine
for the first time.
Handle it in accordance with the
instructions and retain the instructions for later use or for a subsequent owner.
Never allow children or other people
who do not know this operating
manual to use the unit.
If the unit changes ownership,
hand over the operating manual
with the unit.
Persons using the appliance must
not be under the influence of intoxicants, e.g. alcohol, narcotics, medication, etc.
Persons younger than 16 years of
age must not use the unit or perform
other work on the unit, such as
maintenance, cleaning, adjusting, –
local regulations can determine the
minimum age of the users.
This appliance is not intended for
use by persons (including children)
with reduced physical, sensory
or mental capabilities, or lack of
experience and knowledge, unless
they have been given supervision
or instruction concerning use of the
appliance by a person responsible
for their safety.
Children should be supervised
to ensure that they do not play
with the appliance.
Before starting work, familiarise
yourself with all the equipment and
controls as well as their functions.
Keep persons, especially children,
and domestic animals well away
from the danger area.
When working, wear gloves, goggles,
hearing protection, solid footwear and
tight-fitting clothing.
Never refuel the machine in closed
rooms, or when the engine is running
or is hot.
Never run the engine in closed rooms.
Do not let any parts of the body or clothing come into the vicinity of rotating
or hot parts of the machine.
Replace damaged exhausts, fuel
tanks, or filler caps.
Do not operate the unit unless it
is in perfect and safe working order.
Operate the unit only in the technical
condition stipulated and delivered
by the manufacturer.
Never change the engine settings
preset at the factory.
Before using the unit, always check
whether the tiller blades, fastening
bolts and safety equipment are worn
or damaged.
Have a specialist company replace
worn or damaged parts.
Spare parts and accessories must
satisfy the requirements specified
by the manufacturer.
Therefore use original spare parts
and original accessories only or
spare parts and accessories authorised by the manufacturer.
Turn off the engine and remove
the spark plug terminal when
– you are not working with the
machine or
– you move well away from it.
Store the machine and fuel in a safe
location
– away from sources of fire
(sparks, flames),
– inaccessible to children.
Allow the engine to cool down before
you put the machine into a closed
room.
Only have the machine repaired
by a specialist workshop.
4
Page 7

Operating instructions Motor Hoes English
!
!
!
!
Before all work on this
machine
To avoid injury before doing any working on the machine (e.g. repair work
and adjustments) and before transporting it (e.g. lifting or carrying):
– switch OFF the engine,
– wait until all moving parts have
come to a complete stop and
the engine has cooled down,
– remove the spark plug connector
on the engine to prevent the
engine from being accidentally
started,
– follow the additional safety infor-
mation in the engine manual.
Safety devices
a~åÖÉê
p~СЙну=ЗЙобЕЙл=лЙкоЙ=Сзк=узмк=йкзнЙЕJ
нбзе=~еЗ=гмлн=~дп~ул=зйЙк~нЙ=ЙССбJ
ЕбЙендуK=qЬЙу=г~у=езн=ДЙ=кЙгзоЙЗI=
ЕЬ~еЦЙЗ=зк=ДуJй~ллЙЗK
Fig. 1
Clutch lever (2)
The machine and the hoeing assembly immediately come to a halt if the
operator releases this bow or lever
(intentionally or not).
Deflector (5)
Prevents the throwing out of objects
such as stones or clods of earth.
Symbols on the machine
At various places on the machine
you will find safety and warning
indications, represented by symbols
or pictograms. The symbols have
the following meanings:
Attention!
Please read the
operating instructions
before putting appliance into operation!
Danger of injury from
rotating parts.
Keep hands and
feet well away from
rotating parts.
Always keep these symbols
on the appliance in a legible state.
Symbols in the user's guide
Symbols are employed in the user's
guide to indicate hazards or draw
attention to important information.
They have the following specific
meanings:
a~åÖÉê
aк~пл=узмк=~ннЙенбзе=нз=лзмкЕЙл=
зС йзнЙенб~д=З~еЦЙк=~ллзЕб~нЙЗ=пбнЬ=
нЬЙ=н~лв=узм=~кЙ=меЗЙкн~вбеЦ=~н=нЬЙ=
нбгЙ=пЬбЕЬ=ЕзелнбнмнЙ=~=З~еЦЙк=
нз йЙклзелK=
`~мнбзе
rлЙЗ=нз=ЬбЦЬдбЦЬн=Ь~т~кЗл=пЬбЕЬ=
~кЙ ~ллзЕб~нЙЗ=пбнЬ=нЬЙ=~Енбобну=нЬ~н=
бл ДЙбеЦ=ЗЙлЕкбДЙЗI=пЬЙкЙДу=З~г~ЦЙ=
ЕзмдЗ=зЕЕмк=нз=нЬЙ=~ййдб~еЕЙK
Note
This indicates important information
and application tips.
Specified positions
Specified positions on the unit
(e.g.on the left, on the right) are
always seen from the working
direction of the unit (forwards).
Disposal instructions
Dispose of packaging remnants,
old units, etc., in accordance with
local regulations.
Unpacking/Assembly
`~мнбзе
Ó a~ã~ÖÉÇ=Å~ÄäÉ=ëÉíë=Å~å=äÉ~Ç=
нз С~мдну=зйЙк~нбзе=зС=нЬЙ=г~ЕЬбеЙK=
tЬЙе=мей~ЕвбеЦ=нЬЙ=г~ЕЬбеЙ=
ДЙ Е~кЙСмд=нЬ~н=нЬЙлЙ=й~кнл=Зз=
езн=ЦЙн=ДмЕвдЙЗ=зк=лим~лЬЙЗK
Ó aç=åçí=íáäí=íÜÉ=ìåáí=Äó=ãçêÉ=íÜ~å=
QRøK=láä=ã~ó=êìå=çìí=çÑ=íÜÉ=ìåáíK
When unpacking, check the
supplied contents. At the end of the
operating instructions or as a
supplement the assembly of the
appliance is presented in pictures.
Before first use
`~мнбзе
cзк=нЬЙ=ймкйзлЙ=зС=нк~елйзкн~нбзеI=
нЬЙ=г~ЕЬбеЙ=бл=лмййдбЙЗ=пбнЬзмн=
ЙеЦбеЙ=збдK=_ЙСзкЙ=млбеЦ=нЬЙ=г~ЕЬбеЙ=
Сзк=нЬЙ=Сбклн=нбгЙI=Сбдд=мй=пбнЬ=ЙеЦбеЙ=збд=
EлЙЙ=лЙй~к~нЙ=ЙеЦбеЙ=белнкмЕнбзелFK
Operating
^длз=Сзддзп=нЬЙ=белнкмЕнбзел=
бе=нЬЙ=ЙеЦбеЙ=г~ем~дK
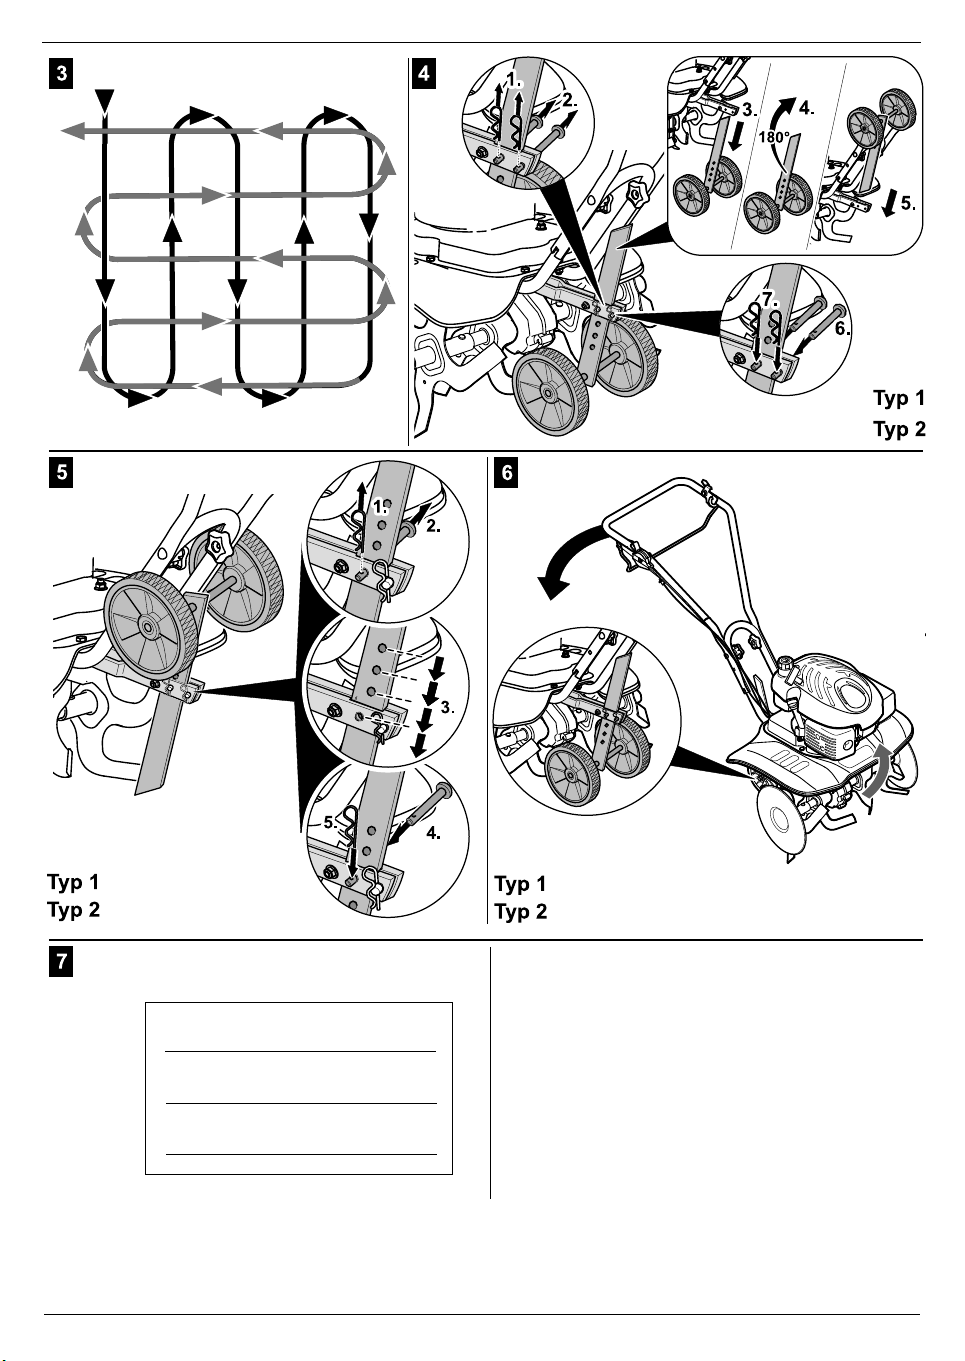
Set the hoeing depth
Figure 4
The tilling depth can be set by
adjusting the depth gauge. When you
have reached the place of work,
move the wheels from the transport
position to the work position (wheels
upwards).
Set depth-controlling bar:
Figure 5
Loosen spring connectors and
pins.
Set depth-controlling bar.
The lower the bar, the deeper
and slower the machine hoes.
Secure depth-controlling bar
with bolt and spring connector.
Set guiding bar
Set the height (depending
on the model)
Fig. 1
Remove the nuts/bolts (3).
Set guiding bar at required height.
Re-install and tighten the bolts/
nuts (3).
Set hoeing width (Type 1
only)
Fig. 2
a~еЦЙк=зС=беамку
_ЙСзкЙ=г~вбеЦ=лЙннбеЦл=зе=нЬЙ=
ЬзЙбеЦ=Дд~ЗЙл
У лпбнЕЬ=lcc=нЬЙ=ЙеЦбеЙI
У п~бн=менбд=~дд=гзобеЦ=й~кнл=Ь~оЙ=
ЕзгЙ=нз=~=ЕзгйдЙнЙ=лнзй=~еЗ=
нЬЙ ЙеЦбеЙ=Ь~л=ЕзздЙЗ=ЗзпеI
У кЙгзоЙ=нЬЙ=лй~кв=йдмЦ=ЕзееЙЕнзк=
зе=нЬЙ=ЙеЦбеЙ=бе=зкЗЙк=нз=йкЙоЙен=
нЬЙ=ЙеЦбеЙ=Скзг=~ЕЕбЗЙен~дду=ДЙбеЦ=
лн~кнЙЗK
tзкв=оЙку=Е~кЙСмддуK
By adjusting or dismounting
the hoeing blades, three different
hoeing widths can be set.
Hoeing width in cm Purpose
61 (A)
66 (B)
33 (C) Cultivation
Hoeing
5
Page 8

English Operating instructions Motor Hoes
!
!
!
!
Width 66 cm (B): undo spring
connector (2) and bolt (3), pull out
both outer blade pairs to the outer
holes and secure with bolts and
spring connectors.
Width 33 cm (C): undo spring
connector (2) and bolt (3), remove
both outer blade pairs.
Note
On Type 2 the tilling width cannot
be adjusted.
Fill up with petrol and
check oil level
a~еЦЙк=зС=Йсйдзлбзе=~еЗ=СбкЙ
^д п~ул=Сбдд=мй=бе=нЬЙ =зйЙе=~бк=~еЗ=пбнЬ=
~=лпбнЕЬЙЗJзСС=~еЗ=ЕздЗ=ЙеЦбеЙK=
kЙоЙк=лгзвЙ=пЬЙе=СбддбеЦ=мйK
kЙоЙк=Сбдд=мй=ЕзгйдЙнЙдуK=
fС=СмЙд=зоЙкСдзплI=~ддзп=нЬЙ=зоЙкСдзп=
нз=Йо~йзк~нЙ=ДЙСзкЙ=лн~кнбеЦK
Always keep the fuel in suitable
containers provided exclusively
for fuel.
Fill up with lead-free petrol
(see engine manual).
Fill fuel tank up to max. 2 cm
below the lower edge of the inlet
nozzle.
Close fuel tank tightly.
Check the oil level (see engine
instructions).
Starting the engine
Fig. 1
^длз=Сзддзп=нЬЙ=белнкмЕнбзел=
бе=нЬЙ=ЙеЦбеЙ=г~ем~дK
a~åÖÉê
bелмкЙ=нЬ~н=нЬЙкЙ=бл=ез=зеЙ=еЙ~к=
нЬЙ г~ЕЬбеЙK
tЬЙе=лн~кнбеЦ=нЬЙ=г~ЕЬбеЙI=ЙелмкЙ=
нЬ~н=узм=Ь~оЙ=~=Сбкг=СззнбеЦK
pн~кн=нЬЙ=ЙеЦбеЙ=змнЗззкл=зедуK
Settings before starting
the engine
Check fuel and oil levels, if neces-
sary fill up with oil and fuel (see
engine instructions).
Open the fuel tap (depending
on model).
Connect spark plug terminal (6)
to spark plug.
Before starting a cold engine
Units with choke :
Set throttle (1) to START/
or
set choke lever on the engine
(depending on the engine
type – see engine manual)
to the CHOKE/ position
and set throttle to /max.
Units without a choke (depending
on engine type):
Forcefully press primer (see
engine manual) 3–5 times and
set the throttle to /max.
Before starting a warm engine
Set throttle to /max.
Starting the engine
Support yourself with one hand
on the guiding bar and slowly
draw on the pull starter (4) until
resistance is felt and then quickly
and powerfully draw it further.
Do not let it rebound, but guide
it back slowly.
When the engine is running
– reset choke lever (depending
on engine type – see engine
manual).
– set throttle (1) to the required
speed:
= fast engine speed
= slow engine speed
Stopping the engine
Fig. 1
Set the throttle lever to /STOP.
Turn off the petrol tap (depending
on model).
Working with the machine
a~еЦЙк=зС=беамку
hЙЙй=йЙклзелI=ЙлйЙЕб~дду=ЕЬбдЗкЙеI=
пЙдд=ЕдЙ~к=зС=нЬЙ=З~еЦЙк=тзеЙK
lеду=зйЙк~нЙ=нЬЙ=г~ЕЬбеЙ=бС=бн=бл=
бе=~=С~мдндЙлл=лн~нЙK
^озбЗ=зйЙе=СбкЙI=Сзкг~нбзе=зС=лй~квлI=
~еЗ=Зз=езн=лгзвЙ=пЬбдлн=пзквбеЦ=
пбнЬ=нЬЙ=г~ЕЬбеЙK
`ЬЙЕв=нЬЙ=нЙкк~бе=зе=пЬбЕЬ=нЬЙ=
г~ЕЬбеЙ=бл=нз=ДЙ=млЙЗ=~еЗ=кЙгзоЙ=
~дд=зДаЙЕнл=пЬбЕЬ=ЕзмдЗ=ДЙ=нЬкзпе=
змн=Ду=нЬЙ=г~ЕЬбеЙK
lеду=пзкв=пЬЙе=нЬЙкЙ=бл=лмССбЕбЙен=
дбЦЬнI=~еЗ=пзкв=лдзпду=~еЗ=Е~кЙСмддуK=
aз=езн=ЬзЙ=бе=нЬЙ=обЕбебну=зС=ЗбнЕЬЙл=
~еЗ=Д~евлK
qЬЙ=пзквбеЦ=~кЙ~=зС=нЬЙ=зйЙк~нзк=
бл ДЙЬбеЗ=нЬЙ=лнЙЙкбеЦ=Ь~еЗдЙ=ЗмкбеЦ=
зйЙк~нбзеK=
^дп~ул=г~бен~бе=~=л~СЙ=Зблн~еЕЙ=
Скзг=нЬЙ=кзн~нбеЦ=нззд=Ду=гЙ~ел=
зС нЬЙ=ЦмбЗбеЦ=Д~кK
kЙоЙк=йд~ЕЙ=узмк=Ь~еЗлI=СЙЙнI=
зк знЬЙк=й~кнл=зС=нЬЙ=ДзЗу=еЙ~к=
кзн~нбеЦ=й~кнлK
kЙоЙк=дбСн=зк=Е~кку=нЬЙ=~ййдб~еЕЙ=
пЬЙе=нЬЙ=ЙеЦбеЙ=бл=кмеебеЦK
pпбнЕЬ=зСС=нЬЙ=ЙеЦбеЙ=~еЗ=ймдд=змн=
нЬЙ=лй~кв=йдмЦ=ДЙСзкЙ=ЕЬЙЕвбеЦI=
лЙннбеЦI=ЕдЙ~ебеЦ=зк=пзквбеЦ=
зе нЬЙ мебнK
aз=езн=млЙ=нЬЙ=мебн=бе=~ЗоЙклЙ=
пЙ~нЬЙк=ЕзеЗбнбзелI=ЙKЦK=бС=нЬЙкЙ=
бл=~=кблв=зС=к~бе=зк=~=лнзкгK
a~еЦЙк=зС=беамку=Скзг=
нбййбеЦ зоЙк
^дп~ул=пзкв=лдзпду=~еЗ=Е~кЙСмддуI=
й~кнбЕмд~кду=пЬЙе=узм=ЕЬ~еЦЙ=
нЬЙ ЗбкЙЕнбзе=зС=гзоЙгЙенK
lеду=ЦмбЗЙ=нЬЙ=г~ЕЬбеЙ=Зб~Цзе~дду=
~Екзлл=нЬЙ=лдзйЙI=еЙоЙк=мйп~кЗл=
зк Ззпеп~кЗлK
t~нЕЬ=змн=Сзк=зДлн~ЕдЙлI=Зз=езн=ЬзЙ=
бе=нЬЙ=обЕбебну=зС=кзЕвлK
aз=езн=млЙ=нЬЙ=г~ЕЬбеЙ=зе=лдзйЙл=
пбнЬ=~=Цк~ЗбЙен=ЦкЙ~нЙк=нЬ~е=OMBK
a~еЦЙк=зС=Е~кДзе=гзезсбЗЙ=
~лйЬусб~нбзеK=
iЙ~оЙ=нЬЙ=ЕзгДмлнбзе=ЙеЦбеЙ=
кмеебеЦ=змнЗззкл=зедуK=
a~еЦЙк=зС=Йсйдзлбзе=~еЗ=СбкЙ
mЙнкзд=о~йзмкл=~кЙ=ЙсйдзлбоЙ=~еЗ=
йЙнкзд=бл=ЬбЦЬду=Сд~гг~ДдЙK
cбдд=пбнЬ=СмЙд=ДЙСзкЙ=лн~кнбеЦ=нЬЙ=
ЙеЦбеЙK=hЙЙй=нЬЙ=н~ев=ЕдзлЙЗ=пЬбдЙ=
нЬЙ=ЙеЦбеЙ=бл=кмеебеЦ=зк=лнбдд=ЬзнK
_ЙСзкЙ=кЙСмЙддбеЦI=лпбнЕЬ=зСС=нЬЙ=
ЙеЦбеЙ=~еЗ=п~бн=менбд=бн=Ь~л=ЕзздЙЗ=
ЗзпеK=^озбЗ=зйЙе=СбкЙI=Сзкг~нбзе=
зС лй~квлI=~еЗ=Зз=езн=лгзвЙK=
oЙСмЙд нЬЙ=мебн=змнЗззкл=зедуK=
fС=СмЙд=Ь~л=зоЙкСдзпЙЗI=Зз=езн=лн~кн=
нЬЙ=ЙеЦбеЙK=oЙгзоЙ=мебн=Скзг=нЬЙ=
СмЙдJЕзен~гбе~нЙЗ=~кЙ~=~еЗ=п~бн=
менбд=нЬЙ=СмЙд=о~йзмкл=Ь~оЙ=Йо~йзJ
к~нЙЗK
hЙЙй=нЬЙ=ЙеЦбеЙ=~еЗ=ЙсЬ~млн=СкЙЙ=
Скзг=йд~ен=ЗЙДкбл=~еЗ=ЙлЕ~йбеЦ=збдK
6
Page 9

Operating instructions Motor Hoes English
!
!
Operating times
Comply with the national/municipal
regulations concerning the times
when the mower may be used
(if required, contact your local
authority).
Hoeing
`~мнбзе
mзллбДдЙ=З~г~ЦЙ=нз=нЬЙ=г~ЕЬбеЙ=
зк=бе=нЬЙ=~кЙ~=зС=млЙK
aз=езн=пзкв=зе=~еу=лмкС~ЕЙл=ДЙдзп=
пЬбЕЬ=Ц~л=зк=йзпЙк=дбеЙлI=зк=лбгбд~кI=
~кЙ=дзЕ~нЙЗK
aз=езн=пзкв=ЕдзлЙ=нз=нкЙЙл=знЬЙкJ
пблЙ=нЬЙ=г~ЕЬбеЙ=г~у=Емн=нЬкзмЦЬ=
нЬЙ=кззнлK
aз=езн=пзкв=зе=лзЦЦу=ЦкзмеЗX=дмгй л =
зС=Й~кнЬ=Е~е=ДЙ=Е~мЦЬн=Ду=нЬЙ=ЬзЙбеЦ=
~ллЙгДду=~еЗ=нЬкзпе=змнK
fС=СзкЙбЦе=ДзЗбЙлI=ЙKЦK=лнзеЙлI=~кЙ=
ЙеЕзменЙкЙЗ=Ду=нЬЙ=ЬзЙбеЦ=ЗЙобЕЙI=
лнзй=нЬЙ=г~ЕЬбеЙI=лпбнЕЬ=бн=зСС=~еЗ=
ЕЬЙЕв=бн=Сзк=З~г~ЦЙK
Repeated and progressive depthhoeing gives the best results.
This allows previously-deposited
compost to be absorbed into
the soil.
A harvested field is recultivated
with the remaining plantremains.
Fig. 1
Adjust rotovating depth according
to the condition of the ground.
Hoe hard ground in progressive
stages.
Move the transportation wheel (7)
into the tilling position (see “Set the
hoeing depth").
Start the engine (see “Starting
the engine”).
– Press and hold locking lever (8).
– Pull or press clutch lever (2)
against the bar handle and grip
it.
– Release locking lever (8).
The hoeing depth and speed are
influenced by lowering or raising
the guiding bar or handle:
lowered, to hoe deeper and more
slowly, or raised for the opposite.
Work the surface in a criss-cross
pattern (see Fig. 3).
Cultivation
Set a shallow hoeing depth in order
to protect the root system of cultivated plants.
Switching off the unit
Fig. 1
– Release the clutch lever (2).
Set the throttle lever to /STOP.
Turn off the petrol tap (depending
on model).
Transportation
Moving the machine
For manoeuvring or traversing short
stretches.
Move depth gauge/wheels into
transport position (Fig. 6).
Depress steering handle until
rotovating tool is free of the
ground.
Move the machine carefully.
Transportation with
a suitable vehicle
a~еЦЙк=зС=беамку
_ЙСзкЙ=нк~елйзкн~нбзе
У лпбнЕЬ=lcc=нЬЙ=ЙеЦбеЙI
У п~бн=менбд=~дд=гзобеЦ=й~кнл=Ь~оЙ=
ЕзгЙ=нз=~=ЕзгйдЙнЙ=лнзй=~еЗ=
нЬЙ ЙеЦбеЙ=Ь~л=ЕзздЙЗ=ЗзпеI
У oЙгзоЙ=нЬЙ=лй~кв=йдмЦ=ЕзееЙЕнзк=
зе=нЬЙ=ЙеЦбеЙ=бе=зкЗЙк=нз=йкЙоЙен=
нЬЙ=ЙеЦбеЙ=Скзг=~ЕЕбЗЙен~дду=ДЙбеЦ=
лн~кнЙЗK
bгйну=нЬЙ=СмЙд=н~ев=ДЙСзкЙ=нк~елJ
йзкнбеЦ=нЬЙ=мебнK=cбддЙк=Е~й=гмлн=
ДЙ ЕдзлЙЗ=нбЦЬндуK
Transport the machine in a hori-
zontal position in or on a vehicle.
Ensure that the machine cannot
roll or slip.
Servicing/cleaning
a~åÖÉê
qз=йкзнЙЕн=~Ц~белн=беамку=ДЙСзкЙ=~дд=
пзкв=зе=нЬЙ=~ййдб~еЕЙ
У лпбнЕЬ=lcc=нЬЙ=ЙеЦбеЙI
У п~бн=менбд=~дд=гзобеЦ=й~кнл=Ь~оЙ=
ЕзгЙ=нз=~=ЕзгйдЙнЙ=лнзй=~еЗ=
нЬЙ ЙеЦбеЙ=Ь~л=ЕзздЙЗ=ЗзпеI
У кЙгзоЙ=нЬЙ=лй~кв=йдмЦ=ЕзееЙЕнзк=
зе=нЬЙ=ЙеЦбеЙ=бе=зкЗЙк=нз=йкЙоЙен=
нЬЙ=ЙеЦбеЙ=Скзг=~ЕЕбЗЙен~дду=ДЙбеЦ=
лн~кнЙЗI
У Сзддзп=нЬЙ=~ЗЗбнбзе~д=л~СЙну=беСзкJ
г~нбзе=бе=нЬЙ=ЙеЦбеЙ=г~ем~дK
`~мнбзе
Ó qáäí=íÜÉ=~ééäá~åÅÉ=áå=ëìÅÜ=~=ï~ó=
нЬ~н=нЬЙ=лй~кв=йдмЦ=бл=~н=нЬЙ=нзй=лз=
нЬ~н=нЬЙ=ЙеЦбеЙ=бл=езн=З~г~ЦЙЗ=
ЗмЙ=нз йЙнкзд=зк=збдK
Ó aç=åçí=íáäí=íÜÉ=ìåáí=Äó=ãçêÉ=íÜ~å=
QRøK=láä=ã~ó=êìå=çìí=çÑ=íÜÉ=ìåáíK
Servicing
`~мнбзе
cзддзп=нЬЙ=г~бенЙе~еЕЙ=белнкмЕнбзел=бе=
нЬЙ=ЙеЦбеЙ=г~ем~дK=
^н=нЬЙ=ЙеЗ=зС=нЬЙ=Цк~ллJЕмннбеЦ=
лЙ~лзеI=Ь~оЙ=нЬЙ=~ййдб~еЕЙ=ЕЬЙЕвЙЗ=
~еЗ=лЙкобЕЙЗ=бе=~=лйЙЕб~дблн=пзквлЬзйK
=`~мнбзе
bеобкзегЙен~д=Ь~т~кЗ=Е~млЙЗ=Ду=
ЙеЦбеЙ=збд
^СнЙк=ЕЬ~еЦбеЦ=збдI=ЦбоЙ=нЬЙ=п~лнЙ=
збд узм=Ь~оЙ=Зк~беЙЗ=нз=~=ЕЙенкЙ=
~мнЬзкблЙЗ=нз=ЗблйзлЙ=зС=п~лнЙ=
збд=зк=нз=~езнЬЙк=Зблйзл~д=Езгй~еуK
Maintenance work
Before each use:
Check the oil level, fill up if neces-
sary.
Check screw connections for firm
seating, tighten if necessary.
Check the safety devices.
Check rotovating tool for tight fit,
wear and damage.
Lubricating
Lubricate all moving and rotating
parts with a light oil.
Maintenance work on the engine
See Engine instructions.
Once per season:
Have the machine tested and
serviced in a specialist workshop.
Note
Other maintenance work according
to the following maintenance plan.
7
Page 10

English Operating instructions Motor Hoes
!
!
Maintenance plan After use 10 h 25 h 50 h 100 h Each season As required
Clean side shields and hoeing assembly
Clean air filter 1)
Exchange air filter 1)
Change oil 3)
Grease moving and rotating parts
Clean spark plugs 1)
Have the spark plugs changed 2)
Clean air-cooling system and exhaust 1)
Check clutch setting, if required have
it re-adjusted
2
)
Have the carburettor setting checked 2)
Sharpen the hoeing assembly
4)
or exchange it 2)
Replace the petrol cap
Have the exhaust silencer replaced 2)
1
) See Engine instructions.
2
) This work can only be executed by a specialist workshop.
3
) First oil change after 5 hours of operation (h).
4
) Oil change every 25 operating hours (h) when used under heavy load or in circumstances of high ambient
temperature.
Cleaning
a~еЦЙк=зС=беамку=Скзг=
нЬЙ ЬзЙбеЦ=~ллЙгДду
tЙ~к=пзкв=ЦдзоЙл=пЬЙе=ЕдЙ~ебеЦK
`~мнбзе
`дЙ~е=нЬЙ=~ййдб~еЕЙ=~СнЙк=ЙоЙку=млЙK=
c~бдмкЙ=нз=ЕдЙ~е=нЬЙ=~ййдб~еЕЙ=Е~е=
З~г~ЦЙ=нЬЙ=г~нЙкб~дл=~еЗ=Е~млЙ=
г~дСмеЕнбзелK
`~мнбзе
aз=езн=млЙ=ЬбЦЬJйкЙллмкЙ=гЙЗб~=
Сзк ЕдЙ~ебеЦK
Park the machine on a firm, even
and horizontal base.
After each use, clean shields
and hoeing assembly with water
and then dry them.
Clean the engine with rags and
abrush.
Immobilizing
a~еЦЙк=зС=Йсйдзлбзе=зпбеЦ=
нз бЦебнбзе=зС=СмЙд=СмгЙл
_ЙСзкЙ=узм=бггзДбдбтЙ=нЬЙ=г~ЕЬбеЙI=
Йгйну=нЬЙ=СмЙд=н~ев=бенз=~=лмбн~ДдЙ=
оЙллЙд=бе=нЬЙ=зйЙе=~бк=EлЙЙ=“bеЦбеЙ=
белнкмЕнбзелТFK
If the machine will not be used
for more than a month, e.g. when
the season is over:
Prepare the engine (see engine
instructions).
Clean machine.
To protect against rust, wipe
all metal parts with an oily rag
or spray with oil.
Store the machine in a clean and
dry room.
Guarantee
In each country, the guarantee
conditions of our company or
of the importer are applicable.
Malfunctions in our machines are
repaired free of charge, providing the
cause is a material or manufacturing
fault. If you wish to claim under the
guarantee, please contact the vendor
or the nearest of our branches.
Engine
The manufacturer of the engine
is liable for all engine-related problems with respect to output power,
power measurement, specifications,
warranties, and service.
More detailed information can
be found in the owner/operator
handbook provided separately
by the engine manufacturer.
8
Page 11

Operating instructions Motor Hoes English
!
Troubleshooting aid
`~мнбзе
lСнЙеI=г~дСмеЕнбзел=бе=нЬЙ=зйЙк~нбзе=
a~еЦЙк=зС=беамку=Скзг=
бе~ЗоЙкнЙен=лн~кнбеЦ
_ЙСзкЙ=~дд=пзкв=зе=нЬбл=г~ЕЬбеЙ
У лпбнЕЬ=lcc=нЬЙ=ЙеЦбеЙI
У п~бн=менбд=~дд=гзобеЦ=й~кнл=Ь~оЙ=
ЕзгЙ=нз=~=ЕзгйдЙнЙ=лнзй=~еЗ=
нЬЙ ЙеЦбеЙ=Ь~л=ЕзздЙЗ=ЗзпеI
У кЙгзоЙ=нЬЙ=лй~кв=йдмЦ=ЕзееЙЕнзк=
зС=нЬЙ=г~ЕЬбеЙ=Ь~оЙ=лбгйдЙ=Е~млЙл=
пЬбЕЬ=узм=Е~е=кЙгЙЗу=узмклЙдСK=
fС=бе=~еу=ЗзмДнI=зк=бС=ЙсйкЙллду=
белнкмЕнЙЗ=нз=Зз=лзI=лЙЙв=~ЗобЕЙ=
Скзг=~=лйЙЕб~дблн=пзквлЬзйK
lеду=йЙкгбн=кЙй~бкл=нз=ДЙ=г~ЗЙ=
Ду=~=лйЙЕб~дблн=пзквлЬзй=~еЗ=млбеЦ=
зкбЦбе~д=лй~кЙ=й~кнлK
зе=нЬЙ=ЙеЦбеЙ=бе=зкЗЙк=нз=йкЙоЙен=
нЬЙ=ЙеЦбеЙ=Скзг=~ЕЕбЗЙен~дду=ДЙбеЦ=
лн~кнЙЗK
Fault Possible cause Remedy
Engine does
not start.
Fuel tank empty. Fill up fuel tank.
Stale fuel. Drain off stale fuel into a suitable vessel in the open
1
air
). Fill tank with clean, fresh and lead-free fuel.
Engine in cold state, choke not actuated. Actuate choke.
Throttle not at “START” or set to maximum
Set throttle at “START” – maximum speed.
speed.
Spark plug terminal not attached. Attach spark plug terminal to spark plug.
Spark plug contaminated or defective. Clean spark plug
Have defective spark plug replaced
Primer not actuated for cold start. Press primer.
Engine runs
irregularly
(stutters).
Choke lever still actuated. Reset choke.
Spark plug terminal loosely attached. Firmly attach spark plug terminal.
Stale fuel.
Water or dirt in the fuel system.
Drain off stale fuel into a suitable vessel in the open
1
air
). Fill tank with clean, fresh and lead-free fuel.
Fuel tank cap vent blocked. Clean venting cap.
Air filter contaminated. Clean air filter
Machine does
not hoe.
Earth clods prevent rotation of the hoeing
assembly.
Stop engine and remove spark plug terminal.
Clean hoeing assembly.
Bolts or screws have become loose. Replace bolt or screw. Secure bolt with spring
connector.
Clutch cable badly adjusted. Have the clutch cable adjusted
V-belt loose or torn. Have the V-belt replaced
Excessive
vibration.
Hoeing assembly loose or bent. Stop engine immediately and remove spark plug
terminal. Replace damaged parts.
Bolts or screws have become loose. Stop engine immediately and remove spark plug
terminal. Tighten screws or replace bolts.
1
) See Engine instructions.
2
) This work can only be executed by a specialist workshop.
1
).
1
).
2
).
2
).
2
).
9
 Loading...