

Page 1

Operator’s Manual
Mulch Kit Models
OEM-190-118
190-118-000
190-118-100
For Lawn Tractors & Garden Tractors
with a 46-inch Deck
PRINTED IN U.S.A.
MTD LLC, P.O. BOX 361131 CLEVELAND, OHIO 44136-9722
FORM NO.
770-10259D.fm
(6/5/2007)
Page 2
SECTION 1: TO THE OWNER
The Model 118 mulch kit is designed for use with 46-inch cutting decks on Lawn Tractors and Garden
Tractors manufactured after 1996 ONLY. It will NOT fit on tractors made in 1996 or prior. If you should own
such a tractor and would like to convert the deck to a mulcher, purchase kit 190-117-000/OEM-190-117. If you are
unsure of the manufacturing date of your tractor, contact the Customer Support department at 1(800) 800-7310.
Have your model number and serial number (located on the underside of the tractor seat) ready for prompt service.
IMPORTANT:
Cadet model LT 1022 lawn tractors and can NOT be safely installed and used as part of this mulch kit.
Contact your Cub Cadet dealer for more information on mulch kits for Cub Cadet lawn tractors.
NOTE: References to LEFT and RIGHT indicate the left and right sides of the tractor when facing forward in the operator’s position. Reference to the FRONT indicates the grille end; to the REAR the drawbar end.
The blades included in this kit are NOT compatible with the deck spindles found on Cub
SECTION 2: CONTENTS OF CARTON
Before beginning installation, remove all parts from the carton to make sure everything is present. Carton contents
are listed below. Part numbers are shown in parentheses.
One Mulch Plug (731-05264)
Two 16.28” 3-n-1 Blades (742-0611A)
One 14.88” 3-n-1 Blade (742-0612A)
14.88” Blade (Short)
One Plastic Wing Nut, 1/4” (712-3087)
One Carriage Screw, 1/4” (710-0134)
Hex Flange Nuts
16.28” Blades (Long)
Figure 1
NOTE: Many tractors manufactured by MTD are equipped with 3-n-1 (mulching) blades from the factory. Compare
the blades in this kit with the blades on your tractor’s deck. If the blades appear to be identical and your tractor’s
blades are neither dull nor damaged, you may choose to postpone installing the blades included in this kit
2
Page 3

SECTION 3: INSTALLATION
WARNING: Before beginning installation,
place the tractor on a firm and level surface,
set the parking brake, place the PTO in the
disengaged (OFF) position, stop the tractor’s
engine and remove the ignition key to
prevent unintended starting.
WARNING: Cutting blades are sharp.
Always protect hands by wearing heavy
leather work gloves to grasp blades.
Installing the Blades
IMPORTANT:
are NOT compatible with the deck spindles
found on Cub Cadet model LT 1022 lawn
tractors and can NOT be safely installed and
used as part of this mulch kit. Contact your
Cub Cadet dealer for more information on
mulch kits for Cub Cadet lawn tractors.
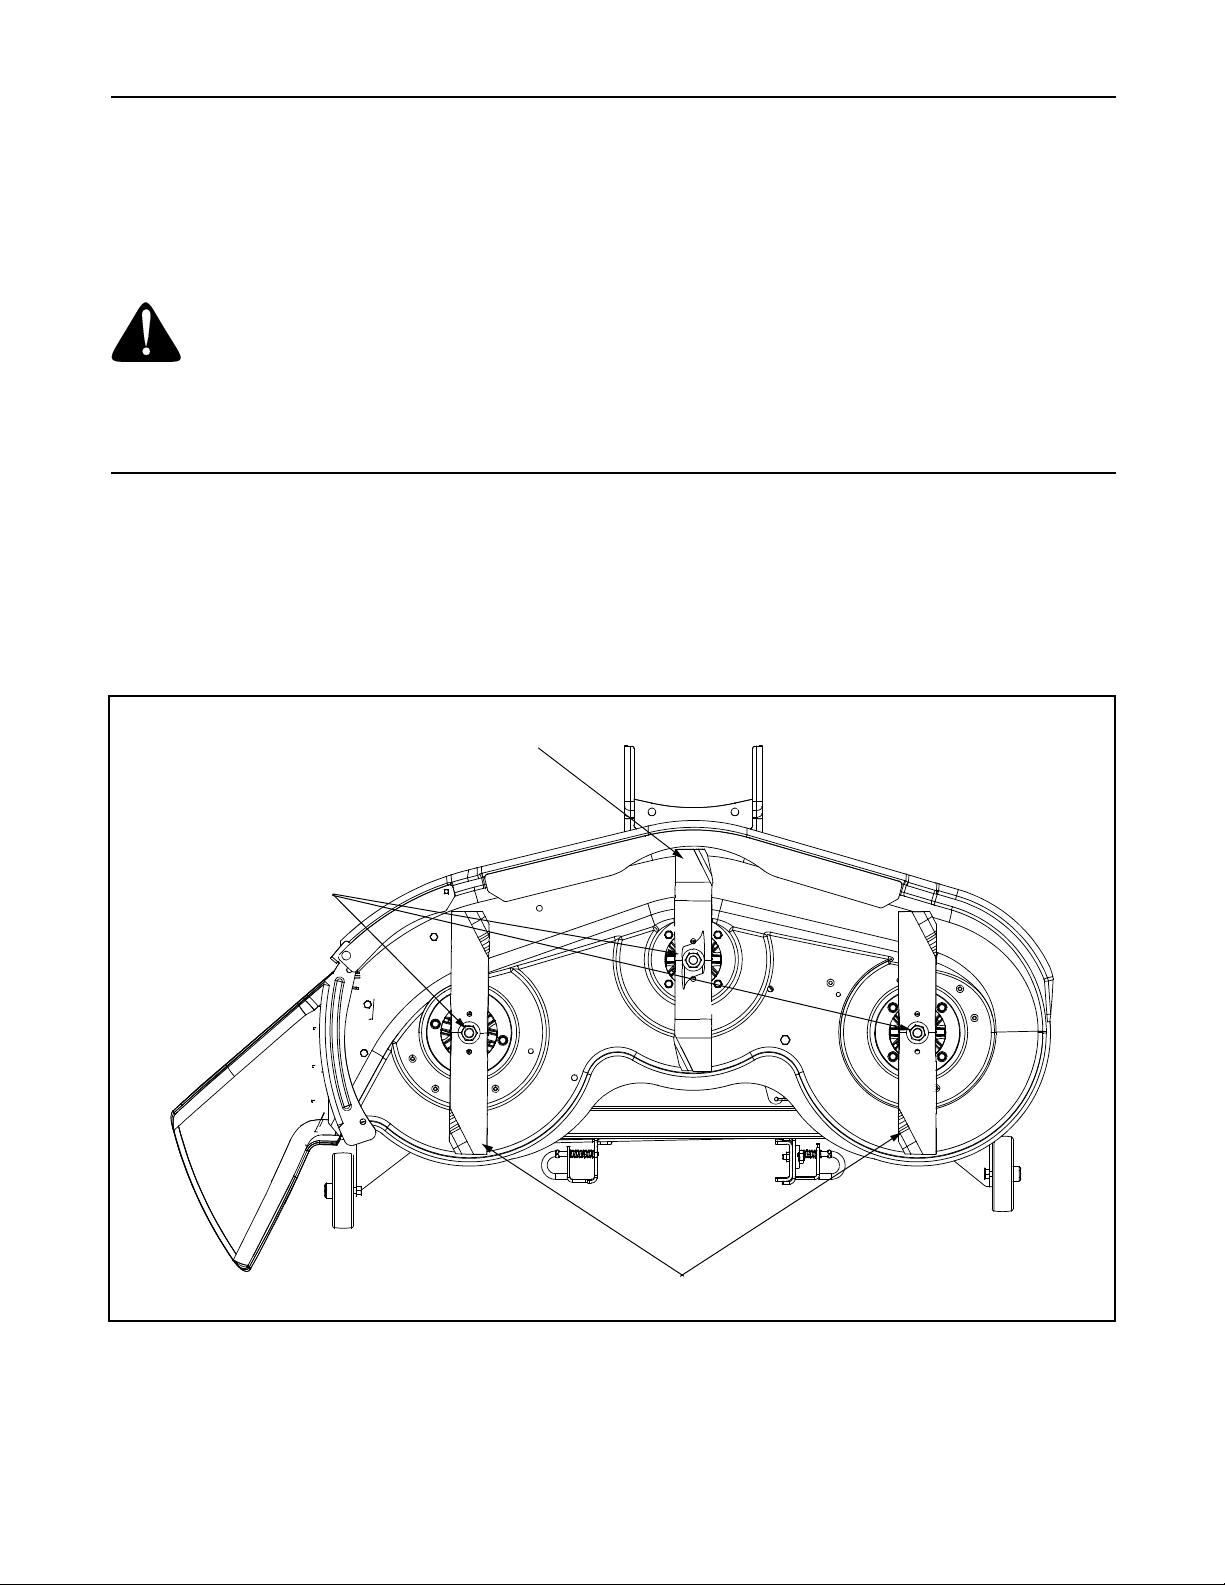
1. Remove the cutting deck from beneath the tractor
as instructed in your tractor’s Operator’s Manual,
then gently flip the deck over to expose its
underside,
2. Place a block of wood between the deck housing
baffle and the cutting blade to act as a stabilizer,
then use a wrench to remove the hex flange nut that
secures each blade to its spindle assembly. Refer
to Figure 2.
The blades included in this kit
3. Replace the blades with the blades included in the
kit. Be sure to install each blade with the side
marked ‘‘Bottom’’ (or with a part number stamped in
it) facing the ground when the mower is in the
operating position. Be certain to mount the SHORT
BLADE to the CENTER SPINDLE.
Refer to Figure 1.
IMPORTANT:
spindle’s hex flange nut to between 70 ft-lb and 90 ft-lb.
Use a torque wrench to tighten each blade
Inserting the Mulch Plug
1. Remove the carriage screw and plastic wing nut
from the mulch plug.
2. Pivot the discharge chute upward as shown in
Figure 3 and carefully insert the mulch plug into the
discharge chute opening.
3. Reinsert the carriage screw down through the deck
surface and mulch plug and secure it in place with
the plastic wing nut removed earlier. See Figure 3.
Discharge Chute
Carriage Screw
Mulch Plug
Figure 2
IMPORTANT:
(normal) thread pattern. Do NOT attempt to force the
nuts in the opposite direction. Doing so may damage
the nut.
The hex flange nuts have a right-handed
Plastic Wing Nut
Figure 3
NOTE: It is NOT necessary to remove the discharge
chute to operate the mower with the mulch kit installed.
It is also unnecessary to change the mower blades
should you choose to operate the mower without the
mulch plug installed.
IMPORTANT:
hole is not present to insert the carriage screw, mark
the location with a drift and use a 3/8”drill bit to create a
round hole in its place.
On older model decks where a square
3
Page 4

SECTION 4: OPERATION
This mulch kit incorporates special blades in a process of recirculating grass clippings repeatedly beneath the
cutting deck. After which, the ultra-fine clippings are forced back into the lawn where they act as a natural
fertilizer. Observe the following recommendations for the best results when mulching.
• ALWAYS operate the tractor with the throttle control in the FAST (rabbit) position while mulching
• Clear the lawn of all debris prior to mowing. Running over stick, rocks, children’s toys, etc. can damage the
mulching blades and make them less effective. Such objects can also be thrown by the mower and cause
serious personal injury or damage to surrounding property, even with the mulch plug in place.
• Never attempt to mulch if the lawn is damp. Wet grass tends to stick to the underside of the cutting deck
preventing proper mulching of the clippings.
• Do NOT attempt to mulch more than 1/3 the total height of the grass or approximately 1-1/2 inches. Doing
so will cause the clippings to clump up beneath the deck and not be mulched effectively.
WARNING: Do NOT under any circumstances attempt to mow through grass which exceeds ten
inches in height. Debris may build up on the mowing deck and come into contact with belts and other
moving parts or the engine’s exhaust system presenting a potential fire hazard.
• Maintain a slow ground speed to allow the grass clippings more time to effectively be mulched.
MTD LLC, P.O. BOX 361131 CLEVELAND, OHIO 44136-9722
4
 Loading...