

Page 1
Safety ,, Set-Up ,,Operation ,,Adjustments ,, Maintenance ,,Troubleshooting ,, Parts Lists ,,Warranty
OF A O
A AL
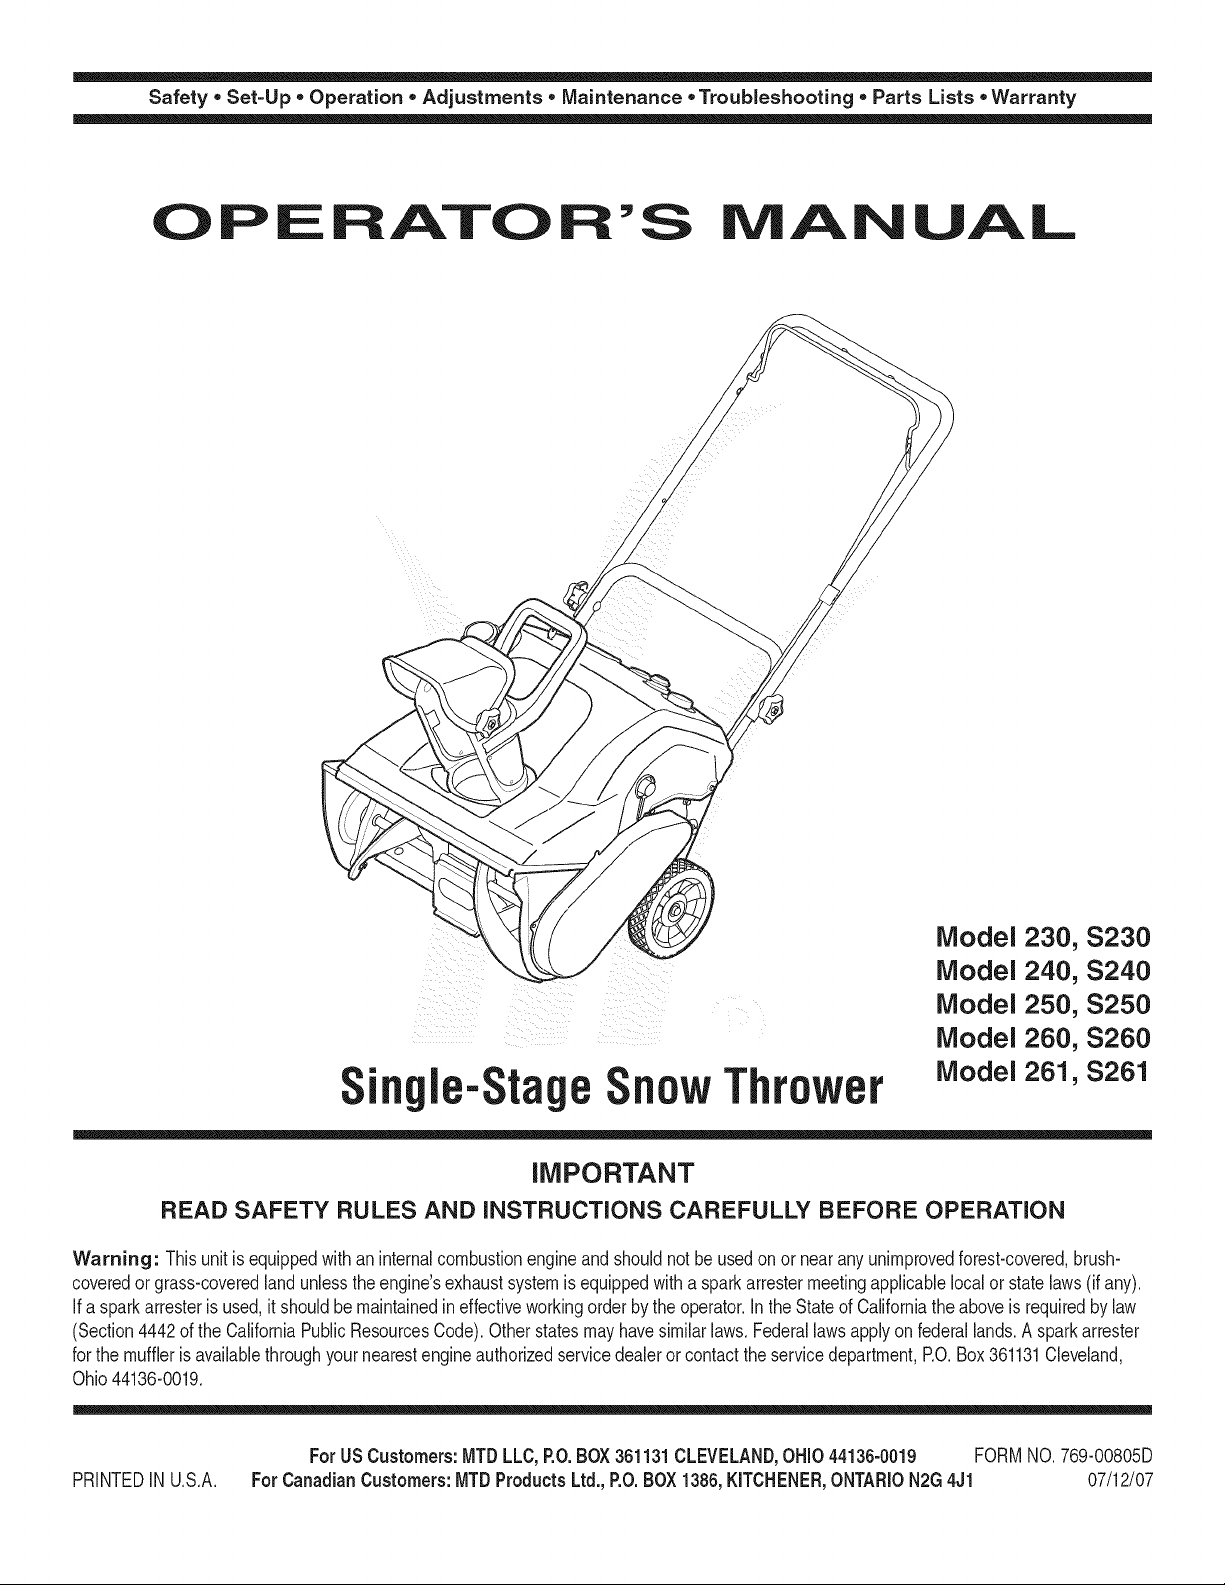
Model 230, $230
Model 240, S240
Model 250, S250
Model 260, S260
ingle-Sta!e
iMPORTANT
READ SAFETY RULES AND iNSTRUCTiONS CAREFULLY BEFORE OPERATION
Warning: Thisunit isequippedwithaninternalcombustionengineandshouldnot beusedon or nearany unimprovedforest-covered,brush-
coveredor grass-coveredlandunlesstheengine'sexhaustsystemisequippedwithasparkarrestermeetingapplicablelocalorstatelaws(if any).
If a sparkarresterisused,it shouldbemaintainedineffectiveworkingorderbythe operator.IntheStateofCaliforniatheaboveisrequiredbylaw
(Section4442ofthe CaliforniaPublicResourcesCode).Otherstatesmayhavesimilarlaws.Federallawsapplyonfederallands.A sparkarrester
forthe mufflerisavailablethroughyournearestengineauthorizedservicedealeror contacttheservicedepartment,RO.Box361131Cleveland,
Ohio44136-0019.
ForUSCustomers: MTDLLC,P.O.BOX361131CLEVELAND,OHIO44136-0019 FORMNO 769-00805D
PRINTEDIN U.S.A.
ForCanadianCustomers:MTDProducts Ltd.,P.O.BOX1386,KITCHENER,ONTARION2G4J1 07/12/07
now
Thrower
Model 261, S261
Page 2
This Operator's Manual is an important part of your new snow thrower, it will help you assemble,
prepare and maintain the unit for best performance. Please read and understand what it says.
Table of
Safety Labels ...................................................... 3
Safe Operation Practices ................................... 4
Set Up & Adjustment .......................................... 6
Know Your Snow Thrower .................................. 7
Operation ............................................................. 8
Finding and Recording Model Number
BEFOREYOU STARTASSEMBLING
YOURNEW EQUIPMENT,
please locatethe modelplateonthe equipmentand copythe
the modelnumberandthe serial number to the sample model
plate providedto the right.You can locatethe modelplate by
standing atthe operatingposition and looking down at the
frame.
Contents
Adjustments & Maintenance ........................... 10
Off-Season Storage .......................................... 12
Trouble Shooting .............................................. 13
illustrated Parts Lists ....................................... 14
Warranty ............................................................ 18
Model Number Serial Number
Num#ro de mod#le Num#ro de s#rier
XXXXXXXXXXX XXXXXXXXXXX
MTD LLC
CLEVELAND, OH 44136
MTD PRODUCTSLIMITED
KITCHENER, ON N2G 4J1
USA-www.mtdproducts.com 1-800=800-7310
CAN=www.mtdcanada.com 1=800=668=1238
Customer Support
Please do NOTreturn the unit to the retailer from which it was purchased,
without first contacting Customer Support.
Ifyou havedifficulty assembling this productor haveany questionsregarding the controls, operationor maintenanceof this unit,
youcan seek helpfrom theexperts. Choose fromtheoptions below:
1.Visit www.mtdcanada.cafor manyusefulsuggestions,click on CustomerSupportbutton.
2. Call a CustomerSupport Representative:For US Customers: 1-330-220-4MTD (4683)or 1-800-800-7310
ForCanadianCustomers" 1-800-668-1238
3. The engine manufactureris responsiblefor all enigne-relatedissues with regardsto performance, power-rating,specifica-
tions,warrantyandservice. Pleaserefer to the engine manufacturer'sOwner's/Operator'sManual, packedseparatelywith
your unit,for more information.
Please haveyour unit's modelnumber and serial number readywhenyou call.See previoussection to locate this information.
Youwill be asked to enterthe serial number inorderto processyour call.
2
Page 3
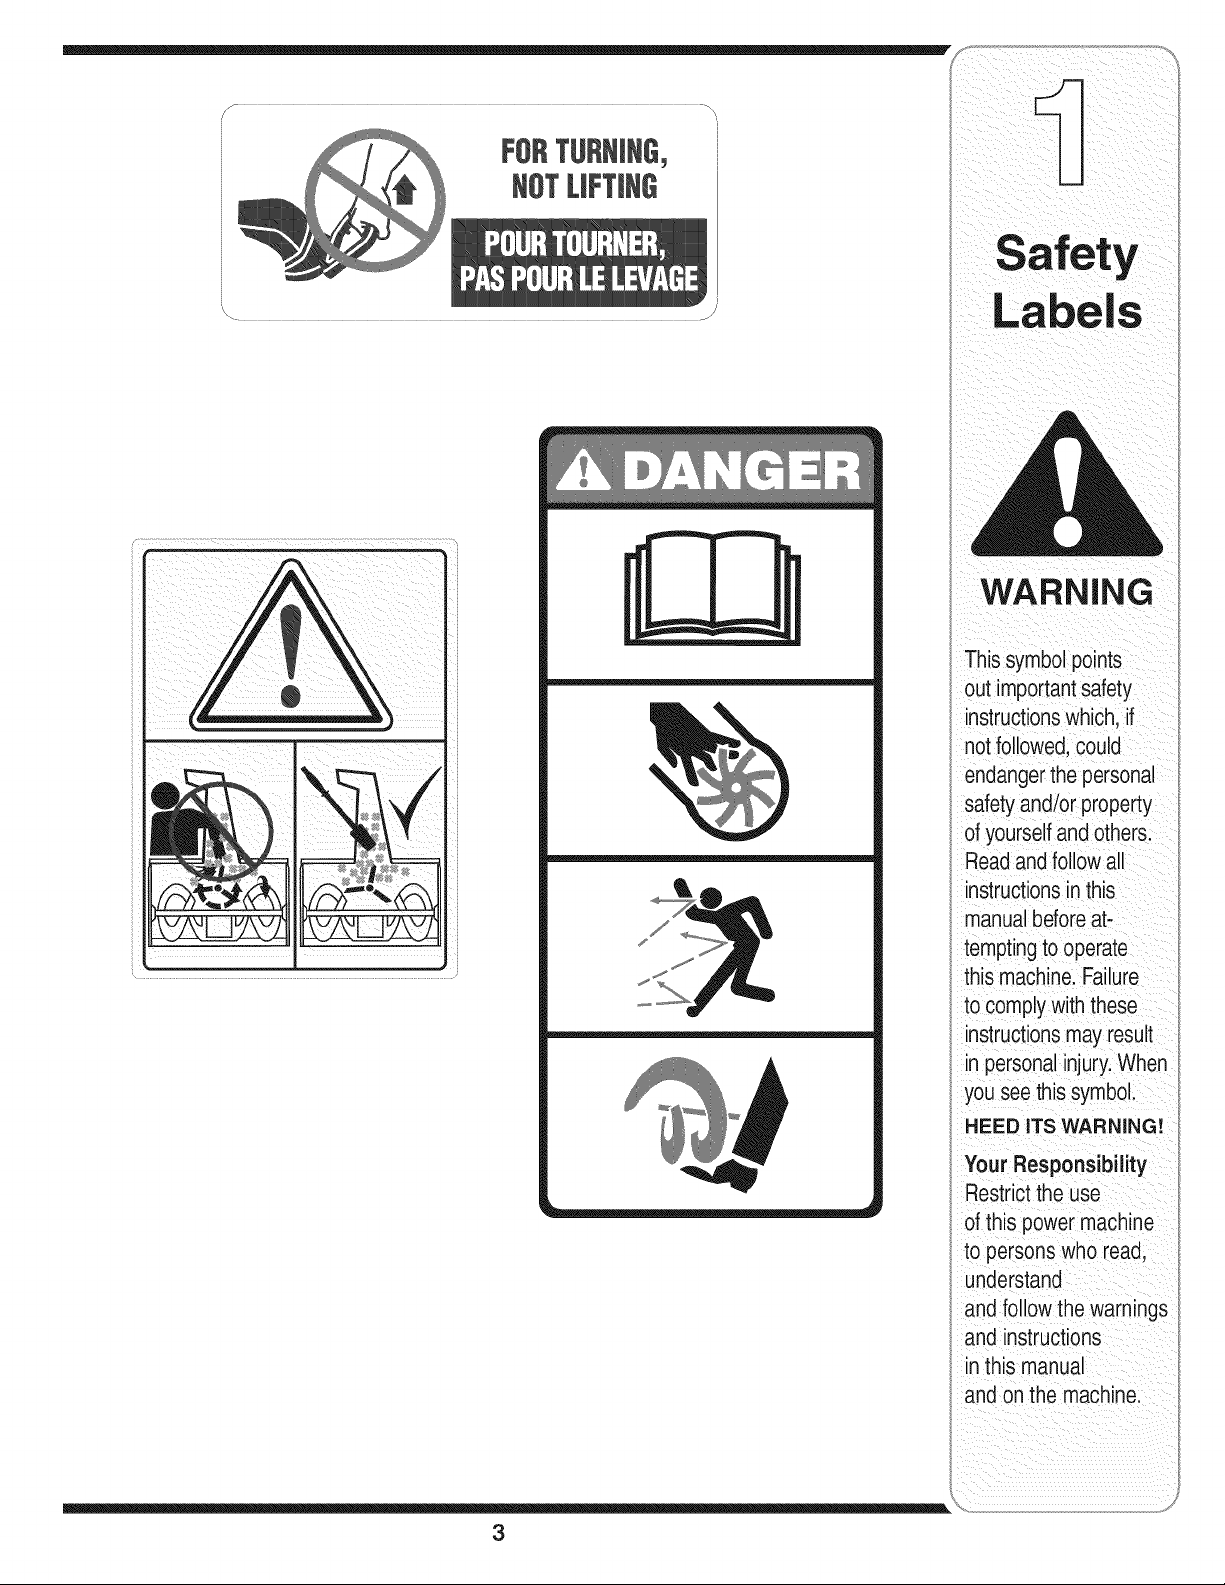
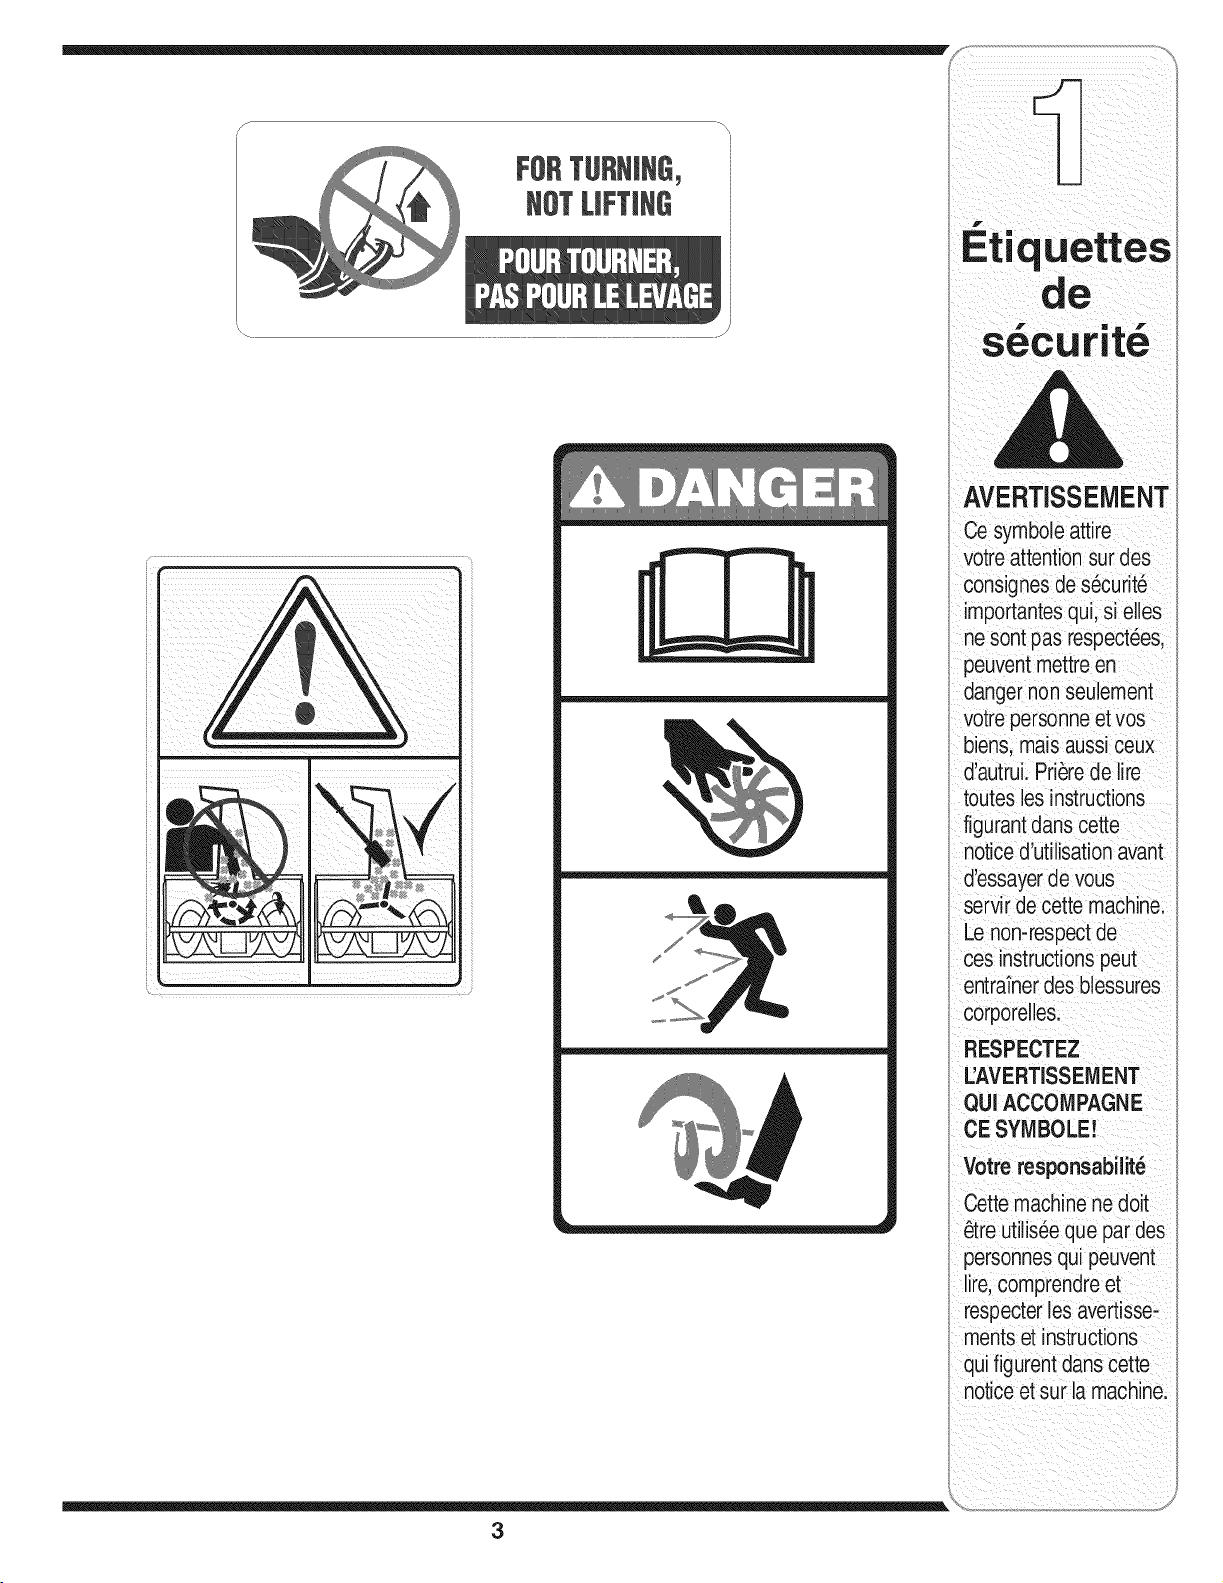
FORTURNING,
NOTLiFTiNG
WARNING
Thissymbolpoints
out importantsafety
instructionswhich,if
notfollowed,could
endangerthepersonal
safetyand/or property
of yourselfand others.
Readand followall
instructionsinthis
manualbeforeat-
temptingto operate
this machine.Failure
to complywith these
instructionsmayresult
in personalinjury.When
youseethis symbol.
HEED ITS WARNING!
Your Responsibility
Restrictthe use
ofthis power machine
to persons who read,
understand
and follow thewarnings
and instructions
in this manual
and onthe machine.
3
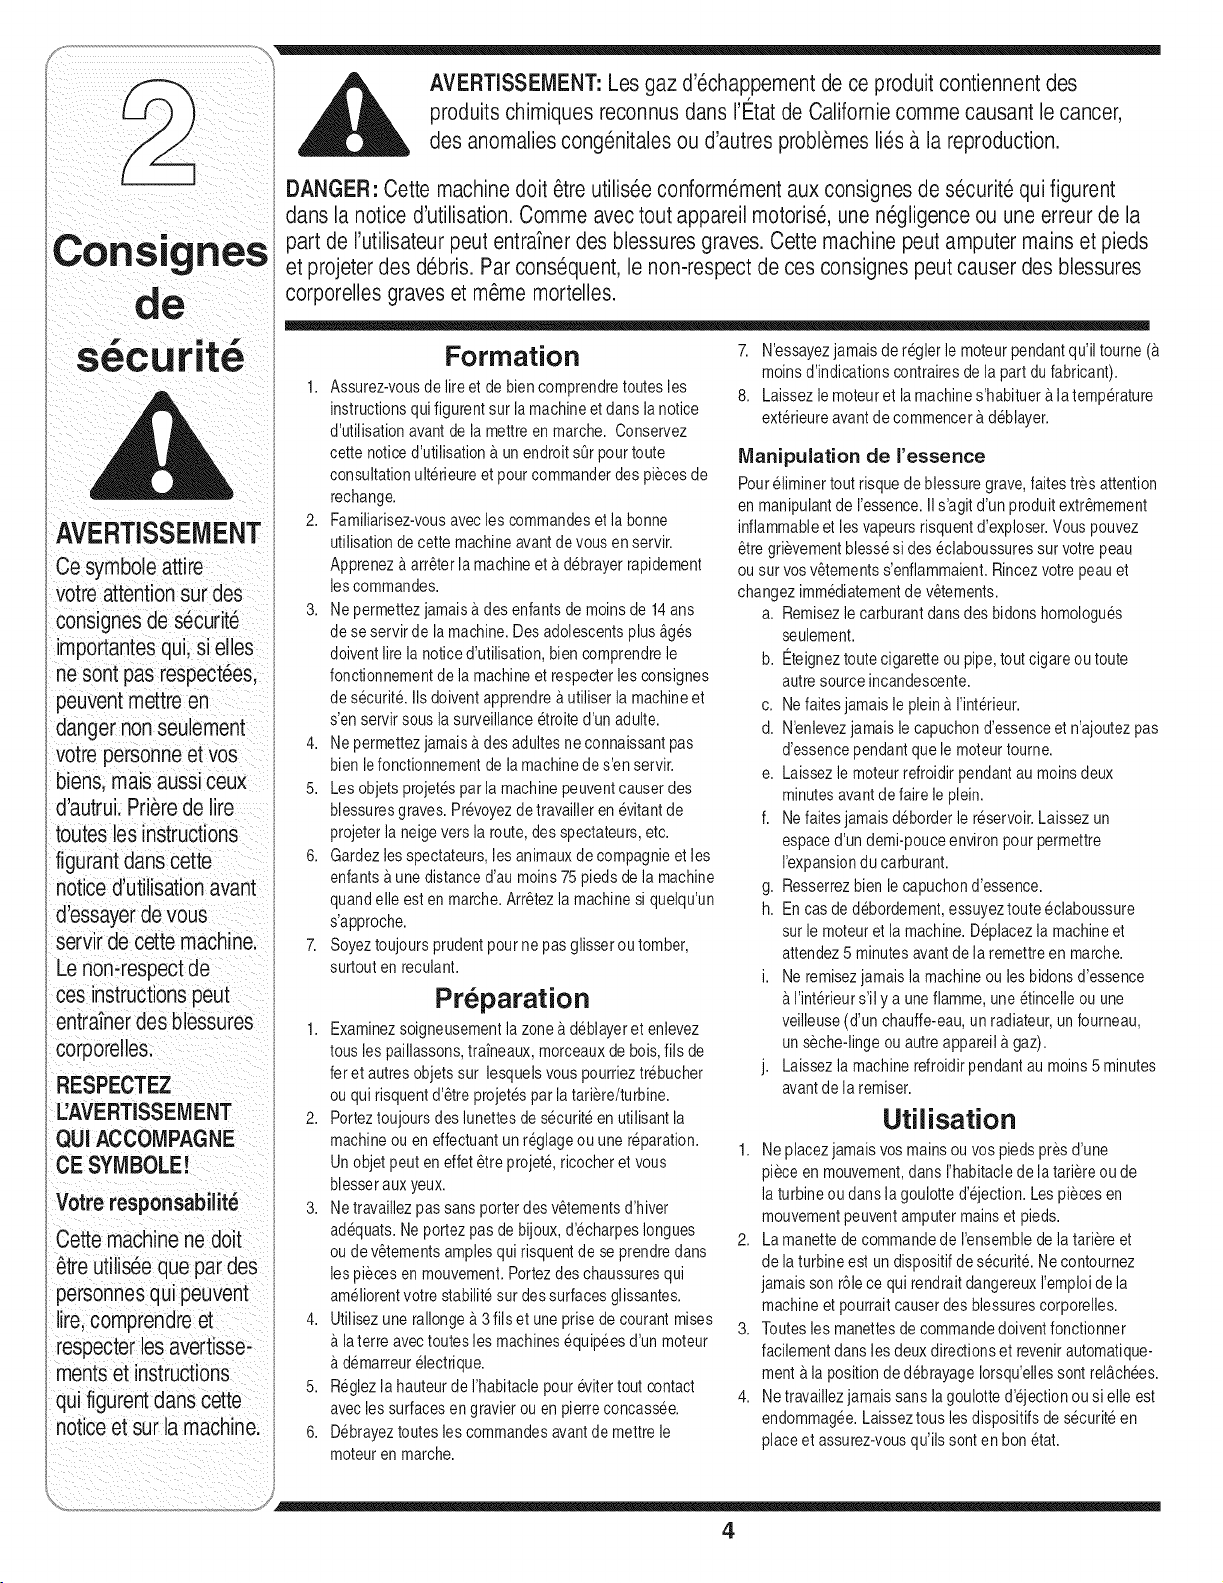
Page 4
WARNING: EngineExhaust,some of itsconstituents,andcertain vehicle compo-
nentscontain or emit chemicals knownto Stateof Californiato cause cancerand
birth defects or other reproductiveharm.
DANGER: This machinewas builtto be operatedaccordingto the safe operation practices in this
manual.As with anytypeof power equipment,carelessnessor erroron the part ofthe operatorcan
result in seriousinjury.This machine iscapableof amputating hands andfeet andthrowing objects.
Failureto observethe followingsafetyinstructionscould result in serious injury or death.
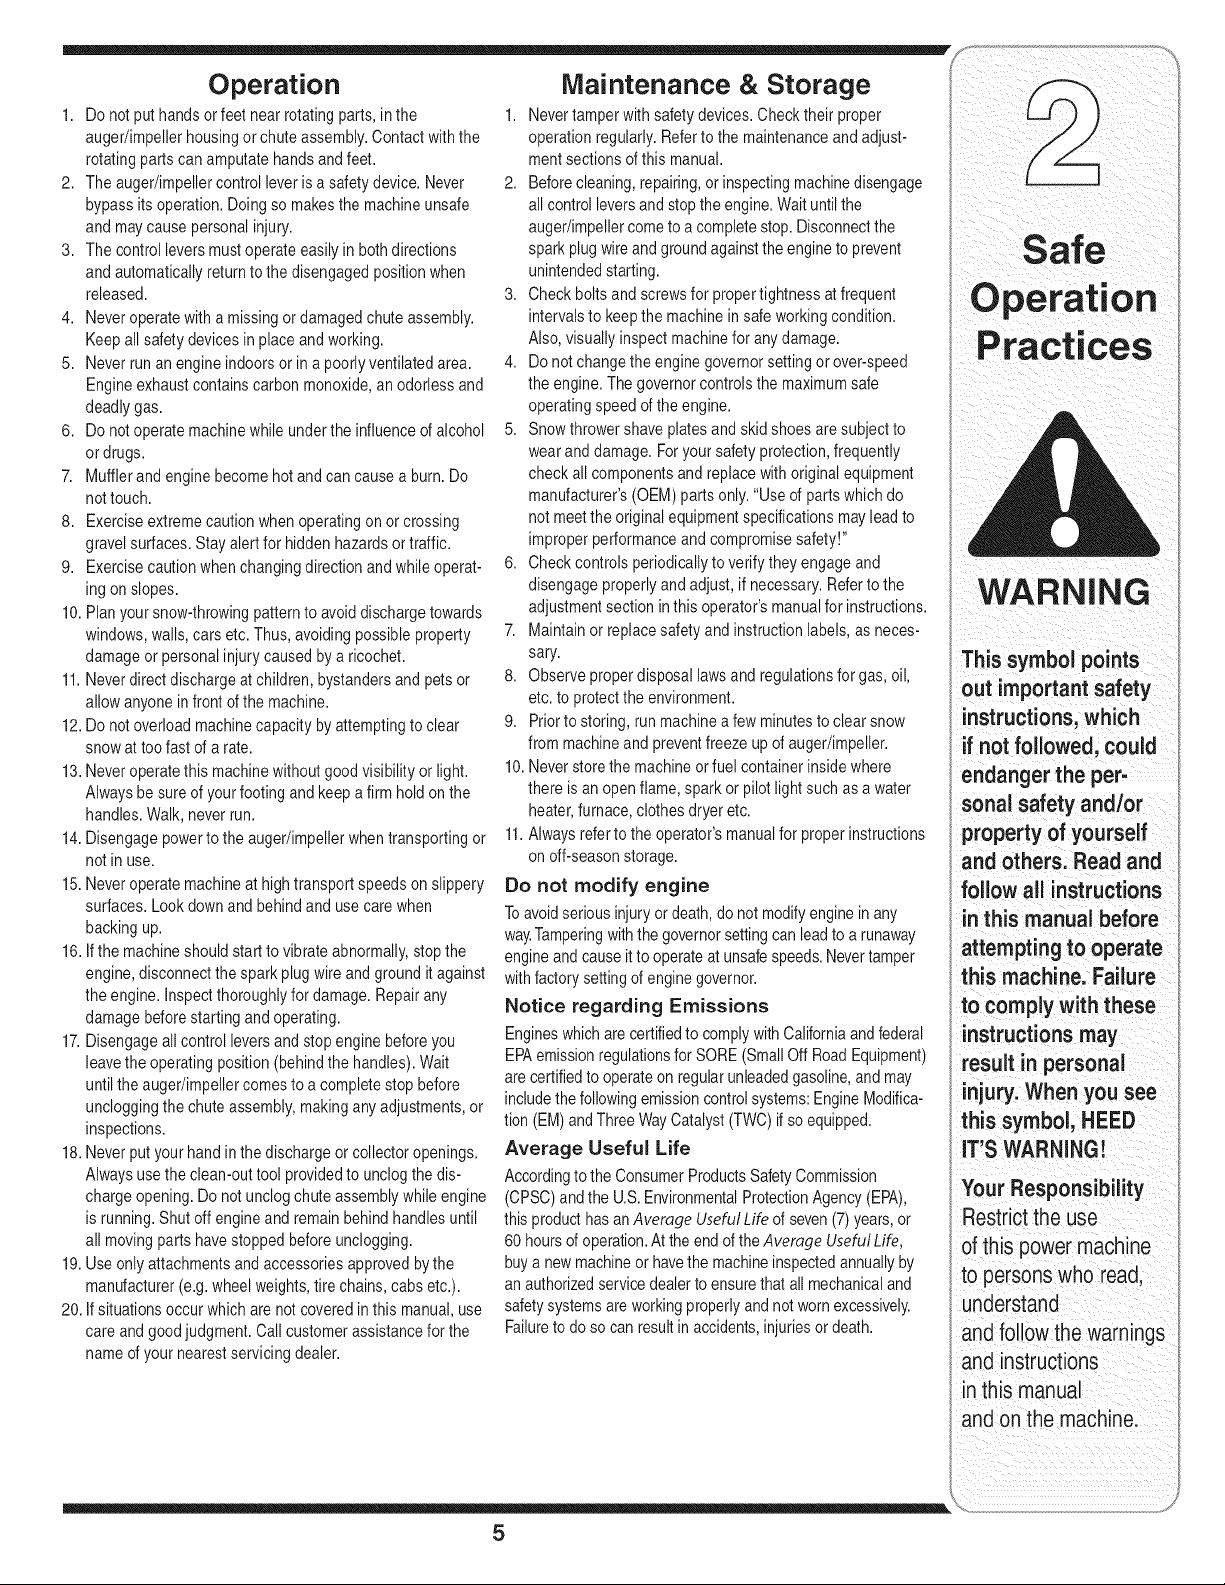
WARNING
Thissymbolpoints
outimportantsafety
instructionswhich,
ifnotfollowed, could
endangerthe per-
sonalsafetyand/or
propertyof yourself
andothers.Readand
followallinstructions
inthismanualbefore
attemptingtooperate
thismachine.Failure
i to complywith these
instructionsmay
; resultin personal
injury.Whenyou see
this symbol, HEED
iTS WARNING!
Your Responsibility
Restrictthe use
of this powermachine
to personswho read,
understand
I andfollow thewarnings
and instructions
inthis manual
and on the machine.
Training
1. Read,understand,andfollowall instructionson the
machineandin themanual(s)beforeattemptingto
assembleandoperate.Keepthis manualina safe placefor
futureandregularreferenceandfor orderingreplacement
parts.
2. Befamiliarwithall controlsandtheirproperoperation.
Knowhowto stopthe machineanddisengagethemquickly.
3. Neverallowchildrenunder14yearsoldto operatethis
machine.Children14yearsold andovershouldreadand
understandtheinstructionsandsafeoperationpractices
inthismanualand onthemachineandbetrainedand
supervisedbyan adult.
4. Neverallowadultsto operatethis machinewithoutproper
instruction.
5. Thrownobjectscancauseseriouspersonalinjury.Plan
yoursnow-throwingpatternto avoiddischargeof material
towardroads,bystandersandthe like.
6. Keepbystanders,helpers,petsandchildrenat least75feet
fromthe machinewhileit isin operation.Stopmachineif
anyoneentersthearea.
7. Exercisecautiontoavoidslippingor falling,especially
whenoperatingin reverse.
Preparation
1. Thoroughlyinspectthe areawherethe equipmentisto be
used.Removealldoormats,newspapers,sleds,boards,
wiresand otherforeignobjects,whichcouldbetripped
overor thrownbythe auger/impeller.
2. Alwayswearsafetyglassesor eyeshieldsduring
operationandwhileperforminganadjustmentor repair
toprotectyoureyes.Thrownobjectswhich ricochetcan
causeseriousinjurytothe eyes.
3. Do notoperatewithoutwearingadequatewinteroutergar-
ments.Donotwearjewelry,longscarvesor otherloose
clothing,whichcouldbecomeentangledin movingparts.
Wearfootwearwhichwillimprovefootingonslippery
surfaces.
4. Useagroundedthree-wireextensioncordand receptacle
forall unitswithelectric startengines.
5. Adjustcollectorhousingheightto cleargravel orcrushed
rocksurfaces.
6. Disengageallcontrolleversbeforestartingthe engine.
7. Neverattemptto makeanyadjustmentswhileengineis
running,exceptwherespecificallyrecommendedinthe
operator'smanual.
8. Letengineandmachineadjusttooutdoortemperature
beforestartingtoclearsnow.
Safe Handling of Gasoline
Toavoidpersonalinjuryorpropertydamageuseextremecare
in handlinggasoline.Gasolineisextremelyflammableandthe
vaporsareexplosive.Seriouspersonalinjurycanoccurwhen
gasolineisspilled onyourselfor yourclothes,whichcanignite.
Washyourskin andchangeclothesimmediately.
a. Useonlyanapprovedgasolinecontainer.
b. Extinguishallcigarettes,cigars, pipesandothersources
ofignition.
c. Neverfuelmachineindoors.
d. Neverremovegascap oradd fuelwhilethe engineis hot
or running.
e. Allowengineto coolat leasttwo minutesbeforerefuel-
ing.
f. Neveroverfillfueltank. Filltankto nomorethanY2inch
belowbottomoffiller neckto providespacefor fuel
expansion.
g. Replacegasolinecap andtightensecurely.
h. If gasolineis spilled,wipe itoff theengineandequip-
ment.Movemachinetoanotherarea.Wait5 minutes
beforestartingtheengine.
i. Neverstorethe machineorfuel containerinside where
there isan openflame,sparkor pilotlight(e.g.furnace,
waterheater,spaceheater,clothesdryeretc.).
j. Allowmachinetocoolat least5 minutesbeforestoring.
4
Page 5
Operation
1. Donot puthandsorfeetnearrotatingparts,inthe
auger/impellerhousingor chuteassembly.Contactwiththe
rotatingpartscanamputatehandsandfeet.
2. The auger/impellercontrolleveris asafetydevice.Never
bypassitsoperation.Doingso makesthe machineunsafe
andmaycausepersonalinjury.
3. The controlleversmustoperateeasilyin bothdirections
andautomaticallyreturntothe disengagedpositionwhen
released.
4. Neveroperatewitha missingor damagedchuteassembly.
Keepall safetydevicesinplaceandworking.
5. Neverrunan engineindoorsor in apoorlyventilatedarea.
Engineexhaustcontainscarbonmonoxide,anodorlessand
deadlygas.
6. Donotoperatemachinewhileunderthe influenceofalcohol
or drugs.
7. Mufflerandenginebecomehotandcan causea burn.Do
nottouch.
8. Exerciseextremecautionwhenoperatingonor crossing
gravelsurfaces.Stayalertfor hiddenhazardsortraffic.
9. Exercisecautionwhenchangingdirectionandwhileoperat-
ingonslopes.
10.Planyoursnow-throwingpatternto avoiddischargetowards
windows,walls,carsetc.Thus,avoidingpossibleproperty
damageor personalinjury causedby aricochet.
11.Neverdirectdischargeatchildren,bystandersand petsor
allow anyoneinfrontofthe machine.
12.Donotoverloadmachinecapacitybyattemptingto clear
snowattoofast of arate.
13.Neveroperatethis machinewithoutgoodvisibility or light.
Alwaysbe sureofyourfootingandkeepa firmholdonthe
handles.Walk,neverrun.
14.Disengagepowerto the auger/impellerwhentransportingor
notinuse.
15.Neveroperatemachineat hightransport speedsonslippery
surfaces.Lookdownand behindandusecare when
backingup.
16.Ifthe machineshouldstartto vibrateabnormally,stopthe
engine,disconnectthesparkplugwireand groundit against
the engine.Inspectthoroughlyfordamage.Repairany
damagebeforestartingandoperating.
17.Disengageallcontrolleversandstopenginebeforeyou
leavethe operatingposition(behindthe handles).Wait
untilthe auger/impellercomestoa completestopbefore
uncloggingthe chuteassembly,makinganyadjustments,or
inspections.
18.Neverputyourhandin thedischargeor collectoropenings.
Alwaysuse theclean-outtoolprovidedtounclogthe dis-
chargeopening.Donot unclogchuteassemblywhileengine
isrunning.Shut offengineandremainbehindhandlesuntil
all movingpartshavestoppedbefore unclogging.
19.Useonly attachmentsandaccessoriesapprovedbythe
manufacturer(e.g.wheelweights,tirechains,cabsetc.).
20. Ifsituationsoccurwhich arenotcoveredin thismanual,use
careand goodjudgment.Callcustomerassistanceforthe
nameof yournearestservicingdealer.
Maintenance & Storage
1. Nevertamperwithsafetydevices.Checktheir proper
operationregularly.Refertothe maintenanceandadjust-
mentsectionsofthis manual.
2. Beforecleaning,repairing,orinspectingmachinedisengage
allcontrolleversandstopthe engine.Waituntilthe
auger/impellercometo a completestop.Disconnectthe
sparkplugwireand groundagainsttheengineto prevent
unintendedstarting.
3. Checkbolts andscrewsfor propertightnessatfrequent
intervalstokeepthe machineinsafeworkingcondition.
Also,visuallyinspectmachinefor anydamage.
4. Do notchangetheenginegovernorsettingor over-speed
theengine.The governorcontrolsthemaximumsafe
operatingspeedoftheengine.
5. Snowthrowershaveplatesandskidshoesaresubjectto
wearanddamage.Foryoursafetyprotection,frequently
checkallcomponentsandreplacewith originalequipment
manufacturer's(OEM) partsonly."Useof partswhichdo
notmeetthe originalequipmentspecificationsmayleadto
improperperformanceandcompromisesafety!"
6. Checkcontrolsperiodicallytoverify theyengageand
disengageproperlyandadjust,if necessary.Referto the
adjustmentsectioninthis operator'smanualfor instructions.
7. Maintainor replacesafetyandinstructionlabels,as neces-
sary.
8. Observeproperdisposallawsandregulationsfor gas,oil,
etc.toprotectthe environment.
9. Priorto storing,run machineafew minutestoclearsnow
frommachineandpreventfreezeupof auger/impeller.
10.Neverstorethemachineorfuel containerinsidewhere
thereisan openflame,sparkor pilotlightsuchas a water
heater,furnace,clothesdryeretc.
11.Alwaysreferto theoperator'smanualforproperinstructions
onoff-seasonstorage.
Do not modify engine
Toavoidseriousinjuryordeath,donot modifyengineinany
way.Tamperingwiththegovernorsettingcan leadto a runaway
engineandcauseit tooperateat unsafespeeds.Nevertamper
withfactorysettingofenginegovernor.
Notice regarding Emissions
Engineswhicharecertifiedto complywithCaliforniaandfederal
EPAemissionregulationsfor SORE(SmallOff RoadEquipment)
arecertifiedto operateonregularunleadedgasoline,andmay
includethefollowingemissioncontrolsystems:EngineModifica-
tion(EM)andThreeWayCatalyst(TWO)ifso equipped.
Average Useful Life
Accordingto the ConsumerProductsSafetyCommission
(CPSC)andthe U.S.EnvironmentalProtectionAgency(EPA),
thisproducthasanAverage UsefulLife ofseven(7)years,or
60hoursof operation.Attheend oftheAverage UsefulLife,
buya newmachineorhavethe machineinspectedannuallyby
anauthorizedservicedealertoensurethat all mechanicaland
safetysystemsare workingproperlyandnotwornexcessively.
Failuretodosocanresultin accidents,injuriesordeath.
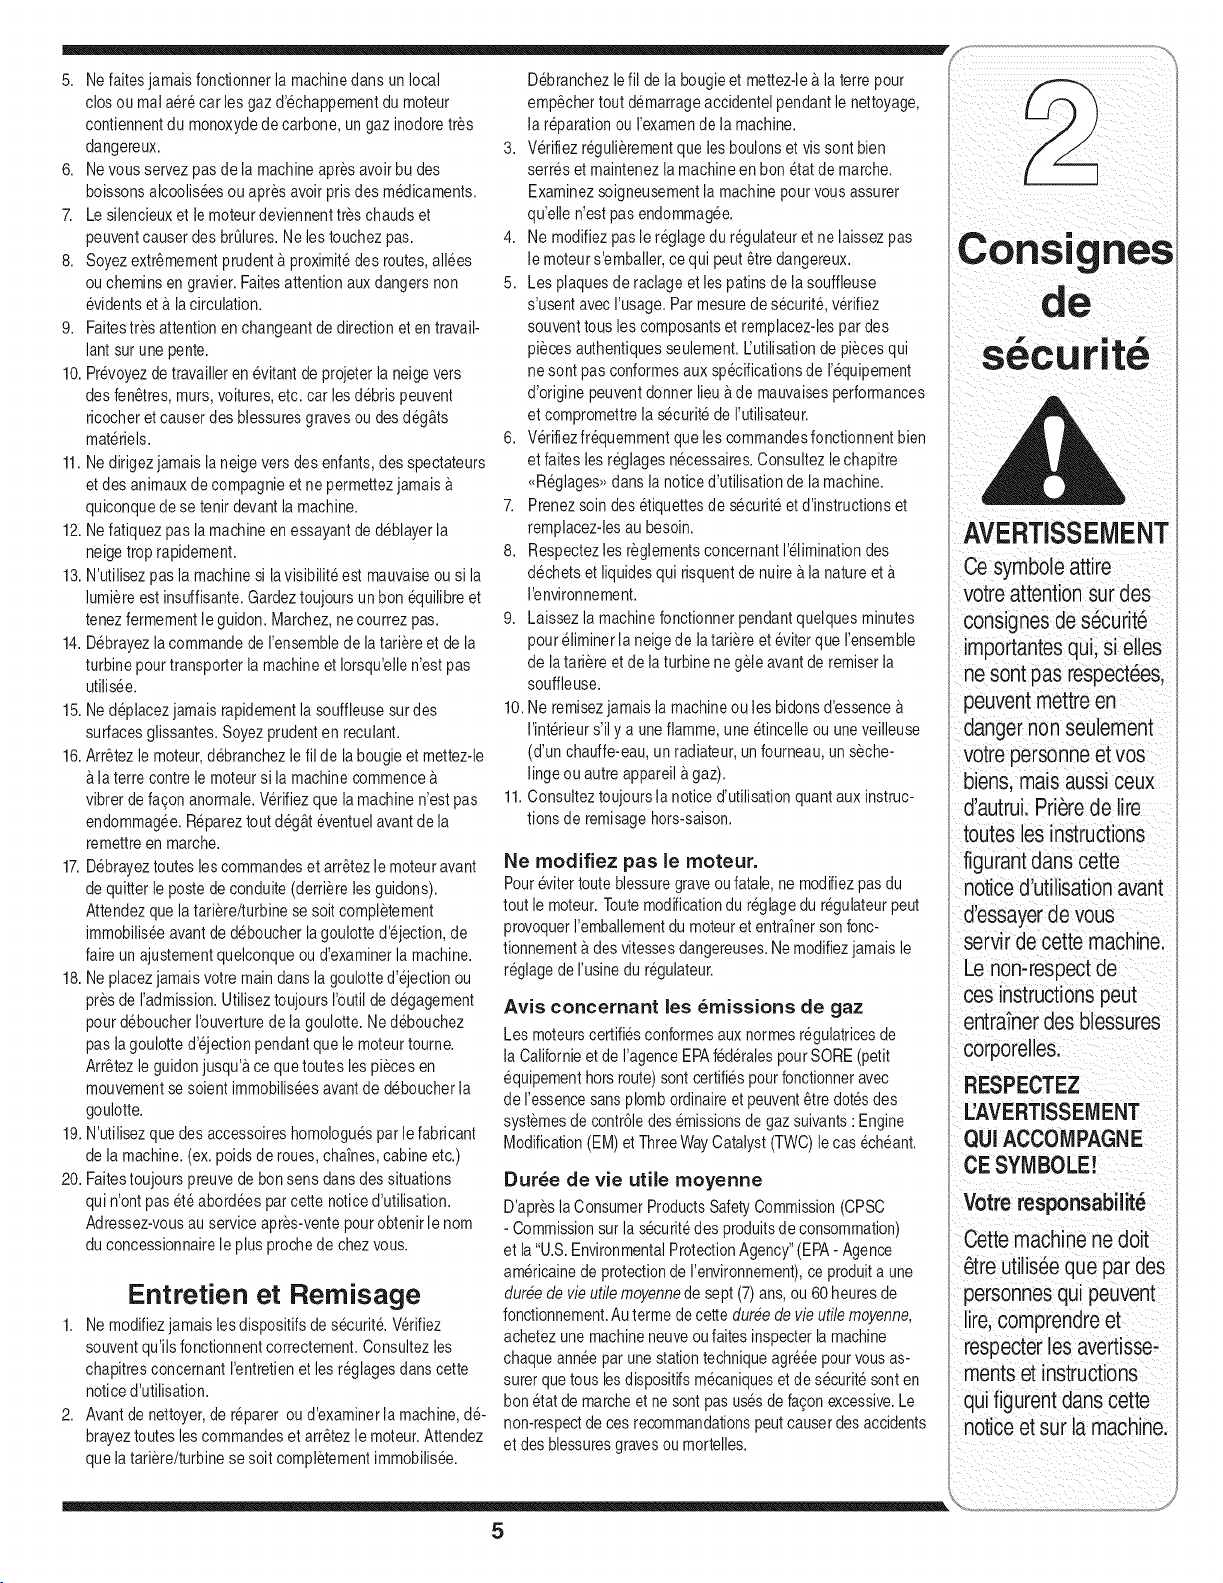
WARNING
This symbol points
out important safety
instructions,which
if not followed, could
endanger the per-
sonalsafety and/or
property of yourself
and others. Read and
follow all instructions
in this rnanuai before
attempting to operate
this machine. Failure
to complywith these
instructionsmay
result in personal
injury.When you see
this symbol, HEED
IT'S WARNING!
Your Responsibility
Restrictthe use
ofthis powermachine
to personswho read,
understand
and followthe warnings
and instructions
in this manual
and on the machine.
5
Page 6
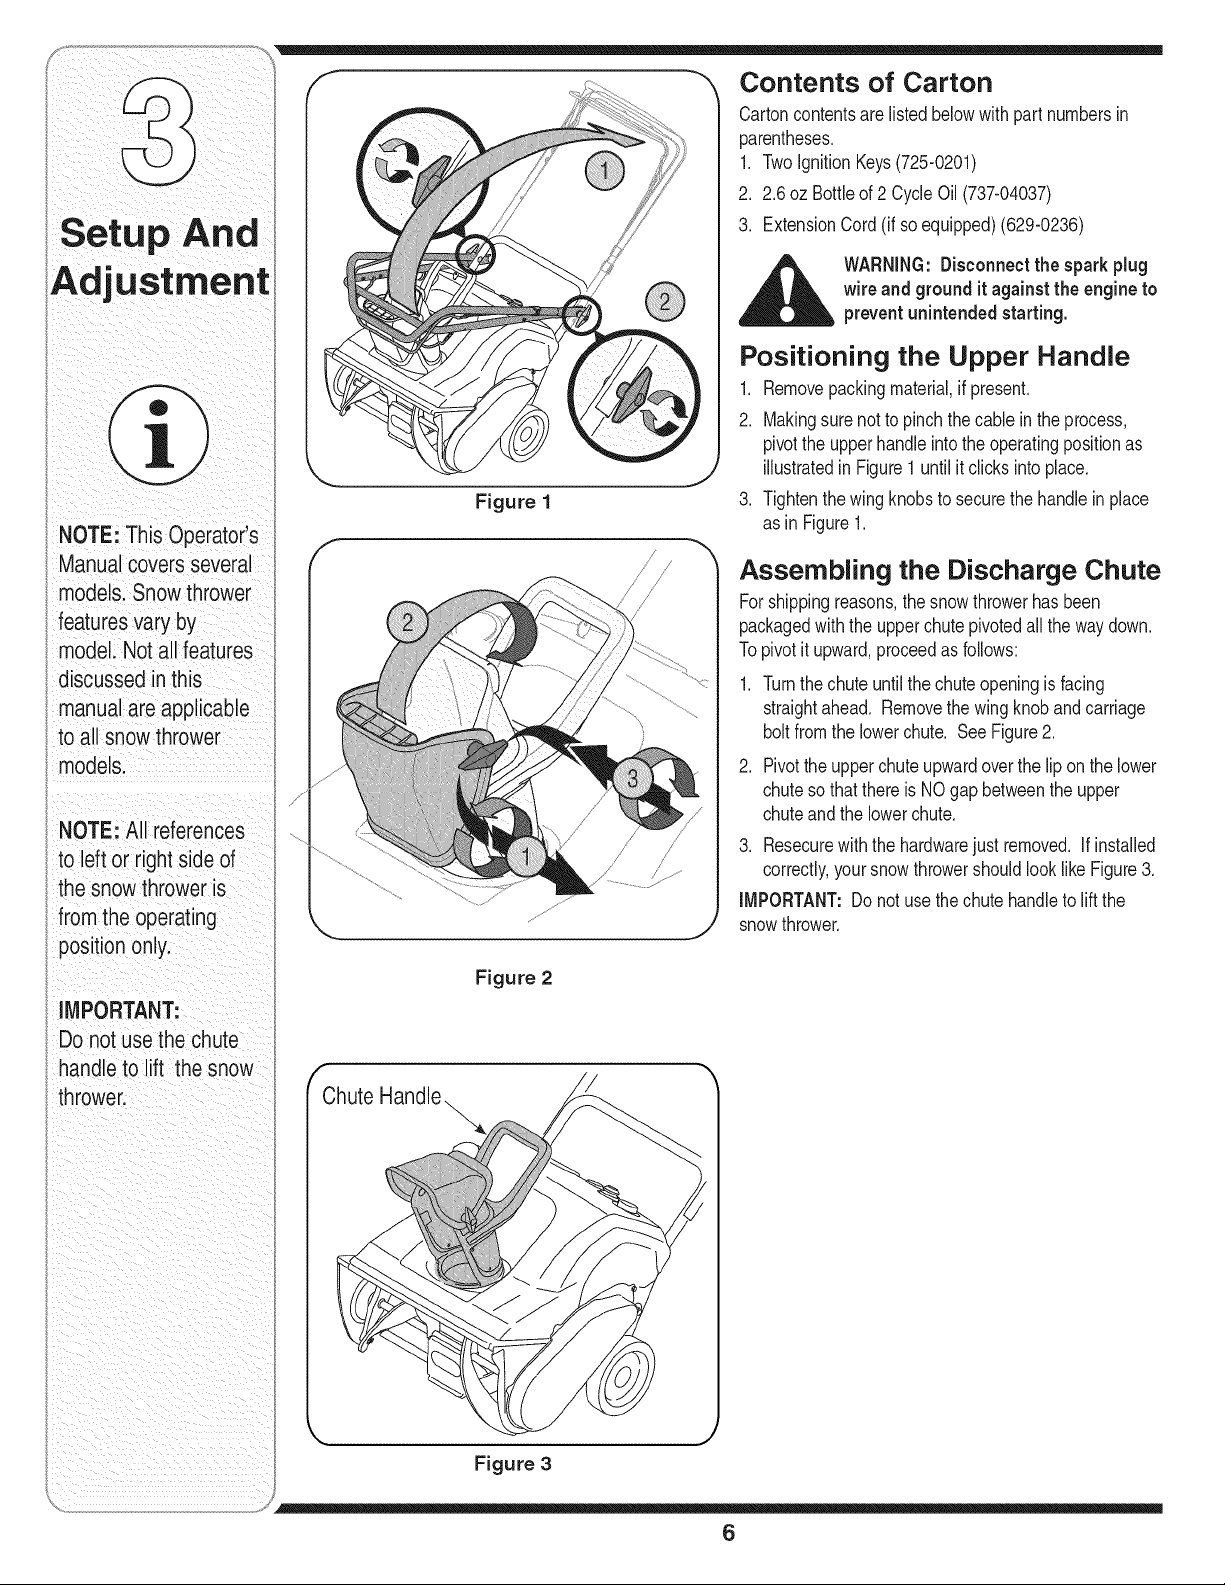
Contents of Carton
Cartoncontentsare listedbelowwithpart numbersin
parentheses,
1. TwoignitionKeys(725-0201)
2, 2,6oz Bottleof 2 CycleOil (737-04037)
3, ExtensionCord(if soequipped)(629-0236)
Adjustment
NOTE: This Operator's
Manual coversseveral
models.Snowthrower
featuresvary by
model.Not all features
discussed inthis
manualare applicable
to all snowthrower
models.
NOTE: All references
i to leftor right sideof
thesnowthrower is
i fromtheoperating
positiononly.
IMPORTANT:
Do not usethe chute
handleto lift the snow
thrower.
f
Chute
__IL ARNING: Disconnectthe sparkplug
wireand grounditagainst the engineto
preventunintended starting.
Positioning the Upper Handle
1. Removepackingmaterial,if present.
2. Makingsurenotto pinchthe cableinthe process,
pivottheupperhandleintotheoperatingpositionas
illustratedinFigure1 untilit clicksintoplace.
Figure 1 3. Tightenthewingknobsto securethehandleinplace
asin Figure1.
Assembling the Discharge Chute
Forshippingreasons,the snowthrowerhasbeen
packagedwiththeupperchutepivotedallthe waydown.
Topivotitupward,proceedasfollows:
,
Turnthechuteuntilthe chuteopeningisfacing
straightahead. Removethewingknobandcarriage
boltfromthe lowerchute. SeeFigure2.
,
Pivottheupperchuteupwardoverthe lip onthelower
chutesothatthere isNOgap betweentheupper
chuteandthelowerchute.
3. Resecurewiththe hardwarejust removed.If installed
correctly,your snowthrowershouldlooklikeFigure3.
IMPORTANT:Do notusethechutehandleto liftthe
snowthrower.
Figure 2
Figure 3
6
Page 7
f ",
AugerControl
ElectricStarterButton Srl_
< Key _ .. //
ChuteAssembl FuelCap_ _ YJ/__ """_ Primer
Y__ _/_ _ t_,_/' ,//" SparkPlugAccass
_,,_k,_._/_"J / _ ,., ChuteHandle
, ) IMPORTANT:
_,_I _\ This unit runs on a
/ / ChokeLever'_ and oil. Do NOT
ShavePI ) thrower without first
_/_ operatethe snow
mixture of gasoline
-_ -- reading!,heengines
operator s manual for
Figure 4 instructionsregard-
ing proper fuel and
IMPORTANT:Thisunit runson a mixtureofgasoline Spark Plug Cover engine oil.
andoil.Do NOToperatethe snowthrowerwithoutfirst Removesparkplugcoverto accesssparkplug.
readingtheenginesoperator'smanualforinstructions
regardingproperfuelandengineoil. Auger
Whenengaged,theaugersrotationdrawssnowintothe
Choke Lever augerhousingandthrowsitout thedischargechute.
Activatingchokecontrolclosesthechokeplateon Rubberpaddleson theaugersalsoaidin propellingthe
carburetorandaidsin startingengine.Referto theengine unitastheycomeincontactwiththe pavement.
manualpackedwithunitformoredetailedinstructions.
Auger Control Handle
Primer
Depressingprimerforcesfueldirectlyinto engine's isusedtoengageanddisengagedrivetotheauger.
carburetortoaid incold-weatherstarting.Refertoengine Squeezethecontrolhandleagainsttheupperhandleto
manualpackedwithunitformoredetailedinstructions.
Locatedontheupperhandle,theaugercontrolhandle
engageauger;releaseittodisengage.
Ignition Key Discharge Chute / Chute Handle
Ignitionkeymustbe present,insertedinkeyswitch,and Rotatethedischargechutetotheleftor rightusingchute
inthe"ON"positionforengineto start.
handle.Pitchof thedischargechutecontrolsangleat
Recoil Starter whichthesnowisthrown.Loosenwingknobonside
Thestarterhandleisusedtomanuallystarttheengine, of thedischargechutebeforepivotingdischargechute
upwardordownward.Retightenthe knoboncedesired
Electric Starter Button (If so equipped) positionhasbeenachieved.
Pressingthe electric starterbuttonengagesthe
engine'selectricstarterwhenpluggedintoa 120V Shave Plate
powersource Theshaveplatemaintainscontactwithpavementas
Electric Starter Plug (If so equipped)
Requiresuseof a two-prongoutdoorextensioncord pavement'ssurfacetobedischarged.
(packedwiththesnowthrower)anda 120Vpower
source/walloutlet.
thesnowthrowerispropelled,allowingsnowcloseto
7
Page 8
Before Starting
Electric Starter(if equipped)
WARNING
Read, understand,
and follow all instruc-
tions and warnings
onthe machineand
in this manual before
operating.
Useextreme care
when handling
gasoline.Gasoline is
extremelyflammable
i and the vapors are
explosive. Neverfuel
the machine indoors
or while the engine
is hot or running.
Extinguishcigarettes,
; cigars,pipes and
other sourcesof
ignition.
' The electric starter
must be used with a
properly grounded
three=prongrecep-
tacleat alltimes to
avoidthe possibility
of electric shock. Fol-
i lowallinstructions
i carefullypriorto
operatingthe electric
starter.
_ ARNING:Beforestartingthe
1. Thesparkplugwirewasdisconnectedfor safety.
Attachsparkplugwireto sparkplugbeforestarting.
IMPORTANT:Forcompleteanddetailedengine
starting,stoppingand storinginstructions,it is recom-
mendedthatyou readtheenginemanualalsoincluded
withthisunit.
engine,read, understand,and follow
all instructionsand warnings on the
machine and inthis manual.
Fuel And Oil Mixture
_ ARNING:Useextremecarewhen
IMPORTANT:Thisunitrunson a mixtureofgasoline
andoil. Do NOToperatethesnowthrowerwithout
firstreadingtheenginesoperator'smanualfordetailed
instructionsregardingproperfuelandengineoil.
DoNOToperatethesnowthrowerwithoutthefuelcap
securelyinplaceonthefuel tank.
handlinggasoline. Gasoline is
extremely flammableand the vapors
are explosive. Neverfuel machine
indoorsor while the engine ishot or
running.Extinguish cigarettes, cigars,
pipesand other sources of ignition.
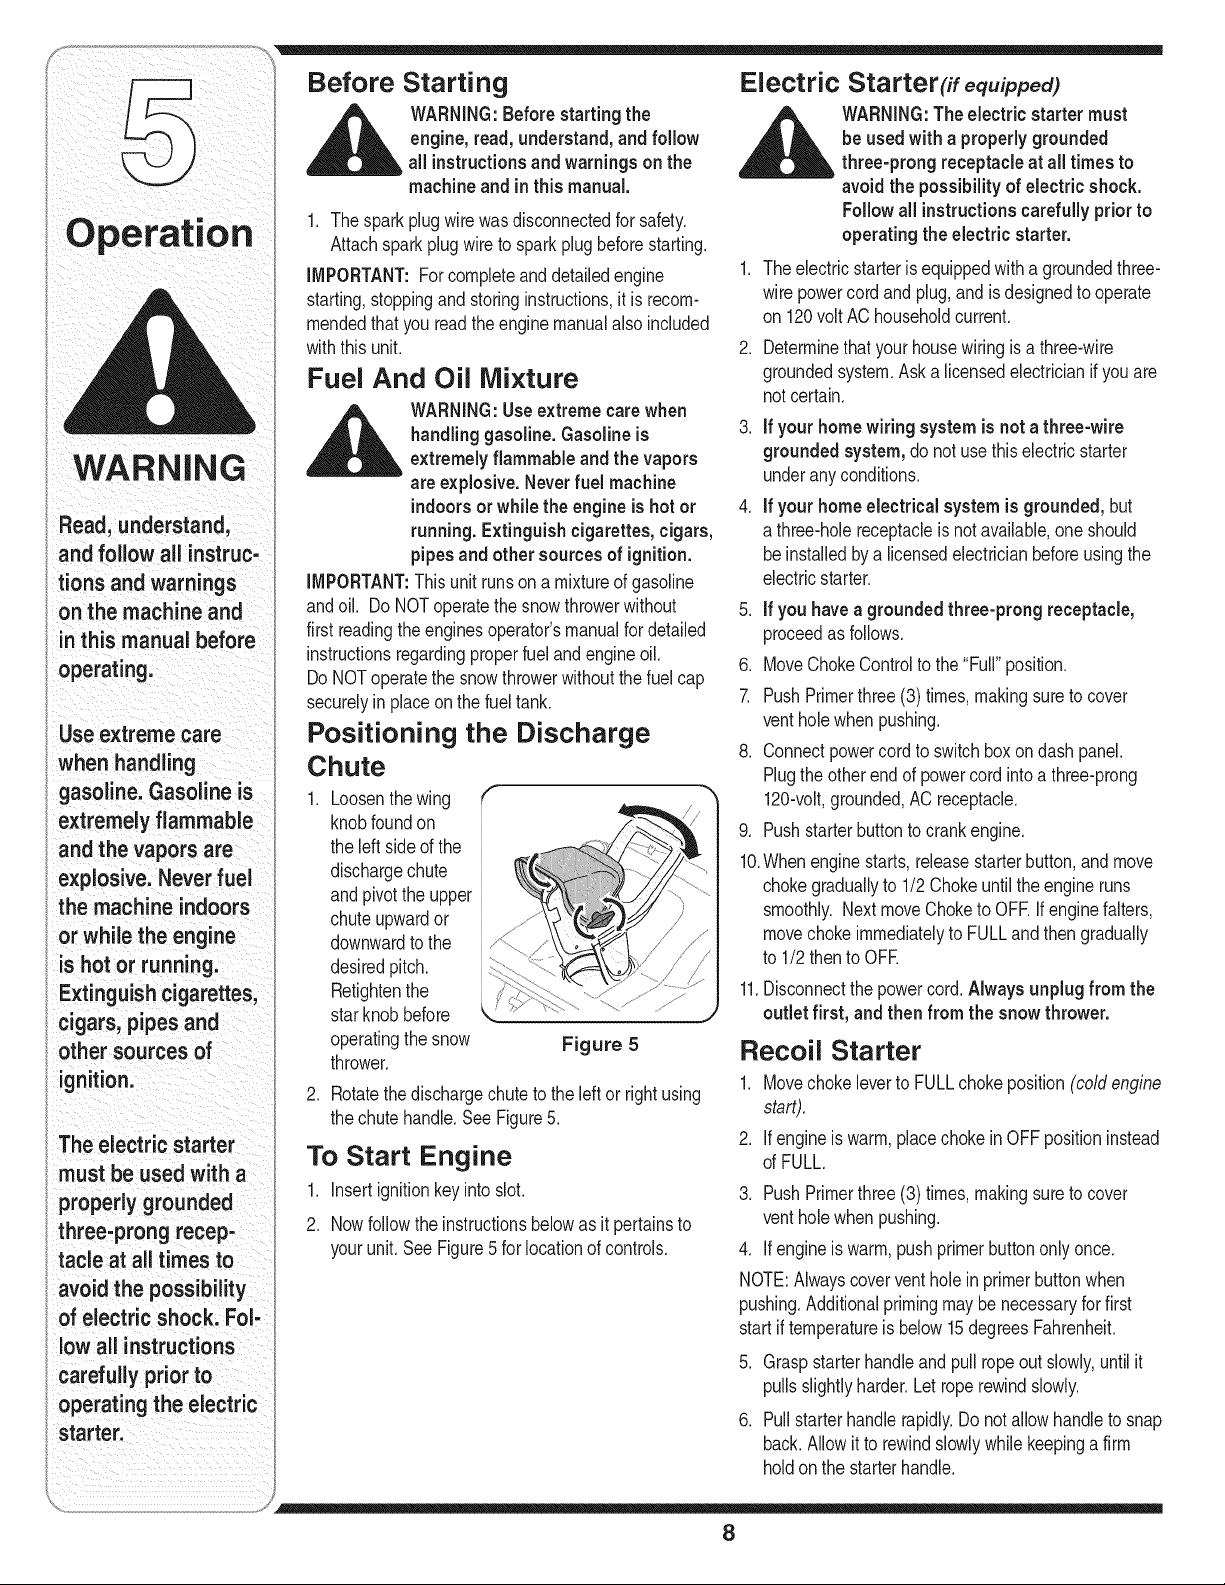
Positioning the Discharge
Chute
1. Loosenthewing f
knobfoundon
theleftside ofthe
dischargechute
andpivotthe upper
chuteupwardor
downwardto the
desiredpitch.
Retightenthe
starknobbefore
operatingthesnow
thrower.
2. Rotatethedischargechuteto theleftor rightusing
thechutehandle.SeeFigure5.
Figure 5
To Start Engine
1. Insertignitionkeyintoslot.
2. Nowfollowthe instructionsbelowasit pertainsto
yourunit.SeeFigure5forlocationof controls.
_ ARNING:Theelectricstartermust
1. Theelectricstarterisequippedwitha groundedthree-
wirepowercordandplug,and isdesignedtooperate
on 120voltAChouseholdcurrent.
2. Determinethatyourhousewiringis a three-wire
groundedsystem.Aska licensedelectricianifyouare
notcertain.
3. If your homewiringsystem isnot a three-wire
grounded system, do notusethiselectricstarter
underanyconditions.
4. If your homeelectricalsystemisgrounded, but
a three-holereceptacleisnot available,oneshould
beinstalledbya licensedelectricianbeforeusingthe
electricstarter.
5. If youhavea grounded three-prong receptacle,
proceedasfollows.
6. MoveChokeControlto the"Full"position.
7. PushPrimerthree(3)times,makingsureto cover
ventholewhenpushing.
8. Connectpowercordtoswitchboxondashpanel.
Plugtheotherendof powercordintoa three-prong
120-volt,grounded,ACreceptacle.
9. Pushstarterbuttonto crankengine.
10.Whenenginestarts,releasestarterbutton,andmove
chokegraduallyto 1/2Chokeuntil theengineruns
smoothly.NextmoveChoketoOFRIf enginefalters,
movechokeimmediatelytoFULLandthen gradually
to1/2 thento OFF.
11.Disconnectthepowercord.Always unplug from the
outlet first, and then from the snow thrower.
be used witha properly grounded
three-prong receptacle at all times to
avoid the possibilityof electric shock.
Follow all instructionscarefullypriorto
operating the electric starter.
Recoil Starter
1. Movechokeleverto FULLchokeposition(cold engine
start).
2. If engineis warm,placechokein OFFpositioninstead
ofFULL.
3. PushPrimerthree(3)times,makingsureto cover
ventholewhenpushing.
4. If engineis warm,pushprimerbuttononlyonce.
NOTE:Alwayscoverventholein primerbuttonwhen
pushing.Additionalprimingmaybe necessaryforfirst
startif temperatureis below15degreesFahrenheit.
5. Graspstarterhandleandpullropeout slowly,untilit
pullsslightlyharder.Letroperewindslowly.
6. Pullstarterhandlerapidly.Donotallowhandleto snap
back.Allowitto rewindslowlywhilekeepinga firm
holdonthestarterhandle.
8
Page 9
7. As enginewarmsupand beginstooperateevenly,
rotatechokeleverslowlytothe 1/2Chokeposition.
Whenthe enginebeginsto runsmoothly,movethe
choketo the OFFposition.Ifenginefalters,return
to FULLchoke,thenslowlymoveto1/2 thenOFF
position.
To Stop Engine
1. To stopengine,turnignitionkeycounter-clockwise.
Disconnectthe sparkplugwirefromthe sparkplug
to preventaccidentalstartingwhileequipmentis
unattended.
Tohelp preventpossiblefreeze-upof starter,
proceedas follows:
1. Runengineforafew minutesbeforestoppingtohelp
dryoff anymoistureonthe engine.
2. ElectricStarter:Connectpowercordtoswitchbox
on engine,thento 120voltAC receptacle.Withthe
enginerunning,pushstarterbuttonandspin the
starterfor severalseconds.Theunusualsoundmade
byspinningthestarterwillnot harmengineorstarter.
Disconnectthe powercordfromreceptaclefirst,and
thenfromswitchbox.
.
RecoilStarter:Withenginerunning,pullstarterrope
witha rapid,continuousfullarm strokethreeorfour
times.Pullingthestarterropewillproducea loud
clatteringsound,whichisnotharmfulto theengineor
starter.
4. Wipeall snowand moisturefromthe carburetorcover
in theareaof thecontrollevers.Also,movecontrol
leversbackandforthseveraltimes.Leavechoke
controlintheFULLchokeposition.
5. Removeignitionkeyanddisconnectsparkplugwireto
preventaccidentalstarting.
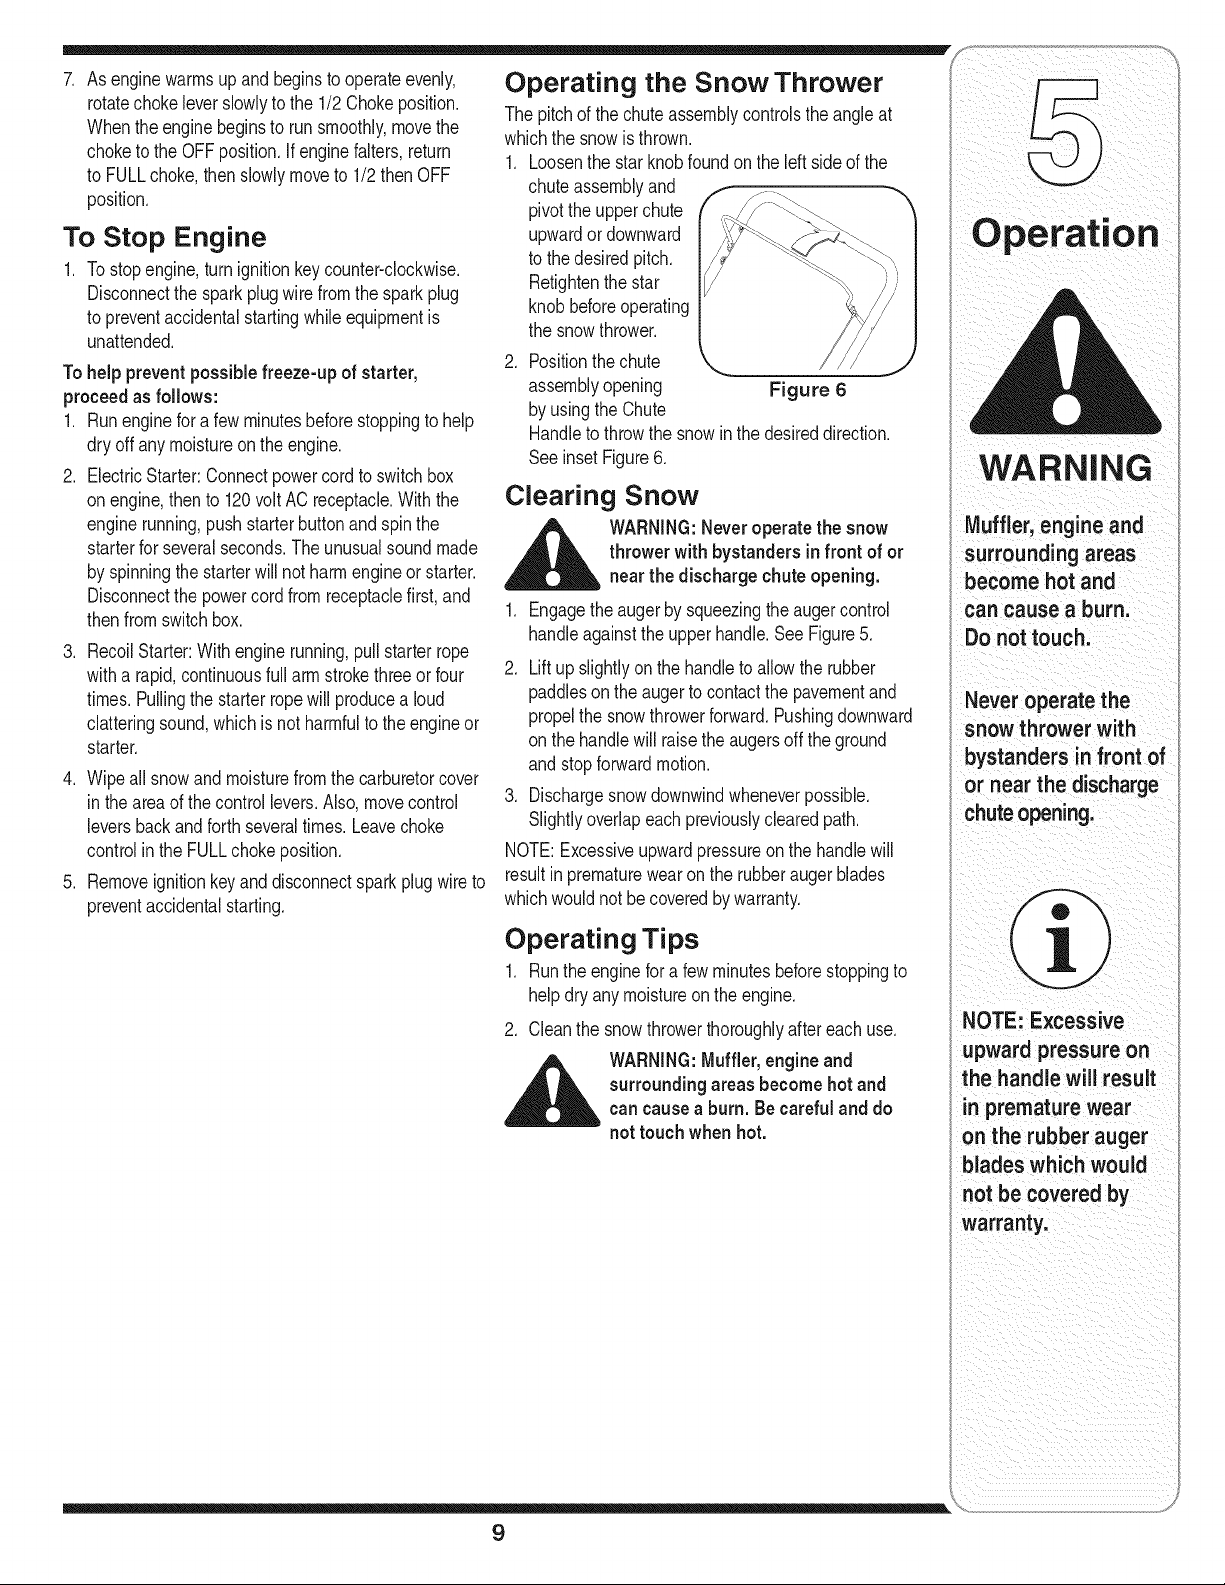
Operating the Snow Thrower
Thepitchof thechuteassemblycontrolstheangleat
whichthesnowisthrown.
1. Loosenthestarknobfoundon the leftsideof the
chuteassemblyand
pivottheupperchute
upwardordownward
tothe desiredpitch.
Retightenthe star
knobbeforeoperating
thesnowthrower.
. Positionthechute
assemblyopening Figure 6
byusingtheChute
Handletothrowthesnowin the desireddirection.
SeeinsetFigure6.
Clearing Snow
_ ARNING:Neveroperatethe snow
1. Engagetheaugerbysqueezingthe augercontrol
handleagainsttheupperhandle.SeeFigure5.
2. Liftup slightlyonthehandleto allowthe rubber
paddlesonthe augertocontactthe pavementand
propelthesnowthrowerforward.Pushingdownward
onthehandlewill raisethe augersoffthe ground
andstopforwardmotion.
3. Dischargesnowdownwindwheneverpossible.
Slightlyoverlapeachpreviouslyclearedpath.
NOTE:Excessiveupwardpressureon the handlewill
resultinprematurewearonthe rubberaugerblades
whichwouldnot becoveredbywarranty.
thrower with bystandersin front of or
nearthe dischargechuteopening.
WARNING
Muffler'engineand
surroundingareas
become hot
can cause a burn,
Do not touch;
Neveroperate the
snow thrower with
bystanders in front of
or near the discharge
chute opening,
Operating Tips
1. Runtheenginefor a fewminutesbeforestoppingto
helpdryanymoistureonthe engine.
2. Cleanthesnowthrowerthoroughlyaftereach use.
__i= ARNING:Muffler,engineand
surroundingareasbecome hot and
cancausea burn.Becarefuland do
nottouch when hot.
NOTE: Excessive
upward pressure on
the handlewill result
in premature wear
on the rubber auger
blades which would
not be covered by
warranty.
9
Page 10
WARNING
i Disconnectthe
spark plug wire
and ground itagainst
the engine to prevent
i unintended starting.
NEVERattem pt to
make any adjust-
ments while
the engine is run-
i ning, except where
specified in
the operator's
manual.
Before servicing,
_repairing, or inspect-
ing,disengage the
control bail and
stop engine. Wait
until all moving
parts havecome to a
complete stop.
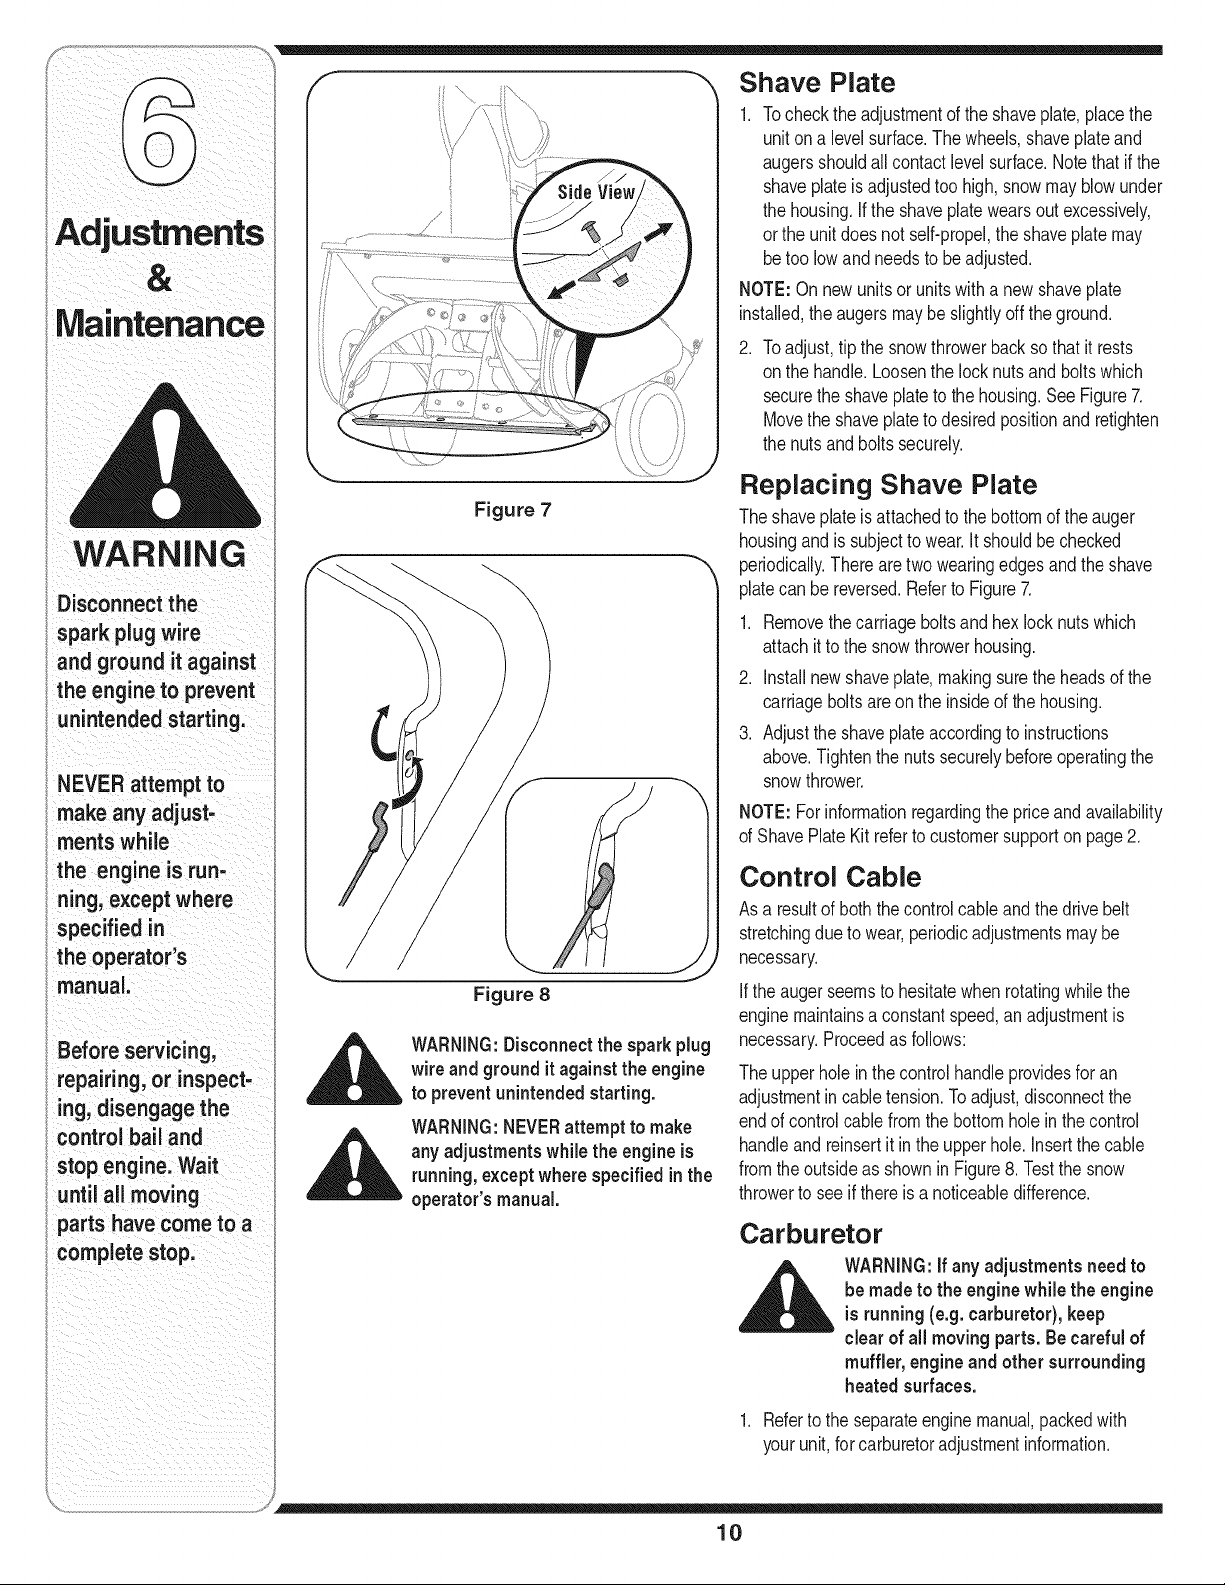
Figure 7
Figure 8
__ ARNING:Disconnectthe spark plug
_ ARNING:NEVERattempt to make
wire and groundit against the engine
to preventunintended starting.
any adjustments while the engineis
running, except wherespecified in the
operator's manual.
Shave PJate
1. Tocheckthe adjustmentofthe shaveplate,placethe
uniton a levelsurface.Thewheels,shaveplateand
augersshouldallcontactlevelsurface.Notethatif the
shaveplateisadjustedtoohigh,snowmayblowunder
thehousing,if theshavepJatewearsout excessively,
ortheunit doesnot self-propeJ,the shaveplatemay
betoolowand needsto beadjusted.
NOTE:On newunitsorunitswitha newshaveplate
installed,the augersmaybeslightlyoff theground.
2. Toadjust,tip thesnowthrowerbacksothat itrests
onthehandle.Loosenthelocknutsandboltswhich
securetheshaveplatetothe housing.See Figure7.
Movetheshaveplatetodesiredpositionand retighten
thenutsandboltssecurely.
Replacing Shave Plate
Theshaveplate isattachedtothe bottomof theauger
housingandis subjecttowear.It shouldbechecked
periodically.Therearetwo wearingedgesandtheshave
platecan bereversed.RefertoFigure7.
1. Removethecarriageboltsand hexlocknutswhich
attachit tothe snowthrowerhousing.
2. installnewshaveplate,makingsuretheheadsof the
carriageboltsareonthe insideofthehousing.
3. Adjustthe shaveplateaccordingtoinstructions
above.Tightenthenutssecurelybeforeoperatingthe
snowthrower.
NOTE:Forinformationregardingthe priceandavailability
ofShavePlateKit refertocustomersupportonpage2.
Control CabJe
Asa resultof boththecontrolcableandthedrivebelt
stretchingduetowear,periodicadjustmentsmaybe
necessary.
If theaugerseemsto hesitatewhenrotatingwhilethe
enginemaintainsa constantspeed,an adjustmentis
necessary.Proceedasfollows:
Theupperholeinthe controlhandleprovidesforan
adjustmentincabletension.Toadjust,disconnectthe
endofcontrolcablefromthebottomholeinthecontrol
handleand reinsertit inthe upperhole.Insertthecable
fromtheoutsideas shownin Figure8.Testthe snow
throwerto seeif thereisa noticeabledifference.
Carburetor
,__ WARNING:If any adjustments needto
1. Referto theseparateenginemanual,packedwith
yourunit,for carburetoradjustmentinformation.
be madeto the enginewhile the engine
isrunning(e.g. carburetor), keep
clear of all moving parts.Becareful of
muffler, engine and other surrounding
heatedsurfaces.
10
Page 11

Replacing Belt
_ ARNING:Beforeservicing,repairing,
Removethebeltcoverbyremovingfivehexscrews.See
Figure9. Thensimplypullthebeltoffbygraspingitfromthe
bottomoftheaugerpulleyandpullingoff. Onceyouremove
thebeltfromthepulleys,youcanpushdownontheidler
pulleytoreleasethebeltfromunderthebeltkeeper.
Toreplacethebeltfollowtheseinstructionsandreferto
Figure10:
1. Pushdownon the Idlerpulley.
2. Putbelton top ofthe augerpulley,underbeltkeeper.
3. Threadbeltaroundenginepulley.
4. Pushbeltoverbottomof augerpulley.
Reinstallthe beltcoverremovedearlier.
or inspecting,disengage the control
bail and stop engine.Wait until all
moving partshavecome to a complete
stop. Disconnect spark plug wire and
ground itagainst the engine to prevent
unintended starting.
Engine
1. Referto theseparateenginemanualforall engine
maintenanceprocedures.
2. Checkengineandsnowthrowerfrequentlyforloose
hardware,andtightenasneeded.
Lubrication
Lubricatepivotpointsonthecontrolhandleandthe
extensionspringatthe endofthe controlcable witha
lightoilonce everyseasonandbeforestorageofthe
snowthroweratthe endofthe season.
Belt Keeper
To remove,pullbelt off here
Figure 9
iustments
J
WARNING
Before servicing;
repairing, or inspecting,
disengage the control
stopengine:
lall moving
parts havecome to a
complete stop. Distort'
nect spark plugwi e
and ground itagainst
the engine to prevent
unintendedstarting:
Replacing Auger Paddles
Thesnowthrowerauger'srubberpaddlesaresubjectto
wearandshouldbe replacedifanysignsof excessive
wearis present.
IMPORTANT:Do NOTallowthe auger'srubberpaddles
toweartothe pointwhereportionsofthe metalauger
itselfcancomeincontactwiththepavement.Doingso
canresultinseriousdamagetoyour snowthrower.
NOTE:Forinformationregardingthepriceandavailability
ofAugerKit referto customersupporton page2.
Tochangetherubberpaddles,proceedasfollows:
1. Removetheexistingrubberpaddlesby unscrewingthe
self-tappingscrewswhichsecurethemtotheauger.
SeeFigure11.
2. Securethereplacementrubberpaddlestotheauger
usingthe hardwareremovedearlier.
Figure 10
f
\ \,
_..L J
Figure 11
iMPORTANT:
Do.oTallow
augeCs rubber
paddles to wear
to the point where
portions of the metal
auger itself can come
in contact with the
pavementloo ngso
result inserious
damage to your snow
thrower.
11
Page 12

WARNING
Never store snow
i thrower with fuel
in tank indoorsor
in poorly ventilated
areas, where fuel
fumes may reach an
open flame, spark
or pilotlight as ona
furnace, water heater,
clothes dryer or gas
appliance.
i Drainfuel intoan
' approved container
outdoors,awayfrom
any open flame. Be
certain engine is
i cool. Do not smoke.
i Fuel left in engine
i during warm weather
deteriorates and
will cause serious
starting problems.
Do not drain
carburetor if using
fuel stabilizer.
i Never use engine or
carburetor cleaning
products inthe fuel
tank or permanent
damage may occur.
Observethefollowing,whenpreparingyoursnow
throwerforoff-seasonstorage:
• Drainfuelintoanapprovedcontaineroutdoors,away
fromanyopenflame.Allowengineto cool.Extin-
guishcigarettes,cigars,pipesandothersources
ofignitionpriortodrainingfuel. Fuelleft inengine
duringwarmweatherdeterioratesandwillcause
seriousstartingproblems.
If unitis tobestoredover30 days,preparefor
storageasinstructedinthe separateenginemanual
packedwithyourunit.
Runengineuntilfueltankis emptyandenginestops
duetolackof fuel.
Removegasolinefromcarburetorandfueltankto
preventgumdepositsfromformingon theseparts
andcausingpossiblemalfunctionofengine.
Draincarburetorbypressingupwardonbowldrain,
locatedbelowthecarburetorcover.
• Fuelstabilizers,suchas STA-BIL®,areanaccept-
ablealternativein minimizingtheformationoffuel
gumdepositsduringstorage.Donotdraincarburetor
ifusinga fuelstabilizer.
• Wipeequipmentwithanoiledragto preventrust.
• Removesparkplugandpouroneounceofengine
oilthroughsparkplugholeinto cylinder.Coverspark
plugholewithrag.Crankengineseveraltimesto
distributeoil.Replacesparkplug.
• Followthelubricationrecommendationsfoundinthe
MaintenanceSection.
Alwaysstorethe snowthrowerina clean,dryarea.
12
Page 13

Problem Cause Remedy
Fnrl n_.f_ .£f_ I 1: Choken0t'inON positionl 1: M0veChoketoONpostion:
! '_- 2. Sparkp!ugwiredisconnected. 2. c0nnect wireto Sparkplug.
&Fue! tankemptyorstalefue!. &Fi!! tankwithclean,freshgaSOlinel
4 Enginen0tPrimed. 41 meengineasinstructedin
OpeiatingYou[sniw ThrOwer
6 B!0#kedfue!
7_ SafetykeYnotinigniti0nonengine: I
I 8: FuelShut-offValveClosed.(If 8. Open fuelshut-offvalve:
Engineruns erratic
1. UnitrunningonCHOKE.
2. Blockedfuellineor stalefuel.
3. Wateror dirt in fuelsystem.
4. Carburetorout ofadjustment.
1. Movechokeleverto OFFposition.
2. Cleanfuelline; filltankwithclean,
freshgasoline.
3. Drainfueltank. Refillwith
freshfuel.
4. ContactServiceCenter.
Engne overheats 1. Carburetornotadjustedproperly. 1. ContactServiceCenter.
.
Excessive 1. Loosepartsor damagedauger. 1. Stopengineimmediatelyand
Vibration disconnectsparkplugwire.Tighten
all boltsand nuts.Ifvibration
continues,haveunit servicedbya
ServiceCenter.
Lossof power 1, Sparkplugwire loose. 1. Connectandtightensparkplug
wire
2. Gas capventholeplugged. 2, Removeiceandsnowfromgas
cap.Becertainventholeisclear
• 3. Exhaustportplugged. . 3, ContactServiceCenter.
NOTEi ThiSsection
addressesminor
service issues: For
further details,contact
customerassistancel
ii i _iI_ ii
Unit fails 1. Drivecontrolcablein needof adjust- 1. Adjustdrivecontrolcable.Referto
to propel itself merit. "Adjustments".
2. Drivebelt looseordamaged. 2. Replacedrivebelt.
Unit fais 1, Chuteassembyclogged. 1. Stopengineimmediatelyand
to dscharge snow disconnectsparkplugwire.Clean
chuteassemblyandinsideof
augerhousingwithclean-outtool
ora stick.
2. Foreignobjectlodgedinauger. 2, Stopengineimmediatelyand
disconnectsparkplugwire.
Removeobjectfromauger.
3. Augerbeltlooseor damaged. 3, Referto Maintenancesection.
13
Page 14
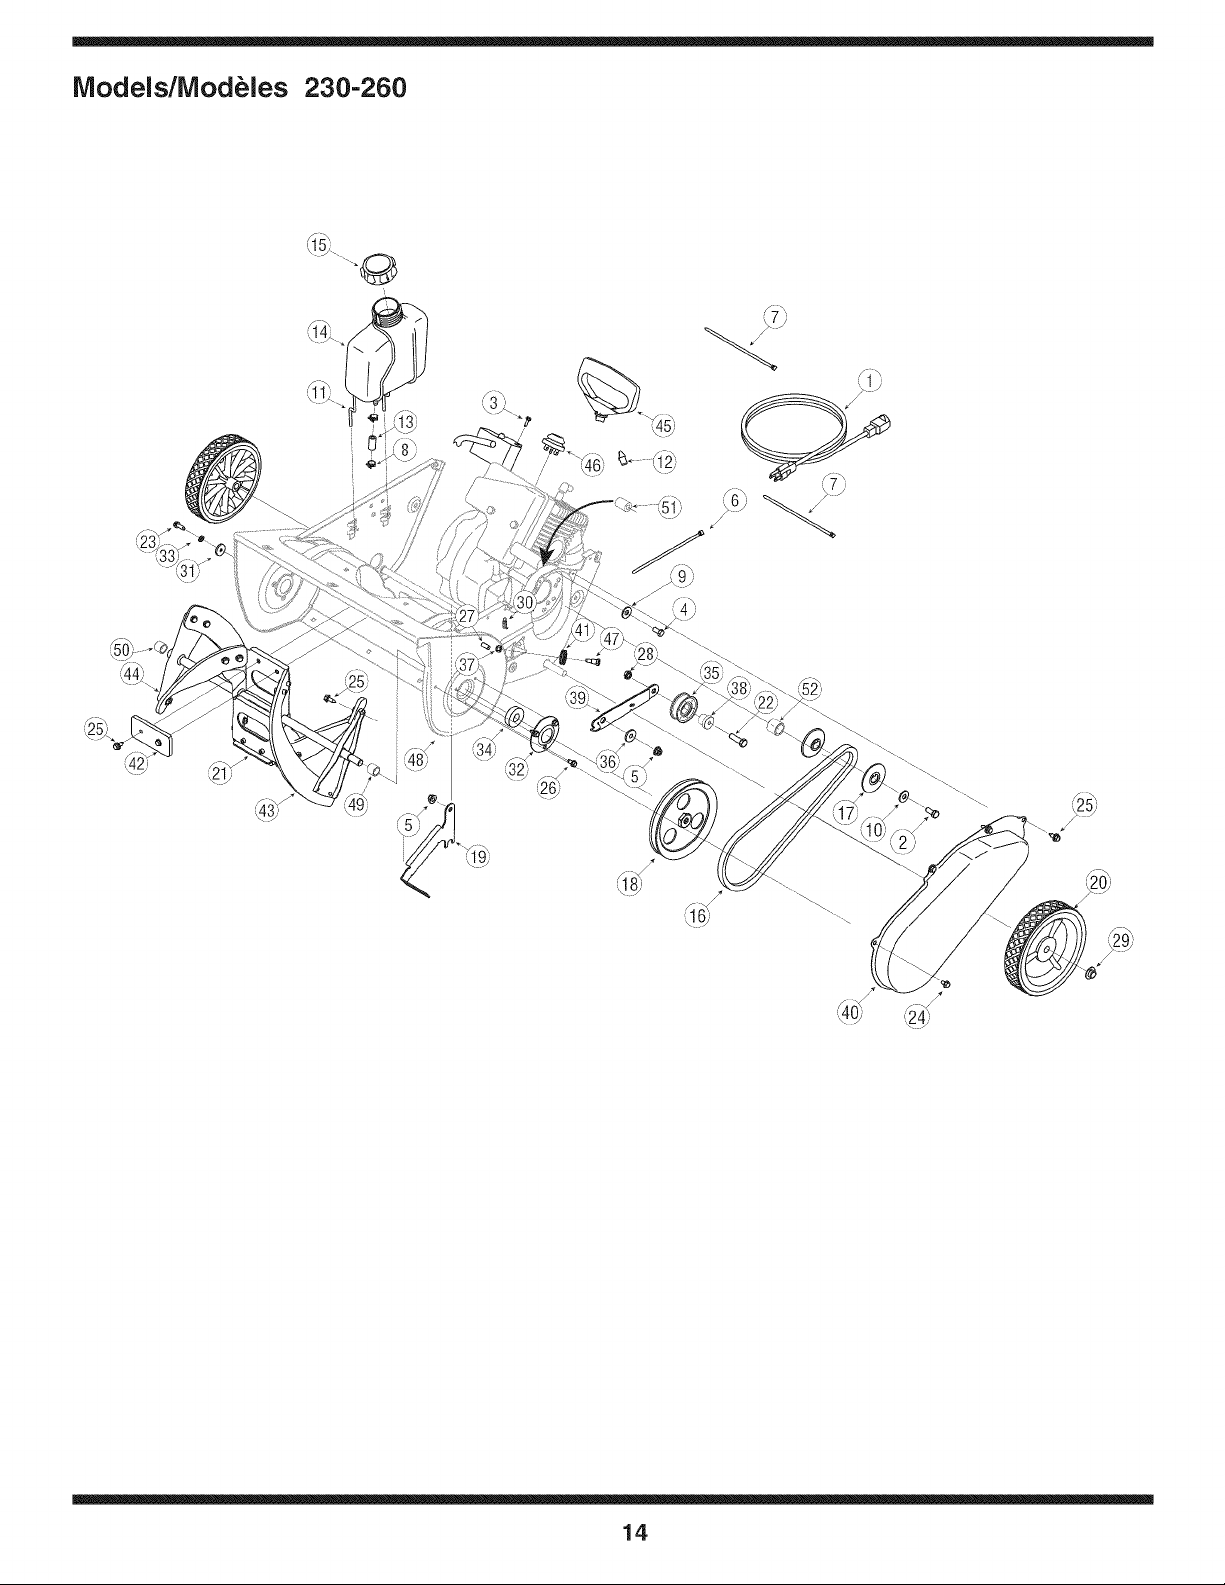
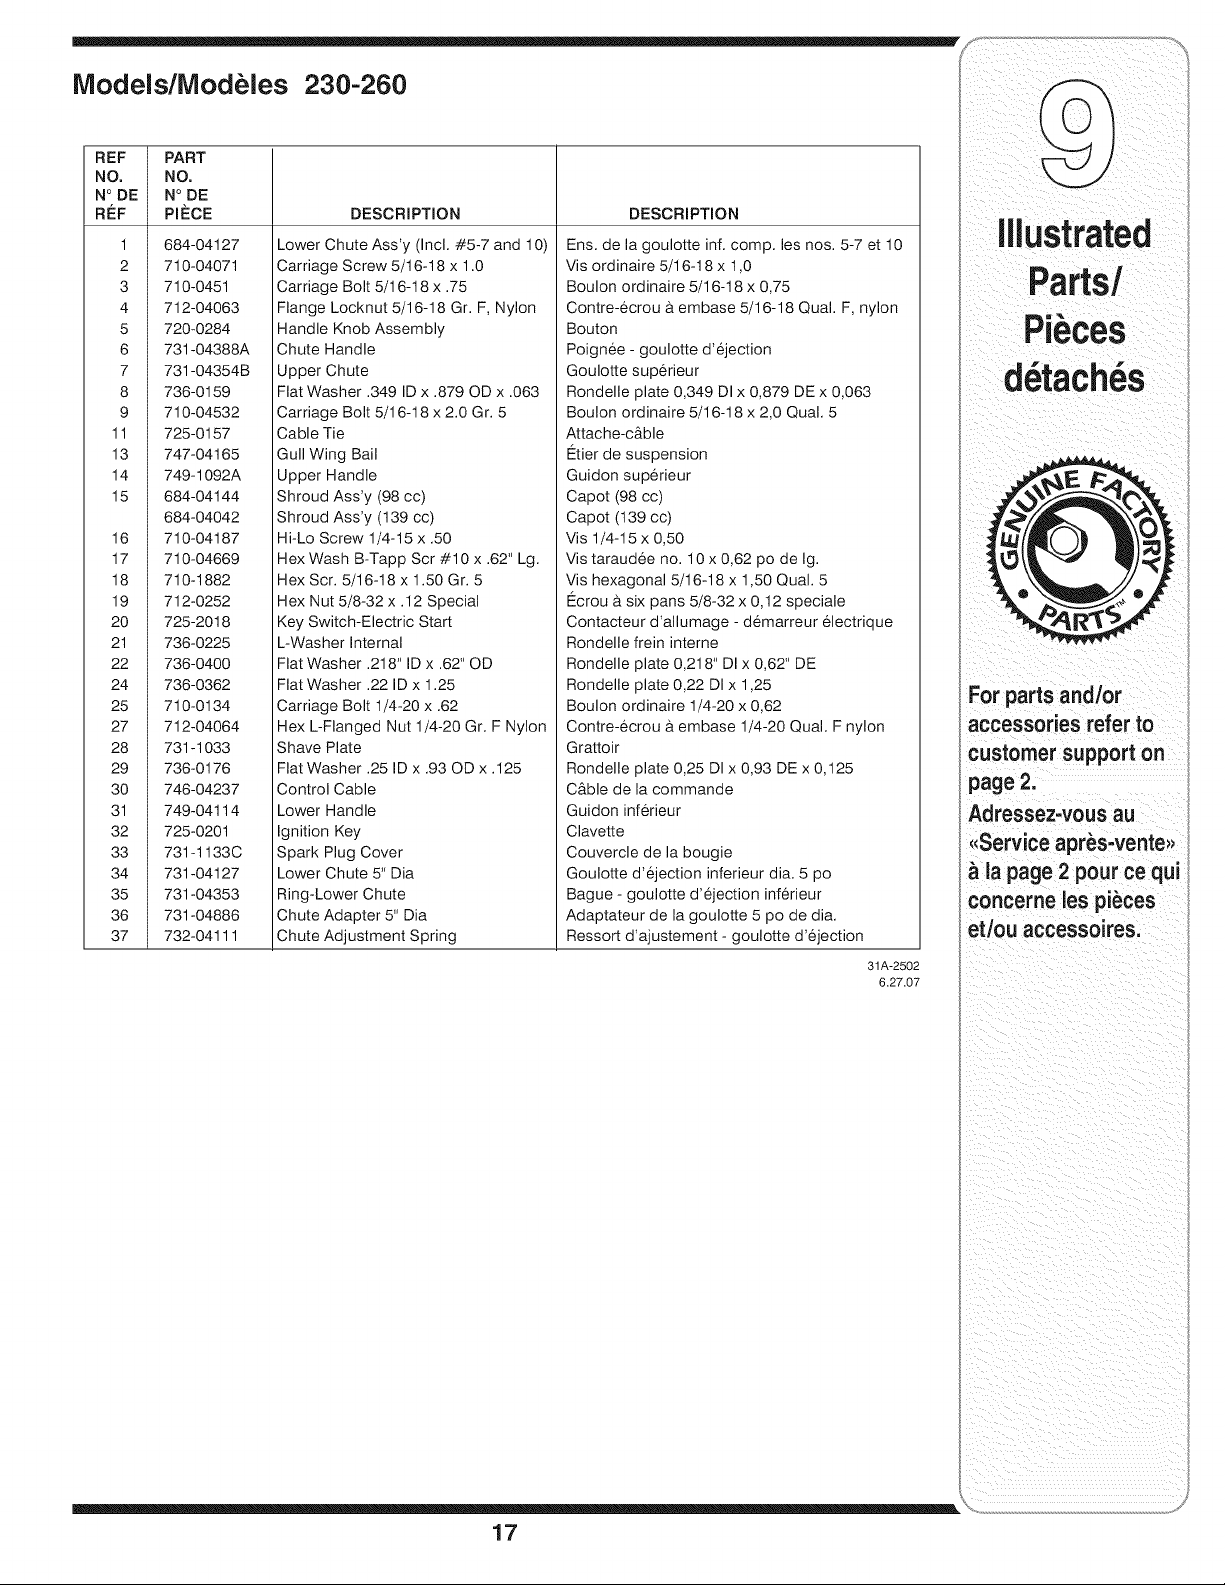
iVlodels/iVlodeles 230-260
14
Page 15

Models/Modeles 230-260
i
REF
NO.
N° DE
REF
*4
10
11
12
13
14
15
"16
17
"18
19
2O
21
22
23
24
25
26
27
28
29
30
31
32
33
34
35
36
37
38
39
40
41
42
43
44
45
46
47
48
* 49
* 50
"51
* 52
1
2
3
5
6
7
8
9
PART
NO.
N° DE
PIECE
629-0236
710-0627
710-1003
710-0805
710-3025
712-04063
725-0157
726-0154
726-0205
736-0119
736-0242
747-04150
7511825510
751-0535
751-10023
751-10487
754-0367
754-0101A
756-0416B
756-04243
756-04232
790-00225
734-04070
684-04253
710-0106
710-0642
710-0653
710-0896
710-1005
710-3008
712-04064
726-0299
732-0357A
736-0176
790-00249
736-0329
741-04188A
684-04168
748-0234
712-0896
750-04571
790-00238A
790-00045A
756-0625
735-04033
735-04032
684-04252
7510009636
7512B1476
738-0924A
684-04227
750-04757
750-04758
750-0589
750-0716A
DESCRIPTION DESCRIPTION
Cord-Extension 110V3M 2 Prong
Hex L-Bolt 5/16-24 x .75 Gr. 5
Hex Wash B-Tapp Scr #10 x .62" Lg.
Screw-Hex Cap 5/16-18 x 1.5 Gr. 5
Screw-Hex Cap 5/16-18 x .625 Gr. 5
Flange Locknut 5/16-18 Gr. F, Nylon
Cable Tie
Push Mount Tie
Hose Clamp
Lockwasher 5/16
Cupped Washer .340 ID x .872 OD x .06
Gas Tank Support Wire
Choke Lever Knob
Fuel Line
Fuel Tank 2 Quart
Cap-Fuel
V-Belt
V-Belt 1/2 x 35.0" Lg.
Pulley Half .625 ID x 2.25 OD
Pulley
V-Pulley 1/2 x 6,0" OD
2-cycle Mounting Bracket
Wheel, 7 x 1.50 dia. Lug
Auger Assembly
Hex Screw 1/4-20 x 1.25 Gr. 5
Thd Forming Scr. 1/4-20 x .75 Lg.
Hex Wash HD Tapp Scr 1/4-20 x .375
Hex B-Tap Scr 1/4-28 x .25" Lg
Hex Tap Scr. 1/4-14 x .5" Lg.
Hex Bolt 5/16-18 x .75" Lg. Gr. 5
Flange Locknut 1/4-20 Gr. F, Nylon
Push Cap x 1/2" Rod
Extension Spring .33 OD x 1.12 Lg.
Flat Washer .25 ID x .93 OD x .125
Bearing Cup
L-Wash 1/4 ID
Ball Bearing .625 x 37 x 12.63
Idler Pulley (1/4" hole)
Shoulder Spacer .25 Thk.
Hex Ins Jam L-Nut 1/4-28
Shoulder Spacer
Idler Bracket
Belt Cover
Cable Guide Roller
Rubber Paddle
Rubber Spiral-Crescent
Auger Ass'y 21" w/Solid Shaft
(w/o rubber paddels)
Recoil Handle, Mitten
Primer
Hex Shld.Scr.1/4-28 x .375
Auger Assembly Housing
Auger Spacer LH
Auger Spacer RH
Spacer .325 ID x .625 OD x .88
Spacer .630 x .88 x .747
Corde
Boulon hex 5/16-24 x 0,75 Qual. 5
Vis taraudee nO. 10 x 0,62 po de Ig.
Vis &t6te hex. 5/16-18 x 1,5 Qual. 5
Vis & t6te hex. 5/16-18 x 0,625 Qual. 5
Contre-ecrou & embase 5/16-18 Qual. F, nylon
Attache-c&ble
Tige de poussoir
Collier
Rondelle frein 5/16
Rondelle creuse 0,340 Dt x 0,872 DE x 0,06
Fil de support - reservoir & carburant
Manette du volet de depart
Ligne d'essence
Reservoir de carburant de 2 quarts
Capuchon d'essence
Courroie trapezoidale
Courroie trapezoidale 1/2 x 35,0 po de Ig
Moitie poulie 0,625 DI x 2,25 DE
Poulie
Poulie, 1/2 x 6,0" DE
Support de montage
Roue, 7 x 1,50 diam. Lug
Ensemble de la tariere
Vis & t6te hexagonale 1/4-20 x 1,25 Qual 5
Vis taraudee 1/4-20 x 0,75 Ig.
Vis auto-taraudeuse hexagonale 1/4-20 x 0,375
Vis taraudee a t6te hexagonale 1/4-28 x 0,25
Vis taraudee 1/4-14 x 0,50 po de Ig.
Boulon hex. 5/16-18 x 0,75 po de Ig. Qual. 5
Contre-ecrou a embase 1/4-20 Qual. F, nylon
Ecrou pour tige de 1/2 po
Ressort d'extension 0,33 DE x 1,12 po de Ig
Rondelle plate 0,25 DI x 0,93 DE x 0,125
Roulement a cuvette
Rondelle frein 1/4 Dt
Roulement a billes 0,625 x 37,0 x 12,63
Poulie du tendeur (trou 1/4 po)
Entretoise epaul6e
Contre-ecrou de blocage 1/4-28
Entretoise
Support du tendeur
Couvercle de courroie
Guide du c&ble
Pale en caoutchouc
Spirale en caoutchouc - croissant
Ensemble de la tari@e de 21 po avec arbre solide
(sans pale en caoutchouc)
Poignee du demarreur
Amorgeur
Vis a epaulement 1/4-28 x 0,375
Logement de la tariere
Entretoise de la tariere - gauche
Entretoise de la tariere - droite
Entretoise 0,325 DI x 0,625 DE x 0,88
Entretoise 0,630 Dt x 0,88 DE x 0,747
Illustrated
Parts/
Pi ces
Oel:aClleS
!
Forparts and/or
accessories refer to
customer support on
page 2.
Adressez-vous au
,,Service apr_s-vente_>
la page 2 pource qui
;oncerne les pi_ces
et/ou accessoires.
* 98 cc Tec. only/98 cc Tec. seulement 31A-2501
** 139 cc Tec. only/139 cc Tec. seulement 6,26,07
NOTE:Snowthrowerfeatures/componentsvaryby model.NOTall partslistedaboveandpicturedonthe previous
pageare standardequipment.
15
Page 16
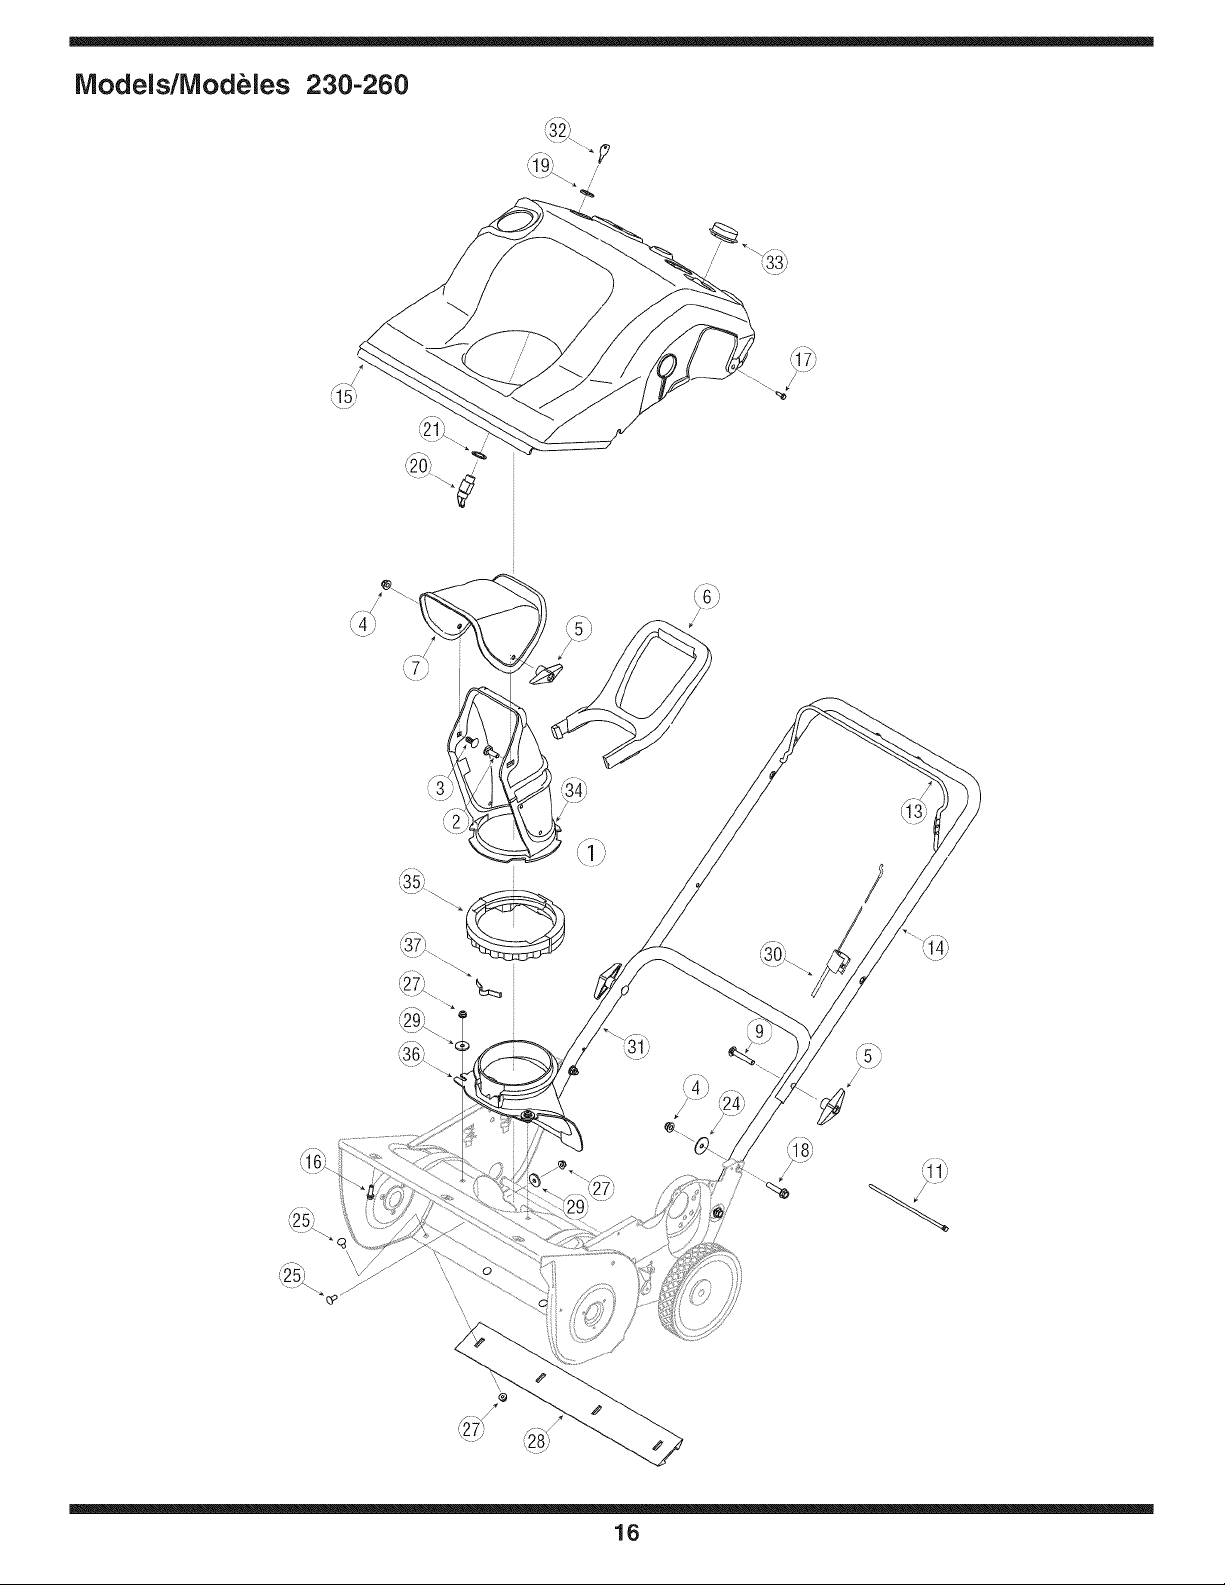
iVlodels/iVlodeles 230-260
/
16
Page 17
Models/Modeles 230-260
REF PART
NO. NO.
N°DE N°DE
REF PIECE
1 684-04127
2 710-04071
3 710-0451
4 712-04063
5 720-0284
6 731-04388A
7 731-04354B
8 736-0159
9 710-04532
11 725-0157
13 747-04165
14 749-1092A
15 684-04144
684-04042
16 710-04187
17 710-04669
18 710-1882
19 712-0252
20 725-2018
21 736-0225
22 736-0400
24 736-0362
25 710-0134
27 712-04064
28 731-1033
29 736-0176
30 746-04237
31 749-04114
32 725-0201
33 731-1133C
34 731-04127
35 731-04353
36 731-04886
37 732-04111
Lower Chute Ass'y (Incl. #5-7 and 10)
Carriage Screw 5/16-18 x 1.0
Carriage Bolt 5/16-18 x .75
Flange Locknut 5/16-18 Gr. F, Nylon
Handle Knob Assembly
Chute Handle
Upper Chute
Flat Washer .349 ID x .879 OD x .063
Carriage Bolt 5/16-18 x 2.0 Gr. 5
Cable Tie
Gull Wing Bail
Upper Handle
Shroud Ass'y (98 cc)
Shroud Ass'y (139 cc)
Hi-Lo Screw 1/4-15 x .50
Hex Wash B-Tapp Scr #10 x .62" Lg.
Hex Scr. 5/16-18 x 1.50 Gr. 5
Hex Nut 5/8-32 x .12 Special
Key Switch-Electric Start
L-Washer Internal
Flat Washer .218" ID x .62" OD
Flat Washer .22 ID x 1.25
Carriage Bolt 1/4-20 x .62
Hex L-Flanged Nut 1/4-20 Gr. F Nylon
Shave Plate
Flat Washer .25 ID x .93 OD x .125
Control Cable
Lower Handle
Ignition Key
Spark Plug Cover
Lower Chute 5" Dia
Ring-Lower Chute
Chute Adapter 5" Dia
Chute Adjustment Spring
DESCRiPTiON
DESCRiPTiON
Ens. de la goulotte inf. comp. les nos. 5-7 et 10
Vis ordinaire 5/16-18 x 1,0
Boulon ordinaire 5/16-18 x 0,75
Contre-ecrou a embase 5/16-18 Qual. F, nylon
Bouton
Poignee - goulotte d'ejection
Goulotte superieur
Rondelle plate 0,349 DI x 0,879 DE x 0,063
Boulon ordinaire 5/16-18 x 2,0 Qual. 5
Attache-c&ble
Etier de suspension
Guidon superieur
Capot (98 cc)
Capot (139 cc)
Vis 1/4-15 x 0,50
Vis taraudee no. 10 x 0,62 po de Ig.
Vis hexagonal 5/16-18 x 1,50 Qual. 5
Ecrou a.six pans 5/8-32 x 0,12 speciale
Contacteur d'allumage - demarreur electrique
Rondelle frein interne
Rondelle plate 0,218" DI x 0,62" DE
Rondelle plate 0,22 DI x 1,25
Boulon ordinaire 1/4-20 x 0,62
Contre-ecrou a embase 1/4-20 Qual. F nylon
Grattoir
Rondelle plate 0,25 DI x 0,93 DE x 0,125
C&ble de la commande
Guidon inferieur
Clavette
Couvercle de la bougie
Goulotte d'ejection inferieur dia. 5 po
Bague - goulotte d'ejection inferieur
Adaptateur de la goulotte 5 po de dia.
Ressort d'ajustement - goulotte d'ejection
31A-2502
6.27.07
For parts and/or
accessories refer to
customer support on
page 2.
Adressez-vous au
_Service apr_s-vente_,
la page2 pour ce qui
concerne les pi_ces
et/ou accessoires.
17
Page 18

Failureto comply
with suggested
maintenance
andlubrication
specificationswill
void warranty.
TWO YEAR LiMiTED WARRANTY
The limited warrantyset forth belowis given by MTD LLCwith respect to new merchandisepurchasedand used in the United
Statesand/or its territories and possessions, and by MTDProducts Limitedwith respect to newmerchandise purchasedand
usedin Canadaand/or itsterritoriesand possessions (eitherentity respectively,"MTD").
MTDwarrantsthis product (excludingits normal wearparts asdescribed below)against defects in material andworkman-
shipfor a periodof two (2) years commencingon the date oforiginal purchase and will, at its option, repair or replace,free
ofcharge, any partfound to be defective in materials orworkmanship. This limited warrantyshall onlyapply if this product
has beenoperated and maintained in accordance withthe Operator's Manual furnished with the product,and hasnot been
subjectto misuse,abuse, commercialuse, neglect, accident, improper maintenance,alteration, vandalism,theft, fire,water,
or damage because ofother perilor natural disaster. Damageresultingfrom the installationor use of anypart, accessory
or attachmentnot approved by MTD for use withthe product(s) covered bythis manualwill voidyourwarranty asto any
resulting damage.
Normalwear partsare warranted to befree from defects inmaterial and workmanship fora period of thirty (30)days from the
dateof purchase.Normal wearparts include, but are notlimited to items such as: batteries,belts, blades,blade adapters,
grass bags, rider deck wheels,seats, snow throwerskid shoes,friction wheels, shaveplates, augerspiral rubber and tires.
HOWTO OBTAIN SERVICE: Warranty service isavailable, WITHPROOF OF PURCHASE,throughyour local authorized
servicedealer.To locatethe dealer inyour area;
In the U,S,A,: Check yourYellowPages, orcontact MTD LLCat RO. Box361131,Cleveland,Ohio 44136-0019,orcall
1-800-800-7310or
1-330-220-4683 or log on to our Web siteat www.mtdproducts.com.
In Canada: Contact MTD ProductsLimited, Kitchener,ON N2G 4J1,or call 1-800-668-1238or log on to our Website at
www.mtdcanada.com.
This limited warrantydoes notprovide coveragein the following cases:
a. The engineor component parts thereof.These itemsmaycarry a separate manufacturer'swarranty. Refer toapplicable
manufacturer'swarrantyforterms and conditions.
b. Log splitter pumps, valves,and cylinders have aseparate one-year warranty.
c. Routinemaintenance itemssuch as lubricants,filters, bladesharpening, tune-ups, brakeadjustments, clutch adjust-
ments,deck adjustments, and normal deteriorationof the exteriorfinish due to use or exposure.
d. Service completedby someoneother than an authorizedservice dealer.
e. MTD doesnotextend any warranty for products sold or exported outside ofthe United States and/or Canada, andtheir
respectivepossessions and territories,except thosesold through MTD'sauthorizedchannels of exportdistribution.
f. Replacement partsthat arenot genuine MTDparts.
g. Transportation chargesand service calls.
h. If Productsare usedcommercially. (MTD may separatelyoffer Limited CommercialWarrantieson certain select
products. Ask yourdealer or retailerfor details or contact MTD Service for moreinformation.)
No impliedwarranty, including any impliedwarranty of merchantability of fitness for a particularpurpose, ap-
plies after the applicable periodof express written warranty above as to the parts as identified. Noother express
warranty, whetherwritten or oral, exceptas mentionedabove, given by any personor entity, includinga dealer or
retailer, with respect to any product, shall bind IVITD.During the period of the warranty, the exclusive remedy is
repair or replacement of the productas set forth above,
The provisions as set forth in this warranty providethe sole and exclusive remedy arising from the sale. MTDshall
not be liable for incidental or consequential loss or damage including,without limitation, expenses incurred for
substitute or replacement lawn care services or for rental expenses to temporarily replace awarranted product,
Somejurisdictions do notallow the exclusionor limitation of incidental or consequential damages,or limitationson how long
an implied warranty lasts,so theabove exclusions orlimitations maynot apply to you.
In noevent shallrecovery of any kind begreater than theamount of the purchase price of the product sold.Alteration of
safety features of the productshall void this warranty. Youassume the risk andliability for loss,damage, or injury to you
andyour property and/or to others and their property arising out of the misuse or inability to usethe product.
This limited warrantyshall notextend to anyoneother than the original purchaseror tothe person for whom it was purchased
asa gift.
HOWLOCAL LAWSRELATE TO THIS WARRANTY: This limited warrantygives youspecific legal rights, and you may also
haveother rights that vary in different jurisdictions.
IMPORTANT:Owner must presentOriginal Proof of Purchasetoobtain warranty coverage.
MTDLLC, P.O.BOX361131 CLEVELAND, OHiO 44136-0019; Phone: 1-800-800-7310, 1-330-220-4683
MTDProducts Ltd., P.O. BOX 1386, KITCHENER, ON N2G4J1; Phone: 1-800-668-1238
18
Page 19
S6curit6 = Montage = Fonctionnernent =Reglages, Entretien , D_pannage
, Listes des pi_ces d6tach6es • Garantie
NO'T'|C | D" U|| L|SA"r'|o N
IViodeles 230, S230
\
lVlodeles 240, S240
Modeles 250, S250
lVlodeles 260, S260
Modeles 261, S261
iMPORTANT
LISEZ ATTENTIVEMENT LES REGLES DE SECURITE ET LES
iNSTRUCTiONS AVANT DE METTRE EN MARCHE LA MACHINE.
Avertissement:Cetappareilestequiped'unmoteur&combustioninterne.Pourcetteraison,ilnedoltpas_treutilisesurunterrainforestiernon
debroussailleousurtoutautreterrainrecouvertdebroussaillesoud'herbess'il n'estpas equiped'unpare-etincellesconforme&touteslesloisappli-
cables&I'echellelocaleoudeI'etat(lecasecheant).Toutpare-etincellesdolt _tremaintenuenparfaitetatde fonctionnementparrutilisateur.L'!_tat
deCalifornierexigeenvertudu Codesurlesressourcespubliques4442et 4443.D'autresloissimilairespeuvent_treenvigueurdanscertains
autresetats.Lesloisfederalessontapplicablessurles terresfederales.Vouspouvezvousprocurerunpare-Oincelles&installersur le silencieux
aupresdelastationtechniqueagreeelaplusprocheouadressez-vousauserviceapres-vente,P.O.361131,Cleveland,Ohio44136-0019.
For USCustomers: MTDLLC,P.O.BOX361131CLEVELAND,OHiO44136-0019 FORMNO.769-00805D
PRINTEDIN U.S.A.
ForCanadianCustomers:MTDProducts Ltd., P.O.BOX1386,KITCHENER,ON N2G4J1 07/12/07
Page 20

Cette noticed'utilisationest une piece importantede votre nouvel _quipement. Elle vousfoumit les renseignements
n6cessaires _ I'assemblage,_ la preparation et _ rentretien de votre machine. Veuillezdonc la lire attentivement et
vousassurer de bien comprendretoutes les instructions.
Table des mati res
Etiquettes ............................................................ 3
important consignes de s_curit6 ...................... 4
instructions de montage .................................... 6
Connaitre votre souffleuse ................................ 7
Utilisation de la souffleuse ................................ 8
R_glages ............................................................ 10
Pour trouver le nurn ro de module
AVANTDE PROC¢:DER,AEASSEMBLAGEDEVOTRE
NOUVELLESOUFFLEUSE,
Iocaliserlaplaquesignaletiquesur I'equipement,et recopier
le numero de modele et le numero de serie sur lemodele
de plaquesignaletiquefourni sur la droite.PourIocaliserla
plaquesignal_tique,placez-vousderriere la souffieuse&la
poste de conduite et regardez& I'arrieredu ch&ssisde la
souffleuse.
Entretien de la souffleuse ................................ 10
Remisage hors saison ..................................... 12
D_pannage ........................................................ 13
Garantie ............................................................. 14
Pieces d_tach_es (voir la page 14
de la version anglaise de cette notice
d'utilisation
Model Number Serial Number
Num_ro de module Num_ro de s_rier
XXXXXXXXXXX XXXXXXXXXXX
MTD LLC
CLEVELAND, OH 44136
MTD PRODUCTSLIMITED
KITCHENER, ON N2G 4JI
USA=www.mtdproducts.com 1=800=800=7310
CAN-www.mtdcanada.com I=800-668-1238
Service apr s-vente
Veuillez retoumer la machine au d6taillant qui vous I'a vendue,
sans vous adresser d'abord au service aprbs-vente.
Si I'assemblagede cette machinevous pose desproblemesou pour toutequestion concernant lescommandes,lefonc-
tionnementou I'entretiende lamachine, lesspecialistes sont&votre disposition.ChoisissezI'unedes optionsci-dessous:
1. Visitez le sitewww.mtdcanada.caoQvous trouverezde nombreusessuggestionsutiles. Cliquezsur lebouton Service apres-
vente.
2. Appelez un agent du service apres-vente au: Pour clients des Etats-Unis: 1-330-220-4MTD (4683)or 1-800-800-7310
Pour clients du Canada" 1-800-668-1238
3. Le fabricant dumoteurest responsable de touteslesquestionsconcernant lesperformances,la puissance indiquee,les
caracteristiquestechniques,lagarantieet le service apres-ventedu moteur.Pour plusde renseignements&ce sujet,veuillez
consulterla notice d'utilisationdu moteurfournie avecvotre machine.
Pr@arez vos numerosde modeleet deserie avantde tel@honer. Veuillezlire le chapitre precedent pour determiner
I'emplacementde ces numeros.On vous demanderad'enregistrerle numerode serie avantde pouvoirpoursuivrevotreconsul-
tation.
2
Page 21
S
J!
; de¸¸¸¸
AVERTISSEIViENT
Ce symboleattire
votreattentionsur des
consignesdes_curit6
importantesqui,si elles
nesontpas respect_es,
peuventmettreen
dangernon seulement
votrepersonneetvos
bens, mais aussiceux
dautrUi.Pri_rede fire
touteslesinstructions
figurantdanscette
noticed'utilisationavant
d'essayerdevous
servirde cettemachine.
Lenon-respectde
cesinstructionspeut
entrafnerdesblessures
corporelles.
RESPECTEZ
EAVERTiSSElViENT
QUIACCOIViPAGNE
CESYMBOLE!
Votre responsabilit_
Cettemachinene dolt
_treutilis_equepardes
personnesquipeuvent
fire,comprendreet
respecterles avertisse-
mentset instructions
quifigurentdanscette
noticeetsurla machine.
3
Page 22
AVERTISSEMENT:Lesgaz d'@happement dece produitcontiennent des
produitschimiques reconnusdans I'€:tatde Californie commecausant le cancer,
des anomaliescongenitales ou d'autresproblemes lies a la reproduction.
DANGER: Cette machine dolt_tre utilis@ conformement aux consignes de s@urite qui figurent
dans la notice d'utilisation.Comme avectout appareil motorise, une negligenceou uneerreur de la
part de I'utilisateurpeutentrafnerdesblessures graves.Cette machine peut amputermains et pieds
et projeterdes debris. Par cons@uent, le non-respectdeces consignes peutcauser desblessures
corporellesgraveset m_memortelles.
AVERTiSSElVlENT
Cesymboleattire
votreattentionsur des
consignesde s@urit_
importantesqui.si elles
nesontpasrespect_es.
peuventmettreen
dangernonseulement
votrepersonneet vos
biens,maisaussiceux
d'autrui.Pri_redefire
touteslesinstructions
figurantdanscette
noticed'utilisationavant
d'essayerdevous
servirde cettemachine.
Lenon-respectde
ces instructionspeut
entrafnerdesblessures
corporelles.
RESPECTEZ
UAVERTISSEMENT
QUI ACCOMPAGNE
CESYMBOLE!
Votre responsabilite
Cettemachinene dolt
@e utilis@que pardes
personnesquipeuvent
lire,comprendreet
respecterlesavertisse-
mentset instructions
qui figurentdanscette
noticeet surlamachine.
Formation 7. N'essayezjamaisde reglerle moteurpendantqu'il tourne(&
1. Assurez-vousdelireet debiencomprendretoutesles
instructionsquifigurentsur lamachineet danslanotice
d'utilisationavantde la mettreenmarche. Conservez
cettenoticed'utilisation&un endroitsQrpourroute
consultationult@ieureet pourcommanderdes pi@esde
rechange.
2. Familiarisez-vousavecles commandesetlabonne
utilisationde cettemachineavantde vousenservir.
Appreneza.arr_terla machineet& debrayerrapidement
lescommandes.
3. Nepermettezjamais&des enfantsde moinsde 14ans
deseservirde la machine.Desadolescentsplus &ges
doiventlirela noticed'utilisation,biencemprendrele
fonctionnementde la machineet respecterlesconsignes
des@urite.IIsdoiventapprendre_.utiliserlamachineet
s'enservir sousla surveillanceetroited'unadulte.
4. Nepermettezjamais&des adultesneconnaissantpas
bienlefonctionnementdela machinedes'enservir.
5. Lesobjetsprojetesparla machinepeuventcauserdes
blessuresgraves.Pr@oyezdetravailleren@itantde
projeterlaneigevers la route,desspectateurs,etc.
6. Gardezlesspectateurs,les animauxdecompagnieetles
enfantsa.unedistanced'aumoins75pieds delamachine
quandelle esten marche.Arr6tezla machinesi quelqu'un
s'approche.
7. Soyeztoujoursprudentpournepas glisserou tomber,
surtouten reculant.
Preparation
1. Examinezsoigneusementla zone&deblayeret enlevez
tousles paillassons,traineaux,morceauxde bois,ills de
feret autresobjetssur lesquelsvouspourrieztrebucher
ouquirisquentd'etreprojetesparla tariere/turbine.
2. Porteztoujoursdeslunettesdes@uriteen utilisantla
machineou eneffectuantunreglageou une r@aration.
Unobjetpeuten effet_treprojete,ricocheret vous
blesserauxyeux.
3. Netravaillezpassans porterdesv_tementsd'hiver
adequats.Neportezpas debijoux,d'@harpesIongues
oudev_tementsamplesqui risquentde seprendreclans
lespiecesen mouvement.Portezdeschaussuresqui
ameliorentvotre stabilitesurdessurfacesglissantes.
4. Utilisezune rallonge&3ills et uneprisede courantmises
a.laterreavectoutesles machinesequipeesd'un moteur
a.demarreurelectrique.
5. Reglezla hauteurde I'habitaclepourevitertoutcontact
avecles surfacesen gravierouen pierreconcassee.
6. Debrayezrouteslescommandesavantdemettre le
moteurenmarche.
moinsd'indicationscontrairesdelapartdufabricant).
8. Laissezlemoteuret lamachines'habituera.latemp@ature
ext@ieureavantdecommencer&deblayer.
Manipulation de I'essence
Poureliminertoutrisquedeblessuregrave,faitestres attention
enmanipulantde I'essence.IIs'agitd'unproduitextr_mement
inflammableet lesvapeursrisquentd'exploser.Vouspouvez
_tregrievementblessesi des@laboussuressurvotre peau
ousurvosv_tementss'enflammaient.Rincezvotrepeauet
changezimmediatementde v_tements.
a. Remisezle carburantdansdesbidonshomologues
seulement.
b. Eteignezroutecigaretteoupipe,toutcigareoutoute
autresourceincandescente.
c. Nefaitesjamaisle plein&I'int@ieur.
d. N'enlevezjamaisle capuchond'essenceetn'ajoutezpas
d'essencependantquele moteurtourne.
e. Laissezle moteurrefroidirpendantaumoinsdeux
minutesavantdefaire le plein.
f. Nefaitesjamaisdeborderle reservoir.Laissezun
espaced'undemi-pouceenvironpourpermettre
I'expansionducarburant.
g. Resserrezbien lecapuchond'essence.
h. Encasde debordement,essuyezroute@laboussure
surlemoteuretla machine.D@lacezlamachineet
attendez5 minutesavantdela remettreen marche.
i. Ne remisezjamaislamachineoules bidonsd'essence
a.I'int@ieurs'ily a uneflamme,une etincelleouune
veilleuse(dun chauffe-eau,unradiateur,un fourneau,
un@che-lingeouautreappareila.gaz).
j. Laissezla machinerefroidirpendantau moins5 minutes
avantdela remiser.
Utilisation
1. Neplacezjamaisvosmainsou vospiedspres d'une
pieceen mouvement,dans I'habitaclede latari@eoude
la turbineouclanslagoulotted'ejection.Lespisces en
mouvementpeuventamputermainsetpieds.
2. Lamanettede commandede I'ensembledelatari@eet
dela turbineest undispositifdes@urite.Necontournez
jamaisson r61ecequi rendraitdangereuxI'emploide la
machineet pourraitcauserdes blessurescorporelles.
3. Touteslesmanettesdecommandedoiventfonctionner
facilementclanslesdeuxdirectionset revenirautomatique-
ment&lapositionde debrayageIorsqu'ellessent rel&ch@s.
4. Netravaillezjamaissans lagoulotted'ejectionousielle est
endommagee.Laisseztousles dispositifsdes@uriteen
placeetassurez-vousqu'ilssonten bonetat.
4
Page 23
5. Nefaitesjamaisfonctionnerla machinedansunlocal
clos oumal a6recar lesgazd'@happementdumoteur
contiennentdu monoxydede carbone,ungazinodoretres
dangereux.
6. Nevousservezpas delamachineapresavoir budes
boissonsalcoolis@sou apresavoirprisdesmedicaments.
7. Lesilencieuxet lemoteurdeviennenttreschaudset
peuventcauserdesbrt_lures.Ne lestouchezpas.
8. Soyezextr6mementprudenta proximitedesroutes,allees
ou cheminsengravier.Faitesattentionauxdangersnon
@identseta la circulation.
9. Faitestresattentionenchangeantdedirectionetentravail-
lantsurunepente.
10.Pr@oyezdetravailleren@itantde projeterlaneigevers
des fen6tres,murs,voitures,etc.car lesdebris peuvent
ricocheret causerdes blessuresgravesoudesd6g&ts
mat@Ms.
11.Nedirigezjamaisla neigevers desenfants,desspectateurs
etdesanimauxdecompagnieet nepermettezjamaisa.
quiconquede se tenirdevantla machine.
12.Nefatiquezpas lamachineenessayantdedeblayerla
neigetroprapidement.
13.N'utilisezpasla machinesi lavisibiliteestmauvaiseousi la
lumiereestinsuffisante.Gardeztoujoursunbonequilibreet
tenezfermementleguidon. Marchez,necourrezpas.
14.DebrayezlacommandedeI'ensemblede latari@eet dela
turbinepourtransporterlamachineet Iorsqu'ellen'est pas
utilisee.
15.Ned@lacezjamaisrapidementla souffleusesurdes
surfacesglissantes.Soyezprudenten reculant.
16.Arr6tezle moteur,debranchezlefil de labougieetmettez-le
a.laterrecontrele moteursi lamachinecommence
vibrer defa_onanormale.V@ifiezquela machinen'estpas
endommagee.R@areztoutd6g&t@entuelavantde la
remettreen marche.
17.Debrayezrouteslescommandeset arr6tezle moteuravant
de quitterlepostedeconduite(derrierelesguidons).
Attendezquelataft@e/turbinesesoitcompletement
immobilis@avantdedeboucherlagoulotted'ejection,de
faireun ajustementquelconqueou d'examinerla machine.
18.Neplacezjamaisvotremaindartsla goulotted'ejectionou
presde I'admission.UtiliseztoujoursI'outildedegagement
pourdeboucherI'ouverturedelagoulotte. Nedebouchez
paslagoulotted'ejectionpendantquele moteurtourne.
Arr6tezle guidonjusqu'a,ce querouteslespiecesen
mouvementsesoientimmobilis@savantde deboucherla
goulotte.
19.N'utilisezque desaccessoireshomologuesparle fabricant
de la machine.(ex.poidsderoues,chaines,cabineetc.)
20. Faitestoujourspreuvedebonsensdansdessituations
qui n'ontpas6re abord@sparcette noticed'utilisation.
Adressez-vousauserviceapres-ventepourobtenirle nom
du concessionnairele plusprochede chezvous.
Entretien et Rernisage
1. Nemodifiezjamaislesdispositifsdes6curite.Wrifiez
souventqu'ilsfonctionnentcorrectement.Consultezles
chapitresconcemantI'entretienetlesreglagesclanscette
noticed'utilisation.
2. Avant denettoyer,der@arer oud'examinerlamachine,de-
brayezrouteslescommandesetarr6tezle moteur.Attendez
quela tariere/turbinesesoit completementimmobilisee.
Debranchezlefil dela bougieet mettez-lea laterrepour
emp6chertoutdemarrageaccidentelpendantlenettoyage,
la r@arationouI'examendela machine.
3. Wrifiez regulierementque lesboulonset vissont bien
serresetmaintenezlamachineen bonetatdemarche.
Examinezsoigneusementlamachinepourvousassurer
qu'ellen'estpasendommagee.
4. Ne modifiezpasle reglagedu regulateuret nelaissezpas
le moteurs'emballer,ce qui peut6tredangereux.
5. Lesplaquesde raclageet lespatinsde lasouffieuse
s'usentavecI'usage.Parmesuredes@urit6,v@ifiez
souventtousles composantset remplacez-lespardes
piecesauthentiquesseulement,lJutilisationdepi@esqui
nesontpas conformesaux sp@ificationsde I'equipement
d'originepeuventdonnerlieu a.demauvaisesperformances
etcompromettrela s@urit6deI'utilisateur.
6. Wrifiez frequemmentqueles commandesfonctionnentbien
etfaitesles reglagesn@essaires.Consultezle chapitre
<_R6glages>>dansla noticed'utilisationde lamachine.
7. Prenezsoindesetiquettesde s@urit6etd'instructionset
remplacez-lesau besoin.
8. RespectezlesreglementsconcernantI'eliminationdes
d@hetsetliquidesqui risquentdenuire ala natureeta.
I'environnement.
9. Laissezla machinefonctionnerpendantquelquesminutes
poureliminerla neigede latariereet @iterque I'ensemble
de lata@re etde la turbinenegeleavantde remiserla
souffleuse.
10.Neremisezjamaisla machineou les bidonsd'essencea.
I'interieurs'ilya unefiamme,une etincelleouuneveilleuse
(d'unchauffe-eau,unradiateur,unfourneau,un @che-
lingeouautreappareila.gaz).
11.Consulteztoujourslanoticed'utilisationquantauxinstruc-
tions de remisagehors-saison.
Ne rnodifiez pas le rnoteur.
Poureviterrouteblessuregraveoufatale,ne modifiezpasdu
toutle moteur.Toutemodificationdureglageduregulateurpeut
provoquerI'emballementdu moteuret entrainersonfonc-
tionnementadesvitessesdangereuses.Nemodifiezjamaisle
reglagedeI'usineduregulateur.
Avis concernant les 6missions de gaz
Lesmoteurscertifiesconformesauxnormesregulatricesde
la CalifornieetdeI'agenceEPAf6deralespourSORE(petit
equipementhorsroute)sontcertifiespourfonctionneravec
deI'essencesansplombordinaireetpeuvent6tredotesdes
systemesdecontr61edesemissionsde gazsuivants:Engine
Modification(EM)etThreeWayCatalyst(TWC)lecas@h6ant.
Dur6e de vie utile rnoyenne
D'apreslaConsumerProductsSafetyCommission(CPSC
-Commissionsurla s@urit6despro@itsdeconsommation)
etla "U.S.EnvironmentalProtectionAgency"(EPA- Agence
am@icainedeprotectiondeI'environnement),ce produitaune
dureedevie utilemoyennedesept (7)ans,ou 60heuresde
fonctionnement.Auterme decettedureedevie utilemoyenne,
achetezunemachineneuveou faitesinspecterlamachine
chaqueann@parunestationtechniqueagre6epourvousas-
surerquetousles dispositifsm@aniquesetdes@urit6sonten
bonetatde marcheetnesontpasusesde fa{;onexcessive.Le
non-respectdecesrecommandationspeutcauserdesaccidents
etdesblessuresgravesoumortelles.
AVERTISSEMENT
Ce symboleattire
votreattentionsur des
consignesdes@urit6
importantesqui.si elles
nesontpas respect6es,
peuventmettreen
dangernonseulement
votrepersonneetvos
biens,mais aussiceux
d'autrui.P@redelire
touteslesinstructions
figurantdanscette
noticed'utilisationavant
d'essayerdevous
servirde cettemachine.
Lenon-respectde
cesinstructionspeut
entratnerdesblessures
corporelles.
RESPECTEZ
LAVERTISSEMENT
GUIACCOMPAGNE
CESYMBOLE!
Votre responsabi_ite
Cettemachiqene dolt
_treutilis6equepar des
personnesquipeuvent
life,comprendreet
respecterles avertisse-
mentset instructions
quifigurentdanscette
noticeetsurla machine.
5
Page 24
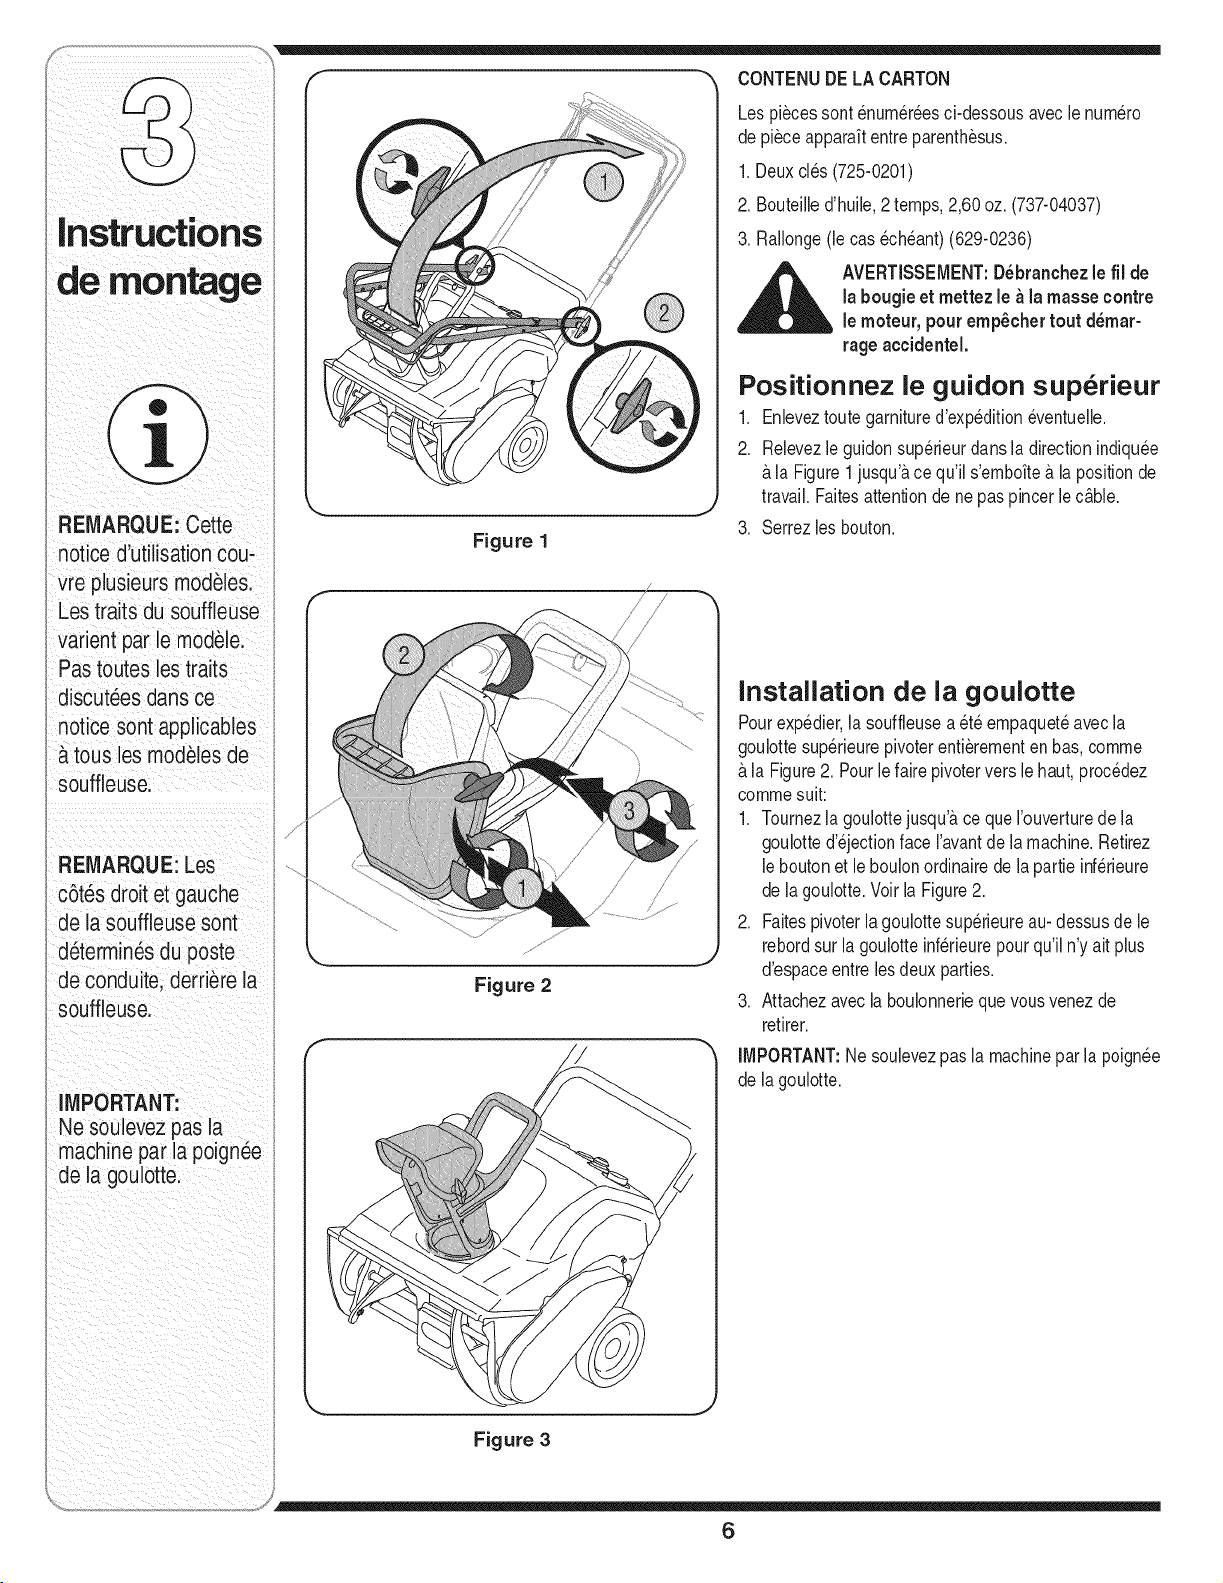
'i " _ CONTENUDELA CARTON
Lespiecessontenumereesci-dessousaveclenumero
depieceapparaffentreparenthesus.
1.Deuxcles(725-0201)
2.Bouteilled'huile,2temps,2,60oz. (737-04037)
3.Rallonge(le casecheant)(629-0236)
REIVlARQUE:Cette
notice dutilisationcou-
vre plusieursmodules.
Lestraits dusouffleuse
varient par le modele.
Pastoutes lestraits
discut6esdansce
notice sont applicables
&tous les modulesde
souffleuse,
REMARQUE: Les
c6t_sdroit et gauche
de lasouffleusesont
d_termin_sdu poste
deconduite, derrierela
souffleuse.
IMPORTANT:
Ne soulevezpas la
machine par lapoignee
de lagoulotte.
,_, ,J
Figure 1
/ /
// /,'
/
__i VERTISSEMENT:D_branchezle fil de
ia bougie etmettez le _la massecontre
le moteur, pour emp6cher tout d_mar-
rage accidentel.
Positionnez le guidon superieur
1. Enleveztoutegarnitured'expeditioneventuelle.
2. Relevezleguidonsuperieurdartsla directionindiquee
Ala Figure1jusqu'acequ'ils'emboffea lapositionde
travail.Faitesattentiondenepaspincerle cable.
3. Serrezlesbouton.
installation de la goulotte
Pourexpedier,la souffleusea eteempaqueteavecla
goulottesuperieurepivoterentierementenhas,comme
AlaFigure2. Pourlefaire pivoterversle haut,procedez
cornmesuit:
1. Tournezlagoulottejusqu'&cequeI'ouverturedela
goulotted'ejectionfaceI'avantde lamachine.Retirez
leboutonetle boulonordinairedela partieinferieure
de lagoulotte.Voirla Figure2.
2. Faitespivoterlagoulottesuperieureau-dessusde le
rebordsurla goulotteinferieurepourqu'iln'yaitplus
d'espaceentrelesdeuxparties.
3. Attachezavecla boulonneriequevousvenezde
retirer.
iMPORTANT:Ne soulevezpas la machineparla poignee
de lagoulotte.
Figure 3
6
Page 25

Manettede commande
Demarreurelectrique
(lecasecheant)
Bouchondecarburant
Goulotted'ejection
Plaquederaclage
Tariere
Figure 4
IMPORTANT:Cettemachinefonctionnesurunmelange
d'essenceet I'huile.NEFAITESPASfonctionnerla
souffleusesansavoirconsulterla noticed'utilisationdu
moteurpourlesinstructionsquantaucarburantapproprie
et I'huilede moteur.
Manette du volet de d_part
Lamanetteduvoletde departpermetdefermerle volet
ducarburateurcequifacilite ledemarrage.Consultezla
noticed'utilisationdumoteurquiaccompagnelamachine
pourplusderenseignements.
Amorgeur
Lenfoncementdu boutond'amorcageforcelecarburant
directementdansle carburateurdu moteurpouraider
&fairedemarrerlemoteurentempsfroid.Consultezla
noticed'utilisationdumoteur.
Cl6 de contact
Lacledecontactest undispositifdesecurit& Elledolt
_trecomplNementenfonceepourmettrele moteuren
marche.Retirezlaclequandlasouffleusen'estpas
utilisee.N'essayezpasdetournerla cl&
Demarreur a lanceur
Pourfairedemarrerle moteurmanuellement.
Dernarreur _lectrique(le cas _ch_ant)
Pourfairedemarrerunmoteuravecune sourcede
courantde 120V
Prise pour d_marrage _lectrique
ExigeI'utilisationd'unerallonge&3fichespourI'exterieur
et unesourcede courantde 120V.
Poigneedudemarreur
Amor{;eur
Bouchonde bougie
ded@art
Acc_s a la bougie
La bougiesetrouvesouslecouvercle.
Tariere
Lorsqu'ellessontenclenchees,les tarieresamenent
la neigedartsI'habitacleentournantet la neigeest
ensuiteevacueeparla goulotted'ejection.Lesaubes
encaoutchoucdestarierespermettede faireavancer
la souffleusequandellestouchentla surface&deblayer.
Manette de commande des tarieres
Ellesetrouvesur leguidonsuperieuret sert &embrayer
oua.debrayerlestarieres.Serrezlamanettecontrele
guidonsuperieurpourembrayerlestarieres,I_.chez-la
pourlesdebrayer.
Goulotte d'_jection/Poign_e de la
goulotte d'6jection
Utilisezlamanettedela goulotted'ejectionpourlafaire
tournerversla droiteouverslagauche.L'angledela
goulotted'ejectiondetermineladistance&laquellela
neigeest projetee.Redressezlagoulottepourprojeter
la neigeplusloin ouabaissez-lapourla projeterplus
pres.Desserrezle boutonsurle c6tede lagoulotte
d'ejectionpourI'ajuster.Inclinezlagoulotte&la position
voulueet resserrezle bouton.
Plaque de raclage
Ellemaintientlecontactavecle sol etfacilite le
degagemente la neigeprochedela surface&deblayer
aufuret _.mesureque la souffleuseavance.
votre
souffleUse
IMPORTANT: Cette
machine fonctionne
sur un melange
d'essence et I'huile.
NE FAITESPASfonc-
tionner la souffleuse
sans avoir consulter
la notice d'utilisation
du moteur pour les
instructionsquant au
carburant appropri_
et I'huile de moteur.
7
Page 26

Utilisation
de la
AVERTISSEMENT
Lisez, comprenez,
etsuiveztoutesles
instructionset les
consignessur la
machineet darts
ce notice avant le
fonctionnement.
Faites tr_s attention
en manipulant de
I'essence.L'essence
est extr_mement
inflammableet lesva-
peurs sontexplosif.
Ne faites jamais le
pieind"essence
I'int_rieur,pendant
que lemoteur tourne
ou quandle moteur
est chaud. I_teignez
toute cigarettes ou
pipe, tout cigare ou
toute autresource
incandescente.
Le d_marreur _lec-
trique (en option)
dolt _tre utilis_avec
une prise de courant
trois fils reli_ _ la
terre _ tout instant,
pour eviter la possi-
bilit6 d'une d_charge
_lectrique. Suivez soi-
gneusementtoutes
les instructionsavant
d'utiliserle demarreur
_lectrique.
Avant le demarrage
mencer lemoteur, lisez,comprenez
_ VERTISSEMENT:Avantdecom-
1. Lefil debougied'allumageaetedebranchepour
la sOrete.Attachezlefil de bougied'allumagea.la
bougied'allumageavantdecommencer.
IMPORTANT:Nousvousconseillonsde lirela notice
d'utilisationdumoteur,fournieaveclamachine,
pourobtenirdesinstructionscompletesetdetaillees
concernantla raiseenmarcheetI'arr_tdumoteurainsi
quesonremisage.
et suiveztoutes les instructionset les
consignessurla machine et dartsce
noticeavantlefonctionnement.
Pleins d'essence et d'huile
en manipulant de Fessence.[.'essence
_htb VERTISSEMENT:Faitestr_s attention
surunmelanged'essenceet I'huile.NEFAITESPAS
fonctionnerlasouffleusesansavoirconsulterla notice
d'utilisationdumoteurpourlesinstructionsquantau
carburantapproprieetI'huilede moteur.
Nefaites PASfonctionnerlasouffleusesansavoir
bienserrezlebouchondecarburantsurle reservoir&
carburant.
est extr_mement inflammableet les
vapeurssontFexplosif. Nefaites
jamaisleplein d'essence _ Fint_rieur,
pendantque lemoteur tourne ou
quand lemoteur est chaud.Ne fumez
pasen faisant le pleind'essence.
IMPORTANT:Cettemachinefonctionne
Montage de la goulotte
d'ejection
1. Desserrezleboutonenformed'Ooilequisetrouve
surlec6tegauchede lagoulotted'ejectionetfaites
pivoterlagoulotte
superieurvers le
hautou dehauten
hasau direction
desirable.Reserrez
le boutonenforme
d'etoileavantle
fonctionnementde
la souffleuse.
2. Tournezlagoulotte ,. j
d'ejectionversla
droiteouversla Figure 5
gauche&raidede
la poigneede la
goulotte.Voirla Figure5.
Mise en rnarche du moteur
1. Enfoncezlacle decontact.
2. Suivezmaintenantlesinstructionsci-dessouscomme
ils'appliquea.votremachine.VoirlaFigure5 pourla
positiondescommandes.
D_marrage _lectrique
(le cas 6ch_ant)
_ii_lLiillb VERTISSEMENT:Led_marreur
1. Cedemarreurestequiped'unfilet d'uneprise
electriquea.troisills et il estconqupourfonctionner
suruncourantde 120volts,C.A.
2. Wrifiez quelec_blagede votremaisoncomporte
troisfilreliesa la terre.Sivousn'estpascertain,
renseignez-vousaupresd'unelectricien.
3 Si le c_blagedevotremaison n'est pas un
syst_me_ trois fils reli_s_ laterre, n'utilisezen
aucuncasce demarreurelectrique.
4. Si votre syst_me est reli_ _ laterre, maisil n'y a pas
deprisea troistrousa.rendroitoule demarreurdolt
normalement_tre utilise,faites-eninstalleruneparun
electricienqualifie.
5 Si vousavez uneprisedecourant_trois trous
reli_ _ la terre, procedezcommesuit:
6. Tournezleboutonduvoletde depart&laposition
VOLETPLEIN.
7. Appuyezlentementtrois (3) foissurleboutonde
I'amorceur.CouvreztoujoursI'eventdu boutonde
I'amorceurenappuyant.
8. Branchezlefil electriquedanslecommutateur,sur
le moteur.BranchezI'autreextremitedufil dansune
prisedecourantde 120volts C.A.&troistrous,mise&
laterre.
9. Enfoncezleboutondudemarreurpourfairetournerle
moteur.Quandlemoteurdemarre,I_.chezle bouton
dudemarreurettournezprogressivementleboutondu
voletdedepart&la positionSANSVOLET.
10.Silemoteurhesite,deplacezimmediatementle
boutonduvoletde depart&lapositionVOLETPLEIN,
puisrevenezprogressivement&lapositionSANS
VOLET.
11.D_brancheztoujours d'abord lefil _lectrique
de la prisede courantreli__ la terre, puis de la
souffleuse,
_lectrique (enoption)doit _tre utilis_
avec uneprisede courant_trois fils
reli__ la terre _tout instant,pour_viter
lapossibilit_ d'une d_charge_lectrique.
Suivezsoigneusementtoutes les
instructionsavant d'utiliser led_mar-
reur_lectrique,
Dernarreur a lanceur
1. Tournezleboutonduvoletde departa laposition
VOLETPLEIN(demarrageAfroid).
2. Si lemoteurestchaud,tournezle boutondu voletde
departa lapositionSANSVOLET.
8
Page 27

3. Appuyezlentementdeuxou trois(3)fois sur lebouton
de ramorceurpourdemarrage&froid.
4. Sile moteurestchaud,appuyezuneseulefoissurle
boutonderamorceur.
REMARQUE:Couvreztoujoursreventdu boutonde
ramorceurenappuyant.Unamor£agesupplementaire
pout_trenecessaireIorsdupremierdemarragesi la
temperatureest inferieure&15°F(-9°C).
5. Tirezlentementsurla poigneedudemarreurjusqu&
cequevoussentiezune legereresistance.Laissezla
cordes'enroulerlentement.
6. Tireza.nouveau,maisrapidement.Ne laissezpas
lapoigneeclaquercontrelasouffieuse.Laissezla
cordes'enroulerlentementenretenantlapoigneedu
demarreur.
7. Aufur eta mesurequele moteurchauffeetquandil
commence&tournerregulierement,tournezlentement
leboutonduvoletde departversla positionSANS
VOLET.Sile moteurhesite,tournez&nouveaule
boutonduvoletde depart& lapositionVOLETPLEIN,
puisrevenezlentement&la positionSANSVOLET.
Pour arr_ter le moteur
1. Pourarr_terlemoteur,tournezlaclevers laposition
"OFF"(ARREST).Debranchezlefil de labougiepour
emp_chertout demarrageaccidentel.
Pouremp_cherled_marreurde geler, proc_dez
comme suit:
1. Laisseztournerle moteurpourpendantquelques
minutespoursechertouterhumiditequi auraitpu s'y
accumuler.
2. D_marreur_lectrique (onoption): Branchezlefil
electriquesurlecommutateurdu moteur,puis&une
prisedecourantde 120voltsC.A.Quandle moteur
tourne,appuyezsurleboutondudemarreuret faites
tournerledemarreurpendantquelquessecondes.Le
bruitparticulieremisparle demarreurne risquepas
d'endommagerlemoteurnile demarreur.Debranchez
lefilelectriquedela prisede courantd'abord,puisdu
commutateur.
3. D_marreur_ lanceur: Quandlemoteurtourne,tirez
rapidementetfermementsurla cordedu demarreur&
troisou quatrereprises.Vousentendrezunclaque-
meritqui nerisquepasd'endommagerle moteurni le
demarreur.
4. Enleveztoutelaneigeet rhumiditedu couvercledu
carburateuretpresdesmanettesdecommande.
Deplacezcelles-ciplusieursfois.Laissezlamanette
de robturateurAla positionARRI_Tetleboutondu
voletdedepartAlapositionVOLETFERMI_.
5. Enlevezlacle de contactetdebranchezlefil de la
bougiepouremp_chertoutdemarrageaccidentel.
Utilisation de la souffleuse
La
distancedeprojectiondela neigepout_tremodifiee
en
relevantouabaissantlagoulottesuperieur.
1.
Desserrezle bouton&enformed'etoilequisetrouve
surle c6tegauchedela goulotted'ejectionet faites
pivoterla goulottesuperieurvers,e hautoude haut Utilisation
enhasaudirectiondesirable.Reserrezlebouton
enformed'etoileavantlefonctionnementdela
souffieuse.
Positionnezrouverturedela goulotted'ejection&
raidede lapoigneede lagoulotted'ejectionpour
projeterlaneigea rendroitvoulu.Voirla Figure4A&
la page7.
souffleuse
Deblayage de la neige
Projetezla neigedanslesonsduventdartsla mesure
dupossible.
AVERTISSEMENT
fonctionner la souffleuse avecdes
__k VERTISSEMENT:Nefaites jamais
1. Pressezla manette
decommandocontre
le guidonsuperieur
pourenclencher
lostarieres.Voirla
Figure6.
2. Soulevez-vous
legerementsurle
guidonsuperieurpour Figure 6
permettrelatariere
d'entrerencontactavecletrottoiret propulsezla
souffleuseenavant.Appuyezsurle guidonpour
releverlatariereet pourarr_terle mouvementde la
souffieuse.
3. Dartslamesuredupossible,projetezlaneige
dansle sonsdu vent.Chevauchezlegerementlos
passagessuccessifs.
REMARQUE:Unepressionascendanteexcessive
causeune usureprematureedespalesencaoutchouc
dela tariere.L:usureresultanteneseraitpas couverte
solonla garantie.
spectateurs devantou pros de
rouverture de la goulotted'_jection.
Conseils d'utilisation
1. Apresavoirdeblayelaneige,laissezlemoteur
tournerpendantquelquesminutesavantderarr_ter.
Cecipermetlemoteurde secher.
2. Essuyezlaneigeet lacondensationde lamachine.
rnoteuret des zonesvoisines devien-
__5 VERTISSE_ENT:Lesilencieux,le
nent chauds et peuvent causer des
br_lures. Evitezde los toucher.
Le silencieux; ie
moteur et des zones
chauds et peuvent
Evitez de los toucher.
Ne fakes jamais
souffleuse avec des
spectateurs devant
ou pros de I'ouverture
la goulotte
ectioni
aE AaQUE:une
pression ascendante
excessive cause une
usure pr_matur_e des
pales en caoutchouc
de la tari_re: L:usure
r_sultante ne serait
pas couverte solon ia
garantie;
de la
deviennent
la
9
Page 28

/,
AVERTISSEIVlENT
D_branchez lefil
de labougie et
rnettez-le _ laterre
contre le rnoteur
pour emp_cher
tout d6marrage
accidentei.
N'essayez jarnais
d'effectuer un
r_glage quelconque
_endant que le
rnoteur tourne, saul
en cas d'instructions
sp_cialesdans la
notice d'utilisation.
D_brayez la manette
de cornmandeet
arr_tez le moteur
avant de faire
une r_paration,
un ajusternent
quelconq ue ou
d'examiner la
machine. Attendez
que la tari_re/turbine
se soit cornpl_tement
immobilis_e.
Reglage de la plaque de 3. Ajustezla plaquede raclagecommeinstruitdansla
raclage
1. Pourverifierle reglage,phcezla souffieusesurune
surfaceplate.Laplaquedoit _treregleedemaniere
quelesroues,la plaqueet latarieretouchentlesol
simultanementlots derutilisationdelasouffleuse.
VoirlaFigure6.Si laneigesouffleen dessousdu
Iogementde lasouffieuselaplaquepeut_treregle
troshaut.Sila plaquepresentedessignesd'usure
excessive,ou la souffleusen'auto-propulserapas,la
plaquepeut_tre ajustetrophas
REMARQUE:Lestarierespeuvent_trelegerement
releveessurles modelesneufsousurles modeles
equipesd'unplaquederaclageneuve.
2. Pourajuster,basculezlasouffleuseenarrierepour
qu'ilreposesurle guidon.Desserrezlesecrous&
six pansetlesboulonsordinairequimaintiennent
laplaquederaclageauIogement.VoirlaFigure7.
Ajustezlaplaquede raclagea lapositionvoulueet
serreza fondles ecrousa sixpanset lesboulons
ordinaires.
sectionReglagesde cette noticed'utilisation.Serrez
lesecrousaufondavantlefonctionnement.
REMARQUE:Adressez-vousau ,,Serviceapres-vente,,a
la page2,pourrinformationencequiconcernele prix et
la disponibilitedu kitde h plaquederaclage.
f
\ , j
Figure 8
Reglage de le c_ble
d'embrayage
Unreglageperiodiquedela courroieetlecfible
d'embrayagepeuts'averernecessairedufaitde
retirementet de rusurenormalede lacourroieetdu
cable.
IIfautreglerlacourroieoule cablesi la tarierepara_t
d'hesiteralorsquelemoteurtourneaum_meregime.
Procedezcommesuit:
Letrousuperieurdansla manettedecommandeprevoit
unajustementdansla tensionducable.Pourajuster,
debrancherla finde cabled'embrayagedutroudefond
dansla manettedecommandeetle reinserentdansle
Figure 7
Remplacement de la plaque de
raclage
Laplaquederaclages'useraetdevrait_treverifie
periodiquement.Laplaquede raclagea deuxc6tes
d'usageetpeut_trerenverseapresqueunc6tes'use.
VoirlaFigure7.Pourremplacerou renverserla plaque
de raclage,procedezcommesuit:
1. Enlevezlesquatreboulonsordinaire,et lesecrousa
six pansquilamaintiennentsurlasouffieuse.
2. Installezlaplaqueneuve assurantquela t_te
desboulonsordinairessetrouvesurrinterieurdu
Iogement.
trousuperieur,l_valuezlasouffleusepourvoirs'ilya une
differenceconsiderable.
Carburateur
_ VERTISSEMENT:Sivousdevezfaire
1. Consultezlanoticed'utilisationdu moteurfoumie
aveclasouffieusequantaux reglagesa effectuerau
carburateur.
desreglagesquelconquesau moteurpen-
dantqu'iltourne(parex.au carburateur),
eloignez-vousde touteslespiecesmobiles.
Netouchezpasles surfaceschaudesnile
silencieux.
10
Page 29

Replacement de la courroie
decommandeetarr_tez lemoteur avant
__lb VERTISSEMENT:D_brayezlamanette
de faire uner_paration,un ajustement
quelconqueou d'e×aminerlamachine.
Attendezquelatari_re/turbine sesoit
compl_tementimmobilis_e.D_branchez
lefil dela bougieetmettez-le_ la terre
contrele moteur pouremp_chertout
Remplacementde lacourroie
Enlevezlescinq vis hex.pourdemonterlecouvre-cour-
roie.Voirla Figure9.Enlevezlacourrieenla degageant
simplementdela basede la pouliedela tariere.IIsera
alorspossibled'abaisserlapouliedetensionpour
degagerla poulieduguide-courroie.
Pourreplacerlacourroie,suivezces instructionset
consultezla Figure10.
1. Abaissezla pouliedetension.
2. Placezlacourriesurle dessusde la pouliede la
tariere,sousleguide-courroie.
3. Glissezlacourroiesurla pouliemotrice.
4. Inserezla courroiesurlabasede lapouliedela
tariere.
Replacezle couvre-courroieretireplust6t.
Moteur
1. Consultezlanoticed'utilisationdu moteurqui
accompagnela souffleusepourtoutce quiconcerne
I'entretiendumoteur.
2. Verifiezfrequemmentquetoute laboulonneriedu
moteurestbienserreeet resserrez-laselonle besoin.
Lubrification
Lubrifiezlespointsde pivotsur la manettede commande
et leressortd'extensiona lafindu cabled'embrayage
avecunehuilelegereunefoischaquesaisonetavantle
rernisagedela souffleusealafin dela saison.
Poulietendeur
Guidedecourroie '_
Tirezicisur la
courroiepourla retirer.
Figure 9
f
Figure 10
r
'\
AVERTISSEMENT
D_brayez la manette de
commandoet arr_teZle
moteur avant de faire
une r_parationl un ajus:
tement quelconque ou
d'examiner la machine.
Attendez que latari_rei
/
/'
turbine se soit
pl_tement immobilis_e,
D_branchez le fil de la
bougie et mettezqe _. la
torte c0ntre le moteur
pouremp_cher tout
Reraplacement de la
Remplacement des pales en
caoutchouc
Lespalesencaoutchoucsurlatariereontunetendance
s'useretdevraient_treremplacedesI'apparitionde
signesd'usure.
IMPORTANT:Ne laissezpaslesaubesencaoutchouc
de latarieres'useraupointoQcertainespartiesdela
tarieremetalliquepeuventtoucherle sol,car la souffleuse
pourrait_tregravementendommagee.
Pourchangerlespalesencaoutchouc,procedezcomme
suit:
1. Pourdemonterlespales,enlevezlesvistaraudeequi
lesmaintiennentsurlasouffleuse.VoirIf Figure11.
2. Maintenezlesnouvellespales decaoutchoucenplace
surla tariereaveclesvistaraudee.
Figure 11
REMARQUE:Adressez-vousau ,,Serviceapres-vente>,
&lapage2,pourI'informationence quiconcernele prix
etla disponibilitedu kitde tarriere.
11
i_ iiii/ _iiii_i_ ii! iiiii iiiiiii _ _
I[VlPORTANT:Ne
laiSsezpas ies aubes
en caoutchouc de la
tari_re s'user au point
O_Certaines parties
dela tari_re m_tallique
peuvent toucher le
sol, carla souffleuse
pourrait _tre gravement
ii i i
Page 30

AVERTISSEIViENT
N'entreposezjamaisle
moteur avecdu carburant
clansle r_servoir
I'int_rieuroudans
des endroitsferm_s
si la ventilation n'est
pasadequateet si les
vapeurs de carburant
peuventvenir encontact
avec unefJammeouune
_tincefle ou veilleuse d'un
chauffe-eau,unradiateur,
un fourneau, uns_che-
linge ouautre appareiJ
gaz.
Videzle carburant
I'e×t_rieur dans un
r_cipient homologu_,
distance detoute flamme
nue.Assurez-vousque le
moteur arefroidi. Nefu-
mez pas.Tout carburant
restant dans Jer_servoir
par temps chaudse
d_t_riorera et causera
de gravesprobl_mesau
d_marrage.
Procedezcommesuitpourpreparerlasouffleuseavant
de laremiser.
* Videzle carburantaI'exterieurdansunrecipient
homologue,a distancedetoutefiammenue.
Assurez-vousquelemoteura refroidi.Nefumezpas
eteteigneztoutesourcedechaleurincandescente
avantdeviderle carburant.Toutcarburantrestant
dansle reservoirpartempschaudse deterioreraet
causeradegravesproblemesaudemarrage.
* Si lamachinedolt_tre entreposeependantplusde
30jours,preparez-laselonlesinstructionsfournies
dansla noticed'utilisationdumoteurqui accom-
pagnevotresouffieuse.
* Laisseztournerle moteurjusqu'acequ'ils'arr_te
pourcausedepanned'essence.
* Videztouteressenceducarburateuret du reservoir
poureviterlaformationdedep6tsde gommequi
pourraientcauserlemauvaisfonctionnementdu
moteur.
* Videzle carburateurenappuyantsurI'evacuationqui
setrouvesouslecouvercleducarburateur.
Lesagentsde stabilisationducarburant(STA-BIL®
parexemple)offrentunesolutionacceptable
pourminimiserlaformationde dep6tsde gomme
pendantleremisage.Nevidezpasle carburateursi
vousdecidezd'utiliserunagentdestabilisationdu
carburant.
• Essuyezlamachineavecunchiffonimbibed'huile
pouremp_cherla formationde rouille.
• Retirezlabougieetversezuneonced'huile
moteurdansletrou de labougiede la chemise.
Reouvrezletrou avecunchiffonet faitestourner
le moteurplusieursloispourbienrepartirI'huile.
Remettezla bougieen place.
• Suivezlesinstructionsconcernantlalubrification
dansle chapitresur rentretien.
• Entreposeztoujourslasouffleusedansunendroit
secetpropre.
Nevidezpasle carbura-
teur si vousutiJisezun
stabilisateur de carbu-
rant. N'utiJisezjamais des
produitsde nettoyagedu
moteur oudu carburateur
pournettoyer le r_servoir
de carburant carvous
pouvezcauserdes
d_g_ts permanents.
Page 31

Probibme Cause(s) Solution
Lemoteurned6marrepas 1. Voletded6partferm6. 1. Ouvrezievoletded6part.
2. Filde la bougied6branch6. 2. Branchezle filde labougie.
3. R6servorv deou essence6ventee. 3. Fate e pe n avecuneessencepropre
Fonctionnementirregulier
Moteursurchauffe 1. Carbureteurestmal r6g16. 1. Addressez-vous_ unestation
Vibrationexcessives 1. Piecesdesserreesouvis sansfin 1. Arr6tezimmediatementle moteuret
Pertede puissance , 1. Filde la bougiedesserr6. 1, Branchezet serrezlefil delabougie.
1. Machinefonctionnantaveclevoletde
departferme.
2. Canalisationdecarburantboucheeou
essence6ventee.
3. Eauou saletedansle systemed'essence.
4. Carburateurestrealregl6.
endommagee, debranchezle filde la bougie.Serrez
2. Chapeaud'6chappementdutrou 2. D6gagezla glaceetla neigedu
da6rationbouch6, chapeau.Assurez-vousde la propret6
3. Le portd6chappementestbouch6. 3. Adressez-vous_.unestation
1. Ouvrezlevolet de depart.
2. Nettoyezlacanalisation;faitesle plein
avecuneessencepropre.
3. Debranchezlacanalisationd'essence
aucarburateurpourvider lereservoir
d'essence.Faitesle pleinavecune
essencefraiche.
4. Adressez-vousa.unestation
technique.
technique.
tousles boulonset ecrous.Siles
vibrationspersistent,faitesverifierla
machineparunestationtechnique
agre6e.
dutroud'a6ration.
technque.
_UE: Ce
probi_mesd,entretien
mineurs. Pouiplus de
d6tails;adressez:vous
au sewice apres!vente:
Lasouffieusen'avance 1. C_.bled'entrainementmalregl6. 1. Reglezle c_.bled'entrafnement.
pas VoirleReglages.
2. Courroied'entrainementabfm6eouayant 2. Remplacezlacourroied'entrainement.
Laseuffieusen'6vacuepas 1. Goulotted'6vacuationbouch6e. 1. Arr6tezimm6diatementle moteur
laneige etd6branchezlefil dela bougie.
,N.ettoyezlagoulotted6jection et
Iint6rieurdu Iogementde latari_re
I goulotteouun b&ton.
2. Pr6sencedecorps 6trangerdansla 2. Arr6terimmediatementle moteur
' tari_re, etd_brancheziefil dela bougie.
abi'm6eouayantdu jeu.
avecI'outilde d6gagementdela
13
Page 32
Le non-respect des
conseilsd'entretien
et de iubrification
annule lagarantie.
GARANTIE LIMITEE DE DEUX ANS
Lagarantielimit_equiest_nonc6eci-dessousestofferteparMTDLLCpourtouteslesmarchandisesneuvesachet_eset
utilis_esaux I_tats-Unis,danssespossessionsetterritoires,etparMTDProductsLimited,pourtouteslesmarchandises
acheteeset utilis_esauCanadaet/ousesterritoires(l'uneou I'autreentiterespectivementappelee,,MTD,_).
,,MTD,_garantitqueceproduit(aI'exceptiondespiecesausurenormale6num@_esci-dessous)estexemptdetoutvice
demati_reetdefabricationpourunedur_ede deux(2)ans&compterdeladatedeI'achatinitialets'engage&r@arerou
remplacer,gratuitementeta sonchoix,toutepiecequis'averedefectueuseenraisond'unvicedematiereoudefabrica-
tion.Cettegarantielimit_en'estapplicablequesiceproduita _t_utilis_etentretenuconform_mentauxinstructionsdela
noticed'utilisationquiI'accompagne.Deplus,leproduitnedoltpasavoirfaitI'objetd'unemploiincorrectouabusif,d'une
utilisation&desfinscommerciales,d'unenegligence,d'unaccident,d'unentretienincorrect,d'unemodification,d'un
actedevandalisme,d'unvol,d'unincendie,d'uneinondationoude toutautred_g&tcaus_partoutincidentoud_sastre
naturel.Lesdeg&tscausesparI'installationouI'utilisationd'unepiece,d'unaccessoireoud'un_quipementannexe,dont
I'emploiavecle produitfaisantI'objetdela noticed'utilisationn'estpashomologu_parMTD,rendrontla garantienulleet
nonavenue.
Lespiecesoucomposantsausurenormalesontgarantisexemptsdetoutvicede matiereetde fabricationpourune
periodede 30jours&compterdela dated'achat.Lespi_cesetcomposantsausurenormalecomprennent,sanss'y
limiter,les batteries,courroies,lames,adaptateursdelame,sacsa herbe,rouesduplateaudecoupe,sieges,patinsde
souffleuses,rouesdefrottement,lamesderaclage,lecaoutchoucdela tari@eetpneus.
POURFAIREHONORERLAGARANTIE:PresentezUNEPREUVED'ACHATa.lastationtechniqueagr_6edevotre
Iocalite.PourIocaliserunestationtechniqueagr_6eou unconcessionnairedansvotrer6gion:
AuxEtats-Unis : ConsultezlesPagesJaunesouadressez-vous_.MTDLLC,P.O.Box361131,Cleveland,Ohio
44136-0019ou appelezle 1-800-800-7310oule1-330-220-4683.Vouspouvezaussivisiternotresitewebau www.
mtdproducts.com
Au Canada: Adressez-vousa.MTDProductsLimited,Kitchener,Ontario,N2G4J1ouappelezle1-800-668-1238ou
visiteznotresitewebau www.mtdcanada.com
Cettegarantielimiteene couvrepas:
a. Lemoteurou sescomposants.Cesarticlespeuvent_trecouvertsparunegaranties@ar_edufabricant.Consultezla
garantiedufabricantquantauxconditions.
b. Lespompes,soupapesetpistonsdesfendeusesaboissontcouvertsparunegaranties@ar_ed'unan.
c. Lesarticlesd'entretiencouranttelsqueleslubrifiants,filtres,aiguisagesdelameetr@isions,lesr_glagesde frein,de
I'embrayageouduplateaudecoupeetlad_t@iorationnormaledelafinitiondu faitdeI'utilisationdela machineoude
sonexpositionauxintemp_ries.
d. L'entretienou lesr@arationseffectu_sparquiconqueautrequ'unestationtechniqueagr_e.
e. MTDnegarantitpasles produitsvendusouexporteshorsdesI_tats-Uniset/ouduCanada,deleurspossessionset
territoiresrespectifs,saulsicesproduitsont_t6vendusparI'interm_diairedesservicesd'exportationde MTD.
f. Lespiecesderechangesi ellesnesontpasdespiecesMTDauthentiques.
g. Lesfraisdetransportdesmachineset ded@lacementdestechniciens.
h. Lesproduitsutilisesdansunbutcommercial.(Certainsproduitspeuvent_treaccompagn_sd'unegarantielimit_e
MTDs@ar_epourusagecommercial.Renseignez-vousaupresduconcessionnaireoudetaillantpourplusded_tails
ouadressez-vousdirectementau serviceapres-ventedeMTD.)
Aucunegarantietacite, y compristoute garantie tacJtede qualit_marchandeoud'adaptabilit_ dartsunbut
partJculJer,nes'applJqueau×pi_cesidentifi_esci-dessusapr_s lap@iodedevigueurde lagarantie_crJte
expresse.Aucuneautregarantie expresse,qu'elle soit verbaleou_crite,_ I'e×ceptiondesstipulations ci-dessus,
offerte partoutepersonneouentit_ (ycompds un concessJonnaire/revendeur),pourtout produit, n'engage
MTD.Pendantla p@iodedegarantJe,la r_parationouleremplacementdu produitci-dessus constitue le recours
e×clusif_ ladisposition duclient.
Lesstipulations _nonc_esdartscette garantJeoffrentleseulrecours ala suitede lavente.MTDne peut_tre
tenueresponsablepourtoute perte ou tout dommageaccessoireou immat@ielcomprenant,sanss'y limiter,
lesfrais de remplacementoude substitution desservices d'entretJendespelousesoulesfrais de locationpour
remplacertemporairementunarticle sous garantie.
CertainesjuridictionsnepermettentpasI'inclusionoula restrictiondesdommagesaccessoiresou immat@ielsouune
limite&ladureedela garantietacite.Parconsequent,lesexclusionsci-dessuspeuventnepass'appliquerdartsvotre
situation.
Leremboursementouremplacementquelqu'ilsoitneseraenaucuncassup@ieuraumontantduprixd'achatduproduit
vendu.Toutemodificationdes caract@istJquesde s_curit_ rendralagarantienulleet non avenue.Eutilisateur
assumetoutrisqueettouteresponsabilit_encasdeperte,dedommagemat@ieloudeblessureresultantdeI'utilisation
incorrecteduproduitoude I'incapacit_deI'employer.
Cettegarantielimiteen'estoffertequ'&I'acheteurinitialou&lapersonne&laquelleleproduita_t_offertencadeau.
LESLOiS LOCALESETCETTEGARANTIE: Cettegarantielimit_evousaccordedesdroitsjuridiquessp@ifiqueset
vouspouvezb_neficierd'autresdroitsquivarientselonlesjuridictions.
iMPORTANT: Leproprietairedoltpresenterle re_uoriginalpourfairehonorerlagarantie.
MTDLLC,P.O.Box361131,Cleveland,Ohio 44136-0019;t_l_phone: 1-800-800-7310,1-330-220-4683
MTDProducts Ltd.,C.P.1386,Kitchener,OntarioN2G4J1; t_l_phone:1-800-688-1238
14
 Loading...