

MTD 13AP625K730 Owner’s Manual

Safety • Assembly • Operation • Tips & Techniques • Maintenance • Troubleshooting • Parts Lists • Warranty
A O AL
)
Hydrostatic Lawn Tractor- Model Series 620
iMPORTANT
READ SAFETY RULES AND iNSTRUCTiONS CAREFULLY BEFORE OPERATION
Warning: Thisunitisequippedwithan internalcombustionengineandshouldnotbeusedon or nearanyuniiprovedforest-covered,brush-
coveredor grass-coveredlandunlesstheengine'sexhaustsystemisequippedwitha sparkarrestermeetingapplicablelocalor statelaws(if any).
If a sparkarresterisused,it shouldbemaintainedineffectiveworkingorderby theoperator.IntheStateofCaliforniatheaboveisrequiredbylaw
(Section4442oftheCaliforniaPublicResourcesCode).Otherstatesmayhavesimilarlaws.Federallawsapplyonfederallands.A sparkarrester
forthemufflerisavailablethroughyournearestengineauthorizedservicedealeror contactthe servicedepartment,RO.Box361131Cleveland,
Ohio44136-0019.
PRINTEDIN U.S.A
MTD LLC, P.O. BOX 361131 CLEVELAND, OHIO 44136-0019
FORMNO.769-02964
12/13/2006

This Operator's Manual is an important part of your new lawn tractor, it will help you assemble,
prepare, and maintain the unit for best performance. Please read and understand what it says.
Table of Contents
Slope Gauge ........................................................ 3
Safe Operation Practices ................................... 4
Setting UpYour Lawn Tractor ............................ 8
Operating Your Lawn Tractor ........................... 12
Adjusting Your Lawn Tractor ............................ 20
Finding and Recording Model Number
BEFOREASSEMBLINGYOURNEW EQUIPMENT,please
locatethe model plateon the equipmentandcopy the
informationtothe sample modelplate providedtothe right.
Youcan locatethe model plate by looking under the seat. This
informationwill be necessaryto usethe manufacturer'sweb
site,to obtain assistancefrom theCustomerSupport Depart-
ment,orwhen contacting an authorizedservice dealer.
Maintaining Your Lawn Tractor ........................ 22
Off-Season Storage / Attachments ................. 28
Safety Labels .................................................... 29
Troubleshooting ................................................ 30
Replacement Parts ........................................... 32
Model Number
www.mtdproducts,com
Serial Number
MTD LLC
P.O= BOX 361131
CLEVELAND, OH 44136
330-220-4683
800-800-7310
Customer Support
Please do NOTreturn the unit to the retailer from which it was
purchased, without first contacting Customer Support.
Ifyou have difficulty assemblingthis product or have any questions regardingthe controls, operation,or maintenanceof this
unit,youcanseek helpfromthe experts.Choosefrom the options below:
1. Visit www.mtdproducts.com.
2. Phonea Customer Support Representative at 1 (800) 800-7310.
3. The engine manufacturer isresponsibleforall engine-relatedissueswith regardsto performance, power-rating,specifica-
tions,warranty and service. Pleasereferto the engine manufacturer'sOwner's/Operator'sManual,packedseparatelywith
your unit, for moreinformation.
2

Sight and h01dthis levelwith a vertical tree..,
>:.
G.)
o9
(13
(13
O
O
C
::>.,
E
c_
O
G.)
_-- (13
co .oo
G.) o9
o -_
O9 C:_
G.) O9
C C
_ o
(13
-_ o_
O
(13
c_
o3
o6
C
0
m_,_ or a corner of a building...
I
I
__ ora fencepost
I
i i
do;
-- fine (repros
I _ _ er_ts a 15o
15°
_0
co 0
_ a
0
C

Operation
WARNING: EngineExhaust,some of its constituents,andcertain vehicle compo-
nentscontain or emit chemicals knownto Stateof Californiato cause cancerand
birth defects or other reproductiveharm.
DANGER: This machinewas builtto beoperatedaccordingto the rulesfor safe operation in this
manual.As with anytypeof power equipment,carelessnessor error on the part of the operator can
result in seriousinjury.This machine iscapableof amputatinghands andfeet andthrowing objects.
Failureto observethe followingsafetyinstructionscould result in serious injury or death.
WARNING
Thissymbol points
out importantsafety
instructionswhich, if
notfollowed, could
i endangerthe personal
safetyand/or property
ofyourself and others.
I Readand follow all
i instructionsinthis man-
i ualbeforeattempting to
i operatethis machine.
Failureto complywith
these instructionsmay
resultin personalinjury.
i Whenyou see this
symbol.
i HEED ITS WARNING
Your
i Responsibility
Restrictthe use
ofthis powermachine
I to personswho read,
understand
and followthe warnings
and instructions
inthis manual
Children
1. Tragicaccidentscanoccuriftheoperatoris not
alertto thepresenceofchildren.Childrenareoften
attractedto themachineandthemowingactivity.
Theydo notunderstandthedangers.Neverassume
thatchildrenwillremainwhereyoulastsawthem.
a. Keepchildrenoutofthemowingareaandin
watchfulcareofaresponsibleadultotherthan
theoperator.
b. Bealertandturnmachineoff ifa childenters
thearea.
c. Beforeandwhilebacking,lookbehindand
downfor smallchildren.
d. Nevercarrychildren,evenwiththeblade(s)
shutoff.Theymayfalloffandbeseriously
injuredorinterferewithsafemachineoperation.
e. Useextremecarewhenapproachingblind
corners,doorways,shrubs,treesorother
objectsthatmayblockyourvisionof achild
whomayrunintothemachine.
f. Toavoid back-overaccidents, always
disengagethe cuttingblade(s) before
shiftingintoReverse.Ifequipped,the
"Reverse CautionMode"shouldnotbe
usedwhenchildrenor others are around.
g. Keepchildrenawayfromhotorrunning
engines.Theycansufferburnsfroma hot
muffler.
h. Removekeywhenmachineisunattendedto
preventunauthorizedoperation.
2. Neverallowchildrenunder14yearsoldto operate
themachine.Children14yearsoldandovershould
readand understandtheoperationinstructionsand
safetyrulesinthis manualandshouldbetrainedand
supervisedbya parent.
Operation
Safe Handlingof Gasoline:
1. Toavoid personalinjuryor propertydamageuse
extremecareinhandlinggasoline.Gasolineis
extremely flammableand the vapors areexplo-
sive. Seriouspersonalinjurycanoccurwhengasoline
isspilledonyourselfor yourclotheswhichcanignite.
Washyourskinandchangeclothesimmediately.
a. Useonlyanapprovedgasolinecontainer.
b. Neverfillcontainersinsideavehicleorona
truckor trailerbedwithaplasticliner.Always
placecontainersonthegroundawayfrom
yourvehiclebeforefilling.
c. Whenpractical,removegas-powered
equipmentfromthetruckortrailerand refuelit
ontheground.Ifthis isnotpossible,then
refuelsuchequipmenton a trailerwitha
portablecontainer,ratherthanfromagasoline
dispensernozzle.
d. Keepthenozzlein contactwiththerimof
thefueltankorcontaineropeningatall
timesuntilfuelingiscomplete.Donotusea
nozzlelock-opendevice.
e. Extinguishallcigarettes,cigars,pipesand
othersourcesofignition.
f. Neverfuelmachineindoors.
g. Neverremovegascaporaddfuelwhilethe
engineishot or running.Allowenginetocool
atleasttwominutesbeforerefueling.
h. Neveroverfill fueltank.Filltanktonomore
than1/2inchbelowbottomoffillerneckto
allowspacefor fuelexpansion.
i. Replacegasolinecapandtightensecurely.
j. If gasolineisspilled,wipe itoff theengine
andequipment.Moveunittoanotherarea.
Wait5 minutesbeforestartingtheengine.
k. Toreducefirehazards,keepmachinefreeof
grass,leaves,orotherdebrisbuild-up.Clean
upoilorfuelspillageandremoveanyfuel
soakeddebris.
I. Neverstorethemachineorfuelcontainer
insidewherethereisanopenflame,spark
orpilotlightason a waterheater,space
heater,furnace,clothesdryerorothergas
appliances.
m. Allowa machinetocoolatleastfiveminutes
beforestoring.
4

GeneralOperation:
1. Read,understand,andfollowall instructionsonthe
machineandinthemanual(s)beforeattemptingto
assembleandoperate.Keepthismanualina safe
placefor futureandregularreferenceandforordering
replacementparts.
2. Befamiliarwithallcontrolsandtheir properoperation.
Knowhowtostopthe machineanddisengagethem
quickly.
3, Neverallowchildrenunder14yearsold tooperate
this machine.Children14yearsoldandovershould
readandunderstandtheoperationinstructionsand
safetyrulesinthis manualandshouldbetrainedand
supervisedbyaparent.
4. Neverallowadultstooperatethismachinewithout
properinstruction.
5. To helpavoidbladecontactora thrownobjectinjury,
keepbystanders,helpers,childrenand petsat least
75feetfromthemachinewhileitis inoperation.Stop
machineifanyoneentersthearea.
6. Thoroughlyinspecttheareawheretheequipmentisto
be used.Removeall stones,sticks,wire,bones,toys,
andotherforeignobjectswhichcouldbepickedup
andthrownbytheblade(s).Thrownobjectscancause
seriouspersonalinjury.
7. Planyourmowingpatterntoavoiddischargeof
materialtowardroads,sidewalks,bystandersandthe
like.Also,avoiddischargingmaterialagainstawallor
obstructionwhichmaycausedischargedmaterialto
ricochetbacktowardtheoperator.
8. Alwayswearsafetyglassesor safetygogglesduring
operationandwhile performingan adjustmentor
repairtoprotectyoureyes.Thrownobjectswhich
ricochetcancauseseriousinjurytotheeyes.
9. Wearsturdy,rough-soledworkshoesandclose-fitting
slacksandshirts.Loosefittingclothesandjewelry
canbecaughtinmovableparts.Neveroperatethis
machinein barefeetorsandals.
10.Beawareofthemowerandattachmentdischarge
directionanddonotpointitatanyone.Donotoperate
themowerwithoutthedischargecoverorentiregrass
catcherin itsproperplace.
11.Donotputhandsor feetnearrotatingpartsor under
thecuttingdeck.Contactwiththeblade(s)can
amputatehandsandfeet.
12.A missingor damageddischargecovercan cause
bladecontactorthrownobjectinjuries.
13.Stop theblade(s)whencrossinggraveldrives,walks,
or roadsandwhilenotcuttinggrass.
14.Watchfortrafficwhenoperatingnearor crossing
roadways.Thismachineisnotintendedforuseon
anypublic roadway.
15.Donotoperatethe machinewhileundertheinflu-
enceof alcoholordrugs.
16.Mowonlyindaylightorgoodartificiallight.
17.Nevercarrypassengers.
18.Disengageblade(s)beforeshiftingintoreverse.
Backupslowly.Alwayslookdownandbehindbefore
andwhilebackingtoavoida back-overaccident.
19.Slowdownbeforeturning.Operatethe machine
smoothly.Avoiderraticoperationandexcessive
speed.
20.Disengageblade(s),setparkingbrake,stopengine
andwaituntiltheblade(s)cometoa completestop
beforeremovinggrasscatcher,emptyinggrass,
uncloggingchute,removinganygrassor debris,or
makinganyadjustments.
21.Neverleavea runningmachineunattended.Always
turnoff blade(s),placetransmissionin neutral,set
parkingbrake,stopengineand removekeybefore
dismounting.
22.Useextracare whenloadingorunloadingthe
machineintoa trailerortruck.Thisunit shouldnot
bedrivenupor downramp(s),becausethe unit
couldtip over,causingseriouspersonalinjury.The
unitmustbepushedmanuallyon ramp(s)toloador
unloadproperly.
23.Mufflerandenginebecomehotandcancausea
burn.Do nottouch.
24.Checkoverheadclearancescarefullybeforedriving
underlowhangingtreebranches,wires,dooropen-
ingsetc.,wheretheoperatormaybestruckor pulled
fromthe unit,whichcouldresultinseriousinjury.
25.Disengageallattachmentclutches,depressthe
brakepedalcompletelyandshift intoneutralbefore
attemptingtostartengine.
26.Yourmachineisdesignedto cutnormalresidential
grassofa heightnomorethan10".Donotattemptto
mowthroughunusuallytall,dry grass(e.g.,pasture)
or pilesof dryleaves.Drygrassorleavesmay
contacttheengineexhaustand/orbuildup onthe
mowerdeckpresentingapotentialfirehazard.
27.Useonlyaccessoriesandattachmentsapprovedfor
thismachinebythemachinemanufacturer.Read,
understandandfollowallinstructionsprovidedwith
theapprovedaccessoryorattachment.
28.Dataindicatesthat operators,age60 yearsand
above,are involvedin a largepercentageofriding
mower-relatedinjuries.Theseoperatorsshould
evaluatetheirabilitytooperatethe ridingmower
safelyenoughto protectthemselvesandothersfrom
seriousinjury.
29.Ifsituationsoccurwhicharenotcoveredinthis
manual,usecareandgoodjudgment.Contactyour
customerservicerepresentativefor assistance.
!i!i ¸¸¸:¸/: :!i¸ ¸¸¸ : :
WARNING
Thissymbol points
out importantsafety
instructionswhich, if
notfollowed,could
endangerthe personal
safety and/or property
ofyourself and others.
Readand followall
instructions inthis man-
ual before attemptingto
operatethis machine.
Failureto comply with
these instructionsmay
result in personalinjury.
Whenyou seethis
symbol.
HEED ITS WARNING
Your
Responsibility
Restrictthe use
ofthis powermachine
to personswho read,
understand
and follow thewarnings
and instructions
inthis manual
5

Operation
This symbol points
out important safety
instructionswhich, if
notfollowed, could
endangerthe personal
i safety and/or property
of yourself and others.
Readandfollow all
=nstructionsinthis man-
ualbefore attempting to
I operate this machine.
I Failureto comply with
i these instructions may
i resultin personalinjury.
Whenyou seethis
symbol.
HEED ITS WARNING
Slopesarea majorfactorrelatedtolossofcontroland
tip-overaccidentswhichcanresultin severeinjuryor
death.All slopesrequireextracaution.If youcannot
backuptheslopeor if youfeel uneasyonit,donotmow
it.
Foryour safety,usetheslopegaugeincludedaspartof
thismanualtomeasureslopesbeforeoperatingthisunit
onaslopedor hillyarea.Iftheslopeisgreaterthan15
degreesasshownontheslopegauge,do notoperate
thisunitonthatareaorseriousinjurycouldresult.
DO:
1. Mowupanddownslopes,notacross.Exercise
extremecautionwhenchangingdirectiononslopes.
2. Watchforholes,ruts,bumps,rocks,orotherhidden
objects.Uneventerraincouldoverturnthe machine.
Tallgrasscan hideobstacles.
3. Useslowspeed.Choosealowenoughspeed
settingso thatyouwillnothaveto stopor shiftwhile
ontheslope.Tiresmaylosetractiononslopeseven
thoughthebrakesarefunctioningproperly.Always
keepmachineingearwhengoingdownslopesto
takeadvantageofenginebrakingaction.
4. Followthe manufacturer'srecommendationsfor
wheelweightsorcounterweightstoimprovestability.
5. Useextracare withgrasscatchersorotherat-
tachments.Thesecanchangethestabilityofthe
machine.
6. Keepall movementon the slopesslowand gradual.
Donotmakesuddenchangesin speedordirection.
Rapidengagementor brakingcouldcausethe front
ofthemachineto liftand rapidlyflipoverbackwards
whichcouldcauseseriousinjury.
7. Avoidstartingorstoppingona slope.If tireslose
traction,disengagethe blade(s)andproceedslowly
straightdowntheslope.
Do Not:
1. Do notturn on slopesunlessnecessary;then,turn
slowlyandgraduallydownhill,ifpossible.
2. Do notmowneardrop-offs,ditchesorembankments.
Themowercouldsuddenlyturnoverif awheelisover
theedgeofacliff,ditch,or ifan edgecavesin.
3. Do nottry to stabilizethemachinebyputtingyourfoot
ontheground.
4. Do notuseagrasscatcheronsteepslopes.
5. Do notmowonwetgrass.Reducedtractioncould
causesliding.
6. Do notshifttoneutralandcoastdownhill.Over-speed-
ingmaycausetheoperatortolosecontrolofthe
machineresultingin seriousinjuryordeath.
7. Do nottow heavypullbehindattachments(e.g.loaded
dumpcart, lawnroller,etc.)on slopesgreaterthan
5 degrees.Whengoingdown hill,the extraweight
tendsto pushthetractorandmaycauseyou toloose
control.(e.g.tractormayspeedup,brakingandsteer-
ingabilityarereduced,attachmentmayjack-knifeand
causetractorto overturn).
Towing:
1. Towonlywithamachinethathasa hitchdesignedfor
towing.Donotattachtowedequipmentexceptatthe
hitchpoint.
2. Followthe manufacturersrecommendationforweight
limitsfor towedequipmentandtowingonslopes.
3. Neverallowchildrenorothersin oron towedequip-
ment.
4. Onslopes,theweightof thetowedequipmentmay
causelossoftractionandlossof control.
5. Travelslowlyandallowextradistancetostop.
6. Do notshifttoneutralandcoastdownhill.
Your
Responsibility
Restrictthe use
of this power machine
to personswho read,
understand
and followthe warn=ngs
and instructions
in this manual
6

Service
1. Neverrunanengineindoorsorina poorlyventilated
area.Engineexhaustcontainscarbonmonoxide,an
odorless,anddeadlygas.
2. Beforecleaning,repairing,or inspecting,makecertain
theblade(s)andallmovingpartshavestopped.
Disconnectthe sparkplugwireandgroundagainstthe
engineto preventunintendedstarting.
3. Periodicallychecktomakesurethe bladescometo
completestopwithinapproximately(5) fiveseconds
afteroperatingthebladedisengagementcontrol.Ifthe
bladesdo notstopwithinthethis timeframe,yourunit
shouldbe servicedprofessionallybyanauthorized
MTDServiceDealer.
4. Checkbrakeoperationfrequentlyas itissubjectedto
wearduringnormaloperation.Adjustandserviceas
required.
5. Checktheblade(s)andenginemountingboltsat
frequentintervalsfor propertightness.Also,visually
inspectblade(s)fordamage(e.g.,excessivewear,
bent,cracked). Replacetheblade(s)withtheoriginal
equipmentmanufacturer's(O.E.M.)blade(s)only,
listedinthismanual."Useof partswhichdonotmeet
theoriginalequipmentspecificationsmayleadto
improperperformanceandcompromisesafety!"
6. Mowerbladesaresharp.Wrapthebladeorwear
gloves,anduseextracautionwhenservicingthem.
7. Keepallnuts,bolts,andscrewstighttobesurethe
equipmentis insafeworkingcondition.
8. Nevertamperwiththe safetyinterlocksystemorother
safetydevices.Checktheirproperoperationregularly.
9. Afterstrikingaforeignobject,stopthe engine,
disconnectthesparkplugwire(s)andgroundagainst
theengine.Thoroughlyinspectthemachineforany
damage.Repairthedamagebeforestartingand
operating.
10.Neverattempttomakeadjustmentsor repairstothe
machinewhilethe engineisrunning.
11.Grasscatchercomponentsandthedischarge
coveraresubjecttowearanddamagewhichcould
exposemovingpartsor allowobjectstobethrown.
Forsafetyprotection,frequentlycheckcomponents
andreplaceimmediatelywithoriginalequipment
manufacturer's(O.E.M.)partsonly,listedinthis
manual."Useofpartswhichdonotmeettheoriginal
equipmentspecificationsmayleadto improper
performanceandcompromisesafety!"
12.Donotchangetheenginegovernorsettingsor
over-speedtheengine.Thegovernorcontrolsthe
maximumsafeoperatingspeedoftheengine.
13.Maintainor replacesafetyandinstructionlabels,as
necessary.
14.Observeproperdisposallawsandregulationsfor
gas,oil,etc.toprotecttheenvironment.
Thissymbol points
out importantsafety
instructionswhich, if
notfollowed,could
endangerthe personal
safetyand/or property
ofyourself and others.
Readandfollow all
instructionsin this man-
ual before attemptingto
operatethis machine.
Failureto complywith
these instructionsmay
result in personalinjury.
When yousee this
symbol.
HEED iTS WARNING
Your
Responsibility
Restrictthe use
ofthis powermachine
to personswho read,
understand
and followthe warn=ngs
and instructions
in this manual
7

Use extreme care
henhandling
gaso nelGasoline
extremely flammable
and the vapors are
explosive: Never fuel
machine indoors
or while the engine
is hotor running:
Extinguish cigarettes,
cigars;pipes,and
other sOurceS of
ignition:
NOTE:ThisOperatorsManualcoversa rangeof prod-
uctspecificationsforvariousmodels.Characteristics
andfeaturesdiscussedand/orillustratedin thismanual
maynotbeapplicableto allmodels.MTDLLCreserves
therighttochangeproductspecifications,designs
andequipmentwithoutnoticeandwithoutincurring
obligation.
Attaching the Battery Cables
NOTE: If thesecablesarealreadyattached,ignore
thesestepsand proceedto"Gas& Oil Fill-Up."
NOTE: ThepositivebatteryterminalismarkedPos.(+).
Thenegativebatteryterminalis markedNeg.(-).
Thepositivecable(heavyredwire)is securedtothe
positivebatteryterminal(+)witha hexboltandhex
nutatthefactory.Makecertainthatthe rubberboot
coverstheterminaltohelpprotectit fromcorrosion.
.
Removethehexboltandwingnut(orhexnut)from
thenegativecable.SeeFig.3-1.
.
Removetheblackplasticcover,ifpresent,fromthe
negativebatteryterminalandattachthenegative
cable(heavyblackwire)tothenegativebattery
terminal(-) withthebolt andwingnut(orhexnut).
4. Makecertainthehold-downstrapisinpositionover
thebattery,securingitinplace.
NOTE: If thebatteryis putintoserviceafterthe
dateshownon topof battery,chargethebatteryas
instructedin themaintenancesectionofthismanual
priortooperatingthetractor.
Gas and Oil Fill-up
Thegasolinetank islocatedunderthehoodandhasa
capacityof3 gallons.Donotoverfill.
Rubber Boot
Figure 3=1
NOTE: This Operators
Manual Coversa range
ofprOduCtSpecifications
for variousmodels.
Characteristicsand
features disCussed
and/or illustrated
this manual may not be
I
applicable to all modelsl
MTD LLC reservesthe
righttOchangeproduct
specifiCationsldesigns
and equipmentwithout
notice andwithout incur-
ting oblieation ,,
_ WARNING:Useextremecare when
Servicetheenginewithgasolineandoilasinstructed
in theseparateEngineOperator/OwnerManualpacked
withyourtractor.Readinstructionscarefully.
IMPORTANT:Yourtractorisshippedwith motoroil
in theengine.However,youMUSTchecktheoillevel
beforeoperating.Becarefulnotto overfill.
handling gasoline. Gasolineis extremely
flammableand the vapors are explosive.
Neverfuel machine indoors or while
the engine is hot or running. Extinguish
cigarettes, cigars, pipes, and other
sources of ignition.
8
Shipping Brace Removal
WARNING:Makesure the riding mower's
engine is off, removetheignition key,and
set theparking brakebefore removing the
shipping brace.
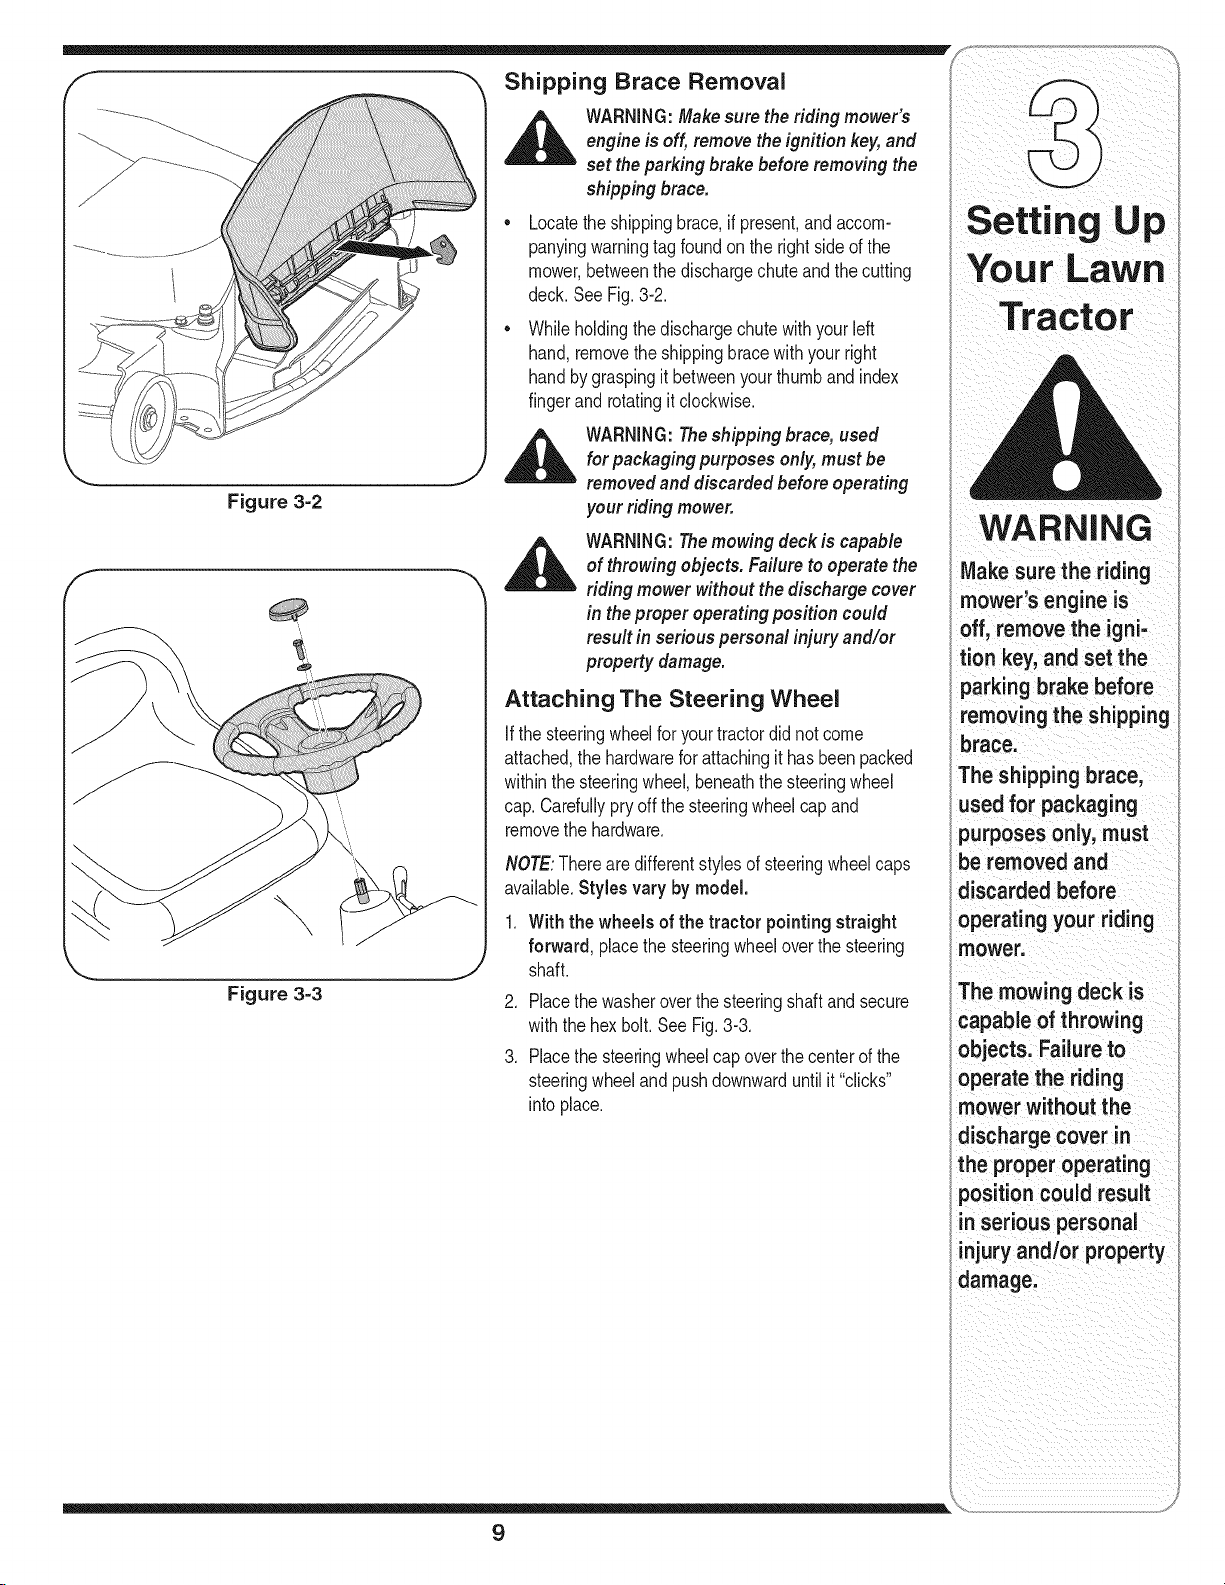
Locatetheshippingbrace,ifpresent,andaccom-
panyingwarningtagfoundontherightsideofthe
mower,betweenthe dischargechuteandthecutting
deck.SeeFig.3-2.
Whileholdingthe dischargechutewithyourleft
hand,removetheshippingbracewithyourright
handbygraspingitbetweenyourthumbandindex
fingerandrotatingitclockwise.
WARNING:Theshipping brace, used
\
Figure 3=2
f
for packaging purposes only, must be
removedanddiscarded before operating
your riding mower.
WARNING:Themowing deck is capable
of throwing objects. Failureto operate the
riding mower without thedischarge cover
in theproper operating position could
result in serious personal injury and/or
property damage.
Attaching The Steering Wheel
Setting Up
WARNING
Make sure the riding
mower's engine is
off, remove the igni-
tion key, and set the
parkingbrake before
removing the shipping
\
Figure 3-3
If thesteeringwheelforyourtractordidnotcome
attached,thehardwareforattachingithasbeenpacked
withinthesteeringwheel,beneaththesteeringwheel
cap.Carefullypryoffthesteeringwheelcapand
removethehardware.
NOTE:Thereare differentstylesof steeringwheelcaps
available.Stylesvary by model.
.
With the wheels of the tractor pointingstraight
forward, placethesteeringwheeloverthesteering
shaft.
2. Placethewasheroverthesteeringshaftandsecure
withthehexbolt.See Fig.3-3.
3. Placethesteeringwheelcapoverthecenterofthe
steeringwheeland pushdownwarduntilit "clicks"
intoplace.
brace.
The shipping brace,
used for packaging
purposes only, must
be removed and
discarded before
operating your riding
mower.
The mowing deck is
capableof throwing
objects. Failure to
operatethe riding
mower without the
discharge cover in
the proper operating
positioncould result
in serious personal
injuryand/or property
damage.
9

/
WARNING
Before operatingthis
machine,make sure
the seat is engaged in
the seat stop, stand
behindthe machine
and pull back on seat
untilfully engaged
intostop.
Attaching The Seat
Seatstylesvarybytractormodelandtherearethree
differentstylesavailable:
• StandardAdjustment
QuickAdjustment&
• KnobAdjustment
If theseatforyourtractordidnotcomeattached,
referto Fig.3-4,Fig.3-5,andFig.3-6to identifyyour
tractor'sseatstyleandfollowthe applicableinstructions
belowto attachit.
NOTE:Forshippingreasons,seatsareeitherfastened
tothetractorseat'spivotbracketwitha plastictie,or
mountedbackwardtothepivotbracket.Ineithercase,
freethe seatfromitsshippingpositionand removethe
twohexscrews(or knobs,onmodelsso equipped)from
thebottomof seatbeforeproceedingwithapplicable
instructionsbelow.
Standard Adjustment Seat
1. Positiontheshoulderscrews(foundonthe baseof
theseat)insidetheslotopeningsintheseatpivot
bracket.SeeFig.3-4.
2. Slidethe seatslightlyrearwardintheseatpivot
bracket,liningupthe rearslots inthepivotbracket
withtheremainingtwoholesintheseat'sbase.
3. Selectdesiredpositionforthe seat,andsecurewith
thetwohexscrewsremovedearlier.SeeFig.3-4.
Quick Adjustment Seat
NOTE:Ifyour seatwas shippedmountedbackwardson
theseatpivotbracket,pulloutthe tabfoundonthe seat
stopandholditopenwhileslidingtheseatoff theseat
pivotbracket.SeeFig.3-5.
1. Lineuptheplasticseatspacerswiththeslotsinseat .................,
pivotbracket.
2. Slideseatinuntilfrontseatspacerengagestheseat
stop.SeeFig.3-5.
f
f
f
x.............................................................................
J
Figure 3-4
f
x............................_................................................
J
Figure 3=5
_ ARNING:Beforeoperating this ma-chine, makesure the seat is engaged in
theseat stop, stand behind themachine
and pull back on seat until fully engaged
into stop.
Knob Adjustment Seat
1. Positiontheshoulderscrews(foundonthe baseof
theseat)insidetheslotopeningsintheseatpivot
bracket.Fig.3-6.
2. Slidethe seatslightlyrearwardintheseatpivot
bracket,liningupthe rearslots inthepivotbracket
withtheremainingtwoholesintheseat'sbase.
3. Selectdesiredpositionforthe seat,andsecurewith
thetwoknobsremovedearlier.SeeFig.3-6.
Figure 3=6
10
Setting the Gauge Wheels
Selecttheheightpositionofthecuttingdeckbyplacing
thedeckliftleverinanyofthesix differentcuttingheight
notchesonthe rightfender.
Adjustthedeckwheelssothattheyarebetween1A-inch
and1/2-inchabovethegroundasfollows.
SettingUp
\ J
Figure 3=7
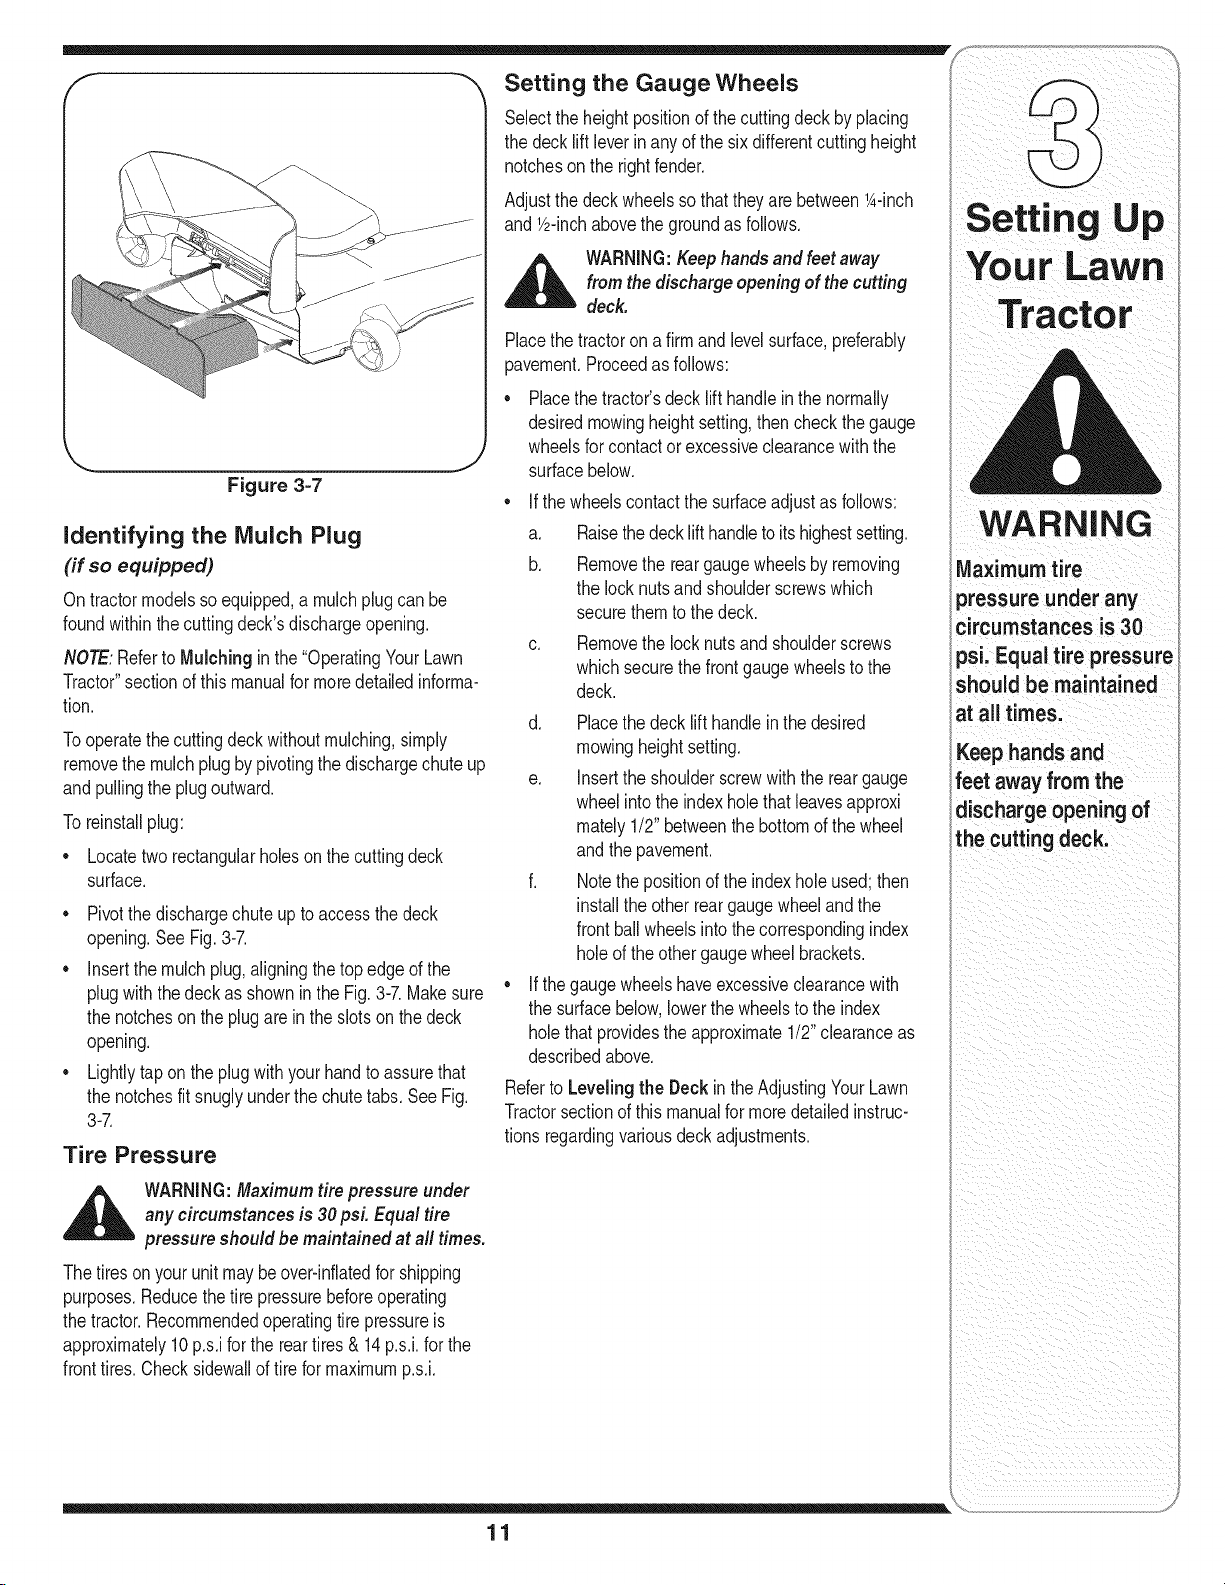
identifying the Mulch Plug
(if so equipped)
On tractormodelssoequipped,a mulchplugcanbe
foundwithinthecuttingdeck'sdischargeopening.
NOTE:Referto Mulching in the"OperatingYourLawn
Tractor"sectionofthismanualformoredetailedinforma-
tion.
Tooperatethecuttingdeckwithoutmulching,simply
removethemulchplugbypivotingthedischargechuteup
and pullingthe plugoutward.
Toreinstallplug:
• Locatetworectangularholesonthecuttingdeck
surface.
Pivotthedischargechuteup toaccessthedeck
opening.SeeFig.3-7.
Insertthemulchplug,aligningthetopedgeofthe
plugwiththedeckasshownin theFig.3-7.Makesure
thenotchesontheplugareintheslotson the deck
opening.
Lightlytapon the plugwith yourhandto assurethat
thenotchesfitsnuglyunderthechutetabs.SeeFig.
3-7.
Tire Pressure
,_ WARNING:Keephands andfeetaway
Placethetractoron afirmand levelsurface,preferably
pavement.Proceedas follows:
Referto Levelingthe DeckintheAdjustingYourLawn
Tractorsectionofthis manualformoredetailedinstruc-
tionsregardingvariousdeckadjustments.
fromthedischargeopeningof thecutting
deck.
Placethetractor'sdecklift handleinthe normally
desiredmowingheightsetting,thencheckthegauge
wheelsforcontactorexcessiveclearancewiththe
surfacebelow.
If thewheelscontactthesurfaceadjustasfollows:
a. Raisethedecklifthandletoitshighestsetting.
b. Removethe reargaugewheelsbyremoving
thelocknutsand shoulderscrewswhich
securethemtothedeck.
C. Removethe locknutsandshoulderscrews
whichsecurethefrontgaugewheelstothe
deck.
d. Placethedeck lifthandleinthedesired
mowingheightsetting.
e. Inserttheshoulderscrewwiththereargauge
wheelintotheindexholethatleavesapproxi
mately1/2"betweenthebottomofthewheel
andthepavement.
f. Notethepositionofthe indexholeused;then
installtheotherreargaugewheelandthe
frontballwheelsintothecorrespondingindex
holeoftheothergaugewheelbrackets.
If thegaugewheelshaveexcessiveclearancewith
thesurfacebelow,lowerthewheelsto theindex
holethatprovidestheapproximate1/2"clearanceas
describedabove.
WARNING
_aximum tire
pressure under any
circumstances is30
psi. Equal tire pressure
should be maintained
at all times.
Keep hands and
feet away from the
discharge opening of
the cutting deck.
,_ WARNING:Maximum tirepressure under
Thetiresonyourunitmaybeover-inflatedforshipping
purposes.Reducethetire pressurebeforeoperating
thetractor.Recommendedoperatingtirepressureis
approximately10p.s.iforthereartires& 14p.s.i,forthe
fronttires.Checksidewallof tireformaximump.s.i.
any circumstances is 30psL Equal tire
pressure should be maintained at all times.
11
 Loading...