

Page 1

Safety • Assembly • Operation • Tips & Techniques • Maintenance • Troubleshooting • Parts Lists • Warranty
A O A AL
\
\
\
22=inch Rotary Mower- Model Series 030
READ SAFETY RULES AND iNSTRUCTiONS CAREFULLY BEFORE OPERATION
Warning: Thisunit isequippedwithan internalcombustionengineandshouldnot beusedon or nearany unimprovedforest-covered,brush-
coveredor grass-coveredlandunlesstheengine'sexhaustsystemisequippedwithasparkarrestermeetingapplicablelocalorstatelaws(if any).
If a sparkarresterisused,it shouldbemaintainedineffectiveworkingorderbythe operator.IntheStateofCaliforniatheaboveisrequiredbylaw
(Section4442ofthe CaliforniaPublicResourcesCode).Otherstatesmayhavesimilarlaws.Federallawsapplyonfederallands.A sparkarrester
forthe mufflerisavailablethroughyournearestengineauthorizedservicedealeror contacttheservicedepartment,RO.Box361131Cleveland,
Ohio44136-0019.
PRINTEDIN U.S.A
MTD LLC, P.O. BOX 361131 CLEVELAND, OHIO 44136-0019
Model034Dshown
iMPORTANT
FORMNO.769-00901B
01/24/2006
Page 2

This Operator's Manual is an important part of your new lawn mower, it will help you assemble,
prepare, and maintain the unit for best performance. Please read and understand what it says.
Table of Contents
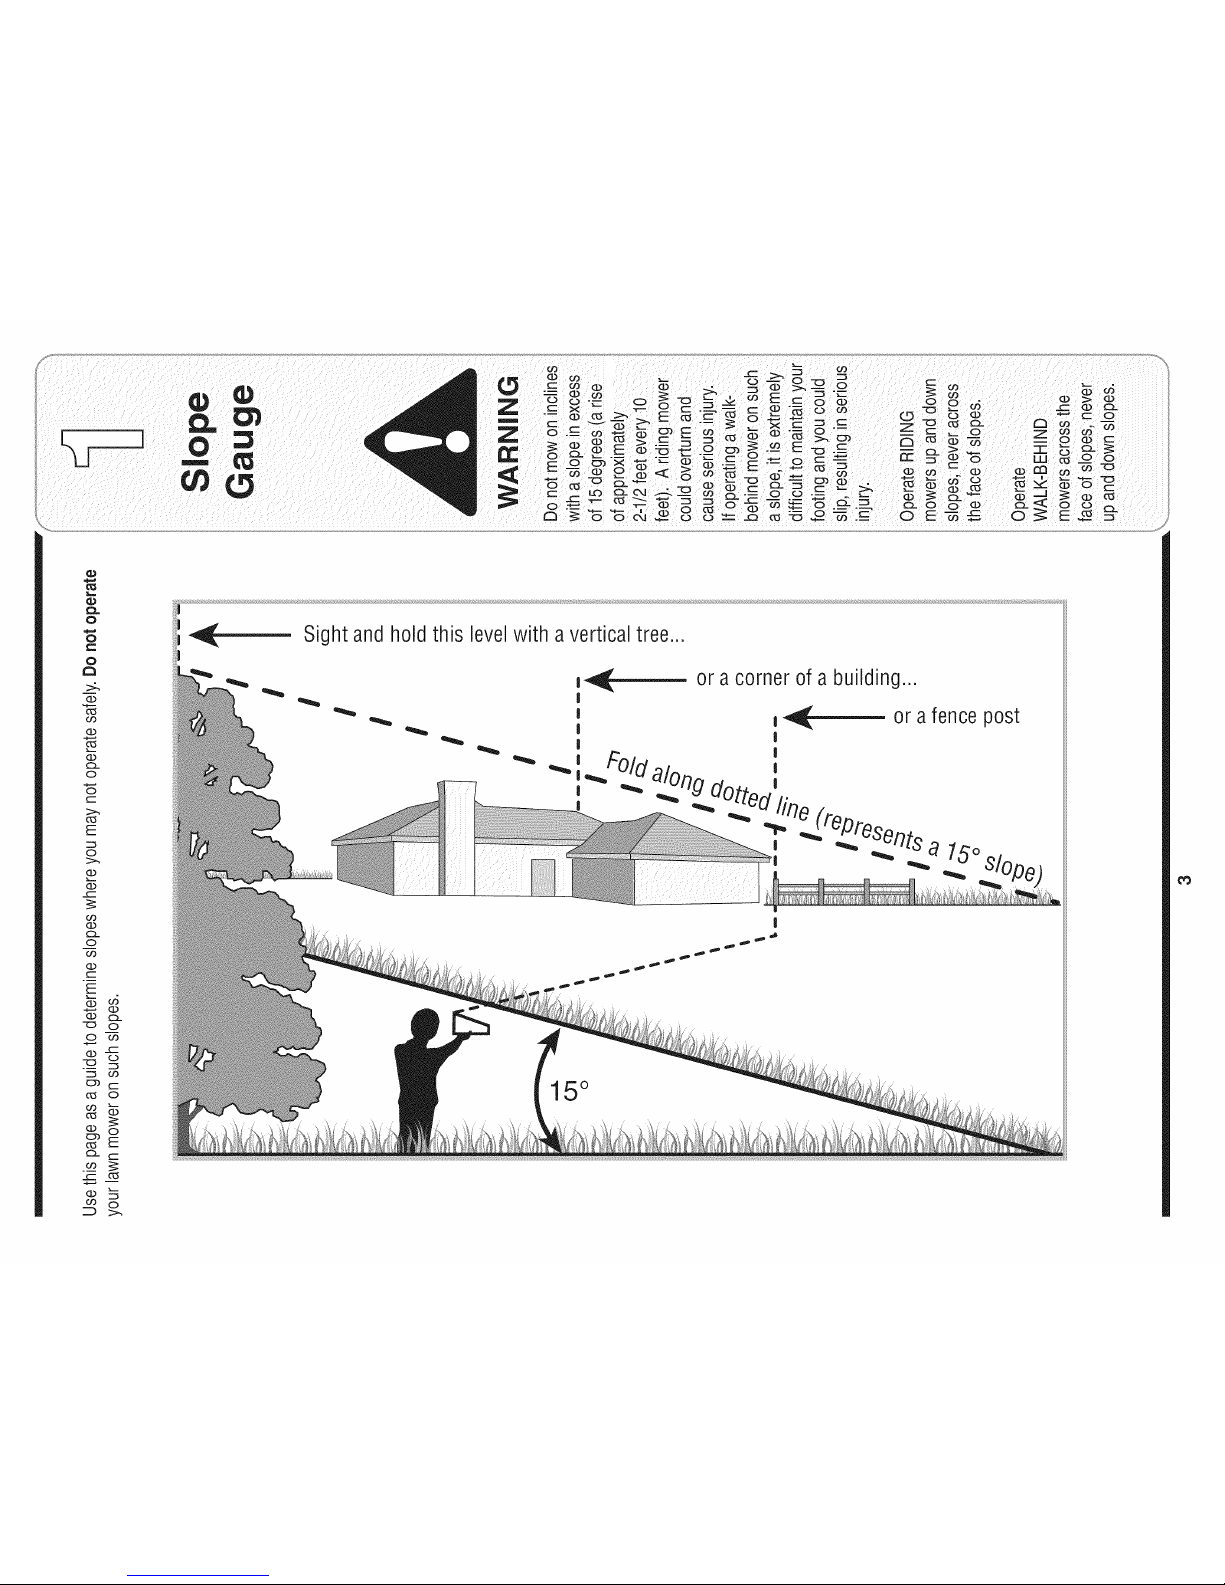
Slope Gauge ....................................................... 3
Safe Operation Practices ................................... 4
Setup and Adjustment ....................................... 6
Operating Your Lawn Mower ............................ 12
Maintaining Your Lawn Mower ......................... 14
Finding and Recording Model Number
BEFOREASSEMBLINGYOURNEW EQUIPMENT,please
locatethe model plateon the equipmentandcopy the infor-
mationto the sample model plate providedto the right. You
can locatethe model plate by standing atthe operatingposi-
tion and lookingdown atthe rearofthe deck.This information
will be necessaryto use the manufacturer'sweb site, to obtain
assistancefromthe CustomerSupport Department, or when
contactingan authorizedservicedealer.
Troubleshooting ................................................ 16
Safety Labels .................................................... 17
Parts List ........................................................... 18
Warranty ............................................ Back Cover
r
Model Number
Serial Number
MTD LLC
P.O= BOX 361131
CLEVELAND, OH 44136
330-220-4683
www.mtdproducts.corn
800-800-731 0
Customer Support
Please do IVOTreturn the unit to the retailer from which it was purchased, without first
contacting Customer Support.
Ifyou havedifficultyassemblingthis productor haveany questionsregardingthecontrols, operation,or maintenanceof this
unit,youcan seek helpfrom the experts. Choosefrom the optionsbelow:
• Visit www.mtdproducts.com. Click the Service& Supportmenuoption.
MTD _n_er#ati_e_ Awa_g Wi_ni¢-_ Prod_f_ O#r Compalr_'y
'.Service 8_Support
Product Registration
o
Phonea Customer Support Representativeat 1-800-800-7310.
o
The enginemanufactureris responsiblefor all engine-relatedissueswith regardsto performance, power-rating,specifica-
tions,warranty,and service. Please refertothe enginemanufacturer's0wner's/0perator's Manual, packedseparately with
your unit,for more information.
Con_ac_ Us i Privacy Po,_k_
2
Page 3
O
o
o
>:.
(13
O3
(13
(13
O-
O
O
(--
O5
E
O
(13
(13
o3
(13
O-
O
o3
(13
E
(]3
(13
o
(13
C5
('5
O3
O5
(13
t"b
(13
O9
o5
(13
O-
O
O3
-5
O3
O
O
E
Sightandhold this levelwith averticaltree...
also
I
15°
Page 4
WARNING: EngineExhaust,some of its constituents, andcertain vehiclecompo-
nentscontain or emit chemicals knownto Stateof Californiato cause cancer and
birth defects or other reproductiveharm.
DANGER: This machinewas builtto beoperatedaccordingto the rulesfor safe operation in this
manual.As with any type of powerequipment,carelessnessor error onthe part ofthe operatorcan
result in seriousinjury.This machine is capable of amputatinghands andfeet andthrowing objects.
Failureto observethe followingsafety instructionscould resultin serious injuryordeath.
WARNING
Thissymbolpoints
out importantsafety
instructionswhich,if
notfollowed,could
endangerthe personal
i safetyand/or property
I ofyourselfand others.
Readandfollowall
instructionsinthis
manualbeforeat-
temptingto operate
i this machine.Failure
I to complywiththese
instructionsmayresult
i inpersonalinjury.When
youseethis symbol.
i HEED ITS WARNING!
Your Responsibility
Restrictthe use
ofthis powermachine
to personswho read,
_understand
ano followthe warnings
and instructions
inthis manual
and on the machine.
Children
Tragicaccidentscanoccurifoperatorisnotalertto presence
ofchildren.Childrenare oftenattractedtomowerand mowing
activity.Theydo notunderstandthedangers.Neverassume
thatchildrenwill remainwhereyoulastsawthem.
1. Keepchildrenoutof the mowingareaand underwatchful
careof a responsibleadultotherthanthe operator.
2. Bealert andturn moweroffif achildentersthearea.
3. Beforeandwhilemovingbackwards,lookbehindanddown
forsmallchildren.
4. Useextremecarewhenapproachingblind corners,
doorways,shrubs,trees,or otherobjectsthatmayobscure
yourvisionofa childwhomayrunintothe mower.
5. Keepchildrenawayfromhotor runningengines.Theycan
sufferburnsfroma hotmuffler.
6. Neverallowchildrenunder14yearsoldto operatea power
mower.Children14yearsoldandovershouldreadand
understandoperationinstructionsandsafetyrulesinthis
manualandshouldbetrainedandsupervisedbyaparent.
General Operation
1. Readthis operator'smanualcarefullyin its entiretybefore
attemptingtoassemblethismachine.Read,understand,
andfollowall instructionsonthe machineandin the
manual(s)beforeoperation.Becompletelyfamiliarwith
thecontrolsandthe properuseof this machinebefore
operatingit.Keepthis manualin asafeplaceforfuture
andregularreferenceandfor orderingreplacementparts.
2. Thismachineisa precisionpieceof powerequipment,
nota plaything.Therefore,exerciseextremecautionat all
times.Yourunithas beendesignedto performonejob: to
mowgrass.Do notuseit for anyotherpurpose.
3. Neverallow childrenunder14yearsoldto operatethis
machine.Children14yearsoldand overshouldreadand
understandthe instructionsinthis manualandshould
betrainedand supervisedbya parent.Onlyresponsible
individualswhoarefamiliarwiththese rulesof safe
operationshouldbeallowedto usethis machine.
4. Thoroughlyinspectthe areawherethe equipmentisto
beused.Removeall stones,sticks,wire,bones,toys
andotherforeignobjects,whichcouldbetrippedover or
pickedupandthrownbythe blade.Thrownobjects can
causeseriouspersonalinjury.Planyourmowingpattern
toavoiddischargeof materialtowardroads,sidewalks,
bystandersandthe like.Also,avoiddischargingmaterial
againsta wallor obstruction,whichmaycausedischarged
materialto ricochetbacktowardthe operator.
5. Tohelpavoidbladecontactora thrownobjectinjury,
stayinoperatorzone behindhandlesandkeepchildren,
bystanders,helpersandpetsatleast75feetfrom mower
whileit is inoperation.Stop machineifanyoneenters
area.
6. Alwayswearsafetyglassesor safetygogglesduringopera-
tionandwhileperforminganadjustmentor repairtoprotect
youreyes.Thrownobjectswhich ricochetcancauseserious
injurytothe eyes.
7. Wearsturdy,rough-soledworkshoesandclose-fitting
slacksandshirts. Shirtsand pantsthatcoverthe armsand
legsandsteel-toedshoesare recommended.Neveroperate
thismachinein barefeet,sandals, slipperyor light-weight
(e.g.canvas)shoes.
8. Do notputhandsorfeetnearrotatingpartsor undercutting
deck.Contactwithbladecanamputatehandsandfeet.
9. A missingor damageddischargecovercancause blade
contactor thrownobject injuries.
10.Manyinjuriesoccuras a resultofthe mowerbeingpulled
overthefoot duringafall causedby slippingortripping.
Do notholdontothe mowerifyouarefalling;releasethe
handleimmediately.
11.Neverpullthe mowerbacktowardyouwhileyouare
walking.Ifyoumustbackthe mowerawayfromawallor
obstructionfirstlookdownand behindtoavoidtrippingand
thenfollowthesesteps:
a. Stepbackfrommowertofully extendyourarms.
b. Besureyouarewellbalancedwithsurefooting.
c. Pullthe mowerbackslowly,no morethanhalfway
towardyou.
d. Repeatthesestepsas needed.
12.Donotoperatethe mowerwhileunderthe influenceof
alcoholordrugs.
13.Donotengagetheself-propelledmechanismon unitsso
equippedwhilestartingengine.
14.Thebladecontrolhandleis asafetydevice.Neverattempt
tobypassitsoperation.Doingso makesthesafetydevice
inoperativeandmayresult inpersonalinjurythrough
contactwiththe rotatingblade.Thebladecontrolhandle
mustoperateeasily in bothdirectionsandautomatically
returntothe disengagedpositionwhenreleased.
15.Neveroperatethe mowerinwetgrass.Alwaysbesure of
yourfooting. A slipandfallcancauseseriouspersonal
injury.If youfeelyouare losingyourfooting,releasethe
bladecontrolhandleimmediatelyandthe bladewillstop
rotatingwithinthreeseconds.
16.Mowonlyin daylightor goodartificiallight.Walk,neverrun.
17.Stopthe bladewhencrossinggraveldrives,walksor roads.
18.Iftheequipmentshouldstartto vibrateabnormally,stopthe
engineandcheck immediatelyfor the cause.Vibrationis
generallya warningoftrouble.
4
Page 5
19.Shuttheengineoff andwait untilthe bladecomesto a
completestopbefore removingthe grasscatcheror unclog-
ging thechute.
The cuttingbladecontinuesto rotatefora fewseconds after
the engineisshutoff. Neverplaceany part ofthe bodyin
the bladearea untilyou aresurethe blade hasstopped
rotating.
20. Neveroperatemowerwithoutpropertrail shield,discharge
cover,grasscatcher,bladecontrolhandleor othersafety
protectivedevicesin placeandworking.Neveroperate
mowerwithdamagedsafetydevices.Failuretodo socan
resultin personalinjury.
21. Mufflerandenginebecomehotandcan causeaburn.Do
nottouch.
22.Onlyuseparts andaccessoriesmadefor thismachineby
manufacturer.Failuretodo socanresult inpersonalinjury.
23. Ifsituationsoccurwhicharenotcoveredinthis manual,
usecareand goodjudgment.Contactyourdealerfor
assistance.Telephone1-800-800-7310for the nameofyour
nearestdealer.
Slope Operation
Slopesare amajorfactorrelatedto slipandfallaccidents,which
can resultinsevereinjury.Operationonslopesrequiresextra
caution.Ifyoufeeluneasyon aslope,do notmowit.Foryour
safety,usetheslopegaugeincludedas partofthis manualto
measureslopesbeforeoperatingthisunitona slopedor hilly
area.Iftheslopeisgreaterthan15degrees,donot mowit.
Do:
1. Mowacrossthefaceof slopes;neverup anddown.Exercise
extremecautionwhenchangingdirectiononslopes.
2. Watchfor holes,ruts,rocks, hiddenobjects,or bumpswhich
can causeyouto slipor trip. Tallgrasscanhideobstacles.
3. Alwaysbesureof yourfooting.A slip andfall cancause
seriouspersonalinjury.If youfeelyouarelosingyour
balance,releasethebladecontrolhandleimmediately,and
the bladewill stoprotatingwithin 3seconds.
Do Not:
1. Donot mowneardrop-offs,ditchesorembankments,you
could loseyourfootingorbalance.
2. Donot mowslopesgreaterthan 15degreesasshownon
the slopegauge.
3. Donot mowon wetgrass.Unstablefootingcouldcause
slipping.
Service
Safe HandlingOf Gasoline:
1. To avoidpersonalinjuryorpropertydamageuseextreme
care inhandlinggasoline.Gasolineisextremelyflammable
andthevaporsare explosive.Seriouspersonalinjurycan
occurwhengasolineis spilledonyourselforyourclothes,
whichcanignite.
2. Wash yourskin andchangeclothesimmediately.
3. Useonly anapprovedgasolinecontainer.
4. Neverfillcontainersinsidea vehicleoron atruckor trailer
bedwitha plasticliner.Alwaysplacecontainerson the
groundawayfromyourvehiclebeforefilling.
5. Removegas-poweredequipmentfromthetruck ortrailer
andrefuelit on theground.If thisis notpossible,then refuel
suchequipmentonatrailerwitha portablecontainer,rather
thanfroma gasolinedispensernozzle.
6. Keepthe nozzleincontactwiththe rimof thefueltankor
containeropeningat alltimesuntilfuelingis complete.Do
notuseanozzlelock-opendevice.
7. Extinguishallcigarettes,cigars, pipesandothersources
ofignition.
8. Neverfuel machineindoorbecauseflammablevaporswill
accumulatein thearea.
9. Neverremovegascap oradd fuelwhileengineishot or
running. Allowengineto coolat leasttwominutesbefore
refueling.
10.Neveroverfillfueltank. Filltankto nomorethanY2inch
belowbottomoffiller neckto provideforfuelexpansion.
11.Replacegasolinecapandtightensecurely.
12.Ifgasolineis spilled,wipeitoff theengineandequipment.
Moveunitto anotherarea.Wait5 minutesbeforestarting
engine.
13.Neverstorethemachineorfuel containernearanopen
flame,sparkor pilot lightas onawater heater,space
heater,furnace,clothesdryerorothergasappliances.
14.Toreducefire hazard,keepmowerfreeofgrass, leaves,
orotherdebrisbuild-up.Cleanupoil orfuelspillageand
removeanyfuel soakeddebris.
15.Allowamowerto coolat least5 minutesbeforestoring.
GeneralService:
1. Neverrunanengineindoorsorin apoorlyventilatedarea.
Engineexhaustcontainscarbonmonoxide,anodorlessand
deadlygas.
2. Beforecleaning,repairing,orinspecting,makecertainthe
bladeandall movingpartshavestopped.Disconnectthe
sparkplugwireandgroundagainsttheengineto prevent
unintendedstarting.
3. Checkthebladeandenginemountingboltsatfrequent
intervalsfor propertightness.Also,visuallyinspectbladefor
damage(e.g.,bent,cracked,worn)Replacebladewiththe
originalequipmentmanufacture's(O.E.M.)bladeonly,listed
inthismanual."Useof partswhichdo notmeetthe original
equipmentspecificationsmayleadto improperperformance
andcompromisesafety!"
4. Mowerbladesaresharpandcancut.Wrapthebladeor wear
gloves,anduseextracautionwhenservicingthem.
5. Keepallnuts,bolts,andscrewstightto besuretheequip-
mentis insafeworkingcondition.
6. Nevertamperwithsafetydevices.Checktheirproperopera-
tionregularly.
7. Afterstrikingaforeignobject,stopthe engine,discon-
nectthesparkplugwireandgroundagainsttheengine.
Thoroughlyinspectthemowerforanydamage.Repairthe
damagebeforestartingandoperatingthemower.
8. Neverattempttomakeawheelorcuttingheightadjustment
whiletheengineis running.
9. Grasscatchercomponents,dischargecover,andtrail
shieldaresubjecttowear anddamagewhichcould expose
movingpartsor allowobjectsto bethrown.Forsafety
protection,frequentlycheckcomponentsandreplaceim-
mediatelywithoriginal equipmentmanufacturer's(O.E.M.)
partsonly,listedinthis manual."Useof partswhich do
notmeetthe originalequipmentspecificationsmayleadto
improperperformanceandcompromisesafety!"
10.Donotchangetheenginegovernorsettingor over-revthe
engine.Thegovernorcontrolsthe maximumsafeoperating
speedoftheengine.
11.Maintainorreplacesafetylabels,asnecessary.
12.Observeproperdisposallawsand regulations.Improper
disposaloffluidsand materialscanharmtheenvironment.
Operation
WARNING
Thissymbol points
out importantsafety
instructions,whichif
notfollowed,could
endangerthe personal
safety and/or property
of yourselfand others.
Readand followall
instructions inthis man-
ual before attemptingto
operatethis machine.
Failureto comply with
these instructionsmay
result in personalinjury.
Whenyou seethis
symbol.
HEED IT'S WARNING!
YourResponsibility
Restrictthe use
of this powermachine
to personswho read.
understand
and followthe warnings
and instructions
in this manua
and on the machine.
5
Page 6
Adjustment
Referenceto right, left
front, or back of the
lawnmower is from
the operatingposition
only, unlessotherwise
stated.
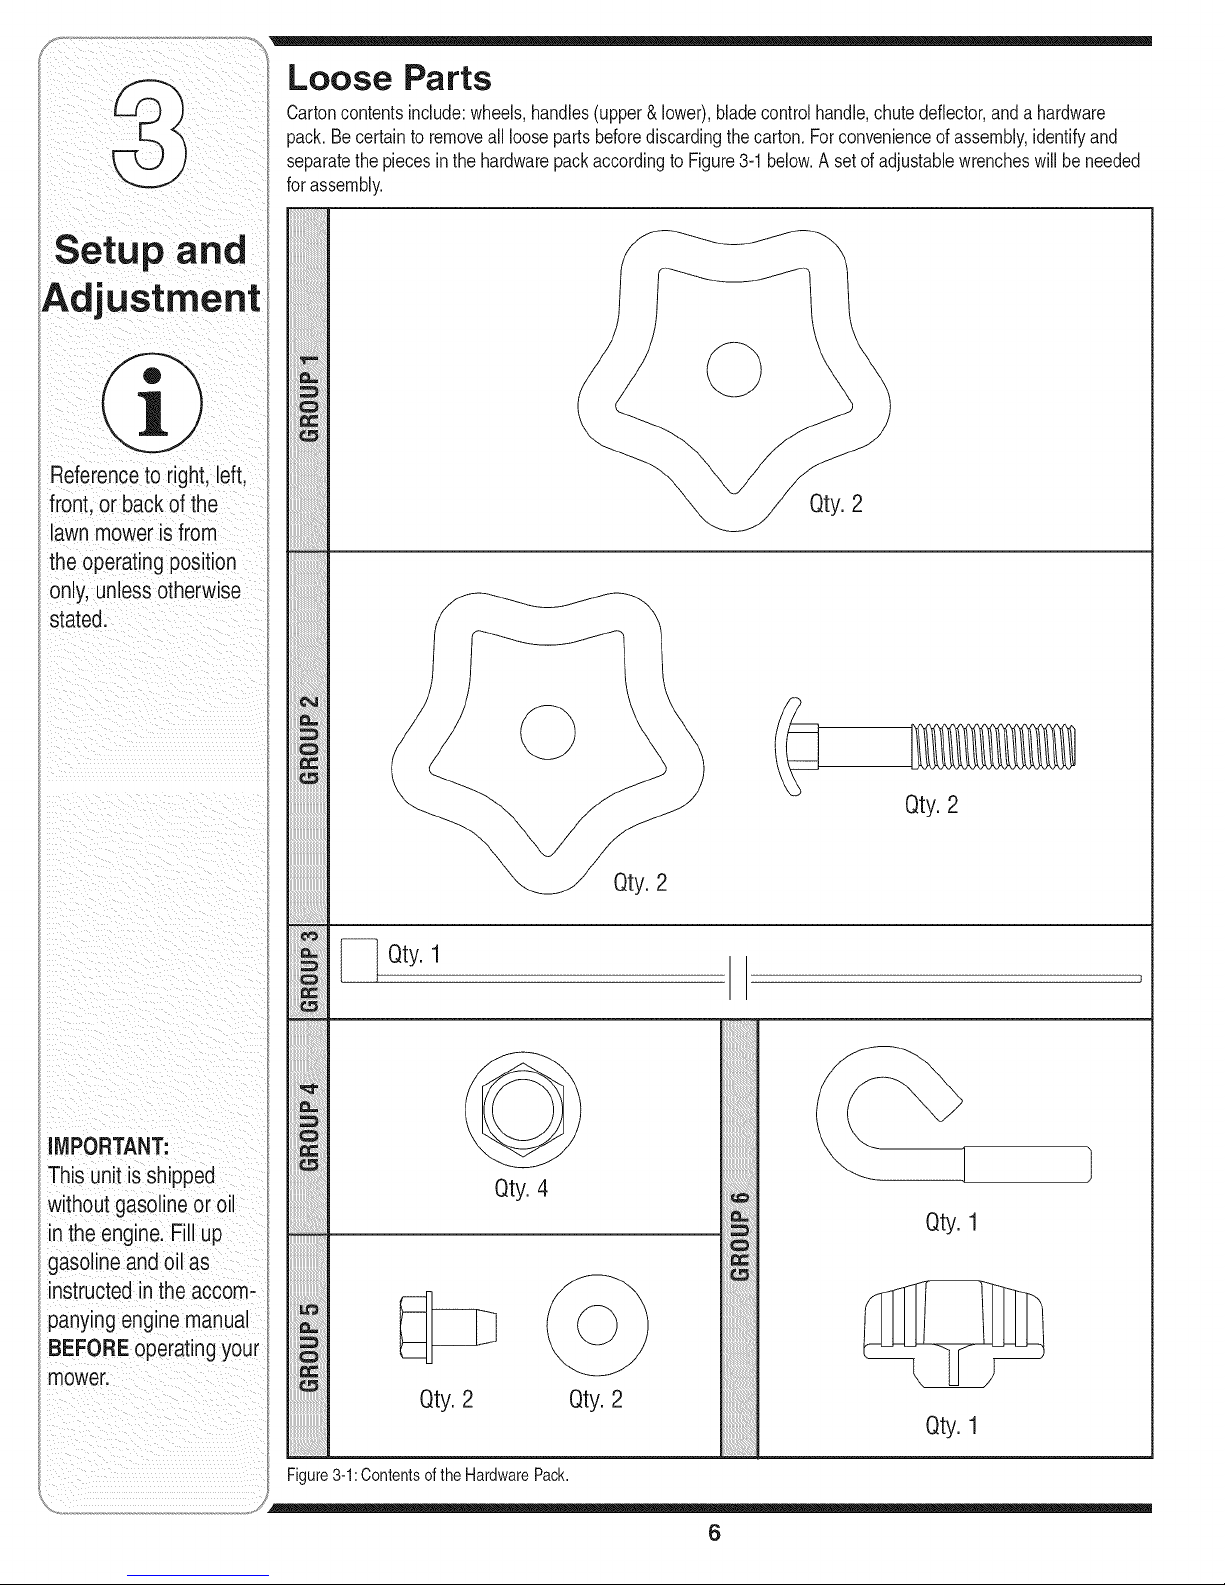
Loose Parts
Cartoncontentsinclude:wheels,handles(upper&lower),bladecontrolhandle,chutedeflector,anda hardware
pack.Becertainto removeall loosepartsbeforediscardingthecarton. Forconvenienceofassembly,identifyand
separatethepiecesin the hardwarepackaccordingto Figure3-1below.A setof adjustablewrencheswill be needed
forassembly.
IMPORTANT:
This unit isshipped
without gasolineor oil
in the engine. Fill up
gasolineandoilas
instructedinthe accom-
panyingenginemanual
BEFOREoperatingyour
mower.
iiiiiiiiiiiiiiiiiiiiiiiii
Qty. 4
Qty. 2 Qty. 2
iiiiiiiiiiiiiiiiii_i
iiiiiiiiiiiiiiiiiii
!!!!!!!!!!!!!!!!_
?
Qty. 2
Qty. 1
Qty. 1
Figure3-1:Contentsof theHardwarePack.
6
Page 7

Blade Control *blade
Handle* be detached
control may
Spark Plug Wire
Disconnectsparkplugwirefromthesparkplugand
groundit againsttheengine.If engineis equippedwitha
rubberboot,attachrubberboottoa bolton theengine.
Thiswillpreventtheenginefromfiringduringassembly.
Attaching The Handles
Thelowerhandlehastwo flatendswiththreeholeseach,
onesmallandtwolarge.The upperhandlehasindented
endswithone holeand mayhavethebladecontrol
handleattached,Figure3-2.
UpperHandle
Figure3-2:Theupperandlowerhandles.
Figure3-3:Attachthelowerhandleto the bracketsondeck.
LowerHandle
\
Attaching Lower Handle
NOTE:Usethe hardwarein Group 1 to attachthe lower
handle.
J
1. Placethelowerhandleoverthe handlebracket
assembliesandpositioneachbracketstudintothe
topor bottomhole,Figure3-3.
2. Securewiththestarknobs,Figure3-3.Eachsideof
thelowerhandlemustbe positionedontothestudat
thesameposition.
Attaching Upper Handle
NOTE:Usethe hardwarein Group 2 to attachthe upper
handle.
1. Placetheupperhandleinpositionoverthelower
handlekeepingthe bladecontrolhandlefacingup.
2. Securetheupperhandleto thelowerhandleusingthe
carriageboltsandstar knobs,Figure3-4.Makesure
thatthecarriageboltheadsgoon theoutsideof the
handle.
Referenceto right,left,
front, or back of the
lawn mower is from
theoperating position
only,unlessotherwise
stated.
Figure3-4:Attachtheupperhandletothelowerhandle.
7
Page 8

-- Attaching Blade Control
cableis attachedtothe
enginefrom the factory.
Youwill needto attach
thefree endof the cable
o the upper handle.
Curve, E., Ifthebladecontrolhandlebecamedisplacedeitherduring
Figure3-5:Installthe bladecontrolhandle(ifneeded).
f
shippingorduringassembly,reassembleit now.Ifthe
bladecontrolhandleisfirmlyinplace,youmayproceedto
thenextstep.
1. Insertthecurvedendof thebladecontrolhandleinto
therighthole,StepA Figure3-5.Squeezethehandle
in andinsertthestraightendof the bladecontrol
handleintothe leftholeofthe upperhandle,StepB
Figure3-5.
2. Squeezethebladecontrolhandleagainsttheupper
handletocheckforproperassembly.Theholeinthe
bladecontrolhandlemustbeon theleftsideandthe
controlhandlemusttouchtheupperhandlewhen
squeezed.
Attaching Blade Control
Cable
1. Routethe cableunderthe lowerhandle.Pressthe
snapfitting intothe holeon theupperhandleas
shownin Figure3-6.
2. Hookthe "Z"endof thebladecontrolcableintothe
bladecontrolhandlefromtheoutsideto theinside,
Figure3-6.
IMPORTANT:
Thisunit isshipped
without gasolineor
oil inthe engine. Fill
up gasolineandoil
_sinstructedin the
accompanyingengine
"nanualBEFORE
operatingyour mower.
Figure3-6:Attachthe bladecontrolcable.
f
Securing the Cable
NOTE:Usethe hardwareinGroup3 to securetheblade
controlcable.
Thecable mustberoutedproperlytoavoidcontactwith
allsharpedgesand hotsurfaces.Suchcontactsdamage
thecableandrenderthecontrolsinoperative.
1. Securethecabletothe lowerleft handlenearthe
baseof theunitwith acabletie,Figure3-7.Trimoff
-_ anyexcess.
Attaching Wheels
NOTE:Usethe hardwareinGroup4 to securethe
wheels.
1. Placethemoweronblocksupoff ofthe ground.
2. Placethelargertwowheelsonthe rearpivotarm
axlesandsecurewiththeflangedlocknuts,Figure
3-8.
3. Repeatwiththetwo smallerwheelsonthefrontpivot
armaxles, Figure3-8.
4. Removeblocksandputthemoweronground.
\
Figure3-7:Securecabletolowerhandleusingacabletie.
J
8
Page 9

Figure3-8:Installthewheels.
.....; ..... •...... ,,
1. Alignthe holesonthe chutedeflectorwiththe
correspondingholeson thedeck.
2. Securewithself-tappingscrewsandbellwashers
fromundersideofthedeckandupthroughthechute
deflector,Figure3-9.
Attaching Recoil Starter
NOTE:Usethe hardwarein Group 6 to securetherecoil
starter.
J
1. Looselyattachtheropeguideto theoutsideof the
upperhandleandthreadthewingnutonlyafew
turns,Figure3-10.Donottighten.
2. Depressthebladecontrolhandle.
3. Pullthe recoilstarteroutof theengine.
4. Slipthe ropethroughthe ropeguideas shownin
Figure3-10.Tightenthewingnutto securetherope
guide.
iMPORTANT:
i This unitisshipped
without gasolineor oil
inthe engine. Fillup
} gasoline and oil as
i instructedinthe accom-
i panyingenginemanual
BEFOREoperatingyour
Figure3-9:Installthe chutedeflector.
f
Reattach The Spark Plug
Wire
Reattachthesparkplugwiretothe sparkplug.if engine
isequippedwitha rubberboot,makesuretherubber
bootsnapsdownontothe sparkplug.
i mower.
Figure3-10:Securetherecoilstarter.
9
Page 10

WARNING
Alwaysstop engine,
disconnect spark plug,
and ground against
engine beforeperform-
ing adjustments.
Adjustments
_l lways stop engine, disconnect
Cutting Height
Eachwheelhasa heightadjustmentleverto changethe
cuttingheightof the mower.
1. Depressthelevertowardsthewheelandslide the
IMPORTANT:Allwheelsmust bepositionedatthe
sameheight.
f
spark plug,and groundagainst
engine before performing
adjustments.
leverassemblytodesiredpositiontochangethe
cuttingheight,Figure3-11.
Handle Height
Forconvenienceofoperating,youmayadjustthehandle
heightasfollows:
1. Removethestarter ropefromtheropeguide.
2. Removethestar knobsshownin Figure3-12and
removethelowerhandles.
3. Positioneachhandlebracketstudinto theappropriate
holeinthelowerhandle,Figure3-12.Eachendof the
lowerhandlemustbe placedinthe sameposition.
4. Attachandtightenthestarknobs.
5. Reinsertstarterropeinto ropeguide.For instructions,
referto page9.
Rememberto attachthe sparkplugwireaftercompleting
theadjustmentsand beforeoperatingyourmower.
IMPORTANT:
Allwheels must be
placed in thesame
position. Forroughor
uneven lawns,movethe
wheelsto a higher posi-
[ionto prevent scalping
of grass.
J
Figure3-11:Adjustingthe cuttingheight. Figure3-12:Adjustingthehandleheight.
10
Page 11

NOTES
11
Page 12

Know Your Lawn Mower
BladeControl Handle
Your LaWn
WARNING
This blade con|rol isa
_afety device. Do not
bypass itsoperations.
Useextreme care
when handling
gasoline. Gasoline is
extremelyflammable
andthe vapors are
explosive. Neverfuel
the machine indoors
or whilethe engine
is hot or running.
Extinguish cigarettes,
cigars, pipes and
other sources of
ignition.
RecoilStarter
Height
Adjustment
Lever(front
and rear)
ChuteDeflector
Figure4-1:Themaincomponentsonthemower.(Model034Dshown)
Nowthatyouhaveassembledyour lawnmower,it's importanttobecomeaquaintedwithitscontrolsandfeatures.
Blade Control Handle
Thebladecontrolhandleisattachedto theupper
handle.Depressand squeezeitagainstthe upper
handletooperatetheunit.Releaseit tostopthe engine
andblade.
_ WARNING:This blade control handle is
a safety device. Neverattempt to bypass
itsoperations.
Cutting Height Adjustment
Levers
Oneadjustmentleveris locatedoneachwheelandis
usedto adjustthecuttingheight.All fourwheelsmust be
movedtothe sameheightto ensureauniformcut.
Gas and Oil Fill-Up
1. Checkoillevelandaddoilif necessary.Followengine
manualforthis.
2. Servicethe enginewithgasolineasinstructedinthe
enginemanual.
,_ WARNING:Useextremecarewhen
Neverfuel the machine indoorsor while the engine is
hot or running.Extinguish cigarettes, cigars, pipes
and other sources of ignition.
handlinggasoline. Gasolineisextremely
flammableand the vapors are explosive.
Recoil Starter
Therecoilstarteris attachedtotherightupperhandle.
Standbehindthe unit,depressbladecontrol,andpull
therecoilstarterropeto startthe unit.
12
Page 13

_ ARNING:Theoperationof any lawn
youreyesseverely.Alwayswearsafetyglasses
whileoperatingthe mower orwhileperformingany
adjustmentsor repairsonit.
mowercan result in foreign objects being
thrownintothe eyes,whichcandamage
Starting Engine
_ WARNING:Besurenooneotherthan the
Neverrunengine indoorsorinenclosed,poorly
ventilatedareas.Engineexhaustcontainscarbon
monoxide,an odorless and deadly gas.Keephands,
feet, hair and looseclothingaway from any moving
partson engineand lawnmower.
1. Pushprimerthreetimes.Waitabouttwo seconds
betweeneachpush,Figure4-2.Intemperature
around55°Forbelow,primefivetimes.Donotprime
torestarta warmengine.
NOTE:For the locationof the primeron yourmower,
refertothe enginemanualshippedwith yourunit.
.
Standingbehindthemower,squeezethe blade
controlhandleagainstupperhandle,Figure4-2.
3.
Holdingthesetwohandlestogetherfirmly,grasp
recoilstarterhandleandpull ropeoutwitha rapid,
continuous,fullarm stroke,Figure4-2.Keepinga firm
griponthestarterhandle,letthe roperewindslowly.
Repeatuntilenginecranks.Lettheroperewindeach
timeslowly.
operatorisstandingnearthe lawnmower
whilestarting engineoroperating mower.
Using Your Lawn Mower
Besurethe lawnisclearof stones,sticks,wire,or other
objectswhichcoulddamagethe lawnmowerorthe
engine.Suchobjectscouldbeaccidentlythrownbythe
mowerin anydirectionandcauseseriouspersonalinjury
tothe operatorandothers.
,_11 WARNING:if youstrikeaforeign object,
for any damage,and repair the damage before
restartingand operating the mower.Extensive vibra-
tion of the mowerduring operation is an indicationof
damage.The unit shouldbepromptlyinspectedand
repaired.
stop the engine.Removewire from the
spark plug, thoroughly inspectthemower
Operating Tips
o
Forbestresults,donot cutwetgrass.
o
Newgrass,thickgrass,orwet grassmayrequirea
narrowercut.
• Fora healthierlawn,nevercutmorethanone-thirdof
thetotallengthofthe grass.
• Yourlawnshouldbecut inthefallaslongas there
isgrowth.
• Adjustgroundspeedaccordingto conditionof lawn.
iiiii iii! ii ii! iiiiiii il!
Your LaWn
Mower
WARNING
The operationof any
lawn mower can result
in foreign objects
being thrown into
the eyes, which can
damage your eyes
severely. Alwayswear
safety glasseswhile
operating the mower,
or while performing
anyadjustments or
repairs on it.
Figure4-2:Tostartmower,primetheengine,squeezeblade
controlhandle,andpullrecoilstarter.
Stopping Engine
1. Releasebladecontrolhandleto stoptheengineand
theblade.
2. Disconnectsparkplugwirefromsparkplugand
groundagainsttheengine.
Be sure no one other
than the operator is
standing nearthe lawn
mower while starting
engine or operating
mower.Never run
engineindoors or
in enclosed, poorly
ventilated areas. En-
gineexhaust contains
carbonmonoxide, an
odorless and deadly
gas. Keep hands, feet,
hair and loose clothing
away from any moving
parts on engine and
lawn mower.
13
Page 14

WARNING
Always stop engine,
disconnect spark
plug, and ground
against engine before
performingany type
of maintenance on
your machine.
Nevertip the mower
morethan900inany
directionanddonot
leavethe mowertipped
for anylengthoftime.
Oilcan draininto
the upperpartof the
engine.
Recommendations
• Alwaysobservesafetyruleswhenperforming
maintenancework.
Thewarrantyon thislawnmowerdoesnotcover
itemsthathavebeensubjectedto operatorabuse
or negligence.Toreceivefullvaluefromwarranty,
operatormustmaintainthelawn mowerasinstructed
here.
• Changingof engine-governedspeedwillvoidengine
warranty.
• Alladjustmentsshouldbecheckedat leastonce
eachseason.
_ ARNING:Alwaysstopengine,disconnect
beforecleaning,lubricating, or performinganykind
of maintenanceon your machine.
sparkplug, and ground against engine
Lubrication
• Lubricatepivotpointsonthe bladecontrolhandleat
leastoncea seasonwithlightoil.The bladecontrol
mustoperatefreelyinbothdirections,Figure5-1.
• Lubricatethewheelsatleastoncea seasonwith
lightoil (or motoroil). Ifwheelsareremovedforany
reason,lubricatesurfaceof theaxleboltandinner
surfaceofthewheelwithlightoil, Figure5-1.
• Lubricatethetorsionspringandpivotpointonthe
chutedeflectorperiodicallywith lightoilto prevent
rust,Figure5-1.
• Followtheaccompanyingenginemanualforengine
lubricationscheduleand instructions.
Cleaning the Mower
Cleanundersideofthe mowerdeckaftereachuse to
preventbuild-upofgrassclippingsorotherdebris.
_ ARNING:Nevertip the mowermore than 90°
tipped for any length of time. Oil can drainintothe
upper partof the enginecausingastartingproblem.
NOTE:Referto Engine Manualfor location of engine
components.
1. Disconnectsparkplugwire.
2. Draingasolineorplacea pieceof plasticunderthe gas
3. Tip themowersothat itrestsonthehousing.Keep
4. Scrapeandcleanthe undersided thedeckwitha
5. Putthemowerbackonits wheelsonthe ground.Ifyou
inany directionanddo not leavethe mower
cap.
thesidewiththeaircleanerfacingup.Holdthemower
firmly.
suitabletool.Donotspraywithwater.
hadputplasticunderthegascapearlier,makesureto
removeit now.
Blade Care
,_lk WARNING:When removingthe cutting blade
handswith a pair of heavy gloves or usea heavy rag
to hold the blade.
Periodicallyinspectthe bladeadapterforcracks,
especiallyifyoustrikea foreignobject.Replacewhen
necessary.
1. Disconnectsparkplugwirefromsparkplug.Turn
2. Removethebolt andthebladebellsupportwhich
for sharpeningor replacement, protectyour
moweronitssidemakingsurethat theair filterand the
carburetorareup.
holdthebladeandthe bladeadapterto theengine
crankshaftFigure5-2.
f
NOTE:Donot usea
pressurewasheror
gardenhoseto clean
the mower.These
maycausedamageto
electriccomponents,
spindles,pulleys,bear-
ings,orthe engine.The
Figure5-1:Lubricationareasonthemower.
useofwaterwUlresult
inshortenedlifeand
reduceserviceability.
Figure5-2:Thebladeandcorrespondinghardware.
14
Page 15

3, Removebladeandadapterfromthe crankshaft,
Figure5-2.
4, The bladecanbesharpenedwitha fileor ona grind-
ingwheel.Donot attempttosharpenthebladewhile
itis stillonthemower.Whensharpeningtheblade,
followtheoriginalangleof grind.Grindeachcutting
edgeequallyto keepthe bladebalanced,
5. Removebladefromtheadapterandbalanceona
roundshaftscrewdriverfor testingbalance.Remove
metalfromtheheavyside untilit balancesevenly.
,_ WARNING:Anunbalanced bladewill
speeds, it maycause damageto mower and could
breakcausing personal injury.
6. Lubricatetheenginecrankshaftandthe innersurface
7. Placethebladeonthe adaptersuchthatthe side
8. Placebladebellsupporton theblade.Align notches
9. Replacehexboltandtightenhexboltto torque:450
Toensuresafeoperationofyourmower,periodically
checkthe bladeboltfor correcttorque.
excessivevibration when rotating at high
ofthe bladeadapterwithlightoil.Slidetheblade
adapterontotheenginecrankshaft.
ofthe blademarked"Bottom"(or withpartnumber)
facesgroundwhenthemoweris intheoperating
position.Makesurethat thebladeis alignedand
seatedonbladeadapterflanges.
onthebladebellsupportwithsmallholesinblade.
in.Ibs.rain.,600in.Ibs. max.
cause
Off-Season Storage
Thefollowingstepsshouldbetakento prepareyourlawn
mowerforstorage.
• Cleanandlubricatemowerthoroughlyasdescribedin
thelubricationinstructions.
• Donotusea pressurewasheror gardenhoseto
cleanyour unit.
Refertoenginemanualforcorrectenginestorage
instructions.
Coatmower'scuttingbladewithchassisgreaseto
preventrusting.
Storemowerinadry,cleanarea.Do notstorenextto
corrosivematerials,suchas fertilizer.
Whenstoringany typeofpowerequipmentin a poorly
ventilatedormetalstorageshed,careshouldbetakento
rust-proofthe equipment.Usingalight oilor silicone,coat
theequipment,especiallycablesandall movingpartsof
yourlawnmowerbeforestorage.
WARNING
When removingthe
cutting blade for
sharpening or replace-
ment, protect your
hands with a pair of
heavy gloves or use a
heavy rag to hold the
blade.
An unbalanced blade
will cause excessive
vibrationwhen rotat-
ing at high speeds, it
may cause damage
to mower and could
break causing per-
sonal injury.
Do not use a pressure
washer or garden
hoseto clean your
unit. These may cause
damage to electric
components, spindles,
pulleys, bearings, or
the engine. The use
of water will result
in shortened life and
reduce serviceability.
15
Page 16

Problem Cause Remedy
Engine fails to Start i. Blade controldisengaged. Engagebiadecontrol
sparkp!ugwiredisconnected: I conBect WiretoSparkp!ug_
3. Fueltankemptyorstalefuel. 3. FiItankwithclean,freshgasoline.
4. Enginenotchoked. 4. Chokeengineas instructedinthe
OPe[atingYOU[LawnMower section•
5: Faultyspark pug 5, Clean,adjustgap, orreplace.
6. BloCkedfuel linel 6, cieanfueliinel
7: Engineflooded. 7: Wait afew minutesto iestart,butdo
I notprime:
Enginerunserratic 1. Sparkplugwireloose.
repairsbeyond
Engine overheats 1 Engineoil levellow. 1. Fillcrankcasewithproperoil.
theminoradjustments
listed here, contact
an authorizedservice
Occasional skips 1. Sparkpluggap tooclose. 1. Adjust gapto .030-inch.
(hesitates) at high speed 2. Carburetoridlemixtureadjustment 2. Referto enginemanual.
Idles poorly 1. Sparkplugfouled,faultyor gaptoowide. 1. Resetgapto .030-inchorreplace
Excessive Vibration 1. Cuttingbladelooseor unbalanced. 1. Tightenbladeandadapter.Balance
Mower will not mulch grass 1 Wetgrass• 1. Donot mowwhengrassiswet wait
1. Connectandtightensparkplugwire.
2. Blockedfuel lineor stalefuel.
3. Ventingascap plugged.
4. Wateror dirt infuel system.
5. Dirtyair cleaner.
6. Carburetorout ofadjustment.
2....Ar fow restrcted I 2 Removebower housngand cean
3. Carburetornotadjustedpropery. 3• Referto engne manua.
improperlyset.
2 Carburetorimproperlyadjusted 2. Referto enginemanual.
. 3. Dirtyair cleaner. 3. Referto enginemanual.
2. Bentcuttingblade. 2. See anauthorizedservicedealer.
2. Excessivelyhighgrass. 2. Mowonceat ahighcutting height,
, 3. Du bade. , 3. Sharpenor replaceblade.
2. Cleanfuelline; filltank withclean,
freshgasoline.
3. Clearvent.
4. Drainfueltank. Refillwithfresh fuel.
5. Refertoenginemanual.
6. Refertoenginemanual.
sparkpug.
blade.
untillatertocut.
then mowagainatdesiredheightor
I makea narrowercuttingpath.
_i_i_i_ i i_ ii_i_ i i_i_ _/_iii_ii
ii_ i!_i_ii_ii_I _ii i ii _i i
NOTE:SpeCifications are
SubjeCt to change without
notification or obligation.
!mage s my not reflect your
exact model and are for
[efe[ence purposes oniy:
Uneven cut 1. Wheelsnotpositionedcorrectly. 1. Placeallfour wheelsin same
i
heightposition.
2. Dullblade. 2. Sharpenor replaceblade.
16
Page 17

iii i_ _ iiii
ii i _iI_ii
17
Page 18

fJ_
18
Page 19

1 710-1205 EyeBolt
2 720-0279 WingNut
3 747-1161A BladeControlHandle
4 749-1092A UpperHandle
5 746-0957 BladeControlCable-37.25 inch
746-0946 BladeControlCable-48.25inch
746-1130 BladeControlCable- 40.00inch
6 749-04037 LowerHandle
7 725-0157 CableTie
8 787-01097 DeckAssembly22-inch
9 710-0654A TTScrew3/8-16x 1.0
_FACTORY PARTS
10 748-0376C BiadeAdapter
11 742-0642A StandardBiade22-inch
12 736-0524B BladeBellSupport
13 710-1044 Screw3/8-24x 1.5
14 712-04065 LockNut3/8-16
15 741-0751 HeightAdjusterBearing
16 687-02094 PivotArm
17 687-02051 LeverAssembly
18 736-0741 BeiiWasher.760IDx 1.25OD
19 738-1172 ShoulderScrew
20 734-1988 FrontWheel7 x 1.8
21 710-0599 TT Screw1/4-20x .5
22 736-0270 BellWasher.265IDx .75OD
23 710-0216 Screw3/8-16x .75
24 738-1173 ShoulderScrew
25 734-1987 RearWheel8 x 1.8
26 682-3064 HandleBracketAssemblyRH
682-3065 HandleBracketAssemblyLH
27 720-04072 StarKnob
28 731-04019 Trailshield
29 17098 HingeClip
30 710-1174 CarriageBolt5/16-18x2
31 731-1035B ChuteDeflector
32 732-1014 TorsionSpring
33 17032A ChuteHinge
34 747-0710 HingePin
35 731-1034B HingedChuteDeflectorAssembly
Toorder replacement
parts,call1-800-800-7310
or visitus onthe webat
www.mtdproducts.com
19
Page 20

MANUFACTURER'S LiMiTED WARRANTY FOR
Thelimitedwarrantysetforthbelowisgivenby MTDLLCwithrespect
tonewmerchandisepurchasedandusedin theUnitedStates,its
possessionsandterritories.
"MTD"warrantsthisproductagainstdefectsinmaterialandworkman-
shipfor a periodoftwo (2)yearscommencingonthe dateof original
purchaseandwill,at itsoption,repairor replace,freeofcharge,any
partfoundto bedefectiveinmaterialsorworkmanship.Thislimitedwar-
rantyshallonlyapplyif thisproducthasbeenoperatedand maintained
inaccordancewiththe Operator'sManualfurnishedwiththeproduct,
andhasnotbeensubjectto misuse,abuse,commercialuse,neglect,
accident,impropermaintenance,alteration,vandalism,theft,fire,water,
ordamagebecauseofotherperilor naturaldisaster.Damageresulting
fromthe installationor useof anypart,accessoryor attachmentnot
approvedby MTDforusewiththeproduct(s)coveredbythis manual
willvoid yourwarrantyasto anyresultingdamage.
Normalwearpartsarewarrantedto befreefromdefectsinmaterialand
workmanshipfora periodof thirty(30)daysfromthe dateof purchase.
Normalwearpartsinclude,butare notlimitedto itemssuchas: batter-
ies,belts,blades,bladeadapters,grassbags,riderdeckwheels,seats,
snowthrowerskidshoes,shaveplates,augerspiralrubberandtires.
NOW TO OBTAIN SERVICE: Warrantyservice isavailable,WITH
PROOFOF PURCHASE, throughyour localauthorized service
dealer.To locate the dealer in your area, check yourYellow Pages,
or contact MTDLLC at RO. Box 361131,Cleveland, Ohio 44136-
0019,or call 1-800-800-7310or 1-330-220-4683 or log on to our
Website at www.mtdproducts.com.
Thislimitedwarrantydoesnot providecoverageinthe followingcases:
a. Theengineor componentpartsthereof.Theseitemsmaycarrya
separatemanufacturer'swarranty.Refertoapplicablemanufacturer's
warrantyfortermsandconditions.
b. Logsplitterpumps,valves,andcylindershavea separateoneyear
warranty.
c. Routinemaintenanceitemssuchaslubricants,filters,blade
sharpening,tune-ups,brakeadjustments,clutchadjustments,deck
adjustments,andnormaldeteriorationoftheexteriorfinishdueto
useor exposure.
d. Servicecompletedbysomeoneotherthananauthorizedservice
dealer.
e. MTDdoesnot extendanywarrantyforproductssoldor exported
outsideofthe UnitedStates,its possessionsandterritories,except
thosesoldthroughMTD'sauthorizedchannelsofexportdistribution.
f. ReplacementpartsthatarenotgenuineMTDparts.
g. Transportationchargesandservicecalls.
Noimpliedwarranty,includingany impliedwarranty of mer-
chantabilityof fitness for a particular purpose,appliesafter the
applicable periodof express written warranty aboveasto the
partsasidentified.Nootherexpresswarranty, whetherwritten or
oral, except as mentioned above,givenby any personor entity,
includinga dealeror retailer, withrespect to any product,shall
bindMTD.Duringthe periodof the warranty,the exclusiveremedy
isrepairor replacementof the productas setforth above.
Theprovisionsas set forth inthis warrantyprovidethesoleand
exclusiveremedy arising from the sale.MTDshallnot be liable
for incidentalor consequentiallossor damageincluding,without
limitation, expensesincurredfor substituteor replacementlawn
careservicesor for rentalexpensesto temporarily replacea
warranted product.
Somestatesdo notallowthe exclusionor limitationofincidentalor
consequentialdamages,or limitationsonhowlongan impliedwarranty
lasts,sothe aboveexclusionsorlimitationsmaynotapplytoyou.
Innoeventshallrecoveryofany kindbegreaterthanthe amountofthe
purchasepriceof theproductsold.Alterationof safetyfeaturesof
the product shallvoid this warranty.Youassumetheriskandliability
forloss,damage,or injuryto youandyourpropertyand/orto othersand
theirpropertyarisingoutof themisuseor inabilitytousethe product.
Thislimitedwarrantyshallnotextendto anyoneotherthantheoriginal
purchaserorto the personforwhomitwas purchasedas a gift.
HOWSTATELAWRELATESTOTHISWARRANTY:This limited
warrantygivesyouspecificlegalrights,andyoumayalsohaveother
rightswhichvaryfromstateto state.
IMPORTANT:OwnermustpresentOriginalProofof Purchaseto obtain
warrantycoverage.
MTD LLC, P.O. BOX 361131 CLEVELAND, OHIO 44136=0019; Phone: 1=800=800=7310, 1=330=220=4683
 Loading...