

Page 1
MC702
MUSICAL INTERCOM SYSTEM
OWNER'S GUIDE
S A F E T Y INSTRUCTIO
2
CONGRATULATIONS
Your purchase of an M&S built-in musical intercom system is an investment
that will provide years of service and convenience. M&S built-in music systems
are backed with more than 50 years of experience in the design and
NS ........................................................... 3
ABOUT YOUR SYSTEM ......................................... 4
SETUP ....................................................... 5
Setting the time .......................................... 5
Setting Automatic on/off time................................ 5
Setting the auto on volume level ............................. 6
Remote Intercom Station Selection ........................... 7
Setting the intercom level................................... 7
Setting up the wireless remote control......................... 8
MUSIC OPERATION ............................................ 9
Controls ................................................ 9
Operating the tuner ......................................10
Using Memory Presets .......................................... 10
Storing radio station frequencies ............................ 10
Recalling radio station frequencies .......................... 10
Operating a tape or CD player ............................. 11
Adjusting music volume ................................... 11
INTERCOM OPERATION........................................ 12
Communicating with other rooms ........................... 12
Monitoring other rooms ................................... 13
Communicating with door locations .......................... 13
TROUBLESHOOTING .......................................... 14
Problem - What to check .................................. 14
Manual reset procedure ................................... 14
CARE AND MAINTENANCE ..................................... 15
NOTES ...................................................... 15
WARRANTY .................................................. 15
Copyright © 2000 by M&S Systems
Page 2
3
Read instructions - All the
safety and operating
instructions should be read
before the appliance is
operated.
Retain instructions - The
safety and operating
instructions should be
retained for future reference.
Heed warnings - All warnings
on the appliance and in the
operating instructions should
be adhered to.
Follow instructions - All
operating and use instructions
should be followed.
Water and moisture The appliance should
not be used near water
- for example; near
bathtub, washbowl,
kitchen sink, laundry
tub, in a wet basement,
or near a swimming
pool, and the like.
Attachments - Do not
use attachments not
recommended by the
product manufacture as
they may cause
hazards.
Ventilation - The appliance
should be situated so that its
location or position does not
interfere with its proper
ventilation. For example, the
appliance should not be
situated on a bed, sofa, rug,
or similar surface that may
block the ventilation
openings: or, placed in a
built-in installation, such as a
bookcase or cabinet that may
impede the flow of air to the
ventilation openings.
Heat - The appliance should
be situated away from heat
sources such as radiators,
heat registers, stoves, or
other appliances (including
amplifiers) that produce heat.
Power sources - The
appliance should be
connected to a power supply
only of the type described in
the operating instructions or
as marked on the appliance.
Grounding or polarization -
Precautions should be taken
so that the grounding or
polarization means of an
appliance is not defeated.
Power lines - An outdoor
antenna should be located
away from power lines.
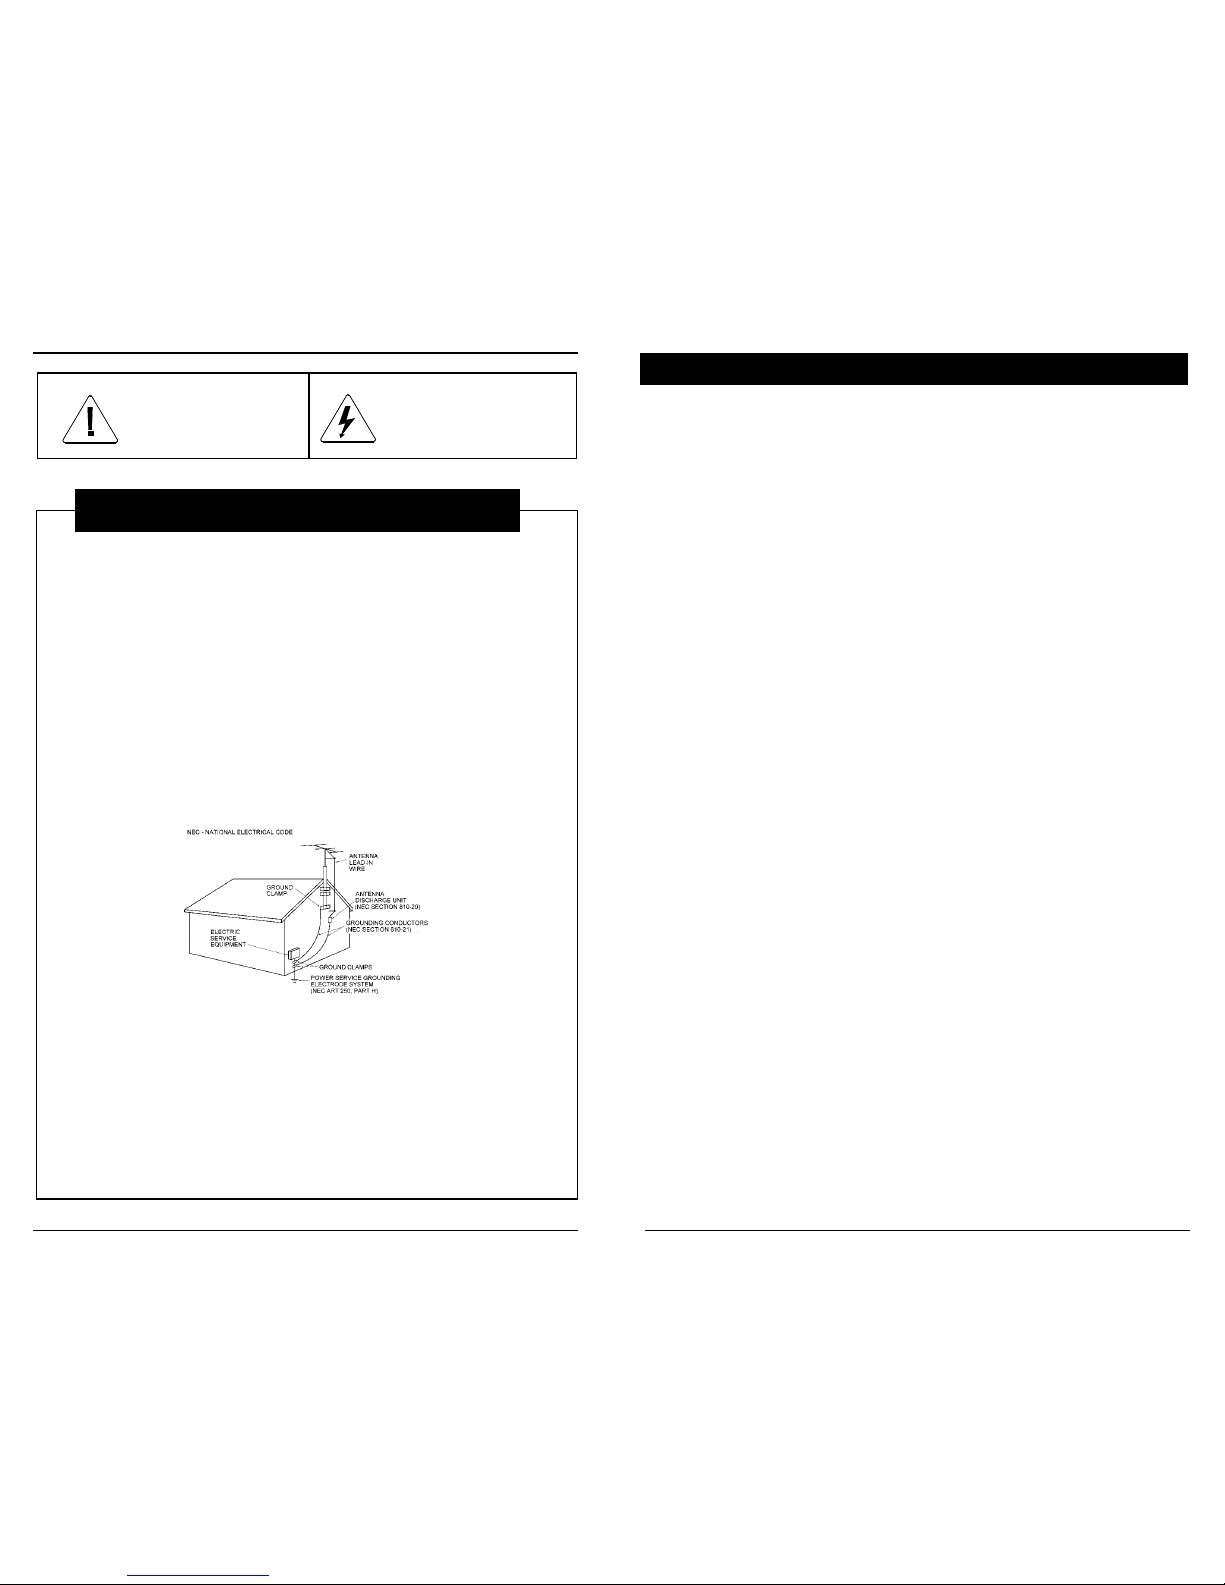
Outdoor antenna grounding If an outside antenna is
connected to the receiver, be
sure the antenna system is
grounded so as to provide
some protection against
voltage surges and built up
static charges. Section 810
of the National Electrical
Code, ANSI/NFPA No.
70-1984, provides information
with respect to proper
grounding of the mast and
supporting structure,
grounding of the lead-in wire
to an antenna discharge unit,
size of grounding conductors,
location of antenna discharge
unit, connection to grounding
electrodes, and requirements
for the grounding electrode.
See Figure below.
Object and liquid entry Never push objects of
any kind into this
product through
openings as they may
touch dangerous
voltage points or
short-out parts that
could result in a fire or
electric shock. Never
spill liquid of any kind
on the product.
Servicing - The user
should not attempt to
service the appliance
beyond that described in the
operating instructions. All
other servicing should be
referred to qualified service
personnel.
Damage requiring service The appliance should be
serviced by qualified service
personnel when:
The power-supply
SAFETY INSTRUCTIONS
The exclamation point within an
equilateral triangle is intended
to alert the user to the presence
of important operating and
The lightning flash with
arrowhead symbol within an
equilateral triangle is intended to
alert the user to the presence of
4
ABOUT YOUR SYSTEM
Your new Model MC702 is a state of the art stereo music and intercom system that
provides music and room to room communication throughout your house. An
optional door chime can be integrated into the system to provide door
communication with automatic muting. The MC702 contains a digital clock with
backup power source that maintains the correct time for up to 3 hours without
power and never needs replacing.
The innovative transflective LCD display and power-conserving back light can be
read in any lighting condition from direct sunlight to complete darkness. The unit
provides music for up to 15 rooms with plenty of power. The MC702 has a digital
phase lock loop tuner with 8 AM and 8 FM station presets. It also has two external
source inputs (AUX IN and TAPE IN) and one line output (TAPE OUT) that can be
used with M&S's built-in cassette tape and/or CD player, as well as your TV or
other music sources. The MC702 enables communication between up to 15
rooms and the master location plus up to 4 door entry locations.
The MC702 can turn itself ON and OFF at preset times like an alarm clock or
sleep-to-music device. As a home security device, it can be programmed to play
talk radio when the house is vacant. The MC702 was designed to be as userfriendly as possible the display tells you how to set the time and alarm functions.
It also shows when and how the intercom function is being used. It has a built-in
door release which can be used to open a door or gate from the master unit or
from any indoor remote room station.
The MC702 has an optional hand-held RF REMOTE CONTROL which allows you
to turn the radio on or off, scan radio stations up or down, change sources, and
change the volume up or down from ANYWHERE in or around the house.
The MC702 allows you to monitor any room (including the master unit location) to
let you know when a baby is crying or when an elderly person needs help.
Like all M&S products, the MC702 is designed to make your home atmosphere
more enjoyable. M&S is committed to producing high quality products for your
home. If you have any questions about the operation of your system, please call
us at
(800) 366-9422.
Page 3
5
SETUP
Note: The MC702 remains in the set mode for 25 seconds with no activity
(no buttons being pressed) after which the unit automatically returns
to the normal mode of operation. The TIME SET button must be
pressed again to return to the set mode.
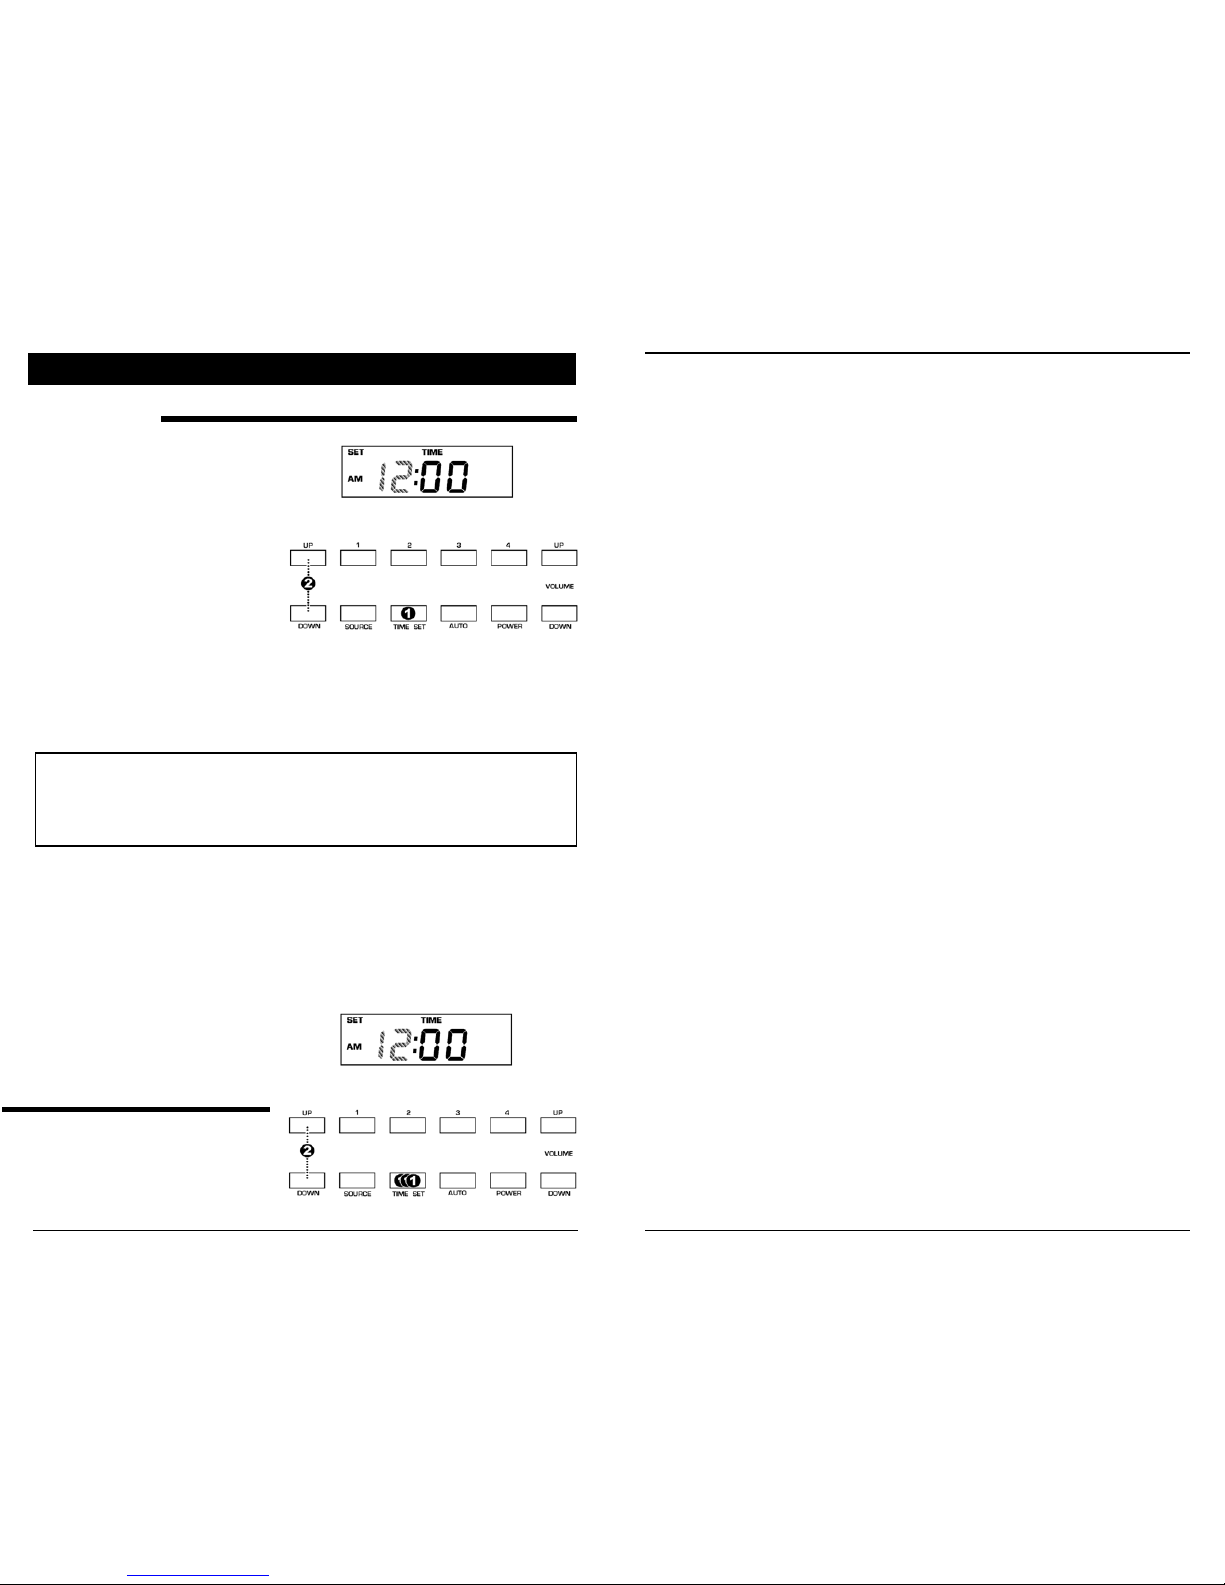
SETTING THE TIME
When the Time/Auto Set button is
pressed momentarily, the display
will show SET TIME and the current
time will be displayed with the hours
flashing. The UP and DOWN
buttons (either TUNING UP and
DOWN or VOLUME UP and
DOWN) can then be used to
increment or decrement the current
time hours. Pressing the UP button
(or DOWN button) momentarily will
increment (or decrement) the hours
by one each time the key is pressed. Holding the UP button (or DOWN button)
depressed will rapidly increment (or decrement) the hours until the button is
released. The time display also includes the AM or PM indicator that is changed
by scrolling the hours past 12:00.
Once the current hours have been set correctly, momentarily press the
TIME/AUTO SET button again. The display will show SET TIME and the current
time will be shown with the minutes flashing. The UP and DOWN buttons can be
used as described previously to increment or decrement the current time minutes.
Once the current minutes have been set correctly, momentarily press the
TIME/AUTO SET button again to
return to the normal mode or let the
MC702 automatically return to the
normal mode if no buttons are
pressed for 25 seconds.
S
ETTING AUTOMATIC ON/OFF TIME
To set the AUTO on and off times,
the TIME/AUTO SET button must
be momentarily pressed three times
6
without changing the current time. After pressing the TIME/AUTO SET button for
the third time, the display will show SET AUTO ON TIME and the auto on time will
be displayed with the hours flashing. The UP and DOWN buttons can be used as
previously described to increment or decrement the auto on time hours.
Page 4
7
Once the AUTO ON TIME hours has been set correctly, momentarily press the
TIME SET button again. The display will show SET AUTO ON TIME and the
AUTO ON TIME will be displayed with the minutes flashing. The UP and DOWN
buttons can be used as previously described to increment or decrement the AUTO
ON TIME minutes.
Once the AUTO ON TIME minutes has been set correctly, momentarily press the
button again. The display will show SET AUTO OFF TIME and the AUTO OFF
TIME will be displayed with the hours flashing. The UP and DOWN buttons can
be used as previously described to increment or decrement the AUTO OFF TIME
hours.
Once the AUTO OFF TIME hours has been set correctly, momentarily press the
TIME SET again. The display will show SET AUTO OFF TIME and the AUTO
OFF TIME will be displayed with the minutes flashing. The UP and DOWN buttons
can be used as described previously to increment or decrement the AUTO OFF
TIME minutes.
S
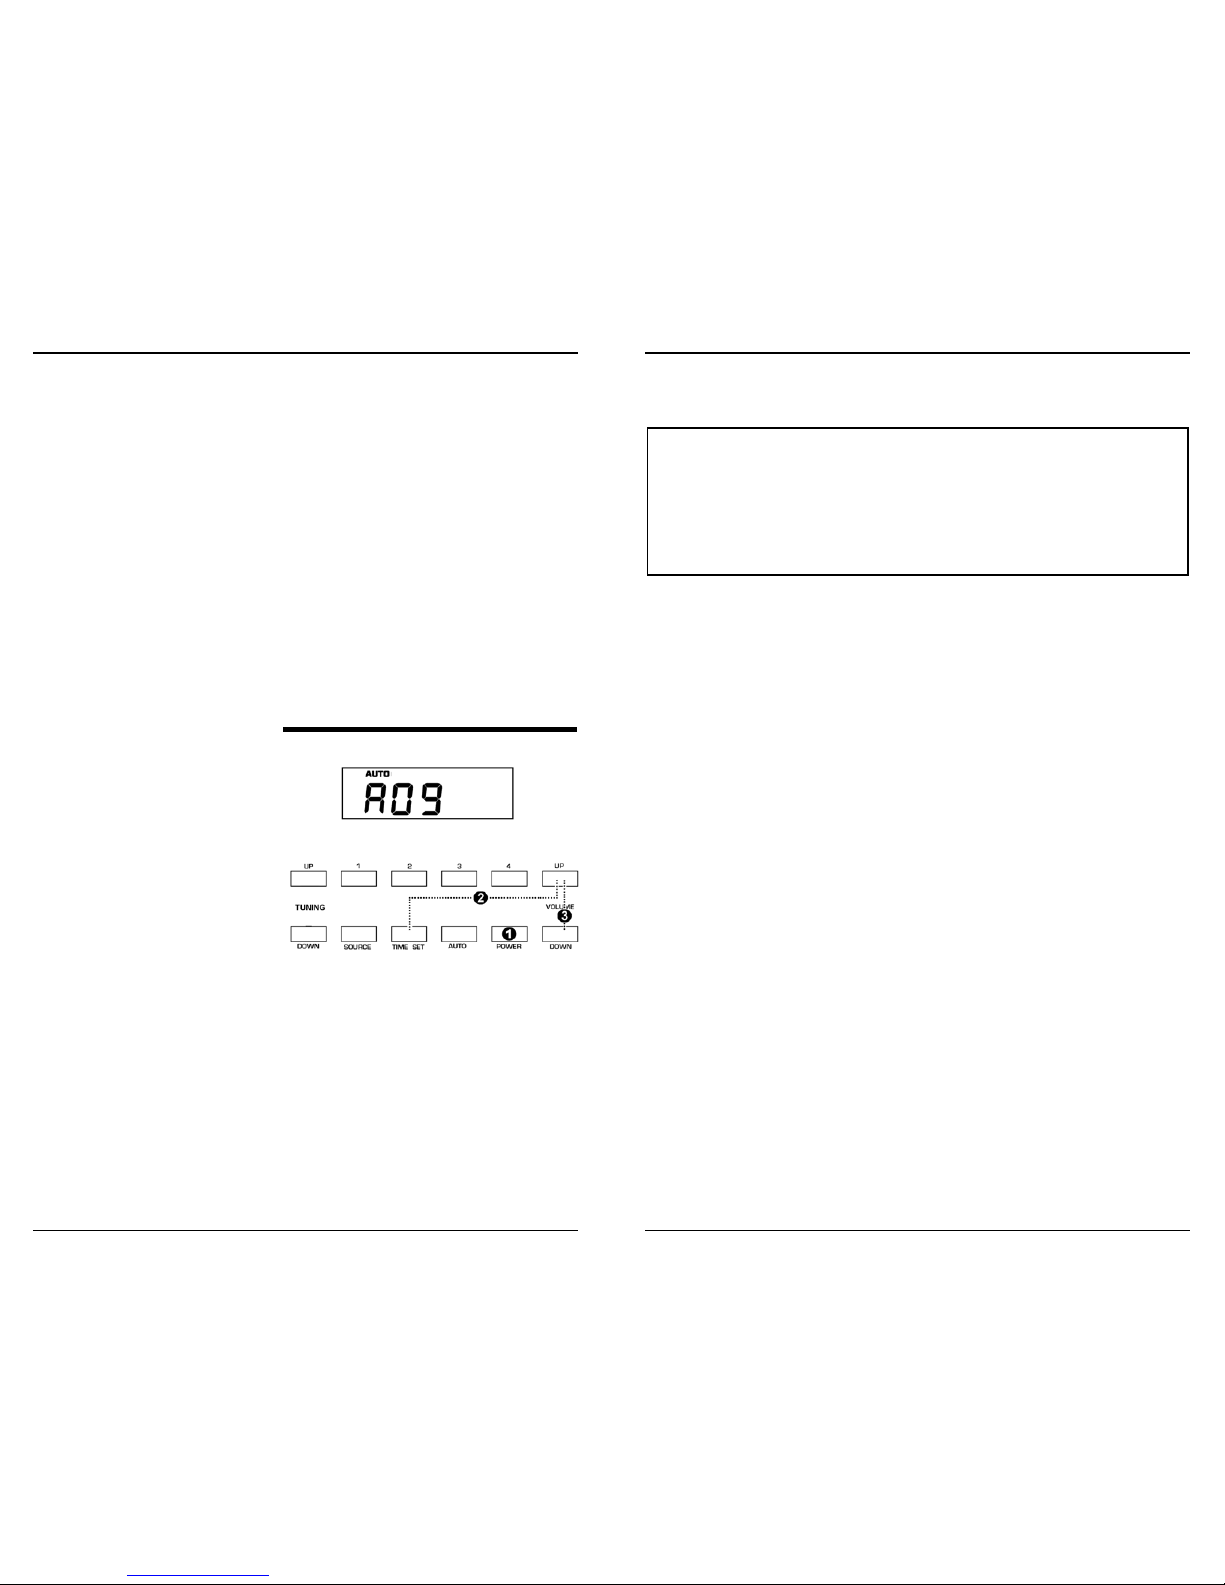
ETTING THE AUTO ON VOLUME LEVEL
When the Auto function is turned
on, the MC702 will turn itself on
automatically when the current time
reaches the Automatic ON TIME
and will then turn itself OFF when
the current time reaches the
Automatic OFF TIME. When the
MC702 automatically turns itself
ON it will always turn on at the
same volume level. This "AUTO
ON VOLUME LEVEL" has a default
of 12 but it can be changed
following these simple steps:
ì Turn on the MC702 by momentarily depressing the POWER button (unless the
radio is already on).
í Momentarily press the VOLUME UP and AUTO buttons, at the same time, and
then release. The display will show the letter 'A' for AUTO ON volume followed
by the current music volume setting.
î Depress the VOLUME UP or VOLUME DOWN buttons to set the desired
music volume level. (1-32).
8
NOTE: The MC702's AUTO ON volume is defaulted to the last volume setting
when the music was last turned off. Therefore, it is recommended that
a new fixed auto volume setting be set since the MCTX wireless
remote control transmitter, effectively, turns off the radio when the
volume is turned down completely. If the music is turned off using the
MCTX wireless transmitter the music will AUTO ON at a volume level
of 1.
ï When you have the volume set to your desired level wait for 9 seconds. The
display will revert to the time display.
Page 5

9
Step 1 - Push in
to release
Step 2 -
Release to
open
Step 3 - Open
R
EMOTE INTERCOM STATION SELECTION
These switches are used to control the operation of the room
station in each corresponding room. The MASTER
INTERCOM switch controls the master room station. ROOM
SELECTOR switches 1 through 9 control the corresponding
remote room stations. The PATIO SELECTOR switch controls
patio room station(s).
There are four positions
for each of these
switches:
INTERCOM- A room station with its switch set in the
INTERCOM position will only hear intercom
(excluding monitor) and the chime.
RAD/INT - A room station with its switch set in the ON
position will hear intercom communications,
music and chime.
OFF - A room station with its switch set in the OFF position
will not hear anything, but can still talk to other room
stations and the door.
MONITOR A room station with its switch set in the MONITOR
position will not hear any intercom
communications, but the room station will be used
as a microphone. Any sounds that this microphone picks up will be
heard from any room station that is in the ON position. The
MONITOR position can be used to listen to (monitor) a baby's or
elderly person's room.
Your MC702 may be equipped with either a 3-note or 8-note Door Chime. This
optional chime always mutes the radio and rings through the master speaker when
the doorbell button is pressed. It also rings through all the room stations that are
turned on. However, the music speakers mute while the chime is broadcast
through the room stations and the master unit.
S
ETTING THE INTERCOM LEVEL
The INTERCOM LEVEL adjust the gain of the entire intercom system. The
INTERCOM LEVEL is generally set by the installer upon initial installation to match
your home's acoustics and should not require further adjustment. However, if you
find the system's intercom gain is too high or too low, follow the procedure below
to reestablish the correct intercom gain setting.
ì Turn all room station volume controls to maximum (fully-clockwise). Turn the
master speaker volume to maximum (fully-clockwise). Set all PRIVACY
switches to the OFF or out position (N75/N78 only).
10
NOTE: Your MC702 system is designed for high intercom gain and very low
noise simultaneously. When monitoring room stations, it is not necessary
to increase the intercom level in an effort to hear 'something'. Doing so
will unnecessarily increase any background noise, such as air
conditioning systems and other appliances built-in to your home. If you
are monitoring a baby's room, for example, no noise will be heard until
the baby cries or makes a noises at which time you will hear with ample
volume.
Steady SAVE (Release
transmitter button)
Press and
hold the
TUNING UP
button to
signal the
MC702
wireless
receiver
Flash between TEST &
SAVE
í Depress and hold ROOM TALK at the master location while speaking.
î Adjust the INTERCOM LEVEL until good clear audio is heard at the remote
stations without hearing acoustic feedback (squeal). This initial setting should
result in audio that is likely to be as loud as you would normally need. This
setting should not be readjusted. The volume controls at the individual room
stations can be adjusted as desired for that room.
S
ETTING UP THE WIRELESS REMOTE CONTROL
PROGRAMMING - Upon initial
power up of the MC702 or upon
applying power after the unit loses its
memory (power outages greater than 2
hours), the unit must be programmed
or taught the unique code that is
present in the REMOTE CONTROL
TRANSMITTER. To do this, the
MC702 must be put into its test mode
by momentarily pressing the VOLUME
UP and SOURCE buttons at the same
time on the MC702. The display on the MC702 should show TEST.
While the MC702 is in the
test mode, press and hold
the TUNING UP button on
the REMOTE CONTROL
TRANSMITTER. The
display on the MC702 will
flash between TEST and
SAVE. When the display
shows SAVE without flashing, release the button on the
transmitter. The MC702 has now learned the
TRANSMITTER. Momentarily press both VOLUME UP and
POWER buttons at the same time to restore the MC702 to
normal operating mode.
If more than one transmitter is to be used with the system,
the second, third, and fourth transmitters must be learned by
pressing the TUNING DOWN, VOL UP, and VOL DOWN on
Page 6

11
Exiting TEST mode or 'RESETTING' the
MC702
NOTE: Pressing the same button
on two different
transmitters will automatically overwrite
the
previous transmitter stored in memory. Always
MUSIC OPERATION
the respectively instead of the TUNING UP button on the TRANSMITTER.
To exit the TEST mode, press the
VOLUME UP and POWER buttons at
the same time and then release.
CONTROLS
LCD DISPLAY - This back lighted1
readout indicates: current time,
auto radio on/off status, radio
station frequency, station memory
setting, and active intercom status.
This display also shows diagnostic
codes when the TEST mode is
enabled.
UP/DOWN BUTTONS - These
2
buttons are used to scan through
FM or AM radio stations.
1, 2, 3, and 4 BUTTONS - These
3
12
NOTE: The VOLUME UP/DOWN, TUNING UP/DOWN and SOURCE select
buttons are duplicated on the wireless remote control transmitters.
buttons are used to save and
recall your most frequently used
FM and AM radio stations.
VOLUME UP/DOWN BUTTONS -
4
These buttons are used to
increase and decrease the overall
system radio volume.
POWER ON/OFF BUTTON - This
5
button is used to turn the MC702
music source ON and OFF. Note:
The intercom is always on!
AUTO button - This button is used
6
to turn the Automatic Music (AUTO
*) function ON and OFF.
TIME/AUTO SET BUTTON - This
7
button is used to access the time
setting mode.
SOURCE button - This button is
8
used to select the audio source
(FM A, FM B, AM A, AM B, AUX
input, or TAPE input).
Page 7

13
OPERATING THE TUNER
To listen to broadcast stations, press the POWER button. Notice the display will
change from the time to station frequency. Pressing the SOURCE select button will
allow you to change from FM, AM, TAPE and AUX respectively. The SOURCE
button is available on the MCTX wireless remote control transmitter.
AUTO SCAN When any AM or
FM band is chosen, momentarily
pressing the TUNING UP and
TUNING DOWN buttons will
change the tuned station frequency
to the next local station. The audio
will be muted and the display will
show radio station frequencies
increasing or decreasing as it
scans. When the next local radio
station is detected, audio will again
be heard.
MANUAL SCAN Pressing and holding either the TUNING UP or TUNING
DOWN button will cause the tuner to scan each successive frequencies one at a
time whether a radio station is broadcasting on that frequency or not. You will also
be able to hear the reception at these frequencies as they are scanned. When the
desired radio station is tuned, release the TUNING UP or TUNING DOWN button
to stop the manual scan function. Manual scanning is useful for reception of distant
stations that would not otherwise be tuned with the auto scan feature. The MC702
automatically switches from stereo to mono to allow greater sensitivity for a distant
radio station. NOTE: To scan upward or downward by just one frequency, the
TUNING UP/DOWN button should be depressed until the frequency changes--then
immediately released.
U
SING MEMORY PRESETS
Storing radio station frequencies
Change to the desired radio band
1
(FM1, FM2, AM1 or AM2), using
the source button.
Tune to the desired radio station.
2
Press and hold a numbered button
3
until the preset number is
displayed.
Example: Save a radio station in band
FM2, preset 3.
Press the SOURCE button to
1
change to FM2.
14
Tune to the desired radio station.2
Hold the 3 button until a 3 appears
3
as the preset number.
Recalling radio station frequencies
Change to the desired radio band,
1
using the SOURCE button.
Momentarily press the desired
2
numbered preset button.
Example: Recall the radio station saved
in band AM1, preset 2.
Press the SOURCE button to
1
change to AM1.
Momentarily press the 2 button.
2
O
PERATING A TAPE OR CD PLAYER
The MC702 features two
source inputs to connect a
variety of built-in and
external music sources such
as Laser disc players, CD
players and tape players. The
different sources connected
to the TAPE and AUXILIARY
inputs are selectable by
pressing the SOURCE select
button once the POWER is
turned on. Momentarily
depressing the SOURCE
button changes the music
source from FM, AM, AUX and TAPE inputs, respectively. The SOURCE button
on the MCTX wireless remote control performs the same function as the SOURCE
select button on the MC702. NOTE: The SOURCE button is only active when the
power is on. NOTE: IF the MC702 is installed with the MCD6 multidisc CD
changer, the TUNING UP/DOWN buttons on the MCTX wireless remote control
transmitter will operate the track selection when AUX mode is selected on the
MC702.
A
DJUSTING MUSIC VOLUME
Page 8

15
CAUTION: Take care not to overdrive the amplifier by using excessive
system volume to overcome the low volume settings on the
music speakers. Doing so will result in distorted audio and may
cause amplifier failure!
There are two ways to
adjust music volume.
The MC702 system
volume control adjusts
the music volume for all
music speakers in the
house and shows the
volume setting on the
display. (1 = lowest
volume and 32 = highest
volume) Depressing and
holding the VOLUME
UP or VOLUME DOWN
button steadily
increases or decreases,
respectively, the system volume. Momentarily depressing the VOLUME UP or
VOLUME DOWN increases or decreases, respectively, the system volume by one
level. Each speaker in the house has a volume control to adjust the output at the
speaker itself. Normally, the individual speaker volume controls are set to
maximum or near maximum settings.
16
INTERCOM OPERATION
ROOM TALK function (all call)
C
OMMUNICATING WITH OTHER ROOMS
The MC702 system with it's N75, N75RS, and NRC75 series speakers are
designed for whole house communication and ease of use. To talk to the room
station depress the ROOM TALK button while speaking. To hear the response
depress the ROOM LISTEN button. It is not necessary for the called party to press
ROOM TALK to reply. Therefore, this type of hands-free communication is
beneficial when communicating with someone who is unable to reach the controls
of room station to reply. If you are receiving a call from someone else, and are at
a non-RS room station that has the PRIVACY feature enabled, you must either
turn off the PRIVACY feature or press ROOM TALK to respond. When performing
a ROOM TALK function, audio will be heard only at the stations that are turned on
at the master and have their volume controls set above the minimum (counterclockwise) setting. Stations that are set to the OFF or MONITOR position at the
master will not hear the ROOM TALK call nor will they be heard in the ROOM
LISTEN mode.
Page 9

17
ROOM LISTEN function (all listen)
Monitoring rooms
M
ONITORING OTHER ROOMS
Room station monitoring is useful for constant monitoring of small children and
those requiring special care. Any station in which you wish to monitor should be
set to the MONITOR position on the room switch panel. The result of the combined
monitored stations will be broadcast to any station set to ON at the room switch
panel. Non-RS room stations that have the PRIVACY feature enabled cannot be
monitored regardless of the room switch setting at the room switch panel. The
MC702 is designed to prevent the door chime from ringing at stations set to the
MONITOR position at the room switch panel. This will prevent disturbing the
occupants of the monitored rooms.
C
OMMUNICATING WITH DOOR LOCATIONS
The MC702 features two way intercom to the door locations. With the MC702 you
need not risk unwanted intrusion by opening the door to respond to the door bell.
To communicate with the visitor, depress both ROOM TALK and ROOM LISTEN
buttons and speak. To hear the response from the visitor, simply release BOTH
buttons. This will automatically switch the system to DOOR LISTEN mode.
Pressing both ROOM TALK and ROOM LISTEN again allows you to again talk to
the visitor. The DOOR LISTEN function will automatically time out in about 20
seconds or when you momentarily depress ROOM LISTEN or ROOM LISTEN by
itself.
18
Talking to the door stations Listening to the door stations
TROUBLESHOOTING
M&S Systems products are designed for years of reliable service. If you encounter
any problems with your system review this operating guide again. Your installer
or dealer can charge you for a service call to come to your home and show you
how to operate your system. Most problems are caused by incorrect setup,
improper adjustment and incorrect operation and can be corrected by following the
instructions in this operating guide. The table below should assist in
troubleshooting your problem. If after reviewing this operating guide and are
unable to resolve the problem contact your installer/dealer or technical service at
(800) 366-9422.
PROBLEM WHAT TO CHECKProblem - What to check
System squeals when
ROOM TALK or ROOM
LISTEN is depressed
INTERCOM level is set too high at the master
location. Reduce the INTERCOM level.
Radio turns on by itself Check for AUTO operation. If the display shows
'AUTO', turn off the AUTO feature. If the AUTO
feature is being enabled inadvertently, program a
more suitable AUTO ON/AUTO OFF to prevent
being disturbed by AUTO ON activation.
Can't get more than one
wireless remote control
transmitter to work.
The working transmitter's identification has
overwritten the other transmitters. Reprogram all
transmitters making sure to depress a different
button on each transmitter. (see 'Setting up the
MCTX wireless remote control')
Check batteries - replace batteries if necessary
Cannot monitor rooms Check the monitored room stations and ensure
that the PRIVACY switches are off and the
volume controls are turned up (clockwise).
Page 10

19
Resetting the MC702
Display shows TALK or
LIST without any buttons
depressed
Shorted cable or bad speaker. Turn off room
speaker switches to isolate which remote station
run is causing the problem. Contact
dealer/installer.
M
ANUAL RESET PROCEDURE
In some cases, performing a reset on the MC702 may resolve your problem. First
try resetting the MC702 by pressing the POWER and VOLUME UP buttons at the
same time.
20
CARE AND MAINTENANCE
Please record the following information for future reference:
Installer Date of
installation
Model MC702 Serial number
(Serial number is located behind the face panel insert on the MC702)
NOTES
WARRANTY
No maintenance is required to provide reliable operation. The MC702 can be
cleaned using a slightly dampened cloth. No chemicals should be used to clean
the face panel components. Many common household chemicals may damage or
discolor the face panel components. Use care when cleaning the display window.
M&S SYSTEMS Limited 2-Year No-Fault Product Warranty
M&S SYSTEMS warrants for 2 years all products to be free of defects (M&S SYSTEMS honors the 10-Year No-Fault warranty for AirVac Gold
power units. See section below). The warranty period begins from either (1) the date of “first user” purchase of this product or (2) the first close of
escrow date on a residence in which this new product was originally installed. This warranty extends to the original user of the product and to each
subsequent owner of the product during the term of this warranty. M&S SYSTEMS will repair or replace, at its option, parts and materials at no charge.
Parts supplied under this warranty may be new or rebuilt at the option of M&S SYSTEMS.
If, during the limited warranty period, it appears as though this product contains a defect which is covered by this limited warranty, call our toll free
service number before dismantling the product (1-800-877-6631). Remember to attain a Return Authorization Number (RAN) before
returning any product to M&S SYSTEMS. Send this product freight pre-paid and insured to our service center for warranty repair. You
will be advised on shipping instructions when you call the toll free service number. M&S SYSTEMS will return the repaired product freight pre-paid
within the U.S.A. The installing dealer or distributor may assist you, at your choice and expense, with returning product for repair. Please include a
brief description of the problem and a dated proof-of-purchase receipt with any product that is returned for warranty repair. ANY PRODUCT
RETURNED WITHOUT A RETURN AUTHORIZATION NUMBER WILL BE REFUSED.
THIS LIMITED WARRANTY IS IN LIEU OF ANY OTHER WARRANTIES, EXPRESS OR IMPLIED, INCLUDING ANY IMPLIED
WARRANTY OF MERCHANTABILITY OR FITNESS FOR A PARTICULAR PURPOSE OR OTHERWISE, AND OF ANY OTHER
OBLIGATIONS OR LIABILITY ON THE SELLER’S PART. THIS LIMITED WARRANTY DOES NOT COVER DAMAGE CAUSED
BY IMPROPER INSTALLATION, THE VIOLATION OF APPLICABLE BUILDING OR ELECTRICAL CODES, OR THE USE OF NONM&S/NON-AIRVAC WIRE, CABLE OR WALL HOUSINGS. THIS LIMITED WARRANTY APPLIES ONLY TO PRODUCTS
INSTALLED IN A PRIVATE RESIDENCE.
UNDER NO CIRCUMSTANCES SHALL THE SELLER BE LIABLE FOR CONSEQUENTI AL, INCIDENTAL OR SPE CIAL DAMAGES
ARISING IN CONNECTION WITH USE, OR INABILITY TO USE THIS PRODUCT. IN NO EVENT SHALL SELLER’S LIABILITY,
FOR BREACH OF WARRANTY, BREACH OF CONTRACT, NEGLIGENCE, OR STRICT LIAB ILITY, EXCEED THE COST OF THE
PRODUCT COVERED HEREBY. NO PERSON IS AUTHORIZED TO ASSUME FOR US ANY OTHER LIABILITY IN CONNECTION
WITH THE SALE OF THIS PRODUCT.
Some states do not allow the exclusion or limitation of consequential, incidental or special damages, so the above limitation or exclusion may not apply
to you. This limited warranty gives you specific legal rights, and you may also have other rights which vary from state to state.
Page 11

Distributed by:
Printed in the U.S.A.
11584
8
115848 Rev B
 Loading...