

Page 1
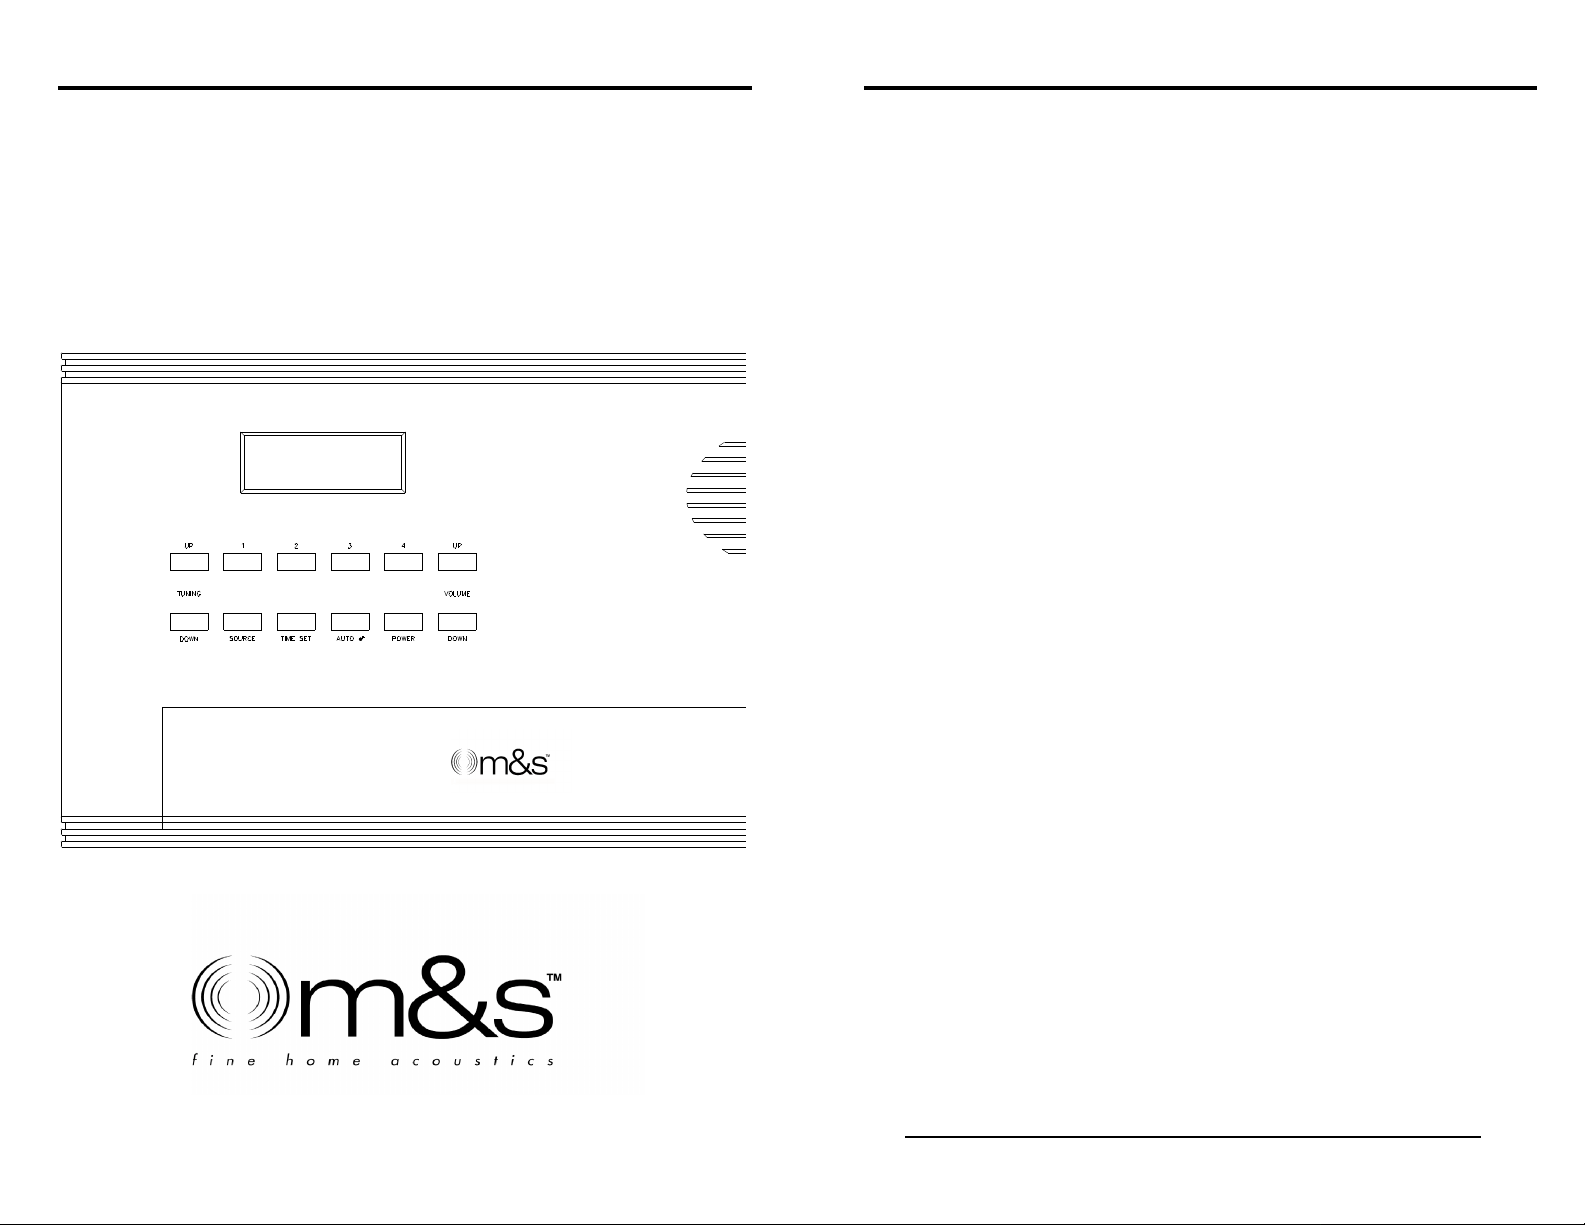
M&S SYSTEMS
Model MC602
Master Unit
Owner's Guide
This booklet contains the information you need to get the most from your musical
intercom system. It also tells you what to do if your system develops operating
problems, and contains applicable statements of warranty. Keep this booklet for
future reference.
Page 2

CONTENTS
MC602 FEATURES
MC602 Features ..................................................... 1
MC602 Master Unit Operation .......................................... 2
Setting Time................................................. 4
Seek/Scan .................................................. 6
Memory Operation ............................................ 7
Intercom .................................................... 9
Intercom Selector Switches .................................... 10
MC602 Room Speaker Operation ...................................... 12
MC602 Remote Scan Speaker Operation ................................ 14
MC602 Hand Held RF Remote Control .................................. 15
MC602 Advanced Features ........................................... 18
MC602 Troubleshooting Tips .......................................... 19
Statements of Warranty .............................................. 20
Congratulations! Your new Model MC602 is a state of the art Music Center that
provides Hands Free Room to Room communication throughout your house as well
as furnishing AM, FM, or auxiliary source audio. An optional door chime can be
integrated into the system to provide door communication with automatic music
muting. The MC602 contains a Digital Clock with a back-up power supply that never
needs replacing. It maintains the correct time and presets for up to 2 hours during a
power outage.
The Hands Free communications allows every station in the house to initiate a call
and then to listen for the response. The call initiator does have to press TALK and
LISTEN but the person responding does not need to press any buttons. The door is
even easier to answer with Automatic Hands Free communications from any station.
The system automatically listens to the door after you talk to it.
The state of the art transreflective LCD display and power conserving backlight can
be read in any lighting condition from direct sunlight to complete darkness. The unit
provides excellent fidelity for up to 15 rooms with plenty of power. The MC602 has a
Digital Phase Lock Loop Tuner with 8 AM and 8 FM Station Presets. The MC602 also
has two external source inputs (AUX IN and TAPE IN) and one line output (TAPE
OUT) that can be used with M&S's built-in Cassette Tape and/or CD player as well as
your TV or other music sources.
The MC602 has the ability to turn itself ON and OFF at preset times (like an alarm
clock or for security--to play music in the house while you are gone). The MC602 was
designed to be as user friendly as possible. It also indicates when and how the
intercom function is being used. The MC602 has an optional Door Release which can
be used to open a door or gate from the Master or any room with remote scan
speakers. The MC602 provides a Security interface which allows any remote scan
speaker to be used as a panic alarm for the security system or the MC602 can
provide a Home Automation interface which allows any remote scan speaker to
control a group of lights and/or appliances. These same remote scan speakers allow
memory or station tuning, changing sources, music ON/OFF control and system wide
music volume control. Up to four optional hand-held remote controls can be used to
control the MC602 from any room inside and even outside your house.
The MC602 allows you to monitor any room (including the Master) to let you know
when a baby is crying or when an elderly person needs help. The MC602 can be set
up so that this 'monitored room' does or does not hear other communication in the
house. There is also an intercom only position, a music with intercom override
position, and an off position for each room.
1
Page 3
In addition, your new musical intercom also features:
information is explained under the function with which it is associated.
*Smart Chime which will not interfere with Door Communications
*Lightning, static, and surge protection
*Improved reliability and serviceability
Your MC602 is designed to make your home more functional and enjoyable. Prepare
yourself for a more satisfying home living experience.
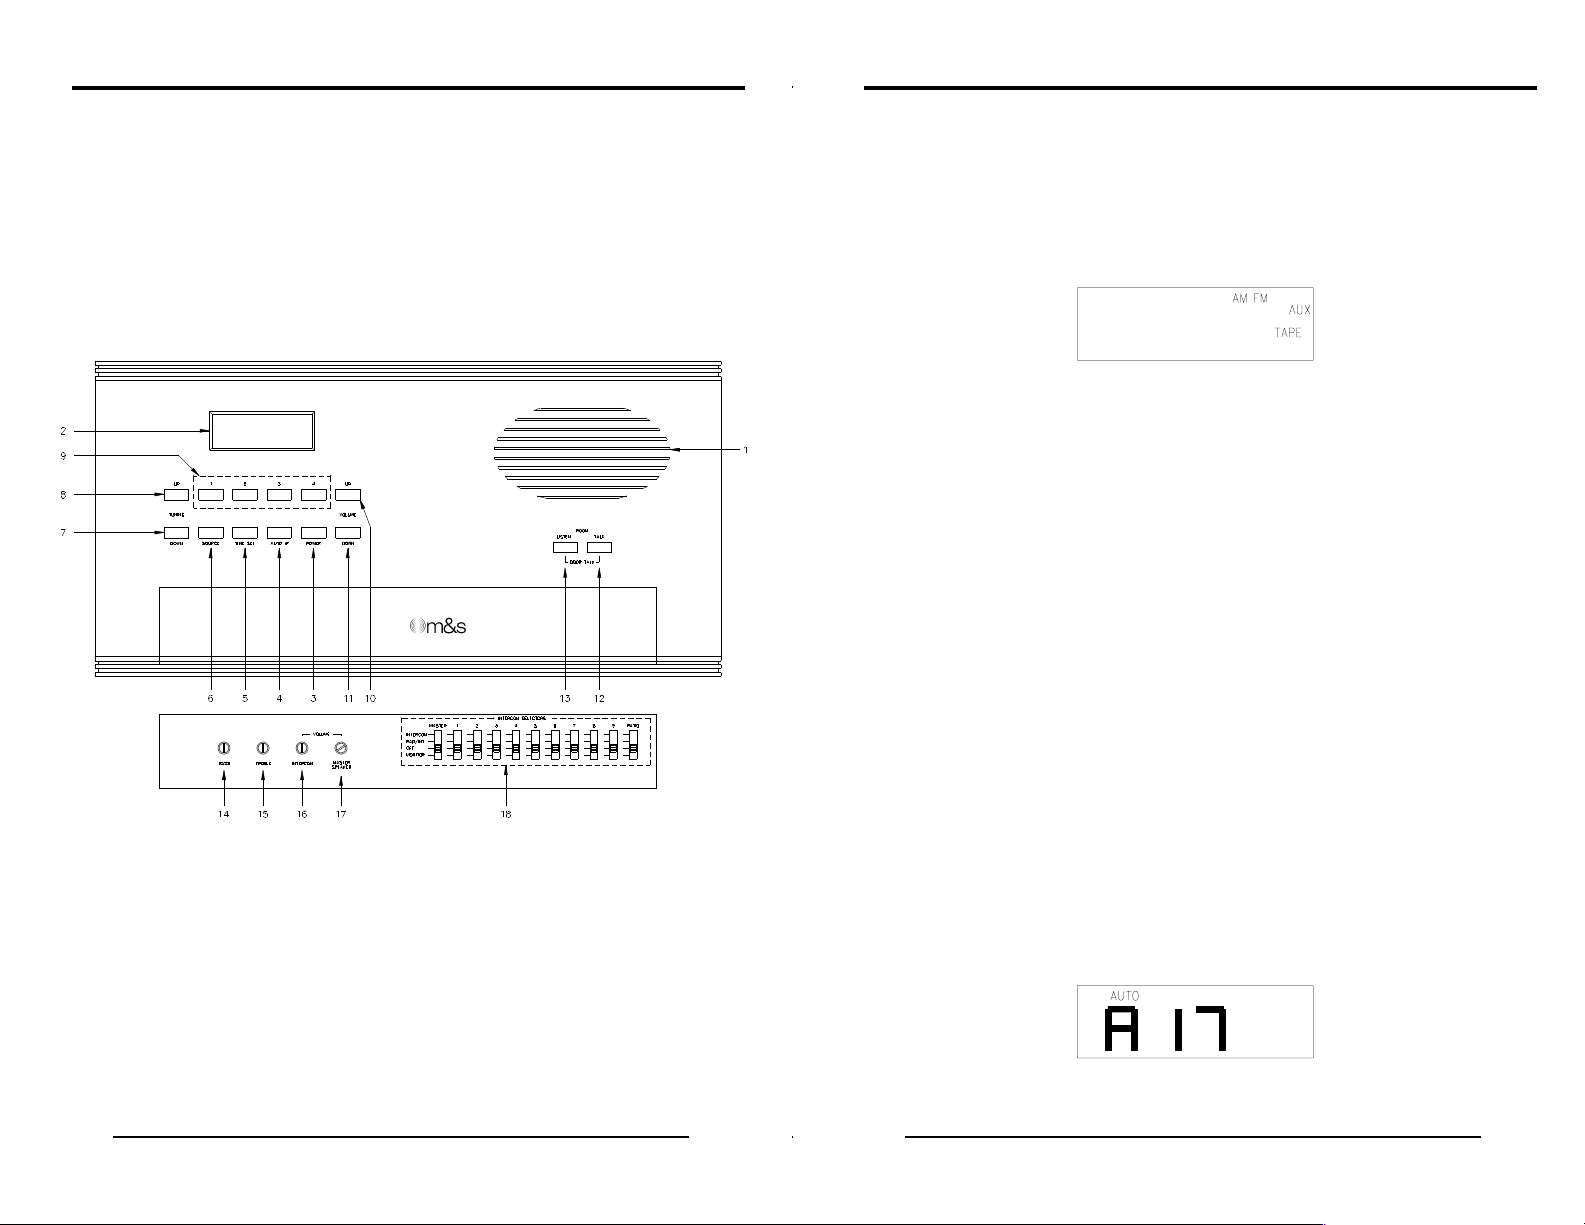
MC602 MASTER UNIT OPERATION
3. POWER button - This button is used to turn the MC602 ON and OFF. When
the unit is turned on, one of the four source indicators (AM, FM, AUX, or TAPE) on the
right side of the display will be SHOWN. When the unit is off, all four of these
annunciators will be off. The MC602 must be turned on to operate the radio, or to
listen to other music through the unit. Setting the times and auto * functions as well
as all intercom functions will work with the power ON or OFF.
Display
4. AUTO **** button - This button is used to turn the Automatic Music (AUTO *)
function ON and OFF. Pressing the AUTO * button momentarily, turns the function
ON and pressing it again turns it OFF. The AUTO * function is ON when the AUTO
indicator is displayed on the top of the display. When the AUTO * function is turned
on, the MC602 will turn itself ON Automatically when the current time reaches the
Automatic ON TIME and then turn itself OFF when the current time reaches the
Automatic OFF TIME. When the MC602 automatically turns itself ON it will always
turn on at the same volume level. This "AUTO ON VOLUME LEVEL" has a default
of 6 (See Sections 10 & 11) but it can be changed following these simple steps:
A. Turn the MC602 ON.
B. Momentarily press the VOLUME UP and AUTO * buttons at the
same time. Release both buttons.
When the MC602 is first connected to 120V house power the unit will set itself to
12:00 AM and the time will flash. The flashing display indicates that power has been
applied to the unit for the first time or that there has been an extended power outage
and the unit has lost its memory. The unit will operate properly and keep time from
this initial 12:00 AM setting, but it should have its memory restored by performing
sections 4, 5 and 9 in the following instructions:
1. MASTER SPEAKER/MICROPHONE High-Fidelity Speaker. This also is the
microphone for communications from the master unit.
2. DISPLAY Easy to read and understand Liquid Crystal Display with
backlight. The display normally functions as a clock or frequency readout for AM and
FM, but the display can also show additional important information. This other
2
C. The display will show the letter "A" for AUTO ON VOLUME followed
by a number. This number is the volume of the music currently
playing and this will be the volume of the MC602 when it
automatically turns ON.
D. This AUTO ON VOLUME can be changed by using the VOLUME
UP & DOWN buttons.
E. When you have the volume at the level that you want the MC602 to
automatically turn on to, do not press any buttons for 9 seconds.
The display will go back to normal and the new AUTO ON VOLUME
will be
saved.
Display
3
Page 4

5. TIME SET button - This button is used to access the time setting mode.
When the TIME SET button is pressed momentarily, the display will indicate "SET
TIME" and the current time will be displayed with the hours flashing. The UP and
DOWN buttons (either TUNING UP and DOWN or VOLUME UP and DOWN) can then
be used to increment or decrement the current time hours. Pressing the UP button (or
DOWN button) momentarily will increment (or decrement) the hours by one each time
the key is pressed. Holding the UP button (or DOWN button) depressed will rapidly
increment (or decrement) the hours until the button is released. The time display also
includes the AM or PM indicator which is changed by scrolling the hours past 12:00.
Note: The MC602 remains in the set mode for 25 seconds with no activity (no buttons
being pressed) after which the unit automatically returns to the normal mode of
operation. The TIME SET button must be pressed again to return to the set mode.
Once the current hours have been set correctly, momentarily press the TIME SET
button again. The display will indicate "SET TIME" and the current time will be shown
with the minutes flashing. The UP and DOWN buttons can be used as described
previously to increment or decrement the current time minutes.
Once the current minutes have been set correctly, momentarily press the TIME SET
button again to return to the normal mode or let the MC602 automatically return to the
normal mode if no buttons are pressed for 25 seconds.
To set the AUTO * ON and OFF times, the TIME SET button must be momentarily
pressed three times without changing the current time. After pressing the TIME SET
button for the third time, the display will indicate "SET AUTO ON TIME" and the auto
on time will be displayed with the hours flashing. The UP and DOWN buttons can be
used as previously described to increment or decrement the auto on time hours.
minutes.
6. SOURCE button - active only when the MC602 is ON. This button is used
to select the audio source (FM A, FM B, AM A, AM B, AUX input, or TAPE input)
which the MC602 will output to the speakers. The A and B following FM and AM
indicate the preset memory bank selection. The A bank indicates the first four preset
memories A1, A2, A3, and A4, while the B bank indicates the second four preset
memories B1, B2, B3, and B4. The use of the memory banks is explained in
paragraph 10. Each time the SOURCE button is momentarily pressed the audio
source changes. The active source is displayed on the right side of the display (the
memory bank indicator is on the right side of the display after MEM).
Display
7. TUNING DOWN button - active only when the MC602 is ON and the FM or
AM source is selected. This button is used to scan down through the FM or AM radio
stations. The radio stations can be scanned down in two ways using this button:
1. To scan down until the next strong station is found (Automatic
Search), the TUNING DOWN button is simply pressed momentarily. The
audio will be muted and the display will show the radio station frequency
decreasing until a strong station is found. Once the MC602 locks onto a
strong station, it will stop scanning. This station's frequency will be shown on
the display, and the audio will again be heard through the speakers.
Once the AUTO ON TIME hours have been set correctly, momentarily press the TIME
SET button again. The display will indicate "SET AUTO ON TIME" and the AUTO ON
TIME will be displayed with the minutes flashing. The UP and DOWN buttons can be
used as previously described to increment or decrement the AUTO ON TIME minutes.
Once the AUTO ON TIME minutes have been set correctly, momentarily press the
TIME SET button again. The display will indicate "SET AUTO OFF TIME" and the
AUTO OFF TIME will be displayed with the hours flashing. The UP and DOWN
buttons can be used as previously described to increment or decrement the AUTO
OFF TIME hours.
Once the AUTO OFF TIME hours have been set correctly, momentarily press the
TIME SET again. The display will indicate "SET AUTO OFF TIME" and the AUTO
OFF TIME will be displayed with the minutes flashing. The UP and DOWN buttons
can be used as described previously to increment or decrement the AUTO OFF TIME
4
2. To scan down to a specific frequency and/or hear the stations as
they are scanned (Manual Scan), the TUNING DOWN button is held in. After
about 1 second the MC602 will go into Manual Scan Down mode and the
display will decrement in frequency while the audio at this frequency will be
heard. The unit will continue to decrement and play each frequency until the
TUNING DOWN button is released. The Manual scan can be used to select
a station that is not strong enough to be picked up by the Automatic Search,
to scan through many frequencies without stopping on each strong station, or
to quickly hear a sample of each station as it is scanned.
NOTE: To decrement the frequency down just once, the TUNING
DOWN button should be held in until the frequency changes--then
immediately released.
5
Page 5

The TUNING DOWN button is also used to decrement the time when the unit
is in the SET TIME, SET AUTO ON TIME, or SET AUTO OFF TIME mode as
described under the TIME SET button.
8. TUNING UP button - active only when the MC602 is ON and the FM or AM
source is selected. This button is used to scan up through the FM or AM
radio stations. This button operates the same (Automatic Search and
Manual Scan) as the TUNING DOWN button except that it scans the
frequencies up instead of down.
The TUNING UP is also used to increment the time when the unit is in the
SET TIME, SET AUTO ON TIME, or SET AUTO OFF TIME mode as
described under the TIME SET button.
9. 1, 2, 3, and 4 buttons - active only when the MC602 is ON and the FM or
AM source is selected. These buttons are used to save and recall your most
frequently used FM and AM radio stations (presets). Along with the
SOURCE button, these buttons provide 8 FM memories (A1, A2 , A3 , A4, B1,
B2, B3, and B4) and another 8 AM memories A1 through B4).
To save a radio station in memory FM B3:
1. Using the SOURCE button, change the source to FM B.
2. Tune the radio to the station which is desired to be saved.
3. Hold in the 3 button until a 3 appears as the memory number.
To recall the radio station saved in memory AM A2:
1. Using the SOURCE button, change the source to AM A.
2. Momentarily press the 2 button. The memory number should
display 2 and the station that was stored in memory A2 should be
displayed and heard through the speakers.
Display
increased, the display will show the level of this volume with a number from 1
(minimum volume) to 32 (maximum volume).
Each Room Speaker including the MASTER SPEAKER has its own volume control
which can be used to turn down the audio level for each particular room.
The VOLUME UP button is also used to increment the time when the unit is
in the SET TIME, SET AUTO ON TIME, or SET AUTO OFF TIME mode as
described under the TIME SET button.
11. VOLUME DOWN button - active only when the MC602 is ON. This button is
used to decrease the audio level (volume) of the selected source (FM, AM, AUX, or
TAPE) which is sent to all the speakers. Whenever this "system volume" is adjusted,
the display will show the level of this volume with a number from 1 (minimum volume)
to 32 (maximum volume).
Each Room Speaker including the MASTER SPEAKER has its own volume control
which can be used to turn down the audio level for each particular room.
The VOLUME DOWN button is also used to decrement the time when the
unit is in the SET TIME, SET AUTO ON TIME, or SET AUTO OFF TIME
mode as described under the TIME SET button.
NOTE: For best performance, the individual speaker volume controls should be
turned to maximum volume (fully clockwise) and then the VOLUME UP and DOWN
buttons adjusted for the proper listening volume (this is really setting the maximum
listening volume). The individual speaker volume control can then be adjusted in
rooms which require less volume.
IMPORTANT: Do not set this "system volume" to a high number and then adjust all
individual speaker volume controls down to acceptable listening level. This is very
inefficient, will cause the amplifier to overheat, and will add distortion to the system.
10 & 11. OPTIONAL DOOR RELEASE - always active. If the system is set up to
use the Door/Gate release function, the VOLUME UP button and VOLUME DOWN
button are used to open the Entry Door or Gate. The Door/Gate release is activated
by pushing both the VOLUME UP and VOLUME DOWN buttons at the same time and
holding them for 4 seconds. The display will show "door" when the buttons are
pressed at the same time and it will show RELS when the door release is activated.
10. VOLUME UP button - active only when the MC602 is ON. This button is
used to increase the audio level (volume) of the selected source (FM, AM, AUX, or
TAPE) which is sent to all the speakers. Whenever this "system volume" is
6
10 & 11. OPTIONAL HOME AUTOMATION INTERFACE - always active. If the
system is connected with a HOME AUTOMATION system the VOLUME UP button
and VOLUME DOWN button are used to activate (turn on) the automated function.
7
Page 6

The function is turned on by pushing both the VOLUME UP and VOLUME DOWN
buttons at the same time and holding them for 4 seconds.
10 & 11. OPTIONAL SECURITY INTERFACE - always active. If the system is
connected with a SECURITY system the VOLUME UP button and VOLUME DOWN
button are used to activate the panic alarm. The panic alarm is turned on by pushing
both the VOLUME UP and VOLUME DOWN buttons at the same time and holding
them for 4 seconds.
12. ROOM TALK button - always active. This button is used for communicating
with the other rooms. To talk to someone in another room hold the ROOM TALK
button in while talking in the direction of the microphone. The display will show that
you are in the talk mode. Release the ROOM TALK button when you are finished
talking.
NOTE: When talking to a person in another room, you will be heard at each speaker
that is in the RAD/INT, or INT position (See section 18).
13. ROOM LISTEN button - always active. This button is used for listening to
the other rooms. To listen to other rooms hold the ROOM LISTEN button in. The
display will show that you are in the listen mode. Release the ROOM LISTEN button
when you are finished listening.
NOTE: To get the maximum benefit from this Hands Free system, make it a house
rule that whoever initiates a call will always follow up by pressing the ROOM LISTEN
button. This allows someone to respond to the call without getting up or stopping their
current activities.
NOTE: When listening to other rooms, you will hear each speaker that is in the
MONITOR, RAD/INT, or INT position (See section 18).
NOTE: When communicating with the person at the door(s), both sides of the
conversation will be heard at each speaker that is in the RAD/INT, or INT position
(See section 18).
14. BASS CONTROL - Recommended setting:12:00. This CONTROL is used
to adjust the low tones of the audio heard on all the speakers (room speakers as well
as the MASTER SPEAKER). Turning the BASS CONTROL clockwise increases the
bass (makes the low frequencies louder) and turning it counter-clockwise decreases
the bass (makes the low frequencies quieter).
15. TREBLE CONTROL - Recommended setting: 12:00. This CONTROL is
used to adjust the high tones of the audio heard on all the speakers (room speakers
as well as the MASTER SPEAKER). Turning the TREBLE CONTROL clockwise
increases the treble (makes the high frequencies louder) and turning it counterclockwise decreases the treble (makes the high frequencies quieter).
16. INTERCOM VOLUME CONTROL - Recommended setting: 12:00. This
CONTROL is used to adjust the level of the intercom communications. Turning the
INTERCOM VOLUME CONTROL clockwise increases the volume of intercom
communications and turning it counter-clockwise decreases the volume. The
INTERCOM VOLUME CONTROL should be set to a point where intercom
communications can easily be heard, but not so high that the speakers feedback or
squeal when communications are attempted.
17. MASTER SPEAKER VOLUME CONTROL - Recommended setting:
Maximum. This CONTROL is used to control the volume of the MASTER SPEAKER.
Turning the MASTER SPEAKER VOLUME CONTROL clockwise increases the
MASTER SPEAKER volume and turning it counter-clockwise decreases the MASTER
SPEAKER
12 & 13. DOOR TALK - always active. These buttons are used for communicating
with the outside door speaker(s). To talk to someone at the door speaker(s) hold the
ROOM LISTEN and ROOM TALK buttons in while talking in the direction of the
microphone. The display will show that you are in the talk mode. Release the ROOM
LISTEN and ROOM TALK buttons when you are finished talking--the MC602 will
automatically listen (you will hear what is being said) to the person at the door(s) for
approximately 25 seconds. The display will show that you are in the listen mode.
You may talk to the person at the door again anytime by holding in the ROOM
LISTEN and ROOM TALK buttons. Each time the buttons are released, the door
speaker(s) can be listened to for another 25 seconds. If you are done communicating
with the person at the door and/or you do not want to listen to the door speaker, the
25 second listening time can be canceled by momentarily pressing either the ROOM
LISTEN or the ROOM TALK button by itself.
8
volume. The MASTER SPEAKER VOLUME CONTROL should be normally be set to
maximum (fully clockwise) and the VOLUME UP and DOWN buttons should be used
to adjust for the proper listening volume. If however, another room needs more
volume than the MASTER SPEAKER, the MASTER SPEAKER VOLUME CONTROL
may have to be turned down somewhat and then the music volume increased with the
VOLUME UP button to get the perfect volume in each room.
18. INTERCOM SELECTOR SWITCHES These switches are used to control
the operation of the Room Speaker in each corresponding room.
The MASTER SPEAKER Switch controls the MASTER SPEAKER.
The ROOM SPEAKERS Switches 1 through 9 control the corresponding Room
Speakers.
The PATIO SPEAKER Switch controls the Patio Speaker(s).
9
Page 7

There are four positions for each of these switches.
INTERCOM - A speaker with its switch set in the INTERCOM position will
hear all intercom communications (including the chime, if
used), but will not hear the audio sources (FM, AM, AUX,
and TAPE).
RADIO-INT A speaker with its switch set in the RADIO-INT position will
hear the audio sources (FM, AM, AUX, and TAPE) as well
as all intercom communications (including the chime, if
used).
OFF A speaker with its switch set in the OFF position will not
hear anything.
Note: If one of the indoor rooms (master - 9) are turned off, that speaker can
still be used to talk to other rooms or listen to other rooms when its talk and
listen buttons are pressed. However, when the patio is turned off, it is
disconnected from the master and can not be used to talk from, listen to, or
anything else.
MONITOR A speaker with its switch set in the MONITOR position will
not hear anything, but the speaker will be used as a
microphone. Any sounds that this microphone picks up will
be added to the selected source and heard from any
speaker that is in the RADIO-INT position. The MONITOR
position can be used to listen to (monitor) a baby's or
elderly person's room..
from the speaker being monitored. See Appendix A for details on changing the
monitor override configuration.
Your MC602 may be equipped with either a 3-note or an 8-note Door Chime. This
optional chime rings through the Master speaker or any room speaker and mutes the
radio when the doorbell button is pressed.
IMPORTANT: At least one speaker (Master or Room Speaker) must be in the
RADIO-INT or INT position for the Door Chime to function. The volume of the chime
is controlled at each speaker with the speaker volume CONTROL.
To make your MC602 easier to use, you should label the INTERCOM SELECTOR
SWITCHES. Remove the door that covers the switches by pulling it straight out. Turn
the radio ON but move all the INTERCOM SELECTOR SWITCHES to OFF. Move
one switch at a time to RADIO-INT to determine the location it controls. On the back
of the door, write with pen or pencil in the corresponding box, which room each switch
controls.
NOTE: The sounds from the MONITORED room will be added to the
selected source--means that if you are listening to the FM radio in the Living
room and the baby starts crying in the MONITORED baby's room, the baby's
crying will be combined with the FM radio and you will hear both at the same
time.
To listen only to the MONITORED room, simply turn the MC602 off with the
POWER button.
The MC602 is normally configured so that intercom communications, including the
door chime, will not be heard from the speaker being monitored. However as we
understand that each customer and installation is unique, the MC602 can be
configured with monitor override when it is installed. If the MC602 is configured with
monitor override, all intercom communications, including the door chime, will be heard
10
11
Page 8
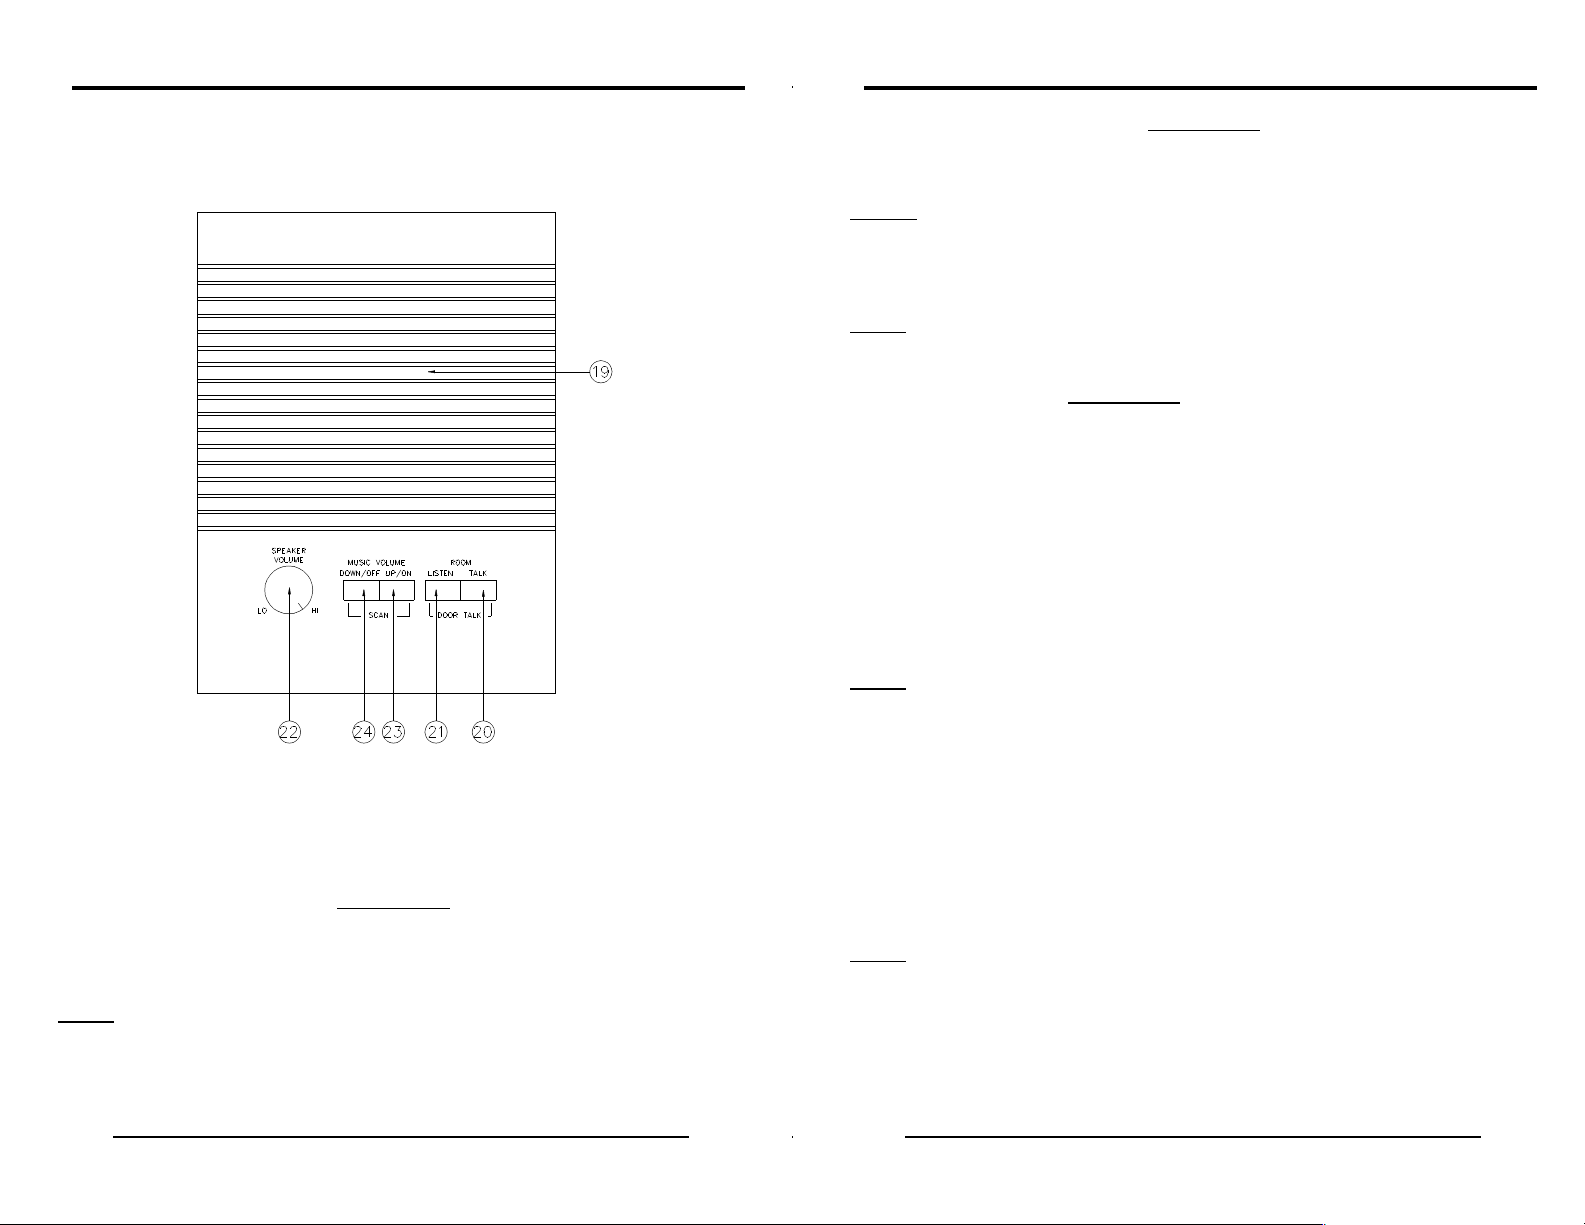
MC602 ROOM SPEAKER OPERATION
21. ROOM LISTEN button - always active. This button is used for listening to
the other rooms and the master. To listen to other rooms and the master hold the
ROOM LISTEN button in. Release the ROOM LISTEN button when you are finished
listening.
NOTE: To get the maximum benefit from this Hands Free system, make it a house
rule that whoever initiates a call will always follow up by pressing the ROOM LISTEN
button. This allows someone to respond to the call without getting up or stopping their
current activities.
NOTE: When listening to other rooms, you will hear each speaker including the
master that is in the MONITOR, RAD/INT, or INT position (See section 18).
20 & 21. DOOR TALK - always active. These buttons are used for communicating
with the outside door speaker(s). To talk to someone at the door speaker(s) hold the
ROOM LISTEN and ROOM TALK buttons in while talking in the direction of the
microphone. Release the ROOM LISTEN and ROOM TALK buttons when you are
finished talking--the MC602 will automatically listen (you will hear what is being said)
to the person at the door(s) for approximately 25 seconds. You may talk to the
person at the door again anytime by holding in the ROOM LISTEN and ROOM TALK
buttons. Each time the buttons are released, the door speaker(s) can be listened to
for another 25 seconds. If you are done communicating with the person at the door
and/or you do not want to listen to the door speaker, the 25 second listening time can
be canceled by momentarily pressing either the ROOM LISTEN or the ROOM TALK
button by itself.
NOTE: When communicating with the person at the door(s), both sides of the
conversation will be heard at each speaker including the master that is in the
RAD/INT, or INT position (See section 18).
19. ROOM SPEAKER/MICROPHONE High-Fidelity Speaker. This also is
the microphone for communications from the room.
20. ROOM TALK button - always active. This button is used for talking to the
other rooms and to the master. To talk to other rooms and the master hold the ROOM
TALK button in while talking in the direction of the microphone. Release the ROOM
TALK button when you are finished talking.
NOTE: When talking to a person in another room, you will be heard at each speaker
that is in the RAD/INT, or INT position (See section 18).
12
22. ROOM SPEAKER VOLUME CONTROL - Recommended setting:
Maximum.
Turning the ROOM SPEAKER VOLUME CONTROL clockwise increases the ROOM
SPEAKER volume and turning it counter-clockwise decreases the ROOM SPEAKER
volume. The ROOM SPEAKER VOLUME CONTROL should normally be set to
maximum (fully clockwise) and the VOLUME UP and DOWN buttons (See section 10
& 11) should be used to adjust for the proper listening volume.
This CONTROL is used to control the volume of the ROOM SPEAKER.
NOTE: The ROOM SPEAKER VOLUME CONTROL can be used to prevent others
from monitoring the room that you are in by turning the VOLUME CONTROL fully
counter-clockwise. Just remember that you will not hear the intercom or door chime
with the VOLUME CONTROL in this position!
13
Page 9

OPTIONAL
REMOTE SCAN
SPEAKER OPERATION
23. MUSIC VOLUME UP/ON button -
increase the audio level (volume) of the selected source (FM, AM, AUX, or TAPE)
which is sent to all the speakers.
The MUSIC VOLUME UP/ON button can also be used to turn the MC602 ON if it is
OFF. To turn the MC602 ON, momentarily press the MUSIC VOLUME UP/ON button.
always active. This button is used to
24. MUSIC VOLUME DOWN/OFF button - active only when the MC602 is
ON. This button is used to decrease the audio level (volume) of the selected source
(FM, AM, AUX, or TAPE) which is sent to all the speakers.
The MUSIC VOLUME DOWN/OFF button can also be used to turn the MC602 OFF.
To turn the MC602 OFF, press the MUSIC VOLUME DOWN/OFF button after the
volume has decreased to its minimum level.
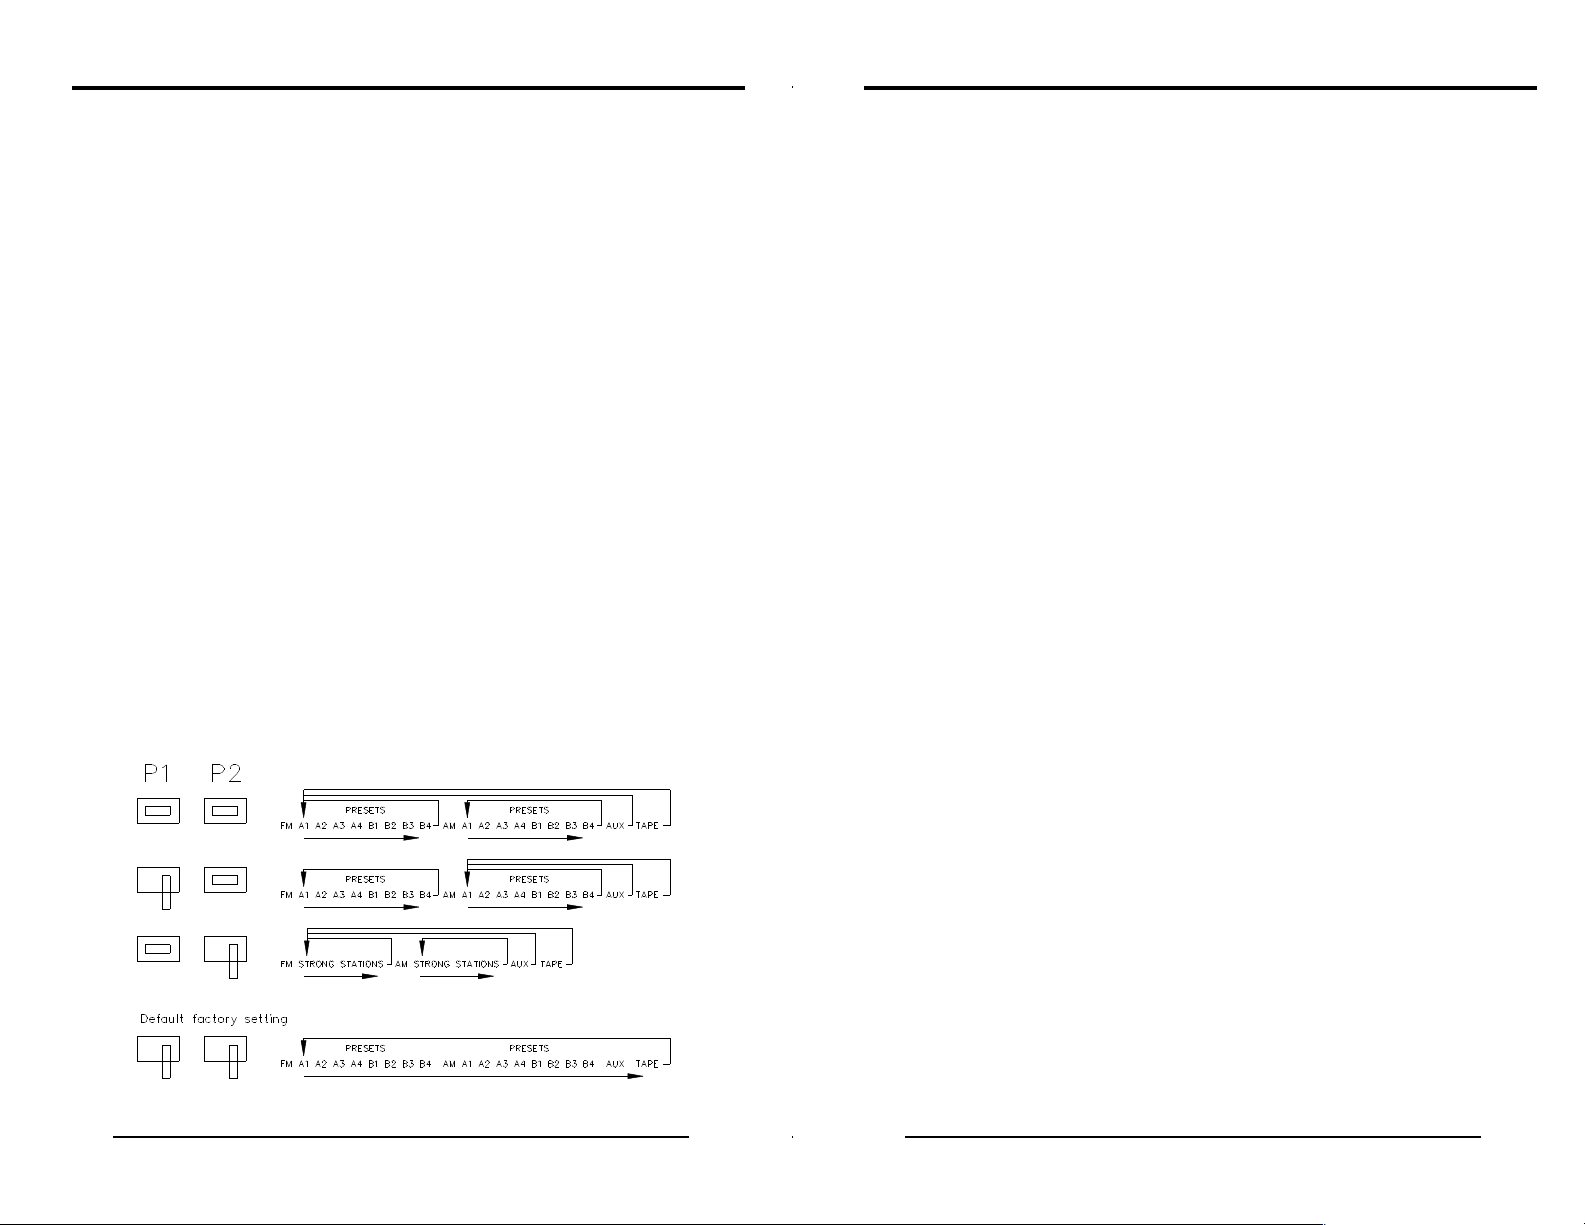
23 & 24. SCAN - active only when the MC602 is ON. This function is used to
change memories and/or sources. Momentarily pressing both the MUSIC VOLUME
UP and DOWN buttons at the same time will execute the SCAN function. The way
that the SCAN function works is dependant on the configuration of the two jumpers P1
and P2 behind the face panel on the master that were set when the MC602 was
installed. The factory default mode of operation is described here. Appendix B
describes the other modes and how to change modes.
23 & 24. OPTIONAL HOME AUTOMATION INTERFACE - always active. If
the system is connected with a HOME AUTOMATION system the VOLUME UP button
and VOLUME DOWN button are used to activate (turn on) the automated function.
The function is turned on by pushing both the VOLUME UP and VOLUME DOWN
buttons at the same time and holding them for 4 seconds.
23 & 24. OPTIONAL SECURITY INTERFACE - always active. If the system is
connected with a SECURITY system the VOLUME UP button and VOLUME DOWN
button are used to activate the panic alarm. The panic alarm is turned on by pushing
both the VOLUME UP and VOLUME DOWN buttons at the same time and holding
them for 4 seconds.
If the MC602 has the FM or AM source selected, the SCAN function will step through
the 8 memory presets of the source that is selected then advance to the next source.
The SCAN function will step from AUX to TAPE and from TAPE to FM (preset A1).
For example, if the current source is FM and preset B4 is tuned in, executing the
SCAN will tune in preset A1 in the AM band. Executing SCAN again will tune in
preset A2 in the AM band. If the MC602 has the TAPE source selected, executing the
SCAN function will change the source to FM and tune in preset A1. Executing SCAN
again will turn in preset A2 in the FM band.
23 & 24. OPTIONAL DOOR RELEASE - always active. If the system is set up
to use the Door/Gate release function, the VOLUME UP button and VOLUME DOWN
button are used to open the Entry Door or Gate. The Door/Gate release is activated
by pushing both the VOLUME UP and VOLUME DOWN buttons at the same time
and holding them for 4 seconds.
14
15
Page 10
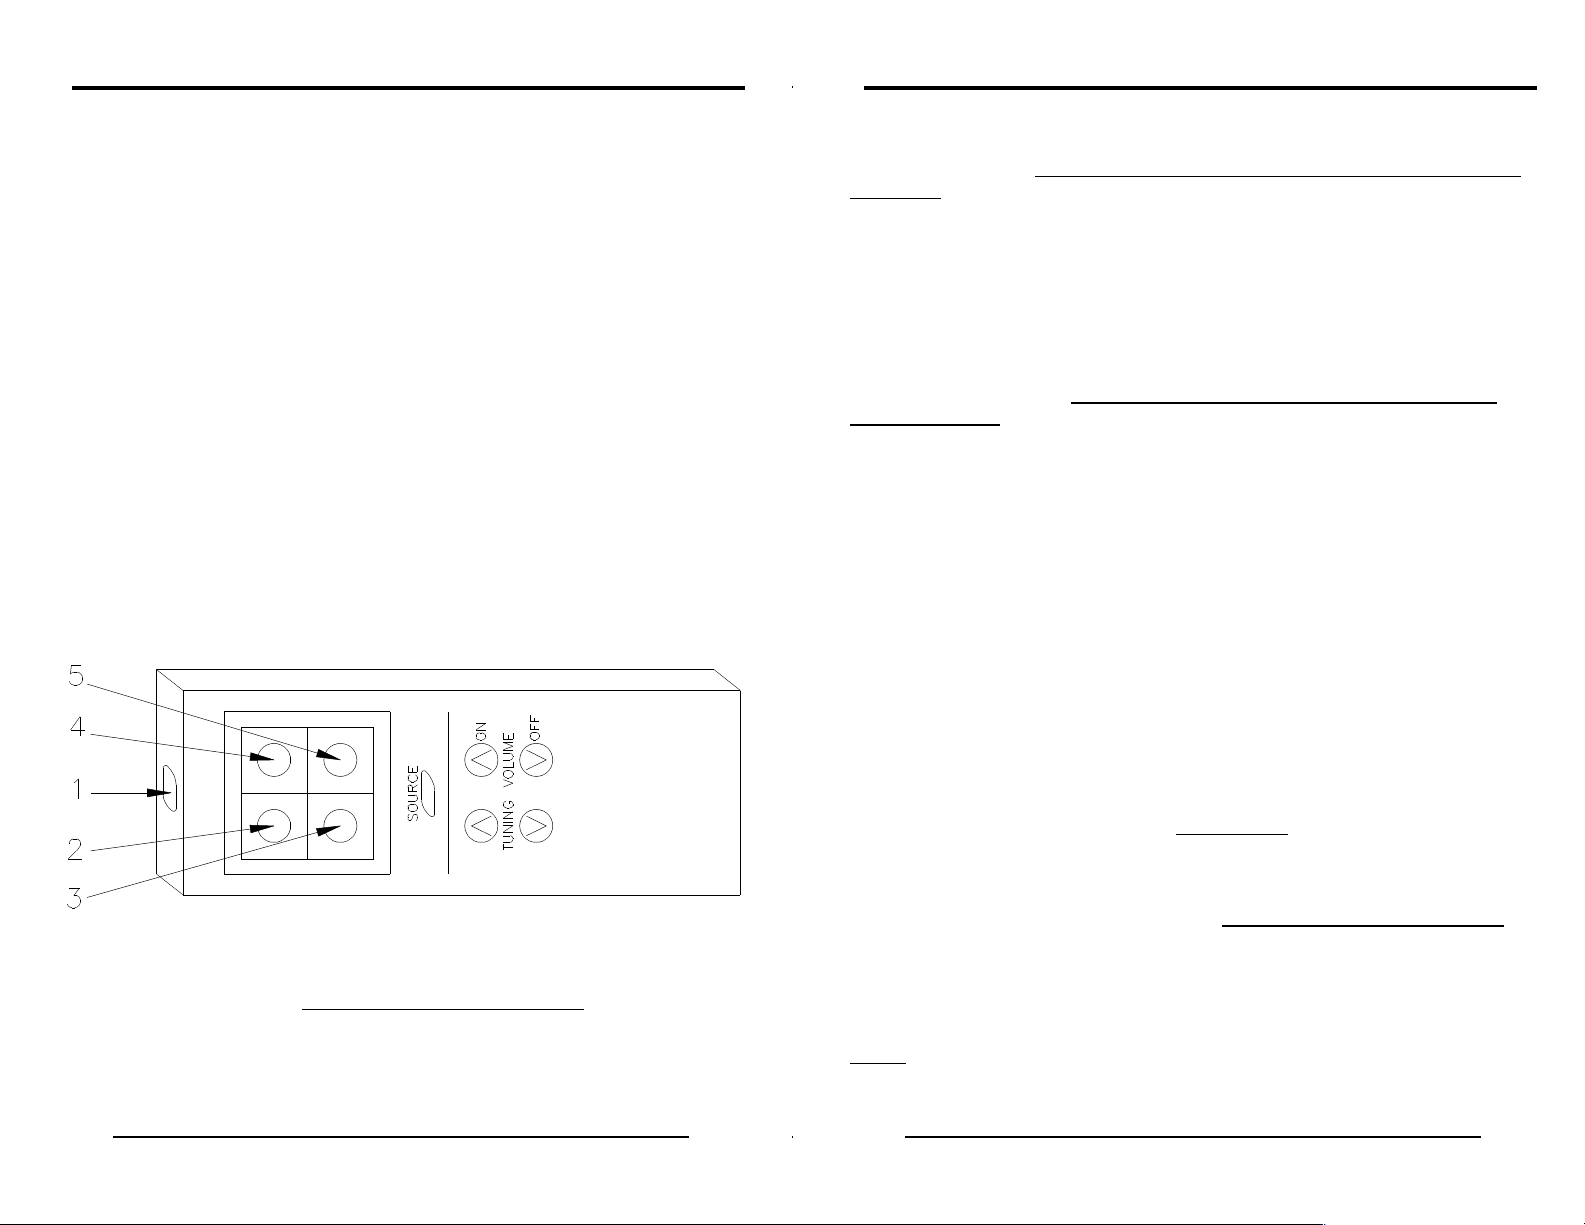
OPTIONAL
HAND HELD
RF REMOTE CONTROL
PROGRAMMING -
after the unit loses its memory (power outages greater than 2 hours), the unit must be
programmed or taught the unique code that is present in the REMOTE CONTROL
TRANSMITTER. To do this, the MC602 must be put into its test mode by
momentarily pressing the VOLUME UP and SOURCE buttons at the same time. The
display on the MC602 should show TEST. Now press the TUNING UP button on the
REMOTE CONTROL TRANSMITTER until the display flashes SAVE twice. The
MC602 has now learned the TRANSMITTER. If more than one transmitter is to be
used with the system, the second, third, and fourth transmitters must be learned by
pressing the TUNING DOWN, VOL UP, and VOL DOWN on the respective
TRANSMITTER. Always press a different button for each TRANSMITTER to be
programmed. The test mode is exited by momentarily pressing the VOLUME UP and
POWER buttons at the same time.
Upon initial power up of the MC602 or upon applying power
OPERATION - Your MUSICAL INTERCOM HAND HELD CONTROLLER is an RF
remote control which means that it will work anywhere in or around your house (you
do not have to be in the same room as the master). The system also has a unique
code in the transmitter that is learned by the MC602, virtually insuring that no one else
can interfere with your system and you will not interfere with anyone else.
to FM.
2. UP button - active only when the MC602 is ON and the FM or AM source
is selected. This button is used to scan up through the FM or AM memory presets. To
go up to the next preset, the UP button is simply pressed momentarily. The MC602
will tune in the next preset station (the sequence is A1, A2, A3, A4, B1, B2, B3, B4,
A1, A2, ...). The band will not change (stays in AM or FM).
NOTE: If the P1 and P2 jumpers are set to the strong station scanning mode then
the UP button will scan to the next strong station just like the TUNING UP button
[automatic search] (See section 8) on the master.
3. DOWN button - active only when the MC602 is ON and the FM or AM
source is selected. This button is used to scan down through the FM or AM memory
presets. To go down to the next preset, the DOWN button is simply pressed
momentarily. The MC602 will tune in the previous preset station (the sequence is B4,
B3, B2, B1, A4, A3, A2, A1, B4, B3, ...). The band will not change (stays in AM or
FM).
NOTE: If the P1 and P2 jumpers are set to the strong station scanning mode then
the DOWN button will scan to the next strong station just like the TUNING DOWN
button
[automatic search] (See section 7) on the master.
Hand Held RF Remote Control
1. SOURCE button - active only when the MC602 is ON. This button is used
to select the audio source (FM, AM, AUX input, or TAPE input) which the MC602 will
output to the Music Speakers. Each time the SOURCE button is momentarily
pressed, the audio source changes. The sequence is FM, AM, AUX, TAPE, and back
16
Note: To change the function of the TUNING UP and DOWN buttons to select all
strong stations, instead of memory presets, select the SCAN STATIONS mode as
shown in Appendix B.
4. VOLUME UP [ON] button - always active. This button is used to
increase the audio level of the selected source (FM, AM, AUX, or TAPE) which is sent
to all the Music Speakers. Pressing this button also turns the MC602 ON if it is OFF.
5. VOLUME DOWN [OFF] button - active only when the MC602 is ON.
This button is used to decrease the audio level of the selected source (FM, AM, AUX,
or TAPE) which is sent to all the Music Speakers. Pressing this button also turns the
MC602 OFF when its audio level is all the way down.
NOTE: For best performance, the individual music speaker volume controls should
be turned to maximum volume (fully clockwise) and then the volume adjusted with the
17
Page 11
VOLUME buttons on the MCTX HAND HELD CONTROLLER for the proper listening
volume (this is really setting the maximum listening volume). The individual music
speaker volume control can then be adjusted in rooms which require less volume.
MC602 TROUBLESHOOTING TIPS
ADVANCED FEATURES
APPENDIX A - Monitor Override
The way that the MONITOR function works is dependant on the configuration of the
three jumpers P1, P2, and P3 on the back of the master next to the terminal block for
the green wires. The MC602 comes from the factory with only the P1 pins jumpered
(the other jumper is on only 1 pin of P2 in case it is needed). In this configuration the
monitored room does not hear any intercom communication or the chime.
The MC602 can also be configured for MONITOR OVERRIDE. This is done by
removing the jumper from the P1 pins, inserting it on both P3 pins, and moving the P2
jumper onto both P2 pins. (A pair of needlenose pliers may be necessary to move the
jumpers). In MONITOR OVERRIDE the monitored room hears all intercom
communications including the chime.
APPENDIX B - Station Scanning
The way that the SCAN function works is dependant on the configuration of the two
jumpers P1 and P2 behind the face panel just above and to the right of the display on
the master. The following table shows how the SCAN function operates:
Problem What to Check
_____________________________________________________________
No FM or 1. Power turned on (Section 3)
AM reception 2. Proper Source selected (Section 6)
3. Speaker Switches set correctly (Section 18)
Display Flashing Extended loss of electrical power
Set clock and auto * (Section 5)
Program radio frequencies (Section 9)
Program REMOTE CONTROL TRANSMITTER(s)
_____________________________________________________________
Feedback or Squeal Intercom Volume CONTROL adjusted properly (Section
16)
Weak or no Intercom 1. Intercom Volume CONTROL adjusted properly
(Section 16)
2. Speaker Switches set correctly (Section 18)
3. Room Speaker Volume CONTROL adjusted
properly (Section 22)
_____________________________________________________________
Display Flashing Reset Not complete from power loss
Strange Characters
Remove the face panel and touch the four silver solder
dots next to the word RESET to the right of the twelve
buttons.
18
This should insure a proper reset of the MC602--the
display should blink 12:00.
Set clock and auto * (Section 5)
Program radio frequencies (Section 9)
Program REMOTE CONTROL TRANSMITTER(s)
19
Page 12

STATEMENTS OF WARRANTY
M&S SYSTEMS Limited 2-Year No-Fault Product Warranty
M&S SYSTEMS warrants for 2 years all products to be free of defects (M&S SYSTEMS honors the
10-Year No-Fault warranty for AirV ac Gold power units. See sec tion below). The warranty period
begins from either (1) the date of “first user” purchase of this product or (2) the first close of escrow
date on a residence in which this new product was originally installed. This warranty extends to the
original user of the product and to each subs equent owner of the product during t he term of t his
warranty. M&S SYSTEMS will repair or replace, at its optio n, pa rts and materials at no charge. Parts
supplied under this warranty may be new or rebuilt at the option of M&S SYSTEMS.
If, during the limi ted warranty period, it appears as t hough thi s produc t c ontai ns a def ect whi ch is
covered by this limited warranty, call our toll free service number before dismantling the
product (1-800-877-6631). Remember to attain a Return Authorization Number (RAN) before
returning any product to M&S SYSTEMS. Send this product freight pre-paid and insured to
our service center for warranty repair. You will be advised on shipping instructions when you call
the toll free service number. M&S SYSTEMS will return the repaired product freight pre-paid within
the U.S.A. The inst alling dealer or distributor m ay assist you, a t you r cho ice and expense, with
returning product for repair. Please include a brief description of the problem and a dated proof-ofpurchase receipt with any product that is returned for warranty repair. ANY PRODUCT RETURNED
WITHOU T A RETUR N AUTHORIZATION NUMB ER WIL L BE REFUSED.
THIS LIMITED WAR RANT Y IS IN LIEU OF A NY OTH ER WARRA NTIE S, EXPRESS OR IMPLIED,
INCLUDING ANY IMPLIED WARRANTY OF MERCHANTABILITY OR FITNESS FOR A
PARTICULA R PURPOSE OR OTHERWISE, AND OF ANY OTHER OBLIGAT IONS OR LIABILITY
ON THE SELLER’S PART. THIS LIMITE D WARRANTY DOES NOT COVER DAMAGE C AUSED
BY IMPROPER INSTALLATION, THE VIOLATION OF APPLICABLE BUILDING OR
ELECTRICAL CODES, OR THE USE OF NON-M&S/NON-AIRVAC WIRE, CABLE OR WALL
HOUSING S. THIS LIM ITED WARRANTY APPLIES ONL Y TO PRODUCTS INS TALLED IN A
PRIVATE RESIDENCE.
UNDER NO CIRCUMSTANCES SHALL THE SELLER BE LIABLE FOR CONSEQU ENTIAL,
INCIDENTAL OR SPECIAL DAMAGES ARISING IN CONNECTION WITH USE, OR I NABILITY
TO USE THIS PRODUCT. IN NO EVENT SHALL SELLER’S LIABILITY, FOR BREACH OF
WARRANTY, BREACH OF CONTRACT, NEGLIGENCE, OR STRICT LIABILITY, EXCEED THE
COST OF THE PRODUCT COVERED HEREBY. NO PERS ON IS AUTHORIZED TO ASSUME
FOR US ANY OTHER LIABILITY IN CONNECTION WITH THE SALE OF THIS PRODUCT.
Some states do not allow the exclusion or limitation of consequential, incidental or special damages,
so the above limitation or exclusion may not appl y to you. This limited warranty gives you specific
legal rights, and you may also have other rights which vary from state to state.
20
IMPORTANT: Al l M&S Wire and Cable Products are U.L. Approved
Printed in U.S.A. Lit. No. 115758 Rev. C
21
 Loading...