

Page 1
MC2000
Owner’s Manual
2861 Congressman Lane | Dallas, Texas 75220 | 800.877.6631 | www.mssystems.com
Page 2

Copyright 2003 by M&S Systems
MC2000 and the M&S Digital Networks logo are registered trademarks of M&S
Systems.
RealOne Player is a registered trademark of RealNetworks, Inc.
Windows is a registered trademark of Microsoft Corporation.
Page 3

Table of Contents
MC2000 Owner’s Manual...................................................................................... 1
Introduction.............................................................................................................. 3
System Description and Features........................................................................ 3
Important Safety Instructions for the MC2000 ................................................ 5
Getting Started: Set up the System ..................................................................... 7
Set the Time ............................................................................................................. 9
Set the Date............................................................................................................10
Name a Roomstation............................................................................................11
Room Features.......................................................................................................12
Door Stations.........................................................................................................14
Setting up a Password .......................................................................................... 16
Establishing a Password................................................................................. 16
Removing or Changing a Password ............................................................18
Establish Intercom Settings ................................................................................. 19
Using the MC2000 ................................................................................................21
Main Menu...............................................................................................................23
Music Menu.............................................................................................................24
Select and Set a Radio Station ............................................................................25
Select a Radio Station.................................................................................... 25
Set a Preset Station........................................................................................ 26
Playing from Local and Remote Devices..........................................................27
Listen to a Local Device................................................................................ 27
Listen to a Remote Device........................................................................... 27
Wake Menu ............................................................................................................29
Sleep Menu..............................................................................................................30
Page Menu............................................................................................................... 31
Intercom Menu ...................................................................................................... 32
Monitor Menu ........................................................................................................33
Answering a Doorbell ..........................................................................................34
2861 Congressman Lane | Dallas, Texas 75220 | 800.877.6631 | www.mssystems.com
Page i
Page 4

Info Menu ................................................................................................................34
Troubleshooting ....................................................................................................36
Warranty................................................................................................................. 37
Definitions...............................................................................................................39
Index......................................................................................................................... 40
Figure Index ............................................................................................................41
2861 Congressman Lane | Dallas, Texas 75220 | 800.877.6631 | www.mssystems.com
Page ii
Page 5

Introduction
V
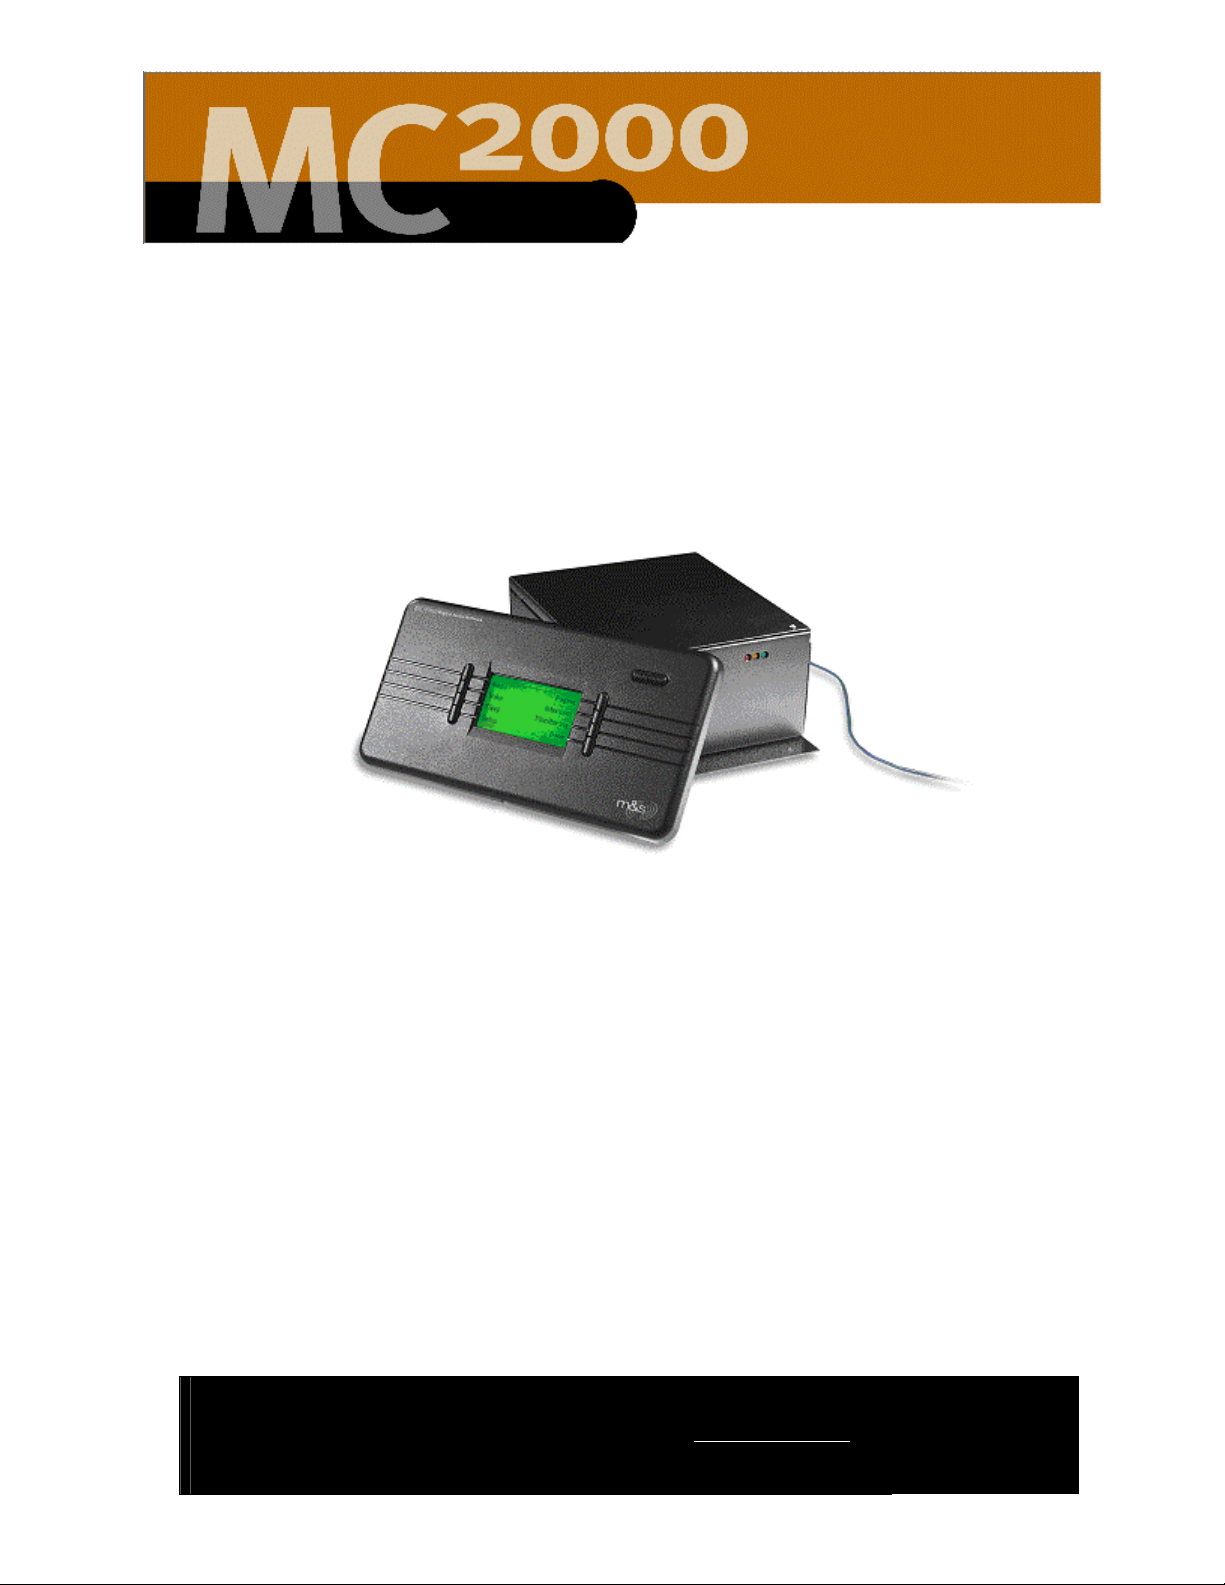
Built around a digital network hub, the MC2000 is a whole-house distributed audio
communications system complete with multi-source music, door chimes, intercom,
paging, and monitoring.
The illustration below shows you the layout of your new MC2000 room station.
olume Controls
Display Menu
Microphone Control Buttons
Figure 1 - Room Station Layout
Keep this manual in a safe place for future reference. If you lose the manual, you can
download it from the M&S Systems web site (www.mssystems.com). You will need
Adobe Acrobat Reader (www.adobe.com) to view the file.
System Description and Features
The MC2000 System includes:
• A digital hub installed in an environmentally protected closet or utility area.
• Up to ten room stations installed in rooms throughout the house.
• Up to two door stations for the front and rear doors.
• Two tuners for AM/FM radio listening.
• An optional digital media manager for playing MP3 files.
Although networked together, each room station is independent of every other one
in the house. You can play your favorite oldies albums in one room while the kids
2861 Congressman Lane | Dallas, Texas 75220 | 800.877.6631 | www.mssystems.com
Page 3
Page 6

have their favorite rock station blaring in another room. You can even select the
music playing in another room to play in the room you’re in.
You can program the MC2000 to let you go to sleep with music and to wake up
with music. The intercom feature lets you communicate with someone at the front
door or talk to someone in another room. The paging feature lets you make
announcements (for example, “Dinner is ready. Everyone wash hands and come to
the table!”). You can even monitor another room (the baby’s room, for example) if
you wish.
This manual provides directions and guidelines for using the MC2000 System and
programming it to meet your needs.
If you have any questions not answered in this manual please contact the M&S
Systems technical support team at 1-800-366-9422 or for online support, go to our
web site: www.mssystems.com.
2861 Congressman Lane | Dallas, Texas 75220 | 800.877.6631 | www.mssystems.com
Page 4
Page 7

Important Safety Instructions for the MC2000
The MC2000 must be installed by certified M&S Systems dealers or
installers, and must conform to all local building and electrical codes.
DO NOT expose the MC2000 to moisture. Doing so can create fire or shock
hazards and void the warranty.
DO NOT attempt to service this product yourself as opening or removing covers
may expose you to dangerous voltage or other hazards and will invalidate your
warranty. Neither the hub nor the room stations contain any user-serviceable parts.
REFER ALL SERVICING TO QUALIFIED SERVICE PERSONNEL.
The lightning flash with arrowhead symbol within an equilateral triangle is intended
to alert the user to the presence of uninsulated “dangerous voltage” within the
product’s enclosure that may be of sufficient magnitude to constitute a risk of shock
to persons.
The exclamation point within an equilateral triangle is intended to alert the user to
the presence of important operating and maintenance (servicing) instructions in the
literature accompanying the product.
USE ONLY M&S Systems certified replacement parts and have them installed by an
MC2000 certified dealer or installer. Unauthorized substitutions can result in fire,
electric shock, or other hazards.
2861 Congressman Lane | Dallas, Texas 75220 | 800.877.6631 | www.mssystems.com
Page 5
Page 8

Unplug the MC2000 from the wall outlet prior to cleaning. Use only a damp cloth to
clean the hub cabinet, room stations, and speakers. Do not wipe the LCD with a
damp cloth; use only a soft cloth on the LCD screen. Do not use liquid cleaners or
aerosol cleaners.
2861 Congressman Lane | Dallas, Texas 75220 | 800.877.6631 | www.mssystems.com
Page 6
Page 9
Getting Started: Set up the System
We recommend you customize your MC2000 prior to using the system.
Customizing the system will make the system easier to use and will allow you to
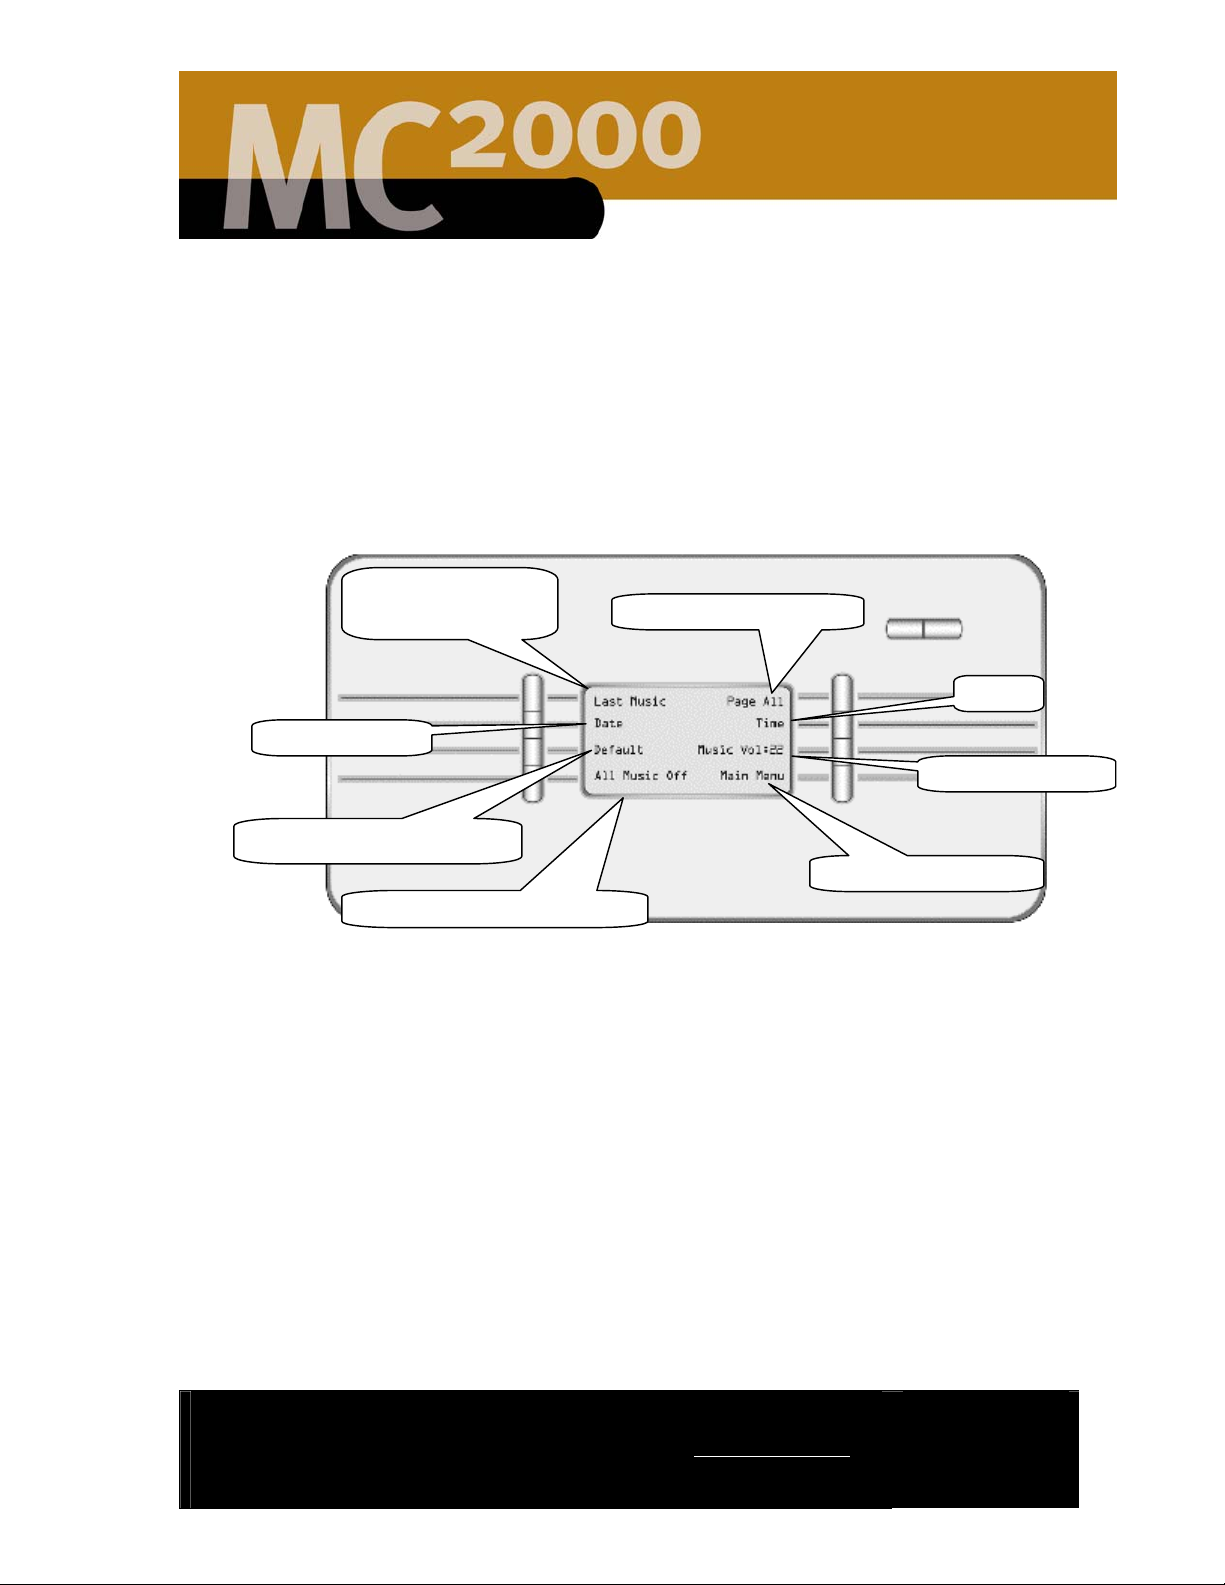
access all system features. The Greeting Menu is shown in Figure 2. This is the
default MC2000 room station menu. This menu provides you with single button
access to several key features. Each of these features will be described later in this
document.
Currently selected
audio media
Today’s date
Page all room stations
Time
Volume settings
Current room configuration
Access the main menu
Room/system - on/off control
Figure 2 - Greeting Menu
The Setup Menu (shown in Figure 5) allows you to configure the basic system and
individual room settings. Begin by configuring the MC2000 system through the
Setup Menu. To get to the Setup Menu first press the Main Menu button on
the room station, as shown in Figure 2. Then follow these steps:
2861 Congressman Lane | Dallas, Texas 75220 | 800.877.6631 | www.mssystems.com
Page 7
Page 10
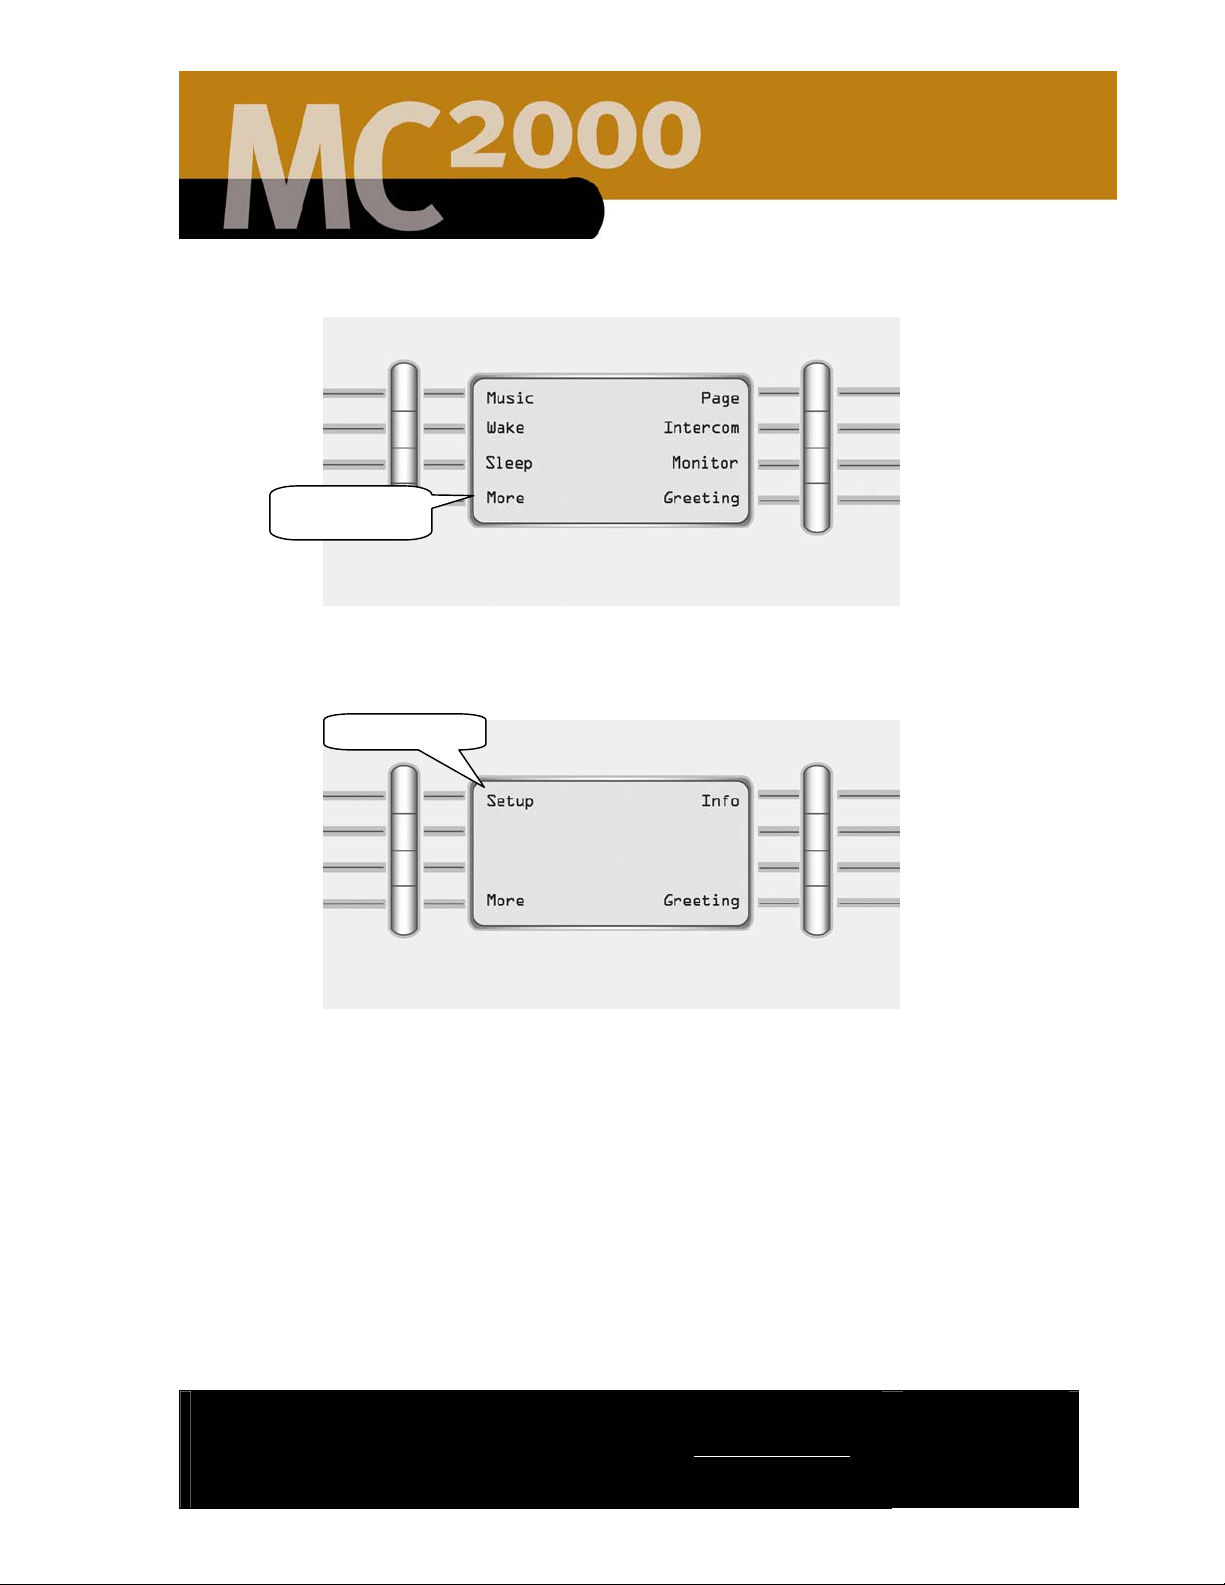
1. Press the More button shown in Figure 3.
More Button
Figure 3 - Main Menu
2. Press the Setup button shown in Figure 4.
Setup Button
Figure 4 - More Screen
2861 Congressman Lane | Dallas, Texas 75220 | 800.877.6631 | www.mssystems.com
Page 8
Page 11

The Setup Menu is where you establish the time, date, and year settings and
A
customize the system to meet your needs for each room with the room station.
Set the Date
Enable or disable
password function
Figure 5 - Setup Menu
Set the Time
The Set Time menu allows you to set or change the current system time. To set
or change the time on the MC2000 system, follow the steps shown below.
1. Press the Set Time button shown in Figure 5.
Set the time
Adjust intercom
settings
The current system time
ssign names to
the roomstations
Set the privacy features for
the room stations
Set options for the
door stations
Return to the Main Menu
Down arrows
Cancel the changes
Minute setting
Hour setting
Up arrows
Save the settings
Figure 6 - Set Time Menu
2. The Set Time menu shown in Figure 6 displays the current system time. To
change the time use the up and down arrow keys to change the hour and the
minutes.
2861 Congressman Lane | Dallas, Texas 75220 | 800.877.6631 | www.mssystems.com
Page 9
Page 12

3. After you have the time at the correct setting, press Set to save the settings or
Cancel to discard them.
After 30 seconds of inactivity, the room station screen will return to the Greeting
Menu shown in Figure 2.
Set the Date
The Set Date menu allows you to set or change the current system date. Follow
the steps below to set or change the date.
1. Press the Set Date button shown in Figure 5.
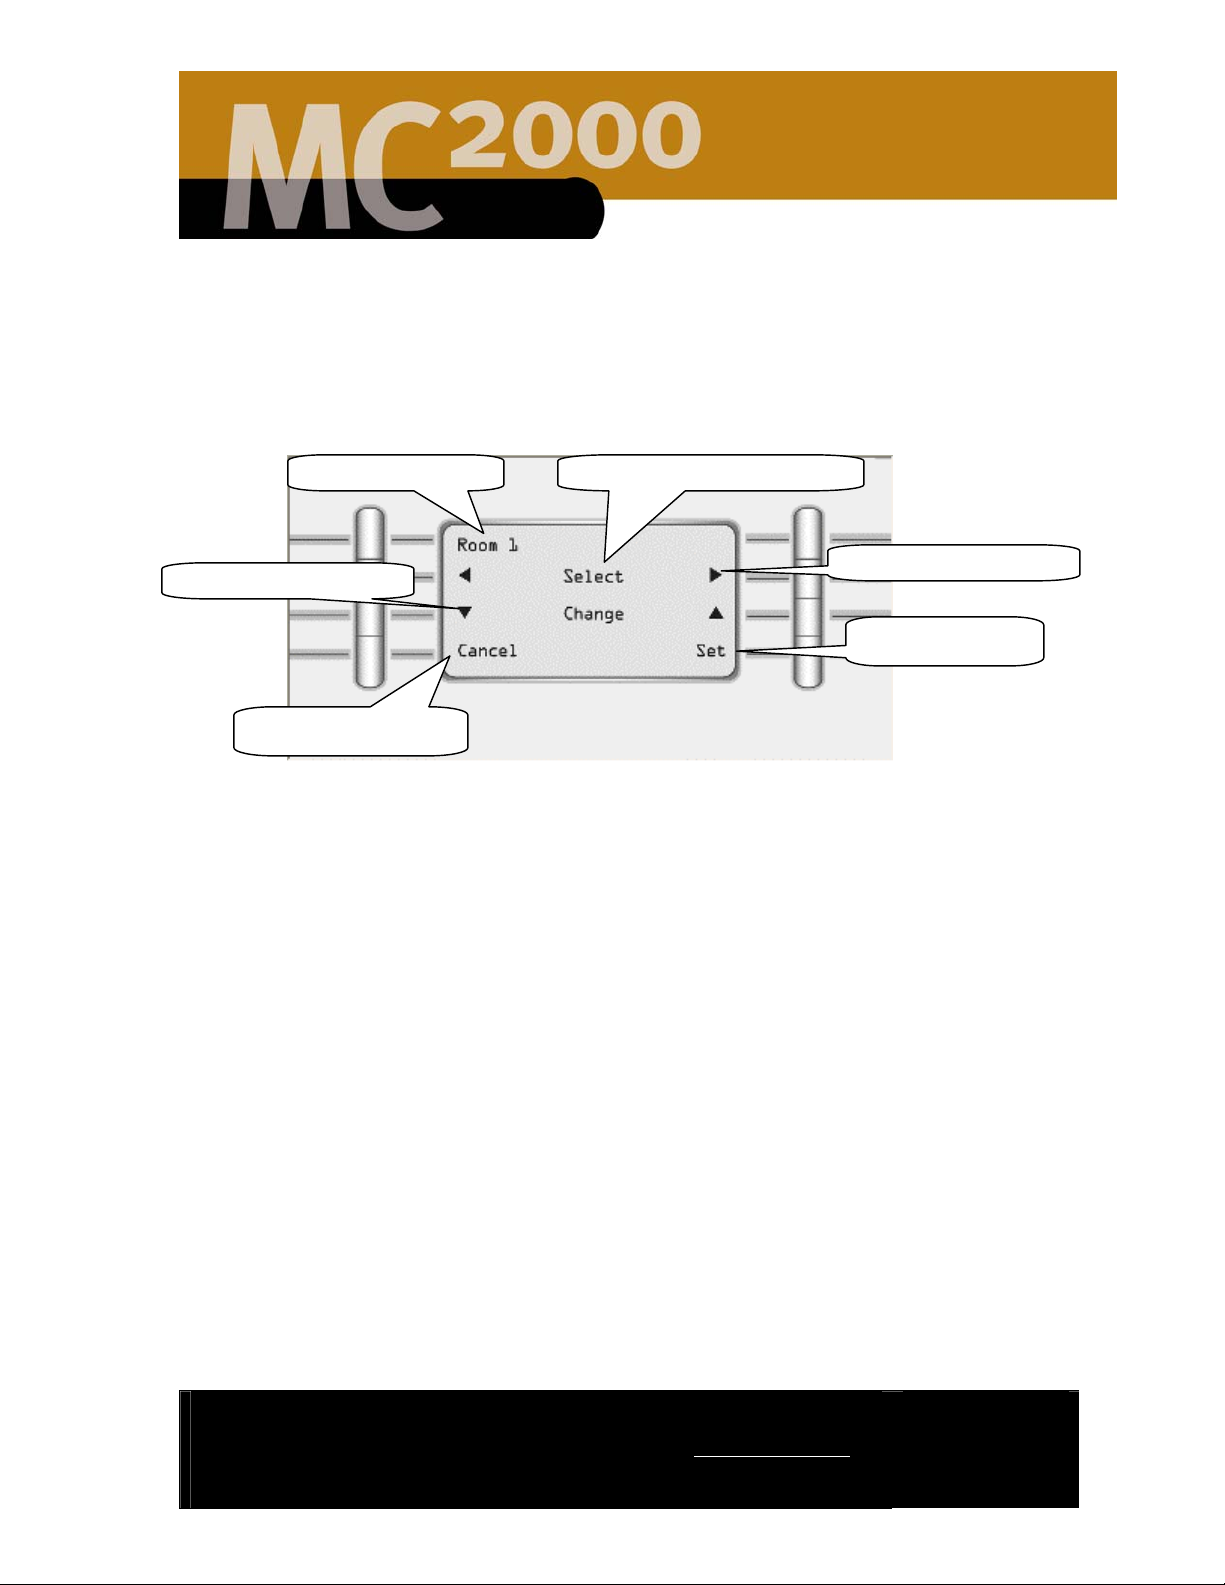
The current system date
(month/day/year)
Decrease setting
Cancel the changes
Modify month, day
& year setting
Select month, day
& year to change
Increase setting
Save the settings
Figure 7 - Set Date Menu
2. The Set Date menu shown in Figure 7 displays the current system date. To
change the date, use the select arrows to choose between the month, day and
year.
3. Once you have the item highlighted use the change arrows to increase or
decrease the value of the date.
4. After 30 seconds of inactivity, the room station returns to the Greeting Menu
shown in Figure 2
2861 Congressman Lane | Dallas, Texas 75220 | 800.877.6631 | www.mssystems.com
Page 10
Page 13
Name a Roomstation
The Name Room menu allows you to customize each room station’s system
name. To change the room station name, follow the steps shown below.
1. Press the Name Room button shown on Figure 5.
Name of the room
Select the letters of the name.
Up and down arrows.
Cancel the changes
Figure 8 - Name Room Menu
2. To set the room name use the right and left arrows (shown in Figure 8) to select
the character to change and the up and down arrows to change the letters or
numbers in the room name. The up and down arrows cycle through upper case
letters, then lower case letters and finally numbers. The MC2000 system
supports room names up to 12 characters long.
3. Press Set to save the changes or Cancel to discard them.
After 30 seconds of inactivity, the room station returns to the Greeting Menu as
shown in Figure 2.
Right and left arrows.
Save the settings
2861 Congressman Lane | Dallas, Texas 75220 | 800.877.6631 | www.mssystems.com
Page 11
Page 14
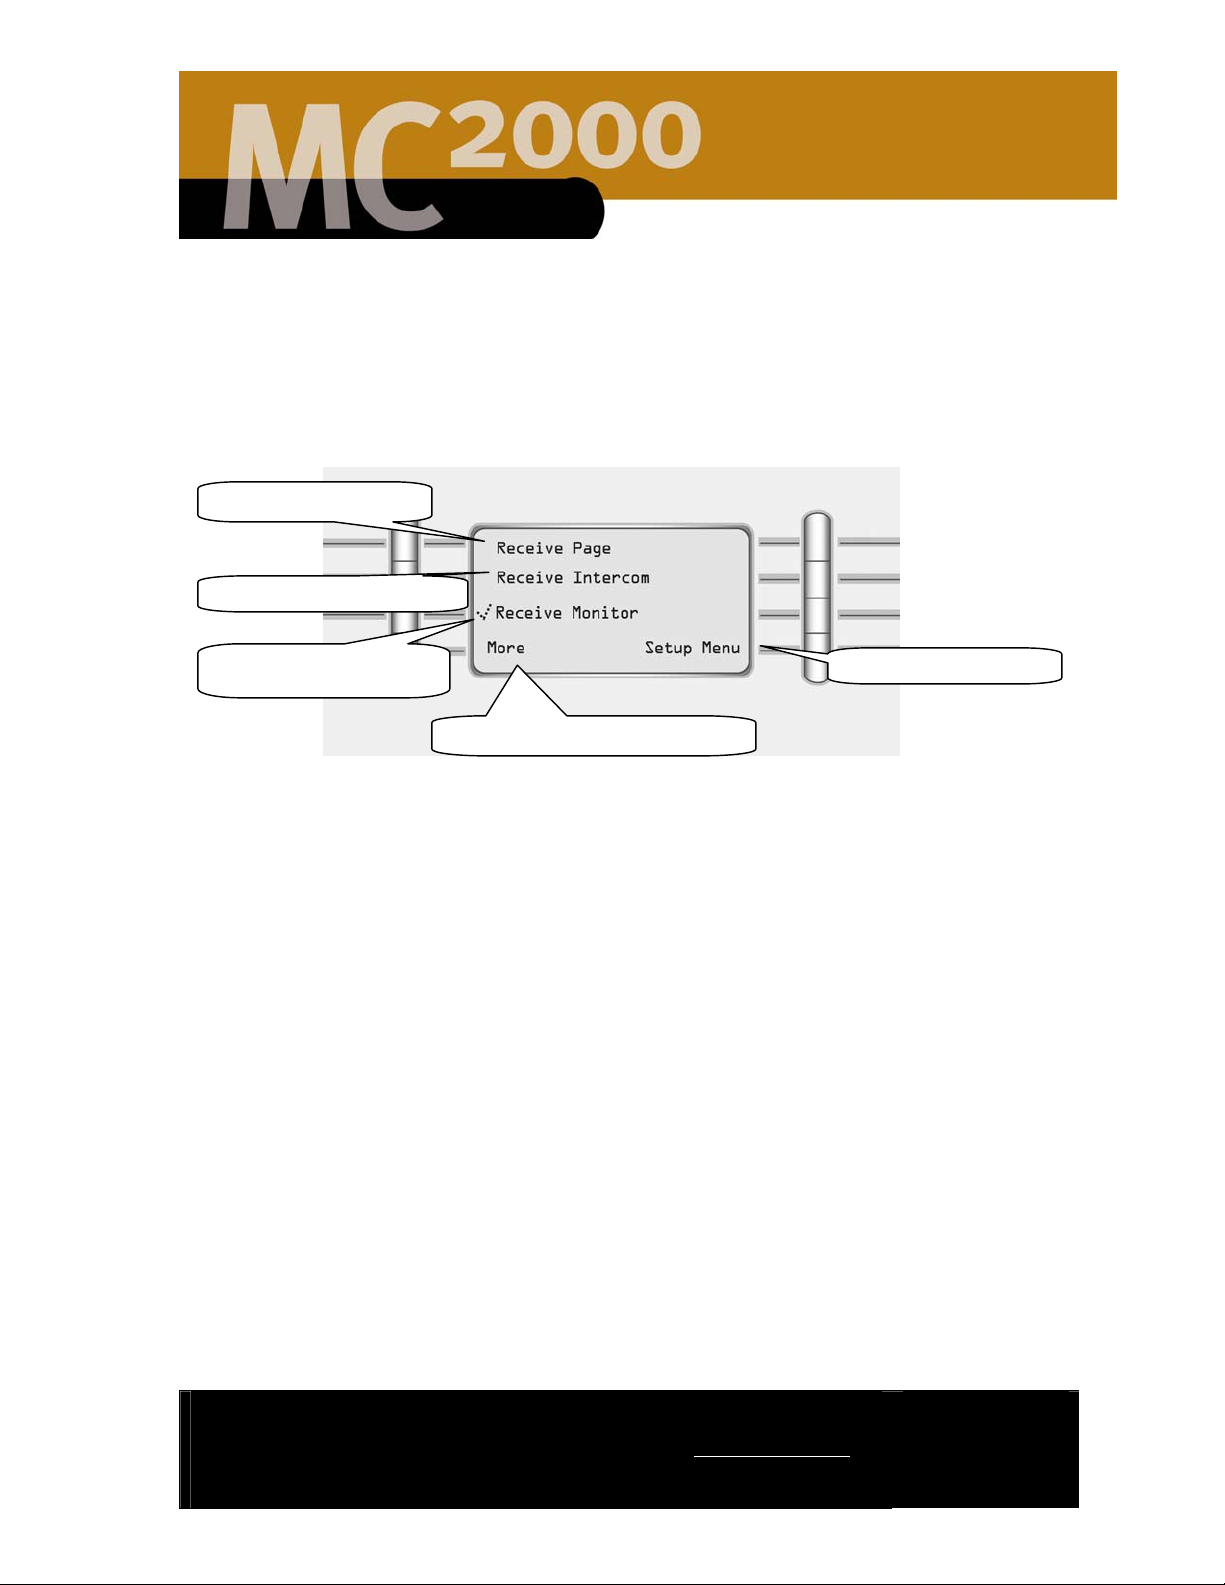
Room Features
The Room Features menu allows you to customize each room’s intercom, paging
and monitoring settings. These settings must be adjusted at each room station on
the MC2000 system. To set the options for a room station follow the steps
presented below.
Receive page toggle
Receive intercom toggle
Receive monitor toggle
Press to get to additional options
Figure 9 - Room Features Menu
Return to setup menu
All options are toggles; pressing the button alternates between turning the feature
on and off. A check mark () next to an option indicates that the feature is turned
on. The features included on your MC2000 System include:
• Receive Page
• Receive Intercom
• Receive Monitor
• Send Page
• Send Intercom
• Send Monitor
• Receive Doorbell
• Wake Control
• Sleep Control
• Mode Control
• Music Control
• Presets Control
These settings can be overridden by changing the room setting on the Greeting
Menu shown in Figure 2. If Default is selected all options are turned on. If Nap is
selected the following options are disabled; Receive Page, Receive Intercom, and
Receive Doorbell. The Privacy setting turns off all the receive options (including
page, intercom, monitor, and doorbell). The Custom setting allows you to pick and
choose which options you want active.
2861 Congressman Lane | Dallas, Texas 75220 | 800.877.6631 | www.mssystems.com
Page 12
Page 15

To select one of these room station configurations press the button shown in Figure
2, each button press will toggle between the pre-configured room settings.
After 30 seconds of inactivity, the room station returns to the Greeting Menu
shown in Figure 2.
2861 Congressman Lane | Dallas, Texas 75220 | 800.877.6631 | www.mssystems.com
Page 13
Page 16

Door Stations
r
p
The MC2000 system supports two door stations. Once the doorbells are installed,
they will ring on all room stations. Whether the doorbells can be heard or
monitored from an individual room station depends on how it’s been set up. To set
up the door station functionality for a particular room station, follow the steps
shown below.
Use the same method shown below to establish the defaults for each of the two
door stations. To get to the Door Station Menu select Door Station on the Setup
Menu shown in Figure 5.
Setup for front doo
Door station name
Figure 10 – Door station Menu
1. Press the Setup button for the desired door (front door or back door) as
shown on Figure 10. The Door Station Setup menu is shown in Figure 11.
Give a room
station a name
Setup for back door
Return to setup menu
Set door system volume
Return to door station
menu
setu
Figure 11 – Door Station Setup Menu
2861 Congressman Lane | Dallas, Texas 75220 | 800.877.6631 | www.mssystems.com
Page 14
Page 17

2. To change the name of a door station, press the Name Station button. The
y
default MC2000 settings are “Front Door” and “Rear Door”. The Name Station
menu looks like the Name a Room menu shown in Figure 8.
3. To set the microphone volume and acoustic decay press the Intercom button
shown in Figure 11. These settings allow you to enhance the sound of your
MC2000 system and to set the sensitivity of the microphone.
Use the top set of up and
down arrows to set the
microphone volume
Cancel the settings
Figure 12 - Microphone Setting Menu
Note: acoustic decay relates to the fact that acoustic echoes decay exponentially
with time. The settings below allow the echo canceller in the room stations to
perform better with a known decay rate for a particular room.
Setting Name Actual Value Usage
None 0 dB/ms For acoustically live room (good
Slight .19 dB/ms For acoustically live rooms (good
Use the bottom set of up
and down arrows to set the
acoustic decay
Store the settings in
stem
the s
echo/sound reflections)
echo/sound reflections)
Default .38 dB/ms For typical rooms with carpet
(default setting)
Rapid .75 dB/ms For acoustically dead rooms (poor
echo/sound reflections)
After 30 seconds of inactivity, the room station returns to the Greeting Menu
shown in Figure 2.
2861 Congressman Lane | Dallas, Texas 75220 | 800.877.6631 | www.mssystems.com
Page 15
Page 18

Setting up a Password
The Password menu allows you to establish a four-digit password for your
MC2000 system. This password protects your system settings and keeps them from
being changed. The MC2000 passwords are numerical (numbers 1 – 8) and are four
numbers in length. Once a password is established, it must be entered at the room
station before making any changes to the room station. Please record your
password and keep it in a safe place.
Establishing a Password
Establishing a password is a two-step process.
1. To get to the Password menu Press the Main Menu button on the greeting
screen shown in Figure 2
2. Press the More button shown on the Main Menu in Figure 3
3. Press the Setup button shown on the More Menu in Figure 4
4. Press the Password button shown on the Setup Menu in Figure 5.
5. The Enable Password screen appears shown in Figure 13.
Figure 13 - Enable Password Screen
6. Press the Enable Password button. Enter a four-digit number by pressing
the buttons next to the desired numbers shown in Figure 14. You may use
each number as many times as you wish. Please record your password and
keep it in a safe place.
2861 Congressman Lane | Dallas, Texas 75220 | 800.877.6631 | www.mssystems.com
Page 16
Page 19

Figure 14 - Enter Password Screen
7. You are required to confirm the password by re-entering the same four
numbers. A confirmation screen tells you the password has been set. DO NOT
FORGET THIS NUMBER! Record it in a safe place for safekeeping. If you
forget the password number, you will not be able to make changes to the setup
menu (for example, changing the time) and will have to contact M&S Systems
technical support team at 1-800-366-9422 to get instructions for resetting your
password.
Figure 15 - Confirm Password Screen
After ten seconds of inactivity, the room station returns to the Enable Password
screen shown in Figure 13.
After 30 seconds of inactivity, the room station returns to the Greeting Menu
screen shown in Figure 2.
2861 Congressman Lane | Dallas, Texas 75220 | 800.877.6631 | www.mssystems.com
Page 17
Page 20

Removing or Changing a Password
Follow the steps below to change or remove your MC2000 password. You will need
to have the current password to complete this step.
1. Press Setup from the Main Menu shown in Figure 3. You will be prompted to
enter the password as shown in Figure 16.
Figure 16 - Enter Password Screen
2. Enter the password.
3. Press the Password button shown in Figure 5.
4. To change the password, press the Change Password button shown in Figure
17.
Figure 17 - Change or Disable Password Screen
2861 Congressman Lane | Dallas, Texas 75220 | 800.877.6631 | www.mssystems.com
Page 18
Page 21

5. Enter the new password following the same steps previously described and as
p
y
shown in Figure 14.
6. Confirm the password by reentering it. You will receive a password confirmation
screen. Please record the new password and keep it in a safe place.
7. To disable the password follow steps 1 – 3, but select the Disable Password
button as shown in Figure 17. The password is now disabled.
After 30 seconds of inactivity, the room station returns to the Greeting Menu as
shown in Figure 2.
Establish Intercom Settings
Pressing the Intercom key produces the same Microphone Volume and Acoustic
Delay menu seen in the Door Station option. This allows you to set the volume
control and microphone sensitivity for the intercom.
1. To adjust the intercom settings press the Main Menu button from the
greeting menu shown in Figure 2.
2. Press the More button on the Main Menu shown in Figure 3.
3. Press the Setup button on the More Menu shown in Figure 4.
4. Press the Intercom button on the Setup Menu shown in Figure 5.
5. You will see Intercom adjustment screen shown in Figure 18.
6. Use the arrows to adjust the intercom settings.
Use the bottom set of
Use the top set of up
and down arrows to set
the micro
hone volume
Cancel the settings
up and down arrows to
set the acoustic decay
Store the settings in
stem
the s
Figure 18 - Intercom Settings Adjustment Screen
2861 Congressman Lane | Dallas, Texas 75220 | 800.877.6631 | www.mssystems.com
Page 19
Page 22

Note: acoustic decay relates to the fact that acoustic echoes decay exponentially
with time. The settings below allow the echo canceller in the room stations to
perform better with a known decay rate for a particular room.
Setting Name Actual Value Usage
None 0 dB/ms For acoustically live room (good
echo/sound reflections)
Slight .19 dB/ms For acoustically live rooms (good
echo/sound reflections)
Default .38 dB/ms For typical rooms with carpet
(default setting)
Rapid .75 dB/ms For acoustically dead rooms (poor
echo/sound reflections)
After 30 seconds of inactivity, the room station returns to the Greeting Menu.
2861 Congressman Lane | Dallas, Texas 75220 | 800.877.6631 | www.mssystems.com
Page 20
Page 23

Using the MC2000
A
The Greeting Menu is the default menu for the room station display. Any time a
menu is inactive for more than 30 seconds, the display returns to this menu.
Currently selected
audio media
Today’s date
Room control
Room/system - on/off control
Figure 19 - Greeting Menu
• Currently selected audio media provides access to the current music playing
or to the last music played in the room.
o Last Music pressing this button provides quick access to the last
music played in the room. When music is playing this location
displays the current music source.
FM/AM Radio Station pressing this button will allow you to
Page all button
Current time
Volume setting
ccess the main menu
scroll through and select preset radio stations configured for
this room.
DM pressing this button takes you to the currently playing
DMM song. From this screen you can change or control the
song playing.
Local pressing this button has no effect on the local source.
Remote pressing this button allows you to choose between
the two radio stations currently playing in the home and the
remote devices connected to the system
• Date shows the month, day of the month, and the year.
2861 Congressman Lane | Dallas, Texas 75220 | 800.877.6631 | www.mssystems.com
Page 21
Page 24

• Room Control toggles between Default, Privacy, Nap, and Custom (see
Setup, page 12, for detailed information):
• Default: Someone in another room can monitor this room; send a page
to a person in this room, establish an intercom conversation with this
room, and the doorbell will ring over the speakers in this room.
• Nap: The room can be monitored, but the paging, intercom and doorbell
functions are inactive.
• Privacy: This is the equivalent of a “Do not disturb” sign: the room will
not hear the doorbell and it cannot be monitored, paged, or accept an
intercom call.
• Custom: Allows you to adjust the custom settings to meet your needs,
for example, receive pages and monitor the room, but deactivate the
intercom.
• The room/system control toggles between Room Music Off and All Music
Off. Room Music Off turns off the music in just this one room. All Music
Off turns off all the room stations in the house.
• Page All is a quick one-button command that allows you to send a page that
is broadcasted to all the room stations.
• Time shows the hour, the minutes, and whether it is AM or PM.
• The Volume setting toggles between music, doorbell chimes, and intercom
and shows the actual volume level for each. Use the volume control buttons
on the upper right of the room station to adjust the actual volume for each.
The plus button increases the volume, the minus button deceases the
volume.
• Use the Main Menu button to access the main and additional menus.
2861 Congressman Lane | Dallas, Texas 75220 | 800.877.6631 | www.mssystems.com
Page 22
Page 25

Main Menu
p
The Main Menu provides easy access to all MC2000 functions:
Music menu
Wake menu
Sleep menu
Additional options –
and information
setu
Figure 20 - Main Menu
Greeting (default
menu)
• Music: Select music sources.
• Wake: Set the time you want the music to come on.
• Sleep: Set the time you want the music to go off.
• More: Shows two additional functions:
o Setup: Set up all the system preferences for this room and the door
stations.
o Info: Used in diagnosing problems with the system.
• Page: Broadcast a message to another room station or to all room stations.
• Intercom: Establish an intercom conversation with a person in another
room.
• Monitor: Listen to another room, such as the baby’s room.
Greeting: Returns you to the default room station display menu.
Page menu
Intercom menu
Monitor menu
To select a menu option press the button next to the desired option. If the menu is
inactive for more than 30 seconds, it returns to the Greeting Menu shown in
Figure 19.
2861 Congressman Lane | Dallas, Texas 75220 | 800.877.6631 | www.mssystems.com
Page 23
Page 26

Music Menu
The Music menu contains the options for personalizing and managing your music
choices.
Select FM radio station
Select AM radio station
Digital Media
(MP3 files)
Room/system – on/off control
Figure 21 - Music Menu
• FM/AM: Select FM or AM radio frequency bands or preset stations.
• DM (Digital Music): Play MP3 music files stored on the optional Digital
Media Manager. If your MC2000 System does not have the Digital Media
Manager this space will be empty.
• Room Music Off/All Music Off: Turn music off in the room or on the
entire system. Room Music Off turns off the audio in the room off. All Music
Off turns off all music though out the house.
• Local: Play music from a locally attached device in the room. This requires
having a line level input (RCA) wall jack installed near the room station. To
play music from, for example, a portable CD player, plug it into the wall jack.
When you press the Local button, you can listen to music playing on the
connected device. You must have music playing on the connected device to
listen to it.
• Remote: Listen to music playing on a connected device in another room.
Press the button to see a list of all rooms on the system. Select the room
you want to listen to. The connected device in the other room must be
playing music for you to hear it.
• Tone: Adjust the sound quality for the room. This includes balance, treble,
loudness and bass settings.
• Main Menu: Return to the main menu shown in Figure 20.
Play music from a locally
connected music source
Listen to music
playing in another
room
Adjust music settings
for this room
Return to the Main menu
2861 Congressman Lane | Dallas, Texas 75220 | 800.877.6631 | www.mssystems.com
Page 24
Page 27

After 30 seconds of inactivity, the room station returns to the Greeting Menu
shown in Figure 19.
Select and Set a Radio Station
Select a Radio Station
NOTE: You must have the AM and FM antennas installed before you can select
radio stations (the antennas should have been installed by your dealer when the
MC2000 system was installed).
1. Select the frequency (AM or FM) from the music menu show in Figure 21.
The room station display shows (see Figure 22) the stations programmed
into the system for the selected frequency with the currently selected station
highlighted. (The system allows for ten FM and ten AM preset stations).
2. Select Tune/Presets as shown in Figure 22.
FM preset stations
Access to additional
preset stations
Return to music menu
Figure 22 - FM Menu
Tune new stations or
add/modify preset
stations
Return to main menu
2861 Congressman Lane | Dallas, Texas 75220 | 800.877.6631 | www.mssystems.com
Page 25
Page 28

3. Use the Tune up and down arrows shown in Figure 23 to move
incrementally though the radio band. Use the Seek buttons to find the
station you want. Select FM (or AM if you are programming an AM station)
to store the station in the system memory.
Radio station
tuned for FM 1
Toggle between preset
locations from 1 to 10
Down arrow keys
Select this to store
preset station
Figure 23 - Tune/Presets Menu
Set a Preset Station
1. Toggle between the FM 1 – FM 10 (see Figure 23) locations to find an empty
location or to modify an existing preset station. Each time you press this button
it will advance one preset location.
2. Select the preset location and tune in the radio station you would like to save
using seek and tune and the up and down keys. Seek takes you to the next radio
station and Tune allows you to manually advance through the radio frequency
locations.
3. Select Store to add the station to the system. After you select store the
FM/Preset menu will look as shown in Figure 24.
Up arrow keys
Takes you back to FM
presets menu
2861 Congressman Lane | Dallas, Texas 75220 | 800.877.6631 | www.mssystems.com
Page 26
Page 29

Figure 24 - Tune/Presets Menu - Stored Station
If the menu is inactive for more than 30 seconds, it returns to the Greeting Menu
shown in Figure 19.
Playing from Local and Remote Devices
The MC2000 lets you play music from a locally attached device such as a portable
CD player. You can even listen to an attached device in another room. Before you
can listen to an attached device, you must have a line level input line run from the
room station to a jack installed in the room.
Listen to a Local Device
1. Attach the device to the jack.
2. Select Main Menu on the room station and then select the Music Menu.
3. Select Local. You should hear the media in the attached device immediately.
Note: The connected local device must be playing for music to be heard over the
MC2000 system.
Listen to a Remote Device
1. Make sure the device with the selected media is attached to the jack in the other
room.
2. Select Main Menu from the Greeting Menu show in Figure 19 on the room
station and then select the Music Menu from the Main Menu shown in Figure
20.
3. Select Remote from the Music Menu show in Figure 21.
2861 Congressman Lane | Dallas, Texas 75220 | 800.877.6631 | www.mssystems.com
Page 27
Page 30

4. Select the room name playing the remote device you want to hear as shown in
Figure 25. You should hear the media playing from the remote device. You may
also select one of the radio stations displayed. These are stations currently tuned
to on the MC2000’s two tuners.
Currently tuned to
radio station
Currently tuned to
radio station
Remote source rooms
Return to music menu
Return to main menu
Access to additional
rooms on the
Figure 25 - Remote Menu
NOTE: The device must be playing music for you to pick up the audio stream. The
MC2000 cannot control the remote device. If the music does not play when the
remote device is selected, check the remote device to see if it is currently playing
music.
2861 Congressman Lane | Dallas, Texas 75220 | 800.877.6631 | www.mssystems.com
Page 28
Page 31

Wake Menu
The wake feature allows you to program the MC2000 room station to begin playing
music at a specific time, much like an alarm clock, or clock radio. You can store up
to five events, or wake times. The wake function works only with the AM or FM
source. To select the Wake Menu see Figure 20.
Toggle between the wake
events - up to 5 events
Change the Wake Event
Source.
Volume setting
Figure 26 - Wake Menu
• Event: The currently selected wake event. The MC2000 allows you to
preset up to 5 unique wake events per room on the system.
• Advance the Wake Event Source: It advances in this sequence: FM1,
FM2, FM3 (etc.), AM1, AM2, AM3 (etc.), Then back to FM1.
• Volume control. It is set at 06 for the lowest, and 34 for the highest. To
change the volume, press the button until it reads the desired volume.
• Cancel: Cancels all the changes and they will not be saved on the system.
• Enabled/Disabled: A toggle activating or deactivating the current event. If
the room station displays “Enabled” the wake even is scheduled. If the display
says, “Disabled” the wake event is not scheduled.
• Time setting: Press to access the time set menu. Use the up and down
arrow keys to set the hour and minute. Be sure and press Set to save the
time in the system.
• Snooze – This feature allows you to establish a preset snooze time of an
additional 5, 10 or 15 minutes. After the wake event is triggered, you can hit
snooze for the preset snooze time. The music will go off until the desired
number of minutes has passed then the music will start playing again.
Cancel the changes or Store
the wake settings.
Enables or disables the wake
event currently showing.
Sets the time of the event.
Snooze setting duration
Return to the Main Menu.
2861 Congressman Lane | Dallas, Texas 75220 | 800.877.6631 | www.mssystems.com
Page 29
Page 32

• Store: Changes do not occur unless you press the Store button and then
press Yes on the Overwrite Wake Event menu. You get a confirmation
message for both saving and canceling an event. If you do not press OK, the
menu times out after five seconds and returns to the Wake menu.
• Main Menu: Return to the Main Menu.
After 30 seconds of inactivity, the room station returns to the Greeting Menu
shown in Figure 19.
Sleep Menu
Use the Sleep menu to program the room station to play your selected music for a
specific amount of time. If you aren’t playing any audio when you enter the Sleep
menu, pressing the Sleep button (third button on the right) starts the last Sleep
audio source and initializes the timer at five minutes (the default time).
Preset FM stations
Play something from a
locally connected device
Preset AM stations
Access DM options
Return to Main Menu
Figure 27 - Sleep Menu
1. Use the buttons to select the media:
• FM or AM radio stations: to select a station (either FM or AM), press
the appropriate button, and then select Tune/Presets. You can either
select one of the preset stations or another one (see Select and Set a
Radio Station, page 25, for detailed instructions).
• DM: accesses the Digital Media Manager display
• Local: Play music from a connected device (or example, walkman). The
music must be playing on the connected device.
• Remote: Play music from a connected device in another room station.
The music must be playing on the connected device.
Play something from
a connected device
in another
roomstation
Set the time for music
to play
2861 Congressman Lane | Dallas, Texas 75220 | 800.877.6631 | www.mssystems.com
Page 30
Page 33

2. Press the Sleep button to start the audio, either the last audio played, or a
currently selected audio. Press the button again to increase the time. The
increments are 5, 10, 15, 30, 45, 60, 75, and 90 minutes.
After 30 seconds of inactivity, the room station returns to the Greeting Menu.
Page Menu
The Page function allows you to send an announcement to a particular room or to
broadcast a message to all room stations on the system. To send a page to all
rooms on the system you can select the Page All button on the Greeting Menu (see
Figure 19) and begin talking. To send a page to individual or a combination of rooms
follow the steps below:
1. Press Main Menu on the Greeting Menu shown in Figure 19.
2. Press Page on the Main Menu show in Figure 20.
3. Select the room (or combination of rooms) you wish to page. To select a room
press the button next to that room (as shown in Figure 28), the room name will
be highlighted when it is selected. Continue to select rooms if you want to send
the page to more than one room.
Rooms to select for
page
Select All to page all
rooms on the
Access to additional
rooms
Figure 28 - Page Menu
4. Press the Connect button shown in Figure 28 to initiate the page.
5. Begin speaking.
6. To conclude the page, press End.
2861 Congressman Lane | Dallas, Texas 75220 | 800.877.6631 | www.mssystems.com
Establishes Page
connection with desired
Return to main menu
Page 31
Page 34

After 30 seconds of inactivity, the room station returns to the Greeting Menu
shown in Figure 19.
Intercom Menu
The Intercom function allows you to establish a private conversation between two
room stations on the MC2000 system. The intercom connection will continue for 15
minutes or until the End button is selected. The intercom connection is “hands
free” once it is established. Note: if a room has the intercom function disabled you
will not be able to establish an intercom connection with that room.
Access to additional
rooms on the system
Room or door
location to select for
intercom call
Return to main menu
Figure 29 - Intercom Menu
1. To get to the Intercom Menu, select Main Menu from the Greeting
Menu shown in Figure 19.
2. Select Intercom from the Main Menu shown in Figure 20.
3. To initiate an intercom call, select the room you want to speak with. To
select a room just press the button next to the room name on the
screen. The screen will indicate if a connection is established.
4. If a room has intercom functionality disabled the screen will display an
“unable to establish connection with room X” message.
5. The party receiving the intercom call can just speak to reply to the call,
they do not have to go to the room station or press any buttons to reply.
6. Once the call is established the initiating room can walk away from the
room station and continue the conversation in a “hands free” mode.
7. To end the call, press End. The intercom connection times out after 15
minutes.
2861 Congressman Lane | Dallas, Texas 75220 | 800.877.6631 | www.mssystems.com
Page 32
Page 35

After 30 seconds of inactivity, the room station returns to the Greeting Menu
shown in Figure 19.
Monitor Menu
The Monitor function allows you to monitor a particular room on the MC2000
system. A room can only be monitored from one room station at a time. A room
cannot be monitored if the monitor function is disabled or if it is in Privacy mode.
To monitor a room follow the steps below:
Access to additional
rooms on the system
Room or door
location to select for
monitoring
Return to main menu
Figure 30 - Monitor Menu
1. To get to the Monitor Menu, select Main Menu from the Greeting
Menu shown in Figure 19.
2. Select Monitor from the Main Menu shown in Figure 20.
3. To monitor a room, select the room you wish to monitor. To select a
room just press the button next to the room name on the screen. The
screen will indicate if a connection is established.
4. If a room has monitor functionality disabled the screen will display an
“unable to monitor room X” message.
5. The room station in the room being monitored will display “Being
monitored by room X” on its screen.
6. To stop monitoring a room, press the End button.
After 30 seconds of inactivity, the room station returns to the Greeting Menu
shown in Figure 19.
2861 Congressman Lane | Dallas, Texas 75220 | 800.877.6631 | www.mssystems.com
Page 33
Page 36

Answering a Doorbell
r
When either of the doorbells ring, all room stations on the system will show the
message shown in Figure 31. The doorbell ring will interrupt any music playing or
intercom calls in progress.
If a room station has the doorbell function disabled or is in Nap or Privacy mode,
the doorbell will not ring over its speakers.
Location or name of
the door ringing
Selecting this will
cancel the screen or
ignore the doorbell
Figure 31 - Doorbell Ringing Menu
To answer the doorbell:
1. Select the Answer button (shown in Figure 31) to establish an intercom
2. If you do not want to speak with the party at the door select Cancel as
After 30 seconds of inactivity, the room station returns to the Greeting Menu
shown in Figure 19.
Info Menu
The information menu provides access to diagnostic and software version
information. You should only access this menu if you need to provide your dealer
with system information of if you need to reset a room station on the system.
Selecting this will establish
an intercom connection
with the doo
conversation with the door.
shown in Figure 31)
1. To get to the Info Menu (shown in Figure 32) select the Main Menu
option from the Greeting Menu shown in Figure 19
2. Select More from the Main Menu shown in Figure 20
3. Select Info from the Setup Menu shown in Figure 5
2861 Congressman Lane | Dallas, Texas 75220 | 800.877.6631 | www.mssystems.com
Page 34
Page 37

Used by your dealer to
obtain troubleshooting
and repair information
Information on how to
contact M&S Systems
Technical Support
Figure 32 - Info Menu
If you are in need of assistance with your MC2000 system please contact our
technical support team at the number shown in Figure 33.
Software version
running on your
MC2000 system
Returns you to the
Main Menu
Figure 33 - M&S Technical Support Information
2861 Congressman Lane | Dallas, Texas 75220 | 800.877.6631 | www.mssystems.com
Page 35
Page 38

Troubleshooting
If you need assistance with your MC2000 System please contact our technical
support team at 1-800-366-9422. You can also obtain system information, software
upgrades and technical support on our web site:
Prior to contacting your dealer or M&S Systems refer to the table below for systems
assistance. If the actions described in the table below do not correct your problem
please contact the M&S Systems technical support team or your dealer for
assistance.
MC2000 Problem Corrective Action
www.mssystems.com.
The room station indicates on the menu
that it is music but no music can be
heard over the speakers
You experience a power failure or
brown-out and the system does not
operate properly after power is
restored.
A page or intercom connection cannot
be heard over the speakers in a
particular room
The doorbell cannot be heard in a
particular room
1. Verify that the volume is set
properly.
2. If using a remote or local device,
make sure music is playing on those
devices.
3. Cycle power at the MC2000 hub by
turning the power switch off and
then back on.
1. Cycle power at the MC2000 hub by
turning the power switch off and
then back on.
1. Make sure the room station is
configured to receive page or
intercom calls
1. Make sure the room station is
configured to receive the door bell
2861 Congressman Lane | Dallas, Texas 75220 | 800.877.6631 | www.mssystems.com
Page 36
Page 39

Warranty
M&S Systems Limited 2-Year Warranty
M&S Systems warrants its products to be free of defects for 2 years. Except for the
AirVac Gold power units (See below). The warranty period begins on either (a) the
date of purchase or installation date of this product or (b) the date of closing on a
new residence in which this product was originally installed.
The warranty extends to the original user of the product and to each subsequent
owner of the product during the term of the warranty. M&S will repair or replace, at
its option, parts and materials at no charge. Parts supplied under this warranty may
be new or rebuilt at the option of M&S Systems.
If during the warranty period the product appears to have a defect, please call our
toll free service number (800-366-9422) prior to dismantling. Dismantling the
product prior to calling our service number may void the warranty. Before returning
any product to M&S Systems, obtain a Return Authorization Number (RAN) from
our service department. M&S Systems will return the repaired product freight
prepaid within the continental United States. ANY PRODUCT RETURNED TO
M&S SYSTEMS WITHOUT A RAN NUMBER WILL BE REFUSED.
This limited warranty is in lieu of any other warranties, express or implied, including
any implied warranty of merchantability or fitness for a particular purpose or
otherwise, and of any other obligations or liability on the seller’s part. This limited
warranty does not cover damage caused by improper installation, acts of God,
criminal acts, the violation of applicable building or electrical codes or the use of
non-M&S wire, cable (excluding CAT5 and RG-6) or wall housings.
Under no circumstances shall M&S Systems be liable for consequential, incidental or
special damages arising in connection with use, or inability to use this product. In no
event shall M&S Systems liability hereunder exceed the cost of the product covered
hereby. No person is authorized to assume for us or obligate us for any other
liability in connection with the sale of this product. Some states do not allow the
exclusion or limitation of consequential, incidental or special damages, so the above
limitation or exclusion may not apply to you. This limited warranty gives you specific
legal rights, and you may also have other rights, which vary from state to state.
M&S Systems Limited 10-Year Warranty for AirVac Gold Power Units
M&S Systems offers a 10-Year Warranty on our AirVac Gold power units. This
warranty is identical to the M&S Systems 2-Year Warranty, with the exception that
2861 Congressman Lane | Dallas, Texas 75220 | 800.877.6631 | www.mssystems.com
Page 37
Page 40

this warranty covers the AirVac Gold power units for 10 years instead of 2. The
M&S Systems 10-Year Warranty applies ONLY to the AirVac Gold power units and
to no other M&S Systems, M&S or AirVac products.
2861 Congressman Lane | Dallas, Texas 75220 | 800.877.6631 | www.mssystems.com
Page 38
Page 41

Definitions
Category 5 (CAT5): Four twisted pairs of copper wire enclosed in an outer jacket
used for telephone, fax, modem and high-speed digital computer transmissions.
Digital Jukebox Software: A program that provides the ability to copy CDs onto
the computer in MP3 format. This software can also be used to generate playlists.
DMM: The Digital Media Manager is an internal storage device that provides the
ability to play 4 simultaneous digital music streams.
Ethernet: A network protocol that uses hubs or switches as the central connection
method.
• Ethernet: transfers data at up to 10 megabits (1.25 megabytes) per second
• Fast Ethernet: up to ten times faster
• Gigabit Ethernet—up to 100 times faster
IP Number/IP Address (Internet Protocol): A unique number consisting of 4
parts separated by dots. Every machine on the Internet has a unique IP number.
LAN (Local Area Network): A computer network limited to the immediate area,
usually the same building including a home.
Modem: A device that you connect to your computer and to a hone line that
allows the computer to talk to other computers through the phone system.
MP3: A standard format for compressing large sound files such as songs into a small
file while preserving the original level of sound quality. MP3 files can be generated
by using a digital jukebox software program such as Real Audio.
Network: A collection of connected devices that share information with each
other. Can include computers, printers and scanners and other household
appliances.
RG6: Coaxial cable with an insulated center wire and four layers of shielding that is
used for cable television, digital satellite, cable modem and high-speed interactive
video services.
2861 Congressman Lane | Dallas, Texas 75220 | 800.877.6631 | www.mssystems.com
Page 39
Page 42

Index
Alarm clock .........................................................29
Clock radio.......................................................... 29
Date ......................................................................10
Devices
Local ................................................................. 27
Remote ............................................................27
Doorbell............................................................... 14
Answering ....................................................... 34
Greeting Menu.................................................... 21
Info Menu............................................................. 34
Intercom Menu................................................... 32
Introduction .......................................................... 3
Local devices....................................................... 27
Main Menu........................................................... 23
Menus
Greeting........................................................... 21
Info.................................................................... 34
Intercom.......................................................... 32
Main.................................................................. 23
Monitor............................................................ 33
Music ................................................................24
Paging ............................................................... 31
Sleep................................................................. 30
Wake................................................................ 29
Monitor Menu..................................................... 33
Monitoring........................................................... 33
Music
Menu................................................................. 24
Page Menu ...........................................................31
Paging.................................................................... 31
Password.............................................................. 16
Radio stations
Setting ..............................................................25
Settings .............................................................26
Remote devices...................................................27
Repairs ....................................................................5
Safety Instructions ................................................ 5
Servicing..................................................................5
Settings
Clock.................................................................29
Date ..................................................................10
Doorstations...................................................14
Intercom...........................................................19
Name Station ..................................................11
Password..........................................................16
Radio stations...........................................25, 26
Room features ................................................12
Sleep..................................................................30
System ................................................................7
Time....................................................................9
Wake ................................................................29
Setup Menu ............................................................ 7
Sleep Menu...........................................................30
Speaker Balance ..................................................24
System
Description........................................................ 3
Features..............................................................3
Servicing .............................................................5
Time.........................................................................9
Volume Control
Doorbell chimes.............................................22
Intercom...........................................................22
Music.................................................................22
Wake Menu..........................................................29
Warnings ................................................................5
Warranty..............................................................37
2861 Congressman Lane | Dallas, Texas 75220 | 800.877.6631 | www.mssystems.com
Page 40
Page 43

Figure Index
Figure 1 - Room Station Layout.............................................................................................................................. 3
Figure 2 - Greeting Menu.........................................................................................................................................7
Figure 3 - Main Menu ................................................................................................................................................8
Figure 4 - More Screen.............................................................................................................................................8
Figure 5 - Setup Menu...............................................................................................................................................9
Figure 6 - Set Time Menu.........................................................................................................................................9
Figure 7 - Set Date Menu .......................................................................................................................................10
Figure 8 - Name Room Menu................................................................................................................................11
Figure 9 - Room Features Menu...........................................................................................................................12
Figure 10 – Door station Menu ............................................................................................................................14
Figure 11 – Door Station Setup Menu ................................................................................................................14
Figure 12 - Microphone Setting Menu.................................................................................................................15
Figure 13 - Enable Password Screen....................................................................................................................16
Figure 14 - Enter Password Screen......................................................................................................................17
Figure 15 - Confirm Password Screen.................................................................................................................17
Figure 16 - Enter Password Screen......................................................................................................................18
Figure 17 - Change or Disable Password Screen..............................................................................................18
Figure 18 - Intercom Settings Adjustment Screen............................................................................................19
Figure 19 - Greeting Menu.....................................................................................................................................21
Figure 20 - Main Menu ............................................................................................................................................23
Figure 21 - Music Menu ..........................................................................................................................................24
Figure 22 - FM Menu ...............................................................................................................................................25
Figure 23 - Tune/Presets Menu.............................................................................................................................26
Figure 24 - Tune/Presets Menu - Stored Station...............................................................................................27
Figure 25 - Remote Menu ......................................................................................................................................28
Figure 26 - Wake Menu..........................................................................................................................................29
Figure 27 - Sleep Menu ...........................................................................................................................................30
Figure 28 - Page Menu.............................................................................................................................................31
Figure 29 - Intercom Menu....................................................................................................................................32
Figure 30 - Monitor Menu......................................................................................................................................33
Figure 31 - Doorbell Ringing Menu......................................................................................................................34
Figure 32 - Info Menu..............................................................................................................................................35
Figure 33 - M&S Technical Support Information...............................................................................................35
2861 Congressman Lane | Dallas, Texas 75220 | 800.877.6631 | www.mssystems.com
Page 41
Page 44

115972-1
2861 Congressman Lane | Dallas, Texas 75220 | 800.877.6631 | www.mssystems.com
Page 42
 Loading...