

Page 1

System Recovery Manual
Page 2

1
Table of Content
English .................................................................................................................. 4
繁體中文............................................................................................................... 14
简体中文............................................................................................................... 24
Deutsch ............................................................................................................... 34
Français .............................................................................................................. 44
Русский............................................................................................................... 54
Español ............................................................................................................... 64
Italiano................................................................................................................. 74
Türkçe ................................................................................................................. 84
Magyar................................................................................................................. 94
Čeština ...............................................................................................................104
Polski..................................................................................................................114
Українська .........................................................................................................124
Português ..........................................................................................................134
Page 3

2
한국어..................................................................................................................144
Dutch ..................................................................................................................154
Български .........................................................................................................164
Dansk .................................................................................................................174
Suomi .................................................................................................................184
Slovensky ..........................................................................................................194
Română..............................................................................................................204
Srpski .................................................................................................................214
Hrvatski ..............................................................................................................224
Svenska..............................................................................................................234
Slovenščina .......................................................................................................244
Bosanski ............................................................................................................254
Eesti keeles........................................................................................................264
Norsk ..................................................................................................................274
Bahasa Indonesia..............................................................................................284
ไทย .....................................................................................................................294
Page 4

3
Português do Brasil ..........................................................................................304
Lietuviškai..........................................................................................................314
Latviski...............................................................................................................324
日本語 .................................................................................................................334
Tiếng Việt ...........................................................................................................344
Ελληνικά.............................................................................................................354
364 ..................................................................................................................ﯽﺴﻴﻠﮕﻧا
374 ....................................................................................................................ﺔﻴﺑﺮﻌﻟا
384 .................................................................................................................. עתירב
Page 5

4
English
System Recovery Manual
Page 6

5
System Recovery Manual
Introductions
Purposes for Using the System Recovery Function
This Recovery Manual provides instructions and illustrations on how to recover the system of the notebook users
purchased to the manufactory default settings.
The purposes for using the System Recovery Function may include:
Restore the system back to the initial status of original manufacturer’s default settings.
When some errors have occurred to the operating system in use.
When the operating system is affected by virus, and is not be able to work normally.
Please be noticed that it is always recommended to read this manual carefully before proceeding the System
Recovery Function.
Precautions for Using the System Recovery Function
The following precautions should be observed before proceeding the System Recovery Function:
1. If your hard drive and system encountered non-recoverable problems, please use the F3 Hotkey recovery from
the Hard Drive first to perform the System Recover Function.
2. Before using the System Recovery Function, please backup the important data saved on your system drive to
other storage devices.
3. If an USB flash drive or a SD card is used for performing the Recover Function, please be noted that it is
always necessary to backup the data saved in the USB flash drive or memory card to other storage devices.
4. If the System Recover Function is not able to proceed with any method provided in this Recovery Manual, it is
strongly recommended to contact the authorized local distributor or service center for further assistant. Be
noted that any improper attempt to change the default settings of the notebook may cause the warranty void.
Page 7

6
System Recovery Manual
Getting St arted
This System Recovery Manual provides users three methods to perform the System Recovery Function.
They are:
1. Recover the system with the F3 Hotkey on the keyboard of the notebook.
2. Recover the system with the Driver CD that comes with the package.
3. Recover the system with a personal USB flash drive or a SD card.
Users are recommended to read this section from start to finish first, and then may go directly to the specific method
that is selected by users to perform the System Recovery Function to restore the system back to its factory default
settings.
Page 8

7
System Recovery Manual
Recover the system with the F3 Hotkey
If the hard drive and system encountered non-recoverable problems, it is always recommended to perform the
System Recovery Function with the F3 Hotkey from the Hard Drive first.
Follow the instructions below to continue:
1. Restart the notebook.
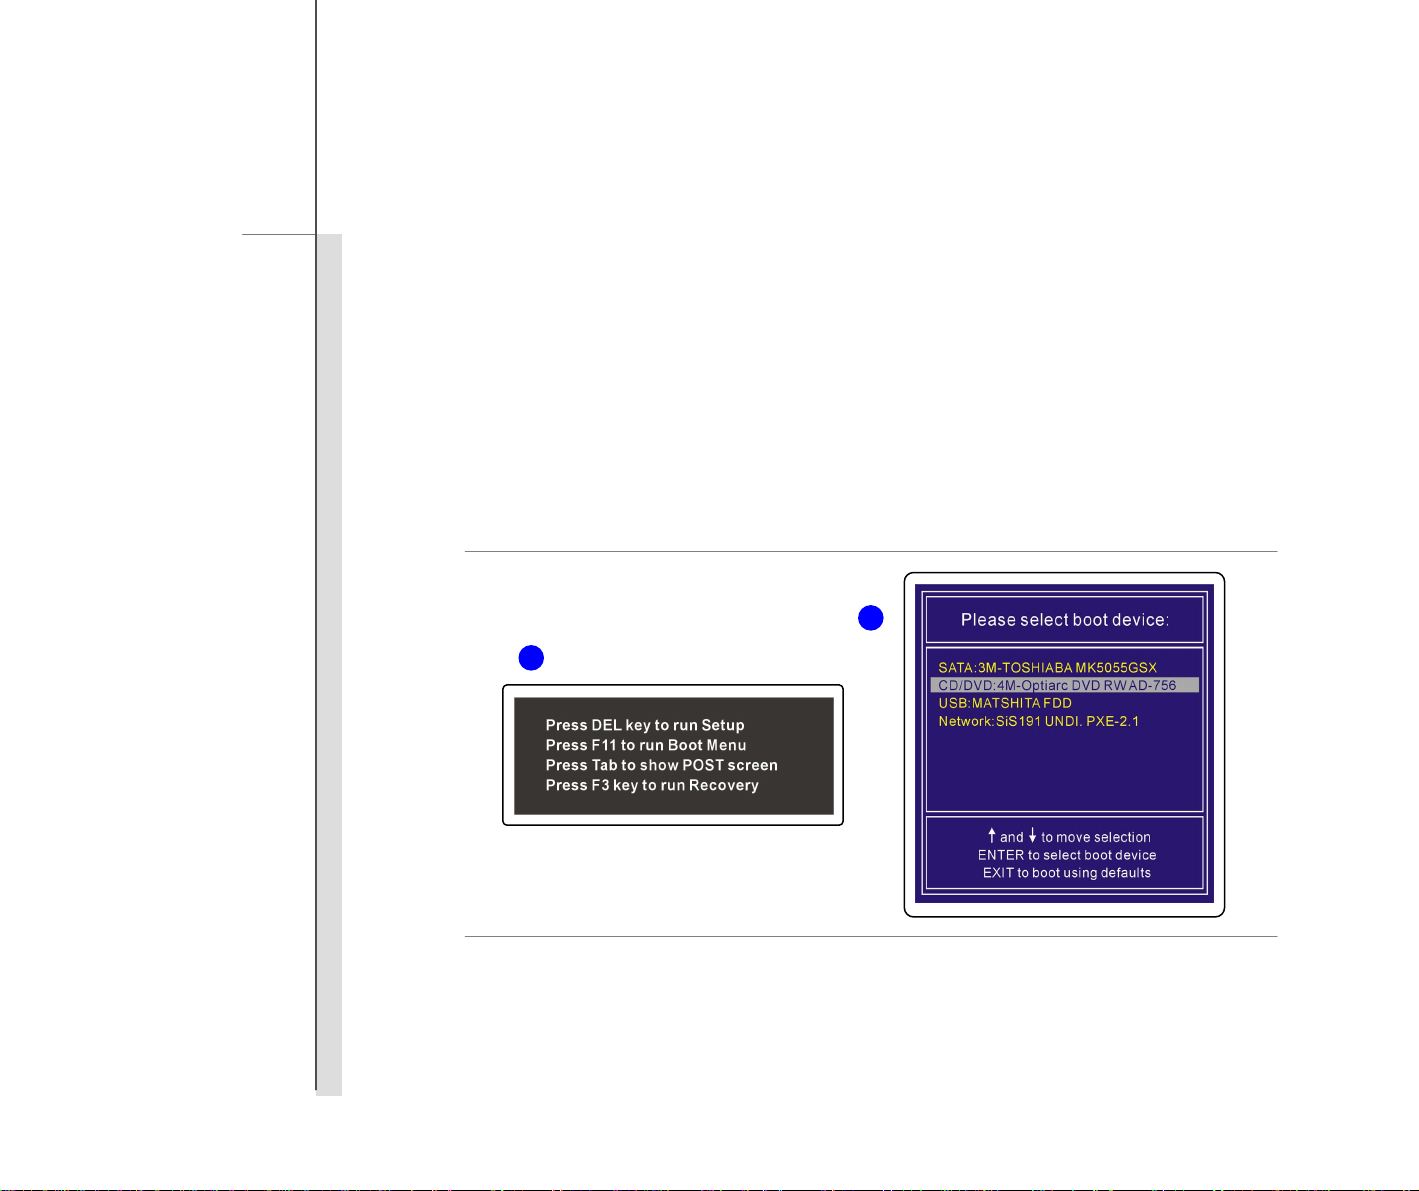
2. Press the F3 hotkey on the keyboard when the following message appears on the display
3.
Select [MSI Recovery Manager] to start the System Recovery Function; or select [EXIT] to restart the system
2
3
Page 9
8
System Recovery Manual
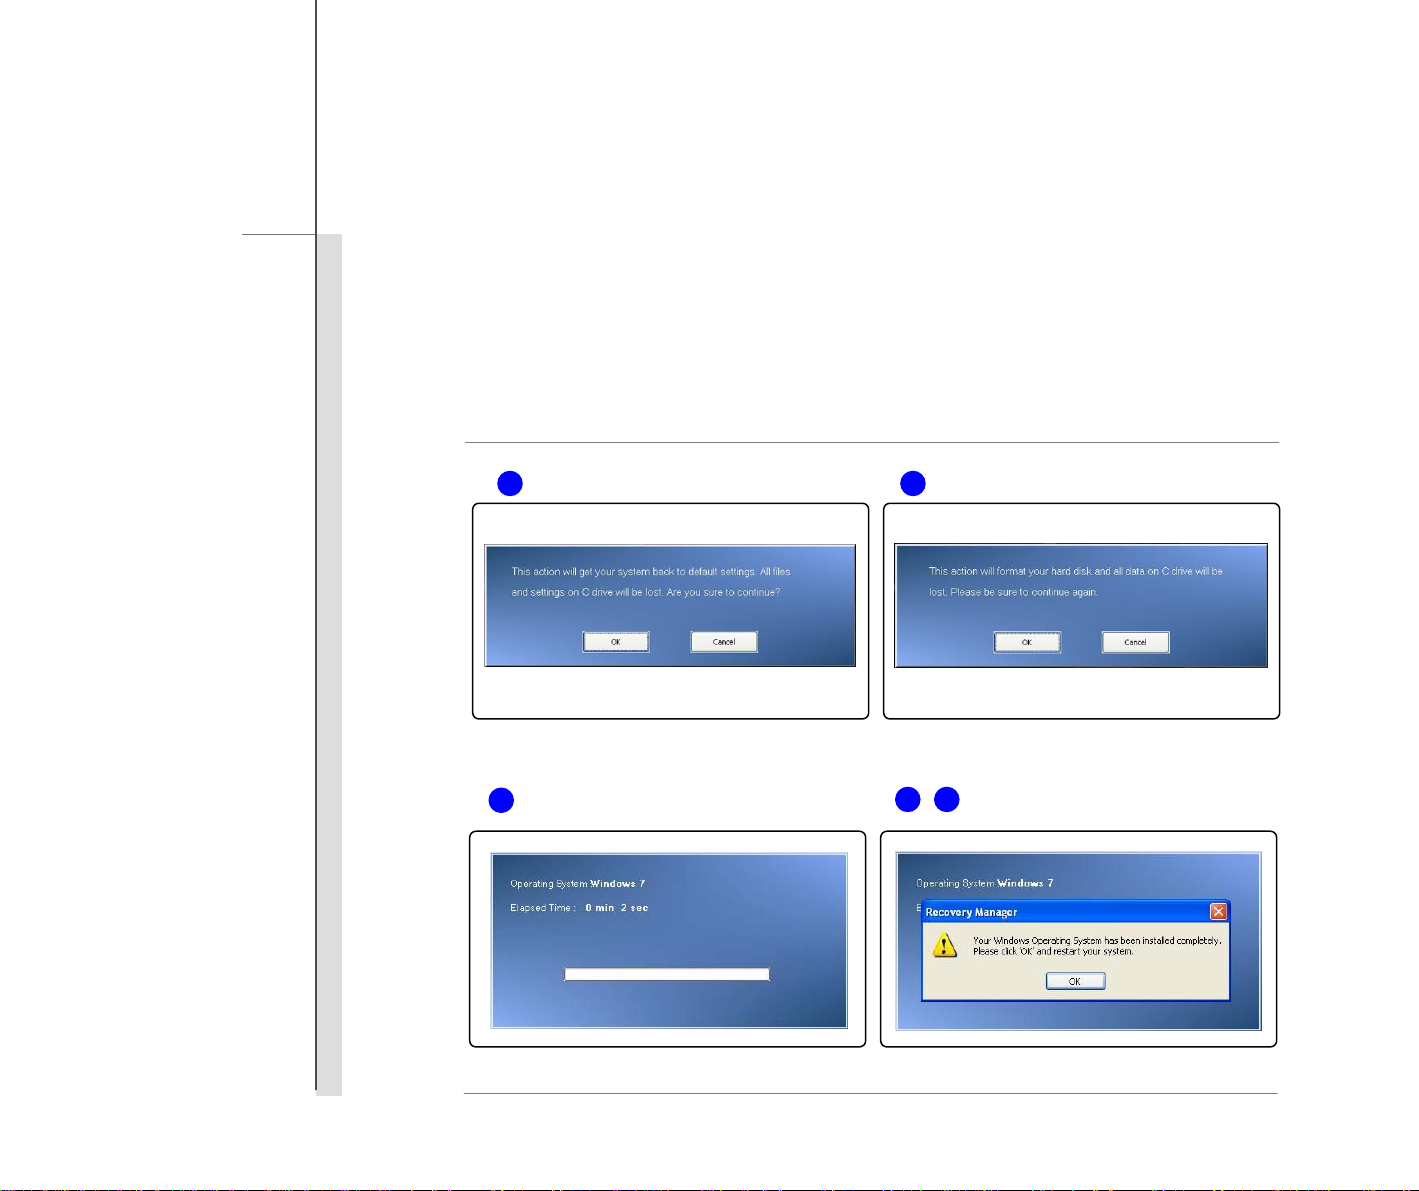
4. Press [OK] to continue proceeding the System Recovery Function.
5. Press [Cancel] to stop proceeding the System Recovery Function at any time.
6. The System Recovery Function is in proceeding now.
7. When the following window appears, the system is recovered successfully.
8. Press [OK] to reboot the system and access Windows operating system as usual.
6
5 4
7 8
Page 10
9
System Recovery Manual
Recover the system with the Driver CD
If your notebook is equipped with an optical disk drive device or an external one, you may perform the System
Recovery Function with Driver CD that comes with the package. Follow the instructions below to continue:
1. Insert the Driver CD into the optical disk drive, and then restart the notebook by pressing the Power button.
2. Press the F11 hotkey on the keyboard of the notebook when the following message appears on the display.
3. Select the [CD/DVD] device as the boot device, and press [Enter] to confirm the selection, and then, press
any key to reconfirm the selection when the prompt message of [Press any key to boot from CD or DVD…]
appears.
2
3
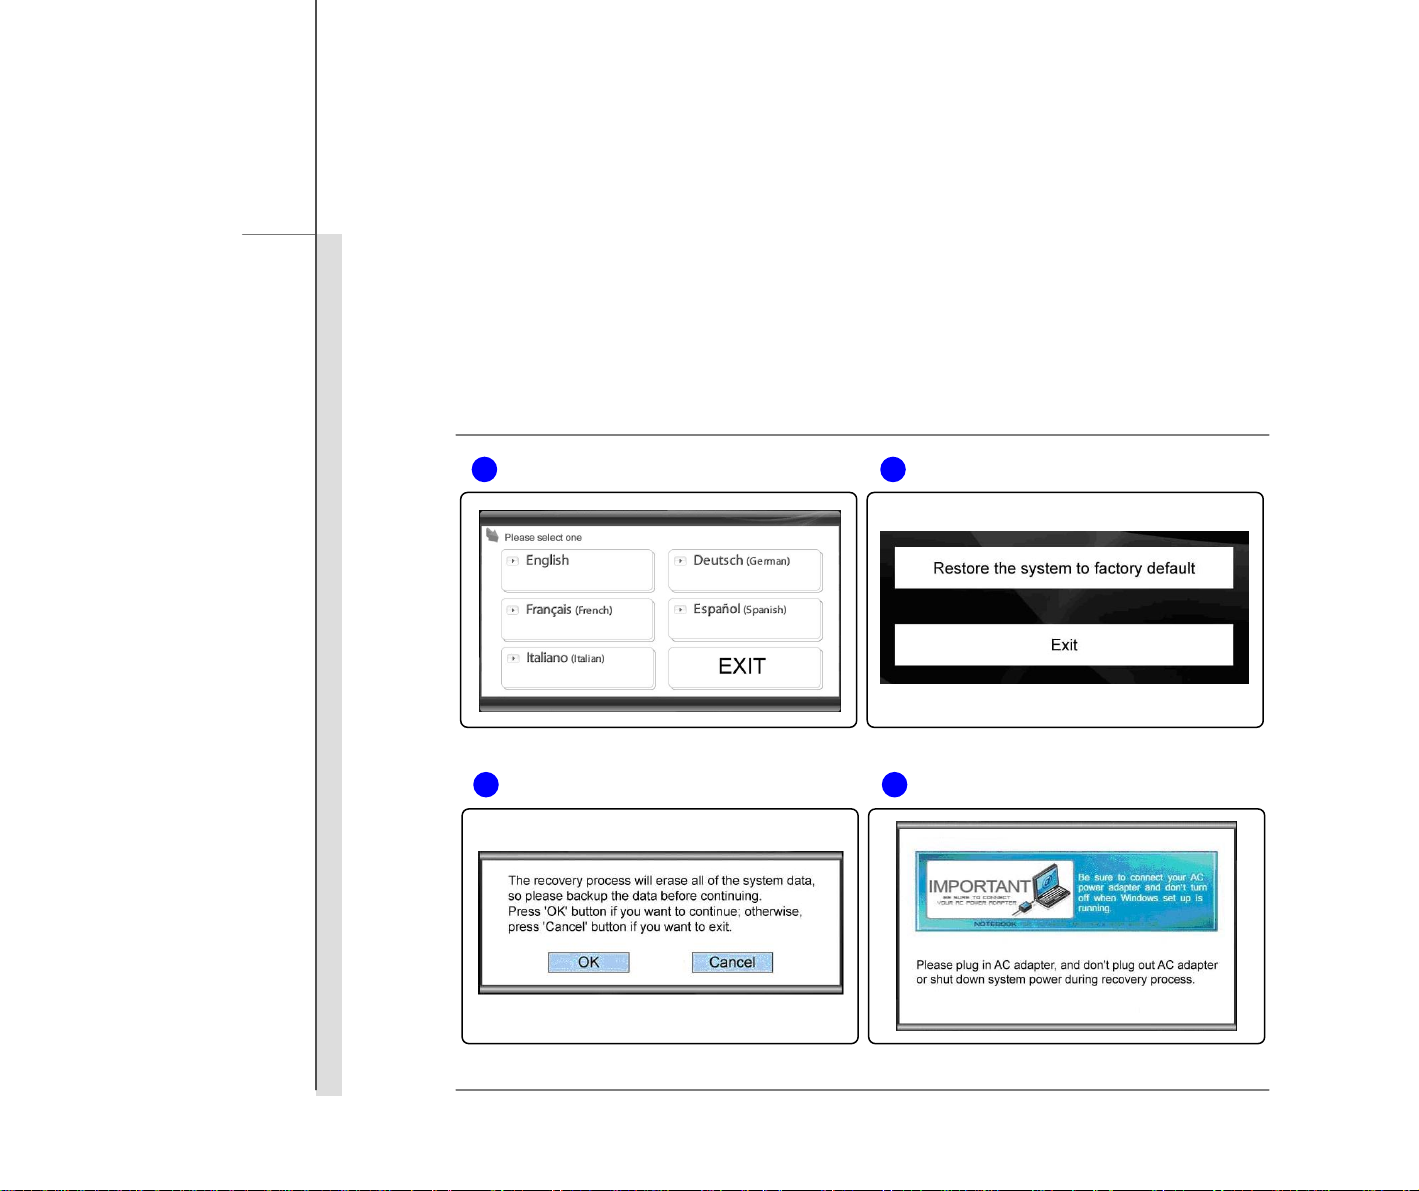
4. The Language Menu appears. Select the language you prefer by clicking the given icon with the mouse
connected to the notebook; or select [EXIT] to restart the system.
5. And then, select [Restore the system to factory default] to start the System Recovery Function process; or
select [EXIT] to restart the system.
Page 11
10
System Recovery Manual
6. The system recovery process will format your hard disk drive partition; make sure that the important data has
been backed up before continuing the process. Click [OK] to continue; click [Cancel] to stop the system
recovery process.
7. AC power is required while proceeding the System Recovery Function. Assure that the AC power is
connected to the notebook before moving forward to the next step.
4 5
6 7
Page 12
11
System Recovery Manual
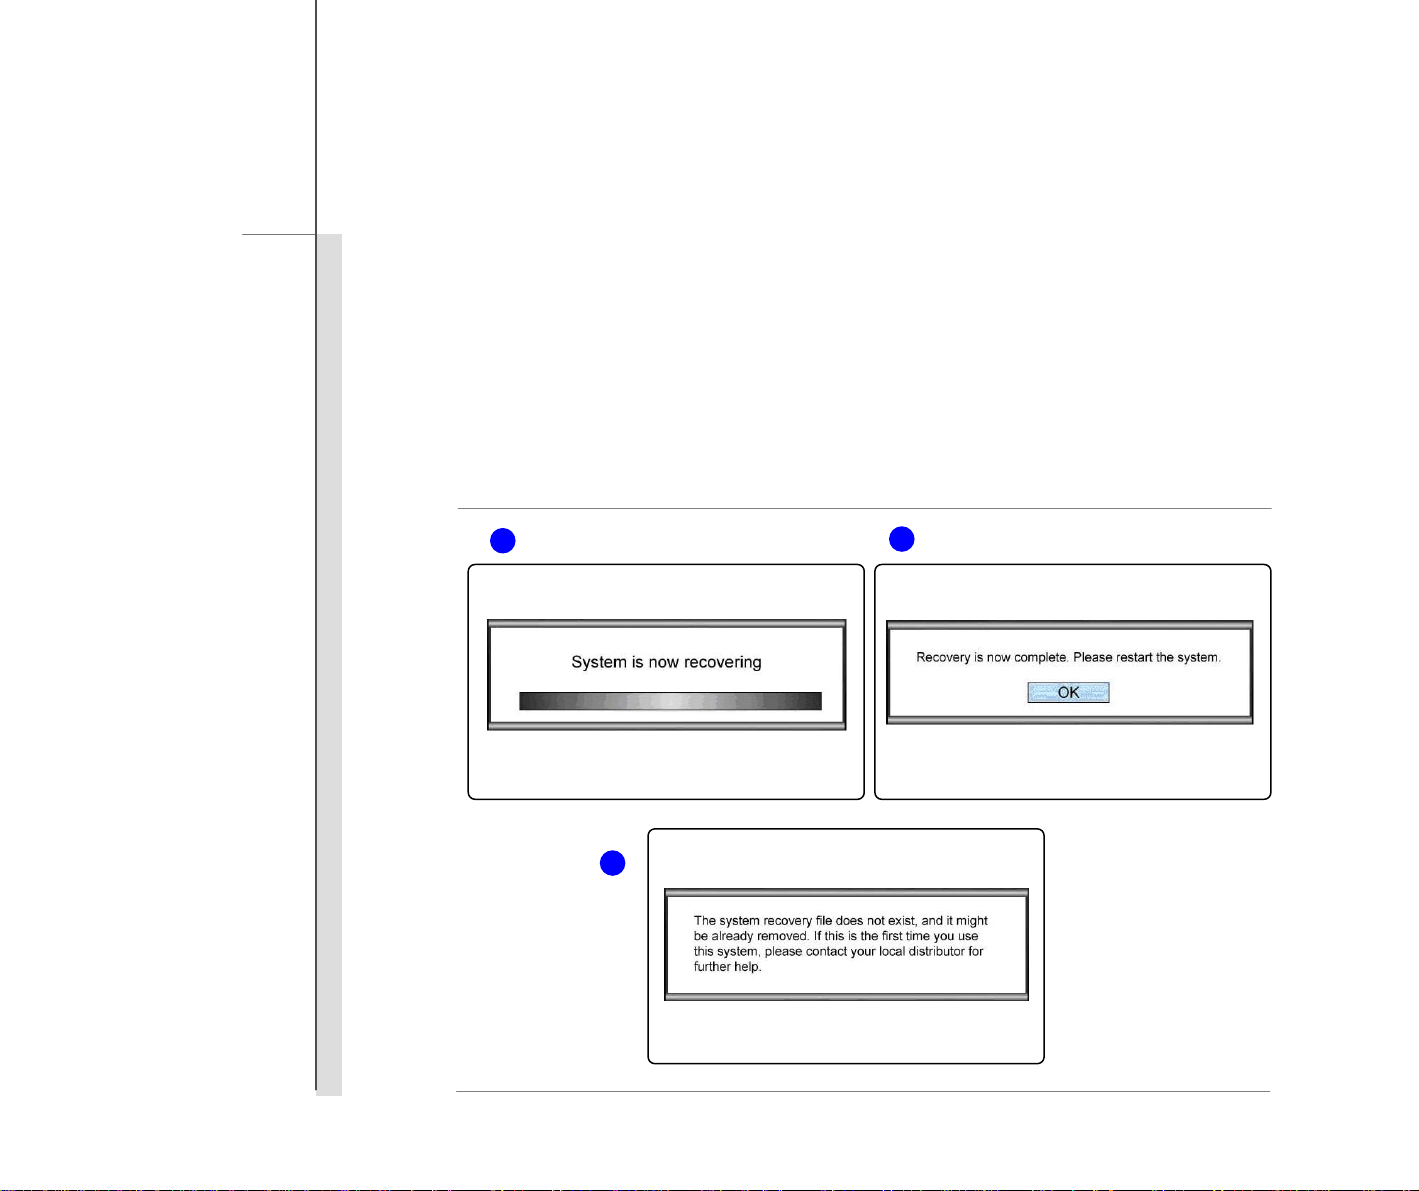
8. Be aware of that do not turn off the system power during the process of performing the System Recover
Function, or it may cause some unknown damage to the system.
9. When the system recovery process is finished, please click [OK] to restart the system. Now, your system is
restored to its factory default setting.
10. If the system recovery function is not able to be performed successfully, it is always recommended to contact
the authorized local distributor or the service center for further assistant.
11. If the recovery process is interrupted or failed, please repeat recovery procedure from the beginning.
8
9
10
Page 13

12
System Recovery Manual
Recover the system with an USB flash drive or a SD card
If your notebook is not equipped with any optical disk drive, you may perform the System Recovery Function with
a personal USB flash drive or a SD card. Follow the instructions below to continue:
1. Make sure that you have the Driver CD that comes with the package and a personal USB flash drive or SD
card with you.
(a) the minimum capacity of 256MB of the USB flash drive or SD card is required;
(b) the USB flash drive or SD card must not be a boot able one. If the device is found to be a bootable
one, please format the device first either in NTFS or FAT32.
(c) it is not required to delete all the personal data files stored in the USB flash drive or SD card which is
going to be used for performing the System Recovery Function.
However, it is still recommended to back up the data stored in the USB flash drive or SD card to
another storage device.
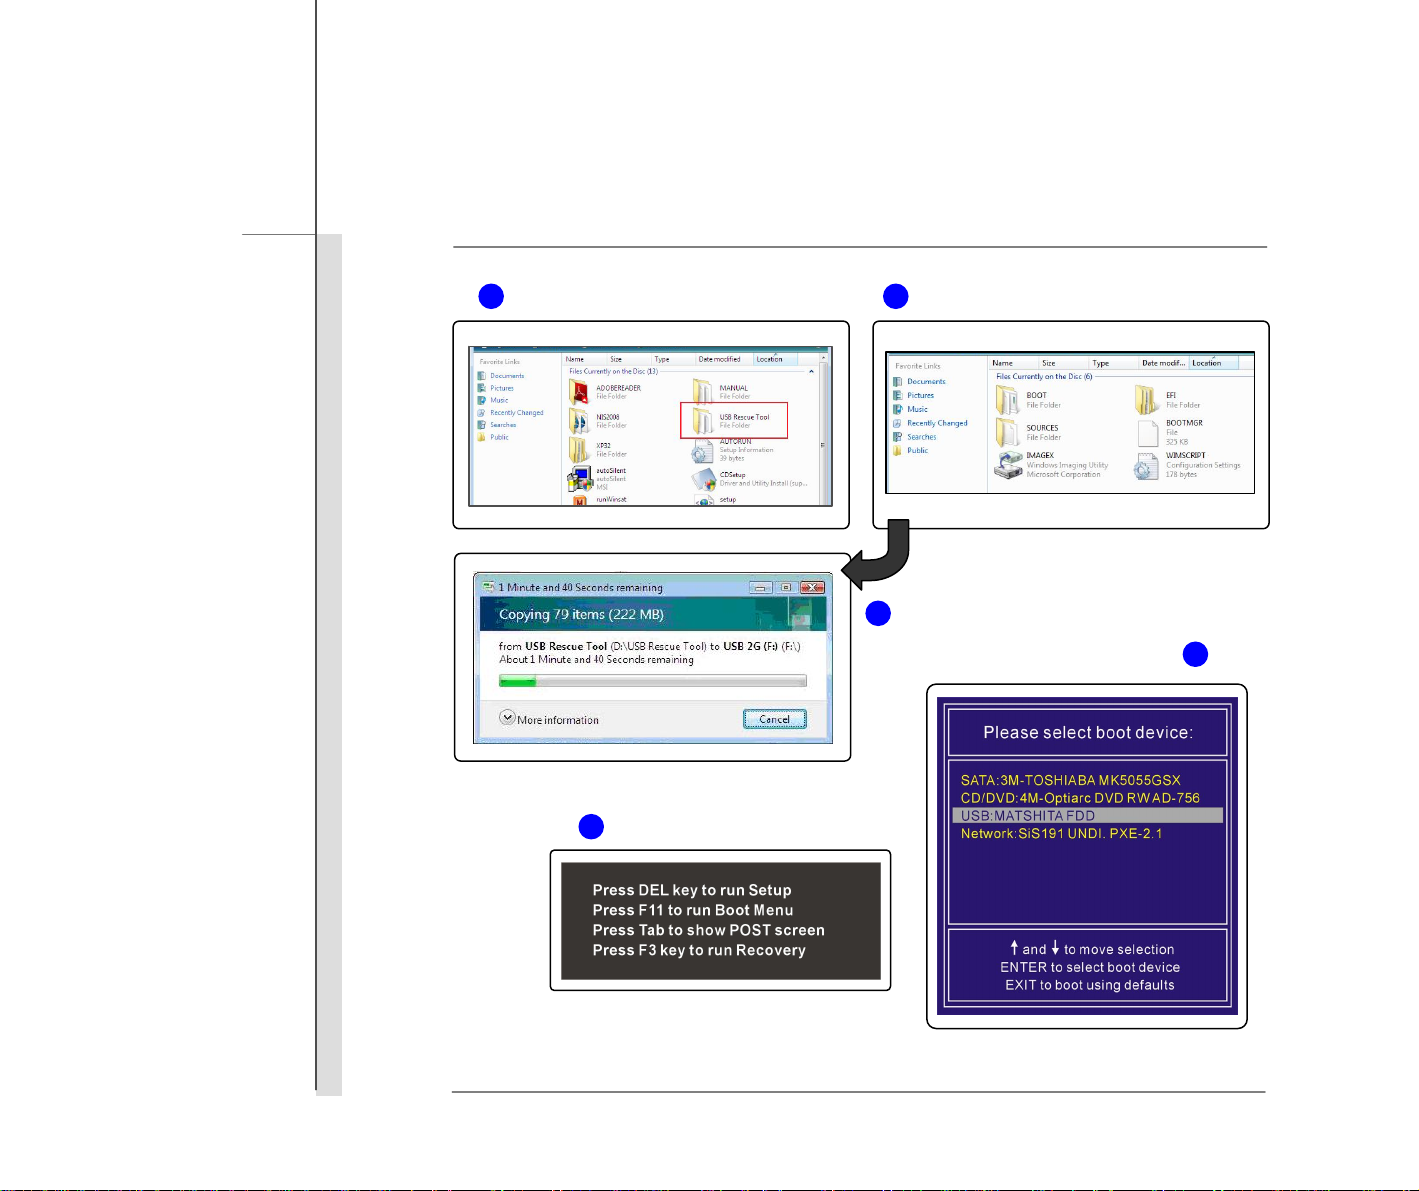
2. Find a computer which is equipped with an optical disk drive. Insert the Driver CD into the optical disk drive,
and locate the folder named [USB Rescue Tool] in the Driver CD.
3. Browse the folder named [USB Rescue Tool], and copy all the data files in the folder into the USB flash drive
or SD card.
4. Restart the system and press the F11 hotkey on the keyboard of the notebook when the following message
appears on the display.
5. Select the [USB] device as the boot device, and press [Enter] to confirm the selection.
6. Refer to the instructions of “Recover the system with the Driver CD” to continue the process.
7. If any failure occurred while proceeding the System Recovery Function with an USB flash drive or a SD card,
it is recommended to try the previous steps again with another USB flash drive or SD card.
Page 14
13
System Recovery Manual
3 2
3
5
4
Page 15

14
繁體中文
系統還原手冊
Page 16

15
系統還原手冊
簡介
使用系統還原功能的目的
本系統還原手冊提供的說明與圖解,在於讓使用者了解其所購買之筆記型電腦,如何可以還原系統回到其出廠的初始設
定值。
使用系統還原功能的目的,可能包含:
還原系統回到其出廠的初始設定值。
目前所使用的操作系統發生錯誤。
操作系統感染病毒,且無法繼續正常運作。
建議您在進行系統還原功能之前,先仔細閱讀本手冊。
使用系統還原功能的注意事項
在正式進行系統還原功能之前請了解以下注意事項:
1. 當硬碟與系統發生無法回復的狀況,請先利用本機硬碟內建之 F3 快速鍵來執行系統還原功能。
2. 在使用系統還原功能之前,請先備份系統儲存硬碟裡的重要資料到其他儲存裝置。
3. 若要使用 USB 隨身碟或 SD 記憶卡來執行系統還原功能,請注意儲存隨身碟或記憶卡內的資料到其他儲存裝置
是必要的。
4. 如果本手冊內提供之三種系統還原方式皆無法順利執行,建議使用者與授權許可之當地經銷商或維修服務中心聯
絡尋求進一步資訊。請留意,任何不恰當的變更出廠設定值有可能造成您的筆記型電腦保固失去效力。
Page 17

16
系統還原手冊
開始使用
本系統還原手冊提供三種系統還原方式,使用者可以視個人情況選擇使用。
此三種系統還原功能包含:
1. 利用筆記型電腦鍵盤上的 F3快速鍵來執行系統還原功能。
2. 利用配件包內的驅動程式光碟來執行系統還原功能。
3. 利用 USB 隨身碟或 SD 記憶卡來執行系統還原功能。
建議使用者先把此部分說明由頭至尾閱讀一次,之後再詳細閱讀您所選擇的系統還原方式,來將系統還原到出廠原始設
定值。
Page 18
17
系統還原手冊
利用筆記型電腦鍵盤上的 F3 快速鍵來執行系統還原功能
當硬碟與系統發生無法回復的狀況,請先利用本機硬碟內建之 F3快速鍵來執行系統還原功能。
閱讀以下說明來執行系統還原功能:
1. 啟動筆記型電腦。
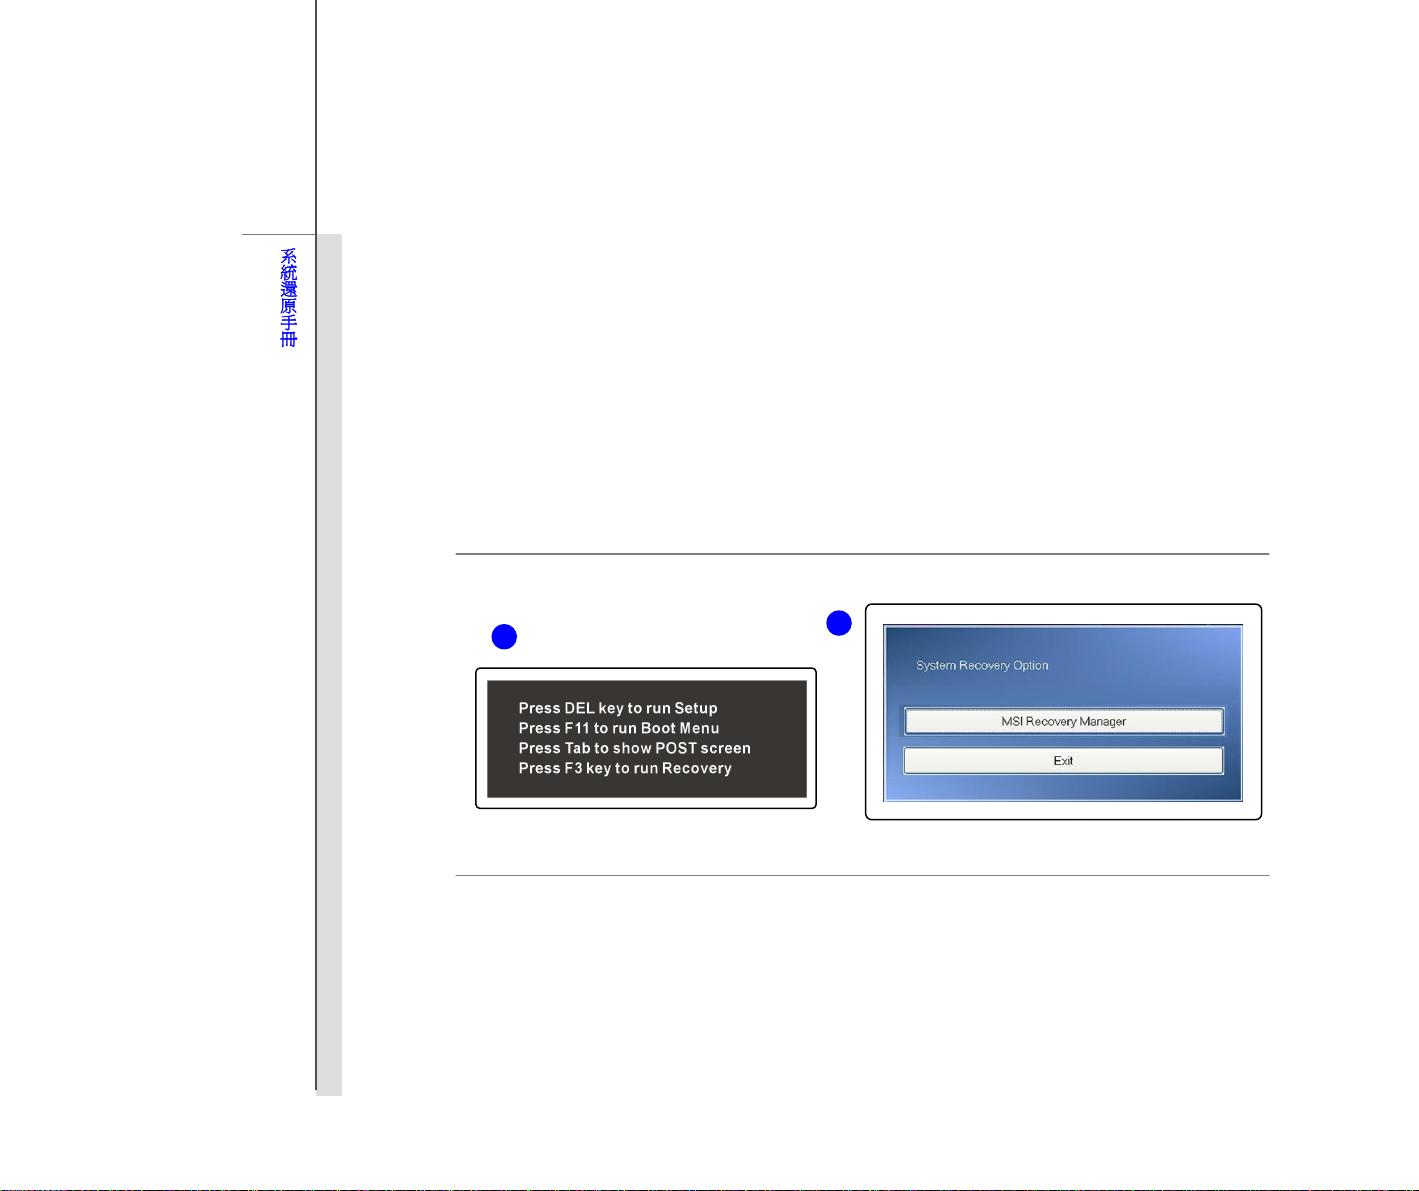
2. 當以下訊息出現在螢幕上時,請按鍵盤上的 F3 快速鍵。
3.
選擇 [MSI Recovery Manager] (MSI 系統還原功能) 來啟動系統還原功能;或選擇 [EXIT] (離開) 重新啟動
系統。
2
3
Page 19

18
系統還原手冊
4. 選擇 [OK] (確認) 繼續執行系統還原功能。
5. 選擇 [Cancel] (取消) 停止執行系統還原功能。
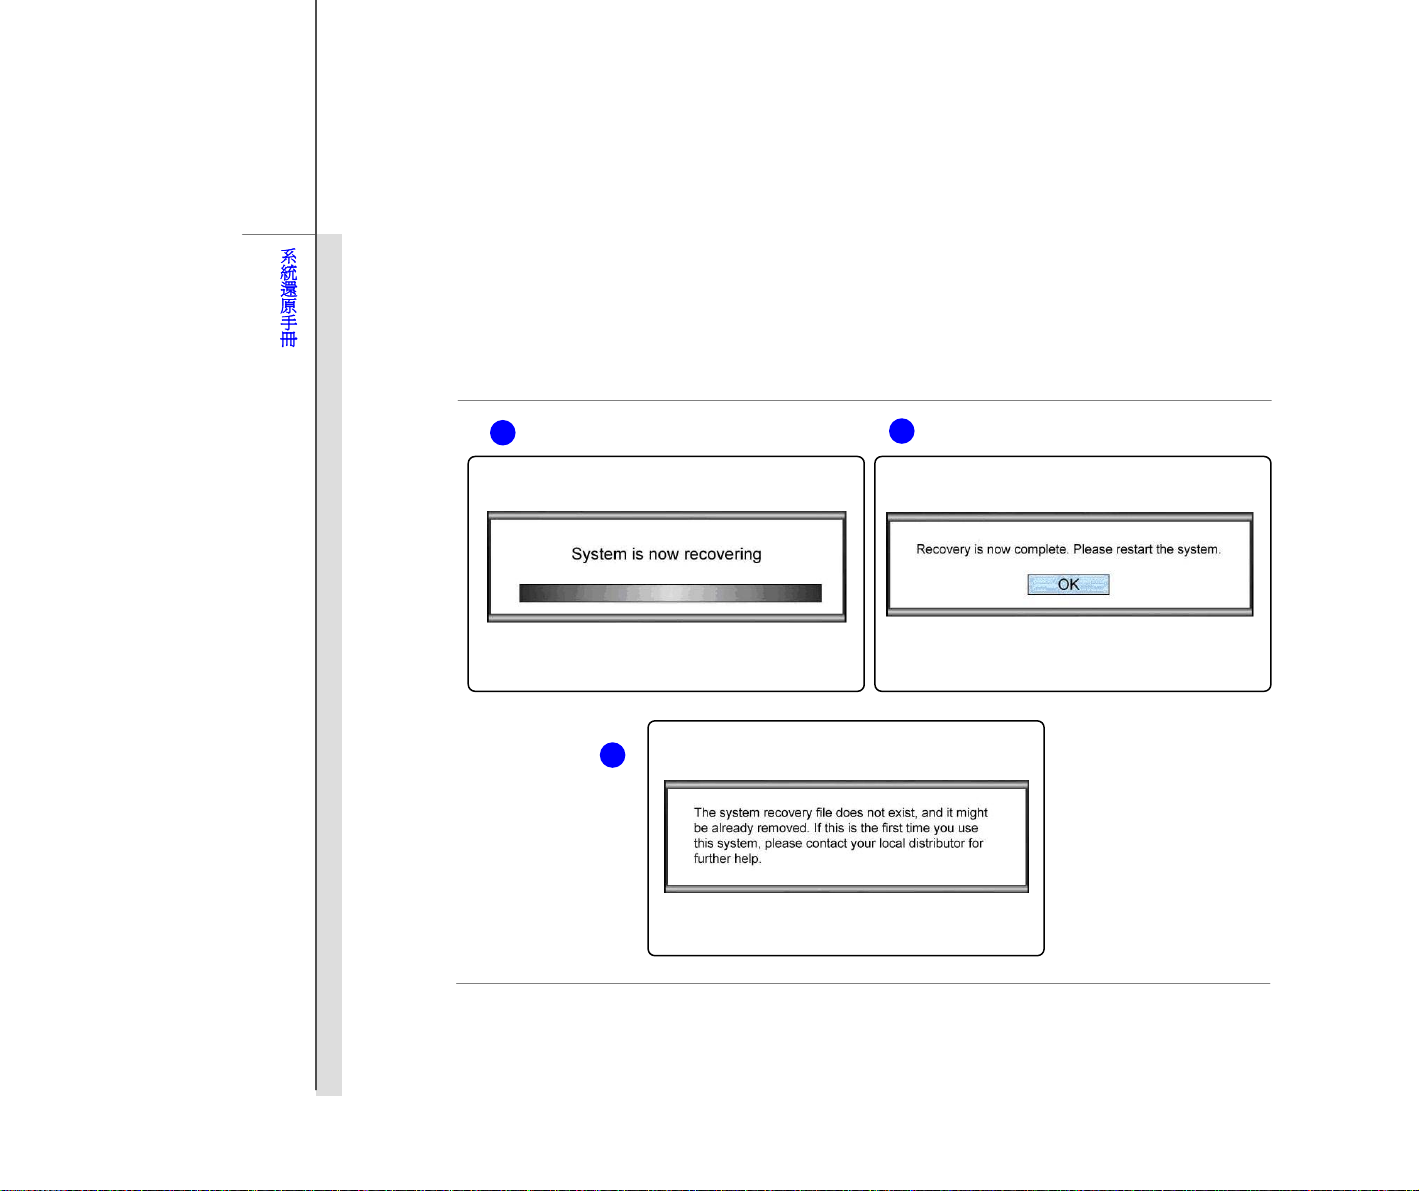
6. 系統還原功能執行中。
7. 當此畫面出現時,表示系統已經成功還原到出廠設定值。
8. 選擇 [OK] (確認) 重新啟動系統,即可正常進入 Windows 操作系統。
6
5 4
7 8
Page 20

19
系統還原手冊
利用驅動程式光碟來執行系統還原功能
如果您的筆記型電腦配有光碟機或外接式光碟機,您可利用配件包內的驅動程式光碟來執行系統還原功能。
閱讀以下說明來執行系統還原功能:
1. 將驅動程式光碟置入光碟機中,按下電源按鍵啟動您的筆記型電腦。
2. 當以下訊息出現在螢幕上時,請按 F11 快速鍵。
3.
選擇 [CD/DVD] 裝置為開機裝置,按下鍵盤上的 [Enter] 鍵,確認您的選擇,接著當螢幕出現提示文 [Press
any key to boot from CD or DVD…] (按任意鍵由 CD 或 DVD開機…) 時,請按一次任意鍵確認。
2
3
4. 螢幕顯示語言別選單。利用連結到筆記型電腦的滑鼠來選擇您所需的使用介面語言,或選擇 [EXIT] (離開) 重
新啟動系統。
5. 接著,選擇 [Restore the system to factory default] (還原系統為出廠設定值) 來執行系統還原功能,或選擇
[EXIT] (離開) 重新啟動系統。
Page 21

20
系統還原手冊
6. 執行系統還原功能將重新格式化您的硬碟磁區,繼續執行此功能前,請確認重要資料檔案已經備份完成。按一
下 [OK] 繼續執行此功能,或按一下 [Cancel] (取消) 停止繼續執行此功能。
7. 執行系統還原功能必需使用 AC 電源,在執行下一步驟之前,請先確認您的筆記型電腦已經正確的連接上AC
電源。
4 5
6 7
Page 22
21
系統還原手冊
8. 請注意在執行系統還原功能的過程中,請勿隨意關閉電源,以免造成系統的損害。
9. 系統還原功能執行成功,按一下 [OK] 鍵,重新啟動筆記型電腦。
10. 如果系統還原功能無法成功執行,建議使用者與授權許可之當地經銷商或維修服務中心聯絡尋求進一步資訊。
11. 如果系統還原功能於執行中被中斷或失敗,請重新依照前述步驟執行此功能。
8
9
10
Page 23

22
系統還原手冊
利用 USB 隨身碟或 SD 記憶卡來執行系統還原功能
如果您的筆記型電腦並未配有光碟機或外接式光碟機,您可利用個人的 USB 隨身碟或 SD 記憶卡來執行系統還原功能。
閱讀以下說明來執行系統還原功能:
1. 確認準備好驅動程式光碟以及您個人的 USB 隨身碟或 SD記憶卡。
(a) USB 隨身碟或 SD 記憶卡的容量至少需要 256MB。
(b) USB 隨身碟或 SD 記憶卡不可以具備開機功能,如果您準備的 USB隨身碟或 SD 記憶卡具備開機功能,
請先將其格式化為 NTFS 或 FAT32 格式。
(c) 用來執行系統還原功能的 USB隨身碟或 SD 記憶卡並不需要移除所有其所儲存的資料,但仍建議使用者
將 USB 隨身碟或 SD 記憶卡的重要資料備份到其他儲存裝置。
2. 找一部配備有光碟機的電腦,將驅動程式光碟置入光碟機中,找到驅動程式光碟中命名為 [USB Rescue Tool]
的資料夾。
3. 展開資料夾 [USB Rescue Tool],複製資料夾內所有的檔案到 USB 隨身碟或 SD 記憶卡中。
4. 將 USB 隨身碟或 SD 記憶卡插入您的筆記型電腦,並啟動筆記型電腦,當以下訊息出現在螢幕上時,請按 F11
快速鍵。
5. 選擇 [USB] 裝置為開機裝置,按下鍵盤上的 [Enter] 鍵確認您的選擇。
6. 參閱 “利用驅動程式光碟來執行系統還原功能” 的說明來執行系統還原功能。
7. 在利用 USB 隨身碟或 SD記憶卡來執行系統還原功能的過程中,如果遇到錯誤或不成功狀況,建議您使用其
他 USB 隨身碟或 SD 記憶卡再次重新執行上述步驟。
Page 24

23
系統還原手冊
3 2
3
5
4
Page 25

24
简体中文
系统还原手册
Page 26

25
系统还原手册
简介
使用系统还原功能的目的
本系统还原手册提供的说明与图解,在于让使用者了解其所购买之笔记型计算机,如何可以还原系统回到其出厂的初始
设定值。
使用系统还原功能的目的,可能包含:
还原系统回到其出厂的初始设定值。
目前所使用的操作系统发生错误。
操作系统感染病毒,且无法继续正常运作。
建议您在进行系统还原功能之前,先仔细阅读本手册。
使用系统还原功能的注意事项
在正式进行系统还原功能之前请了解以下注意事项:
1. 当硬盘与系统发生无法回复的状况,请先利用本机硬盘内建之 F3 快速键来执行系统还原功能。
2. 在使用系统还原功能之前,请先备份系统储存硬盘里的重要数据到其它储存装置。
3. 若要使用 USB 随身碟或 SD 记忆卡来执行系统还原功能,请注意储存随身碟或记忆卡内的数据到其它储存装置
是必要的。
4. 如果本手册内提供之三种系统还原方式皆无法顺利执行,建议使用者与授权许可之当地经销商或维修服务中心联
络寻求进一步信息。请留意,任何不恰当的变更出厂设定值有可能造成您的笔记型计算机保固失去效力。
Page 27

26
系统还原手册
开始使用
本系统还原手册提供三种系统还原方式,使用者可以视个人情况选择使用。
此三种系统还原功能包含:
1. 利用笔记型计算机键盘上的 F3 快速键来执行系统还原功能。
2. 利用配件包内的驱动程序光盘来执行系统还原功能。
3. 利用 USB随身碟或 SD 记忆卡来执行系统还原功能。
建议使用者先把此部分说明由头至尾阅读一次,之后再详细阅读您所选择的系统还原方式,来将系统还原到出厂原始设
定值。
Page 28

27
系统还原手册
利用笔记型计算机键盘上的 F3 快速键来执行系统还原功能
当硬盘与系统发生无法回复的状况,请先利用本机硬盘内建之 F3 快速键来执行系统还原功能。
阅读以下说明来执行系统还原功能:
1. 启动笔记型计算机。
2. 当以下讯息出现在屏幕上时,请按键盘上的 F3 快速键。
3.
选择 [MSI Recovery Manager] (MSI 系统还原功能) 来启动系统还原功能;或选择 [EXIT] (离开) 重新启动
系统。
2
3
Page 29
28
系统还原手册
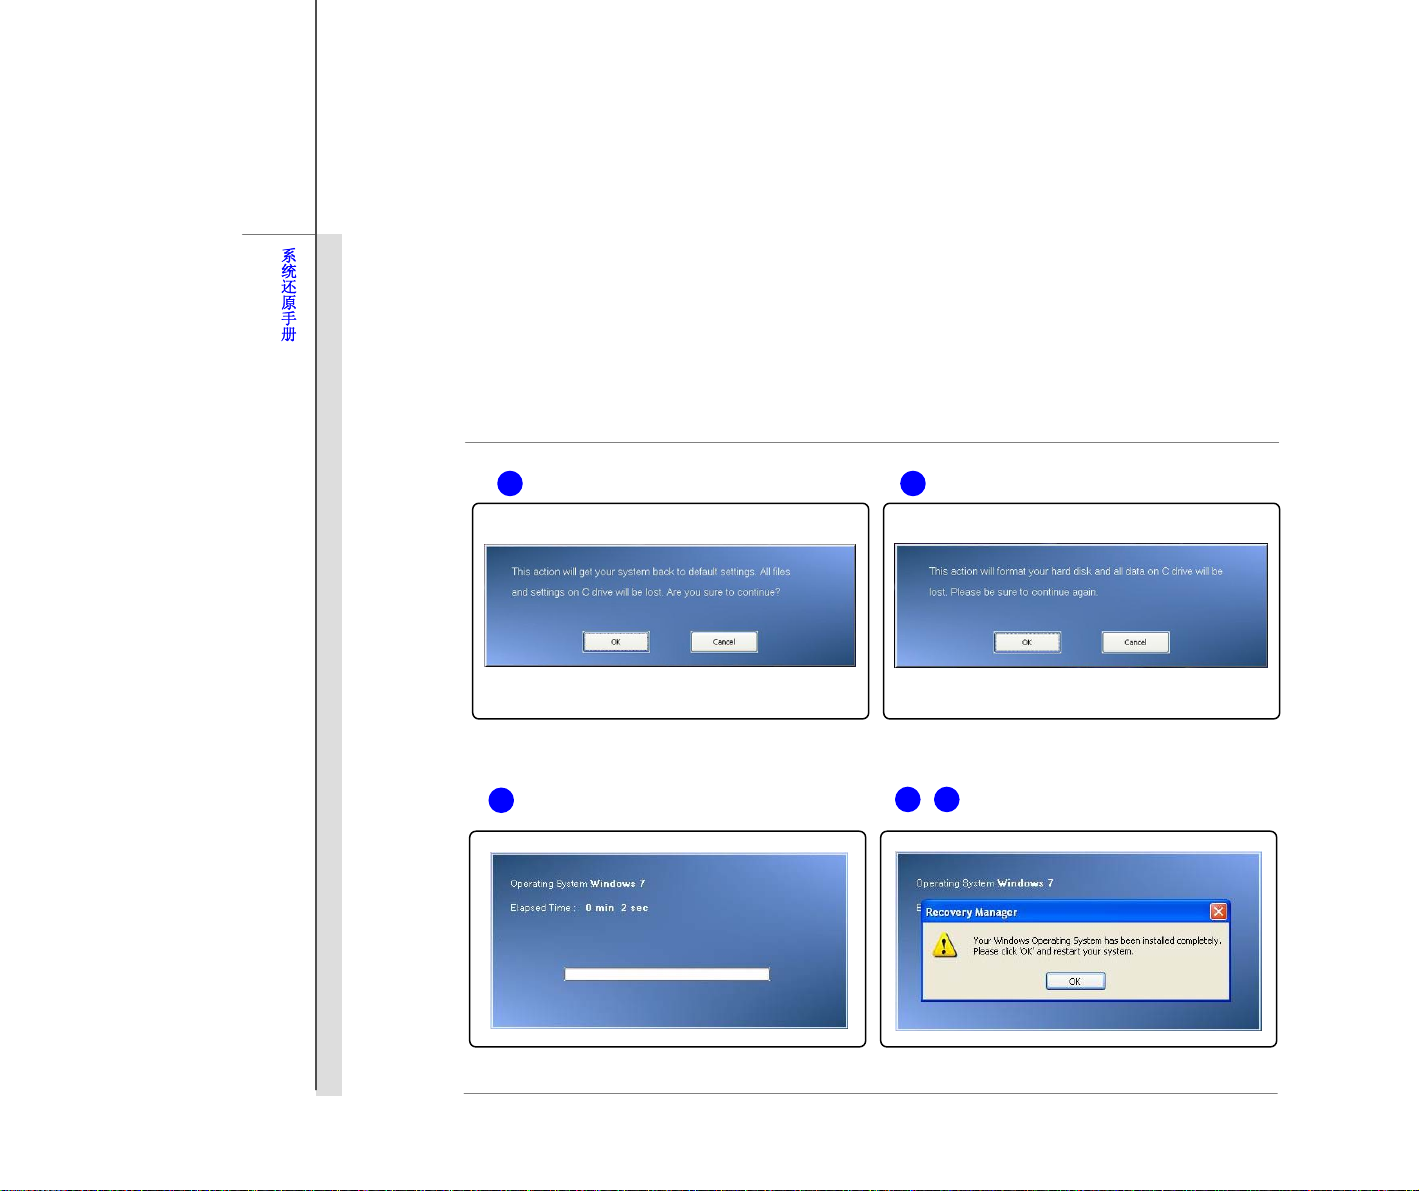
4. 选择 [OK] (确认) 继续执行系统还原功能。
5. 选择 [Cancel] (取消) 停止执行系统还原功能。
6. 系统还原功能执行中。
7. 当此画面出现时,表示系统已经成功还原到出厂设定值。
8. 选择 [OK] (确认) 重新启动系统,即可正常进入 Windows 操作系统。
6
5 4
7 8
Page 30

29
系统还原手册
利用驱动程序光盘来执行系统还原功能
如果您的笔记型计算机配有光驱或外接式光驱,您可利用配件包内的驱动程序光盘来执行系统还原功能。
阅读以下说明来执行系统还原功能:
1. 将驱动程序光盘置入光驱中,按下电源按键启动您的笔记型计算机。
2. 当以下讯息出现在屏幕上时,请按 F11快速键。
3.
选择 [CD/DVD] 装置为开机装置,按下键盘上的 [Enter] 键,确认您的选择,接着当屏幕出现提示文 [Press
any key to boot from CD or DVD…] (按任意键由 CD 或 DVD 开机…) 时,请按一次任意键确认。
2
3
4. 屏幕显示语言别选单。利用连结到笔记型计算机的鼠标来选择您所需的使用接口语言,或选择 [EXIT] (离开) 重
新启动系统。
5. 接着,选择 [Restore the system to factory default] (还原系统为出厂设定值) 来执行系统还原功能,或选择
[EXIT] (离开) 重新启动系统。
Page 31

30
系统还原手册
6. 执行系统还原功能将重新格式化您的硬盘扇区,继续执行此功能前,请确认重要数据文件已经备份完成。按一
下 [OK] 继续执行此功能,或按一下 [Cancel] (取消) 停止继续执行此功能。
7. 执行系统还原功能必需使用 AC 电源,在执行下一步骤之前,请先确认您的笔记型计算机已经正确的连接上 AC
电源。
4 5
6 7
Page 32

31
系统还原手册
8. 请注意在执行系统还原功能的过程中,请勿随意关闭电源,以免造成系统的损害。
9. 系统还原功能执行成功,按一下 [OK] 键,重新启动笔记型计算机。
10. 如果系统还原功能无法成功执行,建议使用者与授权许可之当地经销商或维修服务中心联络寻求进一步信息。
11. 如果系统还原功能于执行中被中断或失败,请重新依照前述步骤执行此功能。
8
9
10
Page 33

32
系统还原手册
利用 USB 随身碟或 SD 记忆卡来执行系统还原功能
如果您的笔记型计算机并未配有光驱或外接式光驱,您可利用个人的 USB 随身碟或 SD 记忆卡来执行系统还原功能。
阅读以下说明来执行系统还原功能:
1. 确认准备好驱动程序光盘以及您个人的 USB 随身碟或 SD 记忆卡。
(a) USB 随身碟或 SD 记忆卡的容量至少需要 256MB。
(b) USB 随身碟或 SD 记忆卡不可以具备开机功能,如果您准备的 USB 随身碟或 SD 记忆卡具备开机功能,
请先将其格式化为 NTFS 或 FAT32 格式。
(c) 用来执行系统还原功能的 USB 随身碟或 SD 记忆卡并不需要移除所有其所储存的数据,但仍建议使用者
将 USB 随身碟或 SD 记忆卡的重要数据备份到其它储存装置。
2. 找一部配备有光驱的计算机,将驱动程序光盘置入光驱中,找到驱动程序光盘中命名为 [USB Rescue Tool] 的
数据夹。
3. 展开数据夹 [USB Rescue Tool],复制数据夹内所有的档案到 USB 随身碟或 SD 记忆卡中。
4. 将 USB 随身碟或 SD 记忆卡插入您的笔记型计算机,并启动笔记型计算机,当以下讯息出现在屏幕上时,请
按 F11 快速键。
5. 选择 [USB] 装置为开机装置,按下键盘上的 [Enter] 键确认您的选择。
6. 参阅 “利用驱动程序光盘来执行系统还原功能” 的说明来执行系统还原功能。
7. 在利用 USB 随身碟或 SD 记忆卡来执行系统还原功能的过程中,如果遇到错误或不成功状况,建议您使用其
它 USB 随身碟或 SD 记忆卡再次重新执行上述步骤。
Page 34

33
系统还原手册
3 2
3
5
4
Page 35

34
Deutsch
Handbuch zur
Systemwiederherstellung
Page 36

35
Handbuch zur Systemwiederherstellung
Einleitung
Gründe zur Nutzung der Systemwiederherstellungsfunktion
Dieses Handbuch zur Systemwiederherstellung erläutert mit Hilfe von Anweisungen und Abbildung das Zurüc ksetzen
des Systems von Notebook-Benutzern auf die Werkseinstellungen.
Gründe für eine Systemwiederherstellung können u. a. sein:
Das Wiederherstellung des ursprünglichen Systemzustands ab Werk.
Wenn Fehler bei der Nutzung des Betriebssystems auftreten.
Wenn das Betriebssystem von Viren infiziert ist und nicht mehr normal funktioniert.
Bitte denken Sie daran, dieses Handbuch stets aufmerksam zu lesen, bevor Sie die
Systemwiederherstellungsfunktion nutzen.
Vorsichtsmaßnahmen bei der Nutzung der Systemwiederherstellungsfunktion
Die nachstehenden Vorsichtsmaßnahmen sollten Sie vor dem Durchführen der Systemwiederherstellungsfunktion
unbedingt beachten:
1. Falls Ihre Festplatte und das System auf nicht-wiederherstellbare Probleme stoßen, nutzen Sie zur
Systemwiederherstellung bitte zuerst die Wiederherstellung von der Festplatte mittels F3 -Schnelltaste.
2. Bitte sichern Sie vor der Nutzung der Systemwiederherstellungsfunktion alle wichtigen Daten, die auf der
Systemfestplatte gespeichert sind, auf einem anderen Speichergerät.
3. Falls Sie ein USB-Flash-Laufwerk oder eine SD-Karte zur Systemwiederherstellung nutzen, denken Sie bitte
daran, stets die auf dem USB-Flash-Laufwerk oder der Speicherkarte abgelegten Daten zuvor auf einem
anderen Speichergerät zu sichern.
4. Sollte die Systemwiederherstellungsfunktion mit keiner der in diesem Handbuch genannten Verfahren möglich
sein, kontaktieren Sie bitte einen autorisierten örtlichen Vertreiber oder ein Kundendienstcenter - diese werden
Ihnen weiterhelfen. Beachten SIe, dass jeder unangemessene Versuch zur Änderung der
Standardeinstellungen des Notebooks die Garantie erlischen lässt.
Page 37

36
Handbuch zur Systemwiederherstellung
Erste Schritte
Das Handbuch zur Systemwiederherstellung bietet Anwendern drei Verfahren zur Durchführung der
Systemwiederherstellungsfunktion.
Dies sind:
1. Die Wiederherstellung des Systems mit Hilfe der F3-Schnelltaste auf der Notebook-Tastatur.
2. Die Wiederherstellung des System mit Hilfe der im Lieferumfang enthaltenen Treiber-CD.
3. Die Wiederherstellung des Systems mit Hilfe eines USB-Flash-Laufwerks oder einer SD-Karte.
Wie empfehlen Ihnen, sich zuerst diesen Abschnitt von Anfang bis Ende durchzulese n und anschließend direkt zu
dem bevorzugten Verfahren zur Systemw iederh erstellung zu blättern, welches sie zur Wiederherstellung der
Werkseinstellungen ausgewählt haben.
Page 38

37
Handbuch zur Systemwiederherstellung
System mit der F3-Schnelltaste wiederherstellen
Falls die Festplatte und das System auf nicht-wiederherstellbare Probleme stoßen, empfehlen wir stets zuerst die
Durchführung der Systemwiederherstellungsfunktion von der Festplatte mit Hilfe der F3-Schnelltaste.
Befolgen Sie zum Fortfahren die nachstehenden Anweisungen:
1. Starten Sie das Notebook neu.
2. Drücken Sie die F3-Schnelltaste auf der Tastatur, sobald die folgende Mitteilung auf dem Bildschirm
angezeigt wird:
3. Wählen Sie zum Start der Systemwiederherstellungsfunktion [MSI Recovery Manager]
(MSI-Wiederherstellungsmanager); oder wählen Sie zum Neustart des Systems [EXIT](Verlassen)
2
3
Page 39

38
Handbuch zur Systemwiederherstellung
4. Drücken Sie zum Fortfahren der Systemwiederherstellungsfunktion auf [OK].
5. Sie können die Systemwiederherstellungsfunktion jederzeit beenden, indem Sie [Cancel] (Abbrechen)
drücken.
6. Die Systemwiederherstellungfunktion wird nun durchgeführt.
7. Sobald das folgende Fenster angezeigt wird, ist das System erfolgreich wiederhergestellt.
8. Starten Sie mit [OK] das System neu und rufen wie gewohnt das Windows-Betriebssystem auf.
5 4
6
7 8
Page 40

39
Handbuch zur Systemwiederherstellung
System mit der Treiber-CD wiederherstellen
Falls Ihr Notebook über ein optisches integriertes oder externes Laufwerk verfügt, können Sie die
Systemwiederherstellungsfunktion mit Hilfe der mitgelieferten Treiber-CD durchführen. Befolgen Sie zum Forfahren
die nachstehenden Anweisungen:
1. Legen Sie die T reiber-CD in da s optische Lauf w erk, st arten sie das Notebook mit Hilfe de s Ei n-/Ausschalters
neu.
2. Drücken Sie die F11-Schnelltaste auf der Tastatur, sobald die folgende Mitteilung auf dem Bildschirm angezeigt
wird:
3. Wählen Sie das [CD/DVD]-Gerät als Boot-Gerät, drücken Sie dann zum Bestätigen der Ausw ahl auf [Enter].
Drücken Sie zum erneuten Bestätigung der Auswahl eine beliebige Taste, sobald die Mitteilung [Press any
key to boot from CD or DVD…] (Drücken Sie zum Starten von CD oder DVD e in e beliebige Taste) erscheint.
3
2
4. Das Sprachmenü wird angezeigt. Wählen Sie die gewünschte Sprache, indem Sie das entspre chende
Symbol mit der am Notebook angeschlossenen Maus anklicken; oder wählen Sie zum Neustart des System
[EXIT] (Verlassen).
Page 41

40
Handbuch zur Systemwiederherstellung
5. Wählen Sie dann zum Start der Systemwiederherstellungsfunktion [Restore the system to factory default]
(Werkseinstellungen des Systems wiederherstellen); oder wählen Sie zum Neustart des Systems [EXIT]
(Verlassen).
6. Durch die Systemwiederherstellung werden Ihre Festplattenpartitionen formatieren; denken Sie daran, zuvor
alle wichtigen Daten zu sichern. Klicken Sie zum Fortfahren auf [OK]; mit [Cancel] (Abbrechen) beenden Sie
die Systemwiederherstellung.
7. Während der Systemwiederherstellung muss das Notebook am Stromnetz angeschlossen sein. Achten Sie
vor dem Fortfahren mit dem nächsten Schritt darauf, dass das Netzteil an das Notebook angeschlossen ist.
4 5
6 7
Page 42

41
Handbuch zur Systemwiederherstellung
8. Denken Sie in jedem Fall daran, das System während der Systemwiederherstellung nicht auszuschalten -
andernfalls kann dies zu unbekannten Systemschäden führen.
9. Klicken Sie zum Neustart des Systems auf [OK], sobald die Systemwiederherstellung abgeschlossen ist.
Nun ist das System auf die Werkseinstellungen zurückgesetzt.
10.
Sollte eine erfolgreiche Systemwiederherstellung nicht möglich sein, kontaktieren Sie bitte ein en
autorisierten örtlichen Vertreiber oder ein Kundendien stcenter - dort w ird Ihnen weitergeholfen.
11. Falls der Wiederherstellungsvorgang unterbrochen werden oder scheitern sollte, wiederholen Sie das
Verfahren bitte von vorne.
8
9
10
Page 43

42
Handbuch zur Systemwiederherstellung
System mit einem USB-Flash-Laufwerk oder einer SD-Karte wiederherstellen
Sollte Ihr Notebook nicht über ein optisches Laufwerk verfügen, können Sie die Systemwiederherstellung mit
einem eigenen USB-Flash-Laufwerk oder einer SD-Karte durchführen. Befolgen Sie zum Forfahren die
nachstehenden Anweisungen:
1. Überprüfen Sie, ob Sie die mitgelieferte Treiber-CD und ein USB-Flash-Laufwerk oder eine SD-Karte bei sich
haben.
(a) die Kapazität des US B-Flash-Laufwerks oder der SD-Karte muss mindetens 256 MB betragen;
(b) das USB-Flash-Laufwerk oder die SD-Karte dürfen nicht bootbar sein. Sollte das Gerät bootbar sein,
formatieren Sie es zuerst in NTFS oder FAT32.
(c) es ist nicht notwendig, alle Dateien zu löschen, die sich auf dem USB-Flash-Laufwerk oder der
SD-Karte befinden, das/die Sie zur Systemwiederherstellung nutzen.
Dennoch empfehlen wir, die auf dem USB-Flash-Laufwerk oder der SD-Karte gespeicherten Dateien
auf einem anderen Speichergerät zu sichern.
2. Nun benötigen Sie einen Computer, der über ein optisches Laufwerk verfügt. Legen Sie die Treiber-CD in
das optische Laufwerk ein, wählen Sie den Ordner mit dem Namen [USB Rescue Tool]
(USB-Rettungswerkzeug) auf der Treiber-CD.
3. Durchsuchen Sie den Ordner [USB Rescue Tool] (USB-Rettungswerkzeug), kopieren Sie alle darin
enthaltenen Dateien und Ordner auf das USB-Flash-Laufwerk bzw. die SD-Karte.
4. Drücken Sie die F1 1-Schnelltaste auf der Notebook-Tastatur, sobald die folgende Mitteilung auf dem
Bildschirm angezeigt wird:
5. Wählen Sie das [USB]-Gerät als Boot-Gerät, drücken Sie zur Bestätigung der Auswahl [Enter].
6. Befolgen Sie zum Fortfahren die Anweisungen im Abschnitt “System mit der Treiber-CD wiederherstellen”.
7. Falls Fehler während der Systemwiederherstellung mit einem USB-Flash-Laufwerk oder einer SD-Karte
auftreten, empfehlen wir, den vorherigen Schritt mit einem anderen USB-Flash-Laufwerk oder einer anderen
SD-Karte erneut zu versuchen.
Page 44

43
Handbuch zur Systemwiederherstellung
3 2
3
5
4
Page 45

44
Français
Manuel de remise en état
du système
Page 46

45
Manuel de remise en état du système
Introduction
Buts de la Fonction de remise en état du système
Ce Manuel de remise en état contient des instructions et des illustrations sur la remise en état du système ou de
l'ordinateur portable que vous avez acheté, pour restaurer les réglages par défaut du fabricant.
La Fonction de remise en état est utilisée dans les cas suivants :
Remettre le système à son état original avec les réglages par défaut du fabricant.
Lorsque des erreurs se sont produites avec le système d'exploitation.
Lorsque le système d'exploitation a été infecté par un virus et qu'il ne marche plus normalemen t.
Veuillez noter qu'il est toujours recommandé de lire attentivement ce manuel avant de procéder avec la Fonction de
remise en état du système.
Précautions à propos de l'utilisation de la Fonction de remise en état du
système
Les précautions suivantes doivent être prises avant d'utiliser la Fonct ion de remise en état du système :
1. Si votre disque dur et votre système a des erreurs irréparables, veuillez utiliser en premier la touche de
raccourci de remise en état F3 du disque dur pour lancer la Fonction de remise en état du système.
2. Avant d'utiliser la Fonction de remise en état du système, sauvegardez tous vos fichiers importants de votre
système sur des autres périphériques de stockage.
3. Si vous utilisez une clé USB ou une carte SD pour lancer la Fonction de remise en état, veuillez noter qu'il est
aussi nécessaire de sauvegarder les données enregistrées sur la clé USB ou sur la carte mémoire sur des
autres périphériques de stockage.
4. Si la Fonction de remise en état du système ne marche pas même en utilisant les méthodes fournies dans le
Manuel de remise en état, il est fortement recommandé de contacter votre distributeur régional ou un centre de
service pour de l'aide. Veuillez noter la modification des réglages par défaut de l'ordinateur portable annulera
automatiquement la garantie.
Page 47

46
Manuel de remise en état du système
Mise en route
Ce Manuel de remise en état du système contient trois méthodes différentes pour utiliser la Fonction de remise en
état du système.
Elles sont :
1. Remise en état du système avec la touche de raccourci F3 du clavier de l'ordinateur portable
2. Remise en état du système avec le CD des pilotes fourni dans la boîte.
3. Remise en état du système avec une clé USB ou une carte SD.
Il est recommandé de lire cette section du début jusqu'à la fin avant de continuer, puis d'aller directement à la
méthode désirée pour lancer la Fonction de remise en état du système pour remettre en état le système et restaurer
les réglages par défaut du fabricant.
Page 48

47
Manuel de remise en état du système
Remise en état du système avec la touche de raccourci F3
Si votre disque dur et votre système a des erreurs irréparables, il est recommandé d'essayer en premier de lancer la
Fonction de remise en état du système avec la touche de raccourci F3 du disque dur.
Suivez les instructions suivantes pour continuer :
1. Redémarrez l'ordinateur portable.
2. Appuyez sur la touche de raccourci F3 du clavier lorsque le message suivant s'affiche sur l'écran.
3. Choisissez [MSI Recovery Manager] (Gestionnaire de remise en état MSI) pour lancer la Fonction de remise
en état du système ou choisissez [EXIT] (QUITTER) pour redémarrer le système.
2
3
Page 49

48
Manuel de remise en état du système
4. Appuyez sur [OK] pour continuer avec la Fonction de remise en état du système.
5. Appuyez sur [Cancel] (Annuler) pour arrêter la Fonction de remise en état du système n'importe quand.
6. La Fonction de remise en état du système commence.
7. Lorsque la fenêtre suivante s'affiche, le système a été remis en état correctement.
8. Appuyez sur [OK] pour redémarrer le système et utilisez le système d'exploitation Windows comme
d'habitude.
5 4
6
7 8
Page 50

49
Manuel de remise en état du système
Remise en état du système avec le CD des pilotes
Si votre ordinateur portable possède un lecteur de disque optique interne ou externe, vous pouvez lancer la Fonction
de remise en état du système à partir du CD des pilotes fourni dans la boîte. Suivez les instructions suivantes pour
continuer :
1. Insérez le CD des pilotes dans le lecteur de disque optique et redémarrez l'ordinateur portable en appuyant
sur le bouton de mise en marche.
2. Appuyez sur la touche de raccourci F11 du clavier de l'ordinateur portable lorsque le message suivant
s'affiche sur l'écran.
3. Choisissez le périphérique [CD/DVD] comme périphérique de démarrage et appuyez sur [Enter] (Entrer) pour
confirmer la sélection, puis appuyez sur n'importe quelle touche pour reconfirmer la sélection lorsque le
message [Press any key to boot from CD or DVD…] (Appuyez sur une touche pour redémarrer à partir du CD
ou DVD) s'affiche.
2
3
4. Le menu de la langue s'affiche. Choisissez la langue désirée en cliquant sur l'icône correspon dante avec la
souris connectée à l'ordinateur portable ou choisissez [EXIT] (Quitter) pour redémarrer le système.
Page 51

50
Manuel de remise en état du système
5. Choisissez alors [Restore the system to factory default] (Remise en état du système avec les réglages par
défaut) pour lancer la Fonction de remise en état du système, ou choisissez [EXIT] (QUITTER) pour
redémarrer le système.
6. Le processus de remise en état du système va formater les partitions de votre disque dur ; assurez-vous
d'avoir sauvegarder toutes les données importantes avant de continuer à l'étape suivante. Cliquez sur [OK]
(OK) pour continuer, cliquez sur [Cancel] (Annuler) pour arrêter le processus de remise en état du sy stème.
7. L'alimentation secteur est requise pendant la Fonction de remise en état du système. Assurez-vous que le
cordon d'alimentation est branché sur l'ordinateur portable avant d'aller à l'étape suivante.
4 5
6 7
Page 52

51
Manuel de remise en état du système
8. Attention : N'éteignez pas le système pendant le processus de remise en état du système, ceci pourrait
causer des erreurs irréparables au système.
9. Lorsque la remise en état du système est terminée, cliquez sur [OK] pour redémarrer le système. Votre
système a été remis en état avec les réglages par défaut du fabricant.
10. Si la Fonction de remise en état du système n'a pas marchée correctement, il est fortement recommandé de
contacter votre distributeur régional ou un centre de service pour de l'aide.
11. Si le processus de remise en état a été interrompu ou a échoué, répétez la méthode de remise en état depuis
le début.
8
9
10
Page 53

52
Manuel de remise en état du système
Remise en état du système avec une clé USB ou une carte SD
Si votre ordinateur portable ne possède pas un lecteur de disque optique, vous pouvez lancer la Fonction de
remise en état du système à partir d'une clé USB ou d'une carte SD. Suivez les instructions suivantes pour
continuer :
1. Assurez-vous que vous avez avec vous le CD des pilotes, fourni avec la boîte, et une clé USB ou une carte
SD.
(a) La clé USB ou la carte SD doit avoir une capacité d'au moins 256Mo libre ;
(b) La clé USB ou la carte SD ne doit pas être un appareil de démarrage. Si ce périphérique est un
appareil de démarrage, veuillez le formater en premier avec NTFS ou FAT32..
(c) Il n'est pas obligatoire d'effacer tous les fichiers personnels sur la clé USB ou la carte SD que vous
voulez utiliser pour lancer la Fonction de remise en état du système.
Par contre, il est fortement recommandé de sauvegarder les données enregistrés sur la clé USB ou la
carte mémoire sur un autre périphérique de stockage.
2. Utilisez un ordinateur qui possède un lecteur de disque optique. Insérez le CD des pilotes dans le lecteur de
disque optique et trouvez le dossier [USB Rescue Tool] (Outil de sauvegarde USB) sur le Cd des pilotes.
3. Ouvrez le dossier [USB Rescue Tool] (Outil de sauvegarde USB), et copiez tous les fichiers qu'il contient sur
la clé USB ou la carte mémoire.
4. Redémarrez le système et appuyez sur la touche de raccourci F11 du clavier de l'ordinateur portable lorsque
le message suivant s'affiche sur l'écran.
5. Choisissez le périphérique [USB] comme périphérique de démarrage et appuyez sur [Enter] (Entrer) pour
confirmer la sélection.
6. Référez-vous aux instructions de la section “Remise en état du système à partir du CD des pilotes” pour
continuer et terminer la remise en état du système.
7. Si une panne se produit pendant la Fonction de restauration du système avec une clé USB ou une carte SD,
il est recommandé de ré-essayer les étapes précédentes avec une autre clé USB ou carte SD.
Page 54

53
Manuel de remise en état du système
3 2
3
5
4
Page 55

54
Русский
восстановлению системы
Руководство по
Page 56

55
Руководство по восстановлению системы
Введение
Назначение функции восстановления системы
В данном руководстве по восстановлению содержатся инструкции и иллюстрации для восстановления
заводских настроек системы для пользователей ноутбука.
Функция восстановления системы может использоваться в следующих случаях:
Восстановление начальных заводских настроек системы.
В случае выявления ошибок операционной системы при использовании.
В случае заражения операционной системы вирусом и невозможностью ее нормальной работы.
Перед использованием функции восстановления системы рекомендуется предварительно внимательно
ознакомиться с данным руководством.
Меры предосторожности при использовании функции восстановления
системы
Перед использованием функции восстановления системы следует предпринять следующие меры
предосторожности:
1. Если возникли неустранимые проблемы с жестким диском или системой, в первую очередь выполните
восстановление системы с жесткого диска, используя клавишу быстрого вызова функции
восстановления F3.
2. Перед использованием функции восстановления системы, создайте на других накопителях резервные
копии важной информации, хранящейся на системном
3. Если для выполнения функции восстановления системы используется флэш-накопитель USB или карта
SD, всегда необходимо создавать на других накопителях резервную копию данных, находящихся на
флэш-накопителе USB или карте SD.
4. Если функцию восстановления системы невозможно выполнить ни одним из описанных в данном
диске.
Page 57

56
Руководство по восстановлению системы
руководстве способом, то для получения дальнейших консультаций настоятельно рекомендуется
связаться с местным официальным дистрибьютором или центром обслуживания. Обратите внимание
на то, что любая недопустимая попытка изменить настройки, установленные в ноутбуке по умолчанию,
может привести к аннулированию гарантии.
Подготовка к работе
В данном руководстве по восстановлению системы приведены три способа выполнения функции
восстановления системы.
Это:
1. Восстановление системы с использованием клавиши F3 на клавиатуре ноутбука.
2. Восстановление системы с использованием компакт-диска с драйверами, который поставляется в
комплекте.
3. Восстановление системы с использованием флэш-накопителя USB или карты SD пользователя.
Пользователям рекомендуется сначала прочитать данное руководство полностью, после чего можно перейти
непосредственно к изучению определенного способа, выбранного пользователем для выполнения функции
восстановления заводских настроек системы.
Page 58

57
Руководство по восстановлению системы
Восстановление системы с использованием клавиши F3
Если возникли неустранимые проблемы с жестким диском или системой, в первую очередь рекомендуется
выполнить восстановление системы с жесткого диска, используя клавишу быстрого вызова функции F3.
Для продолжения следуйте инструкциям, приведенным ниже:
1. Перезапустите ноутбук.
2. Нажмите клавишу F3 на клавиатуре, когда на экране отобразится следующее сообщение
3.
Выберите [MSI Recovery Manager] (Диспетчер восстановления MSI) для запуска функции
восстановления системы или [EXIT] (Выход) для перезапуска системы
2
3
Page 59

58
Руководство по восстановлению системы
4. Для продолжения восстановления системы нажмите [OK].
5. В любой момент для останова процедуры восстановления системы можно нажать [Cancel] (Отмена).
6. После нажатия кнопки [OK] запускается функция восстановления системы.
7. Когда восстановление системы успешно завершится, то отобразится следующее сообщение.
8. Нажмите [OK] для перезагрузки системы и войдите в операционную систему Windows обычным
порядком.
5 4
6
7 8
Page 60

59
Руководство по восстановлению системы
Восстановление системы с использованием компакт-диска с
драйверами
Если ноутбук оснащен приводом оптических дисков или используется внешний привод оптических дисков,
функцию восстановления системы можно выполнить с использованием компакт-диска с драйверами, который
поставляется в комплекте. Для продолжения следуйте инструкциям, приведенным ниже:
1. Вставьте компакт-диск с драйверами в привод оптических дисков, а затем перезапустите ноутбук,
нажав кнопку питания.
2. Нажмите клавишу F11 на клавиатуре ноутбука, когда на экране отобразится следующее сообщение
3. Выберите устройство [CD/DVD] (привод CD/DVD-дисков) в качестве устройства загрузки и нажмите
клавишу [Enter] (Ввод) для подтверждения выбора, а затем, после того, как отобразится подсказка
[Press any key to boot from CD or DVD…] (Нажмите любую клавишу для загрузки с компакт-диска или
DVD-диска), нажмите любую клавишу для повторного подтверждения выбора.
2
3
Page 61

60
Руководство по восстановлению системы
4. Отобразится меню Language (Язык). Выберите язык, щелкнув нужный значок кнопкой мыши,
подключенной к ноутбуку, или выберите [EXIT] (Выход) для перезапуска системы.
5. Затем выберите [Restore the system to factory default] (Восстановить заводские настройки системы),
чтобы запустить функцию восстановления системы; или [EXIT] (Выход) для перезапуска системы.
6. В процессе восстановления системы будет отформатирован раздел на жестком диске; перед
продолжением процесса убедитесь, что сделаны резервные копии всей важной информации. Для
продолжения щелкните [OK]; для останова процесса восстановления системы щелкните [Cancel]
(Отмена).
7. При использовании функции восстановления системы следует использовать питание от сети. Перед
переходом к следующему шагу убедитесь, что ноутбук подключен к сети питания.
4 5
6 7
Page 62

61
Руководство по восстановлению системы
8. В процессе выполнения функции восстановления системы не отключайте питание системы, так как это
может привести к непредсказуемым повреждениям системы.
9. После завершения процесса восстановления системы щелкните [OK] для перезапуска системы.
Заводские настройки системы будут восстановлены.
10. Если функция восстановления системы не выполняется должным образом, для получения
консультаций настоятельно рекомендуется связаться с уполномоченным местным дистрибьютором
или центром обслуживания.
11. Если процесс восстановления прерван или не удался, повторите процедуру восстановления с начала.
8
10
9
Page 63

62
Руководство по восстановлению системы
Восстановление системы с использованием флэш-накопителя USB или
карты SD.
Если ноутбук не оснащен приводом оптических дисков, можно выполнить функцию восстановления
системы с использованием флэш-накопителя USB или карты SD пользователя. Для продолжения
следуйте инструкциям, приведенным ниже:
1. Убедитесь в наличии компакт-диска с драйверами, поставляемом в комплекте, и флэш-накопителя
USB или карты SD.
(a) требуется флэш-накопитель USB или карта SD с объемом памяти не менее 256 Мб;
(b) флэш-накопитель USB или карта SD не должны быть загрузочными. если устройство окажется
загрузочным, сначала отформатируйте его в формате NTFS или FAT32.
(c) если флэш-накопитель USB или карта SD будет использоваться для выполнения функции
восстановления системы, не требуется удалять все данные, сохраненные на них.
Однако все же рекомендуется сохранить на другом накопителе резервные копии данных,
хранящихся на флэш-накопителе USB или карте SD .
2. Потребуется компьютер, оснащенный приводом оптических дисков. Вставьте компакт-диск с
драйверами в привод оптических дисков и найдите на нем папку с именем [USB Rescue Tool]
(Аварийное восстановление USB).
3. Откройте папку с именем [USB Rescue Tool] (Аварийное восстановление USB) и скопируйте все файлы
данных в папку на флэш-накопителе USB или карте SD.
4. Перезапустите систему и нажмите клавишу F11 на клавиатуре ноутбука, когда на экране отобразится
следующее сообщение
5. Выберите устройство [USB] как устройство загрузки и нажмите клавишу [Enter] (Ввод) для
подтверждения.
6. Продолжение процедуры описано в инструкции «Восстановление системы с компакт-диска с
драйверами».
7. Если произойдет сбой при выполнении функции восстановления системы с использованием
флэш-накопителя USB или карты SD, рекомендуется повторить предыдущие операции с
использованием другого флэш-накопителя USB или карты SD.
Page 64

63
Руководство по восстановлению системы
3 2
3
5
4
Page 65

64
Español
Manual de recuperación
del sistema
Page 66

65
Manual de recuperación del sistema
Introducción
Objetivos del uso de la Función de recuperación del sistema
Este manual que trata sobre la recuperación proporciona instrucciones e ilustracione s acerca de cómo recuperar el
sistema del equipo portátil adquirido por los usuarios restableciendo la configuración predeterminada de fábrica.
Los objetivos de utilizar la Función de recuperación del sistema son:
Restaurar el sistema restableciendo el estado inicial de la config uración predeterminada d el fabricante.
Cuando se han producido algunos errores en el sistema operativo en uso.
Cuando el sistema operativo está infectado por un virus y no puede funcionar con normalidad.
Tenga en cuenta que siempre es recomendable leer este manual atentamente antes de llevar a cabo la Función de
recuperación del sistema.
Precauciones relacionadas con el uso de la Función de recuperación del
sistema
Debe tener en cuenta las siguientes precauciones antes de llevar a cabo la Función de recuperación del siste m a:
1. Si el disco duro y el sistema detectaron problemas irrecuperables, utilice primero la recuperación mediante la
tecla de acceso directo F3 desde el disco duro para ejecutar la Función de recuperación del sistema.
2. Antes de utilizar la Función de recuperación del sistema, realice una copia de seguridad de los datos
guardados en la unidad del sistema y conserve dicha copia en otros dispositivos de almacenamiento.
3. Si utiliza una unidad flash USB o una tarjet a SD p ara realizar la función de recu peració n, tenga en cuent a qu e
siempre es necesario hacer una copia de seguridad de los datos guardados en dicha unidad o tarjeta y
conservarla en otros dispositivos de almacenamiento.
4. Si la Función de recuperación del sistema no se puede realizar con ninguno de los métodos proporcionados
en este manual de recuperación, es muy recomendable que se ponga en contacto con el distribuidor local o
centro de atención al cliente autorizado para obtener ayuda. Tenga en cuenta que si intenta cambiar la
configuración predeterminada del equipo portátil inadecuadamente, puede provocar la anulación de la
garantía.
Page 67

66
Manual de recuperación del sistema
Primeros pasos
Este manual de recuperación del sistema proporciona a los usuarios tres métodos para llevar a cabo la Función de
recuperación del sistema.
Son los siguientes:
1. Recuperar el sistema con la tecla de acceso directo F3 del teclado del equipo portátil.
2. Recuperar el sistema con el CD de controladores proporcionado con el paquete.
3. Recuperar el sistema con una unidad flash USB o una tarjeta SD personal.
Se recomienda a los usuarios que lean esta sección de principio a fin y, a continuación, vayan directamente al método
específico que hayan seleccionado para llevar a cabo la Función de recuperación del sistema para restaurar la
configuración predeterminada de fábrica en el sistema.
Page 68

67
Manual de recuperación del sistema
Recuperar el sistema con la tecla de acceso directo F3
Si el disco duro y el sistema detectaron problemas irrecuperables, siempre es recomendable llevar a cabo primero la
Función de recuperación del sistema con la tecla de acceso directo F3 desde el disco duro.
Siga estas instrucciones para continuar:
1. Reinicie el equipo portátil.
2. Presione la tecla de acceso directo F3 del teclado cuando aparezca el siguiente mensaje en la pantalla.
3. Seleccione [MSI Recovery Manager] (Administrador de recuperación MSI) para iniciar la Función de
recuperación del sistema. También puede seleccionar [EXIT] (SALIR) para reiniciar el sistema.
2
3
Page 69

68
Manual de recuperación del sistema
4. Presione [OK] (Aceptar) para seguir con la Función de recuperación del sistema.
5. Presione [Cancel] (Cancelar) para detener la Función de recuperación del sistema en cualquier momento.
6. La Función de recuperación del sistema se está ejecutando ahora.
7. Cuando aparezca la siguiente ventana, el sistema se habrá recuperado correctamente.
8. Presione [OK] (Aceptar) para reiniciar el sistema y acceder al sistema operativo Windows como de
costumbre.
5 4
6
7 8
Page 70

69
Manual de recuperación del sistema
Recuperar el sistema con el CD de controladores
Si el equipo portátil cuenta con un dispositivo de unidad de disco óptica o uno externo, puede llevar a cabo la Función
de recuperación del sistema con el CD de controladores incluido en el paquete. Siga estas instrucciones para
continuar:
1. Inserte el CD de controladores en la unidad de disco óptica y, a continuación, reinicie el equipo portátil
presionando el botón de encendido.
2. Presione la tecla de acceso directo F11 del teclado del equipo portátil cuando aparezca el siguiente mensaje
en la pantalla.
3. Seleccione el dispositivo [CD/DVD] como el dispositivo de arranque y presione [Enter] (Entrar) para confirmar la
selección. A continuación, presione cualquier tecla para volver a confirmar la selección cuando aparezca el
mensaje de solicitud [Press any key to boot from CD or DVD...] (Presione cualquier tecla para arrancar desde
CD o DVD).
3
2
4. Aparecerá el menú de idioma. Seleccione el idioma que desee haciendo clic en el icono en cuestión
mediante el ratón conectado al equipo portátil; o bien, seleccione [EXIT] (SALIR) para reiniciar el sistema.
Page 71

70
Manual de recuperación del sistema
5. Por último, seleccione [Restore the system to factory default] (Restaurar la configurac ión predeterminada de
fábrica en el sistema) para iniciar el proceso de la Función de recuperación del sistema; o bien, seleccione
[EXIT] (SALIR) para reiniciar el sistema.
6. El proceso de recuperación del sistema formateará la partición del disco duro; asegúrese de que tiene una
copia de seguridad de los datos importantes antes de continuar con el proceso. Haga clic en [OK] (Aceptar)
para continuar; haga clic en [Cancel] (Cancelar) para detener el proceso de recuperación del sistema.
7. La alimentación de CA debe estar conect ada mientras se lleva a cabo la Función de recuperación del
sistema. Asegúrese de que la alimentac ión de CA está conectada al equipo portátil antes de continuar con el
paso siguiente.
4 5
6 7
Page 72

71
Manual de recuperación del sistema
8. Asegúrese de no apagar la alimentación del sistema mientras se realiza la Función de recuperación del
sistema. De lo contrario, se puede producir algún daño desconocido en el sistema.
9. Cuando el proceso de recuperación del sistema finalice, haga clic en [OK] (Aceptar) para reiniciar el sistema.
Ahora, la configuración predeterminada de fábrica se restaurará en el sistema.
10. Si la Función de recuperación del sistema no se realiza correctamente, siempre es recomendable ponerse
en contacto con el distribuidor local o centro de atención al cliente autorizado para obtener ayuda.
11. Si el proceso de restauración se interrumpe o falla, repita el procedimiento de recuperación desde el
principio.
8
9
10
Page 73

72
Manual de recuperación del sistema
Recuperar el sistema con una unidad flash USB o una tarjeta SD
Si el equipo portátil no cuenta con una unidad de disco óptica, puede llevar a cabo la Función de recuperación
del sistema con una unidad flash USB o una tarjeta SD persona l. Siga estas instrucciones para continuar:
1. Asegúrese de que tiene el CD de los controladores incluido con el paquete y una unidad flash USB o tarjeta
SD personal.
(a) es necesario que la unidad flas h USB o la tarjeta SD tenga una capacidad mínima de 256 MB;
(b) la unidad flash USB o la tarjeta SD no debe ser uno de los dispositivos de arranque. Si se detecta que
se trata de un dispositivo de arranque, formatéelo primero con el formato de archivos NTFS o FAT32.
(c) no es necesario eliminar todos los archivos de datos personales almacenados en la unidad flash USB
o en la tarjeta SD que se va a usar para realizar la Función de recuperación del sistema.
Sin embargo, es recomendable realizar una copia de seguridad de los datos almacenados en dichos
medios y conservarla en otro dispositivo de almacenamiento.
2. Busque un equipo que tenga una unidad de disco óptica. Inserte el CD de los controladores en la unidad de
disco óptica y busque la carpeta denominada [USB Rescue Tool] (Herramienta de rescate USB) en el CD de
los controladores.
3. Busque la carpeta denominada [USB Rescue Tool] (Herramienta de rescate USB) y copie todos los archivos
de datos en la unidad flash USB o en la tarjeta SD.
4. Reinicie el sistema y presione la tecla de acceso directo F11 del teclado del equipo portátil cuando aparezca
el siguiente mensaje en la pantalla.
5. Seleccione el dispositivo [USB] como el dispositivo de arranque y presione [Enter] (Entrar) para confirmar la
selección.
6. Consulte las instrucciones de la sección “Recuperar el sistema con el CD de controladores” para continuar
con el proceso.
7. Si se produce cualquier error al procesar la Función de recuperación del sistema con una unidad flash USB o
una tarjeta SD, es recomendable intentar realizar de nuevo los pasos anteriores con otra unidad flash USB o
tarjeta SD.
Page 74

73
Manual de recuperación del sistema
3 2
3
5
4
Page 75

74
Italiano
Manuale di ripristino del
Page 76

75
Manuale di ripristino del sistema
Introduzione
Scopo d’uso della funzione di ripristino del sistema
Questo Manuale di ripristino del sistema fornisce le istruzioni e le illustrazioni per ripristinare il sistema del notebook
acquistato sulle impostazioni predefinite.
Lo scopo d'uso della funzione di ripristino del sistema può includere:
Ripristino del sistema allo stato iniziale sulle impostazioni predefinite.
Quando si verificano degli errori del sistema operativo in uso.
Quando il sistema operativo è infettato da virus e non è in grado di funzionare in modo normale.
Si prega di notare che si raccomanda di leggere accuratamente questo manua le ogni volta che si usa la funzione di
ripristino del sistema.
Precauzioni d'uso della funzione di ripristino del sistema
Osservare le seguenti precauzioni prima di procedere con la funzione di ripristino del sistema:
1. Se il disco rigido ed il sistema manifestano errori non risolvibili, prima usare il tasto di scelta rapida F3 per
eseguire la funzione di ripristino del sistema.
2. Prima di usare la funzione di ripristino del sistema, eseguire il backup di tutti i dati importanti salvati sull’unità
del sistema o altri dispositivi d’archiviazione.
3. Se per eseguire la funzione di ripristino del sistema è usata una unità Flash USB o una scheda SD, si prega di
notare che è sempre necessario eseguire il backup su altri dispositivi dei dati salvati nell’unità Flash USB o
nella scheda di memoria.
4. Se la funzione di ripristino del sistema non procede impiegando i metodi forniti in questo Manuale, si
raccomanda vivamente di rivolgersi al distributore locale autorizzato o al nostro Centro assistenza per il
supporto. Notare che tutti i tentativi inappropriati di modifica delle impostazioni predefinite del notebook
annulleranno la garanzia.
Page 77

76
Manuale di ripristino del sistema
Preparazione
Questo Manuale di ripristino del sistema mette a disposizione tre metodi per eseguire la funzione di ripristino del
sistema.
In dettaglio sono:
1. Ripristino del sistema usando il tasto di scelta rapida F3 sulla tastiera del notebook.
2. Ripristino del sistema usando il CD Driver fornito in dotazione.
3. Ripristino del sistema usando una unità Flash USB o scheda SD personale.
Si raccomanda prima di leggere questa sezione dall’inizio a lla fine e poi di anda re al metodo sp ecifico selezio nato per
eseguire la funzione di ripristino del sistema e ripristinare il sistema sulle impostazioni predefinite.
Page 78

77
Manuale di ripristino del sistema
Ripristino del sistema usando il tasto di scelta rapida F3
Se il disco rigido ed il sistema manifestano errori non risolvibili, si raccomanda sempre – per prima cosa – di usare il
tasto di scelta rapida F3 per eseguire la funzione di ripristino del sistema.
Attenersi alle istruzioni che seguono per continuare:
1. Riavviare il notebook.
2. Quando sullo schermo appare il seguente messaggio, premere il tasto di scelta rapida F3 sulla tastiera del
notebook
3. Selezionare [MSI Recovery Manager] (Gestione ripristino MSI) per avviare la funzione di ripristino del
sistema; oppure selezionare [EXIT] (Esci) per riavviare il sistema
2
3
Page 79

78
Manuale di ripristino del sistema
4. Premere [OK] per continuare e procedere con la funzione di ripristino del sistema.
5. Premere [Cancel] (Annulla) in qualsiasi momento per arrestare la funzione di ripristino del sistema.
6. Adesso la funzione di ripristino del sistema sta svolgendo le sue funzioni.
7. Quando appare la seguente finestra, il sistema è stato ripristinato.
8. Premere [OK] per riavviare il sistema ed accedere al sistema operativo Windows, come di solito.
5 4
6
7 8
Page 80

79
Manuale di ripristino del sistema
Ripristino del sistema usando il CD Driver
Se il notebook è dotato di una unità ottica, oppure se si possiede un lettore esterno, si può eseguire la funzione di
ripristino del sistema usando il CD Driver fornito in dotazione. Attenersi alle istruzioni che seguono per continuare:
1. Inserire il CD Driver nell’unità ottica, poi riavviare il notebook premendo il tasto d’alimentazione.
2. Quando sullo schermo appare il seguente messaggio, premere il tasto di scelta rapida F11 sulla tastiera del
notebook
3. Selezionare il dispositivo [CD/DVD] come dispositivo d’avvio, premere [Enter] (Invio) per confermare la
seleziona, quando appare il messaggio [Press any key to boot from CD or DVD] (Premere un tasto qualsiasi
per avviare dal CD o DVD) premere un tasto qualsiasi per confermare di nuovo questa selezione.
2
3
4. Appare il menu della lingua. Selezionare la lingua preferita facendo clic sull’icona relativa usando il mouse
collegato al notebook; oppure selezionare [EXIT] (Esci) per riavviare il sistema.
5. Poi, selezionare [Restore the system to factory default] (Ripristina il sistema sui valori predefiniti) per avviare
la procedura della funzione di ripristino del sistema; oppure selezionare [EXIT] (Esci) per riavviare il sistema.
Page 81

80
Manuale di ripristino del sistema
6. La procedura di ripristino del sistema formatterà la partizione del disco rigido; assicurarsi di eseguire il
backup di tutti i dati importanti prima di continuare con la procedura. Fare clic su [OK] per continuare; fare clic
su [Cancel] (Annulla) per arrestare la procedura di ripristino del sistema.
7. È necessaria l’alimentazione CA mentre si procede con la funzione di ripristino del sistema. Assicurarsi che
l’alimentazione CA sia collegata al notebook prima di procedere con la fase successiva.
4 5
6 7
Page 82

81
Manuale di ripristino del sistema
8. È importante non spegnere il sistema durante la procedura della funzione di ripristino del sistema,
diversamente si provocano danni irreparabili al sistema.
9. Quando la procedura di ripristino del sistema è terminata, fare clic su [OK] per riavviare il sistema. Adesso il
sistema è ripristinato sulle impostazioni predefinite.
10. Se la funzione di ripristino del sistema non procede, si raccomanda vivamente di rivolgersi al distributore
locale autorizzato o al nostro Centro assistenza per il supporto.
11. Se la funzione di ripristino del sistema è interrotta oppure non riesce, ripetere la procedura dall’inizio.
8
9
10
Page 83

82
Manuale di ripristino del sistema
Ripristino del sistema usando una unità Flash USB o una scheda SD
Se il notebook non è dotato di una unità ottica, la funzione di ripristino del sistema può essere eseguita usando
una unità Flash USB o una scheda SD personale. Attenersi alle istruzioni che seguono per continuare:
1. Assicurarsi di avere il CD Driver fornito in dotazione ed unità Flash USB o una scheda SD personale.
(a) La capacità minima richiesta per l’unità Flash USB o per la scheda SD è di 256MB;
(b) L’unità Flash USB o la scheda SD non deve essere un dispositivo avviabile. Se il dispositivo è avviab ile,
prima formattarlo usando il FileSystem NTFS o FAT32.
(c) Non è necessario eliminare tutti i file archiviati nell’unità Flash USB o nella scheda SD che sarà usata
per eseguire la funzione di ripristino del sistema.
Tuttavia, si raccomanda sempre di eseg uire su un altro dispositivo il backup dei dati archiviat i nell’unità
Flash USB o nella scheda SD.
2. Trovare un computer dotato di unità ottica. Inserire il CD Driver nell’unità ottica e - nel CD Driver - trovare la
cartella col nome [USB Rescue Tool] (Strumento di salvataggio USB).
3. Andare alla cartella col nome [USB Rescue Tool] (Strumento di salvataggio US B) e copiare tutti i file d i dati in
una cartella dell’unità Flash USB o della scheda SD.
4. Riavviare il sistema e, quando sullo schermo appare il seguente messaggio, premere il tasto di scelta rapida
F11 sulla tastiera del notebook.
5. Selezionare il dispositivo [USB] come dispositivo d’avvio, poi premere [Enter] (Invio) per confermare la
selezione.
6. Fare riferimento alle istruzioni della sezione “Ripristino del sistema usando il CD Driver” per continuare con la
procedura.
7. Se si verifica una qualsiasi anomalia durante l’esecuzione della funzione di ripristino d el sistema usando una
unità Flash USB o una scheda SD, si raccomanda di provare ad eseguire di novo le istruzioni precedenti
usando un’altra unità Flash USB o un’altra scheda SD.
Page 84

83
Manuale di ripristino del sistema
3 2
3
5
4
Page 85

84
Türkçe
Sistem Kurtarma El Kitabı
Page 86

85
Sistem Kurtarma El Kitabı
Bilgiler
Sistem Kurtarma İşlevi'ni Kullanma Amaçları
Bu Kurtarma El Kitabında, kullanıcıların satın aldıkları dizüstü bilgisayar sistemini fabrika varsayılan ayarlarına
kurtarmayla ilgili yönerge ve resimler bulunmaktadır.
Sistem Kurtarma İşlevi kullanımı amaçlarına şunlar dahil olabilir:
Sistemi orijinal fabrika varsayılan ayarlarının ilk durumuna geri yükleme.
Kullanılan işletim sisteminde bazı hatalar oluştuğunda.
İşletim sistemi virüsten etkilendiğinde ve normal çalışamadığında.
Lütfen, Sistem Kurtarma İşlevi'ne devam etmeden önce daima bu el kitabının okunmasının önerildiğini unutmayın.
Sistem Kurtarma İşlevi'ni Kullanma Önlemleri
Sistem Kurtarma İşlevi'ne devam etmeden önce aşağıdaki önlemler alınmalıdır:
1. Sabit sürücü ve sisteminiz kurtarılamayan sorunlarla karşılaşırsa, lütfen Sistem Kurtarma İşlevi'ni
gerçekleştirmek için önce Sabit Sürücü F3 Kısayol tuşunu kullanın.
2. Sistem Kurtarma İşlevi'ni kullanmadan önce, lütfen sistem sürücünüzde kayıtlı önemli verileri başka depolama
aygıtlarına yedekleyin.
3. Kurtarma İşlevi'ni gerçekleştirmek için USB flash sürücü veya SD kart kullanılırsa, lütfen USB flash sürücü
veya bellek kartında kayıtlı verileri daima başka depolama aygıtına yedeklemenin gerekli olduğunu unutmayın.
4. Sistem Kurtarma İşlevi bu Kurtarma El Kitabı'nda verilen yöntemlerle gerçekleştirilemezse, daha fazla yardım
için yetkili yerel dağıtıcı veya servis merkezine başvurmanız şiddetle önerilir. Dizüstü bilgisayarınızın
varsayılan ayarlarının uygun değiştirilmemesinin garantiyi geçersiz kılabileceğini unutmayın.
Page 87

86
Sistem Kurtarma El Kitabı
Başlarken
Sistem Kurtarma El Kitabı, Sistem Kurtarma İşlevi'ni gerçekleştirmek için kullanıcılara üç yöntem sağlar.
Bunlar:
1. Dizüstü bilgisayarın klavyesinde F3 Kısayol tuşuyla sistemi kurtarma.
2. Sistemi paketle birlikte gelen Sücüsü CD'si ile kurtarma.
3. Sistemi kişisel USB flash sürücü veya SD kartla kurtarma.
Kullanıcıların önce bu bölümü baştan sona okumaları ve daha sonra sistemi fabrika varsayılan ayarlarına geri
yüklemek üzere Sistem Kurtarma İşlevi'ni gerçekleştirmek için doğrudan seçtikleri özel yönteme gitmeleri önerilir.
Page 88

87
Sistem Kurtarma El Kitabı
Sistemi F3 Kısayol Tuşuyla Kurtarma
Sabit sürücü ve sistem kurtarılamayan sorunlarla karşılaşırsa, önce Sabit Sürücüden F3 Kısayol Tuşuyla Sistem
Kurtarma İşlevi'nin gerçekleştirilmesi önerilir.
Devam etmek için aşağıdaki yönergeleri uygulayın:
1. Dizüstü bilgisayarı yeniden başlatın.
2. Ekranda aşağıdaki ileti göründüğünde klavyedeki F3 kısayol tuşuna basın
3.
Sistem Kurtarma İşlevi'ni başlatmak için [MSI Recovery Manager (MSI Kurtarma Yöneticisi)]'ni seçin veya
sistemi yeniden başlatmak için [EXIT (ÇIKIŞ)]'ı seçin
2
3
Page 89

88
Sistem Kurtarma El Kitabı
4. Sistem Kurtarma İşlevi'ne devam etmek için [OK (Tamam)]'a basın.
5. Sistem Kurtarma İşlevi'ni istediğiniz zaman durdurmak için [Cancel (İptal)]'e basın.
6. Sistem Kurtarma İşlevi gerçekleştirilir.
7. Aşağıdaki pencere göründüğünde, sistem başarıyla kurtarılmıştır.
8. Sistemi yeniden başlatmak ve Windows işletim sistemine normal olarak erişmek için [OK (Tamam)]'a basın.
6
5 4
7 8
Page 90

89
Sistem Kurtarma El Kitabı
Sürücü CD'si ile sistemi kurtarma
Dizüstü bilgisayarınız optik disk sürücü aygıtıyla veya harici tipi ile donatıldıysa, Sistem Kurtarma İşlevi'ni paketle
gelen Sürücü CD'si ile gerçekleştirebilirsiniz. Devam etmek için aşağıdaki yönergeleri uygulayın:
1. Sürücü CD'sini optik disk sürücüsüne takın ve ardından Güç düğmesine basarak dizüstü bilgisayarı yeniden
başlatın.
2. Ekranda aşağıdaki ileti göründüğünde dizüstü bilgisayarın klavyesindeki F11 kısayol tuşuna basın
3. Önyükleme aygıtı olarak [CD/DVD] seçin ve ardından seçimi onaylamak için [Enter (Gir)] 'a basın ve [Press
any key to boot from CD or DVD… (CD veya DVD'den önyüklemek için herhangi bir tuşa basın...)] iletisi
göründüğünde seçimi yeniden onaylamak için herhangi bir tuşa basın.
2
3
4. Dil Menüsü görünür. Dizüstü bilgisayara bağlı fare ile belirtilen simgeyi tıklatarak tercih ettiğiniz dili seçin ve
sistemi yeniden başlatmak için [EXIT (ÇIKIŞ)]'ı seçin.
5. Ve ardından Sistem Kurtarma İşlevi'ni başlatmak için [Restore the system to factory default (Sistemi fabrika
varsayılanına geri yükle)]'yi seçin veya sistemi yeniden başlatmak için [EXIT (ÇIKIŞ)]'ı seçin.
Page 91

90
Sistem Kurtarma El Kitabı
6. Sistem kurtarma işlemi sabit disk sürücü bölümünüzü biçimlendirir, işleme devam etmeden önce önemli
verilerin yedeklendiğinden emin olun. Devam etmek için [OK (Tamam)]'ı, sistem kurtarma işlemini
durdurmak için [Cancel (İptal Et)]'i tıklatın.
7. Sistem Kurtarma İşlemi sırasında AC gücü gereklidir. Sonraki adıma ilerlemeden önce dizüstü
bilgisayarınıza AC gücünün bağlı olduğundan emin olun.
4 5
6 7
Page 92

91
Sistem Kurtarma El Kitabı
8. Sistem Kurtarma İşlevi sırasında sistem gücünü kapatmamaya dikkat edin, aksi takdirde sistemde bilinmeyen
zararlara neden olabilir.
9. Sistem kurtarma işlemi bittiğinde, lütfen sistemi yeniden başlatmak için [OK (Tamam)]'ı tıklatın. Artık
sisteminiz fabrika varsayılan ayarına geri yüklenmiştir.
10. Sistem kurtarma işlevi başarıyla gerçekleştirilmezse, daha fazla yardım için yetkili yerel dağıtıcı veya servis
merkezine başvurmanız önerilir.
11. Kurtarma işlemi kesilir veya başarısız olursa, lütfen kurtarma işlemini baştan yineleyin.
8
9
10
Page 93

92
Sistem Kurtarma El Kitabı
Sistemi USB flash sürücü veya SD kartla kurtarma.
Dizüstü bilgisayarınızda optik disk sürücüsü bulunuyorsa, Sistem Kurtarma İşlevi'ni kişisel USB flash sürücü
veya SD kart ile gerçekleştirebilirsiniz. Devam etmek için aşağıdaki yönergeleri uygulayın:
1. Paketle birlikte gelen Sürücü CD'si ve kişisel USB flash sürücü ya da SD kartın yanınızda olduğundan emin
olun.
(a) minimum 256 MB USB flash sürücü veya SD kart kapasitesi gereklidir;
(b) USB flash sürücü veya SD kart önyüklenebilir olmamalıdır. Aygıtın önyüklenebilir olduğu belirlenirse,
lütfen aygıtı önce NTFS veya FAT32 ile biçimlendirin.
(c) Sistem Kurtarma İşlevi'nin gerçekleştirileceği USB flash sürücü veya SD kartta depolanan tüm kişisel
verilerin silinmesi gerekmez.
Ancak, USB flash sürücü veya SD kartta depolanan verilerin başka bir depolama aygıtına
yedeklenmesi önerilir.
2. Optik disk sürücüsüne sahip bir bilgisayar bulun. Sürücü CD'sini optik disk sürücüsüne takın ve Sürücü
CD'sinde [USB Rescue Tool (USB Kurtarma Aracı)] adındaki klasörü bulun.
3. [USB Rescue Tool (USB Kurtarma Aracı)] adındaki klasöre gözatın ve klasördeki tüm dosyaları USB flash
sürücüsü veya SD karta kopyalayın.
4. Sistemi yeniden başlatın ve ekranda aşağıdaki ileti göründüğünde dizüstü bilgisayarın klavyesindeki F11
kısayol tuşuna basın.
5. Önyükleme aygıtı olarak [USB] aygıtını seçin ve seçimi doğrulamak için [Enter (Gir)]'a basın.
6. İşleme devam etmek için “Sürücü CD'si ile sistemi kurtarma” yönergelerine bakın.
7. USB flash sürücü veya SD kart ile Sistem Kurtarma İşlevini çalıştırırken bir hata meydana gelirse, başka bir
flash sürücü veya SD kart ile önceki adımları tekrar denemeniz önerilir.
Page 94

93
Sistem Kurtarma El Kitabı
3 2
3
5
4
Page 95

94
Magyar
Rendszer helyreállítási
Page 96

95
Rendszer helyreállítási kézikönyv
Bevezetés
A rendszer helyreállítás funkció használatának célja
Ez a kézikönyv a notebook felhasználóinak szánt, a rendszernek a gyári alapbeállításokra való helyreállításával
kapcsolatos utasításokat és ábrákat tartalmaz.
A rendszer helyreállítás funkció például a következő esetekben használható:
A rendszer visszaállítható eredeti állapotába, az eredeti gyári alapbeállításokra.
A használatban levő operációs rendszerben bizonyos hibák jelentkeztek.
A rendszert vírus fertőzte és többé nem működik megfelelően.
Azt ajánljuk, hogy a rendszer helyreállítás funkció minden egyes használata előtt olvassa el figyelmesen ezt a
kézikönyvet.
Óvintézkedések a rendszer helyreállítás funkció használatakor
A rendszer helyreállítása funkció használata előtt tartsa be a következő óvintézkedéseket:
1. Ha a merevlemezen és a rendszerben kijavíthatatlan hibák jelentkeztek, először a merevlemezről indítsa a
rendszer helyreállítás funkciót az F3 gyorsbillentyűvel.
2. A rendszer helyreállítás funkció használata előtt rendszermeghajtón található fontos adatairól készítsen
biztonsági másolatot más tárolóeszközökre.
3. Ha a helyreállítás funkció végrehajtására USB flash drive eszközt vagy SD kártyát használ, ne feledje, hogy az
USB flash drive eszközre vagy SD kártyára mentett adatokat mindig mentse le egy más tárolóeszközre.
4. Ha a rendszer helyreállítás funkció nem működik a jelen helyreállítási kézikönyvben leírt módszerek egyikével
sem, azt ajánljuk, hogy további segítségért forduljon a hivatalos helyi forgalmazóhoz vagy szervizközponthoz.
Ne feledje, hogy amennyiben nem megfelelően próbálja megváltoztatni a notebook alapértelmezett
beállításait, a jótállás érvényét veszítheti.
Page 97

96
Rendszer helyreállítási kézikönyv
Első lépések
Ez a rendszer helyreállítási kézikönyv a Rendszer helyreállítás funkció három végrehajtási módját írja le.
Ezek a következők:
1. A rendszer helyreállítása a notebook F3 gyorsbillentyűjével.
2. A rendszer helyreállítása a csomagban található illesztőprogramos CD lemezzel.
3. A rendszer helyreállítása egy saját USB flash drive eszközzel vagy egy SD kártyával.
A felhasználónak azt ajánljuk, hogy először olvassa el elejétől végéig ezt a fejezetet, és csak azután térjen rá a kívánt
Rendszer helyreállítási funkció módra annak érdekében, hogy a rendszert visszaállítsa a gyári alapbeállításokra.
Page 98

97
Rendszer helyreállítási kézikönyv
A rendszer helyreállítása az F3 gyorsbillentyűvel
Ha a merevlemezen vagy a rendszerben kijavíthatatlan hiba jelentkezett, mindig először a merevlemezről ajánlatos
az F3 gyorsbillentyűvel végrehajtani a rendszer helyreállítás funkciót.
Ha folytatni szeretné, kövesse az alábbi utasításokat:
1. Indítsa újra a notebook gépet.
2. Miután a képernyőn az alábbi üzenet jelenik meg, nyomja meg az F3 gyorsbillentyűt
3. Válassza a [MSI Recovery Manager] (MSI helyreállítás kezelő) gombot, hogy elindítsa a rendszer
helyreállítás funkciót; vagy válassz az [EXIT] (Kilépés) gombot, hogy újraindítsa a rendszert
2
3
Page 99

98
Rendszer helyreállítási kézikönyv
4. Nyomja meg az [OK] gombot, hogy továbblépjen, elindítva a rendszer helyreállítás funkciót.
5. Nyomja meg a [Cancel] (Mégse) gombot, hogy bármelyik pillanatban leállítsa a rendszer helyreállítás
funkciót.
6. Elindul a rendszer helyreállítás funkció.
7. Ha a képernyőn az alábbi ablak jelenik meg, azt jelenti, hogy a rendszer helyreállítása sikeres volt.
8. Nyomja meg az [OK] gombot, hogy újraindítsa a rendszert, és normál módon lépjen a Windows operációs
rendszerbe.
5 4
6
7 8
Page 100

99
Rendszer helyreállítási kézikönyv
A rendszer helyreállítása az illesztőprogramos CD lemezzel
Ha a notebook optikai meghajtóval vagy egy külső meghajtóval rendelkezik, a rendszer helyreállítás funkciót a
csomagban található illesztőprogramos CD lemezről is végrehajthatja . Ha folytatni szeretné, kövesse az alábbi
utasításokat:
1. Heéyezze be az illesztőprogramos CD lemezt az optikai meghajtóba, majd indítsa újra a notebook-ot a
ki/-bekapcsoló gombbal.
2. Miután a képernyőn az alábbi üzenet jelenik meg, nyomja meg az F11 gyorsbillentyűt
3. Válassza a [CD/DVD] meghajtót mint rendszerindító eszközt, majd nyomja meg az [Enter] billentyűt, hogy
erősítse meg választását, majd nyomja meg bármelyik billentyűt, hogy ismét megerősítse választását, ha a
képernyőn a [Press any key to boot from CD or DVD...] (Nyomja meg bármelyik billentyűt, hogy CD-ről vagy
DVD-ről indítsa a rendszert) üzenet jelenik meg.
2
3
4. A Nyelv menü jelenik meg. A notebook-hoz kapcsolt egér bal gombjával kattinson a kívánt nyelvnek
megfelelő ikonra; vagy válassza az [EXIT] (Kilépés) gombot, hogy újraindítsa a rendszert.
 Loading...