

Page 1

i
MSI
Version 1.0
G52-MA00552
MS-6390 (v1.X) Micro-ATX Mainboard
MICRO-STAR INTERNATIONAL
Page 2

ii
Manual Rev: 1.0
Release Date: Feb. 2002
FCC-B Radio Frequency Interference Statement
This equipment has been tested and found to comply with the limits for a class
B digital device, pursuant to part 15 of the FCC rules. These limits are designed
to provide reasonable protection against harmful interference when the equipment is operated in a commercial environment. This equipment generates, uses
and can radiate radio frequency energy and, if not installed and used in accordance with the instruction manual, may cause harmful interference to radio
communications. Operation of this equipment in a residential area is likely to
cause harmful interference, in which case the user will be required to correct
the interference at his own expense.
Notice 1
The changes or modifications not expressly approved by the party responsible for compliance could void the user’s authority to operate the equipment.
Notice 2
Shielded interface cables and A.C. power cord, if any, must be used in order to
comply with the emission limits.
VOIR LA NOTICE D’INSTALLA TION AVANT DE RACCORDER AU
RESEAU.
Micro-Star International MS-6390
T ested to comply
with FCC Standard
For Home or Office Use
Page 3

iii
Edition
Feb. 2002
Copyright Notice
The material in this document is the intellectual property of MICRO-STAR
INTERNATIONAL. We take every care in the preparation of this document,
but no guarantee is given as to the correctness of its contents. Our products
are under continual improvement and we reserve the right to make changes
without notice.
Trademarks
All trademarks are the properties of their respective owners.
AMD, Athlon and Duron are registered trademarks of AMD Corporation.
PS/2 and OS®/2 are registered trademarks of International Business Machines
Corporation.
Windows® 95/98/2000/NT/ME/XP are registered trademarks of Microsoft
Corporation.
Netware® is a registered trademark of Novell, Inc.
Award® is a registered trademark of Phoenix T echnologies Ltd.
AMI® is a registered trademark of American Megatrends Inc.
Revision History
Revision Revision History Date
1 . 0 First Release Feb. 2002
Page 4

iv
1. Always read the safety instructions carefully.
2 . Keep this User’s Manual for future reference.
3 . Keep this equipment away from humidity.
4 . Lay this equipment on a reliable flat surface before setting it up.
5. The openings on the enclosure are for air convection hence protects the
equipment from overheating. DO NOT COVER THE OPENINGS.
6 . Make sure the voltage of the power source and adjust properly 110/220V
before connecting the equipment to the power inlet.
7. Place the power cord such a way that people can not step on it. Do not
place anything over the power cord.
8. Always Unplug the Power Cord before inserting any add-on card or module.
9. All cautions and warnings on the equipment should be noted.
1 0 . Never pour any liquid into the opening that could damage or cause electri-
cal shock.
11. If any of the following situations arises, get the equipment checked by a
service personnel:
z The power cord or plug is damaged
z Liquid has penetrated into the equipment
z The equipment has been exposed to moisture
z The equipment has not work well or you can not get it work according
to User’s Manual.
z The equipment has dropped and damaged
z If the equipment has obvious sign of breakage
12. DO NOT LEAVE THIS EQUIPMENT IN AN ENVIRONMENT
UNCONDITIONED, STORAGE TEMPERA TURE ABOVE 600 C (1400F), IT
MA Y DAMAGE THE EQUIPMENT .
Safety Instructions
CAUTION: Danger of explosion if battery is incorrectly replaced.
Replace only with the same or equivalent type recommended by the
manufacturer.
Page 5

v
CONTENTS
Chapter 1. Getting Started ........................................................................ 1-1
Mainboard Specification ......................................................................1-2
MSI Special Features ...........................................................................1-5
PC Alert™ III .................................................................................1-5
Mainboard Layout ...............................................................................1-6
Quick Components Guide .................................................................... 1-7
Chapter 2. Hardware Setup ....................................................................... 2-1
Central Processing Unit: CPU .............................................................. 2-2
CPU Installation Procedures ......................................................... 2-2
CPU Core Speed Derivation Procedure .........................................2-4
CPU Clock Selection ...................................................................... 2-4
Memory................................................................................................2-5
Introduction to DDR SDRAM.......................................................2-5
DIMM Module Combination.........................................................2-6
Installing DIMM Modules ............................................................2-6
Power Supply ....................................................................................... 2-7
ATX 20-Pin Power Connector: CONN1 ......................................... 2-7
Back Panel ............................................................................................ 2-8
Mouse Connector ......................................................................... 2-8
Keyboard Connector ..................................................................... 2-9
USB Connectors ............................................................................ 2-9
Serial Port Connectors: COM A & COM B..................................2-10
VGA DB 15 Pin Connector .......................................................... 2-10
Parallel Port Connector: LPT1...................................................... 2-11
LAN (RJ-45) Jack ......................................................................... 2-12
Joystick/Midi Connector ............................................................. 2-12
Audio Port Connectors ............................................................... 2-12
Connectors......................................................................................... 2-13
Floppy Disk Drive Connector: FDD1...........................................2-13
Page 6

vi
Hard Disk Connectors: IDE1 & IDE2 ........................................... 2-14
Fan Power Connectors: CPUF A1/SYSF A1 .................................. 2-15
IrDA Infrared Module Header: JIR1 ............................................ 2-16
Chassis Intrusion Switch Connector: JCI1 .................................. 2-16
Front Panel Connectors: JFP1 & JFP2 ......................................... 2-17
Modem Connector: JMC1 ........................................................... 2-18
Front Panel Audio Connector: JAUD1 ........................................ 2-19
Front USB Connector: JUSB1...................................................... 2-20
Power Saving Switch Connector: JSLP1...................................... 2-20
CD-In Connector: JCD1 ............................................................... 2-21
Aux Line-In Connector: JAUX1 .................................................. 2-21
Modem-In Connector: JMD1.......................................................2-21
TV-Out Connector: JTV1 (Optional)............................................ 2-22
Jumpers .............................................................................................. 2-23
Clear CMOS Jumper: JBA T1........................................................ 2-23
CPU FSB Clock Jumper: SW1 ...................................................... 2-24
Slots ................................................................................................... 2-25
AGP (Accelerated Graphics Port) Slot......................................... 2-25
PCI Slots...................................................................................... 2-25
CNR (Communication Network Riser) Slot .................................. 2-25
PCI Interrupt Request Routing .................................................... 2-26
Chapter 3. BIOS Setup.............................................................................. 3-1
Entering Setup......................................................................................3-2
Control Keys ................................................................................. 3 -2
Getting Help .................................................................................. 3-3
The Main Menu ...................................................................................3-4
Standard CMOS Features .................................................................... 3-6
Advanced BIOS Features .................................................................... 3-8
Advanced Chipset Features............................................................... 3-11
Integrated Peripherals ........................................................................ 3-16
Page 7

vii
Power Management Setup ................................................................. 3-21
PnP/PCI Configurations ..................................................................... 3-25
PC Health Status ................................................................................ 3-27
Frequency/Voltage Control ................................................................ 3-28
Load Fail-Safe/Optimized Defaults ..................................................... 3-29
Set Supervisor/User Password........................................................... 3-30
Glossary ....................................................................................................G-1
Page 8

Getting Started
1-1
Chapter 1. Getting Started
TOPICS
Mainboard Specification 1-2
MSI Special Features 1-5
Mainboard Layout 1-6
Quick Components Guide 1-7
Thank you for purchasing MS-6390 motherboard. The MS-6390
Micro-ATX mainboard is a high-performance computer mainboard based on
VIA® KM266 & VT8233A/8235 chipsets and designed for the AMD
®
Athlon™, Athlon™ XP or Duron™ (PGA) processor for value business/
personal desktop markets.
1
Getting Started
Page 9

Chapter 1
1-2
CPU
Supports Socket A (Socket-462) for AMD® Athlon™/Athlon™ XP /Duron™
processor
Supports 1GHz to 2000+MHz and higher processor
Chipset
VIA® KM266 chipset
- FSB @200/266MHz
- Integrated ProSavage8 4 2D/3D Graphic Controller
- AGP 4x and high bandwidth V-link host controller
- Advanced memory controller supports PC200/266 DDR
VIA® VT8233A/8235 chipset
- High bandwidth V-link client controller
- Direct sound ready AC97 digital audio controller
- Ultra DMA 33/66/100 master mode EIDE controller
- Supports both ACPI and legacy APM power management
- USB 2.0 Integrated for VT8235 option
Clock Generator
100/133MHz clocks are supported.
Main Memory
Supports four memory banks using two 184-pin DDR DIMMs
Supports a maximum memory size up to 2GB
Supports 2.5V DDR SDRAM DIMM
Slots
One AGP (Accelerated Graphics Port) slot
- AGP specification compliant
- Supports AGP 2.0 1x/2x/4x
Three 32-bit Master PCI bus slots (support 3.3v/5v PCI bus interface)
One CNR (Communication Network Riser) slot
On-Board IDE
An IDE controller on the VT8235/8233A chipset provides IDE HDD/CDROM with PIO, Bus Master and Ultra DMA33/66/100 operation modes
Can connect up to four IDE devices
Mainboard Specification
Page 10

Getting Started
1-3
Audio
Front Audio supported
Chip integrated
- Direct Sound AC97 Audio
TV-Out Onboard (Optional)
Chrontel 7005
Reserve 2 x 3 pin out
LAN Onboard
Realtek 8101L
RJ45 connector
Modem pin out
Reserve 2 x 6 pin out
Must use proprietary PCI Modem card with PCTEL solution
Must work with LAN chip
On-Board Peripherals
On-Board Peripherals include:
- 1 floppy port supports 2 FDDs with 360K, 720K, 1.2M, 1.44M and
2.88Mbytes
- 1 serial port (COM A)
- 1 VGA port
- 1 parallel port supports SPP/EPP/ECP mode
- 4 USB ports (2 Rear Connectors/ 1 USB Front Pin Header -- 2 ports)
Note: All USB ports are compatible with USB2.0 spec when 8235
chipset is integrated on the board.
- 1 IrDA connector for SIR/CIR/ASKIR/HPSIR
- 1 audio/game port
BIOS
The mainboard BIOS provides “Plug & Play” BIOS which detects the peripheral devices and expansion cards of the board automatically.
The mainboard provides a Desktop Management Interface (DMI) function
which records your mainboard specifications.
Dimension
Micro-ATX Form Factor: 24.5 cm x 21.55 cm (9.6” x 8.5”)
Page 11

Chapter 1
1-4
Mounting
6 mounting holes
Others
Modem (External/Internal) Ring Wake Up Function (Internal modem is
through PME)
LAN Wake Up Function (through PME)
Supports PCI 2.2
Suspend to RAM/Disk
Page 12

Getting Started
1-5
PC Alert™ III
The PC AlertTM III is a utility you can find in the CD-ROM disk. The
utility is just like your PC doctor that can detect the following PC hardware status during
real time operation:
* monitor CPU & system temperatures
* monitor fan speed(s)
* monitor system voltage
* monitor chassis intrusion
If one of the items above is abnormal,
the program main screen will be immediately
shown on the screen, with the abnormal item
highlighted in red. This will continue to be
shown until user disables the warning.
Note: Items shown on PC Alert III vary depending on your system’s
status.
MSI Special Features
Page 13

Chapter 1
1-6
Mainboard Layout
MS-6390 Micro-ATX Mainboard
S
O
C
K
E
T
4
6
2
Top : mou se
Bottom: keyboard
T: L AN j ac k
B: USB ports
JCD1
JTV1
(Optional)
JMD1
JMC1
Codec
Realtek
8101L
JAUD1
JAUX1
Chron tel
7005
(Optional)
AGP Slot
BATT
+
BIOS
Winbond
W83697HF
VT8233A/
8235
VIA
KM266
D
D
R
1
D
D
R
2
I
D
E
1
I
D
E
2
F
D
D
1
PCI Slot 1
PCI Slot 2
PCI Slot 3
CNR
JUSB1
JFP1
JIR1
JFP2
JCI1
CPU FA1
SYS FA1
A
T
X
P
o
w
e
r
S
u
p
p
l
y
SW1
JBAT1
JSLP1
To p :
Mid i /
Game port
Botto m:
Line-Out
Line-In
Mic
To p : L PT
Botto m:
COM A
VGA port
JCOM 2
Page 14

Getting Started
1-7
Quick Components Guide
Component Function Reference
DDR1~2 Installing DDR SDRAM modules See p. 2-5~2-6
Socket 462 Installing CPU See p. 2-2~2-4
CPUFA1 Connecting to CPUFAN See p. 2-15
SYSFA1 Connecting to SYSTEM FAN See p. 2-15
ATX Power Supply Installing power supply See p. 2-7
IDE1 & IDE2 Connecting to IDE hard disk drive See p.2-14
FDD1 Connecting to floppy disk drive See p.2-13
JUSB1 Connecting to USB interfaces See p. 2-20
PCI Slot 1~3 Installing expansion cards See p. 2-25
AGP Slot Installing AGP cards See p. 2-25
CNR Slot Installing CNR cards See p. 2-25
JMC1 Connecting to modem module See p. 2-18
JBAT1 Clearing CMOS data See p. 2-23
JFP1/2 Connecting to case See p. 2-17
JIR1 Connecting to IR module See p. 2-16
JCI1 Connecting to chassis intrusion switch See p. 2-16
JSLP1 Connecting to power saving switch See p. 2-20
JTV1 Connecting to TV-Out bracket See p. 2-22
JCOM2 Connecting to COM port See p. 2-10
JAUD1 Connecting to audio connector See p. 2-19
JCD1 Connecting to CD-ROM audio connector See p. 2-21
JAUX1 Connecting to DVD add-on card See p. 2-21
JMD1 Connecting to modem’s audio connector See p. 2-21
Page 15

Hardware Setup
2-1
Chapter 2. Hardware Setup
This chapter provides you with the information about hardware setup
procedures. While doing the installation, be careful in holding the components and follow the installation procedures. For some components, if you
install in the wrong orientation, the components will not work properly.
Use a grounded wrist strap before handling computer components. Static
electricity may damage the components.
TOPICS
Central Processing Unit: CPU 2-2
Memory 2-5
Power Supply 2-7
Back Panel 2-8
Connectors 2-13
Jumpers 2-23
Slots 2-25
2
Hardware Setup
Page 16

Chapter 2
2-2
Central Processing Unit: CPU
The mainboard supports AMD® Athlon™, Athlon™ XP and Duron™
processors in the 462 pin package. The mainboard uses a CPU socket called
Socket A for easy CPU installation. When you are installing the CPU, make
sure the CPU has a heat sink and a cooling fan attached on the top to prevent
overheating. If you do not find the heat sink and cooling fan, contact your
dealer to purchase and install them before turning on the computer.
1. Pull the lever sideways away
from the socket. Then, raise
the lever up to a 90-degree
angle.
2. Look for the cut edge. The
cut edge should point towards the lever pivot. The
CPU will only fit in the correct
orientation.
3. Hold the CPU down firmly, and
then close the lever to complete the installation.
CPU Installation Procedures
Overheating will seriously damage the CPU and system,
always make sure the cooling fan can work properly to
protect the CPU from overheating.
WARNING!
Open Lever
Cut edge
Sliding
Plate
Close
Lever
Page 17

Hardware Setup
2-3
As processor technology pushes to faster speeds and higher performance,
thermal management becomes increasingly crucial when building computer
systems. Maintaining the proper thermal environment is key to reliable
operation. As such, the processor must be maintained in the specified thermal
requirements.
AMD Athlon™/Duron™/Athlon™ XP processor with a speed of 600MHz
and above requires LARGER heatsink and fan. You also need to add thermal
grease between the CPU and heatsink to improve heat dissipation. Then, make
sure that the CPU and heatsink are securely fastened and in good contact with
each other. These are needed to prevent damaging the processor and ensuring reliable operation. If you want to get more information on the proper
cooling, you can visit AMD’ s website for reference.
WARNING! Thermal Issue for CPU
Page 18

Chapter 2
2-4
CPU Core Speed Derivation Procedure
If CPU Clock = 100MHz
Core/Bus ratio = 7
then CPU core speed = Host Clock x Core/Bus ratio
= 100MHz x 7
= 700MHz
Overclocking
This motherboard is designed to support overclocking.
However, please make sure your components are able to
tolerate such abnormal setting, while doing overclocking.
Any attempt to operate beyond product specifications is
not recommended. We do not guarantee the damages or
risks caused by inadequate operation or beyond product
specifications.
WARNING!
CPU Clock Selection
The hardware configuration for CPU Front Side Bus (FSB) frequency on
the motherboard is set to 100MHz by default. Therefore, to enable a 133MHz
CPU to run at 133MHz when it is installed on the board, you have to adjust the
CPU clock frequency through the jumper SW1.
For more information on the issue, refer to CPU FSB Clock Jumper: SW1
later in this chapter.
Page 19

Hardware Setup
2-5
The mainboard provides 2 sockets for 184-pin DDR SDRAM DIMM
(Double In-Line Memory Module) modules and supports the memory size up
to 2GB. Y ou can install PC2100/DDR266 or PC1600/DDR200 DRAM modules
on the DDR DIMM slots (DIMM 1~2).
Memory
DDR DIMM Slots
(DIMM 1~2)
Introduction to DDR SDRAM
DDR (Double Data Rate) SDRAM is similar to conventional SDRAM,
but doubles the rate by transferring data twice per cycle. It uses 2.5 volts as
opposed to 3.3 volts used in SDR SDRAM, and requires 184-pin DIMM modules rather than 168-pin DIMM modules used by SDR SDRAM. High memory
bandwidth makes DDR an ideal solution for high performance PC, workstations and servers.
Page 20

Chapter 2
2-6
Install at least one DIMM module on the slots. Memory modules can be
installed on the slots in any order. You can install either single- or doublesided modules to meet your own needs.
Memory modules can be installed in any combination as follows:
Slot Memory Module Total Memory
DIMM 1
(Bank 0 & 1)
S/D 64MB~1GB
DIMM 2
(Bank 2 & 3)
S/D 64MB~1GB
Maximum System Memory Supported
64MB~2GB
DIMM Module Combination
S: Single Side D: Double Side
1. Insert the DIMM memory module vertically into the DIMM slot. Then push
it in.
2. The plastic clip at each side of the DIMM slot will automatically close.
Installing DIMM Modules
Volt
notch
The DDR DIMM has only one notch on the center of the module. The
module will only fit in the right orientation.
Page 21

Hardware Setup
2-7
Power Supply
A TX 20-Pin Power Connector: CONN1
This connector allows you to connect to an ATX power supply. To
connect to the ATX power supply, make sure the plug of the power supply is
inserted in the proper orientation and the pins are aligned. Then push down
the power supply firmly into the connector.
The mainboard supports ATX power supply for the power system. Before inserting the power supply connector, always make sure that all components are installed properly to ensure that no damage will be caused.
CONN1
10
1
20
11
PIN SIGNAL
11 3.3V
12 -12V
13 GND
14 PS_ON
15 GND
16 GND
17 GND
1 8 -5V
19 5V
20 5V
PIN SIGNAL
1 3.3V
2 3.3V
3 GND
45V
5 GND
65V
7 GND
8 PW_OK
9 5V_SB
10 12V
CONN1 Pin Definition
Page 22

Chapter 2
2-8
The Back Panel provides the following connectors:
Back Panel
Mouse Connector
The mainboard provides a standard PS/2® mouse mini DIN connector for
attaching a PS/2® mouse. You can plug a PS/2® mouse directly into this
connector. The connector location and pin assignments are as follows:
PIN SIGNAL DESCRIPTION
1 Mouse DAT A Mouse DAT A
2 NC No connection
3 GND Ground
4 VCC +5V
5 Mouse Clock Mouse clock
6 NC No connection
Pin Definition
PS/2 Mouse (6-pin Female)
2
1
3
4
5
6
Mouse
Keyboard USB
Parallel
COM A VG A L-out L-in MIC
Midi/Joystick
LAN
Page 23

Hardware Setup
2-9
Keyboard Connector
The mainboard provides a standard PS/2® keyboard mini DIN connector
for attaching a PS/2® keyboard. You can plug a PS/2® keyboard directly into
this connector.
USB Connectors
The mainboard provides a UHCI (Universal Host Controller Interface)
Universal Serial Bus root for attaching USB devices such as keyboard, mouse
or other USB-compatible devices. You can plug the USB device directly into
the connector.
With 8233A chipset, the USB connectors are compliant to USB1.1 spec;
with 8235 chipset, the connectors are compliant to USB2.0 spec, which is 40
times faster than USB1.1, and is ideal for connecting high-speed USB peripherals such as USB-interfaced HDD, printer, modem, digital camera, MP3 player
and so on.
PIN SIGNAL DESCRIPTION
1 VCC +5V
2 -Data 0 Negative Data Channel 0
3 +Data0 Positive Data Channel 0
4 GND Ground
5 VCC +5V
6 -Data 1 Negative Data Channel 1
7 +Data 1 Positive Data Channel 1
8 GND Ground
PIN SIGNAL DESCRIPTION
1 Keyboard DAT A Keyboard DAT A
2 NC No connection
3 GND Ground
4 VCC +5V
5 Keyboard Clock Keyboard clock
6 NC No connection
Pin Definition
USB Port Description
USB Ports
1 2 3 4
5 6 7 8
PS/2 Keyboard (6-pin Female)
2
1
3
4
5
6
Page 24
Chapter 2
2-10
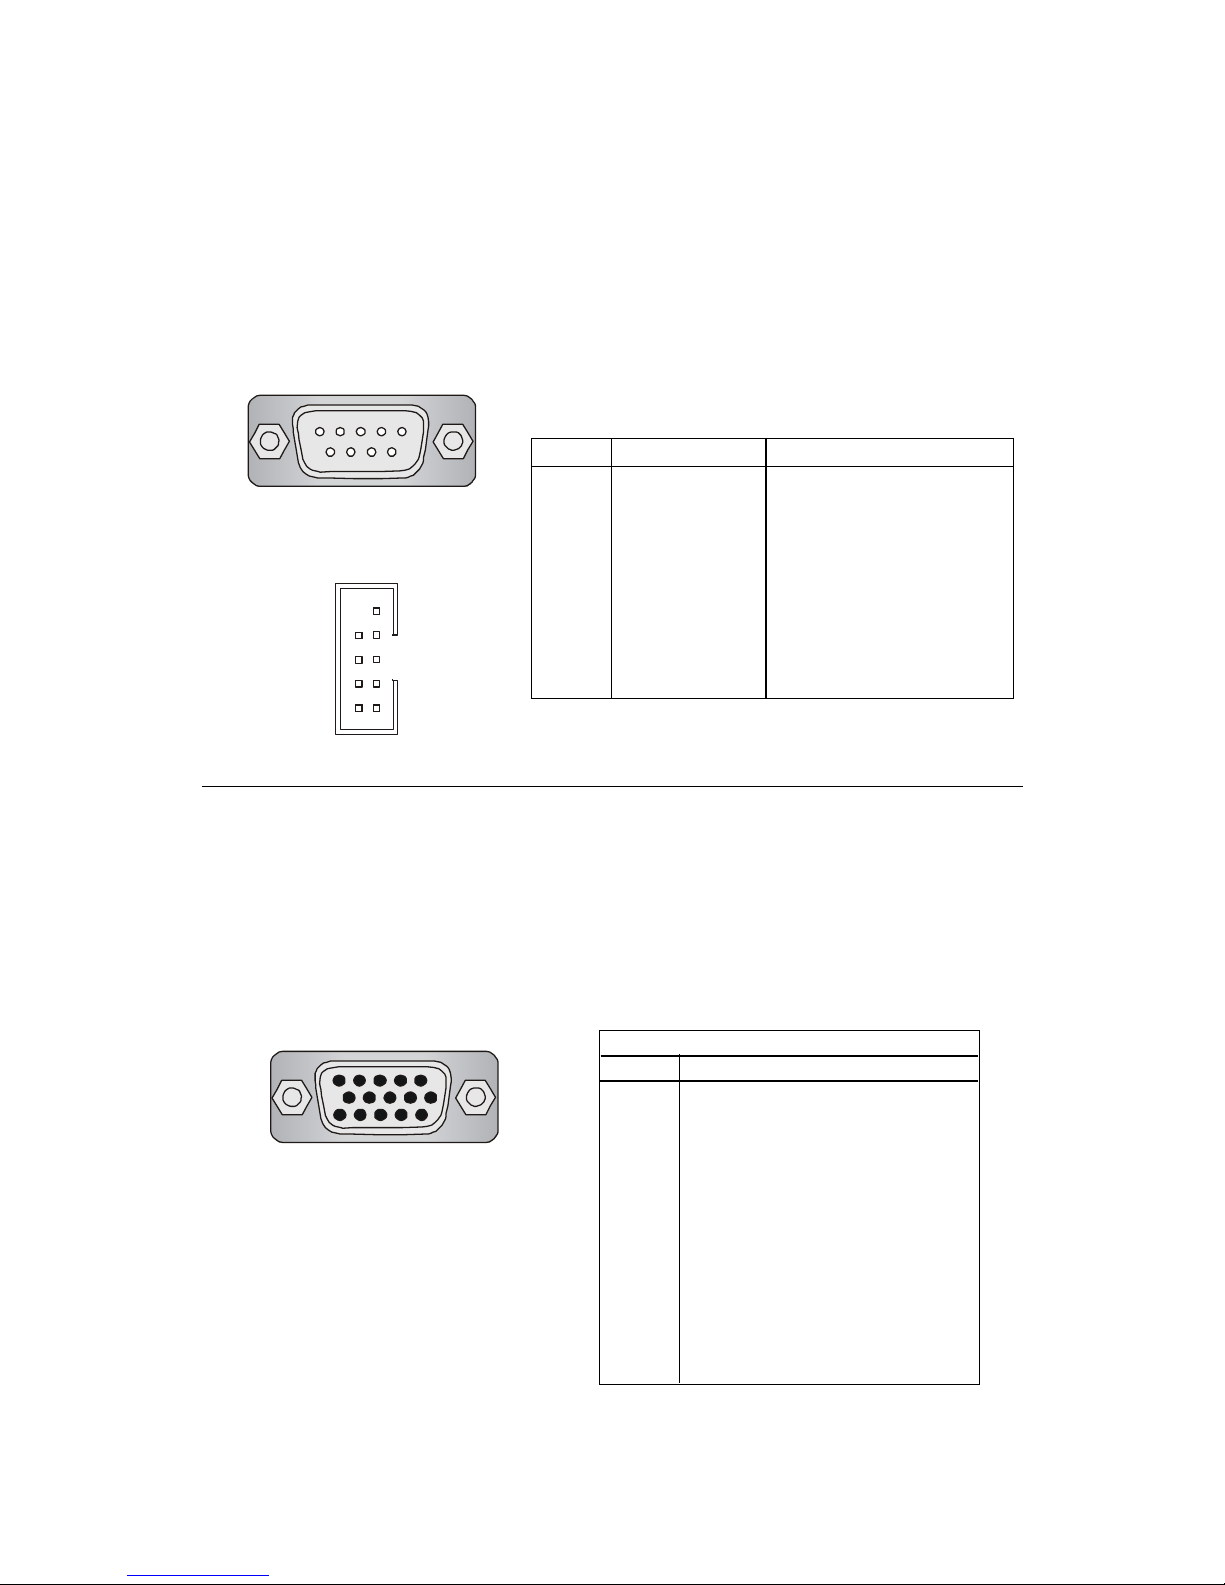
Serial Port Connectors: COM A & COM B
The mainboard offers two 9-pin male DIN connectors as serial port COM
A & COM B (COM B is the header JCOM2 on the board). The ports are
16550A high speed communication ports that send/receive 16 bytes FIFOs.
You can attach a serial mouse or other serial devices directly to the connectors.
PIN SIGNAL DESCRIPTION
1 DCD Data Carry Detect
2 SIN Serial In or Receive Data
3 SOUT Serial Out or Transmit Data
4 DTR Data Terminal Ready
5 GND Ground
6 DSR Data Set Ready
7 RTS Request To Send
8 CTS Clear To Send
9 RI Ring Indicate
Pin Definition
9-Pin Male DIN Connector
1 2 3 4 5
6 7 8 9
VGA DB 15 Pin Connector
One DB 15-pin VGA connector is supplied for connection to a VGA
monitor.
DB 15-Pin Female Connector
5 1
15 11
Analog Video Display Connector (DB-15S)
PIN SIGNAL DESCRIPTION
1 Red
2 Green
3 Blue
4 Not used
5 Ground
6 Ground
7 Ground
8 Ground
9 Power
10 Ground
1 1 Not used
1 2 SDA
1 3 Horizontal Sync
1 4 Vertical Sync
15 SCL
Pin Definition
JCOM 2 (COM B)
8
6
4
2
9
7
5
3
1
Page 25
Hardware Setup
2-11
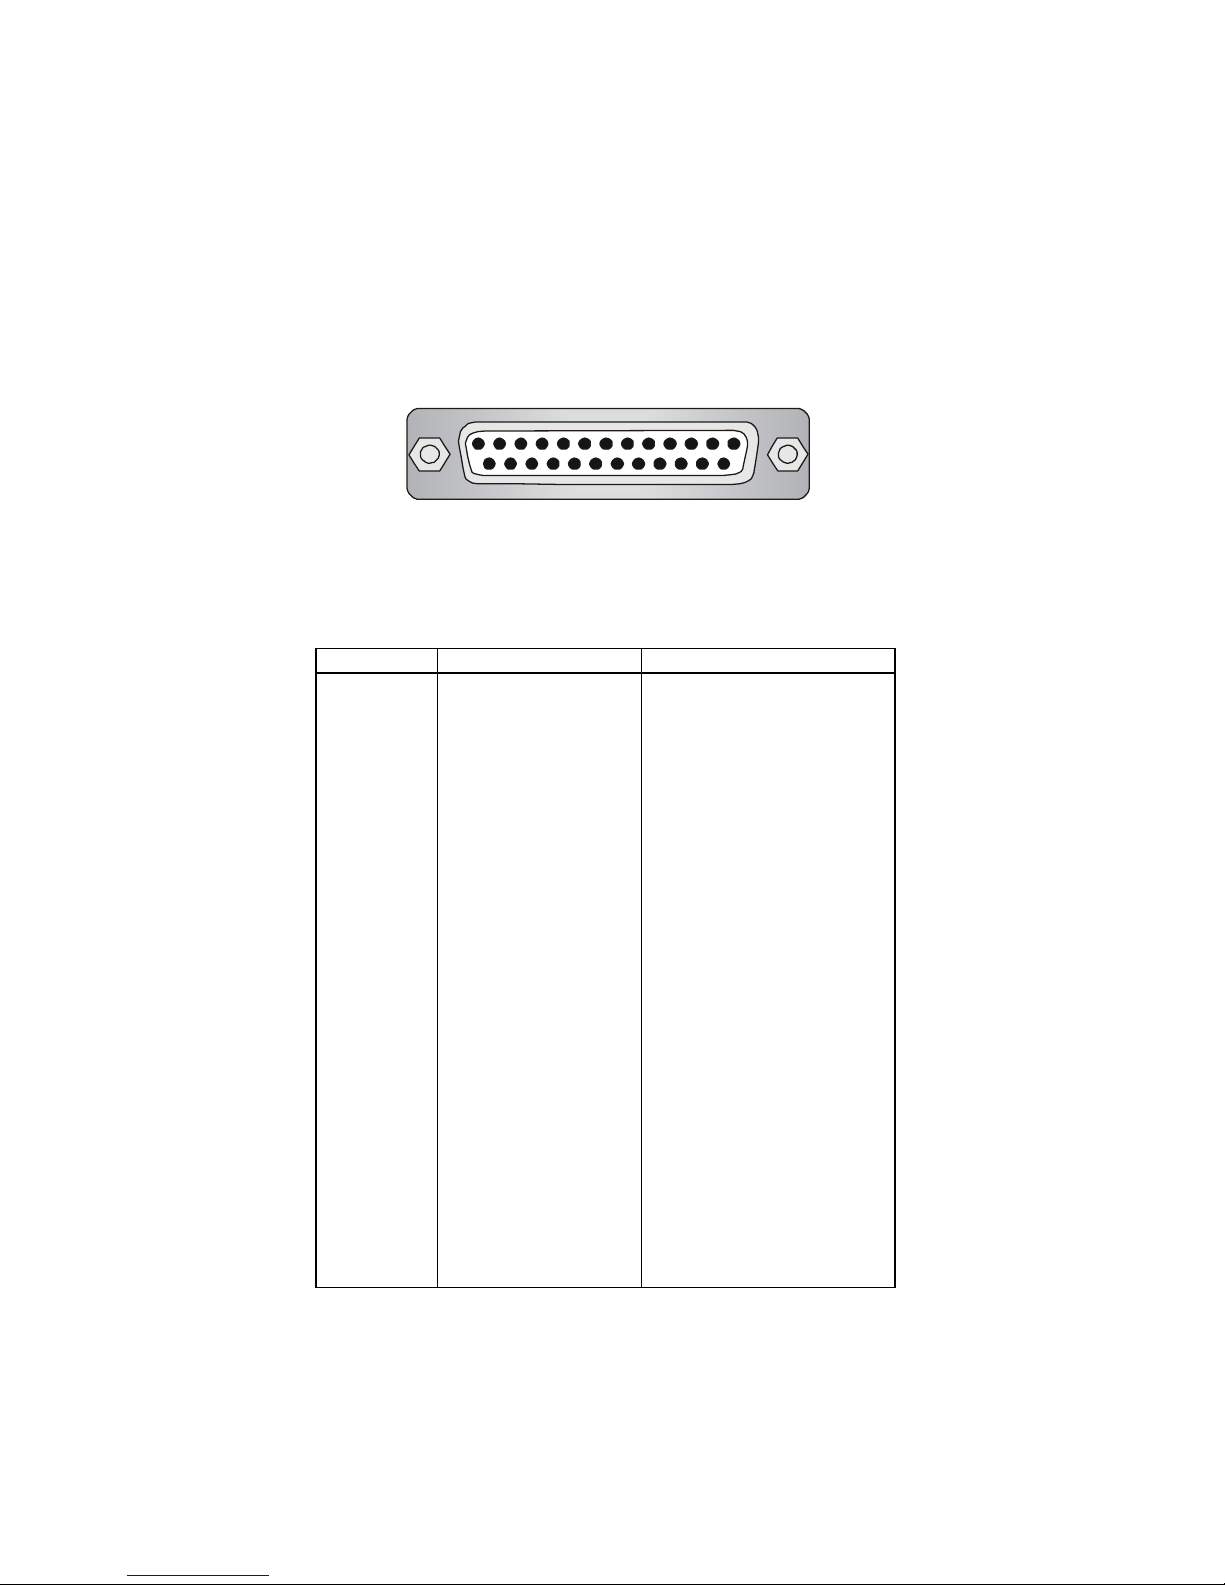
Parallel Port Connector: LPT1
The mainboard provides a 25-pin female centronic connector as LPT. A
parallel port is a standard printer port that supports Enhanced Parallel Port
(EPP) and Extended Capabilities Parallel Port (ECP) mode.
13 1
14
25
PIN SIGNAL DESCRIPTION
1 STROBE Strobe
2 DA T A0 Data0
3 DA T A1 Data1
4 DA T A2 Data2
5 DA T A3 Data3
6 DA T A4 Data4
7 DA T A5 Data5
8 DA T A6 Data6
9 DA T A7 Data7
10 ACK# Acknowledge
11 BUSY Busy
12 PE Paper End
1 3 SELECT Select
1 4 AUTO FEED# Automatic Feed
15 ERR# Error
1 6 INIT# Initialize Printer
17 SLIN# Select In
18 GND Ground
19 GND Ground
20 GND Ground
21 GND Ground
22 GND Ground
23 GND Ground
24 GND Ground
25 GND Ground
Pin Definition
Page 26
Chapter 2
2-12
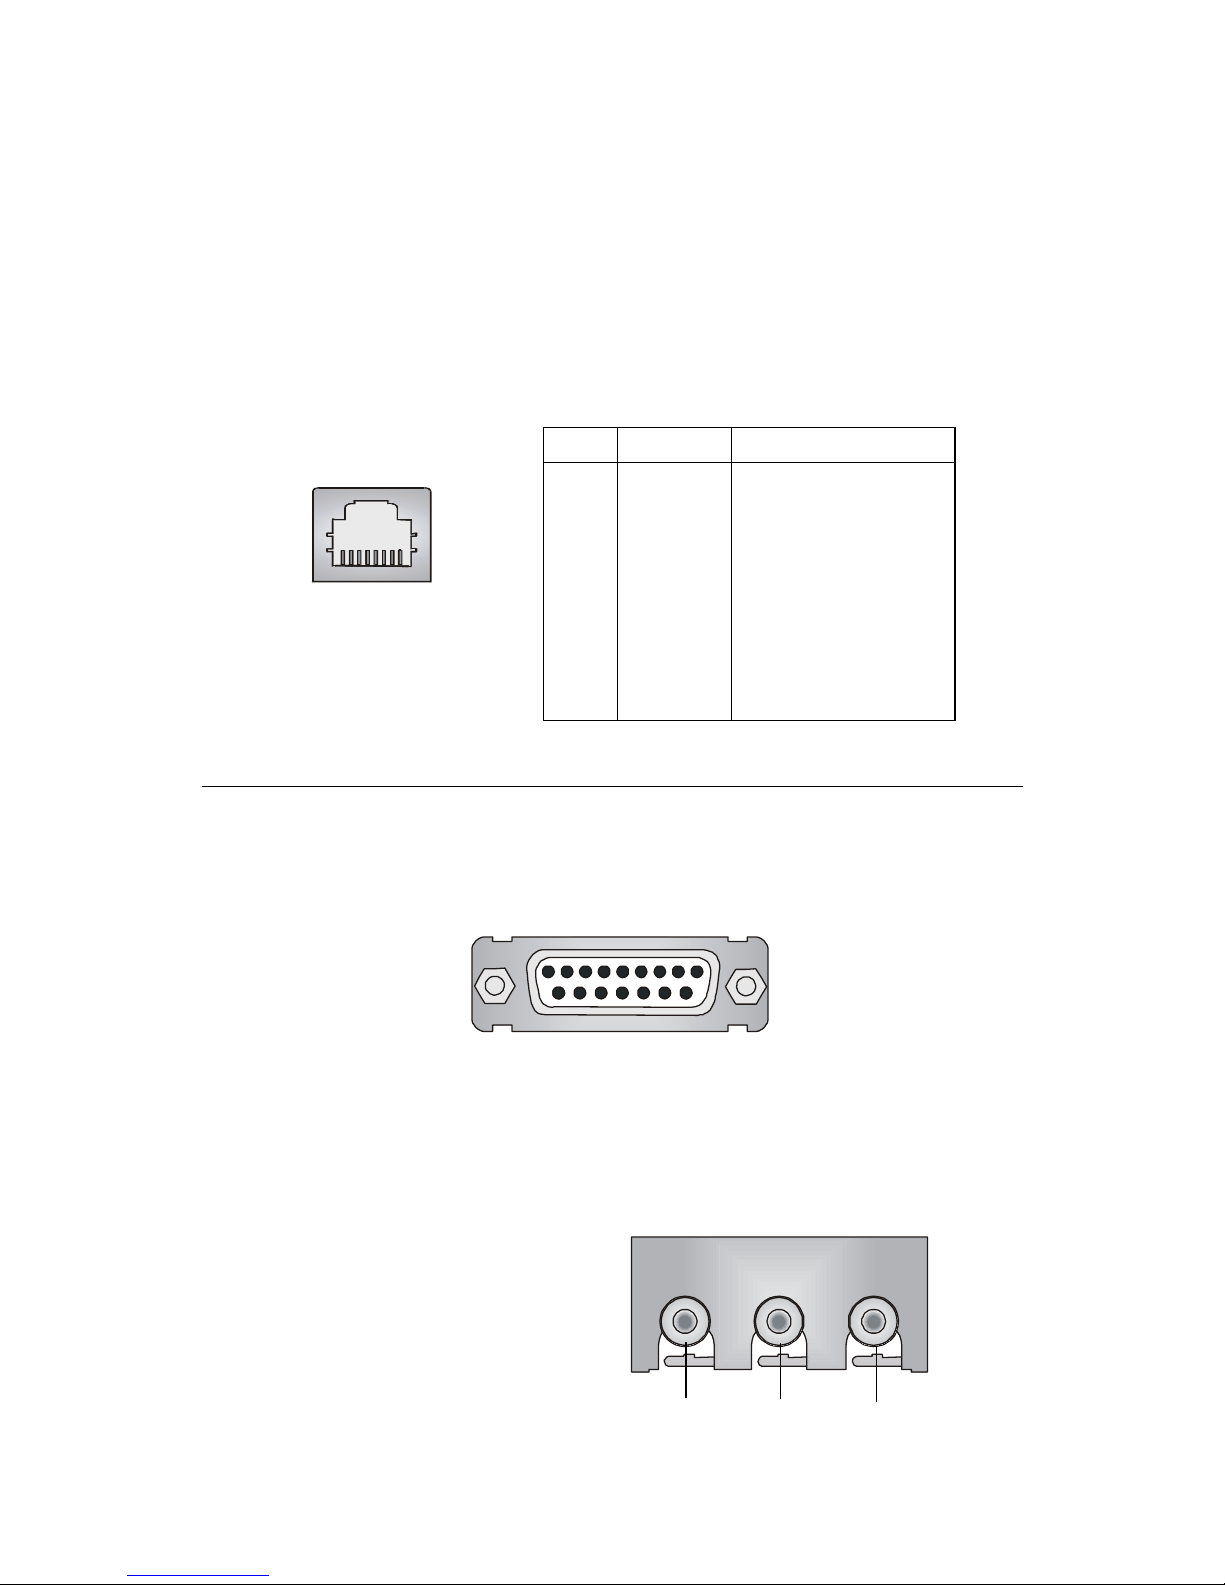
Audio Port Connectors
Line Out is a connector for Speakers or Headphones. Line In is used for
external CD player, Tape player, or other audio devices. Mic is a connector for
microphones.
1/8” Stereo Audio Connectors
Line Out Line In MI C
Joystick/Midi Connector
You can connect a joystick or game pad to this connector.
LAN (RJ-45) Jack
The mainboard provides one standard RJ-45 jack for connection to Local
Area Network (LAN). You can connect a network cable to the LAN jack.
Pin Definition
PIN SIGNAL DESCRIPTION
1 TDP Transmit Differential Pair
2 TDN Transmit Differential Pair
3 RDP Receive Differential Pair
4 NC Not Used
5 NC Not Used
6 RDN Receive Differential Pair
7 NC Not Used
8 NC Not Used
RJ-45 LAN Jack
Page 27
Hardware Setup
2-13
The mainboard provides connectors to connect to FDD, IDE HDD, case,
modem, USB Ports, IR module and CPU/System F AN.
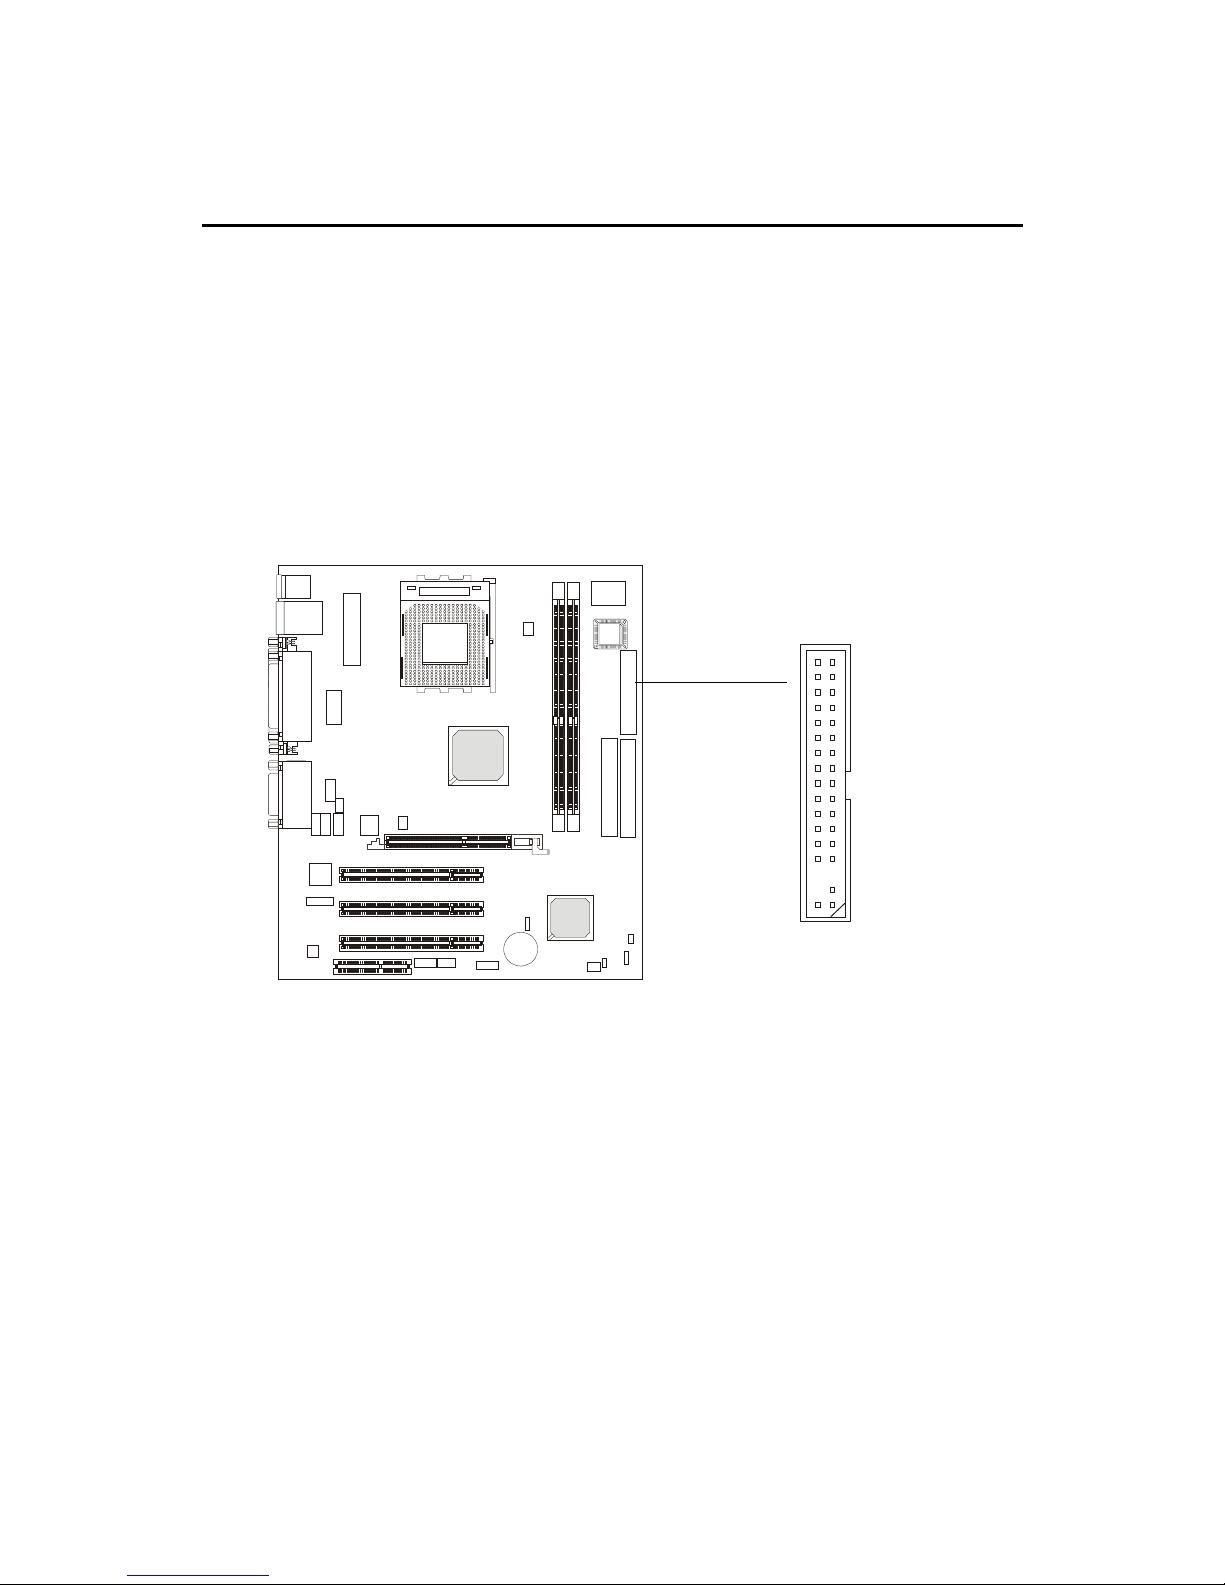
Floppy Disk Drive Connector: FDD1
The mainboard provides a standard floppy disk drive connector that
supports 360K, 720K, 1.2M, 1.44M and 2.88M floppy disk types.
Connectors
FDD1
Page 28
Chapter 2
2-14
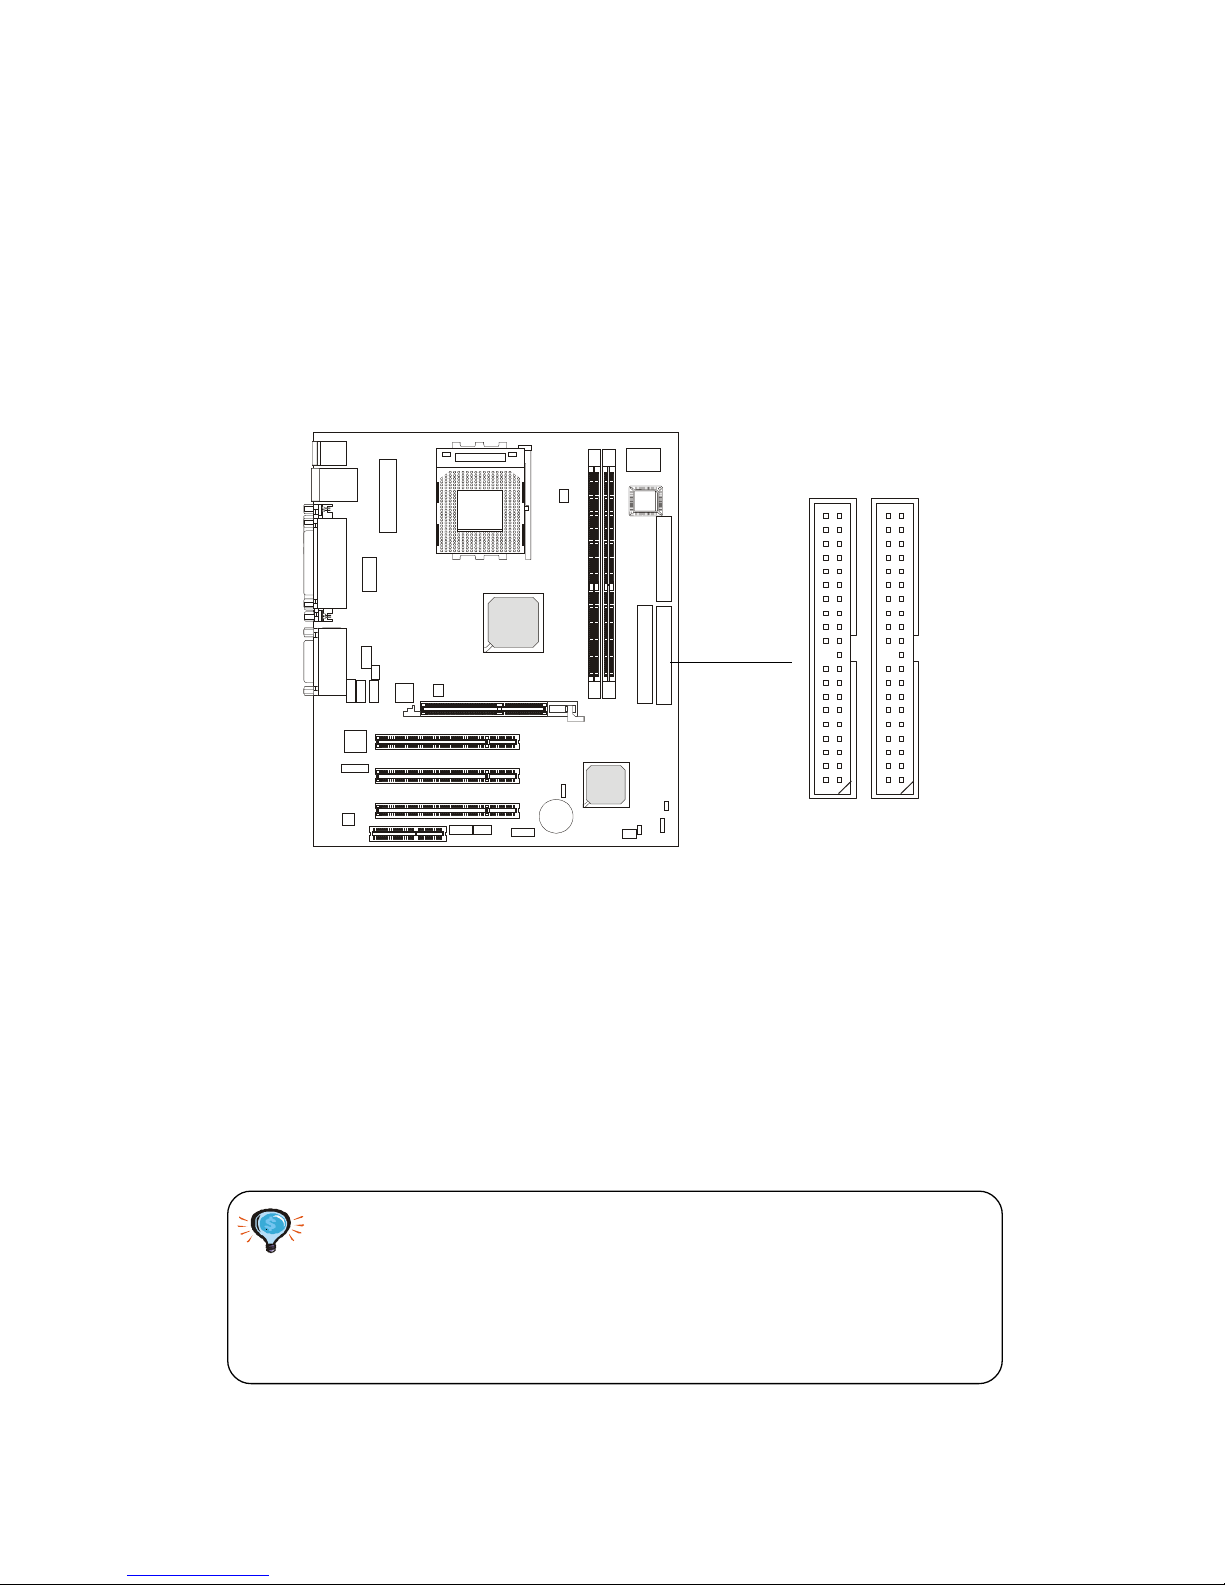
Hard Disk Connectors: IDE1 & IDE2
The mainboard has a 32-bit Enhanced PCI IDE and Ultra DMA 33/66/100
controller that provides PIO mode 0~4, Bus Master, and Ultra DMA 33/66/100
function. You can connect up to four hard disk drives, CD-ROM, 120MB
Floppy (reserved for future BIOS) and other devices. These connectors support the provided IDE hard disk cable.
IDE1 (Primary IDE Connector)
The first hard drive should always be connected to IDE1. IDE1 can
connect a Master and a Slave drive. You must configure second hard
drive to Slave mode by setting the jumper accordingly.
IDE2 (Secondary IDE Connector)
IDE2 can also connect a Master and a Slave drive.
IDE2IDE1
TIP:
If you install two hard disks on cable, you must configure the
second drive to Slave mode by setting its jumper. Refer to the
hard disk documentation supplied by hard disk vendors for
jumper setting instructions.
Page 29
Hardware Setup
2-15
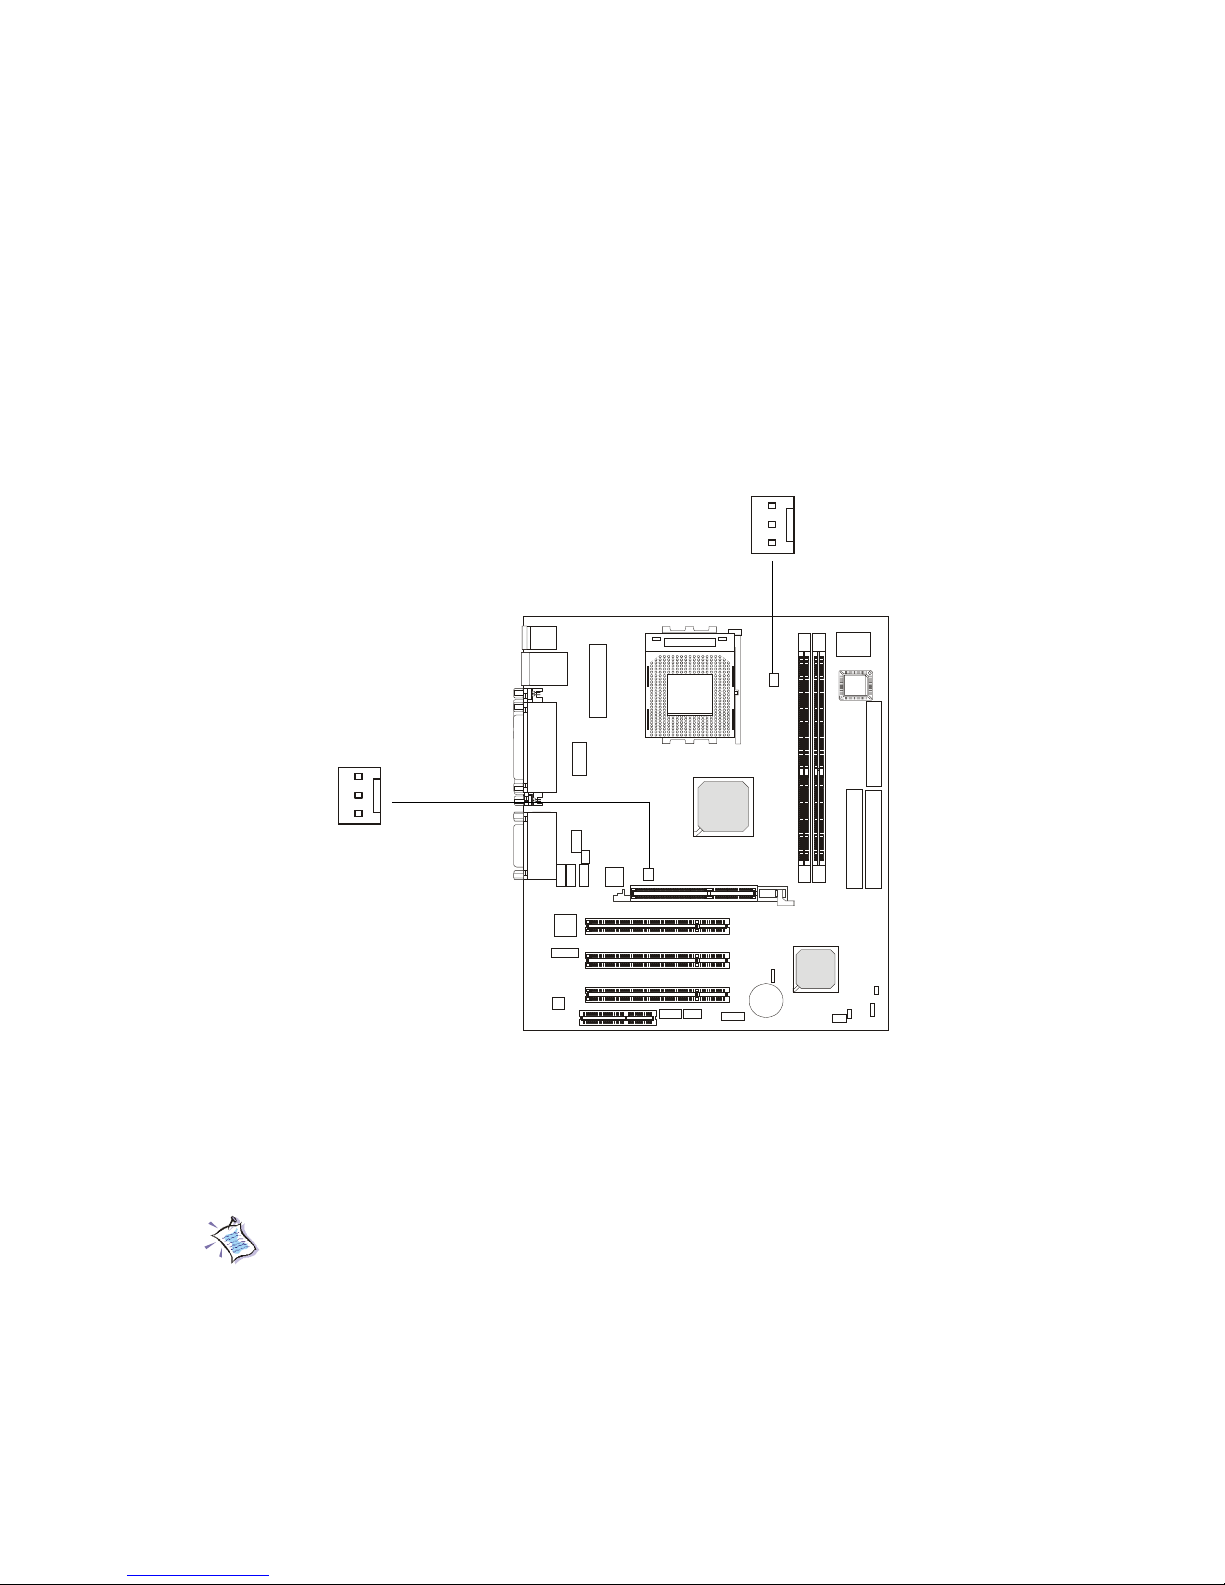
Fan Power Connectors: CPUF A1/SYSF A1
The CPUFA1 (processor fan) and SYSFA1 (system fan) support system
cooling fan with +12V. It supports three-pin head connector. When connecting the wire to the connectors, always take note that the red wire is the positive
and should be connected to the +12V, the black wire is Ground and should be
connected to GND. If the mainboard has a System Hardware Monitor chipset
on-board, you must use a specially designed fan with speed sensor to take
advantage of the CPU fan control.
Note:
1. Always consult the vendor for proper CPU cooling fan.
2. CPU Fan supports the fan control. You can install the PC Alert
utility that will automatically control the CPU Fan speed according to the actual CPU temperature.
SYSFA1
SENSOR
+12V
GND
CPUFA1
SENSOR
+12V
GND
Page 30
Chapter 2
2-16
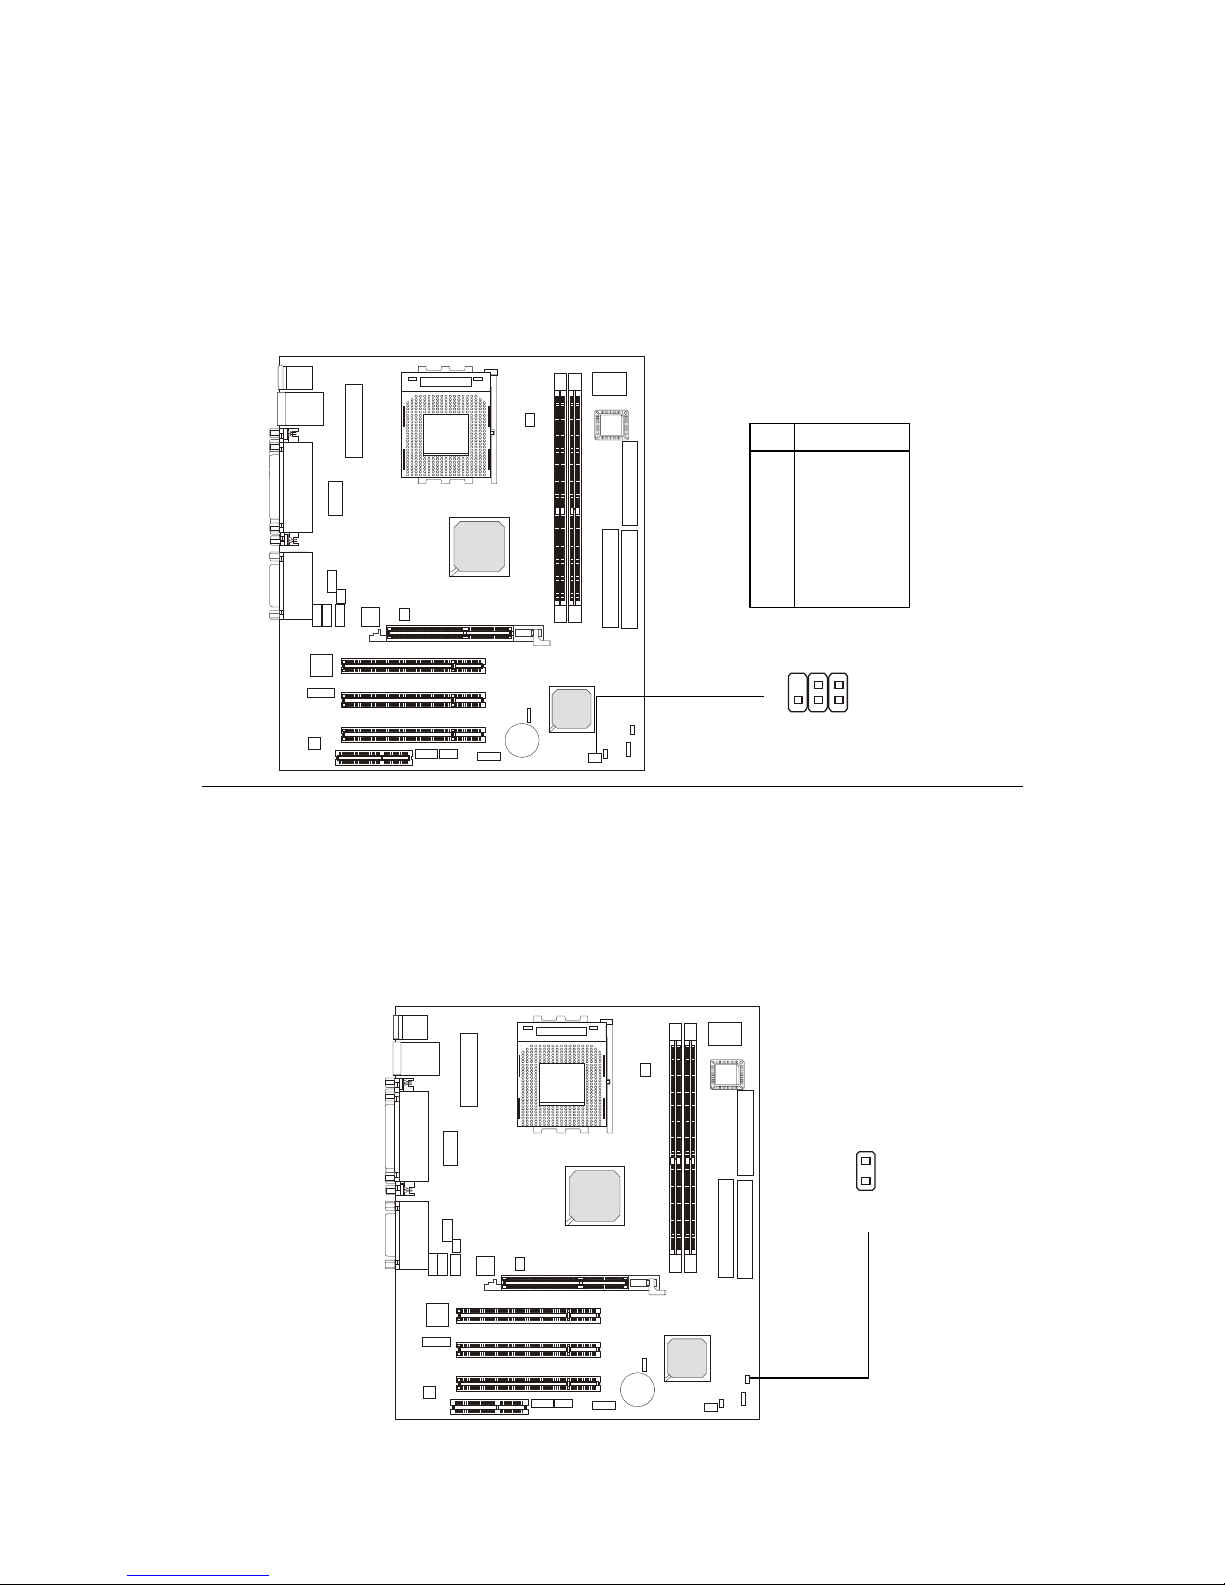
IrDA Infrared Module Header: JIR1
The connector allows you to connect to IrDA Infrared module. You must
configure the setting through the BIOS setup to use the IR function. JIR1 is
compliant with Intel® Front Panel I/O Connectivity Design Guide.
Pin Signal
1NC
2NC
3 VCC5
4 GND
5 IRTX
6 IRRX
JIR1 Pin Definition
JIR1
2
1
6
5
Chassis Intrusion Switch Connector: JCI1
This connector is connected to a 2-pin chassis switch. If the chassis is
opened, the switch will be short. The system will record this status and show
a warning message on the screen. To clear the warning, you must enter the
BIOS utility and clear the record.
JCI1
Page 31
Hardware Setup
2-17
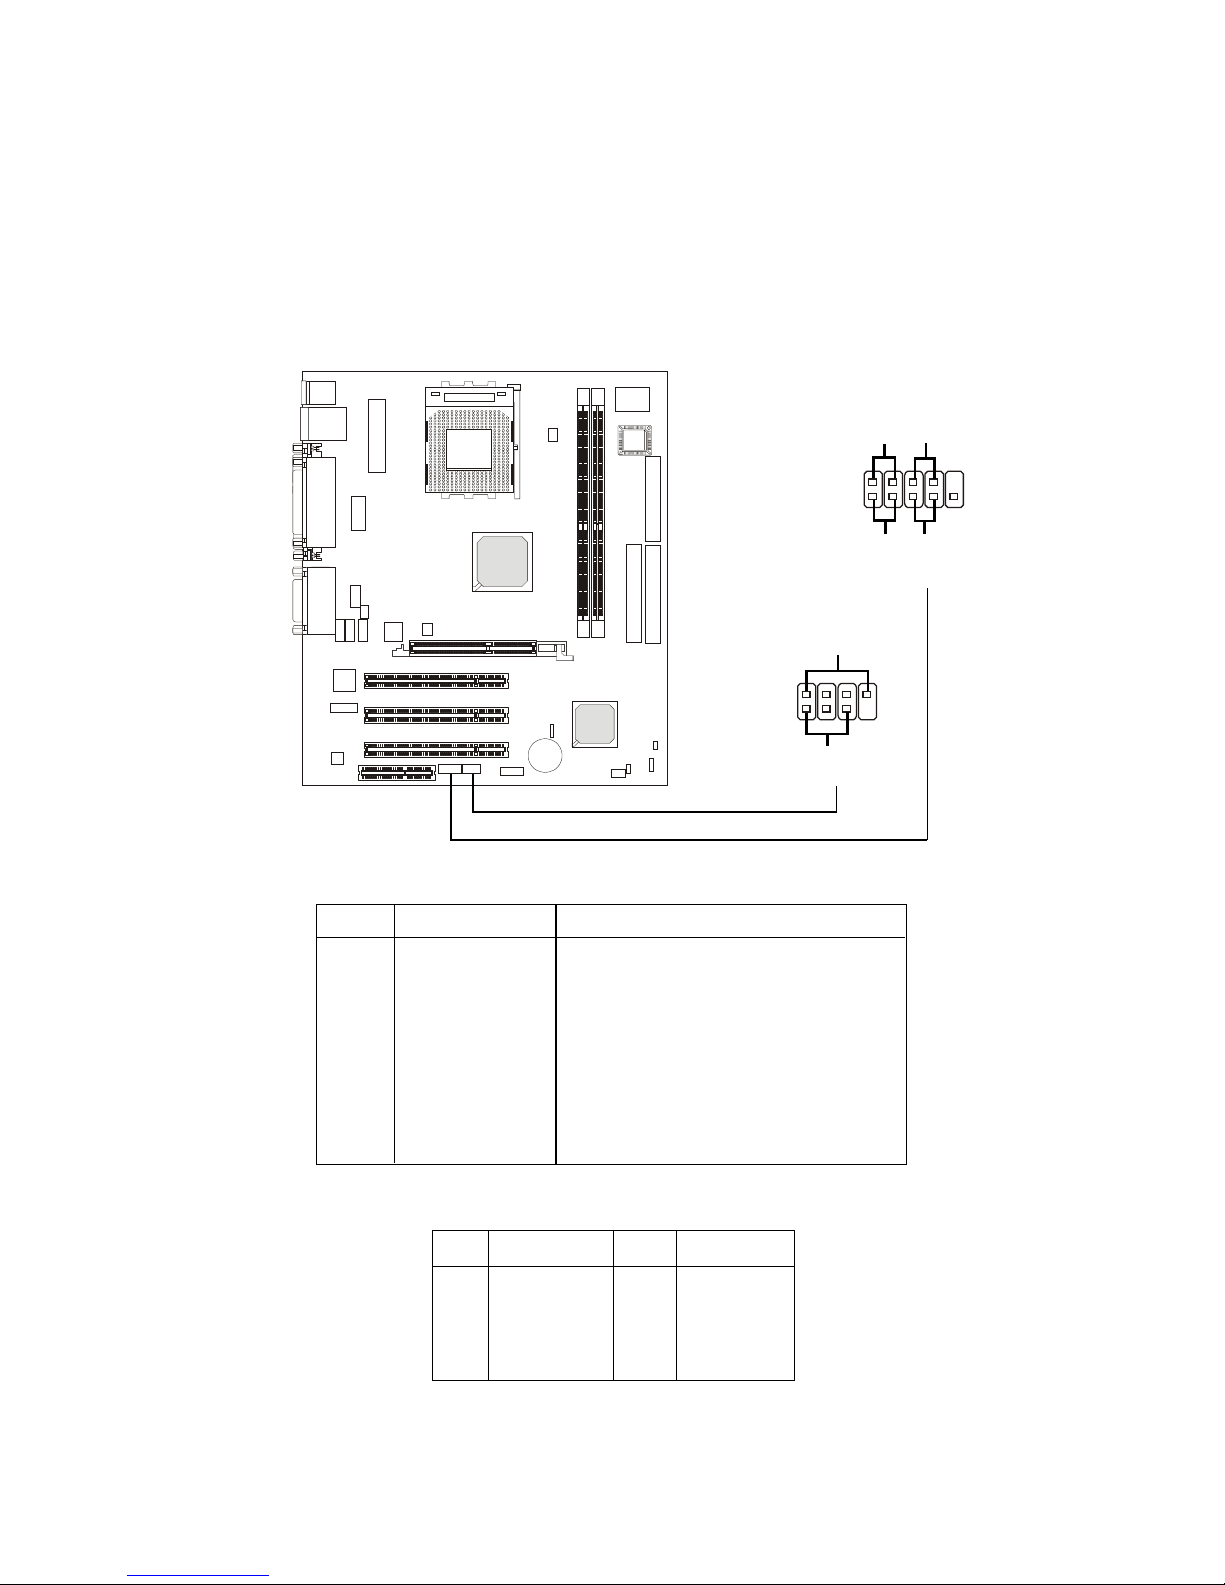
Front Panel Connectors: JFP1 & JFP2
The mainboard provides two front panel connectors for electrical connection to the front panel switches and LEDs. JFP1 is compliant with Intel
®
Front Panel I/O Connectivity Design Guide.
PIN SIGNAL DESCRIPTION
1 HD_LED_P Hard disk LED pull-up
2 FP PWR/SLP MSG LED pull-up
3 HD_LED_N Hard disk active LED
4 FP PWR/SLP MSG LED pull-up
5 RST_SW_N Reset Switch low reference pull-down to GND
6 PWR_SW_P Power Switch high reference pull-up
7 RST_SW_P Reset Switch high reference pull-up
8 PWR_SW_N Power Switch low reference pull-down to GND
9 RSVD_DNU Reserved. Do not use.
JFP1 Pin Definition
1
2
9
10
JFP1
HDD
LED
Reset
Switch
Power
LED
Power
Switch
PIN SIGNAL PIN SIGNAL
1 GND 2 SPK3 SLED 4 BUZ+
5 PLED 6 BUZ7 NC 8 SPK+
JFP2 Pin Definition
Power
LED
Speaker
1
2
7
8
JFP2
Page 32
Chapter 2
2-18
Modem Connector: JMC1
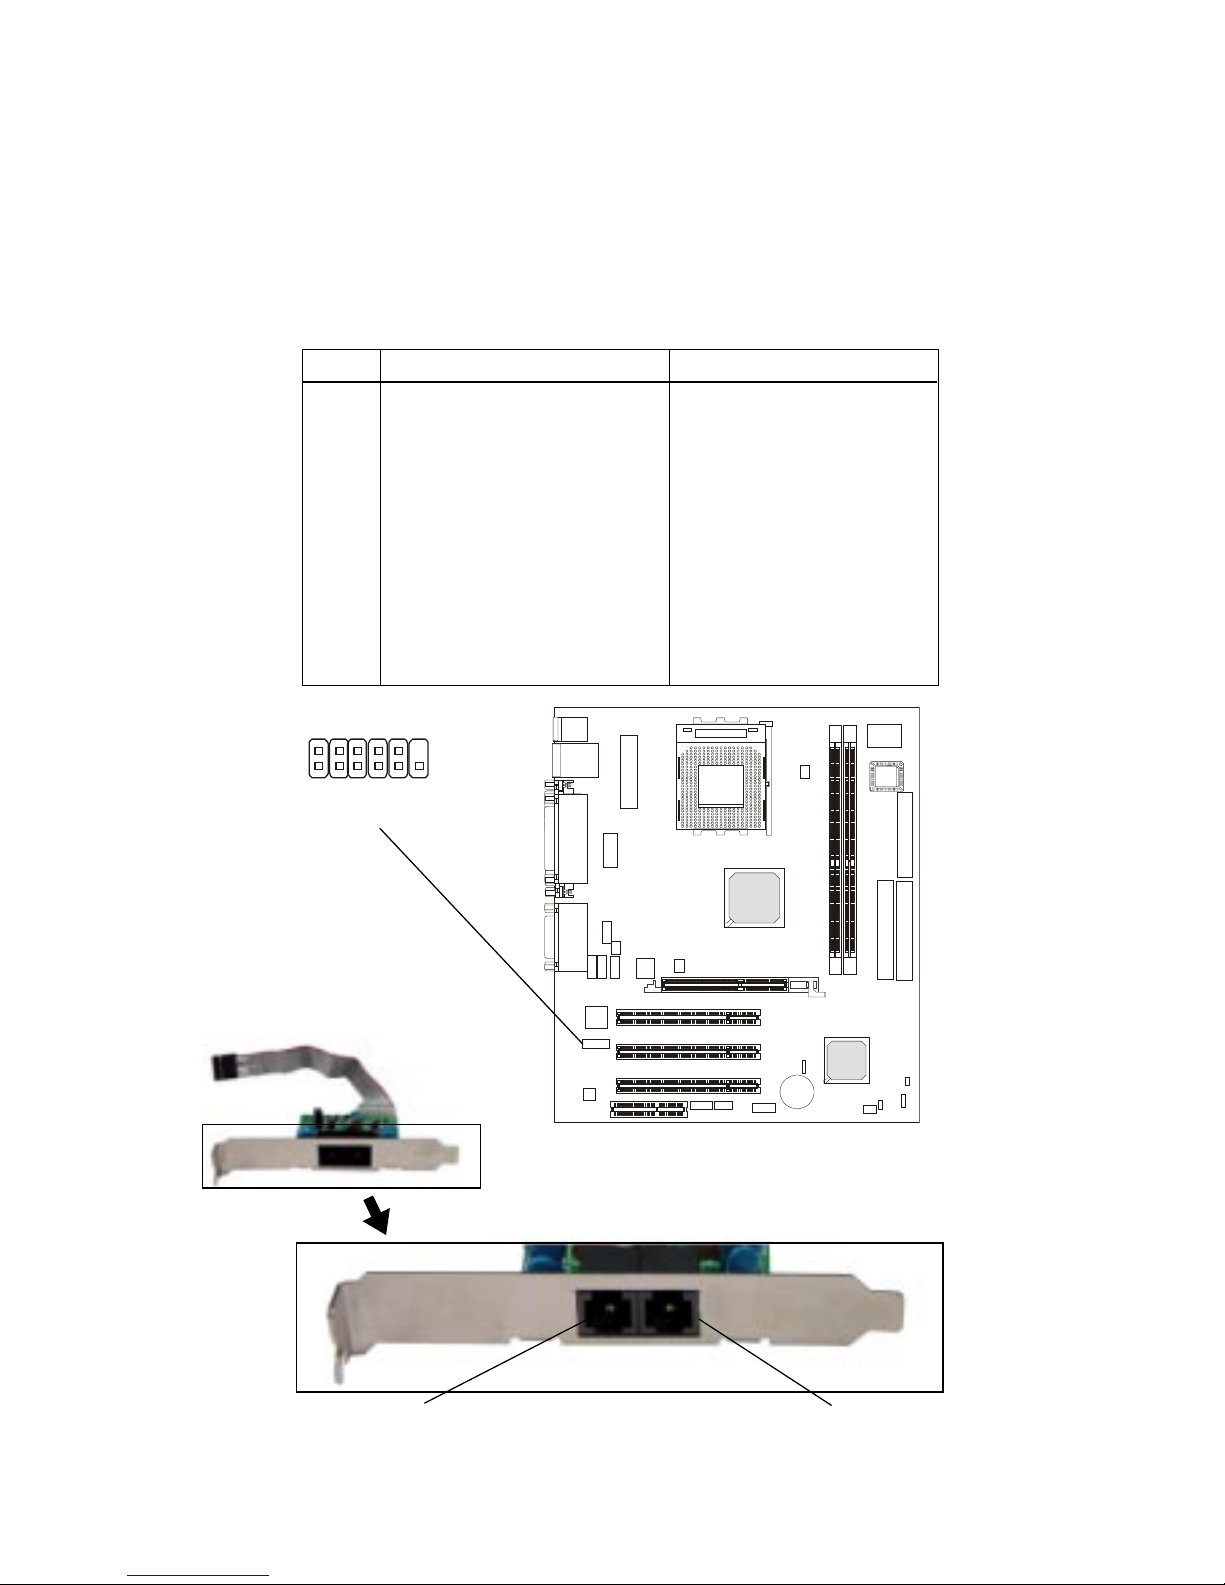
This connector is connected to a modem module. The modem module
functions in the same way as a modem, which allows users to connect to the
internet via the telephone line.
PIN SIGNAL DESCRIPTION
1 BIT_CLK (to LAN controller) Serial port bit clock output/input
2 SYNC (from LAN controller) Frame Sync input
3 RESET (from LAN controller) Reset input (active low)
4 SDA TA_OUT (from LAN controller) Serial port data input
5 SDA T A_IN (to LAN controller) Serial port data output
6 Ground (from M/B) Connect to System Digital Ground
7 Ground (from M/B) Connect to System Digital Ground
8 Aout (to M/B) Analog speaker output
9 +3.3V aux (from M/B) +3.3V Vaux power input
1 0 Ground (from M/B) Connect to System Digital Ground
11 +3.3Vaux (from M/B) +3.3V Vaux power input
1 2 PIN REMOVE PIN REMOVE
JMC1 Pin Definition
JMC1
2
1
12
11
Modem Module
Connect to a telephone set
Connect to a telephone line from the wall
Page 33
Hardware Setup
2-19
Front Panel Audio Connector: JAUD1
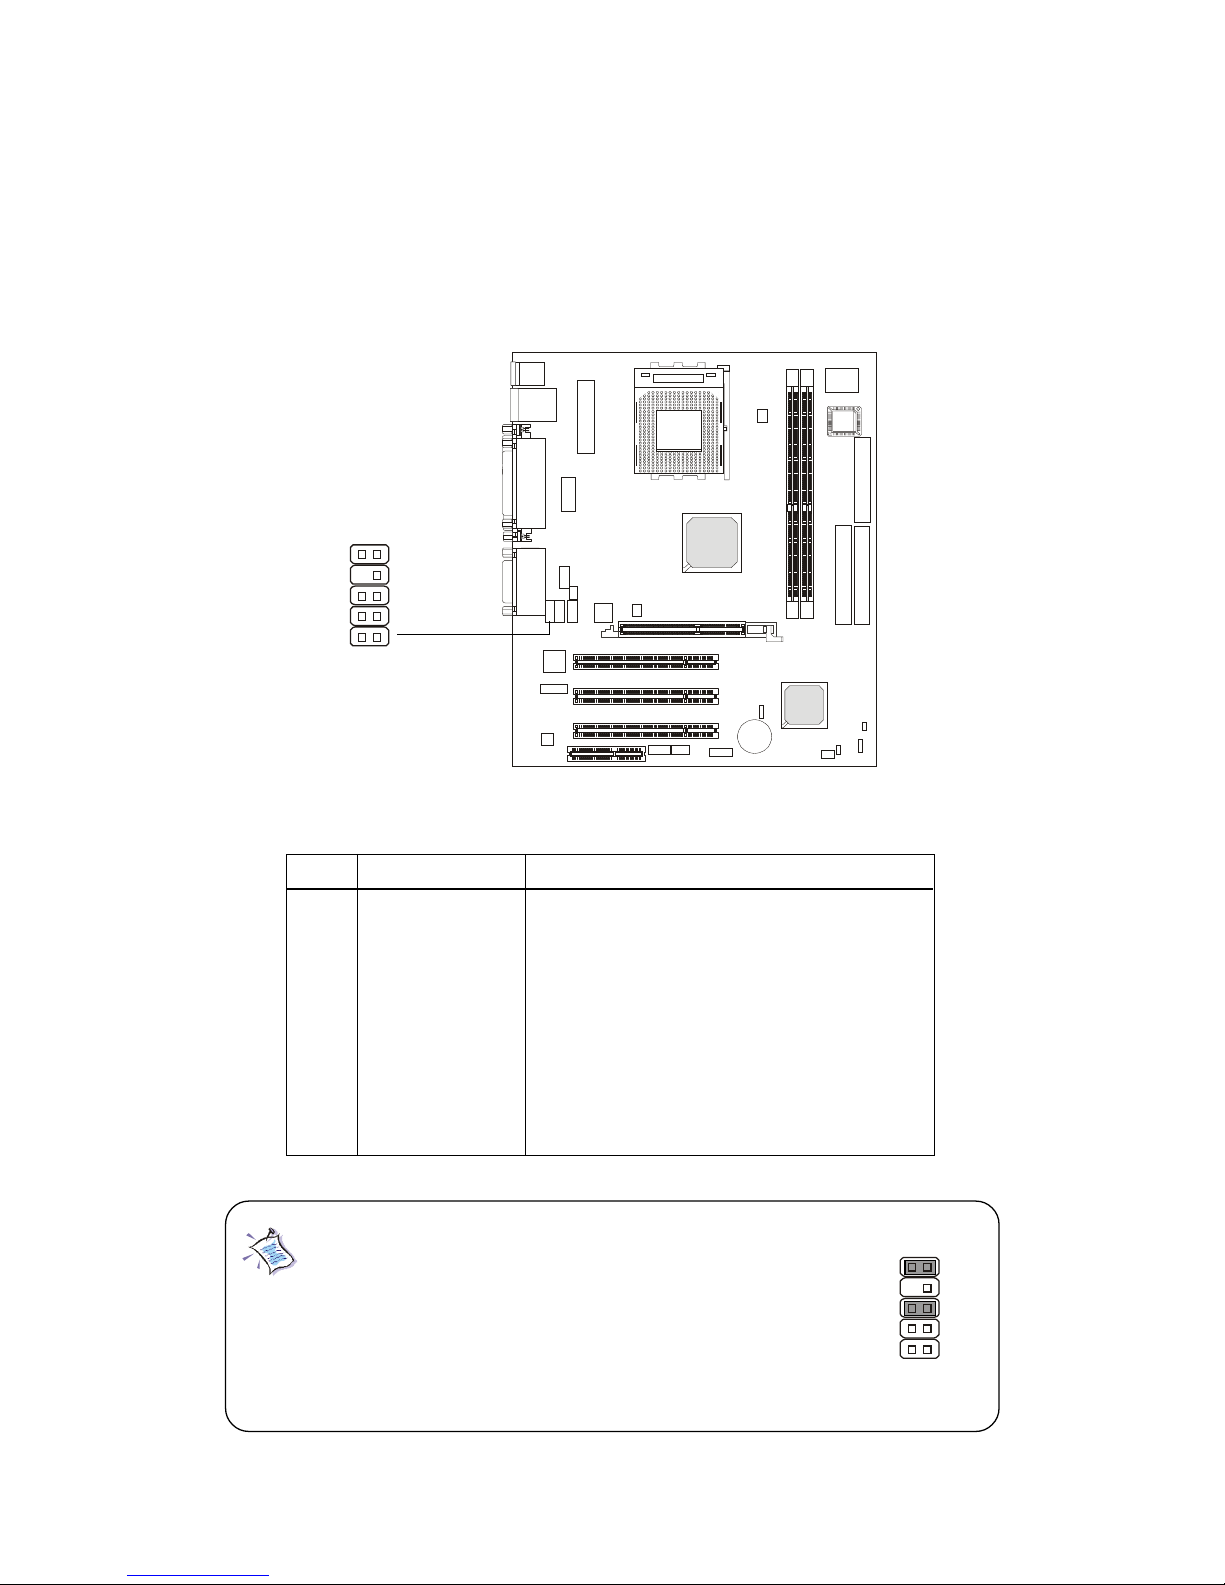
The JAUD1 front panel audio connector allows you to connect to the
front panel audio and is compliant with Intel® Front Panel I/O Connectivity
Design Guide.
PIN SIGNAL DESCRIPTION
1 AUD_MIC Front panel microphone input signal
2 AUD_GND Ground used by analog audio circuits
3 AUD_MIC_BIAS Microphone power
4 AUD_VCC Filtered +5V used by analog audio circuits
5 AUD_FPOUT_R Right channel audio signal to front panel
6 AUD_RET_R Right channel audio signal return from front panel
7 HP_ON Reserved for future use to control headphone amplifier
8 KE Y No pin
9 AUD_FPOUT_L Left channel audio signal to front panel
1 0 AUD_RET_L Left channel audio signal return from front panel
Pin Definition
Note:
If you don’t want to connect to the front audio
header, pins 5 & 6, 9 & 10 have to be jumpered
in order to have signal output directed to the
rear audio ports. Otherwise, the Line-Out connector on the back panel will not function.
JAUD1
1
2
910
5
6
10
9
Page 34
Chapter 2
2-20
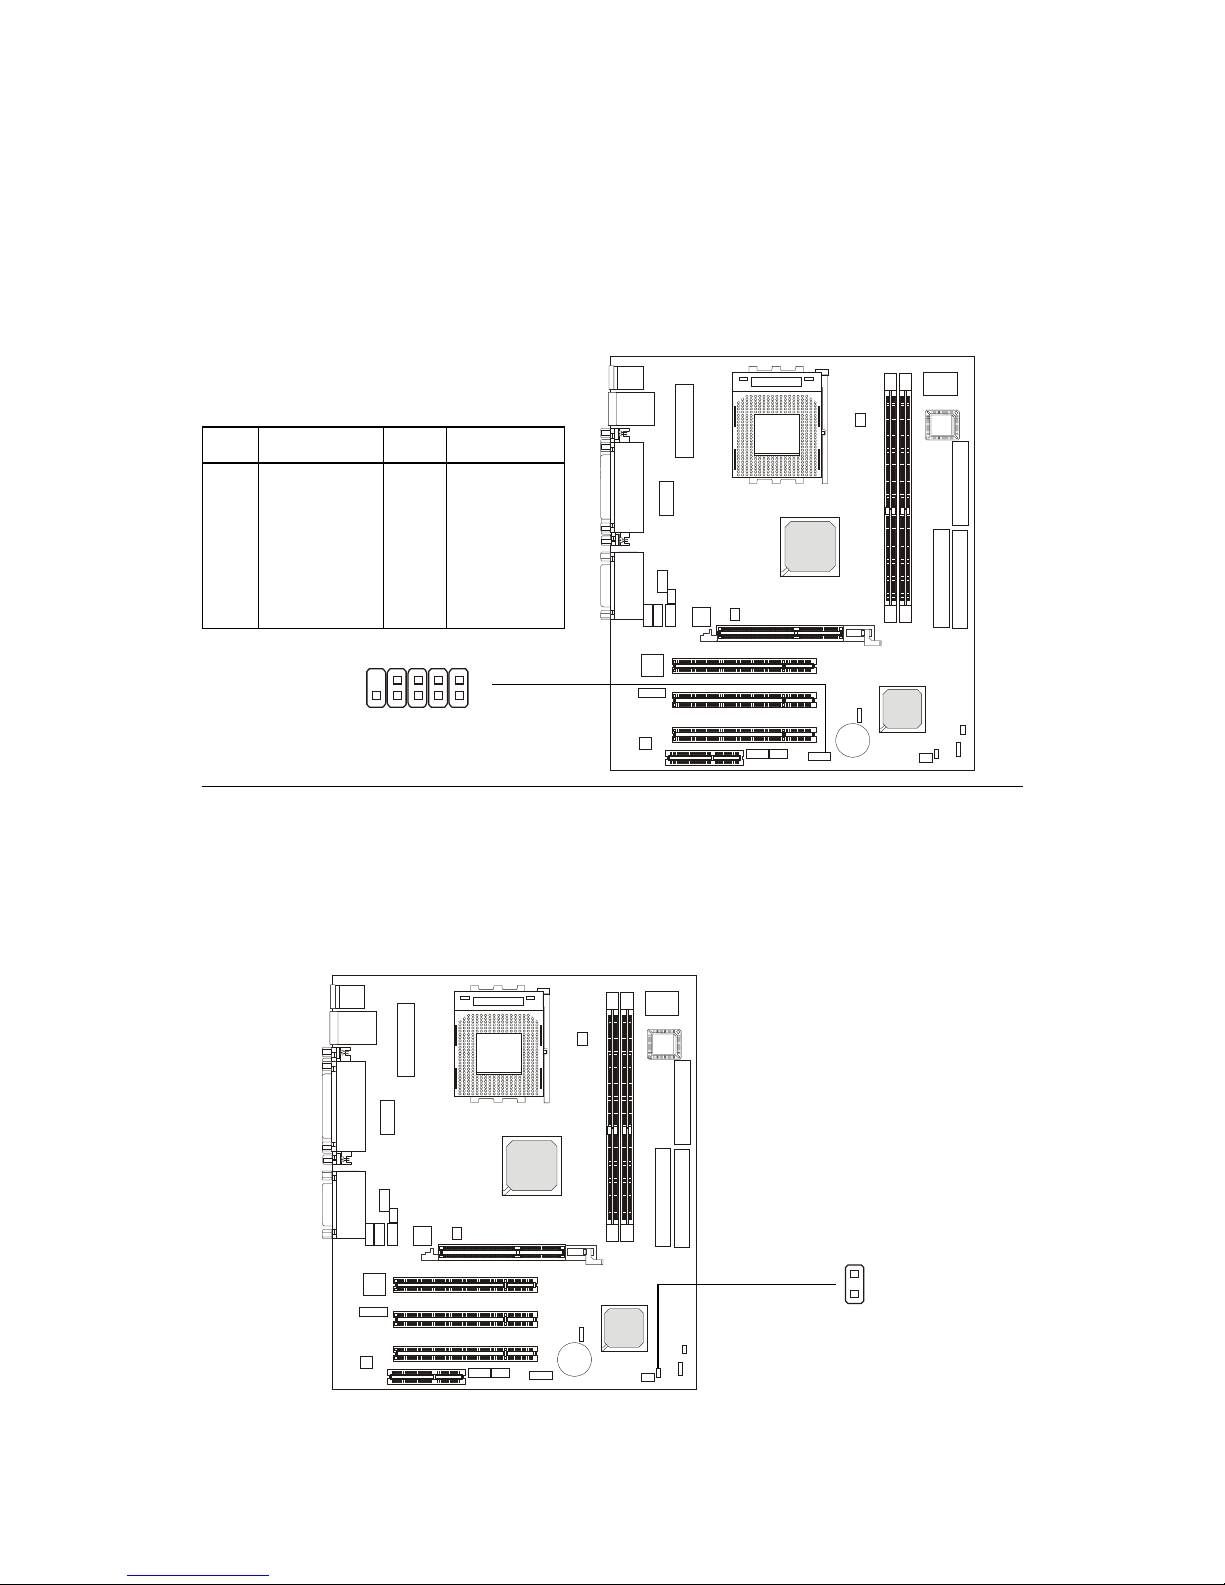
Pin Description Pin Description
1 USBPWR 2 USBPWR
3 USBP2- 4 USBP35 USBP2+ 6 USBP3+
7 GND 8 GND
9 NC 10 USBOC
JUSB1 Pin Definition
Front USB Connector: JUSB1
The mainboard provides one front Universal Serial Bus connector for
users to connect to USB ports. JUSB1 is compliant to Intel® Front Panel I/O
Connectivity Design Guide. If your motherboard uses 8235 South Bridge,
this connector will be compatible with USB2.0 spec and can connect highspeed USB peripherals.
Power Saving Switch Connector: JSLP1
Attach a power saving switch to this connector. Pressing the switch
once will have the system enter the sleep/suspend state. Press any key to
wake up the system.
JSLP1
1
9
2
10
JUSB1
Page 35
Hardware Setup
2-21
Modem-In Connector: JMD1
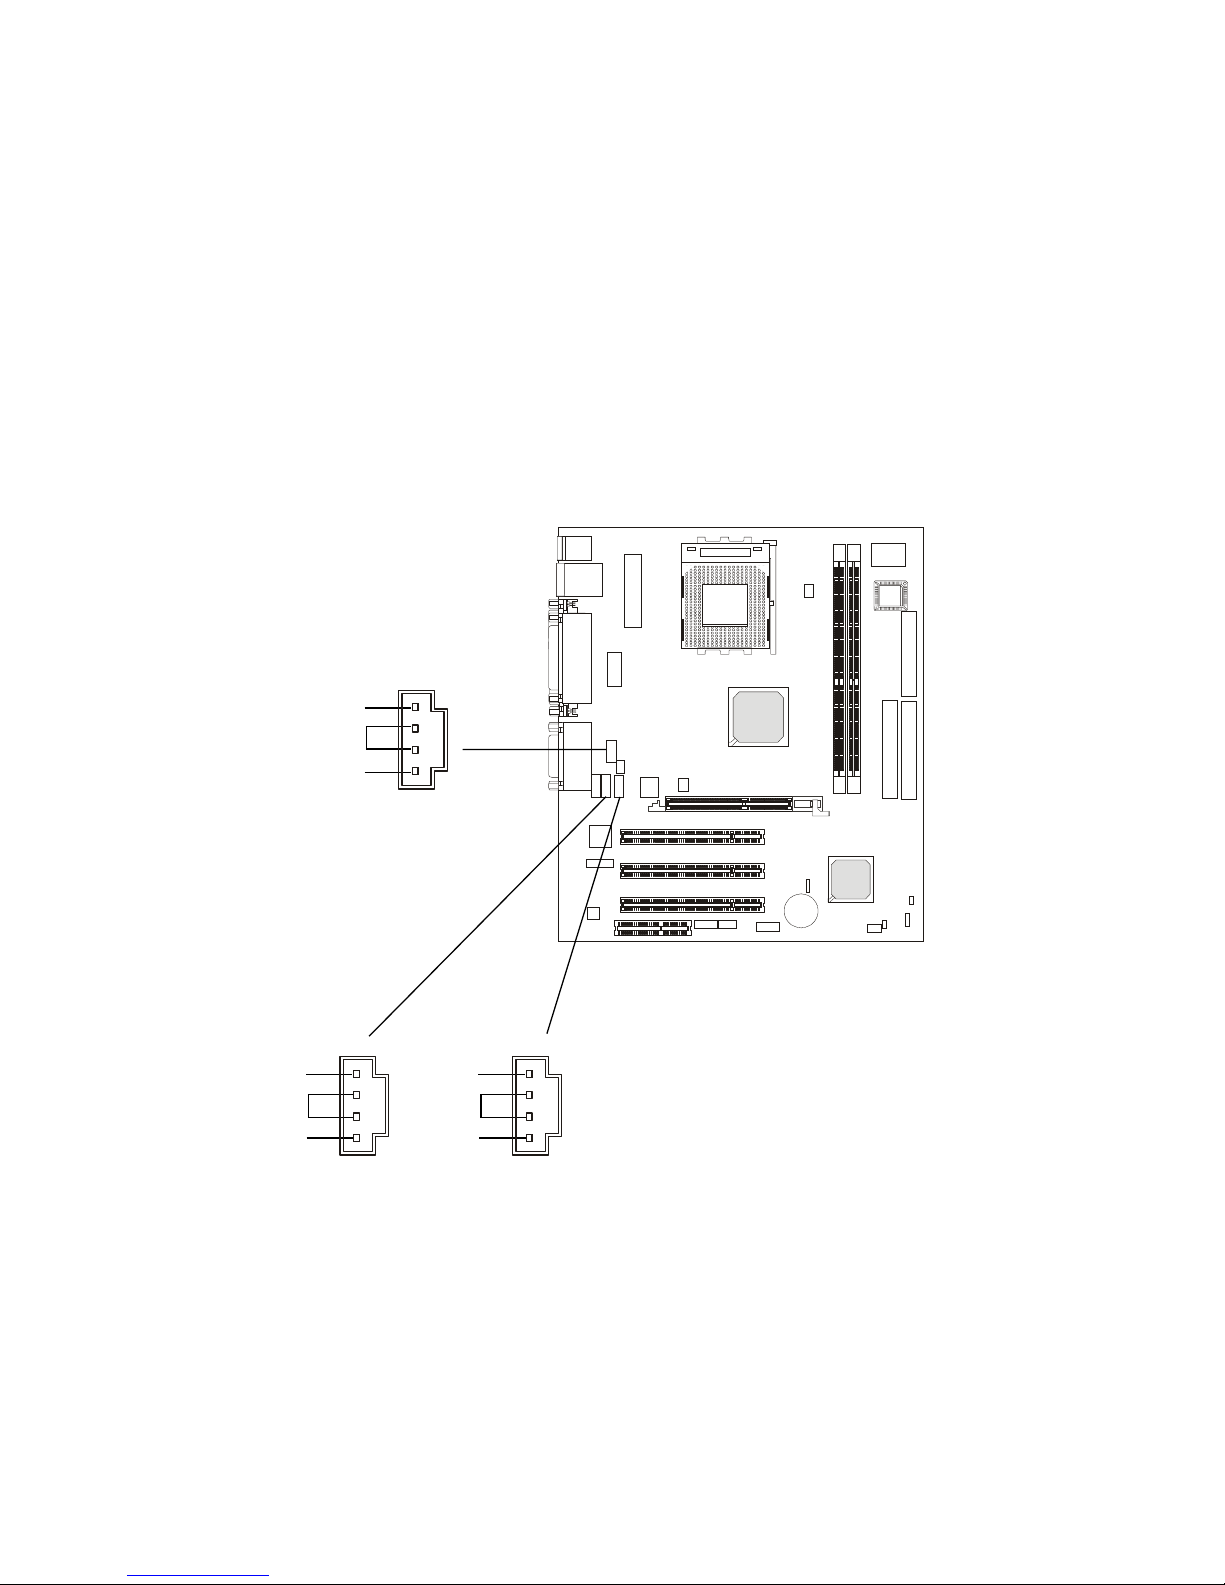
The connector is for modem with internal audio connector.
CD-In Connector: JCD1
The connector is for CD-ROM audio connector.
Aux Line-In Connector: JAUX1
The connector is for DVD add-on card with Line-in connector.
GND
L
R
JCD1
GND
L
R
JAUX1
Phone_In
Mono_Out
GND
JMD1
Page 36
Chapter 2
2-22
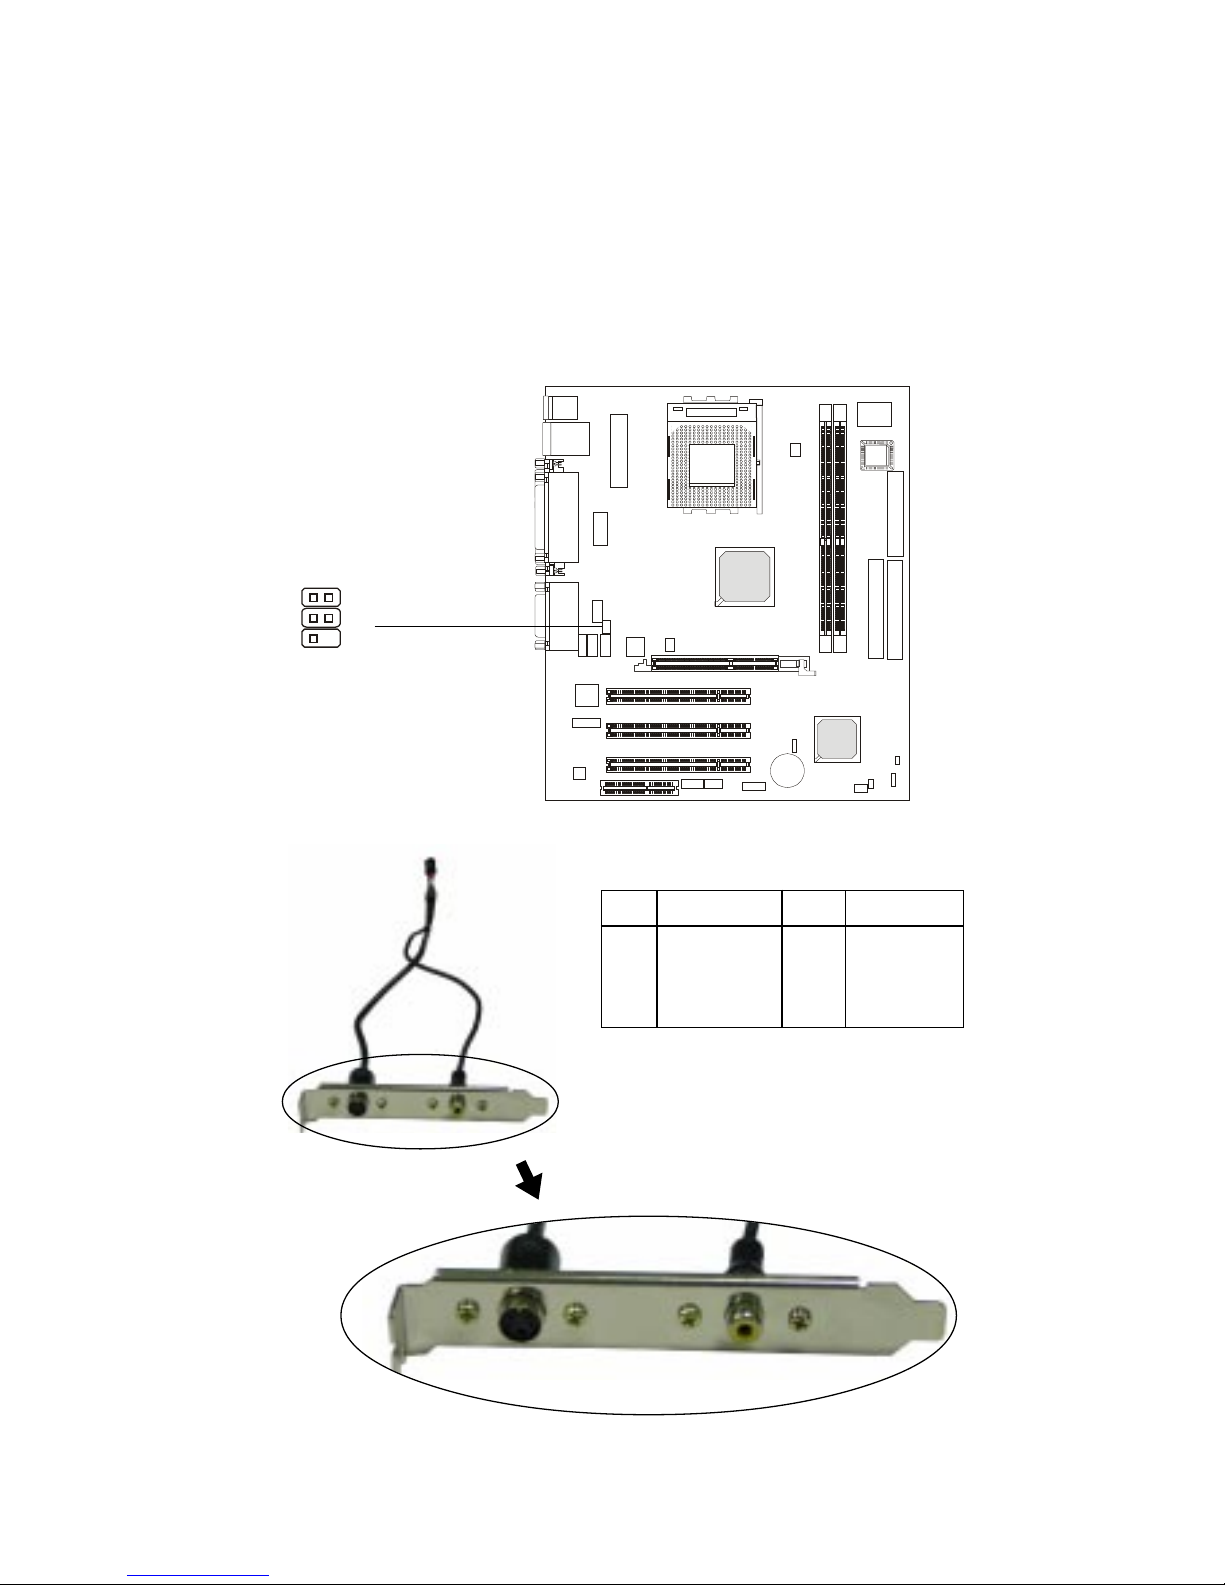
TV-Out Connector: JTV1 (Optional)
The mainboard optionally provides a TV-Out connector for you to attach a TV-Out bracket. The TV-Out bracket offers two types of TV-Out
connectors: S-Video and RCA Composite connector. Select the appropriate
one to connect to the television and the television will be able to display PC’ s
information.
TV-Out Bracket
JTV1
1
5
3
4
Pin Description Pin Description
1 GND 4 CVBS
2 Yout 5 GND
3 Cout
JTV1 Pin Definition
TV-Out Connector
(S-Video)
TV-Out Connector
(RCA Composite)
Page 37
Hardware Setup
2-23
The motherboard provides the following jumpers for you to set the
computer’s function. This section will explain how to change your
motherboard’s function through the use of the jumpers.
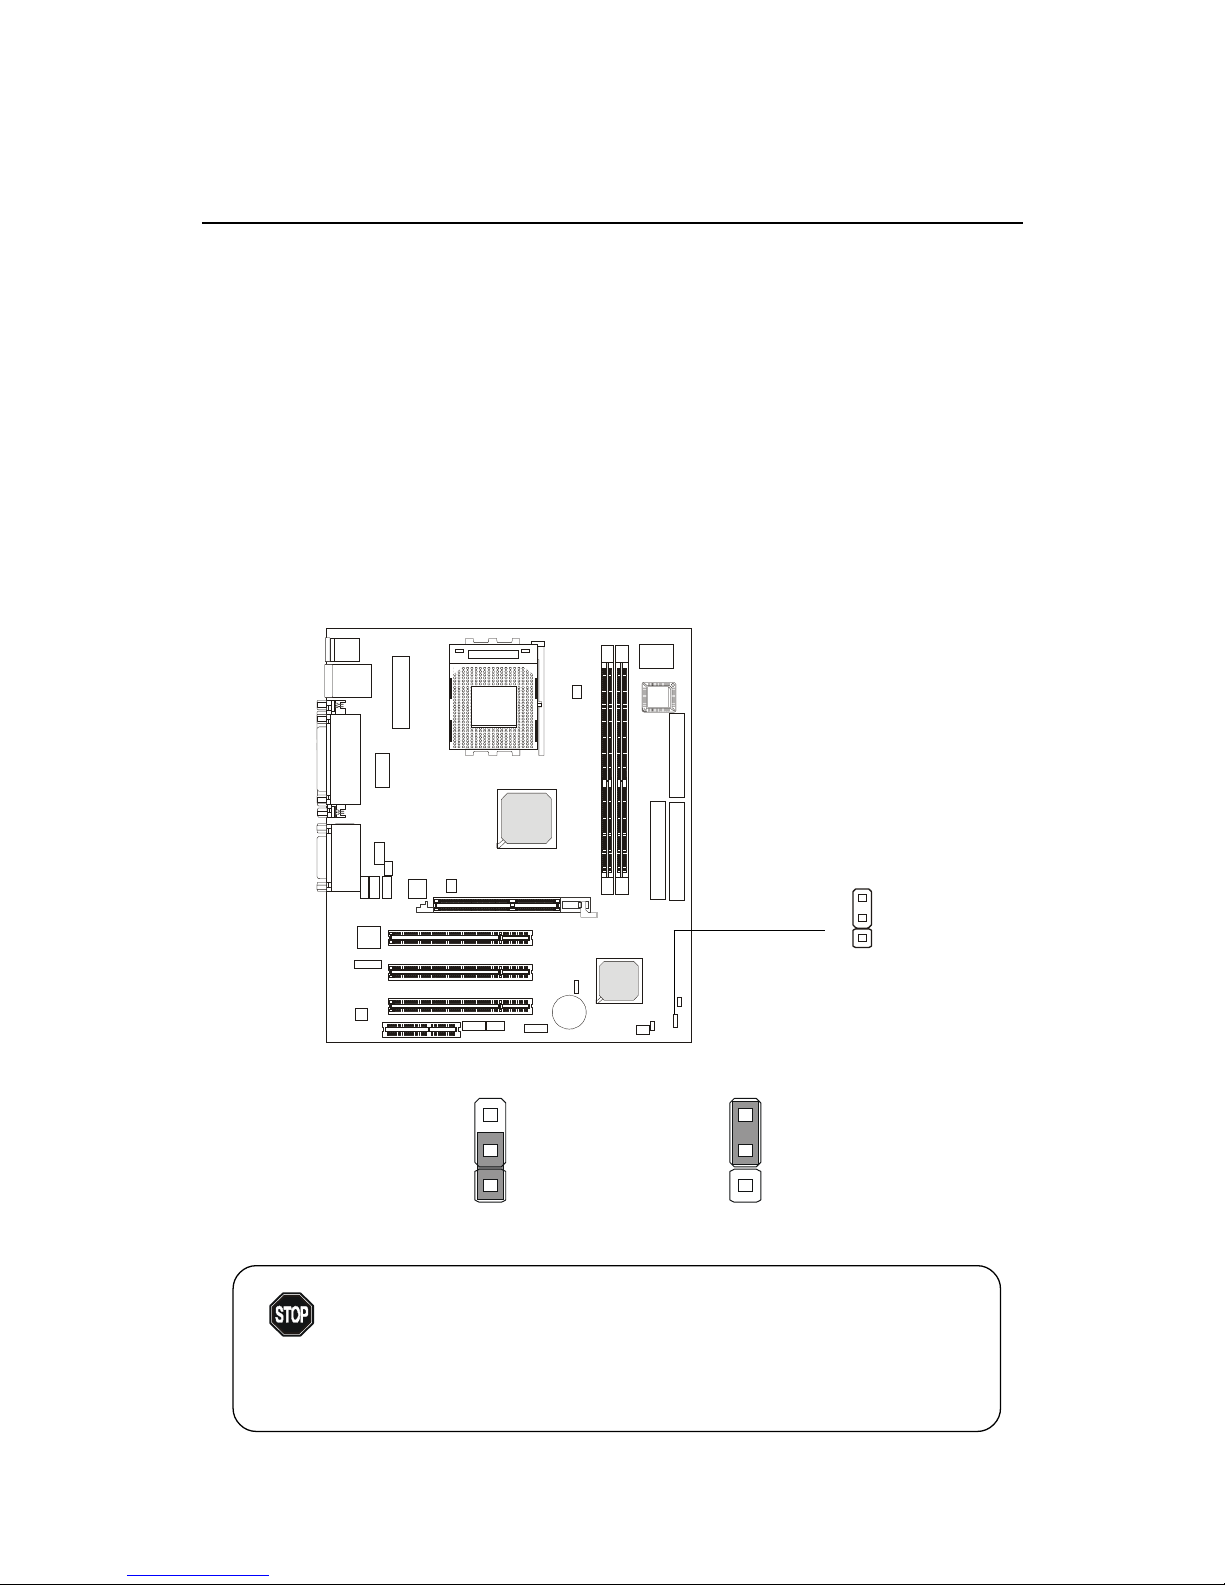
You can clear CMOS by shorting 2-3 pin while the
system is off. Then return to 1-2 pin position. Avoid
clearing the CMOS while the system is on; it will damage the mainboard.
WARNING!
Clear CMOS Jumper: JBA T1
There is a CMOS RAM on board that has a power supply from external
battery to keep the data of system configuration. With the CMOS RAM, the
system can automatically boot OS every time it is turned on. If you want to
clear the system configuration, use the JBAT1 (Clear CMOS Jumper ) to clear
data. Follow the instructions below to clear the data:
Jumpers
Clear Data
Keep Data
JBAT1
1
3
1
3
1
Page 38
Chapter 2
2-24
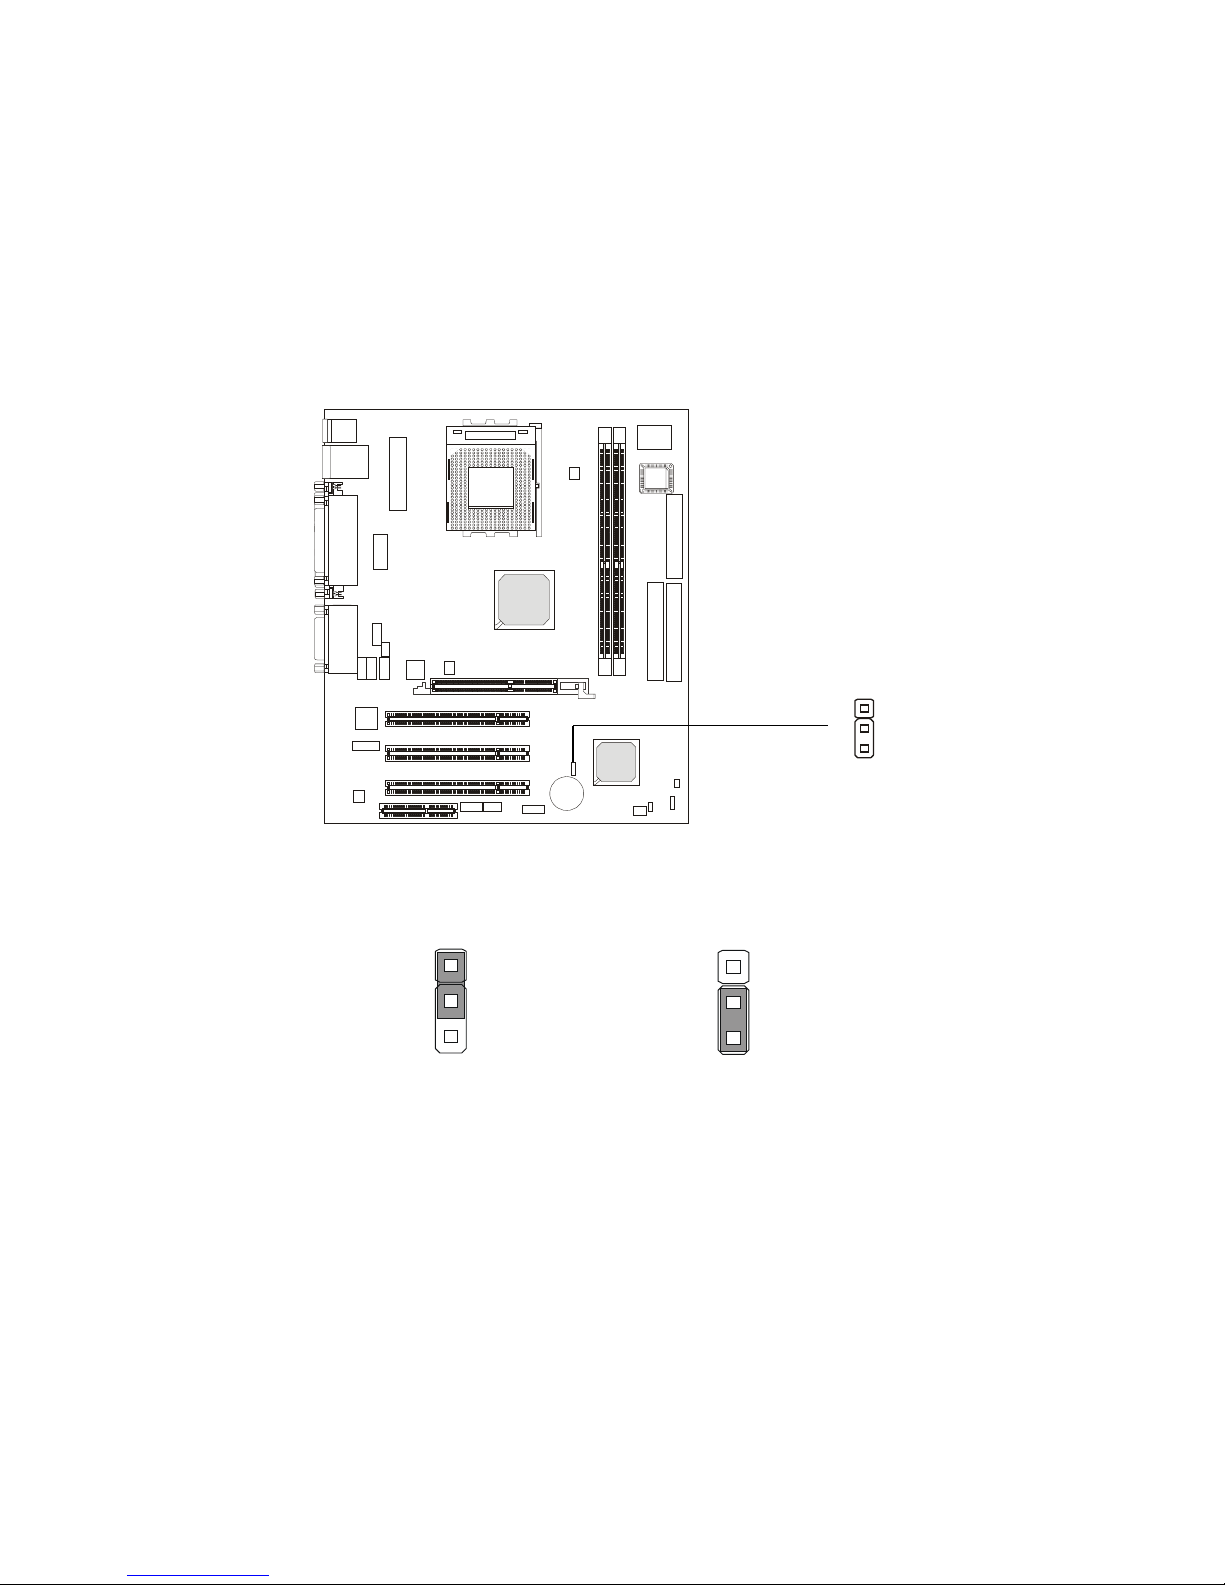
CPU FSB Clock Jumper: SW1
The jumper is used to set the CPU Front Side Bus (FSB) frequency for the
CPU installed on the board. If you install a 100MHz CPU, then set the jumper
to 100MHz, and the CPU will run at 100MHz; if you install a 133MHz CPU, set
the jumper to 133MHz, and the CPU will run at 133MHz.
SW1
1
FSB = 100MHz
1
3
FSB = 133MHz
1
3
Page 39
Hardware Setup
2-25
Slots
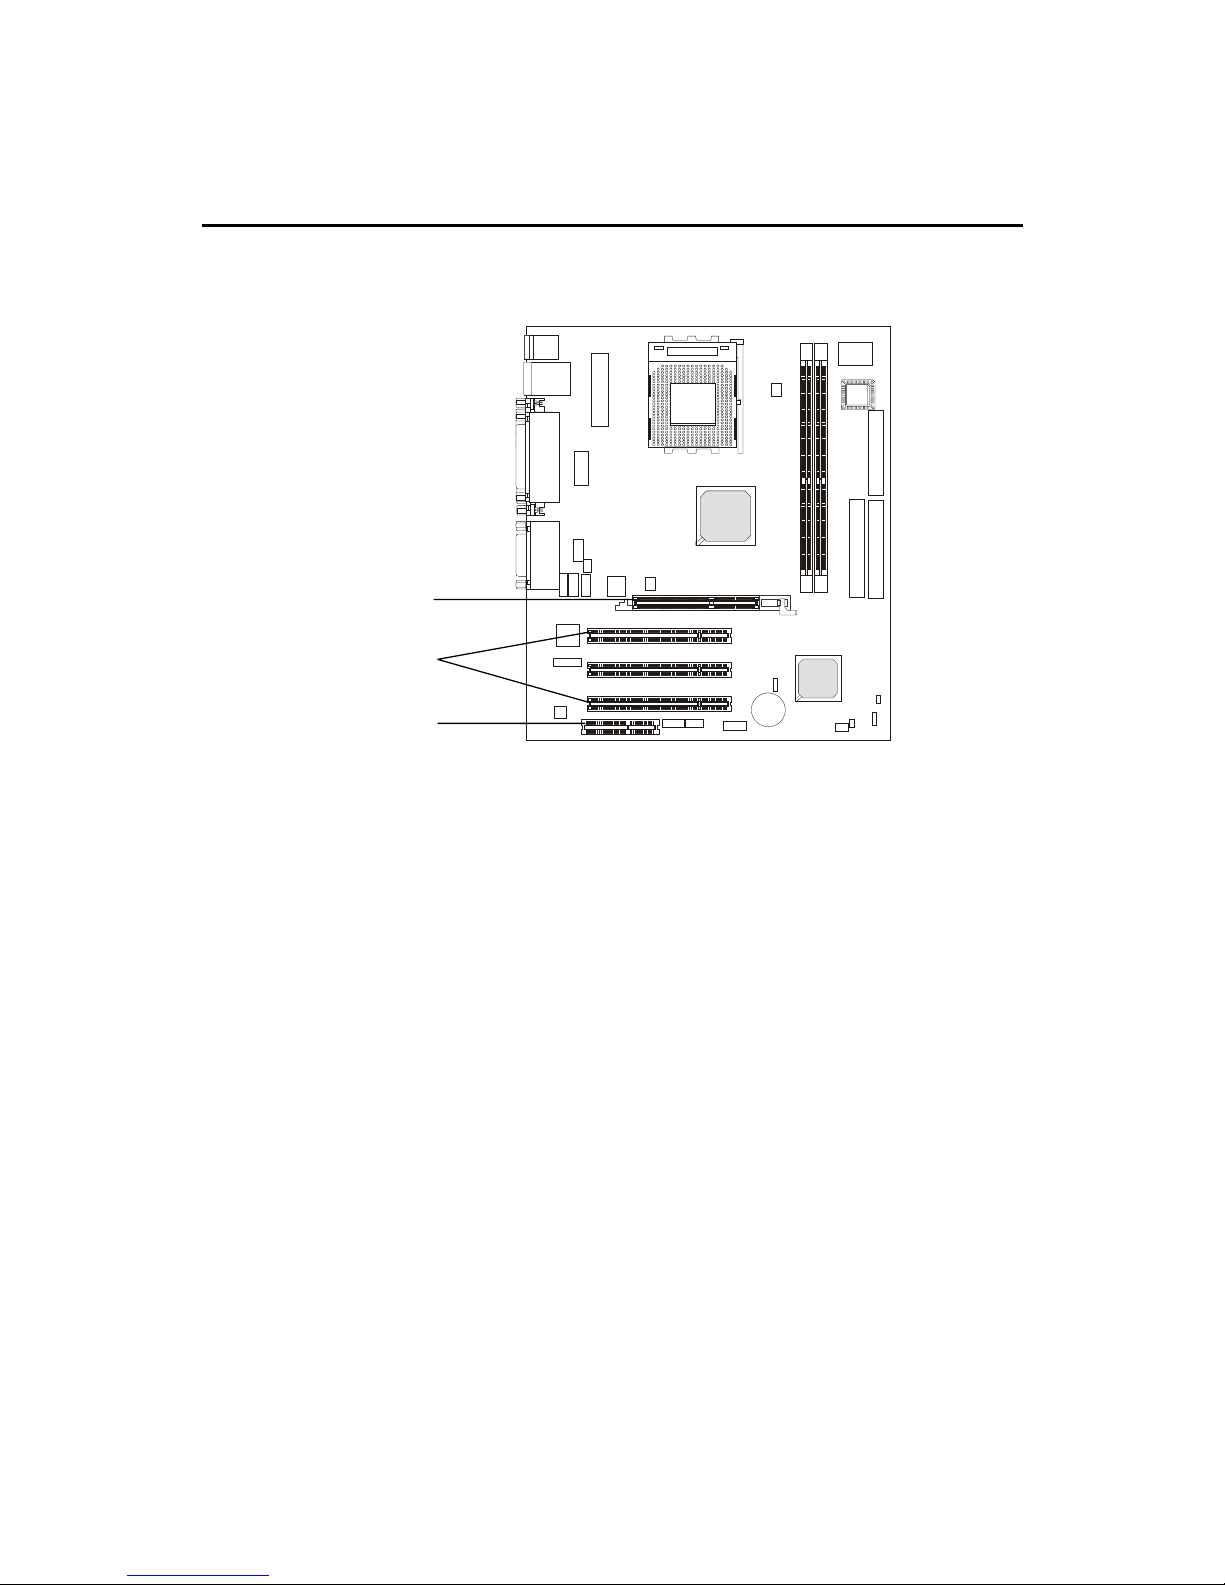
AGP (Accelerated Graphics Port) Slot
The AGP slot allows you to insert the AGP graphics card. AGP is an
interface specification designed for the throughput demands of 3D graphics.
It introduces a 66MHz, 32-bit channel for the graphics controller to directly
access main memory and provides three levels of throughputs: 1x (266Mbps),
2x (533Mbps) and 4x (1.07Gbps).
PCI Slots
Three PCI slots allow you to insert the expansion cards to meet your
needs. When adding or removing expansion cards, make sure that you unplug
the power supply first. Meanwhile, read the documentation for the expansion
card to make any necessary hardware or software settings for the expansion
card, such as jumpers, switches or BIOS configuration.
CNR (Communication Network Riser) Slot
The CNR slot allows you to insert the CNR expansion cards. CNR is a
specially designed network, audio, or modem riser card for ATX family
motherboards. Its main processing is done through software and controlled
by the motherboard’s chipset. Please note the CNR slot of the mainboard
supports audio and modem only.
The motherboard provides one AGP slot, three 32-bit Master PCI bus
slots, and one CNR slot.
PCI Slots
CNR Slot
AGP Slot
Page 40

Chapter 2
2-26
PCI Interrupt Request Routing
The IRQ, abbreviation of interrupt request line and pronounced I-R-Q,
are hardware lines over which devices can send interrupt signals to the
microprocessor. The “AGP/PCI” IRQ pins are typically connected to the PCI
bus INT A# ~ INT D# pins as follows:
Order 1 Order 2 Order 3 Order 4
AGP INT A# INT B# INT C# INT D#
PCI Slot 1 INT A# INT B# INT C# INT D#
PCI Slot 2 INT B# INT C# INT D# INT A#
PCI Slot 3 INT C# INT D# INT A# INT B#
AGP & PCI Slot 1 shared.
PCI Slot 1~3: Bus Master
Page 41

BIOS Setup
3-1
Chapter 3. BIOS Setup
3
BIOS Setup
This chapter provides information on the BIOS Setup program and allows you
to configure the system for optimum use.
You may need to run the Setup program when:
An error message appears on the screen during the system booting up, and
requests you to run SETUP.
You want to change the default settings for customized features.
TOPICS
Entering Setup 3-2
The Main Menu 3-4
Standard CMOS Features 3-6
Advanced BIOS Features 3-8
Advanced Chipset Features 3-11
Integrated Peripherals 3-16
Power Management Setup 3-21
PnP/PCI Configurations 3-25
PC Health Status 3-27
Frequency/Voltage Control 3-28
Load Fail-Safe/Optimized Defaults 3-29
Set Supervisor/User Password 3-30
Page 42

Chapter 3
3-2
Entering Setup
Control Keys
Power on the computer and the system will start POST (Power On Self Test)
process. When the message below appears on the screen, press <DEL> key to
enter Setup.
Press DEL to enter SETUP
If the message disappears before you respond and you still wish to enter
Setup, restart the system by turning it OFF and On or pressing the RESET
button. You may also restart the system by simultaneously pressing <Ctrl>,
<Alt>, and <Delete> keys.
<↑>
Move to the previous item
<↓>
Move to the next item
<←>
Move to the it em in the left hand
<→>
Move to the it em in the right hand
<Enter> Select the item
<Esc> Jumps to the Exit menu or returns to the main menu from a submenu
<+/PU > Increase the num e r i c value or make changes
<-/PD> Decrease the numeric value or make changes
<F1> General help, only for Status Page Setup Menu and Option Page
Setup Menu
<F5> Restore the previous CMOS value from CMOS, only for Opt i on Page
Setup Menu
<F6> Load the default CMOS value from Fail-Safe default table, only for
Option Page Setup Menu
<F7> Load Optimized defaults
<F10> Save all the CMOS changes and exit
Page 43
BIOS Setup
3-3
Getting Help
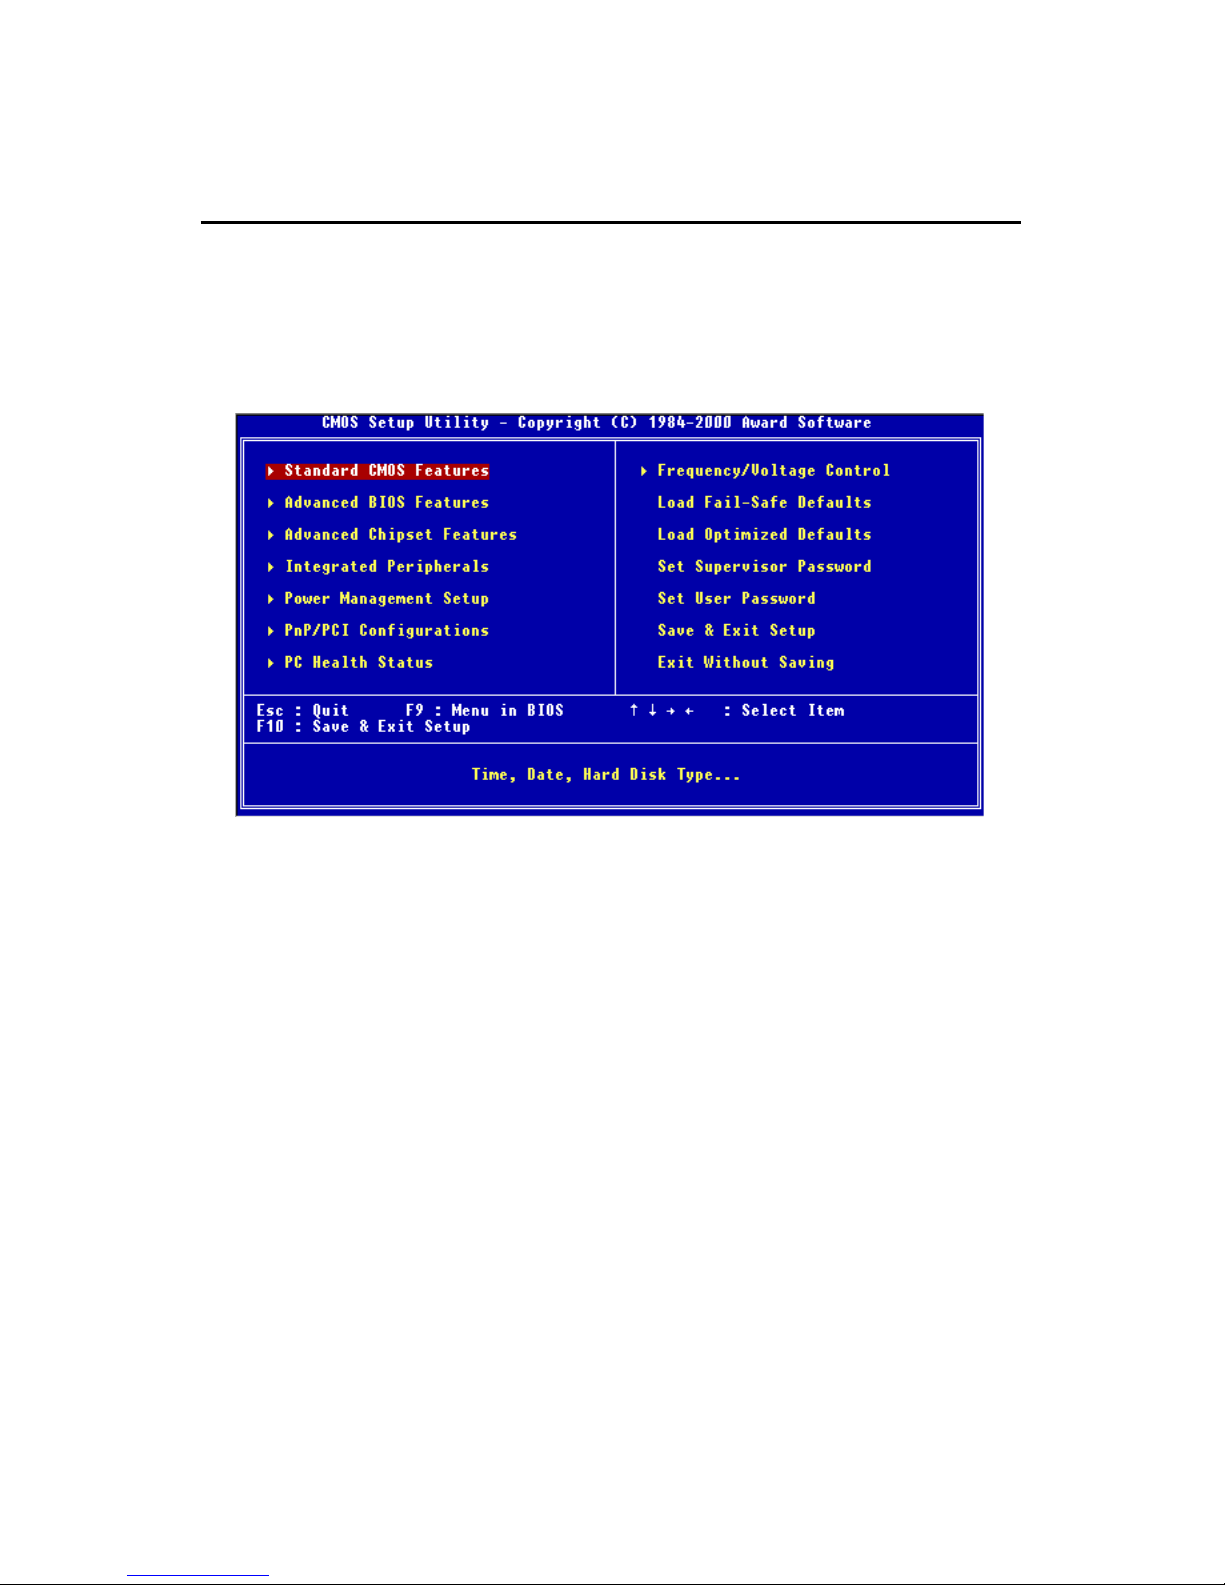
After entering the Setup menu, the first menu you will see is the Main Menu.
Main Menu
The main menu lists the setup functions you can make changes to. You can
use the control keys ( ↑↓ ) to select the item. The on-line description of the
highlighted setup function is displayed at the bottom of the screen.
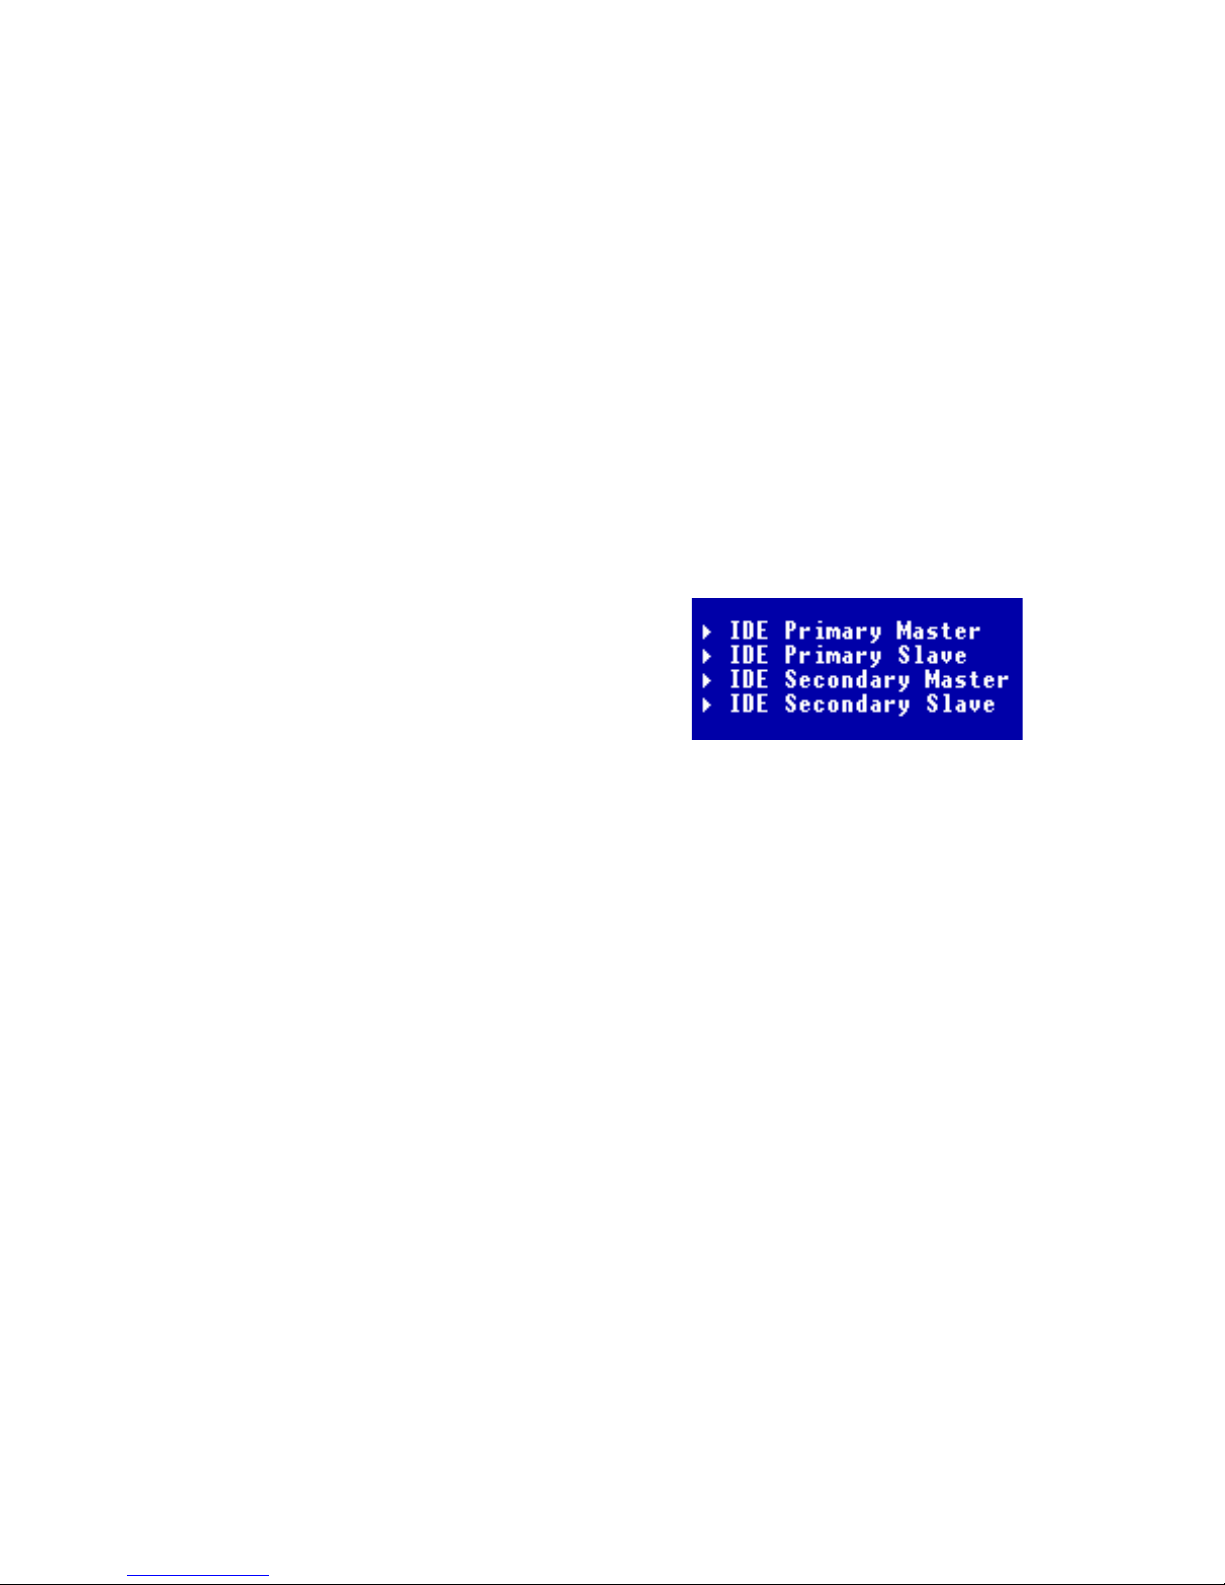
Sub-Menu
If you find a right pointer symbol (as shown
in the right view) appears to the left of certain
fields that means a sub-menu containing additional options can be launched from this
field. You can use control keys ( ↑↓ ) to
highlight the field and press <Enter> to call
up the sub-menu. Then you can use the control keys to enter values and move from field
to field within a sub-menu. If you want to
return to the main menu, just press <Esc >.
General Help <F1>
The BIOS setup program provides a General Help screen. Y ou can call up this
screen from any menu by simply pressing <F1>. The Help screen lists the
appropriate keys to use and the possible selections for the highlighted item.
Press <Esc> to exit the Help screen.
Page 44
Chapter 3
3-4
The Main Menu
Standard CMOS Features
Use this menu for basic system configurations.
Advanced BIOS Features
Use this menu to set the Advanced Features available on your system.
Advanced Chipset Features
Use this menu to change the values in the chipset registers and optimize your
system’ s performance.
Integrated Peripherals
Use this menu to specify your settings for integrated peripherals.
Power Management Setup
Use this menu to specify your settings for power management.
PnP/PCI Configurations
This entry appears if your system supports PnP/PCI.
Once you enter A ward® BIOS CMOS Setup Utility , the Main Menu will appear
on the screen. The Main Menu allows you to select from twelve setup functions and two exit choices. Use arrow keys to select among the items and press
<Enter> to accept or enter the sub-menu.
Page 45

BIOS Setup
3-5
PC Health Status
This entry shows your PC health status.
Frequency/V oltage Control
Use this menu to specify your settings for frequency/voltage control.
Load Fail-Safe Defaults
Use this menu to load the BIOS default values for minimal but stable system
performance.
Load Optimized Defaults
Use this menu to load the BIOS default values that are factory settings for
optimal system operations.
Set Supervisor Password
Use this menu to set Supervisor Password.
Set User Password
Use this menu to set User Password.
Save & Exit Setup
Save CMOS value changes to CMOS and exit setup.
Exit Without Saving
Abandon all CMOS value changes and exit setup.
Page 46
Chapter 3
3-6
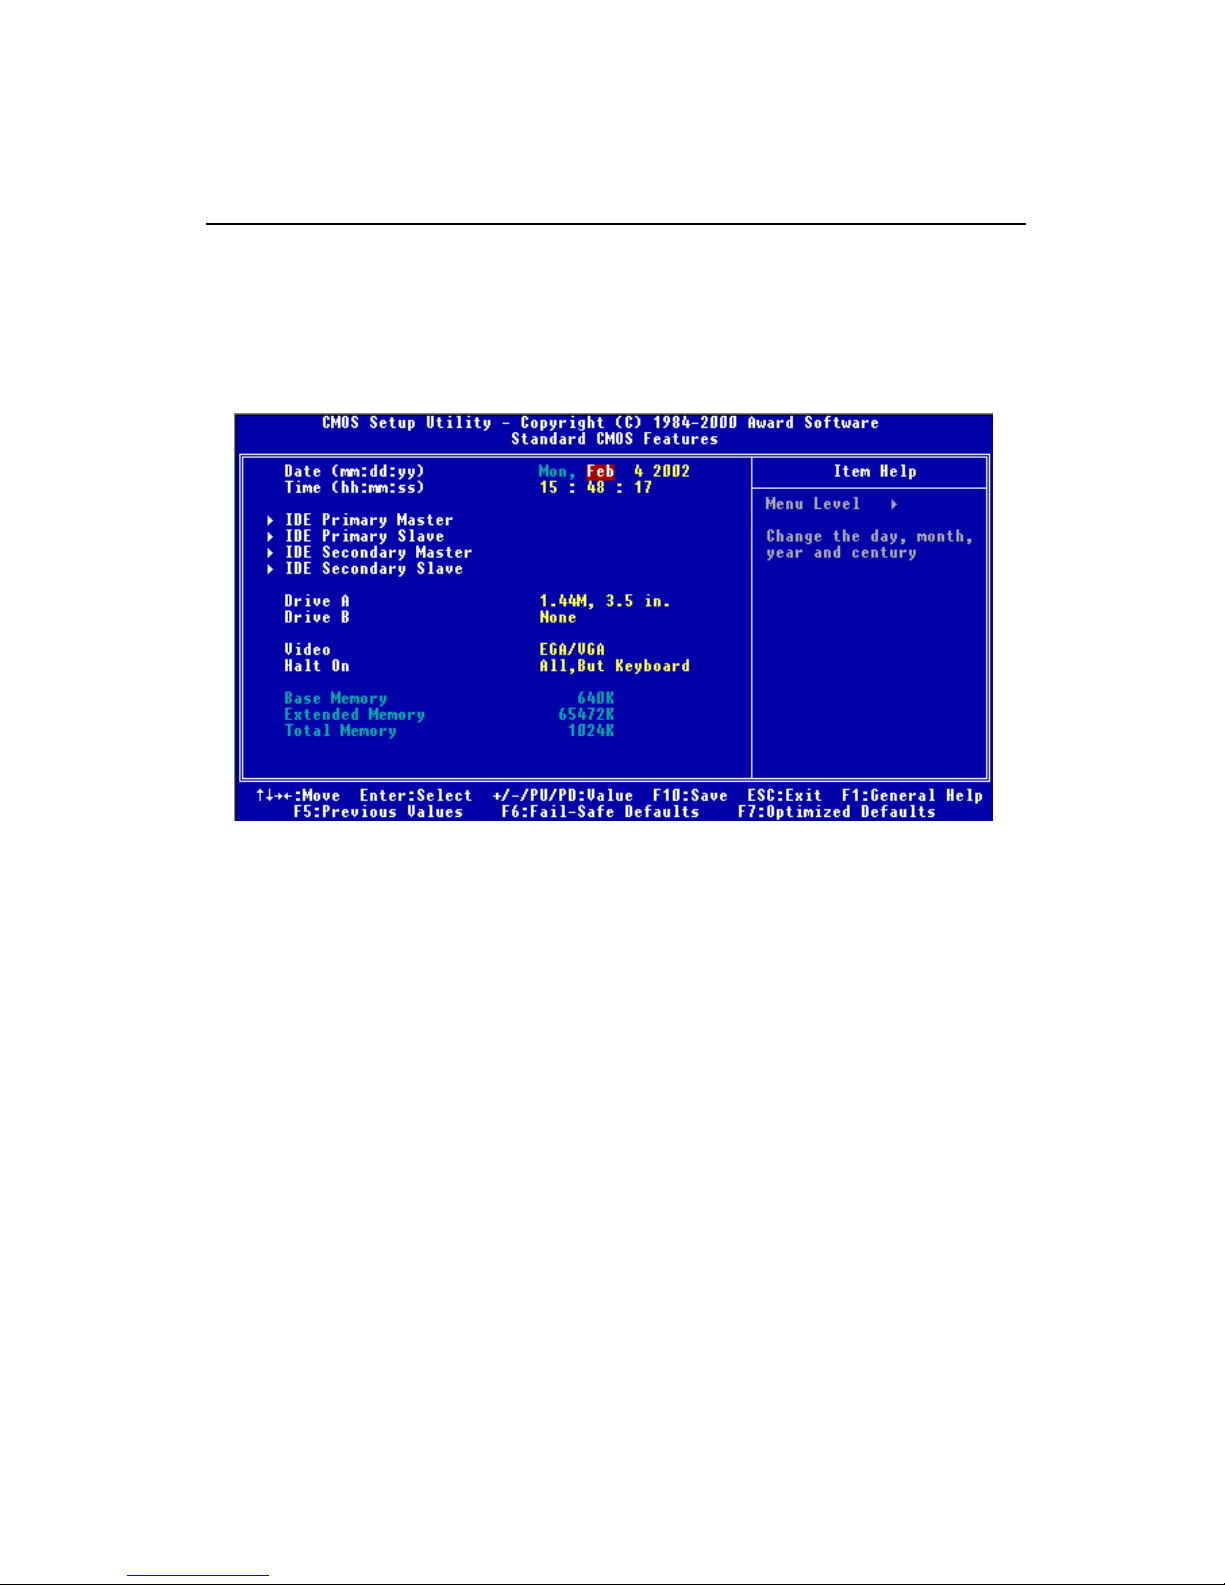
Standard CMOS Features
Date
The date format is <day> <month> <date> <year>.
day Day of the week, from Sun to Sat, determined by BIOS. Read-only.
month The month from Jan. through Dec.
date The date from 1 to 31 can be keyed by numeric function keys.
year The year can be adjusted by users.
Time
The time format is <hour> <minute> <second>.
IDE Primary/Secondary Master/Slave
Press PgUp/<+> or PgDn/<-> to select Manual, None or Auto type. Note that
the specifications of your drive must match with the drive table. The hard disk
will not work properly if you enter improper information for this category. If
your hard disk drive type is not matched or listed, you can use Manual to
define your own drive type manually.
If you select Manual, related information is asked to be entered to the follow-
The items in Standard CMOS Features Menu are divided into 10 categories.
Each category includes no, one or more than one setup items. Use the arrow
keys to highlight the item and then use the <PgUp> or <PgDn> keys to select
the value you want in each item.
Page 47

BIOS Setup
3-7
ing items. Enter the information directly from the keyboard. This information
should be provided in the documentation from your hard disk vendor or the
system manufacturer.
Access Mode The settings are CHS, LBA, Large, Auto.
Capacity The formatted size of the storage device.
Cylinder Number of cylinders.
Head Number of heads.
Precomp Write precompensation.
Landing Zone Cylinder location of the landing zone.
Sector Number of sectors.
Drive A/B
This item allows you to set the type of floppy drives installed. Available
options: None, 360K, 5.25 in., 1.2M, 5.25 in., 720K, 3.5 in., 1.44M, 3.5 in., 2.
88M, 3.5 in.
Video
The setting controls the type of video adapter used for the primary monitor of
the system. A vailable options: EGA/VGA , CGA 40, CGA 80, MONO .
Halt On
The setting determines whether the system will stop if an error is detected at
boot. Available options are:
All Errors The system stops when any error is detected.
No Errors The system doesn’t stop for any detected error.
All, But Keyboard The system doesn’t stop for a keyboard error.
All, But Diskette The system doesn’t stop for a disk error.
All, But Disk/Key The system doesn’t stop for either a disk or a
keyboard error.
Page 48
Chapter 3
3-8
Advanced BIOS Features
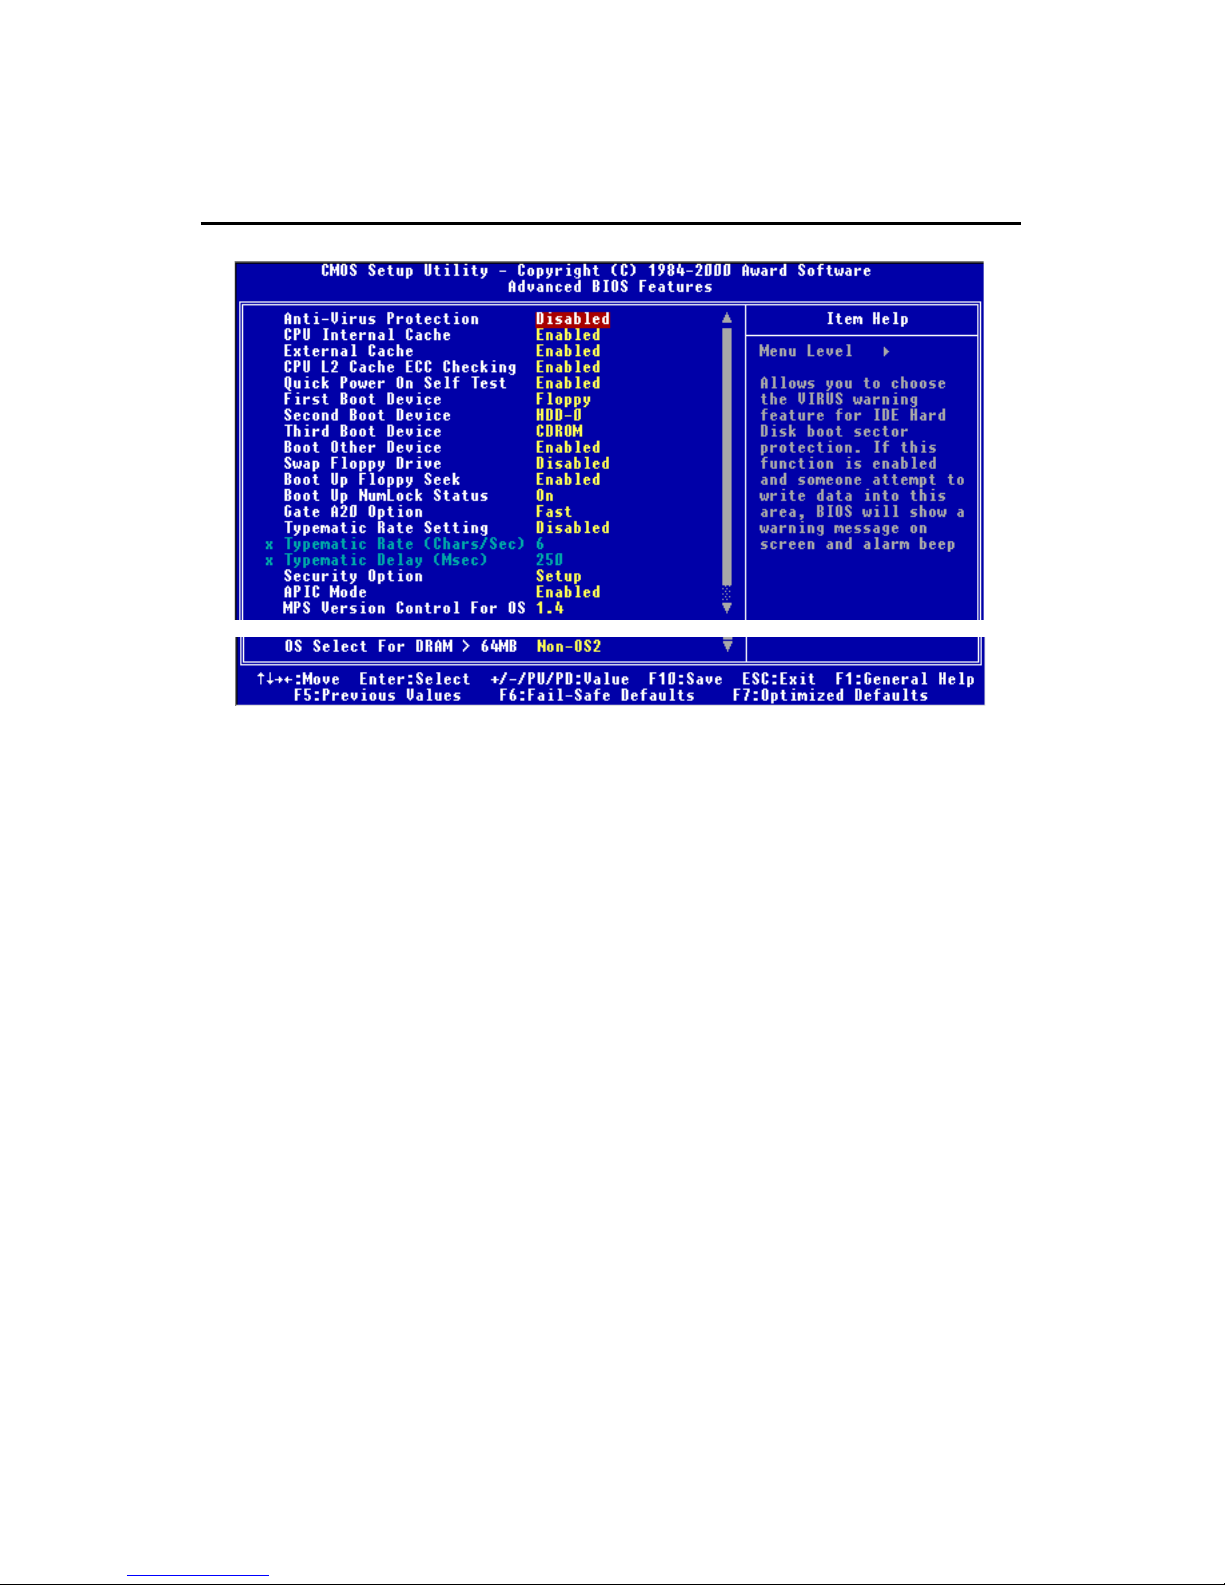
Anti-Virus Protection
The item is to set the Virus Warning feature for IDE Hard Disk boot sector
protection. If the function is enabled and any attempt to write data into this
area is made, BIOS will display a warning message on screen and beep. Settings:
Disabled, Enabled.
CPU Internal/External Cache
The item allows you to turn on or off CPU’s internal (L1) and external (L2)
cache. Settings: Enabled, Disabled.
CPU L2 Cache ECC Checking
This allows you to enable or disable the ECC (Error-Correcting Code) feature
for error detection and correction when data passes through L2 cache memory.
Settings: Enabled, Disabled.
Quick Power On Self Test
The option speeds up Power On Self Test (POST) after you power on the
computer. When setting the item to Enabled, BIOS will shorten or skip some
check items during POST. Settings: Enabled, Disabled.
Page 49

BIOS Setup
3-9
First/Second/Third Boot Device
The items allow you to set the sequence of boot devices where BIOS attempts
to load the disk operating system. The settings are:
Floppy The system will boot from floppy drive.
LS120 The system will boot from LS-120 drive.
HDD-0 The system will boot from the first HDD.
SCSI The system will boot from the SCSI.
CDROM The system will boot from the CD-ROM.
HDD-1 The system will boot from the second HDD.
HDD-2 The system will boot from the third HDD.
HDD-3 The system will boot from the fourth HDD.
ZIP The system will boot from ATAPI ZIP drive.
LAN The system will boot from the Network drive.
Disabled Disable this sequence.
Boot Other Device
Setting the option to Enabled allows the system to try to boot from other
device if the system fails to boot from the 1st/2nd/3rd boot device.
Swap Floppy Drive
Setting to Enabled will swap floppy drives A: and B:.
Boot Up Floppy Seek
Setting to Enabled will make BIOS seek floppy drive A: before booting the
system. Settings: Disabled, Enabled.
Boot Up NumLock Status
This setting is to set the Num Lock status when the system is powered on.
Setting to On will turn on the Num Lock key when the system is powered on.
Setting to Off will allow users to use the arrow keys on the numeric keypad.
Setting options: On, Off.
Gate A20 Option
This item is to set the Gate A20 status. A20 refers to the first 64KB of extended
memory. When Fast is selected, the Gate A20 is controlled by Port92 or chipset
specific method resulting in faster system performance. When Normal is
selected, A20 is controlled by a keyboard controller or chipset hardware.
T ypematic Rate Setting
This item is used to enable or disable the typematic rate setting including
Page 50

Chapter 3
3-10
T ypematic Rate & Typematic Delay .
T ypematic Rate (Chars/Sec)
After Typematic Rate Setting is enabled, this item allows you to set the
rate (characters/second) at which the keys are accelerated. Settings: 6, 8,
10, 12, 15, 20, 24, 30.
T ypematic Delay (Msec)
This item allows you to select the delay between when the key was first
pressed and when the acceleration begins. Settings: 250, 500, 750 and
1000.
Security Option
This specifies the type of BIOS password protection that is implemented. Settings are described below:
APIC Mode
This field is used to enable or disable the APIC (Advanced Programmable
Interrupt Controller). Due to compliance to PC2001 design guide, the system is
able to run in APIC mode. Enabling APIC mode will expand available IRQs
resources for the system. Settings: Enabled, Disabled.
MPS V ersion Contr ol For OS
This field allows you to select which MPS (Multi-Processor Specification)
version to be used for the operating system. You need to select the MPS
version supported by your operating system. To find out which version to
use, consult the vendor of your operating system. Settings: 1.4, 1.1.
OS Select For DRAM > 64MB
This allows you to run the OS/2® operating system with DRAM greater than
64MB. Setting options: Non-OS2, OS2.
Option Description
Setup The password prompt appears only when end users try to
run Setup.
System A password prompt appears every time when the com-
puter is powered on or when end users try to run Setup.
Page 51
BIOS Setup
3-11
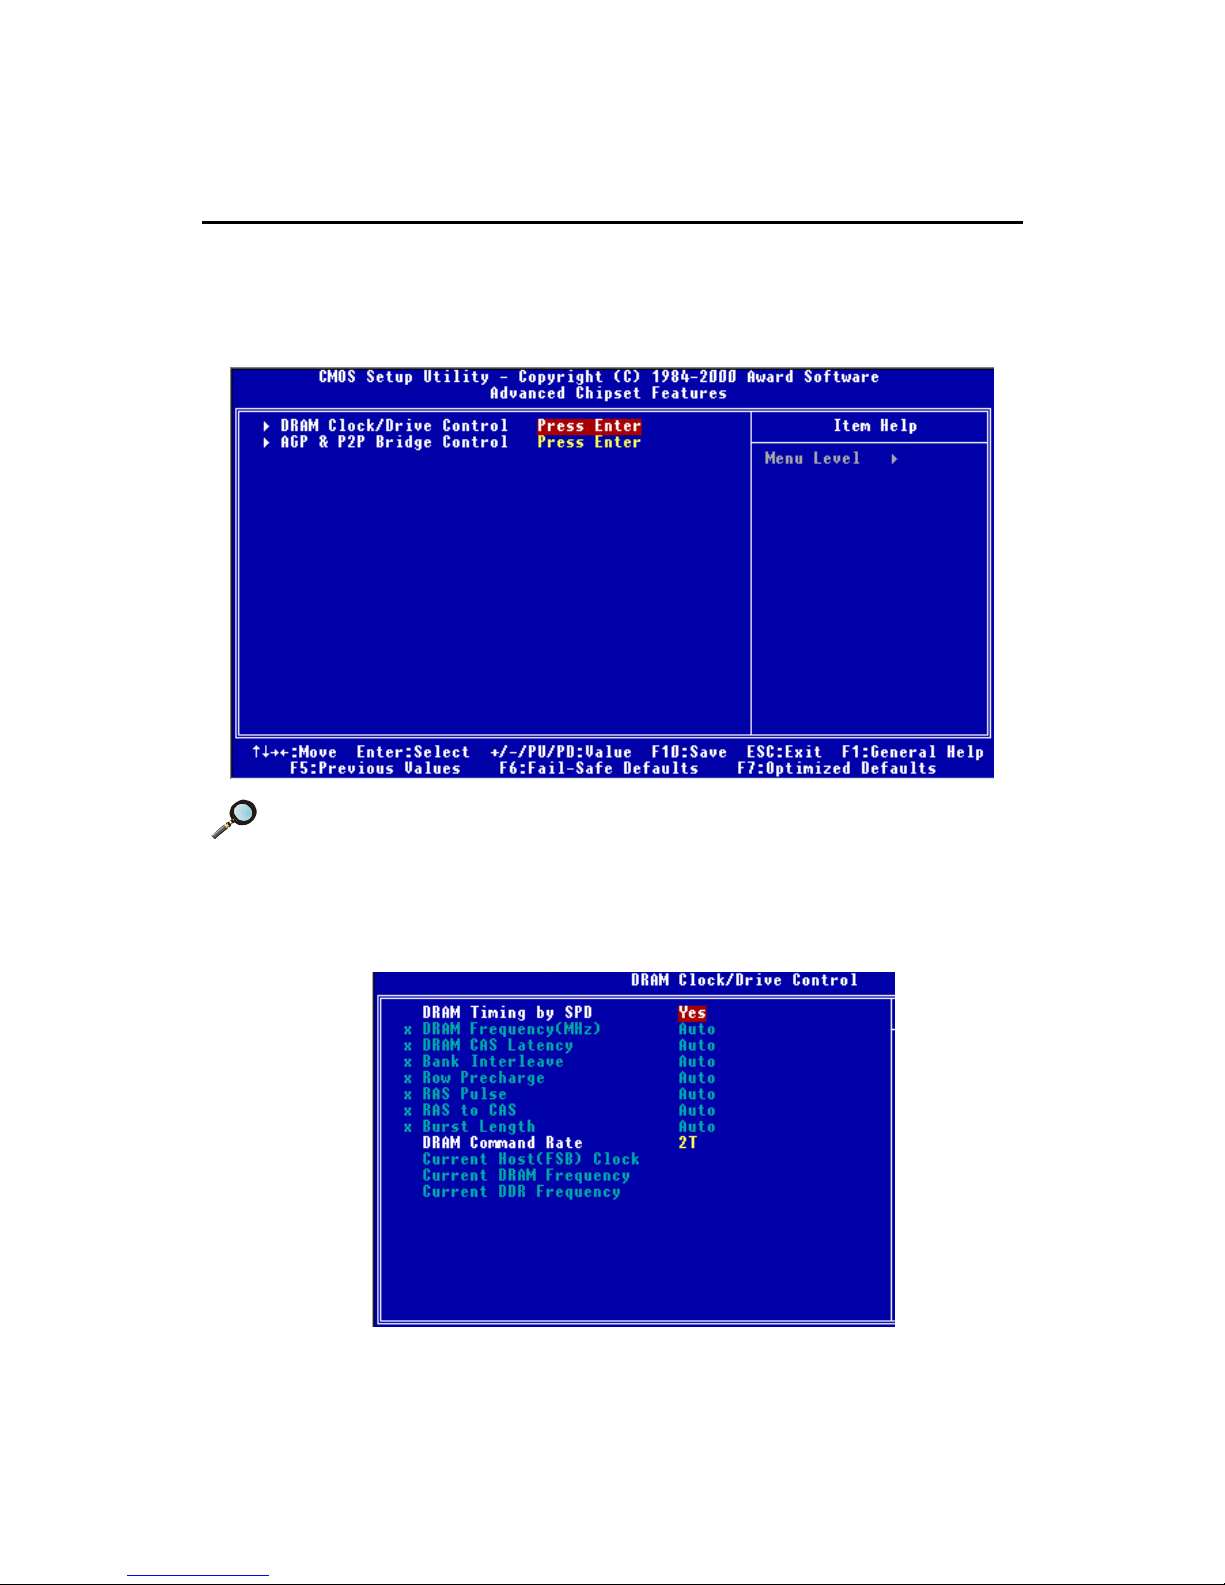
Advanced Chipset Features
Note: Change these settings only if you are familiar with the chipset.
DRAM Clock/Drive Control
Press <Enter> and the following sub-menu screen will appear.
DRAM Timing by SPD
Selects whether DRAM timing is controlled by the SPD (Serial Presence
The Advanced Chipset Features setup options are used to change the values
of the chipset registers. These registers control most of the system options in
the computer.
Page 52

Chapter 3
3-12
Detect) EEPROM on the DRAM module. Setting to Yes enables DRAM
Frequency(MHz), DRAM CAS Latency, Bank Interleave, Row Precharge,
RAS Pulse, RAS to CAS and Burst Length automatically to be determined
by BIOS based on the configurations on the SPD. Selecting No allows
users to configure these fields manually.
DRAM Frequency(MHz)
The chipset supports synchronous and asynchronous mode
between host clock and DRAM clock frequency. Settings are:
HCLK The DRAM clock will be equal to the Host Clock.
HCLK-33 The DRAM clock will be equal to the Host Clock
minus 33MHz. For example, if the Host Clock is
133MHz, the DRAM clock will be 100MH.
HCLK+33 The DRAM clock will be equal to the Host Clock
plus 33MHz. For example, if the Host Clock is
100MHz, the DRAM clock will be 133MHz.
Auto BIOS will automatically determine the clock
frequency.
DRAM CAS Latency
This controls the timing delay (in clock cycles) before SDRAM
starts a read command after receiving it. Settings: 2, 2.5, 3, Auto.
2 (clocks) increases the system performance the most while 3
(clocks) provides the most stable performance.
Bank Interleave
This field enables or disables bank interleave for the installed
SDRAM. Disable the function if 16MB SDRAM is installed.
Settings: Disabled, Auto.
Row Precharge
This item controls the number of cycles for Row Address Strobe
(RAS) to be allowed to precharge. If insufficient time is allowed for
the RAS to accumulate its charge before DRAM refresh, refresh
may be incomplete and DRAM may fail to retain data. This item
applies only when synchronous DRAM is installed in the system.
Available settings: 3T, 2T, Auto.
RAS Pulse
This setting allows you to select the number of clock cycles
Page 53

BIOS Setup
3-13
allotted for the RAS pulse width, according to DRAM
specifications. The less the clock cycles, the faster the DRAM
performance. Settings: 6T, 5T, Auto.
RAS to CAS
This field allows you to set the number of cycles for a timing delay
between the CAS and RAS strobe signals, used when DRAM is
written to, read from or refreshed. Faster speed offers faster
performance while slower speed offers more stable performance.
Settings: 3T, 2T, Auto.
Burst Length
This setting allows you to set the size of Burst-Length for DRAM.
Bursting feature is a technique that DRAM itself predicts the
address of the next memory location to be accessed after the first
address is accessed. To use the feature, you need to define the
burst length, which is the actual length of burst plus the starting
address and allows internal address counter to properly generate
the next memory location. The bigger the size, the faster the
DRAM performance. Settings: 4, 8, Auto.
DRAM Command Rate
This setting controls the SDRAM command rate. Selecting 1T allows
SDRAM signal controller to run at 1T (T=clock cycles) rate. Selecting 2T
makes SDRAM signal controller run at 2T rate. 1T is faster than 2T.
Setting options: 1T, 2T.
Current Host(FSB) Clock, Current DRAM Frequency, Current DDR
Frequency
These items show the current clock frequency of Front Side Bus and
installed DRAM.
AGP & P2P Bridge Control
Press <Enter> to enter the following sub-menu screen.
Page 54

Chapter 3
3-14
AGP Aperture Size (MB)
This setting controls just how much system RAM can be allocated to
AGP for video purposes. The aperture is a portion of the PCI memory
address range dedicated to graphics memory address space. Host cycles
that hit the aperture range are forwarded to the AGP without any translation.
The option allows the selection of an aperture size of 4MB, 8MB, 16MB,
32MB, 64MB, 128MB, and 256 MB.
AGP Driving Control
This field is used to adjust the AGP driving force. Selecting Manual
allows you to select an AGP driving force in AGP Driving Value. It is
strongly suggested to select Auto to avoid causing any system error.
AGP Driving V alue
This item specifies an AGP driving force.
AGP Fast Write
Use the field to enable or disable the AGP Fast Write feature. The Fast
Write technology allows CPU to write directly into the graphics card
without passing anything through system memory and improves 4X speed
accordingly. Select Enabled only when your AGP card supports the
feature.
VGA Share Memory Size
The field specifies the size of system memory allocated for video memory.
Settings: 8M, 16M, 32M, Disabled.
Page 55

BIOS Setup
3-15
Select Display Device
Use the field to select the type of device you want to use as the display(s)
of the system. Settings: Auto, CRT, LCD, CRT+LCD, TV, CRT+TV.
TV_type
Select the TV standard which is used as the video signal format of your
TV if you have connected a TV to the system. Three TV standards are
available for the field:
JP NTSC NTSC format which is used in Japan.
US NTSC NTSC format which is used in United States.
PAL PAL format. This is a dominant standard in Europe.
Page 56
Chapter 3
3-16
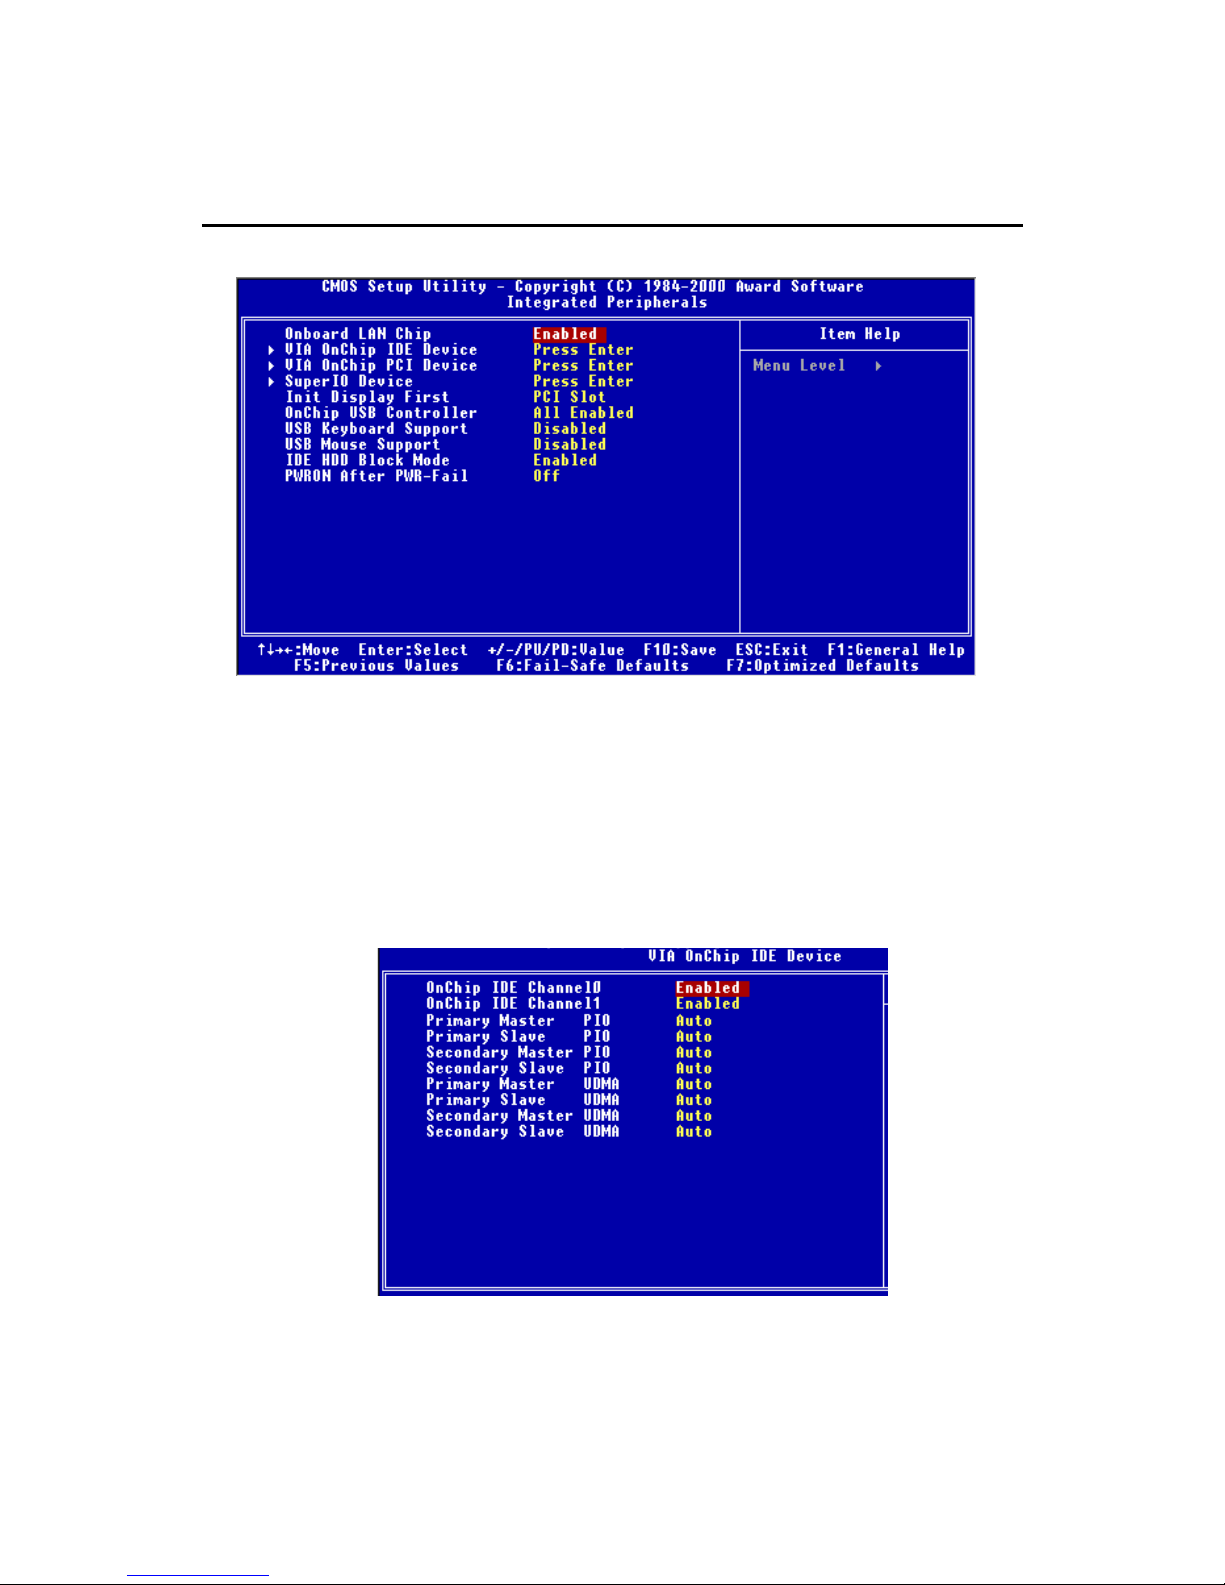
Onboard LAN Chip
This is used to determines whether the onboard LAN controller is activated.
Settings: Enabled, Disabled.
VIA OnChip IDE Device
Press <Enter> to enter the following sub-menu screen.
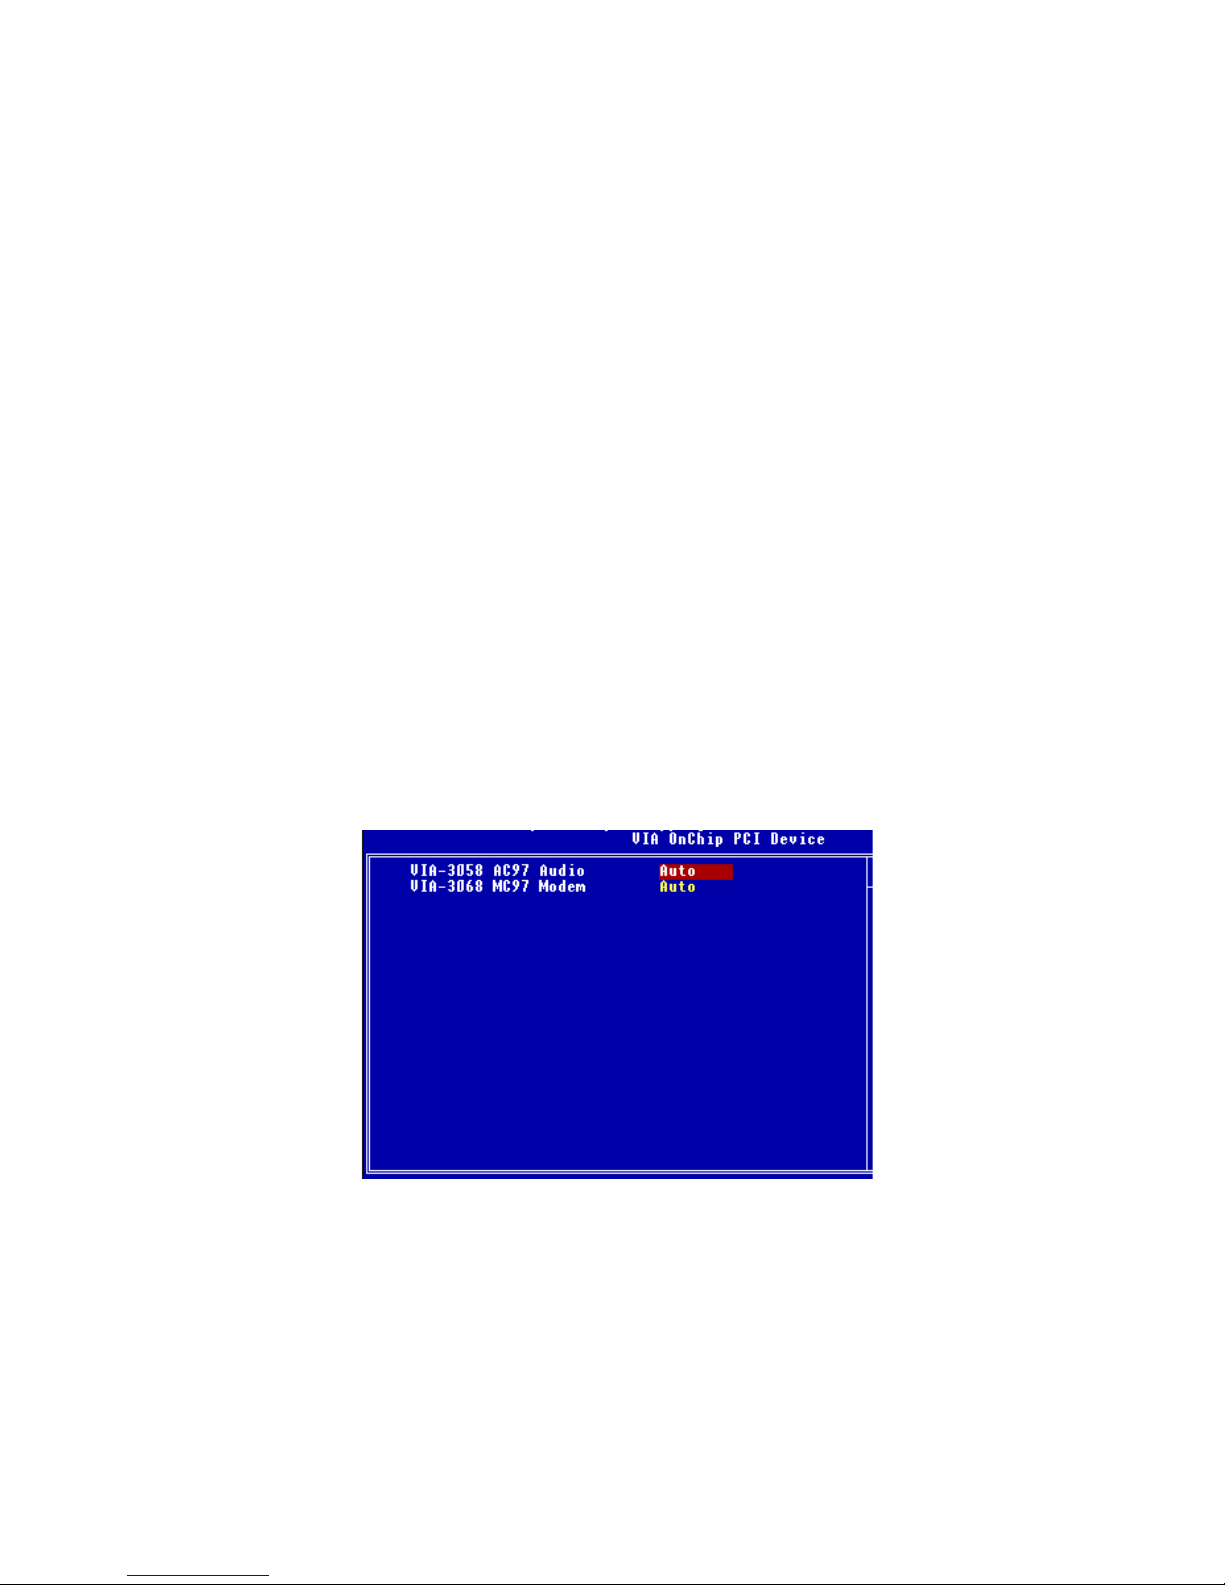
OnChip IDE Channel0/1
The integrated peripheral controller contains an IDE interface with support for two IDE channels. Choose Enabled to activate each channel
Integrated Peripherals
Page 57
BIOS Setup
3-17
separately.
Primary/Secondary Master/Slave PIO
The four IDE PIO (Programmed Input/Output) fields let you set a PIO
mode (0-4) for each of the four IDE devices that the onboard IDE interface
supports. Modes 0 through 4 provide successively increased
performance. In Auto mode, the system automatically determines the
best mode for each device. The settings are: Auto, Mode 0, Mode 1,
Mode 2, Mode 3, Mode 4.
Primary/Secondary Master/Slave UDMA
Ultra DMA/33/66/100 implementation is possible only if your IDE hard
drive supports it and the operating environment includes a DMA driver
(W indows 95 OSR2 or a third-party IDE bus master driver). If your hard
drive and your system software both support Ultra DMA/33, Ultra DMA/
66 or even Ultra DMA/100, select Auto to enable BIOS support. Settings:
Auto, Disabled.
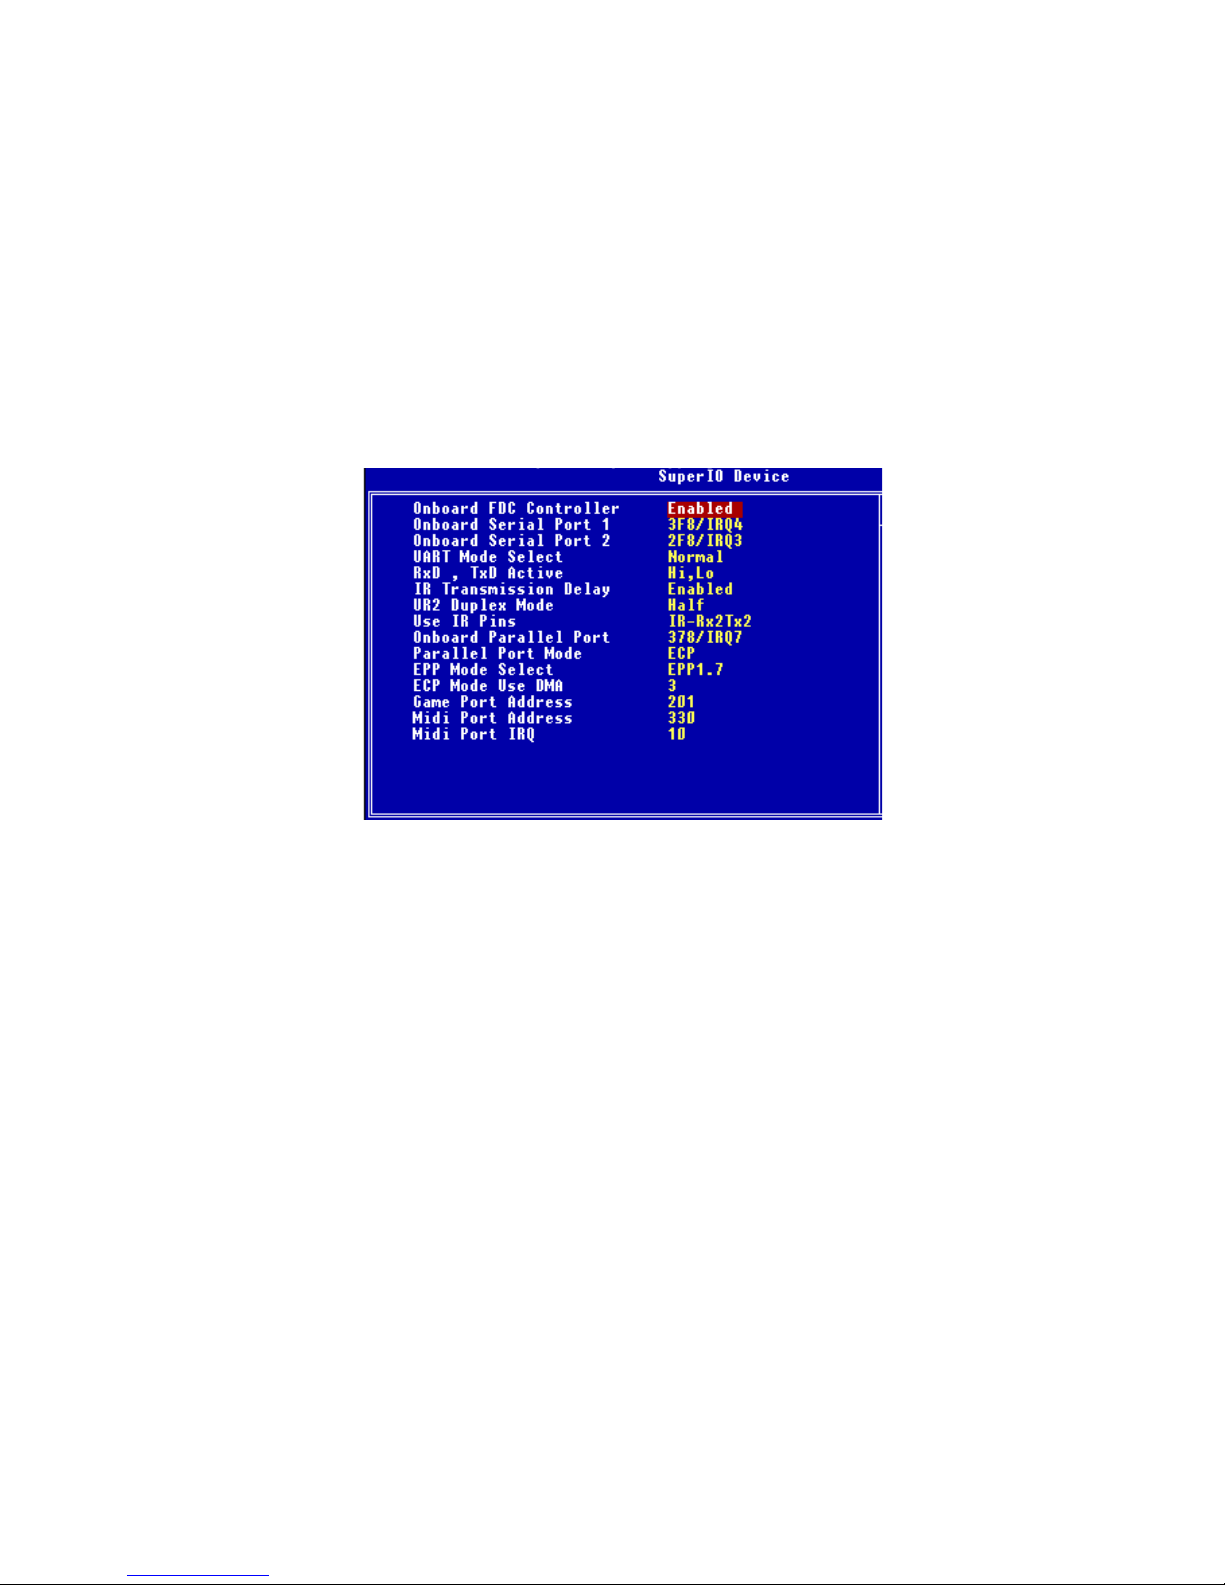
VIA OnChip PCI Device
Press <Enter> to enter the following sub-menu screen.
VIA-3058 AC97 Audio
Auto allows the mainboard to detect whether an audio device is used. If
an audio device is detected, the onboard AC’97 (Audio Codec’97) controller will be enabled; if not, it is disabled. Disable the controller if you
want to use other controller cards to connect an audio device. Settings:
Auto, Disabled.
Page 58
Chapter 3
3-18
VIA-3068 MC97 Modem
Auto allows the mainboard to detect whether a modem is used. If a modem is detected, the onboard MC’97 (Modem Codec’97) controller will be
enabled; if not, it is disabled. Disable the controller if you want to use
other controller cards to connect a modem. Settings: Auto, Disabled.
SuperIO Device
Press <Enter> to enter the following sub-menu screen.
Onboard FDC Controller
The item is used to enable or disable the onboard Floppy controller.
Select Enabled when you have installed a floppy disk drive and want to
use it.
Onboard Serial Port 1/2
The items specify the base I/O port address and IRQ for the onboard
Serial Port 1 (COM A)/Serial Port 2 (COM B). Selecting Auto allows BIOS
to automatically determine the correct base I/O port address. Settings:
Disabled, 3F8/IRQ4, 2F8/IRQ3, 3E8/IRQ4, 2E8/IRQ3, Auto.
UART Mode Select
This setting allows you to specify the operation mode for serial port 2.
Setting options: IrDA, ASKIR, Normal.
IrDA IrDA-compliant Serial Infrared Port
ASKIR Amplitude Shift Keyed Infrared Port
Normal RS-232C Serial Port
Page 59

BIOS Setup
3-19
RxD, TxD Active
This setting controls the receiving and transmitting speed of the IR peripheral in use. Setting options: Hi,Hi, Hi,Lo, Lo,Hi, Lo,Lo.
IR T ransmission Delay
This setting determines whether the IR transmission rate will be delayed
while converting to receiving mode. Setting options: Disabled, Enabled.
UR2 Duplex Mode
This setting controls the operating mode of IR transmission/reception.
Setting options: Full, Half. Under Full Duplex mode, synchronous, bidirectional transmission/reception is allowed. Under Half Duplex mode,
only asynchronous, bi-directional transmission/reception is allowed.
Use IR Pins
Please consult your IR peripheral documentation to select the correct
setting of the TxD and RxD signals. Setting options: RxD2,TxD2, IR-
Rx2Tx2.
Onboard Parallel Port
This specifies the I/O port address and IRQ of the onboard parallel port.
Settings: 378/IRQ7, 278/IRQ5, 3BC/IRQ7, Disabled.
Parallel Port Mode
This item selects the operating mode for the parallel port: SPP, EPP, ECP,
or ECP+EPP.
SPP: Standard Parallel Port
EPP: Enhanced Parallel Port
ECP: Extended Capability Port
ECP + EPP: Extended Capability Port + Enhanced Parallel Port
EPP Mode Select
The onboard parallel port is EPP Spec. compliant, so after the user chooses
the onboard parallel port with the EPP function, the setting “EPP Version”
should be set. At this time either 1.7 spec or 1.9 spec can be chosen.
ECP Mode Use DMA
The ECP mode has to use the DMA channel, so after the user chooses the
onboard parallel port with the ECP feature, the setting “ECP Mode User
DMA” should be set. At this time, the user can choose between DMA
Page 60

Chapter 3
3-20
channel 3 or 1.
Game Port Address
This item is used to specify the address for the onboard game port.
Midi Port Address
The field specifies the base I/O port address for the onboard Midi Port.
Midi Port IRQ
The item is used to select the IRQ line for onboard Midi port.
Init Display First
This item specifies which VGA card is your primary graphics adapter. Settings:
PCI Slot and AGP.
OnChip USB Controller
This setting is used to enable/disable the onboard USB ports. Setting options:
All Enabled, All Disabled, 1&2 USB Port, 2&3 USB Port (optional), 1&3
USB Port (optional), 1 USB Port, 2 USB Port, 3 USB Port (optional).
Note: “3 USB Port”, “1&3 USB Port”, and “2&3 USB Port” options appear only when your motherboard uses 8235 South Bridge.
USB Keyboard/Mouse Support
Set to Enabled if you need to use a USB keyboard/mouse in the operating
system that does not support or have any USB driver installed, such as DOS
and SCO Unix.
IDE HDD Block Mode
Block mode is also called block transfer, multiple commands, or multiple sector
read/write. If your IDE hard drive supports block mode (most new drives do),
select Enabled for automatic detection of the optimal number of block read/
writes per sector the drive can support. Settings: Enabled, Disabled.
PWRON After PWR-Fail
This item specifies whether your system will reboot after a power failure or
interrupt occurs. Available settings are:
Off Leaves the computer in the power off state.
On Reboots the computer.
Former-Sts Restores the system to the status before power failure
or interrupt occurred.
Page 61
BIOS Setup
3-21
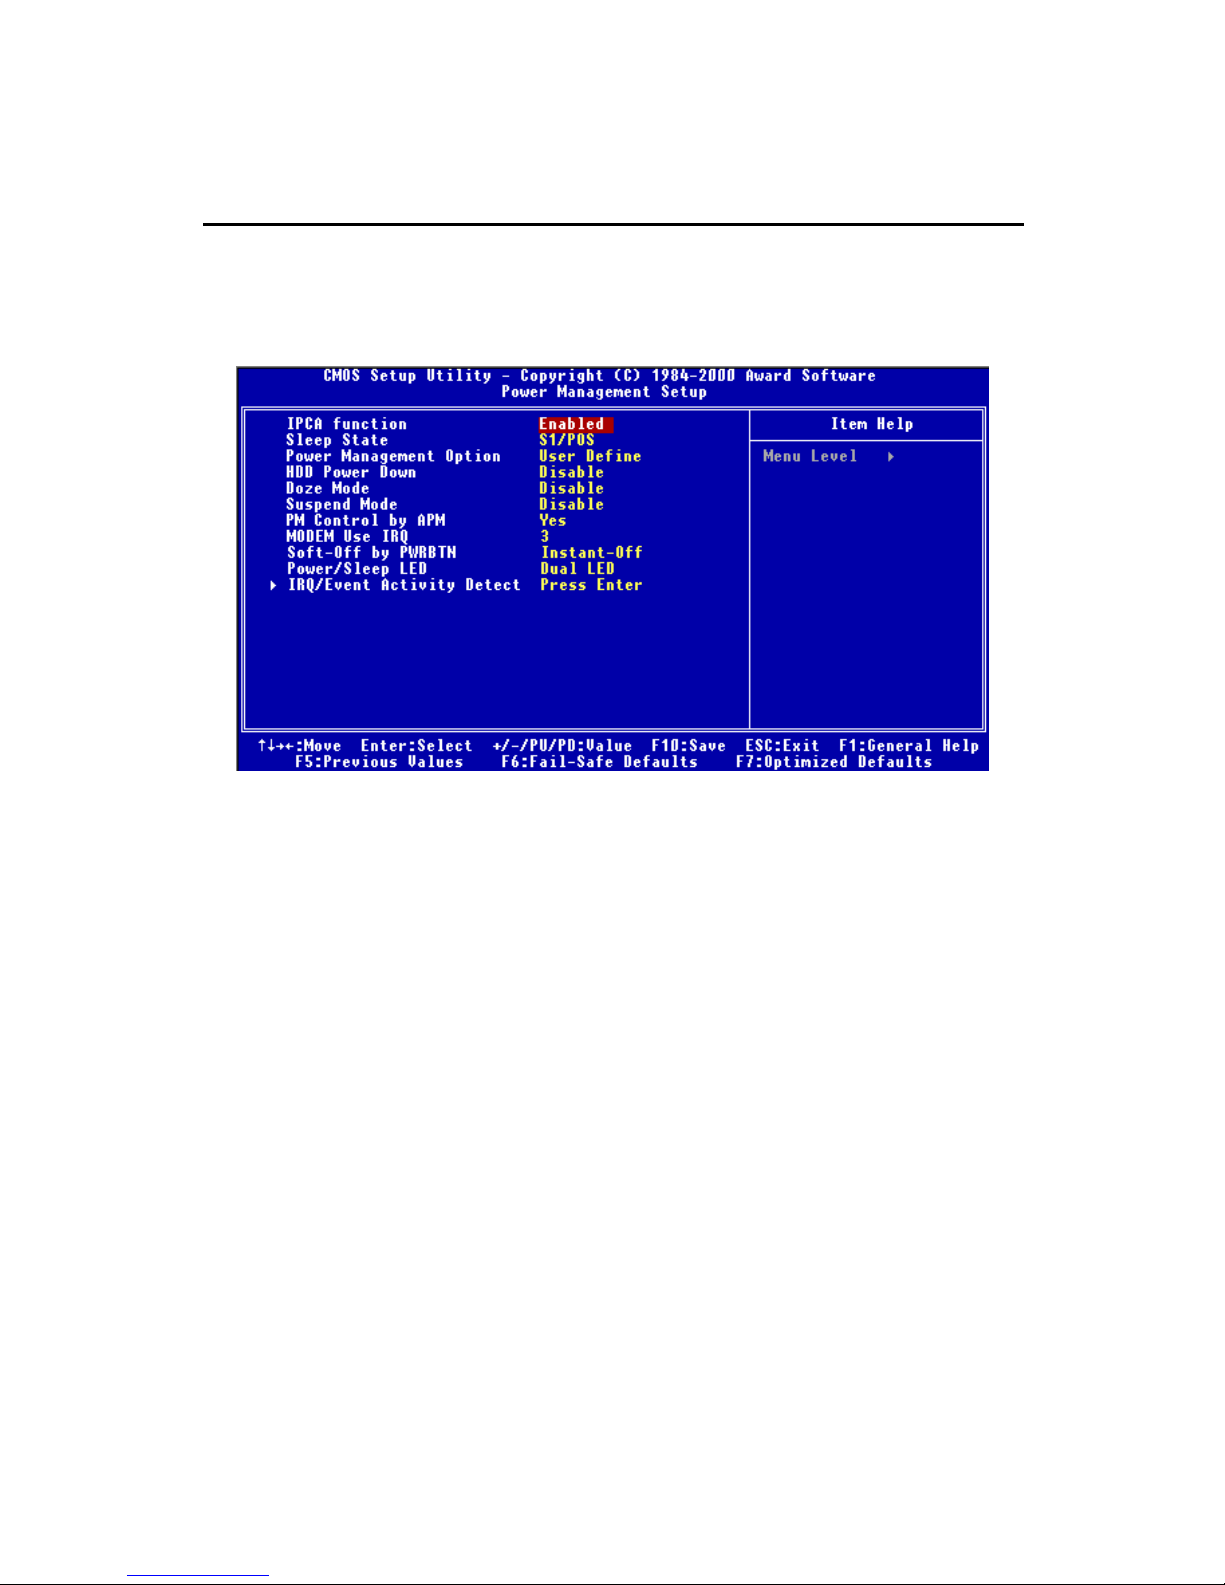
Power Management Setup
The Power Management Setup allows you to configure you system to most
effectively save energy while operating in a manner consistent with your own
style of computer use.
IPCA Function
This item is to activate the ACPI (Advanced Configuration and Power Management Interface) Function. If your operating system is ACPI-aware, such as
Windows® 98SE/2000/ME, select Enabled. Settings: Enabled, Disabled.
Sleep State
This item specifies the power saving modes for ACPI function. Options are:
S1/POS The S1 sleep mode is a low power state. In this state, no
system context (CPU or chipset) is lost and hardware
maintains all system context.
S3/STR The S3 sleep mode is a power-down state in which power
is supplied only to essential components such as main
memory and wake-capable devices and all system context is saved to main memory. The information stored in
memory will be used to restore the PC to the previous
state when a “wake up” event occurs.
Page 62

Chapter 3
3-22
Power Management Option
This item is used to select the degree (or type) of power saving and is
related to these modes: Doze Mode and Suspend Mode. There are three
options for power management:
Min Saving Minimum Power Management. Doze Mode = 1 Hour,
Suspend Mode = 1 Hour.
Max Saving Maximum Power Management. Doze Mode = 1 Min.,
Suspend Mode = 1 Min.
User Define Allows end users to configure each mode separately.
HDD Power Down
If HDD activity is not detected for the length of time specified in this field,
the hard disk drive will be powered down while all other devices remain
active. Settings: Disable and 1 through 15 Min.
Doze Mode
If system activity is not detected for the length of time specified in this field,
the CPU clock will run at slower speed while other devices still run at full
speed. Settings: Disable, 1 Min, 2 Min, 4 Min, 6 Min, 8 Min, 10 Min, 20
Min, 30 Min, 40 Min, 1 Hour.
Suspend Mode
If system activity is not detected for the length of time specified in this field,
all devices except CPU will be shut off. Settings: Disable, 1 Min, 2 Min, 4
Min, 8 Min, 12 Min, 20 Min, 30 Min, 40 Min, 1 Hour.
PM Control by APM
Setting to Yes will activate an Advanced Power Management (APM) device to
enhance Max Saving mode and stop CPU internal clock. Settings: Yes, No.
MODEM Use IRQ
This setting names the interrupt request (IRQ) line assigned to the modem (if
any) on your system. Activity of the selected IRQ always awakens the system.
Setting options: 3, 4, 5, 7, 9, 10, 11, NA.
Soft-Off by PWRBTN
This feature allows users to configure the power button function. Settings
are:
Instant-Off The power button functions as a normal power-on/-
Page 63
BIOS Setup
3-23
off button.
Delay 4 Sec When you press the power button, the computer
enters the suspend/sleep mode, but if the button is
pressed for more than four seconds, the computer
is turned off.
Power/Sleep LED
This item configures how the system uses power LED on the case to indicate
the sleep/suspend state. Available options are:
Single LED The power LED turns off during the sleep/suspend mode.
Dual LED The power LED changes its color to indicate the sleep/
suspend state.
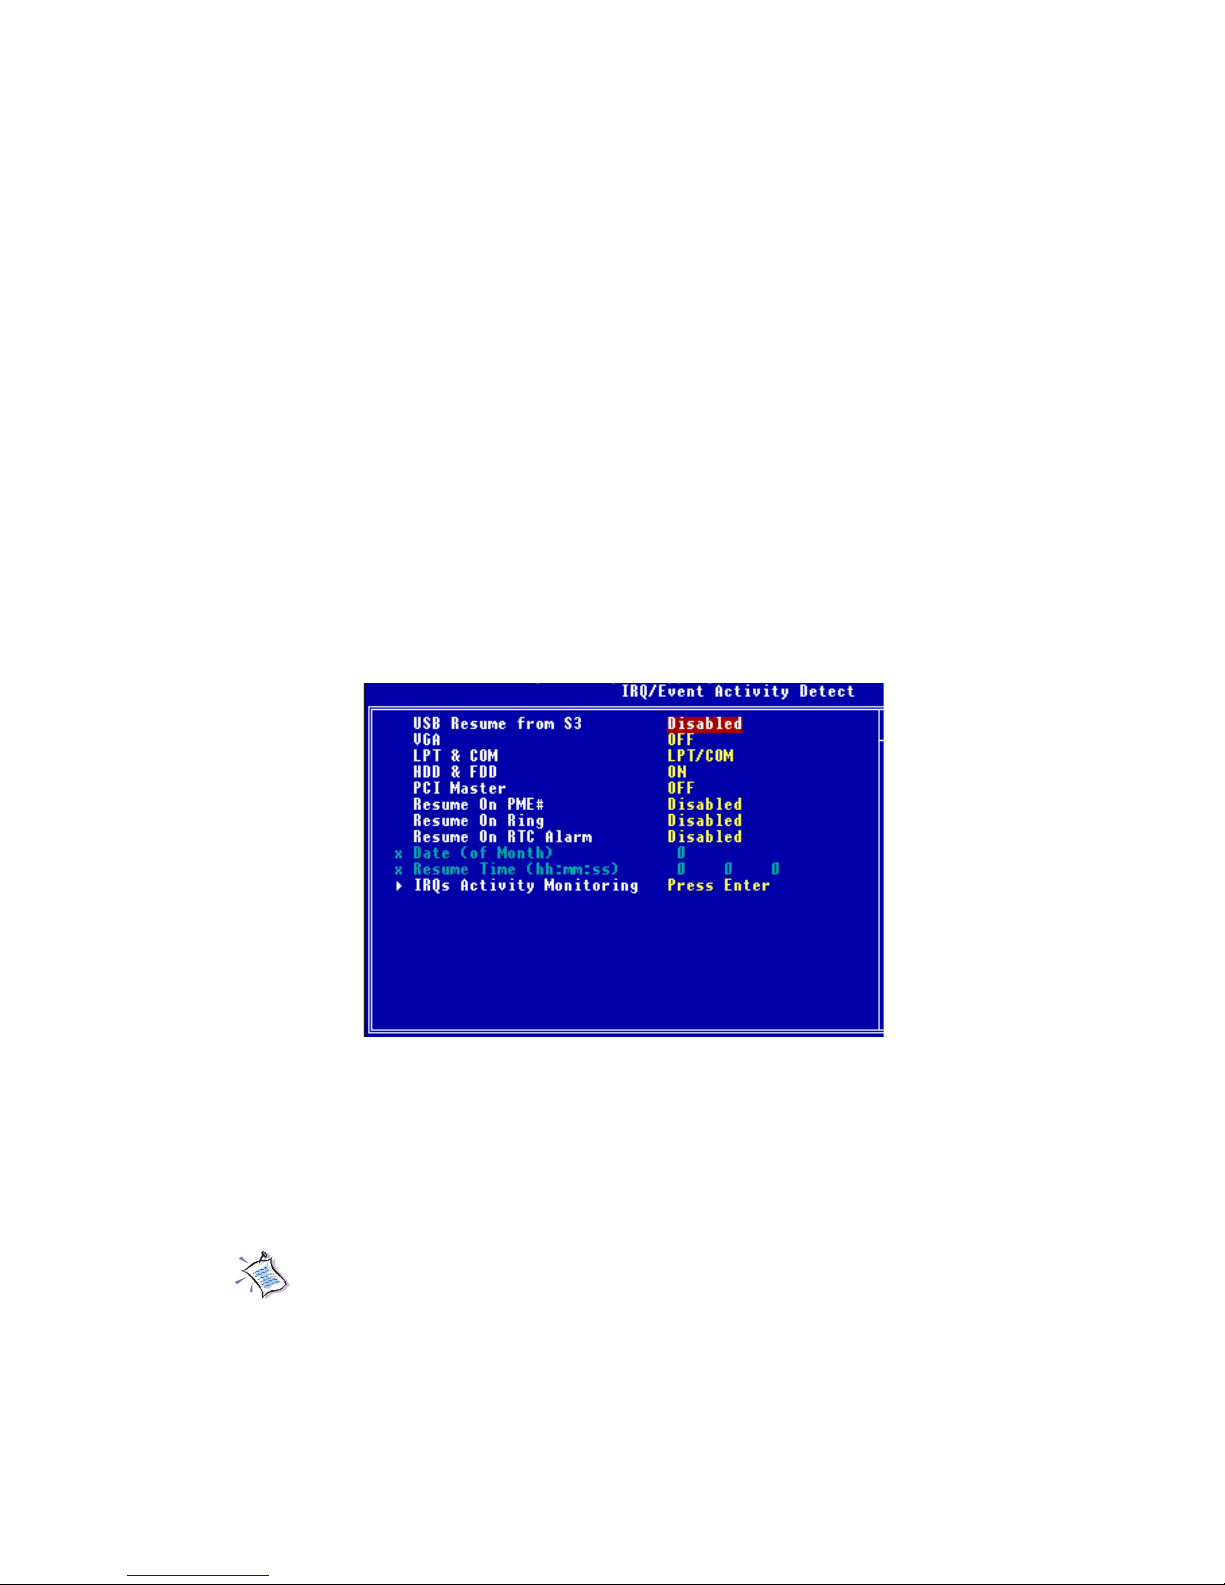
IRQ/Event Activity Detect
Press <Enter> to enter the sub-menu and the following screen appears.
USB Resume from S3, VGA, LPT & COM, HDD & FDD, PCI Master,
Resume On PME#/Ring
These fields specify whether the system will be awakened from power
saving modes when activity or input signal of the specified hardware
peripheral or component is detected.
Note: To use the function of “Resume On Ring” , you need to install
a modem card supporting power on function.
Resume On RTC Alarm
The field is used to enable or disable the feature of booting up the system
on a scheduled time/date.
Page 64
Chapter 3
3-24
Date(of Month)
The field specifies the date for RTC Alarm Resume. Settings: 0~31.
Resume Time(hh:mm:ss)
The field specifies the time for RTC Alarm Resume. Format is <hour>
<minute><second>.
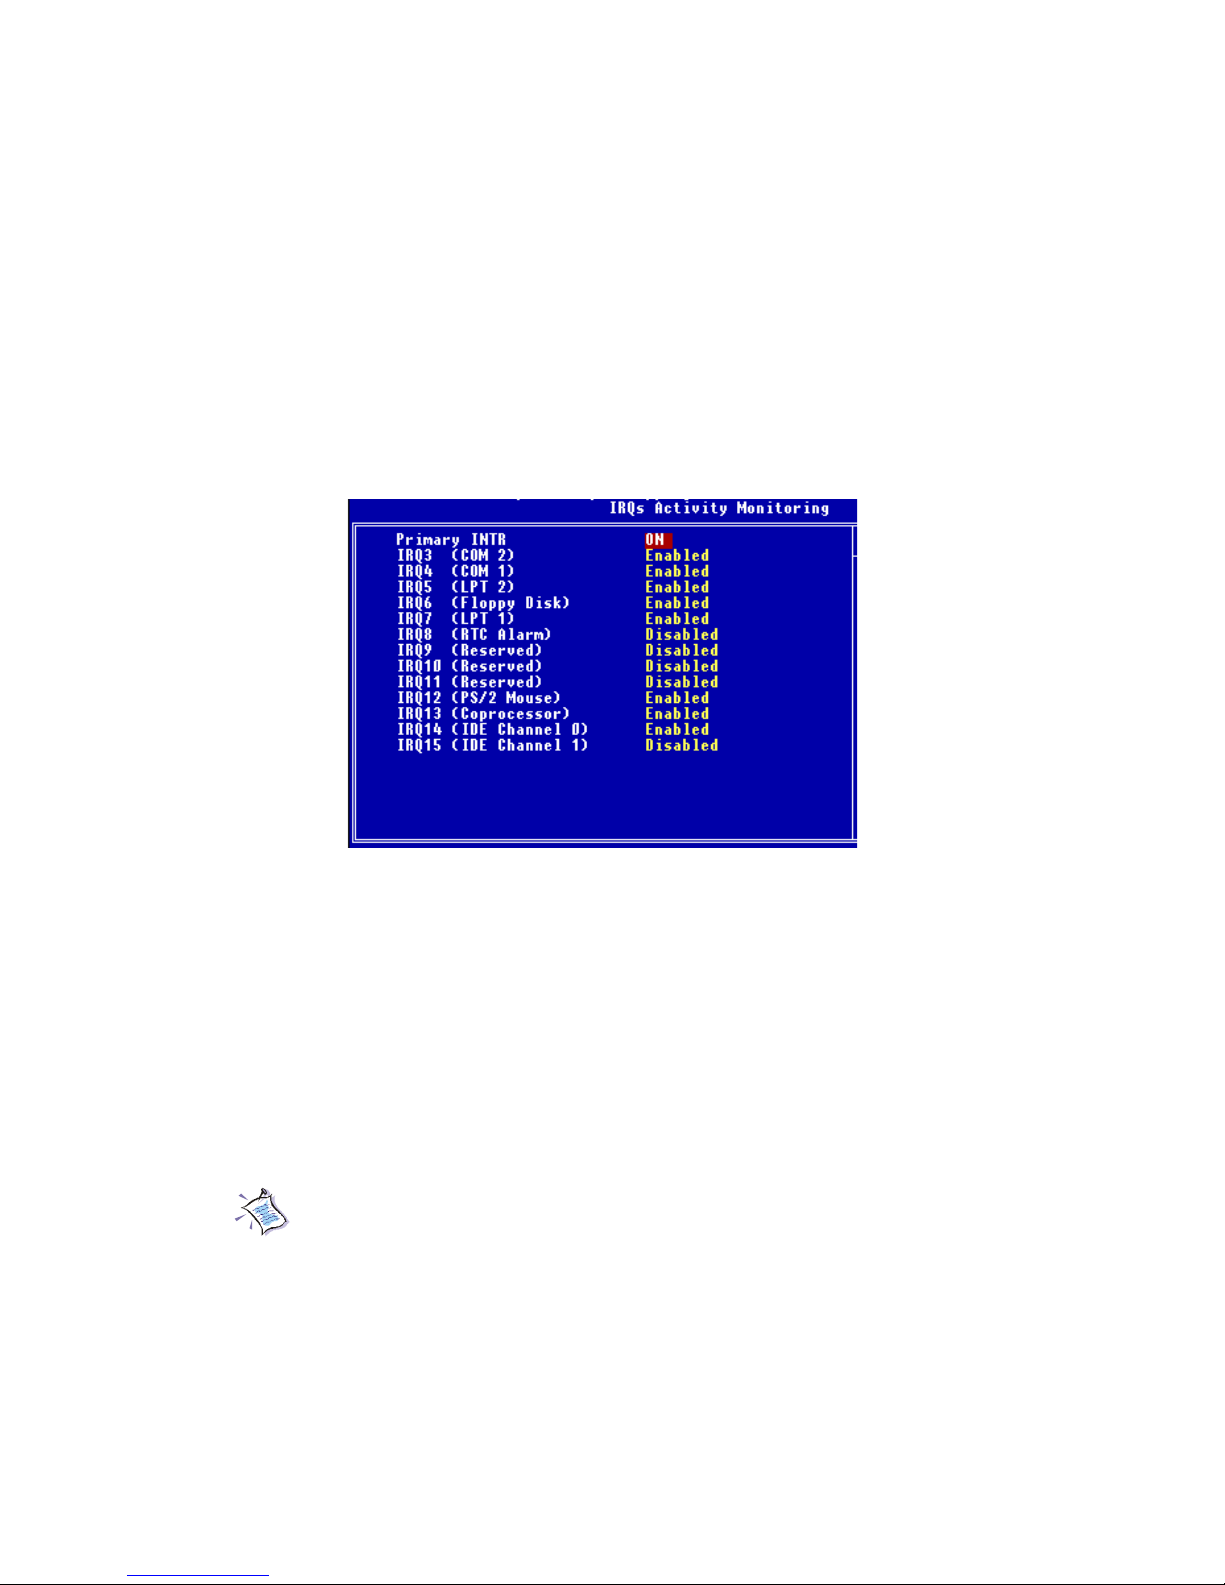
IRQs Activity Monitoring
Press <Enter> to enter the sub-menu and the following screen appears.
Primary INTR
When this is set to ON, any event occurring will wake up the
system which has been powered down.
IRQ3 ~ IRQ15
Enables or disables the monitoring of the specified IRQ line. If set to
Enabled, the activity of the specified IRQ line will prevent the system
from entering power saving modes or awaken it from power saving
modes.
Note: IRQ (Interrupt Request) lines are system resources allocated to I/O devices. When an I/O device needs to gain attention
of the operating system, it signals this by causing an IRQ to occur.
After receiving the signal, when the operating system is ready, the
system will interrupt itself and perform the service required by the
I/O device.
Page 65
BIOS Setup
3-25
PnP/PCI Configurations
This section describes configuring the PCI bus system. PCI, or Peripheral
Component Interconnect, is a system which allows I/O devices to operate at
speeds nearing the speed the CPU itself uses when communicating with its
own special components. This section covers some very technical items and
it is strongly recommended that only experienced users should make any
changes to the default settings.
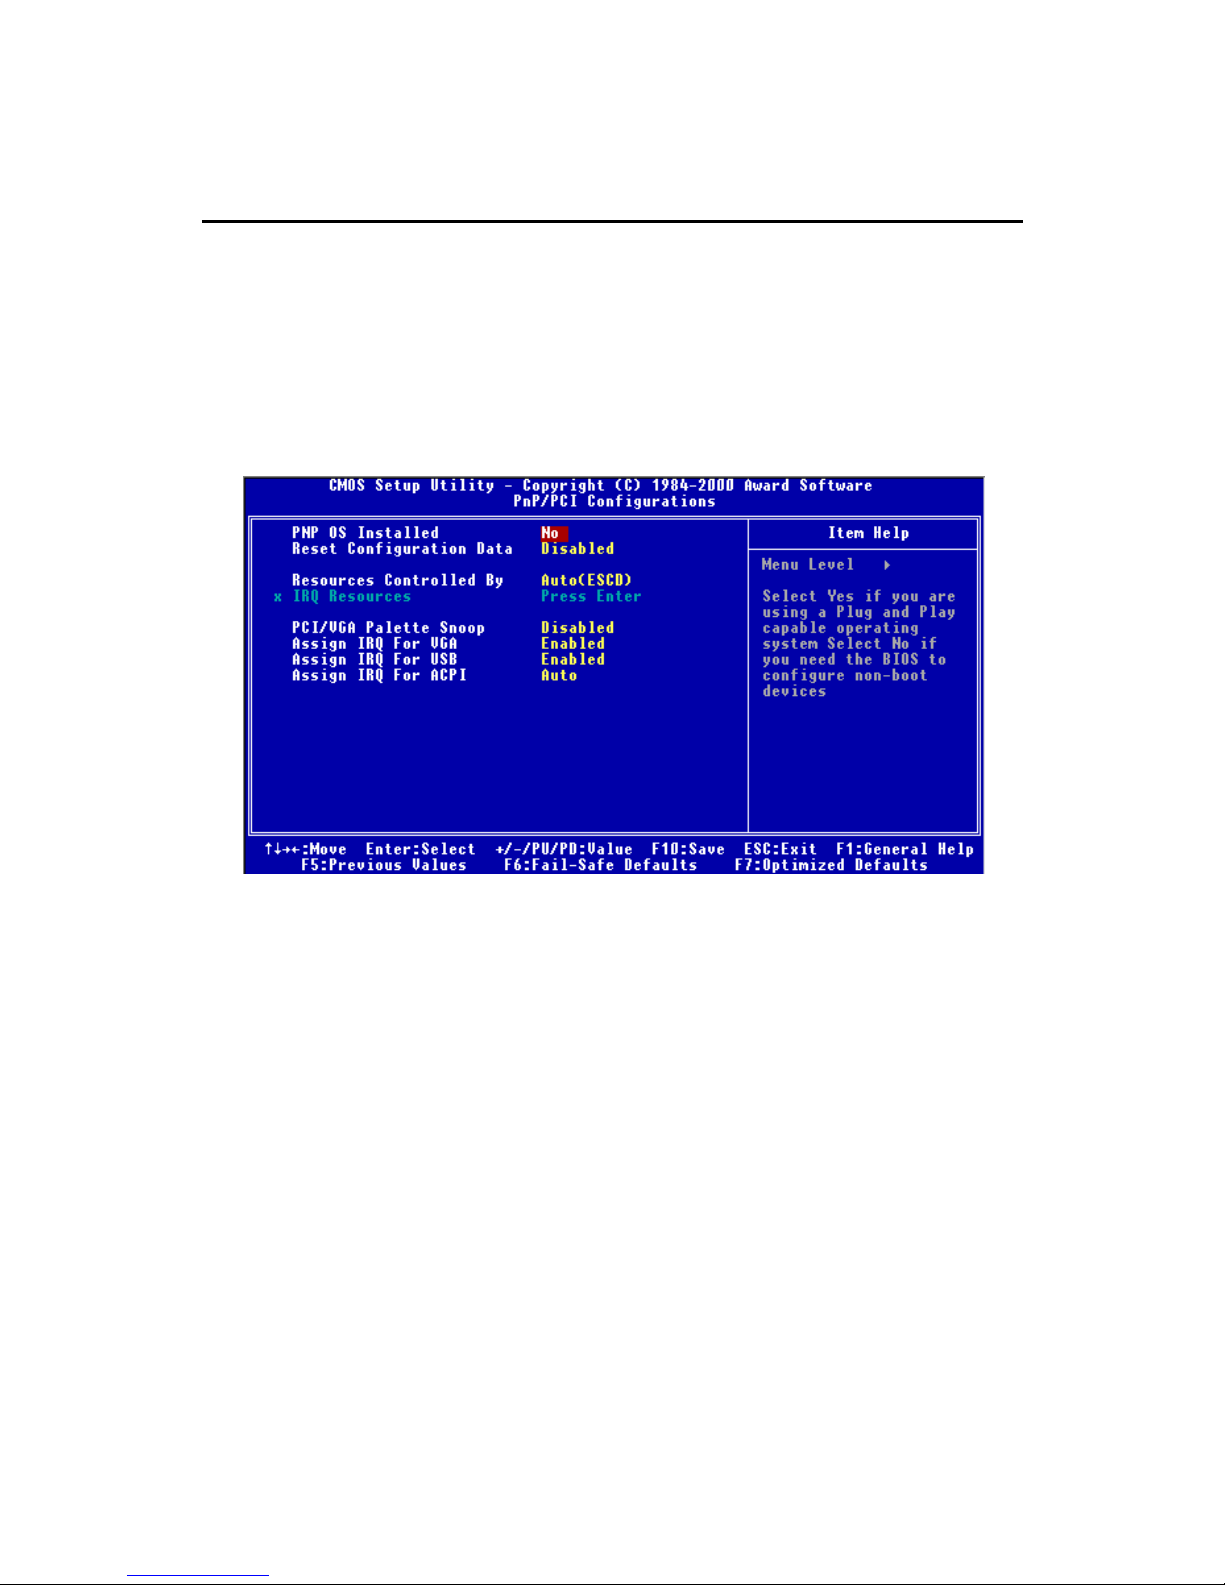
PNP OS Installed
When set to YES, BIOS will only initialize the PnP cards used for booting
(VGA, IDE, SCSI). The rest of the cards will be initialized by the PnP operating system like Windows® 98. When set to NO, BIOS will initialize all the
PnP cards. So, select Yes if the operating system is Plug & Play aware.
Reset Configuration Data
Normally, you leave this field Disabled. Select Enabled to reset Extended
System Configuration Data (ESCD) when you exit Setup if you have installed a
new add-on card and the system reconfiguration has caused such a serious
conflict that the operating system can not boot. Settings: Enabled, Disabled.
Resources Controlled By
The Award Plug and Play BIOS has the capacity to automatically configure all
of the boot and Plug and Play compatible devices. However, this capability
means absolutely nothing unless you are using a Plug and Play operating
Page 66

Chapter 3
3-26
system such as Windows® 98/2000. If you set this field to “manual”, choose
specific resources by going into each sub-menu that follows this field. Settings:
Auto(ESCD), Manual.
IRQ Resources
The item is adjustable only when Resources Controlled By is set to Manual.
Press <Enter> and you will enter the sub-menu screen. IRQ Resources list
IRQ-3/4/5/7/9/10/11/12/14/15 for users to set each IRQ a type depending on
the type of device using the IRQ. Settings are:
PCI Device For Plug & Play compatible devices designed for PCI
bus architecture.
Reserved The IRQ will be reserved for further request.
PCI/VGA Palette Snoop
PCI VGA palette is the set of colors currently used by the video device.
Some special VGA cards may not show colors correctly and need to look
into the video device’ s VGA palette to determine what colors are in use.
Then you have to turn on the palette “snoop”, permitting the palette
registers of both VGA devices to be identical. The setting must be set to
Enabled if any non-standard VGA adapter card, such as MPEG card,
installed in the system requires VGA palette snooping.
Assign IRQ For VGA/USB
Set to Enabled allows BIOS to assign an IRQ to VGA card/USB device.
Choose Disabled if you want to release the IRQ.
Assign IRQ For ACPI
Selecting Auto allows BIOS to automatically assign an IRQ for SCI (System
Control Interrupt) of ACPI spec. Settings: Auto, IRQ 9, IRQ 10, IRQ 1 1.
Page 67
BIOS Setup
3-27
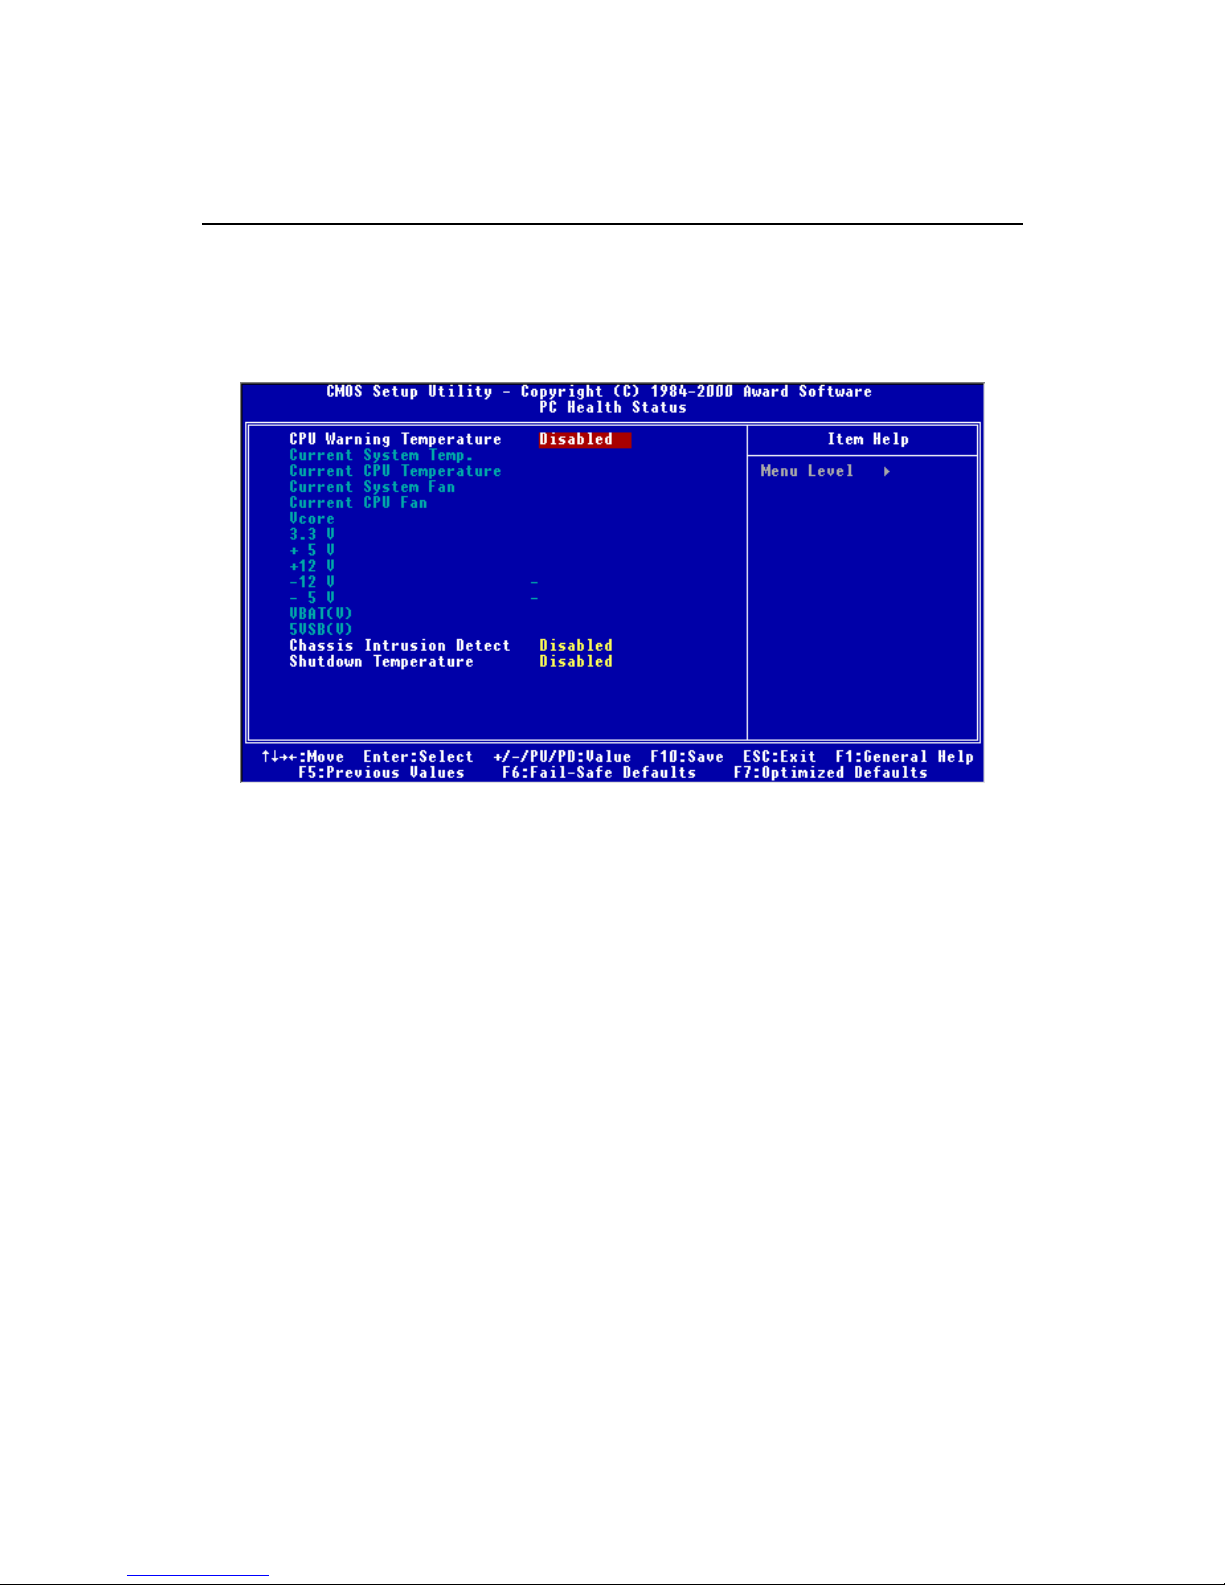
PC Health Status
This section shows the status of your CPU, fan, and warning for overall system status. Monitor function is available only if there is hardware monitoring
mechanism onboard.
CPU Warning T emperature
If the CPU temperature reaches the upper limit preset in this setting, the warning mechanism will be activated. This helps you to prevent the CPU overheating problem.
Current System Temp., Current CPU T emperatur e, Current System/CPU
Fan, Vcore, 3.3 V, +5 V, +12 V, -12 V, -5 V, VBAT(V), 5VSB(V)
These items display the current status of all of the monitored hardware devices/components such as CPU voltages, temperatures and all fans’ speeds.
Chassis Intrusion Detect
The field enables or disables the feature of recording the chassis intrusion
status and issuing a warning message if the chassis is once opened. To
clear the warning message, set the field to Reset. The setting of the field will
automatically return to Enabled later. Settings: Enabled, Reset, Disabled.
Shutdown Temperature
The item allows ACPI-aware OS to automatically shutdown if the system
temperature reaches a thermal level preset in the field. This can prevent the
system components from being damaged due to overheating.
Page 68
Chapter 3
3-28
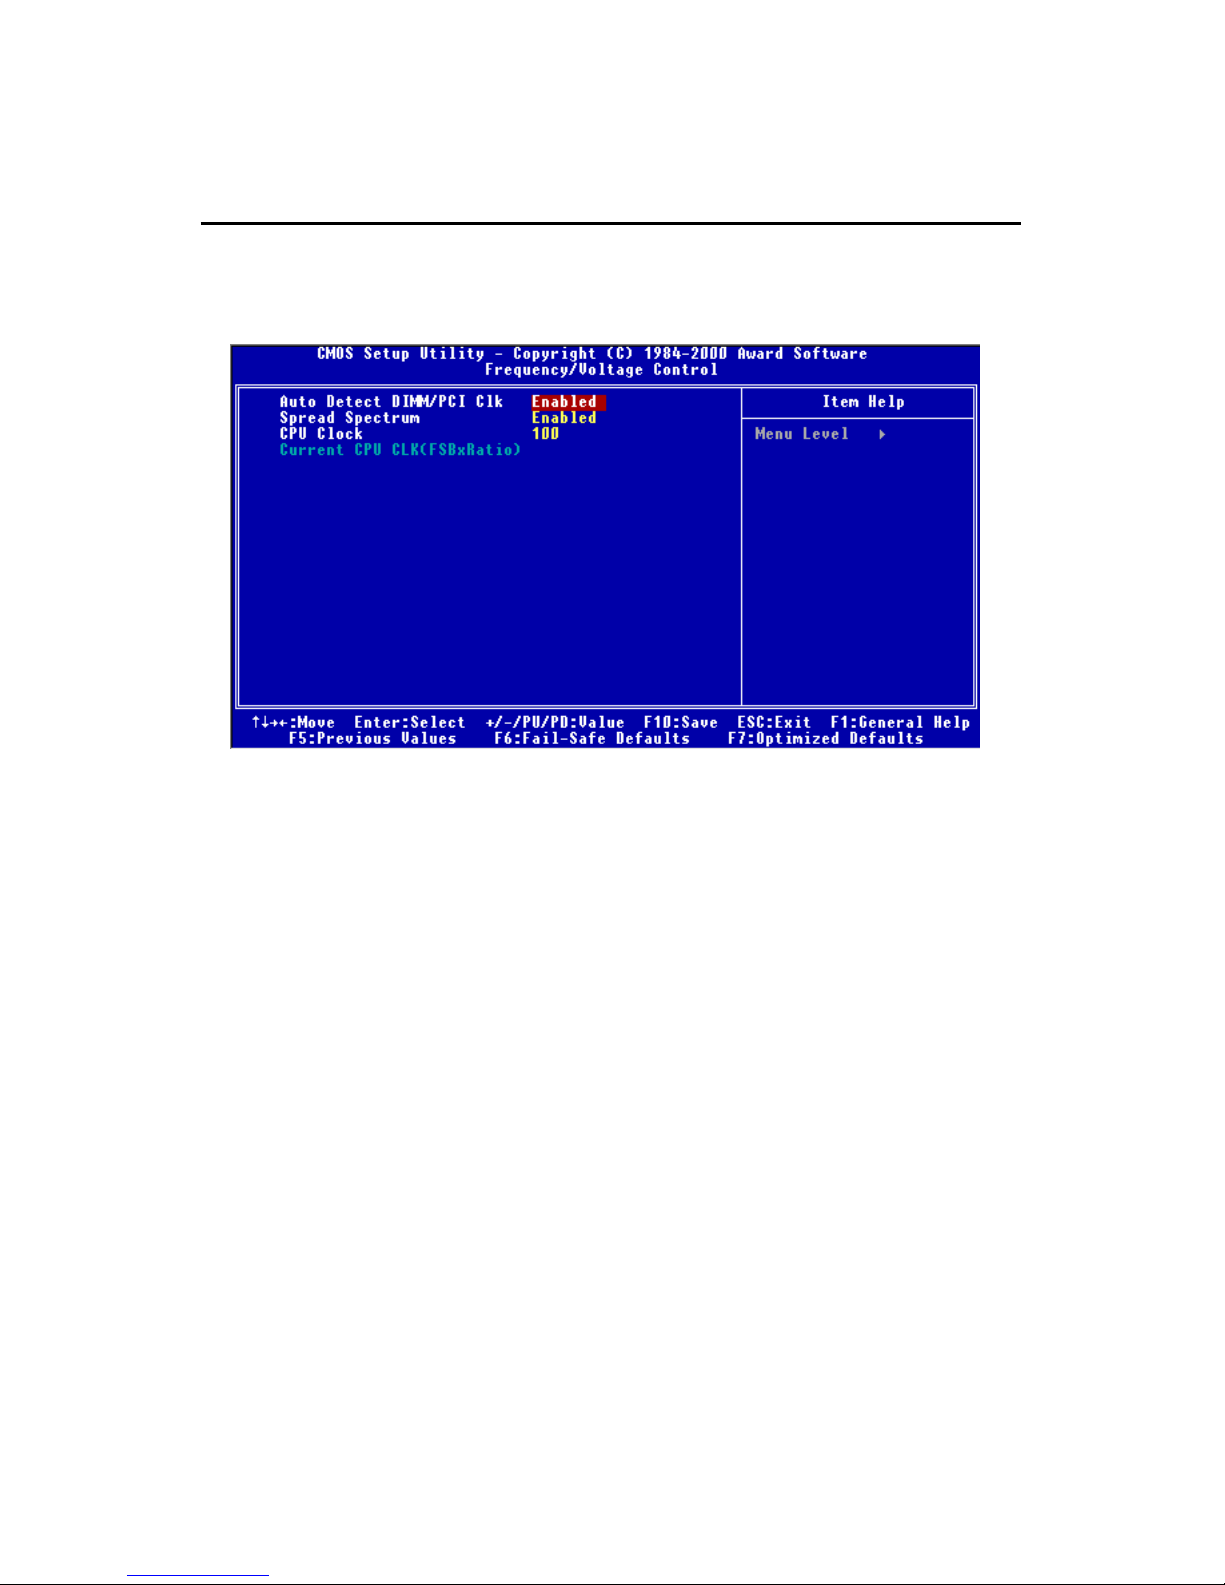
Frequency/Voltage Control
Auto Detect DIMM/PCI Clk
This item is used to auto detect the DIMM/PCI slots. When set to Enabled,
the system will remove (turn off) clocks from empty DIMM/PCI slots to
minimize the electromagnetic interference (EMI). Settings: Enabled,
Disabled.
Spread Spectrum
This item is used to configure the clock generator’s Spread Spectrum feature.
Settings: Disabled, Enabled. Always disable the feature when overclocking
the processor.
CPU Clock
This item specifies the clock frequency of CPU host bus (FSB). It provides a
method for end users to overclock the processor.
Current CPU CLK(FSBxRatio)
This item displays the current CPU clock frequency including Front Side Bus
(FSB) and clock multiplier (ratio).
This section describes how to set the CPU FSB frequency, spread spectrum
etc.
Page 69
BIOS Setup
3-29
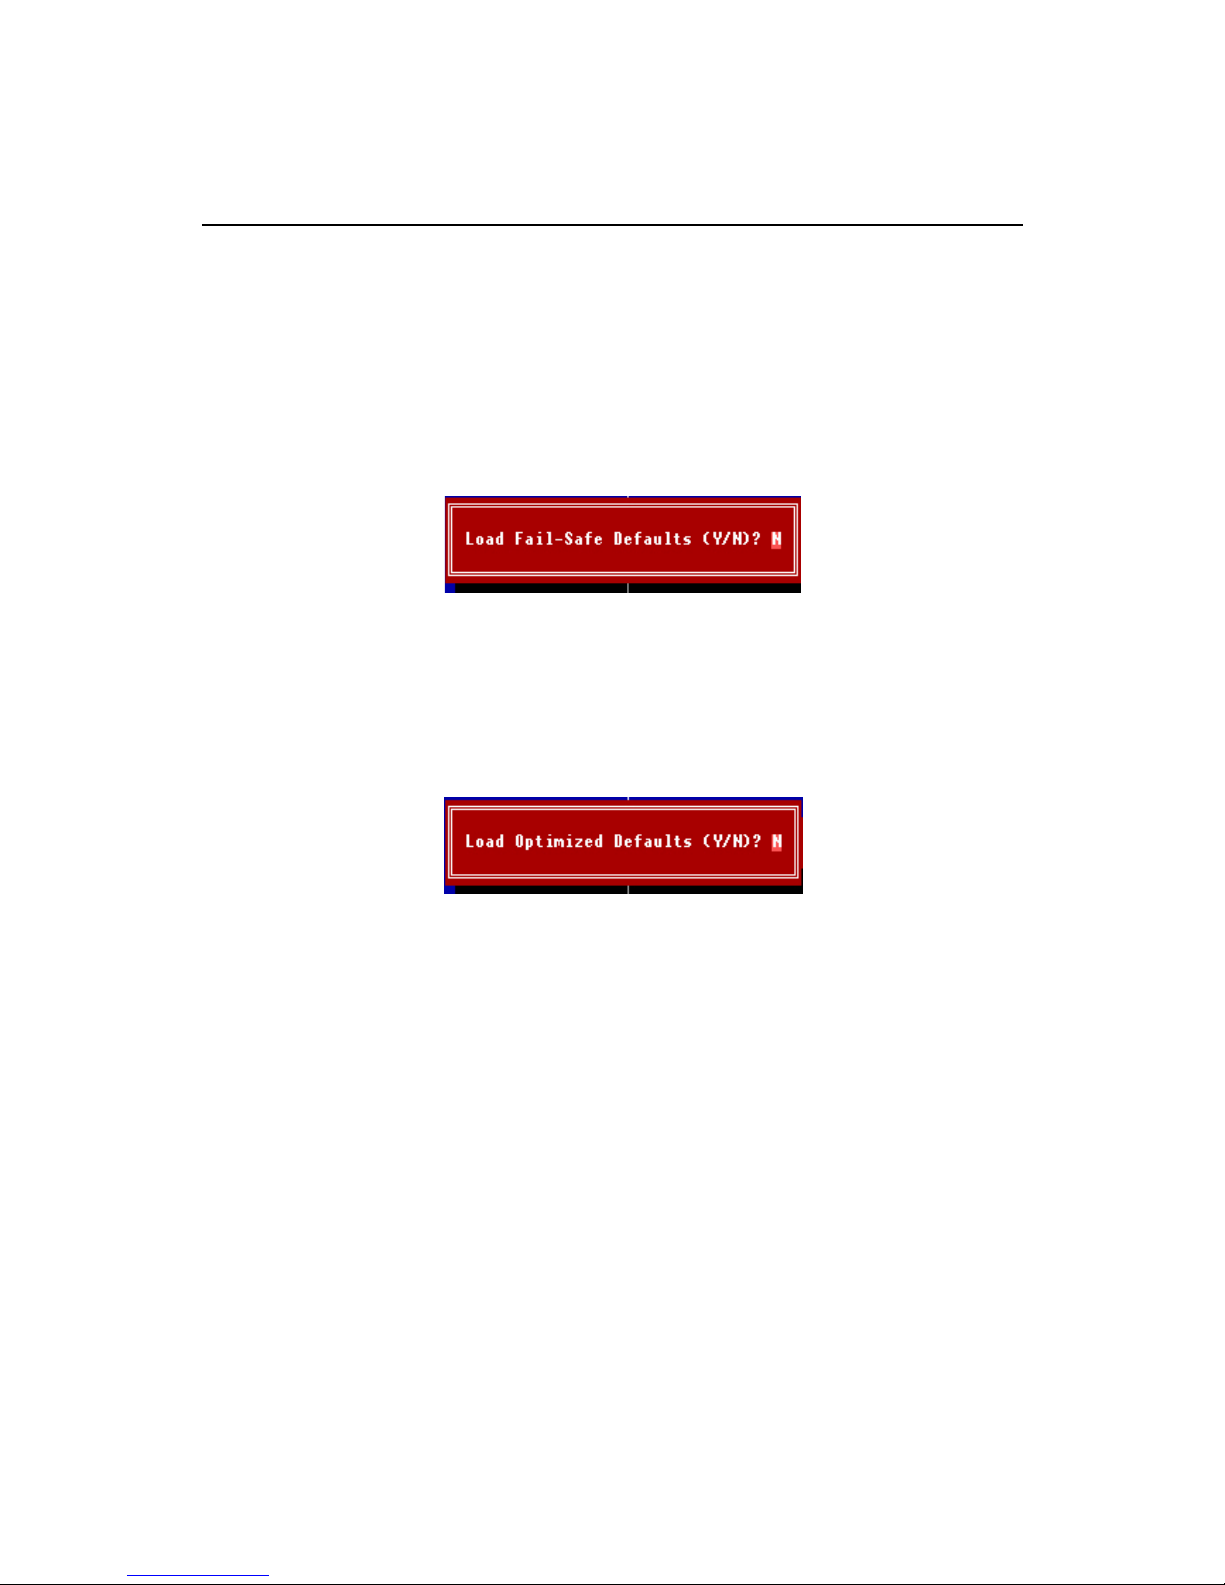
When you select Load Optimized Defaults, a message as below appears:
Pressing Y loads the default factory settings for optimal system performance.
The two options on the main menu allow users to restore all of the BIOS
settings to the default Fail-Safe or Optimized values. The Optimized Defaults
are the default values set by the mainboard manufacturer specifically for optimal performance of the mainboard. The Fail-Safe Defaults are the default values set by the BIOS vendor for stable system performance.
When you select Load Fail-Safe Defaults, a message as below appears:
Pressing Y loads the BIOS default values for the most stable, minimal system
performance.
Load Fail-Safe/Optimized Defaults
Page 70
Chapter 3
3-30
Set Supervisor/User Password
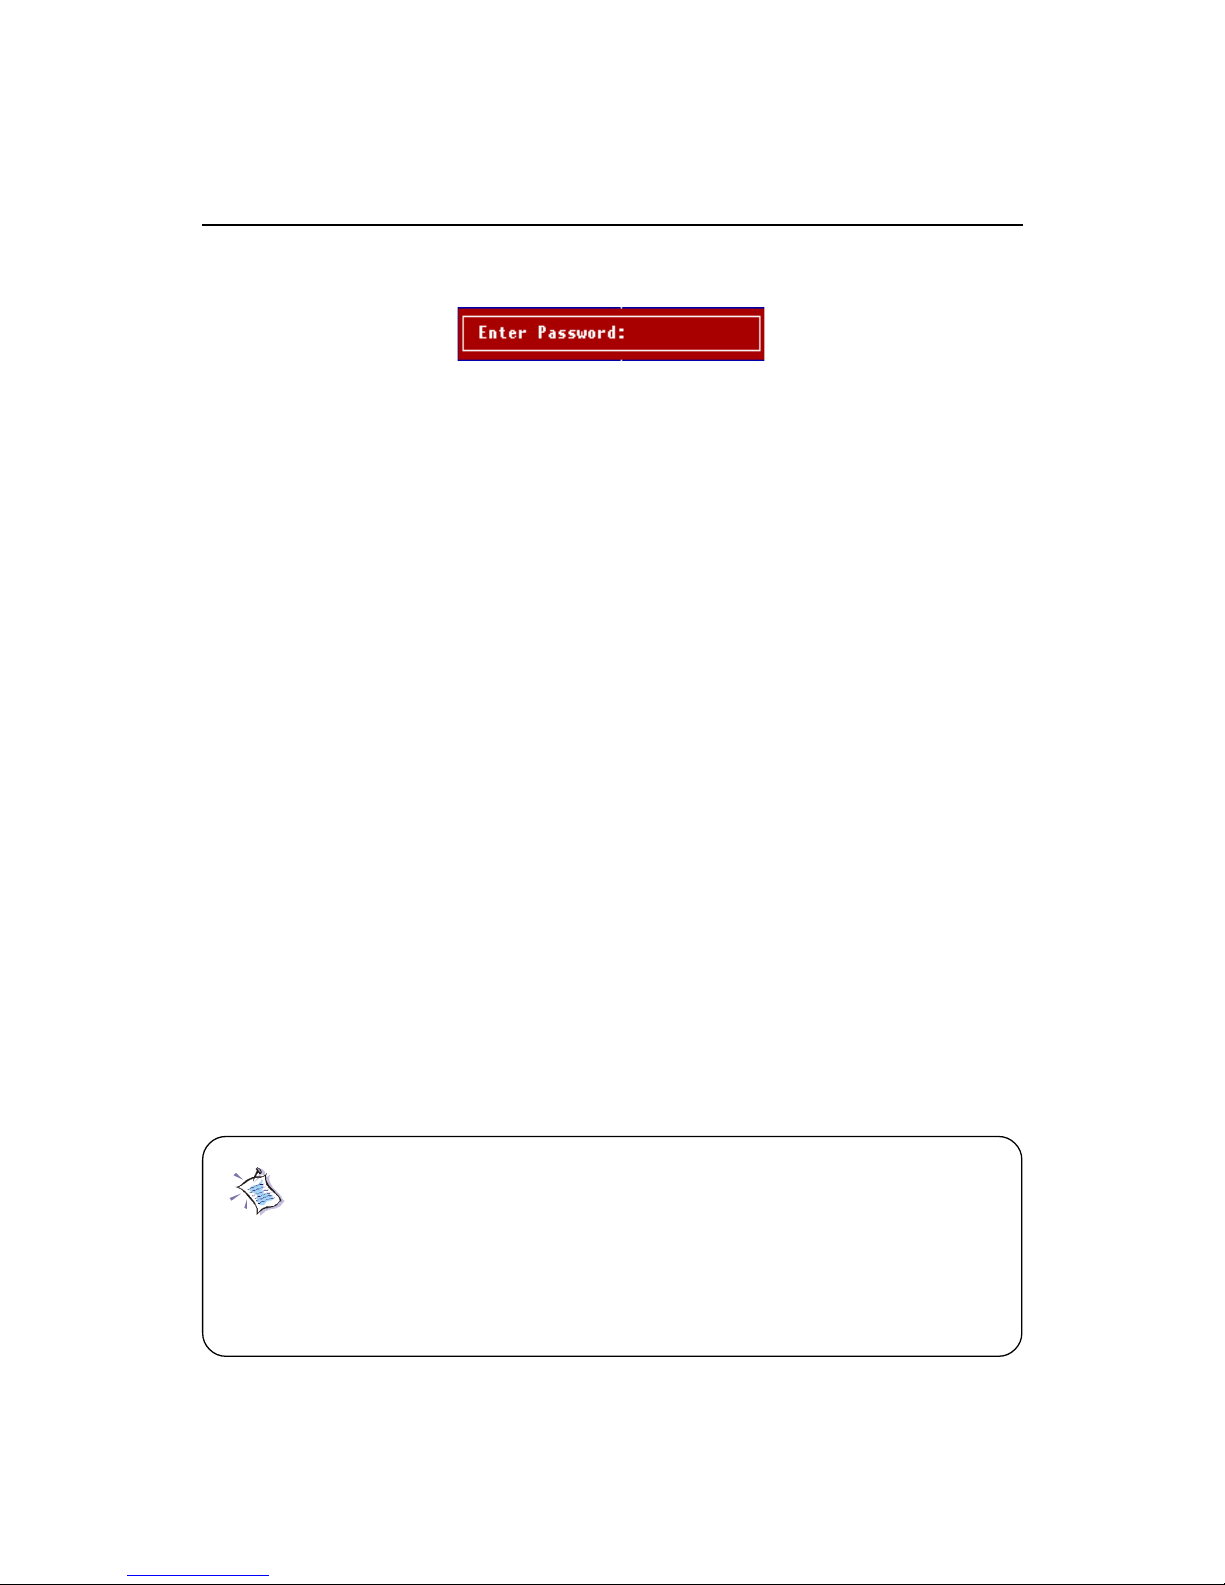
When you select this function, a message as below will appear on the screen:
Type the password, up to eight characters in length, and press <Enter>. The
password typed now will replace any previously set password from CMOS
memory. You will be prompted to confirm the password. Retype the password
and press <Enter>. You may also press <Esc> to abort the selection and not
enter a password.
T o clear a set password, just press <Enter> when you are prompted to enter the
password. A message will show up confirming the password will be disabled.
Once the password is disabled, the system will boot and you can enter Setup
without entering any password.
When a password has been set, you will be prompted to enter it every time you
try to enter Setup. This prevents an unauthorized person from changing any
part of your system configuration.
Additionally, when a password is enabled, you can also have BIOS to request
a password each time the system is booted. This would prevent unauthorized
use of your computer. The setting to determine when the password prompt is
required is the SECURITY OPTION field of the ADV ANCED BIOS FEATURES
menu. If the SECURITY OPTION field is set to System, the password is required both at boot and at entry to Setup. If set to Setup, password prompt
only occurs when you try to enter Setup.
About Supervisor Password & User Password:
Supervisor password: Can enter and change the settings of
the setup menu.
User password: Can only enter but do not have the right
to change the settings of the setup menu.
Page 71

G-1
Glossary
ACPI (Advanced Configuration & Power Interface)
This power management specification enables the OS (operating system) to control the
amount of power given to each device attached to the computer. Windows 98/98SE,
Windows 2000 and Windows ME can fully support ACPI to allow users managing the
system power flexibly.
AGP (Accelerated Graphics Port)
A new, high-speed graphics interface that based on PCI construction and designed
especially for the throughput demands of 3-D graphics. AGP provides a direct channel
(32-bit wide bus) between the display controller and main memory for high graphics
quality and performance.
ATX
A modern shape and layout of mainboard that supersedes the widely-used Baby AT
form factor. It improves many placement of components and makes a more efficient
design.
BIOS (basic input/output system)
On PCs, an essential software that contains all the control code of input/output interface (such as keyboard, disk drives, etc.). It executes hardware test on booting the
system, starts the OS, and provides an interface between the OS and the components.
The BIOS is stored in a ROM chip.
Bus
A set of hardware lines within the computer system, through which the data is transferred among different components. In a PC, the term bus usually refers to a local bus
that connects the internal components to the CPU and main memory.
Cache
A special memory subsystem that is used to speed up the data transfer. It stores the
contents of frequently accessed RAM locations and the addresses where these data
items are stored.
Chipset
A collection of integrated chips designed to perform one or more related functions. For
Glossary
Glossary
Page 72

G-2
Glossary
Dynamic RAM (DRAM) Memory Technologies
Type
FPM (60,70ns)
EDO (50,60,70ns)
SDRAM (66MHz)
SDRAM (100MHz)
SDRAM (133MHz)
RDRAM (Direct Rambus)
DDR SDRAM (100MHz)
DDR SDRAM (133MHz)
First Used
1990
1994
1996
1998
1999
1999
2000
2000
Clock Rate
25MHz
40MHz
66MHz
100MHz
133MHz
400MHz
100MHz
133MHz
Bus* Width
64 bits
64 bits
64 bits
64 bits
64 bits
16 bits
64 bits
64 bits
Bandwidth
200 MBps
320 MBps
528 MBps
800 MBps
1.1 GBps
1.6 GBps
1.6 GBps
2.1 GBps
Volts
5v
5v
3.3v
3.3v
3.3v
2.5v
3.3v
3.3v
Peak
* Memory channel width (64 bits started with 75MHz Pentium)
Source: Computer Desktop Encyclopedia
example, a modem chipset contains all the primary circuits for transmitting and receiving data; a PC chipset provides the electronic interfaces between all subsystems.
CMOS (complementary metal-oxide semiconductor)
CMOS is a widely used type of semiconductor, which features high speed and low
power consumption. PCs usually contain a small amount of battery-powered CMOS
memory to retain the date, time, and system setup parameters.
COM
In MS-DOS system, the name of a serial communications port. DOS supports four
serial ports. For example, if a modem is connected to one serial port and a serial mouse
to another, they are identified as COM1 and COM2.
DIMM (dual in-line memory module)
A small circuit board that holds memory chips. A SIMM (single in-line memory
module) has a 32-bit path to the memory chips whereas a DIMM has 64-bit path.
DRAM (Dynamic RAM)
A most common type of computer memory. It usually uses one transistor and a
capacitor to represent a bit. As the development of technology, the memory type and
specification used in computer becomes variety, such as SDRAM, DDR SDRAM, and
RDRAM. For further instruction, please see the table below:
Page 73

G-3
Glossary
ECC Memory (error correcting code memory)
A type of memory that contains special circuitry for testing the accuracy of data and
correcting the errors on the fly.
IDE (Integrated Drive Electronics)
A type of disk-drive interface widely used to connect hard disks, CD-ROMs and tape
drives to a PC, in which the controller electronics is integrated into the drive itself,
eliminating the need for a separate adapter card. The IDE interface is known as the
ATA (AT Attachment) specification.
IEEE 1394
A new, high speed external bus standard, also known as FireWire or iLink, which
supports data transfer rates of up to 400 Mbps for connecting up to 63 external
devices.
IrDA (Infrared Data Association)
A group of device vendors, including computer, component and telecommunications,
who have developed a standard for transmitting data via infrared light waves. This
enables you to transfer data from one device to another without any cables.
LAN (local area network)
A computer network that covers a relatively smaller area, such as in a building or an
enterprise. It is made up of servers, workstations, shared resources, a network operating system and a communications link. These individual PCs and devices on a LAN
are known as “nodes”, and are connected by cables to access data and devices anywhere on the LAN, so that many users can share expensive devices and data.
LED (light emitting diode)
A semiconductor device that converts electrical energy into light. Since it lights up
(usually red) when electricity is passed through it, it is usually used for the activity
lights on computer’s component, such as disk drivers.
LPT (line printer terminal)
Logical device name for a line printer; a name reserved by the MS-DOS for up to three
parallel printer ports: LPT1, LPT2, and LPT3. It is frequently used by the OS to
identify a printer.
Page 74

G-4
Glossary
PCI (Peripheral Component Interconnect)
A local bus standard developed by Intel that first appeared on PCs in late 1993. PCI
provides “plug and play” capability and allows IRQs to be shared. The PCI controller
can exchange data with the system's CPU either 32 bits or 64 bits at a time.
PnP (Plug and Play)
A set of specifications that allows a PC to configure itself automatically to work with
peripherals. The user can "plug" in a peripheral device and "play" it without configuring the system manually. To implement this useful feature, both the BIOS that supports PnP and a PnP expansion card are required.
POST (Power On Self Test)
During booting up your system, the BIOS executes a series of diagnostic tests, include
checking the RAM, the keyboard, the disk drives, etc., to see if they are properly
connected and operating.
PS/2 Port
A type of port developed by IBM for connecting a mouse or keyboard to a PC. The
PS/2 port supports a mini DIN plug containing just 6 pins. Most modern PCs equipped
with PS/2 ports so that the special port can be used by another device, such as a
modem.
USB (universal serial bus)
A hardware interface for low-speed peripherals such as the keyboard, mouse, joystick,
etc. USB provides a maximum bandwidth of 12 Mbit/sec (Mbps) for connecting up to
127 peripheral devices to PC. USB features hot swap capability and multiple data
streams, allows external devices to be plugged in and unplugged without turning the
system off.
Virus
A program or a piece of code that infects computer files by inserting in those files
copies of itself. The virus code is buried within an existing program, and is activated
when that program is executed. All the viruses are man-made, and often have damaging
side effects.
 Loading...