

Page 1

GX620 (MS-1651)Disassemble SOP
■ 1、Battery Pack
■ 2、BOTTOM DOOR ASSY
■ 3、THERMAL-KIT And CPU Module
■ 4、RAM、WLAN And TUNER Module
■ 5、HDD Module ASSY
■ 6、ODD Module ASSY
■ 7、HINGE COVER ASSY
■ 8、UP CASE ASSY
■ 9、LOWER CASE ASSY
■ 10、LCD MODULE ASSY
Page 2
GX620&MS-1651 Disassemble SOP
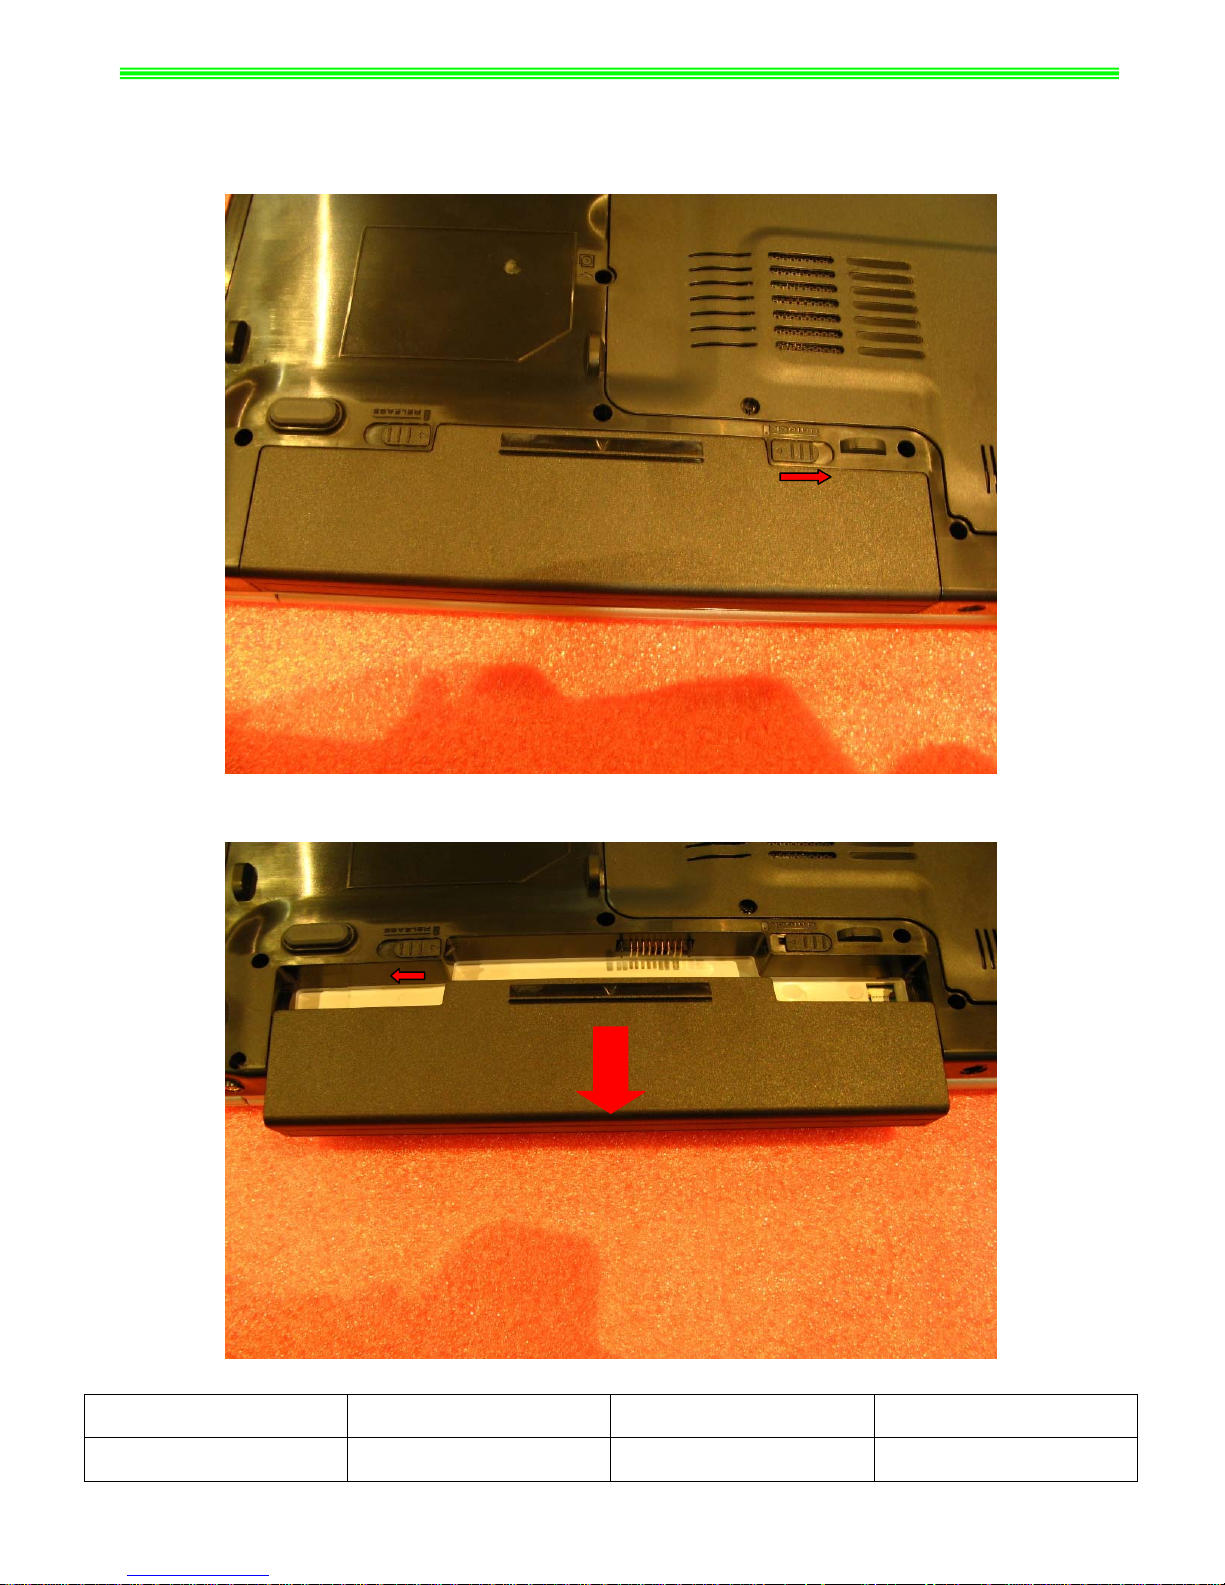
■ 1、Battery Pack
1-1:
Push the battery Unlock button as below;
1-2:Push the battery Release button as below, then slide the battery pack out of the slot;
NO. Part Name Part No. Qty
1 Battery Pack S9N-0366200-SB3 1
Page 3
GX620&MS-1651 Disassemble SOP
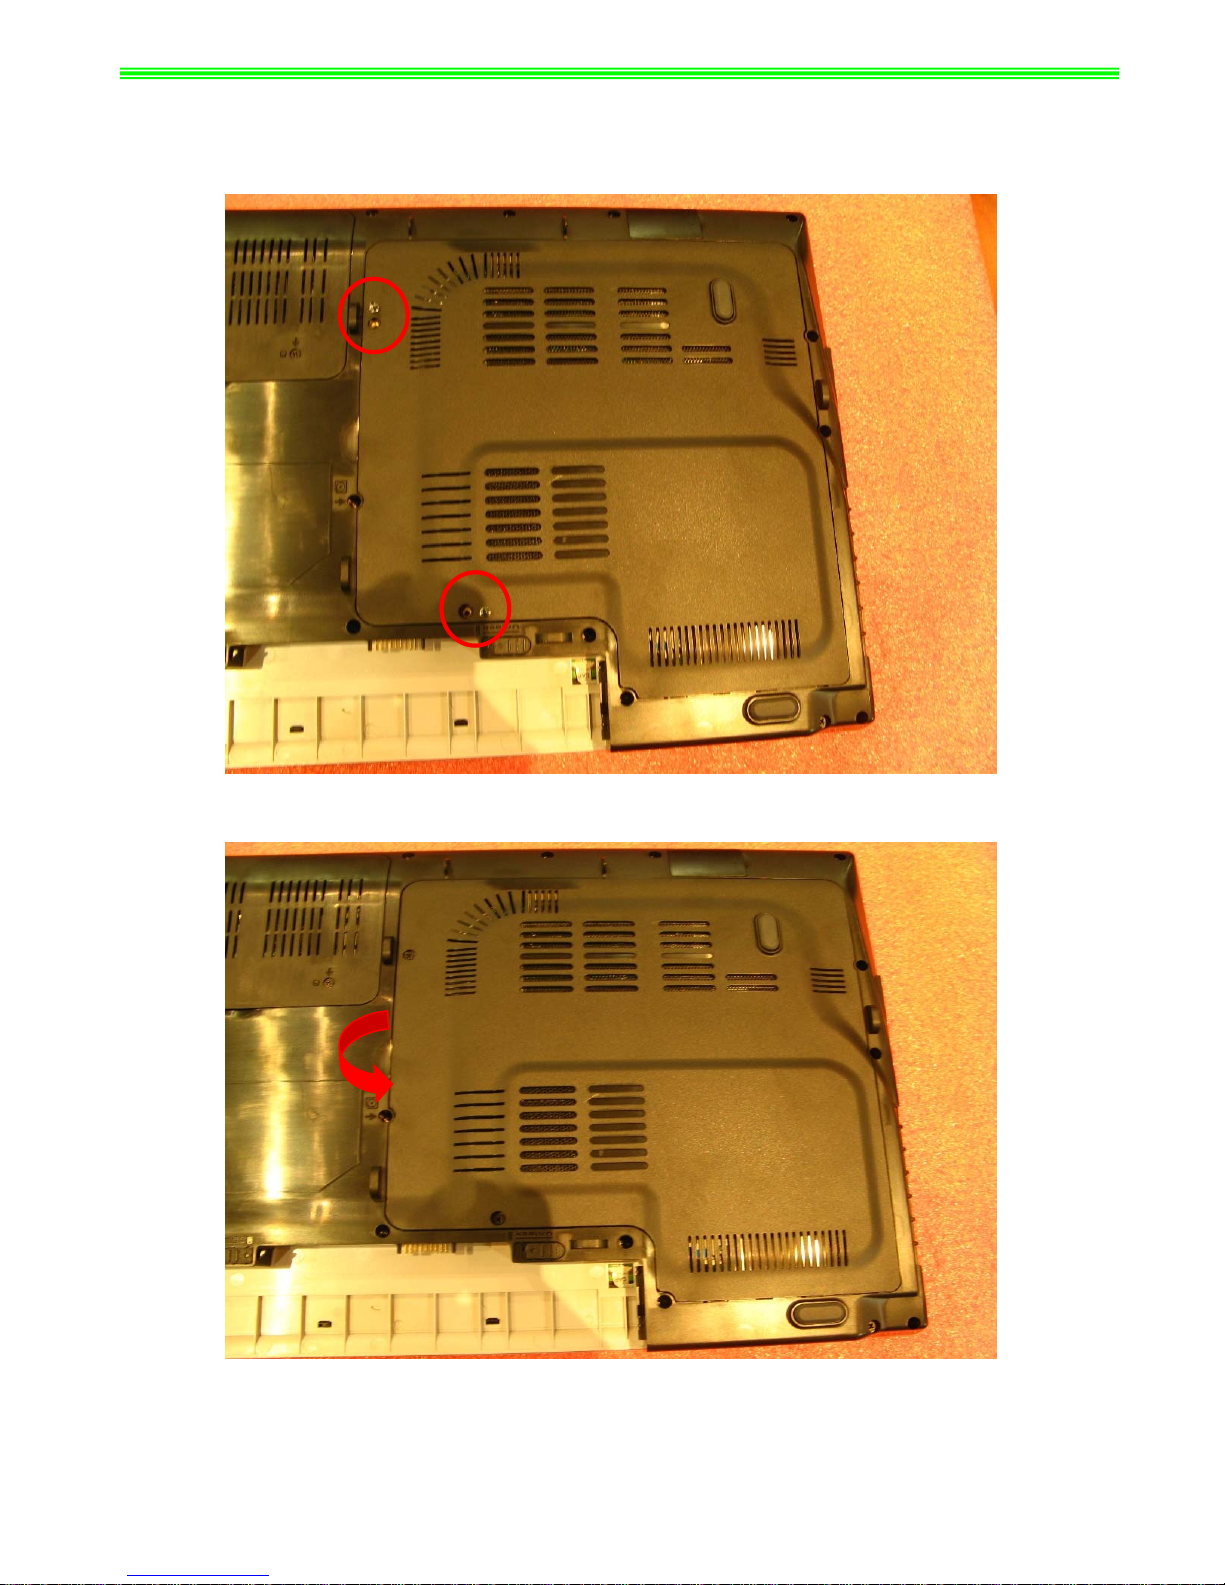
■ 2、BOTTOM DOOR ASSY
2-1:
Remove 2pcs M2.5*5mm Screws;
Note:Screw driver torque is 2.0~2.5kgf.cm
2-2:Remove Bottom Door Assy as below;
Page 4

GX620&MS-1651 Disassemble SOP
2-3:
Remove SIM Card Door as below;
NO. Part Name Part No. Qty
1 Screw E43-1255001-H29 2
2 SIM CARD DOOR E2P-6510511 -Y31 1
2 BOTTOM DOOR ASSY 307-651J411-Y31 1
Page 5
GX620&MS-1651 Disassemble SOP
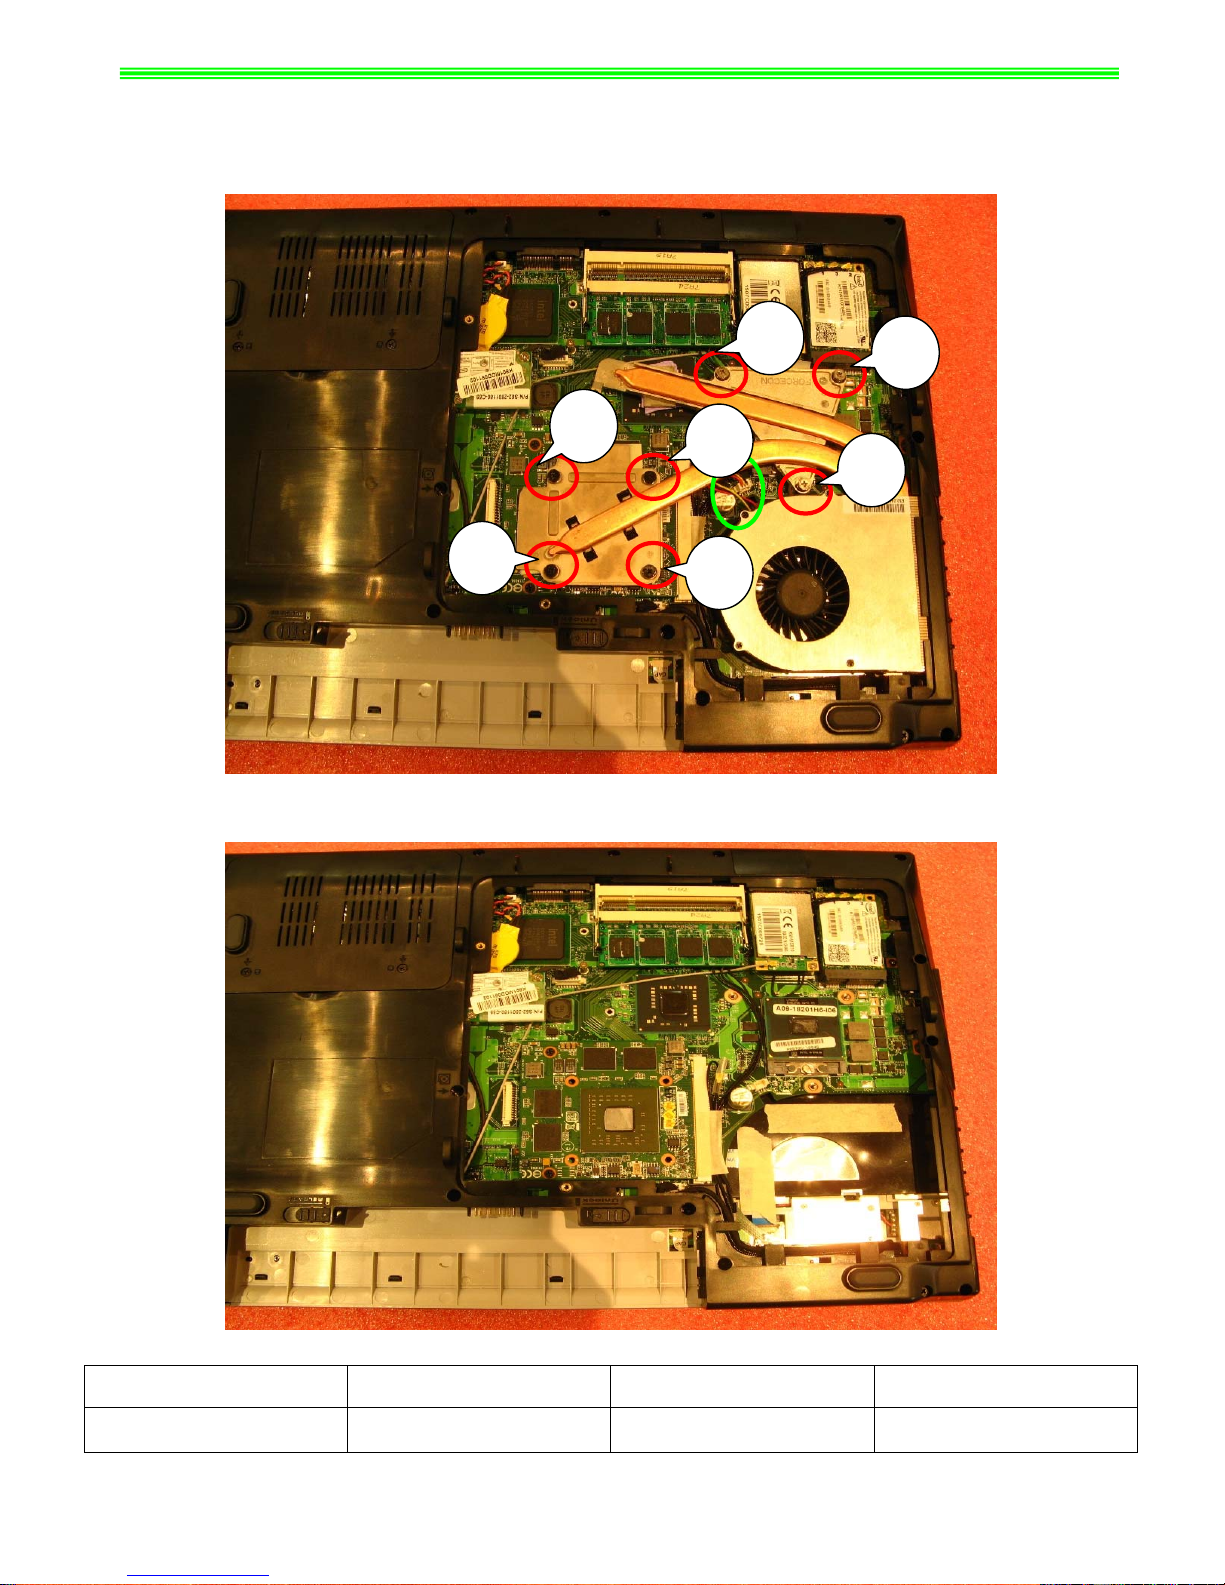
■ 3、THERMAL-KIT And CPU Module
3-1:
Remove 7pcs SPING Screws, Then Disconnect CPU Fan sink Cable;
Note:Screw driver torque is 2.0~2.5kgf.cm
6
5
2
1
3
7
4
3-2:Remove CPU Fan sink;
NO. Part Name Part No. Qty
1 CPU FANSINK E32-0900531-F05 1
Page 6
GX620&MS-1651 Disassemble SOP
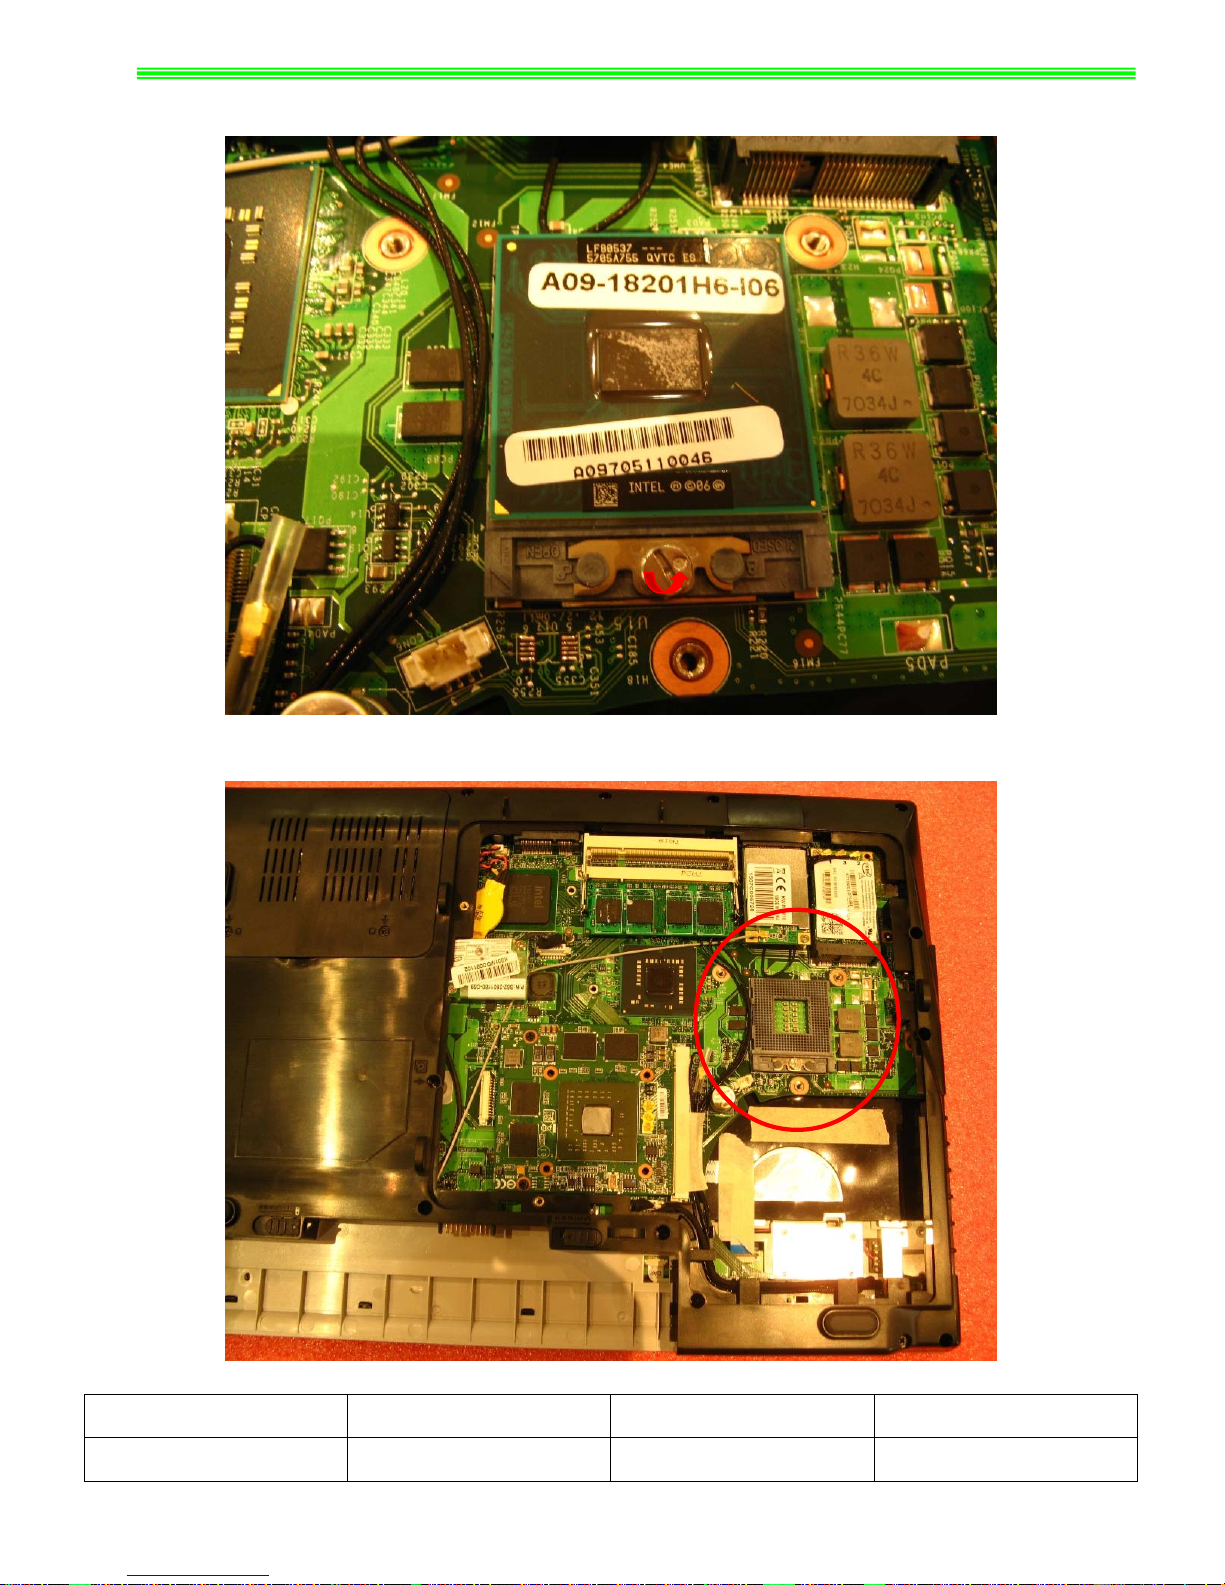
3-3:
Open CPU slot as below;
3-4:Remove CPU Module;
NO. Part Name Part No. Qty
1 CPU Module A09-2520106-I06 1
Page 7
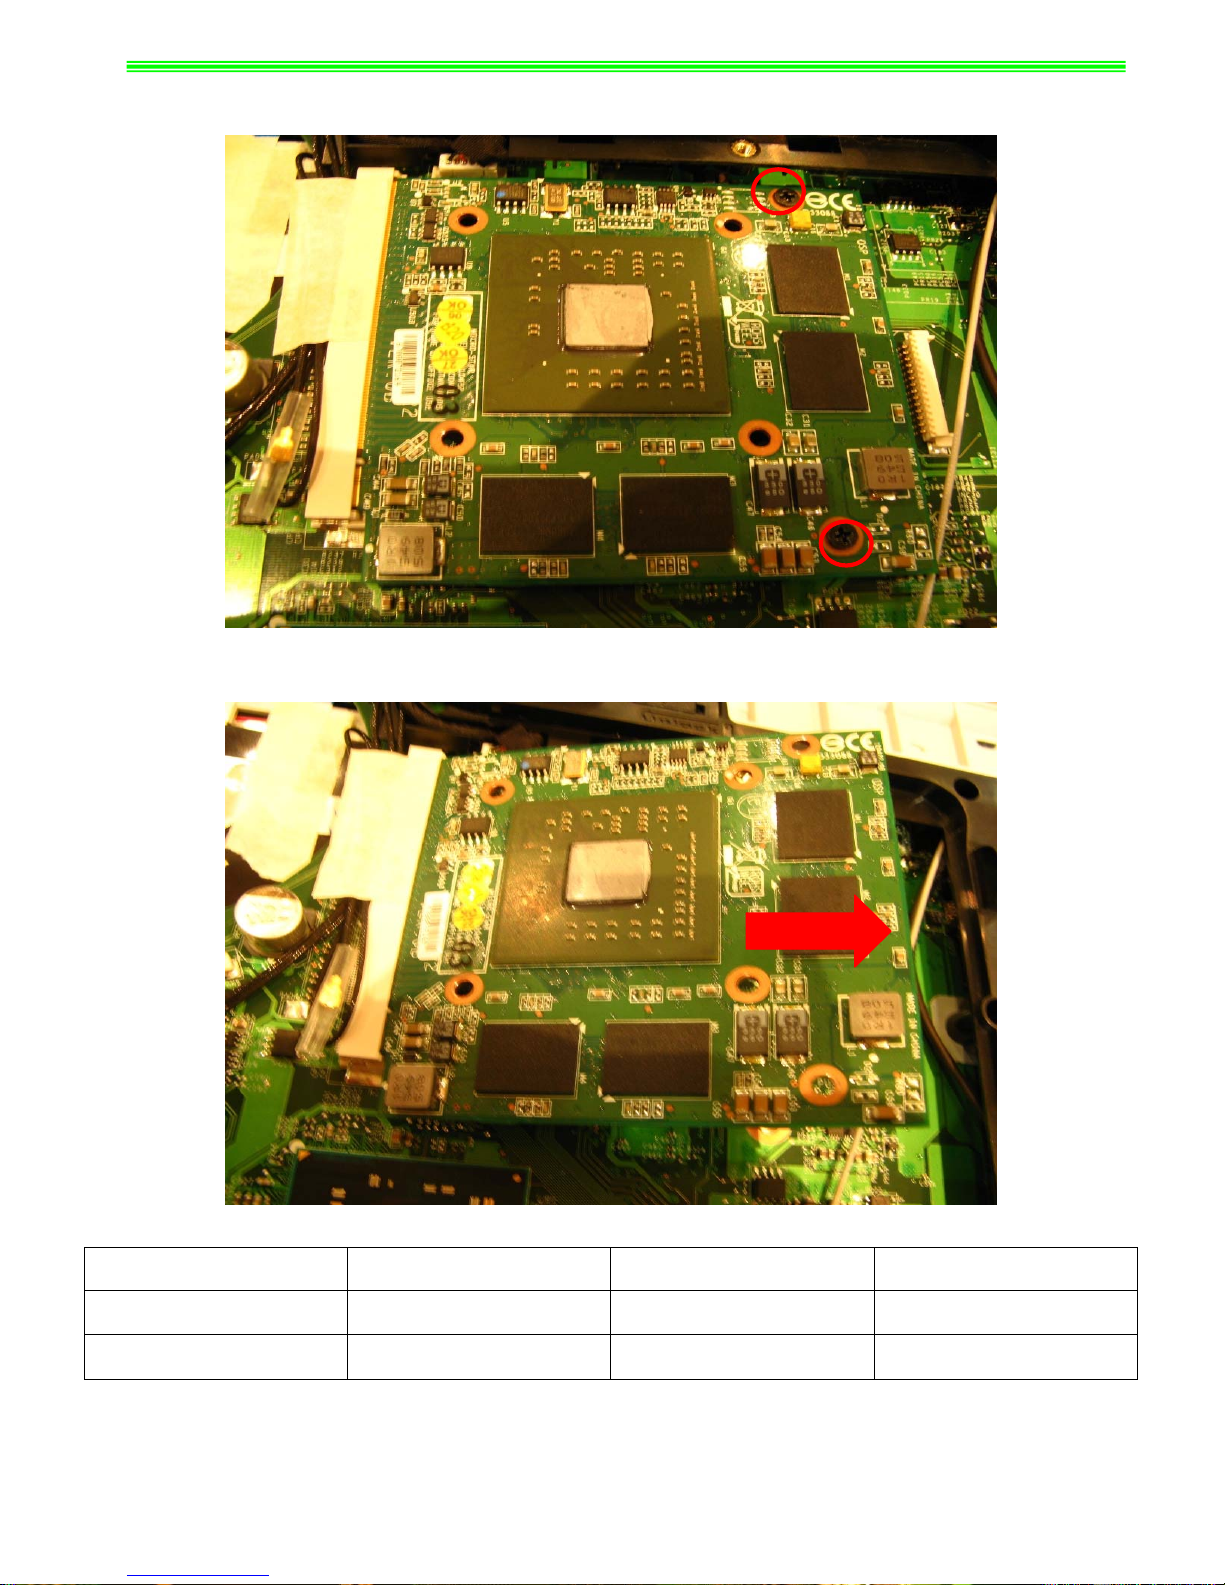
GX620&MS-1651 Disassemble SOP
3-5:Remove 2pcs M2.5*5mm Screws;
Note:Screw driver torque is 2.5~3.0kgf.cm
3-6:
Remove VGA Card Module;
NO. Part Name Part No. Qty
1 VGA CARD Module 602-V114-06S 1
2 Screw E43-1255001-H29 2
Page 8
GX620&MS-1651 Disassemble SOP
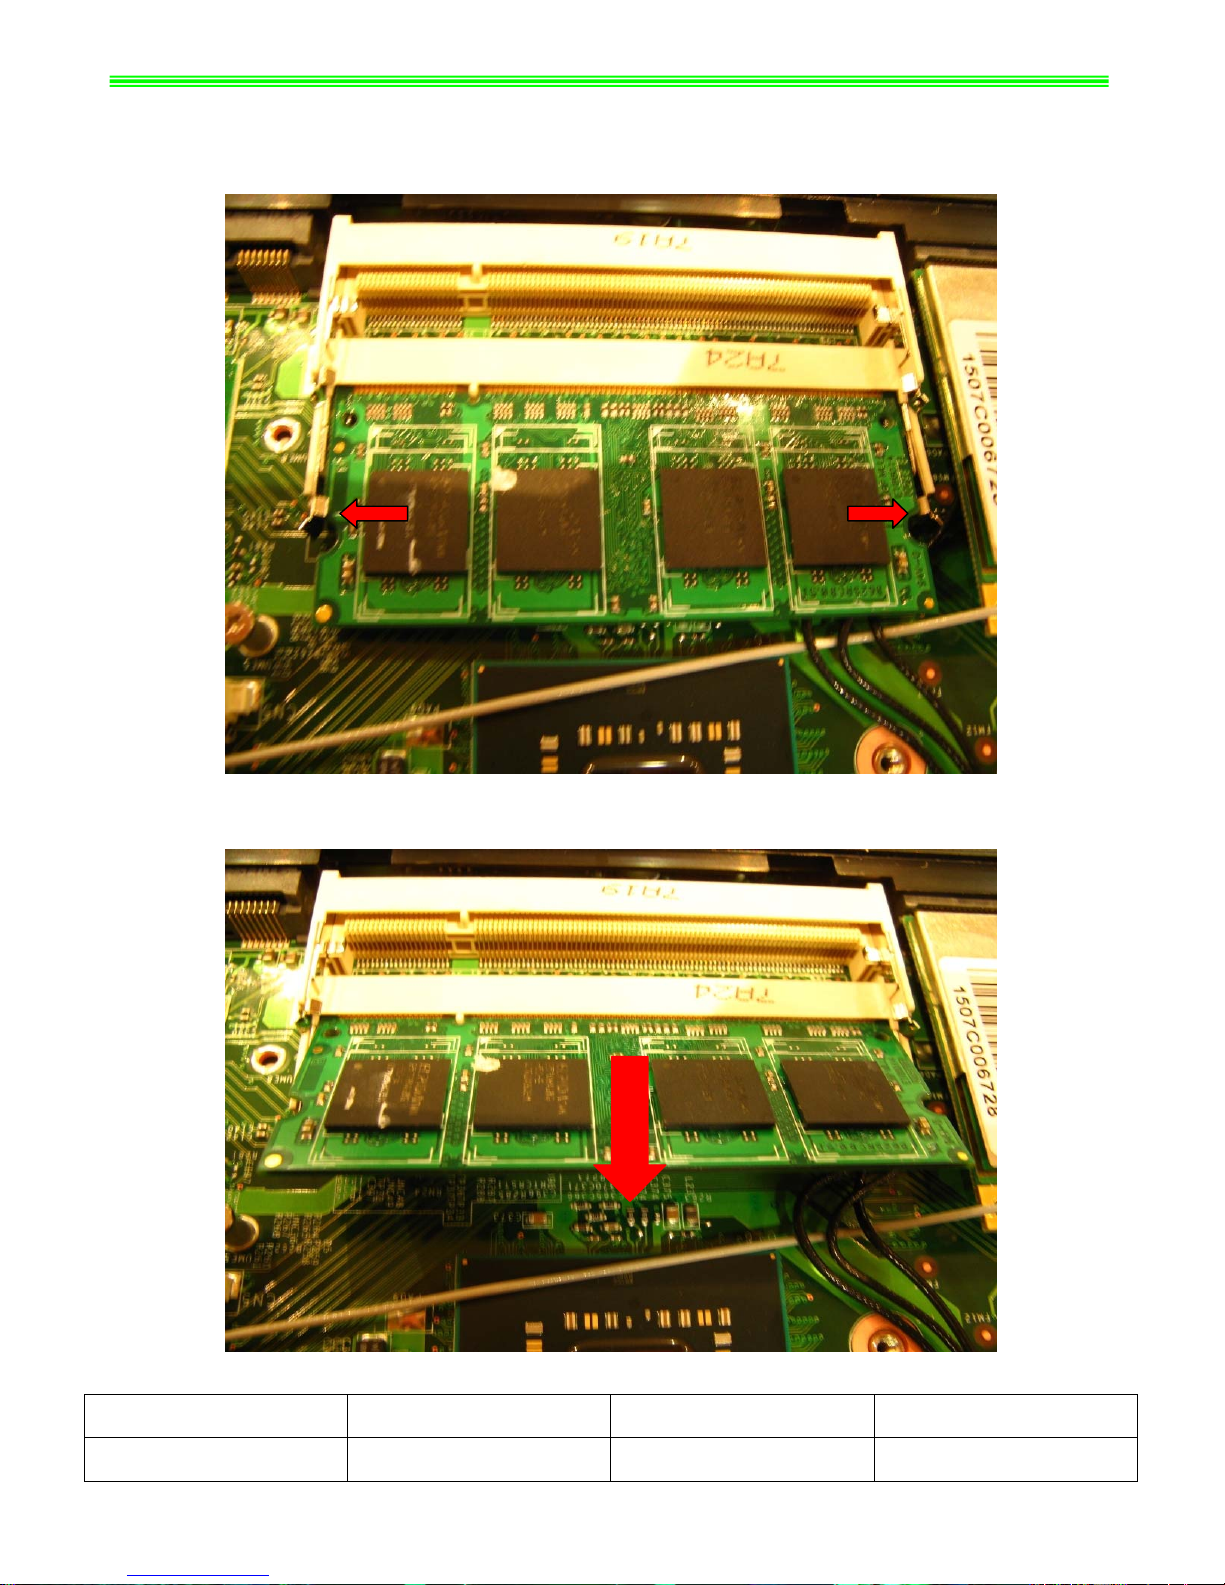
■ 4、RAM、WLAN And TUNER Module
4-1:Push RAM Slot Fastener as below;
4-2:Remove RAM Module;
NO. Part Name Part No. Qty
1 RAM Module S7C-S347701-T10 2
Page 9
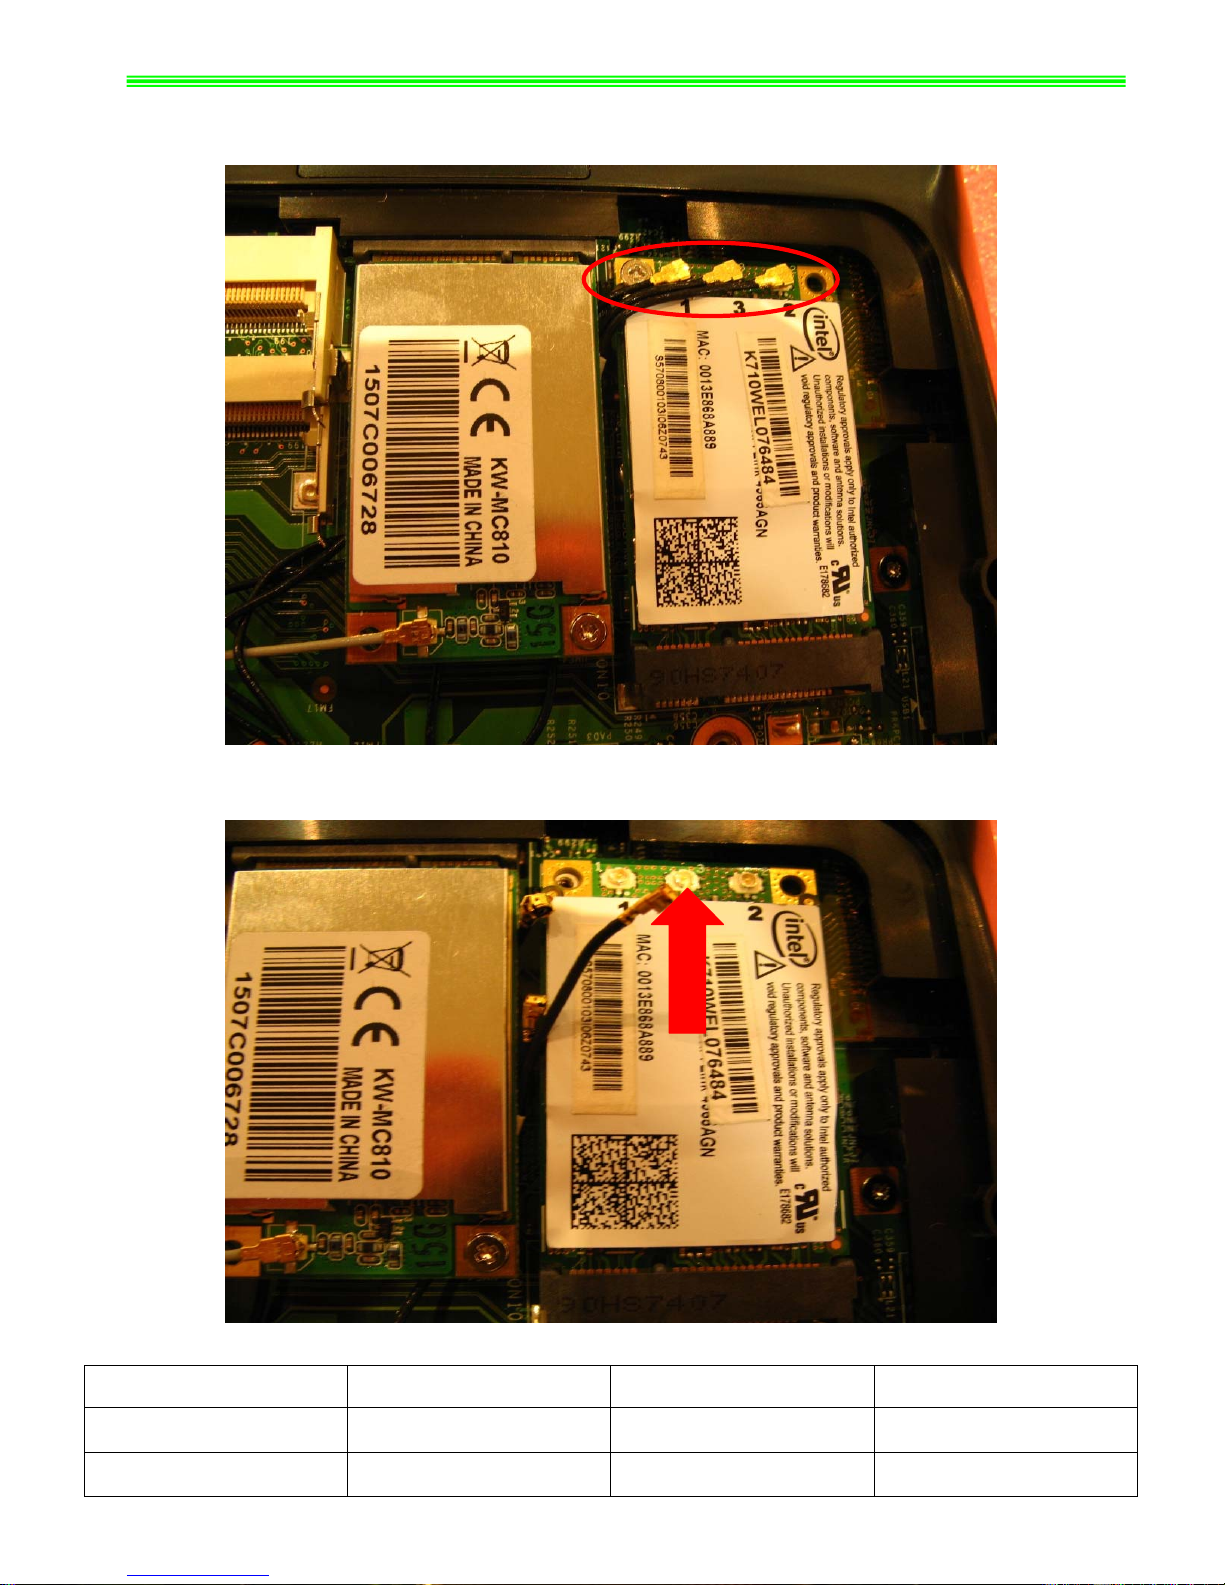
GX620&MS-1651 Disassemble SOP
4-3:
Remove WLAN Card Antenna, Then remove 1pcs M2*3mm Screw;
Note:Screw driver torque is 1.8~2.2kgf.cm
4-4:Remove WLAN Card Module;
NO. Part Name Part No. Qty
1 WLAN CARD Module S57-0800180-I06 1
2 Screw E43-1203003-H29 1
Page 10
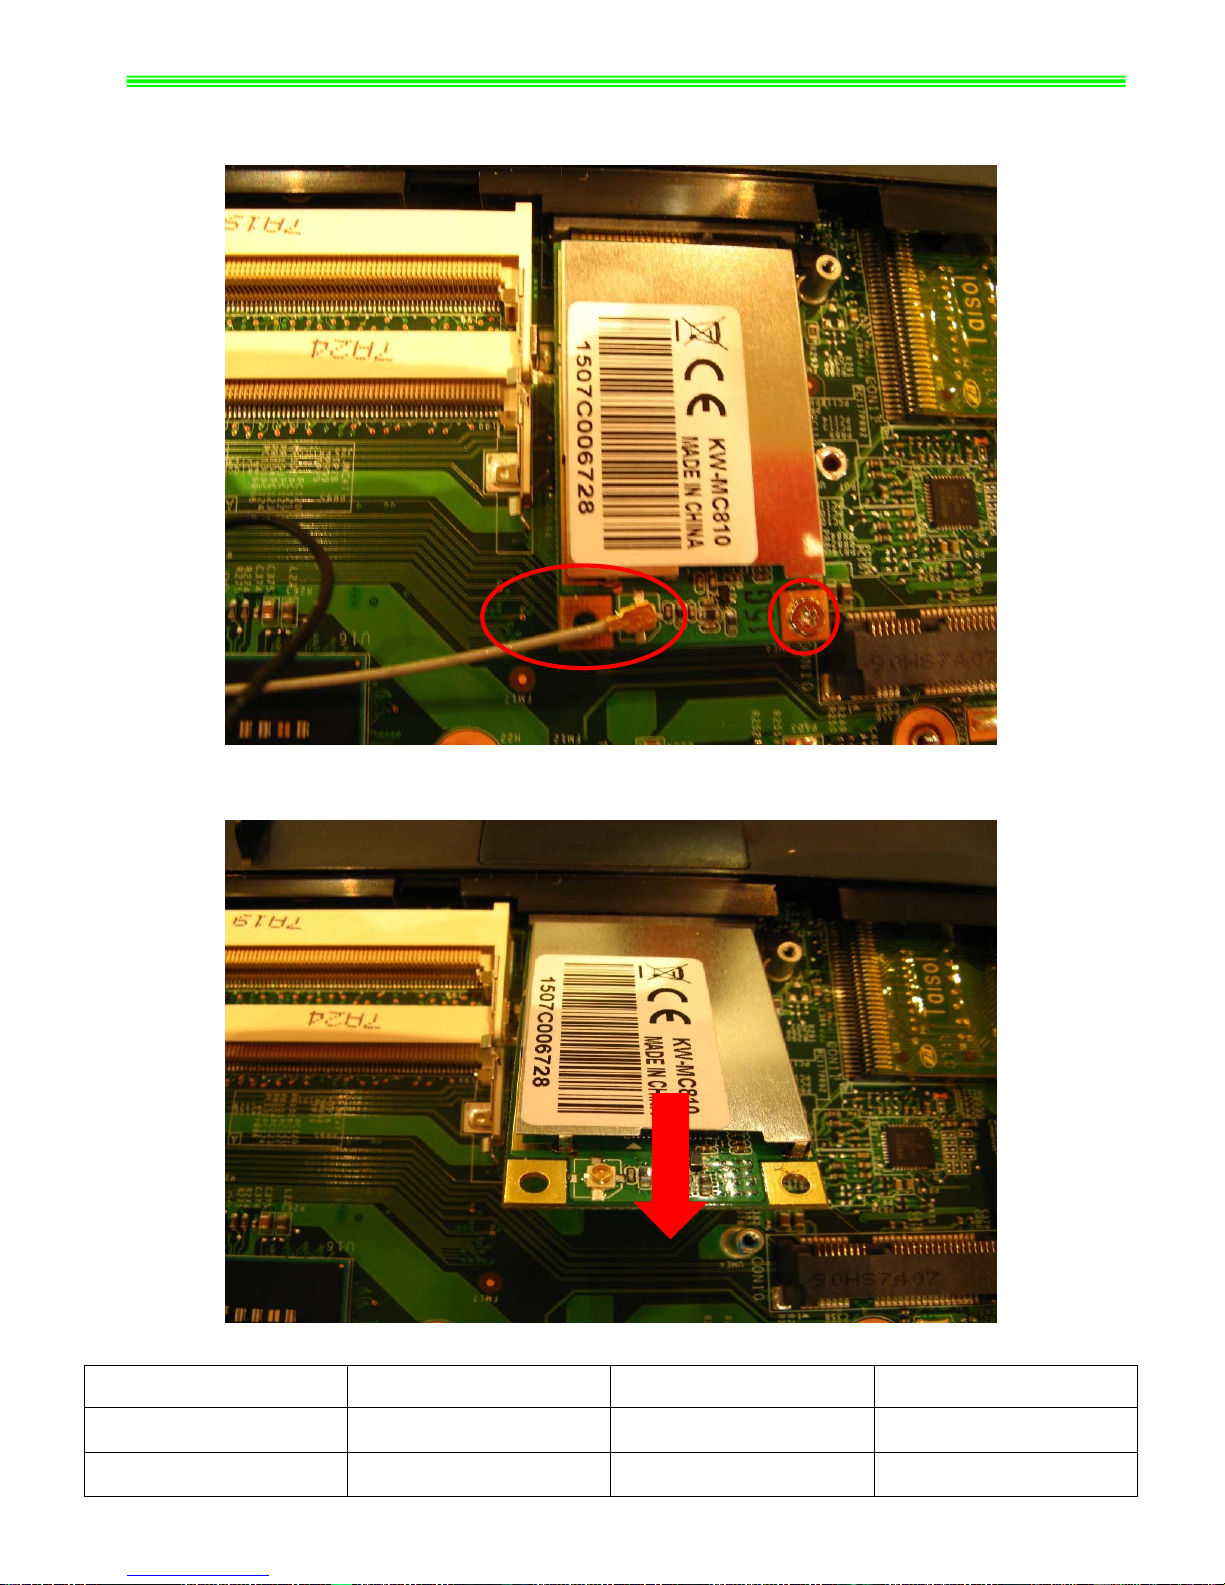
GX620&MS-1651 Disassemble SOP
4-5:
Remove Tuner Antenna, Then remove 1pcs M2*3mm Screw;
Note:Screw driver torque is 1.8~2.2kgf.cm
4-6:Remove Tuner Module;
NO. Part Name Part No. Qty
1 TUNER Module S36-0000610-K45 1
2 Screw E43-1203003-H29 1
Page 11
GX620&MS-1651 Disassemble SOP
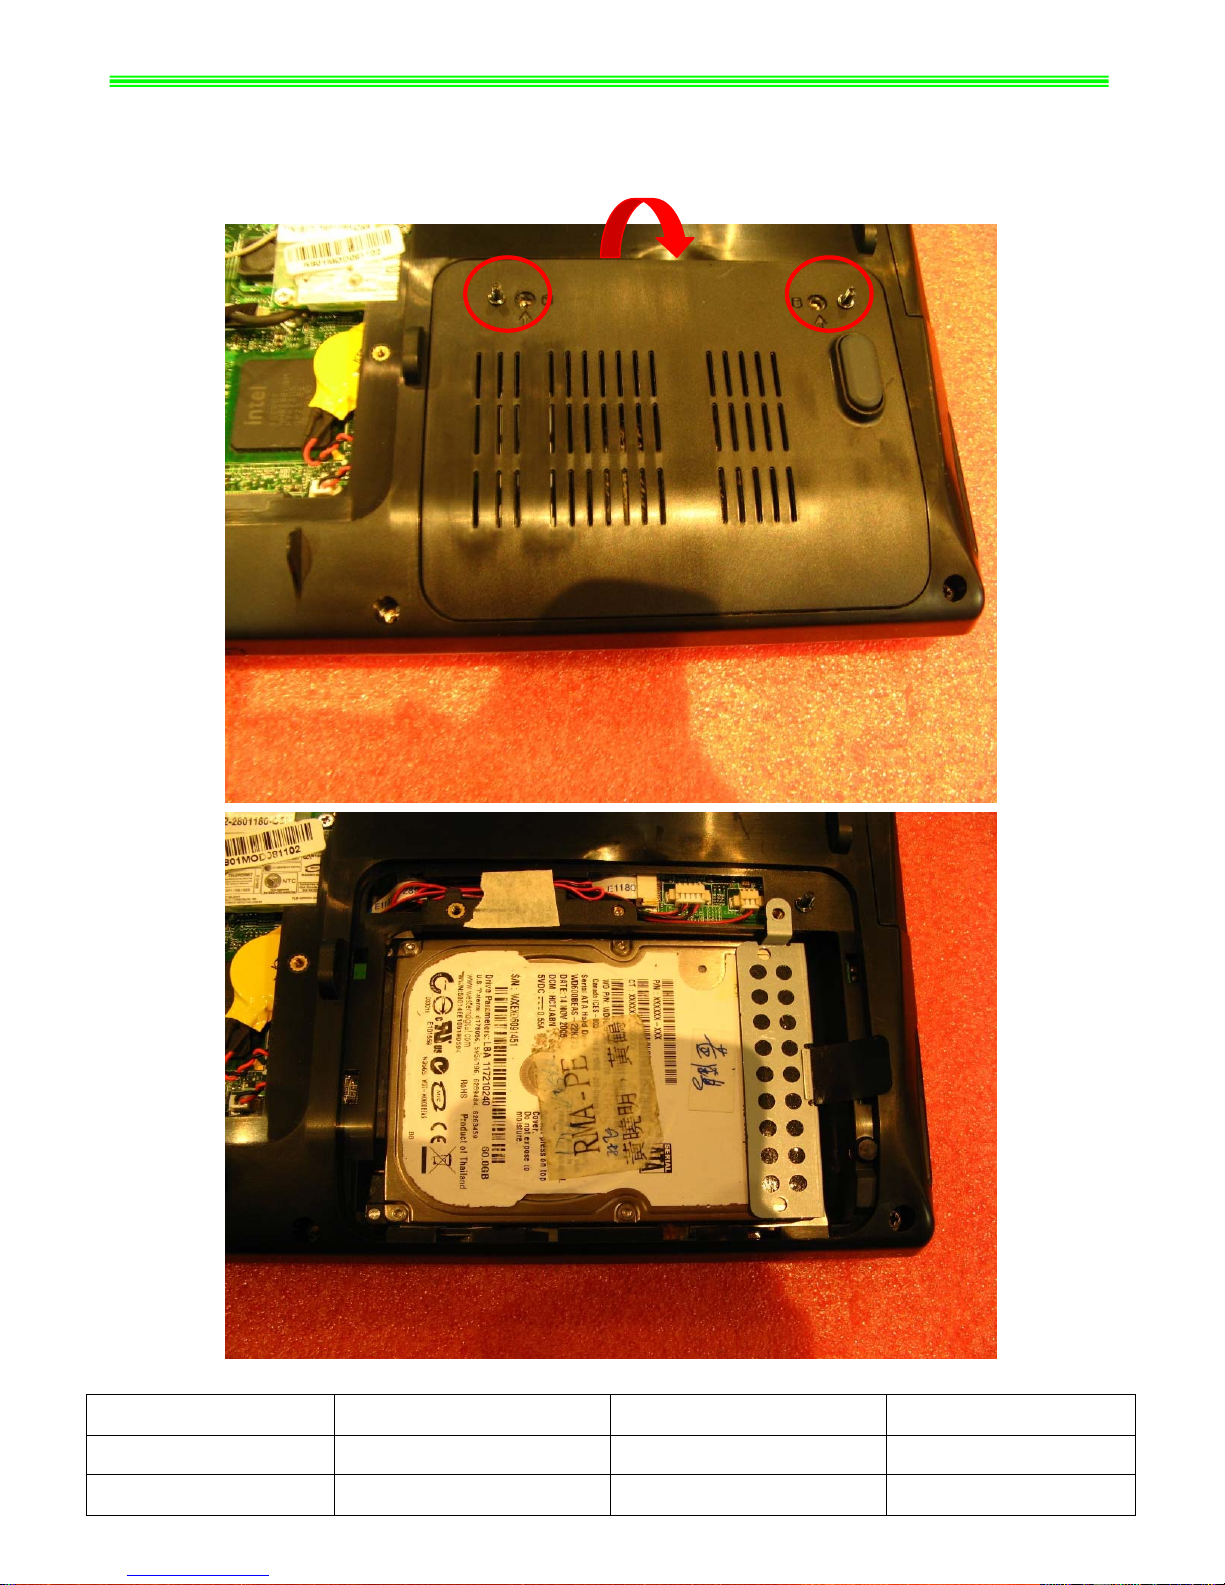
■ 5、HDD Module ASSY
5-1:Remove 2pcs M2.5*5mm Screws Then remove HDD Door Assy as below;
Note:Screw driver torque is 2.0~2.5kgf.cm
NO. Part Name Part No. Qty
1 Screw E43-1255001-H29 2
2 HDD DOOR ASSY 307-651K411-Y31 1
Page 12

GX620&MS-1651 Disassemble SOP
5-2:
Remove HDD Module as below;
NO. Part Name Part No. Qty
1 Screw E43-1255001-H29 1
Page 13
GX620&MS-1651 Disassemble SOP
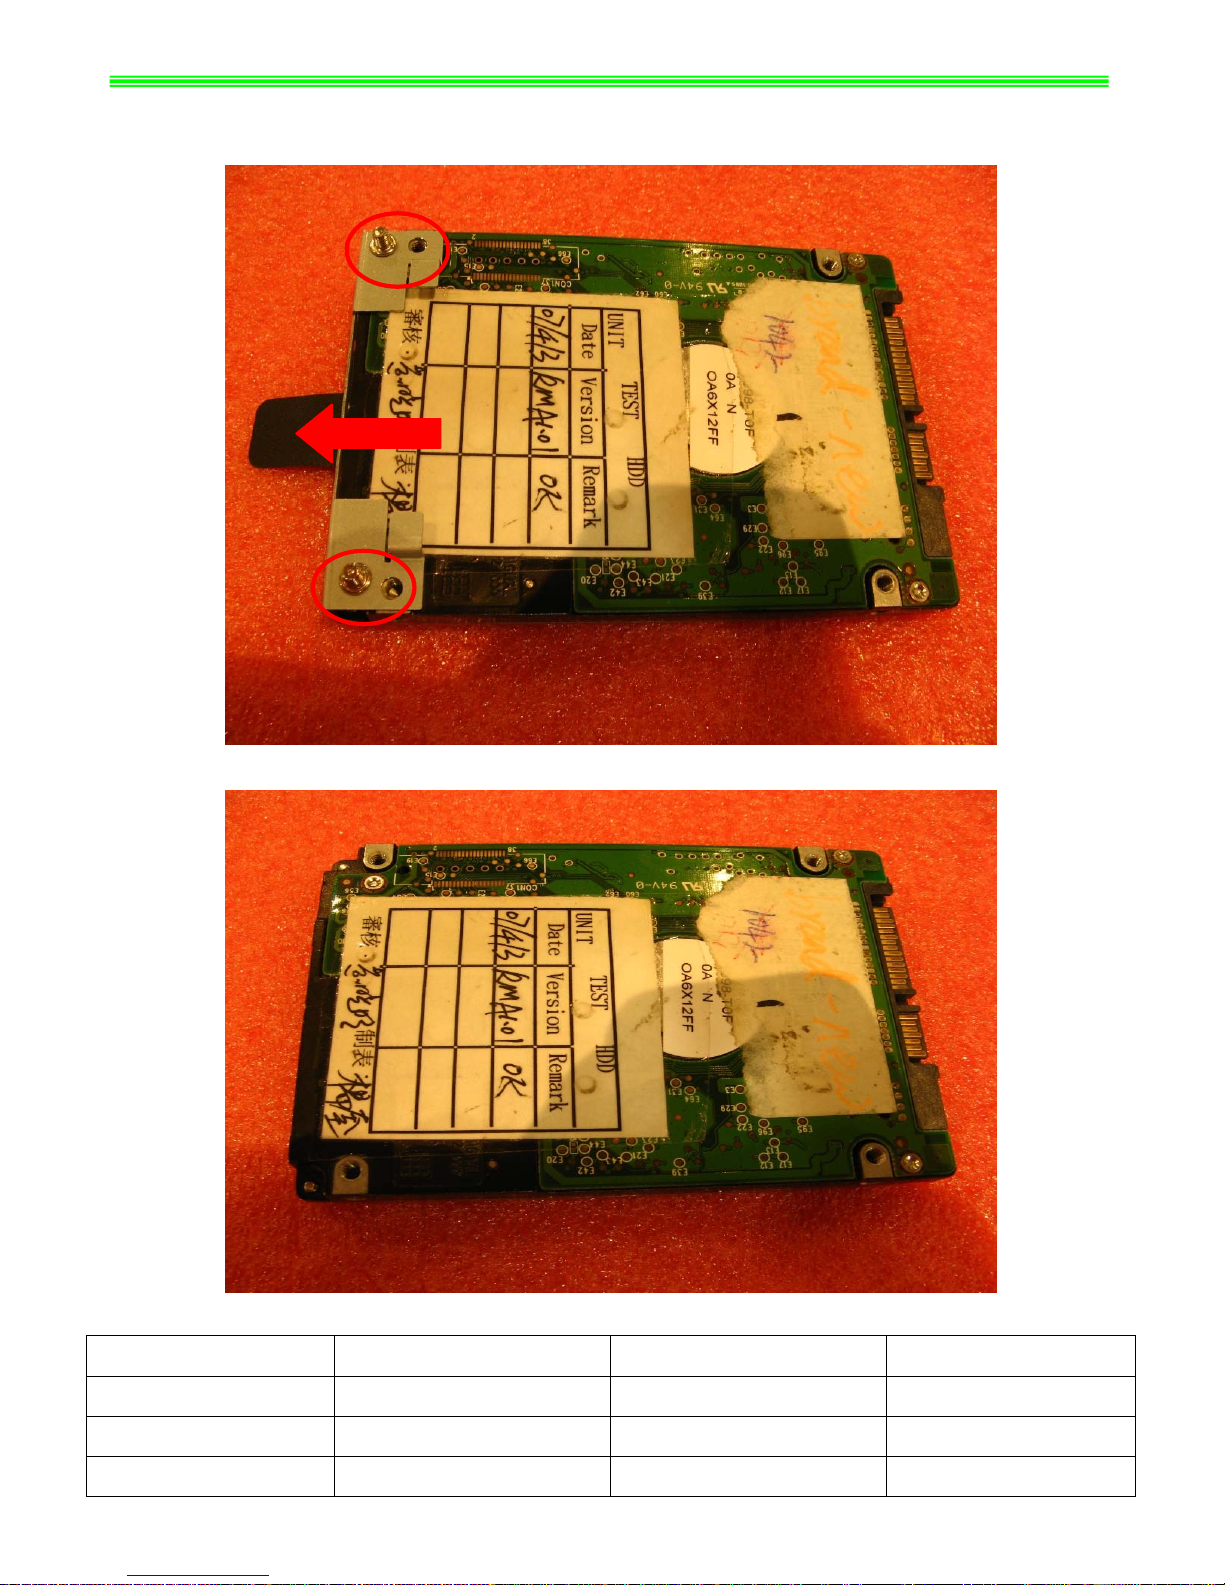
5-3:
Remove 2pcs M3*3.5mm Screws Then remove HDD Bracket as below;
Note:Screw driver torque is 2.0~2.5kgf.cm
NO. Part Name Part No. Qty
1 Screw E43-1303501-H29 2
2 HDD Bracket 307-6510111-Y28 1
3 HDD MODULE ASSY S71-2425504-F06 1
Page 14

GX620&MS-1651 Disassemble SOP
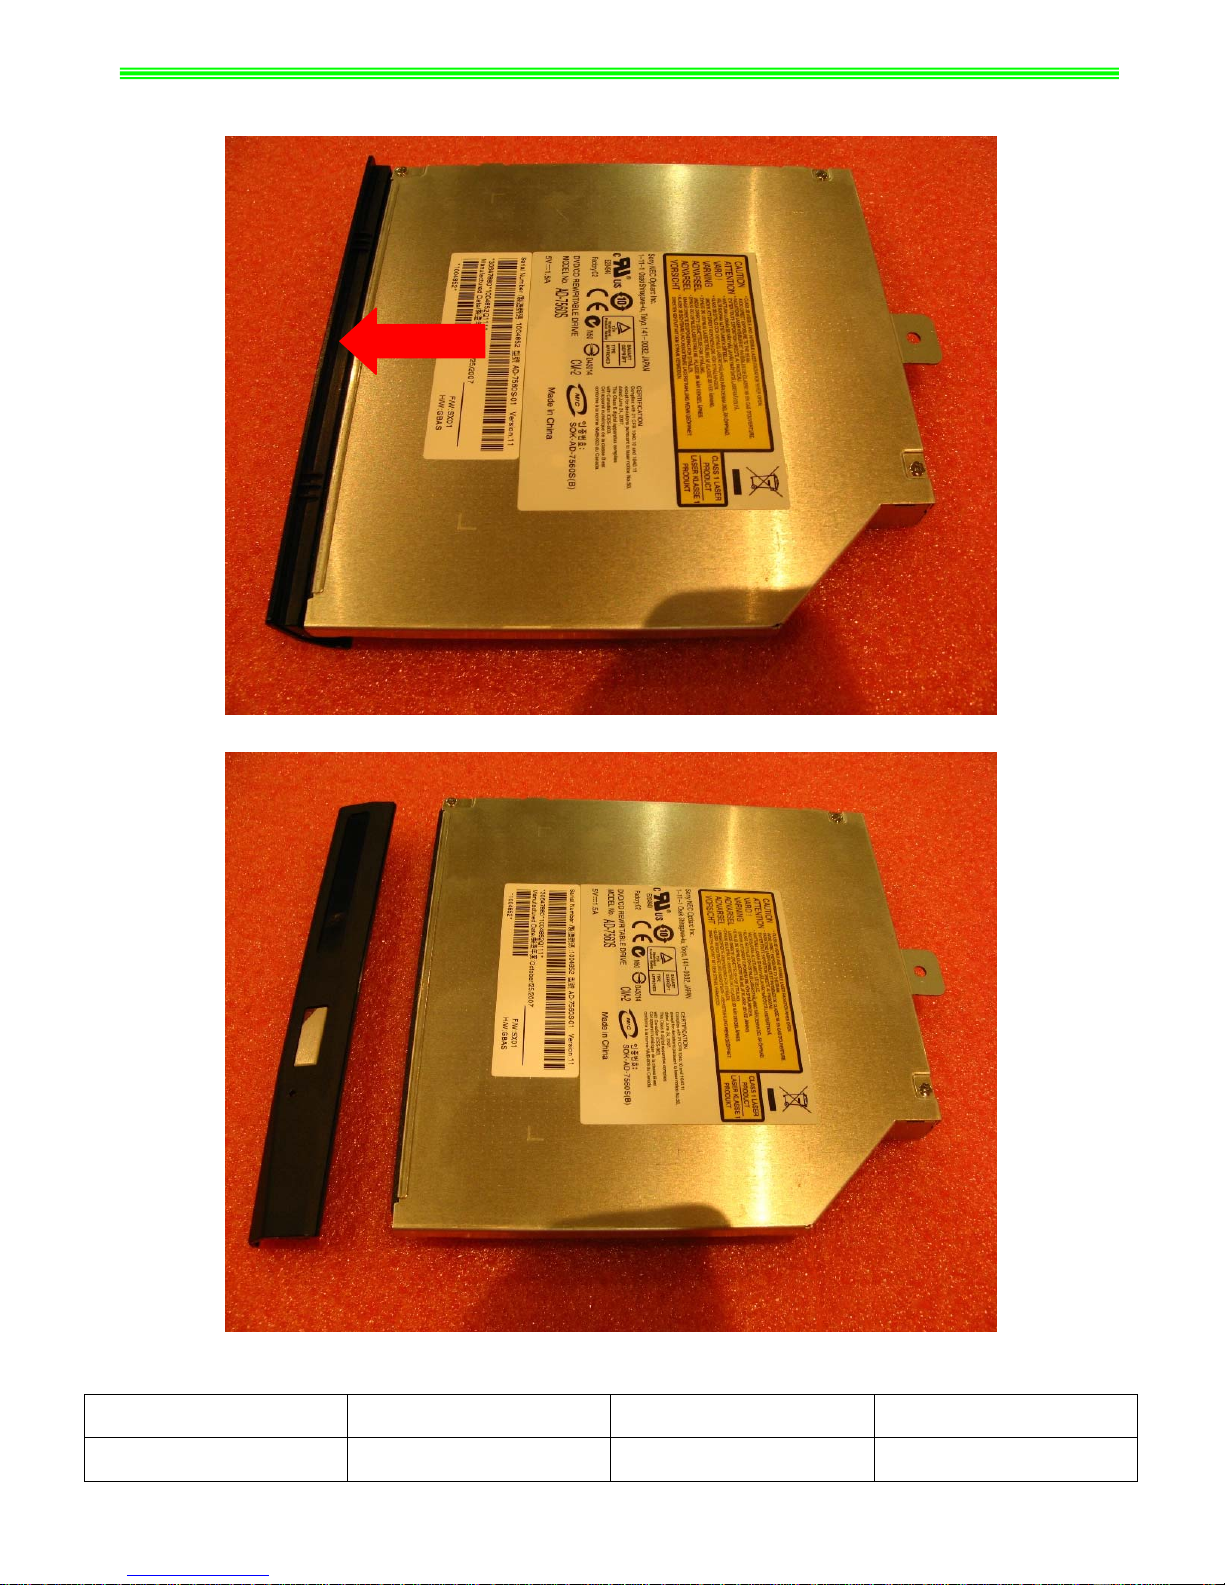
■ 6、ODD Module ASSY
6-1:Remove 1pcs M2.5*5mm Screw Then remove ODD Module Assy as below;
Note:Screw driver torque is 2.0~2.5kgf.cm
NO. Part Name Part No. Qty
1 Screw E43-1255001-H29 1
Page 15
GX620&MS-1651 Disassemble SOP
6-2:
Remove ODD Bezel as below;
NO. Part Name Part No. Qty
1 ODD Bezel E2P-651F211-Y31 1
Page 16
GX620&MS-1651 Disassemble SOP
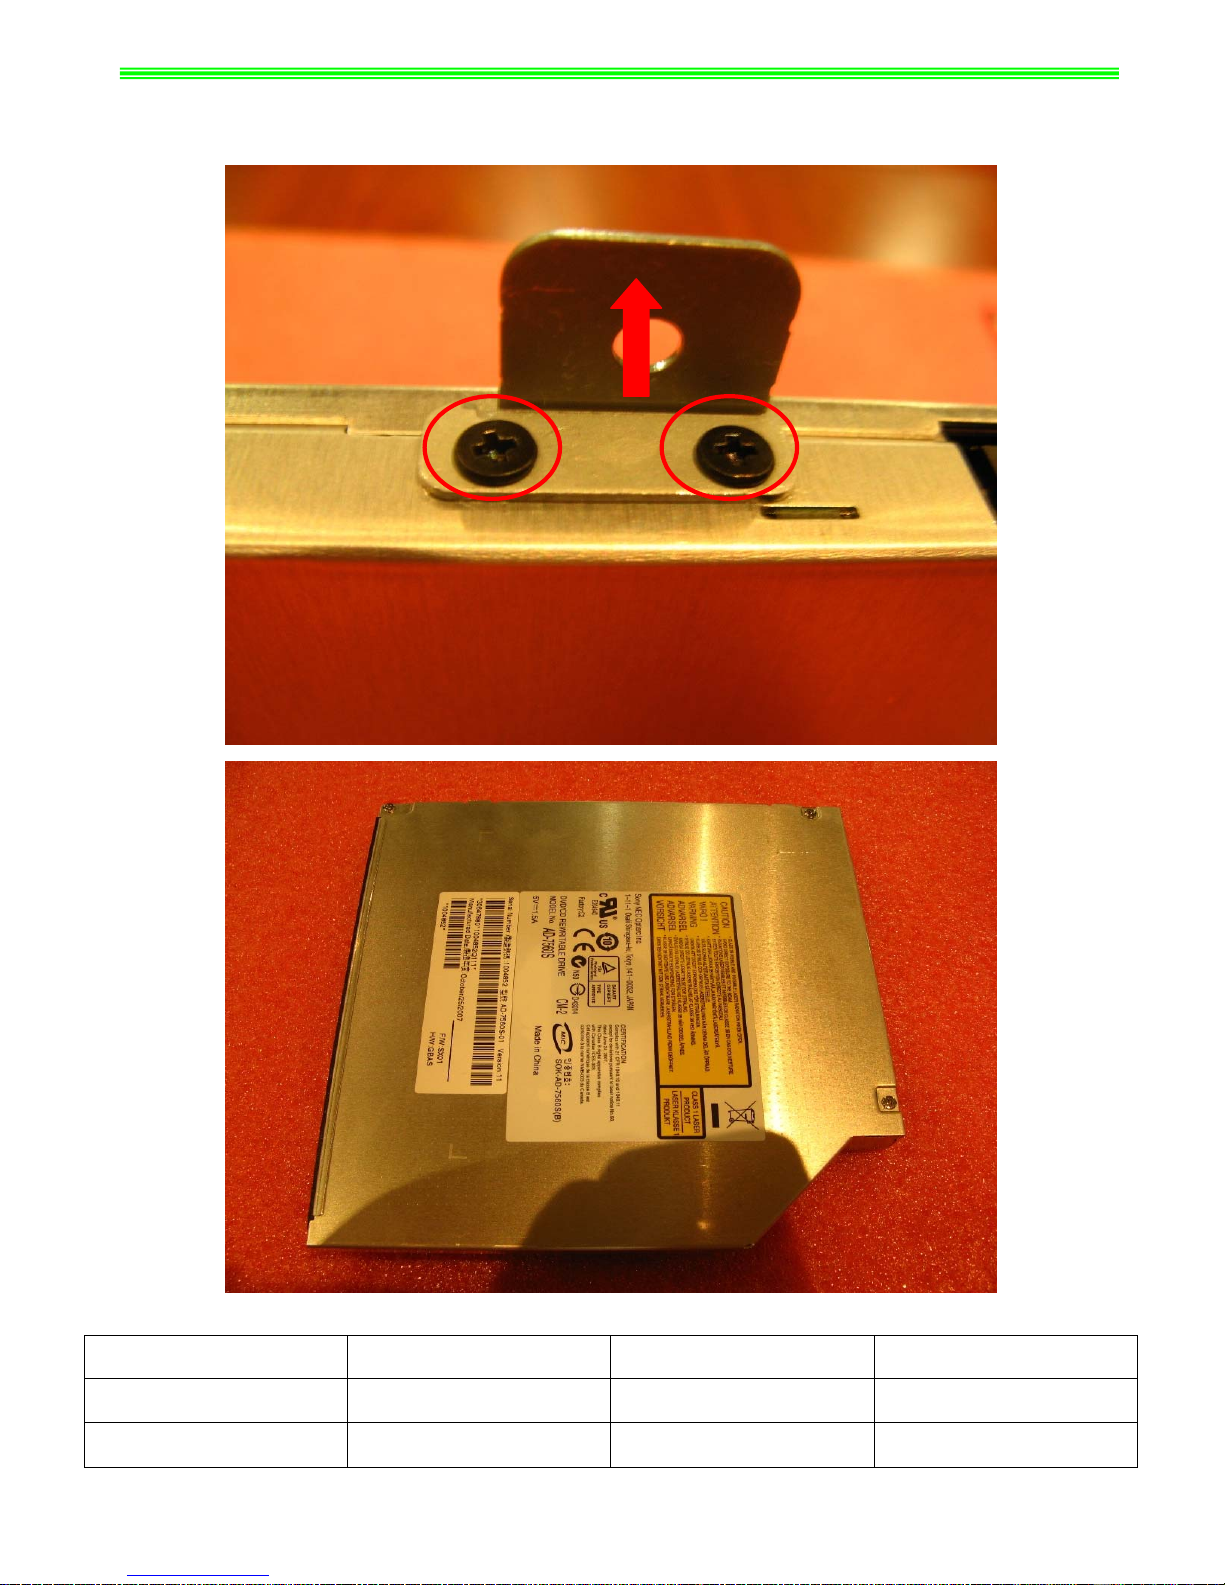
6-3:
Remove 2pcs M2*3mm Screws Then remove ODD Bracket as below;
Note:Screw driver torque is 1.5~1.8kgf.cm
NO. Part Name Part No. Qty
1 Screw E43-1203007-H29 2
2 ODD Bracket E2M-6510211-Y28 1
Page 17
GX620&MS-1651 Disassemble SOP
■ 7、HINGE COVER ASSY
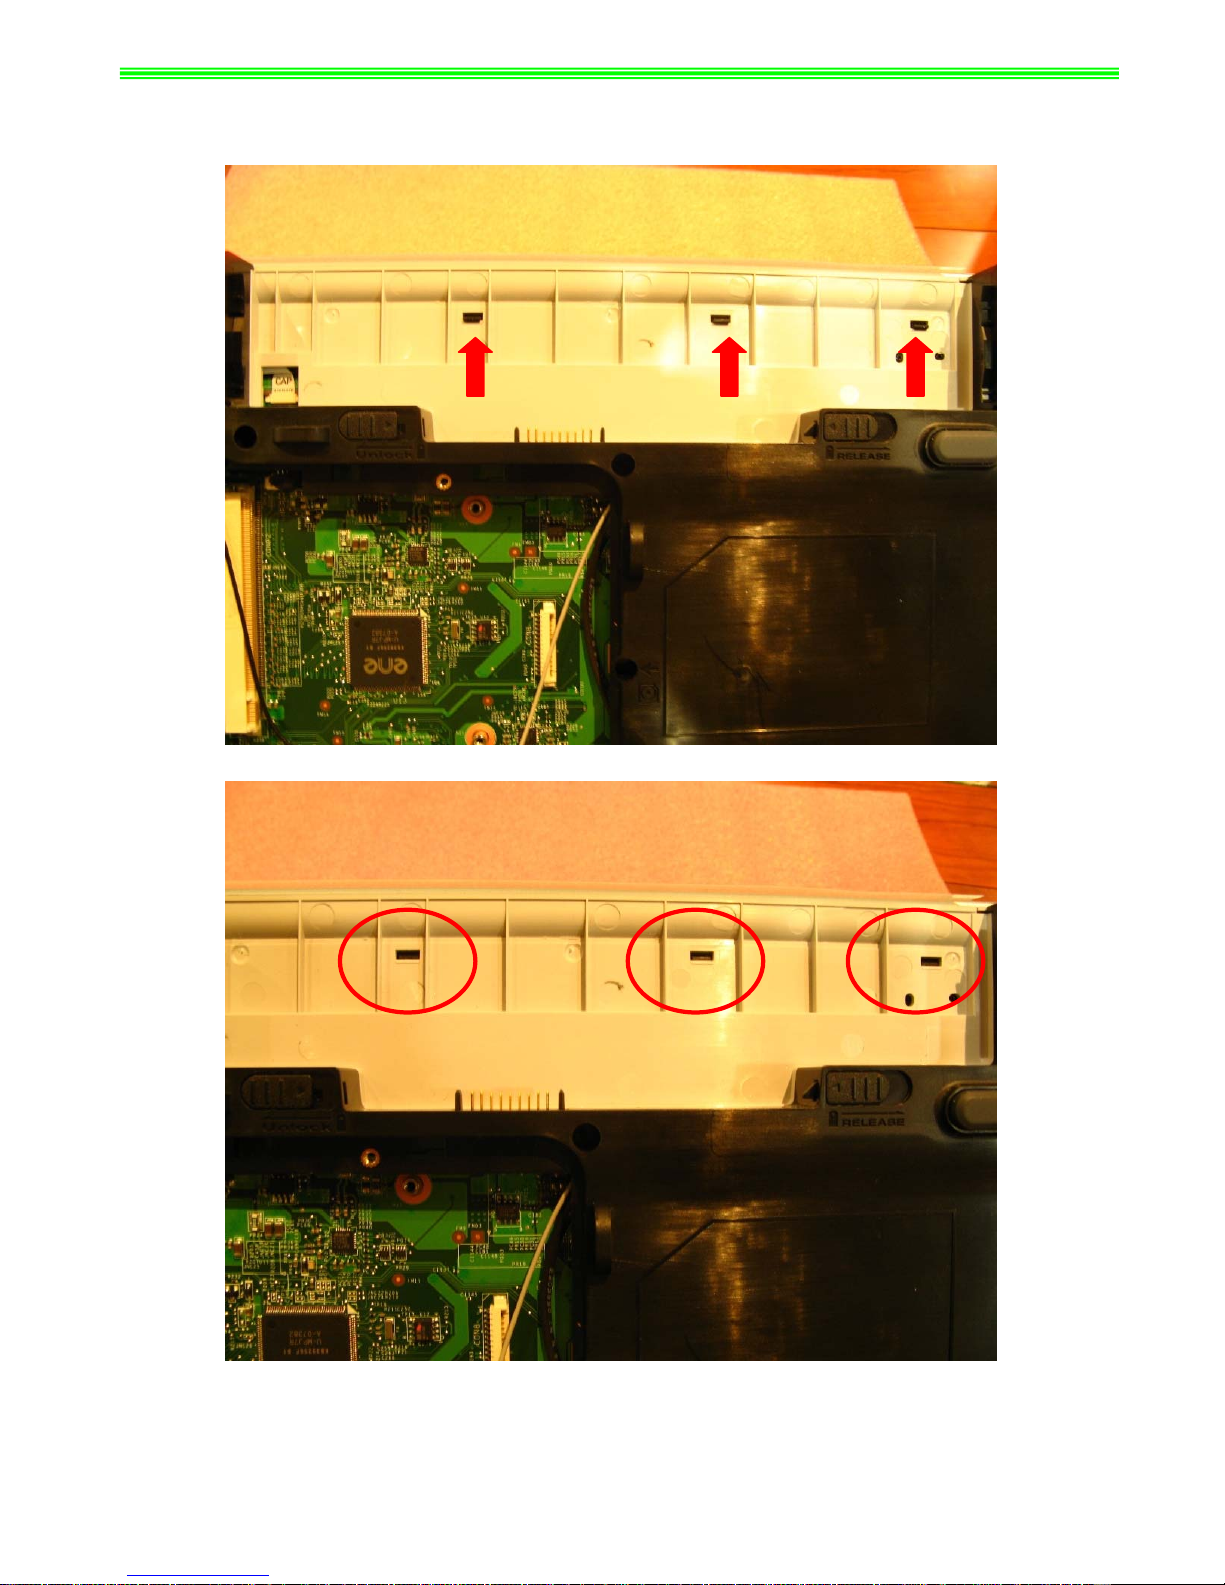
7-1:
Push Fastener as below;
Page 18
GX620&MS-1651 Disassemble SOP
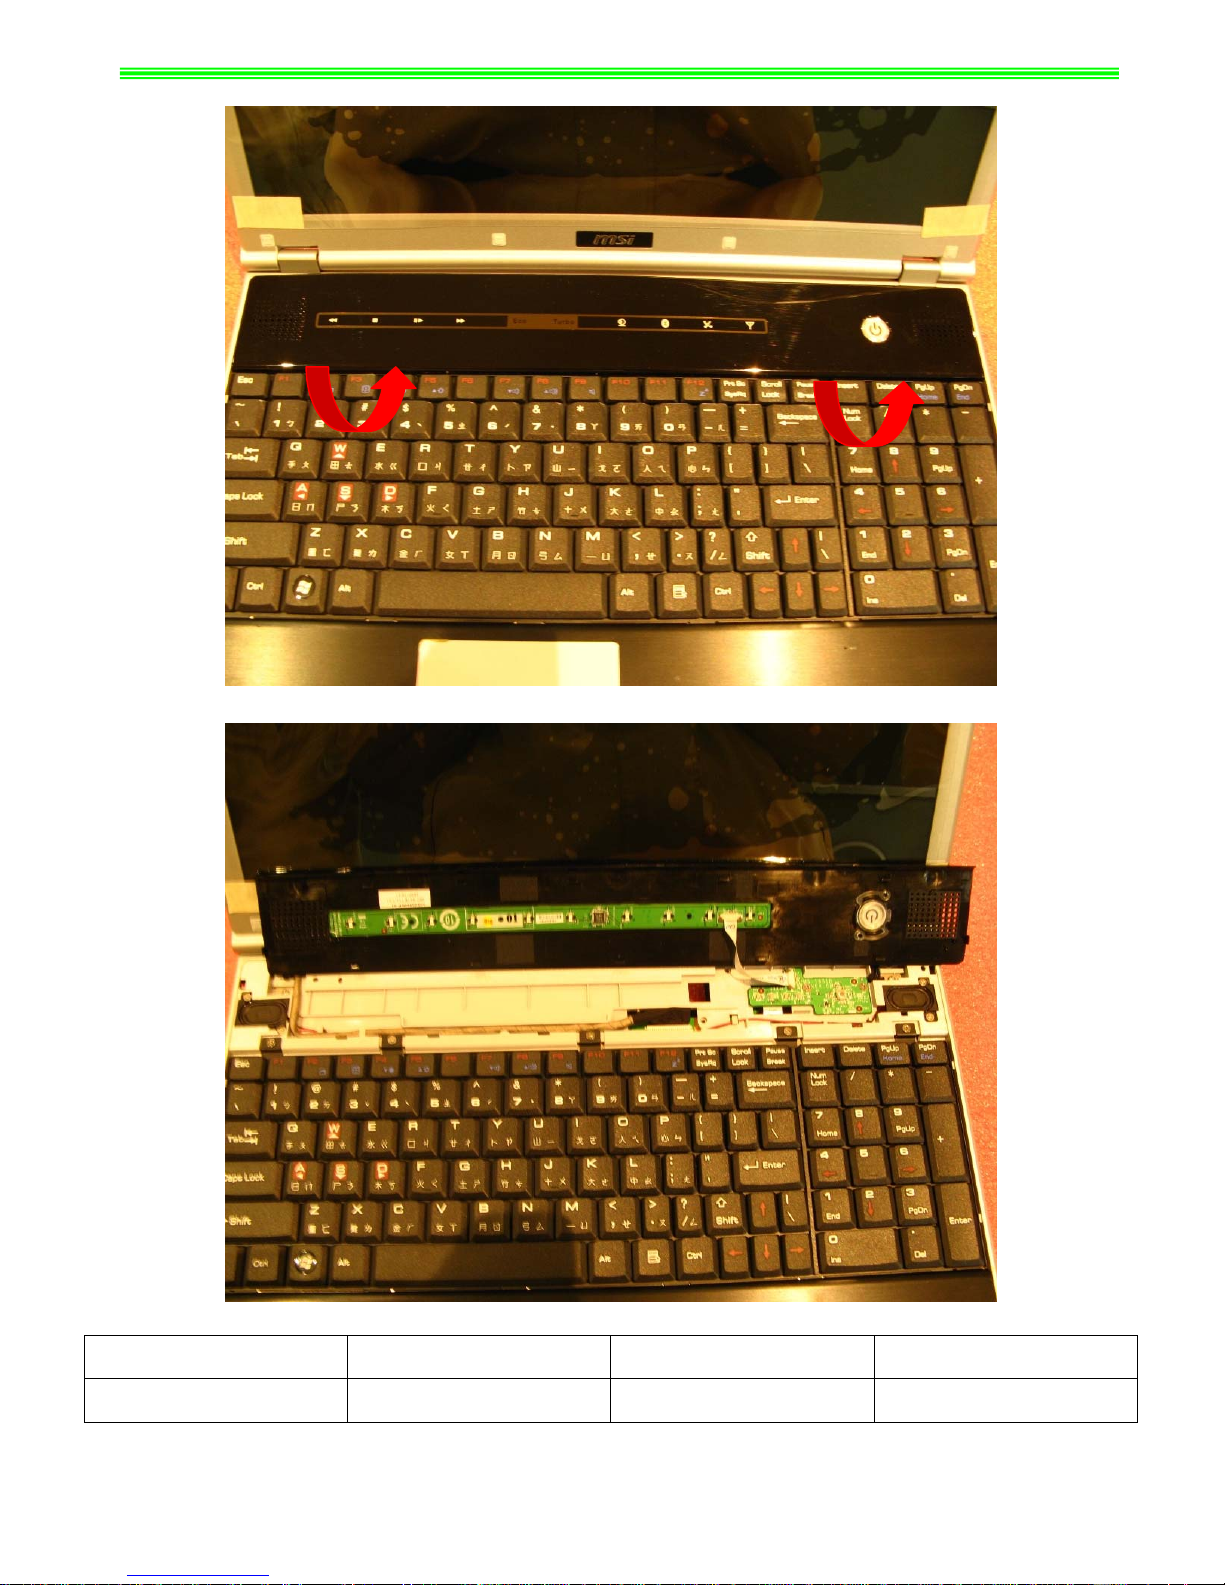
7-2:Remove Hinge Cover as below;
NO. Part Name Part No. Qty
1 HINGE COVER 307-651E111-Y31 1
Page 19

GX620&MS-1651 Disassemble SOP
7-3:
Remove Hinge Cover Cable as below;
NO. Part Name Part No. Qty
1 POWER BOARD 607-1651B-C10 1
Page 20

GX620&MS-1651 Disassemble SOP
7-4:
Remove Cap Sensor Board as below;
NO. Part Name Part No. Qty
1 Cap Sensor Board 607-1651D-C10 1
Page 21

GX620&MS-1651 Disassemble SOP
7-5:
Remove Cap Sensor Board as below;
NO. Part Name Part No. Qty
1 Cap Sensor Board 607-1651D-C10 1
2 Cap Sensor Board Cable K1C-1012023-J36 1
Page 22

GX620&MS-1651 Disassemble SOP
■ 8、UPCASE ASSY
8-1:
Remove 5pcs M2*3mm Screws, Then remove Keyboard as below;
Note:Screw driver torque is 1.5~2.0kgf.cm
NO. Part Name Part No. Qty
1 Screw E43-1203003-H29 5
2 Keyboard S1N-3UTC131-C54 1
Page 23

GX620&MS-1651 Disassemble SOP
8-2:
Remove 2pcs M2*3mm Screws, Then remove Power Board as below;
Note:Screw driver torque is 1.5~2.0kgf.cm
NO. Part Name Part No. Qty
1 Screw E43-1203003-H29 2
2 Power Board 607-1651B-C10 1
Page 24

GX620&MS-1651 Disassemble SOP
8-3:
Remove 13pcs M2.5*5mm Screws, Then remove 2pcs M2.5*7mm Screws;
Note:Screw driver torque is 2.0~2.5kgf.cm
NO. Part Name Part No. Qty
1 Screw E43-1255001-H29 13
2 Screw E43-1257001-H29 2
Page 25

GX620&MS-1651 Disassemble SOP
8-4:
Remove PCI-E Card And XD Card as below;
NO. Part Name Part No. Qty
1 PCI-E Card E2P-6510411-Y31 1
2 XD Card E2P-6510611-Y31 1
Page 26

GX620&MS-1651 Disassemble SOP
8-5:
Disconnect Speaker Cable and Microphone Cable as below;
NO. Part Name Part No. Qty
1 Speaker Cable S33-A020200-F33 1
2 Microphone Cable S34-2100580-F33 1
Page 27

GX620&MS-1651 Disassemble SOP
8-6:
Remove FFC Cable(TO Audio Board) and FFC Cable(TO M/B) as below;
NO. Part Name Part No. Qty
1 FFC Cable(TO Audio Board) K1C-1020003-J36 1
2 FFC Cable(TO M/B) K1C-1012024-J36 1
Page 28

GX620&MS-1651 Disassemble SOP
8-7:
Remove 2pcs M2*3mm Screws, Then remove FFC Cable(TO M/B)&(TO Button) as below;
Note:Screw driver torque is 1.5~2.0kgf.cm
8-8:
Remove Touchpad Bracket;
NO. Part Name Part No. Qty
1 Screw E43-1203003-H29 2
2 FFC Cable(TO Button) K1C-1012025-J36 1
3 Touchpad Bracket E2M-6510911-Y28 1
Page 29

GX620&MS-1651 Disassemble SOP
8-9:
Remove 1pcs M2*3mm Screw, Then remove Touchpad Button Board;
Note:Screw driver torque is 1.0~1.5kgf.cm
NO. Part Name Part No. Qty
1 Screw E43-1203003-H29 1
2 T ouchpad Button Board 607-1651C-C10 1
Page 30

GX620&MS-1651 Disassemble SOP
8-10:
Remove FFC Cable (TO Button) as below;
NO. Part Name Part No. Qty
1 FFC Cable(TO Button) K1C-1012025-J36 1
2 Touchpad Module S78-3700360-SD2 1
Page 31

GX620&MS-1651 Disassemble SOP
■ 9、LOWER CASE ASSY
9-1:
Remove 1pcs M2.5*5mm Screw, Then remove FFC Cable (TO Audio Board) as below;
Note:Screw driver torque is 2.3±0.2kgf.cm
9-2:
Remove FFC Cable (TO Power Board) as below;
NO. Part Name Part No. Qty
1 Screw E43-1255001-H29 1
2 FFC Cable(To Audio Board) K1C-1020003-J36 1
3 FFC Cable(To Power Board) K1C-1018003-J36 1
Page 32

GX620&MS-1651 Disassemble SOP
9-3:
Remove RJ11 Cable and Bluetooth Cable as below;
9-4:
Remove M/B;
NO. Part Name Part No. Qty
1 RJ11 CABLE K10-3002110-H58 1
2 BLUETOOTH CABLE K10-3008077-H39 1
3 M/B 607-16511-B10 1
Page 33

GX620&MS-1651 Disassemble SOP
9-5:
Remove 1pcs M2*3mm Screw, Then remove Bluetooth Antenna;
Note:Screw driver torque is 1.0~1.5kgf.cm
NO. Part Name Part No. Qty
1 Screw E43-1203003-H29 1
2 BLUETOOTH ANTENNA S79-1800890-V03 1
3 BLUETOOTH MODULE 605-6837D-070 1
Page 34

GX620&MS-1651 Disassemble SOP
9-6:
Remove 2pcs M2*3mm Screws, Then remove Audio Board;
Note:Screw driver torque is 1.0~1.5kgf.cm
NO. Part Name Part No. Qty
1 Screw E43-1203003-H29 2
2 AUDIO BOARD 607-1651A-C10 1
3 LOWER CASE ASSY 307-651D411-Y31 1
Page 35

GX620&MS-1651 Disassemble SOP
9-7:
Remove Bluetooth Antenna、RJ11 Cable and TV IO Jack;
NO. Part Name Part No. Qty
1 BLUETOOTH ANTENNA S79-1800890-V03 1
2 RJ11 CABLE K10-3002110-H58 1
3 TV IO JACK K19-3001017-H39 1
Page 36

GX620&MS-1651 Disassemble SOP
■ 10、LCD MODULE ASSY
10-1:
Disconnect Camera Cable as below;
NO. Part Name Part No. Qty
1 Camera Cable K10-3006056-H39 1
Page 37

GX620&MS-1651 Disassemble SOP
10-2:
Remove 2pcs M2.5*5mm Screws;
Note:Screw driver torque is 2.0~2.5kgf.cm
10-3:Use Plastic Stick Push Hinge Cap as below;
NO. Part Name Part No. Qty
1 Screw E43-1255001-H29 2
2 Hinge Cap_L E2P-6511311-Y31 1
3 Hinge Cap_R E2P-6511411-Y31 1
Page 38

GX620&MS-1651 Disassemble SOP
10-4:
Draw Out Camera Cable、Wireless Antenna and 3G Antenna as below;
NO. Part Name Part No. Qty
1 3G Antenna S79-1800780-V03 1
2 Wireless Antenna_L S79-1800800-V03 1
3 Wireless Antenna_R S79-1800790-V03 1
Page 39

GX620&MS-1651 Disassemble SOP
10-5:
Disconnect Coaxia Cable as below;
NO. Part Name Part No. Qty
1 Coaxia Cable K19-3040006-H39 1
Page 40

GX620&MS-1651 Disassemble SOP
10-6:
Remove 2pcs M2.5*7mm Screws;
Note:Screw driver torque is 3.5±0.2kgf.cm
NO. Part Name Part No. Qty
1 Screw E43-1257001-H29 2
Page 41

GX620&MS-1651 Disassemble SOP
10-7:
Remove 8pcs LCD Rubbers Then remove 8pcs M2.5*5mm Screws;
Note:Screw driver torque is 2.0~2.5kgf.cm
NO. Part Name Part No. Qty
1 LCD Rubber E2Y-6510111-Y40 8
2 Screw E43-1255001-H29 8
Page 42

GX620&MS-1651 Disassemble SOP
10-8:
Remove LCD Bezel as below;
NO. Part Name Part No. Qty
1 LCD BEZEL 307-651B411-Y31 1
Page 43

GX620&MS-1651 Disassemble SOP
10-9:Remove 6pcs M2.5*5mm Screws, Then remove Left And Right Hinge;
Note:Screw driver torque is 2.0~2.5kgf.cm
NO. Part Name Part No. Qty
1 Screw E43-1255001-H29 6
2 Hinge_Left E2M-6510411-G60 1
3 Hinge_Right E2M-6510711-G60 1
Page 44

GX620&MS-1651 Disassemble SOP
10-10:
Remove Inverter Cable, Then remove Display Module;
NO. Part Name Part No. Qty
1 Display Module S1J-690A004-S02 1
Page 45

GX620&MS-1651 Disassemble SOP
10-11:
Remove Inverter Module、3G Antenna、WLAN Antenna;
NO. Part Name Part No. Qty
1 INVERTER S78-3300450-SG3 1
2 Wireless Antenna_R S79-1800790-V03 1
3 Wireless Antenna_L S79-1800800-V03 1
4 3G Antenna S79-1800780-V03 1
Page 46

GX620&MS-1651 Disassemble SOP
10-12:
Remove CMOS Camera Module as below;
NO. Part Name Part No. Qty
1 CMOS Camera Module S1F-0003020-C54 1
2 Camera Cable K10-3006056-H39 1
3 LCD Cover Assy 307-651A511-CG0 1
Page 47

GX620&MS-1651 Disassemble SOP
10-13:
Remove Coaxial Cable as below;
NO. Part Name Part No. Qty
1 Coaxial Cable K19-3001017-H39 1
2 Display Module S1J-690A004-S02 1
Page 48

GX620&MS-1651 Disassemble SOP
10-14:
Remove 8pcs M2*3mm Screws, Then remove LCD Bracket as below;
Note:Screw driver torque is 1.5~2.0kgf.cm
NO. Part Name Part No. Qty
1 Screw E43-1203007-H29 1
2 LCD Bracket_Left E2M-6510511-Y28 1
3 LCD Bracket_Right E2M-6510611-Y28 1
Page 49

GX620 (MS-1651)screws specification
Photo Screw specification Label
(M2.5*L5MM) black
(M2*L3MM)white
(M3*L3.5MM) white
(M2.5*L7MM) black
Page 50

GX620 (MS-1651)screws specification
■ 1、BOTTOM DOOR ASSY total 18Pcs M2.5*5 and 2pcs M2.5*7 screws,
■ specification:
Photo Screw specification
label
(M2.5*L7MM) black
(M2.5*L5MM) black
Page 51

GX620 (MS-1651)screws specification
■ 2、THERMAL-KIT total 7pcs spring Screws
6 5
1
4
2
3
7
Page 52

GX620 (MS-1651)screws specification
■ 3、TUNER, WIRELESS ,MDC CARD and HDD ASSY total 8Pcs screws,
■ specification:
Photo Screw specification label
(M3*L3.5MM) white
(M2*L3MM)white
Page 53

GX620 (MS-1651)screws specification
■ 4.UPCASE ASSY total 13pcs screws ,
■ specification:
Photo Screw specification Label
(M2*L3MM)white
(M2.5*L5MM) black
Page 54

GX620 (MS-1651)screws specification
■ 5.LCD Bezel total 8pcs screws,
■ specification:
Photo Screw specification label
(M2.5*L5MM) black
Page 55

GX620 (MS-1651)screws specification
■ 6. LCD MODULE ASSY total 14cs screws
■ specification:
Photo Screw specification label
(M2.5*L5MM) black
(M2*L3MM)white
Page 56

GX620 (MS-1651)screws specification
■ 7. UPCASE and LOWER CASES total 3pcs screws,
■ specification:
Photo Screw specification label
(M2*L3MM)white
Page 57

GX620 (MS-1651)screws specification
■ 8、NB total 1pcs screw,
■ specification:
Photo Screw specification label
(M2.5*L5MM) black
Page 58

GX620 (MS-1651)screws specification
■ 9. Bluetooth and Audio Board 3pcs screws
■ specification:
Photo Screw specification label
(M2*L3MM)white
Page 59

GX620 (MS-1651)screws specification
■ 10. Touch Pad Board total 3pcs screws
■ specification:
Photo Screw specification label
(M2*L3MM)white
 Loading...