

Page 1
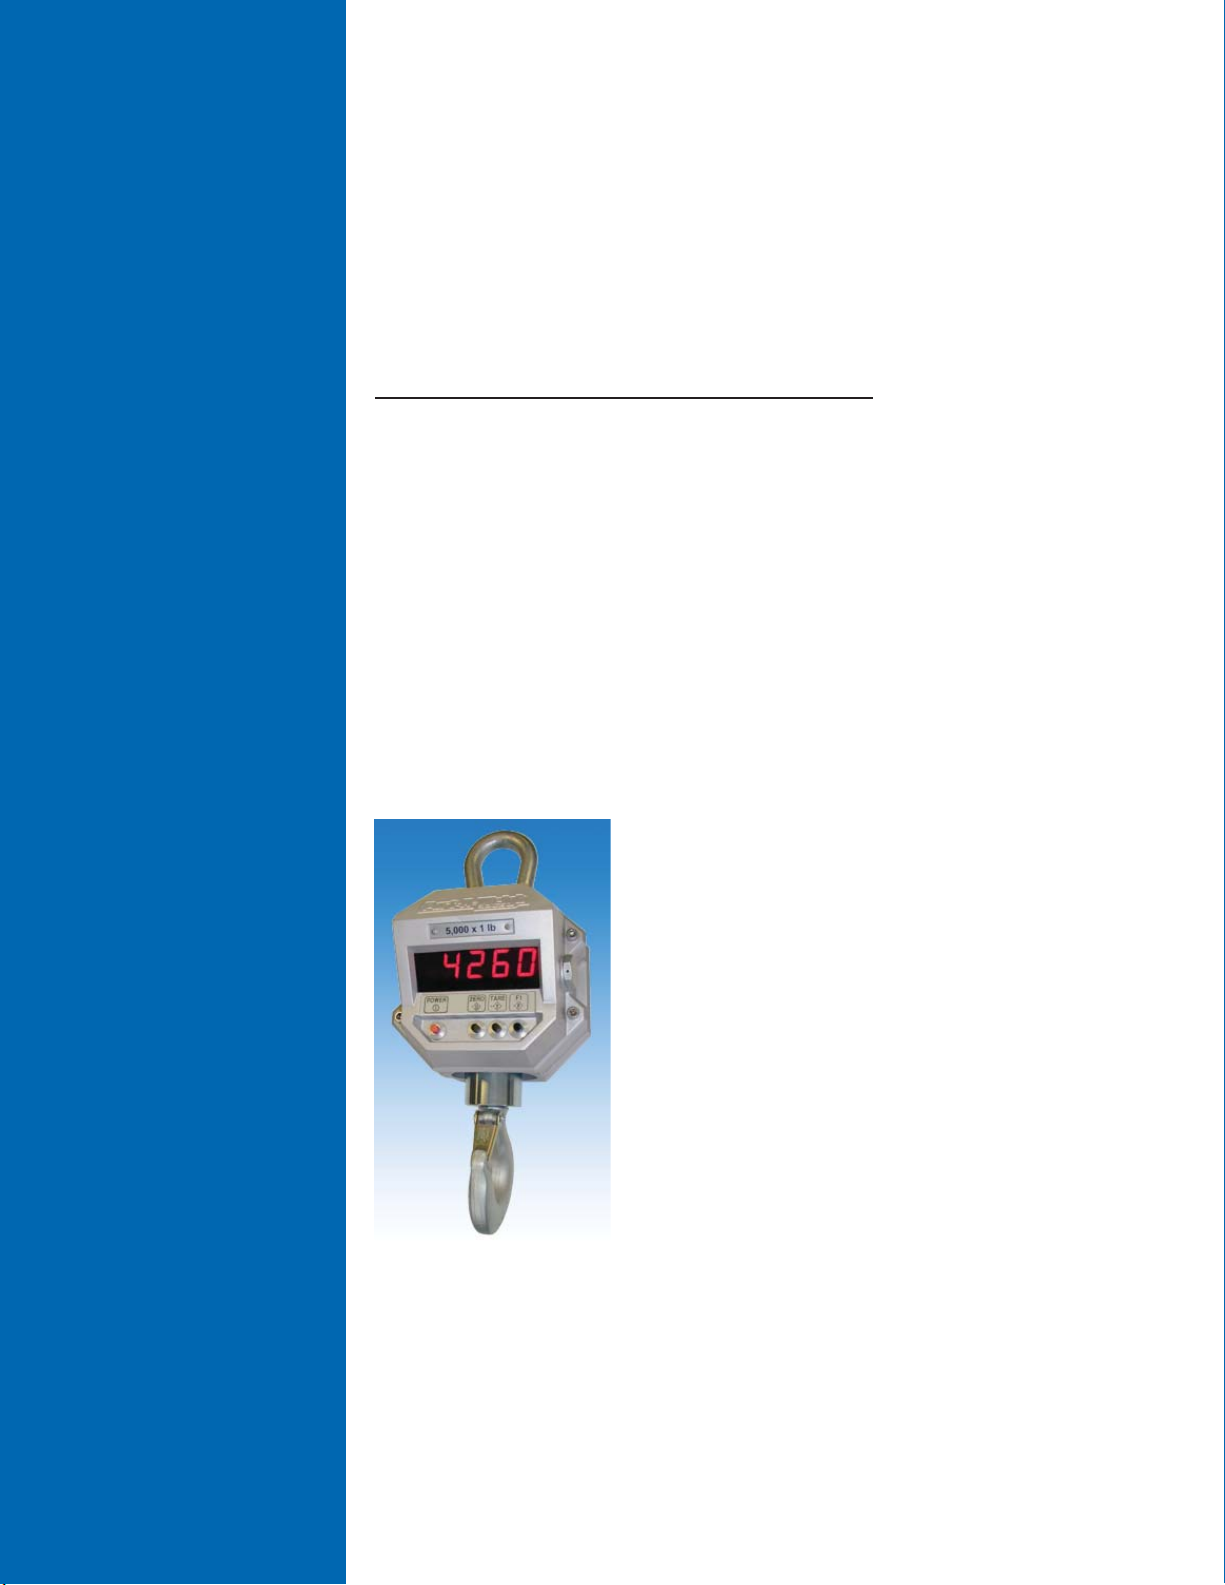
MSI4260
PORT-A-WEIGH CRANE SCALES
User
Guide
Quality
Industrial
Weighing
and Force
Measurement
Equipment
Measurement Systems International
Page 2

M E A S U R E M E N T S Y S T E M S I N T E R N A T I O N A L
Please read this manual carefully before using the MSI-4260 Port-A-Weigh
Program Number Capacity and Resolution
Serial Number Cal Number
Page 2 MSI-4260 Port-A-Weigh • User Guide
IMPORTANT
Page 3

M E A S U R E M E N T S Y S T E M S I N T E R N A T I O N A L
TABLE OF CONTENTS
Introduction ...........................................................................4
Specifi cations ........................................................................4
Features .................................................................................5
Options ..................................................................................6
Unpacking .............................................................................6
Battery Pack ..........................................................................7
Battery Operation ..................................................................7
Battery Life ...........................................................................7
Battery Charger .....................................................................8
Battery Removal and Replacement ....................................... 9
Operation Guide ....................................................................9
Power ....................................................................................9
Zero .....................................................................................10
T are .....................................................................................10
F1 ........................................................................................ 11
Test (tESt) ...........................................................................11
Accessing the Service Counters ..........................................12
Reset the Service Counter Warning ....................................13
Total (totAL) .......................................................................13
Manual T otal .......................................................................13
Auto T otal ...........................................................................13
To Clear the Last Totalled Weight ....................................... 14
To Clear the Total Value ...................................................... 14
Viewing Total ......................................................................15
Unit (lb/kg) ..........................................................................15
Peak (Phold) ........................................................................15
Net/Gross (nEtGr) ...............................................................16
Scale Setup ..........................................................................16
Quick User Setup Guide .....................................................17
Function (Func) ................................................................... 17
Automatic Power Off (A-OFF) ........................................... 18
Filter (Filtr) .........................................................................18
LED Brightness (LEds) .......................................................19
Unit (kg/lb) ..........................................................................19
Set Points (StPt1, StPt2) .....................................................19
Set Point Entry ....................................................................20
To Disable a Set Point .........................................................20
Total (totAL) .......................................................................20
System Initialize ..................................................................21
Calibration Setup ................................................................21
Quick Calibration Setup Guide ...........................................22
Calibration (CAL) ...............................................................22
Initial Calibration ................................................................ 23
Subsequent Calibration .......................................................25
Fine Calibration (F-CAL) ...................................................25
Calibration with Calibration Offset Resistor (CAL-r) ........ 26
Standards (StAnd) ...............................................................26
Auto Zero Maintenance (AZM) ..........................................27
RF Remote Control ............................................................. 27
Troubleshooting Guide ....................................................... 29
Service Counter Warning .................................................... 31
MSI Limited Warranty ........................................................ 31
Proper Loading Procedures .................................................32
MSI-4260 Port-A-Weigh • User Guide Page 3
Page 4

M E A S U R E M E N T S Y S T E M S I N T E R N A T I O N A L
INTRODUCTION
The MSI-4260 Port-A-Weigh is an electronic, self-contained, battery-operated crane scale.
The scale is made up of three separate sections which house the electronics, load cell and
battery respectively. The sections are bolted together and sealed agaist moisture by the use of
O-Rings. The scale housing is made of impact resistant, marine grade 356 alloy. All electronics are shock mounted and the display window is impact resistant polycarbonate. The
accuracy of the scale meets or exceeds the requirements of National Institute of Standards
Technology, Handbook 44. For most scales, this is 0.1% of applied load.
SPECIFICATIONS
Accuracy: ± 0.1% of applied load ± one displayable increment
Resolution: Standard displayed resolution: 2500 counts Internal A/D resolution: 1,048,576 counts (20 bits)
Capacities: lb 500 2000 5000 10,000 20,000 30,000 50,000 70,000 100,000
kg 250 1000 2500 5000 10,000 15,000 25,000 35,000 50,000
Power: Battery operated, rechargeable sealed lead acid battery pack up to 100 hours of battery life
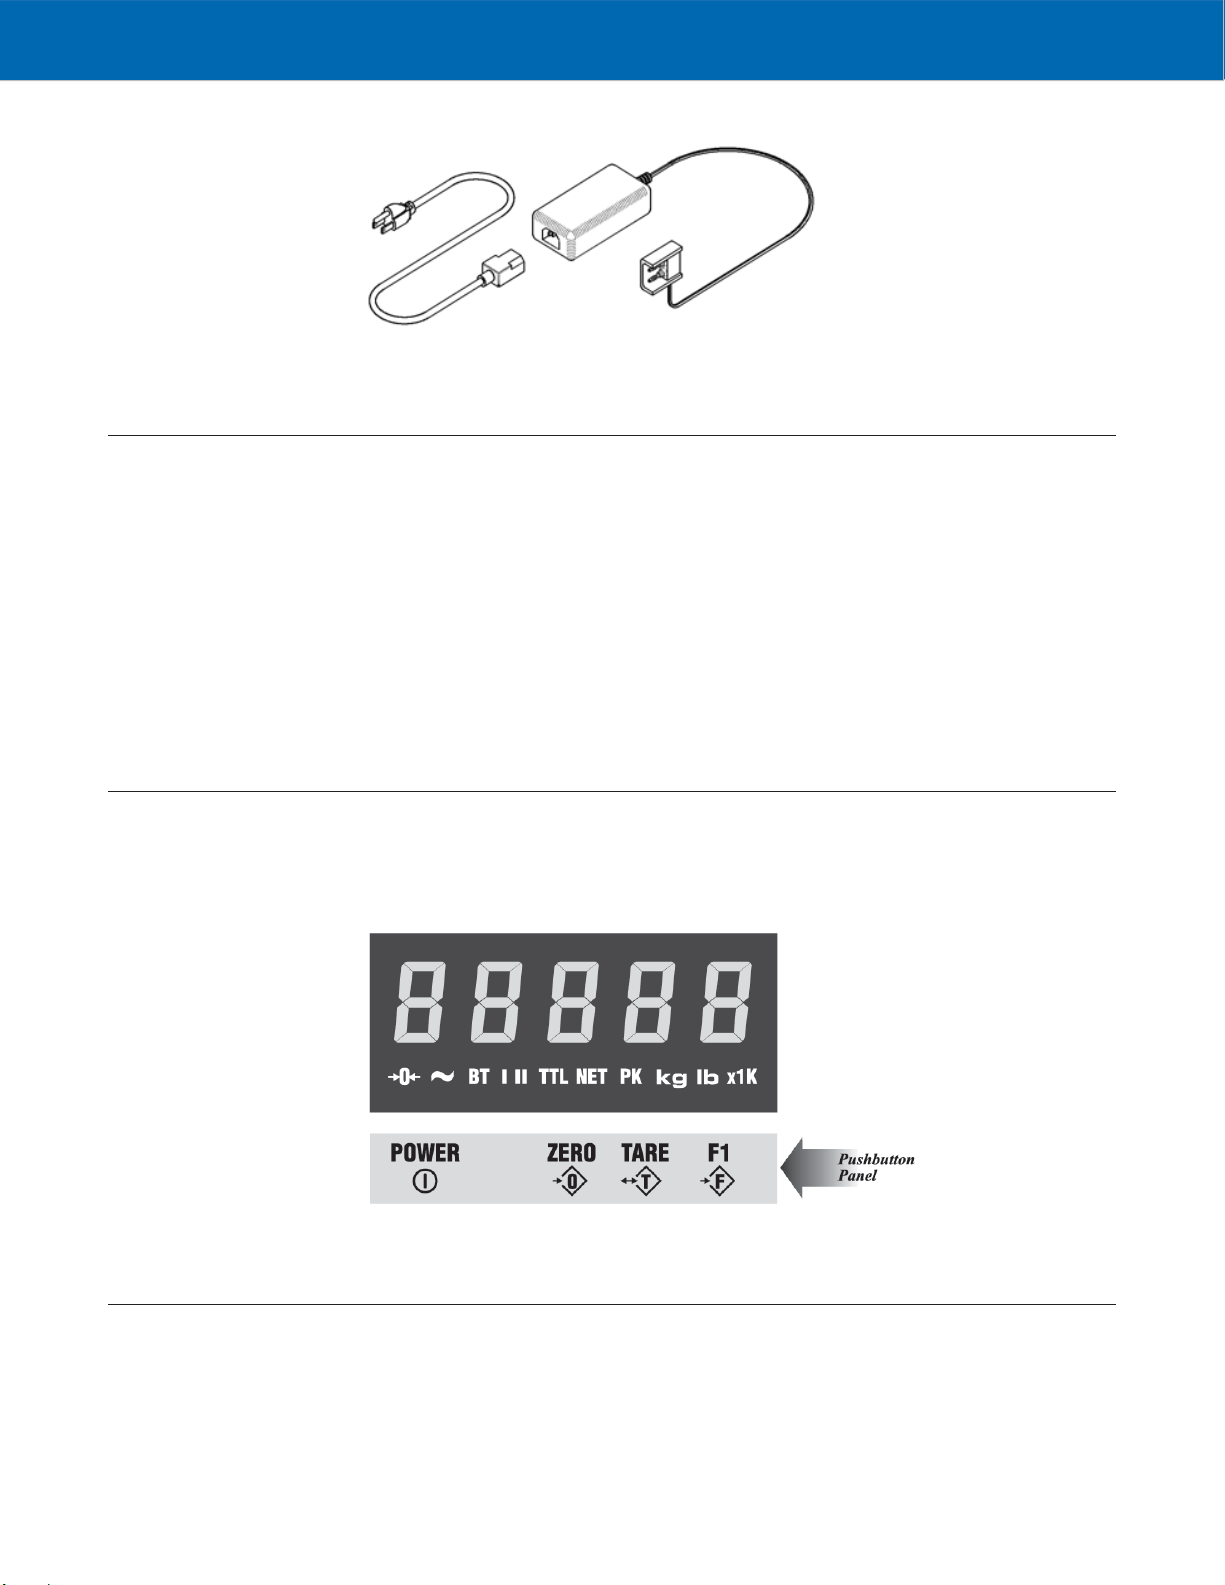
Display: 5 digit, large 1.2 in (30 mm) high numeric LED with selectable brightness control
Operating Temperature: +14°F to +140°F (-10°C to +60°C) NTEP range -10°C to +40°C
Operating Time: 100+ hours depending on brightness settings and average number of sements lit
Enclosure: Marine grade 356 alloy, sealed to NEMA 4/IP66
Load Cell: Standard 350 Ω Bridge
Indicators: Low Battery, PEAK, MOTION, Center of ZERO, NET, GROSS, TOTAL, X1000, kg/lb, SP1, SP2
Function buttons: POWER - Turns scale on and off
ZERO - Zeros applied load up to 100% of capacity
TARE - Tares applied load and displays weight in Net mode, and returns the scale to Gross mode
F1 - User programmable function switch for use as Test, Unit Select, Total (Auto or Manual),
Peak Hold and Set Points.
Calibration switch
(located behind seal screw): Initiates full digital calibration procedure
Function Switch options: TEST (default), TOTAL, UNIT, PEAK, NET/GROSS, OFF
Auto Zero Maintenance: Standard, can be disabled internally
Auto-Off Mode: Prolongs battery life by turning POWER off after 12 minutes or one hour (operator deter-
mined) of no scale activity
Auto-Sleep Mode: Prolongs battery life by dimming LED display after one minute of no activity
Unit: kg, lb (other Units available with custom calibrations)
Filtering: Low (LO), Medium (HI-1), High (HI-2)
Totalization: Standard: Press button or Automatic; TOTAL weight up to 99999 X 1000 kg or lb
Peak: Uses unfi ltered faster reading of A/D
with Automatic Sleep Mode and Automatic Power Off
Page 4 MSI-4260 Port-A-Weigh • User Guide
Page 5
M E A S U R E M E N T S Y S T E M S I N T E R N A T I O N A L
WARNING
Set Points: Two internal standard Set Points and two ultra-bright LEDs on indicator panel
Service Counter: Two independent 24 bit registers; Register 1 updated each time weight exceeds 25% of
capacity; Register
99,999 or register 2 exceeds 1000, display reads "LCnt" for load cell counter; Test function
shows the two readings in order
Connectors: Connections are made with PCB mounted terminal strips allowing easy upgrading. Cables
are brought out through water tight fi ttings
Optional Remote Controller: Option includes On/Off, Zero, Tare, Net/Gross, Total, View Sum, and programmable func-
tion keys
All of these features are housed in a single, low-profi le, cast aluminum housing consisting of
three sections:
1) The front of the scale houses the display, controls and all necessary electronics.
2) The center section contains the load cell, lifting eye and hook.
3) The rear of the scale features a quick access battery compartment.
WARNING: The scale has a safe mechanical overload of 200%, and an ultimate overload
WARNING
of 500%. Overloads greater than 500% may result in structural failure and dropped loads.
Dropped loads may cause serious personal injury or death.
2 updated each time weight exceeds overload; when register 1 exceeds
FEATURES
• Designed to meet or exceed US and International Standards
• Over 100 hours of weighing time utilizing Automatic Sleep Mode
• Automatic Power Off conserves battery life by sensing no activity after 12 minutes or one
hour, determined by operator, and turns Power off
• Automatic Sleep Mode preserves battery life by dimming the LED display after one minute
of no activity
• Rugged construction throughout. Buttons are sealed and rated for over 1 million operations
• Precise high resolution (2500 - 5000 division standard and up to 10,000 possible) 20 bit A/D
conversion coupled with advanced 16 bit micro controller provides world class features and
accuracy
• Five large, 1.2 inch LED digits for clear weight readings from a distance
• Easy to maintain: Full digital calibration assures reliable, repeatable measurements
• Selectable for kgs/lbs; unless prohibited by regulations
• Automatic or manual weight totalization for loading operations
• Easily customized for special applications
• PEAK Mode for stress analysis
• Two Set Points can be set for any in-range weight for operator alearts or process control
MSI-4260 Port-A-Weigh • User Guide Page 5
Page 6
M E A S U R E M E N T S Y S T E M S I N T E R N A T I O N A L
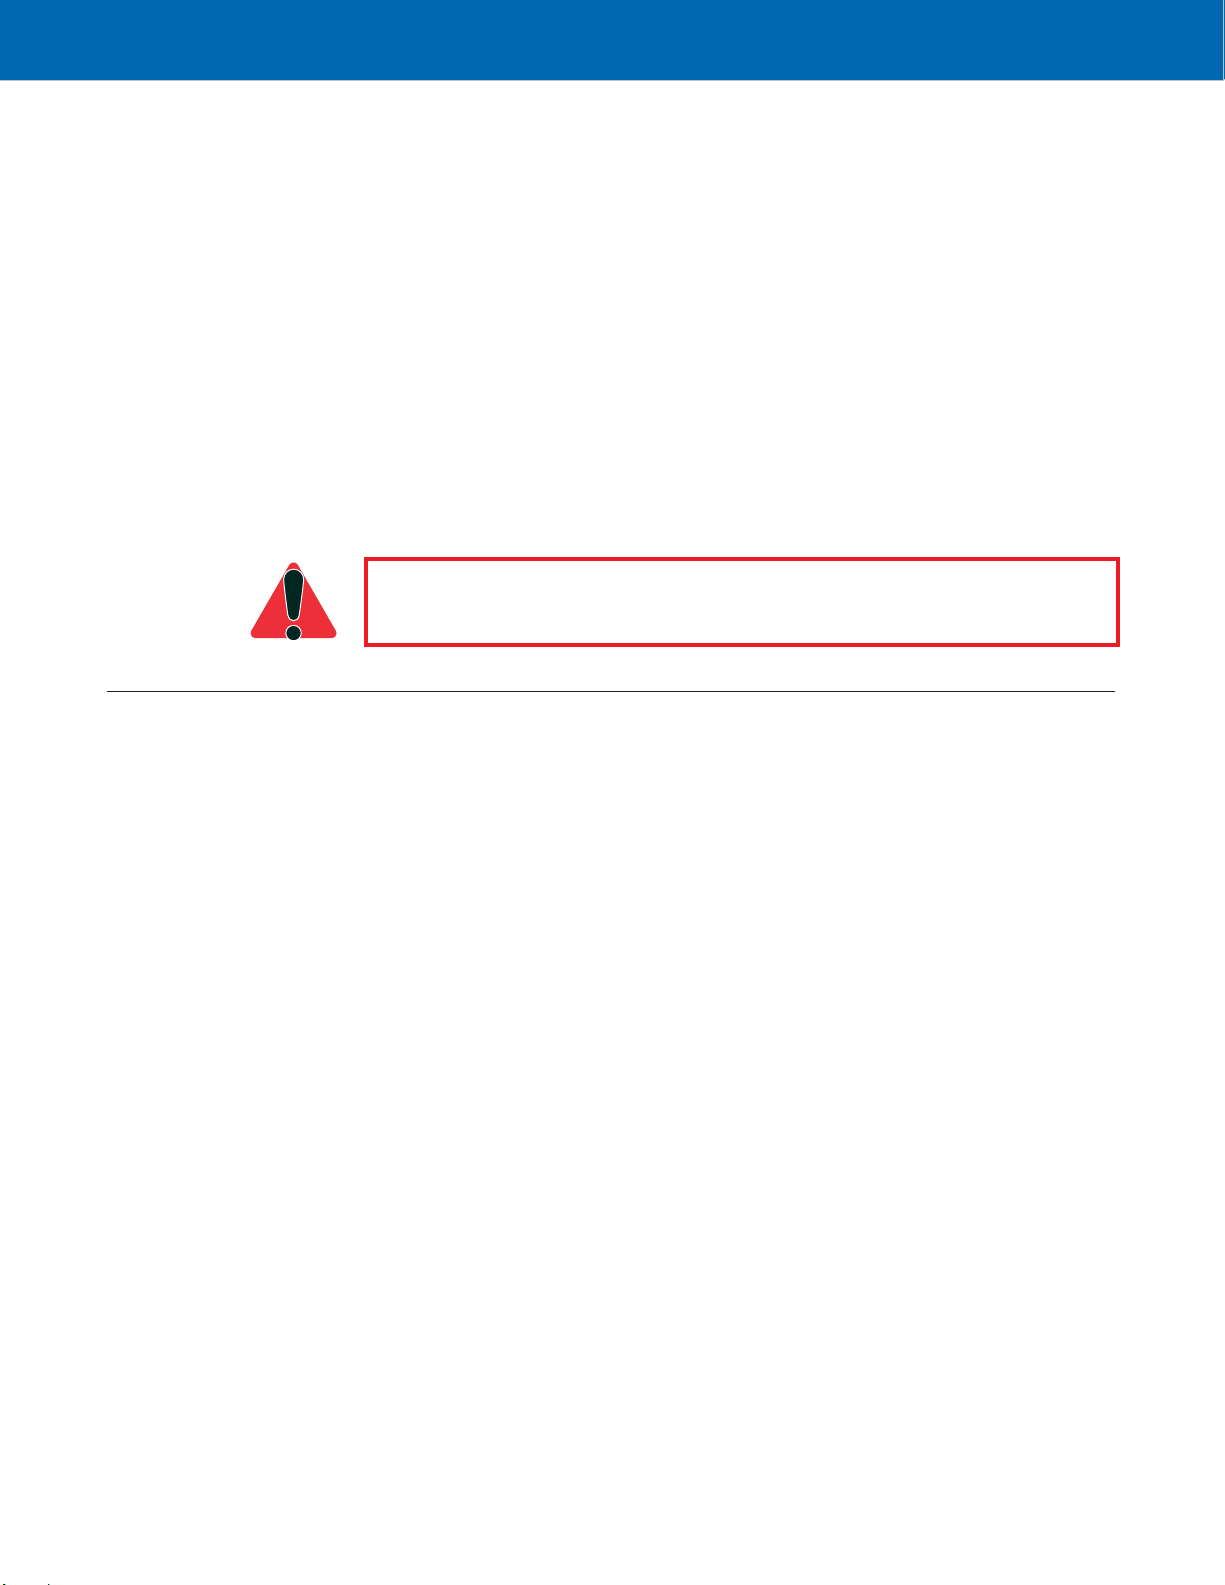
The LED display
provides excellent
readability from
full sunlight to
total darkness.
OPTIONS
In the event of an
overload condition,
the display will
fl ash a warning to
the operator.
Options which you may have ordered with your Port-A-Weigh may include the following:
• NTEP approval for use in commercial trade
• Substitute shackle for bottom swivel hook
• Oversized top lifting eye or shackle
• Universal direct power supply: 85-265 VAC, 47-440 Hz / 100-300 VDC
• Heat shield for high temperature applications
• Factory Mutual approved (intrinsically safe for use in hazardous environments)
• RF Remote Controller
UNPACKING
When unpacking the scale from the shipping container, ensure that all assembly parts are
accounted for. Check the scale for any visible damage and immediately report any damage to
your shipper. It is advisable to use the original shipping container when shipping or transporting the Port-A-Weigh.
Page 6 MSI-4260 Port-A-Weigh • User Guide
Page 7
M E A S U R E M E N T S Y S T E M S I N T E R N A T I O N A L
BATTERY PACK
The Port-A-Weigh is powered by a 12 volt rechargeable battery. The battery is located in the
rear compartment of the scale. Two stainless steel fasteners secure the battery access door. To
remove the battery for charging; unlatch the fasteners and pull the battery straight out. The
battery will automatically disengage from its connectors and may be plugged into the battery
charger for recharging.
BATTERY OPERATION
BATTERY LIFE
The battery will operate continuously for 100 hours with the LED display before requiring
recharging. The Port-A-Weigh will alert you when the battery is within 2 hours of requiring
recharging by illuminating the “BT” (Low Battery) annunciator.
When the battery requires recharging, the weight reading on the display will be replaced by
“LO”, after which the scale will shut itself off to prevent battery damage. If the On button is
depressed at this point, “LO” will reappear and then the scale will again deactivate automatically.
Instructions for charging are located on the battery charger. Charging time for a completely
discharged battery is approximately 16 hours. A spare battery pack is recommended to keep
the Port-A-Weigh continuously operational.
Note: More frequent charging of the battery prolongs its life.
The MSI-4260 battery life depends on a number of factors: Brightness of the LED display,
the number of segments lit, and the age and condition of the SLA (sealed lead acid) battery.
The MSI-4260 will automatically turn the scale off when the SLA battery drops to approximately 10.5V. You must recharge the battery when this happens. Leaving a discharged
battery in the scale, which has a maintenance battery drain, can result in a deep discharge
battery which will shorten its service life.
SLA batteries do not suffer from memory effects and actually benefi t from frequent recharg-
ings. Recharge the battery whenever it is convinent even when it still has available life. Due
MSI-4260 Port-A-Weigh • User Guide Page 7
Page 8

M E A S U R E M E N T S Y S T E M S I N T E R N A T I O N A L
to the maintenance discharge imposed on the battery by the MSI-4260 electronics, do not
store the MSI-4260 away with the battery inside. Remove the battery if the MSI-4260 will
not be used for more than 2 weeks.
Battery Use Guidelines
1) Recharge whenever convenient. Do not wait for the scale to shut itself off if your work
situation permits.
2) If you need the scale continuously, keep a fully charged spare battery at hand. Replace the
drained battery as close as possible to the low battery warning or earlier.
3) SLA batteries that have not been deep discharged should withstand 500 to 1500 charging
cycles.
4) The low battery warning will indicate about 2-4 hours of additional use before the MSI4260 turns itself off.
5) If the MSI-4260 is not going to be used again soon, remove the SLA battery to prevent
deep discharge while the unit is in storage.
6) Recycle the battery to an authorized recycling center when average life drops to 20 hours
or less.
BATTERY CHARGER
Each Port-A-Weigh is shipped with a battery charger designed to charge and maintain the
battery. Exact charging time will depend on the degree of discharge of the battery. A battery removed when the low battery warning fi rst appears should take about 4 hours to fully
charge.
When the battery is new, it may take signifi cantly longer for the initial charge. MSI recom-
mends charging a new battery for 24 hours. It might take several charge/discharge cycles
before full capacity is reached. Deep discharge batteries will also take signifi cantly longer to
charge.
Using the Charger
1) Remove the battery from the MSI-4260. See previous page for removal instructions.
2) Connect the charger assembly to the AC supply (86-260VAC). The Power Status light
should be green. If the Power Status light fails to illuminate, check your AC power connection and make sure the Vin jack is fully seated. AC power cords suitable for any world
location are available from MSI.
3) Plug in the polarized connector to the jacks on the battery.
4) The Charge Status light should turn orange, indicating fast charge.
If the status light remains green when the battery is fi rst plugged in, the battery may be
defective.
5) Charge until the status light turns green.
When the charge cycle is complete, you can (and should) leave the battery on the charger
until it is needed. The charger keeps a maintenance fl oat charge on the battery to ensure the
best possible operation times. For scales that are in high usage, MSI recommends obtaining a
spare battery so one can always be on the charger.
Page 8 MSI-4260 Port-A-Weigh • User Guide
Page 9
M E A S U R E M E N T S Y S T E M S I N T E R N A T I O N A L
The charger is a universal input type and is rated for 100-240VAC, 50-60Hz. AC power
cords suitible for any world location are available from MSI.
BATTERY REMOVAL AND REPLACEMENT
1) Turn the MSI-4260 off.
2) With one hand, hold the battery access cover.
3) Release the two latches holding the access cover.
4) Carefully lower the cover and when possible, hold the battery in place. The battery might
be loose and subject to falling.
5) Remove the battery by pulling straight back.
6) Install a fully charged battery by plugging it in to the exposed battery jacks. The MSI4260 may or may not turn on once the new battery is installed.
7) Reseat the access panel.
8) Reset the latches. Insure the latches are completely latched and the plate is fi rmly in
place.
OPERATION GUIDE
POWER
Port-A-Weigh operation is controlled by four push buttons located below the display window.
The four pushbutton functions are as follows:
Function
Turns the scale on/off (toggle action).
MSI-4260 Port-A-Weigh • User Guide Page 9
Page 10

M E A S U R E M E N T S Y S T E M S I N T E R N A T I O N A L
Use
1) The battery pack must have enough charge to ensure accurate operation (>10.5V).
2) Ambient temperature must be greater than -10°C and less than 60°C (14°F to 140°F).
Action
1) Press [POWER] and hold for one second.
2) Display check: All segment and indicator LED’s are illuminated for one second.
3) Numerics display the software version number for one second.
4) Any weight on the scale up to 5% of capacity will be automatically zeroed.
5) During display test, all internal operations are checked and any non-conformance causes
an Error message display.
Final
Scale reads the current weight in the last set Mode (NET, GROSS, PEAK NET, PEAK
GROSS).
ZERO
Function
Sets scale to ZERO.
TARE
Use
1) The scale must be stable. The scale will not ZERO if the motion detect indicator is on.
2) The scale must be in the GROSS Mode. The scale will not ZERO in NET Mode.
3) The scale will accept a ZERO setting over the full range of the scale (Legal For Trade
models might have a limited ZERO range). ZERO settings greater than 5% of capacity
will subtract from the overall capacity of the scale.
Action
1) Press [ZERO]. The weight reading must be stable within ±1 division. If this condition is
met, the digits display "0" (or "0.0" or "0.00", depending on resolution).
2) The ZERO setting is stored in backup memory, and the setting will be restored the next
time the scale is turned on.
Final
Digits display "0" (or "0.0" or "0.00", depending on resolution).
Function
TARE IN - Stores a TARE weight when in GROSS Mode and displays all subsequent
readings in NET Mode; or, TARE OUT - Clears the TARE weight when in NET Mode and
returns the scale to GROSS Mode.
Action
TARE IN
1) Press [TARE].
2) The scale must be in GROSS Mode: The entire range of the scale can be tared.
3) The Motion indicator must be off and the weight reading must be stable. (The weight
reading must be stable within ± 1 division).
4) If the Motion condition is met, the NET indicator lights and the weight registers "0". All
subsequent readings are deviations from the set TARE value.
Page 10 MSI-4260 Port-A-Weigh • User Guide
Page 11
M E A S U R E M E N T S Y S T E M S I N T E R N A T I O N A L
5) Only positive weight readings can be tared.
6) Setting or changing TARE has no effect on the ZERO setting.
7) Tareing will reduce the apparent overrange of the scale. For example, if a 1000 lb container is tared and the scale capacity is 5000 lb, the scale will overload at a new weight of
4000 lb (5000 - 1000) plus any additional allowed overload (usually 9 divisions).
8) TARE value is stored in backup memory, and the value will be restored the next time the
scale is turned on.
TARE OUT
1) The scale must be in NET Mode.
2) Press [TARE] to clear the value.
3) Returns to GROSS Mode.
Final
TARE IN
TARE is set, displaying NET weight.
TARE OUT
TARE weight will be cleared and the scale will revert to GROSS Mode.
F1
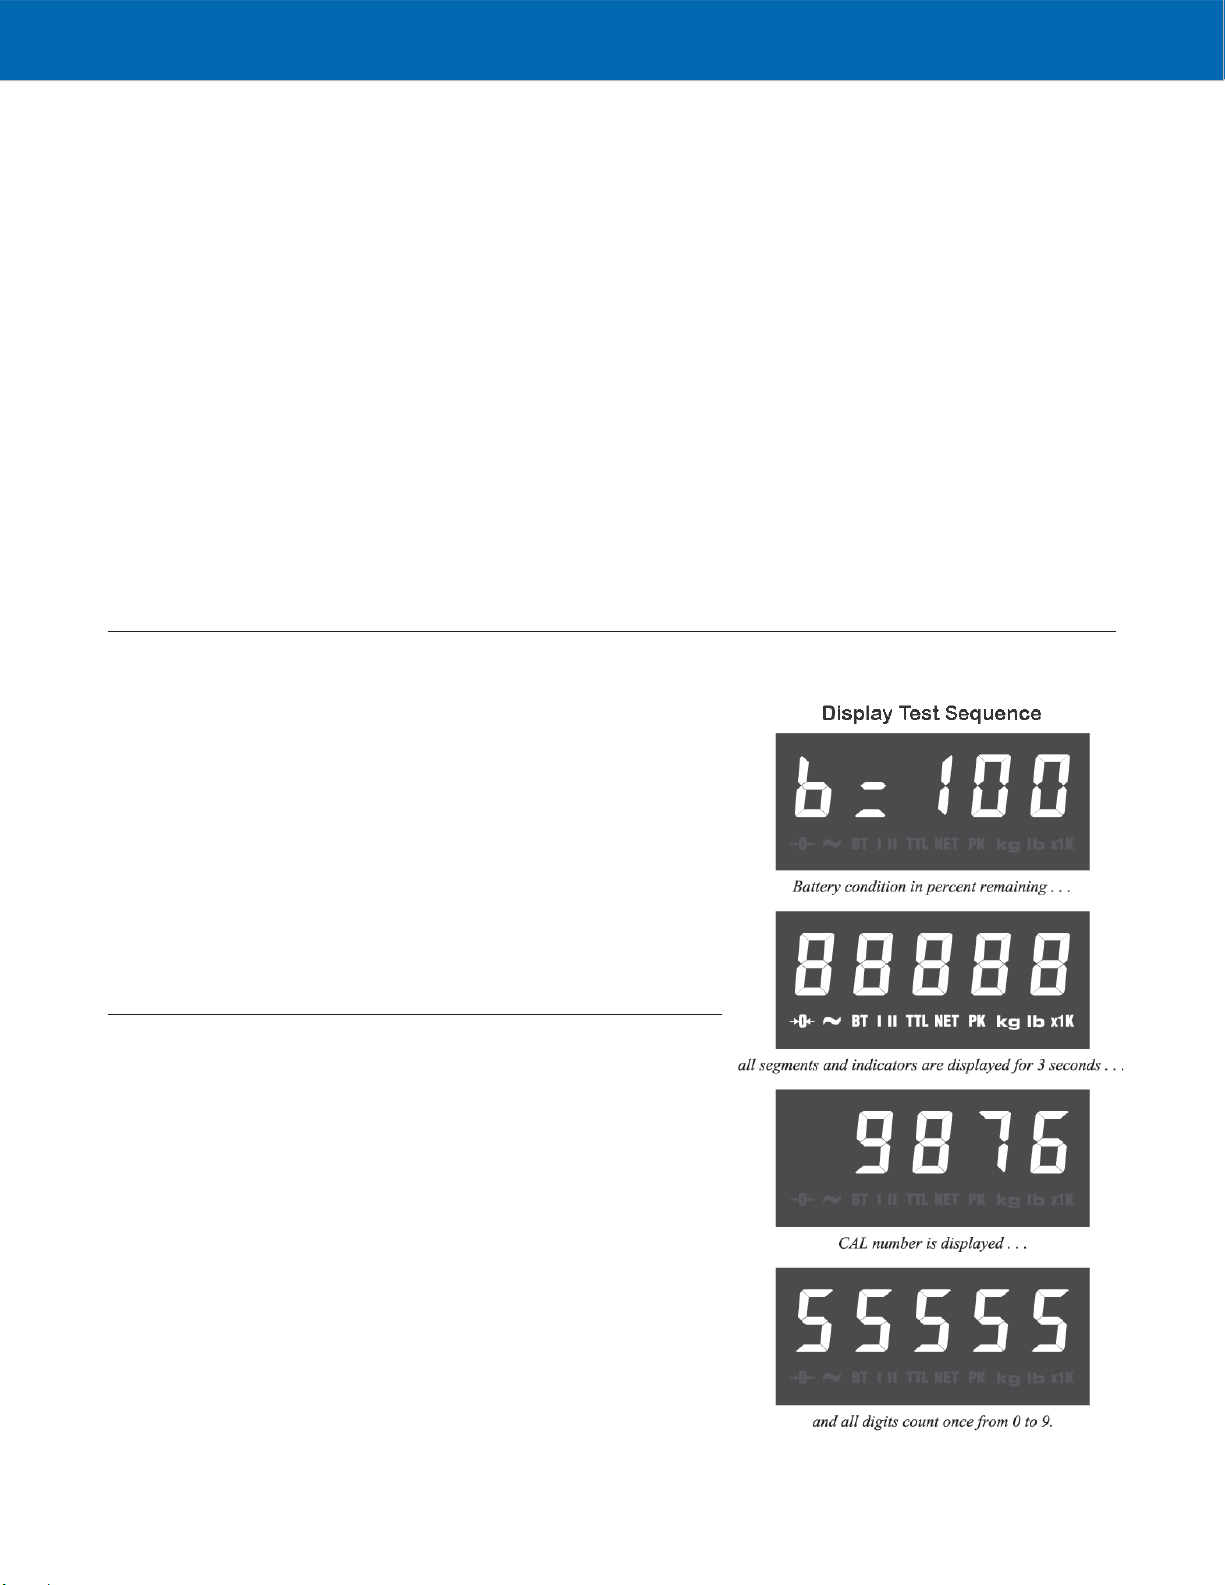
TEST (tESt)
Function
F1 can be programmed to any of fi ve func-
tions:
TEST (tESt), NET/GROSS (nEtGr),
TOTAL(totAL), UNIT(kg/lb) and
PEAK(Phold). See Scale Setup for instructions on programming the F1 function
button.
Action
Press [F1] to initiate the preprogrammed
function.
Function
Provides a functional system test, and an
on-demand display check without disturbing the current weighment. Also provides
calibration verifi cation in the form of a load
cell CAL number.
Action
1) Press [F1] (Function button must be
programmed as Test (see Scale Setup)).
2) Battery condition is displayed in Percent
of battery life remaining with b = xxx
fi gure from 0 to 100 on the digits (in 5%
increments).
3) All segments and indicators are dis-
MSI-4260 Port-A-Weigh • User Guide Page 11
Page 12

M E A S U R E M E N T S Y S T E M S I N T E R N A T I O N A L
played for 3 seconds.
4) The CAL number is displayed next. To ensure that the CAL number is accurate, the scale
must be unloaded. Cal number shifts of up to 10 counts are insignifi cant.
5) All digits (7 segment and 16 segment) count once from 0 to 9. All indicators are tested.
6) Internal tests are performed to further ensure scale integrity.
Final
The reading returns to the last condition, or an Error message is displayed.
ACCESSING THE SERVICE COUNTERS
Function
Port-A-Weigh maintains two service counters
for safety, and two service counters that monitor internal electronics. These Service Counters are used to judge when the load bearing
elements or electronic components should be
inspected.
Action
1) To access the Service Counters, program
the F1 button to TEST (tESt).
2) Press [TEST] and hold until the display
reads "LCnt1" (Load Counter #1). This
will occur after the RCAL value has been
displayed. "LCnt1" will be displayed for
1 second, followed by a fl ashing numeric
value. This value signifi es the number of
weighments that exceeded 25% of capacity.
3) Press [TEST], "LCnt2" (Load Counter #2)
will be displayed for one second, followed
by a fl ashing numeric value. This value
signifi es the number of weighments that
surpassed capacity.
4) Press [TEST], "A2DEr" (A2D Errors) will be
displayed for one second, followed by
a fl ashing numeric value. This value signi-
fi es the number of times the internal microprocessor has reset the analog to digital
converter.
5) Press [TEST], "EE Er" (EEPROM Errors)
will be displayed for one second, followed by a fl ashing numeric value. This value
signifi es the number of retries needed to successfully read from or write to the long term
memory module.
6) Press [TEST] again to complete the TEST sequence.
Final
TEST sequence continues.
Page 12 MSI-4260 Port-A-Weigh • User Guide
Page 13

M E A S U R E M E N T S Y S T E M S I N T E R N A T I O N A L
RESET THE SERVICE COUNTER WARNING
1) After inspecting the load train, remove the calibration seal screw.
2) Push the Calibration button using a blunt screwdriver.
3) Push [ZERO] to return to normal operation.
Note: This procedure does not reset the service counter.
TOTAL (totAL)
Function
For accumulation of multiple weighments. The accumulator always uses the displayed
weight, so GROSS and NET readings can be added into the same TOTAL. There are two
Modes of totalizing: Manual and Auto. The Manual Mode requires the TOTAL button be
pressed with the weight on the scale. The weight will be added to the previously accumulated
value. The Auto Mode will automatically add the last settled and stable value to the TOTAL.
Both Modes require that the weight on the scale return within 1% (relative to full scale) of
GROSS ZERO or NET ZERO before the next weighment can be added. This assures that a
weight on the scale is only added to the total once. Applied weight must be 2% of full scale
above GROSS ZERO or NET ZERO before it can be totaled.
MANUAL TOTAL
Function
Allows for accumulating weight manually by pressing a button.
Use
1) The Motion indicator must be off, the scale must be stable ±1 division. If there is considerable motion on the scale, use the Medium or High Filter setting (see Filter Setup).
The scale will accept the TOTAL button when in motion, but will not TOTAL until the
Motion indicator is off.
2) Only positive readings can be accumulated.
3) After a weight is totaled, the weight on the scale must return below 1% of full scale
capacity relative to GROSS ZERO or NET ZERO before another weight can be added to
the TOTAL. This assures that a weight on the scale is only added to the scale once.
4) Press
5) If the Motion indicator is on, the TOTAL indicator will begin blinking, and continue
6) The TOTAL indicator (center right of display) will also illuminate for 4 seconds provid-
Final
After totaling, normal weighing resumes.
[F1] (Function button must be programmed as TOTAL (see Scale Setup).
blinking, until motion stops and the Motion indicator turns off. The current weight is
added to the TOTAL register and the TOTAL weight is displayed.
ing reinforcement that the TOTAL command was accepted.
AUTO TOTAL
Function
Allows for Auto accumulate.
MSI-4260 Port-A-Weigh • User Guide Page 13
Page 14

M E A S U R E M E N T S Y S T E M S I N T E R N A T I O N A L
WARNING
Use
1) When a weight threshold of 2% of Full Scale (FS) above NET ZERO or GROSS ZERO
is exceeded, the accumulate function operates automatically.
2) When a weight that meets the minimum acceptable limit settles (no Motion), the TOTAL
indicator will fl ash 3 times.
3) If the weight changes to a new settled value the TOTAL indicator will fl ash again indicat-
ing the previous settled reading has been replaced.
4) When a weight is totaled, the TOTAL indicator will fl ash for a steady 4 seconds, indicat-
ing the weight has been totaled and the TOTAL value will be displayed.
5) The displayed weight is added to the accumulated value in the TOTAL Register only
when the weight returns to ZERO (±1% of Full Scale ).
6) The last settled reading is what will be used for totalizing when the scale returns to
ZERO.
WARNING: The operator must take caution that, when removing the load, the scale does
WARNING
not go out of Motion; or an erroneous reading could occur. The last settled weight is actually
added to the TOTAL when the scale returns to less than 1% of full Scale capacity.
Action
1) The scale cannot be in motion. An Auto TOTAL acceptable reading is indicated by 3 or
more short fl ashes of the TOTAL indicator.
2) Weight readings must be greater than 2% of full scale, relative to NET ZERO or GROSS
ZERO.
3) Each reading added to TOTAL must be preceded by a return to ZERO (NET or GROSS)
±1% of full scale. Totalization of the last settled weight is indicated by a 4 second fl ash of
the TOTAL indicator, and a display of the current TOTAL.
Final
After totaling, normal weighing resumes.
TO CLEAR THE LAST TOTALLED WEIGHT
Function
If the last totaled (automatic or manual) weighment was a mistake, it can be erased with the
following procedure. This erases only the last totaled value.
Action
1) Press [F1], then [ENTER/TARE]. The display will read the revised TOTAL for 2 seconds.
(This procedure assumes that you have not modifi ed the F1 function.)
Final
After displaying the update TOTAL, normal weighing resumes.
TO CLEAR THE TOTAL VALUE
Function
To clear the TOTAL register in order to start a new series of totals.
Action
1) Press [F1], then [CLEAR/ZERO]. (This procedure assumes that you have not modifi ed the F1
function.)
Page 14 MSI-4260 Port-A-Weigh • User Guide
Page 15

M E A S U R E M E N T S Y S T E M S I N T E R N A T I O N A L
CAUTION
2) The display reads "0" and the TOTAL indicator will illuminate for 2 seconds.
Final
After clearing the TOTAL, normal weighing resumes.
VIEWING TOTAL
Function
After a weight has been totaled or before the 1% threshold has been exceeded, the current
TOTAL can be Viewed.
Action
1) Make sure there is no load on the scale. Press [F1] (Function button must be programmed
as TOTAL).
2) The current TOTAL will be displayed for 3 seconds. The TOTAL indicator will illuminate.
Final
Normal weighing resumes.
UNIT (lb/kg)
PEAK (Phold)
CAUTION
Caution: If in Manual TOTAL and you push the TOTAL button to view the TOTAL value,
be certain that you are not weighing more than 2% of capacity. (If you press USER to view
the TOTAL and the weight is above 2% of capacity, you will add to the TOTAL, rather than
view the TOTAL.).
Function
To change unit between kg/lb.
Action
1) Press [F1] to select kg or lb Mode (Function must be programmed as Unit; see USER
Setup). The kg and lb indicators are located on the front panel adjacent to their relative
capacity labels.
Final
The correct unit of measurement/weight is displayed.
Alternate Method: Use the Setup UNITS Mode to change the UNITS without programming
Function to UNITS.
Function
Allows the capture of a PEAK weight. Useful for stress testing and related operations where
the maximum load measured is stored.
Action
1) Press [F1] (Function button must be programmed as PEAK(Phold); see Function Setup).
2) To enable PEAK(Phold), the PEAK indicator must be off. Press [F1].
3) To disable PEAK(Phold) the PEAK indicator must be on. Press [F1].
MSI-4260 Port-A-Weigh • User Guide Page 15
Page 16

M E A S U R E M E N T S Y S T E M S I N T E R N A T I O N A L
Final
1) When enabled, the PEAK (Phold) value is reset to 0 and any subsequent displayed value
will correspond to the greatest positive weight detected.
2) When PEAK(Phold) is disabled the scale will perform normally.
NET/GROSS (nEtGr)
Function
Switches the display between NET and GROSS Modes. NET Weight is defi ned as GROSS
Weight minus a TARE Weight.
Use
1) There must be a TARE weight established to switch from GROSS Mode to NET Mode
(see TARE).
2) NET GROSS(nEtGr) will work even when the scale is in Motion.
Action
1) Press [F1] (Function button must be programmed as NET GROSS (nEtGr), see USER
Setup).
2) No current TARE is stored (TARE =0). No action, display continues to read the Gross
weight only.
3) A TARE value is stored: Toggles between NET and GROSS indicators.
SCALE SETUP
Final
NET or GROSS indicator will illuminate.
Function
Scale Setup facilitates changes to various internal settings of the scale. Setup initiated by
holding in the F1 button while turning POWER on.
Action
When in SETUP, the following buttons are used for selecting and changing scale settings:
ZERO functions as CLEAR/EXIT: Used to exit from a Setup menu without affecting the
previous setting and for exiting Setup Mode completely. Used also to clear the current digit
when entering numeric values; i.e., Set Points.
TARE functions as ENTER: Used to enter into menus and choose menu items.
F1 functions as SELECT: Used to scroll through menu selections. If held down, SELECT
will automatically repeat.
Final
Pressing [CLEAR/ZERO] will skip all remaining parameters and return the scale to normal operation. Pressing [POWER] will also exit the Setup Mode (and turn Power off).
Page 16 MSI-4260 Port-A-Weigh • User Guide
Page 17

M E A S U R E M E N T S Y S T E M S I N T E R N A T I O N A L
QUICK USER SETUP GUIDE
Note: Display items in
bold are defaults.
Top Menu Selection Display Sub-Menu Display Defi nition
Func Function
OFF Off
tESt Test
totAl Total
Unit Unit
Phold Peak Hold
nEtGr Net/Gross
A-OFF Automatic Power Off
OFF Off
.2 hr 12 minutes
1 hour 1 hour
Filtr Filter
LO Low
HI-1 Medium
HI-2 High
LEdS Light Emitting Diodes
LO Low
HI-1 Medium
HI-2 High
Unit Units
Unit(kg) Kilograms
Unit(lb) Pounds
FUNCTION (Func)
StPt1 Set Point 1
OFF Off
GrEAt LESS,GrEAt Greater than
LESS followed by value Less Than
StPt2 Set Point 2
OFF Off
GrEAt LESS,GrEAt Greater Than
LESS followed by value Less Than
totAL Total
OFF Off
PrESS Press User Button
Auto Automatic Total
Function
Allows the F1 button to be programmed to TEST, TOTAL, UNIT, NET/GROSS or PEAK
Action
1) Hold in the [F1] button while turning on the power.
2) Press [SELECT/F1] until the display reads "Func".
3) Press [ENTER/TARE] and currently selected function will fl ash.
4) Press [SELECT/F1] until desired function is displayed.
5) Press [ENTER/TARE] to store or press [CLEAR/ZERO] to exit without changing.
MSI-4260 Port-A-Weigh • User Guide Page 17
Page 18

M E A S U R E M E N T S Y S T E M S I N T E R N A T I O N A L
Final
Setup menu is displayed. Press [CLEAR/ZERO] to return to normal operation or press to scroll
[SELECT/F1] to a different USER Setup operation.
AUTOMATIC POWER OFF (A-OFF)
Function
The A-OFF feature, when enabled, prolongs the battery life of the scale by turning POWER
off when the scale is not in use. Any time a button is depressed (any button), or the detected
weight is in Motion, the time limit is reset. Therefore, the scale will stay on indefi nitely if the
weight is changing or any button is pressed at least once. With A-OFF disabled, the scale will
remain on; only pressing POWER will turn it off.
Action
To Change the A-OFF Mode:
1) Hold in the [F1] button while turning on the power.
2) Press [SELECT/F1] until the display reads "A-OFF".
3) Press [ENTER/TARE]. You are now in the A-OFF menu.
4) Press [SELECT/F1] to choose: OFF, .2 hours (12 minutes), or 1 hour.
FILTER (Filtr)
When the desired Mode is displayed, press [ENTER/TARE] or press [CLEAR/ZERO] to exit without
changing.
Final
USER Setup menu is displayed. Press [CLEAR/ZERO] to return to normal operation or press
[SELECT/F1] to scroll to a different USER Setup operation.
Function
Allows three levels of fi ltering to stabilize readability of the weight display.
Use
1) Use LO (low setting), for most scale applications. It settles fastest and is intended for
general use.
2) Use HI-1 (medium setting), when the scale is being used under conditions that cause light
to medium swinging.
3) Use HI-2 (high setting), when there is signifi cant scale motion. There is a time penalty
when using the HI-2 setting. The operator should wait at least 5-15 seconds to ensure
that the fi nal reading has settled (motion indicator off). (Not available in some Legal For
Trade scales).
Action
To change the Filter settings:
1) Hold in the [F1] button while turning on the power.
2) Press [SELECT/F1] until the message reads "Filtr".
3) Press [ENTER/TARE]. The currently selected fi lter will fl ash.
4) Press [SELECT/F1] to change from LO (low), HI-1(medium) or HI-2 (high) settings. When
the desired Filter setting is displayed on the message display, pressor [ENTER/TARE] press
[CLEAR/ZERO] to exit without changing the setting.
Page 18 MSI-4260 Port-A-Weigh • User Guide
Page 19

M E A S U R E M E N T S Y S T E M S I N T E R N A T I O N A L
Final
Setup menu is displayed. Press [CLEAR/ZERO] to return to normal operation or press [SELECT/
F1]
to scroll to a different USER Setup operation.
LED BRIGHTNESS (LEdS)
Function
Sets the LED brightness to one of three fi xed settings; or to an automatic setting that adjusts
brightness according to ambient light, and also adjusts to the lowest level of brightness when
the scale is inactive for 1 minute (Automatic Sleep Mode). Automatic Sleep Mode is recommended for minimizing battery consumption.
Action
1) Hold in the [F1] button while turning on the power.
2) Press [SELECT/F1] until "LEdS" is displayed.
3) Press [ENTER/TARE] and currently selected brightness will fl ash.
4) Press [SELECT/F1] to change from LO, HI-1 or HI-2 settings.
5) Press [ENTER/TARE] to store, or press [CLEAR/ZERO] to exit without changing.
Final
Setup menu is displayed. Press [CLEAR/ZERO] to return to normal operation or press [SELECT/
F1]
to scroll to a different USER Setup operation.
Note: To maximize battery life, set the LED to the Automatic Sleep Mode.
UNIT (kg/lb)
SET POINTS (StPt1, StPt2)
Function
Allows Units to alternate between kg and lb without the use of the USER button.
Action
1) Hold in the [F1] button while turning on the power.
2) Press [SELECT/F1] until "Unit" is displayed.
3) Press [ENTER/TARE]. The display will show "Unit" while the indicator which correlates to
the currently set Unit (kg or lb) will fl ash.
4) Press [SELECT/F1] until desired Unit (kg or lb) is displayed.
5) Press [ENTER/TARE] to store, or press [CLEAR/ZERO] to exit without changing.
Final
Setup menu is displayed. Press [CLEAR/ZERO] to return to normal operation or press [SELECT/
F1]
to scroll to a different USER Setup operation.
Alternate Method: Program the USER button as UNITS or press [SELECT/F1] to scroll to a
different USER Setup operation.
Function
Set Points provide warnings and indications of weighments. When the weight is above
(greater than) or below (less than) a set value, the Port-A-Weigh can respond by turning on
the Set Point indicator light.
MSI-4260 Port-A-Weigh • User Guide Page 19
Page 20

M E A S U R E M E N T S Y S T E M S I N T E R N A T I O N A L
SET POINT ENTRY
Function
To enter a Set Point.
Action
1) Hold in the [F1] button while turning on the power.
2) Press [SELECT/F1] to choose the Set Point you wish programmed. Set Point 1 will be used
for this example.
3) When the display reads "StPt1" press [ENTER/TARE].
4) Determine if the Set Point will be active when the weight is above ("GrEAt") or below
("LESS") the entered value. Press [SELECT/F1] to choose the mode. For an overload alarm,
for example, you would choose greater. Press [ENTER/TARE].
5) The current Set Point value will fl ash.
6) Press [SELECT/F1] to enter the fi rst digit of the desired Set Point weight value (Value
cannot exceed scale capacity). Continue to press [SELECT/F1] until the desired numeral for
the digit is obtained, then press [ENTER/TARE].
Note: Pressing [SELECT/F1] repeatedly will cycle through numeric values 0 to 9, and then 0 to
9 with the decimal point before repeating the cycle.
7) The next signifi cant digit fl ashes. Press [SELECT/F1] to enter the next digit. Press [ENTER/
TARE]
twice after the last character to complete the Set Point entry.
TO DISABLE A SET POINT
TOTAL (totAL)
Final
Setup menu is displayed. Press [CLEAR/ZERO] to return to normal operation or press [SELECT/
F1]
to scroll to a different USER Setup operation.
Function
To turn off a Set Point.
Action
1) Hold in the [F1] button while turning on the power.
2) Press [SELECT/F1] to identify the Set Point you wish to disable. Set Point 1 will be used
for this example.
3) When the display reads "StPt1" press [ENTER/TARE].
4) Press [SELECT/F1] until the message "OFF" appears. Press [ENTER/TARE]. This disables the
Set Point and returns you to the Set Point menu.
Final
Setup menu is displayed. Press [CLEAR/ZERO] to return to normal operation or press [SELECT/
F1]
to scroll to a different USER Setup operation.
Function
Allows the TOTAL function to be set or disabled. The USER button must be programmed to
TOTAL in order to view the current TOTAL value, or to use Manual TOTAL.
Page 20 MSI-4260 Port-A-Weigh • User Guide
Page 21

M E A S U R E M E N T S Y S T E M S I N T E R N A T I O N A L
CAUTION
Action
1) Hold in the [F1] button while turning on the power.
2) Press [SELECT/F1] until "totAL" is displayed.
3) Press [ENTER/TARE] and the currently selected total mode will fl ash.
4) Press [SELECT/F1] until the desired TOTAL Mode — OFF, PrESS (manual), or AUTO
(automatic) is displayed.
5) Press [ENTER/TARE] to store, or press [CLEAR/ZERO] to exit without changing.
Final
Setup menu is displayed. Press [CLEAR/ZERO] to return to normal operation or press [SELECT/
F1]
to scroll to a different USER Setup operation.
SYSTEM INITIALIZE
Caution: Do Not Initialize the scale for routine calibration. System initialize is only needed
CAUTION
when the circuit boards are replaced. This procedure should be initiated only by the factory
or any authorized service representative.
Function
Clears the internal Calibration settings. Usually used for board replacement, troubleshooting,
or load cell replacement. This procedure does not alter factory feature settings.
Action
1) Turn on the scale by pressing the [POWER] button.
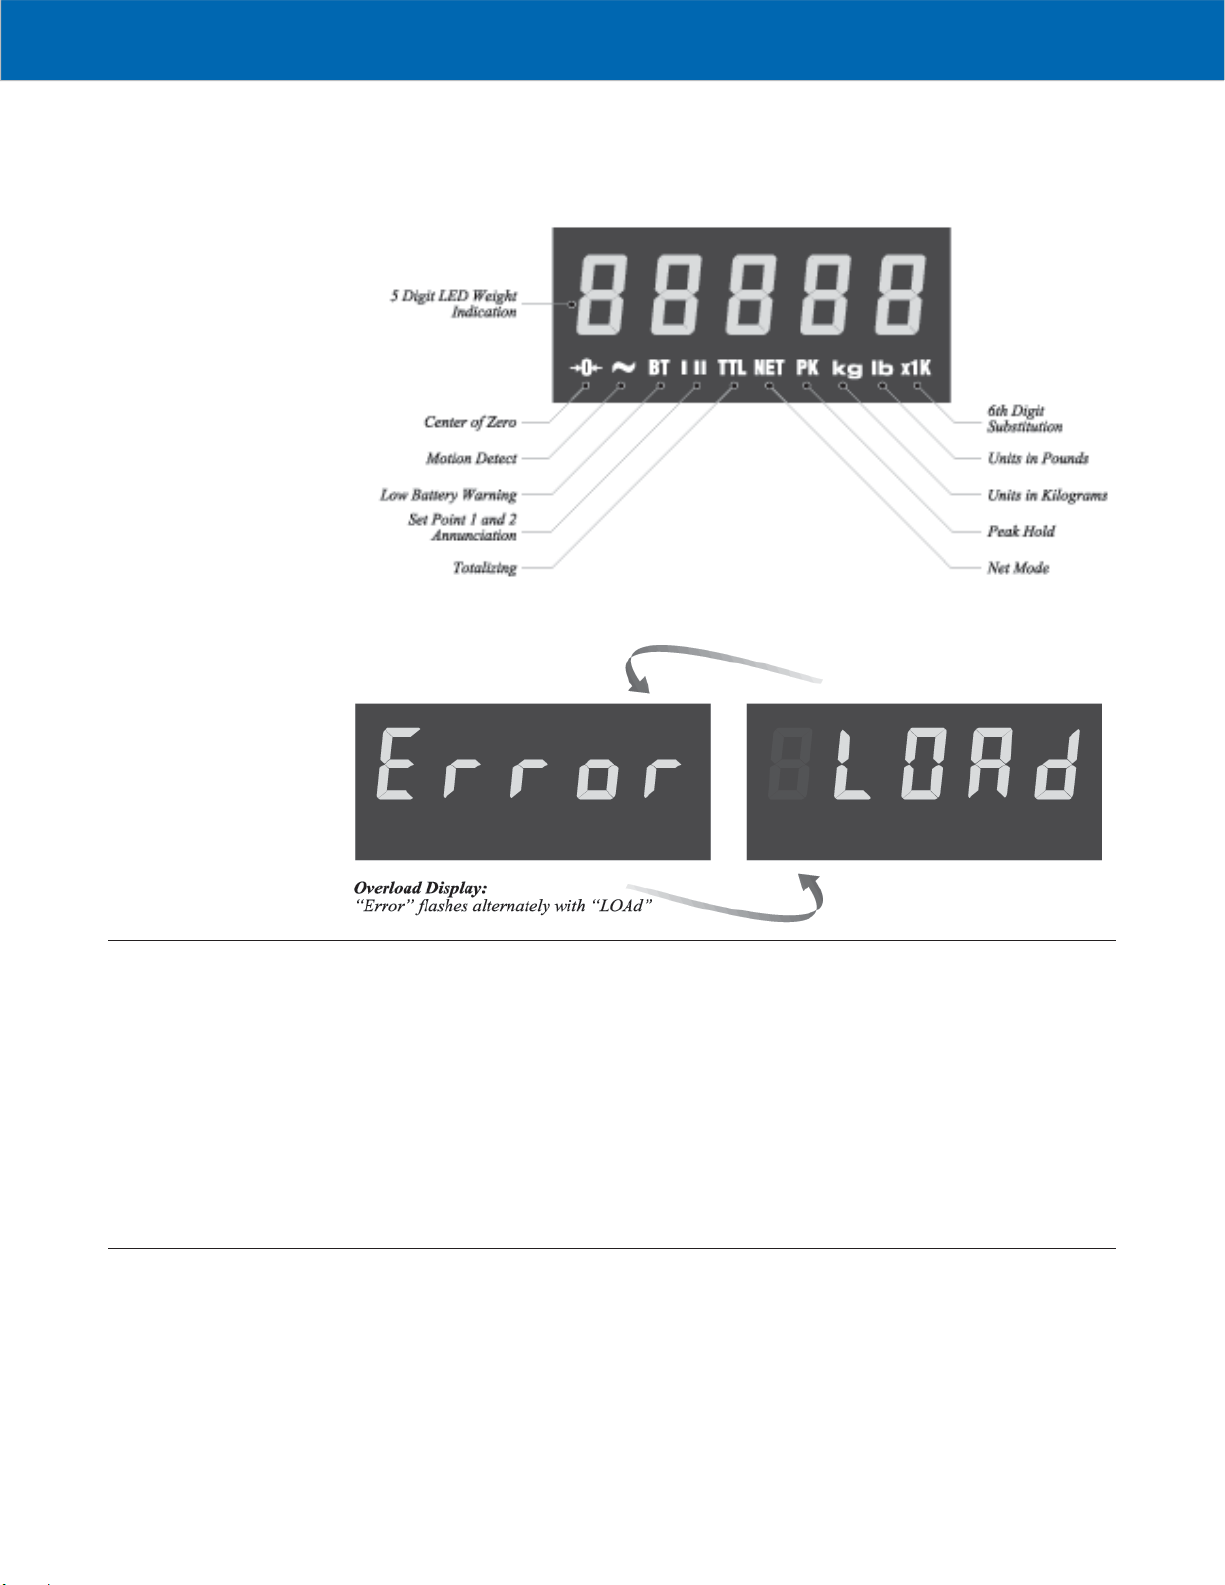
2) Remove the seal port on the right side of the scale’s front casting.
3) Press the Cal switch button in the hole with your fi nger (the button is located on the dis-
play board, see photos below).
4) Within 2 seconds and while the display is reading “C-SEt”, press the [ZERO] key. The
display should read “C-CLr” to indicate calibration is cleared.
5) The display will then read “CAL”.
Note: If you do not manage to press the buttons in the proper sequence, turn the power off
and try again.
6) Next, perform an Initial Calibration.
(Left) Seal Port removed and CAL Switch Button shown
(Right) Pressing CAL Switch Button with tip of fi nger
MSI-4260 Port-A-Weigh • User Guide Page 21
Page 22

M E A S U R E M E N T S Y S T E M S I N T E R N A T I O N A L
CALIBRATION SETUP
Function
Calibration Setup is used to initiate calibration or to set seldom changed factory settings.
There are two types of calibration:
1) Initial Calibration;
2) Subsequent Calibration
Calibration must be accomplished by a qualifi ed scale technician trained in Certifi ed Calibra-
tion Standards. To initiate calibration of a Port-A-Weigh, the technician is required to have an
accurate test weight system of adequate capacity and, in the case of a Legal For Trade PortA-Weigh, the test weight system must be certifi ed by the appropriate regulatory agency.
Important Note: At any point (except when entering calibration weight values), the calibration procedure can be halted by turning POWER off.
Action
1) Turn on the scale by pressing the [POWER] button.
2) Remove the seal port on the right side of the scale’s front casting.
3) Press the Cal switch button in the hole with your fi nger (see photos on page 21). The
display will show "C-SEt" for 2 seconds.
4) The Calibration Setup Menu appears. Press the [SELECT/F1] button to scroll through the
various Calibration Setup menu choices.
5) Once the desired operation is displayed, press [ENTER/TARE].
Final
To return to normal operation either scroll with the [SELECT/F1] button to exit and press
[ENTER/TARE], or press [CLEAR/ZERO].
QUICK CALIBRATION SETUP GUIDE
Top Menu Selection Display Display Defi nition
CAL Calibration
F-CAL Fine Calibration
CAL-r Calibration with Offset Calibration Resistor
StAnd Standards
IndUS Industry
nISt National Institute of Standards & Technology
EuroP Metric (kg only)/OIML
1 Unit One Unit Only
r-Ctl Remote Control
On
OFF
AZM Automatic ZERO Maintenance
On
Off
Note: Display items in
bold are defaults.
Page 22 MSI-4260 Port-A-Weigh • User Guide
Page 23

M E A S U R E M E N T S Y S T E M S I N T E R N A T I O N A L
CALIBRATION (CAL)
Function
Used to Calibrate the scale load cell. There are two types of calibration:
1) Initial Calibration and
2) Subsequent Calibration
INITIAL CALIBRATION
Function
Initial Calibration is used at the factory when Calibrating for the fi rst time, when the circuit
boards have been replaced or after the scale has gone through System Initialize.
Note: Do not use this procedure for routine Calibration.
Action
1) Turn on the scale by pressing the [POWER] button.
2) Press Cal button once. "CAL" will appear, then press [ENTER/TARE]. The following steps
will occur:
3) Units selection: Display fl ashes “Unit” with the lb indicator. If calibrating in lb, press
[ENTER/TARE], or to select kg, press [SELECT/F1], then [ENTER/TARE]. This step only effects
what the test weight unit is, it does not prevent lb/kg switching.
Note: This step will not occur in scales setup by the Standards menu to measure in only one
unit.
4) Display shows “CAP” for 2 seconds then fl ashes “0”. Input the capacity using [SELECT/F1]
and [ENTER/TARE]. After each digit is entered another digit is brought up by pushing F1.
For 100,000 lb capacity, since there are only have 5 digits, the correct procedure is to
enter the capacity as 99980, assuming a 20 lb ‘d’, or 99950 with a 50 lb ‘d’. 20 lb. is
the highest MSI recommended resolution for the 100k Load Cell. The scale will reach
a few ‘d’ over 100,000 lb using the X1000 annunciator, however it cannot be calibrated
at 100,000 lb since there are only 5 digits in the display. It is recommended that 100,000
lb systems be set to a “count by” not less than 20 lb, preferribly at a “count by” of 50 lb.
A 50 lb ‘d’ will settle faster and will display with more stability, though this depends on
the application. With a 20 lb ‘d’, the scale will display overload at about 100140 which
will display as 100.14 X1000. With a 50 lb ‘d’, the scale will display overload at 100400
which will display as 100.40 X1000. This assumes capacity was set at 99980 or 99950.
5) Display shows “d” for 2 seconds, then fl ashes the default Count By (division). Press
[ENTER/TARE] to accept, or press [SELECT/F1] to pick another Count By, then press [ENTER/
TARE]
.
MSI-4260 Port-A-Weigh • User Guide Page 23
Page 24

M E A S U R E M E N T S Y S T E M S I N T E R N A T I O N A L
5) Display fl ashes “GAin4”. Press [ENTER/TARE] to accept, or press [SELECT/F1] to pick an-
other gain, then press [ENTER/TARE]. See Gain Table.
Capacity of Scale Gain Capacity of Scale Gain
500 lb 250 kg 4 30,000 lb 15,000 kg 3
2,000 lb 1,000 kg 3 50,000 lb 25,000 kg 3
5,000 lb 2,500 kg 4 70,000 lb 35,000 kg 3
10,000 lb 5,000 kg 4 100,000 lb 50,000 kg 3
20,000 lb 10,000 kg 4
Gain Table
For example, a 100,000 lb load cell needs a gain of 3. Press [SELECT/F1] until GAin3
appears, then press [ENTER/TARE].
6) Display fl ashes “UnLd”. Unload the scale, wait for the Scale to stabilize (not swinging or
vibrating) and press [ENTER/TARE]. The scale will display “CALC”, for calculating.
7) Display shows “LOAd” for 2 seconds then fl ashes the capacity. Load the scale with a test
weight that is equal to capacity weight; or if the test weight is less than capacity, load the
scale fi rst and then enter the actual weight of the test weight by pressing [SELECT/F1] then
[ENTER/TARE]. Make sure the scale is stable before entering the last number. After the last
number of the weight has been entered and the motion indicator is off press [ENTER/TARE].
If the motion indicator never goes off, stabilize the scale and weight as much as possible
before pressing [ENTER/TARE]. The display will show “CAL’d” if successful, or “CErr” if
not successful. An unsuccessful calibration can be due to an improper gain setting, or use
of a calibration weight that is too light.
A common error is entering the calibration weight value before the scale is loaded. The
weight must be on the scale and stable before the ENTER key is pressed or a cal weight
value is entered. On large scales like this 100k in question, it is rare that capacity weights
are available. However, during the initial calibration of this scale, you will have to use a
real weight. Until the scale has been calibrated once, you cannot use R-Cal techniques.
Recommend a test weight of at least 20,000 lb. However you can probably get by at
10,000 lb. For example, to enter a 20,000 lb load as the calibration weight, the procedure
is:
a) [/F1] “1”
b) [/F1] “2”
c) [ENTER/TARE] display reads “2”
d) [/F1] display reads “20”
e) [ENTER/TARE]
f) [/F1] “0” display reads “200”
g) [ENTER/TARE]
h) [/F1] “0” display reads “2000”
i) [ENTER/TARE]
j) [/F1] “0” , display reads “20000
k) [ENTER/TARE] fi nishes the test weight entry.
Of course, at any time you can use the [/F1] key to enter any number using the same
procedure. Not that it’s applicable here, but to enter less than fi ve digits, just press [ENTER/
TARE]
moves on to the next step. Again, make sure the test weight was loaded and the scale is
stable before entering the last digit.
Page 24 MSI-4260 Port-A-Weigh • User Guide
twice after the last relevant digit is entered. If 5 digits are entered, then the scale
Page 25

M E A S U R E M E N T S Y S T E M S I N T E R N A T I O N A L
8) Display fl ashes “UnLd”. Unload the scale and press the [ENTER/TARE] button. Afterwards
“r-CAL” will be displayed until the value is determined. If successful, then the r-CAL
value is displayed for 10 seconds or until any button is pressed. NOTE THIS VALUE! If
unsuccessful, the display will show “r-Err” for 2 seconds.
A display reading “r=Err” is not necessarily a problem, the scale will still function, but
you will be unable to show an R-Cal number or calibrate without test weights.
Final
Display shows “StorE” to signify that the calibration parameters are being saved in
backup memory. When complete the display will show “F-CAL” for the next menu item.
Press
[CLEAR/ZERO] to return to normal scale operation.
SUBSEQUENT CALIBRATION
Function
Subsequent Calibration is used for routine annual Calibration or when the scale is not weigh-
ing accurately.
Action
1) Press the Cal button. Scale will display “C-SET”, then displays “CAL”.
2) Press [ENTER/TARE] .
3) To set ZERO the display fl ashes "UnLd". Unload the scale and press [ENTER/TARE]. The
scale will display "CALC" (for calculating).
4) To input the Calibration weight value the display will show "LOAd" for 2 seconds then
fl ash the capacity. Load the scale with this weight or input another weight. After the last
number of the weight has been entered and the motion indicator is off, press [ENTER/TARE].
The display will show "CAL’d" if successful, or "CErr" if not successful. An unsuccessful calibration can be due to an improper gain setting, or use of a calibration weight that
is too light.
5) To set the CAL-r value the display fl ashes "UnLd". Unload the scale and press the
[ENTER/TARE] button. Afterwards "CAL-r" will be displayed until the value is determined.
If successful, then the CAL-r value is displayed for 10 seconds or until any button is
pressed. If unsuccessful, the display will show "r-Err" for 2 seconds.
Note: It may be desirable to bypass a calibration step. To do so press [CLEAR/ZERO]. The step
bypassed will retain the default or last set value. However, bypassing a calibration step
may result in an incomplete or inaccurate calibration.
Final
Calibration is complete and the display shows "StorE" to signify that the calibration param-
eters are being saved in backup memory. When complete the display will show "F-CAL"
for the next menu item. Press
[CLEAR/ZERO] to return to normal scale operation.
FINE CALIBRATION (F-CAL)
Function
Fine Calibration (F-CAL) is for minor adjustments to calibration and is usually not neces-
sary. It is useful, however, in hydraulic calibration fi xtures for fi ne adjustments.
Action
1) Press Cal button.
2) Press [SELECT/F1] to scroll to the "F-CAL" message. Press [ENTER/TARE].
MSI-4260 Port-A-Weigh • User Guide Page 25
Page 26

M E A S U R E M E N T S Y S T E M S I N T E R N A T I O N A L
WARNING
3) Pick up a test weight of (or set the hydraulic tension to) at least 25% of capacity. The
weight is indicated on the numeric digits. The display will fl ash "LOAd" if the weight is
under 25%.
WARNING
WARNING: Fine Calibration will not function unless the scale is loaded at 25% of capacity
or more.
3) Press [SELECT/F1] to cause the displayed reading to move up slightly. Press the button
[CLEAR/ZERO] to cause the reading to move down. Each press of the [SELECT/F1] or [CLEAR/
ZERO]
button causes the calibration to shift by 1/4 displayed count. When the displayed
reading is acceptable, press [ENTER/TARE].
Final
Fine Calibration is complete, press [CLEAR/ZERO] to return to normal scale operation, or press
[SELECT/F1] to choose another Calibration Setup function.
CALIBRATION WITH CALIBRATION OFFSET RESISTOR (CAL-r)
Function
Calibration with the Cal Resistor (CAL-r) is for emergency calibration only when test
weights or a calibration system are not available.
Action
1) Press [SELECT/F1] to scroll to the "CAL-r" message. Press [ENTER/TARE].
2) Display fl ashes "UnLd". Unload the scale and press [ENTER/TARE]. The scale will display
"CALC" (for calculating).
3) Display shows "LOAd" for 2 seconds then fl ashes last set CAL-r value. Input the CAL-r
value printed on the load cell Cal Sheet. After the last number has been entered, press
[ENTER/TARE]. The display will show "CAL’d".
4) Display fl ashes "UnLd". Unload the scale and press [ENTER/TARE]. Afterwards CAL-r
will be displayed until the value is determined. Then the CAL-r value is displayed for 10
seconds, or until any button is pressed.
Final
Calibration is complete and the display shows "StorE" to signify that the calibration param-
eters are being saved in backup memory. The calibration menu returns. Press [CLEAR/ZERO]
to return to normal operation or press [SELECT/F1] to scroll to a different Calibration Setup
operation.
Note: When Calibration is fi nished, seal the Calibration Port on the front panel of the scale.
STANDARDS (StAnd)
Function
Facilitates calibration to your required standard:
IndUS Industrial
nISt National Institute of Science and Technology (NTEP setting)
EuroP Metric/OIML
1Unit One Unit only (for custom scales)
Page 26 MSI-4260 Port-A-Weigh • User Guide
Page 27

M E A S U R E M E N T S Y S T E M S I N T E R N A T I O N A L
CAUTION
Action
1) Press [SELECT/F1] until "StAnd" is displayed.
2) Press [ENTER/TARE] and the currently selected standard will fl ash.
3) Press [SELECT/F1] to choose desired standard.
4) Press [ENTER/TARE] to store, or press [CLEAR/ZERO] to exit without changing.
Final
The calibration menu is displayed. Press [CLEAR/ZERO] to return to normal operation or press
[SELECT/F1] to scroll to a different Calibration Setup operation.
AUTO ZERO MAINTENANCE (AZM)
Function
To enable/disable AZM for certifi cation testing.
Action
1) Press [SELECT/F1] until "AZM" is displayed.
2) Press [ENTER/TARE] and the currently selected AZM Mode (On/Off) will fl ash.
3) Press [SELECT/F1] to choose the desired AZM Mode (On/Off).
4) Press [ENTER/TARE] to store or press [CLEAR/ZERO] to exit without changing.
CAUTION
RF REMOTE CONTROL
Caution: Disabling Auto Zero Maintenance will degrade temperature and drift performance
of the Port-A-Weigh. Disabling the AZM is only intended for certifi cation testing. Under no
other circumstances should the scale be used with AZM disabled.
Description
MSI-4260 crane scale can be equipped with a RF Remote Control
(RFRC). The RFRC is a transmit only device that can be used to perform basic scale functions. Range will vary from 25’ to 100’ depending
on room conditions and line of sight to the display. The remote receiving
antenna is behind the red lens of the crane scale and best range will occur when the display is visible to the operator using the RFRC. One big
advantage the RFRC provides is the ability to turn the unit on remotely.
The RFRC is available in three versions differing only in transmit frequency. The standard version operates at 418MHz. Available alternative
frequencies are 315 MHz and 433 MHz.
Functions
The RF Remote control (RFRC) duplicates the function of the front panel keys on MSI-4260
crane scales. The POWER, ZERO, NET/GROSS, and TARE key function identically.
Note: F2, Total (F3) and View Total (F4) on the RFRC are not supported by the Port-A-
Weigh. Total and Viewing the Total can be initiated with the F1 key on the RFRC.
The F1 key functions the same as the User Programmable Function (F1) key on the front
panel. The exact function of the key depends on the F1 key setup procedure. See page 11 for
the procedure to confi gure the F1 key, which will also confi gure the F1 key on the remote.
MSI-4260 Port-A-Weigh • User Guide Page 27
Page 28

M E A S U R E M E N T S Y S T E M S I N T E R N A T I O N A L
Setting the Transmitter Address
In order to allow the formation of up
to 1024 unique Transmitter-Receiver
relationships, the transmitter’s address may be selected using internal
DIP switches as shown. The switches
are accessed by removing the DIPswitch access cover.
Note: If the switch is on, the address
line is connected to ground,
otherwise it is fl oating. The
receiver’s address must match
in order for the units to communicate.
MSI supplies the transmitter and receiver as a matched set with the DIP switches already
confi gured. A replacement RFRC will only need to have the transmitter DIP switches set. To
change the DIP switch in the receiver requires disassembly of the crane scale front casting.
Note: Due to different DIP switch styles, the receiver DIP switch appears opposite to that of
the transmitter. On the receiver, the OFF position is on the right, and the ON position
is on the left.
Contension Considerations
It is important to understand that only one transmitter at a time can be
activated within a reception area. While the transmitted signal consists
of encoded digital data, only one carrier of any frequency can occupy
airspace without contention at any given time.
Battery Replacement
The remote unit utilizes a CR-2032 Button Lithium Cell. In normal use
it will provide 1-2 years of operation. Access for replacement is accomplished by removing the battery access cover by pressing down fi rmly on
the label area and sliding it off. Once the unit is open, remove the battery
by sliding it from beneath the holder. Replace the cell with the same type
while observing the polarity shown.
RF Remote Control FCC Statement
Instruction to the User
This equipment has been tested and found to comply with the limits for a class B digital
device, pursuant to Part 15 of the FCC Rules. These limits are designed to provide reasonable protection against harmful interference in a residential installation. This equipment
generates, uses and can radiate radio frequency energy and communications. However, there
is no guarantee that interference will not occur in a particular installation. If this equipment
does cause harmful interference to radio or television reception, which can be determined by
turning the equipment off and on, the user is encouraged to try to correct the interference by
one or more of the following measures: Reorient or relocate the receiving antenna. Increase
the separation between the equipment and receiver. Connect the equipment into an outlet
on a circuit different from that to which the receiver is connected. Consult the dealer or an
experienced radio/TV technician for help.
Page 28 MSI-4260 Port-A-Weigh • User Guide
Page 29

M E A S U R E M E N T S Y S T E M S I N T E R N A T I O N A L
This Equipment has been certifi ed to comply with the limits for a Class B computing device,
pursuant to FCC Rules. In order to maintain compliance with FCC regulations, shielded cables must be used with this equipment. Operation with non-approved equipment or unshielded cables is likely to result in interference to radio and TV reception. The user is cautioned
that changes and modifi cations made to the equipment without the approval of manufacturer
could void the user’s authority to operate this equipment.
TROUBLESHOOTING GUIDE
Problem Possible Cause Solution
1. Display is blank A) Discharged battery Recharge
when POWER button is B) Defective battery Replace
depressed C) Corroded battery Clean connections
D) Defective button or Requires authorized service
electronic circuit board
E) Power button not Press POWER fi rmly and hold until
properly depressed Power turns on.
2. Display does not function A) Computer lock-up Remove and re-insert battery. If problem
properly persists, authorized service is required
or B) Faulty electronic circuit Requires authorized service
front panel buttons do not board
function normally C) Faulty front button assembly Requires authorized service
or
scale will not turn off
3. Display does not A) Same as 2A, B above See 2A, B above
respond to weight changes B) Out of calibration Check calibration
C) Faulty load cell or Requires authorized service
electronic circuit board
D) Load cell disconnected Plug in
from printed circuit board
4. Display over-ranges A) Tared out weight Normal (See Operation Guide)
below 100% of capacity is added to load when
overload condition is
determined
B) Zero requires Recalibrate
adjustment
C) Out of Zero range Remove dead load and re-zero
5. Display experiences A) AZM turned off Go into Cal menu and turn AZM on
excessive Zero drift B) Scale electronics do not Warm up scale for 5 minutes then
between weighments stabilize after turning on re-Zero
(probably due to rapid temp-
erature change)
MSI-4260 Port-A-Weigh • User Guide Page 29
Page 30

M E A S U R E M E N T S Y S T E M S I N T E R N A T I O N A L
Problem Possible Cause Solution
6. Display shows large number A) ZERO requires adjustment Follow Calibration Section
after Power-up sequence B) Defective load cell or Requires authorized service
with AZM feature Off, and no electronic circuit board
applied weight
7. Displayed weight A) Scale not Zeroed before Depress ZERO before applying weight
shows large error applying weight
B) Requires recalibration See Calibration
C) lb/kg in wrong selection Set to correct selection
8. Display reading not stable A) Filter set too low Change fi lter setting
B) Faulty electronic circuit Requires authorized service
board
9. Battery charger A) Corroded battery Clean connections
indicator does not come connections
on when discharged B) Defective charger Requires authorized service
battery is inserted C) Defective battery Replace
10. Display is "LCnt1" A) Service Counter exceeded Inspect load train and contact factory
and/or "LCnt2" at
Power on
11. Display toggles A) Broken wire or Check load cell wiring for connectivity
between "Error" and improper connection
"A2dLo" or "A2dHi" B) Unit mis-calibrated Re-calibrate with Initial Calibration
C) Load cell damaged Replace load cell
12. Display toggles A) A button is being Release button or contact factory
between "Error" and depressed, or button
"buttn" is stuck
13. Display toggles between A) Current weight is greater Remove excess weight
"Error" and "LOAd" than rated capacity
B) Load cell damaged Replace load cell
C) Defective electronics Contact qualifi ed service technician
D) Broken wire or improper Check Load Cell connection wiring
load cell wiring
Page 30 MSI-4260 Port-A-Weigh • User Guide
Page 31

M E A S U R E M E N T S Y S T E M S I N T E R N A T I O N A L
SERVICE COUNTER WARNING
Function
A Warning is reported at Power On if:
Capacity of the scale has been exceeded more than 1,000 times or a weight in excess of 25%
of capacity has been detected more than 100,000 times. This warning informs the operator
that the load train should be inspected by a qualifi ed technician.
Action
If a weight in excess of 25% of capacity has been detected more than 100,000 times, then
"LCnt2" (Load Counter #2) is displayed, followed by the fl ashing numeric value. To continue
with Power On, press any button.
Final
Power On sequence continues.
Note: If Service Counter Warning has not been reset, it will be displayed the next time
POWER is turned on with the updated numeric values.
MSI LIMITED WARRANTY
MEASUREMENT SYSTEMS INTERNATIONAL, INC., WARRANTS load sensing elements and electronics against defects in workmanship and materials for a period of one year
from date of purchase and warrants electrical cables and batteries against the same defects for
a period of ninety (90) days from date of purchase.
Any device which proves defective during the warranty period will be replaced or repaired at
no charge; provided that the defective device is returned to the Company freight prepaid.
In no event shall the Company be liable for the cost of any repairs or alterations made by
others except those repairs or alterations made with its specifi c written consent, nor shall the
Company be liable for any damages or delays whether caused by defective workmanship,
materials or otherwise.
The Company shall not be liable for any personal injury or property damage resulting from
the handling, possession or use of the equipment by the customer.
The warranty set forth herein is exclusive and is expressly in lieu of all other warranties,
express or implied, including without limitation any implied warranties of merchantability or
fi tness, or of any other obligations or liability on the part of the Company.
The liability of the Company under this warranty is limited solely to repairing or replacing its
products during the warranty periods; and the fi nal judgement and disposition of all claims
will be made by MEASUREMENT SYSTEMS INTERNATIONAL, INC.
MSI-4260 Port-A-Weigh • User Guide Page 31
Page 32

M E A S U R E M E N T S Y S T E M S I N T E R N A T I O N A L
PROPER LOADING PROCEDURES
Page 32 MSI-4260 Port-A-Weigh • User Guide
Page 33

M E A S U R E M E N T S Y S T E M S I N T E R N A T I O N A L
NOTES
MSI-4260 Port-A-Weigh • User Guide Page 33
Page 34

“We weigh quality first”
MADE IN THE
USA
© 2009 by Measurement Systems International, Inc.
Printed in U.S.A.
PUB.114-02-90F
Measurement Systems International
14240 Interurban Avenue South STE. 200
Seattle, Washington 98168-4661 U.S.A.
Phone: 206-433-0199 • Fax: 206-244-8470
Web: www.msiscales.com • Email: info@msiscales.com
 Loading...