

MSB Technology Universal Media Transport plus User Manual
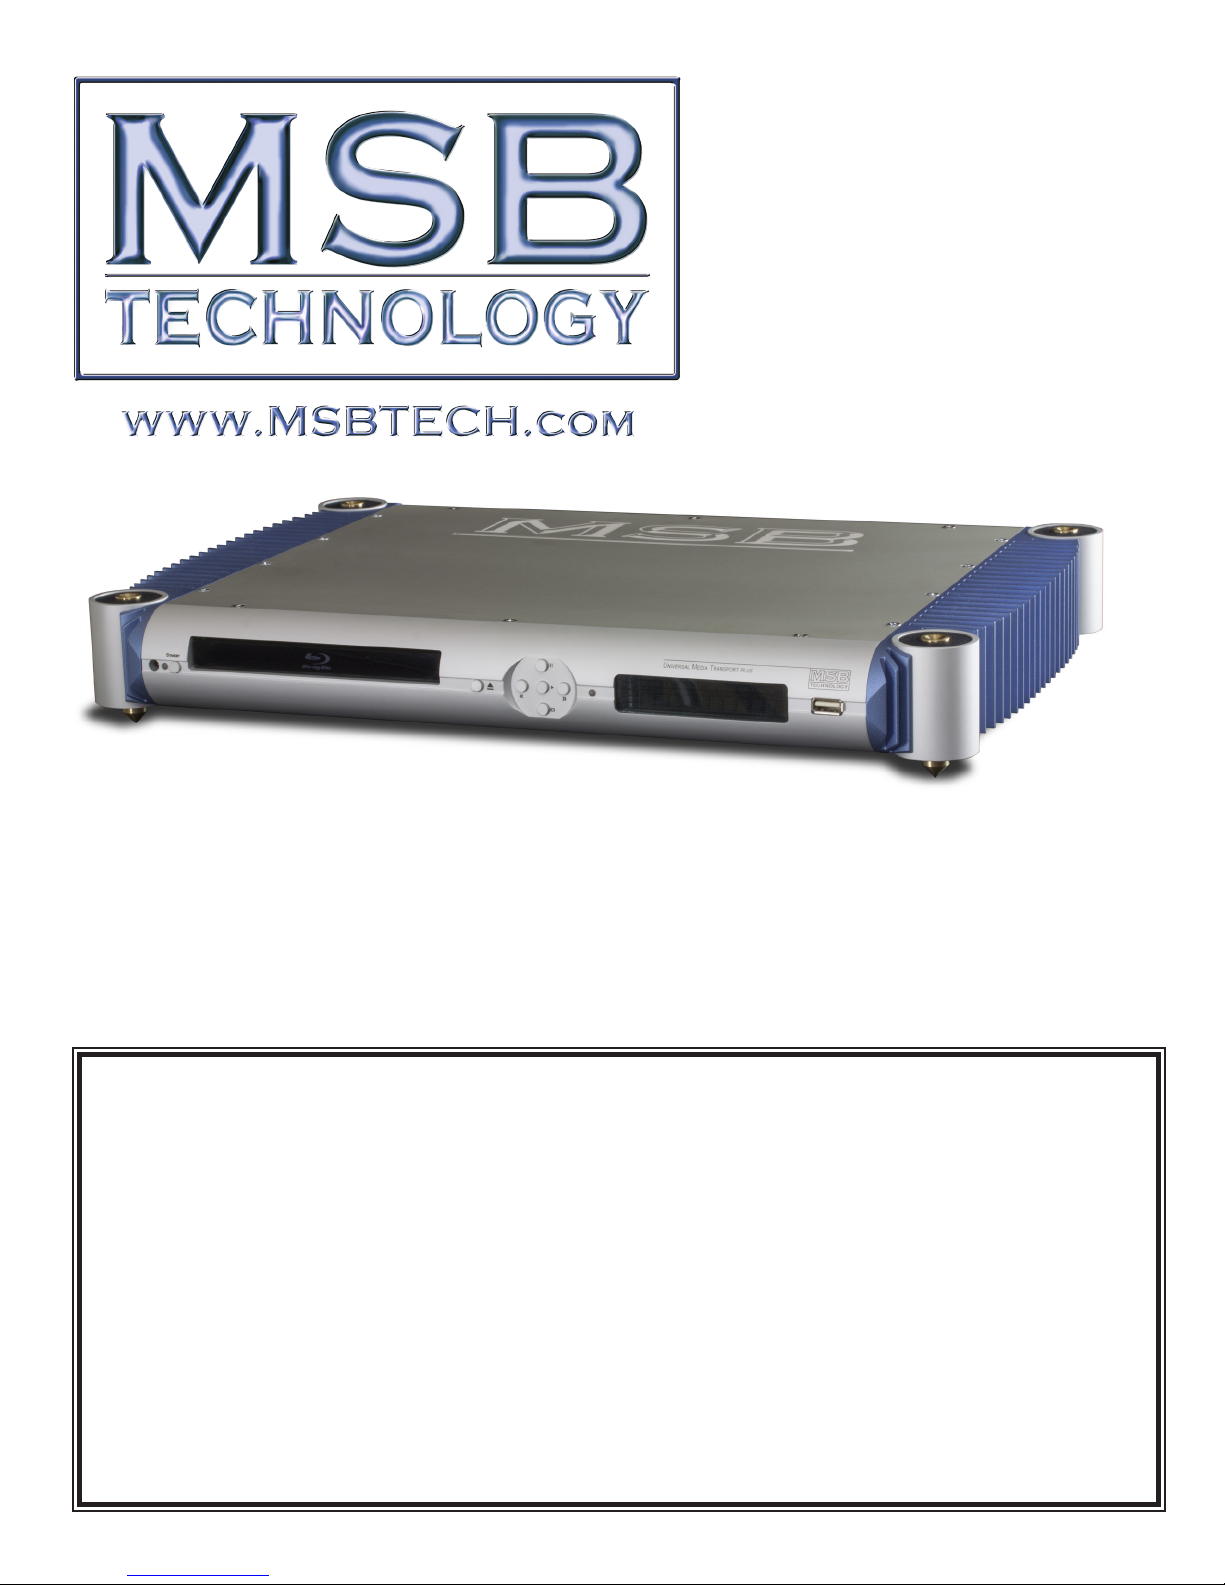
Universal Media Transport plus
Users Manual
Rev 2 (5/13)
Video outputs: 2 HdMi
digital audio outputs: optical, coaxial Rca x 3, Balanced xlR, MsB pRoi2s
clock inteRface: inteRnal clock HeadeR, exteRnal 512 clock in oR out
analog audio outputs: none
Bit stReaM suRRound outputs: optical and coaxial
exteRnal Media connections: 3 usB poRts, coMputeR netwoRk stReaMing
MaxiMuM output Resolution: 24 Bit, 192 kHz pcM, 32 Bit, 192 kHz MsB pRoi2s
file types: waV, flac, dsd 64x, Mp3, dolBy digital Hd, dts Hd and MoRe
disc types: cd, sacd, BluRay (3d, Bd-liVe, Bd-R/Re), HRx, dVd, dVd audio and MoRe
1
Universal Media Transport Plus
Quick start guide
Setup and Connections:
1. Display - If you plan to play music from DVD, BluRay, USB or Network, attach any display to HDMI 1.
2. Internet - If you plan to stream from the internet or want a rmware update online, plug COMPUTER LAN into any computer
network (wireless is not recommended).
3. Connect Audio - For use with an MSB DAC, use the MSB CAT-6 cable to connect MSB ProI2S OUTPUT to the MSB ProI2S
INPUT on the DAC. For other DACs, connect any of the DIGITAL AUDIO OUTPUTS (1 to 5) to the DAC.
Disc Operations: Normally for disc operations you just put the disc in and it will start playing. Volume up/down buttons on the remote
actually control the volume of the DAC IV plus.
Basic File Operations: Get to know the HOME MENU button, navigation arrows and RETURN buttons on the remote. They get you
around the operation of the transport. All sources are treated basically the same, whether they are CD, USB Memory stick or Network
streaming. You select and browse the source.
Video Settings:
Feel free to browse and adjust video and HDMI settings as needed. They can be changed using the dedicated remote buttons, or changed
in the Video Setup Menu. Either way changes will be saved when the unit is put in Standby.
Audio Settings:
Any adjustment of audio processing menu settings may dramatically hurt the audio quality. The only “safe” setting is audio delay if needed.
Advanced Audio Settings:
There is a hidden Advanced Audio menu. This is the place to select multichannel, DSD and clock options.
Factory Reset:
If all goes wrong do a reset to factory settings. This resets all the important audio and video settings. It will not delete your Subscription
passwords (like Netix). This process is slow and takes about 1.5 minutes to complete. The ProI2S Indicator will blink continuously
until the reset is complete. Here is the sequence:
PRESS <DIMMER> <DIMMER> <DIMMER> <CLEAR>
Network Player:
This unit will play music from any computer or storage device on your network, but they must rst be shared. You can share your music
on a network storage device. Instructions for sharing vary depending on your computer OS and applications.
Burn-In:
The concept of burn-in is little understood. Does it take your ears some time to get used to the incredibly detailed and life-like sound of
an MSB product or is something actually changing? The feedback we receive leads us to recommend at least 100 hours of burn-in on
this UMT. Customers generally recommend one month.
Warning: Please verify that the UMT you just purchased is covered under warranty. This UMT was sold to the Distributor named on
your box label If the country and year do not match your purchase location, your warranty may be invalid. Check with MSB.
2
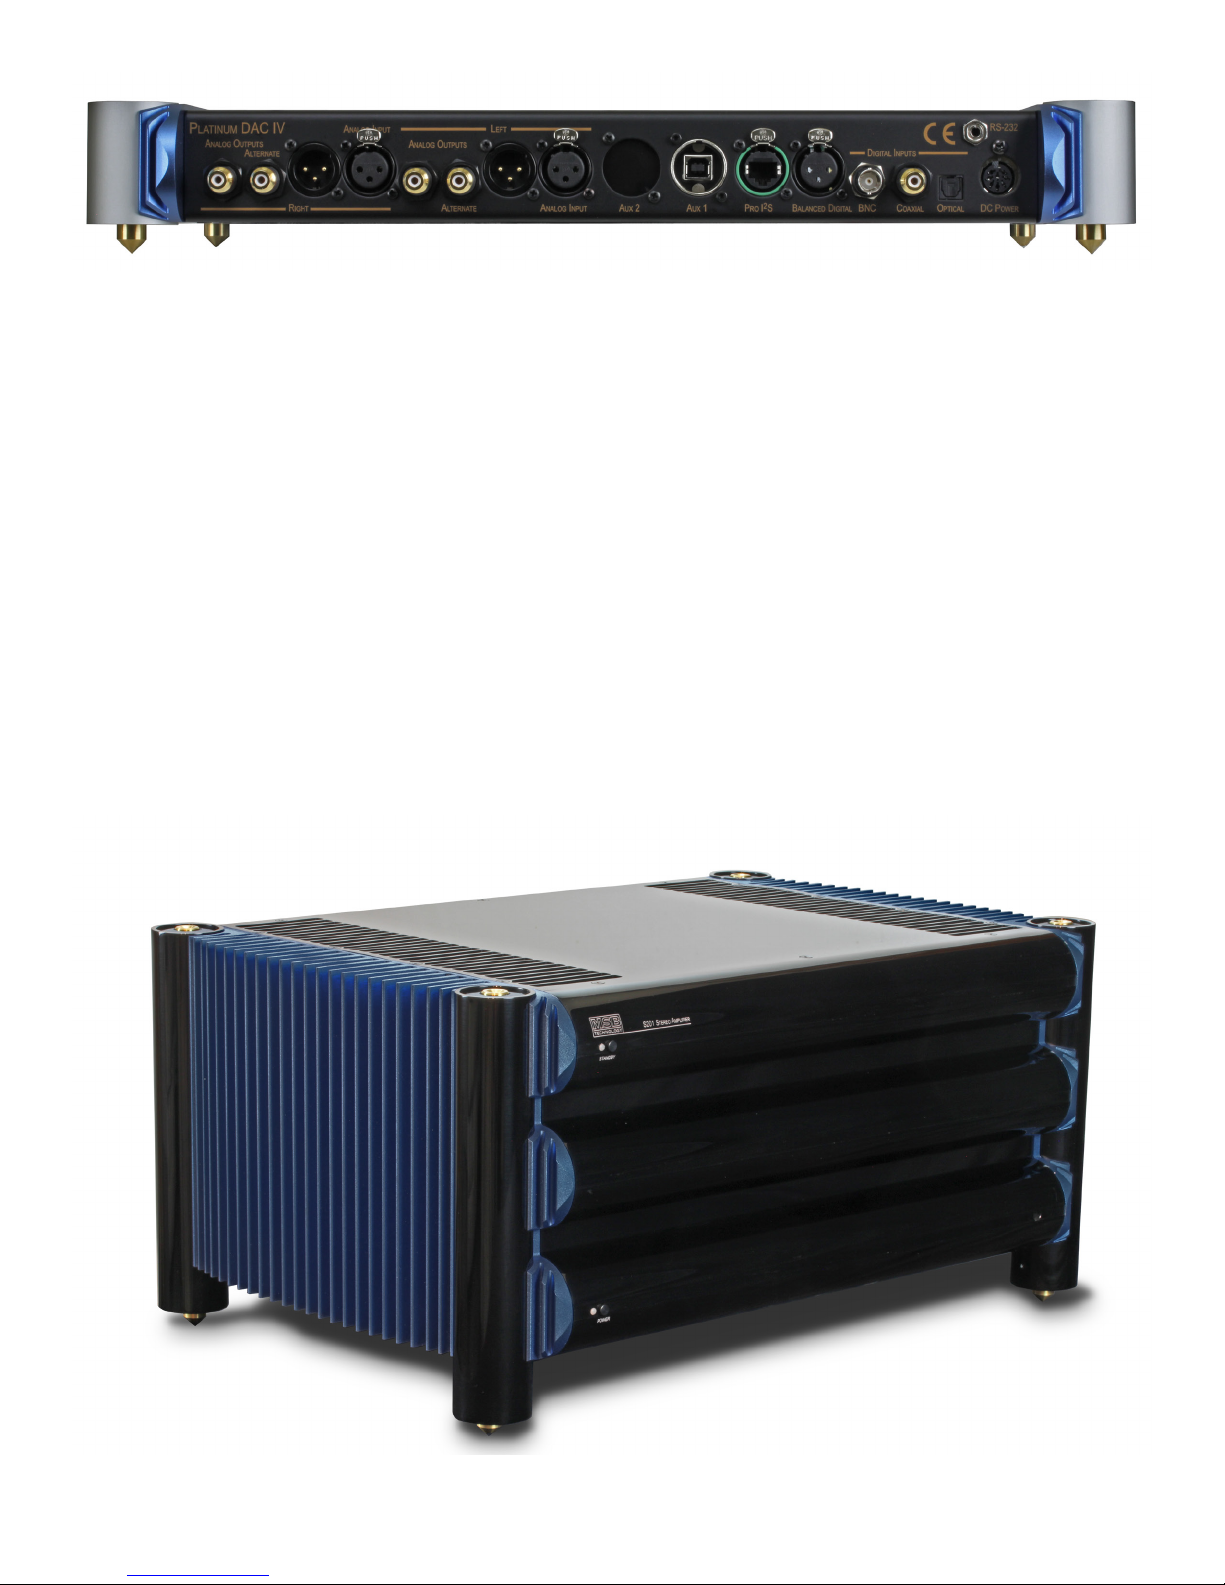
Here is the back panel of an MSB DAC. Note the ProI2S input on the DAC (Green Ring). This special input can be connected to the
UMT ProI2S output and this connection will not only transfer data bit perfectly, but will do it without any ground connection, PLUS
the low jitter clock in the DAC will be sent to the UMT, and the UMT will operate in sync with the DAC clock.
This connection is made with an MSB Network cable or any CAT-5 or CAT-6 cable. The connection will not work with CAT-7 or
shielded cables.
MSB System
Although the UMT can be used with any DAC there are special features that can only be enjoyed with an MSB DAC. The big limitation
is the standard S/PDIF digital audio output format. Is is limited to 24 bits. The MSB ProI2S which is used to connect the UMT to an
MSB DAC is limited to 32 bits, so extra resolution is provided with the MSB DAC. The UMT also communicates DSD directly to the
DAC when an SACD is played. This resolution comes into play with sources like SACD and multichannel DTS and Dolby Digital HD
Blu-ray discs.
With the fantastic detail of the DAC IV, we recommend not using an external preamp, but taking advantage of the passive stepped attenuator
option in the DAC IV. With no preamp to muddy the signal, the amp is presented with an amazingly detailed signal.
Also please consider one of the MSB Amps, also optimized for the speed and accuracy of the MSB DAC.
The S201 is a Class A 200 Watt Stereo Amplier, perfectly matched to reveal all the detail of the MSB DAC.
3

Contents
Quick start guide 2
Setup and Connections: 2
Audio Settings: 2
Advanced Audio Settings: 2
Network Player: 2
Burn-In: 2
MSB System 3
Rear Panel Details 5
Multi Channel MODE outputs 5
Connections 6
Video Connections 6
Method 1 – HDMI Connection Directly to a Display 6
Method 2 – DVI Connection to a Display 6
Video Settings 6
Audio Connection 6
Audio on HDMI 6
The Ground Lift feature of the DAC IV 7
The ProI2S Interface 7
UMT with Dual Power Supplies 7
UMT with Non-MSB DAC 7
Clock Links 7
MSB Clock Header 8
External Clock Interface 8
Power Connection 8
USB Connections 10
Computer Network Connection 10
Internet connection through Ethernet cable 10
Internet connection through Wireless USB Adaptor 10
Custom Installation 10
External IR (Infrared Remote) Installation 10
RS232 Control 11
REMOTE CONTROL 11
Changing Volume 11
Changing the Backlight Method 11
Using the MSB DAC Remote (Default = Not Enabled)
11
Changing the Remote Code 12
Remote Buttons 12
Front Panel Controls 13
MSB Advanced Audio Setup 14
SETUP MENU OPTIONS 14
Using the Setup Menu System 14
Playback Setup 15
Video Setup 16
Detailed Video Setup 18
Picture Adjustment 18
HDMI Options 19
Audio Format Setup 20
Blu-ray Audio Playback 21
Multichannel Audio Processing Setup 22
Speaker Conguration 22
Down Mix Mode 22
Speaker Settings 22
Other Audio Processing Settings 22
Device Setup 23
BASIC OPERATIONS 28
Disc Playback 28
OPTION Menu 28
Fast Playback 29
Pause and Frame-by-Frame 29
Slow Playback 29
Blu-ray Disc Menu Playback 29
DVD Menu Playback 29
On-Screen Display 29
Volume Control 30
Audio Language/Track Selection 30
Subtitle Selection 30
HDMI / MHL Input 30
Audio Return Channel (ARC) Selection 31
BD-Live 31
ADVANCED OPERATIONS 32
Output Resolution 32
Zoom Levels for HDMI 1 Output 32
Repeat Playback 34
Repeat a Selected Section 34
Shufe and Random Playback 34
Playback by Chapter or Track Number 34
Playback from a Specic Location - DVD and Blu-ray Discs 35
CD and SACD discs 35
Memory and Automatic Resume 36
Viewing Pictures on DVD-Audio Discs 36
Pure Audio Mode 36
MEDIA FILE PLAYBACK 37
Supported USB Drives 37
In-home Network Media Sharing 37
Internet Streaming on HOME Menu 38
Playing Music Files 39
Playing Movie Files 40
Viewing Photo Files 40
System Automation 41
Troubleshooting Guide 41
Language Code List 42
Warranty 42
Optional Zone Free Upgrade 43
4
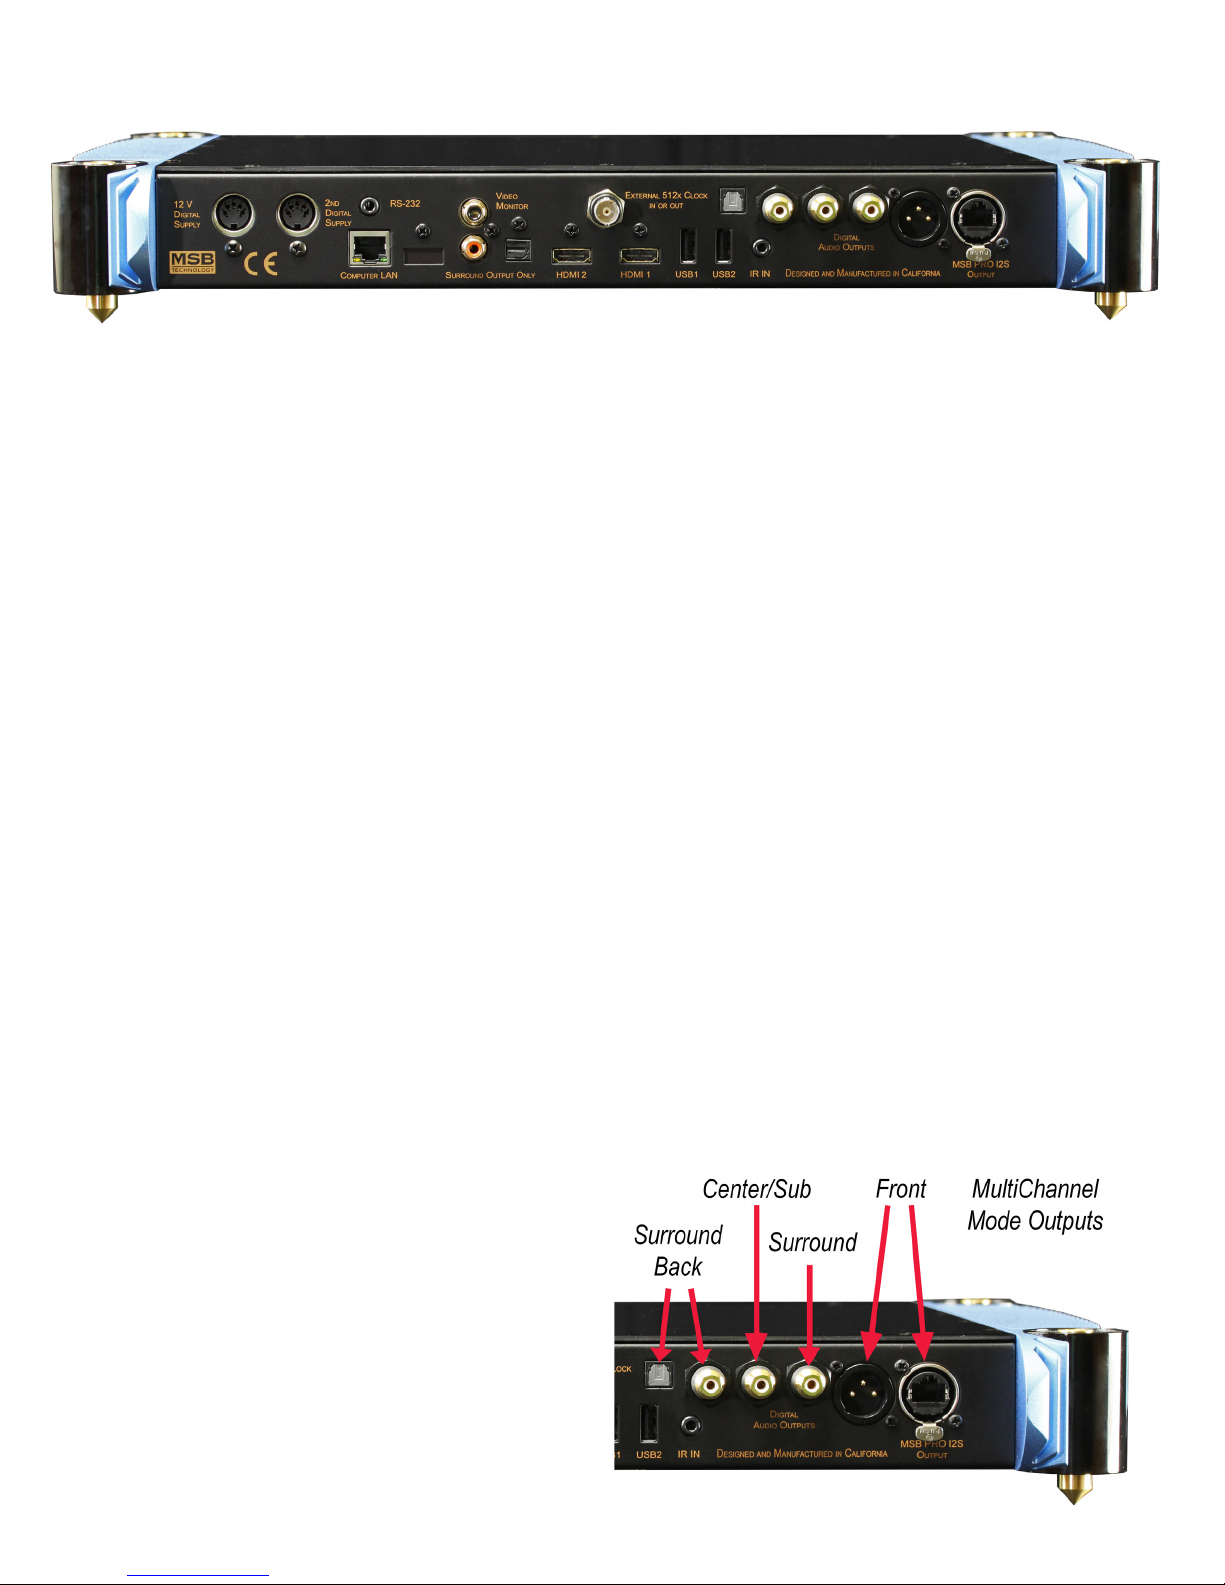
Rear Panel Details
1. Power Input – This product must be plugged into a Signature Transport Power Base, any of the DAC IV power bases with a digital
supply or an external desktop supply. For improved performance plug in a second supply. This completely separates the video and
drive part of the UMT from the Audio part.
2. RS-232– The RS-232 input is for control of the unit. For use with complete system controllers.
3. Computer LAN Port– This is for connection the UMT to a home computer network for streaming and for connection to the internet.
4. Video Monitor Output– A standard analog video output is only for looking at menus and navigation.
5. Surround Coaxial Output– This is only to be used with an external surround processor. It’s not recommended for normal use.
6. Surround Toslink Output– This is only to be used with an external surround processor. It’s not recommended for normal use.
7. HDMI 2– This is a secondary HDMI output. For normal operation use HDMI 1.
8. HDMI 1– This is the primary HDMI output. This is the preferred method of connection a video display.
9. External 512x Clock in or out. This impressive clock port will accept and use an external clock if the clock is present, and if it is
the right frequency. Otherwise the internal clock will be used. Can also be congured to output the current master clock.
10. USB 2.0 Port– This port is the same as the front. It is to be used with the optional wireless network device or an external USB hard
drive or USB ash drive.
11. USB 2.0 Port– This port is the same as the front. It is to be used with the optional wireless network device or an external USB hard
drive or USB ash drive.
12. IR In Port– An IR port for use with an external receiver. The tip of a 3.5 mm Mono plug is the IR carrier, the sleeve is ground.
13. Toslink – The highest jitter format but offering ground isolation and noise immunity over long runs. Limited to 24 bit data.
14. Three Coaxial – A good output for short runs. Limited to 24 bit data. These default to front channel and are all the same. In surround
mode, each becomes a surround pair, offering a full digital 7.1 system output.
15. Balanced digital – The AES/EBU Professional output is the preferred output for non-MSB equipment. The balanced nature of this
output allows great cable lengths as well as total noise immunity. Limited to 24 bit data. In surround mode, this is your non- MSB
front channel output.
16. MSB ProI2S output – The MSB connection uses CAT-6 cabling. It provides an output for use with other MSB products. It can
handle 8 channels of data up to 192 kHz and 32 bits.
Multi Channel MODE outputs
The default mode for the UMT is STEREO outputs as shown above.
If you select the MULTICHANNEL mode, than the outputs are
redened as shown. To set UMT to MULTICHANNEL mode:
On the remote press: <DIMMER> <DIMMER> <DIMMER> <6>
TO SET BACK TO 2 CHANNEL OUTPUT: On the remote press:
<DIMMER> <DIMMER> <DIMMER> <4>
Note: With an MSB DAC the MSB ProI2S should be used for
the front channels as this will assure that there is no latency or
lip sync issues.
5

Connections
Video Connections
The UMT has a range of applications. If your only use is the playing of audio discs, then no video connection is required. The system
setup is optimum for you and all you have to do is make the proper audio connections. If your interests is in playing music from a Hard
Disc, USB stick or from a computer network, then a video display is needed for navigation. A small computer monitor with no audio
and an HDMI input would be ideal. If you plan to watch DVDs or Blu-Ray discs then the UMT will need to be connected to your video
display or projector.
Method 1 – HDMI Connection Directly to a Display
If your Display has an HDMI (High-Denition Multimedia Interface) input, you can use the
included HDMI cable to connect the player to the Display. This connection method delivers
both video and audio in a digital format via a single cable. The HDMI video output of the
player allows for the highest possible video quality and resolution. The audio is of low quality
and should NOT be used.
There are two HDMI output terminals (HDMI 1 and HDMI 2) on the rear panel of UMT, both
of which can be connected to your Display. We recommend to use HDMI 1 since it benets
from the dedicated Marvell DEO video processor, and set the “Primary Output” option in the
setup menu to “HDMI 1” (below). This output should also be set to “Video Only”.
You may connect the composite video cable to a TV for troubleshooting purposes, or if only
menu navigation is desired, because it only produces a standard denition video signal and forfeits the advantage of high denition video.
Method 2 – DVI Connection to a Display
If your display has a DVI input that supports HDCP, you can purchase an HDMIDVI adapter cable to connect the player to the display. This connection method
delivers digital video to the display without any signal degradation. The HDMI
video output of the UMT presents the highest possible video quality and resolution.
We recommend to use HDMI 1 since it can benet from the dedicated video
processor, and set the “Primary Output” option in the setup menu to “HDMI 1”
(please see more details below).
Video Settings
Primary Output: To select the primary video output port. The options are:
• HDMI 1 – Use HDMI 1 as the primary video output port. This setting will ensure that the HDMI 1 output gets the best possible
picture quality. The dedicated QDEO DE2750 video processor will be used unless “Source Direct” for output resolution is selected,
in which case QDEO DE2750 video processor is bypassed. Component and composite video output may not be available or may be
limited to a lower resolution based on content source limitations.
• HDMI 2 – Use HDMI 2 as the primary video output port. Similar to “HDMI 1”, this setting ensures that the HDMI 2 output gets
the best possible picture quality, except that it utilizes the video decoder in the player to perform necessary video processing, not the
DE2750 video processor.
Audio Connection
Audio on HDMI
Although the UMT can output audio over HDMI, this audio will not benet from the MSB processing and its use is not recommended.
We set the HDMI Audio output to “OFF”.
Audio Ground Noise
Today we are on a new frontier of performance with new multi-media sources loaded with electrical noise unlike anything we ever
experienced in the past. At the same time we have made great improvements in jitter, the enemy of the last decade, making ground noise
which used to be lost in the jitter, the dominant problem. And again, grounding issues are back, making a huge difference, but now in
harshness, focus, detail and air, instead of hum.
There is no intuition, right or wrong with high frequency ground noise. When all we had to deal with was 60 Hz AC hum, the concept
was easy to visualize. Get rid of ground loops. But now we are ghting a new animal. We have had some idea about ground noise, but our
experience has shown just how tricky it is. It all started for me with the question of why the sound changed when I changed my digital
cable? The DAC reclocks and all the bits arrive correctly in memory. What is different? Ground noise. Now as we do network streaming
and have a Blu-ray player hooked up to an LCD monitor as a source, the matrix becomes impossible to deal with anyway but the old
way. Try making changes and listen.
6
The Ground Lift feature of the DAC IV
This feature is the most powerful tool available for UMT setup and makes a huge difference in sound!
So we have given you all the tools to get it right. The most important is a ground lift in the DAC IV menus that disconnects the analog
part of the DAC output stage from the chassis and digital ground. The idea is to avoid ground loops and if your Amps are grounded this
connection SHOULD be lifted. If your AMPs oat, lifting this ground connection could result in the destruction of your DAC should you
accidentally discharge a lot of static to the AMP. So make sure the Amplier case is grounded before doing the ground lift.
The ProI2S Interface
The next tool is the interconnect. The job of the interconnect is to get the digital bits from the transport to the DAC. We want all the bits
sent without errors. All the interconnect types will do this. The standard connections are limited to 24 bits and the MSB network is 32
bits. Otherwise they all do the same job, EXCEPT were it relates to ground noise. Here we have big differences. Optical has no ground
and the balanced almost no ground. Coax has a transformer coupled ground and the MSB ProI2S has absolutely no ground. This is the
best of all worlds and is the preferred output for the UMT. If you do not have the PRO input on your DAC and you are hooked up to
video, you may well nd the optical connection best sounding. There is no ground connection at all. There is no rule. Any could sound
best in your system. You just have to try them.
UMT with Dual Power Supplies
The nal layer of isolation is the use of two power supplies. This further isolates the video and audio parts of the UMT. The sonic impact
of this isolation will be system dependent and may vary from minor to major depending on the exact conguration of your system and
the quality of your power. See the power section below.
UMT with Non-MSB DAC
With a UMT set up for use without an MSB DAC, the highest quality digital connection should be made with the DAC that the DAC
can support. We would generally rank the connections in this order: Balanced XLR, Coaxial RCA, Optical. If your DAC supports DSD
via DoP than you are all set. If not you need to reprogram the UMT to output PCM DSD when an SACD is played (This mode is not
available in the MULTICHANNEL MODE).
TO SET DSD TO PCM OUTPUT: On the remote press: <DIMMER> <DIMMER> <DIMMER> <5>
TO SET DSD BACK TO DoP OUPUT: On the remote press: <DIMMER> <DIMMER> <DIMMER> <4>
Clock Links
The single most important component of good sound in a transport is low jitter. In the UMT we have taken this problem very seriously.
The best possible clock for the UMT is the clock of the DAC. When this clock is used to run the UMT, the audio and video in the UMT
is actually clocked from the DAC clock. This can be accomplished with an MSB DAC using the ProI2S connection. In this case the
clock in the UMT is only used to get the UMT going until the DAC link is established. With an older MSB DAC or a non-MSB DAC,
the clock is vitally important.
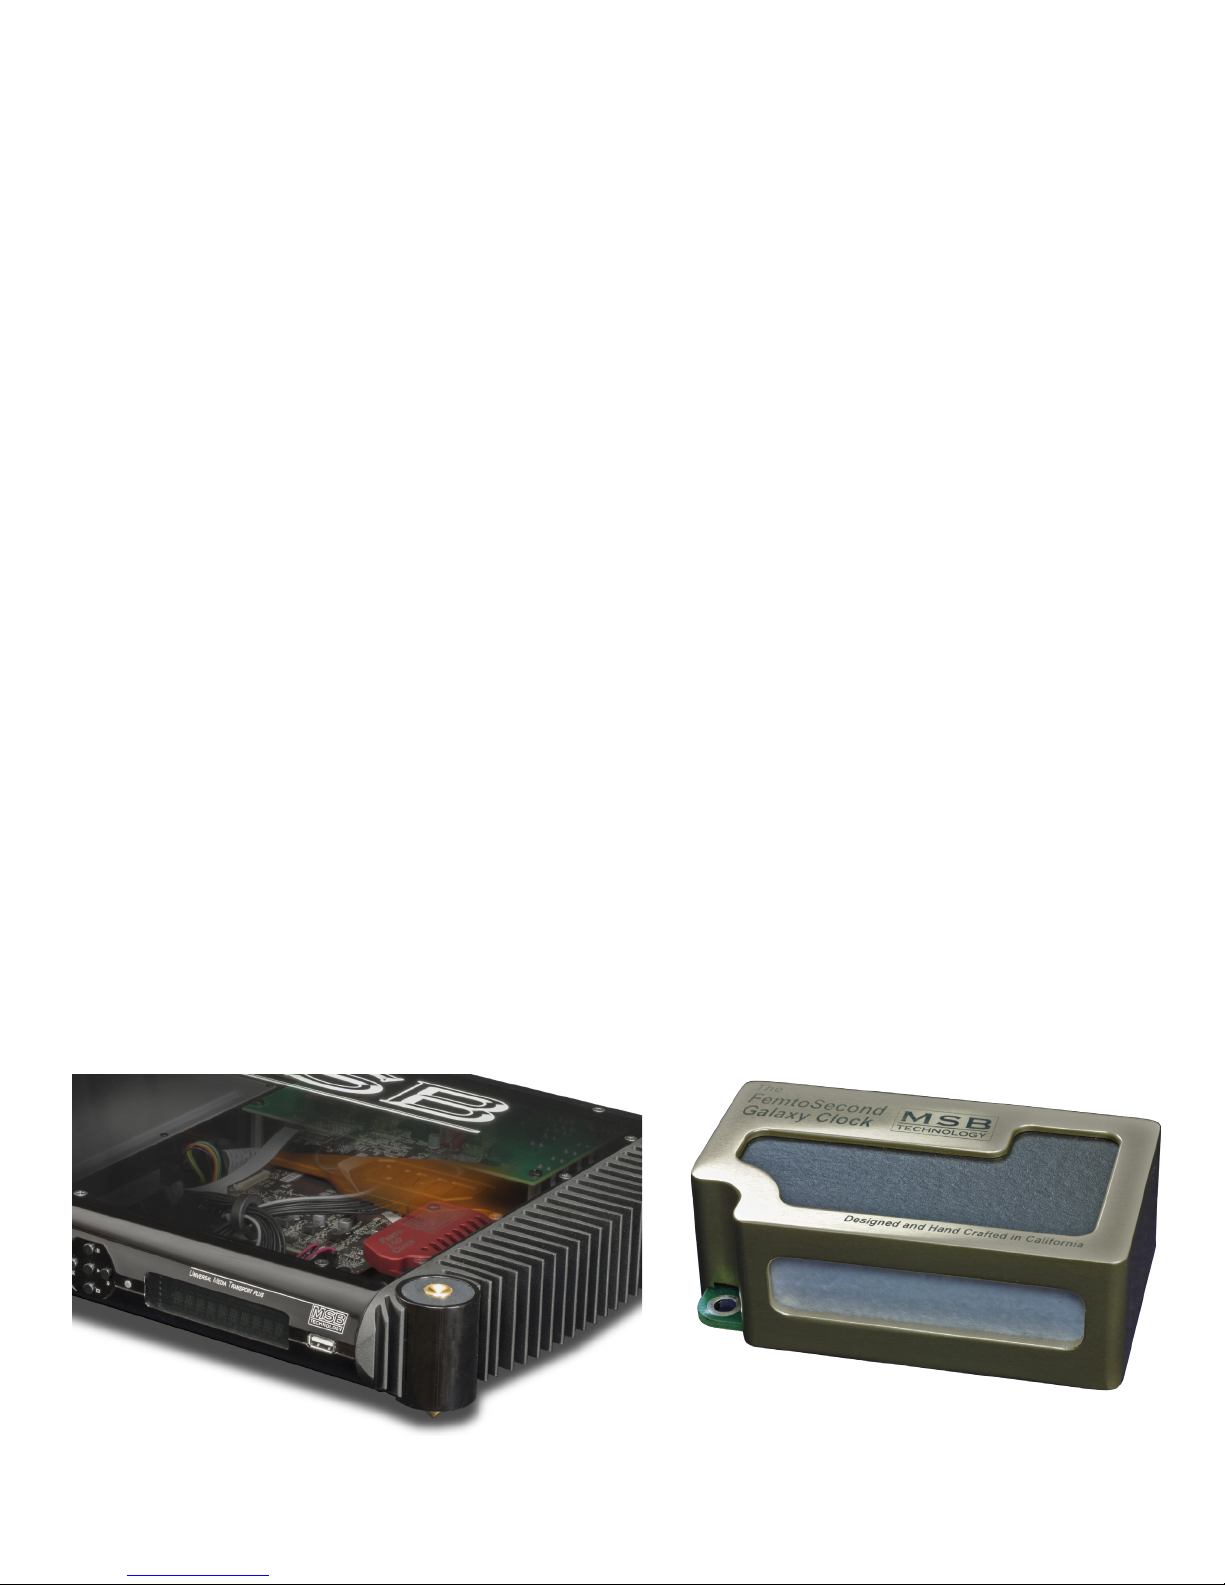
This view of the UMT has the optional Red Femto140 clock
installed.
The Galaxy Femtosecond Clock is the ultimate clock for the
lowest possible jitter.
7
MSB Clock Header
The UMT offers an amazing opportunity to install the lowest jitter clock in the world and use it to clock our data going to non MSB
DACs with depend on the incoming data stream to recover the clock.
The standard MSB Clock Header allows both the Femto140 Clock and the Galaxy Femtosecond Clock to be installed. It is user installable.
Just plug it in and the UMT will detect it and start using it.
External Clock Interface
The UMT is truly exible when it comes to clock interfaces. A clock BNC connector is provided which can be used as an external 512x
clock in or out. This impressive clock port will accept and use an external clock if the clock is present, and if it is the right frequency.
If the clock is not correct or not present, the internal clock will be used. This assures seamless operation.
Now just a comment about clocks. A master clock is 512 times the base sample rate. So a 48 kHz DVD needs a master clock of 24.576
MHz. This is not the same clock needed for a CD. So you cannot really just add an external clock and expect everything to be great.
The clock must be changed to match the material being played. How does the clock know? It doesn’t. This is what is so clever about
the ProI2S interface. The UMT starts out using its internal clock to read the media. Once the sample rate of the material is established,
the UMT tells the DAC and the DAC switches its internal clock to match the UMT and then sends that clock back to the UMT. It senses
the new incoming clock and seamlessly merges to the new clock. But with our clever automatic clock switching, you can hook up an
external clock for CDs for example, and when a CD is played, the external clock will be used, but when DVDs are played, the UMT will
see that the external clock is the wrong frequency and will just use the internal clock instead. Totally seamless.
This clock interface can also be congured to output the current master clock. So you can see that a better option would be to set the
UMT clock interface as an output and send the low jitter master clock to the DAC, provided that the DAC has the ability to accept an
external master clock.
Again, just for clarity, we are talking about a master clock, not a word clock. A word clock is at the sampling rate of the media and will
have to be multiplied up 512 times to make a useful clock inside a DAC. This is a poor alternative. We do not support word clock in
or out of the UMT.
DEFAULT CLOCK PORT: INPUT
TO SET CLOCK PORT TO OUTPUT: On the remote press: <DIMMER> <DIMMER> <DIMMER> <0>
TO SET CLOCK PORT BACK TO INPUT: On the remote press: <DIMMER> <DIMMER> <DIMMER> <9>
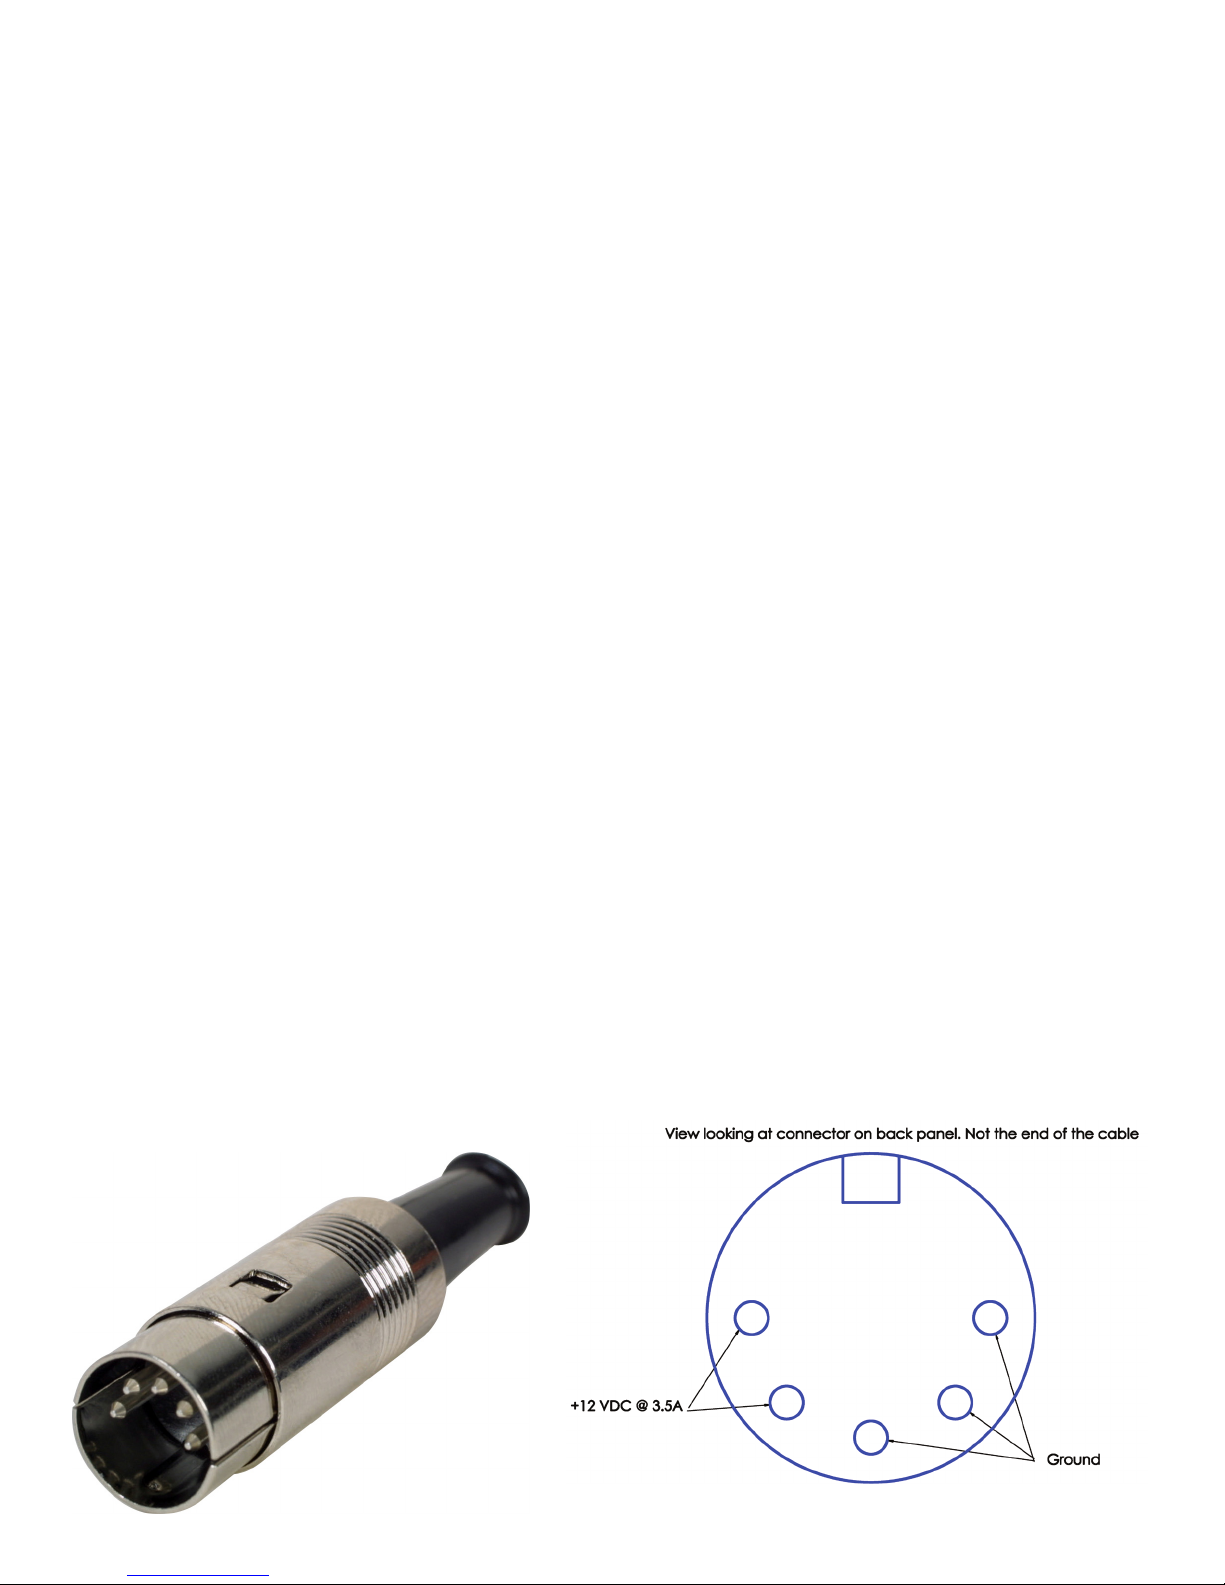
Power Connection
The UMT must be connected to a 12 VDC supply with a 5 pin DIN connector. But that is just the basic requirement. The quality of the
power supply directly affects the quality of both the audio and video. The UMT is unique in having the option to use either one or two
power supplies. Basically when power is detected on the second power connector, the grounds and power supplies are disconnected for
the audio and video processing. This is an automatic function. When the power is unplugged from the second supply, the video and
audio are again combined. The second supply becomes the AUDIO supply and should be of the highest quality. This is very important
even if you are not using video with the UMT as the drive, and drive controller and video processing still takes place to some degree
even if video is not used and can corrupt the audio by coupling noise through the power supply connections.
You have many options here.
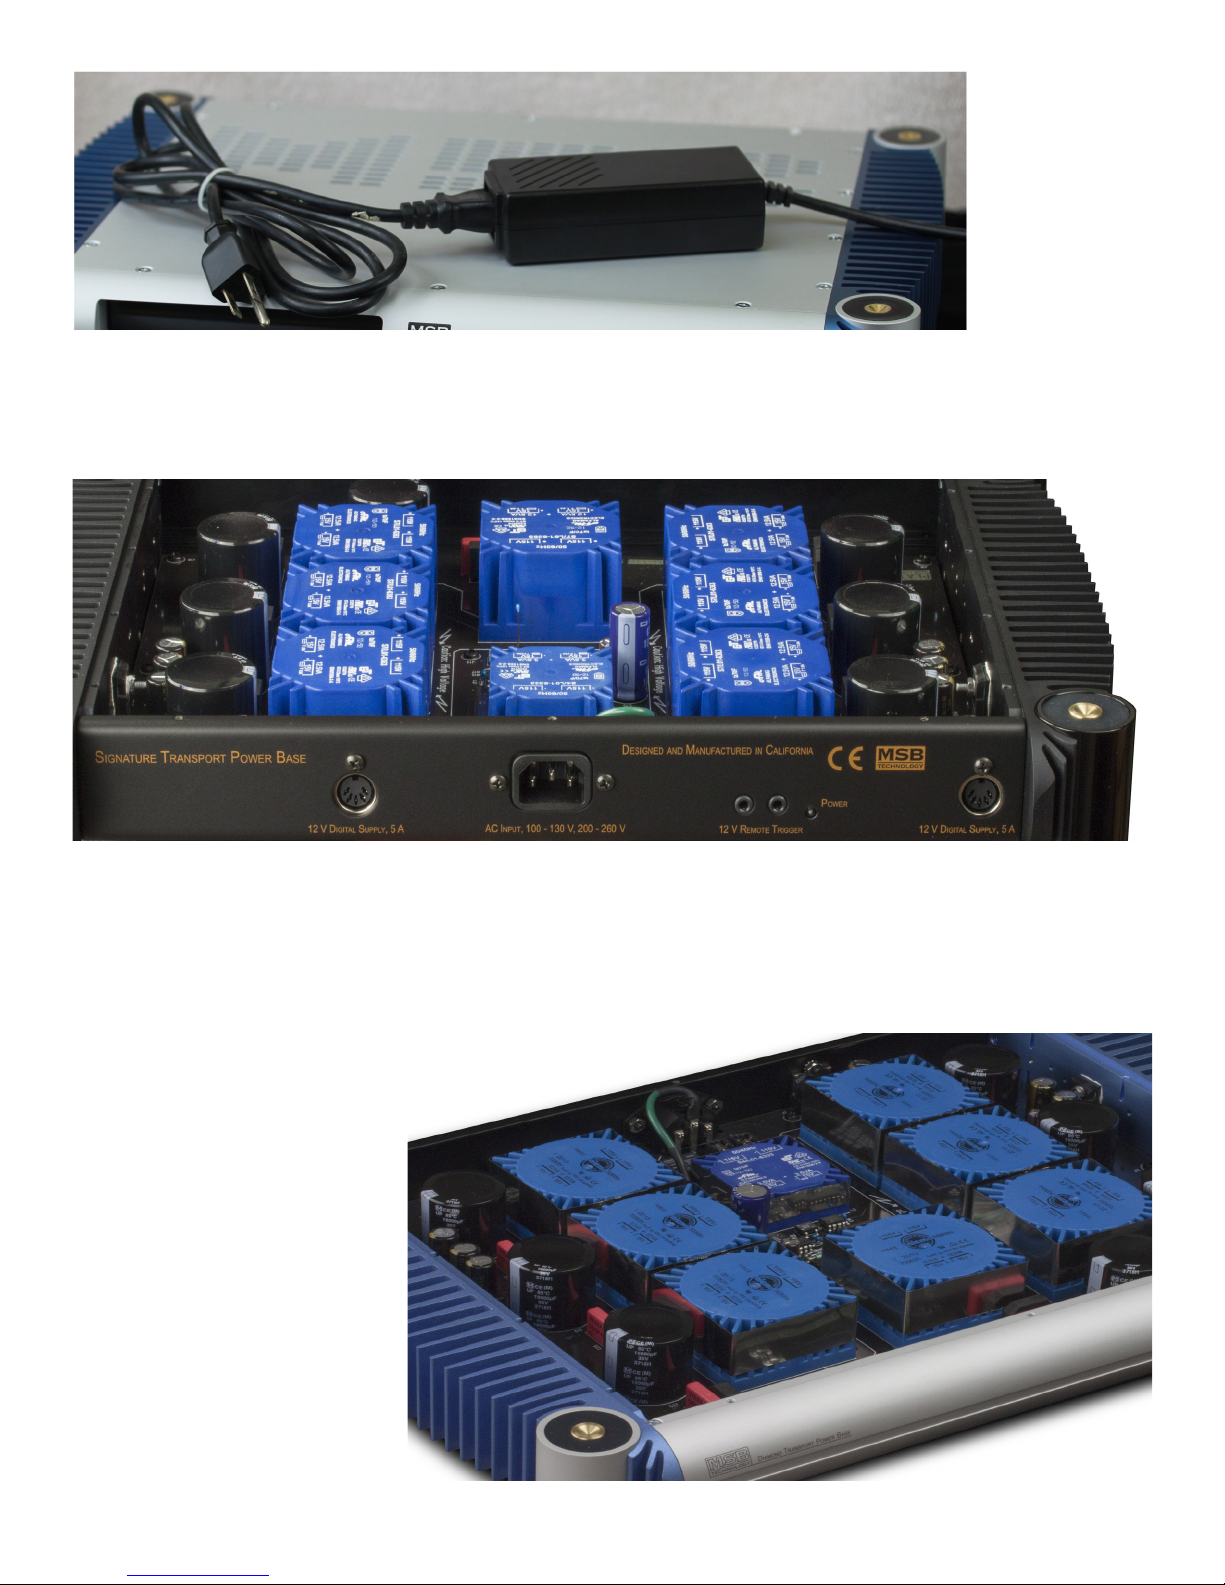
First of all, all DAC IV Power Bases have a transport power supply included. It can be used for either audio or video.
One or two separate medical grade switching desktop supplies are offered and can be used for either audio or video.
8
One or two
medical grade
desktop supplies
can be used with
the UMT.
The Signature Transport Power Base is a dedicated high quality power supply for the UMT. It is a linear power supply with ultra low
noise. It can be used alone or in conjunction with any other power supply for better isolation. It should be hooked up to the audio
supply when used with a desktop supply.
The Dual Signature Transport Power Base is equivalent to two Signature Power bases combined. It has two independent linear power
The Dual Signature Transport Power Base is the perfect companion to the UMT. It has two linear power supplies, one for audio and
one for video.
supplies including separate transformers. It was designed specically for the UMT. It is a recommended option.
The Diamond Transport Power Base has twice the power of the Signature is as the ultimate option for both the audio and video requirements
of the UMT. Again, it can be mixed with other supplies. All supplies MUST be exactly 12 V.
The second power connection can
be used. When power is detected on
this second input, the audio circuits
are disconnected from the rst power
connector and operated off this second
supply. This is an automatic function.
The second supply becomes the
AUDIO supply and should be of the
highest quality.
Power consumption varies depending
on what drives or devices might be
plugged in the USB connections.
Normally the UMT draws up to about
5A on the rst supply and about 0.5 A
on the secondary audio supply unless
a clock is installed and then a 1.5A
supply is needed.
The Diamond Transport Power base has twice the power of the Signature.
9
USB Connections
A USB Storage device may be attached to any of the USB inputs. These inputs
are for reading storage devices only and should not be attached to a computer,
iPod or other USB peripheral. Appropriate devices would include USB memory
sticks and USB Hard Drives.
Computer Network Connection
The UMT has signicant internet exploration capabilities. Currently it supports
both Netix and Blockbuster for instant online media streaming, as well as inhome network media sharing via My Network which is functionally equivalent
to DLNA. Additional network applications may be added with future rmware
updates. The UMT also supports the BD-Live feature offered on some Blu-ray
Disc titles. BD-Live offers extra downloadable content and additional online interactive programs. Content available on BD-Live vary by
discs and studios, and may include additional subtitles, commentaries, movie trailers, games, or online chat. Connecting the player to the
Internet will also allow the player to obtain rmware updates via the Internet. In order to utilize the BD-Live feature or update rmware
via the Internet, the player needs to be connected to a broadband Internet connection. It is not necessary to connect to the Internet if you
do not intend to use the network streaming, BD-Live and online rmware updating functionality.
The UMT provides two network connection methods: through Ethernet cable or through the external wireless adaptor included with the
player. For the fastest and most stable network connection, we recommend using Ethernet cable whenever it is possible.
Internet connection through Ethernet cable
• Plug one end of a network cable (Category 5/5E straight Ethernet cable) into the LAN port on the back of the UMT.
USB memory sticks and USB Hard Disc drives can
be attached.
• Plug the other end of the network cable into a LAN port on the broadband router or modem.
• After physically connecting the player to a broadband Internet connection, some network conguration may be required. Please refer
to the Network Setup section for details.
• Refer to the operating instructions supplied with the broadband router or modem, or contact the Internet service provider for questions
related to setting up the router or modem.
NOTE: Only connect the LAN port of the player to an Ethernet port that supports 10BASE-T or 100BASE-TX. Connecting to any other
ports or jacks, such as a phone jack, can damage the player. Streaming services such as Netix and Blockbuster may require membership
and may also be limited to service in the US only.
Internet connection through Wireless USB Adaptor
The wireless adaptor included in the UMT package has been pre-congured to work with your player. It is compatible with 802.11b/g/n
2.4GHz wireless networks.
Make sure the broadband Internet connection is available and the Wi-Fi function on your wireless router or access point has been turned
on, then plug the adaptor into one of the two USB2.0 ports available on your UMT.
After the physical connection, some network conguration is required. Please refer to the Network Setup section for details.
A 6-foot USB extension cable is also included in the package. Connect it between the USB port on the player and your wireless adaptor
if needed.
Custom Installation
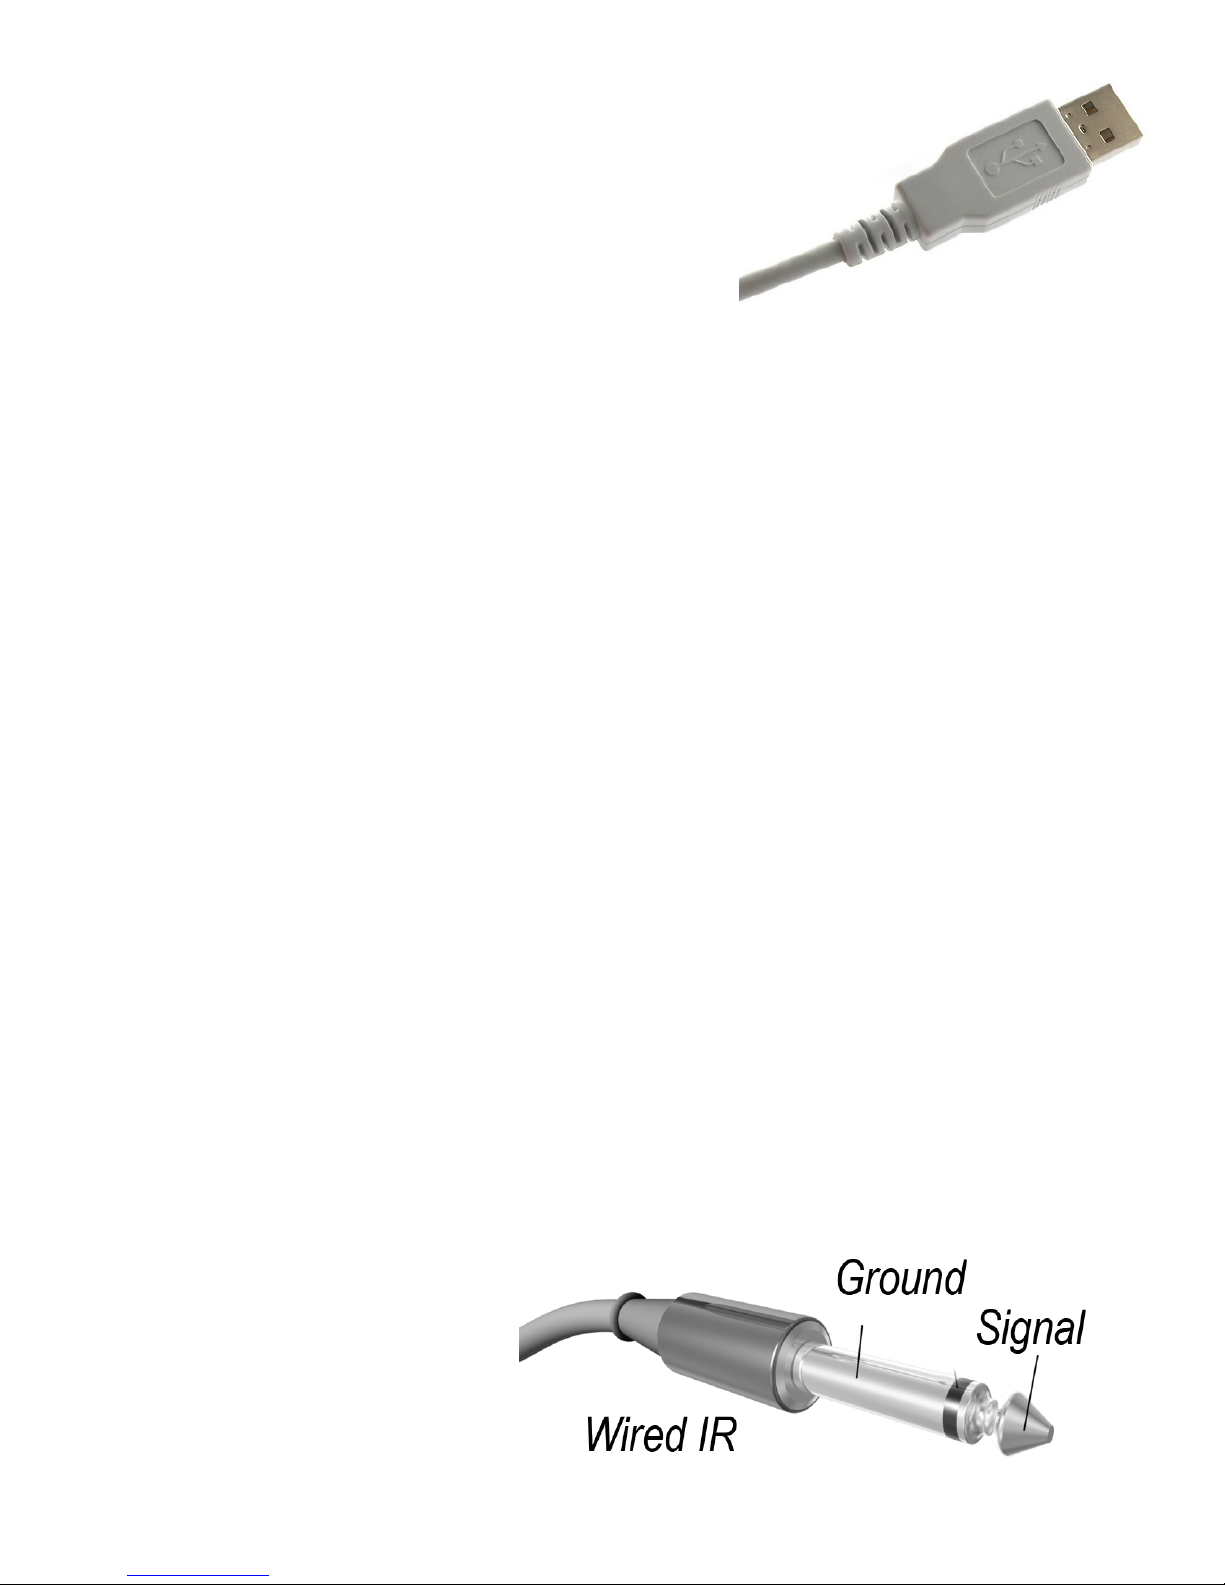
External IR (Infrared Remote) Installation
The UMT features an IR IN port on its back panel. If
the player is to be installed in an equipment cabinet
where direct line-of-sight is not available for remote
control, your custom home theater installer can
purchase an external IR Remote Sensor and plug
it into the IR IN port. Place the sensor head at a
location where there is direct line-of-sight to ensure
reliable operation.
Use a 3.5mm Mono Cable to make the connection.
• When an external IR sensor is plugged in, the
original IR sensor window on the front panel
10
will be disabled.
• MSB cannot guarantee that the IR IN port will be compatible with devices that are not manufactured by MSB.
• Connecting the IR IN port to an incompatible device may result in damage to the connected device or the player.
Please contact MSB customer support if you plan to integrate the player into an IR distribution system. Customer support can provide
recommendations on how to properly connect the control signals.
RS232 Control
The UMT has an RS232 control port and can be integrated into most custom home theater control systems. Please ask your custom
installer to contact MSB for the RS232 control protocol.
Changing Volume
Changing the volume on the UMT remote does nothing at all in the UMT, but if an MSB DAC is used in the system which has the volume
option installed, the UMT remote can be used to change the volume of the DAC. Ignore the volume setting on the video display. Instead
pay attention to the volume readout on the DAC.
Changing the Backlight Method
The remote control supports one of two backlight methods. By default, pressing the LIGHT button will turn on the backlight, and pressing
any other button within 10 seconds will keep the backlight on. The alternative method will activate
the backlight whenever any button is pressed; in this mode, the light will stay on for 10 seconds, and
pressing any other button will keep the backlight on. To switch between these two backlight methods,
press and hold the LIGHT button for 5 seconds.
Using the MSB DAC Remote (Default = Not Enabled)
The MSB DAC remote control can support the key features of the UMT Plus, including:
• POWER • Number Pad 0 - 9 • * (Pure Audio Mode) • EJECT • STOP
• REPEAT • TRACK FORWARD • TRACK BACKWARD
TO ENABLE DAC REMOTE: On the UMT remote press: <DIMMER> <DIMMER> <DIMMER> <8>
TO DISABLE DAC REMOTE (default): On the UMT remote press: <DIMMER> <DIMMER> <DIMMER> <7>
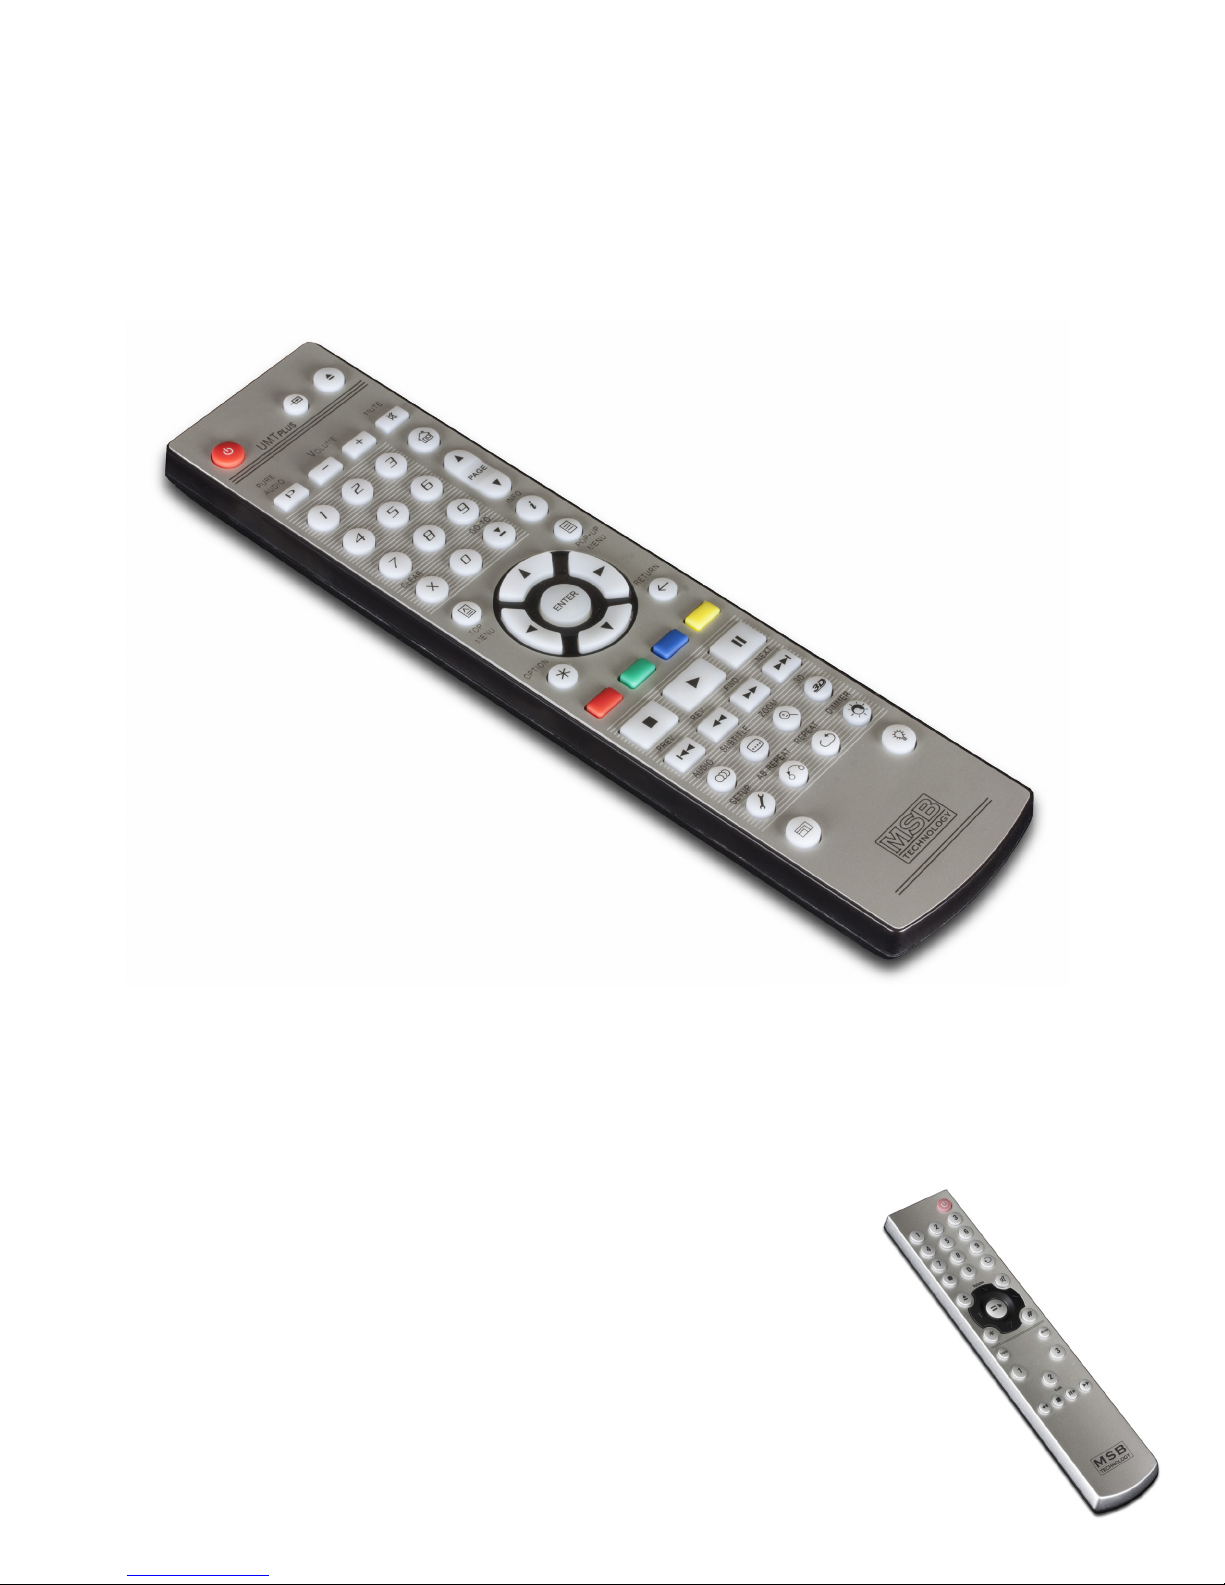
REMOTE CONTROL
11
Remote Buttons
1. POWER: Toggle power STANDBY and ON
3. PURE AUDIO: Turn off/on video
4. NUMBER Buttons: Enter numeric values
5. CLEAR: Clear numeric input
6. TOP MENU: Show BD top menu or DVD title menu
7. ARROW and ENTER Buttons: Navigate menu selection
8. OPTION: Brings up the context-related menue
9. COLOR Buttons: Function varies by content
10. PLAY: Start playback
11. STOP: Stop playback
12. REV: Fast reverse play
13. PREV: Skip to previous
14. AUDIO: Change audio language or channel
15. SUBTITLE: Change subtitle language
16. SETUP: Enter the player Setup Menu
17. A-B REPLAY: Repeat play the selected section
Changing the Remote Code
The remote control supports one of three remote codes. The default
is “Code 1”. If you experience conicts with another remote, you can
select a different remote code.
To select a new remote code, open the battery compartment cover of
the remote control, and then ip the switch to one of the positions
marked as “1”, “2”, or “3”. Close the battery compartment cover. Make
sure that the UMT player is turned on and the disc tray is ejected. Aim
the remote control at the player. Press and hold the ENTER button for
5 seconds. The player will start using the new remote code.
The advanced audio commands only work with remote code 1.
18. RESOLUTION: Switch output resolution
19. OPEN: Open/close the disc tray
20. INPUT: Select the input source
22. MUTE: Mute audio (Mutes UMT, not DAC)
23. VOLUME +/-: Increase/Decrease volume on DAC IV
(Volume bar on OSD should be ignored)
24. HOME: Go to Home Menu to select media source
25. PAGE UP/DOWN: Show the previous/next page
26. INFO: Show/hide the on-screen Display
27. GOTO: Play from a specied location
28. POP-UP MENU: Show BD pop-up menu or DVD menu
29. RETURN: Return to the previous menu or mode
30. PAUSE: Pause playback
31. FWD: Fast forward play
32. NEXT: Skip to the next
33. 3D: Enable 2D->3D conversion or bring up the 3D menu
34. ZOOM: Zoom in/out and adjust aspect ratio
35. DIMMER: Dim the front panel display
36. REPEAT: Repeat play
37. LIGHT: Activate the back light for the remote control
SPECIAL MODE:
<DIMMER> <DIMMER> <DIMMER> <number pad> is used
for advanced audio settings and a common zone free upgrade.
12
Front Panel Controls
Standby Button – This is used to reset the unit. When the light is red, the unit is in standby and the MSB Network Input is selected. When
the light is green, the UMT is on. The UMT is slow when going into or out of standby. Also, the UMT saves it’s settings only when
going into Standby. If you do allow the unit to go into Standby it will not save it’s settings.
Eject – It open and closes the drawer. If Autoplay is enabled in the settings (default setting) the UMT will start playing the disc when
the drawer is closed.
Track Arrows/Navigation Arrows - When a disc is playing these buttons will track. When in the UMT or a DVD menu these buttons will
function as left/right navigation control.
Pause/Navigation Arrow - When a disc is playing the button will function as pause. When in the UMT or a DVD menu this button will
function up.
Play/Enter - When a disc is playing the button will function as play. When in the UMT or a DVD menu this button will function enter.
Stop/Navigation Arrow - When a disc is playing the button will function as stop. When in the UMT or DVD menu this button will
function down.
ProI2S Indicator - The LED to the left of the display indicates a ProI2S connection has been made and the UMT is running as a slave to
the DAC Clock. Dark = no lock, Green = Locked to DAC.
Display - The display can be used with the playback of standard discs. If you need to play data discs (HRx) or Network streaming and
external display will need to be used.
USB Input - The front panel USB can be used to plug in USB
Flash drives or other external storage devices. It’s for playback
of music and video les and MUST NOT be connected to a
computer. This port will not work with a iPod.
1. Mute Icon – Indicates that the audio is muted
2. Audio Type Indication – Indicates the type of audio tracks
being played
3. Disc Type Indication – Indicates the currently playing disc type
4. Main Display – Text messages and numeric display
5. Title – When illuminated, the displayed time applies to a title
6. Group – When illuminated, the displayed time applies to a group
7. Track – When illuminated, the displayed time applies to a track
8. Audio Channel Indication – Indicates whether the audio being
played is 2ch stereo or multi-channel surround
9. Remaining – When illuminated, the displayed time is the
remaining play time
10. Chapter – When illuminated, the displayed time applies to a
chapter
11. Playback Status – Indicates playback status such as Play, Pause,
Repeat, Repeat All, and Random Mode
12. Ethernet – Indicates that an active Ethernet cable is attached
13. Wireless – Indicates that the player is connected to a wireless
network
13
MSB Advanced Audio Setup
There are several special setup modes possible relating to the MSB audio processing. These modes are enabled with a special series of
remote keystrokes. When pressed correctly the UMT will acknowledge by blinking the red LED on the front panel for 5 seconds. Here
are the commands.
1. DSD Mode: The UMT defaults with DSD output on the digital outputs. This is perfect for use with an MSB DAC. For use with a
non- DSD DAC, the DSD mode may be turned off.
• TO SET DSD TO PCM OUTPUT: On the remote press: <DIMMER> <DIMMER> <DIMMER> <5>
The LED to the left of the display will ash ORANGE twice.
• TO SET DSD BACK TO DoP OUPUT: On the remote press: <DIMMER> <DIMMER> <DIMMER> <4>
The LED to the left of the display will ash ORANGE once.
2. Clock Mode: The 512x Clock jack defaults as an input clock. It can be switched to an output clock.
• TO SET CLOCK PORT TO OUTPUT: On the remote press: <DIMMER> <DIMMER> <DIMMER> <0>
The LED to the left of the display will ash GREEN twice.
• TO SET CLOCK PORT BACK TO INPUT: On the remote press: <DIMMER> <DIMMER> <DIMMER> <9>
The LED to the left of the display will ash GREEN once.
3. MultiChannel: By default, the three RCA connectors on the back of the UMT output identical front channel information.
• TO SET UMT FOR MULTICHANNEL OUTPUT: On the remote press: <DIMMER> <DIMMER> <DIMMER> <6>
The LED to the left of the display will ash ORANGE three times.
• TO SET BACK TO 2 CHANNEL OUTPUT: On the remote press: <DIMMER> <DIMMER> <DIMMER> <4>
SETUP MENU OPTIONS
The Setup Menu of the UMT presents many setup and conguration options. For most users, the default conguration will be sufcient
and will not require any changes to the settings. However if you need to congure the player to perfectly match your home theater setup
and viewing preferences, please refer to the following sections for details about each conguration option.
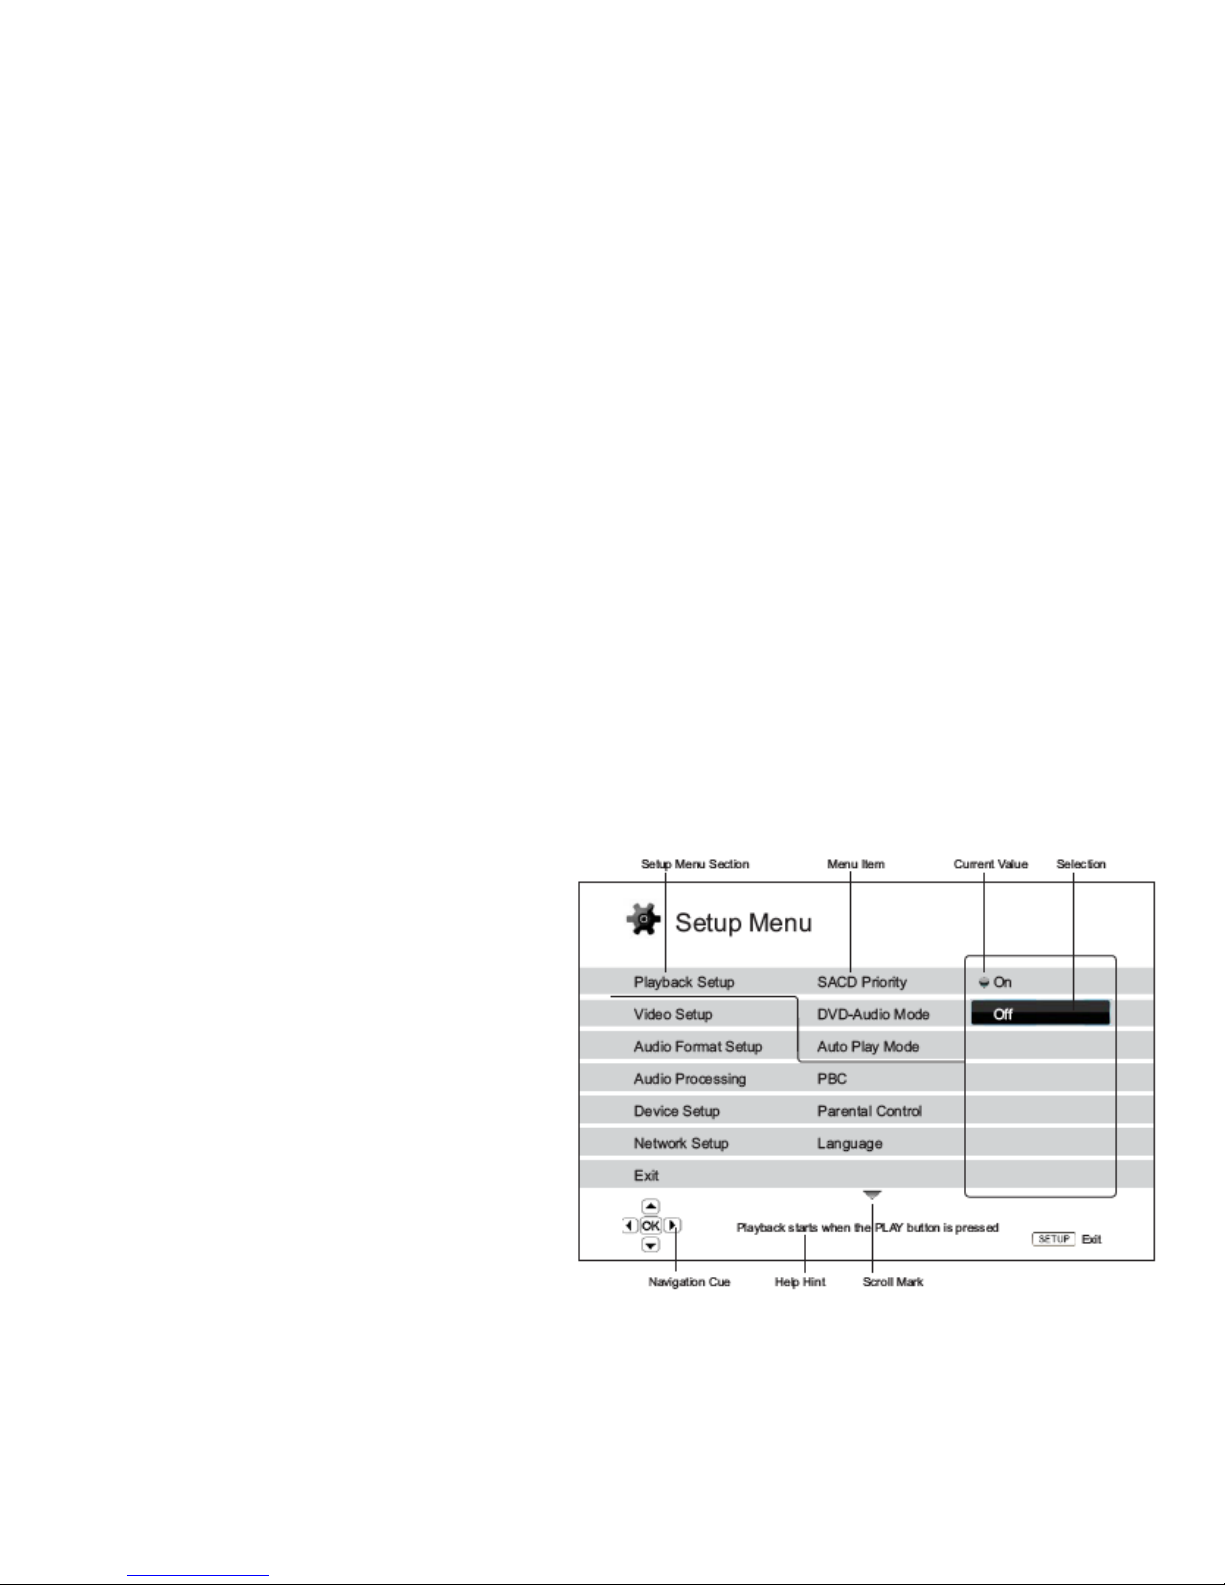
Using the Setup Menu System
In many places of this guide, the player’s Setup Menu needs to
be adjusted to match your specic audio/video conguration.
When performing menu adjustments, we will use the following
terminology to indicate the location of the desired function:
Setup Menu Section > Menu Item > Selection
Setup Menu Section is the uppermost Setup Menu level. With
the UMT there are six (6) Setup Menu sections listed in the left
column of the Setup Menu screen. They are: Playback Setup,
Video Setup, Audio Format Setup, Audio Processing, Device
Setup, and Network Setup.
Menu Item is the parameter to be adjusted which appears in
the center column of the Setup Menu. Once you enter a Setup
Menu Section, the list of Menu Items and their current value
are displayed in a box.
Selection is the actual numeric or descriptive element that
represents the change being made to the selected parameter. It
is the item located to the right of its corresponding Menu Item.
A Scroll Mark appears at the top or bottom of the menu when there are more Menu Items or Selections than what can t in a screen. You
may use the UP and DOWN ARROW buttons to scroll the display in order to access additional items.
The preceding diagram should give a good description of the various elements and their context. In this screen we could, for example,
instruct you to set the Auto Play Mode parameter to Off in the Playback Setup section. To indicate where we were, you would see the
following: Playback Setup > Auto Play Mode > Off.
NOTE: It is possible that some setup items may be grayed-out and inaccessible. This can be caused by a disc being played back or having
changed a prerequisite setup item. Please stop playback or eject the disc before trying to change these setup items. If you still cannot
14
 Loading...