

Mr. Steam MSBUTLER1RDRAW, MSITEMPORDBN, MSBUTLER1SQWH, CT15EC1I3BK, 90C1ATRDPC Installation Manual
...Page 1

Installation, Operation & Maintenance Manual
iTEMPO™ & iTEMPOPLUS™ CONTROLS
®
mr.steam
www.mrsteam.com
Feel Good Inc.
Page 2

When installing and using this electrical equipment, basic safety precau-
tions should always be followed, including the following:
IMPORTANT SAFETY INSTRUCTIONS
1. READ AND FOLLOW ALL INSTRUCTIONS
WARNING
!
2. Do not permit children under
the age of 16 to use this steambath.
WARNING
3. Steam is hot and can cause injury or death if
!
improperly used. Steam rooms contain steam and elevated temperatures. Please read and observe all warnings in this manual
before installing or using a steam room.
4. To reduce the risk of injury:
WARNING
!
A. The wet surfaces of steam enclosures may be slippery. Use
care when entering or leaving.
B. The steam head is hot. Do not touch the steamhead and avoid
the steam near the steamhead.
C. Prolonged use of the steam system can raise excessively the
internal human body temperature and impair the body’s ability to regulate its internal temperature (hyperthermia). Limit
your use of steam to 10-15 minutes until you are certain of
your body’s reaction.
D. Excessive temperatures have a high potential for causing fetal
damage during the early months of pregnancy. Pregnancy or
possibly pregnant women should consult a physician regarding
correct exposure.
E. Obese persons and persons with a history of heart disease, low or
high blood pressure, circulatory system problems,
or diabetes should consult a physician before using a steambath.
F. Persons using medication should consult a physician before using
a steambath since some medication may induce drowsiness while
other medications may affect heart rate, blood pressure and
circulation.
HYPERTHERMIA
internal temperature of the body
reaches a level several degrees above
the normal body temperature of 98.6°
F. The symptoms of hyperthermia
include an increase in the internal
temperature of the body, dizziness,
lethargy, drowsiness, and fainting.
The effects of hyperthermia include:
a) Failure to perceive heat;
b) Failure to recognize the need to
exit the steambath;
c) Unawareness of impending risk;
d) Fetal damage in pregnant women;
e) Physical inability to exit the steambath; and
f) Unconsciousness.
WARNING
!
The use of alcohol, drugs, or
medication can greatly increase the
risk of hyperthermia.
occurs when the
SAVE THESE INSTRUCTIONS
2
Page 3

mr.steam
______________________________________________________________
®
Installation & Operating Instructions
READ ME FIRST!
WARNING
!
As you follow these instruc-
tions, you will notice warning and caution
symbols. This blocked information is important for the safe and efficient installation
and operation of this generator. These are
types of potential hazards that may occur
during installation and operation:
WARNING
!
Indicates a potentially
hazardous situation, which, if not avoided,
could result in death or serious injury.
Indicates a potentially
CAUTION
!
hazardous situation, which, if not avoided
may result in minor or moderate injury or
product damage.
IMPORTANT NOTE: This highlights
information that is especially relevant to
a problem-free installation.
All information in these instructions is
based on the latest product information
available at the time of publication.
Sussman-Automatic Corporation reserves
the right to make changes at any time
without notice.
Table of Contents:
Important Safety Instructions .............................. 2
Before Installing .................................................. 4
Dimensional Information .................................... 5
Installations ...................................................... 6-8
Installing the Remote Temperature Probe ....9-11
iTempo Operating Instructions ...................12-13
iTempoPlus Operating Instructions ............. 14-17
Care and Maintenance ..................................... 18
Warranty ........................................................... 18
3
Page 4

mr.steam
______________________________________________________________
®
Installation & Operating Instructions
BEFORE INSTALLING
Carefully inspect the control and packaging for shipping damage. In the event of shipping damage, please
contact the carrier for claim information. Our customer
service department can assist you with any missing or
damaged parts.
CAUTION
!
To avoid unintentional steambath operation, do not locate the control where other controls,
accessories, shower heads, valves, body sprays or similar within the shower could cause confusion or interfere
with the Mr.Steam
Do not use any iTempoPlus
or iGenie
the respective Installation and Operation Manual and
Mr.Steam steam generator Installation and Operation
Manual (PN 101289 Revision number 10.0/08 or higher).
Failure to read and understand these instructions may
result in an inoperative or hazardous installation.
WARNING
A peel and stick warning sticker is
!
provided in the MrSteam steam generator Installation,
Operation and Maintenance Manual. This manual is
provided with every steam generator. The warning
sticker must be read and permanently affixed in a
conspicuous location near the steam room. Failure to
read and affix this warning sticker in a conspicuous
location may result in serious injury or death. Please call
MrSteam at 800 767-8326 for a free replacement or if
you have any questions regarding the warning sticker.
Install the iTempo or iTempoPlus controls according to
installation instructions. Failure to install according to
instructions will result in an inoperative control or hazardous overheating or inadequate heating of the steam
room. If an iTempo or iTempoPlus control is installed
outside the steam room a Remote Temperature Probe
(PN MSTS) must be installed inside the steam room
®
control’s intended use and function.
™
®
controls without reading and understanding
, iTempo™, HomeWizard™
per instructions for the Remote Temperature Probe.
Failure to install according to instructions will result in
an inoperative control and overheating of the steam
room.
WARNING
Do not route iTempoPlus, iTempo,
!
Home Wizard or iGenie control wiring inside conduit
together with power lines or close to hot water or
steam piping. Doing so may result in an inoperative or
hazardous installation.
WARNING
Do not alter or modify any Mr. Steam
!
product. Doing so may result in an inoperative or hazardous installation and will void the warranty.
IMPORTANT NOTES:
• Turn power to the steam generator OFF before connecting the control to the generator. Failure to turn
the power off will result in an inoperable control.
• Do not operate iTempoPlus, iTempo, Home Wizard or iGenie controls with anything other than a
Mr.Steam iTempo compatible steam generator.
Mr.Steam residential steam generators with serial
numbers lower than 900000, or any other brand
of steam generator are not to be operated with
iTempo controls. Doing so may result in an
inoperative installation.
• This document contains important safety,
operation and maintenance information. Leave this
document with the homeowner.
Do not discard this document.
• Discontinue use of the steam generator
or control if the steam generator is damaged or otherwise not functioning properly. Doing so may result
in an inoperative or hazardous installation.
• All illustrations are for illustrative purposes only.
4
Page 5
mr.steam
______________________________________________________________
®
Installation & Operating Instructions
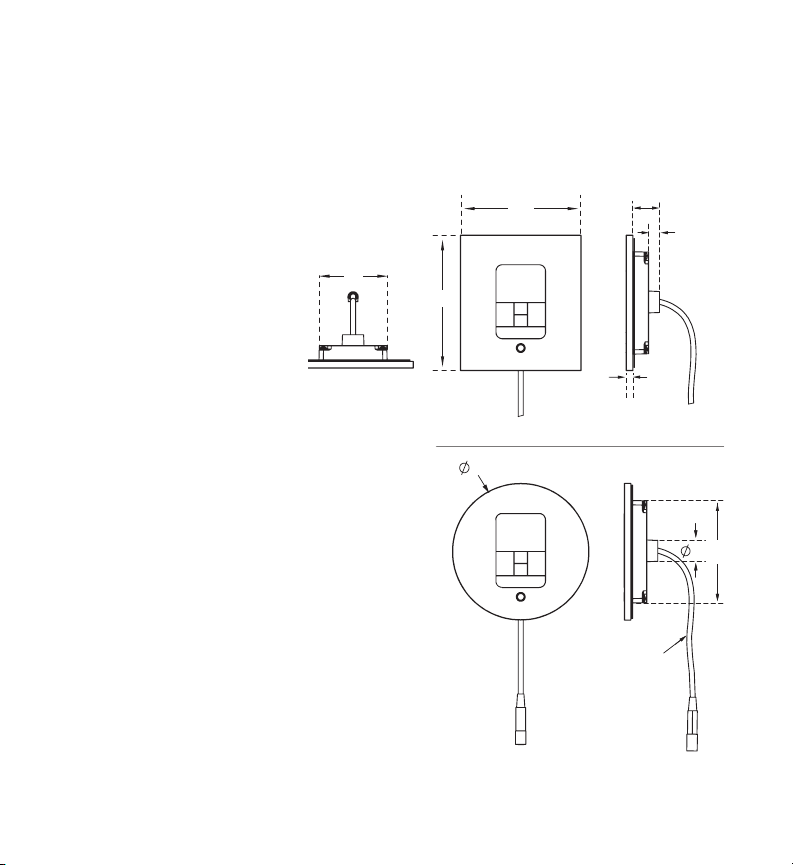
Dimensional Information
for the Round and Square
iTempo
™
and iTempoPlus
BOX CONTENTS:
• iTempo™ or iTempoPlus™ Control
• Control Cable (30 ft.)
• Steam head
• Tube of Silicone Sealant
• Owner’s Manual
™
1
4
/
”
2
1
2
/
”
2
5”
5”
1”
3
/
”
8
1
/
”
4
3
/
4
3
”
3
/
”
4
12” long
pigtail
Drawings for Illustrative Purposes Only.
5
Page 6
mr.steam
______________________________________________________________
®
Installation & Operating Instructions
Installation Instructions for Round & Square
iTempo
™
and iTempoPlus
STEP 1
Determine the desired installation location of the control.
The iTempo
installed inside or outside the steam room as a matter of personal
preference. If the control is installed outside the steam room a
Remote Temperature Probe part number MSTS must be
installed inside the steam room. If the control is installed
inside the steam room the control must be located:
• 4-5 feet above the oor near the bather seating area.
• The control features an integral temperature sensor. Locate
• On a vertical wall
• The control cable length is 30 feet. Insure that the control and/or steam
generator are located accordingly. Contact a Mr.Steam technical service
representative if a longer cable is required (60 ft. cable, PN 103990-60).
IMPORTANT NOTE: The control cable should be run in a dedicated
1” conduit to facilitate installation and service.
IMPORTANT NOTE: See installation instructions for the MSTS
Temperature Probe before rough-in or installation of control (pgs. 8-9).
STEP 2
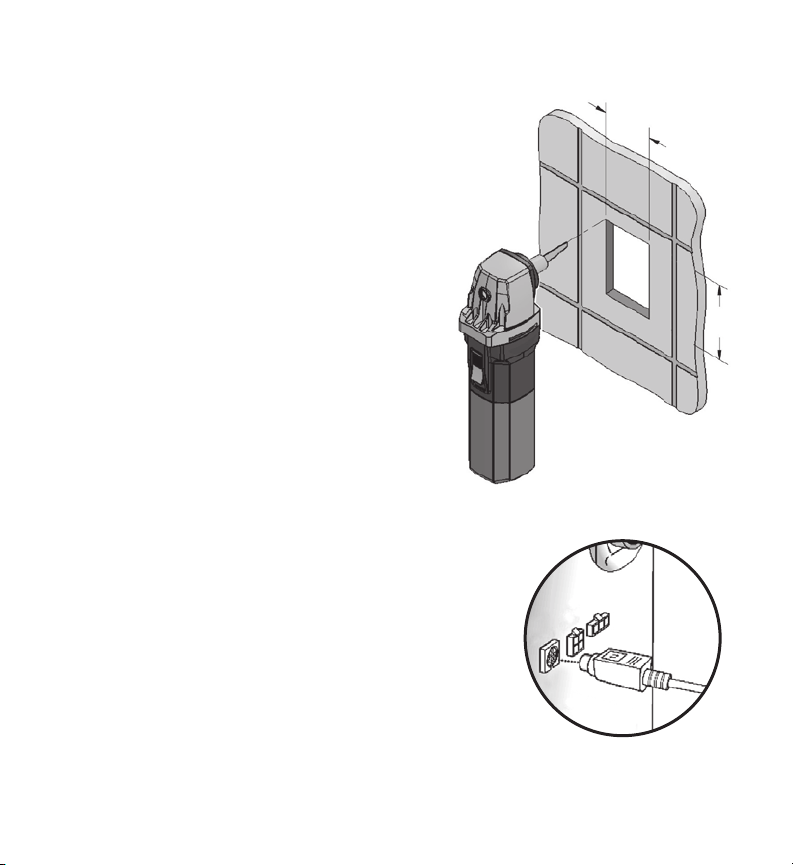
Make a 2-5⁄8” wide by 3-7⁄8” high cutout in the desired control location.
Do not oversize or under size the cutout.
STEP 3
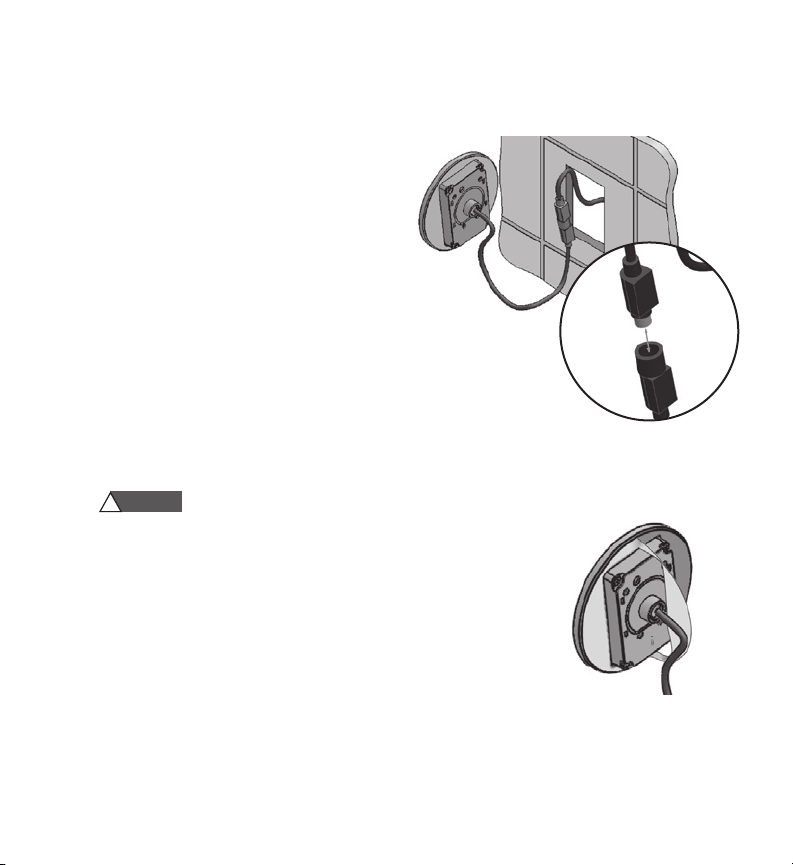
Route the control cable (provided with the control) from the wall cutout
to the steam generator. Connect one end of the cable to the steam
generator connector.
™
and iTempoPlus
the control in a location representative of the desired steam
bathing temperatures. Do not locate the control above or
near the steam head or direct steam emissions. Locating the
controls near the steamhead or near direct steam emissions
may result in poor steam room temperature control.
Diagram 1
Diagram 2
™
™
controls are designed to be
6
Drawings for Illustrative Purposes Only.
5
2-
⁄ 8”
DIAGRAM 1
DIAGRAM 2
7
3-
⁄ 8”
Page 7
mr.steam
______________________________________________________________
NOTE:
The connector is keyed with the at facing
up. The control cable is the same at both ends.
®
Installation & Operating Instructions
IMPORTANT NOTE:
strain, staple, pinch or otherwise damage the
control cable. Route cable as required to permit
replacement. Do not route cable inside conduit
together with power lines or close to hot water or
steam piping.
STEP 4
Firmly connect the other end of the cable to the
control. Turn on power to the steam generator
and test the control to verify correct connections.
Test per the instructions on pages 10-15. With
verification of proper control function, proceed to
Step 5.
If the generator is on for more
than a few minutes steam will start coming out
of the steamhead. Insure that steam room is not
occupied.
STEP 5
Remove and discard peel-off paper to expose
adhesive liner.
CAUTION
!
Diagram 3
Diagram 4
Be careful not to
DIAGRAM 3
DIAGRAM 4
7
Drawings for Illustrative Purposes Only.
Page 8
mr.steam
______________________________________________________________
®
Installation & Operating Instructions
STEP 6
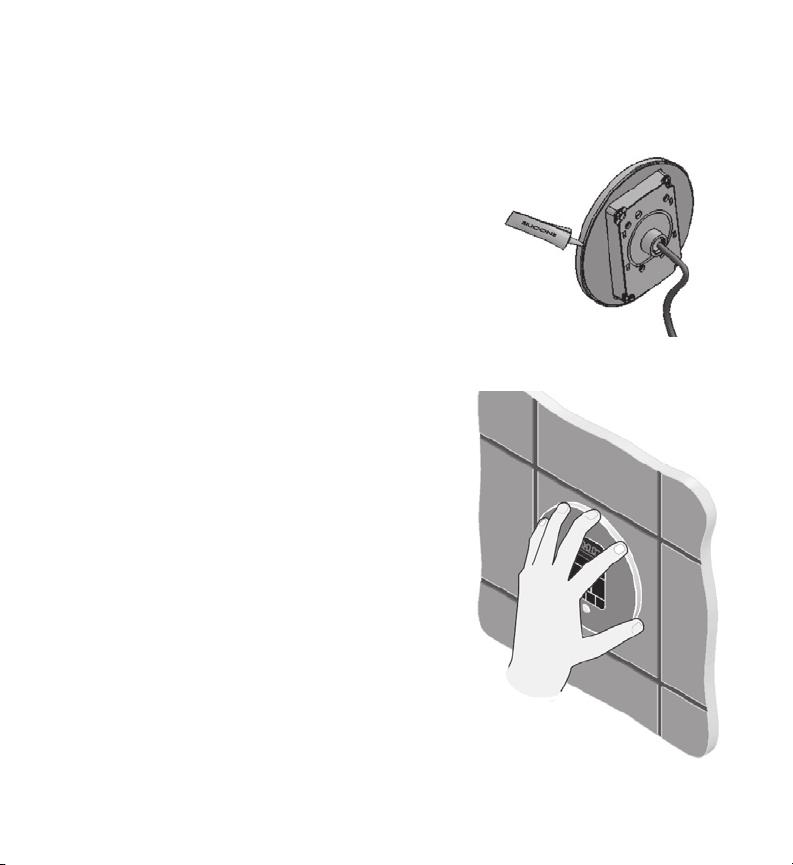
Run a bead of silicone (provided) as shown
to the outer edge of the control faceplate,
following the contour of the circle or square
shape. Use silicone as required to create a
moisture seal.
NOTE: The silicone supplied by Mr. Steam
can be used to meet a variety of sealing and
gasketing. It cures to silicone rubber and
adheres to glass, wood, metal, porcelain,
ceramic tile, painted surfaces, many plastics
and rubber. Surfaces must be clean and dry.
Apply thin layer of product. Fit together and
support if necessary. Allow excess material
to cure, then trim with a sharp blade.
Sealant “skins” in 5 minutes, dries to touch
in 1 hour. Fully cures and bonds in 24 hrs.
IMPORTANT NOTE:
excessive amounts of silicone. Do not apply
silicone to any other parts of the control
including the adhesive gasket.
STEP 7
Insure the mounting surface is clean and
dry as required for good adhesion. Hold
the control with the LED display in the
12 o’clock position and press the control
against the wall u ntil the adhesive sticks
and holds firmly. Control may have to be
supported or secured until the silicone fully
cures and bonds.
Diagram 5
DIAGRAM 5
DIAGRAM 6
Do not apply
Diagram 6
8
Drawings for Illustrative Purposes Only.
Page 9

mr.steam
______________________________________________________________
®
Installation & Operating Instructions
Installing the Remote Temperature Probe
The Remote Temperature Probe is required
when the iTempo or TempoPlus Controls are
installed outside the steam room.
CAUTION
The Remote Temperature
!
Probe (P/N MSTS) is for use with iTempo
and iTempoPlus Controls only. Do not use
with any other controls. Do not use any other
temperature probe with the iTempo and
iTempoPlus controls. Noncompatible products may result in an inoperative control and
a hazardous condition.
CAUTION
Install the iTempo or
!
iTempoPlus controls according to the
installation instructions on pages 3-5. Failure
to do so may result in an inoperative control
and a hazardous condition.
1. Determine the location of the Remote
Temperature Probe:
The Remote Temperature Probe must
be installed
a. On a vertical surface
b. 4-5 feet above the oor
c. in a location representative of the de-
sired steam bathing temperature. Locating
the MSTS near the steamhead or near
direct steam emissions may result in poor
steam room temperature control.
:
d. The probe has an integral 30’ cable. Insure that the probe and/or steam generator
are located accordingly.
2. Drill a 5/16 inch diameter hole in the wall.
Do not oversize or under size the hole.
Clean area thoroughly.
NOTE: The silicone supplied by Mr. Steam can
be used to meet a variety of sealing and
gasketing. It cures to silicone rubber and
adheres to glass, wood, metal, porcelain,
ceramic tile, painted surfaces, many plastics
and rubber. Surfaces must be clean and dry.
Apply thin layer of product. Fit together and
support if necessary. Allow excess material
to cure, then trim with a sharp blade. Sealant
“skins” in 5 minutes, dries to touch in 1 hour.
Fully cures and bonds in 24 hrs.
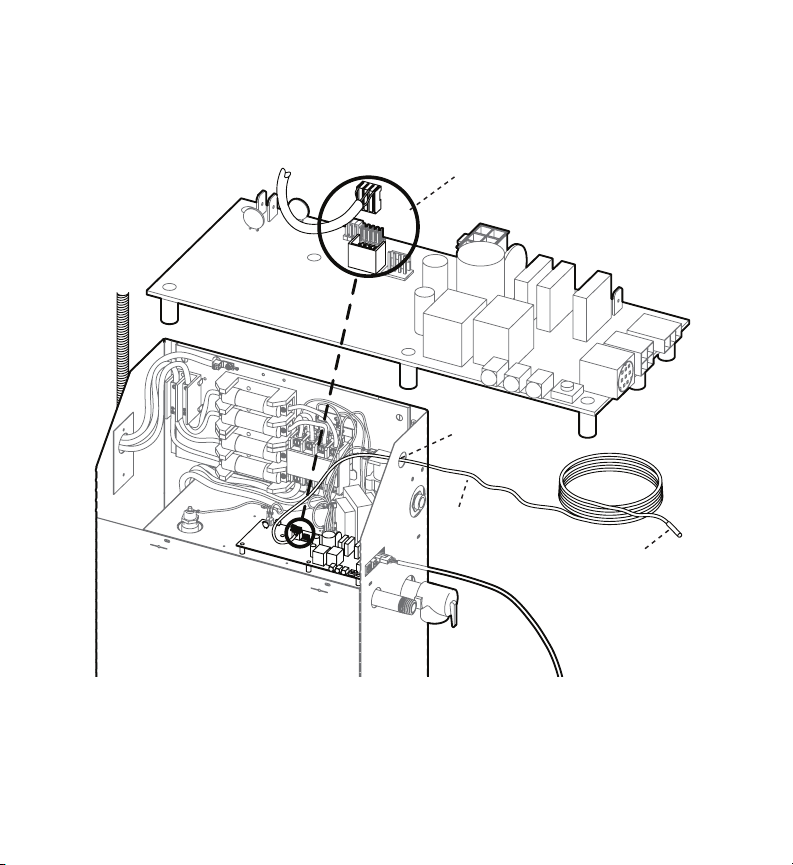
3. Remove the knock-out from the steam
generator jacket as shown in Diagram 1.
4.
Insert the probe cable through the knock-out
and connect to the connector on the steam
generator printed circuit board marked EXT
TEMP as shown in Diagram 1.
(PN: MSTS)
9
Drawings for Illustrative Purposes Only.
Page 10
mr.steam
______________________________________________________________
®
Installation & Operating Instructions
DIAGRAM 1
Mr.Steam Steam Generator
(shown with cover removed
and NOT installed)
Temperature
Probe Connection
Knock-Out
Temperature
Probe Cable
(30 feet)
Temperature
Sensor Probe
10
Drawings for Illustrative Purposes Only.
Page 11
mr.steam
______________________________________________________________
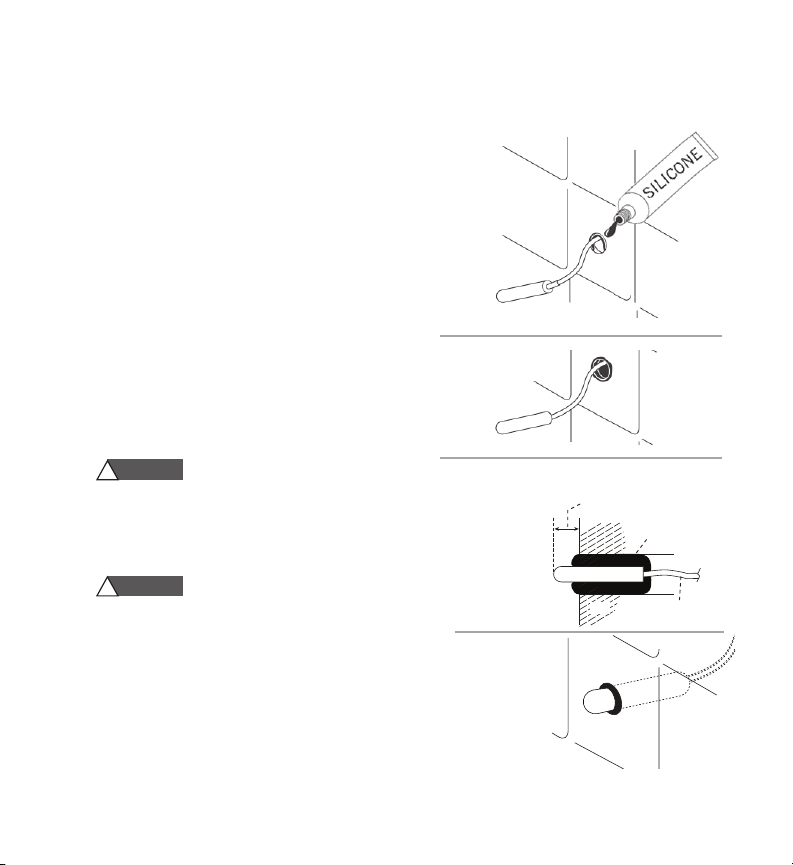
5.
Route the end of the probe cable with the
temperature probe through the wall into the
steam room as shown in Diagram 2.
IMPORTANT NOTE:
®
Installation & Operating Instructions
s t e am r oo m i nt er io r
DIAGRAM 2
Do not strain,
staple, pinch or otherwise damage the probe
cable.
6. With a minimal length of the cable exposed
apply silicone (provided) to the hole in the
wall as required to create a moisture seal as
shown in Diagram 2.
7. Push the temperature cable and probe into
DIAGRAM 3
hole as required to leave minimum 1/4”,
maximum 1/2” of the bulb exposed as
shown in Diagram 3.
WARNING
Insure a minimum of 1/4” of
!
the temperature probe is exposed to the air.
Failure to do so may interfere with the ability
to sense temperature and may result in
Sectional View
1
⁄4" minimum
1
maximum
⁄2"
Silicone Sealant
excessive steam room temperatures.
WARNING
The exposed area of the tem-
!
perature probe must be free of silicone or any
Wall
Cable
materials or obstructions that prevent direct
exposure to the steam room air. Failure to
do so may interfere with the ability to sense
temperature and may result in excessive steam
room temperatures
NOTE: For Illustrative Purposes Only.
Drawings Not to Scale
.
Installed Remote
Temperature Probe
showing a minimum
of 1/4” of the probe
exposed to steam
room air
11
Page 12
mr.steam
______________________________________________________________
®
Installation & Operating Instructions
iTempo™ Operating Instructions
The iTempo Control features programmable digital temperature control, a fixed (60) minute duration, ON/OFF and PAUSE. The control can be set
at a temperature range from 80˚
WARNING
!
Set the steam bathing temperature according to personal preference, however
it is highly recommended to begin steam bathing
at a low temperature setting for a very short duration to gauge comfort and safety levels.
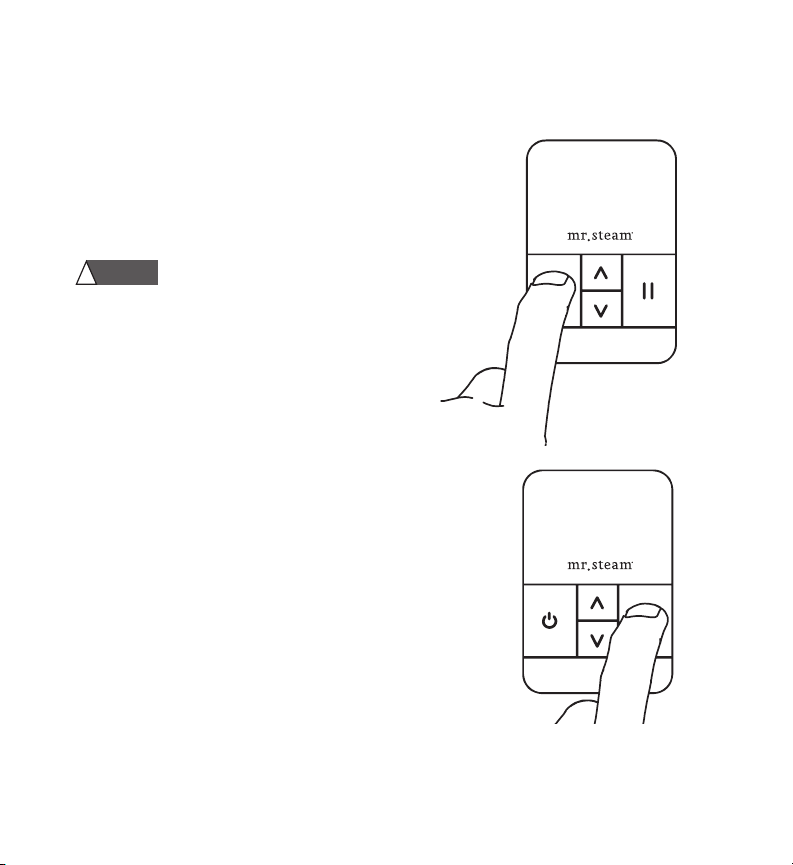
ON/OFF
Press the ON/OFF key to start or stop the ow
of steam. Steam will begin to ow a few minutes
after the control is turned ON. The duration required for the steam room to reach steam bathing temperatures depends on the steam room
construction and steam generator specifications.
Steam may continue to ow for a short time after
the control is turned OFF.
PAUSE FEATURE
If a pause in steam ow is desired press the
PAUSE key. The display will ash while the con-
trol is in the PAUSE mode. The timer will continue to countdown while in the PAUSE mode.
Steam may continue to ow for a short time after
pause is pressed.
Diagram 1
f up to 120˚f
DIAGRAM 1
Diagram 2
DIAGRAM 2
12
Drawings for Illustrative Purposes Only.
Page 13
mr.steam
______________________________________________________________
TIMER FEATURE
When the control is turned ON a 60 minute time
duration is initiated. The control will turn off
after 60 minutes unless the control is turned off
manually.
MEMORY FEATURE
If the control is turned off manually before 60
minutes then the default temperature of 110˚F
will be used the next time the control is turned
on. If the control times out at 60 minutes (not
manually turned off) then the previous user temperature setting will be used when the steambath is used again.
®
Installation & Operating Instructions
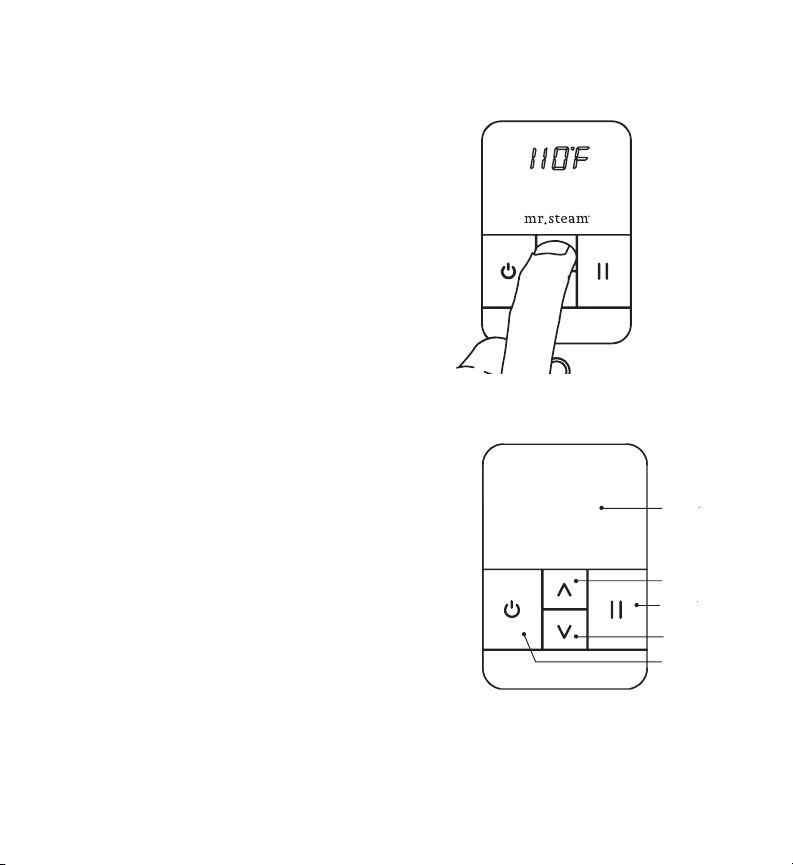
DIAGRAM 3
SETTING THE TEMPERATURE
Diagram 3
The control is pre-set and will display the tem-
perature setting of 110˚F (default setting). Use
the UP and DOWN keys to change the temperature setting from 80˚ F to 120˚ F in one degree
increments.
CHANGING THE TEMPERATURE
UNITS
(F˚/C˚) Diagram 4
When the generator is Off, Press and hold ON/
OFF key for 10 seconds. The temperature units
will be displayed as Fahrenheit (TuF) or Celsius
(TuC). Use the UP/DOWN keys to choose between (TuF) and (TuC). Press ON/OFF key to accept the new units and exit.
13
Display
mr.steam
Up Key
Pause Key
Down Key
ON/OFF
Key
DIAGRAM 4
Drawings for Illustrative Purposes Only.
Page 14
mr.steam
______________________________________________________________
®
Installation & Operating Instructions
iTempoPlus™ Operating Instructions
The iTempoPlus Control features programmable
temperature control, programmable time duration,
clock, AromaSteam, ChromaSteam
two personal settings.
WARNING
Set the steam bathing temperature ac-
!
cording to personal preference, however it is highly
recommended to begin steam bathing at a low temperature setting for a very short duration to gauge
comfort and safety levels.
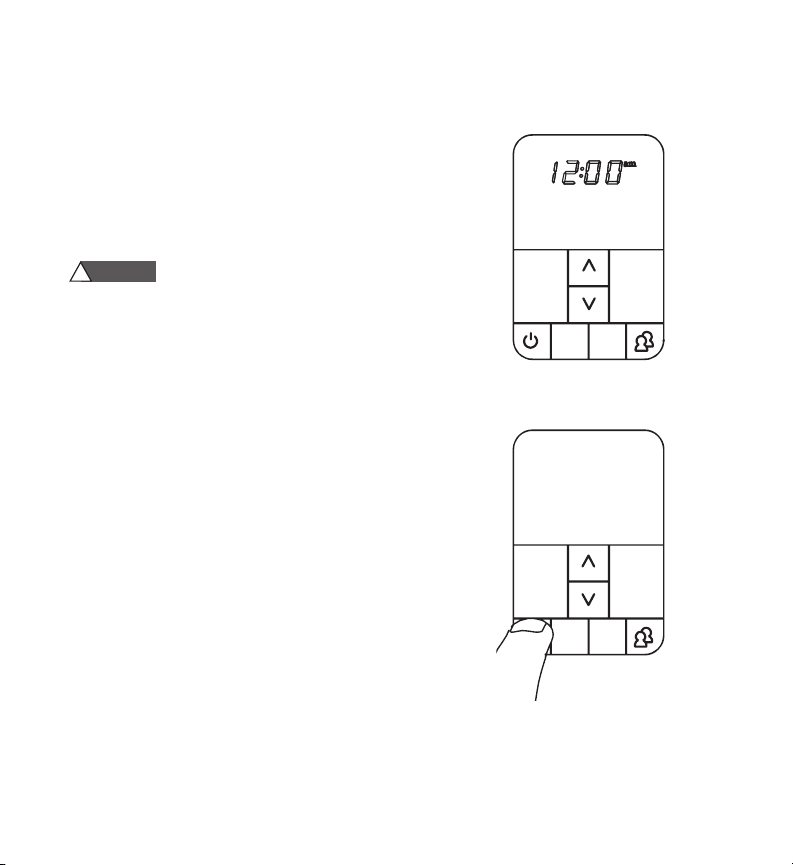
POWERING UP THE UNIT
When the generator is first powered up or after a
power interruption, the clock display ashes and the
clock is ready to be set up.
NOTE:
Pressing the ON/OFF will start the generator
even if the clock has not been set.
ON/OFF
Press the ON/OFF key to start or stop the ow of
steam. The Temperature Set Point is displayed. Steam
will begin to ow a few minutes after the control is
turned ON. The duration required for the steam room
to reach steam bathing temperatures depends on the
steam room construction and steam generator speci-
cations. Steam may continue to ow for a short time
after the control is turned OFF.
Diagram 2
®
, ON/OFF and
Diagram 1
mr.steam
temp
aroma chroma
DIAGRAM 1
mr.steam
temp
aroma chroma
DIAGRAM 2
time
time
14
Drawings for Illustrative Purposes Only.
Page 15
mr.steam
______________________________________________________________
®
Installation & Operating Instructions
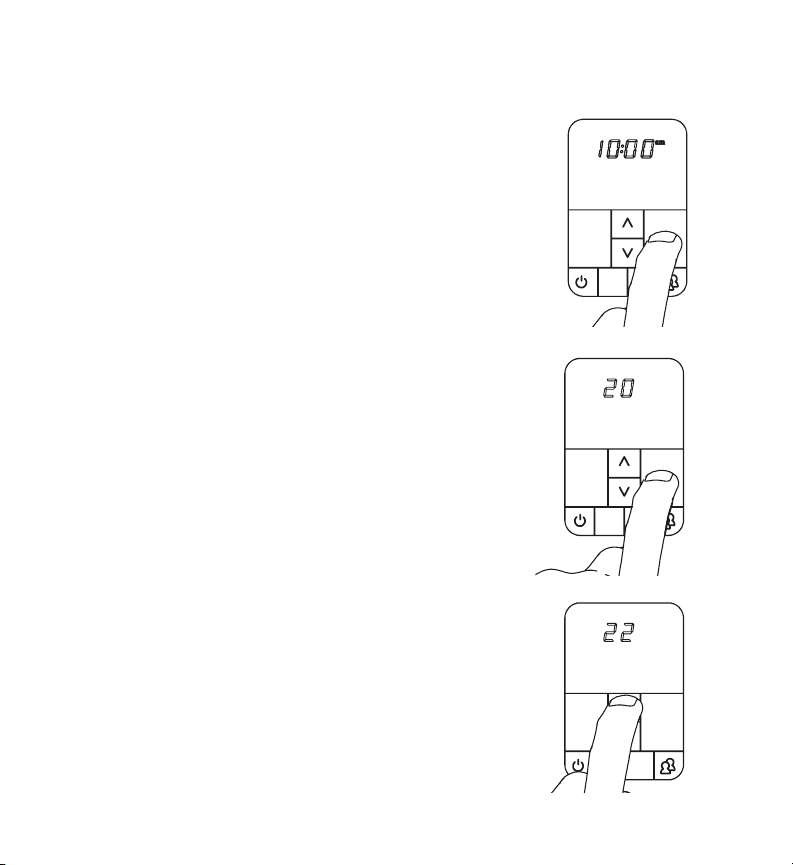
SETTING THE CLOCK
When the display is not ashing: Press and hold the
TIME key until the display starts ashing.
Use the UP/DOWN keys to select the desired time,
at this time the AM/PM logo will be displayed.
Press the TIME key to save changes.
NOTE:
The clock can only be set when the
generator is off.
SETTING THE STEAMBATH DURATION
Diagram 4
Press TIME key to set or display the steambath
duration time on the clock. The control is pre-set
and will display a TIME setting of 20 minutes (default setting). With the TIME or CLOCK displayed,
press the UP or DOWN keys (Diagram 5) to set the
desired duration time (2-60 minutes) in two minute
increments.
Set the steambath duration according to personal
preference, however it is highly recommended to
begin steam bathing at a very short duration to
gauge comfort and safety levels. The control will
turn off when the duration period times out. Then,
the clock time will be displayed.
Diagram 3
DIAGRAM 3
DIAGRAM 4
DIAGRAM 5
mr.steam
temp
aroma
15
Drawings for Illustrative Purposes Only.
Page 16
mr.steam
______________________________________________________________
®
Installation & Operating Instructions
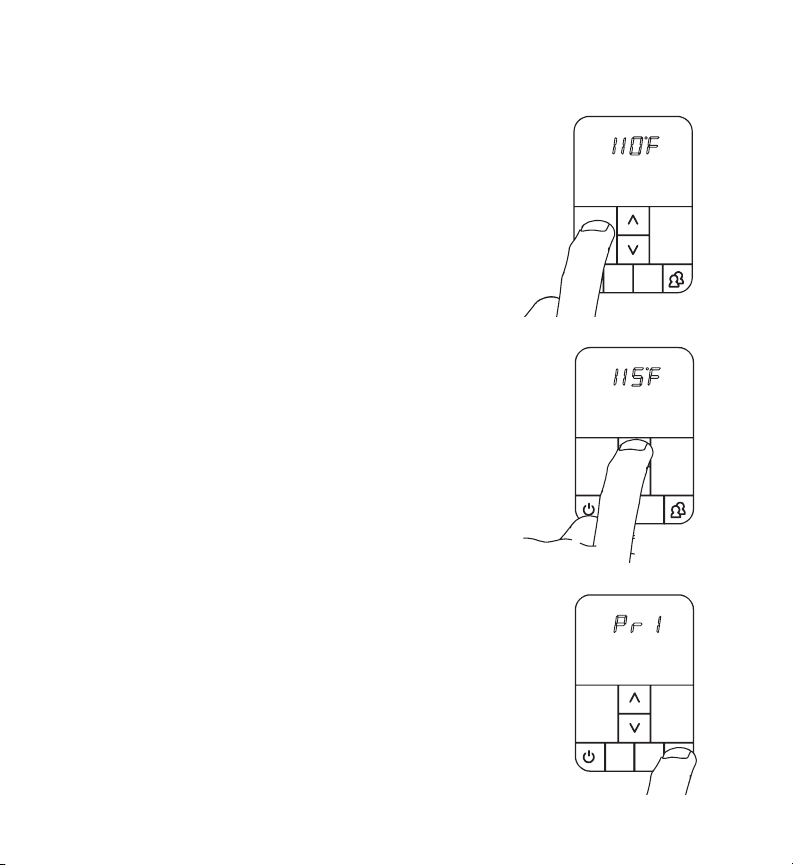
SETTING THE TEMPERATURE
Diagram 6: Press TEMP key to set the desired temperature or
display the temperature setting.
Diagram 7: The control is preset and will display a temperature setting of 110˚F (default setting). With the temperature
DIAGRAM 6
displayed, press the UP or DOWN keys to set the desired tem-
mr.steam
time
perature (80°F to 120°F) in one degree increments.
Set the steam bathing temperature according to personal
aroma chroma
preference, however it is highly recommended to begin steam
bathing at a low temperature setting to gauge comfort and
safety levels.
MEMORY FEATURE
If the control is turned off manually before it times out then the
default settings of 20 minutes and 110°F will be used the next
time the control is turned on. If the control times out (not manually turned off) then the previous user time and temperature
DIAGRAM 7
settings will be used when the steambath is turned on.
PROG 1 AND PROG 2
Diagram 8
mr.steam
timetemp
chroma
Use the P1/P2 key program to store preferred settings.
To program preferred settings:
Press ON/OFF key to turn generator on.
Press P1/P2 key once to program PROG1.
Press it twice to program PROG2. The selected parameter
will be displayed. Enter the preferred time and
temperature settings.
DIAGRAM 8
mr.steam
The iTempoPlus will store the following settings: set point, time
duration & aroma state. To select PROG1 or PROG2:
timetemp
Press ON/OFF key then press P1/P2 key once to select
PROG1, press it twice to select PROG2. The steambath will
aroma chroma
begin to operate at the stored settings.
16
Drawings for Illustrative Purposes Only.
Page 17
mr.steam
______________________________________________________________
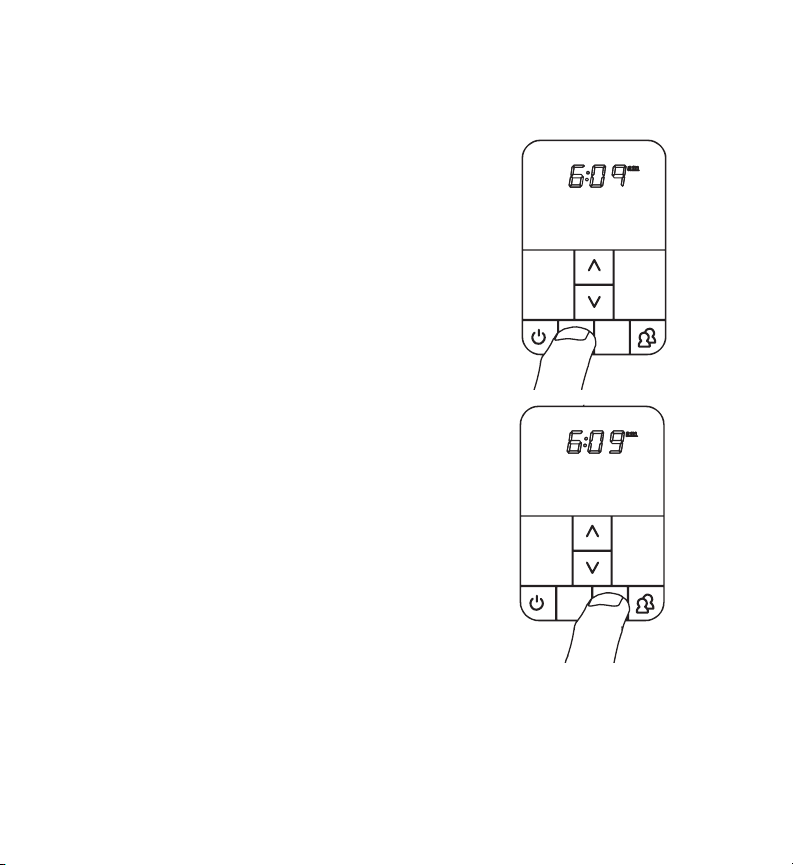
CHANGING THE TEMPERATURE UNITS
(˚F/˚C)
When the generator is Off, Press and hold ON/OFF
key for 10 seconds. The temperature units will be
displayed as Fahrenheit (TuF) or Celsius (TuC). Use
the UP/DOWN keys to choose between (TuF) and
(TuC). Press ON/OFF key to accept the new value
and exit.
®
Installation & Operating Instructions
aroma
mr.steam
timetemp
AROMASTEAM
The AromaSteam is an optional accessory that
automatically injects aromatic oil into the steam.
Press the ON/OFF key to turn the steam generator on. Then, press the AROMA key. The Aroma
indicator will be displayed. The AromaSteam
turns off automatically when the steam generator stops heating. Press the AROMA key to turn
it off during a steam session. The indicator will
turn off.
CHROMASTEAM® Diagram 10
The ChromaSteam is an optional accessory that
provides colored light in the steam room. Press
the CHROMA key to turn light on. Press twice to
select the next color. Press again to turn the light
off. Note that the light can be turned ON even if
the steam generator is OFF.
Diagram 9
17
chroma
DIAGRAM 9
chroma
mr.steam
timetemp
aroma
DIAGRAM 10
Drawings for Illustrative Purposes Only.
Page 18
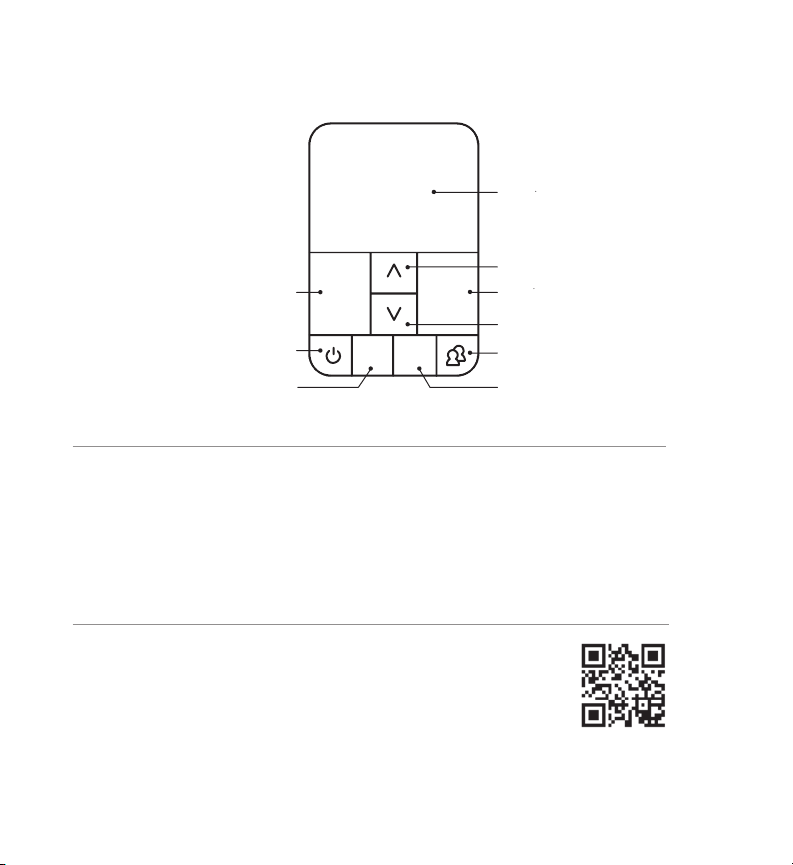
mr.steam
______________________________________________________________
®
Installation & Operating Instructions
Display
mr.steam
Up Key
Time Display/
Adjust Key
ON/OFF Key
AromaSteam
Key
temp
time
aroma chroma
Time Display/
Adjust Key
Down Key
Program Key
ChromaSteam
Key
Care Tips for all Controls and Steamheads
1. Use only mild soap and water on a soft cloth to clean the control and steamhead.
2. Do not use abrasive cleansers
™
3. If the decorative cover is damaged on the iTempo
call Mr.Steam
NOTE:
®
technical service for replacement parts.
Replacement of the decorative covers requires removal and
or iTempoPlus™
reinstallation of the control from the mounting surfaces.
Warranty
To register your steam generator unit online and
to review the Mr.Steam Limited Lifetime Warranty please go to:
blog.mrsteam.com/wr
18
Page 19

Page 20

®
mr.steam
Feel Good Inc.
Products, information and specifications are subject to change without notice.
For more information call Sales & Support at:
1.800.76.STEAM
2015 © Sussman-Automatic Corporation Mr.Steam and des., AromaFlo, AutoFlush, AutoSteam, Butler Package,
ChromaSteam, Clean Steam...Every Time, Club Therapy, Digital 1, Express Steam, From Bathroom to Spa, iDream Package, iGenie, iSizing, iSteam, MusicTherapy, Spa Package, Steam@Home, Steam Therapy, Sussman, Valet Package, Virtual
Spa System, Voice Genie and Voice Wizard are registered trademarks of Sussman-Automatic Corporation. AudioWizard,
HomeWizard, iButler, iTempo, iTempoPlus, Smart Sizing, SteamStart, The Intelligent Steambath are trademarks of SussmanAutomatic Corporation.
100474a rev. 6.15
(East Coast)
1.800.72.STEAM
(West Coast)
 Loading...