

Important!
During installation always make sure that the power cord (3) is inserted into
the cigar lighter and power provided before connecting your mobile phone.
The connection of your mobile phone should ALWAYS be the LAST step of
complete mr Handsfree installation!
¡Importante!
Durante la instalación asegurarse de que el cable de alimentación (3) está dentro
del conector de mechero y tiene corriente antes de conectar el teléfono móvil.
La conexión a su teléfono móvil debe ser SIEMPRE lo ÚLTIMO que usted
haga cuando instale el manos libres.
Belangrijk!
Tijdens de installatie dient u er steeds voor te zorgen dat de stroomkabel (3) in
de stekker van de sigarenaansteker steekt en dat de stroom aan staat alvorens
uw mobiele telefoon aan te sluiten. De aansluiting van uw mobiele telefoon
moet ALTIJD de LAATSTE stap zijn van de volledige mr Handsfree installatie.
Durante a instalação e antes de ligar o seu telemóvel, confirme se o cabo de
alimentação (3) está ligado ao isqueiro do carro e se existe energia. A ligação
do seu telemóvel deverá ser SEMPRE o ÚLTIMO passo para a completa
instalação do mr Handsfree!
Important!
Pendant l’installation vous devez sauvegarder que le câble d’alimentation (3)
soit inséré dans la douille de l’allume-cigare et que l’unité soit branchée avant
de connecter votre téléphone mobile. La connexion de votre téléphone mobile
devrait être TOUJOURS la DERNIÈRE étape de l’installation complète du
mr Handsfree.
Рсйн нб ухндЭуефе фп фзлЭцщнп убт нб вевбйщиеЯфе ьфй рЬнфб хрЬсчей сеэмб
кбй ьфй фп кблюдйп фпх сеэмбфпт (3) нб еЯнбй ухндедемЭнп уфпн бнбрфЮсб фпх
бхфпкЯнзфпх. З уэндеуз фпх кйнзфпэ убт фзлецюнпх рсЭрей нб еЯнбй рЬнфб
з фелехфбЯб енЭсгейб рпх рсЭрей нб кЬнефе кбфЬ фзн егкбфЬуфбуз фпх
mr Handsfree.
Importante!
Durante l’installazione assicuratevi sempre che il cavo di alimentazione (3) sia
inserito nell’accendisigari e che vi sia alimentazione, prima di collegare il vostro
telefono cellulare. Il collegamento del vostro telefono, dovrebbe SEMPRE
essere l’ULTIMO passo dell’installazione del vostro mr Handsfree.
Во время установки, перед тем как подсоединить Ваш мобильный телефон,
убедитесь, что сетевой шнур (3) вставлен в прикуриватель и питание подведено.
Подключение Вашего мобильного телефона ВСЕГДА должно быть
ПОСЛЕДНИМ шагом при полной установке
Wichtig!
Während der Installation darauf achten, dass die mr Handsfree Basis mit dem
Ladekabel (3) verbunden ist. Erst NACH Verbindung mit dem Ladekabel das
Mobiltelefon mit mr Handsfree Basis verbinden.
Under installationen skal du være sikker på, at strøm stikket (3) er monteret i
cigaretstikket før du monterer mobiltelefonen. Forbindelsen til mobiltelefonen
skal ALTID være det SIDSTE der gøres, inden mr Handsfree installationen
er færdig.
Importante!
РспупчЮ
Важно!
Vigtigt

Dear mr Handsfree Car-kit owner,
Congratulations on your purchase of one of the most
sophisticated and handy car kits ! This model provides
you with the highest quality full-duplex voice
communication. Now you can enjoy the safest telephone
conversations with your friends in your car without any
inconveniences.
WHAT DOES THE MR HANDSFREE CAR KIT
CONCEPT INCLUDE?
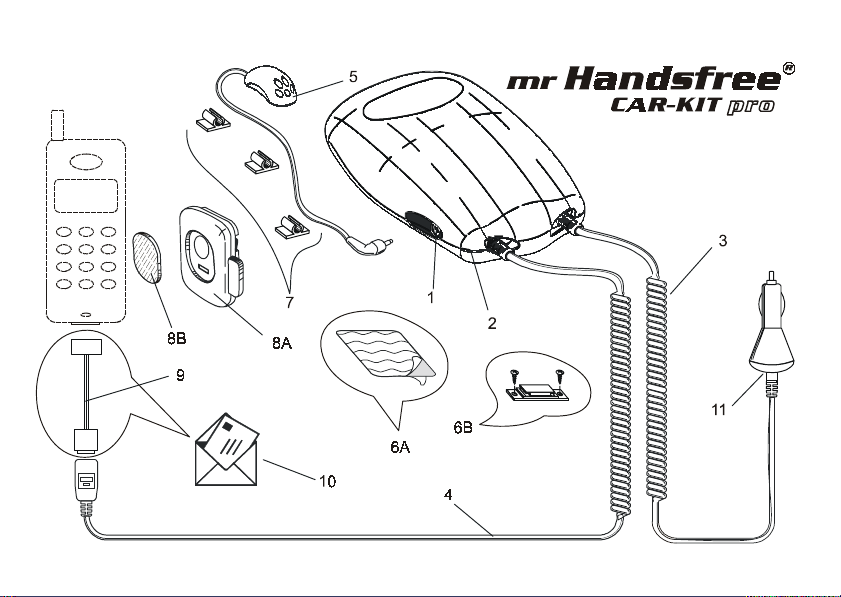
MR HANDSFREE CAR KIT
1. Connection for Microphone
2. Power ON/OFF LED
3. Power cord
4. Cable for mobile phone connection
LIST OF MR HANDSFREE CAR-KIT PARTS
5. Microphone
6. Mr Handsfree installation tools
6A. VELCRO parts
6B. Mounting bracket + 2 screws
7. Clips for guiding the microphone cord
8. Mobile phone installation tools
8A. Magnetic holder
8B. Magnet to be placed on back of mobile phone
9. Mr Handsfree ‘Special Brand’ mobile phone connector
(not included)
10. Voucher for ordering ‘Special Brand’ mobile phone
connector (not included for each country)
11. Connection for ALCATEL connector
INSTALLATION
MOUNTING MR HANDSFREE
• Choose the place where you want to install the
appliance, so that the length of the power cord (3)
and the cable for mobile phone connection (4) is
LONG enough to connect it with the cigar lighter
socket and mobile phone.
• There are 2 mounting methods :
1. VELCRO mounting :
• Remove the cover of the adhesive piece of Velcro
and press firmly in the correct location on the
back of your mr Handsfree.
• Remove the other cover of the adhesive piece of
Velcro and press the appliance to the location in
your car where you want to install your mr
Handsfree .
Before you attach it to your car, make sure the
location is free of dust.
GB–1

2. Bracket Mounting (most advisable mounting method)
• Place the supplied bracket (6B) on the location
where you want to install your mr Handsfree by
using the screws.
• Place the mr Handsfree on the bracket first by
pressing and than sliding it in the correct position.
You will hear a click sound when the unit is
installed correctly.
MOUNTING YOUR MOBILE PHONE
• Remove the cover of the adhesive piece on the back
of the magnet (8B) and press firmly to the correct
location on the back of your mobile phone.
• Remove the 2 covers of the adhesive pieces on the
back of the magnetic holder (8A) and place it at the
most convenient and visible location on your
dashboard.
• Now you can attach your mobile phone to the
magnetic holder.
MICROPHONE CONNECTION
• Place the microphone (5) on the dashboard using
Velcro.
• Connect the microphone cord plug to the mr
Handsfree microphone jack (1).
• Now use the three clips (7) to guide the microphone
cord.
IMPORTANT !
For optimum performance, the microphone should be
located at least 40-50 cm from the drivers’ mouth.
Make sure that the microphone is directed towards
the driver.
POWER CONNECTION
• Do not operate your appliance on a positive ground
electrical system.
• Remove the vehicle’s cigar lighter from its socket and
insert your mr Handsfree power cord (3) into the
cigar lighter socket of your car. The LED indicator of
the power plug will light GREEN.
• LED indicator of mr Handsfree unit will light YELLOW.
This means that your mr Handsfree Car Kit is in ON
position.
IMPORTANT !
MR HANDSFREE CAR KIT is equipped with ultra wide
(12/24 V DC) power supply adapter. This makes it
possible to use the mr Handsfree in vehicles with
different values of on-board voltage.
Only ALCATEL connector CANNOT be used with 24 V
DC.
GB–2

MOBILE PHONE CONNECTION
• Connect the mr Handsfree mobile telephone cable (4)
to your ‘Special Brand’ mobile phone connector (9).
• Connect this mr Handsfree ‘Special Brand’ mobile
phone connector (9) to your mobile phone.
The mobile phone connector should be handled
with care when connecting and disconnecting
your mobile phone.
• Saving/charging function is activated now.
IMPORTANT !
• Always read the ‘TROUBLE-SHOOTING’ chapter p.4
carefully.
• The mr Handsfree ‘Special Brand’ mobile phone
connector can be obtained by mail or directly from
your local supplier.
• Due to the ‘Special Brand’ mobile phone connector
which can be ordered separately for each mobile
phone model (Nokia, Ericsson …), your mr
Handsfree is suited for any type of mobile phone.
OPERATION OF MR HANDSFREE
HOW TO SWITCH ON ?
• Insert your mr Handsfree power cord (3) into the
cigar lighter of your car to switch mr Handsfree in
ON-position.
• LED indicator lights YELLOW.
• To switch off, you simply plug out your power cord
from cigar lighter.
HOW TO ANSWER A CALL ?
• Answer incoming calls as normal on your mobile
phone.
• You can start the conversation immediately by
speaking into the microphone (5).
• Adapt to the appropriate speaker-volume by using
your mobile phone control panel.
HOW TO PLACE A CALL ?
• Dial the telephone number as normal on your mobile
phone.
• You can start the conversation immediately after
being connected by speaking into the microphone
(5).
HOW TO END A CALL ?
• At the end of your conversation hang up your mobile
phone as normal.
• The mr Handsfree speaker will switch off within 10
seconds after the end of the conversation or if no
voice message is coming in, for your comfort.
GB–3

TROUBLE-SHOOTING
If the mr Handsfree is not working:
 Check the power cord.
Make sure that the power cord is properly installed
in the cigar lighter (power plug LED=GREEN).
 Is your cigar lighter clean and free from corrosion ?
 Check the mr Handsfree LED status :
When this LED is YELLOW your mr Handsfree should
be working perfectly.
Speaker & microphone are switched ON.
IMPORTANT !
Check the ‘Special Brand’ mobile phone connector. If
your mr Handsfree is not working you should
immediately try to replace this mobile phone
connector with another, new connector. This will
probably be solution n° 1 in the case of
malfunctioning of your mr Handsfree car kit!
MAINTENANCE
Please check following mr Handsfree maintenance TIPS
to keep your kit in top condition:
 Do not leave the appliance in direct sunlight for long
 Do not expose the appliance to moisture
 Always unplug the power cable when not in use
mr Handsfree wishes you a nice
and safe journey!
GB–4

Beste eigenaar van de mr Handsfree Car kit,
Gefeliciteerd met de aankoop van één van de meest
gesofisticeerde handenvrije car kits! Dit model biedt u de
hoogste kwaliteit op het gebied van full-duplex voice
communication. Nu kan u in alle veiligheid en zonder
ongemakken vanuit uw wagen met uw vrienden
telefoneren.
WAT OMVAT DE MR HANDSFREE CAR KIT?
MR HANDSFREE CAR KIT
1. Microfoonaansluiting
2. LED voor de weergave AAN/UIT
3. Stroomkabel
4. Aansluitkabel voor uw mobiele telefoon
ONDERDELENLIJST VAN DE MR HANDSFREE CAR KIT
5. Microfoon
6. Benodigdheden voor de installatie van mr Handsfree
6A. VELCRO-strips
6B. Bevestigingsbeugel + 2 schroeven
7. Clips voor de geleiding van de microfoonkabel
8. Benodigdheden voor de installatie van uw mobiele
telefoon
8A. Magnetische houder
8B. Magneet om aan te brengen op de achterkant
van uw mobiele telefoon
9. Speciale connector van mr Handsfree voor uw mobiele
telefoon (niet inbegrepen)
10. Coupon voor het bestellen van de speciale connector
van mr Handsfree voor uw mobiele telefoon (niet voor
alle landen inbegrepen)
11. Aansluiting voor ALCATEL connector
INSTALLATIE
HET MONTEREN VAN MR HANDSFREE
• Kies de plaats waar u de houder wilt aanbrengen,
zodat de stroomkabel (3) en de kabel voor de
aansluiting van uw mobiele telefoon (4) LANG genoeg
zijn om aangesloten te worden op de stekker van uw
sigarenaansteker en uw mobiele telefoon.
• Er zijn 2 methoden voor de montage:
1. Montage met behulp van de VELCRO-strips:
• Verwijder de bescherming van de Velcro-strip en
druk deze stevig op de juiste plaats aan de
achterkant van uw mr Handsfree.
• Verwijder de andere bescherming van de Velcro-
strip en druk uw mr Handsfree op de plaats in uw
wagen waar u uw set wilt installeren.
Zorg ervoor dat deze plaats vrij is van stof.
NL–1

2. Montage met behulp van de bevestigingsbeugel (meest
aangeraden methode)
• Breng de bijgeleverde beugel (6B) met behulp van
de schroeven aan op de plaats waar uw mr
Handsfree moet komen.
• Breng uw mr Handsfree op de beugel aan door
eerst te drukken en hem dan in de juiste positie
te schuiven. U hoort een klik als hij correct
geïnstalleerd is.
HET MONTEREN VAN UW MOBIELE TELEFOON
• Verwijder de beschermstrip aan de achterkant van de
magneet (8B) en druk deze stevig op de juiste positie
aan de achterkant van uw mobiele telefoon.
• Verwijder de 2 beschermstrips aan de achterkant van
de magnetische houder (8A) en breng deze aan op
een gemakkelijke en goed zichtbare plaats op uw
dashboard.
• Nu kunt u uw mobiele telefoon op de magnetische
houder bevestigen.
MICROFOONAANSLUITING
• Plaats de microfoon (5) op het dashboard met behulp
van de Velcro-strip.
• Verbind de plug van de microfoonkabel met de
microfoonbus (1) van uw mr Handsfree.
• U kunt nu gebruik maken van de drie clips (7) om
uw microfoonkabel te geleiden.
BELANGRIJK !
Voor een perfecte werking moet de microfoon op
minstens 40-50 cm van de mond van de bestuurder
aangebracht zijn.
Vergewis u ervan dat de microfoon naar de bestuurder
toe gericht is.
STROOMAANSLUITING
• Gebruik uw apparatuur niet op een positief geaard
elektrisch systeem.
• Verwijder de sigarenaansteker uit de stekker en steek
de stroomkabel van mr Handsfree (3) in de stekker
van de sigarenaansteker. Het LED van de
stroomstekker zal GROEN oplichten.
• De LED van uw mr Handsfree zal GEEL oplichten.
Dit betekent dat uw mr Handsfree Car Kit aanstaat.
BELANGRIJK !
MR HANDSFREE CAR KIT is uitgerust met een
ultrabrede (12/24 V DC) netadapter. Hierdoor kan u
uw mr Handsfree ook gebruiken in wagens met een
verschillende bordspanning.
Enkel de ALCATEL-connector kan NIET gebruikt
worden op 24 V DC.
NL–2

AANSLUITING MOBIELE TELEFOON
• Verbind de mobiele telefoonkabel (4) van uw mr
Handsfree met de speciale connector (9).
• Verbind de speciale connector van mr Handsfree (9)
met uw mobiele telefoon.
• De stand-by/oplaad-functie wordt nu geactiveerd.
BELANGRIJK!
• Lees zorgvuldig het hoofdstuk ‘VERHELPEN VAN
PROBLEMEN’ op p. 4.
• U kunt de speciale connector voor uw mr
Handsfree per post of rechtstreeks bij uw
plaatselijke verdeler bestellen.
• Dankzij de speciale connector, die afzonderlijk
besteld kan worden voor elk type mobiele telefoon
(Nokia, Ericsson …), is uw mr Handsfree voor
elk type van mobiele telefoon geschikt.
WERKING VAN MR HANDSFREE
HET AANZETTEN
• Steek de stroomkabel van mr Handsfree in de stekker
van de sigarenaansteker van je auto om uw mr
Handsfree aan te zetten.
• De LED licht GEEL op.
• Om uit te zetten moet u enkel de stroomkabel uit de
sigarenaansteker verwijderen.
HET BEANTWOORDEN VAN EEN OPROEP
• Beantwoord de inkomende oproep zoals u dat normaal
met uw mobiele telefoon doet.
• U kunt het gesprek nu starten door in de microfoon
te spreken (5).
• Pas het geluidsniveau aan door middel van het
controlepaneel op uw mobiele telefoon.
HET TELEFONEREN
• Vorm een telefoonnummer zoals u dat met uw mobiele
telefoon gewend bent
• Als u verbinding krijgt, kunt u het gesprek beginnen
door in de richting van de microfoon (5) te praten.
HET BEËINDIGEN VAN EEN GESPREK
• Op het einde van een gesprek verbreekt u de
verbinding zoals u dat normaal doet met uw mobiele
telefoon.
• Met het oog op uw comfort zal de luidspreker van uw
mr Handsfree 10 seconden na het beëindigen van het
gesprek of wanneer er geen gesproken boodschap
binnenkomt vanzelf uitschakelen.
NL–3

VERHELPEN VAN PROBLEMEN
Als uw mr Handsfree niet werkt:
 Controleer de stroomkabel.
Ga na of de stroomkabel goed op de sigarenaansteker
aangesloten is (LED stroomstekker=GROEN).
 Is uw sigarenaansteker zuiver en vrij van corrosie?
 Controleer de status van de Led van uw mr Handsfree:
Als de LED GEEL is, zou uw mr Handsfree perfect
moeten werken.
De luidspreker en de microfoon zijn ingeschakeld.
BELANGRIJK !
Controleer de speciale mobiele telefoonconnector
(10). Als uw mr Handsfree niet werkt, moet u deze
mobiele telefoonconnector onmiddellijk door een
nieuwe vervangen. Dit zal vermoedelijk de oplossing
nr. 1 zijn bij een slechte werking van uw mr Handsfree
car kit!
ONDERHOUD
Gelieve de volgende TIPS ter harte te nemen om uw mr
Handsfree in optimale toestand te houden:
 Stel de apparatuur niet langdurig bloot aan
rechtstreeks zonlicht
 Stel de apparatuur niet bloot aan vocht
 Trek de stroomkabel altijd uit als u uw kit niet
gebruikt
mr Handsfree wenst u een aangename
en veilige rit toe!
NL–4

Cher propriétaire d’un mr Handsfree Car-kit,
Nous tenons à vous féliciter pour avoir acquis l’un des
kits automobiles les plus sophistiqués et les plus pratiques!
Ce modèle vous offre des communications vocales,
totalement en duplex, de la plus haute qualité. Vous
pourrez maintenant pleinement profiter des conversations
téléphoniques avec vos amis dans votre véhicule, en toute
sécurité et sans le moindre désagrément.
QU’INCLUT LE CONCEPT
MR HANDSFREE CAR-KIT ?
MR HANDSFREE CAR KIT
1. Connexion pour le microphone
2. Témoin lumineux de branchement/débranchement
3. Cordon d’alimentation
4. Câble pour la connexion du téléphone mobile
LISTE DES PIECES DU MR HANDSFREE CAR-KIT
5. Microphone
6. Outils d’installations du kit mr Handsfree
6A. Bandes VELCRO
6B. Support de montage + 2 vis
7. Clips pour guider le cordon du microphone
8. Outils d’installation pour le téléphone mobile
8A. Support magnétique
8B. Aimant à placer à l’arrière du téléphone mobile
9. Connecteur spécial du téléphone mobile (non-inclus)
10. Bon pour commander le connecteur spécial du
téléphone mobile (non-inclus pour chaque pays)
11. Connection pour connecteur “ALCATEL”
INSTALLATION
MONTAGE DU KIT MR HANDSFREE
• Choisissez l’emplacement où vous souhaitez installer
l’équipement, en veillant à ce que le câble
d’alimentation (3) et le câble de connexion du
téléphone mobile (4) soient suffisamment LONGS pour
connecter le kit à la prise de l’allume-cigare et au
téléphone mobile.
• Vous avez le choix entre 2 modes de montage :
1. Montage VELCRO :
• Enlevez la couche protectrice des bandes Velcro et
pressez celles-ci fermement sur la face arrière de
votre kit mr Handsfree en veillant à les appliquer
à l’emplacement choisi.
• Enlevez la couche protectrice des autres bandes
Velcro et appliquez-les à l’endroit choisi pour
l’installation de votre kit mr Handsfree dans votre
véhicule.
Avant de les fixer dans le véhicule, il convient de
vérifier si l’emplacement choisi est libre de toute
poussière.
F–1

2. Montage au moyen du support (mode de montage le
plus conseillé)
• Placez le support (6B) fourni à l’endroit où vous
souhaitez installer votre kit mr Handsfree à l’aide
des vis.
• Placez le kit mr Handsfree sur le support en
poussant d’abord pour le glisser ensuite vers sa
position correcte. Vous entendrez un clic lorsque
l’unité sera installée correctement.
MONTAGE DE VOTRE TELEPHONE MOBILE
• Enlevez la couche protectrice recouvrant l’arrière de
l’aimant (8B) et pressez celui-ci fermement à l’endroit
choisi à l’arrière de votre téléphone mobile.
• Enlevez les 2 plaquettes protectrices recouvrant
l’arrière du support magnétique (8A) et placez celuici à l’endroit le plus pratique et le plus visible de
votre tableau de bord.
• Vous pouvez maintenant fixer votre téléphone mobile
sur le support magnétique.
CONNEXION DU MICROPHONE
• Placez le microphone (5) sur le tableau de bord à
l’aide des bandes Velcro.
• Connectez la fiche du cordon du microphone à la
fiche du microphone du kit mr Handsfree (1).
• Vous pouvez maintenant utiliser les trois clips (7)
pour guider le cordon du microphone.
IMPORTANT !
Pour obtenir un résultat parfait, le microphone devra
être placé à au moins 40-50 cm de la bouche du
conducteur.
Veillez à ce que le microphone soit dirigé vers le
conducteur.
RACCORDEMENT DU COURANT
• Ne connectez pas votre équipement à un système
électrique à masse positive.
• Enlevez l’allume-cigare de sa douille et insérez le câble
d’alimentation de votre kit mr Handsfree (3) dans la
douille de l’allume-cigare de votre véhicule.
L’indicateur lumineux de la fiche d’alimentation
s’allumera et sera VERT.
• L’indicateur lumineux s’allumera et sera JAUNE.
Cela signifie que votre mr Handsfree Car-Kit est
branché.
F–2

IMPORTANT !
Le MR HANDSFREE CAR KIT est équipé d’un adaptateur
de courant à vaste plage de courant (12/24 V CC).
Cela permet d’utiliser le kit mr Handsfree dans des
véhicules à système électrique de différents voltages.
Seul le connecteur “ALCATEL” ne peut pas être utilisé
avec 24 V DC.
CONNEXION DU TELEPHONE MOBILE
• Connectez le câble du téléphone mobile (4) de votre
kit mr Handsfree au connecteur spécial de votre
téléphone mobile (9).
• Connectez ce connecteur spécial mr Handsfree ‘en
fonction de la marque’ à votre téléphone mobile.
• La fonction économie/charge est maintenant activée.
IMPORTANT !
• Lisez soigneusement le chapitre p.4 consacré à la
‘DETECTION DES PANNES’.
• Le connecteur spécial du téléphone mobile peut
être obtenu par courrier ou directement auprès
de votre fournisseur local.
• Grâce au connecteur spécial du téléphone mobile
qui peut être commandé spécialement pour
chaque type de téléphone mobile (Nokia, Ericsson
…), votre kit mr Handsfree convient pour tous
les modèles de téléphones mobiles.
MANIEMENT DU KIT MR HANDSFREE
COMMENT LE BRANCHER ?
• Insérez le câble d’alimentation de votre Kit mr
Handsfree dans la douille de l’allume-cigare de votre
véhicule, afin de brancher le kit mr Handsfree.
• Le témoin lumineux s’allume et est de couleur JAUNE.
• Pour arrêter, il suffit d’enlever le câble d’alimentation
de l’allume-cigares.
COMMENT REPONDRE A UN APPEL ?
• Répondez à un appel entrant comme vous le faites
normalement avec votre téléphone mobile.
• Vous pouvez maintenant engager la conversation en
parlant en direction du microphone (5).
• Adaptez le volume du haut-parleur au moyen du
panneau de contrôle de votre téléphone mobile.
COMMENT LANCER UN APPEL ?
• Formez le numéro de téléphone comme vous le faites
habituellement avec votre téléphone mobile.
• Lorsque vous êtes en communication, vous pouvez
engager la conversation en parlant en direction du
microphone (5).
F–3
 Loading...