

MPC F1925 User Manual
F1925 LCD Monitor
User’s Guide

2
Table of Contents
User’s Guide........................................................................3
Packing List.........................................................................3
Safety Information ..............................................................3
LCD Monitor Features ........................................................5
Setup Instructions ..............................................................6
Monitor Base .........................................................................................6
Power Cord and Power Adapter ........................................................... 6
Video Cables ......................................................................................... 8
Adjusting the Viewing Angle..............................................8
Operating Instructions .......................................................9
General Instructions ..............................................................................9
Front Panel Controls ............................................................................. 9
Accessing the Adjustment Controls .................................................... 10
Adjusting the Picture ........................................................................... 11
Cleaning the Monitor ...........................................................................13
Monitor Drivers .................................................................13
Warranty Information........................................................14
Features.............................................................................14
Energy Star Standards........................................................................ 14
Plug & Play DDC1/2B Feature ............................................................14
Appendix A — Troubleshooting ......................................15
Appendix B — On-Screen Messages ..............................17
Appendix C — Factory Preset Timing.............................18
Appendix D — VESA Mounting........................................19
Appendix E — Connector Pin Assignment.....................20
Appendix F — Acceptable LCD defects ..........................21
Appendix G — Monitor Specifications............................22
Appendix H — FCC Notice ...............................................24

3
USER’S GUIDE
This user’s guide provides important information about operating your
monitor. Before using the monitor, please read this guide thoroughly and
then save it for future reference.
PACKING LIST
Before setting up and using your monitor, examine the items in the
monitor package. If anything is missing or damaged, please contact
MPC immediately. Look for the following items:
• 19” LCD Monitor
• F1925 LCD Monitor User’s Guide
• 100/120 VAC rated Power Cord
• External Power Adapter Brick (12 VDC)
• Monitor Base
• DB-15 Analog video cable
• DVI-D Digital video cable
Note: Save the original shipping carton and packing materials for
transporting your monitor in the future. If you transport the monitor over
long distances, completely repackage the monitor in its original packing
material.
SAFETY INFORMATION
• Do not use the monitor near standing bodies of water or in humid
envirionments.
• Set the monitor on a flat, stable surface. Do not place it on an
unstable cart, stand, or table. If the monitor falls, it might injure a
person and/or cause serious damage to the monitor.
• When placing the monitor on a cart or stand, use only a cart or stand
recommended by the manufacturer or sold with the monitor. If you
mount the monitor on a wall or shelf, use a mounting kit approved by
the manufacturer and follow the kit instructions.
• Slots and openings in the back and bottom of the monitor are
provided for ventilation. To ensure reliable operation of the monitor,
and to protect it from overheating, these openings must not be
blocked or covered. Do not place the monitor on a bed, sofa, rug, or
similar surface. This monitor must never be placed near or over a
radiator or heat register. This monitor must not be placed in a built-in
enclosure of any kind unless proper ventilation is provided.

4
•
The monitor must only be connected to the AC power source as
indicated on the label. If you are unsure of the type of AC power
available, ask your local power company. Only connect this monitor
to a power outlet that matches the power requirements of this
monitor.
• The monitor is equipped with a three-prong, grounded plug (a plug
with a third pin for grounding). For safety purposes, this plug will only
fit into a grounded power outlet. If your outlet does not accommodate
the three-wire plug, have an electrician install the correct type of
outlet, or use an adapter to ground the appliance safely.
• During a lightning storm, unplug the monitor. Also unplug the monitor
when it will not be used for a long time. This will protect the monitor
from damage due to power surges.
• Do not overload power strips and extension cords. Overloading
power strips and extension cords can result in a fire or electric
shock.
• Never push objects of any kind into the monitor through openings.
The objects could touch dangerous voltage points or short out parts,
possibly resulting in an electric shock or a fire hazard.
• Never spill liquid of any kind on the monitor. If this occurs,
disconnect from the power source immediately.
• Do not attempt to service the monitor yourself. Opening or removing
the monitor’s cover can expose you to dangerous voltages and other
hazards. Please refer all servicing to qualified service personnel.
• To ensure satisfactory operation, only use the monitor with UL listed
computers that have the appropriate configured receptacles marked
between 100–240 VAC, Min. 3.5A.
• Do not allow anything to rest on the power cord. Do not place the
monitor where people might walk on the cord.
• Do not place the monitor in direct sunlight, or where it is near
excessive dust, mechanical vibration, or shock.
• This monitor is for use only with the included power adapter (output
12Vdc) that has a UL CSA listed license.
Warning: To prevent a fire or shock hazard, do not expose the monitor
to rain or moisture. Dangerously high voltages are present inside the
monitor. Do not open the monitor cabinet. Refer servicing to qualified
personnel only.
Warning: Keep all packing materials away from children.

5
LCD MONITOR FEATURES
• 19-inch (48.0 cm) TFT Color LCD Monitor
• 75 mm x 75 mm VESA Mounting Pad (removable base)
• EPA E
NERGY STAR
®
• Ergonomic Design (MPRII Approved)
• Space Saving, Compact Case Design
• Dual Input – Analog and Digital
The following occurrences are normal with an LCD monitor and do not
indicate a problem.
• Due to the nature of the internal fluorescent backlights, the screen
may flicker during initial use. If this occurs, turn off the monitor and
then turn it on again, making sure the flicker disappears.
• You may find slightly uneven brightness on the screen depending on
the desktop pattern you use.
• The LCD screen has an effective pixel count of 99.99% or more. It
may include blemishes of 0.01% or less, such as a missing pixel or a
pixel lit all of the time. Refer to Appendix F – Acceptable LCD
Defects for additional details.
• The life of the internal fluorescent backlights used in the LCD
monitor is approximately 10,000 hours. Contact MPC technical
support or an authorized dealer for a replacement when the screen
is dark, flickering, or not lighting up. Never attempt to replace the
light yourself. Refer servicing to qualified personnel only.
6
SETUP INSTRUCTIONS
The following sections provide information about attaching the base to
your monitor and using the power cord and video cable.
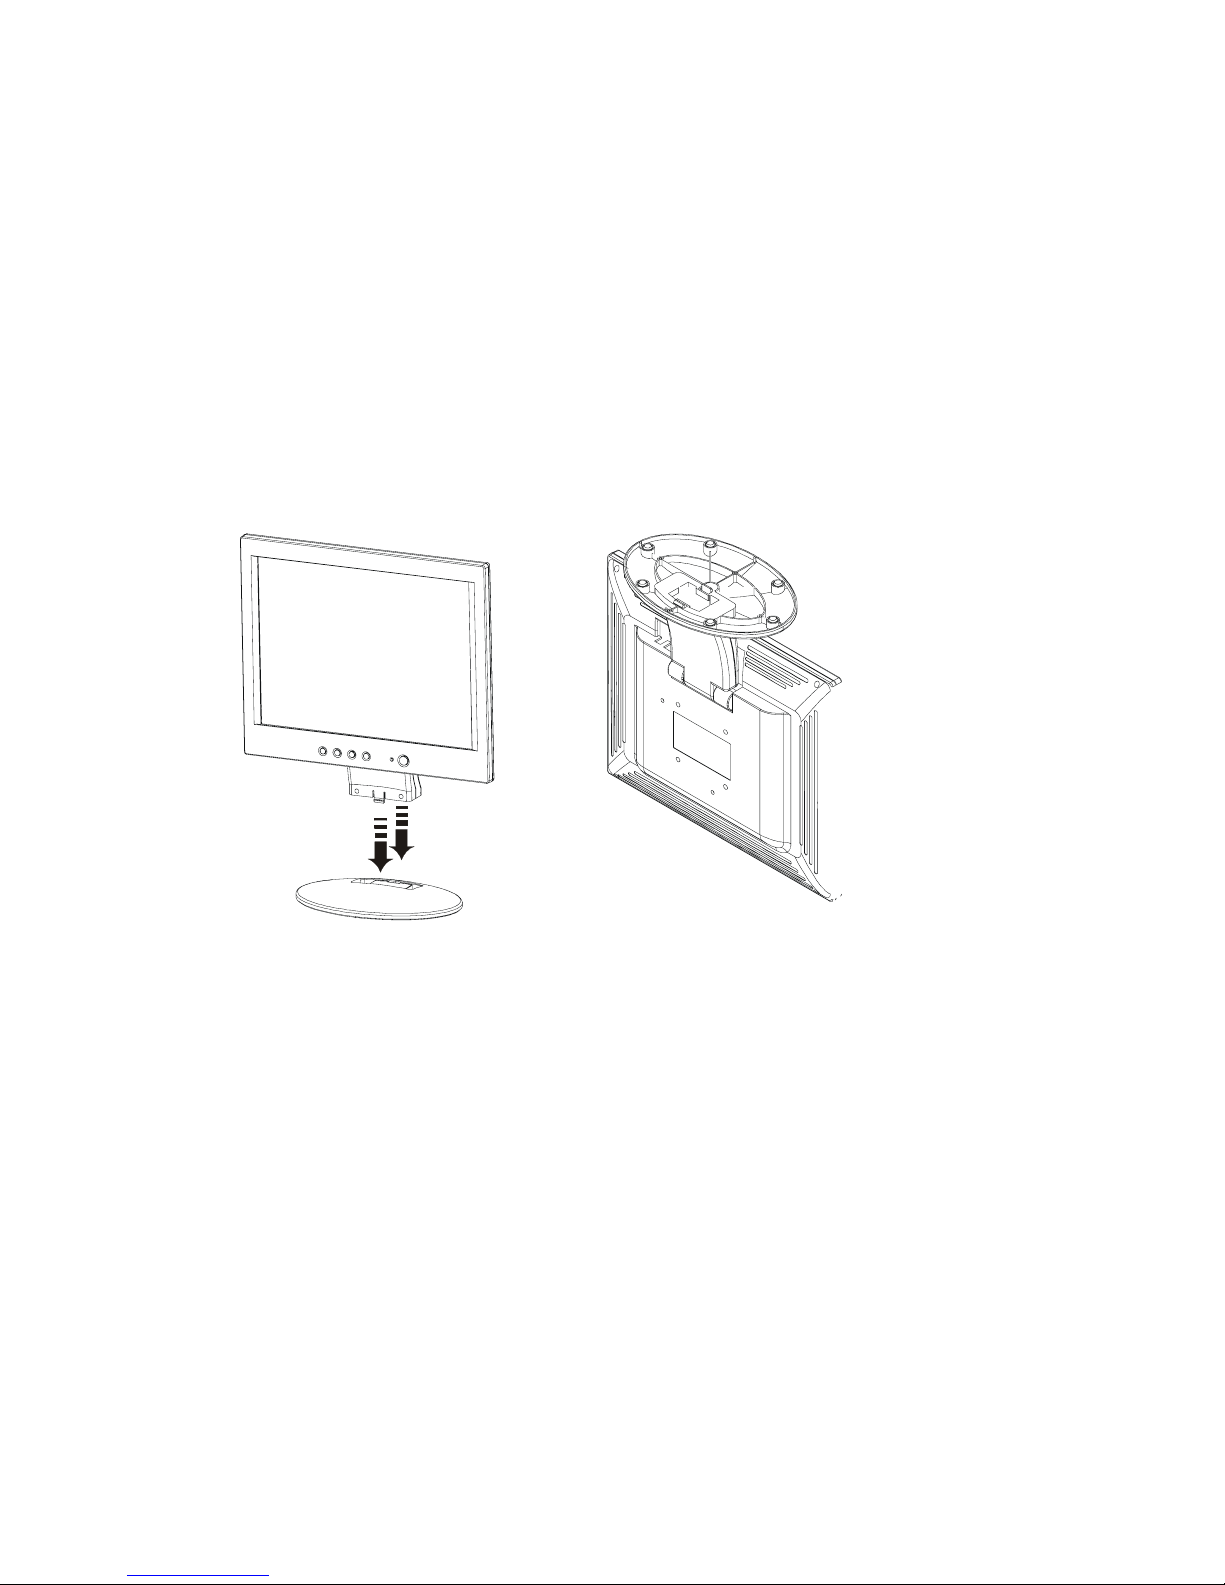
Monitor Base
To install the monitor base, place the monitor in the base until it snaps
into place. To remove the monitor base, gently turn the monitor upside
down and press the four retention clips apart to release the base. Pull
the base straight away from the monitor. See Figure 1 below.
Install Remove
Figure 1: Installing and Removing the Monitor Base
Power Cord and Power Adapter
Before connecting your monitor’s power cord and adapter, read the
guidelines below:
• Use only the Power Adapter included with your monitor. One of the
two Power Adapters listed below should be included. You will find
the following markings on the Power Adapter included with your
monitor:
•
Manufacturer: Polaris Electronics (Dong guan) Co; Ltd. (CHI SAM)
Model: CH -1205
Output: 12 VDC 5 A
•
Manufacturer: TPV Electronics (FUJIAN) CO., LTD
Model: ADPC-12V Series
Output: 12 VDC 5 A
7
•
This monitor has a universal power supply. It can operate in either a
100/120 VAC or 220/240 VAC voltage area (no user adjustment is
required).
• Make sure the power cord meets the specifications and
requirements for your area. The power cord included with your
monitor is rated for 100/120 VAC.
To connect the power cord to your monitor and a power source, follow
the steps below:
Caution: If the AC outlet is not grounded (with three holes), install the
proper grounding adapter (not supplied).
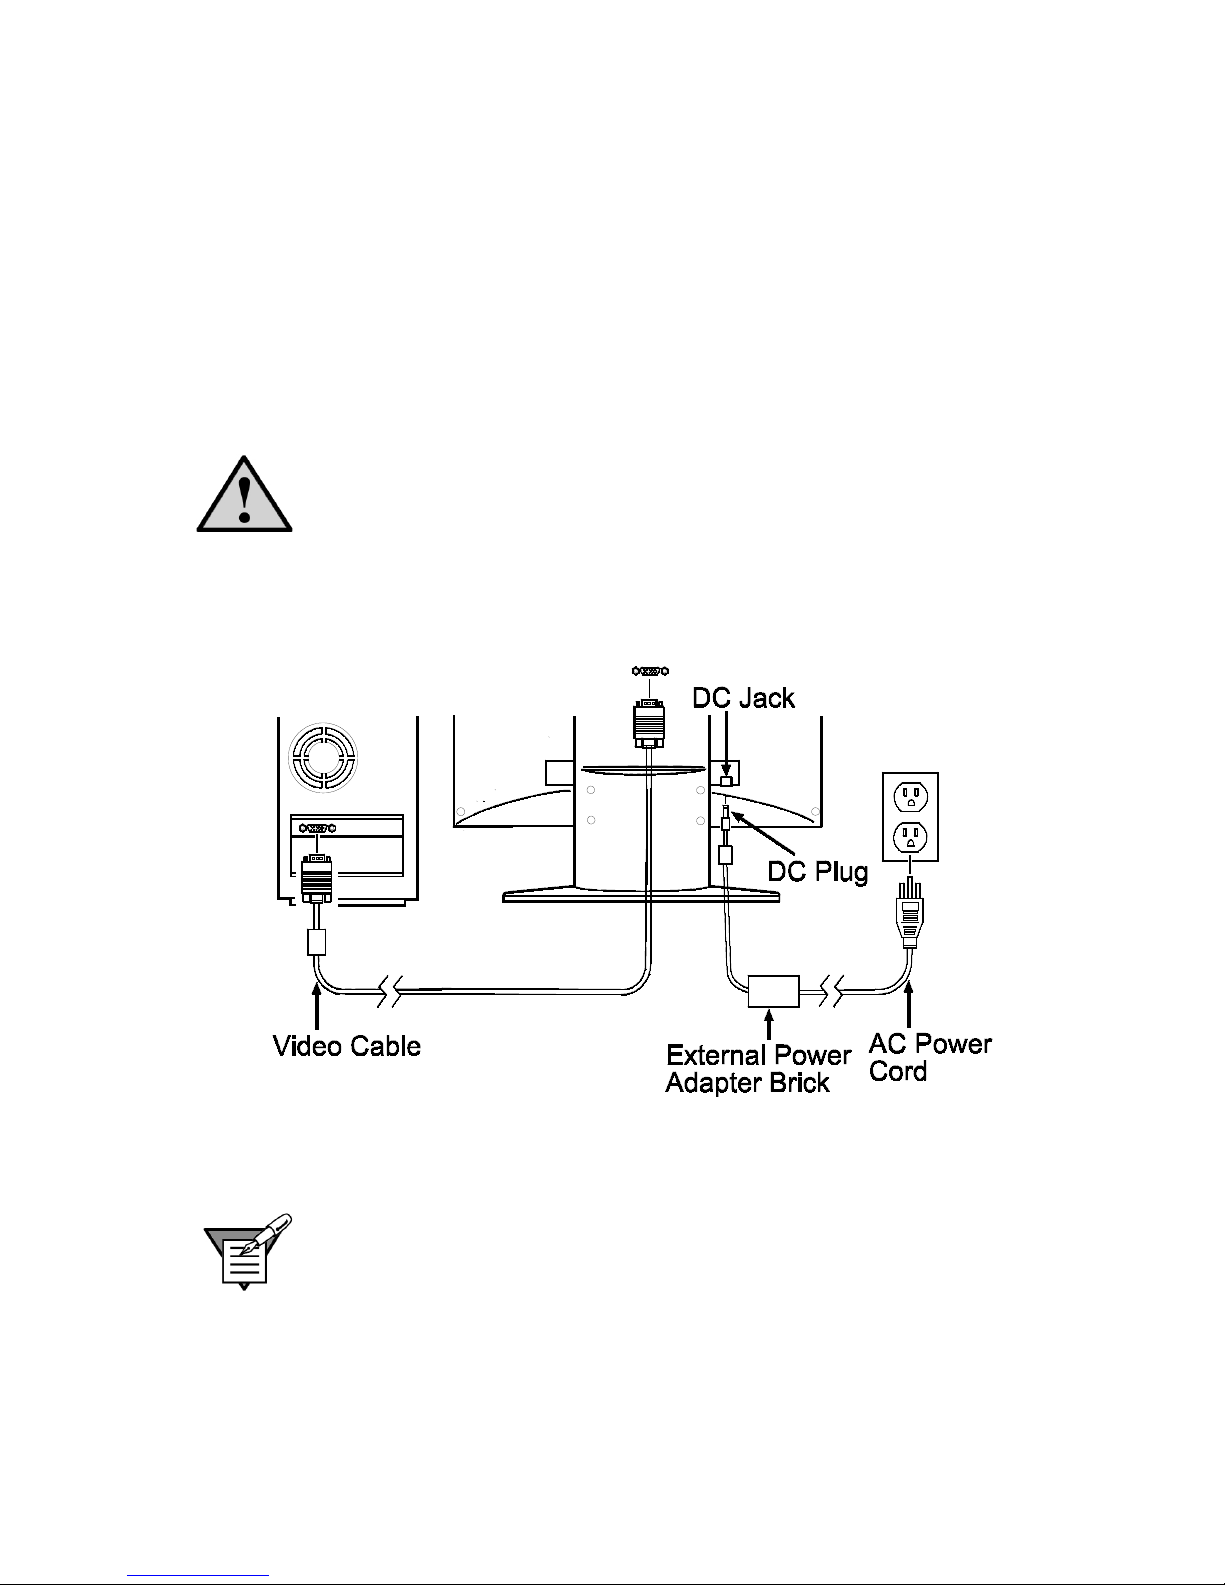
1 Plug the AC power cord into the supplied external power adapter
brick. Plug the small end of the power adapter cord (DC Plug) into
your monitor’s power input socket (DC Jack). See Figure 2.
Figure 2: Connecting Cables
2 Plug the other end of the power cord into a three-pin AC power outlet
or a UL-approved power strip.
Note: A certified power supply cord must be used with this equipment. The
relevant national installation and/or equipment regulations need to be
considered. A certified power supply cord not lighter than ordinary polyvinyl
chloride flexible cord according to IEC 60227 (designation H05VV-F 3G
0.75mm or H05VVH2-F2 3G 0.75mm) should be used. As an alternative, a
flexible cord of synthetic rubber, according to IEC 60245 (designation
H05RR-F 3G 0.75mm), can be used.
8
Video Cables
The monitor comes with separate video cables for analog and digital
connections. The cable you choose to use will depend on the input type
you select. The analog cable has a blue 15 pin connector at each end.
The digital cable has a white 24+ pin connector at each end.
Caution: Do not bend the signal cable excessively, or you might break
the wires inside the cable.
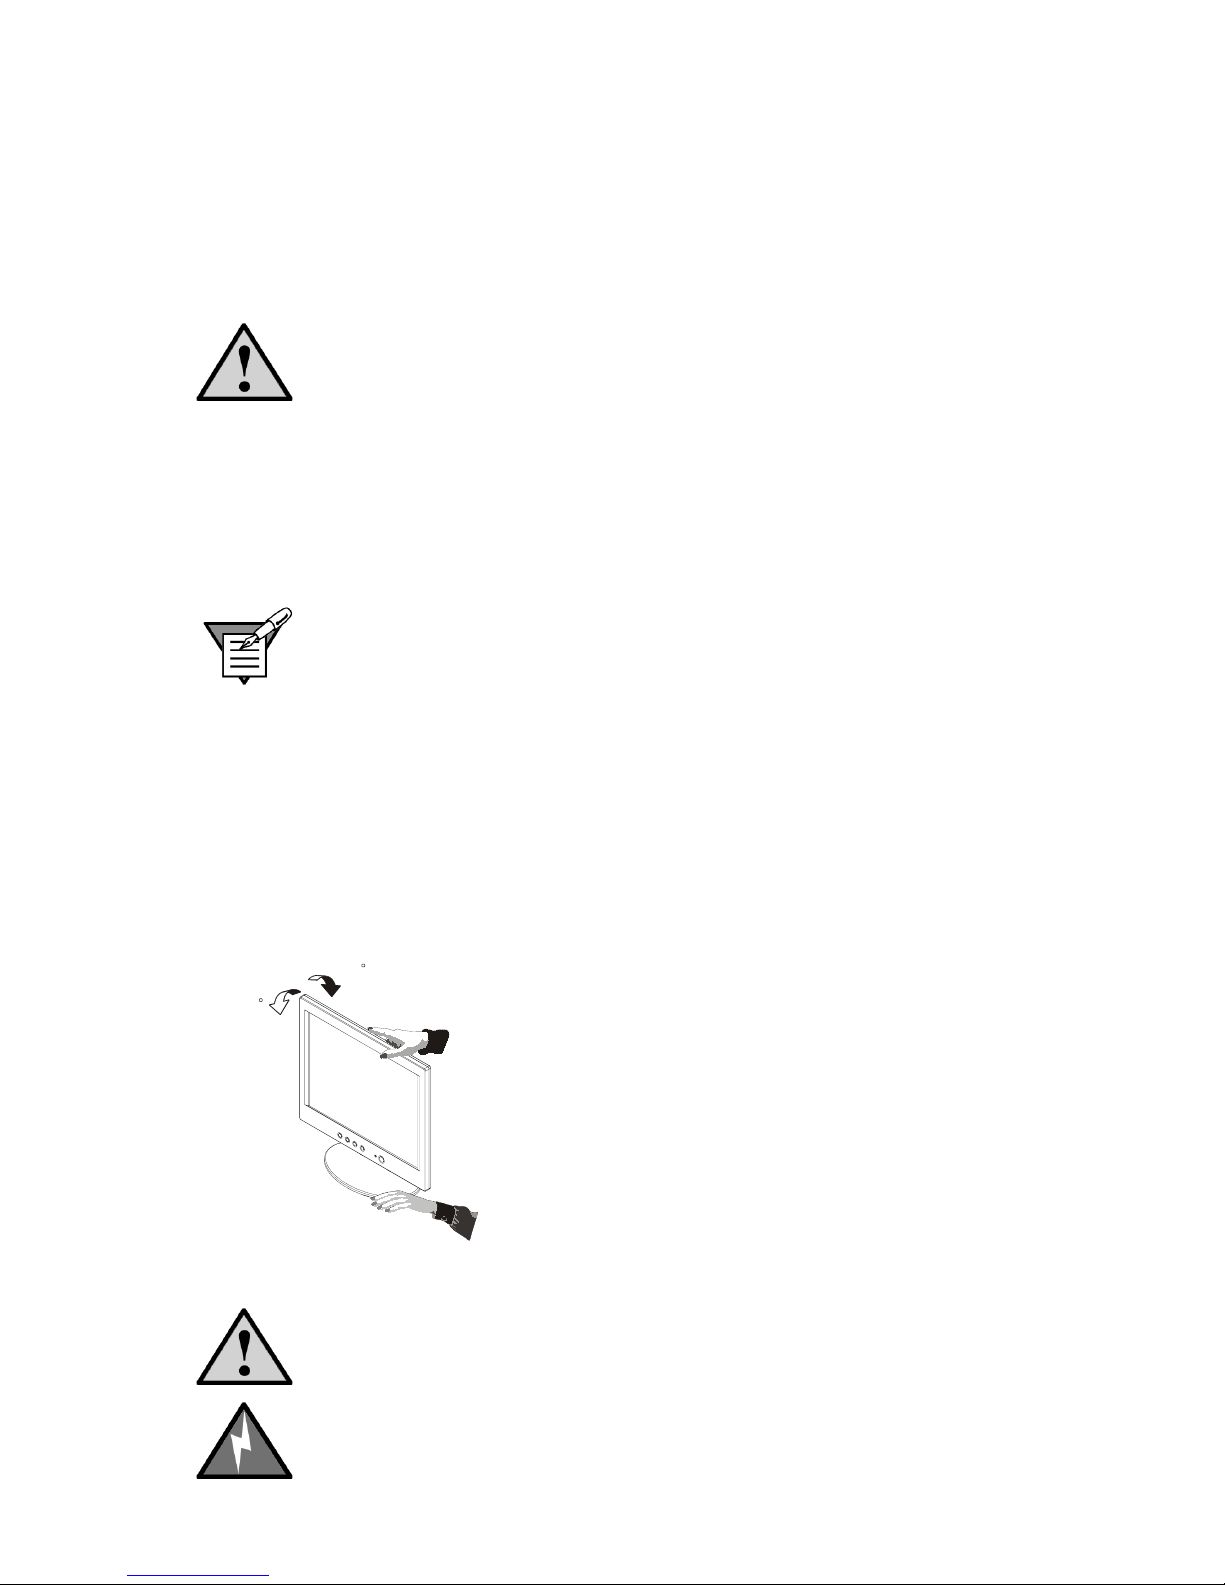
1 Plug the video cable connector (see Figure 2 on page 7) into the
computer's video port, taking care not to bend any pins on the
connector.
2 Tighten the two screws on the video connector with your fingers to
secure the connection.
Note: Over-tightening this connection can damage the monitor cable or
your computer’s video card.
ADJUSTING THE VIEWING ANGLE
• For optimal viewing, look at the full face of the monitor, and then
adjust the monitor’s angle to your own preference.
• Hold the base so the monitor does not fall when you change the
monitor’s angle.
•
You are able to adjust the monitor’s angle from -5° to 25°.
-5
25
Figure 3: Adjusting the Monitor’s Angle
Caution: Do not touch the LCD screen when you change the angle, or
the screen may become damaged or broken.
Warning: Be careful not to pinch your fingers when adjusting the
monitor’s angle.
 Loading...