

Page 1

Mobile Phone
Model Name: M5
Brand Name: MOX
FCC ID: 2ABBS-M5
Page 2

Table
of
Table
Table
1.
1.
1.
1. Foreword
2.
2.
2.
2. Quick
3.
3.
3.
3. Call
4.
4.
4.
4. Messages
5.
5.
5.
5. Phonebook
6.
6.
6.
6. Call
Table of
Foreword
Foreword
Foreword
Quick
start
Quick
start
Quick start
start
Icon Explain .............................................. 9
Knowing the Keys
Install SIM card ...................................... 10
Install T-flash card .................................
Installing Battery ....................................
Battery Charging ....................................
Switching on/off ..................................... 12
Call
function
Call
function
Call function
function .......................................
Dialing telephone ................................... 14
Receiving telephone ............................. 15
call in the menu ..................................... 15
Messages
Messages
Messages ............................................
Write message ....................................... 17
Inbox ....................................................... 17
Drafts ...................................................... 18
Outbox .................................................... 18
Sent messages ...................................... 19
Service messages ................................. 19
SMS settings .......................................... 19
Phonebook
Phonebook
Phonebook .........................................
Quick search .......................................... 21
Browse contacts .................................... 21
Add new contact .................................... 22
Call
center
Call
center
Call center
center ..........................................
Call history ............................................. 23
Contents
of
Contents
of Contents
Contents
...............................................
...............................................
...............................................
...............................................
............................................
............................................
............................................
............................................
...............................
.......................................
.......................................
....................................... 14
............................................
............................................
............................................ 17
.........................................
.........................................
......................................... 21
..........................................
..........................................
.......................................... 23
1
5
5
5
5
9
9
9
9
9
11
11
11
14
14
14
17
17
17
21
21
21
23
23
23
Page 3

Call settings ........................................... 23
7.
Settings
7.
Settings
7.
7. Settings
Settings ...............................................
8.
Multimedia
8.
Multimedia
8.
8. Multimedia
Multimedia ..........................................
9.
9.
9.
9. Extra
10.
10.
10.
10. File
11.
11.
11.
11. Services
12.
12.
12.
12. Fun&Games
13.
13.
13.
13. Input
...............................................
...............................................
............................................... 27
Dual SIM settings .................................. 27
Phone settings ....................................... 27
Network settings .................................... 29
Security Settings ................................... 29
Connectivity ........................................... 32
Restore factory settings ........................ 34
Image viewer .......................................... 35
Video recorder ....................................... 36
Video player ........................................... 37
Audio player ........................................... 37
Sound recorder ...................................... 38
FM radio ................................................. 39
Extra
Extra
Extra ..................................................
Torch ....................................................... 40
Calculator ............................................... 40
Calendar ................................................. 40
Alarm ....................................................... 41
File
File
File manager
Services
Services
Services
Homepage .............................................. 43
Bookmarks ............................................. 43
Input URL ............................................... 43
Recent pages ......................................... 43
Settings ................................................... 44
Fun&Games
Fun&Games
Fun&Games
Input
Input
Input methods
..........................................
..........................................
.......................................... 35
..................................................
..................................................
.................................................. 40
manager
manager
manager ...................................
...................................
...................................
................................... 42
...........................................
...........................................
...........................................
...........................................
....................................
....................................
....................................
....................................
methods
methods
methods ................................
................................
................................
................................ 46
2
27
27
27
35
35
35
40
40
40
42
42
42
43
43
43
43
45
45
45
45
46
46
46
Page 4

14.
Phone
14.
14.
14. Phone
15.
15.
15.
15. Accessories
16.
16.
16.
16. Environment
17.
17.
17.
17. TechnicalSpecifications
maintenance
Phone
maintenance
Phone maintenance
maintenance .......................
Accessories
Accessories
Accessories
Environment
Environment
Environment ...................................
TechnicalSpecifications
TechnicalSpecifications
TechnicalSpecifications ...............
.......................
.......................
....................... 47
....................................
....................................
....................................
....................................
...................................
...................................
................................... 50
3
...............
...............
............... 51
47
47
47
49
49
49
49
50
50
50
51
51
51
Page 5
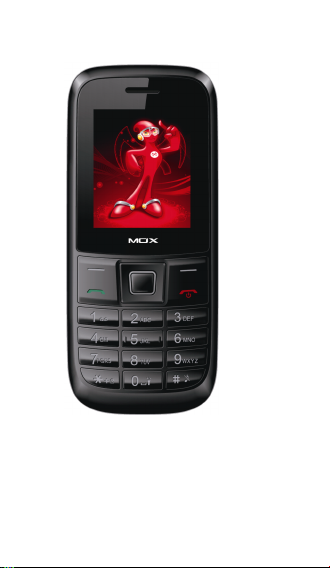
Mobile appearance picture
4
Page 6

1.
Foreword
1.
Foreword
1.
1. Foreword
Foreword
Honorific mobile phones user, thank you for
choosing our mobile phone!
Our cellular phones is according with the
communication industry standards of PRC, and
also according with the standards of European,
and are approved for GSM networks.
Your phone may be used internationally with
various networks depending on your roaming
arrangements with your service provider.
To
use this phone you must subscribe to a GSM
service from a provider. We have included many
features in this device but their function depends
on the features available with your subscribed
wireless network. Please contact your service
provider for more information.
We strongly recommend you carefully read and
understand this manual before using your phone
in order to keep it under best conditions for your
effective usage and utmost satisfaction.
Safety
Safety
Safety
Safety
Never attempt to disassemble your phone.
alone are responsible for how you use your phone
and any consequences of its use.
As a general rule, always switch off your phone
wherever the use of a phone is prohibited.
Use of your phone is subject to safety measures
designed to protect users and their environment.
Do not use your phone in damp areas (bathroom,
swimming pool … ). Protect it from liquids and other
moisture.
Do not expose your phone to extreme
temperatures lower than - 10 ° C and higher than +
5
You
Page 7

5 0°C.
The physicochemical processes created by
chargers impose temperature limits when
charging the battery. Your phone automatically
protects the batteries in extreme temperatures.
Do not leave your phone within the reach of small
children (certain removable parts may be
accidentally ingested).
Electrical safety
Only use the chargers listed in the manufacturer’s
catalogue. Using any other charger may be
dangerous; it would also invalidate your warranty.
Line voltage must be exactly the one indicated on
the charger ’ s serial plate.
Aircraft safety
When traveling by plane, you will need to switch
your phone off when so instructed by the cabin
crew or the warning signs. Using a mobile phone
may be dangerous to the operation of the aircraft
and may disrupt the phone network.
Its use is illegal and you could be prosecuted or
banned from using cellular networks in the future if
you do not abide by these regulations.
Explosive materials
Please comply with warning signs at petrol station
when personnel asking you to switch your phone
off.
You
will need to comply with radio equipment
usage restrictions in places such as chemical
plants, fuel depots and at any location where
blasting operations are under way.
Electronic equipment
To
avoid the risk of demagnetization, do not let
electronic devices close to your phone for a long
time.
6
Page 8

Electronic medical equipment
Your phone is a radio transmitter which may
interfere with electronic medical equipment or
implants, such as hearing aids, pacemakers,
insulin pumps, etc. It is recommended that a
minimum separation of 15cm be maintained
between the phone and an implant. Your doctor or
the manufacturers of such equipment will be able
to give you any advice you may need in this area.
Hospitals
Always make sure that your phone is switched off
in hospitals when so instructed by warning signs
or by medical staff.
Road safety
Do not use your phone when driving. In order to
give your full attention to driving, stop and park
safely before making a call.
any current legislation.
Distance of operation
This phone model has been tested and meets
radiofrequency exposure guidelines when used
As follows:
· Against the ear: place or receive a phone call and
hold the phone as you would a wire line telephone.
· Body worn: when transmitting, place the phone in
a carry accessory that contains no metal and
positions the phone a minimum of 0.5cmformyour
body. Use of other accessories may not ensure
compliance with radiofrequency exposure
guidelines. If you do not use a body worn
accessory and are not holding the phone at the
ear, position the phone a minimum of 0.5cmfrom
your body,
· Data operation: when using a data feature,
You
must comply with
7
Page 9

position the phone a minimum of 0.5cmfromyour
body for the whole duration of the data
transmission.
8
Page 10
2.
Quick
2.
Quick
2.
2. Quick
Quick start
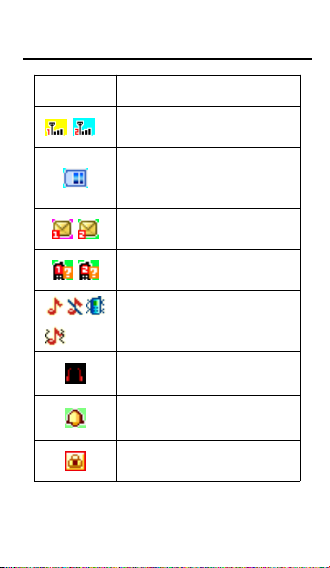
Icon
Explain
Icon
Explain
Icon
Explain
Icon
Explain
Icon
Icon
Icon
Icon
Knowing
Knowing
Knowing
Knowing
1.
Left
soft
1.
Left
soft
1.
Left
soft
1.
Left
soft
functions shown in the lower left/right hand corner.
start
start
start
Function
description
Function
description
Function
Function description
description
Network
signal
Network
signal
Network
Network signal
signal strength:
of the more stronger the signal;
Battery
capacity
Battery
capacity
Battery
Battery capacity
capacity
number of the more power the more
full;
SMS
SMS
SMS
SMS
SIM1/SIM2 have unread SMS
Missed call
SIM1/SIM2 have missed calls
Used
profiles
Used
profiles
Used
Used profiles
profiles
Different icons show different icon:
General, Silent, Me e ting, Outdoor ,
Headset
Headset
Headset
Headset
Plug in h eadset
Alarm
Alarm
Alarm
Alarm
Alarm function opened
Key
lock
Key
lock
Key
Key lock
lock
Show key and screen lock
the
Keys
the
Keys
the
Keys
the
Keys
key/Right
key/Right
key/Right
key/Right
soft
soft
soft
soft
strength:
strength:
strength: number
key:
key:
key:
key:
Implement the
9
Page 11

2.Green
key:
2.Green
key:
2.Green
key:
2.Green
key:
SIM Card. Press if there is an in coming call to
answer. Press from standby to go to call records
list.
3.
Red
3.
Red
3.
Red
3.
Red
Press to end, reject call; or to exit a menu.
4.
OK
4.
OK
4.
OK
4.
OK
access.
5.Navigation
5.Navigation
5.Navigation
5.Navigation
direction in menu to scroll, browse or in edit page
to move cursor. In idle mode, press the
up/down/left/right direction keys to select th e
shortcut function showed on the bottom of the
screen, and then press the OK key to confirm.
6.0-9
6.0-9
6.0-9
6.0-9
keys to in put numbers when dialing or numbers
and characters when editing.
In the idle screen, long press 0 key to open or
close the torch.
7.
7.
7.
7.
* (Star)
character; in the idle screen, Long press * key to
lock or unlock key pad.
8.
#
Key:
8.
#
Key:
8.
#
Key:
8.
#
Key:
in the idle screen, long press from standby to
activate or deactivate silent mode.
Install
Install
Install
Install
This phone supports two GSM SIM cards. Find
SIM card ’ s groove in t he back of the phone and
slide it completely there. During installation,
please make sure the ch ip is facing downwards
and pay attention to slot direction.
Note
Note
Note
Note
touch.
touch.
touch.
touch.
Press after dialing to connect by
key:
key:
key:
key:
Long press to switch phone on/off;
key:
key:
key:
key:
Confirm or accept selection in menu
Keys:
Keys:
Keys:
Keys:
Press the up/down /left/right
alphanumeric
alphanumeric
alphanumeric
alphanumeric
(Star)
(Star)
(Star)
Press in standby to input “ # ” character;
SIM
SIM
SIM
SIM
:
1.Keep
:
1.Keep
:
1.Keep
:
1.Keep
keys:
keys:
keys:
keys:
Press corresponding
Key:
Key:
Key:
Key:
Press in standby to input “ * ”
card
card
card
card
SIM
card
SIM
SIM
SIM
out
card
out
card
out
card
out
of
children
of
children
of
children
of
children
10
’
s
’
s
’
s
’
s
Page 12

2.
Any
abrasion
2.
Any
abrasion
2.
Any
abrasion
2.
Any
abrasion
damage
SIM
damage
SIM
damage
SIM
damage
SIM
careful
when
careful
when
careful
when
careful
when
it.
it.
it.
it.
3.
Please
3.
3.
3.
power
power
power
power
before
before
before
before
Install
Install
Install
Install
1. First switch off the phone and remove the
battery.
2. Push the metal card holder toward the bottom of
the phone and l ift the released end of the holder.
3. Place the memory card into the holder with the
metal contacts face down and push the holder
until it locks into place.
Note
Note
Note
Note
please
please
please
please
frequently.
frequently.
frequently.
frequently.
2.
2.
2.
2.
cards
cards
cards
cards
Cards
Cards
Cards
Cards
uncertain
uncertain
uncertain
uncertain
loss
loss
loss
loss
Installing
Installing
Installing
Installing
Align the battery chip with the metallic salient point
in battery jar, insert the battery until it is inserted
into the battery jar. Slide battery cover into back of
the phone until it is locked.
Battery
Battery
Battery
Battery
Unclose dustproof soft gum of attachment mode
on the bottom of the phone, insert one end of the
charger, i.e., the charging plug into attachment
mode and the other end into electrical outlet,
Screen will display the charging sign. After
make
Please
make
Please
make
Please
make
supply
supply
supply
supply
you
you
you
you
T-flash
T-flash
T-flash
T-flash
:
1.
T
o
:
1.
T
o
:
1.
T
o
:
1.
T
o
do
do
do
do
Please
regularly
Please
regularly
Please
regularly
Please
regularly
on
on
on
on
like
like
like
like
factors
factors
factors
factors
to
the
to
the
to
the
to
the
Battery
Battery
Battery
Battery
Charging
Charging
Charging
Charging
or
folding
could
or
folding
or
folding
or
card,
card,
card,
card,
you
you
you
you
remove
remove
remove
remove
card
card
card
card
avoid
avoid
avoid
avoid
not
not
not
not
other
other
other
other
T-flash!
T-flash!
T-flash!
T-flash!
content
content
content
content
folding
so
please
so
please
so
please
so
please
insert,
R
emove
insert,
R
emove
insert,
R
emove
insert,
R
emove
sure
that
you
sure
sure
sure
and
and
and
and
SIM
SIM
SIM
SIM
damag
damag
damag
damag
plug
plug
plug
plug
backup
backup
backup
backup
equipment
equipment
equipment
equipment
may
may
may
may
in
in
in
in
have
that
you
have
that
you
have
that
you
have
have
taken
have
taken
have
taken
have
taken
card.
card.
card.
card.
ing
memory
ing
memory
ing
memory
ing
memory
memory
memory
memory
memory
information
information
information
information
when
when
when
when
Improper
Improper
Improper
Improper
cause
the
cause
the
cause
the
cause
the
the
cards.
the
cards.
the
cards.
the
cards.
Easily
could
Easily
could
Easily
could
Easily
be
extremely
be
extremely
be
extremely
be
extremely
and
preserve
and
preserve
and
preserve
and
preserve
cut
off
cut
off
cut
off
cut
off
out
battery
out
battery
out
battery
out
battery
card
card
card
card
card
fast
card
card
card
use
use
use
use
or
fast
or
fast
or
fast
or
in
the
in
the
in
the
in
the
you
use
you
use
you
use
you
use
or
othe
or
othe
or
othe
or
othe
damage
or
damage
or
damage
or
damage
or
11
the
the
the
the
,
,
,
,
r
r
r
r
Page 13

charging is finished, just pull out the plug.
Note:
1.
Please
use
the
standard
battery
Note:
1.
Please
use
the
is
is
is
is
avoid
avoid
avoid
avoid
optimal
optimal
optimal
optimal
and
and
and
and
Red
Red
Red
Red
use
use
explode.
explode.
explode.
explode.
completely
completely
completely
completely
the
the
the
the
charger,
charger,
charger,
charger,
of
of
of
of
the
the
phone
phone
phone
phone
two
two
two
two
discharge
discharge
discharge
discharge
straight.
straight.
straight.
straight.
key
key
key
key
standard
standard
standard
discharged,
discharged,
discharged,
discharged,
be
in
charge
be
in
charge
be
in
charge
be
in
charge
Generally
Generally
Generally
Generally
time
time
time
time
using
using
using
using
charge,
charge,
charge,
charge,
based
based
based
based
(if
boot,
(if
boot,
(if
boot,
(if
boot,
for
2
to
for
2
to
for
2
to
for
2
to
charging
charging
charging
charging
USB
USB
USB
USB
battery
battery
battery
battery
to
three
to
three
to
three
to
three
cycles.
cycles.
cycles.
cycles.
please
please
please
please
to switch your phone on
Note:
1.
Please
Note:
1.
Please
charger,
or
charger,
charger,
charger,
2.
2.
2.
2.
battery
battery
battery
battery
minutes
minutes
minutes
minutes
current
current
current
current
of
of
of
of
3.
3.
3.
3.
as
as
as
as
4.
4.
4.
4.
the
the
the
the
battery
battery
battery
battery
new
new
new
new
more
more
more
more
Switching
Switching
Switching
Switching
Long p ress the
or off.
1. If there is n o SIM card, SIM card is defective, or
SIM card contact is loose, you will be prompt with
a warning after powering on, shut down and check
your SIM and its installation.
2. If inserted one GSM SIM card only into the
phone, meanwhile phone code and PIN code is
turn on. When switched on, after entering the PIN
code and phone code, the phone enter the
standby mode by the current SIM.
3. If inserted two GSM SIM cards, meanwhile
phone code, PIN1 code and PIN2 code are all
turned on. When switched on, you will be
prompted to enter the code one by one. After
switched on, the phone will automatically search
the network.
4. If the phone detected authorized network, the
may
or
may
or
may
or
may
If
the
battery
If
the
battery
If
the
battery
If
the
battery
icon
should
icon
should
icon
should
icon
should
to
appear.
to
appear.
to
appear.
to
appear.
state
of
state
of
state
of
state
different
different
different
different
Please
Please
Please
Please
possible
possible
possible
possible
To
To
To
To
of
charging
charging
charging
charging
use
the
use
the
use
the
use
the
to
to
to
to
ensure
ensure
ensure
ensure
completion
completion
completion
completion
charge
charge
charge
charge
battery
initial
battery
initial
battery
initial
battery
initial
than
10
hours
than
10
hours
than
10
hours
than
10
hours
on/off
on/off
on/off
on/off
the
the
the
and
battery
and
battery
and
battery
and
after
2
to
after
2
to
after
2
to
after
2
to
on
on
on
on
call,
etc.)
call,
etc.)
call,
etc.)
call,
etc.)
5
hours.
5
hours.
5
hours.
5
hours.
as
much
as
much
as
much
as
much
cable.
cable.
cable.
cable.
performance,
performance,
performance,
performance,
times
times
times
times
Several
Several
Several
Several
charge
charge
charge
charge
12
the
the
the
the
3
3
3
3
the
the
the
the
the
the
the
the
Page 14

screen will display network name and signal
strength ; If there is no authorized network is
found , the phone can only make emergency calls
or use non-communications features.
13
Page 15

3.
Call
3.
3.
3. Call
Dialing
Dialing
Dialing
Dialing
1. Direct dial
In standby mode, press the corresponding
numeric keys to enter the phone number that you
want to dial, including necessary area codes.
Short Press the Right soft key [Clear] to delete
one character, and Long Press delete all inputs, if
inserted only one SIM card, press the Green key
can directly to dial, if inserted two SIM card, press
the Green key into the SIM select screen.
2 . Making an International Call:
To
until the prefix symbol " + " of international call
displays in screen.
3 . Dialing from Phonebook
Enter the Phonebook via the menu, use the
Up/Down Navigator keys to scroll to the desired
contact, or press the first letter of the name of the
desired contact as saved in your phonebook for
quick access to names beginning with the letter
then scroll to the desired, press the green key to
dial.
4 . Dialing from Call history
Enter the Call center (press the Green key from
standby or via the menu), use the Up/ Down
navigator keys to scroll to the desired contact,
press the green key can direct dial.
5 . Dial emergency service
You
number without SIM card. Different networks use
different urgency service numbers, so for details
function
Call
function
Call function
function
telephone
telephone
telephone
telephone
make an international call, long press * key
can directly dial the emergency service
14
Page 16

please inquire the network operation company .
Receiving
Receiving
Receiving
Receiving
When there is an incoming call, the phone will give
corresponding alert, if your network supports caller
ID, the screen will display caller’s name or number
(depending on whether th ere is information of the
caller in your phonebook).
1. Press the green key or press the Left soft key
and confirm [ Answer ] to answer the incoming call.
2. If function of [ call center /call set ting / Advanced
setting / Answer mode] is selected as [Any - key],
p ress the any key to answer the incoming call
except the Right soft key or the Red key.
3. If you do not want to answer an incoming call,
press the Red key or the Right soft key [Reject] to
reject it.
call.
4. During a call, you can press the Up/Down
navigator key to adjust receiver volume.
call
call
call
call
During a call, press the right soft key can also
open / close the hands - free function , press the left
soft-key into the options:
-
-
-
-
switch between calls
-Conference*:
-Conference*:
-Conference*:
-Conference*:
you can follow the prompts to answer the waiting
call , to add multi- session conference call will be
maintained ; and the party conference in private
conversation , the call to keep all other parties ; the
parties to keep the party ; the end of the current
Calls and all calls remain .
- End
telephone
telephone
telephone
telephone
You
can also press the Red key to end a
in
the
menu
in
the
menu
in
the
menu
in
the
menu
Swap*:
Swap*:
Swap*:
Swap*:
Is maintained in the current call and
Into the multi-party conference call,
End
single
call*
End
single
End
single
single
:
call*
:
call*
:
call*
:
end off the current call.
15
Page 17

-End
all
calls*
-End
all
calls*
-End
all
calls*
-End
all
calls*
call
-Transfer*:
-Transfer*:
-Transfer*:
-Transfer*:
New
New
New
- New
-Phonebook
-Phonebook
-Phonebook
-Phonebook
interfaces.
-
Message
-
Message
-
Message
-
Message
-Sound
-Sound
-Sound
-Sound
Note:
Note:
Note:
Note:
Recording
Recording
Recording
Recording
illegal.
illegal.
illegal.
illegal.
should
should
should
should
party's
party's
party's
party's
-
Mute:
-
Mute:
-
Mute:
-
Mute:
do not send local voice.
Vloume
Vloume
Vloume
- Vloume
the up/down navigation to adjust volume.
Note:
Note:
Note:
Note:
Denotes
Denotes
Denotes
Denotes
circumstances.
circumstances.
circumstances.
circumstances.
Such
Such
Such
Such
phone
phone
phone
phone
suspended.
suspended.
suspended.
suspended.
conferencing,
conferencing,
conferencing,
conferencing,
service
service
service
service
:end off the current call and the hold
the function need network support.
call:
call:
call:
call:
enter the dial-up interfaces.
:
:
:
:
enter the phonebook list of
s
:
s
:
s
:
s
:
access to the message menu.
recorder
:
recorder
:
recorder
:
recorder
:
record the current call.
of
the
call,
in
of
the
of
the
of
the
Therefore,
Therefore,
Therefore,
Therefore,
seek
prior
seek
prior
seek
prior
seek
prior
consent.
consent.
consent.
consent.
mute on or off, open the case in the quiet
:
:
:
:
into the volume screen, you can press
menu
items
menu
items
menu
items
menu
items
as:
[
Swap
]
as:
as:
as:
and
and
and
and
provider
provider
exist
[
Swap
]
exist
[
Swap
]
exist
[
Swap
]
exist
call
the
call
the
call
the
call
the
At
At
At
At
you
you
you
you
to
provider
to
provider
to
to
some
call,
in
some
call,
in
some
call,
in
some
when
you
when
you
when
you
when
you
approval
approval
approval
approval
only
appear
only
appear
only
appear
only
appear
only
only
only
only
phone
only
phone
only
phone
only
phone
only
the
same
the
same
the
same
the
same
need
to
need
to
need
to
need
to
subscribe.
subscribe.
subscribe.
subscribe.
16
countries
countries
countries
countries
talk
to
talk
to
talk
to
talk
to
from
from
from
from
in
the
state
in
the
state
in
the
state
in
the
state
appears
appears
appears
appears
time
time
time
time
the
appropriate
the
appropriate
the
appropriate
the
appropriate
is
is
is
is
Recording,
Recording,
Recording,
Recording,
the
other
the
other
the
other
the
other
in
specific
in
specific
in
specific
in
specific
of
the
of
the
of
the
of
the
to
be
to
be
to
be
to
be
for
the
for
the
for
the
for
the
Page 18

4.
Messages
4.
Messages
4.
4. Messages
Messages
Message service is a network dependent function,
which allows you to send, receive and edit all
kinds of messages. Please contact the network
operator for more details.
Write
message
Write
message
Write
message
Write
message
Edit a new message, save or send it to the
recipient.
Note:
Note:
Note:
Note:
T
o
send
SMS,
you
need
to
set
the
correct
T
o
send
SMS,
you
need
to
set
T
o
send
SMS,
you
T
o
send
SMS,
service
center
service
center
service
center
service
center
from
network
from
network
from
network
from
network
While editing, press the # key to change input
method, a text message can be up to 612
characters in length.
Press the OK Key , into add recipient interface, you
can enter number and add from phonebook, you
can add one number or more number, press the
Left Soft key [Options] to select options when
editing:
-Send
to
:
-Send
to
:
-Send
to
:
-Send
to
:
press OK into the address book to find the
necessary records, you can select the type of SIM
card, confirmed, you can send
-
-
-
-
-
-
-
-
outbox
-Advanced:
-Advanced:
-Advanced:
-Advanced:
name, insert bookmark.
Inbox
Inbox
Inbox
Inbox
Received SMS messages can be stored either in
phone or in SIM1/SIM2 memory, and are
accessed here.
Enter the destination number is sent, or
Input
method:
Input
method:
Input
method:
Input
method:
Save
to
Drafts
Save
to
Drafts
Save
to
Drafts
Save
to
Drafts
need
you
need
number
number
number
number
provider.
provider.
provider.
provider.
you can select input method.
:
:
:
:
Save the edited message to the
you can select insert number, insert
the
to
set
the
to
set
the
which
can
which
can
which
can
which
can
SMS
correct
SMS
correct
SMS
correct
SMS
be
obtained
be
obtained
be
obtained
be
obtained
17
Page 19

When you have received a message, the tones or
vibration to alert you and message mark will also
be shown on the screen. Press the Left soft key
[Read] or the OK key to read the new message,
press the Right soft key [Back] to return, and you
can also access the inbox to read the new
message.
If the message memory is full, the indication
“ Memory full ” an d the message icon will be shown
on the screen and flashed. Before you can receive
new messages, delete some of your old
messages in the inbox folder. If the capacity of
new messages is beyond the capacity of the inbox,
the information will be lost and incomplete.
In message list, press the OK key to read the
selected message, press the Left soft key [Options]
to make the following menu:
-View:
-View:
-View:
-View:
view the current message
-Reply:
-Reply:
-Reply:
-Reply:
Reply SMS to the message sender
directly.
-Call
Sender
-Call
-Call
-Call
-Forward:
-Forward:
-Forward:
-Forward:
number.
-Delete:
-Delete:
-Delete:
-Delete:
-Delete
-Delete
-Delete
-Delete
-Save
-Save
-Save
-Save
sender number to the phonebook.
-
Filter
-
Filter
-
Filter
-
Filter
message in the inbox.
Drafts
Drafts
Drafts
Drafts
Not send SMS, will be stored in the mail within, the
operation is the same with inbox
Outbox
Outbox
Outbox
Outbox
Not send SMS or sent successfully SMS, will be
:
Sender
:
Sender
:
Sender
:
Select to call the sender number
forward the current message to other
Delete the messages.
all:
all:
all:
all:
delete all messages in inbox.
to
phonebook:
to
phonebook:
to
phonebook:
to
phonebook:
by:
by:
by:
by:
you can select SIM1/phone to filter the
Save the information in the
18
Page 20

stored in the mail within, the operation is the same
with inbox
Sent
messages
Sent
messages
Sent
messages
Sent
messages
If SMS sent successfully , then be stored in the
letter box. Automatically save messages need to
select [ SMS Settings → Save sent message ],
other operation is the same with inbox
Service
messages
Service
messages
Service
messages
Service
messages
Inbox: received service messages will be stored in
the box.
Service messages
Enable push: you can select accept all push
messages or disable.
Enable service loading: you can select prompt,
Auto launch or disable.
SMS
settings
SMS
settings
SMS
settings
SMS
settings
SIM
setting:
SIM
setting:
SIM
setting:
SIM
setting:
including the center number, Validity period and
Message type .
Delivery report: Open the function, after a
successful send text messages, the system will
return to report .
Reply path: If the network allows, open the
function , the recipient receives a text message,
the system will send a confirmation message .
Voicemail server: When you can not answer the
phone, automatically incoming calls to voice mail
number, you can let the other party to your
message, a message stored in the network's voice
mail system, and afterwards, you can access the
voice mail system to listen to a message.
Into the voice mail sub-menu, you can see the
current voice message (up to the establishment of
two voice mail)
you can setting SIM parameter ,
19
Page 21

Voice mail function needs the support of network
operator, you may need to subscribe to the service.
For details, please contact with the operator .
Memory
status
status
status
status
message:
message:
message:
message:
storage:
storage:
storage:
storage:
:
:
:
:
can view the memory storage
open the function, After the
you can choose to give
Memory
Memory
Memory
status.
Save
sent
Save
sent
Save
sent
Save
sent
success of SMS will be automatically saved in the
Outbox .
Preferred
Preferred
Preferred
Preferred
priority to messages stored in SIM card or mobile
phone.
20
Page 22

5.
Phonebook
5.
Phonebook
5.
5. Phonebook
Phonebook
The Phone for your well-prepared high-capacity
phone storage space.
contacts feature to save the contact name,
number and caller ring-tone . The phone can save
20 0 phonebook records, SIM card number of
records stored phone numbers vary because of
their capacity.
Quick
search
Quick
search
Quick
search
Quick
search
In order to facilitate you to quickly search the
phone book to the desired number, the phone
prompts you to quickly find features .
In the con tact list interface, you press # key to
switch input method, enter the contact name of the
first characters to locate search .
After searching for the name, press the Green key
to dial the number and press the Red key to end
dialing.
Browse
contacts
Browse
contacts
Browse
contacts
Browse
contacts
navigation key to select the contact record, press
the green key to dial the number in the record, then
the red key to end the dialing. Press the OK Key to
display the details of the selected record. In the
phonebook list screen, select either the phonebook
record, press the left key to perform the following
operation :
-View:
-View:
-View:
-View:
view the select
-Send
text
-Send
-Send
-Send
number
-Call
-Call
-Call
-Call
-Edit
-Edit
-Edit
-Edit
message
text
message
text
message
text
message
:
:
:
:
call the select number
:
:
:
:
you can edit the select record 。
You
can use the phone's
:
:
:
:
send SMS to the select
21
Page 23

-
Delete:
-
Delete:
-
Delete:
-
Delete:
D elete th e select record
-
Copy:
-
Copy:
-
Copy:
-
Copy:
this record can copy to “ SIM1 ” “ SIM2 ” or
“ phone ”
-Phonebook
-Phonebook
-Phonebook
-Phonebook
Preferred storage: you can set the preferred
storage as SIM or Phone or all.
Extra numbers : set this number to own number
Memory Status : Query "SIM1", "SIM2", "phone"
memory address book using status
Add
Add
Add
Add
-SIM1
-SIM1
-SIM1
-SIM1
name can only be stored under a number.
-SIM2
-SIM2
-SIM2
-SIM2
name can only be stored under a number.
-
P
hone
-
P
hone
-
P
hone
-
P
hone
caller ring-tone. T his Records stored in your
phone .
settings
:
settings
:
settings
:
settings
:
new
contact
new
contact
new
contact
new
contact
: New records added to the SIM1, each
: New records added to the SIM 2 , each
: you can input name, number and set
22
Page 24

6.
Call
6.
6.
6. Call
This phone can record all received , dialed and
missed calls as well as their call time. Only when
related function is supported by network and
phone is switched on and in network service area,
it can record the answered and missed calls. Call
records may be accessed by pressing the Green
key from standby or accessing through the menu.
Access the Call Center menu using the normal
menu path, the submenus are as follow:
Call
Call
Call
Call
Missed/dialed/Received/all calls
In the call history list , Once on the call records list,
press the Green key to make a call; press the OK
key to view the details of current call record; press
the left soft key to make the following options:
-View
-View
-View
-View
-Call
-Call
-Call
-Call
-Send
-Send
-Send
-Send
number
-
Save
-
Save
-
Save
-
Save
phonebook entry.
-Delete
-Delete
-Delete
-Delete
-Edit
-Edit
-Edit
-Edit
history
Call
Call
Call
Call
-SIM
-SIM
-SIM
-SIM
Call waiting:
Y
ou can choose to Activate, Deactivate or Query
status of this feature.
Activate this feature, if you call any other incoming
call, the phone beeps, and the screen will display
the caller number or name and call waiting
center
Call
center
Call center
center
history
history
history
history
:
:
:
:
View the details of current call record.
:
:
:
:
call current record.
text
message
text
text
text
to
phonebook
to
phonebook
to
phonebook
to
phonebook
:
:
:
:
Delete the current call record.
before
before
before
before
settings
settings
settings
settings
call
settings
call
settings
call
settings
call
settings
:
message
:
message
:
message
:
:
:
:
call
:
call
:
call
:
call
:
Edit number before the call
send SMS to the select
:
Store the number as a
23
Page 25

information.
Call divert:
This feature allows you to play to your phone calls
transferred to your voice mailbox or another phone
number you specify. Th is function needs th e
support of network operator, please contact the
network operator.
Transfer in the following ways, each way can be
set to enable, disable, and query status. When
turned on, the on-screen prompts to transfer the
phone number.
Divert all voice call: Transfer all voice calls to your
settings in the ph one number or voice mail
Divert if unreachable: When your phone is off or
not on the network service area, the transfer of all
voice calls to your phone number or set voice mail
Divert if no answer: No answer transfer all voice
calls to your phone number or set voice mail
Divert if busy: When the call is busy, the transfer of
all voice calls to your phone number or set voice
mail
Divert all data calls: Transfer all the data calls to
the phone number you set, this function is
supported by the network operator, please contact
the network operator.
Cancel all diverts: cancel all call forwarding type.
Ca ll barring:
Set limits each case to answer or dial the phone.
Network operators must first apply for international
calling features, and limit access network
password, to set the limit function.
This function needs the support of network
operator, please contact the network operator.
Call restrictions can be set for activate , deactivate
24
Page 26

and query status
Line switching:
Can switch to Line 1 or Line 2, Line 1 is default, if
you choose line 2, then there may be no phone
call.
-Advanced
-Advanced
-Advanced
-Advanced settings
Auto redial:
You
is turned on, after the dial-up, then if the other
party does not answer the phone over a period of
time will be automatically re-dial, redial the
number up to 10 times, in this period, the user can
not call any other phone , to end the re-dial, simply
press the right soft key to cancel.
C all time reminder: Can set the prompt type
Off: When the phone call, no minutes of tone.
Single: Select 1-3000 seconds after the prompt
enter either of the time, when you call the phone at
the time when prompted.
Periodic: Select 30-60 seconds after the input in
any one time, when you call for every minute the
phone will be reminded of the time.
Auto quick end:
In order to save the cost of calls , you can turn on
auto quick end function , set automatically end time ,
when the time to call , the mobile phone will
automatically hang up
Answer mode:
Any key: Select the feature, all incoming calls, in
addition to the red key and right soft keys, all keys
can answer the call
Auto answer when headset: Enable this feature,
when the phone is in headset mode, there are
settings
settings
settings
can enable or disable this feature, the feature
25
Page 27

about 2 seconds after the incoming call, the phone
will automatically answer the call.
26
Page 28

7.
Settings
7.
Settings
7.
7. Settings
Settings
Dual
SIM
settings
Dual
SIM
settings
Dual
SIM
settings
Dual
SIM
settings
You
can choose dual-mode card, only SIM1 open
or SIM2 open .
Phone
settings
Phone
settings
Phone
settings
Phone
settings
Time
and
Time
Time
Time
Set home city :
in the city as the current time zone of your location
S et time/ date: Under this you can set the phone to
the current date and time. The phone allows you to
set the date range of calendar 2000 to 2030 .
Set format : Under this you can set the time and
date display format
L
L
L
L
Under this you can choose the language provided
by the phone .
Pref.
Pref.
Pref.
Pref.
Y
Display
Display
Display
Display
W allpaper: The standby interface is used to set
the background wallpaper.
You
also be selected from File Manager image file .
Power on display: The animation can be set to
boot , you can choose preset animation for mobile
phones , but also into the File Manager , select the
desired animation.
Power off display: The animation can be set to
shutdown , set with the power on display
Show date and time:
time display on or off .
Dedicated
Dedicated
Dedicated
Dedicated
Y
date
and
date
and
date
and
date
You
can choose a phone provided
anguage
anguage
anguage
anguage
input
method
input
method
input
method
input
ou can set default input method.
ou can change navigation keys function
method
can choose from the built-in wallpaper can
You
can set the idle screen
key
key
key
key
27
Page 29

corresponding to the shortcut in the idle screen
Flight
mode
Flight
mode
Flight
mode
Flight
mode
This optiona l mode in which the phone is normal
mode or flight mode, flight mode if you choose , the
phone can only use some of the functions of
non- communications
Misc.
settings
Misc.
settings
Misc.
settings
Misc.
settings
Under this function can be left / right navigation
key on the backlight to adjust the brightness and
backlight time
User
profiles
User
profiles
User
profiles
User
profiles
The phone provides you with five profiles : general,
silent, meeting, outdoor. I t’s help you according to
the different events and environments in different
custom ring tones. according to different
scenarios, choose a different profile, then you only
need to personalize your profile and activate.
Note:
The
factory
setting
various
modes
Note:
The
factory
setting
Note:
The
The
been
been
been
been
factory
factory
done
done
done
done
of
the
of
the
of
the
of
the
Start the selected profile.
You
and
and
and
and
default
default
default
default
Note:
has
has
has
has
pattern
pattern
pattern
pattern
Activate:
Activate:
Activate:
Activate:
Customize:
Customize:
Customize:
Customize:
own needs. In the Settings screen, press the
down navigation key to move the highlight to the
item needs to be set .
Alert type: Press the left/right navigation key to
select: vibrate only, vibrate and ring, vibrate then
ring or ring only .
Ring type: Press the left/right navigation key to
select: Repeat, Ascending, Beep once
Incoming call: There are ten built-in ring tones to
choose for you, and you may also to choose your
favorite audio file as your ring - tone from file
management.
various
setting
various
setting
various
has
been
has
has
has
can set all kinds of effects to your
the
been
the
been
the
been
the
start
start
start
start
set
modes
set
modes
set
modes
set
general
general
general
general
28
Page 30

Ring-tone volume: Press the left/right navigation
key to adjust the ring-tone volume.
Message ring-tone: There are five built-in ring
tones to choose for you, and you may also to
choose your favorite audio file as your ring - tone
from file management.
Message volume: Press the left/right navigation
key to adjust the ring-tone volume.
Keypad: Press the left/right navigation key to
select click, or tone.
Key-tone volume: Press the left/right navigation
key to adjust the key-tone volume.
Power on/off: Phone preset five tone to choose for
you, you can also choose silent to turn off the
power on/off tone.
System alert:
alert tone.
Reset:
Reset:
Reset:
Reset:
Network
Network
Network
Network
Can be set automatically or manually select the
network, select Automatic, the phone will be SIM
card based on the network where the first
selection, select Manual , you need to select the
SIM card registered with the network operator can
use the same network
Security
Security
Security
Security
SIM
SIM
SIM
SIM
You
boot password and set security features to protect
information security.
PIN password (PIN1) is the SIM card PIN. If the
user don ’ t changes the password ,the original
password is 1234 or 0000. If you enable the boot
PIN code, then after each start 4-digit PIN code is
Y
ou can set whether to open system
restore the default settings.
settings
settings
settings
settings
Settings
Settings
Settings
Settings
security
security
security
security
can use the PIN code, PIN2 code, set the
29
Page 31

necessary to input, PIN code can be amended, to
protect their SIM card is not used by others. Note
that, if the input PIN code wrong three times, the
phone card will automatically lock and unlock
prompted to enter PUK code, this time close to the
edge of danger, so if unauthorized modification of
the PIN code, we must bear in mind.
PUK password (PUK1) from consists of 8 digits,
which users can not change. PIN code when the
phone is locked, and when prompted enter the
PUK password , do not act rashly, because the
PUK code input opportunities is only 10 times and
if enter the wrong words for 10 times, SIM card will
be permanently locked, that is scrapped. Part of
the SIM card PUK code is never used when the
user comes with the card, while the other part of
the network operators will need to obtain the PIN
code if you do not know the PUK code locked, do
not random input, then the correct way is to call
the SIM card hotline operators, after a simple user
data are verified, you can obtain the PUK
password to unlock the phone lock, the service is
free of charge.
Note
:
Please
use
this
feature
with
Note
:
Please
use
this
Note
:
Please
Note
:
Please
forget
PUK
forget
forget
forget
network
network
network
network
10
times
10
times
10
times
10
times
scrapped.
scrapped.
scrapped.
scrapped.
PIN lock
Under this you can enable or disable PIN
password , PIN code on or off are required to enter
the correct PIN password . When open this feature,
every time you turn the phone prompts you to
enter the PIN password .
password,
PUK
password,
PUK
password,
PUK
password,
operator.
operator.
operator.
operator.
consecutive
consecutive
consecutive
consecutive
feature
use
this
feature
use
this
feature
please
please
please
please
If
input
PUK
If
input
PUK
If
input
PUK
If
input
PUK
ly
,
ly
,
ly
,
ly
,
caution,
with
caution,
with
caution,
with
caution,
contact
contact
contact
contact
code
in
error
code
in
error
code
in
error
code
in
SIM
SIM
SIM
SIM
error
card
will
card
will
card
will
card
will
30
if
if
if
if
the
the
the
the
for
for
for
for
be
be
be
be
Page 32

Change PIN
If the current PIN password is already open, you
can make changes to the PIN password . First
enter the old PIN password , after repeated twice
to determine and identify new password.
Change PIN2
PIN2 ( PersonalIdentificationNumber2 ) password is
to enter a particular function (such as setting a
fixed number, set the call billing, etc.) to enter the
personal identification number.
Pin2 password is provided by suppliers for SIM
card to another password, used to qualify the dial
personal identification password , Mainly used to
eliminate the call cost information, set the phone
calls and the billing currency unit, the cost limit
function, limited dial-up ("Security settings "---"
limited dial-up" can only be opened after the
phone call which can be used to set the number
and do not call this). My phone's S IM card
predictive value is 12345. Pin2 after input error
password 3 will be locked, needed Puk2 to unlock.
PIN2 password is used to set the phone billing. If
you enter three times wrong, the phone will need
PUK2 unlock password , the process described in
the previous PIN password , PUK password the
same. However, both the password and network
SIM card billing and modify the internal data, it will
not open, and even if PIN2 password locked, it will
not affect the normal use of mobile phones. Thus,
PIN2 password , and not to deliberately ignore
PUK2 password .
Note:
Note:
Note:
Note:
Please
use
this
feature
with
Please
use
this
Please
use
Please
use
feature
this
feature
this
feature
caution,
with
caution,
with
caution,
with
caution,
31
If
If
If
If
Page 33

input
PUK
code
in
error
for
10
input
PUK
code
in
input
PUK
input
consecutive
consecutive
consecutive
consecutive
Change operation with the PIN1.
Phone
Phone
Phone
Phone
Under this password there you can set the phone
to avoid unauthorized use of your mobile phone
Phone lock
Under this you can enable or disable phone
password , phone password on or off are required
to enter the correct phone password . When open
this feature, every time you turn the phone
prompts you to enter the phone password .
Change password
Y
ou can make changes to the phone password .
First enter the old phone password , after repeated
twice to determine and iden tify new password.
Auto
Auto
Auto
Auto
Under this you can set the time to open or close
the keyboard lock keyboard lock feature. Set the
keyboard lock time, the idle screen, mobile ph one
within the set time the keyboard does not perform
any operation, it will be automatically locked, then
you can press the # key to unlock .
Note:
Note:
Note:
Note:
to
be
to
be
to
be
to
be
press
press
press
press
Connectivity
Connectivity
Connectivity
Connectivity
Bluetooth
Bluetooth
Bluetooth
Bluetooth
The phone supports Bluetooth , users can turn the
feature on according to demand .
Bluetooth technology can connect electronic
devices wirelessly. Because Bluetooth
communic ate by radio, so in your phone and
another Bluetooth device do not need to in the
code
PUK
code
ly
ly
ly
ly
security
security
security
security
keypad
lock
keypad
lock
keypad
lock
keypad
lock
Keyboard
Keyboard
Keyboard
Keyboard
selected
button
selected
button
selected
button
selected
button
the
#
key
the
#
key
the
#
key
the
#
key
error
in
error
in
error
,
SIM
card
,
,
,
locked
locked
locked
locked
to
to
to
to
will
SIM
card
will
SIM
card
will
SIM
card
will
and
the
and
the
and
the
and
the
lights
up
lights
up
lights
up
lights
up
unlock
unlock
unlock
unlock
times
for
10
times
for
10
times
for
10
times
be
scrapped.
be
scrapped.
be
scrapped.
be
scrapped.
backlight
backlight
backlight
the
the
the
the
is
backlight
is
is
is
screen,
screen,
screen,
screen,
32
off,
off,
off,
off,
then
then
then
then
Page 34

opposite direction, please maintain the maximum
distance that between two devices is not more
than 10 meters during communicating. In some
countries or regions may be developed within a
number of provisions restricting the use of
Bluetooth devices, please contact your local
authorities.
Power : Press th e OK key or the left soft key to
open or close the Bluetooth function. If close some
function, then you will end all the Bluetooth
connection. Bluetooth connection will consume
battery power, reducing cell phone operation time,
when using the phone to perform other operations,
please consider this factor.
V isibility : Press the OK key or the left soft key to
switch on or off , if you select on , other Bluetooth
devices can find the phone ; if you select off, other
Bluetooth devices can ’ t find the phone.
My device : Select to add new equipment, search
for Bluetooth devices within range of the signal.
After the Bluetooth device is found, you can select
the matching connections.
Search audio device: Search within signal range
of Bluetooth hands-free devices, such as
Bluetooth headsets.
My name: Display the Bluetooth device name of
the machine can access to vies and edit.
Advanced:
Audio path: set the audio path, is leave in phone or
forward to Bluetooth headsets.
Storage : set storage location in phone or memory
card.
My address : Display the Bluetooth device
address.
33
Page 35

Data
account
Data
account
Data
account
Data
account
You
c an choose the Internet account.
Internet accounts by yourself .
In the Internet interface, press [Options], you can
do operations as followed:
Edit: Edit selected network count.
Add PS account: Mobile support 6 maximum
data account. E very account to edit the
information : account name, APN, user n ame,
password, auth type, SIM selection, advanced
settings etc.
Delete: delete the selected Internet account
Change default: select this function to restore
default.
Restore
factory
Restore
Restore
Restore
Reset the parameter value mobile phone, make
your phone reset to default settings. Please enter
a privacy password (initial password is 1234),
restore factory settings.
settings
factory
settings
factory
settings
factory
settings
You
34
c an add
Page 36

8.
Multimedia
8.
Multimedia
8.
8. Multimedia
Multimedia
Camera
Camera
Camera
Camera
Your phone is fitted with camera allows you to take
photos whenever possible.
pictures in phone or customize the wallpaper.
In the multimedia menu, select the camera into the
camera preview screen, Press the OK key to take
photo, press the right soft key to return, press the
left soft key to option:
Switch
to
video
Switch
Switch
Switch
directly switch to video preview screen.
Photos:
Photos:
Photos:
Photos:
Camera
Camera
Camera
Camera
following options, including Anti-flicker and Delay
timer, Profile that is complete, press the left soft
key or the OK key to confirm the current setting .
Image
Image
Image
Image
image size.
W
hite
balance:
W
hite
balance:
W
hite
balance:
W
hite
balance:
Scene
Scene
Scene
Scene
night.
Storage:
Storage:
Storage:
Storage:
the storage location
Restore
Restore
Restore
Restore
confirmed, the camera parameters can be
restored to the default location
After taking pictures, press the back button to
return camera preview screen, press the left soft
key to enter options, can take pictures to send or
delete
Image
Image
Image
Image
This feature is convenient for users to view the
photos stored in albums, press the OK key to open
recorder:
to
video
recorder:
to
video
recorder:
to
video
recorder:
select the function into image viewer.
settings:
settings:
settings:
settings:
Press the OK key to adjust the
settings:
settings:
settings:
viewer
viewer
viewer
viewer
settings:
mode:
mode:
mode:
mode:
can set the image quality and
can set white balance
can set the photo mode as auto or
Can choose phone or memory card as
default:
default:
default:
default:
You
can store the
select the function can
select the function and
35
Page 37

the picture, press the left soft key to open the
option menu:
View:
View:
View:
View:
open the current image to view.
Image
information:
Image
information:
Image
information:
Image
information:
information.
Browse
style:
Browse
style:
Browse
style:
Browse
style:
Send
Send
Send
Send
: Pictures can be selected through
"Bluetooth" method to send.
Rename:
Rename:
Rename:
Rename:
picture.
Delete
Delete
Delete
Delete
: Delete the select image.
Storage
Storage
Storage
Storage
: Can choose phone or memory card as
the storage location
Note:
Note:
Note:
Note:
When
no
pictures
When
no
pictures
When
no
When
menu
menu
menu
menu
storage.
storage.
storage.
storage.
Video
Video
Video
Video
In the multimedia menu, select the video recorder
into the video preview screen, Press up/down
navigation key to adjust [Focal distance], press the
left soft key into options menu:
Switch
Switch
Switch
Switch
directly switch to camera preview screen.
Camcorder
Camcorder
Camcorder
Camcorder
the Anti-flicker.
Video
Video
Video
Video
Storage:
Storage:
Storage:
Storage:
memory card location
Press the OK key to start recorder, recording ,
press the OK key to pause or resume recording;
Press the right soft key to stop recording, the
screen will be auto save video and auto back to
pictures
no
pictures
only
only
only
only
recorder
recorder
recorder
recorder
to
to
to
to
settings:
settings:
settings:
settings:
Can choose view image in the phone or
can display the current image
can set to list style or Matrix style.
Change the name of the selected
in
Image
viewer
in
Image
viewer
in
Image
viewer
in
Image
displays
displays
displays
displays
camera:
camera:
camera:
camera:
settings:
settings:
settings:
settings:
Can set the video quality
viewer
the
brows
the
brows
the
brows
the
brows
select the function can
Press the OK key to adjust
,
the
options
,
the
options
,
the
options
,
the
options
e
style
and
e
style
e
style
e
style
and
36
and
and
Page 38

the video preview screen.
Video
player
Video
player
Video
player
Video
player
This feature can be played stored in the mobile U
disk or video files, supported formats to 3gp, mp4,
Avi file player.
I n the multimedia menu, select the video player
into the video list, press left soft key open the
option menu:
Play
Play
Play
Play
: Play the current video file
Send:
Send:
Send:
Send:
can be selected video through "Bluetooth"
method to send.
Rename
Rename
Rename
Rename
: Change the name of the selected video .
Delete
Delete
Delete
Delete
: Delete the select video .
Storage
Storage
Storage
Storage
: Can choose phone or memory card as
the storage location
Audio
player
Audio
player
Audio
player
Audio
player
Play the audio files saved in the phone or memory
card.
In playing interface, press the OK key to start or
pause playing, press the up navigation key into
the play list screen, press the down navigation
key to stop play, press the left/right navigat ion
key to switch previous/next song; press the */#
key to adjust the volume,
In playing interface, press the red key or the right
soft key to exit player interface, Phone into the
background playing mode, while the idle screen
shows the name of the music.
Press the left soft key into the play list, play the left
soft key into option menu :
Play
Play
Play
Play
: play th e current song.
Details
Details
Details
Details
: can view the current song information,
include song size and time.
37
Page 39

Refresh
list:
Refresh
list:
Refresh
list:
Refresh
list:
Settings
Settings
Settings
Settings
Pre. P lay list: Press the left/right navigation key to
switch phone or memory card.
List auto gen.: Select this option enabled, each
time the player list will automatically update .
Repeat:
repeat one or off.
Shuffle: When you select on , the player will not
play in order by list .
Background play: Select ON when playing the exit
music player can continue playing .
Sound
Sound
Sound
Sound
Enter the recording screen, press the left key into
options menu:
New
New
New
New
new record, In recording, press the left soft key to
pause/ continue record, press the right soft key to
stop record, the screen will be prompted to save
video, press the left soft key to save and return to
the record screen, press the right soft key to not
save and directly Back to the record screen.
Play*:
Play*:
Play*:
Play*:
Rename*:
Rename*:
Rename*:
Rename*:
recorder file
Delete*:
Delete*:
Delete*:
Delete*:
List:
List:
List:
List:
Settings:
Settings:
Settings:
Settings:
quality.
Use
Use
Use
Use
coming call ring-tone.
Send*:
Send*:
Send*:
Send*:
“ Bluetooth ” method to send.
can refresh the play list.
:
You
can choose play mode repeat all,
recorder
recorder
recorder
recorder
record:
record:
record:
record:
when you choose the function, start
can play the current recording.
Change the name of the current
Delete the current recording.
Display recorder files list
you can set storage location and audio
as*:
as*:
as*:
as*:
You can set the current recorder as
Can be current recorder through
38
Page 40

FM
radio
FM
radio
FM
radio
FM
radio
FM radio is supported by the phone. Access the
function only when you have plugged the
earphone.
In FM radio interface, press the up/down
navigation key to move forward/backward 0.1
MHZ. , press the left/right navigation key to move
forward/backward auto search until the search to
the channel so far. P ress the ok key to
open/close the FM function, Press the */# key to
adjust play volume. Press the right soft key or red
key to exit FM radio , and FM plays in the
background. Press the left soft key to the option
menu:
Channel
list
Channel
list
Channel
list
Channel
list
Manual
Manual
Manual
Manual
Radio interface automatically skip to the frequency
to listen.
Auto
Auto
Auto
Auto
channel
Settings:
Settings:
Settings:
Settings:
Background
Background
Background
Background
after Select the function, FM plays in the
background.
Note:
Note:
Note:
Note:
influenced
influenced
influenced
influenced
shield.
shield.
shield.
shield.
following:
following:
following:
following:
the
the
the
the
channel
channel
channel
channel
: Display channel list
input
input
input
input
: Manual enter frequency to identify,
search
search
search
search
: Can auto search channel and save
play
play
play
play
: Phone back to the idle screen
Quality
of
radio
Quality
Quality
Quality
by
by
by
by
You
You
You
You
stand
stand
stand
stand
position
position
position
position
manually
manually
manually
manually
subscription
of
radio
subscription
of
radio
subscription
of
radio
subscription
environment
environment
environment
environment
can
improve
can
improve
can
improve
can
improve
closer
to
closer
to
closer
to
closer
of
of
of
of
to
earphone
earphone
earphone
earphone
like
like
like
like
the
the
the
the
this
this
this
this
line
line
line
line
indoor
indoor
indoor
indoor
situation
situation
situation
situation
window,
window,
window,
window,
or
or
or
or
is
possible
is
possible
is
possible
is
possible
or
under
or
under
or
under
or
under
adjust
adjust
adjust
adjust
adjust
adjust
adjust
adjust
39
as
as
as
as
the
the
the
the
Page 41

9.
Extra
9.
Extra
9.
9. Extra
Extra
Torch
Torch
Torch
Torch
I nto the Torch interface, press the OK key or the
left soft key to on/off the Torch. Standby interface,
long press the 0 key, Torch on or off quickly
Calculator
Calculator
Calculator
Calculator
Into the calculator, the calculator interface:
Press 0 - 9 numeric keys to en ter the number to be
calculated,
Press the navigation key to select the location on
the screen corresponding to add, subtract, multiply
and divide symbols for computing
Press the # key for a decimal point.
Press the right soft key to clear the last bit can be
input or the result (no input figures, has withdrawn
from the calculator function)
Press the left soft key or the OK button to display
the results.
Calendar
Calendar
Calendar
Calendar
Choose to enter the calendar, the screen will
display the system date on the calendar month,
and have a background box marked the current
date. Press the navigation key to select the date,
calendar information on the screen will be updated
accordingly.
Select any date, press the left soft key to enter
options to the following:
Jump
to
date:
Jump
to
date:
Jump
to
date:
Jump
to
date:
today:
today:
today:
today:
to
to
to
to
weekly/monthly
weekly/monthly
weekly/monthly
weekly/monthly
Jump the selected date.
the date of the input query calendar
view:
view:
view:
view:
can set the
Go
to
Go
to
Go
to
Go
to
information
Go
Go
Go
Go
calendar display mode through week or month.
40
Page 42

Alarm
Alarm
Alarm
Alarm
You
can use the phone as alarm clock, this feature
allows you to set time arrives, make the phone
ring or vibrate to remind issue.
When the alarm is turned on state, the alarm
symbol is displayed in the top of the screen.
When the alarm clock for reminders, press the left
soft key to terminate the alarm reminder, press the
right soft key is the alarm clock to sleep .
The ph one number of alarm clocks available , both
in the off or silent mode , set the alarm clock
function has been effective.
Select any of the alarm clock , press the left soft
key or OK key to the following:
1, can be turned on or off the selected alarm to
open before the alarm clock icon will be displayed
2, set the alarm, reminder time
3 , according to the time you need to set the alarm
clock to remind the period of a day , week or
custom to be reminded of a few days
4, the selected option when the alarm time to
remind ring-tone
5 , you can set the alarm time to remind the
selected mode : ring and vibration, ring , vibration
6 , you can set sleep time
Set the required entry, press the right soft key to
save and return directly .
41
Page 43

10.
File
10.
10.
10. File
In document management, you can open files in
the Phone or Memory card, you can select file or
folder to press the left soft key into [Options], you
can do the following ( Perform different file
operations are also different, depending on the
specific operation by the file ) :
-Open:
-Open:
-Open:
-Open:
-
New
-
New
-
New
-
New
New Folder.
-Rename:
-Rename:
-Rename:
-Rename:
-
Delete:
-
Delete:
-
Delete:
-
Delete:
-
Use
-
Use
-
Use
-
Use
the file use as SIM1/SIM2 incoming call; if the
selected file is image file, can set the file use as
wallpaper, Screen saver, Power on display or
Power off display.
-Sea
-Sea
-Sea
-Sea
all the documents.
-S
ort
-S
ort
-S
ort
-S
ort
“ none ” .
-Send:
-Send:
-Send:
-Send:
-
Copy
-
Copy
-
Copy
-
Copy
folders.
-Move:
-Move:
-Move:
-Move:
folders.
-
Details
-
Details
-
Details
-
Details
Note:
Memory card as the default save path, order to
facilitate the use of multimedia features, please
copy the appropriate files to Audio, My music,
Photos, Videos etc. folders.
manager
File
manager
File manager
manager
open the file or folder.
Folder:
Folder:
Folder:
Folder:
the folder in the selected directory
you can rename the select folder.
delete the selected file or folder.
as
:
as
:
as
:
as
:
if the selected file is audio files, can set
r
ch
:
r
ch
:
r
ch
:
r
ch
:
memory card can be customized to find
by
:
by
:
by
:
by
:
can "name", “ time ” , "size" , "type" or
the select file can send by bluetooth
:
:
:
:
you can copy the select file to other
you can move the select file to other
:
:
:
:
you can view the select file information.
42
Page 44

11.
Services
11.
Services
11.
11. Services
Services
The Internet is the combination of wireless
communications and Internet application
platform that enables you to get rich by phone
and ecommerce and other Internet information
resources application.
Note:
Note:
Note:
Note:
1.
Your
ISP
may
not
support
some
1.
Your
ISP
may
not
1.
Your
ISP
1.
Your
ISP
in
order
to
in
order
to
in
order
to
in
order
to
the
browser,
the
browser,
the
browser,
the
browser,
supported
supported
supported
supported
2.
2.
2.
2.
fees
fees
fees
fees
Homepage
Homepage
Homepage
Homepage
Bookmarks
Bookmarks
Bookmarks
Bookmarks
In this menu, the display has all the bookmarks in
the bookmark, you can add and save you
frequently visit the site name and address for
future quick access .
Input
Input
Input
Input
Enter the need to access the WAP services, and
URL addresses, complete, can be connected to
the WAP site you want to connect. From the
surface in the bookmarks, web history, other than
to provide you a flexible way to access the
network.
Recent
Recent
Recent
Recent
List of pages you have recently visited records to
facilitate your browsing history in selected cases,
and
and
and
and
If
you
browse
If
you
browse
If
you
browse
If
you
browse
related
related
related
related
This is the W AP settings you set in the
hom e page address , if you have no other set
will have a direct connection to the phone
pre-set or the default home page.
URL
URL
URL
URL
pages
pages
pages
pages
support
may
not
support
may
not
support
ensure
the
ensure
ensure
ensure
make
make
make
make
to
to
to
to
normal
the
normal
the
normal
the
normal
sure
sure
sure
sure
open
Internet
open
Internet
open
Internet
open
Internet
the
web,
you
the
web,
you
the
web,
you
the
web,
traffic.
traffic.
traffic.
traffic.
you
features,
some
features,
some
features,
some
features,
operation
operation
operation
operation
your
SIM
your
your
your
card
SIM
card
SIM
card
SIM
card
access.
access.
access.
access.
need
to
charge
need
to
charge
need
to
charge
need
to
charge
43
of
of
of
of
is
is
is
is
Page 45

can directly select [Enter] to access the page, the
record could be deleted.
Settings
Settings
Settings
Settings
Homepage:
Homepage:
Homepage:
Homepage:
default homepage or user-defined .
Select
Select
Select
Select
ask/SIM1/SIM2.
Data
Data
Data
Data
correspond SIM card data account.
Browser
Browser
Browser
Browser
information and cookie, it ’ s can avoid congestion
and improve web browsing speed, periodically
clear.
Preferences:
Preferences:
Preferences:
Preferences:
parameters, including the display time, display
pictures, cache and cookie.
Into th e function, you can se lec t
profile:
profile:
profile:
profile:
account:
account:
account:
account:
Y
ou can select always
Into the function, you can set
options:
options:
options:
options:
Clear the temporary buffer
You
can set the appropriate
44
Page 46

12.
Fun&Games
12.
Fun&Games
12.
12. Fun&Games
Fun&Games
F1
race
F1
race
F1
race
F1
race
T he phone for you built-in games for a racing.
For specific operations, please refer to the
directions of the game.
Games
settings
Games
settings
Games
settings
Games
settings
Select this function, you can set the game sound
effect and volume etc.
45
Page 47

13.
Input
13.
13.
13. Input
This phone provides diversified input modes for
you to enter letter information when editing SMS
and adding phonebook.
Use the # key to switch between different input
methods.
When editing the key controls:
The
Left
The
Left
The
Left
The
Left
confirmation.
The
Right
The
Right
The
Right
The
Right
long press to clear all.
The
End/Power
The
End/Power
The
End/Power
The
End/Power
[*]
key:
[*]
key:
[*]
key:
[*]
key:
out punctuation and symbol input frame.
ABC
(abc)
ABC
(abc)
ABC
(abc)
ABC
(abc)
Each key is used to input several characters. Fast
and repeatedly press key until your required
character appears.
When you need to input English punctuation and
some special signs, press the [*] numeric key to
call out special sign input box in English input
status
Press the [0] key to input blank once.
The
Numeric
The
Numeric
The
Numeric
The
Numeric
To
input numerical values, press the respective
numeric keys.
methods
Input
methods
Input methods
methods
soft
key:
soft
key:
soft
key:
soft
key:
Generally represents
soft
key:
soft
key:
soft
key:
soft
key:
Press to clear one character,
key:
key:
key:
key:
In every input status, press this key to call
input
input
input
input
Return to the idle screen.
method
method
method
method
input
method
input
method
input
method
input
method
46
Page 48

14.
Phone
14.
Phone
14.
14. Phone
Phone maintenance
Mobile is a high-precision electronic products,
please carefully maintained. The following
suggestions can help you maintain phone, to
extend the lifespan: - P hone and its accessories
should be placed out of the reach of children.
- Keep the device dry . Rain, humidity or moisture
will corrode the circuit board. If the phone is
accidentally flooded, shall promptly remove the
battery, and immediately sent to a local authorized
service center for processing. - Do not
place your phone in dusty places, this may affect
the normal use of mobile phones.
- LCD display is easily damaged cell phone parts,
mobile phone dropped onto the ground should be
avoided or be strong vibration; prohibit the use of
sharp objects to touch the screen.
- Do not place the phone where the temperature is
too high. High temperatures can shorten the life of
electronic devices, damage batteries, and warp or
melt plastic shell phone.
- Do not place the phone where the temperature is
too low. Otherwise, when the phone temperature
to normal temperature, moisture will be generated
internally, could damage the device electronic
circuit boards. - Do not drop,
knock or severe shaking the phone, so as not to
damage the internal circuit boards and precision
mobile structure.
- Do not use chemicals, cleaning solvents or strong
detergents to clean the device, apply a soft cloth
soaked in soapy water and gently scrub.
- Do not use paint pigment cell phone to avoid
maintenance
maintenance
maintenance
47
Page 49

moving parts and be stuck to proper operation.
- Use a clean soft lens cleaning cloth. Such as:
camera lens.
-R eplacement antenna, use only the supplied or
designated by the antenna. Use of unauthorized
antennas, cell phone accessories or modifications,
could damage the device and may violate
regulations governing radio devices.
48
Page 50

15.
Accessories
15.
Accessories
15.
15. Accessories
Accessories
Use only batteries, chargers, and accessories
approved by the manufacturer with this device.
Use of any other types will invalidate the warranty
and may be dangerous. Check with your dealer for
available accessories.
Extra
Battery
Extra
Battery
Extra
Battery
Extra
Battery
Extra batteries of various capacities are available
from our company or through your dealer.
Charger
Plug,
Charger
Plug,
Charger
Plug,
Charger
Plug,
Charger plug used to connect with the charger
cable for charging on wall outlets. Also you can
use the charger cable to connect with the other
devices such as the personal computers to charge
the phone.
Charging time is about 2 to 3 hours. The charging
condition is displayed on screen.
your phone while charging.
Earphone
Earphone
Earphone
Earphone
A
mini, practical, hands-free device; you can use
its button to answer and end calls. Some models
may also come with a volume control knob.
Do not plug or unplug the earphone when
connecting dialed or incoming calls.
Please to adjust the incoming call alert volume to
the felicitousness before you plug in the earphone.
You
may opt to buy:
charger
cable
charger
cable
charger
cable
charger
cable
You
may use
49
Page 51

16.
Environment
16.
Environment
16.
16. Environment
Environment
Packaging
Packaging
Packaging
Packaging
To
facilitate the recycling of packaging materials,
please obey the sorting rules instituted locally for
this type of waste.
Batteries
Batteries
Batteries
Batteries
Spent batteries must be deposited at the
designated collection points.
The
product
The
product
The
product
The
product
The crossed-out waste bin mark affixed to the
product means that it belongs to the family of
electrical and electronic equipment.
To
promote the recycling and recovery of waste
electrical and electronic equipment (WEEE) and at
the same time safeguard the environment,
European regulations require you to obey the
sorting rules instituted locally for this type of
waste.
50
Page 52

17.
TechnicalSpecifications
17.
TechnicalSpecifications
17.
17. TechnicalSpecifications
TechnicalSpecifications
Weight: 6 2 g (including the Battery and Battery
cover)
Dimensions: 106*45*14.5mm
Battery: Li-ion Battery, 3.7V
Band: 850/900/1800/1900
Battery Capacity: 10 00mAh
Talk Time: about 4 h
Standby Time: about 260 h
Note: Actual operating conditions depend on the
local network environment, SIM, and user
behavior.
Warning: Any consequence caused by misuse,
abuse, or not following any and all of the
above-written suggestions and instructions shall
not hold the producer in any way responsible to
any degree.
Announcement: The manufacturer reserves the
right to change or upgrade specifications or
software versions without prior or separate notice.
Trademarks mentioned or used in this material
belong to their respective owners.
51
Page 53

FCC RF EXPOSURE INFORMATION:
WARNING!! Read this information before using your phone
In August 1986 the Federal Communications Commission (FCC) of the United States with its
action in Report and Outer FCC 96-326 adopted an updated safety standard for human exposure
to radio frequency (RF) electromagnetic energy emitted by FCC regulated transmitters. Those
guidelines are consistent with the safety standard previously set by both U.S. and international
standards bodies. The design of this phone complies with the FCC guidelines and these
international standards. Use only the supplied or an approved antenna. Unauthorized antennas
modifications, or attachments could impair call quality, damage the phone, or result in violation
of FCC regulations. Do not use the phone with a damaged antenna. If a damaged antenna comes
into contact with the skin, a minor burn may result. Please contact your local dealer for
replacement antenna.
BODY-WORN OPERATION:
This device was tested for typical body-worn operations with the back of the phone kept 0.5cm
from the body. To comply with FCC RF exposure requirements, a minimum separation distance
of 0.5cm must be maintained between the user's body and the back of the phone, including the
antenna, whether extended or retracted. Third-party belt-clips, holsters and similar accessories
containing metallic components shall not be used. Body-worn accessories
that cannot maintain 0.5cm separation distance between the user’s body and the back of the
phone, and have not been tested for typical body-worn operations may not comply with FCC RF
exposure limits and should be avoided.
For more information about RF exposure, please visit the FCC website at www.fcc.gov
Your wireless handheld portable telephone is a low power radio transmitter and receiver. When
it is ON, it receives and also sends out radio frequency (RF) signals. In August, 1996, the Federal
Communications Commissions (FCC) adopted RF exposure guidelines with safety levels for
hand-held wireless phones. Those guidelines are consistent with the safety standards previously
set by both U.S. and international standards bodies:
<ANSIC95.1> (1992) / <NCRP Report 86> (1986) / <ICIMIRP> (1996)
Those standards were based on comprehensive and periodic evaluations of the relevant
scientific literature. For example, over 120 scientists, engineers, and physicians from universities,
government health agencies, and industry reviewed the available body of research to develop
the ANSI Standard (C95.1). Nevertheless, we recommend that you use a hands-free kit with
your phone (such as an earpiece or headset) to avoid potential exposure to RF energy. The
design of your phone complies with the FCC guidelines (and those standards).
Use only the supplied or an approved replacement antenna. Unauthorized antennas,
modifications, or attachments could damage the phone and may violate FCC regulations.
NORMAL POSITION:
Hold the phone as you would any other telephone with the antenna pointed up and over your
shoulder.
TIPS ON EFFICIENT OPERATION:
For your phone to operate most efficiently:
• Extend your antenna fully.
• Do not touch the antenna unnecessarily when the phone is in use. Contact with the antenna
affects call quality and may cause the phone to operate at a higher power level than otherwise
needed.
RF Exposure Information:
FCC RF Exposure requirements: The highest SAR value reported under this standard
during product certification for use next to the body with the minimum separation distance
of 0.5cm is 1.074W/kg; next to the head is 0.815W/kg. This transmitter must not be
collocated or operating in conjunction with any other antenna or transmitter.
Page 54

This device complies with part 15 of the FCC rules. Operation is subject to the following two
conditions:
(1) this device may not cause harmful interference, and
(2) this device must accept any interference received, including interference that may
cause undesired operation.
NOTE: The manufacturer is not responsible for any radio or TV interference caused by
unauthorized modifications to this equipment. Such modifications could void the user’s
authority to operate the equipment.
NOTE: This equipment has been tested and found to comply with the limits for a Class B
digital device, pursuant to part 15 of the FCC Rules. These limits are designed to provide
reasonable protection against harmful interference in a residential installation. This equipment
generates uses and can radiate radio frequency energy and, if not installed and used in
accordance with the instructions, may cause harmful interference to radio communications.
However, there is no guarantee that interference will not occur in a particular installation. If
this equipment does cause harmful interference to radio or television reception, which can be
determined by turning the equipment off and on, the user is encouraged to try to correct the
interference by one or more of the following measures:
- Reorient or relocate the receiving antenna.
- Increase the separation between the equipment and receiver.
-Connect the equipment into an outlet on a circuit different from that to which the receiver is
connected.
-Consult the dealer or an experienced radio/TV technician for help
Do not use the device with the environment which below minimum -10℃ or over maximum
50℃, the device may not work.
Changes or modifications to this unit not expressly approved by the party responsible for
compliance could void the user’s authority to operate the equipment.
 Loading...