

Page 1
user manual
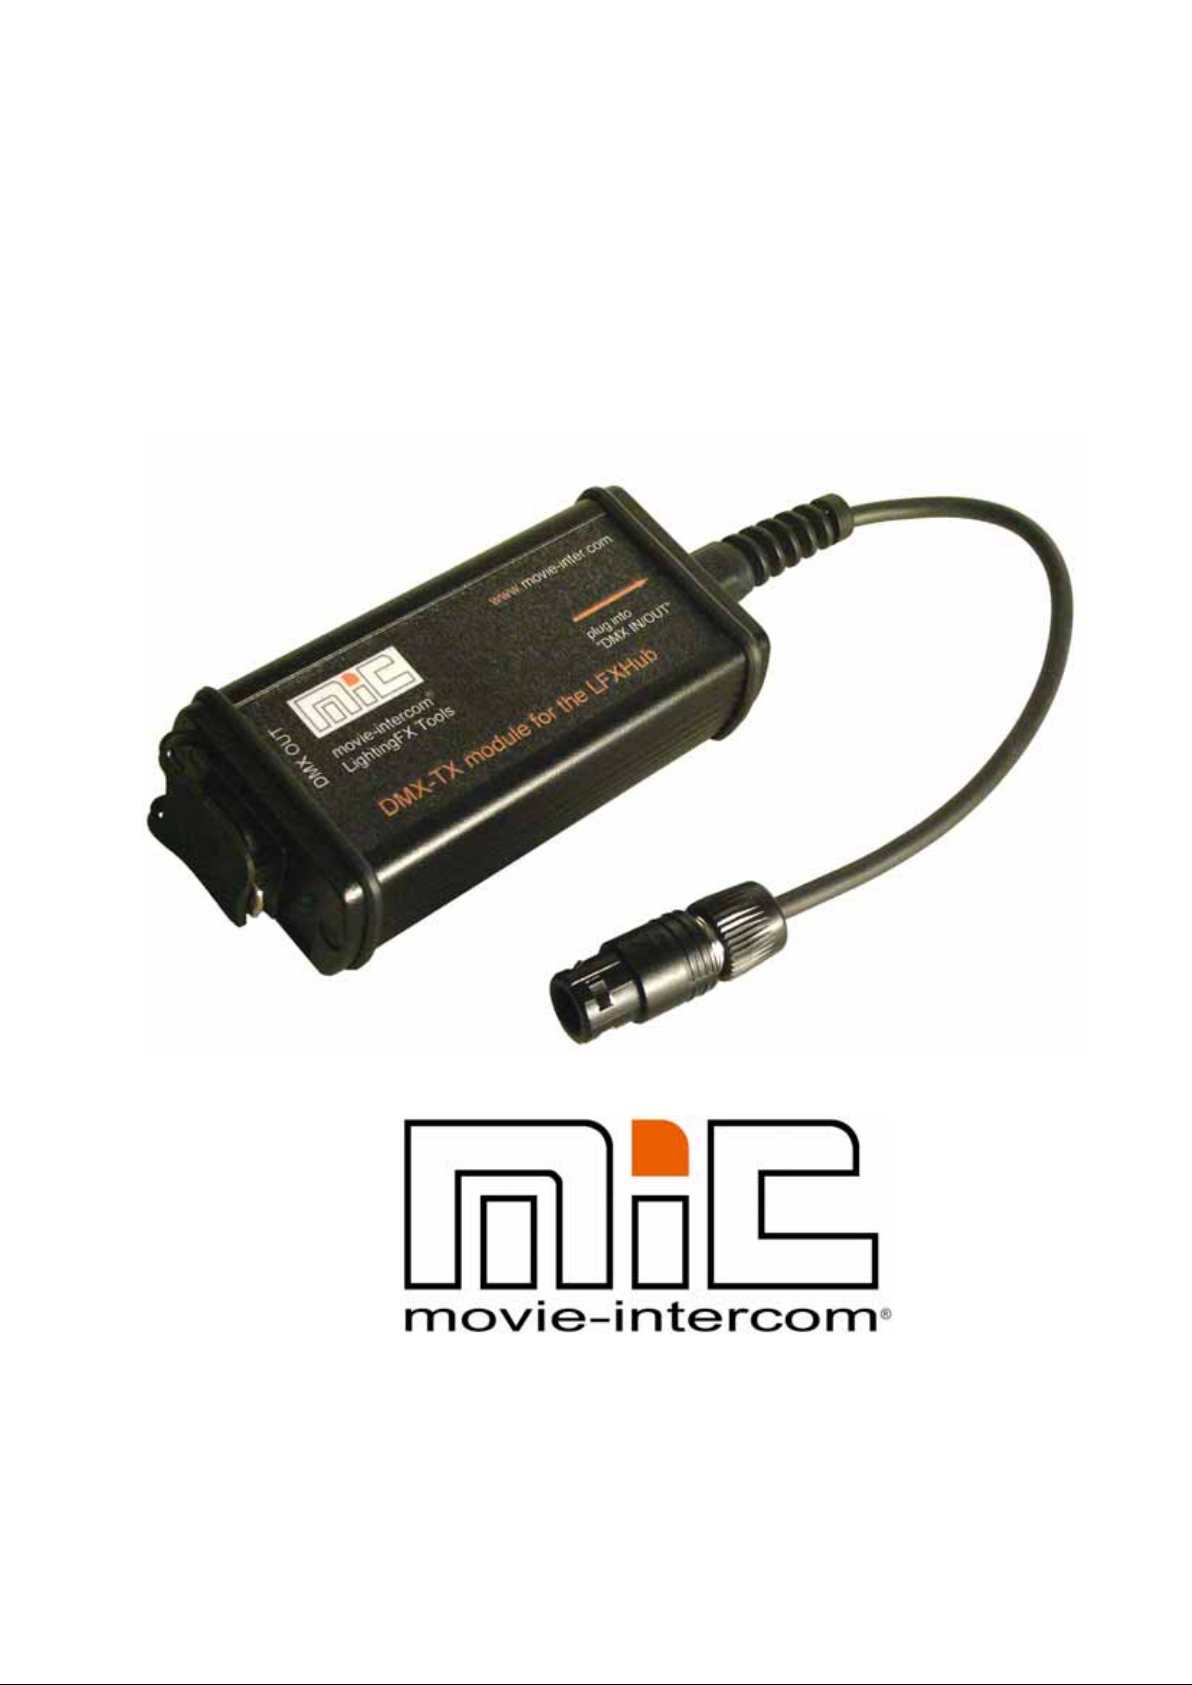
DMX-TX module
for the LFXHub
®
LightingFX Tools
for professional filmmakers
www.movie-inter.com
Page 2

copyright © movie-intercom® 2006
edition 2006-0410V1e
This user manual is valid for the DMX-TX module for the
LFXHub
download the latest user manual:
http://www.movie-inter.com
This user manual is also available in german language
http://www.movie-inter.com/de/support/downloads/index.html
movie-intercom® und LFXHub®
are registered trademarks
of Olaf Michalke, movie-intercom
LightingFX Tools.
use or dispersal of the mentioned trademarks
is strictly vorbidden.
This user manual is alos available in german language.
http://www.movie-inter.com/de/support/downloads.html
Page 3
user manual DMX-TX module for the LFXHub
page 3 of 16
chapter table of content
1. safety first please read me first 4
2.
3.
4.
5.
6.
7.
8.
9.
10.
11.
12. index 15
quick start
function overview
conditions for operation with the LFXHub
included in delivery
indicators and interfaces
connect DMX-TX module at the LFXHub
menu structure for DMX at the LFXHub
menu language
setting up DMX channels
resetting DMX-IDs to factory settings
upgrading the software of the LFXHub
trouble shooting / maintenance / disposal
specifications
address / support
page
10
11
12
13
14
5
6
7
8
9
2006-0410V1e http://www.movie-inter.com
Page 4
user manual DMX-TX module for the LFXHub
to table of content
page 4 of16
1.
Safety instructions
PLEASE READ ME FIRST!
Please read this user manual before the first operation !
This user manual is always available for download from the homepage of
movie-intercom >
http://www.movie-inter.com/en/support/downloads/index.html
Please protect the DMX-TX module against humidity and rain before and
during operation.
This optional available DMX transmitter "DMX-TX module" is exclusively engineered to be operated with the LFXHub.
The safety instructions for operation with DMX based equipment must be
observed.
2006-0410V1e http://www.movie-inter.com
Page 5
user manual DMX-TX module for the LFXHub
to table of content
page 5 of 16
2.
LFXHub
quick start
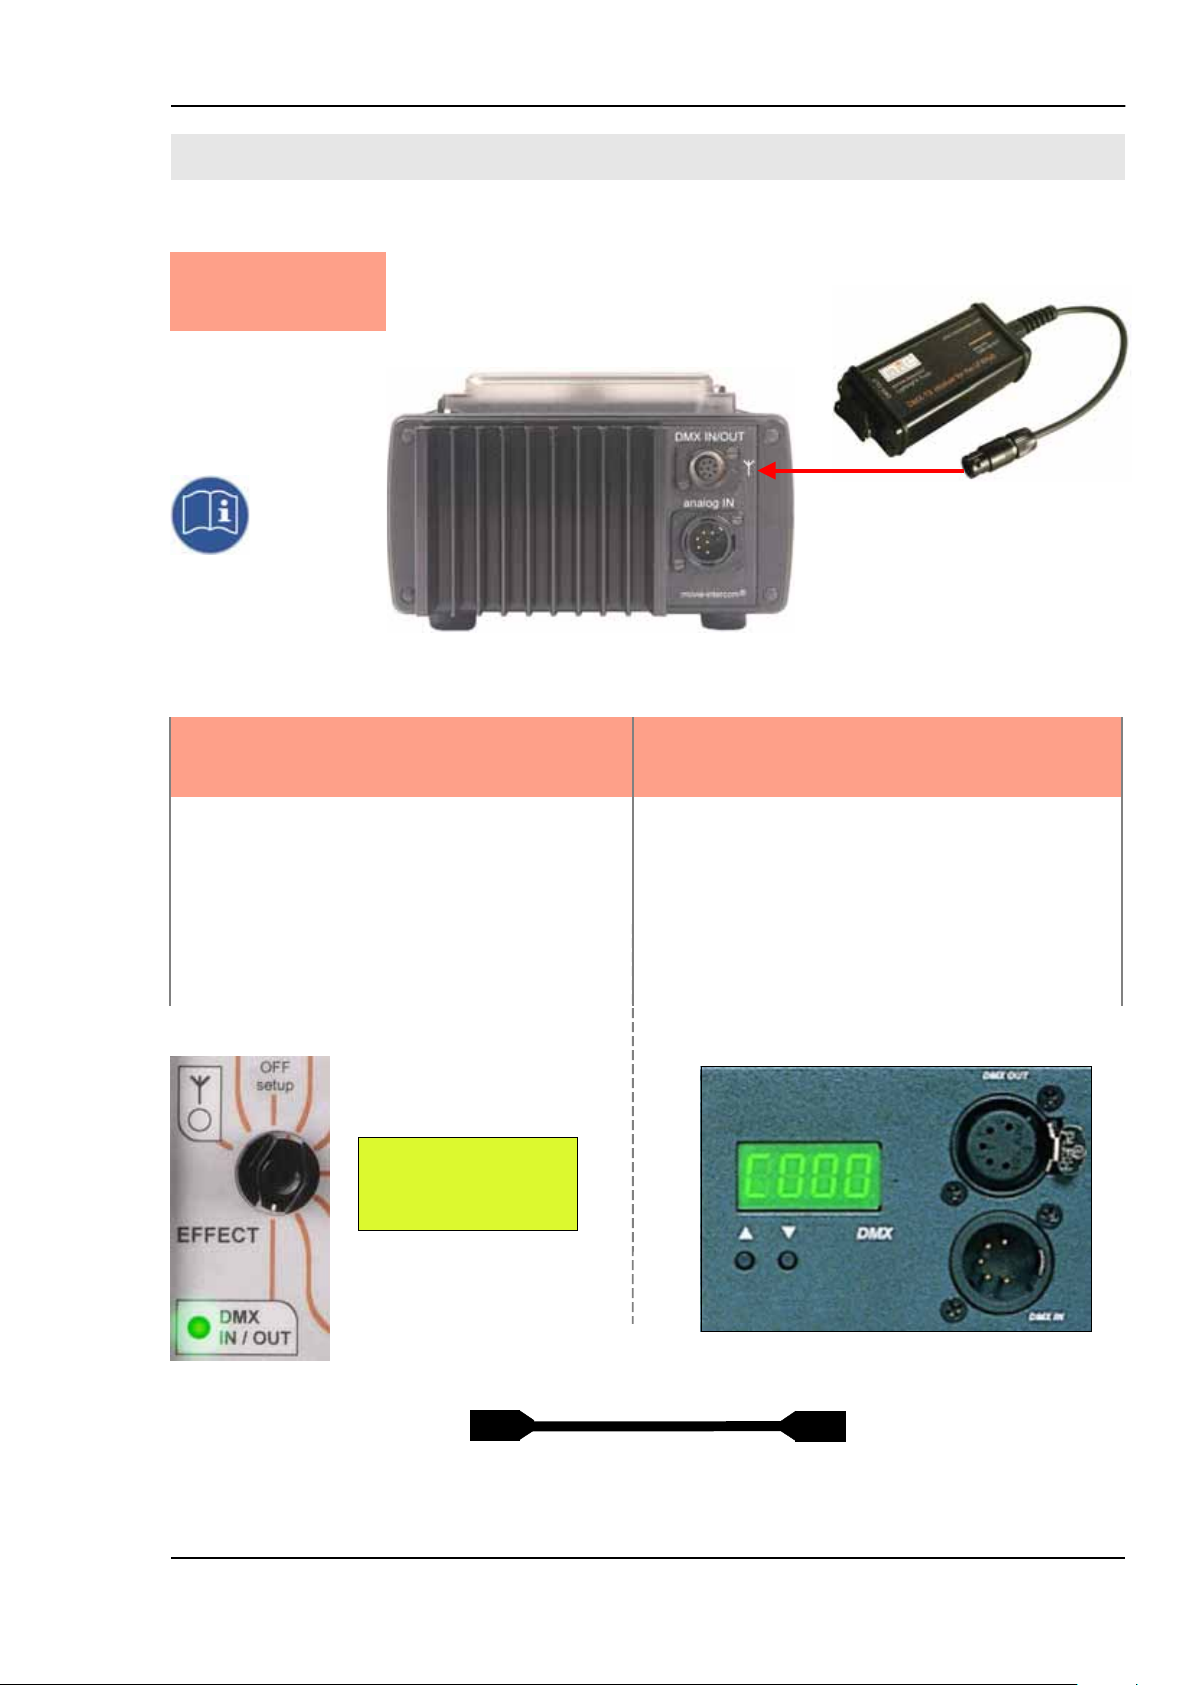
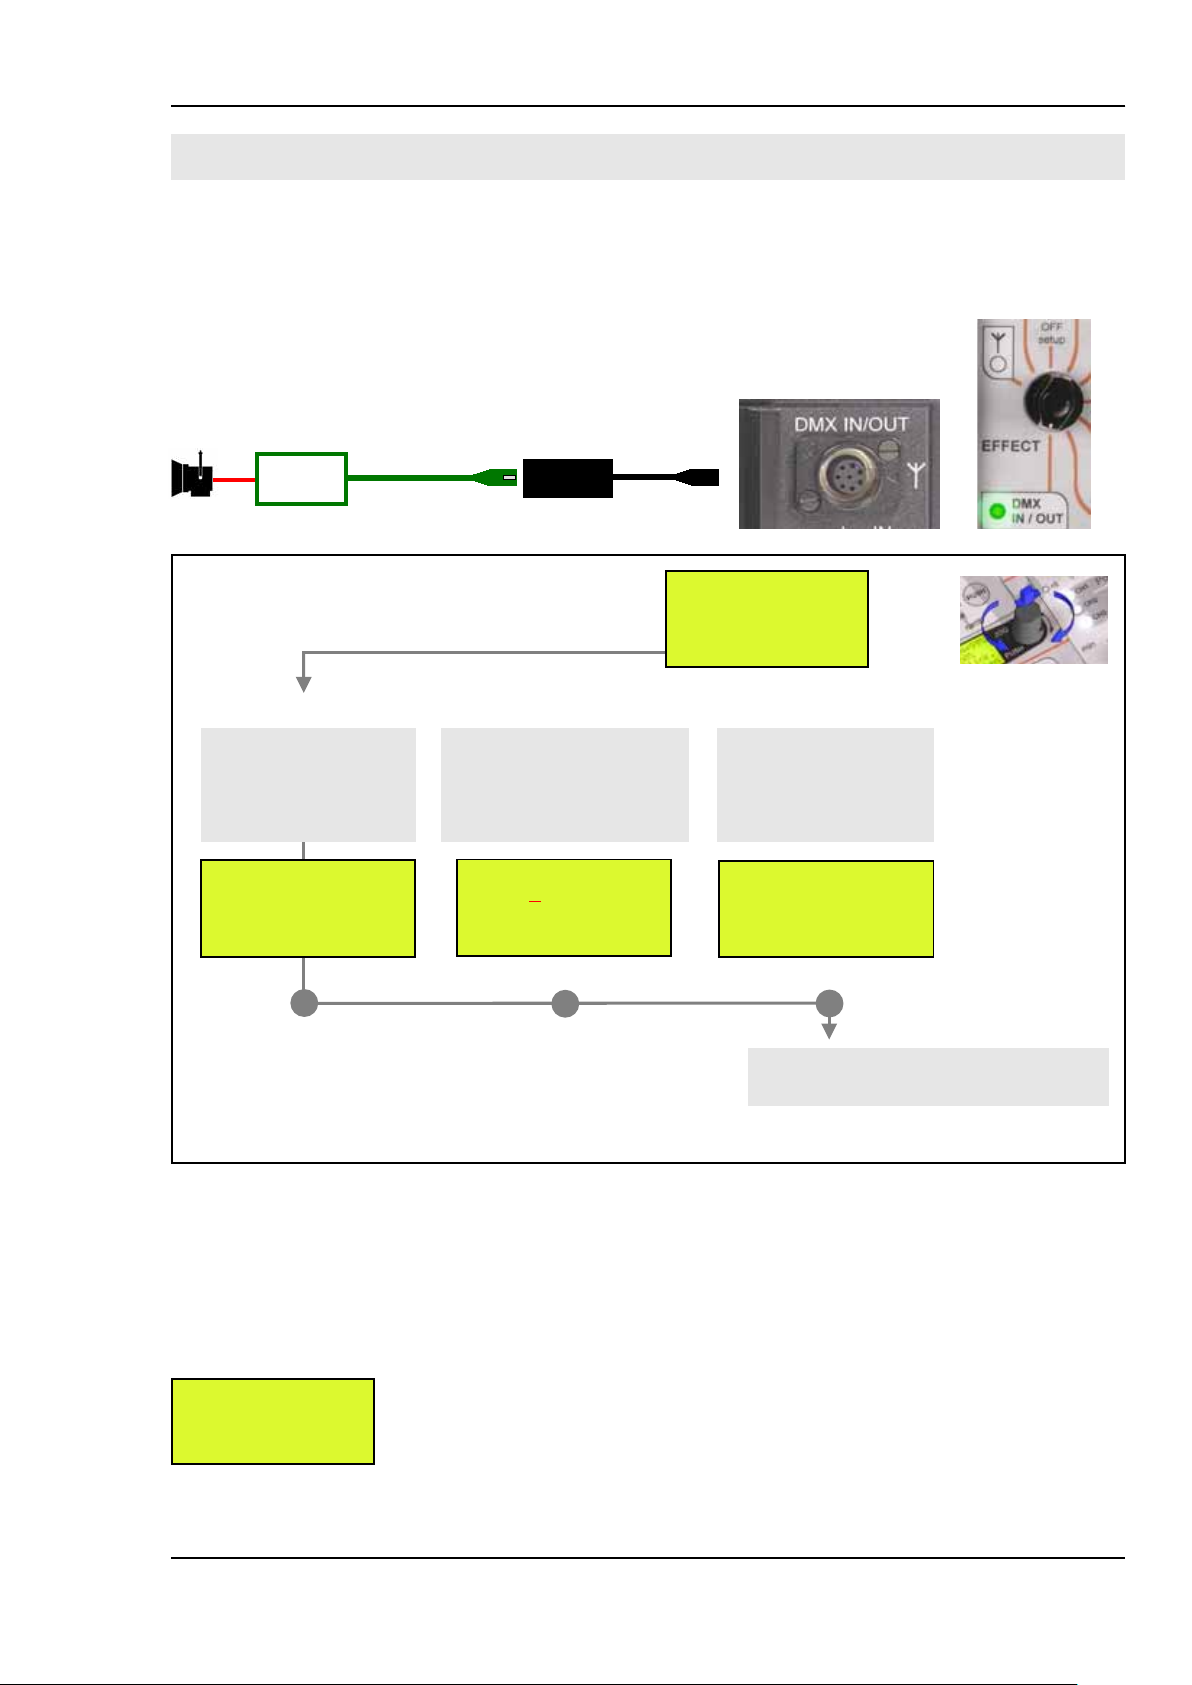
connect the DMX-TX module at the
LFXHub´s socket "DMX IN/OUT"
1
23
read all DMX IDs from the LFXHub
 turn rotary switch "EFFEKT" to position*
"DMX IN/OUT"
 read addresses of channel 1 to 6
* in this position there will be no DMX transmission
display of the LFXHub
CH1= 001 and 004
CH2= 002 and 005
CH3= 003 and 006
»change DMX-ID
DMX IDs at the receiver
 verify DMX IDs of the LFXHub´s DMX IDs
 connect DMX cable
example control panel of a DMX dimmer
2006-0410V1e http://www.movie-inter.com
DMX-TX module
DMX line
DMX-receiver
Page 6
user manual DMX-TX module for the LFXHub
to table of content
page 6 of 16
3.
Key features of the DMX-TX module
key features
 control DMX-512 dimmer packs
 Output of six DMX channels
 self-locking plug at socket DMX IN/OUT of the LFXHub
 plug & play
 maintenance free
 individual choice of DMX channels to send
 multilingual display (English, French, Spanish, German)
 configuration of DMX IDs via the display of the LFXHub
Requirements of the LFXHub for operation of the DMX-TX module
The operation of the DMX-TX module requires the latest DMX software in the LFXHub.
Because of the software based engineering of the LFXHub, the required software can be
installed later either.
DMX-512
LFXHubs, delivered after May 1, 2006 are already equipped with DMX software.
In this case there is no software upgrade necessary.
How to find out whether my LFXHub is equipped with DMX software:
 turn "EFFECT" to position "off/set-up"
 with JOG navigate to:
basic settings > identity > software versions
the display should
show this:
The version for "CHP" must be at least version 1.15!
If the mentioned software version of CHP is not shown please read
software-versions:
CIO: 1.0 CHP: 1.15
FT: 1.11 MT: 1.10
XTM: 1.0 r
☞ upgrading the software of the LFXHub, chapter 8, page 11
Please read the safety instructions before the DMX module will be used for the first
time. As well please read the safety instructions of the LFXHub!
included in delivery
- DMX-TX module
- user manual
- eventually a CD containing DMX software for the LFXHub
(depending on the version of the LFXHub´s software)
2006-0410V1e http://www.movie-inter.com
Page 7
user manual DMX-TX module for the LFXHub
to table of content
page 7 of 16
4.
indicators and interfaces
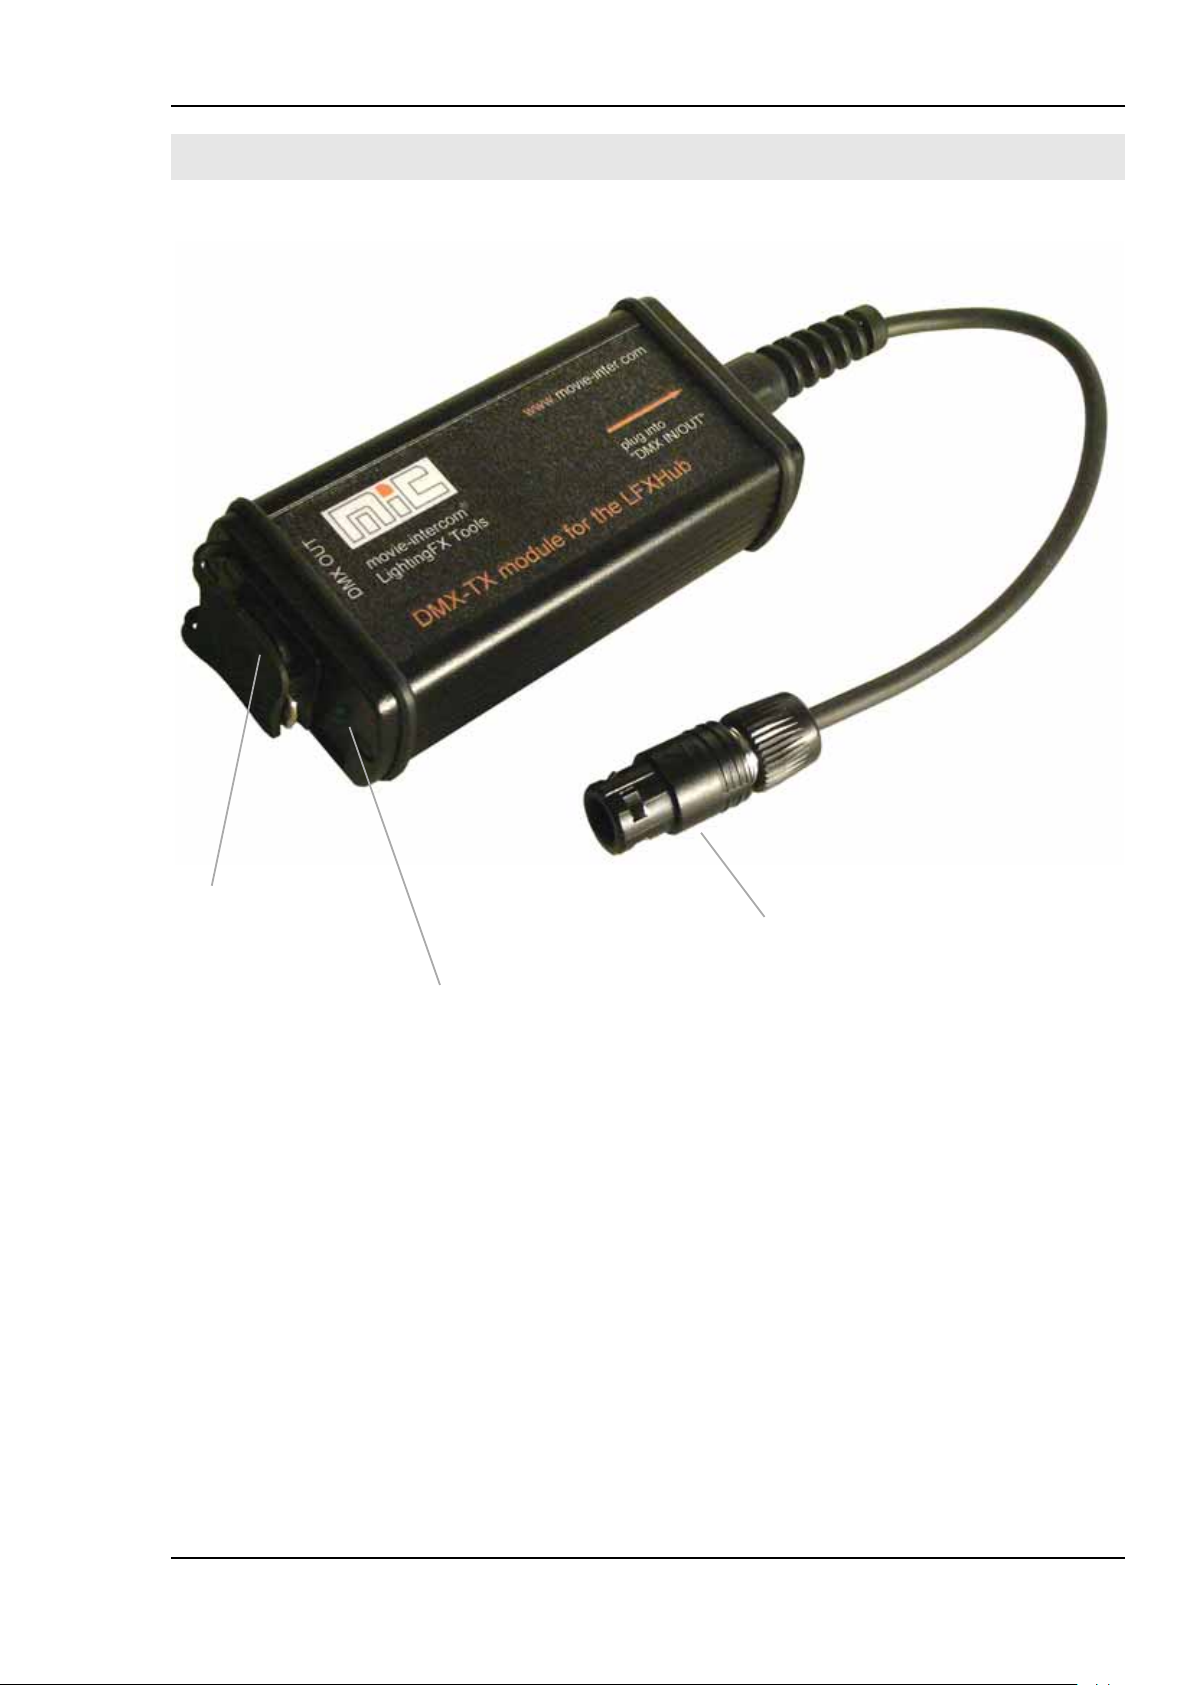
output for
DMX-512 receiver
5-pin XLR female
behind protector
status indicator DMX
is flashing during transmission of a DMX signal
The serial number is located on the bottom of the module.
connector
plug into "DMX IN/OUT" of the LFXHub
2006-0410V1e http://www.movie-inter.com
Page 8
user manual DMX-TX module for the LFXHub
to table of content
page 8 of 16
5.
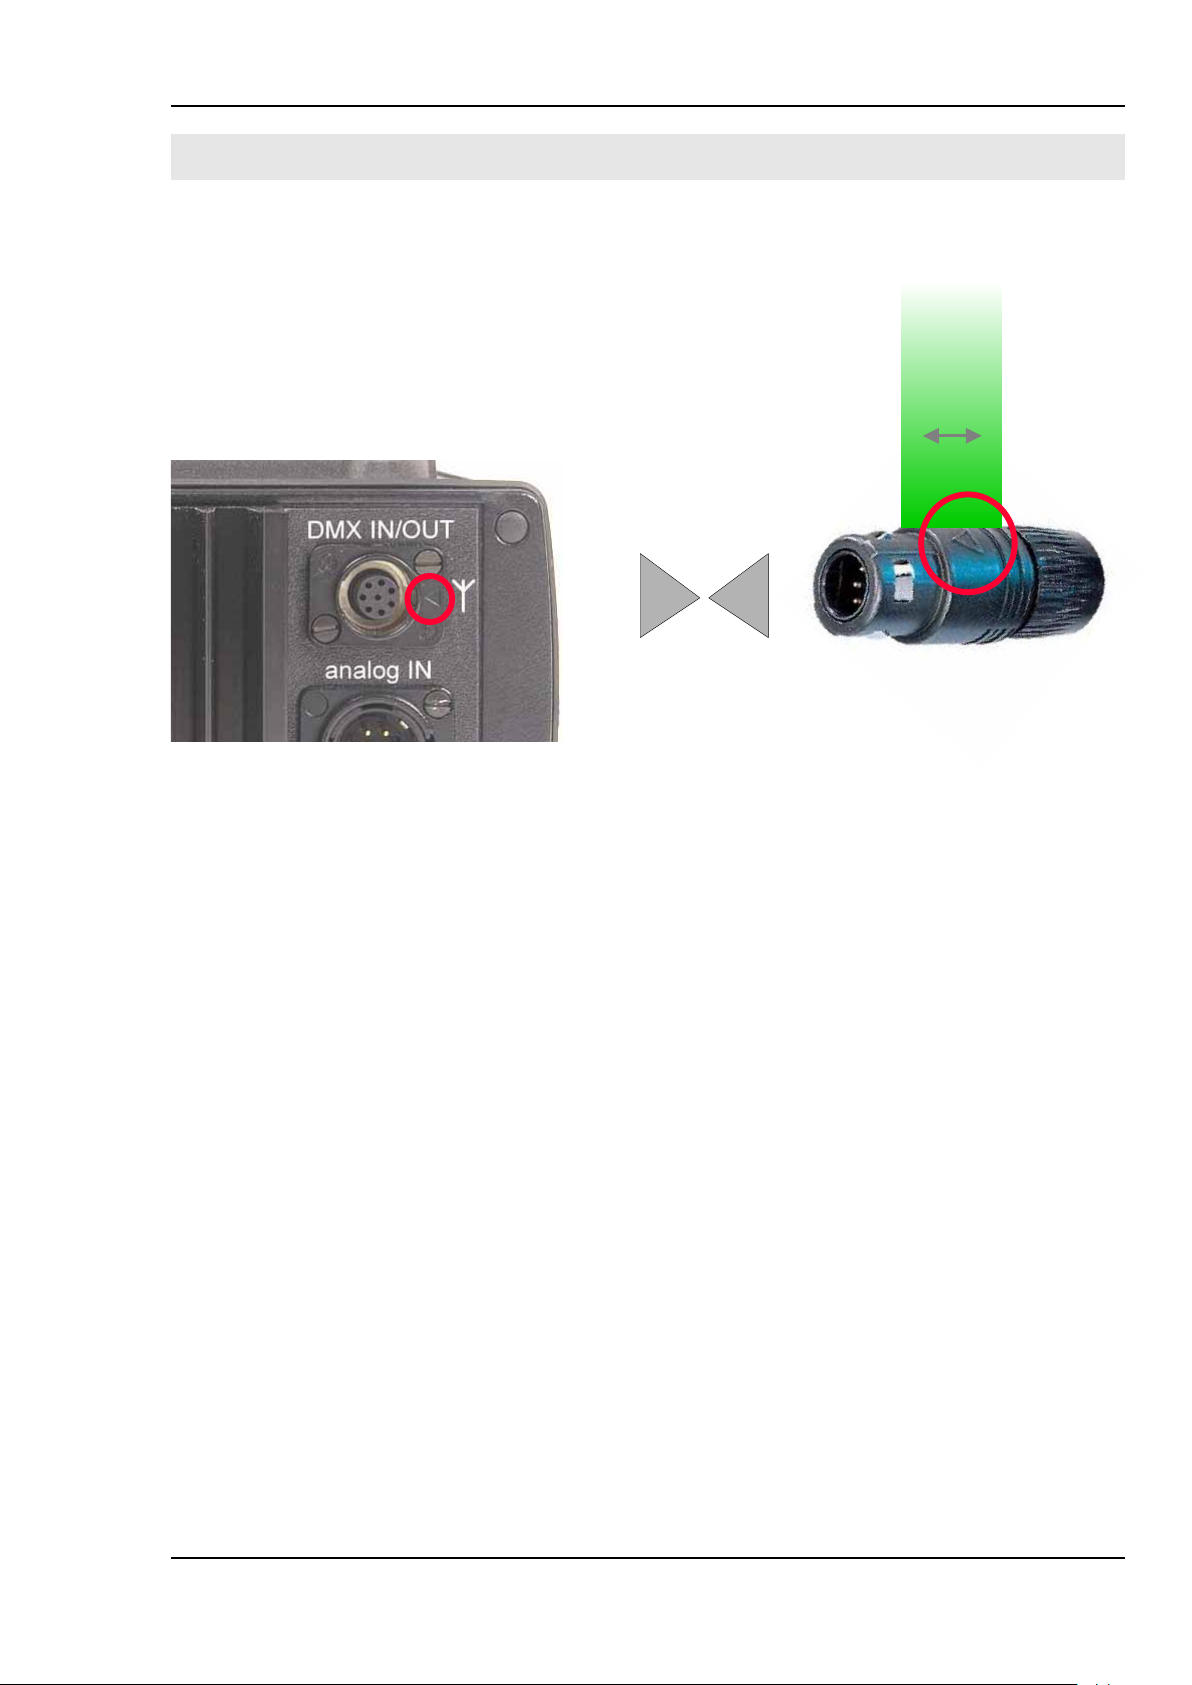
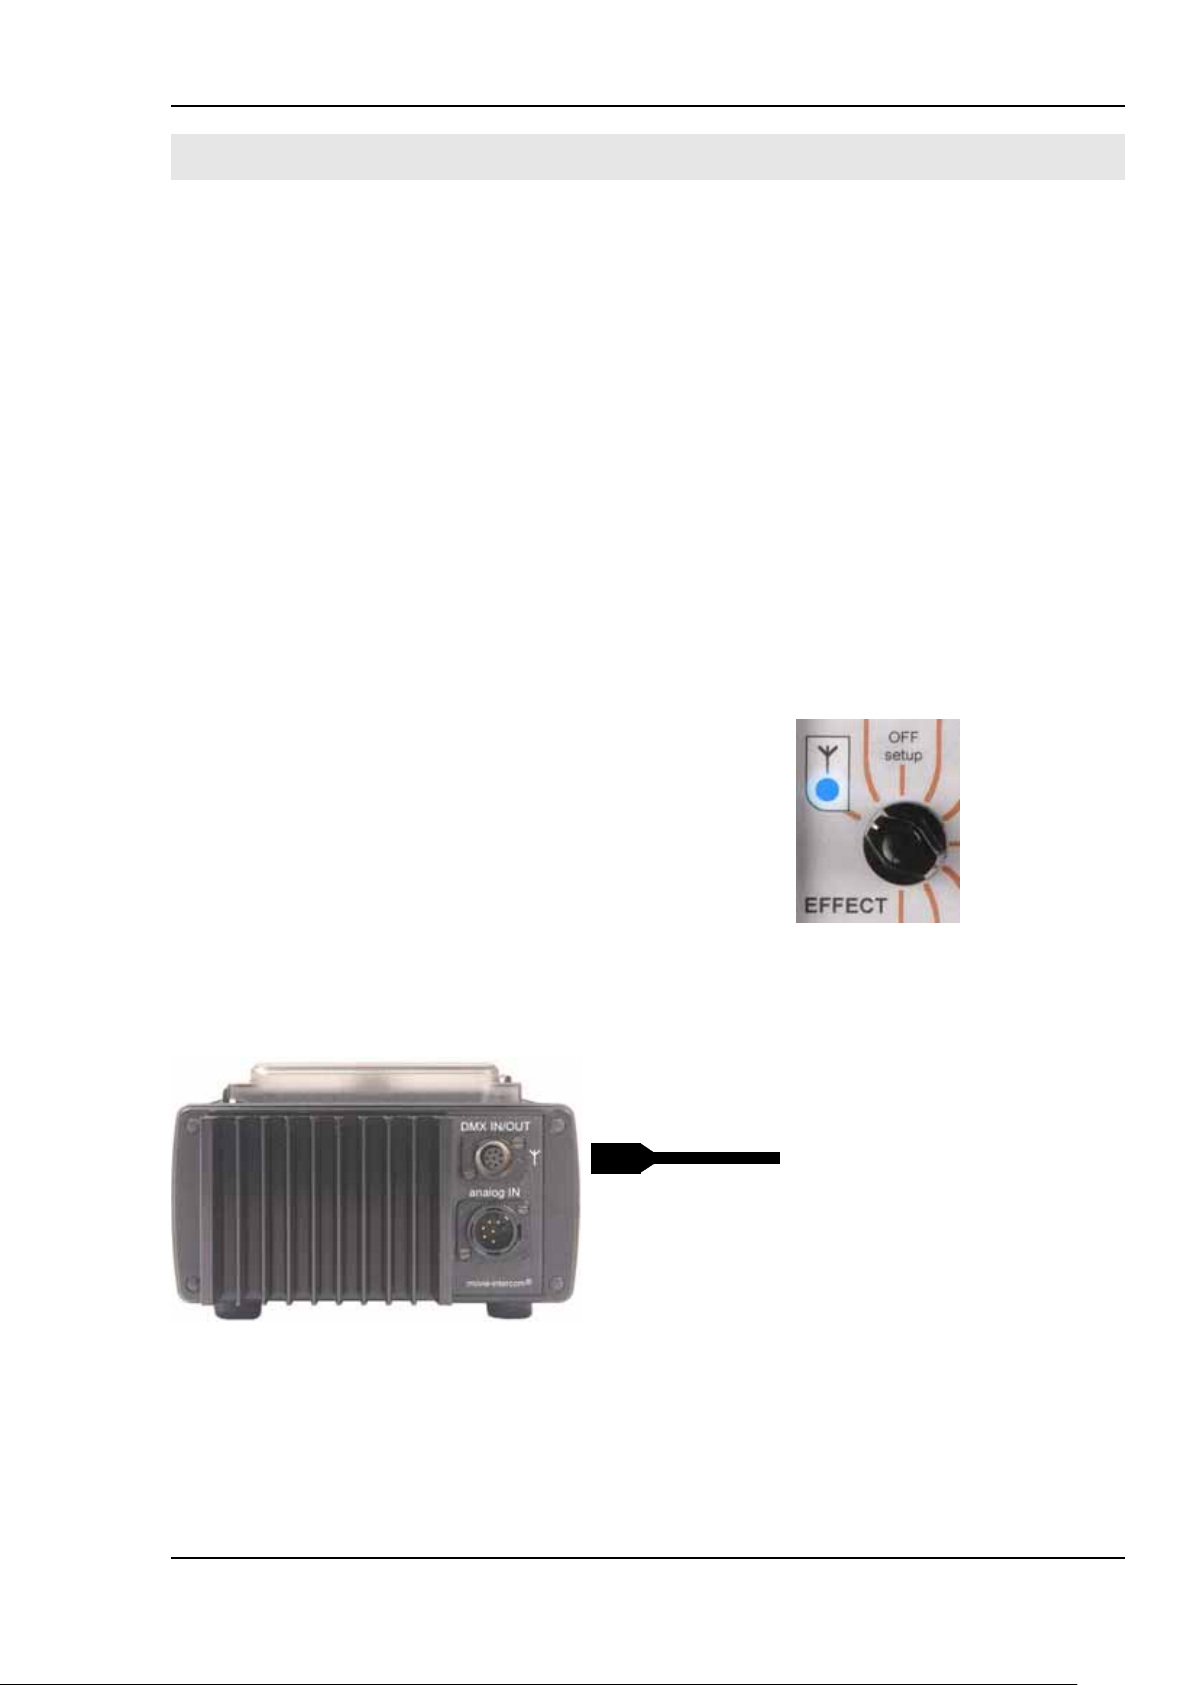
The plug of the DMX-TX module is self-locking.
To lock or unlock the plug please exclusively move the centre part of the plug (as marked below.)
The external DMX module is powered by the LFXHub.
connect DMX-TX module at the LFXHub
,
both arrows should
face to each other
2006-0410V1e http://www.movie-inter.com
Page 9
user manual DMX-TX module for the LFXHub
to table of content
page 9 of 16
6.
menu structure
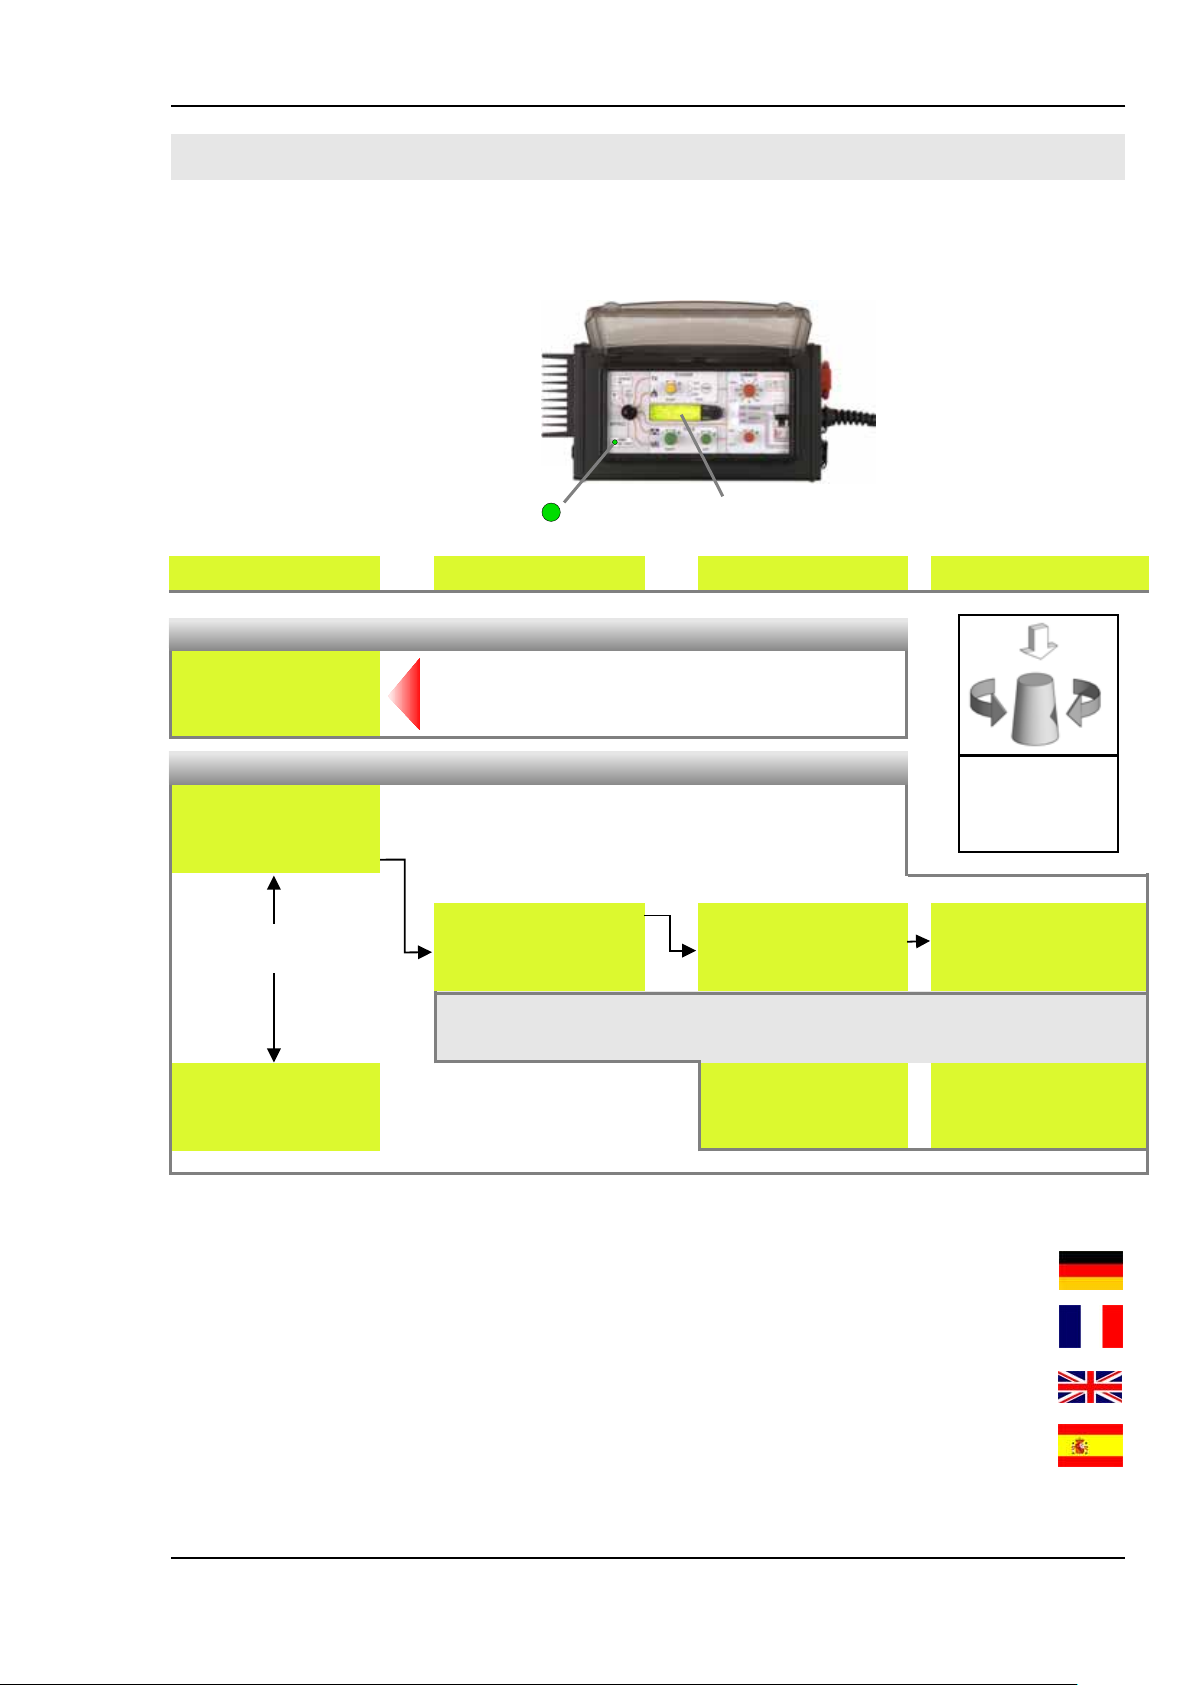
This menu is visible when the DMX-TX module is connected to "DMX IN/OUT" and the
rotary switch "EFFECT" is in position "DMX IN/OUT".
Ï
connection status LED
LCD menu level 1 LCD menu level 2 LCD menu level 3 LCD menu level 4
Ï
DMX IN/OUT
Please connect DMX
module at socket "DMX
IN/OUT" on your left
hand side!
no external LFX Tool
is connected at "analog IN":
green LED at LFXHub is flashing
LCD
DMX IN/OUT
CH1= 001 and 004
CH2= 002 and 005
CH3= 003 and 006
»change DMX-TX-ID
display alternates
every 5 sec
DMX-512 module
is connected
and controls
these DMX channels:
external DMX-TX module is connected:
green LED at LFXHub is steadily on
change DMX-ID: »help
CH1= 001 und 004
CH2= 002 und 005
CH3= 003 und 006 r
alert after invalid entries
of an DMX-ID...
help: change DMX-ID
1. turning JOG
selects digit
2. push JOG »
...if chosen DMX-ID is already in use:
Chosen DMX-ID is
already is use.
please change ID r
3. turning JOG
changes digit
4. pushing JOG
confirms digit r
... if chosen DMX-ID is not in
valid range between 001
and 512:
DMX-ID should have a
value between
001 and 512!
please change ID r
Red digits are variables and might show different values, depending on your settings.
Menu language
If the menu language of the LFXHub will be set to a certain language, the chosen languge will be displayed in the DMX menu either.
Please refer to the user manual of the LFXHub how to set up the menu language.
navigation
with the
Jogshuttle
Hint
A reset to factory settings of the LFXHub does not have an influence to the selected
language.
2006-0410V1e http://www.movie-inter.com
Page 10
user manualLFXHub
to table of content
user manual DMX-TX module for the LFXHub
externe Steuerung durch Zusatzgeräte über den Eingang "analog IN" (Fortsetzung)
14.
7.
Each DMX channel can be configured seperately.
The DMX-TX module transmitts up to six different DMX-IDs.
The three output channels of the LFXHub are transmitted twice, channels 4, 5 and 6 (as
shown in figure 1) have the same signal as the ID of the channels 1, 2 and 3.
For that reason two different DMX channels are controlled by a single output channel of
the LFXHub.
When the rotary switch "EFFECT" is on position "DMX IN/OUT" no lamp will be on.
setting up DMX channels
page 10 of 16
page 10 of 16
DMX
dimmer
figure 1 - setting up DMX channels
change DMX-ID menu selecton of a digit change value of digit
select a digit with the
JOG
 turn JOG
change DMX-ID: »help
CH1= 001 and 004
CH2= 002 and 005
CH3= 003 and 006 r
DMX line
 turn "EFFECT" to "DMX IN/OUT"
 push JOG
seleceted digit is flashing
underlined
(here: "1" of CH1)
 confirm selection
by pushing JOG
change DMX-ID: »help
CH1= 001111 and 004
CH2= 002 and 005
CH3= 003 and 006 r
DMX-TX module
CH1= 001 and 004
CH2= 002 and 005
CH3= 003 and 006
»change DMX-TX-ID
seleceted digit is
flashing bewteen the
arrows
 turning JOG
changes value
change DMX-ID: »help
CH1= 0❱11
CH2= 002 and 005
CH3= 003 and 006 r
11
❰ and 004
Ï
Ð
The procedure how to change a DMX-ID is described in
the built-in "help"-function of the LFXHub either.
Invalid entries of DMX-IDs will result in an alert in the dis-
play, the user will be prompted to change the ID.
 push JOG
confirms new ID
✔
☞ chapter 6, page 9 "alert during change of an DMX-ID"
Resetting DMX-IDs to factory settings
The DMX-TX module stores all set up DMX-addresses without any time limit.
Please consider:
The DMX-IDs are stored in the external module, not in the LFXHub.
We do recommend resetting to factory settings if the LFXHub is returned to the rental
house. Every lighting crew starts so with same conditions.
resetting LFXHub
to factory settings?
yes •No
DMX factory settings of all channels are shown in figure 1 above
2006-0410V1e http://www.movie-inter.com
1. turn "EFFECT" to position "OFF / set-up"
2. choose menu item
"basic settings" > "factory reset"
3. confirm with "yes"
Page 11
user manual DMX-TX module for the LFXHub
to table of content
page 11 of 16
8.
The functionality of the LFXHub is based upon software.
Additional software can be installed to the LFXHub to extend the functionality e.g....
 language packets
 functions with new features (e.g. DMX)
The required Software will be send via e-mail or will be shipped as a CD.
LFXHubs delivered after May 2006 are already equipped with the DMX software.
system requirements
 data cable for the LFXHub (optional available)
 PC with Windows 95 / 98 / 2000 / XP and serial interface (COM-port)
installation procedure
1. remove all external components from the LFXHub and disconnect loads
2. Plug in the data cable in socket "DMX IN/OUT" and
3. Connect the LFXHub with the power plug to stable 230 V /50 Hz
4. turn the rotary switch "EFFECT" to position "radio"
5. launch your PC and double click the EXE-database received
Upgrading the software of the LFXHub
of "POWER OUT".
connect the SUB-D plug of the data cable to a COM-port of the
PC.
power network.
from movie-intercom and follow the instructions.
Please be aware:
The power of your PC and the power of the LFXHub must not
be interrupted during the installation process.
connection of data cable at "DMX IN/OUT"
data cable
¢¡
COM-port
For detailed installation instructions please refer to the user manual delivered with the
data cable.
2006-0410V1e http://www.movie-inter.com
Page 12
user manual DMX-TX module for the LFXHub
to table of content
page 12 of 16
9.
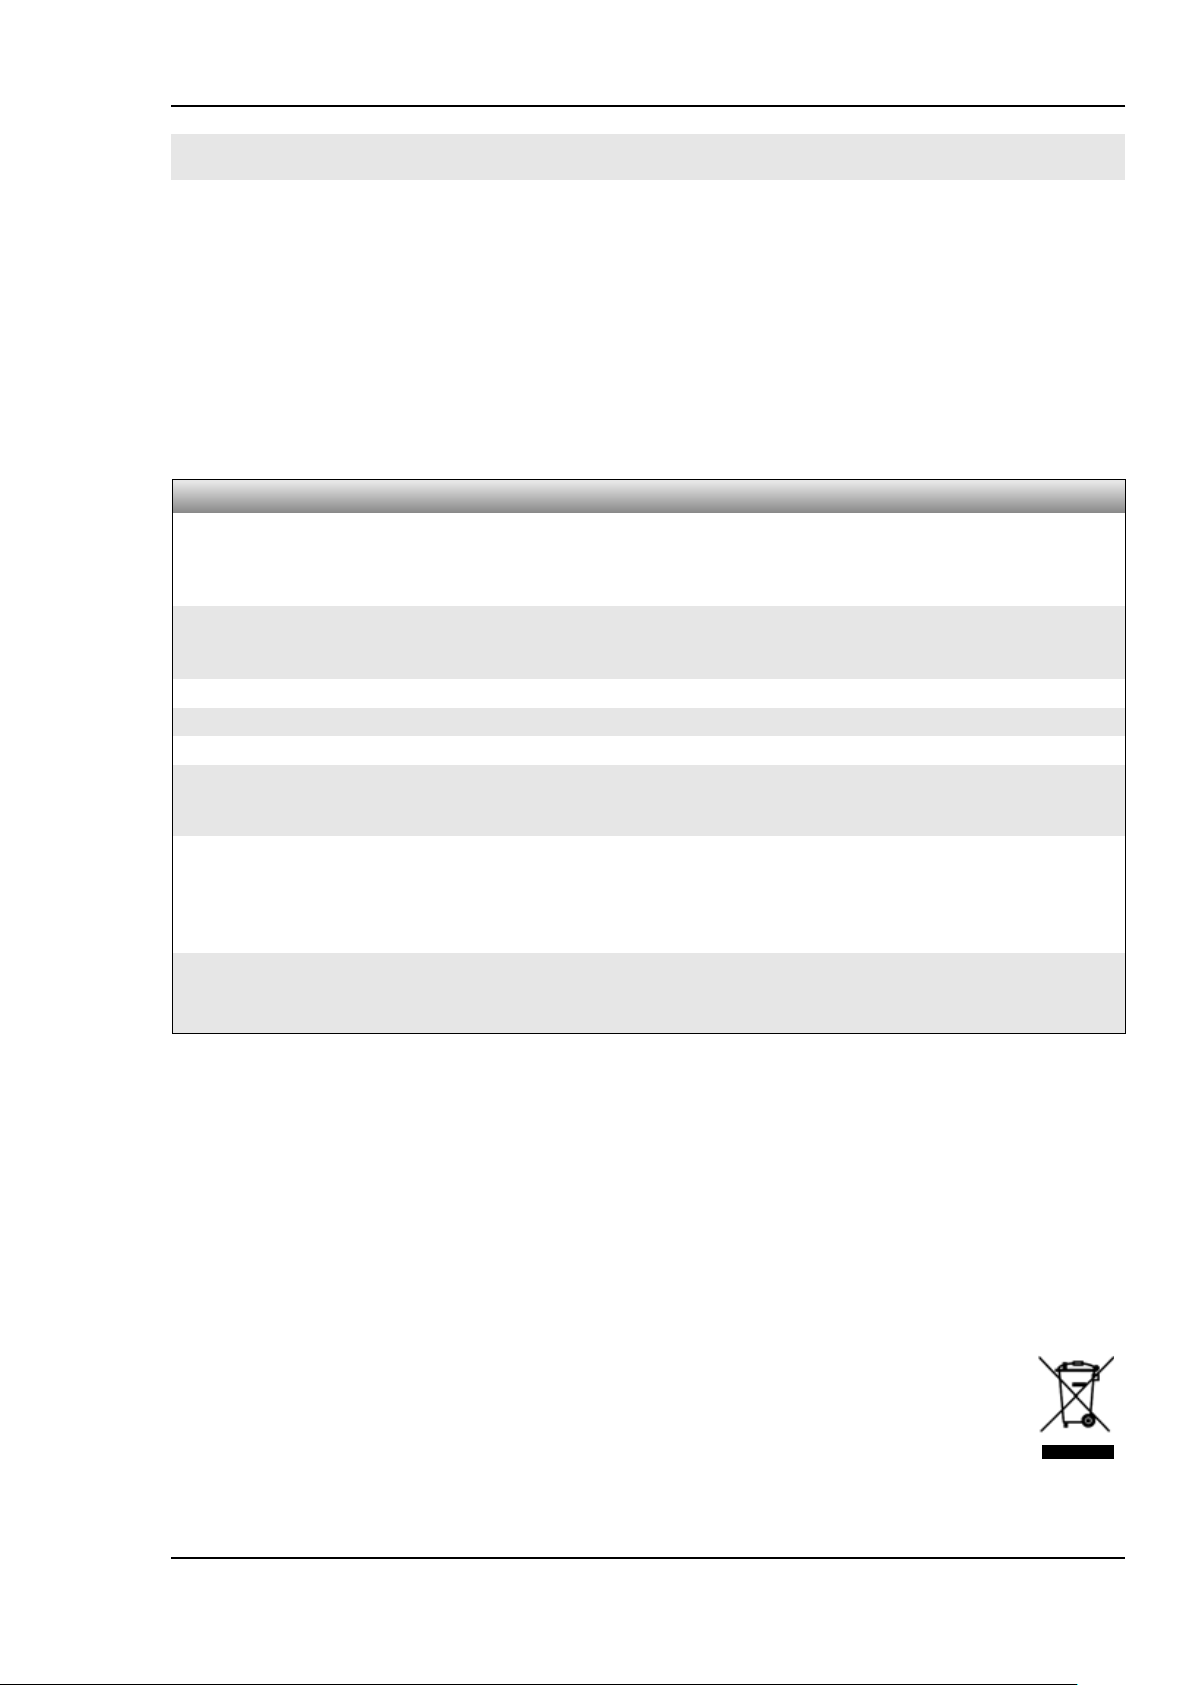
Possible problems using the LFXHub might be solved here.
Basic conditions for operation
1. The DMX-TX module and the LFXHub, especially the power cord, have no damages.
2. The operation voltage of the LFXHub is 220 - 240 VAC /50 Hz.
3. The built-in main fuse is turn on.
4. The DMX-TX Modul is properly connected to the socket "DMX IN/OUT" of the LFXHub.
In case of a malfunction of the LFXHub the internal fuse of the power supply could have been triggered.
This internal fuse is self resetting. Please wait 10 minutes and try again. Do not open the the LFXHub, it is
not necessary.
symptom possible fault solution
DMX module is not
identified by the LFXHub
a connected lamp of a
DMX dimmer pack will
not come on
a connected lamp at the
dimmer pack is still on
when the DMX-TX module is unplugged
the unit does not work
although all settings are
correct
Trouble shooting
the software of the LFXHub is not upgraded to
DMX
check if the LFXHubs´ software is ready for
DMX > page 6
DMX dimmer pack is not powered
connected lamp is switched off
connected lamp is broken
value of "Dimmer max." is too low
DMX-ID of the transmitter (LFXHub) is different
to DMX address of the dimmer pack
specifications of the dimmer pack manufacturer
might prevent the connected lamps from switching off.
Partially lamps will be dimmed to 50%. This effect is not part of the DMX-512 specifications.
Did you use the device in wet environment?
Humidity might be to strong inside the DMX-TX
module.
load latest software for the
LFXHub
> page 11
power up the DMX dimmer
pack
switch on lamp
exchange lamp
increase "Dimmer max."
set up DMX-ID
- at the LFXHub or
- at the dimmer pack
prior unplugging the DMX mo-
dule turn "EFFECT" to position
"OFF/set-up"
Leave the device dehumidify at
a warm and dry place for at
least one hour.
If you have a problem which can not be solved by this manual, please disconnect the DMX-TX module from the LFXHub / DMX line and contact movie-intercom.
cleaning the unit
ONLY clean the unit when disconnected completely from all cables!
Use a clean slightly wet cloth.
disposal
In order to avoid any possible effects resulting from the disposal of electrical an electronic equipment containing substances damaging the environment and human health, the European Parliament and Council directives
2002/96/EC on waste electrical and electronic equipment (WEEE) and
2002/95/EC on the restriction of the use of certain hazardous substances in electrical and electronic equipment (RoHS) have been transferred into national law in all EU member states.
The product you have purchased was developed in line with the current state of the art in an
environmentally friendly manner and with the view of recycling.
The product is labelled with the symbol illustrated above. If you wish to dispose this product,
this symbol obliges you to do so separately from industrial sorted waste.
Waste equipment should be shipped to movie-intercom. We will dispose the waste for you.
Electrical equipment does not belong in regular waste.
2006-0410V1e http://www.movie-inter.com
Page 13
user manual DMX-TX module for the LFXHub
to table of content
page 13 of 16
10.
Specifications
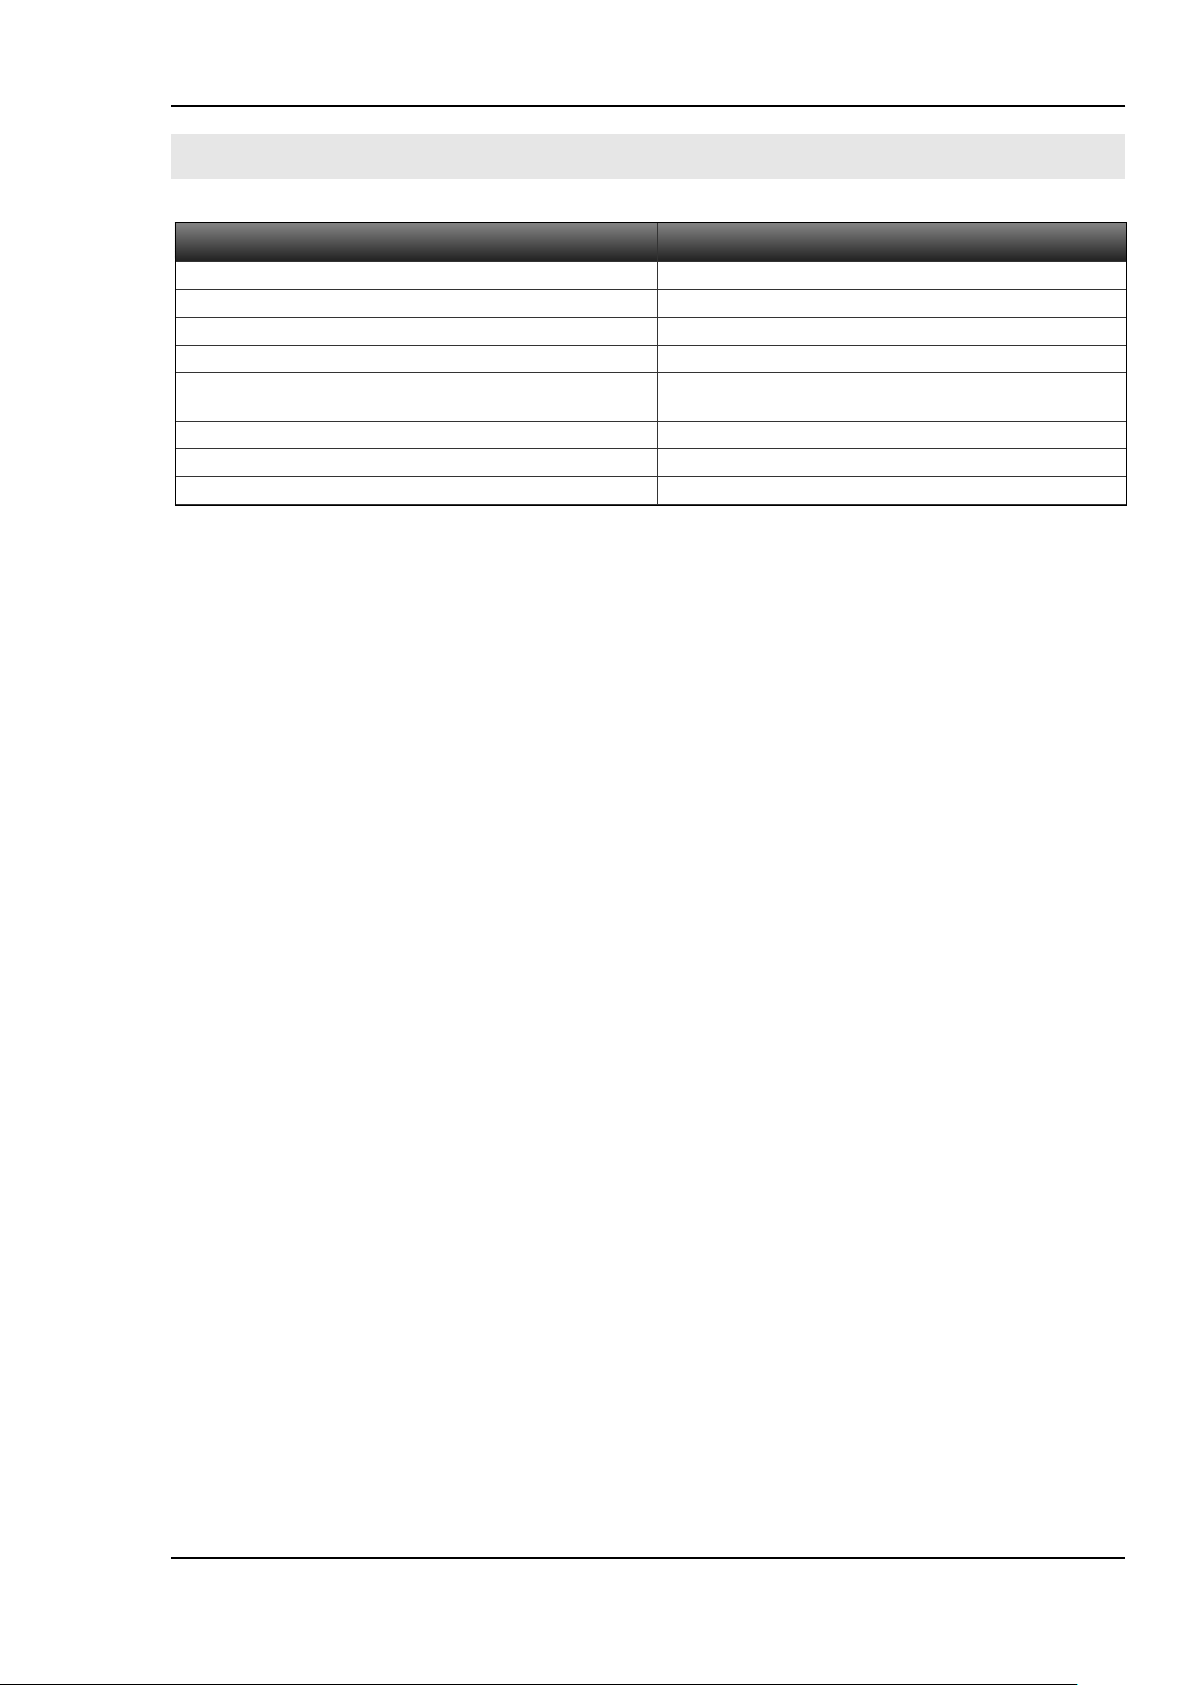
general
operation voltage
temperature range
dimensions (l x b x d)
weight
DMX output socket
DMX protocol
number of DMX channels
DMX channel selection range
5VDC (powered by the LFXHub)
-20°C ...50°C
125 x 61 x 26 mm (without cable)
220 grams
5-pin XLR ((Pin 1 ground, Pin 2 DMX-, Pin 3 DMX+,
Pins 4 and 5 not connected))
USITT DMX-512 (1990) / DIN 56930-2
six
001 to 512
2006-0410V1e http://www.movie-inter.com
Page 14
user manual DMX-TX module for the LFXHub
to table of content
page 14 of 16
11.
Do not hesitate to contat movie-intercom.
We are looking forward to answer your questions.
postal address movie-intercom
phone 24h / 7 days +49 (0)30 22 32 05 75
fax
Address / Support
Wegenerstr. 4
10713 Berlin
Germany
+49 (0)30 22 32 05 71
~
§
¨
e-mail
web http://www.movie-inter.com
@
Þßà
2006-0410V1e http://www.movie-inter.com
Page 15
g
g
pp
user manual DMX-TX module for the LFXHub
to table of content
page 15 of 16
12.
C channel set-up -page 10
D dimmer pack -page 5, 10
E
F
H
I
J
L
M
O
Q
R
S
Index
ABCDEFGHI JKLM
NOPQRSTUVWXYZ
connection to LFXHub -page 6
contact to movie-intercom -pa
displays -page 7
disposal -page 12
DMX -page 13
DMX-ID reset -page 10
DMX-ID set-up -page 10
EFFECT-rotary switch -page 10
factory reset -page 10
functional overview -page 6
help -page 12
included in delivery -page 6
Jogshuttle (JOG) -page 9,10,
language set-up -page 9
maintenance -page 12
menu structure -page 9
Multi-functional display -page 10
operation voltage -page 7
output channel confi
output socket DMX -page 7
quick start -page 5
rain, operation with- -page 4
rotary switch -page 10
safety instructions -page 4
serial number -page 7
software -page 6, 11
ort -page 14
su
uration -page 10
e 14
2006-0410V1e http://www.movie-inter.com
Page 16
www.lfxhub.com
 Loading...