

Page 1

全自动*地面清洁机器人
使用说明书
P50
*全自动:指自动洗拖布和自动集尘功能,且与前代本品牌扫地机器人产品相比,全自动综合效果更优异。
*本说明书图示仅供参考,实际外观请以实物为准。
P50 Ultra
Robot Vacuum and Mop with
Auto-Empty and Mop Self-Cleaning
User Manual
The illustrations in this manual are for reference only. Please refer to the actual product.
Page 2

Contents
EN
User Manual
DE
Benutzerhandbuch
FR
Manuel d'utilisation
IT
Manuale utente
ES
Manual de usuario
PL
Instrukcja obsługi
NL
Gebruikershandleiding
NO
Brukerhåndbok
SV
Användarmanual
Εγχειρίδιο χρήστη
EL
PT
Manual do utilizador
HE
שמתשמל ךירדמ
01
28
55
82
109
136
163
190
217
244
271
298
AR
325
Page 3

EN
Safety Information
To avoid electric shock, fire or injury caused by improper use of the appliance, please read the user manual carefully before using the
appliance and keep it for future reference.
·
Usage Restrictions
This product should not be used by children younger than 8 years old nor
persons with physical, sensory, intellectual deficiencies, or limited experience
or knowledge without the supervision of a parent or guardian to ensure safe
operation and to avoid any risks. Cleaning and maintenance shall not be
performed by children without supervision.
·
The appliance is only to be used with the power supply unit provided with the
appliance.
·
This appliance contains batteries that are only replaceable by skilled persons.
·
Clear the area to be cleaned. Children shall not play with the appliance.
Ensure children and pets are kept at a safe distance from the robot while it is
operating.
·
Do not install, charge or use the appliance in the bathrooms or around the
pools.
·
This product is for floor cleaning in a home environment only. Do not use it
outdoors, on non-floor surfaces, or in a commercial or industrial setting.
·
Ensure that the appliance operates correctly in a proper environment.
Otherwise, do not use the appliance.
·
If the power cord is damaged, it must be replaced by a special cord or
assembly available from the manufacturer or its service agent.
1
Page 4

Safety Information
Usage Restrictions
·
Do not use the robot in an area suspended above ground level without a
protective barrier.
·
Do not place the robot upside down. Do not use the LDS cover, robot cover, or
bumper as a handle for the robot.
·
Use the robot in environments with an ambient temperature above 0°C and
below 40°C. Make sure there is no liquid or sticky substance on the floor.
·
To prevent damage or harm from dragging, clear any loose objects from the
floor, and remove cables or power cords on the cleaning path before operating
the appliance.
·
Remove fragile or small items from the floor to prevent the robot from bumping
into and damaging them.
·
Keep hair, fingers, and other body parts away from the suction opening of the
robot.
·
Do not operate the appliance in a room where an infant or child is sleeping.
·
Do not place children, pets, or any item on top of the robot regardless of
whether it is stationary or moving.
·
Only clean water and the officially-approved cleaning solution can be added
to the clean water tank. Do not add any other liquid such as alcohol or
disinfectant. The ratio of the cleaning solution to clean water can be checked
on the cleaning solution bottle. Keep the cleaning solution out of reach of
children.
·
Do not use the robot to clean any burning objects. Do not use the robot to pick
EN
2
Page 5

EN
Safety Information
Usage Restrictions
Batteries and
Charging
3
up flammable or combustible liquids, corrosive gases, or undiluted acids or
solvents.
·
Do not vacuum hard or sharp objects. Do not use the appliance to pick up
objects such as stones, large pieces of paper or any item that may clog the
appliance.
·
Plug must be removed from the socket-outlet before cleaning or maintaining
the appliance.
·
Do not wipe the robot or the base station with a wet cloth or rinse them with
any liquid. After cleaning washable parts, fully dry the parts before reinstalling
and using them.
·
Please use this product in accordance with the instructions in the User Manual.
Users are responsible for any loss or damage that arise from improper use of
this product.
·
Do not use any third-party battery or base station. The robot can only be used
with the model RCPE0105 base station.
·
Do not attempt to disassemble, repair, or modify the battery or the base station
on your own.
·
Do not place the base station near a heat source.
·
Do not use a wet cloth or wet hands to wipe or clean the base station's
charging contacts.
Page 6

Safety Information
Batteries and
Charging
Laser Safety
Information
For indoor use only
Read operator's manual
·
Do not improperly dispose of old batteries. Unneeded batteries should be
discarded at an appropriate recycling facility.
·
If the power cord becomes damaged or broken, stop using it immediately and
contact after-sales service.
·
Make sure the robot is turned off when being transported and kept in its
original packaging if possible.
·
If the robot will not be used for an extended period of time, fully charge it, then
turn it off and store it in a cool, dry place. Recharge the robot at least once
every 3 months to avoid over-discharging the battery.
·
The laser sensor in this product meets the IEC 60825-1:2014/EN 60825-1:2014/
A11:2021 Standard for Class 1 laser products. Please avoid direct eye contact
with it during use.
CLASS 1 LASER PRODUCT
CONSUMER LASER PRODUCT
EN 50689:2021
EN
Hereby, Moonstone Technology (Shaoxing) Co., Ltd. declares that the radio equipment type RLP23SE is in compliance with Directive 2014/53/EU.
The full text of the EU declaration of conformity is available at the following internet address: www.mova-tech.com
For detailed e-manual, please go to https://www.mova-tech.com/pages/user-manuals-and-faqs
4
Page 7
EN
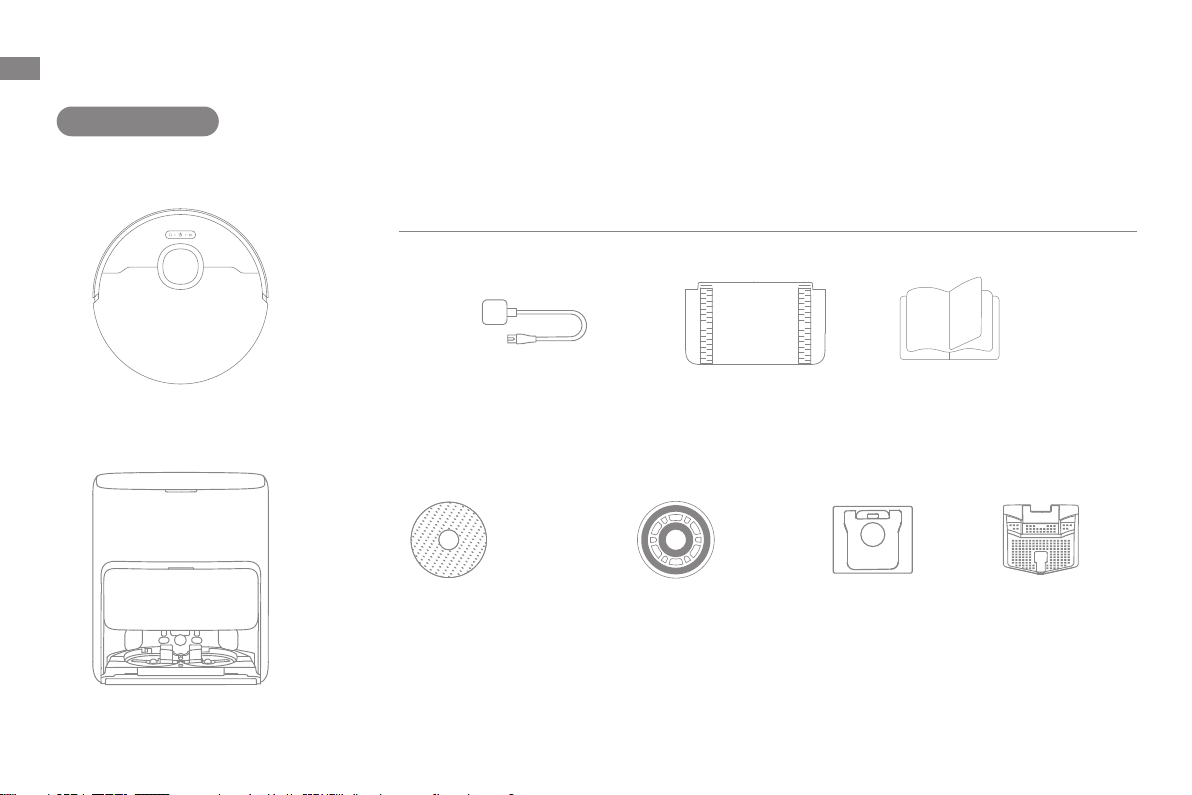
Product Overview
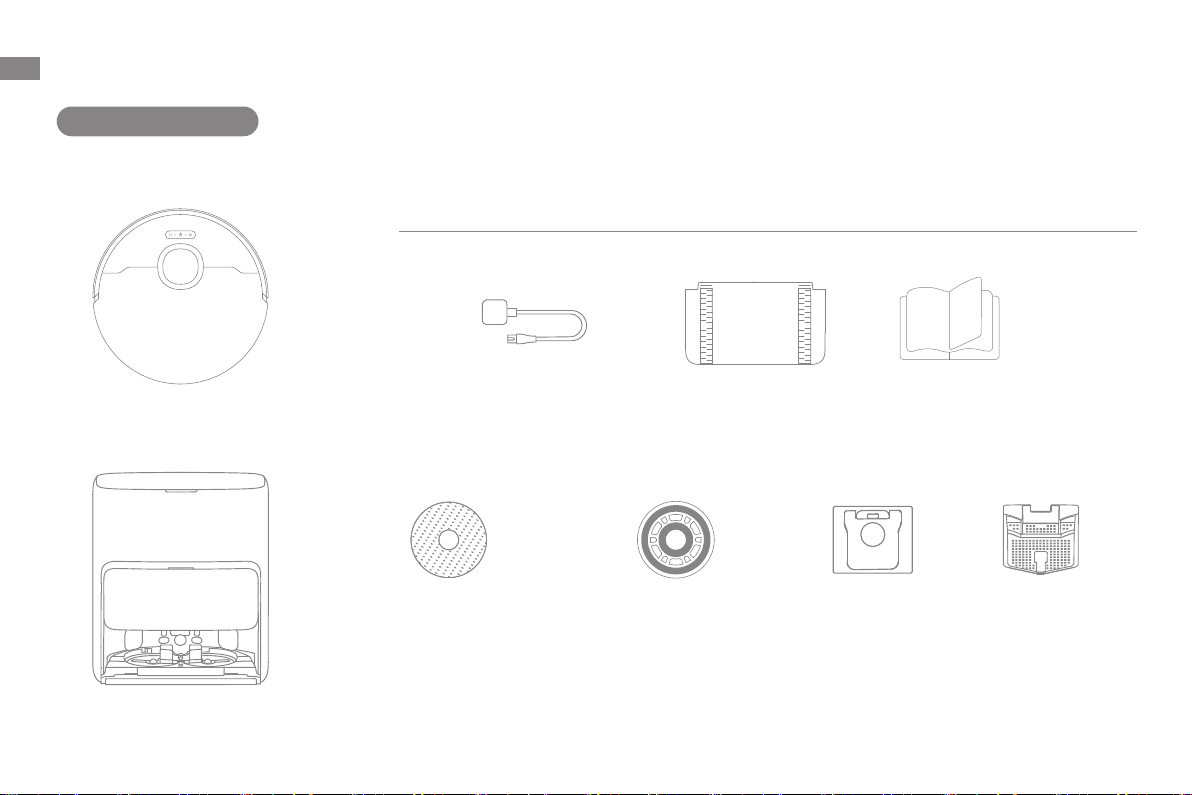
Package Contents
Other Accessories
Robot
Base Station
Mop Pad × 2
(pre-installed)
Mop Pad
Holder × 2
Extension Plate
Dust Bag
(pre-installed)
User ManualPower Cord Base Station Ramp
Washboard Filter
(pre-installed)
5
Page 8
EN
Product Overview
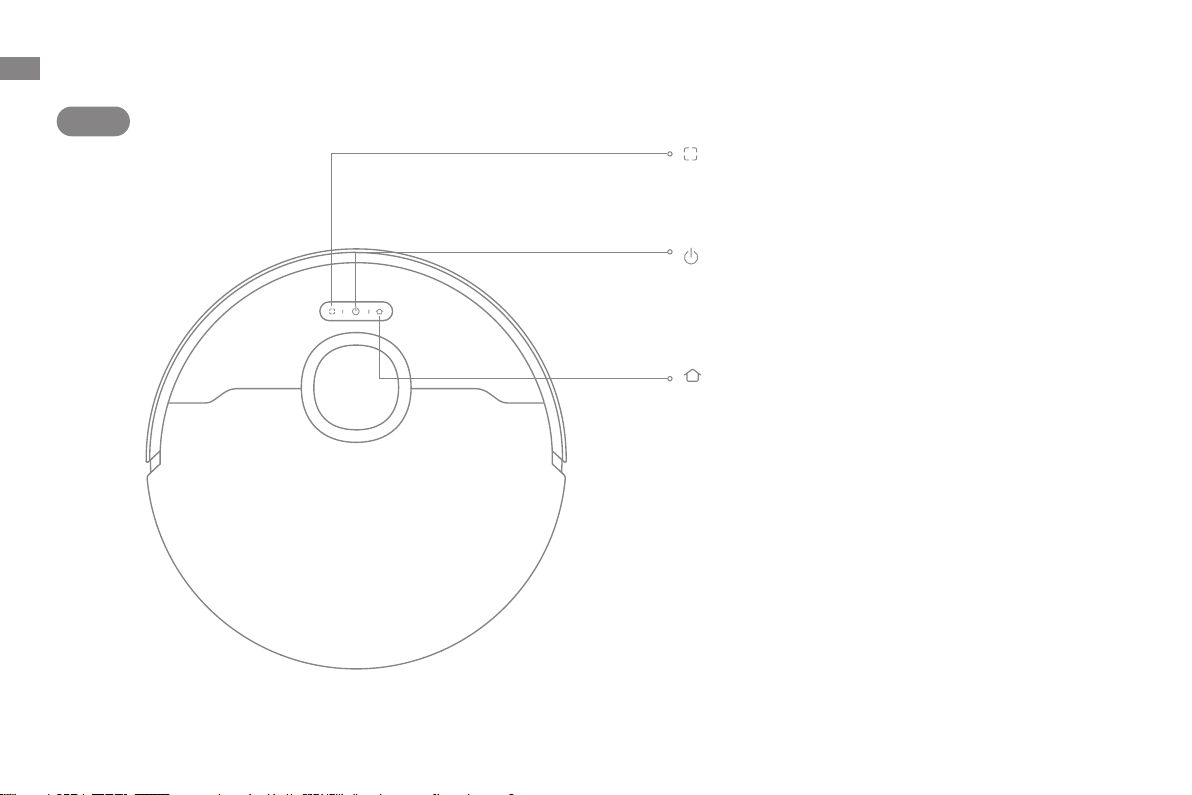
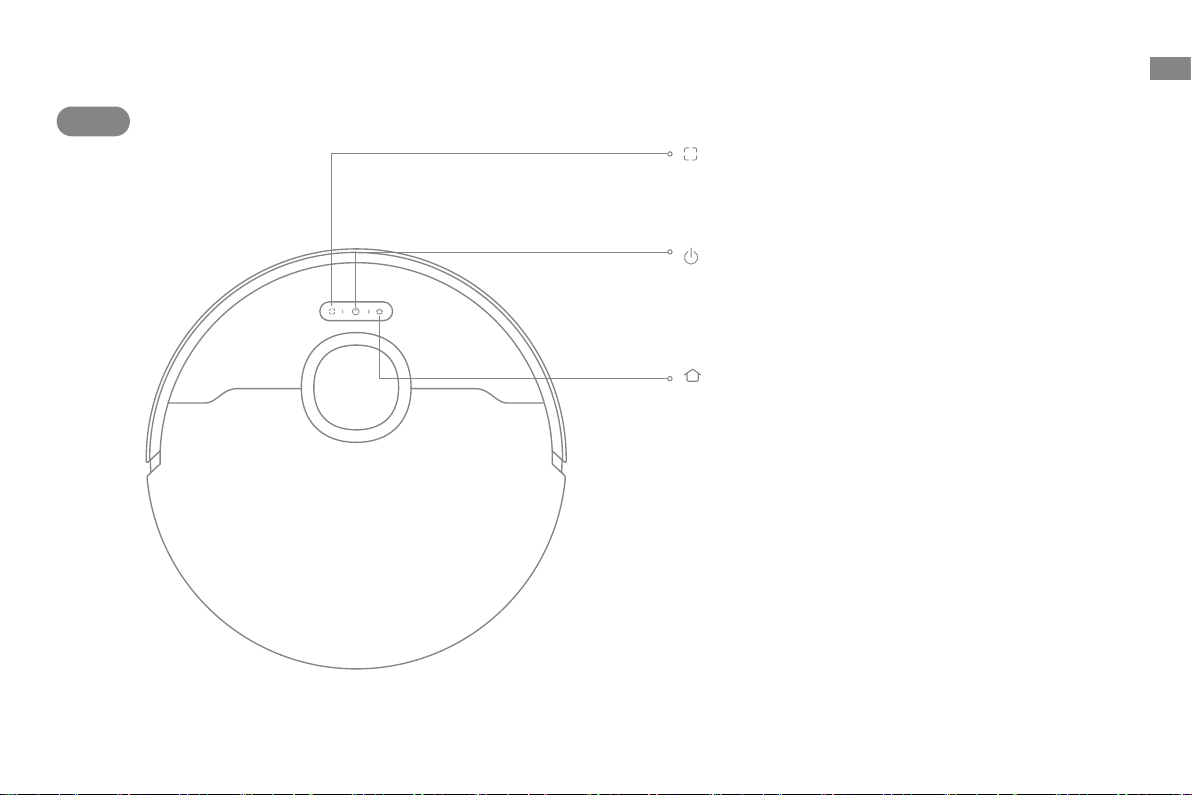
Robot
Spot Cleaning Button
· Press to start spot cleaning
Power / Clean Button
· Press and hold for 3 seconds to turn on or off
· Press to start cleaning after the robot is turned on
Dock Button
· Press to send the robot back to the base station
· Press and hold for 3 seconds to disable Child Lock
Status Indicator
· Solid White: Cleaning or cleanup completed
· Breathing White: Charging (not low battery)
· Solid Orange: Standby at low battery or paused at low battery
· Breathing Orange: Charging (low battery)
· Blinking Orange: Error
Note:
· Press any button on the robot to pause while the robot is cleaning
or returning to charge.
· Child Lock can be enabled/disabled through the MOVAhome app.
6
Page 9
Product Overview
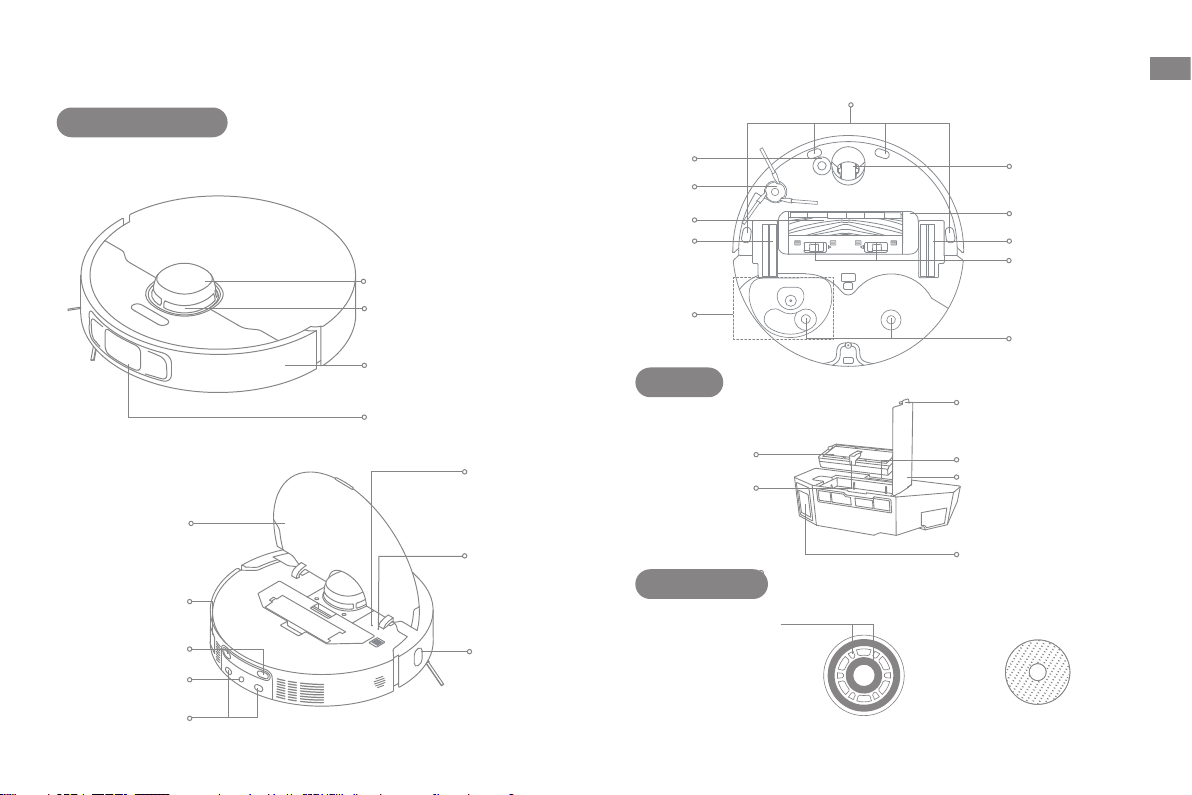
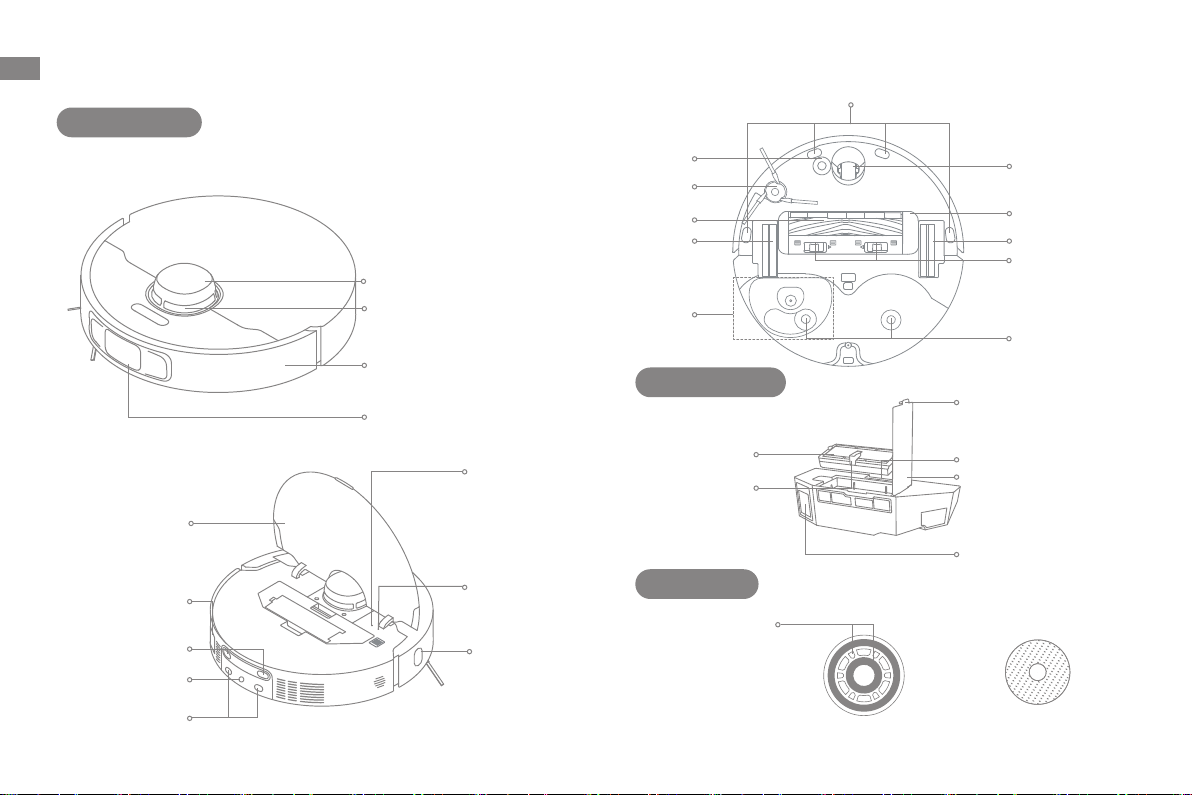
Robot and Sensors
Cli Sensors
EN
Cover
Auto-empty
Vent
Charging Contacts
Automatic Water
Refilling Inlet
Connectors
LDS Cover
Laser Distance
Sensor (LDS)
Bumper
3D Line Laser Sensor
Reset Button
· Press and hold for 3
seconds to restore to
factory settings
Wi-Fi Indicator
Edge Sensor
Carpet Sensor
Side Brush Extension
Assembly
Main Brush
Main Wheel
MopExtend
Assembly
Dust Box
Filter Handle
Mop Assembly
Attachment Area
Filter
Mop Pad
Omnidirectional
Wheel
Brush Guard
Main Wheel
Brush Guard Clips
Mop Pad Holder
Mounting Holes
Dust Box Cover Clip
Dust Box Clip
Dust Box Cover
Auto-empty Vent
Mop Pad Holder Mop Pad
7
Page 10
EN
Product Overview
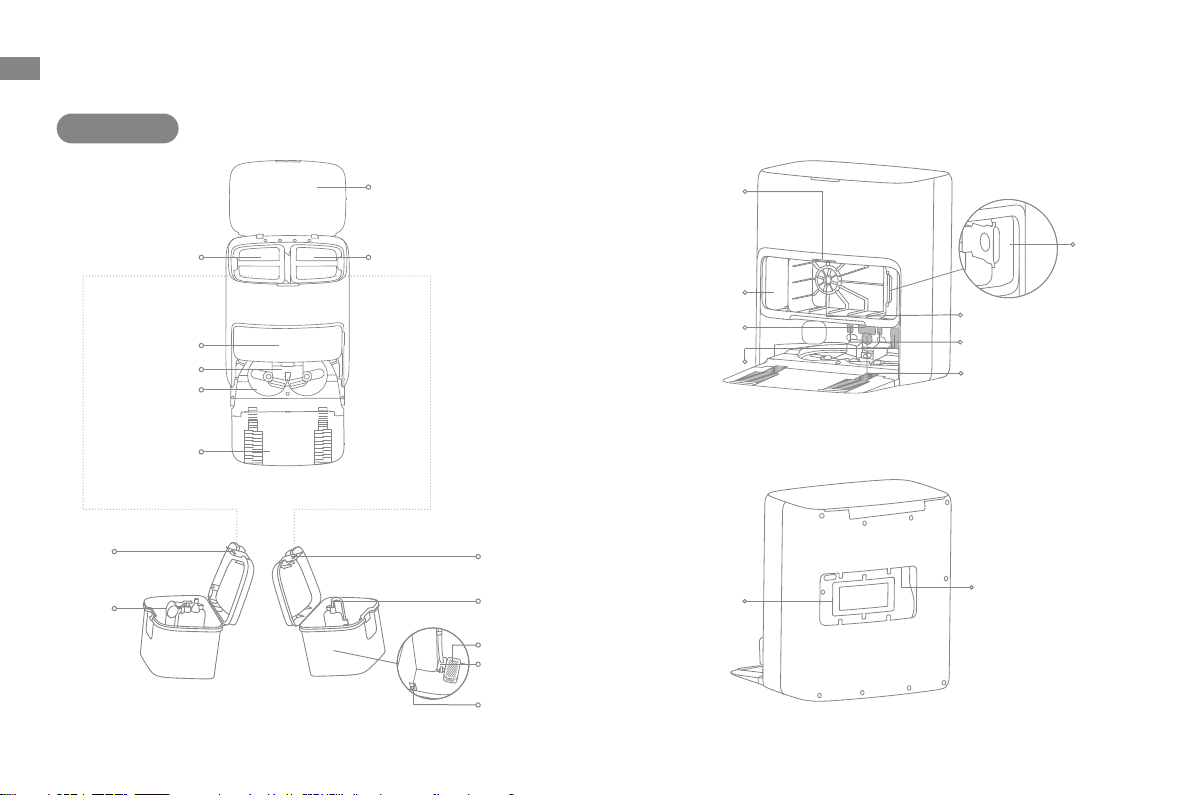
Base Station
Used Water Tank
Dust Tank Cover
Washboard Filter
Water Tank
Clip
Float Ball
8
Washboard
Ramp
Extension
Plate
Used Water Tank Clean Water Tank
Upper Cover
Clean Water Tank
Solid White: The base station
is connected to power
The base station has an error
Auto-Detergent Compartment
Water Tank Clip
Water Pipe
Scale Inhibitor
Filter
Floater
Reserved Slot for
Auto-empty Vent
Note: The auto-detergent compartment needs to be purchased separately.
Power Cord Storage Slot
Status Indicator
Solid Orange:
Signaling Area
Dust Bag
Slot
Filter
Charging Contacts
Automatic Water
Adding Outlet
Power Port
Page 11
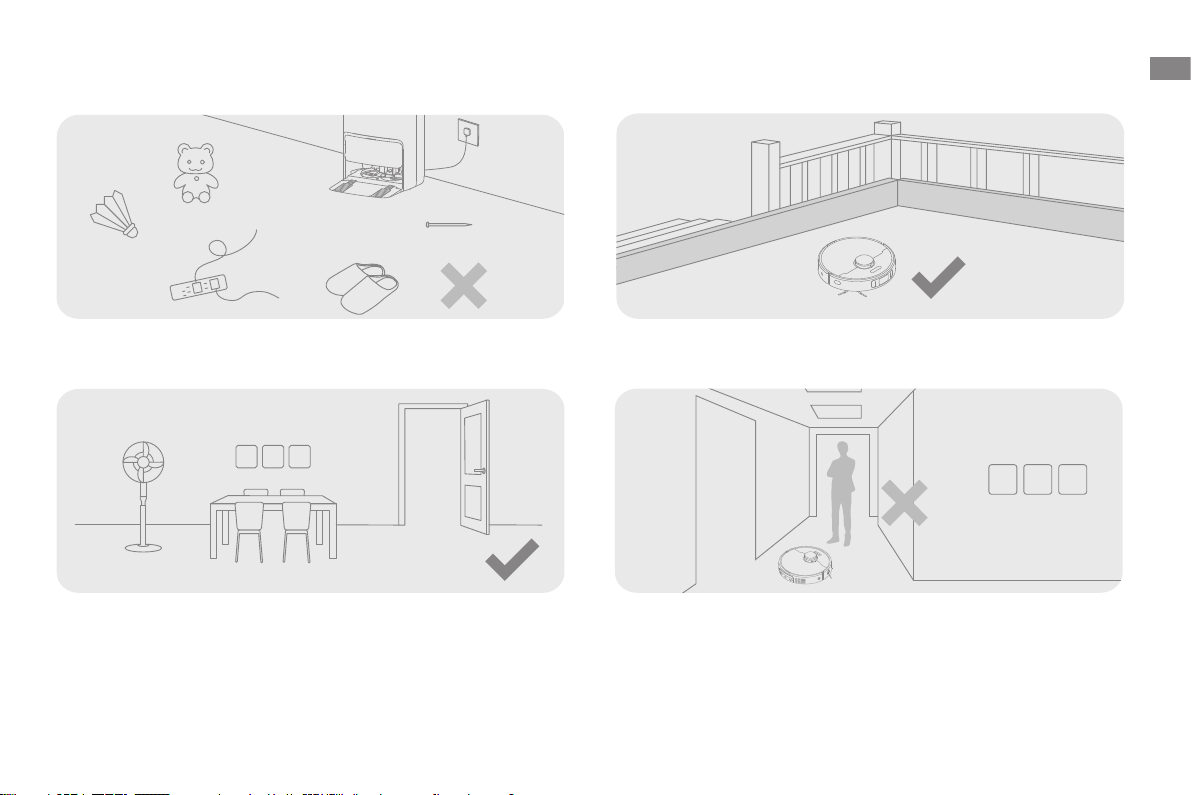
Preparing Your Home
EN
Before cleaning, please move away unstable, fragile, valuable or dangerous
items, and clean up cables, cloths, toys, hard objects and sharp objects on
the ground to avoid being entangled, scratched or knocked over by the robot
and causing losses.
Open the door of the room to be cleaned, and put the furniture in its proper
place to leave more space.
Note:
· When operating the robot for the first time, follow it around while cleaning to remove any potential obstacles in time.
· Do not vacuum hard objects like stones, steel balls and toy parts, or sharp objects like construction waste, broken glass and nails, otherwise the ground may be
scratched.
Before cleaning, place a physical barrier at the edge of the stairs to ensure
the secure and smooth operations of the robot.
To prevent the robot from not recognizing areas that need to be cleaned, do
not stand in front of the robot, threshold, hallway, or narrow places.
9
Page 12
EN
>1.5m
>5cm
>5cm
④
Before Use
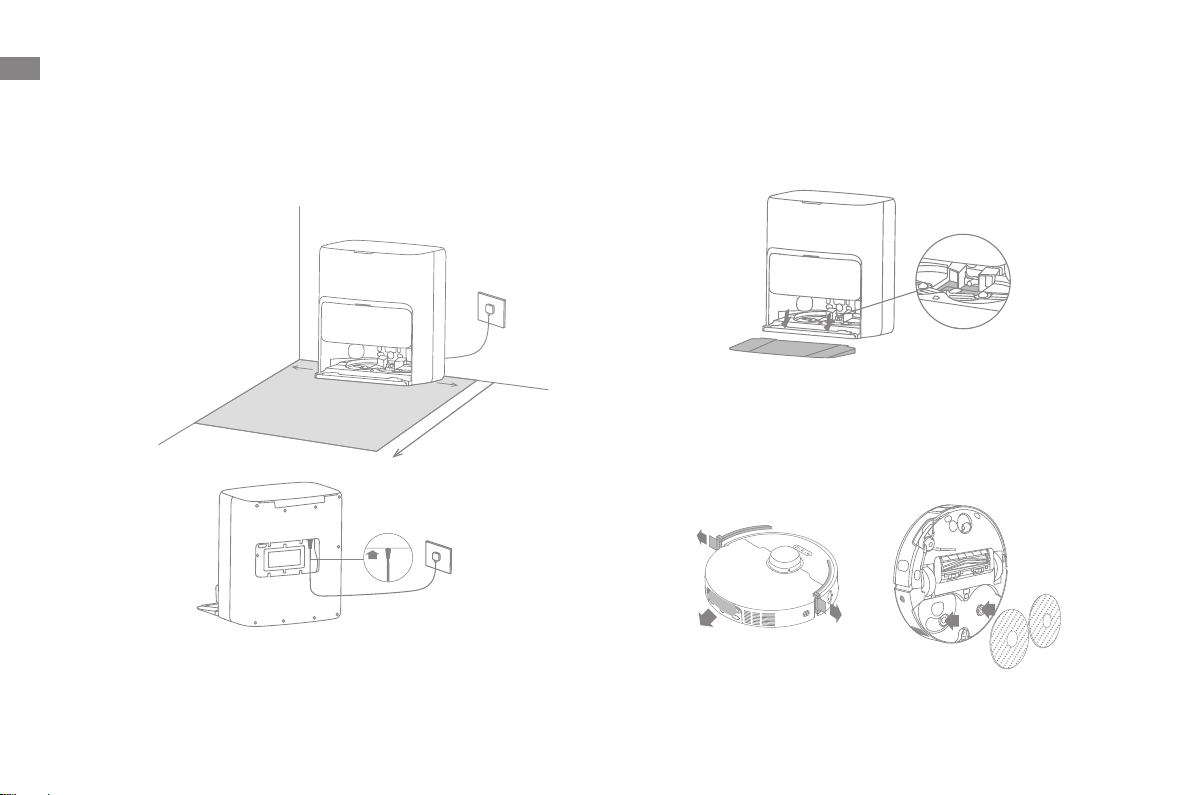
1. Place the Base Station and Connect to an Electrical Outlet
Place the base station in a location that is as open as possible with a good
Wi-Fi signal. Leave enough space as shown in the figure and remove any
objects in the shaded area. Insert the power cord into the base station and
plug it into the socket.
Firmly insert the power cord
upwards until the indicator turns on.
Note:
· Make sure that no objects might block the signaling area.
· To prevent water stains from wetting wood floors or carpets, placing the
base station on tile floors or marble floors is recommended.
2. Install the Ramp Extension Plate
Washboard Filter
Note: Ensure the washboard filter is installed into place.
3. Remove Robot Protections and Install the Mop Assembly
②
①
③
10
Page 13
Before Use
EN
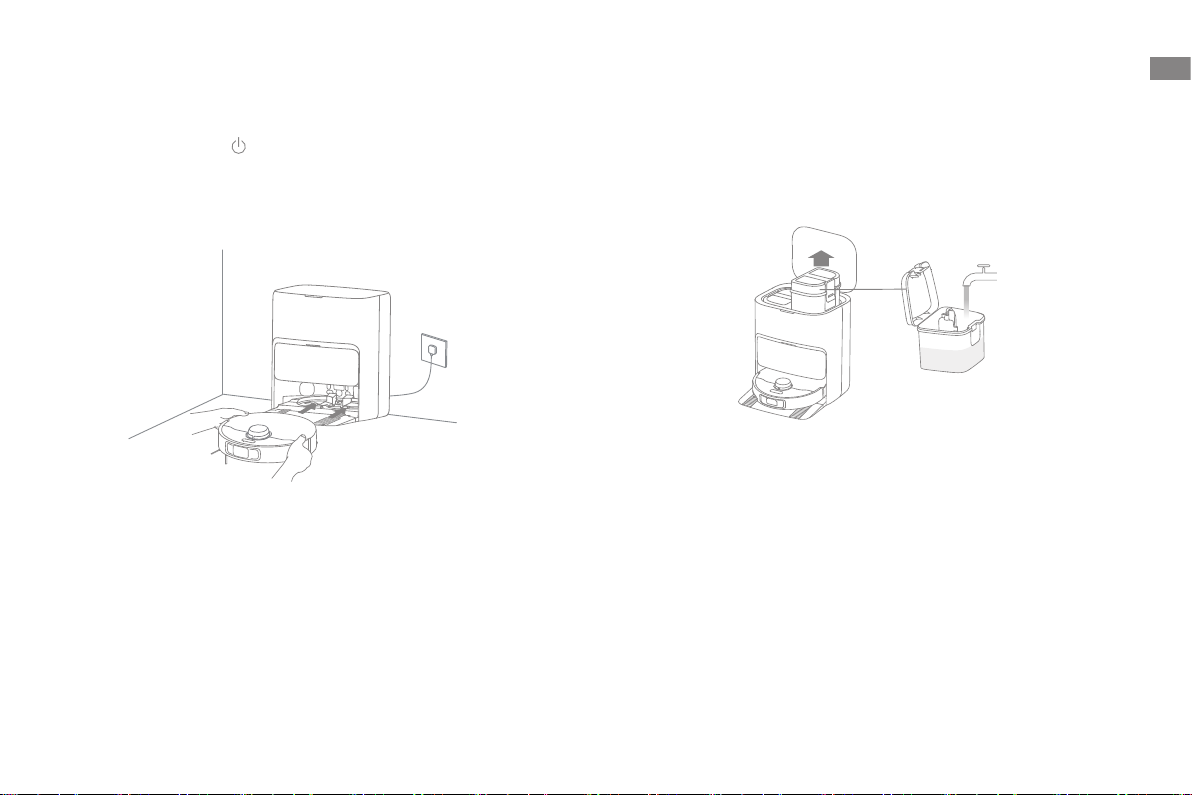
4. Connect the Robot to the Base Station
Press and hold the button on the robot for 3 seconds to turn it on. Place
the robot onto the base station with the mop assembly facing toward
the washboard. Then you will hear a voice notification when the robot
successfully connects to the base station. After the robot is fully charged,
the status indicators on the robot and the base station will remain lit for 10
minutes and then dim.
>1.5米
Note: It is recommended to fully charge the robot before its first use. When
the robot cannot be turned on after the battery is depleted, manually connect
the robot with the station to charge it.
5. Add Water to the Clean Water Tank
Take out the clean water tank from the base station and fill up the tank with
clean water. Then install it back into the base station.
Note: Do not add hot water into the water tank, as this may cause the tank to
become deformed.
11
Page 14
EN
Connecting with the MOVAhome App
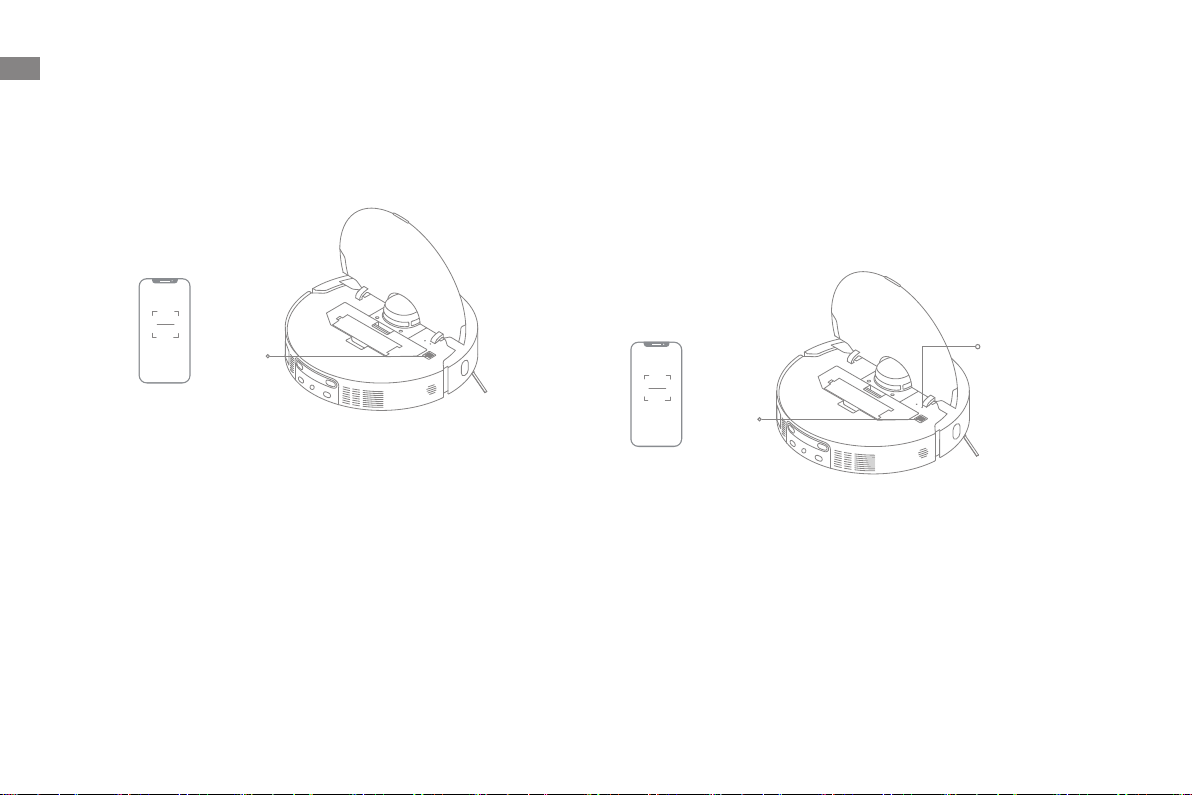
1. Download the MOVAhome App
Scan the QR code on the robot or search "MOVAhome" in the app store to
download and install the app.
QR Code
Note:
Only 2.4 GHz Wi-Fi is supported.
·
Due to upgrades in the app software, the actual operations may differ from
·
the directions in this manual. Please follow the instructions based on the
current app version.
2. Add Device
Open the MOVAhome App, tap "Scan QR code to connect", and scan the same QR
code on the robot again to add the device. Please follow the prompts to finish the
Wi-Fi connection.
Note: To reset Wi-Fi, repeat step 2 and then follow the prompts to finish the
Wi-Fi connection.
Wi-Fi Indicator
· Blinking slowly: To
be connected
QR Code
· Blinking quickly:
Connecting
· On: Connected
12
Page 15

How to Use
EN
Turn On/O
Press and hold the button for 3 seconds to turn on the robot. The power
indicator should be illuminated. Place the robot onto the base station, the
robot should turn on automatically and begin charging. To turn o the robot,
move the robot away from the base station and press and hold the button
for 3 seconds.
Fast Mapping
After configuring the network for the first time, follow the instructions in the
app to quickly create a map. The robot will start mapping without cleaning.
When the robot returns to the base station, the mapping process has been
completed and the map will be saved automatically.
Pause/Sleep
When the robot is running, press any button to pause it. If the robot is paused
for more than 10 minutes, it automatically enters sleep mode. All indicators on
the robot will turn o. Press any button on the robot, or use the app to wake up
the robot.
Note: If the robot is paused and placed onto the base station, the current
cleaning process will end.
Auto Resume Cleaning
If the battery is too low, the robot will automatically return to the base station
to charge. After charging to the appropriate battery level, it will resume
unfinished cleaning tasks.
Do Not Disturb (DND) Mode
When the robot is set to the Do Not Disturb (DND) mode, the robot will be
prevented from resuming cleaning. The DND mode is disabled by default at
the factory. You can use the app to enable the DND mode or modify the DND
period. The DND period is 22:00-8:00 by default.
Note:
The scheduled cleaning tasks will be performed as usual during the DND
·
period.
The robot will resume cleanup where it left off after the DND period expires.
·
Spot Cleaning
When the robot is on standby, press briefly the button to enable the spot
cleaning mode. In this mode, the robot cleans a square-shaped area of 1.5 ×
1.5 meters around it and returns to its starting point once the spot cleaning is
completed.
Robot Restarting
If the robot stops responding or cannot be turned o, press and hold the
button for 10 seconds to forcefully turn it o. Then, press and hold the
button for 3 seconds to turn the robot on.
Note: To use this function, please enable it in the app.
13
Page 16
EN
How to Use
Vacuum and Mop
Note: When using the mop assembly for the first time, the robot performs the
"Vacuum and Mop" task by default.
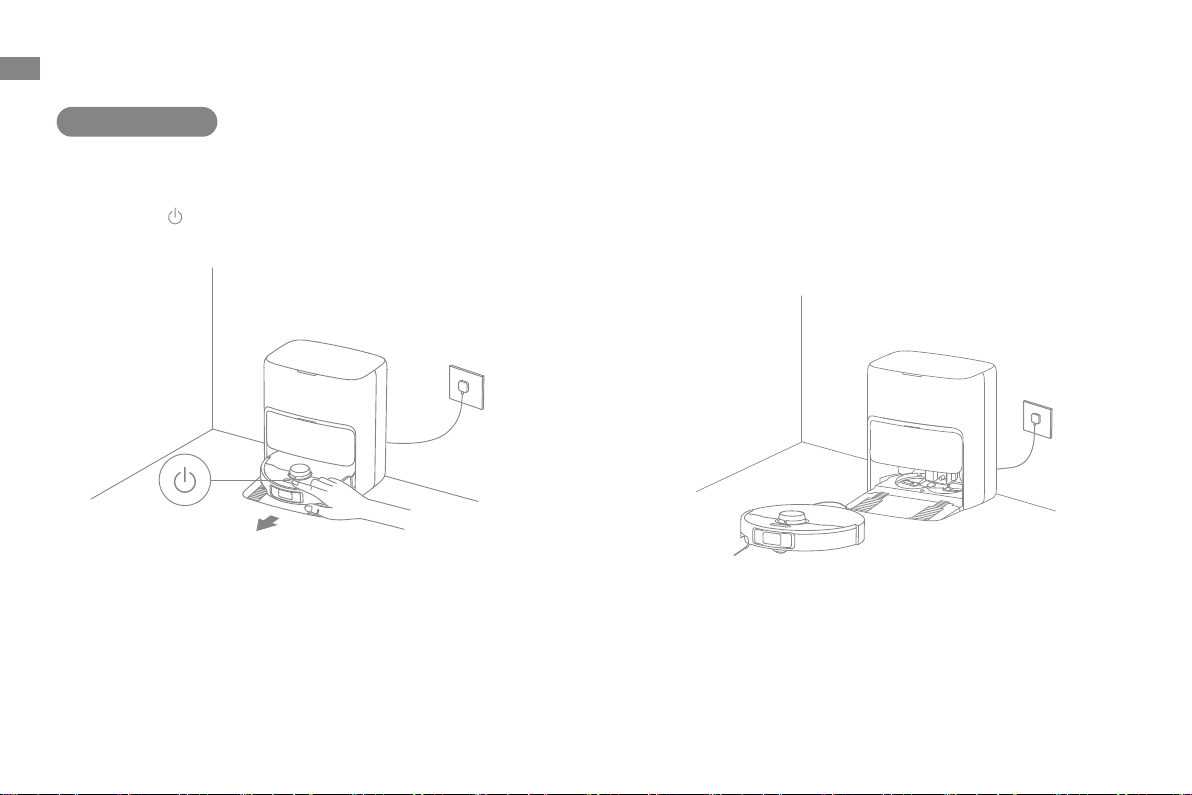
1. Start cleaning
Press the button on the robot, or use the app to make the robot start from
the base station. Then the robot will plan the optimal cleaning route and
perform the cleaning task based on the created map.
Note:
To ensure the robot easily returns to the base station after cleaning, it is
·
recommended to make the robot start from the base station.
The mop pads will be cleaned before the robot starts mopping, please wait
·
patiently.
Do not move the base station, the clean water tank, the used water tank, or
·
the washboard filter during operation.
Hot water cleaning can be enabled in the app for mop pad, which applies
·
to all modes. To prevent scalding, do not touch the water outlet when the
function is on.
2. Auto mop washing
When cleaning, the robot will automatically return to the base station to wash
mop pads based on the mop pad cleaning frequency specified in the app.
The base station will automatically refill the robot's water tank and the robot
will resume cleanup.
14
Page 17
How to Use
EN
3. Automatically empty the dust box and wash and dry the mop
pads
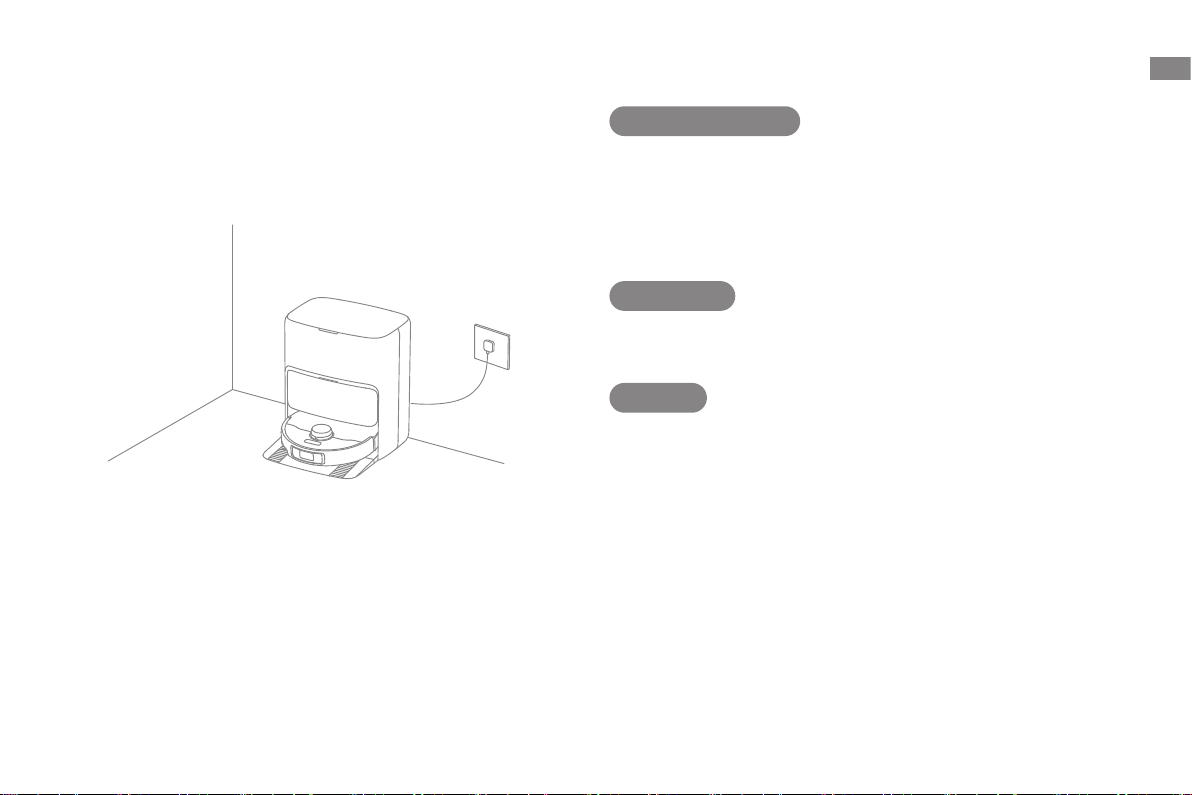
After the robot finishes a cleaning task and returns to the base station to
charge, the base station will automatically start emptying the dust box. Then
it will wash and dry the mop pads.
Note:
If the auto-empty function is turned off in the app, the base station will not
·
automatically empty the dust box.
The base station will empty the dust box according to the setting in the app.
·
4. Clean the used water tank
After the robot has completed its task, please clean the used water tank to
prevent any odor.
Mop after Vacuuming
Enable the mopping after vacuuming function in the app, and the robot will
automatically lift the mop assembly to vacuum the floor. After vacuuming is
completed, the robot will return to empty the dust box and then start mopping
after lowering the mop assembly and raising the side brush.
Vacuum Only
Enable the vacuuming function in the app, and the robot will automatically lift
the mop assembly and start vacuuming.
Mop Only
Enable the mopping function in the app, and the robot will check if the mop
assembly is installed. If not, manually install the mop assembly, and then the
robot will automatically start mopping after raising the side brush.
15
Page 18
EN
Routine Maintenance
Parts
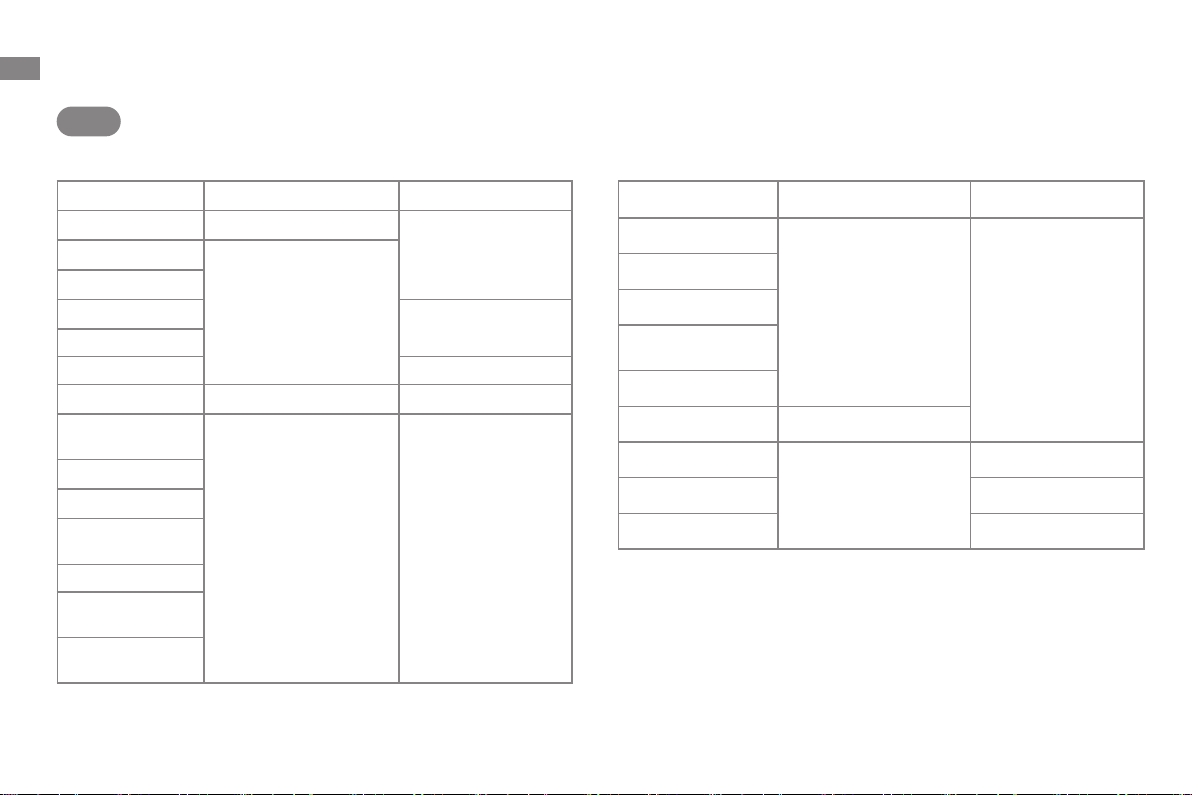
To keep the robot in good condition, it is recommended to refer to the accessory usage in the app or the following table for routine maintenance.
Par t Maintenance Frequency Replacement Period
Used water tank After each use
/Clean water tank
Main brush
Dust box's filter
Side brush
Mop pad holder /
Washboard filter Once every 1 to 2 months /
Base station's
signaling area
Charging contact
Auto-empty vent
Omnidirectional
wheel
Edge sensor
Laser Distance
Sensor (LDS)
3D line laser
sensor
Once every 2 weeks
Once every month /
Every 3 to 6 months
16
Par t Maintenance Frequency Replacement Period
Carpet sensor
Cli sensor
Bumper
Robot's automatic
water refilling inlet
Bottom of the robot
Dust box Clean it as needed
Dust bag
Mop pad Every 1 to 3 months
Scale inhibitor Every 18 to 36 months
Note: The replacement frequency will depend on your usage of the robot.
If an exception occurs due to special circumstances, the parts should be
replaced.
Once every month
/
Every 2 to 4 months
/
Page 19
Routine Maintenance
>1.5米
Washboard Filter
EN
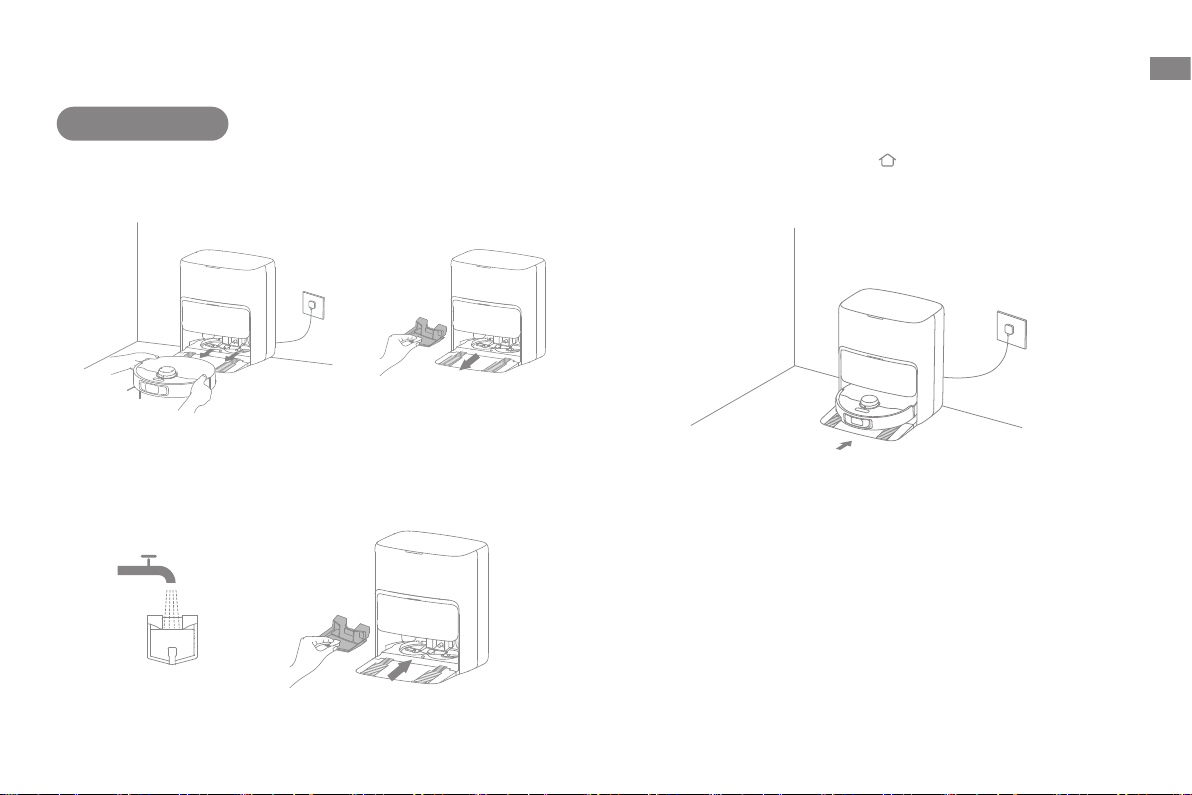
1. Take out the robot and remove the washboard lter after the mop
pad cleaning is complete.
2. Rinse the washboard lter with clean water, wipe it clean, and
then reinstall it in the washboard.
3. Use the app or press the button to return the robot to the base
station, or manually put the robot back.
17
Page 20
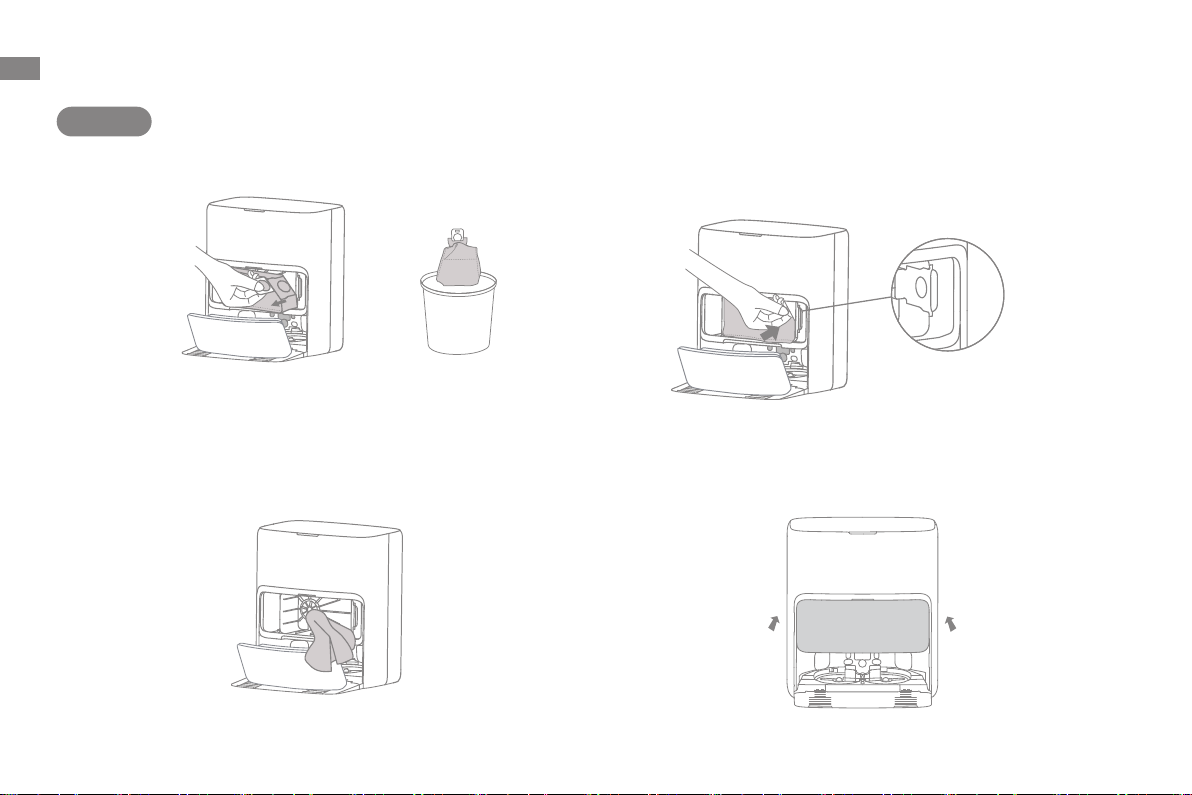
EN
Routine Maintenance
Dust Bag
1. Remove the dust tank cover and discard the dust bag.
Note: Pulling upwards on the handle will seal the bag to prevent the dust and
debris from accidentally falling out.
3. Install a new dust bag.
2. Remove the dust and debris from the filter with a dry cloth.
18
4. Reinstall the dust tank cover.
Page 21
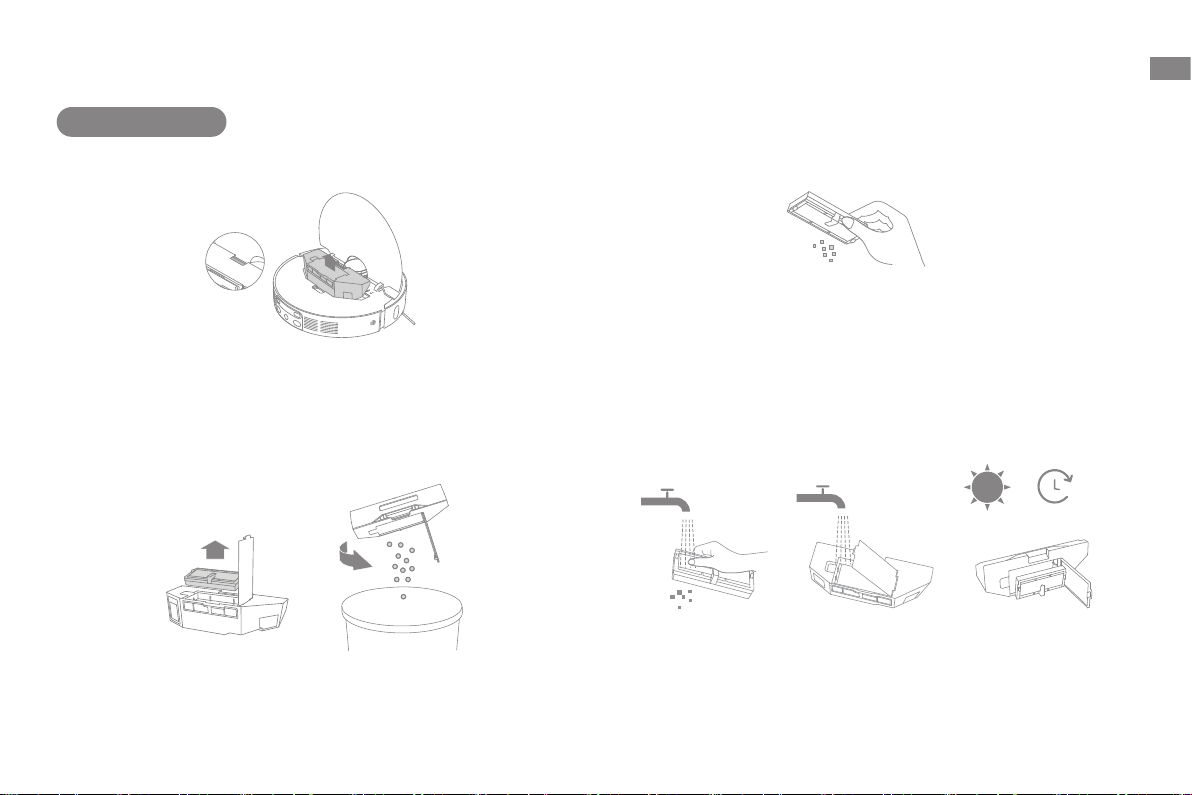
Routine Maintenance
EN
Dust Box and Filter
1. Open the robot cover and press the dust box clip to remove the dust box.
2. Open the dust box cover, remove the filter, and then empty the dust box as
shown in the figure.
3. Gently tap the basket of the filter to remove the dirt.
Note: Do not attempt to clean the filter with a brush, a finger or sharp objects
to prevent damage.
4. Rinse the dust box and filter with water and dry them completely before
reinstalling.
24h
Note:
Rinse the dust box and filter with clean water only. Do not use any detergent.
·
Use the dust box and filter only when they are completely dry.
·
19
Page 22
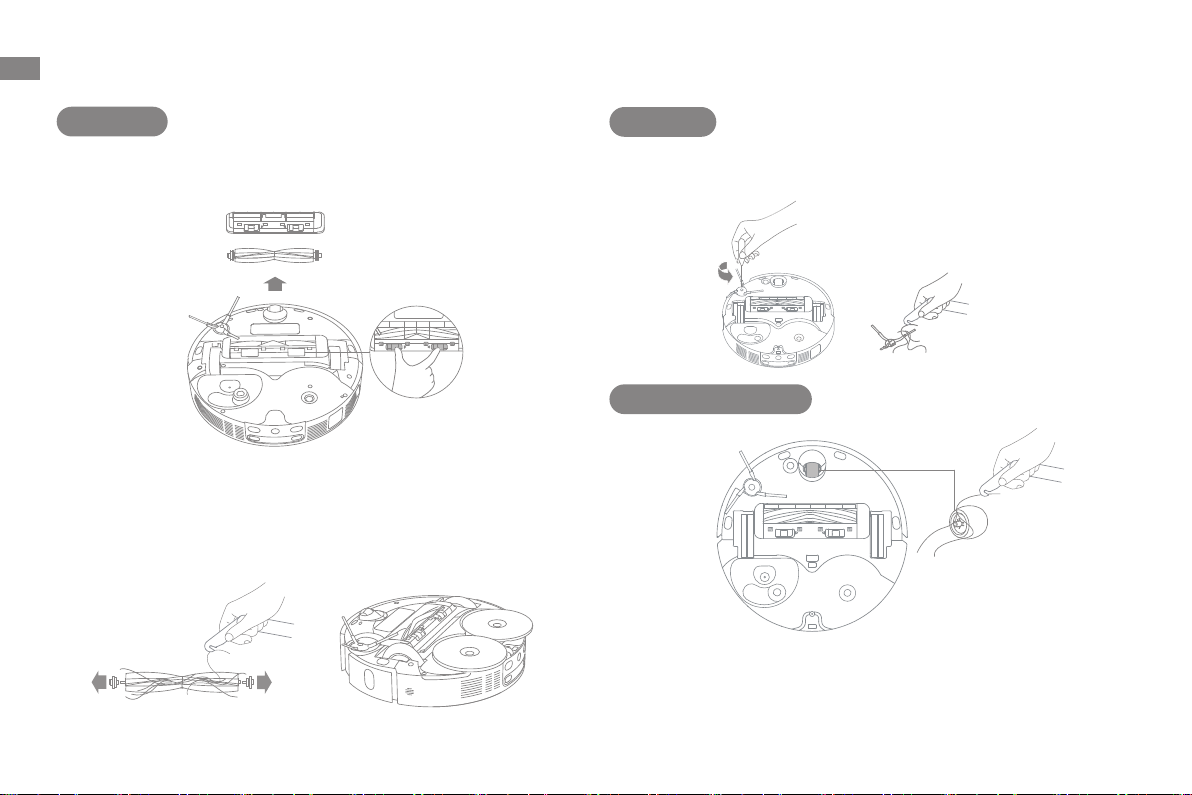
EN
Routine Maintenance
Main Brush
1. Press the brush guard clips inwards to remove the brush guard and lift the
brush out of the robot.
2. Pull out the brush covers at both ends of the brush as shown in the figure.
Use a proper cleaning tool to remove any hair tangled in the brush. Reinstall
the brush covers on both ends of the brush, and then reinstall the brush.
Press on the brush guard to lock it in place.
20
Side Brush
Unscrew the side brush with a screwdriver, clean the hair from the brush, and
then screw it back on.
Omnidirectional Wheel
Note:
Use a tool such as a small screwdriver to separate the axle and tire of the
·
omnidirectional wheel. Do not use excessive force.
Rinse the omnidirectional wheel under the running water and put it back
·
after drying it completely.
Page 23
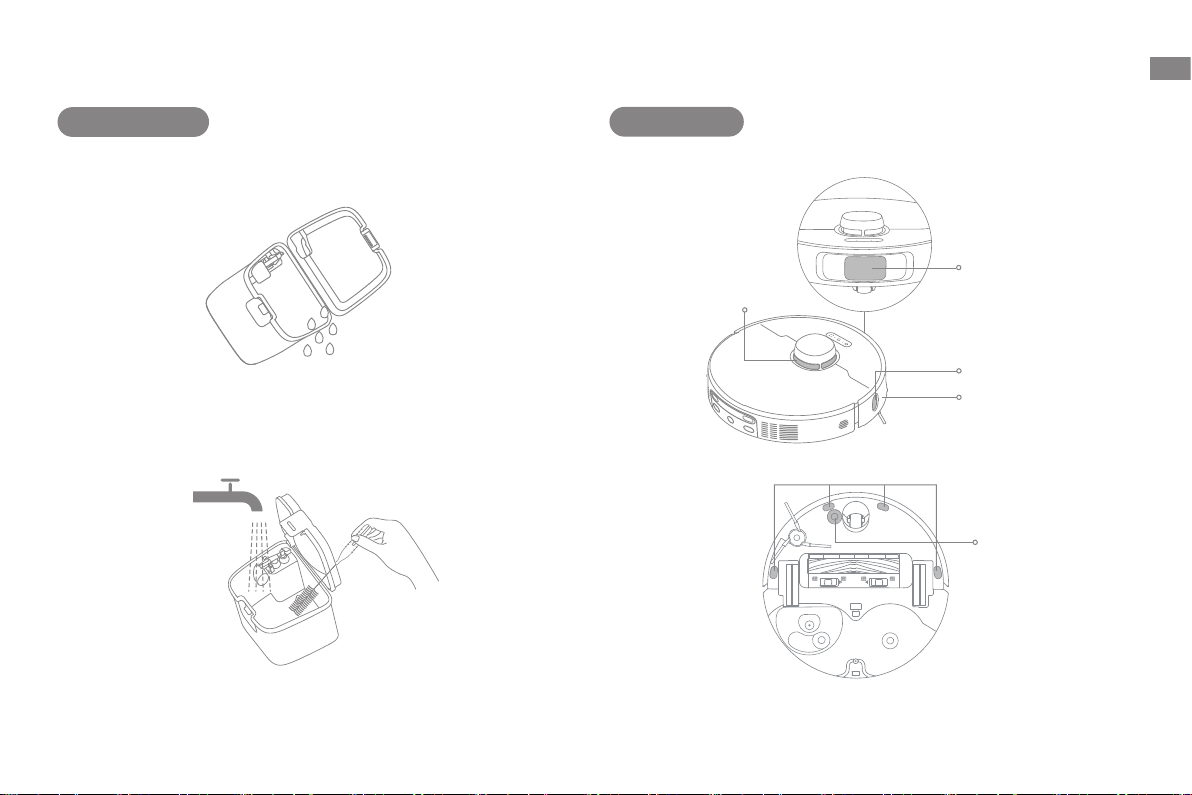
Routine Maintenance
EN
Used Water Tank
1. Remove the used water tank, open its cover and pour out the used water.
2. Rinse the used water tank with clean water, and use a proper cleaning
tool to clean the inner wall of the used water tank.
Robot Sensors
Wipe the robot sensors by using a soft and dry cloth, as shown in the below
figure:
Laser Distance
Sensor (LDS)
Cli Sensors
3D Line Laser Sensor
Edge Sensor
Bumper
Carpet Sensor
Note: The float ball in the used water tank is a movable part. Do not apply
too much force when cleaning it to avoid damaging it.
Note: A wet cloth can damage sensitive elements within the robot and the
base station. Please use a dry cloth for cleaning.
21
Page 24
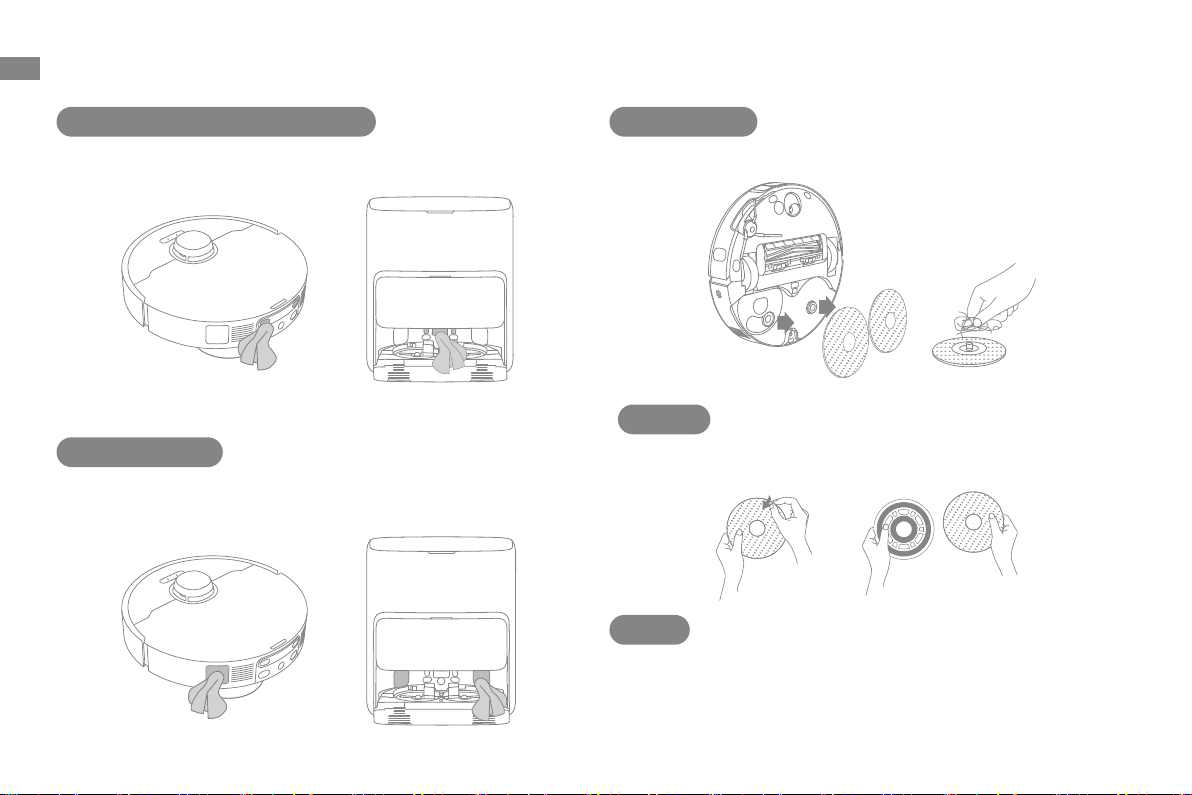
EN
Routine Maintenance
Charging Contacts and Signaling Area
Clean the charging contacts and the signaling area with a soft and dry cloth.
Auto-empty Vents
Clean the auto-empty vents of the robot and the base station with a soft and
dry cloth.
22
Mop Pad Holder
Remove and clean the mop pad holders.
Mop Pad
Remove the mop pad from the mop pad holder to replace it.
Battery
The robot contains a high-performance lithium-ion battery pack. Make sure
that the battery remains well-charged for daily use to maintain optimal
battery performance. If the robot is not used for an extended period of time,
turn it o and put it away. To prevent damage from over-discharging, charge
the robot at least once every three months.
Page 25
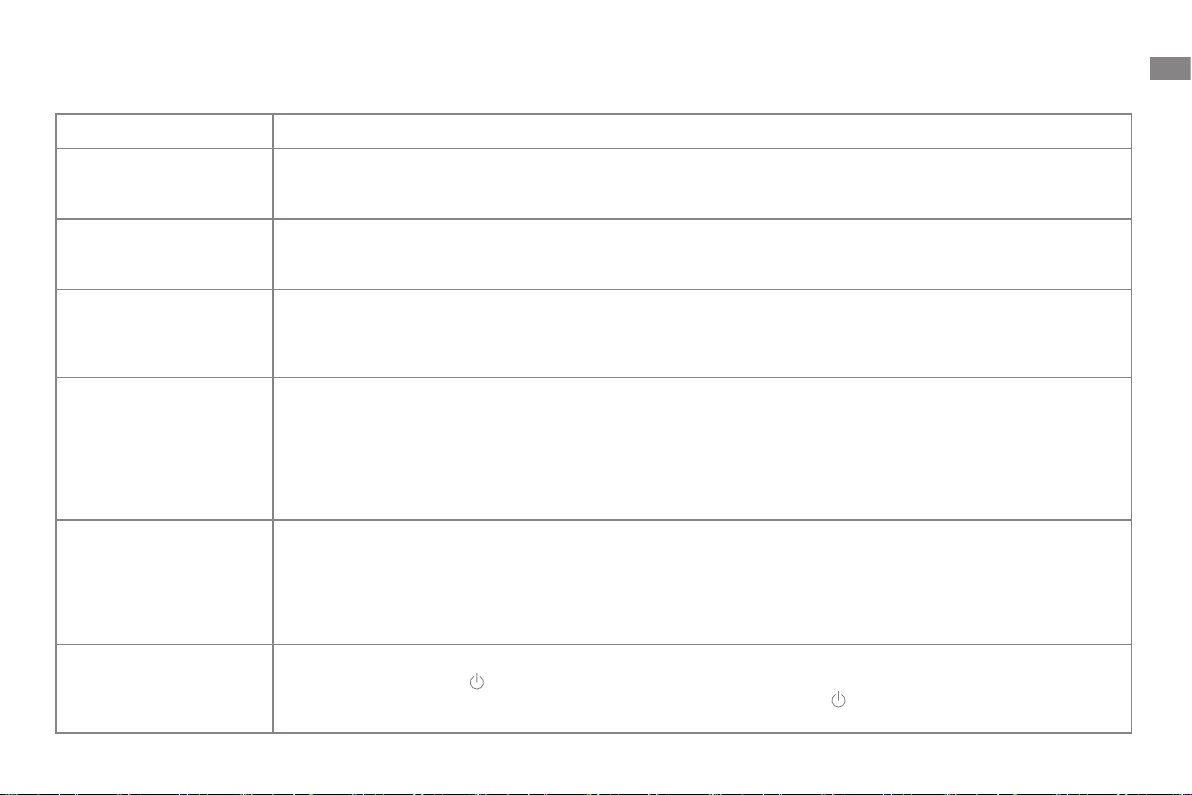
Troubleshooting
Problem Solution
EN
The robot will not turn on.
The robot will not charge.
The robot fails to connect
to Wi-Fi.
The robot cannot find and
return to the base station.
The robot gets stuck in
front of the base station
and cannot return to it.
The robot will not turn o.
The battery is low. Recharge the robot on the base and try again.
The temperature of the battery is too low or too high. It is recommended to operate the appliance at a temperature above 0°C
(32°F) and below 40°C (104°F).
The base station is not connected to power, please make sure both ends of its power cord are correctly plugged in.
The contact between the charging contacts on the base station and the robot is poor, please clean the charging contacts.
Check whether there is any foreign object at the connector of the robot and remove the foreign object if any.
The Wi-Fi network password is incorrect. Make sure the password used to connect to your Wi-Fi network is correct.
The robot does not support a 5 GHz Wi-Fi connection. Make sure the robot is connected to a 2.4 GHz Wi-Fi connection.
The Wi-Fi signal is weak. Make sure the robot is in an area with good Wi-Fi coverage.
The robot may not be ready to be configured. Please exit and re-enter the app, and then try again as instructed.
The base station is disconnected from power or moved when the robot is not on it. Please connect the base station to the
power supply or place the robot onto the base station to charge.
There are too many obstructions around the base station. Place the base station in a more open area.
Moving the robot may cause it to re-position itself, and it will recreate a map if re-positioning fails. If the robot is too far
from the base station, it might not be able to automatically return on its own, in which case you will need to manually
place the robot onto the base station.
Wipe the signaling area on the base station to remove dust or debris.
Check whether there is enough space on both sides or in front of the base station to prevent the robot from being blocked.
The route for returning to charge is blocked, e.g. the door is closed.
The robot may slip if the floor in front of the base station is overly wet. If so, clean the excess water before trying again.
It is recommended to move the base station to a dierent place and try again.
Make sure the ramp extension plate is installed properly.
The robot cannot be turned o when it is charging. It is recommended to move the robot from the base station, and then
press and hold the button for 3 seconds to turn it o.
If the robot cannot be turned o by performing step 1, press and hold the button for 10 seconds to forcibly turn o the
robot. If the problem persists, please contact after-sales service.
23
Page 26
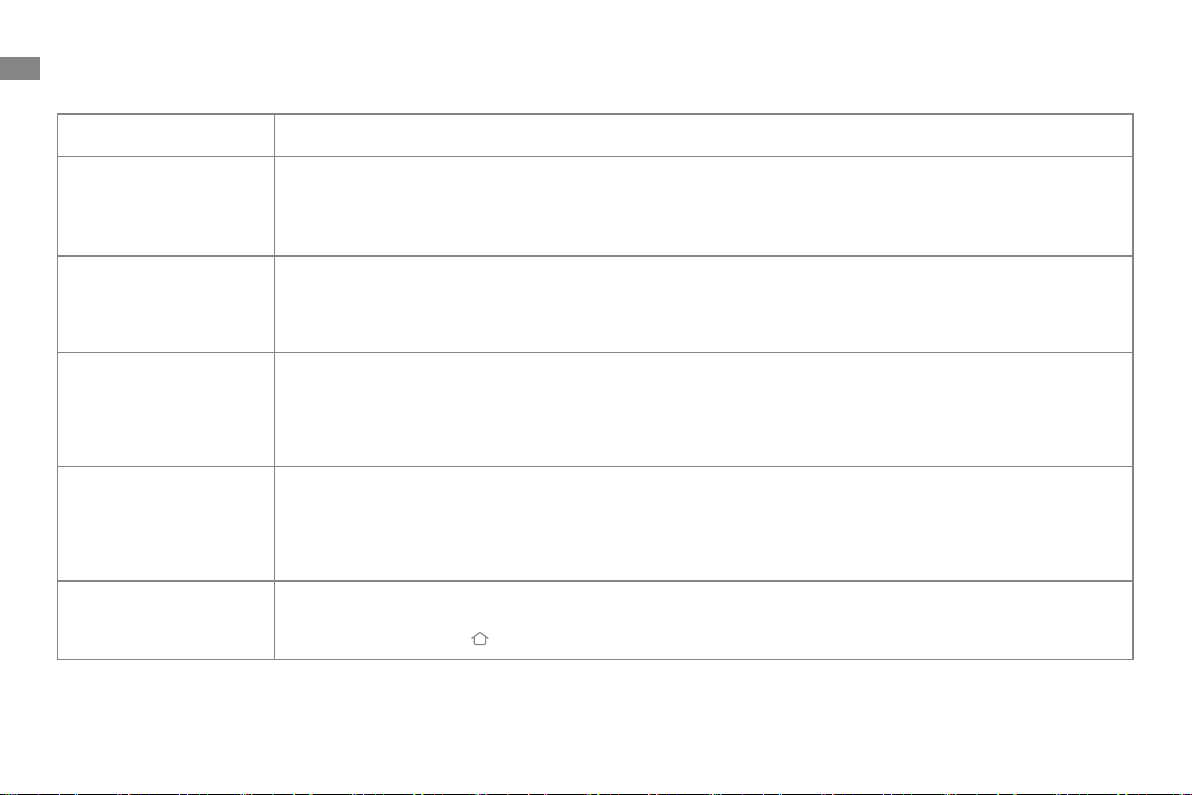
EN
Troubleshooting
Problem Solution
The charging speed is
slow.
The noise increases
while the robot is
operating.
The robot moves
without following the
set route.
The robot misses the
rooms to be cleaned.
The robot will not
resume cleaning after
charging.
24
It takes about 3.5 hours to fully charge the robot when its battery is low.
If you operate the robot at temperatures outside of the specified range, the charging speed will automatically slow down
to extend the battery life.
The charging contacts on both the robot and the base may be dirty, please wipe them with a dry cloth.
Check whether the dust box filter is clogged. If so, clean it or replace it.
A hard object may be caught in the main brush or the dust box. Check and remove any hard object.
The main brush or the side brush may become tangled. Check and remove any foreign objects.
Switch the suction mode to Standard or Quiet.
Objects such as power cords and slippers should be organized before using the robot.
Working on wet slippery surfaces causes the main wheel to slip. It is recommended to dry the wet places before using
the robot.
Wipe the 3D line laser sensor on the robot with a clean, soft cloth to keep it clean and unobstructed.
Make sure that the doors of the rooms to be cleaned are open.
Check whether there is a threshold higher than about 2 cm at the door of the room. The robot cannot climb over high
thresholds or steps.
The place in front of the room to be cleaned may be wet and slippery, causing the robot to slip and work abnormally.
Please try drying the floor before using the robot.
Make sure that the robot is not set to the Do Not Disturb (DND) mode, which will prevent it from resuming cleaning.
The robot will not resume cleaning after you manually place the robot on the base station or send the robot to charge
via the app or the button .
Page 27
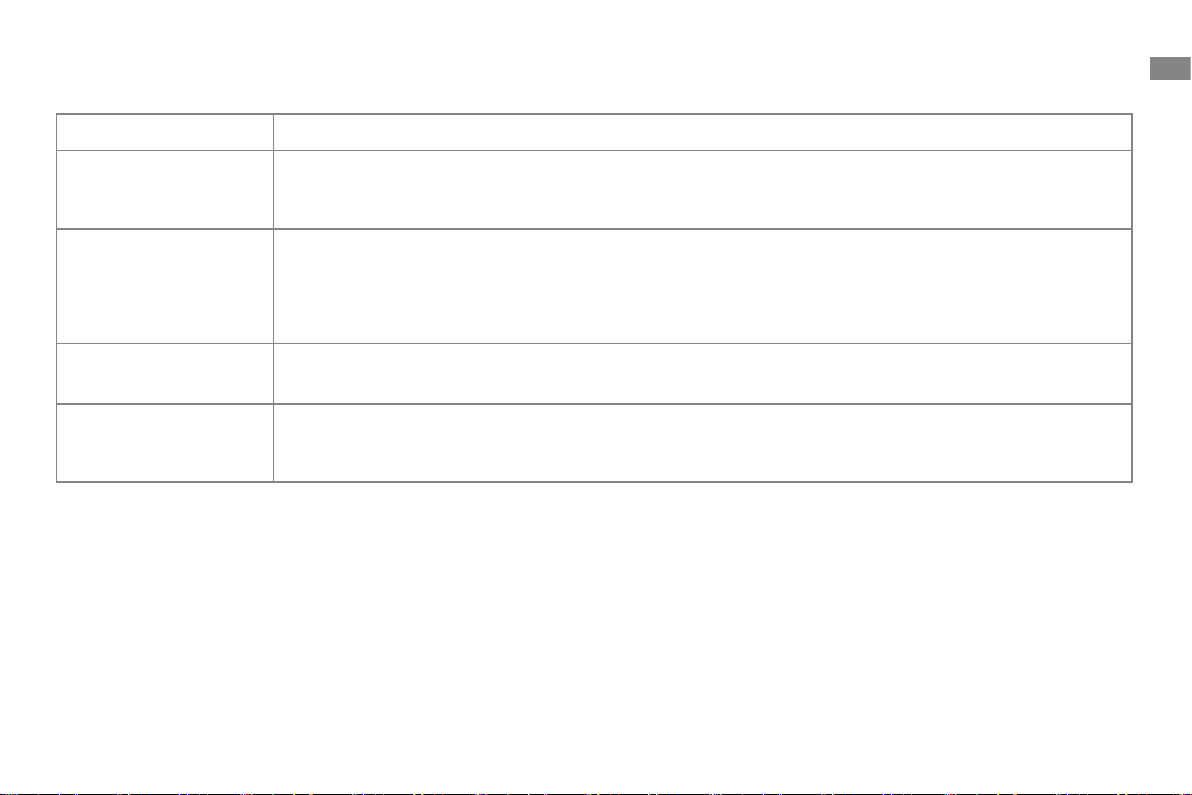
Troubleshooting
Problem Solution
EN
The station cannot
automatically empty
the dust box.
The water level in
the washboard is
abnormal.
The mop pad holder is
raised abnormally.
There is water under
the clean water tank or
around the seal.
For more support, contact us via www.mova-tech.com
Check whether the dust bag in the dust tank is full.
If the dust bag is not full, check whether there is any obstruction at the auto-empty vents of the robot, the base station,
or the dust box. If any, clean the blocked part in time.
Check whether the seal on the used water tank is loose or not correctly installed, and manually reset it if so. If the
problem persists, please contact the after-sales service team.
Gently press down on the used water tank to make sure it is installed correctly.
Remove the washboard filter and check whether the sewage drain is blocked and clean it.
Check the cleaning solution. Do not add any liquid other than the ocially-approved cleaning solution.
Please remove the mop pad holder to check if there is any foreign object stuck in it, and try to restart the robot. If the
problem persists, please contact the after-sales service team.
When taking out the clean water tank, some water in the pipe may be left under the tank or around the seal. This is
normal. Please wipe with a dry cloth.
25
Page 28
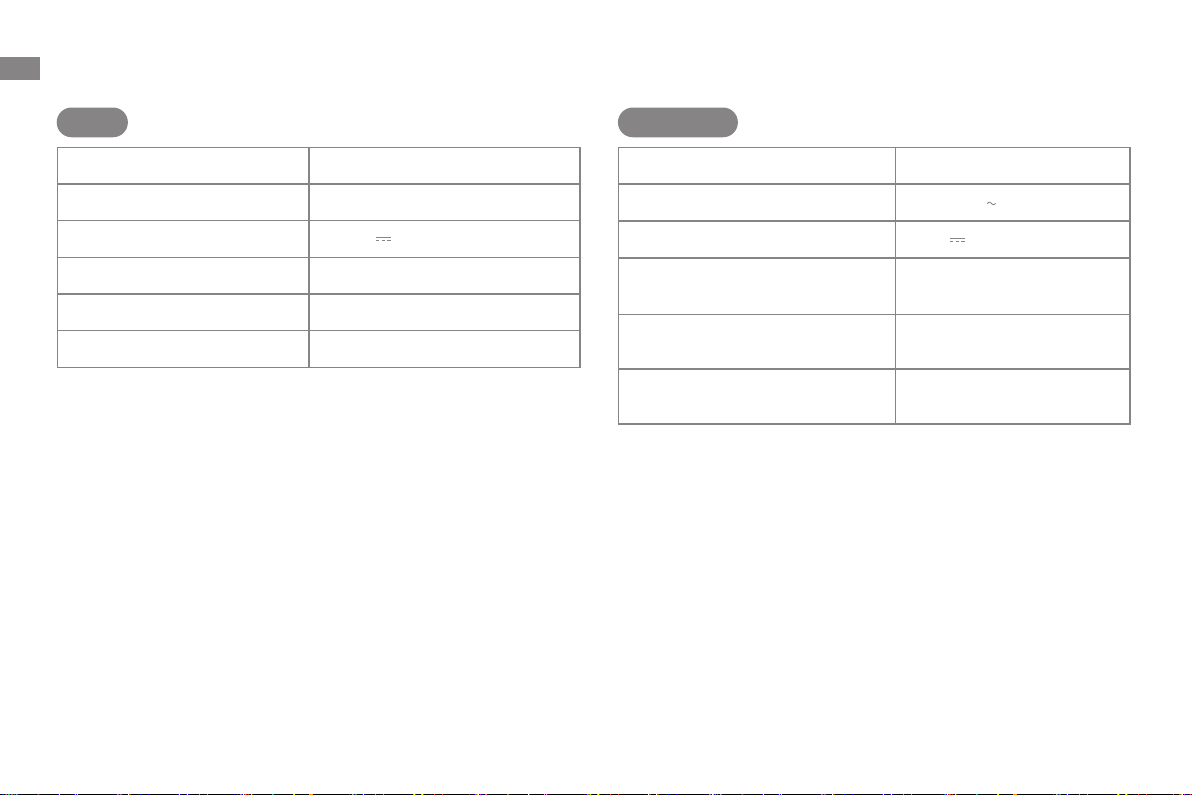
EN
Specifications
Robot
Model RLP23SE
Charging Time Approx. 3.5 hours
Rated Voltage 14.4 V
Rated Power 75 W
Operation Frequency 2400–2483.5 MHz
Maximum Output Power <20 dBm
Base Station
Model RCPE0105
Rated Input 220-240 V 50-60 Hz
Rated Output 20 V 2 A
Rated Power (during dust
emptying)
Rated Power (during hot water
cleaning)
Rated Power (during charging and
drying)
Under normal use of condition, this equipment should be kept a separation
distance of at least 20 cm between the antenna and the body of the user.
Note:
Rated Power (during hot water cleaning) is determined by the power value
·
during the representative period (water temperature 25°C).
Rated Power (during charging and drying) is determined by the power
·
value during full load period.
700 W
1160 W
87 W
26
Page 29

Battery Disposal and Removal
The built-in lithium-ion battery contains substances that are hazardous to the environment. Before disposing of the battery, make sure the battery is removed
by qualified technicians and discarded at an appropriate recycling facility.
– the battery must be removed from the appliance before it is scrapped;
– the appliance must be disconnected from the supply mains when removing the battery;
– the battery is to be disposed of safely.
CAUTION:
Before removing the battery, disconnect the power and run out the battery as much as possible.
Unneeded batteries should be discarded at an appropriate recycling facility.
Do not expose to high temperature environment to avoid risks of explosion.
Under abusive conditions, liquid may be ejected from the battery. If contact occurs, flush with water and seek medical help.
Removal Guide:
1. Turn over the robot, use a proper tool to remove the screws on the back of the robot, and then remove the cover.
2. Unplug the terminals between the battery and PCB board to remove the battery.
WEEE Information
All products bearing this symbol are waste electrical and electronic equipment (WEEE as in directive 2012/19/EU) which should not be mixed
with unsorted household waste. Instead, you should protect human health and the environment by handing over your waste equipment to a
designated collection point for the recycling of waste electrical and electronic equipment, appointed by the government or local authorities.
Correct disposal and recycling will help prevent potential negative consequences to the environment and human health. Please contact the
installer or local authorities for more information about the location as well as terms and conditions of such collection points.
EN
27
Page 30

PL
Informacje o bezpieczeństwie
Celem niedopuszczenia do porażenia prądem elektrycznym, pożaru lub obrażeń spowodowanych niewłaściwym użytkowaniem
urządzenia, przed jego użyciem należy uważnie zapoznać się z treścią obsługi oraz zachować ją na wypadek konieczności skorzystania z
niej w przyszłości.
·
Ograniczenia
użytkowania
Z niniejszego urządzenia nie powinny korzystać dzieci w wieku poniżej 8
lat ani osoby o ograniczonych możliwościach fizycznych, zmysłowych lub
intelektualnych, ani osoby o niewystarczającym doświadczeniu lub wiedzy,
chyba że znajdują się pod nadzorem rodzica lub opiekuna. Dzieci pozostające
bez nadzoru nie mogą czyścić urządzenia ani dokonywać czynności
konserwacyjnych.
·
Urządzenie należy używać tylko wraz z modułem zasilania, z nim
dostarczanym.
·
To urządzenie zawiera baterie, które mogą być wymieniane tylko przez
personel o odpowiednich umiejętnościach.
·
Uprzątnij teren, który ma być czyszczony. Nie wolno zezwalać, by dzieci
używały urządzenia do zabawy. Dbaj o to, by dzieci i zwierzęta domowe
pozostawały w bezpiecznej odległości od robota podczas jego pracy.
·
Nie instaluj, nie ładuj ani nie używaj urządzenia w łazienkach ani wokół
basenów.
·
Niniejszy produkt przeznaczony jest wyłącznie do czyszczenia podłóg w
warunkach domowych. Nie należy z niego korzystać na wolnym powietrzu, do
czyszczenia powierzchni innych niż podłogi, ani w obiektach komercyjnych lub
przemysłowych.
136
Page 31

Informacje o bezpieczeństwie
·
Ograniczenia
użytkowania
Upewnij się, czy urządzenie działa poprawnie we właściwym otoczeniu. W
przeciwnym razie nie używaj urządzenia.
·
Jeżeli kabel zasilania jest uszkodzony, należy go zastąpić specjalnym
przewodem lub zespołem dostępnym u producenta, lub u jego przedstawiciela
serwisowego.
·
Nie używaj robota w miejscach zawieszonych ponad poziomem gruntu, bez
bariery ochronnej.
·
Nie ustawiaj robota kołami do góry. Nie używaj pokrywy LDS, pokrywy robota ani
zderzaka w charakterze uchwytu.
·
Używaj robot w środowiskach, gdzie temperatura otoczenia wynosi powyżej 0°C
i poniżej 40°C. Dbaj o to, by na podłodze nie było cieczy ani substancji lepkich.
·
Aby uniknąć uszkodzenia lub szkód wskutek włóczenia, usuń wszelkie luźne
przedmioty z podłogi, usuń kable i przewody zasilające z drogi, zanim
uruchomisz urządzenie.
·
Usuń wrażliwe lub małe przedmioty z podłogi, aby zapobiec obijaniu się o nie
robota oraz ich uszkodzeniu.
·
Włosów, palców i innych części ciała nie wolno zbliżać do otworu ssącego
robota.
·
Nie używaj urządzenia w pomieszczeniu, gdzie przebywa śpiące niemowlę lub
dziecko.
·
Dzieci, zwierząt domowych ani żadnego przedmiotu nie stawiaj na robocie, bez
względu na to, czy jest on nieruchomy, czy się porusza.
·
Do zbiornika na czystą wodę można wlewać wyłączenie czystą wodę i
zatwierdzone przez producenta środki czyszczące. Nie dodawaj żadnej cieczy,
PL
137
Page 32

PL
Informacje o bezpieczeństwie
Ograniczenia
użytkowania
Baterie i
ładowanie
138
jak alkohol lub środek dezynfekcyjny. Proporcję między środkiem czyszczącym
do czystej wody można sprawdzić na butelce z roztworem. Środki czyszczące
należy przechowywać w miejscu niedostępnym dla dzieci.
·
Nie używaj robota do sprzątania palących się przedmiotów. Nie używaj robota
do zbierania cieczy zapalnych ani palnych, żrących cieczy, nierozcieńczonych
kwasów ani rozpuszczalników.
·
Nie odkurzaj twardych ani ostrych przedmiotów. Nie używaj urządzenia do
zbierania przedmiotów takich, jak kamienie, duże kawałki papieru lub inne,
które mogłyby zatkać urządzenie.
·
Wtyczkę należy wyjąć z gniazdka elektrycznego przed czyszczeniem lub
serwisowaniem urządzenia.
·
Nie wycieraj robota ani stacji bazowej mokrą ścierką ani nie zmywaj żadną
cieczą. Po wyczyszczeniu wszystkich elementów, które można umyć, przed ich
ponownym zamontowaniem i użyciem należy je dokładnie wysuszyć.
·
Używaj to urządzenie zgodnie z zaleceniami zawartymi w instrukcji obsługi.
Użytkownicy ponoszą odpowiedzialność za wszelkie straty lub uszkodzenia
wynikłe z nieprawidłowego użycia produktu.
·
Nie używaj akumulatora ani stacji dokującej innych producentów. Robot może
być używany tylko ze stacją bazową modelu RCPE0105.
·
Nie próbuj na własną rękę demontować, naprawiać ani modyfikować
akumulatora lub stacji bazowej.
·
Nie ustawiaj stacji bazowej w pobliżu źródła ciepła.
·
Nie używaj mokrej ściereczki ani mokrych rąk do czyszczenia styków ładowania
stacji bazowej.
Page 33

Informacje o bezpieczeństwie
·
Baterie i
ładowanie
Informacja o
bezpieczeństwie
laserowym
Wyłącznie do użytku w pomieszczeniach
zamkniętych
Zużytych akumulatorów nie likwiduj w sposób nieodpowiedni. Niepotrzebne
akumulatory należy poddać utylizacji w odpowiednim zakładzie
recyklingowym.
·
W razie uszkodzenia lub zerwania kabla zasilania zaprzestań niezwłocznie
używania wyrobu i skontaktuj się z serwisem posprzedażnym.
·
Upewnij się, czy robot jest wyłączony na czas transportu, w miarę możliwości
przechowywany w oryginalnym opakowaniu.
·
Jeżeli robot nie będzie używany przez dłuższy czas, w pełni naładuj go,
wyłącz i złóż w chłodnym, suchym miejscu. Akumulator należy naładować
przynajmniej raz na 3 miesiące, dzięki czemu nie dopuści się do jego
nadmiernego rozładowania.
·
Czujnik laserowy w tym produkcie spełnia normę IEC 60825- 1:2014/EN 608251:2014/A11:2021 dla produktów laserowych Klasy 1. Promienia laserowego nie
wolno kierować bezpośrednio w stronę oczu.
PRODUKT LASEROWY KLASY 1
KONSUMENCKI PRODUKT LASEROWY
EN 50689:2021
PL
Zapoznaj się z treścią instrukcji obsługi.
Niniejszym firma Moonstone Technology (Shaoxing) Co., Ltd. oświadcza, że urządzenie radiowe typu RLP23SE jest zgodne z wymogami
określonymi w Dyrektywie 2014/53/UE.
Pełny tekst Deklaracji Zgodności UE jest dostępny na stronie internetowej www.mova-tech.com.
Szczegółowy e-podręcznik, patrz https://www.mova-tech.com/pages/user-manuals-and-faqs
139
Page 34
PL
Opis produktu
Zawartość opakowania
Inne akcesoria
140
Robot
Stacja bazowa
Podkładka mopa x 2
(zainstalowany
fabrycznie)
rampę stacji bazowej
Uchwyt podkładki
mopa x 2
Podręcznik użytkownikaKabel zasilania Płytka wydłużająca
Worek na kurz
(zainstalowany
fabrycznie)
Filtr tarki
(zainstalowany
fabrycznie)
Page 35
Opis produktu
Robot
PL
Przycisk czyszczenia punktowego
· Wciśnij, aby rozpocząć czyszczenie punktowe
Przycisk Zasilanie / Czyszczenie
· Wciśnij i przytrzymaj przez 3 sekundy, aby włączyć lub wyłączyć
· Wciśnij, aby rozpocząć czyszczenie po włączeniu robota
Przycisk dokowania
· Wciśnij, aby odesłać robot do stacji bazowej
· Wciśnij i przytrzymaj przez 3 sekundy, aby dezaktywować Blokadę
rodzicielską
Wskaźnik stanu
· Ciągły biały: czyszczenie lub sprzątanie zakończone
· Pulsujący biały: ładowanie (akumulator nie jest rozładowany)
· Ciągły pomarańczowy: gotowość lub pauza przy niskim poziomie
naładowania akumulatora
· Pulsujący pomarańczowy: ładowanie (niski stan naładowania
akumulatora)
· Migający pomarańczowy: Błąd
Uwaga:
· Podczas gdy robot sprząta lub powraca do ładowania,
naciśnięcie dowolnego przycisku na robocie powoduje
wstrzymanie jego działania.
· Blokadę rodzicielską można włączyć/wyłączyć w aplikacji
MOVAhome.
141
Page 36
PL
Opis produktu
Robot i czujniki
Czujniki klifu
Pokrywa
Odpowietrznik
samoopróżniania
Styki ładowania
Automatyczna woda
Wlot uzupełniania
Złącza
142
Pokrywa LDS
Czujnik dalmierza
laserowego (LDS)
Zderzak
Liniowy czujnik laserowy 3D
Przycisk Reset
· Wciśnij i przytrzymaj
przez 3 sekundy,
aby przywrócić
ustawienia
fabryczne
Wskaźnik Wi-Fi
Czujnik krawędzi
Czujnik dywanu
Zespól przedłużenia
MopExtend
Szczotka główna
Koło główne
Zespół
przedłużacza
mopa
Pojemnik na kurz
Uchwyt filtra
Zespół mopa
Miejsce mocowania
podkładki mopa
Filtr
Uchwyt podkładki
mopa
Kółko
wielokierunkowe
Osłona szczotki
Koło główne
Zaciski osłony
szczotki
Otwory montażowe
uchwytu podkładki
mopa
Zatrzask pokrywy
pojemnika na kurz
Zatrzask pojemnika na kurz
Pokrywa pojemnika na
kurz
Odpowietrznik
samoopróżniania
Podkładka mopa
Page 37
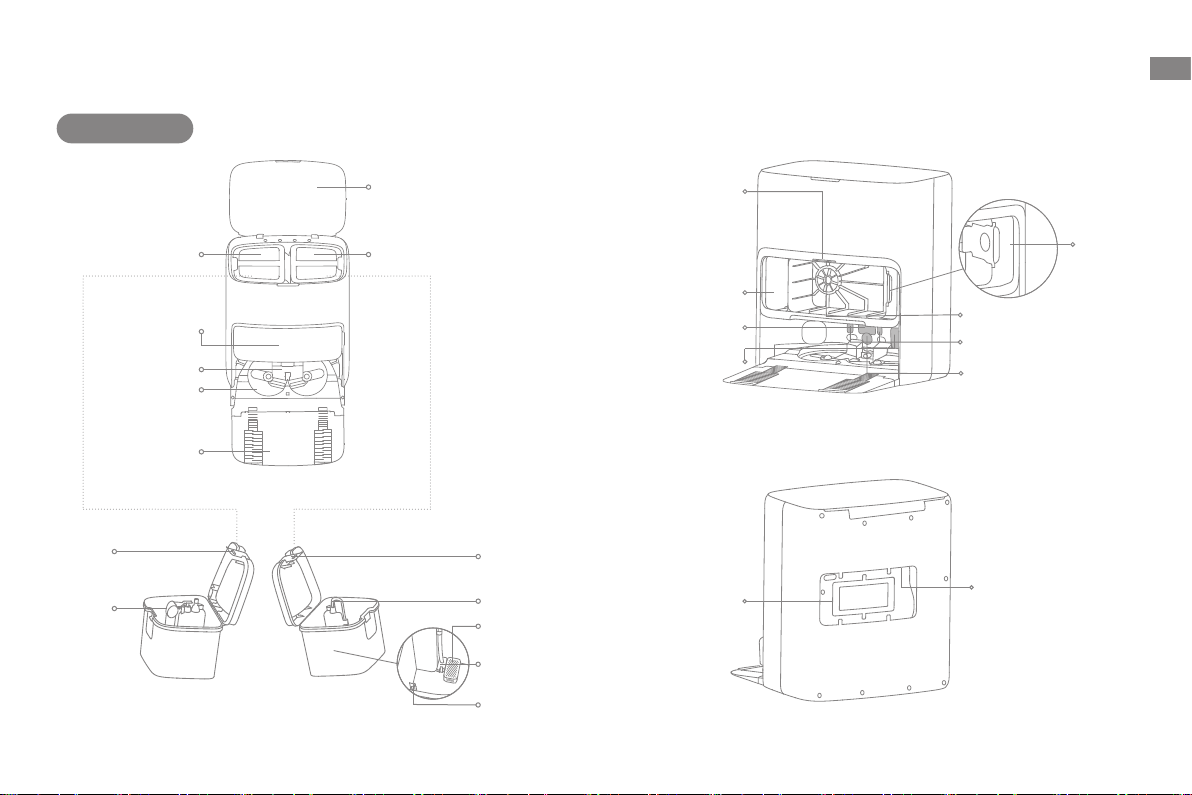
Opis produktu
Stacja bazowa
PL
Zbiornik na brudną
zbiornika na kurz
Zacisk
zbiornika na
wodę
Kulka
pływająca
wodę
Pokrywa
Filtr tarki
Tarka
Płytka
rozszerzająca
rampę
Zbiornik na brudną
wodę
Zbiornik na
czystą wodę
Pokrywa górna
Zbiornik na czystą
wodę
Ciągły biały: Stacja bazowa
jest podłączona do zasilania
Miejsce zarezerwowane na
Automatyczny dozownik detergentu
Odpowietrznik samoopróżniania
Zacisk zbiornika
na wodę
Rura wodna
Inhibitor kamienia
kotłowego
Filtr
Pływak
Wskaźnik stanu
Ciągły pomarańczowy:
stacja bazowa ma błąd
Obszar sygnalizacji
Uwaga: Automatyczny dozownik detergentu należy zakupić osobno.
Szczelina do
magazynowania
kabla zasilającego
Worek na
kurz
Gniazdo
Filtr
Styki ładowania
Wylot automatycznego
dodawania wody
Gniazdo zasilania
143
Page 38
PL
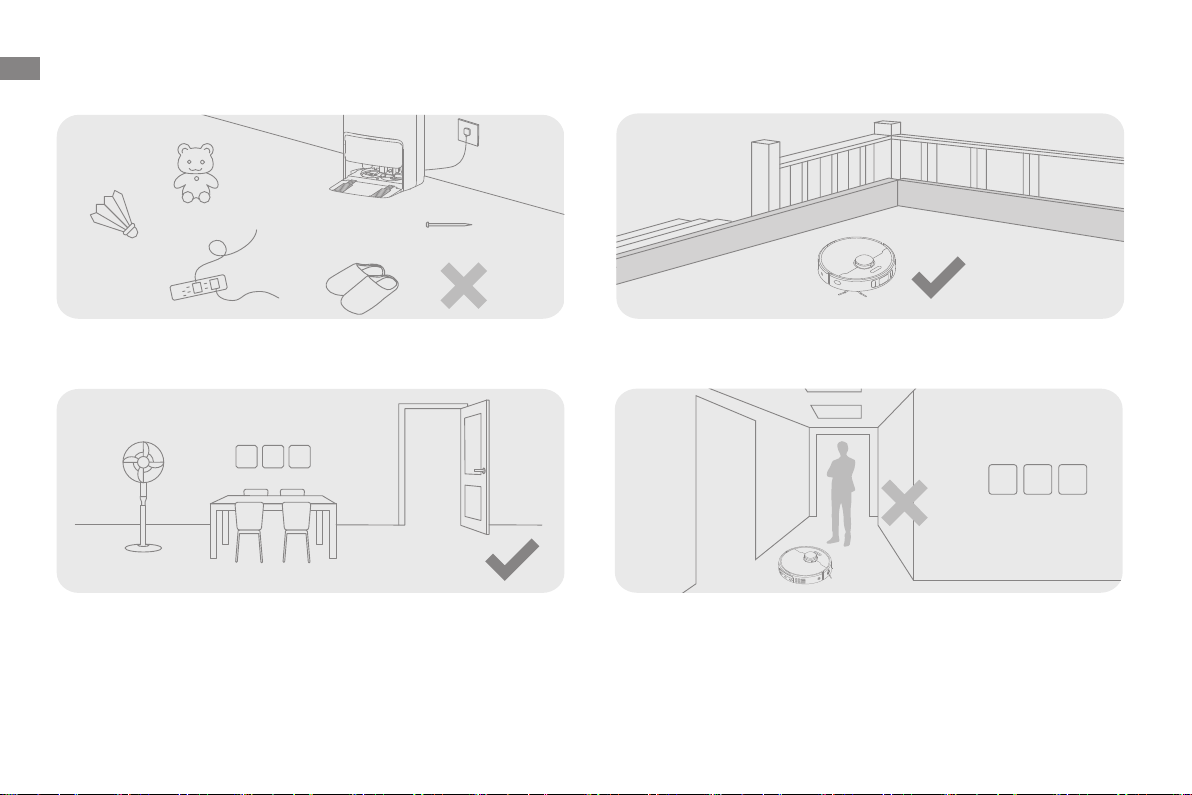
Przygotowanie domu
Przed czyszczeniem usuń z podłoża przedmioty niestabilne, kruche, cenne
lub niebezpieczne, a kable, odzież, zabawki, przedmioty twarde i ostre
uporządkuj, aby uniknąć zaplątania, porysowania lub uderzenia o robota i
spowodowania strat.
Otwórz drzwi pomieszczenia do sprzątania i ustaw meble we właściwym
miejscu, aby zostawić więcej przestrzeni.
Uwaga:
· Uruchamiając robot po raz pierwszy śledź go wokół podczas sprzątania, aby na czas usuwać ewentualne przeszkody.
· Nie odkurzaj twardych przedmiotów, jak kamienie, kulki stalowe i części zabawek ani twardych przedmiotów, jak gruz, potłuczone szkło, gwoździe, w
przeciwnym razie może dojść do porysowania podłoża.
Przed sprzątaniem ustaw barierę fizyczną na krawędzi schodów, aby
zapewnić bezproblemowe działanie robota.
Aby uchronić robot przed nierozpoznanymi miejscami wymagającymi
sprzątania, nie stawaj przed nim, przed progiem, korytarzem lub wąskimi
miejscami.
144
Page 39
Przed użyciem
>1,5 m
>5 cm
>5 cm
④
PL
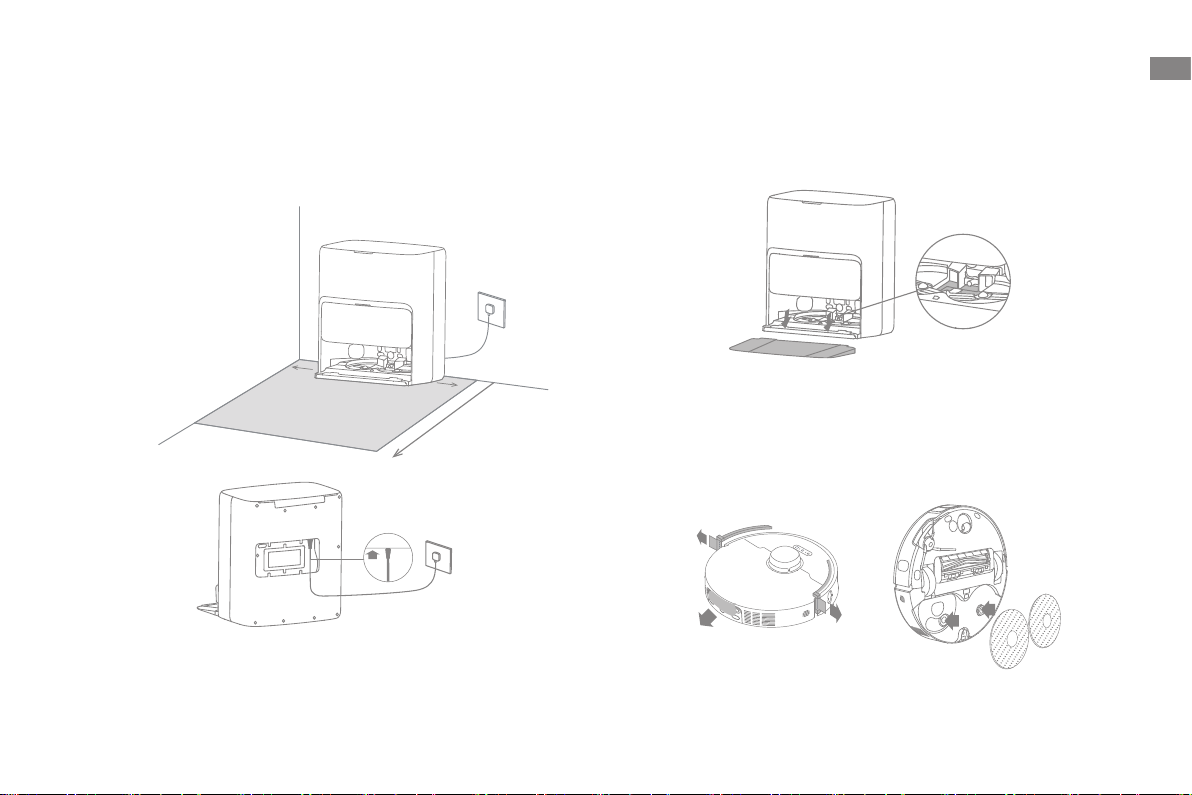
1. Ustaw stację bazową i podłącz do gniazdka elektrycznego
Umieść stację bazową w miejscu maksymalnie otwartym, z dobrym
sygnałem Wi-Fi. Wokół urządzenia pozostaw wystarczająco dużo miejsca,
jak przedstawiono na ilustracji, a zacienionego obszaru usuń wszystkie
przedmioty. Następnie włóż przewód zasilający do stacji bazowej i wetknij
wtyczkę do gniazdka.
Pewnie włóż przewód do góry, aż
kontrolka się zaświeci.
Uwaga:
· Upewnij się, czy żaden obiekt nie będzie blokować obszaru
sygnalizacyjnego.
· Aby zapobiec zamoczeniu podłóg drewnianych lub dywanów, zalecane jest
umieszczanie stacji bazowej na płytkach ceramicznych lub marmurowych.
2. Zainstaluj płytkę przedłużającą rampy
Filtr tarki
Uwaga: Sprawdź, czy filtr tarki poprawnie założony.
3. Usuń zabezpieczenia robota i zainstaluj zespół mopa
②
①
③
145
Page 40
PL
Przed użyciem
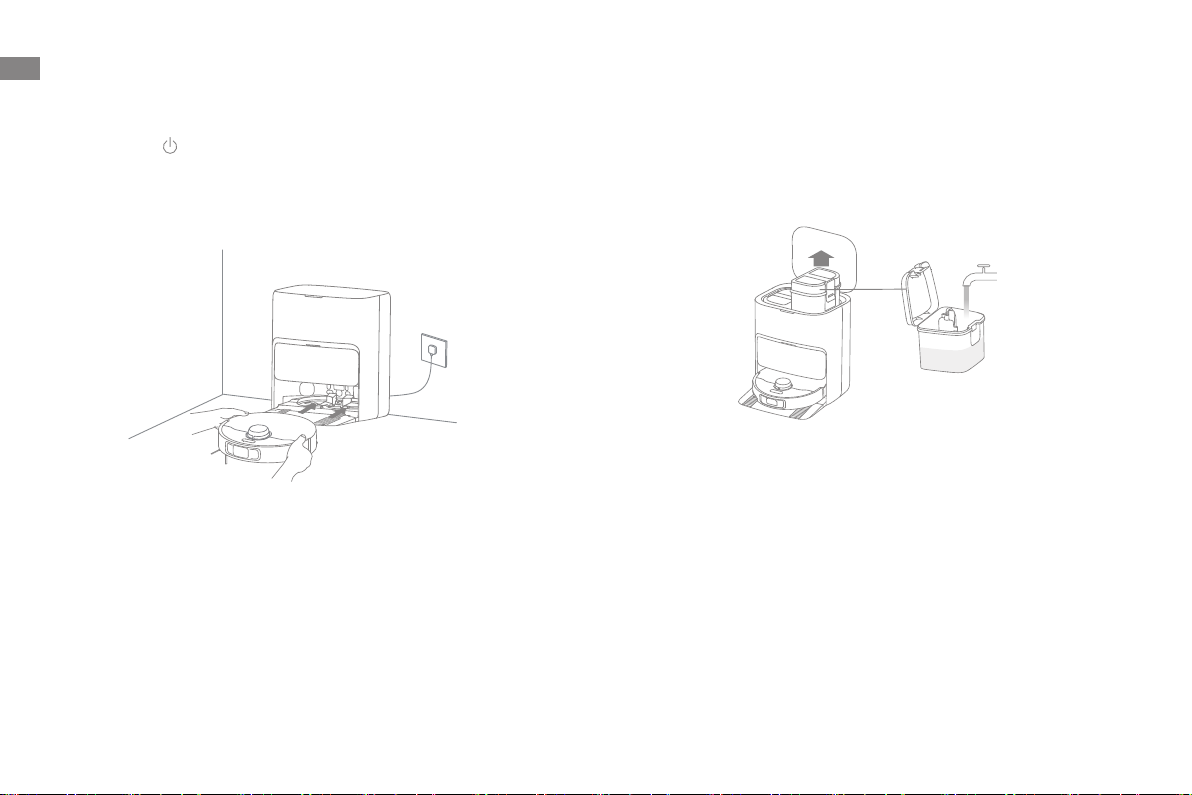
4. Podłącz robot do stacji bazowej
Wciśnij przycisk na robocie na 3 sekundy, co spowoduje jego włączenie.
Umieść robota w stacji bazowej z zespołem mopa zwróconym w kierunku
tarki. Wówczas usłyszysz instrukcję głosową, gdy robot pomyślnie połączy
się ze stacją bazową. Po pełnym naładowaniu akumulatora robota kontrolki
stanu robota i stacji bazowej będą świecić przez 10 minut, a następnie
zgasną.
>1.5米
Uwaga: Zaleca się pełne naładowanie robota przed jego pierwszym użyciem.
Gdy robot nie może być włączony po wyczerpaniu się baterii, ręcznie połącz
go ze stacją bazową i naładuj.
5. Dolej wody do zbiornika na czystą wodę
Wyjmij zbiornik na czystą wodę ze stacji bazowej i napełnij go czystą wodą.
Następnie zainstaluj go na powrót w stacji bazowej.
Uwaga: Nie dodawaj gorącej wody do zbiornika, gdyż może to spowodować
jego odkształcenie.
146
Page 41
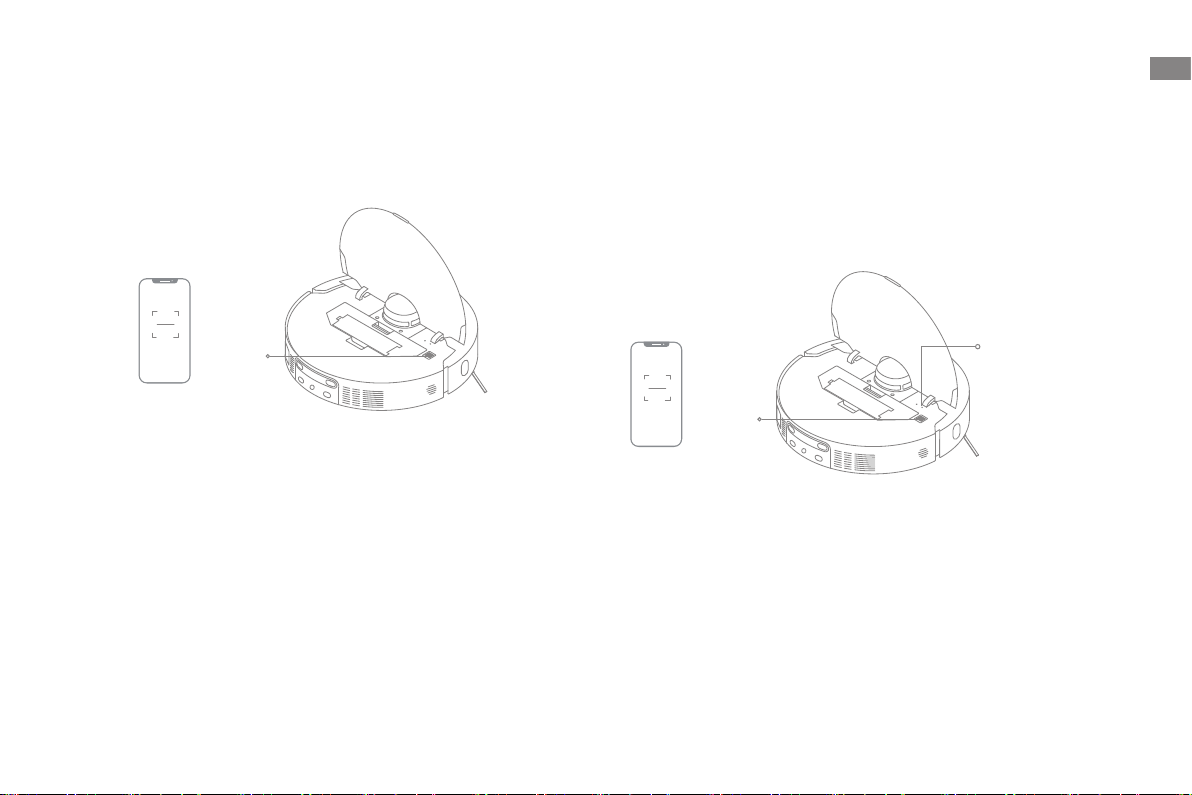
Łączenie z aplikacją MOVAhome
PL
1. Pobieranie aplikacji MOVAhome
Zeskanuj kod QR umieszczony na robocie lub wyszukaj „MOVAhome” w
sklepie z aplikacjami, po czym pobierz i zainstaluj aplikację.
Kod QR
Uwaga:
Obsługiwane jest tylko Wi-Fi 2,4 GHz.
·
Ze względu na aktualizacje w oprogramowaniu aplikacyjnym faktyczne
·
operacje mogą odbiegać od instrukcji w tym podręczniku. Stosuj się do
instrukcji w oparciu o bieżącą wersję aplikacji.
2. Dodawanie urządzenia
Otwórz aplikację MOVAhome, dotknij opcji „Zeskanuj kod QR, aby połączyć”,
a następnie ponownie zeskanuj ten sam kod QR umieszczony na robocie,
co umożliwi dodanie urządzenia. Stosuj się do wyświetlanych instrukcji, aby
ukończyć połączenie Wi-Fi.
Uwaga: Celem zresetowania połączenia Wi-Fi powtórz etap 2, a następnie
postępuj zgodnie z poleceniami.
Wskaźnik Wi-Fi
· Miga powoli: należy
połączyć
Kod QR
· Miga szybko:
łączenie
· Wł.: Połączony
147
Page 42

PL
Użytkowanie
Włączanie/wyłączanie
Wciśnij przycisk na 3 sekundy, co spowoduje włączenie robota. Wskaźnik
zasilania powinien podświetlić się. Umieść robota na stacji bazowej, powinien
on włączyć się automatycznie i rozpocząć ładowanie. Chcąc wyłączyć robota
odsuń go od stacji bazowej, po czym wciśnij przycisk na 3 sekundy.
Szybkie mapowanie
Skonfigurowawszy sieć po raz pierwszy stosuj się do instrukcji w aplikacji, aby
szybko utworzyć mapę. Robot rozpocznie mapowanie bez czyszczenia. Gdy
robot powróci do stacji bazowej, proces mapowania jest zakończony, a mapa
zostanie automatycznie zapisana.
Pauza/uśpienie
Gdy robot pracuje, wciśnij dowolny przycisk, aby go spauzować. Jeżeli robot
nie pracuje dłużej niż 10 minut, automatycznie wchodzi w tryb uśpienia.
Wszystkie wskaźniki w robocie wyłączą się. Wciśnij dowolny przycisk w robocie
bądź użyj aplikacji, aby go obudzić.
Uwaga: Jeżeli robot jest spauzowany i umieszczony w stacji bazowej, proces
bieżącego czyszczenia zakończy się.
Auto-wznawianie czyszczenia
Jeżeli akumulator jest bliski rozładowania, robot automatycznie powróci
do stacji bazowej w celu ładowania. Po doładowaniu do odpowiedniego
poziomu, robot wznowi niedokończone zadania czyszczenia.
Uwaga: Aby skorzystać z tej funkcji, aktywuj ją w aplikacji.
Tryb Nie przeszkadzać (DND)
Gdy robot jest ustawiony na tryb „Nie Przeszkadzać” (DND), nie wznowi
sprzątania. Tryb DND jest domyślnie dezaktywowany w fabryce. Możesz użyć
aplikacji do aktywacji trybu DND lub zmodyfikować okres DND. Domyślnie
okres DND wynosi 22:00-8:00.
Uwaga:
W okresie DND zaplanowane zadania sprzątanie nie będą wykonywane.
·
Robot wznowi sprzątanie po upływie okresu DND.
·
Czyszczenie punktowe
Gdy robot jest w trybie czuwania, krótkotrwale naciśnij przycisk , co
spowoduje włączenie trybu czyszczenia punktowego. W tym trybie robot czyści
obszar kwadratowy 1,5 x 1,5 metra wokół i powraca do punktu początkowego,
zakończywszy czyszczenie punktowe.
Ponowne uruchamianie robota
Jeżeli robot przestaje reagować lub nie może się wyłączyć, wciśnij przycisk
na 10 sekund, co spowoduje wymuszone wyłączenie urządzenia. Następnie,
celem włączenia robota, wciśnij przycisk na 3 sekundy.
148
Page 43
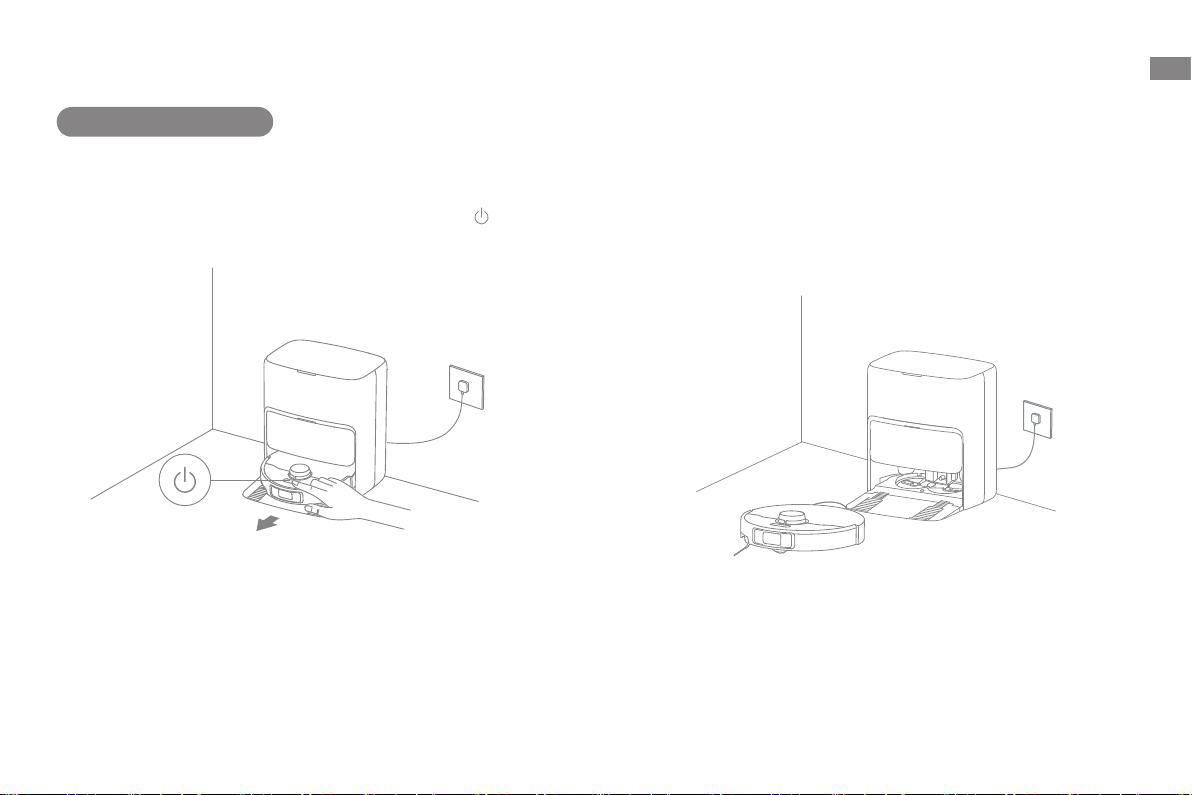
Użytkowanie
Odkurzanie i mopowanie
Uwaga: Używając zespół mopa po raz pierwszy robot wykonuje domyślnie
zadanie „Odkurzanie i mopowanie”.
1. Rozpoczęcie czyszczenia
Celem uruchomienia robota ze stacji bazowej naciśnij przycisk na
robocie lub posłuż się aplikacją. Następnie robot zaplanuje optymalną trasę
czyszczenia i wykona to zadanie w oparciu o stworzoną mapę.
Uwaga:
Aby zapewnić łatwy powrót robota do stacji bazowej po czyszczeniu,
·
zaleca się jego uruchamianie ze stacji bazowej.
Podkładki mopa będą czyszczone przed rozpoczęciem mopowania przez
·
robota, czekaj cierpliwie.
Podczas pracy nie poruszaj stacją bazową, zbiornikiem na czystą wodę,
·
zbiornikiem na brudną wodę ani filtrem tarki.
Funkcję prania gorącą wodą można włączyć w aplikacji w zakładce
·
poświęconej podkładkom mopa, a funkcja ta działa we wszystkich
trybach. Aby zapobiec oparzeniu, nie dotykaj wylotu wody, gdy funkcja jest
włączona.
PL
2. Automatyczne pranie mopa
Podczas sprzątania robot będzie automatycznie powracać do stacji bazowej,
aby wyprać ścierki mopa w oparciu o częstotliwość jej użycia określoną w
aplikacji. Stacja bazowa automatycznie uzupełni wodą zbiornik robota i ten
wznowi sprzątanie.
149
Page 44
PL
Użytkowanie
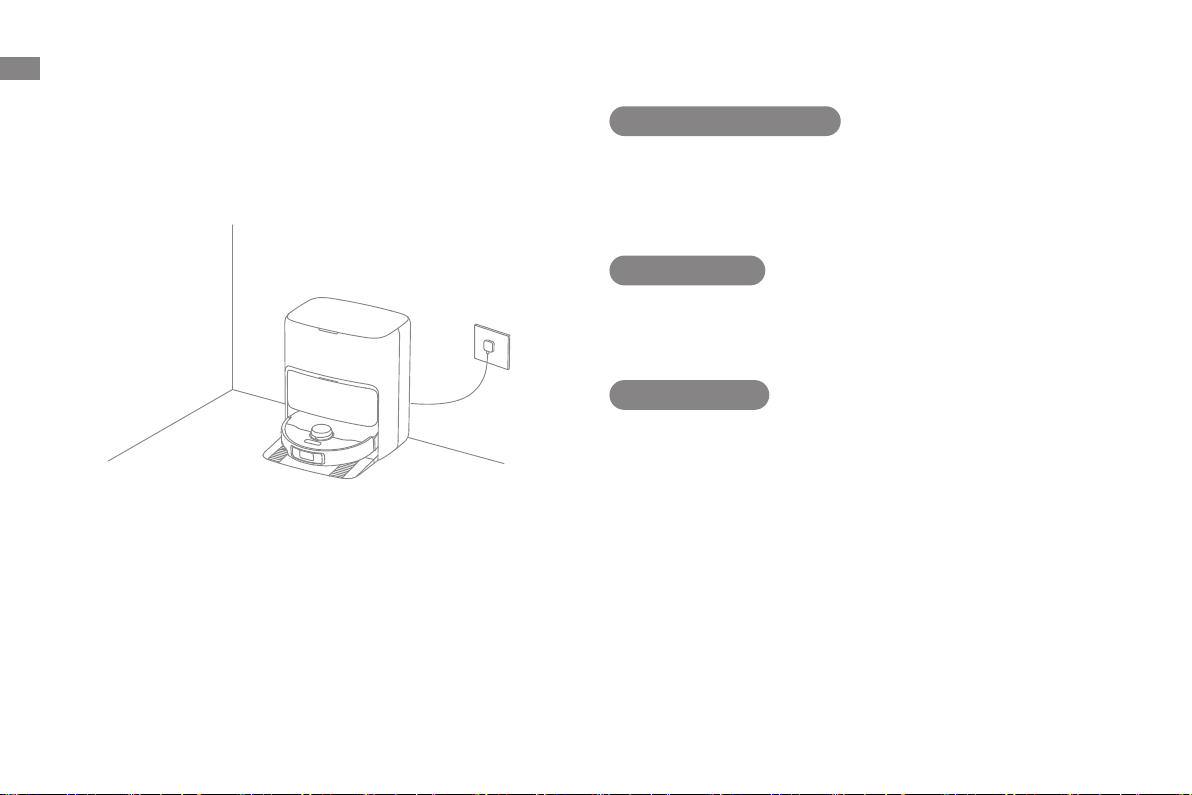
3. Automatyczne opróżnianie pojemnika na kurz oraz pranie i
suszenie nakładki mopa
Gdy robot zakończy zadanie czyszczenia i powróci do stacji bazowej celem
ładowania, stacja automatycznie opróżni pojemnik na kurz. Następnie umyje
i wysuszy ścierki mopa.
Uwaga:
Jeżeli funkcja auto-opróżniania jest wyłączona w aplikacji, stacja bazowa
·
nie będzie automatycznie opróżniać pojemnika na kurz.
Stacja bazowa będzie opróżniać pojemnik na kurz zgodnie z ustawieniami
·
w aplikacji.
4. Wyczyść zbiornik na brudną wodę
Gdy robot zakończy zadanie, umyj zbiornik na brudną wodę, co zapobiegnie
powstawaniu nieprzyjemnego zapachu.
Mopowanie po odkurzaniu
Aktywuj funkcję mopowania po odkurzaniu, a robot automatycznie uniesie
zespół mopa, aby odkurzać podłogę. Po zakończeniu odkurzania robot
powróci do stacji bazowej celem opróżnienia pojemnika na kurz, a następnie,
po opuszczeniu mopa i podniesieniu szczotki bocznej, rozpocznie mopowanie.
Tylko odkurzanie
Aktywuj funkcję odkurzania w aplikacji, a robot automatycznie uniesie zespół
mopa i rozpocznie odkurzanie podłogi.
Tylko mopowanie
Aktywuj funkcję mopowania w aplikacji, a robot sprawdzi, czy jest
zainstalowany zespół mopa. Jeśli nie jest, zamontuj mopa ręcznie, a po
podniesieniu szczotki bocznej robot automatycznie rozpocznie mopowanie.
150
Page 45
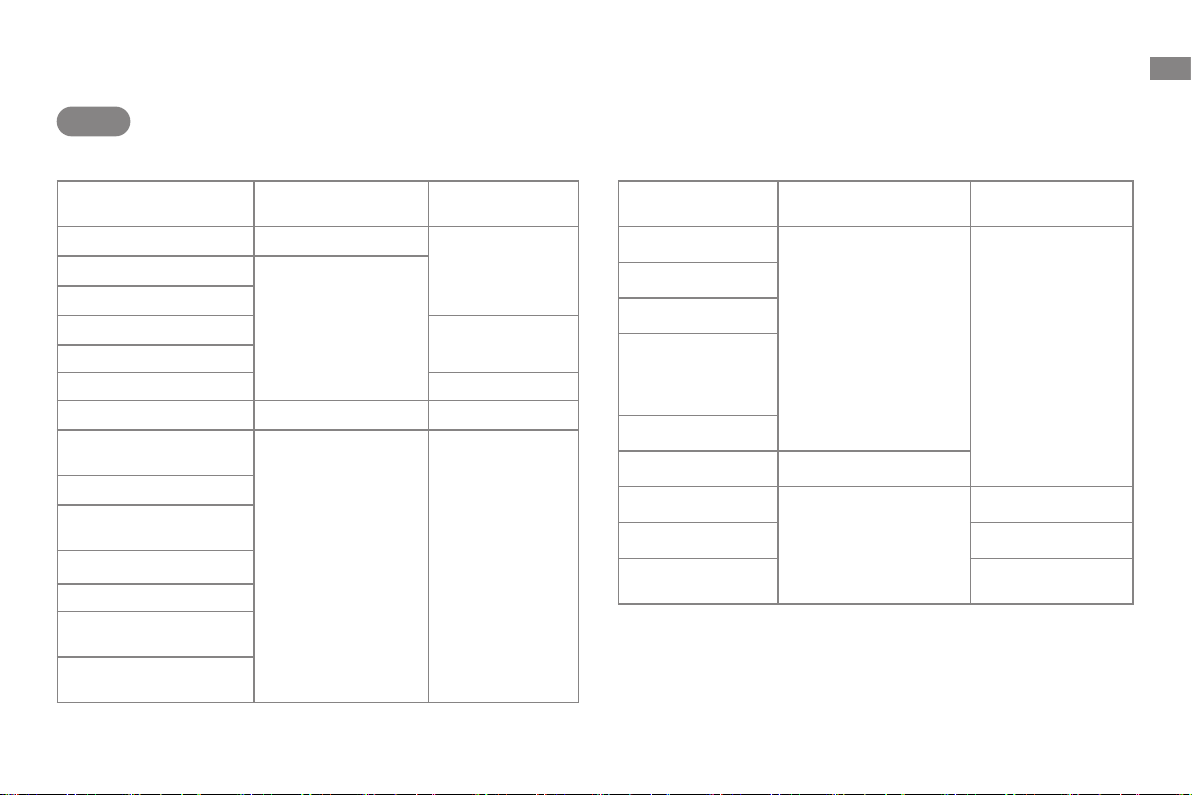
Rutynowa konserwacja
Części
Aby utrzymać robot w dobrym stanie, zaleca się sprawdzanie użytkowania akcesoriów w aplikacji lub następującej tabeli w kwestii planowej konserwacji.
PL
Część
Zbiornik na brudną wodę Po każdym użyciu
Szczotka główna
Filtr pojemnika na kurz
Szczotka boczna
Uchwyt podkładki mopa /
Filtr tarki Raz na 1 do 2 miesięcy /
Obszar sygnalizacyjny
stacji bazowej
Styk ładowania
Odpowietrznik
samoopróżniania
Kółko wielokierunkowe
Czujnik krawędzi
Czujnik dalmierza
laserowego (LDS)
Liniowy czujnik laserowy
3D
Częstotliwość
konserwacji
Raz na 2 tygodnie
Raz na miesiąc /
Okres wymiany
/Zbiornik na czystą wodę
Co 3 do 6 miesięcy
Część
Czujnik dywanu
Czujnik uskoku
Zderzak
Wlot
automatycznego
uzupełniania wody
robota
Dno robota
Pojemnik na kurz Czyść w miarę potrzeby
Worek na kurz
Podkładka mopa Co 1 do 3 miesięcy
Inhibitor kamienia
kotłowego
Uwaga: Częstotliwość wymiany zależy od użytkowania robota. W razie
wystąpienia wyjątku ze względu na szczególne okoliczności, części należy
wymienić.
Częstotliwość
konserwacji
Raz na miesiąc
/
Okres wymiany
/
Co 2 do 4 miesięcy
Co 18 do 36 miesięcy
151
Page 46
PL
>1.5米
Rutynowa konserwacja
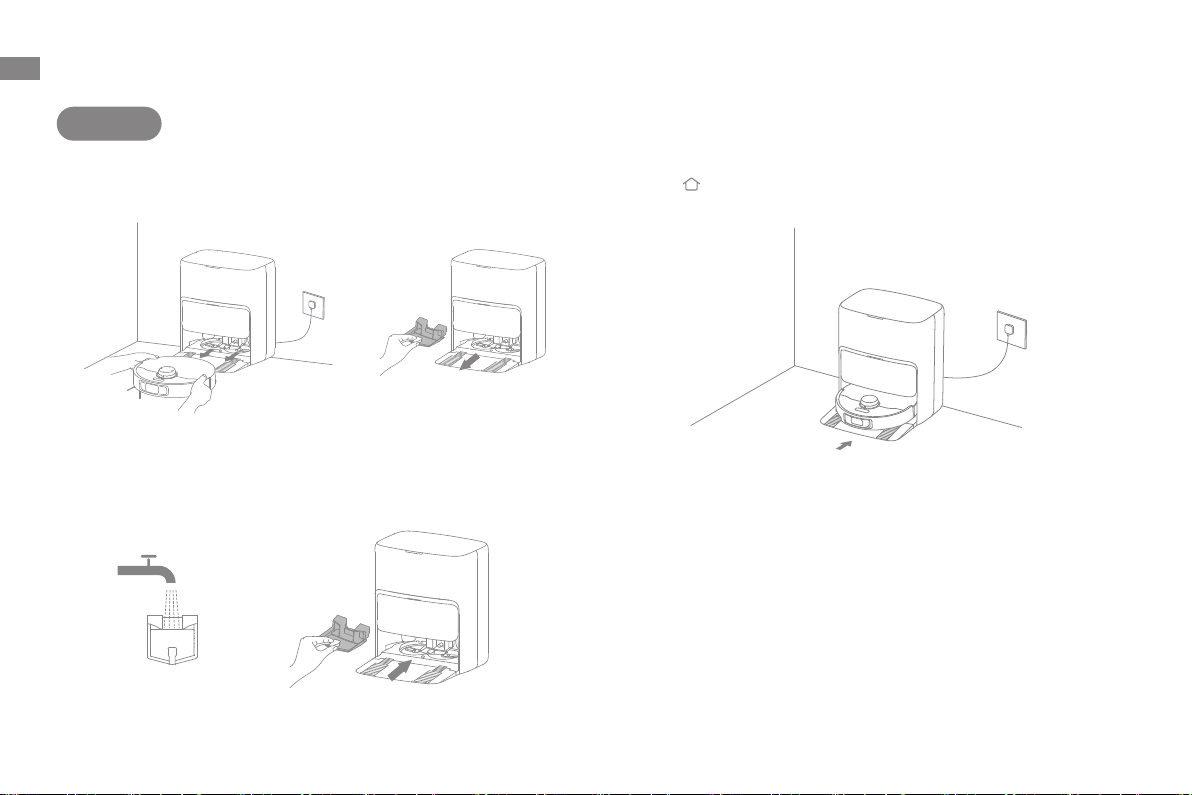
Filtr tarki
1. Po zakończeniu prania podkładek mopa wyjmij robota i
wymontuj ltr tarki.
2. Wypłucz ltr tarki czystą wodą, wytrzyj go do sucha, a następnie
zamontuj go ponownie w tarce.
3. Odeślij robota do stacji bazowej używając aplikacji lub naciskając
przycisk , albo też zrób to ręcznie.
152
Page 47
Rutynowa konserwacja
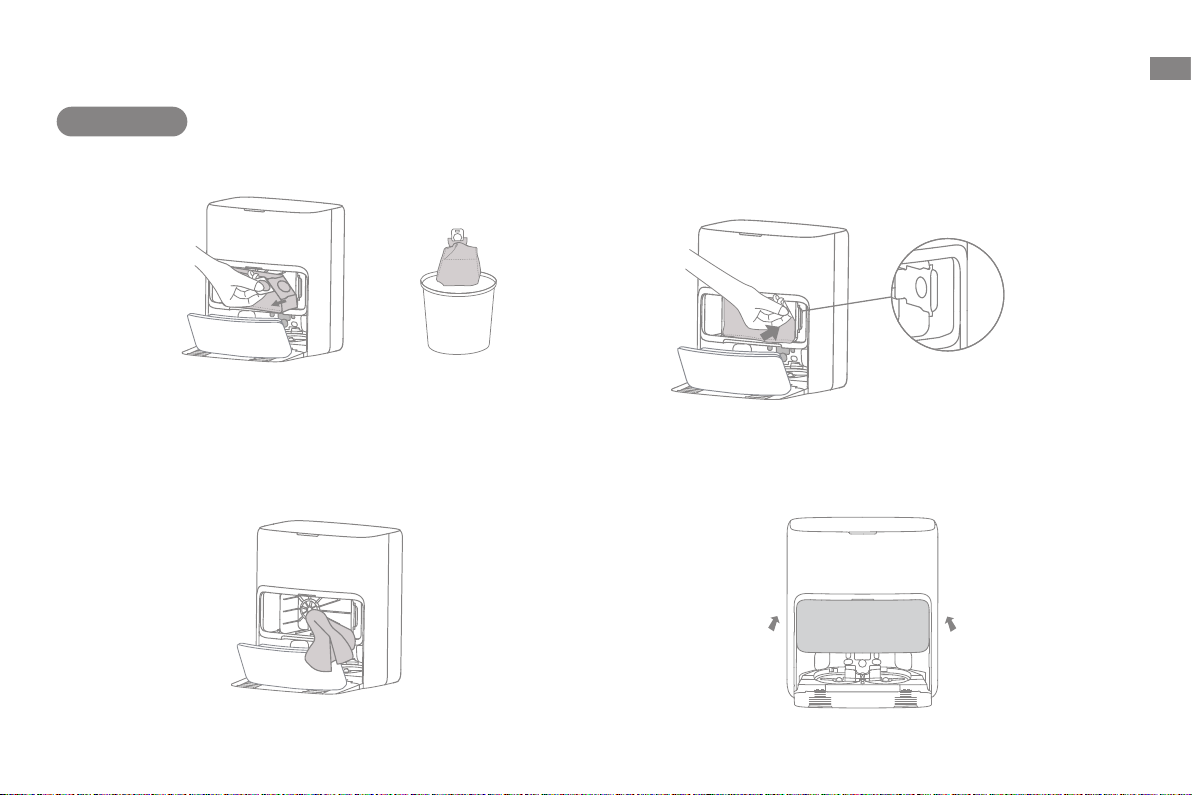
Worek na kurz
1. Zdejmij pokrywę zbiornika na kurz i wyrzuć worek.
Uwaga: Pociągnięcie do góry za uchwyt uszczelni worek na kurz, aby
zapobiec przypadkowemu wypadaniu jego i śmieci.
PL
3. Zainstaluj nowy worek na kurz.
2. Kurz i śmieci z filtra usuwaj suchą ściereczką.
4. Zainstaluj na powrót pokrywę zbiornika.
153
Page 48
PL
Rutynowa konserwacja
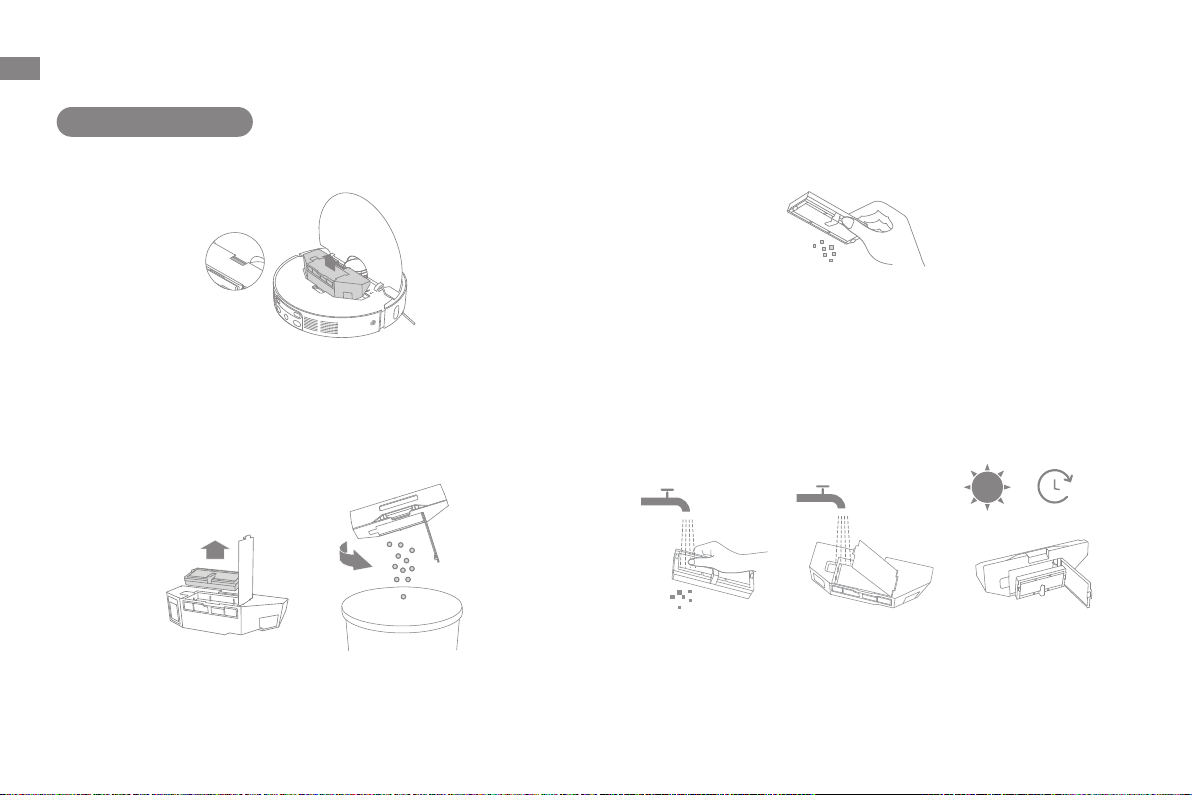
Pojemnik na kurz i filtr
1. Otwórz pokrywę robota i wciśnij zatrzask pojemnika na kurz, aby go wyjąć.
2. Otwórz pokrywę pojemnika na kurz, wyjmij filtr i opróżnij pojemnik, jak
przedstawiono na ilustracji.
154
3. Delikatnie stukaj w kosz filtra, aby usunąć brud.
Uwaga: Nie próbuj czyścić filtra szczotką, palcem ani ostrymi przedmiotami,
gdyż grozi to jego uszkodzeniem.
4. Wypłucz wodą pojemnik na kurz i filtr, wysusz je całkowicie przed ponownym
zainstalowaniem.
24h
Uwaga:
Pojemnik na kurz i filtr płucz wyłącznie czystą wodą. Nie używaj detergentu.
·
Pojemnik na kurz i filtr używaj dopiero po całkowitym wyschnięciu.
·
Page 49
Rutynowa konserwacja
PL
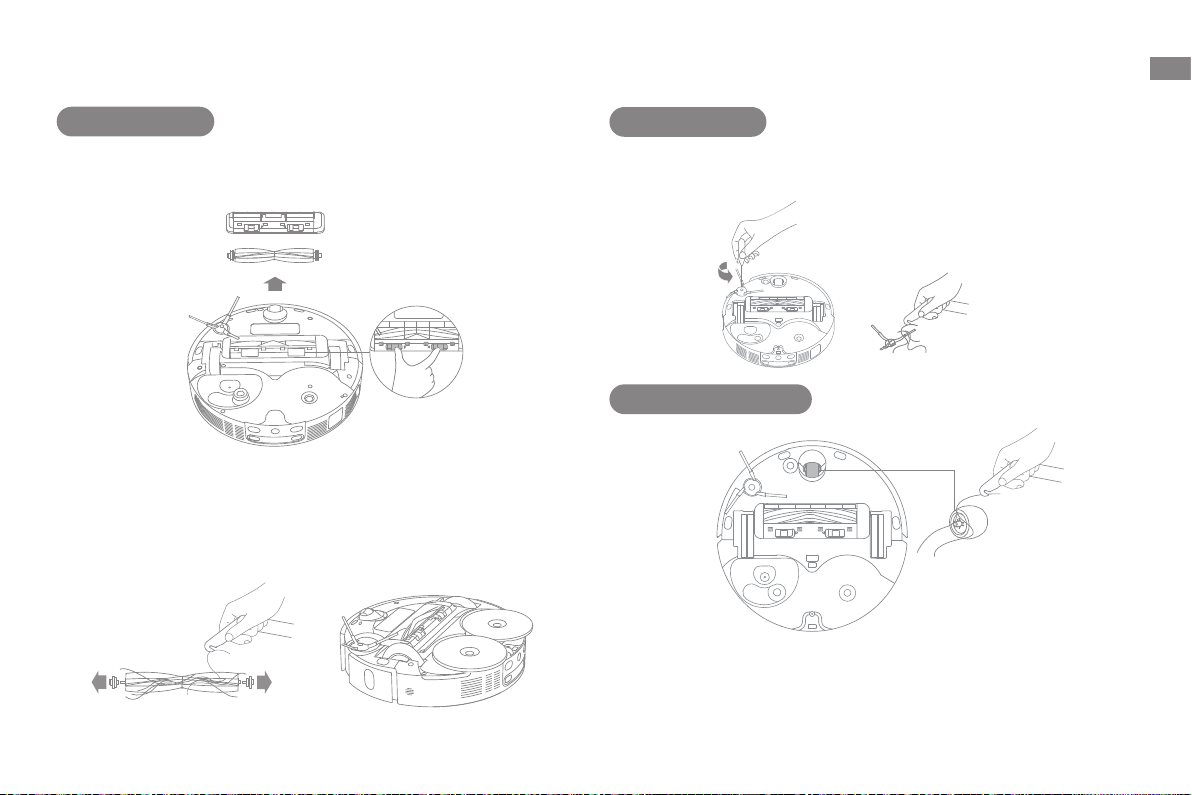
Szczotka główna
1. Wciśnij zatrzaski osłony szczotki do środka, aby wyjąć osłonę, wyjmij
szczotkę z robota.
2. Wyciągnij osłony szczotki na obu końcach szczotki, jak przedstawiono na
rysunku. Zastosuj właściwe narzędzie do czyszczenia, aby usunąć włosy
wplątane w szczotkę. Ponownie załóż pokrywy szczotki na obu jej końcach, a
następnie samą szczotkę. Wciśnij ochraniacz szczotki, aby ją zablokować na
miejscu.
Szczotka boczna
Śrubokrętem odkręć szczotkę boczną, usuń z niej włosy, a następnie przykręć
z powrotem.
Kółko wielokierunkowe
Uwaga:
Małym śrubokrętem oddziel oś od opony kółka wielokierunkowego. Nie
·
wywieraj nadmiernej siły.
Wypłucz kółko wielokierunkowe pod bieżącą wodą i załóż z powrotem po
·
całkowitym wysuszeniu.
155
Page 50
PL
Rutynowa konserwacja
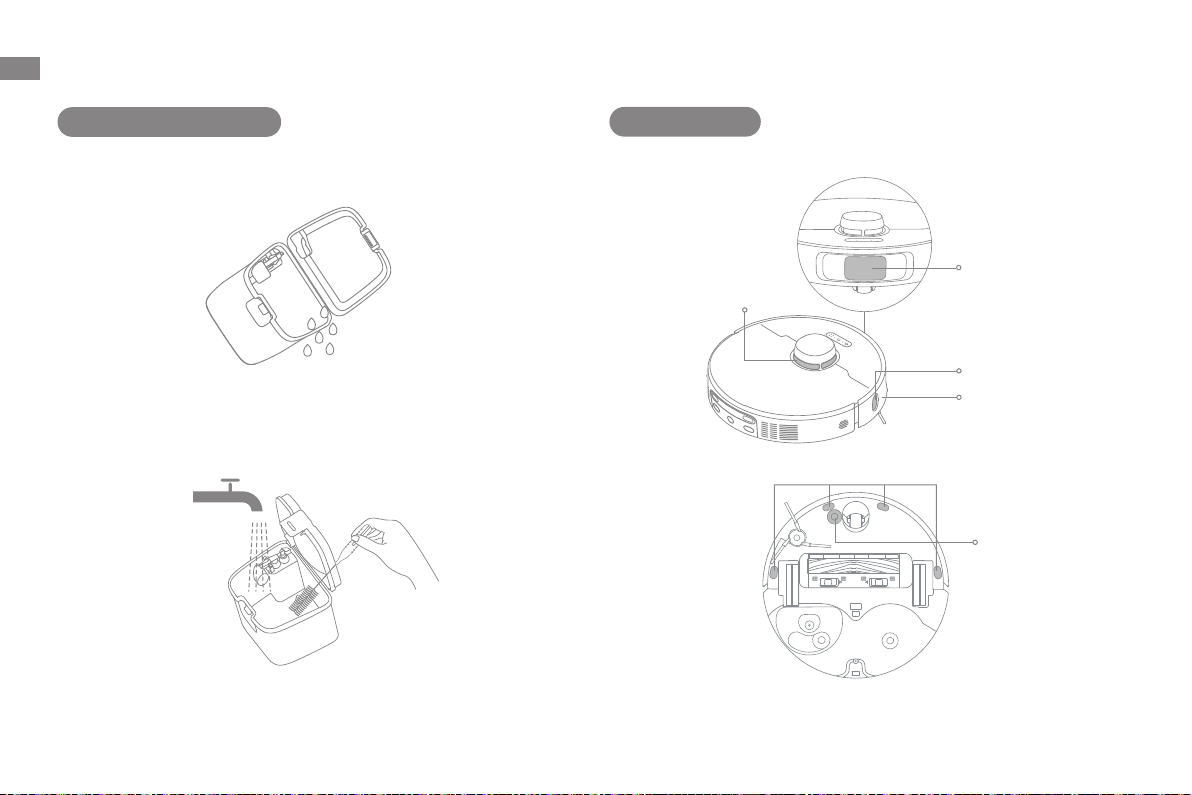
Zbiornik na brudną wodę
1. Wyjmij zbiornik na brudną wodę, otwórz pokrywę i wylej zawartość.
2. Czystą wodą wypłucz zbiornik używanej wody, wykorzystując
dostarczone narzędzie do czyszczenia ściany wewnętrznej zbiornika.
Czujniki robota
Czujniki robota przetrzyj miękką i suchą ściereczką, jak przedstawiono na
rysunku poniżej:
Czujnik dalmierza
laserowego (LDS)
Czujniki klifu
Liniowy czujnik
laserowy 3D
Czujnik krawędzi
Zderzak
Czujnik dywanu
Uwaga: Pływająca kula w zbiorniku użytej wody jest częścią ruchomą. Nie
wywieraj nadmiernej siły czyszcząc ją, aby uniknąć uszkodzenia jej.
156
Uwaga: Mokra ścierka może uszkodzić czułe elementy robota i stacji bazowej.
Do czyszczenia używaj suchej ściereczki.
Page 51
Rutynowa konserwacja
PL
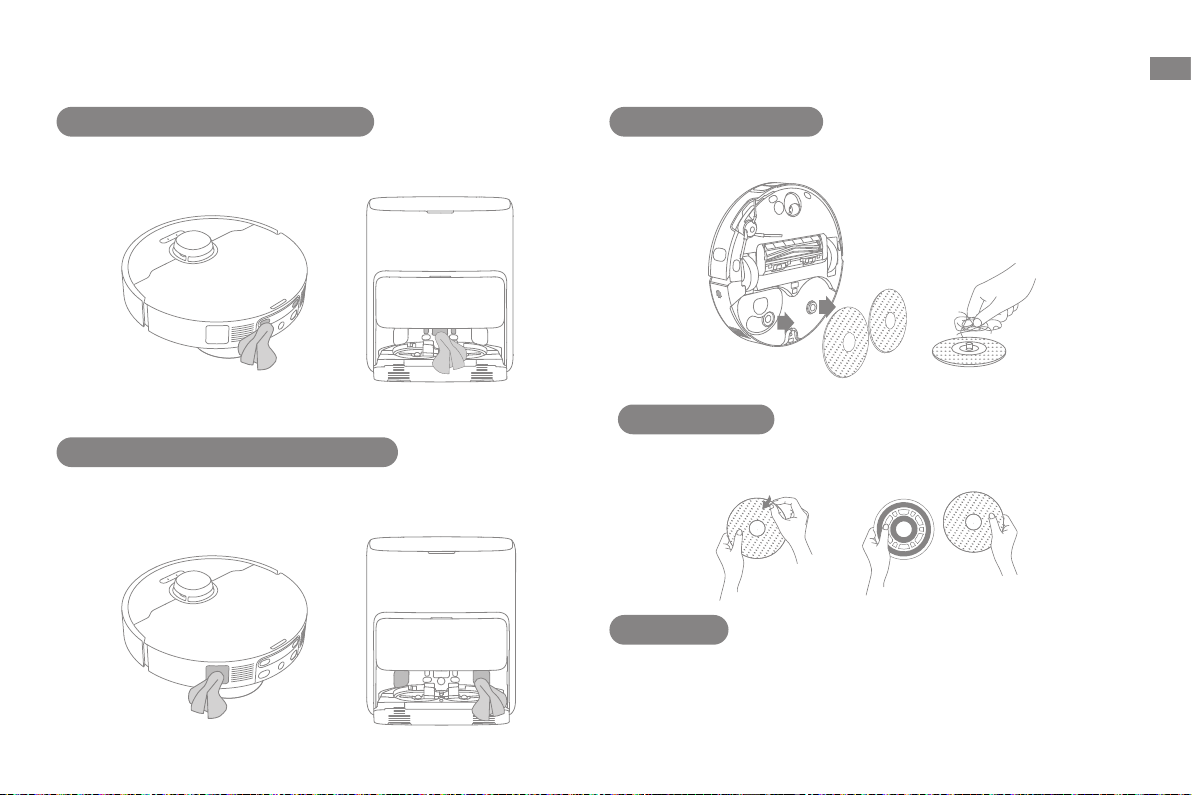
Styki ładowania i pole sygnalizacyjne
Styki ładowania i pole sygnalizacyjne czyść miękką, suchą ściereczką.
Wyloty automatycznego odpowietrzania
Wyloty automatycznego odpowietrzania robota i stacji bazowej czyść miękką,
suchą ściereczką.
Uchwyt podkładki mopa
Wyjmij i umyj uchwyty podkładek mopa.
Podkładka mopa
Zdejmij podkładkę mopa z uchwytu i wymień ją.
Akumulator
Robot zawiera pakiet akumulatora litowo-jonowego o wysokich parametrach
użytkowych. Dbaj o to, by akumulator był dobrze naładowany do
codziennego użytku, aby zachować jego parametry użytkowe na optymalnym
poziomie. Jeżeli robot nie jest używany przez dłuższy czas, wyłącz go i
złóż. Aby uniknąć szkód wskutek nadmiernego rozładowania, robot należy
doładowywać przynajmniej raz na trzy miesiące.
157
Page 52
PL
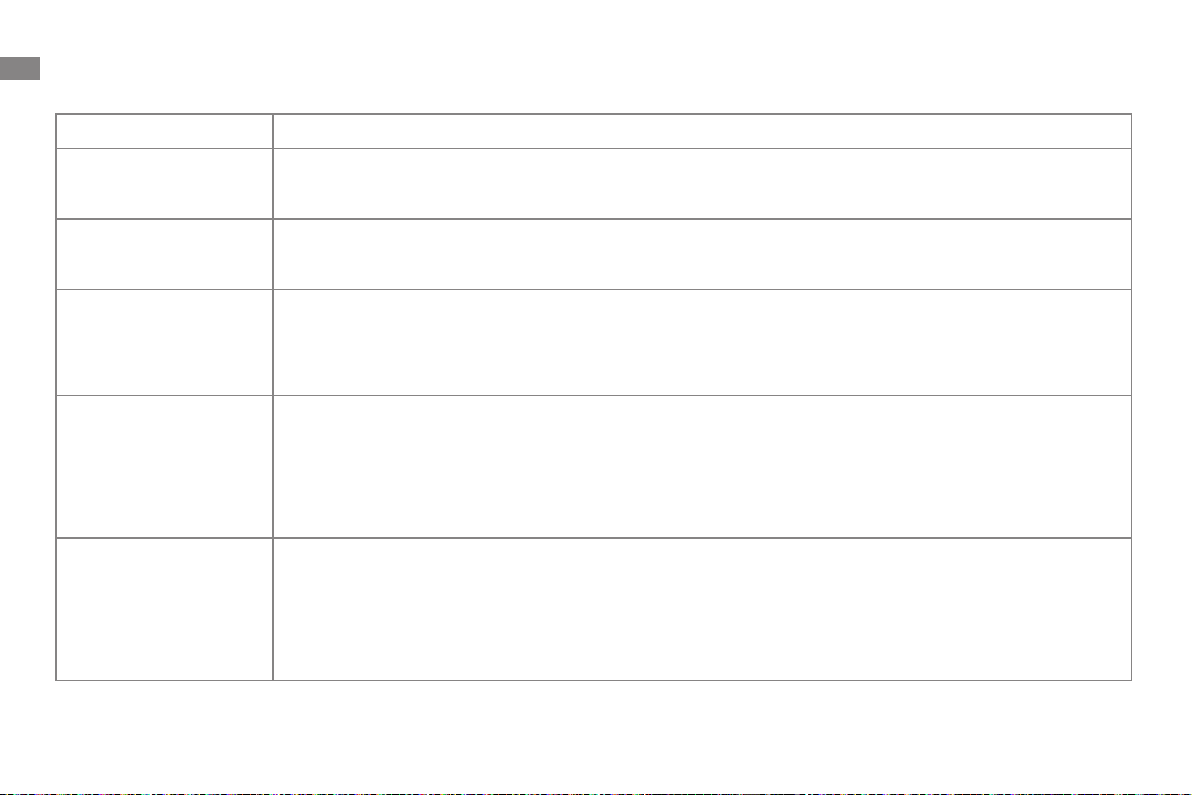
Wykrywanie i usuwanie usterek
Usterka Rozwiązanie
Robot nie włącza się.
Robot nie ładuje się.
Robot nie łączy się z Wi-Fi.
Robot nie może znaleźć
i powrócić do stacji
bazowej.
Robot utyka przed stacją
bazową i nie może
powrócić do niej.
Akumulator jest rozładowany. Doładuj robot w stacji bazowej i spróbuj ponownie.
Temperatura baterii jest zbyt niska lub zbyt wysoka. Urządzenie należy użytkować w temperaturze otoczenia w zakresie od
0 °C do 40 °C.
Stacja bazowa nie jest podłączona do zasilania, upewnij się, czy oba końce kabla zasilania są prawidłowo wetknięte.
Słaby kontakt między stykami ładowania w stacji bazowej i robocie, oczyść styki ładowania.
Sprawdź, czy na złączu robota nie ma jakiegoś ciała obcego, usuń je w takim przypadku.
Nieprawidłowe hasło sieci Wi-Fi. Sprawdź, czy hasło używane do łączenia się z siecią Wi-Fi, jest prawidłowe.
Robot nie obsługuje połączenia Wi-Fi 5 GHz. Upewnij się, czy robot jest połączony z siecią Wi-Fi 2,4 GHz.
Słaby sygnał Wi-Fi. Upewnij się, czy robot jest w obszarze o dobrym zasięgu Wi-Fi.
Robot może nie być gotowy do skonfigurowania. Wyjdź z aplikacji i wejdź ponownie, następnie spróbuj jeszcze raz
zgodnie z instrukcją.
Stacja bazowa została odłączona od zasilania lub poruszona, gdy robot znajdował się poza stacją. Połącz stację bazową z
zasilaniem lub umieść robot na stacji celem ładowania.
Za dużo jest przeszkód wokół stacji bazowej. Ustaw stację bazową w terenie bardziej otwartym.
Poruszenie robotem może spowodować ponowne jego pozycjonowanie, a to spowoduje ponowne tworzenie mapy, jeżeli
ponowne pozycjonowanie zawiedzie. Jeżeli robot jest zbyt daleko od stacji bazowej, może nie być w stanie powrócić
samodzielnie, w którym to przypadku konieczne jest jego ręczne umieszczenie w stacji bazowej.
Wytrzyj pole sygnalizacji w stacji bazowej, aby usunąć kurz i śmieci.
Sprawdź, czy jest wystarczająco dużo miejsca po obu stronach stacji bazowej i przed nią, aby zapobiec zablokowaniu
robota.
Trasa powrotu do ładowania jest zablokowana, np. zamknięte drzwi.
Robot może ślizgać się, jeżeli podłoga przed stacją bazową jest nadmiernie mokra. W takim przypadku usuń nadmiar
wody przed podjęciem ponownej próby.
Zaleca się przesunięcie stacji bazowej w innej miejsce i spróbowanie ponownie.
Upewnij się, czy płytka przedłużająca rampy jest prawidłowo zamontowane.
158
Page 53
Wykrywanie i usuwanie usterek
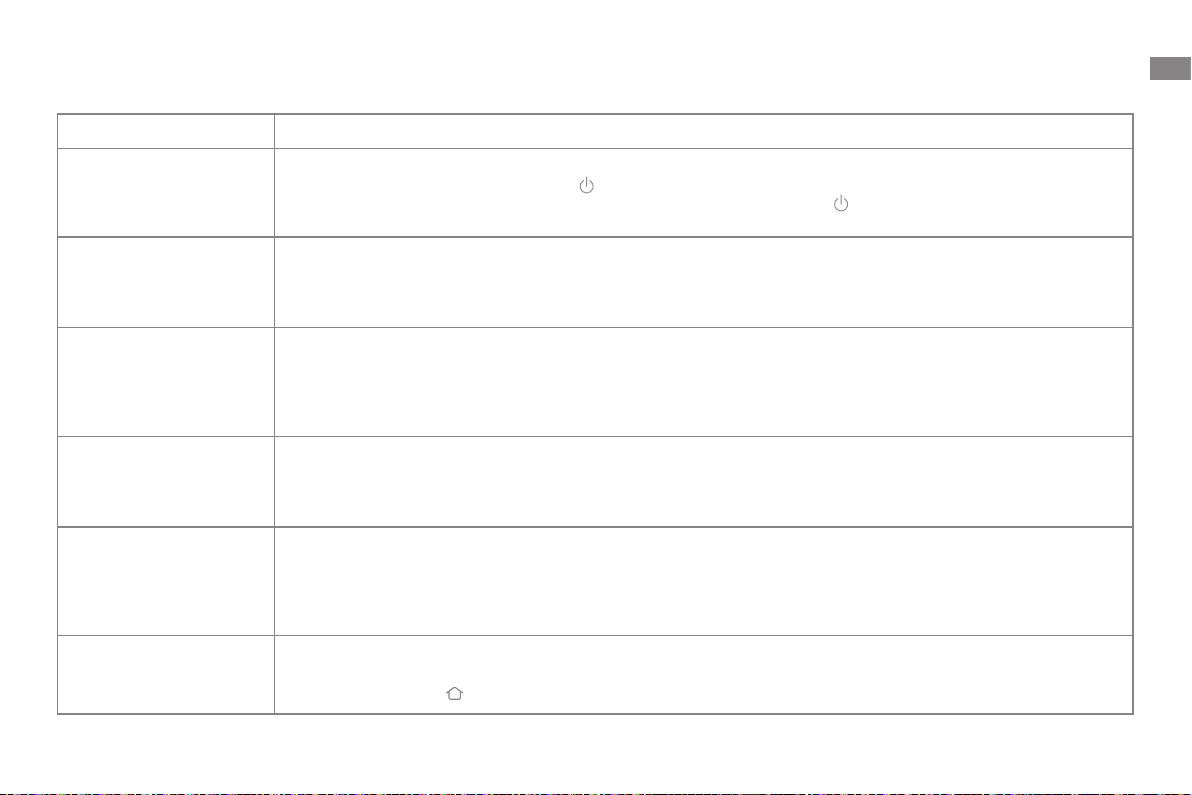
Usterka Rozwiązanie
Robot nie może być wyłączony podczas ładowania. Celem wyłączenia robota zaleca się odsunięcie robota od stacji
Robot nie wyłącza się.
bazowej, a następnie wciśnięcie przycisku na 3 sekundy.
Jeżeli robota nie można wyłączyć wykonując czynność 1, należy wcisnąć przycisk na 10 sekund, co spowoduje
wymuszenie wyłączenia robota. Jeżeli problem się utrzymuje, skontaktuj się z działem obsługi posprzedażnej.
PL
Niska prędkość
ładowania.
Hałas zwiększa się, gdy
robot pracuje.
Robot porusza się nie
trzymając się ustalonej
trasy.
Robot pomija
pomieszczenia, które
mają być czyszczone.
Robot nie wznawia
sprzątania po ładowaniu.
Pełne naładowanie rozładowanego akumulatora robota trwa około 3,5 godziny.
Jeżeli pracujesz robotem w temperaturach poza zakresem określonym w specyfikacji technicznej, prędkość ładowania
automatycznie zmniejsza się, aby wydłużyć trwałość akumulatora.
Styki ładowania w robocie i stacji mogą być zabrudzone, wytrzyj je suchą ściereczką.
Sprawdź, czy filtr pojemnika na kurz nie jest zatkany. Jeśli tak, oczyść go lub wymień.
Twardy przedmiot mógł zostać uchwycony przez szczotki główne lub pojemnik na kurz. Sprawdź i usuń wszelkie twarde
przedmioty.
Szczotka główna lub boczna może być splątana. Sprawdź i usuń wszelkie obce ciała.
Tryb ssania przełącz na Standard lub Spokojny.
Przedmioty takie, jak kable zasilania i pantofle należy zorganizować przed użyciem robota.
Praca na mokrych, śliskich powierzchniach powoduje poślizg głównego kółka. Zaleca się wysuszenie mokrych miejsc
przed użyciem robota.
Wytrzyj czujnik lasera liniowego 3D w robocie czystą i miękką ściereczką, aby usunąć wszelkie zanieczyszczenia.
Upewnij się, czy drzwi sprzątanych pomieszczeń są otwarte.
Sprawdź, czy w drzwiach do pomieszczenia nie ma progu wyższego niż około 2 cm. Robot nie jest w stanie wspiąć się na
wysoki próg ani pokonać stopni schodów.
Miejsce przed pomieszczeniem do czyszczenia może być mokre lub śliskie, powodują poślizg robota i nienormalną pracę.
Wysusz podłogę przed użyciem robota.
Upewnij się, czy robot nie jest ustawiony w tryb „Nie przeszkadzać” (DND), co uniemożliwia wznowienie sprzątania.
Robot nie wznawia sprzątania po ręcznym umieszczeniu go w stacji bazowej lub wysłaniu go do ładowania za pomocą
aplikacji lub przycisku .
159
Page 54
PL
Wykrywanie i usuwanie usterek
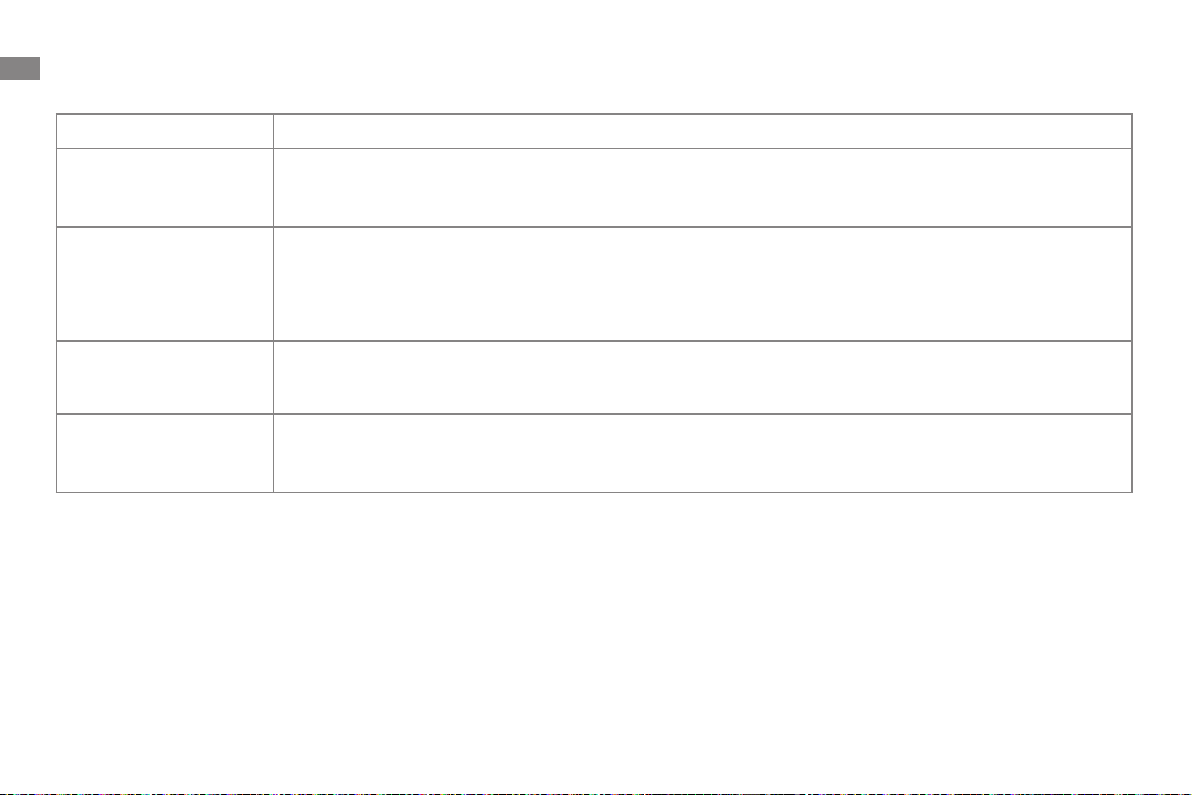
Usterka Rozwiązanie
Stacja nie może
automatycznie opróżnić
pojemnika na kurz.
Poziom wody na tarce nie
jest prawidłowy.
Uchwyt podkładki
mopa jest nienormalnie
podniesiony.
Pod zbiornikiem na czystą
wodę lub wokół uszczelki
jest woda.
W razie konieczności uzyskania dalszej pomocy prosimy o kontakt za pośrednictwem strony www.mova-tech.com
Sprawdź, czy worek na kurz w pojemniku nie jest zapełniony.
Jeżeli worek na kurz nie jest pełny, sprawdź, czy nie ma jakiejś przeszkody na automatycznych odpowietrznikach robota,
stacji bazowej lub pojemnika na kurz. W takim przypadku wyczyść na czas zablokowaną część.
Sprawdź, czy uszczelka w zbiorniku używanej wody nie jest poluzowana lub niewłaściwie założona, ręcznie skoryguj w
razie potrzeby. Jeżeli problem utrzymuje się, skontaktuj się z zespołem serwisu posprzedażnego.
Delikatnie wciśnij w dół zbiornik na brudną wodę sprawdzając, czy jest prawidłowo założony.
Wymontuj filtr tarki i sprawdź, czy odpływ brudnej wody nie jest zatkany; jeśli jest, udrożnij go.
Sprawdź roztwór do czyszczenia. Nie dodawaj innej cieczy niż oficjalnie zaaprobowany roztwór czyszczący.
Wyjmij uchwyt podkładki mopa i sprawdź, czy nie utknęły w nim jakieś ciała obce, po czym uruchom robota ponownie.
Jeżeli problem utrzymuje się, skontaktuj się z zespołem serwisu posprzedażnego.
Przy wyjmowaniu zbiornika na czystą wodę w rurze pod zbiornikiem lub wokół uszczelki może pozostawać nieco wody. To
jest normalne zjawisko. Wytrzyj suchą ściereczką.
160
Page 55
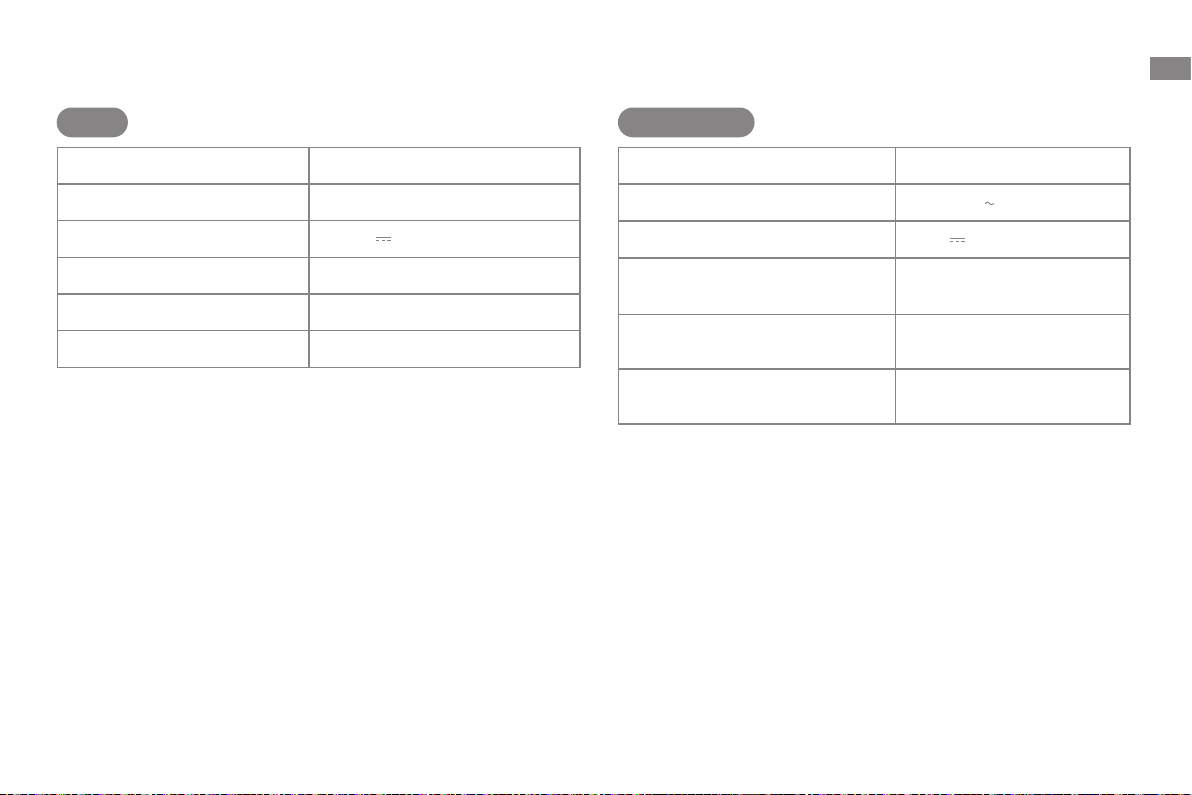
Dane techniczne
PL
Robot
Model RLP23SE
Czas ładowania Około 3,5 godziny
Napięcie znamionowe 14,4 V
Moc znamionowa 75 W
Częstotliwość robocza 2400–2483,5 MHz
Maksymalna moc wyjściowa <20 dBm
Stacja bazowa
Model RCPE0105
Znamionowy prąd zasilania 220-240 V 50-60 Hz
Znamionowa moc wyjściowa 20 V 2 A
Moc znamionowa (podczas
opróżniania z kurzu)
Moc znamionowa (podczas mycia
gorącą wodą)
Moc znamionowa (podczas
ładowania i suszenia)
W normalnych warunkach eksploatacji ten sprzęt powinien być utrzymywany
w odstępie przynajmniej 20cm między anteną i ciałem użytkownika.
Uwaga:
Moc znamionowa (podczas czyszczenia gorącą wodą) jest wyznaczana
·
przez wartość mocy w okresie reprezentatywnym (temperatura wody 25°C).
Moc znamionową (podczas ładowania i suszenia) determinuje wartość
·
mocy podczas całego okresu ładowania.
700 W
1160 W
87 W
161
Page 56

PL
Wyjęcie i likwidacja akumulatora
Wbudowany akumulator litowo-jonowy zawiera substancje, które są niebezpieczne dla środowiska. Demontażu akumulatora może dokonać wyłącznie
wykwalifikowany serwisant, a sam akumulator należy przekazać do odpowiedniego punktu zajmującego się recyklingiem.
– akumulator przed złomowaniem należy wyjąć z urządzenia;
– podczas wyjmowania akumulatora urządzenie musi być odłączone od zasilania sieciowego;
– akumulator należy utylizować w sposób bezpieczny.
OSTROŻNIE:
Przed wyjęciem akumulatora odłącz zasilanie i rozładuj akumulator, ile się da.
Niepotrzebne akumulatory należy poddać utylizacji w odpowiednim zakładzie recyklingowym.
Akumulatora nie narażaj na działanie wysokiej temperatury, gdyż grozi to jego wybuchem.
W niewłaściwych warunkach użytkowania z akumulatora może wydobywać się elektrolit. W przypadku dostania się elektrolitu do oczu lub na skórę skażone
miejsce należy przepłukać dużą ilością wody, po czym zasięgnąć porady lekarskiej.
Instruktaż usuwania:
1. Odwróć robot, za pomocą odpowiedniego narzędzia odkręć śruby z tyłu robota i zdejmij pokrywę.
2. Odłącz zaciski między akumulatorem i płytką drukowaną, aby wyjąć ten pierwszy.
Informacje o WEEE
Wszystkie produkty oznaczone tym symbolem stanowią zużyty sprzęt elektryczny i elektroniczny (WEEE zgodnie z Dyrektywą 2012/19/UE),
którego nie należy mieszać z niesortowanymi odpadami domowymi. Chroniąc zdrowie ludzkie i środowisko, zużyty sprzęt elektroniczny i
elektroniczny należy przekazać do wyznaczonego przez władze lokalne punktu zbiórki zajmującego się recyklingiem zużytego sprzętu tego
rodzaju. Prawidłowa utylizacja i recykling pomogą zapobiec potencjalnym negatywnym konsekwencjom dla środowiska i zdrowia ludzkiego.
Celem uzyskania dodatkowych informacji na temat lokalizacji takich punktów zbiórki należy skontaktować się z lokalnymi władzami.
162
Page 57
Move on, ventures await
For more support, contact us via www.mova-tech.com
Manufactured by: Moonstone Technology (Shaoxing) Co., Ltd.
Made in China EU-S00
 Loading...