

Page 1
MT push
User Manual
Page 2

MT push - Owner’s Manual Issue 1
2
MT push Frame Number
MT push Owner’s Manual
1st Edition 2015
This manual is designed to meet EN Standards 12182, 12183, 14971
IMPORTANT:
This owner’s manual contains important safety, performance and service
information. Please read it before you take the first ride on your new MT push and
keep it for reference.
Additional safety, performance and service information for specific components
such as the suspension on your MT push may also be available. Make sure that your
dealer has given you all the manufacturers’ literature that was included with your
MT push; a complete list can be found on page 9. In case of a conflict between the
instructions in this manual and information provided by a component
manufacturer, always follow the component manufacturer’s instructions.
If you have any questions or do not understand something, take responsibility for
your safety and consult with your dealer.
NOTE:
This manual is not intended as a comprehensive use, service, repair or
maintenance manual. Please see your MT push dealer for all service, repairs or
maintenance.
MT push Order Number
Date of Purchase
Page 3

MT push - Owner’s Manual Issue 1
3
Introduction
Congratulations! You now possess one of the finest all terrain wheelchairs in the world. The
following pages will provide you with the information you need to properly use, adjust and
maintain your new MT push, so you can get the most out of every ride.
It is essential that you read this owner’s manual thoroughly before riding your MT push, we know
you’re anxious to get riding, but it will only take a few minutes, and then you can unleash the full
potential of your MT push
Please pay special attention to the safety information and cautions shown throughout this
owner’s manual.
If you encounter any issues with your MT push that aren’t covered in this manual, please contact
your nearest Authorized MT push Dealer. As your number one resource, your MT push dealer can
answer questions, perform required maintenance and recommend the best equipment to
complement your ride.
Thank you for buying an MT push!
Enjoy the ride!
All diagrams included in this manual are based on a standard MT push, although some custom
options may also be available at your MT push dealer.
Some images have parts of the MT push removed to make the image and instruction clearer
Page 4

MT push - Owner’s Manual Issue 1
4
Table of Contents
A word about Warnings, Accidents and Saf ety .................................................................. 5
Think Safety................................................................................................................... 6
A special note f or par ents .............................................................................................. 6
Your MT push ................................................................................................................... 7
1.0 Setting up your MT push ............................................................................................ 7
1.1 Intended Operator ................................................................................................ 7
1.2 Folding ................................................................................................................ 8
2.0 Riding Instruc tions ................................................................................................. 12
2.1 Pre-Ride Mechanical Safety Checks .................................................................. 12
2.2 Transfer r ing in and out ....................................................................................... 13
2.3 Steering .............................................................................................................. 15
2.4 Braking ............................................................................................................... 15
2.5 Hill and Kerb Clim bing ........................................................................................ 16
2.6 Descending Slopes ............................................................................................ 16
3.0 Safety Advice ........................................................................................................ 17
3.1 Riding safely Off Road ....................................................................................... 17
3.2 Riding safely about town .................................................................................... 18
3.3 Wet and Cold Weather Riding ............................................................................ 18
3.4 Night Riding ....................................................................................................... 19
3.5 Adding Accessories and Cha nging Components ................................................ 19
4.0 Service .................................................................................................................. 19
4.1 Looking after Y our MT push ............................................................................... 20
4.2 Maintenanc e S c hedule ....................................................................................... 22
4.3 Bedding in Period ............................................................................................... 22
5.0 Warranty ................................................................................................................ 23
Page 5

MT push - Owner’s Manual Issue 1
5
A word about Warnings, Accidents and Safety
The MT push is designed to be used for transportation, recreation and exercise. Riding off road
can be dangerous, especially if you or your pusher go beyond the limits of your ability.
All terrain riding involves risk of injury and damage. By choosing to ride an MT push, you assume
the responsibility for that risk, so you need to know and to practice the rules of safe and
responsible riding and of proper use and maintenance. Proper use and maintenance of your MT
push reduces risk of injury.
If you crash or apply force that is higher than the limits of your MT push, you are very likely to
cause damage to it or its parts. If your MT push has been damaged and you crash or load it again
later, this additional impact or loading can cause a failure at a much lower load.
This Manual contains many “Warnings” and “Cautions” concerning the consequences of failure to
maintain or inspect your MT push and of failure to follow safe riding practices.
• The combination of the safety alert symbol and the word WARNING indicates a
potentially hazardous situation which, if not avoided, could result in serious injury or death.
• The combination of the safety alert symbol and the word CAUTION indicates a
potentially hazardous situation which, if not avoided, may result in minor or moderate injury,
or is an alert against unsafe practices.
• The word CAUTION used without the safety alert symbol indicates a situation which, if not
avoided, could result in serious damage to the MT push or the voiding of your warranty.
Many of the Warnings and Cautions say “you may lose control and fall”. Because any fall can
result in serious injury or even death, we do not always repeat the warning of possible injury or
death.
Because it is impossible to anticipate every situation or condition which can occur while riding,
this Manual makes no representation about the safe use of the MT push under all conditions.
There are risks associated with the use of any MT push, which cannot be predicted or avoided,
and which are the sole responsibility of the rider.
Page 6

MT push - Owner’s Manual Issue 1
6
Think Safety
Always think about your safety and avoid dangerous situations. Make sure you read this manual
before you ride. You add to your risk when you make modifications, ride in unusual locations or
ride in a high-risk manner.
A special note for parents
As a parent or guardian, you are responsible for the activities and safety of your minor child, and
that includes making sure that the MT push is properly fitted to the child; that it is in good repair
and safe operating condition; that you and your child have learned and understand the safe
operation of the MT push. As a parent, you should read this manual, as well as review its warnings
and the MT push’s functions and operating procedures with your child, before letting your child
ride.
CAUTION – You may wish to ensure that your child always wears an approved Bicycle
helmet when riding; but also make sure that your child understands that a Bicycle helmet
is for MT push riding only, and must be removed when not riding. A helmet must not be
worn at any time while not riding a MT push, if the helmet is caught on an object, the
wearer could choke.
Page 7

MT push - Owner’s Manual Issue 1
7
Your MT push
Each MT push has its own unique
identification (ID) number. This MT push
ID enables you and the dealer to identify
the MT push and record its history. The
MT push ID can be found stamped into
the frame under the seat.
Please take a moment to write down
your MT push ID and Dealer’s name for
your own records on page 3 in this
manual.
Accompanying this manual you should
also have been supplied with the
following:
• Brake Instruction manual
• Shock Instruction manual
1.0 Setting up your MT push
We strongly urge you to read this Manual in its entirety before your first ride. At the very least,
read and make sure that you understand each point in this section, and refer to the cited sections
on any issue which you don’t completely understand. Please note that not every MT push has all
of the features described in this manual and the MT push pictured in the images may differ
slightly to your own MT push. Ask your dealer to point out the features of your MT push.
1.1 Intended Operator
The MT push is a manual all terrain wheelchair that gives unsurpassed performance on a variety
of challenging types of terrain. The MT push is an attendant wheelchair where the person in the
MT push (rider) is pushed along by someone (pusher) who applies force to the push handle. The
Pusher must accept full responsibility for control of the MT push and must be capable of
controlling the device. If you are unsure as to whether you could use the MT push safely and
effectively, your MT push dealer can assist you and make the appropriate recommendations.
Page 8
MT push - Owner’s Manual Issue 1
8
Frame Size and seating adjustment
To get the most enjoyment from riding your MT push, it is important to ensure the seating is
adjusted correctly for you. Your MT push Dealer will advise you on the correct seating position for
you.
CAUTION - The designed maximum weight of the rider is 100 kg (17 stone)
1.2 Folding
The MT push is designed in such a way that, when folded, it will fit into the back of a car for easy
transport or require as little space as possible for storage.
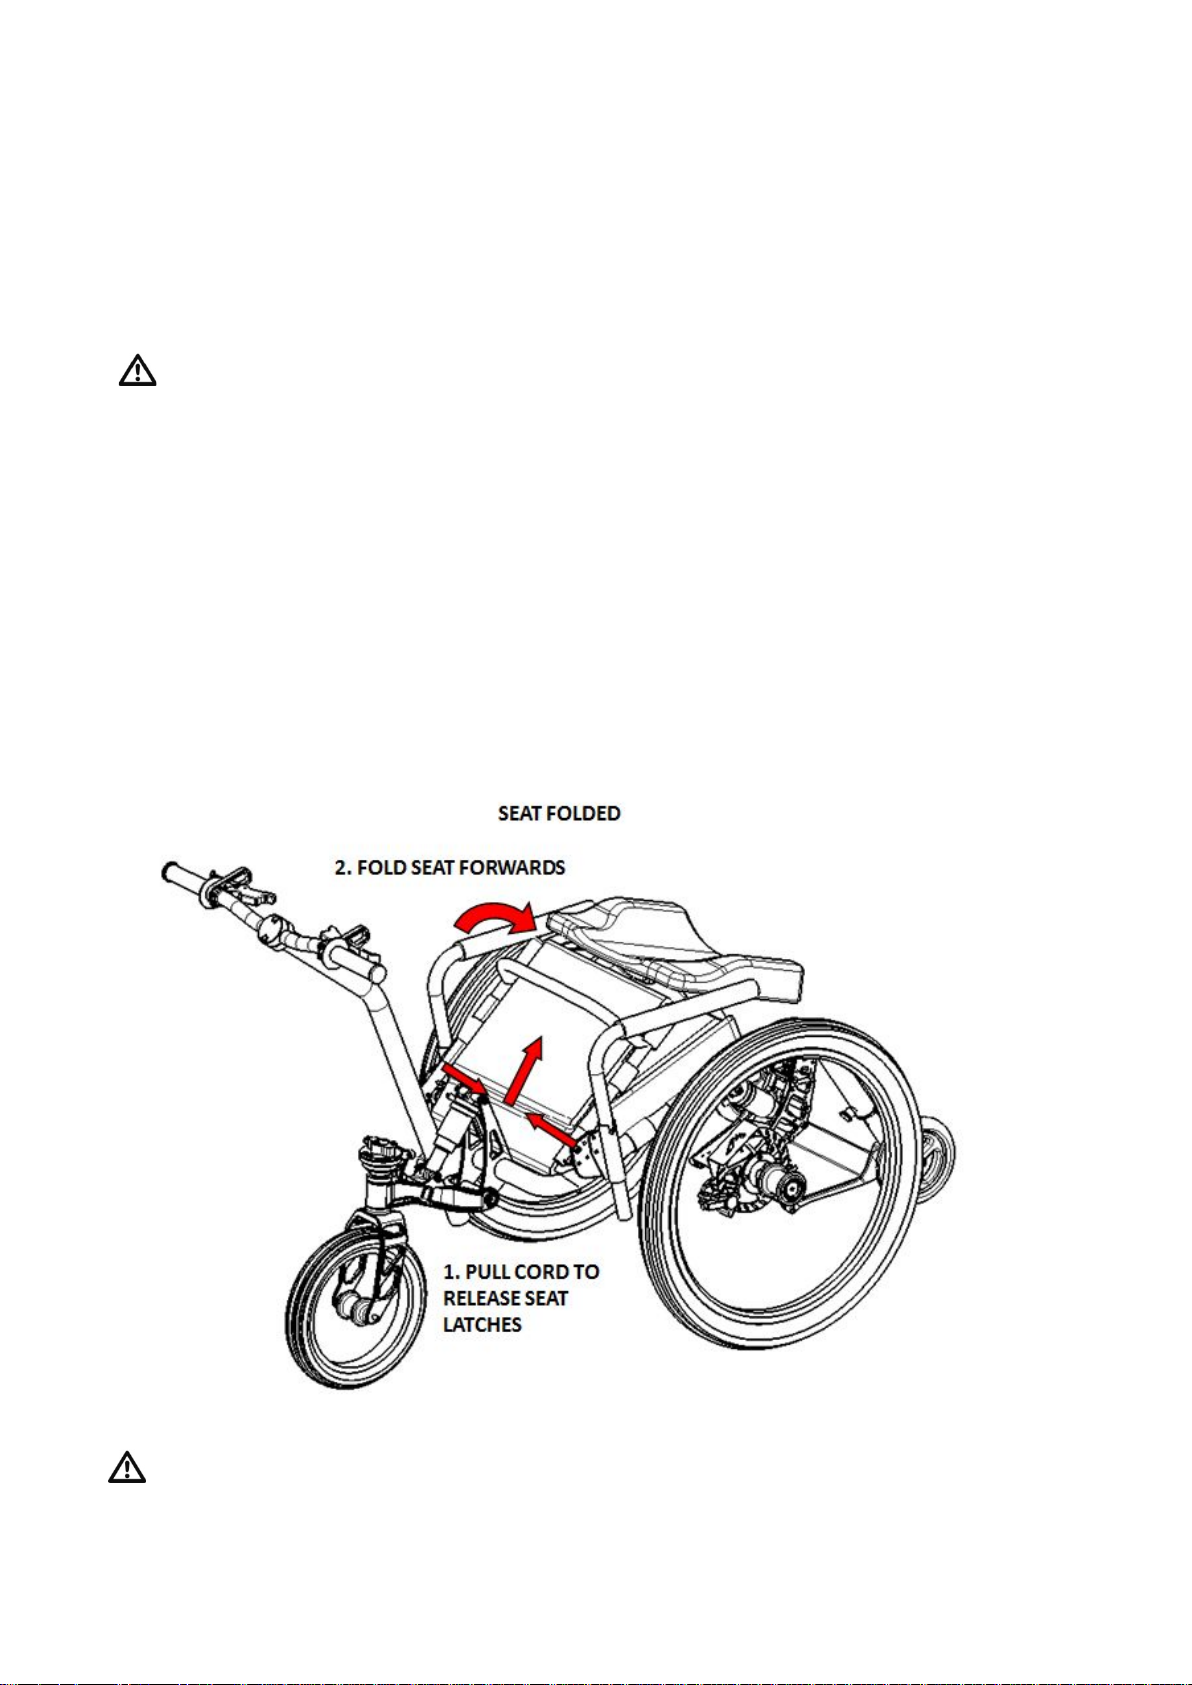
Seat Folding
For efficient stowing of the MT push for transport or storage, pull the seat back cushion out at its
base then pull the cord joining the two locking pins and push seat forward. To restore the seat to
its upright position, lift the seat back whilst pulling the cord, allowing the locking pins to retract.
Once in the upright position, release the cord and the locking pins will spring out into the holes in
the frame.
CAUTION - Ensure the locking pins are BOTH fully engaged in the holes in the frame before
riding. Failure to do so could result in the seat back becoming unstable such that the user
could lose control and fall.
Page 9
MT push - Owner’s Manual Issue 1
9
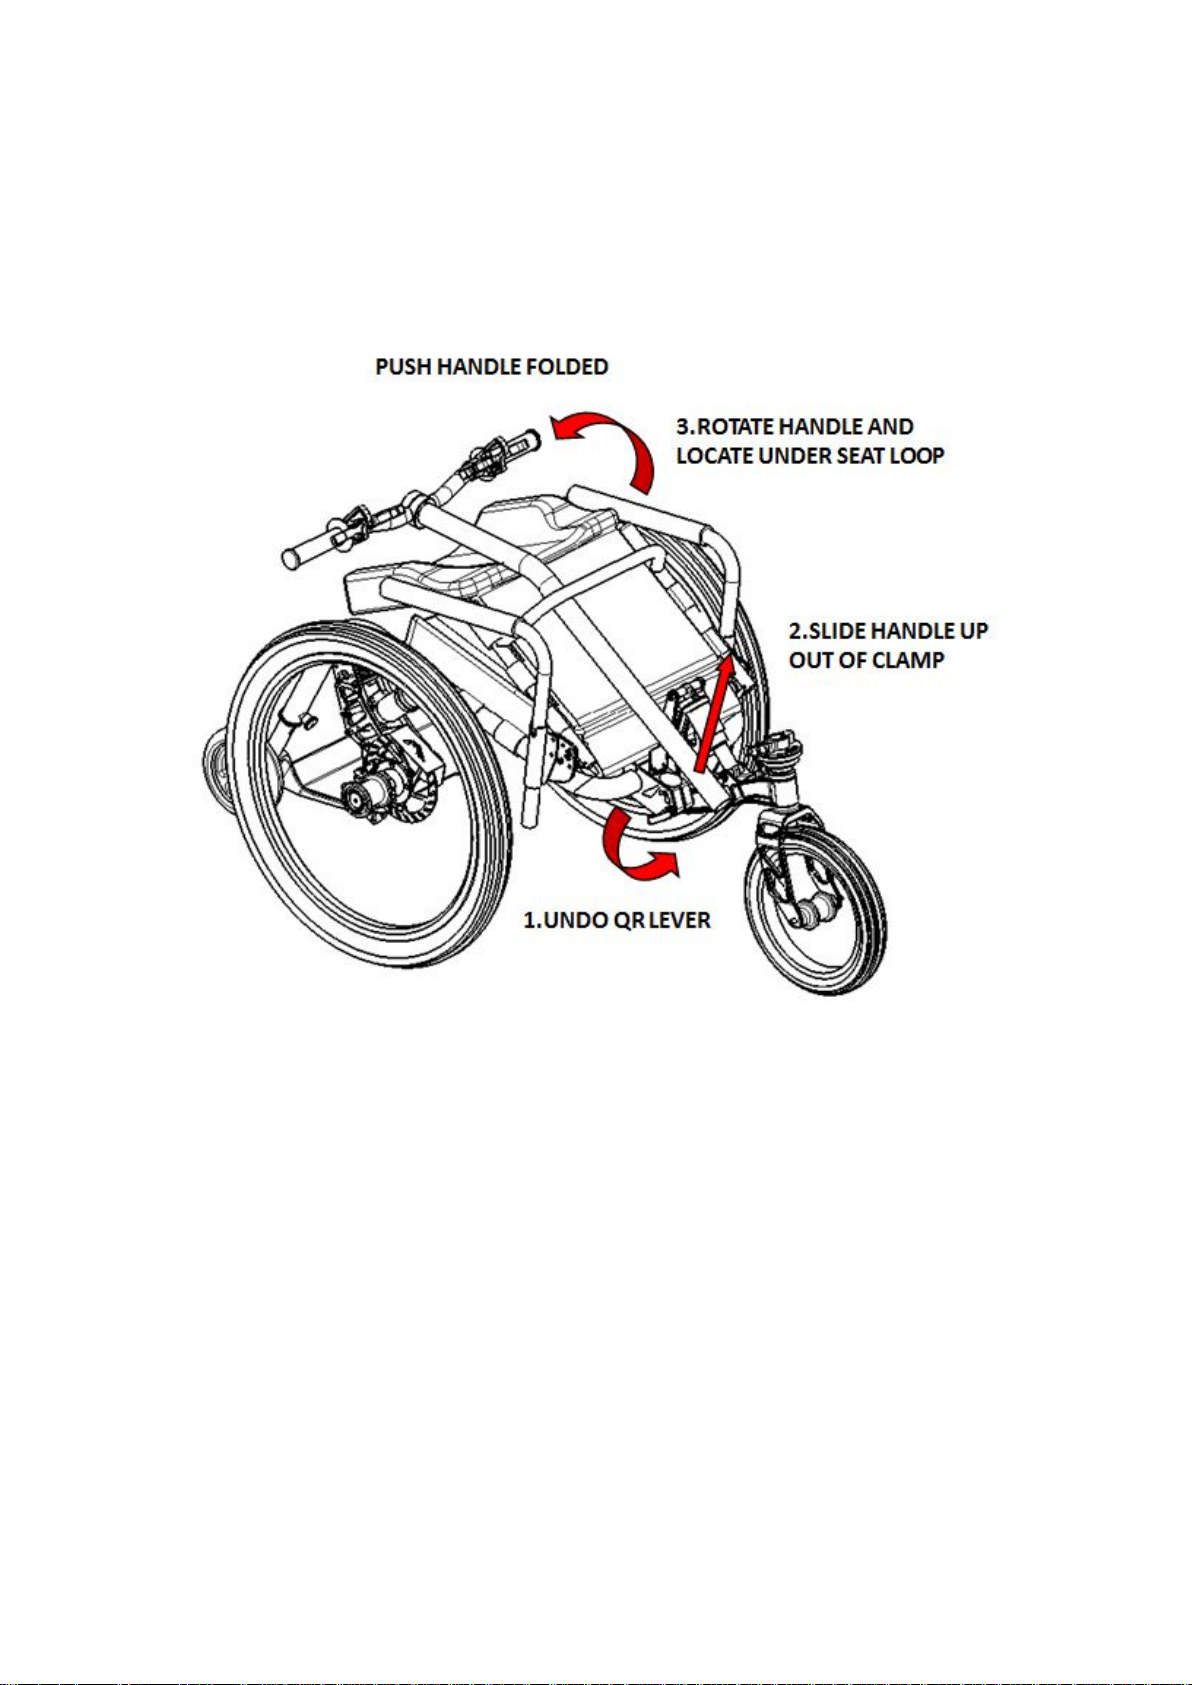
Folding the Push Handle
Remove the push handle from the clamp by undoing the Quick Release lever. Slide the push
handle up and out of the clamp and taking care not to overstretch the brake hoses, locate the
handle under the loop on the back of the seat.
To refit the handle, slide it out from the seat back and slot in into the Clamp at the desired height.
Ensure the handle is straight before tightening the Quick Release (QR) lever. (See instructions
below for QR details)
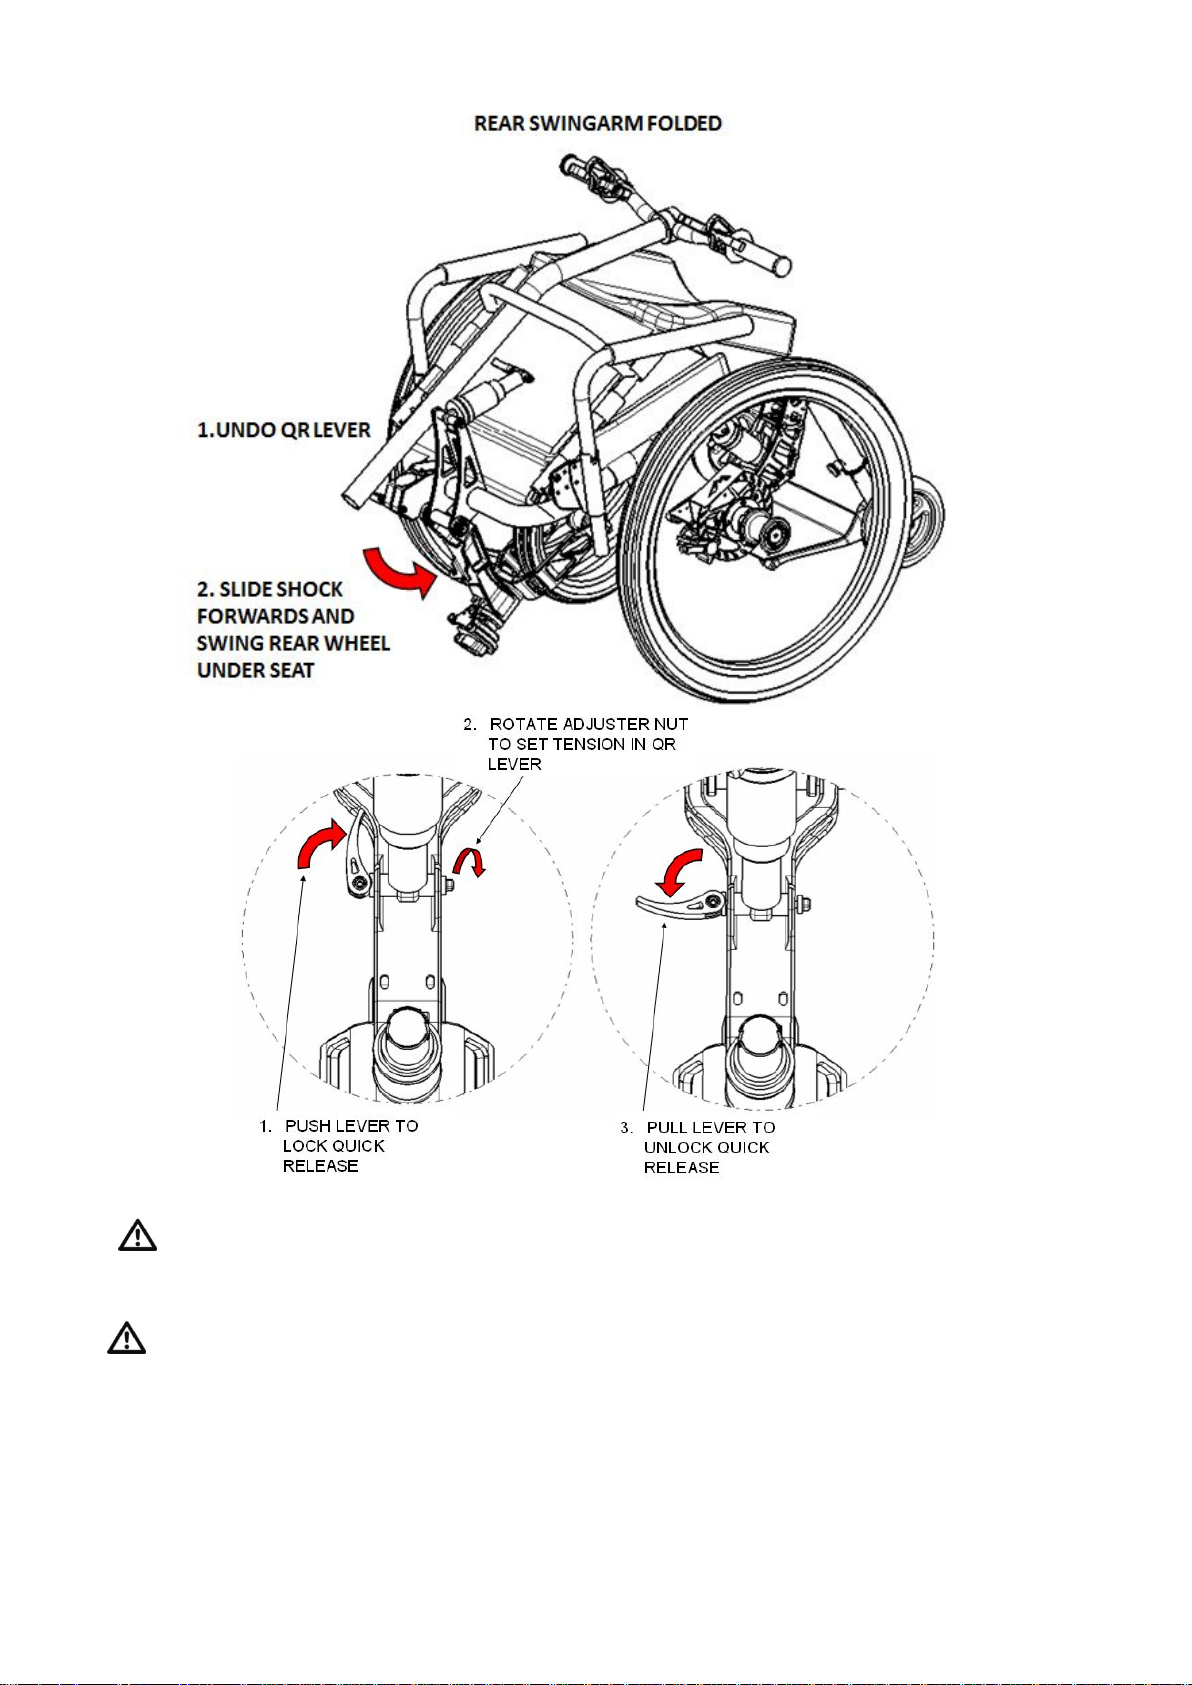
Folding the Rear Wheel
Like the seat, the rear wheel can also be folded away. This is done by simply releasing the rear
shock absorber from the rear swingarm as shown below. Once folded, the rear wheel can be held
in place with a Velcro strap underneath the seat base.
Using the Quick Release (QR) Lever, located at the connection between the rear shock absorber
and the rear swingarm, the rear shock absorber can be separated from the Rear Swing Arm,
allowing the rear wheel and swing arm to fold underneath the seat. QR levers are designed such
that reasonable hand/finger strength is sufficient to provide the required compression force upon
flipping the lever closed. If the lever flips with little or no resistance, then the adjusting nut will
need tightening until the lever flips with enough resistance to provide adequate compression.
Page 10
MT push - Owner’s Manual Issue 1
10
WARNING - It is important that the QR levers are set to the right compression force,
failure to do so could result in the rear shock becoming loose and in a worst case scenario,
detaching during a ride causing the rider to lose control and fall.
WARNING - The full force of the QR cam action is needed to clamp the rear shock
absorber securely. To fasten securely, hold the QR lever in the open position, as indicated
in step 3 in the second diagram above, and tighten the adjuster nut until it is tight before
closing the QR lever.
Page 11
MT push - Owner’s Manual Issue 1
11
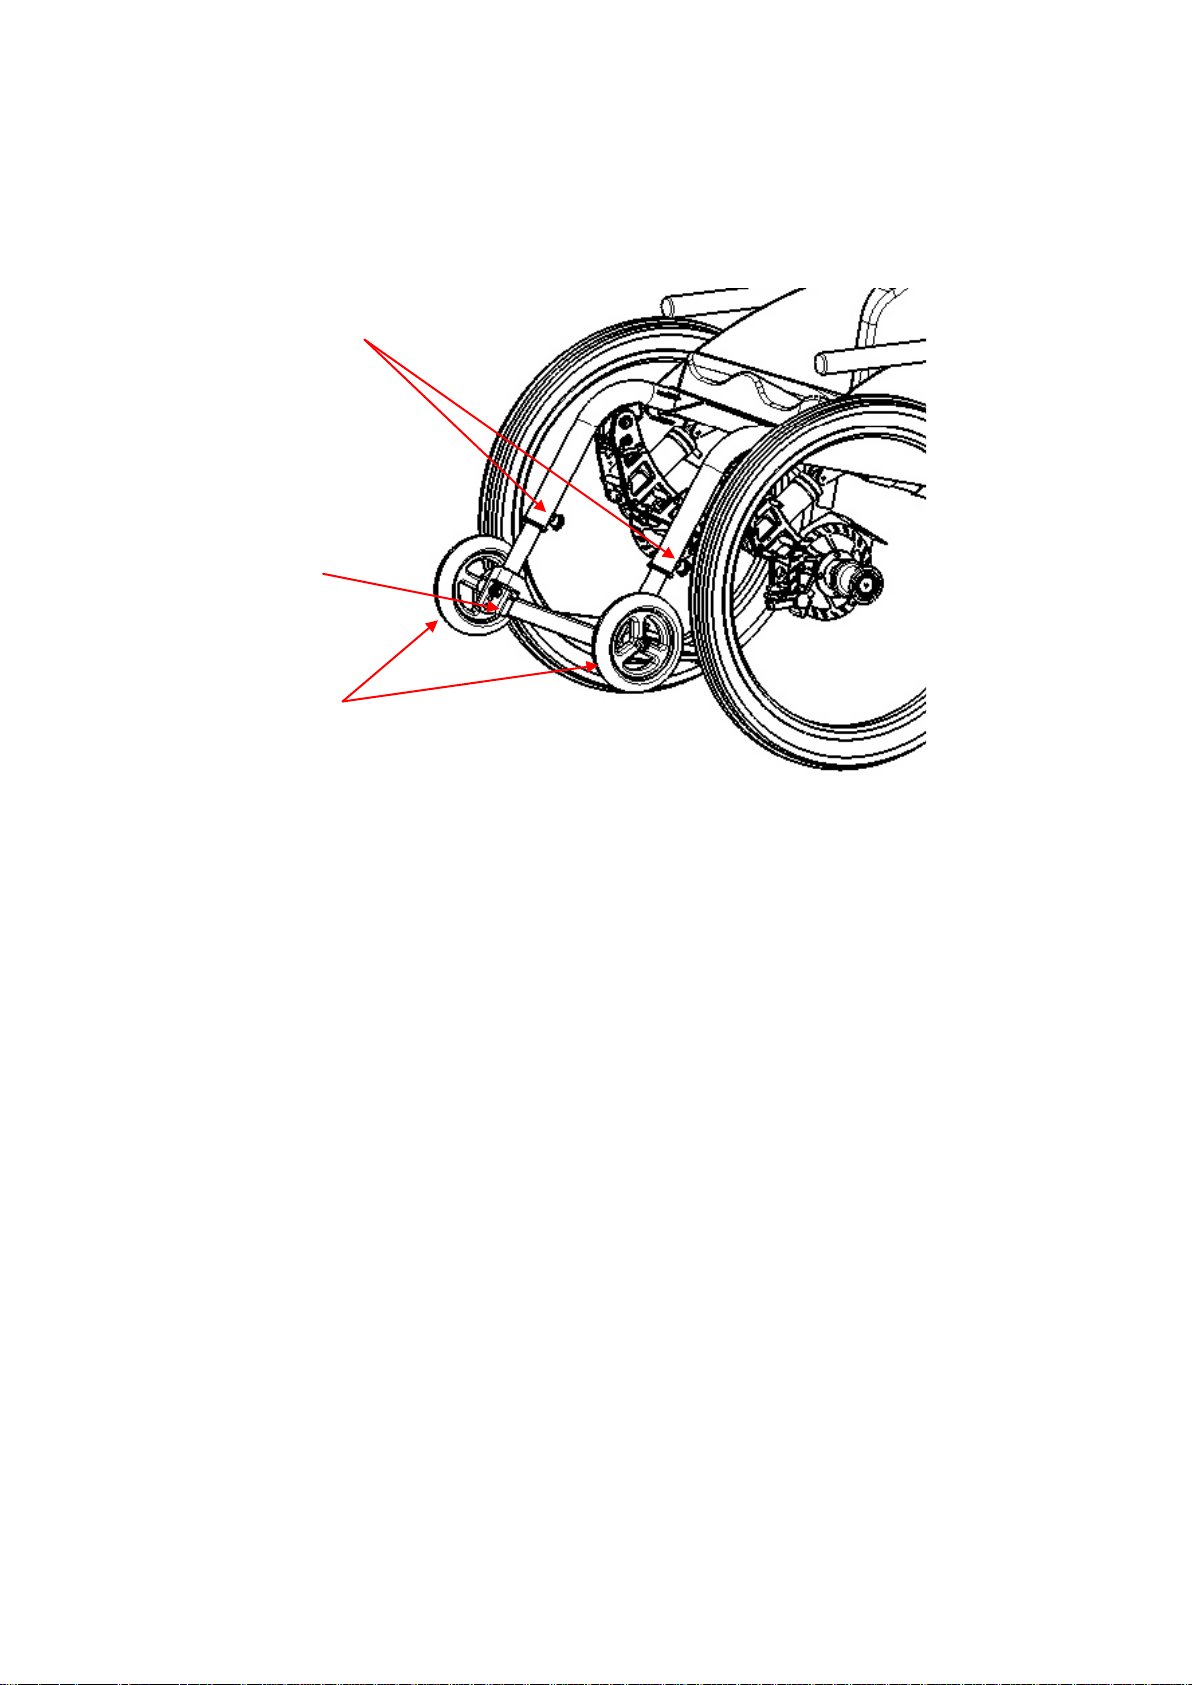
Anti-Tip Wheels
Footrest
Footrest Release Pins
Footrest and Anti-tip Wheel Adjustment
The footr es t and anti-tip wheels c an be raised, lowered or removed by pulli ng the spring
loaded pins located behind t he front legs of the frame and mov ing the footrest to the
desired position.
Page 12

MT push - Owner’s Manual Issue 1
12
2.0 Riding Instructions
The MT push control systems are designed to be simple to use, intuitive and give the rider
unsurpassed levels of ride comfort. However, it may take a few moments to become familiar with
the controls upon your first try.
Please choose a smooth and level piece of ground that is clear of obstructions and contains
sufficient space when riding your MT push for the first time.
Areas that contain rough or steep terrain, open water, manoeuvring vehicles or large amounts of
pedestrian traffic are not recommended.
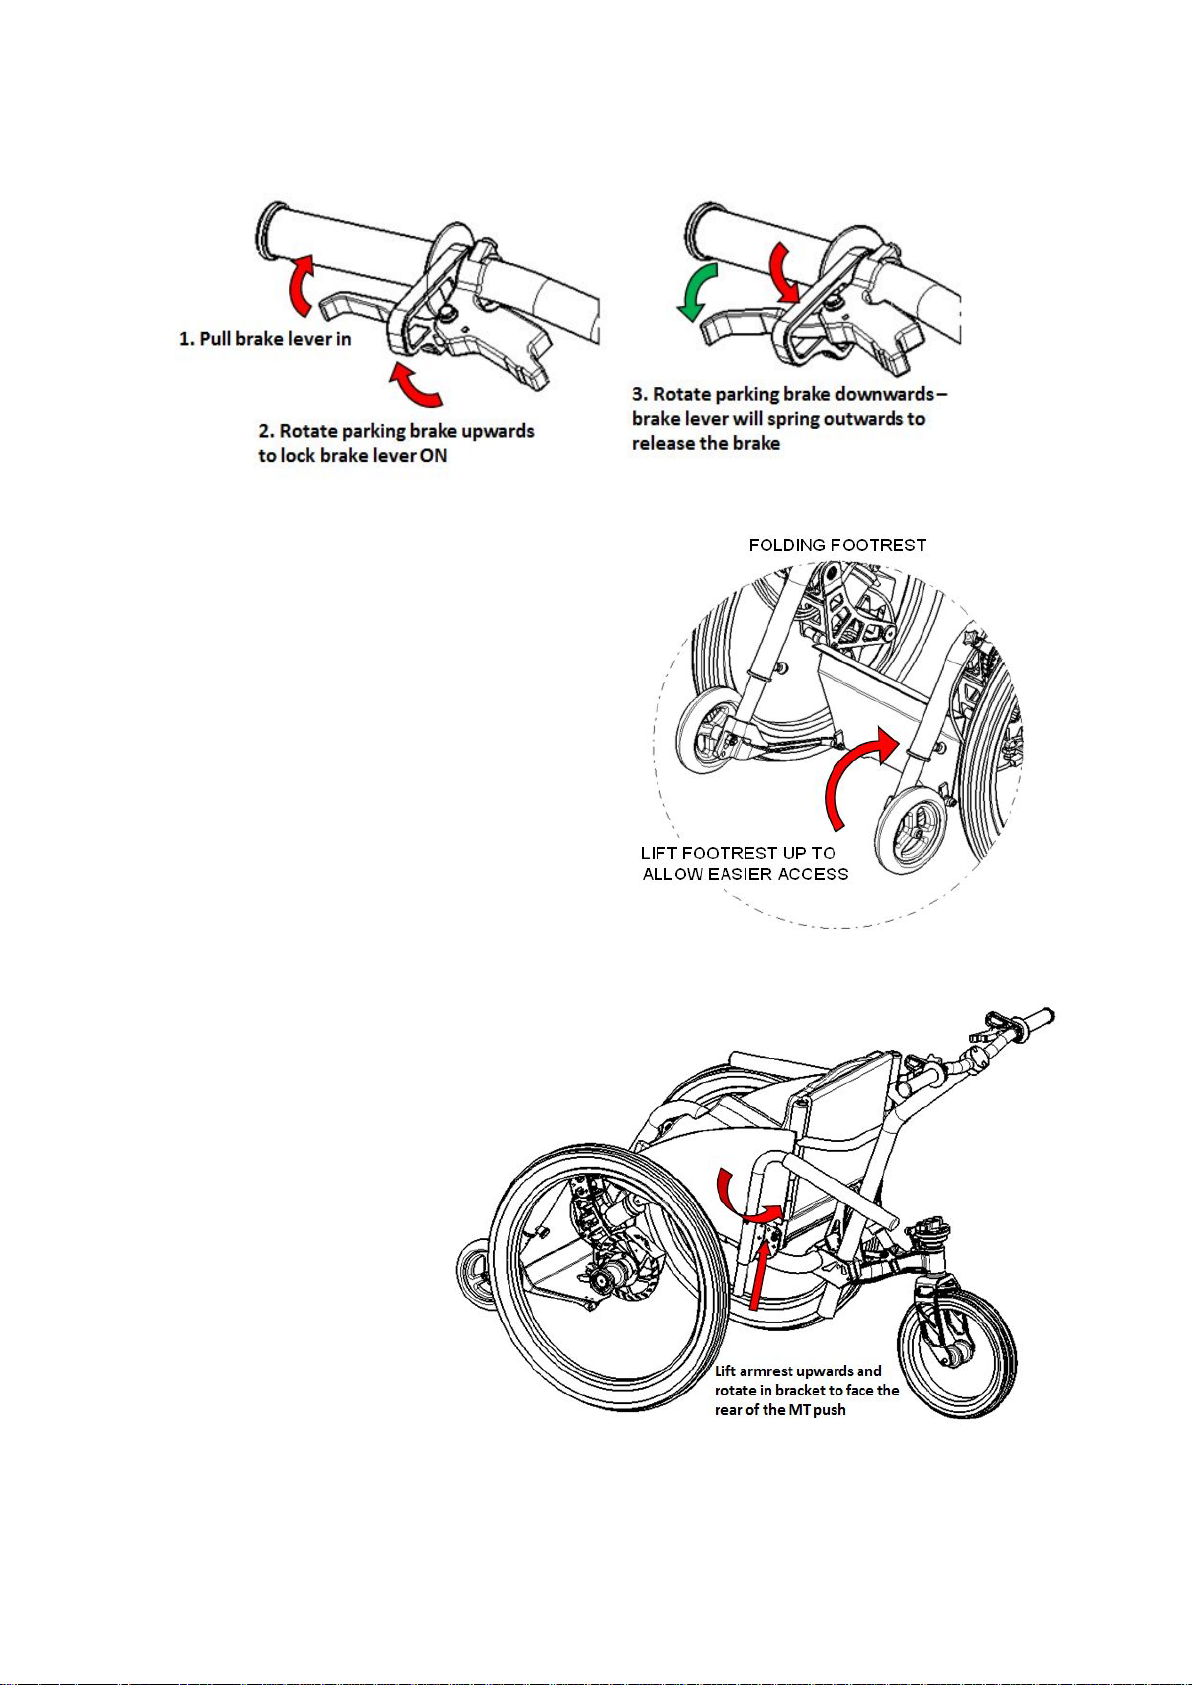
Apply the parking brakes during transfer into the MT push. Release the parking brakes when the
rider is ready to go and push the push handle to go forwards.
To steer the MT push apply sideways motion to the push handle to initiate a turn. You may wish
to apply the brake on the inside wheel to help make a tight turn. E.g. apply right Brake to help
initiate a tight right turn.
The pusher must look ahead to anticipate obstacles and pick the best route over the terrain.
Some larger obstacles such as kerbs may be better tackled in reverse by lifting the rear wheel up
onto the ledge, then pulling the Trike up next.
2.1 Pre-Ride Mechanical Safety Checks
Before riding your MT push, it is imperative that you make the appropriate safety checks to
ensure that the MT push is fit to ride.
• Make sure the rear shock absorber QR lever is located correctly and is tight.
• Check both locking pins on the seat back are engaged and the seat is not free to swing or
fold.
• Ensure that footrest locking pins are correctly engaged so that it is not free to move.
• Set the push handle at the required height and ensure the QR lever is tight so the handle is
secure.
Make a thorough visual inspection for damaged parts or any areas that show excessive wear or
exhibit unintended movement or looseness.
• Check all of the bolts that connect the parts of the MT push together. For advice on
tightening bolts see maintenance Section 3: ‘Service’.
Page 13

MT push - Owner’s Manual Issue 1
13
• Check the spokes of the wheels, they should all be of uniform tension and none of the spokes
or adjusting nipples should be loose. For advice checking wheel spokes see maintenance
Section 4: ‘Service’
• Check for unintended movement in the wheel bearings by lifting each wheel off the ground
slightly, and holding the top of the wheel, try to wiggle it side to side. There should be no
sideways movement or knocking felt.
• Do the same at the rear wheel. Ensure there is no unintended movement in either the rear
wheel bearings or the steering bearings.
• Check Hydraulic brake hose for physical damage and leakage. If the hose is damaged do not
ride your MT push until it has been repaired by your MT push dealer
If the wheels appear loose, or if you discover that anything is not as it should be, do not ride the
MT push and consult your MT push dealer.
Suspension
There is an individual shock absorber for each wheel of the MT push. The shock absorber units
have been factory set. (There are however several adjustments that can be made to suit personal
preference). Your MT push dealer can help you set the suspension for you needs.
Tyre Pressure
Check that the tyre pressures are even and are suited to the terrain and the type of riding being
undertaken. The range of acceptable tyre pressures is printed on the tyre, depending on the
manufacturer’s specification. Recommended tyre pressures for different riding conditions:
• Wet mud, wet grass, gravel 20 - 25 psi (1.38 - 1.72 bar)
• Dry dirt, dry grass 25 - 35 psi (1.72 - 2.41 bar)
• Wet street 30 - 35 psi (2.07 - 2.41 bar)
• Dry street 35 - 40 psi (2.41 - 2.76 bar)
WARNING - Failure to ride with the appropriate tyre pressures can increase the risk or
punctures, damage to the Trike or could possible cause the rider to lose control and fall.
2.2 Transferring in and out
Due to the presence of the extra features and systems on a MT push, special care must be taken
whilst transferring in and out. Whilst every effort has been made to make the transfer as straight
forward as possible, some extra consideration should be made before first attempting to transfer.
Choose a piece of smooth, flat ground to perform the transfer with sufficient space to use
transfer aids if necessary and allow assistance if required.
Ensure the parking brakes are applied on both brakes, one on each side, to stop the MT Push
moving during transfer.
Page 14
MT push - Owner’s Manual Issue 1
14
Lift the footrest up to enable the Rider to get closer
to the Seat during transfer. Do not stand on the
footplate during transfer as this can overstrain the
footplate or cause the MT push to tip forwards
unexpectedly.
You may wish to move the
arm rests to improve access
to the seat during Transfer.
The Armrests can be
removed completely or
turned to face the rear of the
MT push whilst still in the
bracket.
Page 15

MT push - Owner’s Manual Issue 1
15
Take a moment to decide the best approach when transferring. It may not be possible to use the
method you would normally use transferring chair to chair, so make sure you’re comfortable with
any approach before an attempt is made.
CAUTION - Contact with the high performance, off road tyres can cause abrasion to skin
and clothing during transfer. If a side-on transfer is attempted, ensure the tyres are
covered or that sufficient clearance can be guaranteed before any attempt is made.
Your MT push dealer can advise you on recommended modes of transfer, however, the method
and the approach taken is down to the individual. Please take a moment to determine the best
method for you.
2.3 Steering
It is also recommended to practice turning and get a feel for the turning circle of the MT push in a
flat and smooth area that’s free of obstructions before moving onto more challenging terrain or
busy or confined spaces.
It is important to consider your speed when attempting turns. Avoid making quick turns especially
on uneven or cambered ground.
CAUTION – The Pusher / attendant must be aware of their responsibility to take care
when steering as the User’s safety is their responsibility
2.4 Braking
The MT push come equipped with two high specification mountain bike hydraulic disc brakes.
These provide an unsurpassed level of braking power and control. The brakes work on the two
main front wheels.
Only very gentle pressure on the brake lever is required to begin braking. To provide small
amounts of braking force to check speed, only gentle pressure is required. As the left and right
brakes are independent it is also important to apply force evenly to each brake lever so that each
wheel is experiencing the same amount of force, otherwise you could veer to the side.
Again, use smooth, flat and open ground to practice braking and get a feel for the brakes and
making controlled stops before attempting more challenging terrain.
Note: Always keep at least one or two fingers resting on the brakes at all times when riding.
This is known as ‘covering the brakes’ and is a technique that can give better control and reduce
any tendency to ‘grab’ the brakes suddenly.
Page 16

MT push - Owner’s Manual Issue 1
16
WARNING - Excessive braking force could cause the MT push to tip causing the rider to
lose control and fall.
WARNING - Uneven force applied to each brake when using independent brakes can
cause the MT push to change direction causing the rider to lose control and fall.
Anti-tip wheels
The anti-tip wheels at the front of the MT push are designed to prevent the rider from tipping too
far forward and falling out when applying the brakes. The use of the optional seat belt may help
riders feel more secure in the event of tipping.
2.5 Hill and Kerb Climbing
The features of the MT push allow the rider to climb slopes that would be very difficult to climb in
any other wheelchair. Climbing can be thought of as an advanced riding technique and should
only be attempted once a good level of all round control has been achieved.
Before attempting to climb any surface, check thoroughly that it will be possible to get back down
safely. It is recommended that the climbing technique is practiced on gently inclined surfaces
before climbing any steeper terrain.
Use of the brakes on climbs is recommended so the Pusher can apply the brakes to hold the MT
push in position on the slope if necessary.
WARNING - Riding on steep terrain can be unforgiving and increases the risk of the rider
losing control and falling.
CAUTION - When climbing a kerb or similar obstacle always approach it head on and
ensure that the steering is straight until the rear wheel has successfully traversed the
obstacle. Turning before the rear wheel has passed up and over the obstacle may result in
you becoming stuck.
2.6 Descending Slopes
Descending requires the use of the steering and braking systems, but can also require input from
the Pusher.
It is extremely important to check the suitability of any terrain considered for descending before
attempting to ride it. If for any reason you are unsure, do not ride it, find an alternative way
around.
The most important aspect of descending is using the brakes to control speed. Feathering or
‘Modulating’ the brakes, using finely controlled pressure on the brake lever is required to keep
Page 17

MT push - Owner’s Manual Issue 1
17
the wheels rolling whilst providing the required braking force to maintain controllable speed. Too
little braking force and speed will increase until control is lost, too much braking force can cause
tipping or locking of the wheels which could lead to a fall. The Pusher must also hold tightly to
the handle bar to maintain good control especially when descending slopes.
3.0 Safety Advice
Please read this section carefully, the amount of detail may seem excessive or appear to be
stating pure common sense, but the MT push Company is committed to ensuring its rider’s are as
safe as possible so they gain the maximum enjoyment from riding their MT push.
Seat Belt and Foot Straps
A seat belt and foot strap are provided with your MT push should you so wish to use them. The
use of these items is an optional User preference as you are best placed to judge the suitability of
them for your use. The Footstrap may be located in front or behind the Rider’s feet depending on
preference.
3.1 Riding safely Off Road
All riders should exercise their own judgement as to whether the area they are travelling requires
them to need assistance and take a capable companion if necessary. Children should be
accompanied by a responsible adult when travelling Off Road.
1. Off road terrain can feature variable conditions and hazards, so stay alert and ride within
your abilities. Follow the advice in our Operation section and build up your skill gradually on
easy terrain before attempting more challenging ground
2. We recommend you wear appropriate clothing
4. We recommend the you take a mobile phone, money, additional clothing, food and drink,
tools, puncture kit etc and always tell someone where you are going and when you expect to
be back
5. Observe the Countryside Code with regards to other people and animals, give way to them
Page 18

MT push - Owner’s Manual Issue 1
18
3.2 Riding safely about town
You may wish to ride your MT push around town, over uneven pavements, cobbled streets or
inside buildings.
1. Avoid riding in the road as this can be highly dangerous, always stay on the pavement where
possible
2. Obey all Rules of the Road and all local traffic laws
3. Respect other people and observe rights of way
4. Beware that others may not see you coming
5. Be prepared to avoid obstacles and look ahead for
• Vehicles slowing or turning, entering the road or your lane ahead of you, or coming up
behind you.
• Parked car doors opening.
• Pedestrians
• Children or pets playing nearby.
• Narrow gaps or spaces
• Kerbs, pot holes, drain covers, railway tracks, expansion joints, construction works,
debris and other obstructions that could cause you to swerve into the path of others, or
hinder your progress
6. Slow down and look both ways at street crossings
7. Never ride with headphones as they can drown out noises from potential hazards around
you, or the cables may tangle in the moving parts of the MT push
8. Never carry a passenger as this could make the MT push unstable
9. Take care when carrying luggage, always ensure it is strapped properly to the Trike and
cannot become tangled in moving parts
12. Don’t weave through traffic or make any moves that may surprise people
13. Never operate your MT push when under the influence of alcohol or inhibiting drugs.
14. Take care when riding in bad weather conditions, when visibility is obscured, at dawn, dusk
or in the dark, or if you are very tired. These conditions have associated higher risks.
3.3 Wet and Cold Weather Riding
1. Wet weather reduces grip for steering, braking and drive, therefore the risk of an accident is
dramatically increased in wet conditions.
2. Avoid excessive speed and allow greater stopping distances and apply the brakes gently to
avoid skidding.
3. Take care when crossing soft wet ground, if in doubt; avoid extremely boggy ground which
may result in the MT push becoming stuck.
4. Take care when riding over snow or ice as the ground may be slippery, reducing the
effectiveness of the brakes.
Page 19

MT push - Owner’s Manual Issue 1
19
3.4 Night Riding
Your MT push does not come supplied with lights or approved reflectors.
1. Night riding presents increased risk over riding in the day as visibility is reduced.
2. Push more slowly as the lower visibility will reduce the time available for you to react to
hazards. Expect the unexpected!
3. Conditions can also be colder at night, so ensure you take enough warm clothes
3.5 Adding Accessories and Changing Components
Many of the components on the MT push are standard mountain bike parts which may be
changed if you wish. However, changing components is done so at your own risk as they may not
have been tested by the manufacturer for compatibility or performance. Consult your dealer
before changing any components.
Only use approved accessories and parts. Follow the associated instructions when installing them.
Please consult your MT push dealer as some parts can only be fitted by a qualified technician or if
you require any other assistance with fitting accessories.
WARNING - Failure to confirm compatibility, properly install, operate and maintain any
component or accessory can compromise safety causing the User to lose control and fall.
WARNING - Fitting components or parts to your MT push which are not Mountain Trike
Company Ltd approved replacements may compromise your safety and may void the
warranty. Check with your dealer before changing any components on your MT push.
4.0 Service
The MT push is a highly technical piece of equipment and must be maintained and serviced
appropriately to provide the required service life and safe operating performance. The MT push
shares many features and systems of high specification mountain bikes and the maintenance and
service regimes are therefore similar.
Due to the potential safety risks of operating a badly maintained MT push, it is recommended
that you consult your MT push dealer for all your maintenance needs and servicing, and follow
the recommended maintenance schedule, shown in 4.2. However, some maintenance can and
should be performed by the user and requires no special tools.
Page 20

MT push - Owner’s Manual Issue 1
20
Following the bedding in period, discussed in 4.3, The Mountain Trike Company Ltd recommends
a complete service by a competent technician every 6 months or 50 hours of riding, which ever
comes sooner, or if any fault is suspected.
4.1 Looking after Your MT push
To keep the MT push running at peak performance and to ensure the longest possible service life,
after every long ride, or if ever the MT push is exposed to water (especially Sea water), mud and
grit, the following service checks and actions should be made. If you are in any doubt about
performing a service task yourself, you must consult your MT push dealer before attempting the
task or riding the MT push.
General cleaning is recommended after every ride. Warm water with a small amount of detergent
is sufficient to remove most dirt. Be careful to avoid excessive amounts of water entering the
braking or steering systems. Refrain from using high pressure washing systems as these can
penetrate sealed parts, reducing life. Once cleaned, thoroughly dry the MT push, as if water is left
to collect it can corrode moving parts.
Once clean, the following checks and maintenance should be performed with every ride.
Wheels
With the wheel clear of the ground and free to spin, check the wheel spins freely and true
without resistance or wobbling.
On each wheel, check the rims for damage or dents. Take a pair of spokes between fingers and
thumb and squeeze together, they should feel tight and each pair should feel roughly equal. If
there is any rim damage or significantly loose spokes, seek the advice of your MT push dealer as
they may need to re-tension the spokes or rebuild the wheel.
Check the tyres for any cuts, damage, excessive tread wear or embedded objects. If any damage
is found, the tyres should be replaced.
Check the suspension is operating correctly by pushing down on the seat or frame, the shock
absorbers should move smoothly. If the shock absorbers do not move freely, or appear to be
leaking or seized seek the advice of your MT push dealer as the shocks are an item requiring
specialist knowledge and tools to service.
Check the Accessory clamp which secures the push handle is clamped correctly and does not
rotate on the frame. Ensure the quick release lever is tight so that the push handle does not
rotate in the clamp.
Page 21

MT push - Owner’s Manual Issue 1
21
Brakes
Pull each brake lever. It should swing smoothly and there should be a distinct ‘bite point’ at which
the pads contact the disc. If the brake lever is rough, the bite point feels spongy or there is a
reduction is braking power, seek the advice of your MT push dealer as the brakes require
specialist knowledge and tools to service.
Warning - Hydraulic brakes contain fluid which is hazardous to health if ingested and
irritates skin on contact. The Mountain Trike Company recommend any maintenance or
service to the brakes themselves is carried out by your MT push dealer. If a brake fluid leak
is suspected, seek the advice of your MT push dealer
Warning - Hydraulic disc brake systems are sensitive to temperature. If the brake systems
experience prolonged exposure to intense, direct sunlight, the fluid can expand, locking
the brakes and potentially damaging the internal seals. If high surface temperature
exposure is suspected, contact your MT push dealer.
Steering
Lift the rear wheel off the ground and rotate the fork from side to side, it should feel smooth and
positive without looseness or ‘play’. Hold the fork and the steering unit and pull backwards and
forwards to check for any looseness or ‘play’. If there is any looseness the rear steering pivot will
need tightening. Seek the advice of your MT push dealer.
Check the operation of the Steering Unit engage and disengage system. The module should
release easily and once engaged, be attached solidly with no looseness. If engaging or disengaging
is difficult, or the Steering Unit is loose when engaged, seek the advice of your MT push dealer
WARNING - Never ride your MT push if the steering unit is loose as this can result in poor
steering response which could cause you to lose control and fall.
Page 22

MT push - Owner’s Manual Issue 1
22
Frame and Seat
Check the overall condition of the frame for cracks, dents and other damage. If the frame is
suspected of having any damage at all, seek the advice of your MT push dealer.
Check the seat for tears or lesions, if the seat is damaged or not functioning correctly, it should be
replaced. Although the seat material passes the relevant fire retardant standards, care should still
be taken to avoid open flames or exposure to high temperatures.
In the case of a crash or fall, thoroughly check the MT push for any damage. Never ride your MT
push unless you are completely confident that it is in full working order.
4.2 Maintenance Schedule
1. Check tyres after every ride
2. Check shocks after every 50-60 hours use, though servicing would only be expected every 12 -
18 months
3. To service bearings, special tools are necessary, only your MT push dealer should do this.
Wheel, steering and pivot bearings should be serviced every 12 - 18 months or when
looseness is felt in the bearing.
4.3 Bedding in Period
When first riding the MT push from new, it is important to understand that various components
and systems will be ‘bedding in’ and will take time to reach their full operating performance. As
every rider will use their MT push differently, the bedding in period will vary from person to
person. Typically this may occur after the first 30 days of use or earlier if ridden hard for 3 – 5
hours. Section 2.1 ‘The Mechanical Safety Check’ section provides an excellent guide to what
areas to check for signs of looseness or unintended movement in the systems. It is important to
perform these checks before and after each ride.
• The spokes in the wheels can sometimes stretch, requiring the wheels to be serviced by a
capable bicycle technician.
• The interface between the brake pads and the discs take time to bed in, such that the brakes
won’t work at their full power straight away.
Your MT push will last longer and serve you better if you observe the initial bedding in period and
ride gently and cautiously before riding hard on challenging terrain.
Page 23

MT push - Owner’s Manual Issue 1
23
5.0 Warranty
Thank you for choosing an MT push. We are sure you will have many years of enjoyment from
your new purchase. Your 3 year warranty was automatically registered to you when you bought
the MT push. Keep your receipt safe and you may wish to take a moment to write down your date
of purchase, dealer details and MT push ID number on page 3 of this manual for your own
records.
A Note about Warranty Claims:
If you suspect you have reason to make a warranty claim, it is important to follow the proper
procedure. The first thing to do is immediately contact the MT push dealer from whom you
purchased your MT push. They will be able to assist you with the claim and answer any queries
you may have.
THE MOUNTAIN TRIKE COMPANY LIMITED WARRANTY
The Mountain Trike Company Ltd warrants each MT push frame and MT push manufactured parts
for 3 years from the purchase date of the original owner.
Warranty claims for all non Mountain Trike Company manufactured components, including shock
absorbers, disc brakes, brake levers, wheels etc… should be sent to the representative of the
respective manufacturer via the MT push dealer.
This warranty is limited to the repair or replacement of a defective frame or components and is
the sole remedy of the warranty and applies only to a MT push purchased from an authorised MT
push dealer.
The warranty does not cover normal wear and tear, improper assembly (such as crossed clamp
bolt threads), poor maintenance or installation of parts and accessories not originally intended
for, or compatible with the MT push - Specifically the fitting or modification of suspension units or
brakes not supplied as original equipment.
The Mountain Trike Company reserve the right not to warranty MT push’s, frames or components
which in their opinion have been used for riding conditions outside the limits of the product.
These limits are described in the Owner’s Manual Section 3.5. Your MT push dealer can provide
clarification of these categories and the intended use for the MT push.
Use of the MT push in competitive events, trick riding, ramp riding, jumping, aggressive riding,
riding on severe terrain, riding in severe climates, riding with heavy loads, commercial activities
and other types of non standard use can dramatically shorten the useful product life cycle of MT
Page 24

MT push - Owner’s Manual Issue 1
24
push and may result in an unpredictable failure of a MT push that would not be covered by this
warranty.
The warranty does not apply to damage or failure due to accident, abuse, collision, impact or
neglect.
The warranty excludes MT push’s used for competition, speed or time trials, hire, reward or
rental.
The Mountain Trike Company Limited shall not be responsible for incidental or consequential
damages.
Claims under this warranty are to be made through an authorised MT push dealer. The complete
MT push must be returned at owner’s expense via the authorised MT push dealer to allow
inspection of all the components and parts. Proof of purchase is required before warranty claims
can be processed.
This warranty does not take the place of any legal and contractual rights between the MT push
dealer and the owner. In the event of a problem the owner should contact the MT push dealer in
the first instance.
All MT push’s should be checked before every ride and periodically checked by an authorised MT
push dealer, for indicators of stress and/or potential failure, including cracks, deformation,
corrosion, paint peeling, dents and any other indicators of potential problems, inappropriate use,
or abuse. If any abnormality or indication of a problem is found the MT push should be returned
to an authorised MT push dealer or to The Mountain Trike Company Ltd for further checks before
being ridden again. These are important safety checks and very important to help prevent
accidents, bodily injury to the rider and shortened useful product life cycle of a MT push.
IMPORTANT NOTE: This warranty applies only to the original owner and is not transferable.
Page 25

Page 26

Page 27

Page 28
MT push - Owner’s Manual Issue 1
25
www.mountaintrike.com
The Mountain Trike Company Ltd
 Loading...