

Moulinex MASTERCHEF COMPACT QB207138 User Manual

EN
NL
ES
HU
CS
SK
BG
BS
HR
RO
SR
SL
ET
LV
LT
PL
TR
p4- 14
p 15 - 25
p 26 - 36
p 37 - 47
p 48 - 58
p 59 - 69
p 70 - 80
p 81 - 91
p 92 - 102
p 103 - 113
p 114 - 124
p 125 - 135
p 136 - 146
p 147 - 157
p 158 - 168
p 169 - 179
p 180 - 190
Réf. : 8080014582

masterchef compact
EN
NL
ES
HU
CS
SK
BG
BS
HR
RO
SR
SL
ET
LV
LT
PL
TR


1.a
1.d 2.a 2.b
1.b 1.c
2.c
3.c
3.a
3.d
3.e
3.b
3.f

4.a
4.c
4.b

SAFETY INSTRUCTIONS
•Read the instructions for use carefully before using your
appliance for the first time and retain them for future
reference: the manufacturer shall accept no liability in the
event of any use that does not comply with the instructions.
•This appliance is not designed to be used by persons (including
children) with reduced physical, sensorial or mental capacities,
or by people with no prior knowledge or experience, except
where they have benefited from supervision or previous
instructions relating to the use of the appliance, from a person
responsible for their safety. Children must be supervised to
ensure that they do not play with the appliance.
•This product has been designed for indoor and domestic use
only, and at an altitude below 2000 m.
•Do not use the appliance if it is not working properly or if it
has been damaged. Contact an authorised service centre (see
list in the service booklet).
•Any maintenance other than routine cleaning and upkeep by
customers must be carried out by an approved service centre
(see list in the service booklet).
•Always disconnect the appliance from the supply if it is left
unattended and before assembling, disassembling or cleaning.
•Remember: you may injure yourself if you use the appliance
incorrectly.
•Be careful if hot liquid is poured into the food processor or
blender as it can be ejected out of the appliance due to a
sudden steaming.
•Do not place the appliance, the supply cable or the plug in
water or any other liquid.
•Do not place the accessories in a microwave oven.
4EN5

•For your own safety, use only accessories and spare parts
designed for your appliance and sold in an approved service
centre.
•Always remove the blender jug (d) before pressing the multifunction head (a4) release button (a3).
•Switch off the appliance and unplug it from the mains power
supply before changing the accessories or touching the parts
which move during operation.
•Do not touch the mixer accessories nor the knives when the
appliance is running.
•Do not allow long hair, scarves, ties etc. to dangle over the
appliance during operation.
•Never insert utensils (spoon, spatula, etc.) through the
opening in the lid (d2), into the bowl (b1) or into the feed
tube of the drum body (e2).
•Blades are very sharp: to prevent injuries, handle them with
care when emptying the blender jug or the mini mincer,
assembling and dismantling the slicer drum A (e5), the mini
mincer and the mincer head (depending on model), and when
cleaning all those accessories.
•Do not use this appliance to blend or mix non-food items.
•Do not pour boiling liquids (over 80°C/176°F) in the bowls (b1
and d1 depending on model).
•Always pour the liquid ingredients into the blender jug
first,before adding the solid ingredients.
•In order to prevent overflow, do not fill the bowl or jug over
the maximum level (if indicated).
•Never place your fingers or any other object in the blender jug
when the appliance is running.
•Never remove the lid or the blender jug before the appliance
has come to a complete stop.
EN

•Always use the pusher (e3) with the vegetable slicer accessory
(e) and the mincer head (depending on model)to guide food
into the feed tube.
Never use your fingers, a fork, a spoon, a knife or any other
object.
•Do not operate the blender jug (d) without the lid (d2),
without ingredients or with dry products only.
•Use only one accessory at a time.
EN
•Do not use the bowls (b1, d1) as containers for freezing,
cooking or sterilisation.
•It is not intended to be used in the following applications, and
the guarantee will not apply for:
- staff kitchen areas in shops, offices and otherworking
environments;
- farm houses;
- by clients in hotels, motels and other residentialtype
environments;
- bed and breakfast type environments.
•Refer to the instructions to obtain the operating time and
speed settings for each accessory.
•Refer to the instructions for correct fitting and assembly of
your accessories.
•Refer to the instructions for initial and regular cleaning of
surfaces in contact with foodstuff, and for cleaning and
maintenance of your appliance.
EUROPEAN MARKETS ONLY
•With all accessories (depending on model) except whisk (c3)
and graters (e6,e7,e8,e9): this appliance shall not be used by
children. Keep the appliance and its cord out of reach of
children.
6

Children shall not play with the appliance.
•This appliance may be used by persons with reduced physical,
sensory or mental capabilities, or whose experience or
knowledge is not sufficient, provided they are supervised or
have received instruction to use the device safely and
understand the dangers.
•The whisk (c3) and graters (e6,e7,e8,e9) (depending on model)
can be used by children aged from 8 years and above if they
have been given supervision or instruction concerning use of
the appliance in a safe way and if they understand the hazards
involved. Cleaning and user maintenance shall not be made by
children unless they are aged from 8 years and above and
supervised. Keep the appliance and its cord out of reach of
children aged less than 8 years.
On connection to power supply:
•Check that the power rating of your appliance corresponds to
your electrical supply. Any incorrect connection invalidates
the guarantee.
•Never pull the power cord to disconnect the appliance.
•The appliance must be unplugged when no longer in use, during
cleaning or in the event of a power cut.
•The power cord must be kept out of the reach of children and
must not be placed near or come into contact with the hot
parts of the appliance, sources of heat or sharp corners.
•If the power cable or the plug are damaged, do not use the
appliance. To maintain safety, these parts must be replaced by
an approved service centre (see list in the service booklet).
EN
7

DESCRIPTION
a - Motor unit
a1 Speed selector
a2 Low-speed outlet
a2.1 Mixer accessories outlet
a2.2 Vegetable slicer outlet
a3 Multi-function head release button
a4 Multi-function head
a5 High-speed outlet
a6 Cover for outlet a5
b - Bowl assembly
EN
b1 Bowl
b2 Lid
c - Mixer accessories
c1 Kneader
c2 Mixer
c3 Balloon whisk
The accessories contained in the model you have bought are represented on the label located
on the top of the packaging.
d - Blender jug (depending on model)
d1 Jug
d2 Lid
d3 Measuring cap
e - Vegetable slicer (depending on model)
e1 Vegetable slicer attachment
e2 Drum body
e2.1 Shaft
e3 Pusher
e4 Drum retaining collar
e5 Slicer drum A
e6 Coarse grater drum C
e7 Fine grater drum D
e8 Parmesan drum E (depending on model)
e9 Potato shredder R
(for potato fritters - depending on model)
FIRST USE
•Before using for the first time, wash all accessory parts in soapy water. Rinse and dry.
•Place the appliance on a flat, clean and dry surface. Make sure that the speed selector (a1) is in
"0" position and plug in your appliance.
• You have several options for starting your appliance:
- Intermittent operation (pulse): turn the speed selector (a1) to the "pulse" position. Using a
succession of pulses can give you better control when preparing certain foods.
- Continuous operation: turn the speed selector (a1) to the desired position from "1" to "4"
depending on the food you are preparing.
•You can change the speed required during preparation.
•To stop the appliance, turn the selector (a1) to "0" and then unplug your appliance.
Overloading protection:
Your kitchen appliance is equipped with a microprocessor that controls and analyses the power when
operating. If your appliance is overloaded, it will adapt by reducing its speed or switching off by
itself. If it switches off, set the speed selection button (a1) to position "0", unplug your appliance,
and remove some of the ingredients. Allow your appliance to rest for a few minutes. You can then
plug in and restart your appliance by turning the speed selection button (a1) to the speed required
for the recipe.
The paragraph numbering corresponds to the numbers in the diagrams.
8

1 - MIXING/KNEADING/BEATING/EMULSIFYING/WHISKING
ACCESSORIES USED:
- Bowl (b1)
- Lid (b2)
- Kneader (c1) or mixer (c2) or balloon whisk (c3)
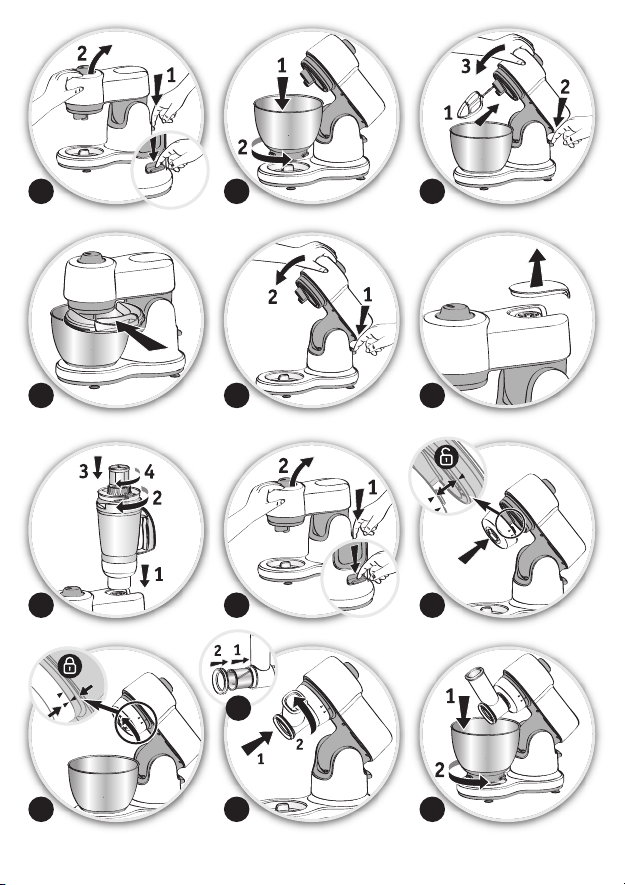
1.1 ASSEMBLING THE BOWL ACCESSORIES (DIAGRAMS 1):
•Press the button (a3) to release the multi-function head (a4) and raise it until it locks in place.
•Lock the bowl (b1) (anti-clockwise) on the appliance and put in the ingredients.
•Insert the desired accessory (c) into the outlet (a2.1), until it is clipped in place.
•Place the multi-function head (a4) to the horizontal position: press the button (a3) and manually lower
the multi-function head (a4) until it locks (the button (a3) returns to its initial position).
•Slide the lid (b2) over the bowl (b1).
Please note: it is not necessary to use the lid. It limits the risk of splashing.
•Make sure that the cover (a6) is correctly in place on the high-speed outlet (a5).
1.2 USAGE:
•Start by turning the selector (a1) to the desired speed according to the recipe.
•You can add food through the hole in the lid (b2) during preparation.
•To stop the appliance, turn the selector (a1) to "0".
Tips:
- Kneading
- Use the kneader (c1) at speed "1" only.
You can knead up to:
- 500 g strong bread flour for bread dough (e.g. white bread, whole-grain bread, etc.)
- 400 g flour for speciality types of bread (French flour above type T55, rye bread, whoelmeal bread, ...)
- 250 g flour for enriched yeast dough and pastry dough (brioche, kouglof, pizza dough, shortcrust pastry,
etc.)
- 750 g flour for milk bread (see basic recipe in recipe section)
- Maximum operating time: 13 min.
For the best results, follow the instructions in figure 4.
Liquid for yeast dough and bread dough should be at 25-30 C.
- Mixing
- Use the mixer (c2) at speed "1" to "4".
You can mix up to:
- 1 kg of sponge cake mixture, choux pastry, etc.
- 2.7 kg of mixture vanilla sponge slab cake (see basic recipe in recipe section).
- Never use the mixer (c2) to knead heavy dough.
- Maximum operating time: 13 min.
- Beating / emulsifying / whisking
- Use the balloon whisk (c3) at speed "1" to "4".
You can prepare: mayonnaise, aioli, sauces, beaten egg whites (up to 8 egg whites), chantilly cream or
whipped cream (up to 500 ml), etc.
- Never use the balloon whisk (c3) to knead heavy dough or mix light cake mixture.
- Maximum operating time: 10 min.
1.3 - DISMANTLING THE ACCESSORIES:
9
EN

•Wait for the appliance to come to a complete stop and unplug it.
•Remove the lid (b2).
•Using the button (a3), release the multi-function head (a4) and raise it to the upper position.
•Pull the accessory (c1), (c2) or (c3) to remove it from the multi-function head.
•Remove the bowl.
2 - BLENDING/MIXING (DEPENDING ON MODEL)
Depending on the nature of the food, you can use the blender (d) to prepare up to 1 L of thick mixtures
and 0.75 L of liquid mixtures.
ACCESSORIES USED:
- Blender jug (d)
EN
2.1 - ASSEMBLING THE BLENDER JUG ACCESSORIES (DIAGRAMS 2):
•Place the multi-function head (a4) in the horizontal position: press the button (a3) and manually lower
the multi-function head (a4) until it locks (the button (a3) returns to its initial position).
•Pull the cover (a6) upwards to remove it from the high-speed outlet (a5).
•Make sure that the appliance is switched off before fitting the blender jug (d).
•Fit the blender jug (d) on the high-speed outlet (a5). Four positions are possible.
•Place the food in the blender jug, and lock the lid (d2) fitted with the measuring cap (d3), by rotating
it clockwise.
2.2 - USAGE
•Start by turning the selector (a1) to the desired speed according to the recipe.
Use the "Pulse" position for better mixing control and for a better blending of your preparation.
You can add food after removing the measuring cap (d3) from the lid (d2) during preparation.
•To stop the appliance, turn the selector (a1) to "0".
Tips:
- Use the blender jug (d)
Maximum operating time: 3 min.
You can prepare:
- finely blended soups, sauces, stewed fruit, milkshakes and cocktails.
- liquid batter (pancake, fritters, clafoutis and custard flans).
- If ingredients stick to the sides of the jug when mixing, stop the appliance. Remove the blender jug,
and push the food down onto the blades using a spatula and put your blender jug back to continue
your preparation.
- Never fill the blender jug with boiling liquid.
- Never run the blender empty.
- Always use the blender jug with its lid.
- Never remove the lid before the blades have stopped completely.
Always pour liquid ingredients into the blender jug first before adding solid ingredients.
-
2.3 - DISMANTLING THE ACCESSORY
•Wait for the appliance to come to a complete stop and unplug it. Remove the blender jug. Put back the
cover (a6) on the outlet (a5).
at speed "3" to "4".
3 - GRATING/SLICING (DEPENDING ON MODEL)
ACCESSORIES USED:
10

- Vegetable slicer attachment (e1)
- Drum body (e2) + pusher (e3)
- Drums (depending on model)
- Drum retaining collar (e4)
3.1 - ASSEMBLING THE ACCESSORIES (DIAGRAMS 3)
•Press the button (a3) to release the multi-function head (a4) and raise it until it locks in place.
•Fit the attachment (e1) under the multi-function head (a4): align the left-hand mark on the attachment
(e1) with the mark on the multi-function head (a4), and turn until the right-hand mark on the attachment
(e1) is aligned with that of the multi-function head (a4).
•Insert the chosen drum into the body, and make sure that it is fully engaged in the body. Fit the drum
retaining collar (e4).
•Facing the attachment (e) outlet, insert the drum body (e2) inclined to the right, aligning the two
bayonets in the drum body with the two notches in the attachment. Push it home. If you find it difficult
to fit it, slightly turn the shaft (e2.1) of the drum body and push it again. Turn the drum body anticlockwise until it latches with the feed tube in the vertical position.
•Lock the bowl (b1) (anti-clockwise) on the appliance.
•Make sure that the cover (a6) is correctly in place on the high-speed outlet (a5).
3.2 - USAGE AND TIPS:
•Run the appliance by turning the selector (a1) to speed "3".
•Maximum operating time: 10 min.
•Place the food in the feed tube on the body and press down with the pusher (e3).
ingredients with your fingers or any other utensil.
•To stop the appliance, turn the selector (a1) to "0". Wait for the appliance to come to a complete stop
and unplug it.
•Unlock the drum body in the reverse order of the assembly.
•With the cones, you can prepare up to 2 kg of:
- Grate coarsely C (e6) / grate finely D (e7): carrots, celery, potatoes, cheeses, etc.
- Slice thickly A (e5): potatoes, carrots, cucumbers, apples, beetroot, etc.
- Parmesan E (e8): potatoes, parmesan, etc.
- Potato shredder R (e9): potatoes.
Maximum quantity: 2 kg.
Never push the
4 - CHOPPING SMALL QUANTITIES (DEPENDING ON MODEL)
ACCESSORY USED:
- Assembled mini-mincer.
With the mini-mincer, you can chop in few seconds by pulsing: dried figs, dried apricots, etc.
Quantity / max time: model QA100: 50g / 8 sec, model QA200: 90g / 8 sec.
The mini-mincer is not designed for hard products like coffee.
EN
11

CLEANING
•Unplug the appliance.
•Never immerse the motor unit (a) in water or put it under running water. Wipe it with a dry or
slightly damp cloth.
•For easier cleaning, rinse the accessories quickly after use. Handle the blades with care to prevent
injury.
•Wash, rinse and dry the accessories: they are all dishwasher-safe.
Tip:
- In the event any of your accessories are coloured by food (carrots, oranges, etc.), rub with a cloth
dipped in cooking oil and then clean them as usual.
- Blender jug (d): pour some hot water containing a few drops of washing up liquid into the blender
EN
jug. Close the lid. Place it on the appliance and pulse a few times. After removing it, rinse the bowl
in running water and allow to dry (bowl upside down).
STORAGE
Do not store your appliance in a humid environment.
WHAT TO DO IF YOUR APPLIANCE DOES NOT WORK
If your appliance does not work, check:
- that it is plugged in correctly.
- that the accessories are correctly locked.
- The position of the speed selector (a1): turn it to position "0" and then select the desired speed
again.
Your appliance still does not work? Contact an approved service centre (see list in service booklet).
DISPOSAL OF PACKAGING AND THE APPLIANCE
The packaging is comprised exclusively of materials that present no danger for the
environment and which may therefore be disposed of in accordance with the recycling
measures in force in your area.
For disposing of the appliance itself, please contact the appropriate service of your local
authority.
END-OF-LIFE ELECTRICAL OR ELECTRONIC PRODUCTS
Think of the environment first!
Your appliance contains valuable materials which can be recovered or recycled.
Leave it at a local civic waste collection point.
12

ACCESSORIES
You can customise your appliance and obtain the following accessories from your usual retailer or an
authorised service centre:
Bowl
Bowl lid
Kneader
Mixer blade
Balloon whisk
Note: you can purchase an accessory only when you present your instruction leaflet or your
appliance.
Blender jug
Mini-mincer
Mincer head
Vegetable slicer attachment
Vegetable slicer:
- A: slicing
- C: coarse grating
- D: fine grating
- E: parmesan
- R: Potato shredder
BASIC RECIPES
White bread
Ingredients: 350 g flour (type 55), 210 ml warm water, 5 g dried baker's yeast, 5 g salt.
Put the salt, flour and baker's yeast in the bowl. Fit the kneader and the lid. Run for a few seconds
at speed 1, and add water with the appliance running. Knead for about 8 minutes on speed 1. Allow
the dough to rest at room temperature for around half an hour. Then work the dough by hand into a
ball. Place the ball of dough on a buttered, floured baking sheet. Allow to rise for about an hour.
Preheat the oven to 240°C. Make cuts on the top of the loaf with a sharp blade, and brush with
lukewarm water. Put a small container full of water into the oven as this helps the bread to form a
golden crust. Bake for 30 minutes.
For the UK only: Use 350 g strong white bread flour - 1½ tsp Easy Bake or Fast Action dried yeast –
¾ tsp salt – ½ tsp sugar – 2 tsp vegetable oil – 210 ml lukewarm water.
Make the dough as the recipe directs but there is no need to rest the dough for half an hour with UK
dried yeast. Shape the dough as directed and leave to prove until doubled in size (for about 45 min
to 1 hour). Bake in a preheated oven at 230°c for 15 minutes and then reduce to 190°C and bake for
a further 15 minutes.
Butter shortcrust pastry
Ingredients: 200 g flour (plain), 100 g softened butter cut into pieces, 50 ml cold water, 1 pinch of
salt.
Put the flour, butter and salt in the bowl. Fit the kneader and the lid. Run for a few seconds at speed
1, and add water with the appliance running. Continue to knead until the pastry forms a ball. Remove
from the bowl, cover it in cling film and allow the pastry to rest in a cool place or refrigerator for
about half an hour before rolling out and cooking.
Note: Do not substitute butter with margarine or lard.
Milk bread buns
These sweet buns have a light, airy texture similar to brioche.
Ingredients: 500 g flour, 1 egg, 80 g softened butter cut into pieces, 80 g sugar, 250 ml warm milk, 5
g dried baker's yeast, 1 pinch of salt.
Put all the ingredients in the bowl. Fit the kneader and the lid. Run the appliance at speed 1 for
about 8 minutes. Allow the dough to rest at room temperature for about 1 hour and then work the
dough by hand. Cut the dough into small pieces and form them into buns. Place them on a baking
13
EN

sheet lined with parchment paper and allow to rise for about 30 to 40 minutes. Preheat the oven to
200°C. Brush the buns with egg yolk mixed with a little milk and sugar. Bake for about 15 to 20
minutes. Note: Do not substitute butter with margarine or lard.
For UK only: Use 500 strong white bread flour, 80 g softened butter, 80 caster sugar, 250 ml lukewarm
milk, 2 tsp Easybake or Fast Action dried yeast, 1 pinch of salt, 1 egg beaten with 1 tsp water, for
glaze.
Make the dough as the recipe directs but there is no need to rest the dough for 1 hour. Shape the
dough as directed and leave to prove until doubled in size (for about 45 min to 1 hour). Bake as
directed above.
Vanilla Sponge Slab Cake
Ingredients: 2 eggs, 125 g caster sugar, 125 g softened butter in pieces, 250 g flour (plain), 70 ml
EN
milk, 1 sachet (11 g) baking powder or 4 level tsp baking powder, 1 sachet (6.5 g) vanilla sugar or 1
tsp vanilla extract.
Put all the ingredients in the bowl except for the flour. Fit the kneader and the lid. Run for a few
seconds at speed 1, and add the flour little by little with the appliance running. Mix for 3 minutes.
Preheat the oven to 180°C. Place the mixture in a buttered and floured non-stick loaf tin (900g /2
lb size). Bake for about 40 minutes or until a fine skewer inserted in the centre come out clean with
no mixture attached. Best eaten within 2 days of making .
Feta, Olive and Sun-dried Tomato Loaf
Ingredients: 200 g flour (plain), 4 eggs, 1 sachet (11 g) baking powder or 4 level tsp baking powder,
100 ml cold milk, 50 ml olive oil, 12 dried tomatoes, 200 g feta cheese, 15 destoned green olives cut
into pieces, salt, pepper.
Preheat the oven to 180°C. Butter and flour a loaf tin. Put the flour, eggs and baking powder in the
bowl. Fit the kneader and the lid. Start at speed 1 and then increase to speed 3. Add the olive oil and
milk with the appliance running for one and a half minutes. Decrease to speed 1 and add the dried
tomatoes, feta cheese and olives. Add salt and pepper. Pour the mixture into the tin and bake for 30
to 40 minutes.
Mayonnaise
Ingredients: 1 egg yolk, 1 tablespoon mustard, 1 teaspoon white wine vinegar, 250 ml oil (sunflower,
olive or half and half of each), salt, pepper.
Attention: all the ingredients must be at room temperature.
Put all the ingredients except for the oil in the bowl. Fit the balloon whisk and lid. Start at speed 1
and begin to pour the oil in a thin trickle. After 10 seconds, increase to speed 4, and continue to add
the oil little by little. Once you have added all the oil, run the appliance for another 30 seconds.
NB: Keep refrigerated and consume within 24 hours.
Chantilly cream
Ingredients: 250 ml very cold liquid crème fraiche*, 50g icing sugar.
Put the cream and icing sugar in the bowl. Fit the balloon whisk and lid. Run the appliance at speed
3 for 2 minutes and then at speed 4 for one and a half minutes.
* liquid creme fraiche is not available in all countries.
For the UK only: Use 300 ml well chilled double cream and 35 g icing sugar. Place the cream and
icing sugar in the bowl. Fit the balloon whisk and lid. Whip on speed 3 until it forms firm peaks
(takes about 2 to 3 minutes).
14

VEILIGHEIDSVOORSCHRIFTEN
•Lees de gebruiksaanwijzing zorgvuldig door voordat u het
apparaat in gebruik neemt: bij een verkeerd gebruik vervalt
elke aansprakelijkheid van de fabrikant.
•Dit apparaat is niet bedoeld om zonder hulp en/of toezicht
gebruikt te worden door kinderen of andere personen indien
hun fysieke, zintuiglijke of mentale vermogen hen niet in staat
stellen dit apparaat op een veilige wijze te gebruiken.
Er moet toezicht zijn op kinderen zodat zij niet met het
apparaat kunnen spelen.
•Uw apparaat is uitsluitend bedoeld voor huishoudelijk gebruik
binnenshuis en op een hoogte van minder dan 2000 m.
•Maak geen gebruik van het apparaat als het niet goed werkt of
als het beschadigd is. Richt u in dit geval tot een erkend
servicecentrum (zie lijst in het serviceboekje).
•Met uitzondering van de gebruikelijke reinigings- en
onderhoudswerkzaamheden die de klant zelf kan uitvoeren,
dienen alle werkzaamheden door een erkend centrum te worden
uitgevoerd (zie lijst in het serviceboekje).
•Trek altijd de stekker van het apparaat uit het stopcontact
wanneer u het onbewaakt achterlaat en voordat u het
monteert, demonteert of reinigt.
•Wees voorzichtig om het risico op verwondingen bij foutief
gebruik van het apparaat te voorkomen.
•Verhit de accessoires niet in de magnetron of oven.
•Gebruik voor uw eigen veiligheid uitsluitend de voor uw
apparaat geschikte accessoires en onderdelen, verkocht in een
erkend servicecentrum.
•Verwijder altijd de mixkom (d) voor u de ontgrendelingsknop
(a3) van de multifunctionele kop (a4) activeert.
15
NL

•Schakel het apparaat uit en trek de stekker uit het stopcontact
alvorens u de accessoires vervangt of in de buurt komt van de
tijdens de werking bewegende delen.
•Raak de mengaccessoires of de messen niet aan wanneer het
toestel werkt.
•Laat geen lang haar, sjaals, stropdassen enz. boven het
werkende apparaat hangen.
•Steek nooit keukengerei (lepel, spatel, ...) in de opening van
NL
het deksel (d2), in de kom (b1) en in de trechter van het
trommelmagazijn (e2).
•De lemmeten zijn zeer scherp: ga voorzichtig te werk zodat u
zich niet snijdt wanneer u de kom (d) en de minihakmolen
leegt, wanneer u trommel A voor het snijwerk (e5) van de
minihakmolen en de hakkop monteert / demonteert, alsook
wanneer u deze accessoires reinigt (afhankelijk van het model).
•Gebruik dit apparaat nooit om andere bestanddelen te bereiden
dan voedingsingrediënten.
•Giet geen kokende vloeistof (van meer dan 80°C/176°F) in de
kommen (b1 en d1 afhankelijk van het model).
•Giet altijd eerst de vloeibare ingrediënten in de mengbeker
(afhankelijk van het model) en voeg dan pas de vaste
ingrediënten toe.
•Zorg ervoor dat het maximumniveau niet wordt overschreden
om te vermijden dat de beker overloopt.
•Steek tijdens de werking van het apparaat uw vingers of andere
voorwerpen niet in de mengbeker (afhankelijk van het model).
•Verwijder het deksel en/of de mengbeker (afhankelijk van het
model) nooit voordat het apparaat volledig tot stilstand is
gekomen.
•Gebruik het apparaat op een vlakke, schone en droge
ondergrond.
16

•Gebruik samen met het groentesnijderaccessoire (e) en de
hakkop (afhankelijk van het model): altijd de drukstaaf om de
voedingsmiddelen door de trechter te leiden, en nooit de
vingers, een vork, lepel, mes of ander voorwerp.
•Laat de mixkom (d) nooit werken zonder deksel (d2), zonder
ingrediënten of met enkel droge ingrediënten.
•Gebruik slechts één accessoire per keer.
•Gebruik de kommen (b1, d1) niet als gewone kommen
(diepvriezer, koken, steriliseren, …).
•Uw apparaat is uitsluitend bedoeld om gebruikt te worden voor
huishoudelijk gebruik. Deze is niet ontworpen voor gebruik in
de volgende gevallen, waarvoor de garantie niet geldig is:
- in kleinschalige personeelskeukens in winkels, kantoren en
andere arbeidsomgevingen,
- door gasten van hotels, motels of andere verblijfsvormen.
•Raadpleeg de gebruiksaanwijzing om de snelheden in te stellen
en voor de werkingsduur van elk accessoire.
•Raadpleeg de gebruiksaanwijzing voor het in elkaar zetten en
om de accessoires op het apparaat te monteren.
•Raadpleeg de gebruiksaanwijzing voor de eerste en periodieke
reiniging van de onderdelen die in contact komen met voedsel,
alsook voor de reiniging en het onderhoud van uw apparaat.
NL
ENKEL VOOR DE EUROPESE MARKT
•Dit apparaat en zijn accessoires (afhankelijk van het model)
met uitzondering van de klopper (c3) en de raspen (e6, e7, e8,
e9): het apparaat mag niet door kinderen worden gebruikt.
Bewaar het apparaat en het snoer buiten bereik van kinderen.
•Kinderen mogen het apparaat niet als speelgoed gebruiken.
•Dit apparaat mag niet worden gebruikt door personen waarvan
de lichamelijke, zintuiglijke of geestelijke vermogens
17

verminderd zijn of door personen zonder enige ervaring of
kennis, tenzij zij onder toezicht staan of van tevoren instructies
hebben gekregen over het veilige gebruik van het apparaat en
er de mogelijke gevaren van inzien.
•Accessoires (afhankelijk van het model) meerdradige garde (c3)
en de raspen (e6, e7, e8, e9): mogen worden gebruikt door
kinderen van 8 jaar en ouder, op voorwaarde dat zij onder
toezicht staan of instructies hebben gekregen inzake het veilige
NL
gebruik van het apparaat en op de hoogte zijn van de risico's
waaraan zij zijn blootgesteld. De reiniging en het onderhoud
mogen niet worden uitgevoerd door kinderen, tenzij ze
minstens 8 jaar oud zijn en onder het toezicht staan van een
volwassene. Houd het apparaat en diens snoer buiten bereik
van kinderen onder de 8 jaar.
Elektrische aansluiting:
•Controleer of de netspanning van uw apparaat overeenkomt
met de netspanning van het elektriciteitsnet. Een verkeerde
aansluiting maakt de garantie ongeldig.
•Trek niet aan het snoer om het apparaat uit te zetten.
•Haal de stekker altijd uit het stopcontact zodra u het apparaat
niet meer gebruikt, in het geval van een stroomonderbreking
en wanneer u het reinigt.
•Dompel het apparaat, het netsnoer of de stekker nooit in water
of een andere vloeistof.
•Hou het netsnoer buiten het bereik van kinderen, blijf uit de
buurt en vermijd contact met de hete delen van het apparaat,
hittebronnen en scherpe randen.
•Maak geen gebruik van het apparaat als het netsnoer of de
stekker beschadigd is. Om gevaarlijke situaties te voorkomen,
moet u deze onderdelen laten vervangen door een erkende
servicedienst (zie de lijst in het serviceboekje).
18

BESCHRIJVING
a - Motorblok
a1 Snelheidsregelaar
a2 Trage uitgang
a2.1 Uitgang mengaccessoires
a2.2 Uitgang groentesnijder
a3 Ontgrendelingsknop voor
de multifunctionele kop
a4 Multifunctionele kop
a5 Snelle uitgang
a6 Klep
b - Komset
b1 Kom
b2 Deksel
c - Mengaccessoires
c1 Kneedarm
c2 Kneder
c3 Meerdradige garde
De accessoires bij het model dat u net hebt gekocht, worden voorgesteld op het label op de
bovenkant van de verpakking.
d - Mixkom (afhankelijk van het model)
d1 Kom
d2 Deksel
d3 Doseerstop
e - Groentesnijder (afhankelijk van het model)
e1 Adapter groentesnijder
e2 Trommelmagazijn
e2.1 As
e3 Drukstaaf
e4 Ringhouder voor de trommel
e5 Trommel A snijden
e6 Trommel C grof raspen
e7 Trommel D fijn raspen
e8 Trommel E Parmezaanse kaas
(afhankelijk van het model)
e9 Trommel R Reibekuchen
(afhankelijk van het model)
EERSTE GEBRUIK
•Was alle onderdelen van de accessoires vóór het eerste gebruik met zeepsop. Spoel en droog af.
•Zet het apparaat op een vlak, schoon en droog oppervlak, controleer of de snelheidsregelaar (a1)
in stand 0 staat en steek dan de stekker in het stopcontact.
• Om het apparaat in te schakelen, hebt u verschillende mogelijkheden:
- Onderbroken werking (pulse) : draai de snelheidsregelaar (a1) met opeenvolgende impulsen naar
de stand 'pulse', voor een betere controle van de bereidingen.
- Continu werking: draai de snelheidsregelaar (a1) naar de gewenste stand van 1 naar 4, afhankelijk
van de gewenste bereiding.
•U kunt deze wijzigen tijdens de bereiding.
•Om het apparaat stop te zetten, draait u de knop (a1) weer naar 0 en trekt u de stekker uit het
stopcontact.
Beveiliging tegen overbelasting :
Uw keukenmachine is voorzien van een microprocessor die het gebruiksvermogen controleert en
analyseert. Bij overbelasting, zal uw apparaat zich aanpassen en de snelheid verminderen of
automatisch uitschakelen. Bij uitschakeling, zet u de snelheidsregelknop (a1) op stand «0», trekt u
de stekker uit het stopcontact, en verwijdert u een gedeelte van de ingrediënten. Laat het apparaat
enkele minuten afkoelen. U kunt de stekker daarna opnieuw in het stopcontact steken, de
snelheidsregelknop (a1) op de gewenste snelheid zetten en het apparaat aanzetten.
De nummering van de paragrafen komt overeen met de nummering van de omkaderde
afbeeldingen.
NL
19

1 - VERMENGEN / KNEDEN / KLOPPEN /EMULGEREN / OPKLOPPEN
GEBRUIKTE ACCESSOIRES:
- Kom (b1)
- Deksel (b2)
- Kneedarm (c1) of kneder (c2) of meerdradige garde (c3)
1.1 DE ACCESSOIRES PLAATSEN (SCHEMA 1):
•Vergrendel de kom (b1) (tegen de klok in) op het toestel en doe er de ingrediënten in.
•Steek het gewenste accessoire (c) in de uitgang (a2.1), tot het vastklikt.
•Zet de multifunctionele kop (a4) in horizontale positie: druk op de knop (a3) en verlaag de
multifunctionele kop (a4) handmatig, tot deze vergrendelt (de knop (a3) keert terug in zijn beginstand).
•Schuif het deksel (b2) op de kom (b1).
NL
Opmerking: het gebruik van het deksel is niet verplicht. Het beperkt wel het risico op spatten.
•Controleer of de klep (a6) goed is bevestigd op de snelle uitgang (a5).
1.2 INSCHAKELEN:
•Schakel in door de snelheidsregelaar (a1) naar de voor het recept gewenste snelheid te draaien.
•U kunt tijdens de bereiding ingrediënten toevoegen via de opening in het deksel (b2).
•Zet de knop (a1) weer op 0 om het apparaat uit te schakelen.
Tips:
- Kneden
- Gebruik de kneder (c1) enkel op snelheid 1.
De max. hoeveelheden die u kunt kneden:
- 500 g bloem voor brooddeeg (bv.: wit brood, granenbrood, …)
- 400 g bloem voor speciaal brood (bloem met een T-nummer vanaf 55 (T55): roggebrood,
volkorenbrood,…)
- 250 g bloem voor gistdeeg (brioche, tulband, pizzadeeg, kruimeldeeg, …)
- 750 g bloem voor melkbrood (zie basisrecept)
- Maximale werkingstijd: 13 min
Volg voor een geslaagd resultaat de instructies getoond in schema 4.
- Vermengen
- Gebruik de kneder (c2) van snelheid 1 tot 4.
De max. hoeveelheden die u kunt vermengen:
- 1 kg beslag voor bijvoorbeeld cake, soezendeeg, …
- Gebruik nooit de kneder (c2) om zwaar deeg te kneden
- 2,7 kg zoet cakebeslag (zie basisrecept).
- Maximale werkingstijd: 13 min.
- Kloppen / emulgeren / opkloppen
- Gebruik de meerdradige garde (c3) van snelheid 1 tot 4.
Wat u kunt bereiden: mayonaise, aïoli, sauzen, opgeklopt eiwit (tot 8 eiwitten), slagroom (tot 500 ml),
…
- Gebruik nooit de meerdradige garde (c3) om zwaar deeg te kneden of licht beslag te vermengen.
- Maximale werkingstijd: 10 min.
1.3 - DE ACCESSOIRES VERWIJDEREN:
•Wacht tot het apparaat volledig tot stilstand is gekomen en trek de stekker uit het stopcontact.
•Verwijder het deksel (b2).
•Ontgrendel de multifunctionele kop (a4) met de knop (a3) en til die omhoog.
20

•Trek het accessoire (c1), (c2) of (c3) van de multifunctionele kop.
•Neem er de kom uit.
2 - GLAD KLOPPEN / VERMENGEN / MIXEN
(AFHANKELIJK VAN HET MODEL)
Afhankelijk van de aard van de voedingsmiddelen kunt u met de mixkom (d) tot 1 L dikke mengsels en
0,75 L vloeibare mengsels bereiden.
GEBRUIKTE ACCESSOIRES
- Mixkom (d)
2.1 - DE ACCESSOIRES PLAATSEN (SCHEMA 2):
•Zet de multifunctionele kop (a4) horizontaal: druk op de knop (a3) en verlaag de multifunctionele knop
(a4) handmatig tot deze vergrendelt (de knop (a3) staat dan weer in zijn beginpositie).
•Trek de klep (a6) naar boven toe van de snelle uitgang (a5).
•Het apparaat moet helemaal tot stilstand zijn gekomen voor u de mixkom plaatst (d).
•Zet de mixerkom (d) op de snelle uitgang (a5). Er zijn vier standen mogelijk.
•Doe de ingrediënten in de mixkom en vergrendel het deksel (d2) met de doseerstop (d3) door die met de
klok mee te draaien.
2.2 - INSCHAKELEN:
•Schakel in door de snelheidsregelaar (a1) naar de voor het recept gewenste snelheid te draaien.
Gebruik de 'pulse' stand voor een betere controle van de mixer en een gladdere bereiding.
U kunt tijdens de bereiding ingrediënten toevoegen door de doseerstop (d3) van het deksel (d2) te nemen.
•Zet de knop (a1) weer op 0 om het apparaat uit te schakelen.
Tips:
- Gebruik de mixkom (d)
Maximale werkingstijd: 3 min.
Wat u kunt bereiden:
- Fijngemixte soepen, roomsoepen, stamppotten, milkshakes, cocktails, ...
- Licht beslag (pannenkoeken, beignets, wafels, ...).
- Als de ingrediënten tijdens het mixen aan de wanden van de kom blijven kleven, schakelt u het apparaat
uit, verwijdert u de mixkom, laat u de ingrediënten op de messen vallen en plaatst u de mixkom terug
om verder te mixen.
- Vul de mixkom nooit met kokendhete vloeistof.
- Gebruik de mixkom niet leeg.
- Gebruik de mixkom altijd met het deksel.
- Verwijder nooit het deksel voor het apparaat volledig tot stilstand is gekomen.
Doe altijd eerst de vloeibare ingrediënten en dan pas de vaste ingrediënten in de mixkom.
-
2.3 - HET ACCESSOIRE VERWIJDEREN:
•Wacht tot het apparaat volledig tot stilstand is gekomen en trek de stekker uit het stopcontact. Verwijder
de mixkom. Zet de klep (a6) weer op de uitgang (a5).
van snelheid 3 tot 4.
3 - RASPEN / SNIJDEN (AFHANKELIJK VAN HET MODEL)
GEBRUIKTE ACCESSOIRES:
- Adapter groentesnijder (e1)
- Trommelmagazijn (e2) + drukstaaf (e3)
21
NL

- Trommels (afhankelijk van het model)
- Ringhouder voor de trommel (e4)
3.1 - DE ACCESSOIRES PLAATSEN (SCHEMA 3):
•Druk op de knop (a3) om de multifunctionele kop (a4) te ontgrendelen en til die helemaal op.
•Zet de adapter (e1) onder de multifunctionele kop (a4): zet het linkerteken van de adapter (e1) gelijk
met het teken van de multifunctionele kop (a4) en draai tot het rechterteken van de adapter (e1)
overeenkomt met dat van de multifunctionele kop (a4).
•Steek de gekozen trommel in het magazijn en controleer of deze er helemaal in zit. Plaats de ringhouder
voor de trommel (e4).
•Hou het trommelmagazijn (e2) schuin naar rechts, voor de uitgang van de adapter (e), en steek de twee
pinnen van het trommelmagazijn in de twee uitsparingen van de adapter. Duw ze er helemaal in. Als het
plaatsen moeilijk gaat, draait u lichtjes aan de as (e2.1) van het trommelmagazijn om het nog eens te
NL
proberen. Zet de trechter van het magazijn verticaal door tegen de klok in te draaien, tot hij blokkeert.
•Vergrendel de kom (b1) (tegen de klok in) op het apparaat.
•Controleer of de klep (a6) goed is bevestigd op de snelle uitgang (a5).
3.2 - INSCHAKELEN EN TIPS:
•Schakel in door de regelaar (a1) op snelheid 3 te plaatsen.
•Maximale werkingstijd: 10 min.
•Steek de ingrediënten in de trechter van het magazijn en duw ze erdoor met de drukstaaf (e3).
ingrediënten er nooit in met de vingers of keukengerei!
•Zet de regelaar (a1) weer op 0 om het apparaat uit te schakelen.
stilstand is gekomen en trek de stekker uit het stopcontact
•Ontgrendel het trommelmagazijn in de omgekeerde volgorde van het monteren.
•Met de trommels kunt u tot 2 kg van het volgende bereiden:
- Grof raspen C (e6) / fijn raspen D (e7): wortels, knolselderij, aardappelen, kaas, …
- In dikke plakken snijden A (e5): aardappelen, wortels, komkommers, appels, bieten, …
- Parmezaanse kaas E (e8): aardappelen, Parmezaanse kaas, …
- Reibekuchen R (e9): aardappelen.
De maximumhoeveelheid: 2 kg.
Wacht tot het apparaat volledig tot
4 - KLEINE HOEVEELHEDEN FIJNHAKKEN
(AFHANKELIJK VAN HET MODEL)
GEBRUIKT ACCESSOIRE:
- Gemonteerde minihakker
Met de minihakker kunt u in pulse in enkele seconden fijnhakken: gedroogde vijgen, gedroogde
abrikozen, … Hoeveelheid / max. tijd: type QA100: 50 g / 8 s, type QA200: 90 g / 8 s.
Deze minihakker is niet geschikt voor harde producten zoals koffiebonen.
Duw de
22

REINIGING
•Trek de stekker uit het stopcontact.
•Dompel het motorblok (a) nooit onder in water en hou het niet onder de kraan. Neem het af met
een droge of enigszins vochtige doek.
•Spoel de accessoires af snel na gebruik voor een gemakkelijkere reiniging nadien. Houd alle messen
heel voorzichtig vast om snijwonden te voorkomen.
•Was de accessoires, spoel en droog af: ze mogen allen in de vaatwasser.
Tip:
- Als uw accessoires verkleuren door gebruik van bepaalde ingrediënten (wortels, sinaasappels, ...),
smeer ze dan in met een doekje met voedingsolie en maak ze vervolgens op de gebruikelijke wijze
schoon.
- Mixkom (d): giet warm water met enkele druppels afwasmiddel in de mixkom. Sluit het deksel. Plaats
hem op het apparaat en laat een paar keer kort draaien. Verwijder de kom, spoel onder stromend
water en laat drogen (omgekeerd).
OPBERGEN
Berg uw apparaat niet op in een vochtige omgeving.
WAT TE DOEN ALS UW APPARAAT NIET WERKT?
Als uw apparaat niet werkt, controleert u:
- Of de stekker in het stopcontact zit.
- Of elk accessoire is vergrendeld.
- De stand van de snelheidsregelaar (a1): zet hem weer in stand 0 en kies dan opnieuw de gewenste
snelheid.
Werkt het apparaat nog steeds niet? Richt u tot een erkend servicecentrum (zie lijst in het
serviceboekje).
WEGGOOIEN VAN VERPAKKINGSMATERIAAL EN HET APPARAAT
De verpakking omvat uitsluitend voor het milieu ongevaarlijke stoffen die weggeworpen
kunnen worden overeenkomstig de geldende bepalingen voor recycling.
Vraag voor het wegwerpen van het apparaat om inlichtingen bij de bevoegde dienst in
uw gemeente.
NL
ELEKTRISCHE OF ELEKTRONISCHE PRODUCTEN
AAN HET EINDE VAN DE LEVENSDUUR
Wees vriendelijk voor het milieu !
Uw apparaat bevat materialen die geschikt zijn voor hergebruik.
Lever het in bij het milieustation in uw gemeente of bij onze technische dienst.
23

ACCESSOIRES
U kunt uw apparaat personaliseren en bij uw erkende retailer of servicecentrum de volgende accessoires
kopen:
Kom
Deksel voor kom
Kneedarm
Kneder
Meerarmige garde
Mixkom
Minihakker
NL
Opgelet: u kunt enkel accessoires kopen op vertoon van uw handleiding of apparaat.
Hakkop
Adapter groentesnijder
Groentesnijder:
- A: snijden
- C: grof raspen
- D: fijn raspen
- E: Parmezaanse kaas
BASISRECETEN
Wit brood
Ingrediënten: 350 g bloem van het type 55, 210 ml lauw water, 5 g gedroogde bakkersgist, 5 g zout.
Doe het zout, de bloem en de bakkersgist in de kom. Plaats de kneedarm en het deksel. Laat enkele
seconden draaien op snelheid 1 en voeg dan het water toe terwijl het apparaat blijft draaien. Kneed
gedurende ongeveer 8 min. Laat het deeg een ½ uur rusten op kamertemperatuur, kneed dan met de
hand en vorm een bol die u op een met boter ingevette en met bloem bestrooide bakplaat legt. Laat
ongeveer 1 uur rijzen. Verwarm de oven voor op 240 °C. Maak inkepingen op de bovenkant van het brood
en bestrijk met lauw water. Zet een kommetje met water in de oven om de korst mooi goudkleurig te
maken. Zet 30 min in de oven.
Kruimeldeeg
Ingrediënten: 200 g bloem, 100 g zachte boter in stukjes, 50 ml water, 1 snufje zout.
Doe de bloem, de boter en het zout in de kom. Plaats de kneedarm en het deksel. Laat enkele seconden
draaien op snelheid 1 en voeg dan het water toe terwijl het apparaat blijft draaien. Laat kneden tot
het deeg een mooie bol wordt. Wikkel de bol in huishoudfolie en laat ongeveer ½ uur rusten in de
koelkast voor u hem uitrolt en bakt.
Melkbrood
Ingrediënten: 500 g bloem, 1 ei, 80 g zachte boter in stukken, 80 g suiker, 250 ml lauwe melk, 5 g
gedroogde bakkersgist, 1 snufje zout.
Doe alle ingrediënten in de kom. Plaats de kneedarm en het deksel. Laat ongeveer 8 min werken op
snelheid 1. Laat het deeg ongeveer 1 uur rusten op kamertemperatuur en kneed het dan met de hand.
Snij kleine stukken van het deeg en rol ze tot kleine broodjes. Leg ze op een bakplaat bedekt met
bakpapier en laat 30 tot 40 minuten rijzen. Verwarm de oven voor op 200 °C. Bestrijk de broodjes
met eigeel dat u losklopte met wat melk en suiker. Laat ongeveer 20 min bakken.
Zoete cake
Ingrediënten: 2 eieren, 125 g suiker, 125 g zachte boter in stukjes, 250 g bloem, 70 ml melk, 1 zakje (11
g) bakpoeder, 1 zakje (6,5 g) vanillesuiker.
Doe alle ingrediënten, met uitzondering van de bloem, in de kom. Plaats de kneder en het deksel.
Laat enkele seconden draaien op snelheid 1 en voeg dan beetje bij beetje de bloem toe terwijl het
apparaat blijft draaien. Laat in totaal 3 min kneden. Verwarm de oven voor op 180 °C. Giet het deeg
in een ingevette en met bloem bestrooide cakevorm. Laat ongeveer 40 minuten bakken.
24

Hartige cake
Ingrediënten: 200 g bloem, 4 eieren, 1 zakje (11 g) bakpoeder, 100 ml koude melk, 50 ml olijfolie, 12
zongedroogde tomaten, 200 g feta, 15 ontpitte groene olijven in stukjes, zout, peper.
Verwarm de oven voor op 180 °C. Vet een cakevorm in met boter en bestrooi met bloem. Doe de
bloem, de eieren en het bakpoeder in de kom. Plaats de kneder en het deksel. Start op snelheid 1 en
verhoog dan naar snelheid 3. Giet er de olijfolie en de melk bij terwijl u het apparaat 1.30 min laat
draaien. Ga weer naar snelheid 1 en voeg de zongedroogde tomaten, de feta en de olijven toe. Kruid
met peper en zout. Giet de bereiding in de vorm en laat 30 tot 40 min bakken.
Mayonaise
Ingrediënten: 1 eidooier, 1 eetlepel mosterd, 1 theelepel azijn, 250 ml olie, peper en zout.
Opgelet: alle ingrediënten moeten op kamertemperatuur zijn.
Doe alle ingrediënten, met uitzondering van de olie, in de kom. Plaats de meerdradige garde en het deksel.
Start op snelheid 1 en begin de olie in een dun straaltje toe te voegen. Ga na 10 sec naar snelheid 4
terwijl u de olie er langzaam in blijft gieten. Wanneer alle olie is opgebruikt, laat u het apparaat nog 30
sec draaien.
Opgelet: bewaar in de koelkast en gebruik binnen 24 uur.
Slagroom
Ingrediënten: 250 ml heel koude room, 50 g poedersuiker.
Doe de room en de poedersuiker in de kom. Plaats de meerdradige garde en het deksel. Laat 2 min
werken op snelheid 3 en dan 1.30 min op snelheid 4.
NL
25

CONSIGNAS DE SEGURIDAD
•Lea detenidamente las instrucciones de uso antes de utilizar el
aparato por primera vez : un uso no conforme con las
instrucciones eximirá al fabricante de cualquier responsabilidad.
•Este aparato no está previsto para ser utilizado por personas
(incluso niños) cuyas capacidades físicas, sensoriales o mentales
estén reducidas, o personas provistas de experiencia o de
ES
conocimiento, excepto sin han podido beneficiarse a través de
una persona responsable de su seguridad, de una vigilancia o
instrucciones previas referentes al uso del aparato. Hay que
vigilar a los niños para asegurarse de que no juegan con el
aparato.
•Este aparato está destinado únicamente a uso doméstico, siempre
en el interior del hogar y a altitudes inferiores a 2000 m.
•No utilice el aparato si no funciona correctamente o si se ha
estropeado. En este caso, diríjase a un centro de servicio oficial
(consulte la lista en el folleto de servicio).
•Cualquier tarea de mantenimiento, salvo las tareas de limpieza y
conservación habituales realizadas por el cliente, debe llevarse
a cabo en un centro de servicio oficial (consulte la lista en el
folleto de servicio).
•Desconecte siempre el aparato de la corriente eléctrica si se deja
sin supervisión o antes de montarlo/desmontarlo o limpiarlo.
•Riesgo de heridas en caso de mala utilización del aparato.
•No meta los accesorios en el microondas.
•Por su seguridad, utilice únicamente accesorios y piezas de
recambio adecuadas para el aparato, suministradas por un centro
de servicio oficial.
•Retire siempre el vaso mezclador (d) antes de pulsar el botón de
desbloqueo (a3) del cabezal multifunción (a4).
26

•Apague el aparato y desconéctelo de la red eléctrica cuando vaya
a cambiar los accesorios o a tocar alguna de las piezas que son
móviles durante su funcionamiento.
•No toque ni los accesorios mezcladores ni las cuchillas mientras
el aparato esté en funcionamiento.
•Mantenga el pelo, bufandas, corbatas, etc. fuera del alcance del
aparato en funcionamiento.
•Nunca introduzca utensilios (cucharas, espátulas, etc.) por la
abertura de la tapa (d2), en el vaso (b1) ni por el tubo del
depósito del cilindro (e2).
•Las hojas cortan mucho. Manipúlelas con cuidado para no hacerse
daño cuando vacía el recipiente (d) y la minipicadora, durante
el montaje/desmontaje del cilindro A para cortar (e5) de la
minipicadora y del cabezal picador, y durante la limpieza de estos
accesorios (accesorios según el modelo).
•Nunca utilice este aparato para preparar elementos que no sean
alimentos.
•No vierta líquido hirviendo (superior a 80 ºC/176 ºF) en los
recipientes (b1 y d1 según el modelo).
•Vierta siempre los ingredientes líquidos en primer lugar en el
vaso mezclador (según el modelo) antes de añadir los
ingredientes sólidos.
•Para evitar desbordamientos, no supere el nivel máximo del
recipiente cuando se indica.
•Nunca introduzca los dedos o cualquier otro objeto en el vaso
mezclador (según el modelo) mientras el aparato esté en
funcionamiento.
•Nunca retire la tapa y/o el vaso mezclador (según el modelo)
antes de que el aparato se detenga completamente.
•Utilice el aparato en una superficie plana, limpia y seca.
•Con el accesorio cortador de verduras (e) y el cabezal picador
27
ES
 Loading...