

Page 1

FR
EN
NL
Page 2
E
e1
A
e2
B
e3
D
C
d1
b2
b1 b4b3
c1
c2 c3* c4 c6 c7 c8 c9
c5
F*
f1
f2
b5
c10
c11
d2
d3
d4
d5
Page 3
1
2
1
2
3
5
!!
MIN
7
9
4
6
8
10
!!
MAX
Page 4
11
1
2
a. b.
2
1
c. d.
12
1
13
a.
FR Selon modèle / EN Depending on the model / NL Afhankelijk van model
2
b.
*
c.
Page 5

START START
En parcourant cette notice, vous découvrirez des conseils d’utilisation qui vous feront entrevoir
le potentiel de votre appareil : préparation de soupes veloutées ou moulinées, de soupes avec
morceaux, de sauces et de compotes, de smoothies, de cocktails et des recettes vapeur.
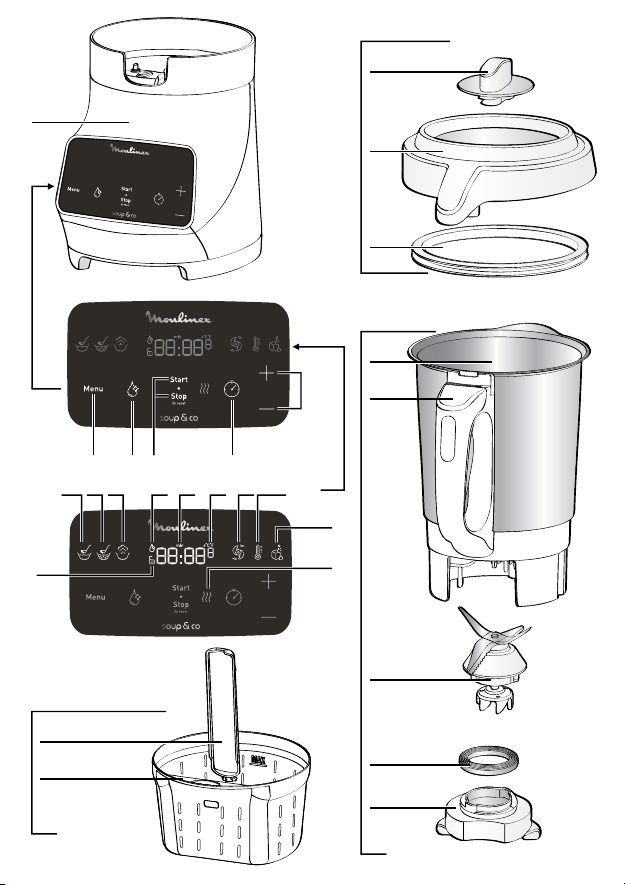
DESCRIPTION DE L’APPAREIL
A Bloc moteur
B Tableau de commande
b1 Bouton MENU
b2 Bouton AUTOCLEAN
b3 Bouton START / STOP / RESET
b4 Sélecteur de durée de fonctionnement
(le timer)
b5 Sélecteur de Vitesse / Température / Temps +/C Ecran d’affichage
c1 : SOUPE VELOUTEE
c2 : SOUPE MOULINEE
c3 : VAPEUR * (selon modèle)
c4 : Affichage autoclean
c5 :
Affichage témoin de sécurité
c6 : Affichage temps
c7 : Affichage vitesse ou température
c8 : MODE BLENDER
c9 : MODE CUISSON
c10 : GLACE PILEE
c11 : Voyant de chauffe
CONSIGNES DE SECURITE
FR
D Ensemble Bol blender
d1 Bol inox
d2 Gâchette poignée
d3 Couteau démontable
d4 Joint
d5 Bague de verrouillage
E Ensemble couvercle
e1 Bouchon
e2 Couvercle
e3 Joint d’étanchéité
F Panier de cuisson (selon modèle*)
f1 Poignée
f2 Panier
Données techniques de l’appareil :
Température maximum : 100°C
Puissance : 1100W
Temps de programmation maximum : 59 minutes.
Vis-à-vis de la sécurité de la
personne
• Lisez attentivement le mode
d’emploi avant la première
utilisation de votre appareil
et conservez-le : une utilisation
non conforme au mode d’emploi
dégagerait le fabricant de toute
responsabilité.
• Ne pas laisser les enfants utiliser
l’appareil sans surveillance.
• AVERTISSEMENT : Lors de
l’utilisation de l’appareil, certaines
pièces atteignent des températures
élevées et présentent une chaleur
résiduelle après utilisation:
paroi inox du bol, parties non
préhensibles du couvercle et du
bouchon, pièces métalliques sous
le bol, panier (selon modèle).
Elles peuvent occasionner des
brûlures. Manipulez l’appareil
par les pièces plastiques froides:
poignées, bloc moteur, zones de
préhension du couvercle ou du
bouchon pendant la chauffe et
jusqu’au refroidissement complet.
Le témoin lumineux de chauffe
1
Page 6

rouge indique qu’il y a un risque de
brûlure.
• Si le câble d’alimentation ou
la prise est endommagé, il doit
être remplacé par le fabricant,
son service après-vente ou des
personnes de qualification
similaire afin d’éviter un danger
(voir liste des centres service
agréés dans le livret service).
• Votre machine a été conçue pour
un usage domestique seulement
et à une altitude inférieure à 2000
m. Le fabricant décline toute
responsabilité et se réserve le droit de
résilier la garantie en cas d’utilisation
commerciale ou inadaptée, ou de
non respect des consignes.
• AVERTISSEMENT : Votre
appareil émet de la vapeur
qui peut occasionner des
brûlures.
Manipulez avec précau tion le
couvercle et le bouchon (utilisez si
nécessaire un gant, une manique,
etc.) Manipulez le bouchon par sa
partie centrale.
• Être vigilant si un liquide chaud
est versé dans le préparateur
culinaire ou le mélangeur dans
la mesure où il peut être éjecté
de l’appareil en raison d’une
ébullition soudaine.
• Ne faites pas fonctionner
l’appareil si le bouchon n’est
pas positionné dans l’orifice du
couvercle et/ou si le joint n’est
pas positionné dans le couvercle.
2
• AVERTISSEMENT : Attention
aux risques de blessure en cas
de mauvaise utilisation de
l’appareil.
• Les lames sont très
coupantes : manipulezles avec précaution pour
ne pas vous blesser lors
du vidage du bol, du
nettoyage, du montage et
démontage du couteau.
• AVERTISSEMENT : Soyez prudent
lors de la manipulation de votre
appareil (nettoyage, remplissage
et versage) : éviter tout
débordement de liquide sur l’écran
d’affichage et les connecteurs.
• Reportez-vous au mode d’emploi
pour le réglage des vitesses et le
temps de fonctionnement de
chaque programme.
• Reportez-vous au mode d’emploi
pour l’assemblage et le montage
des accessoires sur l’appareil.
• Reportez-vous au mode d’emploi
pour le nettoyage et l’entretien
de votre appareil.
• Toujours suivre les instructions
de nettoyage pour nettoyer
votre appareil:
- Débrancher l’appareil.
- Ne pas nettoyer l’appareil chaud.
- Nettoyer avec un chiffon ou
une éponge humide.
- Ne jamais mettre l’appareil dans
l’eau ou sous l’eau courante.
• Cet appareil est destiné à être
utilisé dans des applications
domestiques et analogues sauf :
Page 7

- les zones de travail de cuisine
dans les magasins, bureaux et
autres environnements de travail.
- des coins cuisines réservés au
personnel dans des magasins,
• L’appareil ne doit pas être
• Ne laissez pas le câble
bureaux et autres environnements professionnels.
- des fermes.
- l’utilisation par les clients des
hôtels, motels et autres environnements à caractère résidentiel.
Vis-à-vis d’une mauvaise
- des environnements du type
chambres d’hôtes.
• N’utilisez pas votre appareil s’il ne
Vis-à-vis du raccordement
électrique
• L’appareil doit être branché sur
une prise de courant électrique
• N’utilisez jamais le bol blender
reliée à la terre.
• L’appareil est conçu pour
fonctionner uniquement en
• Versez toujours les ingrédients
courant alternatif. Vérifiez que la
tension d’alimentation indiquée
sur la plaque signalétique de
l’appareil corresponde bien
à celle de votre installation
électrique.
• Toujours déconnecter l’appareil
de l’alimentation, si on le laisse
sans surveillance et avant
montage, démontage et
• Certaines recettes peuvent
nettoyage.
• Toute erreur de branchement
annule la garantie.
• Ne tirez jamais sur le câble
d’alimentation pour débrancher
l’appareil.
• Ne mettez pas l’appareil, le câble
3
d’alimentation ou la prise dans
du liquide.
immergé.
d’alimentation à portée de mains
des enfants, être à proximité ou en
contact avec les parties chaudes
de l’appareil, près d’une source de
chaleur ou sur un angle vif.
utilisation
fonctionne pas correctement, s’il
est endommagé. Faites le réparer
dans un centre service agréé (voir
liste dans le livret service).
sans ingrédient ou avec des
produits secs uniquement.
solides en premier dans le bol
avant d’ajouter des ingrédients
liquides, sans dépasser le repère
MAX gravé ou marqué sur le bol
(Cf Fig.8). Si le blender est trop
rempli, de l’eau bouillante peutêtre éjectée. Attention à avoir un
niveau de liquide suffisant pour
recouvrir le repère mini(Fig.7).
provoquer des débordements
intempestifs, en raison de
l’apparition de bulles, en
particulier lors de l’utilisation de
légumes congelés. Dans ce cas,
il vous appartient de réduire les
volumes en conséquence. En
cas de débordement, veuillez
Page 8

débrancher le produit et
attendre le séchage complet du
produit avant de le réutiliser.
• Ne placez jamais vos doigts
ou tout autre objet dans le bol
blender pendant le fonctionnement de l’appareil.
• N’utilisez pas le bol comme
récipient (congélation, stérilisation).
• Placez l’appareil sur un plan
de travail stable, résistant à la
chaleur, propre et sec.
• Ne placez pas l’appareil près
d’un mur ou d’un placard :
la vapeur produite pouvant
endommager les éléments.
•
Ne laissez pas pendre vos cheveux,
un foulard, une cravate,…
au dessus du bol pendant le
fonctionnement de l’appareil.
• Ne passez jamais les accessoires
dans un four à micro-ondes.
• N’utilisez pas l’appareil en plein
air.
• Ne dépassez jamais la quantité
maximum indiquée dans la
notice.
• Rangez l’appareil lorsqu’il est
refroidi. Ne pas mettre de l’eau
sur l’écran d’affichage.
• Ne pas utiliser l’appareil avec les
doigts humides.
MARCHES HORS EUROPE
UNIQUEMENT
•
Cet appareil n’est pas prévu pour
être utilisé par des personnes
(y compris les enfants) dont les
capacités phy siques, sensorielles
ou mentales sont réduites ou des
personnes dénuées d’expérience
ou de connaissance, sauf si
elles ont pu bénéficier, par
l’inter médiaire d’une personne
responsable de leur sécurité, d’une
surveillance ou d’instructions
préalables concernant l’utilisation
de l’appareil.
• Il convient de surveiller les
enfants pour s’assurer qu’ils ne
jouent pas avec l’appareil.
MARCHÉS EUROPÉENS
SEULEMENT :
•
En fonction chauffe seule : Cet
appareil peut être utilisé par des
enfants âgés d’au moins 8 ans, à
condition qu’ils bénéficient d’une
surveillance ou qu’ils aient reçu des
instructions quant à l’utilisation
de l’appareil en toute sécurité
et qu’ils comprennent bien les
dangers encourus. Le nettoyage
et l’entretien par l’utilisateur ne
doivent pas être effectués par
des enfants sans surveillance, à
moins qu’ils ne soient âgés de
plus de 8 ans et qu’ils soient sous
la surveillance d’un adulte.
• Dans toutes les utilisations
en mode mixage ou blender :
Cet appareil ne doit pas
être utilisé par les enfants.
Conserver l’appareil et son câble
hors de portée des enfants.
• En fonction chauffe seule :
Conserver l’appareil et son câble
4
Page 9

hors de portée des enfants âgés
START START
de moins de 8 ans.
• Les enfants ne doivent pas
utiliser l’appareil comme un
jouet.
• Cet appareil peut être utilisé
par des personnes dont les
capacités physiques, sensorielles
ou mentales sont réduites ou
dont l’expérience ou les connaissances ne sont pas suffisantes,
à condition qu’ils bénéficient
d’une surveillance ou qu’ils
aient reçu des instructions quant
MISE EN SERVICE
Votre appareil possède 2 modes de fonctionnement
• Mode automatique : température, durée de cuisson et
le mixage sont préprogrammées. La durée de cuisson
peut être ajustée
- : soupe veloutée (texture fine)
- : soupe moulinée (texture dense)
- *: cuisson vapeur avec l’accessoire panier vapeur
• Mode manuel : réglage des paramètres selon votre
convenance
- : savoureux smoothies et cocktails. Réglage
personnalisé de la vitesse et de la durée de mixage
- : cuisson. Réglage personnalisé de la température
et de la durée de cuisson. Possibilité d’activer la
vitesse en cours de cuisson
- : glace pilée. Réglage de la durée des pulses
Mise en place du bol et de l’ensemble couvercle
• Avant la première utilisation, nettoyez tous les
accessoires (D, E et F) à l’eau chaude savonneuse, mais
pas le bloc moteur (A).
• Assurez-vous que tout emballage soit retiré avant le
fonctionnement de l’appareil.
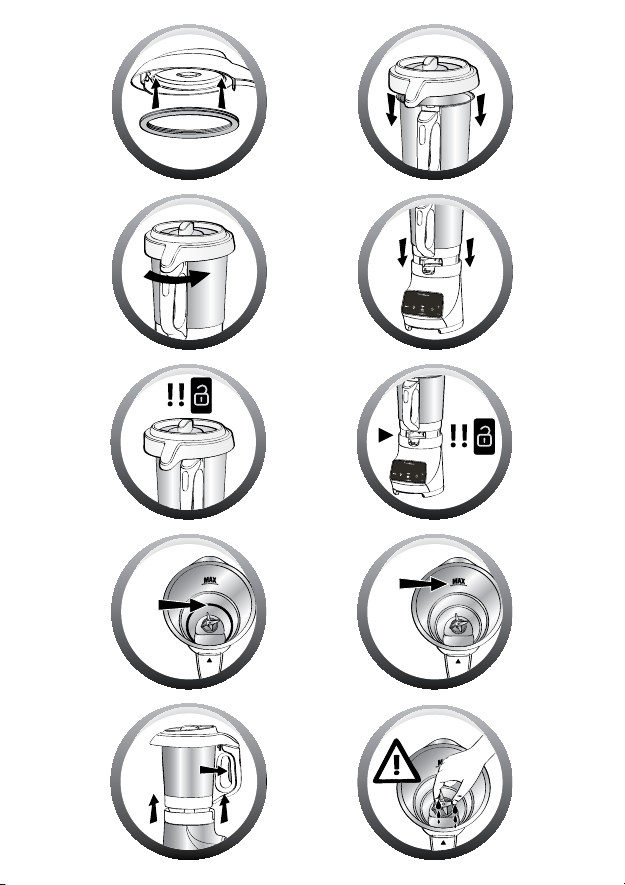
• Placez le joint sur le couvercle (Cf. Fig. 1).
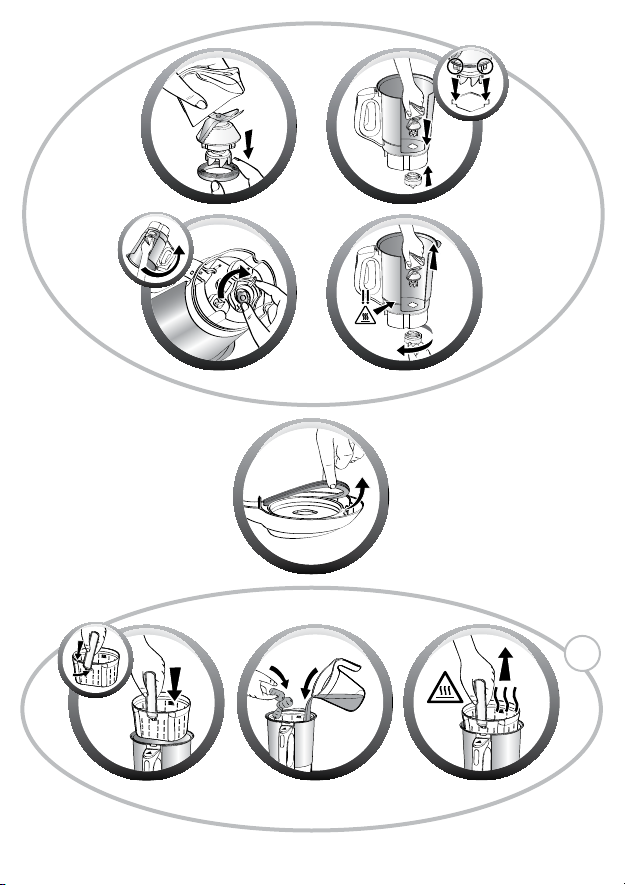
• Pour réaliser des cuissons vapeur, positionnez le panier
avec les légumes coupés en morceaux et remplissez le
bol avec 0.5 litre d’eau froide sans dépasser le bas du
panier (Cf. Fig.13 a; b; c).
• Positionnez le couvercle (E) sur le bol (D) (Cf. Fig.2),
verrouillez le couvercle sans appuyer en tournant dans
le sens de la flèche (Cf. Fig.3).
• Positionnez le bol blender (D) sur le bloc moteur (A)
jusqu’à entendre un « clic » (Cf. Fig. 4).
à l’utilisation de l’appareil en
toute sécurité et en comprennent bien les dangers potentiel.
SAV
• Pour votre sécurité, n’utilisez
pas d’accessoires ou de pièces
de rechange, autres que ceux
fournis par les centres de service
après-vente agréés.
• Toute intervention autre que le
nettoyage et l’entretien usuel
par le client doit être effectuée
par un centre service agréé.
• L’appareil démarre uniquement si le bol et le
couvercle sont correctement positionnés et
verrouillés sur le bloc moteur.
En cas de mauvais positionnement ou de mauvais
verrouillage de l’un ou de l’autre (Cf. Fig. 5 et 6), le
logo
se met à clignoter lorsque l’on active une
fonction.
Mise en place du couteau sur le bol
• Montage du couteau démontable (Cf. Fig. 11 a; b; c) :
1. Vérifiez que le joint est bien positionné sur la partie
couteau (Cf. 11.a).
2. Prenez le couteau avec un linge et placez-le dans
son logement dans le fond du bol, en veillant à bien
positionner les ergots du couteau dans les encoches
du bol (Cf. 11.b).
3. Retournez le bol en maintenant le couteau dans son
logement (Cf. 11.c).
4. Verrouillez la partie couteau à l’aide de la bague de
verrouillage (Cf. 11.c).
• Démontage du couteau démontable (Cf. Fig. 11.d) :
Placez le bol au dessus d’un plan de travail.
1. Maintenez le couteau à l’aide d’un linge.
2. Retournez le bol tout en maintenant le couteau.
3. Faites tourner la bague de verrouillage pour
déverrouiller le couteau.
Avertissement : les lames sont très coupantes :
manipulez-les avec précaution pour ne pas vous blesser
lors du montage, démontage et nettoyage du bol et
du couteau.
5
Page 10
UTILISATION DE L’APPAREIL
MODE PROGRAMMES AUTOMATIQUES
Une fois l’eau et les ingrédients placés au fond du bol ou dans le panier vapeur, verrouillez le couvercle et positionnez le
bol sur le bloc moteur (voir mise en service), puis sélectionnez le programme automatique désiré.
Vous pouvez modifier vos paramètres temps en appuyant sur le timer . Puis ajustez le temps à l’aide des touches + (augmenter)
et - (diminuer) (b5). Pour démarrer le programme automatique, appuyez sur START/STOP (b3)
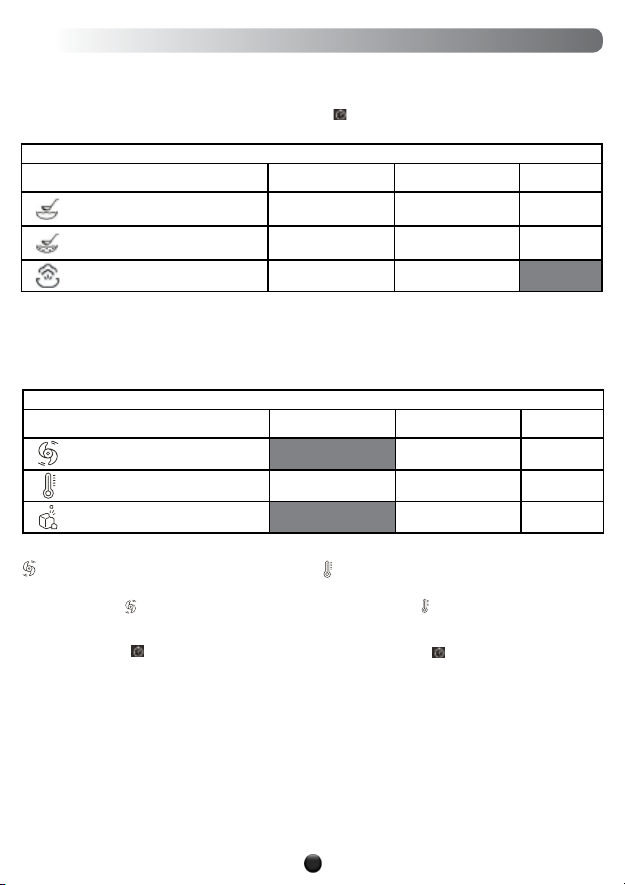
Découvrez les programmes automatiques proposés
Température (max) Temps ajustable Mixage
Soupe Veloutée (texture fine) 100°C
Soupe Moulinée (texture dense) 100°C
Cuisson vapeur avec le panier de
cuisson et 50 cl d’eau *
Lorsque le programme est terminé, l’appareil émet 3 bips.
Déverrouillez le bol en appuyant sur la gâchette (d2) située à l’intérieur de la poignée (cf. Fig. 9) et servez de suite ou
laissez le bol en place en maintien au chaud (jusqu’à 40 minutes).
100°C
30 min. (+ ou -10 min)
40 min. (+ ou -10 min)
30 min. (+ ou -20 min)
MODES MANUELS
Découvrez les programmes automatiques proposés
Température (max) Temps ajustable Mixage
Mode blender
Mode Cuisson De 60°C à 100°C
Glace pilée
De 0 à 3 minutes
De 0 à 59 minutes
De 5 secondes à
30secondes
Vitesse maxi
1 min
Vitesse mini
13s
De V1 à V5
De V1 à V5
Pulse
MODE BLENDER (sans cuisson)
• Appuyez sur la touche MENU jusqu’au pictogramme
MODE BLENDER puis sélectionnez la vitesse de
mixage avec les touches +/-.
• Si vous souhaitez programmer le temps de mixage,
appuyez sur TIMER et réglez le temps à l’aide des
touches +/-.
• Appuyez sur START/STOP pour démarrer le mixage.
• Une fois votre préparation mixée, appuyez sur la
gachette (d2) puis soulevez le bol blender.
6
MODE CUISSON
• Appuyez sur la touche MENU jusqu’au pictogramme
MODE CUISSON puis sélectionnez la température
avec les touches + et – .
• Si vous souhaitez programmer le temps de cuisson,
appuyez sur TIMER , et réglez le temps à l’aide des
touches +/-.
• Appuyez sur START/STOP pour démarrer la cuisson.
Le témion luminueux rouge s’allume pour vous
informer que la cuisson a démarré.
• A tout moment en cours de programme, vous pouvez
actionner le moteur en appuyant sur la touche +
- en vitesse lente (v1) pour mélanger des aliments
liquides (ex: réalisation de sauces)
- en vitesse rapide (à partir v2) pour mixer
- Une fois votre cuisson terminée, appuyez sur la
gachette (d2) puis soulevez le bol blender
Page 11

9
MODE GLACE PILEE :
• Mettre de 6 à 8 glaçons maximum dans le bol et
fermez le couvercle
• Appuyez sur la touche MENU jusqu’au pictogramme
MODE GLACE PILEE .
CONSEILS PRATIQUES
• Attention à avoir un niveau de liquide suffisant pour
recouvrir le repère mini (Cf. Fig. 7). et à ne pas dépasser
le repère MAX gravé à l’intérieur du bol (Cf. Fig. 8).
• Certaines recettes peuvent provoquer des
débordements intempestifs, en raison de
l’apparition de bulles, en particulier lors de
l’utilisation de légumes congelés. Dans ce cas, il vous
appartient de réduire les volumes en conséquence.
• L’information temps ou température clignote : vous
avez la possibilité de modifier cette information. Ajustez
si besoin le temps à l’aide des touches + (augmenter) et
– (diminuer) (b5), en fonction des ingrédients utilisés et
du volume préparé (voir tableau des temps de cuisson
des soupes dans le livret recettes).
• Le panier de cuisson (selon modèle*) vous permet de
réaliser des cuissons vapeur (avec 0.5 litre d’eau),
ou pour une préparation avec morceaux, de cuire
des ingrédients entiers tels que viandes, poissons,
légumes, en même temps que votre soupe.
NETTOYAGE DE L’APPAREIL
• L’appareil ne doit pas être immergé. Ne passez pas le
bloc moteur (A) sous l’eau chaude courante.
• Nettoyez immédiatement votre bol après utilisation.
• Remplissez le bol avec 1 litre d’eau chaude
additionné de 2, 3 gouttes de produit vaisselle.
Respectez les quantités d’eau et de liquide
vaisselle préconisés. Un surplus de liquide
vaisselle augmente fortement le moussage et par
conséquent favorise les débordements.
• Utilisez le programme automatique Autoclean : pour
réaliser un prélavage du bol.
• Une fois le programme terminé, débranchez l’appareil.
• Appuyez sur la gâchette (d2) puis soulevez le bol
blender (D).
• Placez le bol sur une surface plane.
• Déverrouillez le couvercle en le tournant d’un quart
de tour dans le sens des aiguilles d’une montre.
Retirez le couvercle avec précaution.
• Lorsque le couvercle est refroidi, retirez le joint
d’étanchéité. Pour cela, attrapez-le entre le pouce et
l’index, puis tirez pour l’extraire. Le joint se démonte
sans risque de détérioration (Cf. fig.12).
• Finissez le nettoyage du bol à l’aide d’une éponge.
• Rincez l’intérieur du bol sous l’eau courante ainsi que
• En cas d’encrassement prononcé de la partie
• Pour nettoyer le bloc moteur (A), utilisez un chiffon
• Les éléments amovibles (couvercle, joint, bouchon,
• Afin de préserver l’aspect et la longévité du couvercle
• Le couteau démontable ne passe pas au lave-vaisselle,
• Par défaut le temps de mixage est réglé à 30s.
Si vous souhaitez ajuster ce temps, appuyez sur
TIMER et réglez à l’aide des touches +/-
• Appuyez sur START/STOP pour démarrer le mixage
• Une fois votre préparation mixée, appuyez sur la
gachette (d2) puis soulevez le bol blender
• A la fin des programmes automatiques, l’appareil
passe automa tiquement en maintien au chaud
pendant 40minutes pour conserver la préparation
prête à être consommée. Pour stopper le maintien au
chaud, il suffit d’appuyer sur la touche START/STOP.
Si vous ouvrez le couvercle, appuyez sur la gâchette
ou retirez le bol, le maintien au chaud sera
automatiquement arrêté.
• Lorsque le programme est lancé, vous avez la
possibilité d’arrêter l’appareil à tout moment en
appuyant sur la touche START/STOP (émission de
2 bips sonores). Le programme est alors en mode
pause, vous avez la possibilité de le relancer en
appuyant de nouveau sur START/STOP (émission
d’un bip sonore).
Si vous vous êtes trompé de programme et si vous
voulez annuler, appuyez pendant 2 secondes sur le
bouton START/STOP, cela permet de réinitialiser les
temps et les températures.
• Lorsque vous transportez l’appareil portez-le par son
bloc moteur A.
son couvercle.
chauffante du bol, laissez tremper pendant
plusieurs heures avec de l’eau additionnée de
liquide vaisselle pour faciliter le nettoyage.
• Prenez des précautions avec les lames
(d3) du bol blender lorsque vous les
nettoyez et lorsque vous videz le bol,
elles sont coupantes.
humide. Séchez-le soigneusement.
panier de cuisson) se nettoient à l’aide d’une
éponge et d’eau chaude savonneuse.
de votre appareil, lavez-le à la main. N’utilisez pas
le côté abrasif de l’éponge afin d’éviter les rayures.
lavez-le sous le robinet à l’aide d’une brosse.
7
Page 12

SI VOTRE APPAREIL NE FONCTIONNE PAS, QUE FAIRE ?
PROBLÈMES
La prise n’est pas branchée
L’appareil ne fonctionne pas
Vibrations excessives
Fuite par le couvercle
Les lames ne tournent
pas facilement
Affichage “StoP”
Affichage “SECU” + témoin
lumineux rouge clignote
Affichage « Err4 »
+ témoin lumineux rouge clignote
Affichage « ntc »
+ témoin lumineux rouge
L’écran tactile ne fonctionne pas
Votre appareil ne fonctionne toujours pas ?
Adressez-vous à un centre service agréé (voir la liste dans le livret service).
clignote
Le bol ou le couvercle ne sont pas
correctement positionnés
ou verrouillés
L’appareil n’est pas posé sur une
surface plane, l’appareil n’est pas stable
Volume d’ingrédients
trop important
Volume d’ingrédients
trop important
Le couvercle n’est pas bien
positionné ou verrouillé
Le joint d’étanchéité
n’est pas présent
Le joint d’étanchéité est coupé,
détérioré
Morceaux d’aliments
trop gros ou trop durs
Surcharge moteur provoquée par une
quantité d’ingrédients trop importante
ou des morceaux trop durs ou trop gros.
Bol vide, presque vide ou préparation
pas assez liquide
La résistance chauffante
ne fonctionne pas
Le
ne fonctionne plus
L’écran est peut-être humide
CAUSES
capteur de température
SOLUTIONS
Branchez l’appareil sur une prise.
Vérifiez que le bol ou le couvercle sont
bien positionnés et verrouillés suivant
les schémas de la notice
Placez l’appareil sur une surface plane
Réduisez la quantité d’ingrédients
traités.
Réduisez la quantité d’ingrédients
traités
Verrouillez correctement
le couvercle sur le bol
Positionnez le joint d’étanchéité sur
le couvercle.
Changez le joint, contactez
un centre service agréé
Réduisez la taille ou la quantité
d’ingrédients traités. Ajoutez du liquide.
Laissez refroidir l’appareil 30 min,
et réduisez la quantité d’ingrédients
à traiter
Ajoutez du liquide jusqu’au niveau
minimum du bol
Contactez un centre agréé
Contactez un centre agréé
Laisser reposer l’appareil 15 minutes
(Cf. Fig. 7)
RECYCLAGE
• Elimination des matériaux d’emballage et de l’appareil
L’emballage comprend exclusivement des matériaux sans danger pour l’environnement, pouvant
être jetés conformément aux dispositions de recyclage en vigueur.
Pour la mise au rebut de l’appareil, se renseigner auprès du service approprié de votre commune.
• Produits électroniques ou produits électriques en fin de vie :
Participons à la protection de l’environnement !
Votre appareil contient de nombreux matériaux valorisables ou recyclables.
Confiez celui-ci dans un point de collecte pour que son traitement soit effectué.
.
899
Page 13

By reading this guide, you will find some user instructions that will help you discover the full potential
START START
of your appliance: make creamy or thick soups, chunky soups, sauces and fruit purées, smoothies,
cocktails and steam based recipes and much more.
APPLIANCE DESCRIPTION
A Motor unit
B Control panel
b1 MENU button
b2 AUTOCLEAN button
b3 START/STOP/RESET button
b4 Operating time selector (timer)
b5 Speed/Temperature/Time +/- selector
C Display screen
c1 FINE BLENDING
c2 COARSE BLENDING
c3 STEAM* (depending on model)
c4 Autoclean display
c5 Safety indicator display
c6 Time display
c7 Speed or temperature
c8 BLENDER MODE:
c9 COOKING MODE:
c10 CRUSHED ICE
c11 Heating indicator
SAFETY INSTRUCTIONS
D Blender jug unit
d1 Stainless steel jar
d2 Handle with trigger
d3 Removable blade assembly
d4 Seal
d5 Locking ring
E Lid unit
e1 Measuring cap
e2 Lid
e3 Waterproof seal
F Cooking basket (depending on model*)
f1 Handle
f2 Basket
Technical data on appliance:
Maximum temperature: 100°C
Power: 1100W
Maximum programming time: 59 minutes.
EN
Personal safety
• Read the instruction
manual carefully before
you use your appliance
for the first time and
retain them for future use:
improper use will release
the manufacturer from any
liability.
• Do not allow children to use
the appliance unsupervised.
• WARNING: When using the
appliance, some parts become
very hot and give off a residual
heat after use: the stainless
steel wall of the bowl, parts of
the lid and cap that cannot be
gripped, metal parts under the
bowl, basket (depending on
the model). This can lead to
burns. Handle the appliance by
the cold plastic parts: handles,
motor block, grip areas of the
lid or cap, during heating and
until the appliance has cooled
completely. The red heating
indicator light warns of a risk
of burns.
Page 14

• Do not use your appliance if
it is not working correctly, if
it has been damaged or if the
power cord or plug have been
damaged. To avoid any danger
have the cord replaced by an
approved service centre (see
list in the service booklet).
• Your appliance has been
designed for domestic use only
and at an altitude lower than
2000 m. The manufacturer
shall not accept any liability
and reserves the right to cancel
the guarantee in the event of
commercial or unsuitable use,
or if the instructions have not
been followed.
• WARNING: Your
appliance releases steam
that could cause burns.
Handle the lid and measuring
with care (if necessary, use a
glove, hotpad, etc.). Handle the
measuring by its central part.
• Be careful if pouring hot liquid
into the food processor or
mixer, as it could be ejected
from the appliance due to a
sudden steaming.
• Do not operate the appliance if
the measuring is not correctly
positioned in the hole in the
lid and/or if the seal is not
correctly positioned on the lid.
• WARNING: Injuries may
occur if the appliance is used
incorrectly.
• The blades are very
sharp: handle them with
care so as not to injure
yourself when emptying
the bowl, as well as
cleaning, assembling and
disassembling the blade
assembly.
• WARNING: Take care when
handling your appliance
(cleaning, filling and pouring):
avoid any overflow of liquids
onto the display screen and
the connectors.
• Refer to the instruction
manual to set the speeds
and operating times for each
program.
• Refer to the instruction manual
for details on assembling and
fitting the accessories to the
appliance.
• Refer to the instruction manual
for details on cleaning and
maintaining your appliance.
• Always follow the cleaning
instructions to clean your
appliance:
- Disconnect the appliance.
10
10
Page 15

- Do not clean the appliance
when it is hot.
- Clean with a damp cloth or
sponge.
- Never put the appliance in
water or under running water.
• This appliance is not intended
to be used in the following
applications, and the
guarantee will not apply for:
- kitchen work areas in shops,
offices and other work
environments.
- kitchens used by employees
in shops, offices and other
working environments.
- farms.
- use by guests in hotels,
motels and other residential
environments.
- other bed and breakfast-type
accommodation.
Electrical connection
• The appliance must be
connected to an earthed
electrical socket.
• The appliance is designed to
operate on alternating current
only. Check that your mains
voltage matches the voltage
indicated on the appliance’s
identification plate.
• Given the diverse standards in
effect, if the appliance is used
11
11
in a country other than that
in which it is purchased, have
it checked by an Approved
Service Centre.
• Always disconnect the
appliance from the mains if
leaving unattended and before
assembling, disassembling
and cleaning.
• Any error in connection will
invalidate the guarantee.
• Never pull out the power cable
to disconnect the appliance.
• Never submerge the appliance,
power cable or plug in liquid.
• The appliance must not be
immersed in water or any
other liquid..
• The power cord must be kept
out of the reach of children
and must not be placed near
or come into contact with the
hot parts of the appliance,
sources of heat or sharp edges.
Incorrect use
• Never use the blender bowl
without ingredients or with
only dry products.
• Always add solid ingredients
into the bowl before adding
liquid ingredients, without
exceeding the MAX mark
engraved or marked on the
bowl (depending on the
model). If the blender is too
full, boiling water may be
ejected. Ensure that the liquid
level is sufficient to cover the
minimum mark (Fig.7).
Page 16

• Some recipes can cause
• This appliance is not intended
unwanted overflows, due to
the appearance of bubbles,
especially when using frozen
vegetables. In this case, it is up
to you to reduce the volumes
accordingly.
• Never place your fingers or
other objects in the blender
bowl while the appliance is
operating.
• Do not use the bowl as
a container (freezing,
• Children must be supervised to
sterilisation).
• Set the appliance on a stable,
heat-resistant, clean and dry
work surface.
• Do not place the unit
EUROPEAN MARKETS ONLY:
• When heating only: This
near a wall or cupboard:
the steam produced may
damage the components.
• Do not allow your hair, scarf,
tie, etc. to hang over the bowl
during operation.
• Never put the accessories into
a microwave oven.
• Never use the appliance
outdoors.
• Never exceed the maximum
quantity indicated in the
instructions.
• Store the appliance when it
has cooled down. Do not get
• When using the
water on the control screen.
• Do not operate the appliance
with wet hands.
NON-EUROPEAN MARKETS
ONLY
When heating only: Keep the
12
12
to be used by those (including
children) with reduced
physical, sensory or mental
abilities, or those lacking
experience or knowledge,
unless they have been given
prior instruction on how to
safely use the appliance or
are under the supervision of
a person responsible for their
safety.
ensure that they do not play
with the appliance.
appliance can be used by
children aged 8 years or over,
on the condition that they
are supervised or that they
have received instructions
on how to use the appliance
in total safety and that they
fully understand the dangers
related to the appliance.
Cleaning and maintenance of
the appliance should not be
performed by children without
supervision, unless they are 8
years of age or older and under
the supervision of an adult.
mixer or blender: This
appliance must not
be used by children.
Keep the appliance and its
cable out of reach of children.
Page 17

START START
appliance and its cord out of
the reach of children less than 8
years old.
• Children must not use the
appliance as a toy.
• This appliance can be used
by persons with reduced
physical, sensory or mental
abilities or lacking experience
or knowledge on the condition
that they have been given
supervision or instructions
for using the appliance in a
BEFORE FIRST USE
Your appliance has 2 operating modes
• Automatic mode: temperature, cooking time and
mixing are pre-programmed. The cooking time may
be adjusted.
- : fine blending
- : coarse blending
- *: steam cooking with steam basket accessory
• Manual mode: adjust the settings to your liking
- : tasty smoothies and cocktails. Customised setting
of mixing speed and duration
- : cooking. Customised setting of temperature and
cooking time. Option to activate the speed during
cooking
- : crushed ice. Setting the pulse time
Positioning of the jug and the lid unit
• Before using for the first time, wash all the
accessories (D, E and F) in hot soapy water except
for the motor unit (A).
• Make sure that all packaging is removed before
operating the appliance.
• Place the seal on the lid (Cf. Fig. 1).
• To steam cook, put the basket with the sliced
vegetables in position and fill up the jug with 0.5
litres of cold water without exceeding the bottom
of the basket
• Position the lid (E) on the jar (D) (Cf. Fig. 2), lock the
lid without pressing by turning it in the direction of
the arrow (Cf. Fig. 3).
• Position the blender jar (D) on the motor unit (A)
until you hear it click (Cf. Fig. 4).
• The appliance only starts up once the jug and
(Cf. Fig.13 a; b; c).
safe way and understand the
dangers involved.
AFTER-SALES
• For your safety, do not use
accessories or spare parts,
other than those provided by
authorised service centres.
• Any operation other
than cleaning or routine
maintenance should be
performed by an approved
service centre.
lid are correctly in place and are locked onto the
motor unit.
In the event of incorrect positioning or locking of one
or the other (Cf. Fig. 5 and 6), the lock sign
to flash when you activate a function.
Installing the blade assembly in the jar (*depending
on the model)
• Fitting the removable blade assembly (*depending
on the model
1. Make sure that the seal is properly positioned over
the blade assembly
2. Pick up the blade assembly using a cloth and place
it in its slot at the bottom of the jar, making sure
you carefully position the blade assembly grips in
the jar grooves
3. Return the jar keeping the blade assembly in its slot
(Cf. 11.c)
4. Lock the blade assembly section using the locking
ring
• Dismounting the removable blade assembly
(*depending on the model
Place the jar on a work surface.
1. Use a cloth to help hold the blade assembly.
2. Return the jar while holding the blade assembly.
3. Turn the locking ring to unlock the blade assembly.
Warning: the blades are very sharp: handle them
with care so as not to injure yourself whilst fitting,
dismounting and cleaning the jar and the blade
assembly.
13
13
.
(Cf. 11.c)
Cf. Fig. 11 a; b; c):
(Cf. 11.a)
.
(Cf. 11.b)
.
.
Cf. Fig. 11.d)
starts
:
Page 18

USING THE APPLIANCE
PROGRAM MODE
Once the water and ingredients are in the bottom of the bowl or in the steam basket, lock the lid and place the bowl on
the motor unit (see Getting Started), then select the desired automatic program.
You can modify your settings by pressing on the timer . Next, adjust the time using the + and - (b5). To start the
automatic program, press START/STOP (b3)
Introducing the suggested automatic programs
Temperature (Max) Adjustable times Mixing
Creamy soup (thin texture) 100°C
Chunky Soup (texture dense) 100°C
Steam cooking with cooking basket
and 50 cl water *
When the program is finished, the appliance gives out 3 beeps.
Unlock the jug by pressing the trigger (d2) located on the inside of the handle (cf. Fig. 9) and serve immediately or leave
the jug in place to keep warm (up to 40 minutes).
100°C
30 min. (+ or -10 min)
40 min. (+ or -10 min)
30 min. (+ or -20 min)
Manual Mode
Introducing the suggested automatic programs
Temperature (Max) Adjustable times Mixing
Blender Mode
Cooking Mode
Crushed Ice 5 - 30sec. Pulse
BLENDER MODE (without cooking)
• Press MENU until you reach the BLENDER MODE
icon then select the mixing speed with the +/buttons.
• If you want to program the mixing time, press on
TIMER
• Press on START/STOP for starting up the mixing.
• Once your preparation is mixed, press the release
and set the time using the buttons +/-.
button (d2) and remove the blender bowl.
COOKING MODE
•
Press the MENU button until you reach the COOKING
MODE icon
and – buttons.
•
If you want to program the cooking time, press TIMER ,
and set the time using the +/- buttons.
•
Press START/STOP to start cooking. The red indicator
light comes on to let you know that cooking has started.
then select the temperature with the +
60°C - 100°C
•
At any time during the program, you can operate the
motor by pressing the + key.
- at slow speed (v1) to mix liquid foods (e.g. making
sauces)
- at high speed (from v2) for mixing
- When you have finished cooking, press the release
button (d2) then remove the blender bowl
CRUSHED ICE MODE:
•
Put 6 to 8 ice cubes in the bowl and close the lid.
•
Put Press the MENU key until you reach the CRUSED
ICE icon .
• The default mixing time is set to 30s. If you want
to adjust this time, press TIMER and adjust it using
the +/- buttons
• Press START/STOP to start mixing
- Once your preparation is mixed, press the release
button (d2) then remove the blender bowl
14
14
0 - 3 min.
0 - 59 min.
Max speed
1 min
Min speed
13 secs
V1 - V5
V1 - V5
Page 19

PRACTICAL GUIDANCE
9
• Make sure you have enough liquid to cover the Min
limit marker (Cf. Fig. 7). and take care not to exceed
the MAX limit marker engraved inside the jug (Cf.
Fig. 8).
• Some recipes may cause sudden overflowing, due
to the formation of bubbles, particularly when using
frozen vegetables. In this case, it is up to you to
reduce the quantities accordingly.
• Time and temperature information is flashing:
you can modify this information. Adjust the time
as required with the aid of the + (increase) and (decrease) buttons, depending on the ingredients
used and the amount to be made (see table of the
cooking times for soups in the recipe booklet).
• With the cooking basket (depending on model*)
you can steam cook (use P3 with 0.5 litres of water),
or for chunky soup recipes and cooking whole
ingredients such as meat, fish, vegetables at the
same time as your soup (use P1 or P2).
CLEANING THE APPLIANCE
• At the end of the programs, the appliance
automatically keeps the recipe warm for 40 minutes
so it remains ready to be consumed. To stop
warming, simply press the OFF button.
• If you open the lid, press the trigger or remove the
jug, the warming process will automatically stop.
• When the program has started, you can stop the
appliance at any time by pressing the P button (2
beeps will sound). The program is then in pause
mode and you can restart it by pressing the P button
again or by pressing the OK button (a beep signal
will be emitted).
• If you choose the wrong program by mistake and
you wish to cancel it, press the OFF button for 2
seconds and that will allow you to restart the times
and the temperatures.
• Do not immerse the appliance in water. Never put
the motor unit (A) under hot running water.
• Clean the jug immediately after use.
• Fill up the jug with 1 litre of hot water along with
2 or 3 drops of washing up liquid Only use the
recommended amount of water and washing up
liquid. An excess of washing up liquid creates more
foam and consequently can lead to overflowing.
• Use the Autoclean automatic program: to prewash the bowl.
• Once the program has stopped, unplug the
appliance.
• Press on the trigger (d2) then remove the blender
jug (D).
• Place the jug on a flat surface.
• Unlock the lid by turning it a quarter turn clockwise.
Remove the lid with care.
• When the lid is cool, remove the carrier seal. To do
so, grip it between your thumb and index finger, then
pull to extract it. The seal dismounts without risk of
deterioration (Cf. Fig. 12).
• Finish cleaning the jug with the aid of a sponge.
• Rinse the inside of the jug and the lid under running
water.
• In the event of the heated part of the jug getting
extremely dirty, leave to soak for a few hours in a mix
of water and washing up liquid to help get it clean.
• Take care when cleaning the blades
(d3) in the blender jug and when you
empty the bowl as they are sharp.
• Use a damp cloth to clean the motor unit (A). Dry
it carefully.
• The detachable parts (lid, seal, measuring cap,
cooking basket) can be cleaned with a sponge and
hot soapy water.
• To preserve the appearance and service life of the
lid of your appliance, hand wash it. Do not use the
abrasive side of the sponge to avoid scratches.
• The removable blade is not dishwasher safe — wash
it under running water using a brush.
15
15
Page 20

WHAT TO DO IF YOUR APPLIANCE DOES NOT WORK
PROBLEMS
The appliance does not work.
Excessive vibrations.
Leak through lid.
The blades do not rotate easily
Display “STOP”
Displays “SECU” + red indicator
light is flashing
Displays “Err”
+ red indicator light is flashing
Displays « ntc »
+ red indicator light is flashing
The touchscreen is not working
It is not plugged in.
The jug and the lid are not in the
correct place or are not locked
correctly.
The appliance is not placed on a flat
surface, the appliance is not stable
Volume of ingredients is too high.
Volume of ingredients is too high.
The lid is not positioned or locked
correctly
The waterproof seal is not present
The waterproof seal has been cut
through or damaged
Pieces of food too big or too hard
Motor overload caused by too large
an amount of ingredients or pieces of
food that are too hard or too large
Empty jug, nearly empty or
not enough liquid in recipe
The heating element does not work
The temperature sensor is no longer
working
The screen may be damp
CAUSES
Plug your appliance into the mains
power supply.
Check that the jug and the lid are
correctly positioned and locked following
the diagrams in the instructions
Place the appliance on a flat stable
surface.
Reduce the quantity of ingredients
processed.
Reduce the quantity of ingredients
processed.
Lock the lid firmly onto the jug
Position the carrier seal on the lid.
Change the seal or contact an
approved service centre
Reduce the size or quantity of the
ingredients processed.
Add some liquid
Let the motor cool down and reduce
the amount of ingredients in the jug.
Add liquid up to the jug’s minimum
level marker
Contact the Customer Relations
Helpline - see contact list
Contact the Customer Relations
Helpline - see contact list
Let the appliance rest for 15 minutes
SOLUTIONS
(Cf. Fig. 7)
Your appliance still doesn’t work?
Contact the Customer Relations Helpline - see contact list.
RECYCLING
• Disposal of packaging materials and the appliance.
The packaging is made of exclusively environmentally safe materials that can be disposed of
according to current recycling regulations.
To dispose of your appliance, consult the appropriate department of your local authority.
• Expired electronic or electrical products:
Think of the environment!
Your appliance contains valuable materials which can be recovered or recycled.
Please take it to a local waste collection point where it will be disposed
16
16
Page 21

START START
In deze handleiding vindt u enkele gebruikstips om optimaal van de mogelijkheden van uw apparaat
gebruik te maken: veloutésoepen of gepureerde soepen, soepen met stukjes, sauzen en compotes,
smoothies, cocktails, stoomrecepten ...
BESCHRIJVING VAN HET APPARAAT
A Motorblok
B Bedieningspaneel
b1 MENU knop
b2 AUTOCLEAN knop
b3 START / STOP / RESET knop
b4 Timerregelaar
b5 Snelheid / Temperatuur / Tijd +/- regelaar
C Beeldscherm
c1 : GLADDE SOEP
c2 : GEPUREERDE SOEP
c3 : STOMEN * (afhankelijk van het model)
c4 : Autoclean-indicator
c5 :
Veiligheidsindicator
c6 : Tijdsweergave
c7 : Snelheids- of temperatuurweergave
c8 : BLENDERMODUS
c9 : KOOKMODUS
c10 : IJSGRUIS
c11 : Verwarmingscontrolelampje
VEILIGHEIDSVOORSCHRIFTEN
D Blenderkom met toebehoren
d1 Roestvrijstalen kom
d2 Pal handgreep
d3 Demonteerbaar mes
d4 Ring
d5 Vergrendelingsring
E Deksel met toebehoren
e1 Doseerdop
e2 Deksel
e3 Afdichtingsring
F Kookmandje (afhankelijk van het model*)
f1 Handgreep
f2 Mand
Technische gegevens van het apparaat
Maximum temperatuur: 100°C
Vermogen: 1100W
Maximum programmeertijd: 59 minuten.
NL
Inzake de veiligheid van
personen
• Lees deze gebruiksaanwijzing
aandachtig door voordat u
uw apparaat voor de eerste
gebruikt en bewaar het voor
latere raadpleging. De fabrikant
is niet aansprakelijk voor schade
of letsel door verkeerd gebruik.
• Kinderen mogen het apparaat
niet gebruiken wanneer er geen
toezicht is.
• WAARSCHUWING: Tijdens
het gebruik van het apparaat
kunnen er bepaalde delen een
hoge temperatuur bereiken
en een restwarmte na gebruik
behouden: roestvrijstalen wand
van kom, niet vast te nemen
delen van het deksel en de dop,
metalen delen onder de kom,
mand (naargelang het model).
Deze kunnen brandwonden
veroorzaken. Neem het apparaat
vast bij de koude kunststof
delen, handvatten, motorblok,
vasthoudzones van het deksel
of de dop, tijdens het opwarmen
en tot volledig afgekoeld. Het
rode controlelampje brandt om
17
17
Page 22

aan te geven dat er risico op
brandwonden is.
• Als het snoer beschadigd is, moet
het vervangen worden door de
fabrikant, zijn servicecentrum of
een gelijkwaardig vakbekwaam
persoon om elk gevaar te
vermijden (raadpleeg de lijst
met erkende servicecentra in het
serviceboekje).
• Uw apparaat is alleen ontworpen
voor een huishoudelijk gebruik
en op een hoogte lager dan
2000 m. De fabrikant aanvaardt
geen enkele aansprakelijkheid
en behoudt zich het recht voor
om de garantie te beëindigen
in geval van een commercieel
of ongepast gebruik of het
negeren van de voorschriften.
• WAARSCHUWING: Uw
apparaat geeft stoom af
dat brandwonden kan
veroorzaken.
Wees voorzichtig wanneer u
het deksel en de dop vastneemt
(indien nodig, gebruik een
ovenwant, pannenlap, etc.). Houd
de dop alleen via het middelste
deel vast.
• Wees voorzichtig wanneer
u een warme vloeistof in de
keukenmachine of blender
giet, om het opspatten van
de vloeistof uit het apparaat
door het plotseling koken te
vermijden.
• Schakel het apparaat niet in als
de dop niet in de opening van
het deksel is geplaatst en/of
de pakking niet in het deksel is
aangebracht.
• WAARSCHUWING: Er is risico
op letsel wanneer het apparaat
op een verkeerde manier wordt
gebruikt.
• De messen zijn zeer scherp:
wees voorzichtig wanneer
u de kom leegmaakt
en tijdens de reiniging,
montage en demontage
van het mes om letsel te
vermijden.
• WAARSCHUWING: Wees
voorzichtig wanneer u uw
apparaat aanraakt (reinigen,
vullen of legen): vermijd dat er
vloeistof op het beeldscherm of
de aansluitingen stroomt.
• Raadpleeg de
gebruiksaanwijzing voor
de snelheidsstand en de
werkingstijd van elk programma.
• Raadpleeg de
gebruiksaanwijzing voor het in
elkaar zetten en monteren van
de accessoires op het apparaat.
• Raadpleeg de
gebruiksaanwijzing voor het
reinigen en onderhouden van
het apparaat.
• Volg altijd de
reinigingsinstructies voor het
reinigen van uw apparaat:
- Haal de stekker uit het
stopcontact.
- Reinig het apparaat niet als het
18
18
Page 23

nog warm is.
- Maak het apparaat schoon met
een vochtige doek of spons.
- Dompel het apparaat nooit in
water en reinig het nooit onder
de kraan.
• Dit apparaat is bestemd
voor huishoudelijk gebruik en
gelijksoortige toepassingen,
uitgezonderd:
- kantines in winkels, kantoren en
andere werkruimten.
- kantines voor personeel in
winkels, kantoren en andere
werkruimten.
-boerderijen.
- gebruik door gasten in hotels,
motels en andere residentiële
omgevingen.
bed & breakfasts.
Inzake de elektrische
aansluiting
• Sluit het apparaat alleen aan op
een geaard stopcontact.
• Het apparaat is alleen
ontworpen om te werken
op wisselstroom. Controleer
of de spanning dat op het
typeplaatje van het apparaat is
vermeld overeenstemt met de
netspanning van uw woning.
• Haal altijd de stekker uit het
stopcontact als u het apparaat
zonder toezicht achterlaat en
voordat u het apparaat in elkaar
zet, uit elkaar haalt of reinigt.
• Een verkeerde aansluiting
maakt de garantie ongeldig.
19
19
• Haal de stekker nooit uit het
stopcontact door aan het snoer
te trekken.
• Plaats het apparaat, het snoer of
de stekker niet in een vloeistof.
• Dompel het apparaat nooit
onder.
• Leg het snoer nooit binnen het
bereik van kinderhanden en laat
het geen contact maken met de
warme delen van uw apparaat.
Leg het tevens niet nabij een
warmtebron of een scherpe
rand.
Inzake een verkeerde werking
• Gebruik uw apparaat niet als het
niet juist werkt of beschadigd is.
Laat het apparaat repareren
door een erkend servicecentrum
(zie de lijst in het serviceboekje).
• Gebruik de blenderkom niet
zonder ingrediënten of met
alleen droge producten.
Doe altijd eerst de vaste
ingrediënten in de kom voordat u
vloeibare ingrediënten toevoegt
en zorg dat de MAX markering
die op de kom is gegraveerd of
vermeld (naargelang het model)
niet wordt overschreden. Het
kokend water kan uit de kom
spatten als de blender te veel is
gevuld. Zorg dat de kom minstens
tot aan de minimum markering
met vloeistof wordt gevuld (Afb.8)
• Bepaalde recepten kunnen
omwille van bellenvorming
tot overstroming van de
ingrediënten leiden, in het
Page 24

bijzonder wanneer bevroren
groente wordt gebruikt. Als
dit zich voordoet, doe minder
ingrediënten in de kom.
• Stop nooit uw vingers of
een ander voorwerp in de
blenderkom tijdens de werking
van het apparaat.
• Gebruik de kom niet als houder
(om levensmiddelen in te
• Houd kinderen nauwlettend in
vriezen of te steriliseren).
• Plaats het apparaat op een
stabiel, warmtebestendig,
ALLEEN VOOR EUROPESE
schoon en droog oppervlak.
• Plaats het apparaat niet in de
nabijheid van een muur of kast:
• Alleen voor de opwarmfunctie:
de vrijgekomen stoom kan
schade aanrichten.
• Laat geen haar, sjaal of das, etc.
boven de kom hangen wanneer
het apparaat in werking is.
• Plaats het toebehoren nooit in
een magnetronoven.
• Gebruik het apparaat niet in de
open lucht.
• Overschrijd nooit de
maximum hoeveelheid die
in de gebruiksaanwijzing is
aangegeven.
• In alle mix- of blendermodi:
• Berg het apparaat op eenmaal
het is afgekoeld. Mors geen
water op het beeldscherm.
• Gebruik het apparaat niet met
natte vingers.
ALLEEN VOOR MARKTEN
BUITEN EUROPA:
• Dit apparaat kan niet worden
Alleen voor de opwarmfunctie:
Houd het apparaat en het snoer
altijd uit de buurt van kinderen
jonger dan 8 jaar.
• Kinderen mogen het apparaat
gebruikt door personen
(waaronder kinderen) met
20
20
beperkte fysische, visuele of
mentale mogelijkheden, of die
een gebrek hebben aan ervaring
en kennis, tenzij ze onder toezicht
staan of instructies hebben
gekregen over de werking van
het apparaat door een persoon
die verantwoordelijk is voor hun
veiligheid.
het oog opdat ze niet met het
apparaat spelen.
MARKTEN:
Dit apparaat kan worden
gebruikt door kinderen jonger
dan 8 jaar, als ze onder toezicht
staan of instructies hebben
gekregen over het veilig
gebruik van het apparaat en de
gevaren die het gebruik van het
apparaat met zich meebrengt
begrijpen. Kinderen jonger dan
8 jaar en zonder toezicht van
een volwassene mogen het
apparaat niet schoonmaken of
onderhouden.
Kinderen mogen dit
apparaat niet gebruiken.
Houd het apparaat en snoer uit
de buurt van kinderen.
niet als speelgoed gebruiken.
Page 25

START START
• Dit apparaat kan worden
gebruikt door personen met
beperkte fysische, visuele of
mentale mogelijkheden, of
die een gebrek hebben aan
ervaring en kennis, als ze onder
toezicht staan of instructies
hebben gekregen over het veilig
gebruik van het apparaat en de
gevaren die het gebruik van het
apparaat met zich meebrengt
begrijpen.
Ingebruikname
Uw apparaat is voorzien van 2 werkingsmodi
• Automatische modus: de temperatuur, de kooktijd en
het mixen zijn reeds geprogrammeerd. De kooktijd kan
worden aangepast.
- : gladde soep (fijne textuur)
- : gepureerde soep (compacte textuur)
- *: stoomkoken met de stoommand
• Handmatige modus: de instellingen kunnen naar wens
worden aangepast
- : lekkere smoothies en cocktails. Persoonlijke
instelling van de snelheid en de mixtijd
- : koken. Persoonlijke instelling van de temperatuur
en de kooktijd. De snelheid kan tijdens het
kookproces worden geactiveerd.
- : IJsgruis. Instelling van de pulstijd
Montage van de kom en het deksel met toebehoren
• Maak alle accessoires (D, E en F) , uitgezonderd het
motorblok (A). met warm zeepwater schoon voor
het eerste gebruik.
• Vóór het eerste gebruik controleert u of al het
verpakkingsmateriaal is verwijderd.
• Plaats de ring op het deksel (Cf. Fig. 1).
• Om stoomgerechten te bereiden plaatst u het
mandje met de in stukjes gesneden groenten en vult
u de kom met 0,5 liter koud water (Cf. Fig.13 a; b; c).
• Zet het deksel (E) op de kom (D) (Cf. Fig.2),
vergrendel het deksel zonder te duwen door te
draaien in de richting van de pijl (Cf. Fig.3).
• Zet de blenderkom (D) op het motorblok (A) totdat
je een “klik” hoort (Cf. Fig. 4).
• Het apparaat werkt alleen als de kom en het
deksel correct zijn geplaatst en zijn vergrendeld
op het motorblok.
SERVICECENTRUM
• Voor uw veiligheid, gebruik
alleen accessoires of
reserveonderdelen die door een
erkend servicecentrum worden
geleverd.
• Elke tussenkomst, uitgezonderd
reiniging en regelmatig
onderhoud van het apparaat,
moet door een erkend
servicecentrum worden
uitgevoerd.
Wanneer een van beide onderdelen niet correct
is geplaatst of vergrendeld (Cf. Fig. 5 en 6), begint
het logo
activeren.
Het mes op de kom zetten (*afhankelijk van model)
• Montage van het demonteerbare mes (*afhankelijk
1. Controleer of de ring goed op het mesgedeelte zit
2. Neem het mes vast met een doek en zet het in zijn
3. Draai de kom om en houd intussen het mes in zijn
4. Vergrendel het mesgedeelte met de
• Demontage van het demonteerbare mes
Zet de kom op een werkblad.
1. Houd het mes vast met een doek.
2. Draai de kom om en houd intussen het mes vast.
3. Draai de vergrendelingsring om het mes te
Waarschuwing: de messen zijn heel scherp: neem
ze voorzichtig vast zodat je je niet verwondt bij het
monteren, demonteren en reinigen van de kom het
mes.
21
21
te knipperen wanneer we een functie
van model Cf. Fig. 11 a; b; c):
(Cf. 11.a).
behuizing onderaan de kom. Zorg ervoor dat de
pennen van het mes in de inkepingen van de kom
passen (Cf. 11.b).
behuizing (Cf. 11.c).
vergrendelingsring (Cf. 11.c).
(*afhankelijk van model Cf. Fig. 11.d):
ontgrendelen.
Page 26

GEBRUIK VAN HET APPARAAT
PROGRAMMEERMODUS
Wanneer het water en de ingrediënten aan de kom of de stoommand zijn toegevoegd, zet het deksel vast en breng de
kom aan op het motorblok (zie ingebruikname) en selecteer dan het gewenste automatische programma.
U kunt de tijd aanpassen door op de timer
(verlagen) toets (b5). Om het automatisch programma te starten, druk op START/STOP (b3)
Veloutésoep (fijne textuur) 100°C
Gepureerde soep (dichte textuur) 100°C
Stoomkoken met de stoommand en
50 cl water *
Wanneer het programma stopt, klinken er 3 pieptonen.
Druk op de pal (d2) aan de binnenkant van de handgreep (cf. Fig. 9) om de kom te ontgrendelen en dien onmiddellijk
op of laat de kom staan en maak gebruik van de warmhoudfunctie (tot 40 minuten).
HANDMATIGE MODUS
Blendermodus
Kookmodus 60°C - 100°C
Ijsgruis 5 - 30s Pols
te drukken. Stel vervolgens de gewenste tijd in met de + (verhogen) en -
Ontdek de geadviseerde, automatische programma’s
Temperatuur (Max) Instelbare tijd Mixen
30 min. (+ of -10 min.)
40 min. (+ of -10 min.)
100°C
Introducing the suggested automatic programs
Temperatuur (Max) Instelbare tijd Mixen
30 min. (+ of -20 min)
0 - 59 min.
0 - 3 min.
Max. snelheid
1 min
Min. snelheid
13s
V1 - V5
V1 - V5
BLENDERMODUS (zonder koken)
• Druk op de MENU toets totdat het BLENDERMODUS
pictogram wordt verlicht en selecteer vervolgens
de mixsnelheid met de +/- toetsen.
• Als u een bepaalde mixtijd wilt programmeren, druk
op TIMER
• Druk op START/STOP om het mixproces te starten.
• Wanneer uw bereiding voldoende is gemixt, druk op
de pal (d2) en verwijder de blenderkom.
en stel de tijd in met de +/- toetsen.
KOOKMODUS
• Druk op de MENU toets totdat het KOOKMODUS
pictogram wordt verlicht en selecteer vervolgens de
temperatuur met de toetsen +/-.
•
Als u een bepaalde kooktijd wilt programmeren, druk
op TIMER en stel de tijd in met de +/- toetsen.
22
22
• Druk op START/STOP om het kookproces te starten.
Het rode controlelampje brandt om aan te geven
dat het kookproces is gestart.
•
U kunt op elk moment tijdens het programma de
motor inschakelen door op de + toets te drukken.
- op de lage snelheid (v1) om vloeistoffen te mengen
(bijv. het bereiden van sauzen)
- op de hoge snelheid (vanaf v2) om te mixen
- Wanneer uw kookproces voltooid is, druk op de pal
(d2) en verwijder de blenderkom.
IJSGRUIS
•
Doe maximaal 6 tot 8 ijsblokjes in de kom en sluit het
deksel.
•
Druk op de toets MENU totdat het IJSGRUISMODUS
pictogram wordt verlicht.
• De mixtijd is standaard op 30 seconden ingesteld.
Als u deze tijd wilt aanpassen, druk op TIMER en stel
Page 27

de gewenste tijd in met de +/- toetsen.
9
• Druk op START/STOP om het mixproces te starten.
- Wanneer uw bereiding voldoende is gemixt, druk op
de pal (d2) en verwijder de blenderkom.
HANDIGE TIPSS
• Zorg voor voldoende vloeistof. Vul het apparaat tot
boven de MIN-aanduiding (Cf. Fig. 7). Respecteer
de MAX-aanduiding aan de binnenkant van de kom
(Cf. Fig. 8).
• Tijdens bepaalde bereidingen worden luchtbelletjes
gevormd en kan de kom overlopen. Wees vooral
voorzichtig als u diepvriesgroenten gebruikt. Gebruik
kleinere hoeveelheden om overlopen te voorkomen.
• De informatie over tijd of temperatuur knippert:
u heeft de mogelijkheid om deze informatie
te wijzigen. Stel de tijd in met de knoppen +
(verlengen) en - (verkorten) afhankelijk van de
gebruikte ingrediënten en de bereide hoeveelheid
(zie tabel met de kooktijden van de soepen in het
receptenboekje).
• Met het stoommandje (afhankelijk van het model)
HET APPARAAT SCHOONMAKEN
kunt u stoomgerechten bereiden (op P3 met 0.5 liter
water), of hele ingrediënten zoals vlees, vis, groenten
koken als u soep met stukjes wilt maken (op P1 of
P2).
• Na afloop van de programma’s, schakelt
het apparaat automatisch over naar de
warmhoudmodus om de bereiding serveerklaar te
houden. Deze fase duurt 40 minuten. Druk op de
knop OFF om de warmhoudmodus uit te schakelen.
• Als u het deksel opent, op de pal drukt of de kom
verwijdert, wordt de warmhoudmodus automatisch
uitgeschakeld.
• Wanneer het programma is gestart, kunt u het op elk
moment onderbreken door op de knop P te drukken
(er klinken 2 pieptonen). Het programma schakelt
over naar de pauzemodus. Druk opnieuw op P of op
de knop OK om de bereiding voort te zetten (er klinkt
een pieptoon).
• Als u het verkeerde programma heeft gekozen en u
het programma wilt annuleren, houdt u de knop OFF
2 seconden ingedrukt. Daarna kunt u de tijd en de
temperatuur opnieuw instellen.
• Houd het apparaat nooit onder de kraan. Houd het
motorblok (A) niet onder stromend, warm water.
• Maak de kom onmiddellijk schoon na gebruik.
• Vul de kom met 1 liter warm water en voeg 2,
3 druppels afwasmiddel toe. Houd u aan de
vastgestelde hoeveelheden water en afwasmiddel.
Als u te veel afwasmiddel gebruikt, wordt er te veel
schuim gevormd en wordt de kans op overlopen
vergroot.
• Gebruik het automatisch Autocleanprogramma:
om de kom voor te wassen.
• Trek de stekker van het apparaat uit het stopcontact
na afloop van het programma.
• Druk op de pal (d2) en verwijder de blenderkom (D).
• Zet de kom op een vlak werkblad.
• Draai het deksel een kwartslag in tegen de klok
in om het te ontgrendelen. Verwijder het deksel
voorzichtig.
• Verwijder de afdichtingsring wanneer het deksel is
afgekoeld. Neem hiervoor de ring vast tussen duim
en wijsvinger en trek om hem te verwijderen. Je kunt
de ring verwijderen zonder gevaar voor beschadiging
(Cf. fig.12).
• Eindig het reinigen van de kom met een spons.
• Spoel de binnenkant van de kom en het deksel onder
stromend water.
• Als het verwarmingselement zeer vuil is, laat u het
onderdeel enkele uren in zeepwater weken om het
schoonmaken te vergemakkelijken.
• Wees voorzichtig wanneer u de messen
(d3) van de blenderkom schoonmaakt
en de kom leegt. De messen zijn zeer
scherp.
• Gebruik een vochtige doek om het motorblok (A),
schoon te maken. Droog het daarna zorgvuldig af.
• De verwijderbare elementen (deksel, rubber,
doseerdop, kookmand) kunnen met een spons en
warm zeepwater schoongemaakt worden.
• Om het deksel van uw apparaat lang te kunnen
gebruiken en in goede staat te houden, kunt u
het het beste met de hand afwassen. Om krassen
te vermijden, kunt u beter geen schuursponsje
gebruiken.
• Het afneembaar mes mag niet in de vaatwasser.
Maak het mes onder de kraan schoon en gebruik
een afwasborstel.
23
23
Page 28

UW APPARAAT WERKT NIET. WAT NU?
PROBLEMEN
Het apparaat werkt niet
Overmatige trillingen
Het deksel lekt
De messen draaien niet vrij rond
Weergave ‘STOP’
‘SECU’ verschijnt op het scherm
+ rood controlelampje knippert
Weergave « Err »
+ rood controlelampje knippert
Weergave « ntc »
+ rood controlelampje knippert
OORZAKEN
De stekker zit niet in het stopcontact.
De kom of het deksel zijn niet correct
geplaatst of vergrendeld.
Het apparaat staat niet op een vlakke
en stabiele ondergrond.
De hoeveelheid ingrediënten is te
groot.
De hoeveelheid ingrediënten is te
groot.
Het deksel is niet correct geplaatst of
vergrendeld.
De afdichtingsring is niet geplaatst.
De afdichtingsring is gebarsten of
versleten.
De stukjes zijn te groot of te hard.
De motor is overbelast door een te
grote hoeveelheid ingrediënten of te
harde of te grote stukjes.
De kom is leeg of bijna leeg of de
bereiding is niet vloeibaar genoeg
De verwarmingsweerstand werkt niet.
De temperatuursensor 1 werkt niet
meer.
OPLOSSINGEN
Steek de stekker van het apparaat in
het stopcontact.
Controleer of de kom en het
deksel correct zijn geplaatst en
vergrendeld volgens de schema’s in de
gebruiksaanwijzing
Zet het apparaat op een vlakke
ondergrond.
Verminder de hoeveelheid
ingrediënten
Verminder de hoeveelheid
ingrediënten
Zet de afdichtingsring op het deksel.
afdichtingsringhouder en klik het
geheel op het deksel.
Vervang de afdichtingsring.
Neem contact op met een erkend
service center.
Maak kleinere stukjes of verminder de
hoeveelheden. Voeg vloeistof toe.
Laat de motor afkoelen en verminder
de hoeveelheden in de kom.
Voeg vloeistof toe tot het minimum
niveau van de kom
Neem contact op met een Erkend
Service Center.
Neem contact op met een Erkend
Service Center.
(Cf. Fig. 7).
Het aanraakscherm werkt niet
Uw apparaat werkt nog steeds niet?
Ga naar een erkend service center (zie bijgevoegde lijst).
Het scherm kan vochtig zijn
Laat het apparaat 15 minuten met rust
AFVALVERWERKING
• Vernietiging van de verpakking en het apparaat
De verpakking bestaat voor 100% uit milieuvriendelijk materiaal dat in overeenstemming met de
bepalingen omtrent afvalverwerking kan worden vernietigd.
Breng het apparaat naar een gemeentelijk afvalinzamelpunt.
• Elektrisch of elektronisch product aan het eind van de levenscyclus
Bescherm het milieu!
Uw apparaat bevat verschillende, voor terugwinning of recycling geschikte materialen.
Breng het apparaat naar een afvalinzamelpunt voor een correcte verwerking.
24
24
Page 29

SUISSE SCHWEIZ
THAILAN D
CZECH REPUBLIC
INTERNATIONAL GUARANTEE: COUNTRY LIST
SMALL HOUSEHOLD APPLIANCES
24/10/2018
Date of purchase / Date d’achat / Fecha de compra / Købsdato / Ostopäivä / Kjøpsdato / Inköpsdatum / Ostukuupäev / Pirkuma datums / Įsigijimo data / Data
zakupu
Сатылған күні
Product reference / Référence produit / Referencia del producto / Referencenummer / Tuotenumero / Artikkelnummer /Produktreferens / Toote viitenumber /
Produkta atsauces numurs
Модель
Retailer name and address / Nom et adresse du revendeur / Nombre y dirección del minorista / Forhandler navn & adresse / Jälleenmyyjän nimi ja osoite /
Forhandler navn og adresse
Nazwa i adres sprzedawcy
Назва та адреса продавця
販売店名、住所 / /
/ 소매점 이름과 주소 / Име и адреса на продавач :
Distributor stamp / Cachet / Sello del distribuidor / Forhandler stempel / Jälleenmyyjän leima / Forhandler stempel / Återförsäljarens stämpel / Tempel / Zīmogs /
Antspaudas
продавця
ARGENTINA 0800-122-2732
ԱՅԱՍՏԱՆ
Հ
ARMENI A
AUSTRAL IA 1300307824
ÖSTERREICH
AUSTRIA
BAHRAIN
BELARUS
BELGIQUE
BELGIE
BELGIUM
BOSNA I
HERCEGOVINA
BRASIL
BRAZIL
BULGARIA
CANADA 1-800-418-3325 RO MANIA 0 21 316 87 84
CHILE 02 2 884 46 06
COLOMBIA 018000520022
HRVATSKA
CROATIA
REPUBLIKA
DANMARK
DENMARK
/ Datum izročitve blaga / Datum kupovine / Vásárlás dátuma / Data achiziţiei / Дата на закупуване / Дата продажу / Վաճառքի օր. / Дата продажи /
010 55-76-07
01 890 3476
17716666
017 2239290
070 23 31 59
Info-linija za potrošače
033 551 220
11 2915-4400
0700 10 330
01 30 15 294
731 010 111 SINGAPORE 6550 8900
43 350 350
/ 購入日 / / 구입일자 / Датум на купување :
/ Үлгісі / 製品リファレンス番号 / / 제품명 / Податоци за производот:
/ Gaminio numeris / Referencja produktu / Oznaka proizvoda / Tip aparata / Készülék típusa / Cod produs / Модел / Модель / Մոդել. /
/ Återförsäljarens namn och adress / Müüja kauplus ja aadress / Veikala nosaukums un adrese / Parduotuvės pavadinimas ir adresas /
/ Naziv i adresa prodajnog mjesta / Naziv in naslov trgovine / Forgalmazó neve és címe / Numele şi adresa vânzătorului / Търговки обект /
/ Կազմակերպության անվանում և հասցե. / Название и адрес продавца / Сатушының атауы мен мекен-жайы /
EGYPT
EESTI
ESTONIA
SUOMI
FINLAND
FRANCE Continentale
+ Guadeloupe,
Martinique, Réunion,
St-Martin
DEUTSCHLAND
GERMAN Y
POLSKA
POLAND
PORTUGAL 808 284 735
QATAR
REPUBLIC OF
IRELAND
RUSSIA
SAUDI ARABIA
SRBIJA
SERBIA
SLOVENSKO
SLOVAKIA
09 74 50 47 74
OMAN
połączenie lokalne
495 213 32 30
060 0 732 000
16622 VIETNAM 1800-555521
668 1286
09 8946 150
0212 387 400
24703471 INDONESIA +62 21 5793 7007 NEW ZEALAND 0800 700 711
801 300 420
koszt jak za
44485555
01 677 4003
920023701
232 199 930 LUXEMBOURG 0032 70 23 31 59 U.S.A. 800-395-8325
SLOVENIJA
SLOVENIA
ELLADA
GREECE
香
港
HONG KONG
MAGYARORSZÁG
HUNGARY
ITALIA
ITALY
本
日
JAPAN
JORDAN
KAZAKHS TAN
한국어
KOREA
KUWAIT
LATVJA
LATVIA
LEBANO N
LIETUVA
LITHUANIA
02 234 94 90 MAL AYSIA 603 7802 3000
2106371251 MEXICO (55) 52839354
06 1 801 8434
1 99 207 354
0570-077772
727 378 39 39
080-733-7878
1807777 Ext :2104
6 616 3403
5 214 0057
MACEDONIA
8130 8998 MOLDOVA 22 224035
NEDERLAND
The Netherlands
NORGE
NORWAY
ESPAÑA
SPAIN
5665505
4414727
SVERIGE
SWEDEN
SWITZERLAND
ประเทศไทย
TÜRKIYE
TURKEY
UAE
UKRAINE
UNITED
KINGDOM
(02) 20 50 319
0318 58 24 24
22 96 39 30
933 06 37 65
08 629 25 00
044 837 18 40
02 765 6565
444 40 50
8002272
044 300 13 04
0345 602 1454
/ Pieczęć sprzedawcy / Pečat distributera / Pečat trgovine / Forgalmazó pecsétje / Ştampila vânzătorului / Печат на търговския обект / Печатка
/ Կնիք. / Печать продавца / Сатушының мөрі / 販売店印 / / / 소매점 직인 / Печат на дистрибутер :
Page 30

Page 31

Page 32

FR p. 1 - 8
EN p. 9 - 16
NL p. 17 - 24
1520008212
 Loading...