

MOULINEX LM90A110 User Manual [fr]
FR
EN
IT
ES
PT
EL
DE
NL
A
B
b3
b2
C
c4
c1
b1
E
e1
e2
e3
0
D
d1
d2
max
ice
b4
c3 c2
F*
f1
f2
d3
d4
d5
1
2
1
2
3
5
!!
MIN
7
9
4
6
8
10
!!
MAX
11
1
2
a. b.
2
1
c. d.
12
1
13
a.
FR Selon modèle / EN Depending on the model / IT Secondo il modello / ES Según modelo / PT Consoante o
modelo / EL Aνάλογα με το μοντέλο / DE Je nach Modell / NL Afhankelijk van model
2
b.
c.
*

START START
En parcourant cette notice, vous découvrirez des conseils d’utilisation qui vous feront entrevoir
le potentiel de votre appareil : préparation de soupes veloutées ou moulinées, de soupes avec
morceaux, de sauces et de compotes, de smoothies, de cocktails et des recettes vapeur...
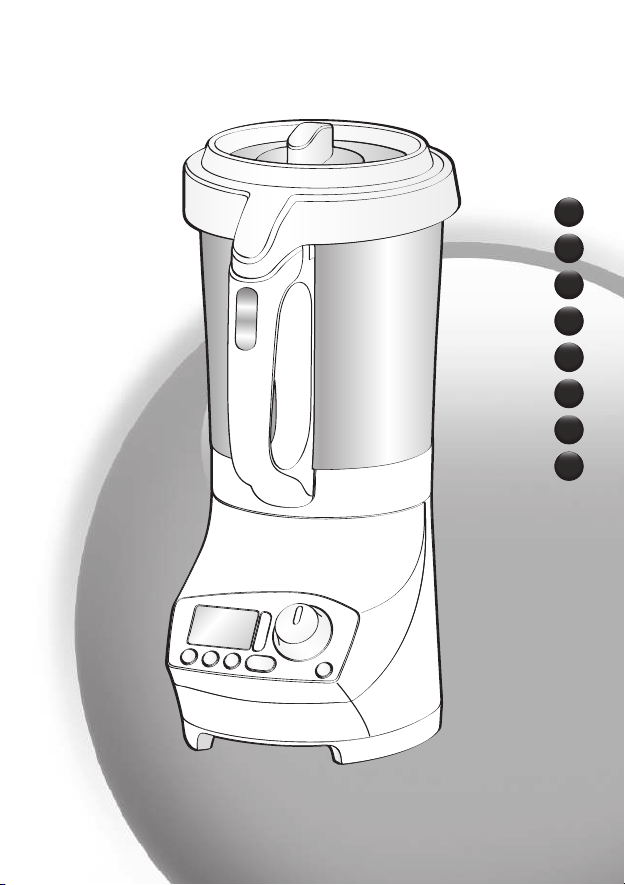
DESCRIPTION DE L’APPAREIL
A Bloc moteur
B Tableau de commande
b1 Touches de sélection
– P - Programmes automatiques
P1 : Soupe Veloutée / P2 : Soupe Moulinée /
Cuisson vapeur: P3 (selon modèle*)
Autoclean: P3 ou P4 (selon modèle*)
– -/+ – Diminution/Augmentation de la
durée ou de la température de cuisson
– OK/OFF – Validation d’un choix de
programme, de la durée ou de la
température de cuisson /Arrêt de
l’appareil
b2 Témoin lumineux de chauffe (si >50°C à
l’intérieur du bol)
b3 Sélecteur de vitesses
b4 Touche ice crush (piler des glaçons)
C Ecran d’affichage
c1 Affichage température réglée
de 60 à 100°C
c2 Affichage timer (temps réglable
de 0 à 59 min)
CONSIGNES DE SECURITE
FR
c3 Affichage programme (P1, P2, P3 et P4
selon modèle*)
c4 Affichage témoin de sécurité
D Ensemble Bol blender
d1 Bol inox
d2 Gâchette poignée
d3 Couteau démontable
d4 Joint
d5 Bague de verrouillage
E Ensemble couvercle
e1 Bouchon
e2 Couvercle
e3 Joint d’étanchéité
F Panier de cuisson (selon modèle*)
f1 Poignée
f2 Panier
Données techniques de l’appareil :
Température maximum : 100°C
Puissance : 1100W
Temps de programmation maximum : 59 minutes.
Vis-à-vis de la sécurité de la
personne
• Lisez attentivement le mode
d’emploi avant la première
utilisation de votre appareil
et conservez-le : une utilisation
non conforme au mode d’emploi
dégagerait le fabricant de toute
responsabilité.
• Ne pas laisser les enfants utiliser
l’appareil sans surveillance.
• AVERTISSEMENT : Lors de
l’utilisation de l’appareil,
certaines pièces atteignent
des températures élevées et
présentent une chaleur résiduelle
après utilisation: paroi inox du
bol, parties non préhensibles
du couvercle et du bouchon,
pièces métalliques sous le bol,
panier (selon modèle). Elles
peuvent occasionner des brûlures.
Manipulez l’appareil par les pièces
plastiques froides: poignées, bloc
moteur, zones de préhension
du couvercle ou du bouchon.
pendant la chauffe et jusqu’au
refroidissement complet. Le
1

témoin lumineux de chauffe
rouge indique qu’il y a un risque
de brûlure.
• Si le câble d’alimentation ou
la prise est endommagé, il doit
être remplacé par le fabricant,
son service après-vente ou des
personnes de qualification
similaire afin d’éviter un danger
(voir liste des centres service
agréés dans le livret service).
• Votre machine a été conçue pour
un usage domestique seulement
et à une altitude inférieure à
2000 m. Le fabricant décline
toute responsabilité et se réserve
le droit de résilier la garantie en
cas d’utilisation commerciale ou
inadaptée, ou de non respect des
consignes.
• AVERTISSEMENT : Votre
appareil émet de la vapeur
qui peut occasionner des
brûlures.
Manipulez avec précau tion le
couvercle et le bouchon (utilisez si
nécessaire un gant, une manique,
etc. Manipulez le bouchon par sa
partie centrale.
• Être vigilant si un liquide chaud
est versé dans le préparateur
culinaire ou le mélangeur dans
la mesure où il peut être éjecté
de l’appareil en raison d’une
ébullition soudaine.
• Ne faites pas fonctionner
l’appareil si le bouchon n’est
pas positionné dans l’orifice du
couvercle et/ou si le joint n’est
pas positionné dans le couvercle.
• AVERTISSEMENT : Attention
aux risques de blessure en cas
de mauvaise utilisation de
l’appareil.
• Les lames sont très
coupantes : manipulezles avec précaution pour
ne pas vous blesser lors
du vidage du bol, du
nettoyage, du montage et
démontage du couteau.
• AVERTISSEMENT : Soyez
prudent lors de la manipulation
de votre appareil (nettoyage,
remplissage et versage) : éviter
tout débordement de liquide sur
les connecteurs.
• Reportez-vous au mode d’emploi
pour le réglage des vitesses et le
temps de fonctionnement de
chaque programme.
• Reportez-vous au mode d’emploi
pour l’assemblage et le montage
des accessoires sur l’appareil.
• Reportez-vous au mode d’emploi
pour le nettoyage et l’entretien
de votre appareil.
• Toujours suivre les instructions
de nettoyage pour nettoyer
votre appareil:
- Débrancher l’appareil.
- Ne pas nettoyer l’appareil
chaud.
- Nettoyer avec un chiffon ou
une éponge humide.
- Ne jamais mettre l’appareil
dans l’eau ou sous l’eau
courante.
2

• Cet appareil est destiné à être
utilisé dans des applications
domestiques et analogues sauf :
• Ne mettez pas l’appareil, le câble
- les zones de travail de cuisine
dans les magasins, bureaux et
autres environnements de travail.
- des coins cuisines réservés au
personnel dans des magasins,
• L’appareil ne doit pas être
• Ne laissez pas le câble
bureaux et autres environnements professionnels.
- des fermes.
- l’utilisation par les clients des
hôtels, motels et autres environnements à caractère résidentiel.
- des environnements du type
Vis-à-vis d’une mauvaise
chambres d’hôtes.
• N’utilisez pas votre appareil s’il
Vis-à-vis du raccordement
électrique
• L’appareil doit être branché sur
une prise de courant électrique
reliée à la terre.
• N’utilisez jamais le bol blender
• L’appareil est conçu pour
fonctionner uniquement en
courant alternatif. Vérifiez que la
• Versez toujours les ingrédients
tension d’alimentation indiquée
sur la plaque signalétique de
l’appareil corresponde bien
à celle de votre installation
électrique.
• Toujours déconnecter l’appareil
de l’alimentation, si on le laisse
sans surveillance et avant
montage, démontage et
nettoyage.
• Toute erreur de branchement
• Certaines recettes peuvent
annule la garantie.
• Ne tirez jamais sur le câble
3
d’alimentation pour débrancher
l’appareil.
d’alimentation ou la prise dans
du liquide.
immergé.
d’alimentation à portée de
mains des enfants, être à
proximité ou en contact avec
les parties chaudes de l’appareil,
près d’une source de chaleur ou
sur un angle vif.
utilisation
ne fonctionne pas correctement,
s’il est endommagé. Faites le
réparer dans un centre service
agréé (voir liste dans le livret
service).
sans ingrédient ou avec des
produits secs uniquement.
solides en premier dans le bol
avant d’ajouter des ingrédients
liquides, sans dépasser le repère
MAX gravé ou marqué sur le
bol (selon modèle) du bol. Si le
blender est trop rempli, de l’eau
bouillante peut-être éjectée.
Attention à avoir un niveau de
liquide suffisant pour recouvrir le
repère mini (Fig.7).
provoquer des débordements
intempestifs, en raison de

l’apparition de bulles, en
particulier lors de l’utilisation de
légumes congelés. Dans ce cas,
il vous appartient de réduire les
volumes en conséquence.
• Ne placez jamais vos doigts
ou tout autre objet dans le bol
blender pendant le fonctionnement de l’appareil.
• N’utilisez pas le bol comme
récipient (congélation, stérilisation).
• Placez l’appareil sur un plan
de travail stable, résistant à la
chaleur, propre et sec.
• Ne placez pas l’appareil près
d’un mur ou d’un placard :
la vapeur produite pouvant
endommager les éléments.
•
Ne laissez pas pendre vos cheveux,
un foulard, une cravate,…
au dessus du bol pendant le
fonctionnement de l’appareil.
• Ne passez jamais les accessoires
dans un four à micro-ondes.
• N’utilisez pas l’appareil en plein
air.
• Ne dépassez jamais la quantité
maximum indiquée dans la
notice.
• Rangez l’appareil lorsqu’il est
refroidi. Ne pas mettre de l’eau
sur le tableau de commande.
MARCHES HORS EUROPE
UNIQUEMENT
•
Cet appareil n’est pas prévu pour
être utilisé par des personnes
(y compris les enfants) dont les
capacités phy siques, sensorielles
ou mentales sont réduites ou des
personnes dénuées d’expérience
ou de connaissance, sauf si
elles ont pu bénéficier, par
l’inter médiaire d’une personne
responsable de leur sécurité, d’une
surveillance ou d’instructions
préalables concernant l’utilisation
de l’appareil.
• Il convient de surveiller les
enfants pour s’assurer qu’ils ne
jouent pas avec l’appareil.
MARCHÉS EUROPÉENS
SEULEMENT :
•
En fonction chauffe seule : Cet
appareil peut être utilisé par des
enfants âgés d’au moins 8 ans, à
condition qu’ils bénéficient d’une
surveillance ou qu’ils aient reçu des
instructions quant à l’utilisation
de l’appareil en toute sécurité
et qu’ils comprennent bien les
dangers encourus. Le nettoyage
et l’entretien par l’utilisateur ne
doivent pas être effectués par
des enfants sans surveillance, à
moins qu’ils ne soient âgés de
plus de 8 ans et qu’ils soient sous
la surveillance d’un adulte.
• Dans toutes les utilisations
en mode mixage ou blender :
Cet appareil ne doit pas
être utilisé par les enfants.
Conserver l’appareil et son câble
hors de portée des enfants.
• En fonction chauffe seule :
Conserver l’appareil et son câble
hors de portée des enfants âgés
4

de moins de 8 ans.
START START
• Les enfants ne doivent pas
utiliser l’appareil comme un
jouet.
• Cet appareil peut être utilisé
par des personnes dont les
capacités physiques, sensorielles
ou mentales sont réduites ou
dont l’expérience ou les connaissances ne sont pas suffisantes,
à condition qu’ils bénéficient
d’une surveillance ou qu’ils
aient reçu des instructions quant
à l’utilisation de l’appareil en
toute sécurité et en comprennent bien les dangers potentiel.
MISE EN SERVICE
Votre appareil possède 3 modes de fonctionnement :
• Mode programme automatique : température, durée
de cuisson et durée de mixage sont préprogrammées
pour réaliser des soupes ou des cuissons vapeur en
automatique.
•
Mode manuel : réglages personnalisés de la température,
de la durée de cuisson pour une utilisation selon votre
convenance.
• Mode blender : sélection de la vitesse moteur sans
utiliser la fonction cuisson pour réaliser de savoureux
smoothies, cocktails.
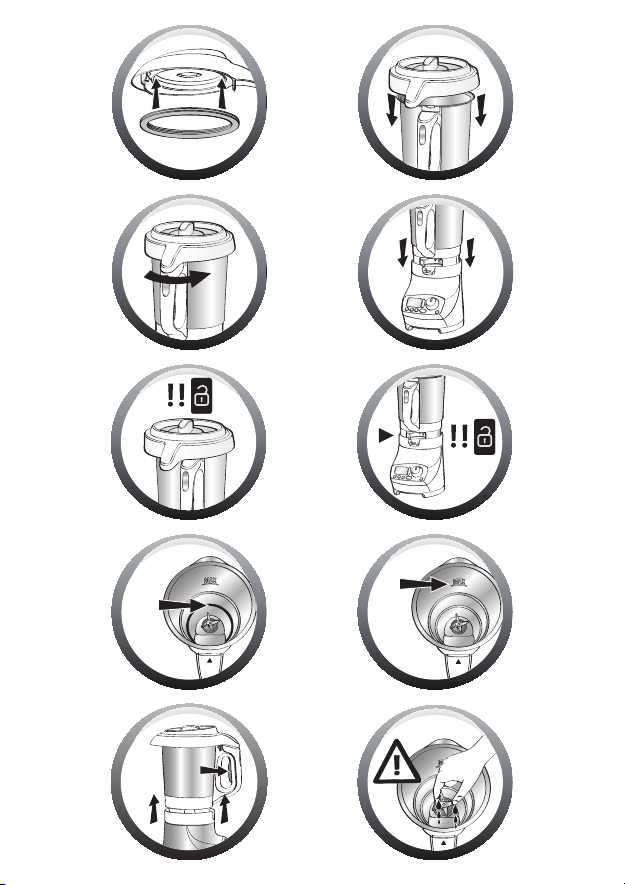
Mise en place du bol et de l’ensemble couvercle
• Avant la première utilisation, nettoyez tous les
accessoires (D, E et F) à l’eau chaude savonneuse, mais
pas le bloc moteur (A).
• Assurez-vous que tout emballage soit retiré avant le
fonctionnement de l’appareil.
• Placez le joint sur le couvercle (Cf. Fig. 1).
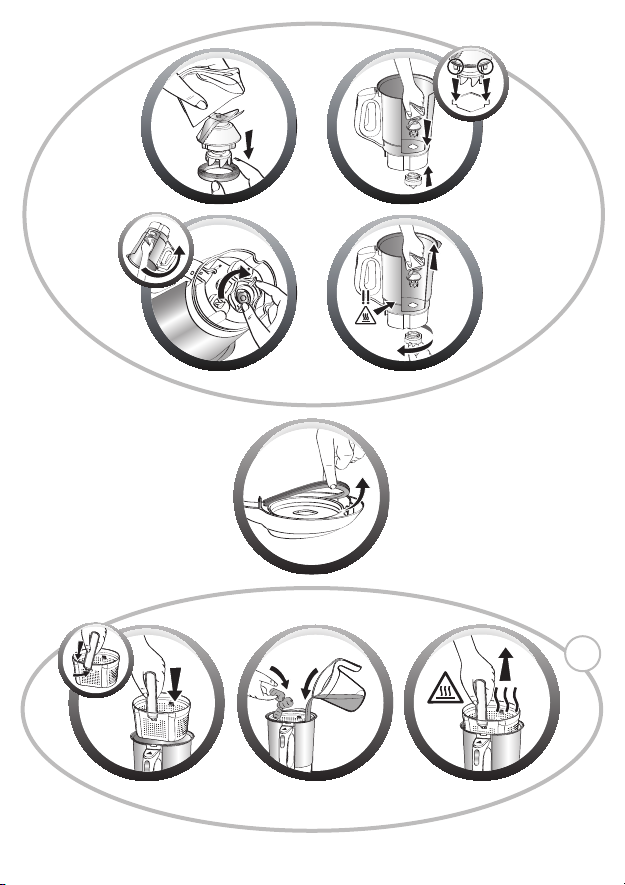
• Pour réaliser des cuissons vapeur, positionnez le panier
avec les légumes coupés en morceaux et remplissez le
bol avec 0.5 litre d’eau froide sans dépasser le bas du
panier (Cf. Fig.13 a; b; c).
• Positionnez le couvercle (E) sur le bol (D) (Cf. Fig.2),
verrouillez le couvercle sans appuyer en tournant dans
le sens de la flèche (Cf. Fig.3).
• Positionnez le bol blender (D) sur le bloc moteur (A)
jusqu’à entendre un « clic » (Cf. Fig. 4).
• L’appareil démarre uniquement si le bol et le
couvercle sont correctement positionnés et
verrouillés sur le bloc moteur.
5
SAV
• Pour votre sécurité, n’utilisez
pas d’accessoires ou de pièces
de rechange, autres que ceux
fournis par les centres de service
après-vente agréés.
• Toute intervention autre que le
nettoyage et l’entretien usuel
par le client doit être effectuée
par un centre service agréé.
En cas de mauvais positionnement ou de mauvais
verrouillage de l’un ou de l’autre (Cf. Fig. 5 et 6), le
logo
se met à clignoter lorsque l’on active une
fonction.
Mise en place du couteau sur le bol
• Montage du couteau démontable (Cf. Fig. 11 a; b; c) :
1. Vérifiez que le joint est bien positionné sur la partie
couteau (Cf. 11.a).
2. Prenez le couteau avec un linge et placez-le dans
son logement dans le fond du bol, en veillant à bien
positionner les ergots du couteau dans les encoches
du bol (Cf. 11.b).
3. Retournez le bol en maintenant le couteau dans son
logement (Cf. 11.c).
4. Verrouillez la partie couteau à l’aide de la bague de
verrouillage (Cf. 11.c).
• Démontage du couteau démontable (Cf. Fig. 11.d) :
Placez le bol au dessus d’un plan de travail.
1. Maintenez le couteau à l’aide d’un linge.
2. Retournez le bol tout en maintenant le couteau.
3. Faites tourner la bague de verrouillage pour
déverrouiller le couteau.
Avertissement : les lames sont très coupantes :
manipulez-les avec précaution pour ne pas vous blesser
lors du montage, démontage et nettoyage du bol et
du couteau.

UTILISATION DE L’APPAREIL
MODE PROGRAMME
Une fois l’eau et les ingrédients placés au fond du bol ou dans le panier vapeur, verrouillez le couvercle et positionnez
le bol sur le bloc moteur (voir mise en service).
Sélectionnez un des programmes automatiques proposés ci-dessous (touche P) et validez (touche OK). Le témoin
lumineux rouge s’allume et un bip sonore est émis pour vous informer que la cuisson a démarré.
Découvrez les programmes automatiques proposés
Température (Max) Temps ajustable Mixage
P1 - Soupe Veloutée
(texture fine)
P2 - Soupe Moulinée
(texture dense)
P3 (uniquement pour le modèle
disposant du panier de cuisson ) –
Cuisson vapeur avec le panier de
cuisson et 50 cl d’eau (selon modèle*)
P3 (ou P4 pour le modèle disposant
du panier de cuisson) - Auto clean :
programme automatique de
nettoyage
Lorsque le programme est terminé, l’appareil émet 3 bips.
Déverrouillez le bol en appuyant sur la gâchette (d2) située à l’intérieur de la poignée (cf. Fig. 9) et servez de suite ou
laissez le bol en place en maintien au chaud (jusqu’à 40 minutes).
CONSEILS PRATIQUES
• Attention à avoir un niveau de liquide suffisant
pour recouvrir le repère mini (Cf. Fig. 7). et à ne pas
dépasser le repère MAX gravé à l’intérieur du bol
(Cf. Fig. 8).
• Certaines recettes peuvent provoquer des
débordements intempestifs, en raison de
l’apparition de bulles, en particulier lors de
l’utilisation de légumes congelés. Dans ce cas, il vous
appartient de réduire les volumes en conséquence.
• L’information temps ou température clignote : vous
avez la possibilité de modifier cette information.
Ajustez si besoin le temps à l’aide des touches
+ (augmenter) et – (diminuer), en fonction des
ingrédients utilisés et du volume préparé (voir
tableau des temps de cuisson des soupes dans le
livret recettes).
• Le panier de cuisson (selon modèle*) vous permet
de réaliser des cuissons vapeur (en P3 avec 0.5 litre
d’eau), ou pour une préparation avec morceaux,
de cuire des ingrédients entiers tels que viandes,
100°C
100°C
100°C
100°C
poissons, légumes, en même temps que votre
soupe, (en P1 ou P2).
• A la fin des programmes, l’appareil passe automatiquement en maintien au chaud pendant 40
minutes pour conserver la préparation prête à être
consommée. Pour stopper le maintien au chaud, il
suffit d’appuyer sur la touche OFF.
Si vous ouvrez le couvercle, appuyez sur la gâchette
ou retirez le bol, le maintien au chaud sera
automatiquement arrêté.
• Lorsque le programme est lancé, vous avez la
possibilité d’arrêter l’appareil à tout moment
en appuyant sur la touche P (émission de 2 bips
sonores). Le programme est alors en mode pause,
vous avez la possibilité de le relancer en appuyant
de nouveau sur P ou sur la touche OK (émission d’un
bip sonore).
Si vous vous êtes trompé de programme et si vous
voulez annuler, appuyez pendant 2 secondes sur le
bouton OFF, cela permet de réinitialiser les temps et
les températures.
30 min.
(+ ou -10 min)
40 min.
(+ ou -10 min)
30 min.
(+ ou -20 min)
30 s
(ajustable
jusqu’à 1 min)
Vitesse maxi
1 min
Vitesse mini
13s
Non
Vitesse maxi
6

MODE MANUEL
9
•
Ajustez le temps de cuisson à l’aide des touches
+ (augmenter) et – (diminuer) en fonction des
ingrédients utilisés et du volume préparé (voir tableau
des temps de cuisson des soupes dans le livret
recettes).
• Validez ensuite le temps sélectionné par la touche
OK.
• L’information température clignote, vous avez la
possibilité de modifier cette information. Réglez
la température de cuisson à l’aide des touches +
(augmenter) et – (diminuer).
• Validez ensuite la température sélectionnée par la
touche OK.
• Le témoin lumineux rouge s’allume et un bip
sonore est émis pour vous informer que la cuisson
a démarré.
• A tout moment vous pouvez actionner le moteur
soit :
- en vitesse lente (position 1) pour mélanger des
aliments liquides (ex : réalisation de sauces).
- en vitesse rapide (à partir de la position 2) pour
mixer des aliments solides.
NETTOYAGE DE L’APPAREIL
• L’appareil ne doit pas être immergé. Ne passez pas le
bloc moteur (A) sous l’eau chaude courante.
• Nettoyer immédiatement votre bol après utilisation.
• Remplissez le bol avec 1 litre d’eau chaude
additionné de 2, 3 gouttes de produit lessiviel.
Respectez les quantités d’eau et de liquide
vaisselle préconisés. Un surplus de liquide
vaisselle augmente fortement le moussage et par
conséquent favorise les débordements.
• Utilisez le programme automatique Autoclean : P3
ou P4 (selon modèle*) pour réaliser un prélavage
du bol.
• Une fois le programme terminé, débranchez
l’appareil.
• Appuyez sur la gâchette (d2) puis soulevez le bol
blender (D).
• Placez le bol sur une surface plane.
• Déverrouillez le couvercle en le tournant d’un quart
de tour dans le sens des aiguilles d’une montre.
Retirez le couvercle avec précaution.
• Lorsque le couvercle est refroidi, retirez le joint
d’étanchéité. Pour cela, attrapez-le entre le pouce et
l’index, puis tirez pour l’extraire. Le joint se démonte
sans risque de détérioration (Cf. fig.12).
MODE BLENDER (sans cuisson)
0
• Sélectionnez une vitesse en tournant
le sélecteur à droite. Le mixage démarre
max
ice
et le temps s’affiche sur l’écran. En
jusqu’à 5 vitesses de mixage différentes. La vitesse
pulse se trouve à gauche de la position 0.
• Tournez le sélecteur de vitesses sur la position 0 pour
arrêter l’appareil.
• Appuyez sur la gâchette (d2) puis soulevez le bol
blender (D). Si vous souhaitez programmer un temps
de fonctionnement avec arrêt automatique :
• Ajustez le temps de fonctionnement à l’aide des
touches + (augmenter) et – (diminuer).
• Sélectionnez une vitesse en tournant le sélecteur. Le
décompte temps s’affiche sur l’écran.
• Le moteur s’arrête automatiquement à la fin du
Touche glace pilée : la touche « Ice » déclenche le
fonctionnement qui permet de réaliser de la glace
pilée, durée de la fonction 30s. Vous pouvez arrêter
l’appareil à votre convenance en appuyant sur la
touche « OFF ». Vous pouvez piler 6 à 8 glaçons
maximum.
• Finissez le nettoyage du bol à l’aide d’une éponge.
• Rincez l’intérieur du bol sous l’eau courante ainsi que
son couvercle.
• En cas d’encrassement prononcé de la partie
chauffante du bol, laissez tremper pendant
plusieurs heures avec de l’eau additionnée de
liquide vaisselle pour faciliter le nettoyage.
• Pour nettoyer le bloc moteur (A), utilisez un chiffon
humide. Séchez-le soigneusement.
• Les éléments amovibles (couvercle, joint, bouchon,
panier de cuisson) se nettoient à l’aide d’une
éponge et d’eau chaude savonneuse.
• Afin de préserver l’aspect et la longévité du couvercle
de votre appareil, lavez-le à la main. N’utilisez pas
le côté abrasif de l’éponge afin d’éviter les rayures.
• Le couteau démontable ne passe pas au lavevaisselle, lavez-le sous le robinet à l’aide d’une
brosse.
7
mode blender, vous pouvez sélectionner
décompte temps.
• Prenez des précautions avec les lames
(d3) du bol blender lorsque vous les
nettoyez et lorsque vous videz le bol,
elles sont coupantes.
SI VOTRE APPAREIL NE FONCTIONNE PAS, QUE FAIRE ?
PROBLÈMES
La prise n’est pas branchée
L’appareil ne fonctionne pas
Vibrations excessives
Fuite par le couvercle
Les lames ne tournent
pas facilement
Affichage “STOP”
Affichage “SECU” + témoin
lumineux rouge clignote
Affichage « Err »
+ témoin lumineux rouge clignote
Affichage « ntc »
+ témoin lumineux rouge
Arrêt du moteur en cours de
préparation, sans affichage de défaut.
Votre appareil ne fonctionne toujours pas ?
Adressez-vous à un centre service agréé (voir la liste dans le livret service).
clignote
Le bol ou le couvercle ne sont pas
correctement positionnés
ou verrouillés
L’appareil n’est pas posé sur une
surface plane, l’appareil n’est pas stable
Volume d’ingrédients
trop important
Volume d’ingrédients
trop important
Le couvercle n’est pas bien
positionné ou verrouillé
Le joint d’étanchéité
n’est pas présent
Le joint d’étanchéité est coupé,
détérioré
Morceaux d’aliments
trop gros ou trop durs
Surcharge moteur provoquée par une
quantité d’ingrédients trop
importante ou des morceaux trop durs
ou trop gros.
Bol vide, presque vide ou préparation
pas assez liquide
La résistance chauffante
ne fonctionne pas
Le
ne fonctionne plus
Si le bol et le couvercle sont
correctement positionnés et verrouillés,
déclenchement de la sécurité moteur.
CAUSES
capteur de température
Branchez l’appareil sur une prise.
Vérifiez que le bol ou le couvercle sont
bien positionnés et verrouillés suivant
les schémas de la notice
Placez l’appareil sur une surface plane
Réduisez la quantité d’ingrédients
traités.
Réduisez la quantité d’ingrédients
traités
Verrouillez correctement
le couvercle sur le bol
Positionnez le joint d’étanchéité sur
le couvercle.
Changez le joint, contactez
un centre service agréé
Réduisez la taille ou la quantité
d’ingrédients traités. Ajoutez du liquide.
Laissez refroidir le moteur
et réduisez la quantité d’ingrédients
dans le bol.
Ajoutez du liquide jusqu’au niveau
minimum du bol
Contactez un centre agréé
Contactez un centre agréé
Laissez refroidir l’appareil 30 min,
et réduisez la quantité d’ingrédients
à traiter.
SOLUTIONS
(Cf. Fig. 7)
.
RECYCLAGE
• Elimination des matériaux d’emballage et de l’appareil
L’emballage comprend exclusivement des matériaux sans danger pour l’environnement, pouvant
être jetés conformément aux dispositions de recyclage en vigueur.
Pour la mise au rebut de l’appareil, se renseigner auprès du service approprié de votre commune.
• Produits électroniques ou produits électriques en fin de vie :
Participons à la protection de l’environnement !
Votre appareil contient de nombreux matériaux valorisables ou recyclables.
Confiez celui-ci dans un point de collecte pour que son traitement soit effectué.
899

By reading this guide, you will find some user instructions that will help you discover the full
START START
potential of your appliance: make creamy or thick soups, chunky soups, sauces and fruit purées,
smoothies, cocktails and steam based recipes and much more.
APPLIANCE DESCRIPTION
A Motor unit
B Control panel
b1 Selection buttons
– P - Automatic programs
P1 : Creamy soup/P2: Thick soup/
Steam cooking: P3 (depending on model*)
Autoclean: P3 or P4 (depending on model*)
– -/+ – Decrease/Increase cooking time or
temperature
– OK/OFF – Validation of program choice,
cooking time or temperature/Stop appliance
b2 Heat indicator light (if >50°C inside
the jug)
b3 Speed selector button
b4 Ice crush button (for crushing ice-cubes)
C Display screen
c1 Temperature adjustment display from
60 to 100°C
c2 Timer display (time adjustable from
0 to 59 mins)
c3 Programme display (P1, P2, P3 and P4
depending on model*)
SAFETY INSTRUCTIONS
c4 Safety indicator display
D Blender jug unit
d1 Stainless steel jar
d2 Handle with trigger
d3 Removable blade assembly
d4 Seal
d5 Locking ring
E Lid unit
e1 Measuring cap
e2 Lid
e3 Waterproof seal
F Cooking basket (depending on model*)
f1 Handle
f2 Basket
Technical data on appliance:
Maximum temperature: 100°C
Power: 1100W
Maximum programming time: 59 minutes.
EN
Personal safety
• Read the instruction
manual carefully before
you use your appliance
for the first time and
retain them for future use:
improper use will release
the manufacturer from any
liability.
• Do not allow children to use
the appliance unsupervised.
• WARNING: When using the
appliance, some parts become
very hot and give off a residual
heat after use: the stainless
steel wall of the bowl, parts of
the lid and cap that cannot be
gripped, metal parts under the
bowl, basket (depending on
the model). This can lead to
burns. Handle the appliance by
the cold plastic parts: handles,
motor block, grip areas of the
lid or cap, during heating and
until the appliance has cooled

completely. The red heating
indicator light warns of a risk
of burns.
• Do not use your appliance
if it is not working correctly,
• WARNING: Injuries may
if it has been damaged or if
the power cord or plug have
been damaged. To avoid any
danger have the cord replaced
by an approved service centre
(see list in the service booklet).
• Your appliance has been
designed for domestic use only
and at an altitude lower than
2000 m. The manufacturer
shall not accept any liability
• WARNING: Take care when
and reserves the right to cancel
the guarantee in the event of
commercial or unsuitable use,
or if the instructions have not
been followed.
• Refer to the instruction
• WARNING: Your
appliance releases steam
that could cause burns.
Handle the lid and measuring
• Refer to the instruction manual
with care (if necessary, use a
glove, hotpad, etc.). Handle the
measuring by its central part.
• Be careful if pouring hot liquid
• Refer to the instruction manual
into the food processor or
mixer, as it could be ejected
from the appliance due to a
• Always follow the cleaning
sudden steaming.
• Do not operate the appliance if
10
10
the measuring is not correctly
positioned in the hole in the
lid and/or if the seal is not
correctly positioned on the lid.
occur if the appliance is used
incorrectly.
• The blades are very
sharp: handle them with
care so as not to injure
yourself when emptying
the bowl, as well as
cleaning, assembling and
disassembling the blade
assembly.
handling your appliance
(cleaning, filling and pouring):
prevent any liquid from spilling
onto the connectors.
manual to set the speeds
and operating times for each
program.
for details on assembling and
fitting the accessories to the
appliance.
for details on cleaning and
maintaining your appliance.
instructions to clean your

appliance:
- Disconnect the appliance.
- Do not clean the appliance
when it is hot.
- Clean with a damp cloth or
sponge.
- Never put the appliance in
water or under running water.
• This appliance is not intended
to be used in the following
applications, and the
guarantee will not apply for:
- kitchen work areas in shops,
offices and other work
environments.
- kitchens used by employees
in shops, offices and other
working environments.
- farms.
- use by guests in hotels,
motels and other residential
environments.
- other bed and breakfast-type
accommodation.
Electrical connection
• The appliance must be
connected to an earthed
electrical socket.
• The appliance is designed to
operate on alternating current
only. Check that your mains
voltage matches the voltage
indicated on the appliance’s
identification plate.
11
11
• Given the diverse standards in
effect, if the appliance is used
in a country other than that
in which it is purchased, have
it checked by an Approved
Service Centre.
• Always disconnect the
appliance from the mains if
leaving unattended and before
assembling, disassembling
and cleaning.
• Any error in connection will
invalidate the guarantee.
• Never pull out the power cable
to disconnect the appliance.
• Never submerge the appliance,
power cable or plug in liquid.
• The appliance must not be
immersed in water or any
other liquid..
• The power cord must be kept
out of the reach of children
and must not be placed near
or come into contact with the
hot parts of the appliance,
sources of heat or sharp edges.
Incorrect use
• Never use the blender bowl
without ingredients or with
only dry products.
• Always add solid ingredients
into the bowl before adding
liquid ingredients, without
exceeding the MAX mark
engraved or marked on the
bowl (depending on the
model). If the blender is too
full, boiling water may be
ejected. Ensure that the liquid

level is sufficient to cover the
minimum mark (Fig.7).
• Some recipes can cause
unwanted overflows, due to
the appearance of bubbles,
especially when using frozen
vegetables. In this case, it is up
to you to reduce the volumes
accordingly.
• Never place your fingers or
other objects in the blender
bowl while the appliance is
operating.
• Do not use the bowl as
a container (freezing,
sterilisation).
• Set the appliance on a stable,
heat-resistant, clean and dry
work surface.
• Do not place the unit
near a wall or cupboard:
the steam produced may
damage the components.
• Do not allow your hair, scarf,
tie, etc. to hang over the bowl
during operation.
• Never put the accessories into
a microwave oven.
• Never use the appliance
outdoors.
• Never exceed the maximum
quantity indicated in the
instructions.
• Store the appliance when it
has cooled down. Do not put
water on the control panel.
• This appliance is not intended
to be used by those (including
children) with reduced
physical, sensory or mental
abilities, or those lacking
experience or knowledge,
unless they have been given
prior instruction on how to
safely use the appliance or
are under the supervision of
a person responsible for their
safety.
• Children must be supervised to
ensure that they do not play
with the appliance.
EUROPEAN MARKETS ONLY:
• When heating only: This
appliance can be used by
children aged 8 years or over,
on the condition that they
are supervised or that they
have received instructions
on how to use the appliance
in total safety and that they
fully understand the dangers
related to the appliance.
Cleaning and maintenance of
the appliance should not be
performed by children without
supervision, unless they are 8
years of age or older and under
the supervision of an adult.
• When using the
mixer or blender: This
appliance must not
be used by children.
Keep the appliance and its
NON-EUROPEAN MARKETS
ONLY
cable out of reach of children.
When heating only: Keep the
12
12

START START
appliance and its cord out of
the reach of children less than 8
years old.
• Children must not use the
appliance as a toy.
• This appliance can be used
by persons with reduced
physical, sensory or mental
abilities or lacking experience
or knowledge on the condition
that they have been given
supervision or instructions
BEFORE FIRST USE
Your appliance has 3 operating modes:
• Automatic program mode: temperature, cooking
and mixing times are pre-programmed to make
soups and to carry out automatic steam cooking.
• Manual Mode: personalised adjustments in
temperature and cooking time for one use can be
made according to your preferences.
• Blender Mode: select the motor speed without using
the cooking function to make some tasty smoothies
or cocktails.
Positioning of the jug and the lid unit
• Before using for the first time, wash all the
accessories (D, E and F) in hot soapy water except
for the motor unit (A).
• Make sure that all packaging is removed before
operating the appliance.
• Place the seal on the lid (Cf. Fig. 1).
• To steam cook, put the basket with the sliced
vegetables in position and fill up the jug with 0.5
litres of cold water without exceeding the bottom
of the basket
• Position the lid (E) on the jar (D) (Cf. Fig. 2), lock the
lid without pressing by turning it in the direction of
the arrow (Cf. Fig. 3).
• Position the blender jar (D) on the motor unit (A)
until you hear it click (Cf. Fig. 4).
• The appliance only starts up once the jug and
lid are correctly in place and are locked onto the
motor unit.
(Cf. Fig.13 a; b; c).
for using the appliance in a
safe way and understand the
dangers involved.
AFTER-SALES
• For your safety, do not use
accessories or spare parts,
other than those provided by
authorised service centres.
• Any operation other
than cleaning or routine
maintenance should be
performed by an approved
service centre.
In the event of incorrect positioning or locking of one
or the other (Cf. Fig. 5 and 6), the lock sign
to flash when you activate a function.
Installing the blade assembly in the jar (*depending
on the model)
• Fitting the removable blade assembly (*depending
on the model
1. Make sure that the seal is properly positioned over
the blade assembly
2. Pick up the blade assembly using a cloth and place
it in its slot at the bottom of the jar, making sure
you carefully position the blade assembly grips in
the jar grooves
3. Return the jar keeping the blade assembly in its slot
(Cf. 11.c)
4. Lock the blade assembly section using the locking
ring
• Dismounting the removable blade assembly
(*depending on the model
Place the jar on a work surface.
1. Use a cloth to help hold the blade assembly.
2. Return the jar while holding the blade assembly.
3. Turn the locking ring to unlock the blade assembly.
Warning: the blades are very sharp: handle them
with care so as not to injure yourself whilst fitting,
dismounting and cleaning the jar and the blade
assembly.
13
13
.
(Cf. 11.c)
Cf. Fig. 11 a; b; c):
(Cf. 11.a)
.
(Cf. 11.b)
.
.
Cf. Fig. 11.d)
starts
:

USING THE APPLIANCE
PROGRAM MODE
Once the water and the ingredients are placed into the jug or into the steam basket, lock the lid and position the jug
onto the motor unit (see before first use).
Select one of the automatic programs suggested below (P button) and validate (OK button). The red indicator light
illuminates and a ‘beep’ will sound to inform you that the cooking has started.
Introducing the suggested automatic programs
Temperature (Max) Adjustable times Mixing
P1 - Creamy soup
(thin texture)
P2 - Chunky Soup
(texture dense)
P3 - (only for model with cooking
basket) – Steam cooking with
cooking basket and 50 cl water
(depending on model*)
P3 - (or P4 for model with cooking
basket) - Autoclean: automatic
cleaning programme
When the program is finished, the appliance gives out 3 beeps.
Unlock the jug by pressing the trigger (d2) located on the inside of the handle (cf. Fig. 9) and serve immediately or leave
the jug in place to keep warm (up to 40 minutes).
PRACTICAL GUIDANCE
• Make sure you have enough liquid to cover the Min
limit marker (Cf. Fig. 7). and take care not to exceed
the MAX limit marker engraved inside the jug (Cf.
Fig. 8).
• Some recipes may cause sudden overflowing, due
to the formation of bubbles, particularly when using
frozen vegetables. In this case, it is up to you to
reduce the quantities accordingly.
• Time and temperature information is flashing:
you can modify this information. Adjust the time
as required with the aid of the + (increase) and (decrease) buttons, depending on the ingredients
used and the amount to be made (see table of the
cooking times for soups in the recipe booklet).
• With the cooking basket (depending on model*)
you can steam cook (use P3 with 0.5 litres of water),
or for chunky soup recipes and cooking whole
ingredients such as meat, fish, vegetables at the
same time as your soup (use P1 or P2).
• At the end of the programs, the appliance
automatically keeps the recipe warm for 40 minutes
so it remains ready to be consumed. To stop
warming, simply press the OFF button.
100°C
100°C
100°C
100°C
• If you open the lid, press the trigger or remove the
jug, the warming process will automatically stop.
• When the program has started, you can stop the
appliance at any time by pressing the P button (2
beeps will sound). The program is then in pause
mode and you can restart it by pressing the P button
again or by pressing the OK button (a beep signal
will be emitted).
• If you choose the wrong program by mistake and
you wish to cancel it, press the OFF button for 2
seconds and that will allow you to restart the times
and the temperatures.
MANUAL MODE
•
Adjust the cooking time with the aid of the +
(increase) and - (decrease) buttons, depending on
the ingredients used and the amount to be made
(see table of the cooking times for soups in the recipe
booklet).
•
You have to then validate the time chosen by pressing
the OK button.
•
The temperature information is flashing, you
can change this information. Adjust the cooking
14
14
30 min.
(+ or -10 min)
40 min.
(+ or -10 min)
30 min.
(+ or -20 min)
30 s.
(adjustable
up to 1 min)
Max speed
1 min
Min speed
13 secs
No
Max speed

temperature with the aid of the + (increase) and -
9
(decrease) buttons.
•
You then have to validate the temperature chosen by
pressing the
•
OK button.
•
The red indicator light illuminates and a ‘beep’ will
sound to inform you that the cooking has started.
•
At any point you can adjust the motor onto either:
- slow speed (position 1) to mix liquid ingredients (e.g.
to make sauces).
- quick speed (position 2 onwards) to mix solid
ingredients.
BLENDER MODE (without cooking)
0
• Select a speed by turning the speed
max
selector to the right. The mixing starts
ice
In blender mode, you can select up to 5 speeds with
different mixing types.
and the time appears on the screen.
CLEANING THE APPLIANCE
The pulse speed can be found to the left of
position 0.
• Turn the speed selector to position 0 to stop the
appliance.
• Press on the trigger (d2) then remove the blender
jug (D). If you wish to program an operation time
which stops automatically:
• Adjust the operation time with the aid of the +
(increase) and - (decrease) buttons.
• Select a speed by turning the speed selector. The
count time appears on the screen.
• The motor stops automatically at the end of the
count time.
Ice crushing button: The “Ice” button starts the ice
crushing operation; this takes 30 seconds. You can
stop the appliance as required by pressing the “OFF”
button. You can crush a maximum of 6 to 8 ice cubes.
• Do not immerse the appliance in water. Never put
the motor unit (A) under hot running water.
• Clean the jug immediately after use.
• Fill up the jug with 1 litre of hot water along with
2 or 3 drops of washing up liquid Only use the
recommended amount of water and washing up
liquid. An excess of washing up liquid creates more
foam and consequently can lead to overflowing.
• Use the automatic Autoclean programme: P3 or P4
(depending on model*) to carry out a prewash of
the bowl.
• Once the program has stopped, unplug the
appliance.
• Press on the trigger (d2) then remove the blender
jug (D).
• Place the jug on a flat surface.
• Unlock the lid by turning it a quarter turn clockwise.
Remove the lid with care.
• When the lid is cool, remove the carrier seal. To do
so, grip it between your thumb and index finger, then
pull to extract it. The seal dismounts without risk of
deterioration (Cf. Fig. 12).
• Finish cleaning the jug with the aid of a sponge.
• Rinse the inside of the jug and the lid under running
water.
• In the event of the heated part of the jug getting
extremely dirty, leave to soak for a few hours in a mix
of water and washing up liquid to help get it clean.
• Take care when cleaning the blades
(d3) in the blender jug and when you
empty the bowl as they are sharp.
• Use a damp cloth to clean the motor unit (A). Dry
it carefully.
• The detachable parts (lid, seal, measuring cap,
cooking basket) can be cleaned with a sponge and
hot soapy water.
• To preserve the appearance and service life of the
lid of your appliance, hand wash it. Do not use the
abrasive side of the sponge to avoid scratches.
• The removable blade is not dishwasher safe — wash
it under running water using a brush.
15
15
WHAT TO DO IF YOUR APPLIANCE DOES NOT WORK
PROBLEMS
It is not plugged in.
The appliance does not work.
Excessive vibrations.
Leak through lid.
The blades do not rotate easily
Display “STOP”
Displays “SECU” + red indicator
light is flashing
Displays “Err”
+ red indicator light is flashing
Displays « ntc »
+ red indicator light is flashing
Motor stops during use, without any
fault being displayed.
Your appliance still doesn’t work?
Contact the Customer Relations Helpline - see contact list.
The jug and the lid are not in the
correct place or are not locked
correctly.
The appliance is not placed on a flat
surface, the appliance is not stable
Volume of ingredients is too high.
Volume of ingredients is too high.
The lid is not positioned or locked
correctly
The waterproof seal is not present
The waterproof seal has been cut
through or damaged
Pieces of food too big or too hard
Motor overload caused by too large
an amount of ingredients or pieces of
food that are too hard or too large
Empty jug, nearly empty or
not enough liquid in recipe
The heating element does not work
The temperature sensor is no longer
working
If the jug and lid are not correctly
assembled and fastened, the safety
motor overload will be triggered.
CAUSES
SOLUTIONS
Plug your appliance into the mains
power supply.
Check that the jug and the lid are
correctly positioned and locked following
the diagrams in the instructions
Place the appliance on a flat stable
surface.
Reduce the quantity of ingredients
processed.
Reduce the quantity of ingredients
processed.
Lock the lid firmly onto the jug
Position the carrier seal on the lid.
Change the seal or contact an
approved service centre
Reduce the size or quantity of the
ingredients processed.
Add some liquid
Let the motor cool down and reduce
the amount of ingredients in the jug.
Add liquid up to the jug’s minimum
(Cf. Fig. 7)
level marker
Contact the Customer Relations
Helpline - see contact list
Contact the Customer Relations
Helpline - see contact list
Leave it to cool down for 30 minutes
and reduce the quantity of ingredients
to process.
RECYCLING
• Disposal of packaging materials and the appliance.
The packaging is made of exclusively environmentally safe materials that can be disposed of
according to current recycling regulations.
To dispose of your appliance, consult the appropriate department of your local authority.
• Expired electronic or electrical products:
Think of the environment!
Your appliance contains valuable materials which can be recovered or recycled.
Please take it to a local waste collection point where it will be disposed
16
16

START START
Leggendo queste istruzioni, scoprirete come usare il vostro apparecchio in tutto il suo potenziale:
per preparare vellutate, passate, minestre, salse, composte, frullati, cocktail, cotture al vapore...
DESCRIZIONE DELL’APPARECCHIO
A Blocco motore
B Pannello di controllo
b1 Pulsanti di selezione
- P – Programmi automatici
P1: Vellutata / P2: Passata /
Cottura al vapore: P3 (a seconda del modello*)
Autoclean: P3 o P4 (a seconda del modello*)
- -/+ - Diminuzione/Aumento della
temperatura o del tempo di cottura
-OK/OFF – Conferma del programma, della
durata o della temperatura di cottura/
Spegnimento dell’apparecchio
b2 Spia di riscaldamento (se la temperatura
all’interno del recipiente è >50°C)
b3 Selettore di velocità
b4 Pulsante Ice (tritaghiaccio)
C Display
c1 Temperatura impostata (da 60 a 100°C)
c2 Timer (da 0 a 59 min)
c3 Indicazione programma (P1, P2, P3 e P4
a seconda del modello*)
NORME DI SICUREZZA
c4 Spia di sicurezza
D Unità recipiente frullatore
d1 Recipiente inox
d2 Grilletto impugnatura
d3 Coltello smontabile
d4 Guarnizione
d5 Anello di bloccaggio
E Unità coperchio
e1 Tappo dosatore
e2 Coperchio
e3 Guarnizione
F Cestello vapore (a seconda del modello)
f1 Impugnatura
f2 Cestello
Specifiche tecniche dell’apparecchio:
Temperatura max: 100°C
Potenza: 1100 W
Tempo di programmazione max: 59 minuti.
IT
Sicurezza personale
• Leggere attentamente il
manuale di istruzioni prima
di usare l’apparecchio per
la prima volta e conservarlo:
un utilizzo non conforme
libera il costruttore da ogni
responsabilità.
• Non lasciare che i bambini
utilizzino l’apparecchio senza
supervisione.
• AVVERTENZA! Durante l’uso
dell’apparecchio alcune parti
raggiungono temperature
elevate e mantengono un
17
17
calore residuo dopo l’uso:
pareti in acciaio inox del
recipiente, parti non isolate
del coperchio e del tappo,
parti metalliche sotto il
recipiente, cestello (a seconda
del modello). Fare attenzione
al rischio di ustioni. Durante
il riscaldamento e fino al
raffreddamento completo,
manipolare l’apparecchio
tramite le parti in plastica
isolate: impugnatura, unità
motore, parti isolate del
coperchio o del tappo. La spia
di riscaldamento rossa indica

che sussiste il rischio di ustioni.
• Per motivi di sicurezza, se la
spina o il cavo di alimentazione
• AVVERTENZA! L’uso improprio
sono danneggiati, devono
essere sostituiti deve essere
sostituito dal fabbricante,
dal suo centro di assistenza
o da un tecnico qualificato
(consultare l’elenco dei centri
di assistenza autorizzati nel
libretto della garanzia).
• Questo apparecchio è
destinato al solo uso domestico
• AVVERTENZA! Prestare
e ad altitudini inferiori a 2000
m. Il costruttore declina ogni
responsabilità e si riserva il
diritto di annullare la garanzia
in caso di utilizzo commerciale
o improprio o del mancato
rispetto delle istruzioni.
• Consultare il manuale di
• AVVERTENZA!
L’apparecchio emette
del vapore suscettibile di
causare ustioni.
• Consultare il manuale di
Manipolare con attenzione
il coperchio e il tappo (se
necessario, utilizzare un guanto,
una presina, ecc.). Manipolare
il tappo tramite la sua parte
centrale.
• Consultare il manuale di
• Prestare attenzione quando
l’apparecchio contiene un
liquido caldo, perché può
fuoriuscire dall’apparecchio
• Rispettare sempre le istruzioni
a causa di un’ebollizione
improvvisa.
• Non mettere in funzione
l’apparecchio se il tappo o la
- Scollegare l’apparecchio dalla
- Non pulire l’apparecchio
18
18
guarnizione non sono installati
nel coperchio.
dell’apparecchio comporta il
rischio di ustioni.
• Le lame sono molto
taglienti: manipolarle
con attenzione per
evitare lesioni durante
lo svuotamento del
recipiente, la pulizia,
l’installazione e la
rimozione delle lame.
attenzione durante
la manipolazione
dell’apparecchio (pulizia,
riempimento e versamento):
evitare qualsiasi fuoriuscita di
liquido sui connettori.
istruzioni per informazioni
sulla regolazione della velocità
e i tempi di funzionamento di
ciascun programma.
istruzioni per informazioni
sull’assemblaggio e
l’installazione degli accessori
sull’apparecchio.
istruzioni per informazioni
sulla pulizia e la manutenzione
dell’apparecchio.
seguenti per la pulizia
dell’apparecchio.
presa di corrente.
 Loading...