

Page 1
com
www.moulinex.
Page 2
D
C D
B
A
1
A
B
2
Page 3
3
4
1
C
A
B
2
5
F E
Page 4
4
Page 5
Français p. 6
English p. 7
Deutsch S. 8
Nederlands p. 9
Español p. 10
Português p. 11
Italiano p. 12
5
Page 6

Consignes de sécurité
- Ne laissez pas le couteau à portée des
enfants.
- Assurez-vous de la concordance du voltage
indiqué sur l’appareil et du voltage de votre
secteur.
Toute erreur de raccordement de l’appareil annule la garantie.
- Si le cable d’alimentation est endommagé,
il doit être remplacé par le fabricant, son
service après-vente ou une personne de
qualification similaire afin d’éviter un danger.
- Faites attention d’éloigner le cordon d’ali-
mentation des lames lors de l’utilisation du
couteau.
- Ne mettez pas le cordon en contact avec
une surface chaude.
- Cet appareil est conçu pour un usage do-
mestique.
- Débranchez l’appareil après chaque utilisation et avant chaque nettoyage.
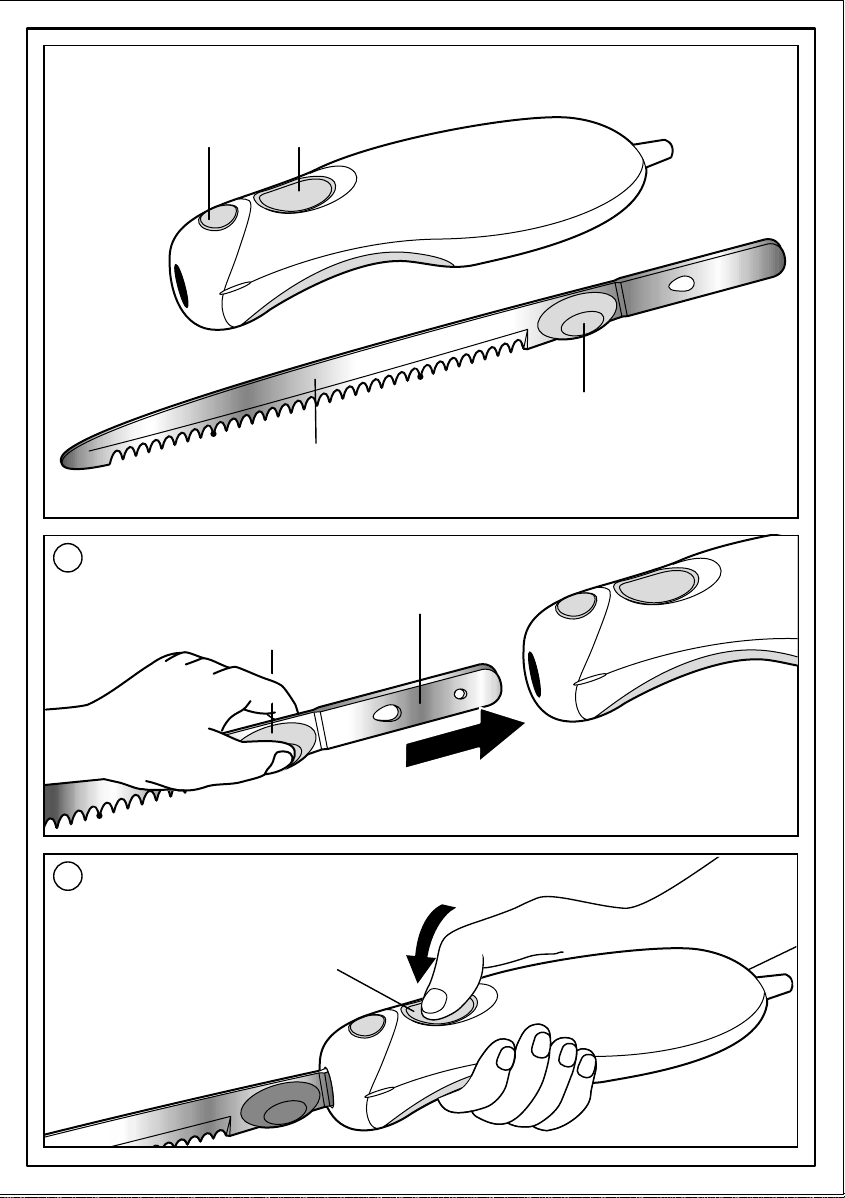
. MONTAGE DES LAMES
- Montez les lames (A) l’appareil débranché.
Les lames sont dans leur étui de protection,
dents vers le bas.
- Introduisez-les doucement dans l’appareil et
1
poussez sur les gardes (B) jusqu’au verrouillage (clic audible).
- Ensuite, enlevez avec précaution l’étui de
protection des lames.
Attention : les lames sont très coupantes.
Soyez vigilant lors de toute maniplation de
celles-ci.
. DÉMONTAGE DES LAMES
4
- Débranchez l’appareil, appuyez sur le bouton d’éjection (C), maintenez la pression et
retirez les lames en les tenant par les gardes-lames.
Attention : Les lames sont très coupantes.
. NETTOYAGE
5
- Séparez les lames, pour cela extraire le ri-
vet (E) de la boutonnière (F). Lavez les lames à l’eau chaude additionnée d’un produit pour la vaisselle. Vous pouvez également les passez au lave-vaisselle.
- Nettoyez l’appareil avec un chiffon humide
et essuyez-le soigneusement.
- L’appareil ne doit jamais être passé sous
le robinet ni trempé dans l’eau.
. FONCTIONNEMENT
- Branchez votre appareil. Enfoncez la tou-
2
che (D) avec le pouce à la verticale.
. UTILISATION DES LAMES
- Lames universelles spécialement étudiées
pour améliorer la coupe et notamment celle
des aliments à croûte (pain, viande, ...).
- Commencez à découper fermement à partir
3
de la croûte, en allant vers le bas des aliments. Les lames restent parallèles à la surface de coupe.
- N’essayez jamais de couper des os.
6
Page 7

Safety information
- Keep the knife out of reach of children.
- Check that your mains supply voltage
matches the voltage marked on the knife.
Use of an unsuitable power connection
invalidates the warranty.
Wiring instructions for U.K and Ireland
only :
APPLIANCES WITH FITTED PLUG
Important : For your convenience this
appliance is supplied complete with a plug
incorporating a 3 amp fuse.
In the event of replacing a fuse in the plug
supplied, a 3 amp fuse approved by ASTA to
BS1362 must be used.
If the socket outlets are not of the 13A BS 1363
type, and therefore do not accept the plug
connected to this appliance, cut off the plugif
moulded type or remove the plug if connected
by screw terminals.
When the plug is a moulded type and this is cut
off from the appliance, the connected wires
are a shock hazard. Do not under any
circumstances connect a cut off plug into the
electrical socket outlet. The cut off plug must
be disposed of in a safe manner that prevents
any form of connection.
If the fuse cover is detachable, never use the
plug with the cover omitted. Replacement
covers can be obtained from your service
agent.
Fit the appropriate plug according to the instructions in paragraph "Fitting a plug". With
alternative plugs a 5 amp fuse must be fitted
either in the plug or adaptor or at the main fuse
box.
APPLIANCES WITHOUT FITTED PLUG
FITTING A PLUG - IMPORTANT
The wires in the mains lead are coloured in
accordance with the following code:
BLUE : NEUTRAL
BROWN : LIVE
But the colours may not correspond with the
coloured markings identifying the terminals in
your plug, proceed as follows:
The wire which is coloured BLUE must be
connected to the terminal which is marked
with the letter ‘N’ or coloured black. The wire
which is coloured BROWN must be connected
to the terminal which is marked with the letter
‘L’ or coloured red.
This appliance is manufactured to conform to
the Low Voltage Electrical Equipment (Safety)
Regulations 1989 and is designed to comply
with BS 3456. It complies with the requirements
of the EEC Directive (89/336/EEC).
- To prevent electrical hazards, damaged
power leads should always be replaced by
the manufacturer, its after-sales service or
a similarly qualified technician.
- Always keep the power lead well clear of the
blades when using the knife.
- Keep the power lead away from hot surfaces.
- This appliance is designed for home use.
- Always unplug the appliance after use
and before cleaning.
. FITTING THE BLADES
- Fit the blades (A) with the appliance
unplugged. Place the blades in their safety
sleeve, teeth facing downward.
- Holding the blades by the safety guards (B),
1
slide them gently into the appliance and push
until they lock into place (indicated by an
audible click).
- Then carefully remove the safety sleeve.
Important: The blades are very sharp. Take
great care when handling them.
. OPERATION
- Plug in the appliance. Press the ‘On’ button
2
(D) with your thumb.
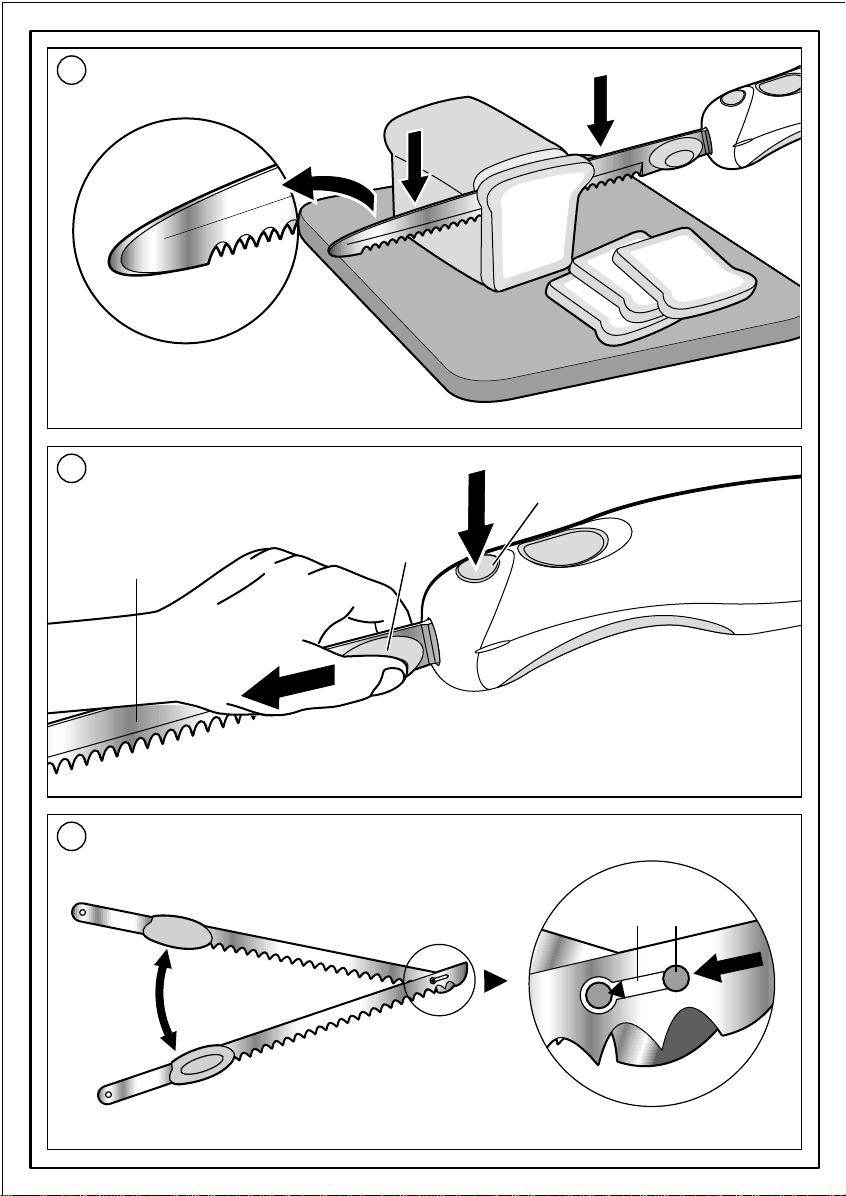
. BLADE USE
- The all-purpose blades have been specially
designed for superior cutting performance,
and in particular for slicing food with a crust
or crispy exterior (e.g. bread, meat joints,
etc.).
- Begin cutting the food firmly from the crust,
3
working from the top downward. Keep the
blades parallel to the cut surface.
- Never attempt to cut through bones.
. REMOVING THE BLADES
4
- Unplug the appliance. Press and hold the
blade release button (C), then slide out the
blades, holding them by the safety guards.
Important: The blades are very sharp.`
7
Page 8

. CLEANING
- Separate the blades before cleaning. Do this
5
by sliding the rivet (E) out of the eyelet (F).
Wash the blades using warm water and
dishwashing detergent. Alternatively, the
blades can be cleaned in a dishwasher.
- Clean the appliance with a damp cloth and
dry carefully.
- NEVER immerse the appliance or clean
it under a running tap.
Sicherheitshinweise
- Überlassen Sie Kindern niemals
unbeaufsichtigt das Messer.
- Überprüfen Sie, ob der Anschlusswert Ihres
Gerätes mit der auf Ihrem Stromzähler
angegebenen Spannung übereinstimmt.
Bei fehlerhaftem Anschluss erlischt die
Garantie.
- Benutzen Sie das Gerät nicht, wenn das
Kabel beschädigt ist. Zur Vermeidung
jeglicher Gefahr muss dieses vom Hersteller,
dem Kundendienst oder einem anderen
Fachmann ausgetauscht werden.
- Achten Sie darauf, das Kabel während des
Betriebs des Messers von den Klingen fern
zu halten.
- Das Kabel darf nicht mit heißen Oberflächen
in Berührung kommen.
- Das Gerät ist ausschließlich für den
Haushaltsgebrauch bestimmt.
- Stecken Sie das Gerät nach jeder
Benutzung und vor jeder Reinigung aus.
. MONTAGE DER KLINGEN
- Zur Montage der Klingen (A) muss das
Gerät ausgesteckt sein. Die Klingen
stecken mit den Sägezähnen nach unten in
einer Schutzhülle.
1
- Führen Sie sie vorsichtig in das Gerät ein
und drücken Sie dabei auf die seitlichen
Knöpfe (B), bis ein hörbares Einklicken
erfolgt.
- Nehmen Sie anschließend die Schutzhülle
von den Klingen ab.
Achtung: die Klingen sind sehr scharf. Gehen
Sie ausgesprochen vorsichtig mit ihnen um.
. INBETRIEBNAHME
2
- Stecken Sie das Gerät an. Drücken Sie den
Knopf (D) mit dem Daumen nach unten.
. HANDHABUNG DER KLINGEN
- Die Universalklingen sind speziell zum
besseren Zerteilen des Schneidguts und
besonders von Schneidgut mit Rinde (Brot,
Fleisch…) angelegt.
3
- Setzen Sie an der Rinde an, halten Sie das
Messer gut fest und arbeiten Sie sich nach
unten vor. Die Klingen müssen dabei immer
parallel zur Schnittfläche bleiben.
8
Page 9

- Versuchen Sie in keinem Fall, Knochen zu
schneiden.
Veiligheidsinstructies
. DEMONTAGE DER KLINGEN
- Stecken Sie das Gerät aus, drücken Sie den
4
Auswurfknopf (C), lassen Sie den Finger auf
dem Knopf und ziehen Sie die Klingen am
Haltegriff heraus.
Achtung: die Klingen sind sehr scharf.
. REINIGUNG
- Nehmen Sie die beiden Klingen durch
5
Entfernen des Metallstifts (E) aus dem
Schlitz (F). Reinigen Sie die Klingen mit
warmem Wasser und Geschirrspülmittel. Sie
sind ebenfalls spülmaschinengeeignet.
- Reinigen Sie das Gerät mit einem feuchten
Tuch und trocknen Sie es sorgfältig ab.
- Das Gerät darf nicht unter laufendes
Wasser gehalten oder ins Wasser
getaucht werden.
- Het mes buiten het bereik van kinderen
houden.
- Controleer of de op het apparaat
aangegeven stroomsterkte overeenkomt
met die van het lichtnet.
Bij een verkeerde aansluiting van het
apparaat is de garantie niet meer geldig.
- Indien de voedingskabel beschadigd is, moet
deze door de fabrikant, diens servicedienst
of een persoon met een gelijkwaardige
vakbekwaamheid vervangen worden,
teneinde ieder gevaar te voorkomen.
- Zorg dat tijdens het gebruik van het mes het
elektrische snoer uit de buurt van de bladen
blijft.
- Zorg dat het snoer niet in aanraking komt
met een warm oppervlak.
- Dit apparaat is bestemd voor huishoudelijk
gebruik.
- Haal na ieder gebruik en voor iedere
reinigingsbeurt de stekker van het
apparaat uit het stopcontact.
. MONTAGE VAN DE BLADEN
- Monteer de bladen (A) met de stekker uit
het stopcontact. De bladen bevinden zich
in de beschermhoes, met de tanden naar
beneden gericht.
1
- Plaats ze voorzichtig in het apparaat en druk
op de plaatjes (B) tot ze vergrendelen
(hoorbare klik).
- Verwijder vervolgens voorzichtig de
beschermhoes van de bladen.
Let op: de bladen zijn zeer scherp. Wees zeer
voorzichtig wanneer u ze vastpakt.
. WERKING
- Steek de stekker in het stopcontact. Duw
2
toets (D) in met uw duim in verticale stand.
. GEBRUIK VAN DE BLADEN
- Universele bladen, speciaal ontworpen om
beter te snijden, met name etenswaren met
een korst (brood, vlees, ...).
3
- Begin bij de korst en houd het mes stevig
vast, waarbij u van boven naar beneden
snijdt. De bladen blijven evenwijdig ten
opzichte van het snijoppervlak.
- Probeer geen botten door te snijden.
9
Page 10
. DEMONTAGE VAN DE BLADEN
- Neem de stekker uit het stopcontact, druk
4
op de uitwerpknop (C), houd de druk vast
en verwijder de bladen aan het onscherpe
deel.
Let op: De bladen zijn zeer scherp.
. REINIGING
5
- Neem de bladen uiteen om de klinknagel (E)
uit het langwerpige gat (F) te halen. Was de
bladen af met warm water en afwasmiddel.
U kunt ze ook in de vaatwasser doen.
- Reinig het apparaat met een vochtige doek
en droog het zorgvuldig af.
- Het apparaat nimmer onder de kraan
afspoelen of onder water dompelen.
Consignas de seguridad
- No dejar el cuchillo al alcance de los
niños.
- Asegurarse de que el voltaje indicado en su
aparato concuerda con el voltaje de su
sector.
Cualquier error de conexión del aparato
anula la garantía.
- Si el cable de alimentación está dañado, el
fabricante o el servicio autorizado postventa
o una persona con una cualificación similar
debe reemplazarlo con el fin de evitar
cualquier peligro.
- Tener la precaución de alejar el cable de
alimentación de las cuchillas durante la
utilización del cuchillo.
- No dejar el cable en contacto con una superficie caliente.
- Este aparato está diseñado para uso
doméstico.
- Desenchufar el aparato después de cada
utilización y antes de cada limpieza.
. MONTAJE DE LAS CUCHILLAS
- Montar las cuchillas (A) con el aparato
desenchufado. Las cuchillas están en la
funda de protección con los dientes hacia
abajo.
1
- Introducirlas con cuidado en el aparato y
presionar las guardas (B) hasta bloquearlas
(clic audible).
- Luego, sacar las cuchillas con precaución
de la funda de protección.
Atención: las cuchillas están muy afiladas.
Tener mucho cuidado cuando las manipule.
. FUNCIONAMIENTO
2
- Enchufar el aparato. Presionar la tecla (D)
con el pulgar de forma vertical.
. UTILIZACIÓN DE LAS CUCHILLAS
- Cuchillas universales especialmente diseñadas
para mejorar el corte, especialmente el de los
alimentos con corteza (pan, carne, ...).
3
- Empezar a cortar firmemente a partir de la
corteza, de los alimentos hacia abajo. Las
cuchillas deben ir paralelas a la superficie
del corte.
- No intentar nunca cortar huesos.
10
Page 11

. DESMONTAJE DE LAS CUCHILLAS
4
- Desenchufar el aparato, presionar el botón
eyector (C), mantener la presión y retirar las
cuchillas sujetándolas por las guardas.
Atención: Las cuchillas están muy
afiladas.
. LIMPIEZA
5
- Separar las cuchillas, para este extraer el
remache (E) del orificio longitudinal (F).
Lavar las cuchillas con agua caliente y
detergente para vajilla. También puede
meterlas en el lavavajillas.
- Limpiar el aparato con un paño húmedo y
secar cuidadosamente.
- No poner nunca el aparato bajo el grifo o
sumergir en agua.
Conselhos de segurança
- Nunca deixe a faca eléctrica ao alcance
das crianças.
- Certifique-se de que a tensão indicada no
aparelho corresponde à tensão de rede da
sua casa.
Qualquer tipo de erro de ligação do
aparelho anula a garantia.
- No caso de danificação do cabo de
alimentação, este último tem de ser
substituído pelo fabricante, no respectivo
serviço pós-venda ou por um técnico
especializado, de modo a evitar a ocorrência
de qualquer situação de perigo.
- T ome as devidas precauções para afastar o
cabo de alimentação das lâminas sempre
que utilizar a faca eléctrica.
- Não coloque o cabo de alimentação em
contacto com uma superfície quente.
- Este aparelho foi concebido para um uso
doméstico.
- Desligue o aparelho após cada utilização
e antes de cada limpeza.
. MONTAGEM DAS LÂMINAS
- Proceda à montagem das lâminas (A) com
o aparelho desligado. As lâminas estão
guardadas no respectivo estojo de
protecção, com a serrilha virada para baixo.
- Insira-as cuidadosamente no aparelho e
1
empurre-as pelas protecções (B), até as
lâminas ficarem bloqueadas (escutará um
clique).
- De seguida, retire com as devidas
precauções o estojo de protecção das
lâminas.
Atenção: as lâminas são extremamente
cortantes. Seja devidamente cuidadoso
sempre que proceder ao seu manuseamento.
. FUNCIONAMENTO
- Ligue o aparelho. Pressione o botão (D) com
2
o polegar na vertical.
. UTILIZAÇÃO DAS LÂMINAS
- Lâminas universais, concebidas
especialmente para melhorar o corte e, mais
especificamente, o corte dos alimentos com
côdea (pão, carne…).
11
Page 12

- Comece a cortar com firmeza a partir da
3
côdea, no sentido descendente dos
alimentos. As lâminas têm de permanecer
paralelas à superfície de corte.
- Nunca tente cortar ossos.
. DESMONTAGEM DAS LÂMINAS
4
- Desligue o aparelho, premindo o botão de
ejecção (C). Mantenha a pressão e retire
as lâminas, segurando-as pelas respectivas
protecções.
Atenção: As lâminas são extremamente
cortantes.
. LIMPEZA
- Separe as lâminas. Para tal, retire o rebite
5
(E) do respectivo entalhe (F). Lave as
lâminas em água quente com um pouco de
detergente para a loiça. Pode, também,
proceder à sua lavagem na máquina da
loiça.
- Limpe o aparelho com um pano húmido e
enxagúe-o com cuidado.
- O aparelho não deve nunca ser colocado
debaixo de uma torneira aberta nem
dentro água.
Consigli di sicurezza
- Non lasciate mai il coltello a portata dei
bambini.
- Verificate che il voltaggio del Vostro
apparecchio sia corrispondente a quello
della Vostra rete elettrica.
Ogni installazione non conforme annulla
la garanzia.
- Questo apparecchio deve essere
assolutamente collegato ad una pressa di
corrente con scarico a terra.
- Se il cavo di alimentazione é danneggiato,
sono necessari degli utensili particolari
quindi, per sostituirlo, dovete assolutamente
rivolgerVi ad un Centro di Assistenza
Moulinex Autorizzato.
- Fate attenzione ad allontanare il cordone
dalle lame nel momento in cui utilizzate il
coltello.
- Non mettete mai il cavo elettrico a contatto
di superfici calde.
- Questo apparecchio é stato ideato al solo
uso domestico.
- Scollegate l’apparecchio dopo ogni
utilizzo e prima di ogni operazione di
pulizia.
. MONTAGGIO DELLE LAME
- Montate le lame (A) sempre con
l’apparecchio scollegato. Le lame sono
nella loro custodia di protezione, parte
dentata verso il basso.
1
- Introducetele delicatamente nell’appa-
recchio, spingendo sui paralame (B) fino
all’aggancio (clic udibile).
- Estraete quindi, con precauzione, la custodia
di protezione delle lame.
Attenzione : le lame sono molto affilate quindi
manipolatele sempre con estrema attenzione.
. FUNZIONAMENTO
2
- Collegate il vostro apparecchio alla corrente.
Pigiate con il pollice il tasto (D) a verso il
basso.
. UTILIZZO DELLE LAME
- Lame universali, appositamente ideate per
ottenere un taglio perfetto, soprattutto per
alimenti tipo pane, carne, ecc..
12
Page 13

3
- Incominciate a tagliare gli alimenti a partire
de la crosta verso il basso. Le lame devono
restare paralleli alla superficie tagliata.
- Non provocate mai a tagliare delle ossa.
. SMONTAGGIO DELLE LAME
4
- Scollegate l’apparecchio, spingete il
pulsante di estrazione (C) e mantenendo la
pressione estraete le lame tenendole per i
paralame.
Attenzione : Ricordate che le lame sono
molto affilate e teglienti.
. PULIZIA
- Separate le lame: per fare questo estraete il
5
rivetto (E) dall’occhiello (F). Lavatele con
dell’acqua calda e sapone per i piatti.
Possono anche essere messe nella
lavastoviglie.
- Pulite l’apparecchio con un panno umido,
asciugandolo accuratamente.
- L’apparecchio non deve mai essere
immerso o posto sotto il getto dell’acqua.
13
Page 14

DJAA EU7 254 33 68
 Loading...