

Page 1
Page 2
Page 3
Page 4
Nous vous remercions d’avoir choisi un appareil de la gamme Moulinex.
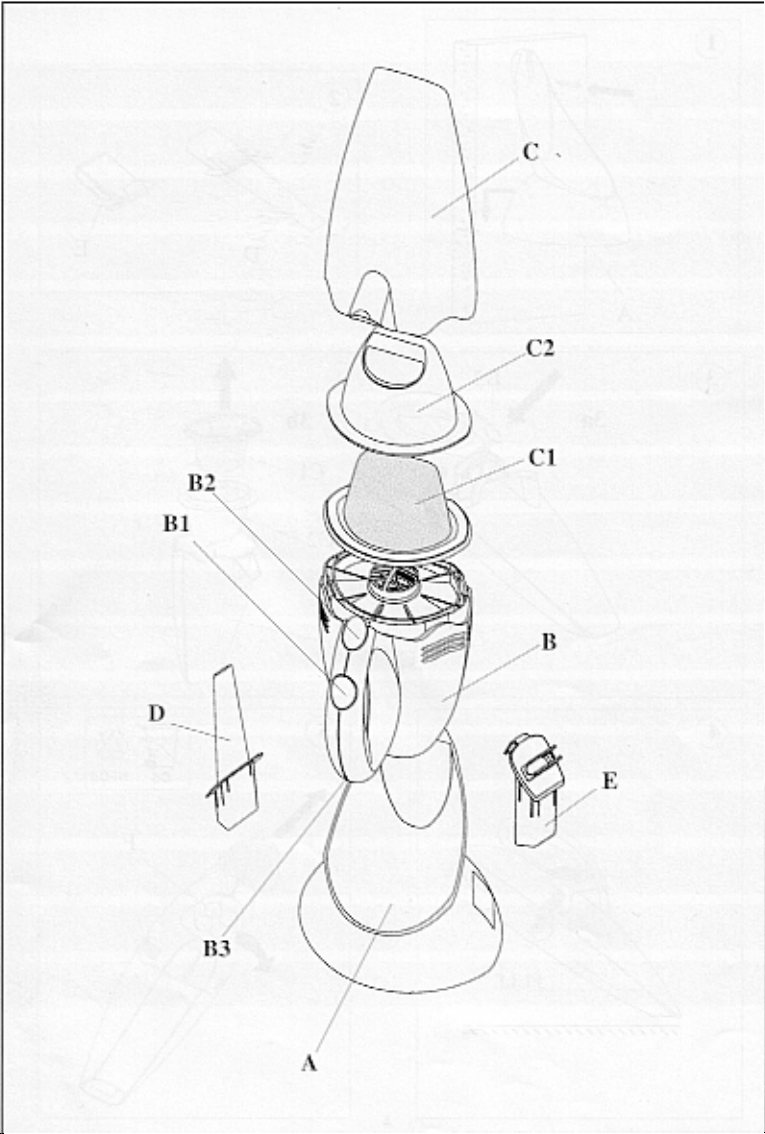
Description
A Support/chargeur
B Bloc moteur
B1 Interrupteur marche/arrêt
B2 Bouton d’ouverture du réservoir
eau/poussière
B3 Témoin lumineux
C Réservoir eau/poussière
C1 Filtre permanent
C2 Boîtier
D Suceur long
E Suceur raclette
F Batteries
Conseils de sécurité
- Lisez attentivement le mode d’emploi avant
la première utilisation de votre appareil : une
utilisation non conforme au mode d’emploi
dégagerait Moulinex de toute responsabilité.
- Ne laissez pas les enfants se servir de l’appareil sans surveillance. L’utilisation de cet
appareil par des jeunes enfants ou des personnes handicapées doit être faite sous surveillance.
- Vérifiez que la tension d’alimentation de votre appareil correspond bien à celle de votre installation électrique.
Toute erreur de branchement annule la garantie.
- Votre appareil est destiné uniquement à un
usage domestique et à l’intérieur de la maison.
- Débranchez votre appareil lorsque vous le
nettoyez.
- N’utilisez pas votre appareil s’il ne fonctionne
pas correctement ou s’il a été endommagé.
Dans ce cas, adressez-vous à un centre
service agréé Moulinex (voir liste dans le livret “Moulinex Service”).
- T oute intervention autre que le nettoyage et
l’entretien usuel par le client doit être effectuée par un centre service agréé Moulinex
(voir liste dans le livret “Moulinex Service”).
- Si le câble d’alimentation ou la fiche sont
endommagés, n'utilisez pas votre appareil.
Afin d'éviter tout danger, faites-les obligatoirement remplacer par un centre service
agréé Moulinex (voir liste dans le livret
"Moulinex Service").
- Pour votre sécurité, n’utilisez que des accessoires et des pièces détachées adaptés
à votre appareil.
- Ne mettez pas l’appareil ou son support dans
l’eau, sous l’eau courante ou tout autre liquide.
- N’aspirez pas de substances inflammables
ou explosives (liquide, gaz).
- N’aspirez pas de résidus incandescents
(cendres chaudes, braises, etc...)
- N’aspirez jamais d’éléments tranchants.
Mise en service/Utilisation
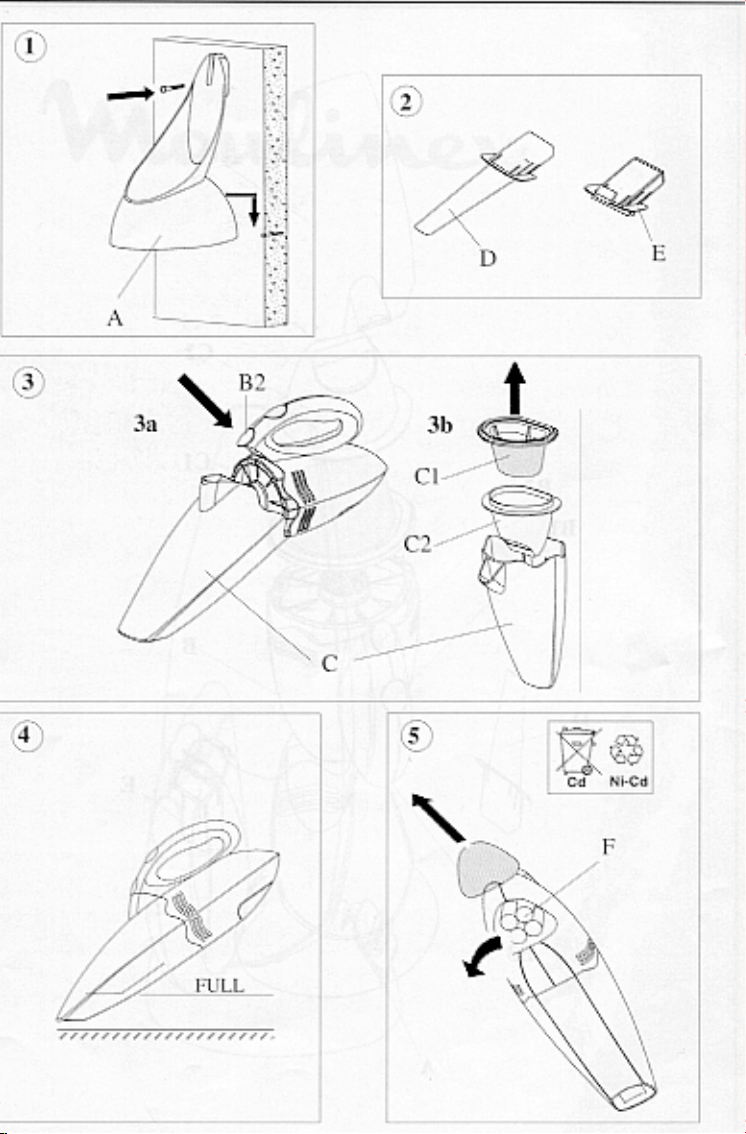
. INSTALLATION DU SUPPORT
Le support/chargeur (A) peut être :
- soit posé sur un plan de travail
1
- soit fixé au mur (set de fixation fourni)
L’excédent de câble peut être enroulé à l’intérieur du support.
. MISE EN CHARGE
- Branchez le support/chargeur (A)
- Placez l’appareil sur son support/chargeur
(A), le témoin lumineux s’allume (B3).
Avant sa première utilisation, l’appareil doit
être chargé pendant au moins 16 h.
. UTILISATION
Votre appareil et ses accessoires sont prévus
pour 2 utilisations : aspiration des poussières,
aspiration des liquides
- Si nécessaire, placez l’accessoire souhaité
sur le réservoir (C) :
. 1 suceur long (D) pour le nettoyage des re-
2
coins, des plinthes...
. 1 suceur raclette (E) pour le nettoyage des
surfaces planes ...
- Appuyez sur l’interrupteur (B1) pour démarrer l’appareil.
- Reposez-le sur son support après utilisation.
Pour l’aspiration de liquides (seulement
liquides non inflammables et non corrosifs) :
4
- Ne dépassez jamais le niveau “FULL”.
- Videz obligatoirement le réservoir avant de
reposer l’appareil sur son support.
. NETTOYAGE DU RÉSERVOIR EAU/POUSSIÈRE
3a
- Appuyez sur le bouton (B2). Retirez le réservoir (C).
3b
- Retirez le filtre permanent (C1) puis le boîtier (C2) et videz le réservoir.
- Brossez délicatement le filtre permanent
(C1) ou lavez-le si nécessaire.
- Vérifiez qu’il est parfaitement sec et remettez-le en place.
6
Page 5
Nota: A chaque changement d’utilisation
(poussière ou liquide), nettoyez le réservoir.
. ÉLIMINATION DES BATTERIES
Important
Votre appareil contient des batteries NickelCadmium.
5
- Avant de mettre votre appareil au rebut, enlevez les batteries (F) et rapportez-les chez votre revendeur ou
jetez-les dans les conteneurs spéciaux fournis par les communes.
Si votre appareil ne
fonctionne pas, que faire ?
Thank you for choosing an appliance from the
Moulinex range.
Description
A Base/Charger
B Motor unit
B1 On/Off switch
B2 Button to open water/dust container
B3 Indicator light
C Water/dust container
C1 Permanent filter
C2 Filter holder
D Crevice tool
E Brush head
F Batteries
- Vérifiez que l’appareil est bien posé sur son
support/chargeur (A).
- Vérifiez que le câble est bien branché et que
la prise de courant fonctionne.
- Les batteries sont peut-être déchargées :
replacez l’appareil sur le support/chargeur.
Vous avez suivi toutes ces instructions et
votre appareil ne fonctionne toujours pas :
adressez-vous à un centre service agréé
Moulinex (voir livret “ Moulinex Service ”).
Accessoires
Vous pouvez vous procurer un filtre permanent de rechange (réf. 0 690 396) en vous
adressant à un centre service agréé Moulinex
(voir livret “Moulinex Service”).
Safety recommendations
- Before using your appliance for the first time,
please read the instructions for use
carefully : any use which does not conform
to these instructions will asbolve Moulinex
from any liability.
- Never allow the children to use the appliance
unsupervised. If young children or disabled
persons use this appliance, they must
alsways be supervised.
- Check that the voltage rating of your
appliance does in fact correspond to that of
your household electrical wiring system. If
your appliance does not correspond with
your household wiring system voltage, do
not attempt to operate. Return the appliance
to the outlet where purchased for replacement.
Wiring instructions for U.K and Ireland
only :
APPLIANCES WITH FITTED PLUG
Important : For your convenience this
appliance is supplied complete with a plug
incorporating a 3 amp fuse.
In the event of replacing a fuse in the plug
supplied, a 3 amp fuse approved by ASTA to
BS1362 must be used.
If the socket outlets are not of the 13A BS 1363
type, and therefore do not accept the plug
connected to this appliance, cut off the plugif
moulded type or remove the plug if connected
by screw terminals.
When the plug is a moulded type and this is cut
off from the appliance, the connected wires
are a shock hazard. Do not under any
circumstances connect a cut off plug into the
electrical socket outlet. The cut off plug must
7
Page 6
be disposed of in a safe manner that prevents
any form of connection.
If the fuse cover is detachable, never use the
plug with the cover omitted. Replacement
covers can be obtained from your service
agent.
Fit the appropriate plug according to the instructions in paragraph "Fitting a plug". With
alternative plugs a 5 amp fuse must be fitted
either in the plug or adaptor or at the main fuse
box.
APPLIANCES WITHOUT FITTED PLUG
FITTING A PLUG - IMPORTANT
The wires in the mains lead are coloured in
accordance with the following code:
BLUE : NEUTRAL
BROWN : LIVE
But the colours may not correspond with the
coloured markings identifying the terminals in
your plug, proceed as follows:
The wire which is coloured BLUE must be
connected to the terminal which is marked
with the letter ‘N’ or coloured black. The wire
which is coloured BROWN must be connected
to the terminal which is marked with the letter
‘L’ or coloured red.
This appliance is manufactured to conform to
the Low Voltage Electrical Equipment (Safety)
Regulations 1989 and is designed to comply
with BS 3456. It complies with the requirements
of the EEC Directive (89/336/EEC).
Any connection error will render the
guarantee null and void.
- Your appliance is intended solely for
domestic use within the home.
- Unplug your appliance when you are
cleaning it.
- Never use your appliance if it is not working
correctly or if it has been damaged. If this
happens, you should contact an approved
Moulinex service centre (see list in the
“Moulinex Service” booklet).
- Any action other than cleaning and normal
maintenance by the customer must be
performed by an approved Moulinex service
centre (see list in the “Moulinex Service”
booklet).
- If the mains lead or the plug are damaged,
do not use your appliance. In order to avoid
any accident, they must be replaced by an
approved Moulinex Centre (see list in the
leaflet "Moulinex Service").
- For your own safety, use only accessories
and spare parts which are suitable for your
appliance.
- Never place the appliance or its base in
water, under running water or in any other
liquid.
- Do not vacuum up inflammable or explosive
substances (liquid, gas).
- Do not vacuum up incandescent waste (hot
ashes, embers, etc...)
- Do not vacuum up sharp items.
Setting-up/Using your handheld vacuum cleaner
. INSTALLATION OF THE BASE
The base/charger (A) can be either :
- placed on a worktop
- or fixed to a wall (wall mounted support
1
provided)
Any excess cable can be wound up inside the
base.
. CHARGING
- Plug in the base/charger (A)
- Place the appliance on its base/charger (A),
the indicator light will come on (B3).
Before being used for the first time, the
appliance must be charged for at least 16
hours.
. USING YOUR HAND-HELD VACUUM CLEANER
Your appliance and its accessories are
designed for 2 uses : to vacuum up dust and
liquids
- If necessary, place the desired accessory on
the container (C) :
. 1 crevice tool (D) for cleaning corners and
2
skirting boards, etc...
. 1 brush head (E) to clean flat surfaces ...
- Press the switch (B1) to start the appliance.
- Replace it on its base after use.
To vacuum up liquids (only for inflammable
and non corrosive liquids) :
4
- Do not go over the “FULL” level.
- Always empty the container before replacing
it on its base.
. CLEANING THE WATER/DUST CONTAINER
- Press the button (B2). Remove the contai-
3a
ner (C).
- Remove the permanent filter (C1) from the
3b
filter holder (C2) and empty it.
- Gently brush the permanent filter (C1) or
wash it if necessary.
- Ensure that it is completetly dry and then
replace it.
Note: Wash the container after each use
(dust or liquid).
8
Page 7

. DISPOSING OF THE BATTERIES
Important
Your appliance contains nickel-cadium batteries.
- Before discarding your appliance,
5
remove the batteries (F) and return
them to your retailer or dispose of them
in the special containers provided by your
local authority.
What to do if your appliance
is not working ?
- Check that the appliance is correctly
positioned on its base/charger (A)
- Check that the cable is properly plugged in
and that the socket is working.
- It may be that the batteries are flat : replace
the appliance on the base/charger.
If you have followed all these instructions
and your appliance still does not work :
contact an approved Moulinex service centre
(see list in the “ Moulinex Service ” booklet).
Accessories
You can obtain a replacement permanent filter
(ref. 0 690 396) by contacting an approved
Moulinex service centre (see list in the
“Moulinex Service” booklet).
Vielen Dank, daß Sie sich für ein Moulinex-
Gerät entschieden haben.
Beschreibung
A Halterung/Ladestation
B Motorblock
B1 Ein-/Ausschalter
B2 Öffnungstaste für Wasser-/
Staubbehälter
B3 Kontrolleuchte
C Wasser-/Staubbehälter
C1 Dauerfilter
C2 Gehäuse
D Fugendüse
E Saugbürste mit Gummilippe
F Akkus
Sicherheitshinweise
- Lesen Sie diese Gebrauchsanleitung vor
dem ersten Einsatz Ihres Gerätes sorgfältig
durch. Eine unsachgemäße Handhabung
entbindet Moulinex von jeglicher Haftung.
- Überlassen Sie Kindern niemals
unbeaufsichtigt das Gerät. Die Benutzung
dieses Geräts durch kleine Kinder darf nur
unter Aufsicht erfolgen.
- Überprüfen Sie, ob der Anschlußwert Ihres
Gerätes mit der auf Ihrem Stromzähler
angegebenen Spannung übereinstimmt.
Bei fehlerhaftem Anschluß erlischt die Garantie.
- Ihr Gerät ist ausschließlich für den
Haushaltsgebrauch und für die Benutzung
in geschlossenen Räumen bestimmt.
- Ziehen Sie den Netzstecker, bevor Sie das
Gerät reinigen.
- Verwenden Sie das Gerät nicht, wenn es
nicht einwandfrei arbeitet oder beschädigt
ist. In diesem Fall wenden Sie sich an den
Moulinex-Kundendienst (siehe Liste im
Moulinex-Serviceheft).
- Jeder andere Eingriff, der über die normale
Reinigung und Pflege hinausgeht, muß vom
Moulinex-Kundendienst durchgeführt
werden (siehe Liste im MoulinexServiceheft).
- Falls das Stromkabel oder der Netzstecker
Ihres Gerätes defekt sind, nehmen Sie es
auf keinen Fall in Betrieb, sondern lassen
Sie diese Teile durch den Moulinex
Kundendienst oder Moulinex Vertragskundendienste (Adressen siehe Serviceheft)
auswechseln.
9
Page 8
- Benutzen Sie zu Ihrer eigenen Sicherheit nur
Zubehörteile und Ersatzteile, die für Ihr Gerät
geeignet sind.
- Tauchen Sie das Gerät oder die Halterung
niemals in Wasser oder andere Flüssigkeiten
und halten Sie es auch nicht unter fließendes
Wasser.
- Saugen Sie keine brennbaren oder
explosiven Stoffe (Flüssigkeiten, Gas) auf.
- Saugen Sie keine glühenden Rückstände
auf (heiße Asche, Kohlenglut usw.).
- Der Hersteller kann nicht für Schäden
verantwortlich gemacht werden, die durch
nicht bestimmungsgemäße Verwendung
oder falsche Bedienung verursacht werden.
Inbetriebnahme/
Gebrauchsanleitung
. MONTAGE DER HALTERUNG
Die Halterung/Ladestation (A) kann:
- entweder auf eine Arbeitsfläche gestellt
werden
1
- oder an einer Wand befestigt werden (mit
Hilfe des mitgelieferten Befestigungssets).
Überstehendes Kabel kann im Inneren der
Halterung aufgerollt werden.
. LADEN
- Schließen Sie die Halterung/Ladestation (A)
am Netz an.
- Stellen Sie das Gerät in die Halterung/
Ladestation (A), die Kontrolleuchte (B3)
leuchtet auf.
Vor dem ersten Gebrauch muß das Gerät
mindestens 16 Stunden aufgeladen werden.
. BENUTZUNG
Ihr Gerät und die Zubehörteile sind für das
Aufsaugen von Staub und von Flüssigkeiten
ausgelegt:
- Je nach Bedarf setzen Sie das gewünschte
Zubehörteil auf den Behälter (C).
. 1 Fugendüse (D) zur Reinigung von Ecken,
2
Fußleisten usw.
. 1 Saugbürste mit Gummilippe (E) zur
Reinigung glatter Flächen usw.
- Drücken Sie den Schalter (B1), um das
Gerät einzuschalten.
- Stellen Sie das Gerät nach der Benutzung
wieder in die Halterung/Ladestation.
Um Flüssigkeiten aufzusaugen (keine
brennbaren oder ätzenden Flüssigkeiten!):
- Überschreiten Sie niemals die Füllhöhe
4
“FULL”.
- Entleeren Sie den Behälter unbedingt, bevor
Sie das Gerät wegräumen.
. REINIGUNG DES WASSER-/STAUBBEHÄLTERS
- Drücken Sie die T aste (B2). Nehmen Sie den
3a
Behälter (C) ab.
- Nehmen Sie den Dauerfilter (C1) und
3b
anschließend das Gehäuse (C2) heraus und
leeren Sie den Behälter.
- Bürsten Sie den Dauerfilter (C1) vorsichtig
ab oder waschen Sie ihn, falls erforderlich.
- Wenn er vollkommen trocken ist, setzen Sie
ihn wieder ein.
Achtung: Bei jeder Nutzungsänderung
(Staub oder Flüssigkeit) sollten Sie vorher
den Behälter reinigen.
. ENTSORGUNG DER AKKUS
Wichtig
Ihr Gerät ist mit Nickel-Cadmium-Akkus
ausgestattet.
- Bevor Sie Ihr Gerät entsorgen,
5
entfernen Sie zuerst die Akkus (F) und
bringen Sie sie zu Ihrem Fachhändler
oder werfen sie in die von den Gemeinden
aufgestellten Sammelbehälter.
Was tun, wenn Ihr Gerät
nicht funktioniert?
- Überprüfen Sie, ob das Gerät
ordnungsgemäß in der Halterung/
Ladestation (A) steht.
- Prüfen Sie, ob das Kabel an der Steckdose
angeschlossen ist und ob die Steckdose
funktioniert.
- Die Akkus könnten entladen sein: Stellen Sie
das Gerät in die Halterung/Ladestation.
Wenn Sie diese Anweisungen befolgt
haben und Ihr Gerät immer noch nicht
funktioniert, wenden Sie sich bitte an den
Moulinex-Kundendienst (siehe “MoulinexServiceheft).
Zubehör
Ein Ersatzdauerfilter (Best.-Nr. 0 690 396) ist
beim Moulinex-Kundendienst erhältlich (siehe
Moulinex-Serviceheft).
10
Page 9

Wij danken u voor de aanschaf van een
apparaat uit het Moulinex assortiment.
Beschrijving
A Houder/oplaadunit
B Motorblok
B1 Aan-/uitschakelaar
B2 Knop voor opening van het water-/
stofreservoir
B3 Controlelampje
C Water-/stofreservoir
C1 Permanent filter
C2 Filterhouder
D Lange zuigmond
E Zuigmond met schrobber
F Batterijen
Veiligheidsvoorschriften
- Lees deze gebruiksaanwijzing zorgvuldig
door voordat u het apparaat in gebruik
neemt: als het apparaat niet overeenkomstig
de gebruiksaanwijzing wordt gebruikt, vervalt
de aansprakelijkheid van Moulinex.
- Het gebruik van het apparaat door kinderen
dient uitsluitend onder toezicht plaats te
vinden.
- Controleer of de netspanning van het
apparaat overeenkomt met de netspanning
bij u thuis.
Verkeerde aansluiting maakt de garantie
ongeldig.
- Het apparaat is uitsluitend bestemd voor
huishoudelijk gebruik en mag alleen
binnenshuis gebruikt worden.
- Haal de stekker uit het stopcontact als u het
apparaat schoonmaakt.
- Maak geen gebruik van het apparaat als het
niet goed functioneert of als het beschadigd
is. Neem in zo’n geval contact op met de
Moulinex reparatie-service (zie adres in het
«Moulinex Service» boekje).
- Met uitzondering van reiniging en
gebruikelijk onderhoud dienen
werkzaamheden aan het apparaat te worden
uitgevoerd door de Moulinex reparatie-service (zie adres in het «Moulinex Service»
boekje).
- Bij beschadiging van het aansluitsnoer en/
of van de stekker, wordt u dringend verzocht
het apparaat niet te gebruiken. Om zeker te
zijn van een juiste vervanging, mag dit
uitsluitend geschieden door en door
Moulinex erkende reparatie-service (het
adres vindt u in het "Moulinex Service"
boekje).
- Voor uw eigen veiligheid, dient u uitsluitend
gebruik te maken van Moulinex accessoires en onderdelen, afgestemd op het
apparaat.
- Plaats noch het apparaat noch de houder in
water, onder stromend water of in een
andere vloeistof.
- Zuig geen brandbare of ontplofbare
(vloeibare, gasvormige) producten op.
- Zuig geen (na)gloeiende producten op (hete
as, gloeiende kooltjes enz.).
- Zuig geen scherpe voorwerpen op.
Ingebruikstelling / gebruik
. INSTALLATIE VAN DE HOUDER
U kunt de houder/oplaadunit (A):
- op een werkblad plaatsen.
1
- aan de wand bevestigen (met de
meegeleverde bevestigingsset).
Als het snoer te lang is, kunt u het oprollen in
de houder.
. OPLADEN
- Steek de stekker van de houder/oplaadunit
(A) in het stopcontact.
- Plaats het apparaat op de houder/oplaadunit
(A), het controlelampje gaat aan (B3).
Voor het eerste gebruik dient het apparaat
minstens 16 uur opgeladen te worden.
. GEBRUIK
Uw apparaat en de accessoires hebben 2
gebruiksmogelijkheden: het opzuigen van stof,
het opzuigen van vloeistoffen.
- Indien noodzakelijk, plaatst u het gewenste
accessoire op het reservoir (C):
. 1 lange zuigmond (D) voor het schoonmaken
2
van hoeken en plinten;
. 1 zuigmond met schrobber (E) voor het
schoonmaken van gladde oppervlakken.
- Druk op de aan-/uitschakelaar (B1) om het
apparaat te starten.
- Plaats het apparaat na gebruik terug op de
houder.
Voor het opzuigen van vloeistoffen
(uitsluitend niet-brandbare en niet-bijtende
vloeistoffen):
4
- Het niveau «FULL» mag nooit overschreden
worden.
- Het reservoir dient altijd geleegd te worden
voordat u het apparaat op de houder
terugplaatst.
11
Page 10
. SCHOONMAKEN VAN HET WATER-/
STOFRESERVOIR
3a
- Druk op de knop (B2) voor opening van het
water-/stofreservoir. Verwijder het reservoir
(C).
- Verwijder het permanente filter (C1) en de
3b
filterhouder (C2); leeg het reservoir.
- Borstel het permanente filter (C1) voorzichtig
schoon; indien noodzakelijk kunt u het ook
wassen.
- Wacht tot het filter volledig droog is voordat
u het terugplaatst in het apparaat.
Let op: Maak het reservoir schoon zodra u
overstapt van de ene gebruiksmogelijkheid
naar de andere (opzuigen van stof naar
vloeistof of andersom).
. VERWIJDEREN VAN DE BATTERIJEN
Belangrijk
Uw apparaat bevat nikkel-cadmium batterijen.
5
- Voordat u het apparaat afdankt, dient
u de batterijen (F) te verwijderen. Breng
ze terug naar de leverancier of naar
een depot voor chemisch afval.
Wat te doen als uw apparaat
niet werkt?
- Controleer of het apparaat goed geplaatst
is op de houder/oplaadunit (A).
- Controleer of het snoer goed aangesloten
is en of het stopcontact werkt.
- De batterijen zijn misschien leeg: plaats het
apparaat terug op de houder/oplaadunit.
U hebt bovenstaande aanwijzingen
opgevolgd en het apparaat werkt nog
steeds niet: neem contact op met de Moulinex
reparatie-service (zie «Moulinex Service»
boekje).
Accessoires
- Voor de aanschaf van een extra permanent
filter (code 0 690 396) kunt u contact
opnemen met Moulinex (zie «Moulinex Ser-
vice» boekje).
Muchas gracias por haber elegido un aparato
de la gama Moulinex.
Descripción
A Soporte/cargador
B Bloque motor
B1 Interruptor marcha/parada
B2 Botón de apertura del depósito de
agua/polvo
B3 Indicador luminoso
C Depósito de agua/polvo
C1 Filtro permanente
C2 Estuche
D Accesorio largo
E Accesorio rascador
F Pilas
Consejos de seguridad
- Lea atentamente las instrucciones de uso
antes de utilizar el aparato por primera vez;
el uso indebido eximiría a Moulinex de toda
responsabilidad.
- No deje que los niños utilicen el aparato sin
vigilancia. Los jóvenes y las personas
discapacitadas deben utilizarlo siempre bajo
vigilancia.
- Compruebe que la tensión del aparato es la
misma que la de su instalación eléctrica.
Los errores de conexión anulan la garantía.
- Este aparato debe utilizarse sólo con fines
domésticos y en el hogar.
- Desconecte el aparato durante la limpieza.
- No utilice el aparato si no funciona
correctamente o está dañado. En este caso
diríjase a un centro de servicio técnico
Moulinex (consulte el folleto “Moulinex Service”).
- Las intervenciones en el aparato que no
sean para el mantenimiento y la limpieza
habituales deben efectuarse en un centro
de servicio técnico autorizado por Moulinex
(consulte el folleto “Moulinex Service”).
- Si el cable de alimentación o el enchufe
estuvieran dañados, no utilice el aparato. A
fin de evitar cualquier percance, deberá
hacerlo reemplazar obligatoriamente en un
servicio técnico Moulinex (ver lista en el
folleto "Moulinex Service").
- Para su seguridad, utilice sólo accesorios y
repuestos adaptados a su aparato.
- No sumerja el aparato o el soporte bajo el
agua, ni bajo el grifo ni ningún otro líquido.
12
Page 11

- No aspire substancias inflamables o
explosivas (líquido, gas).
- No aspire residuos incandescentes (cenizas
calientes, brasas, etc.).
- No aspire nunca elementos cortantes.
Puesta en servicio/
Utilización
. INSTALACIÓN DEL SOPORTE
El soporte/cargador (A) puede colocarse:
- sobre una superficie de trabajo,
- fijo en una pared (equipo de fijación adjunto).
1
El cable que sobra puede enrollarse en el
interior del soporte.
. CARGA
- Conecte el soporte/cargador (A).
- Coloque el aparato en su soporte/cargador
(A); se enciende el indicador luminoso (B3).
Antes del primer uso, el aparato debe cargarse
durante al menos 16 horas.
. USO
Este aparato y sus accesorios están pensados
para dos tipos de uso: aspiración de polvo y
aspiración de líquido.
- Si es necesario, inserte el accesorio
deseado en el depósito (C):
. 1 accesorio largo (D) para limpiar rincones,
2
zócalos ...
. 1 accesorio rascador (E) para limpiar super-
ficies planas ...
- Pulse el interruptor (B1) para poner el
aparato en marcha.
- Colóquelo en el zócalo después de cada
uso.
Para aspirar líquidos (sólo líquidos no
inflamables y no corrosivos):
- No sobrepase jamás el nivel “FULL”.
4
- Debe vaciar siempre el depósito antes de
colocar el aparato en su soporte.
. LIMPIEZA DEL DEPÓSITO DE AGUA/POLVO
3a
- Pulse el botón (B2). Saque el depósito (C).
- Saque el filtro permanente (C1), después la
3b
caja (C2) y vacíe el depósito.
- Cepille con cuidado el filtro permanente (C1)
o lávelo si es necesario.
- Cuando esté perfectamente seco vuélvalo
a colocar en su lugar.
Nota: Cada vez que cambie de uso (polvo
o líquido), debe limpiar el depósito.
. RECICLAJE DE LAS PILAS
Importante
Su aparato contiene baterías Níquel-Cadmio.
- Antes de tirar el aparato, saque las
5
pilas (F) y llévelas a su distribuidor o
deposítelas en los contenedores
especiales de su municipio.
¿Qué hacer si el aparato no
funciona?
- Compruebe que el aparato está bien
colocado en el soporte/cargador (A).
- Compruebe que el cable está bien
conectado y que la toma de corriente
funciona.
- Es posible que las pilas estén descargadas:
vuelva a colocar el aparato en el soporte/
cargador.
Si ha seguido todas las instrucciones y el
aparato sigue sin funcionar, diríjase a un
centro de servicio técnico autorizado por
Moulinex (consulte el folleto “Moulinex Service”).
Accesorios
Puede conseguir un filtro permanente de
recambio (ref. 0 690 396) dirigiéndose a un
centro de servicio técnico autorizado por
Moulinex (consulte el folleto “Moulinex Service”).
13
Page 12
Parabéns por ter escolhido um aparelho da
gama Moulinex.
Descrição
A Suporte/carregador
B Bloco do motor
B1 Interruptor ligar / desligar
B2 Tecla de abertura do compartimento
água/poeira
B3 Luz piloto
C Compartimento água/poeira
C1 Filtro permanente
C2 Vasilha
D Tubo comprido
E Escova raspadeira
F Pilhas
Conselhos de segurança
- Leia atentamente as instruções de utilização
antes de utilizar o aparelho pela primeira
vez : uma utilização não conforme às
instruções de utilização liberta a Moulinex
de qualquer responsabilidade.
- Nunca deixe o aparelho ao alcance das
crianças. O aparelho não deve ser utilizado
por crianças ou pessoas deficientes, excepto
sob a supervisão de um adulto.
- Verifique se a tensão de alimentação do
aparelho corresponde à da sua instalação
Qualquer erro de ligação anula a garantia.
- O seu aparelho destina-se exclusivamente
a uma utilização doméstica e no interior de
casa.
- Tire a ficha da tomada no final de cada
utilização e antes de proceder a qualquer
operação de limpeza.
- Não utilize o aparelho se não estiver a
funcionar correctamente ou se estiver de
algum modo danificado. Se for esse o caso,
dirija-se a um Serviço Após V enda Moulinex
(ver lista no folheto “ Serviço Moulinex ”).
- Qualquer intervenção para além da limpeza
e manutenção normais deve ser levada a
cabo por um Serviço Após V enda Moulinex.
- Se o cabo de alimentação ou a ficha
estiverem danificados, não utilize o
aparelho. Para evitar qualquer perigo, estes deverão ser obrigatoriamente
substituídos por um Serviço Após Venda
Moulinex (ver lista "Moulinex Service").
- Para sua segurança utilize apenas
acessórios e peças separadas adaptadas
ao seu aparelho.
- Não molhe o aparelho, ou o seu suporte com
água ou qualquer outro líquido.
- Não deixe o cabo eléctrico pendurado ao
alcance das crianças.
-Mantenha sempre o aparelho fora do
alcance das crianças.
- O cabo eléctrico nunca deve estar na
proximidade ou em contacto com as partes
quentes do aparelho, perto de uma fonte de
calor ou numa esquina cortante.
- Se o cabo eléctrico ou a ficha estiverem
danificados, não utilize o aparelho. Para
evitar qualquer perigo, mande substituir as
peças num Serviço Após Venda Moulinex
(ver lista no folheto “ Serviço Moulinex ”).
- Para sua segurança, utilize apenas
acessórios e peças separadas Moulinex
adaptadas ao seu aparelho.
- Não aspire substâncias inflamáveis ou
explosivas (líquido, gás…)
- Não aspire resíduos incandescentes (cinzas
quentes, brasas,…)
- Não aspire água ou qualquer outro líquido,
matérias húmidas ou objectos cortantes.
Funcionamento/Utilização
. INSTALAÇÃO DO SUPORTE
O suporte /carregador (A) pode ser:
- colocado sobre uma bancada
1
- fixado na parede (acessórios fornecidos)
O excesso de cabo que não quiser utilizar
pode ser enrolado no interior do suporte.
. POR A CARREGAR
- Ligue o suporte/carregador (A)
- Coloque o aparelho sobre o suporte /
carregador (A), a luz piloto acende (B3).
Antes da primeira utilização, o aparelho deve
ficar a carregar durante pelo menos 16 horas
de seguida.
. UTILIZAÇÃO
O seu aparelho assim como os seus acessórios
foram previstos para dois tipos de utilização :
aspiração de poeiras, aspiração de líquidos.
- Se for necessário, coloque o acessório
desejado sobre o compartimento água e
poeiras (C) :
. 1 tubo comprido (D) para limpar os cantos,
2
os rodapés...
. 1 escova raspadeira (E) para limpar as
superfícies planas...
- Carregue no interruptor (B1) para ligar o
aparelho.
- Coloque o aparelho sobre a base após a
utilização.
14
Page 13
No caso de aspiração de líquidos
(unicamente líquidos que não sejam nem
inflamáveis nem corrosivos) :
- Nunca ultrapasse o nível “FULL”.
4
- Esvazie sempre a vasilha antes de voltar a
pôr o aparelho sobre o seu suporte.
. LIMPEZA DO COMPARTIMENTO DE POEIRAS
3a
- Carregue na tecla (B2). Tire a vasilha (C).
3b
- Tire o filtro permanente (C1) e logo a seguir
a vasilha (C2) e despeje a vasilha.
- Passe cuidadosamente uma escova pelo
filtro (C1) ou lave-o se for necessário.
- Certifique-se que o filtro está perfeitamente
seco antes de voltar a pô-lo no sítio.
Observação : Aquando cada mudança de
utilização (poeiras ou líquidos), limpe a
vasilha
. ELIMINAÇÃO DAS PILHAS
Importante
O seu aparelho vem com pilhas Niquel-Cadmium.
- Antes de deitar fora o aparelho, tire
5
as pilhas (F) e entregue-as ao seu
revendedor ou deite-as em
contentores próprios.
Se o aparelho não funciona,
o que fazer?
- Verifique se o aparelho está perfeitamente
colocado sobre o carregador (A)
- Verifique se o cabo eléctrico está bem ligado
e se a tomada funciona.
- As pilhas podem estar descarregadas: volte
a colocar o aparelho sobre o carregador.
Seguiu todas as instruções e o aparelho
ainda não funciona: dirija-se a um Serviço
Após Venda Moulinex (ver lista no folheto
“ Serviço Moulinex”).
Acessórios
Pode adquirir um filtro permanente para
substituir o antigo (ref. 0 690 395) num Serviço
Após Venda Moulinex (ver lista no folheto
“Serviço Moulinex”).
Vi ringraziamo per aver scelto un apparecchio
della gamma Moulinex.
Description
A Supporto/carica batteria
B Blocco motore
B1 Interrutore avvio/arresto
B2 Tasto di apertura del contenitore
acqua/polvere
B3 Spia luminosa
C Contenitore acqua/polvere
C1 Filtro permanente
C2 Cassetto
D Bocchetta a lancia
E Bocchetta piccola
F Batterie
Consigli di sicurezza
- Leggete attentamente il libretto delle
istruzioni precendentemente al primo utilizzo
del Vostro apparecchio : qualsiasi utilizzo
non conforme alle istruzioni libera Moulinex
da ogni responsabilità.
- Non lasciate che i bambini utilizzino
l’apparecchio senza sorveglianza. L’utilizzo
di questo apparecchio da parte di bambini o
di persone portatrici di handicap deve
avvenire sotto sorveglianza.
- Verficate che la tensione di alimentazione
del Vostro apparecchio corrisponda a quella
della Vostra installazione elettrica.
Qualsiasi errore di collegamento annulla
la copertura della garanzia.
- Il Vostro apparecchio è stato ideato per il
solo uso domestico, all’interno della casa.
- Scollegate il Vostro apparecchio prima di
pulirlo.
- Se il Vostro apparecchio non funziona
correttamente, o se risulta danneggiato, non
utilizzatelo. In questo caso, indirizzateVI
presso un Centro Assistenza autorizzato
Moulinex (vedere elenco nell’opuscolo
“Moulinex Service”).
- Ogni intervento che non sia la pulizia o la
normale manutenzione deve essere
effettuato da un Centro Assistenza
autorizzato Moulinex (vedere elenco
nell’opuscolo “Moulinex Service”).
- Se il cavo di alimentazione o la spina sono
danneggiati, non utilizzate il Vostro
apparecchio. Per evitare qualsiasi pericolo,
fatteli sostituire soltanto ed unicamente
presso un centro Assistenza autorizzato
15
Page 14
Moulinex (vedere opuscolo "Moulinex Service").
- Anche per la Vostra sicurezza, utilizzate
soltanto accessori e pezzi di ricambio
originali, gli unici adatti al Vostro
apparecchio.
- Non mettete mai l’apparecchio o il suo
supporto dentro o sotto l’acqua corrente o
in qualsiasi liquido.
- Non aspirate sostanze infiammabili o
esplosivi (liquidi, gas).
- Non aspirate residui incandescenti (cenere
calde, brace, ecc...)
- Non aspirate mai elementi taglienti.
Messa in funzione/Utilizzo
. MONTAGGIO DEL SUPPORTO
Il supporto/carica batteria (A) puo essere :
- appoggiato su un piano di lavoro
1
- fissato al muro (kit di fissaggio in dotazione)
L’eccesso di cavo di alimentazione puo essere
avvolto all’interno del supporto.
. MESSA IN CARICA
- Collegate il s
upporto/carica batteria (A)
- Inserite l’apparecchio sul suo supporto/
carica batteria (A), la spia luminosa si
accende (B3).
Al primo utilizzo, l’apparecchio deve essere
messo in carica per almeno 16 ore.
. UTILIZZO
Il Vostro apparecchio ed i suoi accessori sono
ideati per 2 tipi di utlizzo : aspirare la polvere,
aspirare i liquidi
- Quando necessario, inserite l’accessorio
desiderato sul contenitore (C) :
2
. 1 bocchetta a lancia (D) per pulire angoli e
battiscopa...
. 1 spazzola piccola (E) per pulire superfici
piane ...
- Premete l’interrutore (B1) per avviare
l’apparecchio.
- Riposizionatelo sul suo supporto dopo
l’utilizzo.
Per aspirare liquidi (esclusivamente liquidi
4
non infiammabili e non corrosivi) :
- Non superate mai il livello “FULL”.
- Svuotate assolutamente il contenitore prima
di riposizionare l’apparecchio sul suo
supporto.
. PULIZIA DEL CONTENITORE POLVERE/LIQUIDI
3a
- Premete il tasto (B2). Estraete il contenitore
(C).
- Estraete il filtro permanente (C1) poi il
3b
cassetto (C2) quindi svuotate il contenitore.
- Strofinate delicatamente il filtro permanente
(C1) oppure lavatelo se necessario.
- Verificate che il filtro permanente sia
completamente asciutto prima di inserirlo di
nuovo.
Nota: Per ogni diverso utilizzo (polvere o
liquidi), pulite il contenitore.
. ÉLIMINAZIONE DELLE BATTERIE
Importante
Il Vostro apparecchio contiene delle batterie
Nickel-Cadmium.
- Prima di eliminare il Vostro
5
apparecchio, togliete le batterie (F) e
riportatele al Vostro rivenditore o
eliminatele negli appositi contenitori forniti
dal Vostro comune.
Se il Vostro apparecchio
non funziona, che fare ?
- Verificate che l’apparecchio sia
correttamente inserito sul suo supporto/
carica batteria (A)
- Verificate che il cavo di alimentazione sia
correttamente collegato e che la spina
elettrica funzioni correttamente.
- Le batterie possono essersi scaricate :
rimettete l’apparecchio sul suo supporto/
carica batteria.
Avete seguito tutte queste istruzioni ed il
Vostro apparecchio continua a non
funzionare : indirizzateVi presso un Centro
Assistenza autorizzato Moulinex (vedere
opuscolo “ Moulinex Service ”).
Accessori
Potete acquistare un filtro permanente di
ricambio (ref. 0 690 396) presso un Centro
Assistenza autorizzato Moulinex (vedere
opuscolo “Moulinex Service”).
16
 Loading...