

Page 1

User Guide
MIDI Express XT
MIDI Express 128
micro express
micro lite
Mark of the Unicorn, Inc.
1280 Massachusetts Avenue
Cambridge, MA 02138
Business voice: (617) 576-2760
Business fax: (617) 576-3609
Tech support fax: (617) 354-3068
Tech support email: techsupport@motu.com
Web site: http://www.motu.com
Page 2

SAFETY PRECAUTIONS AND ELECTRICAL REQUIREMENTS
WARNING: TO REDUCE THE RISK OF FIRE OR ELECTRICAL SHOCK, DO NOT EXPOSE THIS APPLIANCE TO RAIN OR
OTHER MOISTURE.
CAUTION: TO REDUCE THE RISK OF ELECTRICAL SHOCK, DO NOT REMOVE COVER. NO USER-SERVICEABLE
PARTS INSIDE. REFER SERVICING TO QUALIFIED SERVICE PERSONNEL.
WARNING: DO NOT PERMIT FINGERS TO TOUCH THE TERMINALS OF PLUGS WHEN INSTALLING OR REMOVING
THE PLUG TO OR FROM THE OUTLET.
WARNING: IF NOT PROPERLY GROUNDED THE MOTU USB MIDI interface COULD CAUSE AN ELECTRICAL SHOCK.
The MOTU USB MIDI interface is equipped with a three-conductor cord and grounding type plug which has a grounding prong,
approved by Underwriters' Laboratories and the Canadian Standards Association. This plug requires a mating three-conductor
grounded type outlet as shown in Figure A below.
If the outlet you are planning to use for the MOTU USB MIDI interface is of the two prong type, DO NOT REMOVE OR ALTER THE
GROUNDING PRONG IN ANY MANNER. Use an adapter as shown below and always connect the grounding lug to a known
ground. It is recommended that you have a qualified electrician replace the TWO prong outlet with a properly grounded THREE prong
outlet. An adapter as illustrated below in Figure B is available for connecting plugs to two-prong receptacles.
WARNING: THE GREEN GROUNDING LUG EXTENDING FROM THE ADAPTER MUST BE CONNECTED TO A
PERMANENT GROUND SUCH AS TO A PROPERLY GROUNDED OUTLET BOX. NOT ALL OUTLET BOXES ARE
PROPERLY GROUNDED.
If you are not sure that your outlet box is properly grounded, have it checked by a qualified electrician. NOTE: The adapter illustrated is
for use only if you already have a properly grounded two-prong receptacle. Adapter is not allowed in Canada by the Canadian
Electrical Code. Use only three wire extension cords which have three-prong grounding type plugs and three-prong receptacles which
will accept the MOTU USB MIDI interface plug.
IMPORTANT SAFEGUARDS
1. Read instructions - All the safety and operating instructions should be read before operating the MOTU USB MIDI interface.
2. Retain instructions - The safety instructions and owner's manual should be retained for future reference.
3. Heed Warnings - All warnings on the MOTU USB MIDI interface and in the owner's manual should be adhered to.
4. Follow Instructions - All operating and use instructions should be followed.
5. Cleaning - Unplug the MOTU USB MIDI interface from the computer before cleaning and use a damp cloth. Do not use liquid or
aerosol cleaners.
6. Overloading - Do not overload wall outlets and extension cords as this can result in a risk of fire or electrical shock.
7. Power Sources - This MOTU USB MIDI interface should be operated only from the type of power source indicated on the marking
label. If you are not sure of the type of power supply to your location, consult your local power company.
8. Power-Cord Protection - Power-supply cords should be routed so that they are not likely to be walked on or pinched by items placed
upon or against them. Pay particular attention to cords and plugs, convenience receptacles, and the point where they exit from the
MOTU USB MIDI interface.
9. Lightning - For added protection for the MOTU USB MIDI interface during a lightning storm, unplug it from the wall outlet. This will
prevent damage to the MOTU USB MIDI interface due to lightning and power line surges.
10. Servicing - Do not attempt to service this MOTU USB MIDI interface yourself as opening or removing covers will expose you to
dangerous voltage and other hazards. Refer all servicing to qualified service personnel.
11. Damage Requiring Service - Unplug the MOTU USB MIDI interface from the computer and refer servicing to qualified service
personnel under the following conditions.
a. When the power supply cord or plug is damaged.
b. If liquid has been spilled or objects have fallen into the MOTU USB MIDI interface.
c. If the MOTU USB MIDI interface has been exposed to rain or water.
d. If the MOTU USB MIDI interface does not operate normally by following the operating instructions in the owner's manual.
e. If the MOTU USB MIDI interface has been dropped or the cabinet has been damaged.
f. When the MOTU USB MIDI interface exhibits a distinct change in performance, this indicates a need for service.
12. Replacement Parts - When replacement parts are required, be sure the service technician has used replacement parts specified by
the manufacturer or have the same characteristics as the original part. Unauthorized substitutions may result in fire, electric shock or
other hazards.
13. Safety Check - Upon completion of any service or repairs to this MOTU USB MIDI interface, ask the service technician to perform
safety checks to determine that the product is in safe operating conditions.
ENVIRONMENT
Operating Temperature: 10°C to 40°C (50°F to 104°)
AVOID THE HAZARDS OF ELECTRICAL SHOCK AND FIRE
Do not handle the power cord with wet hands. Do not pull on the power cord when disconnecting it from an AC wall outlet. Grasp it by
the plug.
INPUT
Line Voltage: 100 - 120 volts AC, RMS (US and Japan) or 220 - 250 volts AC, RMS (Europe). Frequency: 47 - 63 Hz single phase.
Power: 7 watts maximum.
CAUTION: DANGER OF EXPLOSION IF BATTERY IS REPLACED. REPLACE ONLY WITH THE SAME OR EQUIVALENT
TYPE RECOMMENDED BYMANUFACTURER. DISPOSE OF USED BATTERY ACCORDING TO MANUFACTURER’S
INSTRUCTIONS.
Page 3

Mark of the Unicorn License Agreement and Limited Warranty on Software
TO PERSONS WHO PURCHASE OR USE THIS PRODUCT: carefully read all the terms and conditions of this agreement
before using this software package. Using this software package indicates your acceptance of the terms and conditions of this
license agreement.
Mark of the Unicorn, Inc. (“MOTU”) owns both this program and its documentation. Both the program and the documentation are
protected under applicable copyright laws. Your right to use the program and the documentation are limited to the terms and
conditions described herein.
License
YOU MAY: (a) use the enclosed program on a single computer; (b) physically transfer the program from one computer to another
provided that the program is used on only one computer at a time and that you remove any copies of the program from the
computer from which the program is being transferred; (c) make copies of the program solely for backup purposes. You must
reproduce and include the copyright notice on a label on any backup copy.
YOU MAY NOT: (a) distribute copies of the program or the documentation to others; (b) rent, lease or grant sublicenses or other
rights to the program; (c) provide use of the program in a computer service business, network, time-sharing, multiple CPU or
multiple user arrangement without the prior written consent of MOTU; (d) translate or otherwise alter the program or related
documentation without the prior written consent of MOTU.
Term
Your license to use the program and documentation will automatically terminate if you fail to comply with the terms of this
Agreement. If this license is terminated you agree to destroy all copies of the program and documentation.
Limited Warranty
MOTU warrants to the original licensee that the disk(s) on which the program is recorded be free from defects in materials and
workmanship under normal use for a period of ninety (90) days from the date of purchase as evidenced by a copy of your receipt.
If failure of the disk has resulted from accident, abuse or misapplication of the product, then MOTU shall have no responsibility to
replace the disk(s) under this Limited Warranty.
THIS LIMITED WARRANTY AND RIGHT OF REPLACEMENT IS IN LIEU OF, AND YOU HEREBY WAIVE, ANY AND ALL
OTHER WARRANTIES, BOTH EXPRESS AND IMPLIED, INCLUDING BUT NOT LIMITED TO WARRANTIES OF
MERCHANTABILITY AND FITNESS FOR A PARTICULAR PURPOSE. THE LIABILITY OF MOTU PURSUANT TO THIS
LIMITED WARRANTY SHALL BE LIMITED TO THE REPLACEMENT OF THE DEFECTIVE DISK(S), AND IN NO EVENT
SHALL MOTU BE LIABLE FOR INCIDENTAL OR CONSEQUENTIAL DAMAGES, INCLUDING BUT NOT LIMITED TO
LOSS OF USE, LOSS OF PROFITS, LOSS OF DATA OR DATA BEING RENDERED INACCURATE, OR LOSSES
SUSTAINED BY THIRD PARTIES EVEN IF MOTU HAS BEEN ADVISED OF THE POSSIBILITY OF SUCH DAMAGES.
THIS WARRANTY GIVES YOU SPECIFIC LEGAL RIGHTS WHICH MAY VARY FROM STATE TO STATE. SOME STATES
DO NOT ALLOW THE LIMITATION OR EXCLUSION OF LIABILITY FOR CONSEQUENTIAL DAMAGES, SO THE ABOVE
LIMITATION MAY NOT APPLY TO YOU.
Update Policy
In order to be eligible to obtain updates of the program, you must complete and return the attached Mark of the Unicorn
Purchaser Registration Card to MOTU.
General
This License Agreement shall be governed by the laws of the Commonwealth of Massachusetts and shall inure to the benefit of
MOTU, its successors, administrators, heirs and assigns.
Copyright Notice
Copyright © 2003 by Mark of the Unicorn, Inc. All rights reserved. No part of this publication may be reproduced, transmitted,
transcribed, stored in a retrieval system, or translated into any human or computer language, in any form or by any means
whatsoever, without express written permission of Mark of the Unicorn, Inc., 1280 Massachusetts Avenue, Cambridge, MA,
02138, U.S.A.
Limited Warranty on Hardware
Mark of the Unicorn, Inc. and S&S Research (“MOTU/S&S”) warrant this equipment against defects in materials and
workmanship for a period of NINETY (90) DAYS from the date of original retail purchase. This warranty applies only to hardware
products; MOTU software is licensed and warranted pursuant to separate written statements.
If you discover a defect, first write or call Mark of the Unicorn at (617) 576-2760 to obtain a Return Merchandise Authorization
Number. No service will be performed on any product returned without prior authorization. MOTU will, at its option, repair or
replace the product at no charge to you, provided you return it during the warranty period, with transportation charges prepaid, to
Mark of the Unicorn, Inc., 1280 Massachusetts Avenue, MA 02138. You must use the product’s original packing material for in
shipment, and insure the shipment for the value of the product. Please include your name, address, telephone number, a
description of the problem, and the original, dated bill of sale with the returned unit and print the Return Merchandise Authorization
Number on the outside of the box below the shipping address.
This warranty does not apply if the equipment has been damaged by accident, abuse, misuse, or misapplication; has been
modified without the written permission of MOTU, or if the product serial number has been removed or defaced.
ALL IMPLIED WARRANTIES, INCLUDING IMPLIED WARRANTIES OF MERCHANTABILITY AND FITNESS FOR A
PARTICULAR PURPOSE, ARE LIMITED IN DURATION TO NINETY (90) DAYS FROM THE DATE OF THE ORIGINAL
RETAIL PURCHASE OF THIS PRODUCT.
THE WARRANTY AND REMEDIES SET FORTH ABOVE ARE EXCLUSIVE AND IN LIEU OF ALL OTHERS, ORAL OR
WRITTEN, EXPRESS OR IMPLIED. No MOTU/S&S dealer, agent, or employee is authorized to make any modification,
extension, or addition to this warranty.
MOTU/S&S ARE NOT RESPONSIBLE FOR SPECIAL, INCIDENTAL, OR CONSEQUENTIAL DAMAGES RESULTING
FROM ANY BREACH OF WARRANTY, OR UNDER ANY LEGAL THEORY, INCLUDING LOST PROFITS, DOWNTIME,
GOODWILL, DAMAGE OR REPLACEMENT OF EQUIPMENT AND PROPERTY AND COST OF RECOVERING REPROGRAMMING, OR REPRODUCING ANY PROGRAM OR DATA STORED IN OR USED WITH MOTU/S&S PRODUCTS.
Some states do not allow the exclusion or limitation of implied warranties or liability for incidental or consequential damages, so
the above limitation or exclusion may not apply to you. This warranty gives you specific legal rights, and you may have other rights
which vary from state to state.
MIDI Timepiece, MIDI Express, micro express, ClockWorks and Mark of the Unicorn are trademarks of Mark of the Unicorn, Inc.
This equipment has been type tested and found to comply with the limits for a class B digital device, pursuant to Part 15 of the FCC Rules. These limits
are designed to provide reasonable protection against harmful interference in a residential installation. This equipment generates, uses, and can radiate
radio frequency energy and, if not installed and used in accordance with the instruction manual, may cause harmful interference to radio communications. However, there is no guarantee that interference will not occur in a particular installation. If this equipment does cause interference to radio or
television equipment reception, which can be determined by turning the equipment off and on, the user is encouraged to try to correct the interference
by any combination of the following measures:
• Relocate or reorient the receiving antenna
• Increase the separation between the equipment and the receiver
• Plug the equipment into an outlet on a circuit different from that to which the receiver is connected
If necessary, you can consult a dealer or experienced radio/television technician for additional assistance.
PLEASE NOTE: only equipment certified to comply with Class B (computer input/output devices, terminals, printers, etc.) should be
attached to this equipment, and it must have shielded interface cables in order to comply with the Class B FCC limits on RF emissions.
WARNING: changes or modifications to this unit not expressly approved by the party responsible for compliance could void the user's
authority to operate the equipment.
Page 4

Contents
Part I: For All Users
Packing List and Computer Requirements
7
9
Installing Your MOTU Interface
Installing the MOTU USB MIDI Software
17
21
Using MIDI Software
Part II: For XT & micro Users
ClockWorks
25
Front Panel Presets
49
Synchronization
55
65
MIDI Machine Control
Part III: Appendices
75
Glossary
SMPTE Synchronization Basics
81
Troubleshooting and Customer Support
89
Index
93
4
Page 5

Part I
For All Users
All Users
5
Page 6

Page 7

1
CHAPTER
Packing List and Computer Requirements
THANK YOU FOR CHOOSING MOTU
Thank you for purchasing a MOTU USB MIDI interface.
Please read the important information in this chapter
before using it.
PLEASE REGISTER TODAY
Please send in the registration card included with your
MOTU MIDI interface. As a registered user, you will be
eligible to receive on-line technical support email and
announcements about product enhancements as soon as
they become available. Only registered users receive these
special update notices, so please, complete and mail this
registration card!
Tha nk you for taking t he time to re gister your new MOTU
product!
PACKING LIST
Your MOTU USB MIDI Interface is shipped with the items
listed below. If any of these items are not present when you
first open the box, please immediately contact your dealer
or MOTU.
■
MOTU USB MIDI Interface
■
Power cord
■
USB cable
■
CD with software drivers
■
Manual
■
Product registration card
MIDI CABLES NOT INCLUDED
To connect each of your MIDI devices to your MOTU
MIDI interface, you need MIDI cables, purchased
separately. Talk to your music dealer to decide how many
you need.
COMPUTER REQUIREMENTS
Your MOTU MIDI interface will run with any USBequipped PC compatible running Windows Me,
Windows 2000 or Windows XP.
7
Page 8

MIDI SOFTWARE COMPATIBILITY
Your MOTU USB MIDI Interface works with all MIDI
software that operates under Windows Me, Windows 2000
and Windows XP.
GETTING STARTED
Follow the directions in the next few chapters of this guide
to successfully install and begin using your new MOTU
USB MIDI interface.
FAMILIARITY WITH YOUR COMPUTER
This manual assumes that your are familiar with using
your computer. If not, please review your computer’s user
guide before proceeding.
VISIT MOTU.COM FOR SOFTWARE UPDATES
Driver updates are posted on our web site as soon as they
become available, so check our web site for the latest
drivers: www.motu.com
8
PACKING LIST AND COMPUTER REQUIREMENTS
Page 9

CHAPTER
2
Installing Your MOTU Interface
OVERVIEW
Connecting the power cord . . . . . . . . . . . . . . . . . . . . . . . . . . . . . . . . . . . . 9
Connecting the computer. . . . . . . . . . . . . . . . . . . . . . . . . . . . . . . . . . . . . .9
Connecting MIDI gear . . . . . . . . . . . . . . . . . . . . . . . . . . . . . . . . . . . . . . . . 10
MIDI connections worksheet . . . . . . . . . . . . . . . . . . . . . . . . . . . . . . . . . 11
SMPTE Time Code sync connections . . . . . . . . . . . . . . . . . . . . . . . . . 12
Connecting a foot switch. . . . . . . . . . . . . . . . . . . . . . . . . . . . . . . . . . . . . 14
Connecting an audio click source . . . . . . . . . . . . . . . . . . . . . . . . . . . . 14
Connecting multiple USB interfaces. . . . . . . . . . . . . . . . . . . . . . . . . . 15
CONNECTING THE POWER CORD
Plug the power cord into your MOTU MIDI Interface and
then plug the other end into a grounded power outlet. We
recommend that you leave the interface switched off while
making cable connections during installation.
CONNECTING THE COMPUTER
First, make sure that the interface’s power switch is turned
off. Using the USB cable included with your MOTU MIDI
interface, put the Type A plug into a Type A USB jack on
the computer, the USB computer keyboard, a USB hub, or
any other USB device connected to the computer that has
an available Type A USB jack. The USB cable allows the
Mac to communicate with all MIDI devices connected to
your MOTU MIDI interface. If you have several MOTU
interfaces, see “Connecting multiple USB interfaces” on
page 15.
The flat, “Type A” USB plug
connects to the computer.
Figure 2-1: You can plug the Type A connector directly into the computer itself,
a USB keyboard connected to the computer, or any other USB device already
connected to the computer that has an available Type A USB jack.
Figure 2-2: The square Type B plug goes into your MOTU interface.
9
Page 10
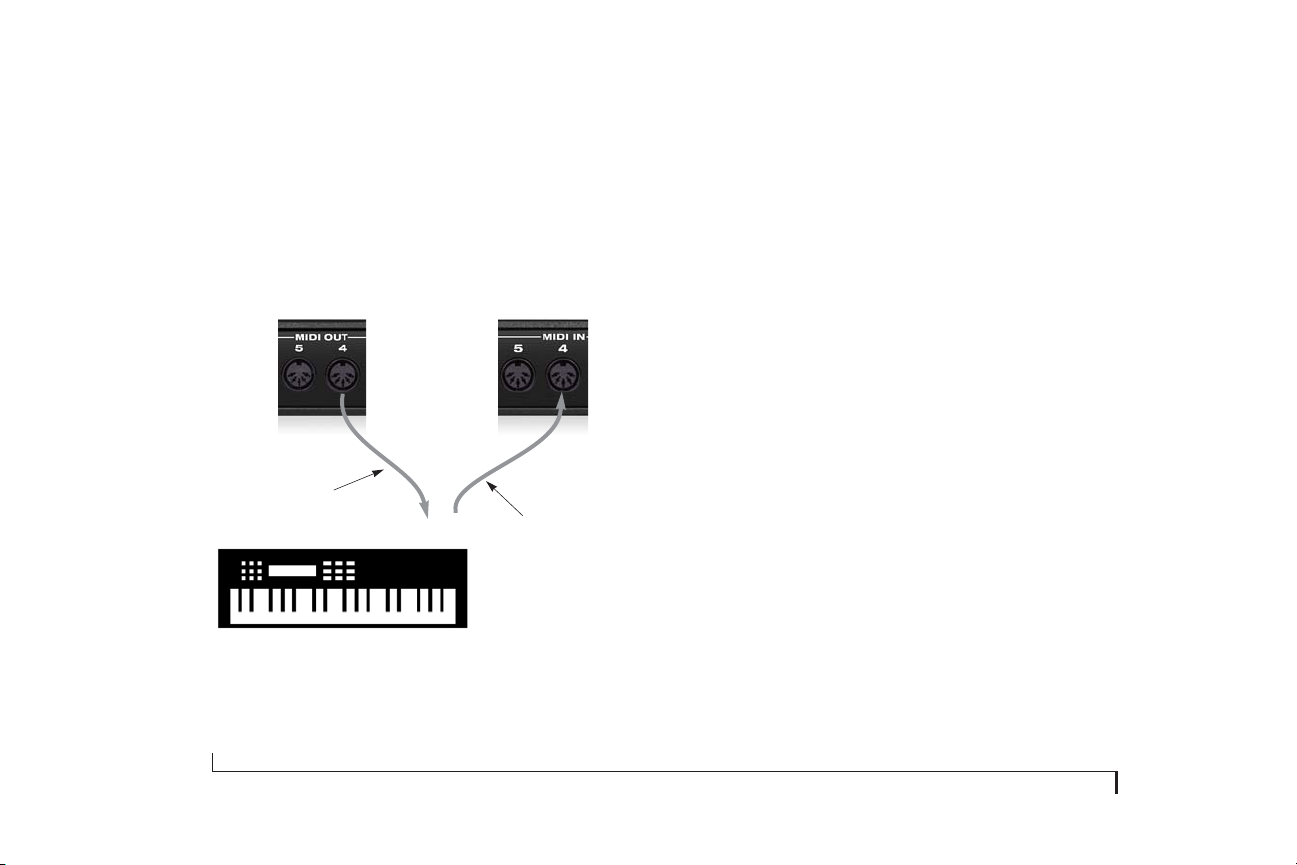
CONNECTING MIDI GEAR
Con nect each MIDI d evic e’s MIDI I N jack to a MIDI OUT
jack on your MOTU MIDI interface as shown by
Connection A below. Conversely, connect the MIDI OUT
jack on the MIDI device to one of the MIDI IN jacks on
your MOTU MIDI interface as shown by Connection B.
MOTU
MIDI interface
rear panel
MIDI
OUT
Connection A
MIDI Device
Figure 2-3: Connecting a MIDI device to your MOTU MIDI interface. If you are
connecting a sound module or other device that does not need to transmit
MIDI data, you only need to make connection A shown above. Conversely, if the
device is a MIDI controller such as a drum pad or guitar controller, you only
need to make Connection B.
MIDI
cables
MIDI INMIDI
OUT
MIDI
Connection B
IN
One-way MIDI connections
MIDI devices that do not receive MIDI data, such as a
dedicated keyboard controller, guitar controller, or drum
pad, only need Connection B shown in Figure 2-3.
Similarly, devices that never send data, such as a sound
module, only need Connection A. However, if you plan to
use editor/librarian software with the sound module, or if
you need to get system exclu sive b ulk dump s fro m it, make
both connections. In general, make both connections for
any device that needs to both send and receive MIDI data.
☛
MOTU MIDI interfaces do not require that you use
the same numbered MIDI IN and MIDI OUT for each
device, but experience shows that your system will be
easier to work with if you do.
Connecting additional gear with MIDI THRUs
If you use up all of the MIDI OUTs on your MOTU MIDI
interface, and you still have more gear to connect, run a
MIDI cable from the MIDI THRU of a device already
connected to the interface to the MIDI IN on the
additional device as shown below in Figure 2-4. The two
devices then share the same MIDI OUT port on the MIDI
10
INSTALLING YOUR MOTU INTERFACE
Page 11
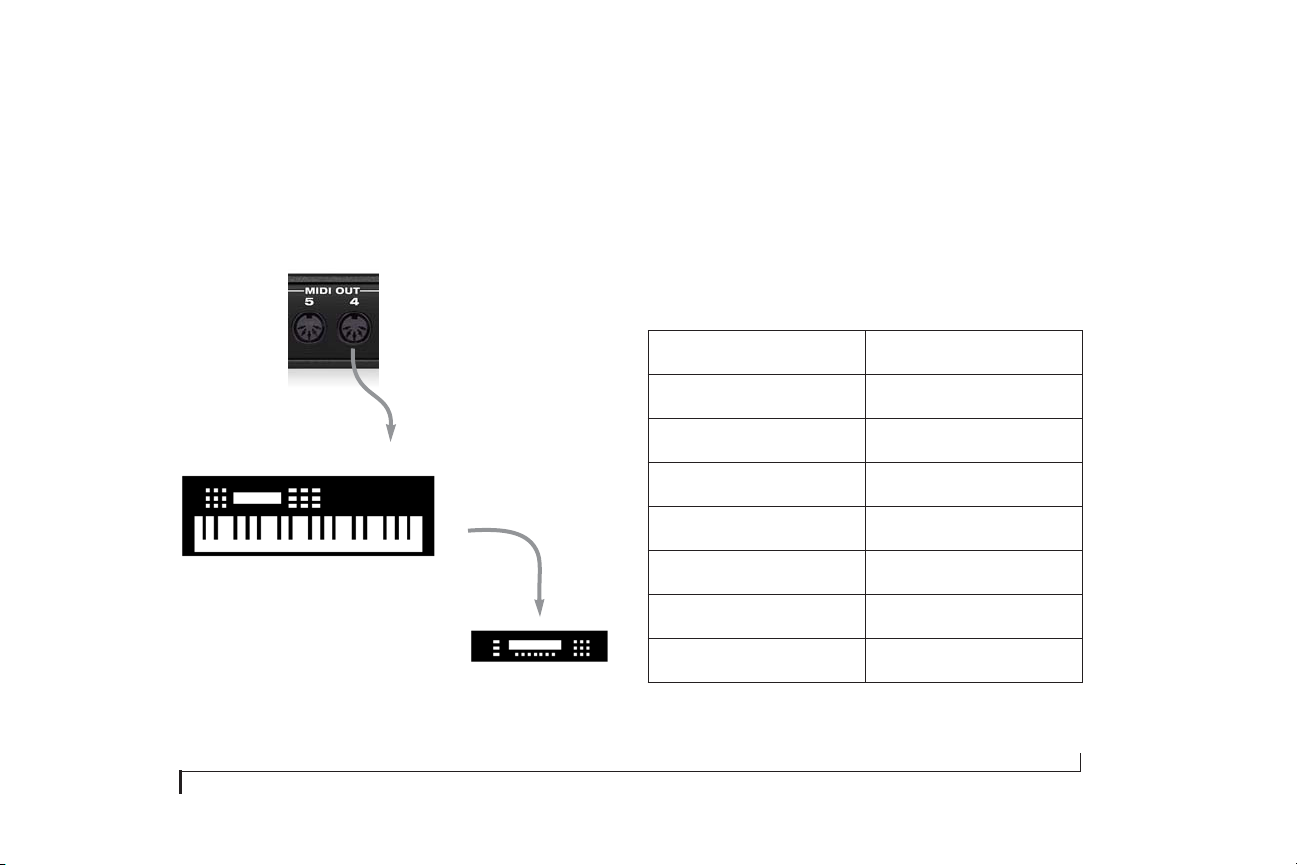
interface. This means that they share the same set of 16
MIDI channels, so try to do this with devices that receive
on only one MIDI channel (such as effects modules) so
their receive channels don’t conflict with one another.
MIDI CONNECTIONS WORKSHEET
Here’s a suggestion. If you have more than a few pieces of
gear connected to your MOTU MIDI interface, jot down
which device is connected to each input and output in the
worksheet below.
MOTU
MIDI interface
rear panel
MIDI
OUT
MIDI
MIDI Device
Figure 2-4: Connecting additional devices with MIDI THRU ports.
INSTALLING YOUR MOTU INTERFACE
IN
MIDI
THRU
Additional device
MIDI IN
MIDI
cable
MIDI IN MIDI OUT
11
22
33
44
55
66
77
88
11
Page 12
SMPTE TIME CODE SYNC CONNECTIONS
Your MOTU MIDI interface is both a SMPTE time code
converter
incoming longitudinal SMPTE time code (LTC) and
converts it to MIDI Time Code (MTC) and reshaped LTC.
As a generator, it produces both LTC and MTC time code,
either running under its own internal clock or while slaved
to external time code (or other time base).
When making the SMPTE time code connections
described in the following sections, do not pass the signal
through any type of signal processing equipment. Use
shielded quarter-inch audio cables.
For a complete explanation of synchronization, see
chapter 7, “Synchronization” (page 55).
and
generator
. As a converter, it locks (slaves) to
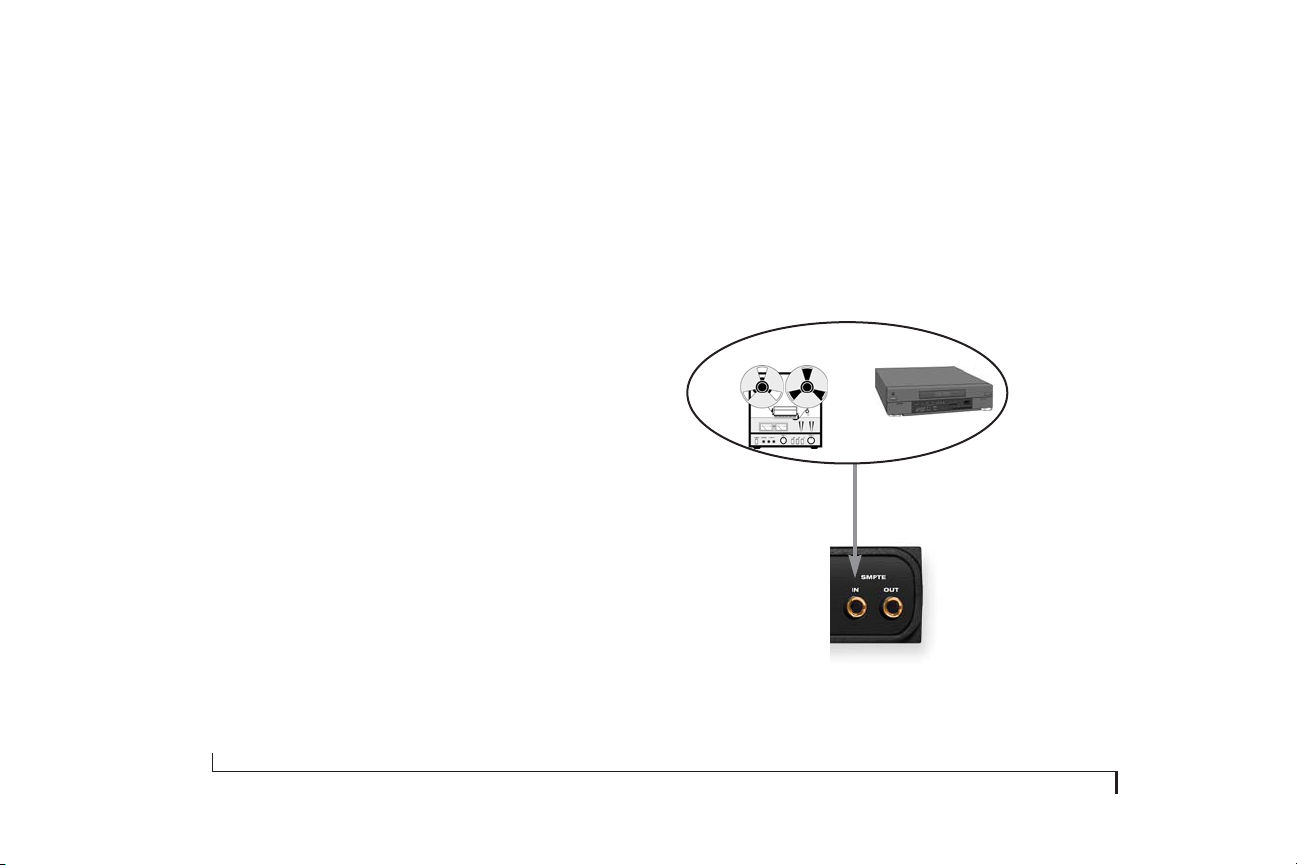
Connecting a SMPTE time code source
Connect any SMPTE time code
source
, such as the SMPTE
timecode track on an analog multitrack tape deck, to the
SMPTE IN port on your MOTU MIDI interface as shown
in Figure 2-5. (For information about recording time code
tracks, see “Striping SMPTE” on page 59.)
Analog audio tape recorder Video tape recorder
Examples of a SMPTE
time code source
Audio or SMPTE out
Shielded, quarter-inch audio cable
MOTU MIDI Interface
SMPTE IN
Figure 2-5: Connecting a SMPTE time code source.
12
INSTALLING YOUR MOTU INTERFACE
Page 13
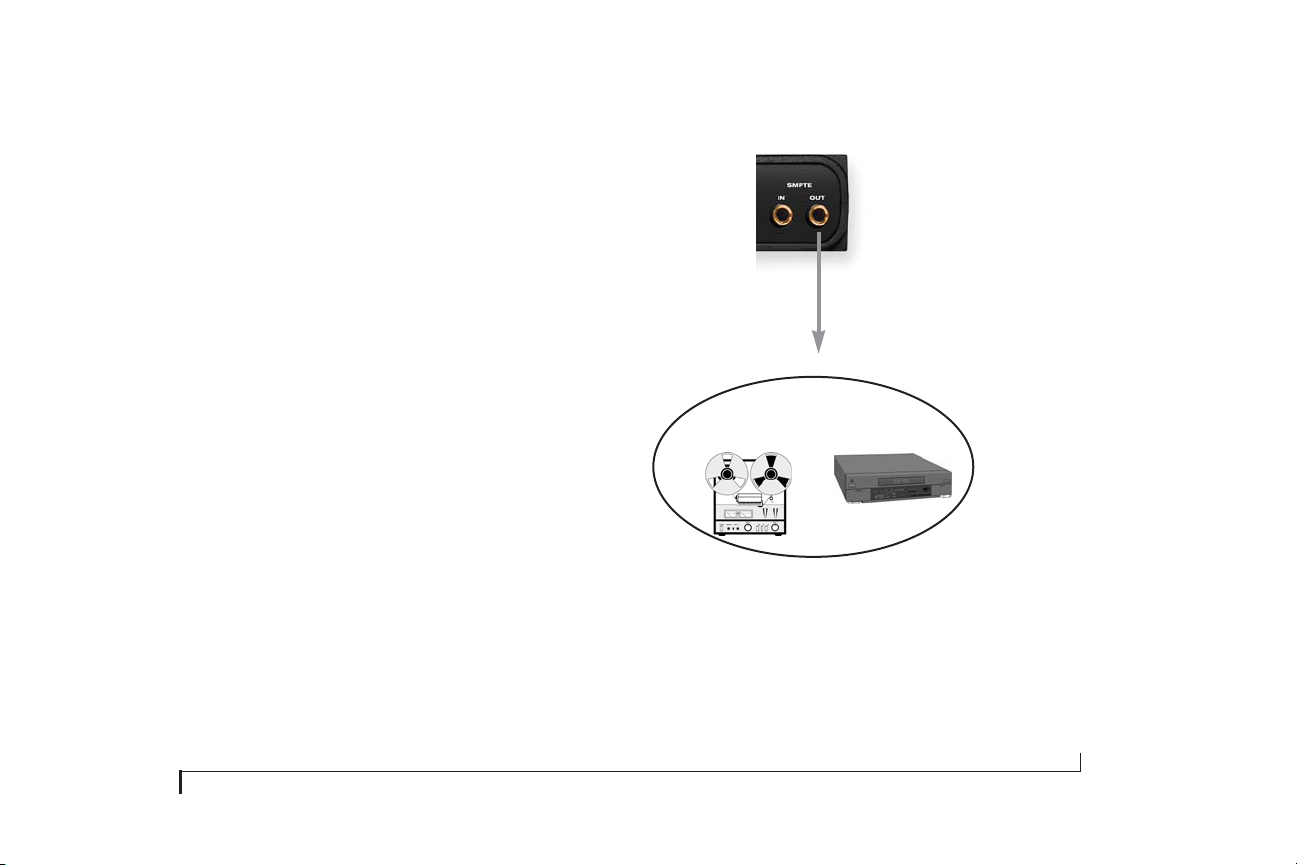
Connecting a SMPTE time code destination
Connect the SMPTE OUT port of your MOTU MIDI
interface to the SMPTE time code input of any
destination
device that accepts SMPTE time code as shown in
Figure 2-6. For example, time code can be recorded on an
outside track of a multitrack tape recorder so that
everything can subsequently be synchronized to the
multitrack. Other examples of a SMPTE time code
destination are systems that have the ability to slave to
SMPTE time code, such as stand-alone hard disk
recording systems, digital audio workstations, or
automated mixing consoles.
Shielded, quarter-inch audio cable
SMPTE or Audio in
Examples of a SMPTE
time code destinations
Analog audio tape recorder
Figure 2-6: Connecting a SMPTE time code destination.
Video tape recorder
MOTU MIDI Interface
SMPTE OUT
INSTALLING YOUR MOTU INTERFACE
13
Page 14
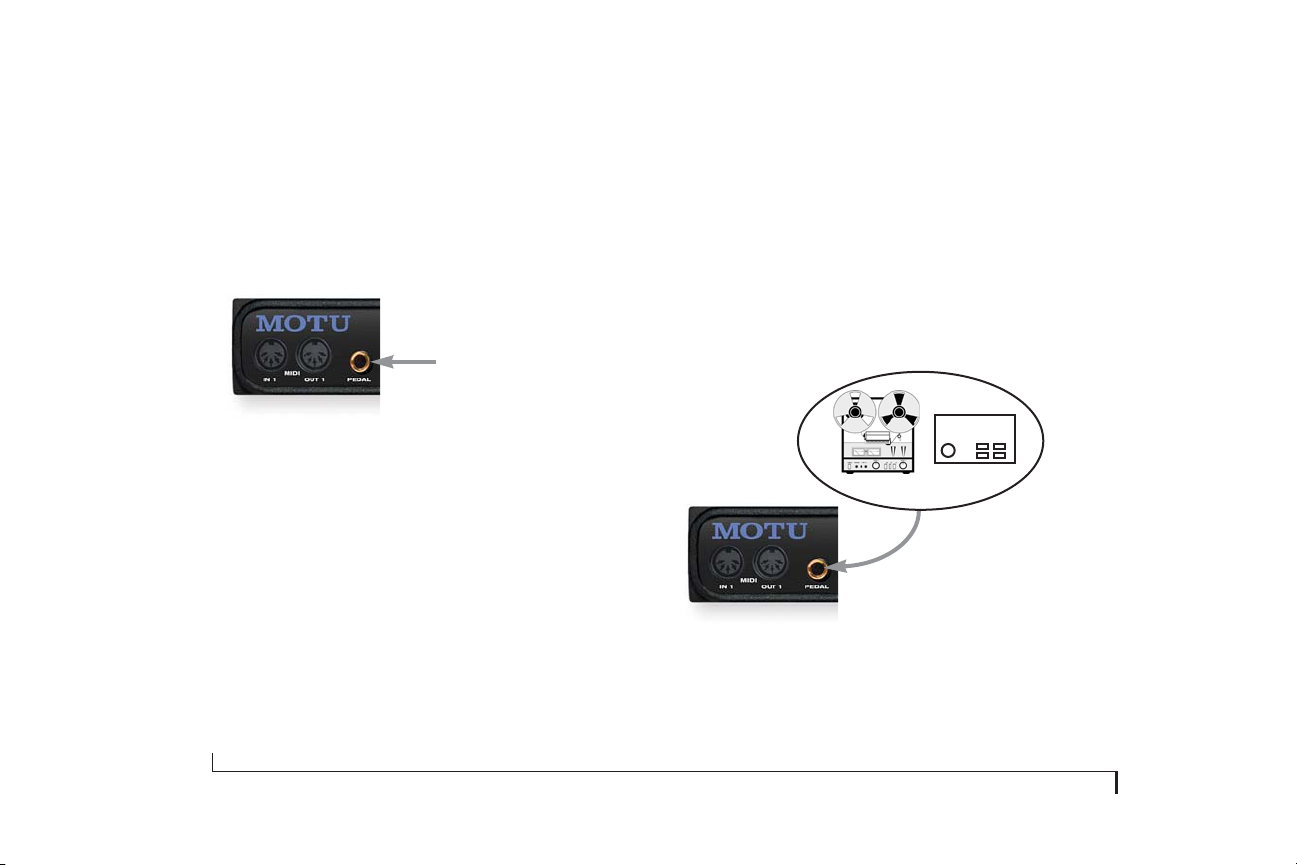
CONNECTING A FOOT SWITCH
If you would like to use a foot switch with your MOTU
MIDI interface, connect it as shown below in Figure 2-7.
For more information about how a pedal input can be
used, see “The Pedal tab” on page 44.
CONNECTING AN AUDIO CLICK SOURCE
If you would like to convert an audio click to MIDI,
connect the audio click source to the Pedal input as using a
shielded, quarter-inch audio cable as shown below in
Figure 2-8. For more information about converting an
audio tempo source (such as a click, bass drum, tape deck
signal, or other audio tempo source) to MIDI, see “Using
an audio click as a tempo source” on page 45.
Figure 2-7: Connecting a foot switch or foot pedal.
14
Click track
Shielded
quarter-inch
audio cable
Figure 2-8: Connecting an audio click input.
INSTALLING YOUR MOTU INTERFACE
Drum machine
Examples of
audio click sources
Page 15
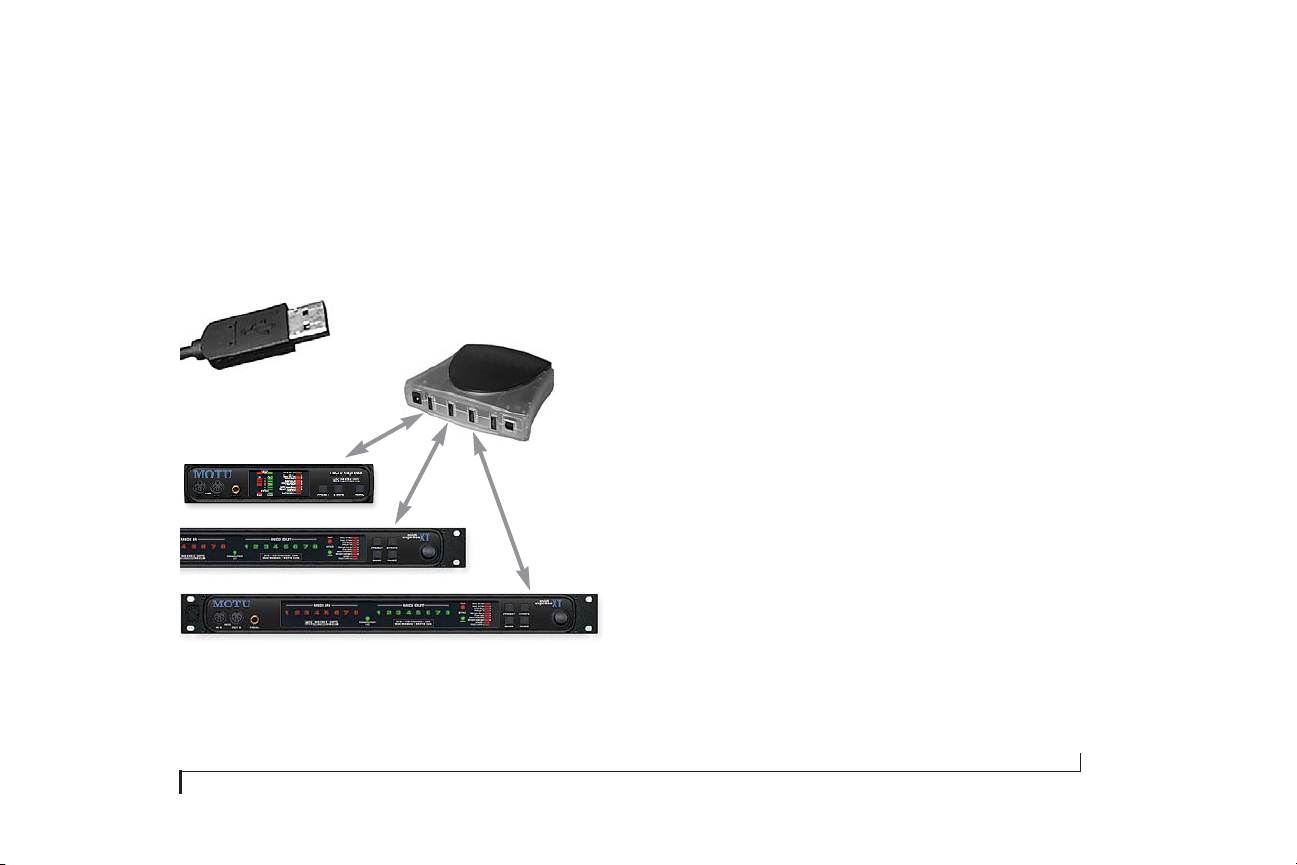
CONNECTING MULTIPLE USB INTERFACES
The USB (
connect multiple MOTU interfaces to a single computer.
You can mix and match any combination of MOTU USB
interfaces to suit your needs.
Figure 2-9: An inexpensive, standard USB hub allows you to connect multiple
MOTU USB MIDI interfaces. You can even mix and match different models of
MOTU interfaces, using the combination that best suites your needs for
synchronization, number of MIDI ports, etc.
Universal Serial Bus
The flat, “Type A” USB plug on the
USB cable from each MOTU interface
connects to the USB hub.
Standard USB Hub
) specification allows you to
USB
cables
The USB (
Universal Serial Bus
) specification allows many
USB devices — theoretically up to 127 — to be connected
to a single computer. However, many USB devices,
including all MOTU USB interfaces, reserve USB
bandwidth, so the theoretical and practical limits for
MOTU interfaces are considerably fewer. In theory, the
maximum number of MOTU USB interfaces you can
connect to one computer is just over 30 interfaces.
Practically speaking, regardless of how slow or fast your
USB-equipped computer is, you should be able to connect
upwards of 10 or more MOTU USB MIDI inter faces to t he
computer and still enjoy just as much performance from
each one as if it were the only one connected. Just don’t try
to run your USB scanner or digital camera while playing
back and recording MIDI!
For further details about USB, visit www.usb.org.
To connect multiple MOTU interfaces to a computer,
you’ll need an inexpensive device called a
USB Hub
(purchased separately from your computer peripherals
dealer). A USB Hub has multiple Type A ports on it,
usually between 4 and 7 ports, to which you connect
INSTALLING YOUR MOTU INTERFACE
15
Page 16

multiple USB MIDI interfaces as shown in Figure 2-9.
Connect them to the hub in the standard fashion, as if you
were connecting them directly to the computer. If needed,
you can connect multiple hubs to each other to get enough
USB ports for your multiple MOTU USB interfaces.
WHAT NEXT?
You’re ready to install software. Turn to chapter 3,
“Installing the MOTU USB MIDI Software” (page 17).
16
INSTALLING YOUR MOTU INTERFACE
Page 17

3
CHAPTER
Installing the MOTU USB MIDI Software
OVERVIEW
Running the MOTU USB MIDI installer . . . . . . . . . . . . . . . . . . . . . . . 17
Daisy-chaining MIDI devices . . . . . . . . . . . . . . . . . . . . . . . . . . . . . . . . . 18
Where to go next . . . . . . . . . . . . . . . . . . . . . . . . . . . . . . . . . . . . . . . . . . . . . 19
RUNNING THE MOTU USB MIDI INSTALLER
Software installation will go a little more smoothly if you
tur n off your interface before switching on your computer.
Don’t worr y, however, if you’ve a lready done so. Just follow
the directions below.
To install the MOTU USB MIDI software:
1
Turn on your co mputer (if you haven’t al ready done so).
2
If the Windows
startup, do not proceed and exit from the Wizard.
Instead of installing the MOTU USB MIDI drivers
manually via the Wizard, you will run the MOTU USB
software installer.
Add Hardware Wizard
appears during
4
If the MOTU USB software installer program does not
automatically begin running, double-click SETUP.EXE on
the installer CD to launch it.
5
Follow the directions the installer gives you.
That’s it!
What gets installed?
The MOTU USB software installer installs drivers for your
MOTU USB MIDI interface, as well as the ClockWorks
application, which gives you access to many of your
interface’s features, including synchronization, MIDI
processing and preset management.
You can find the console application in the Windows Start
menu under
Programs>MOTU
.
3
Insert the MOTU USB software installer CD in the
computer’s CD drive (if you haven’t already).
17
Page 18
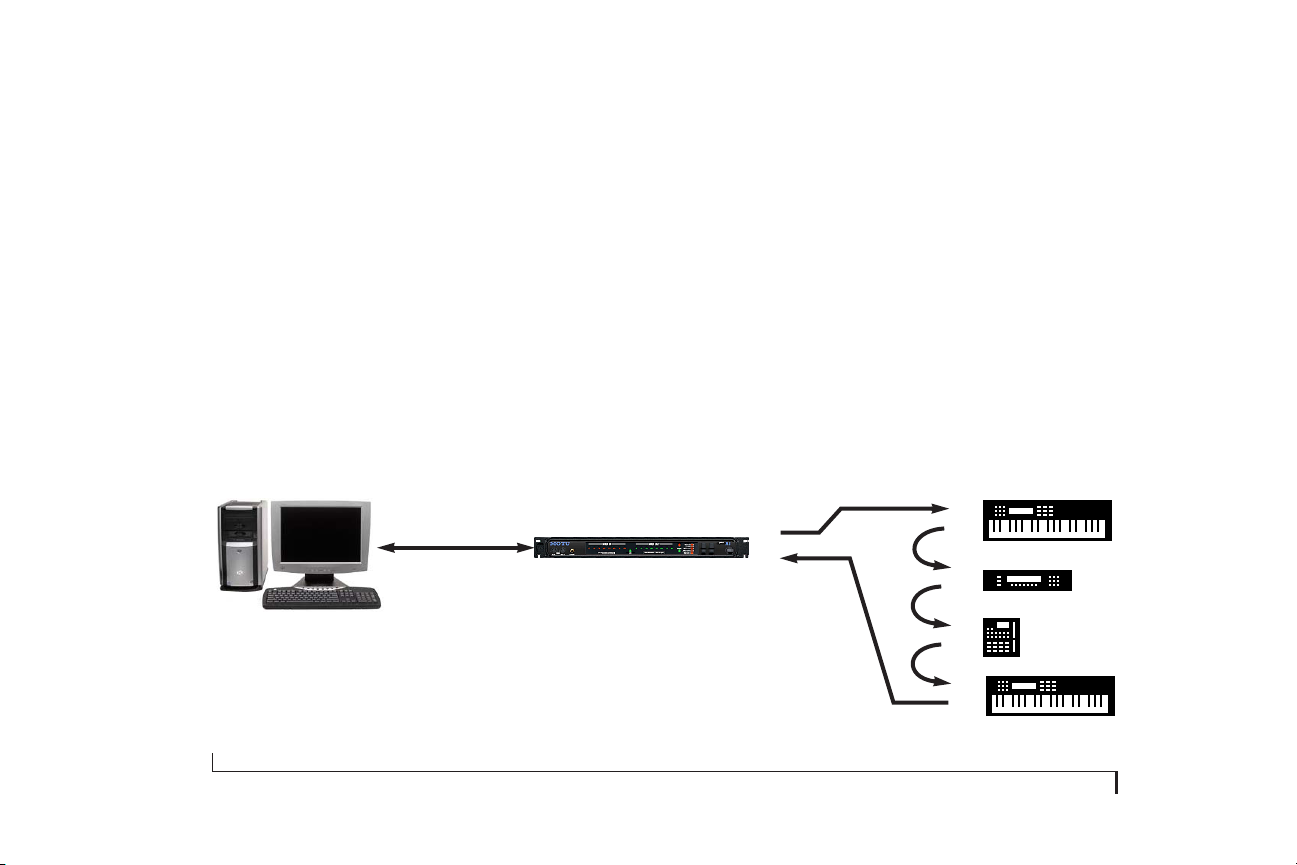
DAISY-CHAINING MIDI DEVICES
In general, daisy-chain MIDI devices (as shown in
Figure 3-1 on page 18) should be avoided because it is
more complicated to set up than connecting each device
directly to your MOTU interface.
If you have no choice but to daisy-chain, you need to
configure each device such that it doesn’t share any MIDI
channels with other devices in the chain. Otherwise, you’ll
USB
cable
MOTU USB MIDI interface
hear several instruments play at once because data sent to
one unit is received by all the devices in the daisy chain
that are listening to that same MIDI channel.
To avoid this sort of unwanted instrument layering, go to
the front panel of each MIDI instrument itself and
program it to respond to a unique set of MIDI channels.
Each device should have its own MIDI channel(s), to
which no other device connected to that MIDI port will
respond. Refer to the documentation for the device for
details.
IN
OUT
IN
THRU
IN
THRU
IN
THRU
Figure 3-1: See “Daisy-chaining MIDI devices” on page 18 for special instructions on setting up your MIDI gear for daisy-chaining in this manner.
18
IN
OUT
INSTALLING THE MOTU USB MIDI SOFTWARE
Page 19

WHERE TO GO NEXT
Refer to the items below that apply to you:
If you want to start using MIDI software with your new MOTU interface...
All MOTU interfaces have factory default settings that
allow any MIDI software to communicate with all MIDI
devices connected to the interface. So from here, you can
turn to your software documentation to get started.
If you want to learn about the front panel controls...
Turn to chapter 6, “Front Panel Presets” (page 49).
If you want to program your interface with ClockWorks...
Your MOTU interface console software is the “front end”
for the features in your MOTU interface. It allows you to
configure and program the powerful MIDI routing and
processing features in the interface. You can graphically
make direct routings from inputs and outputs, stripe
setups
SMPTE time code, create and save interface
consist of the entire internal configuration of the
interface), set up the pedal inputs, or other tasks.For
details, see chapter 5, “ClockWorks” (page 25)
(which
INSTALLING THE MOTU USB MIDI SOFTWARE
19
Page 20

20
INSTALLING THE MOTU USB MIDI SOFTWARE
Page 21
4
CHAPTER
Using MIDI Software
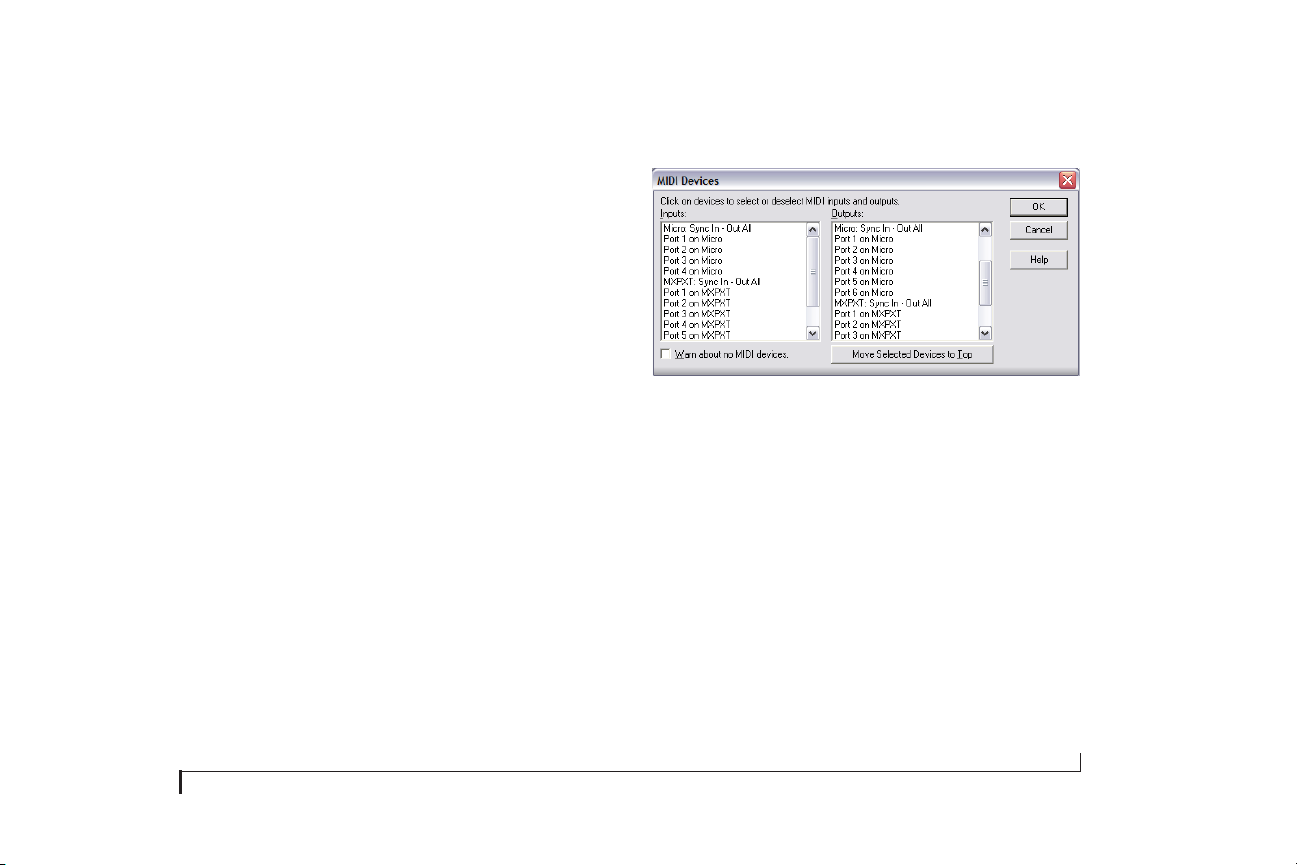
MIDI INPUTS AND OUTPUTS
Once you’ve completed the installation for your MOTU
MIDI interface/synchronizer as described in the previous
chapter, you’ll notice that all MIDI inputs and outputs are
available to your MIDI programs. The port names are
abbreviated as shown in Figure 4-1.
‘SYNC IN - OUT ALL’ PORT
In the list of input ports, the
all MIDI real time and MIDI Time Code messages will
arrive, regardless of the physical MIDI input jack from
which the MOTU interface receives them. All other
received dat a wi ll ar rive at its inp ut por t as appropr iate. So,
to slave your MIDI software to an external sync source,
connect it to this port.
Sync in- out all
port is where
Figure 4-1: MOTU MIDI Express XT and micro express interface ports in
Cakewalk SONAR™.
In the list of output ports, the
you to send the same MIDI data to all MIDI output ports
at once.
Sync in- out all
port allows
21
Page 22
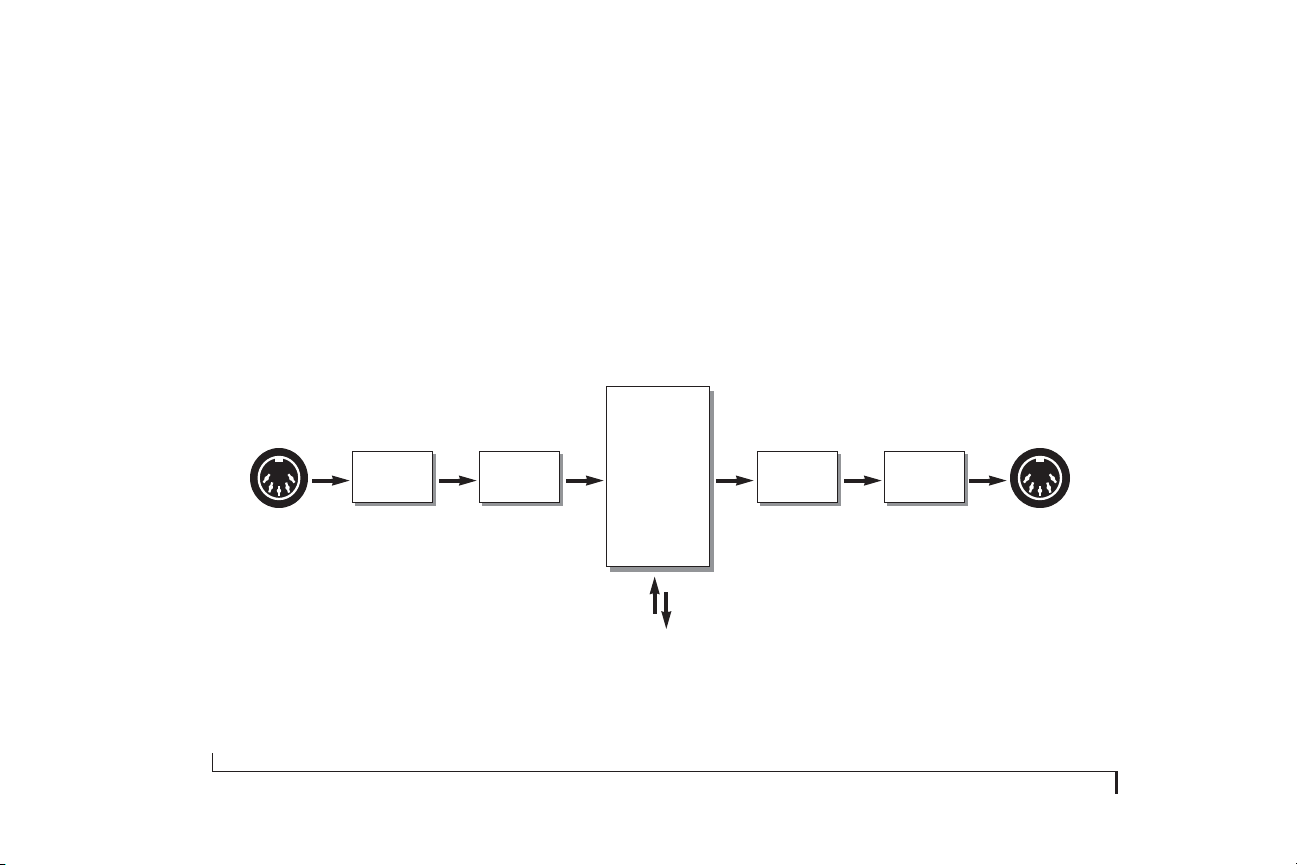
THE MIDI DATA PATH
As for MIDI data arriving and leaving your computer via
the MOTU USB MIDI interface driver, imagine it coming
and going from the MOTU interface as shown in
Figure 4-2. All channelizing and filtering is applied before
the input data arrives at the computer and after it is sent
from the computer. This is a great advantage as it frees up
your computer and MIDI software from having to deal
with the mundane (and time-consuming) chore of such
processing. Just configure your MOTU interface and let it
do all the work!
MDI IN
Event filtering Event filtering
Figure 4-2: The path that MIDI data takes through a MOTU Express XT or micro express. Other MOTU interfaces do not provide MIDI processing.
Channel
mapping
MOTU
MIDI Interface
data bus
Compu ter
Channel
mapping
22
USING MIDI SOFTWARE
MDI OUT
Page 23

Part II
For XT & micro Users
All Users
23
Page 24

Page 25

CHAPTER
5
ClockWorks
OVERVIEW
About ClockWorks . . . . . . . . . . . . . . . . . . . . . . . . . . . . . . . . . . . . . . . . . . . 25
The File menu . . . . . . . . . . . . . . . . . . . . . . . . . . . . . . . . . . . . . . . . . . . . . . . . 27
the Device list . . . . . . . . . . . . . . . . . . . . . . . . . . . . . . . . . . . . . . . . . . . . . . . . 28
The ClockWorks window . . . . . . . . . . . . . . . . . . . . . . . . . . . . . . . . . . . . . 28
The Routings tab . . . . . . . . . . . . . . . . . . . . . . . . . . . . . . . . . . . . . . . . . . . . . 29
The Presets tab . . . . . . . . . . . . . . . . . . . . . . . . . . . . . . . . . . . . . . . . . . . . . . . 32
The Mutings tab. . . . . . . . . . . . . . . . . . . . . . . . . . . . . . . . . . . . . . . . . . . . . . 33
The Mappings tab . . . . . . . . . . . . . . . . . . . . . . . . . . . . . . . . . . . . . . . . . . . . 36
Synchronization and MIDI Machine control . . . . . . . . . . . . . . . . . . 37
Sync tab settings . . . . . . . . . . . . . . . . . . . . . . . . . . . . . . . . . . . . . . . . . . . . . 40
The Pedal tab. . . . . . . . . . . . . . . . . . . . . . . . . . . . . . . . . . . . . . . . . . . . . . . . . 44
Future updates . . . . . . . . . . . . . . . . . . . . . . . . . . . . . . . . . . . . . . . . . . . . . . . 47
ABOUT CLOCKWORKS
ClockWorks is a software program that gives you access to
the programmable features in your MOTU MIDI Express
XT or micro express interface. For example, you can make
changes to the synchronization settings, filter some data
on a particular input or output, or route MIDI data from
any MIDI device to any other MIDI device connected to
your MOTU interface.
ClockWorks cannot be used with a micro lite or
☛
Express 128 interface, as these devices do not support
MIDI processing or synchronization features.
When do you need to use ClockWorks software?
The only time you need to use ClockWorks is when you
would like to make changes to the settings in your MOTU
interface. If all you want to do is use it with a MIDI
sequencer, you don’t need to make any changes at all. The
factory settings allow sequencing software to individually
access any of the input or output ports on your MOTU
interface. Just run your sequencer. You only need to run
ClockWorks if you wish to customize your interface
settings.
25
Page 26
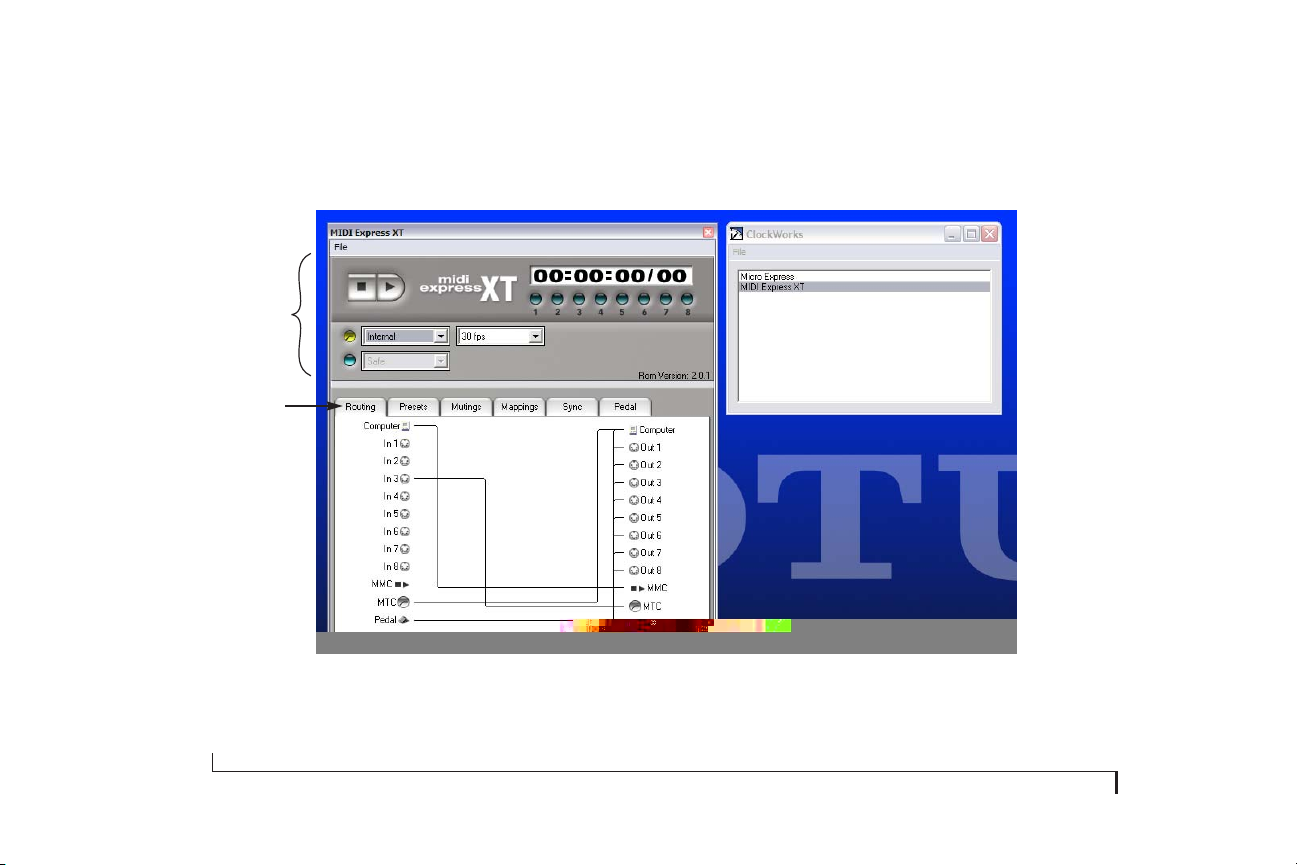
Sync and
MIDI Machine
Control section
Tab s
ClockWorks window Device list
Figure 5-1: Click the tabs to access the settings in ClockWorks.
26
CLOCKWORKS
Page 27

Familiarity with Windows
In explaining how to use ClockWorks, this chapter
assumes that you are already familiar with the standard
Windows interface conventions, such as how to select
options using menus, check boxes, radio buttons, etc. and
how to type and edit text, and so forth.
■
If you make any adjustments to your hardware, choose
Refresh Device
from the ClockWorks File menu.
THE FILE MENU
Here is a brief explanat ion of each item in the ClockWorks
File menu.
Opening ClockWorks
When you first launch ClockWorks, the default view for
ClockWorks is the MIDI Routing window, which displays
the current MIDI processing configuration. (See Figure
5-1 on page 26.)
If your MOTU interface doesn’t appear
If your MOTU interface doesn’t show up in the Device
List, check the following things:
■
Your MOTU interface is turned off. Power it up and
Refresh Device
choose
■
A MOTU interface is not connected to the computer, or
from the ClockWorks File menu.
it is connected improperly. Make sure your cable
connection(s) to the interface match Figure 2-1 and
Figure 2-2 on page 9.
CLOCKWORKS
Device List
The Device List menu item opens the Device List window.
See “the Device list” on page 28 for details.
Load Configuration
The
Load Configuration
menu item opens a previously
saved ClockWorks document and restores all of the
MOTU interface settings saved in the document.
Save Configuration
The
Save Configuration
menu item saves all the current
MOTU inte rf ace set tin gs i n Clo ckWork s as a doc ume nt on
disk. You can restore the settings by opening it with the
Load Configuration command.
27
Page 28

Refresh Device
ClockWorks always reflects the current state of your
MOTU interface. However, if at any time you suspect that
the windows in ClockWorks don’t accurately reflect what’s
going on in the hardware for some reason, choose
from the File menu. ClockWorks will be updated to
Device
Refresh
reflect the current state of the hardware.
How ClockWorks interacts with the hardware
Changes you make in ClockWorks are immediately
reflected in the hardware. Likewise, when you select a
preset from the front panel, your MOTU interface updates
ClockWorks, as long as the software is the currently active
application. This is a convenient way to run through your
user presets and inspect each one’s settings in
ClockWorks. If ClockWorks is not the active application
on the computer, a system exclusive message is sent to
whatever application is currently active. If this application
is recording incoming MIDI, these sysex messages get
recorded as well.
Reset to Factory Settings
This menu item restores the factory default settings in the
interface.
THE DEVICE LIST
The Device List window shows all MOTU USB MIDI
devices connected to the computer. Click on a device to
display its settings in the ClockWorks window.
THE CLOCKWORKS WINDOW
ClockWorks for Windows appears as a single window for
each MOTU interface, as shown in Figure 5-1 on page 26.
Click each tab to view the settings within the tab.
ROM version display
The ROM version of the currently selected USB MIDI
device appears in the transport section of the window, as
shown in Figure 5-1 on page 26.
28
CLOCKWORKS
Page 29
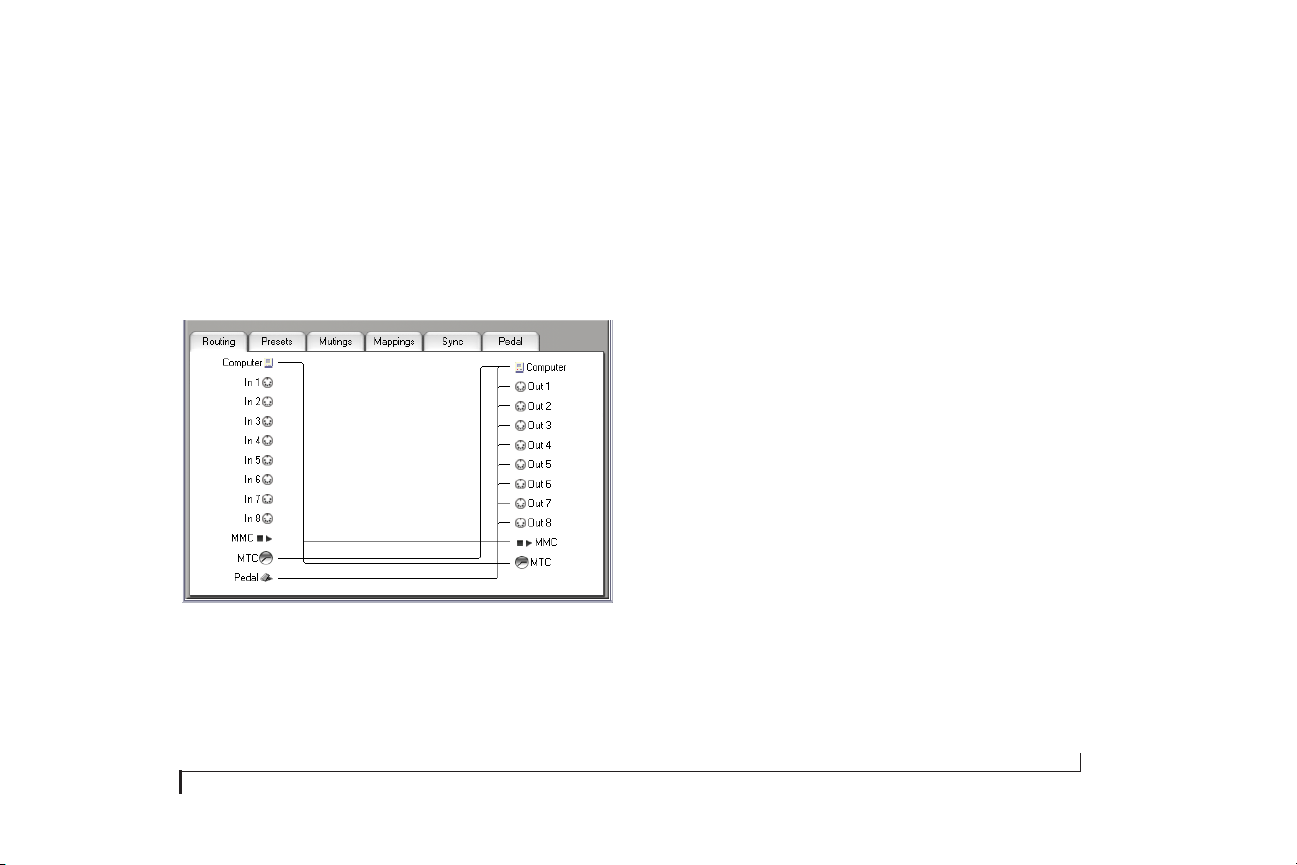
THE ROUTINGS TAB
The Routings tab provides an easy and powerful way for
you to route MIDI data from any device connected to your
MOTU interface to any other device connected to it. This
window provides you with complete control over the flow
of MIDI data through the interface.
Figure 5-2: The Routings Tab for the MIDI Express XT. The micro express has 4
inputs on the left and 6 outputs on the right.
Cable routing to and from the computer
In MOTU USB MIDI interfaces, all MIDI inputs and
outputs are always connected to the computer. Therefore,
in ClockWorks, routings to and from the computer are not
shown in the
Routings
tab. Use the
Routings
tab to make
routings directly from inputs to outputs, or to make
connections between the computer and the ADAT, MMC
or MTC ports.
Making a connection
To route MIDI directly from a MIDI device to any other,
click the source cable icon on the left and drag to the
destination cable icon on the right.
Connecting one input to multiple outputs
To connect an input to more than one output, make each
connection separately as described in the previous
section. As a shortcut, shift-drag from the input cable on
the left over to the first output, and then drag directly to
each additional output on the right. As you “touch” each
output, it highlights and a connection is made.
CLOCKWORKS
29
Page 30

Selecting a connection
To select a connection, click the connection’s input cable
icon on the left or one of its output cable icons on the right.
Deselecting all connections
To deselect all connections, click anywhere in the middle
of the window between the two columns of cables.
The MTC In and MTC Out connections
The MTC In and MTC Out connectors represent MIDI
Time Code (MTC) routing to and from the interface itself.
If you would like to send MIDI Time Code from your
MOTU interface to devices connected to its MIDI Out
ports, create a connection from the MTC Out port (on the
left) to the desired device(s) on the right.
Breaking a connection
To break a connection, select the connection by clicking its
cable icon, and press the delete key.
Breaking one of several connections
Often, a device will be connected to several other devices.
To delete just one of the connections:
1
Redraw the connection you want to break.
2
Press the delete key to remove the highlighted
connection.
30
Routing MTC to your MOTU interface
If you would like to slave your MOTU interface to MIDI
Time Code generated by another device, make a
connection from the device (on the left) to the MTC In
port (on the right).
Routing MTC to the computer port
From the factory, your MOTU interface is programmed to
send MTC to the computer port, as shown in Figure 5-2 on
page 29. This connection is required by any MIDI software
that needs to slave to MTC generated by the interface.
The MMC Out and MMC In ports
The MMC Out and MMC In ports provide routing of
MIDI Machine Control (MMC) transport commands to
and from your MOTU interface itself. For example, if you
CLOCKWORKS
Page 31

would like to send MMC transport commands generated
by (or redistributed by) your MOTU interface itself to
another device, create a connection from the MMC Out
port to the desired device. Usually, you will only have one
such connection at a time, as only one device would be
triggered as the Time Code source. Note also that this
connection is not neces sary, however, if you intend to send
MMC transport commands directly from computer
software (or a MMC hardware device) to a MMC device.
Figure 5-3: Routing MIDI Time Code from your Express interface to other MIDI
devices connected to it.
Routing MMC from the computer to the interface
The MMC In port in the Routings tab represents MIDI
Machine Control input to your MOTU interface itself. In
other words, the interface “listens” to MMC transport
commands from any devices (or computer software)
connected to this port.
For MMC transport control of the interface from the
computer, all you need is the connection from the
computer icon on the left to the MMC icon on the right, as
shown in Figure 5-2 on page 29.
Direct MMC versus redistributed MMC
When the connection shown in Figure 5-2 on page 29 is
made, your MOTU interface “swallows” all MMC
transport commands sent by MMC software running on
the computer, regardless of the MMC device the messages
are intended for (as determined by the MMC device ID
embedded in the messages). If you want to control a MMC
device from your computer, you have two choices:
1. bypass the interface’s MMC features,
CLOCKWORKS
31
Page 32

2. or send the MMC transport commands to the MOTU
interface instead and have it redistribute them to the other
MMC device(s)
If you would like to bypass the interface and control a
MMC device directly from your computer software
(choice #1 above), remove the highlighted connection
shown in Figure 5-2 on page 29.
If you plan to use choice #2 above, maintain the
connection shown in Figure 5-2 on page 29, and also
make connection from your MOTU interface’s MMC Out
port on the left to the MMC device’s destination MIDI
port on the right.
Connecting an MMC controller
If you would like to control your MOTU interface from a
MMC controller connected to one of its MIDI inputs,
connect the device’s input cable to the MMC In port.
THE PRESETS TAB
The presets tab lets you name the users presets in your
MOTU interface and choose which one is active (by
clicking the button next to its name). For complete details
about presets, see “Front Panel Presets” on page 49.
Figure 5-4: The Presets tab.
32
CLOCKWORKS
Page 33

THE MUTINGS TAB
The Mutings tab is a sophisticated MIDI data filter that
controls what types of data will be sent and received by
each MIDI OUT and MIDI IN cable. You can filter out any
type of MIDI data on any channel on any cable. In
addition, each MIDI channel can have its own unique
muting setup. The Mutings tab shows the muting status for
each type of data on all MIDI channels and all cables at
once, giving you immediate feedback on the state of your
interface.
Figure 5-5: The Mutings tab.
Muting basics
A simple way to think of data muting is this: imagine that
each MIDI IN or MIDI OUT cable on your MOTU
interface has a filter just inside the socket. A MIDI data
stream enters the filter and then continues on past the filter
with certain types of data removed. The filter has simply
“swallowed” the data types that are being muted.
On a MIDI IN cable, data is muted before it enters the
interface. On a MIDI OUT cable, data gets muted just
before it gets transmitted out of the interface.
☛
When data is muted on a MIDI IN port, the light on
the front panel still blinks when the data is received on the
port. Don’t be concerned. The light blinks to let you know
that the interface is indeed receiving the data on that port.
However, the data does get muted. (On output, however,
since muted data doesn’t actually get sent, the light does
not
blink.)
Whenever you would like to mute data, begin with the
following procedure:
CLOCKWORKS
33
Page 34

1
If you have more than one MOTU interface, select the
box you want to mute in the Device List window.
2
Click the Mutings tab.
3
Select the type of data to be muted from the
Mute
menu.
Doing so makes the check box grid control the type of
MIDI data you choose.
4
Choose
Input
or
Output
from the cables menu.
Doing so makes the check box grid control muting for
either MIDI IN ports or MIDI OUT ports.
Now you are ready to click check boxes in the grid to mute
data.
Muting data on a single channel
To mute data on a single MIDI channel for a device, click
the appropriate check box in the grid. Check boxes are
numbered from left to right, with each row representing a
MIDI input or output port.
Muting a data type on all channels
To mute a data type on all 16 channels for a device, drag
across its row of check boxes. Doing so will select all check
boxes in the row, selecting all channels for muting.
Muting on all channels, all cables
To mute a data type on all channels and all inputs, choose
Inputs from the cable menu and click Set All. To do the
same for outputs, choose Outputs from the Cable menu
and click Set All.
Unmuting data
To unmute data on a single channel, deselect its check box.
To unmute data on all channels and cables, click Clear.
Muting MIDI beat clocks
When MIDI beat clocks are transmitted to your MOTU
interface (via a MIDI device or the computer) they are
echoed to all cables. If you do not want MIDI beat clocks
sent to all your MIDI devices, mute Real-time data on the
output cables for those devices.
34
CLOCKWORKS
Page 35

Muting and remapping
On the MIDI IN ports, muting occurs before channel
remapping. On the MIDI OUT ports, channel remapping
occurs before muting, as shown in Figure 5-6.
For example, let’s say that on one of the MIDI ports, you
are muting channels 1-8, and you are also remapping all
channels (1-16) to channel 16.
MDI IN
Muting filter
Channel mapping filter
If you did this on a MIDI IN port, channels 1-8 would get
muted, and the data on channels 9-16 would get mapped
to channel 16. If you did this on a MIDI OUT port, all data
on all channels would be sent out on channel 16, since all
channels are mapped to channel 16 before the muting
occurs on channels 1-8.
Here’s another example: Let’s say you are mapping all
channels to channel 1, and you are muting channels 1-8.
On input, only channels 9-16 will get rechannelized to
channel 1, because channels 1-8 get muted first. On
output, no data would be sent because all channels are
mapped to channel one first, and then channel 1 is muted.
CLOCKWORKS
MOTU interface data bus
Channel mapping filter
Muting filter
MDI OUT
Figure 5-6: How muting and remapping interact with each other.
35
Page 36

THE MAPPINGS TAB
The Mappings tab controls the channelizing of MIDI data
on all MIDI IN and MIDI OUT cables. With complete
flexibility, this window can switch data from its current
MIDI channel to any other channel immediately when the
data either enters or exits your MOTU interface.
Figure 5-7: The Mappings tab. Use the Input/Output and Cable menus to
display the desired input or output cable. For each channel (row), click the
check box corresponding to the channel you wish to remap it to.
Mapping basics
A simple way to think of channel mapping is this: imagine
that each MIDI IN or MIDI OUT port connected to your
MOTU interface has a filter just inside the socket. MIDI
data enters the filter on one channel and as it passes
through the filter, it gets switched to a different channel.
On a MIDI IN port, data enters on a given channel. But
before it goes anywhere else, either to the computer or to a
MIDI OUT cable, the Channel Map window can switch
the data to a different MIDI channel.
On a MIDI OUT cable, data exits the interface. But before
it does, the Channel Map window can switch the data to a
different channel.
Using channel mapping
Channel Mapping like this is useful in many different
situations. For example, you may have a MIDI keyboard
that only transmits data on MIDI channel 1. If you want to
transmit its data on a different channel, you can map
channel 1 on the keyboard’s MIDI IN cable to any other
36
CLOCKWORKS
Page 37

MIDI channel. To the rest of the network, it will then
T
appear as if the keyboard is transmitting on the new,
destination channel.
Time Code (MTC) generated by your MOTU interface
and routed to the computer. If the SMPTE Readout is not
responding, make sure the Routings window has a
connection from the MTC Out port on the left to the
Muting and remapping
computer on the right.
For information about when muting occurs before
channel mapping and vice versa, see “Muting and
remapping” on page 35.
ransport controls SMPTE readout
Time base, frame
rate and MMC record
mode menus
and Locate
buttons
SYNCHRONIZATION AND MIDI MACHINE CONTROL
The Sync tab and the sync-related controls at the top of the
window give you control over your MOT U inter face’s sync
and MMC transport control features.
Transport controls
The transport controls are just like standard tape deck
transports. These buttons control the time code generated
by your MOTU interface when it is in Internal mode.
SMPTE Readout
The SMPTE Readout provides a running update of the
time code being generated or converted by your MOTU
interface. This running update is made possible by MIDI
Figure 5-8: The synchronization and MIDI machine controls.
CLOCKWORKS
37
Page 38

Cueing to a specific frame
The SMPTE readout shows your MOTU interface’s current
frame location in hours: minutes: seconds/ frames. You
can also type in any frame location you wish into the
SMPTE Readout to cue your MOTU interface to a specific
frame location. Use the tab key to move from field to field
and press return to confirm the SMPTE location you type
in.
Locate Buttons
You can set the eight locate buttons to any SMPTE frame
location you wish and then cue your MOTU interface (and
all connected devices) as desired by clicking the
appropriate Locate button.
To set a locate point for a locate button, set the SMPTE
counter to the desired location and then shift-click the
button.
Locate points are saved with ClockWorks files.
Clock mode menu
This setting determines the clock mode for your Express
interface. The choices are:
Internal
The Express interface operates under its own clock and
ignores incoming time code.
MTC
Allows your Express interface to sync to MIDI Time Code
from another device. For complete details, see “MTC
Mode” on page 63.
LT C
Al lows your Ex press i nter face to syn c to SMPTE t ime co de
received on its SMPTE input jack. This mode provides
more features than LTC QuickLok mode, such as the
abilit y to regenerate time code via t he SMPTE output jack.
For complete details, see “LTC mode” on page 60.
38
CLOCKWORKS
Page 39

LTC Q ui ck Lok
Al lows your Ex press i nter face to syn c to SMPTE t ime co de
received on its SMPTE input jack and convert it to MIDI
Time Code to be sent to the computer and other devices.
This mode provides fast lockup to LTC, but it doesn’t
provide as many other features as LTC mode (above).
Frame Rate menu
The SMPTE Frame rate menu lets you choose the overall
time base and SMPTE frame rate for your MOTU
interface. For a complete explanation of SMPTE frame
rates, see “Frame rates” on page 84.
The MMC record mode menu
The MMC record mode settings let you control exactly
when recording will occur in MMC devices being
controlled by your MOTU interface.
The MMC record mode menu has three choices: safe,
rehearse, and record.
Safe
No recording can occur in any MMC device.
Rehearse
This mode causes MMC devices to act as if they are
recording, punching in, punching out, etc. but no
recording actually occurs.
☛ Make sure that your MMC device supports rehearse
mode before attempting to use this record feature. If it
doesn’t, rehearse mode may actually record. Consult the
manual for your MMC device for details.
Record
This mode allows recording on the currently recordenabled track(s) for any MMC device. To actually record,
press the record button in your MMC-compatible host
recording software.
CLOCKWORKS
39
Page 40

SYNC TAB SETTINGS
The Sync tab has the following status indicators and
options:
Status section
The status section provides detailed information about
what state your MOTU interface is in as a synchronizer.
The following sections provide a brief explanation of each
term.
Output phase lock
When this status indicator is illuminated, it means that
time code generated by your MOTU interface (MTC and
LTC) is in sync with the current time base.
Input frame phase lock
When this status indicator is illuminated, it means that
your MOTU interface has successfully achieved lockup
with incoming LTC/MTC full frame messages.
Input quarter frame phase lock
When this status indicator is illuminated, it means that
your MOTU interface has successfully achieved lockup
with incoming LTC/MTC quarter frame messages.
External time code detect
When this status indicator is illuminated, it means that
your MOTU interface has successfully detected external
time code (MTC, LTC).
Framelocked
This status indicator means that your MOTU interface is
successfully locked to an external time base and that it is
also successfully generating or converting SMPTE time
code.
Frame lock
The Frame lock check box is only available when your
MOTU interface is locking to external SMPTE time code
(in any form — MTC, LTC or VITC). It is not available
when your MOTU interface is in Internal sync mode.
To understand the Frame lock option, you first need to
know that your MOTU interface continuously monitors
incoming ti me code to detec t any possible d isco ntinuity in
the frame times as they advance. If your MOTU interface
detects more than five frames in a row that are not
40
CLOCKWORKS
Page 41

continuous with respect to previous frames received, then
it does one of two things, depending on whether the Frame
lock option is turned on (checked) or off (unchecked).
If the Frame lock option is turned on (checked), and your
MOTU interface detects more than five frames in a row
that are not continuous with respect to previous frames
received, then it will stop converting altogether.
If the Frame lock option is turned off (unchecked), and
your MOTU interface detects more than five frames in a
row that are not continuous with respect to previous
frames received, then it begins to perform a kind of
“pseudo jam sync”. In this mode, it continues to convert
an uninterrupte d stream of continuous time co de, while at
the same time clocking off of the incoming time code.
Even though the frames it is generating no longer match
the frames it is reading, it will continue to remain in sync
with the incoming time code.
In other words, when the Frame lock option is off, your
MOTU interface ignores discontinuous jumps in
incoming time code by continuing to clock itself off of the
incoming time code without stopping (or pausing). In
doing so, it continues to convert a continuous,
uninterrupted stream of frame times based on the time
code to which it first locked.
Turn on Frame lock when you want your MOTU
interface’s frame times to match incoming frame times,
and you want it to stop converting altogether if there are
jumps in incoming time code.
Turning off Frame lock can be a life saver if you find
yourself in a situation where you have time code on tape
(or other source) but the frame locations jump around to
different times (because of overlapping SMPTE striping,
edits, or whatever). By turning off Frame lock, you can
sync continuously to this type of time code without
glitching or stopping. If the SMPTE on your tape jumps
around as described, you are likely to experience brief
drop-outs at the points where it jumps. If so, just increase
your MOTU interface’s freewheeling to cruise past them.
CLOCKWORKS
41
Page 42

Generate signal when stopped
This option applies to situations in which your MOTU
interface is converting time code and the source time code
continues even when it is parked on a frame. The most
common case is when your MOTU interface is locked to
SMPTE time code being generated from a VITC converter
that generates time code while still-framed (such as a
MOTU Video Timepiece universal synchronizer), and the
video deck is paused. In this situation, the Generate signal
when stopped option, when checked, makes your MOTU
interface continues to output time code (LTC, MTC and
VITC), even while the video is parked on a single frame in
pause mode. It will continue to do so as long as the video
head is engaged and VITC lines can be scanned.
Auto-detect input frame rate
When this option is checked, the MIDI interface will
automatically detect the frame rate of incoming SMPTE
time code (VITC, LTC or MTC). In most situations, this is
desirable because it ensures that your MOTU interface is
properly interpreting and synchronizing to the time code.
If, however, you find yourself in a situation where you
would like to set the frame rate manually, uncheck this
option and set the frame rate in ClockWorks.
LTC Ou tp ut
This slider allows you to adjust the overall gain of the
SMPTE time code from your MOTU interface LTC output
jack. Move it towards the left to reduce the level; move it
towards the right to increase it. This level control affects
LTC output in all sync modes, including LTC, MTC, etc.
Still-frame sensitivity
This option lets you control how many frames in a row
your MOTU interface needs to receive to consider
incoming SMPTE as being parked on a single frame.
While lowering this value makes your MOTU interface
mor e res pons ive w hen you pau se yo ur v ideo deck , it is als o
more likely to misinterpret ordinary transport shuttling.
So ma ke thi s value as low as you can, but r aise it if you start
getting improper frame locations when shuttling your
deck.
42
CLOCKWORKS
Page 43

MIDI Machine ID
The MIDI Machine ID option lets you change the MMC
(MIDI Machine Control) device ID of your MOTU
interface. The factory default ID of your MOTU interface
is 19. The only situation in which you really need to change
it is if you are using MIDI Machine Control with two or
more MOTU interfaces. Otherwise, just leave it set to 19,
an d ma ke su re t hat your MMC tra nsp ort mas ter cont rol ler
device or computer software knows that your MOTU
interface’s ID is 19.
If you change your MOTU interface device ID for some
reason, make sure that it does not match the ID of another
device connected to it.
Freewheel _ frames
This opt ion le ts you set the number of fra mes your MOTU
interface will freewheel over when it encounters a time
code drop-out. For a complete explanation of
freewheeling, see “Freewheeling to avoid time code
dropouts” on page 57.
Infinite freewheel
When you choose this option, your MOTU interface
begins generating time code on its own indefinitely as
soon as it stops receiving incoming time code. And it will
continue to do so until you stop it with the STRIPE button
on the front panel. You can also stop it by changing the
master sync mode or by enabling the Freewheel option in
ClockWorks.
CLOCKWORKS
43
Page 44

THE PEDAL TAB
The Pedal tab lets you program the pedal input(s) on your
MOTU interface.
■ Convert an audio tempo source such as an audio click
into MIDI data in order to slave MIDI hardware or
software to the audio tempo source
Pedal type menu
You have three choices:
■ None
■ Momentary
■ Click to MIDI
The Momentar y setting should be used for momentary
foot pedals. For the click-to-MIDI option, see “Using an
audio click as a tempo source” on page 45.
Figure 5-9: The Pedal tab.
Pedal basics
You can use a foot pedal to:
■ Generate MIDI data, such as notes, controllers, patch
changes, pitch bend, and system exclusive
■ Route the data from the pedal to any device
44
Polarity
Negative polarity reverses the direction of the pedal, so
that if it normally goes up when you press down, negative
polarity will make it go down (and vice versa).
CLOCKWORKS
Page 45

MIDI message
A pedal can generate MIDI notes, pitch bend, controllers,
patch changes, or sysex data. If you chose controller, select
the type of controller you wish to generate. You can either
type in the controller number or choose it by name from
the menu. If you choose system exclusive, see “Sending
sysex data with a pedal” on page 47.
Channel
The output from a pedal can be assigned to any MIDI
channel. To choose the output cable, go to the Routings
tab and drag a connection from the Pedal icon in the left
column to the desired output(s) in the right column.
Sending pedal data
Once you have made the pedal data assignment and
output assignment as described above, no other
preparation is necessary. Just press the pedal.
■ Recording the click’s tempo map into a sequencer
■ Slaving a sequencer to a click track
■ Tr ig ge ri ng dru m s am pl e s
This feature can be used in conjunction with MOTU’s
Digital Performer software to slave a sequence to
prerecorded music on tape while referenced to SMPTE
time code. For more information, please refer to the
Digital Performer manual.
To convert an audio click into MIDI:
1 Be sure that the audio click source is connected to the
quarter-inch pedal input on your Express interface.
2 In ClockWorks, go to the Pedal tab.
3 Under Pedal Type, choose Click-to-MIDI.
Using an audio click as a tempo source
Your Express interface can convert an audio click into any
MIDI event. The audio click can be played back from a
tape deck or generated live by a drummer. This fe ature can
be used for many purposes. Below are a few ideas:
CLOCKWORKS
The Click-to-MIDI options appear in the right-hand side
of the window.
45
Page 46

Figure 5-10: The Click-to-MIDI options.
Threshold and Decay
The threshold can be set anywhere on a scale from 0 to 70.
The audio click must be loud enough to reach the
threshold. A soft click will require a low threshold. Try to
set the threshold as high as possible, however, to avoid
false triggering from noise. Decay is meant to prevent
doubled attacks. The decay can be set from 1 to 31. Low
values make the decay longer; high values make it shorter.
Try to set the decay as long (low) as possible, but if you are
working with a faster tempo, don’t make it too long or you
will miss beats. The decay also determines the duration of
the MIDI note generated by the Express interface. A low
decay produces a long duration; a high decay produces a
short duration. You may need to experiment to adjust
these values.
MIDI message and channel
These are set in the same manner as previously described
in “MIDI message” on page 45 and “Channel” on page 45.
Click input hints
If the Express interface reads the audio click erratically,
such as generating doubled attacks, try adjusting the
threshold and decay values. If you still have trouble, try
attenuating the audio signal from the click source or
through a mixer. The pedal input is purposefully sensitive
so that it can detect a low-amplitude signal.
If you are generating the click that the Express interface
will convert, set the audio level fairly high (at around 0
dB). Also, record a short, transient click sound with no
reverb or other effects. A short and precise click sound will
produce the most reliable results.
46
CLOCKWORKS
Page 47

Sending sysex data with a pedal
A pedal can transmit a sysex message up to 27 bytes long.
To program the sysex message:
1 Set up the knob or pedal as described in the previous
sections.
Once you have selected system exclusive as the type of
data, you’ll see the sysex data entry window.
2 Click inside the sysex data entry box and type in the
bytes necessary.
The message can be up to 27 bytes long, including the F0
and F7 at the beginning and end of the message.
3 Set the output assignment as described in “Channel” on
page 45.
FUTURE UPDATES
Visit www.motu.com for information about future
updates for ClockWorks.
CLOCKWORKS
47
Page 48

48
CLOCKWORKS
Page 49

CHAPTER
6 Front Panel Presets
OVERVIEW
This chapter describes your MOTU Express interface’s
eight factory presets and explains how to:
■ Select a factory preset or one of eight user presets from
the front panel
■ Create your own user presets
■ Use the Presets window in ClockWorks
■ Select presets using patch changes from any MIDI
source (such as a keyboard controller or sequencer)
Factory versus user presets. . . . . . . . . . . . . . . . . . . . . . . . . . . . . . . . . . . 49
Selecting a preset on an Express XT . . . . . . . . . . . . . . . . . . . . . . . . . . 49
Selecting a preset on a micro express . . . . . . . . . . . . . . . . . . . . . . . . 50
Factory Presets . . . . . . . . . . . . . . . . . . . . . . . . . . . . . . . . . . . . . . . . . . . . . . . 50
User Presets . . . . . . . . . . . . . . . . . . . . . . . . . . . . . . . . . . . . . . . . . . . . . . . . . . 54
FACTORY VERSUS USER PRESETS
Your Express interface provides eight factory presets and
eight more user presets. Factory presets are “hard-wired”
and cannot be permanently changed. If a factory preset is
the current preset, changes you make to your Express
interface’s settings will not be remembered unless you save
them to one of its eight user presets.
The eight user presets can be configured any way you wish,
and they can be stored in the interface hardware itself for
later recall.
SELECTING A PRESET ON AN EXPRESS XT
To select a preset from the front panel:
1 If you have a MIDI Express XT, press the BANK button
as needed to choose either the factory preset bank or user
preset bank. The Factory Preset or User Preset LED will
become lit.
2 Repeatedly press the SELECT button until the LED
below the program you want lights up.
49
Page 50

As you repeatedly press the button, the LED cycles
through the eight programs.
SELECTING A PRESET ON A MICRO EXPRESS
To select a preset from the front panel:
1 Repeatedly press the SELECT button until the LED for
the program you want lights up.
2 The SELECT button cycles through both the factory
and user presets, as indicated by the red Use r LED and the
green Factor y LED.
FACTORY PRESETS
The eight factory presets provide you with optimum cable
routing, SMPTE, and other settings for various common
situations in which you will use your Express interface.
The eight factory preset settings are listed on the front
panel as shown below:
MIDI Express XT front panel preset controls
micro express front panel preset controls
Figure 6-1: The eight factory presets on the front panel of the Express XT and
micro express.
Each factory preset is described in the following sections,
including situations in which you would find it useful.
50
FRONT PANEL PRESETS
Page 51

Sequencer 30 fps
This preset is designed for MIDI software, especially
sequencing software, that supports multi-cable interfaces
such as your Express interface. Use this preset if you have
Performer, Vision, Cubase, Logic, or any other MIDI
software that supports multi-cable interfaces.
This preset connects all inputs and outputs to the
computer. In addition, it sets the SMPTE sync settings for
lockup and striping at 30 frames per second (fps).
Sequencer 25 fps
This preset is identical to the Sequencer 30 fps above
except that the frame rate is set to 25 frames per second
(fps) for converting and striping at 25 fps.
Live Keyboards
Use this preset when you want to route any controller
connected to a MIDI IN to all MIDI outputs. This preset is
ideal for quickly routing a controller to a sound module
and for using a MIDI controller without a computer. If you
have connected both the MIDI IN and MIDI OUT of your
keyboard controller to your Express interface, it is best to
match the input/output MIDI port numbers on your
MOTU interface. For example, if the controller is
connected to MIDI IN port 3, connect it to MIDI OUT
port 3 as well. If you do so, this preset prevents
troublesome MIDI feedback loops, which happen when
the controller sends data back to itself via your Express
interface. This preset avoids this problem by not sending
data to the port that has the same number. For example,
MIDI IN port 3 routes data to all MIDI OUT ports except
MIDI OUT number 3.
Merge All
With this preset, any device connected to a MIDI IN will
send data to all devices connected to your Express
interface outputs, including the computer. This preset is
ideal for troubleshooting because it routes everything to
everywhere; any incoming data will be sent to all outputs.
For example, if you are not getting sound from a sound
module when you play notes on your controller, you can
eliminate MIDI routing as the cause of the problem by
temporarily using this preset. You can rest assured that
your Express interface is routing the data to the module
FRONT PANEL PRESETS
51
Page 52

correctly, and you can then focus your efforts on other
possible causes, such as bad MIDI cables, volume settings,
etc.
Use this troubleshooting technique if you cannot
successfully record data into your sequencer on the
computer.
For the Express XT, i
nput 1 is routed to outputs 1-4. Input
5 is routed to outputs 5-8.
MIDI Machine/for the Express XT
This preset provides MIDI data, time code, and MIDI
Machine Control settings for using MIDI Machine
Control between devices without a computer.
Merge Some
The Merge Some preset is similar to the Merge All preset,
except that it divides the inputs into two groups: inputs 14 (1-2 on the micro express) are routed to the computer
only, while inputs 5-8 (3-4 on the micro express) are
routed directly to all outputs (but not the computer).
Dual Split
The Dual Split preset is similar to the Live Keyboards
preset, except that it splits the interface into two sets of
inputs and outputs.
For the micro express, i
nput 1 is routed to outputs 1-3.
Input 3 is routed to outputs 4-6.
52
Inputs 1-4 are reserved for non-MMC devices being
routed to outputs 1-5, as well as the computer.
Input 5 is also routed to the computer but not to any of the
MIDI outputs.
MIDI outputs 6, 7 and 8 are reserved for MIDI Machine
devices, as these ports are programmed to receive MIDI
Time Code and MMC transport commands from the
MIDI Express XT.
MIDI inputs 6, 7 and 8 are intended for MMC controller
devices, and they are each programmed slightly differently
to accommodate three different scenarios. Input 6 routes
FRONT PANEL PRESETS
Page 53

MIDI data only to outputs 6, 7 and 8. Input 7 routes MMC
to the MIDI Express XT only. Input 8 does a combination
of inputs 6 and 7.
MIDI Machine/for the micro express
This preset provides MIDI data, time code, and MIDI
Machine Control settings for using MIDI Machine
Control between devices without a computer.
Inputs 1-2 are reserved for non-MMC devices being
routed to outputs 1-4, as well as the computer.
Input 3 is also routed to the computer but not to any of the
MIDI outputs.
MIDI outputs 5 and 6 are reserved for MIDI Machine
devices, as these ports are programmed to receive MIDI
Time Code and MMC transport commands from the
micro express.
MIDI inputs 3 and 4 are intended for MMC controller
devices, and they are each programmed slightly differently
to accommodate several different scenarios. Input 3 routes
MMC to the micro express only. Input 4 routes MIDI data
only to output 6.
Direct
This preset causes your Express interface to func tion like a
simple 1 IN/8 OUT or 1 IN/ 6 OUT MIDI interface,
respectively. All of the extra routing, merging, muting,
rechannelizing, and running status features are disabled.
Your Express interface applies no processing whatsoever
to MIDI data as it is sent to and from the computer. This
mode is referred to as Direct Connect mode through this
manual.
Input 1 connects to the computer, and the computer
connects to all 8 (or 6) outputs. But none of the inputs are
connected directly to the outputs.
This preset can be used effectively to solve problems with
non-standard MIDI data transfers. For example, some
samplers transmit sample dumps in a way that won’t work
FRONT PANEL PRESETS
53
Page 54

when your Express interface’s MIDI processing features
are enabled. This mode disables the processing features,
which solves the problem. If you experience trouble with
sysex, try this preset.
☛ ClockWorks cannot communicate with your Express
interface when it is in Direct mode. To restore communications, use the front panel controls to choose another
preset.
USER PRESETS
Your Express interface provides eight user presets, which
you can configure any way you wish. From the factory,
these eight user presets match the eight Factory presets
described earlier in this chapter. To change one of the eight
user presets, use ClockWorks as described in chapter 5,
“ClockWorks” (page 25) to modify and save the user
preset in your Express interface itself. Optionally, you can
also save it on your computer hard disk.
54
FRONT PANEL PRESETS
Page 55

CHAPTER
7 Synchronization
OVERVIEW
This chapter explains how to use your MOTU Express
interface to synchronize computer software and other
devices to an audio tape recorder (ATR), video tape
recorder (VTR), or other time code sources using SMPTE
time code. It also explains how to generate SMPTE (a
process commonly referred to as striping).
This chapter also explains how to:
■ Slave your Express interface and other devices to MIDI
Time Code
■ Measure incoming time code to see how fast or slow it is
■ Solve various SMPTE synchronization problems
If you are new to SMPTE Sync . . . . . . . . . . . . . . . . . . . . . . . . . . . . . . . . 55
Accessing sync settings . . . . . . . . . . . . . . . . . . . . . . . . . . . . . . . . . . . . . . 55
Syncing your Express interface to SMPTE . . . . . . . . . . . . . . . . . . . . 55
Slaving a Sequencer to SMPTE . . . . . . . . . . . . . . . . . . . . . . . . . . . . . . . 58
Striping SMPTE. . . . . . . . . . . . . . . . . . . . . . . . . . . . . . . . . . . . . . . . . . . . . . . 59
LTC mode. . . . . . . . . . . . . . . . . . . . . . . . . . . . . . . . . . . . . . . . . . . . . . . . . . . . . 60
MTC Mode . . . . . . . . . . . . . . . . . . . . . . . . . . . . . . . . . . . . . . . . . . . . . . . . . . . 63
IF YOU ARE NEW TO SMPTE SYNC
If you are not familiar with the process of synchronizing
with SMPTE time code, see Appendix B, “SMPTE
Synchronization Basics” page (81)before reading this
chapter. It provides a definition of SMPTE time code and
an explanation of how it is used for synchronizing MIDI
devices to audio and video equipment.
ACCESSING SYNC SETTINGS
You can access the sync settings in your MOTU interface
via ClockWorks. See “Synchronization and MIDI
Machine control” on page 37 and “Sync tab settings” on
page 40 for details.
SYNCING YOUR EXPRESS INTERFACE TO SMPTE
Your Express interface ships from the factory ready to lock
the computer to SMPTE time code via the MIDI Time
Code (MTC) routing shown below:
55
Page 56

When your Express interface locks to the time code, the
green “LOCK” LED on the front panel glows steadily and
the red “TACH” LED blinks regularly. In addition, the
green computer OUT LED glows steadily, indicating that
MIDI time code (MTC) is being sent to the computer.
Figure 7-1: The connection from the MTC out port to the computer in port delivers MIDI Time Code from the Express interface to software running on the
computer.
When this MTC routing is present, your Express interface
will send MIDI Time Code to the computer as soon as it
achieves lockup to the incoming time code. Any software
running on the computer — including ClockWorks —
can then slave to the time code. (Make sure the software is
set up to lock to MIDI time code.)
56
Red TACH light Green LOCK light
Figure 7-2: Converting time code. When your Express interface converts incom-
ing time code, the red TACH light blinks, the green LOCK light glows steadily,
and the green Computer I/O light glows steadily as well.
SYNCHRONIZATION
Page 57

If the LOCK and TACH lights do not behave as described,
your Express interface is not successfully locking to the
SMPTE time code. This could be a problem with the audio
connections between the tape deck and your Express
interface. It could also be that the SMPTE level is not high
enough. See Appendix C, “Troubleshooting and Customer
Support” page (89).
If the LOCK and TACH lights look OK, but the green
computer OUT LED is not glowing, this means that your
Express interface settings have been altered somehow such
that it is not sending MIDI time code to the computer. To
correct the settings, see Figure 7-1.
Time code display
ClockWorks displays a running update of time code when
the Express interface is converting time code.
Routing MIDI Time Code to other devices
At times, you may need to route MIDI Time Code to a
device connected to one of your Express interface’s MIDI
OUTs. To make time code routings such as these, see “The
MTC In and MTC Out connections” on page 30.
Freewheeling to avoid time code dropouts
When your Express interface encounters a drop-out —a
series of missing or unreadable frames—in the SMPTE
time code, it “freewheels” past them, pretending that they
were not missing by briefly generating its own code to
make up for the missing frames. The default freewheel
value is 4 frames. This means that your Express interface
will continue to generate time code for four more frames
after it stops receiving time code. If it does not receive any
more time code after four frames, it will stop converting.
The factory default base setups have the freewheeling
feature set to 4 frames for fastest response when you stop
the tape deck. The Freewheel amount can be adjusted up
to 32 frames. This allows your Express interface to
maintain lockup even over lengthy SMPTE drop outs.
If you encounter a time code drop out that causes your
Express interface to stop converting for a moment, try
increasing the freewheel amount in ClockWorks. Try
adding just a few frames at a time when adjusting the
amount.
SYNCHRONIZATION
57
Page 58

your Express interface freewheels at the frame rate it is
reading at the time it begins freewheeling — except for
29.97 drop and non-drop. If you intend on reading 29.97
SMPTE, be sure to manually set the SMPTE format to
29.97 so that freewheeling will occur at the proper rate.
When you increase the freewheel amount, you also
increase the amount of time that your Express interface
keeps converting when you stop tape. To make your
Express interface as responsive as possible, only raise the
freewheel amount as high as necessary to overcome the
drop-out(s) you are encountering.
Synchronizing to discontinuous time code
your Express interface has the ability to stay in sync with
discontinuous time code — that is, time code that has no
gaps in it but does have jumps in its frame locations. For
details about how to do this, see “Frame lock” on page 40.
SLAVING A SEQUENCER TO SMPTE
To slave a sequencer to SMPTE time code via your MOTU
Express interface:
1 Confirm that the Express Interface is successfully
locking to incoming time code and transmitting MIDI
Time Code to the computer, as explained earlier in this
chapter.
2 Connect the sequencer to the Express interface Sync
port, as demonstrated below in Figure 7-3 for the Express
XT and SONAR™:
Figure 7-3: Slaving to the Sync port for SMPTE synchronization via MIDI Time
Code (MTC), demonstrated here in Cakewalk SONAR.
58
SYNCHRONIZATION
Page 59

STRIPING SMPTE
Along with its other capabilities, your Express interface is
SYNCHRONIZATION
59
Page 60

Of course, if you want to stripe a tape and meanwhile get
on with other work, you can quit ClockWorks. Striping
will proceed in the background.
not bleed into adjacent tracks. -3 VU is only a rule of
thumb, though, so don’t hesitate to use other levels if they
work better for you.
Striping SMPTE on a multitrack tape deck
The go al when stripi ng SMPTE t ime code is to gener ate an
error-free signal strong enough for reliable lockup, but not
so strong that the SMPTE bleeds through to adjacent
tracks.
There are several ways to handle this. One way is to leave
an empty track on your multi-track tape deck as a buffer
between the SMPTE and other tracks. With a buffer track,
SMPTE can be recorded at very strong (“hot”) levels
(above 0 VU) without risk of bleedthrough.
If your tape deck has no tracks to spare, a good level at
which to record is around –3 VU. That is, the VU meter for
the SMPTE track on your tape deck should read –3 when
you stripe the SMPTE. This records SMPTE that is hot
enough for reliable lockup and weak enough so that it will
60
LTC M O DE
In LTC mode, your Express interface locks to incoming
SMPTE time code received on its SMPTE IN jack. But LTC
mode differs from LTC QuikLock mode (page 39) in
several significant ways. In LTC mode, your Express
interface:
■ Emits regenerated LTC on its SMPTE OUT jack
■ Analyzes incoming time code and responds in several
useful ways, depending on what happens to the incoming
time code
■ Measures incoming time code with an extremely
accurate internal clock to see how fast or slow it is running
and displays the results in the SMPTE Reader window in
ClockWorks
Because LTC mode employs a sophisticated phase-lock
synchronization engine in your Express interface, the
amount of time it takes to establish lockup to incoming
SYNCHRONIZATION
Page 61

time code is longer than LTC QuikLock mode. On the
other hand, LTC mode offers the additional capabilities
mentioned above. These features, and how you can use
them, are discussed in the next few sections.
Regenerating fresh time code (‘jam syncing’)
SMPTE is a problem when you are copying tapes: it
degrades rapidly every time you try to copy it from one
tape to another. Often, the SMPTE signal deteriorates so
much that it will not be recognizable by any SMPTE-toMIDI converter, including your Express interface, and you
will no longer be able to lock to it.
The solution to this problem is to use your Express
interface to regenerate fresh SMPTE time code that
matches the original time code while you are copying the
tape. Some people refer to this process as jam syncing.
When your Express interface receives a SMPTE signal on
its SMPTE IN cable, it always regenerates a fresh signal
that exactly matches the incoming signal and sends it out
the SMPTE OUT cable (except for drop-outs, which it
eliminates with freewheeling).
Fresh SMPTE
Time code
MIDI Express XT or micro express
Original
SMPTE Time
code
To regenerate SMPTE:
1 Connect the original SMPTE track to the SMPTE IN on
your Express interface, and connect the SMPTE OUT
from your Express interface to the destination SMPTE
track (which could even be on a different tape deck).
2 Set the free wheel option in the Sy nc/MMC window to a
high enoug h number of fram es to cover any drop outs that
may exist in the current time code.
SYNCHRONIZATION
61
Page 62

Try setting it to between 2 and 8 frames, unless there is an
obviously large dropout. If so, set it more than 8 frames.
This ensures that drop-outs in the old code are not
reproduced in the fresh code.
3 Roll tape and set the SMPTE volume levels.
When your Express interface is reading the old time code,
it generates fresh time code via its SMPTE OUT jack only
when it is in LTC mode; it won’t regenerate LTC in LT C
QuikLock mode.
4 When the levels are set, roll tape and convert as normal.
your Express interface automatically creates fresh SMPTE
time code that matches the original time code and its
relation to the other tracks on the tape. In addition, your
Express interface freewheels over drop-outs in the old time
code so that the new, clean code has none.
Lengthening a SMPTE track
If the time code on your SMPTE track ends too early and
you need to add more code, you can use the “One time”
jam sy nc option. To do so, feed the original track into your
Express interface and record the fresh code onto a new
track. Be sure to start from the beginning so that you
regenerate the entire length of the original track. When
your Express interface reaches the end of the original
SMPTE track, it will begin striping on its own. To stop
striping, click the Stop button or wait until your Express
interface reaches the stop time.
And remember, your Express interface must be in LT C
mode to do this, not LTC QuikLock.
Regeneration and time code bits
Except for when it is in LTC QuikLock mode, your Express
interface always regenerates fresh time code from its
SMPTE out jack. Time code user bits embedded in
incoming LTC on its SMPTE input are not preserved.
62
SYNCHRONIZATION
Page 63

MTC MODE
Choose this synchronization mode when you want your
Express interface to slave to MIDI Time Code (MTC)
being sent from a device connected to one of its inputs.
This mode offers the least amount of time base stability, so
it is recommend that you try to set things up so that you
can use one of the other modes.
When your Express interface operates in MTC mode, it
locks to any MTC coming from your computer. In doing
so, however, it also “swallows” the MTC coming from the
computer. If you attempt to transmit MTC from your host
software to a specific MIDI device in your studio, it won’t
reach the MIDI device because it will get read and
“swallowed” by your Express interface. Since computergenerated MTC is not as stable as other forms of time
code, you are better off doing just the opposite: send MTC
from your Express interface to the computer, and if
necessary, control your Express interface from your
computer software via MIDI Machine Control as
demonstrated in Figure 8-1 on page 68.
If you absolutely must transmit MTC from your computer
for some reason, See “Routing MTC to your MOTU
interface” on page 30 for important information about
routing MTC to your Express interface.
SYNCHRONIZATION
63
Page 64

64
SYNCHRONIZATION
Page 65

CHAPTER
8 MIDI Machine Control
OVERVIEW
Your Express interface can serve as a MIDI Machine
Control (MMC) transport control “hub” for all MMCcompatible devices, allowing you to manipulate the
transport controls of everything from one master set of
controls: either an MMC hardware controller device such
as JL Cooper’s CuePoint or from MMC-compatible MIDI
software on the computer.
How MMC works . . . . . . . . . . . . . . . . . . . . . . . . . . . . . . . . . . . . . . . . . . . . . 65
Setting MMC device ID’s. . . . . . . . . . . . . . . . . . . . . . . . . . . . . . . . . . . . . . 67
Setting up other MMC devices . . . . . . . . . . . . . . . . . . . . . . . . . . . . . . . 67
Preparing software for MMC . . . . . . . . . . . . . . . . . . . . . . . . . . . . . . . . . 67
Using software as an MMC controller . . . . . . . . . . . . . . . . . . . . . . . . 67
Using an MMC control surface . . . . . . . . . . . . . . . . . . . . . . . . . . . . . . . 70
Using other devices as a controller . . . . . . . . . . . . . . . . . . . . . . . . . . . 71
HOW MMC WORKS
An MMC controller (which has transport and cueing
controls) sends transport commands (play, stop, cue, etc.)
to an MMC device that is serving as a time code source.
When the MMC device responds to the transport
commands, it generates time code to which all other
devices (and software) chase and lock. The other devices
do not need to be MMC devices, as they sync in the usual
fashion via time code (LTC or MTC).
A recommended setup for MMC
The best scenario for MMC is to set the Master sync mode
of your Express interface to Internal. You r E xpr ess
interface serves as the time code source, and your
computer software (or hardware MMC controller) serves
as your MMC transport control master. The MMC
controller sends play, stop, start and locate commands to
your Express interface, and all other devices (including the
computer software) chase and lock to time code being
generated by your Express interface. In essence, your
Express interface serves as a time code “hub” for all other
devices as pictured in Figure 8-1 on page 68.
65
Page 66

Other MMC scenarios
In the recommended scenario described in the previous
section, your Express interface receives MMC transport
commands and serves as the time code master for
everything else.
MMC and video
If you are working with video, and you want MMC control
of your rig from your computer software (or MMC-
compatible controller) via your Express interface, your
video deck needs to have the ability to either:
Alternately, you could choose another MMC device, such
as a hard disk recorder, to receive transport commands
and serve as the time code master. For example, the device
would receive transport commands from your computer
software and generate SMPTE time code (LTC). In this
case, you would set your Express interface master sync
mode to LTC QuikLock and feed the LTC into your Express
interface, which would then drive all other devices.
There is no advantage to doing MMC this way; in fact, it
will probably not provide as stable a time base as your
Express interface does in the recommended scenario
described in the previous section. You should only really
use this set up if you have a MMC dev ice t hat does not have
the ability to be a time code slave and therefore must be the
master.
66
■ Synchronize to external SMPTE time code
OR
■ Support MMC
Without either of these capabilities in your video deck,
your Express interface has no way to control the video
deck transports. You’ll instead have to use your video deck
as the transport and time code master.
If your video deck supports the SONY 9-PIN protocol,
consider purchasing MOTU’s Digital Timepiece, which lets
you control your video deck from a computer (or other
MMC controller).
MIDI MACHINE CONTROL
Page 67

SETTING MMC DEVICE ID’S
Each MMC device requires a unique MMC device ID,
including your Express interface itself. The factory default
ID of your Express interface is 19. If needed, you can
change it as shown in Figure 5-8 on page 37.
SETTING UP OTHER MMC DEVICES
If you have an MMC-compatible device, you can slave it to
your Express interface. But first, you need to make your
Express interface send MTC (or LTC for some devices). To
send MTC, use the Routings tab in ClockWorks to make
connections from the MTC Out port in the left-hand
column to the desired destinations in the right-hand
column as demonstrated in Figure 7-1 on page 56.
you are ready to control your MMC device — via your
Express interface — from the computer (or a hardware
MMC controller).
PREPARING SOFTWARE FOR MMC
Regardless of what you decide to use as your MMC
transport control master (an MMC controller device or
computer software), you need to set up the software so
that it will slave to MIDI Time Code (MTC) generated by
your Express interface. This will ensure that your software
chases and locks with all other MMC devices. Check to
make your software is set up to the proper frame rate, and
that it is in “external sync” or “slave” mode, waiting for
MTC.
For most MMC devices that support being an MMC slave,
routing time code (either MTC as just discussed or LTC)
to them is all you need to do. For some devices, you may
also need to get your Express interface to send MMC
transport commands to the device. Once again, you do
this in the Routings tab: connect the MMC Out port in the
left-hand column to the destinations in the right-hand
column as demonstrated in Figure 7-1 on page 56. Then
MIDI MACHINE CONTROL
USING SOFTWARE AS AN MMC CONTROLLER
Most likely, you’ll want to establish your computer
software as the MMC transport control master, so you can
control all MMC devices from your computer, allowing
you to play, stop, and cue all connected devices directly
from your software’s main transport controls.
67
Page 68

This can be accomplished with an MMC-compatible
sequencer, MMC applet, or any other software that
transmits MMC transport control commands.
Your MOTU MIDI interface has the ability to serve as a
MMC transport slave, while at the same time generating
time code for other devices in your studio. In doing so, the
MOTU inter face becomes a ce ntral, st able t ime code “hub”
for a ll o f the dev ices i n you r st udi o, allowin g you play, sto p,
and cue them all directly from your sequencer.
Cakewalk SONAR or any
other Windows sequencer
that support SMPTE sync
and MMC
MIDI Time Code (MTC)
MIDI Machine Control
(MMC)
SMPTE (LTC)
Examples of
devices that can
slave to time code
Akai DR8
Figure 8-1: Your MOTU interface (a MIDI Express XT in this example) can serve
as a time code “hub” while you control it from your sequencer via MMC trans-
port commands.
MOTU MIDI interface
MIDI Time Code (MTC)
Roland VS-880
68
MIDI MACHINE CONTROL
Page 69

Once you have successfully established overall MIDI
communication between your software and your Express
int erf ace, f ollo w thes e ste ps to s et up your sof twar e to serve
as the MMC transport controller:
1 Set up your software to sync to MIDI Time Code as
described in the previous section (“Preparing software for
MMC” on page 67)
2 Tell your MMC software what the MMC Device ID is of
your Express interface.
From the factory, the default MMC device ID for your
Express interface is 19. If you need to, you can change it as
described in “Setting MMC device ID’s” on page 67.
3 Make the MMC routing connection show below from
the computer to your Express interface.
MIDI MACHINE CONTROL
Figure 8-2: To establish MMC control of the Express interface from your
software, make this connection in the Routings tab.
4 Set the Express interface master sync mode to Inter nal.
your Express interface will respond to MMC commands
coming from the computer specifying its device ID. It will
start, stop, and locate to any SMPTE location you
designate from your software.
69
Page 70

Routing time code to other devices
Once you have successfully established MMC control of
the MOTU Express interface as described in this chapter,
you can route MIDI Time Code (MTC) from the MOTU
Expres s inter face to othe r device s in you r studio to control
them remotely from your sequencer, as shown in
Figure 8-1 on page 68. Just drag a connection from the
MTC port to the device’s MIDI out port in the right-hand
column as demonstrated in Figure 5-3 on page 31.
MMC control of record functions
Some sequencers provide MMC remote control of record
features, such as record-arming tracks, setting automatic
punch-in and punch-out points, punching in on the fly,
and so forth. The MOTU interface’s MMC capabilities,
however, do not come int o play with reco rd fu nction s such
as these. It only handles MMC transport functions like
playing, stopping, and locating. For MMC record
functions, the MOTU interface serves only a means of
passing on MMC record commands from your sequencer
and the MMC device. Just send them directly to the
appropriate Windows MIDI port.
USING AN MMC CONTROL SURFACE
To use any MMC-compatible control surface product,
such as the JL Cooper CuePoint™:
1 Connect the MIDI OUT and IN jacks on the MMC
controller to your Express interface.
2 Using ClockWorks, route MTC to the MIDI OUT port
that the MMC controller is connected to as shown in
Figure 5-3 on page 31 so that it can receive MIDI Time
Code from your Express interface.
3 In the MMC controller device, identify the MMC
device ID for your Express interface.
From the factory, the default MMC device ID for your
Express interface is 20. If you need to, you can change it as
described in “Setting MMC device ID’s” on page 67.
From the standpoint of achieving MMC transport control
over your Express interface, the above preparations are all
you need. There may, of course, be other preparations
necessary in the controller itself.
70
MIDI MACHINE CONTROL
Page 71

USING OTHER DEVICES AS A CONTROLLER
We recommend trying to set up MMC as described in “A
recommended setup for MMC” on page 65. However, you
may have an MMC device, such as an MMC-equipped
reel-to-reel tape deck, that does not have the ability to be a
time code slave and therefore needs to be the time code
master. In this case, you need to set up your Express
int erface s o tha t it k nows that this dev ice w ill b e the mas ter
instead of the computer.
If the device transmits LTC, you can simply connect it to
your Express interface’s SMPTE input and set your Express
interface’s master sync mode to LTC QuikLock.
If the device only transmits MIDI Time Code (MTC),
make the connection shown below in Figure 8-3 and set
your Express interface’s master sync mode to MTC.
Figure 8-3: If you have an MMC device that can only transmit time code (and
cannot be a time code slave), then you can make it the time code master by
routing MTC to your Express interface (MTC In) as shown here. It is better to use
LTC, though, or better yet: your Express interface as the time code master. Both
are a more stable time base than MTC.
MIDI MACHINE CONTROL
71
Page 72

72
MIDI MACHINE CONTROL
Page 73

Part III
Appendices
All Users
73
Page 74

Page 75

APPENDIX
A Glossary
Address Track: A third audio track, used for time code,
located on the edge of the video signal on a 3/4” VTR.
Because of its proximity to the video signal, the address
track cannot be recorded by itself; it must be recorded
simultaneously with the video signal.
AT R : Audio Tape Recorder. A device that can record an
audio signal on audio tape.
Burn -in Window : A numeric display of time code
superimposed over the video picture to aid in the postproduction editing process.
Cable routing: An internal connection from one of the
Express interface’s MIDI IN ports to one or more of its
MIDI OUT ports.
Control Track: A video tape track located at the edge of the
video tape containing a series of pulses that serve as a
reference tracking the tape speed. This track is recorded
with the video signal.
CRT: Cathode Ray Tube. The glass screen in TV’s,
computers, etc. upon which video images are projected.
Crosstalk: Interference on a track from the signal of an
adjacent track on a multitrack tape recorder.
Default: An initial value or configuration.
Drop Frame: A SMPTE time code format used to
compensate for an accumulating timing error in color
video. Drop Frame skips two frames at the beginning of
each minute (except every 10th minute) as it counts color
video frames. The result is that the SMPTE time code
values match the actual elapsed time, since color video
runs slower (29.97 frames per second) than black and
white video (30 frames per second). Drop-frame is
required only with color video programs in which the
SMPTE time code numbers must precisely match the
actual elapsed time.
75
Page 76

Drop-out: A brief period of missing information in a
continuous signal, such as a video signal or SMPTE time
code signal. Drop-outs are usually caused by small,
physical imperfections in the surface of the tape on which
the signal is recorded.
Flywheeling: Another name for Freewheeling. See
Freewheeling below.
Freewheeling: A process in which a synchronizer, such as
the MIDI Express XT, continues to generate time code
even when it encounters drop-outs in a time code source.
Converters may briefly lose synchronization during a
drop-out and, in turn, momentarily stop converting time
code. The MIDI Express XT can freewheel up to 32
frames, making it insusceptible to drop-outs.
Guard Track: An empty track adjacent to the LTC track on
a multitrack tape recorder. A guard track prevents
crosstalk from another track, which can interfere with the
time code and cause synchronization problems.
Hard Record: A mode on a VTR that erases and records all
tracks simultaneously.
Horizontal Blanking: A short period of time in the video
display process in a CRT when the electron beam is shut
off to retrace to the next horizontal scan line (similar to a
carriage return on a typewriter).
House Sync: A process in which all video equipment in a
studio is connected to and genlocks to a single video sync
generator.
Genlock: A process in which a video generator (graphics,
picture, or VITC) is locked in phase with an external
source.
76
Input cable: One of the eight (or sixteen) MIDI IN jacks in
a MIDI Time Piece network.
Insert Record: A mode on a VTR that records on the video
tracks without recording on the audio tracks, or vice versa.
APPENDIX A: GLOSSARY
Page 77

Jam Sync: The process of creating fresh, error-free time
code or extending existing time code on tape by locking a
time code generator to existing code.
LT C : Longitudinal Time Code. The Society of Motion
Picture and Television Engineers (SMPTE) time code
format, expressed in audio form as an 80-bit binary audio
signal, that describes the location of each frame on film,
video, or audio tape in hours, minutes, seconds, and
frames. LTC’s video counterpart is VITC (Ve r t i ca l I nte rv al
Time Code), which is the same time code format in the
form of a video signal. In audio production, LTC is often
referred to as SMPTE or SMPTE time code since VITC is
seldom used.
MIDI: Musical Instrument Digital Interface. An
information protocol developed in the early 1980’s by
synthesizer and electronic instrument manufacturers to
allow devices to communicate musical performance data
to one another.
MTC: MIDI Time Code. A form of time code, digitized
within the MIDI format, that expresses time in hours,
minutes, seconds, and frames, just like SMPTE time code
(LTC and VITC).
Network: Two MIDI Time Pieces connected via their
NETWORK serial ports with a mini-DIN 8 cable.
Non-drop Frame: A SMPTE time code format that does
not drop any frames. Its counterpart, Drop Frame, skips
over the first two frames of every minute (except every
10th minute). Non-drop is the least confusing format and
should be used unless Drop Frame is required. Dropframe is required only with color video programs in which
the SMPTE time code numbers must precisely match the
actual elapsed time.
NTSC: National Television Systems Committee Format. A
system of coding color information for broadcasting
television formulated by the NTSC. NTSC uses 30 frames
per second for black and white and 29.97 frames per
second for color.
APPENDIX A: GLOSSARY
77
Page 78

Output cable:
78
APPENDIX A: GLOSSARY
Page 79

Synchroniz er: A dev ice th at re ads t ime code f rom audio or
video tape and is used to synchronize the timing of two or
more devices.
Time Code Generator : A device that is capable of
producing LTC, VITC, or both.
Time Code Window: A display of SMPTE time code
numbers on a video screen.
Universal Serial Bus: An industry standard for connecting
peripheral devices to computers.
USB: See Universal Ser ial Bus.
User Bits: 32 unassigned bits in the 80-bit SMPTE time
code word that have been set aside by the Standards
Committee of SMPTE for users to place their own
information in the time code, such as the shooting date,
take identification, reel number, and so on.
Ve rt ic al Bl a nk in g: The area on video tape between video
frames, which can be seen as the “black bar” above or
below the picture when the vertical hold is adjusted. This
area is where VITC can be recorded.
Video Field: One half (1/60th of a second) of a complete
video scanning cycle (one video frame), which consists of
525 video scan lines. One video field consists of the oddnumbered scan lines; the other consists of the evennumbered scan lines.
Video Frame: One complete video scanning cycle, which
consists of two video fields.
VITC: Vertical Interval Time Code. The Society of Motion
Picture and Television Engineers (SMPTE) time code
format, expressed in video form as binary video signal
recor ded i n th e ver tic al b lanki ng seg ment betwe en fra mes,
that describes the location of each video tape frame in
hours, minutes, seconds, and frames. VITC’s audio
counterpart is LTC (Longitudinal Time Code), which is the
same time code format expressed in the form of a binary
audio signal.
APPENDIX A: GLOSSARY
79
Page 80

VTR: Video Tape Recorder. A dev ice that can record a vide o
signal onto video tape.
80
APPENDIX A: GLOSSARY
Page 81

APPENDIX
B SMPTE Synchronization Basics
OVERVIEW
What Is synchronization?. . . . . . . . . . . . . . . . . . . . . . . . . . . . . . . . . . . . . 81
What is SMPTE? . . . . . . . . . . . . . . . . . . . . . . . . . . . . . . . . . . . . . . . . . . . . . . 81
Two forms of SMPTE: LTC versus VITC. . . . . . . . . . . . . . . . . . . . . . . . . 82
What is LTC? . . . . . . . . . . . . . . . . . . . . . . . . . . . . . . . . . . . . . . . . . . . . . . . . . . 82
What is VITC? . . . . . . . . . . . . . . . . . . . . . . . . . . . . . . . . . . . . . . . . . . . . . . . . . 82
The benefits of VITC over LTC . . . . . . . . . . . . . . . . . . . . . . . . . . . . . . . . . 83
Should I use LTC or VITC? . . . . . . . . . . . . . . . . . . . . . . . . . . . . . . . . . . . . . 84
Frame rates. . . . . . . . . . . . . . . . . . . . . . . . . . . . . . . . . . . . . . . . . . . . . . . . . . . 84
What is drop frame? . . . . . . . . . . . . . . . . . . . . . . . . . . . . . . . . . . . . . . . . . . 84
Why does drop frame exist? . . . . . . . . . . . . . . . . . . . . . . . . . . . . . . . . . . 85
Should I use drop frame? . . . . . . . . . . . . . . . . . . . . . . . . . . . . . . . . . . . . . 86
How does SMPTE synchronization work? . . . . . . . . . . . . . . . . . . . . 86
How does a MOTU synchronizer work?. . . . . . . . . . . . . . . . . . . . . . . 86
What is MIDI Time Code? . . . . . . . . . . . . . . . . . . . . . . . . . . . . . . . . . . . . . 86
Locking a MOTU interface to SMPTE . . . . . . . . . . . . . . . . . . . . . . . . . 87
WHAT IS SYNCHRONIZATION?
Synchronization is the occurrence of two or more events at
exactly the same point in time. In regard to SMPTE and
MIDI, it is the process of making MIDI devices, such as a
MIDI sequencer, precisely follow one another as they play
back. For example, when a tape deck plays, the sequencer
plays right along with it. When the tape fast forwards to a
new location and begins to play, the sequencer will jump
ahead to precisely the same location and begin playing,
too. Synchronization allows you to freely move about in a
piece of music without ever losing the “lockup” between
the tape and the sequencer.
Without synchronization, devices with independent time
bases, no matter how precisely they keep time, will
inevitably drift apart from one another over time.
WHAT IS SMPTE?
The word SMPTE is an acronym for the Society of Motion
Picture and Television Engineers. In the mid 1970’s, the
society established a timing standard, called SMPTE time
code, that is now an international standard. SMPTE time
code, commonly referred to as just “SMPTE”, was
81
Page 82

developed for film and video work but has proven to be
very useful in normal audio work as well. It is an absolute
time code, expressing hours, minutes, seconds and
divisions of a second in digital form.
Because of its accuracy and wide-spread acceptance,
SMPTE is the most powerful of the time code formats that
are used in audio production.
WHAT IS LTC?
Longitudinal Time Code (LTC) is the audio form of
SMPTE Time Code. LTC consists of an audio signal that
oscillates between two frequencies (approximately 2 and 4
kHz) to form an 80-bit word of 1’s and 0’s for each frame
on the tape. The 80 bits in each SMPTE frame describe, in
binary form (1’s and 0’s), the location of that frame in
hours, minutes, seconds, and frames.
TWO FORMS OF SMPTE: LTC VERSUS VITC
SMPTE time code consists of a series of binary impulses
that are recorded onto each frame on film or video tape, or
continuously on audio tape. These binary impulses count
each frame, expressing its location in hours, minutes,
seconds, and frames.
SMPTE has two forms:
1. an audio signal, called Longitudinal Time Code (LTC),
or
2. a video signal recorded in the vert ical bla nking segment
of video frames, called Vertical Interval Time Code (VITC)
82
WHAT IS VITC?
Vertical Interval Time Code (VITC, pronounced “Vit-see”)
is SMPTE time code that is encoded in the video signal in
the vertical blanking segment at the top edge of each
frame. A video signal consists of 525 scan lines, which the
rotating heads of a VTR scan as the tape rolls past them.
The first couple dozen of the scan lines at the edge of each
frame are blank; they do not contain any part of the video
picture. VITC is recorded on several of these blank scan
lines.
APPENDIX B: SMPTE SYNCHRONIZATION BASICS
Page 83

You ca n ac tua lly see VI TC in the ver tic al b lan kin g segm ent
portion of a video picture by adjusting the vertical hold on
a video screen. The 90-bit binary VITC signal appears as a
series of white dots in the black strip between the top and
bottom of the picture.
VITC is part of the video signal; it does not have its own
“track” on the video tape. It is therefore not possible to
stripe VITC by itself onto video tape. VITC can only be
recorded at the same time as the video picture.
THE BENEFITS OF VITC OVER LTC
Of the two forms of SMPTE time code, LTC has become
much more widely used as a synchronization standard in
the audio production industry because VITC
synchronizers in the past have been extremely expensive.
So, the term SMPTE or SMPTE time code has become a
common expression for LTC in recording studios, postproduction houses, MIDI hardware and software
manuals, and so on.
The MOTU Digital Timepiece is an affordable VITC
synchronizer and video character generator. It is both an
LT C and VITC synchronizer, so the distinction between
LTC and VITC becomes important. So, if you are used to
saying “SMPTE”, ask yourself “What type of SMPTE? LTC
or VITC?” This will help prevent confusion as you work
with the Digital Timepiece.
The primary advantage that VITC has over LTC is that
synchronization can be achieved at very slow tape speeds–
–even when shuttling the video tape backwards or
forwards one frame at a time. VITC allows for this because
it is p art of th e vi deo sig nal , whi ch i s con tinuous ly s can ned
by the VTR’s rotating heads even when the tape is stopped.
LTC cannot be read at slow tape speeds because it is an
audio signal in one of the audio tracks, which can only be
read when the tape is moving at a constant speed.
An oth er b enefi t of VITC i s th at i t do es n ot e at u p an y aud io
tracks.
APPENDIX B: SMPTE SYNCHRONIZATION BASICS
83
Page 84

SHOULD I USE LTC OR VITC?
Since VITC only works with video, you must use LTC for
synchronizing a multi-track tape deck. But don’t fret: LTC
is affordable and more than adequate for tape synchronization.
If you compose music for film or video, you too can use
LTC. We strongly recommend, however, that you consider
VITC because of the benefits noted above. Contact MOTU
for more information about the Digital Timepiece.
FRAME RATES
In either form (LTC or VITC), SMPTE time code has
several basic formats for counting frames per second (fps):
24, 25, 29.97 non-drop, 29.97 drop-frame, and 30. 24 is the
standard frame rate for film in the US; 25 is the European
format for film; 30 is the US standard for audio; and 29.97
drop and non-drop are used for video. Drop frame,
explained in detail in the next section, allows SMPTE time
code numbers to precisely match the actual elapsed time.
WHAT IS DROP FRAME?
Drop Frame SMPTE time code counts frames at a rate of
29.97 frames per second but skips two frame numbers at
the beginning of each minute, except every 10th minute.
When the time code display reaches HH:MM:59:29 (59
seconds and 29 frames at the end of each minute), the
frame count skips 00 and 01 and jumps ahead to
HH:MM:00:02. This jump does not happen at minutes 00,
10, 20, 30, 40, and 50.
Thus, frame numbers such as 11:14:00:00 and 11:14:00:01
do not exist in Drop Frame: the display will show a frame
at 11:13:59:29 and the next frame at 11:14:00:02. However,
frame numbers at each tenth minute will not be skipped,
such as from 11:19:59:29 to 11:20:00:00, followed by
11:20:00:01 and 11:20:00:02, etc.
Keep in mind that only numbers are skipped, not actual
frames of the picture. In other words, every picture frame
gets a frame number and the numbers skip every once in a
while.
84
APPENDIX B: SMPTE SYNCHRONIZATION BASICS
Page 85

WHY DOES DROP FRAME EXIST?
Video was first introduced in black and white and it ran at
exactly 30 frames per second. Years later, color video was
developed. The Drop Frame format was developed to
compensate for an accumulating timing error in color
video, which runs slightly slower than black and white
video. Color video frames actually run at a rate of 29.97
frames per second, which is slightly slower than exactly 30
frames per second. Over a period of time, this difference
causes the time code that is counting the frames to fall
behind actual elapsed time.
For example, let’s say our video program is 60 minutes
long. When shown in black and white video at exactly 30
frames per second, it will be precisely 60 minutes long. In
addition, the time code that counts the frames will show
01:00:00:00 (exactly one hour’s worth of frames) on the
final frame. So far, so good.
Now, if we play a color version of the same program, it
actually runs slower at 29.97 frames per second so that the
actual elapsed time is 60 minutes and 3.6 seconds! Here’s
where the discrepancy arises: the time code that counts the
frames shows that one hour’s worth of frames has gone by,
which is 01:00:00:00 on the final frame. But this does not
match the actual elapsed time, which is 01:00:03:18! In
broadcast situations, where edits are calculated down to
fractions of a second, 3.6 seconds is a long, long time––too
large a degree of inaccuracy.
Drop Frame time code fixes this problem by skipping
ahead every once in a while as it counts color video frames
to catch up with actual elapsed time. The result is that over
the period of several minutes, the time code matches the
actual elapsed time.
It is important to note that since frames are dropped only
once ever y mi nute, Drop Frame ti me code does not always
reflect the exact actual elapsed time: it may be up to a 10th
of a second faster or slower than actual elapsed time,
depending on how recently the last frame number was
dropped.
APPENDIX B: SMPTE SYNCHRONIZATION BASICS
85
Page 86

SHOULD I USE DROP FRAME?
Use Drop Frame time code only when it is absolutely
necessary. Drop Frame is required only with color video
projects in which the SMPTE time code numbers must
precisely match the actual elapsed time, such as when
preparing a television broadcast. Otherwise, we suggest
that you use 30 Non-drop time code because of the slight
inaccuracy mentioned above, as well as the confusion that
drop frame can cause.
HOW DOES SMPTE SYNCHRONIZATION WORK?
The syncing process is straightforward. It involves one
device following another. As you play back a tape with
SMPTE time code on it, the SMPTE feeds into a hardware
device called a SMPTE-to-MIDI converter. The converter
translates the SMPTE audio signal into MIDI Time Code
and sends the MIDI Time Code to a MIDI dev ice such as a
sequencer. The MIDI device receives the time code and
adjusts its playback position to match the time code. All of
this happens very quickly, around 30 times per second,
which is fast enough so that the MIDI device follows the
tape smoothly.
Certain phrases are often used to describe synchroni-
zation. The tape deck to which the MIDI device is
synchronized is called the synchronization master; the
MIDI device, which follows, is called the slave. The MIDI
device is slaved to the master. The converter, which reads
the time code on tape, is locked to tape, or when using
SMPTE time code, locked to SMPTE.
HOW DOES A MOTU SYNCHRONIZER WORK?
The MOTU MIDI Express XT and micro express
interfaces function as a SMPTE-to-MIDI converter. When
they receive SMPTE time code, they convert that signal
into MIDI Time Code, which is then sent to MIDI devices
connected to the network. These devices, in turn, slave to
the MIDI Time Code.
WHAT IS MIDI TIME CODE?
MIDI Time Code is time code in the form of MIDI data
that matches the format of SMPTE time code: time is
expressed in hours, minutes, seconds, and frames. Your
MOTU Express interface can send MIDI Time Code over
MIDI to a sequencer, which follows the MIDI Time Code.
86
APPENDIX B: SMPTE SYNCHRONIZATION BASICS
Page 87

LOCKING A MOTU INTERFACE TO SMPTE
In order to sync your MIDI device to tape, you must first
successfully lock your MOTU Express interface to the
SMPTE on the tape. To do so, you need to:
1. Stripe a tape with SMPTE
2. Connect the MOTU Express interface to the tape deck
3. Prepare the MOTU Express interface to convert SMPTE
4. Roll t he t ape to se e if success ful SMPTE lockup has bee n
achieved
These steps are discussed in chapter 7, “Synchronization”
(page 55). Once lockup has been achieved, you can stop
the tape, set up your MIDI hardware or software, and then
slave it to your MOTU Express interface.
APPENDIX B: SMPTE SYNCHRONIZATION BASICS
87
Page 88

88
APPENDIX B: SMPTE SYNCHRONIZATION BASICS
Page 89

APPENDIX
C Troubleshooting and Customer Support
COMMON PROBLEMS AND SOLUTIONS
My MOTU USB interface ports don’t show up in my
Windows MIDI software, no matter what I do.
Have you unplugged the USB cable and then plugged it
back in lately? Under certain circumstances, doing so will
cause the interface’s drivers to lose communication with
the hardware. If this is happening to you, make sure the
USB cable is plugged in (both to the computer and the
interface, of course). Then, quit all MIDI applications.
When you relaunch them, the interface should now be
available to them again. If this is still not the case, shut
down the computer, make sure the interface is powered
on, and power up the computer again.
ClockWorks keeps displaying a message saying that
communication with my MOTU interface has been
disrupted, even though the interface is connected.
If the problem is not simply that your MOTU interface is
switched off or has a loose cable, it may be that
communication between ClockWorks and your MOTU
interface has been disrupted somehow. If you have a drum
machine or sequencer connected to it, be sure that it is not
sending MIDI sync to the Express interface. If so, turn off
the drum machine while launching the ClockWorks and
then mute real time data on its input cable. To reestablish
the connection between ClockWorks and interface, switch
off all MOTU interfaces, quit ClockWorks, let the boxes sit
for a moment, and then turn them back on again. Always
return to the simplest possible scenario if you just can’t
seem to get to the bottom of the problem. Starting from
the ground up usually either corrects the problem or gives
you valuable insight into how to solve it.
My MOTU interface will not sync to SMPTE.
Make sure that the SMPTE IN cable is firmly seated and
connected to the appropriate output on the tape deck.
Observe the LTC LOCK light. Is it flickering quickly and
steadily? If so, the MOTU interface is locked to tape and
the syncing problem is probably related to MIDI. If not,
check the level of the SMPTE: it should be approximately –
3 VU; then, try boosting or attenuating the SMPTE signal
from the tape. You may even want to try recording some
fresh SMPTE and locking to it.
89
Page 90

The SMPTE counter just sits there when my MOTU
interface is syncing to SMPTE, even when its LTC LOCK
LED shows that it seems to be locked up just fine.
This most likely means that MTC (MIDI Time Code) is
not being routed to the computer. Check the Routings tab
in Cl ockWork s to m ake sure there is a connect ion b etween
the MTC port in the left-hand column and the computer
port in the right-hand column.
My MIDI software won’t sync to tape via my MOTU
interface.
Make sure that the interface is slaved to SMPTE first by
opening ClockWorks to see if you get a running update of
time code while tape is running. As long as the SMPTE
display shows that the interface is successfully locking to
the SMPTE and generating MIDI Time Code, MIDI
software should also be able to lock to the MIDI Time
Code.
When I play notes from my MIDI controller, the notes
sound funny/chopped off/phased/etc. OR I run out of
voices sooner than I should on my sound sources.
This means that you are probably routing data to the
sound source twice by accident, either via the Auto Patch
Thru feature in your host MIDI software, or via a routing
you were not aware of in ClockWorks. To solve the
problem, try to identify from where the extra routing is
coming. For example, switching off the computer will tell
you if it’s the culprit or not. The Routings tab in
ClockWorks is also a good place to hunt for a problem.
TROUBLESHOOTING
Troubleshooting is always simplest and most effective
when the exact problem can be specified clearly and
concisely. If you are surprised by an error message or by
seemingly erratic behavior in the console or network, take
a moment to jo t dow n th e relev ant det ails: e xactl y what t he
error message said (including any error ID numbers),
what actions were done on-screen just before the problem
occurred, what kind of file you were working with, how
you recovered from the problem, and any unusual
conditions during the occurrence of the problem. This
may not enable you to solve the problem at once, but will
greatly aid in isolating the problem should it reoccur.
If the problem you are encountering seems inconsistent,
try to determine what the necessary pattern of actions is
that will cause it to occur. Genuine bugs in application
90
APPENDIX C: TROUBLESHOOTING AND CUSTOMER SUPPORT
Page 91

software like the ClockWorks are almost always consistent
in their manifestation: the same set of actions under the
same conditions invariably brings about the same results.
Determining the exact cause of a bug often requires
experiments which replicate the problem situation with
one factor changed.
CUSTOMER SUPPORT
We are happy to provide customer support to our
registered users. If you haven’t already done so, please take
a moment to complete the registration card in the front of
the manual and send it in to us. When we receive your
card, you’ll be placed on our mailing list for free software
updates and other information.
REPLACING DISKS
If your MOTU USB software CD becomes damaged or
lost, our Customer Support Department will be glad to
replace it. Or you can download the latest version of the
drivers and consoles from www.motu.com.
TECHNICAL SU P P O R T
Registered users who are unable, with their dealer’s help,
to solve problems they encounter with the their MOTU
interface may contact our technical support department in
one of the following ways:
■ Tech support phone (9 am to 6 pm EST): (617) 576-
3066
■ Tech support fax: (617) 354-3068
■ Tech support email: techsupport@motu.com
■ On-line tech support database: www.motu.com
If you decide to call, please have your MOTU interface
manual at hand, and be prepared to provide the following
information to help us solve your problem as quickly as
possible:
■ The serial number of your MOTU interface. This is
printed on the bottom of the unit. You must be able to
supply this number to receive technical support.
■ The version of ClockWorks you are working with.
APPENDIX C: TROUBLESHOOTING AND CUSTOMER SUPPORT
91
Page 92

■
92
APPENDIX C: TROUBLESHOOTING AND CUSTOMER SUPPORT
Page 93

Index
3rd party software compatibility 8
A
Address Track 75
ATR 75
Audio click 14
connecting cables for 14
Auto-detect input frame rate 42
Auto-detect input frame rate option 42
C
Channel mapping
before/after muting
Channel Mapping window
before/after muting
Channelizing 36
Click
connecting click source
decay 46
threshold 46
Click input
connecting cables for
Click to MIDI 44
Clock mode 38
Internal 38
LTC 38
LTC QuickLok 39
MTC 38
ClockWorks 25-47
breaking a connection 30
File menu 27
MMC ports 30
35
35
14
14
troubleshooting 27
Compatibility (software) 8
Continuous jam sync 61
Controller
connecting
Convert click to option
connecting audio source
Cubase 51
Customer support 91
D
Decay 46
Device List 27, 28
Device Settings & Routing window
breaking connections
making a connection 29
Direct 1x6 53
Direct Connect mode 53
Disk
getting a replacement
Drop Frame 75
explained 84
E
Event Muting window
before/after channel mapping
External time code detect 40
F
Factory preset
selecting
Factory presets
Express XT
10
14
30
91
49, 50
50
35
micro express 50
File menu 27
Device List 27, 28
Load Configuration 27
Refresh Device 27, 28
Reset to Factory Settings 28
Save Configuration 27
Foot pedal
connecting
Foot switch
connecting
Frame lock option 40
Frame rate
explained
menu 39
Frame Rate Setting 39
Framelocked 40
Freewheel
Infinite
Freewheel _ frames 43
Freewheel _ frames option 43
Freewheeling 57, 61, 76
G
Generate signal when stopped 42
Generate signal when stopped option 42
I
Infinite freewheel 43
Input frame phase lock 40
Input quarter frame phase lock 40
Internal (clock mode) 38
14
14
84
43
INDEX
93
Page 94

J
Jam sync 77
continuous 61
K
Keyboard controller
connecting
L
Live Keyboards 51
Load Configuration 27
Locate Buttons 38
Locate buttons 38
LOCK light 56
Longitudinal Time Code 59, 82
LTC 59, 77, 82
clock mode 38
output slider 42
QuickLok 39
LTC Output Level 42
M
Mappings tab 36
Merge All 51
MIDI
beat clocks
MIDI Express Console
opening
when to use 25
MIDI Machine Control
record mode
MIDI Machine Control window
muting
27
10
34
39
extra settings
MIDI Machine ID 43
MIDI Time Code 77
MIDI time code 56
MMC
In/Out ports in ClockWorks
MMC ID option 43
record mode 39
setting ID of Digital Timepiece 43
Momentary (foot pedal) 44
MTC 63, 77
clock mode 38
display in ClockWorks 37
MTC in/out icons in ClockWorks 30
MTC sync mode
and sending MTC from computer
Muting
before/after channel remapping
Mutings tab 33
N
Negative polarity 44
NETWORK serial port
syncing a device connected to
Noise reduction
with SMPTE
O
Output level 59
Output phase lock 40
P
Packing list 7
40
59
30
57
35
63
Pedal
decay
46
Pedal A 14
Pedal B/LRC 14
threshold 46
Pedal tab 44
Pedal window
basics
Pedals
Performer 51
Polarity 44
Positive polarity 44
Presets
Presets tab 32
R
Real-time data 34
Record (MMC mode) 39
Record setting 39
Refresh Device 27, 28
Rehearse 39
Rehearse mode 39
Remapping 36
Reset to Factory Settings 28
Reshaping time code 62
ROM version 28
Routings tab 29
44
type
44
factory presets
selecting a factory preset 49, 50
user presets 49, 54
50
94
INDEX
Page 95

S
Safe 39
Safe option in MMC window 39
Save Configuration 27
Sequencer 32ch 51
Sequencer 96ch 51
Sequencing
using the Express MIDI ports
SMPTE
bleedthrough
connections 12
display 37
display in ClockWorks 37
drop-outs 57
explained 81-87
frame rate setting 39
freewheeling 57
global offset for Digital Timepiece 37
LTC output level 42
noise reduction 59
output level 59
regenerating over dropouts 61
reshaping 62
synchronization 55
user bits 62
SMPTE Reader
troubleshooting
Software compatibility 8
Sound module
connecting
Still-frame sensitivity 42
Stop button (SMPTE Controls window) 59
Stripe button 59
60
90
10
22
Sync tab 37
settings 40
Synchronization
defined
System exclusive
System requirements 7
T
TACH light 56
Technical support 91
Third-party software compatibility 8
Threshold 46
Time code
Transport controls 37
Troubleshooting 89-92
U
USB
User bits 62
User presets 49, 54
81
bulk dumps
installing for
display in ClockWorks
freewheeling over dropouts 57
LTC output level 42
ClockWorks 27
SMPTE lockup 57
syncing to discontinuous time code 41
using the Merge All preset 52
connecting multiple interfaces
connecting USB interface 9
using a USB hub 15
10
37
15
V
Vertical Interval Time Code 82
Vision 51
VITC 82
generating time code when paused 42
still-frame sensitivity 42
W
Windows
basic knowledge is required
Windows™
Express multimedia extensions ports
8
22
INDEX
95
Page 96

96
INDEX
 Loading...