

Page 1
User Guide
1280 Massachusetts Avenue
Cambridge, MA 02138
Business voice: (617) 576-2760
Business fax: (617) 576-3609
Web site: www.motu.com
Tech support: www.motu.com/support
Page 2

About the Mark of the Unicorn License Agreement and
Limited Warranty on Software
TO PERSONS WHO PURCHASE OR USE THIS PRODUCT: carefully
read all the terms and conditions of the “click-wrap” license agreement
presented to you when you install the software. Using the software or this
documentation indicates your acceptance of the terms and conditions of
that license agreement.
Mark of the Unicorn, Inc. (“MOTU”) owns both this program and its
documentation. Both the program and the documentation are protected
under applicable copyright, trademark, and trade-secret laws. Your right to
use the program and the documentation are limited to the terms and
conditions described in the license agreement.
Reminder of the terms of your MOTU software license
This summary is not your license agreement, just a reminder of its terms.
The actual license can be read and printed by running the installation
program for the software. That license agreement is a contract, and clicking
“Accept” binds you and MOTU to all its terms and conditions. In the event
anything contained in this summary is incomplete or in conflict with the
actual click-wrap license agreement, the terms of the click-wrap agreement
prevail.
YOU MAY: (a) use the enclosed program on a single computer; (b)
physically transfer the program from one computer to another provided that
the program is used on only one computer at a time and that you remove
any copies of the program from the computer from which the program is
being transferred; (c) make copies of the program solely for backup
purposes. You must reproduce and include the copyright notice on a label
on any backup copy.
YOU MAY NOT: (a) distribute copies of the program or the documentation
to others; (b) rent, lease or grant sublicenses or other rights to the program;
(c) provide use of the program in a computer service business, network,
time-sharing, multiple CPU or multiple user arrangement without the prior
written consent of MOTU; (d) translate, adapt, reverse engineer, decompile,
disassemble, or otherwise alter the program or related documentation
without the prior written consent of MOTU.
MOTU warrants to the original licensee that the disk(s) on which the
program is recorded be free from defects in materials and workmanship
under normal use for a period of ninety (90) days from the date of purchase
as evidenced by a copy of your receipt. If failure of the disk has resulted from
accident, abuse or misapplication of the product, then MOTU shall have no
responsibility to replace the disk(s) under this Limited Warranty.
THIS LIMITED WARRANTY AND RIGHT OF REPLACEMENT IS IN LIEU
OF, AND YOU HEREBY WAIVE, ANY AND ALL OTHER WARRANTIES,
BOTH EXPRESS AND IMPLIED, INCLUDING BUT NOT LIMITED TO
WARRANTIES OF MERCHANTABILITY AND FITNESS FOR A
PARTICULAR PURPOSE. THE LIABILITY OF MOTU PURSUANT TO
THIS LIMITED WARRANTY SHALL BE LIMITED TO THE REPLACEMENT
OF THE DEFECTIVE DISK(S), AND IN NO EVENT SHALL MOTU OR ITS
SUPPLIERS, LICENSORS, OR AFFILIATES BE LIABLE FOR
INCIDENTAL OR CONSEQUENTIAL DAMAGES, INCLUDING BUT NOT
LIMITED TO LOSS OF USE, LOSS OF PROFITS, LOSS OF DATA OR
DATA BEING RENDERED INACCURATE, OR LOSSES SUSTAINED BY
THIRD PARTIES EVEN IF MOTU HAS BEEN ADVISED OF THE
POSSIBILITY OF SUCH DAMAGES. THIS WARRANTY GIVES YOU
SPECIFIC LEGAL RIGHTS WHICH MAY VARY FROM STATE TO STATE.
SOME STATES DO NOT ALLOW THE LIMITATION OR EXCLUSION OF
LIABILITY FOR CONSEQUENTIAL DAMAGES, SO THE ABOVE
LIMITATION MAY NOT APPLY TO YOU.
About the Ultimate Sound Bank License Agreement
DO NOT USE THIS PRODUCT UNTIL YOU HAVE READ THIS LICENSE
AGREEMENT. BY USING THIS PRODUCT YOU ACCEPT THIS LICENSE
AGREEMENT.
1. License Grant. USB grants to you, subject to the following terms and
conditions, a non-exclusive, nontransferable right to use each authorized
copy of the enclosed product. The enclosed product is the property of USB
and is licensed to you only for use as part of a musical performance. This
license expressly forbids resale or other distribution of these Sounds or their
derivatives, either as they exist on disc, reformatted for use in another digital
sampler, or mixed, combined, filtered, resynthesized or otherwise edited, for
use as sounds, samples, multisamples, wavetables, programs or patches in
a sampler, microchip or any hardware or software sample playback device.
You cannot sell them or give them away for use by others in their sampling
or sample playback devices.
2. Protection of Software. You agree to take all reasonable steps to protect
this product and any accompanying documentation from unauthorized
copying or use. You agree not to modify the enclosed product to circumvent
any method or means adopted or implemented by USB to protect against or
discourage the unlicensed use of copying of the enclosed product.
3. Ownership. As between you and USB, ownership of, and title to, the
enclosed digitally recorded sounds (including any copies) will be held by
USB. Copies are provided to you only to enable you to exercise your rights
under the license. Only this license is purchased by you.
4. Term. This Agreement is effective from the date you open this package,
and will remain in full force until termination. This Agreement will terminate
if you break any of the terms or conditions of this Agreement. Upon
termination you agree to destroy and return to USB all copies of this product
and accompanying documentation.
5. Restrictions. Except as expressly authorized in this Agreement, you may
not rent, sell, lease, sublicense, distribute, transfer, copy, reproduce, display,
modify or time share the enclosed product or documentation.
Update Policy
In order to be eligible to obtain updates of the program, you must complete
and return to MOTU the Mark of the Unicorn Purchaser Registration Card
found at the beginning of the BPM User Guide.
Copyright Notice
Copyright © 2011, 2010, 2009 by Mark of the Unicorn, Inc. All rights
reserved. No part of this publication may be reproduced, transmitted,
transcribed, stored in a retrieval system, or translated into any human or
computer language, in any form or by any means whatsoever, without
express written permission of Mark of the Unicorn, Inc., 1280
Massachusetts Avenue, Cambridge, MA, 02138, U.S.A.
BPM, Digital Performer, MOTU, Mark of the Unicorn and the unicorn
silhouette logo are trademarks of Mark of the Unicorn, Inc.
All other trademarks are property of their respective owners.
Page 3

Contents
Quick Reference
5
7
About BPM
Installation
11
Tutorial 1: QuickStart Guide
15
23
Tutorial 2: Building a Song
BPM Application
27
35
BPM Plug-in
BPM Window
49
109
Sound and Pattern Library
Effects
239
Troubleshooting
255
261
Index
Contents
III
Page 4

IV
CONTENTS
Page 5
Quick Reference
CHAPTER
1
23
24
25
26
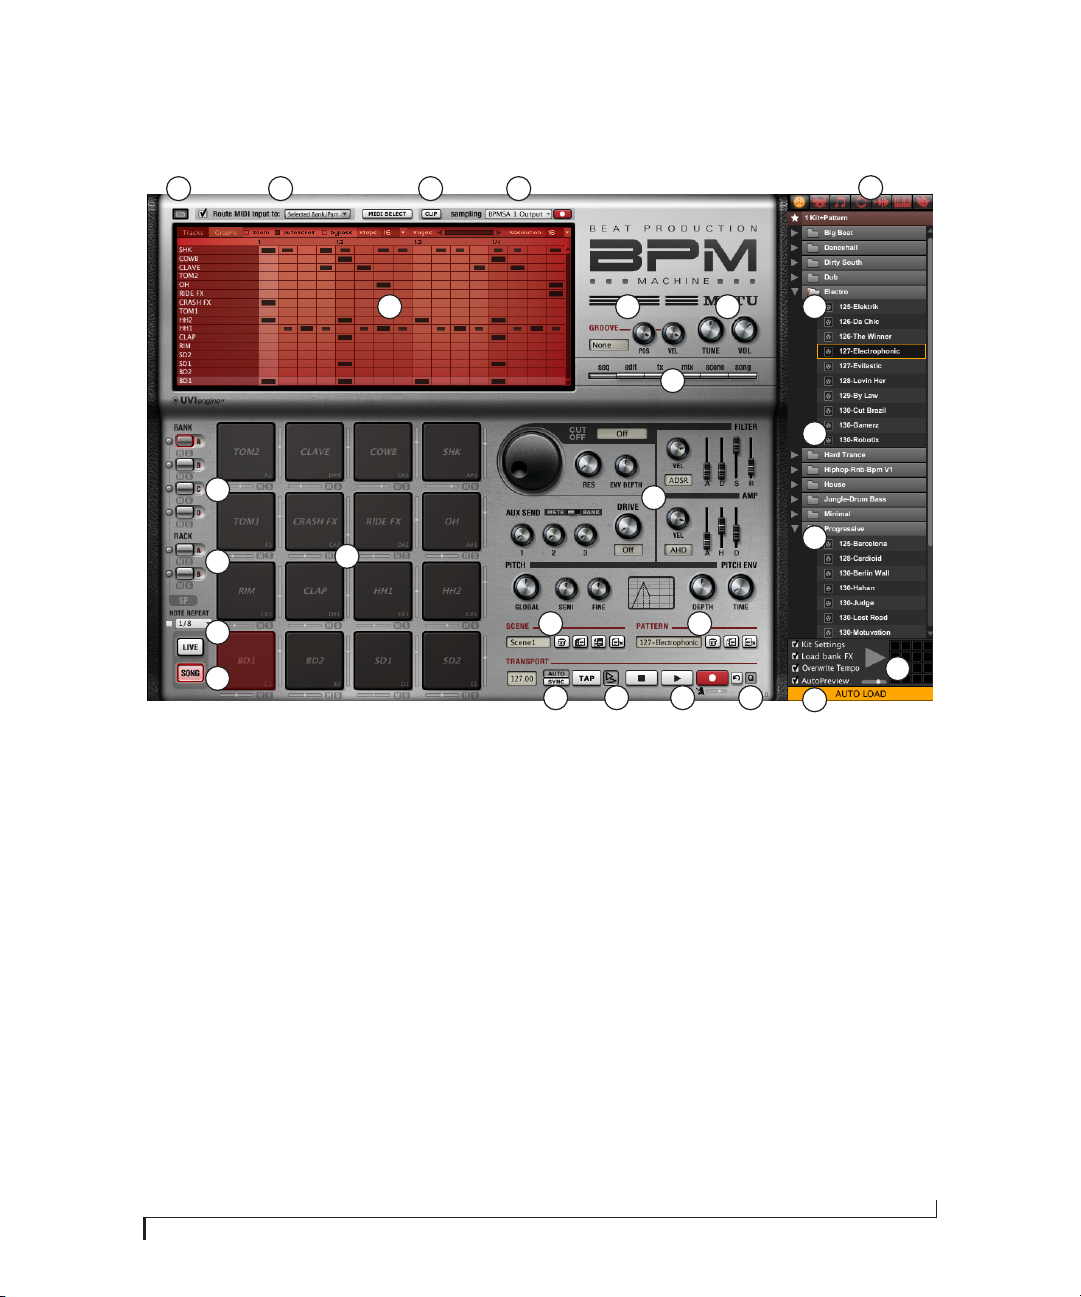
1. The File menu provides commands
for importing and exporting sounds,
patterns, kits, and many other
elements, including Performances,
which are a “snapshot” of the entire
BPM window.
2. BPM conveniently routes incoming
MIDI data to the bank or part you are
working on, but you can also control
where MIDI input goes.
3. BPM lets you sample external live
audio signals, such as a microphone
connected to your computer’s audio
interface, or audio track output from
your host software. You can even
sample directly into a pad.
4. This menu lets you choose the audio
input source for sampling. You can
even choose BPM to record BPM’s
output back into itself.
5. This “virtual LCD screen” displays
BPM’s many features, including
sequencers, editors, the mixer,
effects slots and others. Shown is
the pad step sequencer. Use the tabs
to the right (below the BPM logo) to
choose what is displayed here.
2 3 4
5 6 7
22
6. Apply grooves globally to all BPM
output, including all patterns and
loops. Many classic preset grooves
are provided (MPC, LinnDrum, etc.)
Save and apply your own, too.
7. Master tune and volume.
8. These tabs give you access to BPM’s
various main features, displayed to
the left in the “virtual LCD display”.
9. These browser tabs give you direct
access to BPM’s extensive sound
library, which includes kits, patterns,
loops, samples and instruments.
10. The browser organizes BPM’s sound
library into stylistic categories. BPM
provides many fully programmed
grooves, but it also gives you their
individual elements (referenced by
the same name) so you can easily
“deconstruct” or “reconstruct” them
to make your own unique rhythms.
11. BPM provides extensive drag & drop
functionality. You can drag items
from the browser into target areas in
the BPM window, which highlight
as you drag to indicate they can
accept what you are dragging.
12. Most BPM presets indicate their
original tempo (in beats per minute)
in the name of the preset.
13. When AutoLoad is enabled, items in
the browser are loaded as soon as
you click them. This makes for very
fast, interactive browsing. The check
box options let you control what
gets loaded.
14. This play/stop button lets you
control AutoPreviewing in the
browser. The pad matrix to the right
lets you choose which pads get
loaded (black) and which ones don’t
(gray) when AutoLoading a kit.
15. Quantize mode for recording MIDI
into bank patterns and part
sequences.
16. BPM’s main transport controls.
17. O verdub record mode for loop
recording into bank patterns and
part sequences.
18. When running BPM as a plug-in, you
can lock its tempo and transports to
your host software to make it an
integral part of your virtual studio.
9
10
8
11
21
12
1920
14
15161718
13
19. Each bank holds up to 16 patterns,
one of which is active at a time.
20. Build scenes and trigger them live or
use them to build a song.
21. Synth parameters for the currently
selected bank pad or rack part. Each
one can have its own synth settings.
22. The bank pads are highly programmable, with unlimited sample layers
and independent settings for
volume, pan, FX, synth settings, etc.
23. BPM provides four independent
banks of 16 pads, which can all play
simultaneously.
24. BPM provides two racks, which hold
an unlimited number of parts. A
part can be an instrument sound
(like bass, guitar, etc.) that you play
via BPM’s sequencer, or it can be an
audio loop (REX file, Apple Loop,
etc.)
25. Live mode lets you trigger scenes on
the fly from the on-screen pads or
your MIDI controller.
26. Song mode lets you build an entire
song out of multiple scenes.
5
Page 6

6
Page 7

CHAPTER
1
About BPM
BPM is an advanced urban rhythm production
instrument for Mac and Windows. BPM runs on
Mac or Windows, either standalone or as an
instrument plug-in for your favorite host software,
including Digital Performer, Cubase, Live, Logic,
Pro Tools, SONAR, and others via all major audio
plug-in formats (MAS, VST, AAX, RTAS, and
Audio Units).
Universal plug-in or standalone operation
As a standalone application, BPM turns your Mac
or PC into a urban rhythm production
powerhouse with 19 GB of all new, never before
released sounds. Standalone operation also allows
you to use BPM with music software applications
that do not host third-party instrument plug-ins.
Standalone operation is virtually identical to plugin oper ati on, ex cept for a few addit ional set tin gs fo r
audio/MIDI input and output.
As a plug-in, BPM can be used as a rhythm
production center directly within your projects.
You can save all BPM settings with the project for
instant and total recall. Since all BPM settings are
saved with your host application session, you enjoy
the highest degree of convenience and speed
because there is no separate application or
associated documents to manage.
Collaborate across platforms
Because BPM supports every major audio
production platform, you can effortlessly move
from one platform to another — or collaborate
with colleagues who use different audio software.
For example, you could compose and track a
project in Digital Performer, Logic, or Cubase and
then move to Pro Tools for mixing. Simply save a
BPM performance (a snapshot of all its settings) in
DP, Logic, or Cubase and then load it into BPM
running in Pro Tools. All settings are exactly
preserved, and BPM is ready to go.
Operation at a glance
BPM makes it easy to choose patterns and drum
kits independently, and then mix and match them
to quickly create your own unique beats simply by
browsing the virtually infinite possible
combinations. BPM displays all essential settings
in one window, with a “virtual LCD screen”
providing additional, contextual controls.
Advanced settings are just one click away.
Included sounds, loops and instruments
To get you going right away, BPM provides
hundreds of preset patterns and kits to choose
from, built from an all-new 19 GB core sample
library of never before released samples, loops,
beats and multi-sample instruments. Included are
over 10,000 individual samples and over 1,000 new
loops — all recorded at 24-bit 96kHz resolution
and mastered at Sterling Sound, New York by
renowned urban mastering engineer Chris
Gehringer. Included is Beat Box Anthology, a
comprehensive collection of authentic sounds
from 80 legendary drum machine models from the
the 1970s, 80s, and 90s. From classic beat box to
cutting-edge urban rhythms, you can use BPM’s
comprehensive selection of sounds for many
musical styles, including R&B, hip hop, techno,
electro, house, and even pop, rock and others.
BPM even includes a programmable Drum
Synthesizer with over 250 factory presets, or create
your own. Synth drum sounds can add infinite
variety and serious punch to your beats.
7
Page 8

24-bit 96kHz samples
BPM sampled sounds are provided in 24-bit 96kHz
resolution. BPM also provides on-the-fly
upsampling and downsampling, allowing you to
play BPM sounds at any sample rate that your
current project calls for, without the need for
lengthy sample rate conversion operations.
Interactive browsing
Find a nd org anize p atter ns and s ounds with BPM’s
integrated browser and file management tools.
BPM makes it easy to browse and locate exactly the
sounds you are looking for. Quickly scan
expandable folders to audition and select patterns,
kits, kits+patterns, loops, individual drum samples
and instrument presets. BPM plays — or even
loads — items as you click them, so you can
quickly find the right drum hit, loop or pattern.
You can also drag and drop from the browser or
desktop — including audio files, MIDI files and
loops in all standard formats. BPM is designed to
be live and interactive.
A complete rhythm production center
BPM is a powerful all-in-one rhythm instrument
designed with smooth and seamless workflow in
mind. Record individual samples or loops from
any external source. Just click the Quick Sampling
but ton to record dire ctly into the c urrently selected
drum pad. You can even record BPM’s output back
into itself. Mix and match multiple drum samples
and drum synth sounds — even on the same pad
via unlimited layers, where you can play them
based on rules such as cycle, random or random
cycle.
Building beats and kits
Building beats and kits is fast and easy. As you
would expect, each kit consists of a bank of 16
pads, but BPM provides four separate kits per
scene, each with its own step sequencer. That’s 64
pads playing simultaneously.
Each pad has dedicated solo, mute, gain and pan
controls. Click the pad for more detailed controls,
including velocity, fine/coarse tuning, fill,
timeshift, filter cutoff, resonance, decay, and
others. Each sample layer can be fine-tuned with its
own amplitude envelope, filter, drive, aux sends,
pitch envelope, and more. Plus, you can apply
unlimited insert effects per layer and per pad.
If you need to edit the samples themselves, you can
use the built-in waveform editor with fade in/out,
normalize, silence, gain and more. BPM gives you
unprecedented pin-point control within a beat
production instrument.
Pattern programming with advanced features
BPM’s pattern programming feels so familiar, you
can start using it right away. Use the independent
step sequencer to program, record, overdub and
quantize patterns interactively in real time from
the on-screen pads. The Graph Sequencer
produces ultra-dynamic expression for individual
notes with just a few clicks. Or, record live from a
MIDI keyboard or drum pad controller for that
true, hands-on MPC-style experience with useful
features such as Note Repeat, Record Undo, and
MIDI Select. When you’re done, you can apply
grooves with independent control over timing and
velocity. Choose among dozens of groove presets
or create and apply your own. An advanced
arpeggiator provides variations to your live or
sequenced performance.
Are you a fan of the unique sound of the classic
E-mu SP1200? BPM’s exclusive SP Mode faithfully
reproduces the edgy sound and beat box grit of this
legendary rhythm machine.
Unlimited loops and instruments
Two independent rack modules hold loops, audio
phrases and instrument sounds with unlimited
parts in each rack. These rack parts play simultaneously with BPM’s four drum kit banks to make
8
ABOUT BPM
Page 9

up a scene. This is where you can add bass parts,
rhythm guitar, audio phrases such as background
vocals, breakbeat loops, and much more.
Loops and phrases
Just drag and drop to import any audio into a part,
including REX files, Apple Loops, AIFF, WAV and
all standard audio file formats. BPM will automap
REX loop slices so you can work with them either
as audio clips or individual MIDI-triggered slices.
BPM time-stretches and grooves any audio file in
real t ime with audio quality th at sounds incredible,
even at extreme tempos.
BPM provides a powerful set of tools for
manipulating looped audio. Essential controls such
as tempo, sync, audio drag and drop, MIDI
mapping and MIDI drag and drop are accessed in
the Loop Editor.
Multi-sample instruments
When it’s time to add guitar, bass, keys, or other
instrument sounds, BPM includes a great selection
of instrument presets at your fingertips. Use BPM’s
familiar piano roll editor and pencil tool to
sequence instrument parts, or record them live
from up to 64 separate MIDI channels. Apply
effects with unlimited effects slots per instrument
part. The same goes for loops and phrases.
Compatibility with other UVI instruments
If you own another UVI-based instrument from
MOTU, such as MachFive 2, Electric Keys, Ethno
Instrument or Symphonic Instrument, you can
load sounds from their libraries into BPM’s two
rack modules to incorporate them into your BPM
rhythm productions.
BPM is also compatible with BPM Expander packs
and other UVI SoundCards from UVISoundSource.com.
Powerful synthesis engine
The central section of BPM window shows an
amplitude envelope, filters, velocity response
curves and LFO. These parameters let you carefully
shape the sound of any individual sample, pad,
loop or instrument. The award-winning UVIEngine that powers BPM delivers virtually
unlimited polyphony and ultra-low latency.
Complete mixing
Use BPM’s graphic mixer to refine your mix with
channel strips for all 64 pads, loops and instrument
parts. BPM also provides stereo main outs plus 16
stereo aux channel outputs for sending sub-mixes
to your host audio software.
Comprehensive effects processing
BPM provides the most comprehensive and
flexible effects architecture ever devised in a
rhythm instrument. You can apply professional
quality effects at any point in the signal chain, from
individual samples, pads, loops, and instruments,
to entire drum kit banks, racks, aux returns and
even BPM’s master output.
You get dozens of effects, including EQ,
compressor/gate, filter, delay, reverb, phaser,
chorus, drive, distortion, reverb and many more.
Convolution reverb and real acoustic spaces
For the very best in reverb technology, BPM
includes a convolution reverb processor to produce
the most realistic acoustic spaces available. From
directly in the BPM window, you can audition and
choose plates, halls and authentic acoustic spaces,
such as studio rooms, concert halls and cathedrals.
Live performance and song programming
BPM provides a complete set of features for live
performance and song creation. Combine kits,
patterns and sequences into a scene. Create
multiple scenes and then trigger them during live
ABOUT BPM
9
Page 10

performance by clicking the on-screen pads or
play ing note s on you r MIDI key board or c ontrol ler
— a unique and powerful performance feature.
Build an entire song in seconds by simply dragging
and dropping multiple scenes and adjusting their
lengt h. Sync your song to your host audio s oftware,
or export the song as a stereo audio file.
BPM is complete beat production environment.
BPM delivers the perfect balance of smooth
operation, advanced features, fresh patterns and
sounds, superb audio quality and across-the-board
compatibility.
MIDI Remote Control
BPM and a drum pad controller give you a true
beat box experience. Map hardware pads to BPM’s
sixteen on-screen pads and you are on your way.
BPM includes template files that you can load into
popular pad controller models to get going quickly.
Or program your favorite MIDI keyboard to
control BPM, both from the keyboard and any
knobs, buttons, and sliders it may have. Then use
BPM's MIDI Remote Control features to map
additional controls such as knobs, buttons, and
sliders.
10
ABOUT BPM
Page 11
CHAPTER
2
Installation
Thank you for purchasing BPM, the advanced
urban rhythm instrument.
Package contents . . . . . . . . . . . . . . . . . . . . . . . . . . . . . . . . . . . . 11
Attention new users: an iLok is required . . . . . . . . . . . . . 11
Preparing your iLok USB Smart Key. . . . . . . . . . . . . . . . . . 11
System requirements . . . . . . . . . . . . . . . . . . . . . . . . . . . . . . . . 12
Installation. . . . . . . . . . . . . . . . . . . . . . . . . . . . . . . . . . . . . . . . . . . 13
Connect your iLok . . . . . . . . . . . . . . . . . . . . . . . . . . . . . . . . . . . 14
Getting started . . . . . . . . . . . . . . . . . . . . . . . . . . . . . . . . . . . . . . 14
Familiarity with your computer . . . . . . . . . . . . . . . . . . . . . . 14
Please register your software . . . . . . . . . . . . . . . . . . . . . . . . 14
Visit motu.com for software updates . . . . . . . . . . . . . . . . 14
Technical support. . . . . . . . . . . . . . . . . . . . . . . . . . . . . . . . . . . . 14
PACKAGE CONTENTS
Your BPM package includes:
■
BPM installer CD-ROM disc
■
Two BPM soundbank DVD discs
■
One Beat Box Anthology soundbank DVD disc
■
BPM User Guide with tear-out registration card
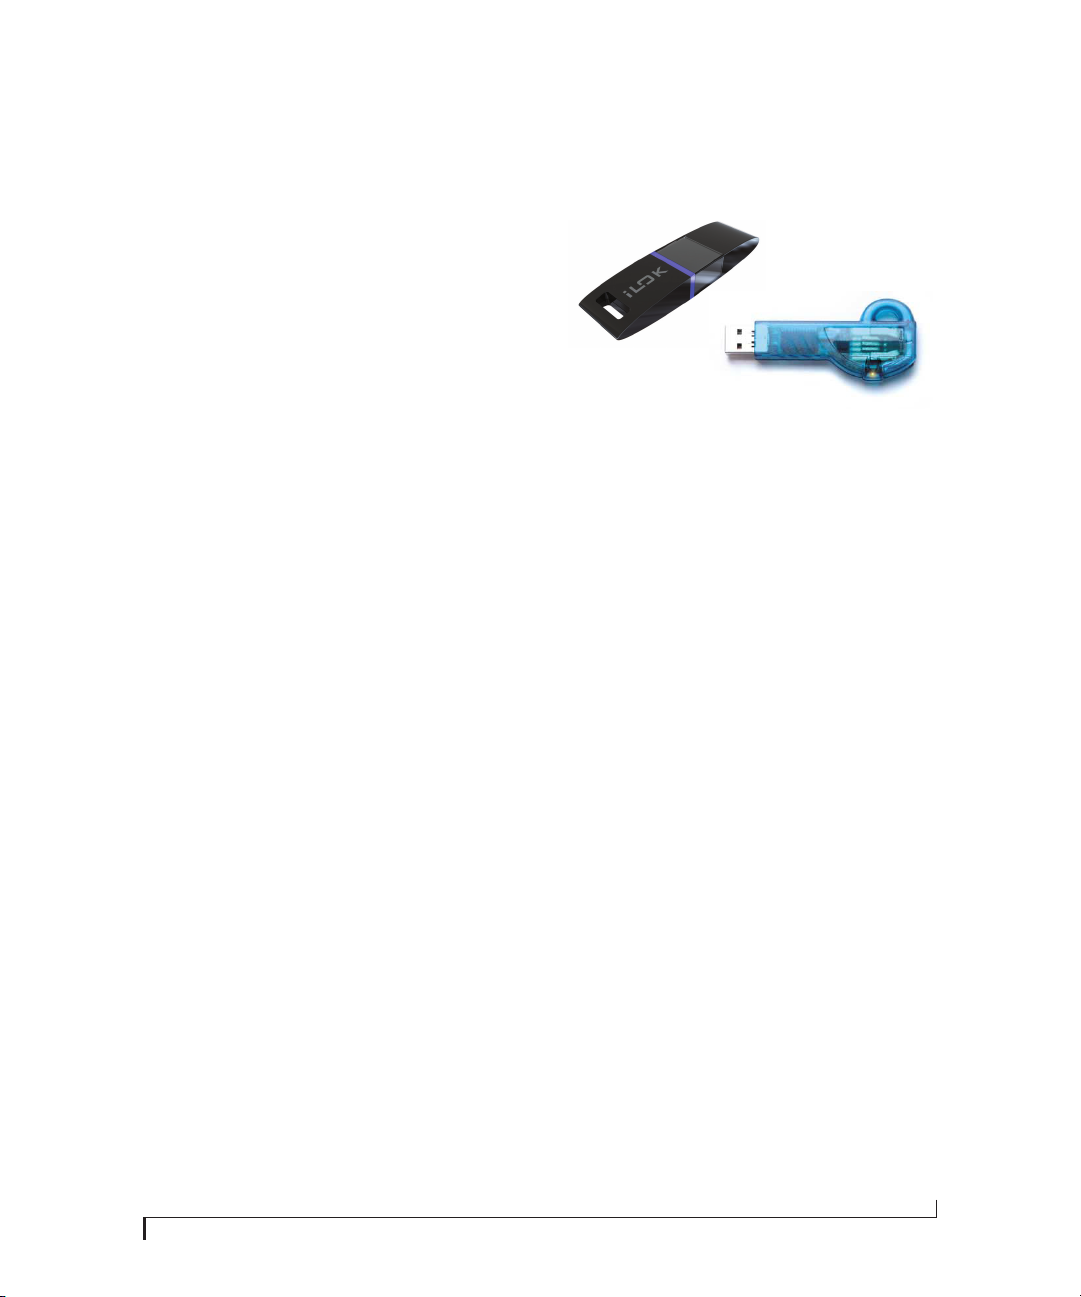
ATTENTION NEW USERS: AN ILOK IS REQUIRED
If you are a new BPM user: this product requires an
iLok Smart Key, a small USB device (sold
separately) that holds the license for your MOTU
software. Before you install and use your MOTU
software, you must obtain an iLok, if you don’t
already have one.
You will not be able to use your BPM software
☛
without an iLok.
iLok 2
iLok 1
Figure 2-1: BPM is compatible with iLok 1 and iLok 2 USB Smart Keys.
Do you already own an iLok?
You may already own an iLok if:
■
you upgraded from BPM 1.0
■
you own another MOTU instrument product
■
you own a 3rd-party product that uses iLok
If so, you can skip to “Preparing your iLok USB
Smart Key”.
Purchasing an iLok
If you do not already own an iLok, you can
purchase one from your local music retail shop, an
on-line music technology reseller, or iLok.com.
iLok compatibility
MOTU instrument products are compatible with
iLok 1 or 2 (Figure 2-1).
PREPARING YOUR iLOK USB SMART KEY
BPM will not run unless it detects an iLok Smart
Key plugged into any available USB port on your
computer. In addition, the iLok must hold both a
BPM license and a Beat Box Anthology license.
Downloading your BPM licenses to your iLok
Your BPM package includes a two-sided card with
unique iLok license redemption codes printed on it
for your BPM software and the Beat Box Anthology
soundbank included in your BPM software
11
Page 12

package. Follow the instructions on the card to
redeem each code and download the resulting two
software licenses to your iLok.
BPM will not run without the downloaded
☛
BPM and Beat Box Anthology licenses in your
iLok, so be sure to follow the important
instructions on the card before proceeding to
install and use BPM.
Managing iLok licenses
If you have multiple iLoks, you can consolidate all
of your licenses onto a single iLok. Use iLok
License Manager to move product licenses from
one iLok to another, consolidate them onto one
iLok, protect them from loss or damage, or
otherwise manage your product license assets.
If you have further questions about your iLok, visit
www.iLok.com, or contact MOTU Customer
Service at +1 (617) 576-2760.
SYSTEM REQUIREMENTS
BPM 1.5.3 has the following minimum and
recommended system requirements:
■
Mac or PC with Intel Core Duo CPU 1.83 GHz
or faster; multiple processors or a multi-core
processor is required. Intel Core 2 Duo CPU
2.0 GHz or faster recommended. Macs with
PowerPC CPUs are not supported.
■
2 GB of RAM is required; 4 GB or more is highly
recommended.
■
CD/DVD disc drive for installation.
Mac OS X version 10.5.8 or later, or Windows 8,
■
7 or Vista (32- or 64-bit; Vista SP2 or later is
required).
■
A digital audio workstation program or other
program that hosts AU, VST, or RTAS instrument
plug-ins. Alternatively, BPM can be used as a
standalone application.
64-bit operation
For native 64-bit operation, BPM has the following
additional requirements:
Mac OS X v10.6, Windows 8, or a 64-bit version
■
of Windows 7 or Vista
■
64-bit CPU
■
64-bit plug-in host application, if using the
64-bit plug-in
Hard disk format
Due to the large size of BPM’s factory soundbank
UFS files, the disk containing the soundbank files
must be able to support individual files larger than
4 GB. This is determined by the disk’s file system
format.
The default file system format for disk drives on
Mac OS X and Windows are compatible with
BPM’s soundbank files:
■
Mac OS X: HFS+ (Mac OS Extended, journaled
or unjournaled)
■
Windows: NTFS
The FAT32 format is not compatible with BPM’s
soundbank files, as it does not allow file sizes
greater than 4 GB.
If you experience trouble copying the UFS files to
your hard disk, refer to the troubleshooting chapter
in the BPM User Guide.
Large hard disk, preferably at least 100 GB. The
■
disk on which the sounds are stored must be a fast
hard disk. Refer to the BPM User Guide
Installation chapter for details.
■
Available USB port for the iLok SmartKey.
12
INSTALLATION
Page 13

INSTALLATION
Run the BPM installer
Run the BPM installer first before you copy the
UFS soundbank files from the soundbank DVDs,
as follows:
1
Insert the
downloaded the BPM installer, locate the folder
containing the download.
2
Double-click
(Windows 32-bit), or
64-bit).
3
Follow the directions the installer gives you.
☛
Windows VST users: The BPM VST plug-in is
installed in:
startup disk:\Program Files\MOTU\Vstplugins
Point your host application to this folder, or copy
BPM.dll
the
Vstplugins folder of your choice.
BPM Installer
BPM Installer
Setup64.exe
and
BPMSampler.dll
CD; or, if you have
(Mac),
Setup32.exe
(Windows
files to the
The term
startup disk
in the path names above is
the name of your system hard drive (usually
Macintosh HD
or C).
Place the UFS files directly in this location. Alternatively, you can place the UFS files in another
location (possibly on an external or second hard
drive), create aliases (Mac OS X) or shortcuts
(Windows) to them, and then place the aliases or
shortcuts in this location.
If you create aliases or shortcuts, the names
☛
must be the same as their corresponding UFS files.
If the alias or shortcut name includes the words
alias
or
☛
shortcut to,
The
BPM.ufs
it will not work.
and
BPM.ufs1
files must be
placed in the same folder.
Installing the Beat Box Anthology soundbank file
To i ns ta ll t h e
Beat Box Anthology.ufs
soundbank
file, copy it from the Beat Box Anthology DVD to
the following location:
Copy the UFS soundbank files to your hard
drive
BPM version 1.5 includes two 8 GB (dual layer)
soundbank
DVDs that contain a total of 15 GB of
drum samples, loops, phrases and multi-sampled
instruments. These sounds are organized into two
separate “.UFS” soundbank files on these DVDs:
BPM.ufs
and
BPM.ufs1
. Additionally, the Beat Box
Anthology.ufs soundbank DVD contains another
4 GB of drum samples, loops, kits, and patterns.
Installing the BPM soundbank files
To i ns ta ll t h e
BPM.ufs
and
BPM.ufs1
soundbank
files, copy them from the DVDs to the following
location:
Mac OS X
startup disk/Library/Application Support/MOTU/BPM/
Win dows
startup disk:\Program Files\MOTU\BPM\
INSTALLATION
Mac OS X
startup disk/Library/Application Support/UVISoundBanks/
Win dows
startup disk:\Program Files\UVISoundBanks\
Place the UFS files directly in this location, or
cre ate an a lias or shor tcut to the fi le in this locati on,
as described for the
BPM.ufs
and
BPM.ufs1
files.
Presets for hardware controllers
The BPM installer disc includes a folder of presets
for popular hardware pad controller products,
including the Akai MPD16, Akai MPD32, Korg
padKONTROL and the M-Audio Trigger Finger. If
you own one of these products, load the supplied
BPM pad preset into the hardware’s utility software
to load BPM’s pad configuration into the controller
hardware. For details, consult the documentation
for your pad controller.
13
Page 14

CONNECT YOUR ILOK
Connect your BPM USB iLok SmartKey to any
available USB port.
Figure 2-2: BPM requires the USB iLok SmartKey (included).
PLEASE REGISTER YOUR SOFTWARE
MOTU can only provide customer service and
technical support to registered users. Therefore, it
is important for you to register your software
immediately after purchase.
To do so, visit www.motu.com/registration to
register online. Or, fill out and mail in the
registration card found at the beginning of the
Use r
Guide (leave the rest of the cardboard page in the
manual for your future reference).
☛ If you purchased an upgrade from an earlier
version at motu.com, you are already registered
and no further action is necessary.
VISIT MOTU.COM FOR SOFTWARE UPDATES
Software updates are periodically posted on our
website, so check our web site for the latest updates
at www.motu.com.
BPM will not run unless it detects that your iLok
SmartKey is plugged into any available USB port
on your computer.
If you wish to transfer the authorization in your
BPM iLok to another iLok, or if you have questions
about your iLok, visit www.ilok.com for further
information, or contact MOTU Technical Support
(as explained on page 259).
GETTING STARTED
Follow the directions in the next few chapters of
this guide to successfully install and begin using
BPM.
FAMILIARITY WITH YOUR COMPUTER
This manual assumes that your are familiar with
using your computer. If not, please review your
computer’s user guide before proceeding.
14
TECHNICAL SUPPORT
If you have questions, please review this manual
carefully first. You can reach MOTU tech support
as follows:
■ 24-hour online tech support database with
search engine: www.motu.com
■ Online: www.motu.com/support
■ Phone: +1 (617) 576-3066
(9 a.m. – 6 p.m. Eastern)
■ Downloads: www.motu.com
INSTALLATION
Page 15
CHAPTER
Open BPM
1 After BPM installation, launch your audio
sequencer or MIDI software.
2 Open BPM in the usual fashion, either as a
standalone application or as a plug-in from within
your audio sequencer.
3 Tutorial 1: QuickStart Guide
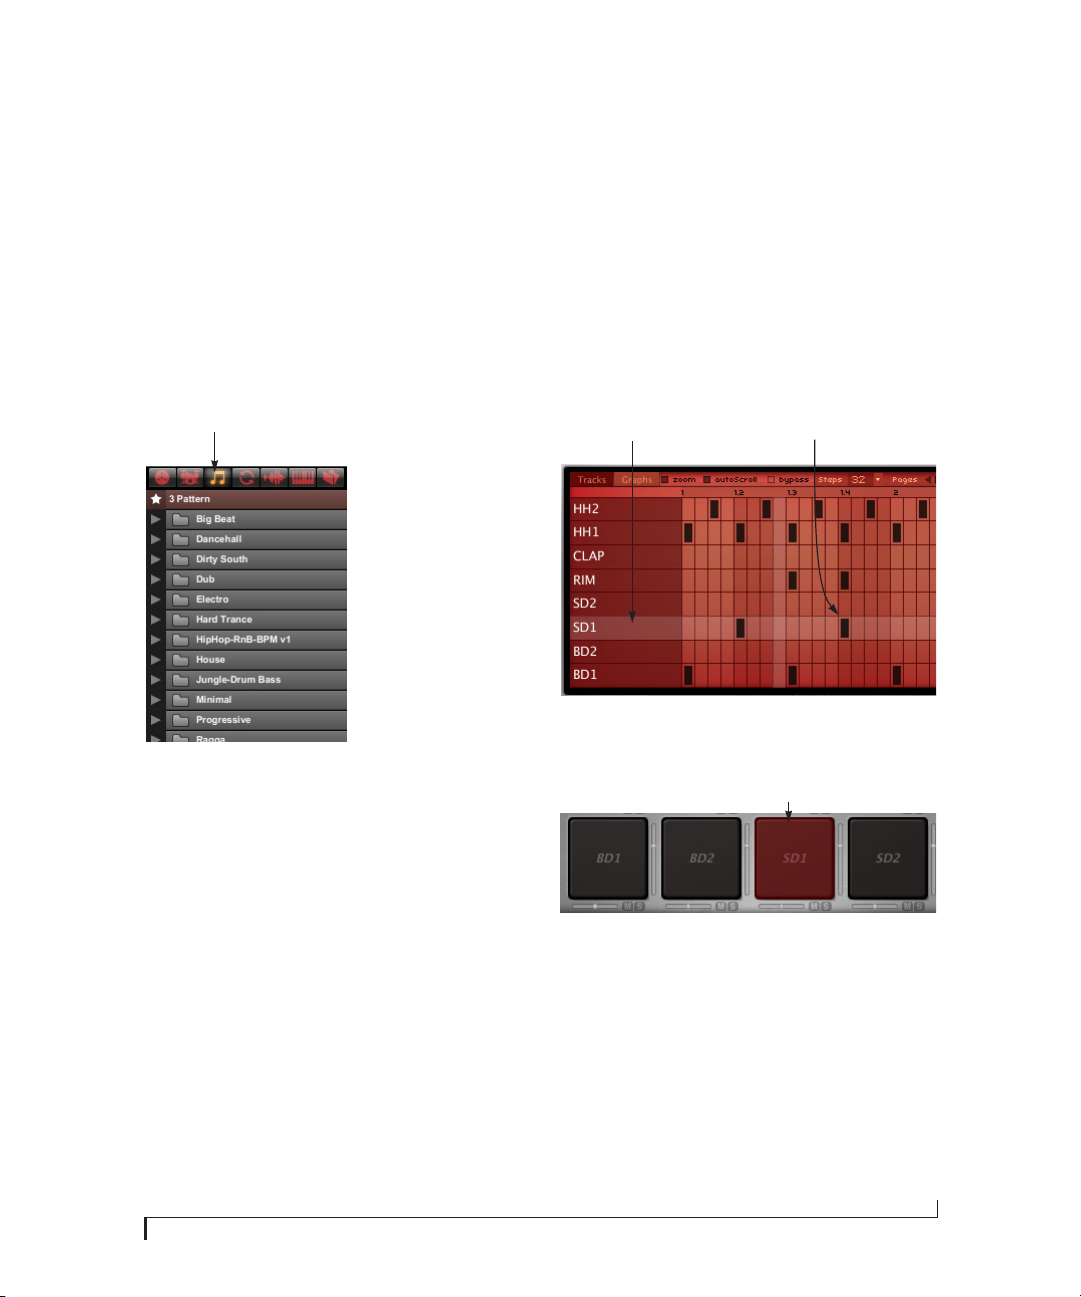
Choose a kit+pattern
A pattern is a rhythm that can b e applied to any kit.
A kit is a collection of drum sounds assigned to
BPM’s sixteen drum pads. A kit+pattern is a
combination of the two that BPM provides as a
preset. All kit+pattern presets are also available as
independent kit and pattern presets.
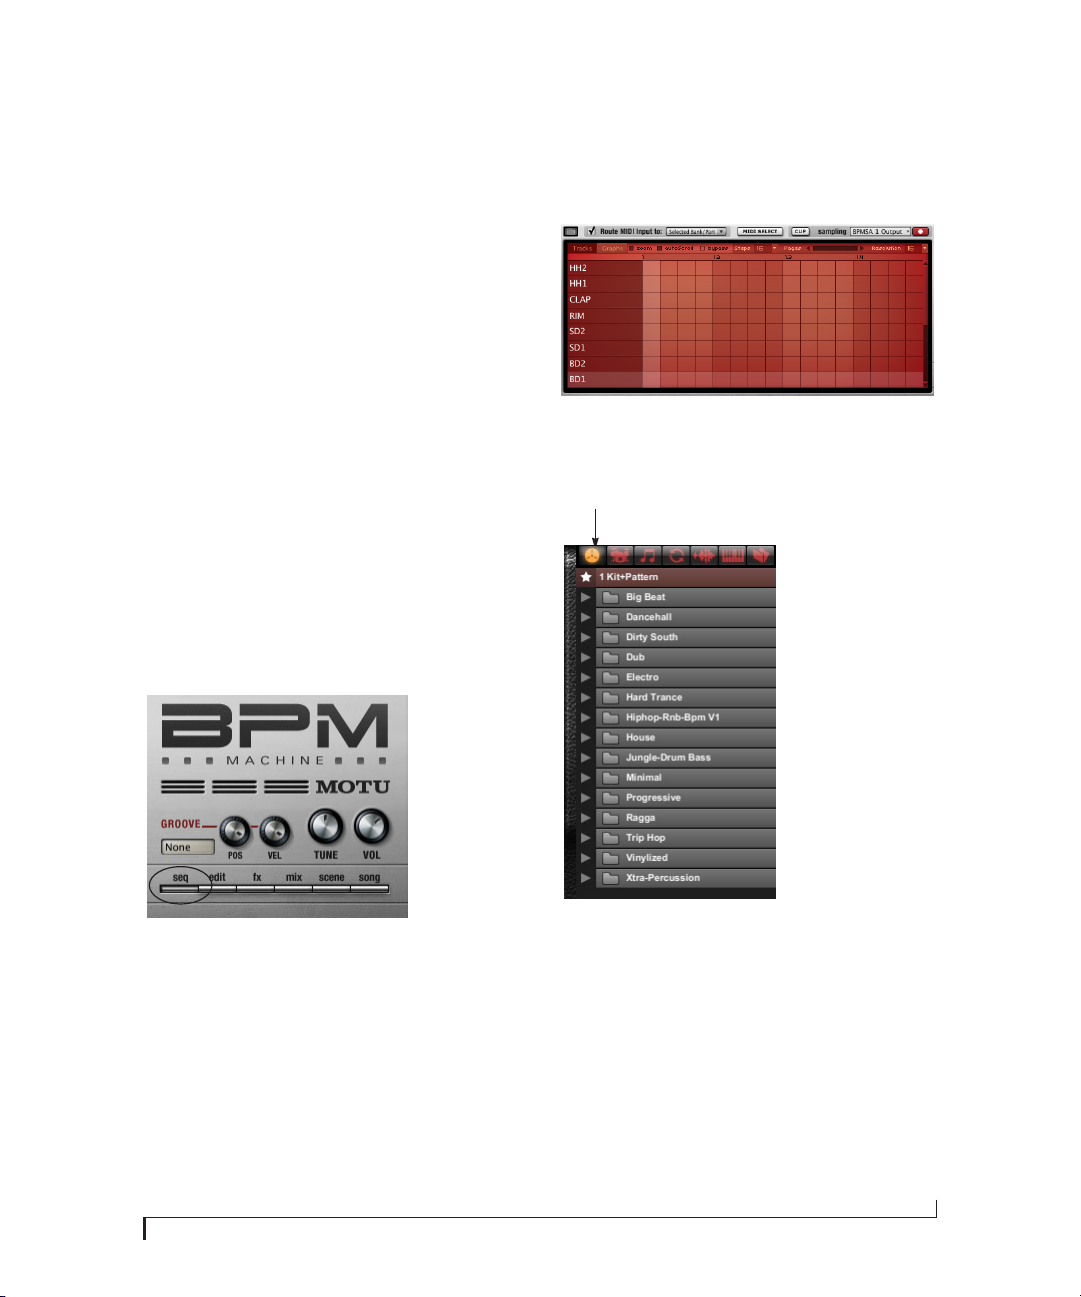
3 Click the Sequence Editor button (Figure 3-1)
so you will be able to see the pattern that will be
loaded.
Figure 3-1: The Sequence Editor button.
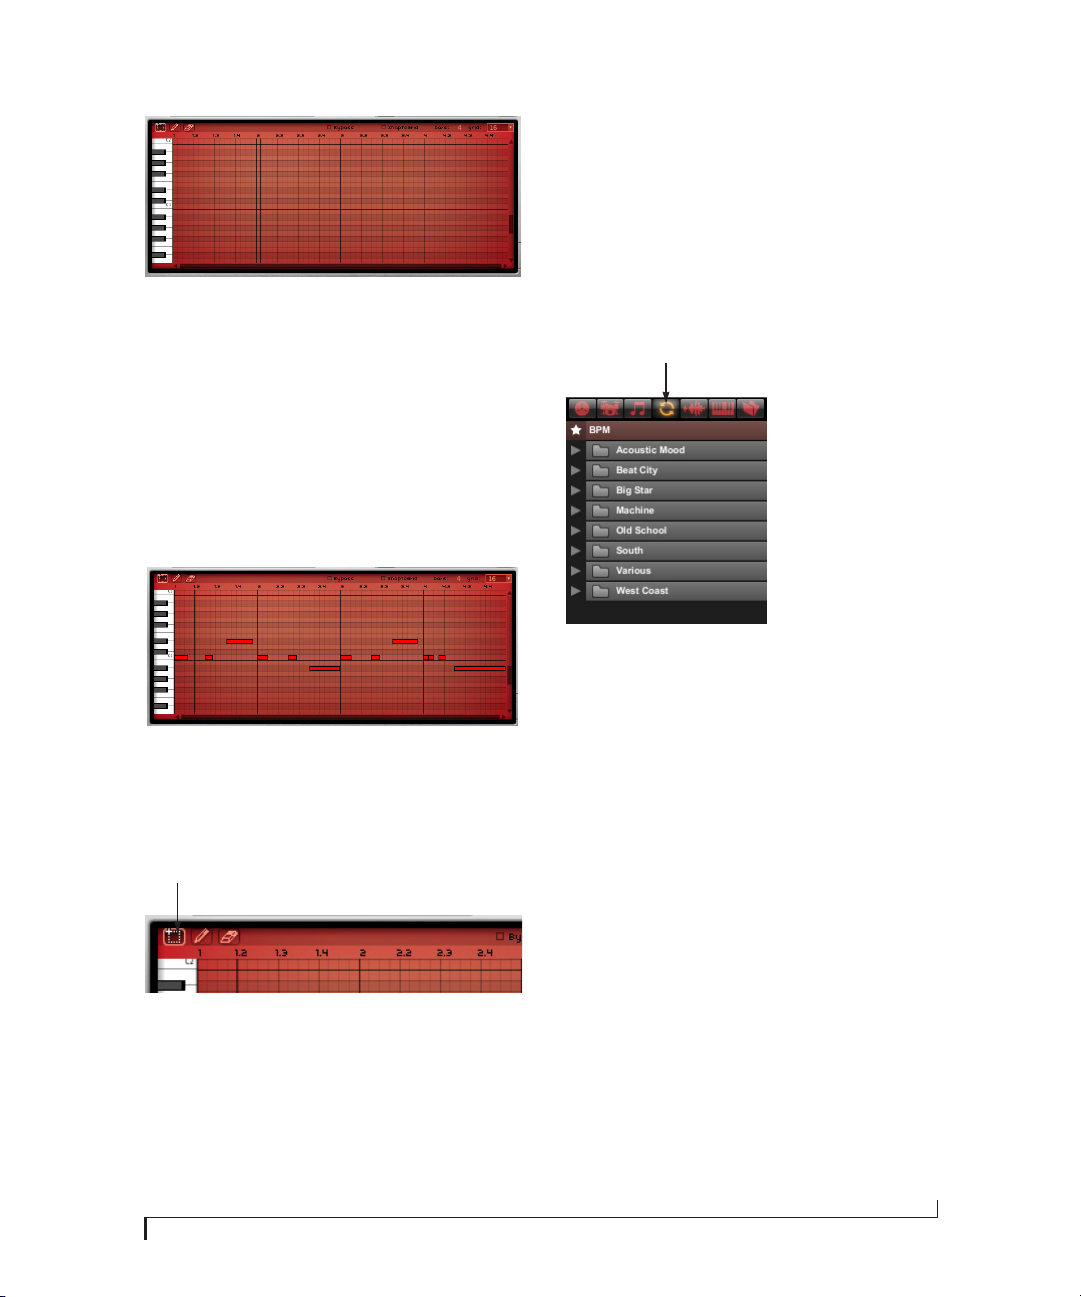
4 Notice that the Sequence Editor is currently
empty (Figure 3-2).
Figure 3-2: The empty Sequence Editor.
5 Click the Kit+Pattern tab (Figure 3-3).
Kit+Pattern tab
Figure 3-3: Browsing Kit+Pattern presets
☛ If the brows er i s emp ty a t this poin t, the n BP M
has lost the location of the BPM.ufs and/or
BPM.ufs1 files. See “When I try to access the
browser, the browser is empty. Why is it empty?” on
page 255.
6 Open the Dirty South folder.
7 Make sure the Auto Loa d button is enabled
(yellow) at the bottom of the browser (Figure 3-4).
15
Page 16

Figure 3-4: Make sure AutoLoad is enabled.
8 Click 076-Brick and Stick (Figure 3-5).
Figure 3-5: Loading the ‘Brick And Stick’ kit+pattern.
9 As soon as you click, the kit+pattern will load
and you will see the notes in the Pattern Editor
(Figure 3-6):
Check the audio output assignment
11 If you are running BPM as a plug-in inside your
audio sequencer host, the BPM track has an audio
output assignment. Make sure that it is assigned to
the appropriate audio output in your system (the
headphone outs, main outs, or whatever you are
using for listening).
12 If you are running BPM as a standalone
application, open the preferences (in the File
menu) and click the Audio Device tab. Check the
Output Device assignment and make sure the
sample rate setting matches the setting on your
audio hardware (or the built-in audio hardware of
your computer, if that is what you are using).
If you don’t hear anything
13 Check the audio output assignment for the track
on which BPM is instantiated. Make sure it is
assigned to your headphones, main speakers, or
whatever you are listening to.
Try a different kit
BPM lets you choose kits and patterns
independently so there are virtually unlimited
possibilities. Let’s keep the same pattern going, but
try it with a different kit:
Figure 3-6: A pattern in the Sequence Editor.
Play the kit+pattern
10 If the kit+pattern is not playing, click the play
button to hear it.
The play button
Figure 3-7: The play button.
16
14 Click the Kits tab in the browser.
Kits tab
Figure 3-8: Kits tab.
TUTORIAL 1: QUICKSTART GUIDE
Page 17
15 Open the Dancehall folder.
16 Click a few of the kits in the Dancehall folder to
audition them. Notice that the pattern stays the
same, but the drum sounds change as try different
kits.
Try a different pattern
Once you find a kit that you like, let it play while
you try different patterns with it.
17 Click the Pat tern s shortcut in the browser.
Replace a snare sound
As you’ve seen and heard so far, patterns and kits
can be chosen independently. The same is true for
individual drum pad sounds. For example, you
might find a beat you like, but you might want to
change the snare drum sound (or any other
individual sound).
22 Make sure the pattern you are currently playing
has a few snare drum 1 (SD1) hits. If not, you can
add a few by clicking on the cells in the SD1 row in
the pattern grid as shown below.
Patterns tab
Figure 3-9: Patterns tab.
18 Open the Hiphop-Rnb-Bpm V1 > Machine
folder.
19 Click a few of the patterns in the Machine folder
to audition t hem. Notice that t he kit stays the same,
but the pattern changes as try different patterns.
20 If you ever want to hear the “original” pattern
that goes with a kit, or vice versa (the original kit
that goes with a pattern), just go to the
Kits+Patterns folder (Figure 3-3 on page 15) and
click the Kit+Pattern with the same name.
Snare drum row Snare drum hit
Figure 3-10: Snare drum hits in the pattern grid.
Click the SD1 pad in to select it.
SD1 pad
Figure 3-11: The snare drum 1 pad.
21 For the purposes of this demo, go back to the
Kit+Pattern folder and choose the Kit+Pattern
called 086-Dentist (in the Machine folder) before
proceeding.
TUTORIAL 1: QUICKSTART GUIDE
17
Page 18
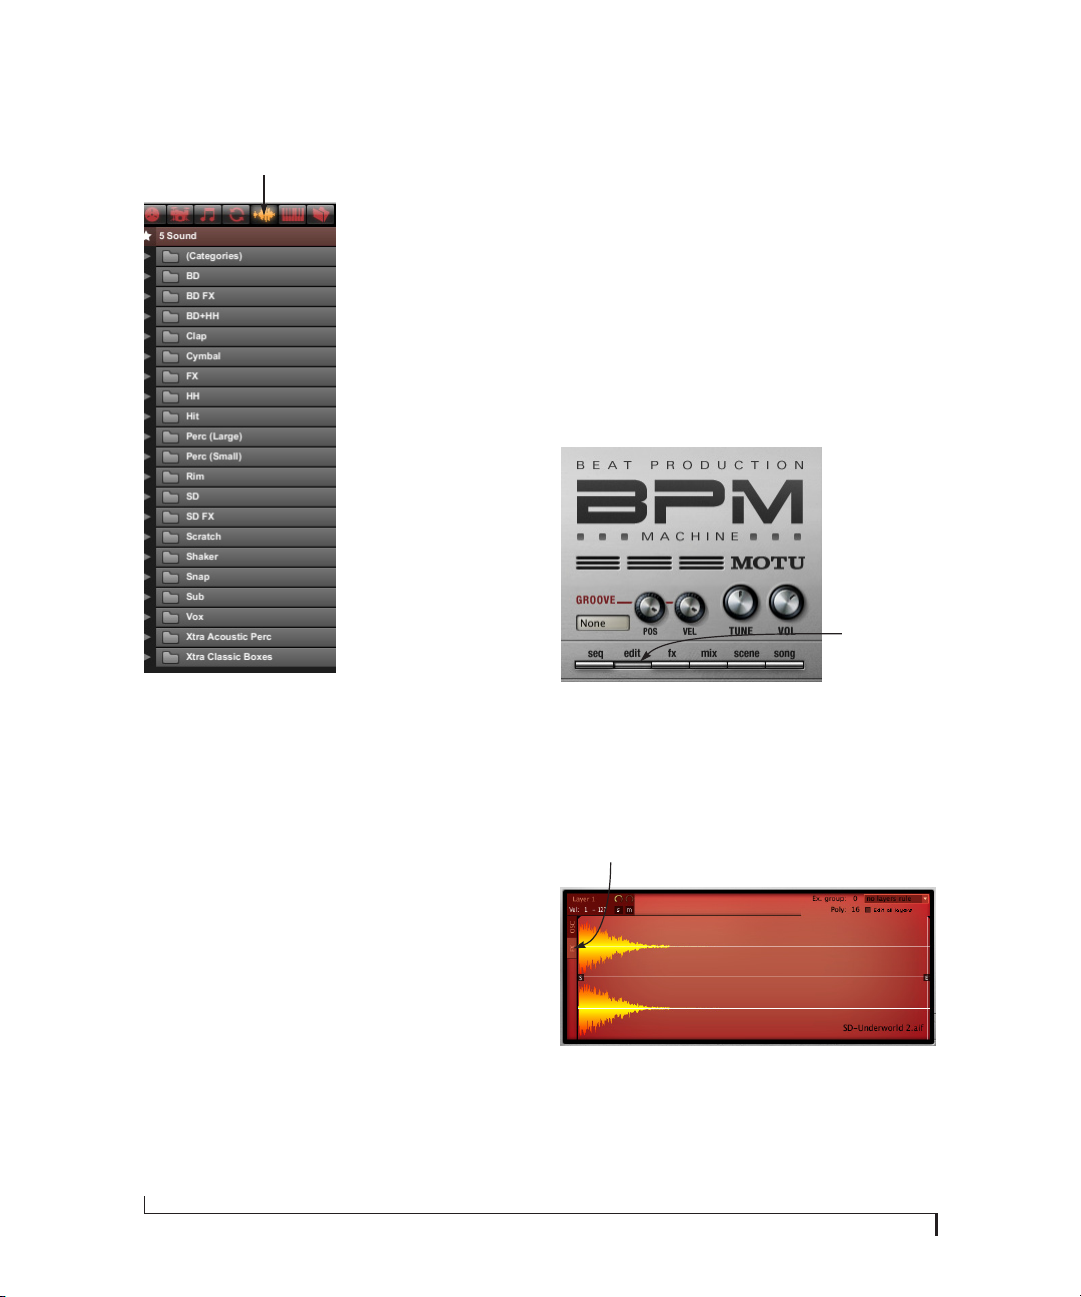
23 Click the Sound tab in the browser.
Sounds tab
Add reverb to the snare
BPM lets you add effects processing to your beats
in just about every way imaginable, from
individual samples to your entire mix. Let’s add a
little reverb to your snare sound. For the purposes
of this tutorial, it would be best to choose a snare
sound that is fairly dry to begin with (there is not a
lot of reverb on the original sample).
28 Make sure the SD1 pad is still selected
(Figure 3-11 on page 17).
29 Click the Edit button.
H
Edit button
Figure 3-12: Sounds tab.
24 Notice that individual sounds are organized by
type (BD for bass drum, SD for snare drum, HH for
hi hat, Clap, Shaker, etc.) In the (Categories) folder
at the top of the list, the same sounds are organized
by the same categories as the drum kits and
patterns (Acoustic Mood, Beat City, etc.), so you
can easily find an individual sound that is part of a
Kit or Kit+Pattern.
25 Open the SD (Snare Drum) folder.
26 Click a few different snare sounds to audition
them.
27 For the purposes of this tutorial, choose
SD-Z Rock (near the end of the list).
18
Figure 3-13: Editing a drum pad.
30 You should now see a waveform display that
represents the audio for the snare drum sample
currently loaded into the SD1 pad. Click the FX
button.
The FX button
Figure 3-14: Adding effects to a sample.
31 Click the Add FX button in the upper right-hand
corner of the FX list.
TUTORIAL 1: QUICKSTART GUIDE
Page 19
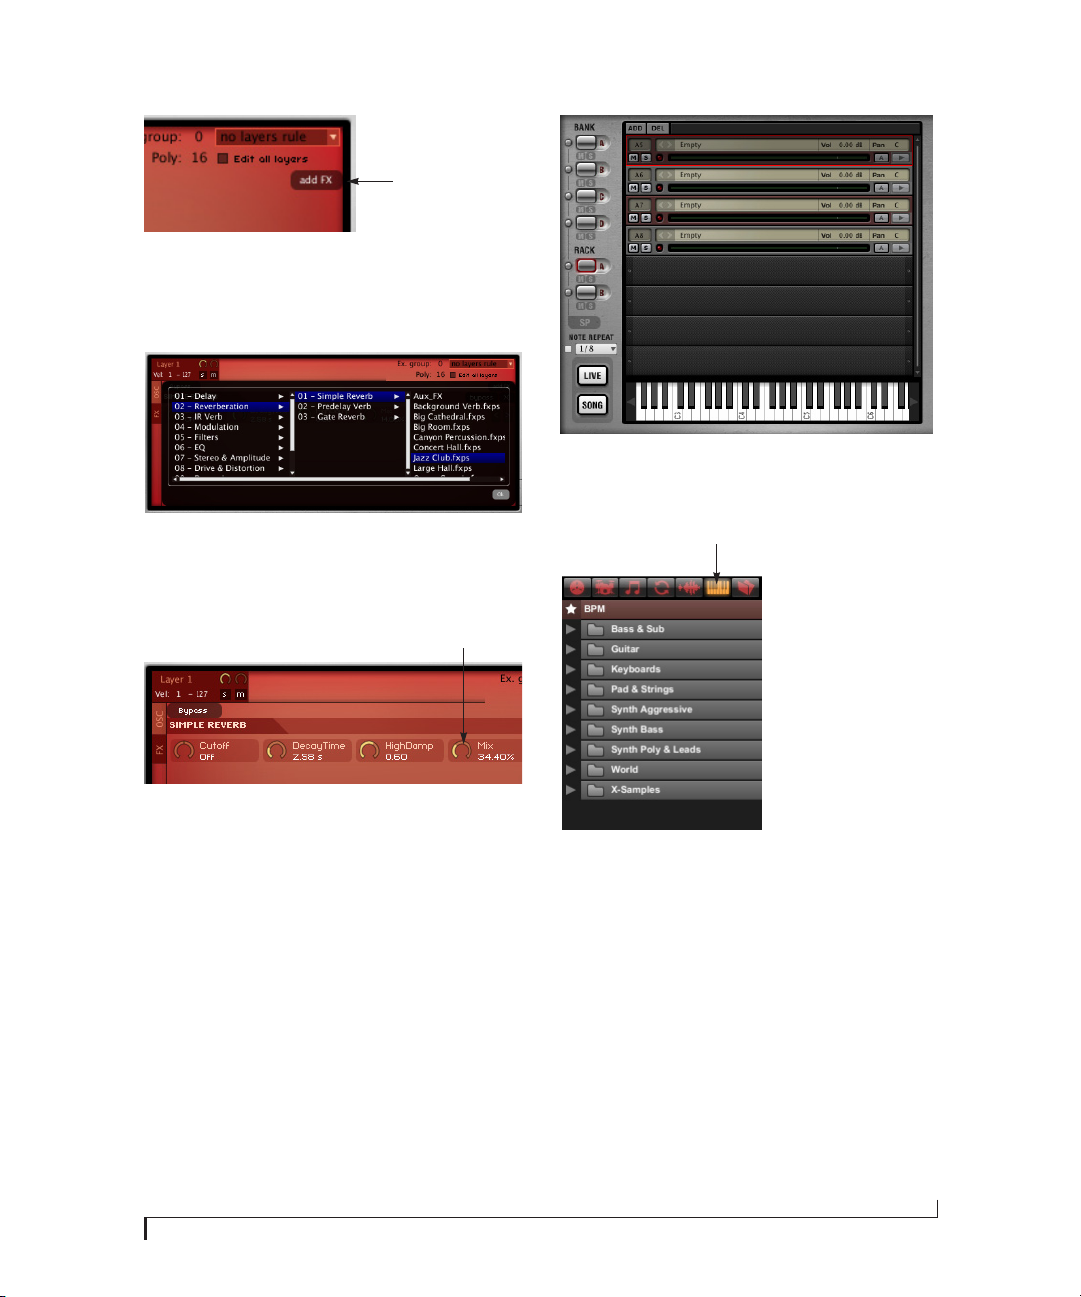
Add FX button.
Figure 3-15: Adding an effect.
32 Choose a Simple Reverb, such as Jazz Club, as
shown below.
Figure 3-18: Click the Rack A button to switch to it.
35 Click the Instr uments tab in the browser.
Figure 3-16: Choosing a reverb.
33 If you don’t hear the reverb very well, turn up
the Mix parameter.
Mix parameter
Figure 3-17: Adjusting the reverb mix.
Add a bass part
Now let’s try recording in a bass line to go with your
beat.
34 Switch from Bank A (the pattern and kit you are
currently playing) to Rack A. These two racks are
where you can add instruments like guitar and
bass, as well as loops and audio phrases.
Instruments tab
Figure 3-19: Instruments tab.
36 Open the Synth Bass folder.
37 Click DSP Bass. This lo ads the bass instrument
sound into the first part.
38 Use the scroll arrow to the left of the small
keyboard at the bottom of the rack (Figure 3-18) to
scroll down to C1 octave on the keys.
39 Click a few keys in this octave to hear the bass
sound.
TUTORIAL 1: QUICKSTART GUIDE
19
Page 20
Set up MIDI keyboard input to BPM
You could record the bass part by clicking on the
on-screen keys with the mouse as you record them
live, while the beat plays. However, for a bass part it
might be more fun — and more musical — to
record from your MIDI keyboard.
Click anywhere on the bass part.
40 If you are running BPM as a plug-in inside your
audio sequencer host, you’ll see BPM as a virtual
instrument destination for your MIDI controller.
Set up your host software so that it sends live MIDI
input from your controller to BPM.
41 If you are running BPM as a standalone
application, open the Audio and MIDI Settings (in
the File menu) and click the MIDI Devices tab.
Figure 3-20: Confirming that an available MIDI device is available for
MIDI input.
42 Make sure that an available MIDI device
connected to your system is chosen for MIDI Port
A.
43 Set the Route MIDI input to menu to Selected
Bank/Part and make sure the check box is checked,
as shown below.
Figure 3-22: Selecting the bass part for MIDI recording.
Play the bass sound with your keyboard controller
45 Try playing your MIDI controller. You should
now hear the same bass sound you heard back in
step 39.
46 If you hear it, you are ready to record the bass
part.
If you don’t hear anything
47 Check to see if the MIDI light for the bass part is
blinking when you play notes on your MIDI
controller. If it blinks, then MIDI is OK. If not,
check your MIDI cables, connections and software
settings again.
Recording a bass part
48 Press the play button (Figure 3-7 on page 16) to
begin playing the drum loop again (if it is not
already playing).
49 Switch back to the Sequence Editor, as shown in
Figure 3-1 on page 15.
Figure 3-21: use these settings to route live MIDI input to the bass
part.
44 Click the bass part in the list to select it. It gets a
bright red border around it when it is selected.
20
50 You’ll see the playback wiper move across the
note grid.
51 Use the scroll bar to the right of the note grid to
sc roll down to the C1 octave range so you can see
the notes appear as you record them.
TUTORIAL 1: QUICKSTART GUIDE
Page 21
Add a loop
BPM includes a large library of loops that you can
freely mix and match with patterns, kits,
instruments and other loops.
56 Back in the rack, click the empty part below the
bass part to select it.
Figure 3-23: Scroll the empty note grid down to the C1 octave .
52 Press the red Record button to the right of the
play button (Figure 3-7 on page 16) to engage
recording. You’ll hear a “blip” metronome sound
when recording is engaged.
53 Wait for the wiper to come around to the
be gin ning of t he lo op, and t hen play you r bas s pa rt.
For the purposes of this tutorial, play a bass line
where the root note is C1.
Figure 3-24: The recorded bass part.
54 If you don’t like what you played, use the
selection cursor to select the notes and then hit the
delete key to erase them. Then just record again.
57 Click the Loops tab in the Browser.
Loops tab
Figure 3-26: Loops tab.
58 Open the Va r i o u s folder.
59 Open the 099-C-Martinik folder.
60 Click 099-Martinik DrmLoop.
61 Now let’s add another loop. Click the empty part
below the Martinik DrmLoop part to select it.
Selection cursor
Figure 3-25: Selecting notes to erase them.
55 When you are finished recording, click the red
record button again to disengage recording.
TUTORIAL 1: QUICKSTART GUIDE
62 Click 099-C-Martinik Gtr+Vox.
Balance the parts in the mixer
BPM provides a complete mixing environment just
a click away.
63 Click the Mix button.
21
Page 22

Export your mix
BPM provides many drag and drop tabs. To finish
this tutorial, drag and drop the new mix to the
desktop. Everything done so far is stored in Scene
1. A scene is a a snapshot of the patterns and
sequences loaded in each bank and rack.
Mix button
Figure 3-27: Opening the mixer.
64 Bring down the volume Part 2 (the drum loop) a
little bit to settle it into the mix. Bring up Part 3 (the
guitar and vocals) so you can hear them a little
better.
The volume slider
Figure 3-28: Mixing the parts.
65 To mix the individual elements of the
Kit+Pattern that you currently have loaded in
Bank A, click the Bank A button.
66 To drag and drop Scene 1 to the desktop, press
on the word SCENE above the scene menu and
then drag to your computer desktop. There will be
a short pause while BPM generates the audio, and
then a WAVE file will appear on your desktop.
Figure 3-30: To export the current scene (in the Scene menu) as an
audio file, drag the word ‘SCENE’ to your computer desktop.
Save a performance
A performance is a snapshot of all settings in BPM,
including all scenes, plus all the kits, loops and
instr uments that might be loaded in the four ba nks
and two racks, along with effects, mix settings —
everything. Saving a performance at the end of a
session is a good idea because it preserves all the
work you have done in BPM in that session. You
can save a performance to disk to archive it and
share it with a colleague.
67 Choose Save Performance from the File menu in
the BPM window, as shown below.
Figure 3-29: Mixing the kit+pattern loaded in Bank A.
22
Figure 3-31: Saving a performance.
Congratulations
You are now ready to create your own beats with
BPM and learn more about BPM’s many other
advanced features.
TUTORIAL 1: QUICKSTART GUIDE
Page 23

CHAPTER
4 Tutorial 2: Building a Song
Overview
The first tutorial focused on perfecting a single
scene; this tutorial focuses on using multiple scenes
to build a complete track entirely in BPM.
Scenes
A Scene is a snapshot of the patterns & sequences
loaded in each bank & rack part. There are 16
scenes available in each instance of BPM.
Two important things to remember about scenes:
■ Only one scene is active at a given time.
■ The kits and instruments loaded in the Banks
and Racks don’t change when you change
scenes — only the patterns/sequences change.
Scene Editor
The Scene Editor provides a simple display to show
which patterns & sequences are assigned to each
scene.
1 Click the Scene tab.
H
By default, each scene uses the patterns of the same
number. That is, Scene 1 has pattern 1 loaded in
each bank, Scene 2 has pattern 2 loaded in each
bank, and so on. However, you can freely assign
any pattern to any scene.
Figure 4-2: The Scene Editor.
In the Scene Editor, each bank and rack part has a
column, and each scene has a row. The number
shown at the intersection of a row and column is
the pattern that will play for that bank/part in that
scene. For example, if a 4 is shown at the
intersection of Scene 3 and Bank C, that means
Bank C’s Pattern #4 will play during Scene 3.
To change the pattern in any cell, click it and
choose the desired pattern from the pop-up menu.
Figure 4-1: Opening the Scene Editor.
Scene tab
Figure 4-3: Choosing a pattern.
23
Page 24
Loading the tutorial file
For this tutorial, you are going to load a
performance that already has a few patterns
programmed and assigned to a number of scenes.
Use the Load Performance command under the File
menu to load the “Tutorial 2” performance file.
Song mode
In Song mode, scenes are placed end-to-end to
create a sequential timeline.
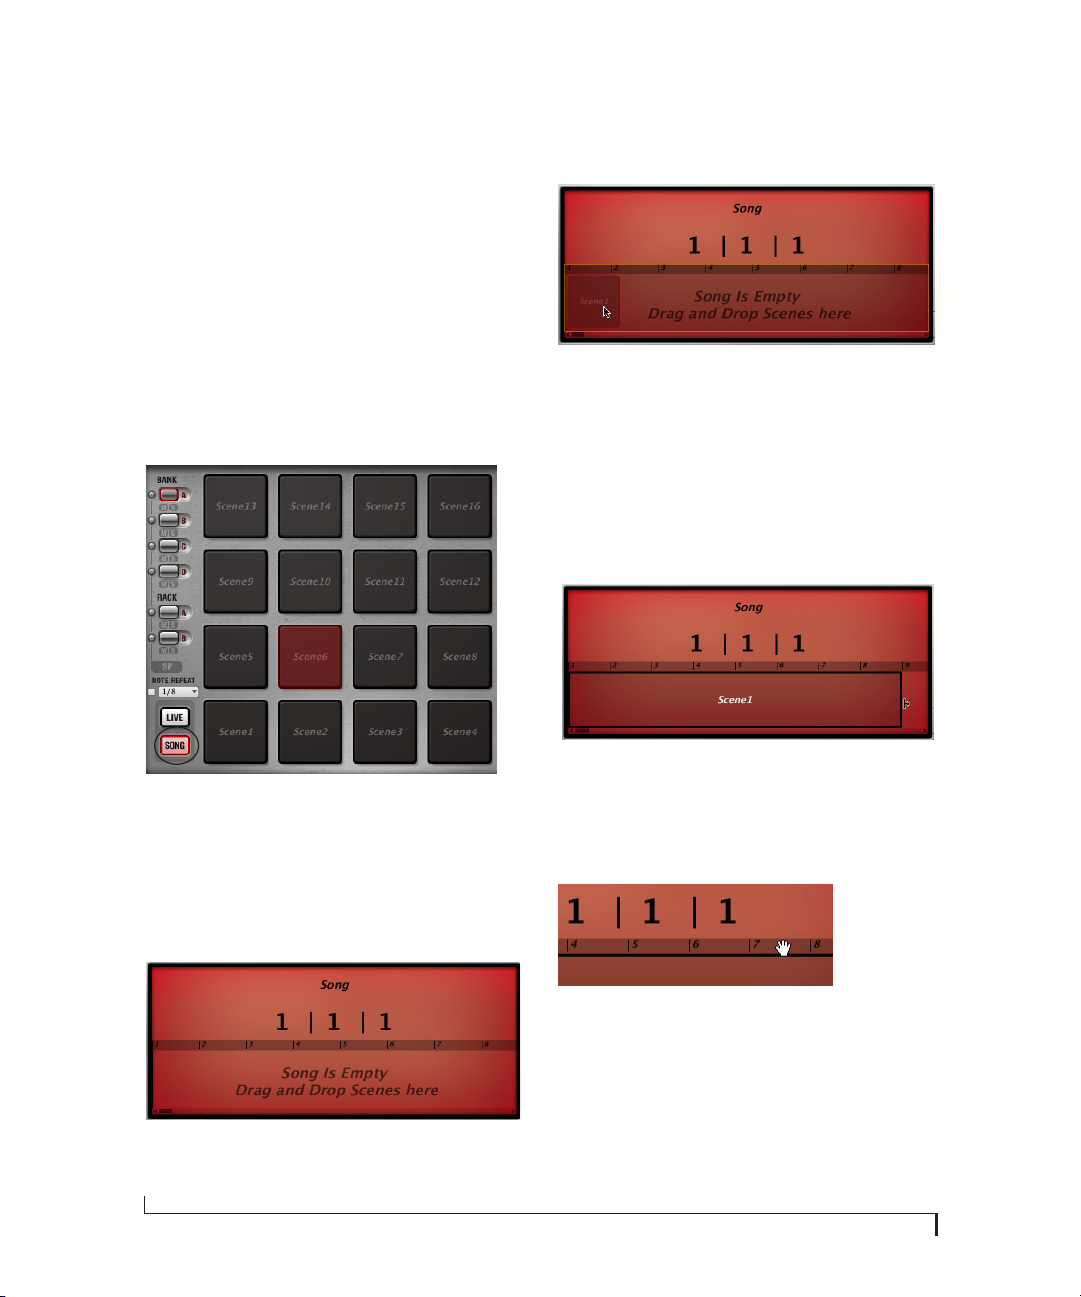
3 To add Scene1 to the song, click and drag the
Scene1 pad to the Song Editor and drop it at bar 1.
Figure 4-6: Dragging Scene1 into the Song Editor
2 To enable Song mode, press the Song button in
the lower left corner.
Figure 4-4: The Song mode button.
Note that the pads have changed from BD1, BD2,
etc. to Scene1, Scene2, etc.
Above the pads, you’ll see the Song Editor, which is
currently empty:
4 Scene1 is 4 bars long. Let’s repeat it 2 times
(ending at the beginning of bar 9).
When you hover the mouse near the right edge of
Scene1, the cursor will change to the edge-edit
cursor. Click and drag to stretch the Scene1 block
to bar 9.
Figure 4-7: Stretching Scene1 to repeat it.
5 To zoom out to see more of the song, hover over
the Song Editor timeline. When you see the hand
cursor, click & drag upward to zoom out.
Figure 4-5: The Song Editor.
24
Figure 4-8: Zooming the Song timeline.
6 Let’s add more scenes to the song. Drag the
Scene2 pad to the Song Editor and drop it at bar 9,
then drag Scene3 to bar 13, and finally, Scene1
again to bar 17.
TUTORIAL 2: BUILDING A SONG
Page 25
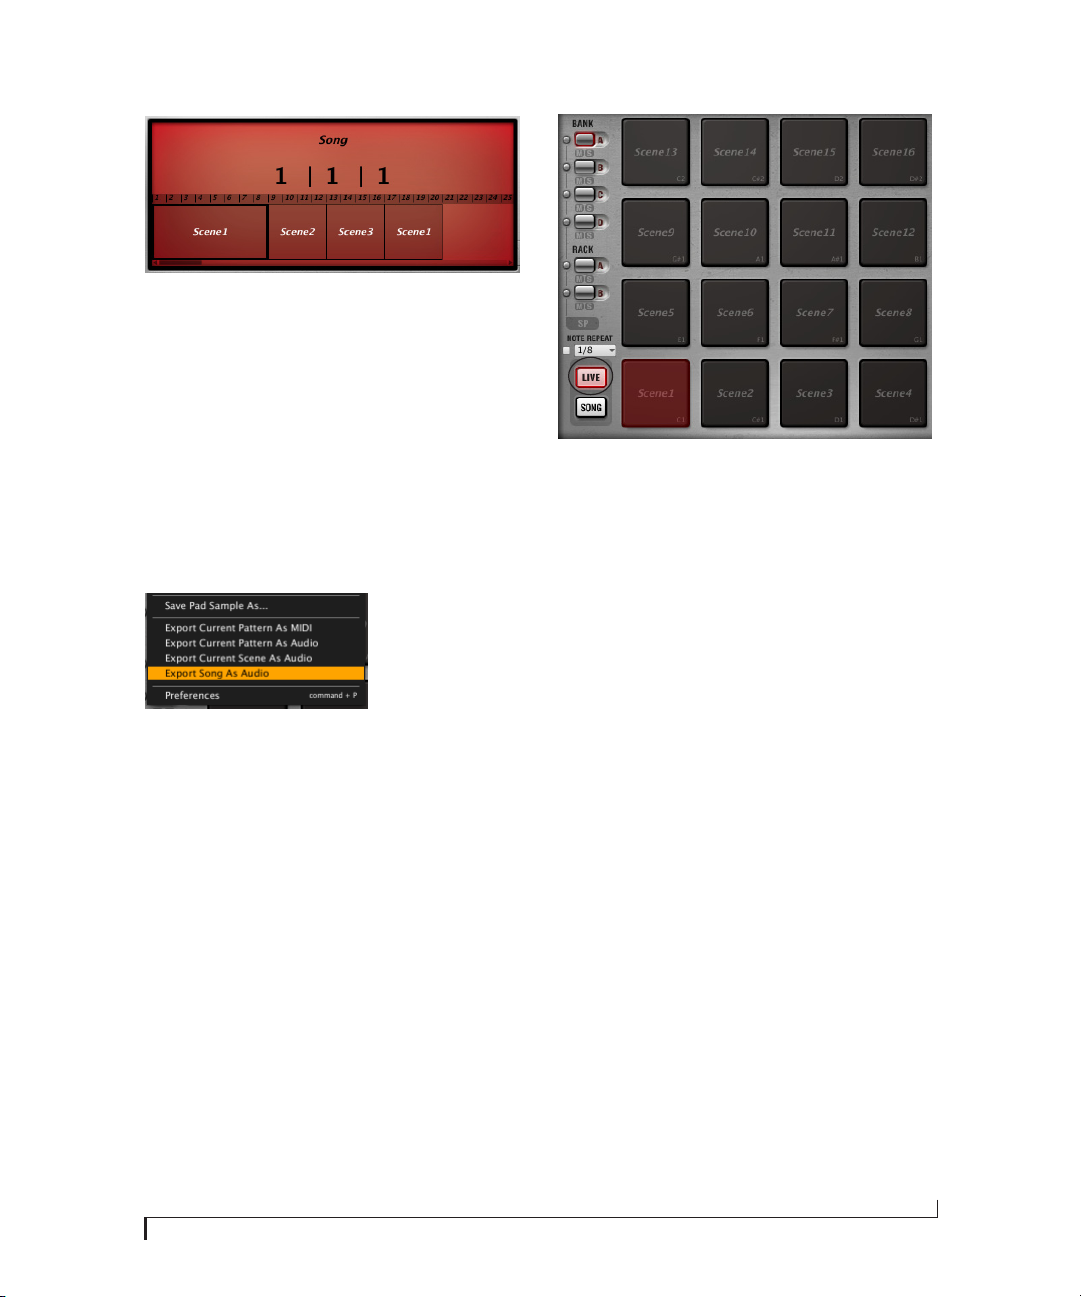
Figure 4-9: Building a song.
7 To hear the song, press Play: you’ll see the
playback wiper advance, as well as the playback
position fields above the timeline.
If you’re using BPM as a plug-in within a
sequencer/DAW, the song playback position will
follow the host.
8 To export the entire song as a new audio file,
choose Export Song as Audio from the File menu.
Figure 4-11: The Live mode button
As with Song mode, the pads are for Scene1,
Scene2, etc.
10 Each scene is assigned a MIDI note
chromatically beginning at C1: Scene 1 is triggered
by C1, Scene 2 by C#1, and so on.
Pl ay C 1 on you r MID I co ntro lle r ke ybo ard : Sc ene 1
starts playing.
Figure 4-10: Exporting a song
Live mode
Instead of planning out your scene changes in Song
mode, you can trigger scenes on-the-fly using Live
mode. In this mode, you change scenes using MIDI
input (from a keyboard or a sequencer/DAW
application) or by clicking on the 16 pads in the
BPM user interface.
9 To ena ble Live mode, press the Live but ton i n th e
lower left corner.
TUTORIAL 2: BUILDING A SONG
11 While Scene1 is playing, play C#1: Scene 2 plays.
12 Now click on the Scene3 pad: Scene 3 plays.
Sequencing Live mode from your host
Live mode is also great for programming scene
changes from your host sequencer. Since the scene
changes are controlled by MIDI notes, you can
insert MIDI notes in your host that can be cut,
copied, pasted, repeated, etc. just like any other
MIDI notes.
13 In your host sequencer, instantiate BPM in the
normal fashion and assign a MIDI track to BPM
channel A-1.
25
Page 26
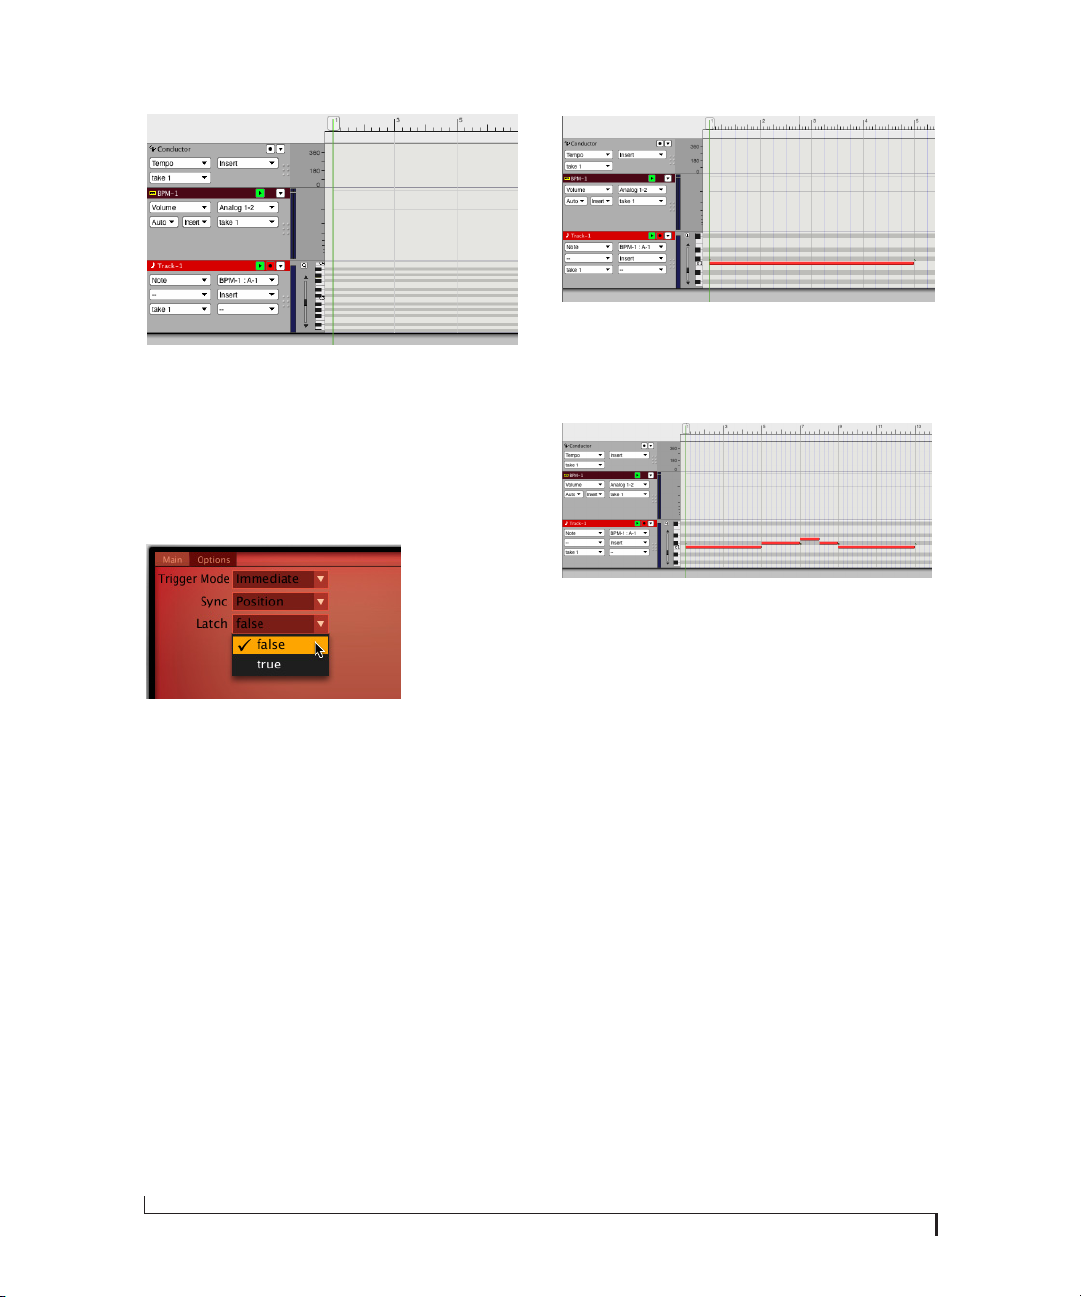
Figure 4-14: Inserting C1 to trigger Scene1
Figure 4-12: The BPM instrument and MIDI tracks
14 In BPM, load the “Tutorial 2” performance file
in the same manner as before.
15 Open the Scene Editor and click on the Options
tab. Change Latch to “False”.
Figure 4-13: Turning off Latch mode
For details on Latch mode, see “Latch” on
page 103.
16 Back in your sequencer, insert or record a C1
from the beginning of bar 1 until bar 5.
17 Insert a few more notes in the following
measures, using C1, C#1, and D1.
Figure 4-15: Inserting additional notes
18 Press Play in your host: as it reaches each MIDI
note, BPM changes to the corresponding scene.
The next step
You’re now ready to build your own songs with
BPM. Keep reading for all of the details about
BPM’s powerful features.
26
TUTORIAL 2: BUILDING A SONG
Page 27
CHAPTER
5 BPM Application
OVERVIEW
BPM is supplied in two forms:
■ As a standalone application
■ As a plug-in
This chapter explains how to use the BPM
standalone application. For information about
operating BPM as a plug-in, see chapter 6, “BPM
Plug-in” (page 35).
Standalone operation . . . . . . . . . . . . . . . . . . . . . . . . . . . . . . . 27
Managing latency with standalone operation . . . . . . . 30
Opening the standalone version. . . . . . . . . . . . . . . . . . . . . 30
Audio and MIDI settings . . . . . . . . . . . . . . . . . . . . . . . . . . . . . 31
Audio device tab. . . . . . . . . . . . . . . . . . . . . . . . . . . . . . . . . . . . . 31
Routing tab . . . . . . . . . . . . . . . . . . . . . . . . . . . . . . . . . . . . . . . . . . 32
MIDI Devices tab . . . . . . . . . . . . . . . . . . . . . . . . . . . . . . . . . . . . . 33
STANDALONE OPERATION
BPM can operate as a standalone instrument
application, independent of a plug-in host, turning
your Mac or PC into a streamlined urban rhythm
production powerhouse. Standalone operation
also allows you to:
These three scenarios are briefly described below.
The rest of this chapter explains the settings in
BPM necessary to establish MIDI and audio
connections for these scenarios.
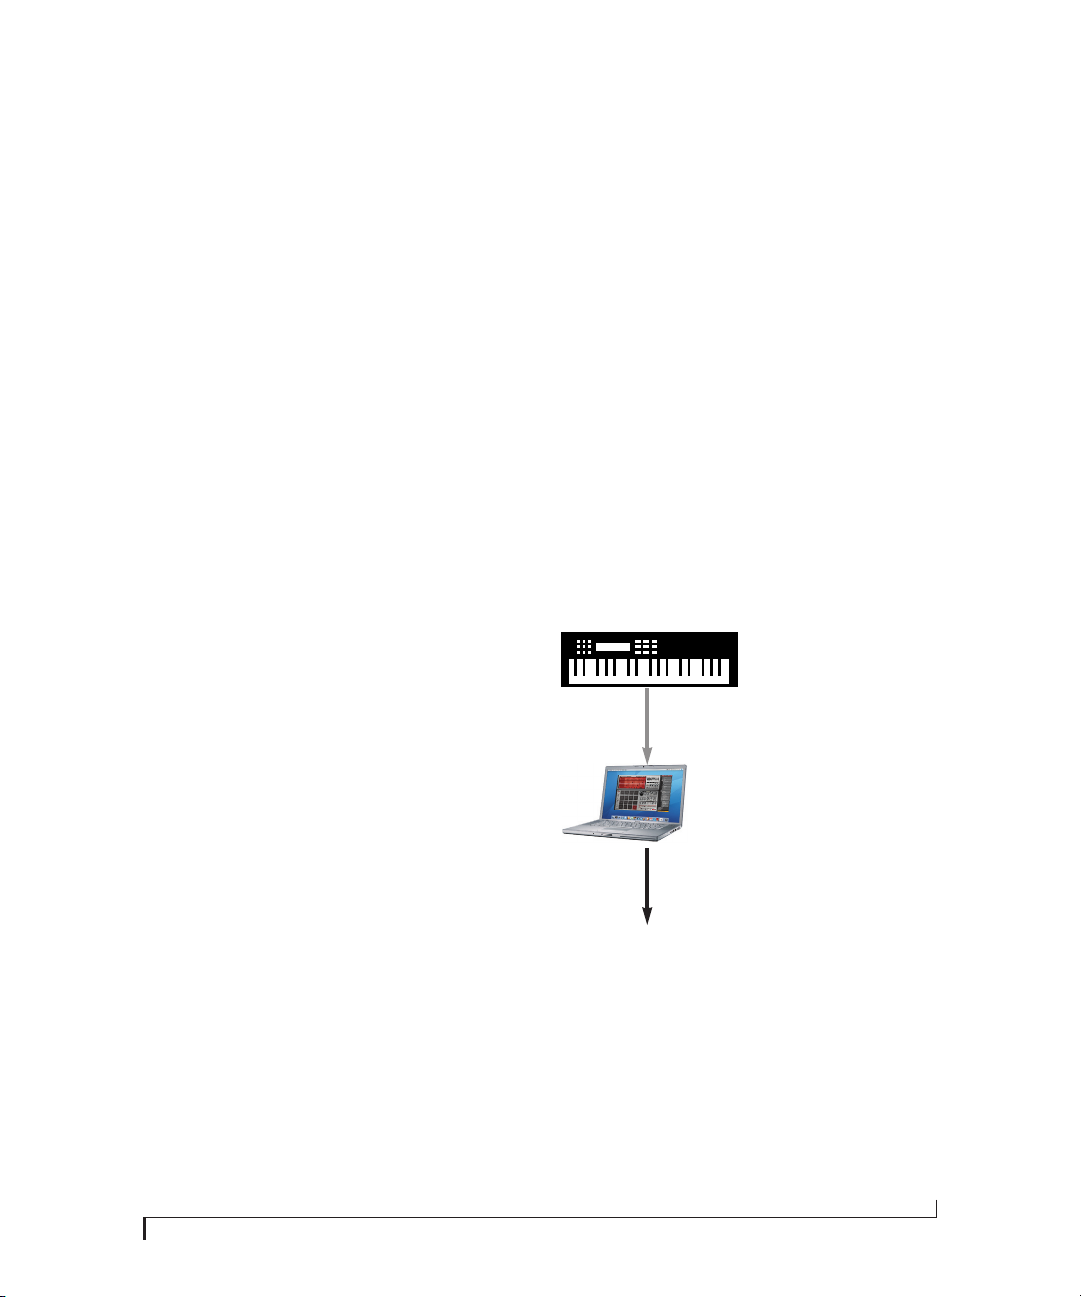
Playing BPM as a live instrument from MIDI controller
To play BPM as a live instrument from a MIDI
controller, you need to route MIDI data from your
controller to BPM via a MIDI interface connected
to the computer, and then route the audio output
from BPM to your computer’s audio hardware, as
shown below. The MIDI data triggers sounds in
BPM, which then produces audio signal to be
routed to your headphones or speakers in your
studio:
MIDI keyboard or controller
MIDI data
BPM running on a computer
■ play BPM from an external MIDI keyboard, pad
controller or other MIDI controller, allowing you
to use BPM as a live instrument
■ use BPM as a comprehensive rhythm instrument
for an external MIDI sequencer or MIDI-capable
music software running on another computer
■ use BPM as a comprehensive rhythm instrument
for MIDI-capable music software that does not
host third-party instrument plug-ins but that is
running on the same computer as BPM
BPM audio output from the computer
Figure 5-1: The flow of MIDI data and audio signal when playing BPM
as a live instrument.
MIDI connections
There are several ways to get MIDI data into your
computer. Here are a few:
■ A USB MIDI keyboard or pad controller that
connects directly to the computer
27
Page 28
■ A MIDI-equipped keyboard connected to a USB
MDI i nterfa ce, or to an audio i nterfa ce th at doubles
as a MIDI interface, via a standard MIDI cable
performance of your audio sequencer, notation
program or other MIDI authoring software
running on your main computer.
Audio connections
There are many ways to play audio from your
computer. The simplest method is to use the
computer’s built-in audio capabilities. You can also
use a third-party audio interface. A perfect
example is the MOTU UltraLite-mk3, an
affordable, bus-powered FireWire audio interlace
that also provides MIDI input and output, as
shown below:
MIDI keyboard or controller
MIDI OUT
MIDI cable
UltraLite-mk3 audio/MIDI interface
FireWire cab le
Figure 5-2: An example setup for standalone operation using a MOTU
UltraLite-mk3 audio interface. In this example, the UltraLite-mk3 is
also handling MIDI data transmission from the keyboard controller
to the computer and BPM.
MIDI data
MIDI IN
MIDI data to BPM and
audio output from BPM
UltraLite-mk3
audio
output
BPM running on a
computer
Speakers or
headphones
The disadvantage to this setup is that you must
manage the operational overhead of two (or more)
computers. For example, you will need to save
BPM settings on the satellite computer in a way that
lets you easily cross-reference them to the
corresponding file or project for your authoring
software on your main computer. If you prefer to
save BPM s etti ngs dire ctly in your host authoriz ing
software, you are better off running BPM as a
plug-in. But if processing resources are at a
premium, and you have an extra computer on
which to run BPM, this “satellite” computing
scenario can be very beneficial.
The setup for running BPM on a satellite computer
is simil ar to the live keyb oard s cena rio descr ibe d in
the previous section, except that audio sequencer
software or other authoring software running on
your main computer serves as the source of MIDI
data being sent to BPM running on the satellite
computer, as demonstrated in Figure 5-3. MIDI
data is transmitted from the host computer via a
FastLane MIDI interface and MIDI cable to the
UltraLite-mk3 audio/MIDI interface connected to
the laptop running BPM.
Using BPM as a sound source for music software running on another computer
When running as a standalone application on a
computer by itself, BPM can serve as a sound
source for MIDI equipped music software, such as
an audio sequencer application, running on
another computer.
The advantage of this “satellite” setup is that you
can fully dedicate the BPM satellite computer’s
processing resources to BPM, without affecting the
28
BPM APPLICATION
Page 29
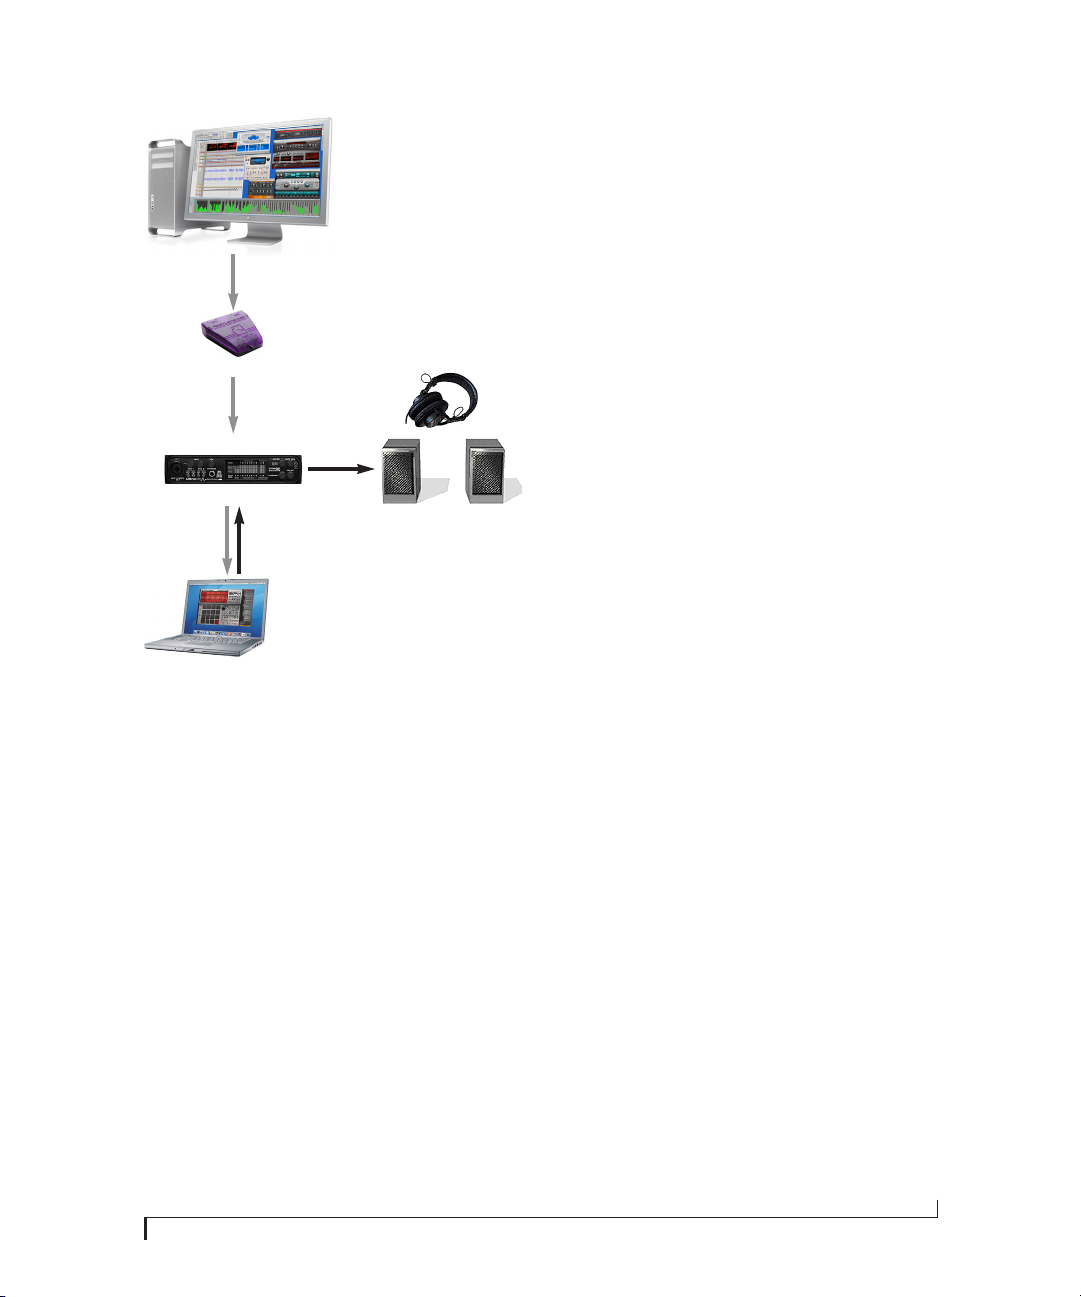
Main computer running
audio sequencer or other
MIDI authoring software
USB cable
USB MIDI interface
MIDI OUT
MIDI cable
UltraLite-mk3 audio/MIDI interface
FireWire cab le
Figure 5-3: An example setup for standalone operation using a MOTU
UltraLite-mk3 audio interface. In this example, the UltraLite-mk3 is
also handling MIDI data transmission from the keyboard controller
to the computer and BPM.
MIDI data
MIDI IN
MIDI data to BPM and
audio output from BPM
UltraLite
audio
output
Satellite computer
running BPM
Speakers or
headphones
The example setup shown in Figure 5-3 shows one
satellite computer. But you can use this same basic
idea for two or more satellite computers, each
running virtual instruments as well. For multiple
satellite computer setups, you may also want to
consider using just one or two computer monitors
connected to a computer monitor switcher. These
devices, available from your favorite computer
supplies retailer, allow you operate multiple
computers from the same screen, keyboard and
mouse.
Running BPM standalone on the same computer as your host software
If you are planning to run BPM on the same
computer as your audio sequencer, notation
program or other MIDI authoring software, it will
be mos t conv eni ent for y ou t o ru n BP M a s a p lug -in
inside your host software.
If, however, your authoring software does not have
th e abi lit y to h ost inst rum ent plug- ins, i t is po ssib le
that you might be able to run BPM in standalone
mode and trigger BPM sounds from your host
software using inter-application MIDI
transmission, if your host software supports this
feature. Inter-application MIDI transmission is
when one program sends MIDI data to another
program that is running at the same time. In
essence, both programs are running side by side as
standalone applications, and they pass MIDI data
(and perhaps even audio streams) between each
other.
Inter-application MIDI
On the Mac, inter-application MIDI functionality
is supported by the Mac operating system (OS)
itself, and many current music software packages
support the Mac OS’s inter-application features.
Consult your host software documentation for
details. On the Mac, you can set up a compatible
host application to publish a virtual MIDI device
(stream), which then appears in BPM’s MIDI
Device tab menus.
BPM APPLICATION
29
Page 30
Inter-application audio
The audio output from BPM can either play
directly to your audio interface hardware
connected (via the settings described later in this
chapter), or you can use third-party downloadable
utilities (such as Cycling 74’s Sound Flower utility
for Mac OS or other similar downloadable
3rd-party audio utility) to route BPM’s audio
output back into your host audio sequencer
application (or any other audio software running
on the same computer).
MANAGING LATENCY WITH STANDALONE OPERATION
Latency is the time it takes for MIDI data from your
controller to reach BPM and then for BPM to
respond to it and produce sound. See “Managing
latency” on page 36, which discusses ways to
manage latency that apply to both plug-in
operation and standalone operation.
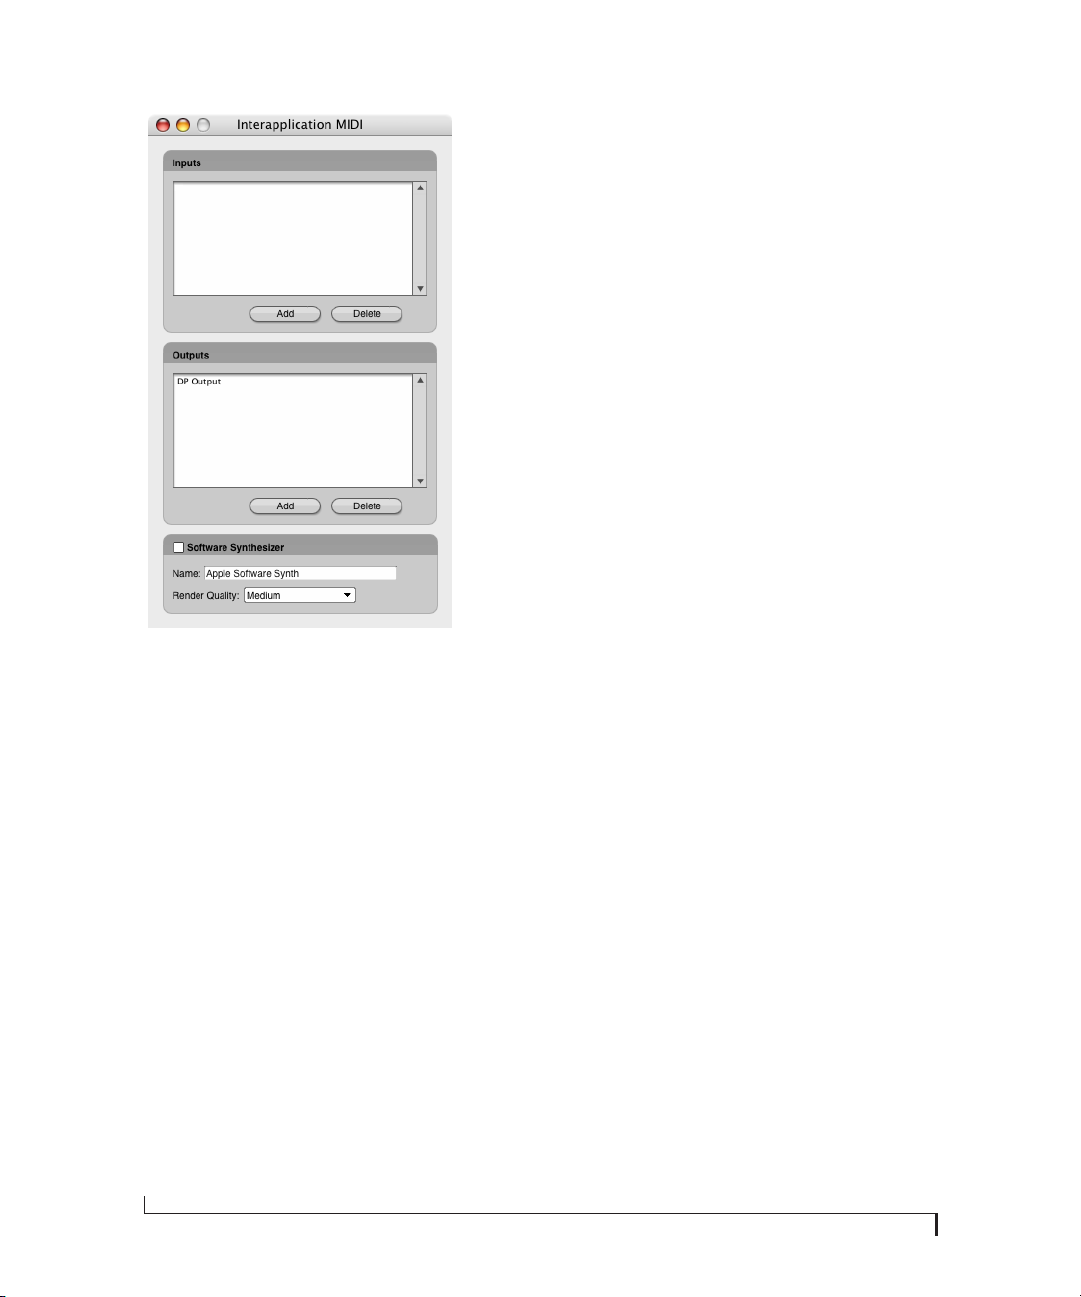
Figure 5-4: An example of the inter-application MIDI feature in a host
program. This window in Digital Performer (Setup menu> Interapplication MIDI) lets you create a ‘virtual’ MIDI output device
(stream) from Digital Performer, as shown in this example by the
name ‘DP Output’. You can then choose this a virtual MIDI device
(source) from within BPM (running standalone, not as a plug-in). If
you then play a MIDI track to the MIDI channels on this virtual output
device, they will trigger parts in BPM that are assigned to receive on
those same MIDI channels.
On Windows, there are third-party utilities
available for Windows, such as LoopBe or MIDI
Yo k e , that allow MIDI programs to transmit MIDI
data to each other.
OPENING THE STANDALONE VERSION
On the Mac, the standalone version of BPM can be
found in your Applications folder. On Windows, it
can be found under the Start menu> Programs>
MOTU.
Standalone operation is identical to plug-in
operation as described in chapter 7, “BPM
Window” (page 49), with the exception of the
additional standalone settings described in this
chapter.
30
BPM APPLICATION
Page 31

AUDIO AND MIDI SETTINGS
The standalone version of BPM has a few basic
settings that can be found in File menu> Audio and
MIDI Settings:
Audio and MIDI settings (Mac OS X)
Audio and MIDI settings (Windows)
Figure 5-5: The standalone version Audio and MIDI settings.
AUDIO DEVICE TAB
The Audio Dev ice tab settings (Figure 5-5) let you
make several audio hardware device settings.
API
Choose the desired audio driver for the audio
interface you are using for BPM. For Mac OS X, this
will almost always be set to Core Audio. If your
Windows audio device provides both MME and
ASIO driver support, you are free to choose either
driver for BPM, but ASIO is recommended.
Output device
Choose the desired audio hardware from the
Output Device menu (Figure 5-5). For example,
you could choose your computer’s built-in audio
hardware. If you have a third party audio interface
installed or connected, and you do not see it in the
menu, be sure that you have correctly installed its
dr iver and th at it is ot her wise fun cti onin g prope rly,
independently of BPM. For example, can you
access the hardware from the system software (Mac
OS or Windows) and other audio applications?
Sample Rate
Choose the desired Sample Rate (Figure 5-5) for
playback. The choices in this menu are provided by
your audio hardware driver, and the setting you
choose here is the sample rate your hardware will
be set to. 44.1 kHz is the standard rate for audio
compact discs. BPM samples are all provided in 24bit resolution at 96 kHz, but if you choose to
operate at a different sample rate, they are samplerate converted on the fly to match the rate you’ve
chosen.
BPM APPLICATION
Buffer size (Mac) Output Latency (Windows)
This setting is crucial for managing your
computer’s processing resources. In general,
settings of 256, 128 or 64 samples produce better
latency performance. But lower settings place
higher demand on your computer’s processor.
31
Page 32

ASIO Config (Windows only)
Click the ASIO config button to open the ASIO
driver configuration window. Consult your audio
hardware documentation for details about the
settings in this window for configuring your
hardware’s ASIO driver.
Refresh Audio Devices
If you make changes to your audio device
configuration (outside of BPM), click the Refresh
Audio Devices button (Figure 5-5) to see those
changes reflected in the BPM Audio Devices tab.
ROUTING TAB
The standalone version of BPM provides 17
independent stereo outputs (a main out pair, plus
16 additional separate output pairs numbered 2
through 17) to which you can freely assign each
part (instrument), as explained in “Outputs” on
page 98.
The Routings tab (Figure 5-6) provides a way for
you to map each BPM output to a physical output
connector on your audio hardware. For example,
you might map the BPM’s “Main Out Left/Right”
output pair to the headphone output of your audio
interface.
Routing (Mac OS X)
Routing (Windows )
The connectors you see in the Physical Output
menus (Figure 5-6) are provided by your hardware
and its software driver. If you do not see the desired
hardware device outputs in the menus, be sure that
you have correctly installed its driver and that it is
otherwise functioning properly, independently of
BPM. For example, can you access the hardware
from the system software (Mac OS X or Windows)
and other audio applications?
32
Figure 5-6: Mapping standalone version outputs to the physical
connectors on your audio hardware.
BPM APPLICATION
Page 33

MIDI DEVICES TAB
The MIDI Devices tab (Figure 5-7) lets you
configure how external MIDI sources are mapped
to BPM’s 64 MIDI channels (four ports of 16
channels each).
MIDI Devices (Mac OS X)
MIDI Devices (Windows)
This means that there is no such thing as MIDI
channel 17, 18, 19, etc. So how does BPM provide
64 MIDI c hanne ls? Th e answer is: b y divi din g them
into four ports of 16 channels each: Port A, Port B,
Port C and Port D. Each port represents one MIDI
cable — or MIDI port on a MIDI interface. The
MIDI Devices tab (Figure 5-7) lets you map
external MIDI sources to each port. These sources
could be any of the following:
■ A MIDI IN port on a MIDI interface that is
connected to the computer
■ A “virtual” MIDI cable from MIDI software
running concurrently with BPM (such as Digital
Per former )
■ A USB MIDI controller (a keyboard controller
that is connected directly to the computer via a
USB cable)
■ A n au dio inte rfac e th at a lso suppl ies one or more
MIDI IN ports (such as the MOTU 828mk3 or
Tr a v e l e r - m k 3 )
When any of these devices are “on line” (that is,
they are connected to your computer with their
drivers properly installed — or in the case of MIDI
software programs, they are running simultaneously with BPM), they will display their available
MIDI ports in the four MIDI port menus shown in
Figure 5-7.
Figure 5-7: MIDI devices.
As defined by the MIDI specification, MIDI
channels are supplied in banks of 16 channels. For
example, one MIDI cable carries 16 MIDI
channels. On multiport MIDI interfaces, such as
the MOTU MIDI Express 128, each MIDI port
carries its own set of 16 MIDI channels.
BPM APPLICATION
You can choose any source you wish for each port.
If you c hoo se t he s ame source for two or more por t,
just be aware that you will trigger the same MIDI
channel on both port. For example, if you assign
your controller to both Port A and Port B, and it
transmits on MIDI channel 1, you will trigger any
BPM parts that are assigned to either channel A1 or
B1. To make channel A1 and B1 independent from
one another, assign them to different sources in the
MIDI Devices tab.
33
Page 34

Refresh MIDI Devices
If you make changes to your MIDI device
configuration (outside of BPM), click the Refresh
MIDI Devices button to see those changes reflected
in the BPM MIDI Devices tab.
34
BPM APPLICATION
Page 35

CHAPTER
6 BPM Plug-in
OVERVIEW
BPM is supplied in two forms:
■ As a standalone application
■ As a plug-in
This chapter provides basic setup and operation
instructions for each supported plug-in format,
with specific explanations for a variety of popular
host audio software applications. After reading the
first two sections (for all users), turn to the section
that applies to you.
For information about operating the standalone
application, see chapter 5, “BPM Application”
(page 27).
When operating BPM as a plug-in inside a host
audio program, you can open — or instantiate —
BPM on two or more tracks at a time. Each
independently operating BPM is referred to as an
instance of BPM. For example, you could say that it
is possible to open multiple instances of BPM in a
project. Each one opens as a separate window and
operates independently.
For all users
Conserving CPU resources . . . . . . . . . . . . . . . . . . . . . . . . . . . 36
Managing latency . . . . . . . . . . . . . . . . . . . . . . . . . . . . . . . . . . . . 36
MAS
Digital Performer (Mac OS X) . . . . . . . . . . . . . . . . . . . . . . . . . 38
AAX/RTAS
Pro Tools (Mac & Windows) . . . . . . . . . . . . . . . . . . . . . . . . . . . 39
Audio Units
Logic (Mac OS X) . . . . . . . . . . . . . . . . . . . . . . . . . . . . . . . . . . . . . 41
Other Audio Unit hosts (Mac OS X) . . . . . . . . . . . . . . . . . . . 42
VST
Cubase and Nuendo (Mac & Windows). . . . . . . . . . . . . . . 43
Live (Mac & Windows) . . . . . . . . . . . . . . . . . . . . . . . . . . . . . . . . 46
Other VST hosts (Mac & Windows) . . . . . . . . . . . . . . . . . . . 47
35
Page 36

CONSERVING CPU RESOURCES
Regardless of your host application, BPM provides
several settings that are crucial for managing your
computer’s precious processing (CPU) resources.
Another setting, generally referred to as hardware
buffer size, can also dramatically impact BPM
performance. This last setting is not in BPM;
instead, you’ll find it either in your host application
or in your audio hardware driver configuration
settings.
The Polyphony setting
The Polyphony setting (see “Pad polyphony” on
page 65) lets you control the maximum allowed
number of stereo notes that can be played
simultaneous by an individual pad. The upper
limit is 256. This setting can be adjusted separately
for each pad. Keep it as low as possible to conserve
CPU bandwidth.
software. For other Windows applications, such as
Cubase and Pro Tools, it is managed by the audio
hardware driver and is usually found in the driver
configuration software for your audio hardware. In
general, settings of 256, 128 or 64 samples produce
better latency performance. But lower settings
place higher demand on your computer’s
processor.
MANAGING LATENCY
Latency is a term used to refer to the very small
delay that can occur between when a MIDI note is
played and the resulting BPM sound is triggered.
The discussion below explains how to best reduce
— and in some cases completely eliminate —
latency. However, regardless of which host
application you use, there are two general
situations that you should be aware of in which
latency may be an issue:
Here are three ways you can optimize BPM
performance:
1. The filter requires processing bandwidth, so
disable the filter (click the Off button) when not
using it.
2. Long envelope times can increase the polyphony
count — without being obvious. Make sure your
amplitude envelope is set as short as necessary. For
details, see “Amplitude Envelope” on page 87.
3. BPM’s effects will increase the CPU load. Reverb
is the most CPU-intensive effect, particularly the
convolution (IR) reverb.
Hardware buffer size
A crucial setting for managing your system’s
resources is the hardware buffer size. This setting is
discussed more specifically for each host
application later in this chapter. In general, under
Mac OS X, this setting is managed by (and found
in) your host audio software. Under Windows,
some host audio applications, such as SONAR,
control this setting, and you’ll find it in the host
■ During live MIDI input
■ During MIDI track playback
Live MIDI input
Live input latency can occur when you play your
MIDI controller to trigger sounds “live” in BPM, as
demonstrated below in Figure 6-1. The most
important setting to control live input latency,
regardless of your host application, is the
“Hardware buffer size” on page 36. Lower
hardware buffer settings (512 samples or below)
make live input latency almost inaudible. The
lower the setting, the more accurate live playing
will feel. However, lower settings place higher
demand on th e comp uter, so if you are plac ing high
demands on BPM, you may not want to go much
lower than 512 samples. If you can live with a little
“sponginess” when playing live parts, you could
even set the buffer size to 1024 samples. This will
give you even better BPM performance.
36
BPM PLUG-IN
Page 37

☛ It is important to note that live input latency
has no effect whatsoever on the accuracy with
which the MIDI data is recorded. This is only a
monitoring issue (i.e. what you hear when you play
live).
MIDI track playback
MIDI sequencers store streams of MIDI data in
their tracks. When you play back the sequence, this
MIDI data is sent to BPM (and other MIDI
instruments) to trigger sounds. The question is:
how much time elapses between when a MIDI data
event is played from the track and when BPM plays
the sample being triggered? This period of time, if
any, could be referred to as MIDI playback latency.
The latest versions of the host applications
described in this chapter all have ways to
completely eliminate MIDI playback latency for
virtual instruments like BPM: their MIDI track
playback is extremely accurate — even sampleaccurate in some cases. (Host applications either
send the MIDI data a little early or cue up BPM’s
audio playback a little early so that it plays exactly
when the MIDI note plays.) For a few host
applications, however, this period of time is
affected by the “Hardware buffer size” on page 36:
the higher the buffer size, the longer the playback
latency. The following sections explain which
applications are affected by this setting with regard
to MIDI track playback. As with live input latency,
lower buffer settings result in more accurate
playback, but at the expense of increased
processing load on your computer.
BPM
MIDI Controller
MIDI or USB Cable
Figure 6-1: Latency during live MIDI input. You press a key on your controller keyboard. The note gets sent to BPM, which then plays a note in
response to the received MIDI data. Latency is the time it takes between when you play the note and then hear it. High latency feels “spongy”. In
other words, notes seem to play consistently a little late. Live input latency has no effect whatsoever on the accuracy with which the MIDI data
is recorded. This is only a monitoring issue (i.e. what you hear when you play live).
BPM PLUG-IN
BPM audio output
37
Page 38

DIGITAL PERFORMER (MAC OS X)
For Digital Performer, BPM operates as a standard
MAS instrument plug-in. Alternatively, you may
use BPM as an Audio Unit (AU) instrument; the
process is the same as described for MAS.
For complete details about running instrument
plug-ins in Digital Performer, refer to your DP
documentation. Here is a brief overview of how to
use BPM in DP.
Installation for DP
BPM Installer places BPM plug-in in the MAS
plug-ins folder:
/Library/Audio/Plug-ins/MAS/
Calling up BPM on an instrument track
BPM is accessed from an instrument track in
Digital Performer’s Mixing Board. To create a new
instrument track with BPM already instantiated on
it, choose Project menu> Add Track> Instrument
Track> BPM. To instantiate BPM on an existing
instrument track, just choose it from the topmost
insert menu.
Using BPM in a V-rack
If you are working with multiple sequences in a
Digital Performer project document, and the
sequences are making use of the same sounds in
BPM, consider instantiating BPM in a V-rack. By
doing so, you will only have to instantiate BPM
once, in the V-rack, instead of multiple times in
each individual sequence. This is a much more
highly efficient way to work, as it speeds up the
time it takes for the project to open and the amount
of time to switch between sequences. It also takes
up much less computer memory.
Initiating BPM operation
Before you can begin using BPM, you need to load
a kit into a bank or load at least one instrument or
loop into a rack. For details, see chapter 3, “Tutorial
1: QuickStart Guide” (page 15).
Specifying audio output
By default, BPM sends the output of all banks and
parts to the audio output assignment of the
instrument track on which it is instantiated. But it
also supplies multiple independent outputs that let
you send parts to different destinations in the
Digital Performer mixing environment, including
the separate outputs on your audio hardware. For
details, see “Outputs” on page 98.
Figure 6-2: Opening BPM on an instrument track in Digital Performer.
Working with multiple instances of BPM
You can open as many instances of BPM in Digital
Per former as you r comp uter’s process ing res ource s
will allow. Keep in mind that BPM operates as a
multitimbral instrument, so each instance of BPM
is capable of playing different instruments
(triggered from separate MIDI channels).
38
Figure 6-3: In Digital Performer, BPM sends audio to the track’s audio
output assignment. In this example, the instrument track is being
played on the main outs of a MOTU FireWire audio interface.
MIDI I/O
MIDI I/O between BPM and Digital Performer is
handled by Mac OS X’s built-in MIDI services
(Core MIDI). When you first instantiate a BPM
plug-in, BPM publishes 64 MIDI channels to
BPM PLUG-IN
Page 39

Digital Performer. (Each instance of BPM
publishes its own set of 64 channels.) These MIDI
channels appear in the output assignment menus
of DP’s MIDI tracks.
☛ BPM must be instantiated in the project
before you’ll see its MIDI channels displayed in the
MIDI output menus in DP.
To send MIDI data from a DP track to a specific
BPM bank or rack part, assign the MIDI track to
the corresponding BPM MIDI channel for the
bank or part. BPM banks A, B, C, and D respond to
MIDI channels A1 through A4, respectively. The
first part in Rack A defaults to MIDI channel A5,
but rack parts can be assigned to any MIDI input
channel you wish. For further important details
about MIDI channel assignments in BPM, see
“MIDI channel” on page 71).
Near sample-accurate MIDI playback
In regard to “Managing latency” on page 36, DP’s
MIDI track playback (the timing between MIDI
tracks in Digital Performer and the audio being
tr igge red in BPM ) is accu rat e to wit hin one s ample .
In other words, BPM audio will never trigger more
than one sample earlier or later than the exact
sample location prescribed by the MIDI data event
triggering the sample. This is because both DP and
BPM take advantage of Mac OS X’s MIDI timestamping features. This allows DP to accurately
pre-cue MIDI data for playback. BPM plays back in
DP with the tightest timing possible.
Reducing live input latency
In regard to “Managing latency” on page 36, you
can minimize live input latency with BPM by
keeping Digital Performer’s Buffer Size setting as
low as possible. This setting is found in
Setup menu> Configure Audio System> Configure
Hardware Driver. Try values of 256 samples or
lower, if your computer can handle them. Lower
settings produce higher processing demands on
your computer’s CPU resources.
PRO TOOLS (MAC & WINDOWS)
BPM operates as a standard AAX or RTAS plug-in.
For complete details about running AAX or RTAS
plug-ins in Pro Tools, refer to your Pro Tools
documentation. Here is a brief overview of how to
use BPM in Pro Tools.
Installation for Pro Tools
The BPM installer places the BPM plug-in here:
Platform Location
Mac OS X /Library/Application Support/Digidesign/Plug-ins
Windows \Program Files\Common Files\DAE\Plug-ins
Calling up BPM on an instrument track
BPM is accessed from the insert menus of any
instrument track in Pro Tools. Just choose it from
the insert menu and it will open as a plug-in.
Figure 6-4: Opening the BPM plug-in in Pro Tools (same for Mac and
Windows).
Working with multiple instances of BPM
You can open as many instances of BPM in Pro
Tools your computer’s processing resources will
allow. Keep in mind that BPM operates as a
multitimbral instrument, so each instance of BPM
is capable of playing different instruments
(triggered from separate MIDI channels).
BPM PLUG-IN
39
Page 40

Initiating BPM operation
Before you can begin using BPM, you need to load
a kit into a bank or load at least one instrument or
loop into a rack. For details, see chapter 3, “Tutorial
1: QuickStart Guide” (page 15).
Specifying audio output
By default, BPM sends the output of all banks and
parts to the audio output assignment of the
instrument track on which it is instantiated. But it
also supplies multiple independent outputs that let
you send parts to different destinations in the Pro
Tools mixing environment, including the separate
outputs on your audio hardware. For details, see
“Outputs” on page 98.
MIDI I/O
MIDI I/O between BPM and Pro Tools is handled
by Mac OS X’s built-in MIDI ser vices (Core MIDI).
When you first instantiate a BPM plug-in, BPM
publishes 64 MIDI channels to Pro Tools. (Each
instance of BPM publishes its own set of 64
channels.) These MIDI channels appear in the
output assignment menus of Pro Tool’s MIDI
tracks.
respond to MIDI channels A1 through A4,
respectively. The first part in Rack A defaults to
MIDI channel A5, but rack parts can be assigned to
any MIDI input channel you wish. For further
important details about MIDI channel
assignments in BPM, see “MIDI channel” on
page 71).
Figure 6-5: Assigning a Pro To ols MIDI track to a BPM MIDI channel.
☛ BPM must be instantiated in the session
before you’ll see its MIDI channels displayed in the
MIDI output menus in Pro Tools (Figure 6-5)
below.
To send MIDI data from a Pro Tools track to a
specific BPM bank or rack part, assign the MIDI
track to the corresponding BPM MIDI channel for
the bank or part. BPM banks A, B, C, and D
40
Reducing buffer latency
In regard to “Managing latency” on page 36, you
can minimize both live MIDI input latency and
MIDI track playback latency by keeping your Pro
To ol s DA E Buffer Size setting as low as possible.
Consult your Pro Tools manual for details about
adjusting the DAE buffer size. Lower settings
produce higher processing demands on your
computer’s CPU resources.
BPM PLUG-IN
Page 41

LOGIC (MAC OS X)
For Logic, BPM operates as a standard Audio Unit
(AU) plug-in.
Installation for Logic
BPM Installer places BPM AU plug-in in the
Components plug-in folder:
/Library/Audio/Plug-ins/Components/
Opening BPM on an instrument track
In Logic, create an audio instrument track. Then
open a stereo BPM on the instrument track.
Figure 6-6: Opening BPM on a Logic instrument track (from the track
settings panel in this example).
Working with multiple instances of BPM
Yo u can ope n as ma ny in stanc es of BPM i n Logi c as
your computer’s processing resources will allow.
Keep in mind that BPM operates as a multitimbral
instrument, so each instance of BPM is capable of
playing different instruments (triggered from
separate MIDI channels).
Initiating BPM operation
Before you can begin using BPM, you need to load
a kit into a bank or load at least one instrument or
loop into a rack. For details, see chapter 3, “Tutorial
1: QuickStart Guide” (page 15).
Specifying audio output
By default, BPM sends the output of all banks and
parts to the audio output assignment of the
instrument track on which it is instantiated. But it
also supplies multiple independent outputs that let
you send parts to different destinations in the Logic
mixing environment, including the separate
outputs on your audio hardware. For details, see
“Outputs” on page 98.
MIDI I/O
MIDI I/O between BPM and Logic is handled by
Mac OS X’s built-in MIDI services (Core MIDI).
When you first instantiate a BPM plug-in and
choose a preset, BPM publishes 16 MIDI channels
to Core MIDI and Logic. (Each instance of BPM
publishes its own set of 16 channels.) These MIDI
channels will automatically become available in
Logic on BPM’s instrument track. No extra
preparation is necessary.
☛ BPM must be instantiated in your Logic
session before you’ll see its MIDI channels
displayed in the MIDI output menus in Logic.
To send MIDI data from a Logic track to a specific
BPM bank or rack part, send MIDI data to the
corresponding BPM MIDI channel for the bank or
part. For further important details about MIDI
channel assignments in BPM, see “MIDI channel”
on page 71).
In the Logic instrument track for BPM (or any
other tracks assigned to BPM instrument object),
each MIDI data event is tagged with a MIDI
channel. Use Logic’s list editor to assign existing
notes to a MIDI channel, and then ass ign t hat same
MIDI channel to the desired part (or parts) in BPM
(as explained in “MIDI channel” on page 71). Any
notes in the instrument track that match a part’s
MIDI receive channel in BPM will play that part.
The same is true for any new data recorded, or live
data that is ‘patched through’ to BPM from your
controller keyboard. In this scenario, make sure
BPM instrument track channel (in the track
settings panel) is set to All or “0” (zero).
BPM PLUG-IN
41
Page 42

You can also route data from other MIDI tracks to
BPM by assigning the track to BPM audio
instrument and tag all notes in the track to the
necessary MIDI channel for BPM.
Latency
In regard to “Managing latency” on page 36,
Logic’s I/O Buffer Size setting (as shown below in
Figure 6-7) has no effect on either live MIDI input
latency or MIDI track playback, as Logic has other
ways of managing them. In general, BPM will
perform as well as any other virtual instrument
that you use in Logic.
OTHER AUDIO UNIT HOSTS (MAC OS X)
For Mac OS X audio/MIDI applications that
support Audio Units (AU) plug-ins, BPM operates
as a standard AU plug-in. The AU host application
must also support MIDI sequencing and Mac
OS X’s built-in MIDI services (Core MIDI) to send
MIDI data to BPM. BPM sounds are triggered by
MIDI data received from the host application.
Installation for AU hosts
BPM Installer places BPM AU plug-in in the
Components plug-in folder:
/Library/Audio/Plug-ins/Components
Calling up BPM on an audio track
BPM is accessed in an Audio Unit host application
in the standard fashion as an AU plug-in.
Working with multiple instances of BPM
You can open as many instances of BPM in your
host application as your computer’s processing
resources will allow. Keep in mind that BPM
operates as a multitimbral instrument, so each
instance of BPM is capable of playing different
instruments (triggered from separate MIDI
channels).
Figure 6-7: Logic’s I/O Buffer Size setting.
42
Initiating BPM operation
Before you can begin using BPM, you need to load
a kit into a bank or load at least one instrument or
loop into a rack. For details, see chapter 3, “Tutorial
1: QuickStart Guide” (page 15).
Specifying audio output
By default, BPM sends the output of all banks and
parts to the audio output assignment of the
instrument track on which it is instantiated. But it
also supplies multiple independent outputs that let
you send parts to different destinations in your
host software’s mixing environment, including the
separate outputs on your audio hardware. For
details, see “Outputs” on page 98.
BPM PLUG-IN
Page 43

MIDI I/O
MIDI I/O between BPM and an AU plug-in host
application is handled by Mac OS X’s built-in MIDI
services (Core MIDI). When you first instantiate an
BPM plug-in, BPM publishes itself as a MIDI
destination to the AU host and appears in the
output assignment menus of the AU host’s MIDI
tracks.
☛ BPM must be instantiated in the AU host
project before you’ll see it displayed in the MIDI
output menus in the host.
To send MIDI data from your AU host software
track to a specific BPM bank or rack part, assign
the host MIDI track to the corresponding BPM
MIDI channel for the bank or part. BPM banks A,
B, C, and D respond to MIDI channels A1 through
A4, respectively. The first part in Rack A defaults to
MIDI channel A5, but rack parts can be assigned to
any MIDI input channel you wish. For further
important details about MIDI channel
assignments in BPM, see “MIDI channel” on
page 71).
CUBASE AND NUENDO (MAC & WINDOWS)
For Cubase or Nuendo, BPM operates as a
standard VST instrument (VSTi).
Installation for Cubase or Nuendo (Mac OS X)
BPM Installer places BPM VST plug-in here:
Platform Location
Mac OS X /Library/Audio/Plug-Ins/VST
Windows \Program Files\MOTU\Vstplugins
If you want to install the VST in another
Vstplugins folder, copy the BPM VST files
from this folder to the desired location.
Opening a BPM VSTi
Go to the VST Instruments r ack an d ch oos e BP M in
a slot, as shown below:
Reducing buffer latency
In regard to “Managing latency” on page 36, the
hardware buffer size may or may not impact live
MIDI input latency and MIDI track playback: it
depends on the host software. Consult the
documentation for your host software for
information about using virtual instruments.
BPM PLUG-IN
Figure 6-8: Opening BPM in the VST Instruments window (same for
Mac and Windows).
Alternatively, you can create an instrument track,
as shown below:
43
Page 44

Figure 6-9: Creating an instrument track for BPM (same for Mac and
Windows).
Working with multiple instances of BPM
You can open as many i nstances of BPM i n the VST
Instruments rack as your computer’s processing
resources will allow. Keep in mind that BPM
operates as a multitimbral instrument, so each
instance of BPM is capable of playing different
instruments (triggered from separate MIDI
channels).
Initiating BPM operation
Before you can begin using BPM, you need to load
a kit into a bank or load at least one instrument or
loop into a rack. For details, see chapter 3, “Tutorial
1: QuickStart Guide” (page 15).
Setting up audio outputs
Use the Device Setup window to enable VST
outputs as usual. Then, add the desired output
busses in the VST Connections window (Devices
menu). For complete information about setting up
audio outputs for VST instruments, refer to your
Cubase or Nuendo manual.
Once you’ve se t up the desired output bus, go to the
Mixing Board and assign BPM output (BPM) to
the desired output bus:
Figure 6-10: Assigning BPM output to the desired output bus (same
for Mac and Windows).
MIDI I/O
MIDI I/O between BPM and Cubase or Nuendo is
handled by VST. When you first instantiate a BPM
plug-in, BPM publishes 16 MIDI channels to
Cubase or Nuendo. (Each instance of BPM
publishes its own set of 16 channels.) These MIDI
channels automatically appear in the output
assignment menus of Cubase or Nuendo’s MIDI
tracks:
Figure 6-11: Assigning a MIDI track to BPM and choosing a MIDI
channel.
☛ BPM must be opened in your Cubase or
Nuendo project before you’ll see its MIDI channels
displayed in the MIDI output menus in Cubase or
Nuen do.
44
BPM PLUG-IN
Page 45

To send MIDI data from your Cubase or Nuendo
MIDI track to a specific BPM bank or rack part,
assign the MIDI track to the corresponding BPM
MIDI channel for the bank or part. BPM banks A,
B, C, and D respond to MIDI channels A1 through
A4, respectively. The first part in Rack A defaults to
MIDI channel A5, but rack parts can be assigned to
any MIDI input channel you wish. For further
important details about MIDI channel
assignments in BPM, see “MIDI channel” on
page 71).
Reducing buffer latency
In regard to “Managing latency” on page 36,
Cubase and Nuendo provide ways to manage
virtual instrument playback timing (consult your
user guide for details). You can minimize live input
latency with BPM by keeping their Audio Buffer
Size setting as low as possible. Try values of 256
samples or lower, if your computer can handle
them. Lower settings produce higher processing
demands on your computer’s CPU resources.
Under Mac OS X, the Audio Buffer setting is found
in the Device Setup window under the VST Audio
System list item (Figure 6-12).
Under Windows, open the Device Setup window
and choose your audio hardware from the list on
the left, found under VST Audio System
(Figure 6-13). Click the Control Panel button to
launch your audio hardware’s configuration
software.
Figure 6-12: Setting the Audio Buffer Size in Cubase or Nuendo (Mac).
BPM PLUG-IN
Figure 6-13: Setting the Audio Buffer Size in Cubase or Nuendo
(Windows).
45
Page 46

LIVE (MAC & WINDOWS)
For Ableton Live running on Mac OS X or
Windows, BPM operates as a standard VST
instrument (VSTi). Alternatively, you may use
BPM as an Audio Unit (AU) instrument when
running Live on Mac OS X; the process is the same
as described for VST.
Installation for Live
The BPM Installer places the BPM VST plug-in
here:
Platform Location
Mac OS X /Library/Audio/Plug-Ins/VST
Windows \Program Files\MOTU\Vstplugins
If you want to install the VST in another
Vstplugins folder, copy the BPM VST files
from this folder to the desired location.
Opening an BPM VSTi
Go to the Plug-in Device Browser and drag the
BPM VST onto a MIDI track, or into the Clip/
Device Drop Area, to create a new track.
Initiating BPM operation
Before you can begin using BPM, you need to load
a kit into a bank or load at least one instrument or
loop into a rack. For details, see chapter 3, “Tutorial
1: QuickStart Guide” (page 15).
Setting up audio outputs
Use the Preferences > Audio window to enable
outputs as usual. Once you’ve set up the desired
outputs, assign the output of the BPM track to the
desired bus. Choose Master to assign it to the
master output bus, or choose Ext. Out and select a
different output from the menu below.
Figure 6-14: Opening BPM in the VST Instruments window.
Working with multiple instances of BPM
You can open as many i nstances of BPM i n the VST
Instruments rack as your computer’s processing
resources will allow.
46
Figure 6-15: Assigning the BPM output to the desired output bus.
MIDI I/O
When you first instantiate an BPM plug-in, BPM
publishes itself as a MIDI destination to Live,
which appears in the output assignment menus of
Live’s MIDI tracks.
☛ BPM must be opened in your Live project
before you’ll see it displayed in the MIDI output
menus in Live.
To send MIDI data from a Live track to a specific
BPM bank or rack part, assign the MIDI track to
the corresponding BPM MIDI channel for the
bank or part. BPM banks A, B, C, and D respond to
BPM PLUG-IN
Page 47

MIDI channels A1 through A4, respectively. The
first part in Rack A defaults to MIDI channel A5,
but rack parts can be assigned to any MIDI input
channel you wish. For further important details
about MIDI channel assignments in BPM, see
“MIDI channel” on page 71).
Reducing buffer latency
In regard to “Managing latency” on page 36, Live
provide ways to manage virtual instrument
playback timing (consult your user guide for
details). You can minimize live input latency with
BPM by keeping the Aud io B uffe r Si ze setting as low
as possible. Try values of 256 samples or lower, if
your computer can handle them. Lower settings
produce higher processing demands on your
computer’s CPU resources.
In Live, the Buffer Size setting is found in the
Preferences > Audio window (Figure 6-16). On Mac
OS X, you can directly change that setting. On
Windows, click the Hardware Setup button to
launch your audio hardware’s configuration
software.
OTHER VST HOSTS (MAC & WINDOWS)
For other VST hosts running on Mac OS X or
Windows, BPM operates as a standard VST
instrument (VSTi).
Installation for Your VST host
The BPM Installer places the BPM VST plug-in
here:
Platform Location
Mac OS X /Library/Audio/Plug-Ins/VST
Windows \Program Files\MOTU\Vstplugins
If you want to install the VST in another
Vstplugins folder, copy the BPM VST files
from this folder to the desired location.
You can copy the BPM VST file from the directory
listed above to the Vstplugins folder of your choice
after installation completes. Or you can point your
host application to the directory listed above.
Calling up BPM on an audio track
BPM is accessed in a VST host application in the
standard fashion as an VST plug-in.
Working with multiple instances of BPM
You can open as many instances of BPM in your
host application as your computer’s processing
resources will allow.
Figure 6-16: Setting the Audio Buffer Size in Live.
BPM PLUG-IN
Initiating BPM operation
Before you can begin using BPM, you need to load
a kit into a bank or load at least one instrument or
loop into a rack. For details, see chapter 3, “Tutorial
1: QuickStart Guide” (page 15).
Specifying audio output
BPM sends its audio output to the audio output
assignment of the instrument track on which it is
instantiated.
47
Page 48

MIDI I/O
When you first instantiate an BPM plug-in, BPM
publishes itself as a MIDI destination to the VST
host and appears in the output assignment menus
of the VST host’s MIDI tracks.
☛ BPM must be instantiated in the VST host
project before you’ll see it displayed in the MIDI
output menus in the host.
To send MIDI data from a VST host track to a
specific BPM bank or rack part, assign the MIDI
track to the corresponding BPM MIDI channel for
the bank or part. BPM banks A, B, C, and D
respond to MIDI channels A1 through A4,
respectively. The first part in Rack A defaults to
MIDI channel A5, but rack parts can be assigned to
any MIDI input channel you wish. For further
important details about MIDI channel
assignments in BPM, see “MIDI channel” on
page 71).
Reducing buffer latency
In regard to “Managing latency” on page 36, the
hardware buffer size may or may not impact live
MIDI input latency and MIDI track playback: it
depends on the host software. Consult the
documentation for your host software for
information about using virtual instruments.
48
BPM PLUG-IN
Page 49

CHAPTER
7 BPM Window
OVERVIEW
Read this first: basic BPM concepts. . . . . . . . . . . . . . . . . . . 50
Conventions and shortcuts . . . . . . . . . . . . . . . . . . . . . . . . . . 51
Using the BPM sound library. . . . . . . . . . . . . . . . . . . . . . . . . 51
Banks and pads . . . . . . . . . . . . . . . . . . . . . . . . . . . . . . . . . . . . . . 55
Patterns. . . . . . . . . . . . . . . . . . . . . . . . . . . . . . . . . . . . . . . . . . . . . . 58
Step Sequencer . . . . . . . . . . . . . . . . . . . . . . . . . . . . . . . . . . . . . . 58
Graph Sequencer . . . . . . . . . . . . . . . . . . . . . . . . . . . . . . . . . . . . 61
Pad Editor. . . . . . . . . . . . . . . . . . . . . . . . . . . . . . . . . . . . . . . . . . . . 63
Racks . . . . . . . . . . . . . . . . . . . . . . . . . . . . . . . . . . . . . . . . . . . . . . . . 69
Piano Roll Sequencer . . . . . . . . . . . . . . . . . . . . . . . . . . . . . . . . 72
Part Editor . . . . . . . . . . . . . . . . . . . . . . . . . . . . . . . . . . . . . . . . . . . 74
Loop Editor . . . . . . . . . . . . . . . . . . . . . . . . . . . . . . . . . . . . . . . . . . 79
Synth Parameters. . . . . . . . . . . . . . . . . . . . . . . . . . . . . . . . . . . . 86
SP mode . . . . . . . . . . . . . . . . . . . . . . . . . . . . . . . . . . . . . . . . . . . . . 89
Transport Control and Tempo . . . . . . . . . . . . . . . . . . . . . . . 90
File menu MIDI input controls Editor area Sampling controls
MIDI Select
Master volume and tune . . . . . . . . . . . . . . . . . . . . . . . . . . . . . 91
Groove . . . . . . . . . . . . . . . . . . . . . . . . . . . . . . . . . . . . . . . . . . . . . . . 91
MIDI automation . . . . . . . . . . . . . . . . . . . . . . . . . . . . . . . . . . . . . 92
MIDI modulation . . . . . . . . . . . . . . . . . . . . . . . . . . . . . . . . . . . . . 92
Recording . . . . . . . . . . . . . . . . . . . . . . . . . . . . . . . . . . . . . . . . . . . . 93
Sampling. . . . . . . . . . . . . . . . . . . . . . . . . . . . . . . . . . . . . . . . . . . . . 95
Mixing. . . . . . . . . . . . . . . . . . . . . . . . . . . . . . . . . . . . . . . . . . . . . . . . 97
Effects . . . . . . . . . . . . . . . . . . . . . . . . . . . . . . . . . . . . . . . . . . . . . . . . 99
Song arranging . . . . . . . . . . . . . . . . . . . . . . . . . . . . . . . . . . . . . 101
Scenes. . . . . . . . . . . . . . . . . . . . . . . . . . . . . . . . . . . . . . . . . . . . . . . 101
Scene Editor. . . . . . . . . . . . . . . . . . . . . . . . . . . . . . . . . . . . . . . . .102
Live mode . . . . . . . . . . . . . . . . . . . . . . . . . . . . . . . . . . . . . . . . . . .103
Song mode. . . . . . . . . . . . . . . . . . . . . . . . . . . . . . . . . . . . . . . . . . 104
File menu. . . . . . . . . . . . . . . . . . . . . . . . . . . . . . . . . . . . . . . . . . . .105
Preferences. . . . . . . . . . . . . . . . . . . . . . . . . . . . . . . . . . . . . . . . . .107
Drag & Drop. . . . . . . . . . . . . . . . . . . . . . . . . . . . . . . . . . . . . . . . . 108
Groove controls
Master Tune
and Volume
Display
tabs
Sound library
browser
Browser
tabs
Banks
Note
Repeat
Live Mode
and Song
mode
Instrument
and loop
racks
Drum pads Synth
Figure 7-1: The BPM window.
section
Scene
menu
Tem po
controls
Overdub
record
mode
Transport
controls
Undo
Record
Quantize
mode
AutoLoad
settings
49
Page 50

READ THIS FIRST: BASIC BPM CONCEPTS
Here are a few basic concepts that lay the
groundwork for how BPM works.
Kits
A kit is a bank of 16 drum pads loaded with
sounds. Each pad has its own name and settings,
and it can hold an unlimited number of drum
sound layers, each with their own settings. You can
apply unlimited effects processing to the pad or its
individual drum sound layers.
Pattern
A pattern is a series of notes in the drum pad Step
Sequencer or the instrument Piano Roll Editor that
together make up a rhythm. Patterns are recorded,
imported and exported as MIDI note data.
Patterns do not contain actual drum sounds. They
consist of rhythmic information that can be
applied independently to any kit (set of sounds).
Kit+Pattern
A kit+pattern is a combination of a pattern with a
kit that can be saved and loaded together.
Kit+patterns are especially convenient for layering
using BPM’s four banks. For example, you could
load a basic beat (kit+pattern) in Bank A and then
layer a conga kit+pattern in Bank B.
Loop
A loop is a short audio clip of anything (drums,
percussion, an instrument sound such as guitar or
bass, etc.) that is meant to be played over and over
again. Most of the loops in BPM’s included library
of sounds are sliced loops, similar to REX files,
which means they have predefined slices that can
be accessed and played individually, if desired.
Phrase
A phrase is an audio clip that is generally not
intended to loop. Instead, phrases are meant to be
played in a “one-shot” fashion, such as a vocal
phrase or guitar lick. Phrases in BPM’s browser are
indicated with a “PHR” at the end of their name.
Sound
A sound is a sho rt au dio c lip of any thi ng, such as an
individual drum hit (snare hit, bass drum hit, hihat, etc.), a sound effect or even an instrument
note. BPM’s included library has a Sounds category
mostly made up of drum hits that are suitable for
loading into individual dr um pads to build custom
kits. However, you could also load a sound into one
of BPM’s two instrument/loop racks.
Instrument
An instrument is a multi-sampled instrument such
as a bass, guitar, piano, synth pad, etc. BPM lets
you load and play instruments along with loops,
patterns and kits.
Working with kits and patterns
At its most basic level, BPM lets you load a
Kit+Pattern from its library, so you can hear a
pattern with the original kit of sounds that goes
with it. However, you can easily switch to a
different kit to hear the same rhythmic pattern
played by different drum sounds.
Conversely, you can keep playing the same kit
(sounds), and try different patterns (rhythms)
with that same kit.
BPM provides four separate banks (A, B, C and D),
each of which can hold a different pattern and kit,
allowing you to layer multiple kit+pattern
combinations.
Working with sounds
Once you find a kit and pattern combination that
you like, you might then decide that you would like
to change individual drum pad sounds. Perhaps
the snare needs to be a tighter, or the kick needs to
be a little deeper. BPM makes it easy to browse and
swap out individual pad sounds.
This basic process is covered step by step in the
chapter 3, “Tutorial 1: QuickStart Guide”
(page 15).
50
BPM WINDOW
Page 51

You can also layer multiple sounds on a single pad
and program BPM to switch between them via
note velocity or other rules. This process is covered
later in “Pad Editor” on page 63.
Adding loops and instruments
Once you’ve programmed your beat by choosing a
kit, pattern and perhaps individual sounds, you
can layer as many loops and instruments as you
wish using BPM’s two Rack modules. These racks
hold an unlimited number of loops and
instruments. For further details about rack
operation, see “Racks” on page 69.
CONVENTIONS AND SHORTCUTS
BPM provides the following user interface
conventions and shortcuts.
Scroll wheel support
BPM supports the scroll wheel on your mouse.
Right-clicking
There is extensive support for right-clicking in
BPM. Except where noted, Mac users can use
Control-clicking as an alternative to right-clicking.
USING THE BPM SOUND LIBRARY
Of course, BPM allows you to build your own kits
and patterns, either from the ground up or by
modifying existing ones. But to get you going
quickly, BPM’s sound library provides a vast
collection of pre-programmed patterns, kits,
kit+patterns, loops, phrases, sounds and
instruments. BPM allows you to freely browse and
combine these elements independently, a degree of
flexibility that produces infinite possible
combinations. The browser gives you access to all
of these elements in the BPM sound library.
Kit+Pattern Pattern Sounds Us er
Kit Loop Instrument
Option/Alt key
In this manual, the convention Option/Alt is used
for any operation or shortcut that involves the
Option key on the Mac or the Alt key on a PC.
Shortcuts for changing BPM settings
Here are several shortcuts for changing settings for
BPM’s controls, knobs, sliders and so on:
Action Shortcut
Return to default Option/Alt-click
Enter numeric value double-click
Fine adjustment hold Option/Alt while dragging control
Relative adjustment hold Shift while dragging control
MIDI learn right-click
Play/stop (standalone
application only)
BPM WINDOW
spacebar
Construction
kit categories
Figure 7-2: Browser tabs
Browser tabs
BPM’s sound library is organized by the categories
discussed earlier in “Read this first: basic BPM
concepts”. The Browser (Figure 7-1 on page 49)
provides tabs that take you directly to each
category (Figure 7-2). Click a tab to go directly to
the folder.
51
Page 52

Navigating the browser
Double-click a folder or click its disclosure triangle
to open it. To go back up one level, double-click the
Parent Folder item at the top of the list, or click the
path menu (Figure 7-3).
Path m enu
Figure 7-3: Navigating the browser.
Tempo indication
Most patterns and loops indicate their original
tempo at the beginning of their name: a three digit
number in beats per minute (BPM). But you can
play them at any tempo you want.
individual elements separately, organized by the
same name (Figure 7-5) so you can easily access
the individual elements that make up the kit.
“Five Billion”
Kit+Pattern
“Five Billion”
Kit only
“Five Billion”
Pattern only
Figure 7-4: Pattern and loop names indicate their original tempo.
Construction kits
A core collection of BPM sound library kits,
patterns, loops and sounds are organized into 200+
“const r uc t ion k its” organized by the stylistic
categories shown in Figure 7-2. A construction kit is
a kit+pattern for which BPM provides all the
52
“Five Billion”
Loop elements
“Five Billion”
Sound elements
Figure 7-5: An example of a construction kit.
Construction kits give you a great deal of flexibility.
For example, if you find a loop that you like, but
you’d like to work with the individual elements
separately, you can go to the loop’s corresponding
Kit+Pattern for complete control over every
BPM WINDOW
Page 53

individual element. The Kit+Pattern will sound
exactly like its corresponding loop, except that you
have access to the individual notes in the Pattern
Sequencer and the individual sounds in each pad.
Here’s another example: if you find a Kit+Pattern
that you like, and you’d like to hear some
ins trument p arts that go with it, suc h as g uitar, bass
or vocals, BPM likely provides them as loops. Just
go to the Loops sub-folder with the same name as
the Kit+Pattern. For example, in Figure 7-5 you
can see in the Loop elements sub-folder there is a
bass loop and instrument loop that goes with the
original Five Billion Kit+Pattern.
‘Xtra’ folders
BPM’s sound library also includes “xtra” folders
that provide a great deal of additional material,
above and beyond the construction kit elements.
The User tab
The Use r tab (Figure 7-2) provides access to the
rest of your computer system.
Current directory
Soundbanks
The Soundbanks section of the User tab
(Figure 7-6) displays UVI-based sample
instrument libraries installed in your system. BPM
can read presets from the libraries of these other
products. See “UVI soundbanks” below.
Places
The Places section of the User tab (Figure 7-6)
displays favorite locations. You can add your own
favorites by navigating to a folder and then rightclicking on the folder. Then choose Add to favor ites
from the menu. To remove it from your favorites,
navigate to the folder, right-click the Current
Directory bar (Figure 7-6) and choose Remove
from favorites.
UVI soundbanks
BPM can load loops and multi-sample instrument
sounds from any MOTU instrument library or any
other third-party UVI sounbank.
If the instrument libraries from your other MOTU
instruments are placed in their proper locations
(refer to each instrument’s documentation), they
will be available in BPM without any additional
steps.
Figure 7-6: Accessing your computer system
BPM WINDOW
Your BPM soundbank library
Other UVI soundbanks
installed on your computer
system
Favo rite s
Mounted hard drives and
network volumes
To access other UVI soundbanks, place them (or
an aliases to them) in your computer’s
UVISoundBanks folder:
Mac:
/Library/Application Support/ UVISoundBanks
Window s:
\Program Files\UVISoundBanks
Using Beat Box Anthology presets
In addition to BPM’s included kits, patterns, and
kit+patterns, the Beat Box Anthology soundbank
included with BPM version 1.5 and later provides
its own kits, patterns, kit+patterns, and loops.
53
Page 54

To access the Beat Box Anthology kits, select the
Kits tab in the browser, click the path menu (as
shown in Figure 7-7, below), and select Beat Box
Anthology from the drop-down menu. The Kits
tab will then display the Beat Box Anthology kits.
The same process can be followed when other
browser tabs are selected (Kit+Pattern, Loop, etc.).
Figure 7-7: Selecting the Beat Box Anthology soundbank
AutoLoading patterns and kits
To AutoLoad patterns and kits:
1 Click the Bank A button (Figure 7-1 on
page 49).
2 Click the Kit+Pattern tab in the browser
(Figure 7-2) and open any folder.
3 Each time you click a Kit+Pattern, it will load
the kit and pattern combination. (Press play to
listen it.)
4 Click the Pattern tab ((Figure 7-2), open any
folder and preview different patterns with the same
loaded kit.
AutoLoad
When Aut oLo ad is on (yellow), items that you click
in the browser load and play immediately, as soon
as you click them. If the transport is engaged
(figure Figure 7-60 on page 90), you will hear
patterns and loops play as soon as you click them
for fast and convenient browsing.
AutoLoad allows you to quickly “surf” different
patterns with the same kit, or different kits with the
same pattern. You can also quickly browse loops.
When AutoLoad is off, you need to drag and drop
the item to any location in the BPM window that
accepts that type of item to load it (explained later),
or double-click the item.
AutoLoad options
Preview start/stop
Pad selector
Locked pad
(gray)
Unlocked pad
(black)
Autoloading sounds
To replace a sound in a pad, AutoLoad works the
same way as described above.
1 Click a pad to select it (it turns red).
2 Click the Sound tab in the browser (Figure 7-2)
and open any folder.
3 Sounds load as soon as you click them.
Autoloading loops and instruments into a part
To autoload a loop or instrument into a rack part,
the procedure is the same as described above.
Figure 7-8: AutoLoad settings
54
Preview level
BPM WINDOW
Page 55

AutoL oad options
When using AutoLoad, the AutoLoad options
(Figure 7-8) let you control what gets loaded into
into banks when browsing patterns and kits.
AutoLoad option What it does
Kit Settings When checked, all current kit settings are
Load bank FX When checked, all current bank effects are
Overwrite Tempo When checked, BPM’s global tempo setting
AutoPreview Causes loops and phrases to play once when
Preview start/stop Plays or stops AutoPreview playback.
Preview volume Preview playback level.
Pad selector Lets you “lock” pads so that they are not
overwritten with those saved with the kit.
Settings include pad volumes, pan settings,
effects, etc.
overwritten with any bank effects saved with
the bank.
is changed to the original, saved tempo of
any kit+pattern when you load it.
you click them in the browser.
changed in any way when loading kits.
BANKS AND PADS
A bank is a set of sixteen drum pads and their
loaded kit sounds, pad settings and patterns. BPM
provides four separate banks (A, B, C and D) that
operate independently. All four banks can play
simultaneously with each other. This allows you to
load and play up to four independent Kit+Pattern
combinations.
Four bank buttons
Click a bank button to view the pads and other
settings for the bank. Below each bank button are
Mute and Solo buttons that allow you to mute and
solo the entire bank during playback. Each bank
also has an SP Mode button next to it. For details,
see “SP mode” on page 89.
Loading a kit into a bank
To load a kit sounds into a bank of pads:
1 Click the bank button (Figure 7-9) for the bank
you wish to load.
2 Go to the browser and navigate to either a kit or
a kit+pattern (Figure 7-2 on page 51).
3 If AutoLoad (Figure 7-8) is turned on, simply
click the kit or kit+pattern to load it into the bank
pads.
4 If AutoLoad is turned off, drag and drop the kit
or kit+pattern from the browser onto the sixteen
pads or onto the Step Sequencer window area
(above the pads).
The target area highlights when you move the
mo use over it to i ndi cate t hat it c an a ccep t what y ou
are dragging.
Bank
buttons
Figure 7-9: BPM provides four independent banks (A, B, C and D) for
kits and patterns.
BPM WINDOW
Figure 7-10: Dragging and dropping a pattern or kit+pattern from
the browser onto the pad bank or the Step Sequencer.
55
Page 56

Loading a sliced loop into a bank
In addition to using loops in rack parts, you can
load sliced loops as kits. When a sliced loop is
loaded in a bank, the first 16 slices of the loop will
be mapped to the pads.
You can load a sliced loop in a bank by selecting it
in the browser while viewing a bank. If you want to
load the entire loop on a single pad, turn off AutoLoad and drag & drop the file directly onto a single
pad. To load a sliced loop as a kit via drag & drop,
drag the sample to the areas between the pads,
rather than directly onto a pad (the highlighted
region will clue you in to which way it will load).
from your computer desktop. Either way, dragging
directly to the pad replaces any sounds currently in
the pad with the newly dropped sound.
To drag multiple samples onto separate pads, drag
& drop the selected samples from the browser or
computer desktop to the space between pad.
To load the sound as a new, independent layer (this
preserves existing sounds already loaded in the
pad), you can drag and drop a sound to the top
portion of the Pad Editor (Figure 7-27). See
“Loading multiple samples into a pad” on page 63
for details.
Drag and drop into the Step Sequencer
You can drag and drop patterns from the browser
(with AutoLoad turned off), and MIDI files from
your computer desktop, into the Step Sequencer.
When importing MIDI files, drag and drop works
best when using single-channel MIDI files of a
reasonable length.
Loading a sound into a pad
The procedure for loading an individual sound
into a pad is similar to loading a kit or kit+pattern.
1 Click the bank button (Figure 7-9) for the bank
you wish to work with.
2 Click the pad you wish to load a sound into to
select it (it turns red).
3 Go to the browser and navigate to any sound in
the Sounds folder (Figure 7-2 on page 51).
4 If AutoLoad (Figure 7-8) is turned on, simply
click any sound in the browser to load it into the
currently selected pad.
Playing a kit using the pads
Once you’ve loaded sounds into the pads as
explained in the previous sections, click the pads to
play the sounds. If a pattern is also currently
loaded, press the play button (Figure 7-60 on
page 90) to play the pattern using the sounds
currently loaded in the pads. You can also play the
pads from your MIDI controller and even record
patterns this way. See “Recording” on page 93 for
further details.
Recording a pattern using the pads
You can record patterns by clicking on the pads
while recording in real time. For details, see
“Recording” on page 93.
Pad settings
Each pad has its own name, volume slider, pan
slider, mute button, solo button and synth section
settings (see “Synth Parameters” on page 86 for
details).
Pad name
Dragging and dropping into a pad
If AutoLoad is turned off, you can drag and drop
the sound from the browser onto the desired pad.
Alternatively, you can drag and drop an audio file
56
Volume slider
Mute/solo buttons
Pan slider
Figure 7-11: Pad settings.
BPM WINDOW
Page 57

Selecting a pad
Click a pad to select it and view its synth settings,
access the pad editor, and other tasks related to the
pad.
Alternatively, pads can be selected by incoming
MIDI notes. When MIDI Select is enabled
(Figure 7-12), playing a note on your MIDI
controller or playing back a note from your host
software will select the pad that is assigned to that
note.
Figure 7-12: MIDI Select
Renaming a pad
Option/Alt–double-click the pad name to change
it. Or right-click to access the Rename pad setting
command (Figure 7-13). You can also double-click
the pad name in the pattern Step Sequencer
(Figure 7-16 on page 59).
Assigning a MIDI note to a pad
Each pad can be played via a corresponding MIDI
note sent from your sequencer or MIDI controller.
The sixteen pads adhere to standard general MIDI
conventions for their factory default MIDI note
assignments, starting at C1 for the bass drum (BD)
pad and ending at A#3 for the shaker (SHK) pad.
However, you can reassign a pad to any MIDI note
you wish using the Learn MIDI Key command in
the pad settings menu (Figure 7-13).
Assigning MIDI notes to all pads
To load a pad template, right-click in the space
between pads and choose a template from the list
— you'll see both factory and user-created pad
templates in the list. To save the current pad
assignments as a template, choose Save Pad
Te m p l a t e from the contextual menu.
Pad settings menu
Right-click to access further pad settings:
Figure 7-13: Pad settings menu.
Copying and pasting pad settings
You can copy and paste all settings for a pad
(including its loaded samples) using the
commands in the pad settings menu (Figure 7-13).
BPM WINDOW
Figure 7-14: Pad template menu
Clearing a pad
Right-click to use the Clear Pad command to clear
all settings and samples from the pad.
Assigning MIDI controllers to pad controls
To assign a MIDI controller to a pad volume, pan,
mute or solo, right-click the item to either choose
the desired controller from a menu or play it from
your MIDI controller. See “MIDI automation” on
page 92.
57
Page 58

Pad synth parameters
BPM provides synth parameter settings for each
pad (to the right of the pads). Click the pad to
select it and then view and adjust its synth settings.
See “Synth Parameters” on page 86. Also see “Edit
All Layers” on page 65.
Sequences
When viewing a rack part, the Pattern menu
changes to Sequences, a slightly different term for
what is essentially the same thing: a sequence of
MIDI data that plays the notes for the part (or the
slices for a sliced loop).
PATTERNS
A bank holds up to sixteen patterns, accessed via
the Pattern menu (Figure 7-15). Only one pattern
is active for the bank at a time (the currently
chosen pattern in the menu). This is the pattern
that accepts patterns from the browser, and it is the
pattern you hear during playback. The sixteen
pattern slots in the menu start out empty and you
load them by choosing them from the menu and
then loading a pattern from the browser. You can
then freely switch among the sixteen patterns at
any t ime by choosing them from the Pattern menu.
To rename the currently selected pattern, doubleclick the name.
Clear
Pattern
menu
current
pattern
Copy
current
pattern
Paste into
current
pattern
Exporting a pattern
You can export a pattern as a WAVE file to your
host software or your computer desktop with the
following drag and drop technique: click the word
Pattern above the Pattern menu (Figure 7-15) and
then drag to your host or desktop.
To export the pattern as a MIDI file, hold Option/
Alt, click the word Pattern above the Pattern menu,
and then drag to your host or desktop.
STEP SEQUENCER
The Step Sequencer (Figure 7-16) provides a
complete environment for programming a pattern
for the current bank.
Accessing the Step Sequencer
To access the Step Sequencer, select a pad and then
click the Seq (Sequencer) display tab in the BPM
window (Figure 7-1 on page 49).
Two editors
The Step Sequencer has two editors accessed via
their buttons (Figure 7-16): Tra c k s (Step
Sequencer) and Graphs (Graph Sequencer). To
access the Graph Sequencer, click the Graphs
button (Figure 7-16).
Figure 7-15: The Pattern menu.
Copying, pasting and clearing patterns
Use the buttons next to the pattern menu to copy,
clear or paste into the current pattern. The copy
and paste buttons let you transfer patterns among
banks, duplicate them and then modify the
duplicate, etc.
58
Track Editor
The Track Editor shown in Figure 7-16 displays
one row for each pad with the pad name in the lefthand column. All notes for the current bank are
shown. Selecting a pad highlights its
corresponding row, and vice versa. Each column in
the track editor represents one step at whatever
resolution you are currently working (see
“Resolution” on page 59).
BPM WINDOW
Page 59

Zoom
Click the Zoom button (Figure 7-16) to toggle
between viewing eight pads at a time or all sixteen
pads at once. Most patterns use the first eight pads,
so this view gives you a convenient close-up of the
first eight pads, with a scroll bar on the right-hand
side to scroll between pads 1-8 and 9-16. When
viewing all sixteen pads, the rows are smaller but
you can see all sixteen at once (Figure 7-17).
automatically scrolls left and right to follow
playback. You can disable AutoScroll to focus on a
page during playback, and scroll manually instead.
Bypass
Click Bypass (Figure 7-16) to turn off the Step
Sequencer entirely. This lets you use the bank
purely as a sound source for an external MIDI
controller or sequencer.
Steps
The Steps menu (Figure 7-16) lets you specify the
number of steps (overall length) of the pattern.
Resolution
The Resolution menu (Figure 7-16) lets you specify
the duration of each step, as indicated below:
Figure 7-17: The Track editor zoomed out to show all sixteen pads.
AutoScroll
If the number of steps exceeds the width of the
editor display, BPM activates the Page scroll bar
(Figure 7-16) and pages left and right to display all
the steps. When Aut oSc rol l is enabled, BPM
Graph Editor
Step sequencer
Pad track
Selected pad track
Zoom
AutoScroll
Bypass
Resolution Metric value
8 Eighth note
8T Eighth note triplet
16 Sixteenth note
16T Sixteenth note triplet
32 Thirty second note
Steps
Page scroll bar
Resolution
Timeline
Soft note
Loud note
Scroll bar
BPM WINDOW
Figure 7-16: Step Sequencer.
59
Page 60

The pattern plays at the currently chosen
resolution. You can freely change the resolution at
any time, but doing so affects how the pattern
plays. For example, if you start with a 16th note
resolution and then switch to 32, the pattern will
play twice as fast. If you switch to 16T, it will play
with a 16th-note triplet feel.
Time line
The Time line (Figure 7-16) indicates measure and
beats. For example, 2.3 indicates measure 2, beat 3.
The number of measures, as well as the number of
cells per beat, are determined by the Steps and
Resolution settings.
Working with the Step Sequencer grid
Click a cell to enter a hit. The size of the square
indicates its velocity (strength). Here is a summary
of techniques for working in the Step Sequencer:
Do this To do this
Click an empty step Enter a hit at the default velocity
Click a step with a hit Remove the hit
Option/Alt-click Enter a hit at a lower velocity
Line templates
To fill a line in the Step Sequencer with a preset
pattern from BPM’s extensive collection of line
pattern templates, right-click, choose Line
Te m p l a t e s and then choose the desired template
from the sub-menus (Figure 7-18).
Shift-click Enter a hit at maximum velocity
Double-click pad name Rename the pad
Right-click > Fill Line Fill a line (all steps) at medium
Right-click > Copy Line Copy line
Right-click > Paste Line Paste line
Right-click >
Line Templates
Right-click > Save Line Save your own line pattern
Right-click > Clear Line Clear line
Right-click >
Clear Pattern
Right-click >
Duplicate Pattern
Right-click >
Double resolution
velocity
Fill a line with a pattern template
Clear entire pattern
Double length of pattern
Keeps current pattern and doubles
the grid resolution
60
Figure 7-18: Right-click on a line in the Step Sequencer to access line
templates.
BPM WINDOW
Page 61

GRAPH SEQUENCER
The Graph Sequencer (Figure 7-19) lets you edit
note parameters one at a time, allowing you to
program a great deal of expression for each
individual note.
Accessing the Graph Sequencer
To access the Graph Sequencer, click the pad you
wish to edit to select it and then click the Seq
(Sequencer) display tab in the BPM window
(Figure 7-1 on page 49), and then click the Graphs
button Figure 7-16 on page 59).
Note menu
The Graph Sequencer displays parameters for the
currently selected pad. Click the desired pad, or
choose it from the note menu (Figure 7-19).
Note parameters
Various note parameters are displayed in the left
column below the note menu. Click a parameter
name to edit it. The Graph Sequencer displays one
parameter at a time. In Figure 7-19 below, note
Ve l o c i t y (loudness) is currently being edited.
hit at that location. As you raise the graph bar, two,
three, or more hits w ill occur during that step. Note
that when you view other graphs (velocity, pan,
etc.) the graph will be divided according to the Roll
parameter which allows you to tweak each hit.
Figure 7-20: A roll value of five produces five subdivisions in that step
for other parameters , such as velocity.
Time Shift
Time Shift (Figure 7-21) lets you advance the step
ahead of the beat (above the center line) or delay it
after the beat (below the line).
Roll
The Roll parameter (Figure 7-19) is the number of
notes that will play within a step, to easily make
rolls on any step. When roll is set to one (no graph
bar visible, the default setting), entering a step (in
the step row at the top of the grid) will trigger one
Graph Sequencer button
Note (pad) menu
Currently selected
note parameter
Note parameters
Figure 7-19: Graph Sequencer.
BPM WINDOW
Figure 7-21: TimeShift.
Playback location
Steps
Parameter value
61
Page 62

Ve l o c i t y
The Ve l o c i t y parameter (Figure 7-19) is similar to
MIDI note velocity and controls loudness.
Length
The Length parameter (Figure 7-19) lets you
control the duration of the step.
Pan
The Pan parameter (Figure 7-19) controls the
panning of each step.
Semi and Fine tuning
The Semi and Fine tuning parameters
(Figure 7-19) allow you to control the pitch of a
step in semitones and cents (100ths of a semitone),
respectively.
CutoffMod, ResonanceMod and DecayMod
These three Graph Editor parameters
(Figure 7-19) control filter cutoff, resonance and
decay, respectively.
Working with the Graph Sequencer grid
Click anywhere in a parameter cell to set the value
for that cell. You can also drag vertically and/or
horizontally to sweep across multiple steps and
create smooth curves or lines (such as a crescendo
for the velocity parameter).
Advanced graph programming
Right-click anywhere on the Graph Sequencer to
access the Graph Sequencer menu (Figure 7-22).
Functions and Graph Templates
The Functions and Graph Templates sub-menus
(Figure 7-22) provide convenient preset patterns
for the Graph Sequencer, such as the sine wave
pattern shown in Figure 7-23.
Figure 7-23: The sinus (sine wave) template for the Graph Sequencer.
The Graph Templates sub-menu (Figure 7-24)
provides templates specifically designed for
velocity and pitch, but they can be used for any
parameter you wish.
Figure 7-24: The Graph Templates sub-menu.
Figure 7-22: Right-click to access the Graph Sequencer menu.
62
Figure 7-25: An example of an arpeggiated pitch template from the
‘Tuned’ sub-menu in Figure 7-24.
Resetting the graph
Choose Reset from the Graph Sequencer menu
(Figure 7-22) to reset all cells to the default value.
BPM WINDOW
Page 63

Saving your own Graph Sequencer patterns
Choose Save Graph from the Graph Sequencer
menu (Figure 7-22) to save any Graph Sequencer
pattern, which then appears by name at the bottom
of the Graph Templates sub-menu (Figure 7-26).
PAD EDITOR
The Pad Editor (Figure 7-27) provides in-depth
programming of individual pads.
Accessing the Pad Editor
To access the Pad Editor, make sure a bank is
currently selected, click the pad you wish to edit to
select it and then click the Edit tab in the BPM
window (Figure 7-1 on page 49).
Figure 7-26: A saved graph can be applied to any parameter.
Saving your own grooves
When viewing either the Velocity or TimeShift
parameters (Figure 7-19 on page 61), the Save
Groove menu item appears in the Graph Sequencer
menu (Figure 7-22 on page 62), allowing you to
save the current velocity and timeshift settings as a
custom groove, which then appears in BPM’s
Groove menu (Figure 7-62). See “Groove” on
page 91.
Applying grooves
You can apply the factory groove presets as well as
your own saved grooves to the Velocity and Time
Shift graphs.
Additional layers
Sample layers
Sample/oscillator
Effects ta b
First layer
tab
Loading multiple samples into a pad
An unlimited number of samples can be loaded
into a pad. When a pad is loaded with its first
sample, this sample is placed in Layer 1, as shown
in Figure 7-27.
To create additional, empty sample layers,
right-click in the empty area to the right of Layer 1,
above the waveform (Figure 7-28).
Figure 7-28: Right-click to add sample layers.
Add more
layers here
Layer settings (all layers)
Exclusive pad groups
Layer rules
Edit all layers button
Polyphony
Sample Editor
BPM WINDOW
Sample
start
Figure 7-27: Pad Editor.
Wave for m
selection
Loop
start
Sample
waveform
Loop
end
Sample
end
63
Page 64

Alternatively, you can drag and drop a sound from
the desktop or the browser to this same empty
space (Figure 7-29), and the new audio file is added
as a new layer.
Figure 7-29: Drag and drop a sample to the empty space above the
waveform to add the sample or audio clip as a new, separate layer.
☛ When you drag and drop a sample or audio
file directly onto a pad, as explained earlier in
“Dragg ing and dropping into a pad” on page 56, all
current layers are replaced by a new Layer 1 that
holds the new sample.
Here are some basic techniques for working with
multiple sample layers:
Do this To do this
Click a layer Select the layer (to view its wave-
Right-click a layer >
Del Layer
Right-click the empty
space to the right of
current layers > Add Layer
Right-click a layer >
Duplicate Layer
Sample layer settings
Each sample layer has its own relative volume, pan,
solo/mute controls and velocity range
(Figure 7-30).
Velocity range
Volume
form and layer-specific settings)
Delete the layer
Add a new layer
Duplicate the layer
PanMute/solo
Sample layer velocity programming
You can specify an independent velocity range for
each layer (Figure 7-30) in a pad. Layers are
triggered when the pad is played with within their
velocity range. If samples share the same velocity
range, or if their ranges overlap, they will play
together when triggered at a shared velocity. In the
example shown in Figure 7-30, there are three
sample layers divided into three separate velocity
ranges with no overlap: 1-39, 40-79 and 80-127. In
this case, only one sample layer will play at a time,
depending on the velocity played.
☛ When programming velocity layers, be sure
there are no gaps in the velocity range between
sample layers. If there are any velocity ranges not
assigned to at least one layer, you will hear silence
when the pad is played at those orphaned velocity
values.
Layer switching using layer rules
The Layer Rules menu (Figure 7-27) provides two
modes for randomly triggering sample layers as
you strike the pad to provide an extra dimension of
realism and “human feel”.
Random mode plays all layers randomly.
Random Cycle mode plays all layers randomly, but
only once per cycle. When all layers have finally
been played once, a new cycle begins. Random
Cycle mode helps prevent repetition, as a sample is
not played again until the current cycle is complete.
Here is a simple example with three layers:
■ random choice among (1,2,3) -> 2
■ random choice among (1,3) -> 3
■ random choice among (1) -> 1
Figure 7-30: Layer settings.
64
■ restart cycle with (1,2,3)
BPM WINDOW
Page 65

Both modes can produce excellent results,
depending on the samples involved and the effect
you are trying to achieve. You can experiment with
each mode to see which one sounds best.
Pad polyphony
The Polyphony setting (Figure 7-27) determines
how many stereo notes the pad can play simultaneously. For example, a setting of 12 lets you play
12 stereo notes. You might think that for a stereo
drum sample, you only need a polyphony of 1.
However, the sample might overlap itself if you
trigger it multiple times. Therefore, the default
value of 16 is adequate for most typical situations.
However, if you are working with multiple sample
layers, you might need to raise it. The maximum
settings is 256 stereo notes (per pad). Note that this
is a per pad setting, and it controls the currently
selected pad.
independently for each layer. For further details
about synth parameters, see “Synth Parameters” on
page 86.
Exclusive pad groups
An exclusive pad group is a group of two or more
pads that cut each other off when they play. This
allows you to create the classic open/closed hi-hat
effect, where the closed hat sample cuts off the
open hat sample. You can include as many pads as
you want in a pad group. BPM allows you to define
up to 32 different pad groups across all four banks.
☛ The exclusive pad group setting applies to all
lay ers i n th e pad; it canno t be se t inde pend entl y pe r
layer.
Creating a pad group
To assign two or more pads to an exclusive pad
group:
☛ Caution: higher polyphony settings demand
more of your host computer’s processing power.
For example, if you set the polyphony to 64 voices
and played only 12 notes, then BPM would require
much more computer processing power than it
would when playing those same 12 notes with a
polyphony setting of 12. Tr y to keep the polyphony
setting as low as possible — only use what you
know you’ll need for the pad. This setting is one of
the most significant ways of optimizing BPM CPU
usage and managing your computer’s processing
resources.
Edit All Layers
As explained earlier, BPM provides synth
parameter settings for each pad (to the right of the
pads). Click the pad to select it and then view and
adjust its synth settings. If the Edit All Layers
option (Figure 7-27) is enabled, then synth
parameter settings apply to all layers in the
currently selected pad. When this option is
disabled, you can adjust synth parameters
1 Click the desired bank and pad to select it.
2 Click the Edit button in the Window buttons
portion of the BPM window (Figure 7-1 on
page 49) to access the pad editor (Figure 7-27).
3 Double-click the Ex. Group (Exclusive Group)
setting (Figure 7-27) and set it to any pad group
you wish between 1 and 32.
4 Click the second pad you wish to include in the
group to select it, and assign it to the same
Exclusive Group number.
5 Repeat step 4 above for any other pads you wish
to include in the group.
Removing a pad from an exclusive pad group
To remove a pad from an exclusive pad group,
assign it to group zero (0).
BPM WINDOW
65
Page 66

Sample Editor
Click the Sample/Oscillator Editor button to access
the Sample Editor for the currently selected sample
layer (Figure 7-27 on page 63). This is a basic
waveform editor that lets you do basic editing on
the actual sample data.
Setting sample and loop start/end points
Drag the “S” and “E” markers to set the sample
start/end times (Figure 7-27). Similarly, you can
drag the “L” and “R” markers to adjust the Loop
Start and Loop End times for sample loops.
Making selections for editing
Drag across the waveform to select a portion of it.
Double-click to Select All.
Insertion Point
Click anywhere on the waveform to place the
Insertion Point. This is the location where sample
material in the clipboard will be inserted.
Drag and drop in the sample editor
You can drag and drop audio selections into the
sample editor. You can also drag and drop the
current selection in the sample editor to any other
portion of the BPM window that accepts audio
clips. To do so, hold down Shift-Option/Alt and
then drag and drop the current selection.
Sample Editor menu
Right-click to access the Sample Editor menu
(Figure 7-31). Here is a brief summary of the menu
operations.
Figure 7-31: Right-click the waveform to access the Sample Editor
menu
Unlimited Undo/Redo
The Sample Editor supports unlimited Undo/
Redo. Use the Undo/Redo commands
(Figure 7-31) to step forwards or backwards
through the undo history.
Destructive editing
The standard Cut, Copy and Past e (Figure 7-31)
commands operate in the standard fashion on the
currently selected portion of the waveform. These
destructive editing commands actually modify the
waveform data. Remember, however, that editing
only occurs in RAM. To permanently save your
edits, you must use one of the various commands
in the File menu that save samples.
Cut
The Cut command (Figure 7-31) removes the
selected sample data and fills the gap. So Cut
actually removes time and makes the sample
sho rter. If you wish to mainta in sa mple lengt h (an d
simply remove waveform data), use the Silence
command (Figure 7-31).
66
Copy
Copy (Figure 7-31) places the currently selected
sample data in the clipboard for pasting.
BPM WINDOW
Page 67

Paste
To Paste sample data that you have just copied or
cut into the clipboard (Figure 7-31), you must first
determine where to paste, as follows:
Method for choosing
where to paste Result when you paste
Click anywhere in the
waveform to place the
Insertion Point)
Make a selection The selected portion of the waveform is
Clipboard data is inserted at the insertion point, and all data after the insertion point is moved later in the sample.
replaced with the clipboard data, even if
their lengths don’t match. For example,
if you select 1 second and paste 2 seconds, the 1-second portion of the waveform is replaced with the 2 seconds of
material on the clipboard.
Crop
The Crop command (Figure 7-31) removes all
sample data that i s not w ithi n the current selec tion.
To use Crop, you must first make a selection over
the sample data you wish to preserve. Then use
Crop to remove everything else.
Delete
The Delete command (Figure 7-31) does the same
thing as Cut, except that it does not place the
deleted material on the clipboard. This command
al lows you to remove samp le da ta w ithout affe cting
any data currently on the clipboard.
Norm alize
The Norm alize command (Figure 7-31) boosts
amplitude by whatever amount is needed to make
the loudest peak reach digital full scale (zero dB).
Fade In/Fade Out
The Fade In/Fade Out commands (Figure 7-31)
apply a linear fade to/from zero dB.
PlaySelection
The PlaySelection command (Figure 7-31) plays
whatever is currently selected in the waveform.
Change Playing Direction to Reverse/Forward
The Change Playing Direction to Reverse command
(Figure 7-31) makes the entire sample layer play in
reverse. To make it play forward again, choose
Change Playing Direction to Forward.
Set As One Shot
When Set As One Shot is enabled (Figure 7-31) and
its amplitude envelope is configured as ADSR, the
note-off event is ignored and the entire sample will
be played.
Create Loop/Delete Loop
The Create Loop command (Figure 7-31) lets you
make a selection in the waveform and then loop
that selection. You can drag the loop points as
needed to adjust them. To get rid of the loop,
choose Delete Loop from the Sample Editor menu
(Figure 7-31).
Pad Editor effects tab
Click the FX tab (Figure 7-27 on page 63) to access
the sample layer effects list (Figure 7-32). The
effects list provides unlimited effects slots for each
sample layer.
Silence
The Silence command (Figure 7-31) gives all
sample data within the current selection a value of
zero (silence).
Reverse
The Reverse command (Figure 7-31) makes the
current selection play backwards.
BPM WINDOW
Applying effects to a layer
To apply an effect to a sample layer, click the layer
to select it, click the FX tab (Figure 7-32) and then
click the Add FX butt on to open the effe cts brow ser.
You can add as many effects as you wish to the list
for the currently selected layer, and each layer can
have its own set of effects. For further details about
working with effects, see “Effects” on page 99.
67
Page 68

Drum synthesizer
BPM provides a drum synthesizer (Figure 7-33)
with dozens of preset sounds. You can use the
drum synthesizer just like a sample layer and even
mix and match drum synth layers with sample
layers using all of the multi-layer features discussed
earlier.
Accessing the drum synthesizer
To access the drum synthesizer, right-click the
Sample/Oscillator tab (Figure 7-27 on page 63) to
open the Change Oscillator Type menu
(Figure 7-34) and choose DrumOscillator. Yo u c an
use this menu to freely switch the layer between
sample playback and the Drum Synth.
Figure 7-34: Accessing the drum synth.
Layer bypass
Effects ta b
Effects slots
Sample/oscillator tab
Effects ta b
Effect name
Figure 7-32: Pad effects tab.
Effects settings
Currently selected drum synth layer
Individual bypass
Effects browse r
Delete effect
Page buttons
Drum synth
preset menu
68
Figure 7-33: Drum Synthesizer.
BPM WINDOW
Page 69

Drum synth (osc) layers work just like sample
layers
A drum synth layer operates in much the same way
as a sample layer, as discussed earlier in this
chapter. This includes velocity layering, layer
switching by rules, polyphony and effects.
Drum synth presets
The drum synth preset menu (Figure 7-33)
provides many useful preset sounds organized by
category. These are a great place to start, even when
you wish to program your own sound with the
many available parameters.
Figure 7-35: Drum synth presets.
Drum synth parameters
The Drum Synth provides straightforward
oscillator settings (Figure 7-33), including basic
waveform (sine, triangle, saw or pulse), oscillator
frequency, simple two-stage attack/decay
amplitude envelope and pitch modulation with
rate and depth controls.
Use the Mix control (Figure 7-33) to blend the
oscillator output with the noise generator, which
provides a standard low/high/band-pass filter, plus
a two-stage amplitude envelope.
The Master section (Figure 7-33) provides built-in
EQ, distortion volume and velocity sensitivity
controls for the oscillator amplitude, oscillator
pitch modulation and noise amplitude.
RACKS
A rack (Figure 7-36) holds multi-sample
instruments, loops and phrases. Each individual
instrument, loop or phrase is loaded into the rack
as a part. A part is like a channel on a mixing
console or instrument track in your audio
workstation software; it can have its own preset
and settings.
Similar to banks, BPM provides two separate racks
(A and B) that operate independently, but play
simultaneously with each other and the four pad
banks. You can load and play an unlimited number
of instrument and loop parts in each rack.
Two rack buttons
Click a rack button (Figure 7-36) to view its parts
list. Below each rack button are Mute and Solo
buttons that allow you to mute and solo the entire
rack during playback. Each rack also has an SP
Mode button next to it. For details, see “SP mode”
on page 89.
Selecting a part
Click a part to select it. A red border appears
around it. The currently selected part is loaded
with any loop, phrase or sound that you select in
the browser with AutoLoad enabled. You can also
select a part to view its synth parameter settings to
the right of the part list.
Adding, deleting and clearing parts
To add a part, click the ADD button (Figure 7-36).
You can also add a part by dragging and dropping
an audio file onto any empty part in the list. If you
are dragging a loop into the part list from the
browser, be sure to turn off AutoLoad first.
Otherwise, the loop you drag will be loaded into
the currently selected part as soon as you click it.
To clear a part of the current loop or instrument,
right-click and choose Empty.
BPM WINDOW
69
Page 70

To delete a part, select it and click the DEL button
(Figure 7-36).
Browsing loops and instruments with AutoLoad
The basic procedure for browsing loops and
instrument parts with AutoLoad mode enabled is
described in “AutoLoad” on page 54. AutoLoad lets
you hear loops as you browse, as long as BPM’s
main play button (Figure 7-60 on page 90) is
engaged. When playback is stopped, you can still
hear loops as you browse using the AutoPreview
option (“AutoLoad options” on page 55), which
plays loops as you click them. Use the Preview
Start/Stop button (Figure 7-8 on page 54) to
control preview playback.
Drag and drop into the part list
If AutoLoad is turned off, you can drag and drop a
loop or instrument preset from the browser onto
an existing part, or an empty part slot. Alterna-
tively, you can drag and drop an audio file from
your computer desktop. Either way, dragging
directly to a part replaces any loop or instrument
currently in the part.
Playing a part using the keyboard
Once you’ve loaded a loop or instrument into a
part as explained in the previous sections, select
the part and then click the keyboard (Figure 7-36)
to play the part. Use the left/right arrows to scroll to
lower or higher octaves. The red line above the keys
indicates the note range for the current slice loop or
instrument preset. If you have loaded a preset from
MachFive that includes key switches, key switch
keys are indicated in blue.
Playing a part using the Piano Roll Sequencer
If a pattern is also currently loaded into the Piano
Roll Sequencer for the part, press BPM’s main play
button (Figure 7-60 on page 90) to play the pattern
70
Add/delete part buttons
Rack
buttons
SP mode
Scroll left Scroll right
Figure 7-36: BPM provides two independent racks
(A and B) for loops, phrases and instruments.
range (red bar)
Part list
Loop part
Instrument part
Currently selected part
(red border)
Empty part slots
Keyboard
OctavePreset note
BPM WINDOW
Page 71

for the part. You can also play the part from your
MIDI controller and even record patterns this way.
See “Recording” on page 93 for further details.
Recording a pattern using the keyboard
You can record patterns by clicking on the
keyboard while recording in real time. For details,
see “Recording” on page 93.
Part settings
Each part has the following settings:
MIDI
channel
Loop or instrument
preset name
Volume
Pan
the part list (as shown in Figure 7-37), you will
always see them presented in this fashion (bank
letter plus MIDI channel number). You can use any
MIDI channel you wish for any of BPM’s 64 parts.
Parts (as many as you wish) can also share any
MIDI channel.
☛ This feature (multiple banks of MIDI I/O) is
supported by the standalone, MAS and RTAS
versions of BPM. As of this writing, the VST and
Audio Unit (AU) standards do not support
multiple banks of MIDI channels. If you are using
BPM in one of these plug-in formats, and you need
more than 16 parts, open a second instance of the
plug-in.
MIDI
activity
Mute
Next/previous
and
preset buttons
Solo
Figure 7-37: Part settings.
Level
meter
Autoplay
Part
play
MIDI (note) activity LED
The MIDI activity LED (Figure 7-37) lights up
wh en t he p ar t rec eives MID I data or n ote data f rom
the Piano Roll Sequencer.
Next/previous preset buttons
The Next/Previous preset buttons (Figure 7-37) let
you easily browse through a series of presets.
MIDI channel
Press the MIDI channel menu for a part
(Figure 7-37) to choose the desired MIDI receive
channel for the part (the channel from your
sequencer or external MIDI keyboard or other
controller).
BPM provides 64 separate MIDI channels, divided
into four banks of 16 channels each: Bank A, B, C
and D. MIDI channels in Bank A are designated as
A1, A2, A3, A4, etc. up to A16. Similarly, channels
in Bank B are designated as B1, B1, B2, B3, etc. and
so on for banks C and D as well. When you choose
MIDI channels for BPM in your h ost software or in
Rack parts can be assigned to any MIDI input you
want. By default, the first part in Rack A defaults to
A5, the second part to A6, and so on. This is
because pad banks A, B, C, and D respond to MIDI
channels A1 through A4, so the parts start at
channel A5 to avoid a MIDI channel conflict with
the pad banks.
For details about setting up MIDI I/O with the
standalone version of BPM, see “MIDI Devices
tab” on page 33. For setting up MIDI I/O with the
plug-in version running in your favorite host, see
chapter 6, “BPM Plug-in” (page 35).
Creating instrument “stacks”
With 64 available MIDI channels, you can assign
each part to its own MIDI channel, if you wish. But
you can also assign multiple parts to the same
channel to easily create layers (“stacks”), where all
instruments that share the same MIDI channel play
exactly the same notes.
Part volume, pan, mute and solo
The drag vertically on the part volume or pan
(Figure 7-37) control to adjust it, or double-click to
edit the value numerically. Volume range is from
-144 to +6 dB. Pan goes from -1.00 to +1.00, where
zero is center (C).
BPM WINDOW
71
Page 72

Click the Mute button (Figure 7-37) to temporarily
silence the part. When you mute a part, it no longer
expends system resources.
Both volume and pan can be automated with the
standard MIDI controllers #7 (volume) and #10
(pan), although you can use any controller you
wish, as explained below. Mute and Solo can also
be automated via MIDI.
Play/Autoplay
The Auto pla y and Part Play buttons (Figure 7-37)
are inactive and grayed out, unless a the part has a
loop, and the loop is currently set to Slice mode
without mapping. For details about these loop
settings, see “Slice” on page 80.
If a loop has been loaded into the part and it is in
Slice mode without mapping, the AutoPlay and
Part Play buttons (Figure 7-37) become activated.
Click the Part Play button to play or stop the loop.
Click the Auto Play button to toggle the part’s
AutoP lay status. When AutoPlay is enabled for the
part, the loop will follow BPM’s main transports.
When it is disabled, the loop will only play when
you click the part’s Play button. For complete
details about the transports, see “Transport
Control and Tempo” on page 90.
Assigning MIDI controllers to part controls
To assign a MIDI controller to a part volume, pan,
mute or solo, right-click the item to either choose
the desired controller from a menu or play it from
your MIDI controller (Figure 7-63 on page 92).
Part sy nth parameters
BPM provides synth parameter settings for each
part (to the right of the parts list). Click the part to
select it and then view and adjust its synth settings.
See “Synth Parameters” on page 86.
PIANO ROLL SEQUENCER
The Piano Roll Sequencer (Figure 7-38) provides a
basic sequencer for the currently selected part.
Accessing the Piano Roll Sequencer
To access the Piano Roll Sequencer, select a part
and then click the Seq (Sequencer) tab in the BPM
window (Figure 7-1 on page 49).
Pitch Ruler
Th e Pian o Rol l gr id i s a s impl e gr id w ith tim e goi ng
horizontally and pitch going vertically. The Pitch
Ruler (Figure 7-38) indicates the pitch for each
note, where C3 is middle C.
72
Pitch ruler
Pencil tool
Selection
Eraser Bypass
tool
Figure 7-38: Piano Roll Sequencer.
Snap to Grid
Length
Grid
Timeline
Sequences of notes
triggering a slice
loop
Scroll bar
BPM WINDOW
Page 73

Timeline
The Timeline (Figure 7-38) indicates measure and
beats. For example, 2.3 indicates measure 2, beat 3.
The number of measures is determined by the
Length (in bars).
To ol s
The Selection tool, Pencil and Eraser (Figure 7-38)
provide standard selection, insertion and deletion
capabilities for the grid. Here is a summary of
techniques:
Zooming the timeline
Click on the time line (Figure 7-38) and drag
vertically to zoom the resolution of the piano roll
grid.
Length
The length setting (Figure 7-38) lets you specify
the length of the time line in the Piano Roll
Sequencer for the part. Each part can have a unique
len gth. Lengt h is specified in a number of complete
bars.
Grid
The Grid menu (Figure 7-38) lets you specify the
grid resolution for editing, as indicated below:
Resolution Metric value
8 Eighth note
8T Eighth note triplet
16 Sixteenth note
16T Sixteenth note triplet
32 Thirty second note
To do this Do this
Insert a note with the duration
of the current grid
Insert a note of any length Drag with the Pencil
Change the pitch of a note Drag it up or down
Change the pitch of several
notes
Change the velocity of one or
more notes
Delete a note Double-click it, or
Delete multiple notes Select them with the Selection
Click with the Pencil, or
Double-click with the Selection
tool
Select them and drag up or
down
Select them and Shift-drag up
or down
click it or drag over it with the
Eraser, or
Select it and hit delete.
tool and then hit delete.
Piano Roll Sequencer menu
Right-click to access the Piano Roll Sequencer
menu (Figure 7-39).
Snap to Grid
Enable the Snap to Grid option (Figure 7-38) to
cause edits and note insertions to automatically
conform to the current Grid resolution.
Bypass
Click Bypass (Figure 7-38) to turn off the Piano
Roll Sequencer entirely. This lets you use the part
purely as a sound source for an external MIDI
controller or sequencer.
BPM WINDOW
Figure 7-39: Right-click the piano roll to access its contextual menu.
73
Page 74

Here is a brief summary of the menu operations:
Menu item What it does
Selection Tool / Pencil /
Eraser
Cut Places the currently selected MIDI
Copy Places the currently selected MIDI
Paste Pastes the MIDI data in the clipboard.
Select All/Deselect All Selects or deselects all notes.
Clear Selection Removes all currently selected notes.
Clear All Removes all notes and other data.
Delete All Notes Removes all notes.
Delete All But Notes Removes all data except for notes.
Quantize Moves all notes, or the currently
Apply Groove Applies the chosen groove to all notes,
Selects the corresponding tool.
data in the clipboard for pasting,
removing the data from the sequence.
data in the clipboard for pasting, leaving the data in the sequence.
selected notes, to nearest grid location.
or the currently selected notes.
Drag and drop into the Piano Roll Sequencer
You can drag and drop patterns from the browser
(with AutoLoad turned off), and MIDI files from
your computer desktop, into the Piano Roll
Sequencer. When importing MIDI files, drag and
drop works best when using single-channel MIDI
files of a reasonable length.
Working with slice loops in the Piano Roll Sequencer
When you load a slice loop into a part, each slice is
mapped to an individual note and the notes are
automatically loaded into the Piano Roll Editor.
The first loop slice is mapped to note C3 and from
there slices are mapped sequentially in ascending
order, chromatically, up the keyboard. The
resulting cascade of notes is a similar to what is
shown in Figure 7-38. You can edit the slice notes in
the grid to modify the loop. You can play slices
from the on-screen keyboard, a MIDI keyboard, a
pad controller or any other MIDI controller.
Essentially, these mapped slice notes give you a
great deal of control over manipulating the loop.
PART EDITOR
The Part Editor (Figure 7-41) provides in-depth
programming of individual rack parts. The Part
Editor provides a wide range of controls (such as
envelopes, multi mode- filters, LFOs, and pitch
controls) that allow you to shape and mold the
instrument sound or loop in the currently selected
part.
Accessing the Part Editor
To access the Part Editor, make sure a rack is
currently selected, click the part you wish to edit to
select it and then click the Edit tab in the BPM
window (Figure 7-1 on page 49).
Applying grooves
The Apply Grooves menu item (Figure 7-39)
provides many classic drum machine groove
“feels”, including MPC swing and LinnDrum
presets (Figure 7-40). You can also create and apply
your own grooves. See “Saving your own grooves”
on page 63.
Figure 7-40: MPC, LinnDrum and other grooves can be applied to
note data in the Piano Roll Sequencer.
74
MIDI automation of part editor parameters
Part Editor parameters can be automated by
sending MIDI control messages to BPM. Rightclick any parameter to either choose the desired
controller from a menu or play it from your MIDI
controller (as shown in Figure 7-63 on page 92).
LFOs (1 to 4)
The Part Editor LFO section (Figure 7-41)
provides four LFOs to shape your parts. Click an
LFO button (1, 2, 3 or 4) to select a specific LFO.
Click the LFO menu to choose a waveform for the
BPM WINDOW
Page 75

LFO. Choose among nine different waveforms for
each LFO, allowing for a great deal of control in
shaping the part you are working with.
Figure 7-42: LFO types.
Retriggering
Retriggering causes each new note that is played to
restart the LFO waveform. LFO 1 and 2 are
retrigger. LFO 3 and 4 are non-retrigger.
Rate
Rate (Figure 7-41) controls the speed of the
currently selected LFO.
Depth
Depth (Figure 7-41) controls the intensity of the
LFO.
Tra nsp ose
The Part Editor Tra n s p o s e section (Figure 7-41)
provides general pitch controls for each part.
Bend
The Bend setting (Figure 7-41) controls the pitch
bend range for the part. The range is from 0 to 24
semitones (2 octaves).
Constant pitch (“Const”)
Enable the Constant Pitch (Const) button
(Figure 7-41) if you would like to maintain the
same pitch, regardless of what MIDI note is being
played. Use the Octave and Semitone settings
(below) to adjust the pitch as desired. This setting
is especially useful for loops, phrases or drum hits
that you do not wish to transpose.
MIDI
The Octave and Semitone (Semi) settings
(Figure 7-41) transpose the current part in octaves
and semitones, respectively. The octave range is
from -2 to +2 octaves. The semitone range is from
-24 to +24 semitones (two octaves).
Sync
Sync (Figure 7-41) allows the LFO’s rate to be
synced to BPM’s global tempo.
Loop Editor tab
Part Editor tab
Figure 7-41: Part Editor.
BPM WINDOW
Polyphony
Velocity curvesArpeggiator
75
Page 76

Play
The Part Editor Play section (Figure 7-41) provides
general controls for part playback.
to confirm the value. Now when you play the part,
the notes will be played at the note-on velocity that
you specified.
Glide
Portamento is used to smooth the transition
between played notes. When in Mono mode, the
Glide setting (Figure 7-41) controls the length of
the portamento transition. The portamento range
is from 0.00 ms (milliseconds) to 10.00 second.
Poly phony
The Polyphony setting (Figure 7-41) determines
how many stereo notes the currently selected part
can play simultaneously. For example, a setting of
12 lets you play 12 stereo notes at a time. The
maximum setting is 256 stereo notes (per part).
☛ Polyphony is a per part setting. Higher
polyphony settings demand and consume more of
your host computer’s processing power, so set this
parameter only as high as needed for each part.
Mono
Click the Mono button (Figure 7-41) to make the
currently selected part play like a monophonic
synth, where only one note can play at a time. Each
new note played replaces any currently sustaining
note, with a degree of glide between them (see
Glide above). Mono mode is ideal for solo
instruments.
Choose the linear curve for a 1-to-1 response curve
(all notes are played at the velocity at which the key
is struck). This is the normal response for MIDI
data.
The exponential curve produces medium velocity
values that result in a lower volume than linear
mode. This curve is well suited for soft keyboards
that send high velocity MIDI values with a light
touch.
The logarithmic curve produces higher velocity
values that result in a higher volume than linear
mode. This curve is good for piano-action
keyboards that require harder action to send high
velocity values.
Modulations
You can modulate the pitch, pan, amplitude, and
filter cut-off parameters to further mould the
sound of the part. Use a parameter’s modulator
menu to choose the type of modulation for that
parameter, and use the Depth control to set the
amount of modulation that is applied. The
modulator menu is shown below:
Ve lo ci t y c ur ve
Click the desired Velocity curve button
(Figure 7-41) to set the note-on velocity response
curve for the current part.
The flat line option plays all struck notes at the
same velocity. By default, the Flat velocity value is
127, but can be set to any value from 1-127. To edit
this va lue, double-click the F lat velo city butt on and
enter a new value. You can then type in a velocity
from your computer keyboard, or you can play a
note on you r MIDI control ler, an d then press E nter,
76
Figure 7-43: The modulators.
BPM WINDOW
Page 77

Here is a brief explanation of the modulation
sources shown in Figure 7-43:
Modulation source Explanation
Off Turns off modulation.
Pitch Env.
Amp. Env
Filter Env.
These options use their corresponding
dedicated envelope.
Alternate modulation
The Alternate modulation option (Figure 7-43)
sends maximum and minimum modulation values
alternately. For example, if applied to pan with a
depth of 1, this modulation source would alternate
between the hard-right and hard-left pan position.
To lower the values, just lower the depth.
LFOs These options use their corresponding
Key
Pitch Bend
After Touch
Velocity
Wheel-> These options use the chosen LFO from the
Organ Pan
Wheel
Alternate
Random
dedicated LFO.
Modulation is controlled by the chosen
type of MIDI data. Key refers to MIDI
pitch.
LFO section, with the addition that the
mod wheel controls LFO depth.
See below.
External modulation via MIDI
As shown in Figure 7-43, modulation can be
controlled from a variety of MIDI sources,
including notes (key number), pitchbend, etc.
Organ Pan modulation
The Organ Pan modulation option (Figure 7-43) is
based on the way organ pipes are set in a church
organ. This option is primarily for panning
samples, but it can be used for other creative
effects, too. This option determines modulation
values depending on incoming MIDI pitch
numbers. For pitches lower than 36, maximum and
minimum values are sent alternately (i.e. note 32
will be generating a value of 0, 33 will generate
127). For pitches between 36 and 108, the
alternating continues but with smaller and smaller
amplitude, until finally, above note 108, all notes
generate a value of 64.
Wheel modulation
The Wheel modulation option (Figure 7-43)
applies mod wheel (CC 1) as the modulation
source.
Random modulation
The Random modulation option (Figure 7-43)
generates a new, random value each time a note-on
is received.
Arpeggiator
Each rack part has an independent arpeggiator, as
shown in Figure 7-44 on page 78.
Accessing the Arpeggiator
Select a rack part, click the Edit display tab, then
select the Arp tab in the virtual LCD screen. To
enable the arpeggiator, click the Enable button.
Steps
The number of steps is set with the NumSteps knob,
from 1 to 128. The Resolution knob sets the value of
the s teps , in me tri c va lues fr om 32 bars to 6 4th not e
triplets.
You can manipulate each step in the following
ways.
To do this Do this
Enable/disable step Click checkbox
Merge with previous step Shift-click checkbox
Change velocity Drag slider/up down
Change length Shift-drag slider left/right
Additionally, the step length can be set globally
with the StepLen knob. The StepLen knob setting is
combined with the setting of each individual step.
For example, if you have shortened a step to 50% by
Shift-dragging it and have the StepLen knob set to
50%, that step will be 25% of the usual length.
BPM WINDOW
77
Page 78

The Ve l B l e n d knob controls the depth of the steps’
velocity. At 0%, the full velocity range is used; at
100%, a constant velocity is used (effectively
making all steps the same velocity, regardless of
their individual values).
Tri gg er Mo de
Tr i g g e r M o d e determines where in the pattern of
steps each note will start.
Note: Each played note restarts the from the first
step.
Legato: the first played note starts on the first step,
and the pattern of steps continues as additional
notes are played. If all held notes are released, the
pattern will restart from the first step when the next
note is played.
Song Position: the position in the pattern is
determined by the song position, regardless of how
notes are being played.
Hold
When Hold is set to True, arpeggiated notes are
held.
Octave
The Octave knob determines how many octaves
above or below the played notes will be
arpeggiated.
Strike and Repeat
To further tailor the way in which each arpeggiated
note is triggered, use the following settings:
Strike: the number of times the note is triggered
before moving on to the next note.
RepeatBottom: the bottom note is repeated.
RepeatTop: the top note is repeated.
Swing
The Swing knob applies swing to the steps.
Arpeggiator presets
Arpeggiator settings can be saved and recalled with
the arpeggiator preset controls.
Figure 7-45: Arpeggiator presets
Mode
The Mode menu determines the order in which the
arpeggiated notes are played.
Figure 7-44: Arpeggiator
78
BPM WINDOW
Page 79

A variety of factory presets are included, and you
can also save and recall your own. Presets can be
loaded by selecting them from the menu, or with
the next/previous preset buttons.
Disabling the arpeggiator
To temporarily disable the arpeggiator, click the
Bypass button. To remove the arpeggiator, deselect
the Enable button.
(Figure 7-1 on page 49) and then click the Loop
Editor tab (Figure 7-41 on page 75). Note that the
Loop Editor tab only appears when the currently
selected part is loaded with a loop (not an
instrument).
Loops versus phrases
In the following discussion, the terms phrase and
loop have the following meaning:
☛ The arpeggiator returns to its default settings
when the arpeggiator is removed. If you would like
to recall your current arpeggiator settings, save an
arpeggiator preset before removing it, or use
Bypass instead.
LOOP EDITOR
The Loop Editor (Figure 7-46) provides in-depth
programming of individual rack parts that are
currently loaded with a loop. The Loop Editor
provides a wide range of controls that allow you to
control the playback behavior and other
parameters of the loop in the currently selected
part.
Accessing the Loop Editor
To access the Loop Editor, make sure a rack is
currently selected, click the part you wish to edit to
select it, click the Edit tab in the BPM window
Loop Editor tab
Part Editor tab
Loop waveform display
■ Loop — a pre-sliced audio file such as a ReCycle
(REX) file, Apple Loop, UVI library Loop, etc.
where each beat has been identified as its own slice.
Almost all loops in BPM’s included library are slice
loops.
■ Phrase — any other audio file (WAVE, AIFF,
Sound Designer II, etc.)
Loop waveform display
The loop waveform display (Figure 7-46) provides
an over view of the loop’s waveform. It is for display
purposes only.
Loop settings
Loop modes
BPM WINDOW
Figure 7-46: Loop Editor.
79
Page 80

Three loop modes
Click the desired loop mode button (Figure 7-46)
to put the part into one of three possible loop
modes:
Sample mode is good for material such as vocal
phrases, where precise tempo control is not
required. It is also good for producing the “sampler
effect”.
Loop mode What it does
Sample Plays the loop like a regular sampler. As
Stretch As you play notes up and down the key-
Slice Same as stretch mode, except that the loop
you play notes up and down the keyboard,
both tempo and pitch change.
board, pitch changes but not tempo.
can also be played as individual slices. Also,
slice loops can be autoplayed (without
being triggered from MIDI or the Piano
Roll Sequencer).
☛ A native “sliced” sound file (REX file, Apple
Loop, etc.) can be switched to Stretch or Sample
mode, but a “non-sliced” sound file cannot be
switched to Slice mode.
As with other loop parameters, each part can have
its own loop mode setting. The mode you use for a
loop or phras e wil l depend on the nature of loop or
phrase itself and how you would like to use it
within a musical context.
Sample
Click the Sample mode button (Figure 7-46) to put
the loop or phrase into Sample mode. In Sample
mode, the loop or phrase is triggered like a
traditional sampler: as you play the loop with
different keys up and down your MIDI controller,
both the pitch and the duration of the audio will
change. The higher the note, the higher the pitch of
the audio and the faster it plays. The lower the note,
the lower and slower the audio plays. BPM’s global
tempo setting (and the tempo setting of the host
software, if any) is ignored. The sample plays at the
speed dictated by the note played.
To play the loop at its original pitch and tempo,
play the note indicated by its Key setting, if any
(Figure 7-46).
Stretch
Click the Stretch mode button (Figure 7-46) to put
the loop or phrase into Stretch mode. In Stretch
mode, the MIDI note you play to trigger the loop or
phrase affects the sample’s pitch, but not the tempo.
For example, if you play a three-note chord, all
three triggered loops (or phrases) will play at the
same speed (but at the different pitches you
played). Playback speed is determined by the speed
controls. Stretch Mode locks the loop’s tempo to
BPM’s global tempo setting (and/or the tempo
setting of the host software, if any).
☛ To ensure that Stretch mode produces high-
quality results, BPM employs very high quality
real-time audio time-stretching DSP technology.
Slice
Click the Slice mode button (Figure 7-46) to put
the loop into Slice mode. If a “non-sliced” loop or
other sound file is loaded in the currently selected
part, slice mode is not available and so the Slice
button is grayed out. Just about all of the loops in
BPM’s included loop library are slice loops. There
are a few audio clips that are non-slice phrases (as
indicated by “PHR” at the end of their name).
☛ If you have your own loop material, and it is
not yet in a slice loop format (such as a REX file),
you can slice the loop using the Clip window, or use
MachFive or other software. See “Slicing a loop” on
page 85.
When AutoPlay is deactivated on the selected part
(see “Play/Autoplay” on page 72), Slice mode
works the same way as described above for Stretch
mode: the MIDI note you play to trigger the loop or
80
BPM WINDOW
Page 81

phrase affects its pitch, but not the tempo. For
example, slice mode allows you to play chords, just
like Stretch mode.
Loop mode summary
Here is a summary of the loop modes discussed
above:
Slice mode differs from Stretch mode in that it
allows the part to play the loop without any MIDI
triggering. It’s like having a very basic loop
sequence for the part. For details, see “Sync menu”
on page 83.
Map
In Slice mode, you can enable the Map button
(Figure 7-46). The Map button splits up the loop
into individual beat slices, mapped chromatically
to MIDI notes starting at C3. This allows you to
play each individual slice by itself from a note on
your MIDI controller.
By playing the notes upwards chromatically, you
can recreate the original loop. But you can mix up
the notes to play the slices in any order you want,
allowing you to create your own rhythms based on
the slices of the original loop. Mapping opens up a
world of possibilities for restructuring the beats of
a loop, quantizing or groove quantizing loop slices,
and so on.
To trigger a sliced loop that has been mapped,
make sure that the part that currently holds the
sliced loop is properly receiving MIDI. See “MIDI
channel” on page 71.
Map mode also allows you to drag and drop the
loop’s MIDI data into a MIDI track in your host
software. You can then manipulate the loop as
MIDI data in your host. For details, see “Loop
export via Drag & Drop” on page 84.
Loop
mode
Sample Loops
Stretch Loops
Slice Loops only Pitch only Speed, tempo
Slice with Map Loops only Slice played N/A
Typically
used with
Phrases
Phrases
MIDI note
affects
Pitch and
duration
Pitch only Speed, tempo
Tempo is
determined by
MIDI note
and loop sync
controls
and loop sync
controls
Sample Start
The Sample Start slider (Figure 7-46) lets you
specify any location in the loop or phrase as the
sample start time. This is the location at which the
loop or phrase will begin playing.
In Sample mode or Stretch mode, the Sample Start
slider provides a range from zero percent (0%) to
100%, where zero is the very beginning of the loop
or phrase.
In Slice mode (without mapping), the Sample Start
slider provides a range from the first slice (0) to the
last slice. The number of the last slice depends on
the length of the loop and the number of slices. For
example, if a two-bar loop is divided into 16th note
slices, it will have 32 slices total. This means that
slice 17 is the downbeat of measure 2. So if you set
the Sample Start slider to 17, the loop will start on
the downbeat of measure 2.
☛ The Sample Start parameter is disabled when
the loop is in Slice+Map mode (because in this
mode, you play slices individually).
BPM WINDOW
Speed control
The Speed control slider (Figure 7-46 on page 79)
lets you speed up or slow down the selected loop or
phrase. This setting is applied relative to the other
sync and tempo settings. The speed range is from
81
Page 82

50% slower to 50% faster than the original tempo,
which is represented by the center position of the
slider. Option/Alt-click the slider to return to zero.
Double-click to type in a value numerically.
☛ The Speed parameter is disabled when the
loop is in Sample mode (because speed is governed
by the MIDI note that you play).
then stop. In either case, play the same key again to
make the loop or phrase stop playing. You can also
disengage the Latch button to stop all latched notes.
Loop mode Latch Off Latch On
Sample Plays only when the
Stretch Plays only when the
note is held on.
note is held on.
Repeats (if the sample
has a loop).
Plays once.
Half/Double
The Half and Double Speed buttons (Figure 7-46
on page 79 ) le t you slow dow n th e lo op or phras e to
one half (50%) or one quarter (25%) of the current
tempo, or speed it up to t wice ( 200%) or four times
(400%) the current tempo. Similar to the Speed
Control slider, this setting is applied relative to the
other sync and tempo settings. It can be combined
with the Speed Control slider, allowing you to
specify any tempo within a range of 25% to 400%
of the current tempo, giving you an extremely wide
range of tempo control.
☛ Half/Double speed parameter is disabled
when the loop is in Sample mode (because speed is
governed by the MIDI note that you play).
Latch
When the Latch button (Figure 7-46 on page 79) is
off (disabled), a loop or phrase plays for as long as
you hold down its corresponding note on your
MIDI keyboard (or any other controller).
When Latch is on (enabled), a loop or phrase
continues to play, even if you lift your finger from
the key on your controller. If the loop or phrase is a
loop in Slice mode (without mapping), it will
conti nue to repe at indefinite ly. If the loop or p hras e
is in Sample or Stretch mode, it will play once and
Slice
(without
mapping)
Plays only when the
note is held on.
Repeats indefinitely until
the same note is played
again. Turning latch off
stops all latched notes.
Latch Start menu
The Latch Start menu (to the right of the Latch
button in Figure 7-46 on page 79) lets you specify
when the loop or phrase begins to play after you
trigger it. Latch Start is different from the Sample
Start control (explained above), which determines
the point (in the actual loop) where the loop will
start to play. Instead, Latch Start determines when
a loop begins to play, relative to other loops
currently playing in BPM.
Start menu setting What happens
Immediate Plays immediately, as soon as the loop or
Next Beat Begins playing at the next beat
Next Bar Begins playing at the downbeat of the
phrase is triggered.
next measure.
☛ Latch is also governed by BPM’s global tempo
setting and/or your host software tempo (if BPM is
synchronized to it).
In Stretch mode (“Stretch” on page 80), loops and
phrases always begin playing at the beginning of
the loop or phrase (plus any offset added by the
Sample Start slider). So if you choose Next Beat, t he
loop or phrase will begin playing at the next beat
from its beginning. This may or may not be what
you want musically. For example, if you trigger the
loop or phrase just after beat 2, it will come in on
beat 3, but start playing at its beginning (beat 1). If
82
BPM WINDOW
Page 83

you are creating poly rhythms in this manner, this
might be just what you want. But if you want the
loop to come in on beat 3 playing its own beat 3,
then use Slice mode (“Slice” on page 80) with
Position sync (see “Position” below). The Position
sync setting keeps the loop’s beats aligned with the
global tempo, regardless of when the loop begins
playing (on the next beat or next bar). Position
sync is only available for loops, not phrases.
Key
The Key display (Figure 7-46 on page 79) shows
the root key for the loop or phrase, if any. This is for
informational purposes and it cannot be changed.
To transpose the key, put the loop or phrase into
Sample mode and play a different note, or use the
Pitch controls in the synth settings section (see
“Pitch settings” on page 88).
Sync menu
The settings in the Loop Sync menu (Figure 7-46
on page 79) let you synchronize the loop or phrase
to BPM’s global tempo setting. If the Sync to Host
option is enabled (Figure 7-60 on page 90), the
loop or phrase will also synchronize to the tempo
of your host software.
Sync menu setting What it does
Off The loop or phrase does not sync to tempo.
Tempo The loop or phrase follows tempo, but not
Position Not available for phrases. Loops follow
position. Loops and phrases always start at
the beginning.
both tempo and position (their beats and
barlines always align with the tempo).
Tem po sy n c
When you choose Te m p o from the Sync menu
(Figure 7-46 on page 79), the loop or phrase will
play at the tempo indicated by BPM’s tempo
set ting, or as determine d by the host sof tware if the
Sync to Host option is enabled (Figure 7-60 on
page 90). However, in this mode, the loop or
phrase always starts at the beginning (or at the
location determined by the Sample start setting).
In addition, it begins to play at the instant it is
triggered, so it is up to you to trigger it “on the
beat”. If you trigger it at between beats, it will play
in tempo, but offset from the beat by what you
played.
Posit ion
The Position sync setting in the Sync menu
(Figure 7-46 on page 79) only affects loops, and
only when they are in Slice mode w ithout mapping
(“Slice” and “Map” on page 81). When a loop is in
Slice mode with Position sync, it might be helpful
to think of the loop as looping indefinite ly, whether
you are actually playing the loop or not.
When you play a note to “trigger” the loop, you are
actually just “unmuting” it, and it begins to play at
the position in the loop that currently matches
BPM’s tempo. For example, if the loop is two bars
long, and you trigger it at the second measure of
your music, then it plays starting at bar two of the
loop.
Loop Sync summary
Putting a loop into Slice mode and choosing
Position sync gives you the highest degree of tempo
synchronization because the loop will not only play
in tempo, but its beats and barlines will always
match the beats and barlines prescribed by the
tempo.
Here’s a summary of the different loop modes and
sync settings:
Sync off Tempo sync Position sync
Sample
Stretch
Slice
Slice+map
Sync setting
has no effect.
Plays at
original
tempo.
Plays at
original
tempo.
No effect No effect No effect
Sync setting
has no effect.
Follows tempo
but does not
automatically
align beats.
Follows tempo
but does not
automatically
align beats.
Sync setting
has no effect.
Follows tempo
but does not
automatically
align beats.
Follows tempo
and aligns
beats.
BPM WINDOW
83
Page 84

Loop export via Drag & Drop
The Drag & Drop button (Figure 7-46 on page 79)
lets you export loops and phrases into the tracks of
your host software, or onto your computer
desktop.
Loops and phrases are transferred as a standard
audio clip. Loops that are in Slice mode with
mapping (“Map” on page 81) can be dragged as
MIDI data (MIDI notes) into a MIDI track, which
can then trigger the mapped loop in BPM.
In either case, once the loop is placed in your host
software, it is completely independent of BPM at
that point, and you can treat it as regular audio or
MIDI data. This opens up a world of possibilities
for manipulating the raw audio or MIDI data using
the features in your host software.
Dragging audio data
When you see the audio data icons shown in
Figure 7-47, this means that you are dragging a
standard mono or stereo audio clip. You can drag
and drop it anywhere into your host software that
accepts audio clips via drag and drop.
display shown in Figure 7-46 on page 79 to
determine if the loop or phrase you ar dragging
from BPM is mono or stereo.
Conforming to the host tempo
If the Sync to Host option is enabled (“Sync to
Host” on page 90) when you perform the drag and
drop operation, the loop or phrase will snap to the
host’s tempo when you place it in an audio track,
such that it conforms to the host’s time line. If your
host software has the ability to snap the drag and
drop operation to measures and/or beats, this will
help produce rhythmically accurate results quickly.
If Sync to Host is disabled, the loop or phrase
retains is original tempo when placed in the track.
Dragging MIDI data
When you see the MIDI data icon shown in
Figure 7-48, this means that you are dragging a
sliced, mapped loop in the form of MIDI data.
Therefore, you should find a destination in your
host software that accepts MIDI data, such as a
MIDI track, although your host may also provide
other possible destinations. For example, in Digital
Performer, you could drag a MIDI loop into a
clipping window.
Figure 7-47: Dragging and dropping an audio loop into a host audio
track.
☛ Here is a good rule of thumb: if it works from
your computer desktop, it should work from BPM.
If your host makes a distinction between mono and
stereo audio material and therefore places
restrictions on where the audio can be placed
based on the channel format, use the waveform
84
Figure 7-48: Dragging and dropping a MIDI loop into a host MIDI
track.
Triggering BPM slices from the host
When a mapped MIDI loop is dropped into a
MIDI track, it looks similar to the MIDI data
shown in Figure 7-48. Each MIDI pitch triggers a
different loop slice. If you play notes chromatically
upwards from C3, you will recreate the original
loop. If you play them rhythmically in a different
BPM WINDOW
Page 85

order, you’ll play the individual slices but the result
will sound quite different from (but similar to) the
original loop.
Make sure that the MIDI track is assigned to play
it s MI DI da ta out put t o th e BP M part t hat hold s the
mapped loop. Otherwise, the MIDI data from the
track will not reach the sliced mapped loop. Also,
clear or bypass the loop’s Piano Roll Sequencer, so
the part does not receive different MIDI input from
two places at once.
Slicing a loop
The Clip window can be used to create slices in
audio files that do not already have slices.
Figure 7-50: Slice controls
To manually edit slices:
To do this Do this
Create slice Double-click in the top ruler
Move slice Click and drag a slice
Lock slice Right-click a slice and choose Lock
Figure 7-49: Clip window
Sample or drag some audio into the Clip window.
You’ll see controls for slicing in the lower left
corner: the Slice on/off button to t oggle slicing, and
the pop-up menu to choose if slices will
determined by Tra n s i e n t s or the Grid. Whe n
Transients is chosen, a sensitivity slider is shown
(see Figure 7-50, below); when Grid is chosen, a
menu with grid settings is shown (1/4, 1/8, 1/16,
etc., including dotted and triplet options).
Mute slice
(temporarily disable)
Delete slice Right-click a slice and choose Delete
Right-click a slice and choose Mute
To audition a selection in the waveform, press the
Play button at the top, next to the Sampling button,
or right-click the waveform and choose Play
Selection from the contextual menu. You can easily
select a slice to audition it by double-clicking on
the slice’s waveform.
After the loop is sliced, you can use the menu in the
upper left to save the entire file as a sliced loop
(Save as...) or export the slices as individual files
(Export slices). Alternatively, you could export the
slice s directly to the current bank’s p ads by clicking
the Map on Pads button in the lower left.
Figure 7-51: Saving or exporting the sliced loop
When using the Clip window’s Map on Pads
feature, it will map each slice to the current bank’s
pads starting with BD1. However, if some of those
BPM WINDOW
85
Page 86

pads already contain samples and you don’t want
their contents to be overwritten, you can “lock”
pads by using the Pad selector grid in the browser.
Figure 7-52: Use the Pad selector to “lock” pads.
Filter
The filter section (Figure 7-54) provides several
filter types for shaping the sound of the pad or part.
Filter type menu
Pads that are checked (black) will be overwritten;
pads that are unchecked (empty/gray) will be
locked. For example, you can use Map on Pads to
map eight slices from one loop, lock those pads,
then load eight slices from a second loop to fill all
sixteen pads.
SYNTH PARAMETERS
The Synth Parameters section of BPM window
(Figure 7-53) provides settings for the currently
selected bank pad or rack part. (See “Selecting a
pad” on page 57 and “Selecting a part” on page 69.)
The parameters discussed below apply to any BPM
material that is currently loaded in the pad or part
(samples, instruments, loops and phrases).
Envelope
menu
Drive menu
Figure 7-54: The Filter section.
Filter Type
Choo se the type of filter you wis h to a pply fr om th e
menu (Figure 7-54). BPM provides the following
filter types:
Figure 7-55: Filter types.
The filter type menu uses the following abbreviations:
Abbreviation Meaning
HP High Pass
Figure 7-53: The Synth Parameters section.
86
LP Low Pass
BP Band Pass
Rez Resonant
Comb+ Comb filter with positive feedback
Comb- Comb filter with negative feedback
BPM WINDOW
Page 87

Cutoff (Cutoff Frequency)
Turn the large Cutoff knob (Figure 7-54) to set the
cutoff frequency of the filter. The cutoff frequency
can be automated by sending a MIDI controller to
BPM, as explained in “MIDI automation” on
page 92.
Res (Resonance)
Resonance (Figure 7-54) emphasizes the cutoff
frequency of the filter. Higher resonance values can
significantly boost gain, so you may need to
attenuate the volume of the pad or part to achieve a
clean sound. Resonance can be automated by
sending a MIDI controller to BPM, as explained in
“MIDI automation” on page 92.
Drive
The Drive setting (Figure 7-54) sets the type and
amount of distortion (if any) that’s applied to the
filter output. In addition to the default setting of
Off, you have three different drive settings to
choose from: Analog, Mild, and Strong. Once you
set the distortion type, use the Drive knob to set
the amount of distortion that is applied.
Filter envelope
BPM provides a dedicated envelope for filter
modulation. Think of the filter envelope
(Figure 7-54) as a hard-wired control signal for the
filter cutoff frequency (although it can also be used
as a modulation source for other parameters, too).
The filter envelope provides the following
conventional 4-stage controls:
Stage Name Unit range
A Attack time msec 0.00 msec to 10 seconds
Alternatively, you can choose a conventional AHD
envelope from the envelope type menu
(Figure 7-54):
Envelope stage unit range
Attack (A) msec 0.00 msec to 10 seconds
Hold (H) msec 0.00 msec to 10 seconds
Decay (D) msec 0.00 msec to 20 seconds
Env (Envelope) Depth
The Env Depth knob (Figure 7-54) is like a valve
that governs the amount of envelope control signal
you want to apply to the filter. Positive envelope
depth values open up the filter relative to the cutoff
frequency; negative values close (invert) it. A value
of +1.00 applies the envelope in full, and -1.00
applies the envelope in full, but completely
inverted.
Ve l o c i t y
Ve l o c i t y (Figure 7-54) allows you to control how
much affect the MIDI note-on velocity has on the
triggering of the envelope. This control has a range
from 0 to 1. If you wish the filter envelope to be
independent of velocity, set this control to zero (0).
Amplitude Envelope
The amplitude envelope (Figure 7-56) lets you
control the attack (A), decay (D), sustain (S) and
release (R) characteristics of the sample,
instrument, loop or phrase loaded into the
currently selected pad or part. Alternatively, you
can choose an AHD envelope from the menu:
attack (A), hold (H) and decay (D).
D Decay time msec 0.00 msec to 20 seconds
S Sustain level Percent of
R Release time msec 0.00 msec to 20 seconds
BPM WINDOW
filter cutoff
frequency
zero to 1.00 (full scale)
Figure 7-56: The Amplitude Envelope is provided in two forms: ADSR
and AHD.
87
Page 88

ADSR envelope
The attack, decay and release parameters are timebased parameters (a length of time), whereas the
sustain parameter is a level (volume) parameter.
When a note is played, the envelope generator
begins to rise to its full level at the rate set by the
attack parameter. Upon reaching peak attack level,
it begins to fall at the rate set by the decay
parameter down to the volume level set by the
sustain parameter. The envelope remains at the
sustain level as long as the note sustains. When the
note stops, level retur ns to z ero at the rate set by the
release parameter.
Below is a summary:
Envelope stage unit range
Attack (A) msec 0.00 msec to 10 seconds
Decay (D) msec 0.00 msec to 20 seconds
Sustain (S) percent zero to 1.00 (full scale)
Release (R) msec 0.00 msec to 20 seconds
AHD envelope
The AHD envelope parameters (Figure 7-56) are
all time-based parameters. When a note is played,
the envelope generator begins to rise to its full level
at the rate set by the attack parameter. Upon
reaching peak level, it remains there for as long as
the hold parameter specifies. At the end of this
period, it begins to fall at the rate set by the decay
parameter down to zero.
Envelope stage unit range
Attack (A) msec 0.00 msec to 10 seconds
Hold (H) msec 0.00 msec to 10 seconds
Decay (D) msec 0.00 msec to 20 seconds
Pitch settings
The pitch settings (Figure 7-57) let you modify the
pitch reference for the currently selected part.
Figure 7-57: The Pitch settings.
Global, Semi and Fine tune
The Global knob lets you adjust pitch in semitones
over a two-octave range (-25.00 to +25.00) with the
precision of one cent (one one-hundredth of a
semitone). This is audio transposition (not MIDI).
The Semi (semitone) and Fine (fine-tune) settings
(Figure 7-57) provide more precise control,
transposing the pad or part in only semitones or
cents, respectively. The Semi range is from -24 to
+24 semitones. The Fine Tune range is from -100 to
+100 cents (one semitone). The Global setting
essentially combines the functionality of the other
two knobs into one: it provides the two-octave
range of the semi knob combined with the
precision (in cents) of the Fine knob.
Pitch envelope
The pitch envelope controls (Figure 7-57) let you
apply a pitch bend envelope to the pad or part. The
basic shape of the envelope is shown by the graph.
The Depth knob sets the amount of pitch bend to
be applied by the pitch envelope (in semitones).
This is the amount of transposition above or below
the root note that the pitch bend will begin. The
Time knob sets the amount of time it takes for the
pitch bend to go from the initial transposed
(depth) setting to the final root pitch of the sample,
loop or instrument note.
Ve l o c i t y
The velocity (Ve l ) knob (Figure 7-56) controls the
sensitivity of the velocity to the envelope’s
amplitude.
88
Aux Send
The Aux Se nd section (Figure 7-58) provides
access to the auxiliary (aux) effects busses. The
three aux send knobs control the amount of signal
being fed by the pad or part to the aux busses.
BPM WINDOW
Page 89

Figure 7-58: The Aux sends.
There are two kinds of aux effects: master and
bank. A switch is provided to toggle the knobs
between the master and bank aux sends. Both sets
of aux sends are active simultaneously; that is,
setting the switch to bank does not mute the master
aux sends, or vice versa.
For details about how to set up the Aux effects, see
“Effects” on page 99.
Master aux effects
Master aux effects busses are shared by all bank
pads and rack parts, but the send levels to the
busses are independent for each pad or part.
Bank aux effects
Bank aux effects provide a flexible way to utilize
and save effects along with a kit. Bank aux effects
operate similarly to the master aux effects, except
bank aux effects are saved with the bank. This
enables you to use an aux send to an effect from a
single pad, for example, but still save the effect
along with the bank.
SP MODE
BPM has four pad banks and two racks for loops
and instruments. Each bank and rack has an
SP Mode on/off switch:
SP mode
Figure 7-59: SP mode can be enabled or disabled independently for
each bank and rack.
When SP Mode is enabled for a bank or rack, BPM
applies advanced DSP technology to emulate the
“gritty” sound of the classic E-mu SP1200 rhythm
machine, as well as the unique sample
transposition behavior of the SP1200.
SP Mode only affects the bank(s) or rack(s) for
which it is enabled, and it affects all audio output
from the bank or rack.
BPM WINDOW
89
Page 90

TRANSPORT CONTROL AND TEMPO
BPM provides a Play and Stop button, along with a
tempo setting, that allows you play all currently
loaded patterns, sequences and loops in tempo
with one another.
Host
AutoPlay
Sync
Tem po
in BPM
Host
Figure 7-60: The transport and tempo controls.
Overdub
Tap
Tempo
to
Stop Play
Play and Stop buttons
Click Play and Stop (Figure 7-60) to start and stop
playback. This includes all currently loaded banks
(with kits and patterns loaded), all currently
loaded instrument parts (with their accompanying
sequences) and parts loaded with loops that have
their individual AutoPl ay setting enabled (see
“Play/Autoplay” on page 72).
Record, Quantize and Overdub
The Record, Quantize and Overdub buttons
(Figure 7-60) can be used for real-time MIDI
recording directly into BPM. For complete details,
see “Recording” on page 93.
Metronome
Click the metronome icon to toggle the
metronome on or off, and drag the slider to set the
metronome level.
Tempo (BPM)
The Tempo setting (Figure 7-60) lets you specify
the tempo in BPM (beats per minute). Drag up or
down on the text, or double-click to type in the
desired tempo. All loops are time-stretched in real
time to match this global tempo setting. When
Record
Record
Undo
Quantize
Metronome
BPM is syncing its tempo to your host software,
this setting reflects the current host software tempo
setting and it cannot be changed.
Host AutoPlay
When the host Aut oPl ay option (Figure 7-60) is
enabled, the plug-in version of BPM follows the
main transports of the host software. You can also
still use BPM’s Play and Stop buttons
independently from the host. In other words,
BPM’s play button won’t start the host, but the
host’s play button will start BPM.
In the standalone version of BPM, the AutoPlay
option is disabled (because there is no host
software present).
Sync to Host
When the Sync to Host option (Figure 7-60) is
enabled in the plug-in version of BPM, the BPM
setting becomes disabled (it cannot be directly
modified) and instead displays the current tempo
setting of the host software. BPM follows the tempo
of the host software, so that all BPM loops play in
tempo with your host software tracks. Use the
tempo controls in the host software to control
overall tempo of both BPM and the host software
tracks.
In the standalone application, when the Sync
button in the transport is enabled BPM will sync to
MIDI Beat Clock messages received on any of its
MIDI input ports (as chosen in the Audio and
MIDI Settings > MIDI Devices tab).
Tap Tempo
Click the Tap Temp o button (Figure 7-60) to set
BPM’s tempo by tapping your mouse. This allows
you to set the tempo intuitively, by “feel”, rather
than by specifying a number.
90
BPM WINDOW
Page 91

Loop tempos and authentic rhythmic feel
BPM loops have been recorded and prepared with
the utmost care in programming a unique, original
rhythmic feel for the loop. As a result, you may
sometimes hear loops with different styles that
sound like they are not playing in tempo with each
other. This is not because the loops are being
incorrectly played by BPM. The tempo settings of
the loops themselves and BPM’s tempo-matching
features are extremely sophisticated, accurate and
true. Instead, loops won’t necessarily always
“groove” with each other, due to their unique, and
possibly irregular, timing. These timing variances
are an essential musical component of the loop,
dutifully preserved by BPM during playback.
In cases like these, you might try applying BPM’s
groove quantization or other tempo and beat
matching features. These features can work
wonders on loop tempos, giving you complete
control over them. For example, you can quantize
loops to a more precise rhythmic grid, apply the
groove of one loop to another to match them, and
many other beat and tempo-related operations. For
details, see “Groove” on page 91 and “Saving your
own grooves” on page 63.
MASTER VOLUME AND TUNE
The master section (Figure 7-61) provides general
settings that affect the entire plug-in as a whole (all
parts).
Tun e
The Tu n e knob (Figure 7-61) is a global tuning
stage for BPM window. It is applied to the entire
plug-in as a whole, in addition to any other
instrument-specific tuning adjustments that have
been made. For example, you could tune BPM to
reference A at 442 Hz (instead of 440). The range is
from 420 Hz to 460 Hz. Option/Alt-click the knob
to return to the default value of 440 Hz. Doubleclick it to enter the desired value numerically.
If you have multiple BPM plug-ins instantiated in
your software, this global tune setting affects each
plug-in separately.
GROOVE
A groove consists of slight variations in the timing
of the beats, along with variations (emphasis and
de-emphasis) of the loudness (velocity) of beats.
The groove controls in the master section
(Figure 7-61) let you apply an overall groove to
BPM’s playback. All patterns and slice loops are
affected. Choose the desired groove from the
Groove menu (Figure 7-62) and then adjust the
amount of position and velocity to be applied with
the Pos and Ve l knobs, respectively. The range of
these settings is 0.00 to 1.00, where zero is no effect
and 1.00 is full effect. This allows you to apply
different amounts of timing and velocity.
Figure 7-61: The Global section.
Global volume
The Vo l u m e setting in the master section
(Figure 7-61) serves as a overall volume setting for
the entire BPM plug-in. It is applied as a final,
additional gain stage for BPM’s Main output.
BPM WINDOW
Figure 7-62: The Groove menu provides dozens of classic grooves,
including MPC and LinnDrum grooves.
91
Page 92

Custom grooves
If you have created and saved any custom grooves,
they appear at the bottom of the Groove menu
(Figure 7-62). See “Saving your own grooves” on
page 63.
MIDI AUTOMATION
You can send MIDI continuous controller data to
any BPM knob or slider to control it remotely from
your MIDI controller or automate it from recorded
controller data in a MIDI track in your audio
sequencer.
To assign a MIDI controller to a knob or slider,
right-click it. A window appears:
Controlling the volume of each pad and part
To control the volume of each bank pad and rack
part individually, perhaps from a MIDI controller
device with faders on it, control-click or right-click
its volume slider in the mixer (Figure 7-74 on
page 97) and then move the desired fader on your
controller to complete the assignment. Repeat this
procedure for each pad and/or part you wish to
control.
Controlling synth parameters
MIDI automati on is an ideal w ay to have hands- on,
real-time dynamic control over the timbre of any
ban k pad or rack part. Here are ju st a few examples:
■ Control the filter cutoff
■ Control filter or amplitude envelope depth
Default MIDI controllers
By default, each bank and each rack part has MIDI
controller numbers 7, 10 and 11 assigned to
volume, pan and expression. These assignments
can be edited or removed in the Mixer view.
Figure 7-63: Assigning a MIDI controller to a control to automate it.
Choose the desired controller from the menu
provided, or send the desired controller from your
keyboard. As you move it, the controller data type
is accepted and the window is dismissed.
To remove a controller, right-click the control and
choose the None option (Figure 7-63).
Automation is assigned per pad/part
When you assign a MIDI controller as described
above, it is connected to the control for the
currently selected pad or part. This gives you the
maximum amount of flexibility, allowing you to
control multiple parts simultaneously.
MIDI automation examples
Here are a few examples of how you could use
MIDI automation to control BPM.
92
MIDI MODULATION
MIDI Modulation is an extension of BPM’s MIDI
automation capabilities. MIDI Modulation works
as a real time control that modulates a parameter’s
value without changing the parameter’s setting
itself. It can either add to or subtract from the
parameter’s current value, while at the same time
preserving the original value of the parameter.
Option/Alt-right-click to bring up the MIDI
Modulation window. The MIDI Modulation
window looks very much like the MIDI Control
window, except this window also has a slider. For a
negative modulation value, drag the slider to the
left; for a positive value, drag the slider to the right.
BPM WINDOW
Page 93

Figure 7-64: Adding a MIDI modulator
This is useful to provide an extra degree of control
and variance over the details of your sounds. For
example, try using MIDI Modulation to modify
the filter cutoff frequency. You can also use it to
create crossfades between different controls. For
example, you could assign two banks to the same
controller: modulate volume on one bank with
Expression (CC 11) and drag the slider to the right,
and modulate volume on the other bank with
Expression and drag the slider to the left. The result
is that you could crossfade between the banks by
moving your expression controller.
Viewing your record pass
To view your record pass as you record it, click the
Seq (Sequencer) display tab in the BPM window
(Figure 7-1 on page 49).
MIDI input
If you will be recording from an external MIDI
source (a MIDI controller or host sequencer), you
need to route MIDI input to the bank or part you
are recording.
The Route MIDI input to option in the top left
corner of the BPM window (Figure 7-65) ensures
that incoming MIDI data is always routed to the
cu rrentl y sel ected bank or r ack p art . Just ma ke sure
that the box is checked and the menu says Selected
Bank/Part, as shown below. This convenient
feature means you won’t have to keep changing
your controller’s transmit channel as you move
around in BPM.
Figure 7-65: Routing incoming MIDI data.
RECORDING
BPM lets you record into the Step Sequencer for a
pad bank (Figure 7-16 on page 59), or the Piano
Roll Sequencer for rack part (Figure 7-38 on
page 72), from the following sources:
■ The on-screen pads
■ The on-screen keyboard
■ A MIDI controller
■ A host sequencer
Choose the bank or part to record into
If you are recording into a bank, click its bank
button (A, B C or D) to make it the current bank. If
you are recording into a rack part, click its rack
button (A or B) and then click the part you want to
record into to select it.
BPM WINDOW
The MIDI input menu shown in Figure 7-65 also
lets you choose a specific MIDI channel. This
allows you move around in BPM while always
routing the incoming MIDI to a par ticular Bank or
Rack part. Banks A, B, C, and D respond to MIDI
channels A1 through A4. (See “MIDI channel” on
page 71 for an explanation of BPM’s four banks of
MIDI channels.) Rack parts can be assigned to any
MIDI input you want. By default, the first part in
Rack A defaults to channel A5, the second part to
A6, and so on, to avoid a MIDI channel conflict
with the pad banks. See “MIDI channel” on
page 71 for details on making part MIDI channel
assignments.
If you uncheck the Route MIDI input to option
(Figure 7-65), incoming MIDI data will be routed
to any ban k or p art that is set to re ceive on the same
channel.
93
Page 94

Quantize
If you would like to quantize your input as you
record, enable the Quantize button in BPM’s main
transports (Figure 7-60 on page 90). Quantizing
records the notes you play precisely on the step
grid. When quantizing is off, notes are recorded
exactly with the timing and feel you play them
with. You can quantize them later using the
TimeShift Graph Sequencer (see “TimeShift” on
page 61).
Overdub
Each time BPM cycles back to the beginning of the
pattern or sequence, a new record pass begins. If
you would like to keep any data you have already
recorded in previous passes and simply layer more
new material on top of them, enable Overdub
record mode in BPM’s main transports
(Figure 7-60 on page 90). If you would like to wipe
out the previous record pass as you record each
new one, disable Overdub.
Note Repeat
The Note Repeat function repeats incoming notes
in metric values. This can be a useful performance
tool, as well as a helpful way to record repetitive
note patterns into BPM’s step sequencer.
Using Note Repe at
To enable Note Repeat, enable the Note Repeat
checkbox (Figure 7-66).
The rate of the repeated notes is controlled by the
Note Repeat rate menu, which ranges in metric
values from 32 bars to 64th note triplets.
Begin recording
To begin recording, press the Record button in
BPM’s main transports (Figure 7-60 on page 90).
During recording, you’ll hear a synthetic click
sound on t he be ats to h elp you play in rhyth m. Thi s
is also an audible indication that BPM is in record
mode.
To record from the on-screen bank pads
(Figure 7-9 on page 55), click them.
To record from the keyboard below the rack part
list (Figure 7-36 on page 70), click its keys.
To record from a MIDI controller, play the
controller.
To r ecor d from your host s eque ncer, ma ke su re that
BPM’s Sync to Host and Host AutoPlay options
(Figure 7-60 on page 90) are enabled and then start
playback from the host.
94
Figure 7-66: Note Repeat
Repeated note velocity
By default, the velocity of the repe ated notes w ill be
the same as the note-on velocity of the initially
triggered note. However, you can use polyphonic
aftertouch to vary the velocity of the repeated
notes; this requires a MIDI controller or a plug-in
host which supports polyphonic aftertouch.
☛ Akai MPD32 users: The MPD32’s pads are
configured to use monophonic (channel)
aftertouch by default. To control the velocity of
repeated notes in BPM, change the pads to use
polyphonic aftertouch. Refer to the MPD32 User
Guide for information on how to configure your
MPD32.
Record Undo
The Record Undo button in the Transport section
will undo the previous record pass in BPM’s
sequencer. You can simply click the button to
activate it, or control it via MIDI Remote Control.
BPM WINDOW
Page 95

SAMPLING
In addition to its extensive drag and drop import
capabilities, BPM also allows you to sample live
audio input. You can sample any audio material
you wish, including individual drum hits, loops or
any audio phrase. Then newly sampled material
can then be assig ned to a pad as par t of a kit, or you
can load it into a part and use it as a loop or phrase.
This opens a world of possibilities for creating truly
unique rhythms with your own custom sounds.
BPM lets you sample audio from outside audio
sources. You can also sample BPM’s main output
back into itself (self-sampling).
BPM provides two ways to sample audio:
■ Direct sampling into a pad
■ Sampling into the Clip window
The sampling controls
The sampling controls are located at the top of the
BPM window:
Level
meters
Figure 7-68: The BPMSampler application
Sampling from an external source
To set up sampling from an external source:
1 In BPMSampler, choose Stereo or Mono as
desired from the Configuration menu.
2 Choose File menu> Audio and MIDI Settings
(Figure 7-69):
Clip window Source Record
Figure 7-67: The sampling controls.
The BPMSampler application
To sample outside sources, such as a microphone
connected to your computer’s audio interface,
launch the BPMSampler application. This is
located side by side with the BPM standalone
application in your Applications folder (Mac) or
Program Files\MOTU\BPM (Windows).
BPM WINDOW
Figure 7-69: Choosing an input to sample from.
3 Click the Audio Devices tab to specify the audio
device driver for your audio interface (or other
audio source). This is the audio input device
installed in (or connected to) your computer that
you would like to sample from.
4 Choose the desired mono or stereo inputs from
the Physical Inputs menus. These are the physical
inputs on your audio interface that you will be
sampling.
95
Page 96

5 If you would like to monitor the inputs, choose
the desired outputs from the Physical Inputs
menus. Choose None if you don’t want to monitor
the input.
Figure 7-71: Choosing the BPMSampler as the source for sampling.
☛ Make sure that the outputs you’ve chosen
won’t cause a feedback loop.
6 Click OK.
7 Use the level meters (Figure 7-68) to set the level
for the input.
8 Leave the BPMSampler applet running during
your sampling session. You can quit from it when
you are done.
Sampling from an audio track in your host audio
software
BPM can also sample the audio output of any track
in your host audio sequencer or other software. To
set up sampling from your host, instantiate the
BPMSampler FX plug-in on the desired track, just
as you would any standard FX plug-in. The plug-in
should already be present in your host’s effects
plug-in menu:
If you would like to sample BPM’s output back into
itself, choose BPMSA 1 Output, where SA refers to
the standalone version. Alternatively, this could be
MAS (for the MAS version), VST (for the VST
version), etc.
The number (1, 2, etc.) in the name of the source
refers to which instance when there are multiple
instances running. For example, you might have
th e st and alon e BP MSa mpler run ning , as w ell as th e
plug-in version (within your host software).
Sampling into a pad
To sample into a pad, click the desired pad and
click the sampling Record button (Figure 7-67).
Click Done when you are finished, or click Cancel
to discard the recording.
Figure 7-72: Sampling into a pad.
Figure 7-70: To record the audio output of a track in you host
software, instantiate the BPMSampler plug-in in the normal fashion
for a standard effects plug-in.
Source
Back in BPM, choose the Source that you would
like to sample from (Figure 7-67). The Source
menu shows the BPMSampler input, plus BPM’s
own output:
96
☛ When sampling, be sure to use the sampling
record button at the top of the window
(Figure 7-67 on page 95), not the record button in
BPM’s main transports (which is used for MIDI
recording into the Step Sequencer).
Sampling a clip
The clip window lets you record independently
from the pads. To use audio recorded in the clip
window in a pad, make a selection in the waveform
and then drag and drop the selection into the BPM
window to any destination that accepts clips (pads,
parts, etc.).
To s am pl e a cl ip :
BPM WINDOW
Page 97

1 Choose the desired input from the Source menu
(Figure 7-71).
2 Click the Clip button (Figure 7-67 on page 95).
The Clip window appears (Figure 7-73).
Figure 7-73: Sampling via the Clip window.
3 Confirm the source from the menu provided.
4 Click the Sampling button to begin sampling.
5 Click the Sampling button again to stop.
6 Select the desired portion of the waveform, or
double-click to select all.
7 Press Command/Control-C to copy the selected
waveform and then paste the selection into the
sample editor (see “Paste” on page 67), OR
8 Hold down Shift-Option/Alt and then drag the
selection to any destination in the BPM window
that accepts audio clips.
MIXING
The Mixer (Figure 7-74) provides a complete
environment for mixing all components of BPM
output.
Accessing the mixer
To access the Mixer, click the Mix display tab in the
BPM window (Figure 7-1 on page 49).
Bank and Rack mixer tabs
Click a Bank or Rack mixer tab (Figure 7-74) to
view the individual mixer channel strips for the
each bank pad or rack part. Each bank and rack
has its own tab.
Channel strips
The pad and part channel strips (Figure 7-74)
provide conventional mixer controls for volume,
pan, mute (m), solo (s), and output assignment
Mixer tabs
Pad or part
channel strips
Selected pad or
part (darkened
channel strip)
BPM WINDOW
Bank and Rack mixer tabs
Figure 7-74: The Mixer.
Master mixer tab
Pad or part name
Pad or part effects
Pan
Volu me
Level meter
Output
97
Page 98

(see below). Signal flows from top to bottom. The
FX button provides direct access to the part effects
for the pad or part (see “Effects” on page 99).
Outputs
The Output channel strip setting (Figure 7-74) let
you assign each part to one of 17 possible stereo
output pairs (main outs plus 16 stereo aux
outputs). Each output pair can be assigned to (or
routed by your host audio software to) a pair of
physical outputs on your audio hardware. This
provides you with a great deal of flexibility in submixing BPM’s four banks, two racks and unlimited
parts.
The list of stereo pairs that you see in each Outputs
menu depends on the situation in which you are
running BPM.
Multiple outputs and standalone operation
If you are running BPM as a standalone
application, the output menu displays a main out
pair, plus 16 additional separate output pairs,
numbered 2 through 17. To learn how to map these
output pairs to the physical outputs on your audio
hardware, see chapter 5, “BPM Application”
(page 27) and “Outputs” on page 98.
Multiple outputs and plug-in operation
If you are running BPM as a plug-in, the output
me nu di splays whatever o utpu ts are ma de av ailab le
to the plug-in by your host software. For example,
in Digital Performer, you will see pairs of busses, as
supplied by Digital Performer’s current studio
configuration (Setup menu). Your host software
allows you to map the busses to the physical
outputs on your audio hardware.
Master mixer tab
Click a Master mixer tab (Figure 7-74) to view the
master channels for the each bank pad or rack part.
Th is t ab a lso dis play s BP M’s ma ster o utput chann el
and three Aux bus channels, as shown below.
Figure 7-76: The master channels.
Figure 7-75: BPM’s seventeen output pairs in the standalone version.
98
Bank and rack master channels
The bank and rack master channels control the
overall output of each bank and rack. The FX
button provides direct access to the bank/rack
effects. You can assign each bank or rack to its own
independent audio output pair.
Aux channels
The three Aux (auxiliary) channels (Figure 7-76)
serve as independent busses with their own effects
processing, volume and pan, similar to a
conventional mixing console. Use the Aux sends
(see “Aux Send” on page 88) to assign bank pads or
rack parts to them. Apply the desired aux channel
effects (Figure 7-77 on page 99) via the FX button,
and use the desired level and pan. The aux channel
BPM WINDOW
Page 99

has no output assignment because it is fed back
into the master channel (at the top of the channel,
before master effects).
Master channel
The master channel (Figure 7-76) provides a final,
global mix stage for BPM’s main stereo output. The
FX button provides direct access to the master
effects (Figure 7-77 on page 99). The output
assignment for the standalone version of BPM is
made in the Audio and M IDI Settings window
(Figure 5-6 on page 32). When running BPM as a
plug-in, the master output assignment is handled
by the host software.
EFFECTS
BPM provides unlimited effects slots at many
points in its signal chain, from individual sample
layers in a pad, all the way up to master effects on
the master output fader. You can apply unlimited
effects independently to the following BPM
elements:
■ Racks
■ Aux busses
■ Bank aux busses
■ Master fader
Accessing effects
To access BPM’s effects (Figure 7-77), click the FX
display tab in the BPM window (Figure 7-1 on
page 49).
Effects tabs
To view the effects for a pad, part, bank or rack,
select it and then click its tab in the Effects display
(Figure 7-77). To view the effects for the aux busses
or master fader, click their corresponding tab at
any time.
Bypassing a tab
Use the tab bypass button (Figure 7-77) to
temporarily bypass all effects currently loaded in
the tab.
■ Pad layers
■ Pads
■ Rack parts
■ Rack presets
■ Banks
Tab bypass
Effect slots
Effect name
BPM WINDOW
Effects tabs for the
currently selected
pad/part or bank/rack
Figure 7-77: Effects.
Aux bus effects
Adding, deleting, bypassing and replacing effects slots
To add an effect to the list, click the Add FX button
(Figure 7-77). Each effect slot has its own bypass
and delete button. If an effect has more parameters
than the slot can display at one time, use the slot’s
Master
Add
effects
effect
Bypass slot
Sync to tempo
Delete slot
Scroll bar
Next/previous
parameters
99
Page 100

next/previous parameter buttons to access them.
To replace an existing effect with a different one,
right-click its name to open the FX browser.
Unlimited effects slots
You can add an unlimited number of effects to the
effect slot list. Use the scroll bar to access the entire
list of effects. Note that signal flows from top to
bottom in the list, so order your effects accordingly.
Sync
Some effects have parameters, such as delay taps,
that can be synced to BPM’s tempo (or the tempo
of your host). To do so, enable the Sync button
(Figure 7-77). Doing so changes the Effect
controls, allowing you to adjust timing via a linear
time reference (such as seconds/milliseconds) or a
beat-based time reference (fractions or multiples of
BPM’s beat and tempo).
The effects browser
When you click the Add FX button (Figure 7-77),
you’ll see BPM’s multi-column effects browser
(Figure 7-78), where effect presets are conveniently
organized by category and sub-category.
The effects
BPM provides dozens of included advanced,
professional quality effects. For details about each
effect and its presets, see Appendix B, “Effects”
page (239).
Effect controls
Each effect has a unique set of controls. You can
adjust them directly in the effect slot. Drag them to
adjust their setting with the mouse. Double-click to
enter values numerically. Right-click to assign
automation, as explained in “MIDI automation” on
page 92. For details on the settings for each specific
effect, see Appendix B, “Effects” page (239).
Preset effects
Preset effects (Figure 7-77) are similar to pad/part
effects in that they apply to the currently selected
pad or part. However, they differ in that they
repres ent any effects that have been saved as part of
the preset loaded from BPM’s preset library. The
preset tab gives you access to these original, saved
effects.
If you add preset effects to a preset, you must
remember to save them as part of a bank (see
“Banks” on page 106).
Pad layer effects
When you program multiple sample layers on a
pad, BPM lets you apply independent effects to
each pad layer, if you wish. Because pad layer
effects are so intimately tied to layer programming,
they are not accessed through the Effects tabs
shown in Figure 7-77. Instead, you can access them
in the Pad Editor effects tab (Figure 7-32 on
page 68).
100
Figure 7-78: Browsing effect presets.
BPM WINDOW
 Loading...