

Page 1

Wireless Assistant
SAGEM W A 3050
Owner’s Guide
Page 2
WA 3050
control/Action
2
1
4
5
7
9
11
3
6
13
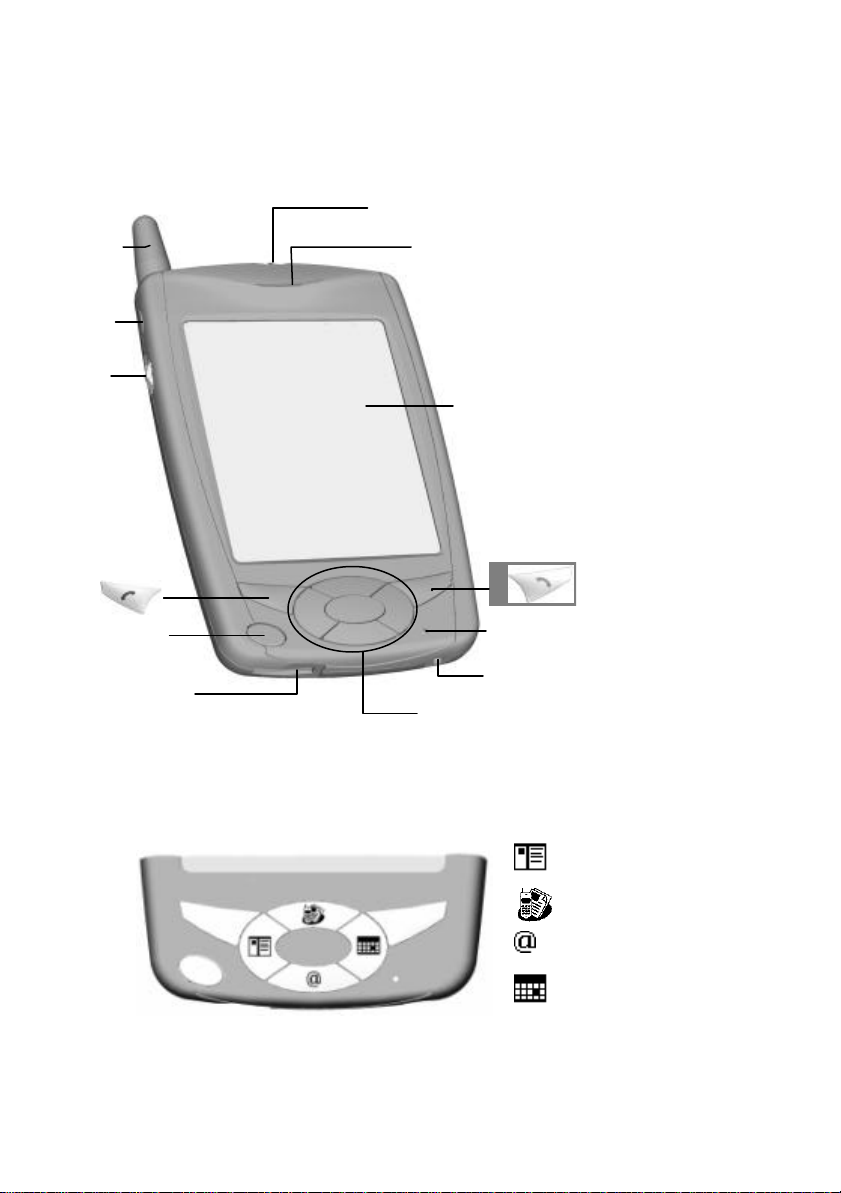
1 Antenna
2 Status LEDs:
GSM | PDA
3 Speaker
4 Record
5 Up/Down
button
6 Touch screen
7 END
Phone OFF
8 SEND /
Phone ON
9 PDA power
ON/OFF
10 Microphone
8
10
11 USB/Serial
port
12
12 DC jack
13 Program
buttons
Program buttons
Contacts
SMS + fax
WAP
Calendar
Page 3
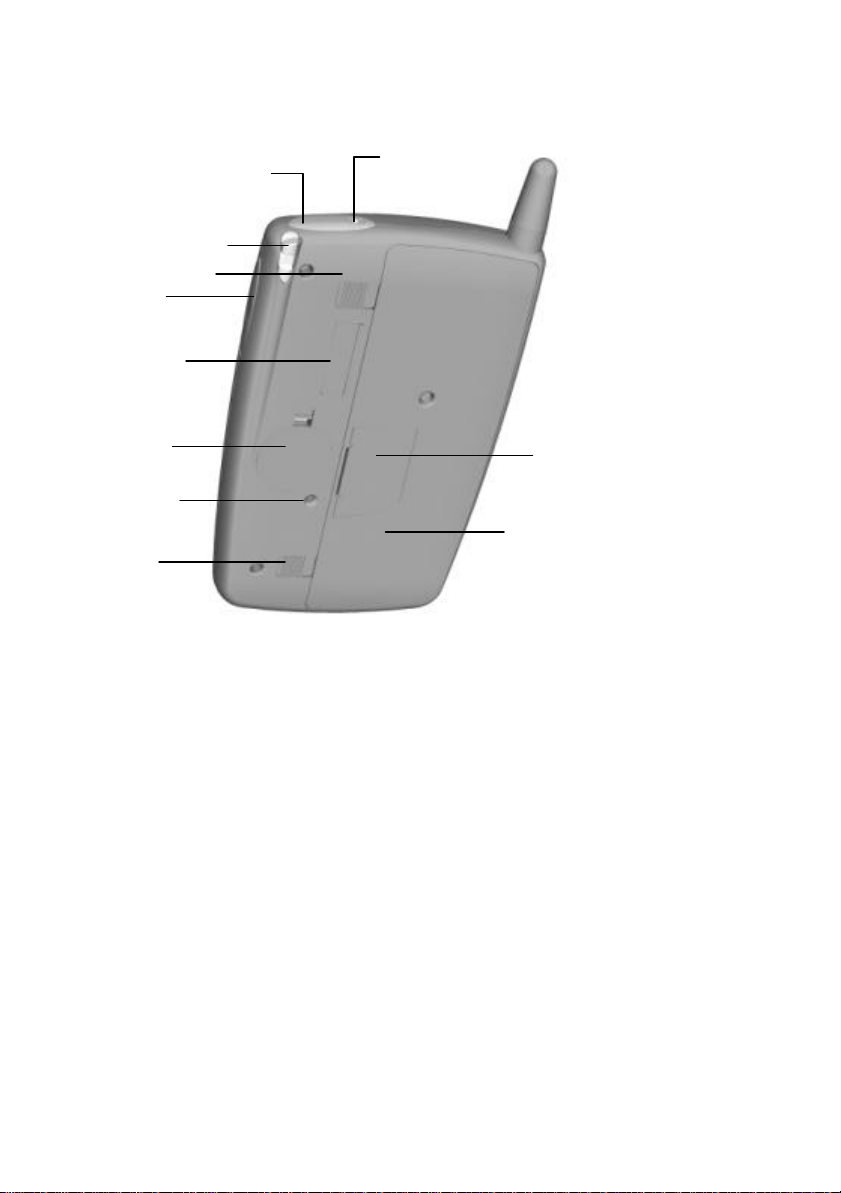
20
23
14
16
23
17
18
19
21
Left LED (GSM) Right LED (PDA) Function
Blinking amber Unit is charging
Blinking green Network found
Solid green Communication in progress
Green / Red Hands-free mode activated
Blinking red Low Battery no call in progress
Solid red Low Battery call in progress or
15
14 Infrared port
15 Stereo
headphone
jack
16 Stylus
17 Volume control
18 CompactFlash
slot
19 Backup battery
20 SIM card door
22
Blinking amber New SMS received
Blinking green Meeting reminder activated
hands-free mode activated.
21 Reset button
22
GSM pack
23 GSM pack
latch
Page 4

Copyright
The information contained in this manual is subject to change without notice.
Sagem shall not be held liable for technical or editorial errors or omissions
contained herein; nor for incidental or consequential damages resulting from
the furnishing, performance, or use of this material.
© Sagem SA 2001.
This document contains proprietary information that is protected by
international copyright laws. All rights are reserved. No part of this document
may be photocopied, reproduced, adapted, or translated to another language
without the prior written consent of Sagem, except as allowed under the
copyright laws.
The programs that control this product are copyrighted and all rights are
reserved. Reproduction, adaptation, or translation of those programs without
prior written permission of Sagem is also prohibited.
Microsoft, ActiveSync, Outlook, Pocket Outlook, Transcriber, Windows,
Windows NT, the Windows logo, and the Windows CE logo are either
registered trademarks or trademarks of Microsoft Corporation in the United
States and other countries. Microsoft products are licensed to OEMs by
Microsoft Licensing, Inc., a wholly owned subsidiary of Microsoft
Corporation.
All other brand names and product names used in this document are trade
names, service marks, trademarks, or registered trademarks of their
respective owners.
Page 5

Contents
Welcome 13
How to use the information in this manual 14
Conventions 16
Where to find information 17
Using online help 18
WA 3050 components 19
Setting up the WA 3050 20
Information on the SIM card 21
Important safety information 22
Specific precautions 23
Charging device 24
European Union Notice 24
Accessories 25
USB cradle and external power adapter 25
Serial cable 25
Stereo headphones with built-in microphone 26
Optional accessories 26
Guidelines for general use 27
Getting started 31
Configuring your WA 3050 device 32
WA 3050 basics 32
Hardware buttons 33
Stylus 34
Today screen 35
Dialing screen 37
Programs 40
Switching among programs/tasks 41
Navigation bar and command bar 42
Pop-up menus 44
Modes of operation 44
Notifications 46
Entering information 47
Typing using the input panel 48
Writing on the screen 50
v
Page 6

Drawing on the screen 54
Recording a message 56
Finding and organizing information 57
Basic calling features 61
Turning the phone on and off 62
Making a call 62
Making an international call 63
Making an emergency call 63
Answering a call 64
Placing a call on hold 64
Rejecting a call 64
Adjusting speaker volume 65
Setting the microphone to mute 66
Activating hands-free mode 66
Activating silent mode 66
Ending a call 67
Advanced calling features 68
Viewing the last number dialed 68
Making a call using rapid redial 68
Making a call from Contacts 69
Setting up a three-way conference call 70
Call-related features 71
Accessing voice mail 72
Activating or deactivating automatic redial when busy 72
Reviewing the status of caller ID settings 73
Blocking outgoing caller ID until the phone is powered
off 73
Activating or deactivating call waiting 74
Forwarding voice, data, or fax calls 74
Using Call Status 76
Monitoring the status of calls in progress 77
Viewing summary-level Contacts information 77
Switching between different calls in progress 78
vi
Page 7

Using the Call Log 79
Reviewing calls made, received, or missed 81
Deleting the information in the Call Log 82
Using the security features of your phone 83
Locking the and phone keys 83
Activating the use of a PIN code 84
Changing the PIN code 86
Changing the PIN2 code 87
Activating call barring 88
Activating fixed dialing numbers 90
Activating cost limitations 92
Turning off transmission of DTMF tones 93
Using the Sync SIM utility 94
Using wireless data applications 101
Configuring SMS & fax settings 102
Configuring WAP settings 105
SMS 106
Sending an SMS message 106
Reading and replying to SMS messages 108
WAP 110
Viewing WAP-enabled sites 111
Fax 113
Sending and receiving faxes 113
Viewing and annotating a fax 117
Resending a fax 118
Getting connected 119
Connecting to an ISP 120
Connecting to your network 121
Ending a connection 125
Connecting directly to an e-mail server 126
Getting help on connecting 128
Inbox: sending and receiving e-mail messages 129
Synchronising messages 129
Sending and receiving e-mail remotely 130
vii
Page 8

Receiving messages 131
Composing messages 133
Managing messages and folders 135
Folder behaviour using ActiveSync 135
Folder behaviour for remote services 136
Pocket Internet Explorer 137
The Mobile Favorites folder 137
Favorite links 137
Mobile favorites 138
Channels 139
Transferring items using Infrared 144
Microsoft ActiveSync 149
Microsoft Pocket Outlook 151
Calendar: scheduling appointments and meetings 151
Summary screen 154
Meetings 154
Contacts: tracking friends and colleagues 155
Summary screen 158
Tasks: keeping a To Do list 158
Summary screen 161
Notes: capturing thoughts and ideas 161
Companion programs 164
Pocket Word 165
Typing mode 167
Writing mode 168
Drawing mode 169
Recording mode 170
Pocket Excel 170
Tips for working in Pocket Excel 172
Microsoft Money 174
Opening and/or creating a new file 174
Navigating within Microsoft Money 175
Creating, editing, and deleting accounts 176
Creating, editing, and deleting categories, payees 178
Adding and working with transactions 178
Creating, editing, and updating your investments 179
viii
Page 9

Synchronising with Microsoft Money on your desktop
PC 181
Configuring Money for Pocket PC 183
Windows Media Player for Pocket PC 185
Using the playlist manager 185
Microsoft Reader 187
Getting books onto the WA 3050 187
Using the Library 188
Microsoft Transcriber 189
Features 190
Starting the program 191
Transcriber tutorials 193
Tutorial One: the basics 193
Tutorial Two: editing gestures 197
Customizing Transcriber 201
Adjusting program settings 201
Personalising handwriting recognition capabilities 204
Editing text 206
Using the iconbar functions 207
Using control gestures 211
Selecting text 214
Using the alternative list 215
Adding words to the dictionary 216
Customizing your WA 3050 device 219
Customizing screens and menus 220
Using Pocket PC security features 222
Adjusting Pocket PC device settings 223
Customizing system settings 226
Setting options for answering calls 229
Setting options to show call length and cost, and delete
the call log 230
Causing the display to be turned off during a call 232
Selecting options for ring tone and vibrating alert 233
Specifying voice mail and other personal numbers 235
Selecting an alternative radio speed (GSM network) 236
Selecting GSM network preferences 236
Adding or removing programs 237
ix
Page 10

Configuring your WA 3050 device to use as a modem
for your PC 240
Managing resources 243
Managing power 243
Adjusting storage and program memory 245
Managing SMS and faxes 248
Stopping or activating a running program 249
Backing up and restoring data 250
Monitoring phone usage 252
Appendix A: Troubleshooting 254
Resetting your device and clearing memory 254
Battery loses power 255
If you need to check the software version 257
If you forget your Pocket PC password 258
If you run out of memory 258
Screen freezes or responds slowly 258
Screen is blank 259
Screen is dark 259
Screen is hard to read 259
Inaccurate response to stylus taps 260
Slow or no response 260
No sound 260
Infrared (IR) connection problems 260
Modem connection problems 261
Network connection problems 263
Cable connection problems 264
Travel guidelines 265
International travel guidelines 265
Shipping guidelines 266
Caring for your device 266
Appendix B: Character Recognizer 267
Tips for writing characters 270
Appendix C: Transferring Palm-size PC data 271
x
Page 11

Appendix D: Supported GSM-standard MMI key
sequences 273
Appendix E: Hardware specifications 277
System specifications 277
Physical specifications 278
Glossary 279
Index 299
xi
Page 12

Page 13

1 Welcome
Congratulations on purchasing a WA 3050 device, the
complete Microsoft® Windows®-powered organiser and
communications solution for the mobile professional. The
WA 3050 device helps you stay in touch, keeping vital
business and personal information current and close at hand.
Integrated into your device is a next-generation GSM phone
with a full range of voice and data capabilities, including the
ability to send and receive SMS and fax, and a WAP browser
for access to the mobile Internet. Microsoft Pocket Outlook
lets you read and write e-mail and manage your appointments
and contacts. Microsoft ActiveSync allows you to
synchronize information on your device with a PC or
notebook computer.
Picture yourself in the following situations:
§ Your cell phone rings, and the boss asks if you are free
this afternoon for a meeting. You scramble through your
briefcase, looking for your digital organiser.
§ You are meeting friends for dinner and a movie. You
download movie listings from the Internet to your PC,
then synchronize it with your organiser. By the time you
arrive for dinner, your friends have already ordered
dessert.
§ You grab your digital organiser to catch the bus. On the
way home, you review your task list, make notes about
new CDs you want to buy, and read and write responses
to e-mail. Then you remember an important fax you
forgot to send before you left the office.
Now imagine how much easier it might be in each of these
situations if you had a single device that:
§ Is both a cell phone and digital organiser
§ Provides fast access to the “wireless web”
13
Page 14

§ Enables you to respond immediately to e-mail
§ Lets you send SMS messages or faxes on the spot
Your WA 3050 device can do all of this and more.
1.1 How to use the information in this
manual
Use as little or as much of the information in this manual as
you think you need. If you are familiar with the way GSM
phones work, you may be able to scan the calling
procedures to quickly grasp how to complete a familiar task
using the WA 3050 device.
You may not need to consult some of the appendices at all,
which contain reference information useful in some
situations. For example, the procedure for transferring
Palm-size PC data may be of interest if you previously
owned a Palm-size PC.
This owner’s guide has been written to meet the broadest
set of needs of users who will have different reasons for
purchasing and using the WA 3050 device. You are
probably interested in using some of its capabilities right
away more than others.
Recognizing this, chapters have been grouped into several
major divisions or topic clusters.
“Getting started” reviews WA 3050 setup information,
provides an overview of product features, and explains the
basics of the Pocket PC and dialing screen features.
“Voice communication” covers what you need to know to
use WA 3050 phone features.
14
Page 15

“Data communication” explains how to configure, access,
and use applications on your WA 3050 device that transmit
and receive data with external resources such as your
carrier network, the Internet, fax machines, and remote
servers.
“Organiser, pocket computing, multimedia” describes how
to get started using ActiveSync, Pocket Outlook,
companion programs such as Word, Microsoft Money,
Excel, Windows Media Player, and Microsoft Reader. The
section on using Transcriber contains information from the
Microsoft Transcriber User Guide.
“Customizing your device” covers procedures for
customizing Pocket PC and phone program settings,
installing additional software, and configuring your WA
3050 device to use as a modem for your PC or notebook
computer.
“Managing resources” describes some tools and procedures
you can use to perform preventive maintenance and track
phone costs.
The appendices present reference information on various
topics.
A glossary defines terms that may be unfamiliar to you.
15
Page 16

1.2 Conventions
§ The names of menus, commands, toolbar buttons, tabs
in a dialog box, dialog box titles, items within a dialog
box, and icons are shown in bold type.
§ The names of function keys or key sequences on a
standard PC keyboard are shown in uppercase.
Examples: TAB, BACKSPACE, ENTER, CTRL+V.
§ The symbol identifies cautions or warnings.
§ “Tap” describes the use of the stylus on a Pocket PC.
§ “Click” describes the use of a mouse on a PC or
notebook computer.
§ “Press” indicates that you can enter data or select
options on the touch screen with your fingers. For
example, the “keys” and options on the soft dialing pad
are finger-activated. You can use your fingers or the
stylus to select them.
§ “Dialing” refers to pressing or tapping keys on the soft
dialing pad.
§ Unless noted otherwise, “writing” refers to any method
of character input using the soft input panel. These
methods include typing using the soft keyboard,
printing using Character Recognizer, or writing cursive
using Transcriber (if installed).
§ “Phone component” refers to hardware and software
features that, collectively, comprise the WA 3050
phone function. “Phone” and “your phone” are
synonymous with “phone component”.
§ “PDA component” refers to hardware and software
features that, collectively, define WA 3050 organiser
and Pocket PC computing functions. “PDA” is
synonymous with “PDA component”.
16
Page 17

1.3 Where to find information
For information on See this source
Programs on the WA 3050 This owner’s guide or online
help. Tap Help on the Start
menu to view Help for the
active program.
Additional programs that can
be installed on your WA 3050
Connecting to and
synchronizing with a
desktop PC
Last-minute updates and
detailed technical information
Troubleshooting connections The ActiveSync
The latest on Windowspowered Pocket PCs
The Extras folder on the
ActiveSync CD-ROM
The Getting Started with
Microsoft ActiveSync booklet
or ActiveSync Help on a
desktop PC
The Readme files in the
Microsoft ActiveSync folder
on a desktop PC and CDROM
Troubleshooter on a desktop
PC. On the ActiveSync File
menu, click Connection
Settings, then click Help.
Appendix A of this guide.
The Microsoft Pocket PC web
site at
http://www.microsoft.com/
pocketpc/default1.asp
17
Page 18

1.4 Using online help
You can access online help for specific programs and for
Windows for Pocket PC by tapping Help on the menu.
Help is displayed for the active program. To display a
menu of all help files, tap the View menu, then tap All
Installed Help.
Navigate in Help by tapping links or the button. When
you have finished using Help, tap to return to the
program you were using.
18
Page 19

1.5 WA 3050 components
Your WA 3050 device includes the following components:
§ PDA and stylus
§ Main battery pack
§ Main battery (attaches to main battery pack)
§ CD-ROM
§ Backup battery
§ Documentation, consisting of this owner’s guide, an
installation guide, and a safety notice
§ Pouch (carrying case)
§ External power adapter
§ USB cradle
§ Stereo headphones with built-in microphone
§ Serial cable.
19
Page 20

1.6 Setting up the WA 3050
Complete the procedures for setting up your WA 3050 as
described in the WA 3050 Wireless Assistant Installation
Guide.
Caution Following are some important points to
consider during the setup process and whenever you
repeat any of the setup procedures:
§ Your WA 3050 device cannot be used if the main
battery has not been installed. Verify that the battery is
present before connecting your unit to external power
or before placing it in the cradle.
§ It is imperative that the main battery is fully charged
(no blinking LEDs) before using your device for the
first time, or before turning it on after an extended
period of disuse (longer than one month) without
having recharged the battery. Make sure that the
device is charging when it is connected to external
power or inserted in the cradle. You may need to
remove and reinsert the adapter plug several times
before the charging LED indicates that the device is
charging (GSM LED blinking amber).
§ Above all, the main battery must be charged and
installed before the installation or replacement of the
backup battery.
§ On the back of your WA 3050 device is a small door
that provides access to the connector for CompactFlash
support. This door must be kept shut at all times
except during the use of the CompactFlash support
feature.
20
Page 21

1.7 Information on the SIM card
Your WA 3050 device includes a small electronic device
called a SIM card. This card contains all of the information
the GSM network needs for you to use your phone as well
as some storage space for personal information, such as
frequently dialed phone numbers, which you can create and
modify as needed.
Handle and store your SIM card with care to avoid
excessive stresses or scratches that could damage it.
Contact your carrier immediately if your SIM card is lost,
stolen, or damaged.
Do not leave your SIM within the reach of small children.
Note Your WA 3050 device is only compatible with
SIM card 3V.
21
Page 22

1.8 Important safety information
Main battery and backup battery
Due to the type of batteries used in your WA 3050 device,
follow the laws in your country concerning their recycling.
Used batteries must be taken to the proper facilities for
recycling.
Some important things to keep in mind
§ There is a risk of explosion and injury if batteries are
not replaced correctly or handled with caution.
§ Do not attempt to open the battery, or dispose of it in
fire or water.
§ Replace the battery pack only with the battery pack
designated for the WA 3050 device.
§ Discard used batteries according to the manufacturer’s
instructions.
§ Only use external power adapters available from the
manufacturer. The charging of the main battery is
accompanied by a light warming.
§ The installation of the battery must be carried out in
conformance with the instructions provided by the
manufacturer (see the installation guide). The GSM
pack is an element that must be handled with care.
22
Page 23

Specific precautions
Caution Your WA 3050 device contains a lithium ion
(LI) battery pack. There is a risk of fire and burns if the
battery pack is handled improperly. Do not disassemble,
crush, puncture, short external contacts, or dispose of in
fire or water. Do not attempt to open or service the
battery pack. Replace only with the battery pack
designated for this product. Discard used batteries
according to the manufacturer's instructions.
Caution Your WA 3050 device also contains a coin cell
lithium battery powered Real-Time Clock circuit. There
is a danger of explosion, and risk of personal injury if the
battery pack is incorrectly replaced or mistreated. Do not
attempt to disassemble, crush, puncture, short external
contacts, or dispose of in fire or water. Do not attempt to
open or service the battery pack. Replace only with the
battery pack designated for this product. Discard used
batteries according to the manufacturer's instructions.
23
Page 24

Charging device
Use only the appropriate charging devices (power adapters)
contained in the manufacturer’s catalogue. The use of
another charging device could prove to be dangerous and
will void the warranty of your WA 3050 device. The main
plug socket must be easily accessible. The main voltage
should correspond to that given on the manufacturer’s plate
on the charging device.
European Union Notice
This marking indicates that your WA 3050 device complies
with directives 91/263/CEE 89/336/CEE - 73/23/CEE,
modified 93/68/CEE.
24
Page 25
1.9 Accessories
In addition to the basic unit , battery pack, and carrying
case, your WA 3050 device includes a number of
accessories that increase its versatility and usefulness.
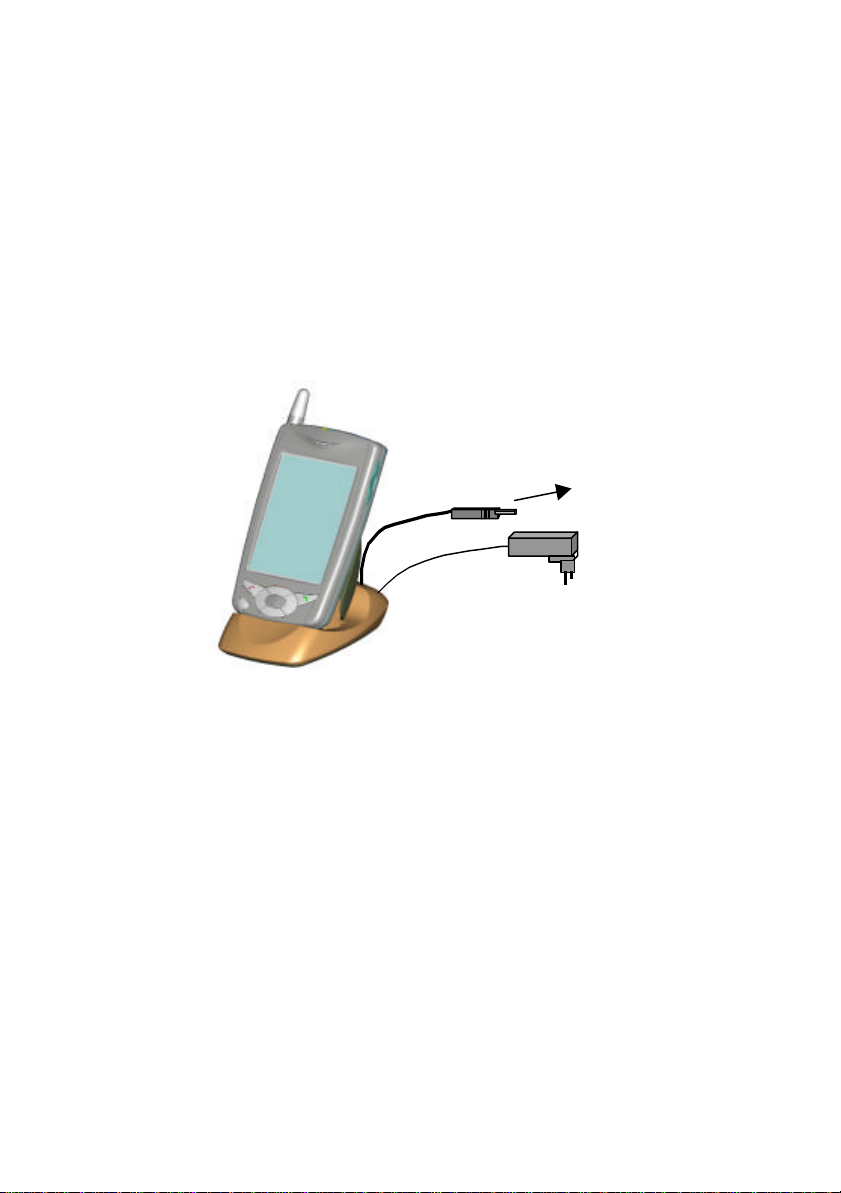
USB cradle and external power adapter
The cradle allows you to connect your device to the USB
To USB port
port on your PC or notebook computer for synchronization
or to recharge the main battery. The cradle integrates both
the USB cable and power supply cord.
Serial cable
If necessary, you have the option of using the serial cable
to connect your device to your PC or notebook computer
for synchronization or data communication. In this case,
you can plug the external power adapter into a separate
connector on your device to power the device or recharge
the main battery while it is connected via the serial cable.
25
Page 26

Stereo headphones with built-in microphone
Stereo headphones with built-in microphone enable you to
listen to your favorite audio files and use your phone in
automatic-answer mode.
Optional accessories
A number of accessories are available as additional options
for your WA 3050 device, mainly:
§ CompactFlash support
§ In-car cradle
§ Vehicle charger
§ Car kit (cradle + hands free kit for the car)
§
26
Page 27

1.10 Guidelines for general use
The use of your phone is controlled by safety regulations
intended to protect both the user and his/her environment.
Airplane safety
In an airplane, your phone must be switched off to ensure
that it does not interfere with the plane’s systems. Its use is
illegal, and you could be prosecuted or banned from air
travel or using cellular networks in the future if you do not
abide by these regulations.
Areas containing combustibles
§ It is highly advisable to switch your phone off in the
vicinity of petrol depots.
§ Regulations limit the use of radio equipment in
chemical factories, petrol depots, and any area where
there are mines. You are advised to abide by these
rules.
Road safety
§ Except in an emergency, do not use your phone when
driving without a hands-free kit that enables you to
maintain your freedom of movement. Stop safely to
make a call. Abide by the current laws and use
common sense.
§ Without sufficient protection, some of the electronic
equipment in your vehicle may be affected by the
microwaves given off by the WA 3050 phone
component.
§ Installation of your WA 3050 device in a vehicle must
only be performed by qualified personnel.
27
Page 28

Non ionising radiation
To ensure your personal safety and obtain maximun
satisfaction from your phone, use it in a vertical position.
Electronic medical equipment
Your phone emits radio waves that could possibly interfere
with electronic medical equipment such as an auditory
prosthesis or pacemaker. Consult with your doctor or
contact the manufacturer for precautions on the use of other
electronic devices in the vicinity of electronic medical
equipment.
General precautions
§ Do not try to open your WA 3050 device and repair it
yourself. The manufacturer cannot be held responsible
for any damage/accident that may result from this.
§ Any work carried out by non-authorised personnel will
result in your guarantee being rendered invalid.
§ Do not use your WA 3050 device in damp areas
(bathroom, swimming pool). Protect it from water and
other liquids.
§ Do not expose your WA 3050 device to extreme
temperatures.
§ Do not leave your WA 3050 device within the reach of
small children.
§ Only use your WA 3050 device with original
accessories. If you do not, your guarantee will be
rendered invalid.
§ The physicochemical processes created by chargers
impose temperature limits when charging the battery.
Your WA 3050 device automatically protects the
batteries in the event of extreme temperatures.
28
Page 29

§ To avoid the risk of demagnetisation, do not place
diskettes, credits cards etc. close to your unit.
Warning The manufacturer will not be held
responsible for failure to follow any of the preceding
recommendations or for improper use of the product.
29
Page 30

Page 31

2 Getting started
“Getting started” provides an overview of the features and
capabilities of your device. Read this section to help you do
the following:
§ Learn how your device operates
§ Navigate in Windows for Pocket PC
§ Recognize features of the dialing screen.
31
Page 32

2.1 Setting up your WA 3050
Follow the setting up procedure described in the WA 3050
Wireless Assistant Installation Guide.
2.2 WA 3050 basics
Review the diagrams inside the front cover to identify
hardware features of your device. Then read the following
sections for an overview of these features and a quick look
at Pocket PC and dialing interface basics.
32
Page 33

2.2.1 Hardware buttons
Your WA 3050 device includes a number of hardware
buttons for easy access to programs and features. The PDA
power ON/OFF button turns the Pocket PC on and off.
The key initially turns the phone on and enables you
to place a call. (This key also supports many other
functions in different contexts.) The key (long
contact) turns off the phone and allows you to terminate the
active call.
Other buttons include the Record button for making audio
files, the Up/Down control/Action button, the Volume
button, and a set of 4 program buttons that turn on your
device instantly and open it to a program assigned to each
of these buttons. The icons on the buttons identify the
programs they activate (see “Programs”).
In the list view of a program, you can rock the Up/Down
control to scroll to the item you want to view, then press
the Action button to open it. You can also use the buttons
within items to perform specific functions. For example, in
Notes, you can press the Action button while looking at a
note to return to the note list.
33
Page 34

2.2.2 Stylus
The WA 3050 includes a stylus for selecting items and
entering information. The following actions are available
with the stylus:
§ Tap. Touch the screen once with the stylus to open
items and select options.
§ Drag. Hold the stylus on the screen and drag across
the screen to select text and images. Drag within a list
to select multiple items.
§ Tap-and-hold. Tap and hold the stylus on an item to
see a list of actions available for that item. Tap the
action you want to perform on the pop-up menu that
appears.
Note The stylus tip can also be used to press the Reset
button and open the doors for the main and backup
batteries.
34
Page 35

2.2.3 Today screen
Tap to switch to a program
Tap here to
Tap here to
Your day at a
When you press the PDA power ON/OFF button for the
first time each day (or after 4 hours of inactivity), you will
see the Today screen. You can also display it by tapping
and then Today. On the Today screen, you can see at a
glance important information for the day.
change the date
and time
customise this
screen
glance
Status icons
Tap to create a new element
35
Page 36

You may see the following status icons on the command
External power source is connected
bar in the Today screen:
Icon Meaning
Turns all sounds on and off
Backup battery is low
Backup battery is very low
Main battery is charging
Main battery is low
Main battery is very low
Dial-up connection
Direct connection
36
Page 37

2.2.4 Dialing screen
Tap to switch to a
different program
Soft dialing pad
When you press the first time after your device has
been completely powered down or when the PDA is
running, the dialing screen appears. This screen and the
hard dialing keys ( and ) provide access to the
basic calling features of your phone. (Authorisation for
specific services accessible through the phone interface is
contained in the SIM card supplied by your carrier when
you purchased your phone.)
Status icons
Message area
Like the Welcome screen, the dialing screen includes the
icon, which you can tap to switch to other programs
while talking on the phone. The dialing screen does not
include the command bar (see “Navigation and command
bar”).
37
Page 38

To the right of the icon on the dialing screen are several
status icons:
Icon Function
Battery level indicator
Voice call in progress
Data call in progress
Fax call in progress
New message in your voice mail box
Silent mode active (if selected)
Hands-free mode active (during a call if selected)
Signal strength and roaming (5 progressively higher
vertical bars and a small antenna). If roaming, a
“running” script “R” replaces the antenna. A
flashing antenna indicates the absence of a steady
signal.
Beneath the row of status icons is the message area .
Information such as the caller’s name and the number, and
the status messages such as “Emergency call mode”, are
displayed in this part of the dialing screen. The message
area expands to reveal information about multiple calls in
progress when you press the Call Status button ( ).
38
Page 39

Situated around the message area are several buttons for
selecting options before or during a call:
Button Name Function
Call Log Display information for up to
20 of the last calls made or
received using your phone
Audio Display a pop-up menu with
finger-activated controls for:
silent mode, hands-free mode,
microphone mute, and speaker
volume
Contact Display summary-level
information from Contacts if
the caller ID matches one in
Contacts
Call Status Display information about the
status of all calls in progress
(up to four at a time) and select
other options
Additional information about the function of these buttons
is provided in the context of specific procedures in which
they are accessed or in other sections of this manual.
Below the messages area is the soft dialing pad. Press or
tap “keys” on this part of the dialing screen to dial a
number and select other options. For example, you can dial
your voice mail number with speed dialing by holding
down the key.
39
Page 40

2.2.5 Programs
The following table contains a partial list of programs that
can be found on the WA 3050 device. The icons appear as
they would look on the Start menu or navigation bar. Look
in the Extras folder on the ActiveSync CD for additional
programs you can install.
Icon Programs Description
Calendar Keep track of your
appointments and events
Contacts Keep track of your friends
and colleagues
EzWAP Browse the wireless Web
Inbox Send and receive e-mail
Notes Create handwritten or
typed notes, drawings, and
recordings
Phone Display the dialing screen
to make a call or use other
mobile phone features
Pocket Excel Create new workbooks or
view and edit Excel
workbooks created on your
desktop computer
40
Pocket Internet
Explorer
Browse the Web anytime,
anywhere with wireless
access
Page 41

Icon Programs Description
Pocket Word Create new documents or
view and edit Word
documents created on your
desktop computer
Windows Media
Player
Microsoft Reader Read or listen to e-books
Solitaire Entertain yourself while on
Sync SIM Save SIM entries to
Tasks Keep track of your tasks
Transcriber Use cursive handwriting
WinPhone Send an SMS or fax
Listen to digital audio files
the road
Contacts; add, modify, or
delete SIM entries; copy
names and numbers from
Contacts to the SIM
tool
2.2.6 Switching among programs/tasks
You can switch from one program to another by selecting it
from the (Start) menu. You can tap this same icon on
the dialing screen during a call to open another program
while continuing to talk on the phone. You can customise
which programs you see on the Start menu (see
“Customizing screens and menus”). For some programs,
you will need to tap , Programs, then a program name
to switch to another program.
41
Page 42

Note Tapping , then Phone displays the dialing screen,
but you will be unable to make a call until the phone has
been turned on (see “Turning the phone on and off”).
You can also switch to some programs by pressing one of
the program buttons located on the front or side of your
device. The icons on the buttons identify the programs they
display. You can select options for customizing which
programs these buttons display (see “Adjusting Pocket PC
device settings”).
2.2.7 Navigation bar and command bar
The navigation bar is located at the top of Pocket PC
program screens when you tap the icon. It displays the
title of the active program and the current time, and allows
you to switch to other programs and close screens.
42
Page 43

Tap to select a program
Tap here to close the
Tap here to switch to
screen
another program
Use the command bar at the bottom of the screen to
perform tasks in programs. The command bar includes
menu names, buttons, and the input panel button. To create
a new item in the current program, tap New. To see the
name of a button, tap and hold the stylus on the button.
Drag the stylus off the button so that the command is not
carried out.
43
Page 44

2.2.8 Pop-up menus
With pop-up menus, you can quickly choose an action for
an item. For example, you can use the pop-up menu in the
contact list to quickly delete a contact, make a copy of a
contact, or send e-mail to a contact. The actions in the popup menus vary from one program to another. To access a
pop-up menu, tap and hold the stylus on the item that you
want to perform the action on. When the menu appears, lift
the stylus, and tap the action you want to perform. Or tap
anywhere outside the menu to close the menu without
performing an action.
2.2.9 Modes of operation
With respect to the phone and PDA components, your
WA 3050 device operates in one of three states:
§ The PDA is turned on but the phone is off
44
Page 45

§ The PDA is turned off but the phone is on
§ Both the phone and PDA are on
Different capabilities are available and certain restrictions
apply in each of these states. Understanding each of these
states and some of the restrictions can help you get a better
understanding of how your device works at a basic level as
well as decide when and whether you need to operate the
phone and PDA components at the same time.
When the PDA is on but the phone is off, you can access
Pocket PC programs but are unable to make or receive
voice calls, receive or reply to SMS messages, or use any
of the other programs that utilise data transmission such as
EzWAP and Inbox. You may find it useful to work in this
mode when you just want to use organizer features or
programs and do not want to be interrupted by incoming
calls.
In the second state, the PDA is turned off to conserve
power. You are unable to access Pocket PC programs or the
dialing screen (to make outgoing calls), but you can still
receive incoming calls because the phone component is
operating in standby mode. When an incoming call is
received, the PDA powers automatically on, the dialing
screen is displayed automatically, and you can accept or
reject the call. Work in this mode when you want to use
your device to answer incoming calls.
When the phone and PDA components are on at the same
time, you can access and work in Pocket PC programs and
answer incoming calls. If you are working in a Pocket PC
program and you receive a call, the display changes
automatically to the dialing screen, and you can answer or
reject the call. When you are done with the call, you can
switch back to the program you were working in and wait
for the next incoming call.
45
Page 46

Note If you switch to one of the programs that utilises
wireless data transmission, you will be unable to receive
incoming calls during the time that your device is
connected.
If you must work with both the PDA and phone on, keep in
mind that you will have to charge the battery more often
and may not be as productive using organiser or other
Pocket PC programs if you are interrupted frequently by
incoming calls.
2.2.10 Notifications
Your WA 3050 device uses a variety of ways to notify you
when you have something to do. For example, if you have
set up an appointment in Calendar, a task with a due date in
Tasks, or an alarm in Clock, you will be notified in any of
the following ways:
§ A status LED flashes (green)
§ A message box appears on the screen
§ A sound is played.
When you receive an incoming call, your device vibrates
and may play a .WAV file or sound a default ring tone. A
status LED flashes amber and a .WAV file plays when you
receive an SMS message.
When the battery is charging, the GSM status LED flashes
amber. When the battery is fully charged, the status LED
remains lit until you disconnect the external power supply.
For more information about LED notification, refer to the
page facing the inside front cover.
To choose reminder types and sounds, tap , then
Settings. In the Personal tab, tap Sounds & Reminders.
46
Page 47

To choose the .WAV file that plays when you receive an
incoming call, refer to the section “Selecting options for
ring tone and vibrating alert”. To choose the .WAV files
that play when you receive an incoming SMS or fax, refer
to “Configuring SMS & fax settings”.
Caution Be sure to tap and close any dialogue
boxes when they appear. Failure to do so may result in
a loss of your WA 3050 device’s audio capabilities.
2.2.11 Entering information
The number “keys” and other “buttons” on the WA 3050
soft dialing pad are designed to be finger-activated. You
can use your fingers or the stylus (if you prefer) to dial a
number and select context-sensitive buttons and other
options while using your phone.
You have a variety options for entering information on
other screens:
§ Use the soft keyboard or Character Recognizer to enter
typed text in the input panel
§ Write directly on the screen
§ Draw pictures on the screen
§ Speak into the microphone to record a message
§ Synchronize or copy information from your computer
to your WA 3050 device using ActiveSync. For more
information on ActiveSync, see the booklet
accompanying the ActiveSync CD or refer to the
ActiveSync Help.
47
Page 48

2.2.12 Typing using the input panel
Use the input panel button to enter information in any
program. You can either type using the soft keyboard or
write using Character Recognizer. In either case, the
characters appear as typed text on the screen.
Tap the Input Panel button to show or hide the input
panel, then tap the arrow next to the Input Panel button to
see your choices.
When you use the input panel, your WA 3050 device
anticipates the word you are typing or writing and displays
it above the input panel. When you tap the displayed word,
it is inserted into your text at the insertion point. The more
you use your device, the more words it learns to anticipate.
48
Page 49

To change word suggestion options, such as the number of
words suggested at one time, tap , Settings, Personal
tab, Input, then the Word Completion tab.
To type with the soft keyboard
1. Tap the arrow next to the Input Panel button, then
Keyboard.
2. Tap the keys with your stylus on the soft keyboard that
is displayed.
To use Character Recognizer
1. Tap the arrow next to the Input Panel button, then
Character Recognizer.
2. Write a letter in the box.
49
Page 50

When you write a letter, it is converted to typed text that
appears on the screen. Some letters must be written in a
particular way to be recognized. For information, tap
to see an online demonstration, or see Appendix B for
specific instructions on using Character Recognizer.
To select typed text
If you want to edit or format typed text, you must select it
first by dragging the stylus across the text you want to
select.
You can cut, copy, and paste text by tapping and holding
the selected words then tapping an editing command on the
pop-up menu, or by tapping the command on the Edit
menu.
2.2.13 Writing on the screen
In any program that accepts writing, such as the Notes
program and the Notes tab in Calendar, Contacts, and
Tasks, you can use your stylus to write directly on the
screen. Write the way you are used to writing on paper.
You can edit and format what you have written and convert
the information to text at a later time.
50
Page 51

To write on the screen
§ Tap the Pen button to switch to writing mode. This
action displays lines on the screen to help you write.
Note Some programs that accept writing may not have the
Pen button. See the documentation for that program to find
out how to switch to writing mode.
To select writing
If you want to edit what you write, you must first select it.
1. Tap and hold the stylus next to the text you want to
select until the insertion point appears.
51
Page 52

2. Without lifting the stylus, drag it across the text you
want to select.
If you accidentally write on the screen, tap Edit then Undo
and try again. You can also select text by tapping the Pen
button to deselect it then dragging the stylus across the
screen.
You can cut, copy, and paste written text in the same way
you work with typed text: tap and hold the selected words,
then tap an editing command on the pop-up menu, or tap
the command on the Edit menu.
To convert writing to text
§ Tap Tools and then Recognize.
If you want to convert only certain words, select them
before tapping Recognize on the Tools menu (or tap and
hold the selected words then tap Recognize on the pop-up
menu). If a word is not recognized, it is left as writing.
52
Page 53

If the conversion is incorrect, you can select different
words from a list of alternates or return to the original
writing. To do so, tap and hold the incorrect word (tap one
word at a time). On the pop-up menu, tap Alternates. A
menu with a list of alternate words appears. Tap the word
you want to use, or tap the writing at the top of the menu to
return to the original writing.
Tips for getting good recognition:
§ Write neatly.
§ Write on the lines and draw descenders below the line.
Write the cross of the “t” and apostrophes below the
top line so that they are not confused with the word
above. Write periods and commas above the line.
§ For better recognition, try increasing the zoom level to
300% using the Tools menu.
53
Page 54

§ Write the letters of a word closely and leave big gaps
between words so that it is easy to tell where words
begin and end.
§ Hyphenated words, words that use special characters
such as accents, and some punctuation cannot be
converted.
§ If you add writing to a word to change it (such as
changing a “3” to an “8”) after you attempt to
recognize the word, the writing you add will not be
included if you attempt to recognize the writing again.
2.2.14 Drawing on the screen
You can draw on the screen in the same way that you write
on the screen. The difference between writing and drawing
on the screen is how you select items and how they can be
edited. For example, selected drawings can be resized,
while writing cannot.
To create a drawing
§ Cross three ruled lines on your first stroke. A drawing
box appears. Subsequent strokes in or touching the
drawing box become part of the drawing. Drawings
that do not cross three ruled lines will be treated as
writing.
54
Page 55

Note You may want to change the zoom level so that you
can more easily work on or view your drawing. Tap Tools
and then a zoom level.
To select a drawing
If you want to edit or format a drawing, you must first
select it. Tap and hold the stylus on the drawing until the
selection handle appears. To select multiple drawings, tap
the Pen button so that it is no longer selected, then drag to
select the drawings you want.
You can cut, copy, and paste selected drawings by tapping
and holding the selected drawing then tapping an editing
command on the pop-up menu, or by tapping the command
on the Edit menu. To resize a drawing, make sure the Pen
button is not selected and drag a selection handle.
55
Page 56

2.2.15 Recording a message
In any program where you can write or draw on the screen,
you can also quickly capture thoughts, reminders, and
phone numbers by recording a message. In Calendar,
Tasks, and Contacts, you can include a recording in the
Notes tab. In the Notes program, you can either create a
stand-alone recording or include a recording in a written
note. If you want to include the recording in a note, open
the note first.
To create a recording
1. Hold theWA 3050 so that the microphone is near the
audio source.
2. Press and hold the Record button until you hear a
beep.
3. Make your recording while holding down the Record
button.
4. Release the Record button to stop recording. Two
beeps will sound. The new recording appears in the
note list or as an embedded icon.
Note You can also make a recording by tapping the
Record button on the Recording toolbar .
To play a recording, tap it in the list, or tap its icon in the
note.
56
Page 57

2.2.16 Finding and organizing information
You can find and organise the files and information on
your WA 3050 device in much the same way you do on
your desktop PC: by using the Find utility or by using File
Explorer. Use the Find utility to locate files that contain a
specified text string or that match specific criteria. Use File
Explorer to find files on your device and to organise these
files into folders.
To use the Find utility
1. Tap then Find.
2. In the Find box, type the text you want to find.
3. To narrow your search to files of a certain type, select
the file type in the Type list.
57
Page 58

Tip To locate files that are taking up storage space,
select Larger than 64 KB in Type.
4. Tap Go.
To access File Explorer
§ Tap and Programs, then tap File Explorer.
58
Page 59

Voice communication
Page 60

Page 61

3 Basic calling features
Once you know a little bit about how your device operates
and can find your way around the Pocket PC and soft
dialing interface, you are ready to start using the basic
calling features of the WA 3050 device. You can:
§ Turn the phone on and off
§ Make a call
§ Make an international call
§ Make an emergency call
§ Answer a call
§ Reject a call
§ Adjust the speaker volume
§ Set the microphone to mute
§ Select hands-free mode (use speaker phone)
§ Turn off the ringer
§ Put a call on hold
§ End a call.
61
Page 62

3.1 Turning the phone on and off
The first thing to know about using your phone is how to
turn it on and off. You must turn it on before you can use
calling features and access phone settings. (In addition, a
SIM card for a valid subscription must be inserted in order
to access settings or do anything other than make
emergency calls).
To turn the phone on
§ Press and hold down
At the first switch on of your phone or after a memory
dump, there's a data exchange with the message
"Retrieving information from the phone…". Please be
patient while this exchange is running.
To turn the phone off
§ Press and hold down for a few seconds until the
message “The phone is now off” is displayed.
3.2 Making a call
When the phone is on, you can make a call by typing a
phone number on the soft dialing pad with your fingers or
by tapping each key with the stylus.
To make a call
1. When the dialing screen is displayed, enter a phone
number by pressing each corresponding number key
on the soft dialing pad.
2. If you make an error, press to delete the last digit
typed, or hold down to delete everything you typed
and reenter the entire number.
62
Page 63

3. Press .
You can also dial a number from Contacts (see “Placing a
call from the Contacts list”) or the Call Log (see “Using the
Call Log”).
3.3 Making an international call
Your WA 3050 device includes support for making
international calls. The phone keypad includes the “+”
character needed to make this type of call.
Note The ability to make international calls may require
authorisation from your carrier provided as part of your
subscription.
To make an international call
§ Follow local dialing instructions. Press and hold
to enter the “+” symbol when it is required.
3.4 Making an emergency call
You can make an emergency call on any network when the
SIM card is absent or a PIN code is activated, or when call
barring or fixed dialing is in effect (see “Using the security
features of your phone”).
To make an emergency call
1. When the dialing screen is displayed, enter the
emergency phone number by pressing each key on the
keypad.
2. Press .
63
Page 64

3.5 Answering a call
You must leave your phone on to receive incoming calls.
The dialing screen does not have to be displayed, and the
PDA component does not have to be powered on for you to
receive them. If the phone is on and you receive an
incoming call, the dialing screen is displayed and you can
proceed to answer the call.
To answer a call
1. If there is no call in progress, press or tap the
message area to answer an incoming call.
2. If a call is in progress, you can choose to end the
current call, or you can place the caller on hold and
answer the incoming call at the same time by tapping
the message area.
3.6 Placing a call on hold
If you receive an incoming call when a call is in progress,
you can place the current call – which can be a conference
call – on hold, then answer the incoming call.
To place a call on hold
§ Tap to place the current call on hold, then tap the
message area notifying you of the incoming call to
accept it.
3.7 Rejecting a call
If you do not want to answer an incoming call, you can
choose to reject it by simply ignoring it. The phone will
continue to ring until the caller hangs up or is switched into
voice mail (if supported as part of your subscription). If the
caller is switched into voice mail, the call is recorded in the
64
Page 65

Call Log as a missed call. You also have the option of
actively rejecting the call, which causes the phone to stop
ringing and sends the caller immediately to voice mail.
To reject a call
§ Press or tap to reject an incoming call. If the phone
is on but no calls are underway, pressing
displays the dialing screen with the message area
unchanged from the previous call. If the phone is on
and an incoming call is received while a call is in
progress, pressing ends all calls in progress and
causes the incoming call to ring through.
3.8 Adjusting speaker volume
You can adjust your phone’s speaker volume before or
during a call. Use the Volume button or select a volume
setting using a finger-activated audio control. The speaker
volume settings during handset, hands-free, and headset
operation are independent of one another, so you may need
to readjust the volume when you switch from one mode to
another. Note that the speaker volume setting does not
affect the system loudness specified as part of configuring
the Pocket PC settings (see “Adjusting Pocket PC device
settings”).
To adjust the speaker volume
Do one of the following:
§ Press the Volume button up and down.
§ When the dialing screen is displayed, press or tap .
Drag the slider on the Volume slide up or down.
65
Page 66

3.9 Setting the microphone to mute
Sometimes you may want to turn off the receiver
(microphone) while you have a caller on the line to speak
with someone privately or as a courtesy if your call is
interrupted for some reason. Microphone service is restored
when you turn it back on or when you end the call.
To set the microphone to mute
1. When the dialing screen is displayed, press or tap .
2. Press or tap .
3.10 Activating hands-free mode
When you need to talk with someone on the phone and use
your hands at the same time, you can work in hands-free
mode. In this mode, the speaker volume is turned up loud
enough so that you do not need to hold your WA 3050 up
to your ear to hear the other person’s voice. The red LED
flashes when hands-free mode is active. You can choose a
car kit that makes it easy and safe for you to use your
device in hands-free mode while you are driving. Handsfree mode ends when you turn it off or when you end a call.
To activate hands-free mode
1. When the dialing screen is displayed, press or tap .
2. Press or tap .
3.11 Activating silent mode
If you do not want to hear the ringer when you receive an
incoming call, you can turn it off before or during a call in
progress by activating silent mode. Turning off the ringer
does not affect settings specified for vibrating alert (see
66
Page 67

“Selecting options for ring tone and vibrating alert”). If you
turn the ringer back on, any vibrating alert settings
specified previously are again in effect.
To activate silent mode
1. When the dialing screen is displayed, press or tap .
2. Press or tap .
3.12 Ending a call
When you are finished talking, be sure to end your call.
To end a call
§ Press to end the currently active call (details
visible in the message area).
Caution Pressing will end all calls in
progress.
67
Page 68

4 Advanced calling features
Your WA 3050 device includes a number of advanced
calling features that enable you to:
§ View the last number dialed
§ Redial the most recent incoming or outgoing call
§ Select a call for rapid redial
§ Place a call from Contacts
§ Set up a three-way conference call.
4.1 Viewing the last number di aled
When the phone is on but no call is in progress, the
message area normally displays the message “All calls are
ended”. You can access the Call Log to view the last
number dialed (see “Using the Call Log”). You can select a
call for rapid redialing from the Call Log if there is a
matching number in Contacts.
4.2 Making a call using rapid redial
You can use rapid redial to call the most recent incoming or
outgoing call.
To redial the most recent call
1. Press (switches to the dialing screen, or turns on
the phone and switches to the dialing screen if both the
phone and PDA are turned off).
2. Press (displays the Call Log).
3. Press (dials the first entry).
68
Page 69

To select a call for rapid redialing
1. Press to display the dialing screen (if necessary).
2. Press in order to access the Call Log.
3. Press the Up and Down button, or tap the up and
down arrow buttons until an entry you want is
highlighted.
4. Do any one of the following to automatically redial the
number shown in the highlighted entry:
§ Press the action button
§ Tap the entry
§ Press or tap Call
§ Press .
4.3 Making a call from Contacts
You can browse information in Contacts, highlight an
entry, then place a call to the selected individual if the entry
includes a phone number.
To make a call from Contacts
1. Tap then Contacts.
2. Select an entry on the list.
3. Tap Tools then Call Contact.
69
Page 70

4.4 Setting up a three-way conference
call
Your WA 3050 device provides support for a caller and
two other parties to participate in a three-way conference
call.
Conferencing can occur when there are two calls in
progress: one active and one on hold. When that call status
configuration occurs, the button lets you conference a
caller with another party.
A conference call is equivalent to a single call, even though
it is shown with two separate Call Status entries, each of
which says “Conference”. Putting a conference call on hold
puts all of the parties on hold.
To set up a three-way conference
1. Make a call.
2. Place the caller on hold and make a second call.
3. Tap .
The status for each call changes from “Active call” or
“On hold” to “Conference”. If call costs are being
shown, the message area includes total call cost (the
sum of the costs for the two connected parties).
70
Page 71

5 Call-related features
The WA 3050 supports a number of call-related features:
§ One-touch access to voice mail
§ Activate or deactivate automatic redial when busy
§ Review the status of caller ID services
§ Block outgoing caller ID until phone powered off
§ Activate or deactivate call waiting
§ Call forwarding.
71
Page 72

5.1 Accessing voice mail
Your WA 3050 device provides one-touch access to your
voice mail.
1. Tap then tap on Settings. In Personal tab tap on
Phone then tap on Ring&Phone numbers.
2. Tap on My numbers tab.
3. Set up the voicemail number (see your operator GSM).
4. Tap on
To access voice mail
§ Press and hold down .
.
5.2 Activating or deactivating
automatic redial when busy
If you receive a busy signal when you make a call, you can
choose to have the number redialed automatically or end
the call. Settings enable you to specify whether and how
automatic redialing should occur.
To activate or deactivate automatic redial when
busy
1. Tap then Settings. On the Personal tab, tap
Phone, then Call Services.
2. Tap the Other tab.
3. By default, Automatic redial when busy / Ask before
redialing is enabled. This option enables you to
specify whether to redial an individual call when the
72
Page 73

line is busy. To have a call redialed automatically
within ten seconds when there is a busy signal, tap
Redial without asking . (If you select this option, you
can still cancel an automatic redial within ten seconds.)
4. If you do not want to use automatic redial, tap
Automatic redial when busy so that it is deactivated
(not selected).
5. Tap .
5.3 Reviewing the status of caller ID
settings
Your WA 3050 device enables you to review the status of
caller ID settings.
To review the status of caller ID settings
1. Tap then Settings. On the Personal tab, tap
Phone, then Call Services.
2. Review caller ID settings.
3. Tap .
5.4 Blocking outgoing caller ID until
the phone is powered off
You can select the option of blocking outgoing caller ID. If
enabled, this option causes a request to be sent to the
network to block caller ID on outgoing calls when you
make a call. If you want to use this feature, you can select it
any time after you turn on the phone but before making a
call. Unlike Block your caller ID for outgoing calls, this
option gives you some control over the blocking of your
caller ID but must be set each time you turn on your phone
if you want to use it.
73
Page 74

To block caller ID until the phone is powered off
(anonymous call)
1. Tap then Settings. On the Personal tab, tap
Phone, then Call Services.
2. Tap Block your caller ID for outgoing calls
(anonymous calls) .
3. Tap .
5.5 Activating or deactivating call
waiting
For most phone subscriptions, call waiting is enabled by
default. If you deactivate this feature, you will not be able
to answer any incoming calls received during a call in
progress. Callers will hear a busy signal, and calls will not
be recorded as missed.
To activate or deactivate call waiting
1. Tap then Settings. On the Personal tab, tap
Phone, then Call Services.
2. Tap the Other tab.
3. Tap Allow call waiting to activate or deactivate it.
4. Tap .
5.6 Forwarding voice, data, or fax calls
The WA 3050 enables you to customise call forwarding for
voice, data, and fax calls. It provides basic forwarding for
any type of call and additional forwarding options for voice
calls if a line is busy, or if a caller is unavailable (phone is
turned off) or not answering calls.
To forward voice, data, or fax calls
74
Page 75

1. Tap then Settings. On the Personal tab, tap
Phone, then Call Services.
2. Tap the Forward tab.
3. Tap on the Call type box and tap Voice, Data, or
Fax.
4. To specify a forwarding destination to use all the time
for the type of call selected, tap Always forward to .
Tap at the right and tap Voice, Data, or Fax. These
options equate to the numbers shown when you review
the phone numbers associated with your personal
subscription (see “Specifying voice mail and other
personal numbers”).
5. To specify multiple forwarding options for voice calls,
tap Forward to the following numbers. (This option
is disabled for Data or Fax calls.)
6. Do one or more of the following:
§ Tap If busy, then tap at the right to enter or
select a phone number to which calls will be
forwarded when the line is busy.
§ Tap If unavailable, then tap at the right to enter
or select a phone number to which calls will be
forwarded when a voice call is received during a
data call, when the modem is in use, or when your
phone is turned off.
§ Tap If no answer after, then tap at the right and
select a time interval after which calls will be
forwarded. Tap to the right of forward to and
enter or select a phone number to which voice
calls will be forwarded when there is no answer
after the time interval has passed.
7. Tap .
75
Page 76

6 Using Call Status
The message area on the dialing screen displays
information about the status of calls in progress. When you
make a call, it displays some or all of the following:
§ The number you are dialing
§ The name of the party you are calling if there is a
matching caller ID in the Contacts list
§ Other information such as call length and cost if
activated.
If you receive an incoming call during a call in progress,
the message area announces the incoming call and may
include the caller’s name and number if the caller ID is
available and it matches one in the Contacts list.
76
Page 77

The contents of the message area changes depending on the
status of calling activity. The Call Status feature enables
you to monitor the status of two or more calls in progress
(up to four at a time) and to perform an action based on the
information in the entry, the type of call, and available
options. Call Status lets you switch among multiple calls
without ending any of them.
Monitoring the status of calls in progress
Access the Call Status feature to monitor the status of
multiple calls in progress.
To monitor the status of calls in progress
1. If more than one call is in progress, press to
access Call Status.
2. Review the list of entries. Do one of the following
(depending on the type of call and options that apply):
§ View summary-level Contacts information for the
current call
§ Put the current call on hold and switch to another
call
§ Set up a three-way conference call
§ Press or tap again to hide the Call Status
entries.
6.2 Viewing summary-level Contacts
information
If caller ID is included on the Call Status entry for the
currently active call, there is a matching caller ID in the
Contacts list. In this case, you can view summary-level
Contacts information for an entry without interrupting or
ending any of your calls.
77
Page 78

To view summary-level Contacts information for
the currently active call
1. Press or tap .
2. Review the list of entries.
3. If the cur rently active entry includes a caller ID, press
to view summary-level Contacts information.
4. Press or tap to return to the dialing screen.
6.3 Switching between different calls in
progress
As part of monitoring the status of calls in progress, you
can put the current caller on hold and answer an incoming
call or switch to another call on hold.
To switch between different calls in progress
1. Press or tap .
2. Review the list of entries.
3. Tap the entry announcing an incoming call to put the
current call on hold and answer the incoming call.
4. If there are no incoming calls and you would like to
switch to another call on hold, let your caller know that
you are putting them on hold, then tap to put your
caller on hold and make the call that has been on hold
the active call.
78
Page 79

7 Using the Call Log
Tap here to display
Tap here to save the
Tap here to call
The Call Log allows you to view a list of all incoming (ç),
outgoing (è), or missed (x) calls. It can hold up to
20 entries showing the date and time of each call.
If you choose the option for showing call length and cost (if
supported by your subscription), the Call Log includes this
information as well (see “Setting options to show call
length and cost, and delete the call log”).
contact summary
information
number in the “Work tel.”
number of a new contact
the selected
number
If caller ID is blocked or there is no data, a call is not
logged in the Call Log. And only the most recent call is
retained if you make or receive more than one call to or
from the same number.
79
Page 80

If there is a matching contact for an entry highlighted in the
Call Log, the Contact button is active. Press the Call
button to make a call to a highlighted number, or press the
Contact button to display the Contact Summary screen.
If there is no matching contact for a highlighted entry, the
Save button is active. Press Save to save the number in the
“Work tel.” number of a new Contact with the name
“Unnamed”. You can later open the Contacts application
and modify that entry by moving the phone number to
another field, and add the caller’s name and any notes you
wish to make.
80
Page 81

7.1 Reviewing calls made, received, or
missed
Access the Call Log to review all calls made (è), received
(ç), or missed (x).
To review calls made, received, or missed
1. When the phone is turned on, press or tap to
access the Call Log.
2. Press or tap á and â or rock the Up/Down control to
scroll the list and highlight successive entries. If there
is a matching contact for a highlighted entry, the Call
and Contact buttons are activated.
3. Do one or more of the following:
§ Review the length and cost of calls if this
information is available (see “Setting options to
show call length and cost, and delete the call log”)
§ Tap an entry, tap or press the Call button, or press
to place a call to the highlighted or selected
number
§ Press the Contact button to display the Contact
Summary screen
§ Press Save to create a new entry in Contacts
§ Delete all of the information in the Call Log (see
“Deleting the information in the Call Log”).
4. When you are done using the Call Log, tap .
81
Page 82

7.2 Deleting the information in the Call
Log
Your WA 3050 device gives you the option of deleting the
information in the Call Log after the phone is turned off.
By default, the information in the Call Log is retained when
the phone is powered off unless you change this setting
(see “Setting options to show call length and cost, and
delete the call log”). In addition, you have the option to
delete all of the information in the Call Log while the
phone is turned on.
To delete all of the information in the Call Log
(while phone is on)
1. When the phone is turned on, press or tap .
2. Press or tap á and â or rock the Up/Down control to
scroll the list of entries.
3. If you are sure you want to delete the contents of the
Call Log, press or tap Clear All.
4. Tap .
82
Page 83

8 Using the security features of
your phone
For your protection, the WA 3050 provides a number of
security features to prevent unauthorised activation, access,
and use of your device. It includes a Pocket PC standard
option for setting a user-defined password to access the
PDA (see “Setting a PDA password”). In addition, it
includes a number of options that let you customise the
type of security you want for your phone:
§ Locking the and keys
§ Activating the use of a PIN code
§ Call barring
§ Fixed dialing
§ Cost limitations.
Note Although phone security features are configured by
selecting options from the Settings panel, your SIM card
must be inserted into the back of your device to change
security and other phone settings and to activate any
changes you make.
8.1 Locking the and phone
keys
To prevent your phone from being turned on
unintentionally, the WA 3050 includes an option for
locking the and keys. If you press one of these
keys when this option has been enabled, a pop-up window
appears asking you if you want to unlock the keys to use
the phone. You can unlock the keys by selecting “Yes” or
by pressing the Action button, or you can leave them
locked and proceed to use the phone. If you leave the keys
83
Page 84

locked and use the phone, the keys are locked again
automatically in 30 seconds. You may find this feature
useful if you store your device in a briefcase or purse or
carry it in your coat pocket for extended periods of time
when travelling.
To lock the and phone keys
1. Tap then Settings. On the Personal tab, tap
Phone, then General.
2. Tap Other.
3. Tap Lock Green and Red keys . Tap this option again
to cancel your selection.
4. Tap .
8.2 Activating the use of a PIN code
Your WA 3050 device includes an option for activating the
use of a PIN code whenever the phone is turned on. If your
device is lost or stolen, it cannot be used to make or receive
calls if this option is enabled.
To activate the use of a PIN code
1. Tap then Settings. On the Personal tab, tap
Phone, then Security.
2. Tap Require PIN code when the phone is powered
on so that it is selected.
3. On the PIN entry window, press the keys or use the
stylus to type a PIN code. PIN codes must be from 4 to
8 characters in length. If you make an error, press and
hold to delete what you typed and reenter your PIN
code.
Note If you make three incorrect entries, the SIM card
is blocked and must be replaced or unlocked by your
84
Page 85

carrier, who may provide a PIN Unlock Key (PUK). If
you select Cancel, you will only be able to place
emergency calls (no PUK required) until your card is
replaced.
4. Tap OK on the PIN entry window to enter the PIN
code.
5. Tap .
To deactivate the use of a PIN code
1. Tap then Settings. On the Personal tab, tap
Phone, then Security.
2. Tap Require PIN code when the phone is powered
on so that it is no longer selected.
3. Enter your phone PIN code.
4. Tap OK.
5. Tap .
85
Page 86

8.3 Changing the PIN code
Occasionally, you may want to change your PIN code for
security reasons.
To change the PIN code
1. Tap then Settings. On the Personal tab, tap
Phone, then Security.
2. Tap Change PIN code.
3. Enter the current PIN code on the PIN entry screen.
4. On the PIN entry window, use the stylus to type a new
PIN code. PIN codes must be from 4 to 8 characters in
length. If you make an error, press and hold to
delete what you typed and reenter your PIN code.
Note If you make three incorrect entries, the SIM card
is blocked and must be replaced or unlocked by your
carrier, who may provide a PIN Unlock Key (PUK) . If
you select Cancel, you will only be able to place
emergency calls (no PUK required) until your card is
replaced.
5. Tap OK, then enter the new PIN code again.
6. Tap .
86
Page 87

8.4 Changing the PIN2 code
A PIN2 code is required to access and activate call cost
options. You may want to update it periodically for security
reasons.
To change the PIN2 code
1. Tap then Settings. On the Personal tab, tap
Phone, then Security.
2. Tap Change PIN2 code.
3. On the PIN entry window, use the stylus to type a new
PIN2 code. PIN2 codes must be from 4 to 8 characters
in length. If you make an error, press and hold to
delete what you typed and reenter your PIN2 code.
Note If you make three incorrect entries, the SIM card
is blocked and must be replaced or unlocked by your
carrier, who may provide a PIN Unlock Key (PUK). If
you select Cancel, you will only be able to place
emergency calls (no PUK required) until your card is
replaced.
4. Tap OK on the PIN entry window to enter the new
PIN2 code.
5. Tap .
87
Page 88

8.5 Activating call barring
Call barring prevents you or another individual from using
your phone to make or receive different types of calls.
Depending on your subscription, no call-barring restrictions
may be in effect when your phone service is established,
but the WA 3050 provides you with options for restricting
incoming and outgoing calls. When outgoing call-barring
restrictions are in effect, the message “The phone is not
allowed to call that number.” is displayed if you attempt to
call a restricted number.
Note You will need to use a password issued to you by
your carrier to complete the procedure for activating call
barring. This password is different from both the PIN and
PIN2 codes.
To activate call barring
1. Tap then Settings. On the Personal tab, tap
Phone, then Security.
2. Tap the Barring tab.
3. Tap on the Call type box and tap Voice, Data, or
Fax.
4. Tap the options you want to define call barring for
incoming and outgoing calls.
5. Tap .
6. On the PIN entry window, use the stylus to type your
call barring password. Unlike the PIN or PIN2 codes,
this password is only 4 characters long. If you make an
error, press and hold to delete what you typed and
reenter your call barring password.
Note If you make three incorrect entries, the SIM card
is blocked and must be replaced or unlocked by your
88
Page 89

carrier, who may provide a PIN Unlock Key (PUK). If
you select Cancel, you will only be able to place
emergency calls (no PUK required) until your card is
replaced.
7. When you have typed your password correctly, tap
OK to enter it and close the PIN entry window.
8. Complete Steps 3-7 for each type of call – Voice,
Data, or Fax – for which you want to activate call
barring.
9. When you are done activating call barring, tap .
89
Page 90

8.6 Activating fixed dialing numbers
Your WA 3050 device gives you the option of using fixed
dialing to restrict the numbers that can be dialed from your
phone. Fixed dialing numbers are stored in a special
directory on the SIM card (separate from other numbers
that may be stored on the SIM). The message “The phone
is not allowed to call that number.” is displayed if you
attempt to call a number that is not on the list when fixed
dialing is in effect.
To activate fixed dialing numbers
1. Tap then Settings. On the Personal tab, tap
Phone, then Security.
2. Tap Fixed Numbers to display the Fixed Numbers
screen.
3. Tap Only allow calls to fixed numbers.
4. Tap in the Name box to enter the name of a contact.
Names can have a maximum of 241 characters. Note
that a number can be entered without a name, but a
name must have a number entered for it.
5. Tap in the Number box, then type the contact number.
Numbers can have a maximum of 20 digits.
6. Tap Add to add the name and number to the list of
fixed dialing numbers.
Note The PIN entry screen is displayed the first time
Add or Remove is selected. Use the stylus to type
your PIN2 code. PIN2 codes must be from 4 to 8
characters in length. If you make an error, press and
hold to delete what you typed and reenter your
code.
If you make three incorrect entries, the SIM card is
blocked and must be replaced or unlocked by your
90
Page 91

carrier, who may provide a PIN Unlock Key (PUK). If
you select Cancel, you will only be able to place
emergency calls (no PUK required) until your card is
replaced.
7. Repeat Steps 4-7 to create additional entries. The
number of entries you can create will depend on the
capacity of the SIM card. After the last available spot
in the fixed number list (maximum determined by SIM
card), a horizontal line indicates how many numbers
can still be entered.
8. Tap Remove to move a highlighted number from the
list to the number input area where you can edit or
delete it. Enter the PIN2 code if the PIN entry screen is
displayed. Tap Add to apply your changes.
9. Tap .
10. To deactivate the use of fixed dialing numbers, repeat
Steps 1-3 and select Only allow calls to fixed
numbers so that this option is not selected, then
tap .
91
Page 92

8.7 Activating cost limitations
In addition to call barring and fixed dialing, the WA 3050
includes an option for setting cost limitations to restrict
phone usage. This option enables you to authorise a fixed
amount of phone service, which could be useful if your
device is on loan to a friend or coworker.
To activate cost limitations
1. Complete the procedure for showing call cost (see
“Setting options to show call length and cost, and
delete the call log”) if you have not done so.
2. Before closing the Cost window, enter an amount not
to exceed a fixed cost of service in the box to the right
of Limit cost to .
3. Tap Limit cost to if it is not selected.
4. Tap .
Note The PIN entry screen is displayed the first time
any value is changed. Use the stylus to type your PIN2
code. PIN2 codes must be from 4 to 8 characters in
length. If you make an error, press and hold to
delete what you typed and reenter the code.
If you make three incorrect entries, the SIM card is
blocked and must be replaced or unlocked by your
carrier, who may provide a PIN Unlock Key (PUK). If
you select Cancel, you will only be able to place
emergency calls (no PUK required) until your card is
replaced.
5. Tap OK on the PIN entry screen.
6. Tap .
92
Page 93

8.8 Turning off transmission of DTMF
tones
By default, DTMF tones (“bips”) are transmitted over the
network when you make a call. These tones are necessary
to use features of applications such as automated voice
response systems and voice mail.
You can turn off the transmission of DTMF tones if you do
not want someone to hear them when you dial another
number during a call in progress.
To turn off transmission of network DTMF tones
1. Tap then Settings. On the Personal tab, tap
Phone, then Call Services.
2. Tap the Network tab.
3. Tap Network transmits DTMF tones so that it is not
selected.
4. Tap .
93
Page 94

9 Using the Sync SIM utility
In addition to subscription information, your SIM card
contains a directory for storing frequently dialed phone
numbers. The number of phone numbers you can store
depends on the capacity of the card issued by your carrier.
If you know its location (index number) in the directory,
you can dial a number by keying in its index number
followed by the pound sign (#) on the dialing screen.
You can remove the SIM card, insert it into a compatible
phone or another WA 3050 unit, and continue to access the
directory of frequently dialed phone numbers to place a
call.
On a Pocket PC device, Contacts is the main place for
storing names and phone numbers and other contact
information. If you use another phone or WA 3050 unit,
you can use the Sync SIM utility installed on your
WA 3050 device to:
§ Save SIM entries to Contacts
§ Add, modify, or delete entries on the SIM
§ Copy names and numbers from Contacts to the SIM
card.
Note Your phone must be powered on for you to access
any of the Sync SIM functions.
To save a SIM entry to Contacts
1. Tap , Programs, then Sync SIM.
2. Tap an entry not preceded by a check mark.
3. Tap Tools, Save SIM Entry… to update Contacts
with the selected entry. The Save SIM Entry to
Contact view is displayed.
94
Page 95

4. Make any needed changes to the name and phone
number shown.
5. By default, a phone number is saved as a mobile
telephone number (Mobile tel) in Contacts. To save it
as another type of number, hold the stylus on next to
Mobile tel, then tap Work tel or Home tel.
6. Tap OK to update Contacts, or Cancel to cancel your
selection.
7. Repeat Steps 2-6 for each entry you want to save to
Contacts, or select another option.
To save all SIM entries to Contacts
1. Tap , Programs, then Sync SIM.
2. Tap Tools, Save All to update Contacts with all entries
that do not have a matching phone number in Contacts.
These entries are not preceded by a check mark.
For each entry saved in this way, an “Unnamed” entry
is created in Contacts. Phone numbers are saved as
“Mobile tel” numbers for each “Unnamed” entry.
You will need to open the Contacts application and
edit each of these entries to add meaningful names,
move phone numbers to other fields, and add any other
information.
To add a SIM entry
1. Tap , Programs, then Sync SIM.
2. Highlight a blank entry.
3. Tap Tools, Modify SIM Entry….
4. Tap and type in information for Name, Number, and
Index.
5. Tap OK to save your changes, or Cancel to cancel
your selection.
95
Page 96

6. Save the new entry to Contacts, or select another
option.
7. Tap Tools, Refresh to refresh the listing of SIM
entries.
To modify a SIM entry
1. Tap , Programs, then Sync SIM.
2. Tap an entry.
3. Tap Tools, Modify SIM Entry….
4. Tap Name and Index and make any needed changes.
5. Tap OK to save your changes, or Cancel to cancel
your selection.
6. Tap Tools, Refresh to refresh the listing of SIM
entries.
To delete a SIM entry
1. Tap , Programs, then Sync SIM.
2. Tap an entry.
3. Tap Tools, Delete SIM Entry.
4. Tap OK to delete the selected entry, or Cancel to
cancel your selection.
Note If there is an entry for the same phone number in
Contacts, you will need to open Contacts to modify or
delete it. An entry already exists in Contacts for each
item that is preceded by a check mark.
5. Tap Tools, Refresh to refresh the listing of SIM
entries, or select another option.
96
Page 97

To copy names and numbers from Contacts to the
SIM card
1. Tap , Programs, then Sync SIM.
2. Tap View, then Contacts View.
3. Tap an entry not preceded by a check mark.
4. Tap Tools, Save Contact… to copy the selected name
and number to the directory on the SIM card.
5. Repeat Steps 2-4 for each entry you want to copy.
6. Tap View, SIM View to save a SIM entry to Contacts,
or select another option.
97
Page 98

Page 99

SMS §§ fax §§ WAP §§ e-mail §§ Web browser
Page 100

 Loading...