


User Guide
Guide de l’utilisateur
VT1000 Series
Voice T erminal
Terminal vocal série VT1000
Important
This guide contains information related to
product warranty, regulatory matters, and
software licenses.
Important
Ce guide contient des informations
concernant la garantie du produit, la
réglementation et les licences de logiciels.

License
Safety and Regulatory Information
WARNING: TO PREVENT FIRE OR SHOCK HAZARD, DO NOT EXPOSE THIS DEVICE TO RAIN OR MOISTURE. THE DEVICE SHALL NOT
BE EXPOSED TO DRIPPING OR SPLASHING AND NO OBJECTS FILLED WITH LIQUIDS, SUCH AS VASES, SHALL BE PLACED ON THE DEVICE.
CAUTION: TO ENSURE REGULATORY AND SAFETY COMPLIANCE, USE ONLY THE PROVIDED POWER AND INTERFACE CABLES. TO
PREVENT ELECTRICAL SHOCK, DO NOT USE THIS PLUG WITH AN EXTENSION CORD, RECEPTACLE, OR OTHER OUTLET UNLESS
THE BLADES CAN BE FULLY INSERTED TO PREVENT BLADE EXPOSURE.
CAUTION: DO NOT OPEN THE UNIT. DO NOT PERFORM ANY SERVICING OTHER THAN THAT CONTAINED IN THE INSTALLATION AND
TROUBLESHOOTING INSTRUCTIONS UNLESS YOU ARE QUALIFIED TO DO SO. REFER ALL SERVICING TO QUALIFIED SERVICE
PERSONNEL.
It is recommended that the customer install an AC surge arrestor in the AC outlet to which this device is connected. This is to avoid damaging the
equipment by local lightning strikes and other electrical surges.
This product was qualified under test conditions that included the use of the supplied cable between system components. To be in
compliance with regulations, the user must use this cable and install it properly.
Different types of cord sets may be used for connections to the main supply circuit. Use only a main line cord that complies with all
applicable product safety requirements of the country of use.
Installation of this product must be in accordance with national wiring codes.
To prevent overheating, do not block the ventilation holes on the sides of the Motorola voice terminal.
Wipe the Motorola voice terminal with a clean, dry cloth. Never use cleaning fluid or similar chemicals. Do not spray cleaners directly on the unit or
use forced air to remove dust.
ii

VT1000 Series Voice Terminal User Guide
License
Important VoIP Service Information
Any services provided through this equipment:
• Are not intended to replace or be a substitute for primary line voice services or Plain Old Telephone Service (POTS)
• Are not meant to provide guaranteed 911 or E911 services or to permit access to 411 directory assistance services
Y our service provider , not Motorola, is responsible for the provision of VoIP telephony services through this equipment. Motorola shall not be liable
for, and expressly disclaims, any direct or indirect liabilities, damages, losses, claims, demands, actions, causes of action, risks or harms arising
from or related to the services provided through this equipment.
IMPORTANT: You CANNOT make any calls using this VoIP device if your broadband connection is not functioning properly or if you lose
electrical power.
FCC Compliance
This equipment has been tested and found to comply with the limits for a Class B digital device, pursuant to Part 15 of the FCC Rules. These limits are designed to provide reasonable
protection against harmful interference when the equipment is operat ed in a residential environment. This equipment generates, uses, and can radiate radio frequency energy and, if not
installed and used in accordance with the instructions, may cause harmful interference to radio communications. However, there is no guarantee that interference will not occur in a
particular installation. If this equipment does cause harmful int erference to radio or television reception, which can be determined by turning the equipment off and on, the user is
encouraged to try to correct the interference by one of the following measures:
• Re-orient or relocate the receiving antenna
• Increase the separation between the equipment and receiver
• Connect the equipment into an outlet on a circuit different from that to which the receiver is connected.
• Consult the dealer or an experienced radio/TV technician for help.
Changes or modification not expressly approved by the party responsible for compliance could void the user’s authority to operate the equipm ent.
Canadian Compliance
This Class B digital device complies with Canadian ICES-003. Cet appareil numérique de la classe B est conforme à la norme NMB-003 du Canada.
iii

License
FCC Declaration of Conformity
According to 47CFR, Parts 2 and 15 for Class B Personal Computers and Peripherals; and/or CPU Boards and Power Supplies used with Class B
101Tourname nt Driv e, Ho rs ha m, PA
Each product marketed is identical to th e
be expected to be within the variation accepted, due to quantity
device must accept any interference received, including interference that may cause undesired operation. The above named party is responsible for ensuring that the equipment complies
with the standards of 47CFR, Paragraph 15.101 to 15.109.
19044, 1-215-323-1000, declares under sole responsibility
representative unit tested and found to be compliant with the standards
production and testing on a statistical basis as required by 47CFR 2.909
that the product
identifies with 47CFR Part 2 and 15 of the FCC Rul es as a Cla s s B di gi tal
. Records maintained continue to reflect the equipme nt being produced can
. Operation is subject to the following condit ion: This
Personal Computers, Moto rola BCS,
device.
International Declaration of Conformity
We, Motorola, Inc. Broadband Communications Sector
101 Tournament Drive
Horsham, PA, U.S.A.
declare under our sole responsibility that the:
Motorola VT1003, VT1005, VT1003v, and VT1005v voice terminals
to which this declaration relates is in conformity with one or more of the following standards:
EN55022 EN55024 CISPR-22 CISPR-24 ETSI EN300 386
EN60950 EN61000-3-2 EN61000-3-3 IEC 60950
the following provisions of the Directive(s) of the Council of the European Union:
EMC Directive 89/336/EEC Low Voltage Directive 73/23/EEC Directive 93/68/EEC
Copyright © 2005 by Motorola, Inc.
All rights reserved. No part of this publication may be reproduced in any form or by any means or used to make any derivative work (such as translation, transformation or adaptation)
without written permission from Motorola, Inc.
Motorola reserves the right to revise this publication and to make changes in content from time to time without obligation on the part of Motorola to provide notification of such revision or
change. Motorola provides this guide without warranty of any kind, either implied or expressed, including, but no t limited to, the implied warranties of merchantability and fitness for a
particular purpose. Motorola may make improvements or changes in the product(s) described in this manual at any time.
MOTOROLA, the Stylized M Logo, and SURFboard are registered in the US Patent & Trademark Office. Microsoft and Windows are registered trademarks of Microsoft Corporation.
Macintosh is a registered trademark of Apple Computer, Inc. Netscape Navigator is a registered trademark of Netscape Communications Corporation. UNIX is a registered trademark of the
Open Group in the United States and other countries. DOCSIS is a registered trademark of Cable Television Laboratories, Inc. All other
respective owners. © Motorola, Inc. 2005.
product or service names are the property of their
iv

Contents
Introduction .............................................................................................................................. 1
Before You Begin .....................................................................................................................9
Installation .............................................................................................................................. 11
Troubleshooting .....................................................................................................................26
Sample Configuration Without A Home Network ............................................................................... 2
Sample Wired Network With Calls Prioritized .................................................................................... 3
Sample Wireless Network With Calls Prioritized ................................................................................ 4
Sample Wired Network Without Calls Prioritized ............................................................................... 5
Sample Wireless Network Without Calls Prioritized ........................................................................... 6
Front Panel ........................................................................................................................................ 7
Rear Panel ......................................................................................................................................... 8
Precautions ...................................................................................................................................... 10
Signing Up for Service ..................................................................................................................... 10
Installation With A Single Computer ................................................................................................ 12
Network Installation With Calls Prioritized ....................................................................................... 14
Network Installation With Calls Not Prioritized .................................................................................16
Connecting a Computer to Display the Configuration Pages ........................................................... 18
Basic Configuration .......................................................................................................................... 19
Advanced Configuration ................................................................................................................... 22
Status ............................................................................................................................................... 24
Help .................................................................................................................................................. 25

Frequently-Asked Questions ................................................................................................27
Glossary ..................................................................................................................................30
Software License and Warranty ............................................................................................34
VT1000 Series Voice Terminal User Guide
Introduction
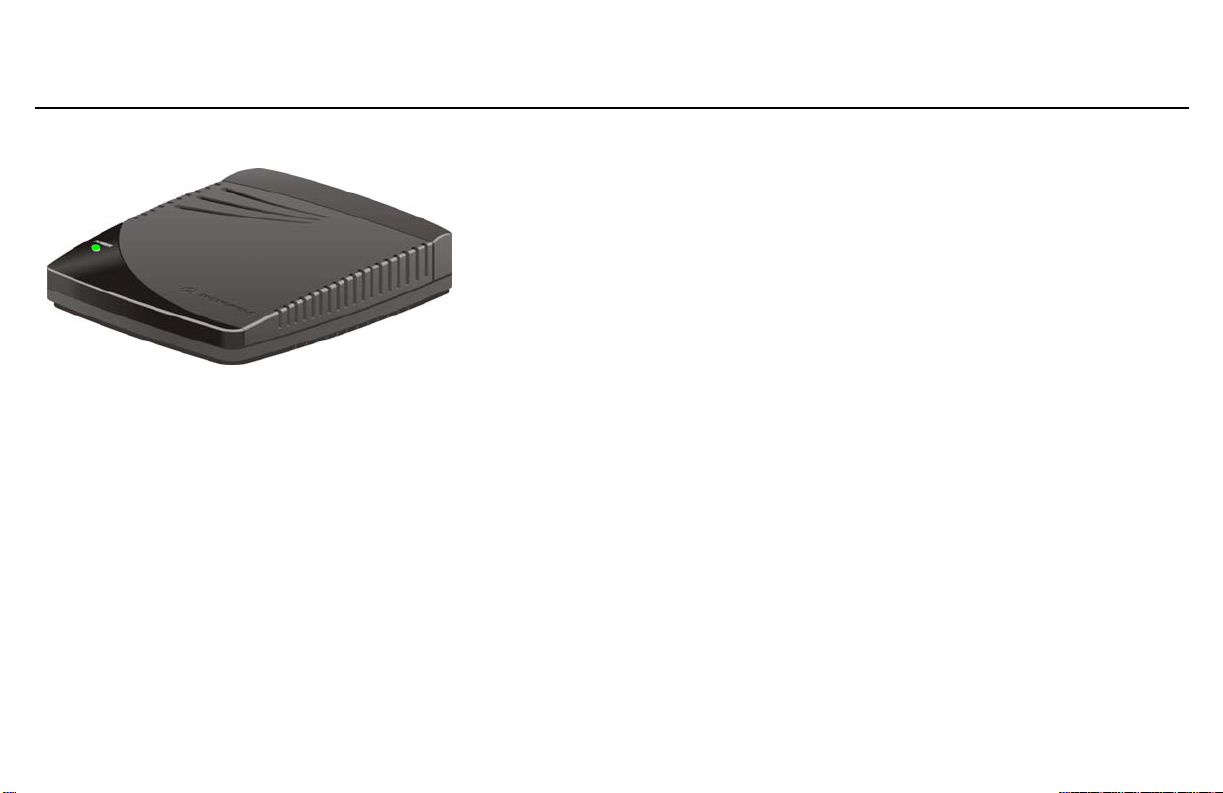
A Motorola voice terminal (digital phone adapter) adds Voice over Internet Protocol
(VoIP) connections for one or two telephones to any broadband Internet connection. The
connection can be through either:
• A cable modem high-speed data service from a cable television company
• A digital subscriber line (DSL) service from a telephone company
• Other high-speed Internet connection
The VT1000 Series includes the following models, which collectively are referred to as a
“Motorola voice terminal” in this guide:
VT1003
VT1003v
Provide one telephone line
VT1005
VT1005v
You can use a Motorola voice termin al with almost any:
• Cable modem or DSL modem (broadband modem)
• Microsoft Windows
• Ethernet router or wireless access point
Provide two telephone lines
®
, Macintosh®, or UNIX® computer with a 10Base-T or
10/100Base-T Ethernet adapter
1
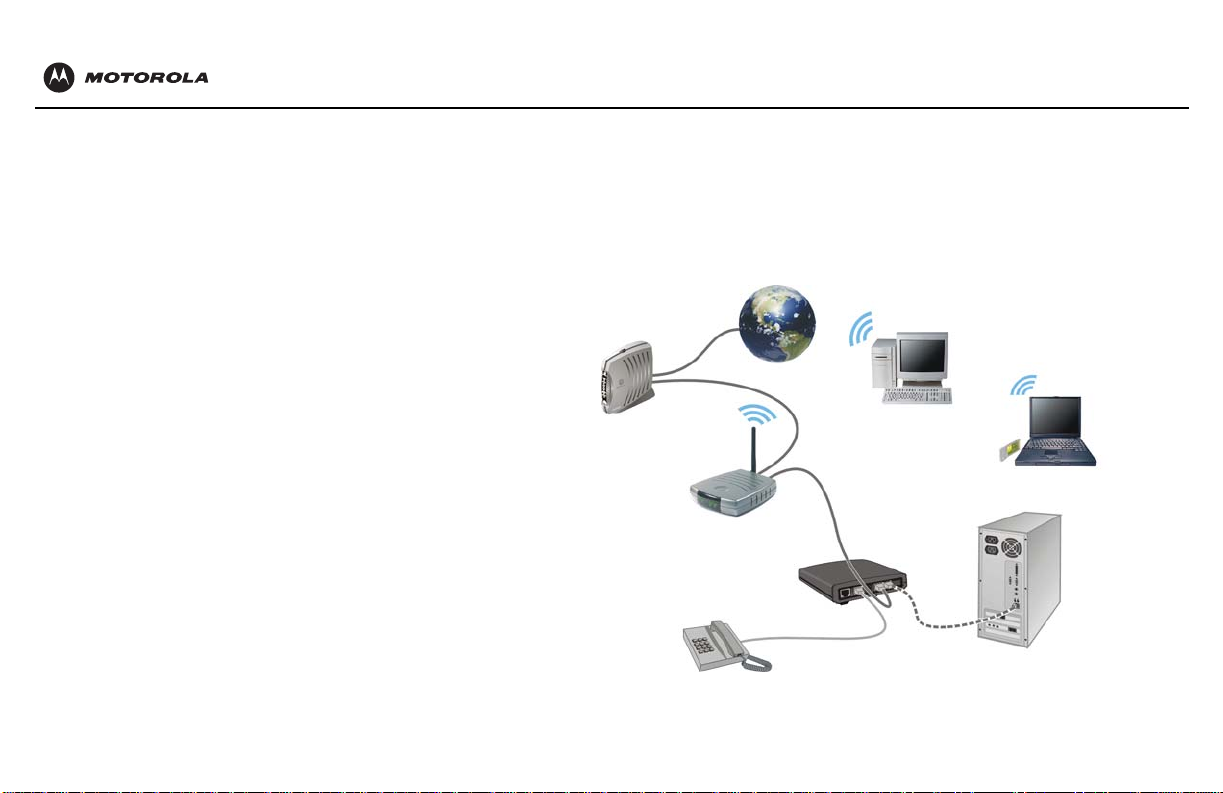
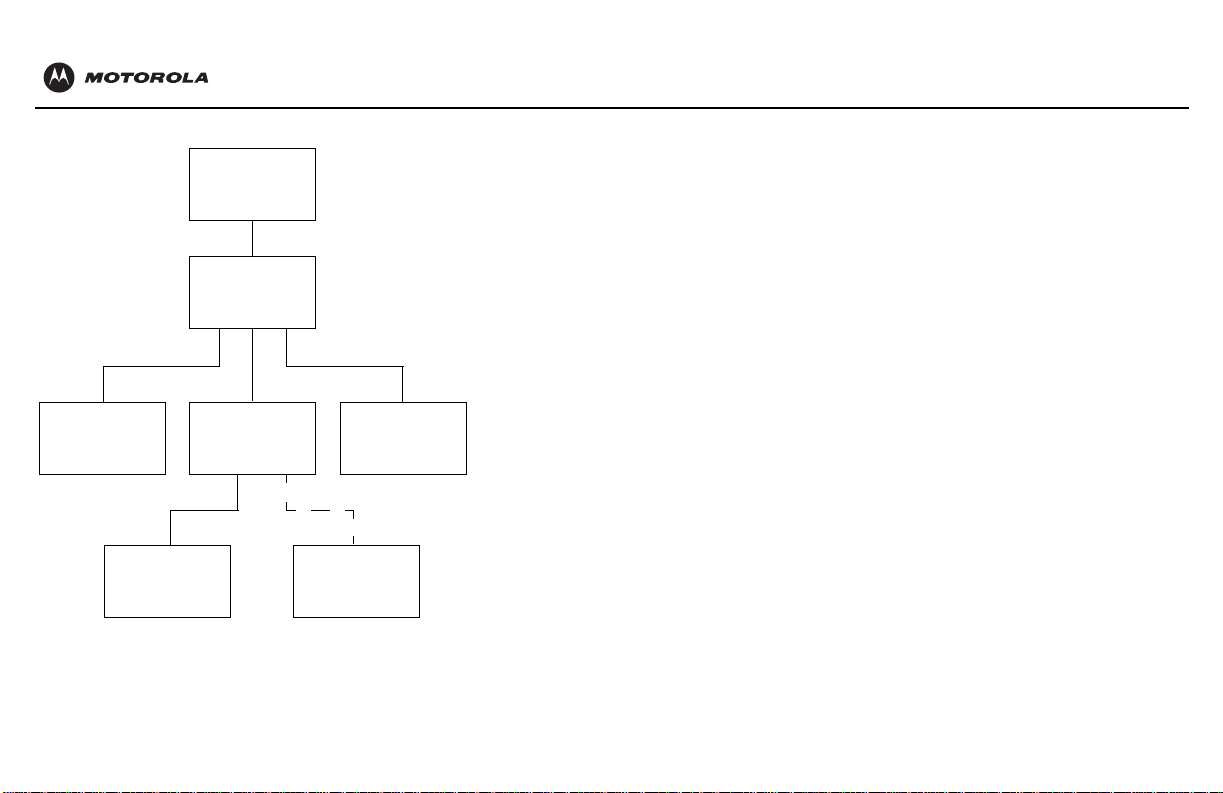
As shown in tn the illustrations on page 2 to page 6, the Motorola voice terminal can
prioritize calls only if you connect it directly to your broadband modem.
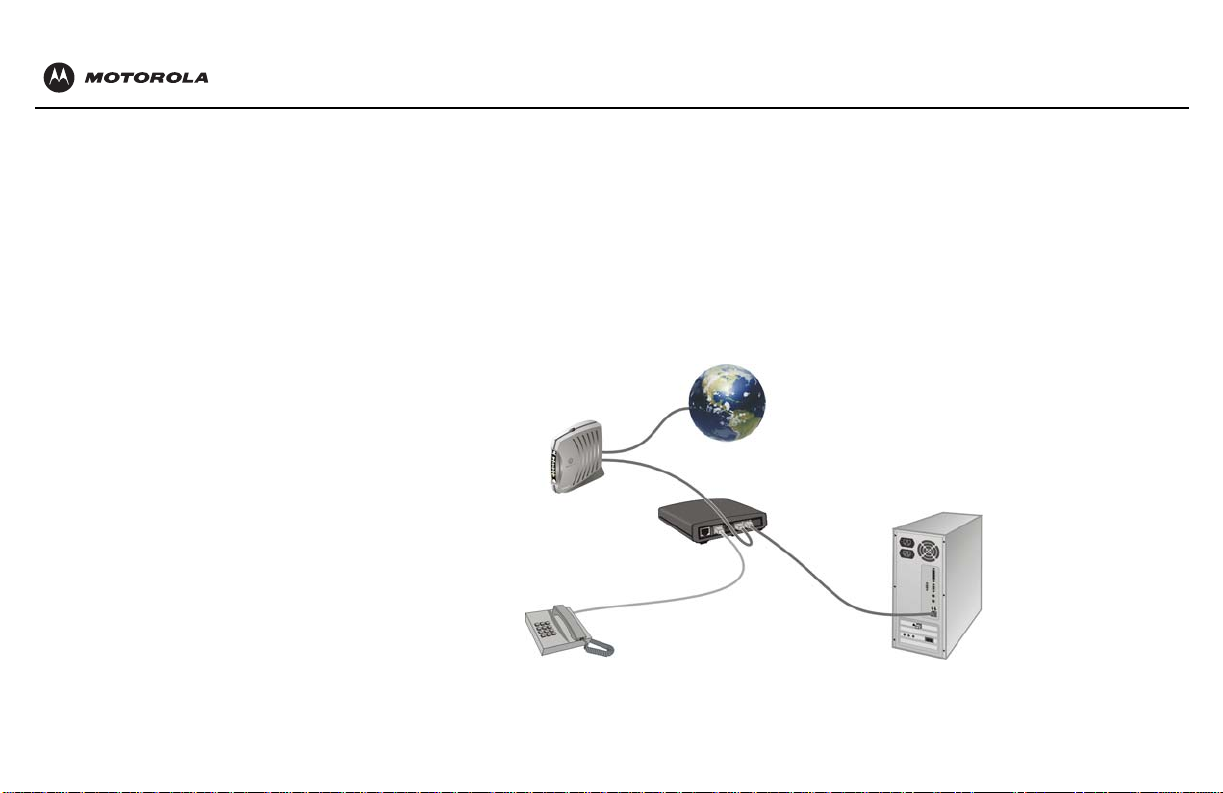
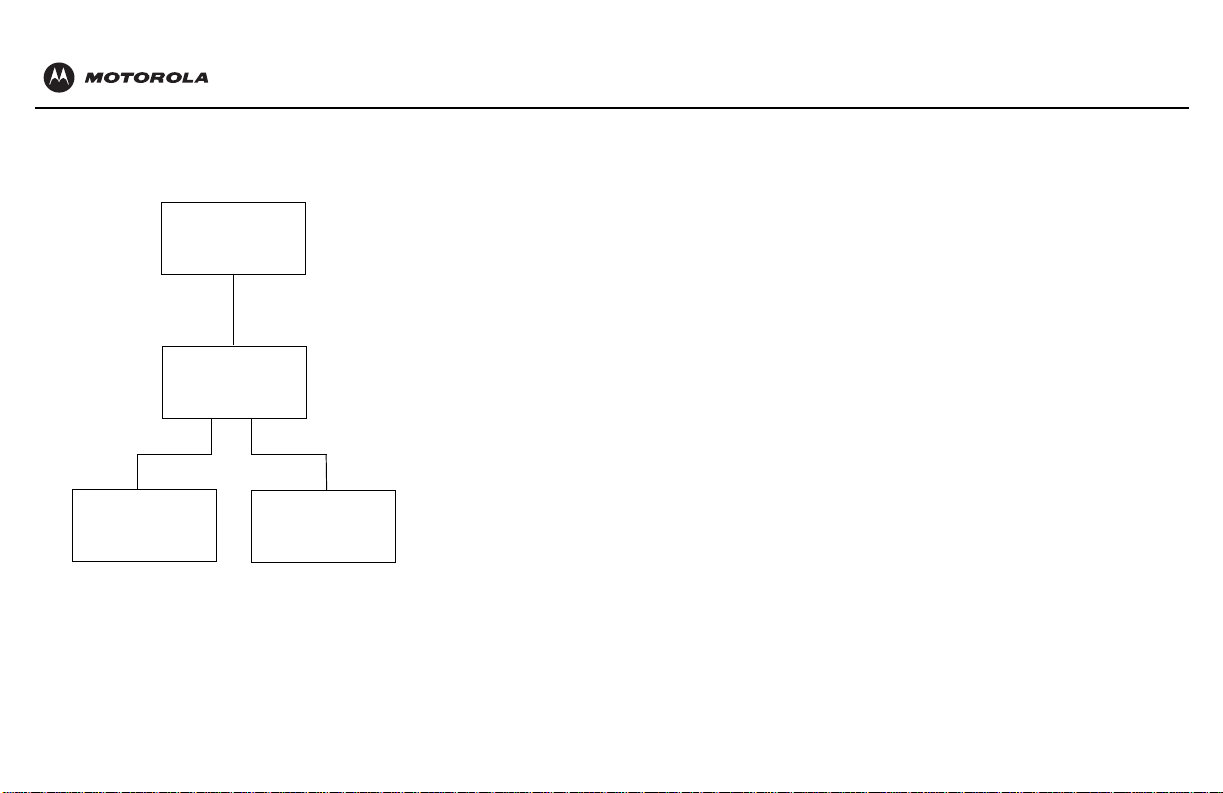
Sample Configuration Without A Home Network
You can connect a Motorola voice terminal to any cable modem or DSL modem.
Because the Motorola voice terminal is directly connected to your broadband modem,
the Motorola voice terminal can prioritize voice calls over data traffic. This helps ensure
high-quality phone service:
Internet
For simplicity, not all cables are shown.
2
Broadband
modem
Motorola voice
terminal
VT1000 Series Voice Terminal User Guide
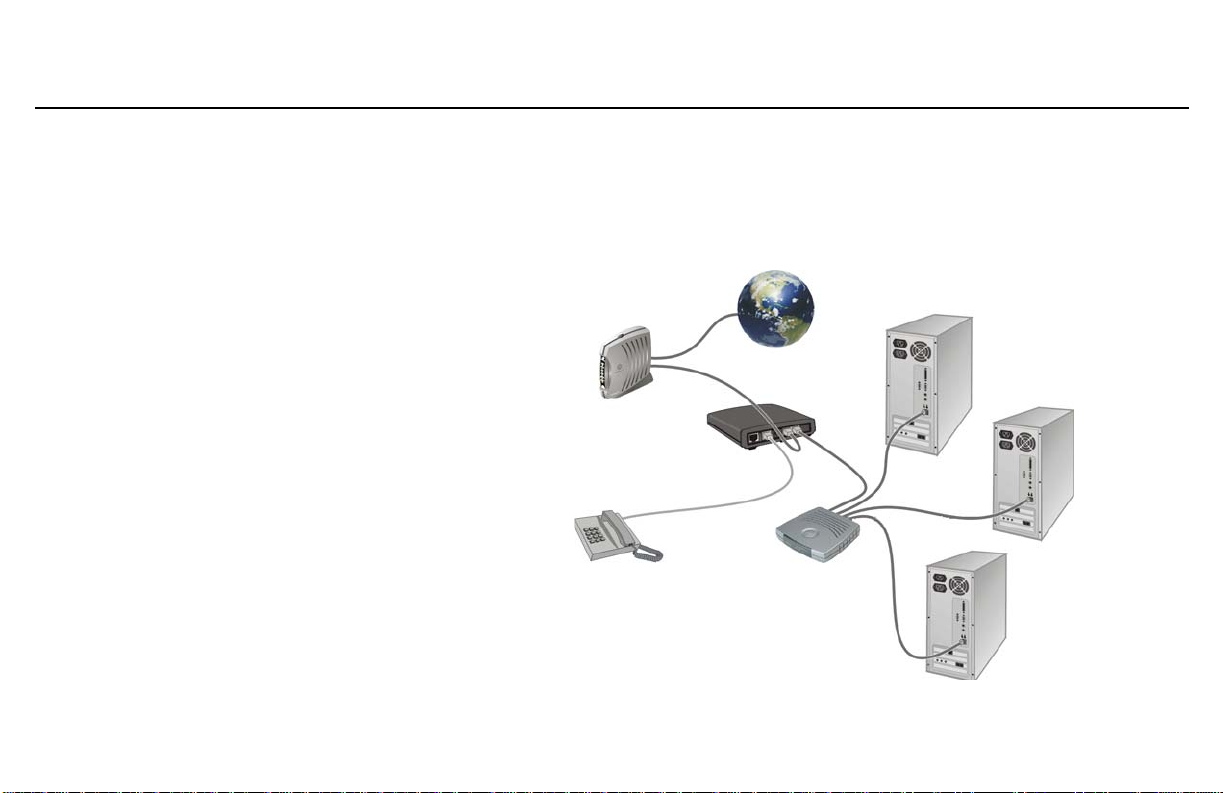
Sample Wired Network With Calls Prioritized
You can connect any Ethernet router to your Motorola voice terminal. Because the
Motorola voice terminal is directly connected to your broadband modem, the Motorola
voice terminal can prioritize voice calls over data traffic. This helps ensure high-quality
phone service:
Internet
Broadband
modem
Motorola voice terminal
Ethernet
router
3
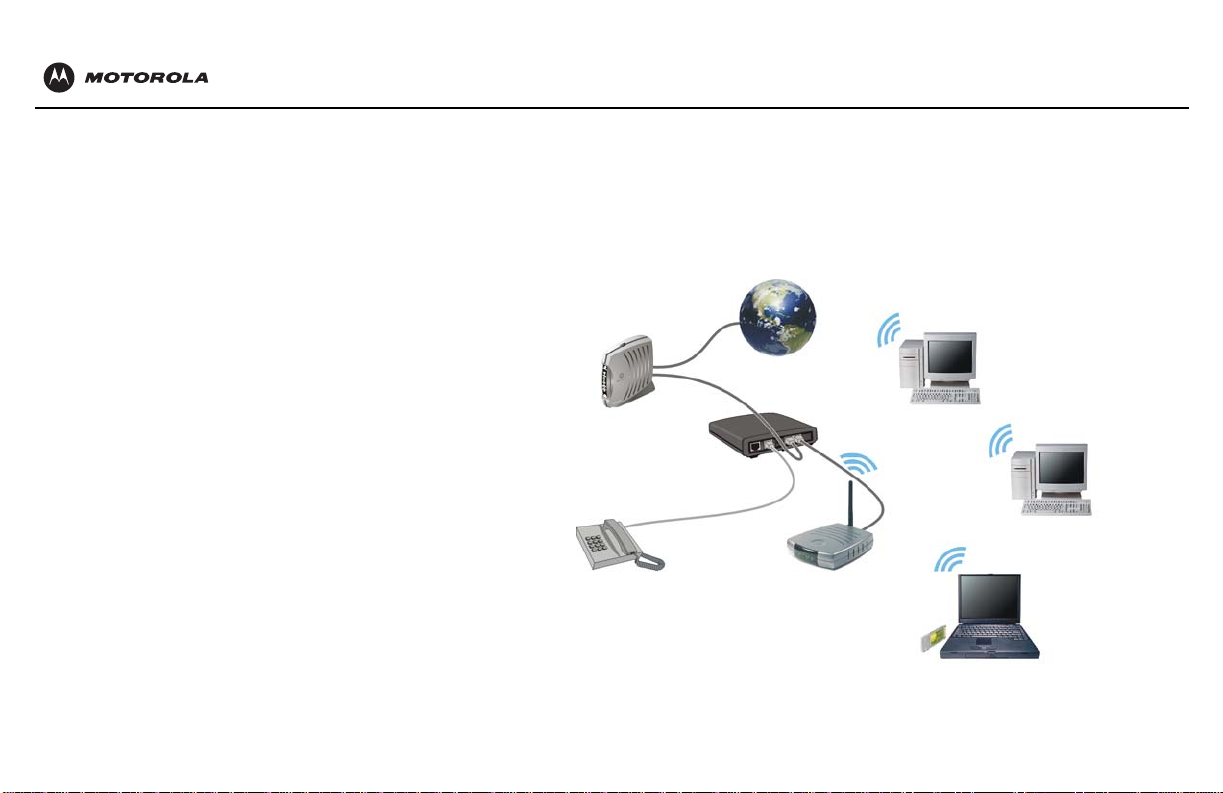
Sample Wireless Network With Calls Prioritized
You can connect any wireless router (access point) to your Motorola voice terminal.
Because the Motorola voice terminal is directly connected to your broadband modem,
the Motorola voice terminal can prioritize voice calls over data traffic. This helps ensure
high-quality phone service:
Internet
Broadband
modem
Motorola voice terminal
Wireless
access point
4

VT1000 Series Voice Terminal User Guide
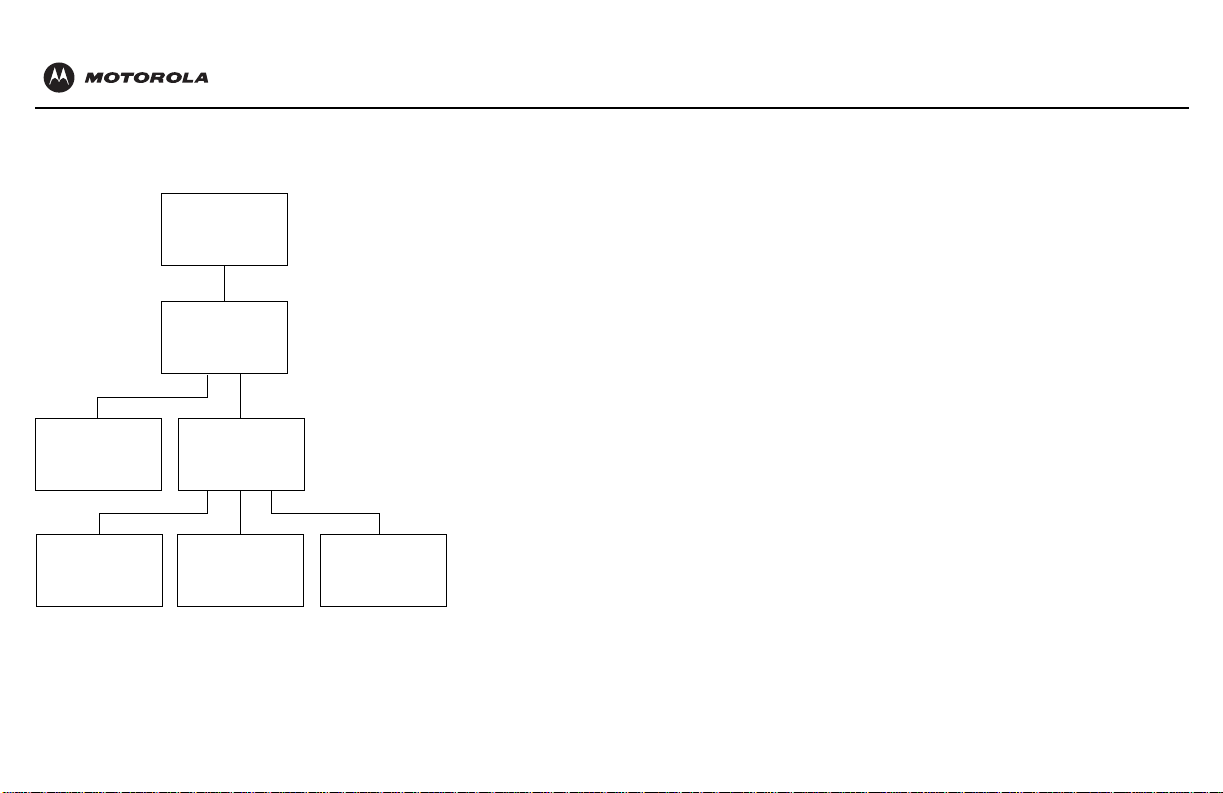
Sample Wired Network Without Calls Prioritized
Y ou can connect a Motorola voice terminal to any Ethernet router on a network having a
high-speed Internet connection. Because the Motorola voice terminal is not directly
connected to your broadband modem, the Motorola voice terminal cannot prioritize
voice calls over data traffic:
Internet
Y ou may prefer this configuration if you already have a
home network.
You may need to connect a computer to the Motorola
voice terminal rear panel to configure the Motorola
voice terminal. See “Connecting a Computer to
Display the Configuration Pages” on page 18.
Broadband
modem
Router
Motorola voice terminal
Only if
necessary
5
Y ou may prefer this configuration if you already have a
wireless LAN.
You may need to connect a computer to the Motorola
voice terminal rear panel to configure the Motorola
voice terminal. See “Connecting a Computer to
Display the Configuration Pages” on page 18.
6
Sample Wireless Network Without Calls Prioritized
You can connect a Motorola voice terminal to any wirel ess access po int on a network
having a high-speed Internet connection. Because the Moto rola voice terminal is not
directly connected to your broadband modem, the Motorola voice terminal cannot
prioritize voice calls over data traffic:
Internet
Broadband
modem
Wireless access point
Only if
Motorola voice terminal
necessary
VT1000 Series Voice Terminal User Guide
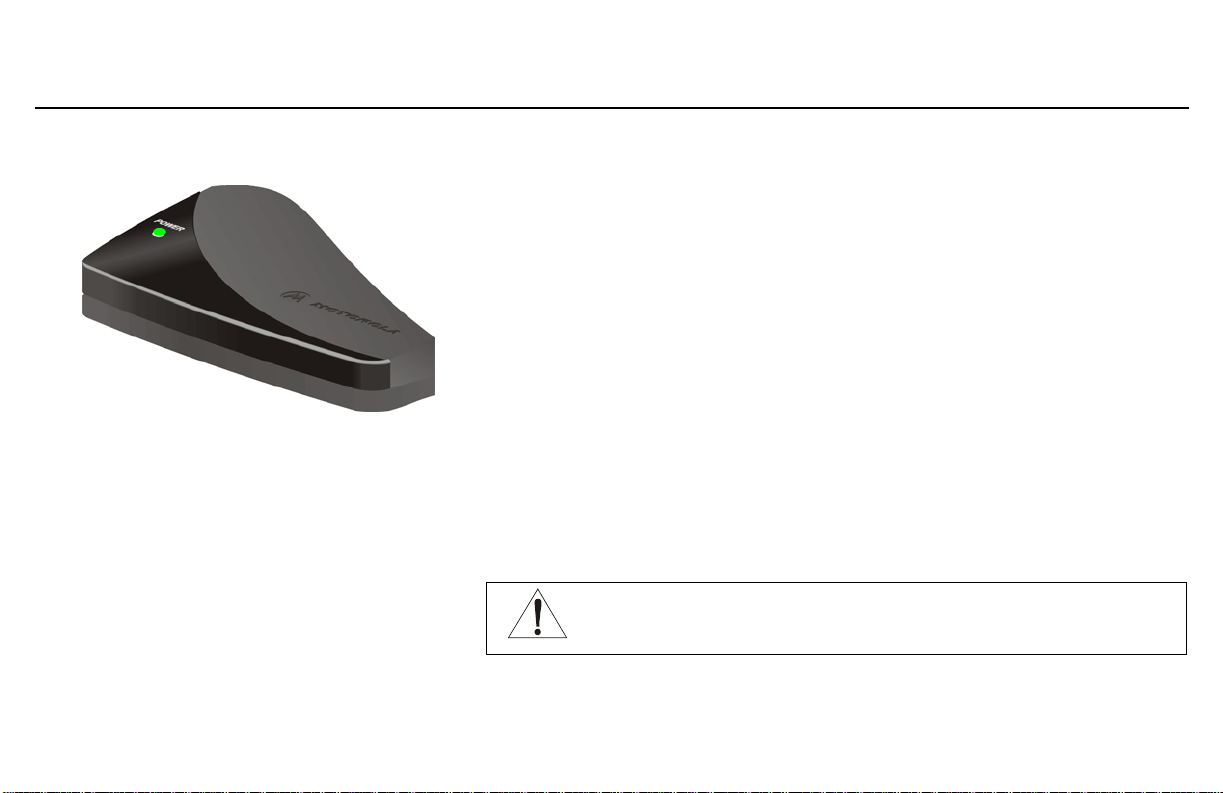
Front Panel
When your Motorola voice terminal is plugged in and operating normally, the POWER
light on the front panel lights solid green.
During start-up and image upgrades, as a Troubleshooting aid, the POWER light blinks:
Blinks Voice Terminal is
Once Performing its initial boot sequence
Two Acquiring its network address
Three Downloading its configuration profile from your VoIP provider
Four Registering with your VoIP provider server
Continuous
Fast
Caution!
Downloading an image upgrade initiated by your VoIP provider
Never unplug your Motorola voice terminal while its light is blinking
continuously. Instead, allow the image upgrade to finish. If you unplug the
Motorola voice terminal during an image upgrade, it may become inoperable.
7
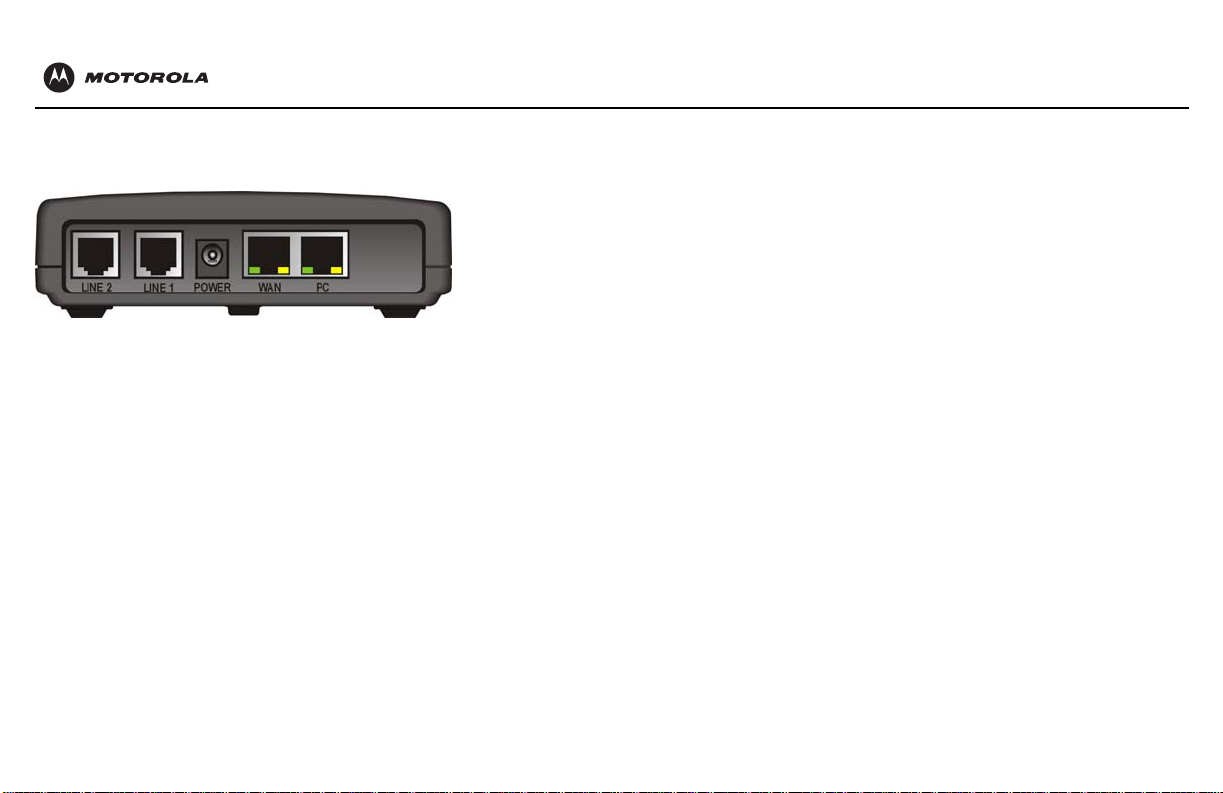
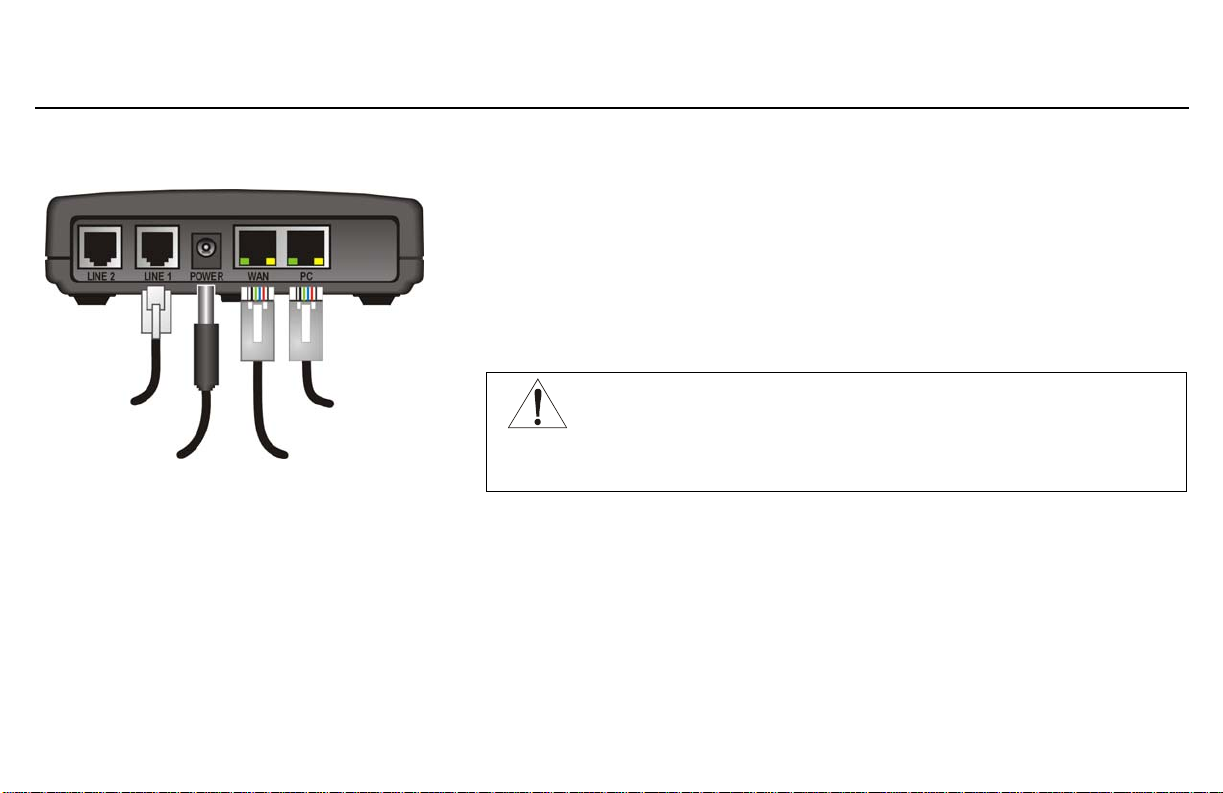
Rear Panel
The rear panel provides the following connectors:
Item Type Connects To
LINE 2 RJ-11 Telephone line two (on the VT1005 or VT1005v only)
LINE 1 RJ-11 Telephone line one
Your Motorola voice terminal may appear slightly
different than in the illustrations in this guide. Some
models do not have every connector illustrated.
8
POWER 12 V An adapter that you plug into an AC power outlet
WAN RJ-45 Ethernet connector to your broadband modem, router, switch, or hub.
(“WAN” means “wide area network”)
PC RJ-45 Ethernet connector to a computer
The WAN and PC connectors each have two adjacent lights:
• The green light is on when the Ethernet connection is available. It blinks during data
transfer over the port.
• The yellow light is on if there is a 100Base-T link and off for a 10Base-T link.
VT1000 Series Voice Terminal User Guide
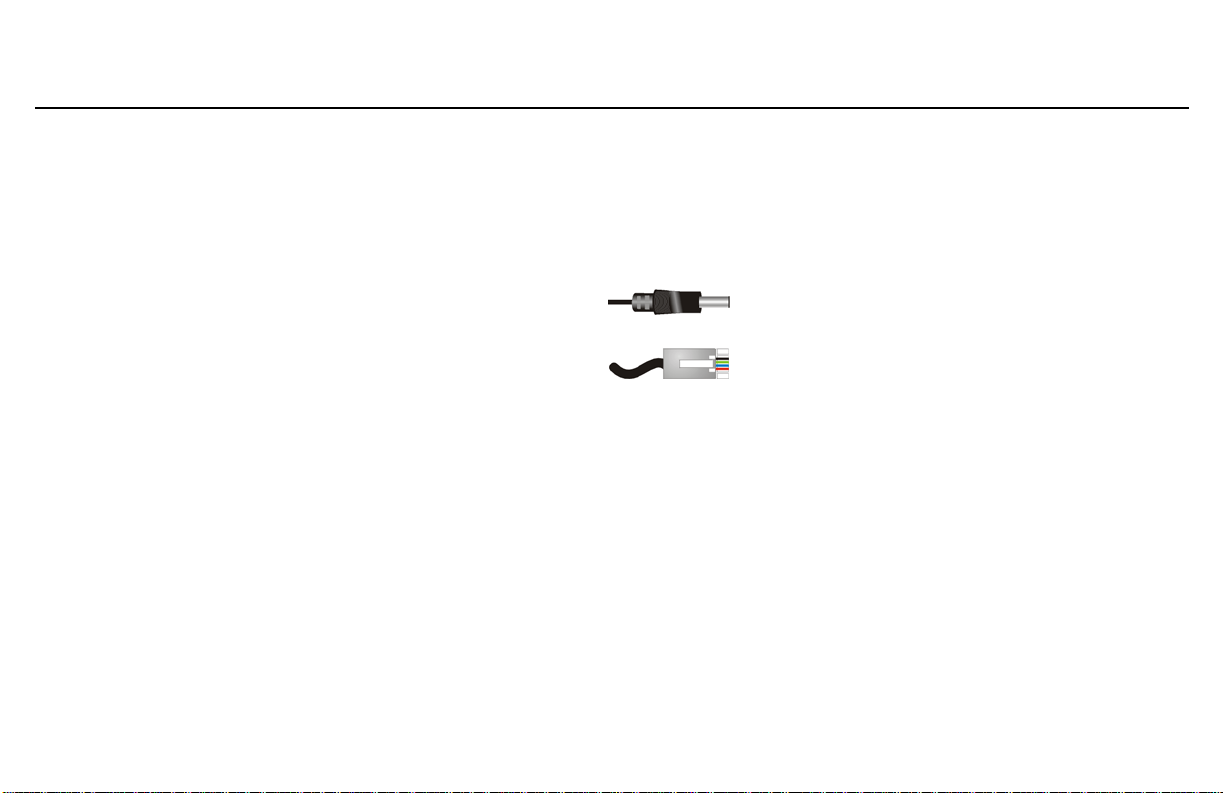
Before You Begin
Before you begin the installation, check that you received the following items with your
Motorola voice terminal:
Item Description
AC adapter
and line cord
Ethernet
cable
You also need:
• DSL, cable modem, broadband gateway, or other high-speed Internet connection
• One or two touch-tone telephones
Y ou may need an additional 10/100Base-T category 3 or better straight-through
cable with RJ-45 terminators.
Connects the Motorola voice terminal to an AC
electrical outlet
Connects the WAN port on the Motorola voice terminal
to a broadband modem (cable or DSL), router,
wireless access point
Connects the LAN port on the Motorola voice terminal to
a computer, router, or wireless access point
or
Ethernet
9
10
Precautions
Caution!
Contact your VoIP provider before connecting your Motorola voice terminal to
your existing telephone wiring. Connect each LINE port to a telephone only;
never to a traditional telephone service.
Postpone installation until there is no risk of thunderstorm or lightning activity in the area.
To prevent overheating the Motorola voice terminal, do not block the ventilation holes on
its sides.
Do not open the Motorola voice terminal. Refer all service to your VoIP provider.
Wipe the Motorola voice terminal wi th a clean, dry clo th. Never use cleaning fluid or similar
chemicals. Do not spray cleaners directly on the unit or use forced air to remove dust.
Signing Up for Service
T o activate voice service, you need to provide the MAC address printed on the bar code label
marked MTA MAC ID on the bottom of the Motorola voice terminal to your VoIP provider.
If you have a DSL modem, you need to obtain the Service Name, User Name, and
Password from your DSL provider.
VT1000 Series Voice Terminal User Guide
Installation
Depending on whether you have a single computer or a home network with multiple
computers and a router or wireless access point, perform one of:
• Installation With A Single Computer
• Network Installation With Calls Prioritized
• Network Installation With Calls Not Prioritized
Caution!
To phone
To AC power
To computer
or router
To modem or router
Contact your VoIP provider before connecting your Motorola voice terminal to
existing phone wiring. Connect each LINE port to a telephone only; never to a
traditional telephone service.
Be sure the LINE connectors are neither connected together nor connected t o
wall jacks on the same network.
11
12
Motorola voice
LINE 1
Phone
Broadband
Modem
Ethernet port
WAN
terminal
PC
Computer
Ethernet port
Installation With A Single Computer
To connect your Motorola voice terminal as shown in “Sample Configuration Without A
Home Network” on page 2:
1 Be sure the Motorola voice terminal is unplugged. Be sure power is off to your
broadband modem (cable or DSL) and computer.
2 Connect one end of an Ethernet cable (RJ-45) to the Ethernet connector on your
broadband modem. Connect the other end of this Ethernet cable to the WAN
connector on the Motorola voice terminal.
3 Connect one end of another Ethernet cable to the PC connector on the Motorola
voice terminal. Connect the other end of this Ethernet cable to the Ethernet
connector on the computer.
4
Connect a telephone to the
or VT1005v only, you can connect a second telephone to the LINE 2 connector.
5 Power on the broadband modem, following the instructions provided with your
modem. Wait about two minutes for it to start up.
6 Plug the AC power adapter to the POWER connector on your Motorola voice
terminal and the electrical outlet. This turns your Motorola voice terminal on. You do
not need to unplug it when not in use.
Wait about two minutes for the Motorola voice terminal to start up. The POWER light
blinks as described in “Front Panel” on page 7.
LINE 1
connector using a phone wire (RJ-11). For a VT1005

VT1000 Series Voice Terminal User Guide
7
After the POWER light on your Motorola voice terminal turns on solid green, power
up your computer. If your broadband Internet service does not work as it did before
you installed your Motorola voice terminal, please refer to “Troubleshooting” on
page 26.
If you have a cable modem, skip to step 9.
8 If you have a DSL modem, enable PPPoE on your Motorola voice terminal as
described in “Basic Configuration” on page 19.
9 Pick up your telephone hand set and listen for a dial tone. If you hear a dial tone,
you can now call anyone as you would with any telephone.
If you have any problems, please refer to “Troubleshooting” on page 26 or call your
VoIP provider.
13
Phone
Broadband
Modem
WAN
Motorola
voice
terminal
PCLINE 1
Router or
wireless
access point
Ethernet or wireless
Network Installation With Calls Prioritized
To connect your Motorola voice terminal directly to your broadband router, as shown on
page 3 or page 4:
1 Be sure your Motorola voice terminal is unplugged. Be sure power is off to your
broadband modem (cable or DSL) and router.
2 Connect one end of an Ethernet cable (RJ-45) to an open Ethernet LAN port on
your broadband modem. Follow the instructions provided with the modem. Connect
the other end of this Ethernet cable to the WAN connector on your Motorola voice
terminal.
3 Connect a telephone to your LINE 1 connector using a phone wire (RJ-11). For a
VT1005 or VT1005v only, you can connect a second telephone to the
4 Connect your router or wireless access point, following the instructions provided
with the router or access point.
5 Power on your broadband modem, following the instructions provided with the
modem. Wait about two minutes for it to start up.
LINE 2
connector.
Computer Computer
14
Computer
6 Plug the AC power adapter to the POWER connector on your Motorola voice
terminal and the electrical outlet. This turns your Motorola voice terminal on. You do
not need to unplug it when not in use.
Wait about two minutes for the Motorola voice terminal to start up. The POWER light
blinks as described in “Front Panel” on page 7.

VT1000 Series Voice Terminal User Guide
After the POWER light on your Motorola voice terminal turns on solid green, pick up
7
the telephone hand set and listen for a dial tone
• If you hear a dial tone, you can now call anyone as you normally would on any
telephone.
• If you do not hear a dial tone, check that all connections described in this
procedure are correct. If you still do not hear a dial tone, you may need to
connect a computer to your Motorola voice terminal and perform Basic
Configuration (see page 19). If after performing Basic Configuration, you still do
not hear a dial tone, see “Troubleshooting” on page 26 or call your
VoIP provider.
8 Power on your router or wireless access point. Wait about two minutes for it to
start up.
9 Configure your home network, following the instructions provided with the router or
access point.
15
16
Computer
LINE 1
Phone
Broadband
Modem
Router or
wireless
access point
WAN
Motorola
voice
terminal
PC
Computer
(only if
necessary)
See “Connecting a
Computer to Display the
Configuration Pages”
Computer
Ethernet port
Network Installation With Calls Not Prioritized
If you already have a home network, you can connect your Motorola voice terminal to
your router or wireless access point, as shown on page 5 or page 6:
1 Be sure your Motorola voice terminal is unplugged. Be sure power is off to your
broadband modem (cable or DSL) and router.
2 If necessary, connect your router or wireless access point to your modem, following
the instructions provided with the router or access point.
3 Connect one end of an Ethernet cable (RJ-45) to an open Ethernet LAN port on
your router or wireless access point. Follow the instructions provided with the
device. Connect the other end of this Ethernet cable to the WAN connector on your
Motorola voice terminal.
4 Connect a telephone to your LINE 1 connector using a phone wire (RJ-11). For a
VT1005 or VT1005v only, you can connect a second telephone to the
5 Power on your broadband modem, following the instructions provided with the
modem. Wait about two minutes for it to start up.
6 Power on your router, following the instructions provided with the router. Wait about
two minutes for it to start up.
7 Plug the AC power adapter to the POWER connector on your Motorola voice
terminal and the electrical outlet. This turns your Motorola voice terminal on. You do
not need to unplug it when not in use.
LINE 2
connector.

VT1000 Series Voice Terminal User Guide
Wait about two minutes for the Motorola voice terminal to start up. The POWER light
blinks as described in “Front Panel” on page 7.
8 After the POWER light on your Motorola voice terminal turns on solid green, pick up
the telephone hand set and listen for a dial tone
• If you hear a dial tone, you can now call anyone as you normally would on any
telephone.
• If you do not hear a dial tone, check that all connections described in this
procedure are correct. If you still do not hear a dial tone, you may need to
connect a computer to your Motorola voice terminal and perform Basic
Configuration (see page 19). If after performing Basic Configuration, you still do
not hear a dial tone, see “Troubleshooting” on page 26 or call your VoIP
provider.
17

18
Connecting a Computer to Display the Configuration Pages
For a Network Installation With Calls Not Prioritized only, you need to connect a
computer with DHCP enabled to the Motorola voice terminal to display the configuration
pages. For information about enabling DHCP, refer to your operating system
documentation.
If you performed an Installation With A Single Computer or a Network Installation With
Calls Prioritized, a computer is already connected to the Motorola voice terminal.
To connect a computer to the back of the Motorola voice terminal:
1 Connect one end of an Ethernet cable to the PC connector on the Motorola voice
terminal.
2 Connect the other end of the Ethernet cable to the Ethernet connector on a
computer.
3 Power up the computer.
VT1000 Series Voice Terminal User Guide
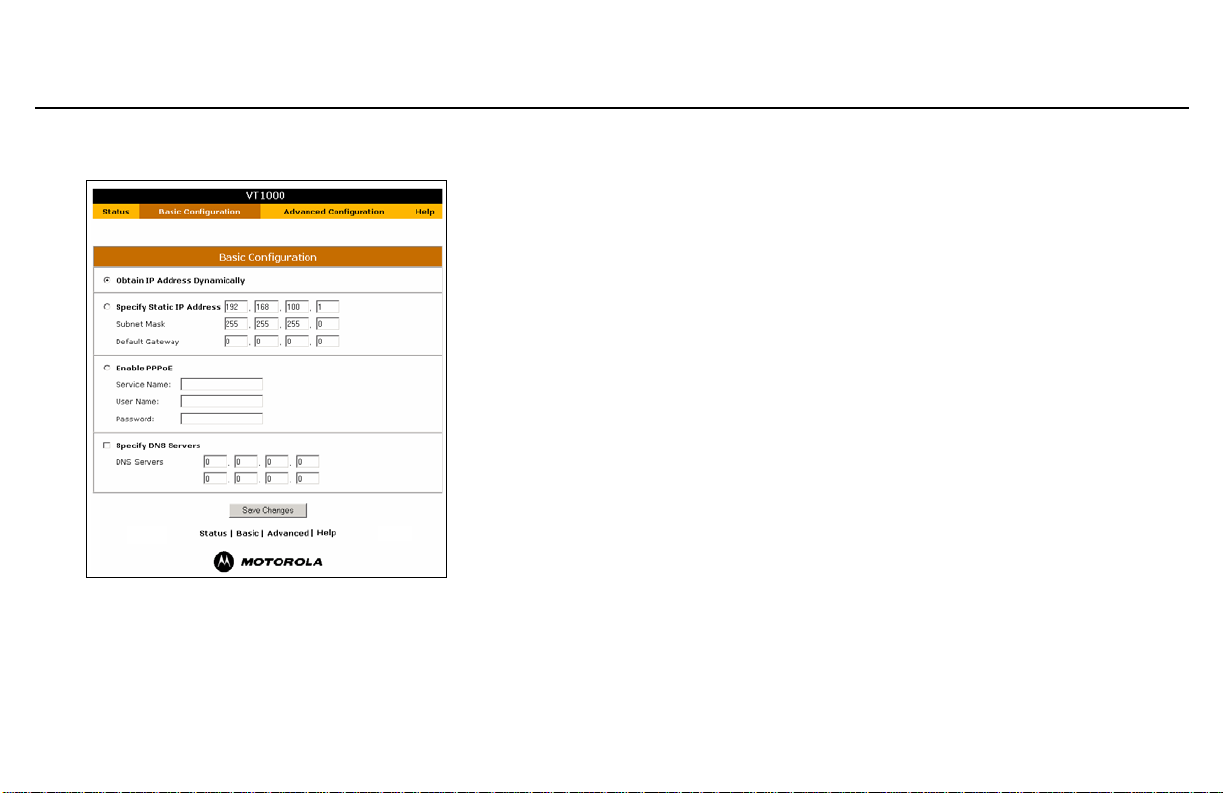
Basic Configuration
To perform basic configuration:
1 On a computer connected to the voice terminal PC port or a router, start a Web
browser such as Microsoft
2 In the Address or Location field, type http://192.168.102.1 and press ENTER to
display the Status page, which displays the Motorola voice terminal settings.
3 Click Basic Configuration to display the Basic Configuration window. Its fields are:
Obtain IP
Address
Dynamically
Specify Static
IP Address
Enable PPPoE If you have a DSL modem and no router, enable PPPoE and type the
This setting is enabled by default. If either of the following is true, no
configuration on this page is required:
•
• If you have a router with DHCP enabled, the Motorola voice
If your broadband provider requires a static IP address, enable
Specify Static IP Address. Type the Static IP Address and IP
addresses for the Subnet Mask, Default Gateway they provide.
Service Name, User Name, and Password provided by your
DSL provider.
®
Internet Explorer or Netscape Navigator®.
If you have a cable modem with no router and your cable provider
assigns IP addresses dynamically, the Motorola voice terminal
obtains its IP address dynamically from your cable provider.
terminal obtains its IP address dynamically from your router.
19

20
Specify DNS
Servers
Enables you to specify Domain Name System (DNS) servers, if
necessary:
•
If Obtain IP Address Dynamically or Enable PPPoE are s elected,
Specify DNS Servers is off by default. If required by your broadband
provider only, select
IP addresses provided by your broadband provider.
• If Specify Static IP Address is selected, Specify DNS Servers is
selected by default. Because no DNS server is automatically
assigned, you need to type the DNS server IP addresses
provided by your broadband provider.
Specify DNS Servers
and type the DNS server
4 Verify that all fields are correctly filled in and click Save Changes. The message
This will require a reboot of the unit. Are you sure?
is displayed.
5 Click OK. Wait about one minute. You cannot display the configuration pages while
the Motorola voice terminal starts up. After the Motorola voice terminal restarts, click
the Web browser Refresh button to display the configuration pages.
6 Pick up the telephone hand set and listen for a dial tone. If you hear a dial tone, you
can now place a phone call as you would with any telephone.

VT1000 Series Voice Terminal User Guide
If you cannot a hear a dial tone, try the following:
• Check that all cabling is correctly connected as described in “Installation” on
page 11.
• Repeat this Basic Configuration procedure. Be sure you enter the correct
information for your service.
• Refer to “Troubleshooting” on page 26.
• Contact your VoIP provider.
21

22
Advanced Configuration
Do not change these settings unless you have the necessary expertise and the need to
do so.
Field or Button Description
Enable DHCP/NAT
on LAN Port
Virtual Servers Configures logical data ports for appl ications requiring multiple data
If this is enabled, the Motorola voice terminal automati cally dist ributes
an IP address to a computer connected to its PC port . It is enabled by
default.
ports. Because NAT assumes that data sent through one port will
return to the same port, you may need to configure virtual servers to
run certain applications:
•
IP is the IP address of the computer connected to the Motorola
voice terminal
• Port sets the port to open. The ports assigned to Motorola voice
terminal voice functions are displayed. If you forward any of
these ports, you may disrupt your voice servic e. The port s shown
in the illustration are examples only.
•
Transport sets the protocol — Disabled, TCP, IP, or UDP.

VT1000 Series Voice Terminal User Guide
Field or Button Description
Enable DMZ Select Enable DMZ to enable the computer having the DMZ Host
Address to be the de-militarized zone (DMZ). Use this setting with
extreme caution because a DMZ host can be accessed by any
computer on the Internet and is completely open to Internet hackers.
DMZ Host Address Type the last octet of the IP address of the device you want to
designate as the DMZ host.
Host Name Type the host
MAC Address
Override
Restore MAC
Address
Save Changes After verifying that all fields are correctly filled in, click to save your
If your broadband provider associates a partic ular service to a speci fic
device, such as your computer, type its MAC address here to use
instead of the Motorola voice terminal MAC address.
By default, the MAC address printed on the Motorola vo ice te rminal is
displayed in this field.
If you type a value in the MAC Address Override field, c li ck t o use th e
actual Motorola voice terminal MAC address instead.
changes. The message
the unit. Are you sure?
Reboot Click to restart the Motorola voice terminal. Rebooting takes about
one minute.
name, if required by your broadband provider.
This will require a reboot of
is displayed. Click OK.
23

Status
The Status window displays the Motorola voice terminal configuration.
Field Description
24
WAN IP Address
Assignment
IP Address
Subnet Mask
Default Gateway
DNS Servers Displays the DNS servers assigned to your computer.
DHCP Server/NAT Displays whether Enable DHCP/NAT on LAN Port is enabled on the
Displays the method chosen on the Basic Configuration page —
Dynamic, Static, or PPPoE.
These fields display the Motorola voice terminal IP address, subnet
mask, and default gateway IP address:
• For a cable modem with no router where the cable provider
assigns IP addresses dynamically, these are obtained
dynamically from the cable provider.
• For static assignment, these are defined on the Basic
Configuration page
Advanced Configuration page.
.

VT1000 Series Voice Terminal User Guide
Field Description
WAN MAC Address Displays the Motorola voic e terminal MAC address. By default, it
displays the MAC address written to read-only memory (ROM) at the
factory and printed in the MTA MAC ID field on the bottom of the unit.
If you use the MAC Address Override field on the Advanced
Configuration page, the MAC address you typed there is displayed in
this field.
User Phone
Number
Displays the telephone number(s) assigned by your VoIP provider.
Help
The Help window displays:
• Software, boot ROM, hardware, and VoIP provider configuration file versions
• Brief descriptions of the Motorola voice terminal configuration pages
25

License
Troubleshooting
If the solutions listed here do not solve your problem, check your broadband modem user guide or contact your VoIP provider. To establish network
connectivity, it is helpful to follow the correct sequence. Be sure you complete the steps in the order specified in “Installation” on page 11.
Problem Possible Solutions
Green POWER light is off Check that the AC power adapter is properly plugged into the electrical outlet and the Motorola voice terminal.
Check that the electrical out le t is w orki n g.
Cannot send or receive dat a
or calls; no dial tone
26
Check whether the telephone line cord is connected to the Motorola voice termi nal.
Check all other cabling between the modem, Motorola voice terminal, computer, and if applicable, routers. Be sure you
used the cables provided with the Motorola voice terminal. All Ethernet cables must be straight-through cables.
Check the lights on the modem front p anel. For exa mple, on the Mot orola SURFBoard
top to bottom that is off indicates the error. For information, see your broadband modem user guide.
Check the POWER light on the Front Panel.
®
cable modem, the first light from

VT1000 Series Voice Terminal User Guide
Frequently-Asked Questions
If you do not understand a term or acronym, please check the “Glossary” on page 30.
Q Where can I find more technical information?
A For technical support, contact your VoIP provider.
For more information about your Motorola voice terminal, other Motorola consumer broadband products, education, and support, visit
http://broadband.motorola.com/consumers/.
Q What does the Motorola voice terminal do?
A Your Motorola voice terminal is part standalone media terminal adapter (S-MTA) and part home broad band router:
• As an S-MTA, it converts analog voice signals to and from a standard telephone to digital data that can be transmissed through a
broadband connection across the Internet. It provides an alternate means to make voice calls.
• As a home broadband router, it provides basic routing to enable simultaneous voice and data communication.
Q Will the Motorola voice terminal work with my cable modem?
A Yes. The Motorola voice terminal supports Dynamic Host Control Protocol (DHCP), which is specified for DOCSIS
Q Will the Motorola voice terminal work with my DSL modem?
A Yes. The Motorola voice terminal supports PPPoE, which is used by most DSL providers.
Q Can I operate a virtual private network (VPN) application behind the Motorola voice terminal?
A Yes. The Motorola voice terminal supports IPSEC and PPTP, the most common VPN protocols.
®
cable modems.
License
27

License
Q Can I play on-line games through my Motorola voice terminal?
A By default, the Motorola voice terminal blocks all unsolicited messages to your computer or home network as a standard security measure.
However, for online games that require some unsolicited messages to be transmitted through the Motorola voice terminal, you can specify
ports and IP addresses on which to allow unsolicited messages. The Motorola voice terminal enables you to set up virtual servers or a DMZ.
Q How do I configure my Motorola voice terminal?
A Most users who perform the appropriate Installation procedure can send and receive calls with no additional configuration! If configuration is
required, there is a graphical user interface (GUI). For information about getting started, see “Basic Configuration” on page 19. Y ou may need
to connect a computer as described in “Connecting a Computer to Display the Configuration Pag es ” on page 18. Alternately, you can
configure your computer statically to 192.169.102.xxx (xxx is from 2 to 254), subnet 255.255.255.0, and default gateway 192.168.102.1.
Q Do I need a router to benefit from the Motorola voice terminal and simultaneously surf the Internet?
A You can use the Motorola voice terminal with or without a home router or wireless access point. It provides the routing functions necessary for
general Internet use, like Network Address Port Translation (NAPT), virtual servers, DMZ, and stealth mode operation.
Q When is a separate rou t e r r ecommended?
A The Motorola voice terminal supports most routing functionality you are likely to need. If you want a firewall, RIP , parental control, port triggers,
or advanced ALGs such as RSVP , POP3, SNMP, or streaming media, purchase a separate router, such as the Motorola BR700 or WR850G.
Q Is any Quality of Service (QoS) implemented on the Motorola voice terminal?
A Although voic e service over the Internet is typically best-effort, the Motorola voice terminal provides upstream voice prioritization to ensure
that upstream voice data has priority over other Web data. This ensures good voice quality even during heavy upstream data transfers such
as e-mail synchronization or file sharing.
28

VT1000 Series Voice Terminal User Guide
License
What codecs and voice protocols does the Motorola voice ter minal support?
Q
A The Motorola voice termi nal supports:
• Many popular coder/decoders (codecs) including G.711 (a-law and µ-law), G.726(16, 24, 32, and 40 kbps), G.729A/B, G.729E, G.728,
G.723, and others. The configuration of supported codecs depends on your VoIP provi d er' s syste m.
• Session Initiation Protocol (SIP) per RFC 3261, Real Time Protocol (RTP) per RFC 1889, and Out of Band Dual Tone Multi Frequency
(OOB DTMF) per RFC 2833.
29

License
Glossary
broadband High-speed telecommunication over a wide range of frequen cies, typ ically 256 Kbps or faster. Broadband enables more information to
be transmitted in less time. The most common broadba nd se rv ice types av ail abl e t o home an d smal l -office users are cable modem or
DSL. Both cable modem and DSL are much faster than a traditional dial-up Internet connect ion.
broadband
provider
cable modem A device enabling a broadband connection to the Internet over cabl e television lines. It requires a subscription for high-speed data
coaxial cable
(coax)
DOCSIS
DMZ A “de-militarized zone” is a host that can be accessed by any computer on the Internet. You can use a DMZ to prevent direct access by
DSL A digital subscriber line enables a broadband connection to the Internet over traditional telephone lines that support DSL. You need a
If you have a cable modem, the cable company from which you subscribe to high-speed data service.
If you have a DSL modem, the company from which you subscribe to DSL service.
service from your local cable provider.
A type of wire consisting of a center wire surrounded by insulation and a grounded shield of braided wire traditionally used mainly to
carry cable television signals. The shield minimizes electrical and radio frequency interference.
The Data-Over-Cable Service Interface Specification defines interface standards for cable modems, gateways, and supporting
equipment to deliver data between an HFC network and computer systems or television set s. Euro-DOCSIS is DOCSIS adapted for
use in Europe.
outside users to private data. (The term comes fro m the geogra phic bu ffers located between some conflicting countries such as North
and South Korea.) The DMZ host cannot initiate a session b ack t o the priv ate LAN. I nt ernet use rs can acces s onl y the DMZ hos t. You
can use a DMZ to set up a Web server or for gaming without exposing confidential data.
subscription for DSL service from your local telephone company.
30

VT1000 Series Voice Terminal User Guide
License
DNS The Domain Name System is the Internet system for converting domain names to IP addresses. A DNS server contains a table
matching domain names such as Internetname.com to IP addresses such as 192.169.9.1. When you access the Web, a DNS server
translates the URL displayed on the browser to the destination website IP address. The DNS lookup table is a distributed Internet
database; no one DNS server lists all domain name to IP address matches.
download To copy a file from one computer to another. You can use the Internet to download files from a server to your home computer.
downstream In a cable data or DSL network, downstream describes the direction of data received by your computer from the Internet.
DHCP
Ethernet The most widely used type of local area network (LAN). The most commonly installed Ethernet networks are called 10Base-T.
host A host is any computer or similar device supporting end-user applications or servic es with full two-way network access. Each ho st has
IP address An Internet Protocol address is an identifier for a computer or device on a TCP/IP network. Networks using the TCP/IP protocol route
IPSec The Internet Protocol Security protocols are authentication and encryption standards for secure data exchange over the Internet.
MAC address The Media Access Control address uniquely identifies each device that can be connect ed to an Ethernet network. It is permanently
MHz Mega Hertz. A measure of radio frequency - millions of cycles per second. One MHz means one million cycles per second.
A Dynamic Host Configuration Protocol server dynamical ly assigns IP addresses to client hosts on an IP network. DHCP eliminates
the need to manually assign static IP addresses by “leasing” an IP address and subnet mask to each client. It enables the automatic
reuse of unused IP addresses.
10Base-T provides transmission speeds up to 10 megabits per second (Mbps), usually over twisted-pair wire. Fast Ethernet
(100Base-T) provides transmission speeds up to 100 Mbps.
a unique host number that combined with the network number forms its IP address.
messages based on the destination IP address. Your broadband provider assigns your cable modem an IP address to provide a
continuous Internet connection.
written to read-only memory (ROM) at the factory and printed on your Motorola voice t erminal.
31

License
NAT Network Address Translation is a standard for a LAN to use one set of IP addresses for internal traffic and a second set of IP
addresses for external traffic.
NAPT
OOB DTMF
port On a computer or other electronic device, a port is a socket or plug used to physically connect it to the network or to other devices.
PPPoE Point-to-Point Protocol over Ethernet is a specification for connecting to the Internet with DSL modems.
PPTP Point-to-Point Tunneling Prot ocol encapsulates other protocols. It is a new technology to create VPNs developed jointly by several
RTP
RJ-11 The most common type of connector for household or office phones.
RJ-45 The most common type of connector for Ethernet networks.
router On IP networks, a device connecting at least two networks, which may or may not be similar. A router filters data based on the IP
SIP Session Initiation Protocol for voice traffic
S-MTA A standalone media terminal adapter converts analog voice signals to and from a standard telephone to digital data that can be
TCP/IP Transmission Control Protocol/Internet Protocol is a set of protocols that provides rules for communication between networks.
upstream In a cable data or DSL network, up stream describes the direction of data sent from your computer to the Internet.
Network Address Port Transla tion is the most common form of translation between public and private IP addresses.
Out of Band Dual Tone Multi Frequency protocol for voice traffic
n TCP/IP, a port is a number from 0 to 65536 used logically by a client program to specify a server program. Ports 0 to 1024 are reserved.
I
vendors.
Real Time Protocol for voice traffic
address, examining the source and destination IP addresses to determine the best route on which to forward it. One example is the
Motorola Ethernet Broadband Router BR700.
transmitted through a broadband connection over the Internet
32

VT1000 Series Voice Terminal User Guide
License
wireless access
point (WAP)
VoIP Voice over Internet Protocol is a method to exchange voice, fax, and other information over the Internet. Voice and fax have
VoIP provider The company from which you purchase VoIP telephone service. It may be different from your broadband provider.
VPN A virtual private network is a private network that uses “virtual” connections (tunnels) routed over a public network (usually the
A device that provides network connectivity to one or more client computers using radio signals over a wireless connection. One
example is the Motorola Wireless Access Point WA840G.
traditionally been carried over telephone lines using a dedicated circuit for each line. VoIP enables calls to travel as discrete data on
shared lines.
Internet) to provide a secure and fast connection; usually to users working remotely at home or in small branch offices. A VPN
connection provides security and performance similar to a dedicated link (for example, a leased line),
but at much lower cost.
33

License
Software License and Warranty
Motorola, Inc., Broadband Communications Sector (“Motorola”)
Cable Data Division
101 Tournament Drive
Horsham, PA 19044
License
IMPORTANT: PLEASE READ THIS SOFTWARE LICENSE (“LICENSE”) CAREFULLY BEFORE YOU INSTALL, DOWNLOAD OR USE ANY APPLICATION SOFTWARE, USB DRIVER
SOFTWARE, FIRMWARE AND RELATED DOCUMENTATION (“SOFTWARE”) PROVIDED WITH MOTOROLA’S CABLE DATA PRODUCT (THE “CABLE DATA PRODUCT”). BY USING
THE CABLE DATA PRODUCT AND/OR INSTALLING, DOWNLOADING OR USING ANY OF THE SOFTWARE, YOU INDICATE YOUR ACCEPTANCE OF EACH OF THE TERMS OF
THIS LICENSE. UPON ACCEPTANCE, THIS LICENSE WILL BE A LEGALLY BINDING AGREEMENT BETWEEN YOU AND MOTOROLA. THE TERMS OF THIS LICENSE APPLY TO
YOU AND TO ANY SUBSEQUENT USER OF THIS SOFTWARE.
IF YOU DO NOT AGREE TO ALL OF THE TERMS OF THIS LICENSE (I) DO NOT INSTALL OR USE THE SOFTWARE AND (II) RETURN THE CABLE DATA PRODUCT AND THE
SOFTWARE (COLLECTIVELY, “PRODUCT”), INCLUDING ALL COMPONENTS, DOCUMENTATION AND ANY OT HER MATERIALS PROVIDED WITH THE PRODUCT, TO YOUR
POINT OF PURCHASE OR SERVICE PROVIDER, AS THE CASE
PROVISIONS OF THIS LICENSE AGREEMENT
The Software includes associated media, any printed materials, and any “on-line” or electronic document ation. So ftware pro vided by 3
agreements from the manufacturers of such Software.
The Software is never sold. Motorola licenses the Software to the original customer and to any subsequent licensee for personal use only on the terms of this License. Motorola and its 3
party licensors retain the ownership of the Software.
You may:
USE the Software only in connection with the operation of the Product.
TRANSFER the Software (including all component parts and printed materials) permanently to another person, but only if the person agrees to accept all of the terms o f this Licen se. If yo u
transfer the Software, you must at the same time transfer the Product and all copies of the Software (if applicable) to the same person or destroy any copies not transferred.
TERMINATE this Lice nse by destroying the original and all copies of the Software (if applicable) in whatever form.
You may not:
(1) Loan, distribute, rent, lease, give, sublicense or otherwise transfer the Software, in whole or in part, to any other person, except as permitted under the TRANSFER paragraph above.
(2) Copy or translate the User Guide included with the Software, other than for personal use. (3) Copy, alter, translate, decompile, disassemble or reverse engineer the Software, including
but not limited to, modifying the Software to make it operate on non-compatible hardware. (4) Remove, alter or cause not to be displayed, any copyright notices or startup message
contained in the Software programs or documentation. (5) Export the Software or the Product components in violation of any United States export laws.
The Product is not designed or intended for use in on-line control of aircraft, air traffic, aircraft navi gatio n or ai rcra f t communications; or in design, construction,
nuclear facility. MOTOROLA AND ITS 3
WARRANT THA T YOU SHALL NOT USE THE PRODUCT FOR SUCH PURPOSES.
.
rd
PARTY LICENSORS DISCLAIM ANY EXPRESS OR IMPLIED WARRANTY OF FITNESS FOR SUCH USES. YOU REPRESENT AND
MAY BE
, FOR A FULL REFUND.
BY INSTALLING OR USING THE SOFTWARE, YOU AGREE TO BE BOUND BY THE
rd
parties may be subject to separate end-user lice nse
operation or maintenance of any
rd
34

VT1000 Series Voice Terminal User Guide
License
Title to this Software, includ ing the owner ship of all copyrigh ts , mask work righ t s, p atent s, trad emarks and all other inte llectual proper ty right s subsisting in the fore going, and all adapt a tions
to and modifications of the foregoing shall at all times remain with Motorola and its 3
including any images, graphics, photographs, animation, video, audio, music and text incorporated therein is owned by Motorola or its 3
copyright laws and international treaty provisions. Except as otherwise expressly provided in this License, the copying, reproduction, distribution or preparation of derivative works of the
Software, any portion of the Product or the documentation is strictly prohibited by such laws and treaty provisions. Nothing in this License constitutes a waiver of Motorola’s rights under
United States copyright law.
This License and your rights regarding any matter it addresses are governed by the laws of the Commonwealth of Pennsylvania, without reference to conflict of laws principles. THIS
LICENSE SHALL TERMINATE AUTOMATICALLY if you fail to comply with the terms of this License.
Motorola is not responsible for any 3
U.S. GOVERNMENT RESTRICTED RIGHTS
The Product and documentation is provided with RESTRICTED RIGHTS. The use, duplication or disclosure by the Government is subject to restrictions as set forth in subdivision (c)(1)(ii)
of The Rights in Technical Data and Computer Software clause at 52.227-7013. The contractor/manufacturer is Motorola, Inc., Broadband Communications Sector, 101 Tournament Drive,
Horsham, PA 19044.
Warranty Information
MOTOROLA DOES NOT EXTEND ANY WARRANTY DIRECTLY TO YOU, THE END USER, WITH RESPECT TO THIS PRODUCT. A LIMITED WARRANTY FOR THIS PRODUCT MAY
HAVE BEEN PROVIDED TO YOU BY YOUR SERVICE PROVIDER (“SERVICE PROVIDER”) FROM WHOM YOU OBTAINED THE PRODUCT. PLEASE CONTACT YOUR SERVICE
PROVIDER IF YOU EXPERIENCE PROBLEMS. MOTOROLA HEREBY EXPRESSLY DISCLAIMS THE APPLICATION OF ANY EXPRESS, IMPLIED OR STATUTORY WARRANTIES,
INCLUDING BUT NOT LIMITED TO ANY IMPLIED WARRANTIES OF MERCHANTABILITY, FITNESS FOR A PARTICULAR PURPOSE, AND/OR THE WARRANTY AGAINST
INFRINGEMENT PROVIDED IN THE UNIFORM COMMERCIAL CODE. MOTOROLA ALSO IS NOT RESPONSIBLE FOR, AND PROVIDES “AS IS” ANY SOFTWARE SUPPLIED BY 3
PARTIES.
IN NO EVENT SHALL MOTOROLA BE LIABLE TO YOU OR ANY OTHER PARTY FOR ANY DIRECT, INDIRECT, GENERAL, SPECIAL, INCIDENTAL, CONSEQUENTIAL, EXEMPLARY
OR OTHER DAMAGES ARISING OUT OF THE USE OR INABILITY TO USE THE PRODUCT (INCLUDING, WITHOUT LIMITATION, DAMAGES FOR LOSS OF BUSINE SS PROFITS,
BUSINESS INTERRUPTION, LOSS OF INFORMATION OR ANY OTHER PECUNIARY LOSS), OR FROM ANY BREACH OF WARRANTY, EVEN IF MOTOROLA HAS BEEN ADVISED
OF THE POSSIBILITY OF SUCH DAMAGES. MOTOROLA IS NOT RESPONSIBLE FOR PROBLEMS OR DAMAGE CAUSED BY THE INTERACTION OF THE PRODUCT WITH ANY
OTHER SOFTWARE OR HARDWARE.
THE REMEDIES DESCRIBED IN THIS DOCUMENT ARE YOUR SOLE AND EXCLUSIVE REMEDIES FOR ANY AND ALL CLAIMS THAT YOU MAY HAVE ARISING OUT OF OR IN
CONNECTION WITH THIS PRODUCT , WHETHER MADE OR SUFFERED BY YOU OR ANOTHER PERSON AND WHETHER BASED IN CONTRACT OR TORT.
These matters are governed by the laws of the Commonwealth of Pennsylvania, without regard to conflict of laws principles and excluding the provisions of the United Nations Convention
on Contracts for the International Sale of Goods.
rd
party software provided as a bundled application, or otherwise, with the Software.
rd
party licensors. Motorola retains all rights not expressly licensed under this License. The Software,
rd
party licensors and is protected by United States
35
rd

Licence
Informations sur la sécurité et la réglementation
AVERTISSEMENT : POUR PRÉVENIR TOUT RISQUE D'INCENDIE OU D'ÉLECTROCUTION, N'EXPOSEZ PAS CET APPAREIL À L'EAU OU
À L'HUMIDITÉ. CET APPAREIL NE DOIT PAS
CONTENANT UN LIQUIDE, COMME UN VASE.
ATTE NT ION : CONFORMÉMENT AUX OBLIGATIONS RÉGLEMENTAIRES ET DE SÉCURITÉ, UTILISEZ UNIQUEMENT LES CÂBLES
D'ALIMENTATION ET D'INTERFACE FOURNIS. POUR ÉVITER TOUT CHOC ÉLECTRIQUE, NE BRANCHEZ PAS CETTE FICHE DANS UNE
RALLONGE, UNE PRISE DE COURANT OU TOUTE AUTRE PRISE D'ALIMENTATION À MOINS QUE LES BROCHES PUISSENT ÊTRE
ENTIÈREMENT INSÉRÉES ET RECOUVERTES, POUR ÉVITER QU'ELLES SOIENT EXPOSÉES.
ATTE NT ION : NE PAS OUVRIR CET APPAREIL. N'EFFECTUEZ AUCUNE OPÉRATION D'ENTRETIEN AUTRE QUE CELLES MENTIONNÉES
DANS LES INSTRUCTIONS D'INSTALLATION ET DE DÉPANNAGE, SAUF SI VOUS AVEZ LES QUALIFICATIONS NÉCESSAIRES. FAITES
APPEL À DU PERSONNEL QUALIFIÉ POUR TOUTE OPÉRATION D'ENTRETIEN.
Il est recommandé à l'utilisateur d'installer un limiteur de surtension sur la prise d'alimentation à laquelle l'appareil est connecté. Cette précaution
évitera de l'endommager en cas de foudre ou d´autre phénomène de surtension.
Ce produit a été homologué dans des conditions d'essai comportant l'utilisation du câble fourni entre les composants du système. Pour
respecter la réglementation, l'utilisateur doit utiliser ce câble et l'installer correctement.
DIFFÉRENTS TYPES DE CORDONS SONT POSSIBLES POUR LE RACCORDEMENT AU CIRCUIT D'ALIMENTATION PRINCIPAL.
Utilisez uniquement un cordon d'alimentation conforme à toutes les exigences de sécurité locales.
L'installation de ce produit doit être conforme aux codes de câblage du pays.
Pour éviter la surchauffe du Terminal vocal Motorola, n'obstruez pas ses orifices de ventilation sur les côtés.
Essuyez le Terminal vocal Motorola avec un chiffon propre et sec. N'utilisez jamais de produit nettoyant liquide ou autre. Ne vaporisez aucun
produit nettoyant directement sur l'appareil, et n'utilisez pas de jets d´air pour le dépoussiérer.
ÊTRE EXPOSÉ À DES ÉCOULEMENTS OU ÉCLABOUSSURES ; NE POSEZ DESSUS AUCUN OBJET
i

Guide de l'utilisateur du terminal vocal série VT1000
Licence
Informations importantes sur le service VoIP
Les services obtenus grâce à cet équipement :
• ne sont pas prévus pour remplacer les services principaux de votre ligne téléphonique vocale principale ou les services classiques du
téléphone analogique,
• ne sont pas conçus pour garantir le fonctionnement des services d'urgences du 911 ou du E911, ni pour permettre d'accéder aux services
d'assistance à l'annuaire en appelant le 411.
Ce n'est pas Motorola mais votre fournisseur d'accès qui est responsable de la fourniture des services de téléphonie en VoIP accessibles à l'aide
de cet équipement. Motorola ne peut être tenue responsable, et se décharge expressément de toute responsabilité directe ou indirecte pour des
dommages, pertes, réclamations, exigences, actions intentées et leurs causes, risques ou autres dommages résultant des services fournis par
l'utilisation de cet équipement ou connexes à ces services.
IMPORTANT : vous NE POURREZ PAS effectuer d'appel à l'aide de ce périphérique VoIP si votre connexion large bande ne fonctionne pas
correctement ou si vous subissez une coupure d'alimentation électrique.
Conformité FCC
Ce matériel a été testé et respecte les limitations concernant les équipements numériques de classe B, conformément au chapitre 15 de la réglementation FCC. Ces limites sont conçues
afin de fournir une protection raisonnable contre le brouillage nuisible en environnement résidentiel. Cet équipement génère, utilise et peut émettre des fréquences radioélectriques et
causer, en cas d'installation et d'utilisation non conformes aux instructions, des interférences préjudiciables aux communications radio. Cependant il n'existe aucune garantie que cette
interférence ne se produira pas dans une installation particulière. Si cet appareil provoque effectivement des interférences préjudiciables à la réception radiophonique ou télévisuelle, ce
que l'on peut vérifier en l'éteignant et le rallumant, l'utilisateur est invité à les corriger en suivant l'une des procédures ci-dessous :
• réorienter l'antenne réceptrice ou la changer de place,
• éloigner l'équipement du récepteur affecté,
• brancher l'équipement sur un circuit d'alimentation différent de celui du récepteur,
• demander l'assistance du distributeur ou d'un technicien radio/TV expérimenté.
Les changements ou modifications qui ne seraient pas expressément approuvés par la partie responsable de la mise en conformité peuvent annuler le droit de l’utilisateur à employer l'appareil.
Conformité canadienne
Cet appareil numérique de classe B est conforme à la norme ICES-003 du Canada. Cet appareil numérique de classe B est conforme à la norme NMB-003 du Canada.
ii

Licence
Déclaration de conformité aux normes de la FCC
Conformément à la norme 47 CFR, Parties 2 et 15 pour des ordinateurs personnels et périphériques de Classe B, et/ou de cartes UC et sources d'alimentation électrique utilisées avec des
ordinateurs personnels de Classe B,
identifié comme un appareil numérique de classe B en vertu de
considéré conforme aux normes.
quantité produite et des tests effectués sur une base statistique suivant les exigences de la norme
accepter toute interférence reçue, y compris les interférences causant un fonctionnement non désiré. La partie ci-dessus mentionnée est responsable de s'assurer que cet appareil est
conforme à la norme 47 CFR, paragraphes 15.101 à 15.109.
Motorola BCS, 101 Tournament Drive, Horsham, PA 19044, États-Unis
Les registres maintenus continuent d'indiquer qu'on peut s'attendre à ce que les appareils produits restent dans la plage d'écarts acceptée, du fait de la
47 CFR, Parties 2 et 15 de la réglementation de la FCC.
, téléphone 1-215-323-1000
47 CFR 2.909
Chaque produit mis sur le marché est identique à
. Le fonctionnement est soumis aux conditions suivantes : cet appareil doit
, déclare à sa seule responsabilité que le produit a été
l'exemplaire testé et
Déclaration internationale de conformité
Motorola, Inc. Broadband Communications Sector
101 Tournament Drive
Horsham, PA, U.S.A.
déclare sous son entière responsabilité que les appareils
terminal vocal Motorola VT1003, VT1005, VT1003v et VT1005v
objet de la présente déclaration, sont conformes à une ou plusieurs des normes suivantes :
EN55022 EN55024 CISPR-22 CISPR-24 ETSI EN300 386
EN60950 EN61000-3-2 EN61000-3-3 IEC 60950
et aux dispositions suivantes des Directives du Conseil de l'Union Européenne :
Directive EMC 89/336/EEC Directive sur les basses tensions 73/23/EEC Directive 93/68/EEC
Copyright © 2005, Motorola, Inc.
Tous droits réservés. Il est interdit de reproduire cette publication, en tout ou en partie, sous quelque forme et par quelque moyen que ce soit, ni de l'utiliser pour tout travail dérivé (comme
une traduction, une transformation ou une adaptation) sans la permission expresse écrite de Motorola, Inc.
Motorola se réserve le droit de réviser cette publication et de modifier son contenu de temps à autre sans aucune obligation de sa part d'aviser quiconque de cette révision ou de ces
changements. Motorola fournit ce guide sans aucune garantie implicite ni explicite, y compris mais sans s'y limiter les garanties implicites de qualité marchande ou d'adaptation à un usage
particulier. Motorola peut apporter des améliorations ou des modifications au(x) produit(s) décrit(s) dans ce guide à tout moment.
MOTOROLA, le logo M stylisé et SURFboard sont des marques déposées auprès du US Patent & Trademark Office (bureau des brevet et marques). Microsoft et Windows sont des marques
déposées de Microsoft Corporation. Macintosh est une marque déposée d'Apple Computer, Inc. Netscape Navigator est une marque déposée de Netscape Communications Corporation.
UNIX est une marque déposée d'Open Group aux États-Unis et dans d'autres pays. DOCSIS est une marque déposée de Cable Television Laboratories, Inc. Tous les autres noms de
produits ou de services sont la propriété de leurs détenteurs respectifs. © Motorola, Inc. 2005.
iii

Table des matières
Introduction .............................................................................................................................. 1
Exemple de configuration sans réseau à domicile ............................................................................. 3
Exemple de réseau câblé avec priorité à la téléphonie ..................................................................... 4
Exemple de réseau sans fil avec priorité à la téléphonie ................................................................... 5
Exemple de réseau câblé sans priorité à la téléphonie ..................................................................... 6
Exemple de réseau sans fil et sans priorité à la téléphonie ............................................................... 7
Panneau avant ................................................................................................................................... 8
Panneau arrière ................................................................................................................................. 9
Avant de commencer .............................................................................................................10
Précautions ...................................................................................................................................... 11
Abonnement à Internet par le câble ................................................................................................. 11
Installation ..............................................................................................................................12
Installation avec un seul ordinateur ................................................................................................. 13
Installation en réseau câblé avec priorité à la téléphonie ................................................................ 15
Installation en réseau sans priorité à la téléphonie .......................................................................... 17
Connexion à un ordinateur pour afficher les pages de configuration ............................................... 19
Configuration de base ...................................................................................................................... 20
Configuration avancée ..................................................................................................................... 23
Status [État] ..................................................................................................................................... 26
Aide .................................................................................................................................................. 27
Dépannage .............................................................................................................................. 28

Foire aux questions ...............................................................................................................29
Glossaire ................................................................................................................................. 32
Licence du logiciel et garantie ..............................................................................................36

Guide de l'utilisateur du terminal vocal série VT1000
Introduction
Le Terminal vocal Motorola (adaptateur pour téléphonie numériq ue) ajoute des
connexions en protocole VoIP pour un ou deux téléphones sur une connexion Internet
en large bande. Cette connexion peut se faire :
• par le service de données à grande vitesse sur modem-câble fourni par une
compagnie de télévision par câble,
• par le service ADSL d'une compagnie du téléphone,
• par d'autres connexions Internet à grande vitesse.
La série VT1000 comprend les modèles suivants, que ce guide mentionne comme
Terminal vocal Motorola :
VT1003
VT1003v
VT1005
VT1005v
Fournissent une ligne téléphonique
Fournissent deux lignes téléphoniques
1

Vous pouvez utiliser un Terminal vocal Motorola avec presque tous les équipements
suivants :
• modems-câbles ou ADSL (modem large bande),
®
• ordinateurs fonctionnant sous Microsoft Windows
, Macintosh® ou UNIX® avec une
carte Ethernet 10Base-T ou 10/100Base-T,
• routeurs ou points d'accès sans fil Ethernet.
Comme indiqué dans les illustrations en page 3 à page 7, le Terminal vocal Motorola
peut gérer la priorité des appels uniquement si vous le connectez directement à votre
modem large bande.
2

Guide de l'utilisateur du terminal vocal série VT1000
Exemple de configuration sans réseau à domicile
Vous pouvez connecter un Terminal vocal Motorola à n'importe quel modem-câble ou
ADSL. Comme le T erminal vocal Motorola est connecté directement à votre modem
large bande, il peut faire passer les appels vocaux en priorité sur le trafic de données.
Cette priorité contribue à l'excellente qualité de la téléphonie :
Internet
Pour simplifier, tous les câbles ne sont pas
montrés.
Modem
large bande
Terminal vocal
Motorola
3

Exemple de réseau câblé avec priorité à la téléphonie
Vous pouvez connecter n'importe quel routeur Ethernet à votre T erminal vocal Motorola.
Comme le Terminal vocal Motorola est connecté directement à votre modem large
bande, il peut faire passer les appels vocaux en priorité sur le trafic de données. Cette
priorité contribue à l'excellente qualité de la téléphonie :
Internet
Modem large
bande
Terminal vocal Motorola
Routeur
Ethernet
4

Guide de l'utilisateur du terminal vocal série VT1000
Exemple de réseau sans fil avec priorité à la téléphonie
Vous pouvez connecter n'importe quel routeur sans fil (point d'accès) à votre Terminal
vocal Motorola. Comme le Terminal vocal Motorola est connecté directement à votre
modem large bande, il peut faire passer les appe ls vocaux en priorité sur le trafic de
données. Cette priorité contribue à l'excellente qualité de la téléphonie :
Internet
Modem
large bande
Terminal vocal Motorola
Point d'accès
sans fil
5

Exemple de réseau câblé sans priorité à la téléphonie
Vous pouvez connecter un Terminal vocal Motorola à n'importe quel routeur Ethernet
d'un réseau ayant une connexion Internet à grande vitesse. Comme le Terminal vocal
Motorola n'est pas connecté directement à votre modem large bande, il ne peut pas faire
passer les appels vocaux en priorité sur le trafic de données. :
Internet
Vous pouvez préférer cette configuration si vous avez
déjà un réseau à domicile.
Il peut être nécessaire de connecter un ordinateur au
panneau arrière du Terminal vocal Motorola pour
configurer ce Terminal vocal Motorola. Voir
« Connexion à un ordinateur pour afficher les pages
de configuration » en page 19.
6
Modem large
bande
Routeur
Terminal vocal Motorola
Seulement si
nécessaire

Vous pouvez préférer cette configuration si vous avez
déjà un réseau sans fil.
Il peut être nécessaire de connecter un ordinateur au
panneau arrière du Terminal vocal Motorola pour
configurer ce Terminal vocal Motorola. Voir
« Connexion à un ordinateur pour afficher les pages
de configuration » en page 19.
Guide de l'utilisateur du terminal vocal série VT1000
Exemple de réseau sans fil et sans priorité à la téléphonie
Vous pouvez connecter un Terminal vocal Motorola à n'importe quel point d'accès sans
fil d'un réseau ayant une connexion Internet à grande vitesse. Comme le Terminal vocal
Motorola n'est pas connecté directement à votre modem large bande, il ne peut pas faire
passer les appels vocaux en priorité sur le trafic de données :
Internet
Modem large
bande
Point d'accès sans fil
Seulement si
Terminal vocal Motorola
nécessaire
7

Panneau avant
Lorsque votre Terminal vocal Motorola est branché au secteur et fonctionne
normalement, le témoin d'alimentation du panneau avant reste allumé en vert.
Pendant le démarrage et les mise à niveau du logiciel le témoin d'alimentation clignote
pour donner une information de Dépannage :
Clignotement Activité du terminal vocal
Une fois Séquence de démarrage initial
Deux fois Acquisition de l'adresse réseau
Trois fois Téléchargement du profil de configuration auprès de votre fournisseur de
service VoIP
Quatre fois Enregistrement auprès du serveur de votre fournisseur de service VoIP
Continu rapide Téléchargement d'une mise à niveau du logiciel initié par votre fournisseur
de service VoIP
Mise en garde !
Ne débranchez jamais votre Terminal vocal Motorola pendant que son témoin
clignote en continu. Au contraire, laissez la mise à niveau du logiciel se
terminer. Si vous déconnectez le Terminal vocal Motorol a pendant un
téléchargement de mise à niveau du logiciel, il risque de ne plus fonctionner.
8

Guide de l'utilisateur du terminal vocal série VT1000
Panneau arrière
Le panneau arrière présente les connecteurs suivants :
Élément Type Connexion
LINE 2 RJ-11 Ligne téléphonique N°2 (sur le VT1005 ou le VT1005v uniquement)
LINE 1 RJ-11 Ligne téléphonique N°1
Votre modèle de Terminal vocal Motorola peut
différer des illustrations de ce guide. Certains
modèles n'ont pas tous les connecteurs illustrés.
Power 12 V Bloc d'alimentation à brancher sur une prise secteur CA
WAN RJ-45 Connexion Ethernet vers un modem large bande, un routeur, un
commutateur ou un concentrateur. (WAN = « wide area network »
[réseau étendu])
PC RJ-45 Connexion Ethernet à un ordinateur
Les connecteurs WAN et PC ont chacun deux témoins :
• le témoin vert est allumé lorsque la connexion Ethernet est disponible. Il clignote
pendant le transfert de données par le port.
• le témoin jaune est allumé pour une liaison 100Base-T, ou éteint pour une liaison
10Base-T.
9

10
Avant de commencer
Avant de commencer l'installation, vérifiez que vous avez bien reçu les éléments
suivants avec votre Terminal vocal Motorola :
Élément Description
Bloc et
cordon
d'alimentation
Câble
Ethernet
Vous avez au ssi bes o in des éléments suivants :
• une connexion ADSL, par modem-câble, par passerelle large bande, ou une autre
sorte de connexion Internet à grande vitesse,
• un ou deux téléphones à numérotation par tonalité.
Un câble
Ethernet direct supplémentaire de catégorie 10/100Base-T avec fiches RJ-45
peut aussi être nécessaire.
Permet de connecter le Terminal vocal Motorola à une
prise secteur CA.
Permet de connecter le port WAN du Terminal vocal
Motorola à un modem large bande (câble or ADSL), un
routeur
ou un point d'accès sans fil.
Permet de connecter le port LAN du Terminal vocal
Motorola à un modem large bande (câble or ADSL), un
routeur ou un point d'accès sans fil.

Guide de l'utilisateur du terminal vocal série VT1000
Précautions
Mise en garde !
Contactez votre câblodistributeur avant de connecter votre Terminal vocal
Motorola à un poste téléphonique existant. Connectez chaque port LINE
uniquement à un téléphone, jamais à à un raccordement téléphonique
classique.
N'effectuez pas l'installation par temps d'orage ou d'éclairs dans votre voisinage.
Pour éviter la surchauffe du Terminal vocal Motorola, n'obstruez pas ses orifices de
ventilation sur les côtés.
Ne cherchez pas à ouvrir le Terminal vocal Motorola. En cas de besoin, adressez-vous à
votre fournisseur de service VoIP.
Essuyez le Terminal vocal Motorola avec un chiffon propre et sec. N'utilisez jamais de
produit nettoyant liquide ou autre
l'appareil, et n'utilisez pas de jets d´air pour le dépoussiérer.
. Ne vaporisez aucun produit nettoyant directement sur
Abonnement à Internet par le câble
Pour activer le service vocal, vous devez fournir à votre fournisseur de service VoIP l'adresse
MAC imprimée sur l'étiquette de code barre
vocal Motorola.
Si vous avez un modem ADSL, votre fournisseur d'accès ADSL doit vous indiquer le
Nom du service, le Nom d'utilisateur et le Mot de passe à utiliser.
marquée MT A MAC ID sur le fond du Terminal
11

Installation
Selon votre installation (ordinateur unique, ou réseau domestique avec plusieurs
ordinateurs et un routeur ou un point d'accès sans fil), effectuez une des procédures
suivantes :
• Installation avec un seul ordinateur
• Installation en réseau câblé avec priorité à la téléphonie
• Installation en réseau sans priorité à la téléphonie
Vers le
téléphone
Vers le courant
de secteur
12
Vers
l'ordinateur ou
le routeur
Vers le modem ou le
routeur
Mise en garde !
Contactez votre fournisseur de service VoIP avant de connecter votre Terminal
vocal Motorola à un poste téléphonique existant. Connectez chaque port LINE
uniquement à un téléphone, jamais à à un raccordement téléphonique
classique.
Assurez-vous que les connecteurs LINE ne sont ni connectés ensemble, ni
connectés à des prises murales du même réseau.

LIGNE 1
Téléphone
Modem large
bande
Port Ethernet
WAN
T erminal vocal
Motorola
PC
Ordinateur
Port Ethernet
Guide de l'utilisateur du terminal vocal série VT1000
Installation avec un seul ordinateur
Pour connecter votre T erminal vocal Motorola comme indiqué en rubrique « Exemple de
configuration sans réseau à domicile » en page 3 :
1 Assurez-vous que le Terminal vocal Motorola est déb ranché, et que votre modem
large bande (câble ou ADSL) et votre ordinateur sont éteints.
2 Connectez une extrémité d'un câble Ethernet (RJ-45) au connecteur Ethernet du
modem large bande. Connectez l'autre extrémité de ce câble Ethernet au
connecteur WAN du Terminal vocal Motorola.
3 Connectez une extrémité d'un second câble Ethernet au connecteur PC du Terminal
vocal Motorola. Connectez l'autre extrémité de ce câble Ethernet au connecteur
Ethernet de l'ordinateur.
4
Connectez un téléphone au connecteur
les modèles VT1005
téléphone au connecteur LINE 2.
ou VT1005v (uniquement), vous pouvez connecter un second
5 Mettez le modem large bande sous tension selon les instructions fournies avec lui.
Attendez environ deux minutes pour son démarrage.
6 Connectez le bloc secteur sur le connecteur POWER du Terminal vocal Motorola et
branchez-le sur une prise secteur. Le Terminal vocal Motorola s'allume
automatiquement. Il n'est pas nécessaire de le débrancher lorsque vous ne l'utilisez
pas.
Attendez environ deux minutes pour le démarrage du Terminal vocal Motorola. Le
témoin POWER clignote (voir description en rubrique « Panneau avant » en
page 8).
LINE 1
avec un câble téléphonique (RJ-11). S ur
13

14
7 Lorsque le témoin POWER du Terminal vocal Motorola reste allumé en vert, mettez
l'ordinateur sous tension. Si votre connexion Internet ne fonctionne pas comme
avant l'installation de votre Terminal vocal Motorola, consultez la rubrique
« Dépannage » en page 28.
Si vous avez un modem-câble, passez directement à l'étape 9.
8 Si vous avez un modem ADSL, activez le service PPPoE sur votre Terminal vocal
Motorola comme indiqué en rubrique « Configuration de base » en page 20.
9 Décrochez le combiné de votre téléphone et vérifiez si vous entendez la tonalité de
numérotation. Si vous l'entendez, vous pouvez dès maintenant effectuer des appels
comme avec n'importe quel téléphone.
En cas de problème, consultez la rubriq ue « Dépannage » en page 28 ou contactez
votre fournisseur de service VoIP.

Modem large
bande
WAN
Terminal
vocal
Motorola
PCLINE 1
Téléphone
Ordinateur Ordinateur
Routeur ou
point d'accès
sans fil
Ordinateur
Connexion
Ethernet ou
sans fil
Guide de l'utilisateur du terminal vocal série VT1000
Installation en réseau câblé avec priorité à la téléphonie
Pour connecter votre Terminal vocal Motorola directement à votre routeur large bande,
comme indiqué en page 4 ou page 5 :
1 Assurez-vous que le Terminal vocal Motorola est déb ranché, et que votre modem
large bande (câble ou ADSL) et votre routeur sont éteints.
2 Connectez une extrémité d'un câble Ethernet (RJ-45) à un port Ethernet libre du
modem large bande. Suivez les instructions fournies avec ce modem. Connectez
l'autre extrémité de ce câble Ethernet au connecteur WAN du Terminal vocal
Motorola.
3 Connectez un téléphone au connecteur LINE 1 avec un câble téléphonique (RJ-1 1).
Sur les modèles
téléphone au connecteur
4 Connectez votre routeur ou votre point d'accès sans fil selon les instructions
fournies avec.
5 Mettez le modem large bande sous tension selon les instructions fournies avec lui.
Attendez environ deux minutes pour son démarrage.
6 Connectez le bloc secteur sur le connecteur POWER du Terminal vocal Motorola et
branchez-le sur une prise secteur. Le Terminal vocal Motorola s'allume
automatiquement. Il n'est pas nécessaire de le débrancher lorsque vous ne l'utilisez
pas.
Attendez environ deux minutes pour le démarrage du Terminal vocal Motorola. Le
témoin POWER clignote (voir description en rubrique « Panneau avant » en
page 8).
VT1005 ou VT1005v (uniquement), vous pouvez connecter un second
LINE 2
.
15

16
7 Lorsque le témoin POWER du Terminal vocal Motorola reste allumé en vert,
décrochez le combiné du téléphone et vérifiez s'il émet une tonalité de
numérotation.
• Si vous l'entendez, vous pouvez dès maintenant effectuer des appels comme
avec n'importe quel téléphone.
• Si vous n'entendez pas la tonalité, vérifiez que toutes les connexions décrites
dans cette procédure sont correctes. S'il n'y a toujours pas de tonalité, vous
devrez peut-être connecter un ordinateur à votre Terminal vocal Motorola et
effectuer la procédure Configuration de base (voir page 20). Après avoir
effectué cette procédure, et si vous n'entendez toujours aucune tonalité,
consultez la rubrique « Dépannage » en page 28 ou appelez votre fournisseur
de service VoIP.
8 Mettez le routeur ou le point d'accès sans fil sous tension. Attendez environ deux
minutes pour son démarrage.
9 Configurez votre réseau selon les instructions fournies avec le routeur ou le point
d'accès.

Guide de l'utilisateur du terminal vocal série VT1000
Ordinateur
Téléphone
Modem large
Routeur ou
point d'accès
LIGNE 1
bande
sans fil
WAN
Terminal
vocal
Motorola
PC
Voir « Connexion à un
ordinateur pour afficher les
pages de configuration »
Ordinateur
Port Ethernet
Ordinateur
(seulement si
nécessaire)
Installation en réseau sans priorité à la téléphonie
Si vous avez déjà un réseau domestique, vous pouvez connecter votre Terminal vocal
Motorola à votre routeur ou à votre point d'accès sans fil, comme indiqué en page 6 ou
en page7:
1 Assurez-vous que le Terminal vocal Motorola est déb ranché, et que votre modem
large bande (câble ou ADSL) et votre routeur sont éteints.
2 Si nécessaire, connectez à votre modem le routeur ou le point d'accès sans fil selon
les instructions fournies avec.
3 Connectez une extrémité d'un câble Ethernet (RJ-45) à un port Ethernet libre du
routeur ou du point d'accès sans fil. Suivez les instructions fournies avec ce
périphérique. Connectez l'autre extrémité de ce câble Ethernet au connecteur WAN
du Terminal vocal Motorola.
4 Connectez un téléphone au connecteur LINE 1 avec un câble téléphonique (RJ-1 1).
Sur les modèles
téléphone au connecteur
5 Mettez le modem large bande sous tension selon les instructions fournies avec lui.
Attendez environ deux minutes pour son démarrage.
6 Mettez le routeur sous tension selon les instructions fournies avec lui. Attendez
environ deux minutes pour son démarrage.
7 Connectez le bloc secteur sur le connecteur POWER du Terminal vocal Motorola et
branchez-le sur une prise secteur. Le Terminal vocal Motorola s'allume
automatiquement. Il n'est pas nécessaire de le débrancher lorsque vous ne l'utilisez
pas.
VT1005 ou VT1005v (uniquement), vous pouvez connecter un second
LINE 2
.
17

18
Attendez environ deux minutes pour le démarrage du Terminal vocal Motorola. Le
témoin POWER clignote (voir description en rubrique « Panneau avant » en
page 8).
8 Lorsque le témoin POWER du Terminal vocal Motorola reste allumé en vert,
décrochez le combiné du téléphone et vérifiez s'il émet une tonalité de
numérotation.
• Si vous l'entendez, vous pouvez dès maintenant effectuer des appels comme
avec n'importe quel téléphone.
• Si vous n'entendez pas la tonalité, vérifiez que toutes les connexions décrites
dans cette procédure sont correctes. S'il n'y a toujours pas de tonalité, vous
devrez peut-être connecter un ordinateur à votre Terminal vocal Motorola et
effectuer la procédure Configuration de base (voir page 20). Après avoir
effectué cette procédure, et si vous n'entendez toujours aucune tonalité,
consultez la rubrique « Dépannage » en page 28 ou appelez votre fournisseur
de service VoIP.

Guide de l'utilisateur du terminal vocal série VT1000
Connexion à un ordinateur pour afficher les pages de configuration
Pour une Installation en réseau sans priorité à la téléphonie uniquement, vous devez
connecter un ordinateur sur lequel DHCP est activé au Terminal vocal Motorola pour
afficher ses pages de configuration. Pour des informations sur l'activation DHCP,
consultez la documentation du système d'exploitation de votre PC.
Si vous avez effectué une Installation avec un seul ordinateur ou une Installation en
réseau câblé avec priorité à la téléphonie, vous avez déjà connecté l'ordinateur au
Terminal vocal Motorola.
Pour connecter un ordinateur à l'arrière du Terminal vocal Motorola :
1 Connectez une extrémité d'un câble Ethernet au connecteur PC du Terminal vocal
Motorola.
2 Connectez l'autre extrémité de ce câble Ethernet au connecteur Ethernet de
l'ordinateur.
3 Mettez l'ordinateur sous tension.
19

20
Configuration de base
Pour effectuer la configuration de base :
1 Sur l'ordinateur connecté au port PC du terminal vocal ou au routeur, ouvrez un
navigateur Internet comme Microsoft
2 Dans le champ Address [Adresse] ou Location [Emplacement], tapez
http://192.168.102.1 et appuyez sur
contient les paramètres du Terminal vocal Motorola.
3 Cliquez sur Basic Configuration [Configuration de base] pour afficher cette
fenêtre. Les champs sont les suivants :
Obtain IP
Address
Dynamically
[Obtention
d'adresse IP
dynamique]
Specify Static
IP Address
[Spécifier une
adresse IP
statique]
Ce paramètre est activé par défaut. Dans les deux cas suivants,
aucune configuration n'est nécessaire sur cette page:
•
Si vous avez un modem-câble sans routeur et si votre
câblodistributeur
Terminal vocal Motorola reçoit son adresse IP de cette manière.
• Si vous avez un routeur et si DHCP est activé, le Terminal vocal
Motorola reçoit son adresse IP du routeur de manière dynamique.
Si votre fournisseur d'accès exige une adresse IP statique, activez
cette option. Tapez cette adresse en Static IP Address [Adresse IP
statique] et les adresses de Subnet Mask [Masque de sous-réseau],
Default Gateway [Passerelle par défaut] qu'il vous a fournies.
®
Internet Explorer ou Netscape Navi ga t or®.
ENTRÉE pour afficher la page Status [État], qui
attribue les adresses IP de façon dynamique, le

Guide de l'utilisateur du terminal vocal série VT1000
Enable PPPoE
[Activer
PPPoE]
Specify DNS
Servers
[Spécifier les
serveurs DNS]
4
Vérifiez que tous les champs sont correctement remplis et cliquez sur Save
Si vous avez un modem ADSL sans routeur , activez PPPoE e t tapez le
Service Name [Nom du service], le User Name [Nom d'utilisat eur] et
le Password [Mot de passe] indiqués par votre fournisseur d'acc ès.
Permet de spécifier si besoin les serveurs DNS (serveurs de noms de
domaines] :
•
Si Obtain IP Address Dynamically [Obtention dynamique de
l'adresse IP] ou Enable PPPoE [Activer PPPoE] est activé,
Specify DNS Servers [Spécifier les serveurs DNS] est désactivé par
défaut. Uniquement dans le cas où votre fournisseur d'accès large
bande l'exige, activez
DNS] et tapez les adresses de
indiquées.
• Si Specify Static IP Address [Spécifier l'adresse IP statique] est
sélectionné, l'option S pecify DNS Servers [Spécifier les serveurs
DNS] l'est aussi par défaut. Puisqu'aucun serveur DNS n'est
affecté automatiquement, vous devez taper les DNS server IP
addresses [Adresses IP des serveurs DNS] indiquées par votre
fournisseur d'accès large bande.
Specify DNS Servers
serveurs DNS qu'il vous a
[Spécifier les serveurs
Changes [Enregistrer les modifications]. Le message This will require a
reboot of the unit. Are you sure? [Vous devez redémarrer l'équipement.
Êtes-vous sûr ?] s'affiche.
21

22
5 Cliquez sur OK. Attendez environ une minute. Vous ne pouvez pas afficher les
pages de configuration pendant le démarrage du Terminal vocal Motorola. Lorsque
le Terminal vocal Motorola a redéma rré, cliquez sur le bouton Refresh [Actualiser]
du navigateur Internet pour les afficher.
6 Décrochez le combiné de votre téléphone et vérifiez si vous entendez la tonalité de
numérotation. Si vous l'entendez, vous pouvez dès maintenant effectuer des appels
comme avec n'importe quel téléphone.
S'il n'y a pas de tonalité, essayez les opérations suivantes :
• Vérifiez si les câbles sont correctement connectés selon les indications en rubrique
« Installation » en page 12.
• Recommencez cette procédure de configuration de base. Veillez à bien entrer les
informations correspondant à votre service.
• Consultez la rubrique « Dépannage » en page 28.
• Contactez votre fournisseur de VoIP.

Guide de l'utilisateur du terminal vocal série VT1000
Configuration avancée
Ne modifiez pas ces paramètres si vous n'en n'avez ni la compétence ni le besoin.
Champ ou
bouton
Enable DHCP/NAT
on LAN Port
[Activer DHCP/NA T
sur le port LAN]
Virtual Servers
[Serveurs virtuels]
Description
Si ce champ est activé, le Terminal vocal Motorola affecte
automatiquement une adresse IP à l'ordinateur connecté à son port
PC. Ce paramètre est activé par défaut.
Configure des ports de données logiques pour les applications qui en
nécessitent plusieurs. Puisque la traduction d'adresses réseau (NAT)
suppose que les données envoyées par un port vont revenir par ce
même port, il peut être nécessaire de configurer des serveurs virtuels
pour exécuter certaines applications :
•
IP est l'adresse IP de l'ordinateur connecté au Terminal vocal
Motorola.
• Port paramètre le port comme ouvert. Les ports attribués aux
fonctions vocales du Terminal vocal Motorola sont affichés. Si
vous transférez l'un de ces ports, le service vocal risque d'être
perturbé. Les ports indiqués en illustration ne sont que des
exemples.
•
Transport définit le protocole — Désactivé, TCP, IP ou UDP.
23

24
Champ ou
bouton
Enable DMZ
[Activer DMZ]
DMZ Host Address
[Adresse de l'hôte
DMZ]
Host Name
[Nom d'hôte]
MAC Address
Override
[Remplacement
d'adresse MAC]
Restore MAC
Address [Rétablir
l'adresse MAC]
Description
Sélectionnez Enable DMZ [Activer DMZ] pour activer l'ordinateur ayant
l'adresse d'hôte DMZ comme « zone démilitarisée » (DMZ). Soyez
extrêmement prudent avec cette option car un hôte DMZ est
accessible par Internet depuis n'importe quel ordinateur, et totalement
exposé aux pirates informatiques d'Internet.
Tapez le dernier octet de l'adresse IP du périphérique que vous voulez
affecter comme hôte DMZ.
Tapez le
Si votre fournisseur d'accès large bande associe un service particulier
à un élément spécifique (par exemple votre ordinateur), tapez son
adresse MAC ici pour qu'elle soit utilisée au lieu de celle du Terminal
vocal Motorola.
Par défaut, l'adresse MAC imprimée sur le Terminal vocal Motorola
s'affiche dans ce champ.
Si vous avez saisi une adresse dans le champ MAC Address Override
[Remplacement d'adresse MAC], cliquez sur ce bouton pour ut iliser
l'adresse MAC du Terminal vocal Motorola à la place.
nom de l'hôte si votre fournisseur d'accès large bande l'exige.

Guide de l'utilisateur du terminal vocal série VT1000
Champ ou
bouton
Save Changes
[Enregistrer les
modifications]
Reboot
[Redémarrer]
Description
Vérifiez que tous les champs sont correctement remplis et cliquez sur
ce bouton pour enregistrer vos modifications. Le message
will require a reboot of the unit. Are you sure?
[Vous devez redémarrer l'équipement. Êtes-vous sûr ?] s'affiche.
Cliquez sur
Cliquez sur ce bouton pour redémarrer le Terminal vocal Motorola. Son
redémarrage prend environ une minute.
OK.
This
25

Status [État]
La fenêtre Status [État] affiche la configuration du Terminal vocal Motorola.
Champ Description
26
WAN IP Address
Assignment
[Affectation
d'adresse IP sur le
WAN]
IP Address
Subnet Mask
Default Gateway
[Adresse IP
Masque de
sous-réseau
Passerelle par
défaut]
DNS Servers
[Serveurs DNS]
Affiche la méthode choisie à la page Basic Configuration
[Configuration de base] — Dynamique, Statique ou PPPoE.
Ces champs affichent l'adresse IP, le masque de sous-réseau et la
passerelle par défaut du Terminal vocal Motorola :
• Si vous avez un modem-câble sans routeur et si votre
câblodistributeur attribue les adresses IP de façon dynamique,
ces informations sont transmises de cette manière.
• En cas d'attribution statique, ces informations sont définies dans
la page de configuration de base
Affiche les serveurs DNS attribués à votre ordinateur.
.

Guide de l'utilisateur du terminal vocal série VT1000
Champ Description
DHCP Server/NAT
[Serveur
DHCP/NAT]
WAN MAC Address
[Adresse MAC sur
WAN]
User Phone
Number [Numéro
de téléphone de
l'utilisateur]
Indique si l'option Enable DHCP/NAT on LAN Port [Activer DHCP sur
le port de réseau local] est activée à la page Advanced Confi guration
[Configuration avancée].
Affiche l'adresse MAC du Terminal vocal Motorola. Par défaut, cette
option affiche l'adresse MAC enregistrée en mémoire ROM en usine,
qui est imprimée dans la zone « MTA MAC ID » sur le fond de
l'appareil. Si vous activez le champ MAC Address Override
[Remplacement d'adresse MAC] à la page Advanced Configuration
[Configuration avancée], l'adresse MAC que vous avez saisie s'aff iche
dans ce champ.
Affiche le(s) numéro(s) de téléphone que votre fournisseur VoIP vous
a attribué(s).
Aide
La fenêtre d'aide affiche :
• les versions de logiciel, de mémoire ROM de démarrage, de matériel et de fichier de
configuration du fournisseur VoIP,
• de brèves descriptions des pages de configuration du Terminal vocal Motorola.
27

Licence
Dépannage
Si les solutions indiquées ici n'apportent pas de solution à votre problème, consultez le guide de l'utilisateur de votre modem large bande ou
contactez votre fournisseur VoIP. Pour établir la connectivité réseau, il est bon de suivre l'ordre voulu. Veillez à effectuer les étapes dans l'ordre
indiqué en rubrique « Installation » en page 12.
Problèmes Solutions possibles
Le témoin vert POWER est
éteint
Impossible d'envoyer ou de
recevoir des données ou
des appels ; pas de tonalité
28
Vérifiez que le bloc secteur est correctement branché à la prise murale et au Terminal vocal Motorola.
Vérifiez que la prise murale donne bien du courant.
Vérifiez si le cordon téléphonique est bien connecté au Terminal vocal Motorola.
Vérifiez tous les autres câbles entre le modem, le Terminal vocal Motorola, l'ordinateur et le(s) routeur(s) (le cas
échéant). Assurez-vous que vous avez bien utilisé les câbles fournis avec le Terminal vocal Motorola. Tous les câbles
Ethernet doivent être droits (non croisés).
Vérifiez les témoins en façade du modem. Par exemple, sur le modem-câble SURFBoard
témoin du haut indique une erreur lorsqu'il est étei nt. Consultez le guid e de l'utilisateur de votre modem large bande pou r
plus d'informations.
Vérifiez si le témoin POWER en façade du Panneau avant est allumé.
®
de Motorola, le premier

Guide de l'utilisateur du terminal vocal série VT1000
Licence
Foire aux questions
Si vous ne comprenez pas un terme ou un acronyme, consultez le « Glossaire » en page 32.
Q Où puis-je trouver plus d'informations techniques ?
R Pour l'assistance technique, veuillez contacter votre fournisseur VoIP.
Pour plus d'information sur votre Terminal vocal Motorola, sur d'autres produits grand public Motorola de transmission en large bande, la
formation ou l'assistance, visitez le site http://broadband.motorola.com/consumers/.
Q À quoi sert le Terminal vocal Motorola ?
R Votre Terminal vocal Motorola fonctionne en partie terminal adaptateur multimédia autonome (S-MTA : Stand-alone Multimedia Terminal
Adapter) et en partie comme routeur large bande en application domestique :
• la fonction S-MTA convertit les signaux vocaux analogiques, échangés avec un téléphone standard, en données numériques qui peuvent
être transmises sur Internet via une connexion large bande. Elle offre ainsi un autre support pour les appels téléphoniques.
• en routeur domestique large bande, le terminal vocal offre les fonctions de base d'un routeur qui permet la communication simultanée
pour la voix et les données.
Q Le Terminal vocal Motorola fonctionnera-t-il avec mon modem-câble ?
R Oui. Le Terminal vocal Motorola accepte le protocole DHCP (Dynamic Host Control Protocol), qui est la norme spécifiée pour les
modems-câbles DOCSIS®.
Q Le Terminal vocal Motorola fonctionnera-t-il avec mon modem ADSL ?
R Oui. Le Terminal vocal Motorola accepte le protocole PPPoE utilisé par la plupart des fournisseurs d'accès ADSL.
29

Licence
Q Puis-je exécuter une application de réseau privé virtuel (VPN) en arrière-plan du Terminal vocal Motorola ?
R Oui. Le Terminal vocal Motorola accepte les protocoles IPSEC et PPTP, qui sont les protocoles VPN les plus courants.
Q Puis-je participer à des jeux en ligne avec mon Terminal vocal Motorola ?
R Par défaut, le Terminal vocal Motorola bloque tous les messages non sollicités qui arrivent sur votre ordinateur ou votre réseau domestique ;
c'est une mesure de précaution standard. Toutefois, pour les jeux en ligne qui nécessitent la transmission de certains messages non sollicités
par le Terminal vocal Motorola, vous pouvez spécifier les ports et les adresses IP sur lesquels vous les autorisez. Le Terminal vocal Motorola
permet de configurer des serveurs virtuels ou une DMZ.
Q Comment configurer mon Terminal vocal Motorola ?
R La plupart des utilisateurs qui effectuent la procédure d'Installation appropriée effectuent et reçoivent des appels sans besoin d'aucune
configuration supplémentaire ! Si une configuration est nécessaire, vous pouvez la faire à l'aide d'une interface graphique. Pour des
informations de début, consultez la rubrique « Configuration de base » en page 20. Vous devrez peut-être connecter un ordinateur, comme
indiqué en rubrique « Connexion à un ordinateur pour afficher les pages de configuration » en page 19. Vous pouvez aussi effectuer une
configuration statique de l'ordinateur avec les paramètres suivants : adresse 192.169.102.xxx (xxx peut aller de 2 à 254), masque de
sous-réseau 255.255.255.0 et passerelle par défaut 192.168.102.1.
Q Ai-je besoin d'un routeur pour utiliser le Terminal vocal Motorola et naviguer en même temps sur Internet ?
R Vous pouvez utiliser le Terminal vocal Motorola avec ou sans routeur ou point d'accès sans fil. Pour les utilisations habituelles d'Internet, le
terminal offre les fonctions de routage nécessaires comme la traduction NAPT (« Network Address Port Translation »), les serveurs virtuels,
la DMZ, et le fonctionnement en mode furtif.
30

Guide de l'utilisateur du terminal vocal série VT1000
Licence
Dans quel cas est-il recommandé d'utiliser un routeur séparé ?
Q
R Le Terminal vocal Motorola prend en charge la plupart des fonctionnalités de routage que vous pourriez utiliser. Si vous voulez utiliser un
pare-feu, un protocole RIP, un contrôle parental, des déclencheurs de ports, ou encore des algorithmes avancés comme RSVP, POP3, SNMP
ou des flux média, achetez séparément un routeur comme le modèle BR700 ou WR850G de Motorola.
Q Le Terminal vocal Motorola incorpore-t-il la qualité du service (QoS) ?
R Même si le service vocal sur Internet fonctionne généralement au mieux des possibilités, le Terminal vocal Motorola fonctionne avec priorité
aux données vocales émises pour assurer qu'elles passent avant d'autres données échangées par Internet. Ce système assurer une bonne
qualité du son, même lors des surcharges de transmission de données comme la synchronisati on du courriel ou le partage de fichiers.
Q Quels sont les codecs et les protocoles vocaux pris en charge par le Terminal vocal Motorola ?
R Le Terminal vocal Motorola prend en charge :
• de nombreux codecs (codeur/décodeur) courants comme G.711 (loi a et loi µ), G.726 (16, 24, 32 et 40 kbps), G.729A/B, G.729E, G. 728,
G.723 et d'autres. La configuration des codecs compatibles dé pend du système de votre fournisseur de service VoIP.
• les protocoles SIP (Session Initiation Protocol) selon la norme RFC 3261, RTP (Real Time Protocol) selon la norme RFC 1889, et OOB
DTMF (Out of Band Dual Tone Multi Frequency) selon la norme RFC 2833.
31

Licence
Glossaire
adresse IP Cette adresse de protocole Internet permet d'identifier un ordinateur ou un périphérique sur un réseau TCP/IP. Les réseaux qui
utilisent le protocole TCP/IP acheminent les messages en fonction de l'adresse IP de destination. Votre câblodistributeur attribue une
adresse IP à votre modem-câble pour assurer une connexion Internet continue.
adresse MAC L'adresse MAC (Media Access Control) donne une identification unique à chaque périphérique pouvant être connecté à un réseau
Ethernet. Elle est enregistrée de manière permanente en mémoire morte (ROM) en usine, et imprimée sur votre Terminal vocal
Motorola.
câble coaxial Type de câble const itué d'un câ ble central en touré d'isol ant et d'un bl indage torsa dé, généralement utilisé p our transport er les signaux
de télévision par câble. Ce blindage minimise les interférences électriques et radioélectriques.
DHCP Le serveur de protocole DHCP (« Dynamic Host Configuration Protocol ») attribue dynamiquement des adresses IP aux hôtes clients
DMZ Une « zone démilitarisée » (DMZ) est le nom donné à un hôte accessible pour tout ordinateur par Internet. Vous pouvez utiliser une
DNS Le système de nom de domaine (« Domain Name System ») est le système Internet de conversion des noms de domaines en
sur un réseau IP. Le protocole DHCP élimine la nécessité d'attribuer manuellement des adresses IP statiques en « louant » une
adresse IP et un masque de sous-réseau à chaque client. Il active la réutilisation automatique des adresses IP inutilisées.
DMZ pour interdire l'accès direct à des données confidentielles par des utilisateurs extérieurs. (Ce terme provient des zones tampon
géographiques situées entre pays en conflit comme la Corée du Nord et la Corée du Sud). L'hôte DMZ ne peut p as ini tier une sess ion
remontant vers le réseau LAN privé. Les utilisateurs sur Internet peuvent accéder uniquement à l'hôte DMZ. Vous pouvez utiliser une
DMZ pour configurer un serveur Web ou jouer à des jeux sans exposer de données confidenti elles.
adresses IP. Un serveur DNS contient une table de correspondance entre les noms de domaines du type nomInternet.com et les
adresses IP du type 192.169.9.1. Lorsque vous accédez à Internet, un serveur DNS traduit l'URL affichée dans le navigateur en
adresse IP du site Web de destination. La t abl e de conve rsion DNS est une base de donnée s Internet d istrib uée; aucun serveur DNS
ne contient l'ensemble des correspondances entre noms de domaines et adresses IP.
32

Guide de l'utilisateur du terminal vocal série VT1000
Licence
DOCSIS Le standard « Data-Over-Cable Service Interface S pecification » (DOCSIS) définit l'interface des modems-câble, des passerell es et du
DSL Une ligne DSL (« digital subscriber line », ligne numérique d'abonné) permet une connexion à Internet en large bande en utilisant les
émission Dans un réseau par le câble ou en ADSL, l'émission représente les données envoyées par votre ordinateur vers Internet.
ETHERNET Type de réseau local (LAN) le plus courant. Les réseaux Ethernet les plus couramment installés sont du type 10Base-T. Ce type
fournisseur
d'accès en large
bande
fournisseur VoIP Compagnie auprès de laquelle vous souscriv ez au servic e du tél éphone en VoIP. Elle peut être différente de votre fournisseur d'accès
hôte Un hôte correspond à tout ordinateur ou appareil similaire sur lequel fonctionnent des applications ou services d'utilisateur final avec
IPSec Les protocoles IPSec (« Internet Protocol Security », sécurité des protocoles Internet) sont des standards d'authentification et de
large bande Télécommunication à grande vitesse sur une large bande de fréquen ces, généralement à 256 Kbp s ou plus. La large bande pe rmet de
matériel de fonctionnement permettant de transmettre des données entre un réseau HFC et des systèmes informatiques ou des
postes de télévision. Le standard Euro-DOCSIS est une adaptation du standard DOCSIS pour l'Europe.
lignes téléphoniques classiques qui sont compatibles DSL. Vous devez souscrire un abonnement au service ADSL auprès de votre
compagnie du téléphone.
10Base-T donne des vitesses de transmission pouvant atteindre 10 Mbps (mégabits par seconde) et utilise généralement des câbles
torsadés. Les réseaux Fast Ethernet (100Base-T) peuvent atteindre une vitesse de transmission de 100 Mbps.
Si vous avez un modem-câble, c'est le cas du câblodistributeur auprès duquel vous avez souscrit au service de données à grande
vitesse.
Si vous avez un modem ADSL, c'est le cas de la société qui vous fournit la connexion ADSL.
en large bande.
accès complet au réseau dans les deux sens. Chaque hôte a un numéro d'hôte unique qui, combi né au numéro du réseau, constitue
son adresse IP.
cryptage pour la sécurité des échanges de données sur Internet.
transmettre plus d'informations en moins de temps. Le s types de se rvices les plu s courant s en large bande p roposés pour ap plications
domestiques et en PME sont le modem-câble et l'ADSL. Ces deux systèmes sont beaucoup plus rapides que les connexions Internet
classiques en RTC (réseau téléphonique commuté).
33

Licence
MHz Mégahertz. Mesure de fréquence radio en millions de cycles par seconde. Un MHz représente un million de cycles par seconde.
modem-câble Périphérique qui permet une connexion large bande à Internet par les lignes de télévision câblée. Vous devez souscrire un
abonnement au service de données à grande vitesse auprès de votre câblodistributeur local.
OOB DTMF
(protocole)
point d'accès
sans fil (WAP)
port Sur un ordinateur ou un autre périphérique électronique, un port e st un conn ecteur ou une pris e servant à le conne cte r physiq uement
PPPoE
(protocole)
PPTP (protocole) Le protocole PPTP (« Point-to-Point Tunneling Protocol », tunnel point-à-point) encapsule d'autres protocoles. Cette nouvelle
réception Dans un réseau par le câble ou en ADSL, la réception représente les données reçues par votre ordinateur depuis Internet.
RJ-11 Type le plus courant de connecteur pour les téléphones domestiques ou de bureau classiques.
RJ-45 Type le plus courant de connecteur pour les réseaux Ethernet.
routeur Dans les réseaux IP, un routeur est un périphérique connectant au moins deux réseaux qui peuvent être similair es ou non. Il filtre les
RTP (protocole)
Protocole « Out of Band Dual Tone Multi Frequency » (multifréquence hors bande à double tonalité) pour la transmission de la
voix
Périphérique qui fournit la connectivité réseau à un o rdinateur client ou p lusieurs en utilisant des signaux radio sur une c onnexion sans
fil. C'est le cas par exemple du point d'accès sans fi l WA840G de Motorola.
au réseau ou à d'autres périphériques.
En protocole
programme de serveur. Les ports 0 à 1024 sont réservés.
Le protocole « Point-to-Point Protocol over Ethernet » (point-à-point sur Ethernet) est une spécification de connexion à Internet pour
les modems ADSL.
technologie permet de créer des réseaux VPN développés conjointement par plusieurs distributeurs.
données en fonction de l'adresse IP, en examinant les adresses IP source et destinatio n pour déterminer le meilleur itinéraire par
lequel les transmettre. C'est le cas par exemple du routeur Ethernet large bande BR700 de Motorola.
TCP/IP, un port est un numéro entre 0 et 65536 utilisé de manière logique par un programme client pour spécifier un
Protocole « Real Time Protocol » (en temps réel) pour la transmission de la voix
34

Guide de l'utilisateur du terminal vocal série VT1000
Licence
SIP (protocole) Protocole « Session Initiation Protocol » (initiation de session) pour la transmission de la voix
S-MTA Un adaptateur de terminal S-MTA convertit les signaux vocaux analogiques, échangés avec un téléphone standard, en données
numériques qui peuvent être transmises sur Internet via une connexion large bande.
TCP/IP Le protocole TCP/IP (Transmission Control Protocol/Int ernet Protocol) est cons titué d'une séri e de protocoles qui déf inissent les règles
téléchargement Copie d'un fichier d'un ordinateur vers un autre. Vous pouvez utiliser Internet pour télécharger des fichiers d'un serveur vers votre
traduction NAPT La traduction NAPT (« Network Address Port Translation», traduction par port d'adresses réseau) est la forme la plus courante de
traduction NAT La traduction d'adresse réseau NAT (« Network Address Translation ») est un standard Internet selon laquelle un réseau local (LAN)
VoIP Le protocole VoIP (« Voice over Internet Protocol » , voix sur IP) est une méthode de transmission pour la voix, la télécop ie et d'autres
VPN Un réseau privé virtuel (VPN = « virtual private network » ) est un réseau qui utilise des connexions « virtuelles » (tunnels) dont le
de communication entre réseaux.
ordinateur.
traduction entre adresses IP publiques et privées.
doit utiliser un jeu d'adresses IP pour son trafic interne et un second jeu pour le trafic externe.
informations par Internet. Les communi cations vocal es ou les t élécopies se t ransmettent généralement p ar le s lignes tél éphoniques et
utilisent un circuit dédié pour chaque ligne. Le protocole VoIP permet de transmettre les appels sous forme de données discontinues
sur des lignes partagées.
routage emprunte un réseau public (généralement Internet) pour of frir une conne xion rapide et sécurisée; les VPN sont généralement
destinés aux utilisateurs qui travaillent à distance depuis leur domicile ou dans de petites agences d'entreprises. Une connexion VPN
offre une sécurité et des performances compa rables à une liaison sécurisée (par exemple une ligne en location),
nettement moindre.
mais à un coût
35

Licence
Licence du logiciel et garantie
Motorola, Inc., Broadband Communications Sector («Motorola »)
Cable Data Division
101 Tournament Drive
Horsham, PA 19044
Licence
IMPORTA N T: VEUILLEZ LIRE ATTENTIVEMENT CETTE LICENCE D'UTILISATION DE LOGICIEL («LICENCE ») AVANT D'INSTALLER, DE TÉLÉCHARGER OU D'UTILISER TOUTE
APPLICATION, PILOTE USB, MICROPROGRAMME, AINSI QUE LES DOCUMENTATIONS CORRESPONDANTES (CI-APRÈS LE «LOGICIEL ») FOURNIS AVEC LE PRODUIT
D'ÉCHANGE DE DONNÉES PAR CÂBLE DE MOTOROLA (« PRODUIT D'ÉCHANGE DE DONNÉES PAR CÂBLE »). PAR L’UTILISATION DU PRODUIT D'ÉCHANGE DE DONNÉES
PAR CÂBLE ET/OU L’INSTALLATION, LE TÉLÉCHARGEMENT OU L’UTILISATION DE TOUT LOGICIEL, VOUS INDIQUEZ VOTRE ACCEPTATION DE CHACUNE DES CLAUSES DE
LA PRÉSENTE LICENCE. À LA SUITE DE VOTRE ACCEPTATION, CETTE LICENCE DEVIENDRA UN CONTRAT EXÉCUTOIRE ENTRE VOUS ET MOTOROLA. LES CONDITIONS DE
CETTE LICENCE S'APPLIQUENT À VOUS ET À TOUT UTILISATEUR SUBSÉQUENT DU LOGICIEL.
SI VOUS N’ACCEPTEZ PAS LA TOTALITÉ DES CLAUSES DE LA PRÉSENTE LICENCE (I) N’INSTALLEZ PAS ET N’UTILISEZ PAS LE LOGICIEL ET (II) RETOURNEZ LE PRODUIT
D'ÉCHANGE DE DONNÉES PAR CÂBLE ET LE LOGICIEL (LE «PRODUIT »), Y COMPRIS TOUS LES COMPOSANTS, LA DOCUMENTATION ET TOUT AUTRE MATÉRIEL FOURNI
AVEC LE PRODUIT, À VOTRE LIEU D'ACHAT OU FOURNISSEUR DE SERVICES,
L’UTILISATION DU LOGICIEL, VOUS INDIQUEZ VOTRE ENGAGEMENT CONTRACTUEL AUX CLAUSES DE LA PRÉSENTE LICENCE.
Ce Logiciel inclut les médias associés, toute documentation imprimée et to ute documenta tion «en ligne » ou électronique. Les logiciels fournis par des tiers peuvent faire l'objet de contrat s
de licence d'utilisateur final distincts établis par leurs fabricants respectifs.
Ce Logiciel n'est jamais vendu. Motorola octroie une licence du L ogiciel au premier acheteur et à to ut licencié subséquent uniquement pour un usage perso nnel co nforme aux co nditions de
cette Licence. Motorola et ses tiers concédants restent propriétaires du logiciel.
Vous pouvez :
UTILISER le Logiciel uniquement en conjonction avec l'utilisation du Produit.
CÉDER le Logiciel (y compris ses composants et la documentation imprimée) de façon définitive à une autre personne, mais uniquement si cette personne est d'accord pour accepter
toutes les conditions de cette Licence. Si vous cédez le Logiciel, vous devez en même temps céder le Produit et toutes les copies du Logiciel (le cas échéant) à la même personne ou
détruire toute copie non cédée.
RÉSILIER cette Licence en détruisant l'original et toutes les copies du Logiciel (le cas échéant) existant sous quelque forme que ce soit.
Vous ne pouvez pas :
(1) Prêter, distribuer, louer, faire une location-vente, donner, octroyer une sous-licence ou par ailleurs céder le Logiciel, en tout ou en partie, à quiconque, sauf dans les cas autorisés dans
le paragraphe CÉDER ci-dessus. (2) Copier ou traduire le Guide de l'utilisateur accompagnant le Logiciel, pour tout usage autre que personnel. (3) Copier, altérer, traduire, décompiler,
désassembler ou désosser le Logiciel, y compris, mais sans s'y limiter, modifier le Logiciel de façon à ce qu'il fonctionne sur du matériel non compatible. (4) Retirer, altérer ou empêcher
l'affichage de tout avis de droit d'auteur ou de message de démarrage contenu dan s les progr ammes ou la document atio n du Logiciel. (5) Exporter le Logiciel ou les composant s du pro duit
en violation des lois américaines sur l'exportation.
SUIVANT LE CAS
, POUR UN REMBOURSEMENT INTÉGRAL.
PAR L’INSTALLATION OU
36

Guide de l'utilisateur du terminal vocal série VT1000
Licence
Le Produit n'est pas conçu pour, ou destiné à, être utilisé pour le contrôle en ligne d'aéronefs, du trafic aérien, de la navi gation ou des communications aériennes, ni pour la conception, la
construction,
IMPLICITE D'ADAPTATION À DE TELLES UTILISATIONS. VOUS GARANTISSEZ PAR LA PRÉSENTE QUE VOUS N'UTILISEREZ PAS LE PRODUIT À DE TELLES FINS.
La propriété de ce logiciel, y compris la propriété de l'ensemble des droits de copyright, des droits relatifs aux masques, des brevets, des marques commerciales et de tout autre droit de
propriété intellectuelle afférent, ainsi que de toutes les adaptations et modifications pouvant être apportées à ce qui précède demeurent la propriété exclusive de Motorola et des tiers
concédants de licences. Motorola conserve tous les droits non expressément octroyés dans cette Licence. Le logiciel, y compris les images, graphismes, photogr aphies, animations,
vidéos, messages audio, la musique et le texte qui y sont inclus sont la propriété de Motorola ou des tiers concédants et sont protégés par les lois en vigueur aux États-unis en matière de
copyright ainsi que par les dispositions des tra ités inte rnationaux. S auf lorsque cela a été expressément stipulé dans cett e Licence, la copie, la reproduction, la di stributi on ou la prép aration
de travaux dérivés du Logiciel, de toute partie du Produit ou de la documentation sont strictement interdites par ces lois et les dispositions de ces traités. Rien dans cette Licence ne peut
constituer une renonciation de Motorola à ses droits en vertu de la loi américaine sur les droits d'auteurs.
Cette Licence et vos droits relatifs à tout élément couvert par elle sont régis par les lois du Commonwealth of Pennsylvania, sans référence aux conflits de principes juridiques. CETTE
LICENCE EST AUTOMATIQUEMENT RÉSILIÉE si vous ne vous conformez pas aux conditions de cette Licence.
Motorola ne peut être tenue responsable de tout logiciel tiers fourni avec le logiciel dans le cadre d'une application groupée ou autre.
DROITS LIMITÉS DU GOUVERNEMENT AMÉRICAIN
Le Produit et la documentation sont fournis avec des DROITS LIMITÉS. L'utilisation, la duplication ou la révélation par le gou vernemen t est soumise aux restrictions stipulées dans l'alinéa
(c)(1)(ii) de la clause 52.227-7013 des Droits sur les données techni ques et les logiciels informatiques (Rights in Technical Data and Computer Software). Le contractant/fabricant est
Motorola, Inc., Broadband Communications Sector, 101 Tournament Drive, Horsham, PA 19044, États-Unis.
Informations sur la garantie
LA GARANTIE DE MOTOROLA NE S'ÉTEND PAS À L'UTILISATEUR FINAL (VOUS-MÊME) POUR CE PRODUIT. LE FOURNISSEUR DE SERVICE AUPRÈS DUQUEL VOUS AVEZ
OBTENU LE PRODUIT PEUT VOUS AVOIR FOURNI UNE GARANTIE LIMITÉE QUI LE COUVRE. VEUILLEZ CONTACTER CE FOURNISSEUR EN CAS DE PROBLÈME. MOTOROLA
DÉCLINE EXPRESSÉMENT ICI L'APPLICATION DE TOUTE GARANTIE EXPRESSE, IMPLICITE OU STATUTAIRE, Y COMPRIS MAIS SANS LIMITATION LES GARANTIES
IMPLICITES DE QUALITÉ MARCHANDE, D'ADAPTATION À UN USAGE PARTICULIER ET/OU LA GARANTIE DE NON CONTREFAÇON PRÉVUE PAR LE CODE DE COMMERCE
UNIFORME. EN OUTRE MOTOROLA NE PEUT ÊTRE TENUE RESPONSABLE DE TOUT LOGICIEL TIERS QUI EST FOURNI « EN L'ÉTAT ».
MOTOROLA NE PEUT EN AUCUN CAS ÊTRE TENUE RESPONSABLE, ENVERS VOUS OU TOUT AUTRE TIERS, DE TOUT DOMMAGE DIRECT, INDIRECT, GÉNÉRAL,
PARTICULIER, ANNEXE, ACCESSOIRE, EXEMPLAIRE OU AUTRE, RÉSULTANT DE L'UTILISA T ION DU PRODUIT OU DE L'INCAPACITÉ DE L'UTILISER (Y COMPRIS SANS
LIMITATION LES DOMMAGES AU TITRE DE PERTE DE BÉNÉFICES, INTERRUPTION D'ACTIVITÉ, PERTE D'INFORMATIONS OU TOUTE AUTRE PERTE PÉCUNIAIRE), OU
RÉSULTANT D'UNE RUPTURE DE GARANTIE, QUAND BIEN MÊME MOTOROLA AURAIT ÉTÉ AVISÉE DE L'ÉVENTUALITÉ DE TELS DOMMAGES. MOTOROLA NE PEUT ÊTRE
TENUE RESPONSABLE DE PROBLÈMES OU DOMMAGES RÉSULTANT DE L'INTERACTION DU PRODUIT AVEC TOUT AUTRE MATÉRIEL OU LOGICIEL.
LES RECOURS DÉCRITS DANS CE DOCUMENT CONSTITUENT VOS SEULS ET UNIQUES RECOURS POUR TOUTE RÉCLAMATION ÉVENTUELLE DE VOTRE PART QUANT AU
PRODUIT OU EN RAPPORT AV EC LUI, QUE VOUS-MÊME OU UNE AUTRE PERSONNE SOYEZ ÉMETTEUR OU VICTIME AU TITRE DE CETTE RÉCLAMATION, POUR RAISON
CONTRACTUELLE OU DÉLICTUELLE.
Ces questions sont soumises à la loi du Commonwealth of Pennsylvania, sans considération des principes de conflit de juridiction et à l'exclusion des dispositions de la Convention des
Nations Unies sur les contrats portant sur la vente internationale de produits.
l'exploitation ou l'entretien d'une inst allation n ucléaire. MOT OROLA AINSI Q UE LES TIERS CONCÉDANTS DE LICENCES DÉCLINENT TOUTE GARANTIE EX PRESSE OU
37

Visitez notre site Web:
Visit our website :
www.motorola.com
519631-003
10/05
 Loading...