

Motorola CLIQ TM1668, CLIQ, T-Mobile CLIQ Start Manual

start guide
II
1
Getting Started
Introducing Your Phone ...........................2
Service Activation ....................................4
SIM Card ..................................................5
Battery ......................................................6
Power .......................................................7
MOTOBLUR™ Account ...........................8
Call Functions ........................................10
Home Screen .........................................12
Personalize Home Screen .....................20
Social Networking ..................................24
Contacts ................................................27
myFaves® ...............................................32
Bluetooth® Setup ...................................40
Having Fun
Turn to the Having Fun section (Page 43)
to learn what else your new phone can do.
2
3
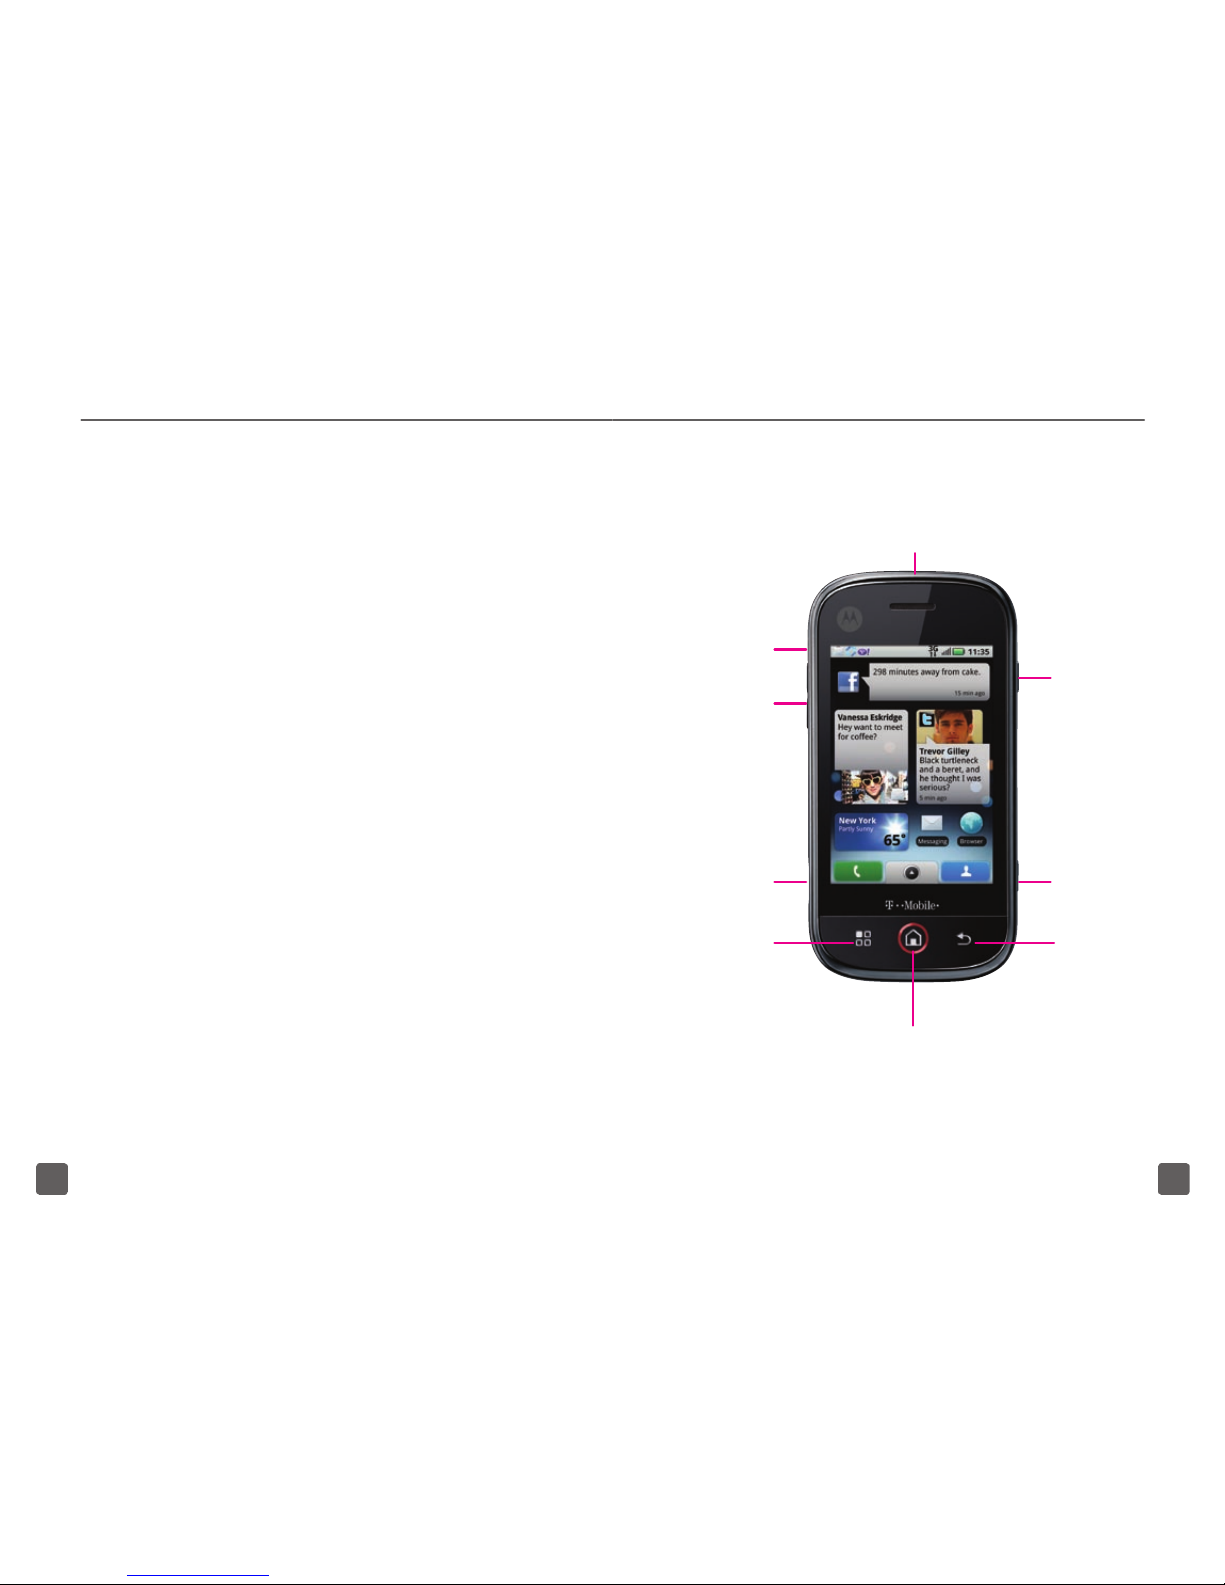
INTRODUCING YOUR PHONE
With the MOTOROLA CLIQ™ with
MOTOBLUR™, you can:
n
Synchronize, view, and share
contacts, messages, feeds,
and updates from the most
popular social Web sites
on your phone (Facebook®,
MySpace®, Twitter®, and more).
n
Access full HTML browser using
high-speed 3G and Wi-Fi networks.
n
Send text messages, e-mails,
and wall posts using the
QWERTY keyboard.
n
Snap photos with the 5 megapixel
camera and post them to
favorite sites, such as Picasa®,
Photobucket®, and more.
n
And much more!
Back key
Camera key
Power /
Lock key
Press and
hold to power
on/off.
Quick press
to lock the
phone and
turn off the
display.
Headset jack
Home key
Ringer On /
Off switch
Volume
keys
Charging /
Data port
Menu key
4
5
By activating service, you acknowledge that you have read,
understand, and agree to be bound by each of T-Mobile’s
Terms and Conditions and your Service Agreement.
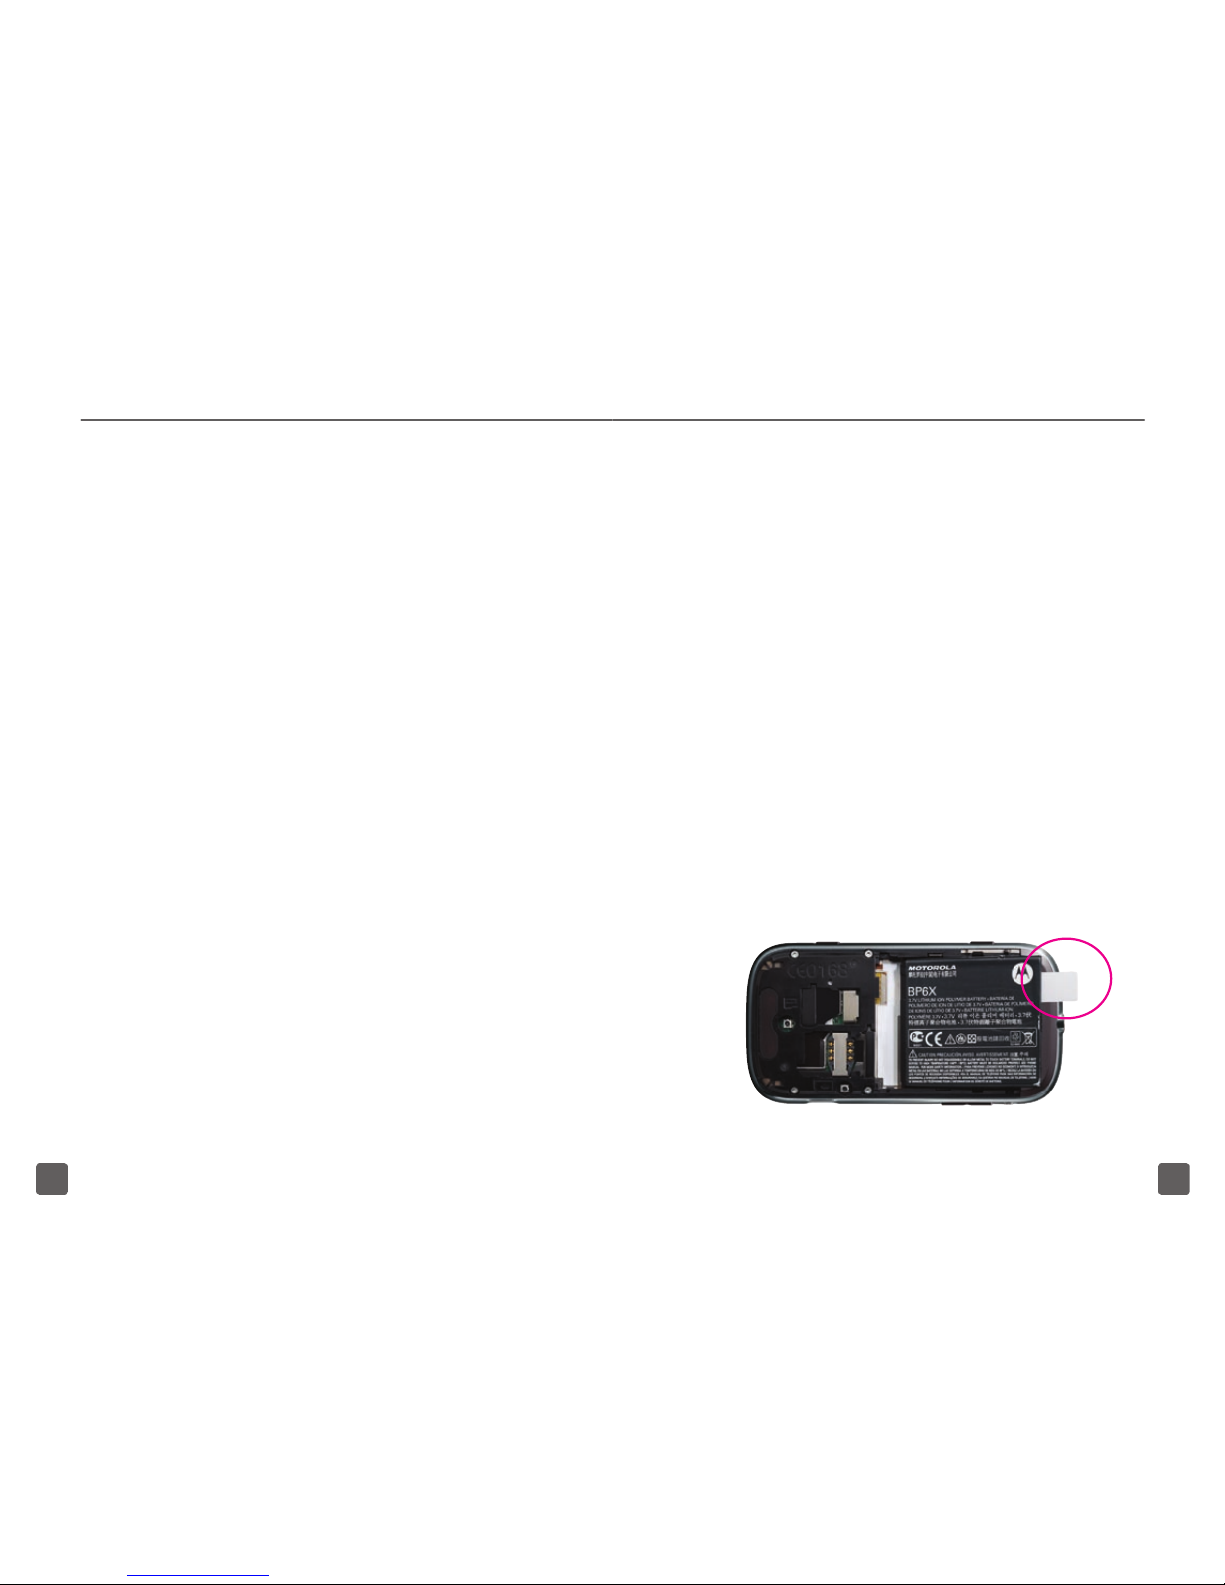
SIM CARD
Your Subscriber Identity Module (SIM) card
identies you to the wireless network. Your
phone will not work without the SIM card.
To insert the SIM card and battery:
1. Detach your SIM card.
2. Press the battery cover and slide
it off. Lift the tab and remove the
battery.
SERVICE ACTIVATION
If you are a new T-Mobile customer
and your service has not been
activated, simply call Customer Care
at 1-800-937-8997 from your landline
phone and a T-Mobile Activations
representative will assist you.
You will need the following information
when activating service:
n
Service Agreement and agent
code on your Agreement
n
Your name, home address, home
phone, and billing address
NOTE: For business and government accounts,
please provide the name of your company or
government agency, address, and tax ID.
n
Your Social Security number, current
driver’s license number, and date
of birth for credit check purposes
n
Your choice of T-Mobile rate plan and
services (see www.t-mobile.com for
latest plan information)
n
SIM serial number and IMEI number
(located on the box bar code label)
6
7
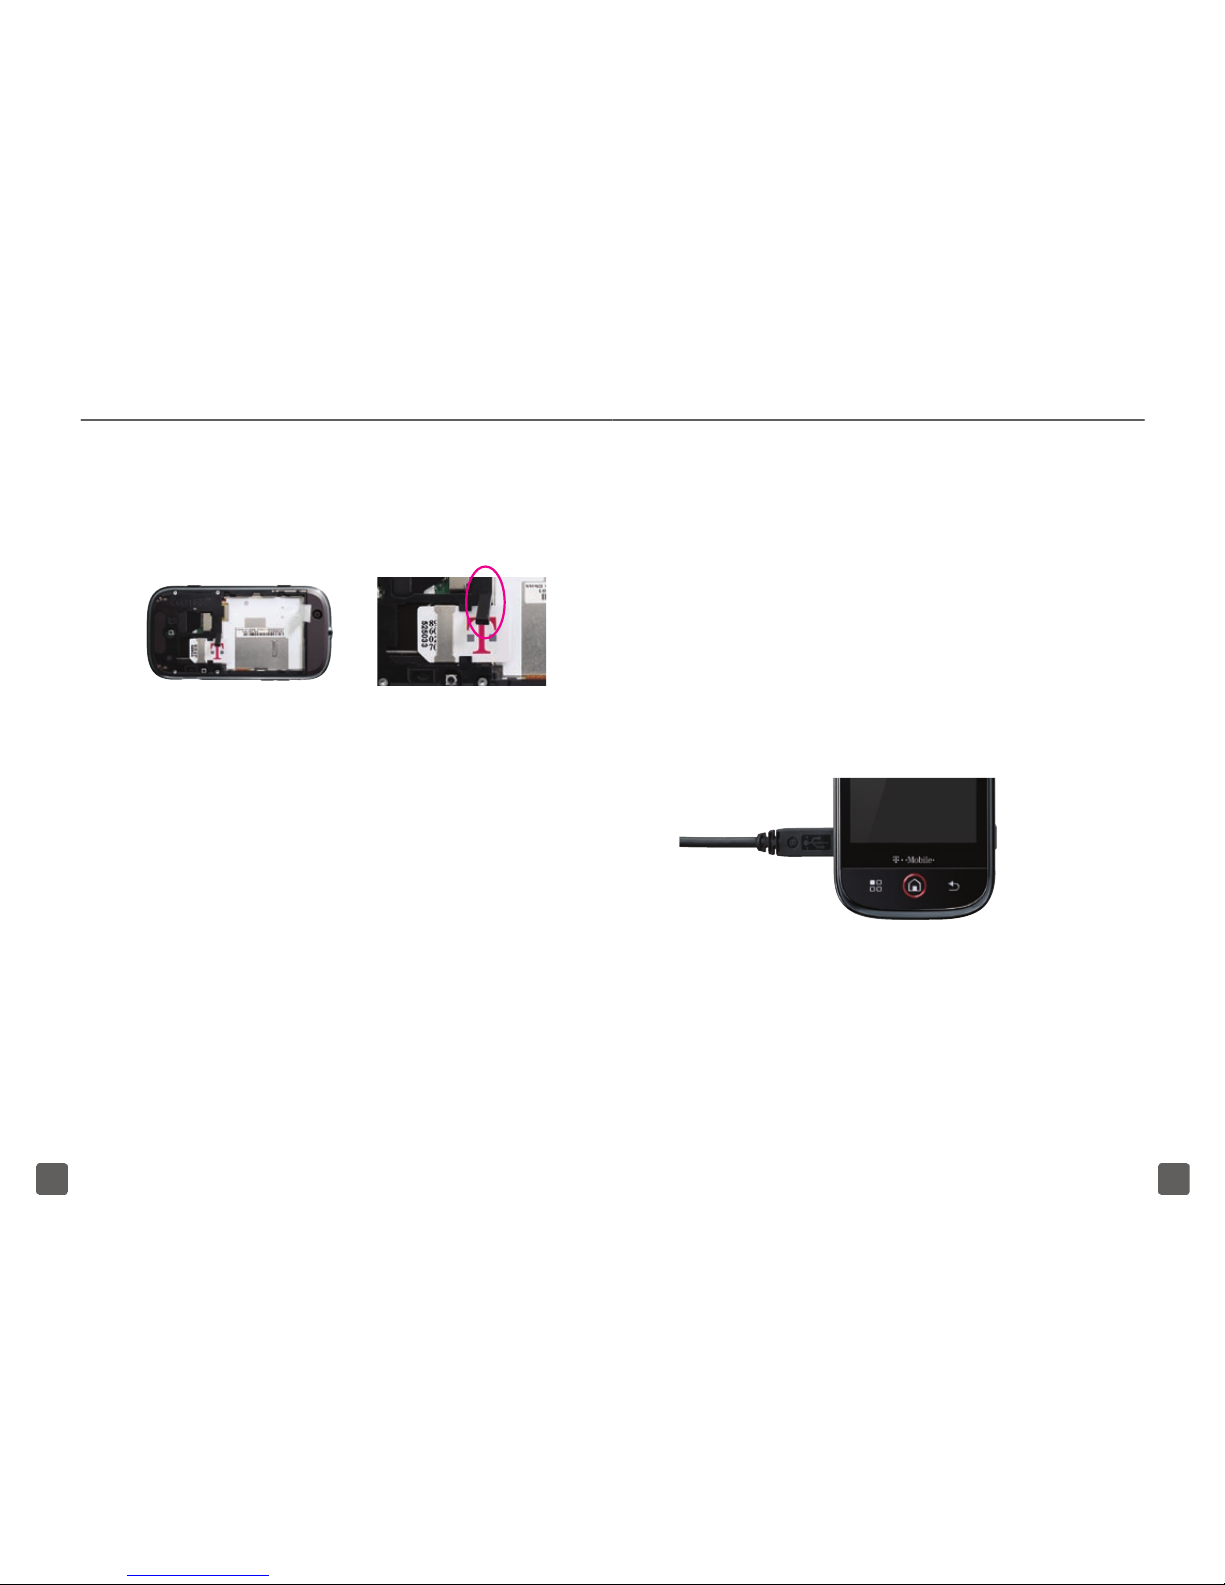
3. Lift the slot guard. Slide the SIM
card into the SIM card slot with the
gold contacts facing down and the
notched corner aligned as shown.
4. Align the gold contacts on the battery
with the contacts in the battery
compartment. Snap the battery into
place and replace the battery cover.
BATTERY
You can charge your phone using the
charger cable connected to a wall power
outlet or by using the USB cable connected
to your computer.
Charge using a charger cable
Connect the small end of the charger
cable to the micro-USB port on the left side
of your phone. Plug the other end of the
charger into a wall outlet.
Charge using a USB cable
Connect the small end of the USB cable to
the micro-USB port on the left side of your
phone. Plug the other end of the USB cable
to the USB port of your computer.
POWER
Press and hold the Power/Lock key on the
right side of the phone to turn on.
8
9
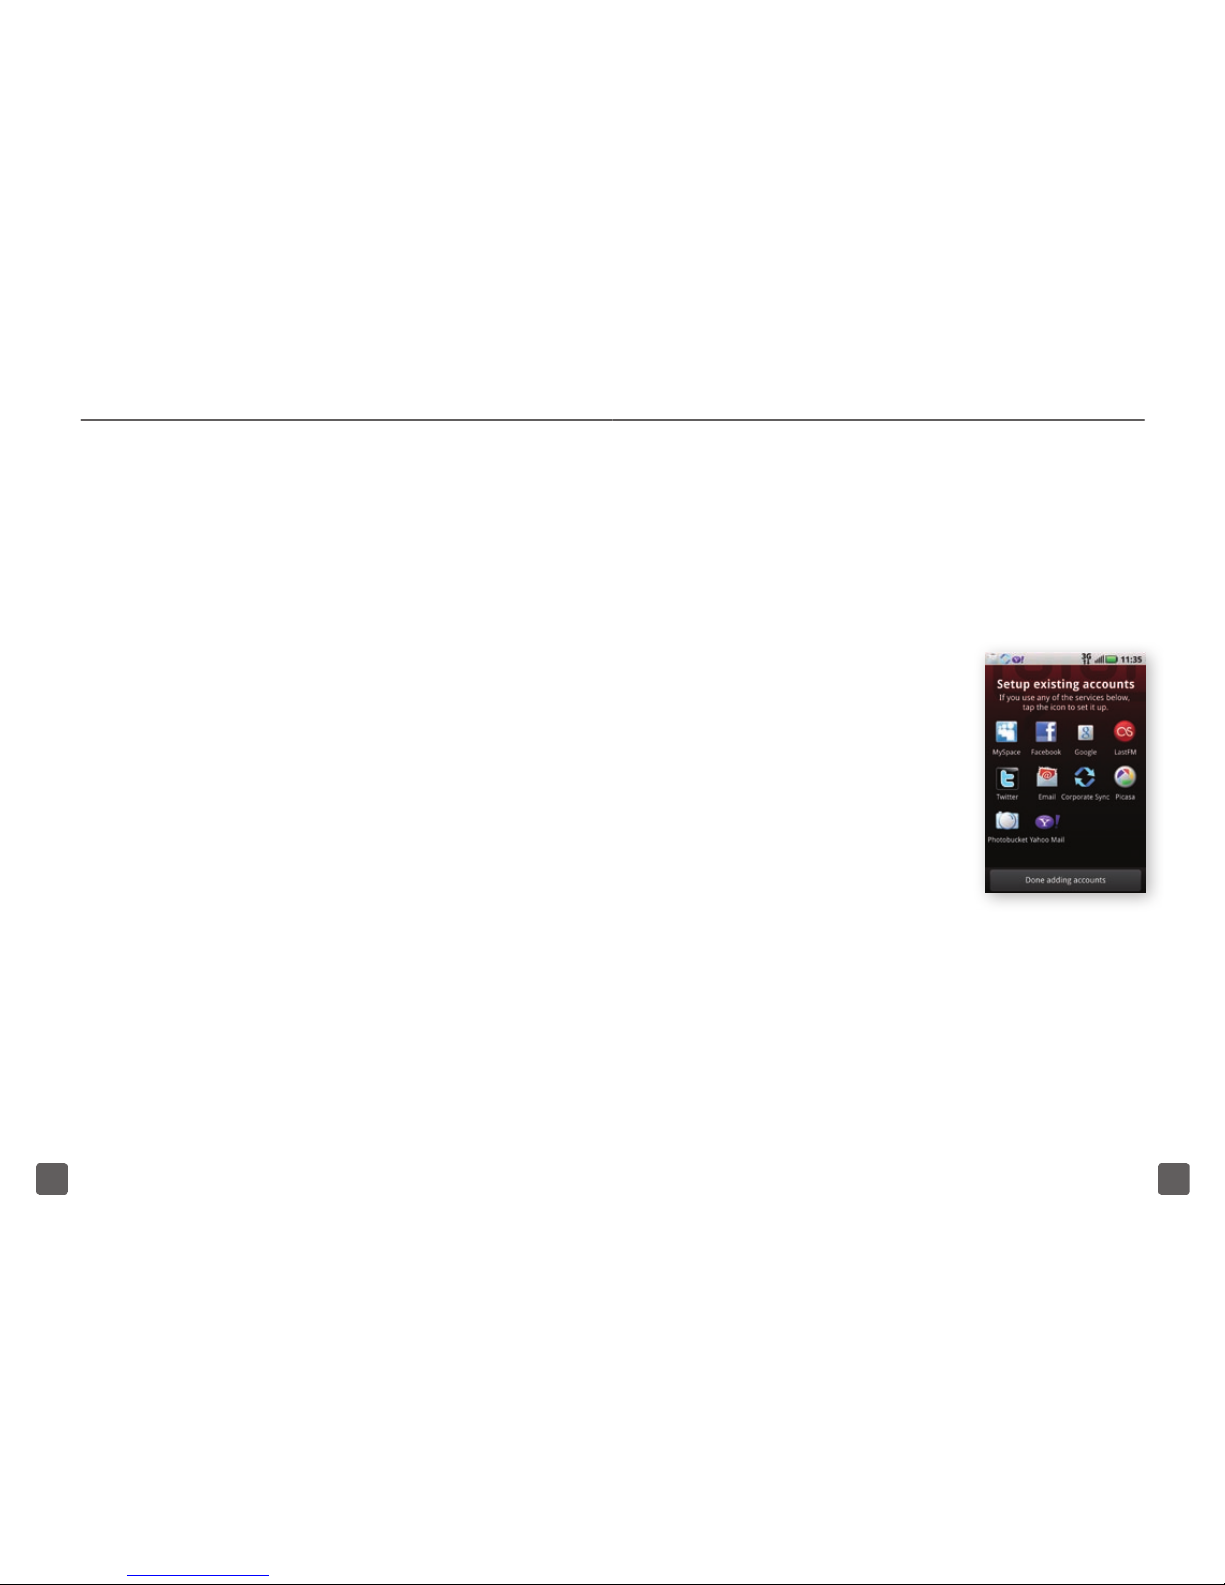
MOTOBLUR ACCOUNT
Before using your phone, you must rst
create a MOTOBLUR account to get
your contacts, e-mail, messages, and
social networking status on your phone
(MySpace, Facebook, Twitter, etc.).
See the Social Networking section in
this guide for more information on how to
manage your accounts.
Create a MOTOBLUR account
1. Select the language.
2. Tap Start.
3. Tap Register new account.
4. Tap Next.
5. Read the MOTOBLUR Terms
of Service, End User License
Agreement, and Privacy Statement.
6. Tap the check mark next to I agree.
7. Tap Next.
8. Enter your name and the e-mail
address where MOTOBLUR can
send account information.
9. Enter a new MOTOBLUR account
password.
10. Tap Next.
11. Verify the information is correct
and tap Conrm.
12. When account creation is
complete, tap Next.
13. Tap the icon for a
service you use.
14. Enter your logon
information for
that service.
15. Tap Next.
16. Repeat steps
13–15 for all of
your accounts.
17. Tap Done adding
accounts.
18. Tap the Down Arrow icon and
then tap the social networking
site you want to use as the picture
source for your contacts’ picture IDs.
19. Tap Next.
10
11
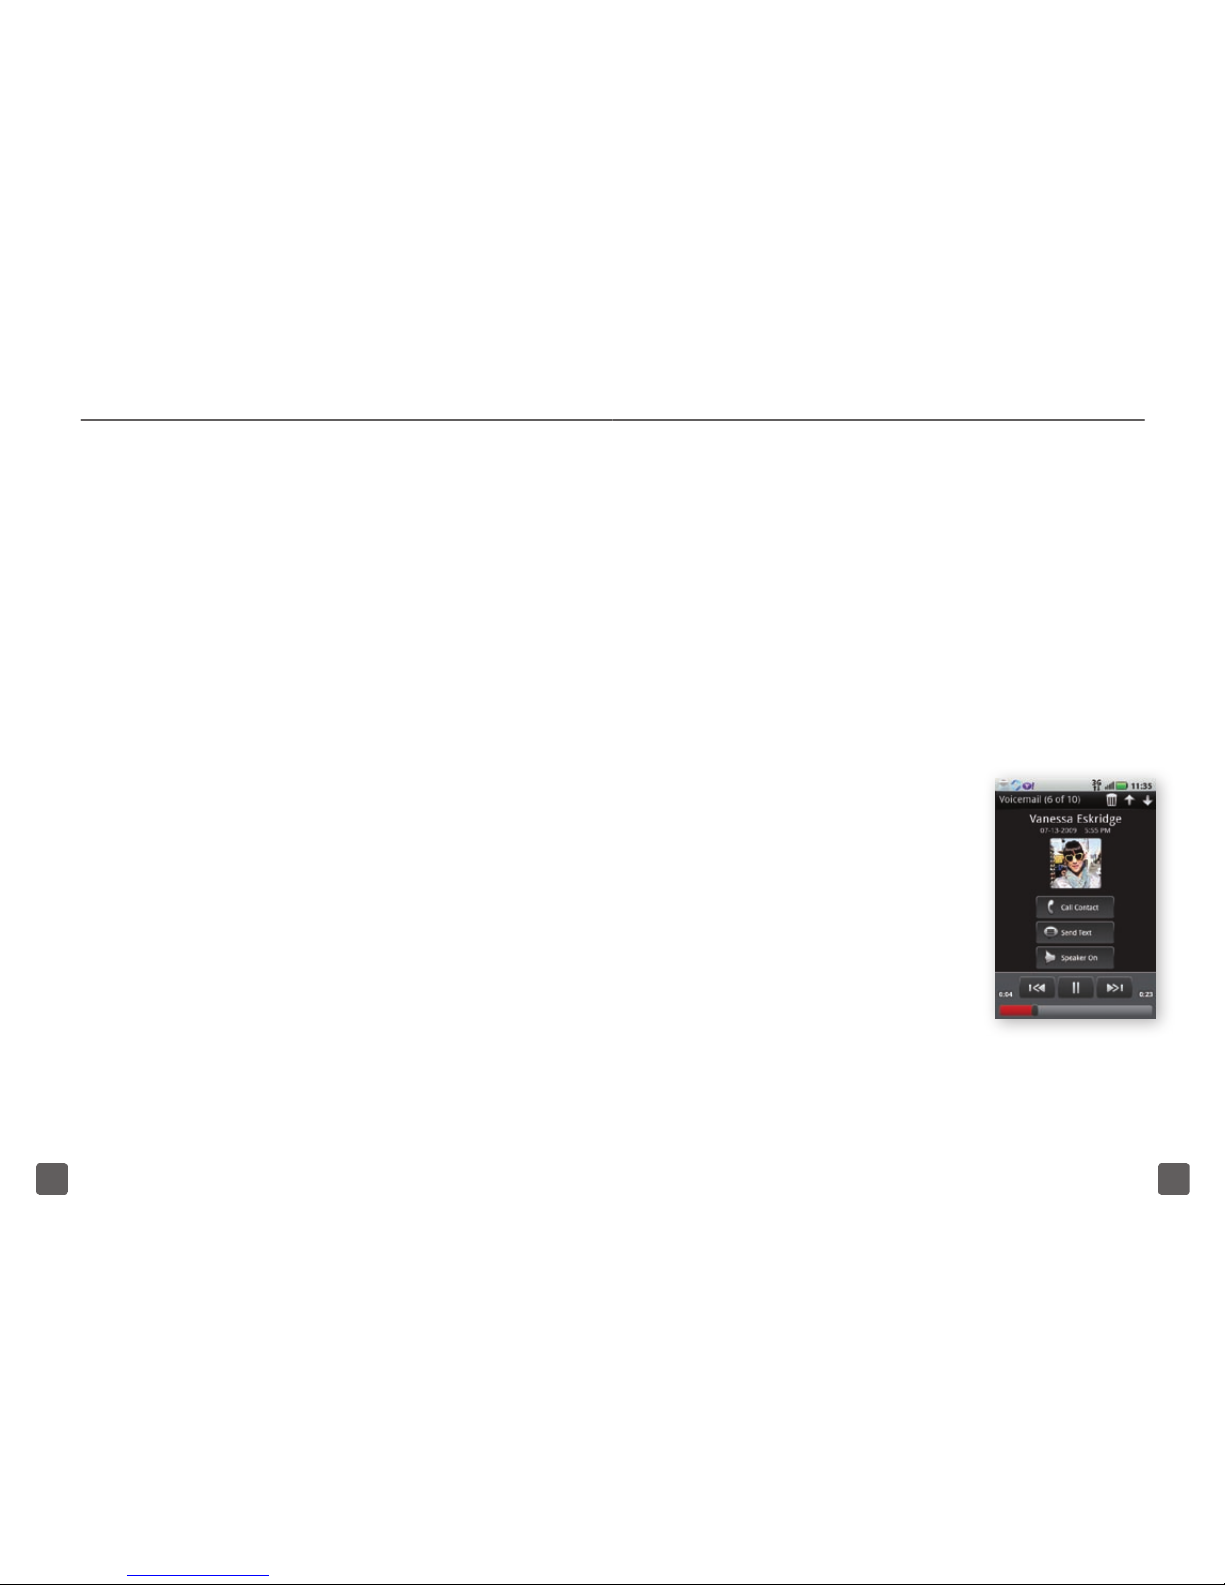
Check Visual Voicemail
Visual Voicemail allows you to play and
replay messages in any order, save voice
messages to your phone, choose how you
want to respond to messages, share special
audio messages via e-mail, and create
personalized greetings.
1. On the Home screen, tap the
Application tab.
2. Scroll down and tap Voicemails.
3. Tap a contact and do the following:
n
Tap the Up or
Down Arrow icons
to scroll through
multiple voicemails.
n
Tap the Play
icon to listen to a
voicemail.
n
Tap the Trash
icon to delete a
voicemail.
n
Tap Call Contact to call the contact.
n
Tap Send Text to send a text
message to the contact.
20. To complete setup and download
your contacts, tap Next.
21. Tap Done.
Congratulations on creating your new
MOTOBLUR account! Now you are ready to
make calls or continue on with this guide to
learn more about your phone.
CALL FUNCTIONS
Make and end calls
1. On the Home screen, tap the green
Phone icon.
2. Tap the Dialer tab, if necessary.
3. Enter the number and tap Call.
4. To end the call, tap End call.
Answer calls
Tap Answer. When the screen is locked,
touch Answer and swipe your nger left.
12
13
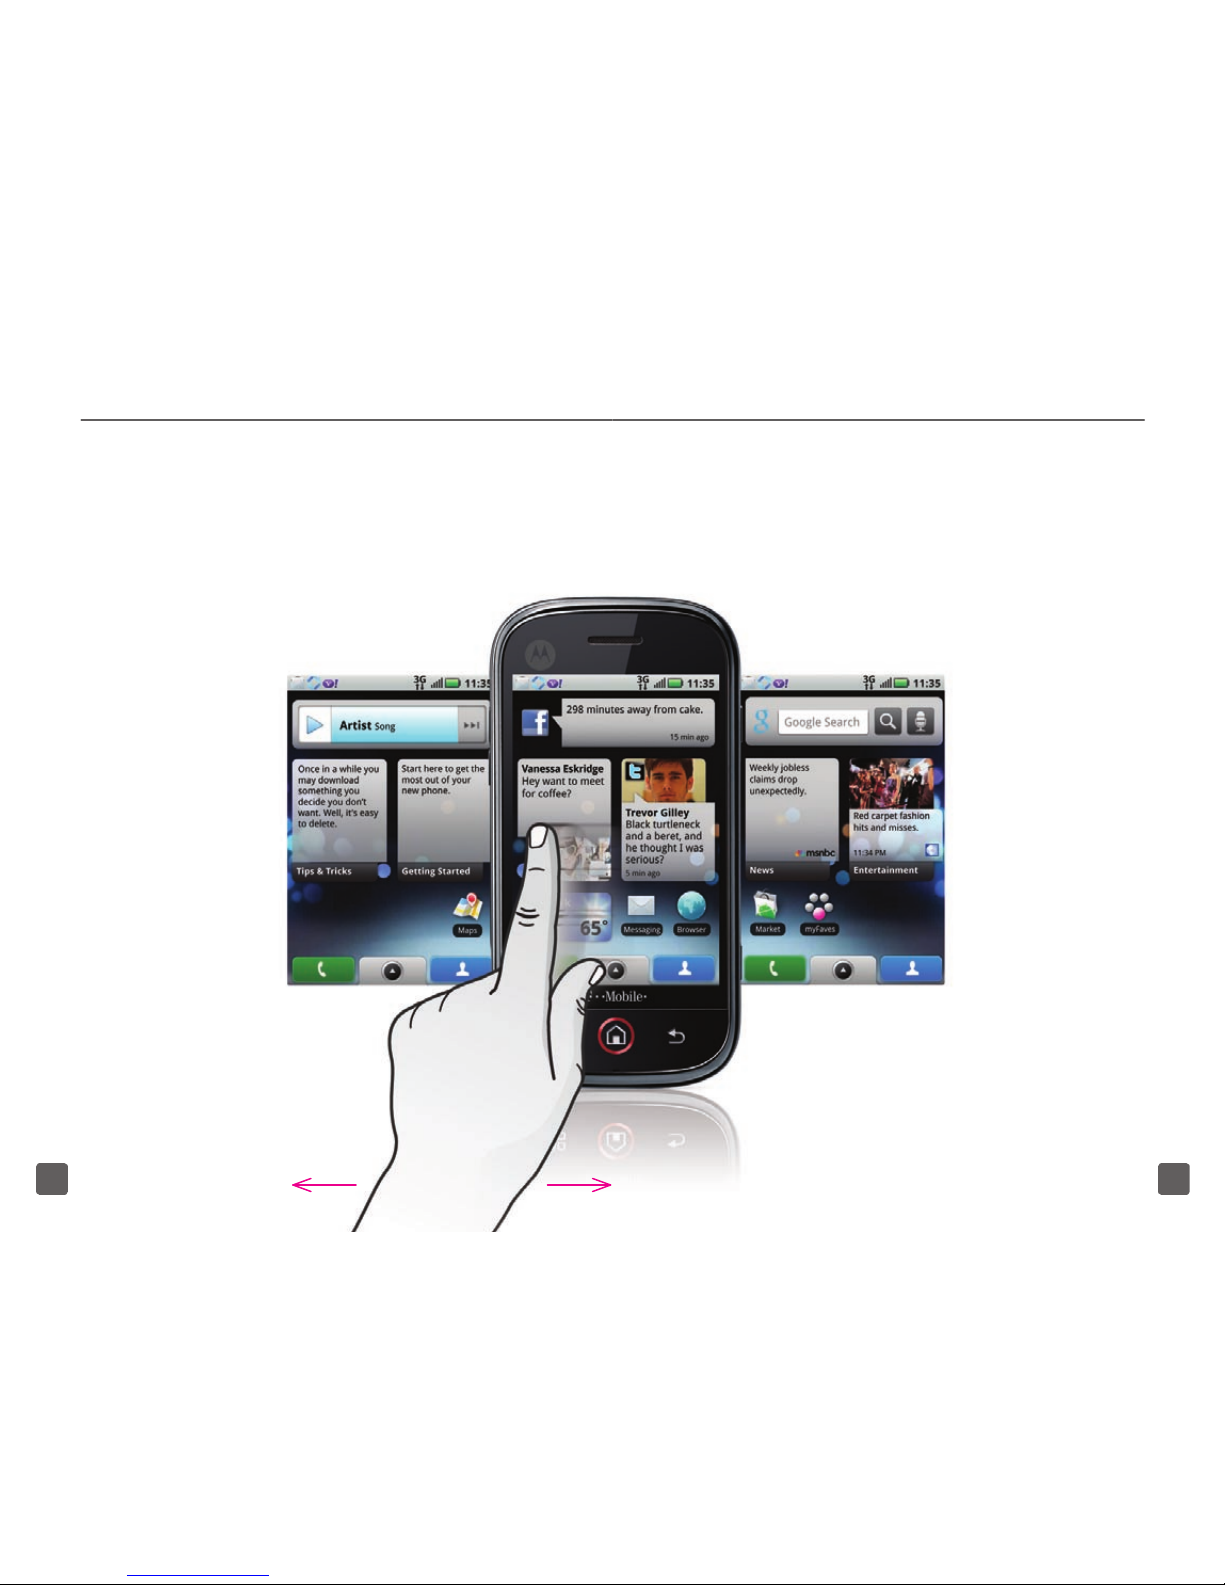
HOME SCREEN
Your Home screen is wider than you’d think.
Simply swipe your nger to the left or right to
view any of the ve panels.
Slide your nger
to the right to see
the left side of your
Home screen.
Slide your nger to
the left to see the
right side of your
Home screen.
You can customize each panel with widgets,
shortcuts to your favorite applications, or
folders that contain shortcuts and les.
14
15
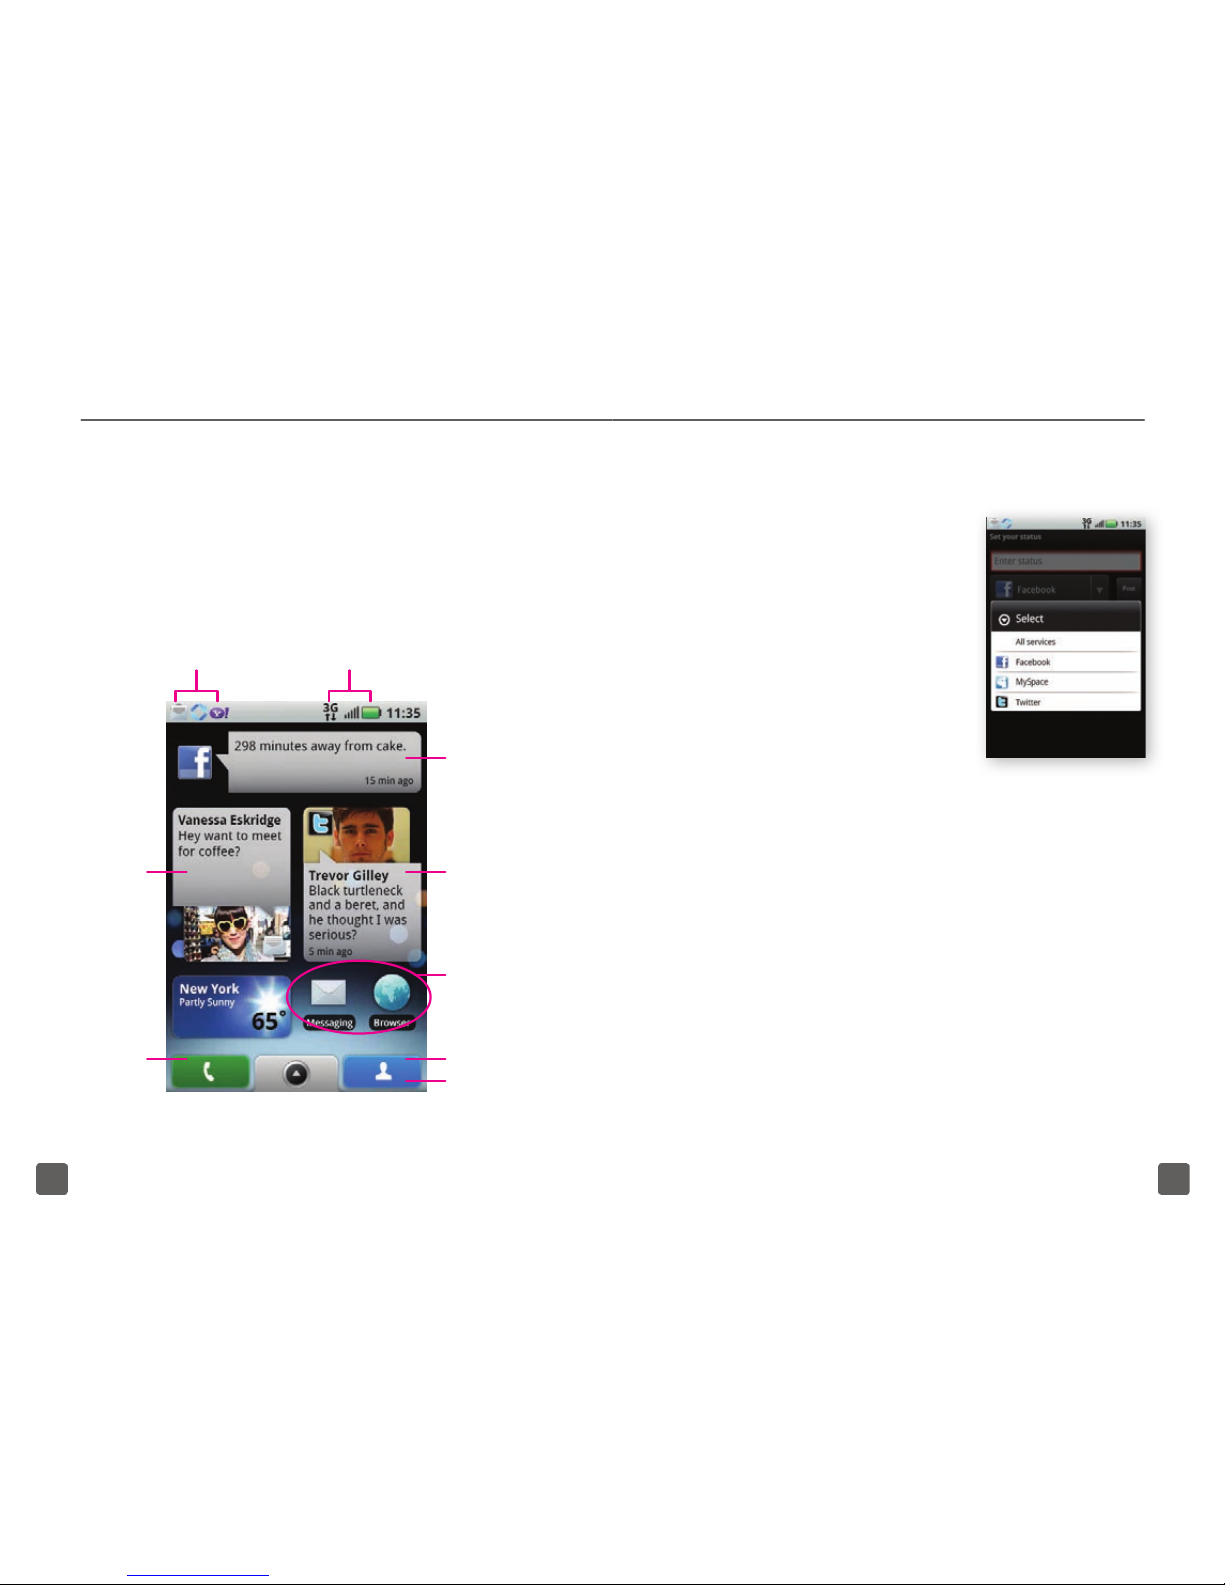
Social Status widget
Tap this widget on the
Home screen to
display your most
recent status updates
to your social networks.
You can then update
your status on one
or all of your social
networks.
Status indicators
Social Status
widget
Tap to update
your status.
Messages
widget
Tap to
view recent
messages.
Happenings
widget
Tap to view
your contacts’
recent posts.
Contact list
Shortcuts
Tap to launch
the application.
Notications
Application
tab
Tap to
view your
applications.
Phone
Tap to
access the
dialer and
call history.
Widgets
Widgets bring the content you want right
to your Home page. Weather, news,
messages, and updates from your social
networking contacts are pushed to your
widgets as the updates happen.
16
17
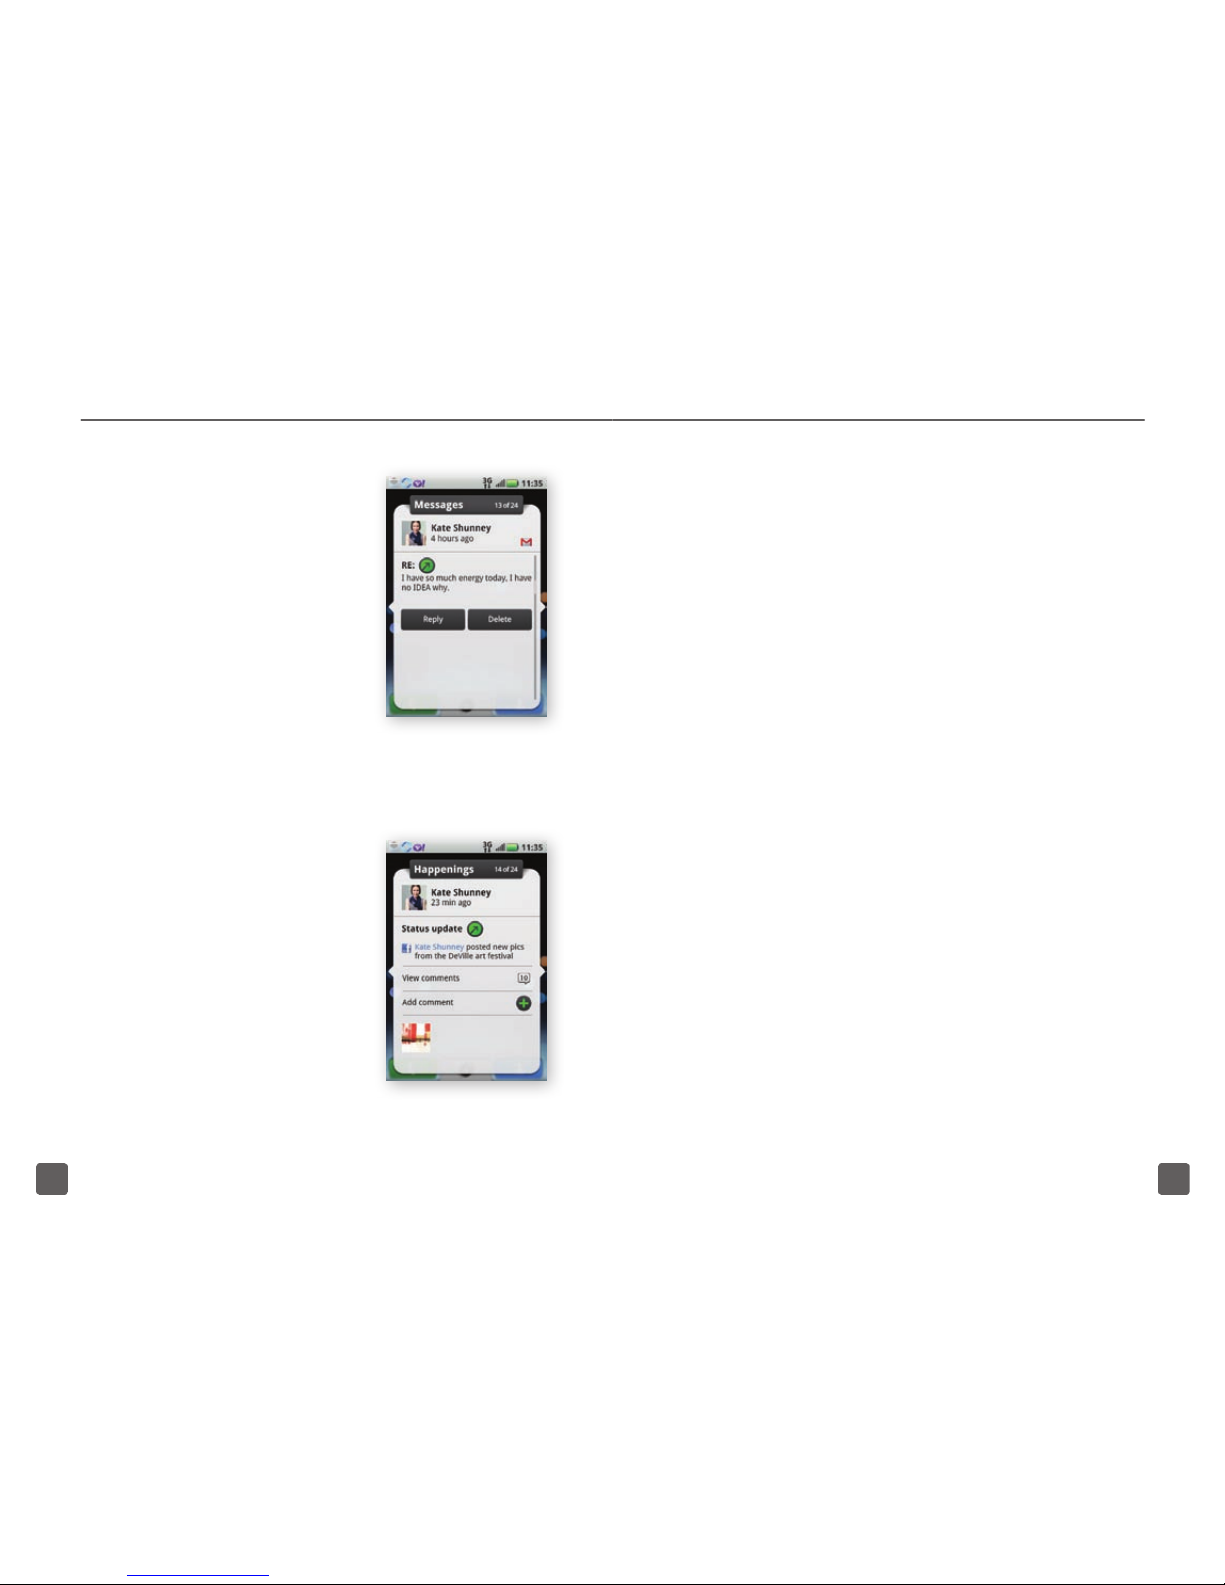
Messages widget
Tap this widget on the
Home screen to display
your recently received
text messages, e-mails,
and social networking direct messages.
Swipe your nger left
or right to scroll through
multiple messages or
tap the title bar to see
the full list.
Happenings widget
Tap this widget on the
Home screen to display
the most recent photos,
events, and other items
posted by your social
networking contacts.
Swipe your nger left
or right to scroll through
multiple happenings or
tap the title bar to see
the full list.
Shortcuts
There are two default shortcuts on your
center Home screen (Messages and
Browser) to allow you to quickly access
your messages and to open up the
browser.
See the Personalize Home Screen
section of this guide for more information
on how to delete and add shortcuts.
18
19
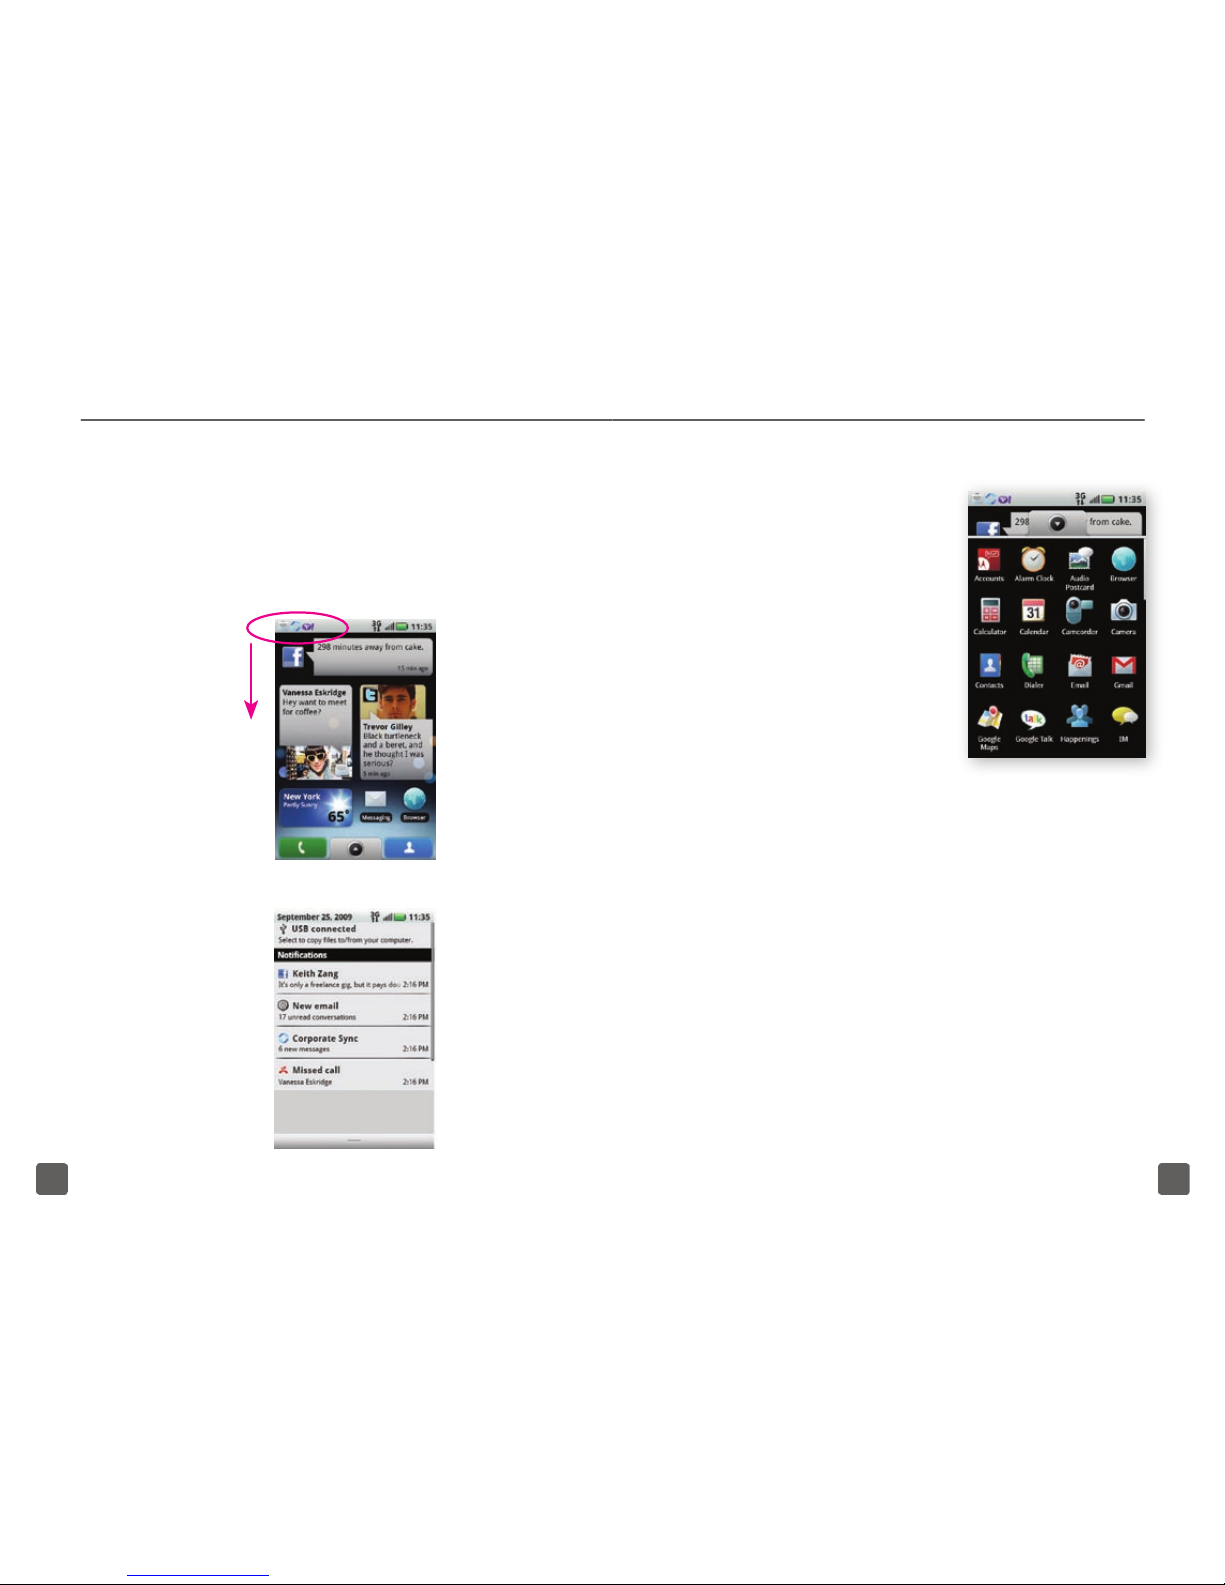
Notification drawer
The Notication drawer runs across the
top of your screen. Icons appear to let you
know when information is waiting for you.
Application tray
Tap the Application
tab to open the
Application Tray.
Touch and slide your
nger up or down the
screen to scroll through
your applications.
New applications are
automatically added
to your drawer in
alphabetical order.
Touch and slide
the drawer down
with your nger.
Tap the desired
Notier icon.

20
21
PERSONALIZE HOME SCREEN
Swipe left or right to personalize each of the
ve panels of your Home screen.
Add widgets to Home screen
1. On the Home screen, touch and
hold an empty space until you see
the Add to Home screen menu.
2. Tap Widgets.
3. Tap the desired widget.
4. If necessary, complete additional
setup steps and tap Done.
Arrange widgets
1. On the Home screen, touch and
hold the widget you want to move.
The Application tab will turn red
when the widget is active.
2. Drag the widget to the desired
location and release your nger
from the screen.
Delete widgets
1. On the Home screen, touch and
hold the widget you want to delete.
The Application tab will turn red
when the widget is active.
2. Drag the widget to the Trash icon on
the Application tab and release your
nger from the screen.
Create shortcuts on the Home screen
1. On the Home screen, tap the
Application tab.
2. Touch and hold the desired
application.
3. Drag the application icon to the
desired location on the desired
panel and release your nger from
the screen.

22
23
Delete shortcuts
1. On the Home screen, touch and hold
the shortcut you want to delete. The
Application tab will turn red when
the shortcut is active.
2. Drag the shortcut to the Trash icon
on the Application tab and release
your nger from the screen.
Change wallpapers
1. On the Home screen, touch and hold
an empty space until you see the
Add to Home screen menu.
2. Tap Wallpapers.
3. Tap one of the following:
n
Picture gallery: Tap to view
a picture. Touch and drag the
Circle and Arrow icons to
adjust the crop box. Tap the
Check Mark icon when done.
n
Wallpaper gallery: Touch
and drag to scroll through the
wallpapers. Tap Set wallpaper.
Create folders on the Home screen
1. On the Home screen, touch and hold
an empty space until you see the
Add to Home screen menu.
2. Tap Folders.
3. Tap New folder.
4. Tap to open the new folder.
5. Touch and hold the top bar to
rename the folder.
6. Enter a name for your folder.
7. Tap OK when done.
Add shortcuts to a folder
1. On the Home screen, touch and hold
the shortcut you want to add to a
folder. The Application tab will turn
red when the shortcut is active.
2. Drag the shortcut on top of the folder
and release your nger from the
screen.
Note: You cannot move widgets into a folder.
 Loading...