

Motorola MH230R - Range FRS/GMRS Radio, Talkabout MH User Manual
MH Series
KEM-PK14190-75
Safety and GeneralInformation
Important Informationon Safeand Efficient Operation
Read ThisInformation BeforeUsing YourRadio.
The information provided inthis documentsupersedes thegeneral
safetyinformation inuser guidespublished priorto December1, 2002.
Transmitand ReceiveProcedure
Yourtwo-way radiocontains atransmitter anda receiver.To control
your exposureand ensurecompliance withthe generalpopulation/
uncontrolled environmentexposure limits,always adhereto the
following procedure:
• Transmitno morethan 50%of thetime.
• Toreceive calls,release thePTT button.
• Totransmit (talk),press thePush toTalk (PTT)button.
Transmitting50% ofthe time,or less,is importantbecause theradio
generates measurableRF energyexposure onlywhen transmitting
(in termsof measuringstandards compliance).
Exposure toRadio FrequencyEnergy
YourMotorola two-wayradio complieswith thefollowing RFenergy
exposure standardsand guidelines:
• United StatesFederal CommunicationsCommission, Codeof
Federal Regulations;47CFR part2 sub-partJ.
• American NationalStandards Institute(ANSI)/Institute of
Electrical andElectronic Engineers(IEEE) C95.1-1992.
• Institute ofElectrical andElectronics Engineers(IEEE) C95.
1-1999 Edition.
• International Commissionon Non-IonizingRadiation Protection
(ICNIRP) 1998.
• Ministry ofHealth (Canada)Safety Code6. Limitsof Human
Exposure toRadiofrequency ElectromagneticFields inthe
Frequency Rangefrom 3KHz to300 GHz,1999.
• Australian CommunicationsAuthority Radiocommunications
(Electromagnetic Radiation—HumanExposure) Standard,2003.
• ANATELANNEXto ResolutionNo. 303of July2, 2002 “Regulationof
limitationof exposureto electrical,magneticand electromagnetic
fieldsin theradio frequencyrange between9 KHzand 300GHz”.
Toensure optimalradio performanceand makesure human
exposure toradio frequencyelectromagnetic energyis withinthe
guidelines setforth inthe abovestandards, alwaysadhere tothe
following procedures.
Portable RadioOperation andEME Exposure
Antenna Care
Use onlythe suppliedor anapproved replacementantenna.
Unauthorized antennas,modifications, orattachments could
damage theradio andmay violateFCC regulations.
Do NOThold theantenna whenthe radiois “INUSE.” Holdingthe
antenna affectsits effectiverange.
Body-Worn Operation
Tomaintain complianceswith FCC/HealthCanada RFexposure
guidelines ifyou weara radioon yourbody whentransmitting
always placethe radioin aMotorola-supplied orapproved clip
holder,holster, caseor bodyharness forthis product.Use of nonMotorola-approved accessoriesmay exceedFCC/Health CanadaRF
exposure guidelines.
If youdo notuse oneof theMotorola-supplied orapproved bodyworn accessoriesand arenot usingthe radioheld inthe normal
use position,ensure theradio and itsantenna are atleast 1inch
(2.5 cm)from yourbody when transmitting.
Data Operation
If applicable,when usingany datafeature ofthe radiowith or
without anaccessory cable,position theradio and itsantenna at
least oneinch (2.5cm) from thebody.
Approved Accessories
For alist ofapproved Motorolaaccessories, visitour Website at
www.motorola.com.
Electromagnetic Interference/Compatibility
Note: Nearlyevery electronicdevice issusceptible to
electromagnetic interference(EMI) ifinadequately shielded,
designed orotherwise configuredfor electromagneticcompatibility.
This devicecomplies withPart 15of theFCC Rules.
Operation issubject tothe followingtwo conditions:
1. This devicemay notcause harmfulinterference; and
2. This devicemust acceptany interferencereceived, including
interference thatmay causeundesired operation.
IC Canada
The term"IC:" before theequipment certificationnumber only
signifies thatthe IndustryCanada technicalspecifications weremet.
Facilities
Toavoid electromagneticinterference and/orcompatibility conflicts,
turn offyour radioin anyfacility whereposted noticesinstruct you
to doso. Hospitalsor healthcare facilitiesmay beusing equipment
that issensitive toexternal RFenergy.
Aircraft
When instructedto doso, turnoff yourradio whenonboard an
aircraft. Anyuse ofa radiomust bein accordancewith applicable
regulations perairline crewinstructions.
Medical Devices– Pacemakers
The AdvancedMedical Technology Associationrecommends that
a minimumseparation of6 inches(15 cm)be maintainedbetween a
handheld wirelessradio anda pacemaker. Theserecommendations
are consistentwith theindependent researchby and
recommendations ofthe U.S.Food andDrug Administration.
People withpacemakers should:
• ALWAYSkeep theradio morethan 6inches (15cm) from their
pacemaker whenthe radiois turnedON.
• Not carrythe radioin thebreast pocket.
• Use theear oppositethe pacemakerto minimizethe potential
for interference.
• Turnthe radioOFF immediatelyif thereis anyreason tosuspect
that interferenceis takingplace.
Medical Devices– HearingAids
Some digitalwireless radiosmay interferewith somehearing aids.
In theevent ofsuch interference,you maywant toconsult your
hearing aidmanufacturer todiscuss alternatives.
Medical Devices– Other
If youuse anyother personalmedical device,consult the
manufacturer ofyour deviceto determineif itis adequately
shielded fromRF energy.Your physicianmay beable toassist you
in obtainingthis information.
Safety andGeneral UseWhile Driving
Check thelaws andregulations regardingthe useof radiosin the
area whereyou drive,and alwaysobey them.If youdo useyour
radio whiledriving, please:
• Give fullattention todriving andto theroad.
• Use hands-freeoperation, ifavailable.
• Pull offthe roadand parkbefore makingor answeringa callif
driving conditionsso require.
The useof atwo-way radiowhile engagedin activitiesrequiring
concentration maycause distractionor otherwiseimpair your
ability tosafely participatein suchactivities. Alwaysuse technology
safely.
Do notplace aportable radioin thearea overan airbag orin the
air bagdeployment area.Air bagsinflate withgreat force.If a
portable radiois placedin theair bagdeployment areaand theair
bag inflates,the radiomay bepropelled withgreat forceand cause
serious injuryto occupantsof thevehicle.
Potentially ExplosiveAtmospheres
Turnoff yourradio priorto enteringany areawith apotentially
explosive atmosphere.Only radiotypes thatare especiallyqualified
should beused insuch areasas “IntrinsicallySafe.” Donot remove,
install orcharge batteriesin suchareas. Sparksin apotentially
explosive atmospherecan causean explosionor fireresulting in
bodily injuryor evendeath.
For MoreInformation
For furtherinformation, youmay callMotorola at1-800-638-5119
(U.S. andCanada), ore-mail usat giantintl@callcenter.com orvisit
us onthe Internetat www.motorola.com.
Note: Theareas with potentiallyexplosive atmospheresreferred to
above includefueling areassuch asbelow deckson boats,fuel or
chemical transferor storagefacilities, areaswhere theair contains
chemicals orparticles (suchas grain,dust ormetal powders)and
any otherarea where youwould normally beadvised toturn offyour
vehicle engine.Areas withpotentially explosiveatmospheres are
often—but notalways—posted.
Blasting Capsand Areas
Toavoid possibleinterference withblasting operations,turn offyour
radio whenyou arenear electricalblasting caps,in ablasting area,
or inareas posted“Turn off two-wayradios.” Obeyall signsand
instructions.
Operational Cautions
Antennas
Do notuse anyportable radio thathas a damagedantenna. Ifa
damaged antennacomes intocontact withyour skin,a minorburn
can result.
Batteries
Allbatteries cancause propertydamage and/orbodily injurysuch as
burnsif aconductivematerial—like jewelry,keys orbeaded chains—
touchexposed terminals.The conductive materialmay completean
electricalcircuit (shortcircuit)and become quite hot.Exercisecare in
handlingany chargedbattery, particularlywhen placingit insidea
pocket,purse orother containerwith metalobjects.
Exercise carewhen removingNiMH orAAA batteries.Do notuse
sharp orconductive toolsto removeeither ofthese batteries.
Battery ChargerSafety Instructions:
Save theseInstructions
1. Do notexpose thecharger torain orsnow.
2. Do notoperate ordisassemble thecharger ifit hasreceived a
sharp blow,or hasbeen droppedor damagedin anyway.
3. Never alterthe ACcord orplug providedwith theunit. Ifthe
plug willnot fitthe outlet,have theproper outletinstalled bya
qualified electrician.An impropercondition canresult ina risk
of electricshock.
4. Toreduce therisk ofdamage tothe cordor plug,pull theplug
rather thanthe cordwhen disconnectingthe chargerfrom the
AC receptacle.
5. Toreduce therisk ofelectric shock,unplug thecharger fromthe
outlet beforeattempting anymaintenance orcleaning.
6. Use ofan attachmentnot recommendedor soldby Motorola
may resultin arisk offire, electricshock orpersonal injury.
7. Make surethe cordis locatedso itwill notbe steppedon,
tripped overor subjectedto damageor stress.
8. An extensioncord shouldnot beused unlessabsolutely
necessary. Useof animproper extensioncord couldresult ina
risk ofa fireand/or electricshock. Ifan extensioncord mustbe
used, makesure that:
• The pinson theplug ofthe extensioncord arethe same
number,size andshape asthose onthe plugof thecharger.
• The extensioncord isproperly wiredand ingood electrical
condition.
• The extensioncord sizeis 18AWG forlengths upto 100 feet,
and 16AWG forlengths upto 150feet.
9. The supplycord ofthe ACadaptor cannotbe replaced.If the
cord isdamaged, callcustomer serviceat 1-800-638-5119(U.S.
and Canada)or e-mailus atgiantintl@callcenter.com.
FCC Licensing Information
YourMotorola radiooperates onGeneral MobileRadio Service
(GMRS) frequenciesand issubject tothe Rulesand Regulationsof
the FederalCommunications Commission(FCC). TheFCC requires
that alloperators usingGMRS frequenciesobtain aradio license
before operatingtheir equipment.To obtainthe FCCforms, please
visit theFCC’s Web siteat wireless.fcc.gov/uls/index.htm?job=home
to sourceform 605and 159,which includesall theinstructions you
will need.
If youwish tohave thedocument faxedor mailed,or ifyou have
questions, pleaseuse thefollowing contactinformation:
Changes ormodifications notexpressly approvedby Motorolamay
void theuser’s authoritygranted by theFCC tooperate thisradio
and shouldnot bemade. To complywith FCCrequirements,
transmitter adjustmentsshould bemade onlyby orunder the
supervision ofa personcertified astechnically qualifiedto perform
transmitter maintenanceand repairsin theprivate landmobile and
fixed servicesas certifiedby anorganization representativeof the
user ofthose services.Replacement ofany transmittercomponent
(crystal, semiconductor,etc.) notauthorized by theFCC equipment
authorization forthis radiocould violateFCC rules.
®
3. Gentlyremove eachbatteryby easingeach batteryout individually.
4. Reposition thebattery coverand pressdown tosecure.
Notes
• Exercise carewhen removingNiMH orAAA batteries.Do not
use sharpor conductive toolsto remove eitherof thesebatteries.
• Remove thebatteries beforestoring yourradio forextended
periods oftime. Batteriescorrode overtime andmay cause
permanent damageto yourradio.
Using theBattery Charger(Optional Accessory)
The batterycharger providesdrop-in chargingconvenience for
NiMH batteriesand canbe placedon anyflat surface,such asa
desk orworkbench. Chargethe NiMHbattery overnight(at least
16 hours)before usingit forthe firsttime. Afterthe initialcharge,
an emptybattery isfully chargedwithin 14hours.
1. Follow thesteps aboveto installa NiMHBattery Pack.
2. Plug theAC powersupply cordinto thejack onthe deskstand.
3. Plug theAC powersupply intoa standardwall outlet.
4. With aradio facingforward, slideit intoone ofthe charging
pockets.
5. When chargingin thebattery charger, thered lighton the
charger basewill glowcontinuously.
Using themini-USB ChargingConnector
The mini-USBcharging connectoris ahandy portthat allowsyou to
conveniently chargeyour NiMHbattery pack.This isan alternative
to chargingyour NiMHbattery packin theBattery Chargerdesk
stand usingthe ACwall adaptorand especiallyuseful whenused
while traveling.
Available mini-USBcharging options:(Optional Accessories)
1. Wall travelcharger
2. Vehicle charger
3. Mini-USB computercable
If usinga computer,the computer mustbe turnedon.
This andother accessories(sold separately)are availablefor
your radio.For moreinformation, visitour Website at
www.motorola.com orshop.giantintl.com.
1. Plug yourmini-USB cableor chargerinto apower sourceas is
appropriate foryour accessory.
2. Plug thecable into themini-USB port onthe bottomof yourradio.
3. An emptybattery willbe fullycharged in14 hours.
4. The LEDindicator lighton theradio willglow toindicate thatthe
battery ischarging.
Notes
• The lightwill remainred afterthe NiMHbattery packis fully
charged.
• When movingbetween hotand coldtemperatures, donot
charge theNiMH batterypack untilthe batterytemperature
acclimates (usuallyabout 20minutes).
• For optimalbattery life,remove theradio fromthe chargerwithin
16 hours.Do notstore theradio whileconnected tothe charger.
• If theradio iskept onwhile charging,the chargingtime willbe
extended.
• Even thoughthe chargeris connected,you maynot beable to
transmit amessage ifthe batteryis completelyempty .
Allow timefor thebattery tocharge to1 bar before
attempting totransmit amessage.
Attaching andRemoving theBelt Clip
1. Attach beltclip topocket orbelt strap.
2. Align thebelt clippost withthe holein theback ofthe radio.
3. Gently pushuntil theclip clicksin place.
ToRemove
1. Push downon therelease tabat thetop ofthe beltclip to
release thecatch.
2. Pull thebelt clipaway fromthe backof theradio.
Turningyour RadioOn and Off
Turn clockwise toturn theradio onand counterclockwiseto
turn theradio off.
1. In theON position,the radiochirps andbriefly showsall feature
icons availableon theradio.
2. The displayscreen thenshows thecurrent channel,code and
all featuresthat areenabled.
Setting theVolume
Press andhold for threeseconds whilerotating until you
reach acomfortable listeninglevel.
1. Rotate clockwise toincrease the volume.
2. Rotate counterclockwise todecrease the volume.
Do nothold theradio closeto yourear. Ifthe volumeis setto an
uncomfortable level,it couldhurt yourear.
Talking andListening
Tocommunicate, allradios inyour groupmust beset tothe same
channel andInterference EliminatorCode.
1. Totalk, press andhold .
2. Whenyou arefinished talking,release .
For maximumclarity, holdthe radiotwo tothree inchesaway from
your mouthand speakdirectly intothe microphone.Do notcover
the microphonewhile talking.
TalkRange
Yourradio isdesigned tomaximize performanceand improve
transmissionrange. Donot usethe radioscloser thanfive feetapart.
Monitor Button
Pressing andholding for threeseconds allowsyou to listento
the volumelevel of theradio whenyou arenot receiving.This allows
you toadjust thevolume, ifnecessary. Youcan alsopress to
check foractivity onthe currentchannel before youtalk.
Push toTalk Timeout Timer
Toprevent accidentaltransmissions andsave batterylife, theradio
emits acontinuous warningtone andstops transmittingif you
press for 60continuous seconds.
Menu Options
Selecting theChannel
Yourradio has22 channels.The channelis thefrequency theradio
uses totransmit. Channels8-14 areFRS 0.5watt onlyand allother
channels areGMRS. (Seethe “Channelsand Frequencies”table on
overleaf fordetails.)
1. With theradio on,press . Whenthe radiois ona 0.5watt
channel, displays. Whenthe radiois on a1 wattchannel,
displays. Thecurrent channelflashes.
2. Press or and select anunused orquiet channel.
3. Press to savethe channelsetting or tocontinue setup.
Selecting theInterference EliminatorCode
Interference EliminatorCodes helpminimize interferenceby
blocking transmissionsfrom unknownsources. Your radiohas 121
Interference EliminatorCodes. Codes1 –38 arethe standardanalog
codes thatappear onother FRS/GMRSradios. Codes39 –121 are
additional digitalcodes addedfor superiorinterference protection.
0 isthe offposition, noanalog ordigital codesare enabled.
Toset thecode fora channel:
1. Press until thecode startsto flash.
2. Press or to selectthe code.
3. Press to savethe codesetting or to continueset up.
Youcan seta differentcode foreach channelusing thisprocedure.
An extendedpress of or allows youto scrollthrough
the InterferenceCode rapidlyso youcan quicklyreach thecode
you want.
Note: Youmust setthe Interference EliminatorCode to0 ona radio
that usesInterference EliminatorCodes tocommunicate withradios
that donot haveInterference EliminatorCodes. Select0 for“no
tone, nocode” andOFF willflash onyour radio’s display.
Setting andTransmitting Call Tones
Yourradio cantransmit differentcall tonesto otherradios inyour
group soyou canalert themthat youwant totalk. You have10 call
tones fromwhich tochoose.
Toset acall tone:
1. With theradio on,press three timesuntil the current
call tonesetting (0- 10)flashes and appears.
2. Press or to changeand hearthe calltone.
3. Press to setthe newcall toneor to continueset up.
Totransmit yourcall toneto otherradios setto thesame channel
and InterferenceEliminator Codeas yourradio, press .
Note: Settingthe callto 0disables thecall tonefeature.
Hands-Free UseWithout Accessories( )
Youcan usethe iVOXfeatureto transmithands-free withoutthe need
forany headsetaccessories.Once iVOXis turnedon, theradiodetects
yourvoice andtransmitswhen you speak into theinternalmicrophone.
1. Press until appears onthe display.The current
setting On/Offwill flash.
2. Press or to selectOn orOff.
3. Press to setor to continueset up.
Hands-Free UseWith Accessories( )
Youcan transmithands-free morereliably withthe useof optional
headset accessories.Once VOXis turnedon, theradio detectsyour
voice andtransmits whenyou speak.
Many accessories(sold separately)are availablefor yourradio.
For moreinformation, visitour Website atwww.motorola.com or
shop.giantintl.com.
1. Turnthe radiooff andplug theVOX accessoryinto the
accessory port.
2. Turnthe radioon. VOXshows onthe display.
3. Adjust thevolume appropriatelyby rotating .Lower the
volume beforeplacing theaccessory onyour head orin yourear.
4. Toturn off,simply removeaccessory.
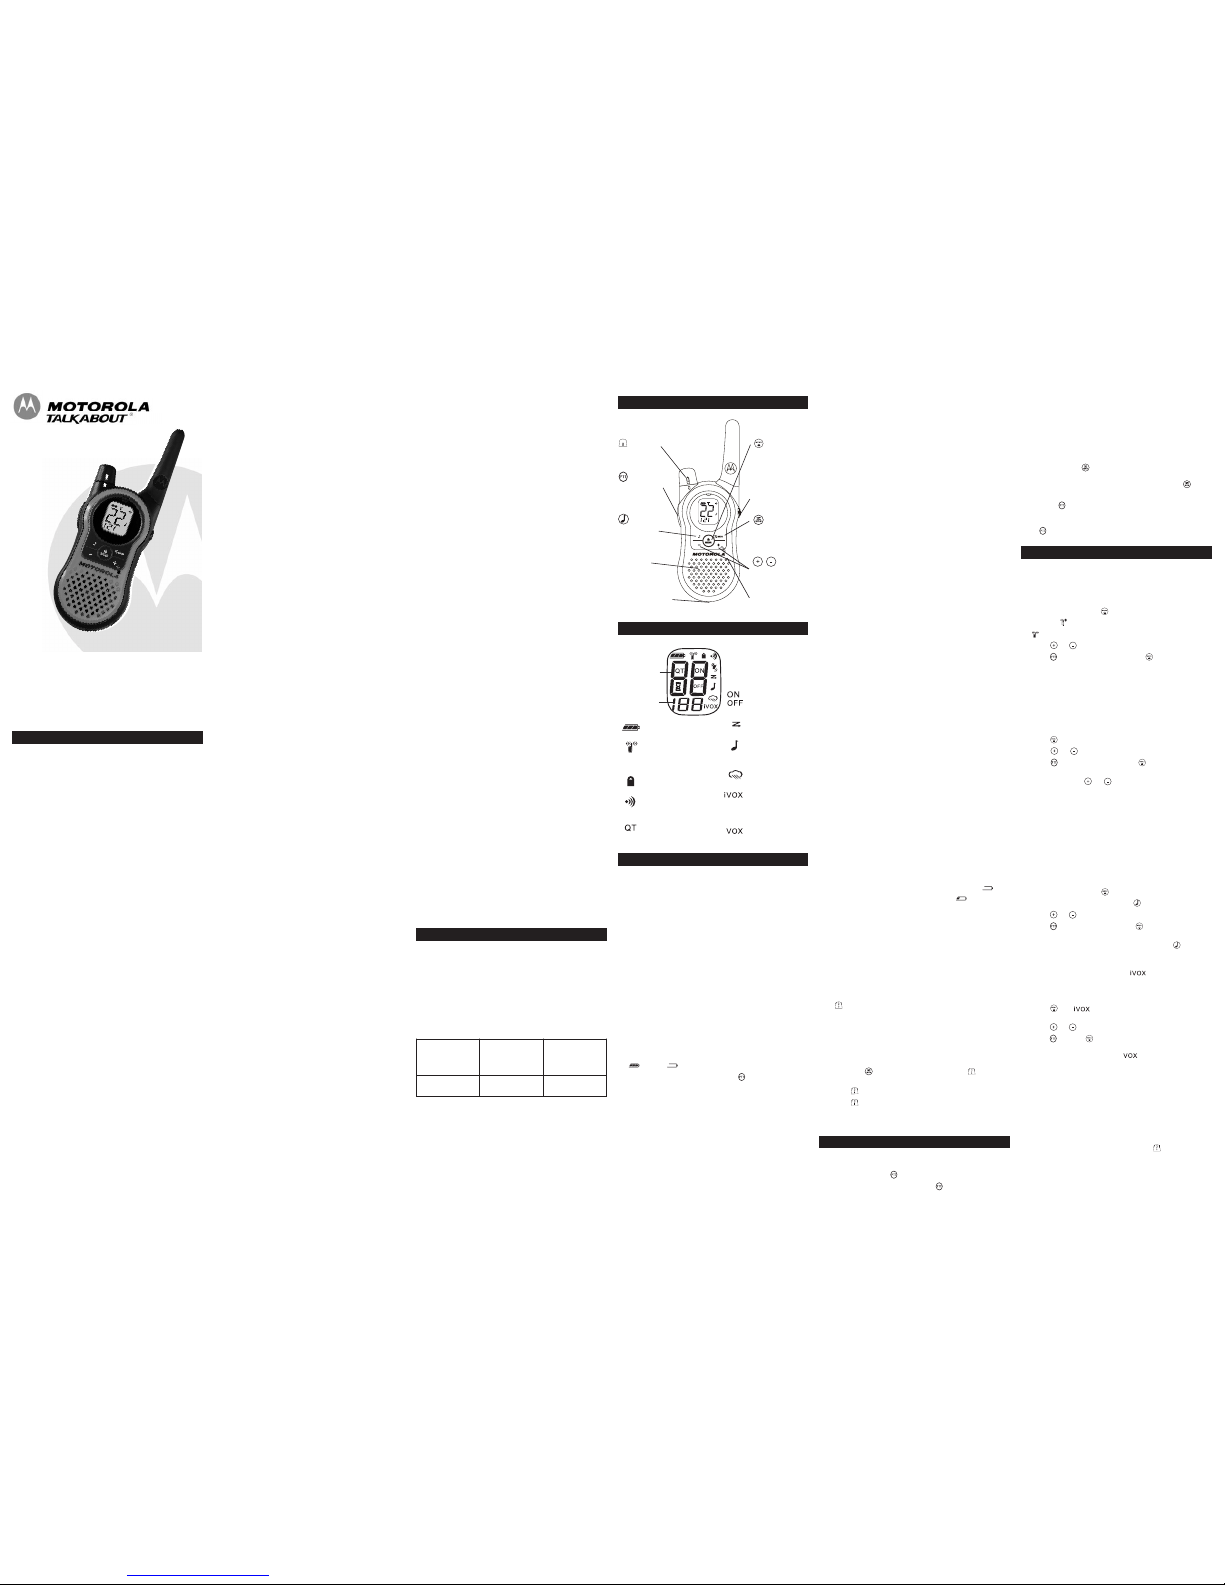
Display Screen Guide
Continued onback
MH Series
Control Buttons
Getting Started
Installing theBatteries
Each radiouses 1NiMH rechargeablebattery packor 3AAA
alkaline batteriesand beepswhen thebatteries arelow.
Installing NiMHRechargeable BatteryPack (Optional Accessory)
1. Turnthe radiooff.
2. With theback ofthe radiofacing you,lift thebattery coverlatch
up andremove thecover.
3. Remove thebattery packfrom theclear plasticbag. (Donot
disassemble orunwrap thebattery pack.)
4. Insert theNiMH batterypack withthe diagramfacing you.
5. Reposition thebattery coverand pressdown tosecure.
Installing theThree AAAAlkaline Batteries
1. Turnthe radiooff.
2. With theback ofthe radiofacing you,lift thebattery coverlatch
up andremove thecover.
3. Insert thethree AAAalkaline batterieswith +and -polarity as
shown inside.
4. Reposition thebattery coverand pressdown tosecure.
Radio BatteryMeter
The radiobattery iconshows theradio batterycharge level,from
full to empty . Whenthe radiohas onesegment left,the
radio chirpsperiodically orafter releasing (LowBattery Alert).
Removing theNiMH BatteryPack (Optional Accessory)
1. Turnthe radiooff.
2. With theback ofthe radiofacing you,lift thebattery latchup to
release thebattery coverand removethe cover.
3. Remove theNiMH batterypack bypulling theribbon attachedto
the battery.
4. Reposition thebattery coverand pressdown tosecure.
Removing theThree AAABatteries
1. Turnthe radiooff.
2. With theback ofthe radiofacing you,lift thebattery latchup to
release thebattery coverand removethe cover.
For afax:
Contact the
Fax-0n-Demand
system
For mailservice:
Call theFCC
Forms Hotline
If youhave
questions about
the FCCLicense:
Call theFCC
1-202-418-0177 1-800-418-FORM
(3676)
1-888-CALL-FCC
(225-5322)
Two-Way Radio
User’s Guide
Number s
for Ch annel,
C
all Tone
Number s
f
or Cod es
-
Batter y Meter
-
Channe l Power
Indica tor (see
M
enu Op tions)
-
Lock
-
Talk Conf irmatio n
Tone (Rog er Beep )
-
Noise Fil tering
-
O
n/Off for e ach
featur e
-
Scan
-
Call Tone ,
Keypad Tone
-
W
eather Al ert
-
Hands- Free Use
Withou t
Access ories
-
Hands- Free Use
With A ccessori es
Push to Talk
Call Tone
Speake r
Menu/Loc k
Accessor y Jack
Scan/Mon itor
Scroll/We ather
Micropho ne
Volume
Mini-U SB
Chargi ng Port
Note: Thereis ashort delaybetween thetime youstart talking
and whenthe radiotransmits. Thereis ashort delaybefore the
transmission iscompleted.
Setting theSensitivity LevelWhen in or Mode
Adjusting theradio’s sensitivitylevel helps minimizethe possibility
of unintendednoises triggeringa transmissionand helpsthe radio
pick upsoft voices.
1. Press until VOX/iVOXand thelevel setting(1-3) appearon
the display.
2. Press or to selectthe sensitivitylevel.
3. Press to setor to continueset up.
3 =High Sensitivityfor quietenvironments
2 =Medium Sensitivityfor mostenvironments
1 =Low Sensitivityfor noisyenvironments
Note: Whenyou connecta headset,the radiois automaticallyset to
the lastchosen sensitivitylevel.
Q
T
Noise Filtering
The QTnoise-filtering featurehelps toensure uninterrupted
communication withother Motorolaradios thathave thisfeature.
This featurealso filtersout unwantedtransmissions fromother
radios. Thisis usefulin placeswhere thereis heavyradio traffic,
such asamusement parksor skiresorts.
Note: QTnoise filteringis notavailable whenthe radiois scanning.
Toturn QTnoise filteringon oroff:
1. Press until displays. Thecurrent setting On/Offwill flash.
2. Press or to turnnoise filteringOn orOff.
3. Press to confirmyour selectionor to continueset up.
Totransmit toa radiothat has
Q
T
noise filteringturned on:
1. Select thesame channeland InterferenceEliminator Codeas
the otherradio.
2. Press to senda calltone. Thisallows yourvoice topass
through the
Q
T
noise filteron thereceiving radio.
3. Press and speaknormally.
Note: Ifyou skipstep 2,the beginningof yourmessage maynot be
heard onthe receivingradio. Fora 30-secondperiod, startingafter
the lasttransmission, alltransmissions receivedon theselected
channel andcode willpass throughthe QTnoise filter.
Keypad Tones
Youmay enableor disablethe speakerkey tones.You will hearthe
key toneeach timea buttonis pushed.
1. Press until appears. Thecurrent settingOn/Off willflash.
2. Press either or to turn Onor Off.
3. Press to confirmor to continueset up.
Note:When thekey tonefeature isoff, thefollowing arenot disabled:
• Transmittimeout alerttone
• Call tone
• Low batteryalert toneor
• The transmittedtalk confirmationtone
Transmittinga Talk ConfirmationTone
Youcan setyour radioto transmita uniquetone whenyou finish
transmitting. Itis likesaying “Roger”or “Over”to letothers know
you arefinished talking.
1. With theradio on,press until the appears. Thecurrent
setting On/Offflashes.
2. Press or to turnOn orOff.
3. Press to setor to quitmenu mode.
Special Features
Keypad Lock
Toavoid accidentallychanging yourradio settings:
1. Press and holduntil displays.
2. When inlock mode,you canturn theradio onand off,adjust
the volume,receive, transmit,send acall tone,and monitor
channels. Allother functionsare locked.
Tounlock theradio, pressand hold until is nolonger
displayed.
Scanning Channels
Use scanto searchthe 22channels fortransmissions from
unknown parties,to findsomeone inyour groupwho has
accidentally changedchannels, orto quicklyfind unusedchannels
for yourown use.
There isa priorityfeature and2 modesof scanning(basic and
advanced) tomake yoursearch moreeffective. Thebasic scan
mode usesthe channeland codecombinations foreach ofthe 22
channels asyou haveset them(or withthe defaultcode valueof 1).
The “AdvancedScan” modewill scanall channelsfor anyand all
codes, detectany codein use,and usethat codevalue temporarily
for thatchannel.
Priorityis givento the“home channel,” thatis, thechannel (and
InterferenceEliminatorCode) your radiois setto whenyou startthe
scan.This means theinitialchannel (and codesetting)is scanned
moreoften than theother 21channels, andyour radiowill respond
quicklyto anyactivityoccurring onthe homechannel asa priority.
Tostart Scanning:
1. Briefly pressthe key. Thescan will appearin the
display, andthe radiowill beginto scrollthrough thechannel
and codecombinations.
2. When theradio detectschannel activitymatching thechannel
and codecombination, itstops scrollingand youcan hearthe
transmission.
3. Torespond andtalk tothe persontransmitting, press within
five secondsafter theend ofthe transmission.
4. The radiowill resumescrolling throughthe channelsfive
seconds afterthe endof anyreceived activity.
5. Tostop scanning,briefly pressthe key.
Tostart AdvancedScanning:
1. Set theInterference EliminatorCode to“zero” orOFF.
2. Briefly pressthe key. Thescan will appearin the
display, andthe radiowill beginto scrollthrough thechannels.
No InterferenceEliminator Codeswill filterwhat isheard.
3. When theradio detectschannel activitywith ANYcode (orNO
code), itstops scrollingand youcan hearthe transmission.Any
Interference EliminatorCode thatmay bein useby thatparty
will bedetected anddisplayed.
4. Torespond andtalk tothe persontransmitting, press within
five secondsof theend ofthe transmission.The radiowill
transmit usingthe newlydetected InterferenceEliminator Code.
5. The radiowill resumescrolling throughthe channelsfive
seconds afterthe endof anyreceived activity.
6. Tostop scanning,briefly pressthe key.
Scanning Notes:
1. If youpress while theradio isscrolling throughinactive
channels, thetransmission willbe onthe “homechannel”.
Scanning willresume fiveseconds afterthe endof your
transmission. Youmay pressthe key tostop scanning
at anytime.
2. If theradio stopson anundesired transmission,you may
immediately resumethe scanby brieflypressing or .
3. If theradio repeatedlystops onan undesiredtransmission,
you maytemporarily removethat channelfrom thescan listby
pressing andholding or for threeseconds. You may
remove morethan onechannel inthis way.
4. Torestore theremoved channel(s)to thescan list,turn theradio
off andthen backon, orexit andre-enter thescanning modeby
pressing .
5. Youcannot removethe homechannel fromthe scanlist.
6. In AdvancedScan, thedetected codewill onlybe usedfor
one transmission.You mustnote the code,exit scan,and set
that detectedcode onthat channelto permanentlyuse the
detected code.
Weather Receiver
Yourradio cantune into broadcastsby theUnited StatesNational
Oceanic andAtmospheric Administration(NOAA) WeatherRadio
and EnvironmentCanada Weatheradio.
Youcan listento aweather channel(see “WeatherChannels and
Frequencies” tablebelow) orset yourradio toalert youto
emergency weatherbroadcasts thatinterrupt routinebroadcasts.
When youlisten toa weatherchannel, youcannot useyour radio
in scanmode orfor two-waycommunications.
Both NOAAand EnvironmentCanada havetransmitters located
throughout theUnited Statesand Canada,respectively. These
transmitters broadcastwatches, forecasts,and otherinformation
24 hoursa day.
Note: NOAAweather radiostations areassigned tocover specific
areas andservice maybe limited.Please checkwith yourlocal
weatherofficefor frequencyanddetails, orvisitwww.weather.gov/nwr
inthe USorwww.msc.ec.gc.ca/msb/weatheradio inCanada toview
the appropriatetransmitter foryour area.
The useof theNOAA logodoes notprovide anendorsement or
implied endorsementby NOAA’sNational WeatherService, nor
does theuse ofthe Weatheradiologo providean endorsementor
implied endorsementby EnvironmentCanada.
TurningWeather ChannelReception On andOff
1. Toturn weatherreception on,press and holdfor three
seconds.
2. Toturn off,press or turnthe radiooff and thenback on.
Setting theWeather Channel
Yourradio receivesweather frequencies:
1. After turningweather receptionon, press . Thecurrent
channel flashes.
2. Press or to selectthe appropriatechannel withgood
reception inyour area.
3. Press to savethe weatherchannel setting.
Setting theWeather Alert
Yourradio canbe setto respondto NOAAWeather Radio
emergency messages.A specialalarm tonesounds analert
and turnson theweather receiverto giveyou immediateweather
and emergencyinformation.
1. After turningweather receptionon, press twice. On/Off
displays.
2. Press or to selectOn/Off. Ifyou activateWeather Alert
and returnto two-waymode, will display.
3. Press to savethe weatheralert setting.
4. Press to returnto two-waymode.
As withtwo-wayradio reception,weather channelreceptiondepends
on howclose youare toa transmitterand whetheryou areindoors or
outdoors.Because weatherchannelsare transmittedwithout codes,
theymay contain static ornoise. WeatherAlert will notfunctionwhile
activelytransmitting orreceivingin two-way mode.
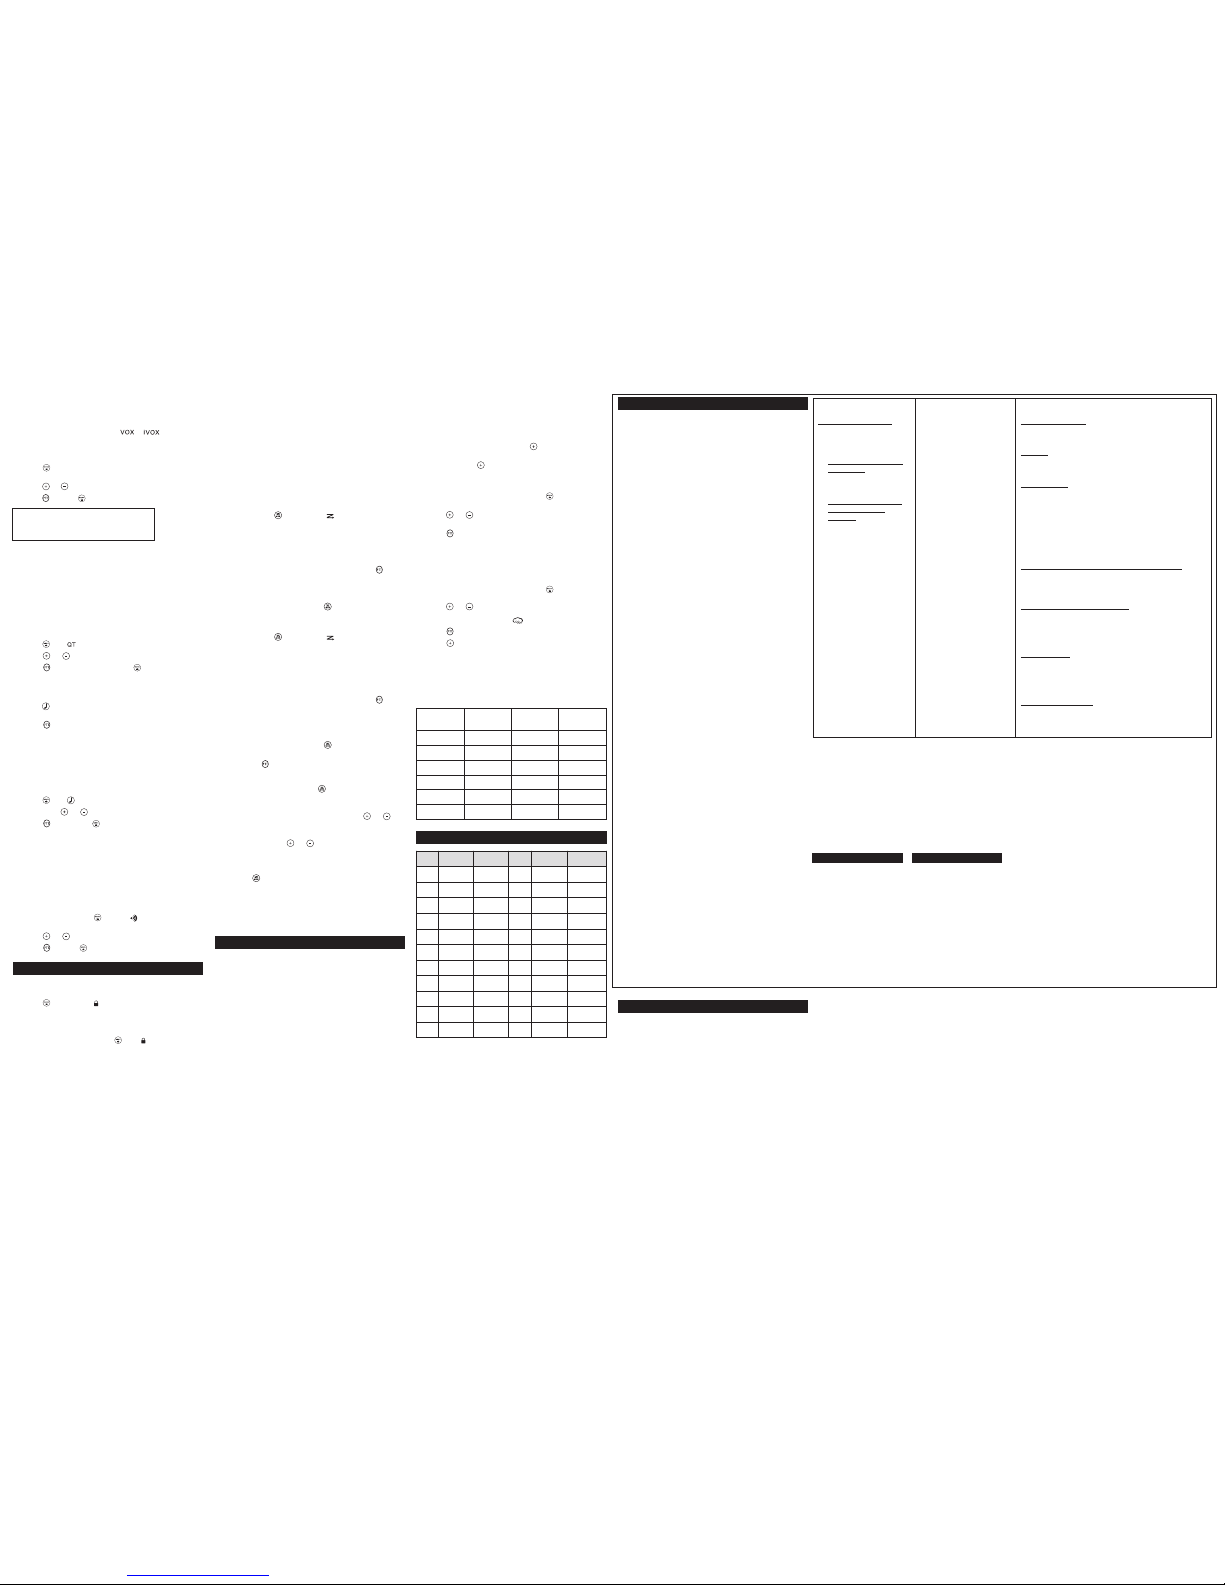
Weather Channelsand Frequencies
Channel Frequency Description Channel Frequency Description
1 462.5625 MHz GMRS/FRS 12 467.6625 MHz FRS
2 462.5875 MHz GMRS/FRS 13 467.6875 MHz FRS
3 462.6125 MHz GMRS/FRS 14 467.7125 MHz FRS
4 462.6375 MHz GMRS/FRS 15 462.5500 MHz GMRS
5 462.6625 MHz GMRS/FRS 16 462.5750 MHz GMRS
6 462.6875 MHz GMRS/FRS 17 462.6000 MHz GMRS
7 462.7125 MHz GMRS/FRS 18 462.6250 MHz GMRS
8 467.5625 MHz FRS 19 462.6500 MHz GMRS
9 467.5875 MHz FRS 20 462.6750 MHz GMRS
10 467.6125 MHz FRS 21 462.7000 MHz GMRS
11 467.6375 MHz FRS 22 462.7250 MHz GMRS
Products Covered
Products andAccessories as
defined above,unless otherwise
provided forbelow.
1. Consumer Two-Way Radio
Accessories.
2. Products andAccessories
that areRepaired or
Replaced.
Length ofCoverage
One (1)year fromthe dateof
purchase bythe firstconsumer
purchaser ofthe productunless
otherwise providedfor below.
1. Ninety (90)days fromthe
date ofpurchase bythe first
consumer purchaserof the
product.
2. The balanceof theoriginal
warranty orfor ninety(90)
days fromthe datereturned
to theconsumer, whichever
is longer.
Exclusions
Normal Wearand Tear.Periodic maintenance,repair and
replacement ofparts dueto normalwear andtear areexcluded
from coverage.
Batteries. Onlybatteries whosefully chargedcapacity fallsbelow
80% oftheir ratedcapacity andbatteries thatleak arecovered by
this limitedwarranty.
Abuse& Misuse. Defectsor damagethat resultfrom: (a)improper
operation,storage, misuseor abuse,accident orneglect, suchas
physicaldamage (cracks, scratches, etc.)to thesurface ofthe
productresulting from misuse;(b) contactwith liquid,water, rain,
extremehumidity orheavy perspiration, sand,dirt orthe like, extreme
heat,or food;(c) useof theProducts orAccessories forcommercial
purposesor subjecting theProduct orAccessory toabnormal usage
or conditions; or(d) otheracts which arenot thefault ofMotorola or
GiantInternational Ltd., areexcluded fromcoverage.
Use ofNon-Motorola brandedProducts and Accessories.Defects
or damagethat resultfrom theuse ofNon-Motorola brandedor
certified Products,Accessories, orother peripheralequipment are
excluded fromcoverage.
Unauthorized Serviceor Modification.Defects ordamages
resulting fromservice, testing,adjustment, installation,
maintenance, alteration,or modificationin anyway bysomeone
other thanMotorola, GiantInternational Ltd.or itsauthorized
service centers,are excludedfrom coverage.
Altered Products.Products orAccessories with(a) serialnumbers
or datetags thathave beenremoved, alteredor obliterated;(b)
broken sealsor thatshow evidenceof tampering;(c) mismatched
board serialnumbers; or(d) nonconformingor non-Motorola
branded housings,or parts,are excludedfrom coverage.
Communication Services.Defects, damages,or thefailure of
Products orAccessories dueto anycommunication serviceor
signal youmay subscribeto oruse withthe Productsor
Accessories isexcluded fromcoverage.
Warranty
Consumer Two-Way RadioProducts andAccessories purchased in
the UnitedStates orCanada.
What Doesthis WarrantyCover?
Subject tothe exclusionscontained tothe right,Giant International
Ltd. warrantsthe Motorolabranded consumertwo-way radiosthat
operate viaFamily RadioService orGeneral MobileRadio Service
that itmanufactures (“Products”),the Motorolabranded orcertified
accessories soldfor usewith theseProducts thatit manufactures
(“Accessories”) tobe freefrom defectsin materialsand
workmanship undernormal consumerusage forthe period(s)
outlined below.This limitedwarranty isa consumer’s exclusive
remedy, andapplies asfollows tonew Motorolabranded Products
and Accessoriesmanufactured byGiant InternationalLtd., and
purchased byconsumers inthe UnitedStates orCanada, whichare
accompanied bythis writtenwarranty:
Who iscovered?
This warrantyextends onlyto thefirst consumerpurchaser, andis
not transferable.
What willGIANT INTERNATIONAL LTD.do?
GIANT INTERNATIONALLTD., atits option,will atno chargerepair,
replace orrefund thepurchase priceof anyProducts or
Accessories thatdoes notconform tothis warranty.We mayuse
functionally equivalentreconditioned/ refurbished/pre-owned or
new Products,Accessories orparts.
How toObtain WarrantyService or OtherInformation?
Toobtain serviceor information,please call:
USA Two-WayRadios Canada Two-WayRadios
1-800-638-5119 1-800-638-5119
giantintl@callcenter.com giantintl@callcenter.com
For Accessories,please callthe telephonenumber designated
above forthe productwith whichthey areused.
Youwill receiveinstructions onhow toship theProducts or
Accessories atyour expense,to aGIANT INTERNATIONAL LTD.
Authorized RepairCenter. Toobtain service,you mustinclude: (a)a
copy ofyour receipt,bill ofsale orother comparableproof of
purchase; (b)a writtendescription ofthe problem;(c) thename of
your serviceprovider, ifapplicable; (d) thename andlocation ofthe
installation facility(if applicable)and, mostimportantly; (e)your
address andtelephone number.
What OtherLimitations AreThere?
ANY IMPLIEDWARRANTIES, INCLUDINGWITHOUT LIMITATION
THE IMPLIEDWARRANTIES OFMERCHANTABILITY ANDFITNESS
FOR APARTICULAR PURPOSE,SHALL BELIMITED TOTHE
DURATIONOF THISLIMITED WARRANTY, OTHERWISETHE REPAIR,
REPLACEMENT,OR REFUNDAS PROVIDEDUNDER THISEXPRESS
LIMITED WARRANTYIS THEEXCLUSIVE REMEDYOF THE
CONSUMER, ANDIS PROVIDEDIN LIEUOF ALLOTHER
WARRANTIES, EXPRESSOF IMPLIED.IN NOEVENT SHALL
MOTOROLA ORGIANT INTERNATIONALLTD. BELIABLE, WHETHER
IN CONTRACTOR TORT(INCLUDING NEGLIGENCE)FOR DAMAGES
IN EXCESSOF THEPURCHASE PRICEOF THEPRODUCT OR
ACCESSORY,OR FORANY INDIRECT, INCIDENTAL, SPECIALOR
CONSEQUENTIAL DAMAGESOF ANYKIND, ORLOSS OFREVENUE
OR PROFITS,LOSS OFBUSINESS, LOSSOF INFORMATION OR
OTHER FINANCIALLOSS ARISINGOUT OFOR INCONNECTION
WITH THEABILITY ORINABILITY TOUSE THEPRODUCTS OR
ACCESSORIES TOTHE FULLEXTENT THESEDAMAGES MAY BE
DISCLAIMED BYLAW.
Some statesand jurisdictionsdo notallow thelimitation or
exclusion ofincidental orconsequential damages,or limitationon
the lengthof animplied warranty,so theabove limitationsor
exclusions maynot applyto you.This warrantygives youspecific
legal rights,and youmay alsohave otherrights thatvary fromstate
to stateor fromone jurisdictionto another.
Patent and CopyrightInformation
Manufactured, distributedor soldby GiantInternational Ltd.,official
licensee forthis product.Motorola, theStylized MLogo, andother
Motorola trademarksand tradedress areowned byMotorola, Inc.
and areused underlicense fromMotorola, Inc.MOTOROLA andthe
Stylized MLogo areregistered inthe USPatent &Trademark Office.
All otherproduct orservice namesare theproperty oftheir
respective owners.©Motorola, Inc.2009. Allrights reserved.
Please contactcustomer serviceat 1-800-638-5119or e-mailus at
giantintl@callcenter.comfor questions/comments,warranty, support
or servicerelated tothis product.
MH Series
Channels and Frequencies
Weather
Channel
Frequency
Weather
Channel
Frequency
WX1 162.550 MHz WX7 162.525MHz
WX2 162.400 MHz WX8 161.650MHz
WX3 162.475 MHz WX9 161.775MHz
WX4 162.425 MHz WX10 161.750MHz
WX5 162.450 MHz WX11 162.000MHz
WX6 162.500 MHz
 Loading...