

Motorola MB, TALKABOUT MB User Manual
MENU
M
ENU
MENU
M
ENU
MENU
MENU
MENU
M
ENU
MENU
MENU
MENU
MENU
MENU
Two-Way Radio
User’s Guide
M
B Series
Safety and GeneralInformation
FCC Licensing Information
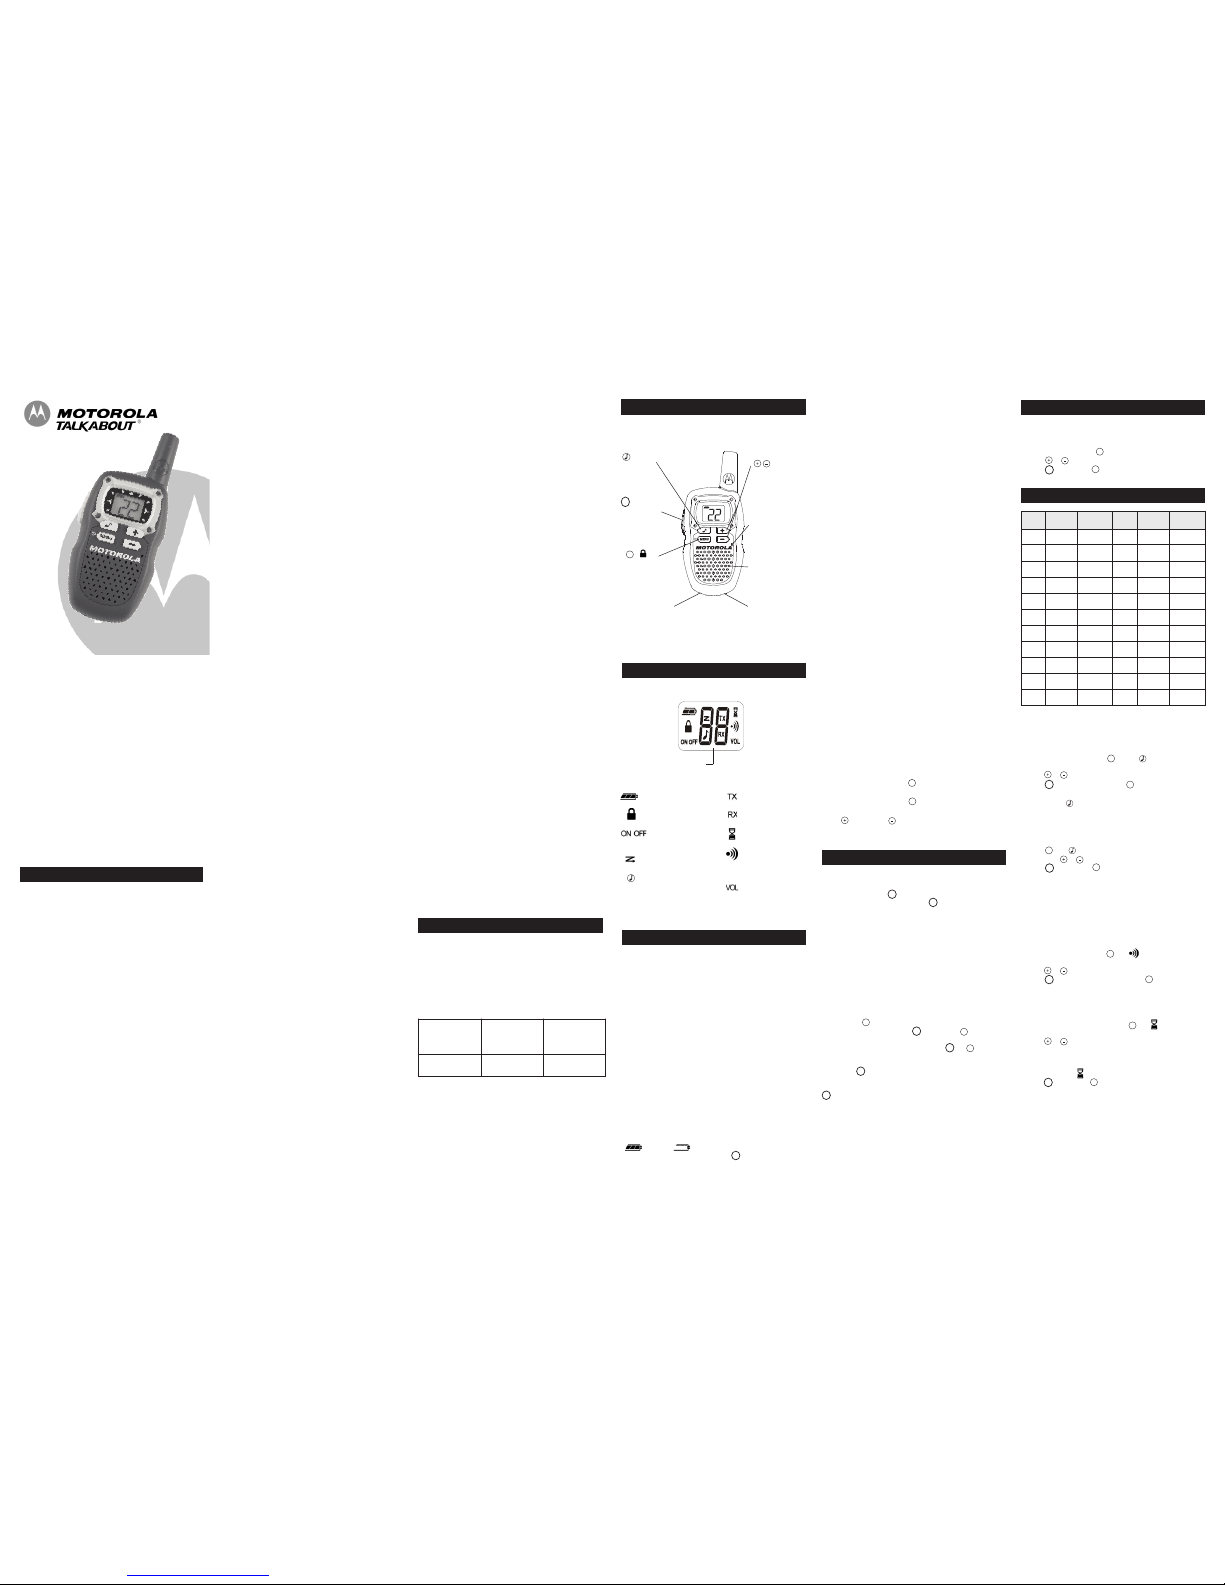
Control Buttons
KEM-ML36000
Important Informationon Safeand EfficientOperation
Read This Information BeforeUsing Your Radio.
The informationprovided inthis documentsupersedes thegeneral
safety informationin userguides publishedprior toDecember 1, 2002.
Transmitand Receive Procedure
Yourtwo-way radio containsa transmitter anda receiver. Tocontrol
your exposureand ensurecompliance withthe general
population/uncontrolled environmentexposure limits,always adhereto
the followingprocedure:
• Transmit nomore than 50%of thetime.
• Toreceive calls, releasethe Push-to-Talk (PTT) button.
• Totransmit (talk), pressthe PTTbutton.
Transmitting50% ofthe time, orless, isimportant becausethe radio
generates measurableRF energyexposure onlywhen transmitting(in
terms ofmeasuring standardscompliance).
Exposure toRadio FrequencyEnergy
YourMotorola two-way radiocomplies with thefollowing RFenergy
exposure standardsand guidelines:
• United StatesFederal communicationsCommission, Codeof Federal
Regulations; 47CFRpart 2sub-part J.
• American NationalStandards Institute(ANSI)/Institute ofElectrical
and ElectronicEngineers (IEEE) C95.1-1992.
• Institute ofElectrical andElectronics Engineers(IEEE) C95.1-1999
Edition.
• International Commissionon Non-IonizingRadiation Protection
(ICNIRP) 1998.
• Ministry ofHealth (Canada)Safety Code6. Limits ofHuman Exposure
to RadiofrequencyElectromagnetic Fieldsin theFrequency Range
from 3KHz to300 GHz,1999.
• Australian communicationsAuthority Radiocommunications
(Electromagnetic Radiation—HumanExposure) Standard,2003.
Getting Started
Display Screen Guide
Installing theBatteries
Each radiouses 1NiMH rechargeablebattery packor 3 AAAalkaline
batteries andbeeps whenthe batteriesare low.
Installing NiMHRechargeable BatteryPack (OptionalAccessory)
1. Turnthe radio off.
2. With theback ofthe radiofacing you,lift the batterylatch up to
release thebattery coverand removethe cover.
3. Remove theNiMH batterypack fromthe clearplastic bag (donot
disassemble orunwrap thebattery pack).
4. Insert theNiMH batterypack withthe diagramfacing you.
5. Reposition thebattery coverand pressdown tosecure.
Installing theThree AAAAlkaline Batteries(Not Included)
1. Turnthe radio off.
2. With theback ofthe radiofacing you,lift the batterylatch up to
release thebattery coverand removethe cover.
3. Insert thethree AAAalkaline batterieswith +and - polarityas
shown inside.
4. Reposition thebattery coverand pressdown tosecure.
Radio BatteryMeter
The radiobattery iconshows theradio batterycharge level, fromfull
to empty . Whenthe radiohas onesegment left,the
radio chirpsperiodically orafter releasing (Low BatteryAlert).
Talking and Listening
Tocommunicate, allradios in yourgroup mustbe setto thesame
channel.
1. Totalk, pressand hold .
2. Whenyou arefinished talking, release .
For maximumclarity, holdthe radiotwo tothree inchesaway from your
mouth andspeak directlyinto themicrophone. Donot cover the
microphone whiletalking.
TalkRange
Yourradio is designedto maximize performanceand improve
transmission range.Do notuse theradios closerthan five feetapart.
Note: Thisradio doesnot haveInterference EliminatorCodes. To
communicate withradios thatuse InterferenceEliminator Codes,the
Interference EliminatorCode mustbe setto 0.
Monitor Button
Use thisfeature tosee ifthere isanyone on thechannel you have
selected.
1. Shortpress until RXappears.
2. Whenyou finishlistening, press to confirmor to continue
set up.
Note: Monitorwill timeout afterfive secondsif or is not
pressed.
Push-to-Talk TimeoutTimer
Toprevent accidentaltransmissions and savebattery life,the radio
emits acontinuous warningtone andstops transmittingif you press
for 60continuous seconds.
Menu Options
S
electing theChannel
Yourradio has 22channels. The channelis thefrequency yourradio
u
ses totransmit. (SeeChannels andFrequencies tablebelow.)
1
. Brieflypress andrelease . Thechannel numberflashes.
2. Press or toselect a channel.
3
. Press to confirmor to continueset up.
For More Information
For furtherinformation, youmay callMotorola at1-800-638-5119 (U.S.),
e-mail usat giantintl@callcenter.com orvisit uson theInternet at
www.motorola.com.
Setting andTransmitting CallTones
Y
our radiocan transmitdifferent calltones toother radios inyour group
so youcan alertthem thatyou wantto talk. Youhave 10call tones from
which tochoose.
T
o seta calltone:
1
. Withthe radioon, short press until the appears.The current
c
all tonesetting flashes.
2. Press or tochange andhear thecall tone.
3
. Press to setthe newcall toneor to continue setup.
Totransmit yourcall tone toother radiosset tothe samechannel as
your radio,press .
Note: Settingthe callto 0disables thecall tone feature.
Keypad Tones
Youmay enable ordisable the speakerkey tones.You willhear thekey
tone eachtime abutton ispushed.
1. Press until appears. Thecurrent setting On/Off willflash.
2. Presseither or to turnOn orOff.
3. Press to confirmor to continueset up.
Note: Whenthe keytone featureis off,the following arenot disabled:
• Transmittimeout alert tone
• Power-down alerttone
• Low batteryalert tone
• The transmittedtalk confirmationtone
Transmittinga TalkConfirmation Tone
Youcan set yourradio to transmita uniquetone whenyou finish
transmitting. Itis likesaying “Roger”or “Over”to let othersknow you
are finishedtalking.
1. Withthe radioon, short press until appears. Thecurrent
setting On/Offflashes.
2. Press or toturn Onor Off.
3. Press to setthe talkconfirmation toneor to continue
setup.
Auto PowerOn/Off
Yourradio will savepower by automaticallyturning itselfoff ifunused
after apredetermined amountof time.
1. Activatethis settingby short pressing until displays.The
current setting(0, 30,60, 90)will flash.
2. Press or toset thetime to30 minutes,60 minutes or
90 minutes.
3. Whenyou exitthe Menu mode,the settingtimer willbegin ifyou are
not usingthe radio.
4. Thescreen shows
5. Press to confirmor to continueset up.
C
all Tone
P
ush-to-Talk
(PTT)
P
ower/Menu/Lock
Scroll
•
ANATELANNEX to ResolutionNo. 303 ofJuly 2,2002 “Regulationof
l
imitation ofexposure toelectrical, magneticand electromagnetic
f
ields inthe radiofrequency rangebetween 9KHz and 300GHz”.
T
o ensureoptimal radioperformance andmake surehuman exposure
t
o radiofrequency electromagneticenergy iswithin theguidelines set
f
orth inthe abovestandards, alwaysadhere tothe following
procedures.
Portable RadioOperation andEME Exposure
A
ntenna Care
Use onlythe suppliedor anapproved replacementantenna.
Unauthorized antennas,modifications, orattachments coulddamage
t
he radioand mayviolate FCCregulations.
Do NOThold theantenna whenthe radiois “IN USE.”Holding the
a
ntenna affectsthe effectiverange.
B
ody-Worn Operation
Tomaintain complianceswith FCC/Health CanadaRF exposure
guidelines, ifyou weara radioon yourbody when transmitting,always
p
lace theradio ina Motorola-suppliedor approvedclip, holder,holster,
case orbody harnessfor thisproduct. Useof non-Motorola-approved
accessories mayexceed FCC/HealthCanada RFexposure guidelines.
I
f youdo notuse oneof theMotorola-supplied or approvedbody-worn
accessories andare notusing theradio heldin the normaluse
p
osition, ensurethe radioand itsantenna areat least 1inch (2.5 cm)
f
rom yourbody whentransmitting.
Data Operation
I
f applicable,when usingany datafeature ofthe radio withor without
a
n accessorycable, positionthe radioand itsantenna at leastone
inch (2.5cm) fromthe body.
A
pproved Accessories
F
or alist ofapproved Motorolaaccessories, visitout Website at
www.motorola.com.
Electromagnetic Interference/Compatibility
N
ote: Nearlyevery electronicdevice issusceptible toelectromagnetic
interference (EMI)if inadequatelyshielded, designedor otherwise
configured forelectromagnetic compatibility.This devicecomplies
w
ith Part15 ofthe FCCRules.
Operation issubject tothe followingtwo conditions:
1. Thisdevice maynot cause harmfulinterference; and
2. Thisdevice mustaccept any interferencereceived, including
i
nterference thatmay causeundesired operation.
F
acilities
Toavoid electromagneticinterference and/or compatibilityconflicts,
turn offyour radioin anyfacility whereposted notices instructyou to
d
o so.Hospitals orhealth carefacilities maybe using equipmentthat
is sensitiveto externalRF energy.
A
ircraft
When instructedto doso, turnoff yourradio when onboardon aircraft.
Any useof aradio mustbe inaccordance with applicableregulations
per airlinecrew instructions.
Medical Devices– Pacemakers
The AdvancedMedical Technology Association recommendsthat a
minimum separationof 6inches (15cm) bemaintained between a
handheld wirelessradio anda pacemaker.These recommendations
are consistentwith theindependent researchby and
recommendations ofthe U.S.Food andDrug Administration.
People withpacemakers should:
• ALWAYSkeep theradio more than6 inches(15 cm)from their
pacemaker whenthe radiois turnedON.
• Not carrythe radioin thebreast pocket.
• Use theear oppositethe pacemakerto minimize thepotential for
interference.
• Turn theradio OFF immediatelyif thereis anyreason tosuspect that
interference istaking place.
Medical Devices– Hearing Aids
Some digitalwireless radiosmay interferewith somehearing aids. In
the eventof suchinterference, youmay wantto consult yourhearing
aid manufacturerto discussalternatives.
Medical Devices- Other
If youuse anyother personalmedical device,consult the
manufacturer ofyour deviceto determineif itis adequately shielded
from RFenergy. Yourphysician may beable toassist youin obtaining
this information.
Safety andGeneral UseWhile Driving
Check thelaws andregulations regardingthe useof radios inthe area
where youdrive, andalways obeythem. Ifyou do useyour radio while
driving, please:
• Give fullattention todriving andto the road.
• Use hands-freeoperation, ifavailable.
• Pull offthe roadand parkbefore making oranswering a callif
driving conditionsso require.
The useof atwo-way radiowhile engagedin activities requiring
concentration maycause distractionor otherwiseimpair yourability to
safely participatein suchactivities. Alwaysuse technologysafely.
Do notplace aportable radioin thearea over anair bag orin theair
bag deploymentarea. Airbags inflatewith greatforce. If aportable
radio isplaced inthe airbag deploymentarea and theair bag inflates,
the radiomay bepropelled withgreat forceand cause seriousinjury to
occupants ofthe vehicle.
P
otentially ExplosiveAtmospheres
T
urn offyour radioprior toentering anyarea with apotentially explosive
atmosphere. Onlyradio typesthat areespecially qualifiedshould be
used insuch areasas “IntrinsicallySafe.” Donot remove, installor
c
harge batteriesin suchareas. Sparksin apotentially explosive
a
tmosphere cancause anexplosion orfire resultingin bodily injuryor
even death.
N
ote: Theareas withpotentially explosiveatmospheres referredto
a
bove includefueling areassuch asbelow deckson boats, fuelor
chemical transferor storagefacilities, areaswhere theair contains
chemicals orparticles (suchas grain,dust ormetal powders) andany
o
ther areawhere youwould normallybe advisedto turn offyour vehicle
e
ngine. Areaswith potentiallyexplosive atmospheresare often—butnot
always—posted.
B
lasting Capsand Areas
Toavoid possibleinterference with blastingoperations, turnoff your
radio whenyou arenear electricalblasting caps,in a blastingarea, or in
a
reas posted“Turn offtwo-way radios.” Obeyall signsand instructions.
O
perational Cautions
A
ntennas
Do notuse anyportable radiothat hasa damagedantenna. Ifa damaged
a
ntenna comesinto contactwith yourskin, aminor burncan result.
Batteries
All batteriescan causeproperty damageand/or bodilyinjury such as
b
urns ifa conductivematerial—like jewelry,keys orbeaded chains—
t
ouch exposedterminals. Theconductive materialmay completean
electrical circuit(short circuit)and becomequite hot.Exercise care in
h
andling anycharged battery,particularly whenplacing itinside a
p
ocket, purseor othercontainer withmetal objects.
Exercise carewhen removingNiMH orAAA batteries.Do not usesharp
o
r conductivetools toremove eitherof thesebatteries.
Battery ChargerSafety Instructions:
S
ave theseInstructions
1. Donot exposethe charger torain orsnow.
2
. Donot operateor disassemble thecharger ifit hasreceived asharp
blow,or has beendropped ordamaged inany way.
3
. Neveralter theAC cord orplug providedwith theunit. Ifthe plug will
not fitthe outlet,have theproper outletinstalled by aqualified
electrician. Animproper conditioncan resultin arisk of electric
shock.
4. Toreduce therisk ofdamage tothe cordor plug,pull theplug rather
thanthe cordwhen disconnectingthe chargerfrom theAC receptacle.
5. Toreduce therisk ofelectric shock,unplug the chargerfrom the
outlet beforeattempting anymaintenance orcleaning.
6
. Useof anattachment not recommendedor soldby Motorolamay
result ina riskof fire,electric shockor personal injury.
7
. Makesure thecord is locatedso itwill notbe steppedon, tripped
over orsubjected todamage orstress.
8. Anextension cordshould not beused unlessabsolutely necessary.
Use ofan improperextension cordcould resultin a riskof a fire
and/or electricshock. Ifan extensioncord mustbe used, makesure
that:
• The pinson theplug ofthe extension cordare the samenumber, size
and shapeas thoseon theplug ofthe charger.
• The extensioncord isproperly wiredand ingood electricalcondition.
• The extensioncord sizeis 18AWG forlengths up to 100feet, and
16 AWG for lengthsup to 150feet.
9. Thesupply cordof theAC adaptorcannot be replaced.If the cordis
damaged, callcustomer serviceat 1-800-638-5119or e-mailus at
giantintl@callcenter.com.
YourMotorola radio operateson General MobileRadio Service(GMRS)
frequencies andis subjectto theRules andRegulations of theFederal
Communications Commission(FCC). TheFCC requiresthat alloperators
using GMRSfrequencies obtaina radiolicense beforeoperating their
equipment. Toobtain the FCCforms, please visitthe FCC’s Web siteat
wireless.fcc.gov/uls/index.htm?job=home tosource form605 and159,
which includesall theinstructions youwill need.
If youwish tohave thedocument faxedor mailed, orif you have
questions, pleaseuse thefollowing contactinformation:
Changes ormodifications notexpressly approvedby Motorolamay void
the user’sauthority granted bythe FCCto operatethis radioand should
not bemade. To complywith FCC requirements,transmitter adjustments
should bemade onlyby orunder thesupervision of aperson certified as
technically qualifiedto performtransmitter maintenanceand repairsin
the privateland mobileand fixedservices ascertified by anorganization
representative ofthe userof thoseservices. Replacementof any
transmitter component(crystal, semiconductor, etc.)not authorizedby
the FCCequipment authorizationfor thisradio couldviolate FCC rules.
Note: Useof thisradio outsidethe countrywhere it wasintended to be
distributed issubject togovernment regulationsand maybe prohibited.
Channel
F
requency
(
MHz)
Description Channel
F
requency
(
MHz)
Description
1 4
62.5625GMRS/FRS12467.6625FRS
2 462.5875 GMRS/FRS 13 467.6875 FRS
3 462.6125 GMRS/FRS 14 467.7125 FRS
4 462.6375 GMRS/FRS 15 462.5500 GMRS
5 462.6625 GMRS/FRS 16 462.5750 GMRS
6 462.6875 GMRS/FRS 17 462.6000 GMRS
7 4
62.7125GMRS/FRS18462.6250GMRS
8 4
67.5625FRS19462.6500GMRS
9 467.5875 FRS 20 462.6750 GMRS
104
67.6125FRS21462.7000GMRS
11 467.6375 FRS 22 462.7250 GMRS
– BatteryMeter
– Scan
– Transmitting
– Receiving
– AutoPower On/Off
– TalkConfirmation
Tone(Roger Beep)
– Volume
– Lock
– CallTone, KeypadTone
– On/Offfor each
feature
Numbers forChannel,
Call Tones
Continued onback
MB Series
PTT
PTT
Removing theNiMH BatteryPack (OptionalAccesory)
1. Turnthe radio off.
2
. With theback ofthe radiofacing you,lift the batterylatch up to
release thebattery coverand removethe cover.
3
. Gently removethe NiMHbattery byeasing itout.
4
. Reposition thebattery coverand pressdown tosecure.
R
emoving theThree AAAAlkaline Batteries
1
. Turnthe radio off.
2
. With theback ofthe radiofacing you,lift the batterylatch up to
r
elease thebattery coverand removethe cover.
3
. Remove eachalkaline batteryby easingeach batteryout
i
ndividually.
4
. Reposition thebattery coverand pressdown tosecure.
N
otes:
•
Excercise carewhen removingNiMH orAAA batteries.Do not use
s
harp orconductive toolsto removeeither ofthese batteries.
•
Remove thebatteries beforestoring yourradio forextended periods
of time.Batteries corrodeover timeand maycause permanent
damage toyour radio.
U
sing thePlug-in ChargingAdaptor (OptionalAccesory)
The batteryplug-in charger(adaptor) providescharging convenience
for NiMHbatteries inone orboth radios.Charge the NiMHbattery
overnight (atleast 16hours) beforeusing itfor the firsttime. After the
i
nitial charge,an emptybattery isfully chargedwithin 14 hours.
1. Followthe stepsabove toinstall aNiMH battery pack.
2
. Connectthe ACpower adaptorplug intothe recharging jackat the
bottom (right)of theradio. (Theadaptor chargestwo radios.)
3
. Plugthe ACpower supplyinto astandard wall outlet.
Notes:
• The lightwill remainred afterthe battery packis fully charged.
•
When movingbetween hotand coldtemperatures, donot charge
t
he batteryuntil thebattery temperatureacclimates (usuallyabout
2
0 minutes).
• For optimalbattery life,unplug thecharging adaptor within16 hours.
Do notstore theradio whileconnected tothe charger.
• When your radiois pluggedinto theAC poweradaptor, yourradio will
automaticallypower off.
Low BatteryAlert
In additionto yourbattery metershowing howmuch battery poweryou
have, yourradio willbeep toalert youto the factthat your batteries
are low.
TurningYour RadioOn andOff
1. Toturn on,press and hold until achannel number appears
and the radio beeps.
2. Toturn off,press and hold until thedisplay goes blank.
Setting theVolume
Press to increaseor to decreasethe volume.The volumelevel
flashes and
VOLdisplays.
MENU
M
ENU
A
udio AccessoryJack
For a fax:
Contact the
Fax-0n-Demand
system
For mail service:
Call the FCC
Forms Hotline
If you have
questions about
the FCC License:
Call the FCC
1-202-418-0177 1-800-418-FORM
(3676)
1-888-CALL-FCC
(225-5322)
PTT
Channels and Frequencies
PTT
PTT
PTT
PTT
PTT
PTT
PTT
PTT
PTT
PTT
Recharging Jack
The MB Seriesis approvedfor use in the US only.
S
peaker
MENU
M
icrophone
MENU
M
ENU
MENU
MENU
MB Series
Products Covered
P
roducts and Accessories
a
s
defined above, unless otherwise
p
rovided for below.
1
. Consumer Two-WayRadio
Accessories.
2
. Products and Accessories
that are Repaired or
R
eplaced.
Length of Coverage
O
ne (1) year from the date of
purchase by the first consumer
p
urchaser of the product unless
otherwise provided for below.
1
. Ninety (90) days from the
date of purchase by the first
c
onsumer purchaser of the
p
roduct.
2
. The balance of the original
warranty or for ninety (90)
d
ays from the date returned
t
o the consumer,whichever
i
s longer.
Exclusions
N
ormal Wear and Tear.
P
eriodic maintenance, repair and
replacement of parts due to normal wearand tearare excluded
f
rom coverage.
B
atteries.
O
nly batteries whose fully charged capacity falls below
8
0% of their rated capacity and batteriesthat leakare coveredby
this limited warranty.
A
buse &Misuse.
D
efectsor damagethat resultfrom: (a) improper
o
peration,storage, misuseor abuse, accidentor neglect,such as
p
hysicaldamage (cracks,scratches, etc.)to thesurface ofthe
productresulting frommisuse; (b) contactwith liquid,water, rain,
e
xtremehumidity orheavy perspiration, sand,dirt orthe like,extreme
h
eat, orfood; (c)use ofthe Productsor Accessoriesfor commercial
p
urposesor subjectingthe Product or Accessoryto abnormalusage
o
r conditions;or (d)other actswhich are notthe faultof Motorolaor
GiantInternational Ltd.,are excluded fromcoverage.
U
se of Non-Motorola branded Products and Accessories.
D
efects
or damage that result from the use ofNon-Motorola brandedor
c
ertified Products, Accessories, or other peripheral equipment are
excluded from coverage.
U
nauthorized Service or Modification.
D
efects or damages
resulting from service, testing, adjustment, installation,
m
aintenance, alteration, or modification in any way bysomeone
other than Motorola, Giant International Ltd. or its authorized
s
ervice centers, are excluded from coverage.
Altered Products.
Products or Accessories with (a) serial numbers
o
r date tags that have been removed,altered orobliterated; (b)
broken seals or that show evidence oftampering; (c)mismatched
board serial numbers; or (d) nonconforming or non-Motorola
b
randed housings, or parts, are excluded from coverage.
C
ommunication Services.
D
efects, damages, or the failure of
Products or Accessories due to any communication serviceor
signal you may subscribe to or usewith theProducts or
A
ccessories is excluded from coverage.
Warranty
C
onsumer Two-WayRadio Products and Accessories purchased in
t
he United States.
What Does this Warranty Cover?
S
ubject to the exclusions contained to theright, GiantInternational
L
td. warrants the Motorola branded consumer two-way radios that
operate via Family Radio Service or General MobileRadio Service
t
hat it manufactures (“Products”) and the the Motorolabranded or
certified accessories sold for use with these Productsthat it
m
anufactures (“Accessories”) to be free from defects in materials
a
nd workmanship under normal consumer usage for theperiod(s)
outlined below. This limited warranty is a consumer’sexclusive
r
emedy, and applies as follows to new Motorola branded Products
and Accessories manufactured by Giant International Ltd., and
p
urchased by consumers in the United States,which are
a
ccompanied by this written warranty:
W
ho is covered?
This warranty extends only to the first consumerpurchaser, and is
not transferable.
What will GIANT INTERNATIONALLTD. do?
GIANT INTERNATIONALLTD., atits option, will at no charge repair,
replace or refund the purchase price of anyProducts or
Accessories that does not conform to this warranty. We may use
functionally equivalent reconditioned/ refurbished/ pre-owned or
new Products, Accessories or parts.
How to Obtain Warranty Service or Other Information?
Toobtain service or information, please call:
USA Two-WayRadios
1-800-638-5119
giantintl@callcenter.com
For Accessories, please call the telephone number designated
above for the product with which theyare used.
Youwill receive instructions on how to ship the Products or
Accessories at your expense, to a GIANT INTERNATIONALLTD.
Authorized Repair Center.To obtainservice, youmust include: (a) a
copy of your receipt, bill of sale orother comparableproof of
purchase; (b) a written description of the problem;(c) thename of
your service provider,if applicable; (d) the name and location of the
installation facility (if applicable) and, most importantly; (e) your
address and telephone number.
W
hat Other Limitations Are There?
ANY IMPLIED WARRANTIES, INCLUDING WITHOUT LIMITATION
THE IMPLIED WARRANTIES OF MERCHANTABILITYAND FITNESS
FOR A PARTICULAR PURPOSE, SHALL BE LIMITED TO THE
DURATIONOF THIS LIMITED WARRANTY,OTHERWISE THEREPAIR,
REPLACEMENT,OR REFUNDAS PROVIDED UNDER THIS EXPRESS
LIMITED WARRANTY IS THE EXCLUSIVE REMEDY OF THE
CONSUMER, AND IS PROVIDED IN LIEU OF ALL OTHER
WARRANTIES, EXPRESS OR IMPLIED. IN NO EVENT SHALL
MOTOROLA OR GIANT INTERNATIONALLTD. BELIABLE, WHETHER
IN CONTRACT OR TORT (INCLUDING NEGLIGENCE) FOR DAMAGES
IN EXCESS OF THE PURCHASE PRICE OF THEPRODUCT OR
ACCESSORY,OR FOR ANY INDIRECT,INCIDENTAL, SPECIALOR
CONSEQUENTIAL DAMAGES OF ANY KIND, OR LOSS OF REVENUE
OR PROFITS, LOSS OF BUSINESS, LOSS OF INFORMATIONOR
OTHER FINANCIAL LOSS ARISING OUT OF OR IN CONNECTION
WITH THE ABILITY OR INABILITY TO USE THEPRODUCTS OR
ACCESSORIES TO THE FULL EXTENT THESE DAMAGES MAYBE
DISCLAIMED BY LAW.
Some states and jurisdictions do not allow thelimitation or
exclusion of incidental or consequential damages, or limitationon
the length of an implied warranty, so the above limitations or
exclusions may not apply to you. Thiswarranty givesyou specific
legal rights, and you may also haveother rightsthat varyfrom state
to state or from one jurisdiction to another.
Patent and CopyrightInformation
Manufactured, distributed or sold by Giant International Ltd., official
licensee for this product. Motorola, the Stylized MLogo, andother
Motorola trademarks and trade dress are owned byMotorola, Inc.
and are used under license from Motorola,Inc. MOTOROLAand the
Stylized M Logo are registered in the USPatent &Trademark Office.
All other product or service names are theproperty oftheir
respective owners. ©Motorola, Inc. 2010. All rights reserved.
Please contact customer service at 1-800-638-5119 or e-mail us
at giantintl@callcenter.comfor questions/comments, warranty,
support or service related to this product.
Special Features
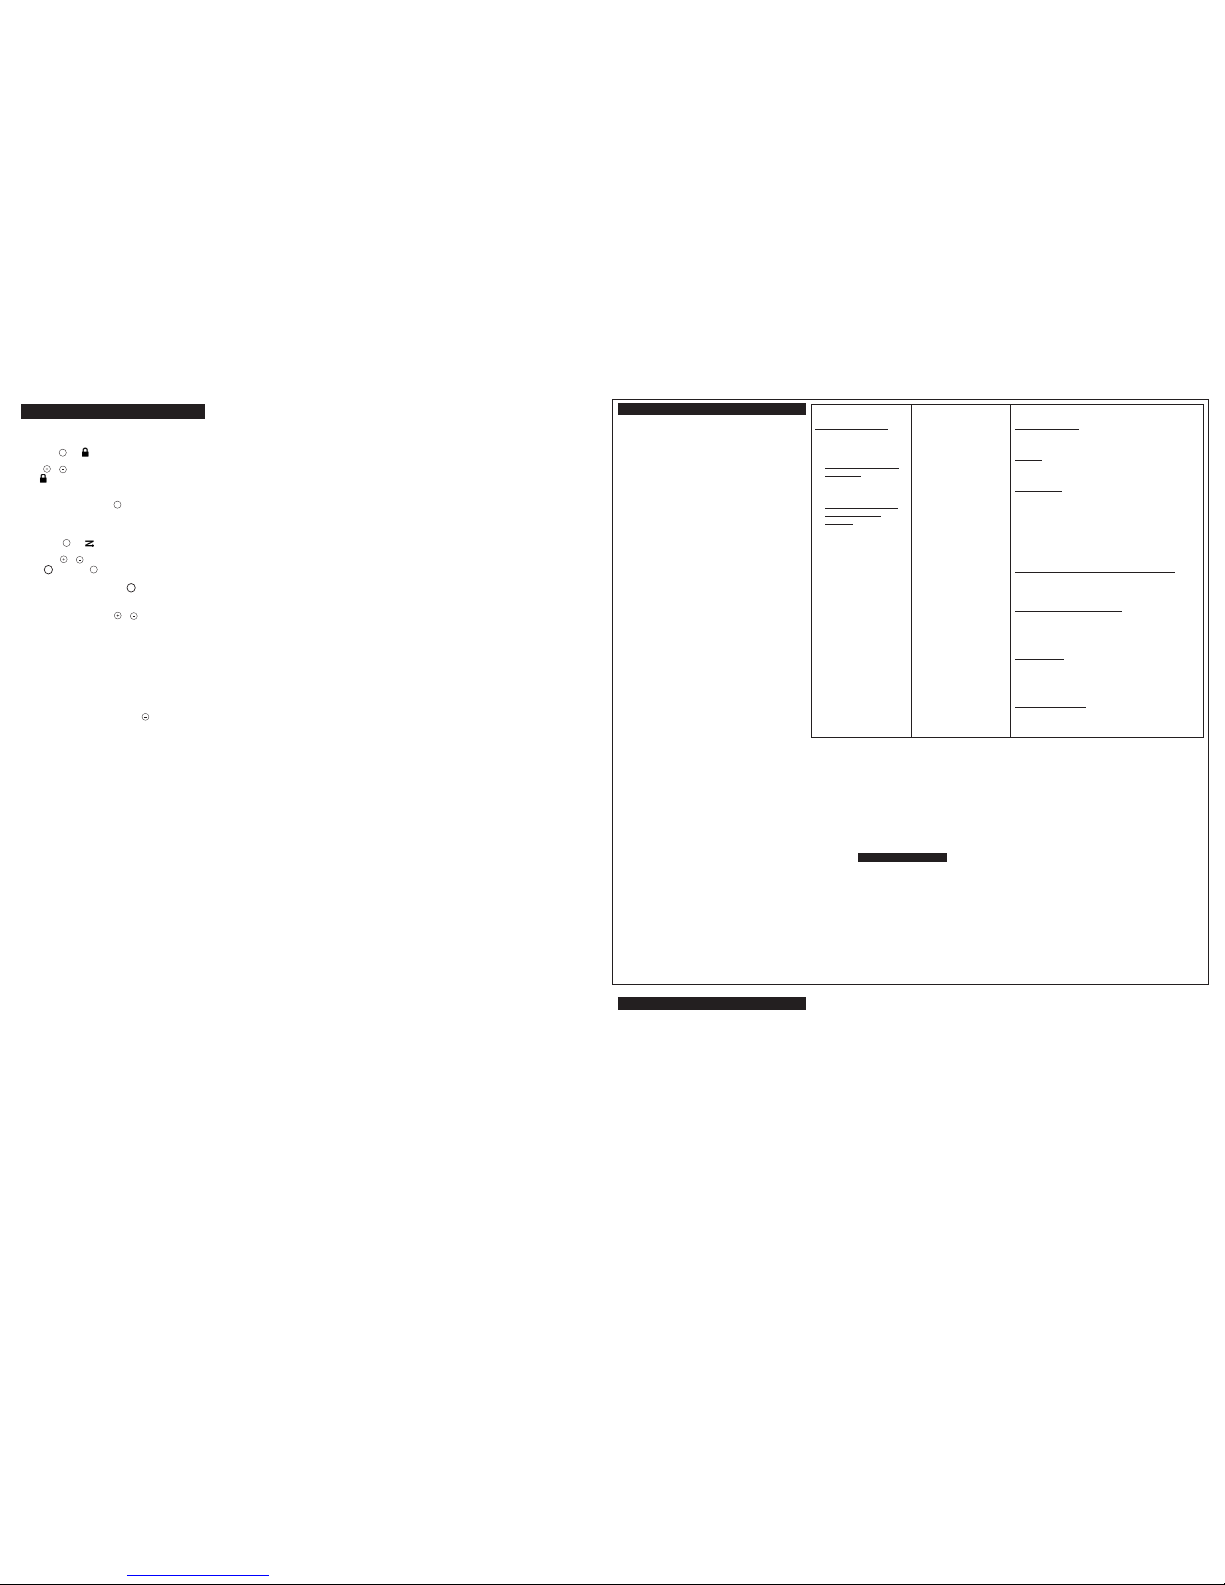
Keypad Lock
T
o avoidaccidentally changingyour radiosettings youcan lock your
k
eypad:
1
. Shortpress until appears. Thecurrent settingOn/Off
w
ill flash.
2
. Push or to turnOn orOff.
3
. The will bedisplayed onyour screen.
W
hen inlock mode,you cannotadjust thevolume, but allother
f
unctions workas usual.
Tounlock theradio, press andhold for afew seconds.
S
canning Channels
U
se scanningto monitorchannels fortransmissions orto find someone
in yourgroup whohas accidentallychanged channels.
1
. Brieflypress until appears. Thecurrent settingOn/Off
will flash.
2. Presseither or to turnOn orOff.
3
. Press to confirmor to continueset up.
W
hen theradio detectschannel activity,it stopsscanning andyou can
h
ear thetransmission. To respond,press within fiveseconds.
Advanced Scan
If theradio stopson anundesired transmission,you may immediately
resume thescan bybriefly pressing or .
Use WithAccessories
Youcan transmit morereliably with theuse ofoptional PTTheadset
accessories. APTT headsetallows privacyto othersaround you while
l
istening.
Many accessories(sold separately)are availablefor yourradio. For
more information,visit ourWeb siteat www.motorola.comor
shop.giantintl.com.
1
. Turnthe radio offand plugthe PTTaccessory intothe accessory
jack.
2
. Turnthe radio on.You maynow press thePTT onthe accessory
m
icrophone insteadof theradio.
3
. Adjustthe volumeappropriately bypressing . Lower thevolume
b
efore placingthe accessoryon yourhead orin your ear.
Note: TheMB Seriesdoes nothave VOXcapabilities, and isonly
c
ompatible withPTT headsetaccessories.
PTT
PTT
 Loading...