

Motorola Talkabout Charger Tray Owner's Manual
®
TALKABOUT
CHARGER TRAY
OWNER’S MANUAL
en-US zh-CN zh-HK ko-KR
id-ID

Important Safety Instructions
!
C a u t i o n
Before using the battery charger, read all the instructions and
cautionary markings on (1) the charger, (2) the battery, and (3)
on the radio’s manual.
Operational Safety Guidelines
• Turn the radio off when charging battery.
• This equipment is not suitable for outdoor use. Use only in
dry locations/conditions.
• Make sure the cord is located where it will not be stepped
on, tripped over, or subjected to water, damage or stress.
The Kit includes two single-unit charger base, two charger
pockets for T82 Series, two charger pockets for T62 Series,
and two single-cable micro-USB power supply.
Twi n P ack
Package Content Quantity
Single-Unit Charger Base 2
Single pack
Charger Pocket
(T82 Series)
Charger Pocket
(T62 Series)
Single-Cable Micro-USB
Power Supply
Owner’s Manual 1
Package Content Quantity
Single-Unit Charger Base 1
Charger Pocket
(T82 Series)
Charger Pocket
(T62 Series)
Owner’s Manual 1
2
2
2
1
1
Charging Instruction
1. Turn the radio off.
2. Insert battery to radio by following the instructions in radio’s
user manual.
3. Close the battery door.
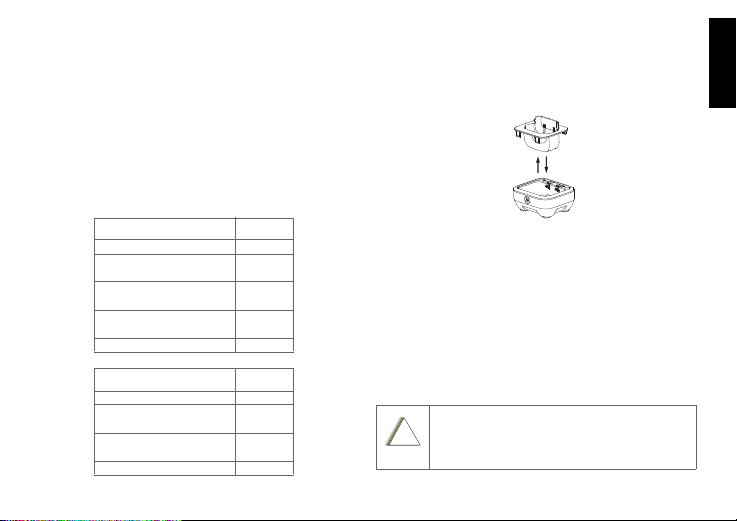
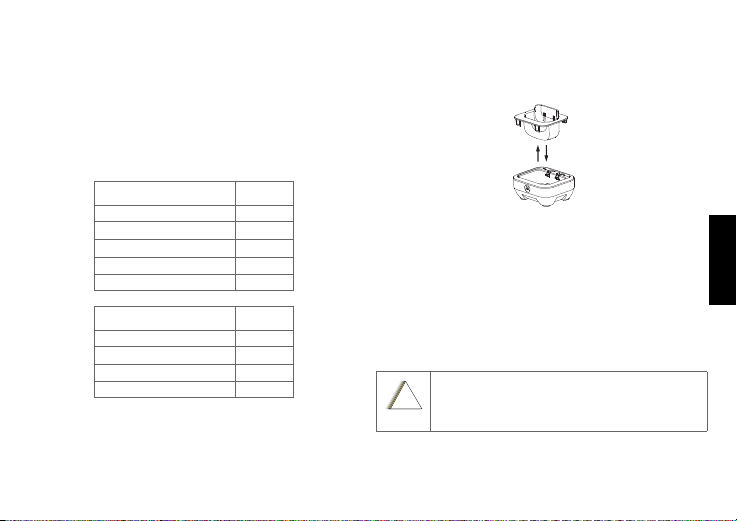
4. Plug desired charger pocket to charger base. Refer to
Table 1 on page 2 for correct charger pocket to use.
Figure 1: Removing and Attaching Charger Pocket
5. Plug the power supply Micro-USB connector to charger
base. Refer to Table 2 on page 3 authorized power supply
to use.
6. Plug the power supply into a standard wall outlet.
7. Put the radio into charger pocket.
8. Charging indicator displays on radio screen.
9. The T82 Series and T62 Series radios are fully charged
within 8 hours for 800 mAh battery.
Note: When the battery level is extremely low, it might take
some time for the radio to start display charging indicator
on screen. For optimal battery life, do not store the radio
or battery in the charger after charging is completed.
Ensure that the proper charger pocket and
power supply are used together. This is stated in
the Table 1 on page 2 and Table 2 on page 3 in
this manual.
English
1

English
Note: Pre-installed in the charger tray when
shipped.
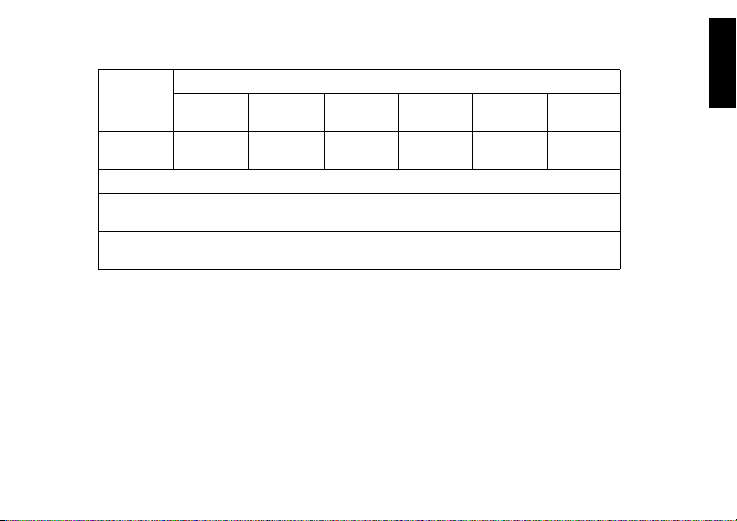
Motorola Solutions Authorized Radios
The radios listed in Ta bl e 1 below are approved for use with the charger.
Radio Radio Image Charger Pocket Image (Bottom View)
T82, T82
Extreme
T62 B
2
Table 1: Motorola Solutions Authorized Radios
A
Motorola Solutions Authorized Power Supplies Warranty Information
Table 2: Motorola Solutions Authorized Power Supplies
Part Number Description
PS000132A02 EU Plug: Single Cable Micro-USB
PS000132A03 UK/HK Plug: Single Cable Micro-USB Power
PS000132A06 CHN Plug: Single Cable Micro-USB Power
PS000132A07 KOR Plug: Single Cable Micro-USB Power
PS000132A12 EU Plug: Dual Cable Micro-USB Power
PS000132A13 UK/HK Plug: Dual Cable Micro-USB Power
PS000132A16 CHN Plug: Dual Cable Micro-USB Power
PS000132A17 KOR Plug: Dual Cable Micro-USB Power
Power Supply, Level V Efficiency, 100–240 V
Supply, Level V Efficiency, 100–240 V
Supply, Level V Efficiency, 100–240 V
Supply, Level V Efficiency, 100–240 V
Supply, Level V Efficiency, 100–240 V
Supply, Level V Efficiency, 100–240 V
Supply, Level V Efficiency, 100–240 V
Supply, Level V Efficiency, 100–240 V
The authorized Motorola Solutions dealer or retailer where you
purchased your Motorola Solutions two-way radio and/or
original accessories will honour a warranty claim and/or
provide warranty service. Please return your radio to your
dealer or retailer to claim your warranty service. Do not return
your radio to Motorola Solutions. In order to be eligible to
receive warranty service, you must present your receipt of
purchase or a comparable substitute proof of purchase bearing
the date of purchase. The two-way radio should also clearly
display the serial number. The warranty will not apply if the
type or serial numbers on the product have been altered,
deleted, removed, or made illegible.
What Is Not Covered By The Warranty
• Defects or damage resulting from use of the product in
other than its normal and customary manner or by not
following the instructions in this user manual.
• Defects or damage from misuse, accident or neglect.
• Defects or damage from improper testing, opera tion,
maintenance, adjustment, or any alteration, or modification
of any kind.
• Breakage or damage to aerials unless caused directly by
defects in material or workmanship.
• Products disassembled or repaired in such a manner as to
adversely affect performance or prevent adequate
inspection and testing to verify any warranty claim.
• Defects or damage due to range.
• Defects or damage due to moisture, liquid or spills.
• All plastic surfaces and all other externally exposed parts
that are scratched or damaged due to normal use.
• Products rented on a temporary basis.
• Periodic maintenance and repair or replacement of parts
due to normal usage, wear and tear.
English
3

English
Copyright Information
The Motorola Solutions products described in this manual may
include copyrighted Motorola Solutions programs, stored
semiconductor memories or other media. Laws in the United
States and other countries preserve for Motorola Solutions,
certain exclusive rights for copyrighted computer programs,
including the exclusive right to copy or reproduce in any form,
the copyrighted Motorola Solutions programs. Accordingly, any
copyrighted Motorola Solutions computer programs contained
in the Motorola Solutions products described in this manual
may not be copied or reproduced in any manner without
express written permission of Motorola Solutions.
Furthermore, the purchase of Motorola Solutions products
shall not be deemed to grant either directly or by implication,
estoppel, or otherwise, any license under the copyrights,
patents or patent applications of Motorola Solutions, except for
the normal non-exclusive royalty free license to use that arises
by operation of law in the sale of a products.
4
Part
Name
Charger
Tray
O: Indicates that the content of such hazardous substance in all homogeneous
X: Indicates that the content of such hazardous substance in at least one homogeneous
(Pb) (Hg) (Cd) (Cr + 6) (PBB) (PBDE)
XOOOOO
This table is prepared according to SJ/T 11364.
materials of such component is within the limits specified in GB/T 26572.
material of such component exceeds the limits specified in GB/T 26572.
Hazardous Substances
English
5

English
6
Notes
重要安全说明
!
䄺䄺
在使用电池充电器之前,请仔细阅读 (1) 充电器、(2) 电池和
(3) 对讲机手册上的所有说明和警告。
安全操作指南
• 请在为电池充电期间关闭对讲机。
• 该设备不适合在室外使用。请仅在干燥的场所/环境下使用。
• 确保将电源线置于适当的位置,以避免发生踩踏、绊倒、浸
水、损伤或挤压等意外。
此套件包括两个单座充电器底座、两个 T82 系列充电座、两个
T62 系列充电座以及两个单线微型 USB 电源。
两个装
包装内容 数量
单座充电器基座
充电座(T82 系列)
充电座(T62 系列)
单电缆微型 USB 电源
使用手册
2
2
2
2
1
单个装
包装内容 数量
单座充电器基座
充电座(T82 系列)
充电座(T62 系列)
使用手册
1
1
1
1
充电指示
1. 关闭对讲机。
2. 按照以下对讲机用户手册说明将电池插入对讲机。
3. 合上电池舱盖。
4. 将所需的充电座插入充电器基座。请参阅第 2 页的表 1 以了
解可以使用的正确充电座。
图 1: 卸下和安装充电座
5. 将电源微型 USB 连接器插入充电器基座。请参阅第 3 页的
表 2 以了解可以使用的认可电源。
6. 将电源插入墙上的标准电源插座。
7. 将对讲机放入充电座。
8. 对讲机屏幕显示充电指示灯。
9. T82 系列和 T62 系列对讲机(800 mAh 电池)可在 8 小时
内充满电。
注意:当电池电量过低,对讲机屏幕可能需要一段时间才开始
显示充电指示灯。要获得最佳电池寿命,充电完成后,
请不要将对讲机或电池存放在充电器中。
确保同时使用正确的充电座和电源。本手册的第 2
页的表 1 和第 3 页的表 2 已经列明。
简体中文
1
 Loading...