

Page 1

APPLICANT: MOTOROLA, INC. FCC ID: IHDT56CN2
INSTRUCTION MANUAL
A preliminary draft copy of the Users Manual follows:
EXHIBIT 8
Page 2

Welcome
This reference guide describes the many features in your A920
multimedia handset.This user’s guide introduces you to the
many features in your A920 multimedia handset.
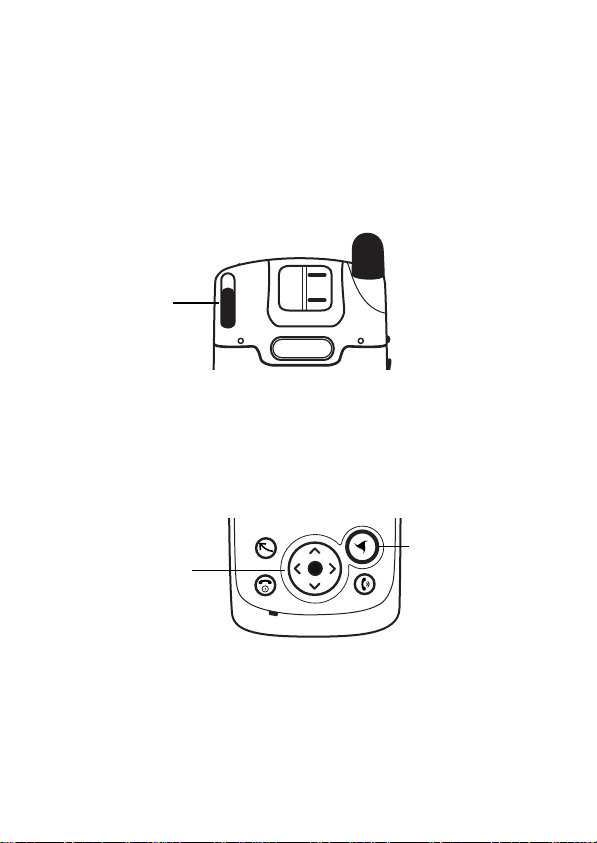
Game Key A
Speakerphone
Key
Vol ume
Up/Down
Voi ce Key
Shortcut Key
Press to go to
favourite
application
(default: Home).
Power/End Key
Press & hold to
turn on & off.
Press & release
to end calls.
Camera
Microphone
Status Light
Earpiece
Game Key B
Touchscreen
Navigation Key
Press arrows to
move through
items.
Press centre to
select highlighted
item.
3 Key
Press to use
features from 3.
Send Key
Press to make &
answer calls.
Welcome - 1
Page 3

www.hellomoto.com
MOTOROLA, the Stylised M Logo, and all other trademarks indicated as such
herein are trademarks of Motorola, Inc.
® Reg. U.S. Pat. & Tm. Off.
All other product or service names are the property of their respective owners.
© 2003 Motorola, Inc. All rights reserved.
Software Copyright Notice
The Motorola products described in this manual may include copyrighted Motorola
and third-party software stored in semiconductor memories or other media. Laws in
the United States and other countries preserve for Mot orola and third-pa rty sof tware
providers certain exclusive rights for copyrighted software, such as the exclusive
rights to distribute or reproduce the copyrighted software. Accordingly, any
copyrighted software contained in the Motorola products may not be modified,
reverse-engineered, distributed, or reproduced in any manner to the extent allowed
by law. Furthermore, the purchase of the Motorola products shall not be deemed to
grant either directly or by implication, estoppel, or otherwise, any license under the
copyrights, patents, or patent applications of Motorola or any third- party software
provider, except for the normal, non-exclusive , royalty-free licence to use t hat arises
by operation of law in the sale of a product.
2 - Welcome
Page 4

Contents
Welcome. . . . . . . . . . . . . . . . . . . . . . . . . . . . . . . . . . . . . . . . . . 1
Safety and General Information . . . . . . . . . . . . . . . . . . . . . .10
Getting Started. . . . . . . . . . . . . . . . . . . . . . . . . . . . . . . . . . . . 17
What’s in the Box?. . . . . . . . . . . . . . . . . . . . . . . . . . . . . . . .17
About this Guide . . . . . . . . . . . . . . . . . . . . . . . . . . . . . . . . .18
Optional Features . . . . . . . . . . . . . . . . . . . . . . . . . . . . . .18
Optional Accessories. . . . . . . . . . . . . . . . . . . . . . . . . . . .18
Installing the USIM Card . . . . . . . . . . . . . . . . . . . . . . . . . . .18
Installing the Memory Card . . . . . . . . . . . . . . . . . . . . . . . . . 20
Installing the Battery . . . . . . . . . . . . . . . . . . . . . . . . . . . . . .21
Charging the Battery . . . . . . . . . . . . . . . . . . . . . . . . . . . . . .22
Battery Use . . . . . . . . . . . . . . . . . . . . . . . . . . . . . . . . . . . . .22
Turning Your Handset On . . . . . . . . . . . . . . . . . . . . . . . . . . 23
Setting up Your Handset . . . . . . . . . . . . . . . . . . . . . . . . . . .24
Making and Answering Calls. . . . . . . . . . . . . . . . . . . . . . . .24
Making a Call. . . . . . . . . . . . . . . . . . . . . . . . . . . . . . . . . .25
Answering a Call . . . . . . . . . . . . . . . . . . . . . . . . . . . . . . .25
Using Your Handset. . . . . . . . . . . . . . . . . . . . . . . . . . . . . . . .26
Handset Screen. . . . . . . . . . . . . . . . . . . . . . . . . . . . . . . . . .26
Using Touchscreen Control . . . . . . . . . . . . . . . . . . . . . . . . .27
Using Navigation Key . . . . . . . . . . . . . . . . . . . . . . . . . . . . .27
Using 3 Key. . . . . . . . . . . . . . . . . . . . . . . . . . . . . . . . . . . . .28
Using Game Keys . . . . . . . . . . . . . . . . . . . . . . . . . . . . . . . . 28
Game Key A . . . . . . . . . . . . . . . . . . . . . . . . . . . . . . . . . . 28
Game Key B . . . . . . . . . . . . . . . . . . . . . . . . . . . . . . . . . . 28
Opening Applications. . . . . . . . . . . . . . . . . . . . . . . . . . . . . .28
Folders. . . . . . . . . . . . . . . . . . . . . . . . . . . . . . . . . . . . . . . . .30
Switching Folders . . . . . . . . . . . . . . . . . . . . . . . . . . . . . . 31
Filing New Entry in Folder . . . . . . . . . . . . . . . . . . . . . . . .31
Contents - 3
Page 5

Moving Entry to a Different Folder. . . . . . . . . . . . . . . . . .31
Adding, Renaming, and Deleting Folders . . . . . . . . . . . .31
Status Indicators . . . . . . . . . . . . . . . . . . . . . . . . . . . . . . . . .32
Status Light . . . . . . . . . . . . . . . . . . . . . . . . . . . . . . . . . . . . .34
Entering Text . . . . . . . . . . . . . . . . . . . . . . . . . . . . . . . . . . . .34
Handwriting Recognition . . . . . . . . . . . . . . . . . . . . . . . . . 35
Virtual Keyboard . . . . . . . . . . . . . . . . . . . . . . . . . . . . . . .36
Home. . . . . . . . . . . . . . . . . . . . . . . . . . . . . . . . . . . . . . . . . . . . 37
Displaying Home . . . . . . . . . . . . . . . . . . . . . . . . . . . . . . . . .37
Screen Contents . . . . . . . . . . . . . . . . . . . . . . . . . . . . . . . . .37
Personalising Home. . . . . . . . . . . . . . . . . . . . . . . . . . . . . . .38
Calling Features. . . . . . . . . . . . . . . . . . . . . . . . . . . . . . . . . . . 39
Opening Phone Application. . . . . . . . . . . . . . . . . . . . . . . . . 39
Displaying Your Phone Number. . . . . . . . . . . . . . . . . . . . . .40
Making a Voice Call. . . . . . . . . . . . . . . . . . . . . . . . . . . . . . .40
Dialling with Keypad . . . . . . . . . . . . . . . . . . . . . . . . . . . . 40
Dialling Special Characters . . . . . . . . . . . . . . . . . . . . . . .40
Dialling Stored Phone Numbers . . . . . . . . . . . . . . . . . . . 41
Redialling Failed Voice Calls. . . . . . . . . . . . . . . . . . . . . .41
Making a Video Call. . . . . . . . . . . . . . . . . . . . . . . . . . . . . . .4 1
Dialling Video Call with Keypad. . . . . . . . . . . . . . . . . . . .41
Dialling Stored Phone Numbers . . . . . . . . . . . . . . . . . . . 42
Retrying Failed Video Calls. . . . . . . . . . . . . . . . . . . . . . . 42
Using Automatic Redial. . . . . . . . . . . . . . . . . . . . . . . . . . . .42
Making an Emergency Call . . . . . . . . . . . . . . . . . . . . . . . . .43
Sending Tones. . . . . . . . . . . . . . . . . . . . . . . . . . . . . . . . . . .43
Answering Calls. . . . . . . . . . . . . . . . . . . . . . . . . . . . . . . . . .44
Adjusting Volume. . . . . . . . . . . . . . . . . . . . . . . . . . . . . . . . . 44
Using Speakerphone. . . . . . . . . . . . . . . . . . . . . . . . . . . . . . 45
Using Features While on a Voice Call. . . . . . . . . . . . . . . . . 45
Muting Microphone . . . . . . . . . . . . . . . . . . . . . . . . . . . . .45
Putting a Call on Hold . . . . . . . . . . . . . . . . . . . . . . . . . . .46
Transferring a Call. . . . . . . . . . . . . . . . . . . . . . . . . . . . . .46
4 - Contents
Page 6

Making Another Call While a Call is Active . . . . . . . . . . . 46
Switching Between Calls. . . . . . . . . . . . . . . . . . . . . . . . . 47
Joining Calls in a Grouptalk. . . . . . . . . . . . . . . . . . . . . . .47
Adding Calls to a Grouptalk. . . . . . . . . . . . . . . . . . . . . . .48
Using Features While on a Video Call. . . . . . . . . . . . . . . . .48
Muting Microphone . . . . . . . . . . . . . . . . . . . . . . . . . . . . .48
Blocking Video. . . . . . . . . . . . . . . . . . . . . . . . . . . . . . . . .48
Viewing Call History. . . . . . . . . . . . . . . . . . . . . . . . . . . . . . .48
Making Calls from the History List. . . . . . . . . . . . . . . . . .49
Clearing the History List. . . . . . . . . . . . . . . . . . . . . . . . . .49
Switching to Aeroplane Mode . . . . . . . . . . . . . . . . . . . . . . .49
Switching Lines . . . . . . . . . . . . . . . . . . . . . . . . . . . . . . . . . .50
Turning off Call Ringing. . . . . . . . . . . . . . . . . . . . . . . . . . . .50
Using Optional Network Features . . . . . . . . . . . . . . . . . . . . 50
Using Caller ID. . . . . . . . . . . . . . . . . . . . . . . . . . . . . . . . .50
Hiding your Caller ID . . . . . . . . . . . . . . . . . . . . . . . . . . . .51
Using Call Waiting . . . . . . . . . . . . . . . . . . . . . . . . . . . . . .51
Using Call Diverting. . . . . . . . . . . . . . . . . . . . . . . . . . . . .52
Using Call Barring . . . . . . . . . . . . . . . . . . . . . . . . . . . . . .53
Monitoring Phone Use. . . . . . . . . . . . . . . . . . . . . . . . . . . . .54
Setting In-Call Timer Options. . . . . . . . . . . . . . . . . . . . . .54
Viewing Call Time Information. . . . . . . . . . . . . . . . . . . . .54
Resetting Call Timers . . . . . . . . . . . . . . . . . . . . . . . . . . .55
Viewing Call Charges . . . . . . . . . . . . . . . . . . . . . . . . . . . 55
Messages and Email . . . . . . . . . . . . . . . . . . . . . . . . . . . . . . . 56
Setting up Messaging Accounts . . . . . . . . . . . . . . . . . . . . .56
Email . . . . . . . . . . . . . . . . . . . . . . . . . . . . . . . . . . . . . . . .56
Multimedia message and text message . . . . . . . . . . . . .60
Opening Messaging Application . . . . . . . . . . . . . . . . . . . . .61
Creating and Sending Messages. . . . . . . . . . . . . . . . . . . . .61
Email and text message . . . . . . . . . . . . . . . . . . . . . . . . . 61
multimedia message . . . . . . . . . . . . . . . . . . . . . . . . . . . . 62
Contents - 5
Page 7

Receiving and Reading Messages . . . . . . . . . . . . . . . . . . . 65
Saving Sender’s Address as a Contact. . . . . . . . . . . . . . . .65
Messaging Folders . . . . . . . . . . . . . . . . . . . . . . . . . . . . . . .66
Finding Messages . . . . . . . . . . . . . . . . . . . . . . . . . . . . . . . .66
Contact List . . . . . . . . . . . . . . . . . . . . . . . . . . . . . . . . . . . . . . 68
Opening Contacts Application. . . . . . . . . . . . . . . . . . . . . . .68
Adding Contacts . . . . . . . . . . . . . . . . . . . . . . . . . . . . . . . . .69
Finding Contacts . . . . . . . . . . . . . . . . . . . . . . . . . . . . . . . . .71
Communicating with Contacts. . . . . . . . . . . . . . . . . . . . . . . 72
Sending Contact Details . . . . . . . . . . . . . . . . . . . . . . . . . . .73
Creating Owner Card. . . . . . . . . . . . . . . . . . . . . . . . . . . . . . 73
Customising Handset Settings . . . . . . . . . . . . . . . . . . . . . . 75
Setting Wallpaper Image. . . . . . . . . . . . . . . . . . . . . . . . . . .7 5
Setting Screen Brightness. . . . . . . . . . . . . . . . . . . . . . . . . .75
Setting System Sounds. . . . . . . . . . . . . . . . . . . . . . . . . . . .76
Setting Shortcut Key . . . . . . . . . . . . . . . . . . . . . . . . . . . . . .76
Choosing Ringtunes . . . . . . . . . . . . . . . . . . . . . . . . . . . . . .76
Choosing Ringtunes for Calls . . . . . . . . . . . . . . . . . . . . .77
Choosing Ringtunes for Messages . . . . . . . . . . . . . . . . . 77
Choosing Vibrate Pattern. . . . . . . . . . . . . . . . . . . . . . . . . . .78
Installing Ringtunes. . . . . . . . . . . . . . . . . . . . . . . . . . . . . . .7 8
Ringtunes File Formats . . . . . . . . . . . . . . . . . . . . . . . . . .78
Installing Audio Files as Ringtunes . . . . . . . . . . . . . . . . . 79
Installing Saved Audio Files as Ringtunes. . . . . . . . . . . .79
Personal Organiser Features . . . . . . . . . . . . . . . . . . . . . . . . 80
Calendar . . . . . . . . . . . . . . . . . . . . . . . . . . . . . . . . . . . . . . . 80
Adding an Calendar Entry . . . . . . . . . . . . . . . . . . . . . . . .80
Switching Calendar Views. . . . . . . . . . . . . . . . . . . . . . . . 82
Assigning Colours to Calendar Folders. . . . . . . . . . . . . .82
Deleting Entries. . . . . . . . . . . . . . . . . . . . . . . . . . . . . . . . 83
Moving Entries to the To Do Application . . . . . . . . . . . . .84
Sending Entries. . . . . . . . . . . . . . . . . . . . . . . . . . . . . . . . 84
6 - Contents
Page 8

Setting Calendar Preferences . . . . . . . . . . . . . . . . . . . . .85
To Do. . . . . . . . . . . . . . . . . . . . . . . . . . . . . . . . . . . . . . . . . .85
Adding Entries. . . . . . . . . . . . . . . . . . . . . . . . . . . . . . . . .86
Marking Tasks as Complete. . . . . . . . . . . . . . . . . . . . . . .87
Finding Entries. . . . . . . . . . . . . . . . . . . . . . . . . . . . . . . . .87
Deleting Entries. . . . . . . . . . . . . . . . . . . . . . . . . . . . . . . .88
Moving Entries to Calendar. . . . . . . . . . . . . . . . . . . . . . . 88
Sending Entries. . . . . . . . . . . . . . . . . . . . . . . . . . . . . . . . 88
Setting To Do Preferences. . . . . . . . . . . . . . . . . . . . . . . .89
Notes. . . . . . . . . . . . . . . . . . . . . . . . . . . . . . . . . . . . . . . . . .89
Adding Notes. . . . . . . . . . . . . . . . . . . . . . . . . . . . . . . . . .89
Using Paste. . . . . . . . . . . . . . . . . . . . . . . . . . . . . . . . . . . 90
Finding Notes. . . . . . . . . . . . . . . . . . . . . . . . . . . . . . . . . .90
Sending Notes. . . . . . . . . . . . . . . . . . . . . . . . . . . . . . . . .90
Time. . . . . . . . . . . . . . . . . . . . . . . . . . . . . . . . . . . . . . . . . . .9 1
Setting Time and Date. . . . . . . . . . . . . . . . . . . . . . . . . . .91
Setting Location. . . . . . . . . . . . . . . . . . . . . . . . . . . . . . . .92
Setting Alarms. . . . . . . . . . . . . . . . . . . . . . . . . . . . . . . . .92
Responding to Alarms. . . . . . . . . . . . . . . . . . . . . . . . . . . 93
Turning Alarm Sounds Off. . . . . . . . . . . . . . . . . . . . . . . .93
Calculator. . . . . . . . . . . . . . . . . . . . . . . . . . . . . . . . . . . . . . .94
News and Entertainment. . . . . . . . . . . . . . . . . . . . . . . . . . . . 95
Web Browser. . . . . . . . . . . . . . . . . . . . . . . . . . . . . . . . . . . .95
Setting Up Internet Account. . . . . . . . . . . . . . . . . . . . . . . 95
Opening Web Browser. . . . . . . . . . . . . . . . . . . . . . . . . . .95
Opening Web Pages . . . . . . . . . . . . . . . . . . . . . . . . . . . .95
Viewing Recently Visited Web Pages . . . . . . . . . . . . . . .96
Adding Bookmarks. . . . . . . . . . . . . . . . . . . . . . . . . . . . . .96
Saving Web Pages . . . . . . . . . . . . . . . . . . . . . . . . . . . . .96
Downloading Audio, Video, and Pictures. . . . . . . . . . . . .97
Setting Web Preferences. . . . . . . . . . . . . . . . . . . . . . . . . 97
Music. . . . . . . . . . . . . . . . . . . . . . . . . . . . . . . . . . . . . . . . . .98
Contents - 7
Page 9

Opening Music. . . . . . . . . . . . . . . . . . . . . . . . . . . . . . . . . 98
Playing an Audio Track . . . . . . . . . . . . . . . . . . . . . . . . . . 99
Managing Music Playlists . . . . . . . . . . . . . . . . . . . . . . . . 99
Playing a Music Playlist. . . . . . . . . . . . . . . . . . . . . . . . .101
Setting Playlist to Shuffle Mode. . . . . . . . . . . . . . . . . . .102
Setting Repeat Mode. . . . . . . . . . . . . . . . . . . . . . . . . . .102
Setting Music Preferences. . . . . . . . . . . . . . . . . . . . . . . 103
Saving Audio Files. . . . . . . . . . . . . . . . . . . . . . . . . . . . .103
Sending Audio Files. . . . . . . . . . . . . . . . . . . . . . . . . . . . 104
Camera . . . . . . . . . . . . . . . . . . . . . . . . . . . . . . . . . . . . . . .104
Opening Camera Application. . . . . . . . . . . . . . . . . . . . . 105
Positioning the Camera Lens. . . . . . . . . . . . . . . . . . . . .105
Taking Still Pictures . . . . . . . . . . . . . . . . . . . . . . . . . . . .106
Setting Picture Size. . . . . . . . . . . . . . . . . . . . . . . . . . . . 106
Recording Video Clips. . . . . . . . . . . . . . . . . . . . . . . . . .107
Using Self-Timer . . . . . . . . . . . . . . . . . . . . . . . . . . . . . .107
Available Memory Indicator. . . . . . . . . . . . . . . . . . . . . . 108
Switching to Pictures. . . . . . . . . . . . . . . . . . . . . . . . . . . 108
Switching to Video. . . . . . . . . . . . . . . . . . . . . . . . . . . . .108
Video . . . . . . . . . . . . . . . . . . . . . . . . . . . . . . . . . . . . . . . . .108
Opening Video. . . . . . . . . . . . . . . . . . . . . . . . . . . . . . . .108
Playing a Video Clip. . . . . . . . . . . . . . . . . . . . . . . . . . . . 110
Switching to Landscape View . . . . . . . . . . . . . . . . . . . . 111
Setting Repeat Mode. . . . . . . . . . . . . . . . . . . . . . . . . . . 111
Playing Streaming Video and Audio . . . . . . . . . . . . . . . 111
Viewing Clip Information . . . . . . . . . . . . . . . . . . . . . . . . 112
Saving Video Clips. . . . . . . . . . . . . . . . . . . . . . . . . . . . . 112
Deleting Video Clips . . . . . . . . . . . . . . . . . . . . . . . . . . . 113
Sending Video Clips . . . . . . . . . . . . . . . . . . . . . . . . . . . 113
Pictures . . . . . . . . . . . . . . . . . . . . . . . . . . . . . . . . . . . . . . . 113
Opening Pictures. . . . . . . . . . . . . . . . . . . . . . . . . . . . . . 113
Viewing Pictures . . . . . . . . . . . . . . . . . . . . . . . . . . . . . . 114
8 - Contents
Page 10

Viewing Slideshow. . . . . . . . . . . . . . . . . . . . . . . . . . . . .115
Editing Pictures . . . . . . . . . . . . . . . . . . . . . . . . . . . . . . .115
Viewing Picture Information. . . . . . . . . . . . . . . . . . . . . . 116
Rotating Pictures. . . . . . . . . . . . . . . . . . . . . . . . . . . . . . 116
Drawing on Pictures. . . . . . . . . . . . . . . . . . . . . . . . . . . . 116
Adding Stamps to Pictures . . . . . . . . . . . . . . . . . . . . . . 117
Adding Frames to Pictures . . . . . . . . . . . . . . . . . . . . . . 117
Sorting Pictures. . . . . . . . . . . . . . . . . . . . . . . . . . . . . . . 118
Sending Pictures . . . . . . . . . . . . . . . . . . . . . . . . . . . . . . 118
Deleting Pictures . . . . . . . . . . . . . . . . . . . . . . . . . . . . . . 119
Getting More Out of Your Handset. . . . . . . . . . . . . . . . . . . 120
Connecting to a Computer. . . . . . . . . . . . . . . . . . . . . . . . . 120
Installing A920 Desktop Suite . . . . . . . . . . . . . . . . . . . . 120
Setting up the Connection. . . . . . . . . . . . . . . . . . . . . . . 120
Running A920 Desktop Suite. . . . . . . . . . . . . . . . . . . . .121
Remote Synchronisation . . . . . . . . . . . . . . . . . . . . . . . . . .121
Setting Up Your Account . . . . . . . . . . . . . . . . . . . . . . . .121
Configuring the Settings . . . . . . . . . . . . . . . . . . . . . . . . 121
Installing Applications on the Handset. . . . . . . . . . . . . . . .122
Downloading Applications from Web. . . . . . . . . . . . . . .122
Downloading Application from Email or
multimedia message . . . . . . . . . . . . . . . . . . . . . . . . . . . 122
Downloading Application from Computer . . . . . . . . . . .123
Downloading Application from Memory Card . . . . . . . .124
Security . . . . . . . . . . . . . . . . . . . . . . . . . . . . . . . . . . . . . . . . 125
Locking and Unlocking handset. . . . . . . . . . . . . . . . . . . . .125
Establishing Password Protection. . . . . . . . . . . . . . . . . . . 125
Troubleshooting. . . . . . . . . . . . . . . . . . . . . . . . . . . . . . . . . .127
Specific Absorption Rate Data . . . . . . . . . . . . . . . . . . . . . . 131
Warranty Information . . . . . . . . . . . . . . . . . . . . . . . . . . . . .133
Index . . . . . . . . . . . . . . . . . . . . . . . . . . . . . . . . . . . . . . . . . . .138
Contents - 9
Page 11

Safety and General Information
IMPORTANT INFORMATION ON SAFE AND EFFICIENT
OPERATION. READ THIS INFORMATION BEFORE USING
YOUR PHONE.
The information provided in this document supersedes the general
safety information in user guides published prior to
December 1, 2002.
Exposure To Radio Frequency (RF) Energy
Your phone contains a transmitter and a receiver. When it is ON, it
receives and transmits RF energy. When you communicate with
your phone, the system handling your call controls the power level
at which your phone transmits.
Your Motorola phone is designed to comply with local regulatory
requirements in your country concerning exposure of human
beings to RF energy.
Operational Precautions
To assure optimal phone performance and make sure human
exposure to RF energy is within the guidelines set forth in the
relevant standards, always adhere to the following procedures.
External Antenna Care
Use only the supplied or Motorola-approved replacement antenna.
Unauthorised antennas, modifications, or attachments could
damage the phone.
Do NOT hold the external antenna when the phone is IN USE.
Holding the external antenna affects call quality and may cause the
phone to operate at a higher power level than needed. In addition,
use of unauthorised antennas may result in non-compliance with
the local regulatory requirements in your country.
10 - Safety and General Information
Page 12

Phone Operation
When placing or receiving a phone call, hold your phone as you
would a wireline telephone.
Body-Worn Operation
To maintain compliance with RF energy exposure guidelines, if you
wear a phone on your body when transmitting, always place the
phone in a Motorola-supplied or approved clip, holder, holster,
case, or body harness for this phone, if available. Use of
accessories not approved by Motorola may exceed RF energy
exposure guidelines. If you do not use one of the body-worn
accessories approved or supplied by Motorola, and are not using
the phone held in the normal use position, ensure the phone and its
antenna are at least 1 inch (2.5 centimetres) from your body when
transmitting.
Data Operation
When using any data feature of the phone, with or without an
accessory cable, position the phone and its antenna at least 1 inch
(2.5 centimetres) from your body.
Approved Accessories
Use of accessories not approved by Motorola, including but not
limited to batteries and antenna, may cause your phone to exceed
RF energy exposure guidelines. For a list of approved Motorola
accessories, visit our website at www.Motorola.com.
RF Energy Interference/Compatibility
Note: Nearly every electronic device is susceptible to RF energy
interference from external sources if inadequately shielded,
designed, or otherwise configured for RF energy compatibility. In
some circumstances your phone may cause interference.
Facilities
Turn off your phone in any facility where posted notices instruct you
to do so. These facilities may include hospitals or health care
Safety and General Information - 11
Page 13

facilities that may be using equipment that is sensitive to external
RF energy.
Aircraft
When instructed to do so, turn off your phone when on board an
aircraft. Any use of a phone must be in accordance with applicable
regulations per airline crew instructions.
Medical Devices
Pacemakers
Pacemaker manufacturers recommend that a minimum separation
of 6 inches (15 centimetres) be maintained between a handheld
wireless phone and a pacemaker.
Persons with pacemakers should:
• ALW AYS keep the phone more than 6 inches (15 centimetres)
from your pacemaker when the phone is turned ON.
• NOT carry the phone in the breast pocket.
• Use the ear opposite the pacemaker to minimise the potential
for interference.
• Turn OFF the phone immediately if you have any reason to
suspect that interference is taking place.
Hearing Aids
Some digital wireless phones may interfere with some hearing aids.
In the event of such interference, you may want to consult your
hearing aid manufacturer to discuss alternatives.
Other Medical Devices
If you use any other personal medical device, consult the
manufacturer of your device to determine if it is adequately
shielded from RF energy. Your GP may be able to assist you in
obtaining this information.
12 - Safety and General Information
Page 14

Use While Driving
Check the laws and regulations on the use of phones in the area
where you drive. Always obey them.
When using your phone while driving, please:
• Give full attention to driving and to the road.
• Use hands-free operation, if available.
• Pull off the road and park before making or answering a call if
driving conditions so require.
Responsible driving best practices may be found in the “Wireless
Phone Safety Tips” at the end of this manual and at the Motorola
website: www.Motorola.com/callsmart.
Operational Warnings
For Vehicles With an Air Bag
Do not place a phone in the area over an air bag or in the air bag
deployment area. Air bags inflate with great force. If a phone is
placed in the air bag deployment area and the air bag inflates, the
phone may be propelled with great force and cause serious injury
to occupants of the vehicle.
Potentially Explosive Atmospheres
Turn off your phone prior to entering any area with a potentially
explosive atmosphere, unless it is a phone type especially qualified
for use in such areas and certified as “Intrinsically Safe.” Do not
remove, install, or charge batteries in such areas. Sparks in a
potentially explosive atmosphere can cause an explosion or fire
resulting in bodily injury or even death.
Note: The areas with potentially explosive atmospheres referred to
above include fuelling areas such as below decks on boats, fuel or
chemical transfer or storage facilities, areas where the air contains
chemicals or particles, such as grain, dust, or metal powders.
Areas with potentially explosive atmospheres are often but not
always posted.
Safety and General Information - 13
Page 15
Blasting Caps and Areas
To avoid possible interference with blasting operations, turn OFF
your phone when you are near electrical blasting caps, in a blasting
area, or in areas posted “Turn off electronic devices.” Obey all
signs and instructions.
Batteries
Batteries can cause property damage and/or bodily injury such as
burns if a conductive material such as jewellery, keys, or beaded
chains touch exposed terminals. The conductive material may
complete an electrical circuit (short circuit) and become quite hot.
Exercise care in handling any charged battery, particularly when
placing it inside a pocket, bag, or other container with metal
objects. Use only Motorola original batteries and chargers.
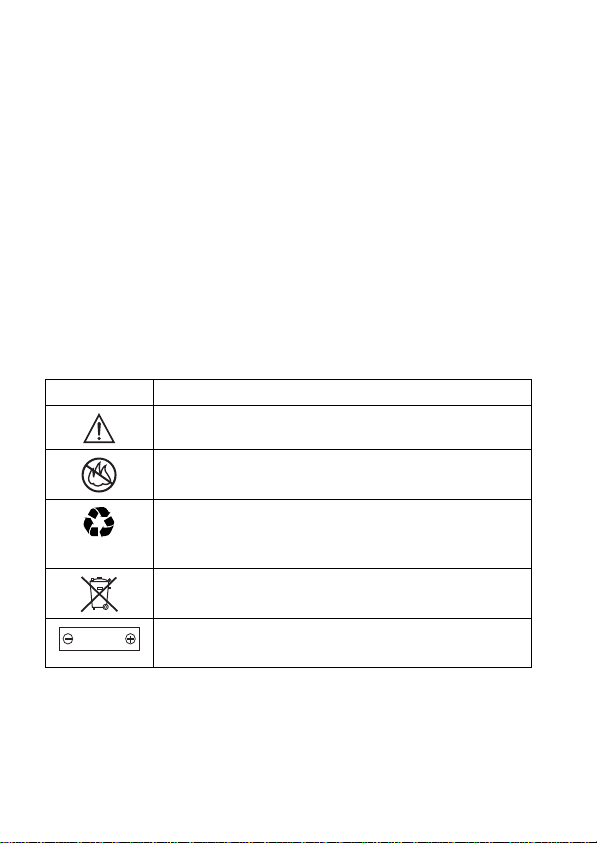
Your battery or phone may contain symbols, defined as follows:
Symbol Definition
Important safety information will follow.
Y our battery or phone should not be disposed of in
a fire.
Your battery or phone may require recycling in
accordance with local laws. Contact your local
regulatory authorities for more information.
Your battery or phone should not be thrown in the
trash.
LiIon BATT
Your phone contains an internal lithium ion
battery.
Seizures/Blackouts
Some people may be susceptible to epileptic seizures or blackouts
when exposed to blinking lights, such as when watching television
14 - Safety and General Information
Page 16

or playing video games. These seizures or blackouts may occur
even if a person never had a previous seizure or blackout.
If you have experienced seizures or blackouts, or if you have a
family history of such occurrences, please consult with your doctor
before playing video games on your phone or enabling a blinkinglights feature on your phone. (The blinking-light feature is not
available on all products.)
Parents should monitor their children's use of video game or other
features that incorporate blinking lights on the phones. All persons
should discontinue use and consult a doctor if any of the following
symptoms occur: convulsion, eye or muscle twitching, loss of
awareness, involuntary movements, or disorientation.
To limit the likelihood of such symptoms, please take the following
safety precautions:
• Do not play or use a blinking-lights feature if you are tired or
need sleep.
• Take a minimum of a 15-minute break hourly.
• Play in a room in which all lights are on.
• Play at the farthest distance possible from the screen.
Repetitive Motion Injuries
When you play games on your phone, you may experience
occasional discomfort in your hands, arms, shoulders, neck, or
other parts of your body. Follow these instructions to avoid
problems such as tendonitis, carpal tunnel syndrome, or other
musculoskeletal disorders:
• Take a minimum 15-minute break every hour of game playing.
• If your hands, wrists, or arms become tired or sore while
playing, stop and rest for several hours before playing again.
• If you continue to have sore hands, wrists, or arms during or
after play, stop playing and see a doctor.
Safety and General Information - 15
Page 17
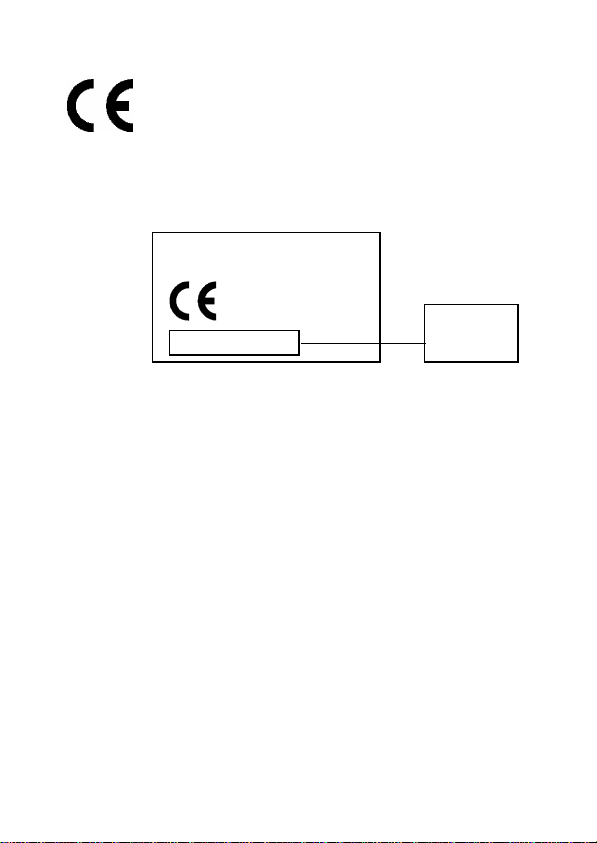
European Union Directives Conformance Statement
Hereby, Motorola declares that this product is in
compliance with
• The essential requirements and other relevant
provisions of Directive 1999/5/EC
• All other relevant EU Directives
IMEI: 350034/40/394721/9
0168
Type: MC2-41H14
The above gives an example of a typical Product Approval Number.
You can view your product's Declaration of Conformity (DoC) to
Directive 1999/5/EC (the R&TTE Directive) at www.motorola.com/
rtte - to find your DoC, enter the product Approval Number from
your product's label in the "Search" bar on the Web site
16 - Safety and General Information
Product
Approval
Number
Page 18

Getting Started
What’s in the Box?
Your A920 multimedia handset comes with:
• Rechargable battery
• Battery charger
• Desktop cradle
• Stylus
• Stereo headset with Send and End keys
• CD-ROM with computer synchronisation software (A920
Desktop Suite), product manuals, and other product
information and software
• Removable memory card
• USB cable (for connecting to computer)
• Regional power adapters
• Protective carrying case
• 3 welcome package (may not be available in all countries)
• Vehicle power adapter (may not be available in all countries)
Notes:
• The in-box items of the A920 multimedia handset may vary by
country. Contact 3 for more details.
• The handset may not come with a removable memory card in
all countries. If it is not included in the box, contact Motorola
for how to buy a memory card.
To purchase Motorola Original™ accessories, please contact
Motorola as per the enclosed User Information publication.
Getting Started - 17
Page 19

About this Guide
This user’s guide describes the most popular features in your
multimedia handset. A reference guide is available on the provided
CD-ROM. The reference guide describes additional features that
are not described in the user’s guide.
This reference guide is a companion to the user’s guide that is
packaged with your handset. Refer to the user’s guide for general
information about using the handset. This reference guide contains
all of the information in the user’s guide, plus information about
additional handset features.
Optional Features
Features marked with this label are
optional network and/or subscriberdependent. They may not be offered by
all service providers in all geographical
areas. Contact your service provider for
availability.
Optional Accessories
Features marked with this label require an
optional Motorola Original™ accessory.
Installing the USIM Card
Your USIM (Universal Subscriber Identity Module) card contains
your phone number, service details, and memory for storing phone
numbers and messages.
18 - Getting Started
Page 20
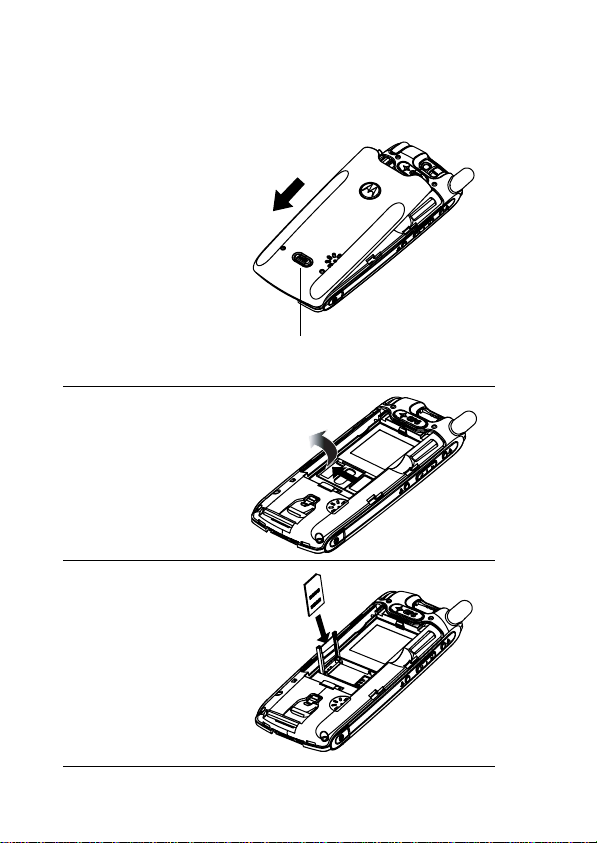
Caution: Do not bend or scratch your USIM card, and avoid
exposing it to static electricity, water, or dirt.
Do This
1 Push down
release latch, slide
back cover down,
and remove.
Release latch
2 Slide USIM card
door to the left and
lift open.
3 Insert USIM card
into tray (notch in
upper right corner,
gold plate down).
Getting Started - 19
Page 21
Do This
4 Close USIM card
door and slide to
right to lock.
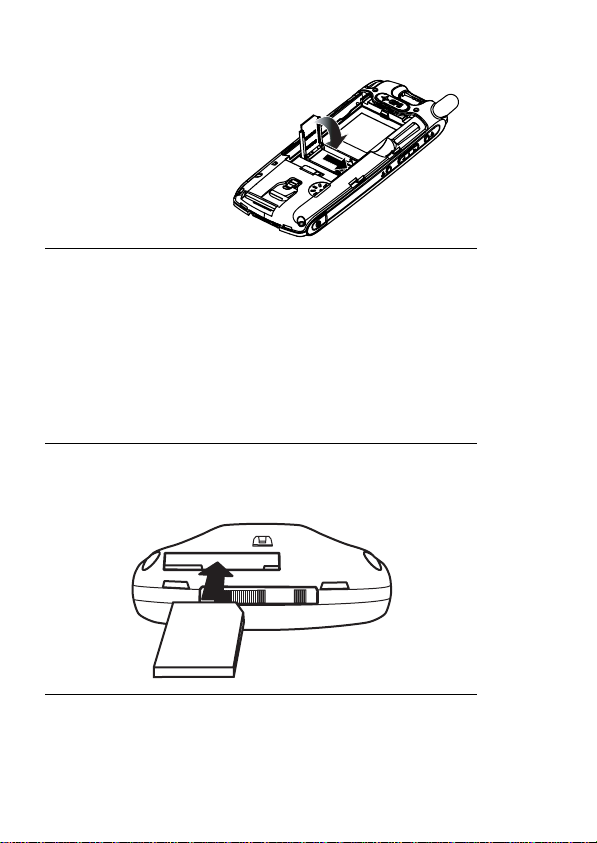
Installing the Memory Card
The memory card lets you store multimedia files, such as audio
clips, pictures, and video clips.
Do This
1 If back cover is on, remove it as described in
“Installing the USIM Card” on page 18.
2 Insert memory card into card slot with notch in upper
right corner. Push card completely into slot until it
locks.
If you need to remove the memory card, push it into the slot until it
unlocks. Then slide it out.
20 - Getting Started
Page 22
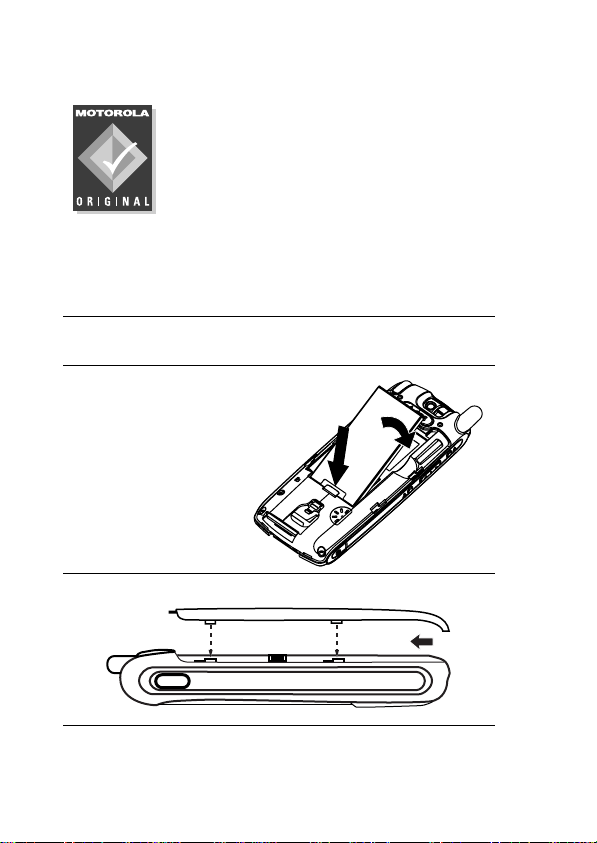
Installing the Battery
You must install and charge the battery to use your handset.
Use only Motorola Original batteries and
accessories. Store batteries in their protective
cases when not in use.
Do This
1 Remove the battery from its protective clear plastic
case.
2 If back cover is on, remove it as described in
“Installing the USIM Card” on page 18.
3 Insert the battery
under the tab and
push down.
4 Replace back cover and slide into place.
Getting Started - 21
Page 23
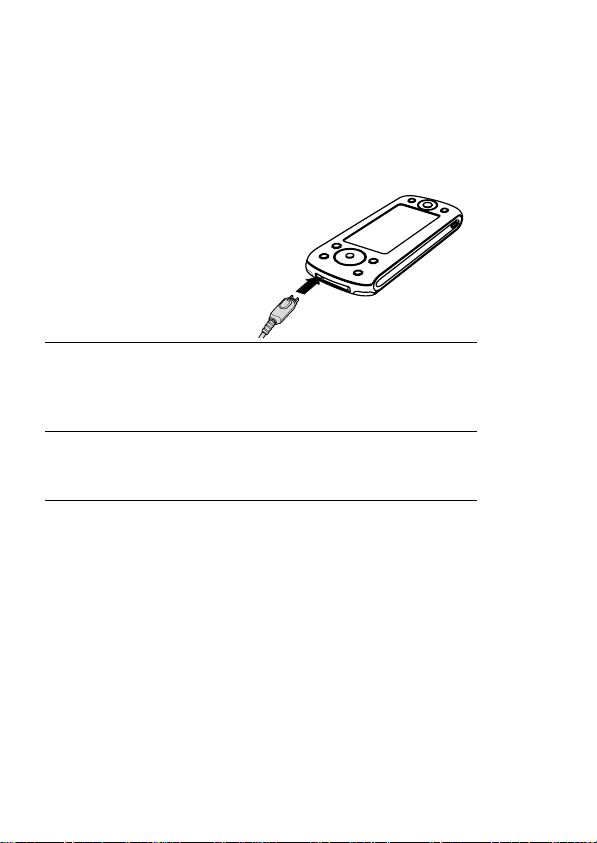
Charging the Battery
New batteries are partially charged, so you must charge them
before you can use your handset. Some batteries perform best
after several charge/discharge cycles.
Do This
1 Plug the charger
in with the release
tab up.
2 Plug the other end of the charger into an electrical
outlet. While the battery is charging,
and the battery’s current charge level (
displays on the screen.
3 When
Charging Complete
and remove the charger. The typical time needed to
fully charge the battery is three hours.
displays, press the release tab
Charging Battery
Very Low
to
High
)
Battery Use
Battery performance depends on your wireless carrier’s network
configuration; signal strength; temperature; features and settings
you select and use; and your voice, data, and other application use.
Caution: To prevent injuries or burns, do not allow metal objects to
contact or short-circuit the battery terminals.
To maximise your battery’s performance:
• Always use Motorola Original™ batteries and battery
chargers. The warranty does not cover damage caused by
using non-Motorola batteries and/or battery chargers.
22 - Getting Started
Page 24
• New batteries or batteries stored for a long time may require a
longer charge time.
• Charge the battery at or near room temperature.
• Do not expose batteries to temperatures below -10° C (14° F)
or above 45° C (113° F). Always take your handset with you
when you leave your vehicle.
• When you do not intend to use a battery for a while, store it
uncharged in a cool, dark, dry place, such as a refrigerator.
• With extended use, batteries gradually wear down and require
longer charging times. This is normal. If you charge a battery
regularly and notice a decrease in talk time or an increase in
charging time, it is probably time to buy a new one.
Dispose of rechargeable batteries properly. You may need to
recycle them. Refer to your battery’s label for battery type, and
contact your local recycling centre for proper disposal methods.
Never dispose of batteries in a fire because they may explode.
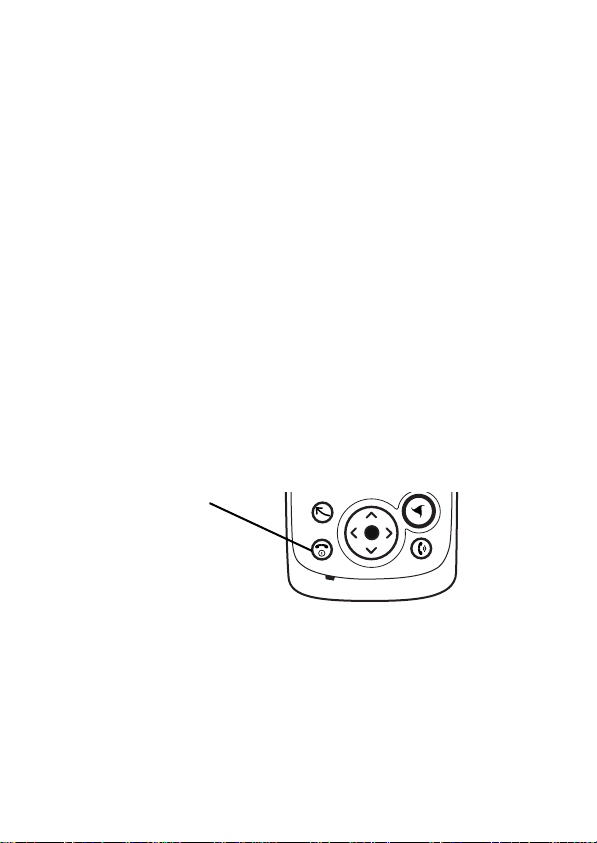
Turning Your Handset On
Press and hold to turn
on and off
After you turn the handset on, your personal home page displays
after the startup sequence. See “Home” on page 37 to learn more
about this screen.
Getting Started - 23
Page 25

Setting up Your Handset
When you turn on the handset for the first time, it prompts you to:
• Select language
• Calibrate the screen for accurate screen taps
• Enter current time and date
See “Customising Handset Settings” on page 75 for other ways to
customise your handset.
If you want to enter information about yourself into the handset, see
“Creating Owner Card” on page 73.
Making and Answering Calls
This section describes the basic calling features. For more
features, see “Calling Features” on page 39.
To make and answer calls, your handset must:
• be turned on
• have a USIM card installed
• have a network connection with adequate signal strength
24 - Getting Started
Page 26

Making a Call
Do This
1 Press
numbers displays.
2 To dial one of the displayed phone numbers, press
C
press
To dial a different phone number, use the provided
stylus to tap
dialling keypad displays.
3 Tap the number you want to dial on the keypad.
4 Press
5 To end the call, press
. A list of the most recently dialled phone
B
(up and down arrows) to highlight the number and
(centre key) to dial.
C
at the bottom of the screen. A
Keypad
to make the call.
B
.
A
Answering a Call
When you receive a call, the handset rings or vibrates (unless set
to Silent mode).
Do This
1 Press
2 To end the call, press
to answer the call.
B
A
.
Getting Started - 25
Page 27
Using Your Handset
See page 1 for a description of your handset’s components.
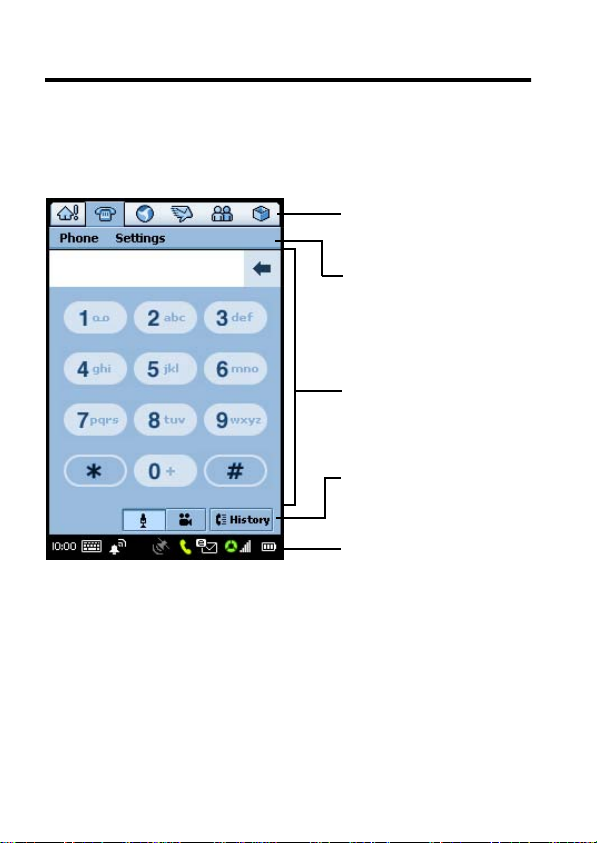
Handset Screen
Application Selector
Bar
Menu Bar
Application Space
Button Bar
Status Bar
Application
Selector Bar
Shows six icons that allow easy access
to commonly used applications.
Menu Bar Shows menus for the open application.
Application
Shows the open application.
Space
Button Bar Shows buttons you can select in the
open application.
26 - Using Your Handset
Page 28
Status Bar Shows handset status information.
Using Touchscreen Control
You can use all of the features by tapping on icons, text, and onscreen buttons with the provided stylus. One tap selects an item.
The stylus fits in a storage compartment on the back of the
handset.
Stylus
Using Navigation Key
Instead of using the stylus, you can use the Navigation key (C).
Press the four arrows to highlight an item on the screen. Press the
centre key to select the highlighted item.
3 Key
Navigation Key
Note: This guide describes how to use touchscreen control to use
the features. In most cases, it does not include the equivalent
Navigation key for using the feature.
Using Your Handset - 27
Page 29

Using 3 Key
The 3 key (E) provides access to unique features from 3. See the
3 welcome package for more about these features.
Using Game Keys
The handset has two Game keys. You can use these keys to play
games that you install on the handset.
Game Key A
In addition to playing games, you can also use these keys as
follows:
Game Key B
Game Key A
In many handset applications, you can press Game key A (F) to
open the first (leftmost) menu in the menu bar. Press
close the menu.
again to
F
Game Key B
Use Game key B (G) in conjunction with the Shortcut key (D) to
lock the handset. See “Locking and Unlocking handset” on
page 125 for instructions.
Opening Applications
Your handset has many built-in applications for communications,
personal organisation, and entertainment. Every application has an
associated icon.
You can open an application in the following ways:
28 - Using Your Handset
Page 30
• Select one of the icons in the Application Selector bar at the
top of the screen. These shortcuts are always visible on the
screen.
• Select . The Application Launcher displays, showing
icons of all of your handset’s applications. Select the
application you want to open.
• Press
(Shortcut key) to open your favourite application.
D
The default application is Home. See “Setting Shortcut Key”
on page 76 for how to assign a different application to this key.
You don’t have to close applications — just open the next one.
Changes or entries are always automatically saved.
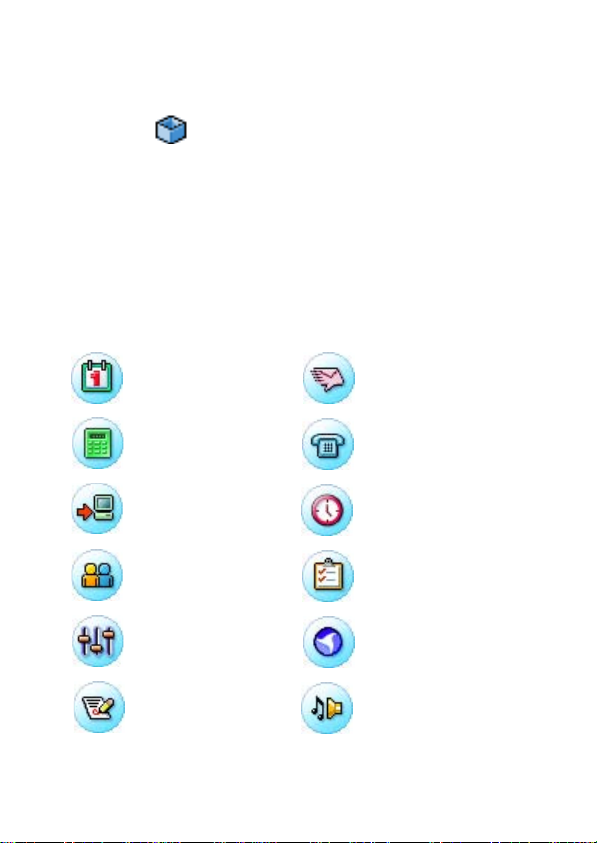
The following icons open the handset applications:
Calendar
(see page 80)
Calculator
(see page 94)
Desktop Suite
(see page 120)
Contacts
(see page 68)
Control Panel
(see page 75)
Notes
(see page 89)
Messaging
(see page 56)
Phone
(see page 39)
Time
(see page 91)
To Do
(see page 85)
Web
(see page 95)
Music
(see page 98)
Using Your Handset - 29
Page 31

Video
(see page 108)
Camera
(see page 104)
Home
(see page 37)
Remote Sync
(see page 121)
Pictures
(see page 113)
Folders
Many applications include a group of folders. The current folder
name appears on the right side of the menu bar at the top of the
screen.
Current folder. Tap folder name to
see list of all folders.
Y ou can use folders to organise your ent ries. For example, you can
create separate folders for business and personal entries.
30 - Using Your Handset
Page 32

Switching Folders
Tap the current folder name and select the desired folder from the
list. If you want to view every entry in every folder, select
.
All
Filing New Entry in Folder
Do This
1 In the application, select the desired folder.
2 Create a new entry. The entry is automatically
assigned to this folder.
Moving Entry to a Different Folder
Do This
1 Open the entry.
2 Select a different folder. The entry is moved to this
folder.
Adding, Renaming, and Deleting Folders
Do This
1 Tap the current folder name and select
2 To add a new folder, tap
To rename a folder, tap
To remove a folder, tap
Add
Edit
Delete
.
.
.
Edit folders
.
Using Your Handset - 31
Page 33

Status Indicators
The status bar at the bottom of the screen shows the following
status indicators:
Battery
Strength
Clock
Alert
Mode
Phone
Network
Keyboard
Launcher
Location
Mode
Message
Signal
Strength
Clock – Shows the current time.
Keyboard Launcher – Tap to display the on-screen keyboard.
(The keyboard displays only when the cursor is in a text-entry field.)
Alert Mode – Shows the currently selected alert mode:
Audio: Vibrate: Silent:
The alert mode indicates how the handset notifies you of an
incoming call or message.
To change the alert mode, tap this indicator and select the setting
you want.
Location Mode – Shows whether the GPS (Global Positioning
System) Location service is off, idle (in standby), or busy
(requesting location information). The colour indicates the Location
mode:
Off: Grey Idle: White Busy: Green
To turn the Location service on or off, tap this indicator and select
the setting you want. The Location service allows you to track your
current location on the handset screen.
Phone – Shows the status of an active call:
Connected: Muted:
32 - Using Your Handset
Page 34

displays when you have a new voice message and no active
call.
Message – Shows that you have a new message and what type:
Email: text message:
multimedia message:
If an multimedia message or text message sender’s phone number
is in your Contact list, the indicator is white. If the message
sender’s phone number is not in your Contact list, the indicator is
amber. If multiple types of new messages are available,
displays.
Network – Shows the type of network service connection:
No service: (grey)
Emergency service: (red)
Connected to GSM home network: (one green segment)
Connected to GPRS home network: (two green segments)
Connected to UMTS home network: (three green segments)
Roaming to non-home type network: Indicator segments are
amber
Aeroplane mode (phone disabled):
To turn Aeroplane mode on or off, tap this indicator and select the
setting you want. (See “Switching to Aeroplane Mode” on page49.)
Signal Strength – Shows the network signal strength. The more
bars, the stronger the network signal.
Battery Strength – Shows the amount of charge in your battery.
The more bars, the greater the charge. The indicator displays in
orange when the handset is consuming a large amount of battery
power, such as during a video call.
Using Your Handset - 33
Page 35

Status Light
The top of the handset has a 3-colour light that shows the network
status and when you have an incoming call or message.
State Indication
Any incoming call or
message
In Service and no
message
In Service and
message waiting
No Service and no
message
No Service and
message waiting
Roaming and no
message
Roaming and
message waiting
Battery charging
(when connected to
battery charger)
Battery fully charged
(when connected to
battery charger)
Alternating red/green (times out
in 15 seconds)
Rapidly flashing green
Alternating green/red
Slowly flashing red
Rapidly flashing red
Rapidly flashing amber
Alternating amber/red
Continuous red
Continuous green
Entering Text
Two text entry methods make it easy to enter names, numbers, and
text messages on your handset.
34 - Using Your Handset
Page 36

Handwriting Recognition
You can use the stylus as a pen to write letters, numbers, and
punctuation directly on the touchscreen. T o write with the stylus, tap
in the status bar. The handwriting pad or the keyboard
appears (depending on which you used last). If the keyboard
appears, tap again, and then tap
Handwriting
menu.
Writing spaces
Tap to write
letters
Tap to write
numbers
Tap to write
special
characters
To write, tap the letters, numbers, or characters button on the left
side of the handwriting pad. Then use the stylus to write in one of
the two writing spaces. For best performance, alternate between
the writing spaces so that recognition can occur in one while you
are writing in the other.
To enter punctuation marks, special characters, spaces, and
returns, tap the buttons beneath the writing spaces.
Note: You can activate the handwriting pad only when the screen
cursor is in a field that allows you to enter text.
in the popup
Using Your Handset - 35
Page 37

Virtual Keyboard
You can use an on-screen keyboard to type text. To activate the
keyboard, tap in the status bar. The handwriting pad or the
keyboard appears (depending on which you used last). If the
handwriting pad appears, tap again, and then tap
in the popup menu.
Keyboard
To type, tap the keyboard keys with the stylus.
Note: You can activate the keyboard only when the screen cursor
is in a field that allows you to enter text.
Roman
36 - Using Your Handset
Page 38

Home
Home is your personal home page on the handset. It shows you the
latest news, entertainment, and sports information, as well as
personal information to help you organise your day.
Displaying Home
Home displays after the startup sequence when you turn on the
handset. You can also display Home by:
• Pressing
• Tapping icon in Application Selector bar or Application
Launcher.
Screen Contents
D
(if Shortcut key is set to default setting).
Information Snacks
Personal Information
Application
Shortcuts
Home - 37
Page 39

Information Snacks – Shows the three most recently
received information snacks (headlines). Tap a snack to
go to a Web page with more information.
Note: See the 3 welcome package for information about
information snacks.
Personal Information – Shows the number of new emails,
voicemails, multimedia messages, text messages, upcoming
appointments, and active tasks. Tap an item to open its application
(Messages, Calendar, or To Do).
Application Shortcuts – Shows three icons that let you start your
favourite applications.
Personalising Home
Do This
1 Go to Home (if not already shown).
2 Tap
3 Tap
4 Select the items you want displayed in the Personal
Information section: Email, Voicemail, multimedia
message, Calendar (appointments), To Do (active
tasks), or text message.
5 Tap
6 Select the applications you want displayed in the
Application Shortcuts section.
Home
Events
Apps
>
Preferences
tab.
tab.
.
38 - Home
Page 40

Calling Features
Opening Phone Application
Use the Phone application to make voice and video phone calls.
You can open this application in the following ways:
• Press
most recently dialled calls displays.
• Tap in the Application Selector bar or Application
Launcher. When the Phone application opens, the dialling
keypad displays:
Display
Tap keys to
dial number
Tap to place
voice call
. When the Phone application opens, a list of the
B
Tap to erase
last digit
Tap to place video call
Tap to switch between
keypad and call list
Calling Features - 39
Page 41

Displaying Your Phone Number
Your phone number must be programmed on your USIM card to
use this feature. Tap
phone number.
Phone
>
My Number
. The handset shows your
Making a Voice Call
Dialling with Keypad
Do This
1 Use stylus to tap phone number on keypad.
If you make a mistake while dialling, tap to
delete last digit. Tap and hold to delete all
displayed digits.
2 Tap .
Dialling Special Characters
While dialling (with digits displayed), tap the star key to insert
special dialling characters into phone number:
Do This To
)
1 Tap star key (
once.
2 Tap and hold star
key.
Insert a star character into
∗
phone number.
Insert a pause character (
phone number. A pause causes
phone to wait until the call
connects before it dials the next
digit(s).
) into
p
40 - Calling Features
Page 42

Do This To
3 Tap and hold #
key.
Insert a wait character (w) into
phone number. A wait character
causes phone to wait until the
call connects, and then prompts
for confirmation before it dials
the next digit(s).
Dialling Stored Phone Numbers
You can automatically dial stored phone numbers. See
“Communicating with Contacts” on page 72.
Redialling Failed Voice Calls
If a voice call fails (busy or not answered), a
displays. To redial the call, tap the
Retry
button.
Call Failed
message
Making a Video Call
You can make video calls to other devices that have video call
capabilities.
Dialling Video Call with Keypad
Do This
1 Position camera lens so that it faces the image you
want to send. (See “Positioning the Camera Lens” on
page 105.)
Note: The speakerphone automatically turns on during a
video call, so you do not have to hold the handset to your
ear.
Calling Features - 41
Page 43

Do This
2 Use stylus to tap phone number on keypad.
If you make a mistake while dialling, tap to
delete last digit. Tap and hold to delete all
displayed digits.
3 Tap .
Dialling Stored Phone Numbers
You can automatically place video calls to stored phone numbers.
See “Communicating with Contacts” on page 72.
Retrying Failed Video Calls
If a video call fails, a message displays indicating the cause of the
failure (for example,
the following buttons on the bottom of the screen to continue:
•
Send multimedia message
to the same phone number.
•
– Press to place a voice call to the same phone number.
Voice
•
– Press to return to the dialling keypad.
Cancel
Caller is not in video call service area
– Press to send an multimedia message
). Press one of
Using Automatic Redial
When Automatic Redial is turned on, the handset automatically
redials failed voice calls (busy or no signal). If the call does not go
through after 10 redial attempts, the handset stops redialling.
To turn on Automatic Redial:
Do This
1 Tap
Settings
42 - Calling Features
>
Call Control
.
Page 44

Do This
2 On the
tab, check the
Basic
Auto Redial
box.
Making an Emergency Call
Your service provider may program one or more
emergency phone numbers, such as 999, that you can
call under any circumstances, even when your handset is
locked or the USIM card is not inserted.
Your service provider can program additional emergency numbers
into your USIM card. Your card must be active to use the numbers
stored on it.
Note: Emergency numbers vary by country. Your handset’s
preprogrammed emergency number(s) may not work in all
locations, and sometimes an emergency call cannot be placed due
to network, environmental, or interference issues.
Sending Tones
While you are on a call, you can enter information such as credit
card numbers, passwords, and extensions by sending tones.
Do This
.
1 In the call screen, tap
2 Tap the characters you want to send on the keypad.
The characters are sent as tones to the network.
keypad
Calling Features - 43
Page 45

Answering Calls
When you receive an incoming voice or video call, the handset
rings or vibrates (unless set to Silent mode).
Do This
Press
If you do not want to accept the call, press
to reject it.
If you answer a new voice call while another voice call is active, the
new call becomes active and the previous call is put on hold.
If you receive a new voice call while one call is active and another
call is on hold, the screen displays the following buttons:
•
•
Note: The handset does not support simultaneous voice and video
calls. If you receive an incoming video call while a voice call is
active, the only options are to ignore the incoming video call or drop
the current voice call and then answer the video call.
or tap
B
: Tap to reject the incoming call.
Ignore
: Tap to answer the incoming call and drop the current
Drop
active call. The call on hold is not affected.
to answer the call.
Answer
A
or tap
Ignore
Adjusting Volume
Press the Volume key on the side of the handset to change the
volume of the earpiece, speakerphone, or headset during a call.
Press the top of the key to increase volume and the bottom of the
key to decrease volume.
44 - Calling Features
Page 46

Speakerphone Key
Vol ume Key
Using Speakerphone
Your handset has a built-in speakerphone that allows hands-free
use. Press the Speakerphone key on the side of the handset to turn
the speakerphone on and off.
If you want to answer an incoming call using the speakerphone,
press the Speakerphone key while the handset is ringing or
vibrating.
Using Features While on a Voice Call
Muting Microphone
To mute the microphone so the person on the other end cannot
hear you, tap the
While the call is on mute, the
the microphone back on, tap
button in the call screen.
Mute
button changes to
Mute
.
Unmute
Unmute
. To turn
Calling Features - 45
Page 47

Putting a Call on Hold
In the call screen, tap the
button changes to
Hold
button. While the call is on hold, the
Hold
. To resume the call, tap
Resume
Resume
.
Transferring a Call
You can transfer an active call or a call on hold to another phone
number.
Do This
1 In the call screen, tap
Phone
>
Transfer
.
The Transfer screen displays.
2 Dial the number to which you want to transfer the call
in one of the following ways:
• On the
and tap
• On the
tab, tap the number you want to dial,
Keypad
.
Done
tab, tap the name of the stored
Contacts
contact you want to call. Then tap the stored
number you want to dial.
The screen displays
Transferred
when the call transfer
completes. Your call is then disconnected.
Making Another Call While a Call is Active
You can make a second call while a call is active or on hold. You
can then switch between the two calls or join the calls in a
Grouptalk.
Do This
1 While the first call is active or on hold, press
The dialling keypad displays.
2 Tap the number you want to dial.
46 - Calling Features
B
.
Page 48

Do This
3 Press
If the call succeeds, one call is active and one call is
on hold. The screen displays both calls:
B
.
Switching Between Calls
To switch between an active call and a call on hold, tap
active call is put on hold and the call on hold becomes active.
Switch
Joining Calls in a Grouptalk
To join an active call and a call on hold so you can talk to
both parties in a Grouptalk, tap
displays, listing the joined parties.
. The Grouptalk screen
Join
. The
Calling Features - 47
Page 49

Adding Calls to a Grouptalk
You can join up to five calls in a Grouptalk. To add each call to the
Grouptalk:
Do This
1 In the Grouptalk screen, tap
2 Tap the number of the party you want to add.
3 Press B.
If the call succeeds, the called number displays below
the Grouptalk screen.
4 Tap
to add the call to the Grouptalk.
Join
Keypad
.
Using Features While on a Video Call
Muting Microphone
To mute the microphone during a video call so the person on the
other end cannot hear you, tap the
To turn the microphone back on, tap
Blocking Video
To block the video during a video call so the person on the other
end cannot see you, tap
To turn video back on, tap
Block
Unblock
.
button in the call screen.
Mute
.
Unmute
.
Viewing Call History
The handset keeps a list of the calls you recently dialled, answered,
and missed (did not answer). It sorts the list from the newest to
oldest entries.
48 - Calling Features
Page 50

To view the call history list:
Do This
1 Tap
History
.
A list of your most recently dialled calls displays on
the
Dialled
tab.
2 To view your most recently missed (unanswered)
calls, tap the
Missed
tab.
3 To view your most recently answered calls, tap the
Answered
tab.
4 To view your most recent video calls (dialled,
answered, and missed), tap the
Video
tab.
Making Calls from the History List
To call a number in the history list, tap the number.
Note: Voice calls are placed to the phone numbers on the
and
Missed
numbers on the
tabs. Video calls are placed to the phone
Answered
tab.
Video
Dialled
Clearing the History List
To delete all of the calls in the history list, tap
Phone
>
Clear Call History
Switching to Aeroplane Mode
If you want to use the handset’s personal organisation and
entertainment features in a situation where telephone use is not
allowed (such as on a plane), switch the handset to Aeroplane
mode.
,
.
Calling Features - 49
Page 51

In Aeroplane mode, you cannot connect to the network to make
phone calls or send messages. Also, GPS Location service is not
available.
Do This
1 Tap the Network indicator ( ) in the Status bar.
2 In the Connection Mode box, select
3 Tap
The indicator appears, indicating the handset is
now in Aeroplane mode.
Done
.
Aeroplane mode
.
To return to normal operation, tap , and select
Phone on
.
Switching Lines
If your USIM card has two phone lines, you can switch
between line 1 and line 2.
To switch lines, tap
Phone
>
Switch to Line 1/2
.
Turning off Call Ringing
You can turn off ringing for incoming calls by setting the handset’s
alert mode to vibrate or silent. See Alert Mode on page 32.
Using Optional Network Features
Using Caller ID
If you subscribe to the calling line identity (caller ID)
feature, you can see who is calling before you answer. If
the caller is stored as a contact, the caller’s name and
50 - Calling Features
Page 52

picture (if included when you added the contact) displays.
Otherwise, the screen displays the caller’s phone number.
If caller ID information is not available for an incoming call, the
screen displays
Unknown
.
Hiding your Caller ID
If you subscribe to the calling line identity restriction
(CLIR) feature, you can prevent your number from
showing when you call another number.
To hide your caller ID for the next phone call, tap
Using Call Waiting
If you subscribe to the call waiting feature, the screen
notifies you of an incoming call while a data call is in
progress. The screen displays the following buttons:
•
– Tap to reject the incoming call.
Ignore
•
– Tap to answer the incoming call and drop the current
Drop
data call.
To turn on the call waiting feature:
Do This
1 Tap
2 On the
Settings
Basic
>
Call Control
.
tab, check the
Call Waiting
box.
>
Hide ID
.
Phone
Calling Features - 51
Page 53

Using Call Diverting
If you subscribe to the call diverting feature, the handset
can forward incoming voice and data calls directly to
another phone number. Use the call diverting options to
specify which calls your handset should forward. When
you are ready to accept calls again, you can turn off call
diverting.
To turn on call diverting:
Do This
1 Tap
2 Tap the
Forwarding
3 Select the type of incoming calls for which you want
to specify forwarding options: Voice or Data.
4 Check the small box next to the type of calls you want
to forward:
only), or
you cannot select the other options.
Settings
>
Call Control
tab.
All calls, Busy
Unreachable
.
(voice only),
No answer
(voice only). If you select
(voice
All calls
,
52 - Calling Features
Page 54

Do This
5 Enter the forwarding number for the selected call
type(s) in one of the following ways:
• To enter the number manually, tap the long box
next to the call type. Tap the number on the
displayed keypad, and tap
Done
.
• To forward the call to a stored contact, tap
next to the call type. Tap the name of the stored
contact and then tap one of the stored numbers.
The selected forwarding number displays in the long
box.
Using Call Barring
If you subscribe to the call barring feature, you can
restrict outgoing or incoming calls. You can restrict all
calls, calls to international numbers, or calls while
roaming.
To turn on call barring:
Do This
1 Tap
2 Tap the
3 Select the type of outgoing and incoming calls you
want to bar.
4 Enter your call barring password and tap
Settings
Barring
>
Call Control
tab.
.
.
Done
To change your barring password:
Do This
1 On the
Barring
tab, tap
Change Password
.
Calling Features - 53
Page 55

Do This
2 Enter your old barring password and tap
Done
.
3 Enter a new password (4 - 10 characters) and tap
.
Done
Monitoring Phone Use
Setting In-Call Timer Options
Do This
1 Tap
2 On the
•
•
Viewing Call Time Information
Y our handset records the time of your phone calls. To view call time
information:
>
Settings
tab, set the following options:
In Call
Audible Timer
Call Tracking
– If you want the handset to sound an
.
alert at specified intervals during a call, select an
interval between 1 and 15 minutes. Select
Off
to
disable audible timer.
In Call Display
display during the call, select
– If you want the call’s elapsed time to
Call Time
. Select
Off
to
disable in-call display.
Do This
1 Tap
Settings
54 - Calling Features
>
Call Tracking
.
Page 56

Do This
2 Tap the
Last Call
tab. The following information displays:
Timers
– Elapsed time of your last dialled or received
call.
– Elapsed time of all dialled calls since last
Outgoing
reset.
– Elapsed time of all received calls since last
Incoming
reset.
– Elapsed time of all dialled and received calls
All Calls
since last reset.
– Elapsed time of all calls on this handset. Y ou
Lifetime
cannot reset this time.
Note: The amount of network connection time you see on these
timers may not equal the amount of time for which you are billed by
your service provider. For billing information, call your service
provider.
Resetting Call Timers
To reset the Outgoing, Incoming, and All Calls timers, tap the
button on the
Timers
tab.
Reset
Viewing Call Charges
Your phone network can provide you with information
about your call charges.
To view this information:
Do This
1 Tap
Settings
2 Tap the
charges displays.
>
Call Tracking
tab. Information about your call
Charges
.
Calling Features - 55
Page 57

Messages and Email
Y ou can create, send, and receive the following types of messages:
email, MMS (Multimedia Message Service), and SMS (Short
Message Service).
You can send stored audio, video, and picture files with your email
and multimedia messages. See the “News and Entertainment”
section for how to download and store these files in the handset.
Setting up Messaging Accounts
Before you can send and receive messages, you must
set up your accounts. Contact your service provider for
account details.
Email
To send and receive emails, you must set up an Internet account
and an email account.
The communicator supports the following email protocols: IMAP4,
POP3, and SMTP.
To create an Internet account:
Do This
1 Open Control Panel application ( ).
2 Tap
Connections
3 Tap
New
4 Enter information about your account.
tab >
Internet accounts
.
>
Accounts
tab.
56 - Messages and Email
Page 58

Do This
5 Enter the following:
Account name
Connection type
– Enter a name for this account.
– Select the type of network this
account uses to connect to the Internet. Your service
provider supplies this information.
6 Tap
7 On the
User name and password
Advanced
Server
.
tab, enter the following:
– Usually, you do not have to
enter these when you connect to the Internet.
However, some service providers may require you to
enter them.
– Enter the Internet address of your account.
Address
Your service provider supplies this address.
8 On the
and
tab, check the
Log in
Get DNS address automatically
Get IP address automatically
boxes.
The handset will automatically retrieve the IP and
DNS addresses from your service provider.
If, after you set up an Internet account, you cannot
connect to the Internet and you suspect these
addresses are incorrect, ask your service provider for
their IP and DNS addresses. Enter these addresses
in the
IP address
and
Primary/Secondary DNS address
boxes.
Messages and Email - 57
Page 59

Do This
9 On the
check the
tab, if your account uses a proxy server,
Proxy
Use proxy server
box . A proxy server is a
computer that stores copies of Web pages so that
you can retrieve them faster or more securely than
you could from their original location(s).
To use a proxy server, specify the proxy server
address and port number, which are available from
your service provider.
If you use a proxy server, you can specify a list of
Web sites that are accessed from their original
location(s), rather than through the proxy server.
Enter each address on a separate line in the
exceptions
10 On the
Enable PPP extensions
box.
tab, select the following:
Other
– Check this box if your service
provider supports these extensions. PPP extensions
allow your handset to provide features such as
encryption, which increases Internet security.
Plain text authentication
– Check this box if your service
provider requires this feature.
11 Tap
Done
.
To create an email account from Control Panel:
Do This
1 Tap
2 Tap
Connections
.
New
tab >
Messaging accounts
>
Email
3 Enter information about your account on the
Inbox, Outbox
, and
Advanced
tabs.
Proxy
tab.
Basic
,
58 - Messages and Email
Page 60

Do This
4 On the
Account name
Your name
tab, enter the following:
Basic
– Enter a name for this account.
– Enter the name that you want to appear on
outgoing emails.
Email address
– Enter the address provided by your
service provider.
Connection type
– Select the type of connection used to
access the email server. Your service provider
supplies this information.
5 On the
User name, Password
tab, enter the following:
Inbox
, and
Incoming server address
service provider supplies this information, which
identifies the computer that stores your incoming
emails.
– If you do not have much time to download
Download
your emails, you can choose to retrieve just a header
(the sender, subject, and date) or set a size limit (if an
email is larger than this limit, only the headers
download). You can download the complete email
later.
6 On the
Outgoing server address
tab, enter the following:
Outbox
– Your service provider supplies
you with their outgoing server address, which
identifies the computer from which your outgoing
emails are sent.
– Your
Messages and Email - 59
Page 61

Do This
7 On the
Secure connection
tab, enter the following:
Advanced
– Check this box if your service
provider tells you that you have a secure connection.
A secure connection means that all information
(including your username, password, and all
messages) is encrypted to maximise security while
you are connected to the Internet.
Outgoing mail port
and
Incoming mail port
– Y ou probably do
not need to change these settings.
Use MIME encoding
– MIME encoding is a standard that
allows you to email non-textual information (for
example, graphics) and accented characters. Check
this box to use this feature.
Secure password authentication
– Check this box if your
service provider tells you that you have this feature.
This feature encrypts only your password.
8 Tap
Done
.
Note: See the A920 Reference Guide on the provided CD-ROM for
more information about setting up Internet and email accounts.
Multimedia message and text message
Your service provider should already have set up
multimedia message and text message accounts on
your handset.
To check account settings from Control Panel:
Do This
1 Tap
Connections
2 Tap the
multimedia message
account settings.
60 - Messages and Email
tab >
Messaging accounts
or
text message
.
tab to view
Page 62

Opening Messaging Application
Use the Messaging application to create, send, and receive
messages. To open this application:
Do This
Tap in the Application Selector bar or Application
Launcher.
When the Messaging
application opens, it shows a
list of your established
accounts:
Creating and Sending Messages
Email and text message
To write and send an email or text message:
Do This
1 Tap the email or text message account in the list of
accounts.
Messages and Email - 61
Page 63

Do This
2 Tap
3 In the
>
Message
field, enter the recipient’s address (email) or
To
New
.
phone number (text message) with the stylus or
virtual keyboard.
To enter a stored address or phone number from
Contacts, tap
.
To
To enter several addresses or phone numbers, enter
a comma between each.
4 In the
field (email only), write a subject line.
Subj
5 In the text area, write the text message.
6 T o add an attachment to an email, tap the tab and
tap
. Then select the stored file that you want to
Add
attach.
7 When message is complete, tap
8 If you want to send the message now, tap
immediately
.
Send
.
Send
multimedia message
Y ou can create and send multimedia messages that contain one or
more slides with images, sounds, and text.
Do This
1 Tap the multimedia message account in the list of
accounts.
62 - Messages and Email
Page 64

Do This
2 Tap
Message
>
New
.
The first slide of the message displays:
Duration label
Image area
Text area
3 In the
field, enter the recipient’s phone number or
To
email address. (The recipient must also subscribe to
multimedia messaging.)
To enter a stored number from Contacts, tap
.
To
To enter several phone numbers, enter a comma
between each.
4 Tap to add a sound. You can then record a new
sound or select a stored audio file.
You can add the following types of stored audio files
to an multimedia message: WAV and AMR.
Messages and Email - 63
Page 65

Do This
5 Tap to add an image. You can then select a
stored image file.
You can add the following types of stored image files
to an multimedia message: BMP, WBMP, GIF, PNG,
JPEG, and TIFF.
6 Tap the text area to place a cursor in the text area.
Enter text with stylus or virtual keyboard.
7 To set the slide duration, tap the duration label (
). Specify how long (in seconds) you want the slide
20s
20/
to play before automatically advancing to the next
slide in the message.
The first number in the duration label indicates the
selected duration of the current slide. The second
number indicates the total duration of all slides in the
message.
8 To add another slide to the message, tap .
9 To play the slide presentation, tap .
10 When message completes, tap
11 To send the message now, tap
.
Send
Send immediately
.
Notes:
• The maximum file size of an multimedia message is 30 KB. If
you exceed this size, a warning message displays. Remove
audio or video files to reduce the file size.
• If you accept a videocall while sending an multimedia
message the multimedia message will be interrupted and only
the videocall will be maintained.
64 - Messages and Email
Page 66

Receiving and Reading Messages
When the handset receives a new message, a message indicator
displays in the status bar. See “Status Indicators” on page32.
Do This
1 Tap message indicator in Status bar.
The Messaging application opens, showing a list of
established accounts. The number of unread
messages displays next to each account.
2 Tap the account containing the message you want to
read.
A list of messages displays. Unread messages
display in bold.
3 Tap the message you want to read.
4 Any attachments to the message display with a .
Tap on the attachment to open it.
Saving Sender’s Address as a Contact
You can save the sender’s name and address or phone number
(depending on message type) in the Contacts application.
Do This
1 Open the message.
2 Tap
The Save Contact screen displays.
3 Enter the sender’s name.
4 Tap
The sender’s name and address or phone number
are saved as a contact.
in front of the sender’s name.
From
.
Save
Messages and Email - 65
Page 67

Messaging Folders
The following folders are preset in Messaging:
•
– Contains received messages. You can reply to,
Inbox
forward, and delete these messages, but you cannot edit
them.
•
– Contains messages that are ready to send.
Outbox
To send messages from the Outbox, select the messages you
want to send by tapping to the left of them. Then tap
•
– Contains messages that are not ready to send. To save
Draft
a message in Draft, create the message and leave it without
tapping
•
Sent
.
Send
– Contains messages you have sent.
Finding Messages
Do This
1 In the list of accounts or list of messages, tap
>
.
Find
2 Enter text you want to search for. This text can be
contained in the message subject line, sender details,
or the body of the message.
3 In the
want to search through. Select
box, select the type of messages you
Where?
to search through
All
all messages.
4 Tap
Find
.
A list of messages containing the specified text
displays.
Message
Send
.
66 - Messages and Email
Page 68

Setting Email Preferences
You can set the following email preferences:
•
Always attach your card
always attached to all emails that you send. See “Creating
Owner Card” on page 73.
If you choose not to automatically attach your owner card, you
can still attach it to individual emails. To attach your owner
card, create the email message and tap
.
card
•
Always reply with history
original message (the history) is included when you reply to an
email message.
•
– Specifies text to display at the end of the emails you
Signature
send.
To set email preferences:
Do This
1 Tap the email account in the list of accounts.
2 Tap
Edit
>
Preferences
3 Select desired settings for each email preference. To
set a signature, write the desired text in the
box.
4 Tap
Done
.
– Specifies whether your owner card is
>
Message
– Specifies whether the text of the
.
Signature
Attach your
Messages and Email - 67
Page 69

Contact List
Use the Contacts application to store details such as names, phone
numbers, and email addresses in an alphabetical list of entries. Y ou
can quickly call or send a message to any stored contact from this
list.
Opening Contacts Application
Tap in the Application Selector bar or Application Launcher.
An alphabetical list of stored contacts displays:
The following icons can display next to a contact name:
– Displays if contact has a voice tag assigned to a phone
number. See “Adding Contacts” on page69 for how to assign a
voice tag.
– Displays if contact is saved in USIM folder.
68 - Contact List
Page 70

To see each contact’s preferred phone number next to their name,
tap
Edit
>
Preferences
and select the
Show preferred phone number
box.
Adding Contacts
Do This
1 Open the folder in which you want to save the
contact. To store the contact on your USIM card,
open the USIM folder.
2 Tap
The Contact information form displays:
Contacts
>
New
.
Contact List - 69
Page 71

Do This
3 Enter contact name, phone numbers, email address,
and other information.
Note: If you enter more than one phone number for a
contact (for example, a work and home number), you can
select which number displays in the contact list as the
preferred phone number. To do so, tap
Preferred number
and select the desired preferred phone
Edit
>
number.
4 Tap preceding each phone number to select its
communication method: Phone (landline), Mobile,
Multimedia Mobile (multimedia message-capable),
Video Phone (landline), Video Mobile, Email, and
Web.
5 T o assign a particular ringtunes to the contact, tap the
box and select a ringtunes from the list.
Ringtunes
When you receive a voice or video call from this
contact, the selected ringtunes plays.
Tap to play the selected ringtunes.
6 To add a note to a contact, tap and enter the note.
Y ou can mark a note as Private. Private notes are not
included when you send or synchronise contact
details.
7 To assign a photo or other image to the contact, tap
.
Then tap and select one of the stored images.
The contact’s assigned image displays when you
make a call to or receive a call from the contact.
70 - Contact List
Page 72

Do This
8 When you have entered all contact information, tap
.
The contact now displays in the alphabetical list of
contact names.
Sample contact pictures are provided on the CD-ROM supplied
with the handset.
Finding Contacts
To find a particular contact in a list:
Do This
>
Contacts
1 Tap
2 To search in all fields, including notes you have
created, tap
To search for names and company, tap
.
Company
3 Enter search criteria in the
Searching is not case-sensitive and you do not have
to enter an entire word to locate a matching entry.
4 Tap
Find
.
.
Find
in all fields
.
Find Contact
in Names &
box.
Contact List - 71
Page 73

Communicating with Contacts
You can easily phone, email, or send messages to your stored
contacts.
Do This
1 In the list of contact entries, tap the contact name.
The contact’s defined phone numbers and email
addresses display:
A phone number or email address might have
additional icons next to it, depending on its defined
communication method.
72 - Contact List
Page 74

Do This
2 To place a voice call, tap the phone number.
To place a video call, tap next to the phone
number.
To send an email, tap the email address.
To send an multimedia message, tap next to the
phone number or email address.
To send a text message tap next to the phone
number.
Sending Contact Details
You can send contact details (including your own) by email, text
message, or multimedia message.
To send contact details:
Do This
1 Open the contact you want to send.
2 Tap
3 Select the method by which you want to send the
contact details.
4 Tap
Contacts
.
Done
>
Send As
.
Creating Owner Card
You can create an electronic version of your business card that
contains your own contact details, including notes and a photo. You
can send your contact details as described in “Sending Contact
Details” on page 73.
Contact List - 73
Page 75

To create your own card:
Do This
>
1 Tap
Contacts
New
.
2 Enter your contact information, as described in
“Adding Contacts” on page 69.
3 Tap
Contacts
>
Set as owner card
.
Sorting Contacts
:
Do This
1 Tap
Edit
>
Preferences
.
2 Select the manner in which you want the contacts
sorted.
3 Tap
74 - Contact List
Done
.
Page 76

Customising Handset Settings
You can adjust handset settings to suit your needs.
Setting Wallpaper Image
You can select an image to display in the background of the
Application Launcher.
Do This
1 Open Application Launcher ( ).
2 Tap
3 Tap
4 Select one of the stored images.
Sample wallpapers are provided on the CD-ROM supplied with the
handset.
Note: See “News and Entertainment” for how to download and
save images you can use as wallpaper.
Setting Screen Brightness
Do This
View
Change
>
Wallpaper
.
.
1 Open Control Panel application ( ).
2 Tap
3 Slide
4 Tap
Screen
Brightness
.
Done
.
dial to desired setting.
Customising Handset Settings - 75
Page 77

Setting System Sounds
To set volume levels for the sounds of screen taps, button presses,
system alerts (for example, incoming call alert), and system notices
(for example, low battery notice):
Do This
1 Open Control Panel application ( ).
2 Tap
3 Select desired sound settings: Off, Quiet, or Loud.
4 Tap
Sounds
Done
.
.
Setting Shortcut Key
The handset’s Shortcut key (D) allows you to open your favourite
application with a one button press. The default setting for this key
is Home.
Y ou can set the Shortcut key to open any application. For example,
to be ready to take pictures with a single button press, select
Camera.
Do This
1 Open Control Panel application ( ).
2 Tap
Shortcut Key
3 Select an application from the list.
4 Tap
Done
.
.
Choosing Ringtunes
When you set the alert mode to audio, the handset rings to indicate
an incoming call or message. You can select from the different
ringtunes provided.
76 - Customising Handset Settings
Page 78

Notes: See Alert Mode on page 32 for how to view and set the alert
mode.
Personalised ringtunes that you assign to stored contacts override
the ringtunes you select here. See “Adding Contacts” on page 69
for how to assign personalised ringtunes.
Choosing Ringtunes for Calls
Do This
1 Open the Phone application ( ).
2 Tap
Settings
>
Tones
.
3 Select the ringtunes you want for 3 phone number, 3
additional line (if applicable), and video calls.
To hear the selected ringtune, tap .
4 Tap
Done
.
Choosing Ringtunes for Messages
Do This
1 Open the Messaging application ( ).
Edit
>
Preferences
2 Tap
3 Select the ringtunes you want for each messaging
account.
.
To hear the selected ringtune, tap .
4 Tap
Done
.
Customising Handset Settings - 77
Page 79

Choosing Vibrate Pattern
When you set the alert mode to vibrate, the handset vibrates to
indicate an incoming call or message. You can select from the
different vibrate patterns provided.
Note: See Alert Mode on page 32 for how to view and set the alert
mode.
Do This
1 Open Control Panel application ( ).
2 Select the
3 Tap
Ringtunes Manager
4 Tap the
5 Tap the vibrate pattern you want to use.
6 Tap
Done
Vibrate
.
General
tab.
tab.
.
Installing Ringtunes
If you want to use ringtunes not supplied with the handset, you can
install audio files as ringtunes. You can then assign the installed
ringtune to a call or message as described in “Choosing Ringtunes
for Calls” and “Choosing Ringtunes for Messages” earlier in this
section. Y ou can also assign installed ringtunes as alarm sounds in
the Contacts, Calendar, To Do, and Time applications.
Sample ringtunes are provided on the CD-ROM supplied with the
handset.
Ringtunes File Formats
You can install the following types of audio files as ringtunes: MIDI,
MP3, and WAV.
78 - Customising Handset Settings
Page 80

Installing Audio Files as Ringtunes
You can install an audio file as a ringtune by downloading it from
the Web or opening it as an email attachment. When the file opens,
a dialog box appears that enables you to install the file.
Installing Saved Audio Files as Ringtunes
To install previously saved audio files as ringtunes:
Do This
1 Open Control Panel application ( ).
2 Tap
Ringtunes Manager
A list of the currently installed ringtune files displays
on the
Audible
3 Tap
4 Select the folder in which the audio file is saved.
5 Tap the file that you want to install.
6 Tap
Install
Select
.
.
.
tab.
Customising Handset Settings - 79
Page 81

Personal Organiser Features
Calendar
Use Calendar to schedule and organise events such as
appointments and meetings. You can review your schedule of
events for the day, week, or month, and have the handset play a
reminder alarm for specific events.
Note: Ensure that the correct time and date are set before using
Calendar. See “Setting Time and Date” on page 91.
Adding an Calendar Entry
You can enter the following types of Calendar entries:
•
Appointment
meeting)
•
Reminder
birthday)
•
All day event
times. Use an all day event for an entry that lasts a whole day
or several days (for example, a grouptalk).
To add an Calendar entry:
Do This
1 Open Calendar ( ).
– An entry with a start and end time (for example, a
– An entry that does not need a time (for example, a
– An entry with a start and end date, but no specific
80 - Personal Organiser Features
Page 82

Do This
2 Tap
Calendar
>
New
.
The Calendar
Entry form
displays:
3 Use stylus or virtual keyboard to enter a description.
4 Select the type of entry.
5 Enter the date, time, and location of the event.
6 Tap the
box if you want the handset to sound a
Alarm
reminder alarm for this entry.
The time and date of the alarm display below the
box. To change when the alarm sounds, tap the
Alarm
time or date.
7 If this entry recurs, tap
to select a repeat
Repeat
interval.
8 To mark this entry as Private when you synchronise
Calendar entries with a computer, tap
Private
.
9 To add a note to the entry, tap and enter the note.
Personal Organiser Features - 81
Page 83

Do This
10 Tap to save the entry.
Switching Calendar Views
Y ou can see your Calendar entries in several views: Day, Week, or
Month. When you first open Calendar, the Day view displays.
To switch to Week view, tap .
To switch to Month view, tap .
To switch back to Day view, tap .
To return to the current day in the selected view, tap .
To see the details of an entry, tap the entry.
Assigning Colours to Calendar Folders
In Calendar, you can assign colours to folders. For example, you
can use different colours for business and personal entries. Entries
in a folder display in the assigned colour in the Day and Week
views so that you can see the pattern of events.
Do This
1 Tap the current folder name.
2 Tap
Edit folders
3 Tap the name of the folder to which you want to
assign a colour.
4 Tap
Edit
5 Tap the
6 Tap the colour you want to assign.
.
Colour
.
box.
82 - Personal Organiser Features
Page 84

Do This
7 Tap
Done
.
Finding Entries
Do This
>
1 Tap
Calendar
Find
.
2 Enter text for which you want to search.
3 In the
box, select whether you want to search
Where?
through future entries, past entries, or everywhere (all
entries).
4 Tap
Find
.
A list of entries containing the specified text displays.
Deleting Entries
Deleting entries helps keep your Calendar from getting too large
and difficult to manage.
To delete an individual or repeat entry:
Do This
1 Open the entry.
2 Tap
Calendar
>
Delete Entry
.
To delete all entries in a specified period of time:
Do This
1 Tap
2 In the
>
Calendar
Removal range
Remove entries
box, select the period of time for
.
which you want to delete entries.
Personal Organiser Features - 83
Page 85

Do This
3 Tap
Done
.
Moving Entries to the To Do Application
Y ou can move Calenda r entries to the To Do application, which lists
tasks you need to complete. See “To Do” on page 85.
Do This
1 Open the entry.
2 Tap
Calendar
>
Move to To Do
.
Notes: To Do entries do not have repeats, times, or locations, so
Calendar entries that you move to To Do lose this information. If
you copy an entry back to Calendar, the handset does not restore
this information.
If you move an entry with an alarm, it will sound in To Do.
Sending Entries
You can send Calendar entries by email, text message, or
multimedia message.
Do This
1 Open the entry you want to send.
2 Tap
3 Select the method by which you want to send the
entry.
4 Tap
Calendar
.
Done
>
Send As
.
84 - Personal Organiser Features
Page 86

Setting Calendar Preferences
Do This
1 Tap
2 On the
>
Edit
Preferences
General
View hours in day
.
tab, you can set the following options:
– Sets the hours you see in Day view
(for example, from 10:00 to 18:00 pm).
Standard time intervals
– Sets the intervals into which the
day divides in Day view. For example, enter 00:30 for
half-hour divisions.
Standard entry length
– Sets the preferred length for
entries. For example, enter 2:00 to set the end date
for new entries to be two hours after the start time.
View hours in week
– Sets the hours you see in Week
view.
3 On the
Alarm precedes event by
tab, you can set the following options:
Alarms
– Sets the time between an
alarm sounding and an entry’s start time.
Alarm sound
– Sets the sound of the alarm. To hear the
selected sound, tap .
.
Done
4 Tap
To Do
Use the To Do application to list and track tasks you need to
complete. Y ou can set due dates for activities, set reminder alarms,
and mark tasks as completed.
Personal Organiser Features - 85
Page 87

Adding Entries
To add a To Do entry:
Do This
1 Open To Do ( ).
2 Tap
The To Do entry
form displays:
3 Use stylus or virtual keyboard to enter a description.
4 Select a priority (1-9, with 1 highest) for the task.
5 T ap the
date.
The current date displays next to the
select a different due date, tap the date and select a
date from the displayed calendar.
To do
>
.
New
box if you want this task to have a due
Due date
Due date
box. To
86 - Personal Organiser Features
Page 88

Do This
6 Tap the
box if you want the handset to sound a
Alarm
reminder alarm for this entry.
The time and date of the alarm displays below the
box. To change when the alarm sounds, tap the
Alarm
time or date.
7 To mark this entry as Private when you synchronise
To Do entries with a computer, tap
Private
.
8 To add a note to the entry, tap and enter the note.
9 Tap to save the entry.
Marking Tasks as Complete
When you open To Do, a list of tasks and their due dates displays.
To mark a task as completed, tap the box next to it. The due date
disappears, indicating the task is completed.
Note: To hide completed entries, tap
the check from
Display completed
.
Edit
>
Preferences
and remove
Finding Entries
Do This
1 Tap
2 Enter text for which you want to search.
3 In the
all folders or the current folder.
4 Tap
A list of entries containing the specified text displays.
>
To Do
Find
.
Find
box, select whether you want to search
Where?
.
Personal Organiser Features - 87
Page 89

Deleting Entries
When you no longer need a record of your completed entries,
delete them.
To delete an individual entry, tap the entry in the list and tap
To delete all completed entries, in your list of entries, tap
Delete completed
.
To do
Delete
>
Moving Entries to Calendar
You can schedule To Do entries on your calendar by moving them
to the Calendar application. See “Calendar” on page 80.
Do This
1 Open the entry.
2 Tap
Notes: If you do not set a due date for the To Do entry, the handset
uses the current date for the new Calendar entry.
If you move an entry with an alarm, it sounds in Calendar.
To do
>
Move to Calendar
.
Sending Entries
You can send To Do entries by email, text message, or multimedia
message.
Do This
1 Open the entry you want to send.
2 Tap
3 Select the method by which you want to send the
entry.
4 Tap
To Do
Done
>
.
Send As
.
.
88 - Personal Organiser Features
Page 90

Setting To Do Preferences
Do This
1 Tap
2 You can set the following options:
3 Tap
>
Edit
Preferences
Display due dates
dates in the list of entries. Due dates are coloured red
if they are overdue.
Display completed
completed entries in the list of entries.
Alarm sound
selected sound, tap .
– Sets the sound of the alarm. To hear the
.
Done
.
– Select this option to display due
– Select this option to display
Notes
Use Notes to write notes and sketch graphics.
Adding Notes
Do This
1 Open Notes ( ).
2 Tap
3 Enter the note using the stylus or virtual keyboard
().
Notes
>
New
.
4 To add a graphic to the note, tap .
5 Use the stylus to sketch your graphic.
On-screen buttons allow you to change line width and
colour, and erase lines.
Personal Organiser Features - 89
Page 91

Do This
6 Tap to save the note.
Using Paste
To create a new note from text or sketches copied from another
application, tap
sketch, the original is deleted.
Edit
>
. If you paste a sketch over an existing
Paste
Finding Notes
Do This
>
Notes
1 Tap
2 Enter text for which you want to search.
3 Tap
Find
A list of notes containing the specified text displays.
.
Find
.
Sending Notes
You can send Notes notes by email, text message, or multimedia
message.
Do This
1 Open the note you want to send.
2 Tap
3 Select the method by which you want to send the
note.
4 Tap
Notes
Done
>
.
Send As
.
90 - Personal Organiser Features
Page 92

Time
Use Time to set the current date and time, and to set alarms you do
not want to include in your Calendar or To Do list.
Setting Time and Date
If you have not already set the current time and date:
Do This
1 Open Time ( ). The Time screen displays:
Current city
Current time and date
Other city time and
date
Alarm slots
2 Tap
Time
>
Set Time & Date
.
3 Enter the current time and date.
4 To set the preferred time and date format, tap the
tab.
Format
Select the time and date format from the lists of
available formats.
5 Tap
Done
.
Personal Organiser Features - 91
Page 93

Setting Location
Time can display time and date information for two locations:
•
– The place where you are at the moment. Time shows
Current
the time and date of your current location in the top half of the
screen.
•
– A city of your choice. Time shows the time of this city
Other
below the time and date of your current location. If you are
abroad, you can check the time at home by setting this
location to your home city.
To set locations:
Do This
1 Tap
2 Select your current location from the
and
>
Time
Set Location
Current city
lists.
.
Current country
Note: If the city you want is not listed, select another city
in the same time zone.
3 Select another location (optional) from the
country
4 Tap
Done
and
.
Other city
lists.
Other
Setting Alarms
You can use Time as an alarm clock. It is ideal for wake-up alarms
and other regular alarms you do not want to include in your
Calendar or To Do list.
You can set up to three alarms in Time. The alarm slots display in
the lower half of the Time screen.
92 - Personal Organiser Features
Page 94

To set an alarm:
Do This
1 Tap one of the alarm slots.
2 Set the following alarm details:
– Select the time of day you want the alarm to
Time
sound.
– Select how often you want the alarm to sound:
When
only once, in the next 24 hours, daily, on workdays
only, or weekly.
Alarm sound
– Select the sound you want the alarm to
make. Tap to listen to the selected sound.
– Select from one of several preset alarm
Message
messages or enter your own.
3 Tap
Done
.
4 Tap the alarm checkbox to activate the alarm.
Responding to Alarms
When an alarm sounds, the message you selected displays
instantly. Tap the
minutes.
Note: The alarm will not sound while you are making a phone call
or recording a voice note.
button to reset the alarm to sound in five
Snooze
Turning Alarm Sounds Off
To silence an alarm before it sounds, do one of the following:
• Turn off the alarm by unchecking the alarm slot checkbox.
• Tap the alarm slot and select
in
Silent
Alarm sound
Personal Organiser Features - 93
.
Page 95

Calculator
To open the calculator, tap in the Application Launcher.
Use the calculator by tapping the on-screen keys. The calculator
has the following memory keys:
Key Description
mr+
Tap to store a number in memory.
mr-
Tap to subtract a number from the number in
memory.
mr
Tap once to retrieve a number from memory and
enter it into the display.
Tap twice to clear memory.
94 - Personal Organiser Features
Page 96

News and Entertainment
Web Browser
The Web browser lets you open Web pages and use
Web-based applications (such as on-line banking,
shopping, and games) on your handset.
Setting Up Internet Account
Before you can use the Web browser, you must set up an Internet
account. See “Setting up Messaging Accounts” on page 56.
Opening Web Browser
Tap in the Application Launcher. An alphabetical list of your
bookmarks and saved Web pages displays.
To open the Web browser and go directly to the Hutchison portal,
press
Note: If you accept a videocall during a browsing session, the
browser session will be interrupted and only the videocall will be
maintained.
Opening Web Pages
You can open a Web page in the following ways:
.
E
• Tap the bookmark or saved Web page you want to open.
• Tap
>
Web
Open web page
want to open and tap
You can omit the
http://
. Enter the address of the Web page you
. (No need to enter the full address.
Open
)
If a page is taking too long to open, you can tap (Stop).
News and Entertainment - 95
Page 97

If you get a message that a Web page cannot display, tap
(Reload).
Viewing Recently Visited Web Pages
You can view recently visited Web pages in the following ways:
• To return to the last page viewed, tap (Back).
• To view a page viewed before tapping , tap (Forward).
• To view a list of pages recently viewed, tap
page in the list to view it.
Web
>
History
. Tap a
Adding Bookmarks
To add a bookmark for a Web page so you can return to the page
without having to enter its address:
Do This
1 Open the Web page.
2 Tap
3 Select a folder for the bookmark.
4 Tap
Web
Add
>
.
Add bookmark
.
Saving Web Pages
To save a Web page so you can view it later when not connected to
the Internet (offline browsing):
Do This
1 Open the Web page.
2 Tap
3 Select a folder for the page.
4 Tap
96 - News and Entertainment
Web
Add
>
.
Save page
.
Page 98

Downloading Audio, Video, and Pictures
You can download audio files, video clips, and pictures from the
Web. To download a file, follow the instructions on the Web page.
When the download completes, the file opens in the browser or in
another handset application (depending on the file type). You can
save the file to a folder in the handset or to the memory card.
Finding Text on a Web Page
Do This
1 While a Web page is open, tap
2 Enter the text you want to find and tap
Edit
>
Find
Find
.
.
The first occurrence of the text highlights.
3 To find the next occurrence, tap
Edit
>
Find next
.
Setting Web Preferences
Do This
1 Tap
2 On the
3 When you finish setting preferences, tap
Edit
Use Cookies
>
Preferences
General
– Specifies whether the browser accepts
.
tab, you can set the following options:
cookies from Web sites. A cookie helps a Web site
track your visits. The site generates a cookie, which is
then stored in the handset.
Cache size
– The cache is part of the handset memory
that stores the Web pages you visit. Setting this
option to
means the pages load faster, but
Large
leaves less memory for other applications.
.
Done
News and Entertainment - 97
Page 99

Music
Use Music to listen to the following types of audio files: AU, AMR,
MIDI, MP3, and WAV. You can listen to audio files that you
downloaded from the Web or received as an email attachment, or
stored on the removable memory card.
Opening Music
Tap in the Application
Launcher. When Music opens,
it shows a list of all saved
audio tracks.
To see the audio tracks saved
in a specific folder, tap the
current folder name (upper
right corner) and select the
desired folder from the list.
Sample music files are provided on the CD-ROM supplied with the
handset.
Note: Audio tracks must be stored in the proper directory on the
memory card for you to see and play them in Music. When you
copy audio files to the memory card from a computer, ensure that
the files are stored in a third-level directory under:
Media Files\Audio\
For example, you can store audio files in any of the following
directories:
Media Files\Audio\Classical
98 - News and Entertainment
Page 100

Media Files\Audio\Rock
Media Files\Audio\Unfiled
Playing an Audio Track
Do This
1 In the list of tracks, tap the track you want to play.
Information about the track displays (artist, album,
etc.) and the track begins to play.
2 While the track plays, you can tap the following
buttons at the bottom of the screen:
Tap and hold down to rewind the track.
Tap to stop playing and return to the start of the
track.
Tap to switch between play and
pause mode.
Tap and hold down to advance (fast forward)
the track.
Note: The
right = fast forward, centre = play/pause.
key also controls audio play: left = rewind,
C
Managing Music Playlists
Music can play all of the tracks in a folder in a sequence that you
specify. To specify the sequence, you must edit the folder’s playlist:
Do This
1 Open the folder containing the tracks you want to
play.
News and Entertainment - 99
 Loading...