

Page 1

APPLICANT: MOTOROLA, INC. FCC ID: IHDT56AD1
INSTRUCTION MANUAL
A preliminary draft copy of the Users Manual follows:
EXHIBIT 8
Page 2

Phoenix Wireless Telephone
User Guide
Draft for FCC Type Approval
March 10, 2000
Page 3

Welcome
Welcome to the world of Motorola digital wireless
communications from a global leader in communications
technology! We are pleased you have chosen the Motorola
V
wireless phone to keep you connected with ease.
All Motorola phones are designed and manufactured to
meet Motorola’s rigorous specifications and world-class
quality standards. During development, our testing team
took the Motorola
tests including temperature, humidity , shoc k, dust, vibration,
and drop tests—and the phone still worked!
We are confident that you and your callers will find your
wireless phone to be a convenient and reliable way to stay
in touch. Thank you for choosing a Motorola
and enjoy your new phone!
phone through rigorous durability
V
V
product
1
Page 4

Contents
Safety Information . . . . . . . . . . . . . . . . . . . . . . . . . . . . .10
Overview . . . . . . . . . . . . . . . . . . . . . . . . . . . . . . . . . . . . .16
Package Content Options . . . . . . . . . . . . . . . . . . . . . .16
Phone Diagram . . . . . . . . . . . . . . . . . . . . . . . . . . . . . .18
Phone Overview . . . . . . . . . . . . . . . . . . . . . . . . . . . . . 19
Understanding the Guide . . . . . . . . . . . . . . . . . . . . . .20
Batteries . . . . . . . . . . . . . . . . . . . . . . . . . . . . . . . . . . . . .22
Storing and Disposing of Batteries . . . . . . . . . . . . . . . 22
Removing and Attaching Battery Covers . . . . . . . . . .23
Installing and Removing Batteries . . . . . . . . . . . . . . .25
Battery Talk Time and Standby Time . . . . . . . . . . . . . 27
Charging Batteries . . . . . . . . . . . . . . . . . . . . . . . . . . . 28
Phone Basics . . . . . . . . . . . . . . . . . . . . . . . . . . . . . . . . .33
Turning the Phone On and Off . . . . . . . . . . . . . . . . . . 33
Activating the Phone . . . . . . . . . . . . . . . . . . . . . . . . . .34
Power-Up Display . . . . . . . . . . . . . . . . . . . . . . . . . . . . 34
The External Display . . . . . . . . . . . . . . . . . . . . . . . . . . 36
The Indicators . . . . . . . . . . . . . . . . . . . . . . . . . . . . . . . 36
Status Light . . . . . . . . . . . . . . . . . . . . . . . . . . . . . . . . .39
Storing the Phone in its Holster . . . . . . . . . . . . . . . . .40
Viewing the Phone Number . . . . . . . . . . . . . . . . . . . . 40
Placing a Call . . . . . . . . . . . . . . . . . . . . . . . . . . . . . . .40
Ending a Call . . . . . . . . . . . . . . . . . . . . . . . . . . . . . . . 41
Redialing a Number . . . . . . . . . . . . . . . . . . . . . . . . . . 41
Receiving a Call . . . . . . . . . . . . . . . . . . . . . . . . . . . . .43
Using the Keypad to Enter Text . . . . . . . . . . . . . . . . . . 45
Controlling the Volume . . . . . . . . . . . . . . . . . . . . . . . . 48
2
Page 5

The Smart Button . . . . . . . . . . . . . . . . . . . . . . . . . . . . 49
The Menu System . . . . . . . . . . . . . . . . . . . . . . . . . . . . . 50
Menu Features . . . . . . . . . . . . . . . . . . . . . . . . . . . . . . 50
Navigating Through the Menu . . . . . . . . . . . . . . . . . . 53
Menu Elements . . . . . . . . . . . . . . . . . . . . . . . . . . . . . . 54
Sending and Receiving Calls
. . . . . . . . . . . . . . . . . . . . 59
Menu Features . . . . . . . . . . . . . . . . . . . . . . . . . . . . . . 60
Dialing Numbers and Characters . . . . . . . . . . . . . . . . 60
Dialing with Speed Dial . . . . . . . . . . . . . . . . . . . . . . . . 62
Dialing with Turbo Dial® . . . . . . . . . . . . . . . . . . . . . . . 62
Dialing Numbers from Missed or Recent Calls . . . . . . 63
Dialing from a Text Message . . . . . . . . . . . . . . . . . . . 66
Adding or Attaching Numbers . . . . . . . . . . . . . . . . . . . 67
Dialing Emergency Calls . . . . . . . . . . . . . . . . . . . . . . 71
Receiving a Basic Call . . . . . . . . . . . . . . . . . . . . . . . . 72
Receiving Calls with Caller ID . . . . . . . . . . . . . . . . . . 73
Using Call Waiting . . . . . . . . . . . . . . . . . . . . . . . . . . . 73
In-Call Features . . . . . . . . . . . . . . . . . . . . . . . . . . . . . . . 76
Menu Features . . . . . . . . . . . . . . . . . . . . . . . . . . . . . . 76
Receiving a Second Call . . . . . . . . . . . . . . . . . . . . . . 77
Sending and Receiving Data or Fax Calls . . . . . . . . . 78
Viewing Your Phone Number . . . . . . . . . . . . . . . . . . . 79
Muting a Call . . . . . . . . . . . . . . . . . . . . . . . . . . . . . . . . 80
Placing a Call on Hold . . . . . . . . . . . . . . . . . . . . . . . . 80
Dialing and Entering Numbers . . . . . . . . . . . . . . . . . . 81
Setting Up a Three-Way Analog Call . . . . . . . . . . . . . 82
Using Digital Conference Call Options . . . . . . . . . . . . 83
Transferring a Call . . . . . . . . . . . . . . . . . . . . . . . . . . . 86
Sending Tones . . . . . . . . . . . . . . . . . . . . . . . . . . . . . . 88
Entering a PIN (Analog) . . . . . . . . . . . . . . . . . . . . . . . 88
Viewing Entries . . . . . . . . . . . . . . . . . . . . . . . . . . . . . . 89
3
Page 6

Using a Speakerphone (Handsfree Mode) . . . . . . . . .92
Recent Calls . . . . . . . . . . . . . . . . . . . . . . . . . . . . . . . . . .93
Menu Features . . . . . . . . . . . . . . . . . . . . . . . . . . . . . . 93
Tips for the Received Calls List . . . . . . . . . . . . . . . . .93
Tips for the Dialed Calls List . . . . . . . . . . . . . . . . . . . . 94
Using the Notepad . . . . . . . . . . . . . . . . . . . . . . . . . . 101
Viewing or Resetting Call Timers . . . . . . . . . . . . . . . 102
Call Forwarding . . . . . . . . . . . . . . . . . . . . . . . . . . . . . .104
Menu Features . . . . . . . . . . . . . . . . . . . . . . . . . . . . . 104
Setting up Call Forwarding . . . . . . . . . . . . . . . . . . . .105
Checking Call Forward Status . . . . . . . . . . . . . . . . .108
Turning Off Call Forwarding . . . . . . . . . . . . . . . . . . . 109
Calls and Messages . . . . . . . . . . . . . . . . . . . . . . . . . . .112
Menu Features for Calls and Messages . . . . . . . . . . 112
Sending a Text Message . . . . . . . . . . . . . . . . . . . . . . 113
Sending Data and Fax Calls . . . . . . . . . . . . . . . . . . . 118
Receiving a Fax . . . . . . . . . . . . . . . . . . . . . . . . . . . . 120
Messages . . . . . . . . . . . . . . . . . . . . . . . . . . . . . . . . . . .123
Menu Features for Messages . . . . . . . . . . . . . . . . . . 123
Types of Messages . . . . . . . . . . . . . . . . . . . . . . . . . .124
Receiving New Messages . . . . . . . . . . . . . . . . . . . . 124
Text and Information Services Messages . . . . . . . . .126
Information Services and Text Message Inboxes . . .138
VoiceMail Messages . . . . . . . . . . . . . . . . . . . . . . . . .159
Quicknotes . . . . . . . . . . . . . . . . . . . . . . . . . . . . . . . .161
The Outbox . . . . . . . . . . . . . . . . . . . . . . . . . . . . . . . . 165
The Drafts Folder . . . . . . . . . . . . . . . . . . . . . . . . . . .170
Synchronizing Messages with PIM Software . . . . . .175
Checking Memory and Cleaning Up All Messages . . 176
Troubleshooting . . . . . . . . . . . . . . . . . . . . . . . . . . . .178
4
Page 7

Phone Status . . . . . . . . . . . . . . . . . . . . . . . . . . . . . . . . 180
Menu Features . . . . . . . . . . . . . . . . . . . . . . . . . . . . . 180
Displaying Your Phone Number . . . . . . . . . . . . . . . . 181
Displaying Credit Information . . . . . . . . . . . . . . . . . . 181
Displaying and Changing Your Active Phone Number . .
182
Changing the Current Phone Line . . . . . . . . . . . . . . 183
Displaying the Battery Charge Level . . . . . . . . . . . . 185
Initial Setup . . . . . . . . . . . . . . . . . . . . . . . . . . . . . . . . . 186
Menu Features . . . . . . . . . . . . . . . . . . . . . . . . . . . . . 187
Changing the Time and Date . . . . . . . . . . . . . . . . . . 187
Setting the Phonebook for One-Touch Dialing . . . . . 191
Adjusting Automatic Redial . . . . . . . . . . . . . . . . . . . . 192
Adjusting the Display Backlight . . . . . . . . . . . . . . . . . 193
Adjusting the Status Light . . . . . . . . . . . . . . . . . . . . . 194
Changing the Zoom Setting . . . . . . . . . . . . . . . . . . . 194
Changing Scrolling Behavior . . . . . . . . . . . . . . . . . . 195
Turning Animation On and Off . . . . . . . . . . . . . . . . . 196
Setting a Language Preference . . . . . . . . . . . . . . . . 197
Setting Battery Charge Conservation Preferences . . 198
Adjusting the DTMF Setting . . . . . . . . . . . . . . . . . . . 198
Master Reset . . . . . . . . . . . . . . . . . . . . . . . . . . . . . . 199
Master Clear . . . . . . . . . . . . . . . . . . . . . . . . . . . . . . . 200
In-Call Settings . . . . . . . . . . . . . . . . . . . . . . . . . . . . . . . 202
Menu Features . . . . . . . . . . . . . . . . . . . . . . . . . . . . . 202
Setting Up In-Call Timers . . . . . . . . . . . . . . . . . . . . . 202
Turning Answer Options On or Off . . . . . . . . . . . . . . 205
Turning Call Waiting On or Off . . . . . . . . . . . . . . . . . 207
Using Lock/Security Features . . . . . . . . . . . . . . . . . . 208
Menu Features . . . . . . . . . . . . . . . . . . . . . . . . . . . . . 209
Locking and Unlocking Your Phone . . . . . . . . . . . . . 209
5
Page 8

Locking and Unlocking the Keypad . . . . . . . . . . . . . . 214
Restricting Access to Applications . . . . . . . . . . . . . .216
Restricting Calls . . . . . . . . . . . . . . . . . . . . . . . . . . . .218
Changing Passwords . . . . . . . . . . . . . . . . . . . . . . . .219
Ring and Vibrate Features . . . . . . . . . . . . . . . . . . . . . .222
Menu Features . . . . . . . . . . . . . . . . . . . . . . . . . . . . . 223
Selecting a Ring/Vibration Type . . . . . . . . . . . . . . . . 223
Changing the Ring Volume . . . . . . . . . . . . . . . . . . . . 224
Selecting a Ring/Vibration for a Specific Event . . . . .225
Selecting a Reminder . . . . . . . . . . . . . . . . . . . . . . . . 226
Changing Keypad Volume . . . . . . . . . . . . . . . . . . . . . 226
Phonebook . . . . . . . . . . . . . . . . . . . . . . . . . . . . . . . . . .228
Menu Features . . . . . . . . . . . . . . . . . . . . . . . . . . . . . 229
Making the Most of Memory . . . . . . . . . . . . . . . . . . . 229
Fields in Phonebook Entry Forms . . . . . . . . . . . . . .230
Storing Phonebook Entries . . . . . . . . . . . . . . . . . . . . 231
Calling Phonebook Entries . . . . . . . . . . . . . . . . . . . . 237
Editing/Deleting Phonebook Entries . . . . . . . . . . . . .239
Adding or Attaching Numbers Before Calling . . . . . .244
Copying Phonebook Entries to a SIM Card . . . . . . . 244
Checking Phonebook Capacity . . . . . . . . . . . . . . . . . 249
Synchronization with PIM Software . . . . . . . . . . . . .250
Phonebook Setup . . . . . . . . . . . . . . . . . . . . . . . . . . .251
Troubleshooting . . . . . . . . . . . . . . . . . . . . . . . . . . . .254
Shortcuts . . . . . . . . . . . . . . . . . . . . . . . . . . . . . . . . . . .256
Menu Features . . . . . . . . . . . . . . . . . . . . . . . . . . . . . 256
Help for Setting Shortcuts . . . . . . . . . . . . . . . . . . . . .257
Setting Navigation Shortcuts . . . . . . . . . . . . . . . . . . 258
Setting Voice Shortcuts . . . . . . . . . . . . . . . . . . . . . . . 262
Shortcut Setup Errors . . . . . . . . . . . . . . . . . . . . . . . .266
Editing Shortcuts . . . . . . . . . . . . . . . . . . . . . . . . . . .268
6
Page 9

Deleting Shortcuts . . . . . . . . . . . . . . . . . . . . . . . . . . 270
Using Shortcuts . . . . . . . . . . . . . . . . . . . . . . . . . . . . 273
Personal Options . . . . . . . . . . . . . . . . . . . . . . . . . . . . . 277
Menu Features . . . . . . . . . . . . . . . . . . . . . . . . . . . . . 277
Reordering the Main Menu . . . . . . . . . . . . . . . . . . . . 277
Changing the Idle Functions of the Smart and Soft Keys
278
Changing the Wake-up Greeting . . . . . . . . . . . . . . . 280
Changing the Phone’s Idle Banner . . . . . . . . . . . . . . 281
Changing Quick Dial Numbers . . . . . . . . . . . . . . . . . 282
The Datebook . . . . . . . . . . . . . . . . . . . . . . . . . . . . . . . . 284
Menu Features . . . . . . . . . . . . . . . . . . . . . . . . . . . . . 285
Using the Datebook Menu . . . . . . . . . . . . . . . . . . . . 285
Datebook Views . . . . . . . . . . . . . . . . . . . . . . . . . . . . 286
Storing a New Event . . . . . . . . . . . . . . . . . . . . . . . . . 290
Editing Events . . . . . . . . . . . . . . . . . . . . . . . . . . . . . . 297
Copying Events . . . . . . . . . . . . . . . . . . . . . . . . . . . . . 299
Deleting Events . . . . . . . . . . . . . . . . . . . . . . . . . . . . 300
Changing the Datebook Setup . . . . . . . . . . . . . . . . . 303
Event Reminders . . . . . . . . . . . . . . . . . . . . . . . . . . . 306
Quick Dial . . . . . . . . . . . . . . . . . . . . . . . . . . . . . . . . . . . 309
Menu Features . . . . . . . . . . . . . . . . . . . . . . . . . . . . . 309
Calling the Quick Dial Number . . . . . . . . . . . . . . . . . 310
Using V oiceNotes . . . . . . . . . . . . . . . . . . . . . . . . . . . . . 313
Viewing the VoiceNotes List . . . . . . . . . . . . . . . . . . . 313
Playing Back a VoiceNote . . . . . . . . . . . . . . . . . . . . . 315
The Playback Screen . . . . . . . . . . . . . . . . . . . . . . . . 315
Using the VoiceNotes Menu . . . . . . . . . . . . . . . . . . . 317
Viewing VoiceNote Recording Instructions . . . . . . . . 318
Recording a VoiceNote . . . . . . . . . . . . . . . . . . . . . . . 320
7
Page 10

Locking/Unlocking a VoiceNote . . . . . . . . . . . . . . . . . 321
Deleting a VoiceNote Entry . . . . . . . . . . . . . . . . . . . .323
Deleting All VoiceNotes . . . . . . . . . . . . . . . . . . . . . . .325
Checking VoiceNotes Memory Capacity . . . . . . . . . . 326
Hands-Free Use . . . . . . . . . . . . . . . . . . . . . . . . . . . . . .328
Menu Features . . . . . . . . . . . . . . . . . . . . . . . . . . . . . 328
Setting Automatic Answer . . . . . . . . . . . . . . . . . . . . . 329
Setting Automatic Hands-Free . . . . . . . . . . . . . . . . . 329
Setting the Power-Off Delay . . . . . . . . . . . . . . . . . . .330
Setting the Phone Charge Time . . . . . . . . . . . . . . . .331
The Browser . . . . . . . . . . . . . . . . . . . . . . . . . . . . . . . . .333
Menu Features . . . . . . . . . . . . . . . . . . . . . . . . . . . . . 334
Starting a Browser Session . . . . . . . . . . . . . . . . . . . 334
Navigating the Browser . . . . . . . . . . . . . . . . . . . . . . . 337
Displaying Content . . . . . . . . . . . . . . . . . . . . . . . . . . 338
Placing Calls in an Active Browser Session . . . . . . .343
Ending Calls in an Active Browser Session . . . . . . . 345
Running the Browser in the Background . . . . . . . . .345
Network Services . . . . . . . . . . . . . . . . . . . . . . . . . . . . .349
Menu Features . . . . . . . . . . . . . . . . . . . . . . . . . . . . . 349
Viewing the Currently Registered Network . . . . . . . . 350
Displaying Available Networks . . . . . . . . . . . . . . . . . 350
Registering on a Network . . . . . . . . . . . . . . . . . . . . . 352
Finding a New Network . . . . . . . . . . . . . . . . . . . . . . . 352
Finding a Public Network . . . . . . . . . . . . . . . . . . . . . 355
Changing Network Setup Values . . . . . . . . . . . . . . . 355
Changing Network Search Types . . . . . . . . . . . . . . . 358
Setting Service Tones . . . . . . . . . . . . . . . . . . . . . . . .360
Setting the Call Drop Alert . . . . . . . . . . . . . . . . . . . .361
Interactive Services . . . . . . . . . . . . . . . . . . . . . . . . . . .363
8
Page 11

Menu Features . . . . . . . . . . . . . . . . . . . . . . . . . . . . . 363
Starting an Interactive Service . . . . . . . . . . . . . . . . . 364
Recognizing Error Conditions . . . . . . . . . . . . . . . . . . 369
Interacting with a Service . . . . . . . . . . . . . . . . . . . . . 370
Infrared Connections . . . . . . . . . . . . . . . . . . . . . . . . . . 376
Menu Features . . . . . . . . . . . . . . . . . . . . . . . . . . . . . 376
Establishing an Infrared Connection . . . . . . . . . . . . . 376
Accessories . . . . . . . . . . . . . . . . . . . . . . . . . . . . . . . . . 378
Troubleshooting . . . . . . . . . . . . . . . . . . . . . . . . . . . . . . 381
Glossary . . . . . . . . . . . . . . . . . . . . . . . . . . . . . . . . . . . . 386
Patent Information . . . . . . . . . . . . . . . . . . . . . . . . . . . 403
9
Page 12

•
•
•
•
Safety Information
Important: Read this information before using your
wireless handheld phone.
Exposure to Radio Frequency Signals
Your wireless handheld portable telephone is a low power
radio transmitter and receiver. When it is ON, it receives
and also sends out radio frequency (RF) signals.
In August 1996, The Federal Communications Commission
(FCC) adopted RF exposure guidelines with safety levels
for handheld wireless phones. Those guidelines are
consistent with safety standards previously set b y both U .S .
and international standards bodies:
American National Standards Institute (ANSI) IEEE.
C95. 1-1992
National Council on Radiation Protection and
Measurement (NCRP). Report 86
International Commission on Non-Ionizing Radiation
Protection (ICNIRP) 1996
Ministry of Health (Canada), Safety Code 6
Those standards were based on comprehensive and
periodic evaluations of the relevant scientific literature. For
example, over 120 scientists, engineers, and physicians
from universities, government health agencies, and industry
reviewed the available body of research to develop the
ANSI Standard (C95.1).
10
Page 13

•
•
The design of your phone complies with the FCC guidelines
(and those standards). For additional information
concerning exposure to radio frequency signals, see the
statement by the FDA at the end of this user guide.
To maintain compliance with FCC RF exposure guidelines,
if you wear a handset on your body, use the Motorolasupplied or approved carrying case, holster, or other bodyworn accessory.
If you do not use a body-worn accessory, ensure the
antenna is at least one inch (2.5 centimeters) from your
body when transmitting. Use of non-Motorola accessories
may violate FCC RF exposure guidelines.
Antenna Care
Use only the supplied or an approved replacement
antenna. Unauthorized antennas, modifications, or
attachments could damage the phone and may violate FCC
regulations.
Phone Operation
Normal Operation
Hold the phone as you would any other telephone, with the
antenna pointed up and over your shoulder.
Tips on Efficient Operation
Observe the following guidelines to operate your phone
most efficiently.
Extend your antenna fully, if applicable.
Do not touch the antenna unnecessarily when the
phone is in use. Contact with the antenna affects call
Safety Information 11
Page 14

•
•
•
12
quality and may cause the phone to operate at a
higher power level than otherwise needed.
Batteries
Caution: All batteries can cause property damage, injury,
or burns if a conductive material, such as jewelry, keys or
beaded chains, touches exposed terminals. The material
may complete an electrical circuit and become quite hot. To
protect against such unwanted current drain, exercise care
in handling any charged battery , particularly when placing it
inside your pocket, purse, or other container with metal
objects. When the battery is detached from the phone, your
batteries are packed with a protective battery cover; please
use this cover for storing your batteries when not in use.
Driving
Check the laws and regulations on the use of wireless
telephones in the areas where you drive. Always obey
them. Observe the following guidelines when using your
phone while driving.
Give full attention to driving--driving safely is your first
responsibility .
Use hands-free phone operation, if available.
Pull off the road and park before making or answering
a call if driving conditions so require.
Electronic Devices
Most modern electronic equipment is shielded from RF
signals. However, certain equipment may not be shielded
against the RF signals from your wireless phone.
Safety Information
Page 15

•
•
•
•
Pacemakers
The Health Industry Manufacturers Association
recommends that a minimum separation of six inches (6")
be maintained between a handheld wireless phone and a
pacemaker to avoid potential interference with the
pacemaker. These recommendations are consistent with
the independent research by and recommendations of
Wireless T echnology Research.
Persons with pacemakers:
should ALW AYS keep the phone more than six inches
from their pacemaker when the phone is turned ON
should not carry the phone in a breast pocket
should use the ear opposite the pacemaker to
minimize the potential for interference
should turn the phone OFF immediately if you have
any reason to suspect that interference is taking
place
Hearing Aids
Some digital wireless phones may interfere with some
hearing aids. In the event of such interference, you may
want to consult your hearing aid manufacturer to discuss
alternatives.
Other Medical Devices
If you use any other personal medical device, consult the
manufacturer of your device to determine if it is adequately
shielded from external RF energy. Your physician may be
able to assist you in obtaining this information.
Safety Information 13
Page 16

14
Turn your phone OFF in health care facilities when any
regulations posted in these areas instruct you to do so.
Hospitals or health care facilities may be using equipment
that could be sensitive to external RF energy.
Vehicles
RF signals may affect improperly installed or inadequately
shielded electronic systems in motor vehicles. Check with
the manufacturer or its representative regarding your
vehicle. You should also consult the manufacturer of any
equipment that has been added to your vehicle.
Posted Facilities
Turn your phone OFF in any facility where posted notices
so require.
Aircraft
Switch OFF your phone before boarding an aircraft. Airline
regulations prohibit using your phone while in the air. Check
and comply with the policy of your airline regarding the use
of your phone while the aircraft is on the ground.
Blasting Areas
To avoid interfering with blasting operations, turn your
phone OFF when in a “blasting area” or in areas posted:
“Turn off two-way radio.” Obey all signs and instructions.
Potentially Explosive Atmospheres
Turn your phone OFF, do not remove your battery when you
are in any area with a potentially explosive atmosphere,
and obey all signs and instructions. Sparks from your
Safety Information
Page 17

battery in such areas could cause an explosion or fire
resulting in bodily injury or even death.
Areas with a potentially explosive atmosphere are often but
not always clearly marked. They include: fueling areas such
as gasoline stations; below deck on boats; fuel or chemical
transfer or storage facilities; areas where fuel odors are
present (for example, if a gas/propane leak occurs in a car
or home); areas where the air contains chemicals or
particles, such as grain, dust, or metal powders; and any
other area where you normally would be advised to turn off
your vehicle engine.
For Vehicles Equipped with an Air Bag
An air bag inflates with great force. Do NOT place objects,
including both installed or portable wireless equipment, in
the area over the air bag or in the air bag deployment area.
If in-vehicle wireless equipment is improperly installed and
the air bag inflates, serious injury could result.
US021600
Safety Information 15
Page 18

Overview
Package Content Options
Your digital wireless phone typically comes equipped with a
charger and at least one battery. A large selection of
accessory options can customize your wireless package for
maximum performance and portability. Below is a sampling
of the different package options.
Note: Your phone and accessories may not look exactly as
pictured.
16
Illustration
to come
Lithium Polymer Battery
Illustration
to come
Headset
Motorola T elephone
Page 19

Illustration
to come
Desktop Charger
(AC Adapter required)
Illustration
to come
Desktop Charger
(AC Adapter required)
Illustration
to come
Holster
Overview 17
Page 20
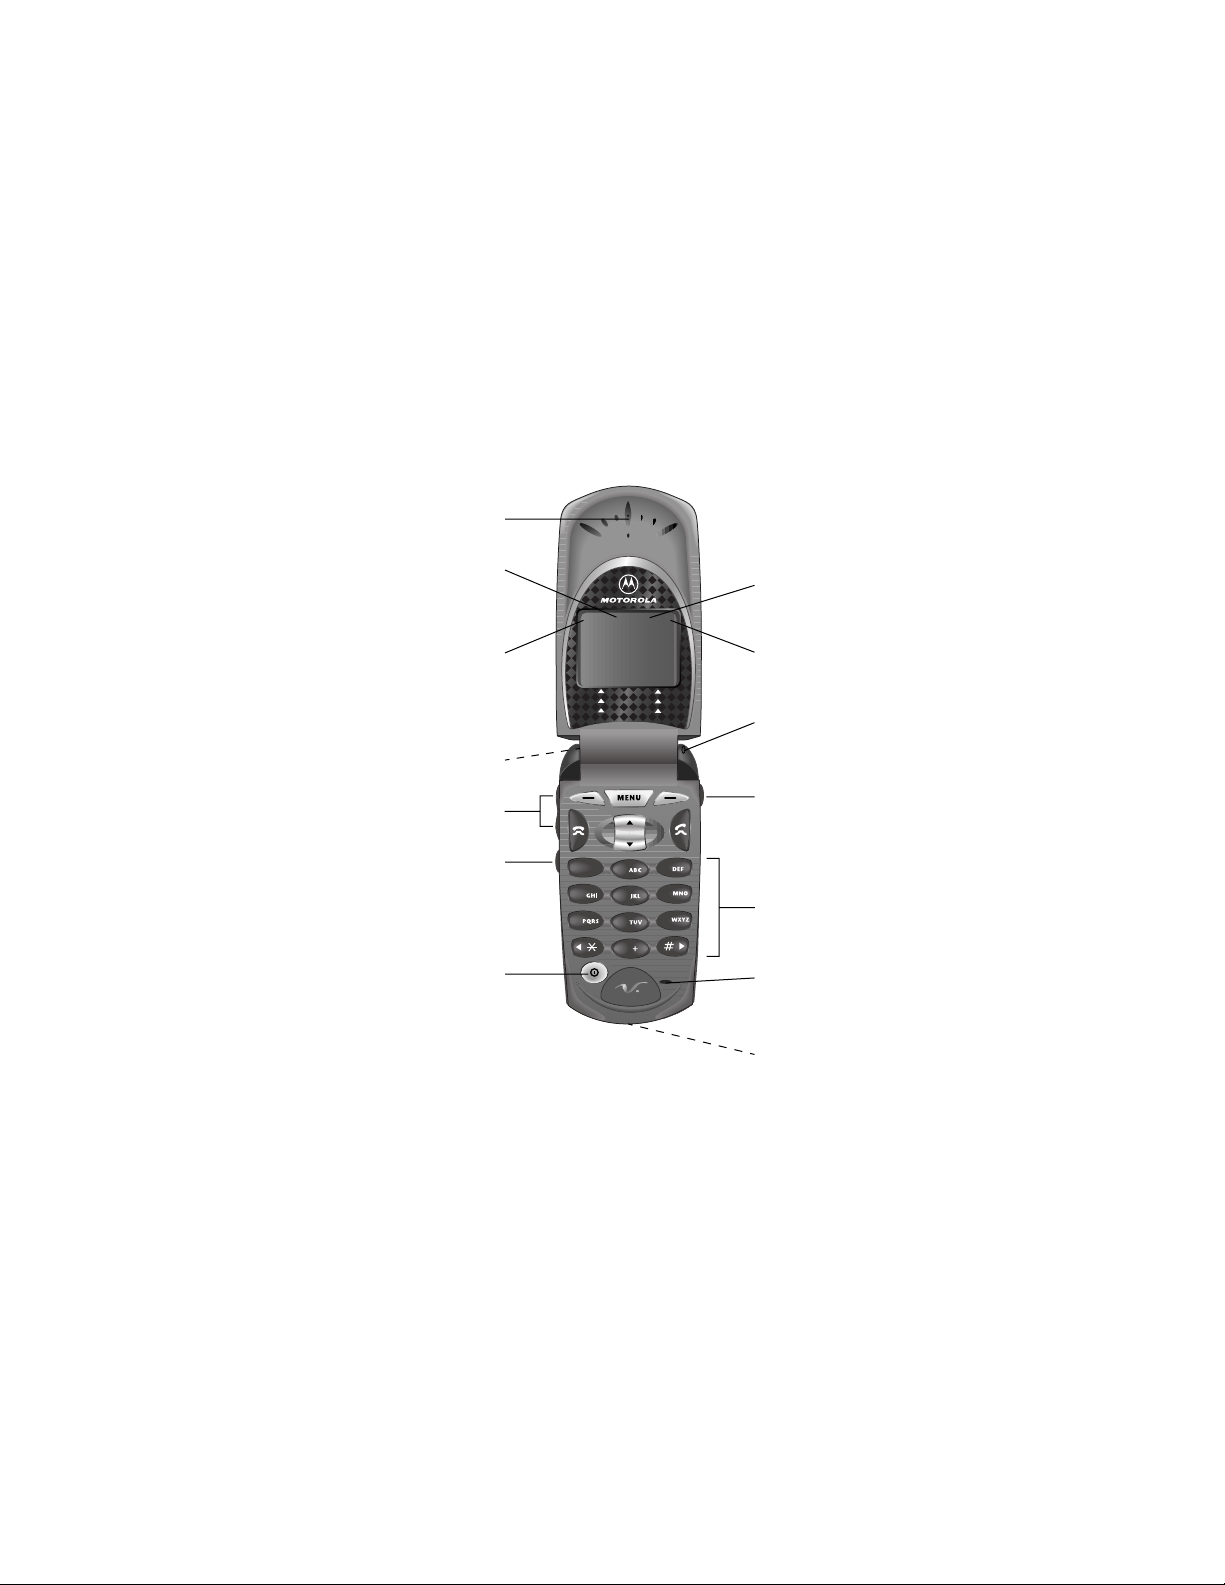
Phone Diagram
Earpiece
Icon Indicators
Signal Strength
Indicator
Headset Jack
Volume Keys
Smart Key
Power On/Off Key
®
VibraCall
Alert
Indicator
Battery Level
Indicator
Power/Status
Indicator
Voice Key
1
4
7
3
2
6
5
9
8
0
Alphanumeric
Keypad
Microphone
Accessory
Connector Port
Overview 18
Page 21

Phone Overview
See “Phone Diagram” on page 18 for an illustration of the
components described below.
Earpiece —Ultra-compact phone speaker.
Headset Jack —Connects an optional headset.
Power/Status Indicator —Provides status information on
the current type of service and message status.
Signal Strength Indicator —Indicates the strength of your
phone’s connection with the local wireless system.
Volume Keys —The upper and lower volume keys can
adjust keypad, earpiece, and ringer volume. .
Smart Key —Use the Smart key to recall information from
memory, place and end calls, select menu features, and
toggle features on and off. The symbol in your display
represents the Smart key.
V oice Key —Use the voice key to record a VoiceNote memo
or to record a voice name for a phonebook entry.
Icon Indicators —Displays various indicators such as
digital, in use, in building, no service, message waiting, and
voice message waiting indicators.
Battery Level Indicator —Show the amount of charge
remaining in your battery.
VibraCall
the ringer and VibraCall alert.
Microphone —Positioned for convenient conversation.
Accessory Connector Port —Provides the connections for
an external power supply and vehicular and optional
accessories.
®
Alert Indicator —Indicates the on/off status of
Overview 19
Page 22

Special Keys
P
The power key turns the phone on and off
20
O
N
M
S
-
and
+
The send key places or answers calls
The end key ends phone calls
The menu key enters the menu system
The scroll key scrolls through memory
entries and menu features, and moves the
cursor when entering names or messages
The soft keys perform context-sensitive
functions as indicated by prompts in the
bottom line of the display.
The
-
(left soft key) usually returns to
a previous menu or exits the menu system.
+
The
an item or confirms an action.
(right soft key) usually selects
Understanding the Guide
Key Presses
Key presses are represented in this guide using symbols so
that you may locate and use the required sequence quickly.
A sequence of key presses may be shown as follows:
1
0
8
This means you should press 1 followed by 0 and
then
8
, in sequence, not simultaneously.
Overview
Page 23

Prompts and Messages
Your phone responds to key presses by displaying either a
prompt that guides you to the next action or a message
confirming that your action is complete. Prompts and
messages are represented in this guide in LCD style, for
example:
Reset Timer
.
Shortcuts and Tips
In the margins of your guide are shortcuts and useful tips to
improve your phone’s performance.
Overview 21
Page 24

Batteries
Your digital phone uses Lithium Polymer batteries. In this
chapter, you will learn how to:
• store and dispose of batteries
• remove and attach the cover to the battery
• install and remove batteries
• interpret battery talk time and standby time
• charge batteries using the internal charger and the
Storing and Disposing of
Batteries
To prolong the life of your batteries, do not expose them to
temperatures below -10°C (14°F) or above 45°C (113°F).
Always take your phone with you when you leave your car.
To dispose of batteries, check with your local recycling
center for a battery recycler near you. Never dispose of
batteries in a fire.
Caution: To prevent injuries or burns, do not allow metal
objects to contact or short-circuit the battery terminals.
desktop charger
22
Page 25

Removing and Attaching
Battery Covers
Your phone’s battery is shipped in an uncharged state and
fitted with a protective cover. Before you can use your
phone, you will need to remove the cover and charge the
battery. The cover prevents metal objects from contacting
the battery terminals, thereby reducing the risk of injury or
damage from a battery short circuit.
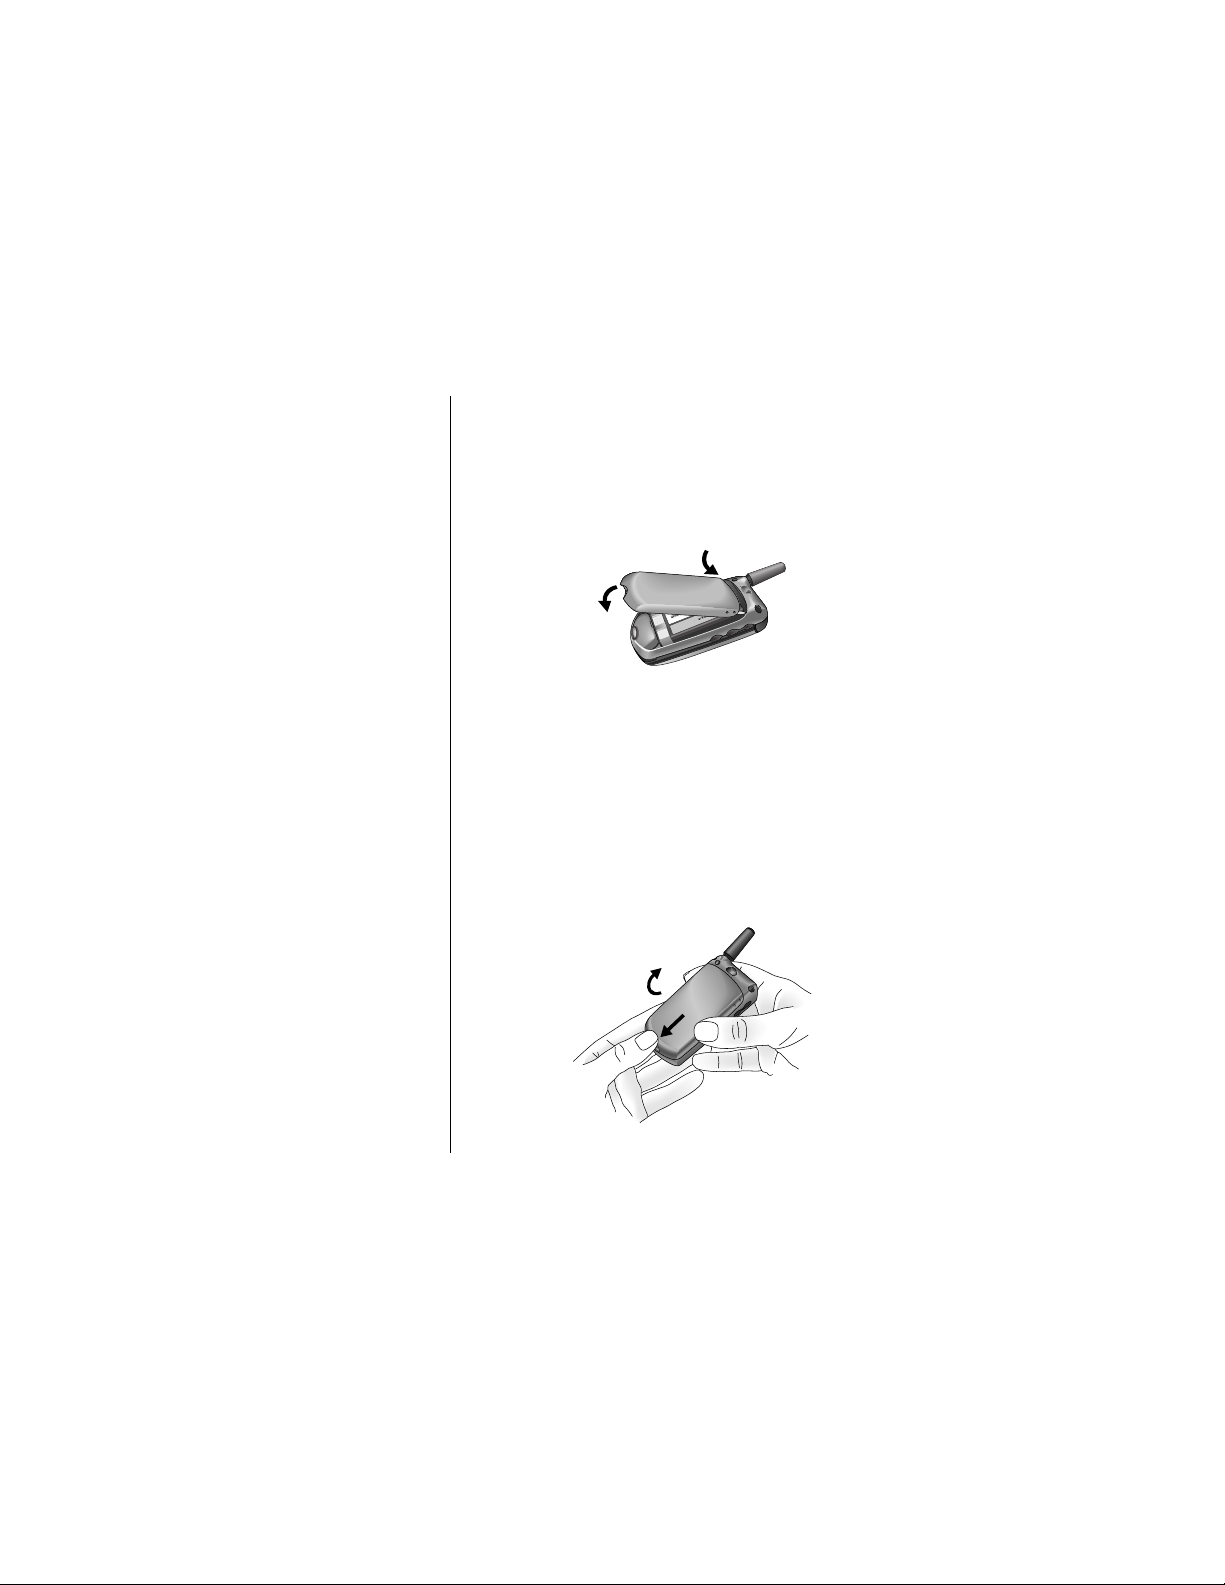
Removing the Battery Cover
Press
tab
Remove
cover
1. Hold one end of the battery cover in
one hand. Press down on the tab at the
opposite end of the cover with your
other hand.
2. Rotate the cover away from the battery .
Illustration
to come
Attaching the Battery Cover
Insert
side
1. Insert one end of the battery into the
cover, so that the battery fits the
notches on the cover.
Batteries 23
Page 26

Click
latch
2. Push down the other side of the battery
until it clicks into place.
Illustration
to come
24 Batteries
Page 27

Installing and Removing
Batteries
Installing the Battery
Remove
cover
Insert
battery
1. Use your thumb to slide the release
latch toward the base of the phone.
2. With your other hand, rotate the cover
away from the phone.
2
1
3. Insert the battery, printed arrows first,
into the top edge of the battery
compartment.
4. Push down the bottom edge of the
battery until it snaps into place.
3
4
Batteries 25
Page 28
Replace
cover
5. Insert the tabs of the battery cover into
the top edge of the battery
compartment.
6. Rotate the battery cover down until it
snaps into place.
6
Removing the Battery
5
26 Batteries
Turn off
phone
Remove
cover
1. Press P to turn off your phone.
2. Use your thumb to slide the release
latch toward the base of the phone.
3. With your other hand, rotate the cover
away from the phone.
3
2
Page 29
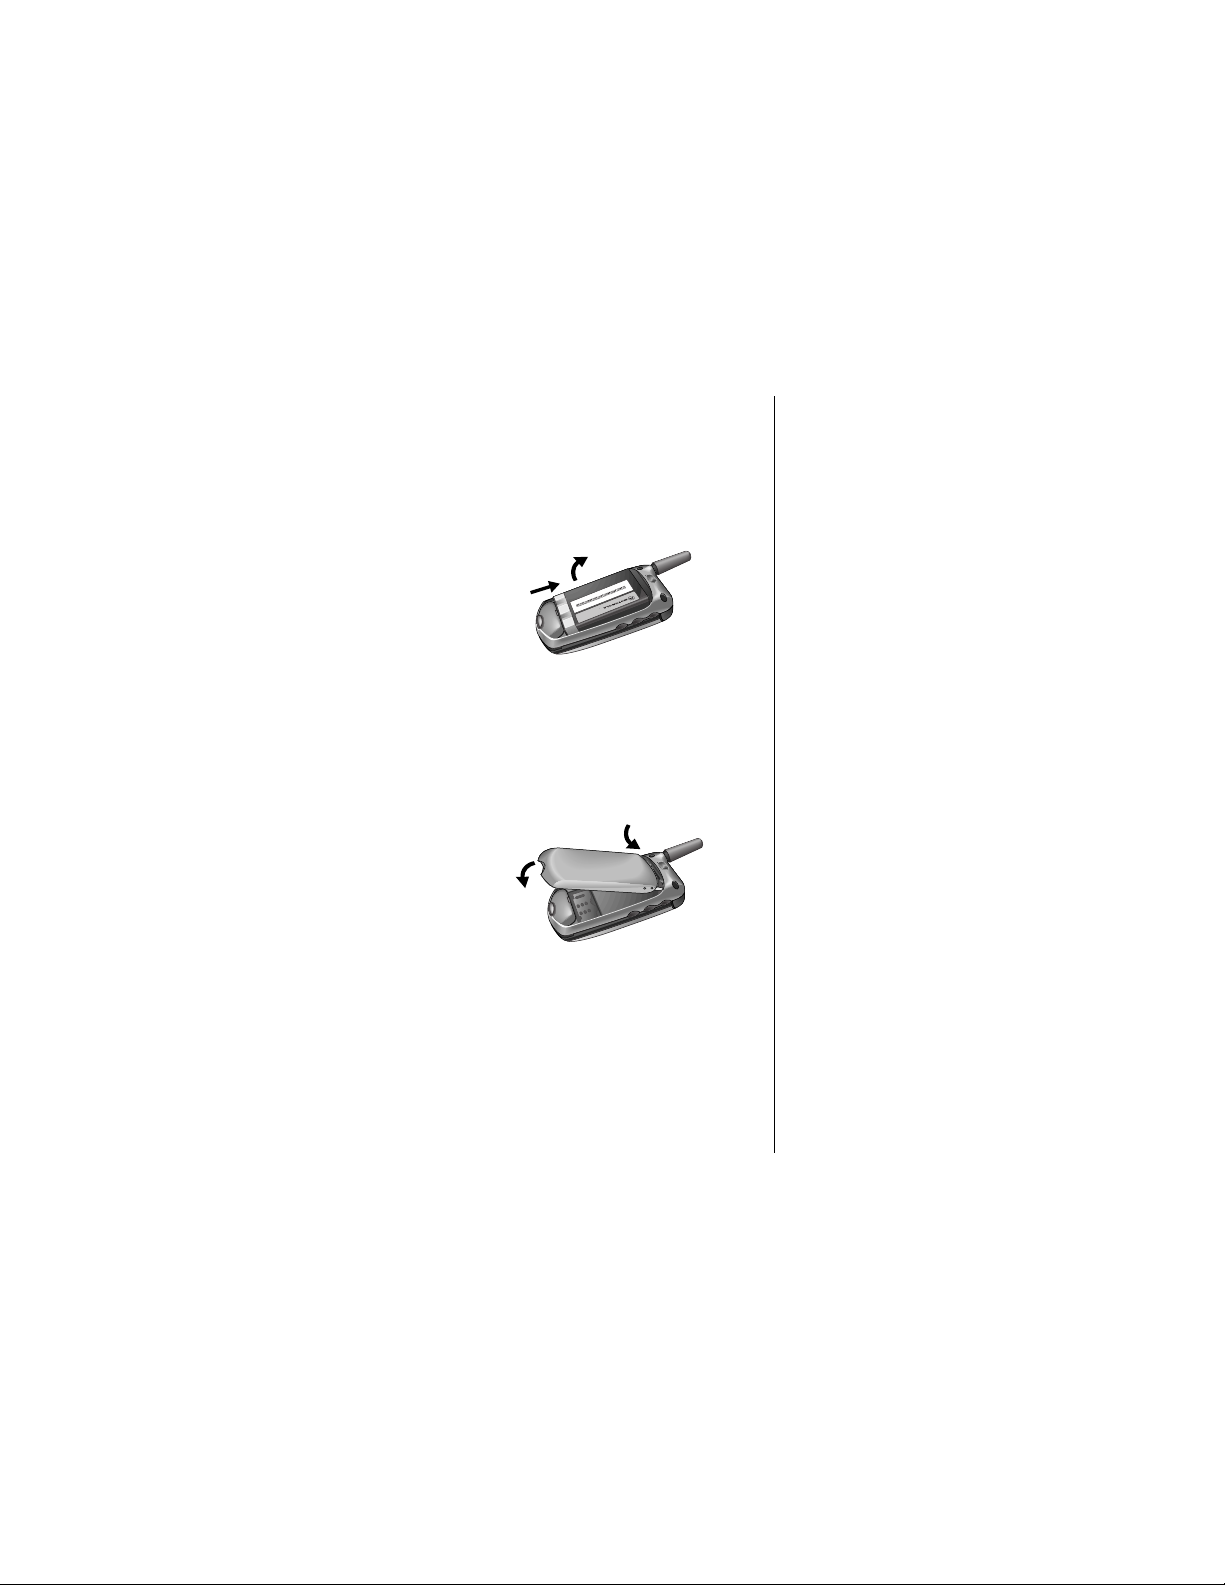
Remove
battery
4. Push the battery toward the top of the
phone until the bottom edge comes
clear.
5. Rotate the bottom edge of the battery
up and lift the battery from the phone.
5
4
Replace
cover
6. Insert the tabs of the battery cover into
the top edge of the battery
compartment.
7. Rotate the battery cover down until it
snaps into place.
6
7
Battery Talk Time and
Standby Time
Talk time
refers to the time you can talk on your phone
before the battery is fully discharged.
time that your phone is on but not used for talking.
Standby time
is the
Batteries 27
Page 30

B
Empty
J
Low
H
Medium
F
High
Tip:
If you talk
on the phone
while charging
your battery,
charging takes
more time. To
place the
phone in
charger-only
mode, turn off
the phone by
pressing
P
once.
Notes:
• Talking on the phone uses more power than leaving it
idle. The more power you use for talking, the less you
will have for standby time, and vice versa.
• Talk time and standby time can vary, depending on
the battery used, network configuration, signal
strength, and the features selected.
Charging Batteries
Using the Internal Charger
Your phone has a built-in battery charger. Using either the
AC or vehicle power adapter, you can plug the handset
directly into a power source to charge any attached
batteries.
You can still place and answer calls while using the internal
charger. To place the phone in charger-only mode, turn off
the phone by pressing
To charge:
Attach
adapter
to
phone
P
once.
1. Plug the AC adapter or vehicle power
adapter into the accessory connector
on the bottom of your phone as shown,
with the release tab facing up.
28 Batteries
Page 31

Illustration
to come
Plug in
adapter
2. Plug the power adapter into an AC
electrical outlet.
or
Plug the vehicle power adapter into the
cigarette lighter opening in the vehicle.
Note: In some cars, the ignition m ust be on
to use the vehicle’s accessory power.
In both cases, a beep tone sounds, and the
battery icon flashes.
Using the Desktop Charger
You can use the desktop charger to charge batteries while
they are attached to your phone, or you can charge a
battery separately.
To charge:
Attach
adapter
to
charger
1. Plug the AC adapter into the back of
the charger, with the release tab f acing
up.
Batteries 29
Page 32

Illustration
to come
Plug in
adapter
Insert
phone
and/or
battery
Note: When the phone is charging, the battery level
indicator flashes. When the battery is fully charged, the
indicator stops flashing. If your phone cannot charge the
battery, this indicator does not appear.
2. Plug the power adapter into an AC
electrical outlet.
3. With battery attached, place the phone
into the charger’s front pocket.
Optionally, place an additional battery
into the charger’s back pocket.
Desktop Charger Indicator Lights
The front LED light for charging a battery attached to the
phone in the charger’s front pocket is:
Yellow
The rear LED lights for charging a battery in the rear pocket
are:
Red
Flashing
yellow
The phone is inserted. Check phone for
battery charge status.
The battery is rapid charging.
The battery is waiting for its charge.
30 Batteries
Page 33

Green
The battery is charged over 90% of its
capacity and can be used. Another hour of
charging will bring it up to 100% capacity.
Flashing
red
Either the battery or the power supply is
damaged and cannot be charged.
Battery Charging Tips
To ensure that you enjoy maximum battery life and use your
battery to its fullest capacity:
• Always use Motorola approved battery chargers.
• For the best results, charge Lithium P olymer batteries
using the E•P® Desktop Charger or your phone’s
internal charger.
• The battery should be at or near room temperature
when charging.
• New batteries or batteries that have been stored for
long periods of time may not rapid charge properly. In
these instances, the battery requires an overnight
charge.
• When you do not intend to use a battery for a while,
store it uncharged in a cool, dark, dry place, such as
a refrigerator.
• Over extended periods of time, batteries gradually
wear down and require longer charging times. This is
normal. If you charge your battery regularly and
notice a decrease in talk time or an increase in
charging time, then it is probably time to purchase a
new battery.
Batteries 31
Page 34

Expert Performance E•P® Charging
System
The Expert Performance E•P® Charging System enables
your phone’s built-in charger to communicate with installed
batteries and tailor its charging cycle to optimize
performance. If you see
up the phone, the built-in charger is not able to
communicate with the battery and cannot charge it. There
are several possible reasons for this message. The most
likely one is that the battery is not a Motorola original, and it
does not have the appropriate E•P
We recommend that you use only Motorola original
batteries and accessories and that you store your batteries
in their protective covers when not in use.
Invalid Battery
®
technology.
when you power
32 Batteries
Page 35

Phone Basics
This chapter introduces you to the basic features of your
new phone. It describes how to:
• turn the phone on and off
• activate your phone
• read the displays
• read the status line indicators
• store the phone in its holster
• view the phone number
• place a call
• end a call
• redial a number
• receive a call
• control the volume
• use the smart button
Turning the Phone On and
Off
To turn the phone on and off:
On
Off
Press the P button.
Press the P power button again.
33
Page 36

Activating the Phone
The first time you turn on your phone, you may see one of
the following messages:
Activation required
If you do not see one of these displays, your phone was
activated at the time of purchase, and you may skip the
steps below.
If you do see one of the activation messages, complete the
activation procedure as follows:
Press to Activate or
.
Place
Call
Help?
Power-Up Display
When you turn on the phone, it plays a single power-up
tone and displays an animated Motorola wake-up greeting
for two seconds.
34 Phone Basics
1. Press O to place the call.
or
Press and hold the smart key on the
left side of your phone until you hear a
high tone.
Once the connection is made,
activation begins.
2. If necessary, contact your service
provider for further assistance.
9
Page 37

Afterwards, the phone displays a customer wake-up
greeting for two seconds.
Safety: Your
Most Important
Call
If the phone detects an invalid battery, it displays the
following message for two seconds:
Invalid Battery
K
Next, the phone scans the area for a network signal and
displays the message:
phone does not find an appropriate network, it displays the
message
found.
When the phone has completed its power up sequence and
is ready to use, it displays the
Registering
Searching for Network
every two seconds until a network is
Ready
. If the
message.
Number Display
Your phone can be activated with two unique phone
numbers. If more than one number is programmed, the
phone displays the active number whenever it is turned on.
To change the active number, see “Changing the Current
Phone Line” on page XX.
Power Saver Mode
If you travel outside the range of available networks, your
phone continues to search for a signal. To save power, it
Phone Basics 35
Page 38

v
Strong
w
Weak
stops searching ever few minutes and displays a
Save
message. Your phone begins searching again in a
minute or two. Press any key to immediately resume
searching.
Power
Standby Mode
Your phone may turn off the backlight to save power when
in standby mode. The backlight comes back on whenever
you press a key.
The External Display
Add information on viewing the external display to find out
information on caller id, voice mail, time and date, call
forwarding status, and alert status.
The Indicators
Signal Strength (1)
The Signal Strength indicator is one of the status icons at
the top of the display. It shows the strength of your phone’s
connection with the local wireless system.
A strong signal increases your ability to place and receive
calls. Weak signal strength can occur at the edge of a
wireless service area or in buildings, tunnels, and during
bad weather. Weak signal strength can interfere with or
block your ability to place and to receiv e calls and can affect
your reception.
36 Phone Basics
Page 39

Battery Level Indicator (2)
B
Empty
J
Low
H
Medium
F
High
The Battery Level indicator at the top of the display shows
the amount of charge left in your battery. The more
segments visible, the greater the charge.
When the battery level is low and only a few minutes of talk
time remain, your phone signals you in three ways:
•
Low Battery
• No bar segments are highlighted.
• A short tone plays periodically.
appears in the first line of the display.
Clock (3)
Your phone displays the current time and date when it is on
a digital network. You can set your clock for either 12 or 24
hour format.
Digital or Analog Indicator (4)
The digital icon appears when you are receiving a digital
signal. The analog icon appears if you receive an analog
signal.
In Use Indicator (5)
The In Use indicator appears when a call is in progress.
Roam Indicator (6)
The roam indicator appears when your phone accesses a
wireless system outside your home network. When you
leave your wireless service area, your phone
seeks another service area.
roams
or
Phone Basics 37
W
Z
p
Page 40

w
P
No Service Indicator (7)
If you travel beyond the range of wireless service, the No
Service indicator appears to let you know that you cannot
place or receive a call.
Message Waiting Indicator (8)
The Message Waiting indicator is displayed when the
phone receives a text message. (This is an optional,
network and subscription-dependent feature that is not
available in all areas.)
O
Voice Message Waiting Indicator (9)
The Voice Message Waiting indicator is displayed when
your voicemail has received a message .(This is an optional,
network and subscription-dependent feature that is not
available in all areas.)
Alphanumeric Display (10)
Text and number messages appear in the middle of the
phone’s display. Text and numbers show keypad input,
information recalled from memory, and other messages.
Alert Indicators (11)
Your phone displays the current selected alert. The default
alert is a ringer.
h
Ringer on—Your phone’s ringer is turned on and vibrate
alert is off.
j
turned off.
38 Phone Basics
Vibrate on—Your vibrate alert is on and ringer is
Page 41

g
Vibrate then ring—Both ring and vibrate alerts are
turned on.
f
Ring then vibrate—Both ring and vibrate alerts are
turned on.
i
Silent—All of your phone’s tones are silenced and the
vibrate alert is turned on.
Your vibrate alert is on.
d
All Alerts off—Both vibrate and ring alerts are turned
off.
e
Vibrate with all tones off—
Status Light
You can check the status light on top of the phone for status
information on your current type of service and message
status. The messages can include voice mails and
messages, or the receipt of recent calls. (This is an
optional, network and subscription-dependent feature that
is not available in all areas.)
The status light changes color and flashes or remains on to
indicate different states. Status lights are as follows:
alternating red and
green
flashing green In Service, home-type system
slow flashing yellow no service
fast flashing yellow roaming, non-home type system
incoming call or message
Phone Basics 39
Page 42

Storing the Phone in its
Holster
To slip your phone into its holster, make sure the battery is
facing the outside of the holster . Then clip the holster onto a
belt, purse or briefcase.
The holster has been designed for your conv enience and is
not meant to secure your phone under all circumstances.
Viewing the Phone Number
Placing a Call
To place a call:
Turn on
Enter
number
40 Phone Basics
1. Press and hold P until the display
appears and you hear an audible alert.
2. Enter the number you want to call, for
example: 555-1212.
-
• Press
time if you make a mistake.
• Press and hold - to clear the
entire entry.
You can also recall a previously dialed
or stored number. See “Using Phone
Memory” for details on storing or
recalling numbers.
to erase one digit at a
Page 43

Place
call
1. Press O to place the call.
or
Press and hold the smart key on the
left side of the phone until you hear a
high tone.
The phone sounds a single-tone alert
(if the keypad tones are turned on) and
displays
Dialing 555-1212
2. You can dial phone numbers with up to
32 digits, but only the last 24 digits
appear in the display.
.
Ending a Call
To end a call:
• Press
• Press and hold the smart key until you hear a second
N
or
tone. The display reads
Press *smart key* again to end the call.
*smart key* To End Call
Redialing a Number
.
Automatic Redial
You may not be able to complete a call if the wireless
system is busy. When this happens, the system transmits a
fast busy signal, and the phone displa ys one of the following
messages :
Call Failed. Press O to redial.
Phone Basics 41
Page 44

WIth Automatic Redial, your phone repeats the call attempt
over the next four minutes. When the call goes through,
your phone rings or vibrates until the other party answers.
To activate Automatic Redial:
Auto
Redial
If you hear an ordinary busy signal, the phone number you
dialed is busy.
Hang Up
Redial
To redial the busy number, press O
or
Press and hold the smart key.
Calling
In either case,
1. Press N to hang up.
2. Press the smart key or O to redial the
busy number.
displayed.
is displayed.
Dialing 5551234
is
Recent Calls
Your phone keeps track of the last ten numbers that you
have dialed. You can display this list and select a number to
call.
Display
1. Press
2. Scroll down and select either
3. Review the list and select a phone
M
. Press S to scroll down
to
Recent Calls
Received Calls
Press
+
.
number. Press
. Press +.
or
Dialed Calls
O
.
.
42 Phone Basics
Page 45

Review
4. Press S to scroll through the last calls.
The display includes the time, date and
phone number.
Call
5. Press O or press and hold *smart key*
to call the number in your display. The
Calling
message is displayed.
Receiving a Call
Answering a Call
Your phone must be turned on to receive calls. When the
phone rings or vibrates, press
Unanswered Call Indicator
When you cannot answer a call, y our phone keeps a record
and a count of your unanswered calls and displays a
message like :
2 Missed Calls
1 Unknown Call
To view and place missed calls:
View list
1. Press +.
The received calls list is displayed.
2. Press
Select any call that you wish to return.
O
to answer the call.
S
to scroll through the list.
Phone Basics 43
Page 46

Place
call
To clear the display, press N.
3. Press O.
The number is dialed and the call
processed for you.
Caller ID
Caller ID is an optional feature that allows you to see who is
calling before you ans wer. Contact your service provider for
information about availability.
• If the caller’s name is recorded in your phone book,
the name is displayed.
• If the name is not in your phone book, the caller’s
phone number is displayed.
If you prefer to always see the caller’s phone number, see
“Turn Number Preference On.” Your phone stores IDs for
the last sixteen callers. See xxx to learn how to review the
stored Caller ID list.
Canceling the Ring or Vibrate Alert
Press either of the volume keys while the phone is ringing
to cancel the ring or vibrate alert.
The ringer or vibrator remains off while the current call
lasts. The caller still hears ringing, and you can still answer
the call by pressing
O
.
Call Waiting
Call Waiting is an optional service available through many
service providers. If you subscribe to call waiting, you may
44 Phone Basics
Page 47

hear a tone while you are on a call. This tone indicates that
you have received a second call.
To answer the second call:
Answer
End and
Answer
1. Press O to answer the new call and
place the first call on hold.
or
1. Press N to end the current call. Your
phone then rings or vibrates to signal
the new call.
2. Press
O
to answer the new call.
Using the Keypad to Enter
Tex t
When you want to add names to your phonebook or send
text messages, you can use your phone’s keypad to enter
letters and other characters.
Each number key represents se veral letters, which you can
cycle through by pressing the key repeatedly. For instance,
2
represents a, b, c, and 2. Press 2 once to enter
the character
times to enter
Press key
once
a,
twice to enter the character b , and three
c.
Follow these steps:
1. When you press 2 once, the letter
a
appears with a flashing block
cursor highlighting the letter.
Phone Basics 45
Page 48

Continue
pressing
keys
2. As long as the block cursor highlights
the letter, press
to see the
a fourth time to see the
to see the
2
a second time
b
, a third time to see the c,
2
, a fifth time
a
again, and so on.
Toggle
case
Enter
character
3. Press S to toggle between upper or
lower case characters.
4. When the block cursor highlights your
selected character, wait for two
seconds.
The block cursor disappears, and a
thin I-beam cursor appears next to
the letter.
5. Enter the next character.
The following table shows you what letters each key
represents, and how many times you ha ve to press the key
for each letter:
Number of key presses
Key
123456789
0
+- 0x*/ =><#(repeat)
1
2
3
4
5
6
.1?!,@&:;“-()’
a b c 2 (repeat)
d e f 3 (repeat)
g h i 4 (repeat)
j k l 5 (repeat)
m n o 6 (repeat
10111213141
5
46 Phone Basics
Page 49

7
q r s 7 (repeat)
8
t u v 8 (repeat)
9
wxyz9(repeat)
The following table explains the roles other keys play while
you enter text.
Key Explanation
*
Moves the I-beam cursor one character to the
left. If the cursor is a block cursor, it changes to
an I-beam cursor.
#
Moves the I-beam cursor one character to the
right. If the cursor is a block cursor, it changes
to an I-beam cursor.
S
Moves the I-beam cursor up or down one line in
the message. If the cursor is a block cursor, the
scroll buttons change the case of the
highlighted character.
-
Cancels the message field and returns you to
the text message form
characters
Deletes the character to the left of the cursor
after
you have entered a character.
+
Takes you to the QuickNote menu, which lets
you select from a list of pre-written messages,
before
you enter any characters. See “Sending
a Message With a QuickNote” on page 113.
Accepts the message and returns to the text
message form
character.
before
you enter any
after
you have entered a
Phone Basics 47
Page 50

Controlling the Volume
Use the upper and lower volume keys to adjust earpiece,
keypad, and ringer volume. When you press these keys, the
phone’s speaker demonstrates the current volume level.
This audio feedback is called
advanced volume settings, refer to “Ring and Vibrate
Features.”
Earpiece Volume
You can adjust the earpiece volume
Press the up volume key to increase earpiece volume.
Press the down volume key to decrease volume. A volume
meter in the display indicates the volume level you have
selected.
Ringer Volume
You can adjust the ringer volume when you are
call. Press the up volume key to increase ringer volume,
and press the down volume key to decrease volume. A
volume meter in the display indicates the volume level you
have selected.
keypad tones
. For more
only
during a call.
not
on a
Keypad Volume
Refer to “Changing K e ypad Volume” for details on adjusting
the keypad volume.
48 Phone Basics
Page 51

The Smart Button
The smart button is the lower key on the left side of the
phone—easy to feel, easy to find, and easy to use. Use the
Smart Button to place and end calls, select menu items,
select items in a display, toggle features on and off, and
open your phonebook.
Place and End Calls
Use the smart button to place or to end a call as described
in “Placing a Call” on page 40 and “Ending a Call” on
page 41.
Select Menu or Display Items
When you access the menu system, you can press the
smart button to select a menu or display item.
Toggle Features On and Off
Some of the phone’s features toggle on and off. Use the
smart button to select the on or off setting of a feature.
Open Your Phonebook
Before you make a call, press the smart button to open your
phonebook. Press
want, the press *smart button* again to place the call.
You can set up your smart button to open an application
other than the phonebook. Refer to “Personalizing Phone
Display Items.”
S
to scroll to the phone number you
Phone Basics 49
Page 52

The Menu System
You can access many of the features in your phone through
a menu system. This chapter provides a table of menu
features and shows you how to navigate through the
menus. It also introduces you to the menu elements,
including lists, forms, and meters.
Menu Features
The menu is the gateway to accessing phone features. This
section provides a list and description of the menu features.
50
Menu Name Features
Recent Calls Received Calls
Dial Calls
Notepad
Call Time
Call Cost
Service Dial Service Dial
Application
Fixed Dial Fixed Dial
Application
Phonebook Phonebook
Application
Submenu
Features
Page 53

Datebook Datebook
Application
Quick Dial
Radio
Messages
SMS Interactive
Shortcuts
V oiceNotes
mymotorola.com
Quick Dial
Application
Radio
Application
Message
Application
SMS Interactive
Application
Shortcuts
Application
V oiceNotes
Application
mymotorola.co
m Application
SIM Apps SIM Application
Browser
World TIme
Calculator
Browser
Application
World Time
Application
Calculator
Application
The Menu System 51
Page 54

Settings Ring/Vibrate Alert
Detail
Call Forward Voice Calls
Fax Calls
Data Calls
Cancel
Status
Phone Status My Tel. No.
Credit Available
Credit Info
PhoneLine 1/2
Signal Strength
Battery Meter
Other
Information
Connection IRDA Link
In Call Setup In Call Timer
Call Cost Setup
My Caller ID
Talk & Fax
Answer Options
Call Waiting
52 The Menu System
Page 55

Settings Security Phone Lock
Lock Keypad
Lock Application
Talk Secure
Fixed Dial
Restrict Calls
Call Barring
User Group
SIM PIN
New Passwords
Other Settings Personalize
Initial Setup
Network
Car Settings
Head-set
Note: Some features are optional network and
subscription-dependent features that are not availab le in all
areas. Contact your service provider for availability.
Navigating Through the
Menu
provides a detailed example of how to navigate through the
menu.
The Menu System 53
Page 56

Navigate through the menu system as follows:
M
- +
S
When scrolling through menus, you can also use the keys
*
and #.
Press the menu key to enter the menu
display.
The soft keys are the two unmarked
keys at the top of your keypad.
Press the scroll key to move up or
down through menu items.
Menu Elements
Menu elements include lists, forms, and meters.
Lists
Lists present menu items, such as tasks or data items that
you can select. When you see a list, you can look at the
entries and select an item.
List Title
All lists begin with a title that identifies the information
contained in the list.
Scrollbar
If a list contains three or more entries, a scrollbar appears
on the right side of the display. The scrollbar indicates that
more items are included in the list than are currently
displayed on the screen.
54 The Menu System
Page 57

The scrollbar changes, depending on where you are in the
list.
• If unseen items are above the list, the scrollbar
contains an up arrow.
• If unseen items are below a list, the scrollbar contains
a down arrow.
When you see a scrollbar, press S to move up or down
through the list.
End of List Indicator
Lists can also contain an
Entry,
that appears at the bottom of the list. You can often
select the end of list indicator to add new entries to the list.
end of list
indicator, such as
New
Soft Key Function
The
soft keys
are the two unmarked keys at the top of your
keypad. Their functions change, but their current function
names always appear in the lower corners of the display.
The last display line, just below a list, describes the function
of the soft keys
Following is a common use of soft keys:
Key Soft Function Action
M M
-
(left)
as they relate to the list
activate a sub-menu
Exit
.
return to a previous
menu or exit the list
Tip:
To move
quickly through
a list, press the
letter or
number key f or
the selection
you want. The
list moves
automatically
to your
selection.
+
(right)
Select
select an item or
confirm an action
The Menu System 55
Page 58

Some lists, like lists of messages, contain long text entries.
In such cases, the soft keys provide navigation through the
message as follows:
Key Soft Function Action
- BACK
+ MORE
+ NEXT
)
return to earlier lines in the
message
ask for more text to go forward
through a message
ask for the next message when
you reach the last line of a
message
Forms
Forms allow you to add or change text or number
characters to update information stored in your phone. The y
appear when you select a menu item to enter or change
information, such as a Phonebook entry. You can update
any part of the entry using the form. Refer to “Adding
Names and Numbers” on page xxx to learn how to enter
data.
Begin
1. When you begin using a new or empty
form, press
+
to
-
CHANGE
to
.
CANCEL
; press
56 The Menu System
Page 59

Enter
letters
2. When you enter character data, such
as letters for a name, in an empty field,
the flashing cursor appears on the
right.
Enter
numbers
Use soft
keys
Add
lines
Finish
3. When you enter numbers, such as for
a phone number, the flashing cursor
appears on the left.
4. While you’re entering data, navigate
as follows:
-
to
DELETE
• Press
• Press
+
to accept the data (OK).
.
After you’ve entered data, the soft
keys change:
• Press - to remove or
CLEAR
the
data that is entered.
+
• Press
to accept the data (OK).
5. When you complete and accept a line
of data, the form automatically
advances to the next line. Continue
entering information into the form.
6. When you have entered all the
required information, the soft keys
change again:
• Press
-
• Press
to accept the entry (
+
to
CHANGE
the entry.
DONE
).
The Menu System 57
Page 60

Meters
Meters provide measurements stored in your phone, such
as how much talk time is left in your battery or how strong
the signal is from your wireless network. Meters also
appear on the display when you need to see or change a
volume.
You can display a meter by pressing a key. The meter only
appears for a few seconds and then disappears.
You can also display a meter by going through a menu. In
this case, press
(
CHANGE
-
to
EXIT
) or edit the setting.
, and press + to dismiss
58 The Menu System
Page 61

Sending and Receiving Calls
Your phone provides several dialing options, from dialing
basic numbers to dialing stored numbers joined into a
single string. You can also receive basic phone calls and
calls with caller ID or call waiting.
In this chapter you will learn how to:
• dial numbers and special characters
• dial with Speed Dial and Turbo Dial®
• dial numbers from missed or recent calls, your
phonebook, or a text message
• add or attach stored numbers
• dial emergency numbers
• receiving a basic call
• using call waiting
• receiving calls with caller ID
59
Page 62

Menu Features
Dialing
Attach Number
Insert Pause
Insert Wait
Insert ‘n’
Send Message
Dialing Numbers and
Characters
The simplest way to dial a number is to enter the number
from the idle state and then send it. This section describes
how to dial numbers and enter special characters, such as
pauses.
To dial a number from the idle state:
Dial
number
60 Sending and Receiving Calls
1. Enter the phone number.
2. Press
The phone displays
Calling . . .
(phone number)
N
.
.
Page 63

Inserting Pause, Wait, and ‘n’
Characters for Calling Cards
You can insert the following types of characters, typically for
calling card numbers:
Pause
character
Wait
character
‘n’
character
To insert a pause, wait, or ‘n’ character in a number:
Insert
character
tells your phone to wait for a defined
length of time before it dials the next
digit in a series
tells your phone to wait for an
undefined length of time before it dials
the next digit in a series
tells your phone to stop and prompts
you for a number before it continues
dialing
1. While dialing, press
S
2. Press
3. Press
to scroll to
Insert Wait
+
The phone displays the special
character:
for ‘n’.
p
M
.
Insert Pause
, or
Insert ÔnÕ
.
for pause, w for wait, or n
.
Inserting the International Dialing
Prefix
The international dialing prefix lets you call from any
country without knowing its international access code.
Shortcut:
While dialing,
press and hold
*
,
phone will
cycle through
p, w
Release the
*
see the
character you
want.
. The
, and n.
when you
Sending and Receiving Calls 61
Page 64

To insert the international dialing prefix:
Insert +
Dial
1. Before dialing any digits, press and
hold
0
.
+
The phone displays a
2. Enter the number and press N.
.
Dialing with Speed Dial
You can dial numbers from your phonebook without viewing
them first. Speed Dial lets you call any phonebook entry
just by entering the two-digit index number.
To dial with Speed Dial:
Dial
number
Press the phonebook entry’s index
number, followed by the
The phone displays
Calling . . .
(entry phone number)
To see the index numbers for your
phonebook entries, refer to
“Phonebook” on page XX.
N
key.
.
Dialing with Turbo Dial®
You can dial some numbers from your phonebook with the
press of a single key. Turbo Dial lets you call your first nine
phonebook entries (one to nine) just by entering their
single-digit index number.
62 Sending and Receiving Calls
Page 65

To dial with Turbo Dial:
Dial
number
Press and hold the phonebook entry’s
index number for one second.
The phone displays
Calling . . .
(entry phone number)
To see the index numbers for your
phonebook entries, refer to
“Phonebook” on page XX.
Note: Pressing and holding
the international dialing prefix.
.
0
inserts
Dialing Numbers from
Missed or Recent Calls
Your phone saves a list of phone numbers from the calls
that you recently dialed or received. You can view this list, or
even select one of the numbers and instantly place a call.
Dialing Missed Calls
Your phone tells you when you have missed a calls by
displaying
missed calls.
Note: If your answering machine feature ans wers a call, it is
not considered missed.
Your display may also tell you that a missed call is one of
the following:
X
Missed Calls
, where X is the number of
Unknown
the caller’s name or number is not available
Sending and Receiving Calls 63
Page 66

Shortcut:
From the
missed call
dialog, Press
and hold the
smart key to
dial the last
missed call.
Private
If the caller’s number is not a v ailab le , y ou cannot redial the
call with this procedure.
To dial the number from a missed call:
Dial the
number
the caller’s name or number is intentionally
blocked by the caller or the network
1. Press the smart key. The phone
displays the
the most recent call selected.
Press
list that you want to call. Calls are listed
from newest (10) to oldest (1).
2. Press
key to dial the selected number.
Received Calls
S
to scroll to the number in the
N
, or press and hold the smart
list, with
Note: You can use
procedure.
+
Dialing Recent Calls
You can view the last ten calls that you dialed or received by
checking the lists under the Recent Calls menu.
To view or dial the number from a recent call:
Find the
feature
Choose
dialed /
received
64 Sending and Receiving Calls
1. Press
feature
2. Press S to scroll to either
Calls
3. Press
of the last ten calls.
in place of the smart key in this
M
and navigate to the
Recent Calls
or
Dialed Calls
+
. The phone displays a list
.
Received
.
Page 67

Dial the
number
4. Press S to scroll to the call you want
to dial. Calls are listed from newest
(10) to oldest (1).
5. Press
+
to dial the number of the
selected call.
Dialing from the Phonebook
You can dial the numbers in your phonebook either from the
list view or the detail view.
To dial a number from your phonebook:
Find the
feature
Dial the
number
1. Press
2. If you want to see an entry’s details,
3. Press S to scroll to the entry you want
4. Press + to dial the entry’s number.
M
and navigate to the
feature
Phonebook
The phone displays the phonebook’s
list view.
S
to scroll to the entry and
press
press
+
to call.
Icons next to the entries identify the
entries for work, home, main, mobiles,
faxes, or pagers.
.
.
Sending and Receiving Calls 65
Page 68

Dialing from a Text Message
Phone numbers can be included in text messages. If you
view a text message with an embedded phone number , y ou
can call the number directly.
Your phone tells you when you have an incoming text
message.
Before you open the inbox, you must set it up. See Inbox
Setup on page XX. When you see this display, you can go
directly to the text message and dial the embedded
number, if there is one. Even if your phone is idle, you can
open your inbox and dial the embedded numbers in old
messages.
To view or dial a number from a text message:
From
new
msg
From
idle
66 Sending and Receiving Calls
1. Press +.
The phone displays the text message
inbox.
or
Press
feature
The phone displays the text message
inbox.
M
and navigate to the
Text Msgs
.
Page 69

Use Call
Back
2. Press S to scroll to the message you
want.
Messages are listed from newest to
oldest (#1). You can press
the full message and the call back
number.
3. .Press
4. Press
M
.
The phone displays the Text Message
Menu.
S
to scroll to
+
Call Back
to see
.
5. Press
+
.
If a message has more than one
embedded number with no preferred
number, the phone displays a list of all
the numbers. Press
number you want and press
The phone displays
Calling...
(phone number)
S
to scroll to the
.
+
.
Adding or Attaching
Numbers
Sometimes you may want to dial a number from your
phonebook or recent calls list with a special prefix or suffix.
If you want to use a prefix, you can enter it and then
a number from your list. If you want to use a suffix, you can
select the listed number and then
add
the suffix.
Sending and Receiving Calls 67
attach
Page 70

Attaching Digits While Dialing
This is an easy way to attach digits to the beginning of a
number from your phonebook or recent calls list. To attach a
number while dialing:
Enter
prefix
Select
source
Attach
number
1. Enter the prefix—the numbers that
precede the number from your
phonebook or recent calls list.
2. Press
3. Press
4. Press
5. Press
6. Press
7. Press S to scroll to the entry you want
8. Press
9. The phone displays your prefix plus the
M
.
S
to scroll to
+
The phone displays the attach menu,
with options such as phonebook and
dialed numbers.
S
to scroll to the source of the
number you want to attach.
+
The phone displays the list of numbers
from the source you selected.
to attach.
+
attached number. You can enter more
numbers to add to the end, or press
to dial.
.
.
.
Attach Number
.
N
68 Sending and Receiving Calls
Page 71

Attaching Numbers from Your
Phonebook or Recent Calls List
You can attach two or more numbers stored in your
phonebook or recent calls list. To attach numbers in your
phonebook or recent calls list:
For
Phonebook
For
Recent
Calls
Select
first
number
1. Press
2. Press S to scroll to the first number
3. Press
4. Press
5. Press
M
and navigate to the
feature
Phonebook
The phone displays the phonebook list.
or
Press
M
feature
Dialed Calls
Calls
.
The phone displays the list of recent
calls for the type you selected.
you want to attach.
M
S
to scroll to
+
The phone displays the attach menu,
with options such as phonebook and
dialed numbers.
.
and navigate to the
or
Received
.
Attach Number
.
.
Sending and Receiving Calls 69
Page 72

Select
second
number
6. Press S to scroll to the source of the
second number you want to attach.
+
7. Press
The phone displays the list of numbers
from the source you selected.
8. Press
number you want to attach.
9. Press
go to the idle number editor, or press
M
step 4).
The phone displays the attached
numbers in the idle number editor.
10. Press
.
S
to scroll to the second
+
to attach the number and
to attach another number (go to
N
to dial.
Adding Digits to the End of a Number
You can open your phonebook or recent calls list, select a
number, and then add digits to the end of the number.
To add digits to numbers from your phonebook or recent
calls list:
For
Phonebook
70 Sending and Receiving Calls
1. Press
feature
The phone displays the phonebook list.
or
M
and navigate to the
Phonebook
.
Page 73

For
Recent
Calls
Press
M
and navigate to the
feature
Dialed Calls
Calls
.
The phone displays the list of recent
calls for the type you selected.
or
Received
Attach
number
Enter
suffix
2. Press S to scroll to the entry to which
you want to attach a number.
M
3. Press
4. Press
5. The phone displays the selected
number in the idle number editor.
6. Enter the suffix—the numbers that will
follow the number you selected from
your list.
7. Press
.
S
to scroll to
N
to dial.
Add Digits
.
Dialing Emergency Calls
Your phone stores one or more emergency numbers, which
can only be changed by your provider or another authorized
technician. You should always know the emergency
numbers stored in your phone.
To dial an emergency number, simply enter the numbers
and press
Emergency numbers are different, because you can dial
them even if the phone, keypad, and SIM card are locked.
You can also dial them if the SIM card is damaged or
missing.
N
, just like other number.
Sending and Receiving Calls 71
Page 74

Refer to your phone provider for questions about the
emergency numbers stored in your phone.
Receiving a Basic Call
When a new call arrives, your phone notifies y ou with a new
call dialog and your chosen alert (for example, ring or
vibrate). When you receive a call:
Setup
Choose
answer
or
Ignore
Your phone notifies you with a new call
dialog and your chosen alert (for example,
ring or vibrate).
The phone displays information about the
caller if:
• you subscribe to caller ID service (CLI)
• the network issues a call waiting flash
with information
Complete one of the following:
N
• Press
• Press
• Press and hold
or + to answer the call.
or
O
or - to ignore the call (the
network handles the call appropriately).
or
O
for one second to end
the call without forwarding it to voicemail
or any other designated number.
72 Sending and Receiving Calls
Page 75

Receiving Calls with Caller
ID
If you subscribe to caller ID (CLI), your phone usually
displays the caller’s name or number when a new call
arrives.
If the caller’s inf ormation is
is displayed in place of the information. You can choose to
answer or ignore these calls.
When you receive a call with no caller ID:
not
available, the w ord
Private
Setup
Choose
answer
or
ignore
An incoming call with no caller information
displays
Private
in place of the caller’s
information.
Complete one of the following:
-
• Press
or
• Press
phone resumes normal function.
or O to ignore the call.
+
or N to answer the call. The
Using Call Waiting
If you subscribe to call waiting, your phone notifies you with
a call waiting tone if you receive a second call while you are
on another call. You can choose to switch to the other call or
not.
Note: If you already have an active call and another call on
hold, your phone does not notify you of additional incoming
calls.
Sending and Receiving Calls 73
Page 76

Call waiting is an optional feature. Contact your service
provider for information about availability.
Using Call Waiting on an Analog
System
When a second call arrives on an analog system, complete
the following:
Setup
Answer
the new
call
Switch
calls
While you are on a call, you hear a call
waiting tone, and the current call stays
active.
The phone displays a call waiting dialog
that identifies the new caller if:
• you subscribe to caller ID service (CLI)
• the network issues a call waiting flash
with info
If you see this notification, you can press
+
to answer the new call.
1. Press N to switch to the new call and
put the current call on hold.
or
O
to end the current call and
Press
switch to the new call.
2. If you put the original call on hold,
press
+
to return to it.
O
3. Press
to end the current call.
Your phone switches to the other call, if
present, or returns to the idle state.
74 Sending and Receiving Calls
Page 77

Using Call Waiting on a Digital
System
When a second call arrives on a digital system:
Setup
Answer
new call
Switch
calls
While you are on a call, you hear a call
waiting tone, and the current call stays
active.
The phone displays a call waiting dialog
that identifies the new caller if your
technology supports this feature.
1. Press N or + to switch to the new
call and put the current call on hold.
You see both calls on your display, with
a flashing phone icon next to the active
call.
or
Press
O
to end the current call and
switch to the new call.
or
-
Press
incoming call. The netw ork handles the
call appropriately.
2. If you put the original call on hold,
press
3. You can press
calls into a conference, so that you can
talk to both people at the same time.
See Conference Calls on pgXX. Press
O
to end the current call.
to ignore the new
+
to return to it.
-
to link the two
Sending and Receiving Calls 75
Page 78

In-Call Features
Phone features that are available during an active call are
called
in-call features
• receive other calls
• look up your phone number , recent calls, phone book
entries, messages, and datebook items
• put a call on mute or hold
• dial/enter numbers, tones, and PIN numbers
• set up a three-way or conference call
• transfer calls
• use a speakerphone (handsfree mode)
Menu Features
Call Menu Call/Dial Menu
My Tel. Number Spkrphone On/Off*
Hold My T el. Number
Mute/Unmute Hold
Talk to One** Mute/Unmute
T ransf er Send T ones
New Call Attach Number
Dialed Calls Hide ID/Show ID
Received Calls Insert Pause
Messages Insert Wait
Datebook Insert ‘n’
. In this chapter you will learn how to:
Send Message
76
Page 79

2 Calls Menu 2 Calls/Dial Menu
Spkrphone On/Off* Switch
Mute/Unmute Link
Transfer Spkrphone On/Off*
Phonebook Mute/Unmute
Dialed Calls Send Tones
Received Calls Attach Number
Messages Hide ID/Show ID
Datebook Insert Pause
Insert Wait
Insert ‘n’
Send Message
* appears only if a speakerphone is connected to the phone
** appears only if a conference call is in progress
Receiving a Second Call
When you receive a second call while you are already on
the line, complete the following steps:
Setup
When a second call arrives, your
phone notifies you with a new call
dialog and an in-call tone.
The phone displays information about
the caller if either:
• you subscribe to caller ID service
(CLI)
• the network issues a call waiting flash
with information
In-Call Features 77
Page 80

Choose
answer
or
Ignore
Press N or + to answer the call.
or
O
or - to ignore the call.
Press
(The network handles the call
appropriately.)
or
O
Press and hold
the call without forwarding it to
voicemail or to any other designated
number.
Note: You can only keep two calls open at a
time. If a third call arrives while you already
have two calls open, your phone does not
notify you.
for 1 second to end
Sending and Receiving Data
or Fax Calls
While your phone is being used as a wireless modem to
send or receive data or fax calls, your phone cannot
perform any other functions. The following conditions occur:
Fax call
78 In-Call Features
Your phone queues all call waiting and
new events (incoming text messages,
voicemail, etc.) so that they reappear
after the fax is complete. You cannot
view or act on them during the fax call.
Page 81

Data call
For more details about these calls, refer to “Sending and
Receiving Data or Fax Calls” on page 78.
For details about how to handle a fax call that arrives while
you are on another call, refer to “Receiving a Second Call”
on page 77.
Your phone ignores all call waiting and
new events (incoming text messages,
voicemail, etc.) unless they are
supported by peripheral software. You
cannot view or act on them.
Viewing Your Phone Number
You can view your own phone number while you are on an
active call.
Find the
feature
Exit
1. Press
2. Press - to return to the active call
M
and navigate to the
feature
My Tel. Number
The phone displays its own telephone
number.
dialog.
.
In-Call Features 79
Page 82

Muting a Call
You can turn off or
call. When you mute a call, you temporarily stop the caller
from hearing you.
Turn
mute on
Turn
mute off
mute
your phone’s microphone during a
1. Press
2. Press + again to turn the mute
M
and navigate to the
feature
Mute
.
The phone displays the message
Mute is on
dialog.
feature off and turn the microphone on.
, followed by the
Mute
Placing a Call on Hold
Your phone lets you put a call on hold.
Find the
feature
1. Press
M
and navigate to the
feature
Hold
.
or
+
Press
Hold
The phone displays an
message, followed by the
dialog.
when the phone displays
above the key.
On Hold
On Hold
Dial
another
call
Exit
80 In-Call Features
2. Optionally, while a call is on hold, you
can press
phonebook and dial another call.
3. Press + to resume the call.
-
to open the
Page 83

Dialing and Entering
Numbers
You can enter digits during an active call, whether it is to
dial another number or to enter a password or credit card
number. Following are some of the tasks you can complete:
Enter
digits
Delete
digits
Dial
number
Create
phonebook
entry
Enter the digits on the keypad or select a
number from your phonebook or other list.
The digits appear in the active call dialog as
you enter them. The phone automatically
stores the digits to Notepad. Ref er to “Using
the Notepad” on page 101.
To delete a single digit, press -.
To delete all of the digits you entered, press
-
and hold
To dial the number you entered, press N.
Refer to “Setting Up a Three-Way Analog
Call” on page 82 or “Using Digital
Conference Call Options” on page 83.
If you do not have a call on hold or muted,
you can create a phonebook entry by
pressing
Refer to “Storing Phonebook Entries” on
page 231.
• If you have a call on hold, pressing
will return to the call.
• If you have a call muted, pressing
will unmute the call.
for one second.
+
.
+
+
In-Call Features 81
Page 84

Send as
DTMF
If you do not have a call on hold, you can
send the numbers as Dual Time MultiFrequency (DTMF) tones, which are used
for passwords, credit card numbers, and
other codes.
For more detail, refer to “Sending Tones” on
page 88.
Send as
MMI
Time
Out
To send MMI commands , press N. Your
network may give you MMI commands to
perform certain tasks.
If you do not take any action within 20
seconds, the phone clears the digits you
entered. How ev er , they are still stored in the
Notepad.
Setting Up a Three-Way
Analog Call
You can set up a three-way call on an analog network by
calling a third party during an active call. However, since
calls on hold have higher priority than three-way calls, you
cannot set up a three-way call if you already have a call on
hold.
Note: Three-way calling is an optional network feature.
Contact your service provider for information about
availability.
82 In-Call Features
Page 85

To set up a three-way call on an analog network:
Call
third
party
Exit
1. During an active call, dial the third
party and press
or
Select a number from your phonebook
or other list and press
Your phone will briefly display:
Dialing
(third party’s phone number)
Your active call display returns, and the
third party should be connected. Since
the phone does not receive any
indication of whether the call connects,
it does not display any notification.
2. Press O to disconnect.
N
.
N
.
Using Digital Conference
Call Options
If you want to talk to sev er al people at once , y ou can set up
a conference call. To do this, call each person separately
and add or link them to the call.
While you are connected to a conference call, you can also
choose to have a private conversation with one of the
people in the call.
Note: You can only set up one conference call at a time.
Conference calls are only available on digital networks. For
analog networks, refer to “Setting Up a Three-Way Analog
Call” on page 82.
In-Call Features 83
Page 86

Setting Up a Conference Call
To set up a conference call:
Call
another
party
Link
calls
Exit
1. During an active call, dial the new party
and press
or
Select a number from your phonebook
or other list and press
Your phone displays the
Connected
new party.
When your phone returns to the active
call display, you see a list of the
connected calls, with a hold icon
next to the call on hold and an active
icon
2. Press - to link the two calls.
Your phone links the new call to the
previous call.
To add more people to the conference
call, repeat these two steps. Since you
can only keep two calls open at once,
you must link each new call to the
conference before making another call.
3. Press O to disconnect.
N
.
N
.
Calling
dialogs while calling the
q
next to the active call.
and
n
84 In-Call Features
Page 87

Setting up a Private Call From a
Conference Call
Note: This feature is only available if you initiated the
conference call and no one else is on hold.
To step out of a conference call and set up a private call
with one of the participants, complete these steps:
Find the
Feature
Select a
single
party
Return
to conf.
call
Exit
1. During an active conference call, press
M
and navigate to the feature
Talk to One
Your phone displays the
with
conference call.
2. Scroll S to the party with whom you
want to have a private call.
3. Press
You begin a private call with the
selected party. The conference call is
on hold, but its participants can
continue to converse.
4. To return to the conference call:
Press
into the conference call.
or
Press
hold and return temporarily.
5. Press O in the conference call to
disconnect.
.
Talk only
menu, listing all the parties in the
+
.
-
to link both of you back
+
to put the private call on
In-Call Features 85
Page 88

Transferring a Call
When you receive a call, you can transf er the call to another
phone, called the
to use a warm and a cold transfer.
Using a Warm Transfer
A
warm transfer
answers the target phone first. You can tell them whom you
are transferring or why, before you transfer the call.
To transfer a call with a warm transfer:
target phone
permits you to speak to the person who
. This section describes how
Put call
on hold
Call
target
phone
86 In-Call Features
1. When you are talking to someone who
you want to transfer to another phone
number, Press
scroll to
2. Press
The phone displays the
dialog. Refer to “Placing a Call on
Hold” on page 80.
3. Dial the target phone number and
press
or
Select a number from your phonebook
or other list and press
The phone displays the
dialog.
4. Speak to the person who answers the
target phone.
Hold
+
N
to call.
.
.
M
. Press S to
On Hold
N
to call.
2 calls
Page 89

Transfer
the call
5. Press
6. Press
7. Press
M
. Press S to scroll to
Transfer
The phone displays the
confirmation dialog.
The phone displays the
dialog and the transfer is complete.
.
+
.
+
to confirm the transfer.
Transfer
Transferring
Using a Cold Transfer
A
cold transfer
phone, without giving you the chance to speak to the
person on the target phone.
To transfer a call with a cold transfer:
sends an active call directly to another
Choose
transfer
Transfer
the call
1. When you are talking to someone you
want to transfer to a target phone,
press
M B Transfer
The phone displays the
dialog.
2. Dial the target phone number and
press
N
to call.
or
Select a number from your phonebook
or other list and press
The phone displays the
dialog and the transfer is complete.
.
Transfer to
N
to call.
Transferring
In-Call Features 87
Page 90

Sending Tones
You can enter digits and send them as Dual Time MultiFrequency tones (DTMF) tones. These tones are used to
access automated calling systems, such as credit card
entry, password entry, or number linking. Your phone
transmits DTMF tones when you press a key on the
keypad.
This feature only applies in certain situations, such as when
you are on an active call, dialing, or viewing your
phonebook, dialed calls, or received calls.
To send tones:
Enter
digits
Send
tones
Entering a PIN (Analog)
On some analog networks, you have to enter a PIN
(Personal Identification Number) to dial certain numbers.
If your Auto-PIN feature is turned on, you can send your
PIN with the press of a button whenever required.
88 In-Call Features
1. Enter the digits on the keypad or select
a number from your phonebook or
other list.
2. Press
M
. Press S to scroll to
Send Tones
or
Press and hold
You can hear the tones in your
earpiece as the phone sends them to
the network.
, and press +.
N
for one second.
Page 91

Otherwise, you can enter your PIN digits and then send
them.
To dial a number with a PIN:
Dial
number
Send
PIN
1. Enter the number you want to dial and
press
N
.
2. If the network requires a PIN for this
number, complete one of the following
steps:
a. If Auto-PIN is on, your phone
displays the
Press
or
b. If Auto-PIN is off, you hear the
network prompt (beep or recording),
and your phone displays the
Connected
Enter your PIN and press
your PIN.
The call proceeds to connect.
Send PIN Code
+
or N to send your PIN.
dialog.
dialog.
N
to send
Viewing Entries
Recent Calls
You can view your list of recent calls while you are on a call.
The list shows you the names or numbers from calls you
In-Call Features 89
Page 92

recently dialed or received. To view the recent calls list
during a call:
Display
the list
Exit
1. Press
2. Press
3. Press
4. Press - to return to the active call.
M
.
S
to scroll to
Received Calls
list you want to see.
+
Your phone displays the list of the ten
most recent calls, numbered from the
oldest (1) to the most recent (10).
For more details, refer to “Recent
Calls” on page 93.
Dialed Calls
, depending on which
.
or
The Phonebook
You can open your phonebook during a call, to see a list of
your entries. To view your phonebook during a call:
Display
phonebook
1. If you have only one call, press -.
or
M
If two calls are active, press
Then press
and press
Your phone displays your list of
phonebook entries. For more detail,
refer to “Using the Phonebook” on
page XX.
S
to scroll to
+
.
.
Phonebook
,
Exit
90 In-Call Features
2. Press - to return to the active call.
Page 93

Messages
During a call, you can look at your messages from any
category, such as Voicemail or Text. To vie w your messages
during a call:
Display
message
menu
Exit
1. Press
2. Press
3. Press
4. Press - to return to the active call.
M
.
S
to scroll to
+
Your phone displays the
Center
menu, where you can select
the messages you want to see. For
more detail, refer to “Using the
Message Center” on page XX.
.
Messages
Message
.
The Datebook
During a call, you can open your datebook and view , edit, or
create entries. To view your datebook during a call:
Display
datebook
Exit
1. Press
2. Press
3. Press
4. Press - to return to the active call.
M
.
S
to scroll to
+
Your phone displays your datebook,
where you can select days to view and
edit. F or more detail, ref er to “Using the
Datebook” on page XX.
Datebook
.
.
In-Call Features 91
Page 94

Using a Speakerphone
(Handsfree Mode)
If you connect your phone to an external earpiece and
microphone, you can switch your phone to communicate
through this handsfree device. You can even do this during
a call.
Note: Speakerphone options are not available on phone
menus unless a speakerphone is plugged into the phone.
To switch to a speakerphone during a call:
Switch
speaker
on
Switch
speaker
off
92 In-Call Features
1. Press #.
Your phone displays a
notification.
2. Press #.
Your phone displays a
notification.
Spkrphone On
Spkrphone Off
Page 95

Recent Calls
Your phone keeps track of the most recent calls you dialed
and received. You can find out what numbers you called (or
what numbers called you) and how long the calls lasted.
In this chapter you will learn how to:
• look at your list of received calls and use its options
• look at your list of dialed calls and use its options
• use the notepad
• view and reset your call timers
Menu Features
Recent Calls Last Calls
Received Calls Store
Dialed Calls Delete
Notepad Delete All
Call Time
Send Message
Add Digits
Attach Number
Send T ones
Tips for the Received Calls
List
Your phone keeps a list of numbers for calls that you most
recently received—both calls that you answered and calls
that you missed. This list tells you the caller’s name and
93
Page 96

number (if available) and whether y ou spok e to the caller or
not.
• The list entries are sorted from newest (10) to oldest (1).
• Each call is represented by the name or, if the name is
unavailable, the number of the other party.
• An icon next to an entry indicates if you answered the
call or have since placed a call to the number.
• Unknown entries and duplicate entries are included in
the list as individual entries.
• Fax and data calls are included in the list, with any
*
unrecognizable characters represented by an asterisk
• SIM or Browser programs may not provide a number to
call back. You can call back the entry if a name is
present, but if none is present and the program
suppressed the number, then the call does not appear in
the list.
• The list reflects changes in the phonebook. F or e xample:
If you make a phonebook entry for a number in the list
and assign a name to it, the list updates to show the
name.
• If caller information is unavailable, the entry says
Unknown
• If caller information is withheld, the entry says
• The list includes calls that are answered by network
voicemail.
.
Private
.
.
Tips for the Dialed Calls List
Your phone keeps a list of the numbers that you called most
recently. This list tells you the caller’s name (if available)
94 Recent Calls
Page 97

and number, and it indicates whether they answered the
call or not.
• The list entries are arranged from newest (10) to oldest
(1).
• Each call is represented by the name or, if the name is
unavailable, the number of the other party.
• Conference calls do not appear as entries in the list.
Each call placed to each member of the conference is a
separate dialed calls entry.
• Duplicate entries are included in the list as individual
entries.
• Fax and data calls are included in the list.
Viewing the Received Calls or Dialed
Calls List
To view the received calls or dialed calls list:
Find the
feature
1. Press
M
and navigate to the
feature
Recent Calls B
Received Calls
The phone displays the list.
or
Dialed Calls
.
Recent Calls 95
Page 98

Complete
tasks
2. You can press S to scroll to an entry
and complete one or more of the
following tasks:
• Press
N
to call the entry’s number.
N
• Press and hold
for one second
(with a call in progress) to send the
entry’s number as DTMF tones.
• Press
+
to view the entry’s
details, if
View
appears above the
key. Refer to “Viewing Details for
Received Calls and Dialed Calls”
on page 98.
or
Press
+
to store the entry’s
details in the phonebook, if
Store
appears above the key. Refer to
“Storing Phonebook Entries” on
page 231.
• Press
M
to open the Last Calls
menu. Refer to “Received Calls and
Dialed Calls Menu Options” on
page 97.
Exit
96 Recent Calls
3. Press - to return to the previous
dialog
or
O
return to the main dialog.
Press
Page 99

Received Calls and Dialed Calls
Menu Options
If you are viewing the received calls or dialed calls list, or
the details of a received calls or dialed calls list entry, you
can press
M
to see the following options:
Store
Delete
or
Delete
all
Send
msg.
Add
digits
Attach
number
Create a new phonebook entry, with the
selected number in the
to “Storing Phonebook Entries” on
page 231.
This option is not available if
appears on the list dialog.
Refer to “Deleting Entries from the
Received Calls or Dialed Calls List” on
page 100.
Create a new message, with the selected
number in the
“Sending a Text Message” on page 113.
Add digits to the end of the selected
number. Refer to “Adding Digits to the End
of a Number” on page 70.
Attach digits to the beginning of the
selected number. You can either use the
keypad or select another number from your
phonebook or other list. Refer to “Adding or
Attaching Numbers” on page 67.
Tel No.
Tel No.
field. Ref er
Store
field. Refer to
Recent Calls 97
Page 100

Send
tones
Send tones, only with a call in progress.
Refer to “Sending Tones” on page 88.
Viewing Details for Received Calls
and Dialed Calls
To view a call’s details in the received calls list:
Find the
feature
Select
entry
1. Press
2. Press S to scroll the desired entry.
3. Press
M
and navigate to the
feature
Recent Calls B
Received Calls
The phone displays the list.
If details are available, the phone
displays
If details are not available, the phone
displays
opens a new phonebook entry with
the call’s number in the
To complete this entry, refer to
“Storing Phonebook Entries” on
page 231.
+
if they are available.
The details form includes: caller
name, caller number, start date and
time, and duration.
or
Dialed Calls
View
over the +.
Store
over the +. This
Tel No
to see an entry’s details,
field.
.
98 Recent Calls
 Loading...