

Page 1

Contents
Introduction 5
Introducing the StarTAC® Clip-On Mobile Organizer . . . . . . . . . . 5
Chapter 1
Getting started 7
Using the StarTAC Clip-On Mobile Organizer . . . . . . . . . . . . . . 7
Getting started with the Setup Wizard . . . . . . . . . . . . . . . . . 8
Chapter 2
About the StarTAC
Clip-On Organizer 13
Calling with the StarTAC Clip-On Mobile Organizer. . . . . . . . . . 13
Using the StarTAC Clip-On’s call memory . . . . . . . . . . . . . 13
Using Contacts. . . . . . . . . . . . . . . . . . . . . . . . . . . . . . 14
Changing views. . . . . . . . . . . . . . . . . . . . . . . . . . . . 14
Sorting cards . . . . . . . . . . . . . . . . . . . . . . . . . . . . . 15
Changing the telephone number display . . . . . . . . . . . . . . . 15
Editing your Contacts. . . . . . . . . . . . . . . . . . . . . . . . . 16
Using the Calendar. . . . . . . . . . . . . . . . . . . . . . . . . . . . 19
Changing views (Daily, Weekly, Monthly). . . . . . . . . . . . . . 19
Using reminder alarms . . . . . . . . . . . . . . . . . . . . . . 19
Viewing events . . . . . . . . . . . . . . . . . . . . . . . . . . 19
Editing your Calendar . . . . . . . . . . . . . . . . . . . . . . . . 20
Using To Do Lists . . . . . . . . . . . . . . . . . . . . . . . . . . . . 22
Checking off completed items . . . . . . . . . . . . . . . . . . . . 23
Creating To Do items . . . . . . . . . . . . . . . . . . . . . . . . . 23
Using Memos . . . . . . . . . . . . . . . . . . . . . . . . . . . . . . 25
Creating QuickNotes . . . . . . . . . . . . . . . . . . . . . . . . . 25
Using Time Zones . . . . . . . . . . . . . . . . . . . . . . . . . . . . 26
Changing cities and time zones. . . . . . . . . . . . . . . . . . . . 27
Setting the clock . . . . . . . . . . . . . . . . . . . . . . . . . . . 27
Using alarms . . . . . . . . . . . . . . . . . . . . . . . . . . . . . 28
Understanding time zones and travel. . . . . . . . . . . . . . . . . 28
Using Preferences . . . . . . . . . . . . . . . . . . . . . . . . . . . . 28
Synchronizing with the Clip-On. . . . . . . . . . . . . . . . . . . . . 30
i Contents i
Page 2

Chapter 3
Setup and
product care 31
Getting connected . . . . . . . . . . . . . . . . . . . . . . . . . . . . 31
Installing new batteries . . . . . . . . . . . . . . . . . . . . . . . . . 32
Product care . . . . . . . . . . . . . . . . . . . . . . . . . . . . . . . 33
Chapter 4
TrueSync Desktop
and TrueSync Plus 35
Introducing TrueSync technology . . . . . . . . . . . . . . . . . . . . 35
Requirements . . . . . . . . . . . . . . . . . . . . . . . . . . . . . . 36
Installing the product . . . . . . . . . . . . . . . . . . . . . . . . . . 36
The Readme file . . . . . . . . . . . . . . . . . . . . . . . . . . . 37
Registering . . . . . . . . . . . . . . . . . . . . . . . . . . . . . . 37
Uninstalling your product . . . . . . . . . . . . . . . . . . . . . . . . 38
Starting TrueSync Desktop . . . . . . . . . . . . . . . . . . . . . . . 38
Starting TrueSync Plus. . . . . . . . . . . . . . . . . . . . . . . . . . 39
About the documentation . . . . . . . . . . . . . . . . . . . . . . . . 39
Using online help. . . . . . . . . . . . . . . . . . . . . . . . . . . 39
For more information. . . . . . . . . . . . . . . . . . . . . . . . . 39
Chapter 5
Synchronizing 41
Setting up TrueSync . . . . . . . . . . . . . . . . . . . . . . . . . . . 41
Using the TrueSync Setup Wizard . . . . . . . . . . . . . . . . . . 42
Synchronizing . . . . . . . . . . . . . . . . . . . . . . . . . . . . . . 44
Changing the TrueSync setup . . . . . . . . . . . . . . . . . . . . . . 45
Changing synchronization options . . . . . . . . . . . . . . . . . . 46
Selecting what to synchronize . . . . . . . . . . . . . . . . . . . . 46
Selecting files, folders, or categories. . . . . . . . . . . . . . . . . 47
Selecting and mapping Contacts fields. . . . . . . . . . . . . . . . 48
Changing your preferences . . . . . . . . . . . . . . . . . . . . . . . 48
Using QuickLists . . . . . . . . . . . . . . . . . . . . . . . . . . . 49
Using the Synchronization Log . . . . . . . . . . . . . . . . . . . . . 49
Setting up multiple users. . . . . . . . . . . . . . . . . . . . . . . . . 49
ii Contents
Page 3

Chapter 6
TrueSync Desktop 51
Using TrueSync Desktop’s features . . . . . . . . . . . . . . . . . . . 51
Shortcut menus . . . . . . . . . . . . . . . . . . . . . . . . . . . . 52
Customizing the Toolbar. . . . . . . . . . . . . . . . . . . . . . . . . 52
Setting preferences. . . . . . . . . . . . . . . . . . . . . . . . . . . . 52
Chapter 7
TrueSync Desktop:
Calendar view 55
Using the Calendar view. . . . . . . . . . . . . . . . . . . . . . . . . 55
Viewing your Calendar . . . . . . . . . . . . . . . . . . . . . . . . . 56
Selecting dates in the Daily view. . . . . . . . . . . . . . . . . . . 57
The Weekly and Monthly views . . . . . . . . . . . . . . . . . . . . . 57
The Yearly View . . . . . . . . . . . . . . . . . . . . . . . . . . . . . 58
Scheduling events . . . . . . . . . . . . . . . . . . . . . . . . . . . . 58
When you travel: changing time zones . . . . . . . . . . . . . . . . . 59
Entering To Do items and calls . . . . . . . . . . . . . . . . . . . . . 60
Chapter 8
TrueSync Desktop: Contacts view 61
Using the Contacts view. . . . . . . . . . . . . . . . . . . . . . . . . 61
Cardfile basics . . . . . . . . . . . . . . . . . . . . . . . . . . . . . . 61
Creating a cardfile . . . . . . . . . . . . . . . . . . . . . . . . . . . . 62
Adding cards. . . . . . . . . . . . . . . . . . . . . . . . . . . . . . . 63
Chapter 9
TrueSync Desktop: Memos view 65
Using the Memos view . . . . . . . . . . . . . . . . . . . . . . . . . 65
Memo files, folders, and memos. . . . . . . . . . . . . . . . . . . . . 66
Creating memos . . . . . . . . . . . . . . . . . . . . . . . . . . . . . 67
Changing margins and tabs . . . . . . . . . . . . . . . . . . . . . . . 67
Chapter 10
TrueSync Desktop: EarthTime view 69
The EarthTime map . . . . . . . . . . . . . . . . . . . . . . . . . . . 69
Selecting cities. . . . . . . . . . . . . . . . . . . . . . . . . . . . . . 70
iii Contents iii
Page 4

Changing the Local Time . . . . . . . . . . . . . . . . . . . . . . . . 71
Changing the Home Clock. . . . . . . . . . . . . . . . . . . . . . . . 71
Chapter 11
TrueSync Desktop: Printing 73
Using the Printing options . . . . . . . . . . . . . . . . . . . . . . . . 73
Calendar printing . . . . . . . . . . . . . . . . . . . . . . . . . . . . 73
Printing in the daily format. . . . . . . . . . . . . . . . . . . . . . 74
Printing different formats. . . . . . . . . . . . . . . . . . . . . . . 74
Printing in Contacts view . . . . . . . . . . . . . . . . . . . . . . . . 74
Printing labels, address book pages, and envelopes . . . . . . . . . 75
Printing in the Memos view . . . . . . . . . . . . . . . . . . . . . . . 76
Index 77
iv Contents
Page 5
Chapter 0
Introduction
Introducing the StarTAC® Clip-On Mobile Organizer
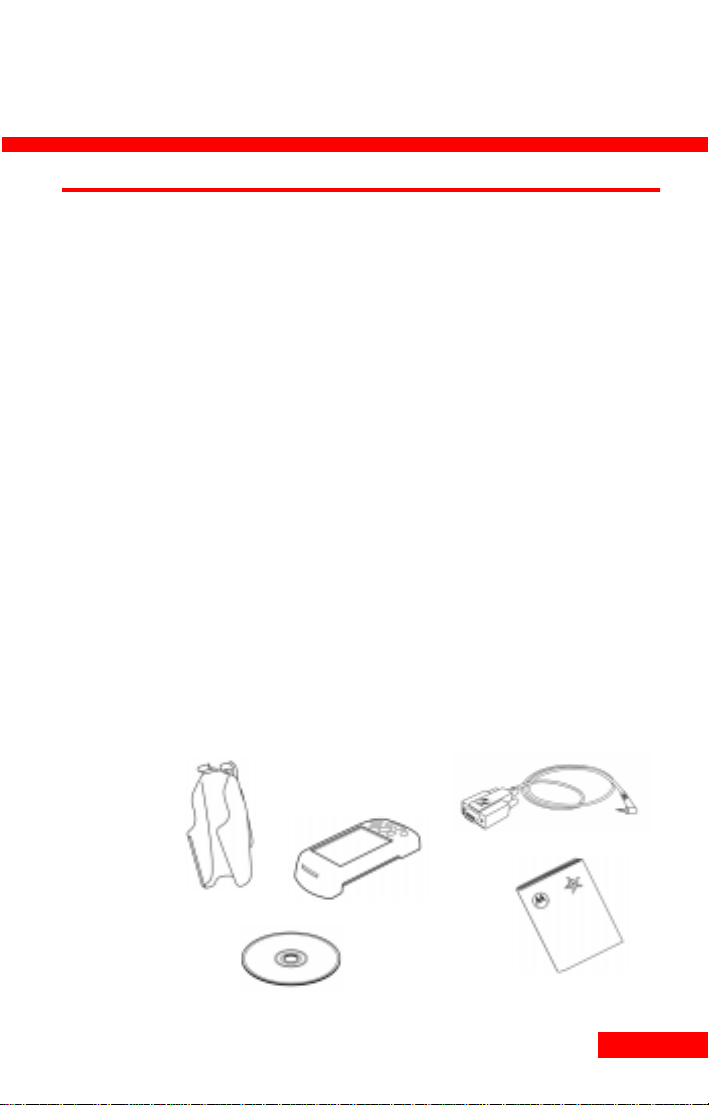
Congratulations on your purchase of the StarTAC Clip-On
Mobile Organizer. Attaching directly to your StarTAC phone,
the StarTAC Clip-On enables you to store, view, and edit
thousands of names, numbers, appointments, notes, and tasks
in a space smaller than the average wallet.
To dial a number, select a contact on your Clip-On and press
the Call button. The Clip-On promptly dials the number for
you.
In addition, the Clip-On can be easily customized to work the
way you do: go to the Preferences screen, and choose whether
you want to operate it with your right hand or left hand.
You can add contacts, names, tasks, and events on your ClipOn, and then synchronize to a personal information manager
(PIM), such as TrueSync
TrueSync Desktop is an easy-to-use personal information
manager that is included with your purchase. To learn more
about Tru eSync Desktop and how to synch ronize, see Chapters
5 and 6.
®
Desktop, and/or a handheld device.
5 Introduction 5
Page 6

Starfish updates its synchronization accessors frequently, to
ensure that customers can synchronize with the most recent
releases of popular software organizers and devices. For all the
latest Starfish news, visit www.starfish.com.
6 Introduction
Page 7
1
g
Chapter 1
Getting started
Using the StarTAC Clip-On Mobile Organizer
This chapter describes the special features of the StarTAC
Clip-On. To turn on the Clip-On, press any of the seven keys
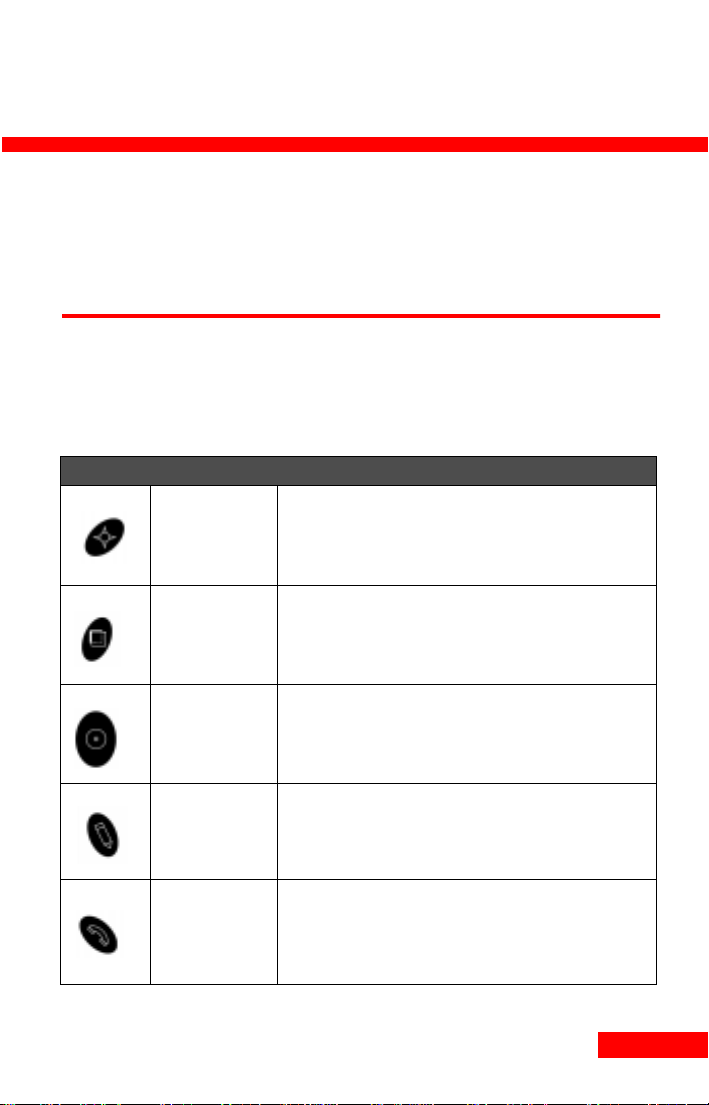
described in the table below.
Icon Name Description
Press Home to
Home
View
Select
Edit
Call
7 Getting started 7
again to return to the main (Home) screen.Press
and hold Home for a few seconds to turn off the
Clip-On.
Press the View key to see a menu of current
options, such as Daily, Weekly, and Monthly views
in the Calendar.
Press the Select key to choose an option.
Press the Edit key to add or edit contacts, tasks, or
events.
With the phone correctly attached and turned on,
select a phone number and then press the Call key
to place a call. You can initiate a call from any
screen that displays a phone number.
o up one level; press and hold
Page 8
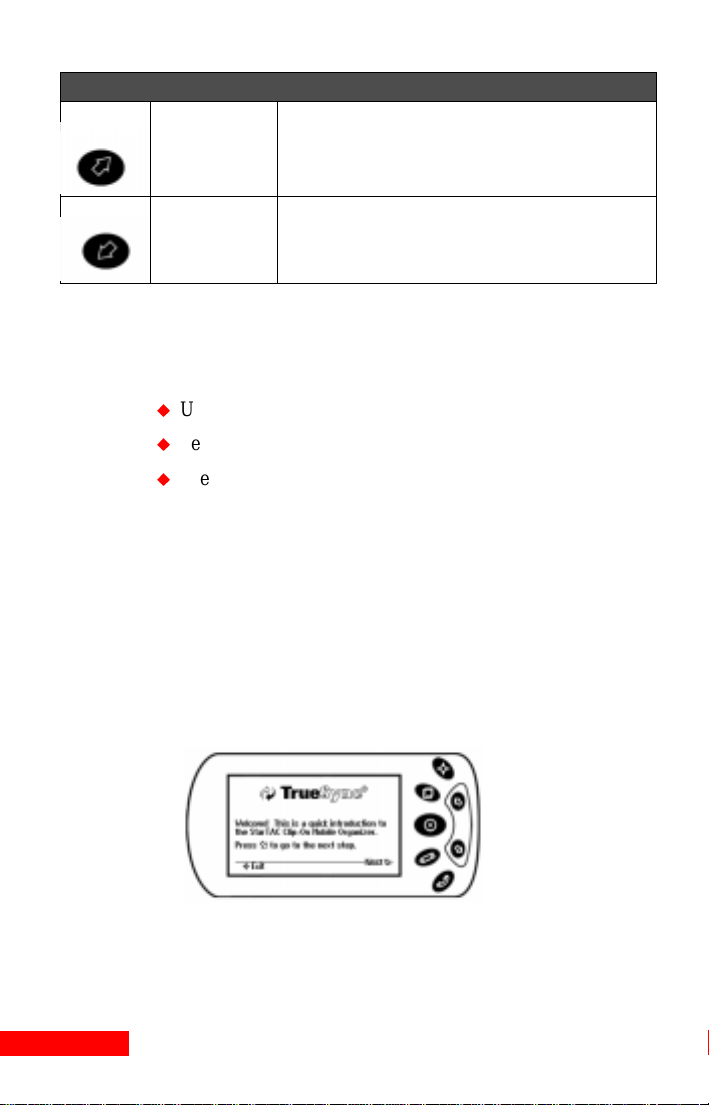
g
Icon Name Description
Press the Back/Up and Next/Down keys to scroll or
Back/Up
Next/Down
move the hi
In Edit mode, you can use these arrow keys to
move from one letter or number to another.
hlight through a list or screen.
Using the Home screen:
Press or hold the Home key until the Home screen appears.
From the Home screen, use the:
Up and Down keys to highlight the icons.
Select key to enter a module.
View key to check the owner information.
The status bar at the bottom displays labeled icons that tell you
which functions you can perfor m f rom that view. For example,
in the Welcome screen of the Setup Wizard, shown below, the
status icons tell you to press the Home key to exit the Setup
Wizard, or the Next/Down key to continue.
Getting started with the Setup Wizard
When you first turn on the Clip-On, the Setup Wizard will help
you get start ed.
The second Wizard screen lets you select your profile. Your
selection determines which set of pre-defined lists is offered
8 Chapter 1
Press the
Next/Down key
to continue.
Page 9
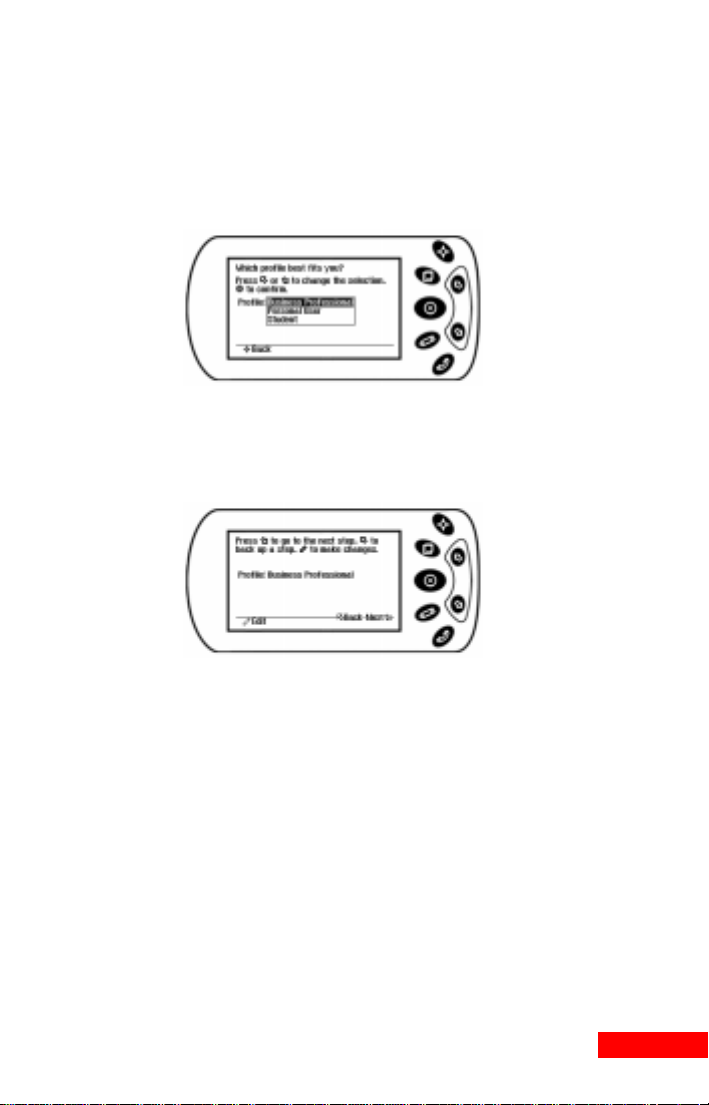
when you add a new event, contact, or task. These lists will be
updated as you e nter new information.
You can change your profile later in the TrueSync Desktop
software. For details, refer to the TrueSync Desktop help
system.
Press the Select
key to enter your
choice. If you want
to return to the
previous screen,
press the Home
key.
The third Wizard screen confirms your profile selection.
Use the Edit key if
you want to change
your profile, then
press the Next/Down
key to continue.
Next, enter your first name, using the arrow keys to select the
letters of your name. To scroll quickly, hold down one of the
arrow keys.
After you have highlighted a choice, press the Select key. If
you make an error, select Erase. If you want to enter numbers,
9 Getting started 9
Page 10
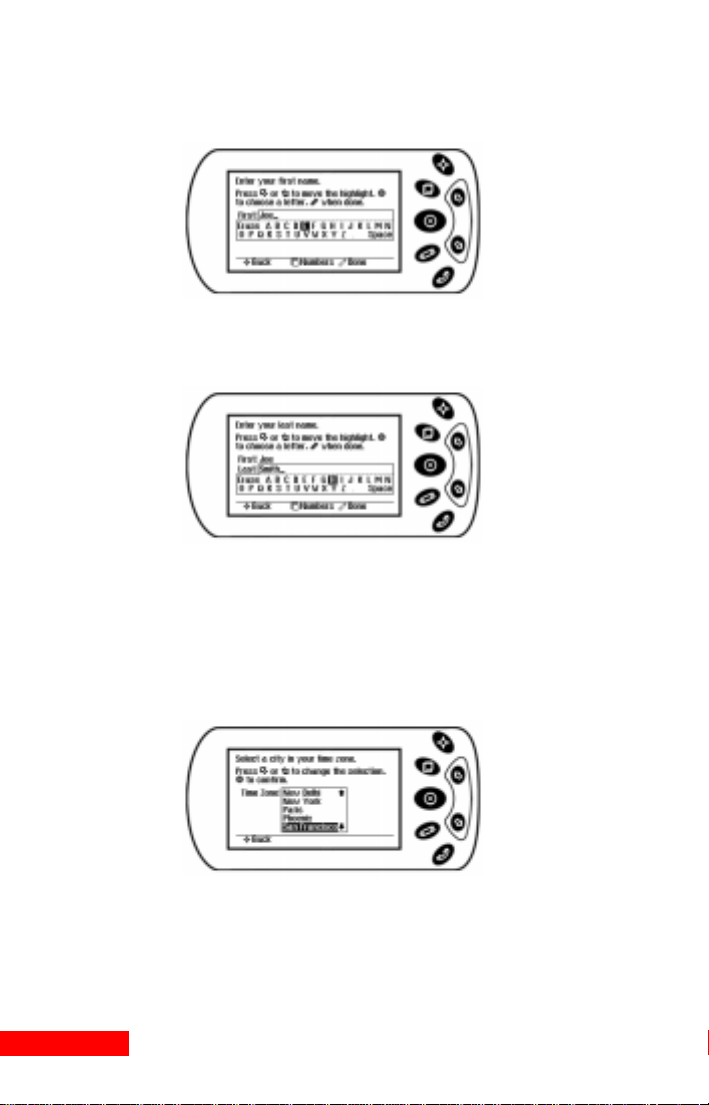
press the View key. To return to letters, press the View key
again.
When your
first name is
spelled
correctly,
press the Edit
key.
Now enter your last name, us i ng t he k eys described previously .
When your last
name is spelled
correctly, press
the Edit key.
After checking your entries to make sure they are correct, press
the Next/Down key.
The next task is to customize the time zone setting. Use the
arrow keys to select a city in your time zone.
To enter the correct date, use the arrow keys to select the
month, and then press the Select key. Then use the arrow keys
10 Chapter 1
Press the
Select key to
continue with
the Wizard.
Page 11

to select the correct day, pressing the Select key to enter your
choice. Follow this same procedure to enter the year.
Press the
Select key to
enter your
choice.
After you have entered the year, select the time, then press the
Select key when you have finished.
The next screen shows a summary of your settings . If they are
correct, press the Next/Down key to continue.
Now press the Select key, and you are ready to start using the
StarTAC Clip-On .
11 Getting started 11
Page 12

12 Chapter 1
Page 13
Chapter 2
About the StarTAC
Clip-On Organizer
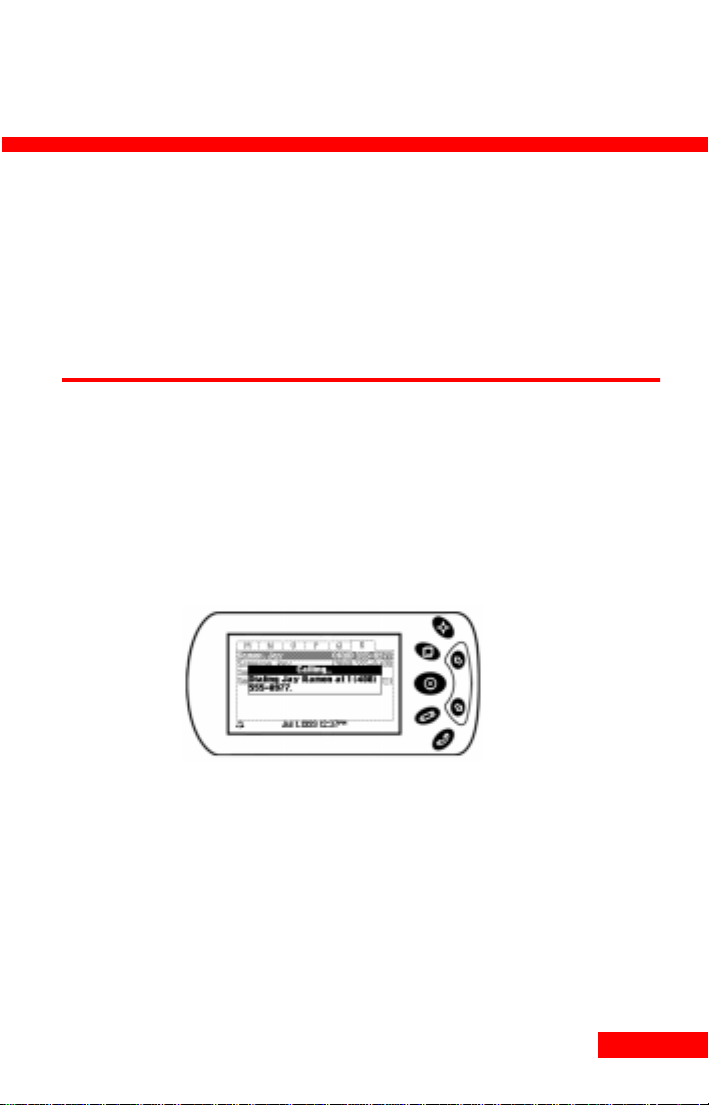
Calling with the StarTAC Clip-On Mobile Organizer
Initiating a telephone call is easy, because you can place your
call from any view: Contacts, Calendar, To Do, or Memos. Just
highlight the telephone number that you want to dial and press
the Call key. You will then see a dialog displaying the
telephone number being dialed, as shown below.
You can view
the number
that is being
dialed.
2
To cancel a call (for example, if you receive a busy signal or
the phone rings numerous t imes withou t a response), pr ess End
on the telephone or close the phone.
Using the StarTAC Clip-On’s call memory
Press the Call key at the Home/Main screen to view a dialog
displaying a list of the ten most recently dialed telephone
numbers. To call one of those numbers, highlight it, and then
press the Call key to dial that number.
13 About the StarTAC Clip-On Organizer 13
Page 14

Using Contacts
Using Contacts, you can view and create cardfiles containing
information such as names, phone numbers, and addresses.
You can also make telephone calls quickly and easily, as
described earlier in this chapter. To enter the Contacts module
from the Home screen, highlight the Contacts icon, and press
the Select key.
Changing view s
You will see a cardfile name or “All Cards” at the top right of
the screen. “All” means that you are viewing all the cardfiles
that were synchronized. (If you have onl y one cardfile category
or the Contacts modules does not contain any cardfiles, “All”
will not appear.)
Now you can:
Choose a cardfile by pressing the View key, highlighting
the desired cardfile with the Up or Down key, and then
pressing the Select key to make your choice.
Scroll through the alphabetical tabs of a cardfile with the Up
or Down key.
Go to a specific lettered tab by pressing the Select key, and
then using the Up or Down key. You can view a specific
card by pressing the Select key, and then using the Up or
Down key. Press the Select key again to view the details,
and the View key to switch between the address, telephone
number, and note views of the card. The views are indicated
14 Chapter 2
Page 15

at the top right of the cards by telephone, house, envelope,
s
and notebook icons.
If the contents of a cardfile field are too long to display, you
will see three dots (...) at the end of the text to indicate that
additional information can be viewed. To view the entire field
if it is a number, highlig ht the number , and press the Select key.
If it is a text field, use the Up or Down key to scroll.
Sorting cards
Y o u can sort cards in cardfiles alphabetically by last name, first
name, or company. When you synchronize the Clip-On, the
order is reset to the last name.
To sort cards:
The
telephone
icon indicate
that you are
viewing
telephone
information.
1
In the Contacts module, press the View key. The menu
appears. Highlight Sort Order, and press the Select key.
2
Use the Up or Down key to move the highlight to the field
by which you want to sort. Press the Select key to choose
the sort order.
Changing the telephone number display
You can determine which telephone numbers, e-mail
addresses, and Web site addresses appear on the alphabetically
tabbed cardfiles view.
15 About the StarTAC Clip-On Organizer 15
Page 16

To change the information di splayed in the Conta cts
index view:
1
In the Contacts module, use the Up or Down key and the
Select key to go to a specific lettered tab.
2
Press the Select key, and then use the Up or Down key to
highlight a specific card. Press Select again to view its
details.
3
Use the Up or Down key to highlight the field that you
want. You may need to press the View key to move to the
correct field. (You are in the telephone field if you see a
telephone icon at the upper right corner of the card). Then
press the Edit key, and select “Display This Number.” (This
option appears only if there are multiple entries.)
4
Press the Select key to choose the field.
The selected item now appears after the name in the tabbed
cardfiles view.
Editing your Contacts
You can create, edit, and delete Contacts by selecting Edit
mode and using the Clip-On’ s W izards. In addit ion, you can set
up a meeting or a telephone call from within a contact in Edit
mode.
To create a new Contact:
1
Press the Edit key in Contacts, or in the Home screen.
2
Use the Up or Down key to highlight the New Contact
option, and press the Select key.
16 Chapter 2
Press the Select
key after
highlighting New
Contact.
Page 17

3
Use the Up or Down key to select the type of Contact that
you want. The Contact types are Bus iness Contact, P ersonal
Contact, and Company; the fields will vary, depending on
the type of contact that you choose.
Choose the
Contact type,
and press the
Select key.
4
Now enter the contact’s first name. If the Contact is a
Company Contact, enter the name of the company. Use the
Up and Down keys to move from one letter to the other, and
use the Select key to enter each letter. To change to
numbers, press the View key. Press the View key again to
move back to letters. When you are finished, press the Edit
key.
5
Enter the Contact’s last name and press the Edit key when
you are finished. (If it is a Company Contact, this screen
will not appear.)
6
Now choose the category for your new Contact. If there are
no categories, or only one category, this Wizard screen will
not be displayed.
7
Confirm the contact nam e by pressin g the Down k ey. I f you
want to make a change, press the Edit key.
8
Depending on your selections, you may be asked to enter
company information for the new Contact. Choose how to
specify the company, then press the Select key. If you
choose “Company in Contacts” use the Up or Down key to
scroll through the alphabetical tabs of a cardfile. You can
use the Select key, and then the Up or Down key, to go to a
specific lettered tab. Press the Select key, and then use the
Up or Down key, to go to the card for the company. Press
the Select key to enter your choice.
17 About the StarTAC Clip-On Organizer 17
Page 18

9
Confirm the company name by pressing the Down key. If
you want to make a change, press the Edit key.
10
Next comes the contact’s information. Use the Up or Down
key to scroll and select the desired contact method, such as
Work Fax. Then enter the phone number, e-ma il add ress, or
Web site address. If you enter a telephone number without
hyphens or parentheses, such as “18001003000,” the ClipOn will auto-format it for you, adding hyphens and
parentheses as needed.
11
Confirm the contact inform atio n by press ing the Down key.
To change it, press the Up key, or the Edit key.
12
At the Contact Summary page, press the Select key to
accept the new contact and add it to the Clip-On.
To remove a Contact:
1
Highlight the Contact, and then press the Edit key.
2
Use the Down key to move the highlight to Remove, and
press the Select key. You will be asked to confirm the
deletion of this contact. Highlight Yes and press the Select
key to complete the removal; highlight No and press the
Select key to keep the Contact.
To set up a meeting or telephone call with a Contact:
1
Highlight the Contact, and then press the Edit key.
2
Choose meeting or call from the menu, and press the Select
key.
3
Next, select a meeting date (or a due date for a call). If you
choose “Specific Date,” use the next Wizard screen to
choose the month, date, and year. Use the Up or Down key
to scroll through each field; move from field to field by
pressing the Select key. For example, if you have used the
Up or Down key to move the month to “Jan,” and then press
the Select key, the highlight will move to the date field.
Press the Home key to undo your selection in a field.
18 Chapter 2
Page 19

4
If you are setting up a meeting, after you enter the date,
enter a meeting time. Then enter the End time.
5
You also have the option of choosing a reminder for a
meeting.
6
The Summary screen will then conclude this task. If you
view the Summary screen and want to make a change, press
the Home key.
Using the Calendar
Using the Calendar, you can view, modify, delete, and create
appointments, birthdays, holidays, and other events. To enter
the Calendar module from the Home screen, highlight the
Calendar icon, and press the Select key.
Changing views (Daily, Weekly, Monthly)
To move from the Daily to the Weekly to the Monthly areas of
your Calendar, press the V iew key. Y ou will see a menu of your
options. Highlight the desired view, and press the Select key.
Using reminder alarms
You can set an alarm for an event in your persona l inform ation
manager, such as TrueSync Desktop. Then synchronize your
desktop Calendar to the StarTAC Clip-On. Wherever you are,
the Clip-On alarm will then remind you of that event. When an
alarm sounds, go to the Home screen to read the reminder
details. Press any key to turn off the alarm. Press the Home or
Select key to clear the reminder notice.
Viewing events
Use the:
Up or Down key to move to the next or previous day, week,
or month, depending on the view.
Select key, then the Up or Down key to highlight a Calendar
event. Press the Select key again to see the details of a
highlighted event. Use the Up or Down key to scroll
through the details.
19 About the StarTAC Clip-On Organizer 19
Page 20
View key to bring up a menu of options.
Icon
Editing your Calendar
You can create, modify, and delete Calendar events by
changing to Edit mode and using the Clip-On’s Wizards.
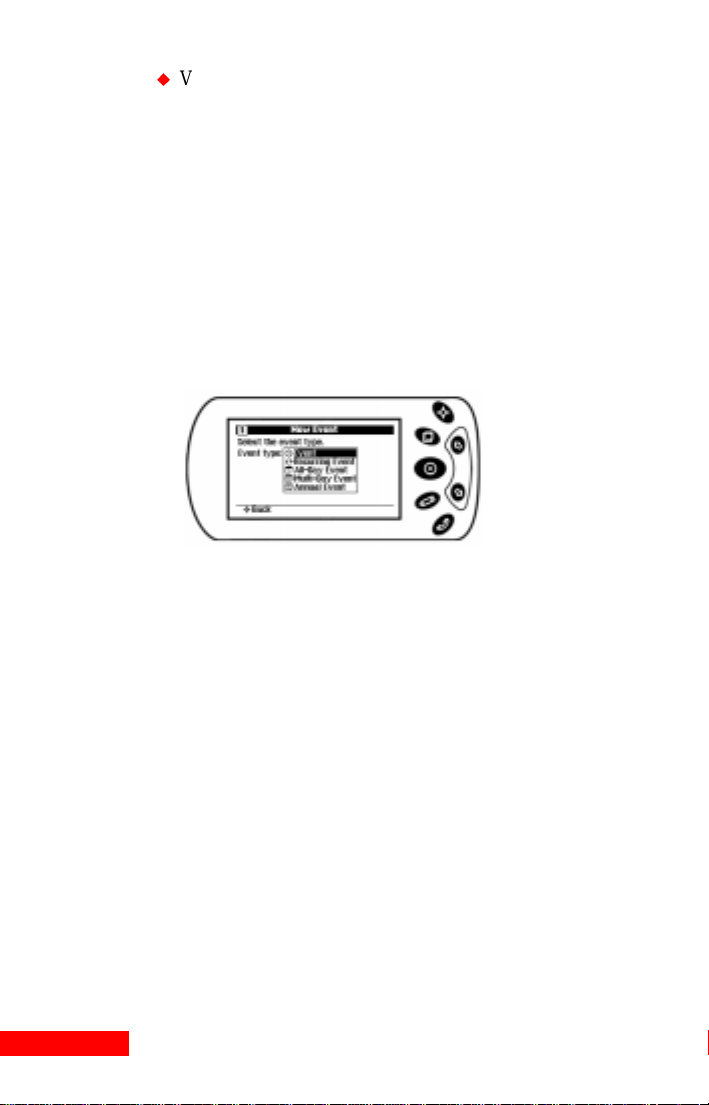
To create a new event:
1
Press the Edit key in the Calendar module, or in the Home
screen.
2
Choose the new event type by highlighting it using the Up
or Down key, and then pressing the Select key.
3
The next Wizard screen will vary, based on the profile you
chose during the StarTAC Clip-On Setup. It will show a
pre-set QuickList of events.
Select the
Event Type
from the list.
Use the Up or Down key to choose from the list, and then
press the Select key.
4
Confirm the event’s type and subject by pressing the Down
key.
5
Depending on your selections, you may now be asked to
select a participant. If you choose to select a participant
from your Contacts, use the Up or Down key to scroll
through the alphabetical tabs of a cardfile. You can use the
Select key, and then the Up or Down key, to go to a specific
lettered tab. Press the Select key, and then use the Up or
Down key, to go to the card for the participant whom you
want to add. Press the Select key to enter your choice.
20 Chapter 2
Page 21

6
To confirm the participant, press the Down key.
7
Next, select the event date with the Up or Down key. Use
the Select key to tab from the month to the day to the year.
Press the Select key again when the date is correct. If you
are creating an event with a time, you will also need to
select the start and end times.
8
To confirm the date, press the Down key.
9
Depending on the event, you may have the opportunity to
set a reminder alarm. (See the section above on Reminder
Alarms.)
10
If you are creating a recurring event, such as an Off-Site
meeting, you can choose the recurrence pattern. The followup meetings are automatically entered, based on the selected
recurrence pattern.
Use the Up or Down key to scroll through the list and
highlight a recurrence pattern. Press the Select key to enter
your choice.
If you select a recurrence pattern, you must select the
duration, such as “2 Weeks.” Highlight a duration, and press
the Select key to enter your choice. Confirm the recurrence
pattern, and press the Edit key to move to the next screen.
11
Press the Select key to accept the Event summary.
To follow up, reschedule, or cancel an event:
1
Go to the event in your Calendar, and highlight it by
pressing the Select key.
2
Press the Edit key, and then highlight the desired option:
“Follow up” creates a new meeting; “Reschedule” moves
the original meeting’s date. Press the Select key.
3
If you are:
following up or rescheduling an event, choose the new
date and/or time, and press the Select key to enter your
selection.
21 About the StarTAC Clip-On Organizer 21
Page 22
canceling an event, you will be asked if you are certain
that you want to delete the event. Highlight Yes, and
press the Select key to remove the event, or No to keep
the event.
To go to a linked Contact in an event:
1
Highlight the event in your Calendar by pressing the Select
key.
2
Press the Edit key.
3
Select Find in Contacts.
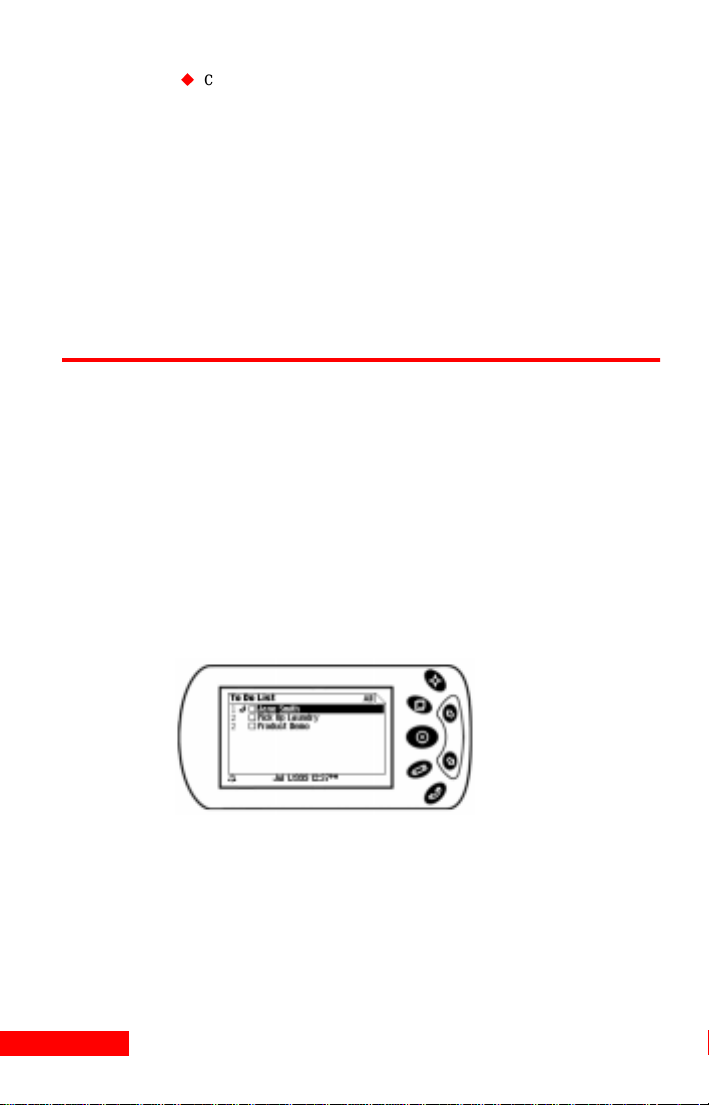
Using To Do Lists
Using the To Do lists, you can view tasks, calls, and overdue
items. Y ou can also create, reschedule, delete, and check off To
Do items. In addition, you can make calls from To Do lists.
To view To Do items:
1
From the Home screen, highlight the To Do icon, and press
the Select key.
2
You will see a list of your To Do items. Highlight a To Do
item, and press the Select key, to see the details of that item.
3
After viewing the details, press the Home key to return to
the To Do list.
4
To see a list of your options in the To Do module, press the
View key. Use the Up or Down key to choose which To Do
items you want to view, and press the Select key.
22 Chapter 2
Highlight an item, and
press the Select key
to see the details.
Page 23

Checking off completed items
You can check off a To Do item as comp leted. Then, when you
synchronize to your desktop application, your To Do item will
be checked off there as well.
To check off completed To Do items:
1
Highlight the item by pressing the Up or Down key, and
then press the Select key to move to the Details of that item.
2
Press the Edit key.
3
Check Off is highlighted in the menu . Pr ess the Select key
to check off the item. (If the item that you check off was
overdue, it will be removed from the Overdue Task s List.)
Creating To Do items
You can create To Do items, including tasks, calls, and
deliverables.
To create a To Do item:
1
Press the Edit key, highlight New To Do, and press the
Select key.
2
Highlight the type of To Do from the menu, and press the
Select key.
3
Select the To Do item subject. The list of subjects will vary,
based on the To Do type and the profile you chose during
the StarTAC Clip-On Setup. Press the Up or Down key to
scroll through th e lis t of su bj ect s an d hi gh li ght your choice.
Press the Select key to enter your choice.
Highlight the
subject, and
press the
Select key.
23 About the StarTAC Clip-On Organizer 23
Page 24

4
The Confirmation screen appears. Press the Down key to
accept your selection, or press the Edit key to change it.
5
Select a due date, if desired. If you select “Specific date”
from the menu, you can enter a month, day, and year in the
next Wizard screen.
6
If you chose Specific Date, use the next Wizard screen to
choose the month, date, and year. Use the Up or Down key
to scroll through each field; move from field to field by
pressing the Select key.
7
Confirm the due date by p res si ng th e Down key . To ch ange
your selections, press the Edit key or the Up key.
8
At the Summary screen, press the Select key to enter your
new To Do item. Press the Up key if you want to return to a
previous Wizard screen.
To reschedule or remove a To Do item:
1
Highlight the To Do item with the Up or Down key.
2
Press the Edit key, and then highlight the Reschedule or
Remove option. Press the Select key.
3
If you are reschedul ing t he To Do i tem, use th e Up or Down
key to choose the new dat e, and the Select key to enter your
selection.
4
If you selected Specific Date from the menu, use the Up or
Down key to change to a different month, day, and/or year.
Press the Select key to move from field to field.
To go to a Contact included in a Call:
1
Go to the detailed view of the Call.
2
Press the Edit key.
3
Select Find in Contacts.
4
The card for the Contact included in that Call appears.
24 Chapter 2
Page 25

Using Memos
You can read Memos or create QuickNotes. QuickNotes are
single lines of text that, when synchronized, become the title of
a Memo in your desktop application. You can create a
QuickNote to remind you of a key phrase, event, or To Do
item.
You can add to a QuickNote at any time. However, other than
the ability to append to your notes, you cannot edit a completed
QuickNote by changing text or deleting text at a later date. If
you want to edit it, synchronize the Quick N ote to TrueSync
Desktop or another PIM. Edit it in that information manager,
and then re-synchronize.
To view or remove Memos and QuickNotes:
1
At the Home screen, highlight the Memos icon, and press
the Select key. A list of your Memos, including your
QuickNotes, will appear. Highlight an item, and then press
the Select key to read it, using the Up or Down key to scroll.
Press the Home key to return to the Memos list.
2
To see a list of all your options in the Memos mo dule, press
the View key. Highlight Remove to delete a memo or
QuickNote.
Creating QuickNotes
To create a QuickNote:
1
Press the Edit key, highlig ht New QuickNot e, and press th e
Select key.
25 About the StarTAC Clip-On Organizer 25
Page 26

2
Enter the text of the QuickNote.
Press the Select
key to enter
each letter or
number.
3
Use the Up and Down keys to move from letter to letter.
Press the Select key after each letter that you want to enter.
Press the View key to change to Numbers, and to return to
Letters. You can also move the highlight to Erase a letter or
number, and to add a Space or a period (.). Press the Edit
key when you are done.
4
Select the Filing Category from the list, using the Up and
Down keys to move from category to category. Press the
Select key when the desired category is highlighted.
5
The Confirmation screen appears. Press the Select key to
accept your selection, or press the Edit key to revise it.
6
If you have entered too many letters to view, the truncated
QuickNote will appear in the list of Memos followed by
three dots (...) at the end of the text.
To add to a QuickNote:
1
Highlight the QuickNote with the Up or Down key.
2
Press the Edit key, and then highlight the Append option.
Press the Select key.
NOTE Appending to a QuickNote adds new text; you cannot
edit existing text by selecting Append.
Using Ti me Zones
The Clip-On has two clocks: the Home clock, which shows th e
time and date in your home city, and the World clock, which
26 Chapter 2
Page 27

can show the times and dates in other cities around the world.
To display the clocks, highlight t he Time Zones icon, and press
the Select key.
When you select a clock, by highlighting it, that clock’s time
becomes your Local Time. The status bar time will change
accordingly.
Changing cities and time zones
You can change both the Home and World clocks to show
different cities and/or time zones.
1
Move from the Home Clock to the World Clock by using
the Up or Down key.
2
Press the Select key to change to a different city or time
zone.
3
Use the Up or Down key to highlight your new choice, and
press the Select key.
Use the Up or
Down key to select
the new time zone,
and then press the
Select key.
Setting the clock
To change the clock settings:
1
In the Time Zones module, press the View key.
2
Select Set Clock from the menu by using the Up or Down
key, and then press the Select key.
27 About the StarTAC Clip-On Organizer 27
Page 28

Using alarms
To activate or change an alarm:
In the Set Clock screen, use the Up or Down key to move
from Alarm to Alarm Time. When yo u have h ighlight ed the
field that you want to change, press the Select key.
To activate or change the alarm, use the Up or Down key to
move through the l ist to the alarm fr equency th at you d esire.
Then press the Select key. If you select Daily, an alarm will
sound every day at the specified time. If you select Once, an
alarm will sound only at the next occurrence of the specified
time.
If you are changing the alarm time, use the Up or Down
key to change the hours, minutes, and/or PM or AM
entries. Press the Select key to move from field to field.
If you are changing the clock time, use the Up or Down
key to change the month, date, year, and/or time. Press
the Select key to move from field to field.
Understanding time zones and travel
When you change the time zone of the currently selected clock,
the calendar events automatically change to reflect the new
time zone. For example, an appointment scheduled for 2 p.m.
in New York changes to 11 a.m. when Los Angeles is selected.
Using Preferences
Preferences include the Time Display , Date Display , Day Start,
Alarm Sound, Key Clicks, Auto Shut -Of f, Cont rast, and Hand.
You can also set your password and clock, or view device
information, such as the amount of free memory, in the
Preferences module.
If you change the Hand setting, you can instantly begin
operating the Clip-On to suit your needs: it automatically
adapts itself to either right-handed or left-handed use.
28 Chapter 2
Page 29

To change your preferences:
1
From the Home screen, highlight the Preferences icon, and
press the Select key. In the Preferences screen, use the Up
or Down key to move from one field to the next.
You can use
the Up or
Down key to
move from
one field to
another.
2
When the field that you want to change is highlighted, press
the Select key. You can then use the Up or Down key to
scroll through the list. When the choice that you desire is
highlighted, press the Select key.
To chang e your password:
1
Press the View key in the Preferences module. Use the
Down key to highlight the Set Password option, then press
the Select key.
2
Press the Down key to move to the Password optio n, then
press the Select key.
You can use
the Up or
Down key to
move from
one field to
another.
3
To set a password, press five keys. You can choose any
order or combination of keys that you desire. When you
have pressed five keys, you will return to the Set Password
Screen.
29 About the StarTAC Clip-On Organizer 29
Page 30

4
If you want to have the Clip-On password-protect ed, choose
an option other than Disabled in the Password Lock field.
When you set a password, the Password Lock option
changes to Always.
To view the device information:
1
Press the View key in the Preferences module, and highlight
Device Information in the menu. Press the Select key.
2
You can now view details about your Clip-On. Press the
View key, and use the menu to return to the Preferences
screen, or to set your clock or password.
Synchronizing with the Clip-On
You can quickly and easily synchronize data from a desktop
application, such as TrueSync Desktop, with the Clip-On. For
details on using TrueSync Desktop and synchronizing, please
read Chapters 5 and 6.
NOTE If you have a password enabled on the Clip-On, you will
need to click the five-key password combination, and
click OK to start the synchronization process. For details
on setting your password, see “Using Preferences” on
page 28.
30 Chapter 2
Page 31

Getting connected
To set up your StarTAC Clip-On Mobile Organizer for
synchronization, you will need to:
use the cable included with your purchase and connect it to
1
your computer, and
connect the StarTAC Clip-On to your telephone.
2
These steps are described below. (For details on system
requirements, please read “Requirements” on page 36.)
To connect the Clip-On to your computer:
Connect the cable to the Clip-On and your computer.
1
You should hear a connection tone.
2
3
Chapter 3
Setup and
product care
.
To connect the Clip-On to your telephone:
The Clip-On uses the auxiliary battery connector on the
1
back of the phone. Insert the spring clip on top of the ClipOn into the connector, and pull it down (the clip is springloaded).
Insert the connector on the bottom of the Clip-On into the
2
connector on the StarTAC telephone.
31 Setup and product care 31
Page 32

3
Apply light pressure to ensure that it is firmly attached.
To remove the Clip-On:
1
Pull the device down and away from the phone.
2
Lift the device’s hook out of the slot on the back of the
phone.
NOTE If you are using vibration mode with an analog phone,
vibration mode will be turned off when you connect the
Clip-On with your phone.
Installing new batteries
The Clip-On is powered by two CR2430, 3-volt batteries,
which can last for up to nine months of average use.
NOTE If you see a message, “Battery is low,” it is important to
replace the batteries promptly.
To remove the old batteries and install new batteries:
1
Turn over the Clip-On.
2
Slide the door open.
3
Insert a new battery, with the positive (+) side facing the
front of the Clip-On.
4
Carefully close the battery compartment door until it snaps
shut.
32 Chapter 3
Page 33

Product care
If the screen of the Clip-On becomes smudged or dusty, apply
eyeglass cleaning fluid or isopropyl alcohol to a clean cloth
and gently wipe the screen clean.
33 Setup and product care 33
Page 34

34 Chapter 3
Page 35

Chapter 4
T rueSync Desktop
and T rueSync Plus
Introducing TrueSync technology
Both TrueSync Desktop and TrueSync Plus use Starfish’s
TrueSync technology, which helps you keep your information
current and accessible anywhere.
TrueSync Desktop is a full-featured personal information
manager (PIM) for your contact n ames and addresses, c alendar
events, tasks, calls, and memos. TrueSync Plus provides direct
synchronization among your desktop applications , devices,
and/or services. Both software programs accompany your
purchase.
You can import your data from another PIM into TrueSync
Desktop, and then sync hro nize us i ng TrueSync Desktop. Or, if
you prefer to synchronize directly from another PIM such as
Outlook, you can use TrueSync Plus. Either choice provides
complete and reliable synchronization .
4
For details on supported applications, devices, and services,
please visit the Starfish Web site:
http://www.starfish.com/products/products.html
Instructions for setting up TrueSync and synchronizing are
provided in ”Synchronizing” on page 41.
35 TrueSync Desktop and TrueSync Plus 35
Page 36

Requirements
Before you install TrueSync Desktop or TrueSync Plus, make
sure that you have the necessary hardware and software listed
here. Some features may require special configurations.
To use TrueSync Desktop or TrueSync Plus, you need:
A computer running Windows 95, Windows 98, or
Windows NT 4.0 workstation (U.S. English version)
A minimum of 15 MB hard disk space for installation of
either TrueSync Deskto p or TrueS ync Plu s (includi ng 1 MB
of temporary space on the same drive as your Windows
directory for installation)
256-color VGA video and monitor
An MPC 2 Compatible CD- ROM drive
A pointing device compatible with Windows 95, Wi nd ows
98, or Windo ws NT 4.0
A sound card and speakers, required to play sounds (.WAV
files) for appointment alarms
A printer supported by Windows 95, Windows 98, or
Windows NT 4.0, required to print from TrueSync Desktop
Installing the product
As with any product, Starfish recommends backing up your
data files before inst allation and peri odically as yo u continue to
use the product. For help backi ng u p yo ur d ata, pl ease v i sit the
Starfish Web site:
http://www.starfish.com/service/backup/
Upgrade information
TrueSync Informa tion Manager users
Desktop upgrades T r ueSync In formatio n Manager to T rueS ync
Desktop.
36 TrueSync Desktop and TrueSync Plus
: Installing TrueSync
Page 37

Sidekick 99 users: Installing TrueSync Desktop upgrades
Sidekick 99 synchronization files so you can continue using
Sidekick 99. You cannot run both Sidekick and TrueSync
Desktop at the same time.
To install TrueSync Desktop or TrueSync Plus
1
Insert the TrueSync Desktop CD-ROM in your CD-ROM
drive.
NOTE When you insert the TrueSync Desktop CD-ROM into
your CD-ROM drive, the installation should launch
automatically. If it does not, follow the steps below.
2
Click Start on the Windows taskbar and then choose
Settings | Control Panel.
3
Double-click Add/Remove Programs.
4
Click the Install button.
5
At the “Install Program From Floppy Disk or CD-ROM”
screen, click the Next button.
6
If necessary, use the Browse button to locate the program
SETUP.EXE on the CD-ROM.
7
To begin the installation, click th e Finish button, or click
SETUP.EXE and then click the Open button.
The Readme file
Any last-minut e changes or additions to TrueSync D esktop or
TrueSync Plus are documented in a Readme file. View the
TrueSync Desktop Readme file by clicking the Windows Start
button and choosing Programs | TrueSync Desktop | Readme.
To see the TrueSync Plus Readme file, click the Windows
Start button and choose Programs | TrueSync Plus | Readme.
Registering
Be sure to register TrueSyn c Desktop and TrueSync Plus so
that you can receive product information and support.
37 TrueSync Desktop and TrueSync Plus 37
Page 38

Uninstalling your product
If you want to remove TrueSync Desktop or TrueSync Plus
from your computer, use the uninstall program, which
permanently removes all of the product’s program files and
entries in the Windows Registry. If you have information files
in the TrueSync Desktop folder (usually Program Files\
Starfish\TrueSync Desktop\Userdata), it does not remove
them. You can preserve these files or remove them manually.
To remove the software from your computer
1
Click Start on the Windows taskbar. Choose Settings |
Control Panel.
2
Double-click Add/Remove Programs.
3
Choose TrueSync Desktop or TrueSy nc Plus from the li sted
applications.
4
Click the Add/Remove button.
5
Click the Yes button.
6
Back up any data you want to keep, and then delete the
TrueSync folder (usually Program Files\Starfish\TrueSync).
7
Restart Windows.
Starting TrueSync Desktop
After you complete the installation, click the Windows Start
button and choose Programs | TrueSync Desktop | TrueSync
Desktop. The first time you start TrueSync Desktop, the Setup
Wizard helps you provide information about your name,
company, and time zone.
Fill in the information in each panel of the Setup Wizard and
click Next to continue. You can click Back if you need to
change the information in an earlier panel. If you need
assistance, click the Help button in any Wizard panel.
38 Chapter 4
Page 39

Starting TrueSync Plus
Instructions for using TrueSync Plus are provided in
”Synchronizing” on page 41.
About the documentation
This User’s Guide provides installation instructions, a guide to
synchronizing, and an overview of TrueSync Desktop.
The Troubleshooter Guide helps you get started and provides
access to online resources, including technical support
information. To view the Troubl es ho ot er Gui de, choose Help |
Troubleshooter or click Start in the Windows Taskbar and
choose Programs | TrueSync Desktop | TrueSync Desktop
Troubleshooter. The Troubleshooter is an HTML document
and starts in your browser.
NOTE The illustrations in this guide are intended as examples.
What you see on your screen may differ, depending on
factors such as the software version and information that
you have entered.
Using online help
Both TrueSync Desktop and TrueSync Plus include detailed
online help systems. To open Help, press
Topics.
F1
, or choose Help |
For more information
For technical support and ordering help, refer to the Readme
file (see ”The Readme file” on page 37).
39 TrueSync Desktop and TrueSync Plus 39
Page 40

40 Chapter 4
Page 41

5
Chapter 5
Synchronizing
Use Starfish TrueSync to synchronize your contact
information, calendar events, tasks, and memos quickly and
easily among your desktop applications, devices, and services.
You can synchronize using TrueSync Desktop or, if you prefer
to synchronize from another personal information manager
such as Outlook, you can use TrueSync Plus. Either choice
provides complete and reli able synchronization.
To prepare for synchronization:
If you want to use TrueSync Plus, right-click the TrueSync
launcher icon in the Windows taskbar, and click Configure.
If you are using TrueSync Deskto p, click the TrueSync i con
on the Deskpad or choose View | TrueSync.
To establish which data to synchronize, you will then use the
TrueSync Setup W i zard to select your sy nchronizati on optio ns,
as explained in the next section, “Setting up TrueSync”.
Setting up TrueSync
Before synchronizing for the first time, you must complete the
TrueSync Setup Wizard, which assists you in specifying:
which clients you want to synchronize (a client is any
device, service, or desktop application supported by
TrueSync).
41 Synchronizing 41
Page 42

specifics about each client, such as where to find the data
for each desktop application, how you connect to your
service, and how you connect your device to your compu ter.
which folders or categories you want to synchronize.
Using the TrueSync Setup Wizard
After you have made your choices in each TrueSync Setup
Wizard panel, click the Next button to continue, or the Back
button to return to a previous panel:
1
First, you see the Welcome panel.
2
Select your desktop application, such as TrueSync Desktop
or Outlook.
3
Specify the location of your application’s data. The default
user data folder is displayed; choose that unless you have
stored your data in another location (depending on the
application, you may have the option to select another
folder by clicking the Browse button).
4
Select the device that you want to synchronize.
5
Depending on the device you chose in step 4, you may be
prompted to specify how you will connect your device to
your computer.
6
If you use a service, you may be as ked wh ether y ou want to
synchronize with that service.
7
Depending on the service yo u chose in step 6, you may need
to enter the service ID, password, and connection method.
8
You are prompted to connect you r device to yo ur compu ter.
After the device is connected, click Next.
TrueSync reads the data from the clients you have chosen.
No data transfers or changes take place during this step.
9
Select your country, and a city that indicates your time
zone.
The next step begins your selections of files, folders and
categories to synchronize, starting with Contacts data. To
learn how to select items to synchronize, see “Selecting
42 Chapter 5
Page 43

files, folders, or categories” on page 47. Please note that
you can change your choices at any time after you have
completed the Setup Wizard.
10
Specify which Contacts fields you want to synchronize.
For details, see “Selecting and mapping Contacts fields”
on page 4 8.
11
Specify the Calendar files or folders you want to
synchronize.
12
Specify the Memos files or folders you want to
synchronize.
13
Specify the To Do list files or folders you want to
synchronize.
14
When you are satisfied with your selections, click Finish
to display the TrueSync window. You can change your
43 Synchronizing 43
Page 44

setup at any time as described in “Changing the TrueSync
setup” on page 45.
Click the TrueSync
icon to synchronize.
The Synchronization
Log shows you the
results of your
synchronizations.
Click the plus signs (+) to expand the log entries.
Select an error message and press F1 for help.
Below is a magnified view of the TrueSync Toolbar.
Start
Synchronization
Stop
Synchronization
Synchronizing
When you perform the first synchronization between two
clients, it is recommended that you overwrite the data in one
of the clients to avoid duplicate records. To learn how, see
“Changing synchronizati on opti on s” on page 46.
To synchronize:
1
Connect your device to your computer.
2
Click the TrueSync icon in the center of the TrueSync
window.
44 Chapter 5
Contacts
Options
Calendar
Options
Memos
Options
T o Do List
Options
Page 45

3
If you are synchronizing with a client that is passwordprotected, you may be prompted to enter your password.
NOTE Do not disconnect your device from your computer
during a synchronization.
See the Synchronization Log for status and information about
the synchronization. See “Using the Synchronization Log” on
page 49.
NOTE If you cancel an in-progress synchronization by clicking
the Stop Synchronization toolbar button, wait until the
synchronization has halted before closing TrueSync
Desktop or the TrueSync window. The cancellation
process may take some time to complete.
Changing the TrueSync setup
At any time after you have completed the TrueSync Setup
Wizard, you can:
add or remove clients.
change the synchronization options for each client.
select the data types to synchronize (data types are
Calendar, Contacts, Memos, and To Do items).
change the files, folders, or categories to synchronize.
specify which Contacts fields t o synchroni ze and how tho se
fields map to corresponding fields in other clients.
To add a client to your configuration:
Add a client to your co nfi g urat ion us i ng th e Cl i en t | Add men u
option. You will be prompted to specify details about each
client, such as which folders or categories to synchronize.
After a client is added, it is represented in the TrueSync
window with an icon.
45 Synchronizing 45
Page 46

To remove a client:
Choose Client | Remove. Select the client and click the
Remove button.
Changing synchronization options
To change how a client will be synchronized:
Choose Client | <clientname> options to display the client’s
Options Page. Use this page to specify how the client’s data
will be synchronized. For details about th e synchronization
options, click the Help button on the Options Page.
Select Do not synchronize to exclude
the client (TrueSync Desktop in this
example) from synchronizations.
Select Synchronize to synchronize
this client’s data with data from one
or more other clients. Records may
be added, deleted, or modified on
this client.
Select one of the overwrite options to
overwrite this client’s data with data
from one or more other clients.
Selecting what to synchronize
To specify which data types to synchronize:
All data types (Calendar, Contacts, Memos, To Do items) will
be synchronized unless you specifically exclude them.
To exclude a data type from synchronization, choose Data |
<datatype>, and check the “Do not synchronize <datatype>”
option. The data type will be excluded from each
synchronization until you uncheck the option.
46 Chapter 5
Page 47

Selecting files, folders, or categories
To specify which files, folders, or categories to
synchronize:
Select Data | <datatype> from the menu to change your
synchronization selection.
To synchronize items between clients:
1
Find the row for the item that you want to synchr onize.
2
Click in the same row under the other client. A down arrow
displays at the right of the column.
3
Click the down arrow to open a list of item choices on that
client.
4
Click on your choice from the list:
Each client’s column lists the files,
folders, or categories available for
synchronization on that client. If you
add items and do not see them in the
list, click the Refresh List button.
If you align <not mapped>
in one column with an
item in another column, it
means that item will not
be synchronized.
If you select an item
followed by <add>, it will
be created during
synchronization.
The number of items you
can synchronize to a
device is limited by the
device.
The number of files, folders, or categories that you can select is
limited by devices. For example, suppose you have four
Contacts folders set up for synchronization to a device, the
limit for that device. You then decide to synchronize another
Contacts folder. Before you can do so, you will need to
47 Synchronizing 47
Page 48

deselect one of your mapped Contacts folders because of the
device limit.
Selecting and mapping Contacts fields
The term “mapping fields” refer s to matc hing one cl ient’s field
with another client’s field. For example, you mi ght map a field
called “Home Phone” on T rueSync Desktop with a field called
“Personal Phone” on your device.
To map your Contacts fields:
1
Select Data | Contacts and click the Fields tab.
2
Highlight the files containing the fields that you want to
map.
3
Specify how to map the fields. You can choose:
SmartMap
SmartMap automatically maps your Contacts fields. All you
have to do is choose one of the SmartMap options; your
choice determines which fields to synchronize. For
information about each of the SmartMap options, click the
Help button.
™
mapping by clicking the SmartMap button.
Customized
button. This option lets you map each pair of fields. To
change mapping, click a field, click the down arrow at the
right, and select the new mapping from the drop-down list.
To save space on your device, unmap any fields you do not
normally use.
mapping by clicking the Customize Mapping
Changing your preferences
To change the preferences for any client, choose Client |
<clientname> options. This displays the client’s Options Page
described in “Changing synchronization options” on page 46.
Depending on the client, there may be additional client
preferences; click the additional tab(s), and change the options
as desired. For assistance, click the Help button on each page.
48 Chapter 5
Page 49

Using QuickLists
Depending on the device that you are using, you may have the
option to customize your QuickLists. QuickLists reflect the
profile that you chose in your device's setup wizard. To change
your QuickLists, choose Client | <devicename> options, and
then click the Edit QuickLists tab. If you need assistance, click
the Help button.
Using the Synchronization Log
The Synchronization Log displays messages about your recent
synchronization sessions. The messages provide details about
the progress and results of the synchronizations.
Select Synchronize | Options to sp ecify how T rueSync displ ays
Log entries. Click the Help button for details.
To get help on error messages, highlight an error and click
Setting up multiple users
F1
.
If you use more than one synchronization configuration, or if
more than one person uses the same computer to synchronize,
set up an additional user to define each configuration.
To create an additional user:
1
Select Synchronize | Options, and then click the Users tab.
2
Use the Setup Wizard to specify the synchronization
preferences for the new user.
3
Select client preferences for the new user by choosing
Client | <clientname> options.
49 Synchronizing 49
Page 50

To specify the user:
1
Choose Synchronize | Set User.
2
Select a user name from the list.
The current username is indicated on the TrueSync window
title bar.
To modify the settings for a user:
You can modify the synchronization settings for any user by
selecting the user, and changing the settings as described in
“Changing the TrueSync setup” on page 45 and “Changing
your preferences” on page 48.
50 Chapter 5
Page 51

Chapter 6
T rueSync Desktop
Using TrueSync Desktop’s features
The following illustration shows the Calendar view and
identifies the features common to most Desktop views.
6
Highlight any
command on the
menu bar and
press F1 for help.
Click buttons on the Toolbar to
perform tasks quickly, without
using the menus.
Pause to see a ToolTip
identifying the button.
The Status bar displays
information about the
current view. Choose
View | Status Bar.
Click an icon
on the
Deskpad to
change to a
different
Desktop view.
T o change how
the Deskpad
appears and
set other
display
options,
choose Tools |
Preferences |
General.
T o delete a
card, memo, or
calendar
activity, drag it
to the Delete
icon.
51 TrueSync Desktop 51
Page 52

Shortcut menus
If you right-click certain TrueSync Desktop objects, such as a
Contact card, Calendar entry, memo, or EarthTime city, a
context-sensitive s ho rt cut m e nu app ears . Th ese menus provide
basic editing commands and other commands specific to that
object or view.
Customizing the Toolbar
To customize the buttons on the Toolbar in the Calendar or
Memos view, choose Tools | Preferences | Toolbar; in the
Contacts view, choose Tools | Toolbar; or double-click any
open space on the Toolbar. The following dialog box appears:
To add a button
1 Click the button you
want to add in the
Available buttons
list.
2 Click the Toolbar
button you want to
add it before.
3 Click Add.
To move a button, click
its name in the Toolbar
button list, then click
Move Up to move the
button to the left or
Move Down to move it
to the right.
To remove a button,
click it in the Toolbar
buttons list, then click
the Remove button.
To return the Toolbar to its original view, click the Reset
button.
Any changes affect only the Toolbar for the current view.
To customize a different Toolbar, select the desired view
and make your changes there.
Setting preferences
You can customize TrueSync Desktop by setting its
preferences. Choose Tools | General Preferences in the
EarthTime and Contacts views or Tools | Preferences | General
52 Chapter 6
Page 53

in the Memos and Calendar views for overall TrueSync
Desktop preferences.
Choose
where you
want the
Deskpad
icons.
Change the
display fonts
for the
Contacts and
Memos views.
Click Password at
Start-Up and set a
Start-up password
so that only
someone with the
password can open
TrueSync Desktop.
Select which view
you want for the
default, or check
the box to return to
the last view used
before exiting.
53 TrueSync Desktop 53
Page 54

54 Chapter 6
Page 55

Chapter 7
T rueSync Desktop:
Calendar view
Using the Calendar view
The Calendar view is a powerful tool for helping you organize
your appointments and other events. Use the Calendar to
schedule events, set reminders, and maintain a list of To Do
items and phone calls.
T o chang e to the Ca lendar v i ew, click the Calendar icon on the
Deskpad, press
, or choose View | Calendar.
F6
7
55 TrueSync Desktop: Calendar view 55
Page 56

The following figure illustrates the Cale ndar Daily view.
A magnified view of
the Toolbar is shown
below.
Change the Local
Time with the
Time Zone dropdown list.
The Events pane
shows all the
scheduled events
for today.
Special days and
Multi-day events
appear at the top
of the Events
pane.
The T o Do pane
shows the tasks you
need to accomplish—
including any you did
not complete
yesterday.
Click a tab to
select the view
of the Calendar
you want.
The Calendar Toolbar:
Save
Calendar
Schedule
An Event
Special Day
Event
Print
TrueSync
Desktop
Daily Format
Viewing your Calendar
To go direct ly to today’s calendar:
Click the Calendar icon on the Deskpad.
56 Chapter 7
MultiDay
Event
The Calls pane
shows the calls
you need to
make.
Recurring
Event
Go T o
T oday
Find
Switch Event
View
Page 57

If you have changed to another date or another view, clicking
the Calendar icon once returns you to the previous view, and
clicking it a second time goes to today.
Selecting dates in the Daily view
In the Daily view, the selected date is highlighted in the minicalendar.
Change to the
previous or next
month by
clicking the left
and right arrows.
Click a date in the minicalendar to go directly to that
day.
The Weekly and Monthly views
The W eekly and Monthly views display scheduled activities in
standard calendar formats. Change to a view by clicking its
view tab.
Monthly view
Change to the
previous or next
week or month
using the left and
right arrows.
Weekly view
Double-click a day in
the Weekly or Monthly
views to go to that day.
Click a tab to change
to another view.
57 TrueSync Desktop: Calendar view 57
Page 58

The Yearly View
The Yearly view displays only multi-day events, such as
vacations and conferences. Change to the Yearly view by
clicking its View tab.
Scheduling events
Enter your appointments and scheduled events on the Events
list. You can have a maximum of 288 events scheduled
Change to the
previous or next year
using the left and right
arrows.
Click a day to go to
that day in the Daily
view.
Drag the mouse over
a range of dates to
schedule multi-day
events.
58 Chapter 7
Page 59

throughout the day, and a maximum of three overlapping
events starting at the same fifteen minute time slot.
Create an
event by typing
in an empty
time slot, or
click the
starting time to
open the
Schedule an
Event dialog
box.
To change an
event’s starting
time, drag its
clock icon up or
bottom edge to
down.
Click an event
and drag its
change its
ending time.
Double-click an event,
or right-click an event
and choose Edit, to
edit its details.
Change the
Local Time
using the Time
Zone dropdown list.
The bell icon
indicates an
alarm.
Overlapping
events appear
side-by-side.
To create multiday, special
day, or recurring
events, choose
Calendar |
Events and
select one of
the options.
When you travel: changing time zones
When you schedule events for a trip to a different time zone,
select the time zone of your destination i n the Schedule an Event
dialog box, which opens when you click a starting t i me.
When you arrive, change the Local Time to your destination,
using the Time Zone drop-d own lis t at th e top of the Event s
pane. All events you have scheduled for your trip will appear
in the Local Time. In addition, you will be able to see any
events back home in “real time,” adjusted for your current
location.
For example, when you enter each appointment for a trip to
New York, select the USA Eastern time zone. When you arri ve
in New York, change the Local Time to New York time. Your
events adjust to display in New York time, whether those
events are in New York or elsewhere. Thus an event you need
to attend in New York at 10 a.m. will appear at 10 a.m. on your
59 TrueSync Desktop: Calendar view 59
Page 60

calendar. If you need to phone in during a meeting in San
Francisco that occurs at 2 p.m. (San Francisco time), it will
appear on your calendar at 5 p.m. (New York time), so you
know when to make the call.
After you synchronize to your device and/or service, your
device and/or service also displays the appointment times
using the Local Time you chose on the desktop.
Entering To Do items and calls
To create a new To Do item or Call, click any blank line in the
To Do or Calls panes and begin typing. When you begin
typing, TrueSync Desktop places an icon in front of the text.
Click the left
column to
check off
items when
completed.
Click any blank
line and begin
typing to create
a new item.
Click the right
column to add
or change the
details for an
item.
Right-click an
item to modify
it.
NOTE You can open calendars from previous versions of
TrueSync Desktop and Sidekick in TrueSync Desktop
2.0. In the Calendar view, choose File | Open Calendar,
then navigate to the previous version’s Userdata
directory. Choose the calendar, and click OK. These files
will be permanently converted to TrueSync Desktop 2.0
format when opened, so it is recommended that you back
up files from earlier versions first.
60 Chapter 7
Page 61

Chapter 8
T rueSync Desktop:
Contacts view
Using the Contacts view
Use the Contacts view to manage personal information stored
in cardfiles, each of which can contain full address information
and numerous other detail s about your cont acts. Once you have
updated your cardfiles, you can use the TrueSync window to
transfer them to your device.
To open the Contacts view, click its Deskpad icon, choose
View | Contacts, or press
Cardfile basics
In the left pane of the Contacts view is the car d list, your visual
index to the cards in the
is selected. In the right pane is the
which you can edit directly. Each cardfile can contain up to
30,000 cards.
F5
active cardfile—
.
the cardfile whose tab
current card
in the cardfile,
8
61 TrueSync Desktop: Contacts view 61
Page 62

The following figure shows the Contacts view.
A magnified view of the
T oolbar is shown below.
The index
lines of
cards in the
current
cardfile.
Click one to
see the card
or modify its
contents.
Click the scroll bar
or letters in the
scale to move in
the cardfile.
The Contacts Toolbar:
Add
New
Card
Type characters in the Look
Click a cardfile’s tab
to change to
another open
cardfile.
Close
Current
Cardfile
Print
Cards
For box to find a card.
Drag the border to
adjust the viewing
area.
Sort
Copy
Cardfile
The index line
is at the top of
each card. It
can contain any
three fields in
the cardfile and
is used to sort
the cards.
The current
card.
To make
changes, click
the field you
want to edit and
type the new
information.
Carriage
returns a re
allowed only in
the last field of
each card.
Find
Open
Cardfile
Save
Current
Cardfile
Creating a cardfile
When you create a cardfile, first decide what fields you want
on each card. You can create all these fields yourself, or you
can use a template—an empty cardfile that already has fields in
place. If you select a template, you can customize it, keeping
some or all of its fields and adding your own.
62 Chapter 8
Cut
Paste
Card View
Page 63

To create a new cardfile
e
Choose File | New Cardfile. Choose the template you want
from the list that appears, as shown below.
If you want to
customize a cardfile,
you may find it
easier to edit the
provided field names
of a cardfile template
rather than to create
all of the field
names.
NOTE: If no cardfiles
are open, use Cards |
Define Fields to open
this dialog box.
Adding cards
To add a card to the cardfile, choose Cards | Add, or click the
Add New Card button on the Toolbar. The Add Card dialog
box appears with a list of the fields that are set up in the
cardfile.
1) Type the
information for
each field in
the list. To
move from one
field to the
next, use the
up and down
arrow keys or
the Tab key.
The new cardfile contains the
field names from the template,
but no information until you
add cards.
Click the arrow and
choose each template
individually from the
list.
You can see the
predefined fields for
each template. When
you find the best
template for your
needs, click OK. If you
want to define all your
own fields, choose
None from the Cardfil
Template list.
2) Click Add to insert the card in the
cardfile. You can then begin
entering information for another
new card, or click Close.
63 TrueSync Desktop: Contacts view 63
Page 64

64 Chapter 8
Page 65

Chapter 9
T rueSync Desktop:
Using the Memos view
The Memos view lets you create memos, organize them in
folders, and save them as files. You can apply formatting to
your memos, and you can even create memos to merge with
names from a cardfile.
To open the Memos view, click the Memos Deskpad icon,
press
, or choose View | Memos.
F7
9
Memos view
65 TrueSync Desktop: Memos view 65
Page 66

The following figure shows the Memos view.
A magnified view of
the T oolbar is shown
The Memos
list displays
the subject
lines of all
memos in
the current
folder. Click
a subject to
display that
memo.
Click the
tab of the
folder you
want.
Here is a magnified view of the Memos Toolbar:
Add
New
Memo
Print
Memos
below.
Size
Click to change between
Index View and fullscreen Memo View.
Italic
Color
The date the memo
was created appears
here.
Use the
Ruler to set
margins
and tabs.
The
currently
selected
memo
appears
here.
To make changes or
additions, type directly into
the memo.
Undo
Quick
Letter
Find
Font
Save Current
Memo File
Bold
Underline
Clipboard Tools
Memo files, folders, and memos
Memo files help you organize your memos by topic. A Memo
file can contain many folders, and each folder contains one or
more memos. Folders in an open Memo file are identified by
tabs at the bottom of the Memos screen.
66 Chapter 9
Alignment
Memo
View
Page 67

By using folders, you can organize memos according to
projects, tasks, people, subject, or any other grouping.
Creating memos
To create a memo
1
Click the tab of the folder into which you want to place the
memo.
2
Click the Add New Memo button or choo se Memos | Memo |
Add. A new, blank memo appears, with the insertion point in
the subject line.
3
Type a subject, and then press the Enter key to move into
the body of the memo.
4
Type and format your text.
Changing margins and tabs
Use the ruler when you want to change margins or set a tab
stop. To change more than one paragraph, select the
paragraphs before you adjust the ruler.
67 TrueSync Desktop: Memos view 67
Page 68

If you do not see the ruler below the Subject, choose View |
Ruler.
Drag to change the
left margin after the
first line of a
paragraph.
Drag to move
both left margin
markers
together.
If you create a new paragraph by
pressing Enter at the end of an
existing paragraph, the new
paragraph retains the margins and
tabs of the existing paragraph.
Drag to change the
left margin for the
first line of a
paragraph.
Tab stop
To add a tab stop: click on the ruler
where you want it.
To move a tab stop: drag it along the
ruler.
T o delete a tab stop: click it, and drag
downward, away from the ruler.
Drag to
change the
right margin.
68 Chapter 9
Page 69

10
Chapter 10
T rueSync Desktop:
EarthT ime view
EarthTime displays a map showing daylight and nighttime
around the world, and shows the cu rrent ti me in ei gh t di f f erent
cities you select. You can use EarthTime to calculate the
difference in time between two locations, and you can
configure it to show both your home location and the local time
as you travel.
To open EarthTime, click the EarthTime icon in the Deskpad
or choose View | EarthTime. The Deskpad icon shows the
current time.
Depending on the device, your EarthTime settings, such as the
Home clock, Local time, and the other world clock settings,
may be transferred to your device when you synchronize.
The EarthTime map
When you click the EarthTime icon, you see a map of the
earth. Light areas are in daylight, and the shading represents
nighttime.
69 TrueSync Desktop: EarthTime view 69
Page 70

City clock for
Scotts Valley.
Icon
indicating
Home
City,
where you
live.
Double-click on the map to
center it at that location.
Icon
indicating
Local City,
where you
are currently
located.
Icon
indicating
that
daylight
saving time
is in effect.
Selecting cities
To change one of the displayed cities:
Click the panel containing the city you want to change.
1 Click the city panel
and choose Select
a Different City
from the shortcut
menu.
2 Specify a
country, or
view cities
from all
countries.
3 Choose a city
from the list.
Icons
indicate
location of
other
selected
cities.
EarthTime
has a
database of
over 540
cities from
which you
can select
world city
clocks to
display.
70 Chapter 10
Page 71

Changing the Local Time
Change the Local Time when you travel to display all your
events in the current local time. For more details, see “When
you travel: changing time zones” on page 59.
To change the Local Time when you change time
zones:
1
Set one of the eight city panels to display the local city.
2
Click the panel containing the local city and click Set as
Local Time from the shortcut menu.
An icon appears, to indicate the Local Time city.
Changing the Home Clock
Your Home Clock indicates the time where you live. It should
be set automatically when you first start TrueSync Desktop.
To change your Home Clock
1
Set one of the eight city panels to display your home city.
2
Click the panel containi ng you r home cit y and cli ck Choo se
As Home Clock from the shortcut menu.
An icon appears in the Home Clock panel.
71 TrueSync Desktop: EarthTime view 71
Page 72

72 Chapter 10
Page 73

Chapter 11
T rueSync Desktop:
Using the Printing options
You can print from the Contacts, Calendar, o r Memo s views to
a variety of formats, using either preprinted or customized
forms. Preview your output before you print it to save time and
materials.
Calendar printing
Select from a variety of formats for printing calendar activities,
including TrueSync Desktop’s daily, weekly, monthly, and
yearly views. You can also print to paper forms for several
popular organizers.
11
Printing
73 TrueSync Desktop: Printing 73
Page 74

Printing in the daily format
Choose File | Print | Truesync Desktop Daily Format from the
Daily view of the Calendar.
Select the dates to
Choose the number of
columns per page.
Choose the type of
activity you want to
appear in each column.
If you pick the same
activity for more than
one column, text flows
continuously from the
bottom of one column to
the top of the next.
Choose the type of
paper you are printing to.
print.
Printing different formats
To print different calendar formats, including one-, two-, and
six-week, monthly and yearly calendars, change to the view
(Weekly, Monthly, or Yearly) that you want to print and
Choose File | Print.
You can print using any paper size, including paper sized for
your personal organizer.
Click to
change your
Windows
print settings.
Click to
preview the
printed
pages.
Click to
change
margins.
Click to
display the
options
panel.
Click to
change the
fonts used in
the calendar.
Printing in Contacts view
You can print individual or several cards in the Contacts view.
To print one or more cards, choose File | Print | Cards, or click
the Print button on the Contacts Toolbar. You can specify how
many cards to print per page.
74 Chapter 11
Page 75

Printing labels, address book pages, and envelopes
You can also print Contact information using almost any label,
address book page, or envelope si ze. Templates let you print in
a variety of popular label, index card, and address book
formats. You can modify these formats or create your own
templates.
To print labels, address book pages, or envelopes
Choose File | Print, and select Labels, Address Book, or
Envelopes. The Print Labels dialog box is shown in the
example below.
Follow the numbered steps in the
dialog box. Step 1 prompts you to
specify the cards to print.
In Step 2, you
determine
placement of
labels on the
page. Click Set
up to create or
modify a
template.
In Step 3, you
specify what
text, fields, or
pictures to
print. Choose
previously
created
contents, or
click Set up to
define/modify
contents.
In Step 4, you specify the
number of copies and other
options.
Click to
preview the
results of
your choices.
You can see
the overall
layout here
as you work.
The numbered steps are designed to help you specify what to
print and arrange it within the print area available. The
procedures for using all three dialog boxes are the same, but
involve different templates and content arrangements.
Once you have specified the information in the four steps, click
Preview to see the result. Click Print when you are ready to
print.
75 TrueSync Desktop: Printing 75
Page 76

Printing in the Memos view
To print memos, cho ose File | Print from the Memos view, or
click the Print button on the Memos Toolbar. The Print Memos
dialog box appears.
You can print a single memo, all of the memos filed in specific
folders, selected memos, marked memos, or, after a search
operation, memos listed in the Found window.
76 Chapter 11
Page 77

Index
A
adding
cards 63
icons to Toolbars 52
memos 67
tab stops 68
address book, printing 75
addresses 61
alarms 19
alphabetical tabs 14
altering time zones 28
appointments, scheduling 58
arranging cards 15
,
59
B
batteries
removing and installing 32
battery icon 32
buttons (Toolbar)
changing 52
removing 52
C
cable 31
Calendar 55
Calls pane 56
changing dates 57
changing time zones 59
Daily view 57
events 58
Events pane 56
printing 73
To Do pane 56
views 57
Calendar views 19
call memory 13
Calls pane (Calendar) 56
canceling a call 13
,
60
,
74
,
60
,
60
canceling events 21
card list (Contacts) 61
card views 14
cardfile
select 14
cardfiles 61
creating 62
cards, ad ding 63
changing
Calendar dates 57
client preferences 48
Contact cards 62
EarthTime clocks 71
EarthTime locations 70
fonts 53
memo margins 67
print settings 74
synchronization options 48
time zones 59
To Do items and Calls 60
Toolbar buttons 52
TrueSync Desktop 52
changing cities 27
changing time zones 27
changing your password 29
checking off To Do items 23
cities, EarthTime 70
cleaning 33
clients
changing preferences 48
clock
setting 27
time zones 28
clocks, EarthTime 71
connecting the Clip-On 31
Contacts 61
adding cards 63
creating new files 62
editing 62
77 Index 77
Page 78

printing cards 74
removing 18
tabs 14
templates 62
Contacts icons 14
creating
cardfiles 62
events 58
memos 67
To Do items and Calls 60
creating Contacts 16
creating events 20
creating QuickNotes 25
creating To Do items 23
customizing
Toolbars 52
TrueSync Desktop 52
D
Daily view 19
Daily view (Calendar) 57
dates, changing 57
default directories 53
default views 53
deleting 51
deleting Contacts 18
deleting To Do items 24
Deskpad 51
device information 30
dialing numbers 13
directories, default 53
displaying telephone numbers 15
Down key 8
E
EarthTime
resetting clocks 71
selecting cities 70
Edit mode 7
editing 9
Calls 60
contacts 62
events 59
T o Do items 60
e-mail addresses 15
ending a call 13
ending times, events 59
entering text 9
envelope icon 14
envelopes 75
events
canceling 21
creating 20
maximum scheduled 58
overlapping 59
rescheduling 21
scheduling 58
viewing 19
Events pane (Calendar) 56
F
files, memo 66
folders, memo 66
fonts 53
full-screen view, memos 66
G
getting started 8
globe, Eart hTime 69
Go to today shortcut 56
H
hardware requirements 36
help 39
Home Clock 71
Home clock 26
Home key 7
house icon 14
I
icons
,
58
78 Index
Page 79

Toolbars 52
index cards, printing 75
Index View, memos 66
,
installation 36
requirements 36
upgrading 36
installing batteries 32
international time zones 69
37
K
keys 8
L
labels 75
lettered tabs 14
letters 65
Local Time 26
changing 59
,
71
viewing 56
N
new batteries 32
new Contacts 16
new events 20
notebook icon 14
O
online help 39
opening
Calendar 55
Contact cardfiles 62
EarthTime 69
Memos view 65
organizing
tasks 55
overview, TrueSync Desktop 51
M
mailing labels 75
making a call 13
map, EarthTime 69
margins 67
meetings
scheduling 18
meetings, scheduling 55
Memos 65
creating memos 67
formatting memos 67
memo files 65
printing 76
removing 25
viewing 25
menu 7
menu bar 51
menus, shortcut 52
mini-calendar 57
Monthly view 19
Monthly view, Calendar 57
multi-day events
79 Index 79
,
66
P
password 30
password, setting 53
placing a call 13
preferences 28
client 48
general 52
previewing printing 75
printing
address books 75
calendar formats 73
Contacts cards 74
envelopes 75
index cards 75
labels 75
memos 76
previewing 75
product care 33
product requirements 36
profile 8
protecting 33
,
74
Page 80

Q
QuickNotes
creating 25
removing 25
viewing 25
R
Readme file 37
recently dialed numbers 13
registering TrueSync Desktop 37
reminde r alarms 19
removing batteries 32
removing Contacts 18
removing To Do items 24
rescheduling Do items 24
rescheduling events 21
resetting EarthTime clocks 71
re-sorting cards 15
ruler (memos) 67
S
scheduling calls 18
scheduling events 58
Select key 7
selecting profiles 8
setting
default directories 53
default views 53
margins 67
preferences 52
setting alarms 19
setting the clock 27
setting up calls 18
setting up for synchronization 31
setting up meetings 18
Setup Wizard 8
shortcut menus 52
sorting cards 15
special days, viewing 56
StarTAC Clip-On Mobile Organizer
batteries 32
,
38
Calendar 19
connecting 31
Contacts 14
features 7
keys 7
making a call 13
Memos 25
Preferences 28
product care 33
T o Do items 22
starting times, events 59
starting TrueSync Desktop 38
starting TrueSync Plus 41
start-up password 53
Status bar 51
status bar 8
synchronization
log 49
options, changing 48
setting up 41
starting 41
stopping 45
T
tab stops (memos) 67
telephone calls 13
telephone icon 14
telephone number display 15
templates (Contacts) 62
text
margins 67
tabs 67
text entry 9
time zones 27
changing 59
T o Do items 22
checking off 23
creating 23
removing 24
rescheduling 24
To Do pane (Calendar) 56
Toolbars 51
,
69
,
71
,
60
80 Index
Page 81

Calendar view 56
changing buttons 52
Contacts view 62
customizing 52
removing buttons 52
TrueSync window 44
traveling, scheduling events 59
TrueSync 41
Setup Wizard 41
starting 41
stopping synchronization 45
synchronization log 49
TrueSync Desktop
customizing 52
installing 36
overview 51
registering 37
setting up 38
starting 38
TrueSync Plus 41
turning off alarms 19
U
uninstalling TrueSync Desktop 37
Up key 8
printing Calendar 74
setting default 53
W
Web site addresses 15
Weekly view 19
Weekly view, Calendar 57
Wizard, Setup 38
World clock 26
world map 69
Y
Yearly view, Calendar 58
Z
zones
changing time 27
V
View ke y 7
viewing
multi-day events 56
special days 56
time zones 69
viewing events 19
viewing To Do items 22
views
Calendar 57
common features 51
Contacts 62
customizing 52
EarthTime 69
Memos 66
81 Index 81
 Loading...